NZ AU
HDHP10DW1
HDHP10DB1
User manual
Heat-Pump-Dryer
contains
Make sure the ventilation paths inside the appliance are
not blocked.
i
Cycle
8
product’s
℃ ℃

certified
!

290
NZ AU
2-Product description
9
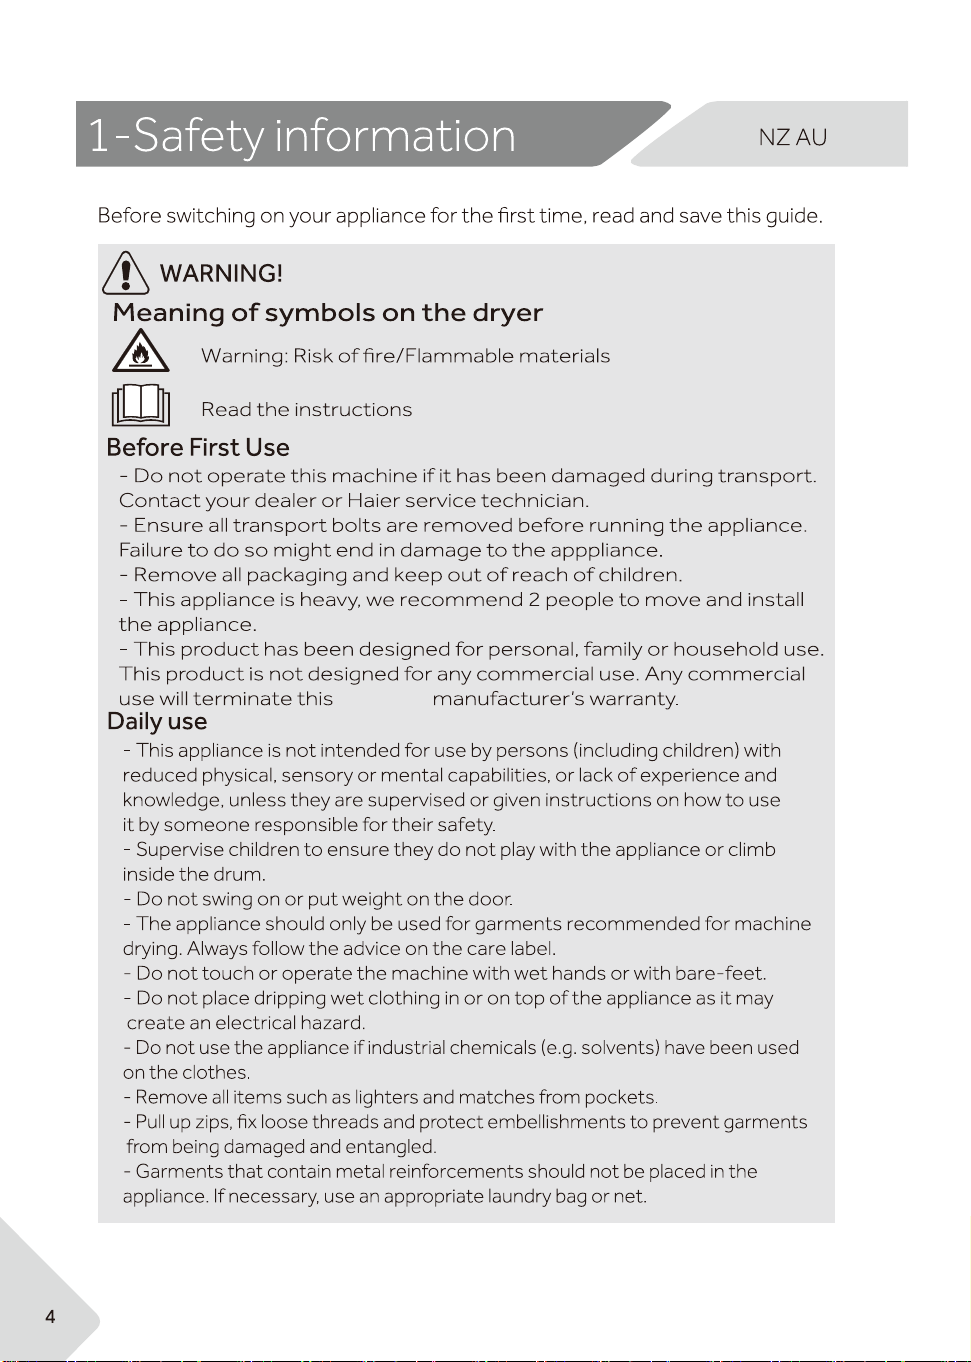
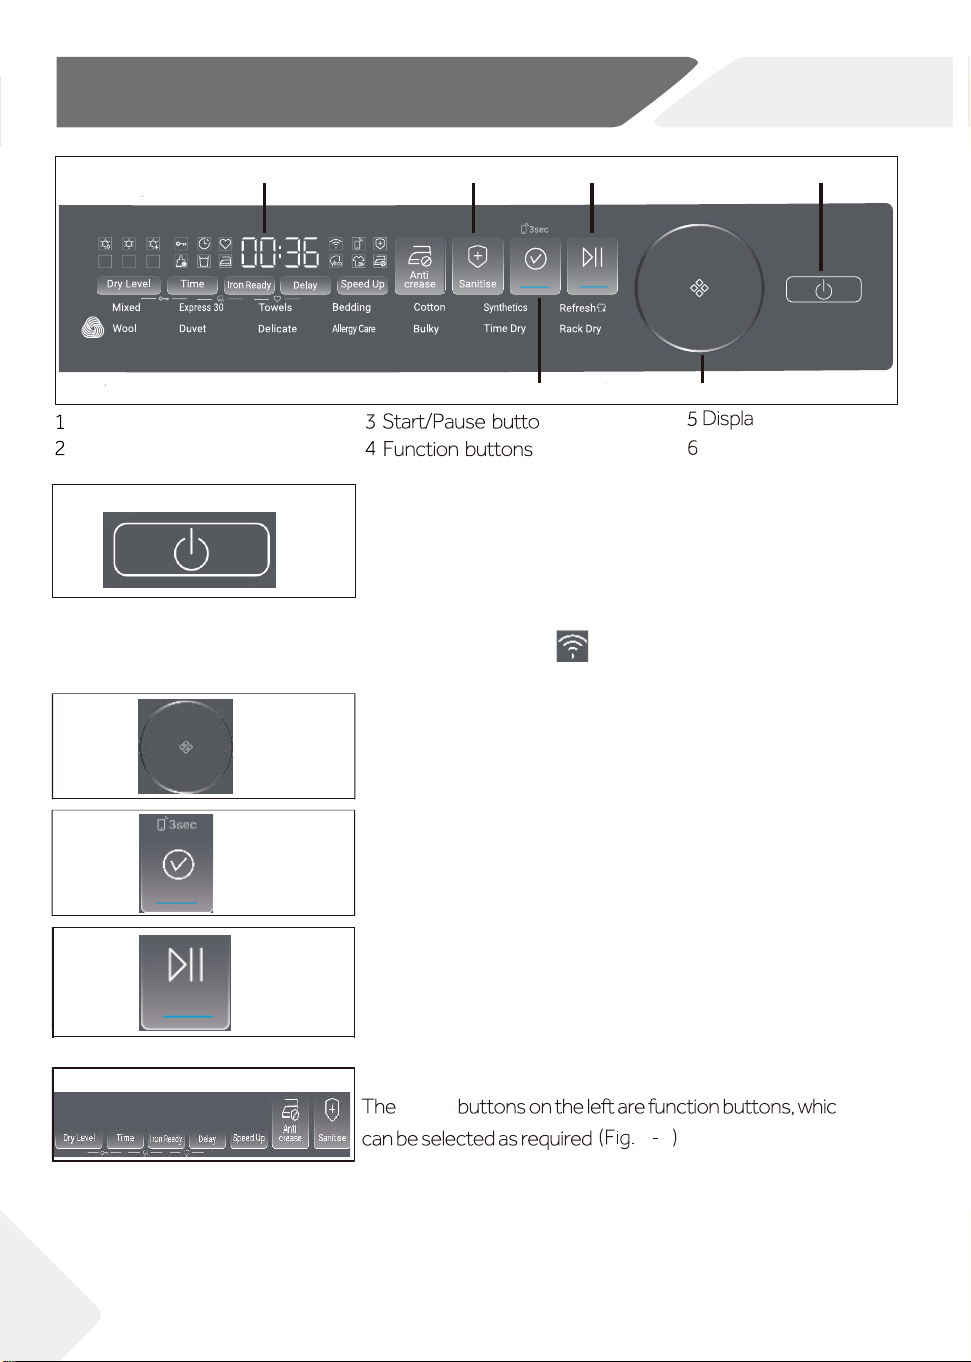
2.1 Picture of appliance
Front (Fig. 2-1): Rear side (Fig. 2-2):
Note:
Due to technical changes and di
erent models, the illustrations in the following chap-
ters may di er from your model.
1 Water tank
2 Tumble dryer door
3 Control panel
4 Power supply cord
5 Back plate
6 Drainage outlet
7 Adjustable feet
User manualWarranty cards
Drain hose Inlet hoseDrying rack
2.2 Accessories
Check the accessories and literature in accordance with this list (Fig.2-3):
2-1
2-2
2-3
1
3
2
4
5
6
7
Adapter
3-Control panel
3-1
3-2
3-3
2
14 3
3.1 Power button
3.2 Dial
h
.
3-6
6
Power button
Dial
y
n
3.5 Function buttons
3-4
3.3
Confirm button
5
10
NZ AU
Confirm button
seven
3-5
Start/Pause button
3.4
3
6
Long press the button (Fig. 3-2) to turn on or turn off the
machine. When the machine is turned on, the Confirm
button will start flashing. No operation on the machine for
more than 2 minutes, the machine will be turned off
automatically. When the machine is turned off, long press the Power button for 5 seconds,
"APP" will be displayed on the screen, and the Wifi icon will start flashing, it means the
machine has activated Wifi provisioning mode.
Turn the dial (Fig. 3-3) to select a cycle. The cycle will be
flashing when selected, and its default settings will also
light up.
Press this button (Fig. 3-5) to start or pause a cycle. When
the cycle is paused, the Confirm button will be flashing. To
restart the cycle, users need to press the Confirm button
first, then press the Start/Pause button.
(Fig. 3-4) Short press to confirm your selection before start
the cycle. Long press for 3 seconds, the icon will flash, then
press the Start/Pause button to activate the Remote mode.
11
3-Control panel
3-8
3-9
NZ AU
Damp Dry Extra Dry
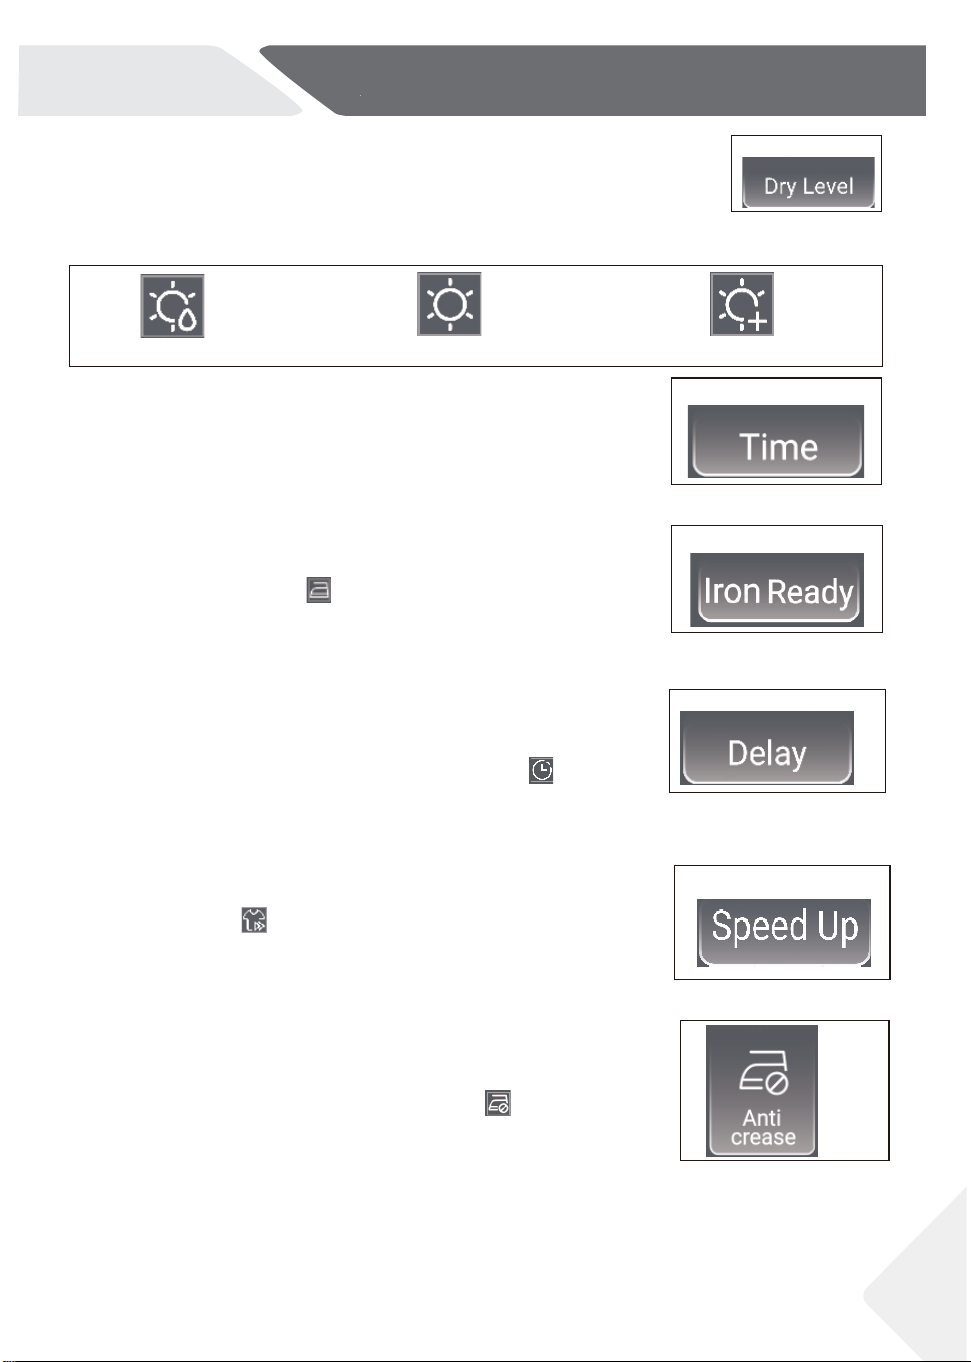
3.5.2 Time button
This function button (Fig. 3-9) is designed for users to adjust
duration of specific cycles including Time Dry/Wool/Rack Dry.
3-10
3.5.3 Iron Ready button
3-11
3.5.4 Delay button
Press this button (Fig. 3-11) to set the delay time from 1 hour to
12 hours with 1-hour increment. After selection, press the
Confirm button and Start/Pause button, the icon will light up.
This function is not available on Refresh cycle.
3.5.5 Speed Up button
Press this button (Fig. 3-12) to increase the drying speed. When
activated, the icon will light up. This function is not available on
Time Dry/Wool/Express 30/Rack Dry/Refresh/Allergy Care cycles.
3-12
3-13
3.5.6 Anti crease button
If the garments aren't taken out timely after the end of the cycle,
wrinkles may occur on them. This function (Fig. 3-13) can help to
prevent this issue. When activated, the icon will light up, and
after the end of the cycle, the drum will keep rotating for 1-12
more hours with cold air blowing in. This function is not available
on Synthetics/Express 30/Rack Dry/Refresh/Wool cycles.
3-7
3.5.1 Dry level button
Press this button (Fig. 3-7) to adjust the dry level: there are totally
3 levels as listed below (Fig. 3-8). This function is not available for
Express 30/Wool/Refresh/Time Dry/Allergy Care/ Rack Dry cycles.
Press this button (Fig. 3-10) to set the iron ready reminder.
After activated, the icon will light up. And when the garments
reach the moisture content level that is most suitable for ironing,
the machine will sound a 2-minute prompt tone to remind user.
12
3-Control panel
NZ AU
3-14
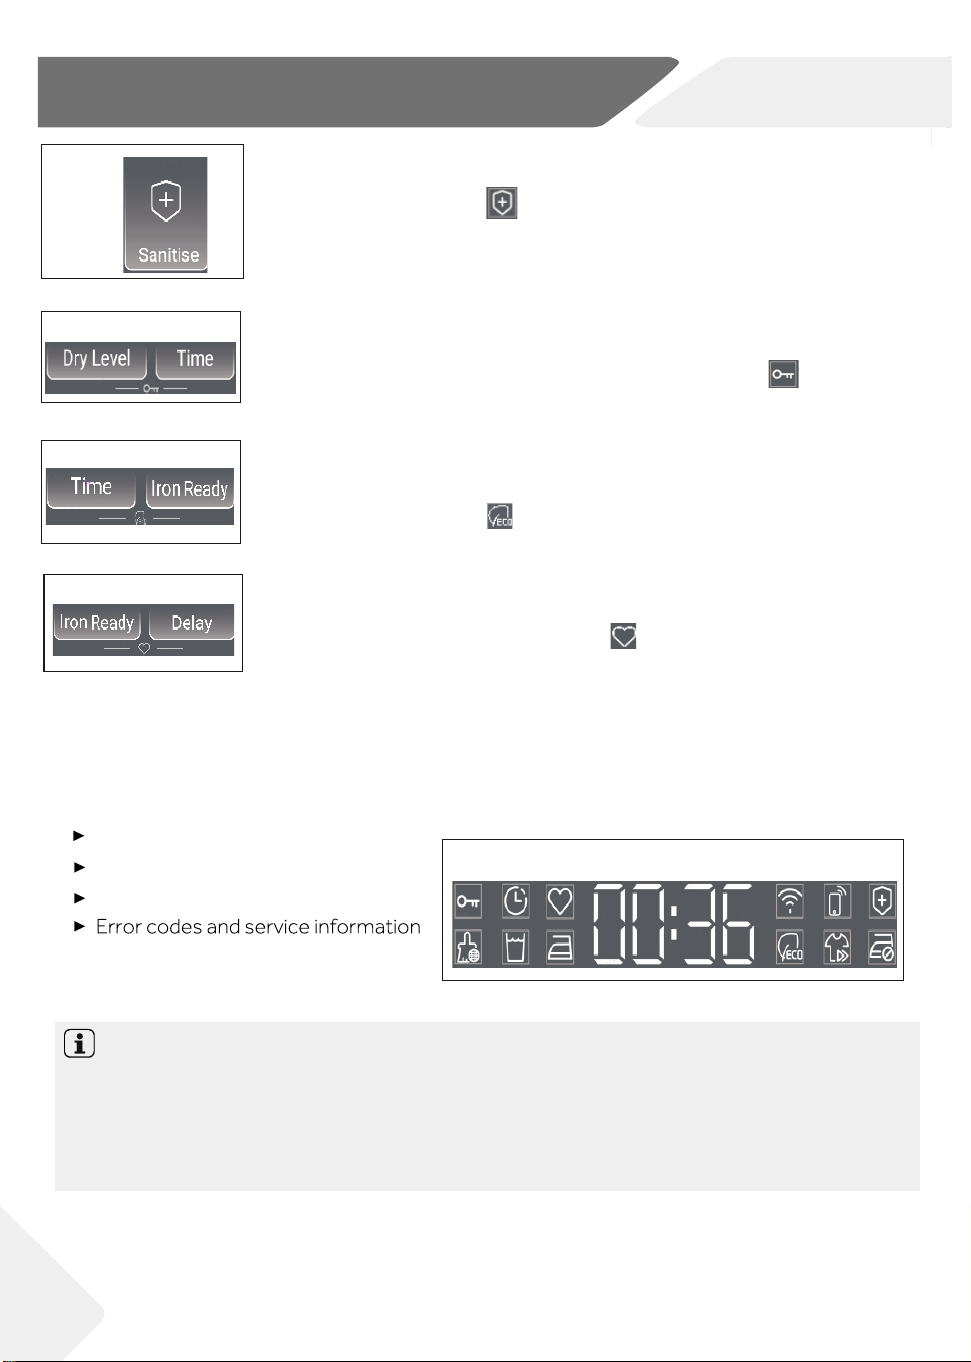
3.5.7 Sanitise button
This function is designed to kill bacteria and mites with high temperature.
When activated, the icon will light up, and the drying time will increase
by 120 minutes. This function is only available on Mixed/Towels/Bedding/
Cotton/Duvet/Bulky/Allergy Care cycles. For Allergy Care cycle, this
function is on by default.
3-15
3.5.8 Keylock button
When the cycle is running, press the 2 buttons (Fig. 3-15) simultaneously
for 3 seconds to activate Keylock function, then the icon will light up.
Deactivate this function with same method.
3-16
3.5.9 ECO button
3.5.10 Favourite button
3-17
3.6 Display
The display(Fig.3-19) shows following information:
Other related information;
Remaining time;
Function information;
Notice:
For Timed cycles, including Time Dry, Rack Dry, Refresh, Express 30, Wool, the remaining
time is a default value.
For other Auto cycles, at first, screen will display "AUTO", then the remaining time will be
calculated based on cycle settings, load size and moisture content level, etc.
3-19
Press the 2 buttons (Fig. 3-16) simultaneously for 3 seconds to activate
ECO mode, then the icon will light up. Deactivate this function with
same method.
Select a cycle and preferred settings, then press the 2 buttons (Fig. 3-17)
simultaneously for 3 seconds, the icon will light up, then the preferred
settings will be saved by the product. Next time users select this cycle,
preferred settings will be automatically selected. Press these 2 buttons simultaneously for 3
seconds, this cycle will recover to its default settings.
13
3-Control panel
NZ AU
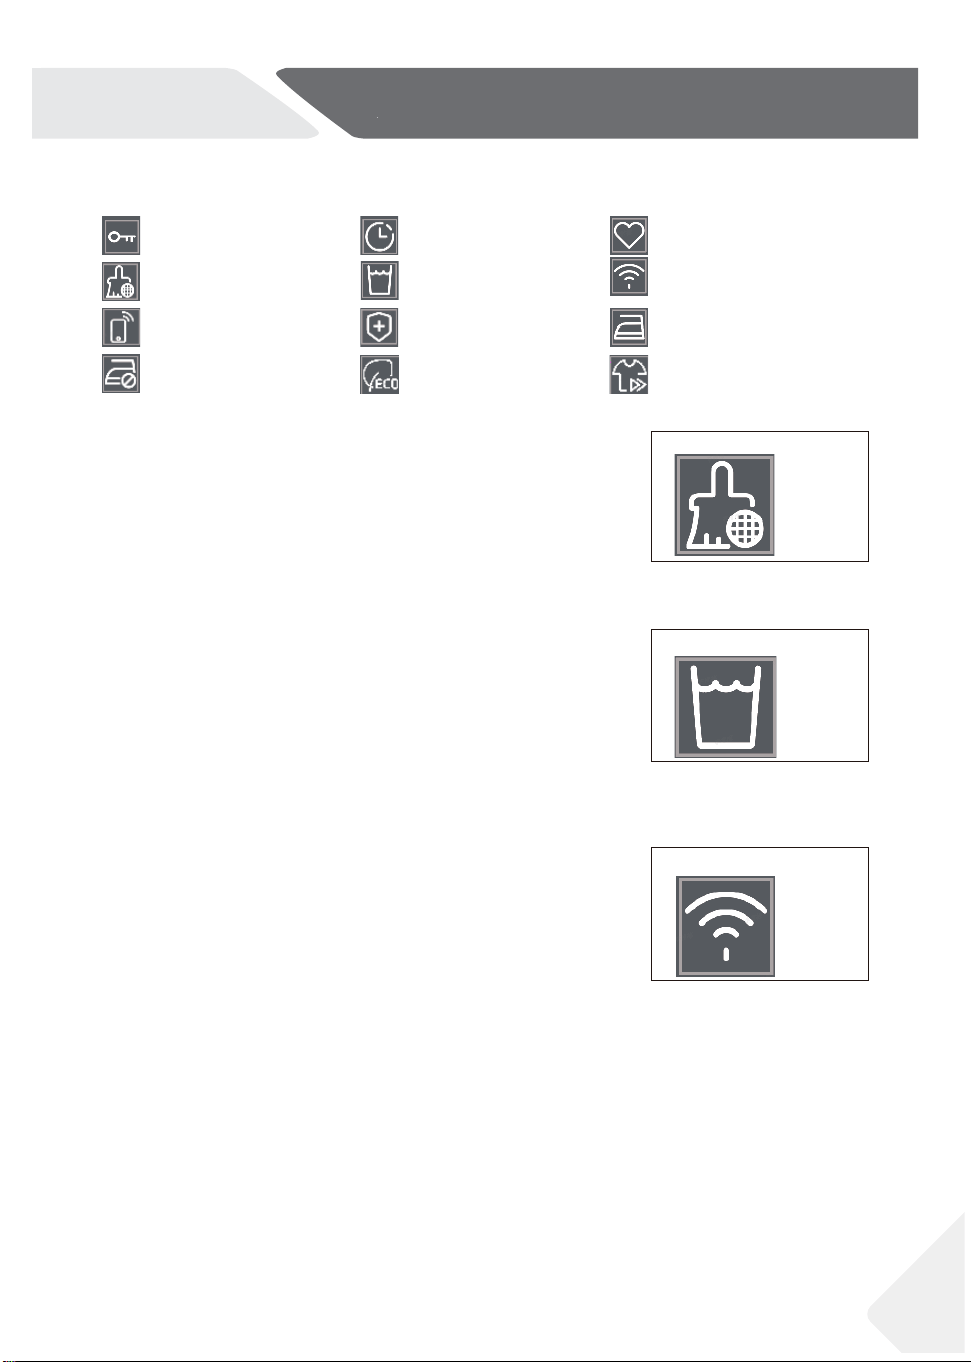
3.7 Icons
Keylock function
Clean filter function Empty tank function
Delay function
Anti-crease function
Iron Ready function
Sanitise function
Remote function
Wifi function
Favourite function
3-19
3-20
3.7.1 Clean filter icon
3.7.2 Empty tank icon
This indicator is designed to remind users to clean filter
before using. When this icon (Fig. 3-19) lights up, users
should clean the filter before use. For the cleaning method,
please refer to the Lint filter cleaning or Condenser filter
cleaning section of this manual.
When this icon (Fig. 3-20) lights up, recommend to empty the
water tank.
Important: recommend to empty the water tank
after each cycle, for specific steps, please refer to the Water
tank section of the manual.
3.7.6 Wifi icon
During the Wifi provisioning process, the icon (Fig. 3-21) will
be flashing (0.5s On, 0.5s Off), when completed, the icon will
remain On.
3-21
Speed Up function
ECO function

14
Yes,
º
Optional(4.2)
/
No
DRYNG
TIME
Cycle
2:00
0:30
h
SELECTABLE OPTIONS
Max.
load
kg
3
10
6
6
4
3
5.5
Towels
Bedding
Delicate
Cotton
Duvet
Wool
Bulky
Allergy care
Mixed
Refresh
Express 30
Time Dry
Synthetic
º
º
º
º
º
º
º
º
º
Iron Ready
/
Speed Up Anti-creaseDry level Delay
Rack Dry
AUTO
AUTO
AUTO
AUTO
AUTO
0:30
AUTO
AUTO
AUTO
/
/
/
/
/
/
º
º
/
/
/
/
/
4-Cycle
NZ AU
Mixed, Dry Level: Dry is the recommended energy saving cycle for everyday drying.
Check the energy label for energy consumption information.
The actual energy consumption may differ from the declared one according to local conditions.
0:40
0:30
AUTO
Time Sanitise
º º º
º
/
/ /
/
/
º º
º
/
/
º º
º
/
ºº º
/
º
/
º º
/
/
/ / /
/
/
º
/
º
º
/
ºº º
/
º º
/
/
/
º
º º º º º
/
/
/
º
/
/
/
/
/
/
1 item
1
1 item
5
1 item
4.2 Optional
4.3 Refresh Cycle
4.1 Registration Cycle
/
/
/
Optional means users can decide to select this option or not based on personal needs.
This cycle is designed to help to remove odor, dust, wrinkle and light moisture. Please make sure
the product is connected to the mains water before each use. If the garments are damp, it is
recommended to dry it before using the Refresh cycle.
15
4-Cycle
NZ AU
4.4 Wool clothing drying and care
5
5
5
4.5.1
5
Press the Confirm button for 3 seconds to turn On and Off the Remote mode.
5.1 Starched laundry
5.2 Softener
dryer.
5.3 Soft care cloths
When the load is less than 1.0kg, the "Timer" cycle should be selected, because sometimes
it may not be able to sense the dryness level of the clothes when the load is too small.
ot emit
ot emit may rotate from murd eht,tuo nekat ton si yrdnual eht fi ,elcyc eht fo dne eht t A
prevent creases.
moisture content, the desired dry level, as well as the spin speed during washing. These
factors are registered by the electronics during the cycle and the
drying time will be
corrected accordingly.
eht pu nesool , deveihca ton si level yrd derised eht fi ,sdne elcyc neh W
Textiles which can easily shrink or lose their shape, as well as silk stockings, lingerie
should not be put in the dryer directly. Put delicate garments inside a laundry bag and
avoid over-drying them.
5.5 Drum interior light
5.7 Anti crease protection
5.8 Remaining time
5.9 Extra large pieces
5.10 Especially delicate fabrics
5-Suggestions and tips
NZ AU
5.4
5.6
Small amounts of filling
Service flap
cycle size,
Time Dry cycle.
16

17
5-Suggestions and tips
NZ AU
5.11 Jersey and knitwear
5.14 Acoustic signal
▶ .lluf si knat retaw eht neh W
▶ .neppah serulia F
5.12 Flipping clothes
5.13 Metal ornament
cycle
▶ .margorp fo dne eht t A
▶ . nottub a gnisserp neh W
▶ .rotceles margorp eht gninrut neh W
Care chart
Washing
normal process normal process mild process
normal process mild process very mild process
normal process mild process very mild process
max. 40°C
Do not wash
Bleaching
non -chlorine
Do not bleach
Drying
Tumble drying possible
normal temperature
Tumble drying possible
lower temperature
Do not tumble dry
Ironing
Iron at a maximum
temperature
up to 200 °C
Iron at a moderate
temperature
up to 150°C
Iron at a low temper-
ature up to 110 °C;
ironing may cause irre-
Do not iron
18
6-1
6-3 6-4
6-5
6-6
6-2
6-Daily use
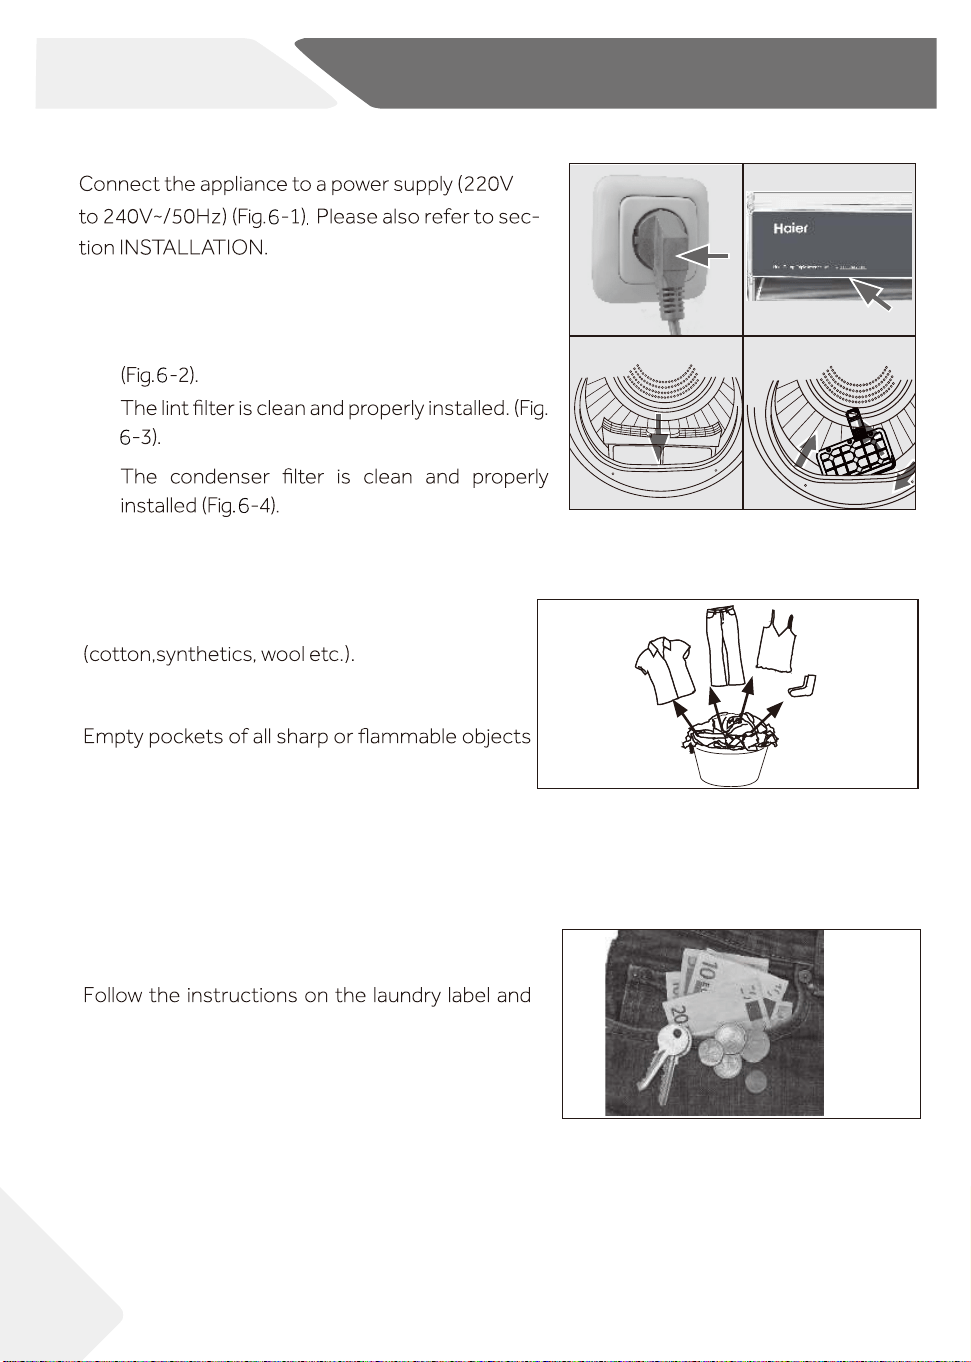
6.2 Prepare the laundry
▶ Sort clothes according to fabric
Only dry clothes that has been spun.
▶
such as keys, lighters and matches. Remove
hard decorative objects such as brooches.
▶ Zippers up and make sure the buttons are sewn
on tightly and place small items such as socks,
bras etc. in a wash bag.
▶ Unfold bulky items of fabric such as bed sheets,
table cloth etc.
▶
dry those garments that can be dried by machine.
6.1 Prepare the appliance
1.
2. Make sure:
▶ The water tank is empty and properly installed.
▶
▶
NZ AU
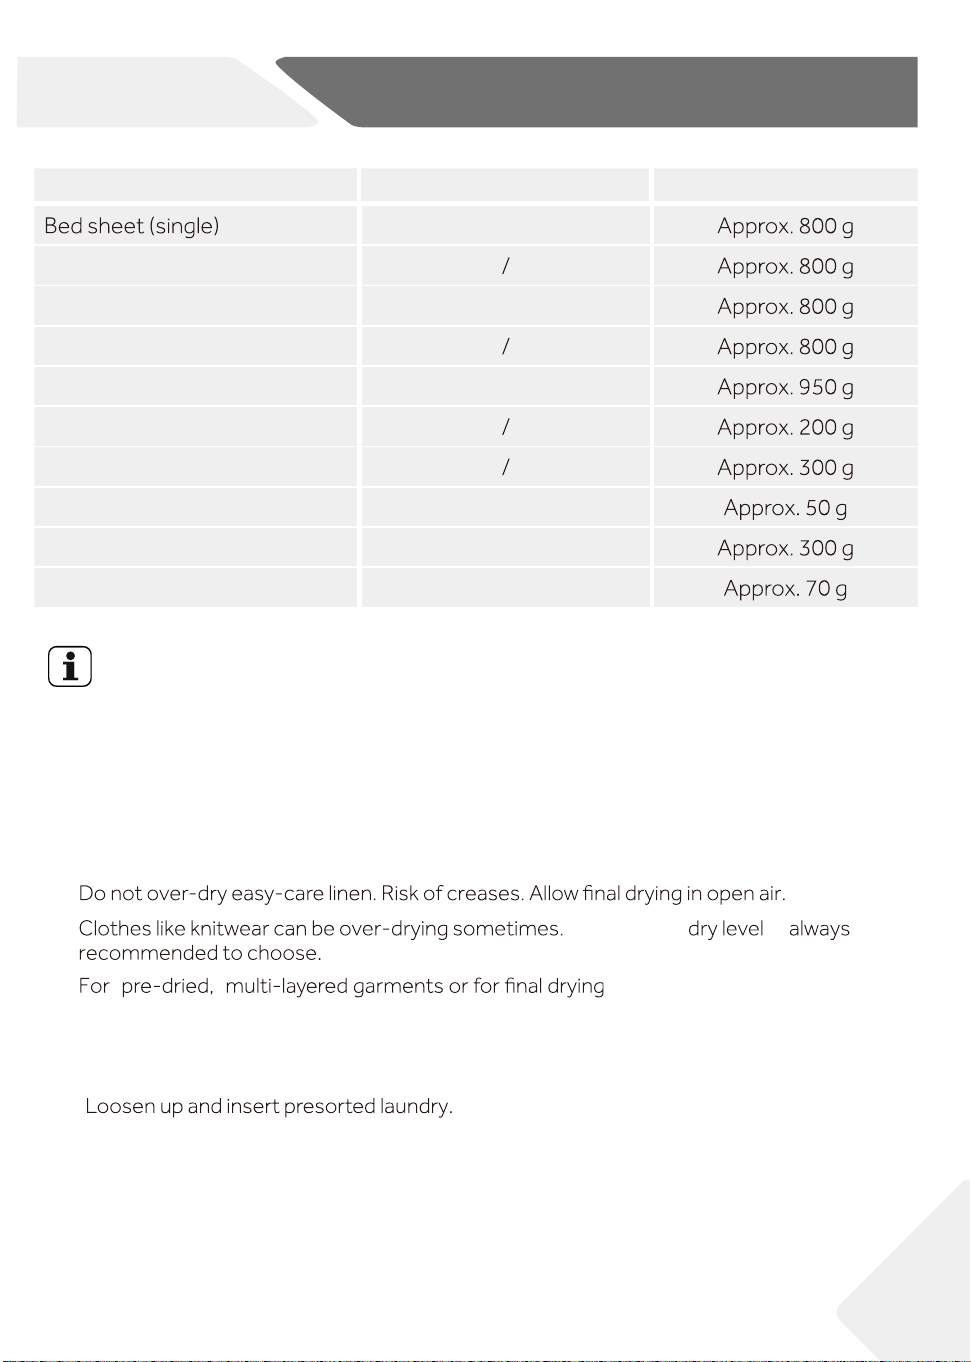
Load Reference
Cotton
Blended fabric clothes
Jackets Cotton
Jeans
Overalls Cotton
Pyjamas
Shirts
Socks Blended fabrics
T-Shirts Cotton
Underwear Blended fabrics
Composition
Average weight per item
19
6-Daily use
NZ AU
Tips:
▶ Separate white clothes from coloured ones.
▶ Bed linen and pillowcases should be buttoned, so that small parts cannot stuck inside.
▶ Close zippers and hooks, and tie loose belts without metal parts, apron strings etc.
together.
▶
▶
Remove loose metal parts of clothes before putting into dryer such as metal
buttons.
▶
▶
"
"
,
the Time Dry cycle
should be selected.
6.3 Load clothes into the appliance
▶
▶ Don‘t overload.
▶ Close the door carefully. Make sure that clothes are not pinched.
Extra dry
is
CAUTION!
Non-textile, as well as small, loose or sharp-edged items may cause malfunctions and
damage of clothes and appliance.
6.4 Take out and add clothes
WARNING!
Never turn off the dryer before the end of the cycle, unless all items are removed and
spread out quickly, so the heat can be released.
To remove or add clothes, the cycle can be interrupted at any time:
▶ The cycle will be interrupted if opening the door.
Be careful when taking out or adding clothes! The Interior of the drum or the clothes
themselves may be hot, so that there is danger of burns .
▶
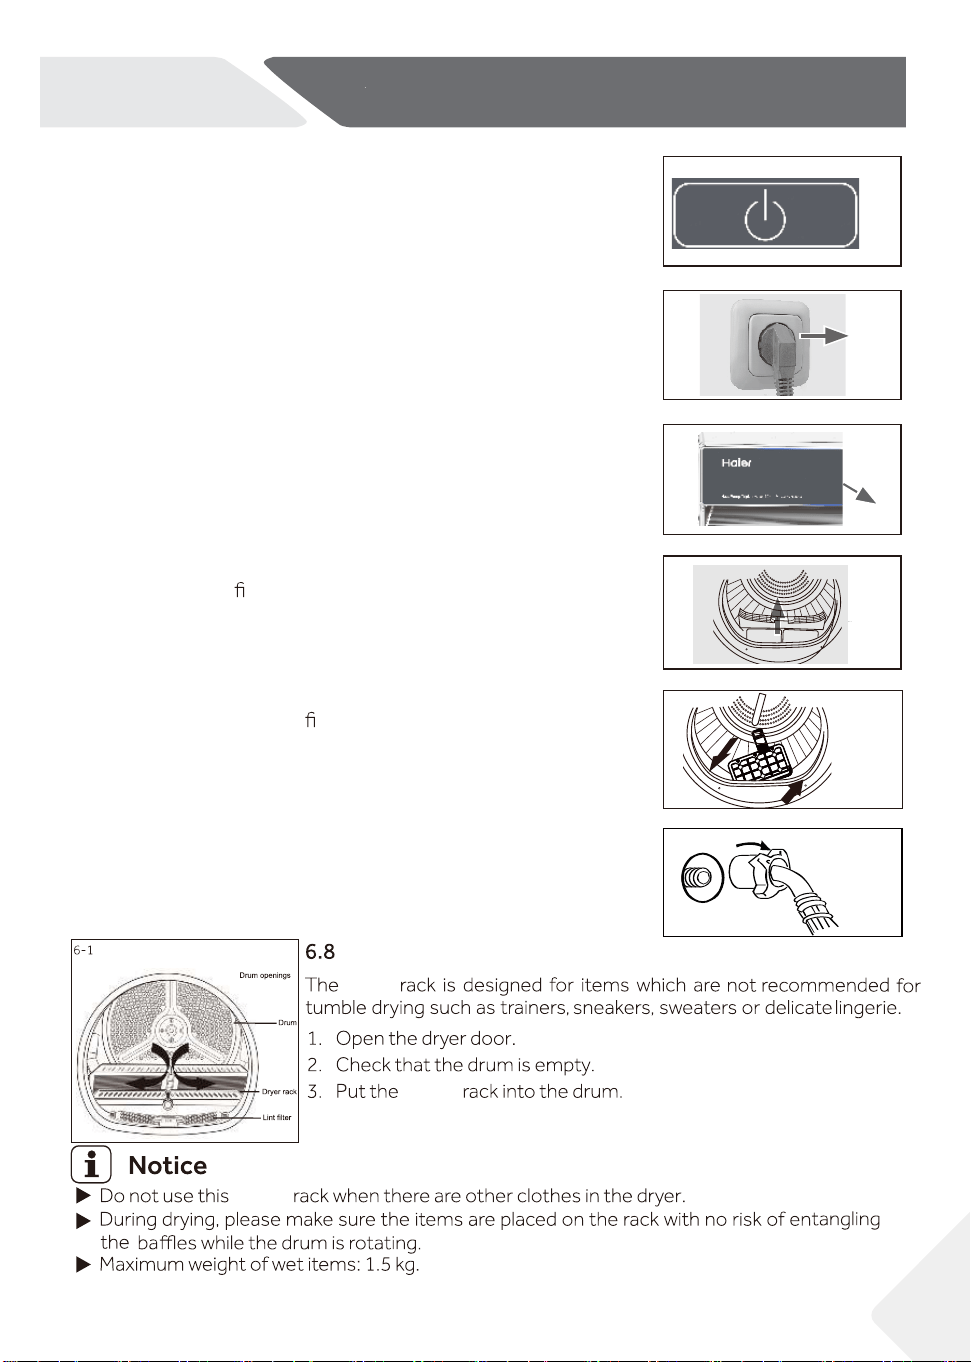
6.5 Loading the dryer
1. Place the laundry evenly in the drum making sure not to overload the dryer.
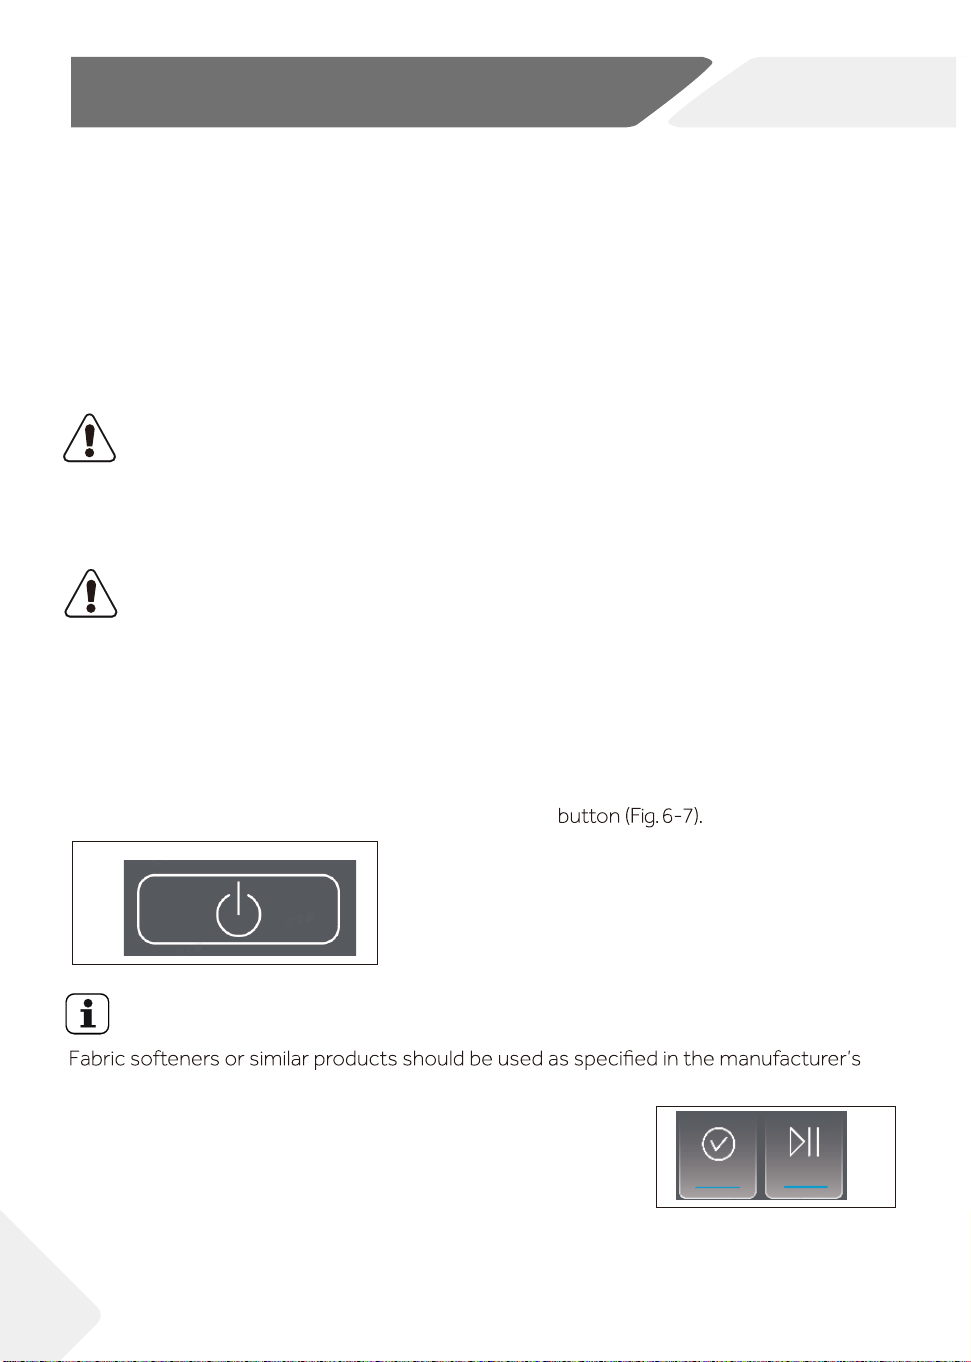
2. Switch on the tumble dryer by pressing the Power
Notice
instructions.
20
CONTRO
6-Daily use
6-7
NZ AU
To continue the cycle, first close the door, then press the Confirm button and the
Start/Pause button.
6-8
3. Set functions such as Temperature, Dry level, Delay, and
then press the Confirm button and Start/Pause button to
start the cycle.
6-9
6-10
6-12
6-13
6-11
21
6.6 End of dry cycle
The tumble dryer stops operation automatically when a dry
cycle is complete. The display shows END for about 5
seconds. Open the tumble dryer door and take out clothes.
1. Switch o the tumble dryer by pressing the Power button
(Fig. 6-9 ).
2. Unplug the tumble dryer from the power socket (Fig. 6-10).
Empty the water tank after each dry cycle (Fig.
6-11) .
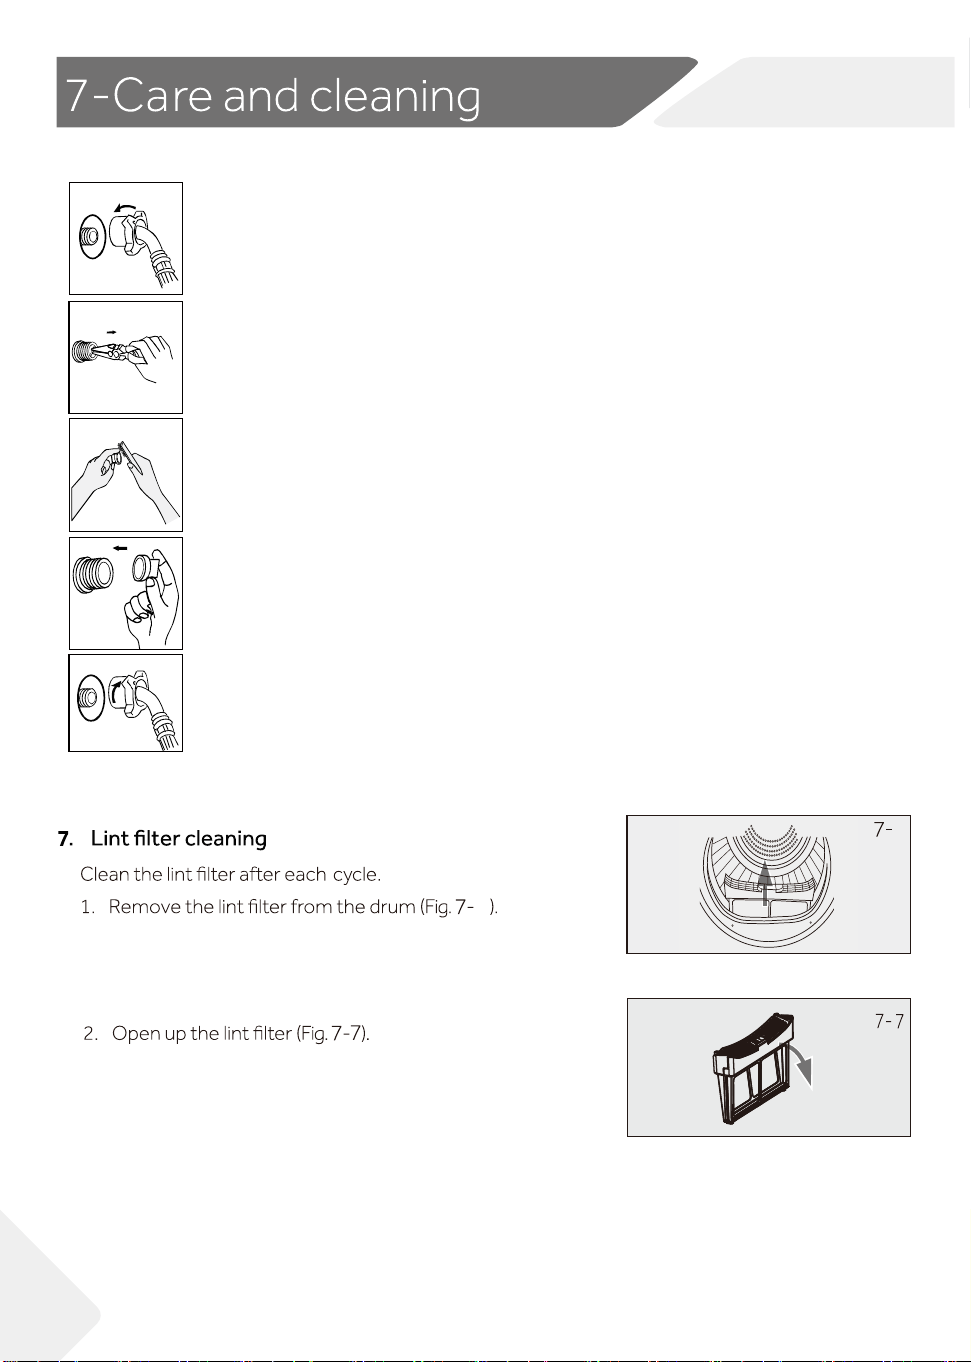
4. Clean the lint
lter after each dry cycle (Fig. 6-12).
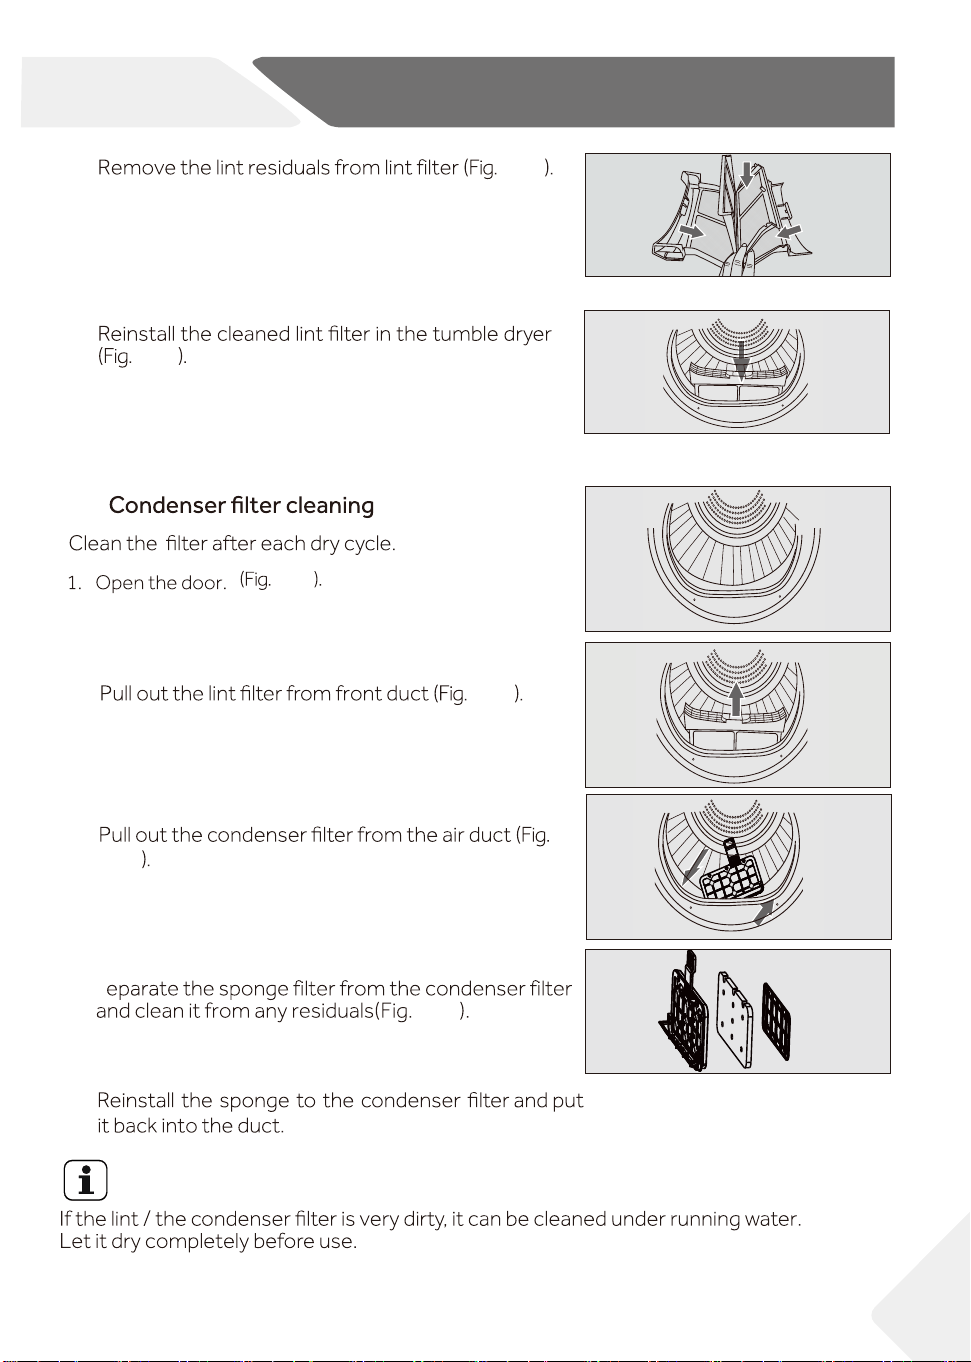
5. Clean the condenser
lter after each dry cycle (Fig. 6-13).
3.
6-Daily use
NZ AU
6-14
6.7 Use Refresh cycle
Connect the inlet pipe to the water valve( Fig.6-14
) .
Turn on the tap and run Refresh cycle.
5
ff
Use drying rack
drying
drying
drying
22
NZ AU
. )-27 .gi iF (Remove the filter with needle-nose pliers
7-1
7-2
( Fig. 7-1) .
Unscrew the inlet pipe
7.1 the inlet valve filter cleaning
7-3
Clean the filter with a soft brush
. )3-7 .gi iF (
7-4
Installing air filters . )4-7 .gi iF (
7-5
Connect the water inlet pipe again
. )-57 .gi iF (
6
2
6
Notice
4
7-8
7-9
7-10
7-11
7-12
7-13
23
7-Care and cleaning
3.
4.
2.
3.
4.
5.
NZ AU
7-8
7-9
7.3
7-11
7-12
7-13
7-10
S
Notice
Do not use the water for any kind of drinking or food processing.
7-15
7.5 Tumble dryer
not use any organic solvent or corrosive agent to avoid damage to the device.
7.6 Drum
some detergent to remove it. Do not use any organic solvent or corrosive agent
to avoid damage to the device.
7-14
7-16
24
7-Care and cleaning
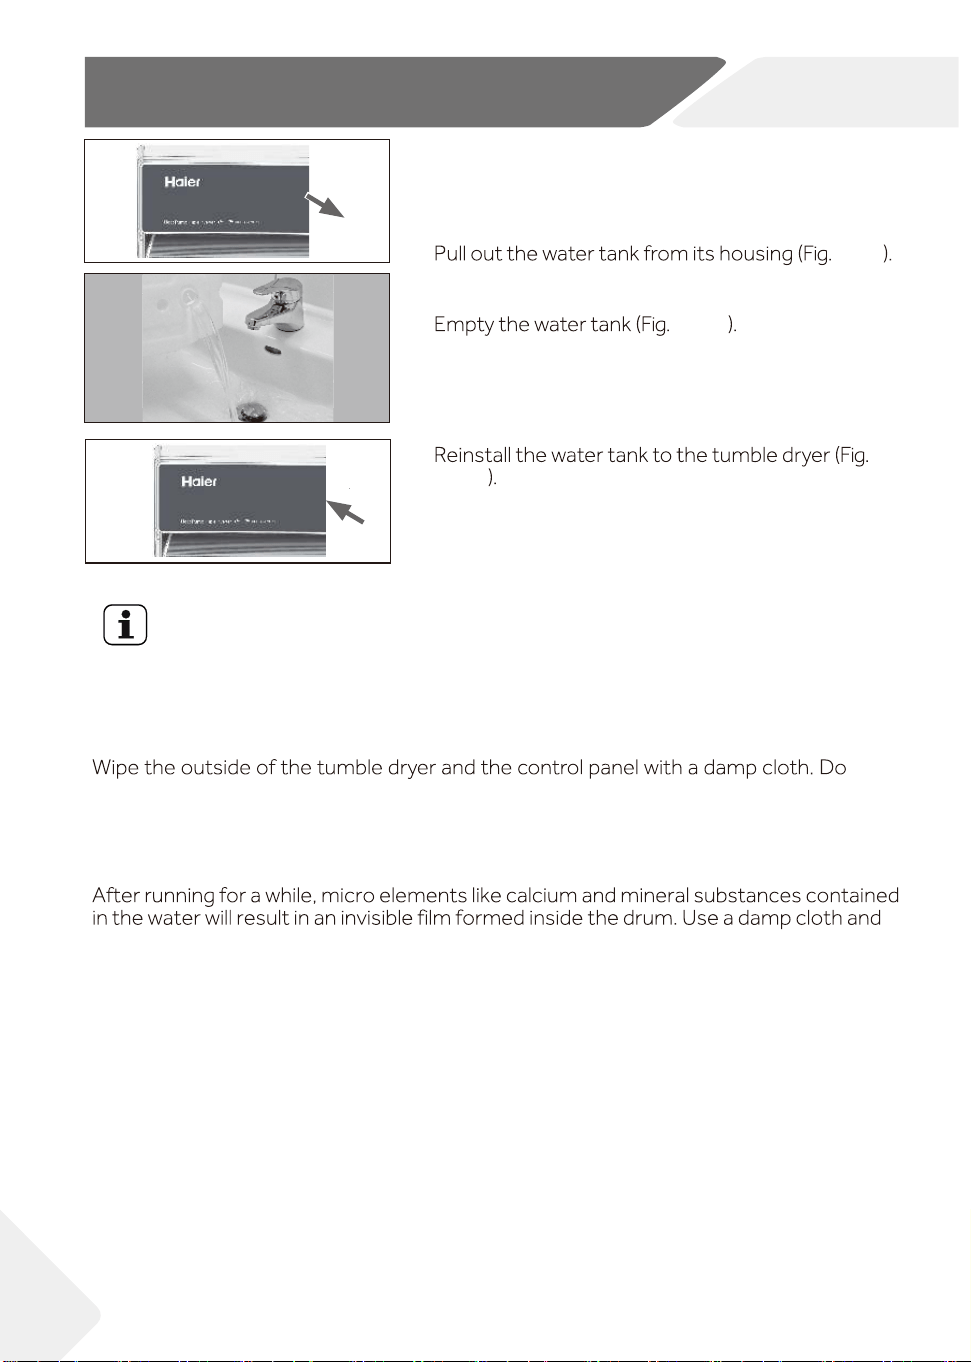
7.4 Empty the water tank
During operation, steam is condensed into water and
collected in the water tank. Empty the water tank after
each drying cycle.
1.
2.
3.
NZ AU
7-14
7-15
7-16
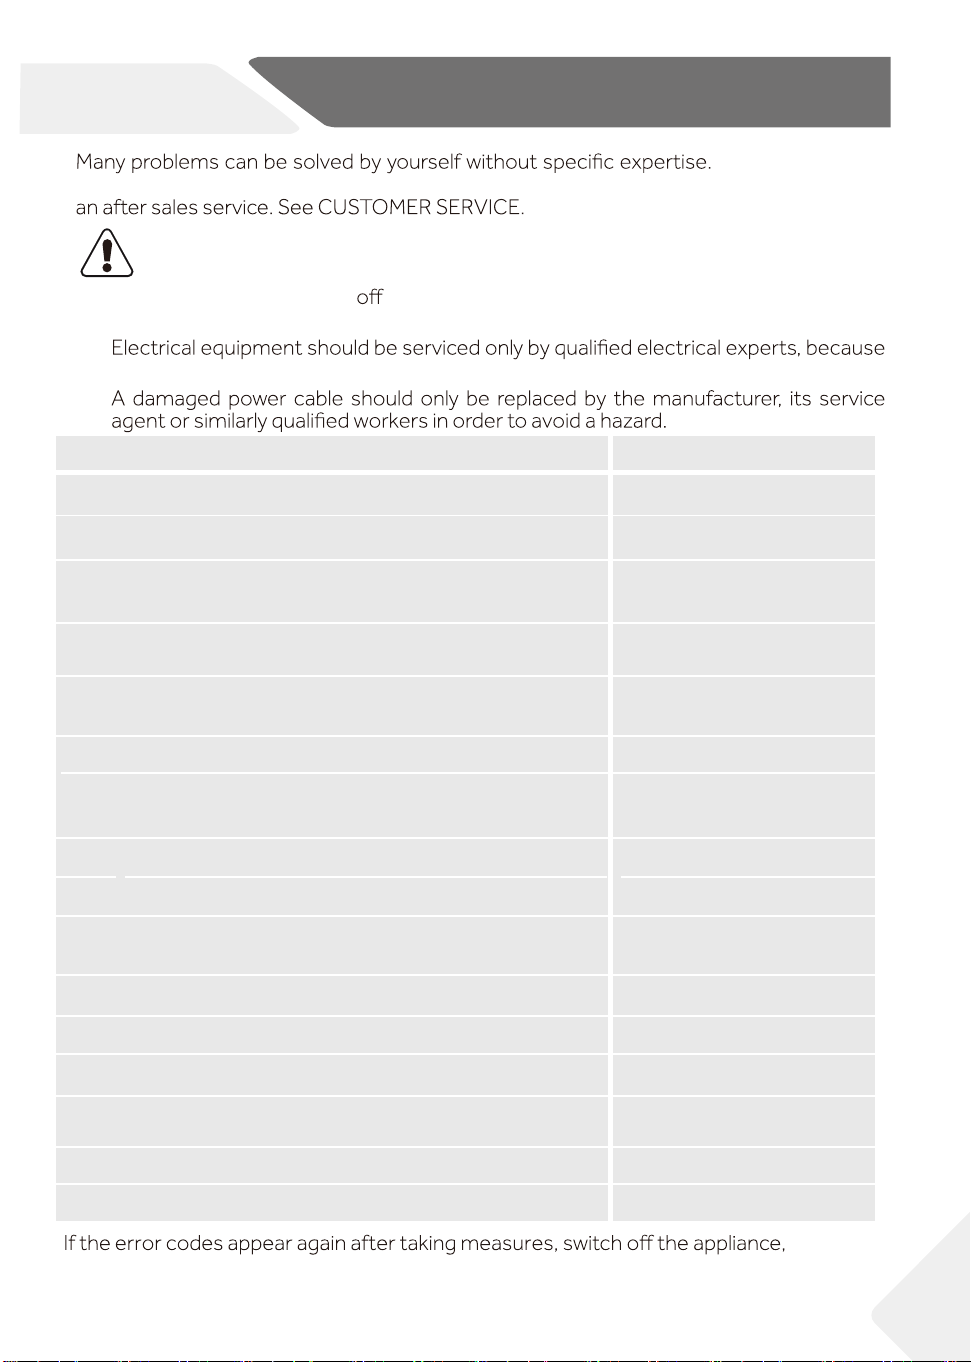
please check all shown possibilities and follow below instructions before you contact
WARNING!
▶ Before maintenance, turn
the appliance and disconnect the mains plug from
the socket.
▶
improper repairs can cause considerable consequential damages.
▶
Display
Solution
hctiws level retaw eht ro noitcnuflam pmup niard ehT:2 F
Contact the customer service.
teltuo resnednoc eht ta detacol rosnes erutarepmet ehT:23 F
Contact the customer service.
.gnitaeh lamronb A:4 F Contact the customer service.
noitacinummoc draob yalpsid eht dna draob rewop ehT:2C F
Contact the customer service.
disconnect the power supply and contact the customer service.
Contact the customer service.
Contact the customer service.
Contact the customer service.
ro daolrevo draob revird rotom eht ( noitcnuflam rotom ehT:7 F
.noitcnuflam noitacinummoc rotom ehT:1C F
.noitcnuflam enil niaM: 0C F
Contact the customer service.
.noitcnuflam noitacinummoc naf ycneuqerf elbairav ehT:6C F
.noitcnuflam noitarepo naf ycneuqerf elbairav ehT:E F
.deliaf
noitarugifnoc
TOI:H
F
Ultra sense module communication abnormality.
:
C2E
F
Communication failure between compressor controller :DC
F
Contact the customer service.
Contact the customer service.
Contact the customer service.
Shut down or click OK
25
8-Troubleshooting
.)gnitaehrevo
malfunction.
malfunction.
teltuo rosserpmoc eht ta detacol rosnes erutarepmet ehT:33 F
it is broken.
is broken.
Empty the tank icon is flashing.
Empty the tank.
Contact the customer service.
NZ AU
Clean the filter.Clean the filter icon is flashing.
and PCB.
FF:
Compressor failure or compressor communication is disconnected.
Contact the customer service.
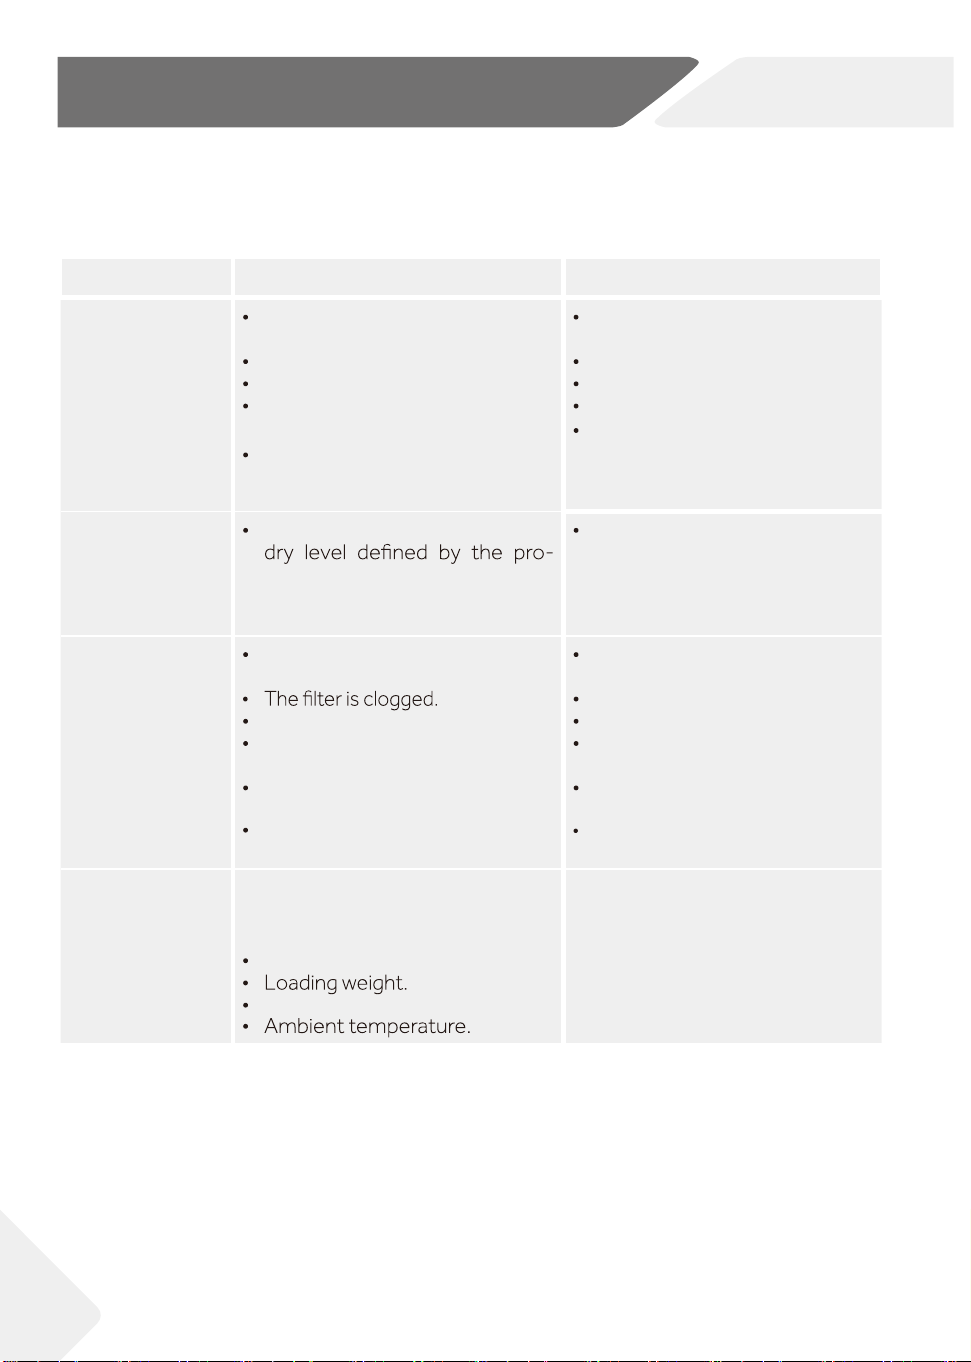
Troubleshooting without display-codes
Problem Possible cause Possible solution
Tumble dryer
fails to operate.
Poor connection to the power
supply.
Power failure.
No cycle selected.
Device has not been switched
on.
The door is not closed properly.
Check connection to the pow-
er supply.
Check the power supply.
Select a cycle.
Switch on the device.
Close the door properly.
Tumble dryer
fails to operate
and the display
shows END..
The laundry has reached the
gram.
Check the cycle setting is
appropriate or not.
Drying time is
too long and
the results are
not satisfactory
The cycle setting is not
correct.
The evaporator is blocked.
The tumble dryer is overloaded.
The laundry is too wet.
The vent duct is blocked.
Make sure the cycle is set
correctly.
Clean the evaporator.
Reduce the amount of laun-
dry.
Spin the laundry completely
before drying.
Check and clean the vent duct.
Remaining time-
on the display-
stops or skips.
The remaining time will be adjus-
ted continuously based upon the
following factors:
.yrdnual fo cirba F
Moisture degree of the laundry.
The automatic adjustment is a
normal operation.
26
8 -Troubleshooting
NZ AU
Clean the filter.
A
B
D
C
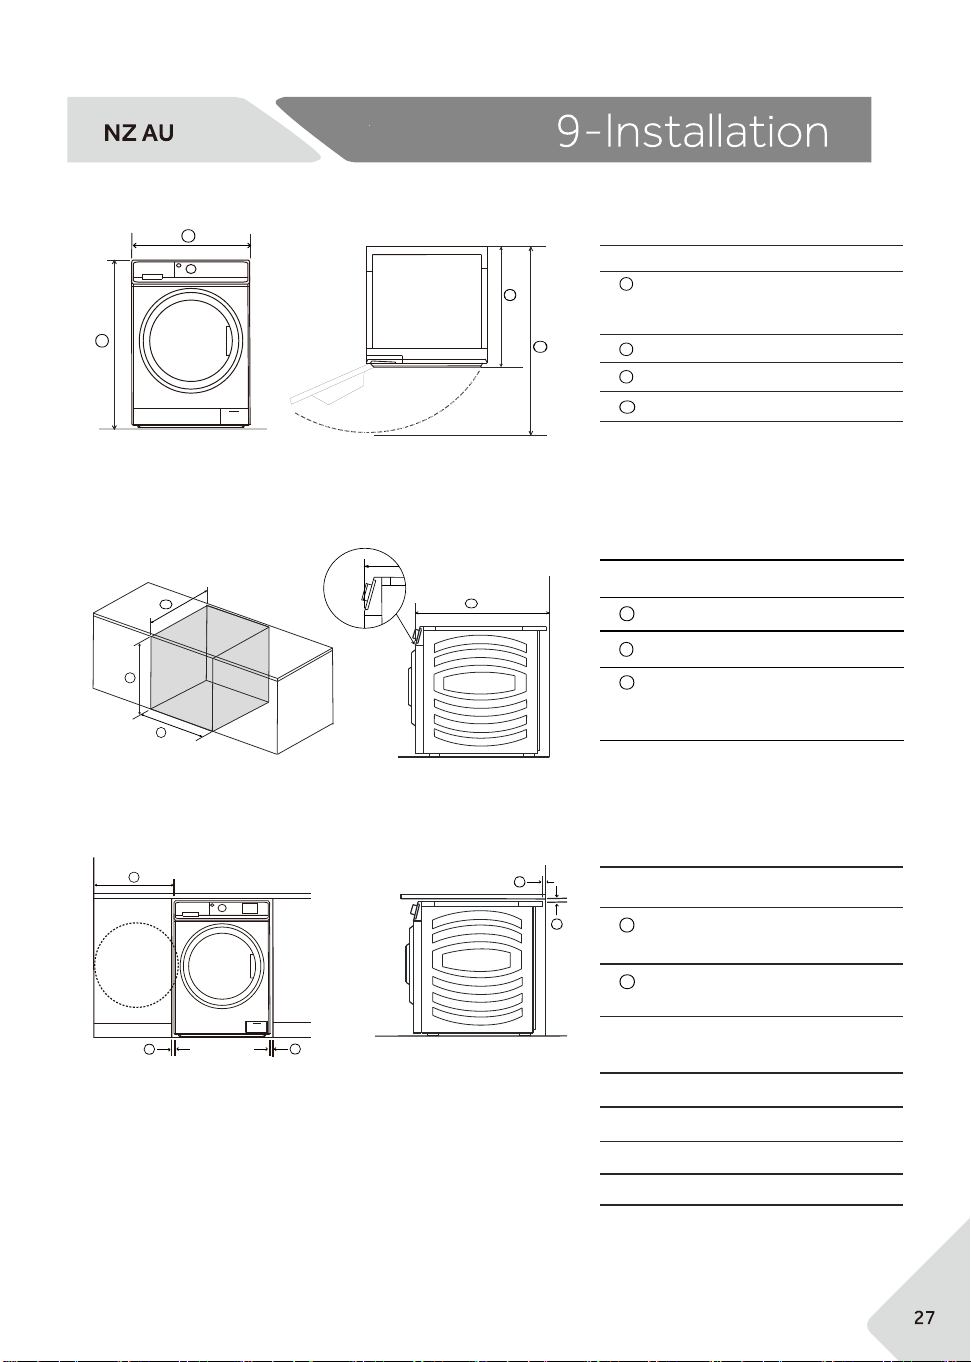
Product dimensions
FRONT PLAN
Cavity dimensions
C
*Front panel of the product
CAVITY DIMENSIONS
Minimum cavity height : 860mm
Minimum cavity width : 622mm
Minimum cavity depth
- Flush with front panel : 688mm*
- In cupboard : 750mm
A
B
C
A
B
C
iSOMETRIC
PRODUCT DIMENSIONS
Overall height*
- Min : 845mm
- Max : 850mm
Overall width : 595mm
Overall depth : 680mm**
Depth of open door : 1171mm
*Exact height is dependent on foot adjustrment
**Including dial and door (when closed)
A
C
B
D
A
B
B
B
B
CLEARANCE DIMENSIONS
Minimum dryer door
clearance to adjacent wall :240mm
Minimum gap clearance to
adjacent product or cabinetry : 15mm*
*Applies to sides, top and rear
A
B
Clearance dimensions
Electrial
Volts(V): 220-240
Hz: 50
Power consumption(w) : 630

m
the
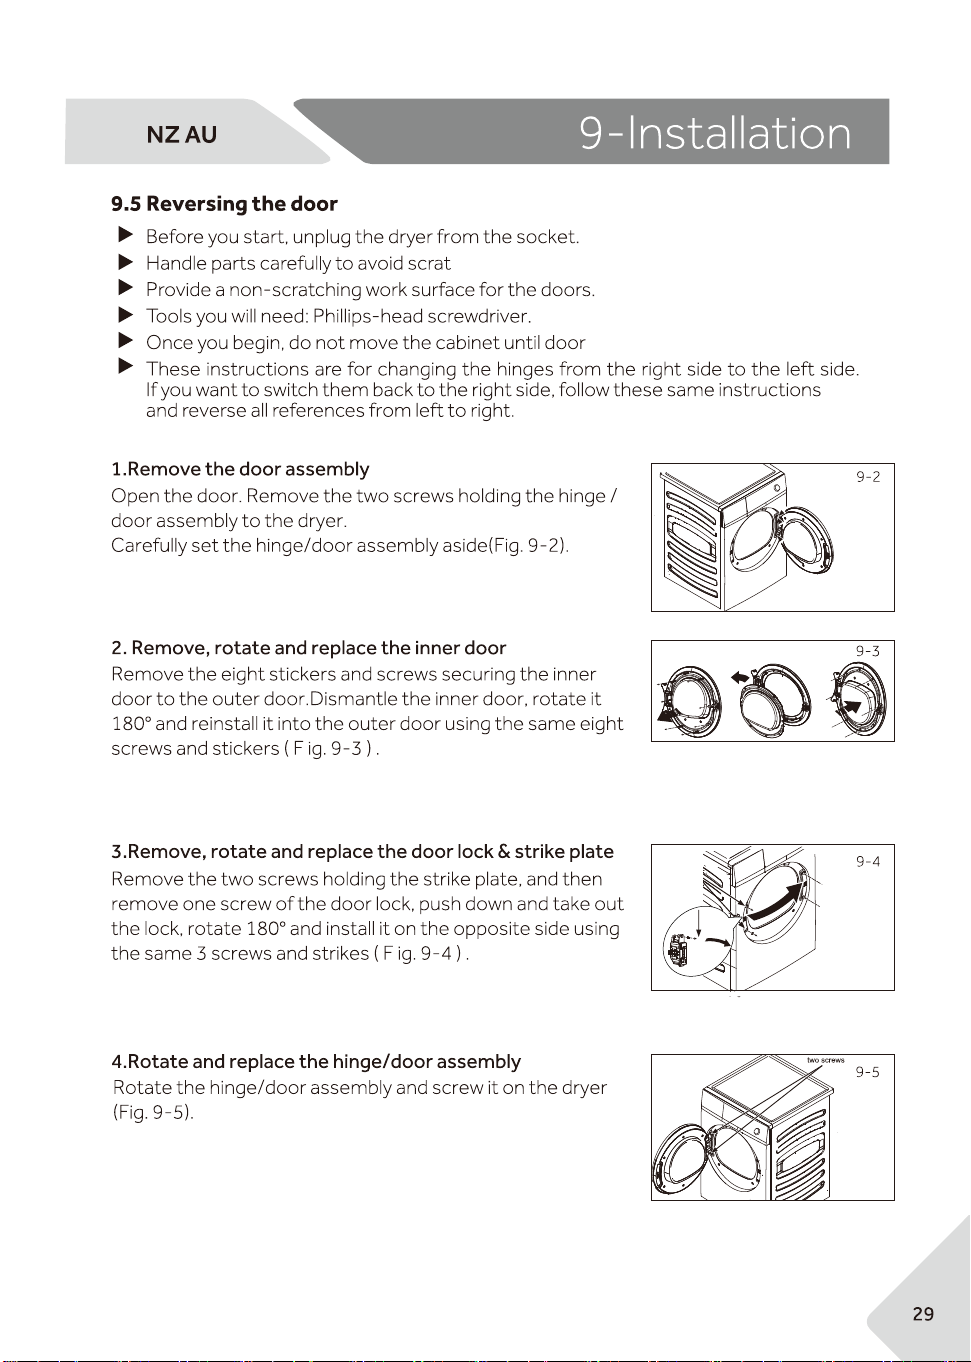
Adjust the feet to the desired level (Fig.9-1).
fully
regarding
ches
reversing work is completed.
The dryer should be leveled, so it stands balanced with all four feet on the ground. Ensure the
dryer does not rock in any direction.
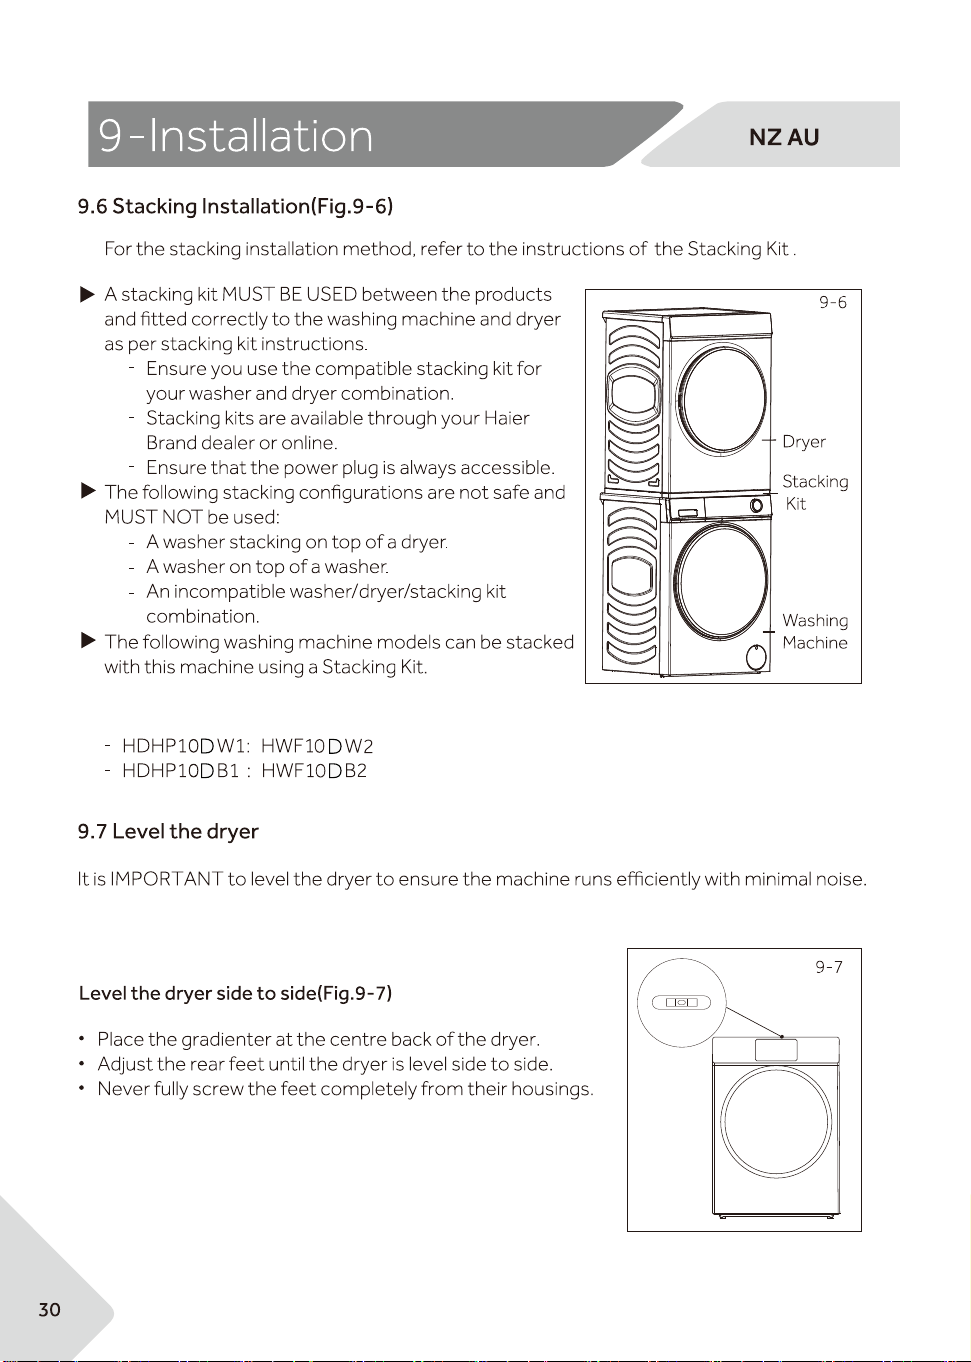
For more
information, please refer to the Installation Guide in the
stacking kit package.
with stacking kit ASKDNW1
with stacking kit ASKDNB1
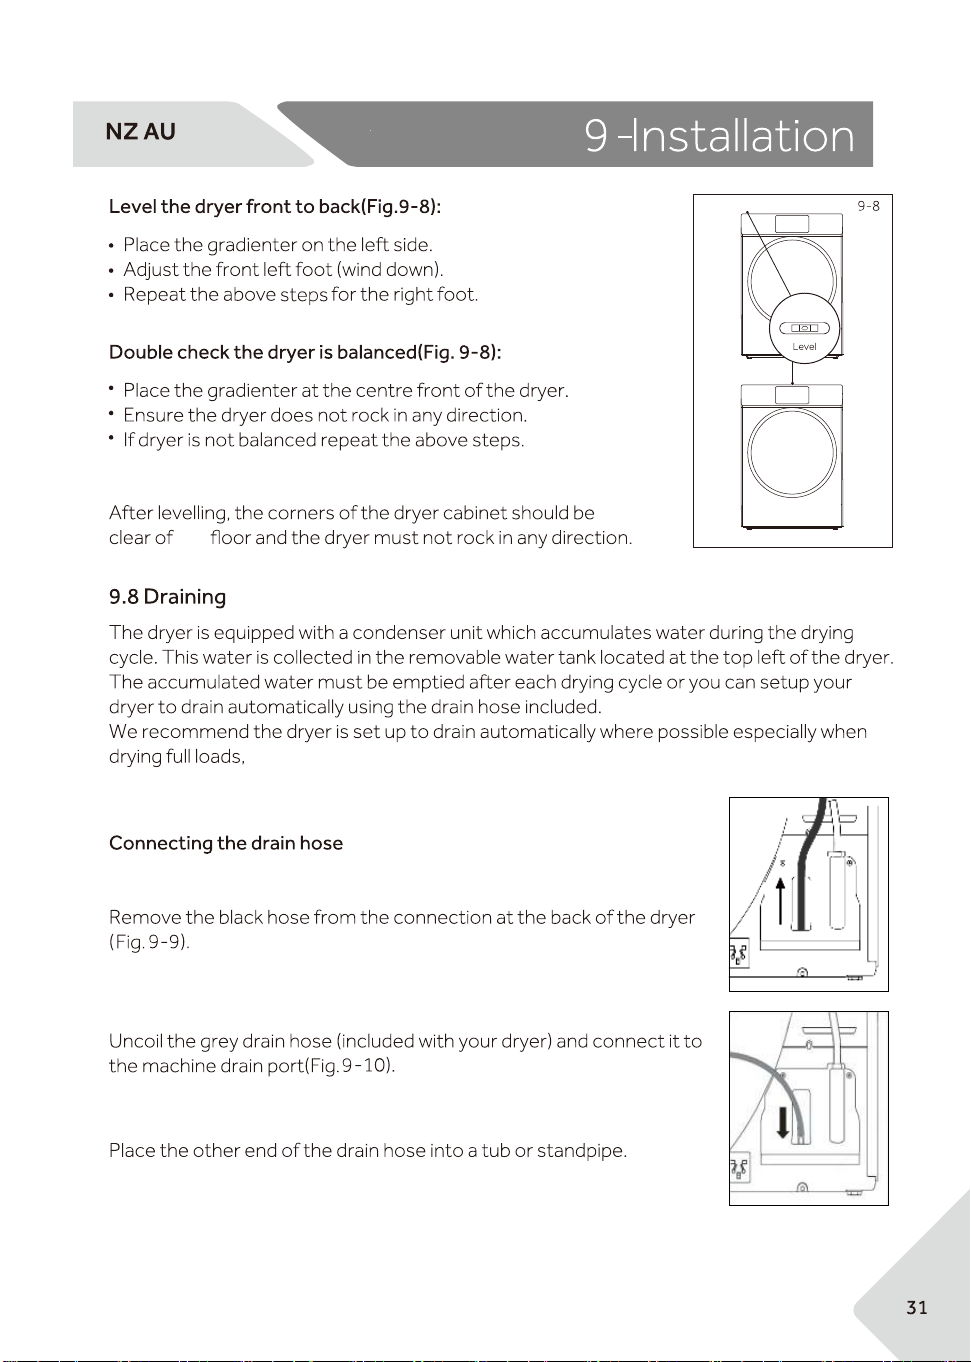
9-9
9-10
the
this will avoid the risk of having to empty the water tank during a cycle.

.


HDHP10DW1/HDHP10DB1
