USER GUIDE
HEAT PUMP CLOTHES DRYER
NZ AU
HDHP80AN1
HDHP80ANB1
Thank you
2
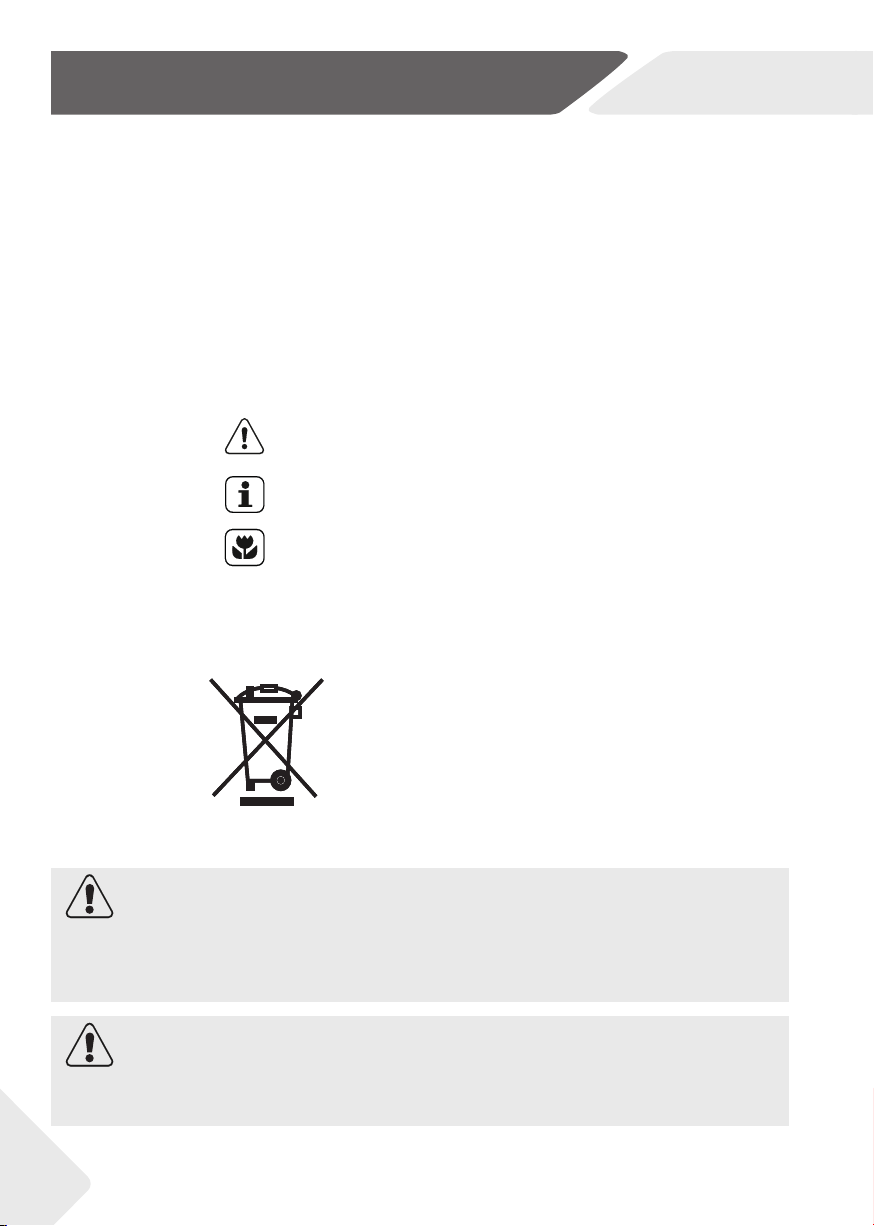
Disposal
Help protect the environment and human health. Put
the packaging in applicable containers to recycle it.
Help to recycle waste of electrical and electronic ap-
pliances. Do not dispose appliances marked with this
symbol with the household waste. Return the product
to your local recycling facility or contact your municipal
offi ce.
WARNING!
Risk of injury or suff ocation!
Disconnect the appliance from the mains supply. Cut off the mains cable and dispose
of it. Remove the door catch to prevent children and pets to get closed in the appliance.
WARNING!
The appliance must not be supplied through an external switching device, such as a
timer, or connected to a circuit that is regularly switched on and off by a utility.
Legend
Warning! – Important safety information
General information and tips
Environmental information
T
hank y
ou f
or pur
chasing a Haier Pr
oduct.
Please read these instructions carefully before using this appliance. T
he instructions con-
tain important information which will help you get the best out of the appliance and ensure
safe and proper installation, use and maintenance.
Keep this manual in a convenient place so you can always refer to it for the safe and proper
use of the appliance.
If you sell the appliance, give it away, or leave it behind when you move house, make sure
you also pass this manual so that the new owner can become familiar with the appliance
and safety warnings.
NZ AU

CONTENT
3
Safety information .......................................................................................................................... 4
Intended use ..................................................................................................................................... 7
Product description ........................................................................................................................ 8
Control panel .................................................................................................................................... 9
WiFi connection & Remote mode...............................................................................................12
Dry cycles..........................................................................................................................................13
Dry Preparation................................................................................................................................14
Care and cleaning ............................................................................................................................18
Before you call for sevice...............................................................................................................21
Fault codes ........................................................................................................................................22
Troubleshooting..............................................................................................................................23
Installation .........................................................................................................................................26
NZ AU
Manufacturer's warranty................................................................................................................29
Customer care .................................................................................................................................31
Getting started quickly...................................................................................................................16

1-Safety Information
4
WARNING!
Before use
˜ Make sure there is no transport damage.
˜ Remove all packaging and keep out of children.
˜ Handle the appliance always with at least two persons because
it is heavy.
Daily use
˜ This appliance can be used by children aged from 8 years and
above and persons with reduced physical, sensory or mental ca-
pabilities or lack of experience and knowledge if they have been
given supervision or instruction concerning use of the appliance
in a safe way and understand the hazards involved.
˜Keep away children under 3 years of age from the appliance un-
less they are constantly supervised.
˜Children shall not play with the appliance.
˜Do make sure the room is dry and well ventilated. The ambient
temperature should be between 5 °C and 35 °C.
˜Do not cover any ventilation openings in the base by a carpet or
similar object.
˜Keep the area around the tumble dryer free of dust and lint.
˜Do make sure that there is only laundry inside the appliance and
no pets or children before you use it.
˜Only touch the mains plug with dry hands and do not touch or
use the appliance if you are barefoot or have wet or damp hands
or feet.
˜Only dry textiles washed in water.
˜Do make sure not to load more than nominal load.
˜Remove all items such as lighters and matches from pockets.
˜Use fabric softeners or similar products as specifi ed by the
manufacturer´s packaging.
˜Do not place heavy objects or sources of heat or damp on top of
the appliance.
˜Hold the plug, not the cable, when unplugging the appliance.
˜Do not touch the rear wall and the drum during operation; they
are hot.
NZ AU

1-Safety Information
5
WARNING!
Daily use
˜Do not dry following items in the appliance:
˜ Items which have been contaminated with inflammable sub-
stances such as cooking oil, acetone, alcohol, benzine, petrol,
kerosene, spot removers, turpentine, waxes, wax removers
or other chemicals. The fumes can cause a fi re or explosion.
These items must always be washed fi rst by hand in hot wa-
ter with an extra amount of detergent and then be dried in the
open air before drying in the appliance.
˜Items which contain padding or fillings (e.g. pillows, jackets), as
the filling can get out with the risk of igniting in the dryer.
˜Items which contain a large proportion of rubber, foam rubber
(latex foam) or rubber like materials such as shower caps, wa-
terproof textiles, rubberised articles and items of clothing and
pillows with foam rubber filling.
˜Do not drink the condensed water.
˜Do not use the appliance without the lint filter or condenser fi lter
in place or with damaged filter.
˜ Notice that the last stage of the drying cycle is a cool down and
the dryer will run without heat for a few minutes to ensure that
the garments are at a safe temperature to be taken out of the
drum. If the cycle is paused during the drying stage, a cool down
might take place. Garments may still feel hot to the touch-
handle with care.
˜Switch off the appliance after each drying programme to save
electricity and for safety.
Maintenance / cleaning
˜Make sure children are supervised if they carry out cleaning and
maintenance.
˜Disconnect the appliance from the electrical supply before un-
dertaking any routine maintenance.
NZ AU
˜ WARNING: Never stop a tumble dryer before the end of the
drying cycle unless all items are quickly removed and spread out
so that the heat is dissipated.

1-Safety Information
6
WARNING!
Maintenance / cleaning
˜Clean the lint filter and the condenser fi lter after each pro-
gramme (refer to CARE AND CLEANING).
˜Do not use water spray or steam to clean the appliance.
˜Do not use industrial chemicals to clean the appliance.
˜Replace a damaged supply cord only by the manufacturer, its ser-
vice agent or similarly qualifi ed persons in order to avoid a hazard.
˜Do not try to repair the appliance by yourself. In case of repair
please contact our customer service.
Installation
˜Ensure a location which allows opening the door fully. Do not in-
stall the tumble dryer behind a lockable door or a door with
hinges on the opposite side of the tumble dryer door as this
limits the full opening of the tumble dryer door.
˜Install the appliance in a well-ventilated, dry place.
˜Never install the appliance outdoors in a damp place, or in an
˜ Ins
area which may be prone to water leaks such as under or near a
sink unit. In the event of a water leak cut power supply and allow
the machine to dry naturally.
tall or use the appliance in places where the temperature is
above 5 °C. If install the product in a low temperature room, and
using the product continuously, there might be some water
condensation and drops on floor.
˜Do not place the appliance directly on a carpet, or close to a wall
or furniture.
˜Do not expose the appliance to any frost, heat or direct sunlight
or in the near of heat sources(e.g. stoves, heaters).
˜Make sure that the electrical information on the rating plate
agrees with the power supply. If it does not, contact an electri-
cian.
˜ Do not use multi-plug adapters and extension cables.
˜ Make sure not to damage the electric cable and the plug.
˜Use a separate earthed socket for the power supply which is
easy accessible after installation. The appliance must be earthed.
NZ AU
7
Notice
The
appliance contains the fl uorinated greenhouse gas HFC-134a (GWP:1430). This
gas is hermetically sealed.
Intended use
This
appliance is
intended
for drying
items which
have been washed in
a water
solution
and
are marked on the manufacturer‘s care label as being suitable for tumble drying.
It is designed exclusively for domestic use inside the house. It is not intended for
commercial or industrial use. Changes or modifications to the device are not allowed.
Unintended use may cause hazards and loss of of all warranty and liability claims.
Envir
onmentall
y r
esponsible use
˜ Thorough spin: Spin the laundry with the maximum spin speed.
˜ Maximum load: Use the maximum filling amount according to the program table, but
do not overload the dryer.
2-Intended Use
NZ AU
HDHP80AN1
8
˜Loosen up the laundry: Shake out the laundry before putting them into the dryer.
˜Avoid excess drying: An excessive drying should be avoided. Select the right pro-
gramme and the appropriate dry level.
˜ Cleaning of the lint filters: Clean the lint filters after each cycle.
˜ Ventilation: Make sure the appliance is properly ventilated (refer to INSTALLATION).
˜ Condensed water reuse: The collected condensed water can be used for the steam
iron. Before it should be poured through a fine sieve or coffee filter paper. Smallest
parts will be retained by the filter.
HDHP80ANB1
8
8
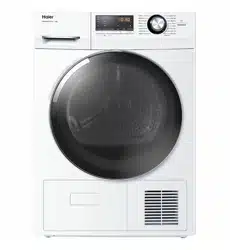
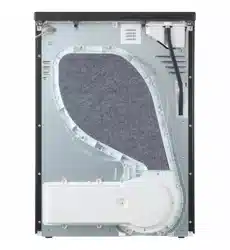
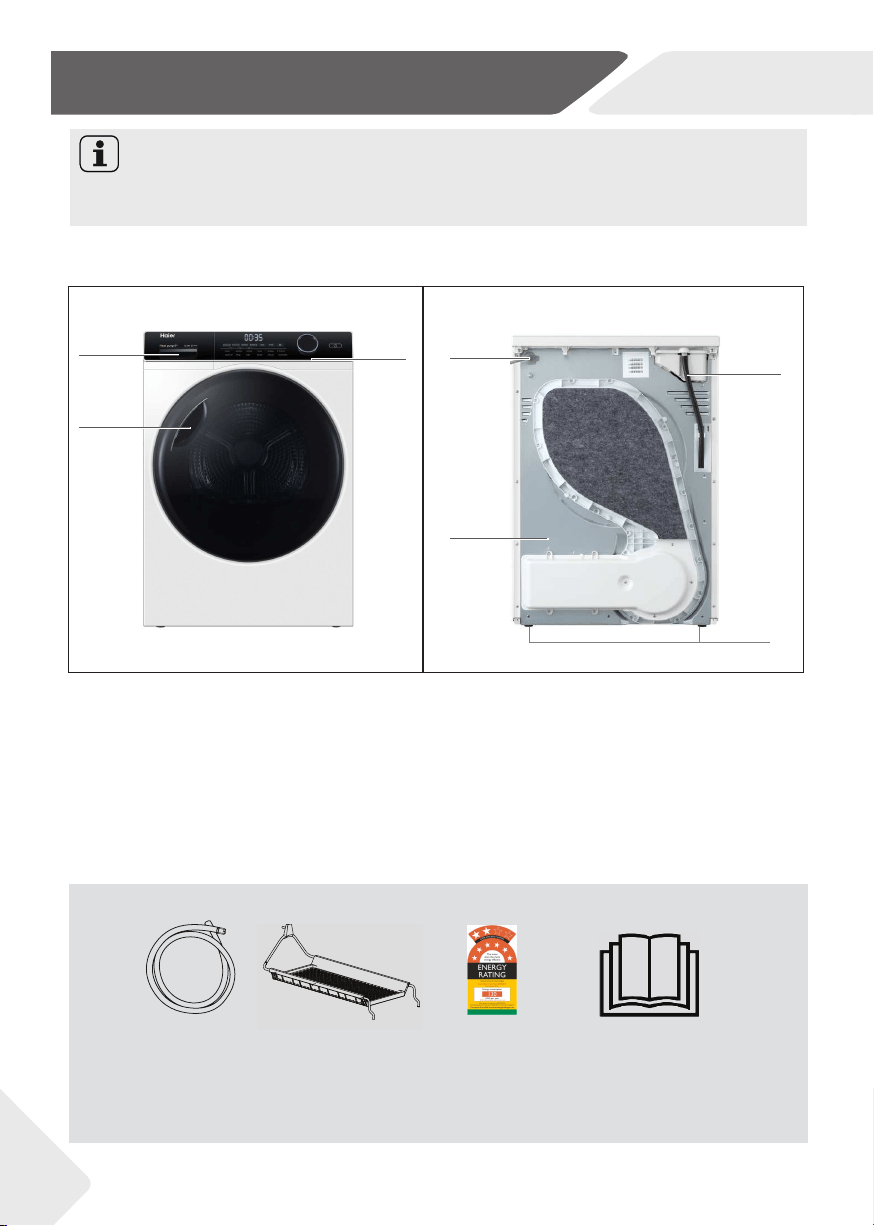
3.1 Pictur
e of appliance
Front (Fig. 3-1): R
ear side (Fig. 3-2):
Due to technical changes and different models, the illustrations in the following
chapters may differ from your model.
1 Water tank
2 Door
3 Control panel
4 Power supply cord
5 Back plate
6 Drainage outlet
7 Adjustable feet
User manual
Drain hose
Energy Label
Drying Rack
3.2 Accessories
Check the accessories and literature in accordance with this list (Fig.3-3):
3-3
NZ AU
Notice
3-Product Description
1
3
2
4
5
6
7
3-1
3-3-22
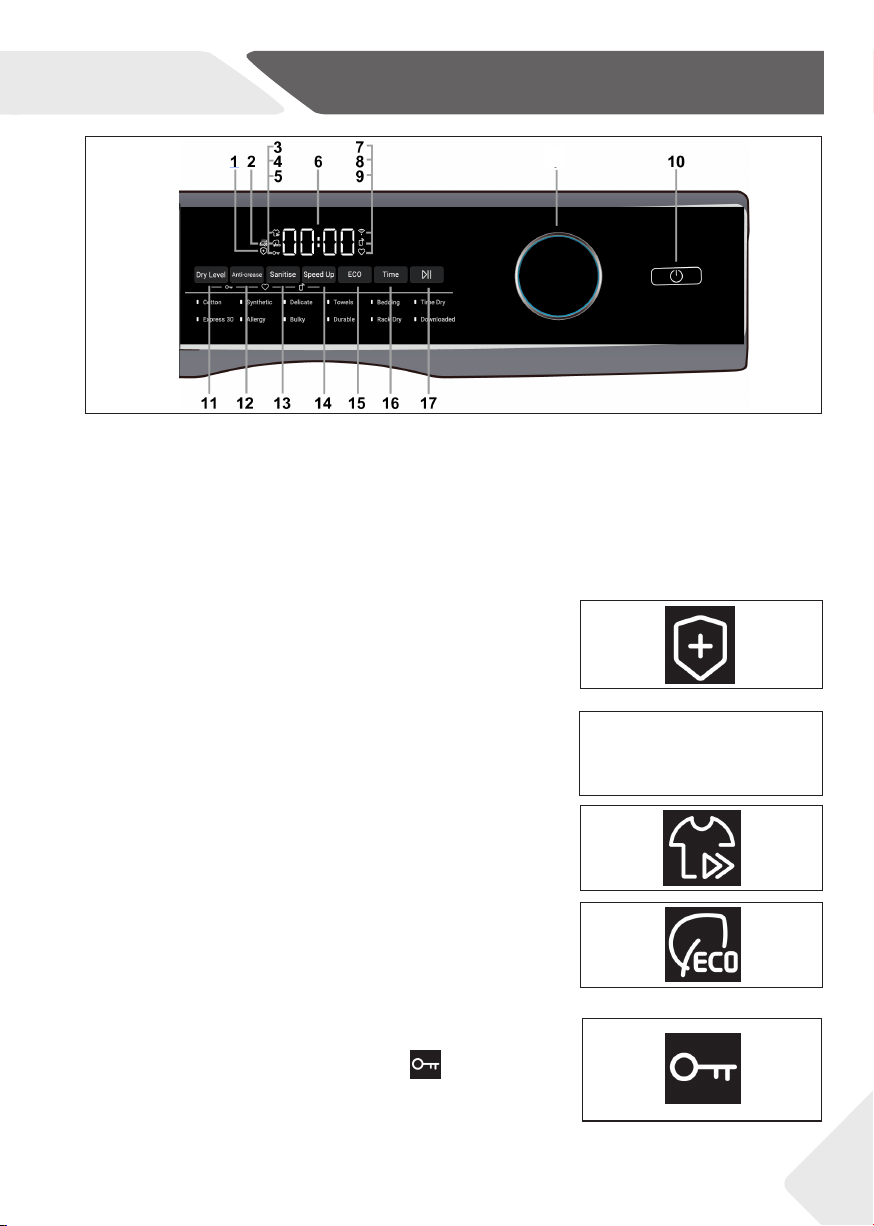
9
1
Sanitise indicator
2 Anti-crease indicator
3 Speed Up indicator
4 ECO indicator
5 Keylock
6 Digital display screen
7 WiFi
8 Remote mode
9 Memory mode
10 Power
11 Dry Level
12 Anti-crease
13 Sanitise
14 Speed Up
15 ECO
16 Time
17 Start/Pause
18 Control dial
4-1
4-2
4-3
4-4
NZ AU
4-Control Panel
4-5
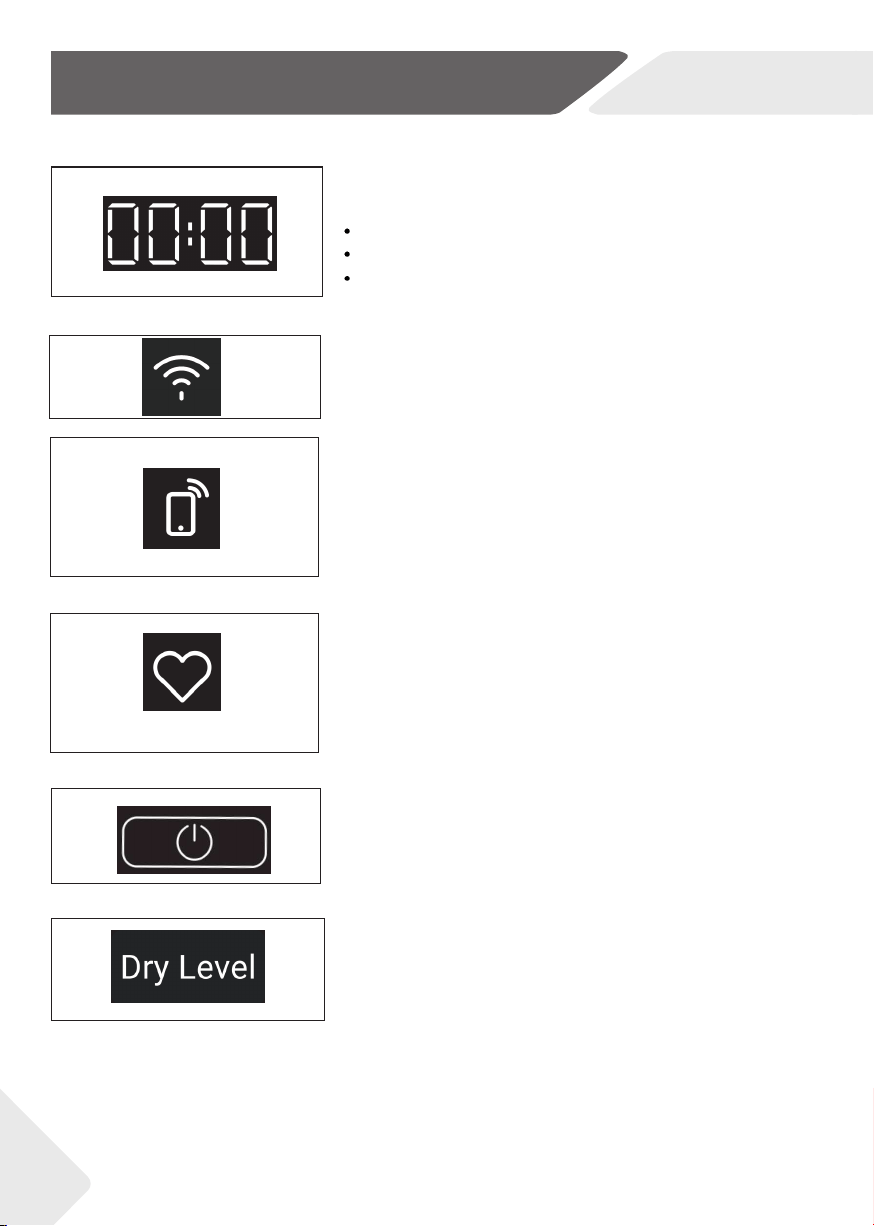
4.1 Sanitise indicator
Press the Sanitise button to select the sanitise function,
then the indicator lights up. When the program enters the
sterilization stage, the indicator light flashes.
4.2 Anti-crease indicator
Press the Anti-crease button to select the anti-crease
function, then the Anti-crease indicator lights up.
4.3 Speed Up indicator
Press the Speed Up button to select the speed up
function, then the Speed Up indicator lights up.
4.4 ECO indicator
Press the ECO button to select the ECO function, then
the ECO indicator lights up..
4.5 Keylock
Press and hold Dry LEVEL and Anti-crease combination
keys for three seconds, the Keylock icon lights up
on the panel. All buttons on the control panel excepting
the Power button are disabled. Repeat the operation to
release the lock.
18
4-Control Panel
10
k
g
kg
i-REFRESH
4-6
4-7
4-8
4-10
4-9
4-11
4.6 Digital display screen
Shows the following:
Dry cycle options and machine settings
Dry progress
Notifications if an error is detected or warning is
necessary.
4.7 WiFi
This icon lights up when the dryer network is connected.
4.8 Remote mode
In standby mode. Press and hold ECO and Speed Up
combination key for three seconds. This icon light is on.
REMOTE MODE is enabled, certain functions of your
dryer can now be accessed via the APP. REMOTE
MODE will be disabled when turning off the dryer.
4.9 Memory mode
Press and hold Anti-crease and Time combination keys
for three seconds, The current program and setting
function will be set to memory mode, and the next time
the program is selected, the memory setting will be
automatically called. Repeat the operation to reset the
memory mode.
4.10 Power
Press to turn the ON/OFF. Press and hold the Power
button for five seconds until the power is turned on and
the APP will be displayed on the screen to turn on the
network function.
4.11 Dry level
Press to select the level of dryness for your load. The
corresponding dryness level of L-1, L-2 and L-3 are
Damp, Dry and Extra dry.
NZ AU

11
4-12
4-13
4-14
4-15
4-16
4-17
e
4-Control Panel
NZ AU
4.12 Anti-crease
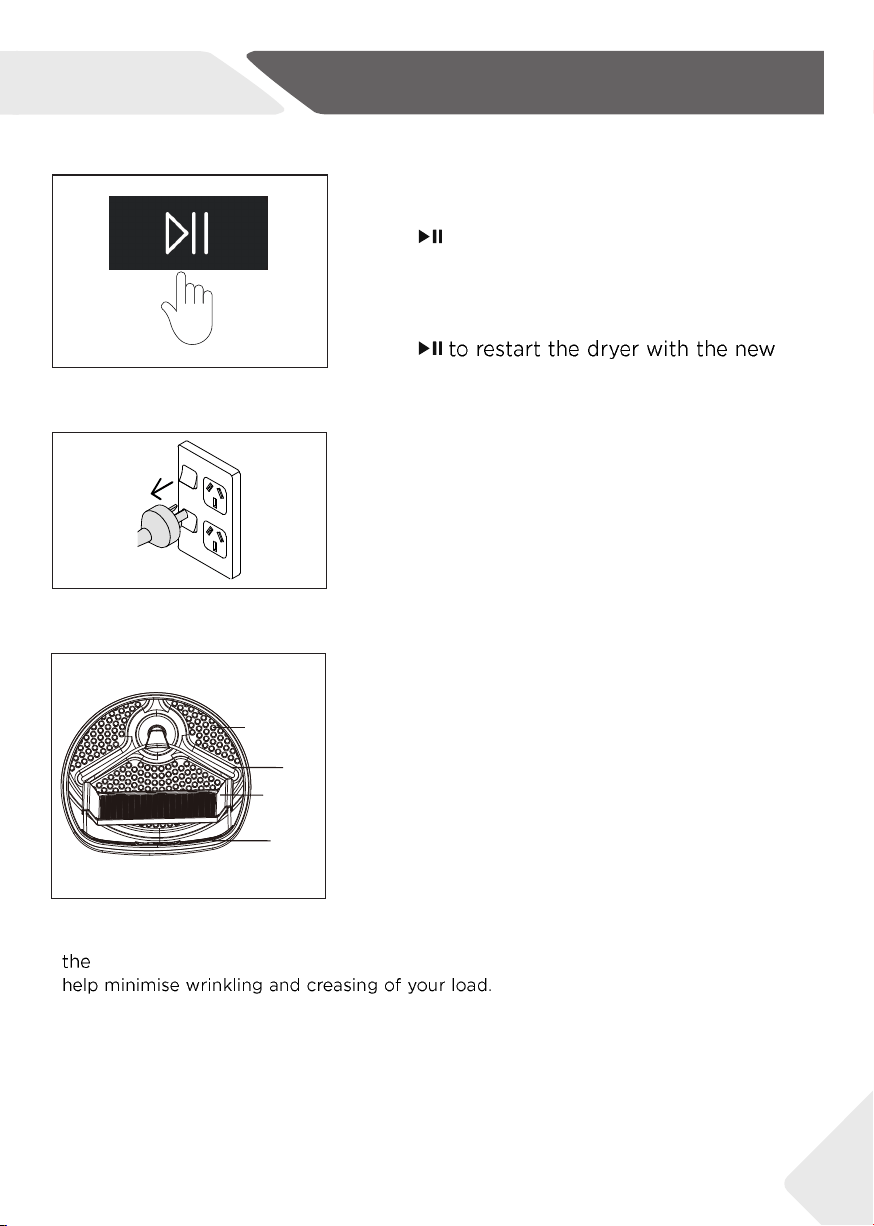
Press to set Anti-crease function. When the cycle finishes,
your dryer will beep and then turn off automatically. If the
Anti-crease option has been selected, the drum will rotate
periodically to minimise wrinkling and creasing. This is
particularly useful if you cannot remove the items
immediately after the cycle ends.
4.13 Sanitise
The dryer has the function of sterilization. This function will
extend the drying time. Press the Sanitise button to select
the function. When the dryer enters the Sanitise phase, the
indicator lights up.
4.14 Speed Up
A special feature designed to offer a shorter cycle whilst
providing good dry performance.
4.15 ECO
Use the ECO option to save energy. Selecting
ECO will reduce the drying temperature slightly.
4.16 Time
When a timed cycle is selected, using the Time
button to adjust the time up or down. For timed
cycles, the display will show approximately how
many minutes the cycle has remaining. For
automatic cycles, the word AUTO will appear on
the screen.
4.17 Start/Pause
Press to start or pause the selected dry cycle.
4.18 Control dial
Rotate to select your desired drying cycle.
White LED illuminates to indicate the selected dry cycle.
4-18
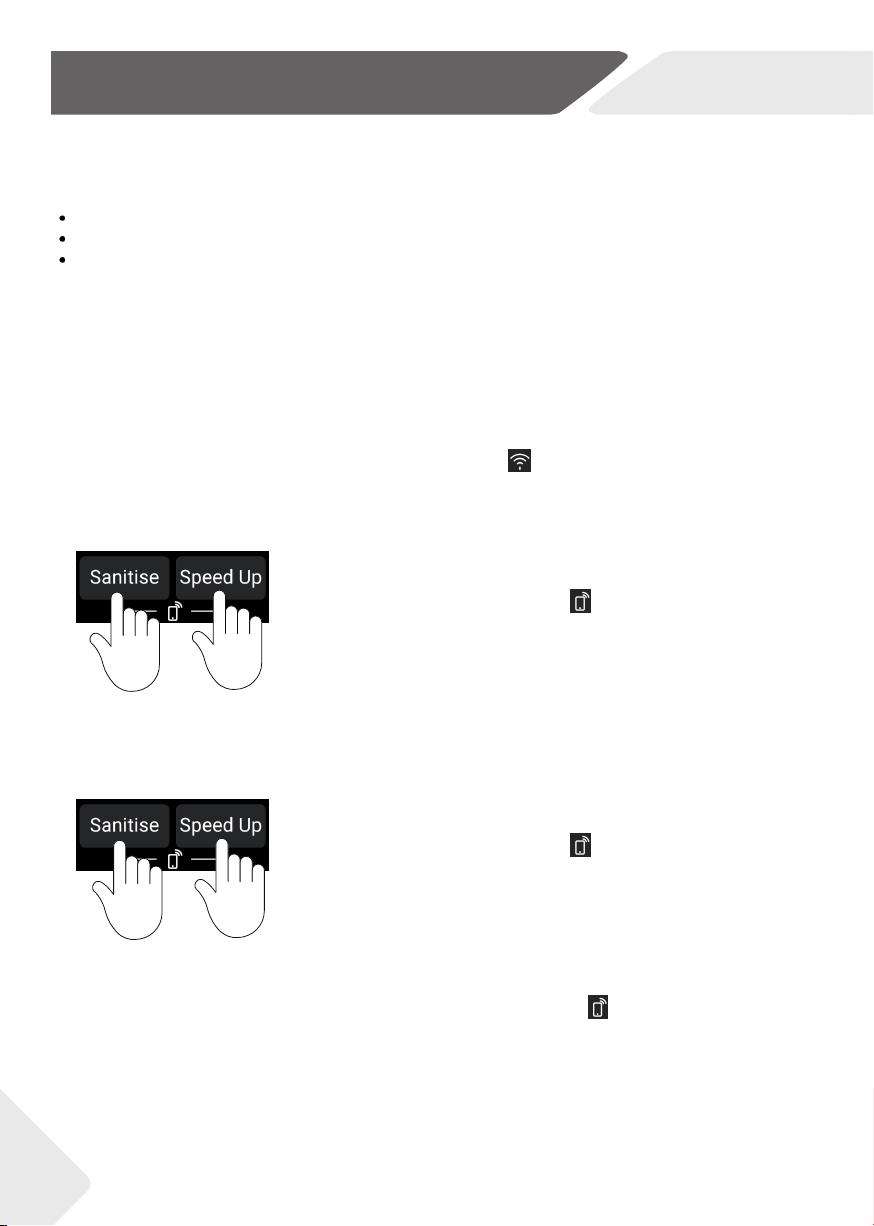
1. Press and hold Sanitise and Speed Up combination keys for
three seconds and the icon lights up. Remote Mode is
now enabled. Certain functions of your dryer can now be
accessed via the APP.
When your machine is connected to WiFi successfully, the icon lights up.
2. Press and hold Sanitise and Speed Up combination keys for
three seconds and the icon brightness disappears.
Remote Mode is now disabled.
3. When turning off the dryer, the Remote Mode will be automatically released. When the dryer
runs the cycle in Remote Mode via APP, the remote mode indicator flashes every second.
When the user stops the drying cycle which is selected through Remote Mode, the Remote Mode
will be disabled.
12
5-WiFi connection & Remote mode
NZ AU
On your mobile device:
1. Your product is WiFi connectable, please visit the webpage below to download the app and find out more:
Australia https://www.haier.com.au/smart
New Zealand https://www.haier.co.nz/smart
2. Register and create an account.
3. Add your appliance and set up the WiFi connection.

CYCLE
DEFAULT
DRY
LEVEL
DESIGNED FOR
MAX.
LOAD SIZE
(KG)
Cotton
Extr
a dry
Cotton garments
8
Synthetic
Dry
Sy
nthetic garments
4
Delicate
Dry
Delicate and heat
sensitive garments
2
Towels
Towels
6
Allergy
Extr
a dry
Clothes that need to
get rid of mites
2
Bedding
Large bedding items
4
Bulky
Extr
a dry
Bulky items
2
Durable
Extr
a dry
Durable garments
8
Time Dry
n/a
A cycle with user selectable
drying times
8
Express 30
n/a
Timed cycle for easy drying items
2
Rack Dry n/a
Using drying rack for items
that cannot be tumbled
3
Downloaded
DOWNLOAD PROGRAM VIA OTA
Extr
a dry
Extra dry
13
6-Dry Cycles
NZ AU
ECO, Cotton program is the recommended energy saving cycle for everyday drying.

Pr
ogramme
Drying
degree
Laundry
Max. Load kg
8
9 10
Mix
Extr
a dry
Heavy fabrics, need further drying
5 6 7
Synthetics
Extra dry
Heavy s
ynthetic
4
4,5 5
Towel **)
Extra dry
T
owels
5
6 7
Duvet
/
Feather clothing
1 1 1,5
Wool
/
Woolfell textiles
3 3 4
Warm up
Extra dry
Cashmere clothing
3 4 4,5
Timer
/
Heavy fabrics, need further drying
- - -
Delicate
Extra dry Underwear 2 2 3
Bulky **)
Extra dry Heavy cotton 2 2 3
Shirt Extra dry
Shirts
4 4,5 5
Sports
Extra dry
Sportswear
4 4,5 5
Babycare
Extra dry Baby clothing 4 4 5
Quick Dry / Sheets 4 4 5
Cotton
Extra dry Cotton, coats 8 9 10
Bedding
or use drying rack for very delicate items.
Allergy
Ensure the items can safely withstand heat.
14
7-Dry Preparation
NZ AU
Mixed clothes
Cotton or
Synthetic
Ensure the items can safely withstand heat.
fabrics) should be dried separately, using the DELICATE cycle, or if you do not want them tumbled use
the RACK DRY cycle. Sleeping bags and other down items should be dried on BULKY cycle.
15
7-Dry Preparation
NZ AU
Allow enough room in the dryer for clothes to tumble freely. Load the dryer in terms of the space
the garments take up when dry, rather than when they are wet.
Shake clothes out and load individually to help items dry evenly and reduce tangling.
Dry permanent press garments (business shirts) together on the Damp dryness level with
Anti-crease option on. This will help reduce wrinkling and the need for ironing.
8.2 Preparing the laundry
-
Sort clothes according to fabric
(cotton,synthetics, wool etc.).
Only dry laundry that has been spun.
-
Empty pockets of all sharp or flammable objects
such as keys and matches.
-
Follow the instructions on the laundry label and
dry loads that can be dried.
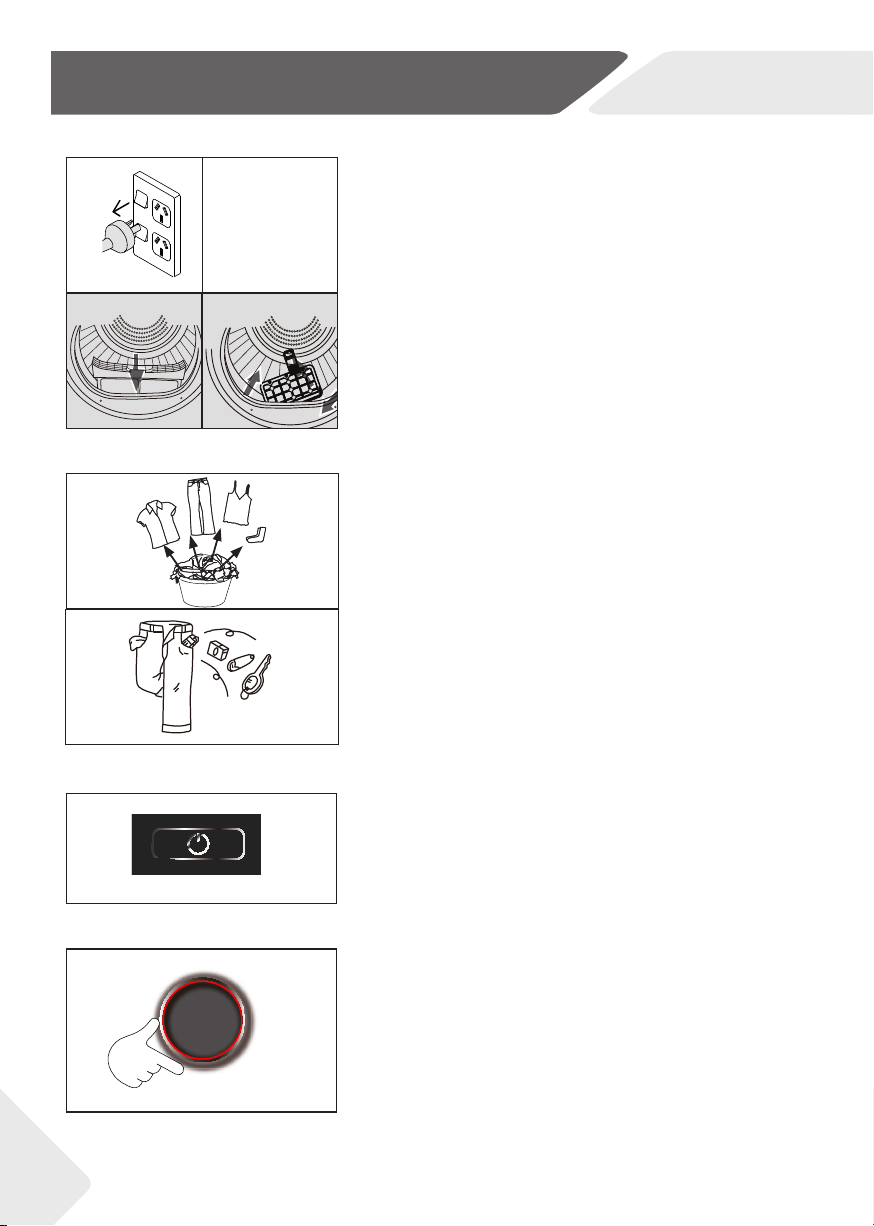
8.1 Preparing the appliance
1. Connect the appliance to a power supply(220V
to 240V~/50Hz) .
2. Make sure:
17
8-
1
8-3 8-4
8-5
8-6
8-2
8.3 Activate the dryer
8-7
-
Press POWER to activate your dryer.
8.4 Set program
8-8
1. Select your desired drying cycle by turning the
control dial. A LED will illuminate as you turn the
dial showing which cycle is selected.
2. Set functions such as Dry level, Sanitise, ECO,
Anti-crease and Time.
16
8-Getting Started Quickly
NZ AU
-the water tank is empty and properly
installed. (Fig. 8-2).
-the lint filter is clean and properly installed.
(Fig. 8-3).
-the condenser filter is clean and properly
installed (Fig. 8-4).
三
8-9
8-10
8.5 Start the cycle
1.
cycle.
2.
Anti-crease option has been selected, the dryer will rotate the drum periodically to
1. Open the dryer door.
2. Check that the drum is empty.
3. Put the dryer rack into the drum.
4. Make sure the catches are inserted in the hole of
the lint filter and locked in the hole of rear drum.
Drum openings
Drum
Dryer rack
Lint filter
8-11
17
8-Getting Started Quickly
NZ AU
8.6 End of the cycle
Press POWER to turn off your dryer
and unplug the dry.
8.7 Drying rack
The dryer rack is designed for use with items which
are not recommended for tumble drying such as
trainers, sneakers, sweaters or delicate lingerie.
If you wish to change a cycle or select a different option
once a drying cycle has started, you should shutdown
and restart the dryer.
9-Care and Cleaning
18
k
g
kg
i-REFRESH
NZ AU
9-5
9-6
9-7
9-8
9.2 Condenser filter cleaning
Clean the lint filter after each dry cycle.
1. Open the door.
2. Pull out the lint filter from its housing (Fig. 9-5).
3. Pull out the condenser filter from the air duct (Fig. 9-6)
4. Remove the sponge and clean the filter screen
form any residuals (Fig. 9-7).
5. Reinstall the sponge to the condenser filter (Fig.
9-8)
9-1
9-2
9-3
9-4
9.1 Lint filter cleaning
Clean the lin
t filter after each dry cycle.
1. Remove the lint filter from the drum (Fig. 9-1).
2. Open up the lint filter (Fig. 9-2).
3. Clean the lint fi lter form any lint residuals (Fig. 9-3).
4. Reinstall the cleaned lint fi lter in the tumble dryer
(Fig. 9-4).
9-Care and Cleaning
19
YER RACK
4. Make sure the catches are
NZ AU
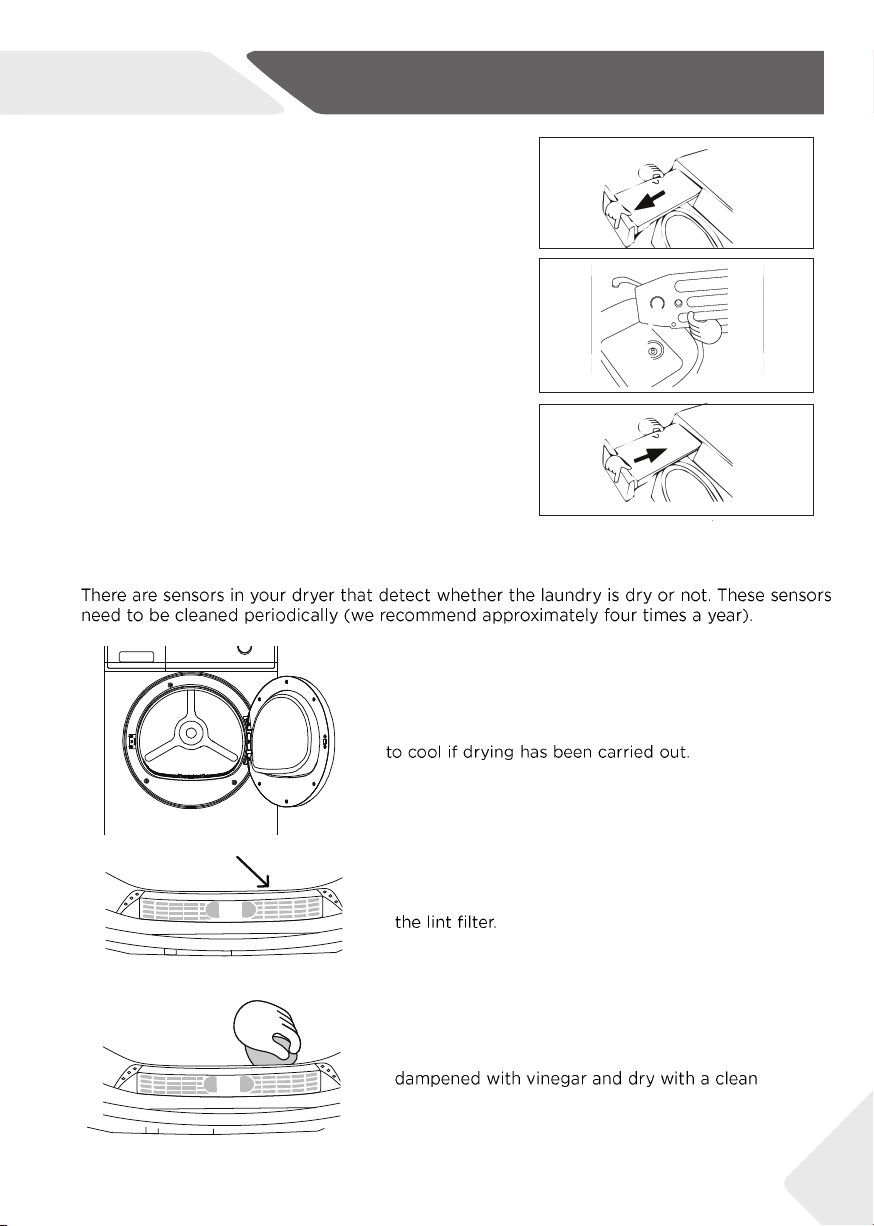
9.3 Emptying the water tank
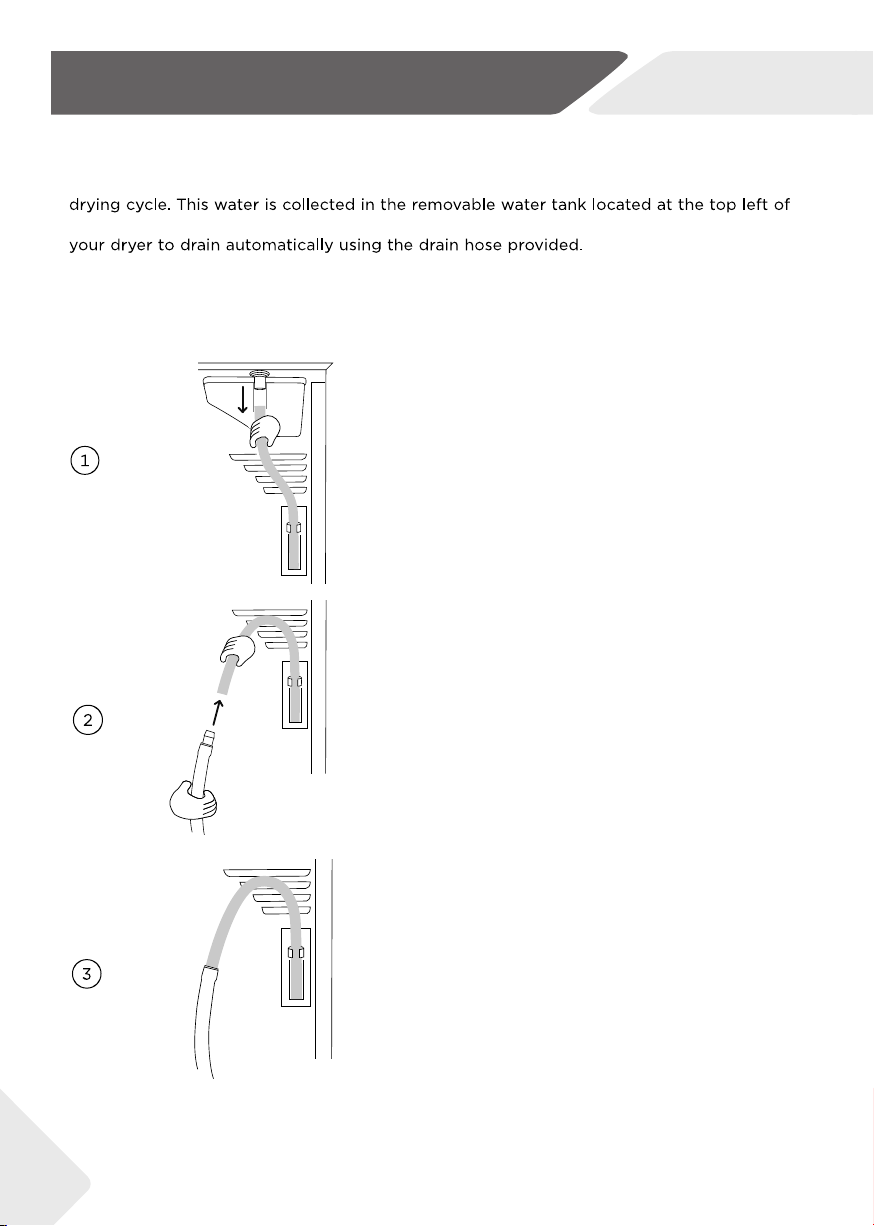
Empty the water tank after each drying cycle.
1. Pull out the water tank from its housing (Fig. 9-9).
2. Empty the water tank (Fig. 9-10).
3. Reinstall the water tank to the dryer (Fig. 9-11)
9.4 Clean the sensors
1.
2.
3.
9-9
9-10
9-11
/
/
/

9-Care and Cleaning
20
NZ AU
9.5 Clean the dryer
Wipe the outside of the tumble dryer and the control panel with a damp cloth. Do
not use any organic solvent or corrosive agent to avoid damage to the device.
9.6 Clean the Drum
After some operation time, fabric care agents or calcium contained in the water
can form an almost invisible film on the inside of the drum. Use a damp cloth and
some detergent to remove it. Do not use any organic solvent or corrosive agent
to avoid damage to the device.
10-Before you call for service
21
NZ AU
Dry level and Sanitise combination

22
NZ AU
11-Fault Codes
string of codes appears on the display, a fault has occurred. Please refer to the following
instructions.
C
ode Cause Solution
Drain pump failure
C
ontact the customer service.
The condenser thermal sensor is open-circuited or
short-circuited.
Contact the customer service.
Temperature of the laundry in the drum does not change. Contact the customer service.
C
ommunication failure between PCB and display. Contact the customer service.
The lint filter is blocked and needs to be emptied.
Empty the lint filter and then
replace it and check the lint filter is
not damaged. Check there is nothing
else stuck in the lint filter holder whick
may be blocking the air flow.
The water tank is full and needs to be emptied.
Network configuration failure Turn off the dryer.
Check and empty the water tank,
if using drain hose, check whether
the water tank or drain hose is
blocked.
12-Troubleshooting
23
NZ AU
Refer to 'Emptying the water tank'.
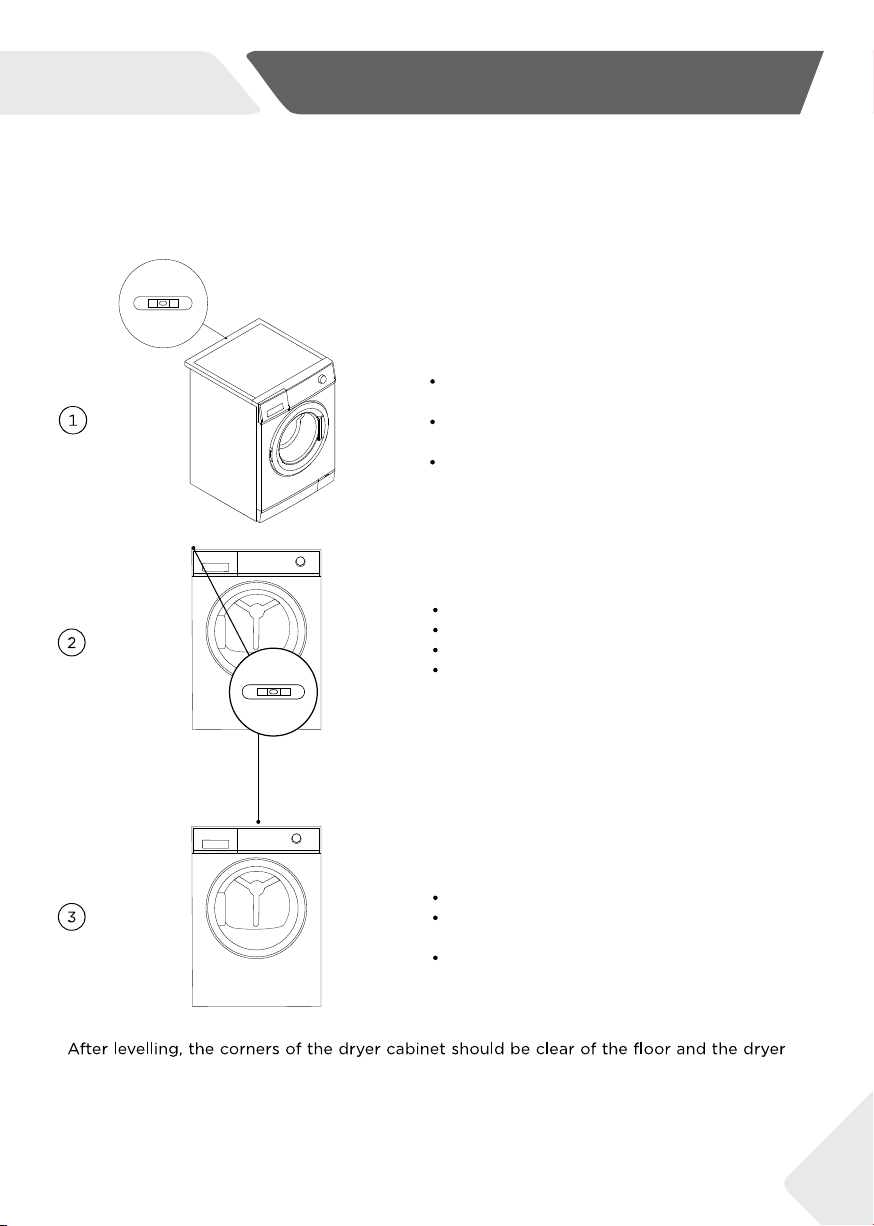
Adjust the adjustable foot under the dryer.
Refer to 'Levelling the dryer'.
Ensure the dryer is installed on a flat,
stable surface.
Ensure the dryer is correctly levelled.
Choose appropriate cycle. Refer
to 'Dry Cycles'
Dry Level selected
Try selecting a lower Dry Level.
or on the inside of the door
12-Troubleshooting
NZ AU
Refer to 'Sorting'.
'Drying rack'.
24
12-Troubleshooting
NZ AU
25
13-Installation
NZ AU
26
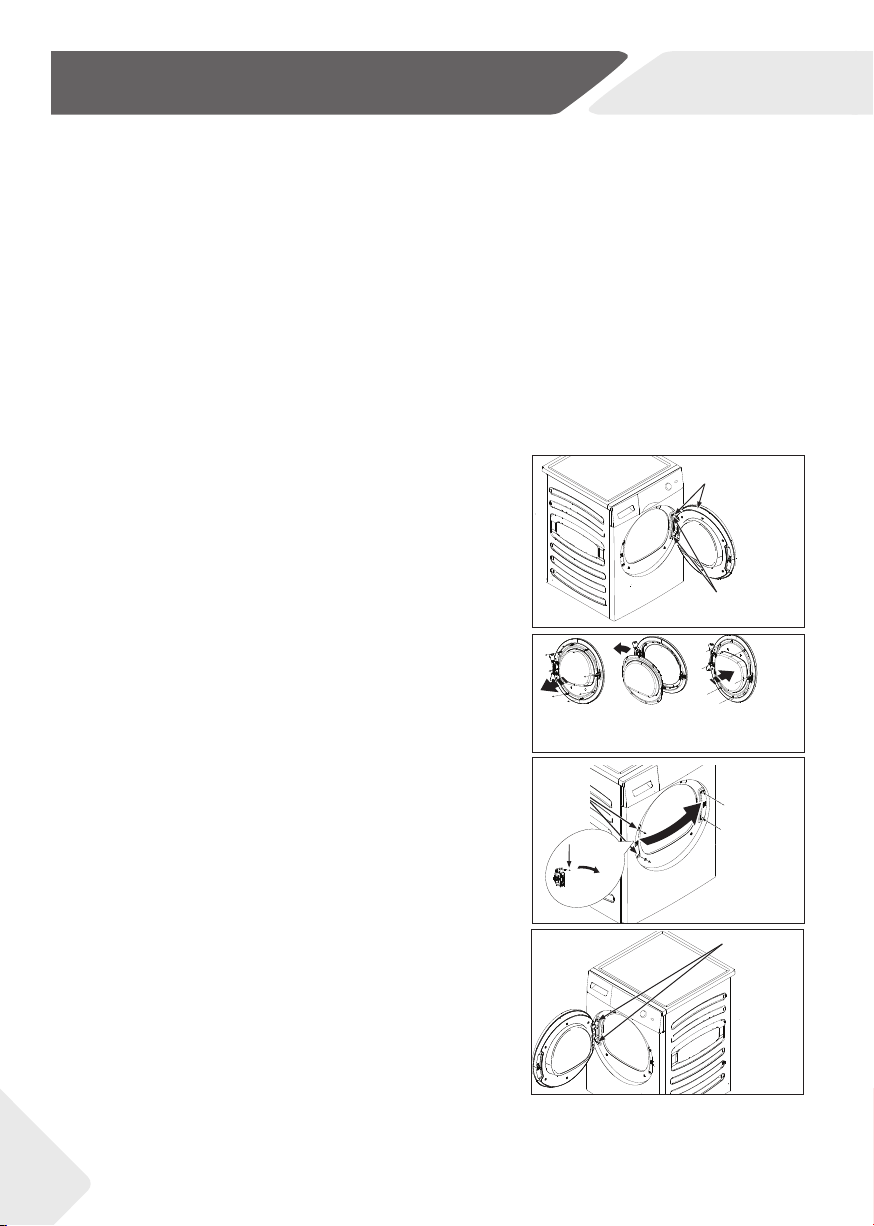
1. Remove the door assembly
Open the door. Remove the two screws holding the-
hinge/door assembly to the dryer. Carefully set the hinge/
door assembly aside (Fig. 13-1).
2. Remove, rotate and replace the inner door
Remove the eight stickers and screws securing the inner
door to the outer door. Remove the inner door, rotate it
180° and reinstall it into the outer door using the same
eight screws and stickers (Fig. 13-2).
3. Remove, rotate and replace the door lock & strike plate
Remove the two screws holding the strike plate, and then
remove one screw of the door lock, push down and take out
the lock rotated 180° and install it on the opposite side. the
same eight screws and stickers (Fig. 13-3).
4. Rotate and replace the hinge/door assembly
Rotate the hinge/door assembly and secure with same two
screws on the hinge/door assembly to the dryer. (Fig. 13-4).
Hinge and Door
Assembly
Hold the Door and
Remove Hinge Screws
from the Dryer
Replace
the Door lock
and then
Reinstall
Strike Plate
and Screws
Strike Plate
and Screws
1.Push
down
2.rotate an
angle then
can take
out
Secure with same
two screws
Remove eight
stickers and
screws
Remove the
Inner door and
rorotated 180
as shown
o
Replace the
inner door with
eight screws and
stickers
13-1
13-2
13-3
13-4
Freestanding & Stacking
Your dryer can be installed one of two ways, either freestanding, or stacked on top of a Haier front
loading washer.
1. The dryer stands on the floor and can easily be moved into position.
2. Your dryer has been designed to be able to be stacked on top of a Haier front loading washer.
A stacking kit MUST BE USED between the products and fitted correctly to the washing machine
and dryer, as per the stacking kit instructions.
Reversing the door swing
These instructions are for changing the hinges from the right side to the left side.
If you ever want to switch them back to the right side, follow these same instructions
and reverse all references to the left and right.
13-Installation
NZ AUNZ
27
13-Installation
NZ AU
28
14-Manufacturer's Warranty
NZ AU
Haier undertakes to:
than a Haier trained and supported service technician or the selling dealer.
installed outside the Haier trained and supported service technician's
29

14-Manufacturer's Warranty
NZ AU
Service under this Manufacturer's Warranty must be provided by a Haier trained
30

31
15-Customer Care
NZ AU
We recommend our Haier Customer Service and the use of original spare parts.
If you have a problem with your appliance, please fi rst check section TROUBLESHOOTING.
If you cannot fi nd a solution there, please contact
˜ your local dealer or
˜ the Service & Support area at www.haier.com where you can fi nd telephone numbers
and FAQs and where you can activate the service claim.
To contact our Service, ensure that you have the following data available.
The information can be found on the rating plate.
Model _________Model ____________________ Serial No. _____________________
Also check the Warranty Card supplied with the product in case of warranty.
For general business requires please find below our addresses in New Zealand and Australia.
For more information, please refer to WWW.HAIER.COM.

HDHP80AN1/HDHP80ANB1