HDHPS70LW1

Warning: Risk of fire/Flammable materials
Read the instructions
Safety information..........................................................................................................................4
Product description.......................................................................................................................9
Control panel.................................................................................................................................10
Dry cycles.......................................................................................................................................13
Dry Preparation.............................................................................................................................14
Getting started quickly................................................................................................................16
Care and clean..............................................................................................................................18
Before you call for sevice............................................................................................................21
Fault codes.....................................................................................................................................22
Troubleshooting............................................................................................................................23
Installation.......................................................................................................................................26
Customer Care..............................................................................................................................31
- This appliance is not intended for use by persons (including children) with
reduced physical, sensory or mental capabilities, or lack of experience and
knowledge, unless they are supervised or given instructions on how to use
it by someone responsible for their safety.
- Supervise children to ensure they do not play with the appliance or climb
inside the drum.
- Do not swing on or put weight on the door.
- The appliance should only be used for garments recommended for machine
drying. Always follow the advice on the care label.
- Do not touch or operate the machine with wet hands or with bare-feet.
- Do not place dripping wet clothing in or on top of the appliance as it may
create an electrical hazard.
- Do not use the appliance if industrial chemicals (e.g. solvents) have been used
on the clothes.
- Remove all items such as lighters and matches from pockets.
- Pull up zips, fix loose threads and protect embellishments to prevent garments
from being damaged and entangled.
- Garments that contain metal reinforcements should not be placed in the
appliance. If necessary, use an appropriate laundry bag or net.
Before switching on your appliance for the first time, read and save this guide.
Before First Use
- Do not operate this machine if it has been damaged during transport.
Contact your dealer or Haier service technician.
- Ensure all transport bolts are removed before running the appliance.
Failure to do so might end in damage to the apppliance.
- Remove all packaging and keep out of reach of children.
- This appliance is heavy, we recommend 2 people to move and install
the appliance.
- This product has been designed for personal, family or household use.
This product is not designed for any commercial use. Any commercial
use will terminate this products manufacturer’s warranty.
Meaning of symbols on the dryer
Warning: Risk of fire/Flammable materials
Read the instructions
Capacity
- Do not overload the appliance beyond its rated capacity:
MAXIMUM DRY CAPACITY: 7 Kg
- Capacity refers to the maximum dry weight of items the appliance can dry at
any one time
Dryer Information
- Ensure all lint filters are cleaned before every load.
- Do not operate this product without the lint filter in place or allow lint
to accumulate in or around the appliance.
- If the lint filter is damaged, contact your Haier service technician to
arrange getting a new filter. Do not operate your appliance with a
damaged lint filter or without the filter in place, as this will cause
damage to your appliance.
- The appliance might get hot during operation, use caution if in close proximity.
- Unplug the appliance before undertaking maintenance. Hold the plug (not the
cable) when unplugging the machine.
- Ensure there are no undesirable objects inside the drum before starting a cycle.
- Ensure that the ambient temperature is between 5C and 35C before using the
appliance.
Intended use
- This appliance is intended for drying garments that can be tumbled.
- Follow the manufacturer instructions found in the garment label.
- Do not make any changes or modifications to this appliance, they might
cause personal injury and damages to property.
- Do not install the appliance behind a lockable door, sliding door, or behind
a door where the hinge is on the opposite side to that of the dryer in such a
way that the full opening of the door is inhibited. Ensure the dryer door can
always be opened fully.
- If installed behind a cabinetry door, it must be hinged on the same side as
the dryer with a minimum clearance of 30mm from the dryer handle to the
internal surface of the cabinetry door.The cabinetry door must remain open
while the machine is running.
- Exhaust air must not be discharged into a flue which is used for exhausting
fumes from appliances burning gas or other fuels.

Dryer Information
- If ducting the dryer to the outdoors, ensure adequate ventilation is
provided during operation of the appliance to avoid any backflow of gases
from fuel burning appliances.
- WARNING:The last stage of the drying cycle is a cool down phase.
Never stop a tumble clothes appliance before the end of the cycle unless
all items are removed and spread out in order to dissipate the heat.
- Do not dry Items which are unwashed.
- Do not dry items which have been cleaned with industrial chemicals.
Items that have previously been cleaned in, washed in, soaked in or
spotted with flammable liquids or solids, eg petrol/gasoline, kerosene,dry
cleaning solvents, vegetable or cooking oil, acetone, denatured alcohol,
some brands of spot removers, turpentine, waxes and wax removers or
other flammable or explosive substances should not be placed in a tumble
dryer.
- Rubber backed articles, foam rubber (latex foam), clothes or pillows
fitted with foam rubber pads, fibreglass, shoes containing rubber, plastic,
shower caps, babies waterproof napkin covers and waterproof textiles
should not be dried in the dryer. These materials when heated can produce
fire by spontaneous combustion.
- Do not dry an electric blanket or any other electrical items in your dryer, unless
the care label specifically states it is safe to do so. Never dry these items at high
temperatures.
- Fabric Softeners or similar products should not be used in a tumble dryer to
eliminate the effects of static electricity, unless this practice is specifically
recommended by the manufacturer of the fabric softener product.
- Oil-affected items can ignite spontaneously, especially when exposed to heat
sources such as a tumble appliance. The items become warm causing an oxidation
reaction in the oil. This oxidation creates heat. If the heat cannot escape the items
can become hot enough to catch fire. Piling, stacking or storing oil-affected items
can prevent heat from escaping creating a fire hazard.
- If it is unavoidable that fabrics that contain vegetable oil, cooking oil or have been
contaminated by hair care products be placed in the appliance, they should first
be washed in hot water with extra detergent – this will reduce, but not eliminate
the fire hazard. The cool down cycle of the appliance should be used to reduce
the temperature of these items. They should not be removed from the tumble
appliance and piled or stacked while hot.
Maintenance, Cleaning and Disposal
- Keep the gasket, dispenser and door clean to prevent odours.
- Do not use water spray or steam to clean the appliance.
- A damaged electrical cable must be replaced by a Haier service technician or
similarly qualified person. Do not use the appliance until it has been repaired to
avoid a risk of electric shock.
- The only user-removable parts of the appliance are the lint filter and the
condenser filter. No other parts are designed to be removed by the user.
- When disposing of the appliance, it is recommended that the door is removed
to avoid children getting trapped inside, and that the electrical cable is cut off
close to the machine.
- Unless the product is modified by an approved technician, any changes might
result in loss of warranty.
Installation
WARNING! Electric Shock Hazard Failure to follow this advice may result
in electric shock or death.
- Ensure that the appliance cable is positioned so that it does not come into
contact with water or moisture.
- The appliance must not be supplied through an external switching device,
such as a timer, or connected to a circuit that is regularly switched on and off
by a utility.
- Install the appliance in a well-ventilated, dust-free environment.
- This appliance must not be installed or operated on a plinth (other than a
genuine Haier part, installed per the instructions).
- We do not recommend the use of extension cords or portable electrical
outlet devices.
- Ensure the installation provides accessibility to the plug or incorporate a
switch in the fixed wiring in accordance with the wiring rules to allow
disconnection of the appliance from the supply after installation.
- Review the electrical information on the rating plate before plugging in this
appliance to make sure the right voltage and current can be supplied.
- Install the appliance on a solid and level surface ensuring it has 20mm
clearance on each side. The appliance must not be installed on any textured
floor coverings (eg carpet, rugs).
- We recommend to replace the inlet hoses (if any) every 5 years.

- WARNING: Failure to do so may result in a flood and damage to property.
- Do not expose the appliance to frost, external heat sources or direct sunlight.
- Do not install the appliance in a location where the ambient temperature
drops below 5°C.
- Do not install the appliance outdoors or in a damp location.
Installation
-
A stacking kit MUST BE USED between the products and fitted correctly to the
washing machine and dryer as per stacking kit instructions.
- Ensure you use the compatible stacking kit for your washer and dryer combination.
- Stacking kits are available through your Haier Brand dealer or online
- Ensure that the power plug is always accessible.
-The following stacking configurations are not safe and MUST NOT be used:
- A washer stacking on top of a dryer.
- A washer on top of a washer.
- An incompatible washer/dryer/stacking kit combination.
2-1
2-2
2-3
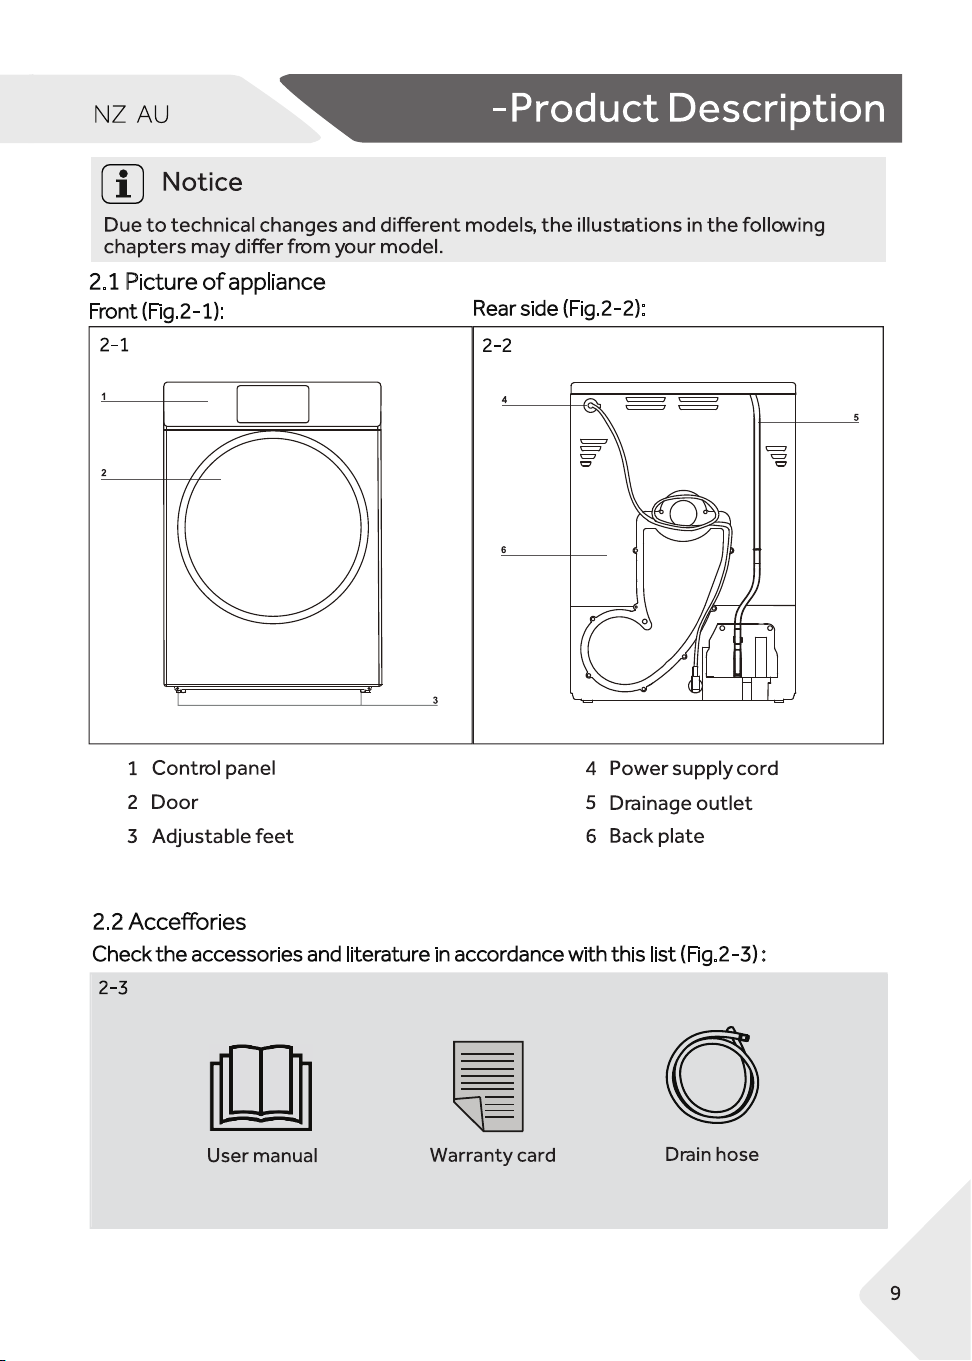
2.1 Picture of appliance
Front (Fig.2-1):
Rear side (Fig.2-2):
2.2 Acceffories
Check the accessories and literature in accordance with this list (Fig.2-3):
2
4
10
11 12 13 14
2
3
5
6
7
8
9
Delay
Dela
1
3.2
Left
Right
Choose a program and the desirable modifiers, then
start the cycle. Press “Dry-Level + Anti-crease” for 3
seconds to save the personalised options. The selection
will become the default setting for that program and the
Favourite icon (Fig. 4-2) will be ON on the display to
indicate it. To restore the default parameters, select
“Dry-Level+Delay”for 3 seconds simultaneausly,
the display will show “dEF” to acknowledge the change.
The favourite function is available for all cycles.
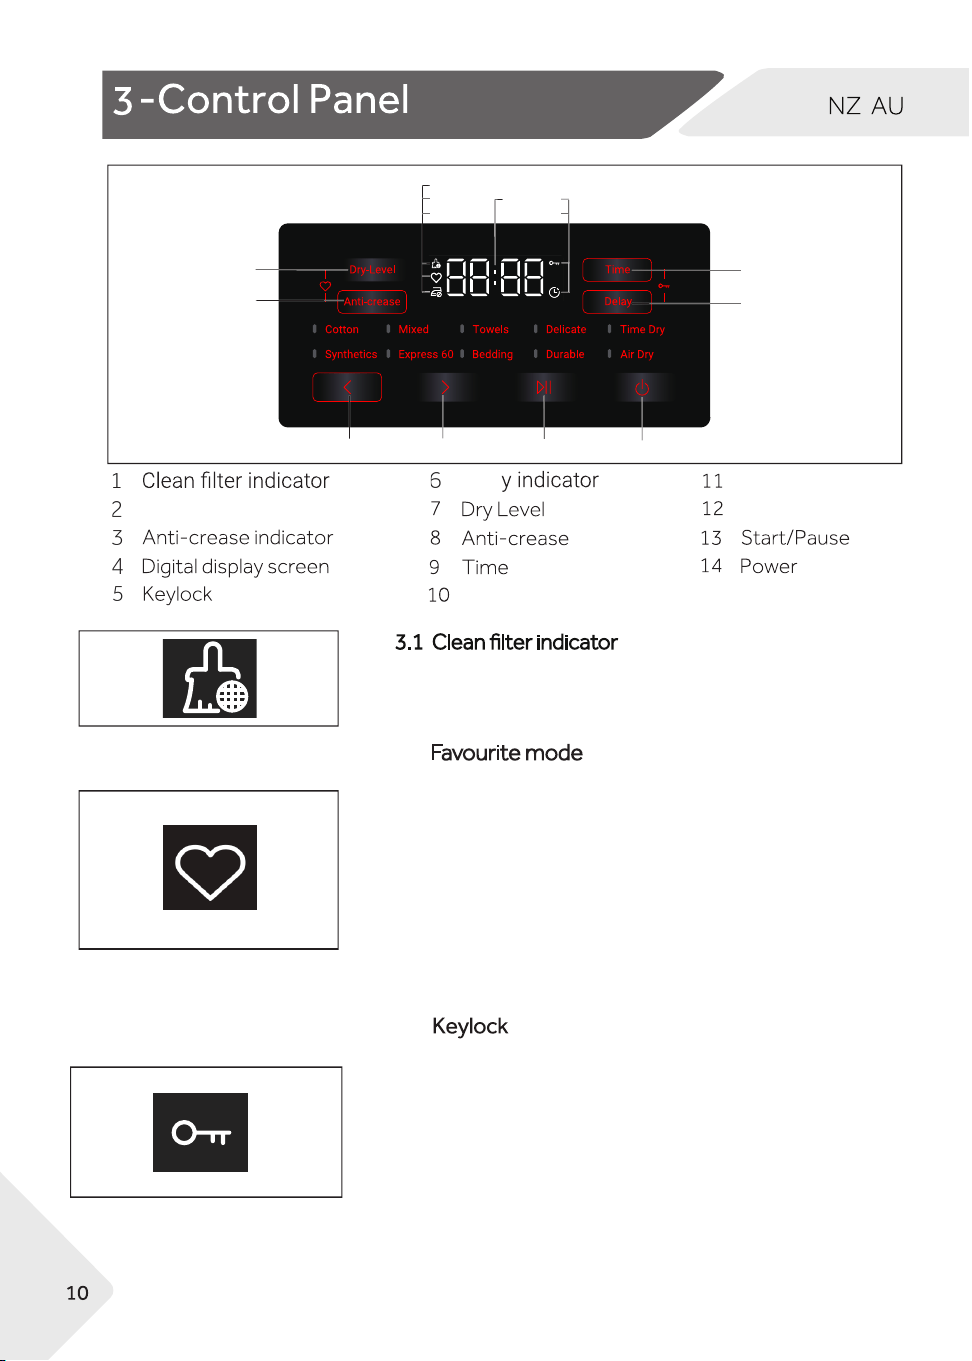
Favorite indicator
3.1 Clean filter indicator
3.3
3-3
Use Key Lock to disable the buttons on the display panel.
Key Lock can be used at any time including while a cycle is
running.When locked, the controls will be unresponsive
except the Power button. Key Lock can be used at any
time including while a cycle is running.To select, press
Time + Delay (Fig. 4-7). The Key Lock icon will turn ON
and the display will show clok to indicate the selection.
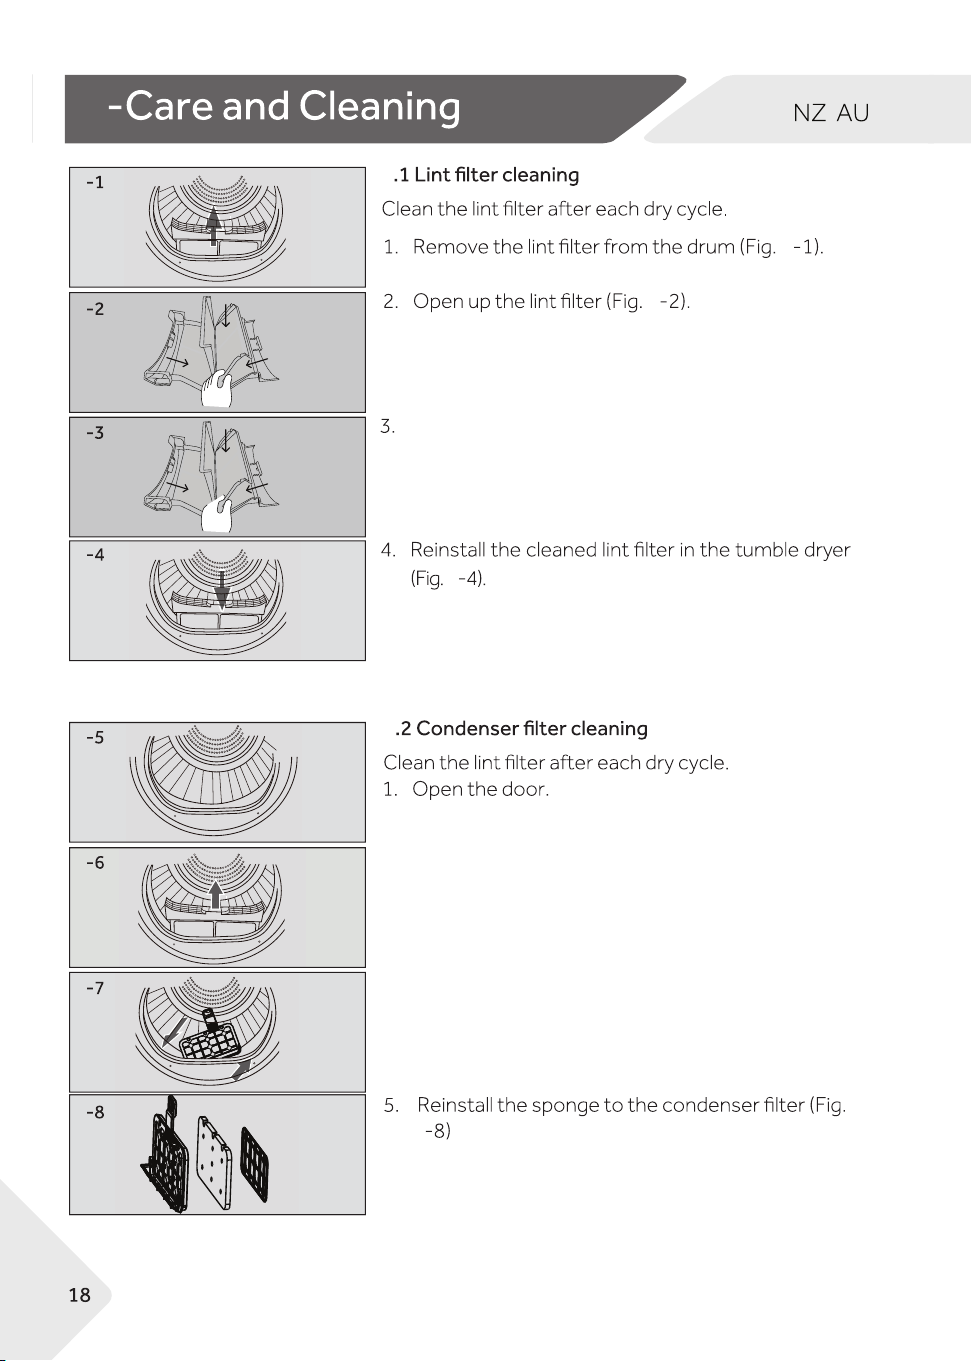
Filters must be cleaned regularly. See Lint Filter
Cleaning or Condenser Filter Cleaning section of
the manual.
Favourite mode
3-2
3-1
3-4
3.4
3-5
3.5
3-6
3.6
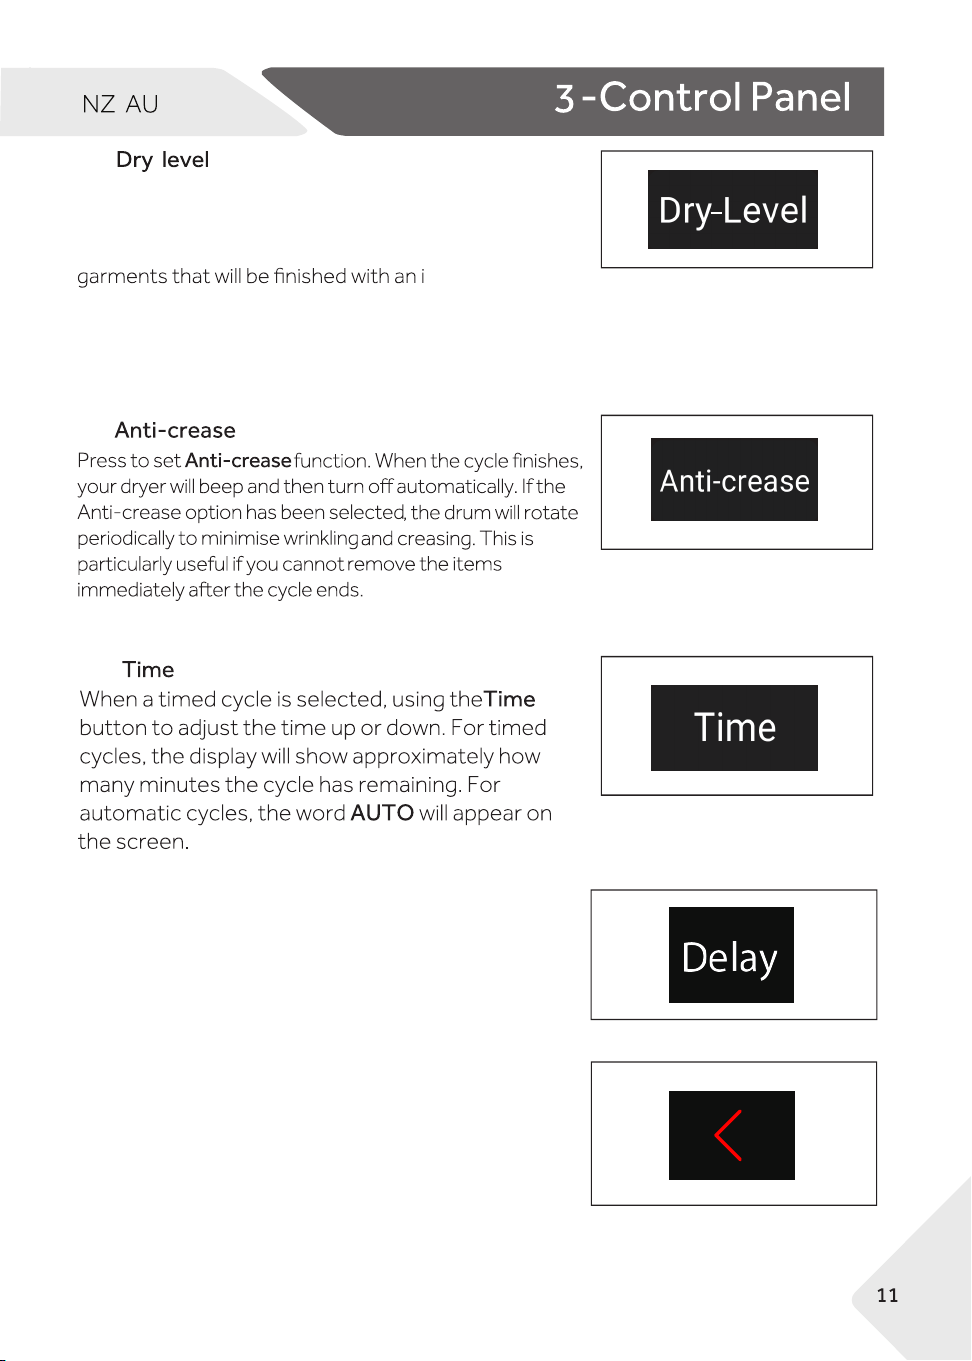
Press the Dry-Level button (Fig. 3-4) to change the
end dry level of the program.
H1: Damp/Dry - This setting is recommended for
ron treatment.
H2: Dry - This setting is recommened for the majority
of garments; garments can be worn after drying.
H3: Extra Dry - Use this setting for large, bulky and
durable items.
-
3.7 Delay
Set a delay time for the cycle to start. Avoid using
this function for damp, non-colourfast items as
this may cause dye run to occur.
The Delay function is available for all cycles.
3.8
Select Programs to the left
Left
3-7
3-8
3-11
3.11
Power
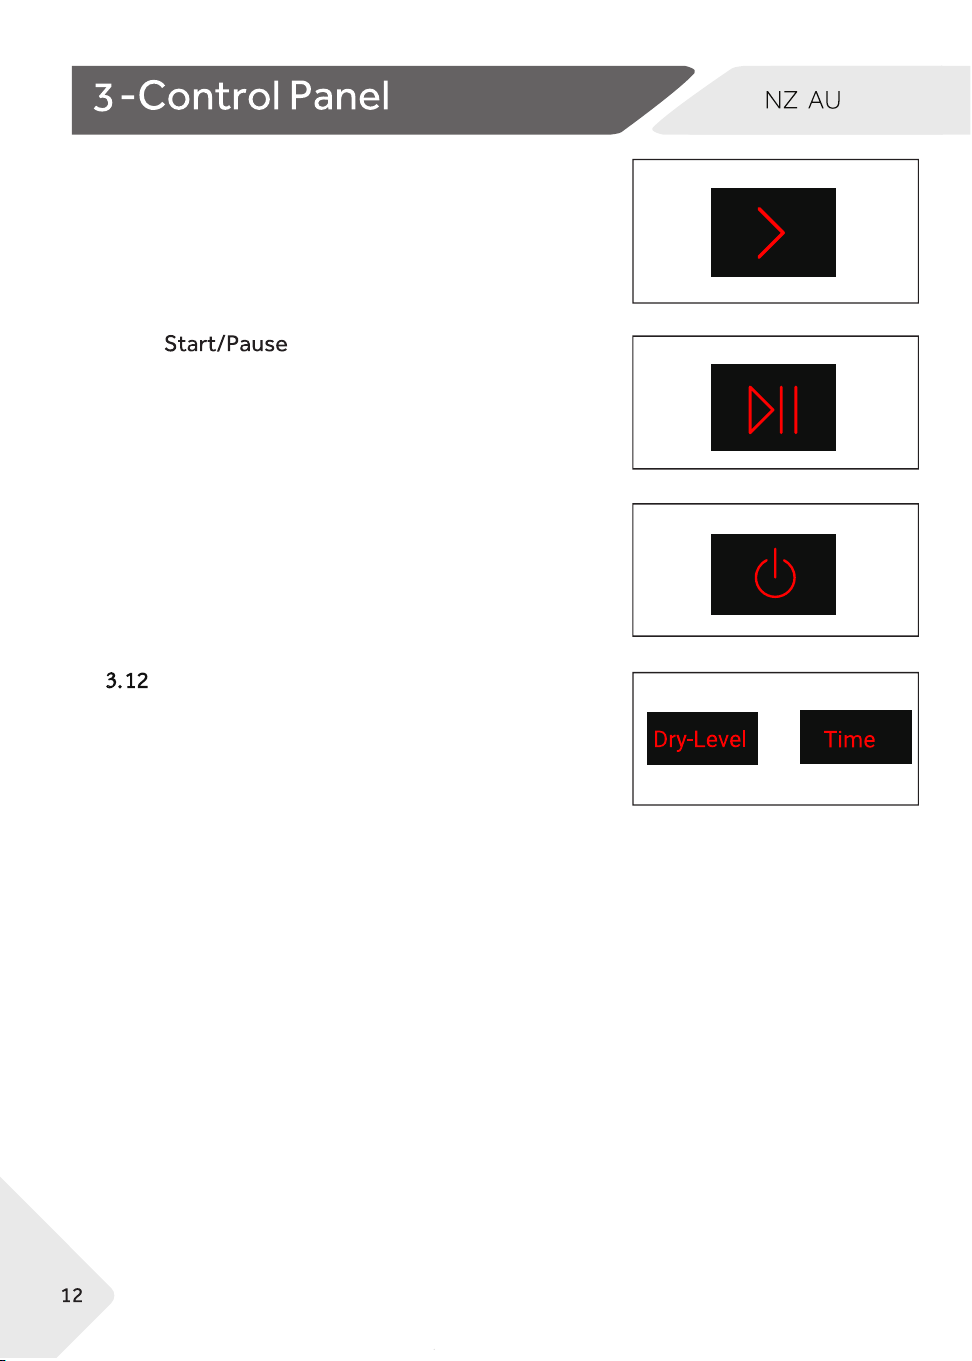
3.12 Mute
3-12
+
3.9
3.10
Select Programs to the right
Press the Start/Pause (Fig. 3-10) to start or pause
the selected program.
Press the Power button (Fig. 3-11) to turn ON and
OFF the product.
Press and hold Time and Delay combination keys for
three seconds to turn OFF or turn On the buzzer, and
the display will show "bEEP OFF" or "bEEP On" .
Right
3-9
3-10
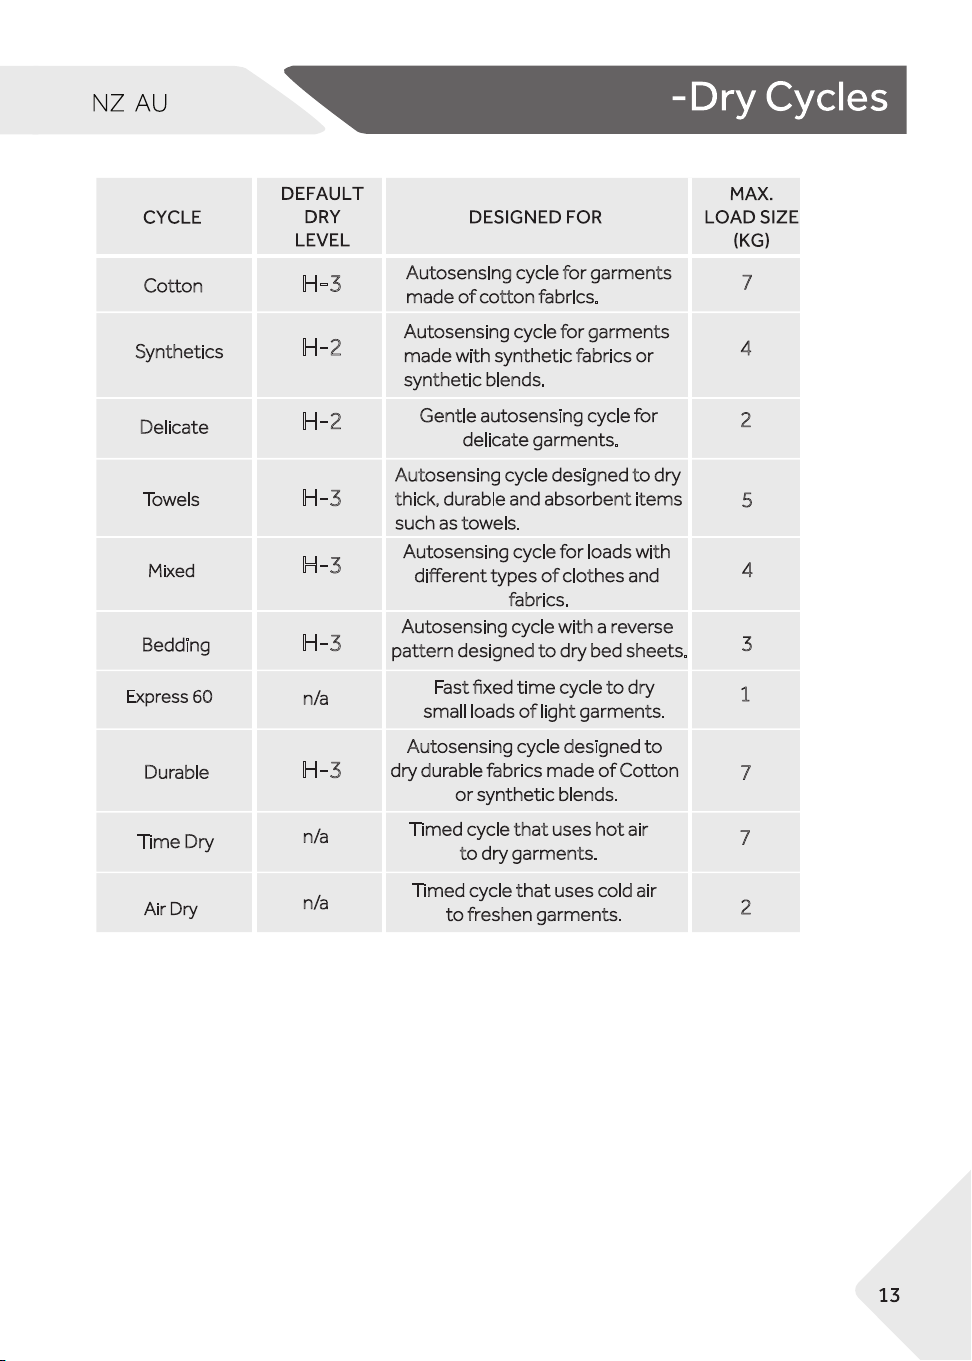
Express 60
Mixed
Air Dry
2
7
2
5
4
4
3
1
7
7
*DEFAULT DRY LEVE : H-3-Extra dry ; H-2-Dry ; H-1-Damp
Cotton
Synthetics
Delicate
Towels
Bedding
Durable
Time Dry
H-3
H-2
H-2
H-3
H-3
H-3
n /a
n /a
n /a
H-3
Autosensing cycle for garments
made of cotton fabrics.
Autosensing cycle for garments
made with synthetic fabrics or
synthetic blends.
Gentle autosensing cycle for
delicate garments.
Autosensing cycle designed to dry
thick, durable and absorbent items
such as towels.
Autosensing cycle for loads with
different types of clothes and
fabrics.
Autosensing cycle with a reverse
pattern designed to dry bed sheets.
Fast fixed time cycle to dry
small loads of light garments.
Autosensing cycle designed to
dry durable fabrics made of Cotton
or synthetic blends.
Timed cycle that uses hot air
to dry garments.
Timed cycle that uses cold air
to freshen garments.
4
Registration Cycle
Cotton, Dry level H-2 is the recommended energy saving cycle for everyday
drying.
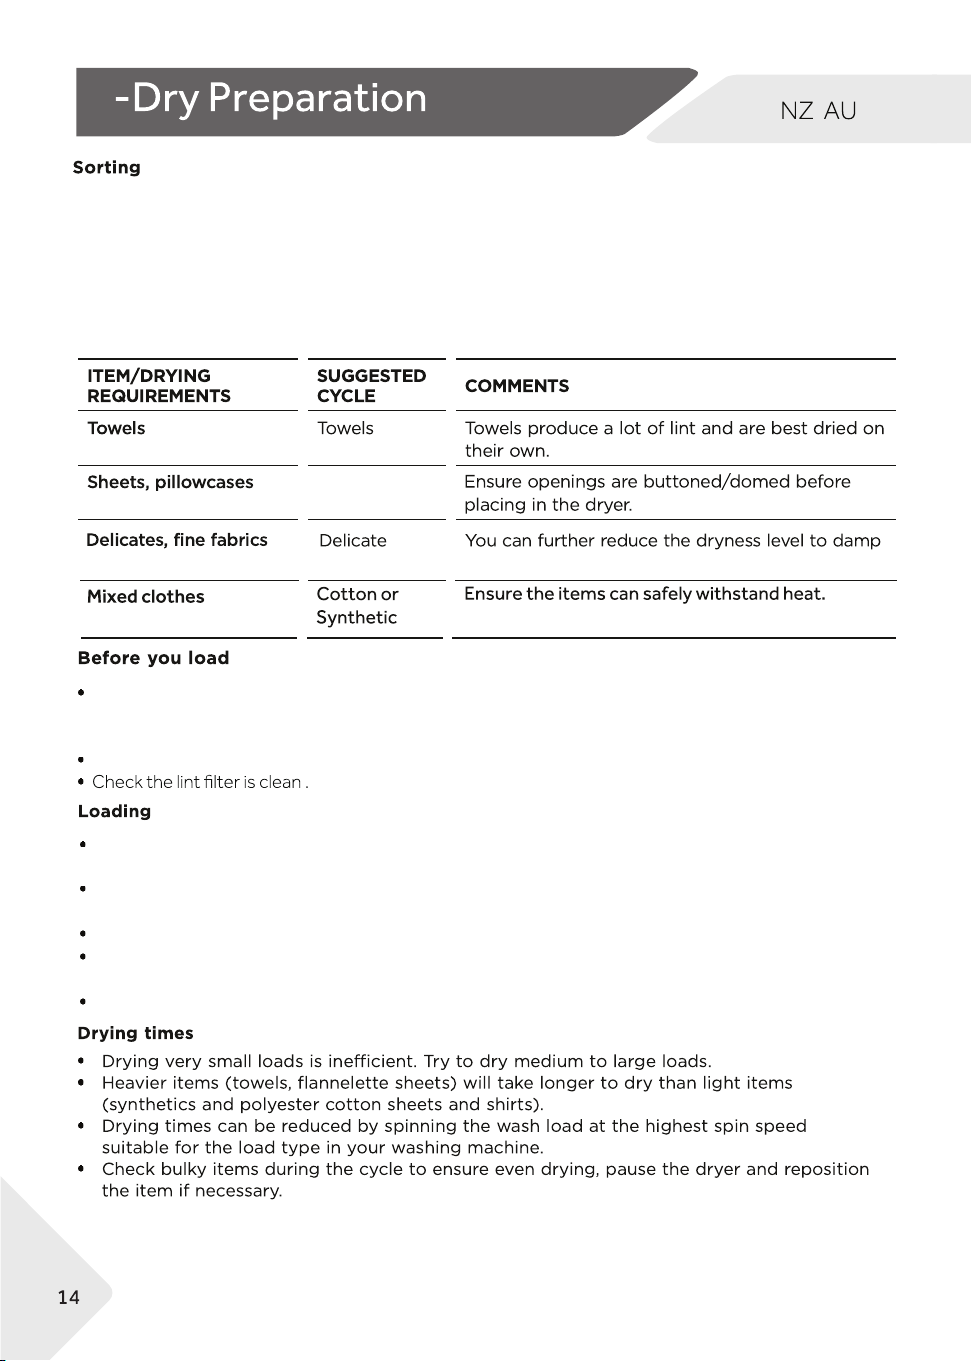
Sort items into loads of similar items,and loads that will likely take similar times to dry.This prevents the
possibility of some items becoming over-dried whilst others are still damp.
Separate coloured items from white/light items where possible, especially when new. Colour run may be
an issue, especially if you intend to delay the start of the drying cycle.
Care labels on garments provide valuable information about the fabric type and how the garment should
be dried. Always follow the advice on garment labels.
Check pockets for items that could damage your clothes or get caught in the dryer. Close zippers, hooks
and eyes, and other fastenings (ie fasten the openings of duvet/ doona covers),and remove loose bra
wires. These may damage both your dryer and your clothes.
Items of clothing with screen-printing should be turned inside out to prevent damage to the print.
for very delicate items
Bedding
Garments need to be loaded correctly to minimise creasing and wrinkling, and to ensure the load is
dried evenly.
Allow enough room in the dryer for clothes to tumble freely. Load the dryer in terms of the space the
garments take up when dry, rather than when they are wet.
Shake clothes out and load individually to help items dry evenly and reduce tangling.
Dry permanent press garments (business shirts) together on the Damp dryness level with Anti-crease
option on. This will help reduce wrinkling and the need for ironing.
Hang garments as soon as the drying cycle is complete to reduce the need for ironing.
5
5
Delicate or easily damaged items (eg nylon stockings fabrics, delicate embroidered fabrics) should be
dried separately, using the DELICATE cycle.
5
6
6
6
6
6
6
6
6
6
4
6
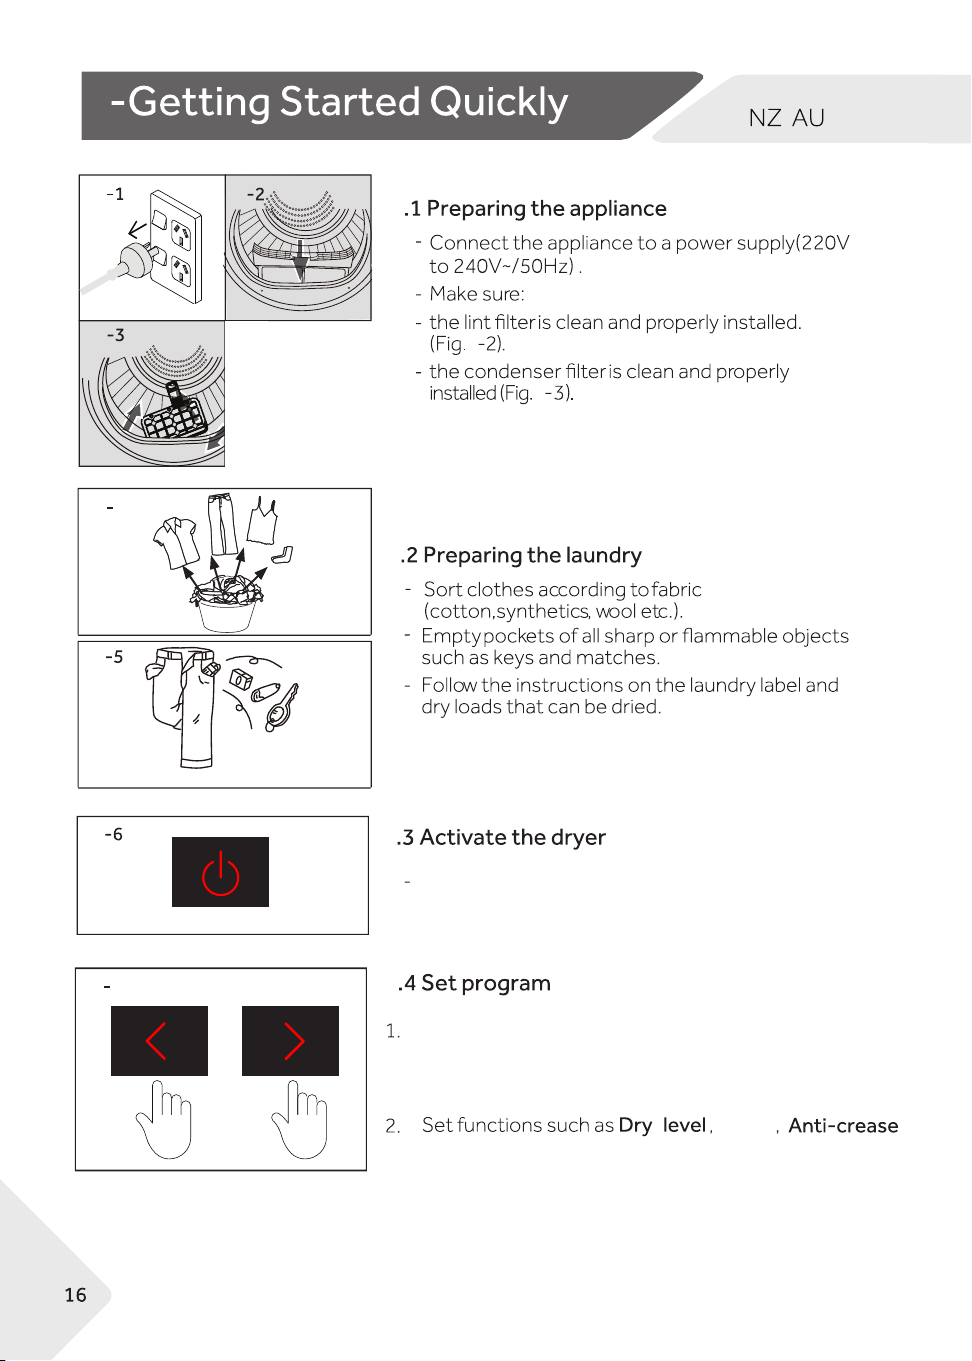
Press the Power button to start the machine
6
6
6
7
Delay
-
Select the required program by pressing the Left and
Right buttons, and the LED in front of the corresponding
program name will light up
6

6
6-
6
8
power off
7
7
7
7
7
7
7
7
7
7
7
7
7
7
Clean the lint filter from any lint residuals(Fig.7-2).
2. Pull out the lint filter from its housing(Fig.7-6).
3. Pull out the condenser filter from the air duct(Fig.7-7).
4. Remove the sponge and clean the filter screen
from any residuals(Fig.7-7)
7
7
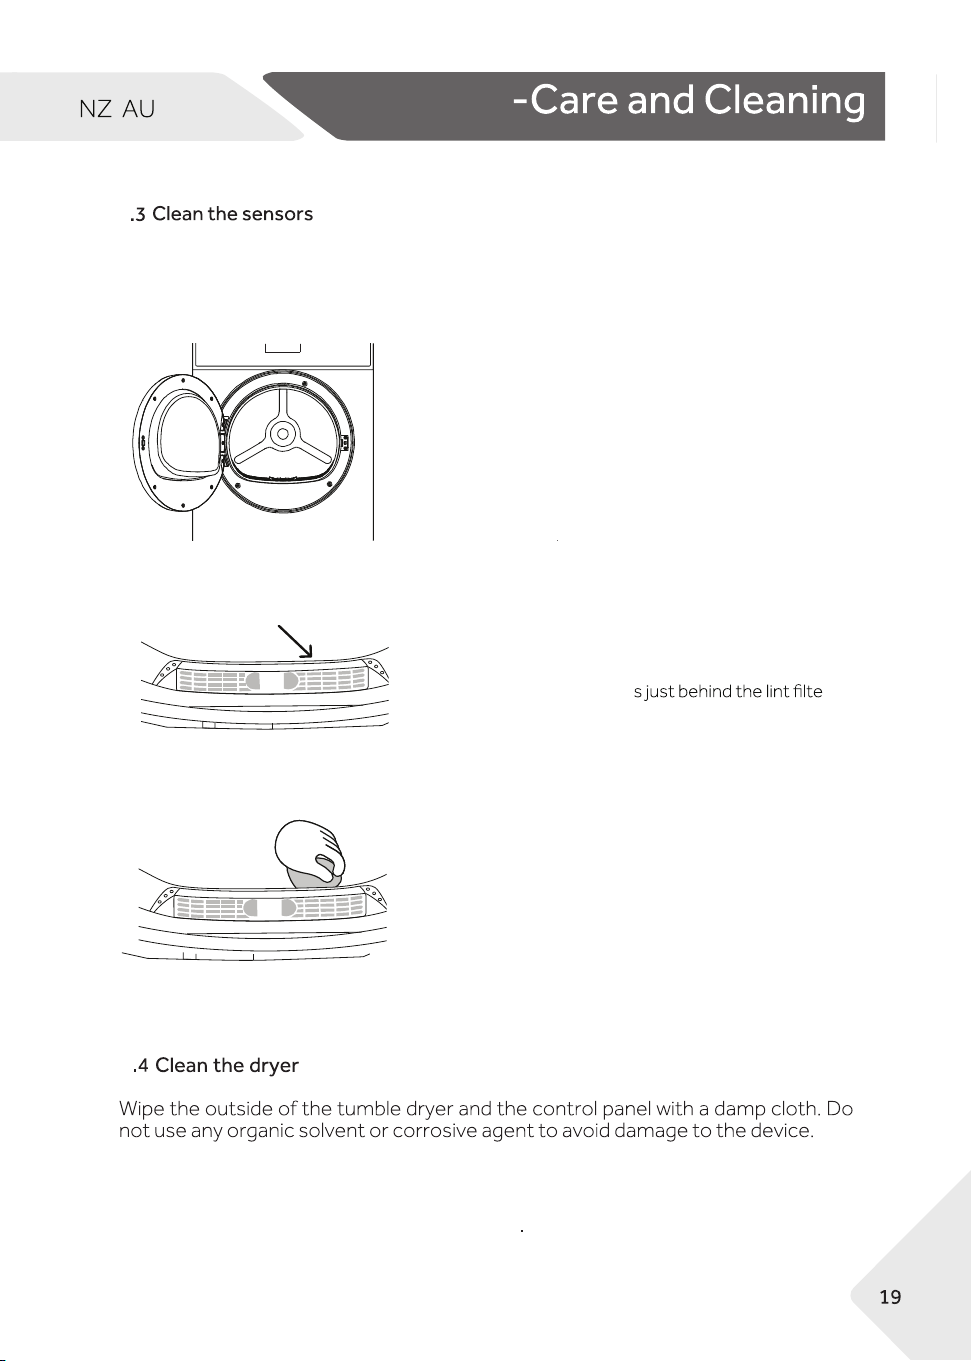
There are sensors in your dryer that detect whether the laundry is dry or not. These sensors need
to be cleaned periodically (we recommend approximately four times a year).
1.Open the door of your dryer. Allow the dryer to cool if
drying has been carried out.
2. Locate the metal sensor
r.
3.Wipe the sensors with a soft cloth,dampened with vinegar
and dry with a clean dry soft cloth.
7
7
7
7
8
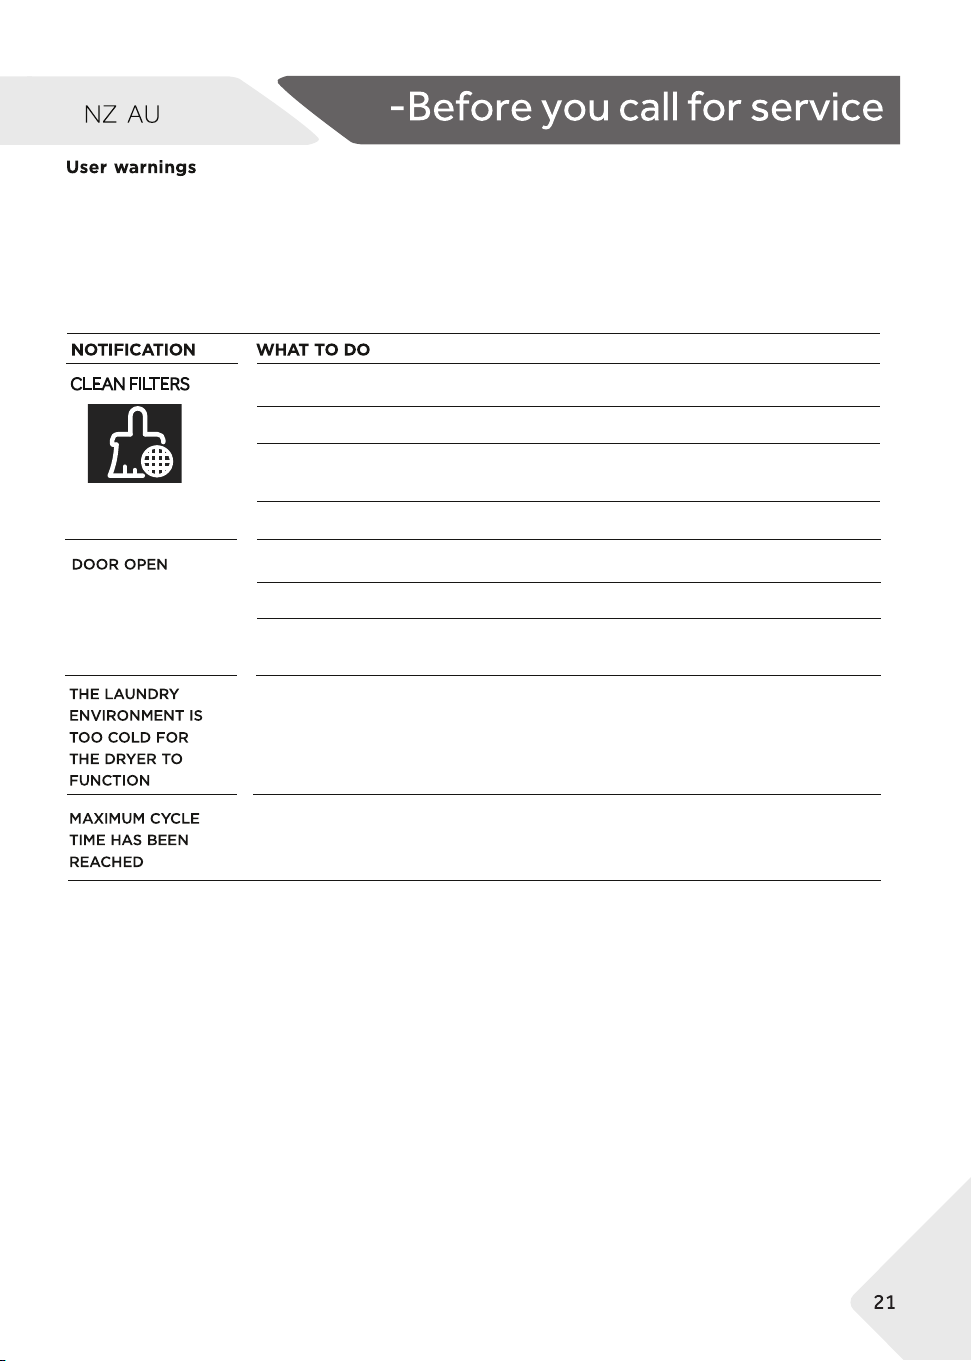
CLEAN FILTERS
Clean lint and condenser filters.
Check the lint filter or condenser filter are not damaged.
Check there is nothing else trapped in the filters, which may be blocking
the air flow.
Check the filters are correctly in place in your dryer
Close the door fully and press start
Try opening and closing the door again.
Reposition the load, make sure the load is correctly in the drum and that
protruding item are not preventing the door from closing.
The room temperature is too low for the heat pump system to work
effectively. Ensure that the room temperature is above five degrees to
avoid loss of efficiency.
There are a number of reasons the maximum cycle time has been reached.
refer to ‘Troubleshooting', 'Dryer is taking too long.’for possible causses and
solutions.
Once you have addressed the issue the user prompt was alerting you to, try using your dryer as per
usual. If the issue persists, call your Haier trained and supported service technician.
Your dryer is capable of diagnosing a number of its own problems. It will sound a continuous series
of beeps and display user prompt when it has a problem that you can correct yourself. To stop
the beeps sounding,touch any button on the control panel. Do not try to continue your runing cycle
once you stop the noise. You must address the problem the dryer is alerting you to.
Check the below table before you call for service.
"cln both Lint FLtr"
8

When a continuous series of beeps sound, all the lights turn off on the conitrol panel and a string of
codes appears on the display ’a fault has occurred’ . Please call your trained and upported Haier service
technician.
9
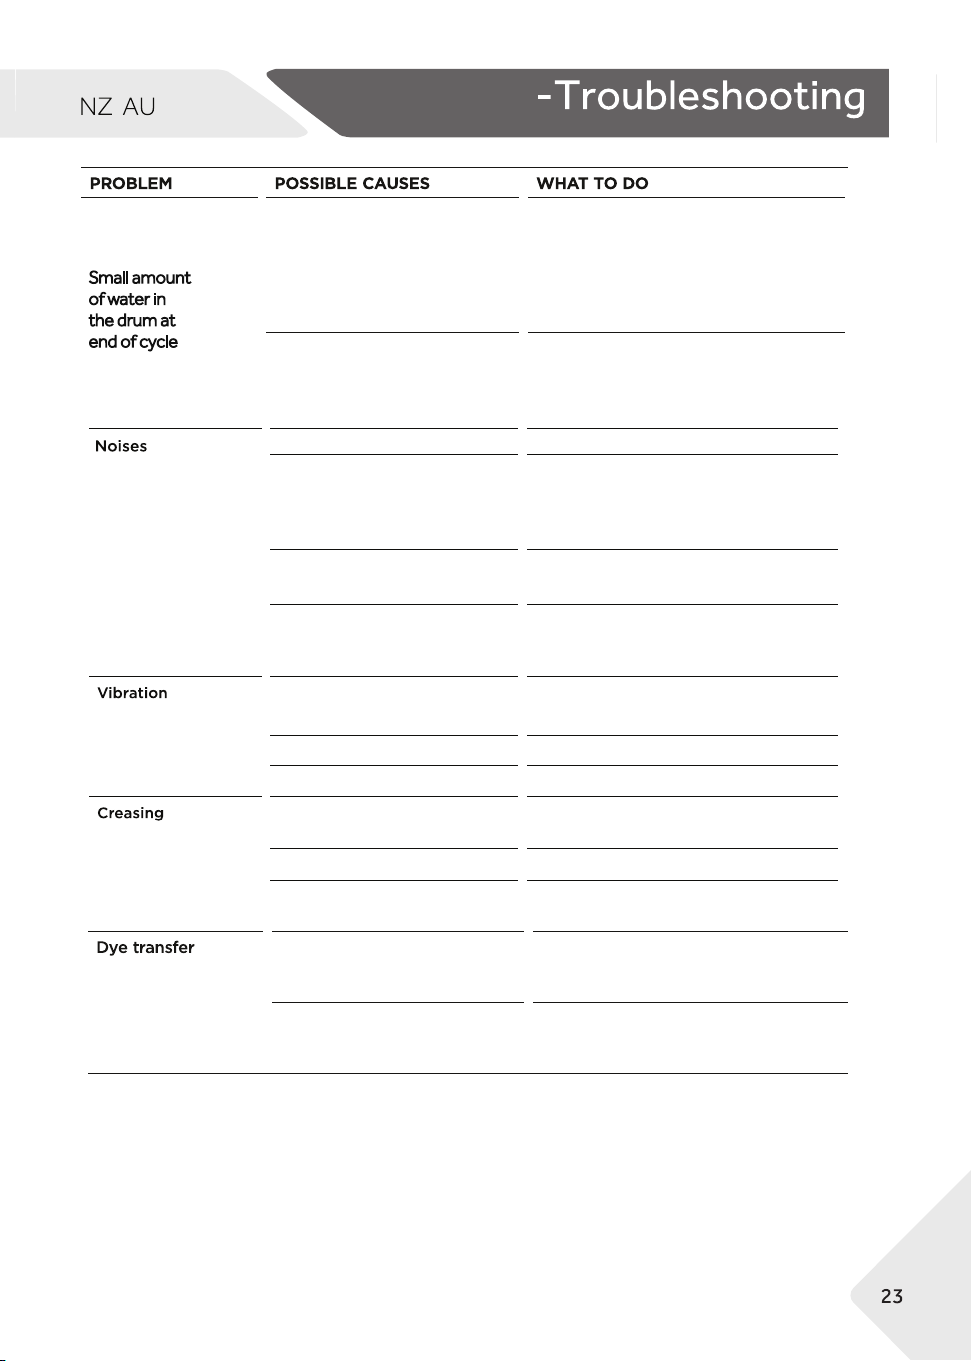
Drain hose is blocked
Check whether the drain hose is
blocked.
Check the drain hose is still attached
at the back of the machine, and is not
kinked or squashed.
If conditions are particularly hot,
humid or cold, it is possible vaporised
water may re-condense in the drum
or on the inside of the door
Small amount
of water in
the drum at
end of cycle
Environmental conditions
may be affecting
dryer operation.
Dryer is overloaded.
Remove some items from the dryer.
Dryer has a fault.
Continuous beeping or a musical
series of beeps with a message
displayed on the display.
Refer to 'Fault codes'.
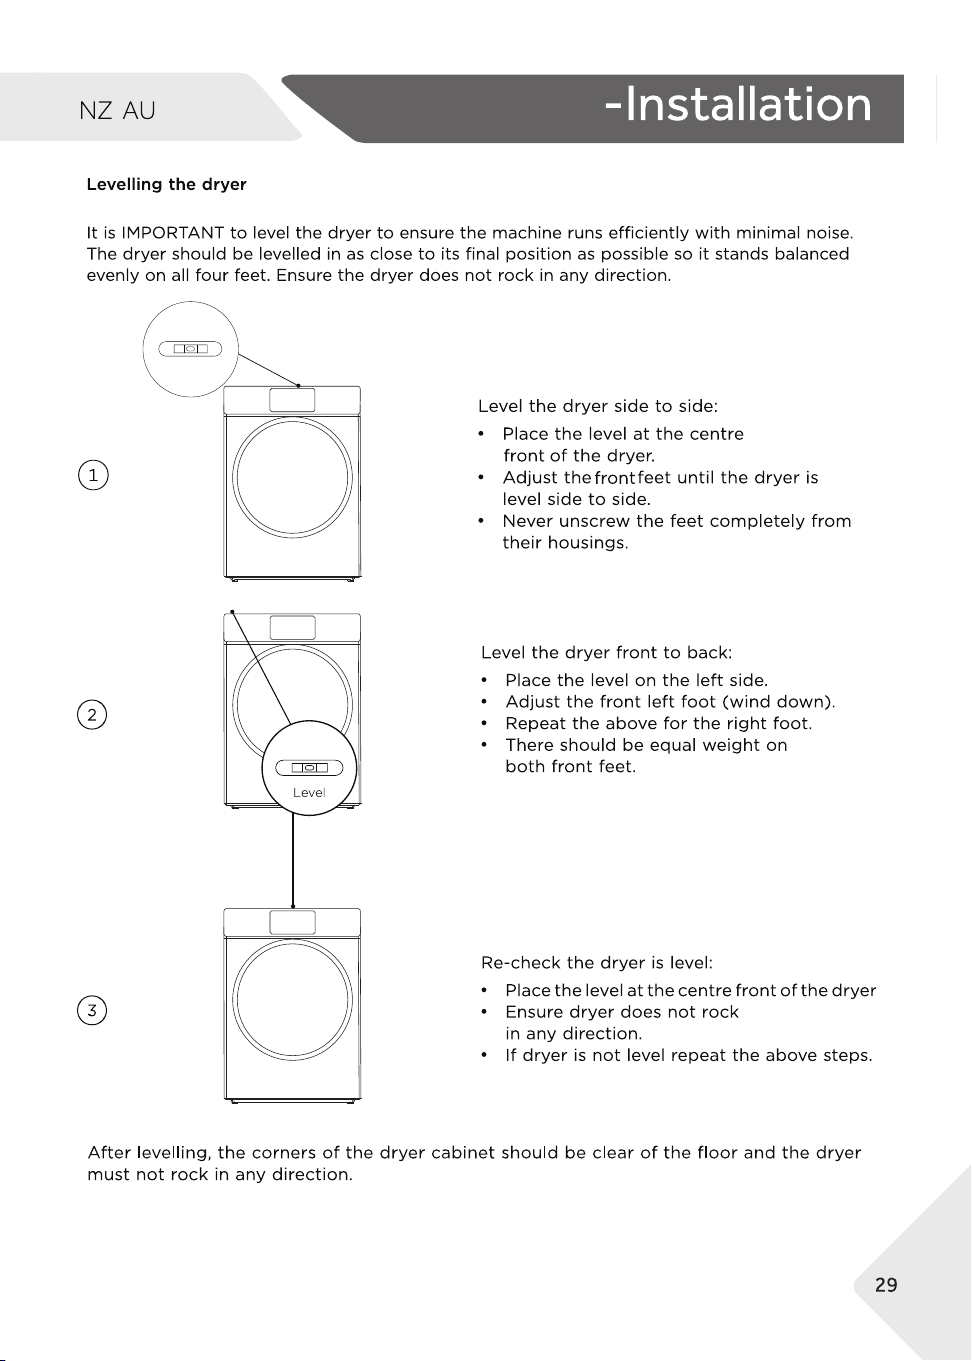
Dryer has not been
levelled properly.
Adjust the adjustable foot under the
dryer.Refer to 'Levelling the dryer'.
Dryer makes unfamiliar noises.
At the start of the cycle the dryer may
make some unfamiliar noises when the
compressor turns on. This is normal.
Dryer is not installed on
a stable surface.
Ensure the dryer is installed on a flat,
stable surface.
Dryer is not level.
Ensure the dryer is correctly levelled.
Dryer is overloaded. Remove some items from the dryer.
Cycle selection not
appropriate for the load.
Choose appropriate cycle.
Refer to 'Dry Cycles'
Dryer is overloaded. Remove some items from the dryer.
Dry Level selected too high
for load type.
Try selecting a lower Dry Level.
White/light and coloured items
not separated before drying.
Remember to separate white/light and
coloured items before placing them in
the dryer.
Wet items left sitting in the
dryer for long periods of time
before drying.
Refer to 'Sorting' for tips to prevent dye
transfer.
10

10
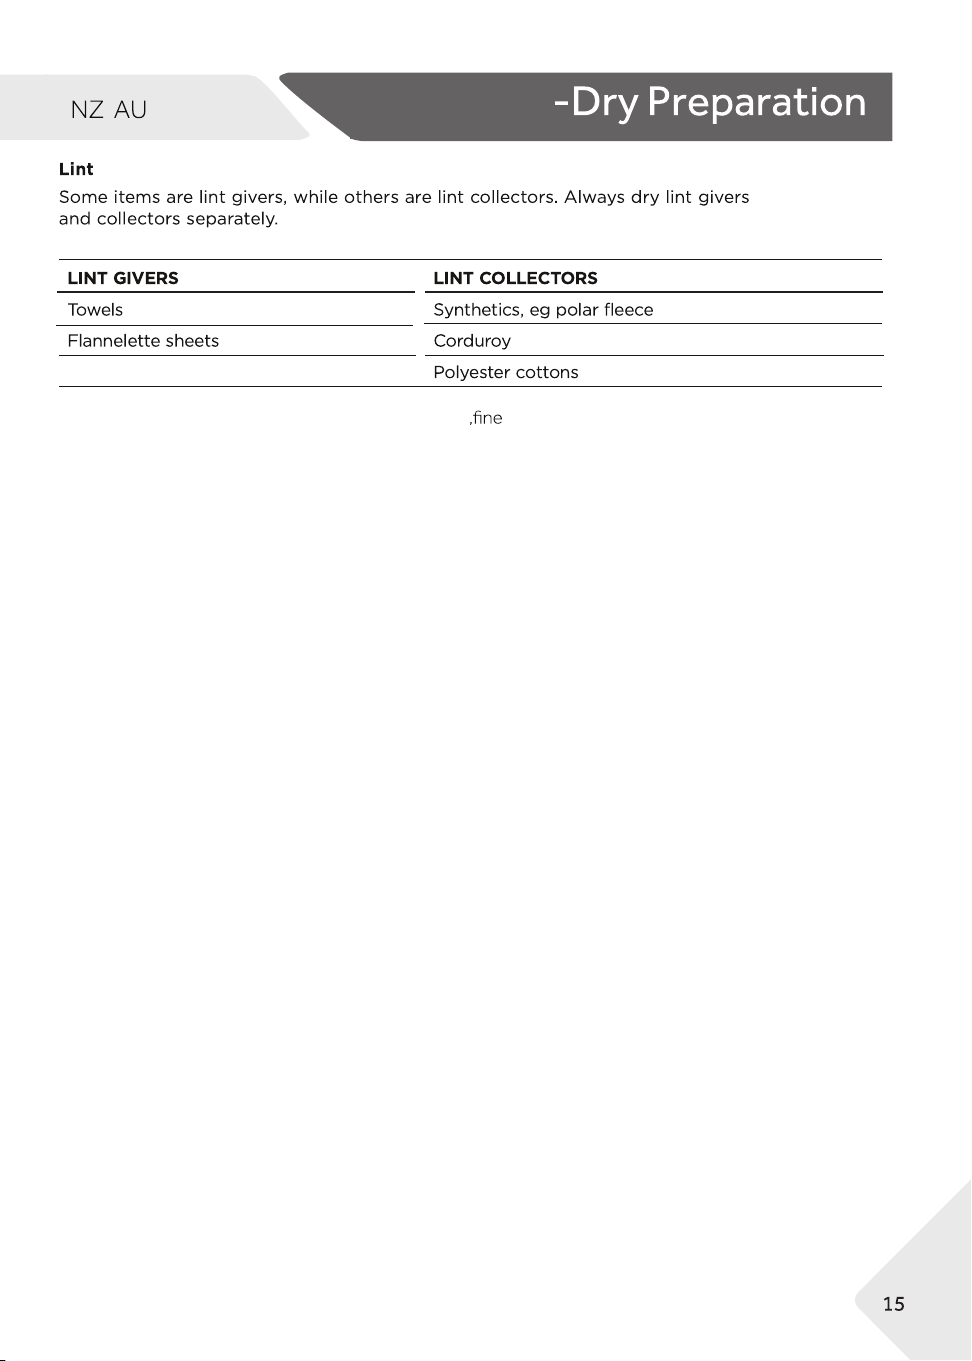
Linting
Lint filter not cleaned or
replaced.
Ensure the lint filter is cleaned after
every cycle and replaced correctly.
Refer to 'Cleaning the filters'.
Loads not sorted correctly.
Dry lint-giving items separately from
lint receivers. Also, dry similar colours
together, eg light coloured items with
light coloured items, dark items with
dark items.
Refer to 'Sorting'.
Clothes over dried.
Over drying clothes in the dryer can
cause them to attract lint.Use an auto
sensing cycle or ensure you check your
load if using the time dry cycles to avoid
over drying.
Fabric damage
Instructions on care label
not followed.
Follow the instructions on the care label
of the items.
DRYNESS LEVEL selected not
appropriate for the fabric type.
Ensure the DRYNESS LEVEL selected
is appropriate for the fabric type.
Refer to the items care label.
Metal parts on the items or in
the load.
Fasten zips and other clasps before
placing items in the dryer.
Items not separated or dried
on an appropriate cycle for
the fabric type.
Dry similar items together.
Ensure an appropriate cycle is selected.
Used a TIME DRY cycle and
did not monitor the dryness
of clothes during the cycle.
Ensure that clothes are checked for
dryness during the cycle when using
the timed programmes to avoid over
drying.
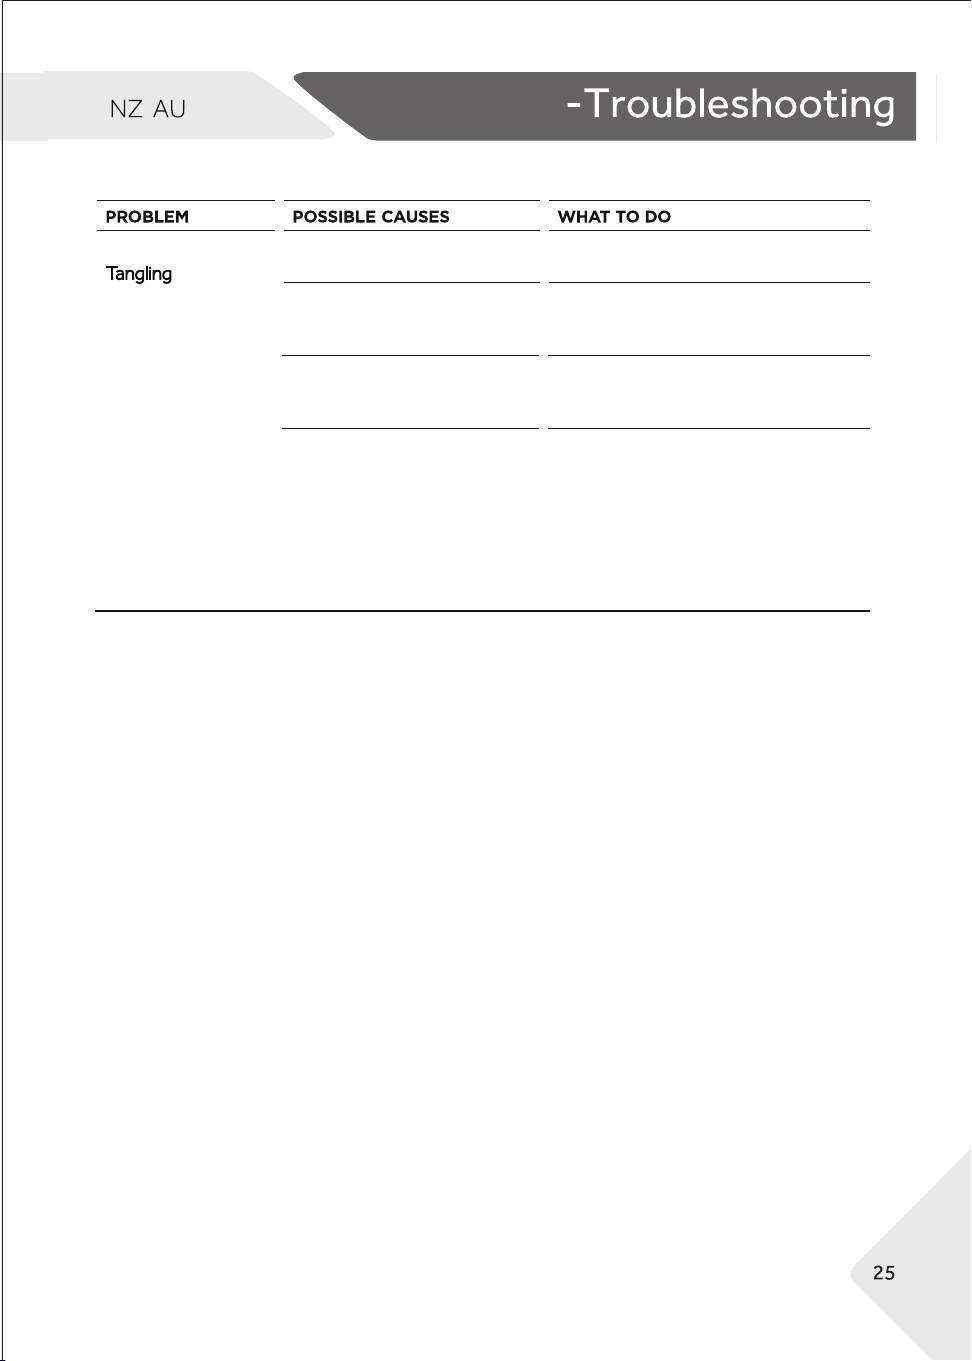
Tangling
Loads not separated during
loading.
Try separating out larger items from
smaller items.
Items loaded into the dryer
incorrectly.
Load items individually into the dryer.
Do not place folded items in the dryer.
Load size too large.
Try drying smaller load sizes.
Some cycles have a lower maximum
load size. Refer to”Drying cycles”.
Sheets and duvet/doona
covers due to their size,
are prone to tangling.
Dry sheets and duvet/doona covers
separately from other laundry, apart
from towels. Ensure duvet/doona
covers are buttoned or fastened
closed before drying.Try adding a
knotted towel to sheets loads if you
are experiencing a lot of tangling.
10
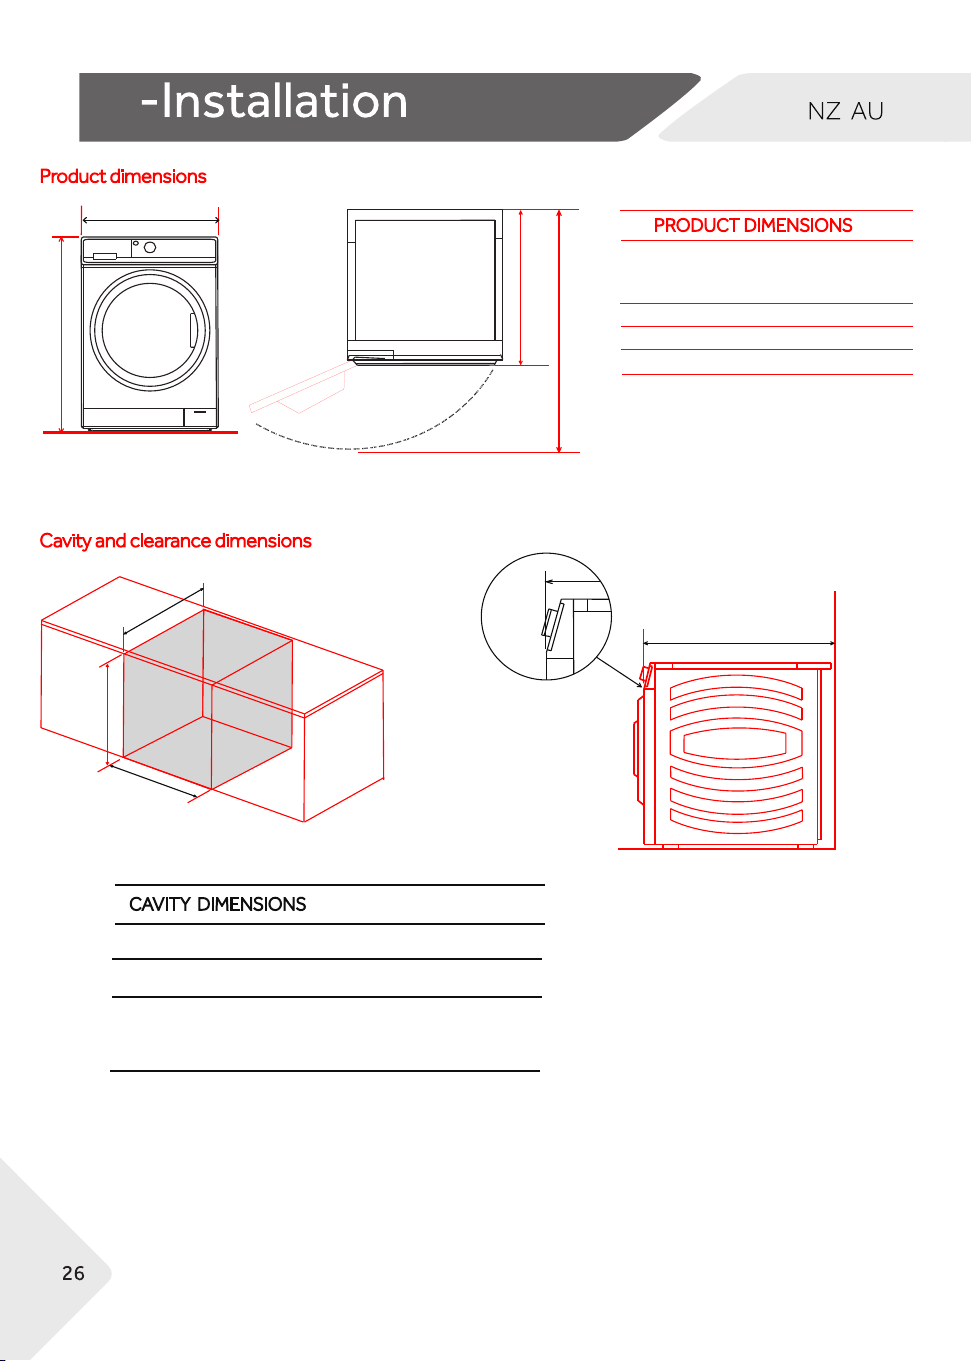
PRODUCT DIMENSIONS
Overall height*
- Min : 845mm
- Max :850mm
Overall width : 595mm
Overall depth :595mm
Depth of open door : 1040mm
*Exact height is dependent on foot
adjustrment
**Including dial and door (when closed)
○
A
○
A
○
B
○
C
○
D
○
B
○
C
○
D
Product dimensions
FRONT
PLAN
Cavity and clearance dimensions
○
A
○
B
○
C
○
C
*Front panel of the product
CAVITY DIMENSIONS
Minimum cavity height : 870mm
Minimum cavity width : 635mm
Minimum cavity depth
- Flush with front panel of the product : 615mm
- In cupboard : 645mm
○
A
○
B
○
C
iSOMETRIC
11
11
○
A
○
B
○
B
○
B
○
B
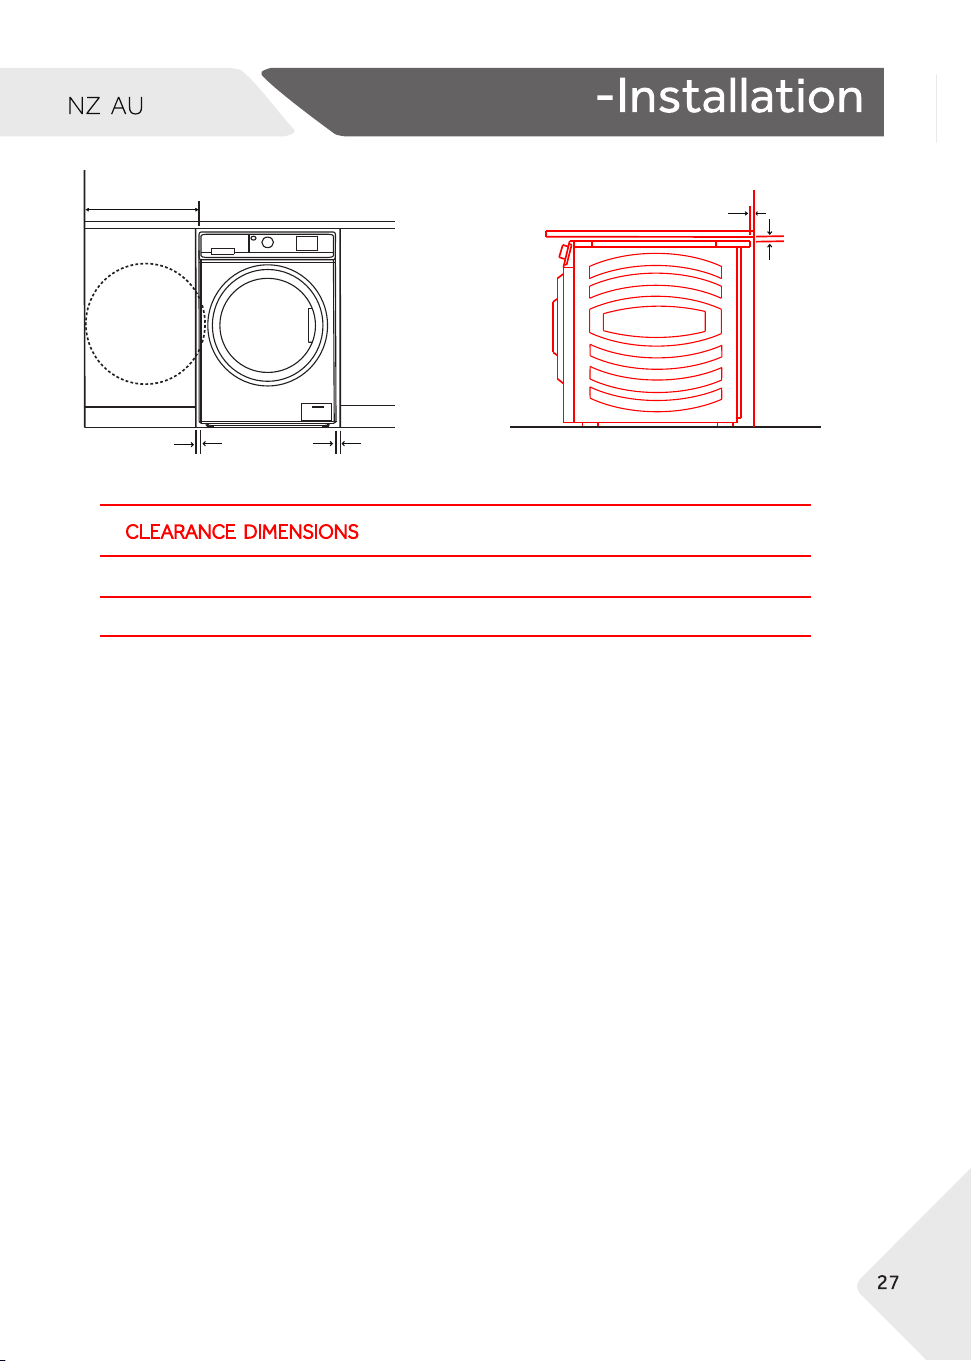
CLEARANCE DIMENSIONS
Minimum washer door clearance to adjacent wall :298mm
Minimum gap clearance to adjacent product or cabinetry : 20mm
*Applies to sides, top and rear
○
A
○
B
11
Dryer
Washing Machine
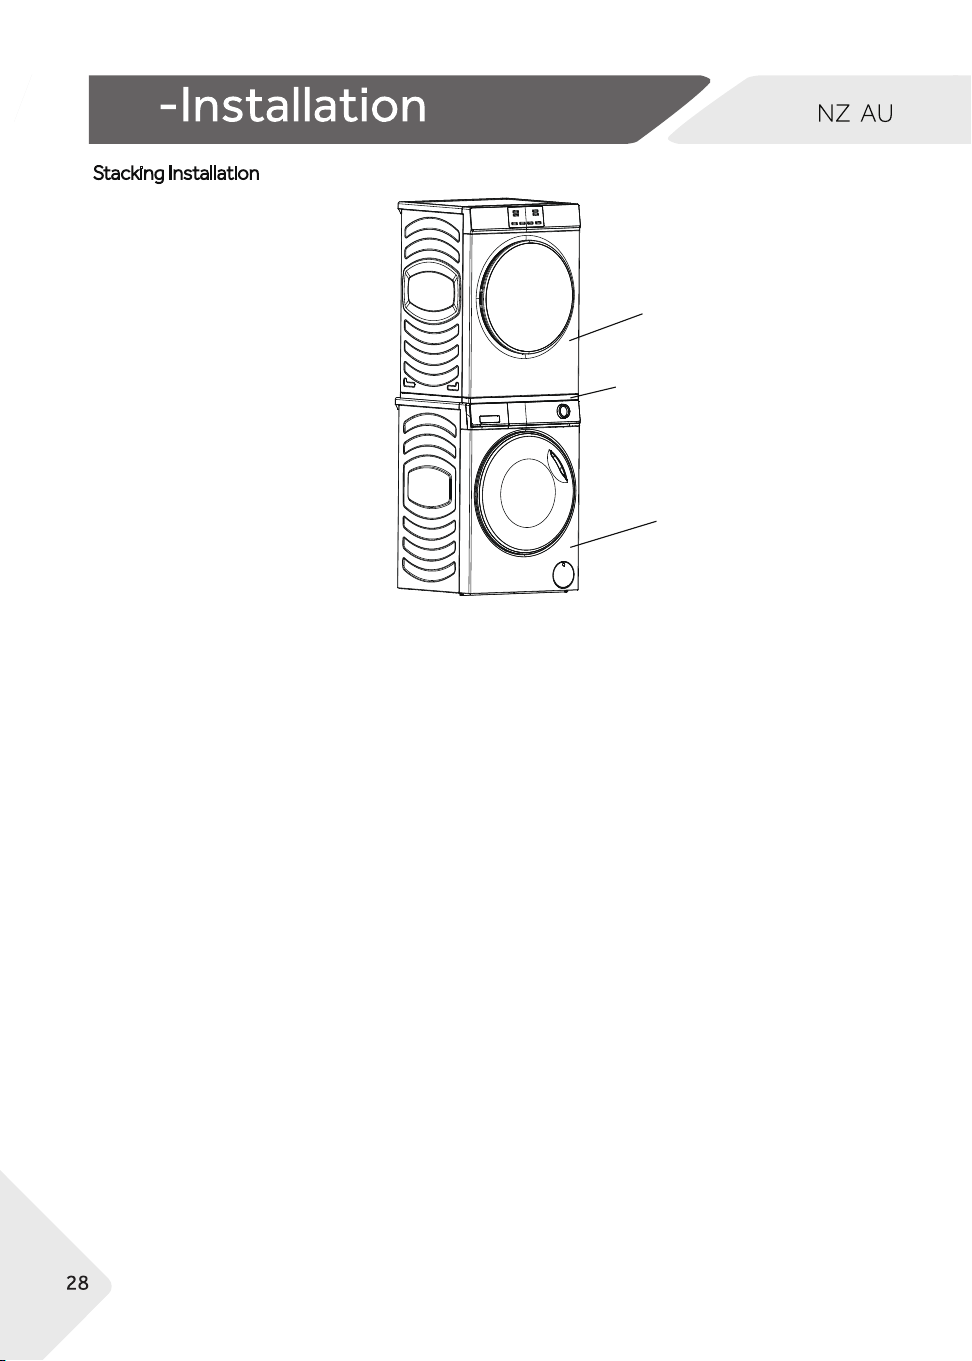
Stacking Installation
Stacking Kit
-The following washing machine models can be stacked with this machine using a
Stacking Kit.
HWF75AW3,HWF85AN1,HWF95AN1,HWF90AN1,HWF10AN1;
-
For the stacking installation method, refer to the instructions of the Stacking Kit .
-
A stacking kit MUST BE USED between the products and fitted correctly to the
washing machine and dryer as per stacking kit instructions.
- Ensure you use the compatible stacking kit for your washer and dryer combination.
- Stacking kits are available through your Haier Brand dealer or online
- Ensure that the power plug is always accessible.
-The following stacking configurations are not safe and MUST NOT be used:
- A washer stacking on top of a dryer.
- A washer on top of a washer.
- An incompatible washer/dryer/stacking kit combination.
11
11
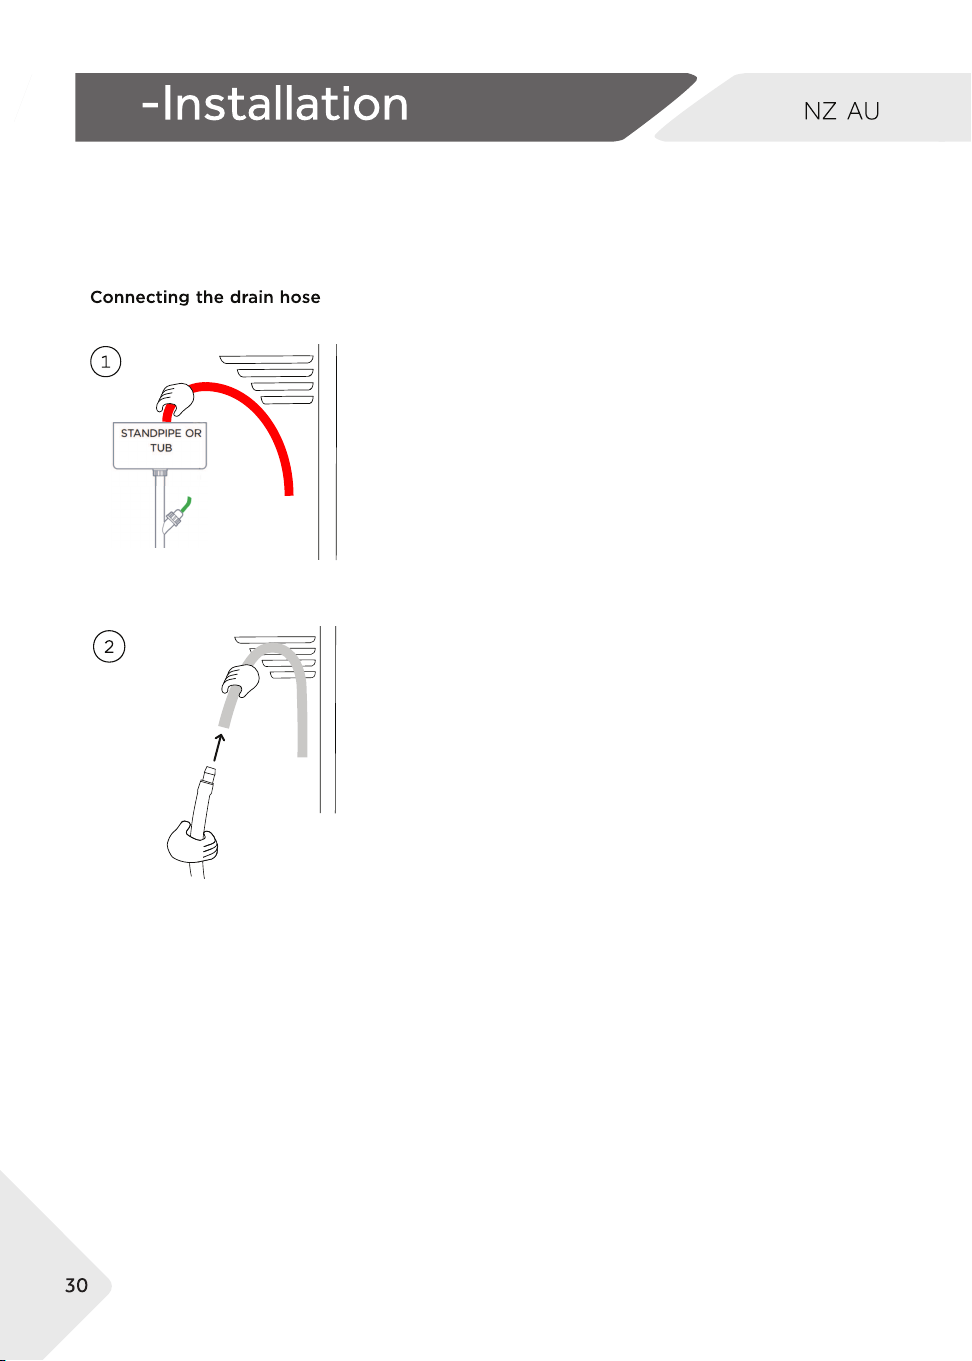
Unclip the drain hose on the back of the product and connect
it to a standpipe or tub.
Drain Hose
Your dryer is equipped with a condenser unit which accumulates water during the drying cycle and
must be plumbed to a drain.
Draining must comply with local by-laws, if in doubt, consult a plumber.
Do not put the drain hose in a position that the end will
become submerged in water (for example in a bucket),
this will prohibit the product from draining water.
If additional length of hose is required, a hose extender is
included with your dryer, uncoil the extender and plug the
2 hoses together.
If draining in the same location as a Haier washing machine it is
recommend having a ø38mm standpipe or larger to
accommodate both drains.
Maximum distance to standpipe when located on the left 2.2m
Maximum distance to standpipe when located on the right 1.6m
Check for leaks after the first cycle.
Regularly check that your tub or standpipe is free from lint or other obstructions. This may affect
operation or cause flooding.

12 -Customer Care
31
Customer Care
We recommend our Haier Customer Service and the use of original spare parts.
If you have a problem with your appliance, please first check the section TROUBLESHOOTING.
If you cannot find a solution there please contact:
- Your local dealer, or
- The Service and Support area at www.haier.com where you can find telephone numbers, FAQs and where you can
activate a service claim
Before contacting our service team, ensure that you have the following information available.
The information can be found in the rating plate.
Model No.__________________________
Serial No.__________________________
Also check the Warranty Card supplied with the product in case of warranty.
For general business enquiries and for more information, please refer to www.haier.com

0180501822
HDHPS70LW1