10035596 10035847
Subi88 Harmony
Keyboard
Teclado
Clavier
Tastiera


DE
3
Sehr geehrter Kunde,
wir gratulieren Ihnen zum Erwerb Ihres Gerätes. Lesen Sie die folgenden Hinweise
sorgfältig durch und befolgen Sie diese, um möglichen Schäden vorzubeugen. Für
Schäden, die durch Missachtung der Hinweise und unsachgemäßen Gebrauch
entstehen, übernehmen wir keine Haftung. Scannen Sie den QR-Code, um Zugriff
auf die aktuellste Bedienungsanleitung und weitere Informationen rund um das
Produkt zu erhalten.
INHALT
Technische Daten 4
Sicherheitshinweise 5
Tasten und Anschlüsse 6
Montage 9
Inbetriebnahme und Bedienung 11
Begleitung 15
Funktionsmenü 19
Spezielle Entsorgungshinweise für Verbraucher in Deutschland 26
Hinweise zur Entsorgung 28
Hersteller & Importeur (UK) 28

DE
4
TECHNISCHE DATEN
Artikelnummer 10035596, 10035847
Tastatur 88-Tasten-Standard-Pianoklaviatur
Anzeige LED-Anzeige
Klangfarben 360 verschiedene Instrumente
Stile 160 Stile
Demo 80 Demolieder
Effekte Anschlagsempndlichkeit, Hall, Chor, Dual, Aufteilen, Funktionsmenü,
Soundkonsole
Aufnahme Einzelspur, mehrere Spuren, kombinierte Aufnahme
Begleitung Start/Stop, Synchronisieren, Einfüllen, Geschwindigkeit
Akkord ABC-Auto-Akkord
Pedale Linkes Pedal (Pianopedal), rechtes Pedal (Haltepedal)
Externe Anschlüsse USB (MP3), USB (MIDI), MIDI IN/OUT
Netzgerät 220 V~, 12-15 V
Spannungseingang 12-15 V , 2-3 A

DE
5
SICHERHEITSHINWEISE
• Lesen Sie sich die Bedienungsanleitung vor der Verwendung des Geräts aufmerksam durch, um Sach-
und/oder Personenschäden zu vermeiden.
• Schließen Sie das Gerät ausschließlich mit dem im Lieferumfang enthaltenen Netzstromadapter an eine
Steckdose an. Durch die Verwendung von anderen Netzstromadaptern könnte Ihr Gerät beschädigt
werden.
• Öffnen Sie keinesfalls das Gehäuse des Instruments.
• Versuchen Sie nicht, dass Gerät selbst auseinanderzubauen oder Teile im Geräteinneren selbst
auszutauschen. Sollten während der Verwendung Fehlfunktionen auftreten, verwenden Sie das Gerät
nicht weiter und setzen Sie sich mit dem Kundendienst in Verbindung.
• Stellen Sie das Gerät nicht an Orten ab, wo es extremem Staub, Vibrationen, niedrigen oder hohen
Temperaturen (wie beispielsweise Orte mit direkter Sonneneinstrahlung, in der Nähe von Wärmequellen,
im Auto, wenn dieses in der Sonne steht etc.), da dadurch sowohl das äußere Erscheinungsbild so wie die
inneren Gerätekomponenten beschädigt werden könnten.
• Stellen Sie das Gerät niemals auf instabilen oder unebenen Flächen ab, da es dadurch umfallen/
herunterfallen und beschädigt werden könnte.
• Stellen Sie niemals mit Flüssigkeit gefüllte Behälter auf dem Gerät ab, da diese Umfallen könnten und die
Flüssigkeit dadurch ins Geräteinnere gelangen könnte.
• Drehen Sie, vor dem Einschalten des Geräts, die Lautstärke auf 0 herunter. Passen Sie die Lautstärke
anschließend stufenweise an, damit die Lautsprecher nicht beschädigt werden.
• Drehen Sie die Lautstärke niemals auf „Maximum“, um zu verhindern, dass Sie durch das Spielen einen
Hörverlust erleiden.
• Wenden Sie niemals extreme Gewalt gegen das Gerät, die Spieltasten, den Einschaltknopf und die
Anschlüsse an und stellen Sie auch keine schweren Objekte auf dem Gerät ab.
• Das Gerät muss von einem Erwachsenen ausgepackt werden, da durch die Verpackungsmaterialien für
Babys und Kleinkinder Erstickungsgefahr besteht. Lagern Sie die Plastikverpackung an einem sicheren
Ort oder entsorgen Sie diese fachgerecht.
• Die kleinen Komponenten im Inneren können für Kinder unter 3 Jahren eine Gefahr darstellen und sind
für diese nicht geeignet.
• Die technischen Eigenschaften des Geräts können ohne Vorankündigung geändert werden.
• Dieses Gerät kann in allen Klimazonen, außer in tropischem Klima, verwendet werden.
• Das Gerät kann nur in Gegenden verwendet werden, welche unterhalb von 2000 Metern über dem
Meeresspiegel liegen.
• Achten Sie darauf, dass keine Wassertropfen oder Spritzwasser auf den Netzstromstecker oder das
Netzstromkabel gelangen.

DE
6
1 POWER - Ein-Ausschalter
2 MASTER VOLUME – Hauptlautstärkeregler
3 LESSON - Lernmodus
4 DSP - DSP aktivieren/deaktivieren
5 TEMPO ∨/∧– Das aktuelle Tempo anpassen
6 ACCOMP VOLUME ∨/∧ Begleitlautstärke
7 SOUND CONSOLE – Das Schaltpultmenü
öffnen
8 FUNCTION MENU - Funktionsmenü
9 LEFT - im Lernmodus den linken Teil der der
Instrumente auswählen
10 DUAL - Dualstimme aktivieren/deaktivieren
11 RIGHT - im Lernmodus den rechten Teil der
der Instrumente auswählen
12 LOWER - untere Klanggruppe wählen
Im Liedmodus
13 Anfang/ Ende eines Liedabsatzes festlegen
14 Pausetaste
15 Schnell rückkwärts spielen
16 Schnell vorwärts spielen
17 Liedwiedergabe starten/ stoppen
Im Stilmodus
13 START/STOP Wiedergabe starten/anhalten
14 SYNC – Synchronisierungsfunktion öffnen/
schließen
15 FILL IN 1 – Variation 1 einfügen
16 FILL IN 2 – Variation 2 einfügen
17 START/ STOP – Die Wiedergabe der
Begleitung starten/ stoppen
18 PIANO - Pianomodus aktivieren/deaktivieren
19 METRONOME – Taktvorgabefunktion öffnen/
schließen
20 A,B,C. - Akkordwahl
21 TOUCH – Tastatur-Touchkurve wählen
22 LCD-Bildschirm – zeigt allen wichtigen
Informationen an
TASTEN UND ANSCHLÜSSE
Linkes Bedienfeld

DE
7
Rechtes Bedienfeld
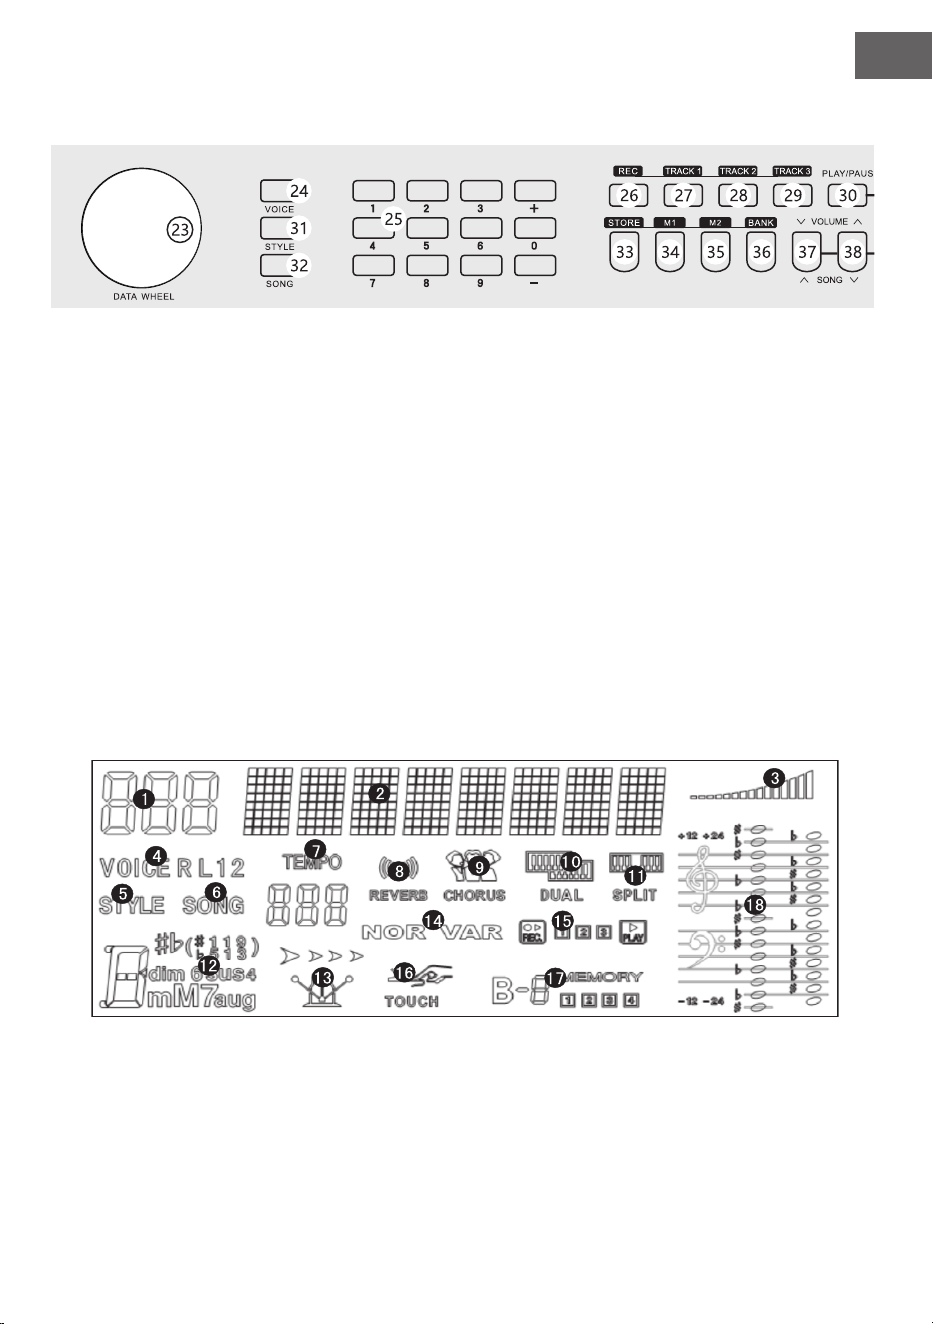
23 Wahlrad: Wert einstellen
24 VOICE: Instrumente aktivieren
25 Ziffernfeld mit +/-: Zahlenwerte einstellen
26 REC - Aufnahme
27 TRACK 1 – Für die Aufnahme Spur 1
auswählen
28 TRACK 2 – Für die Aufnahme Spur 2
auswählen
29 TRACK 3 – Für die Aufnahme Spur 3
auswählen
30 PLAY/PAUSE - Wiedergabe/Pause
31 STYLE - Stil wählen
32 SONG - Liedmodus wählen
33 STORE - aktuelle Konsoleneinstellung
speichern.
34 M1 - Konsoleneinstellung laden
35 M1 - Konsoleneinstellung laden
36 BANK - Speicherbank wechseln
37 SONG ∨/VOLUME ∨
Zum nächsten MP3-Titel springen
Gedrückt halten, um MP3-Lautstärke zu
verringern.
38 SONG ∨/VOLUME ∨
Zum vorherigen MP3-Titel springen
Gedrückt halten, um MP3-Lautstärke zu
erhöhen.
LCD-Bildschirm
1 Digitalanzeige
2 Notenanzeige
3 Lautstärke
4 Klangauswahl
5 Stilauswahl
6 Lieder
7 Tempo
8 Hallefekt
9 Chorus
10 Zweistimmigkeit
11 Tastaturteilung
12 Akkordanzeige
13 Takt
14 FILL IN1/FILL IN2
15 Aufnahme/ Wiedergabe
16 Anschlag
17 Speicher
18 Notenschlüssel

DE
8
Rückseite
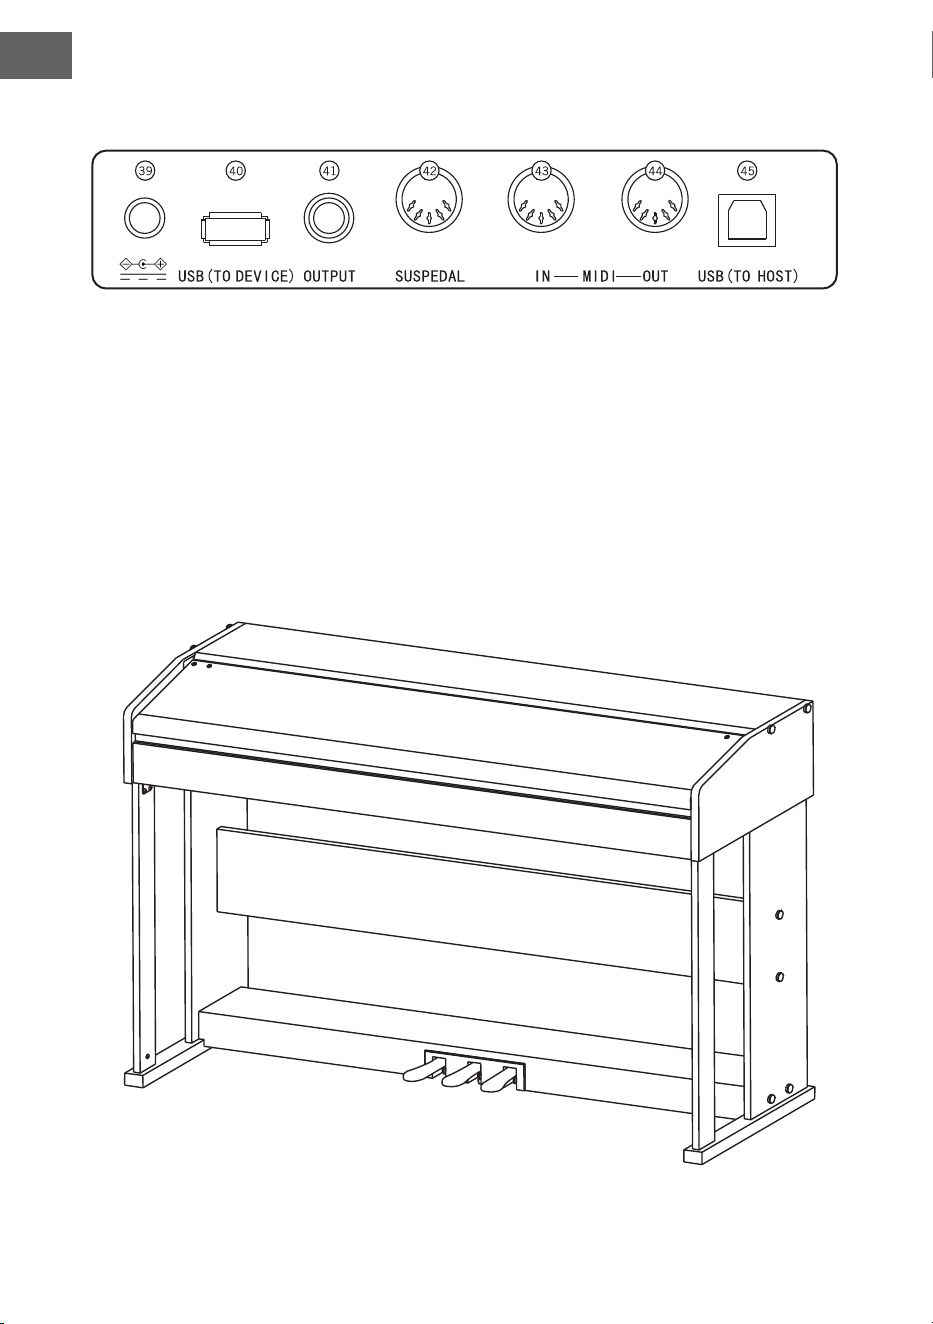
39 Externer Stromanschluss
40 USB (TO DEVICE) - USB-Anschluss
41 OUTPUT – Audioanschluss für externes Audioequipment
42 PEDAL-Anschluss
43 MIDI IN Anschluss – Empfangen von MIDI-Informationen, welche von externem MIDI-Equipment oder
Computern gesendet wurden
44 MIDI OUT Anschluss – Informationen des Geräts über diesen Anschluss an Computer oder andere
MIDI-Geräte senden
45 USB (MIDI)-Anschluss
DE
9
MONTAGE
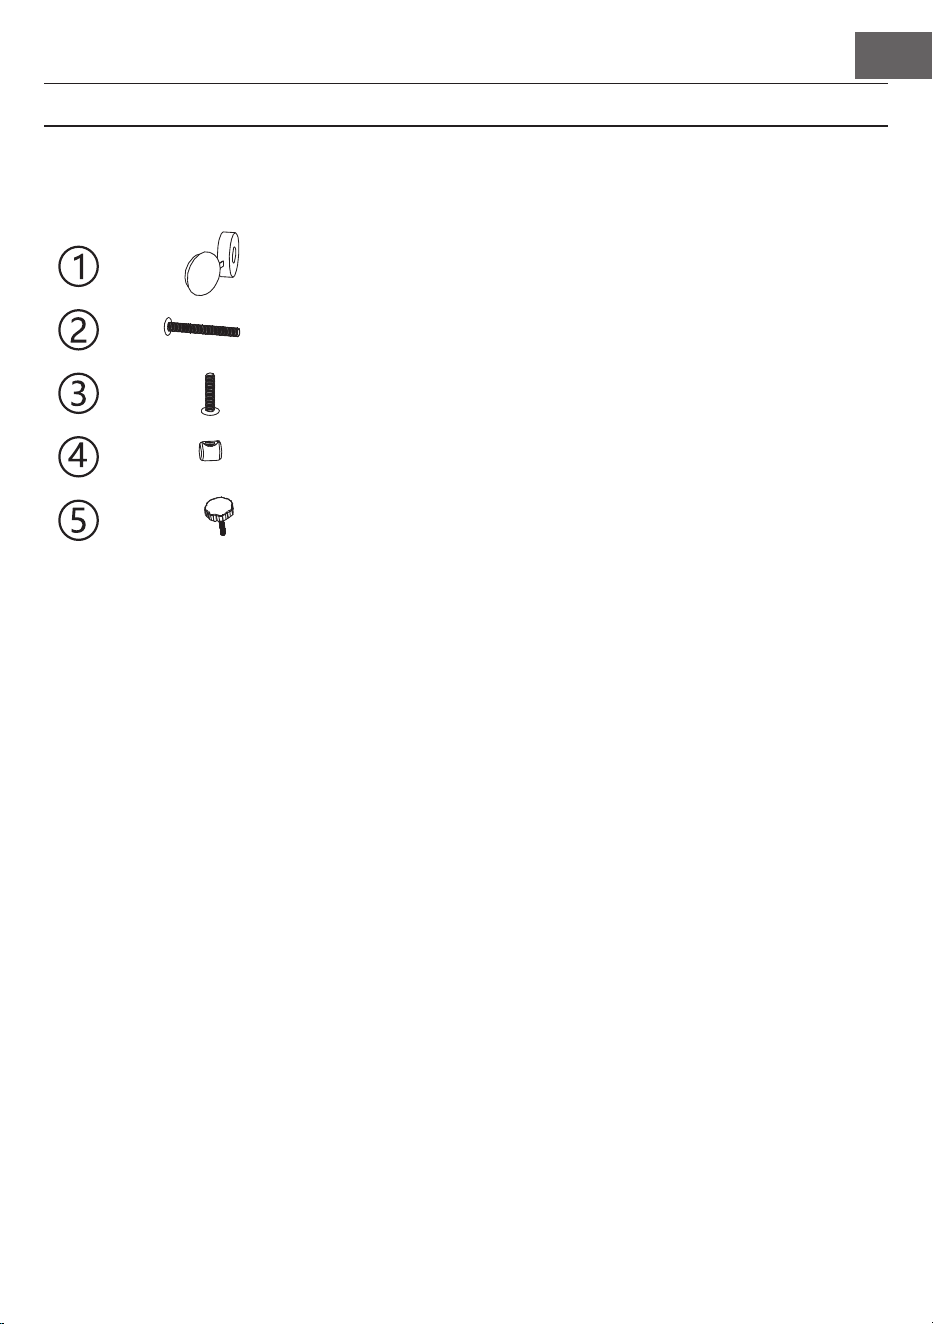
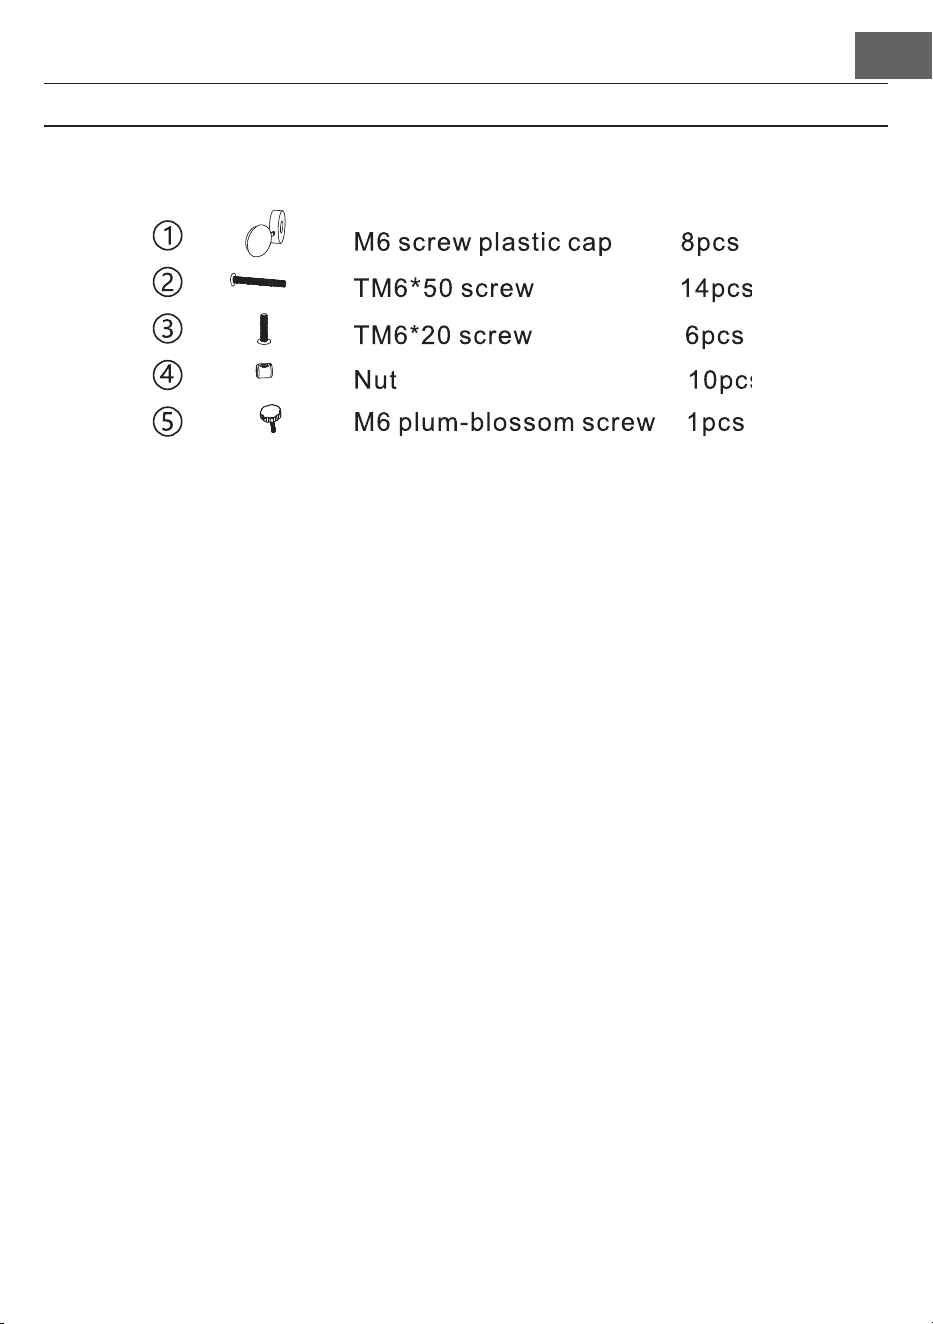
Braune Plastikabdeckung 8
14
6
10
1
8
Bezeichnung Stückzahl
TM6*50 Schrauben
TM6*20 Schrauben
Innenschraube
M6-Handschraube
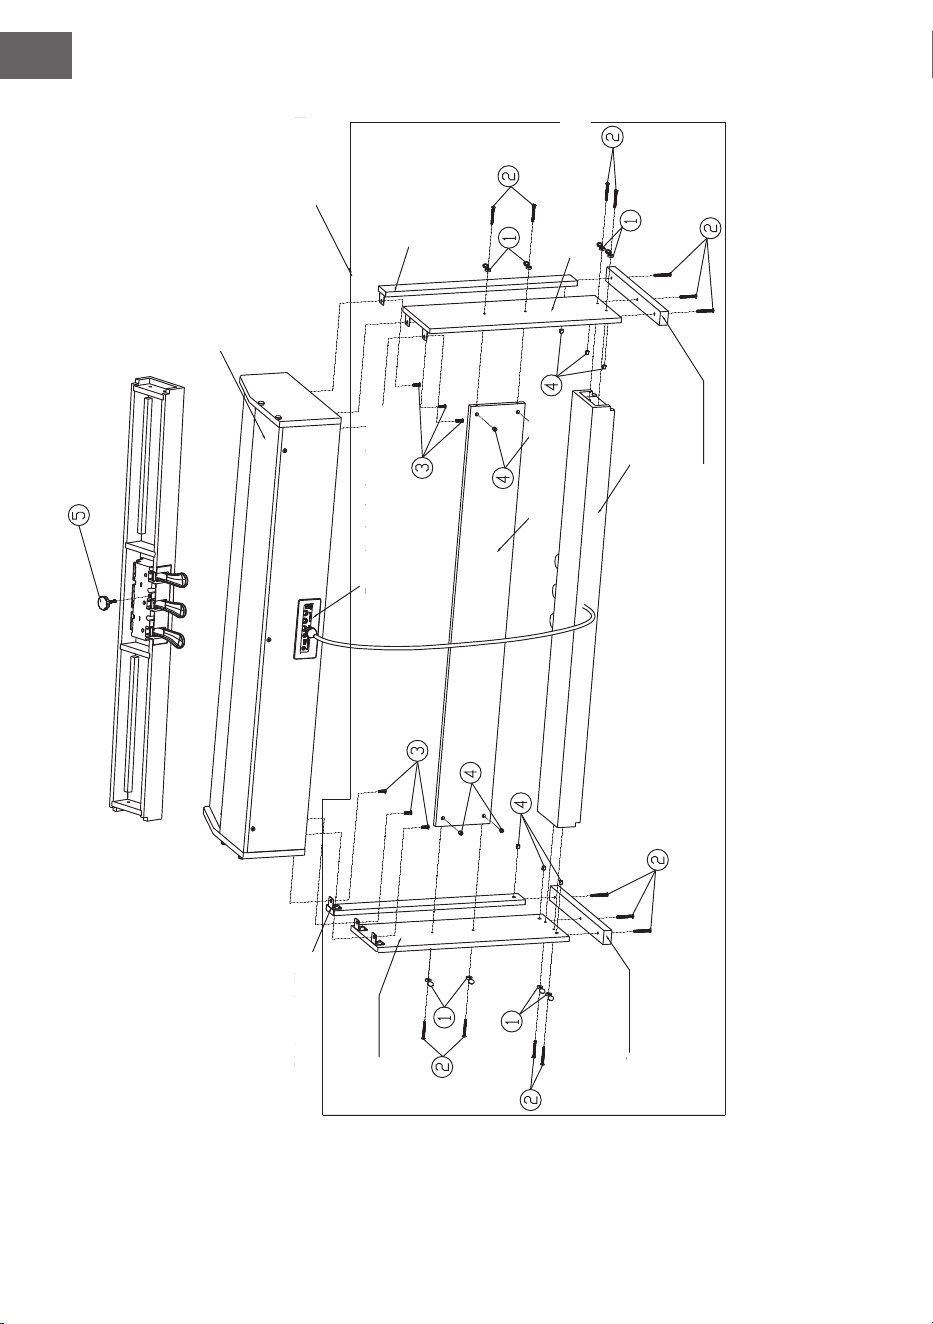
Montage des Klavierkörpers
1. Befestigen Sie den Pedalkasten mit der Handschraube (M6).
2. Drücken Sie 10 Stück Muttern in die entsprechenden Löcher der linken und rechten Stehplatte, der lin-
ken und rechten Standsäulen und der Anschlussplatte
3. Verbinden Sie mit 6 Stück TM6*50-Schrauben die linke und rechte Standplatte und die linken und rech-
ten Standsäulen mit den 2 Stücken der Standfüße.
4. Verbinden Sie mit 4 Stück TM6*50-Schrauben die linke und rechte Standplatte mit der Anschlussplatte
durch 4 Stück M6-Schraubenkappen und schließen Sie die Kappen.
5. Verbinden Sie die Standplatine und den Pedalkasten mit 4 Stück TM6*50-Schrauben und schließen Sie
die Abdeckungen.
6. Setzen Sie den Klavierkorpus auf den Klavierständer und befestigen Sie ihn mit 6 Stück TM6*20-Schrau-
ben.
7. Stecken Sie den Netzstecker des MIDI-Pedals in den Pedalanschluss auf der Rückseite des Klaviers.
DE
10
Spieltisch
Unterbau
Linkes Seitenteil
Rechtes Seitenteil
Rechter Standfuß
Linker Standfuß
Rechte Säule
Linke Säule
Pedalleiste
Rückseite
Anschlussverkleidung

DE
11
INBETRIEBNAHME UND BEDIENUNG
Stromversorgung
1. Vergewissern Sie sich, dass das Gerät ausgeschaltet ist,
wenn Sie es an die Stromverbindung anschließen.
2. Verbinden Sie den Anschlussstecker des Netzstromadap-
ters mit dem DC-Anschluss des Geräts.
3. Stecken Sie den Netzstromstecker in die Steckdose.
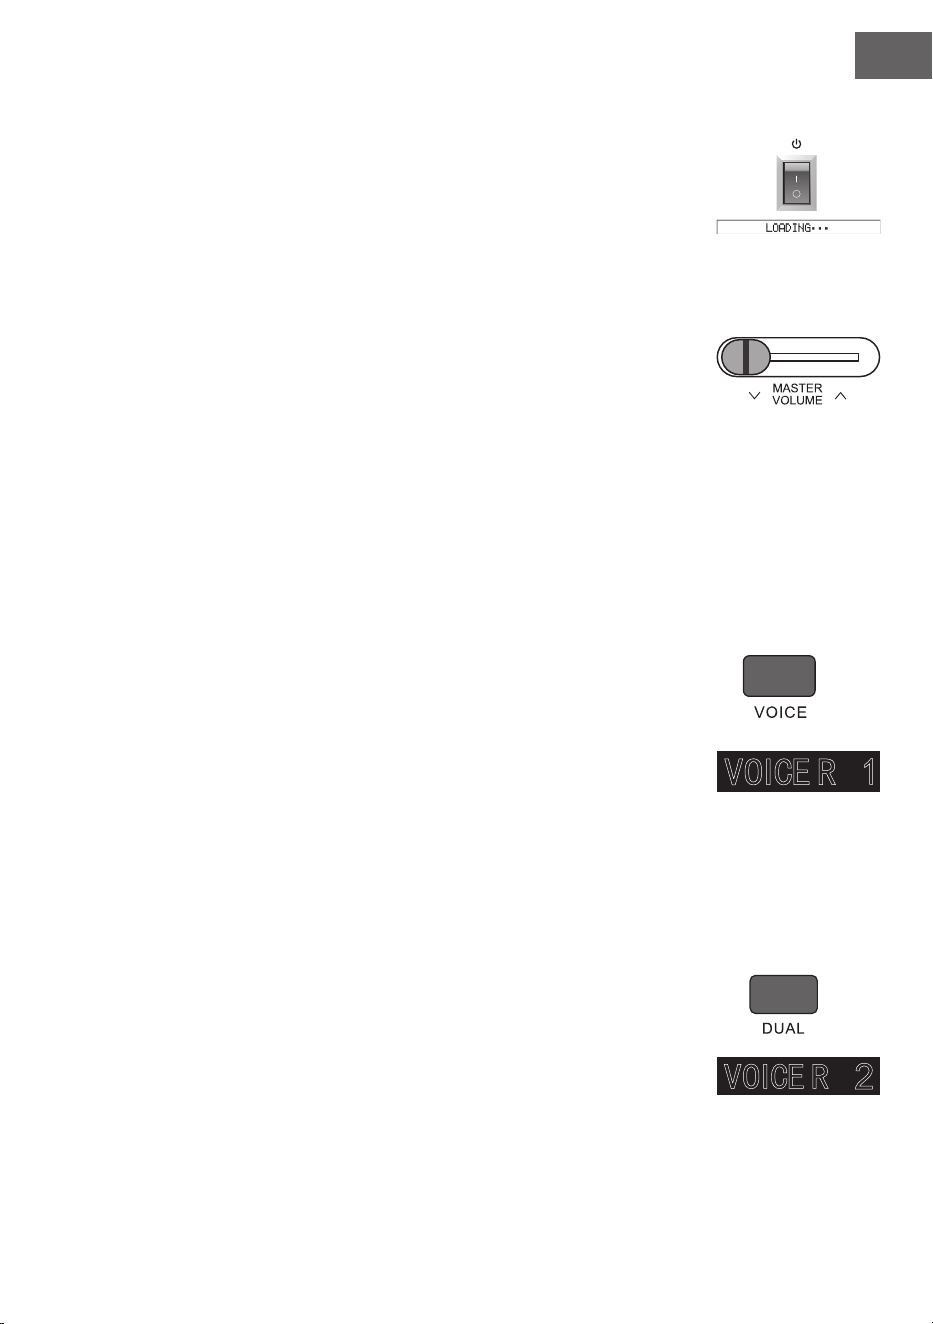
4. Wenn Sie die Taste POWER drücken, zeigt der LCD-Bild-
schirm „Loading“ an, was bedeutet, dass das Klavier geöff-
net wurde.
Hinweis: Schalten Sie, zu Ihrer eigenen Sicherheit, das Gerät bei
Gewittern oder wenn Sie es über einen längeren Zeitraum nicht
verwenden, aus.
Kopfhörer anschließen
• Sie können, wenn Sie alleine oder spät nachts üben
möchten, Stereo-Kopfhörer mit dem Kopfhöreranschluss
Ihres Geräts verbinden.
• Die Lautsprecher des Instruments werden automatisch
deaktiviert, sobald Kopfhörer angeschlossen werden und
der Ton wird nur noch über die Kopfhörer wiedergegeben.
Hinweis: Das Verwenden von zu laut eingestellten
Kopfhörern über einen längeren Zeitraum kann zu
Hörschäden führen.
Audiozubehör mit dem Gerät verbinden
• Durch das Anschließen von externem Audiozubehör
können bessere Musikeffekte erreicht werden.
• Über den AUDIO-OUT-Anschluss auf der Rückseite
des Geräts können Verstärker, Stereoakustiksysteme,
Tonpulte, Aufnahmegeräte etc. über ein Kabel mit dem
Gerät verbunden werden.
Hinweis: Stellen Sie sicher, dass das Gerät ausgeschaltet
und die Lautstärke auf den niedrigsten Wert eingestellt
wurde, bevor Sie andere Geräte mit dem Klavier
verbinden.
Anschluss an Computer
• Dieses Gerät verfügt über einen USB-Anschluss.
• Über ein USB-Kabel können Sie das Gerät mit Ihrem
Computer verbinden und in beide Richtungen
Informationen senden und empfangen.

DE
12
• Sie können beispielsweise Lieder, welche Sie auf dem Klavier
gespielt haben, auf dem Computer speichern oder MIDI-
Dokumente Ihres Computers über das Gerät abzuspielen.
Hinweis: Das USB-Audiozubehör kann nicht zur
gleichzeitig für Audio-Eingang und Audio-Ausgang
eingestellt werden.
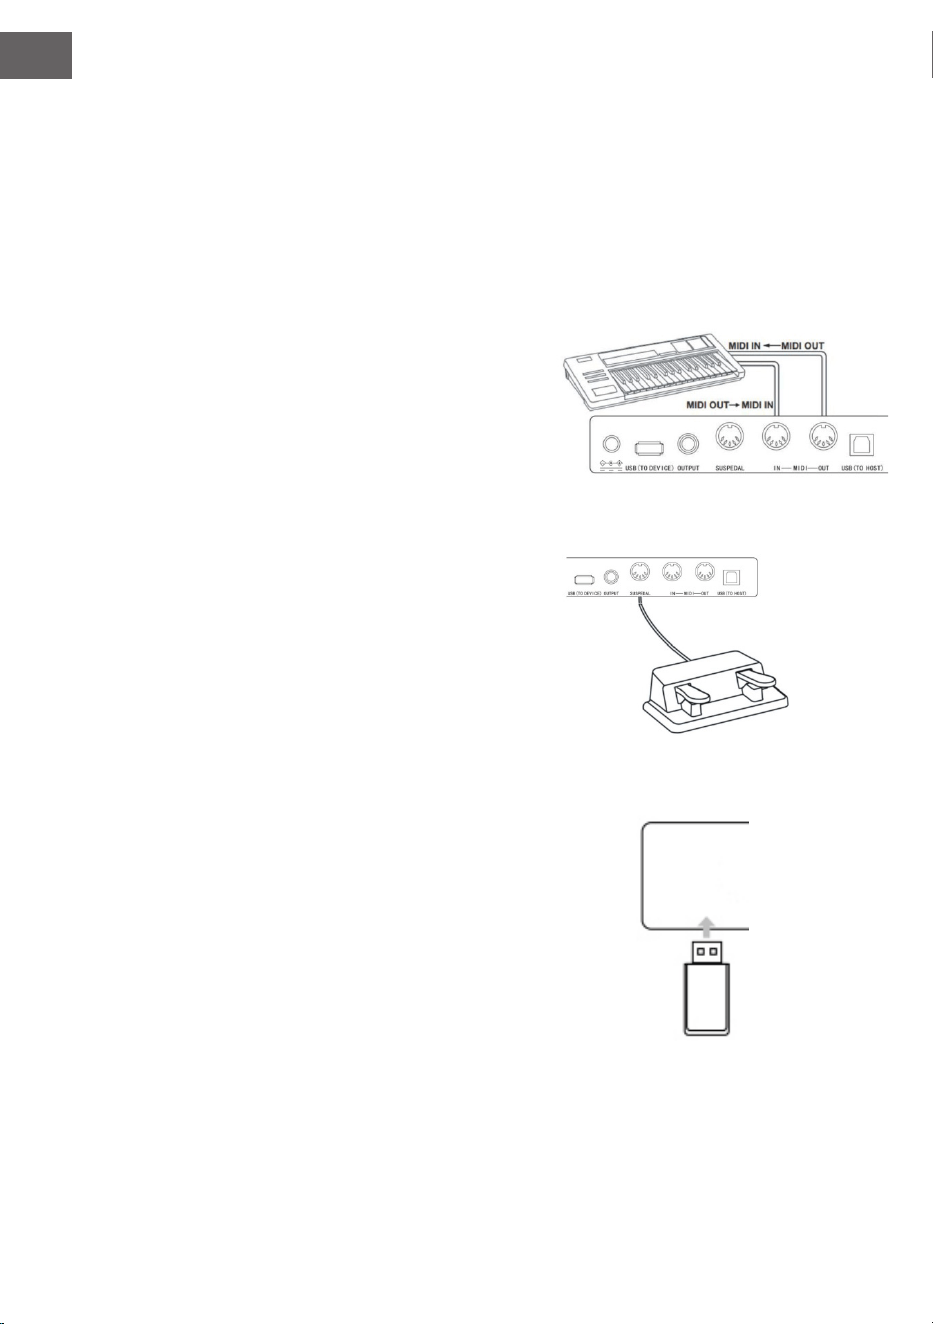
Anschluss an andere Geräte
• Wenn Sie den MIDI IN Anschluss Ihres Geräts mit dem
MIDI OUT Anschluss anderer Geräte verbinden, können
Sie das Klavier als Tonquelle nutzen.
• Wenn Sie den MIDI OUT Anschluss dieses Geräts mit dem
MIDI IN Anschluss anderer Geräte verbinden, kann das
Instrument als MIDI-Steuerung verwendet werden.
Pedalanschluss
Wenn die Pedale mit dem Pedalanschluss auf der Rückseite des
Instruments verbunden wurden, verfügt dieses Gerät über zwei
verschiedene Pedalfunktionen:
1. Wenn Sie dieses Pedal während des Spielens heruntertre-
ten, werden alle Töne leiser wiedergegeben.
2. Wenn Sie dieses Pedal während des Spielens heruntertre-
ten, hallen die gespielten Töne nach.
Anschluss von USB-Geräten
• Das Gerät unterstützt USB-Geräte bis zu 32 GB.
• MP3-Dateien auf dem USB-Stick können über das Gerät
wiedergegeben werden.
Hinweis: Ziehen Sie das USB-Gerät während der
Wiedergabe nicht heraus. Andernfalls kann es zu
Fehlermeldungen oder Schäden am USB-Gerät kommen.

DE
13
Netzschalter
1. Vergewissern Sie sich zunächst, dass der Netzstromadapter richtig ange-
schlossen wurde.
2. Wenn Sie die Taste POWER drücken, wird der LCD-Bildschirm heller und
zeigt den Startbildschirm an.
Hinweis: Wenn der LCD-Bildschirm nicht erleuchtet wird, nachdem Sie die
Taste POWER gedrückt haben, überprüfen Sie, ob der Netzstromadapter
richtig angeschlossen wurde.
Lautstärkeanpassung
• Drehen Sie, nachdem das Instrument geöffnet wurde, den Knopf MASTER
VOLUME nach rechts, um die Lautstärke zu erhöhen und nach links, um die
Lautstärke zu senken.
• Sie können die Lautstärke auf Ihre Bedürfnisse anpassen.
Verschiedene Arten von Instrumentenstimmen einstellen
• Dieses Instrument verfügt über hunderte Arten von Instrumentenstimmen,
einschließlich dem Klang chinesischer Volksmusik, Schlagzeug etc.
• Schauen Sie sich, zum Erhalten von genaueren Informationen, die Klangtabelle
an.
• Das Instrument ist des Weiteren mit einer Effektfunktion ausgestattet,
welche relativ zu dem jeweiligen Klang ist so dass das gespielte Instrument
besser klingt.
Klang auswählen und abspielen
1. Durch Drücken der Taste TONE gelangen Sie in den Klangauswahlmodus. Das
Erinnerungssymbol „R1“, der Name des aktuellen Klangs sowie dessen Num-
mer, werden auf dem LCD-Bildschirm angezeigt.
2. Verwenden Sie zur Auswahl des gewünschten Klanges die Zifferntasten und
die Tasten + und -.
3. Spielen Sie die Tasten und genießen Sie die wundervollen Klänge.
Hinweis: Drücken Sie zum Ändern der Klangquelle erneut die Taste VOICE.
Die Zweistimmigkeitsfunktion wird nun geöffnet. Die jeweils entsprechende
Anzeige „R1/R2/L“ wird auf dem LCD-Bildschirm angezeigt.
Zweistimmigkeit
Dieses Instrument verfügt über eine Zweistimmigkeitsfunktion. Dadurch können
zwei Klänge gleichzeitig überlagert abgespielt werden. Durch diesen Effekt
werden die Musikebenen bereichert und es wirkt so, als würden zwei Instrumente
zur gleichen Zeit abgespielt. Das erste Instrument „R1“ ist bereits vor Beginn der

DE
14
Funktion präsent. Nach dem Aktivieren der Funktion ist zusätzlich das Instrument
„R2“ vorhanden.
1. Drücken Sie zum Öffnen der Funktion die Taste DUAL. „R2“ erscheint auf
dem LCD-Bildschirm. Zusätzlich werden der Klangname und die Nummer
des zusätzlichen Klangs angezeigt.
2. Wählen Sie die von Ihnen gewünschte Zweitstimme mit der Taste VOICE
und den Tasten + und - aus.
3. Dadurch, dass beide Instrumente synchron abgespielt werden, wirkt es so,
als ob zwei verschiedene Instrumente gleichzeitig gespielt werden würden.
4. Die Funktion kann durch erneutes Drücken der Taste DUAL beendet wer-
den. Die Anzeige „R2“ verschwindet vom Bildschirm und dieses kehrt in sei-
nen vorherigen zustand zurück.
Hinweis: Wenn die Tastatur des Instruments geteilt wurde, ist die
Zweistimmigkeitsfunktion nur für die Tasten der rechten Hand verfügbar.
Die Tasten der linken Hand verfügen nicht über diese Funktion.
Lower (Klaviaturaufteilung)
Die Lower-Funktion unterteilt die Klaviatur durch den Klaviaturtrennpunkt in
zwei unabhängige Abschnitte und jeder Abschnitt hat ein anderes Instrument.
Das Instrument des linken Abschnitts ist das untere Instrument, und der
Tastenteilungspunkt kann nach Bedarf auf eine beliebige Taste gesetzt werden.
1. Drücken Sie die Taste LOWER, um die Lower-Funktion zu starten. Das Dis-
play zeigt den aktuellen Namen der Unterstimme und die Nummer sowie die
Anzeige „L“ und „SPLIT“ an.
2. Mit dem Wählrad, der Zifferntaste oder der [+]/[-]-Taste können Sie die zu
spielende Unterstimme auswählen.
3. Wenn Sie die Tastatur in verschiedenen Abschnitten spielen, hören Sie zwei
verschiedene Instrumente.
4. Erneutes Drücken der LOWER-Taste schaltet die Lower-Funktion aus, „L“ er-
lischt auf der LCD-Anzeige, die LCD-Anzeige kehrt zum vorherigen Zustand
zurück.
Keysplit: Die Position, an der die Hauptstimme oder Doppelstimme von
der Unterstimme auf der Tastatur getrennt wird, heißt "KEYSPLIT". Die
Standardeinstellung für den Keysplit ist F#3 (34).
Sie können die Klaviaturteilung auch an einer anderen Stelle der Klaviatur
einstellen, wie im Abschnitt Funktionsmenü Einstellungen für Details beschrieben.
Touchfunktion (Anschlagsempndlichkeit)
Das Bedienfeld des Instruments verfügt über eine Touchfunktion, welche es
ermöglicht, Ihrer Darbietung mehr Ausdruck zu verleihen. Sie können zwischen
drei verschiedenen Touchfunktionen auswählen.
1. Drücken Sie zum Aktivieren der Funktion die Taste TOUCH. Die voreinge-
DE
15
stellte Touchfunktion ist „002“ und wird auf dem LCD-Bildschirm angezeigt.
2. Sie können durch mehrfaches Drücken der Taste Touch, um in der Reihenfol-
ge „001-003; OFF“ eine der Funktionen auswählen.
3. Wenn der LCD-Bildschirm „OFF“ anzeigt, ist die Touchfunktion deaktiviert.
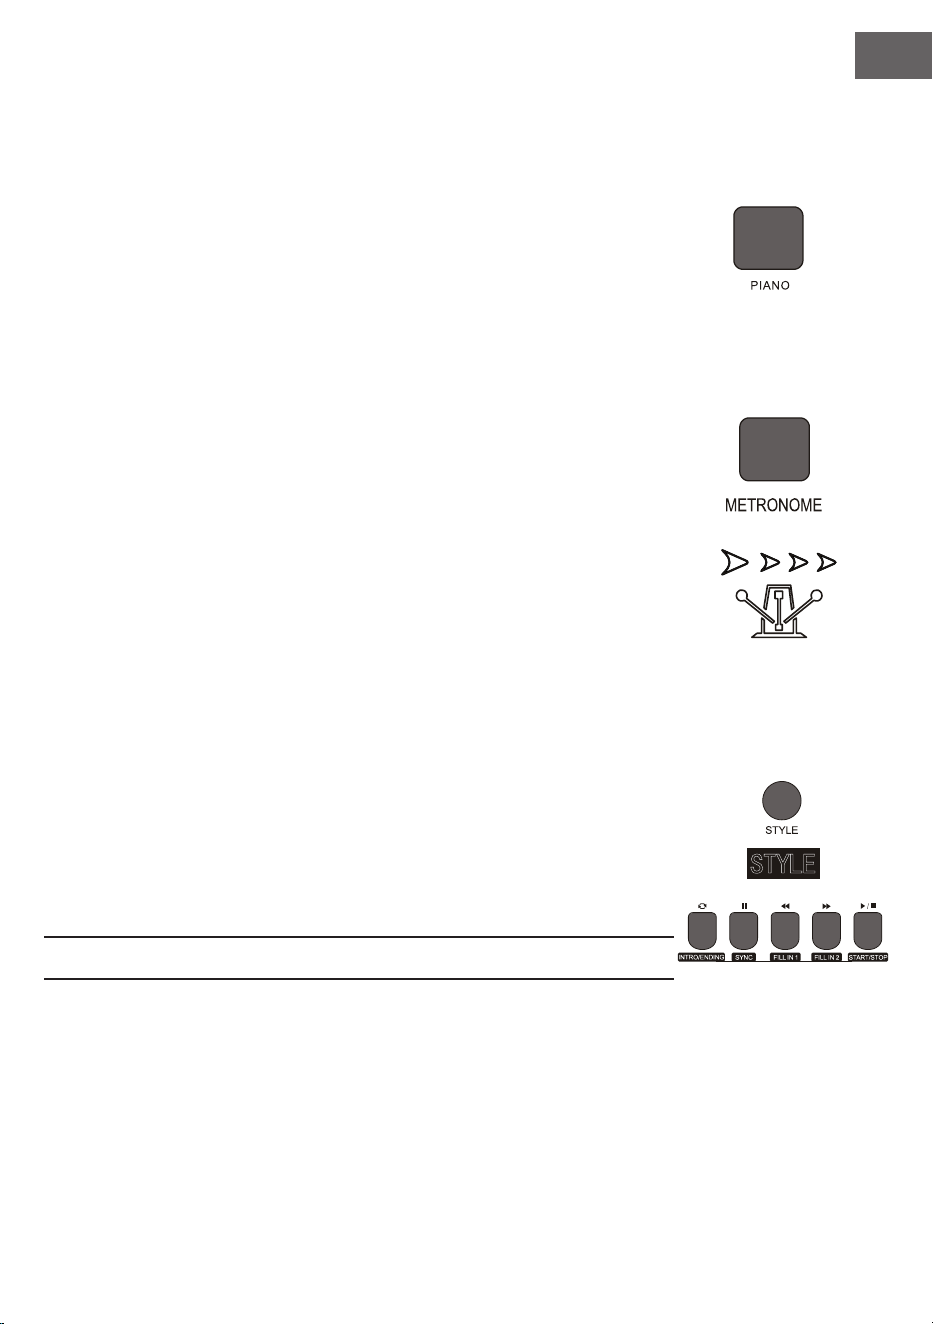
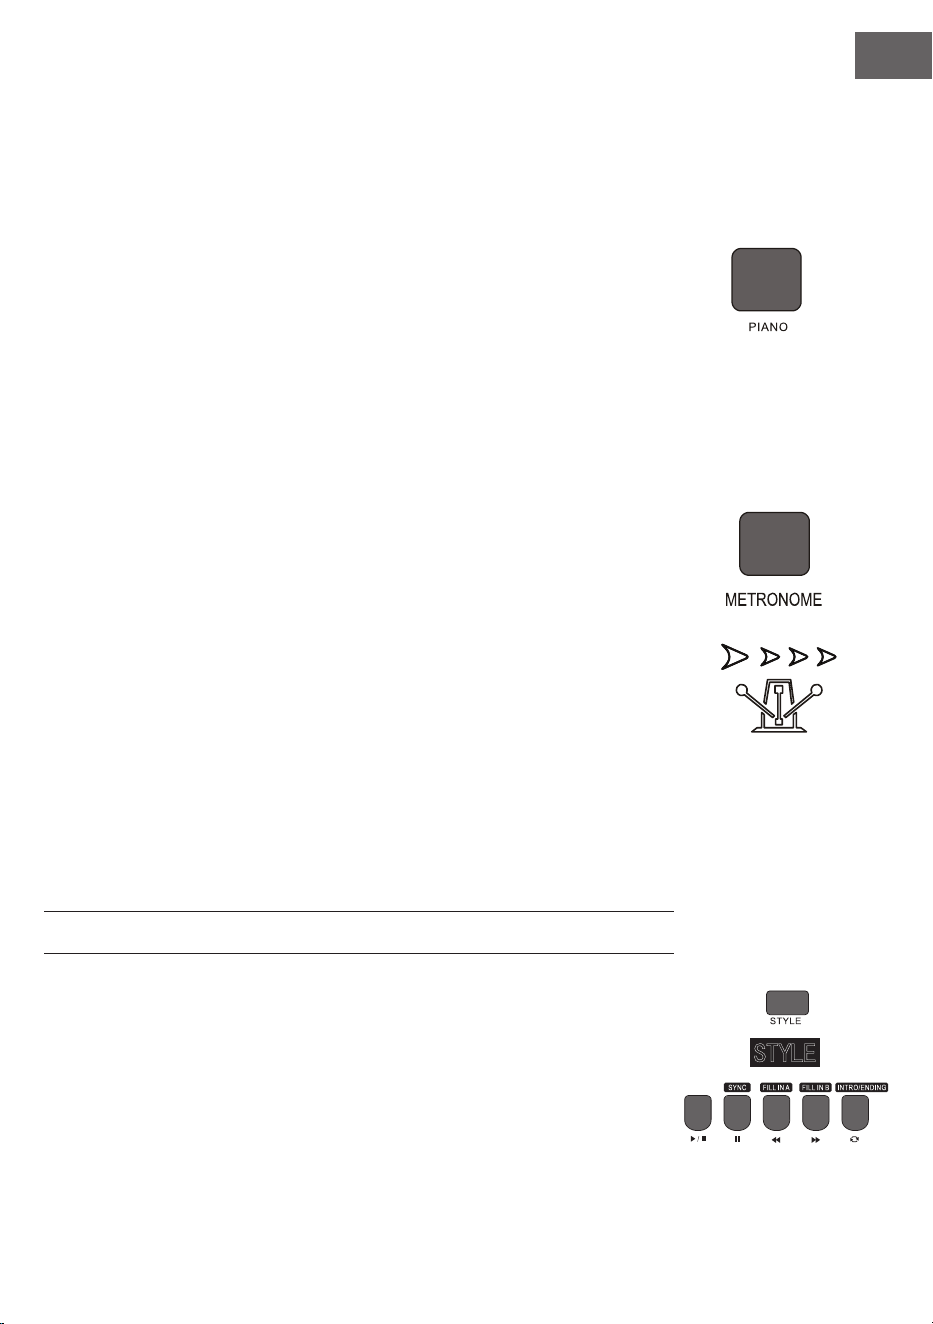
Klavierspielmodus
Durch diese Funktion, können Sie die gesamte Tastatur mit dem Klang eines
Klaviers verwenden.
1. Drücken Sie zum Aktivieren/ Deaktivieren der Funktion die Taste PIANO.
2. Die Auswahl der Begleitung funktioniert genauso wie in anderen Modi. Es
kann allerdings nur eine Schlagzeugbegleitung ausgewählt werden und kei-
ne harmonische.
Hinweis: In diesem Modus können Sie sowohl die Klangkonsole als auch
das Funktionsmenü öffnen. Die Akkordfunktion wird beim Aktivieren
dieses Modus automatisch geschlossen.
Metronom (Taktvorgabe)
Wenn Sie sich beim Üben nicht sicher sind, ob Sie den Takt richtig spielen, können
Sie sich diesen über die Metronomfunktion vorgeben lassen.
1. Drücken Sie zum Aktivieren der Funktion die Taste METRONOME. Der Takt
wird dann vorgegeben. Drücken Sie zum Deaktivieren der Funktion erneut
die Taste METRONOME.
2. Wählen Sie die Taktarteneinstellung im Funktionsmenü aus, um die ver-
schiedenen Einstellungen anzuzeigen.
Hinweis: Wenn Sie Funktion im Spielverlauf geöffnet wird, ertönt das
Taktgeräusch zu Beginn des nächsten Takt und richtet sich nach dem
jeweiligen Stil.
• Wenn die Funktion zuerst geöffnet wird, passt das Instrument dieses
automatisch an den von Ihnen ausgewählten Stil an.
• Die Funktion kann auch während der Aufnahme aktiviert werden, da es
nicht in den gespeicherten Daten zu hören sein wird.
BEGLEITUNG
Automatische Begleitung
• Durch das Aktivieren dieser Funktion können Sie einfach nur Klavier
spielen und die Begleitung, beispielsweise in Form eines Orchesters, wird
automatisch dazu wiedergegeben. Sie müssen lediglich eine Begleitung aus
der Stiltabelle auswählen und mit Ihrer linken Hand die Akkorde spielen.
• Dieses Instrument verfügt über mehrere automatische Begleitungen,

DE
16
welche Sie in der Stiltabelle einsehen können. Wählen Sie einfach die passende aus und genießen Sie es.
Automatische Begleitung wiedergeben (nur den Perkussionsteil abspielen)
1. Drücken Sie die Taste STYLE, um in den Stilmodus zu gelangen. In der oberen linken Ecke des LCD-Bild-
schirms leuchtet die Anzeige „STYLE“ auf. Der Bildschirm zeigt außerdem zeitgleich den Namen und die
Ziffer des aktuell ausgewählten Stils an.
2. Sie können den gewünschten Stil durch Drücken der Zifferntasten oder der Tasten + und -auswählen.
3. Der Perkussionsteil des Stils kann durch Drücken der Taste START/STOP sofort wiedergegeben werden.
Sie können außerdem die Taste SYNC drücken, um den Stil zu synchronisieren. Der Taktpunkt leuchtet
ebenfalls auf dem LCD-Bildschirm auf. Sie können eine beliebige Taste spielen, um die Performance zu
starten.
Automatische Begleitung wiedergeben (all Spuren)
1. Starten Sie die automatische Bass-Akkord-Begleitung: Drücken Sie die Taste [A.B.C.] zum ersten Mal, um
den automatischen Bassakkord-Modus aufzurufen. Die Tastatur ist in zwei Abschnitte aufgeteilt. Der
Abschnitt für die linke Hand ist der Akkord-Erkennungsabschnitt. Das Display zeigt vorübergehend die
Anzeige ‚A.B.C‘. an. Wenn Sie dann eine beliebige Taste im Akkord-Erkennungsbereich drücken (Sync-
Start-Status), hören Sie die fantastische Begleitung. Drücken Sie die Taste [A.B.C. l zum zweiten Mal, um
in den FULL RANGE-Modus zu gelangen. Auf dem LCD wird die Anzeige Full Ran angezeigt. Zu diesem
Zeitpunkt bendet sich die gesamte Tastatur im Akkord-Erkennungsbereich.
2. Die A.B.C.-Begleitung starten
3. Drücken die Sync-Taste, und spielen dann einen Akkord im Akkord-Erkennungsbereich, um die Beglei-
tung von A.B.C. zu starten. Wenn Sie einen Akkord ändern, ändert sich die Begleitung automatisch. Sie
können auch die START/STOP-Taste drücken, um die automatische Begleitung des Rhythmus-Tracks zu
starten, und dann einen Akkord im Akkord-Erkennungsbereich zu spielen. Dadurch wird die Begleitau-
tomatik für alle Tracks gestartet.
Begleitabschnitte
Die automatische Begleitung dieses Instruments beinhaltet viele unterschiedliche Begleitabschnitte, so dass
es empfehlenswert ist, Ihre eigenen Begleitungen speziell anzuordnen. Die Abschnitte beinhalten: Hauptwerk
(A, B), Intro, Ende. Wenn Sie die Begleitung abspielen können Sie durch Verwendung der Abschnitte eine
professionellere Darbietung erreichen.
1. Intro: Die Auswahl des Intros eignet sich zu Beginn eines Stücks. Nach dem Beenden des Intros wechselt
die Begleitung zu den Einstellungen zum Hauptwerk. Die Länge des Intros ist unterschiedlich und hängt
davon ab, welcher Stil ausgewählt wurde.
2. Hauptprogramm: Die Auswahl von „Main Play“ eignet sich dann, wenn der Hauptteil eines Liedes ge-
spielt wird. Das Hauptprogramm wird so lange abgespielt, bis eine andere Taste gedrückt wird.
3. Einfügen (FILL IN): Durch das Einfügen von Abschnitt 1 oder 2 können Sie Ihre Darbietung professio-
neller gestalten. Nach dem Abspielen der eingefügten Abschnitte wechselt die Begleitung wieder zum
Hauptprogramm.
4. Ende
Das Drücken dieser Taste eignet sich am Ende eines Stücks. Das Stück wird automatisch beendet, wenn die
Endsequenz abgespielt wurde. Die Länge der Endsequenz hängt von dem ausgewählten Stil ab und kann
variieren.

DE
17
Hinweis: Wenn Sie die Taste FILL IN 1 oder FILL IN 2 gedrückt halten, wird die Variation so lange in
die Begleitung eingefügt, bis Sie die Taste loslassen. Die Begleitung wechselt dann wieder in das
Hauptprogramm. Das Drücken der Taste FILL IN ändert das voreingestellte Hauptprogramm.
Wenn Die Begleitung stoppt, zeigt der LCD-Bildschirm dies an.
Unterschiedliche Begleitabschnitte wiedergeben
1. Durch Drücken der Taste STYLE gelangen Sie in den Stilauswahlmodus. Wählen Sie den gewünschten
Stil durch Drücken der Zifferntasten oder + und - aus.
2. Drücken Sie die Taste AUTO CHORD, um die automatische Akkordfunktion zu aktivieren.
3. Drücken Sie zum Öffnen der Synchronisierungsfunktion die Taste SYNC.
4. Drücken Sie zur Auswahl der Hauptwiedergabe 1 die Taste FILL IN 1.
5. Wenn Sie die Taste INTRO/ ENDING drücken, zeigt der Bildschirm „NOR“ an, was bedeutet, dass sich
das Instrument im Spielvorbereitungsmodus bendet. Die automatische Begleitung startet sofort, wenn
Sie einen Akkord im Tastaturbereich der linken Hand spielen.
6. Die Begleitung wechselt nach dem Intro zum Hauptprogramm.
7. Wenn Sie die Taste FILL IN 2 drücken, wird eine kleine Variation in die Begleitung eingefügt. Die Beglei-
tung wechselt nach dem Beenden der Variation wieder automatisch zum Hauptprogramm.
8. Wenn Sie die Taste INTRO/ENDING drücken, spielt die Begleitung eine Endsequenz ab und stoppt an-
schließend.
Einstellung der Begleitlautstärke
Die Begleitlautstärke kann für die gesamte Begleitung angepasst werden. Diese Funktion führt zu einem
ausgewogenen Verhältnis zwischen Tastenlautstärke und Begleitlautstärke.
1. Durch Drücken der Taste ACCOMP VOLUME ∧/∨ wird auf dem LCD-Bildschirm die aktuelle Einstellung
der Begleitlautstärke angezeigt. Drücken Sie zum Erhöhen der Lautstärke die Taste ACCOMP VOLUME
∧ und zum Senken die Taste ACCOMP VOLUME ∨ Einstellungsbereich: 0 – 127.
2. Wenn Sie die Tasten ACCOMP VOLUME ∧ und ACCOMP VOLUME ∨ gleichzeitig gedrückt halten, wird
die Begleitlautstärke geschlossen. Der LCD-Bildschirm zeigt dann „Accompaniment volume: OFF“ an.
Drücken Sie zum Öffnen erneut gleichzeitig die beiden Tasten ACCOMP VOLUME ∧ und ACCOMP VO-
LUME ∨ gleichzeitig.
Tempo
Jeder Stil hat einen anderen besten Geschwindigkeitswert. Sie können den Wert abhängig von Ihren
Fähigkeiten und den Anforderungen der jeweiligen Stücke anpassen.
1. Über die Tasten TEMPO ∧ und TEMPO ∨ kann der voreingestellte Geschwindigkeitswert angepasst
werden.
2. Durch gleichzeitiges Drücken der Tasten TEMPO ∧ und TEMPO ∨ wird die Geschwindigkeit auf den ur-
sprünglichen Wert zurückgesetzt.
Hinweis: Die Geschwindigkeit wird für jeden Stil automatisch festgelegt. Während des Spielens in einem
bestimmten Stil bleibt die Geschwindigkeit gleich.

DE
18
DSP
DSP ist eine Technologie zur Schallfeldlokalisierung, die den Klang in der realen Umgebung imitiert.
Wenn Sie diese Funktion verwenden, können Sie eine offenere und vollere Wiedergabe hören.
1. Der DSP-Effekt wird beim Einschalten automatisch eingeschaltet, und die Markierungen "REVERB" und
"CHORUS" leuchten auf dem LCD.
2. Drücken Sie die Taste [DSP], um den DSP-Effekt ein- oder auszuschalten.
Hinweis: Während der Rhythmus- oder Song-Wiedergabe kann das Ein-/Ausschalten des DSP eine kurze
Pause oder ein Geräusch verursachen, was durch das Umschalten der Effektschalter normal ist.
Toneinstellung
• Über die Toneinstellung kann die Lautstärke jedes Titels eingestellt werden.
• Drücken Sie die Taste SOUND CONSOLE, um in das Toneinstellungsmenü zu gelangen. Der LCD-
Bildschirm zeigt den entsprechenden Wert an. Wenn Sie im Toneinstellungsmenü sind, können Sie die
einzelnen Wert einstellen, indem Sie die Taste SOUND CONSOLE mehrfach drücken.
• Die Lautstärke kann für jeden einzelnen Wert, durch Drücken der Tasten + und -, separat eingestellt
werden.
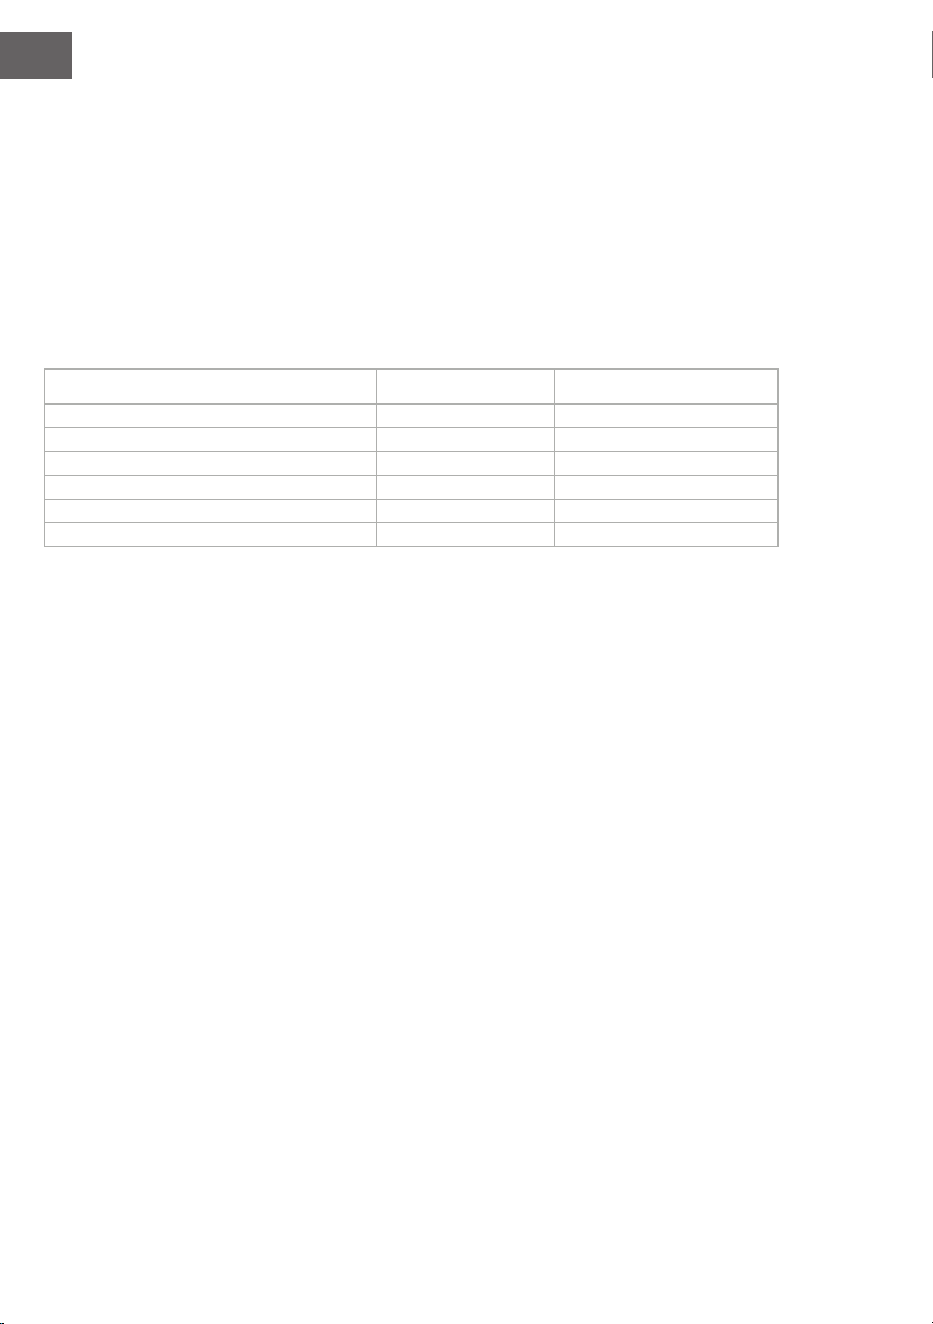
Einstellungswerte
Anpassungsinhalt LCD-Anzeige Anpassungsbereich
Perkussionsmusiklautstärke XXX Rhythm 0 - 127
Basslautstärke XXX Bass 0 - 127
Harmonielautstärke XXX Chord 0 - 127
Abschnittlautstärke XXX Phrase 0 - 127
Lautstärke linker Handabschnitt XXX Lower 0 - 127
Lautstärke rechter Handabschnitt XXX Upper 0 – 127
Hinweis: Wenn innerhalb von 5 Sekunden keine Toneinstellung vorgenommen wird, wird das
Toneinstellungsmenü automatisch verlassen

DE
19
FUNKTIONSMENÜ
Funktionsmenü
Drücken Sie die Taste FUNCTION MENU, um in das Funktionsmenü zu gelangen. Der LCD-Bildschirm zeigt
den entsprechenden Wert an. Im Funktionsmenü können Sie die einzelnen Werte durch Drücken der Tasten +
und - einstellen.
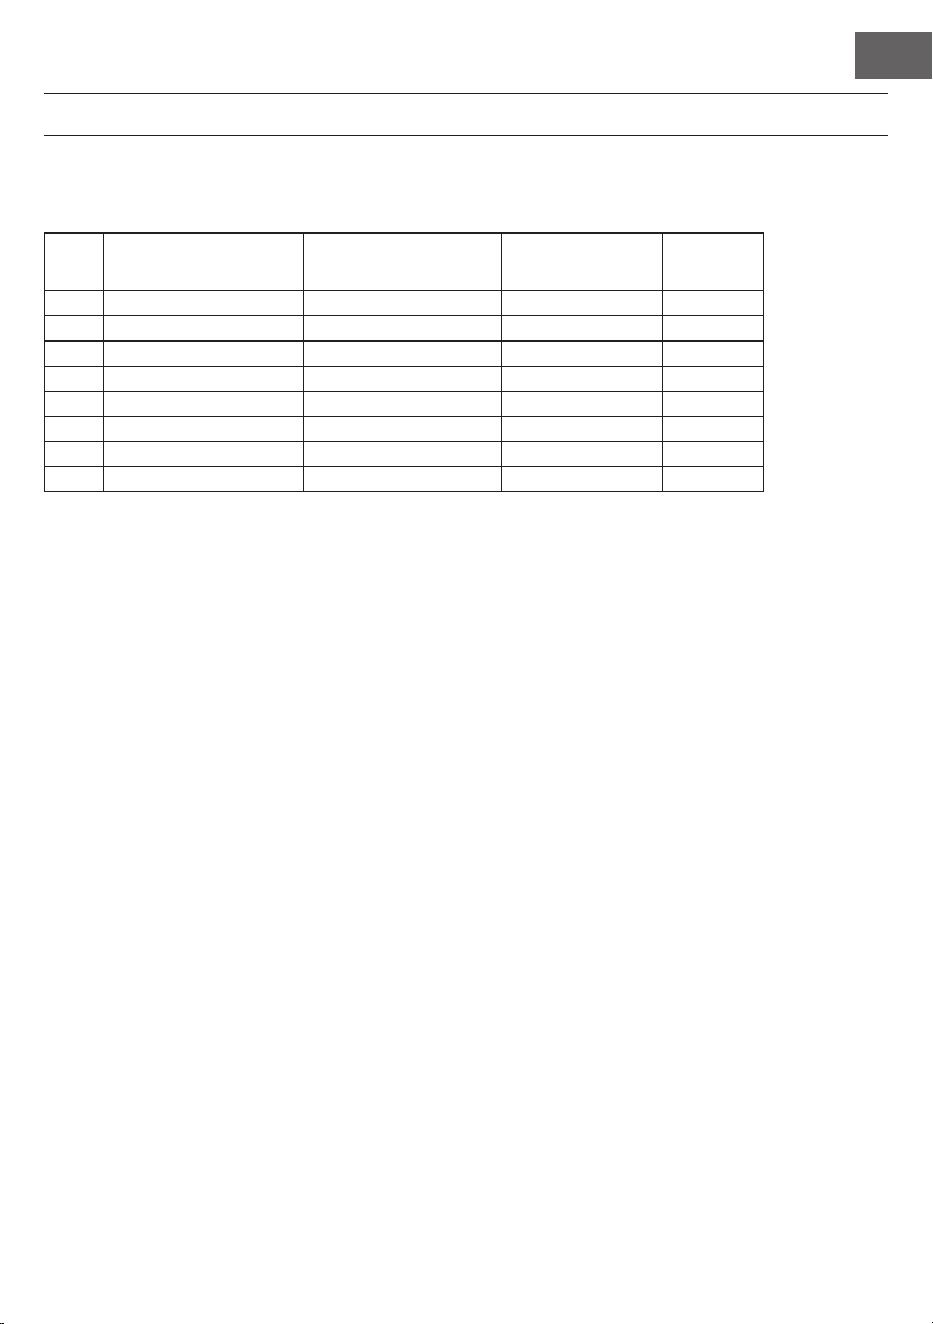
Nr. Inhalt LCD-Anzeige Anpassungsbereich voreingestellter Wetrt
1 Melodie XXX Tune -50 - +50 000
2 Tastaturteilung XXX KeySplit 1 – 88 034
3 Takt XXX BeatType 0, 2 – 9 004
4 Metronomlautstärke XXX 0 – 127 080
5 Halltiefe XXX 0 – 127 050t
6 Chortiefe XXX 0 – 127 000
7 MIDI Empfand XXX 1 – 16, ALL ALL
8 MIDI Sendung XXX 1 – 16 001
Hinweis: Wenn innerhalb von 5 Sekunden keine Einstellung vorgenommen wird, wird das Funktionsmenü
automatisch verlassen.
Melodieeinstellung
Mit dieser Einstellung kann die Tonhöhe detailliert angepasst werden.
1. Drücken Sie zur Auswahl des Melodiemenüs zunächst die Taste FUNCTION MENU. Wählen Sie dort
„tune menu“ aus. Der Bildschirm zeigt zeitweise „XXX Tune“ an. Durch Drücken der Tasten + und - kann
die Tonhöhe, jeweils um einen Halbton, im Bereich von 50 angepasst werden
2. Wenn Sie die Tasten + und - gleichzeitig drücken, wird die Tonhöhe auf den voreingestellten Wert 000
zurückgesetzt. Diese Parametereinstellung gilt für die Tastatur und alle Stile.
Tastatur teilen
Der Punkt, an welchem der automatische Akkordbereich und die Tastatur der rechten Hand geteilt werden
heißt „KEYBOARD SPLIT POINT“.
Wenn die automatische Akkordfunktion deaktiviert ist, kann der linke Tastaturbereich auch zum Spielen von
Musik verwendet werden.
1. Drücken Sie zum Teilen der Tastatur zunächst die Taste FUNCTION MENU und wählen Sie „Keyboard
Split“ aus. Der LCD-Bildschirm zeigt „XXX KeySplit“ an. Sie können zum Festlegen des Punktes die Tasten
+ und - drücken oder direkt über das Ziffernfeld eine Zahl eingeben.
2. Durch gleichzeitiges Drücken der Tasten + und – wird der Tastaturteilungspunkt auf den voreingestell-
ten Wert „F#3 (34)“ zurückgesetzt.

DE
20
Taktart
1. Drücken Sie zur Auswahl der Taktart zunächst die Taste FUNCTION MENU und wählen Sie „Beat-Type“
aus. Der LCD-Bildschirm zeigt „XXX BeatType“ an. Sie können zur Auswahl der Taktart die Tasten + und
– drücken. Insgesamt stehen 9 Taktarten (0, 2-9) zur Verfügung.
2. Durch gleichzeitiges Drücken der Tasten + und – wird die Taktart auf den voreingestellten Wert „004“
zurückgesetzt.
Einstellung der Metronomlautstärke
1. Drücken Sie zum Einstellen der Metronom2lautstärke zunächst die Tasten FUNCTION MENU + oder
FUNCTION MENU - und wählen Sie dort „MetronomeVolume“ aus. Der LCD-Bildschirm zeigt zeitweise
„XXX MetroVol“ an. Zum Einstellen der Metronomlautstärke können Sie die Tasten + und - drücken. An-
passungsbereich: 0 – 127.
2. Durch gleichzeitiges Drücken der Tasten + und – wird die Metronomlautstärke auf den voreingestellten
Wert „080“ zurückgesetzt.
Einstellung der Halltiefe
1. Drücken Sie zur Auswahl der Halltiefe zunächst die Taste FUNCTION MENU und wählen Sie „Reverb
Level“ aus. Der LCD-Bildschirm zeigt „XXX ReverbLev“ an. Sie können zur Einstellung der Halltiefe die
Tasten + und – drücken. Anpassungsbereich: 0 – 127.
2. Durch gleichzeitiges Drücken der Tasten + und – wird die Halltiefe auf den voreingestellten Wert „050“
zurückgesetzt.
Einstellung der Chorlautstärke
1. Drücken Sie zur Auswahl der Chorlautstärke zunächst die Taste FUNCTION MENU und wählen Sie
„Chorus Level“ aus. Der LCD-Bildschirm zeigt „XXX ChorusLev“ an. Sie können zur Einstellung der Chor-
lautstärke die Tasten + und – drücken. Anpassungsbereich: 0 – 127.
2. Durch gleichzeitiges Drücken der Tasten + und – wird die Chorlautstärke auf den voreingestellten Wert
„000“ zurückgesetzt.
MIDI Empfangseinstellung
1. Drücken Sie zur Auswahl des MIDI-Empfangseinstellungsmenüs zunächst die Taste FUNCTION MENU
und wählen Sie „MIDI receiving channel setting menu“ aus. Der LCD-Bildschirm zeigt „XXX MidiIn“ an.
Sie können zur Einstellung der Empfangskanäle die Tasten + und – drücken. Anpassungsbereich: 1 – 16,
ALL.
2. Durch gleichzeitiges Drücken der Tasten + und – wird der Empfangskanal auf den voreingestellten Wert
„ALL“ zurückgesetzt.
MIDI Sendungseinstellung
1. Drücken Sie zur Auswahl des MIDI-Sendungseinstellungsmenüs zunächst die Taste FUNCTION MENU
und wählen Sie „MIDI sendinng channel setting menu“ aus. Der LCD-Bildschirm zeigt „XXX MidiOut“ an.
Sie können zur Einstellung der Empfangskanäle die Tasten + und – drücken. Anpassungsbereich: 1 – 16.
2. Durch gleichzeitiges Drücken der Tasten + und – wird der Empfangskanal auf den voreingestellten Wert
„001“ zurückgesetzt.

DE
21
Zurücksetzen auf Werkseinstellung
Drücken Sie, während das Gerät ausgeschaltet ist, gleichzeitig die Tasten + und -. Das Gerät wird auf
Werkseinstellung zurückgesetzt und löscht alle Nutzerdaten, inklusive: Nutzerlieder, Registrierung, Speicher.
Der LCD-Bildschirm zeigt in dieser Zeit „Wait…!“ an. Nachdem das Gerät zurückgesetzt wurde, kann es ganz
normal verwendet werden.
Bedienfeldregistrierungsspeichereinstellung
Dieses Instrument verfügt über eine Bedienfeldregistrierungsspeichereinstellung. Diese kann dazu verwendet
werden, die am häugsten genutzten Einstellungen zu speichern und dadurch schneller verwenden zu können,
wenn Sie diese brauchen, wodurch das Spielen auf dem Instrument erleichtert werden kann. Mit dieser Funktion
können fast alle Einstellungen des Bedienfelds gespeichert werden, so dass Ihre Lieblingseinstellungen durch
nur einen Tastendruck eingestellt werden können.
Einstellungen speichern
1. Dieses Instrument verfügt über vier Speicherbänke. Jede Speicherbank hat jeweils 2 Speicherzustände.
2. Wenn Sie die Taste STORE drücken und gleichzeitig eine der Tasten M1 oder M2 gedrückt halten, kann
die aktuelle Einstellung gespeichert werden.
Hinweis: Durch das Speichern der aktuellen Einstellung wird der vorherige Speicherstand überschrieben.
Wenn Sie die Tasten STORE und M1 zur gleichen Zeit gedrückt halten werden alle gespeicherten
Einstellungen gelöscht und der Speicher auf Werkseinstellung zurückgesetzt.
Abspielen von gespeicherten Einstellungen
Drücken Sie zum Abspielen von gespeicherten Einstellungen die Tasten M1 oder M2.
Auswahl einer Speicherbank
1. Wenn Sie die Taste BANK drücken, zeigt der LCD-Bildschirm zeitweise die Nummer der aktuell ausge-
wählten Speicherbank an.
2. Wenn Sie die Taste BANK erneut drücken, können Sie den Speicher auswählen. Auswahlbereich:1 – 2.
3. Folgende Inhalte können in den Speichern M1 und M2 gespeichert werden:
• Klangeinstellungen: Hauptstimme, Zweistimmigkeit, Tastaturteilungspunkt, digitale Effekte, Tonpult.
• Begleitungseinstellungen: Stil, Geschwindigkeit, Automatische Akkorde aktivieren/ deaktivieren,
Abschnittauswahl
• Funktionseinstellungen: Touch, Einstellungen im Funktionsmenü

DE
22
Musiksteuerung
1. Taktleitfunktion
• Ein Lied verfügt bereits über einen leitenden Takt bevor das Intro gespielt wird.
2. Vor- und Zurückspulen, Wiedergabe-/Pause- und Stoppfunktion von Liedern
• Durch Drücken der Taste werden Lieder während der Wiedergabe vorgespult.
• Durch Drücken der Taste werden Lieder während der Wiedergabe zurückgespult.
• Durch Drücken der Taste / können Lieder pausiert und durch erneutes Drücken der Taste fortgesetzt
werden.
• Wenn die Taste gedrückt wird, wird die Wiedergabe gestoppt.
3. Abschnittswiederholung
• Durch Drücken der Taste kann der Anfang und das Ende eines Abschnitts festgelegt werden, welcher
anschließend in Dauerschleife, bis zum Beenden der Funktion wiedergegeben wird.
• Wenn Sie die Taste das erste Mal drücken, wird der Abschnittsanfang festgelegt und das Abschnittsende
wird festgelegt, wenn die Taste ein zweites Mal gedrückt wird.
• Ein erneutes Drücken der Taste beendet die Funktion und die Lieder werden wieder vollständig
abgespielt.
Musik aufnehmen
Vor dem Beginn der Aufnahme und der Auswahl einer Spur, muss
ein Lied ausgewählt werden.
1. Drücken Sie die Taste RECORD, um zu Ihrer Liedauswahl zu
gelangen. Auf der oberen linken Seite des LCD-Bildschirms,
wird die Nummer des Lieds angezeigt. Der voreingestellte
Name Ihres aufzunehmenden Liedes ist „RecSong 1“. Sie
können das Lied, welches Sie speichern möchten, über die
Tasten + und – auswählen.
2. Wenn Sie nun die Taste RECORD drücken, gelangen Sie in
den Aufnahmevorbereitungsmodus. Auf der unteren Seite
des LCD-Bildschirms wird in roten Buchstaben „REC“ an-
gezeigt und 4 Taktpunkte erscheinen zur gleichen Zeit im
Taktanzeigebereich. Das Instrument wählt automatisch
eine Spur aus, welche noch keine gespeicherten Daten ent-
hält, um Ihre Aufnahme automatisch zu speichern. Die ver-
wendete Tonspur wird auf dem LCD-Bildschirm angezeigt
und bezieht sich auf die aktuelle Aufnahme, welche dort
gespeichert wird.
3. Sie können im Vorbereitungsmodus Klang, Stil Geschwindigkeit etc. anpassen. Sie können die Tonspur,
auf welcher Ihre Aufnahme gespeichert werden soll, durch Drücken der Tasten TRACK 1, TRACK 2 oder
TRACK 3 auswählen. Begleitungsspur und Melodiespur können zur gleichen Zeit aufgenommen werden
während 2 verschiedene Melodiespuren nicht gleichzeitig aufgenommen werden können.
4. Drücken Sie zum Starten der Aufnahme die Taste START/STOP oder Beginnen Sie das Spielen auf der
Tastatur, nachdem Sie eine Aufnahmespur ausgewählt haben. Nachdem die Begleitung und die automa-
tische Akkordfunktion ausgewählt wurden, um die Akkorde im linken Handbereich effektiv zu spielen,
kann die Aufnahme ebenfalls gestartet werden.

DE
23
Hinweise:
• Die Stildaten können nur in der Begleitspur aufgenommen werden. Die Aufnahmeanzeige verfügt über
drei verschiedene Status: „Shine, Light, Go out.“
• „Shine“ bedeutet, dass diese Spur für die Aufnahme ausgewählt wurde. Wenn auf der Spur bereits Daten
vorhanden sind, werden diese durch die aktuelle Aufnahme überschrieben, wenn Sie fortfahren.
• „Light“ bedeutet, dass die auf der Spur vorhandenen Daten im Aufnahmeprozess synchron überschrieben
werden.
• „Go Out“ bedeutet, dass diese Spur keine Daten hat oder über Daten verfügt, deren Wiedergabe
während der Aufnahme aber verboten wurde.
• Die Aufnahmespur kann im Vorbereitungsmodus noch verändert werden.
• Das Gerät wählt im Vorbereitungsmodus automatisch eine leere Aufnahmespur aus (in der Reihenfolge von
klein nach groß, wie beispielsweise: wenn Spur 2 über Daten verfügt, wird das Instrument für die Aufnahme
Spur 3 auswählen).
Spur 1: Begleitungsspur
Spur 2/ Spur 3: Melodiespuren
Aufnahme stoppen
1. Wenn Sie während der Aufnahme die Taste START/STOP drücken, wird die Aufnahme sofort unterbro-
chen. Durch Drücken der Tasten STYLE oder VOICE können andere Funktionen ausgewählt werden.
2. Wenn der innere Speicher voll ist, wird die Aufnahme gestoppt und automatisch gespeichert. Der LCD-
Bildschirm zeigt dann „Rec_Full“ an.
3. Die Aufnahme stoppt automatisch, wenn das Lied beendet ist oder Sie eine Begleitung ausgewählt ha-
ben.
Aufgenommene Lieder abspielen
1. Wenn während der Aufnahme die Taste RECORD
gedrückt wird, wird die aktuelle Aufnahme unter-
brochen und in Dauerschleife die bisher aufgenom-
menen Lieder abgespielt.
2. Drücken Sie die Taste SONG, um in den Liedmodus
zu gelangen. Alle Lieder werden automatisch in Dau-
erschleife abgespielt. Die Nummer der von Ihnen ge-
speicherten Lieder kann durch Drücken der Tasten
+ und - direkt ausgewählt werden. Wenn Sie keine
gespeicherten Lieder haben zeigt der Bildschirm
„NoFile!“ an. Die Wiedergabe in Dauerschleife wird
dadurch unterbrochen.
3. Wählen Sie, falls vorhanden, ein von Ihnen gespeichertes Lied aus und drücken Sie die Taste START/
STOP, um dieses in Dauerschleife wiedergeben zu lassen.
Aufgenommene Lieder löschen
1. Drücken Sie, wenn das Instrument ausgeschaltet ist, gleichzeitig die Tasten RECORD und SONG, um alle
von ihnen gespeicherten Aufnahmen zu löschen.

DE
24
2. Drücken Sie für 2 Sekunden die Taste RECORD, um im Vorbereitungsmodus Aufnahmen zu löschen.
Der LCD-Bildschirm zeigt dann „Delete“ an. Drücken Sue anschließend die Tasten der jeweiligen Spur
(TRACK 1, TRACK 2, TRACK 3), von welcher Sie die Aufnahme löschen möchten. Wenn Die Anzeige
einer Spur erleuchtet wird, bedeutet dies, dass die Daten gelöscht werden. Wenn die Anzeige ausgeht,
bedeutet dies, dass die Daten behalten werden. Wenn die Anzeigen aller Spuren aueuchten, bedeu-
tet dies, dass alle aufgenommenen Lieder gelöscht werden, wenn der Löschvorgang von Ihnen, durch
Drücken der Taste +, autorisiert wird. Der Löschvorgang kann durch Drücken der Taste - abgebrochen
werden.
MP3-Wiedergabe
MP3-Anschluss:Über diesen Anschluss können Lieder im MP3-Format abgespielt werden.
• Durch Drücken der Taste PLAY/PAUSE können Lieder wiedergegeben/pausiert werden.
• Durch Drücken der Taste SONG ∧ wird das vorherige Lied ausgewählt und durch Drücken der Taste
VOLUME ∨ wird die Lautstärke reduziert.
• Durch Drücken der Taste SONG ∨ wird das nächste Lied ausgewählt und durch Drücken der Taste
VOLUME ∧ wird die Lautstärke erhöht.
Lieder abspielen
Dieses Instrument verfügt über viele verschiedene Lieder (Siehe Liedtabelle). Jedes der Lieder verfügt über
eine Unterrichtsfunktion.
1. Drücken Sie die Taste SONG, um in den Liedmodus zu gelangen. Der LCD-Bildschirm zeigt „SONG“ an.
Alle Lieder werden nun in Dauerschleife abgespielt.
2. Sie können zur Liedauswahl entweder die Ziffer des gewünschten Lieds oder die Tasten + und – ver-
wenden.
3. Drücken Sie zum Unterbrechen der Liedwiedergabe die Taste START/STOP. Wenn Sie die Wiedergabe
fortsetzen möchten, drücken Sie die Taste erneut.
4. Wenn Sie den Liedmodus beenden möchten, drücken Sie die Tasten STYLE, RECORD, VOICE, DUAL
VOICE usw. , sobald ein Lied beendet ist.
Lernmodus
Die Unterrichtsfunktion des Instruments besteht aus den drei Tasten LESSON, LEFT und RIGHT, welche
ausschließlich im Liedmodus verwendet werden können. Alle Lieder können in drei verschiedenen Modi geübt
werden: Dauer, Tonhöhen und Spielmodus. Das Instrument verfügt über eine Bewertungsfunktion, welche
Ihnen hilft, im Lernprozess Fortschritte zu machen.
1. Drücken Sie zum Aktivieren des Unterrichtsmodus die Taste LESSON.
2. Wählen Sie nun über die Tasten LEFT und RIGHT aus, ob Sie das Lied mit der linken oder rechten Hand
üben möchten. Wenn Sie keine Auswahl treffen wird automatisch die rechte Hand ausgewählt.
Hinweis: Die Lerninhalte der linken Hand können, abhängig vom ausgewählten Lied, unterschiedlich
sein. Bei einigen Liedern werden mit der linken Hand Akkorde geübt und bei anderen Liedern Melodien.
Während des Unterrichtsmodus werden die Melodien und Akkorde auf dem LCD-Bildschirm angezeigt,
was das Üben erleichtern soll.

DE
25
Lernmodus 1: Dauer
1. Drücken Sie die Taste LESSON, um den Lernmodus 1 zu aktivieren. Aktuell wiedergegebene Lieder wer-
den gestoppt. Der LCD-Bildschirm zeigt „Les1 R“ an. Das Gerät wird die Übungsdauer schätzen. Das
richtige Spielen der Akkorde und Noten wird in diesem Lernmodus nicht berücksichtigt.
2. Drücken Sie die Taste START/STOP, um mit dem Lernmodus 1 zu beginnen. Wenn Sie die rechte Hand
auswählen, werden die Melodien der rechten Hand angezeigt. Sie müssen lediglich die Dauer korrekt
abspielen, das richtige Spielen der Akkorde und Noten wird nicht berücksichtigt. Die Melodie ertönt
im Hintergrund. Wenn Sie die linke Hand auswählen werden die Akkorde oder Melodieteile der linken
Hand angezeigt. Sie müssen lediglich die Dauer korrekt abspielen, das richtige Spielen der Akkorde und
Noten wird nicht berücksichtigt. Wenn Sie die Tasten LEFT und RIGHT gleichzeitig drücken, kann mit
rechter und linker Hand gleichzeitig geübt werden. Das System schätzt selbst ein, wann das Üben be-
endet ist.
Lernmodus 2: Tonhöhe
1. Drücken Sie mehrfach die Taste LEARN, um Lernmodus 2 zu aktivieren. Die aktuelle Liedwiedergabe
wird unterbrochen. Der LCD-Bildschirm zeigt „Les2 R“ an. Das System schätzt die richtige Tonhöhe ein,
was bedeutet, dass Sie die richtigen Töne spielen müssen. Ein Liedabschnitt kann von vorne beginnen,
wenn falsche Noten gespielt werden. Das Lied bendet sich dann so lange im Wartemodus, bis die rich-
tigen Töne gespielt wurden.
2. Wenn Sie vor Beginn des Lieds die Taste START/STOP drücken, wird das Gerät nach dem Beenden des
Lieds eine Einschätzung abgeben.
Lernmodus 3: Spielmodus
1. Drücken Sie mehrfach die Taste LEARN, um Lernmodus 3 zu aktivieren. Die aktuelle Liedwiedergabe
wird unterbrochen. Der LCD-Bildschirm zeigt „Les3 R“ an. Das System schätzt die richtige Dauer und
Tonhöhe ein, was bedeutet, dass Sie die richtigen Töne und die Originaldauer des Lieds spielen müssen.
2. Wenn Sie vor Beginn des Lieds die Taste START/STOP drücken, wird das Gerät nach dem Beenden des
Lieds eine Einschätzung abgeben.
ANHANG
Liste der Instrumente 53
Liste der Stile 62
Liste der Lieder 65

26
DE
SPEZIELLE ENTSORGUNGSHINWEISE FÜR
VERBRAUCHER IN DEUTSCHLAND
Entsorgen Sie Ihre Altgeräte fachgerecht. Dadurch wird gewährleistet, dass die
Altgeräte umweltgerecht verwertet und negative Auswirkungen auf die Umwelt und
menschliche Gesundheit vermieden werden. Bei der Entsorgung sind folgende Regeln
zu beachten:
• Jeder Verbraucher ist gesetzlich verpichtet, Elektro- und
Elektronikaltgeräte (Altgeräte) sowie Batterien und Akkus getrennt
vom Hausmüll zu entsorgen. Sie erkennen die entsprechenden
Altgeräte durch folgendes Symbol der durchgestrichene Mülltonne
(WEEE-Symbol).
• Sie haben Altbatterien und Altakkumulatoren, die nicht vom Altgerät umschlossen
sind, sowie Lampen, die zerstörungsfrei aus dem Altgerät entnommen werden
können, vor der Abgabe an einer Entsorgungsstelle vom Altgerät zerstörungsfrei zu
trennen.
• Bestimmte Lampen und Leuchtmittel fallen ebenso unter das Elektro- und
Elektronikgesetz und sind dementsprechend wie Altgeräte zu behandeln.
Ausgenommen sind Glühbirnen und Halogenlampen. Entsorgen Sie Glühbirnen
und Halogenlampen bitte über den Hausmüll, sofern sie nicht das WEEE-Symbol
tragen.
• Jeder Verbraucher ist für das Löschen von personenbezogenen Daten auf dem
Elektro- bzw. Elektronikgerät selbst verantwortlich.
Rücknahmepicht der Vertreiber
Vertreiber mit einer Verkaufsäche für Elektro- und Elektronikgeräte von mindestens 400
Quadratmetern sowie Vertreiber von Lebensmitteln mit einer Gesamtverkaufsäche von
mindestens 800 Quadratmetern, die mehrmals im Kalenderjahr oder dauerhaft Elektro-
und Elektronikgeräte anbieten und auf dem Markt bereitstellen, sind verpichtet,
1. bei der Abgabe eines neuen Elektro- oder Elektronikgerätes an einen Endnutzer ein
Altgerät des Endnutzers der gleichen Geräteart, das im Wesentlichen die gleichen
Funktionen wie das neue Gerät erfüllt, am Ort der Abgabe oder in unmittelbarer
Nähe hierzu unentgeltlich zurückzunehmen und
2. auf Verlangen des Endnutzers Altgeräte, die in keiner äußeren Abmessung größer
als 25 Zentimeter sind, im Einzelhandelsgeschäft oder in unmittelbarer Nähe hierzu
unentgeltlich zurückzunehmen; die Rücknahme darf nicht an den Kauf eines Elektro-
oder Elektronikgerätes geknüpft werden und ist auf drei Altgeräte pro Geräteart
beschränkt.

27
DE
• Bei einem Vertrieb unter Verwendung von Fernkommunikationsmitteln ist die
unentgeltliche Abholung am Ort der Abgabe auf Elektro- und Elektronikgeräte der
Kategorien 1, 2 und 4 gemäß § 2 Abs. 1 ElektroG, nämlich „Wärmeüberträger“,
„Bildschirmgeräte“ (Oberäche von mehr als 100 cm²) oder „Großgeräte“
(letztere mit mindestens einer äußeren Abmessung über 50 Zentimeter)
beschränkt. Für andere Elektro- und Elektronikgeräte (Kategorien 3, 5, 6) ist eine
Rückgabemöglichkeit in zumutbarer Entfernung zum jeweiligen Endnutzer zu
gewährleisten.
• Altgeräte dürfen kostenlos auf dem lokalen Wertstoffhof oder in folgenden
Sammelstellen in Ihrer Nähe abgegeben werden: www.take-e-back.de
• Für Elektro- und Elektronikgeräte der Kategorien 1, 2 und 4 bieten wir auch die
Möglichkeit einer unentgeltlichen Abholung am Ort der Abgabe. Beim Kauf eines
Neugeräts haben Sie die Möglichkeit, eine Altgerätabholung über die Webseite
auszuwählen.
• Batterien können überall dort kostenfrei zurückgegeben werden, wo sie verkauft
werden (z. B. Super-, Bau-, Drogeriemarkt). Auch Wertstoff- und Recyclinghöfe
nehmen Batterien zurück. Sie können Batterien auch per Post an uns zurücksenden.
Altbatterien in haushaltsüblichen Mengen können Sie direkt bei uns von Montag bis
Freitag zwischen 07:30 und 15:30 Uhr unter der folgenden Adresse unentgeltlich
zurückgeben:
Chal-Tec GmbH
Member of Berlin Brands Group
Handwerkerstr. 11
15366 Dahlwitz-Hoppegarten
Deutschland
• Wichtig zu beachten ist, dass Lithiumbatterien aus Sicherheitsgründen vor der
Rückgabe gegen Kurzschluss gesichert werden müssen (z. B. durch Abkleben der
Pole).
• Finden sich unter der durchgestrichenen Mülltonne auf der Batterie zusätzlich die
Zeichen Cd, Hg oder Pb ist das ein Hinweis darauf, dass die Batterie gefährliche
Schadstoffe enthält. (»Cd« steht für Cadmium, »Pb« für Blei und »Hg« für
Quecksilber).
Hinweis zur Abfallvermeidung
Indem Sie die Lebensdauer Ihrer Altgeräte verlängern, tragen Sie dazu bei, Ressourcen
efzient zu nutzen und zusätzlichen Müll zu vermeiden. Die Lebensdauer Ihrer Altgeräte
können Sie verlängern, indem Sie defekte Altgeräte reparieren lassen. Wenn sich
Ihr Altgerät in gutem Zustand bendet, könnten Sie es spenden, verschenken oder
verkaufen.
DE
28
HINWEISE ZUR ENTSORGUNG
Wenn es in Ihrem Land eine gesetzliche Regelung zur
Entsorgung von elektrischen und elektronischen Geräten
gibt, weist dieses Symbol auf dem Produkt oder auf der
Verpackung darauf hin, dass dieses Produkt nicht im
Hausmüll entsorgt werden darf. Stattdessen muss es zu
einer Sammelstelle für das Recycling von elektrischen
und elektronischen Geräten gebracht werden. Durch
regelkonforme Entsorgung schützen Sie die Umwelt und die
Gesundheit Ihrer Mitmenschen vor negativen Konsequenzen.
Informationen zum Recycling und zur Entsorgung dieses
Produkts, erhalten Sie von Ihrer örtlichen Verwaltung oder
Ihrem Hausmüllentsorgungsdienst.
Dieses Produkt enthält Batterien. Wenn es in Ihrem Land
eine gesetzliche Regelung zur Entsorgung von Batterien
gibt, dürfen die Batterien nicht im Hausmüll entsorgt werden.
Informieren Sie sich über die örtlichen Bestimmungen zur
Entsorgung von Batterien. Durch regelkonforme Entsorgung
schützen Sie die Umwelt und die Gesundheit Ihrer
Mitmenschen vor negativen Konsequenzen.
HERSTELLER & IMPORTEUR (UK)
Hersteller:
Chal-Tec GmbH, Wallstraße 16, 10179 Berlin, Deutschland.
Importeur für Großbritannien:
Berlin Brands Group UK Limited
PO Box 42
272 Kensington High Street
London, W8 6ND
United Kingdom

EN
29
Dear Customer,
Congratulations on purchasing this equipment. Please read this manual carefully
and take care of the following hints to avoid damages. Any failure caused by
ignoring the items and cautions mentioned in the instruction manual are not
covered by our warranty and any liability. Scan the QR code to get access to the
latest user manual and other information about the product.
CONTENTS
Technical Data 30
Safety Instructions 31
Panel Control and Display Illustration 32
Installation 35
Getting Stated & Operation 37
Accompaniments 41
Function Menu 45
Appendix 52
Disposal Considerations 53
Manufacturer & Importer (UK) 53
EN
30
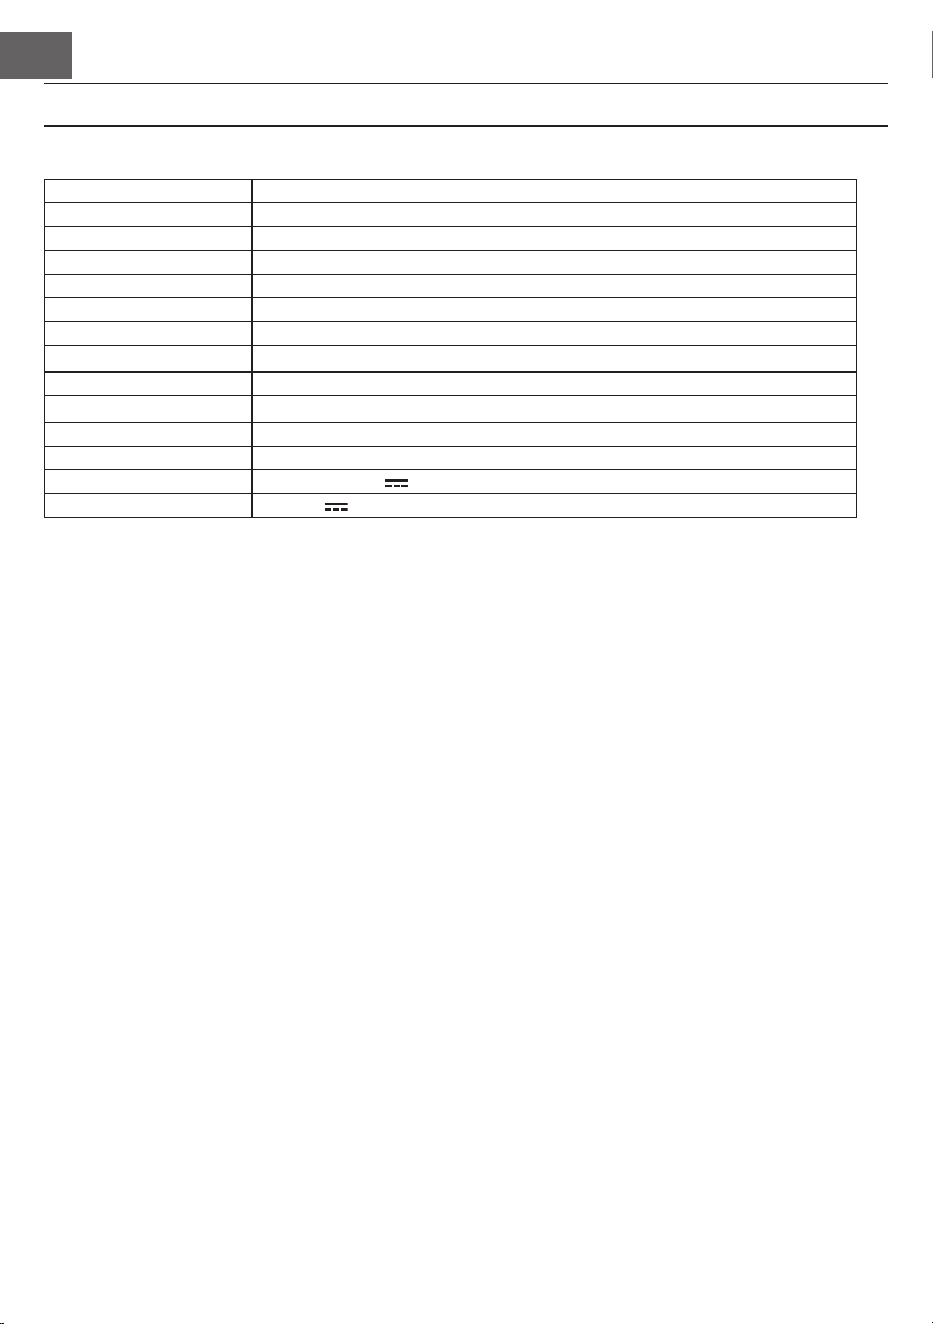
TECHNICAL DATA
Item number 10035596, 10035847
Keyboard 88-key standard keyboard with touch response
Display LED
Voice 360 kinds of voices
Style 160 styles
Demo 80 demo songs
Effect control Touch, reverb, chorus, dual, split, function menu, sound console
Record Single track, multi tracks, combined record
Accompaniment control Accompaniment volume, transpose control, MP3 function
Chord control ABC, auto akkord
Pedal Soft pedal, sustain pedal
External function USB (MP3), USB (MIDI), MIDI IN/OUT
Power adapter 220 V~, 12-15 V
Power input 12-15 V , 2-3 A

EN
31
SAFETY INSTRUCTIONS
• Read the operating instructions carefully before using the appliance to avoid damage to property and/
or personal injury.
• Only connect the unit to a mains socket using the mains power adapter supplied. The use of other mains
adapters could damage your unit.
• Do not open the casing of the instrument under any circumstances.
• Do not attempt to disassemble the unit or replace any parts inside the unit yourself. If any malfunction
occurs during use, stop using the unit and contact the service centre.
• Do not place the unit where it will be exposed to extreme dust, vibration, low or high temperatures (such
as places exposed to direct sunlight, near heat sources, in a car when it is parked in the sun, etc.), as this
may damage both the external appearance and the internal components of the unit.
• Never place the appliance on unstable or uneven surfaces, as this could cause it to fall over or be damaged.
• Never place containers lled with liquids on top of the appliance, as they may fall over and spill into the
interior of the appliance.
• Before switching on the unit, turn the volume down to 0. Then adjust the volume gradually to avoid
damaging the speakers.
• Never turn the volume up to "maximum" to prevent hearing loss from playing.
• Never use extreme force against the unit, the play buttons, the power button and the connectors, nor
place heavy objects on the unit.
• The unit must be unpacked by an adult as the packaging materials may pose a choking hazard to babies
and young children. Store the plastic packaging in a safe place or dispose of it properly.
• The small components inside may pose a danger to children under 3 years of age and are not suitable for
them.
• The technical characteristics of the unit are subject to change without notice.
• This unit can be used in all climates except tropical climates.
• The unit can only be used in areas that are below 2000 metres above sea level.
• Do not allow water drops or splashes to get on the power plug or power cord.

EN
32
1 POWER button
Open/Close power
2 MASTER VOLUME button
Adjust volume size
3 LESSON button
Enter into learning mode
4 DSP button
Open/Close DSP
5 Tempo ∨/ ∧] button
Adjust present tempo
6 Accompaniment volume ∨/ ∧
Adjust accompaniment volume
7 SOUND CONSOLE button
Enter into sound console menu
8 FUNCTION MENU button
Enter into function menu
9 LEFT button
Choose left hand voice part of learning songs
10 DUAL button
Open or close dual voice function
11 RIGHTbutton
Choose right hand voice part of learning songs
12 LOWER button
Open/Close Lower
In the song mode
13 Set the beginning and ending position of song
paragraph loop
14 Pause to play or continue to play the songs
15 To play songs fast backward
16 To play songs fast forward
17 Start or stop to play the songs
In style mode
13 START/STOP Start or stop to play
accompaniment
14 SYNC – Open/Close sync function
15 FILL IN A – Fill in variation A
16 FILL IN B – Fill in variation B
17 INTRO/ENDING – Play the intro/ending of
auto
18 PIANO – Start the record function
19 METRONOME – Open or Close metronome
20 A.B.C.
Switch to chord selection mode.
21 TOUCH button
Choose keyboard touch curve
22 LCD display screen
Display all important setting information
about this equipment
PANEL CONTROL AND DISPLAY ILLUSTRATION
Left control panel
EN
33
Right control panel
LCD
1 Digital code display area
2 Characters display area
3 Volume
4 Voice selection
5 Style selection
6 Songs
7 Tempo
8 Reverb
9 Chorus
10 Dual voice
11 Keyboard split
12 Chord display area
13 Metronome
14 FILL IN A/FILL IN A
15 Record/Play
16 Touch
17 State memory
18 Staff display area
23 Data wheel: Adjust the value.
24 VOICE: Switch to voice function state
25 Number/+: Adjust parameters
26 REC button: Start the record function
27 TRACK1 button: Choose track 1 in record
28 TRACK2 button: Choose Track 2 in record
29 TRACK3 button: Choose Track 3 in record
30 PLAY/PAUSE: Play/ Pause MP3
31 STYLE button: Switch to style function state
32 Song
Switch to song function state
33 STORE
Register the current panel settings.
34 M1
To tune out panel setting1 promptly
35 M2
To tune out panel setting2 promptly
36 BANK
Switch memory bank
37 SONG ∨/VOLUME ∨
Switch to previous song MP3
Press this button longer time to reduce MP3
play volume
38 SONG ∧/VOLUME ∧
Switch to next song MP3
Press this button longer time to increase
MP3 play volume
EN
34
Back panel
39 External power jack: Connect to external power adaptor 40.USB(MP3) equipment jack
40 Connect USB equipment
41 Audio out jack:: Connect to external audio equipment
42 Pedal input jack: Connect to pedal
43 MIDI IN jack: Receiving MIDI information that was sent out by external MIDI equipment or computer
44 MIDI OUT jack: Sending data of this piano to computer or MIDI equipment by this jack
45 USB(MIDI) jack.
EN
35
INSTALLATION
Assembly parts
Piano body assembly
1. Using 1 pcs of plum-blossom M6 screw to x on the plastic pedal box
2. Press 10 pcs of nuts into the corresponding holes of left & right stand board, left & right stand pillars
and connection board
3. Using 6 pcs of TM6*50 screws to connect left & right stand board and left & right stand pillars with the
2 pcs of fallen feet.
4. Using 4 pcs of TM6*50 screws to connect left & right stand board with connection board through 4 pcs
of M6 screw caps separately, then close the caps.
5. Using 4 pcs of TM6*50 screws to connect stand board and pedal box through 4 pcs of M6 screw caps
separately , then close the caps.
6. Put the piano body on the piano stand, and then x it with 6 pcs of TM6*20 screws.
7. Plug the MIDI pedal connection line into the sustainjack on the back of piano.

EN
36

EN
37
GETTING STATED & OPERATION
Power supply
1. Please make sure that this instrument is at off state before
connecting power.
2. Connect power adaptor to the DC jack of this instrument.
3. Insert plugs of power adaptor into AC power socket.
4. Pressing down [power] button, LCD screen displays “Load-
ing.” Indicating that this piano has been opened.
Notice For safety purpose, please cut off the power of this
instrument when you don‘t use it or suffer thunderstorm
weather.
Connect headphone
• You can insert stereo headphone into phone jack of this pi-
ano when you need exercise alone or play it late at night .
• The speakers of this instrument will cut off automatically af-
ter headphone was entered into phone jack, the sound can
only be heard from headphone, You can play as much as you
can, you aren’t afraid to disturb others.
Notice: Please avoid using headphone for long time high
volume, or else, it will cause human ear fatigue, moreover,
hearing damage.
Connect audio equipment
• Connecting this piao with external acoustics equipment,
better music effect can be got. The audio out jack in rear
panel can be used to connect to keyboard volume amplier,
Stereo acoustics systems, Sound console, Recorder or oth-
er equipment Using audio line to connect audio equipment
to audio out jack of rear panel, Connecting another end to
audio input jack of other equipment.
Note: Before connecting other equipment, please make
sure that the power of all equipment had been closed,
moreover, please make sure that volume setting of every
parts had been adjusted to lowest value before opening
power of equipment at the same time.
Connect to a computer
• This piano supplies one USB jack. It can be connected to per-
sonal computer. You only need one USB line, one end was
inserted into USB jack of this piano, other end was inserted
EN
38
into USB port of computer, it can transfer information with
computer in both direction Such as you can store the music
that you had played on this piano to the computer, you also
can play MIDI document of your computer by this piano as
well.
Note: The USB audio equipment cannot be set for input
and output at the same time when you do the setting of
the computer software or else the sound will be overlap-
ping when you play the keys.
Connect to other equipment
• Connecting MIDI IN of this instrument to MIDI OUT of oth-
er equipment, you can use this instrument as sound source.
• Connecting MIDI OUT of this instrument to MIDI IN of
other equipment, you can use this instrument as MIDI con-
troller.
Connect pedal
Three pedals group parts was connected to SUSPEDAL jack of
rear panel of piano, then, this piano can own three different func-
tion pedal: Soft Pedal, Sustain Pedal:
1. Soft Pedal
The soft pedal was stepped on, the played notes will occur
pianissimo effect.
2. Sostenuto Pedal
After this pedal was stepped on the play
3. Sustain Pedal
The sustain pedal was stepped on, playing notes will occur
sustain effect, before this pedal was stepped on.
Connect USB equipment
• The piano support to connect largest 32G USB equipment,
such as U plate etc.
• The MP3 les in USB equipment can be played.
Note: Do not not pull out USB equipment in playing
process, or else it will cause mistake or USB equipment
damage.
EN
39
Power switch
1. Firstly, Please make sure that the power had been connected correctly.
2. Press down Power button, LCD display screen will become lighter, displaying
boot screen, indicating that the piano had been opened.
Note: If the LCD screen has not been lit when you pressed down POWER
button, please check that whether the power was connected correctly.
Adjust the volume
Rotate Master Volumeknob to the right after the piano was opened. The overall
volume will become higher from lower. Rotate Master Volume knob to the left, the
overall volume will become smaller from larger.You can adjust the volume based on
your requirement.
Play various kinds of instruments voice
• This piano has built-in hundreds kinds of vivid voice, including the timbre of
chinese folk music, percussion tone etc.
• The detailed information, please see voice list.We also supply the effect
function that it is relative to voice for your better playing voice.
Choose and play voice (Master voice)
1. Pressing the TONE button, The voice selection mode can be entered into,
the reminding mark “R1”lights in LCD at the same time, moreover, the
present voice name and no. display as well.
2. Using number button and +/- button to choose the voice that you need.
3. To play keys to start play and appreciate wonderful voice.
To change voice selection sourcing you can press Voice button again and
again if you had opened dual voice function. The corresponding R1/R2/L
cursor will switch to light to display in LCD display screen.
Play two kinds of voice Dual voice
This piano has a dual voice function. The casual two kinds of voice can be superposed
and sounded at the same time by this function, The new voice effect will occur to
enrich the layers of music. It seems that two kinds of instruments play at the same
time. The voice will be st “R1”voice before the dual voice function was started, The
chosen voice will be second “R2”after dual voice function had been started.
1. Pressing Dual voice button to open dual voice function, The “R2”mark lights
in LCD, the present dual voice name and No. Display as well at the same time.
2. To choose the dual voice that you want to play by number buttons and
+/-buttons.

EN
40
3. The voice effect that was superposed by two kinds of different voices can
be heared when you play the keyboard, it seems that two kinds of instru-
ments are playing at the same time.
4. Press Dual voice button again, the dual voice effect can be closed,
“R2”cursor goes out in LCD, LCD display screen recovers previous state.
.When the music range of keyboard was divided, Only the keyboard in right
hand area has dual voice function, the keyboard in left hand area doesn’t
have this function.
Lower
The lower function splits the keyboard into two independent sections by the key
split point and each section has different voice. The left section voice is lower voice,
and the key split point can be set on any key as required.
1. Pressing the LOWER button to start lower function. The LCD displays the
current lower voice name and number, and the indication "L" and "SPLIT".
2. You can use the data dial, number button or [+]/[-]button to select the
lower voice you want to play.
3. Play the keyboard in different sections, and you will hear two different
voices.
4. Press LOWER button again will turn lower function off, "L" will goes out on
LCD, LCD display screen recovers previous state.
Keysplit: The position to split master voice or double voice from lower voice
in keyboard is called "KEYSPLIT". The default setting for the keysplit is F#3
(34).
You can also set the keysplit anywhere else on the keyboard, as described in the
function menu Settings section for details.
Touch Response
The keyboard of this piano has touch response function, It can help to enrich per-
formance expression.It can reect the touch that you had used to every notes cor-
rectly, It seems that you are playing real instrument.This piano has three pcs touch
curves for choosing.
1. Press Touch button to enter into touch function choosing state.The touch
curve no.of present keyboard displays in LCD screen temporarily , The de-
fault touch curve is second one in Boot-Up State, there are three pcs touch
curves in total(001-003).
2. Choose touch curve In the state of touch curve that displays in LCD screen
temporarily, you can choose different touch curves by press Touch button
continuously.
3. Close touch response
4. The present touch displays “OFF” in LCD, The relative “Touch” state mark
goes out in LCD, it indicates that present keyboard is without touch re-
sponse state.
EN
41
Piano performance mode
This piano designs this function specially,you can tune out piano tone of full key-
board promptly in other state.
1. Pressing the PIANO button,the piano performance mode can be entered
into or exited directly.
2. Choosing and starting style in piano performance mode. The accompani-
ment control can be operated same other mode,but style only play percus-
sion music part,there is no harmony accompaniment part.
Note: The sound console function and function menu can be entered into in
piano performance mode. The chord function will be closed automatically
after the piano performance mode was entered into.
Metronome
If you are afraid that you are’t sure about beat when you are practing music or
recording,you can get special metronome reminder by metronome function.
1. Open Metronome
2. Pressing Metronome button to open metronome function, beat sounds,
Pressing Metronome button again to close metronome function.
3. Metronome style setting
4. Please jump to beat type setting in funtion menu to see setting method.
Notes:
• If the metronome was opened in style playing process,the beat sound will
be responsed to at the beginning of next beat, the beat point will change fol-
lowed styles.
• If the metronome was opened stly,then,play style,this piano will adjust met-
ronome automatically at the same time that the rst beat of style sounded
to make it match with styles.
• The metronome can be opened in recording,but the sound of metronome
wasn’t stored as recorded data.
ACCOMPANIMENTS
Playing various kinds of style accompaniments
Using auto accompaniment function,you play piano alone and you can enjoy the
accompaniment effect of whole band,moreover, the Orchestra,you only need to
start the different styles of accompaniment that you had choosed and use left hand
to play suitable chord,the music will go ahead all the time.
This instrument has built in various kinds of auto accompaniment (The detailed
information,please see style appendix list),you can choose your favorite

EN
42
accompaniment style and enjoy the pleasure that accompaniments bring to you as much as you can.
Play auto accompaniment (Only play percussion music voice part).
1. Pressing Style button to enter into style mode. The top-left “STYLE”reminder marking lights in LCD and
displays present style name and seria no.at the same time.
2. Choose style: You can choose the styles you need by number buttons or +/-buttons.
3. Start style: he percussion music part of style can be played immediately by pressing Start/Stop
button,you also can press Sync button to make the style to be in sync stat. .The beat point shines in LCD
at the same time, then, play any keys to start style perucussion music performance.
Play auto accompaniment (all tracks)
1. Start the automatic bass chord accompaniment: A.B.C.Press the [A.B.C.] button for the rst time to
enter auto bass chord mode. The keyboard is splitted into two sections. Left hand section is chord
detect section. The LCD will show the indication of A.B.C. temporarily. Then pressing any key in chord
detect section (Sync Start status) you will hear the fantastic accompaniment. Press the [A.B.C. l button
for the second time to enter FULL RANGE mode. The LCD will show the indication of Full Ran. At this
time, the whole keyboard is chord detect section.
2. Start A.B.C. accompaniment
3. You can press [Sync] button, and then play a chord in the chord detect section to start accompaniment
of A.B.C. When you change a chord, the accompaniment automatically changes. You also can press
[Start/Stop] button to start auto accompaniment of rhythm track, then play a chord in chord detect
section. It will start auto accompaniment of all track.
Accompaniment Paragraphs
The auto accompaniment itself of this piano contains many kinds of different accompaniment paragraphs,it
is convenient that you arrange your own accompaniments in various kinds of ways.These paragraphs
including:Main play(A B) FILL IN(1 2) Intro Ending. When you play accompaniment,you can make more profes-
sional performance effect easily by simple switch of these paragraphs.
1. Intro part: Intro is suitable for the beginning of one music,when the intro was played over,the accompa-
niment will enter into preset main play part.The length of intro will be different based on the difference
of chosen style type.
2. Main play part: Main play is suitable to the main part of one song,the main play will loop play all the time
before you had pressed other style control button.
3. FILL IN PART: It can produce various kinds of rich change for songs by FILLING IN paragraph 1 or 2,It
enables your performance to be more proffessional.The accompaniment will switch to relative main
play part automatically when FILL IN paragraphes had been played over.
4. Ending sound part: Ending sound is suitable to the ending of one song,The song will stop immediately
when the ending sound was played over,the length of ending is relative to chosen styles.
Note: Holding one of FILL IN1,FILL IN2 button when the accompaniment are going on,the variation will be loop lled
in ,until releasing this button to enter into relative main play part. Pressing FILL IN button will change initial default
main play paragraph in the state that the accompaniment has stopped,LCD display screen will display relative marking.
Play different accompaniment paragraphs

EN
43
1. Pressing STYLE button,the styles can be selected by pressing +/- button,numbers buttons at this time.
2. Pressing AUTO CHORD button to enter into auto bass chord mode.
3. Pressing SYNC button to open sync start function.
4. Pressing FILL IN 1 to choose main play 1.
5. Pressing INTRO/ENDING button,FILL IN -”NOR” marking continue to shine in LCD,the style is in play
preparation state at this time.
6. The auto accompaniment will start immediately when you pressed one chord in left hand area of key-
board. The accompaniment will switch to relative main play part when intro part was played over.
7. Pressing FILL IN 2 button,one small paragraph of variation will be lled in the accompaniment that are
playing at this time. The accompaniment will switch to relative main play 2 automatically when the vari-
ation was played over.
8. Pressing INTRO/ENDING button,the accompaniment will enter into ending part at this time,the
auto accompaniment will be stopped when the ending was played over.
Accompaniment volume control
The accompaniment volume is used for adjusting the overall volume of auto accompaniment.This function can
get balance between auto accompaniment part and the volume of keyboard tone.
1. Pressing ACCOMP VOLUME ∧/∨ the LCD display screen. will displays present accompaniment volume
size temporarily, the accompaniment volume size can be adjusted by pressing ACCOMPANIMENT
VOLUME ∧/ACCOMPANIMENT VOLUME again at this time. Adjustment range: 0–127.
2. Pressing ACCOMPANIMENT VOLUME and ACCOMPANIMENT VOLUME buttons at the same time,
the accompaniment volume can be closed. LCD display screen displays“Accompaniment volume OFF.
The accompaniment volume can be opened by pressing ACCOMPANIMENT VOLUME and ACCOMPA-
NIMENT VOLUME buttons OFF Accomp again at the same time.
Tempo
Every style has different best tempo value,you can change tempo value based on your hobby and songs require-
ment.
1. The initial default tempo value can be changed by Tempo ∨ /Tempo ∧ button.
2. The tempo can recover initial default value by pressing Tempo ∨ /Tempo ∧ buttons at the same time.
Note: The tempo will be setted for the preset value of present style automatically if you choose style when
the styles stopped,The tempo will keep same if you switch style when the style are playing.
DSP
DSP is a sound eld localization technology that imitates sound in real environment. Use this function will
enable you to hear more open and full performance.
1. The DSP effect is automatically turned on when starting up, and the "REVERB" and "CHORUS" mark
lights on LCD.
2. Pressing [DSP] button to turn DSP effect on or off.
Note: In the process of rhythm or song playing, switching on/off the DSP may cause a short pause or noise,
which is a normal caused by switching effect switches.
EN
44
Sound console
The played volume of every tracks can be controlled solely by sound console function.
1. Pressing the SOUND CONSOLE button to enter into sound console function menu.LCD will display
corresponding value temporarily.The st time to enter into the sound console menu when the power
is on, The rst option is "Percussion music track volume"of sound console menu.The option that was
entered into again later is same as the option that exited from last time.
2. Pressing the SOUND CONSOLE button again and again to choose the track item that you want to do
the setting,then,pressing [-] / [ + l buttons to set parameters.
Concrete function items and parameters range are as following list:
Adjustment content LCD display Adjustment range
Percussion music track volume XXX Rhythm 0 - 127
Bass track volume XXX Bass 0 - 127
Harmony track volume XXX Chord 0 - 127
Phrase track volume XXX Phrase 0 - 127
Left hand track volume XXX Lower 0 - 127
Right hand track volume XXX Upper 0 - 127
Note: lf there is no any setting operation in 5 seconds in sound console setting state.the sound console
function state wil exit automatically
EN
45
FUNCTION MENU
Pressing[FUNCTION MENU]button to enter into function menu, LCD displays present function menu option
temporarily,to set the parameters of present menu by pressing [-] / [ +] buttons..
Nr. Inhalt LCD-Anzeige Anpassungsbereich voreinge-
stellter Wert
1 Melodie Tune -50 - +50 000
2 Tastaturteilung Keyboard split 1 – 88 034
3 Takt Beat type 0, 2 – 9 004
4 Metronomlautstärke Metronome volume 0 – 127 080
5 Halltiefe Reverb depth 0 – 127 050t
6 Chortiefe Chorus depth 0 – 127 000
7 MIDI Empfand MIDI Receiving 1 – 16, ALL ALL
8 MIDI Sendung MIDI Sending 1 – 16 001
Note: If there is no any setting operation in 5 seconds in function menu setting state.the function menu
state will exit automatically.
Tune setting
This function is used to adjust pitch detailedly.
1. Pressing the FUNCTIN MENU button to select tune menu. LCD displays "xxx Tune"temporarily, You
can press [+]/[-]buttons to adjust pitch.the largest adjustment range is ±50, it is to rise or reduce one
half-tone.
2. Pressing [ +] and [-] buttons at the same time.the pitch will recover to presetting value: 000.This
parameter adjustment is valid for keyboard and styles.
Keyboard split setting
The position to split auto bass chord area and right hand area in keyboard is called "KEYBOARD SPLIT POINT".
The keyboard in left hand area are used for controlling auto bass chord accompaniment generally when auto
bass chord function was opened.the keyboard in left hand area also can be used for playing voice.
1. Pressing[FUNCTION MENU]button to choose keyboard split point setting menu.LCD displays "xxx
KeySplit"temporarily. You can press [-]/[+]buttons to set keyboard split point at this time, you also can
play keys directly to do prompt setting. The adjustment range: 1 -88.
2. Pressing [-)and[+]buttons at the same time.the keyboard split point will recover to presetting value.
Beat type setting
1. Pressing [FUNCTIN MENU)button to choose beat type menu,LCD displays "xxx
BeatType"temporarily,You can press [-)/[+)button to choose beat type at this time,this funtion supplys
0, 2~9(total 9 kinds of beats)for your selection.
2. Pressing [-] and [ + l buttons at the same time.beat type will recover to presetting value:004.

EN
46
Metronome volume setting
1. Pressing[FUNCTION MENU+)or[FUNCTION MENU-] button to choose metronome volume setting
menu,LCD displays "xxx MetroVol" temporarily,You can press [+)/[-] button to set metronome volume
at this time,range:0~127.
2. Pressing [+land[-] buttons at the same time,metronome volume will recover to presetting value:080.
Reverb depth settinge
1. Pressing [FUNCTION MENU) button to choose reverb depth setting menu,LCD displays "xxx
Reverblev" temporarily.You can press [-)/[+]button to set reverb depth at this time.Range:0~127.
2. Pressing [-)/[+]buttons at the same time,reverb depth will recover to presetting value:050..
Chorus depth setting
1. Pressing [FUNCTION MENU) button to choose chorusdepth setting menu.LCD displays "xxx Chorus
level emporarily.You can press [-)/[+]button to set chorus depth at this time.Range:0~127.
2. Pressing [-) and [+I buttons at the same time, Chorus depth will recover to presetting value:000..
MIDI receiving setting
1. Pressing[FUNCTION MENU)button to choose MIDI receiving channel setting menu.LCD displays "xxx
Midi In" temporarily,You can press [-)/[+)button to set MIDI receiving channels at this time.Setting
range: 1 ~16,ALL.
2. Pressing [-)and [+I buttons at the same time,MIDI channel will recover to presetting value:ALL..
MIDI sending setting
1. Pressing[FUNCTION MENU)button to choose MIDI sending channel setting menu.LCD displays "xxx
Midi Out" temporarily.You can press [-)/[+)button to set MIDI sending channels at this time.Range: 1
~16
2. Pressing [-)and[+)buttons at the same time,MIDI channel will recover to presetting value:001.
Factory reset
Pressing [-]and[+]buttons when power is off,then,open the power,the system will recover to factory rest,and
delete all users'data in this piano,including:Users'songs,users'registration memory.The system will be entered
into automatically after deletion was nished,then recover to normal open state.
Panel registration memory setting
This instrument has panel registration memory function,it can be used for saving your most favorite setting as
to the setting can be tuned out easily and promptly when you need it,moreover, it can enable your performance
to be more efcient. Panel registration memory function can almost store all setting
of panel,you only need to press one button simply,the setting can be tuned out immediately.

EN
47
Save setting to storage
1. registration bank includes 2 groups storage memory state (M1-M2)
2. When you press [STORE]button,press one of [M1 ]-[M2] button at the same time,present panel can
be setted to registration memory.Please notice:This operation will cover previous stored registration
memory.
Note: Holding [STORE]and [M 1 ]buttons at the same time,open the power again,all registration memory
will all recover to factory reset state at this time.
Tune out registration memory
Pressing one of [ M 1] - [ M2] button to tune out one group
setting to replace present state.
Choose memory bank
1. Pressing [BANK]button,LCD displays memory bank serial no.temporarily.
2. Pressing [BANK]button again and again at this time,you can choose to set memory bank. Range:1-4
3. The following content can be stored in M1-M2 storage memory state
• Voice parameters:Main voice, Dual voice, Keyboard split point voice, Digital effect Sound console.
• Accompaniment parameters:Style, tempo, Auto bass chord open/close, paraghraphs selection.
• Function parameters:Touch, partial parameters in function menu.

EN
48
Record your own songs
The record function of this piano can record/replay your performance,you can appreciate your own opus by
replaying.You can record many pieces of users'songs in this piano,every song can record 3pcs tracks at most,it
is 1 pc accompaniment track and 2pcs melody tracks.
The accompaniment track was used for recording style,it is songs'accompaniment,The melody track was used
for recording playing melody.The accompaniment track and melody track can record at the same time,but,it
cann't record 2pcs melody tracks at the same time,of course,you also can only record melody or accompaniment
separately;The accompaniment track and melody track can replay at the same time. The users'song has storage
function if there is power-fail,the data cann't loss when the power is off.
Start record
You need to choose one pc user's song that will be used for storing record before the record was starting and
set record tracks.
1. Pressing [RECORD] button to enter into users'songs selection interface.The left top of LCD displays
serial no. of users'songs,The characters display area displays users' songs name,The default name is
"RecSong1 ".You can choose users'songs that need to store record by [-]/[+]buttons.
2. Pressing [RECORD]button to enter into record preparation state,"REC"marking lights in bottom part
of LCD,4pcs beat points shine at the same time in beat display area.This piano will choose one melody
track that has no data to store your record automatically. The track cursor shines in LCD ,it refers to the
present track that stored record.
3. You can choose voice, style, adjustment tempo etc.that you
want to record in record preparation state. You can press
[TRACK1] , [TRACK2] ~ [TRACK3] button to choose the
tracks that you want to record,it means that the track was
choosen when cursor shines.The accompaniment track
and melody track can record at the same time, but cannot
record 2 melody tracks at the same time.
4. To press[START/STOP]button or play piano's keys directly
to start record after the record tracks were choosed.When
the record accompaniment was choosed and the auto bass
chord accompaniment function was opened,to play one
effective chord in keyboard left hand area,the record can
be started as well.
Notes:
The style data can only be recorded in accompaniment track.
The record track cursor has three kinds of state:Shine,Light,Go out.
Shining,it means that this track has been choosed for record,if this track has already have data, the original
data will be covered if you continue to record in this track.Lighting,it means that this track has data,lt wil replay
recorded data synchronously in record process.Going out,it means that this track has no data or has data,but
has been prohibited to replay when the record was going on .The tracks state can be switched by pressing
[TRACK1] ~ [TRACK3]again and again in record preparation state.
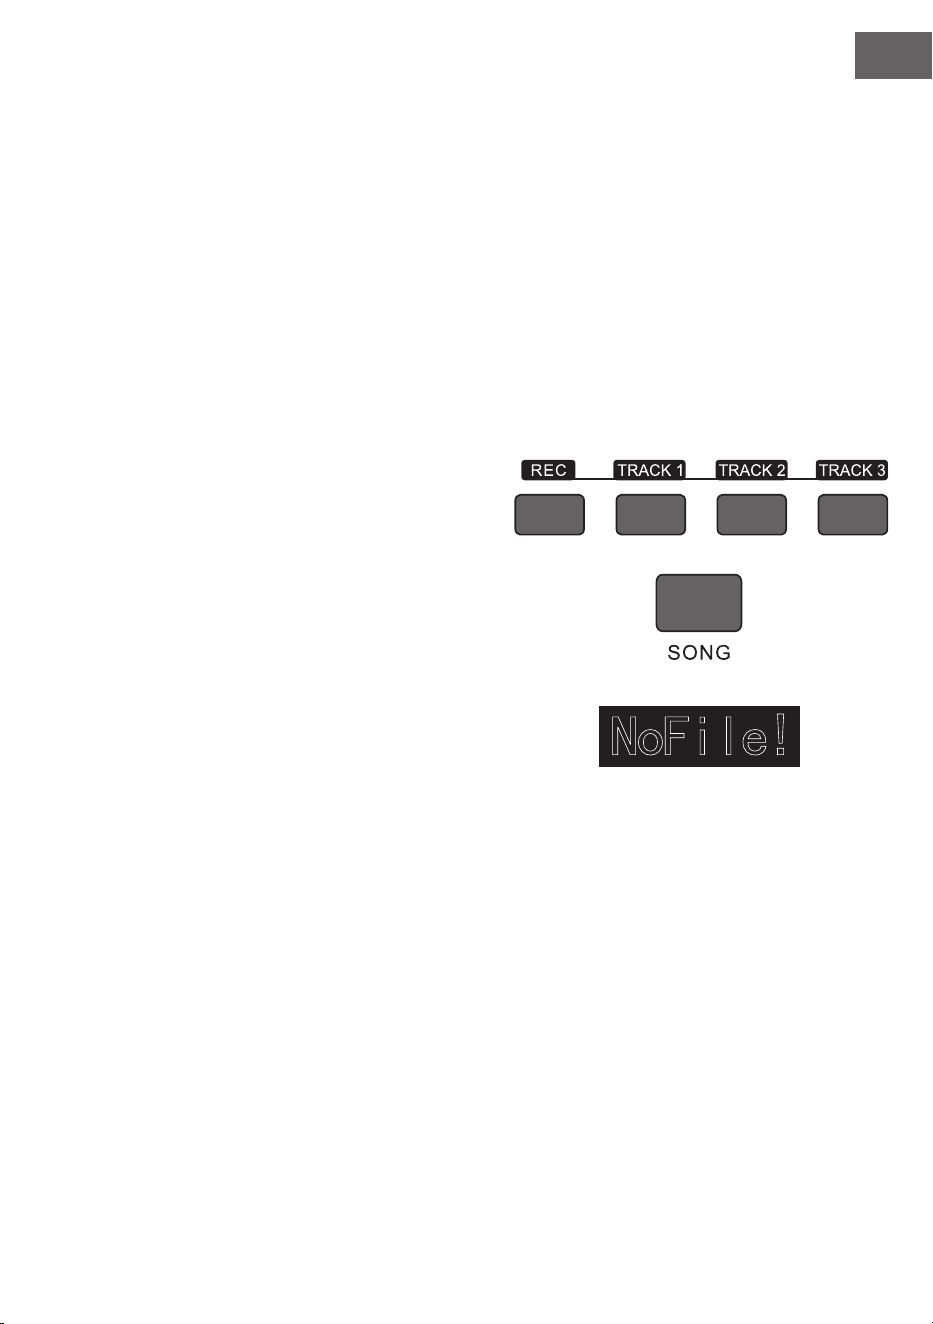
EN
49
This piano will choose one empty melody track to store record automatically (the system will choose
automatically in the order of small to large.such as:if track2 has data,then,the system will choose track3 to
store this time record)in record preparation state,if two tracks had already have data,then,it will choose track2
to store record.
Track1 : Accompaniment track
Track2/Track3: Melody track
Stop recording
1. Pressing the Start/Stop button can stop record immediately in record process,Pressing Style or Voice
selection button can enter into other function.
2. If the internal memory is full,the record will stop and store automatically in record process,“Rec_
Full”will display in LCD temporarily to remind that the internal memory has been recorded full.
3. The record will stop automatically after the style had played ending over if you had choosed record
ccompaniment.
Replay recorded songs
1. The record wil stop and enter into songs state
automatically and loop play previous recorded
users'songs immediately if theRECORD button was
pressed in record process.
2. Pressing the SONG button to enter into song state in
standby mode, all songs will loop play automatically.
The serial no.of users' songs can be selected directly
by pressing [-]/[+] buttons,such as:If there is no
recorded data in one user's songs,“NoFile!”will display
in LCD display screen ,reminding that there is no
recorded data in present les,moreover,the loop play
will stop.
3. Choosing one user's song that has data in the state
that songs has stopped. Pressing the START/STOP
button to start loop play this song.
Delete recorded songs
1. Pressing the RECORD and the SONG at the same time when the power is off,then,open the power,all
users'songs will be cleared.
2. Pressing the RECORD button for 2 seconds to enter into tracking deleting state in record preparation
state,The LCD displays “Delete?”. Pressing TRACK1, TRACK2, TRACK3 to choose the track you want
to delete in deleting state, when the cursor of one certain track lights,it indicates that the data of
this track will be deleted,when the cursor of track goes out,it indicates that the data of this track will
be kept.If the cursors of all tracks light,the data of complete song will be deleted when the deleting
operation was carried out.
3. Pressing the [+] button to carry out deleting operation after the tracks that you want to delete was
choosed,it will return to record preparation state automatically after the operation was nished,
Pressing [-] button to cancel deleting operation and return to record preparation state.
EN
50
Play and control songs
This instrument has presetting many kinds of different types
songs.Every song has learning function.(For detailed information, please see songs list).
Enjoy songs
1. Pressingthe SONG button to enter into song mode, LCD lights “SONG”marking,All songs will begin with
loop play now.
2. You can choose the songs that you want to appreciate by numbers button or [-]/[+]buttons.
3. To press START/STOP button to stop playing in the state that songs are playing,but does not exit song
state, pressing. START/STOP button again,the present song will loop play.
4. Pressing STYLE, RECORD, VOICE, DUAL VOICE, etc function buttons,the song mode can be exited
when the song has stopped playing.
Song control
1. Guiding beat function
The song will have guiding beat instructions before intro was played formally.
2. Fast forward, Fast backward, Play/Pause and stop functions of songs. )> )>)>)>
Pressing down button can speed up to play songs when songs are playing.pressing down [ .,. ] button
can return back songs.pressing down [/ ■ ]button can pause to play songs, pessing down /■
button again to continue to play songs, pressing down [ II ] button can stop playing present songs.
3. The fragment loop function of song
Pressing down button can set starting point and ending point of loop play when the song are
playing, pressing this button rst time to set loop starting point.pressing this button second time to set
loop ending point.when ending point was nished setting.the song will loop play the content between
the two points.
Pressing down button can exit loop and continue to play songs in the state of fragment loop.

EN
51
Song learning mode
The learning function of song are consist of [Lesson], [Left], [Right]these three buttons.these three buttons
are valid only in song mode.All songs can be learned by three mode:Durationlearning,Pitch learning and play
mode.
This piano can give score based on your learning situation when the learning was over,it helps you to make
progress continously in learning process.
1. Enter into song learning mode.
Pressing [Lesson]button to enter into song learning mode in the state of the song had been stopped
play.
2. Choose left hand or right hand to learn songs. The songs of this instrument can be choosed for three
different kinds of way to learn.You can choose the learning part you RIGHT need by [Left] or [Right]
buttons, if you haven't proceed with selection.the system will choose right hand learning for you
automatically.
Note: The content of left hand learning will aslo be different based on different songs type. For style
type songs, the left hand will be used for learning chords;For piano songs.the left hand will be used for
learning part melody of left hand.The MIDI type songs doesn't support left hand learning function.The
staff and chord display area in LCD will display melody or chords of songs when the songs are playing.It
is convenient for following learning.
Learning mode 1: Duration learning
1. Pressing [Lesson] button to enter into learning mode1 in the state that the songs were stopped
playing."Les1 R"will displays in LCD temporarily.The system will estimate the played duration of
learner,it doesn't estimate the correctness of notes and chords in learning mode1 ,the song plays
normally.
2. Pressing[Start/ Stop]button to begin with songs learning. If you choose right hand to learn songs, the
melody part of right hand will be concealed. The learner only needs to play correct duration.the melody
will sound in the process of song playing, it is no need to consider that the played notes are correct
or wong. If you choose left hand to learn songs.the chords of songs or left hand melody part will be
concealed, the learner only need to play correct duration.it is no need to consider that the played notes
are correct or wong, the chords or left hand melody part can sound. Pressing[Left)&[Right)buttons
at the same time, the left hand and right hand can be learned at the same time.The system will make
estimation after thelearning was over.
Learning mode2: Pitch learning
1. Pressing [Learn)button repeatly to enter into learning mode2 in the state that song has been stopped
play."Les2 R"reminder marking lights in LCD .The system only estimates the correctness of pitch of
notes that learner has played,The song can go ahead backwards when it needs learner to play correct
notes. If the pitch of played notes is wrong,the song will be in waiting state until the correct notes was
played.
2. Pressing [Start/Stop)button to begin to learn song,it will give estimation after the learning was over.

EN
52
Learning mode3: P lay mode
1. Pressing [Learn) button repeatly to enter into learning mode3 in the state that song has been stopped
play."Les3 R"reminder marking lights in LCD .The system only estimate the correctness of duration and
pitch that learner are playing comprehensively. The song plays normally,learner must play correct pitch
based on originalduration of song,then,it can be estimated correct by system
2. Pressing[Start/Stop)button to begin to learn song,it wil give estimation after the learning was over.
MP3 Play
MP3 Jack:MP3 song can play by this jack Pressing [Play/Pause) button can switch present state of songs
Pressing [SongA)button ,one song goes backward,pressing [Volumev)button for longer time,the volume will
reduce small. Pressing [Songv) button ,one song goes forward,pressing [Volume/\) button for longer time.the
volume will increase large.
APPENDIX
Voice List 52
Style List 61
Song List 64
EN
53
DISPOSAL CONSIDERATIONS
If there is a legal regulation for the disposal of electrical
and electronic devices in your country, this symbol on the
product or on the packaging indicates that this product must
not be disposed of with household waste. Instead, it must be
taken to a collection point for the recycling of electrical and
electronic equipment. By disposing of it in accordance with
the rules, you are protecting the environment and the health of
your fellow human beings from negative consequences. For
information about the recycling and disposal of this product,
please contact your local authority or your household waste
disposal service.
This product contains batteries. If there is a legal regulation
for the disposal of batteries in your country, the batteries must
not be disposed of with household waste. Find out about local
regulations for disposing of batteries. By disposing of them in
accordance with the rules, you are protecting the environment
and the health of your fellow human beings from negative
consequences.
MANUFACTURER & IMPORTER (UK)
Manufacturer:
Chal-Tec GmbH, Wallstrasse 16, 10179 Berlin, Germany.
Importer for Great Britain:
Berlin Brands Group UK Limited
PO Box 42
272 Kensington High Street
London, W8 6ND
United Kingdom


FR
55
Cher client, chère cliente,
Toutes nos félicitations pour l’acquisition de ce nouvel appareil. Lisez attentive-
ment les indications suivantes et suivez-les pour éviter d'éventuels dommages.
Nous ne saurions être tenus pour responsables des dommages dus au non-res-
pect des consignes et à la mauvaise utilisation de l’appareil. Scannez le QR-Code
pour obtenir la dernière version du mode d'emploi ainsi que d'autres informations
concernant le produit
SOMMAIRE
Consignes de sécurité 57
Touches et connexions 58
Montage 61
Mise en marche et utilisation 63
Accompagnement 67
Menu de fonctions 71
Informations sur le recyclage 78
Fabricant et importateur (UK) 78
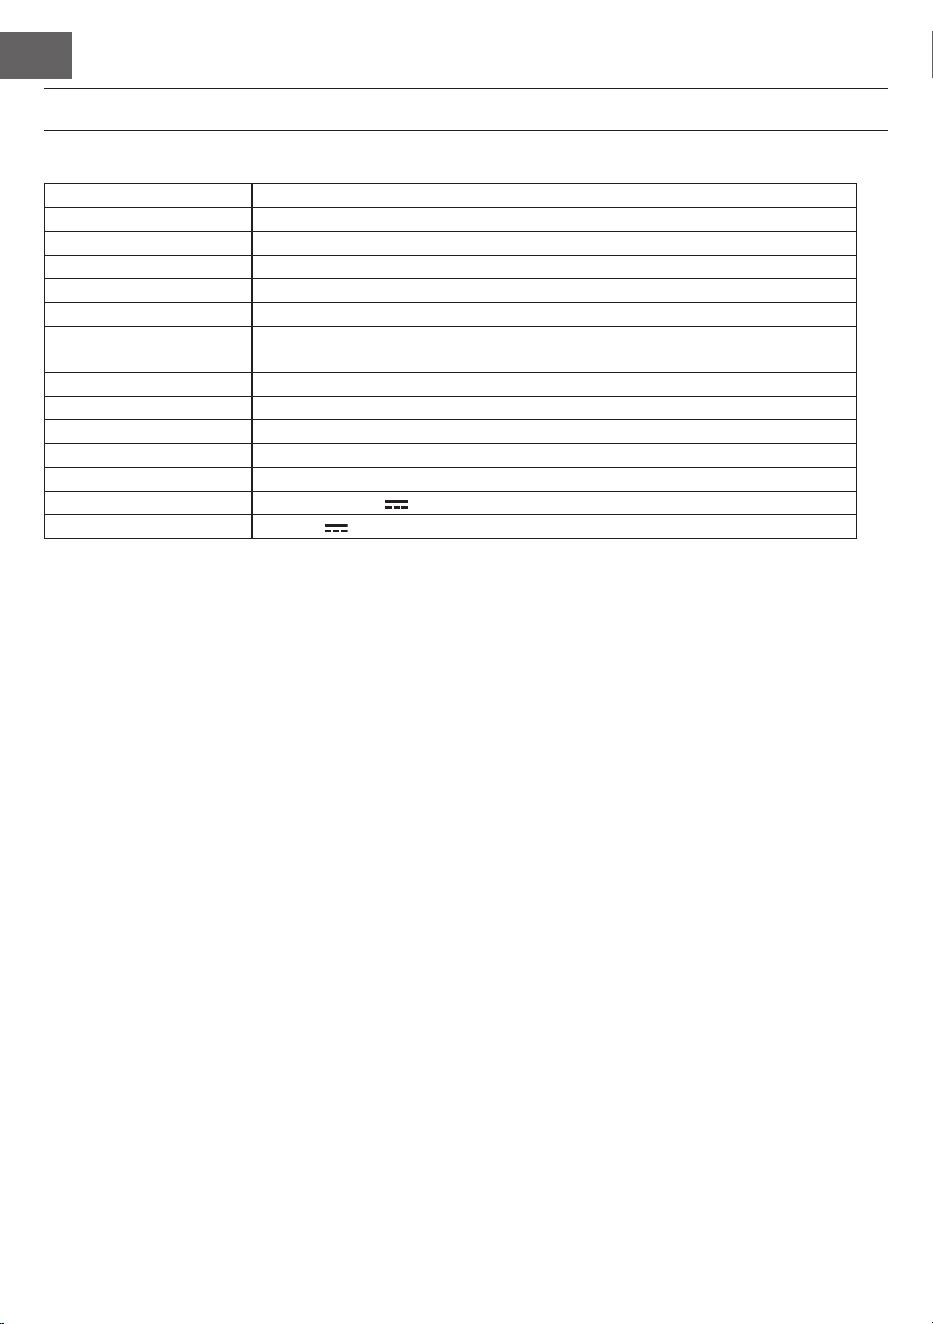
FR
56
FICHE TECHNIQUE
Numéro d'article 10035596, 10035847
Clavier 88 touches standard de piano
Afchage Afchage LED
Sons 360 instruments
Styles 160 styles
Démo 80 chansons démo
Effets Sensibilité d'attaque, réverbération, chorus, double, division, menu de fonc-
tion, console de son
Enregistrement Piste unique, plusieurs pistes, enregistrement combiné
Accompagnement Démarrage / arrêt, synchronisation, arrangement, vitesse
Accord Accord ABC auto
Pédales Pédale gauche (pédale de piano), pédale droite (pédale de maintien)
Connexions externes USB (MP3), USB (MIDI), MIDI IN/OUT
Adaptateur secteur 220 V~, 12-15 V
Tension d'entrée 12-15 V , 2-3 A

FR
57
CONSIGNES DE SÉCURITÉ
• Lisez attentivement le mode d'emploi avant d'utiliser l'appareil an d'éviter des dommages matériels et
/ ou des blessures corporelles.
• Branchez l'appareil sur une prise électrique uniquement à l'aide de l'adaptateur secteur fourni. L'utilisa-
tion d'autres adaptateurs secteur peut endommager votre appareil.
• N'ouvrez en aucun cas le boîtier de l'instrument.
• N'essayez pas de démonter l'appareil vous-même ou de remplacer vous-même des pièces à l'intérieur. En
cas de dysfonctionnements, cessez d'utiliser l'appareil et contactez le service client.
• Ne placez pas l'appareil dans des endroits soumis à une poussière extrême, à des vibrations, à des tem-
pératures basses ou élevées (tels que des endroits exposés à la lumière directe du soleil, à proximité de
sources de chaleur, dans la voiture au soleil, etc.), car cela l'apparence extérieure ainsi que les compo-
sants internes de l'appareil pourraient être endommagés.
• Ne placez jamais l'appareil sur une surface instable ou inégale car cela pourrait basculer / tomber et être
endommagé.
• Ne placez jamais de récipients remplis de liquide sur l'appareil, car ils pourraient tomber et le liquide
pourrait pénétrer à l'intérieur de l'appareil.
• Avant d'allumer l'appareil, baissez le volume à 0. Réglez ensuite progressivement le volume pour éviter
d'endommager les enceintes.
• Ne montez jamais le volume au "maximum" pour éviter une perte d'audition.
• N'exercez jamais une force extrême contre l'appareil, les boutons de jeu, le bouton d'alimentation et les
connexions, et ne placez aucun objet lourd sur l'appareil.
• L'appareil doit être déballé par un adulte car les matériaux d'emballage présentent un risque d'étouffe-
ment pour les bébés et les jeunes enfants. Conservez l'emballage en plastique dans un endroit sûr ou
éliminez-le de manière appropriée.
• Les petits composants à l'intérieur peuvent être dangereux pour les enfants de moins de 3 ans.
• Les caractéristiques techniques de l'appareil sont susceptibles d'être modiées sans préavis.
• Cet appareil peut être utilisé dans tous les climats sauf les climats tropicaux.
• L'appareil ne peut être utilisé que dans des zones situées en dessous de 2000 mètres au-dessus du niveau
de la mer.
• Veillez à ce qu'il n'y ait jamais d'eau qui s'égoutte ni d'éclaboussures sur la che d'alimentation ou le cor-
don d'alimentation.

FR
58
1 POWER - Bouton de marche/arrêt
2 MASTER VOLUME - Réglage du volume
principal
3 LESSON - Mode d'aprentissage
4 DSP - Activer / désactiver DSP
5 TEMPO ∨/∧– réglage du tempo en cours
6 ACCOMP VOLUME ∨/∧ volume de l'accompa-
gnement
7 SOUND CONSOLE – Ouvrez le menu de la
console
8 FUNCTION MENU - menu de fonctions
9 LEFT - sélectionner la partie gauche des ins-
truments en mode apprentissage
10 DUAL - Activer / désactiver la double voix
11 RIGHT - sélectionner la partie droite des
instruments en mode apprentissage
12 LOWER - sélectionnez le groupe de sons
inférieur
En mode chanson
13 Déterminer le début / n d'un couplet de
chanson
14 Touche pause
15 Retour rapide
16 Avance rapide
17 Démarrer / arrêter la lecture
Mode style
13 START/STOP démarrage / arrêt de la lecture
14 SYNC – ouverture / fermeture de la fonction
de synchronisation
15 FILL IN 1 – Insérer la variante 1
16 FILL IN 2 – Insérer la variante 2
17 START/ STOP - démarrer / arrêter la lecture
de l'accompagnement
18 PIANO - activer / désactiver le mode piano
19 METRONOME - ouvrir / fermer le métronome
20 ABC. - Choix d'accord
21 TOUCH – Sélectionnez la courbe tactile du
clavier
22 Écran LCD - afche toutes les informations
importantes
TOUCHES ET CONNEXIONS
Panneau de commande de gauche

FR
59
Panneau de commande de droite
23 Molette de sélection : valeur de consigne
24 VOICE : activer les instruments
25 Champ numérique avec +/- : réglage des
valeurs numériques
26 REC - enregistrement
27 TRACK 1 – enregistrement de la piste 1
28 TRACK 2 – enregistrement de la piste 2
29 TRACK 3 – enregistrement de la piste 3
30 PLAY/PAUSE - Lecture / Pause
31 STYLE - choix du style
32 SONG - choix du mode chanson
33 STORE - Enregistrez les paramètres actuels de
la console.
34 M1 - Charger le réglage de la console
35 M1 - Charger le réglage de la console
36 BANK - Changer de banque de mémoire
37 SONG ∨/VOLUME ∨
passer au titre MP3 suivant
Maintenez pour réduire le volume MP3.
38 SONG ∨/VOLUME ∨
passer au titre MP3 précédent
Maintenez pour augmenter le volume MP3.
Écran LCD
1 Afchage numérique
2 Afchage des notes
3 Volume
4 Choix du son
5 Choix du style
6 Chansons
7 Tempo
8 effet de réverbération
9 Chorus
10 A deux voies
11 Division du clavier
12 Afchage de l'accord
13 Tempo
14 FILL IN1/FILL IN2
15 Enregistrement / lecture
16 Attaque
17 Mémoire
18 Clef

FR
60
Dos de l'appareil
39 Alimentation externe
40 USB (TO DEVICE) - port USB
41 OUTPUT – Connexion audio pour équipement audio externe
42 PEDAL - prise de la pédale
43 prise MIDI IN – pour recevoir des informations MIDI envoyées par des équipements MIDI externes ou
des ordinateurs
44 prise MIDI OUT – pour envoyer des informations de l'appareil à un ordinateur ou à un autre appareil
MIDI
45 port USB (MIDI)

FR
61
MONTAGE
Cache plastique brun 8
14
6
10
1
8
Description Quantité
Vis TM6*50
Vis TM6*20
Vis interne
Vis à main M6
Montage du corps du clavier
1. Fixez le pédalier avec la vis à main (M6).
2. Enfoncez 10 pièces d'écrous dans les trous correspondants des plaques verticales gauche et droite, des
colonnes gauche et droite et de la plaque de raccordement
3. Utilisez 6 pièces de vis TM6 * 50 pour relier les plaques de base gauche et droite et les colonnes gauche
et droite aux 2 pièces des pieds.
4. Utilisez 4 pièces de vis TM6 * 50 pour connecter les plaques de base gauche et droite à la plaque de
connexion à l'aide de 4 pièces de capuchons à vis M6 et fermez les capuchons.
5. Connectez le support et le pédalier avec 4 vis TM6 * 50 et fermez les caches.
6. Placez le corps du piano sur le support de piano et xez-le avec 6 vis TM6 * 20.
7. Branchez le cordon d'alimentation de la pédale MIDI dans le connecteur de pédale à l'arrière du piano.

FR
62
Table de jeu
Structure
Partie latérale gauche
Partie latérale droite
Pied de support
droit
Pied de support
gauche
Colonne de droite
Colonne de
gauche
Barre de pédale
Dos appareil
Cache de connexion

FR
63
MISE EN MARCHE ET UTILISATION
Alimentation
1. Assurez-vous que l'appareil est éteint lorsque vous le bran-
chez.
2. Connectez la che de connexion de l'adaptateur secteur à la
connexion CC de l'appareil.
3. Branchez la che dans la prise.
4. Lorsque vous appuyez sur le bouton POWER, l'écran LCD
afche "Loading" pour signier que le piano a été ouvert.
Remarque : Pour votre propre sécurité, éteignez l'appareil pen-
dant les orages ou si vous ne comptez pas l'utiliser pendant une
longue période.
Branchement d'un casque
• Si vous souhaitez vous entraîner seul ou tard dans la nuit,
vous pouvez connecter un casque stéréo à la prise casque
de votre appareil.
• Les enceintes de l'instrument sont automatiquement dé-
sactivées dès que vous branchez un casque et le son n'est
joué que par le casque.
Remarque : l'utilisation à long terme d'écouteurs réglés
trop fort peut endommager votre audition.
Connexion d'accessoires audio avec l'appareil
• En connectant des accessoires audio externes, vous pouvez
obtenir de meilleurs effets musicaux.
• La prise AUDIO-OUT à l'arrière de l'appareil sert à connec-
ter des amplicateurs, des systèmes acoustiques stéréo,
des consoles de son, des appareils d'enregistrement, etc. à
l'appareil par câble.
Remarque : assurez-vous que l'appareil est éteint et que
le volume est réglé au niveau le plus bas avant de connec-
ter d'autres appareils au piano.
Branchement à un ordinateur
• Cet appareil possède un port USB.
• Vous pouvez connecter l'appareil à votre ordinateur avec
un câble USB et envoyer et recevoir des informations dans
les deux sens.
• Par exemple, vous pouvez enregistrer des morceaux que
vous avez joués sur le piano sur votre ordinateur ou lire des
documents MIDI depuis votre ordinateur sur l'appareil.
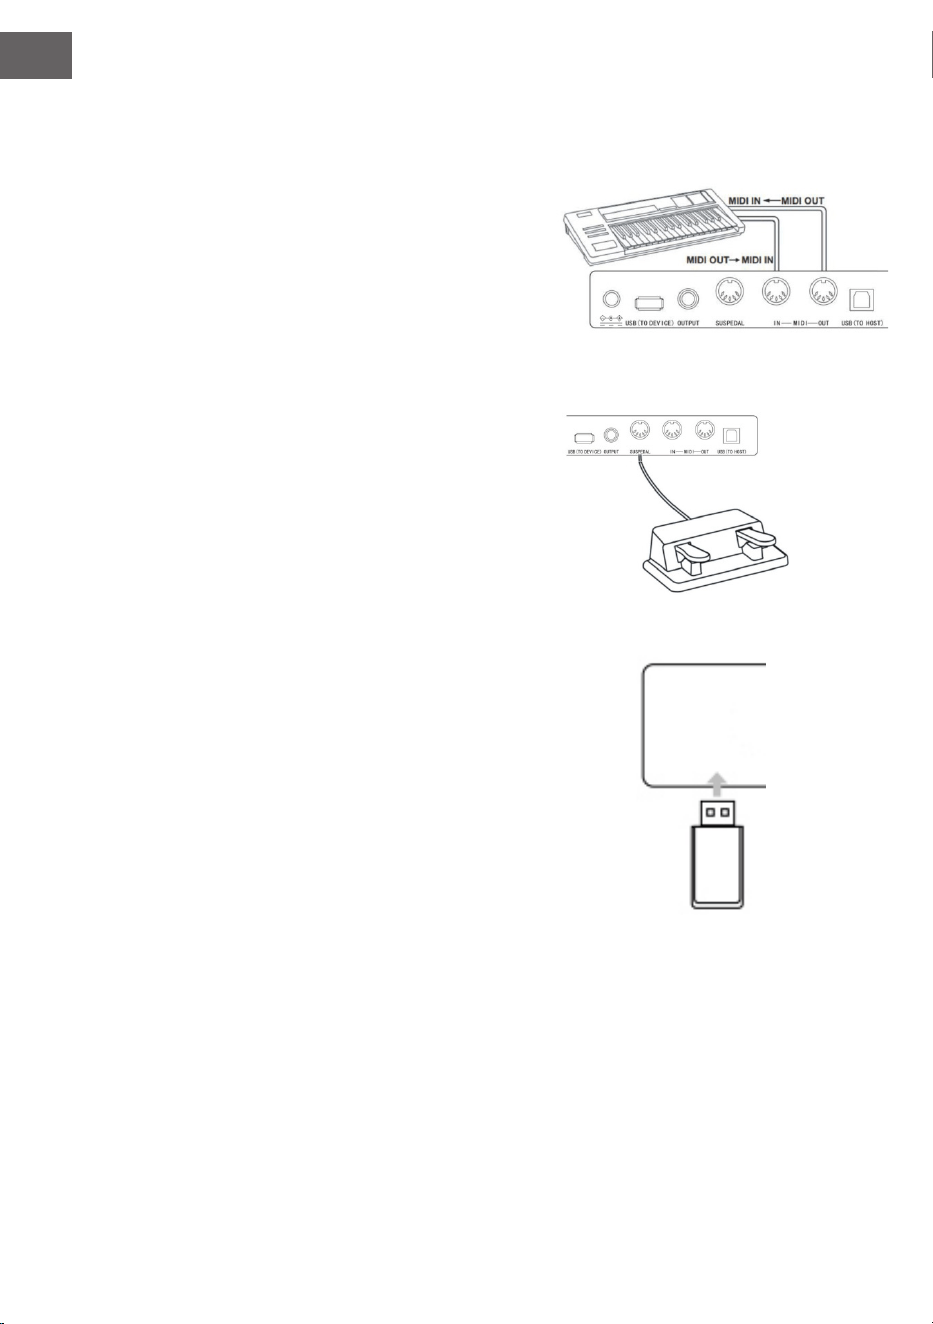
FR
64
Remarque : L'accessoire audio USB ne peut pas être
conguré pour l'entrée audio et la sortie audio en même
temps.
Connexion avec d'autres appareils
• Connectez le port MIDI IN de votre appareil au port MIDI
OUT d'autres appareils pour utiliser le piano comme source
audio.
• Connectez le connecteur MIDI OUT de cet appareil au
connecteur MIDI IN d'autres appareils pour utiliser l'ins-
trument comme contrôleur MIDI.
Branchement des pédales
Lorsque les pédales sont connectées au connecteur de pédale à
l'arrière de l'instrument, cet appareil a deux fonctions de pédale
différentes :
1. Appuyez sur cette pédale pendant que vous jouez, tous les
sons seront reproduits plus silencieusement.
2. Appuyez sur cette pédale pendant que vous jouez pour
faire résonner les sons.
Branchement d'appareils USB
• L'appareil prend en charge les périphériques USB jusqu'à 32
Go.
• Les chiers MP3 sur clé USB peuvent être lus sur l'appareil.
Remarque : ne retirez pas le périphérique USB pendant
la lecture. Cela peut provoquer des messages d'erreur ou
des dommages au périphérique USB.

FR
65
Interrupteur principal
1. Tout d'abord, assurez-vous que l'adaptateur secteur est correctement bran-
ché.
2. Appuyez sur le bouton POWER, l'écran LCD s'éclaircit et afche l'écran de
démarrage.
Remarque : si l'écran LCD ne s'allume pas après avoir appuyé sur le bouton
POWER, vériez que l'adaptateur secteur est correctement branché.
Réglage du volume
• Après avoir ouvert l'instrument, tournez la commande MASTER VOLUME
vers la droite pour augmenter le volume et vers la gauche pour le diminuer.
• Réglez le volume à votre convenance.
Réglage des différents types d'instruments
• Cet instrument possède des centaines d'instruments, y compris le son de la
musique folklorique chinoise, des tambours, etc.
• Reportez-vous au tableau des sons pour des informations plus détaillées.
• L'instrument est également équipé d'une fonction d'effet qui améliore le son
respectif auquel elle s'applique.
Sélectionnez et jouez le son
1. Appuyez sur la touche TONE pour accéder au mode de sélection du son.
L'icône de rappel "R1" et le nom du son actuel et son numéro s'afchent sur
l'écran LCD.
2. Utilisez les touches numériques et les touches + et - pour sélectionner le son
souhaité.
3. Jouez sur les touches et protez de sons merveilleux.
Remarque : pour changer la source sonore, appuyez à nouveau sur le bouton
VOICE. La fonction deux voies va maintenant s'ouvrir. L'afchage correspon-
dant "R1 / R2 / L" est afché sur l'écran LCD.
A deux voies
Cet instrument a une fonction deux voies. Cela permet de superposer deux sons
en même temps. Cet effet enrichit les couches musicales et donne l'impression que
deux instruments jouent en même temps. Le premier instrument "R1" est déjà pré-
sent avant le début de la fonction. Après avoir activé la fonction, l'instrument "R2"
est également disponible.
1. Pour ouvrir la fonction, appuyez sur le bouton DUAL. L'écran LCD afche "R2".
De plus, le nom du son supplémentaire et son numéro sont afchés.

FR
66
2. Sélectionnez une deuxième voix avec la touche VOICE et les touches + et -.
3. Jouer les deux instruments en synchronisation donne l'impression que deux
instruments différents soient joués en même temps.
4. Vous pouvez interrompre la fonction en appuyant à nouveau sur la touche
DUAL. Le voyant "R2" disparaît de l'écran et l'écran revient à son état pré-
cédent.
Remarque : si vous divisez le clavier de l'instrument, la fonction deux voies
n'est disponible que pour les touches de droite. Les touches main gauche ne
disposent pas de cette fonction.
Lower (division du clavier)
La fonction Lower divise le clavier en deux sections indépendantes en utilisant le
point de séparation du clavier, et chaque section a un instrument différent. L'ins-
trument de la section gauche est l'instrument inférieur, et le point de division des
touches peut être réglé sur n'importe quelle touche selon les besoins.
1. Appuyez sur LOWER pour démarrer la fonction Lower. L'écran afche le
nom actuel de la voix inférieure et le numéro ainsi que "L" et "SPLIT".
2. Vous pouvez utiliser la molette, la touche numérique ou la touche [+] / [-]
pour sélectionner la voix inférieure.
3. Si vous jouez au clavier dans différentes sections, vous entendrez deux ins-
truments différents.
4. Appuyez à nouveau sur LOWER pour désactiver la fonction Lower, "L" dispa-
raît de l'écran LCD, l'écran LCD revient à l'état précédent.
Keysplit : La position à laquelle la voix principale ou la voix double est séparée
de la voix inférieure sur le clavier est appelée "KEYSPLIT". Le réglage par
défaut du partage de touches est F # 3 (34).
Vous pouvez également dénir la division du clavier ailleurs comme décrit dans la
section Paramètres du menu de fonction pour plus de détails.
Fonction Toucher (sensibilité d'attaque)
Le panneau de commande de l'instrument dispose d'une fonction toucher, qui per-
met de donner plus d'expression à votre jeu. Vous pouvez choisir entre trois fonc-
tions Toucher différentes.
1. Pour activer la fonction, appuyez sur la touche TOUCH. La fonction Toucher
par défaut est "002" et s'afche sur l'écran LCD.
2. Appuyez plusieurs fois sur la touche Touch pour passer aux fonctions "001-
003 ; OFF" .
3. L'écran LCD afche "OFF" lorsque la fonction Touch est désactivée.
Mode piano
Avec cette fonction, vous pouvez utiliser tout le clavier avec le son d'un piano.

FR
67
1. Pour activer / désactiver la fonction, appuyez sur PIANO.
2. La sélection d'accompagnement fonctionne de la même manière que dans
les autres modes. Cependant, un seul accompagnement de batterie peut
être sélectionné et non une harmonique.
Remarque : dans ce mode, vous pouvez ouvrir à la fois la console audio et
le menu des fonctions. La fonction d'accord est automatiquement fermée
lorsque ce mode est activé.
Métronome (tempo)
Si vous n'êtes pas sûr de jouer correctement le rythme pendant que vous vous en-
traînez, vous pouvez utiliser la fonction métronome pour vous aider.
1. Pour activer la fonction, appuyez sur la touche METRONOME. Le tempo
vous est présenté. Pour activer la fonction, appuyez sur la touche METRO-
NOME.
2. Choisissez le tempo dans le menu des fonctions pour afcher les différents
paramètres.
Remarque : si vous ouvrez la fonction au cours du jeu, le rythme retentit au
début de la mesure suivante et adopte le nouveau style.
• La première fois que vous ouvrez la fonction, l'instrument l'adapte automati-
quement au style que vous avez sélectionné.
• Vous pouvez utiliser la fonction pendant l'enregistrement, car elle ne sera
pas entendue dans les données enregistrées.
ACCOMPAGNEMENT
Accompagnement automatique
• Activez cette fonction pour jouer du piano et l'accompagnement, par
exemple sous la forme d'un orchestre, sera joué automatiquement. Tout ce
que vous avez à faire est de sélectionner un accompagnement dans le ta-
bleau des styles et de jouer les accords avec votre main gauche.
• Cet instrument a plusieurs accompagnements automatiques, que vous pou-
vez voir dans le tableau des styles. Choisissez simplement celui qui vous
convient et protez-en.
Jouer l'accompagnement automatique (jouer la partie de percussion uni-
quement)
1. Appuyez sur STYLE pour passer en mode style. Le voyant "STYLE" s'allume
dans le coin supérieur gauche de l'écran LCD. L'écran afche également le
nom et le numéro du style actuellement sélectionné en même temps.
2. Sélectionnez le style souhaité en appuyant sur les touches numériques ou

FR
68
sur les touches + et -.
3. La partie percussion du style peut être reproduite immédiatement en appuyant sur le bouton START /
STOP. Vous pouvez également appuyer sur le bouton SYNC pour synchroniser le style. Le tempo s'allume
également sur l'écran LCD. Jouez n'importe quelle touche pour démarrer la performance.
Jouer l'accompagnement automatique (toutes les pistes)
1. Démarrez l'accompagnement automatique des accords de basse : appuyez sur la touche [A.B.C.] une fois
pour passer en mode d'accord de basse automatique. Le clavier est divisé en deux sections. La section de
gauche est la section de reconnaissance d'accords. L'écran afche temporairement "A.B.C". Appuyez en-
suite sur n'importe quelle touche dans la zone de reconnaissance d'accord (état de début de synchroni-
sation), vous entendrez un accompagnement fantastique. Appuyez sur la touche [A.B.C. l une deuxième
fois pour entrer en mode FULL RANGE. L'écran LCD afche Full Ran. À ce stade, tout le clavier se trouve
dans la zone de reconnaissance d'accords.
2. Démarrez l'accompagnement A.B.C.
3. Appuyez sur la touche Sync et jouez un accord dans la zone de détection pour jouer l'accompagnement
de A.B.C. Lorsque vous modiez un accord, l'accompagnement change automatiquement. Vous pouvez
également appuyer sur la touche START / STOP pour démarrer l'accompagnement automatique de la
piste rythmique, puis jouer un accord dans la zone de détection d'accord. Cela lance l'accompagnement
automatique pour toutes les pistes.
Sections d'accompagnement
L'accompagnement automatique de cet instrument comporte de nombreuses sections, il est donc judicieux
d'organiser spéciquement vos propres accompagnements. Les sections comprennent : œuvre principale (A,
B), intro, n. Si vous jouez l'accompagnement, vous pouvez utiliser les sections pour une interprétation plus
professionnelle.
1. Intro : La sélection de l'intro convient au début d'un morceau. Après la n de l'intro, l'accompagnement
passe aux réglages de l'œuvre principale. La longueur de l'intro varie et dépend du style sélectionné.
2. Programme principal : sélectionnez "Main Play" convient lorsque la partie principale d'un morceau est
en cours de lecture. Le programme principal est lu jusqu'à ce qu'une autre touche soit jouée.
3. Ajouter (FILL IN) : L'ajout de la section 1 ou 2 vous aidera à rendre votre performance plus profession-
nelle. Après avoir joué les sections insérées, l'accompagnement revient au programme principal.
4. Fin
Appuyez sur cette touche pour terminer un morceau. La piste se termine automatiquement lorsque la séquence
de n est lue. La longueur de la séquence de n dépend du style sélectionné et peut varier.
Remarque : maintenez le bouton FILL IN 1 ou FILL IN 2 pour insérer la variation dans l'accompagnement
jusqu'à ce que vous relâchiez le bouton. L'accompagnement revient ensuite au programme principal. Ap-
puyez sur la touche FILL IN pour changer le programme principal préréglé. Lorsque l'accompagne-
ment s'arrête, l'écran LCD l'indique.
Jouez différentes sections d'accompagnement
1. Appuyez sur la touche STYLE pour accéder au mode de sélection du style. Sélectionnez le style en ap-
puyant sur les touches numériques ou sur les touches + et -.
2. Appuyez sur AUTO CHORD pour activer la fonction d'accord automatique.

FR
69
3. Pour ouvrir la fonction de synchronisation, appuyez sur la touche SYNC.
4. Pour sélectionner la lecture principale 1, appuyez sur la touche FILL IN 1.
5. Lorsque vous appuyez sur INTRO / ENDING, l'écran afche "NOR" pour signier que l'instrument est
en mode de préparation de jeu. L'accompagnement automatique démarre immédiatement lorsque vous
jouez un accord dans la plage de la main gauche du clavier.
6. L'accompagnement passe au programme principal après l'intro.
7. Appuyez sur la touche FILL IN 2 pour ajouter une petite variation à l'accompagnement. L'accompagne-
ment revient automatiquement au programme principal une fois la variation terminée.
8. Appuyez sur la touche INTRO / ENDING pour que l'accompagnement joue une séquence de n puis s'ar-
rête.
Réglage du volume d'accompagnement
Le volume de l'accompagnement peut être réglé pour l'ensemble de l'accompagnement. Cette fonction crée un
bon équilibre entre le volume des touches et le volume de l'accompagnement.
1. Appuyez sur la touche ACCOMP VOLUME∧/∨ pour afcher le réglage actuel du volume de l'accompa-
gnement sur l'écran LCD. Appuyez sur la touche ACCOMP VOLUME ∧pour augmenter le volume et sur
la touche ACCOMP VOLUME ∨ pour le diminuer. Plage de réglage : 0 - 127.
2. Appuyez en même temps sur les touches ACCOMP VOLUME ∧ et ACCOMP VOLUME ∨ pour quitter la
fonction d'accompagnement. L'écran LCD afche alors "Volume d'accompagnement : OFF". Pour la rou-
vrir, appuyez à nouveau en même temps sur les touches ACCOMP VOLUME ∧ et ACCOMP VOLUME ∨
Tempo
Chaque style a une meilleure valeur de vitesse différente. Vous pouvez ajuster la valeur en fonction de vos
compétences et des besoins de chaque morceau.
1. Réglez la valeur du tempo avec les touches TEMPO ∧ et TEMPO ∨.
2. Appuyez en même temps sur les touches TEMPO ∧ et TEMPO ∨ pour réinitialiser la valeur.
Remarque : la vitesse est dénie automatiquement pour chaque style. Dans un style donné, la vitesse
reste la même.
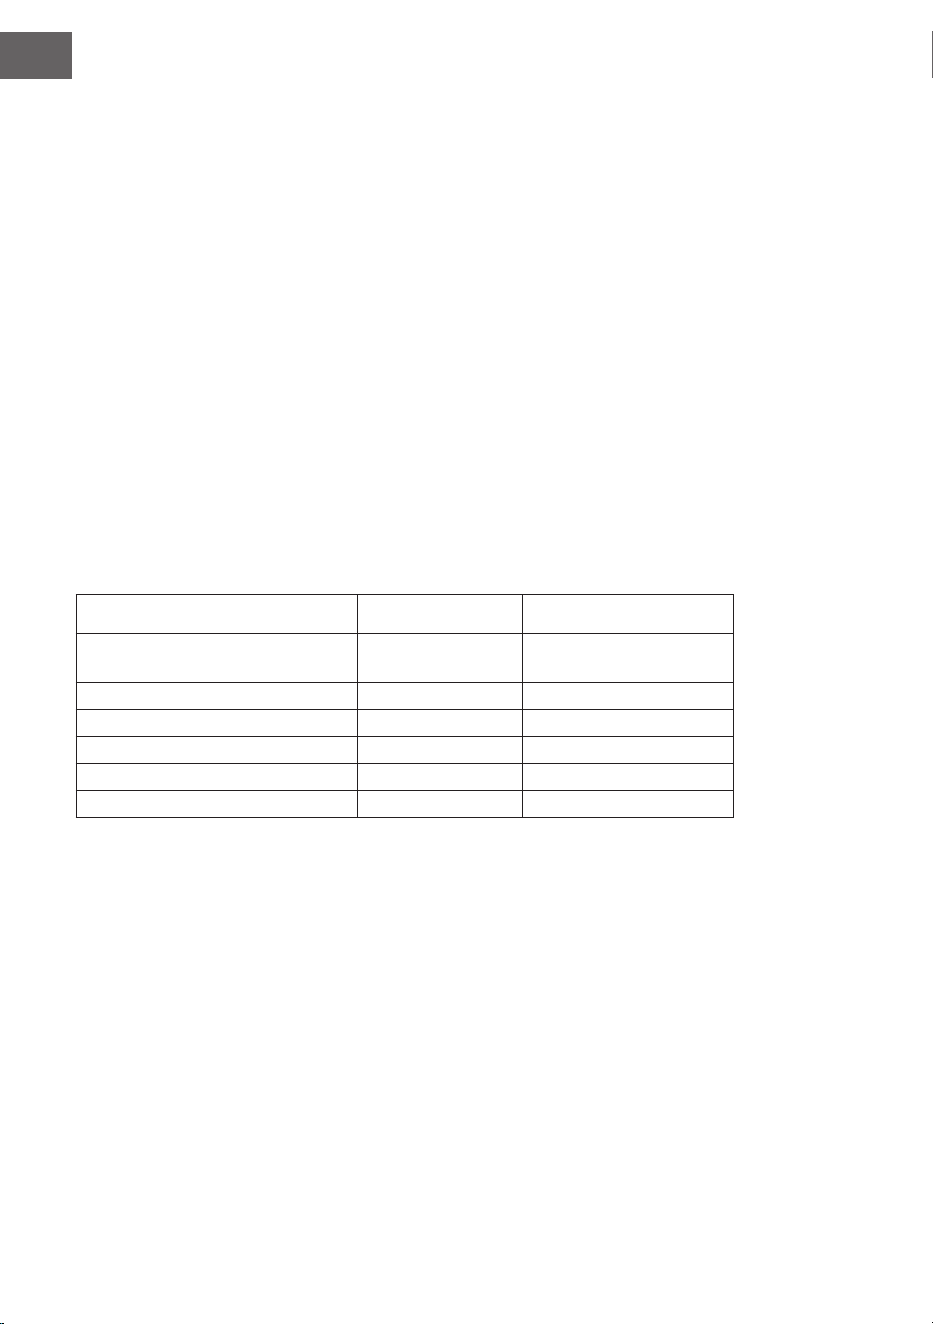
FR
70
DSP
Le DSP est une technologie de localisation de champ sonore qui imite le son dans l'environ-
nement réel. Utilisez cette fonction pour entendre une lecture plus ouverte et complète.
1. L'effet DSP s'active automatiquement à la mise sous tension et les voyants "REVERB" et "CHORUS" s'al-
lument sur l'écran LCD.
2. Appuyez sur la touche [DSP] pour activer ou désactiver l'effet DSP.
Remarque : pendant la lecture d'un rythme ou d'un morceau, l'activation / la désactivation du DSP peut
provoquer une brève pause ou du bruit, ce qui est normal lorsque le commutateur d'effet est basculé.
réglage du son
• Le volume de chaque piste peut être ajusté avec le réglage du son.
• Appuyez sur SOUND CONSOLE pour accéder au menu des paramètres sonores. L'écran LCD afche la
valeur correspondante. Lorsque vous êtes dans le menu des paramètres audio, vous pouvez régler les
valeurs individuelles en appuyant plusieurs fois sur la touche SOUND CONSOLE.
• Le volume peut être réglé séparément pour chaque valeur individuelle en appuyant sur les touches + et -.
Valeurs de réglage
Contenu de personnalisation Afchage LCD Plage de réglage
Volume de la musique de percus-
sion
XXX Rhythm 0 - 127
Volume des basses XXX Bass 0 - 127
Volume d'harmonie XXX Chord 0 - 127
Volume de la section XXX Phrase 0 - 127
Volume section main gauche XXX Lower 0 - 127
Volume section main droite XXX Upper 0 – 127
Remarque : si aucun réglage de son n'est effectué dans les 5 secondes, le menu de réglage du son est
automatiquement quitté

FR
71
MENU DE FONCTIONS
Menu de fonctions
Appuyez sur FUNCTION MENU pour accéder au menu des fonctions. L'écran LCD afche la valeur correspon-
dante. Vous pouvez régler les valeurs personnalisées dans le menu des fonctions en appuyant sur + et -.
N° Sommaire Afchage LCD Plage de réglage Valeur par défaut
1 Mélodie XXX Tune -50 - +50 000
2 Division du clavier XXX KeySplit 1 – 88 034
3 Tempo XXX BeatType 0, 2 – 9 004
4 Volume du métronome XXX 0 – 127 080
5 Profondeur de la réverbé-
ration
XXX 0 – 127 050t
6 Profondeur du chœur XXX 0 – 127 000
7 Réception MIDI XXX 1 – 16, ALL ALL
8 Émission MIDI XXX 1 – 16 001
Remarque : si aucun réglage de son n'est effectué dans les 5 secondes, le menu de réglage du son est
automatiquement quitté.
Réglage de la mélodie
Avec ce paramètre, vous pouvez ajuster la hauteur avec précision.
1. Pour sélectionner le menu de mélodie, appuyez d'abord sur FUNCTION MENU. Sélectionnez "menu de
réglage". L'écran afche temporairement "XXX Tune". Appuyant sur + et - pour régler la hauteur par de-
mi-ton dans la plage de 50
2. Appuyez simultanément sur + et - pour réinitialiser la hauteur de ton à la valeur par défaut de 000. Ce
réglage de paramètre s'applique au clavier et à tous les styles.
Division du clavier
Le point de division entre la section d'accord automatique et le clavier de droite s'appelle "KEYBOARD SPLIT
POINT".
Lorsque la fonction d'accord automatique est désactivée, la partie gauche du clavier peut également être utili-
sée pour jouer de la musique.
1. Pour diviser le clavier, appuyez d'abord sur le bouton FUNCTION MENU et sélectionnez "Keyboard
Split. L'écran LCD afche "XXX KeySplit". Appuyez sur + et - pour dénir le point ou entrer un nombre
directement à l'aide du pavé numérique.
2. Appuyez simultanément sur les touches + et - pour réinitialiser le point de division du clavier à la valeur
préréglée "F # 3 (34)".

FR
72
Style de métronome
1. Pour choisir le type de métronome, appuyez d'abord sur FUNCTION MENU et sélectionnez "Beat-Type".
L'écran LCD afche "Beat-Type". Choisissez le type de métronome avec les touches + et - Au total, 9 types
de métronomes (0, 2-9) sont disponibles.
2. Appuyez simultanément sur les touches + et - pour réinitialiser le type de métronome à la valeur préré-
glée "004".
Réglage du volume du métronome
1. Pour régler le volume du métronome, appuyez d'abord sur FUNCTION MENU + ou FUNCTION MENU
- et sélectionnez "MetronomeVolume". L'écran afche temporairement "XXX MetroVol". Appuyez sur +
et - pour régler le volume du métronome. Plage de réglage : 0 – 127.
2. Appuyez simultanément sur les touches + et - pour réinitialiser le volume du métronome à la valeur
préréglée "080".
Réglage de la profondeur de réverbération
1. Pour régler la profondeur de réverbération, appuyez d'abord sur FUNCTION MENU et sélectionnez
"Reverb Level". L'écran LCD afche "XXX ReverbLev". Réglez la réverbération en appuyant sur + et -
Plage de réglage : 0 – 127.
2. Appuyez simultanément sur les touches + et - pour réinitialiser la réverbération à la valeur préréglée
"050".
Réglage du volume de Chorus
1. Pour régler le volume du Chorus, appuyez d'abord sur FUNCTION MENU et sélectionnez "Chorus Le-
vel". L'écran LCD afche "XXX ChorusLev". Réglez le volume du Chorus en appuyant sur + et - Plage de
réglage : 0 – 127.
2. Appuyez simultanément sur les touches + et - pour réinitialiser le volume du Chorus à la valeur préré-
glée "000".
Réglage de la réception MIDI
1. Pour sélectionner le menu des réglages de réception MIDI, appuyez d'abord sur le bouton FUNCTION
MENU et sélectionnez "MIDI receiving channel setting menu". L'écran LCD afche "XXX MidiIn". Réglez
le canal de réception en appuyant sur + et - Plage de réglage : 1 – 16, ALL.
2. Appuyez simultanément sur les touches + et - pour réinitialiser le canal de réception à la valeur préré-
glée "ALL".
Réglage de l'émission MIDI
1. Pour sélectionner le menu des réglages d'émission MIDI, appuyez d'abord sur le bouton FUNCTION
MENU et sélectionnez "MIDI sending channel setting menu". L'écran LCD afche "XXX MidiOut". Réglez
le canal d'émission en appuyant sur + et - Plage de réglage : 1 – 16.
2. Appuyez simultanément sur les touches + et - pour réinitialiser le canal d'émission à la valeur préréglée
"001".

FR
73
Réinitialiser aux paramètres d'usine
L'appareil étant éteint, appuyez en même temps sur + et -. L'appareil est réinitialisé aux paramètres d'usine et
supprime toutes les données utilisateur, y compris : les chansons utilisateur, l'enregistrement, la mémoire. Pen-
dant ce temps, l'écran LCD afche "Wait ...!". Une fois l'appareil réinitialisé, il peut être utilisé normalement.
Réglage de la mémoire du panneau de conguration
Cet appareil dispose d'un réglage de la mémoire du panneau de conguration. Cela peut servir à enregistrer
les paramètres les plus fréquemment utilisés pour les utiliser plus rapidement lorsque vous en avez besoin, ce
qui peut faciliter le jeu de l'instrument. Cette fonction enregistre presque tous les paramètres du panneau de
commande pour dénir vos paramètres préférés en appuyant simplement sur un bouton.
Mémorisation des réglages
1. Cet instrument dispose de quatre banques de mémoire. Chaque banque de mémoire a 2 états de mé-
moire.
2. Appuyez sur STORE tout en maintenant l'une des touches M1 ou M2 pour enregistrer le réglage actuel.
Remarque : l'enregistrement du paramètre actuel écrasera l'état d'enregistrement précédent. Maintenez
STORE et M1 en même temps pour supprimer tous les paramètres enregistrés et réinitialiser la mémoire
aux paramètres d'usine.
Lecture des paramètres enregistrés
Pour lire les paramètres enregistrés, appuyez sur M1 ou M2.
Chois d'une banque de mémoire
1. Appuyez sur BANK, l'écran LCD afche temporairement le numéro de la banque de mémoire actuelle-
ment sélectionnée.
2. Appuyez à nouveau sur BANK pour sélectionner la mémoire. Choix possibles : 1 - 2.
3. Les contenus suivants peuvent être enregistrés dans les mémoires M1 et M2 :
• Paramètres du son : son principal, deux voies, point de partage du clavier, effets numériques, table de son.
• Paramètres d'accompagnement : style, vitesse, activer / désactiver les accords automatiques, sélection
de section
• Paramètres de fonction : toucher, paramètres dans le menu de fonction

FR
74
Contrôle par la musique
1. Fonction de contrôle par le tempo
• Une chanson comprend déjà un tempo avant que l'intro ne soit jouée.
2. Avance rapide, retour rapide, lecture / pause et arrêt des chansons
• Appuyez sur la touche pour avancer rapidement les morceaux pendant la lecture.
• Appuyez sur la touche pour reculer rapidement les morceaux pendant la lecture.
• Appuyez sur la touche / pour mettre en pause les morceaux et les reprendre en appuyant à nouveau sur
la touche.
• Appuyez sur la touche pour arrêter la lecture.
3. Répétition d'une section
• En appuyant sur la touche pour dénir le début et la n d'une section et la lire en boucle jusqu'à
quitter la fonction.
• Le premier appui sur la touche dénit le début de la section et le second appui la n de la section.
• Appuyez à nouveau sur la touche pour quitter la fonction et lire de nouveau les chansons en entier.
Enregistrement de musique
Avant de commencer l'enregistrement et de sélectionner une piste, un morceau doit être sélectionné.
1. Appuyez sur RECORD pour accéder à votre sélection de chanson. Le numéro du morceau s'afche en
haut à gauche de l'écran LCD. Le nom par défaut du morceau à enregistrer est "RecSong 1". Vous pou-
vez sélectionner le morceau que vous souhaitez enregistrer à
l'aide des touches + et -.
2. Appuyez maintenant sur RECORD pour entrer dans le mode
de préparation d'enregistrement. "REC" s'afche en rouge
sur le côté inférieur de l'écran LCD, et 4 points de mesure
apparaissent dans la zone d'afchage des mesures en
même temps. L'instrument sélectionne automatiquement
une piste vierge pour votre enregistrement. La piste audio
utilisée est afchée sur l'écran LCD et se rapporte à l'enre-
gistrement en cours, qui y est sauvegardé.
3. Vous pouvez régler le son, le style, la vitesse, etc. en mode
préparation. Vous pouvez sélectionner la piste audio sur
laquelle votre enregistrement doit être sauvegardé en ap-
puyant sur les touches TRACK 1, TRACK 2 ou TRACK 3.
La piste d'accompagnement et la piste de mélodie peuvent
être enregistrées en même temps, tandis que 2 pistes de
mélodie différentes ne peuvent pas être enregistrées en même temps.
4. Pour démarrer l'enregistrement, appuyez sur START / STOP ou commencez à jouer au clavier après avoir
sélectionné une piste d'enregistrement. Une fois que l'accompagnement et la fonction d'accord automa-
tique ont été sélectionnés pour jouer efcacement les accords dans la zone de la main gauche, l'enregis-
trement peut également être démarré.
Remarques :
• Les données de style ne peuvent être enregistrées que dans la piste d'accompagnement. Le témoin d'en-
registrement a trois états différents : "Shine, Light, Go out".

FR
75
• "Shine" signie que cette piste est sélectionnée pour l'enregistrement. S'il y a déjà des données sur la
piste, elles seront écrasées par l'enregistrement en cours si vous continuez.
• "Light" signie que les données de la piste seront écrasées de manière synchrone au cours du processus
d'enregistrement.
• "Go Out" signie que cette piste ne contient aucune donnée ou contient des données dont la lecture n'a
pas été autorisée pendant l'enregistrement.
• La piste d'enregistrement peut encore être modiée en mode de préparation.
• L'appareil sélectionne automatiquement une piste d'enregistrement vide en mode préparation (dans l'ordre
de petite à grande, par exemple : si la piste 2 contient des données, l'instrument sélectionnera la piste 3 pour
l'enregistrement).
Piste 1 : piste d'accompagnement
Piste 2 / Piste 3 : pistes de mélodie
Pour arrêter l'enregistrement
1. Appuyez sur START / STOP pendant l'enregistrement, l'enregistrement s'arrêtera immédiatement. Vous
pouvez sélectionner d'autres fonctions en appuyant sur STYLE ou VOICE.
2. Lorsque la mémoire interne est pleine, l'enregistrement s'arrête et se sauvegarde automatiquement.
L'écran LCD afchera alors "Rec_Full".
3. L'enregistrement s'arrête automatiquement lorsque le morceau est terminé ou que vous avez sélection-
né un accompagnement.
Lecture des chansons enregistrées
1. Appuyez sur RECORD pendant l'enregistrement pour l'interrompre et lire en boucle les morceaux en-
registrés jusqu'à présent.
2. Appuyez sur SONG pour passer en mode chanson. Toutes les chansons sont automatiquement lues en
boucle. Le nombre de morceaux sauvegardés peut
être sélectionné directement en appuyant sur + et
-. Si vous n'avez aucune chanson enregistrée, l'écran
afchera "NoFile!". Cela interrompt la lecture en
boucle continue.
3. Si disponible, sélectionnez un morceau que vous
avez sauvegardé et appuyez sur START / STOP pour
le lire en boucle.
Pour effacer des chansons enregistrées
1. Avec l'instrument éteint, appuyez simultanément sur
RECORD et SONG pour supprimer tous vos enregis-
trements sauvegardés.
2. Appuyez sur RECORD pendant 2 secondes pour
supprimer les enregistrements en mode de préparation. L'écran LCD afchera alors "Delete". Appuyez
ensuite sur les boutons de la piste respective (TRACK 1, TRACK 2, TRACK 3) dont vous souhaitez sup-
primer l'enregistrement. Lorsque le voyant d'une piste est allumé, cela signie que les données sont en
cours d'effacement. Lorsque la voyant s'éteint, les données sont conservées. Si les voyants de toutes les
pistes s'allument, tous les morceaux enregistrés seront supprimés si vous autorisez la suppression en
appuyant sur +. Vous pouvez annuler la suppression en appuyant sur -.

FR
76
Lecture des MP3
Connexion MP3 : Cette connexion peut être utilisée pour lire des chansons au format MP3.
• Les morceaux peuvent être lus / mis en pause en appuyant sur PLAY / PAUSE.
• Sélectionnez le morceau précédent en appuyant sur SONG ∧et réduisez le volume est réduit en ap-
puyant sur VOLUME ∨
• Passez au morceau suivant en appuyant sur SONG ∨ et augmentez le volume en appuyant sur VOLUME
∧.
Pour jouer les morceaux
Cet instrument comprend de nombreuses chansons différentes (voir le tableau des chansons). Chacune des
chansons a une fonction pédagogique.
1. Appuyez sur SONG pour passer en mode chanson. L'écran LCD afche "XXX SONG". Toutes les chansons
sont automatiquement lues en boucle.
2. Vous pouvez utiliser le numéro du morceau souhaité ou les touches + et - pour sélectionner un morceau.
3. Pour arrêter la lecture, appuyez sur START / STOP. Appuyez de nouveau sur la touche pour reprendre
la lecture.
4. Si vous souhaitez quitter le mode de chanson, appuyez sur STYLE, RECORD, VOICE, DUAL VOICE etc.
une fois qu'un morceau est terminé.
Mode apprentissage
La fonction d'apprentissage de l'instrument se compose des trois touches LESSON, LEFT et RIGHT, qui ne sont
utilisables qu'en mode Song. Toutes les chansons peuvent être pratiquées dans trois modes différents : durée,
hauteurs et mode de lecture. L'instrument a une fonction d'évaluation qui vous aide à progresser dans le pro-
cessus d'apprentissage.
1. Pour activer le mode leçon, appuyez sur le bouton LESSON.
2. Utilisez maintenant les touches LEFT et RIGHT pour choisir si vous voulez pratiquer le morceau avec
votre main gauche ou droite. Si vous ne faites pas de sélection, la main droite est automatiquement
sélectionnée.
Remarque : le contenu d'apprentissage de la main gauche peut être différent selon la chanson sélection-
née. Certaines chansons sont utilisées pour pratiquer des accords avec la main gauche et d'autres pour
pratiquer des mélodies. Pendant le mode leçon, les mélodies et les accords sont afchés sur l'écran LCD
pour une pratique facile.

FR
77
Mode d'apprentissage 1 : durée
1. Appuyez sur le bouton LESSON pour activer le mode d'apprentissage 1 Les chansons en cours de lecture
s'arrêteront. L'écran LCD afche "Les1 R". L'appareil évaluera la durée de l'exercice. Le jeu correct des
accords et des notes n'est pas pris en compte dans ce mode d'apprentissage.
2. Appuyez sur START / STOP pour démarrer le mode d'apprentissage 1. Si vous sélectionnez la main
droite, les mélodies de la main droite seront afchées. Il suft de jouer correctement la durée, le jeu cor-
rect des accords et des notes n'est pas pris en compte. La mélodie est jouée en arrière-plan. Lorsque vous
sélectionnez la main gauche, les accords ou les parties mélodiques de la main gauche s'afchent. Il suft
de jouer correctement la durée, le jeu correct des accords et des notes n'est pas pris en compte. Appuyez
sur les boutons LEFT et RIGHT en même temps pour vous entraîner avec vos mains droite et gauche en
même temps. Le système estime lui-même lorsque l'exercice est terminé.
Mode d'apprentissage 2 : hauteur du son
1. Appuyez plusieurs fois sur LEARN pour activer le mode d'apprentissage 2 Les chansons en cours de
lecture sont interrompues. L'écran LCD afche "Les2 R". Le système estime la hauteur, ce qui signie
que vous devez jouer les notes correctes. Une section d'un morceau peut recommencer si vous jouez
les mauvaises notes. Le morceau est alors en mode d'attente jusqu'à ce que les notes correctes aient été
jouées.
2. Si vous appuyez sur le bouton START / STOP avant le début de la chanson, l'appareil donnera une évalua-
tion une fois la chanson terminée.
Mode d'apprentissage 3 : mode de jeu
1. Appuyez plusieurs fois sur LEARN pour activer le mode d'apprentissage 3 Les chansons en cours de lec-
ture sont interrompues. L'écran LCD afche "Les3 R". Le système évalue la bonne durée et la hauteur, ce
qui signie que vous devez jouer les notes correctes et respecter la durée d'origine du morceau.
2. Si vous appuyez sur START / STOP avant le début de la chanson, l'appareil donnera une évaluation une
fois la chanson terminée.
ANNEXE
Liste des instruments 53
Liste des styles 62
Liste des morceaux 65

FR
78
CONSEILS POUR LE RECYCLAGE
S‘il existe une réglementation pour l‘élimination ou le
recyclage des appareils électriques et électroniques dans votre
pays, ce symbole sur le produit ou sur l‘emballage indique que
cet appareil ne doit pas être jeté avec les ordures ménagères.
Vous devez le déposer dans un point de collecte pour le
recyclage des équipements électriques et électroniques. La
mise au rebut conforme aux règles protège l‘environnement
et la santé de vos semblables des conséquences négatives.
Pour plus d‘informations sur le recyclage et l‘élimination de ce
produit, veuillez contacter votre autorité locale ou votre service
de recyclage des déchets ménagers.
Ce produit contient des piles. S‘il existe une réglementation
pour l‘élimination ou le recyclage des piles dans votre pays,
vous ne devez pas les jeter avec les ordures ménagères.
Renseignez-vous sur les dispositions locales relatives à la
collecte des piles usagées. La mise au rebut conforme aux
règles protège l‘environnement et la santé de vos semblables
des conséquences négatives.
FABRICANT ET IMPORTATEUR (UK)
Fabricant :
Chal-Tec GmbH, Wallstraße 16, 10179 Berlin, Allemagne.
Importateur pour la Grande Bretagne :
Berlin Brands Group UK Limited
PO Box 42
272 Kensington High Street
London, W8 6ND
United Kingdom

ES
79
Esmado cliente:
Le felicitamos por la adquisición de este producto. Lea atentamente el siguiente
manual y siga cuidadosamente las instrucciones de uso con el n de evitar posibles
daños. La empresa no se hace responsable por los daños causados por el incum-
plimiento de las instrucciones y el uso indebido. Escanee el siguiente código QR
para acceder al último manual de usuario y a más información sobre el producto.
CONTENIDO
Datos técnicos 80
Indicaciones de seguridad 81
Teclas y conexiones 82
Montaje 85
Puesta en funcionamiento 87
Acompañamiento 91
Menú de funciones 95
Indicaciones sobre la retirada del aparato 102
Fabricante e importador (Reino Unido) 102

ES
80
DATOS TÉCNICOS
Número de artículo 10035596, 10035847
Teclado Piano estándar de 88 teclas
Indicador Indicador LED
Tonos 360 instrumentos diferentes
Estilos 160 estilos
Demo 80 canciones demo
Efectos Sensibilidad a la pulsación, reverberación, coro, voz dual, separación, menú
de funciones, consola de sonido
Grabación Pista única, varias pistas, grabación combinada
Acompañamiento Inicio/n, sincronización, relleno, velocidad
Acorde Determinación automática de acordes (ABC)
Pedales Pedal izquierdo (pedal de piano); pedal derecho (pedal de sostenido)
Conexiones externas USB (MP3), USB (MIDI), MIDI IN/OUT
Fuente de alimentación 220 V~, 12-15 V
Tensión de entrada 12-15 V , 2-3 A

ES
81
INDICACIONES DE SEGURIDAD
• Lea atentamente el manual de instrucciones antes de utilizar el aparato para evitar daños personales y/o
materiales.
• Conecte el aparato solamente a una toma de corriente con la fuente de alimentación incluida en el envío.
Si utiliza otras fuentes de alimentación podría averiar el aparato.
• En ningún caso abra la carcasa del instrumento.
• No intente desmontar el aparato ni sustituir por su cuenta piezas del interior. Si durante su uso aparecen
fallos en las funciones, cese la utilización y contacte con el servicio de atención al cliente.
• No coloque el aparato en zonas donde exista demasiado polvo, vibraciones, temperaturas muy elevadas
o muy bajas (como sitios con incidencia directa del sol, cerca de fuentes de calor, en el vehículo si este
está expuesto al sol, etc.), pues tanto la apariencia exterior como los componentes internos del aparato
podrían sufrir daños.
• Nunca coloque el aparato sobre supercies inestables o inclinadas, pues podría caerse/volcarse y averi-
arse.
• Nunca coloque recipientes con líquido sobre el aparato, pues podrían volcarse y ltrar el líquido al inte-
rior del aparato.
• Antes de encender el aparato, baje el volumen a 0. Adapte el volumen gradualmente para no dañar los
altavoces.
• Nunca regule el volumen al máximo para evitar pérdida auditiva mientras toca.
• Nunca utilice violencia extrema contra el aparato, las teclas, el botón de encendido ni las conexiones y
tampoco coloque objetos pesados encima.
• El aparato debe ser desembalado por una persona adulta, pues los materiales de embalaje suponen un
riesgo de asxia para bebés y niños pequeños. Almacene el embalaje de plástico en un lugar seguro o
elimínelo según corresponda.
• Las piezas pequeñas del interior pueden suponer un riesgo para niños menores de 3 años, por lo que no
son aptas para personas menores de esta edad.
• Las características técnicas del aparato pueden modicarse sin previo aviso.
• Este aparato puede utilizarse en todas las zonas climáticas, excepto en las de clima tropical.
• El aparato solo puede utilizarse en zona situadas por debajo de 2000 metros sobre el nivel del mar.
• Asegúrese de que no caigan gotas de agua ni agua pulverizada sobre el enchufe ni en el cable de ali-
mentación.
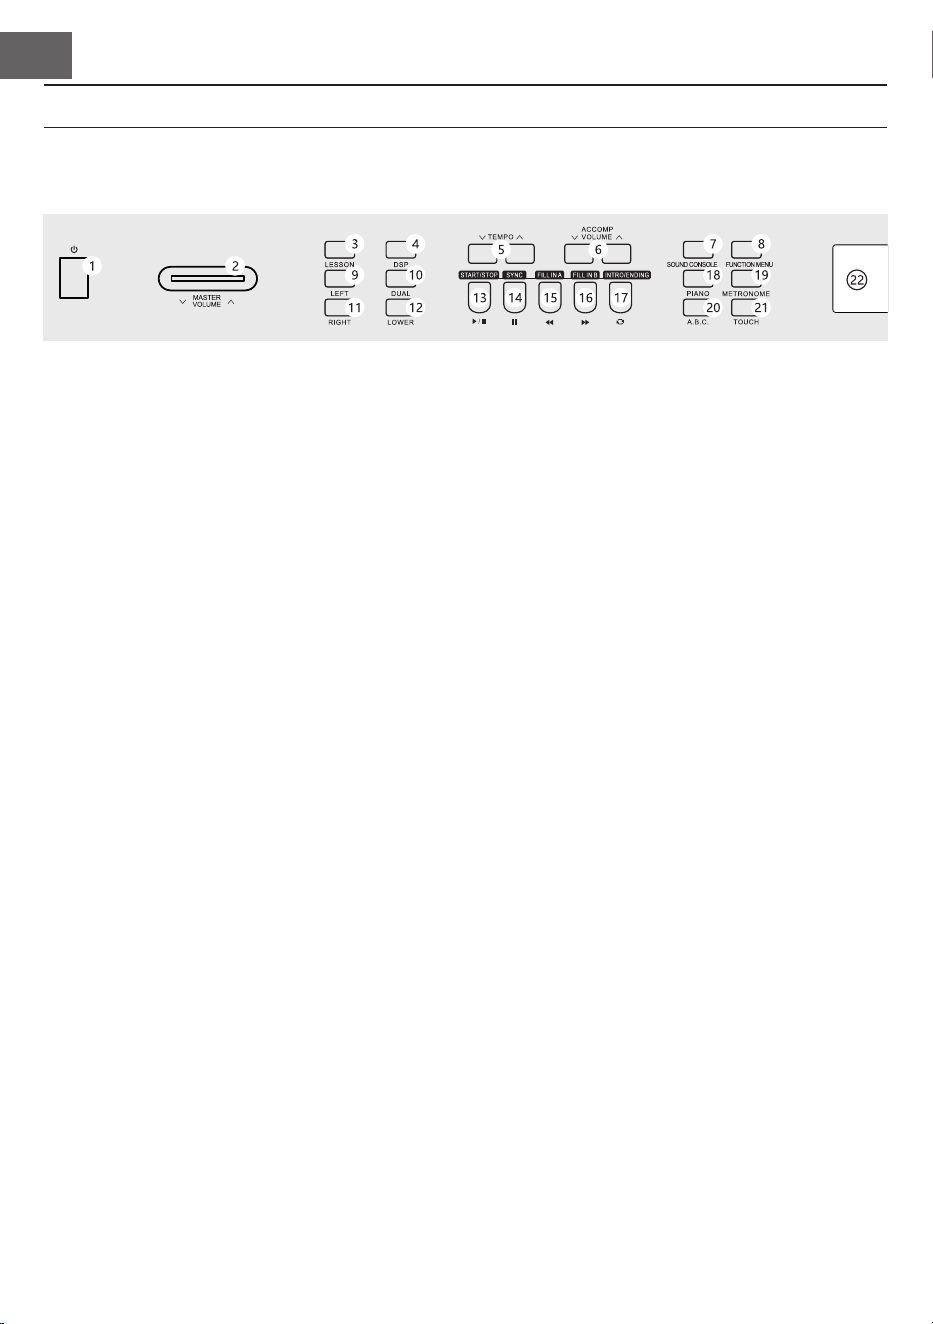
ES
82
1 POWER: encender/apagar
2 MASTER VOLUME: regulador de volumen
principal
3 LESSON: modo aprendizaje
4 DSP: activar/desactivar DSP
5 TEMPO ∨/∧: adaptar el ritmo actual
6 ACCOMP VOLUME ∨/∧: volumen de acom-
pañamiento
7 SOUND CONSOLE: abrir el menú del panel
de control
8 FUNCTION MENU: menú de funciones
9 LEFT: en modo aprendizaje, seleccionar la
parte izquierda de los instrumentos
10 DUAL: activar/desactivar voz dual
11 RIGHT: en modo aprendizaje, seleccionar la
parte derecha de los instrumentos
12 LOWER: seleccionar el grupo de tonos inferior
En modo canción
13 Establecer inicio/nal de un extracto de
canción
14 Tecla de pausa
15 Tocar rápidamente hacia atrás
16 Tocar rápidamente hacia adelante
17 Iniciar/detener reproducción de la canción
En modo silencio
13 START/STOP: iniciar/detener la reproducción
14 SYNC: abrir/cerrar función de sincronización
15 FILL IN 1: añadir variación 1
16 FILL IN 2: añadir variación 2
17 START/STOP: iniciar/detener la reproducción
del acompañamiento
18 PIANO: activar/desactivar el modo piano
19 METRÓNOMO: abrir/cerrar la función de
metrónomo
20 A,B,C: selección de acorde
21 TOUCH: seleccionar la curva táctil del teclado
22 Pantalla LCD: muestra toda la información
importante
TECLAS Y CONEXIONES
Panel de control izquierdo

ES
83
Panel de control derecho
23 Rueda de ajustes: seleccionar valor
24 VOICE: activar instrumentos
25 Teclado numérico con +/-: seleccionar valores
numéricos
26 REC: grabación
27 TRACK 1: seleccionar para grabar la pista 1
28 TRACK 2: seleccionar para grabar la pista 2
29 TRACK 3: seleccionar para grabar la pista 3
30 PLAY/PAUSE: reproducción/pausa
31 STYLE: seleccionar estilo
32 SONG: seleccionar modo canción
33 STORE: guardar los ajustes actuales de la
consola.
34 M1: cargar conguración de consola
35 M1: cargar conguración de consola
36 BANK: cambiar el espacio de memoria
37 SONG ∨/VOLUME ∨
Saltar a la siguiente pista MP3
Mantener presionada para reducir el volumen
MP3.
38 SONG ∨/VOLUME ∨
Retroceder a la siguiente pista MP3
Mantener presionada para subir el volumen
MP3.
Pantalla LCD
1 Indicador digital
2 Indicador de notas
3 Volumen
4 Selección de tono
5 Selección de estilo
6 Canciones
7 Ritmo
8 Efecto reverberación
9 Coro
10 Dos voces
11 División de teclado
12 Visualización de acorde
13 Compás
14 FILL IN1/FILL IN2
15 Grabación/reproducción
16 Pulsación
17 Memoria
18 Clave de las notas
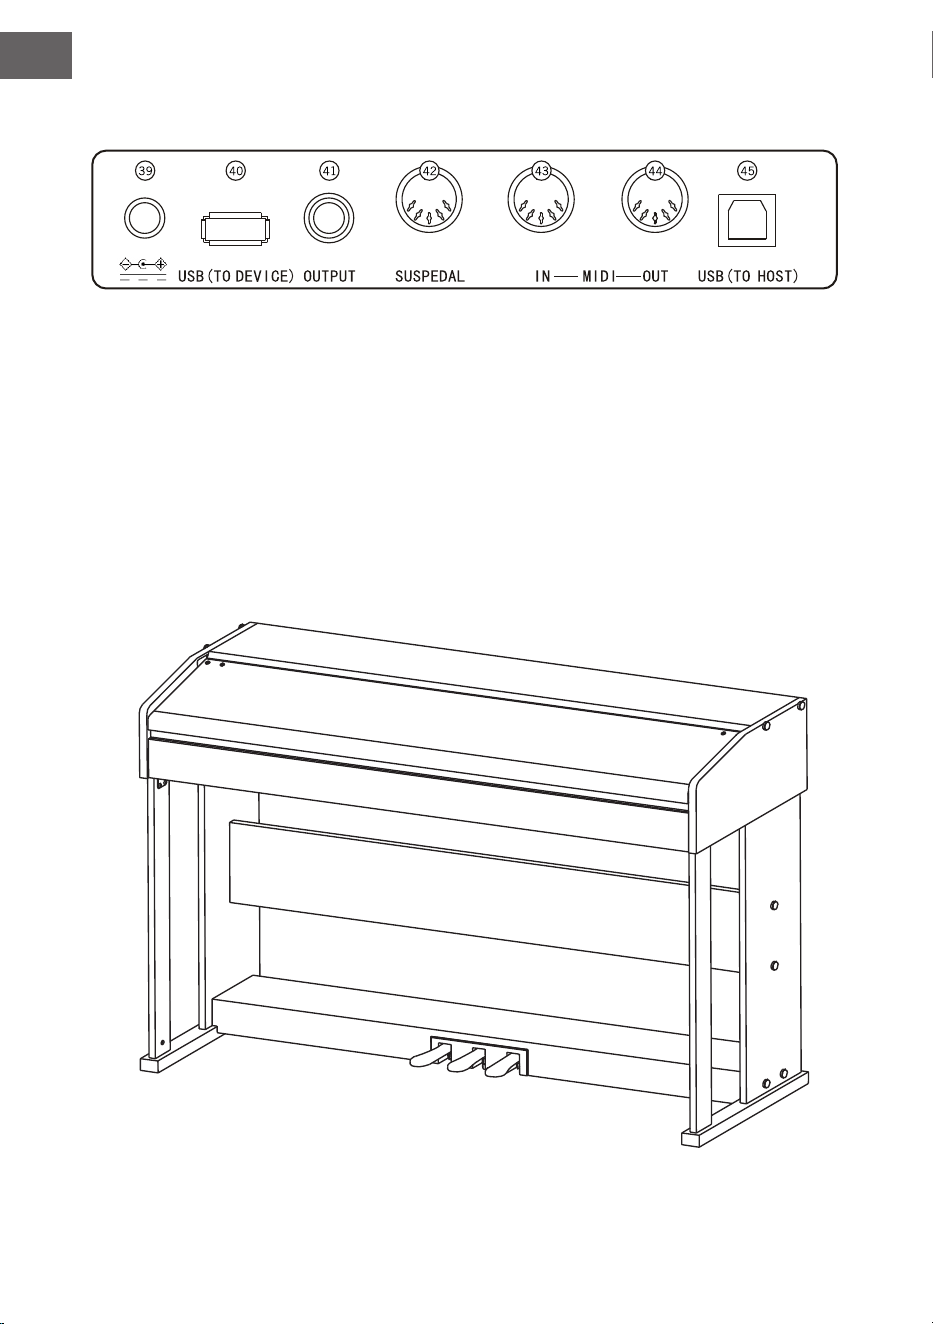
ES
84
Parte trasera
39 Toma para suministro eléctrico externo
40 USB (TO DEVICE): puerto USB
41 OUTPUT: toma de audio para equipo de audio externo
42 Toma para el pedal
43 Toma MIDI IN: para recibir información MIDI, la cual se envía desde equipos MIDI u ordenadores
44 Toma MIDI OUT: para enviar información del aparato al ordenador o a otros dispositivos MIDI a través
de esta toma
45 Toma USB (MIDI)

ES
85
MONTAJE
Cubierta marrón de
plástico
8
14
6
10
1
8
Descripción Número de piezas
Tornillos TM6x50
Tornillos TM6x20
Tornillo interior
Mando M6
Montaje de la estructura del piano
1. Fije las cajas de los pedales con el mando (M6).
2. Introduzca 10 tuercas en los oricios correspondientes de las placas de soporte izquierda y derecha, las
columnas izquierda y derecha y la placa de conexión
3. Una con 6 tornillos TM6x50 las placas de soporte izquierda y derecha y las columnas izquierda y derecha
con las 2 piezas de las patas de apoyo.
4. Una con 4 tornillos TM6x50 las placas de soporte izquierda y derecha a la placa de conexión con 4 tapas
M6 y cierre las tapas.
5. Una la platina de soporte y las cajas de pedales con 4 tornillos TM6x50 y cierre las cubiertas.
6. Coloque la estructura del piano sobre su base y fíjelo con 6 tornillos TM6x20.
7. Conecte el enchufe del pedal MIDI a la toma del pedal situada en la parte trasera del teclado.

ES
86
Mesa para tocar
Construcción in-
ferior
Pieza lateral izqui-
erda
Parte lateral derecha
Pata derecha
Pata izquierda
Columna derecha
Columna
izquierda
Barra del pedal
Parte trasera
Recubrimiento de las
conexiones

ES
87
PUESTA EN FUNCIONAMIENTO
Suministro eléctrico
1. Asegúrese de que el aparato esté apagado cuando lo
conecte al suministro eléctrico.
2. Conecte el conector de la fuente de alimentación a la toma
CC del aparato.
3. Conecte el enchufe a la toma de corriente.
4. Si presiona la tecla POWER, la pantalla LCD le muestra
"Loading", lo que signica que se ha abierto el teclado.
Nota: por su propia seguridad, apague el aparato en caso de tor-
menta o si no lo utiliza durante un periodo prolongado de tiempo.
Conectar auriculares
• Si desea tocar sin molestar a nadie o durante la noche,
puede conectar unos auriculares estéreo a la toma corre-
spondiente de su aparato.
• Los altavoces del instrumento se desactivarán automática-
mente en cuanto conecte los auriculares y el sonido se re-
producirá solamente por estos últimos.
Nota: el uso de auriculares con un volumen excesivo du-
rante un periodo de tiempo prolongado puede ocasionar
daños auditivos.
Conectar accesorios de audio al aparato
• Conectando accesorios de audio externos puede lograr
efectos musicales mejorados.
• A través de la toma AUDIO-OUT, situada en la parte tra-
sera del aparato, puede conectar amplicadores, siste-
mas acústicos estéreo, mesas de sonido, dispositivos de
grabación, etc. mediante un cable.
Nota: asegúrese de que el aparato esté apagado y el vo-
lumen situado en el nivel mínimo antes de conectar otros
dispositivos al piano.
Conectar al ordenador
• Este aparato dispone de un puerto USB.
• A través del cable USB puede conectar el aparato a su orde-
nador y recibir y enviar información en ambas direcciones.
• Por ejemplo, puede almacenar canciones que toque en el
piano en el ordenador o reproducir documentos MIDI de su
ordenador en el aparato.
Nota: el accesorio de audio USB no puede utilizarse al

ES
88
mismo tiempo para la entrada y la salida de audio.
Conectar a otros dispositivos
• Si conecta la toma MIDI IN de su aparato a la MIDI OUT de
un segundo dispositivo, podrá utilizar el piano como fuente
de sonido.
• Si conecta la toma MIDI OUT del aparato a la MIDI IN de un
segundo dispositivo, el instrumento podrá utilizarse como
control MIDI.
Conexión de pedales
Si los pedales se conectan a la toma para pedales de la parte tra-
sera del instrumento, este aparato cuenta con dos funciones dife-
rentes:
1. Si presiona este pedal mientras toca, todos los tonos se re-
producirán más suavemente.
2. Si presiona este pedal mientras toca, se sostendrá el tono
correspondiente.
Conectar dispositivos USB
• El aparato es compatible con dispositivos USB de hasta 32
GB.
• Los archivos MP3 en el dispositivo USB pueden reprodu-
cirse a través del aparato.
Nota: no extraiga el dispositivo USB durante la repro-
ducción. De lo contrario, pueden producirse errores en el
funcionamiento o daños en el dispositivo USB.
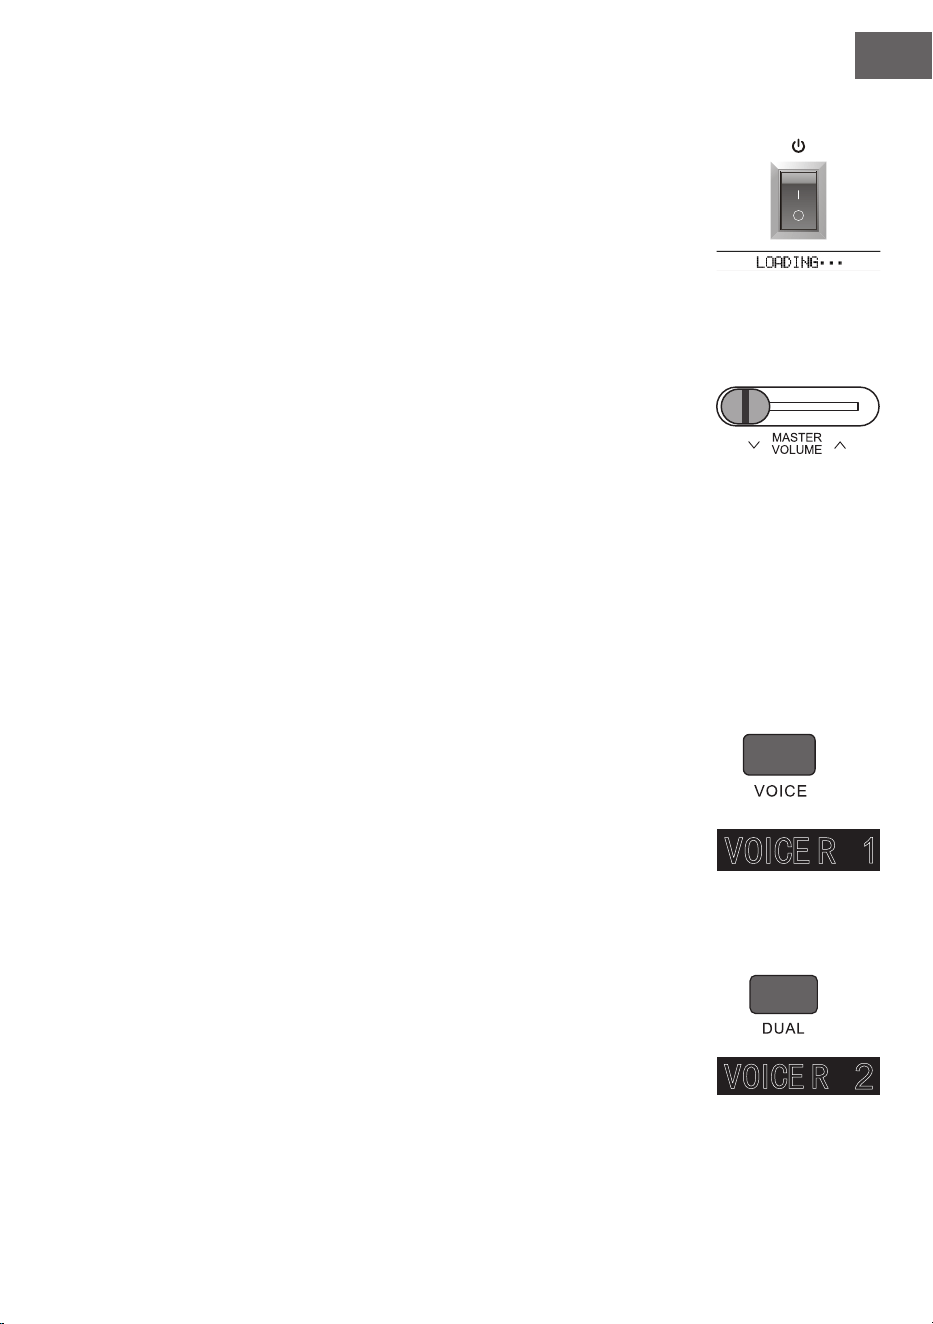
ES
89
Interruptor principal
1. Primero asegúrese de que la fuente de alimentación esté correctamente
conectada.
2. Si presiona la tecla POWER se enciende la pantalla LCD y esta muestra la pan-
talla de inicio.
Nota: si la pantalla LCD no se ilumina después de presionar la tecla POWER,
compruebe que la fuente de alimentación esté conectada correctamente.
Ajuste del volumen
• Después de abrir el instrumento, gire el regulador MASTER VOLUME a la
derecha para subir el volumen y a la izquierda para bajarlo.
• Puede ajustar el volumen según desee.
Seleccionar distintos tipos de sonidos de instrumentos
• Este instrumento dispone de cientos de tipos de sonidos de instrumentos, in-
cluido el sonido de música popular china, percusión, etc.
• Para obtener más información, consulte la tabla de sonidos.
• El instrumento también está equipado con una función de efectos adaptada
relativamente a cada sonido, de modo que el instrumento que toque sonará
mejor.
Seleccionar y reproducir tono
1. Presionando la tecla TONE accederá al modo de selección de tono. El símbolo
de recordatorio "R1", el nombre del tono actual y su número, aparecen en la
pantalla LCD.
2. Para elegir el tono deseado, utilice el teclado numérico y las teclas + y -.
3. Toque las teclas y disfrute de sonidos maravillosos.
Nota: para modicar la fuente del sonido, pulse de nuevo la tecla VOICE.
Ahora se abre la función de dos voces. El indicador correspondiente "R1/
R2/L" se muestra en la pantalla LCD.
Dos voces
Este instrumento dispone de una función de dos voces. Así, pueden reproducirse dos
tonos solapados al mismo tiempo. Con este efecto se enriquece el nivel musical y
simula que dos instrumentos están tocando al mismo tiempo. El primer instrumento
"R1" está presente antes de que se inicie la función. Tras activar la función, también
aparece adicionalmente el instrumento "R2".
1. Para abrir la función, pulse la tecla DUAL. "R2" aparece en la pantalla LCD.
Adicionalmente, aparecen el nombre y el número del tono adicional.

ES
90
2. Seleccione el segundo tono que desee con la tecla VOICE y las teclas `+ y -.
3. De este modo, ambos instrumentos se reproducen de manera sincronizada
y simula que se están tocando dos instrumentos diferentes al mismo tiempo.
4. La función puede nalizarse presionando de nuevo la tecla DUAL. El indica-
dor "R2" desaparece la pantalla y esta regresa a su estado inicial.
Nota: si se ha dividido el teclado del instrumento, la función de dos voces
solo estará disponible para las teclas de la mano derecha. Las teclas de la
mano izquierda no cuentan con esta función.
Lower (división del piano)
La función lower divide el teclado del piano en dos secciones independientes por
el punto de separación y cada una corresponde a un instrumento. El instrumento
de la sección izquierda es el instrumento secundario, y el punto de división de las
teclas puede establecerse en cualquier tecla.
1. Pulse la tecla LOWER para iniciar la función lower. La pantalla muestra el
nombre actual de la voz secundaria y el número, así como el indicador "L" y
"SPLIT".
2. Con la rueda de selección, el teclado numérico o las teclas [+]/[-] puede se-
leccionar la voz secundaria que desee tocar.
3. Si toca el teclado en distintas secciones, escuchará dos instrumentos difer-
entes.
4. Presionando otra vez la tecla LOWER se desactiva la función Lower, "L" de-
saparece de la pantalla LCD y esta regresa a su estado actual.
Keysplit: la posición en la que la voz principal o la voz dual se separa de la
voz secundaria en el teclado se llama "KEYSPLIT". El ajuste estándar para la
keysplit es F#3 (34).
Puede ajustar la división del teclado en cualquier otro punto de este, como se des-
cribe en los ajustes en detalle de la sección del Menú de funciones.
Función táctil (sensibilidad a la pulsación)
El panel de control del instrumento dispone de una función táctil que permite darle
a su representación más expresividad. Puede elegir entre tres distintas funciones
táctiles.
1. Para activar la función, pulse la tecla TOUCH. La función táctil predetermi-
nada es "002" y aparece en la pantalla LCD.
2. Presionando varias veces la tecla Touch podrá seleccionar una de las fun-
ciones en el orden "001-003; OFF" .
3. Si en pantalla aparece "OFF", la función táctil está desactivada.
Modo de piano
Con esta función puede utilizar todo el teclado con el sonido de un piano.

ES
91
1. Pulse la tecla PIANO para activar o desactivar la función.
2. La selección del acompañamiento funciona del mismo modo que en otros
modos. No obstante, solamente puede seleccionarse un acompañamiento
de percusión y ningún armónico.
Nota: en este modo puede abrir tanto la consola de sonido como el menú
de funciones. La función de acordes se cierra automáticamente al activar
este modo.
Metrónomo (indicador de compás)
Si durante su práctica no tiene la seguridad de llevar el compás correctamente,
puede visualizarlo con la función del metrónomo.
1. Para activar la función, pulse la tecla METRONOME. Se indica el compás.
Para desactivar la función, pulse de nuevo la tecla METRONOME.
2. Seleccione los ajustes del compás en el menú de funciones para visualizar las
distintas conguraciones.
Nota: si se abre esta función durante la práctica, se escucha el sonido del
compás al comenzar el siguiente compás y se adapta según el estilo corres-
pondiente.
• Si primero se abre la función, el instrumento se adapta automáticamente al
estilo que haya seleccionado.
• La función también puede activarse durante la grabación, pues no se es-
cuchará en el archivo grabado.
ACOMPAÑAMIENTO
Acompañamiento automático
• Activando esta función puede tocar solamente el piano y el acompañamien-
to, por ejemplo, en forma de orquesta, se reproducirá automáticamente.
Solamente tiene que seleccionar un acompañamiento de la tabla de estilos y
tocar con la mano izquierda los acordes.
• Este instrumento dispone de varios acompañamientos automáticos que es-
tán disponibles en la tabla de estilos. Solo tiene que elegir el que más le guste
y disfrutar de él.
Reproducir acompañamiento automático (reproducir solo la parte de
percusión)
1. Pulse la tecla STYLE para acceder al modo de estilo. En la esquina superi-
or izquierda de la pantalla LCD se ilumina el indicador "STYLE". La pantalla
también muestra simultáneamente el nombre y el número del estilo selec-
cionado.

ES
92
2. Puede elegir el estilo deseado presionando el teclado numérico o las teclas + y -.
3. La parte de percusión del estilo puede reproducirse inmediatamente con la tecla START/STOP. También
puede presionar la tecla SYNC para sincronizar el estilo. El punto del compás también se ilumina en la
pantalla LCD. Puede tocar cualquier tecla para iniciar la actuación.
Reproducir acompañamiento automático (todas las pistas)
1. Inicie el acompañamiento del acorde de bajos automático: pulse la tecla [A.B.C.] una vez para acceder
al modo del acorde de bajos automático. El teclado se divide en dos secciones. La sección de la mano iz-
quierda es la unidad de detección del acorde. La pantalla muestra temporalmente el indicador "A.B.C.". Si
pulsa cualquier tecla en la zona de detección de acorde (estado de inicio de sincronización) escuchará el
fantástico acompañamiento. Pulse la tecla [A.B.C.] por segunda vez para acceder al modo FULL RANGE.
En la pantalla LCD se muestra el indicador Full Ran. En ese momento, todo el teclado se encuentra en la
zona de detección de acorde.
2. Iniciar el acompañamiento A.B.C.
3. Pulse la tecla Sync y toque un acorde en la zona de detección de acorde para iniciar el acompañamien-
to de A.B.C. Si modica un acorde, el acompañamiento se modicará automáticamente. También puede
presionar la tecla START/STOP para iniciar el acompañamiento automático del ritmo de la pista y así
reproducir un acorde en la zona de detección de acorde. En este caso se inicia un acompañamiento au-
tomático para todas las pistas.
Secciones de acompañamiento
El acompañamiento automático de este instrumento contiene muchas secciones diferentes de acompañamien-
to, de modo que se recomienda denominar de manera especial sus propios acompañamientos. Las secciones
incluyen: obra principal (A, B), intro, n. Si reproduce un acompañamiento, puede lograr un resultado más pro-
fesional utilizando las secciones.
1. Intro: la selección del intro es adecuada para comenzar una pieza musical. Tras nalizar la intro, el acom-
pañamiento cambia al ajuste de la obra principal. La longitud de la intro puede variar y depende del estilo
que se haya escogido.
2. Programa principal: la selección de "Main Play" es adecuada para tocar la parte principal de una canción.
El programa principal se reproduce hasta que se presione otra tecla.
3. Relleno (FILL IN): añadiendo la sección 1 o 2 puede crear una pieza musical más profesional. Tras repro-
ducir las secciones añadidas, el acompañamiento pasa de nuevo al programa principal.
4. Fin
Presionar esta tecla es adecuado para nalizar una canción. La canción se naliza automáticamente cuando se
reproduzca la secuencia nal. La longitud de la secuencia nal depende del estilo seleccionado y puede variar.
Nota: si mantiene presionadas las teclas FILL IN 1 o FILL IN 2, la variación se añade en el acompañamien-
to haste que suelte la tecla. El acompañamiento vuelve a cambiar al programa principal. Presionar la
tecla FILL IN modica el programa principal predeterminado. Si el acompañamiento se detiene, la
pantalla LCD lo muestra.
Reproducir distintas secciones de acompañamiento
1. Presionando la tecla STYLE accederá al modo de selección de estilo. Escoja el estilo deseado presionan-
do el teclado numérico o +/-.

ES
93
2. Presione la tecla AUTO CHORD para activar la función de acorde automático.
3. Presione la tecla SYNC para abrir la función de sincronización.
4. Para seleccionar la reproducción principal 1, presione la tecla FILL IN 1.
5. Si presiona la tecla INTRO/ENDING, la pantalla muestra "NOR", lo que signica que el instrumento se
encuentra en el modo de preparación. El acompañamiento automático comienza en cuanto toque un
acorde en la zona del teclado de la mano izquierda.
6. El acompañamiento pasa de la intro al programa principal.
7. Si presiona la tecla FILL IN 2, se añade una pequeña variación en el acompañamiento. El acompañamien-
to, tras nalizar la variación, pasa al programa principal de manera automática.
8. Si pulsa la tecla INTRO/ENDING, el acompañamiento toca una secuencia nal y posteriormente se
detiene.
Conguración del volumen de acompañamiento
El volumen de acompañamiento puede regularse para todo el acompañamiento. Esta función persigue una re-
lación equilibrada entre el volumen de las teclas y el del acompañamiento.
1. Al presionar la tecla ACCOMP VOLUME ∧/∨ aparece en la pantalla LCD el ajuste actual del volumen de
acompañamiento. Presione la tecla ACCOMP VOLUME ∧ para subir el volumen y ACCOMP VOLUME
∨ para bajarlo. Rango de ajuste: 0 - 127.
2. Si presiona las teclas ACCOMP VOLUME ∧ y ACCOMP VOLUME ∨ simultáneamente, el volumen de
acompañamiento se desactiva. La pantalla LCD muestra a continuación "Acommpaniment volume: OFF".
Para activarlo de nuevo, pulse simultáneamente las teclas ACCOMP VOLUME ∧ y ACCOMP VOLUME
∨.
Ritmo
Cada estilo tiene una velocidad que se adecua mejor que el resto. Puede ajustar el valor en función de sus capa-
cidades y de las exigencias de la canción correspondiente.
1. Con las teclas TEMPO ∧ y TEMPO ∨ se puede ajustar el valor de velocidad predeterminado.
2. Presionando simultáneamente las teclas TEMPO ∧ y TEMPO ∨ se restablece la velocidad al valor inicial.
Nota: la velocidad se establece automáticamente para cada estilo. Mientras toca en un determinado es-
tilo, la velocidad será la misma.
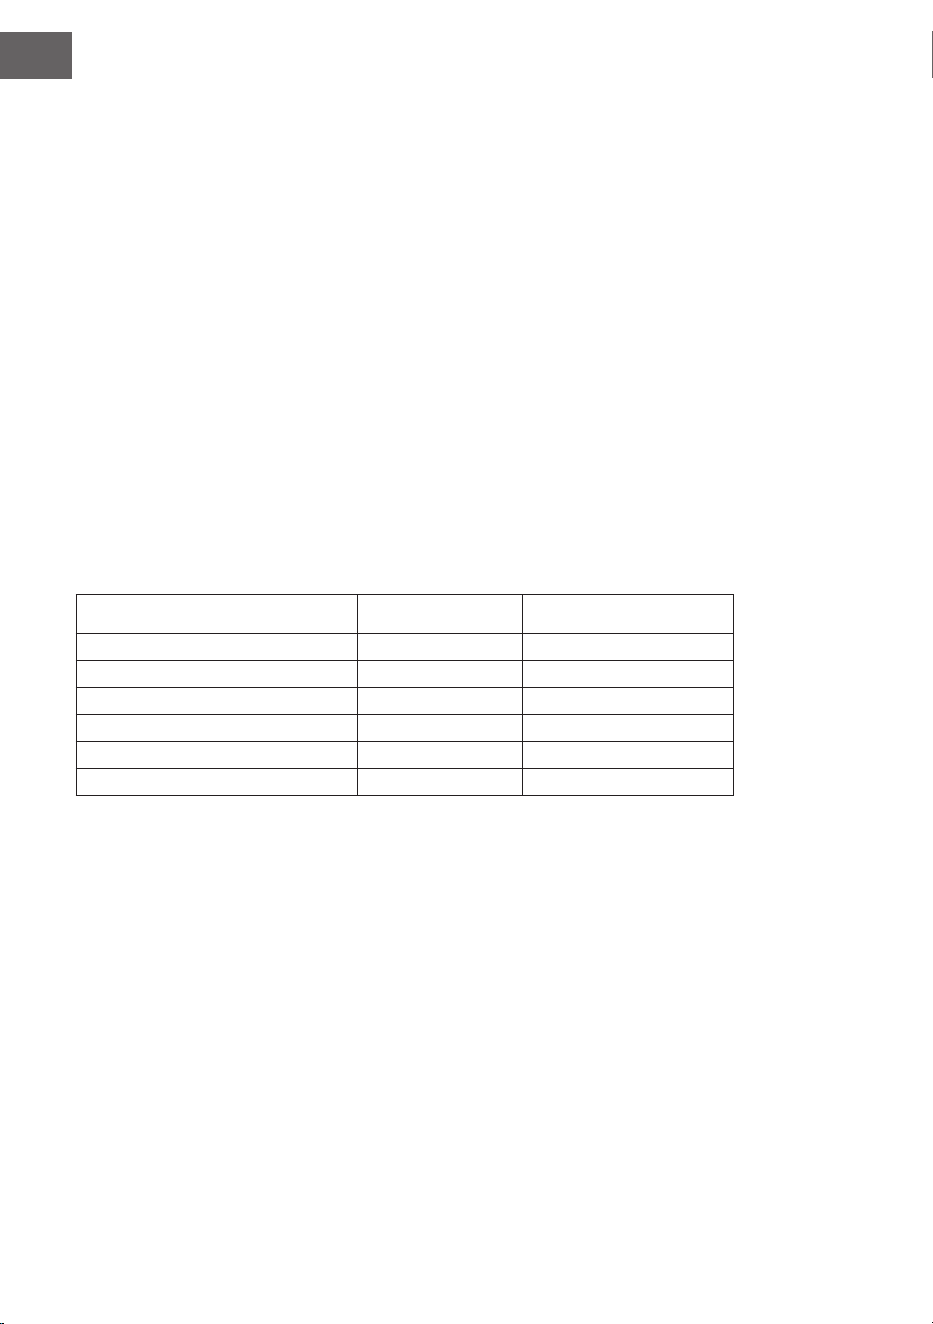
ES
94
DSP
DSP es una tecnología de localización del campo auditivo que imita el sonido en el entor-
no real. Si utiliza esta función puede escuchar una reproducción más abierta y completa.
1. El efecto DSP se activa automáticamente al encender el aparato y la marca "REVERB" y "CHORUS" se
encienden en la pantalla LCD.
2. Presione la tecla [DSP] para activar o desactivar el efecto DSP.
Nota: durante la reproducción del ritmo o de la canción, la activación o desactivación del DSP puede
ocasionar una pausa breve o ruido, algo normal en el cambio del interruptor de efectos.
Ajuste del tono
• Con el ajuste del tono se puede ajustar el volumen de cada pista.
• Pulse la tecla SOUND CONSOLE para acceder al menú de conguración del tono. La pantalla LCD mues-
tra el valor correspondiente. Si se encuentra en el menú de conguración del tono puede ajustar cada
uno de los valores pulsando varias veces la tecla SOUND CONSOLE.
• El volumen puede ajustarse para cada uno de los valores por separado presionando las teclas + y -.
Valores de conguración
Contenido de ajuste Pantalla LCD Rango de ajuste
Volumen de la música de percusión XXX Rhythm 0 - 127
Volumen de graves XXX Bass 0 - 127
Volumen armónico XXX Chord 0 - 127
Volumen de sección XXX Phrase 0 - 127
Volumen de sección izquierda XXX Lower 0 - 127
Volumen de sección derecha XXX Upper 0 – 127
Nota: si a los 5 segundos no se realiza ningún ajuste de tono, se abandona automáticamente el menú de
ajustes de tono
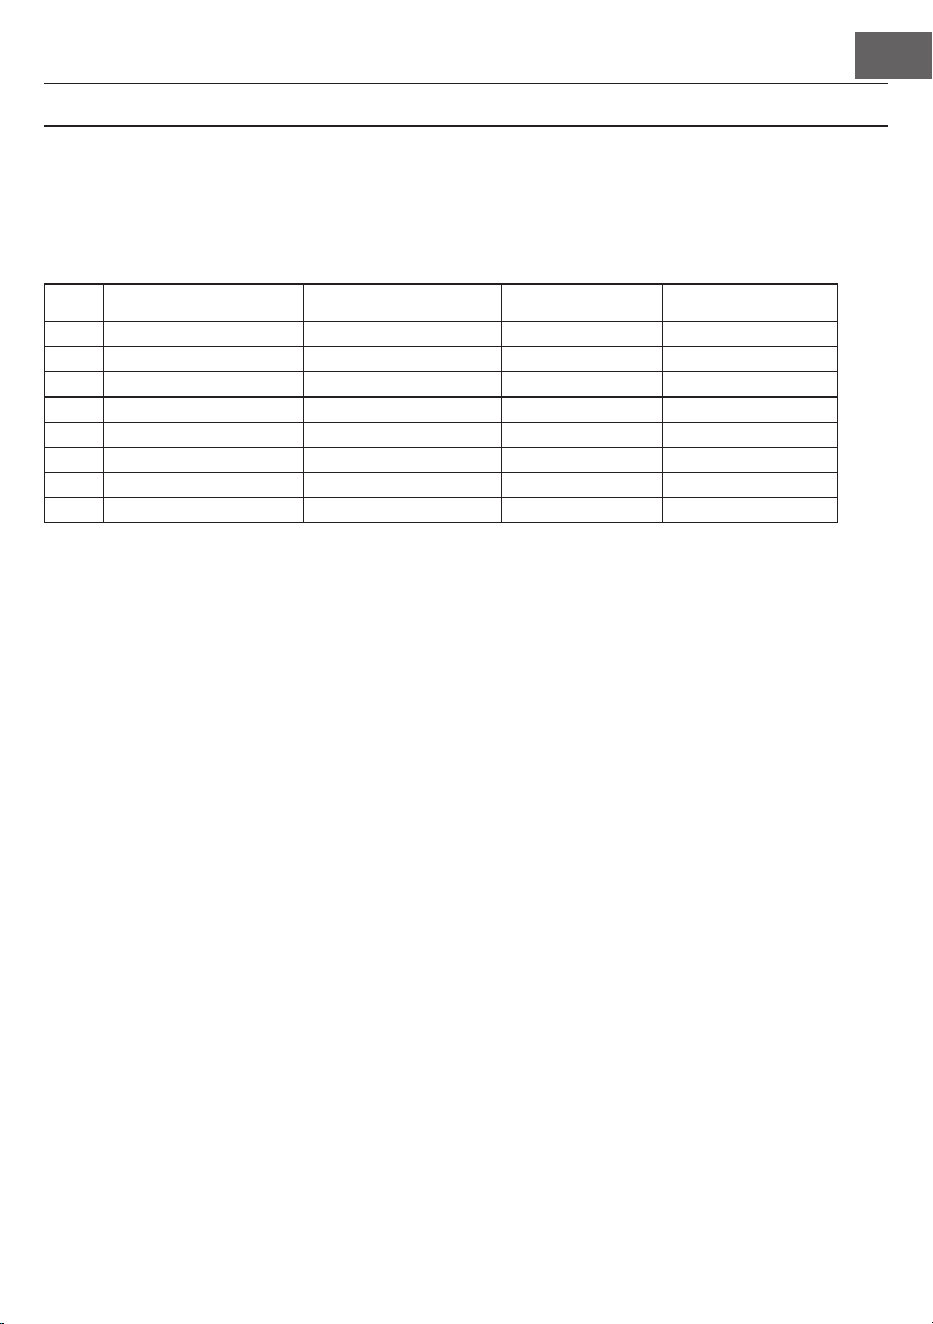
ES
95
MENÚ DE FUNCIONES
Menú de funciones
Pulse la tecla FUNCTION MENU para acceder al menú de funciones. La pantalla LCD muestra el valor corres-
pondiente. En el menú de funciones puede ajustar cada uno de los valores pulsando las teclas + y -.
Núm. Contenido Pantalla LCD Rango de ajuste valor predeterminado
1 Melodía XXX Tune -50 - +50 000
2 División de teclado XXX KeySplit 1 – 88 034
3 Compás XXX BeatType 0, 2 – 9 004
4 Volumen del metrónomo XXX 0 – 127 080
5 Graves en reverberación XXX 0 – 127 050t
6 Graves en coro XXX 0 – 127 000
7 Recepción MIDI XXX 1 – 16, ALL ALL
8 Emisión MIDI XXX 1 – 16 001
Nota: si a los 5 segundos no se realiza ningún ajuste, se abandona automáticamente el menú de funcio-
nes.
Conguración de la melodía
Con este ajuste se puede ajustar el tono en detalle.
1. Para seleccionar el menú de melodía, pulse primero la tecla FUNCTION MENU. Entonces seleccione
"tune menu". En pantalla aparece "XXX tune". Presionando las teclas + y - se puede ajustar la altura del
tono en intervalos de un semitono, en un rango de 50.
2. Si pulsa simultáneamente las teclas + y -, la altura del tono se restablecerá al valor predeterminado, 000.
Esta conguración de parámetros se aplica para el teclado y todos los estilos.
Dividir teclado
El punto en el que se separa la zona automática de acordes y el teclado de la mano derecha se conoce como
"KEYBOARD SPLIT POINT".
Cuando la función de acordes está desactivada, la zona izquierda del teclado también puede utilizarse para
tocar música.
1. Para dividir el teclado, primero pulse la tecla FUNCTION MENU y seleccione el "Keyboard Split". La pan-
talla LCD muestra "XXX KeySplit". Para establecer el punto, puede presionar las teclas + y - o introducir
directamente un número por medio del teclado numérico.
2. Presionando simultáneamente las teclas + y - el punto de división del teclado se restablece al valor pre-
determinado "F#3 (34)".

ES
96
Tipo de compás
1. Para seleccionar el tipo de compás, primero pulse la tecla FUNCTION MENU y elija "Beat Type". La pan-
talla LCD muestra "XXX BeatType". Puede pulsar las teclas + y - para elegir el tipo de compás. En total
existen 9 tipos de compás (0, 2-9) disponibles.
2. Presionando simultáneamente las teclas + y - el tipo de compás se restablece al valor predeterminado
"004".
Conguración del volumen del metrónomo
1. Para congurar el volumen del metrónomo, pulse primero la tecla FUNCTION MENU+ o FUNCTION
MENU- y elija "MetronomeVolume". La pantalla LCD muestra intermitentemente "XXX MetroVol". Para
congurar el volumen del metrónomo puede presionar las teclas + y -. Rango de ajuste: 0 - 127.
2. Presionando simultáneamente las teclas + y - el volumen del metrónomo se restablece al valor prede-
terminado "080".
Conguración de los graves de reverberación
1. Para seleccionar los graves de reverberación, pulse primero la tecla FUNCTION MENU y elija "Reverb
Level". La pantalla LCD muestra "XXX ReverbLev". Puede ajustar el nivel de reverberación con las teclas
+ y -. Rango de ajuste: 0 - 127.
2. Presionando simultáneamente las teclas + y - el nivel de reverberación se restablece al valor predeter-
minado "050".
Conguración del volumen de coro
1. Para seleccionar el volumen de coro, pulse primero la tecla FUNCTION MENU y elija "Chorus Level". La
pantalla LCD muestra "XXX ChorusLev". Puede ajustar el volumen del coro con las teclas + y -. Rango de
ajuste: 0 - 127.
2. Presionando simultáneamente las teclas + y - el volumen del coro se restablece al valor predeterminado
"000".
Conguración de recepción MIDI
1. Para seleccionar el menú de conguración de recepción MIDI, primero pulse la tecla FUNCTION MENU
y seleccione "MIDI receiving channel setting menu". La pantalla LCD muestra "XXX MidiIn". Para cong-
urar los canales de recepción, presione las teclas + y -. Rango de ajuste: 1 - 16, ALL.
2. Presionando simultáneamente las teclas + y - el canal de recepción se restablece al valor predetermi-
nado "ALL".
Conguración de emisión MIDI
1. Para seleccionar el menú de conguración de emisión MIDI, primero pulse la tecla FUNCTION MENU y
seleccione "MIDI sending channel setting menu". La pantalla LCD muestra "XXX MidiOut". Para congu-
rar los canales de recepción, presione las teclas + y -. Rango de ajuste: 1 - 16.
2. Presionando simultáneamente las teclas + y - el canal de recepción se restablece al valor predetermi-
nado "001".

ES
97
Restablecer los valores de fábrica
Con el aparato apagado, pulse simultáneamente las teclas + y -. El aparato restablece los ajustes de fábrica y
elimina todos los datos del usuario, incluidas las canciones de este, el registro y la memoria. En ese momento, la
pantalla LCD muestra "Wait...!". Cuando el aparato se haya reiniciado, podrá utilizarse como siempre.
Conguración de la memoria de registro del panel de control
Este instrumento cuenta con una conguración de memoria de registro del panel de control. Esta puede utili-
zarse para guardar los ajustes más utilizados y así poder utilizarlos más rápidamente cuando los necesite, lo que
agilizará para tocar el instrumento. Con esta función puede guardar casi todos los ajustes del panel de control,
de modo que podrá establecer sus ajustes favoritos con solo pulsar una tecla.
Guardar ajustes
1. Este instrumento cuenta con cuatro bancos de memoria. Cada espacio de memoria tiene 2 espacios de
memoria.
2. Si pulsa la tecla STORE y simultáneamente una de las teclas M1 o M2, se guardará el ajuste actual.
Nota: con la memorización de la conguración actual se sobrescribe el contenido de memoria previo. Si
pulsa simultáneamente las teclas M1 y STORE se eliminan todos los ajustes guardados y la memoria se
reinicia a los ajustes de fábrica.
Reproducir ajustes guardados
Para reproducir los ajustes guardados, pulse las teclas M1 o M2.
Selección del banco de memoria
1. Si pulsa la tecla BANK, la pantalla LCD muestra temporalmente el número del banco de memoria selec-
cionado actualmente.
2. Si pulsa la tecla BANK de nuevo, puede elegir el espacio de memoria. Rango de selección: 1-2.
3. Puede guardar el siguiente contenido en las memorias M1 y M2.
• Ajustes de tono: voz principal, voz dual, punto de división del teclado, efectos digitales, control de sonido.
• Ajustes de acompañamiento: estilo, velocidad, activar/desactivar acordes automáticos, selección de sec-
ción
• Ajustes de funciones: táctil, ajustes en el menú de funciones

ES
98
Control de la música
1. Función de señalización de compás
• Una canción ya dispone del compás marcado antes de que se toque la intro.
2. Funciones de retroceso, avance, reproducción/pausa y detención en canciones
• Pulsando la tecla se avanza en la canción durante la reproducción.
• Pulsando la tecla se retrocede en la canción durante la reproducción.
• Pulsando las teclas / se pausan las canciones y volviendo a pulsar se continúa con la reproducción.
• Si se presiona la tecla se detiene la reproducción.
3. Repetición de la sección
• Presionando la tecla se ja el inicio y el nal de una sección, que se reproduce a continuación en bucle
hasta nalizar la función.
• Si pulsa por primera vez la tecla, se establece el inicio de la sección y, cuando pulse por segunda vez la
tecla, la nalización de la sección.
• Al pulsar de nuevo la tecla naliza la función y las canciones se reproducen completamente de nuevo.
Grabar música
Antes de comenzar la grabación y de seleccionar una pista, es necesario elegir una canción.
1. Pulse la tecla RECORD para acceder a la selección de su canción. En la parte superior izquierda de la
pantalla LCD se muestra el número de la canción. El número predeterminado de su canción para grabar
es "RecSong 1". Puede elegir la canción que desee guardar
con las teclas + y -.
2. Si pulsa la tecla RECORD, accederá al modo de preparación
de grabación. En la página inferior de la pantalla LCD se
muestra en letras rojas "REC" y aparecen 4 puntos de com-
pás al mismo tiempo en la zona del compás. El instrumento
selecciona automáticamente una pista que todavía no con-
tenga datos almacenados para guardar automáticamente
la grabación. La pista de sonido utilizada aparece en la
pantalla LCD y hace referencia a la grabación actual que se
almacena.
3. Puede ajustar el tono, estilo, velocidad, etc. en el modo de
preparación. Puede seleccionar la pista de sonido donde
se guardará su grabación presionando las teclas TRACK 1,
TRACK 2 o TRACK 3. La pista de acompañamiento y la pista
de melodía pueden grabarse al mismo tiempo, mientras que 2
pistas de melodías diferentes no pueden grabarse simultáneamente.
4. Para iniciar la grabación, pulse la tecla START/STOP o comience a tocar en el teclado después de haber
seleccionado una pista de grabación. Después de haber elegido el acompañamiento y la función au-
tomática de acordes para tocar de manera ecaz los acordes con la mano izquierda, puede iniciarse la
grabación.
Notas:
• Los datos del estilo pueden grabarse solo en la pista de acompañamiento. El indicador de grabación dis-
pone de tres estados diferentes: "shine, light, go out".
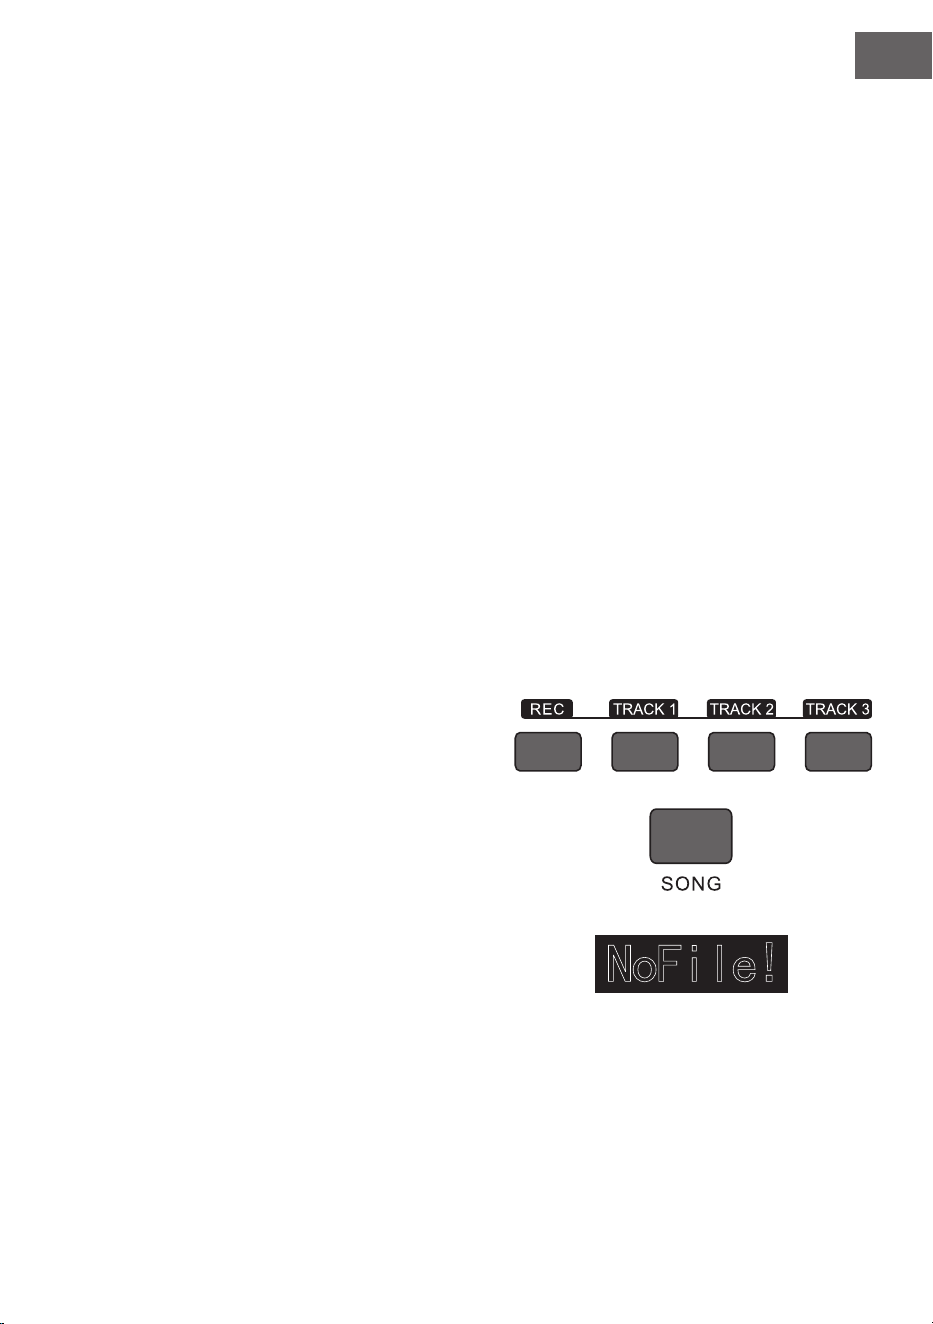
ES
99
• "Shine" signica que esta pista se ha elegido para la grabación. Si en la pista ya hay datos, estos se sobre-
scribirán por los de la grabación actual si continúa.
• "Light" signica que los datos existentes en la pista se sobrescribirán de manera sincronizada con el pro-
ceso de grabación.
• "Go Out" signica que esta pista no tiene o no dispone de datos, pero su reproducción durante la
grabación se ha prohibido.
• La pista de grabación todavía puede modicarse en el modo de preparación.
• En modo preparación, el aparato selecciona automáticamente una pista de grabación vacía (en el orden de
menor a mayor, como por ejemplo: si la pista 2 dispone de datos, el instrumento elegirá para la grabación la
pista 3).
Pista 1: pista de acompañamiento
Pista 2/pista 3: pistas de melodía
Detener grabación
1. Si durante la grabación pulsa la tecla START/STOP, la grabación se interrumpirá inmediatamente. Pulsan-
do las teclas STYLE o VOICE pueden seleccionarse otras funciones,
2. Si la memoria está llena, la grabación se detiene y se guarda automáticamente. La pantalla LCD muestra
"Rec_Full".
3. La grabación se detiene automáticamente si la canción naliza o si ha seleccionado un acompañamiento.
Reproducir pistas grabadas
1. Si durante la grabación se pulsa la tecla RECORD, se interrumpe la grabación actual y se reproducen en
bucle las canciones grabadas hasta el momento.
2. Pulse la tecla SONG para acceder al modo canción. Todas las canciones se reproducen en bucle au-
tomáticamente. El número de las canciones que ha guardado puede seleccionarse presionando las teclas
+ y -. Si no tiene ninguna canción guardada, la pan-
talla muestra "NoFile!". La reproducción en bucle se
interrumpe.
3. Si está disponible, seleccione una de sus canciones
guardadas y pulse la tecla START/STOP para repro-
ducirla en bucle.
Eliminar canciones grabadas
1. Con el instrumento apagado, pulse simultáneamente
las teclas RECORD y SONG para eliminar todas las
grabaciones que ha guardado.
2. Pulse la tecla RECORD durante dos segundos para
eliminar las grabaciones en modo preparación. La
pantalla LCD muestra "Delete". A continuación, pulse
la tecla de la pista (TRACK 1, TRACK 2, TRACK 3) de la que desea eliminar la grabación. Si el indicador de
una pista se ilumina, signicará que se eliminarán esos datos. Si el indicador se apaga, signicará que se
conservarán los datos. Si se iluminan los indicadores de todas las pistas, signicará que todas las pistas
grabadas se eliminarán si usted autoriza el proceso de eliminación presionando la tecla +. El proceso de
eliminación puede interrumpirse presionando la tecla -.

ES
100
Reproducción MP3
Toma MP3: a través de esta toma pueden reproducirse canciones en formato MP3.
• Pulsando la tecla PLAY/PAUSE se reproducen/pausan las canciones.
• Pulse la tecla SONG ∧ para seleccionar la pista anterior y la tecla VOLUME ∨ para bajar el volumen.
• Pulse la tecla SONG ∨ para seleccionar la pista siguiente y la tecla VOLUME ∧ para subir el volumen.
Reproducir canciones
Este instrumento cuenta con muchas canciones diferentes (consultar tabla de canciones). Cada canción dispo-
ne de una función de aprendizaje.
1. Pulse la tecla SONG para acceder al modo canción. La pantalla LCD muestra "SONG". Todas las canciones
se reproducen en bucle.
2. Para elegir la canción, puede utilizar el número de la canción correspondiente o las teclas + o -.
3. Pulse la tecla START/STOP para interrumpir la reproducción de la canción. Si desea continuar con la re-
producción, pulse de nuevo la tecla.
4. Si desea nalizar el modo canción, pulse las teclas STYLE, RECORD, VOICE, DUAL VOICE, etc. en cuanto
nalice una canción.
Modo aprendizaje
La función de aprendizaje del instrumento se compone de tres teclas: LESSON, LEFT y RIGHT, que se pueden
utilizar exclusivamente en el modo de canción. Todas las canciones se pueden practicar en los tres modos dife-
rentes: duración, altura de tonos y modo actuación. El instrumento cuenta con una función de valoración que le
ayuda a avanzar en el proceso de aprendizaje.
1. Para activar el modo de aprendizaje, pulse la tecla LESSON.
2. Ahora, con las teclas LEFT y RIGHT, seleccione si desea practicar la canción con la mano izquierda o
derecha. Si no elige ninguna, por defecto se escogerá la derecha.
Nota: el contenido de aprendizaje de la mano izquierda puede ser diferente en función de la canción selec-
cionada. En algunas canciones se practican acordes con la mano izquierda y en otras, melodías. Durante
el modo de aprendizaje, las melodías y los acordes aparecen en la pantalla LCD, lo que facilita el ejercicio.

ES
101
Modo aprendizaje 1: duración
1. Pulse la tecla LESSON para activar el modo de aprendizaje 1. Las canciones reproducidas en ese mo-
mento se detienen. La pantalla LCD muestra "Les1 R". El aparato estima la duración del ejercicio. En este
modo de aprendizaje no se tienen en cuenta la elección correcta de acordes y notas.
2. Pulse la tecla START/STOP para comenzar con el modo de aprendizaje 1. Si selecciona la mano dere-
cha, se le mostrarán melodías para esa mano. Solamente debe tocar la duración correcta, no se tiene en
cuenta la elección correcta de acordes y notas. La melodía suena de fondo. Si elige la mano izquierda, se
mostrarán los acordes o partes de la melodía para la mano izquierda. Solamente debe tocar la duración
correcta, no se tiene en cuenta la elección correcta de acordes y notas. Si presiona simultáneamente las
teclas LEFT y RIGHT puede practicar con ambas manos al mismo tiempo. El sistema estima de manera
autónoma cúando termina el ejercicio.
Modo de aprendizaje 2: altura del tono
1. Pulse varias veces la tecla LEARN para activar el modo de aprendizaje 2. Se interrumpe la reproducción
de la canción actual. La pantalla LCD muestra "Les2 R". El sistema estima la altura de tono adecuada, lo
que quiere decir que debe tocar el tono correcto. Un fragmento de la canción puede comenzar desde el
principio si toca las notas erróneas. La canción se queda en modo de espera hasta que se toque el tono
correcto.
2. Si antes de comenzar una canción pulsa la tecla START/STOP, el aparato emite una valoración al nalizar
la canción.
Modo de aprendizaje 3: modo actuación
1. Pulse varias veces la tecla LEARN para activar el modo de aprendizaje 3. Se interrumpe la reproducción
de la canción actual. La pantalla LCD muestra "Les3 R". El sistema estima la altura de tono y duración
adecuadas, lo que quiere decir que debe tocar el tono correcto y la duración original de la canción.
2. Si antes de comenzar una canción pulsa la tecla START/STOP, el aparato emite una valoración al nalizar
la canción.
ANEXO
Lista de instrumentos 53
Lista de estilos 62
Lista de canciones 65

ES
102
INDICACIONES SOBRE LA RETIRADA DEL APARATO
Si en su país existe una disposición legal relativa a la
eliminación de aparatos eléctricos y electrónicos, este
símbolo estampado en el producto o en el embalaje
advierte que no debe eliminarse como residuo doméstico.
En lugar de ello, debe depositarse en un punto de recogida
de reciclaje de aparatos eléctricos y electrónicos. Una
gestión adecuada de estos residuos previene consecuencias
potencialmente negativas para el medio ambiente y la salud
de las personas. Puede consultar más información sobre el
reciclaje y la eliminación de este producto contactando con
su administración local o con su servicio de recogida de
residuos.
Este producto contiene baterías. Si en su país existe una
disposición legal relativa a la eliminación de baterías, estas
no deben eliminarse como residuo doméstico. Infórmese
sobre la normativa vigente relacionada con la eliminación de
baterías. Una gestión adecuada de estos residuos previene
consecuencias potencialmente negativas para el medio
ambiente y la salud de las personas.
FABRICANTE E IMPORTADOR (REINO UNIDO)
Fabricante:
Chal-Tec GmbH, Wallstraße 16, 10179 Berlín, Alemania.
Importador para Gran Bretaña:
Berlin Brands Group UK Limited
PO Box 42
272 Kensington High Street
London, W8 6ND
United Kingdom

IT
103
Genle Cliente,
La ringraziamo per aver acquistato il dispositivo. La preghiamo di leggere attenta-
mente le seguenti istruzioni per l’uso e di seguirle per evitare possibili danni. Non
ci assumiamo alcuna responsabilità per danni scaturiti da una mancata osservan-
za delle avvertenze di sicurezza e da un uso improprio del dispositivo. Scansionare
il codice QR seguente per accedere al manuale d’uso più attuale e per ricevere
informazioni sul prodotto.
INDICE
Dati tecnici 104
Avvertenze di sicurezza 105
Tasti e connessioni 106
Montaggio 109
Messa in funzione e utilizzo 111
Accompagnamento 115
Menù funzioni 119
Indicaciones sobre la retirada del aparato 126
Fabricante e importador (Reino Unido) 126

IT
104
DATI TECNICI
Numero articolo 10035596, 10035847
Tastiera Tastiera di pianoforte standard con 88 tasti
Visualizzazione Indicazione LED
Timbro 360 strumenti diversi
Stili 160 stili
Demo 80 brani demo
Effetti Sensibilità di pressione, risonanza, coro, dual, dividere, menù funzioni, con-
solle sound
Registrazione Traccia singola, diverse tracce, registrazione combinata
Accompagnamento Start/Stop, sincronizzare, inserire, velocità
Accordo Accordo automatico ABC
Pedali Pedale sinistro (pedale piano), pedale destro (pedale di risonanza)
Connessioni esterne USB (MP3), USB (MIDI), MIDI IN/OUT
Trasformatore 220 V~, 12-15 V
Ingresso tensione 12-15 V , 2-3 A

IT
105
AVVERTENZE DI SICUREZZA
• Leggere attentamente il manuale d'uso prima dell'utilizzo per evitare danni a cose e/o persone.
• Collegare il dispositivo a una presa elettrica utilizzando esclusivamente l'adattatore incluso in consegna.
L'utilizzo di altri adattatori può danneggiare il dispositivo.
• Non aprire in nessun caso l'alloggiamento dello strumento.
• Non cercare di smontare autonomamente il dispositivo o di sostituire componenti al suo interno. Se do-
vessero comparire malfunzionamenti durante l'uso, smettere di utilizzare il dispositivo e contattare il
servizio di assistenza ai clienti.
• Non posizionare il dispositivo in luoghi estremamente polverosi, dove sono presenti vibrazioni, tempe-
rature basse o alte (come ad esempio luoghi esposti alla luce solare, vicino a fonti di calore, in auto se si
trova al sole ecc.), dato che potrebbero rovinarsi l'aspetto e i componenti interni.
• Non posizionare il dispositivo su superci instabili o sconnesse, altrimenti potrebbe cadere e danneg-
giarsi.
• Non poggiare oggetti pieni di liquidi sul dispositivo, dato che potrebbero cadere e il liquido potrebbe
nire all'interno della tastiera.
• Impostare il volume su 0 prima di accendere il dispositivo. Procedere poi a regolare progressivamente il
volume, in modo da non danneggiare gli altoparlanti.
• Non impostare mai il volume su "Massimo" per evitare di perdere l'udito mentre si suona.
• Non esercitare forza eccessiva sul dispositivo, sui tasti, sul tasto di accensione, sulle connessioni e non
posizionare oggetti pesanti sulla tastiera.
• Il dispositivo deve essere disimballato da un adulto, dato che bambini e bebè corrono il rischio di soffo-
camento a causa dei materiali d'imballaggio. Conservare la confezione di plastica in un luogo sicuro o
smaltirlo nel rispetto delle leggi.
• I piccoli componenti all'interno del dispositivo possono essere pericolosi per bambini sotto ai 3 anni e
non sono adatti a loro.
• Le caratteristiche tecniche del dispositivo possono essere modicate senza preavviso.
• Questo dispositivo può essere utilizzato in tutte le zone climatiche, tranne in zone tropicali.
• Il dispositivo può essere utilizzato solo in luoghi che si trovano al di sotto dei 2000 metri s.l.m.
• Assicurarsi che gocce e spruzzi d'acqua non niscano sulla spina o sul cavo d'alimentazione.

IT
106
1 POWER - Interruttore on/off
2 MASTER VOLUME - Manopola del volume
principale
3 LESSON - Modalità lezione
4 DSP - Attivazione/disattivazione DSP
5 TEMPO ∨/∧– Regolazione della velocità
attuale
6 ACCOMP VOLUME ∨/∧ Volume di accompa-
gnamento
7 SOUND CONSOLE - Aprire il menù di regola-
zione del suono
8 FUNCTION MENU - Menù funzioni
9 LEFT - In modalità lezione selezionare la parte
sinistra degli strumenti
10 DUAL - Attivazione/disattivazione doppia
voce
11 RIGHT - In modalità lezione selezionare la
parte destra degli strumenti
12 LOWER - Selezionare il gruppo sonoro infe-
riore
In modalità canzone
13 Stabilire l'inizio/la ne di una porzione di
brano
14 Tasto pausa
15 Tornare indietro rapidamente
16 Andare avanti rapidamente
17 Avviare/fermare la riproduzione di un brano
In modalità stile
13 START/STOP - Avviare/fermare la riprodu-
zione
14 SYNC - Aprire/chiudere la funzione di sincro-
nizzazione
15 FILL IN 1 - Inserire variazione 1
16 FILL IN 2 - Inserire variazione 2
17 START/STOP - Avviare/fermare la riproduzio-
ne d'accompagnamento
18 PIANO - Attivare/disattivare la modalità piano
19 METRONOME - Aprire/chiudere la funzione
metronomo
20 A,B,C - Selezione accordi
21 TOUCH - Selezione curva touch della tastiera
22 Schermo LCD - Visualizza le informazioni
principali
TASTI E CONNESSIONI
Pannello di controllo sinistro

IT
107
Pannello di controllo destro
23 Manopola di selezione: impostare il valore
24 VOICE: attivare gli strumenti
25 Campo numeri con +/-: impostare i numeri
26 REC - Registrazione
27 TRACK 1 - Selezionare traccia 1 per la regi-
strazione
28 TRACK 2 - Selezionare traccia 2 per la regi-
strazione
29 TRACK 3 - Selezionare traccia 3 per la regi-
strazione
30 PLAY/PAUSE - Riproduzione/Pausa
31 STYLE - Selezionare lo stile
32 SONG - Selezionare la modalità canzone
33 STORE - Memorizzare l'impostazione attuale
del pannello di controllo.
34 M1 - Aprire l'impostazione del pannello di
controllo
35 M1 - Aprire l'impostazione del pannello di
controllo
36 BANK - Cambiare la banca dati
37 SONG ∨/VOLUME ∨
Passare al brano MP3 successivo
Tenere premuto per abbassare il volume
dell'MP3.
38 SONG ∨/VOLUME ∨
Passare al brano MP3 precedente
Tenere premuto per alzare il volume dell'MP3.
Schermo LCD
1 Indicazione digitale
2 Indicazione note
3 Volume
4 Selezione del timbro
5 Selezione dello stile
6 Canzoni
7 Velocità
8 Effetto riverbero
9 Coro
10 Doppia voce
11 Suddivisione tastiera
12 Indicazione accordo
13 Ritmo
14 FILL IN1/FILL IN2
15 Registrazione/Riprodu-
zione
16 Pressione sul tasto
17 Memoria
18 Chiavi musicali

IT
108
Lato posteriore
39 Connessione di alimentazione esterna
40 USB (TO DEVICE) - Connessione USB
41 OUTPUT - Connessione audio per equipaggiamento esterno
42 Connessione PEDALE
43 Connessione MIDI IN - Ricezione di informazioni MIDI, trasmesse da equipaggiamento MIDI esterno o
da computer
44 Connessione MIDI OUT - Inviare informazioni del dispositivo a computer o altri dispositivo MIDI
45 Connessione USB (MIDI)

IT
109
MONTAGGIO
Copertura di plastica
marrone
8
14
6
10
1
8
Denominazione Numero di pezzi
Viti TM6*50
Viti TM6*20
Vite femmina
Vite di regolazione M6
Montaggio del corpo del pianoforte
1. Fissare la pedaliera con la vite di regolazione (M6).
2. Inserire 10 dadi nei fori corrispondenti del pannello di posizionamento sinistro e destro, delle colonne a
sinistra e a destra e della piastra di collegamento.
3. Collegare il pannello di posizionamento sinistro e destro con 6 viti TM6*50 e i 2 piedi d'appoggio alle
colonne a sinistra e a destra.
4. Utilizzare 4 viti TM6*50 per collegare il pannello di posizionamento sinistro e destro alla piastra di colle-
gamento e chiudere i tappi con 4 tappi a vite M6.
5. Utilizzare 4 viti TM6*50 per collegare il pannello di posizionamento alla pedaliera e chiudere le coper-
ture.
6. Posizionare il corpo del pianoforte sul supporto per pianoforte e ssarlo con 6 viti TM6*20.
7. Inserire la spina del pedale MIDI nella presa del pedale sul retro della tastiera.

IT
110
Tavolo per suonare
Sottostruttura
Parte laterale
sinistra
Parte laterale de-
stra
Piede d'appoggio
destro
Piede d'appoggio
sinistro
Colonna destra
Colonna
sinistra
Pedaliera
Lato posteriore
Rivestimento connes-
sione

IT
111
MESSA IN FUNZIONE E UTILIZZO
Alimentazione
1. Assicurarsi che il dispositivo sia spento quando lo si collega
all'alimentazione.
2. Collegare lo spinotto dell'adattatore con la connessione DC
del dispositivo.
3. Inserire la spina nella presa elettrica.
4. Quando si preme il tasto POWER, sullo schermo LCD ap-
pare "Loading", a indicare che il pianoforte è stato acceso.
Nota: per la propria sicurezza, spengere il dispositivo durante
temporali e in caso non venga utilizzato per lunghi periodi.
Collegare le cufe
• Se si vuole esercitarsi da soli o no a tarda notte, è possibile
collegare delle cufe stereo tramite l'apposita connessione
del dispositivo.
• Gli altoparlanti dello strumento vengono disattivati auto-
maticamente non appena si collegano le cufe e l'audio vie-
ne riprodotto solo attraverso le cufe.
Nota: l'utilizzo del volume troppo elevato in cufa per
tempi prolungati può danneggiare l'udito.
Collegare gli accessori audio con il dispositivo
• Collegando gli accessori audio esterni è possibile ottenere
migliori effetti musicali.
• Con la connessione AUDIO OUT sul retro del dispositivo è
possibile collegare con un cavo amplicatori, impianti ste-
reo, mixer, registratori ecc.
Nota: assicurarsi che il dispositivo sia spento e il volume
sia al minimo prima di collegare altri dispositivi al piano-
forte.
Collegamento al computer
• Questo dispositivo è dotato di connessione USB.
• Con un cavo USB è possibile collegare il dispositivo al com-
puter e trasmettere e ricevere informazioni in entrambe le
direzioni.
• Ad esempio è possibile salvare sul computer brani suonati
al pianoforte o riprodurre le MIDI sul proprio computer
tramite il dispositivo.
Nota: gli accessori audio UBS non possono essere impo-
stati contemporaneamente per ingresso e uscita audio.

IT
112
Connessione ad altri dispositivi
• Se si collega la connessione MIDI IN del proprio dispositivo
con la connessione MIDI OUT di altri dispositivi, è possibile
utilizzare il pianoforte come fonte sonora.
• Se si collega la connessione MIDI OUT del proprio dispositi-
vo con la connessione MIDI IN di altri dispositivi, è possibile
utilizzare lo strumento come controllo MIDI.
Connessione pedali
Se i pedali vengono collegati all'apposita connessione sul retro
dello strumento, il dispositivo è dotato di due funzioni diverse per
i pedali:
1. Premendo questo pedale mentre si suona, tutte le note ven-
gono suonate a volume più basso.
2. Premendo questo pedale mentre si suona, le note risuona-
no.
Connessione di dispositivi USB
• Il pianoforte supporta dispositivi USB no a 32 GB.
• Tramite il dispositivo si possono riprodurre le MP3 sulla
chiavetta USB.
Nota: non scollegare il dispositivo USB durante la ripro-
duzione, altrimenti potrebbero risultare avvisi di errore o
danni al dispositivo USB.

IT
113
Interruttore generale
1. Assicurarsi prima di tutto che l'adattatore sia ben collegato.
2. Quando si preme POWER, lo schermo LCD si illumina e appare la schermata
di avvio.
Nota: se lo schermo LCD non si illumina dopo aver premuto POWER, control-
lare se l'adattatore è ben collegato.
Regolazione del volume
• Dopo aver acceso lo strumento, ruotare la manopola MASTER VOLUME ver-
so destra per alzare il volume e verso sinistra per abbassarlo.
• Il volume può essere regolato in base alle singole necessità e preferenze.
Impostazione di diversi tipi di strumenti
• Questo strumento è dotato di centinaia di suoni di strumenti, incluso il suono
di musiche popolari cinesi, batteria ecc.
• Per informazioni più dettagliate dare un'occhiata alla tabella dei suoni.
• Inoltre lo strumento è dotato di un effetto, che è relativo al rispettivo suono, in
modo che lo strumento suonato abbia un suono migliore.
Selezionare e suonare un suono
1. Premendo NOTE si entra nella modalità di selezione del suono. Il simbolo "R1",
il nome del suono attuale e il numero appaiono sullo schermo LCD.
2. Utilizzare i tasti numerici e i tasti + e - per selezionare il suono desiderato.
3. Suonare i tasti e godersi i suoni meravigliosi.
Nota: premere VOICE per cambiare la fonte sonora. Si apre la funzione a
doppia voce. Le relative indicazioni "R1/R2/L" appaiono sullo schermo LCD.
Duale
Questo strumento è dotato di funzione duale. Con questa funzione è possibile suo-
nare contemporaneamente due suoni sovrapposti. Con questo effetto si arricchi-
scono i livelli musicali, dando l'impressione che vengano suonati due strumenti nello
stesso momento. Il primo strumento "R1" è presente già prima dell'inizio della fun-
zione. Dopo aver attivato la funzione è presente anche lo strumento "R2".
1. Premere DUAL per attivare la funzione. Sullo schermo LCD appare "R2". Inol-
tre appaiono il nome e il numero del suono aggiuntivo.
2. Selezionare la seconda voce desiderata con VOICE e i tasti + e -.
3. Suonando entrambi gli strumenti in sincronia sembra che vengano suonati
due strumenti diversi contemporaneamente.
4. La funzione viene disattivata premendo di nuovo DUAL. L'indicazione "R2"

IT
114
scompare dallo schermo, che torna allo stato precedente.
Nota: se la tastiera dello strumento è stata divisa, la funzione duale è di-
sponibile solo per i tasti della mano destra. I tasti della mano sinistra non
sono dotati di tale funzione.
Lower (Suddivisione della tastiera)
La funzione Lower suddivide la tastiera con il punto di divisione in due sezioni di-
verse e ogni sezione ha un altro strumento. Lo strumento della sezione a sinistra
corrisponde allo strumento inferiore e il punto di divisione può essere liberamente
impostato sul tasto desiderato.
1. Premere LOWER per azionare la funzione LOWER. Il display visualizza il
nome attuale, il numero del basso, le indicazioni "L" e "SPLIT".
2. E' possibile selezionare il basso con la manopola, il tasto numerico oppure
[+]/[-].
3. Se si suona la tasteria in diverse sezioni, si sentono due strumenti.
4. Quando si preme nuovamente LOWER, la funzione LOWER si spegne e "L"
scompare dallo schermo LCD, che ritorna nello stato precedente.
Keysplit: la posizione, in cui la voce principale o doppia viene divisa dal basso
sulla tasteria, si chiama "KEYSPLIT". L'impostazione di default per lo keysplit
è F#3 (34).
E' possibile impostare la suddivisione della tastiera anche in un altro punto della
tastiera, come descritto nella sezione Impostazioni del capitolo Menù funzioni.
Funzione touch (sensibilità di pressione)
Il pannello di controllo dello strumento è dotato di una funzione touch, che per-
mette di dare maggiore espressività alla performance. Si possono selezionare tre
diverse funzioni touch.
1. Premere TOUCH per attivare la funzione. La funzione touch predenita è
"002" e appare sullo schermo LCD.
2. Premendo più volte touch è possibile selezionare una delle funzioni nella
sequenza "001-003; OFF" .
3. Quando appare "OFF" sullo schermo LCD signica che la funzione touch è
disattivata.
Modalità pianoforte
Questa funzione permette di utilizzare tutta la tastiera con il suono di un piano-
forte.
1. Per attivare/disattivare la funzione premere il tasto PIANO.
2. La selezione dell'accompagnamento funziona come nelle altre modalità. Si
può selezionare solo un accompagnamento con strumenti a percussione e
non armonici.

IT
115
Nota: in questa modalità è possibile è possibile aprire sia la consolle di re-
golazione del suono che il menù funzioni. La funzione accordo viene chiusa
automaticamente quando si attiva questa modalità.
Metronomo (scansione del ritmo)
Se non si è sicuri che il ritmo sia giusto quando ci si esercita, è possibile attivare la
funzione metronomo.
1. Premere METRONOME per attivare la funzione. Il ritmo viene scandito.
Premere di nuovo METRONOME per disattivare la funzione.
2. Selezionare l'impostazione ritmica nel menù funzioni per visualizzare le va-
rie impostazioni.
Nota: se la funzione viene aperta mentre si suona, il suono del ritmo viene
emesso all'inizio della prossima battuta e si adegua al relativo stile.
• Quando viene aperta la funzione, lo strumento la adatta automaticamente
allo stile selezionato.
• La funzione può essere attivata anche durante la registrazione, dato che il
metronomo non sarà udibile sul le registrato.
ACCOMPAGNAMENTO
Accompagnamento automatico
• Attivando questa funzione è possibile suonare solo il piano e l'accompagna-
mento, ad esempio sotto forma di orchestra, viene riprodotto automatica-
mente. Bisogna solo selezionare un accompagnamento dalla tabella dello
stile e suonare gli accordi con la mano sinistra.
• Questo strumento è dotato di diversi accompagnamenti automatici, visibili
nella tabella dello stile. Non ti resta altro che scegliere quello adeguato e
godertelo.
Riproduzione dell'accompagnamento automatico (riprodurre solo la parte
delle percussioni)
1. Premere STYLE per passare in modalità stile. Nell'angolo in alto a sinistra
dello schermo LCD si illumina l'indicazione "STYLE". Lo schermo visualizza
inoltre contemporaneamente il nome e il numero dello stile attualmente se-
lezionato.
2. Selezionare lo stile desiderato premendo i tasti numerici oppure + e -.
3. La parte delle percussioni dello stile può essere riprodotta subito premendo
START/STOP. Inoltre è possibile premere SYNC per sincronizzare lo stile.
Sullo schermo LCD si illumina anche il punto della battuta. Basta premere un
tasto a piacere per iniziare la performance.

IT
116
Riproduzione dell'accompagnamento automatico (tutte le tracce)
1. Per avviare l'accompagnamento basso-accordo automatico: premere la prima volta il tasto [A.B.C] per
accedere alla modalità automatica basso-accordo. La tastiera è suddivisa in due sezioni, quella per la
mano sinistra è la sezione che riconosce l'accordo. Lo schermo visualizza provvisoriamente l'indicazio-
ne 'A.B.C.'. Quando si preme qualsiasi tasto nella sezione di riconoscimento degli accordi (stato di avvio
sync), si sente l'accompagnamento fantastico. Premere il tasto [A.B.C.] una seconda volta per entrare
nella modalità FULL RANGE. Lo schermo LCD visualizza l'indicazione Full Ran. A questo punto tutta la
tastiera si trova nella sezione di riconoscimento degli accordi.
2. Avviare l 'accompagnamento A.B.C.
3. Premere il tasto Sync e suonare un accordo nella sezione di riconoscimento degli accordi per avviare
l'accompagnamento di A.B.C. Se si modica un accordo, si modica automaticamente anche l'accompa-
gnamento. Si può anche premere START/STOP per avviare l'accompagnamento automatico della traccia
del ritmo e suonare un accordo nella sezione di riconoscimento degli accordi. In questo modo si avvia
l'accompagnamento automatico per tutte le tracce.
Sezioni di accompagnamento
L'accompagnamento automatico di questo strumento comprende numerose sezioni di accompagnamento. Per
questo si consiglia di organizzare appositamente i propri accompagnamenti. Le sezioni comprendono: opera
principale (A, B), intro, ne. Se è possibile riprodurre l'accompagnamento, utilizzando le sezioni si può realizzare
una performance più professionale.
1. Intro: la selezione dell'intro è adatta all'inizio di un pezzo. Finito l'intro l'accompagnamento passa alle im-
postazioni dell'opera principale. La lunghezza dell'intro può essere diversa in base allo stile selezionato.
2. Programma principale: la selezione di "Main Play" è adatta quando viene suonata la parte principale di un
bran Il programma principale viene riprodotto no a quando si preme un altro tasto.
3. Inserire (FILL IN): l'inserimento della sezione 1 o 2 permette di conferire più professionalità alla perfor-
mance. Dopo aver riprodotto le sezioni inserite, l'accompagnamento torna al programma principale.
4. Fine
Questo tasto può essere premuto alla ne di un pezzo. Il pezzo si conclude automaticamente quando viene
suonata la sequenza nale. La lunghezza della sequenza nale dipende dallo stile selezionato e può variare.
Nota: tenendo premuto FILL IN 1 o FILL IN 2, la variazione viene inserita nell'accompagnamento no a
quando si rilascia il tasto. L'accompagnamento torna poi al programma principale. Premendo FILL IN si
cambia il programma principale predenito. Quando l'accompagnamento si ferma viene visualiz-
zato sullo schermo LCD.
Riproduzione di diverse sezioni di accompagnamento
1. Premendo STYLE si entra nella modalità di selezione dello stile. Selezionare lo stile desiderato premendo
i tasti numerici oppure + e -.
2. Premere AUTO CHORD per attivare la funzione di accordo automatico.
3. Premere SYNC per aprire la funzione di sincronizzazione.
4. Premere FILL IN 1 per selezionare la riproduzione principale 1.
5. Se si preme INTRO/ENDING, lo schermo visualizza "NOR", che signica che lo strumento si trova in mo-
dalità di preparazione. L'accompagnamento inizia non appena si suona un accordo nella sezione della
tastiera della mano sinistra.

IT
117
6. Dopo l'intro, l'accompagnamento passa al programma principale.
7. Se si preme FILL IN 2, viene inserita una piccola variazione nell'accompagnamento. Finita la variazione,
l'accompagnamento torna automaticamente al programma principale.
8. Se si preme INTRO/ENDING, l'accompagnamento suona una sequenza conclusiva e poi si arresta.
Impostazione del volume di accompagnamento
Il volume può essere regolato per l'intero accompagnamento. Questa funzione permette di avere un rapporto
equilibrato tra volume dei tasti e dell'accompagnamento.
1. Premendo ACCOMP VOLUME ∧/∨ sullo schermo LCD viene visualizzata l'impostazione attuale del vo-
lume dell'accompagnamento. Premere ACCOMP VOLUME ∧ per alzare il volume e ACCOMP VOLUME
∨ per abbassarlo. Intervallo di regolazione: 0 – 127.
2. Premendo contemporaneamente ACCOMP VOLUME ∧ e ACCOMP VOLUME ∨, viene chiuso il volume
dell'accompagnamento. Lo schermo LCD visualizza poi "Accompaniment volume: OFF". Premere di nuo-
vo ACCOMP VOLUME ∧ e ACCOMP VOLUME ∨ contemporaneamente per aprirlo di nuovo.
Velocità
Ogni stile ha una velocità diversa. Il valore può essere regolato in relazione alle capacità e alle necessità dettate
dei singoli brani.
1. Premendo TEMPO ∧ e TEMPO ∨ si può regolare la velocità predenita.
2. Premendo contemporaneamente TEMPO ∧ e TEMPO ∨ la velocità viene resettata al valore originale.
Nota: la velocità si stabilisce automaticamente per ogni stile. Mentre si suona in un determinato stile, la
velocità resta la stessa.

IT
118
DSP
Con DSP si intende una tecnologia per localizzare il campo del suono, che imita il suono nell'am-
biente reale. Quando si utilizza questa funzione, si può sentire una riproduzione più aperta e piena.
1. L'effetto DSP si aziona automaticamente all'accensione e sullo schermo LCD si illuminano i simboli "RE-
VERB" e "CHORUS".
2. Premere [DSP] per accendere o spegnere l'effetto DSP.
Nota: durante la riproduzione del ritmo o della canzone, l'accensione o lo spegnimento del DSP può cau-
sare una breve pausa o un rumore, cosa normalissima quando si preme l'interruttore a effetto.
Regolazione suono
• Con la regolazione del suono è possibile impostare il volume di ogni brano.
• Premere SOUND CONSOLE per entrare nel menù di regolazione del suono. Lo schermo LCD visualizza
il valore. Quando ci si trova nel menù di regolazione del suono è possibile impostare i singoli valori pre-
mendo più volte SOUND CONSOLE.
• Il volume di ogni singolo valore può essere regolato separatamente con + e -.
Valori di impostazione
Contenuto da regolare Spia LCD Intervallo di regolazione
Volume percussioni XXX Rhythm 0 - 127
Volume basso XXX Bass 0 - 127
Volume armonia XXX Chord 0 - 127
Volume sezione XXX Phrase 0 - 127
Volume sezione mano sinistra XXX Lower 0 - 127
Volume sezione mano destra XXX Upper 0 – 127
Nota: se non si effettuano regolazioni del suono entro 5 secondi, il menù viene abbandonato automati-
camente

IT
119
MENÙ FUNZIONI
Menù funzioni
Premere FUNCTION MENU per entrare in questo menù. Lo schermo LCD visualizza il valore. Nel menù funzio-
ni possono essere impostati i singoli valori premendo + e -.
N. Indice Spia LCD Intervallo di regola-
zione
Valore predenito
1 Melodia XXX Tune -50 - +50 000
2 Suddivisione tastiera XXX KeySplit 1 – 88 034
3 Ritmo XXX BeatType 0, 2 – 9 004
4 Volume metronomo XXX 0 – 127 080
5 Profondità risonanza XXX 0 – 127 050t
6 Profondità coro XXX 0 – 127 000
7 Ricezione MIDI XXX 1 – 16, ALL ALL
8 Trasmissione MIDI XXX 1 – 16 001
Nota: se non si effettuano regolazioni entro 5 secondi, il menù funzioni viene abbandonato automatica-
mente.
Impostazione melodia
Con questa impostazione è possibile regolare in modo dettagliato l'altezza del suono.
1. Premere FUNCTION MENU per selezionare il menù melodia e da qui "tune menu". Lo schermo visualizza
temporaneamente "XXX Tune". Premendo i tasti + e - è possibile regolare l'altezza del suono di mezza
tonalità in un intervallo di 50.
2. Premendo contemporaneamente + e -, l'altezza del suono torna al valore predenito 000. L'impostazione
di questo parametro vale per la tastiera e per tutti gli stili.
Suddivisione della tastiera
Il punto in cui vengono divise la sezione di accordo automatico e la tastiera della mano destra si chiama "KEY-
BOARD SPLIT POINT".
Se la funzione di accordo automatico è disattivata, anche la sezione sinistra della tastiera può essere utilizzata
per suonare musica.
1. Per dividere la tastiera premere FUNCTION MENU e selezionare "Keyboard Split". Sullo schermo LCD
appare "XXX KeySplit". Per determinare il punto, premere i tasti + e - oppure inserire direttamente il
numero con i tasti numerici.
2. Premendo contemporaneamente i tasti + e - , il punto di divisione della tastiera torna al valore prede-
nito di "F#3 (34)".

IT
120
Tipo di ritmo
1. Per selezionare il tipo di ritmo premere FUNCTION MENU e selezionare "Beat-Type". Sullo schermo
LCD appare "XXX BeatType". Il tipo di ritmo può essere selezionato con i tasti + e -. Sono disponibili com-
plessivamente 9 tipi di ritmo (0, 2-9).
2. Premendo contemporaneamente i tasti + e - , il tipo di ritmo torna al valore predenito "004".
Impostazione del volume del metronomo
1. Per impostare il volume del metronomo premere FUNCTION MENU + oppure FUNCTION MENU - e
selezionare "MetronomeVolume". Lo schermo LCD visualizza temporaneamente "XXX MetroVol". Utiliz-
zare i tasti + e - per impostare il volume del metronomo. Intervallo di regolazione: 0 - 127.
2. Premendo contemporaneamente i tasti + e - , il volume del metronomo torna al valore predenito "080".
Impostazione del livello di risonanza
1. Per selezionare il livello di risonanza premere FUNCTION MENU e selezionare "Reverb Level". Sullo
schermo LCD appare "XXX ReverbLev". Utilizzare i tasti + e - per impostare il livello di risonanza. Inter-
vallo di regolazione: 0 - 127.
2. Premendo contemporaneamente i tasti + e - , il livello di risonanza torna al valore predenito "050".
Impostazione del volume del coro
1. Per selezionare il volume del coro premere FUNCTION MENU e selezionare "Chorus Level". Sullo scher-
mo LCD appare "XXX ChorusLev". Utilizzare i tasti + e - per impostare il volume del coro. Intervallo di
regolazione: 0 - 127.
2. Premendo contemporaneamente i tasti + e - , il volume del coro torna al valore predenito "000".
Impostazione ricezione MIDI
1. Per selezionare il menù di impostazione ricezione MIDI premere FUNCTION MENU e selezionare "MIDI
receiving channel setting menu". Sullo schermo LCD appare "XXX Midiln". Utilizzare i tasti + e - per impo-
stare i canali di ricezione. Intervallo di regolazione: 1 - 16, ALL.
2. Premendo contemporaneamente i tasti + e - , il canale di ricezione torna al valore predenito "ALL".
Impostazione trasmissione MIDI
1. Per selezionare il menù di impostazione trasmissione MIDI premere FUNCTION MENU e selezionare
"MIDI sending channel setting menu". Sullo schermo LCD appare "XXX MidiOut". Utilizzare i tasti + e -
per impostare i canali di trasmissione. Intervallo di regolazione: 1 - 16.
2. Premendo contemporaneamente i tasti + e - , il canale di trasmissione torna al valore predenito "001".
Resettare alle impostazioni di fabbrica
Premere contemporaneamente i tasti + e - a dispositivo spento. Il dispositivo torna alle impostazioni di fabbrica
e cancella tutti i dati dell'utente, inclusi: brani dell'utente, registrazione, memoria. In questo lasso di tempo sullo
schermo LCD appare "Wait...!". Una volta resettato il dispositivo, è possibile tornare a utilizzarlo normalmente.
Impostazione della memoria di registrazione del pannello di controllo

IT
121
Questo strumento è dotato di un'impostazione della memoria di registrazione del pannello di controllo, che
può essere utilizzata per salvare le impostazioni usate con maggiore frequenza e per poterle utilizzare più rapi-
damente quando se ne ha bisogno, in modo da facilitare l'uso dello strumento. Con questa funzione è possibile
salvare quasi tutte le impostazioni del pannello di controllo, in modo da poter risalire alle impostazioni preferite
semplicemente premendo un tasto.
Salvataggio delle impostazioni
1. Questo dispositivo è dotato di quattro banche dati. Ogni banca dati ha 2 stati di memoria.
2. Premendo STORE e tenendo premuto contemporaneamente uno dei tasti M1 o M2 è possibile salvare
l'impostazione corrente.
Nota: quando si salva l'impostazione corrente, lo stato della memoria precedente viene sovrascritto. Te-
nendo premuti contemporaneamente STORE e M1 vengono cancellate tutte le impostazioni salvate e la
memoria viene resettata alle impostazioni di fabbrica.
Riproduzione delle impostazioni salvate
Premere M1 o M2 per riprodurre le impostazioni salvate.
Selezione di una banca dati
1. Quando si preme BANK, sullo schermo LCD appare il numero della banca dati attualmente selezionata.
2. Premendo di nuovo BANK è possibile selezionare la memoria. Intervallo di selezione: 1 - 2.
3. I seguenti contenuti possono essere salvati nelle memorie M1 e M2.
• Impostazioni sonore: voce principale, doppia voce, punto di divisione della tastiera, effetti digitali, mixer.
• Impostazioni dell'accompagnamento: stile, velocità, attivare/disattivare accordi automatici, selezione
della sezione
• Impostazioni delle funzioni: touch, impostazioni nel menù funzioni

IT
122
Controllo della musica
1. Funzione ritmo guida
• Un brano è già dotato di un ritmo guida prima che venga suonato l'intro.
2. Avanzare e retrocedere rapidamente, play/pausa e stop dei brani
• Premere per avanzare rapidamente nei brani durante la riproduzione.
• Premere per tornare indeitro rapidamente nei brani durante la riproduzione.
• Premere per mettere in pausa / i brani. Premere una seconda volta per riprendere la riproduzione.
• Premendo si arresta la riproduzione.
3. Ripetere una sezione
• Premendo è possibile determinare l'inizio e la ne di una sezione, che può poi essere riprodotta in
loop no a quando viene terminata la funzione.
• Quando si preme il tasto per la prima volta viene denito l'inizio della sezione. Premendo una seconda
volta si determina la ne.
• Premendo di nuovo si termina la funzione e i brani vengono di nuovo riprodotti completamente.
Registrare la musica
Prima di iniziare la registrazione e di selezionare una traccia, è necessario scegliere un brano.
1. Premere RECORD per accedere alla selezione dei brani. Sul lato in alto a sinistra dello schermo LCD
appare il numero del brano. Il nome predenito del brano da registrare è "RecSong 1". Utilizzare i tasti +
e - per selezionare il brano che si desidera salvare.
2. Premendo ora RECORD si accede alla modalità di prepara-
zione della registrazione. Sul lato inferiore dello schermo
LCD viene visualizzato "REC" in rosso e appaiono contem-
poraneamente 4 punti del ritmo nel settore di indicazione
del ritmo. Lo strumento seleziona automaticamente una
traccia che non contiene le salvati, per memorizzare au-
tomaticamente la registrazione. La traccia utilizzata appare
sullo schermo LCD e si riferisce alla registrazione attuale,
che viene salvata lì.
3. In modalità di preparazione è possibile regolare suono, sti-
le, velocità ecc. Premendo TRACK 1, TRACK 2 o TRACK 3 è
possibile scegliere la traccia su cui salvare la registrazione.
La traccia di accompagnamento e melodica possono essere
registrate contemporaneamente, mentre non è possibile re-
gistrare contemporaneamente 2 tracce melodiche diverse.
4. Premere START/STOP per iniziare la registrazione o a suonare la tastiera, dopo aver selezionato una
traccia di registrazione. Dopo aver selezionato l'accompagnamento e la funzione di accordo automatico,
per suonare in modo efcace gli accordi nella sezione della mano sinistra, è possibile iniziare la registra-
zione.
Note:
• I dati di stile si possono registrare solo sulla traccia di accompagnamento. L'indicazione di registrazione è
dotata di tre stati diversi: "Shine, Light, Go out."
• "Shine" signica che questa traccia è stata selezionata per la registrazione. Se sulla traccia sono già pre-

IT
123
senti dati, questi vengono sovrascritti dalla registrazione attuale quando si procede.
• "Light" signica che i dati presenti sulla traccia vengono sovrascritti in modo sincronizzato nel processo
di registrazione.
• "Go Out" signica che questa traccia non presenta alcun dato o non ha dati a disposizione, la cui riprodu-
zione è stata vietata durante la registrazione.
• In modalità di preparazione è possibile modicare la traccia di registrazione
• Il dispositivo seleziona automaticamente una traccia vuota in modalità di preparazione (nella sequenza da
piccola a grande, ad esempio: se la traccia 2 dispone di dati, lo strumento sceglierà la traccia 3 per la registra-
zione).
Traccia 1: traccia di accompagnamento
Traccia 2/ Traccia 3: tracce melodiche
Arrestare la registrazione
1. Premendo START/STOP durante la registrazione, questa viene interrotta immediatamente. Premendo
STYLE o VOICE è possibile selezionare altre funzioni.
2. Quando la memoria è piena, la registrazione si ferma e viene salvata automaticamente. Sullo schermo
LCD appare "Rec_Full".
3. La registrazione si ferma automaticamente quando un brano è nito o se è stato selezionato un accom-
pagnamento.
Riproduzione dei brani registrati
1. Se si preme RECORD durante la registrazione, la registrazione attuale viene interrotta e vengono ripro-
dotti in loop i brani registrati no a quel momento.
2. Premere SONG per passare alla modalità canzone. Tutti i brani vengono riprodotti automaticamente in
loop. I numeri dei brani salvati possono essere selezionati direttamente con i tasti + e -. Se non ci sono
brani salvati sullo schermo appare "NoFile!". La ri-
produzione in loop si interrompe.
3. Selezionare, se presente, un brano salvato e premere
START/STOP per riprodurlo in loop.
Cancellazione dei brani registrati
1. Premere contemporaneamente RECORD e SONG
quando lo strumento è spento per cancellare tutte le
registrazioni salvate.
2. Premere RECORD per 2 secondi per cancellare
le registrazioni in modalità di preparazione. Sullo
schermo LCD appare "Delete". Premere poi i tasti
della traccia corrispondente (TRACK 1, TRACK 2,
TRACK 3), da cui si desidera cancellare la registra-
zione. Quando la spia di una traccia si illumina signica che i dati vengono cancellati, mentre quando si
spegne signica che i dati vengono conservati. Quando le spie di tutte le tracce si illuminano, signica
che vengono cancellati tutti i brani registrati se la cancellazione viene autorizzata premendo il tasto +. La
cancellazione può essere interrotta premendo il tasto -.

IT
124
Riproduzione MP3
Connessione MP3: tramite questa connessione è possibile riprodurre brani in formato MP3.
• Premendo PLAY/PAUSE è possibile riprodurre/mettere in pausa i brani.
• Premendo SONG ∧ viene selezionato il brano precedente e con VOLUME ∨ si abbassa il volume.
• Premendo SONG ∧ viene selezionato il brano successivo e con VOLUME ∨ si alza il volume.
Riproduzione dei brani
Questo strumento è dotato di numerosi brani (vedi tabella delle canzoni). Ogni canzone è dotata di una funzio-
ne di apprendimento.
1. Premere SONG per passare alla modalità canzone. Sullo schermo LCD appare "SONG". Tutti i brani ven-
gono riprodotti automaticamente in loop.
2. Per selezionare una canzone è possibile utilizzare il numero del brano desiderato oppure i tasti + e -.
3. Premere START/STOP per interrompere la riproduzione della canzone. Premere di nuovo il tasto per
riprenderla.
4. Se si desidera terminare la modalità canzone, premere STYLE, RECORD, VOICE, DUAL VOICE ecc. non
appena è nito il brano.
Modalità di apprendimento
La funzione di apprendimento dello strumento è composta dai tre tasti LESSON, LEFT e RIGHT, che possono
essere utilizzati sono in modalità canzone. E' possibile esercitarsi su tutti i brani in tre modalità diverse: durata,
altezza tonalità e modalità di esecuzione. Lo strumento è dotato di una funzione di valutazione, che aiuta a fare
progressi nel processo di apprendimento.
1. Premere LESSON per attivare la modalità di apprendimento.
2. Selezionare con LEFT e RIGHT se si desidera eseguire la canzone con la mano sinistra o destra. Se non si
effettua alcuna selezione, viene scelta automaticamente la mano destra.
Nota: i contenuti di apprendimento della mano sinistra possono essere diversi a seconda del brano sele-
zionato. In alcune canzoni si esercitano accordi con la mano sinistra e in altre canzoni le melodie. Durante
la modalità di apprendimento le melodie e gli accordi appaiono sullo schermo LCD, in modo da facilitare
l'esercizio.

IT
125
Modalità di apprendimento 1: durata
1. Premere LESSON per attivare la modalità di apprendimento 1. Le canzoni in riproduzione vengono fer-
mate. Sullo schermo LCD appare "Les1 R". Il dispositivo fa una stima della durata dell'esercizio. La corret-
ta esecuzione di accordi e note non viene tenuta in considerazione in questa modalità.
2. Premere START/STOP per iniziare la modalità di apprendimento 1. Se si seleziona la mano destra, ven-
gono mostrate le melodie della mano destra. Ora è sufciente suonare correttamente la durata, mentre
la correttezza di note e accordi viene ignorata. La melodia risuona in sottofondo. Se si seleziona la mano
sinistra, vengono mostrati accordi o parti della melodia della mano sinistra. Ora è sufciente suonare
correttamente la durata, mentre la correttezza di note e accordi viene ignorata. Premendo contempo-
raneamente LEFT e RIGHT è possibile esercitarsi contemporaneamente con la mano destra e sinistra. Il
sistema fa una stima di quando l'esercizio è concluso.
Modalità di apprendimento 2: altezza di tonalità
1. Premere più volte LEARN per attivare la modalità di apprendimento 2. L'attuale riproduzione della can-
zone viene interrotta. Sullo schermo LCD appare "Les2 R". Il sistema fa una stima della corretta altezza
della tonalità e ciò signica che sarà necessario suonare le tonalità giuste. Una sezione di un brano può
ricominciare daccapo se vengono suonate note sbagliate. Il brano si trova in modalità di attesa no a
quando vengono suonate le tonalità corrette.
2. Premendo START/STOP prima dell'inizio della canzone, il dispositivo fornirà un stima alla ne del brano.
Modalità di apprendimento 3: modalità di esecuzione
1. Premere più volte LEARN per attivare la modalità di apprendimento 3. L'attuale riproduzione della can-
zone viene interrotta. Sullo schermo LCD appare "Les3 R". Il sistema fa una stima della corretta durata
e altezza della tonalità e ciò signica che sarà necessario suonare le tonalità giuste e la durata originale
del brano.
2. Premendo START/STOP prima dell'inizio della canzone, il dispositivo fornirà un stima alla ne del brano.
ALLEGATO
Elenco degli strumenti 53
Elenco degli stili 62
Elenco dei brani 65
IT
126
INDICACIONES SOBRE LA RETIRADA DEL APARATO
Si en su país existe una disposición legal relativa a la
eliminación de aparatos eléctricos y electrónicos, este
símbolo estampado en el producto o en el embalaje
advierte que no debe eliminarse como residuo
doméstico. En lugar de ello, debe depositarse en un
punto de recogida de reciclaje de aparatos eléctricos y
electrónicos. Una gestión adecuada de estos residuos
previene consecuencias potencialmente negativas
para el medio ambiente y la salud de las personas.
Puede consultar más información sobre el reciclaje y
la eliminación de este producto contactando con su
administración local o con su servicio de recogida de
residuos.
Este producto contiene baterías. Si en su país existe una
disposición legal relativa a la eliminación de baterías,
estas no deben eliminarse como residuo doméstico.
Infórmese sobre la normativa vigente relacionada con
la eliminación de baterías. Una gestión adecuada de
estos residuos previene consecuencias potencialmente
negativas para el medio ambiente y la salud de las
personas.
FABRICANTE E IMPORTADOR (REINO UNIDO)
Fabricante:
Chal-Tec GmbH, Wallstraße 16, 10179 Berlín, Alemania.
Importador para Gran Bretaña:
Berlin Brands Group UK Limited
PO Box 42
272 Kensington High Street
London, W8 6ND
United Kingdom
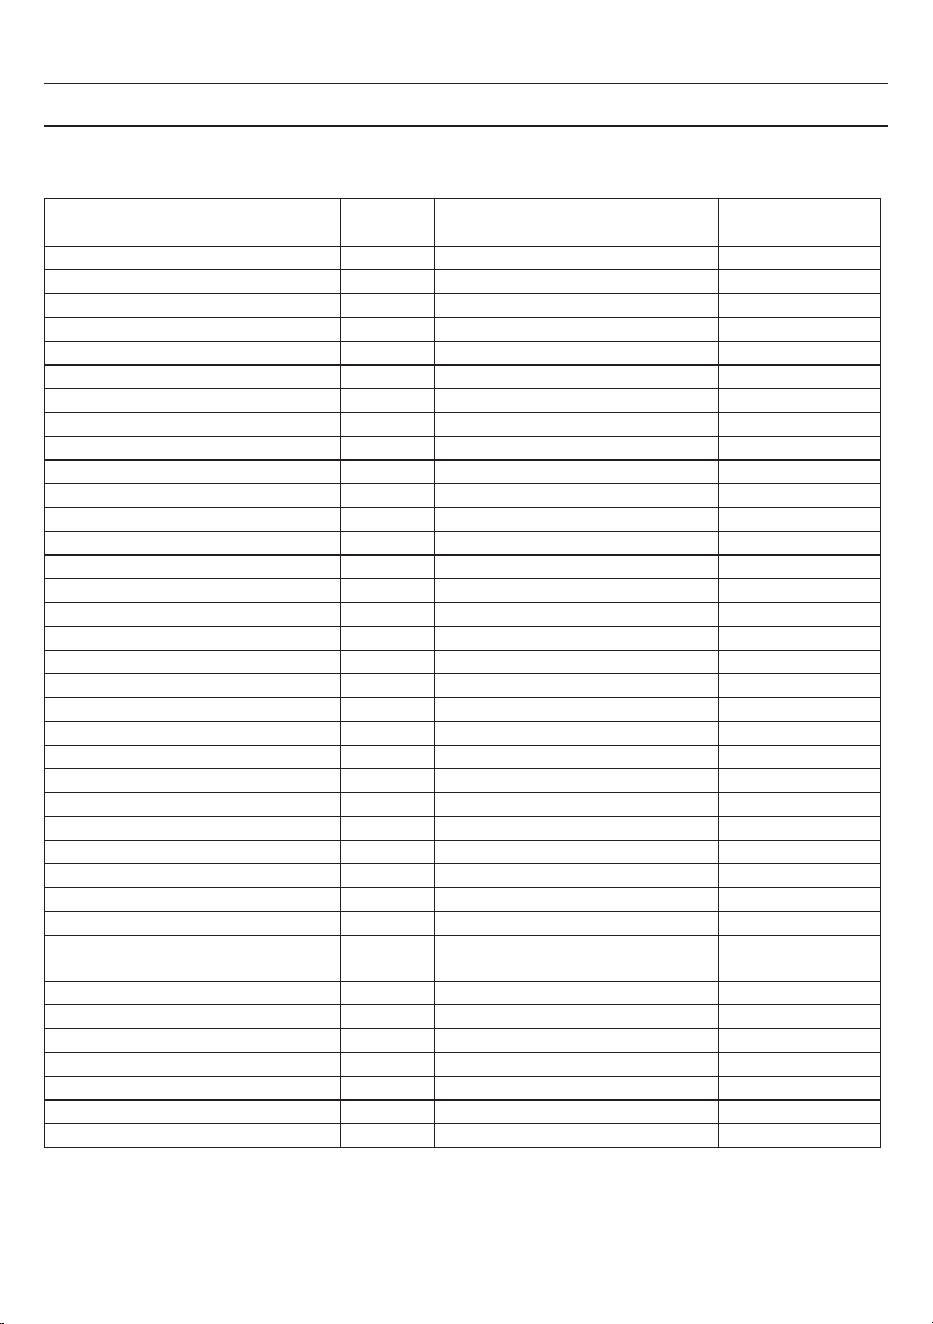
127
ANHANG APPENDIX
Liste der Instrumente Voice List
Instrument Nr. Name
Abkürzung
Abbreviation
Piano 1 Stereo Grand Piano StGrdPno
Piano 2 Acoustic Grand Piano (wide) 1 GrandPnW
Piano 3 Acoustic Grand Piano (dark) GrandPnD
Piano 4 Octave Piano 1 OctPno1
Piano 5 Octave Piano 2 OctPno2
Piano 6 Piano & Strings Pno&Str
Piano 7 Piano & Choir Pno&Cho
Piano 8 Acoustic Grand Piano GrandPno
Piano 9 Stereo Bright Piano StBr tPno
Piano 10 Bright Acoustic Piano BritePno
Piano 11 Bright Acoustic Piano (wide) 1 BritePnW
Piano 12 Chorus Piano ChoruPno
Piano 13 Electric Grand Piano E.Grand
Piano 14 Electric Grand Piano (wide) E.GrandW
Piano 15 Stereo Honk-Tonk StHonkTo
Piano 16 Honky-tonk Piano HnkyTonk
Piano 17 Honky-tonk Piano (wide) 1 HnyTonkW
Piano 18 Stereo Hard Electric Piano StHarEp
Piano 19 Detuned Electric Piano 1 DetunEP1
Piano 20 Detuned Electric Piano 2 DetunEP2
Piano 21 Electric Piano 1 E.Piano1
Piano 22 Electric Piano 2 E.Piano2
Piano 23 Electric Piano (wide) 1 EPnoW1
Piano 24 Electric Piano (wide) 2 EPnoW2
Piano 25 EP Legend EPLegend
Piano 26 EP Phase EPPhase
Piano 27 60's Electric Piano 60'sEP
Piano 28 Electric Piano 1 (velocity mix) E.PnoV1
Piano 29 Electric Piano 2 (velocity mix) E.PnoV2
Piano 30 Velocity Crossfade Electric
Piano
VeCrosEP
Piano 31 Layered Electric Piano 1 LayerEP1
Piano 32 Layered Electric Piano 2 LayerEP2
Piano 33 Nylon Electric Piano NylonEP
Piano 34 Warm Electric Piano WarmEP
Piano 35 Grand Harpsichord GraHarps
Piano 36 Harpsichord 1 Harpsi
Piano 37 Harpsichord 2 Harpsi2
128
Piano 38 Harpsichord (wide) HarpsiW
Piano 39 Harpsichord (octave mix) 1 HarpsiO
Piano 40 Harpsichord Release HarpsiR
Piano 41 Harpsichord (with key off ) HarpsiOf
Piano 42 Clavi 1 Clavi
Piano 43 Clavi 2 Clavi 2
Piano 44 Clavi (wide) 1 ClaviW1
Piano 45 Clavi (wide) 2 ClaviW2
Piano 46 Clavi Wah ClaviWa
Piano 47 Pulse Clavi PulseClv
Chromatic Percussion 48 Celesta 1 Celesta
Chromatic Percussion 49 Celesta 2 Celesta2
Chromatic Percussion 50 Birght Celeasta BirCelea
Chromatic Percussion 51 Celesta & Sine Celes&Si
Chromatic Percussion 52 Reecho Bell ReechBell
Chromatic Percussion 53 Celesta & Music Box Celes&MB
Chromatic Percussion 54 Glockenspiel 1 Glocken
Chromatic Percussion 55 Glockenspiel 2 Glocken2
Chromatic Percussion 56 Music Box 1 MusicBox
Chromatic Percussion 57 Music Box 2 MusicBo2
Chromatic Percussion 58 Music Box 3 MusicBo3
Chromatic Percussion 59 Toy Box ToyBox
Chromatic Percussion 60 Music Box & Harp Mbx&Harp
Chromatic Percussion 61 Stereo Vibrapho StVibes
Chromatic Percussion 62 Rigid Vibraphone RigiVibe
Chromatic Percussion 63 Vibraphone 1 Vibra
Chromatic Percussion 64 Vibraphone 2 Vibra2
Chromatic Percussion 65 Vibraphone (wide) 1 VibraW
Chromatic Percussion 66 Vibraphone (wide) 2 VibraW2
Chromatic Percussion 67 Vibraphone & Bell Bell&Vib
Chromatic Percussion 68 Marimba 1 Marimba
Chromatic Percussion 69 Marimba 2 Marimba2
Chromatic Percussion 70 Marimba (wide) MarimbaW
Chromatic Percussion 71 Stereo Marimba StMarim
Chromatic Percussion 72 Marimba & Vibraphone Mar&Vib
Chromatic Percussion 73 Xylophone 1 Xylophone
Chromatic Percussion 74 Xylophone 2 Xylopho2
Chromatic Percussion 75 Tubular Bells TubulBell
Chromatic Percussion 76 Church Bell ChurBell
Chromatic Percussion 77 Carillon Carillon
Chromatic Percussion 78 Dulcimer Dulcimer
Chromatic Percussion 79 Santur Santur
Organ 80 Drawbar Organ 1 DrawbOrgan
Organ 81 Drawbar Organ 2 DrawbOrgan 2
Organ 82 Soft Stereo Drawbar Organ SfDrawOrgan
129
Organ 83 Mellow Drawbar Organ MellDrOr
Organ 84 Detuned Drawbar Organ 1 DeDraOr
Organ 85 Detuned Drawbar Organ 2 DeDraOr2
Organ 86 Italian 60's Organ 60'sOrgn
Organ 87 1970 Percussive Organ 1970PcOr
Organ 88 Percussive Organ 1 PercOrgn1
Organ 89 Percussive Organ 2 PercOrg2
Organ 90 Light Click Organ LClickOr
Organ 91 Detuned Percussive Organ DePerOrg
Organ 92 Stereo Rotar y Organ StRotaOr
Organ 93 Rock Organ RockOrgn
Organ 94 Rotar y Organ RotaOrgn
Organ 95 Slow Rotar y Organ SloRotOr
Organ 96 Detuned Church Organ DeChuOrg
Organ 97 Church Organ 1 ChurOrgn
Organ 98 Church Organ 2 ChurOrg2
Organ 99 Church Organ (octave mix) ChurOrgO
Organ 100 Reed Organ ReedOrgn
Organ 101 Puff Organ PuffOrgn
Organ 102 Accordion 1 Accordion
Organ 103 Accordion 2 Accordin2
Organ 104 Accordion 3 Accordin3
Organ 105 Mustte Mustte
Organ 106 Accord It Solo AccordSo
Organ 107 Sweet Harmonica SwetHarm
Organ 108 Harmonica 1 Harmonica
Organ 109 Harmonica 2 Harmonic2
Organ 110 Tango Accordion TangoAcd
Guitar 111 Acoustic Guitar (nylon) 1 NylonGtr
Guitar 112 Acoustic Guitar (nylon) 2 NylonGt2
Guitar 113 Acoustic Guitar (nylon + key
off )
NylGtrOf
Guitar 114 Ukulele Ukulele
Guitar 115 Velocity Nylon Guitar NylnGtVe
Guitar 116 Chorus Nylon Guitar ChoNyGt
Guitar 117 Bright Nylon Guitar BrNyGt
Guitar 118 Acoustic Guitar (steel) 1 SteelGtr
Guitar 119 Acoustic Guitar (steel) 2 SteelGt2
Guitar 120 Steel Guitar with Body Sound SteelBdy
Guitar 121 Tremolo Steel Guitar TremGt
Guitar 122 Mandolin Mandolin
Guitar 123 12-Strings Guitar 12StrGtr
Guitar 124 Chorus Steel Guitar ChoSteGt
Guitar 125 Nylon & Steel Guitar Ny&SteGt

130
Guitar 126 Stereo Steel Guitar StSteGt
Guitar 127 Steel Guitar Bend GtBend
Guitar 128 Steel Guitar Harmonics GtHarm
Guitar 129 Velocity Steel Guitar 1 VelSte1
Guitar 130 Velocity Steel Guitar 2 VelSte2
Guitar 131 Velocity Steel Guitar 3 VelSte3
Guitar 132 Electric Guitar ( jazz) 1 JazzGtr
Guitar 133 Electric Guitar ( jazz) 2 JazzGt2
Guitar 134 Electric Guitar (pedal steel) PedalGtr
Guitar 135 Mellow Guitar MellGt
Guitar 136 Velocity Jazz Guitar JazzGtVe
Guitar 137 Jazz Guitar Detuned JazzGtDt
Guitar 138 Mid Tone Guitar MidTonGt
Guitar 139 Electric Guitar (clean) 1 CleanGtr
Guitar 140 Electric Guitar (clean) 2 CleanGtr2
Guitar 141 Stereo Clean Guitar StCleGtr
Guitar 142 Velocity Clean Guitar CleGtVel
Guitar 143 Electric Guitar (detuned clean) DetClnGt
Guitar 144 Electric Guitar (muted velo-sw) MutVelGt
Guitar 145 Electric Guitar (muted) MutedGtr
Guitar 146 Electric Guitar (funky cutting) FunkGt
Guitar 147 Jazz Man JazzMan
Guitar 148 Stereo Muted Guitar StMuGt
Guitar 149 Guitar Pinch GtPinch
Guitar 150 Overdriven Guitar Overdrive
Guitar 151 Distor tion Guitar 1 DistGt
Guitar 152 Distor tion Guitar 2 DistGtr2
Guitar 153 Distor tion Guitar (with
feedback) 1
FeedbkGt
Guitar 154 Distor ted Rhythm Guitar DistRyth
Guitar 155 5th Distor tion 5thDist
Guitar 156 Stereo Distor ted Guitar StDistor
Guitar 157 Guitar Feedback GtFedbk
Guitar 158 Guitar Harmonics GtrHarmo
Bass 159 Acoustic Bass 1 AcoBass
Bass 160 Acoustic Bass 2 AcoBass2
Bass 161 Jazz Style JazzSty
Bass 162 A.Bass & Mute G.T. Ba&GtMu
Bass 163 Resonant Bass ResBass
Bass 164 Wah Bass 1 WahBass1
Bass 165 Electric Bass (nger) 1 FngrBass
Bass 166 Electric Bass (nger) 2 FngrBas2
Bass 167 Electric Bass (nger) 3 FngrBas3
Bass 168 Finger Slap Bass FngrSlap
131
Bass 169 Electric Bass (pick) 1 PickBass
Bass 170 Electric Bass (pick) 2 PickBas2
Bass 171 Fretless Bass 1 Fretless
Bass 172 Fretless Bass 2 Fretless2
Bass 173 Slap Bass 1 SlapBass
Bass 174 Slap Bass 2 SlapBass2
Bass 175 Synth Bass 1 SynBass
Bass 176 Synth Bass 2 SynBass2
Bass 177 Synth Bass 3 (resonance) ResoBass
Bass 178 Synth Bass 4 (attack) AtackBass
Bass 179 Synth Bass (warm) WarmBass
Bass 180 Clavi Bass ClavBass
Bass 181 Hammer Hammer
Bass 182 Synth Bass (rubber) RubbBass
Bass 183 Attack Pulse AtackPls
Strings & Orchestral Instruments 184 The Violin TheVin
Strings & Orchestral
Instruments
185 Violin 1 Violin
Strings & Orchestral Instruments 186 Violin 2 Violin2
Strings & Orchestral Instruments 187 Violin (slow attack) SlViolin
Strings & Orchestral Instruments 188 Soft Violin SoftVin
Strings & Orchestral Instruments 189 Viola 1 Viola
Strings & Orchestral Instruments 190 Viola 2 Viola2
Strings & Orchestral Instruments 191 Cello 1 Cello
Strings & Orchestral Instruments 192 Cello 2 Cello2
Strings & Orchestral Instruments 193 Celloen 16' Celloen
Strings & Orchestral Instruments 194 Contrabass 1 Contrabs
Strings & Orchestral Instruments 195 Contrabass 2 Contrbs2
Strings & Orchestral Instruments 196 Tremolo Strings 1 TremStr
Strings & Orchestral Instruments 197 Tremolo Strings 2 TremStr2
Strings & Orchestral Instruments 198 Pizzicato Strings 1 PizzStr
Strings & Orchestral Instruments 199 Pizzicato Strings 2 PizzStr2
Strings & Orchestral Instruments 200 Orchestral Harp 1 Harp
Strings & Orchestral Instruments 201 Orchestral Harp 2 Harp2
Strings & Orchestral Instruments 202 Timpani 1 Timpani
Strings & Orchestral Instruments 203 Timpani 2 Timpani2
Ensemble 204 String Ensembles 1 Strings1
Ensemble 205 String Ensembles 2 Strings2
Ensemble 206 Synth Strings 1 SynStrs1
Ensemble 207 Synth Strings 2 SynStrs2
Ensemble 208 Synth Strings 3 SynStrs3
Ensemble 209 Synth Strings 4 SynStrs4
Ensemble 210 Stereo Slow Strings SSlowStr
Ensemble 211 Strings and Brass Str&Bras

132
Ensemble 212 Legato Strings LegatStr
Ensemble 213 Orchestra Orchstr
Ensemble 214 60's Strings 60'sStr
Ensemble 215 Solo Strings SoloStr
Ensemble 216 Choir Aahs 1 ChoirAah
Ensemble 217 Choir Aahs 2 ChoirAh2
Ensemble 218 Humming Humming
Ensemble 219 Voice Oohs VoiceOoh
Ensemble 220 Analog Voice AnaVoice
Ensemble 221 Synth Voice SynVoice
Ensemble 222 Bass Hit Plus BassHit
Ensemble 223 Orchestra Hit 1 OrchHit
Ensemble 224 Orchestra Hit 2 OrchHi2
Ensemble 225 Euro Hit EuroHit
Ensemble 226 6th Hit 6thHit
Brass 227 Trumpet 1 Trumpet
Brass 228 Trumpet 2 Trumpet2
Brass 229 Trumpet 3 Trumpet3
Brass 230 Dark Trumpet Soft DarkTrp
Brass 231 Sweet Trumpet SweetTp
Brass 232 Trombone 1 Trombone
Brass 233 Trombone 2 Trmbone2
Brass 234 Bright Trombone BritBone
Brass 235 Tuba 1 Tuba
Brass 236 Tuba 2 Tuba2
Brass 237 Muted Trumpet 1 MuteTrp1
Brass 238 Muted Trumpet 2 MuteTrp2
Brass 239 French Horn 1 FrHorn
Brass 240 French Horn 2 (warm) FrHorn2
Brass 241 Brass Section 1 Brass
Brass 242 Brass Section 2 (octave mix) Brass2
Brass 243 Brass Section 3 Brass3
Brass 244 Brass Section 4 Brass4
Brass 245 Brass Section 5 Brass5
Brass 246 Brass Band BrasBand
Brass 247 Bright Brass Section BrBraSec
Brass 248 Brass & Strings Bras&Str
Brass 249 Synth Brass 1 SynBras1
Brass 250 Synth Brass 2 SynBras2
Brass 251 Synth Brass 3 SynBras3
Brass 252 Synth Brass 4 SynBras4
Brass 253 Analog Synth Brass 1 AnaBras1
Brass 254 Analog Synth Brass 2 AnaBras2
Brass 255 Jump Brass JumpBras
Brass 256 Synth Brass & Strings 1 SyBr&St1

133
Reed 257 Soprano Sax 1 SprnoSax
Reed 258 Soprano Sax 2 SprnSax2
Reed 259 Sweet Soprano Sax SweSpSax
Reed 260 Alto Sax AltoSax
Reed 261 Soft Alto Sax SoftAlto
Reed 262 Tenor Sax 1 TenorSax
Reed 263 Tenor Sax 2 TenoSax2
Reed 264 Baritone Sax BariSax
Reed 265 Sweet Oboe SwetOboe
Reed 266 Oboe 1 Oboe
Reed 267 English Horn 1 EngHorn
Reed 268 Bassoon 1 Bassoon
Reed 269 Clarinet 1 Clarinet
Reed 270 Clarinet 2 Clarine2
Pipe 271 Piccolo Piccolo
Pipe 272 Flute Flute
Pipe 273 Sweet Flute SweeFlut
Pipe 274 Recorder Recorder
Pipe 275 Sweet Pan Flute SwPanFu
Pipe 276 Pan Flute PanFlute
Pipe 277 Blown Bottle Bottle
Pipe 278 Shakuhachi Shakhchi
Pipe 279 Whistle 1 Whistle
Pipe 280 Whistle 2 Whistle2
Pipe 281 Ocarina Ocarina
Synth Lead 282 Lead 1 (square) SquareLd
Synth Lead 283 Square Square
Synth Lead 284 Lead 1b (sine) SineLead
Synth Lead 285 Square Lead 1 SquarLd1
Synth Lead 286 Lead 1a (square 2) SquarLd2
Synth Lead 287 Lead 2a (sawtooth 2) SawLead2
Synth Lead 288 Lead 2d (sequenced analog) SquAnaLd
Synth Lead 289 Lead 2 (sawtooth) SawLead1
Synth Lead 290 Lead 2b (saw + pulse) SawPlsLd
Synth Lead 291 Lead 2c (double sawtooth) DubSawLd
Synth Lead 292 Lead 3 (calliope) CaliopLd
Synth Lead 293 Lead 4 (chiff ) ChiffLd
Synth Lead 294 Lead 5 (charang) CharanLd
Synth Lead 295 Lead 5a (wire lead) WireLead
Synth Lead 296 Lead 6 (voice) VoiceLd
Synth Lead 297 Lead 7 (fths) FifthsLd
Synth Lead 298 Lead 8 (bass + lead) BassLead
Synth Lead 299 Lead 8a (soft wrl) SftWrlLd
Synth Pad 300 Pad 1 (new age) NewAgePd
Synth Pad 301 New Year Pad NewYrPd
134
Synth Pad 302 Pad 2 (warm) WarmPad
Synth Pad 303 Pad 2a (sine pad) SinePad
Synth Pad 304 Pad 3 (polysynth) 1 PolySyPd
Synth Pad 305 Pad 4 (choir) ChoirPad
Synth Pad 306 Pad 4a (itopia) ItopiaPd
Synth Pad 307 Pad 5 (bowed) 1 BowedPad
Synth Pad 308 Pad 6 (metallic) 1 MetalPad
Synth Pad 309 Pad 7 (halo) 1 HaloPad
Synth Pad 310 Pad 8 (sweep) 1 SweepPad
Synth Pad 311 FX 1 (rain) FXRain
Synth Pad 312 FX 2 (soundtrack) Soundtrk
Synth Pad 313 FX 3a (synth mallet) SynMalet
Synth Pad 314 FX 3 (cr ystal) Cr ystal
Synth Pad 315 FX 4 (atmosphere) Atmosphr
Synth Pad 316 Warm Air WarmAir
Synth Pad 317 FX 5 (brightness) Bright
Synth Pad 318 FX 6 (goblins) Goblins
Synth Pad 319 FX 7 (echoes) 1 Echoes
Synth Pad 320 FX 7a (echo bell) 1 EchoBell
Synth Pad 321 FX 7b (echo pan) EchoPan
Synth Pad 322 FX 8 (sci-) Sci-Fi
Ethnic Misc. 323 Sitar 1 Sitar
Ethnic Misc. 324 Sitar 2 (bend) Sitar2
Ethnic Misc. 325 Banjo Banjo
Ethnic Misc. 326 Shamisen Shamisen
Ethnic Misc. 327 Koto Koto
Ethnic Misc. 328 Taisho Koto TaishoKt
Ethnic Misc. 329 Kalimba Kalimba
Ethnic Misc. 330 Bag Pipe Bagpipe
Ethnic Misc. 331 Fiddle Fiddle
Ethnic Misc. 332 Shanai Shanai
Percussive 333 Tinkle Bell TnklBell
Percussive 334 Steel Drums SteelDrm
Percussive 335 Woodblock WoodBlok
SFX 336 Seashore Seashore
SFX 337 Thunder Thunder
SFX 338 Telephone Ring 1 Telphone
SFX 339 Applause Applause
Combined Voice 340 Stereo Piano & Strings Pad StPn&Str
Combined Voice 341 Stereo Piano & Choir StPn&Cho
Combined Voice 342 Stereo Piano & Synth Strings StPn&Syn
Combined Voice 343 Stereo Piano & Warm Pad StPn&Pad
Combined Voice 344 Rock Organ & Strings RoOr&Str
Combined Voice 345 Steel Guitar & Warm Pad StGt&Pad
135
Combined Voice 346 Orchestra Orchest
Combined Voice 347 Full Strings 1 FullStr1
Combined Voice 348 Symphonic Symphon
Chinese Instruments 349 GuZheng GuZheng
Chinese Instruments 350 PiPa PiPa
Chinese Instruments 351 ErHu 1 ErHu1
Chinese Instruments 352 Bandi Bandi
Chinese Instruments 353 Hulusi Hulusi
Chinese Instruments 354 LuSheng 1 LuShen1
Chinese Instruments 355 SuoNa SuoNa
Chinese Instruments 356 PaiXiao PaiXiao
Drum Set 357 Standard Set StandSet
Drum Set 358 Room Set RoomSet
Drum Set 359 Power Set PowerSet
Drum Set 360 Jazz Set JazzSet
136
List der Stile Style List
Genre No. Name Abkürzung
Abbreviation
8 BEAT 1 8 Beat Piano 8BtPiano
8 BEAT 2 8 Beat 1 8Beat1
8 BEAT 3 8 Beat Shufe 8BtShu
8 BEAT 4 Guitar Pop 1 GtPop1
8 BEAT 5 8 Beat Hip Hop 8BtHiHop
8 BEAT 6 8 Beat R&B 8BeatR&B
8 BEAT 7 8 Beat Pop 8BtPop
8 BEAT 8 Pop Funk 1 PopFunk1
8 BEAT 9 Rhythm & Beat 1 Rhy&Bt1
8 BEAT 10 8 Beat Disco 1 8BtDisc1
8 BEAT 11 8 Beat Rock 8BtRock
8 BEAT 12 8 Beat 2 8Bt2
8 BEAT 13 Sweet Beat SweetBt
8 BEAT 14 8 Beat Dance 8BtDance
8 BEAT 15 8 Beat 3 8Bt3
8 BEAT 16 60’s 8 Beat 60’s8Bt
16 BEAT 17 16 Beat 1 16Beat1
16 BEAT 18 16 Beat Funk 1 16BtFuk1
16 BEAT 19 16 Beat Ballad 1 16BtBld1
16 BEAT 20 16 Beat R&B 16BtR&B
16 BEAT 21 Pop 16 Beat 1 Pop16Bt1
16 BEAT 22 16 Beat Dance 16BDanc
16 BEAT 23 16 Beat 2 16Beat2
16 BEAT 24 Modern 16 Beat Modrn16B
16 BEAT 25 16 Beat Hot 16BtHot
16 BEAT 26 16 Beat Modern 16BtModr
16 BEAT 27 16 Beat 3 16Beat3
16 BEAT 28 Cool Beat CoolBeat
16 BEAT 29 16 Beat Ballad 2 A6BtBld2
16 BEAT 30 16 Beat 4 16Beat4
16 BEAT 31 Pop Shufe PopShu
POP 32 Pop Rock 1 PopRock1
POP 33 Pop Dance 1 PopDanc1
POP 34 Pop Fusion PopFusn
POP 35 Analog Night 1 AnalgNt1
POP 36 6/8 Pop 6/8Pop
POP 37 Brit. Pop 1 BritPop1
POP 38 Brit. Pop 2 BritPop2
POP 39 Pop Hit PopHit
POP 40 Fusion Shufe FusShu
POP 41 Pop Beat PopBeat
POP 42 Soft Beat SoftBeat
POP 43 60’s Pop 60’sPop
POP 44 Sting Latin StigLatn
137
BALLAD 45 R&B Ballad 1 R&BBad1
BALLAD 46 Guitar Ballad GtBallad
BALLAD 47 Ballad Rock BalladRk
BALLAD 48 Piano pop PianoPop
BALLAD 49 Soft Ballad SoftBald
BALLAD 50 Natural Ballad NatuBld
BALLAD 51 Love Ballad LoveBld
BALLAD 52 Easy Ballad EasyBld
BALLAD 53 Slow Ballad SlowBald
BALLAD 54 Folk Ballad FolkBld
BALLAD 55 Pop Ballad 1 PopBld1
BALLAD 56 EP Ballad EPBallad
ROCK 57 Rock Rock
ROCK 58 New Wave NewWave
ROCK 59 Ska Ska
ROCK 60 Slow Rock SlowRock
ROCK 61 70’s Rock & Roll 70’s Rock
ROCK 62 Folk Rock FolkRock
ROCK 63 Soft Rock SoftRock
ROCK 64 Easy Rock EasyRock
ROCK 65 New Shufe NewShu
ROCK 66 Rock Hip Hop RkHipHop
ROCK 67 Rock & Roll 1 R’N’R1
ROCK 68 Rock & Roll 2 R’N’R2
BALLROOM 69 Tango 1 Tango1
BALLROOM 70 Spain Matador Matador
BALLROOM 71 Twist 1 Twist1
BALLROOM 72 Big Band Fox BandFox
BALLROOM 73 Tango 2 Tango2
BALLROOM 74 Slow Fox SlowFox
BALLROOM 75 Slow Waltz 1 SlowWlz1
BALLROOM 76 Swing Fox SwingFox
BALLROOM 77 Salsa 1 Salsa1
BALLROOM 78 Cha Cha 1 ChaCha1
BALLROOM 79 Cha Cha 2 ChaCha2
BALLROOM 80 Beguine 1 Beguine1
BALLROOM 81 Beguine 2 Beguine2
BALLROOM 82 Rumba 1 Rumba1
BALLROOM 83 Samba 1 Samba1
BALLROOM 84 Jive Jive
BALLROOM 85 Fox Trot FoxTrot
DANCE 86 Techno 1 Techno1
DANCE 87 Hip Hop 1 HipHop1
DANCE 88 Dream Dance DrmDance
DANCE 89 House House
DANCE 90 Down Beat DownBeat
DANCE 91 Progressive Progress
138
DANCE 92 Rap 1 Rap1
DANCE 93 Disco Disco
DANCE 94 Soft Disco SoftDisc
DANCE 95 Disco Party DscParty
DANCE 96 70’s Disco 70’sDisc
DANCE 97 Club Dance ClubDanc
DANCE 98 Euro Dance EuroDanc
DANCE 99 Hip Hop 2 HipHop2
SOUL & FUNK 100 Funk 1 Funk1
SOUL & FUNK 101 Classic Funk ClasFunk
SOUL & FUNK 102 Gospel Swing GopSwing
SOUL & FUNK 103 Gospel Gospel
SOUL & FUNK 104 Funk 2 Funk2
SOUL & FUNK 105 Electric Funk ElecFunk
SOUL & FUNK 106 Groove Funk GrooveFk
SOUL & FUNK 107 Cool Funky ColFunky
SOUL & FUNK 108 Jazz Funk JazzFunk
SOUL & FUNK 109 Groove Groove
SOUL & FUNK 110 Soul Soul
SOUL & FUNK 111 Hip Hop Beat HipHopBt
SOUL & FUNK 112 R&B R&B
SOUL & FUNK 113 Soul Beat SoulBeat
SWING & JAZZ 114 Latin Jazz 1 LatinJz1
SWING & JAZZ 115 Big Band BigBand
SWING & JAZZ 116 Dixieland 1 Dixland1
SWING & JAZZ 117 Broadway Big Bang BwayBand
SWING & JAZZ 118 Swing Swing
SWING & JAZZ 119 Latin Jazz 2 LatinJz2
SWING & JAZZ 120 Fusion Fusion
SWING & JAZZ 121 Acid Jazz AcidJazz
SWING & JAZZ 122 Cool Jazz Ballad CoolJzBd
SWING & JAZZ 123 Swing Shufe SwingS
SWING & JAZZ 124 Big Band Medium BandMid
139
Liste der Lider Song List
Genre
Classify
Nr.
No.
Name Abkürzung
Abbreviation
FOLK & COUNTRY 1 Jambalaya Jambalaya
FOLK & COUNTRY 2 Ding! Dong! Merril on High DingDong
FOLK & COUNTRY 3 Battle Hymne of the Republic Battle
FOLK & COUNTRY 4 The Old Gray Mare GrayMare
FOLK & COUNTRY 5 American Patrol USPatrol
FOLK & COUNTRY 6 Christmas is Coming IsComing
FOLK & COUNTRY 7 Sippin/Cider through a Stray SCTStraw
FOLK & COUNTRY 8 Christmas Sound Sound
GOLDEN & POP 9 On London Bridge LdBridge
GOLDEN & POP 10 Are You Lonesome Tonight Lonesome
GOLDEN & POP 11 Der Deitcher’s Dog DerDDog
GOLDEN & POP 12 Joy to the World JoyWordl
GOLDEN & POP 13 Silent Night Sltnight
GOLDEN & POP 14 Ave Maria AveMaria
GOLDEN & POP 15 Five Hundred Miles FHMiles
GOLDEN & POP 16 Happy New Year HappyNY
GOLDEN & POP 17 It’s beginning to look a lot like
Christmas
LikeXmas
GOLDEN & POP 18 Jeanie with the light brown hair LightHair
GOLDEN & POP 19 My Bonnie MyBonnie
GOLDEN & POP 20 Song oft he Pearlsher SongOfTP
CLASSICAL 21 Swan Swan
CLASSICAL 22 Prelude to Act 2 (Swan Lake) SwanLak1
CLASSICAL 23 Valse (Swan Lake) SwanLak2
CLASSICAL 24 The Happy Farmer HpFarmer
CLASSICAL 25 The Sleeping Beauty SleepBty
CLASSICAL 26 La Traviata LaTravia
CLASSICAL 27 Wiegenlied Wiegenli
CLASSICAL 28 Mov.2 Adagio Non Troppo
Piano Sonata No. 9 D
Sonata 9
CLASSICAL 29 Mov.1 Andante Grazioso Piano
Sonata No. 11 in A
Sonata 11
CLASSICAL 30 Prelude in C Prelude
CLASSICAL 31 Chinese Dance CHDance
CLASSICAL 32 Emperors Waltz EmprWaltz
CLASSICAL 33 March Militaire MilMar1
CLASSICAL 34 Symphony No.40 Symphony
JAZZ & FUSION 35 ShanZhaShu ShanZaS
JAZZ & FUSION 36 You are my sunshine MySun
JAZZ & FUSION 37 June Samba JunSamba
140
Genre
Classify
Nr.
No.
Name Abkürzung
Abbreviation
JAZZ & FUSION 38 Funk Funk
JAZZ & FUSION 39 I Can… I Can…
JAZZ & FUSION 40 Sea Shore SeaShore
JAZZ & FUSION 41 Guitar & Saxphone Gt&Sax
JAZZ & FUSION 42 The Hip Hop’s Night HipHopNt
JAZZ & FUSION 43 Blue Lunch BlueLunch
JAZZ & FUSION 44 Cobweb Cobweb
JAZZ & FUSION 45 Wine Wine
JAZZ & FUSION 46 Jazz Old Man JzOldMan
JAZZ & FUSION 47 Dark Eyes DarkEyes
JAZZ & FUSION 48 Carlos Carlos
JAZZ & FUSION 49 Sad Sad
JAZZ & FUSION 50 The Jazz TheJazz
PIANO 51 Für Elise FürElise
PIANO 52 Military March Mmarch
PIANO 53 Habanera Habanera
PIANO 54 Minuet Minuet
PIANO 55 Austria Variation Avariati
PIANO 56 Old Macdonald had a Farm OldAFarm
PIANO 57 Wedding March Wedding
PIANO 58 2-Part Invention #13 In A
Minor. B.W. Iii
Invention
PIANO 59 Minuet in G MinuetG
PIANO 60 Turkish March TurkishM
PIANO 61 Hey Diddle Diddle HeDiddle
PIANO 62 Italian Polka ItaPolka
PIANO 63 Moseta Dance MosetaDn
PIANO 64 Bulie Dance BulieDn
PIANO 65 Waltz in A Flat Op.39 No. 15 Waltz 1
PIANO 66 Wild Rose WildRose
PIANO 67 Away in A Manger AwayInAM
PIANO 68 Jack & Jill JackJill
PIANO 69 Angels We Have Heard on High Angels
PIANO 70 Waltz Waltz
PIANO 71 Did you ever see a Lassie Lassie
PIANO 72 Chopsticks Chopstick
PIANO 73 Four Little Swans FLSwans
PIANO 74 Old France OldFrance
PIANO 75 Jesus Saviour pilot Me PilotMe
PIANO 76 Eclogue Eclogue
PIANO 77 Santa Claus is coming to towen SantaCT
PIANO 78 Brave Cavalier Cavalier
PIANO 79 America The Beautiful USFair
PIANO 80 Music Box Dancer Dancer


