
Owner’s Manual
Mode d’emploi
Compact Disc Player
Lecteur Compact Disc
CD-S303
EN
FR
English
Français
2 En
Please read these precautions carefully before
proceeding.
Be sure to follow the instructions
Please carefully read and observe the following
precautions to avoid harm to people or damage
to your personal property.
After reading this document thoroughly, please
retain it in a location that anyone using the
product can access at any time.
WARNING
These precautions alert you to the possibility
of death or serious injury to yourself or others.
If you notice any abnormality
• If any of the following abnormalities occur,
immediately shut down the power.
- The power cord or plug becomes damaged.
- Unusual smells, noise or smoke are emitted
from the product.
- An object or some water has been dropped
into the product.
- Cracks or other damage appear on the
product.
- There is a sudden loss of sound during use of
the product.
Follow the steps below to shut down the power.
- Turn off the power to this product.
- Disconnect the power cord plug from the AC
outlet.
Continuing to use the product as-is may result
in fire, electrical shock or damage to the
product. Request inspection or repair
immediately.
Power supply
• Do not damage the power cord.
- Do not place the power cord near heat
sources such as heaters.
- Do not forcefully bend or modify the power
cord.
- Do not damage the power cord.
- Do not place heavy objects on the power
cord.
- Do not staple the power cord.
Using a frayed power cord with the core wire
exposed may result in fire, electrical shock or
damage to the product.
• During lightning or electrical storms, do not
touch this product, power plug or power cord.
Otherwise, electrical shock may be caused.
• Use the voltage specified for this product.
Using an incorrect voltage may result in fire,
electrical shock or damage to the product.
• Be sure to use only the item listed below to
supply power:
- Included power cord
Otherwise, fire, burns or damage to the product
may be caused.
• Do not use the following Included accessory
with other devices.
- Power cord
Otherwise, fire, burns or damage to the product
may be caused.
• Check the power cord plug periodically and
remove any dirt or dust that may have
accumulated.
Otherwise, fire or electrical shock may be
caused.
• Be sure to fully insert the power cord plug into
an AC outlet.
Otherwise, electrical shock, or fire or damage to
the product due to short circuit may be caused.
• Insert the power cord plug into the AC outlet
that is visible and easily accessible.
If some trouble or malfunction occurs, you
should be able to immediately disconnect the
plug from the AC outlet easily. Even when the
PRECAUTIONS
• Contact the following customer center for
inspection or repair.
- The store you purchased the product
- Yamaha dealer
• This product is intended for use as a general
household device. Do not use it in any field or
activity requiring a high degree of reliability in
relation to human lives or valuable assets.
• Please note that Yamaha cannot accept any
liability for any losses resulting from improper
use or unauthorized modification of the
product.

En 3
power switch is turned off, as long as the power
cord is not unplugged from the wall AC outlet,
the product is not disconnected from the power
source completely.
• If you plan not to use the product for a long
period of time, remove the power cord plug
from the AC outlets.
Otherwise, fire or damage to the product may
be caused.
Do not disassemble
• Do not modify or disassemble this product.
Otherwise, fire, electrical shock, injury or
damage to the product may be caused.
Water warning
• Do not use this product in damp or wet
conditions, such as a bathroom or rainy outdoor
location.
• Do not place on this product any containers
(such as vases or medicine bottles) that contain
liquids.
If liquid spills into the product, fire, electrical
shock or damage to the product may be caused.
• Do not insert the power cord plug into or
remove it from the AC outlet with wet hands. Do
not handle this product with wet hands.
Otherwise, electrical shock or damage to the
product may be caused.
Fire warning
• Do not handle open flames near this product.
Otherwise, fire may be caused.
Vision loss
• Do not look into the laser beam.
If the laser beam hits your eyes, vision loss may
be caused.
Handling
• Do not drop this product or apply any strong
impact to the product.
Otherwise, fire, electrical shock or damage to
the product may be caused.
Batteries
• Do not swallow batteries.
• Keep batteries away from children.
Otherwise, they may swallow the batteries by
accident. Leaking battery liquid may cause loss
of vision or inflammation. If the battery case on
this product is not completely sealed, stop using
the product and keep it away from children. If
someone has swallowed a battery by accident,
consult a physician immediately. If a battery is
swallowed, it can cause serious chemical burns
or melting of body tissue within two hours, leading
to possible death.
• Do not throw batteries into an open fire.
• Do not expose batteries to high temperatures,
such as direct sunlight or an open fire.
Otherwise, they may explode, resulting in fire or
injury.
• If battery liquid is leaking, do not touch the
liquid.
Otherwise, loss of vision or chemical burns may
be caused. If you touch the battery liquid, wash
it away with water immediately, and consult a
physician.
• Do not use batteries other than the specified
type.
• Do not use old and new batteries together.
• Do not use different types of batteries together.
• Do not insert batteries in an orientation opposite
from the polarity indication.
• Do not break down the battery.
• Do not charge non-rechargeable dry cell
batteries.
Otherwise, they may explode or battery liquid
may leak, resulting in fires, burns, loss of vision,
inflammation, or damage to the product. If you
touch the battery liquid, wash it away with water
immediately, and consult a physician.
• Do not carry the batteries in a pocket or bag or
store them along with a piece of metal.
Otherwise, the batteries may short-circuit,
leading to an explosion or leaking liquid, which
could result in fires, loss of vision, or injuries.
• If you plan not to use the product for a long
period of time, or if the batteries are completely
discharged, remove them from the remote
control.
Otherwise, battery liquid may leak, possibly
resulting in loss of vision, inflammatory injury, or
damage to the product.
• Before you store or discard the batteries, apply
a piece of tape to the connectors to insulate
them.
If the battery connectors come into contact with
other batteries or metallic objects, they may
explode or battery liquid may leak, possibly
resulting in fire, burns, loss of vision, or
inflammatory injury.

4 En
CAUTION
These precautions alert you to the possibility
of physical injury to yourself or others.
Power supply
• If the power cord plug inserted into the AC
outlet is wiggly or loose, do not use that outlet.
Otherwise, fire, electrical shock or burns may
be caused.
• When removing the power cord plug from the
product or an outlet, always hold the plug itself
and not the cord.
Otherwise, the power cord may be damaged,
resulting in fire or electrical shock.
Installation
• Do not place this product in an unstable
position or a location subject to vibration.
Otherwise, the product may fall or tip over,
resulting in injuries or damage to the product.
• Do not block the heat dissipation of this product
when installing it.
- Do not cover the product with a cloth or table
cloth.
- Do not install the product on a carpet or rug.
- Make sure that the top surface faces up. Do
not install the product on its sides or upside
down.
- Do not use the product in a confined, poorly-
ventilated location.
Inadequate ventilation may result in
overheating inside the product, possibly
causing damage and fire or malfunction.
Make sure that there is adequate space around
the product at least 2.5 cm (1 in) above, 2.5 cm
(1 in) at the sides and 2.5 cm (1 in) behind.
• During earthquakes, stay away from this
product.
Otherwise, the product may fall or tip over,
resulting in injuries.
• Before moving this product, be sure to turn off
the power switch and remove all connected
cables.
Otherwise, the cables might be caught by a
foot or hand, and the product may fall or tip
over, resulting in injuries or damage to the
product.
Connections
• If you plan to connect external devices, first
read the owner’s manual for each device, and
connect them in accordance with the
instructions.
If you do not follow the instructions correctly,
injury or damage to the product may be
caused.
Hearing loss
• Do not expose yourself to high volume sound
for an extended period of time.Otherwise,
hearing loss may be caused. If you experience
any hearing abnormality, consult a physician.
• If you plan to connect this product to any other
devices, first turn off the power to all devices.
Otherwise, hearing loss, electrical shock or
damage to the product may be caused.
• When turning on the power to the audio system,
always turn on the power to the power amplifier
LAST. When turning off the power to the audio
system, turn off the power to the power
amplifier FIRST.
Otherwise, hearing loss or damage to the
product may be caused.
Maintenance
• Before cleaning the product, be sure to remove
the power cord plug from the AC outlet.
Otherwise, electrical shock may be caused.
Handling
• Do not insert your hands or fingers in any gaps
or openings on this product.
Otherwise, injury may be caused.
• Do not drop a foreign object, such as a piece of
metal or paper, into any gap on this product.
Otherwise, fire, electrical shock or damage to
the product may be caused.
• Do not apply the following excessive force to
this product.
- Resting your weight on this product
- Placing heavy objects on this product
- Stacking up this product
- Applying excessive force to the buttons,
switches, or I/O connectors
Otherwise, injury or damage to the product may
be caused.
• Do not pull connected cables.
Otherwise, the product may fall or tip over,
resulting in injuries or damage to the product.
En 5
NOTICE
Follow the precautions below to avoid malfunction
and damage to this product and to prevent the
loss of data.
Power supply
• If you plan not to use this product for a long
period of time, remove the power cord plug
from the AC outlet. Even when [A] (Power) on
the front panel is turned off, a small amount of
current still flows through this product.
Installation
• Depending on the environment in which you
use the product, a phone, radio or TV may
generate noise. In that case, change the
product location or orientation, or the
surrounding environment.
• Do not install this product in a place subject to:
- Direct sunlight
- Extremely high or low temperatures
- Excessive dust
Otherwise, malfunction or damage to the
product may be caused.
• Do not install this product in a place where
condensation can form due to rapid, drastic
changes in ambient temperature. Using the
product while condensation is present may
cause damage to the product. If there is a
reason to believe that condensation might have
occurred on or in this product, leave it for
several hours without turning on the power.
You can start using the product when the
condensation has completely dried.
Handling
• Do not place any vinyl, plastic or rubber
products on this product. Otherwise, the panel
may be discolored or deteriorate.
Maintenance
• Use a dry, soft cloth to clean this product. Do
not use benzine, thinner, detergent or chemical
rag to clean the surface of the product.
Otherwise, the surface may be discolored or
deteriorate.
NOTE
This section describes precautions to be
observed during use, functional restrictions, and
supplemental information that may be helpful for
you.
Disposal or transfer
• If you plan to transfer ownership of this product,
include this document and the supplied
accessories along with the product.
• Follow the rules of your local authority to
dispose of this product and its accessories.
• Follow the rules of your local authority to
dispose of used batteries.
Precautions for use
Important information
COMPLIANCE INFORMATION STATEMENT
(Supplier’s declaration of conformity procedure)
Responsible Party : Yamaha Corporation of America
Address : 6600 Orangethorpe Ave.,
Buena Park, Calif. 90620
Telephone : 714-522-9011
Type of Equipment : Compact Disc Player
Model Name : CD-S303,CD-S303RK
This device complies with Part 15 of the FCC Rules.
Operation is subject to the following two conditions:
1) this device may not cause harmful interference,
and
2) this device must accept any interference received
including interference that may cause undesired
operation.
Product information, such as the model name
(product number), manufacturing code (serial
number), and power requirements, are displayed on
or in the vicinity of the nameplate on the product
(Rear panel). We recommend that you fill in the
following space with the model name and serial
number, and store this document in a safe place so
that the information will help you identify your product
in case you lose the product.
Model Name
Serial Number
WARNING
Use of controls or adjustments or performance of
procedures other than those specified herein may
result in hazardous radiation exposure.

6 En
FCC INFORMATION (U.S.A.)
1. IMPORTANT NOTICE: DO NOT MODIFY THIS UNIT!
This product, when installed as indicated in the instructions contained in this
manual, meets FCC requirements. Modifications not expressly approved by
Yamaha may void your authority, granted by the FCC, to use the product.
2. IMPORTANT: When connecting this product to accessories and/ or another
product use only high quality shielded cables. Cable/s supplied with this
product MUST be used. Follow all installation instructions. Failure to follow
instructions could void your FCC authorization to use this product in the USA.
3. NOTE: This product has been tested and found to comply with the
requirements listed in FCC Regulations, Part 15 for Class “B” digital devices.
Compliance with these requirements provides a reasonable level of
assurance that your use of this product in a residential environment will not
result in harmful interference with other electronic devices. This equipment
generates/uses radio frequencies and, if not installed and used according to
the instructions found in the users manual, may cause interference harmful
to the operation of other electronic devices. Compliance with FCC
regulations does not guarantee that interference will not occur in all
installations. If this product is found to be the source of interference, which
can be determined by turning the unit “OFF” and “ON”, please try to
eliminate the problem by using one of the following measures:
- Relocate either this product or the device that is being affected by the
interference.
- Utilize power outlets that are on different branch (circuit breaker or fuse)
circuits or install AC line filter/s.
- In the case of radio or TV interference, relocate/reorient the antenna. If the
antenna lead-in is 300 ohm ribbon lead, change the lead-in to co-axial type
cable.
If these corrective measures do not produce satisfactory results, please
contact the local retailer authorized to distribute this type of product. If you
can not locate the appropriate retailer, please contact Yamaha Corporation
of America, 6600 Orangethorpe Ave, Buena Park, CA90620, USA.
The above statements apply ONLY to those products distributed by Yamaha
Corporation of America or its subsidiaries.

En 7
CONTENTS
BEFORE USING THE UNIT 8
Features . . . . . . . . . . . . . . . . . . . . . . . . . . . . . . . . . . . . . . . . . . . . . . . . . . . . . . . . . 8
About this manual. . . . . . . . . . . . . . . . . . . . . . . . . . . . . . . . . . . . . . . . . . . . . . . . 8
Accessories . . . . . . . . . . . . . . . . . . . . . . . . . . . . . . . . . . . . . . . . . . . . . . . . . . . . . . 9
PREPARATION 10
Connecting to an amplifier. . . . . . . . . . . . . . . . . . . . . . . . . . . . . . . . . . . . . . .10
Connecting the power cord . . . . . . . . . . . . . . . . . . . . . . . . . . . . . . . . . . . . . .10
Turning on the power . . . . . . . . . . . . . . . . . . . . . . . . . . . . . . . . . . . . . . . . . . .11
PLAYING AUDIO 12
Playing an audio CD . . . . . . . . . . . . . . . . . . . . . . . . . . . . . . . . . . . . . . . . . . . . .12
Playing music files stored on your USB flash drive . . . . . . . . . . . . . . . . .13
Advanced functions . . . . . . . . . . . . . . . . . . . . . . . . . . . . . . . . . . . . . . . . . . . . .14
Random-sequence playback . . . . . . . . . . . . . . . . . . . . . . . . . . . . . . . . . . . . . . . . . . . . . . . . . . . . . . . . . 14
Repeat playback . . . . . . . . . . . . . . . . . . . . . . . . . . . . . . . . . . . . . . . . . . . . . . . . . . . . . . . . . . . . . . . . . . . . . 14
Playing tracks in the specified order (Program playback) . . . . . . . . . . . . . . . . . . . . . . . . . . . . . . 14
Playing a specified part repeatedly (A-B Repeat playback) . . . . . . . . . . . . . . . . . . . . . . . . . . . . . 15
Enjoying high-quality sound playback (PURE DIRECT) . . . . . . . . . . . . . . . . . . . . . . . . . . . . . . . . . 15
Switching information on the display. . . . . . . . . . . . . . . . . . . . . . . . . . . . . . . . . . . . . . . . . . . . . . . . . 15
Changing the display brightness . . . . . . . . . . . . . . . . . . . . . . . . . . . . . . . . . . . . . . . . . . . . . . . . . . . . . 15
APPENDIX 16
Part names . . . . . . . . . . . . . . . . . . . . . . . . . . . . . . . . . . . . . . . . . . . . . . . . . . . . .16
Front panel. . . . . . . . . . . . . . . . . . . . . . . . . . . . . . . . . . . . . . . . . . . . . . . . . . . . . . . . . . . . . . . . . . . . . . . . . . . 16
Display. . . . . . . . . . . . . . . . . . . . . . . . . . . . . . . . . . . . . . . . . . . . . . . . . . . . . . . . . . . . . . . . . . . . . . . . . . . . . . . 17
Rear panel . . . . . . . . . . . . . . . . . . . . . . . . . . . . . . . . . . . . . . . . . . . . . . . . . . . . . . . . . . . . . . . . . . . . . . . . . . . 17
Remote control. . . . . . . . . . . . . . . . . . . . . . . . . . . . . . . . . . . . . . . . . . . . . . . . . . . . . . . . . . . . . . . . . . . . . . . 18
Advanced settings . . . . . . . . . . . . . . . . . . . . . . . . . . . . . . . . . . . . . . . . . . . . . .19
Playback Mode Memory (PLAY MEM). . . . . . . . . . . . . . . . . . . . . . . . . . . . . . . . . . . . . . . . . . . . . . . . . . 19
Ready Mode (RDY MODE). . . . . . . . . . . . . . . . . . . . . . . . . . . . . . . . . . . . . . . . . . . . . . . . . . . . . . . . . . . . . 19
Automatic Playback (AUTO PLAY) . . . . . . . . . . . . . . . . . . . . . . . . . . . . . . . . . . . . . . . . . . . . . . . . . . . . . 19
Auto Power Standby (AUTO STBY) . . . . . . . . . . . . . . . . . . . . . . . . . . . . . . . . . . . . . . . . . . . . . . . . . . . . 19
Supported file formats/discs/USB flash drives. . . . . . . . . . . . . . . . . . . . .20
Specifications. . . . . . . . . . . . . . . . . . . . . . . . . . . . . . . . . . . . . . . . . . . . . . . . . . . 21
Troubleshooting . . . . . . . . . . . . . . . . . . . . . . . . . . . . . . . . . . . . . . . . . . . . . . . . 22
8 En
BEFORE USING THE UNIT
• Optical digital output
• Coaxial digital output
• Supports playback of CD-R and CD-RW discs
• Supports playback of files stored on USB flash drives or data CDs (MP3/WMA/AAC/
WAV/FLAC)
• Random-sequence playback (page 14)
• Repeat playback (page 14)
• Program playback (audio CDs only) (page 14)
• A-B Repeat playback (audio CDs only) (page 15)
• PURE DIRECT function (page 15)
• Configurable display settings (items to be displayed/brightness) (page 15)
• Remote-controlled Standby On/Off
• Playback Mode Memory (page 19)
• Ready mode (page 19)
• Automatic Playback function (page 19)
• Auto Power Standby function (page 19)
• This manual explains operations performed primarily on the supplied remote control.
• All illustrations in this manual are provided for the purpose of operational instruction.
• In this manual, a music CD is referred to as an audio CD, and a CD that contains
MP3/WMA/AAC/WAV/FLAC data is referred to as a data CD.
• Specifications and appearance are subject to change without notice.
•
WARNING
is intended to alert you to the risk of death or serious injury.
• CAUTION is intended to alert you to the risk of personal injury.
• should be observed to avoid malfunction and damage to this product.
• provide supplemental information that might be handy.
Features About this manual
Notice
Note
En 9
• Remote control
• Power cord
• RCA stereo cable
• Batteries (AA, R6, UM-3) (x2)
• Owner’s Manual (this manual)
Accessories
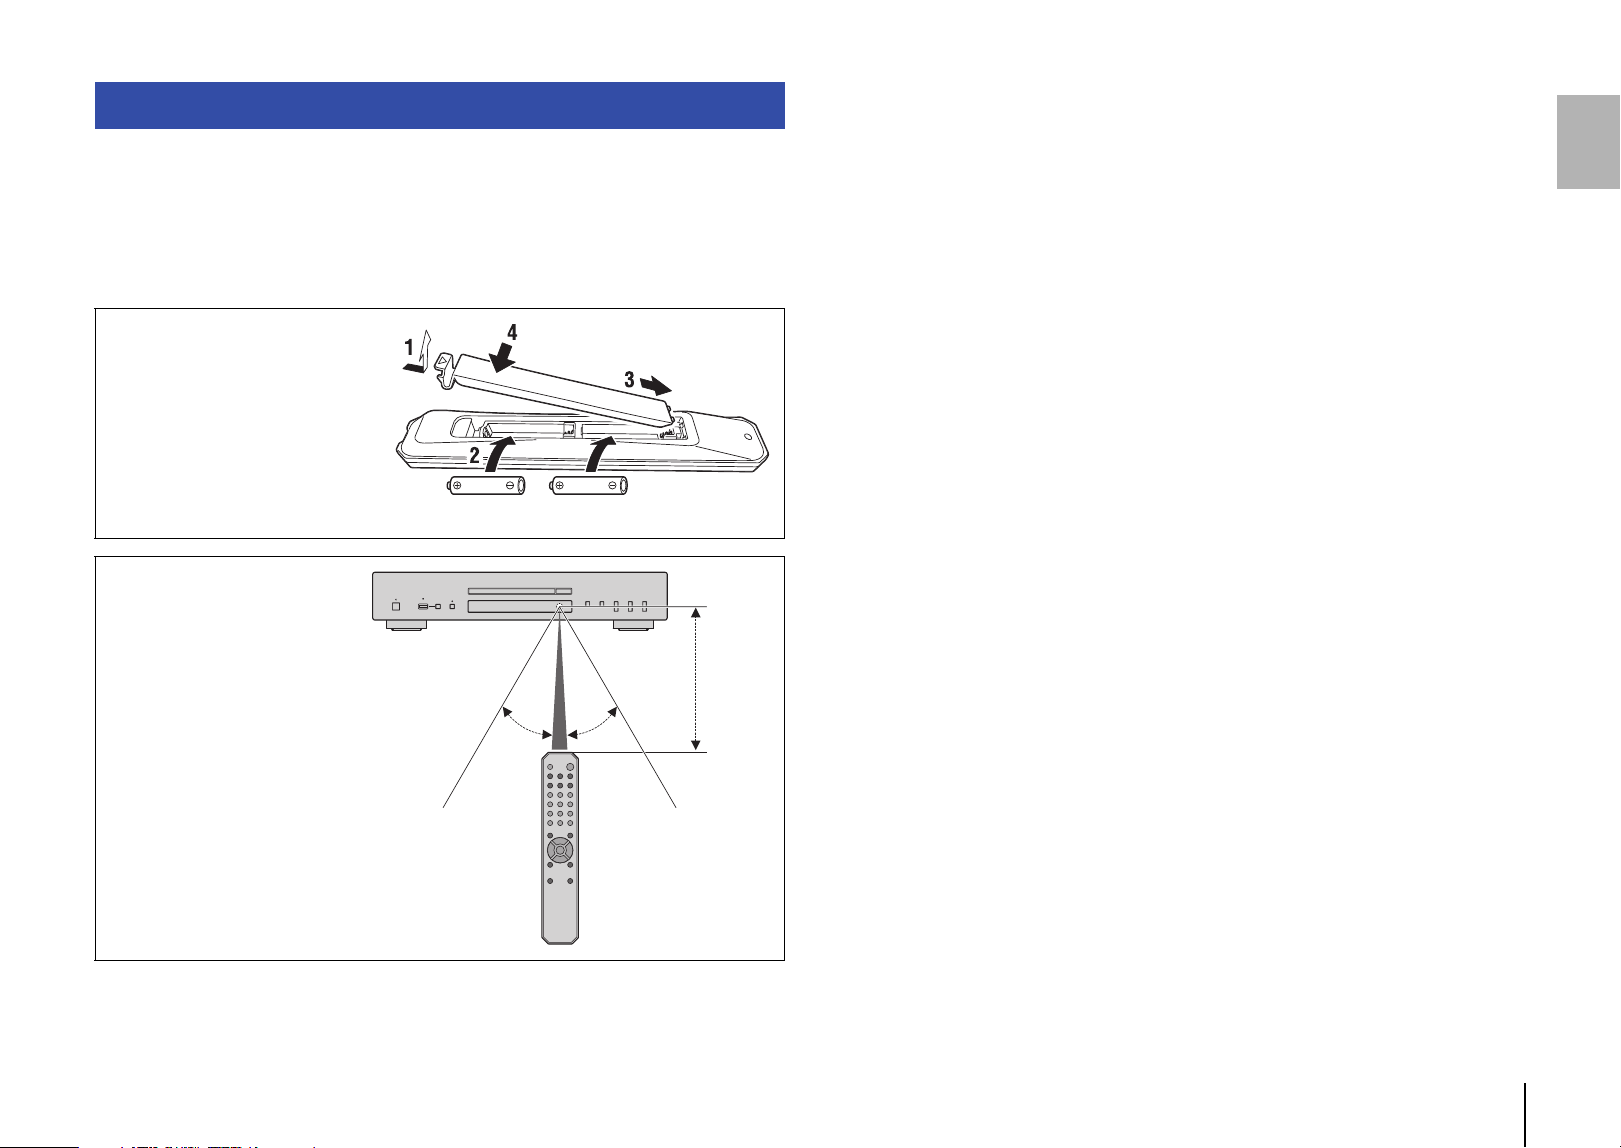
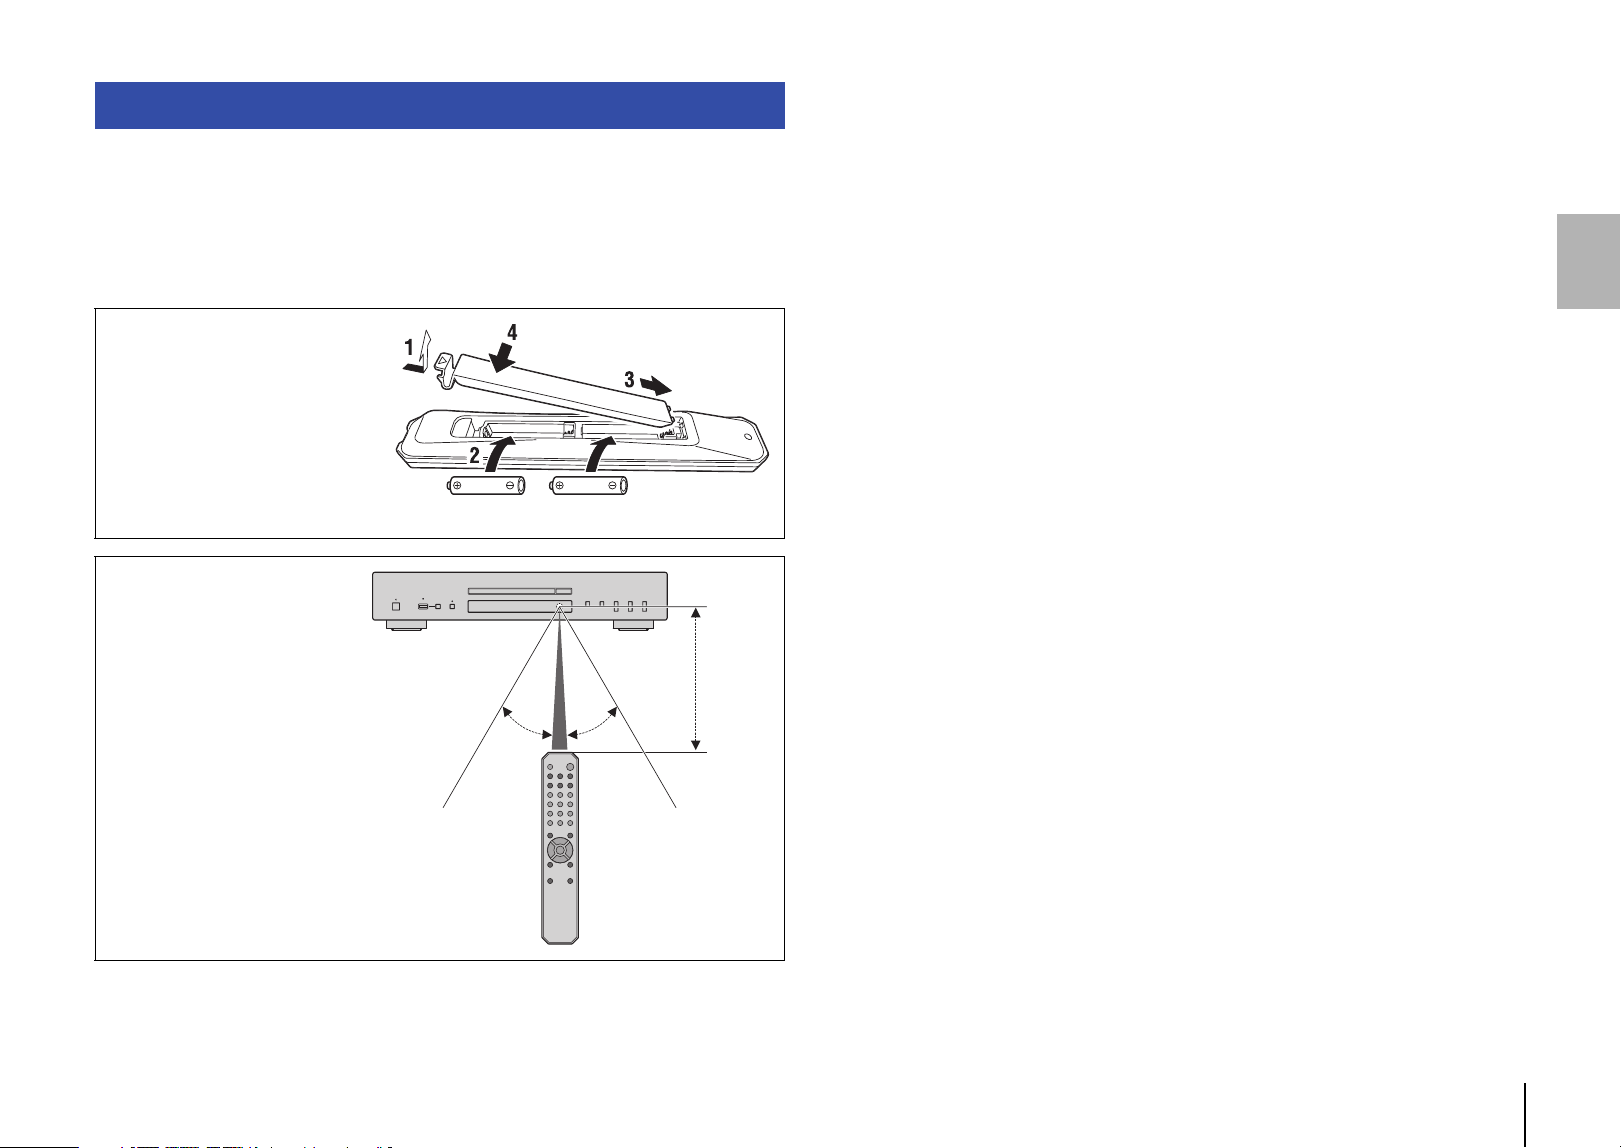
Inserting batteries into the
remote control
Insert the batteries in the proper
orientation.
Remote control operating
range
Point the remote control toward
the remote control sensor on
the unit from within the range
shown in the figure on the right.
Batteries (AA, R6, UM-3)
30° 30°
Within
6m
(20 ft)
10 En
PREPARATION
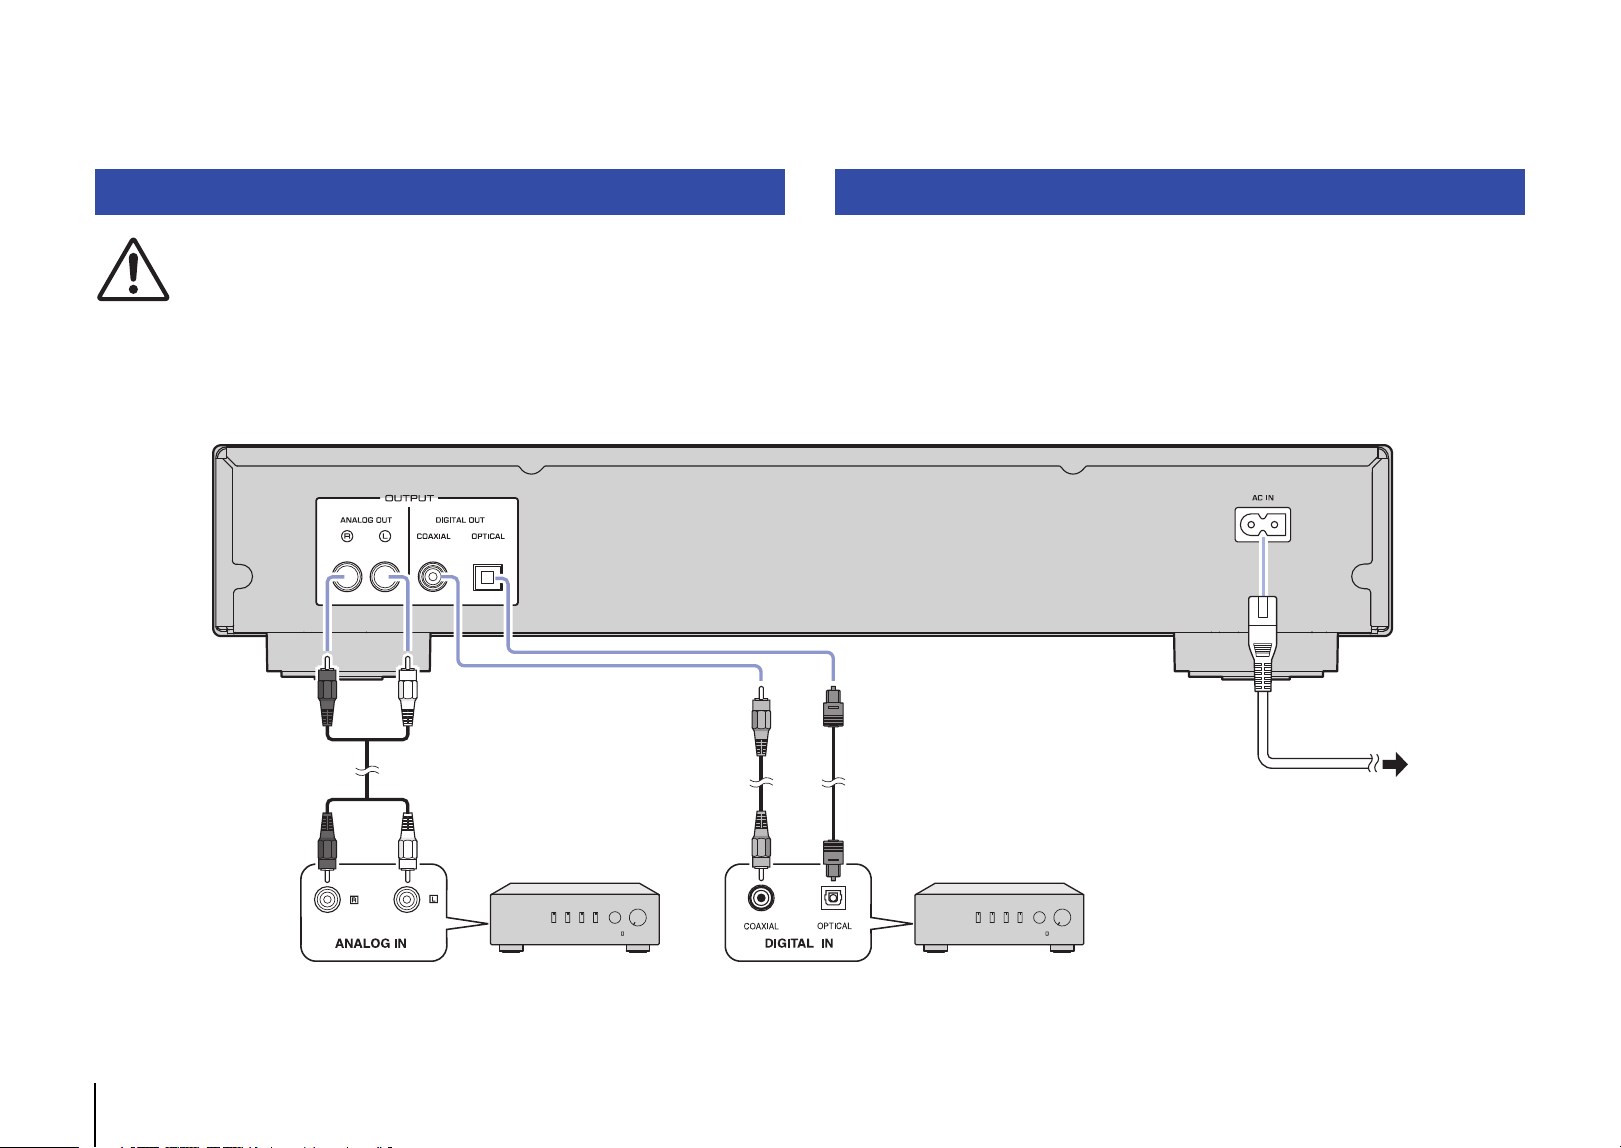
CAUTION
• Do not plug the power cord of this unit and other connected devices into AC outlets until all non-
power connections are complete.
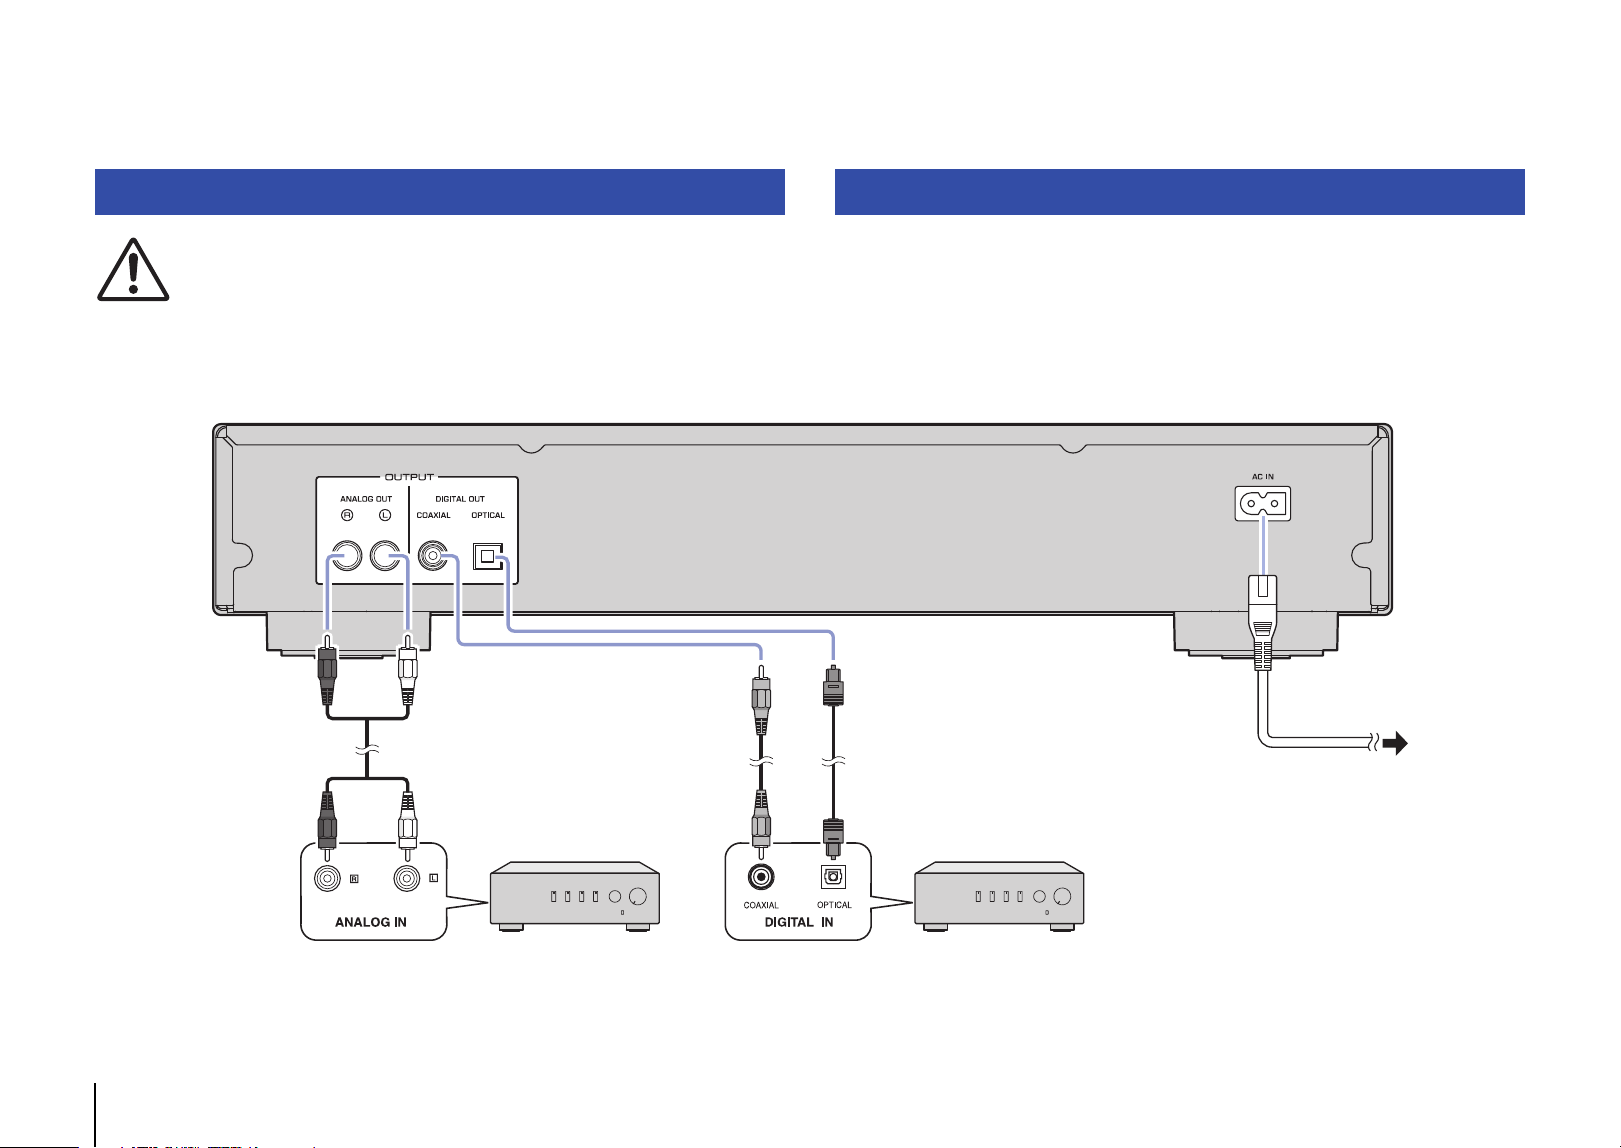
After all the connections are complete, connect the supplied power cord to the AC IN
connector on this unit, and then plug the other end into an AC outlet.
Connecting to an amplifier Connecting the power cord
AmplifierAmplifier
RCA stereo cable
(supplied)
Coaxial digital audio cable
(commercially available)
Optical digital cable
(commercially available)
To an AC wall
outlet
This unit (rear)
Power cord
(supplied)

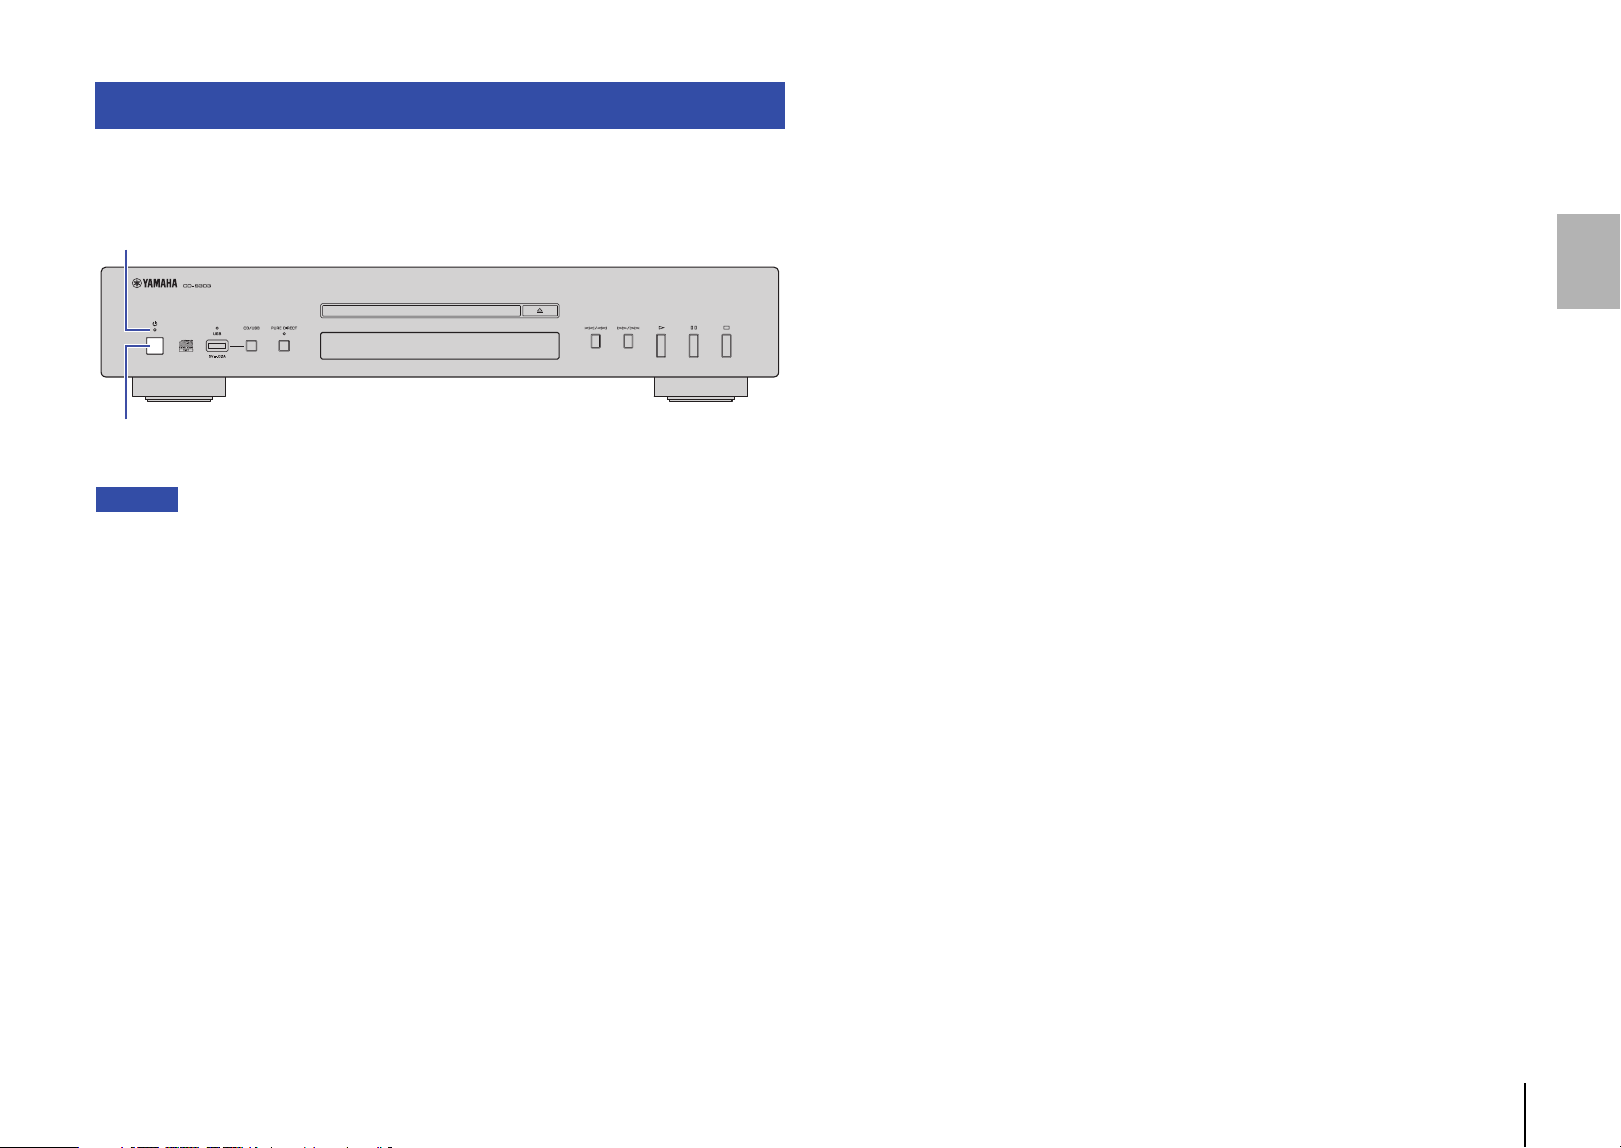
En 11
To turn on the power to the unit, press A (Power) on the front panel.
Note
• If you press A (Power) on the remote control while the power to the unit is on, the unit will enter
Standby mode.
• The power indicator on the unit operates as follows:
Brightly lit: Power is on
Dimly lit: Standby mode
Off: Power is off
• This unit features an Auto Power Standby function that saves power consumption (page 19).
(Default: Auto Power Standby On)
Turning on the power
A (Power)
Power indicator
12 En
CD/USB
OPEN/CLOSE
PLAYING AUDIO
This unit enables you to play data CDs as well as audio CDs. For
information on the type of CDs that can be played on this unit, please
refer to “Supported file formats/discs/USB flash drives” (page 20).
1
If the USB indicator on the front panel is lit, press
CD/USB to switch to Disc mode.
2
Place a CD on the disc tray.
Press OPEN/CLOSE repeatedly to open and close the disc tray.
Note
• You can also press (Open/Close) on the front panel repeatedly to
open and close the disc tray.
• When the unit is ready to play an audio CD, the playback media
indicator (CD) on the display lights up.
3
Press (Play).
The (Play) indicator on the display lights up and playback
starts.
Note
• During audio file playback, the playback media indicator reflecting the
file format lights up.
Notice
• Do not insert your hand or finger into the disc tray slot. Doing so might
cause injury.
Note
• After you place a CD on the disc tray, the disc tray will close and playback
will start if you perform one of the following operations:
– Press (Play).
– Press a numeric key that corresponds to a track number.
• You can configure the unit so that playback automatically starts when
power to the unit is turned on or when you switch to Disc or USB mode
(page 19).
(Default: Automatic Playback On)
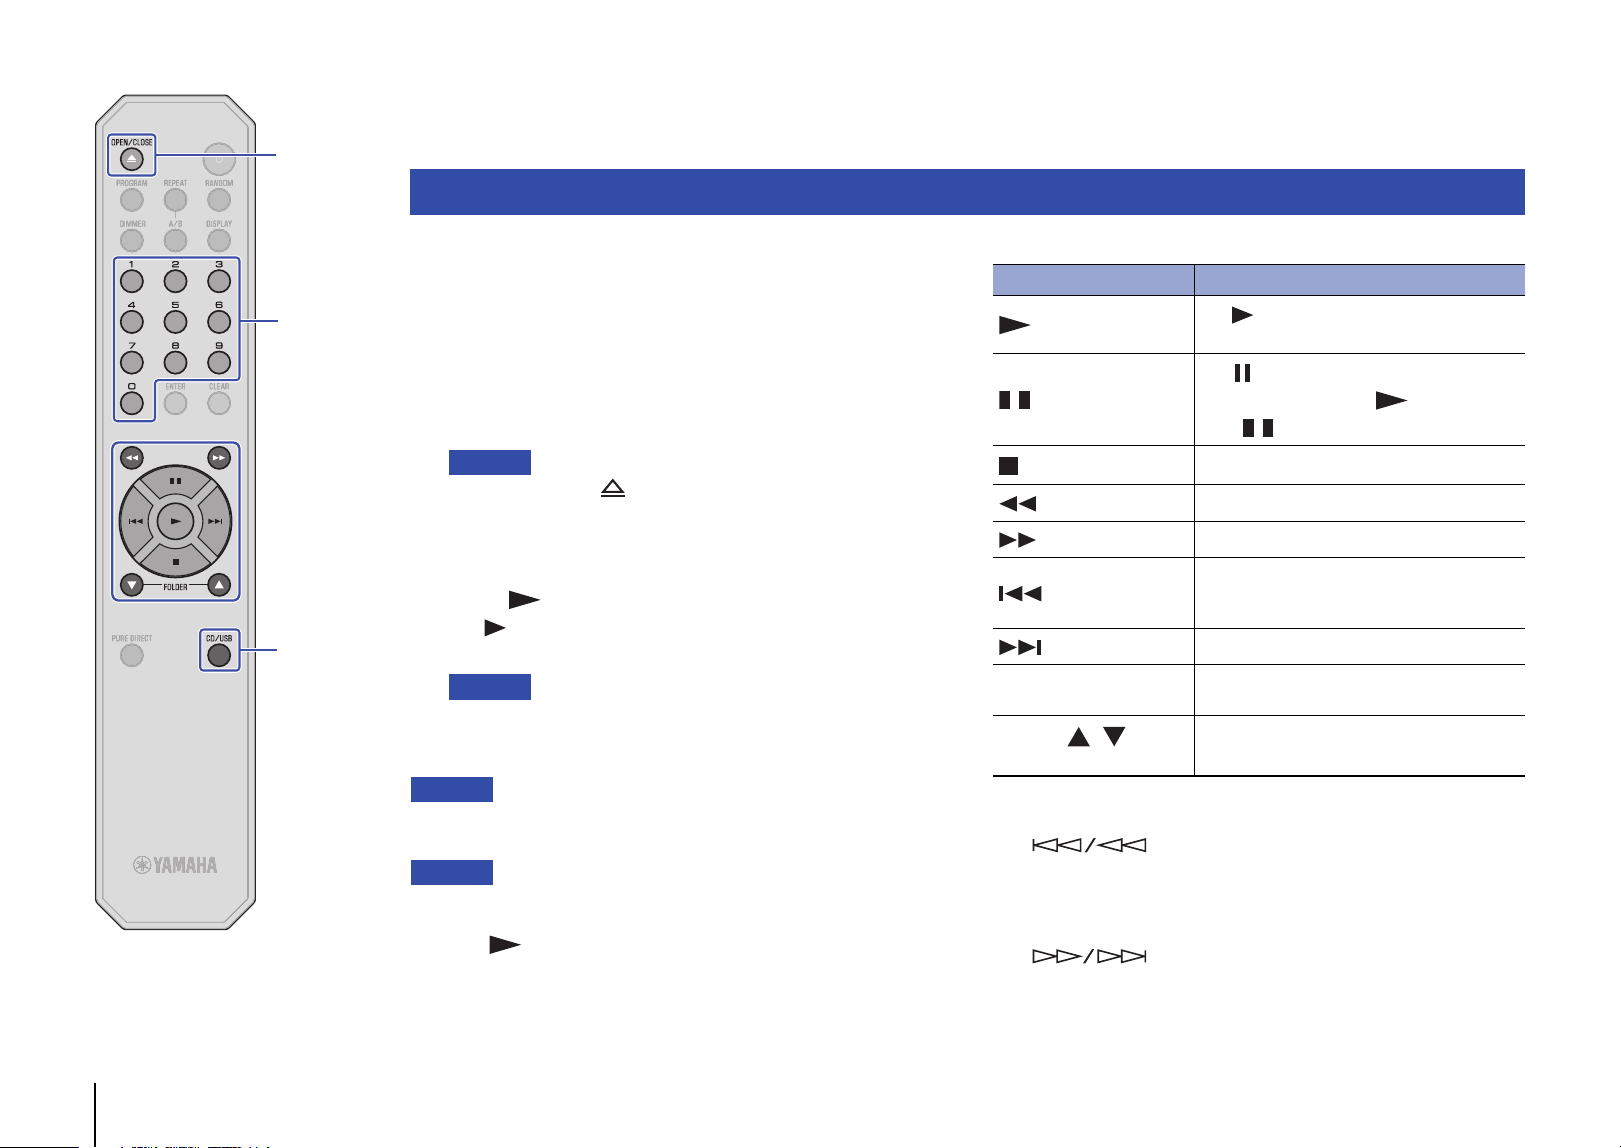
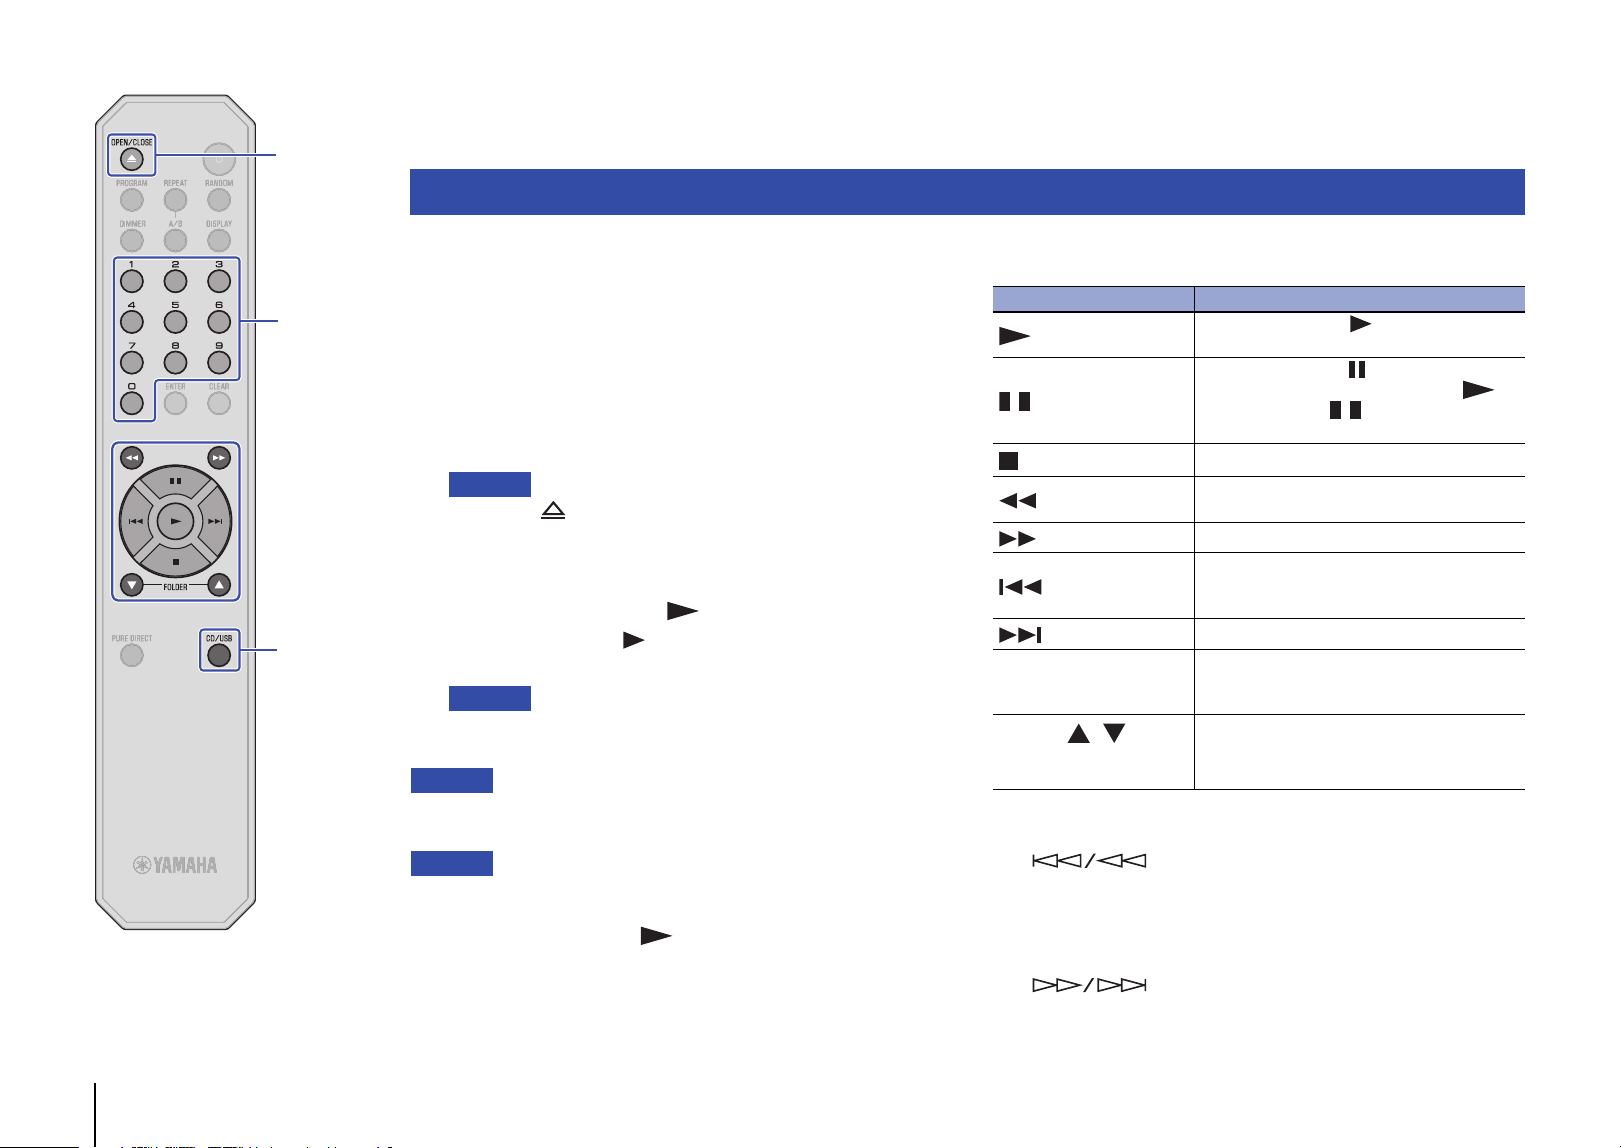
Use the following remote control keys to navigate the operation.
* The control buttons on the front panel function as follows:
(Skip backward/Search backward):
Skips back to the previous track. Skips back to the top of the
current track if pressed during playback. It also searches
tracks backward if you press and hold the button.
(Skip forward/Search forward):
Skips to the next track. It also searches tracks forward if you
press and hold the button.
Playing an audio CD
Available keys Function
(Play)
The (Play) indicator on the display lights
up and playback starts.
(Pause)
The (Pause) indicator on the display lights
up and playback pauses. alternatively,
press to resume playback.
(Stop)
Stops playback.
(Search backward)*
Searches tracks backward.
(Search forward)*
Searches tracks forward.
(Skip backward)*
Skips back to the previous track. Skips back to
the top of the current track if pressed during
playback.
(Skip forward)*
Skips to the next track.
Numeric keys
Enter a track number to directly select the
corresponding track.
FOLDER ,
(Data CDs only)
Enable you to select a folder.
Numeric keys
En 13
CD/USB
You can play music files (stored on your USB flash drive) on this
unit. For information on the supported USB flash drives, please
refer to “Supported file formats/discs/USB flash drives” (page 20).
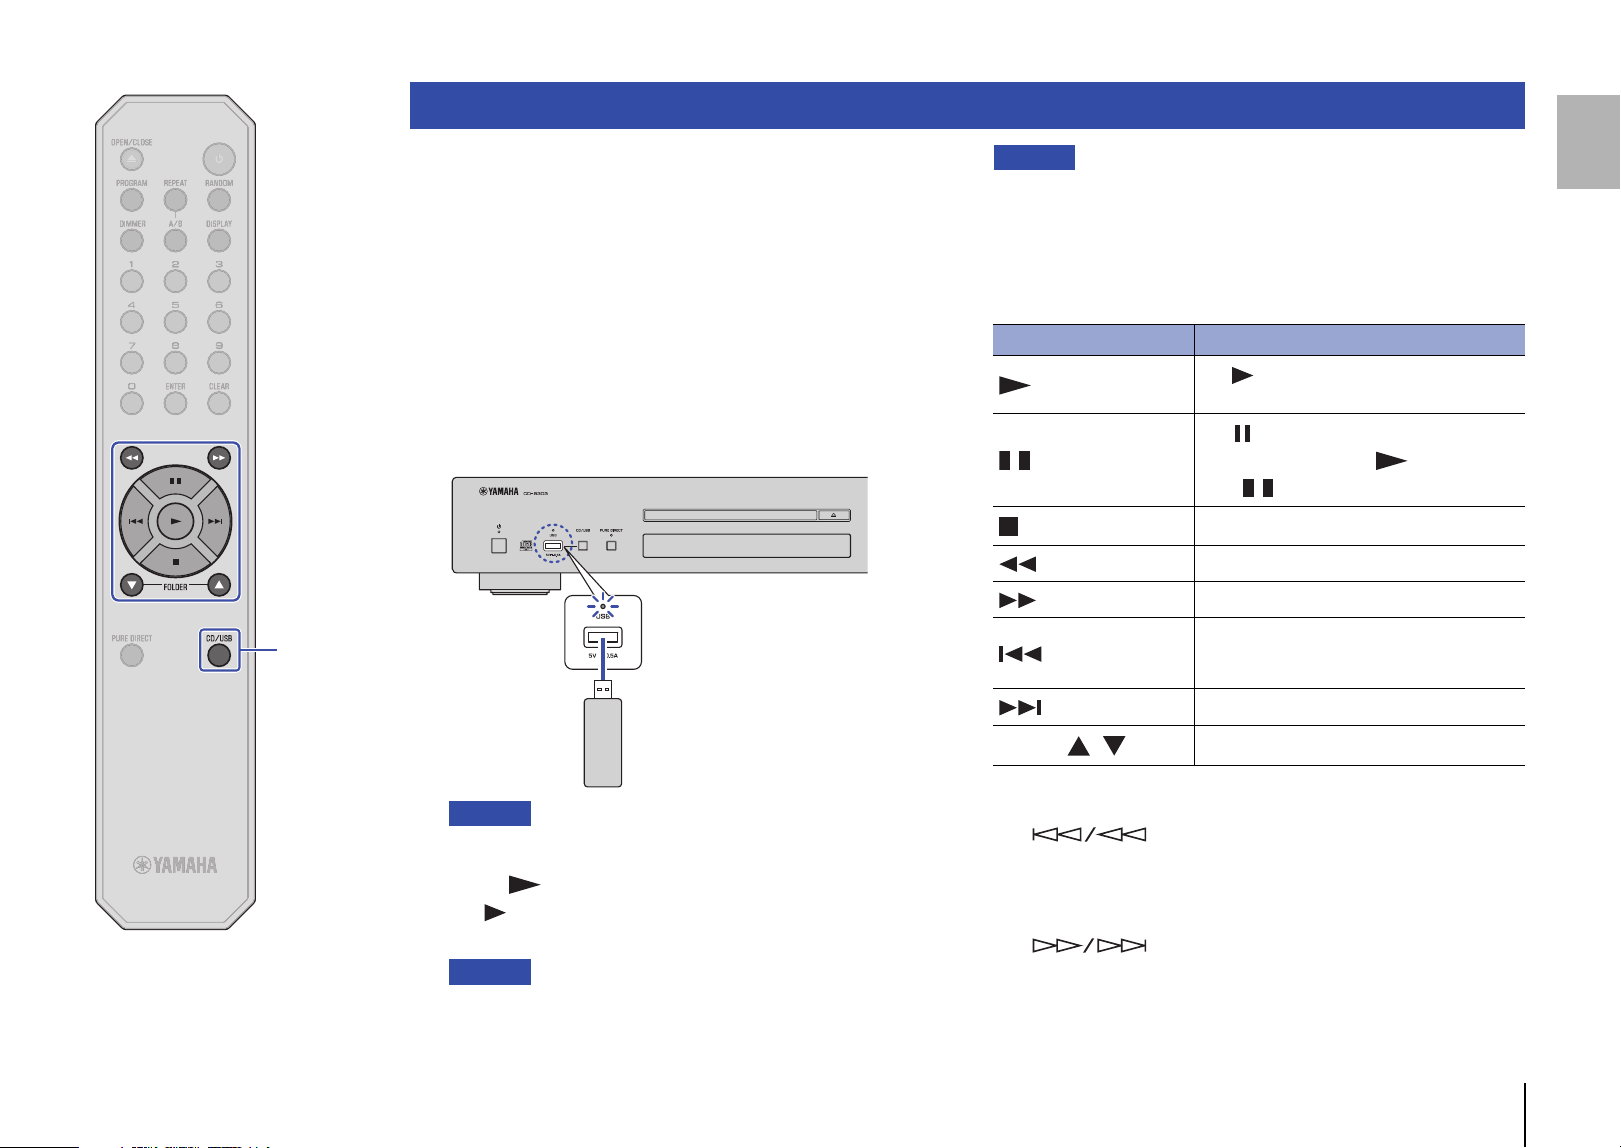
1
If the USB indicator on the front panel is off, press
CD/USB to switch to USB mode.
The USB indicator on the front panel lights up orange.
2
Connect the USB flash drive to the USB jack.
When the unit is ready for playback, the playback media
indicator (USB) on the display lights up, and the USB indicator
on the front panel lights up green.
Notice
• Do not use USB extension cables.
3
Press (Play).
The (Play) indicator on the display lights up and playback
starts.
Note
• During audio file playback, the playback media indicator reflecting the
file format lights up.
• If compatible music files are stored on your USB flash drive, the unit
will play them in chronological order based on date of creation.
Notice
• Do not remove the USB flash drive during playback, or while the information
display on the front panel is indicating “USB READING”. In this case, first
press CD/USB to switch to Disc mode, make sure that the USB indicator
turns off, and then remove the flash drive.
Use the following remote control keys to navigate the operation.
* The control buttons on the front panel function as follows:
(Skip backward/Search backward):
Skips back to the previous track. Skips back to the top of the
current track if pressed during playback. It also searches
tracks backward if you press and hold the button.
(Skip forward/Search forward):
Skips to the next track. It also searches tracks forward if you
press and hold the button.
Playing music files stored on your USB flash drive
This unit (front panel)
USB flash drive
Available keys Function
(Play)
The (Play) indicator on the display lights
up and playback starts.
(Pause)
The (Pause) indicator on the display lights
up and playback pauses. alternatively,
press to resume playback.
(Stop)
Stops playback.
(Search backward)*
Searches tracks backward.
(Search forward)*
Searches tracks forward.
(Skip backward)*
Skips back to the previous track. Skips back to
the top of the current track if pressed during
playback.
(Skip forward)*
Skips to the next track.
FOLDER ,
Enable you to select a folder.
14 En
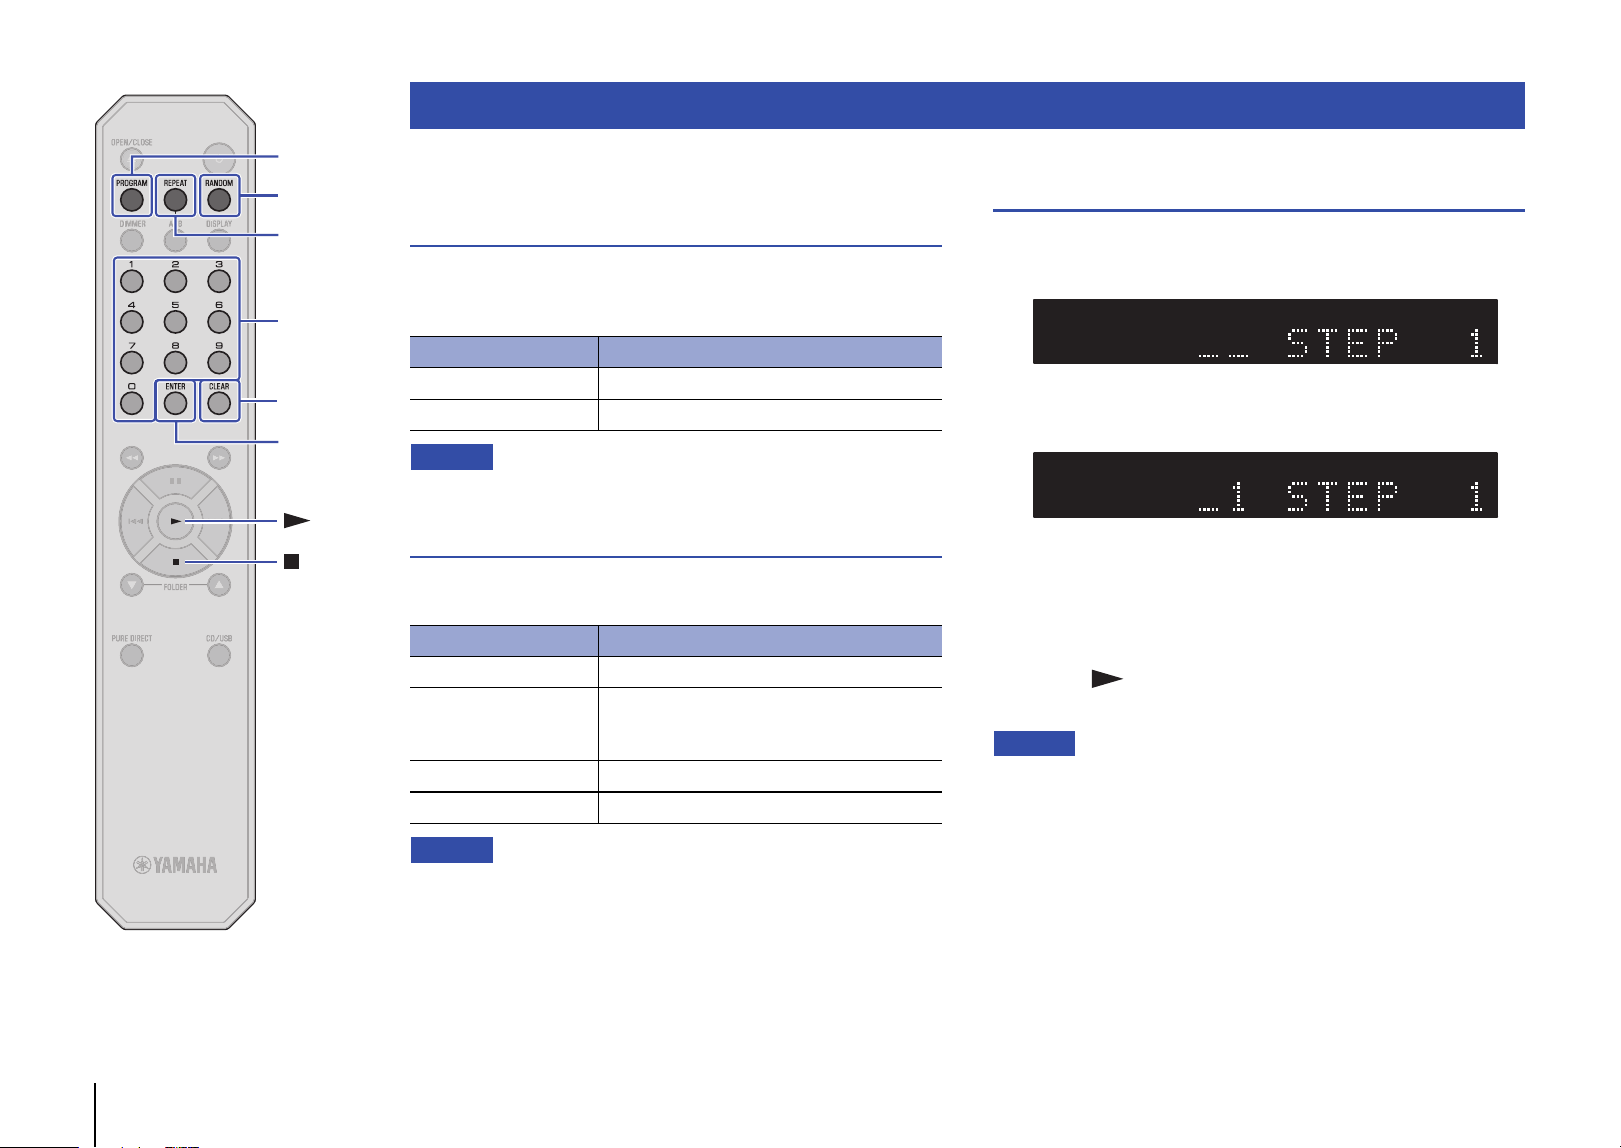
RANDOM
CLEAR
ENTER
REPEAT
PROGRAM
You can configure playback mode and display settings using
advanced functions.
Random-sequence playback
Press RANDOM to play tracks in random order. Pressing RANDOM
repeatedly will change the Random-sequence playback setting as
follows:
Note
• To cancel Random-sequence playback, open the disc tray.
Repeat playback
Press REPEAT to play tracks repeatedly. Pressing REPEAT
repeatedly will change the Repeat playback setting as follows:
Note
• To cancel Repeat playback, open the disc tray.
Playing tracks in the specified order
(Program playback)
You can play audio CD tracks in the specified order.
1
Press PROGRAM while playback is stopped.
2
Use the numeric keys to enter the track number of a
song you want to program.
3
Press ENTER.
Repeat steps 2 and 3 to program each track.
Press CLEAR to cancel each programmed track starting with
the last track you programmed.
4
Press (Play).
The unit starts to play the tracks in the programmed order.
Note
• Program playback does not work with data CDs or USB flash drives.
• You can program up to 24 tracks.
• Do one of the following to clear all programmed tracks:
– Press CLEAR while Program playback is stopped.
– Turn off the power to the unit or set the unit in Standby mode.
– Open the disc tray.
Advanced functions
Indicator Setting
RNDM Plays all tracks in random order.
Off Turns off Random-sequence playback.
Indicator Setting
REP Plays one track repeatedly.
REP FOLDER
(Data CDs and USB
flash drives only)
Plays tracks in the current folder repeatedly.
REP ALL Plays all tracks repeatedly.
Off Turns off Repeat playback.
TRACKTEXT AAC WAV FLAC RESUM RDY TOTAL REMAIN RNDM REP FOLDER ALL A - BCD PROG
TRACKTEXT AAC WAV FLAC RESUM RDY TOTAL REMAIN RNDM REP FOLDER ALL A - BCD PROG
Numeric keys
En 15
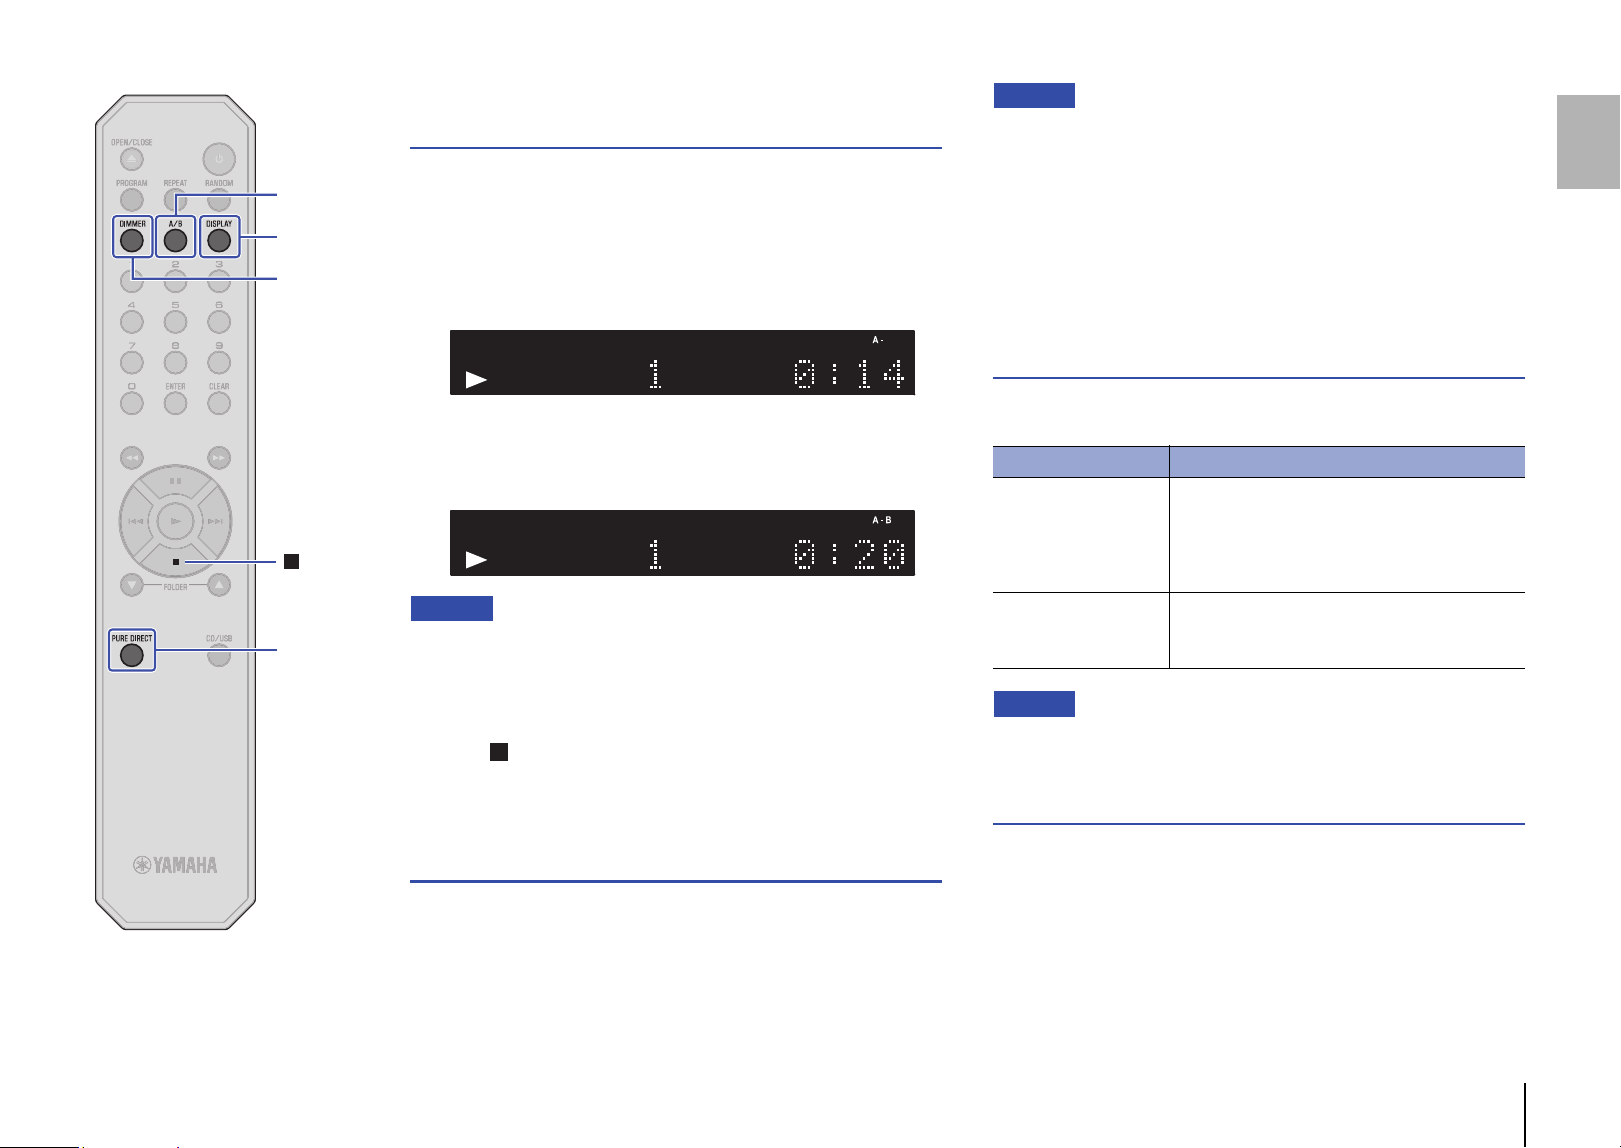
A/B
PURE
DIRECT
DISPLAY
DIMMER
Playing a specified part repeatedly
(A-B Repeat playback)
You can specify the start and end points of a track during audio CD
playback to play the specified part repeatedly.
1
Play an audio CD.
2
Press A/B at the point you want to start Repeat
playback.
3
Press A/B again at the point you want to end Repeat
playback.
The unit starts Repeat playback.
Note
• Repeat playback does not work with data CDs or USB flash drives.
• You cannot specify the A-B Repeat setting when the PURE DIRECT
function is turned on.
• Do one of the following to cancel A-B Repeat playback:
– Press A/B again.
– Press (Stop).
– Open the disc tray.
Enjoying high-quality sound playback
(PURE DIRECT)
If the PURE DIRECT function is turned on, digital audio will not be
output. In this way, the PURE DIRECT function reduces noise that
would affect sound quality, enabling you to enjoy playback of high-
quality sound.
Pressing PURE DIRECT repeatedly will toggle between PURE
DIRECT on and off.
Note
• To use the PURE DIRECT function, connect the ANALOG OUT jacks on
the rear panel to the amplifier. The DIGITAL OUT jacks will not output any
signals.
• When the PURE DIRECT function is turned on:
– The PURE DIRECT indicator lights up.
– The front panel display will be turned off while content is playing.
– Only a minimum number of indicators and messages will appear while
you are operating the unit.
– This setting will be maintained after you turn off the power to the unit.
Switching information on the display
Pressing DISPLAY repeatedly during playback will switch the
information on the display as follows:
Note
• The information display indicates up to 64 characters (1-byte alphanumeric
characters and several symbols).
Changing the display brightness
Press DIMMER repeatedly to switch between four stages of display
brightness.
TEXT AAC WAV FLAC RESUM RDY TOTAL REMAIN RNDM FOLDER ALLPROG CD TRACK REP
TEXT AAC WAV FLAC RESUM RDY TOTAL REMAIN RNDM FOLDER ALLPROG CD TRACK REP
Playback media Information on the display
Audio CD
Elapsed time Remaining time of the current
track (TRACK REMAIN) Total remaining time on
the CD (TOTAL REMAIN) Tra ck n a me*
Artist name* Album title*
* If CD-text has been embedded
Data CD,
USB flash drive
Elapsed time Track name* Artist name*
Album title*
* If tags have been embedded
16 En
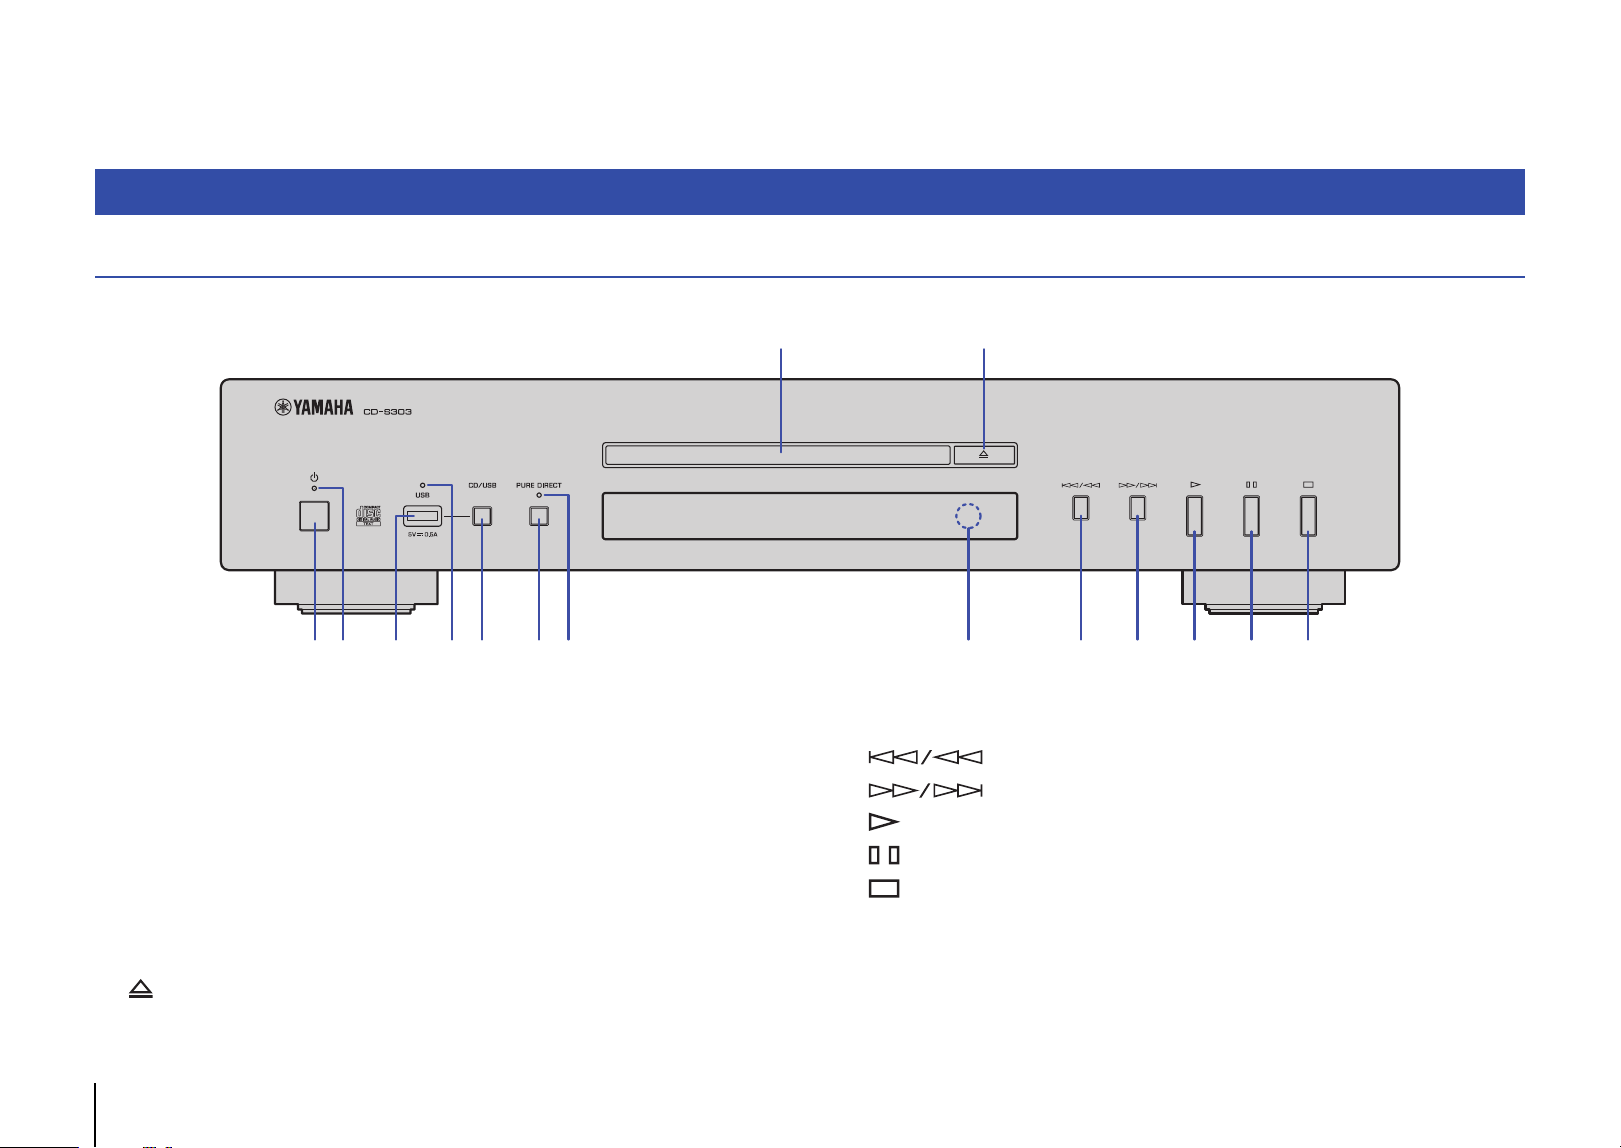
APPENDIX
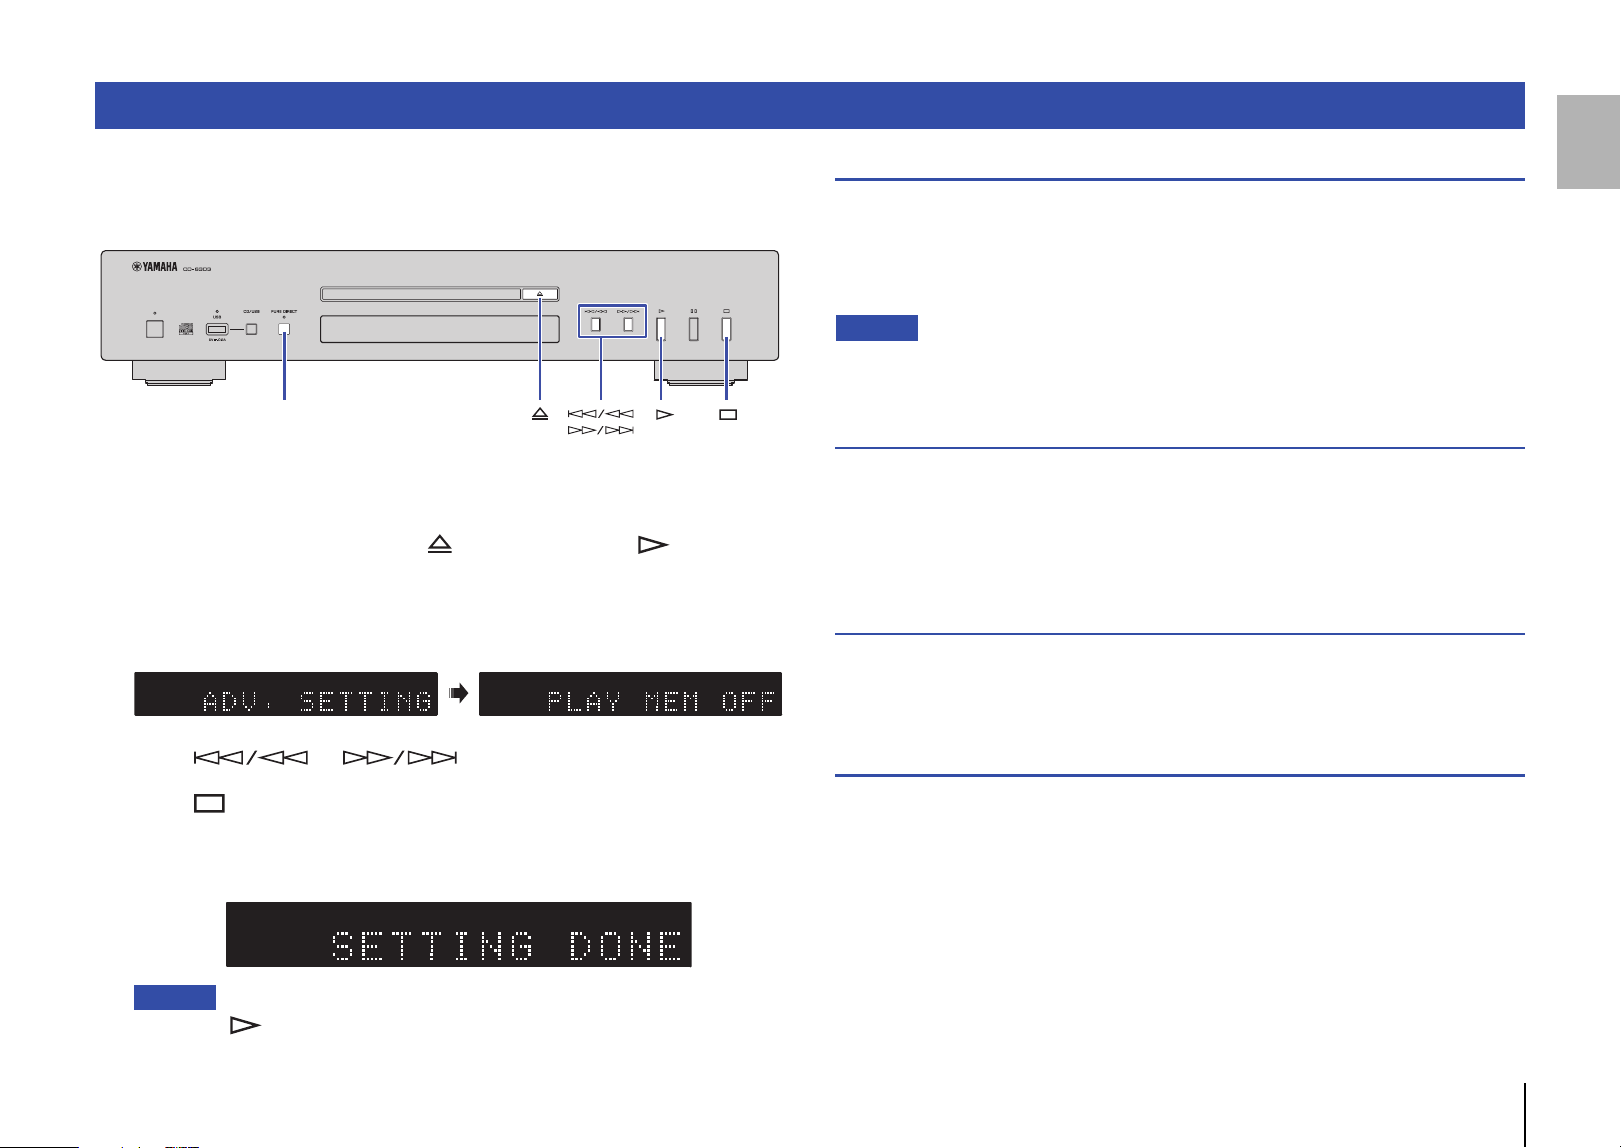
Front panel
1 A (Power) (page 11)
2 Power indicator (page 11)
3 USB jack (page 13)
4 USB indicator (page 13)
5 CD/USB (pages 12, 13)
6 PURE DIRECT (page 15)
7 PURE DIRECT indicator (page 15)
8 Disc tray (page 12)
9 (Open/Close) (page 12)
0 Remote control sensor (page 9)
A (Skip backward/Search backward) (pages 12, 13)
B (Skip forward/Search forward) (pages 12, 13)
C (Play) (pages 12, 13, 14)
D (Pause) (pages 12, 13)
E (Stop) (pages 12, 13, 14, 15)
Part names
1 2 3
4 7 0
8 9
5 6 A B C D E
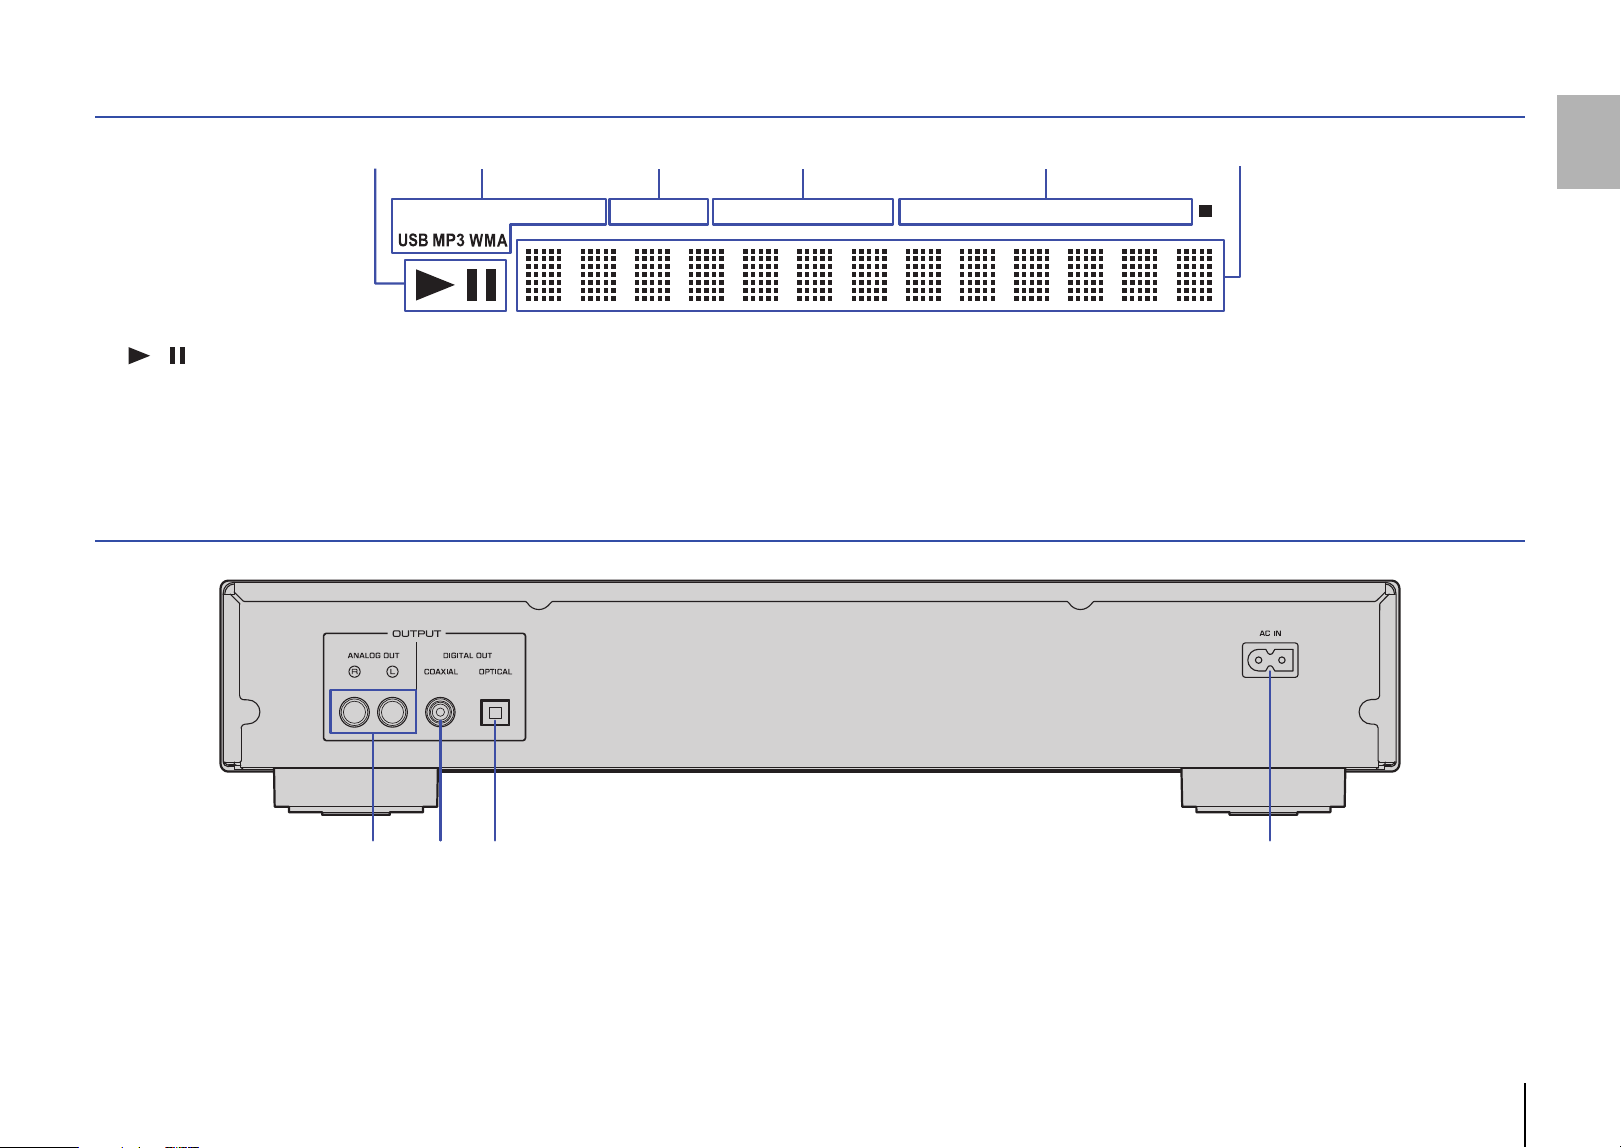
En 17
Display
1 / (Play/Pause) indicator (pages 12, 13)
2 Playback media indicator (pages 12, 13)
3 Advanced setting indicator (page 19)
4 Time indicator (page 15)
5 Playback mode indicator (pages 14, 15)
6 Information display (pages 14, 15, 19)
Rear panel
1 ANALOG OUT jacks (page 10)
2 DIGITAL OUT jack (COAXIAL) (page 10)
3 DIGITAL OUT jack (OPTICAL) (page 10)
4 AC IN connector (page 10)
TRACKCD TEXT AAC WAV FLAC RESUM RDY TOTAL REMAIN PROG RNDM REP FOLDER ALL A - B
1 62 3 54
2 3 41

18 En
Remote control
1 A (Power) (page 11)
2 Remote control signal transmitter (page 9)
3 OPEN/CLOSE (page 12)
4 PROGRAM (page 14)
5 REPEAT (page 14)
6 DIMMER (page 15)
7 RANDOM (page 14)
8 A/B (page 15)
9 DISPLAY (page 15)
0 Numeric keys (pages 12, 14)
A CLEAR (page 14)
B ENTER (page 14)
C (Search backward), (Search forward) (pages 12, 13)
(Pause) (pages 12, 13)
(Skip backward) (pages 12, 13)
(Skip forward) (pages 12, 13)
(Play) (pages 12, 13, 14)
(Stop) (pages 12, 13, 14, 15)
FOLDER , (pages 12, 13)
D CD/USB (pages 12, 13)
E PURE DIRECT (page 15)
3
4
9
0
C
7
8
A
B
D
E
6
5
2
1
En 19
This section explains how to configure various advanced functions. You can configure
most of these settings from the front panel. (Some settings require remote control
operation.)
1
Place the unit in Standby mode (page 11).
2
Press and hold PURE DIRECT, (Open/Close), and (Play),
simultaneously for three seconds or longer.
The following indicator appears on the information display of the front panel, and
the unit enters setting mode. You can set the Playback Mode Memory, Ready
Mode, Automatic Playback, and Auto Power Standby functions in this order.
3
Press or to turn the function on or off.
4
Press (Stop).
The setting is confirmed, and the next parameter is automatically selected. Repeat
steps 3 and 4. When all settings are complete, the following indicator appears on
the information display of the front panel, and the unit enters Standby mode.
Note
• If you press (Play) during this process, the setting at that point will be confirmed, and the
unit will enter Standby mode.
Playback Mode Memory (PLAY MEM)
With this function enabled, the unit retains the Repeat playback and Random-sequence
playback settings even after the power to the unit is turned off. When the Playback
Mode Memory function is turned on, the Advanced setting indicator (RESUM) on the
display lights up.
Default: Off
Note
• If you turn on the power to the unit after enabling the Playback Mode Memory function, the unit will
play the most recently-played track or file from the beginning.
Ready Mode (RDY MODE)
With this function enabled, the unit pauses each time the playback of a track has
completed. You can start playback of the next track when you choose. When the Ready
Mode function is enabled, the Advanced setting indicator (RDY) on the display lights
up.
Default: Off
Automatic Playback (AUTO PLAY)
With this function enabled, the unit automatically starts playback when power to the unit
is turned on or when you switch to Disc or USB mode.
Default: On
Auto Power Standby (AUTO STBY)
With this function enabled, the unit automatically enters Standby mode if you do not
interact with it for 20 minutes after the playback has stopped.
Default: On
Advanced settings
PURE DIRECT
TRACKTEXT A AC WAV FLAC RESUM RDY TOTAL REMAIN RNDM REP FOLDER ALLPROG CD TRACKTEXT A AC WAV FLAC RESUM RDY TOTAL REMAIN RNDM REP FOLDER ALLPROG CD
CD TRACK REP TEXT AAC WAV FLAC RESUM RDY TOTAL REMAIN RNDM FOLDER ALLPROG
20 En
❑ Supported file formats
* Linear PCM format only.
Note
• Files on a data CD or USB flash drive will be played in chronological order based on date of
creation.
• This unit supports ISO9660 format discs.
• If the unit is playing a VBR (variable bitrate) file, an accurate elapsed time might not be displayed.
• Digital Rights Management (DRM) encoded content cannot be played back.
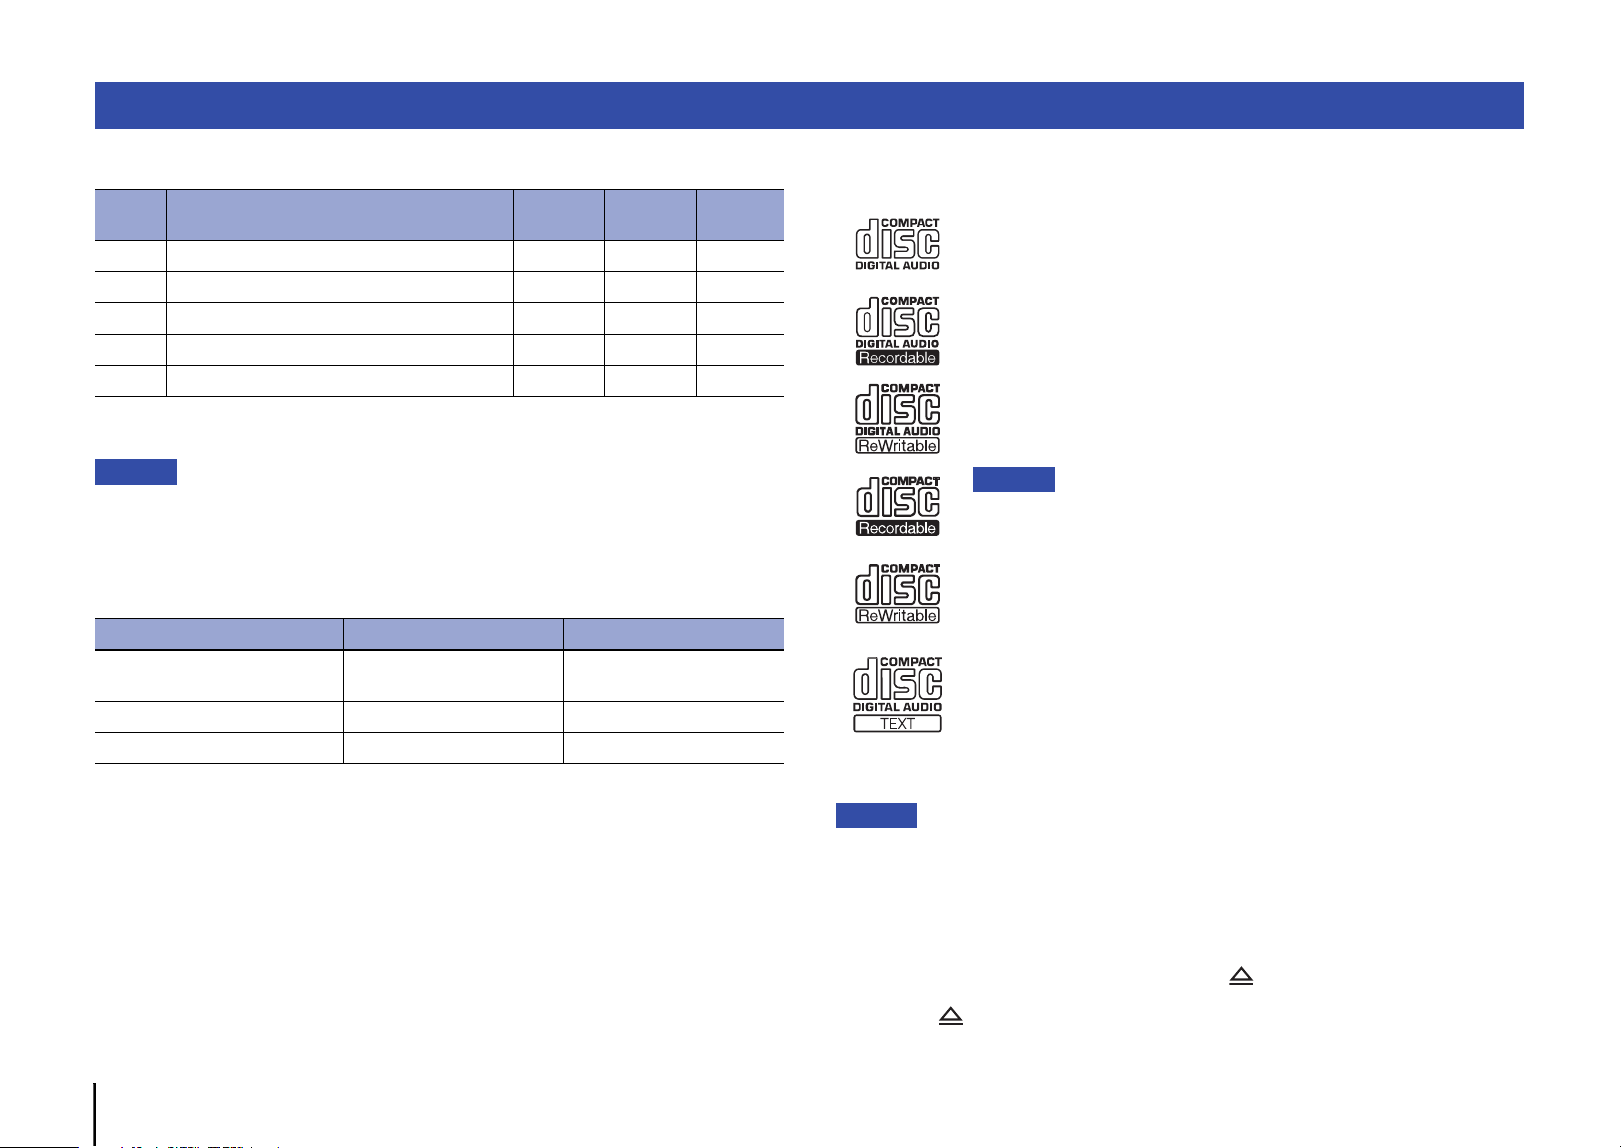
❑ Supported discs
Please use discs with the following logos.
Notice
• Do not use odd-shaped discs or discs with tape or a decal attached. Otherwise, malfunction of the
unit may occur.
• This unit might not play some CD-RW discs or discs that were improperly recorded.
• To play back an 8-cm CD, place it in the inner recessed area of the disc tray. Do not put a normal
(12-cm) CD on top of an 8-cm CD.
• If you insert a disc that is not supported by this unit, the message “No Disc” will be displayed.
In this case, wait for about 15 seconds and then press (open/close) on the front panel to
remove the disc.
If you press (open/close) too soon, the tray will open before the disc stop spinning, which may
damage the disc.
Supported file formats/discs/USB flash drives
File Sampling frequency (kHz)
Bit depth
(bit)
Bitrate
(kbps)
Number of
channels
MP3 32/44.1/48 — 32-320 2
WMA 32/44.1/48 — 48-192 2
AAC 32/44.1/48 — 8-320 2
WAV * 32/44.1/48/64/88.2/96 16/24 — 2
FLAC 32/44.1/48/64/88.2/96 16/24 — 2
Data CD USB flash drive
Number of folder hierarchies
(including the root folder)
99
Number of folders 999 999
Number of files 1100 65535
Compact discs (audio CDs)
CD-R and CD-RW discs
• Discs with one of the following descriptions:
FOR CONSUMER
FOR CONSUMER USE
FOR MUSIC USE ONLY
• For CD-R or CD-RW discs, the unit plays only the finalized discs.
Note
• This unit might not play some CD-R/CD-RW discs or discs that were
improperly recorded.
CD-TEXT discs
These discs contain embedded text information, such as album
titles, song names, and artist names. This information (alphanumeric
characters and some symbols only) along with the elapsed time will
be displayed.

En 21
❑ Handling a disc
• Handle a disc carefully so as not to scratch the recorded
surface. Do not bend a disc.
• If there are any fingerprints or dust on the recorded surface,
use a soft cloth to wipe the surface straight from the center
toward the perimeter.
• Never use a vinyl record cleaner, anti-static agent, or other chemical to wipe a disc.
• Use a soft-tip pen to write only on the label side.
• Do not leave a disc under the direct sunlight or in a location that is exposed to high
temperature or humidity for a long period of time.
• Do not use a commercially-available lens cleaner. Otherwise, a malfunction may
occur.
❑ Supported USB flash drives
Before you use this unit to play music files stored on a USB flash drive, make sure that
the following requirements are satisfied:
• The USB flash drive complies with mass storage class requirements.
• Data has been recorded using the FAT16 or FAT32 file system.
Notice
• Some USB flash drives may not operate properly.
• USB flash drives with encryption cannot be used.
• Yamaha and its dealers are not responsible for the loss of any data stored on a USB flash drive that
is connected to this unit. We recommend that you keep backup data in case of loss of data.
• Yamaha will not guarantee the operation or power supply to any USB flash drives.
The specifications of this unit are as follows.
Audio section
• Output Level (1 kHz, 0 dB, Fs 44.1 kHz) ..................................................... 2.0 ± 0.3 V
• S/N Ratio (IHF-A Network) (1 kHz, 0 dB, Fs 44.1 kHz).......................105 dB or higher
• Dynamic Range (1 kHz, 0 dB, Fs 44.1 kHz) .........................................96 dB or higher
• Harmonic Distortion (1 kHz, 0 dB, Fs 44.1 kHz) ..................................0.003% or lower
• Frequency Response
Audio CD ................................................................................................ 2 Hz – 20 kHz
Data CD/USB Fs 48 kHz ................................................................. 2 Hz – 22 kHz
Fs 96 kHz ......................................................2 Hz – 44 kHz, –3 dB
Laser section
• Laser Type ........................................................................................................ AIGaAs
• Wavelength ........................................................................................................790 nm
• Laser Output ...........................................................................................Max. 1.04 mW
General
• Power Supply
U.S.A. and Canada models................................................................ AC 120 V, 60 Hz
Australia model............................................................................ AC 230-240 V, 50 Hz
Europe and U.K. models .................................................................... AC 230 V, 50 Hz
Asia and General models .......................................................AC 110-240 V, 50/60 Hz
China model........................................................................................ AC 220 V, 50 Hz
• Power Consumption...............................................................................................11 W
• Standby Power Consumption
Power Standby (Standby mode)...........................................................................0.2 W
Power Off ..............................................................................................................0.2 W
• Dimensions (W × H × D)................................................................. 435 x 87 x 260 mm
(17-1/8" × 3-3/8" × 10-1/4")
• Weight..................................................................................................................3.5 kg
(7.7 lb)
* The contents of this manual apply to the latest specifications as of the publishing date.
To obtain the latest manual, access the Yamaha website then download the manual file.
Specifications
Output jacks
• Analog audio x 1 (RCA Unbalanced)
• Digital audio
COAXIAL x 1, OPTICAL x 1
Other jacks
• USB × 1 (USB2.0)

22 En
Refer to the table below if the unit fails to function properly. If your problem is not listed below, or if the symptoms persist after you follow the instructions below, turn off the power to
the unit by pressing A (Power) on the front panel, disconnect the power cord, and contact your nearest authorized Yamaha dealer or service center.
Troubleshooting
Problem Cause Solution Page
Pressing the power switch does not
turn the power on.
The power cord may not be properly plugged in. Connect the power cord firmly to the AC outlet. 10
The disc tray does not close
completely.
A foreign object is inside the disc tray enclosure. Check the disc tray and remove any foreign object. —
Unable to play the inserted disc.
The disc is scratched. Change the disc. —
The lens inside the unit has condensation.
Turn on the power to the unit, wait 20 – 30 minutes, and then try to play
the disc again.
—
The disc is set upside down. Be sure to place the disc with its label side up. —
The disc is dirty or scratched. Wipe off the dirt from the disc surface, or use an unscratched disc. 21
You tried to play files in a format that is not supported by the unit.
Be sure to use a disc that contains files in a format that is supported by
the unit.
20
You tried to play a disc that is not supported by the unit. Be sure to use a disc that is supported by the unit. 20, 21
The unit is in USB mode. Press CD/USB to switch to Disc mode. 12, 16, 18
Playback does not start immediately or
from the correct point.
The disc is dirty or scratched. Wipe off the dirt from the disc surface, or use an unscratched disc. 21
Unable to play a music file stored on the
USB flash drive.
The USB flash drive may not be properly connected to the unit. Connect the USB flash drive properly. 13
You tried to play files in a format that is not supported by the unit.
Be sure to use a USB flash drive that contains files in a format that is
supported by the unit.
20
The unit is in Disc mode. Press CD/USB to switch to USB mode. 13, 16, 18
No sound The unit is not connected to the amplifier properly. Check the connection to the amplifier. 10
Audio is not output from the device
connected to the DIGITAL OUT jacks.
The PURE DIRECT function is turned on. Turn the PURE DIRECT function off. 15
The sound skips.
The unit is affected by vibration or impact. Change the location of the unit. —
The disc is dirty or scratched. Wipe off the dirt from the disc surface, or use an unscratched disc. 21

En 23
Buzzing or hum noise is heard. The RCA stereo cable is not connected firmly.
Connect the RCA stereo cable firmly. If the symptom does not improve,
check to see whether the cable itself is defective.
10
Noise in the tuner The unit is located close to the tuner.
Relocate the unit farther away from the tuner, or turn off the power to
the unit.
—
The disc tray is making noise. The disc is deformed. Use a non-deformed disc. —
No indication on the display The PURE DIRECT function is turned on Turn the PURE DIRECT function off. 15
No folder name or file name appears on
the information display.
Characters other than one-byte alphanumeric are used for the folder or
file name.
Use one-byte alphanumeric characters for the folder and file names. 15
The remote control does not work or
function properly.
The batteries are weak. Replace all batteries. 9
Wrong distance or angle. Use the remote control within the operative range. 9
Direct sunlight or lighting (from an inverter type of fluorescent lamp,
etc.) is striking the remote control sensor of this unit.
Reposition the orientation of the lighting or the unit. —
Problem Cause Solution Page
24 Fr
Lisez attentivement ces consignes avant
l’utilisation du produit.
Assurez-vous de suivre les
instructions
Lisez attentivement et observez les précautions
suivantes pour éviter les blessures corporelles et
les dommages de biens personnels.
Après avoir lu ce document dans son intégralité,
rangez-le dans un lieu accessible en
permanence à tout utilisateur du produit.
AVERTISSEMENT
Ces consignes de sécurité attirent votre
attention sur des risques de décès ou de
blessures graves pour l’utilisateur ou des tiers.
En cas d’anomalie
• Si vous remarquez une des anomalies
suivantes, coupez immédiatement
l’alimentation.
- Le cordon d’alimentation ou sa fiche est
endommagé.
- Le produit émet une odeur ou un bruit
anormal, ou de la fumée.
- Un objet ou de l’eau a pénétré à l’intérieur du
produit.
- Des fissures ou d’autres dommages sont
visibles sur le produit.
- Une brusque perte de son est survenue
durant l’utilisation du produit.
Suivez les étapes ci-dessous pour couper
l’alimentation.
- Mettez le produit hors tension.
- Débranchez la fiche du cordon d’alimentation
de la prise secteur.
Continuer à utiliser le produit avec de telles
anomalies peut causer un incendie, un choc
électrique ou un endommagement du produit.
Faites immédiatement inspecter ou réparer le
produit.
Alimentation
• N’endommagez pas le cordon d’alimentation.
- Ne placez pas le cordon d’alimentation à
proximité de sources de chaleur telles que
des appareils de chauffage.
- Ne pliez pas le cordon d’alimentation avec
une force excessive et ne le modifiez pas.
- N’endommagez pas le cordon d’alimentation.
- Ne posez pas d’objets lourds sur le cordon
d’alimentation.
- N’agrafez pas le cordon d’alimentation.
L’utilisation d’un cordon d’alimentation effiloché
dont les fils sont à nus peut causer un incendie,
un choc électrique ou un endommagement du
produit.
• Pendant un orage et en présence d’éclairs, ne
touchez pas ce produit, ni son cordon et sa
fiche d’alimentation.
Sinon, vous risquez un choc électrique.
• Utilisez la tension spécifiée pour ce produit.
L’utilisation d’une tension incorrecte peut
provoquer un incendie, une électrocution ou
endommager le produit.
• Utilisez exclusivement l’accessoire ci-dessous
pour alimenter l’appareil :
- Le cordon d’alimentation fourni
Sinon, vous risquez un incendie, des brûlures
ou un endommagement du produit.
• N’utilisez pas l’accessoire fourni suivant avec
tout autre dispositif.
- le cordon d’alimentation
Sinon, vous risquez un incendie, des brûlures
ou un endommagement du produit.
PRÉCAUTIONS D’USAGE
• Pour tout travail d’inspection ou de réparation,
adressez-vous à un des centres de service
clientèle suivants.
- Le point de vente où vous avez acheté le
produit
- Un revendeur Yamaha
• Ce produit est conçu pour une utilisation dans
un cadre domestique conventionnel. Ne
l’utilisez pas dans tout cadre ou pour toute
activité requérant une haute fiabilité pour la
gestion des gestes essentiels à la vie ou des
biens de grande valeur.
• Notez que Yamaha décline toute
responsabilité pour toute perte résultant d’une
utilisation incorrecte ou d’une modification
non agrée du produit.

Fr 25
• Vérifiez régulièrement l’état de la fiche du
cordon d’alimentation et dépoussiérez-la en
prenant soin de retirer toutes les impuretés qui
pourraient s’y accumuler.
Sinon, vous risquez un incendie ou un choc
électrique.
• Veillez à insérer à fond la fiche du cordon
d’alimentation dans la prise secteur.
Sinon, cela pourrait causer un court-circuit
provoquant un choc électrique, un incendie ou
un endommagement du produit.
• Insérez la fiche du cordon d’alimentation dans
une prise secteur visible et facilement
accessible.
En cas de problème ou de dysfonctionnement,
vous devez être en mesure de débrancher
immédiatement la fiche d’alimentation de la
prise secteur. Même lorsque l’interrupteur
d’alimentation est en position désactivée,
l’appareil demeure connecté à la source
d’électricité tant que le cordon d’alimentation
reste branché à la prise secteur.
• Si vous ne comptez pas utiliser le produit
pendant une période prolongée, débranchez la
fiche de son cordon d’alimentation de la prise
secteur.
Sinon, vous risquez un incendie ou un
endommagement du produit.
Démontage interdit
• Ne modifiez et ne démontez pas ce produit.
Sinon, cela pourrait causer un incendie, un
choc électrique, des blessures ou un
endommagement du produit.
Avertissement relatif aux liquides
• N’utilisez pas ce produit dans un
environnement humide, comme dans une salle
de bain ou un endroit exposé à la pluie en
extérieur.
• Ne posez pas de récipients (tels que des vases
ou des flacons de médicaments) contenant des
liquides sur ce produit.
La pénétration de tout liquide dans le produit
pourrait causer un incendie, un choc électrique
ou un endommagement du produit.
• Ne branchez jamais la fiche du cordon
d’alimentation à la prise secteur et ne l’en
débranchez jamais avec les mains mouillées.
Ne manipulez pas ce produit avec les mains
mouillées.
Sinon, cela pourrait causer un choc électrique
ou un endommagement du produit.
Avertissement sur les risques d’incendie
• Ne manipulez pas de source de flammes nues
à proximité de ce produit.
Sinon, cela pourrait causer un incendie.
Perte de vision
• Ne regardez jamais directement le faisceau
laser.
Si le faisceau laser entre en contact avec vos
yeux, vous risquez une perte de vision.
Manipulation
• Veillez à ne pas faire tomber le produit ni à le
soumettre à des chocs importants.
Sinon, cela pourrait causer un incendie, un
choc électrique ou un endommagement du
produit.
Piles
• N’avalez jamais des piles.
• Gardez les piles hors de portée des enfants.
Sinon, ils risquent de les avaler accidentellement.
Le liquide fuyant des piles peut causer une perte
de la vue ou une inflammation des yeux. Si le
compartiment des piles de ce produit n’est pas
parfaitement hermétique, cessez d’utiliser le
produit et gardez-le hors de portée des enfants.
En cas d’ingestion accidentelle d’une pile,
consultez immédiatement un médecin.
L’ingestion d’une pile peut causer de graves
brûlures chimiques ou la fonte des tissus
organiques dans les deux heures suivant
l’ingestion, et peut provoquer le décès.
• Ne jetez pas des piles dans un feu ouvert.
• N’exposez pas les piles à une source de
chaleur excessive, comme les rayons directs
du soleil ou un feu ouvert.
Sinon, elles pourraient exploser et causer un
incendie ou des blessures.
• Ne touchez pas le liquide fuyant d’une pile.
Sinon, cela pourrait causer une perte de la vue
ou des brûlures chimiques. Si vous touchez du
liquide fuyant d’une pile, rincez-le
immédiatement à l’eau et consultez un
médecin.
• N’utilisez pas de piles autres que celles du type
spécifié.
• N’utilisez pas à la fois des piles neuves avec
des piles usagées.
• N’utilisez pas simultanément des piles de types
différents.
• N’insérez pas les piles dans le sens contraire
aux indications de polarité.
• Ne percez ni démolissez jamais les piles.
• Ne chargez pas des piles sèches non
rechargeables.
26 Fr
Sinon, les piles pourraient exploser ou du liquide
pourrait en fuir, causant un incendie, des
brûlures, une perte de la vue ou un
endommagement du produit. Si vous touchez du
liquide fuyant d’une pile, rincez-le immédiatement
à l’eau et consultez un médecin.
• Ne transportez pas les piles dans une poche ni
un sac et ne les rangez pas avec tout objet
métallique.
Sinon, cela risquerait de causer un court-circuit
dans les piles susceptible d’entraîner une
explosion ou une fuite de liquide, provoquant
un incendie, une perte de la vue ou des
blessures.
• Si vous ne comptez pas utiliser le produit
pendant une période prolongée, ou si les piles
sont complètement déchargées, retirez-les de
la télécommande.
Sinon, du liquide risque de fuir des piles,
posant un risque de perte de la vue, de lésions
inflammatoires ou d’endommagement du
produit.
• Avant de ranger ou de mettre au rebut des
piles, isolez leurs bornes en les couvrant de
bande adhésive.
Si les bornes d’une pile entrent en contact avec
d’autres piles ou des objets métalliques, cela
pourrait causer une explosion ou une fuite de
liquide des piles pouvant entraîner un incendie,
des brûlures, une perte de la vue ou des
lésions inflammatoires.
ATTENTION
Ces consignes de sécurité attirent votre
attention sur des risques de blessures pour
l’utilisateur ou des tiers.
Alimentation
• Si la fiche du cordon d’alimentation insérée
dans une prise de courant a du jeu, n’utilisez
pas cette prise.
Sinon, cela pourrait causer un incendie, un
choc électrique ou des brûlures.
• Veillez à toujours saisir la fiche du cordon
d’alimentation même, et non le cordon, pour la
retirer du produit ou de la prise secteur.
Sinon, cela pourrait endommager le cordon
d’alimentation, causant un incendie ou un choc
électrique.
Installation
• Ne placez pas ce produit sur une surface
instable ou soumise à des vibrations.
Sinon, le produit risquerait de tomber et d’être
endommagé ou de causer des blessures.
• Veillez à ne pas bloquer la dissipation
thermique du produit lors de son installation.
- Ne couvrez pas le produit d’un morceau de
tissu ni d’une nappe.
- N’installez pas le produit sur une moquette ou
un tapis.
- Veillez à ce que la surface supérieure du
produit soit orientée vers le haut. Ne posez
pas le produit sur son flanc ni à l’envers.
- N’utilisez pas le produit dans un lieu clos et
mal aéré.
Une ventilation insuffisante peut causer une
surchauffe à l’intérieur du produit susceptible
d’entraîner un endommagement et un incendie
ou un dysfonctionnement.
Veillez à conserver un espace libre suffisant
autour du produit : au moins 2,5 cm à la
surface, 2,5 cm sur les côtés et 2,5 cm à
l’arrière.
• Durant un tremblement de terre, tenez-vous à
l’écart du produit.
Sinon, le produit risquerait de tomber et d’être
endommagé, causant des blessures.
• Avant de déplacer ce produit, veillez à
désactiver l’interrupteur d’alimentation et à
débrancher tous les câbles connectés.
Sinon, quelqu’un risque de se prendre le pied
ou la main dans les câbles, causant la chute et
l’endommagement du produit ou des
blessures.
Raccordements
• Si vous comptez brancher des appareils
externes, lisez d’abord le mode d’emploi de
chaque appareil concerné et branchez chaque
appareil en suivant les instructions fournies.
Si vous ne suivez pas ces instructions à la
lettre, cela pourrait causer des blessures ou un
endommagement du produit.
Perte auditives
• Ne vous exposez pas de façon prolongée à un
niveau sonore élevé. Si vous constatez tout
problème auditif, consultez un médecin.
• Avant de brancher ce produit à tout autre
appareil, mettez tous les autres appareils hors
tension.

Fr 27
Sinon, cela pourrait causer une perte auditive,
un choc électrique ou un endommagement du
produit.
• Quand vous mettez votre système audio sous
tension, veillez à toujours mettre l’amplificateur
de puissance sous tension EN DERNIER.
Quand vous mettez votre système audio hors
tension, veillez à toujours mettre l’amplificateur
de puissance hors tension EN PREMIER.
Sinon, cela pourrait causer une perte auditive
ou un endommagement du produit.
Entretien
• Avant de nettoyer le produit, veillez à
débrancher la fiche de son cordon
d’alimentation de la prise secteur.
Sinon, vous risquez un choc électrique.
Manipulation
• N’insérez jamais les mains ni les doigts dans
tout interstice ou ouverture de ce produit.
Sinon, cela pourrait causer des blessures.
• Ne laissez jamais des corps étrangers tels que
des petites pièces métalliques ou du papier
pénétrer à l’intérieur du produit par ses
ouvertures.
Sinon, cela pourrait causer un incendie, un
choc électrique ou un endommagement du
produit.
• N’appliquez pas de force excessive sur le
produit comme décrit ci-dessous.
- Reposer le poids de votre corps sur ce
produit
- Poser des objets lourds sur ce produit
- Placer ce produit en empilement
- Appliquer une force démesurée aux boutons,
commutateurs ou connecteurs d’E/S
Sinon, cela pourrait causer des blessures ou un
endommagement du produit.
• Ne tirez jamais sur des câbles connectés.
Sinon, le produit risquerait de tomber et d’être
endommagé ou de causer des blessures.
AVIS
Suivez les consignes ci-dessous pour éviter un
dysfonctionnement et un endommagement du
produit ainsi que la perte de données.
Alimentation
• Si vous ne comptez pas utiliser ce produit
pendant une période prolongée, débranchez la
fiche de son cordon d’alimentation de la prise
secteur. Même quand le produit a été mis hors
tension avec son commutateur [A]
(alimentation) en face avant, une faible quantité
de courant continue de l’alimenter.
Installation
• Selon l’environnement d’utilisation du produit, il
se pourrait qu’un téléphone, une radio ou un
téléviseur génère du bruit. Dans ce cas,
changez l’emplacement ou l’orientation du
produit, ou modifiez son environnement
d’utilisation.
• N’installez pas ce produit dans des endroits
exposés à :
- La lumière directe du soleil
- Des températures extrêmement basses ou
élevées
- Une quantité excessive de poussière
Sinon, cela pourrait causer un
dysfonctionnement ou un endommagement du
produit.
• N’installez pas ce produit dans un lieu où des
changements abrupts et marqués de la
température ambiante peuvent entrainer la
formation de condensation. L’utilisation de ce
produit en présence de condensation peut
endommager le produit. Si vous suspectez la
présence de condensation sur ou à l’intérieur
de ce produit, laissez-le reposer plusieurs
heures sans le mettre sous tension.
Une fois que la condensation a complètement
disparu, vous pouvez à nouveau utiliser le
produit.
Manipulation
• Ne placez aucun produit en vinyle, en plastique
ou en caoutchouc sur ce produit. Sinon, cela
risquerait de décolorer ou détériorer son
panneau.
Entretien
• Nettoyez ce produit à l’aide d’un chiffon doux et
sec. N’utilisez pas de la benzène, du diluant,
du détergent ni des chiffons de lavage
chimique pour nettoyer la surface du produit.
Sinon, cela risquerait de décolorer ou détériorer
sa surface.
Précautions d’emploi

28 Fr
NOTE
Cette section décrit des précautions à observer
durant l’utilisation, des restrictions de
fonctionnalité et des informations
complémentaires utiles.
Mise au rebut ou transfert
• Avant de transférer la propriété de ce produit,
veillez à inclure ce document et les accessoires
fournis avec le produit.
• Suivez les règlements en vigueur dans votre
région pour mettre au rebut ce produit et ses
accessoires.
• Suivez les règlements en vigueur dans votre
région pour la mise au rebut des piles usagées.
Informations importantes
AVERTISSEMENT
L’utilisation de commandes et l’emploi de réglages ou
de méthodes autres que ceux décrits ci-dessous,
peuvent entraîner une exposition à un rayonnement
dangereux.

Fr 29
Sommaire
AVANT D’UTILISER L’APPAREIL 30
Fonctionnalités . . . . . . . . . . . . . . . . . . . . . . . . . . . . . . . . . . . . . . . . . . . . . . . . .30
À propos de ce manuel . . . . . . . . . . . . . . . . . . . . . . . . . . . . . . . . . . . . . . . . . .30
Accessoires . . . . . . . . . . . . . . . . . . . . . . . . . . . . . . . . . . . . . . . . . . . . . . . . . . . . .31
PRÉPARATION 32
Connexion à un amplificateur . . . . . . . . . . . . . . . . . . . . . . . . . . . . . . . . . . . .32
Raccordement du cordon d’alimentation . . . . . . . . . . . . . . . . . . . . . . . . .32
Mise sous tension . . . . . . . . . . . . . . . . . . . . . . . . . . . . . . . . . . . . . . . . . . . . . . .33
LECTURE AUDIO 34
Lecture de CD audio . . . . . . . . . . . . . . . . . . . . . . . . . . . . . . . . . . . . . . . . . . . . .34
Lecture de fichiers musicaux stockés sur une clé USB . . . . . . . . . . . . . .35
Fonctions avancées . . . . . . . . . . . . . . . . . . . . . . . . . . . . . . . . . . . . . . . . . . . . .36
Lecture en ordre aléatoire. . . . . . . . . . . . . . . . . . . . . . . . . . . . . . . . . . . . . . . . . . . . . . . . . . . . . . . . . . . . 36
Lecture répétée. . . . . . . . . . . . . . . . . . . . . . . . . . . . . . . . . . . . . . . . . . . . . . . . . . . . . . . . . . . . . . . . . . . . . . 36
Lecture des plages selon un ordre défini (lecture programmée) . . . . . . . . . . . . . . . . . . . . . . . 36
Lecture répétée d’un passage spécifique (lecture répétée A-B) . . . . . . . . . . . . . . . . . . . . . . . . 37
Lecture en son de haute qualité (PURE DIRECT) . . . . . . . . . . . . . . . . . . . . . . . . . . . . . . . . . . . . . . . 37
Changement des informations affichées sur l’écran . . . . . . . . . . . . . . . . . . . . . . . . . . . . . . . . . . . 37
Réglage de luminosité de l’écran . . . . . . . . . . . . . . . . . . . . . . . . . . . . . . . . . . . . . . . . . . . . . . . . . . . . . 37
ANNEXE 38
Noms des éléments . . . . . . . . . . . . . . . . . . . . . . . . . . . . . . . . . . . . . . . . . . . . . 38
Panneau avant . . . . . . . . . . . . . . . . . . . . . . . . . . . . . . . . . . . . . . . . . . . . . . . . . . . . . . . . . . . . . . . . . . . . . . . 38
Écran. . . . . . . . . . . . . . . . . . . . . . . . . . . . . . . . . . . . . . . . . . . . . . . . . . . . . . . . . . . . . . . . . . . . . . . . . . . . . . . . . 39
Panneau arrière . . . . . . . . . . . . . . . . . . . . . . . . . . . . . . . . . . . . . . . . . . . . . . . . . . . . . . . . . . . . . . . . . . . . . . 39
Télécommande . . . . . . . . . . . . . . . . . . . . . . . . . . . . . . . . . . . . . . . . . . . . . . . . . . . . . . . . . . . . . . . . . . . . . . 40
Réglages avancés . . . . . . . . . . . . . . . . . . . . . . . . . . . . . . . . . . . . . . . . . . . . . . .41
Mémorisation du mode de lecture (PLAY MEM). . . . . . . . . . . . . . . . . . . . . . . . . . . . . . . . . . . . . . . . 41
Mode paré à lire (RDY MODE) . . . . . . . . . . . . . . . . . . . . . . . . . . . . . . . . . . . . . . . . . . . . . . . . . . . . . . . . . 41
Lecture automatique (AUTO PLAY). . . . . . . . . . . . . . . . . . . . . . . . . . . . . . . . . . . . . . . . . . . . . . . . . . . . 41
Mise en veille automatique (AUTO STBY) . . . . . . . . . . . . . . . . . . . . . . . . . . . . . . . . . . . . . . . . . . . . . . 41
Formats de fichiers/disques/clés USB compatibles. . . . . . . . . . . . . . . . . 42
Caractéristiques techniques . . . . . . . . . . . . . . . . . . . . . . . . . . . . . . . . . . . . . 43
Résolution des problèmes . . . . . . . . . . . . . . . . . . . . . . . . . . . . . . . . . . . . . . .44
30 Fr
AVANT D’UTILISER L’APPAREIL
• Sortie numérique optique
• Sortie numérique coaxiale
• Lecture de disques CD-R et CD-RW prise en charge
• Lecture de fichiers sauvegardés sur clé USB ou CD de données (MP3/WMA/AAC/
WAV/FLAC)
• Lecture en ordre aléatoire (page 36)
• Lecture répétée (page 36)
• Lecture programmée (uniquement pour CD audio) (page 36)
• Lecture répétée A-B (uniquement pour CD audio) (page 37)
• Fonction PURE DIRECT (page 37)
• Paramètres d’écran configurables (éléments affichés/luminosité) (page 37)
• Alimentation/veille commandées à distance
• Mémorisation du mode de lecture (page 41)
• Mode paré à lire (page 41)
• Lecture automatique (page 41)
• Mise en veille automatique (page 41)
• Ce manuel décrit les opérations exécutées principalement avec la télécommande
fournie.
• Toutes les illustrations figurant dans ce mode d’emploi servent à clarifier les
instructions d’utilisation.
• Dans ce mode d’emploi, un « CD audio » désigne un CD de musique et un « CD de
données » un CD contenant des données MP3/WMA/AAC/WAV/FLAC.
• Les spécifications techniques et l’aspect du produit peuvent être modifiés sans
préavis.
•
AVERTISSEMENT alerte sur un risque de décès ou de blessures
graves.
•
ATTENTION alerte sur un risque de blessures corporelles.
• fournit des consignes à respecter pour éviter un dysfonctionnement et un
endommagement du produit.
• fournit des informations utiles supplémentaires.
Fonctionnalités À propos de ce manuel
Avis
Note
Fr 31
• Télécommande
• Cordon d’alimentation
• Câble stéréo RCA/Cinch
• Piles (AA, R6, UM-3) (x2)
• Mode d’emploi (ce manuel)
Accessoires
Mise en place des piles dans
la télécommande
Insérez les piles dans le sens
correct.
Portée de la télécommande
Pointez la télécommande vers
le capteur de télécommande
de l’appareil, en l’utilisant dans
sa zone de portée décrite sur
l’illustration de droite.
Piles (AA, R6, UM-3)
30° 30°
Dans un
rayon de
6 m
32 Fr
PRÉPARATION
ATTENTION
• Ne branchez le cordon d’alimentation ni de cet appareil ni d’aucun autre dispositif au secteur avant
que toutes les connexions audio ne soient terminées.
Quand toutes les connexions sont effectuées, branchez le cordon d’alimentation fourni
à la prise AC IN de l’appareil et l’autre extrémité du cordon à une prise de courant de
tension appropriée.
Connexion à un amplificateur Raccordement du cordon d’alimentation
AmplificateurAmplificateur
Câble stéréo RCA/Cinch
(fourni)
Câble audio numérique coaxial
(disponible dans le commerce)
Câble numérique optique
(disponible dans le commerce)
Branchement
sur une prise
secteur
Cet appareil (arrière)
Cordon
d’alimentation
(fourni)
Fr 33
Pour mettre l’appareil sous tension, appuyez sur le bouton A (alimentation) du
panneau avant.
Note
• Si vous appuyez sur la touche A (alimentation) de la télécommande quand l’appareil est sous
tension, il passe en veille.
• Le témoin d’alimentation de l’appareil fournit les indications suivantes :
Fortement éclairé : alimentation activée
Faiblement éclairé : mode veille
Éteint : hors tension
• La fonction de mise en veille automatique de cet appareil permet de réduire sa consommation
électrique (page 41).
(Réglage par défaut: mise en veille automatique activée)
Mise sous tension
A (alimentation)
Témoin d’alimentation
34 Fr
CD/USB
OPEN/CLOSE
LECTURE AUDIO
Cet appareil permet de lire des CD de données et des CD audio.
Pour des informations sur les types de CD pouvant être lus avec
cet appareil, voyez la section «Formats de fichiers/disques/clés
USB compatibles» (page 42).
1
Si le témoin USB du panneau avant est allumé, appuyez
sur la touche CD/USB pour activer le mode de disque.
2
Insérez un CD dans le tiroir de disque.
La touche OPEN/CLOSE permet d’ouvrir et de fermer
alternativement le tiroir de disque.
Note
• Le bouton (ouverture/fermeture) du panneau avant permet aussi
d’ouvrir et de fermer alternativement le tiroir de disque.
• Quand l’appareil est paré pour la lecture d’un CD audio, le témoin du
support de lecture (CD) s’allume sur l’écran.
3
Appuyez sur la touche (lecture).
Le témoin de lecture ( ) s’allume sur l’écran et la lecture
démarre.
Note
• Durant la lecture d’un fichier audio, le témoin du support de lecture
correspondant au format de ce fichier s’allume sur l’écran.
Avis
• N’insérez pas la main ni les doigts dans la fente du tiroir de disque. Sinon,
cela pourrait causer des blessures.
Note
• Après le chargement d’un CD dans le tiroir de disque, le tiroir se referme et
la lecture démarre si vous effectuez une des opérations suivantes :
– Vous appuyez sur la touche (lecture).
– Vous appuyez sur une touche numérique correspondant au numéro
d’une plage.
• Vous pouvez configurer l’appareil de sorte que la lecture démarre
automatiquement quand vous le mettez sous tension ou quand vous
passez en mode de disque ou en mode USB (page 41).
(Réglage par défaut: lecture automatique activée)
Utilisez les touches suivantes de la télécommande pour contrôler
les fonctions.
* Les boutons de commande du panneau avant opèrent les
fonctions suivantes :
(saut arrière/recherche arrière) :
Retourne au début du morceau précédent. Retourne au début
du morceau courant quand cette touche est enfoncée pendant
la lecture. Permet aussi d’effectuer une recherche arrière
quand la touche est maintenue enfoncée pendant la lecture.
(saut avant/recherche avant) :
Saute au début du morceau suivant. Permet aussi d’effectuer
une recherche avant quand la touche est maintenue enfoncée
pendant la lecture.
Lecture de CD audio
Touches disponibles Fonction
(lecture)
Le témoin de lecture ( ) s’allume sur l’écran
et la lecture démarre.
(pause)
Le témoin de pause ( ) s’allume sur l’écran
et la lecture s’interrompt. Appuyez sur
(ou à nouveau sur ) pour relancer la
lecture.
(arrêt)
Arrête la lecture.
(recherche arrière)*
Effectue une recherche arrière dans le
morceau.
(recherche avant)*
Effectue une recherche avant dans le morceau.
(saut arrière)*
Retourne au début du morceau précédent.
Retourne au début du morceau courant quand
cette touche est enfoncée pendant la lecture.
(saut avant)*
Saute au début du morceau suivant.
Touches numériques
Pour sélectionner une plage, appuyez
simplement sur la touche numérique
correspondante.
FOLDER ,
(uniquement pour les CD
de données)
Permettent de sélectionner un dossier.
Touches
numériques
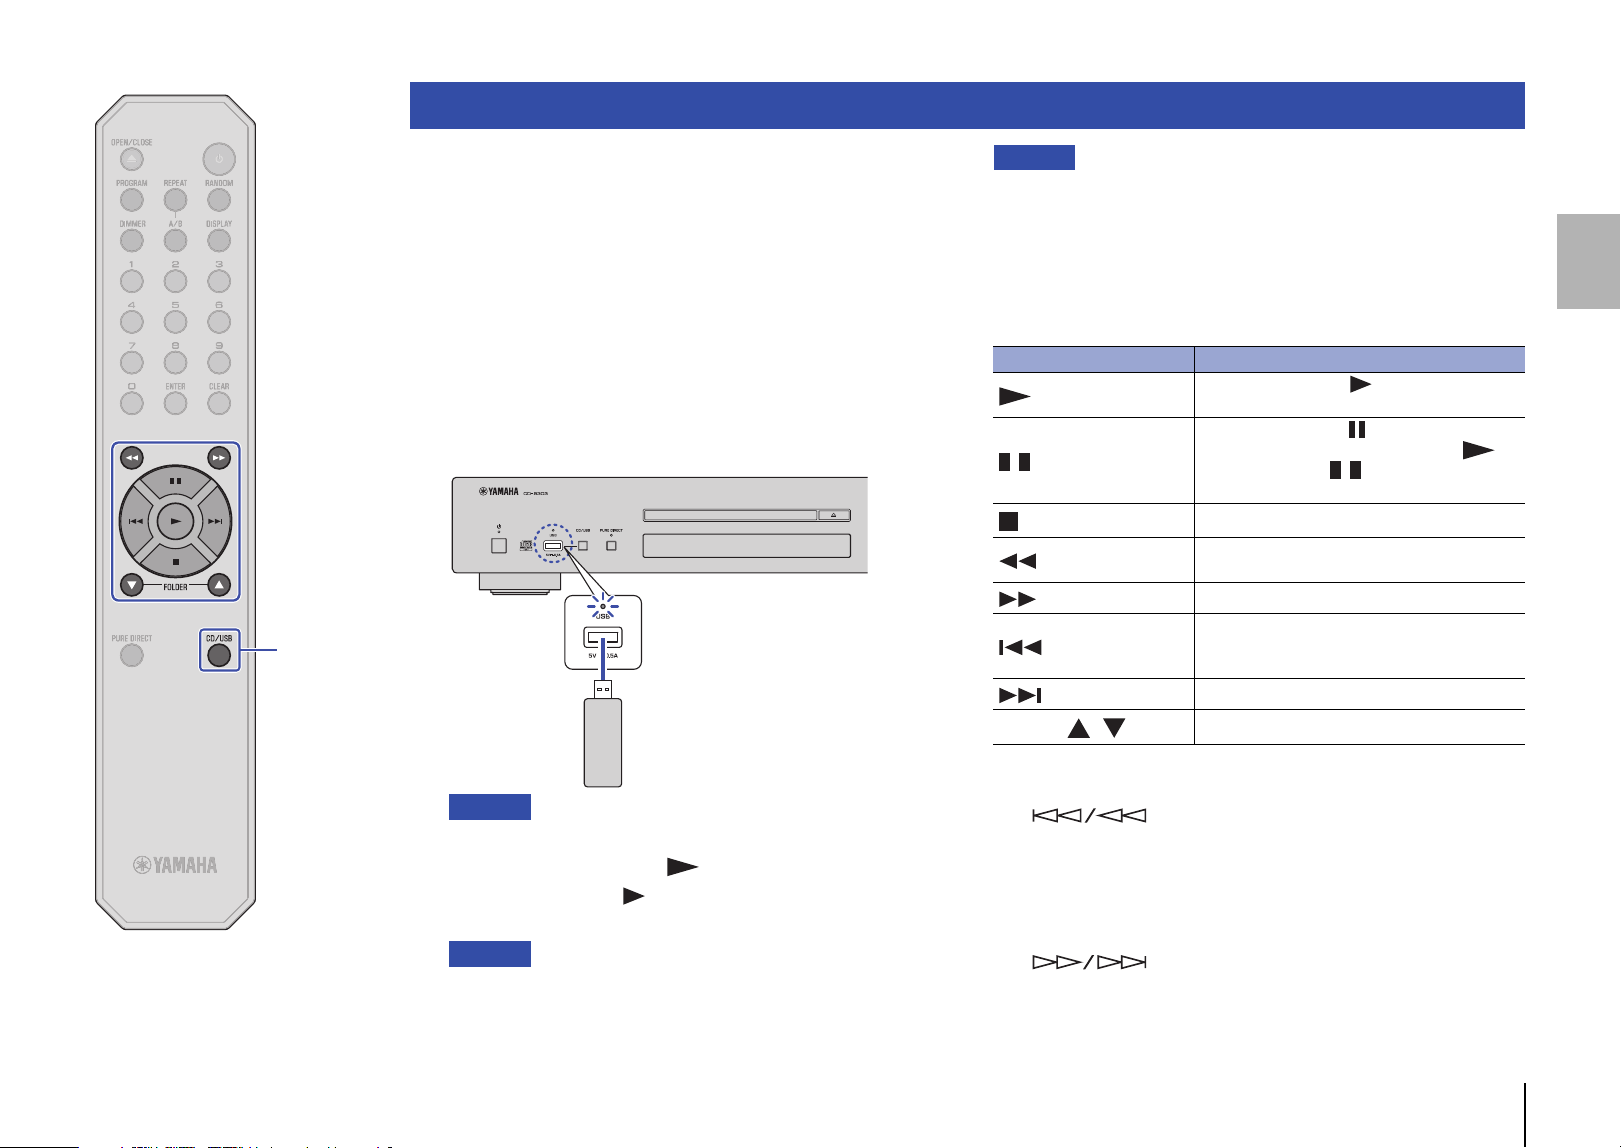
Fr 35
CD/USB
Cet appareil permet de lire des fichiers musicaux (stockés sur une
clé USB). Pour des informations sur les clés USB prises en charge,
voyez la section «Formats de fichiers/disques/clés USB
compatibles» (page 42).
1
Si le témoin USB du panneau avant est éteint, appuyez
sur la touche CD/USB pour activer le mode USB.
Le témoin USB en face avant s’allume en orange.
2
Branchez la clé USB à la prise USB.
Quand l’appareil est paré pour la lecture, le témoin du support
de lecture (USB) s’allume sur l’écran et le témoin USB en face
avant s’allume en vert.
Avis
• N’utilisez pas de rallonge USB.
3
Appuyez sur la touche (lecture).
Le témoin de lecture ( ) s’allume sur l’écran et la lecture
démarre.
Note
• Durant la lecture d’un fichier audio, le témoin du support de lecture
correspondant au format de ce fichier s’allume sur l’écran.
• L’appareil permet de lire des fichiers musicaux compatibles contenus
sur une clé USB dans l’ordre chronologique, sur base de leur date de
création.
Avis
• Ne retirez jamais la clé USB pendant la lecture ou quand
« USB READING » est affiché sur l’écran. Dans ce cas, appuyez d’abord
sur la touche CD/USB pour activer le mode de disque et vérifiez que le
témoin USB est éteint avant de retirer la clé USB.
Utilisez les touches suivantes de la télécommande pour contrôler
les fonctions.
* Les boutons de commande du panneau avant opèrent les
fonctions suivantes :
(saut arrière/recherche arrière) :
Retourne au début du morceau précédent. Retourne au début
du morceau courant quand cette touche est enfoncée
pendant la lecture. Permet aussi d’effectuer une recherche
arrière quand la touche est maintenue enfoncée pendant la
lecture.
(saut avant/recherche avant) :
Saute au début du morceau suivant. Permet aussi d’effectuer
une recherche avant quand la touche est maintenue enfoncée
pendant la lecture.
Lecture de fichiers musicaux stockés sur une clé USB
Cet appareil (panneau avant)
Clé USB
Touches disponibles Fonction
(lecture)
Le témoin de lecture ( ) s’allume sur l’écran
et la lecture démarre.
(pause)
Le témoin de pause ( ) s’allume sur l’écran
et la lecture s’interrompt. Appuyez sur
(ou à nouveau sur ) pour relancer la
lecture.
(arrêt)
Arrête la lecture.
(recherche arrière)*
Effectue une recherche arrière dans le
morceau.
(recherche avant)*
Effectue une recherche avant dans le morceau.
(saut arrière)*
Retourne au début du morceau précédent.
Retourne au début du morceau courant quand
cette touche est enfoncée pendant la lecture.
(saut avant)*
Saute au début du morceau suivant.
FOLDER ,
Permettent de sélectionner un dossier.
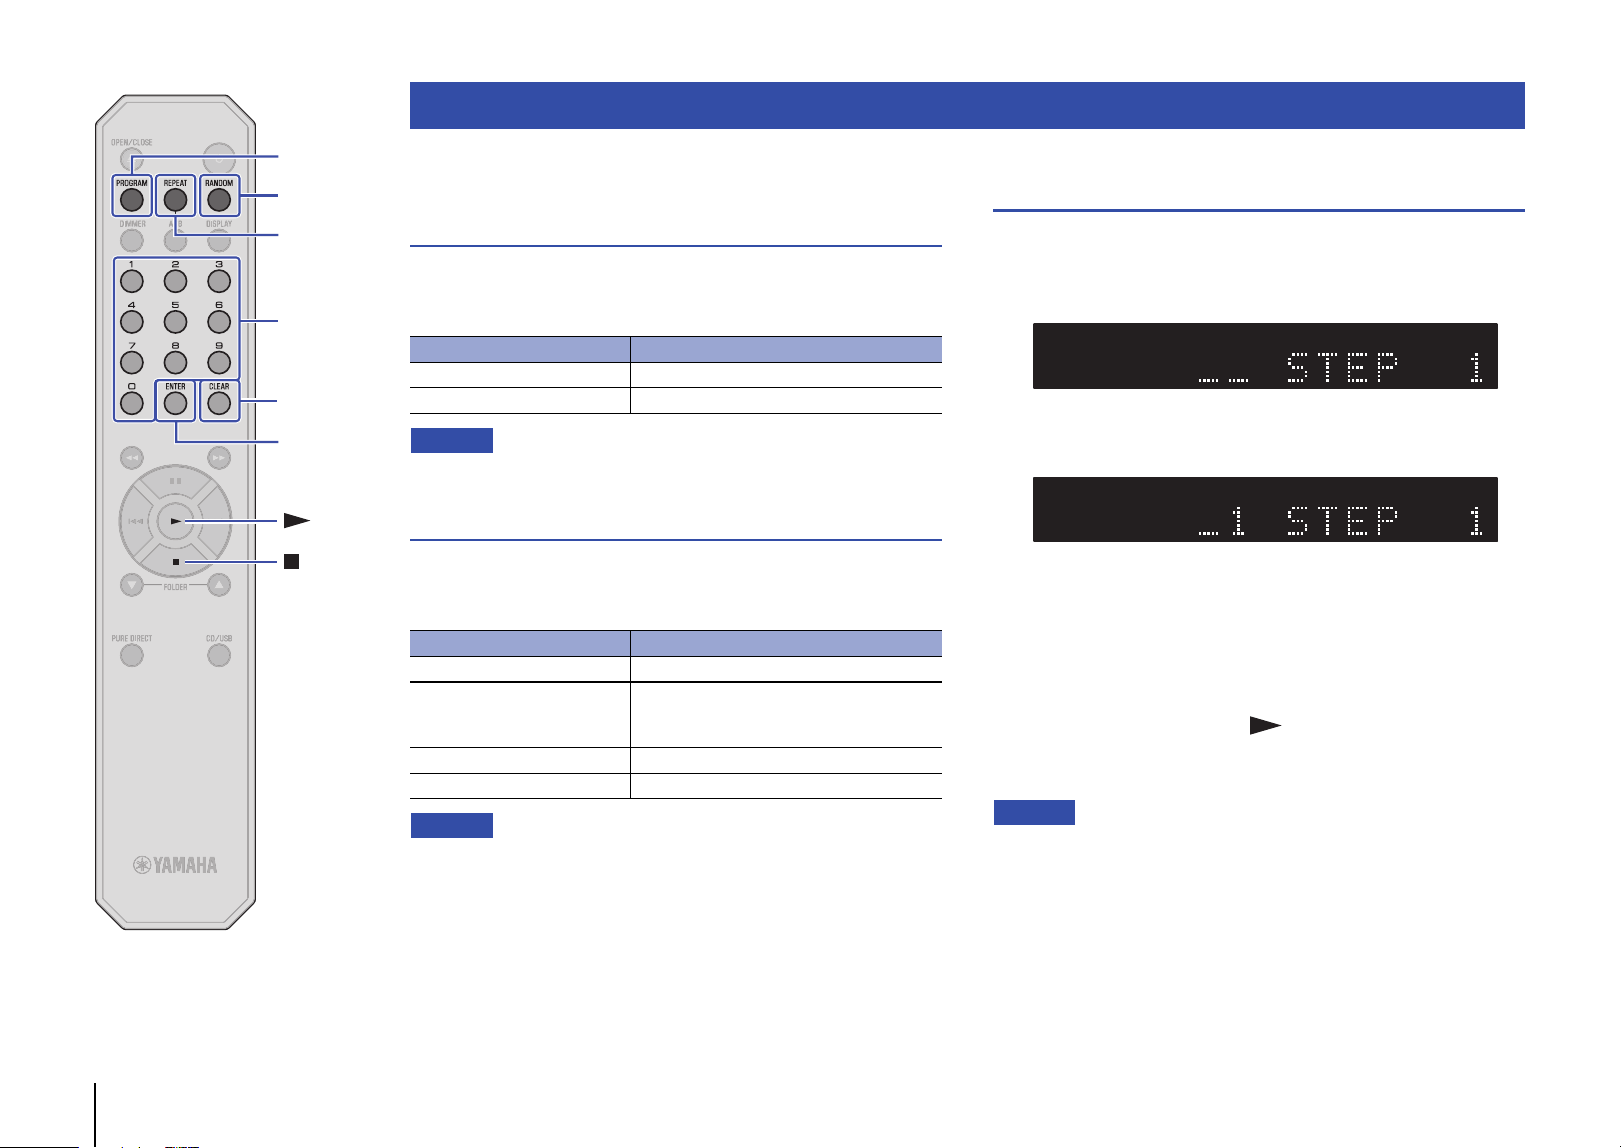
36 Fr
RANDOM
CLEAR
ENTER
REPEAT
PROGRAM
Vous pouvez configurer le mode de lecture et les paramètres
d’affichage à l’aide des fonctions avancées.
Lecture en ordre aléatoire
Appuyez sur la touche RANDOM pour lire les plages dans un ordre
aléatoire. Chaque pression sur la touche RANDOM change le
réglage de lecture aléatoire comme suit :
Note
• Pour annuler la lecture en ordre aléatoire, ouvrez le tiroir de disque.
Lecture répétée
Appuyez sur la touche REPEAT pour lire les plages de manière
répétée. Chaque pression sur la touche REPEAT change le réglage
de lecture répétée comme suit :
Note
• Pour annuler la lecture répétée, ouvrez le tiroir de disque.
Lecture des plages selon un ordre défini
(lecture programmée)
Vous pouvez lire les plages d’un CD selon un ordre défini.
1
Appuyez sur la touche PROGRAM quand la lecture
est arrêtée.
2
Saisissez le numéro d’une plage à programmer avec
les touches numériques.
3
Appuyez sur ENTER.
Répétez les étapes 2 et 3 pour programmer toutes les plages
voulues.
La touche CLEAR supprime chaque plage programmée, en
commençant par la dernière plage programmée.
4
Appuyez sur la touche (lecture).
L’appareil démarre la lecture des plages selon l’ordre
programmé.
Note
• La lecture programmée n’est pas disponible pour les CD de données ni les
clés USB.
• Vous pouvez programmer jusqu’à 24 plages.
• Suivez une des méthodes ci-dessous pour supprimer toutes les plages
programmées :
– Appuyez sur la touche CLEAR quand la lecture est arrêtée.
– Mettez l’appareil hors tension ou mettez-le en mode veille.
– Ouvrez le tiroir de disque.
Fonctions avancées
Témoin Réglage
RNDM Lit toutes les plages dans un ordre aléatoire.
Off La lecture en ordre aléatoire est désactivée.
Témoin Réglage
REP Lit une plage de manière répétée.
REP FOLDER (uniquement
pour les CD de données et
les clés USB)
Lit les plages du dossier actuel de manière
répétée.
REP ALL Lit toutes les plages de manière répétée.
Off La lecture répétée est désactivée.
TRACKTEXT AAC WAV FLAC RESUM RDY TOTAL REMAIN RNDM REP FOLDER ALL A - BCD PROG
TRACKTEXT AAC WAV FLAC RESUM RDY TOTAL REMAIN RNDM REP FOLDER ALL A - BCD PROG
Touches
numériques

Fr 37
A/B
PURE
DIRECT
DISPLAY
DIMMER
Lecture répétée d’un passage spécifique
(lecture répétée A-B)
Vous pouvez définir le point de départ et de fin d’un passage sur
une plage de CD audio de sorte à lire ce passage de manière
répétée.
1
Lisez un CD audio.
2
Appuyez sur la touche A/B au point de départ voulu
pour le passage répété.
3
Appuyez à nouveau sur la touche A/B au point de fin
voulu pour le passage répété.
L’appareil démarre la lecture répétée.
Note
• La lecture répétée n’est pas disponible pour les CD de données ni les clés
USB.
• La lecture répétée A-B n’est pas disponible quand la fonction PURE DIRECT
est activée.
• Suivez une des méthodes ci-dessous pour annuler la lecture répétée A-B :
– Appuyez à nouveau sur la touche A/B.
– Appuyez sur la touche (arrêt).
– Ouvrez le tiroir de disque.
Lecture en son de haute qualité
(PURE DIRECT)
Quand la fonction PURE DIRECT est active, le signal numérique est
désactivé. La fonction PURE DIRECT réduit ainsi le bruit affectant
la qualité sonore et rehausse votre plaisir d’écoute avec un son de
haute qualité.
Chaque pression sur la touche PURE DIRECT active et désactive
alternativement la fonction PURE DIRECT.
Note
• Pour exploiter la fonction PURE DIRECT, branchez les prises de sortie
ANALOG OUT du panneau arrière à l’amplificateur. Les prises DIGITAL
OUT ne produisent aucun signal.
• Quand la fonction PURE DIRECT est active :
– Le témoin PURE DIRECT s’allume.
– L’écran est éteint pendant la lecture de contenu.
– Il affiche un nombre minimum de témoins et messages durant l’utilisation
de l’appareil.
– Le réglage de cette fonction est mémorisé à la mise hors tension de
l’appareil.
Changement des informations affichées
sur l’écran
Chaque pression sur la touche DISPLAY durant la lecture permet
de changer comme suit les informations affichées sur l’écran :
Note
• L’écran peut afficher jusqu’à 64 caractères (caractères alphanumériques
d’un octet et divers symboles).
Réglage de luminosité de l’écran
La touche DIMMER permet de régler la luminosité de l’écran sur
quatre niveaux différents.
TEXT AAC WAV FLAC RESUM RDY TOTAL REMAIN RNDM FOLDER ALLPROG CD TRACK REP
TEXT AAC WAV FLAC RESUM RDY TOTAL REMAIN RNDM FOLDER ALLPROG CD TRACK REP
Support de lecture Informations affichées sur l’écran
CD audio
Durée écoulée Durée résiduelle du morceau
courant (TRACK REMAIN) Durée résiduelle du
CD (TOTAL REMAIN) Nom du morceau*
Nom de l’artiste* Titre de l’album*
* Si le disque contient des données CD-texte
CD de données, clé
USB
Durée écoulée Nom du morceau* Nom de
l’artiste* Titre de l’album*
* À condition que le support intègre ces marqueurs
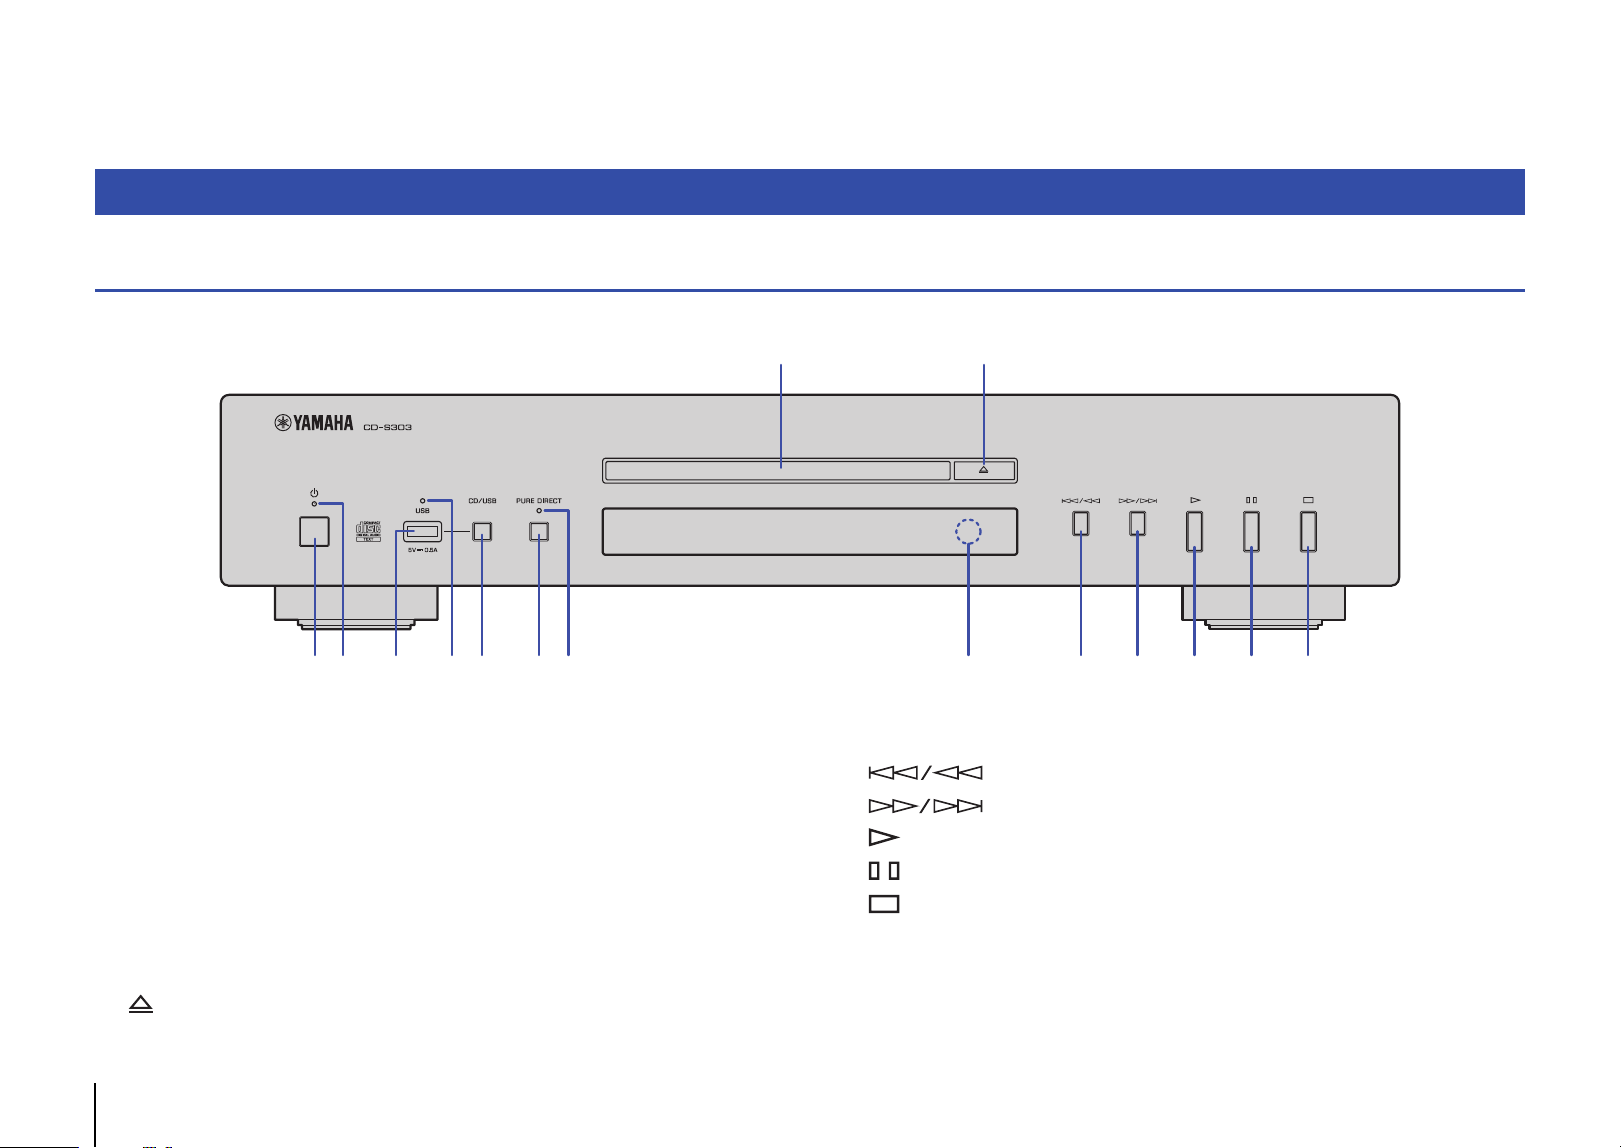
38 Fr
ANNEXE
Panneau avant
1 A (alimentation) (page 33)
2 Témoin d’alimentation (page 33)
3 Prise USB (page 35)
4 Témoin USB (page 35)
5 CD/USB (pages 34, 35)
6 PURE DIRECT (page 37)
7 Témoin PURE DIRECT (page 37)
8 Tiroir de disque (page 34)
9 (ouverture/fermeture) (page 34)
0 Capteur de télécommande (page 31)
A (saut arrière/recherche arrière) (pages 34, 35)
B (saut avant/recherche avant) (pages 34, 35)
C (lecture) (pages 34, 35, 36)
D (pause) (pages 34, 35)
E (arrêt) (pages 34, 35, 36, 37)
Noms des éléments
1 2 3
4 7 0
8 9
5 6 A B C D E
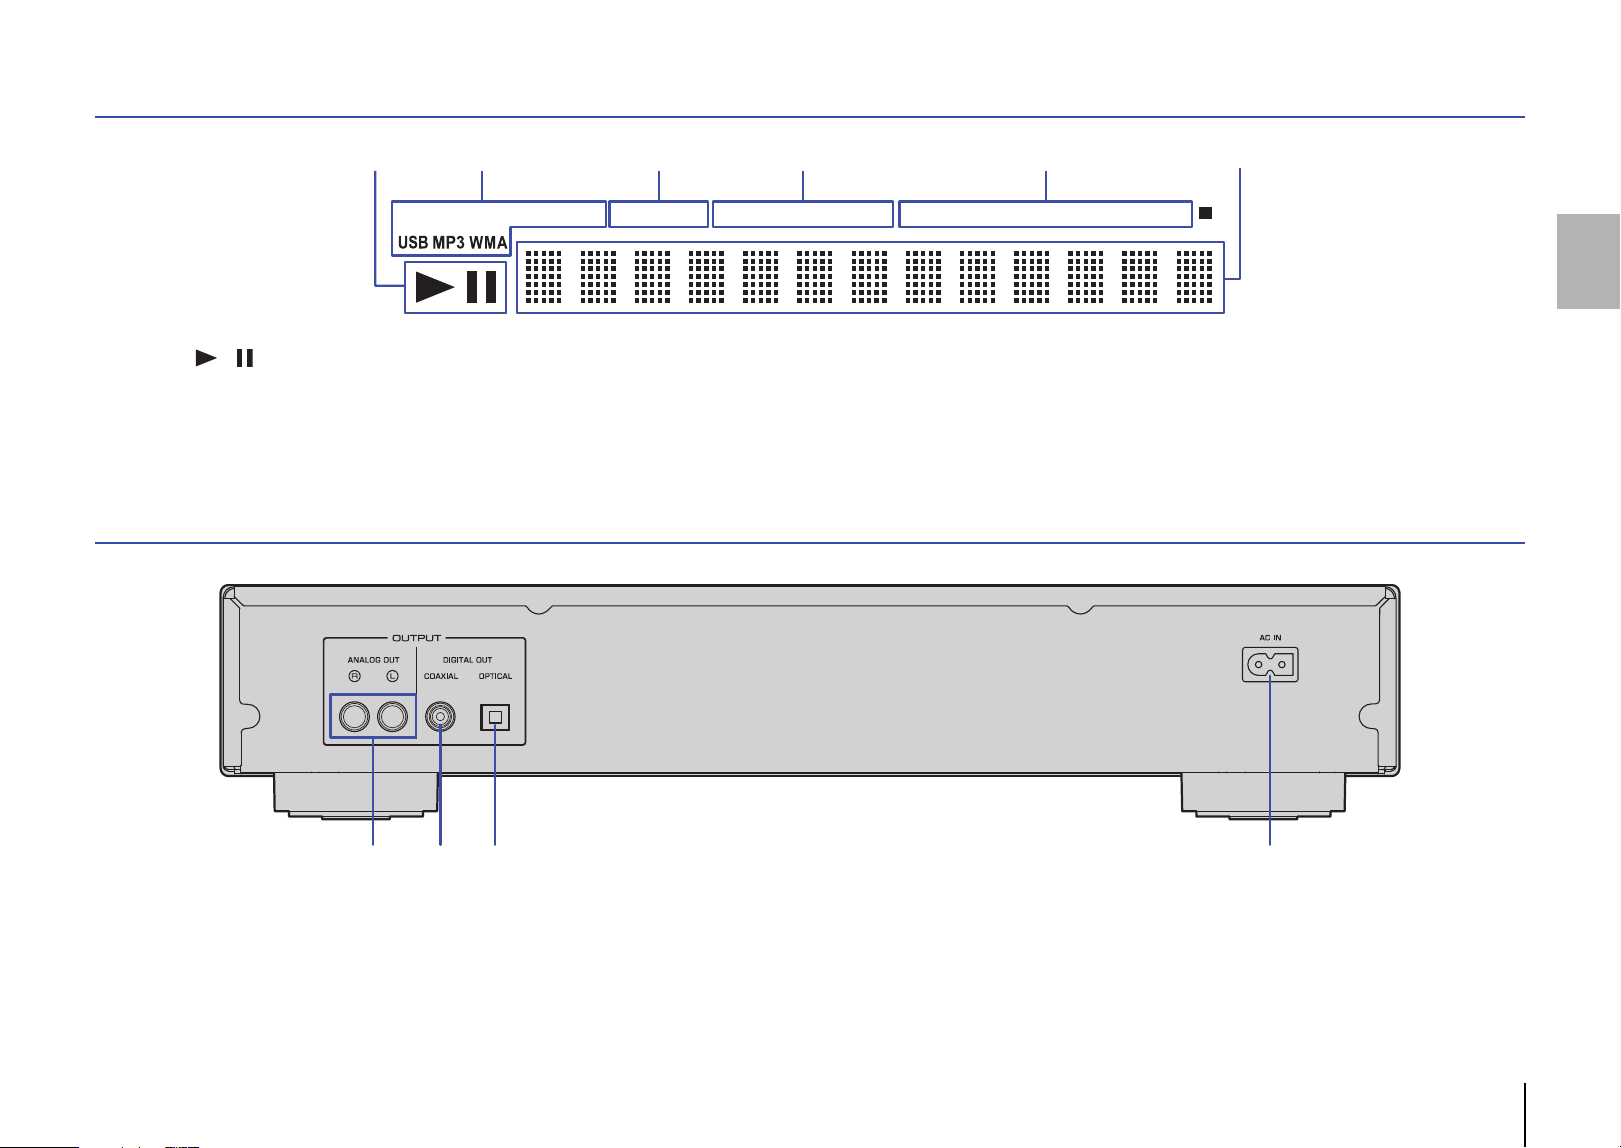
Fr 39
Écran
1 Témoin / (lecture/pause) (pages 34, 35)
2 Témoin de support de lecture (pages 34, 35)
3 Témoin des réglages avancés (page 41)
4 Affichage de durée (Page 37)
5 Témoin du mode de lecture (pages 36, 37)
6 Affichage d’informations (pages 36, 37, 41)
Panneau arrière
1 Prises ANALOG OUT (page 32)
2 Prise DIGITAL OUT (COAXIAL) (page 32)
3 Prise DIGITAL OUT (OPTICAL) (page 32)
4 Prise AC IN (page 32)
TRACKCD TEXT AAC WAV FLAC RESUM RDY TOTAL REMAIN PROG RNDM REP FOLDER ALL A - B
1 62 3 54
2 3 41
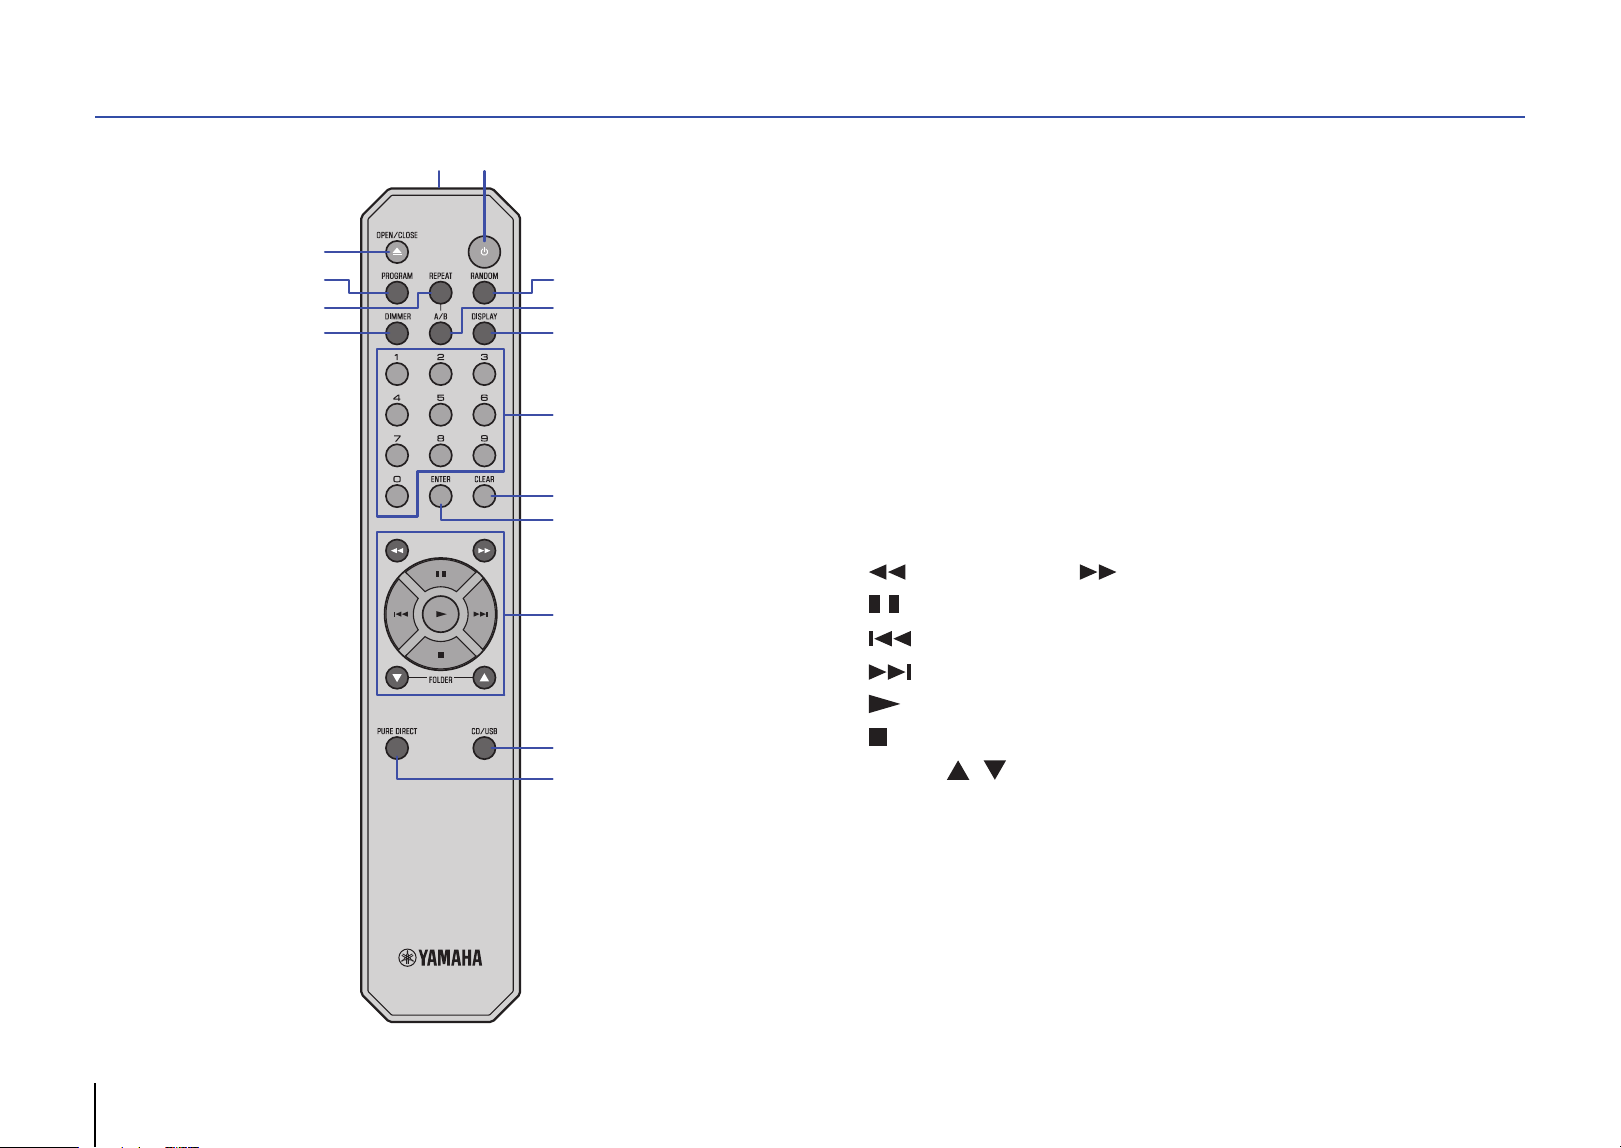
40 Fr
Télécommande
1 A (alimentation) (page 33)
2 Émetteur de signal de télécommande (page 31)
3 OPEN/CLOSE (page 34)
4 PROGRAM (page 36)
5 REPEAT (page 36)
6 DIMMER (page 37)
7 RANDOM (page 36)
8 A/B (page 37)
9 DISPLAY (page 37)
0 Touches numériques (pages 34, 36)
A CLEAR (page 36)
B ENTER (page 36)
C (recherche arrière), (recherche avant) (pages 34, 35)
(pause) (pages 34, 35)
(saut arrière) (pages 34, 35)
(saut avant) (pages 34, 35)
(lecture) (pages 34, 35, 36)
(arrêt) (pages 34, 35, 36, 37)
FOLDER , (pages 34, 35)
D CD/USB (pages 34, 35)
E PURE DIRECT (page 37)
3
4
9
0
C
7
8
A
B
D
E
6
5
2
1
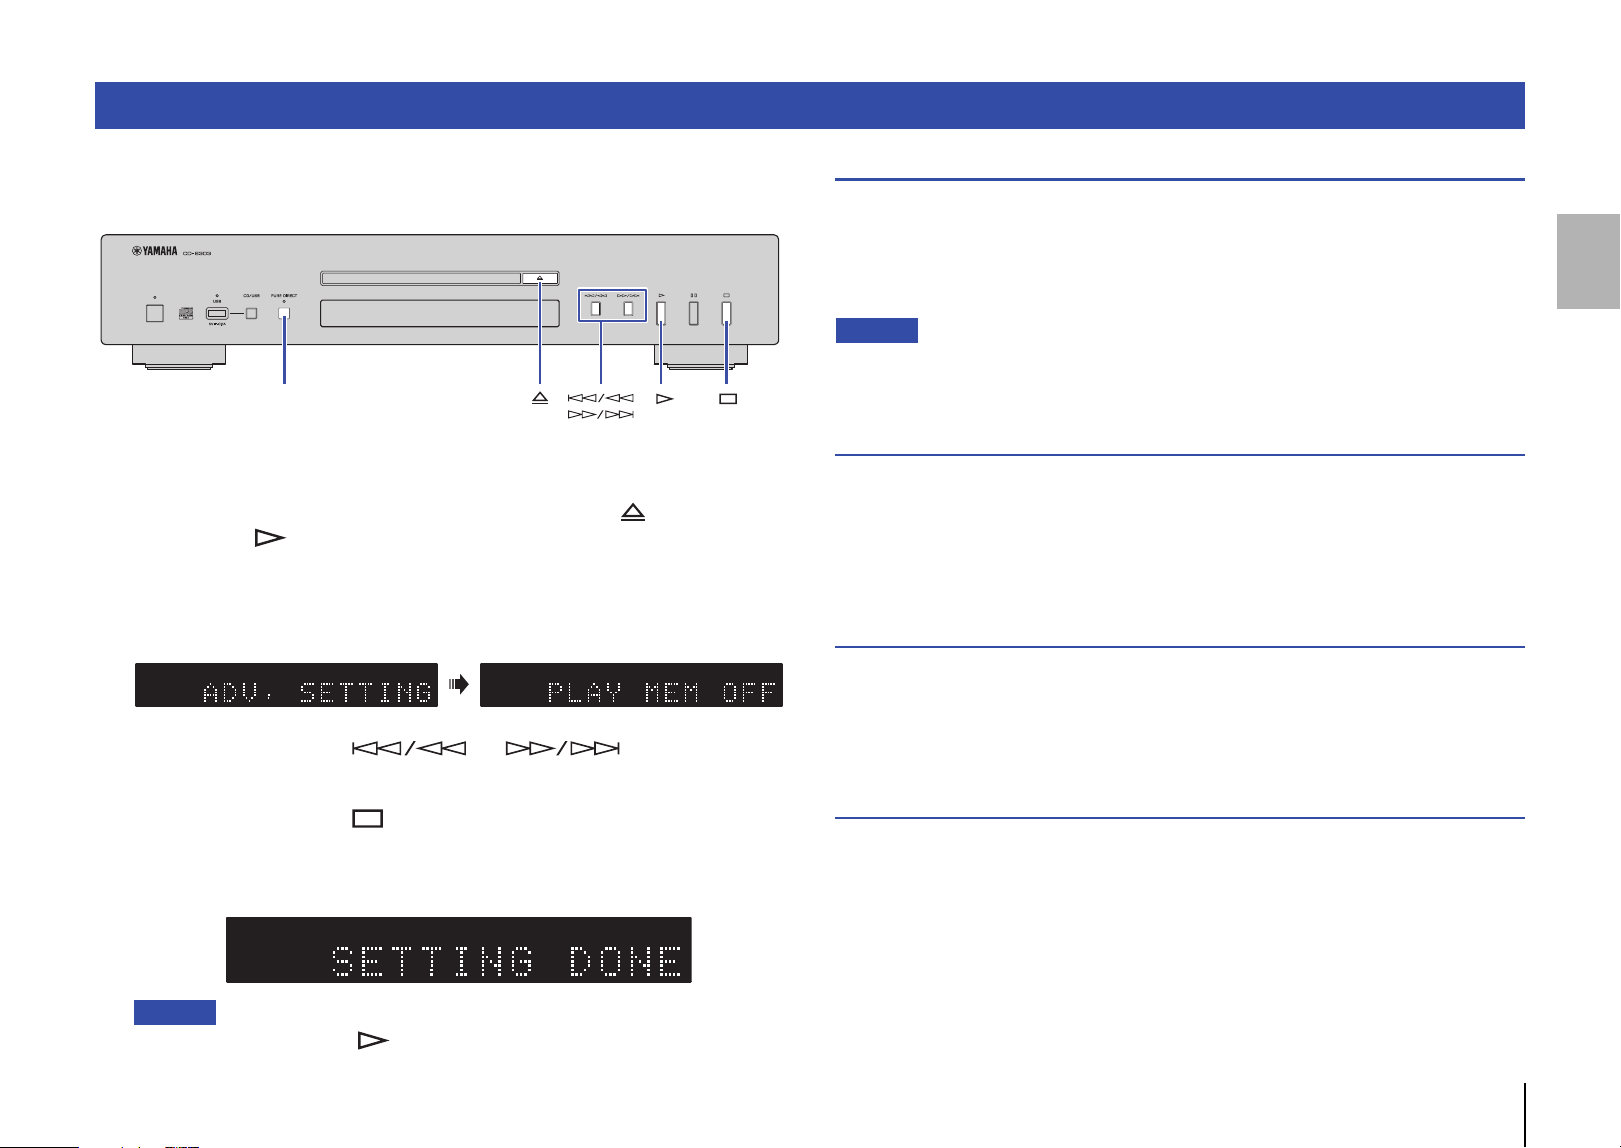
Fr 41
Cette section décrit la configuration des diverses fonctions avancées. Vous pouvez
changer la majorité de ces paramètres depuis la face avant. (Certains paramètres ne
sont accessibles que via la télécommande.)
1
Activez le mode veille de l’appareil (page 33).
2
Maintenez simultanément les touches PURE DIRECT, (ouverture/
fermeture) et (lecture), enfoncées pendant au moins trois secondes.
Le témoin suivant apparaît sur l’affichage d’informations en face avant, puis
l’appareil passe en mode de réglage. Ce mode permet de régler dans cet ordre
les fonctions suivantes : mémorisation du mode de lecture, mode paré à lire,
lecture automatique et mise en veille automatique.
3
Appuyez sur la touche ou pour activer ou
couper la fonction.
4
Appuyez sur la touche (arrêt).
Le réglage est confirmé et le paramètre suivant est automatiquement sélectionné.
Répétez les étapes 3 et 4. Quand tous les réglages sont terminés, le témoin suivant
apparaît sur l’affichage d’informations en face avant, puis l’appareil passe en veille.
Note
• Si vous appuyez sur la touche (lecture) au cours de cette procédure, le réglage est
confirmé et l’appareil passe en veille.
Mémorisation du mode de lecture (PLAY MEM)
Quand cette fonction est active, l’appareil mémorise et conserve les réglages de
lecture répétée et de lecture aléatoire après sa mise hors tension. Quand la
mémorisation du mode de lecture est activée, le témoin des réglages avancés
(RESUM) s’allume sur l’écran.
Réglage par défaut : Désactivé
Note
• Quand la fonction de mémorisation du mode de lecture est activée et que vous mettez l’appareil
sous tension, il lit la dernière plage ou le dernier fichier lu depuis le début.
Mode paré à lire (RDY MODE)
Quand cette fonction est active, l’appareil interrompt momentanément la lecture à la fin
de chaque plage. La lecture de la plage suivante démarre lorsque vous la choisissez.
Quand le mode paré à lire est activé, le témoin des réglages avancés (RDY) s’allume
sur l’écran.
Réglage par défaut : Désactivé
Lecture automatique (AUTO PLAY)
Quand cette fonction est active, la lecture démarre automatiquement quand vous
mettez l’appareil sous tension ou quand vous passez en mode de disque ou mode
USB.
Réglage par défaut : Activé
Mise en veille automatique (AUTO STBY)
Quand cette fonction est active, l’appareil passe automatiquement en veille lorsque 20
minutes s’écoulent sans aucune activité après l’arrêt de la lecture.
Réglage par défaut : Activé
Réglages avancés
PURE DIRECT
TRACKTEXT A AC WAV FLAC RESUM RDY TOTAL REMAIN RNDM REP FOLDER ALLPROG CD TRACKTEXT A AC WAV FLAC RESUM RDY TOTAL REMAIN RNDM REP FOLDER ALLPROG CD
CD TRACK REP TEXT AAC WAV FLAC RESUM RDY TOTAL REMAIN RNDM FOLDER ALLPROG
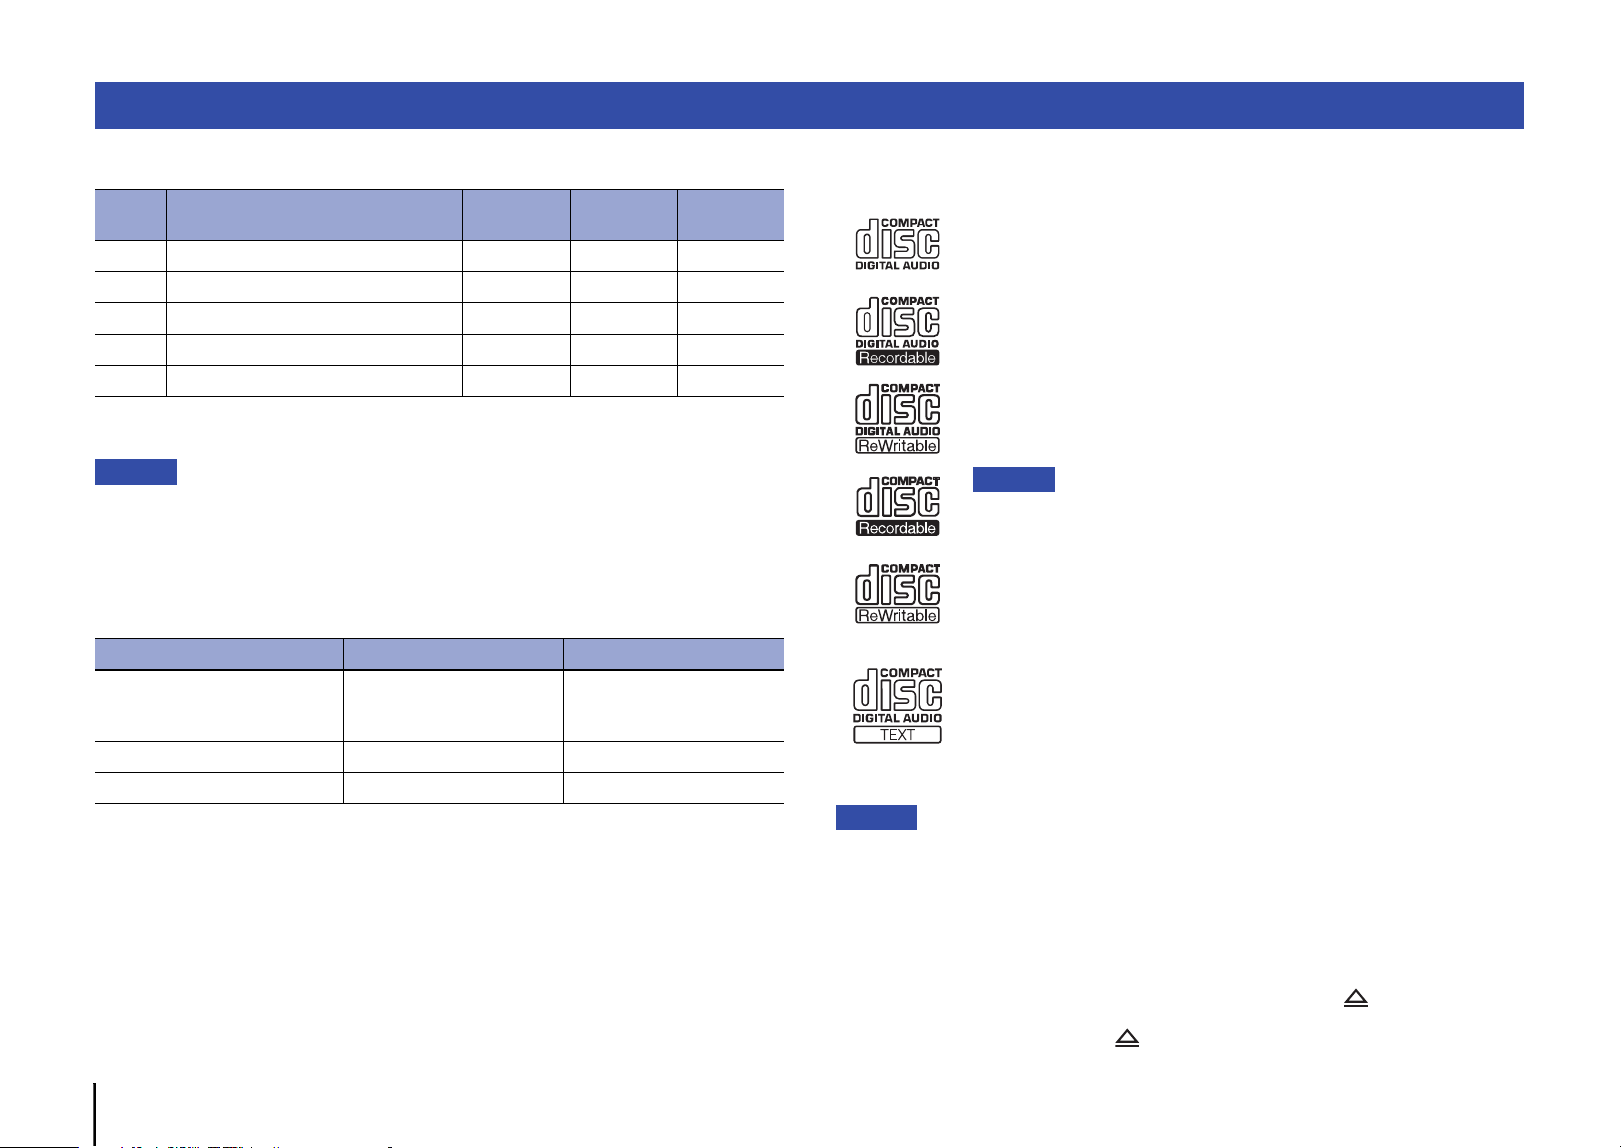
42 Fr
❑ Formats de fichiers compatibles
* Format PCM linéaire uniquement.
Note
• Les fichiers contenus sur un CD de données ou une clé USB sont lus dans l’ordre chronologique,
selon leur date de création.
• Cet appareil prend en charge les disques au format ISO9660.
• Lorsque l’appareil lit un fichier VBR (Variable Bit Rate), la durée écoulée pourrait ne pas être
affichée avec précision.
• Les contenus Digital Rights Management (DRM) encodés ne peuvent pas être lus.
❑ Disques pris en charge
Utilisez des disques affichant un des logos suivants.
Avis
• N’utilisez pas des disques de forme irrégulière ni de disques sur lesquels de la bande adhésive ou
des vignettes sont collées. Sinon cela pourrait entraîner un dysfonctionnement de l’appareil.
• Il se pourrait que l’appareil ne puisse pas lire certains disques CD-RW ou des disques
incorrectement enregistrés.
• Pour lire un CD de 8 cm, posez-le dans le creux au centre du tiroir de disque. Ne posez jamais un
CD conventionnel (de 12 cm) sur un CD de 8 cm.
• Si vous insérez un disque incompatible avec cet appareil, le message « No Disc » s’affiche.
Dans ce cas, attendez environ 15 secondes puis appuyez sur le bouton (ouverture/fermeture)
du panneau avant pour retirer le disque.
Si vous appuyez trop tôt sur le bouton (ouverture/fermeture), le tiroir s’ouvrira quand le disque
tourne toujours, ce qui risque d’endommager ce dernier.
Formats de fichiers/disques/clés USB compatibles
Fichier Fréquence d’échantillonnage (kHz)
Résolution
de bit (bit)
Débit binaire
(kbps)
Nombre de
canaux
MP3 32/44.1/48 — 32-320 2
WMA 32/44.1/48 — 48-192 2
AAC 32/44.1/48 — 8-320 2
WAV * 32/44.1/48/64/88.2/96 16/24 — 2
FLAC 32/44.1/48/64/88.2/96 16/24 — 2
CD de données Clé USB
Nombre de hiérarchies de
dossiers
(y compris le répertoire racine)
99
Nombre de dossiers 999 999
Nombre de fichiers 1100 65535
Disques compacts (CD audio)
Disques CD-R et CD-RW
• Utilisez des disques comportant une des mentions suivantes :
FOR CONSUMER
FOR CONSUMER USE
FOR MUSIC USE ONLY
• L’appareil lit uniquement des disques CD-R et CD-RW finalisés.
Note
• Il se pourrait que l’appareil ne puisse pas lire certains disques CD-R/CD-RW
ou des disques incorrectement enregistrés.
Disques contenant des données CD-texte
Ces disques contiennent des données de texte, comme par
exemple les titres d’albums, noms de morceaux et noms d’artistes.
Ces informations (uniquement des caractères alphanumériques
ainsi que certains symboles) s’affichent en même temps que la
durée écoulée.

Fr 43
❑ Manipulation des disques
• Manipulez les disques avec soin, de sorte à ne pas rayer leur
surface enregistrée. Ne pliez jamais les disques.
• En présence de traces de doigts ou de poussière sur la
surface enregistrée, frottez le disque depuis son centre vers
son bord extérieur avec un chiffon doux.
• N’utilisez jamais de produit nettoyant pour disques vinyles, d’agent antistatique ni
d’autres produits chimiques pour nettoyer un disque.
• Écrivez exclusivement sur le côté étiquette du disque, avec un feutre à pointe douce.
• Ne laissez jamais un disque à la lumière directe du soleil ni dans un endroit soumis à
des températures ou une humidité élevées de manière prolongée.
• N’utilisez pas de nettoyant pour lentille disponible dans le commerce. Sinon cela
pourrait causer un dysfonctionnement.
❑ Clés USB prises en charge
Avant d’utiliser cet appareil pour lire des fichiers musicaux stockés sur une clé USB,
vérifiez que les conditions suivantes sont respectées :
• La clé USB est conforme aux normes des périphériques de stockage de masse.
• Les données ont été enregistrées via le système de fichiers FAT16 ou FAT32.
Avis
• Il se pourrait que certaines clés USB ne fonctionnent pas correctement.
• Les clés USB avec cryptage ne peuvent pas être utilisés.
• Yamaha et ses revendeurs déclinent toute responsabilité pour toute perte de données
sauvegardées sur une clé USB raccordée à cet appareil. Nous vous recommandons de faire
régulièrement des copies de sauvegarde pour vous protéger contre la perte de données.
• Yamaha ne garantit ni le fonctionnement ni l’alimentation de toute clé USB.
Voici les caractéristiques techniques de cet appareil.
Section audio
• Niveau de sortie (1 kHz, 0 dB, Fs 44,1 kHz)................................................. 2,0 ±0,3 V
• Rapport S/B (réseau IHF-A) (1 kHz, 0 dB, Fs 44,1 kHz)....................... 105 dB ou plus
• Plage dynamique (1 kHz, 0 dB, Fs 44,1 kHz)......................................... 96 dB ou plus
• Distorsion harmonique (1 kHz, 0 dB, Fs 44,1 kHz)............................0,003% ou moins
• Réponse en fréquence
CD audio................................................................................................. 2 Hz – 20 kHz
CD de données/USB Fs 48 kHz ....................................................... 2 Hz – 22 kHz
Fs 96 kHz ............................................2 Hz – 44 kHz, –3 dB
Section laser
• Type de laser .................................................................................................... AIGaAs
• Longueur d’onde ...............................................................................................790 nm
• Puissance du laser .................................................................................1,04 mW max.
Généralités
• Tension d’alimentation
Modèles pour les États-Unis et le Canada ......................................... CA 120 V, 60 Hz
Modèle pour l’Australie ............................................................... CA 230–240 V, 50 Hz
Modèles pour l’Europe et le Royaume-Uni ......................................... CA 230 V, 50 Hz
Modèle pour l’Asie et modèle général................................... CA 110–240 V, 50/60 Hz
Modèle pour la Chine ......................................................................... CA 220 V, 50 Hz
• Consommation.......................................................................................................11 W
• Consommation en veille
Standby (mode veille)...........................................................................................0,2 W
Hors tension..........................................................................................................0,2 W
• Dimensions (L × H × P) ................................................................. 435 × 87 × 260 mm
• Poids....................................................................................................................3,5 kg
* Le contenu de ce mode d’emploi s’applique aux dernières caractéristiques techniques connues
à la date de publication du manuel. Pour obtenir la version la plus récente du manuel, accédez au
site Web de Yamaha puis téléchargez le fichier du manuel concerné.
Caractéristiques techniques
Prises de sortie
• Audio analogique x 1 (RCA/Cinch asymétrique)
• Audio numérique
COAXIAL × 1, OPTICAL × 1
Autres prises
• USB × 1 (USB2.0)

44 Fr
Reportez-vous au tableau suivant si l’appareil ne fonctionne pas correctement. Si l’anomalie constatée ne figure pas ci-dessous, ou si la correction suggérée reste sans effet, mettez
l’appareil hors tension en appuyant sur A (alimentation) en face avant, débranchez le cordon d’alimentation et prenez contact avec un revendeur ou un centre SAV Yamaha agréé.
Résolution des problèmes
Anomalies Causes possibles Solution Page
Impossible de mettre l’appareil sous
tension en appuyant sur son
interrupteur d’alimentation.
Le cordon d’alimentation est peut-être mal raccordé. Branchez fermement le cordon d’alimentation à une prise secteur. 32
Le tiroir de disque ne se referme pas
complètement.
Un corps étranger se trouve à l’intérieur du tiroir de disque. Vérifiez le tiroir de disque et retirez-en tout corps étranger. —
Impossible de lire le disque chargé.
Le disque est rayé. Utilisez un autre disque. —
De la condensation s’est formée sur la lentille à l’intérieur de l’appareil.
Mettez l’appareil sous tension et attendez 20 à 30 minutes avant
d’essayer à nouveau de lire le disque.
—
Le disque a été inséré à l’envers. Insérez le disque avec son étiquette orientée vers le haut. —
Le disque est sale ou rayé.
Éliminez la saleté de la surface du disque ou choisissez un disque
intact.
43
Vous tentez de lire un fichier dont le format n’est pas pris en charge par
l’appareil.
Veillez à utiliser un disque contenant des fichiers de format compatible
avec l’appareil.
42
Vous tentez de lire un disque dont le format n’est pas pris en charge
par l’appareil.
Veillez à utiliser un disque de format compatible avec l’appareil. 42, 43
L’appareil se trouve en mode USB. Appuyez sur la touche CD/USB pour activer le mode de disque. 34, 38, 40
La lecture ne commence pas
directement ou ne commence pas à
l’emplacement correct.
Le disque est sale ou rayé.
Éliminez la saleté de la surface du disque ou choisissez un disque
intact.
43
Impossible de lire un fichier musical
stocké sur votre clé USB.
La clé USB n’est peut-être pas correctement raccordée à l’appareil. Raccordez correctement la clé USB. 35
Vous tentez de lire un fichier dont le format n’est pas pris en charge par
l’appareil.
Veillez à utiliser une clé USB contenant des fichiers de format
compatible avec l’appareil.
42
L’appareil se trouve en mode de disque. Appuyez sur la touche CD/USB pour activer le mode USB. 35, 38, 40
Aucun son La connexion de l’appareil à l’amplificateur est incorrecte. Vérifiez la connexion à l’amplificateur. 32
L’appareil branché aux prises DIGITAL
OUT ne produit aucun son.
La fonction PURE DIRECT est active. Désactivez la fonction PURE DIRECT. 37

Fr 45
La lecture est saccadée.
Des vibrations ou des coups affectent la lecture. Changez l’emplacement de l’appareil. —
Le disque est sale ou rayé.
Éliminez la saleté de la surface du disque ou choisissez un disque
intact.
43
L’appareil produit un ronflement ou un
bourdonnement.
Le câble RCA/Cinch stéréo est mal raccordé.
Raccordez fermement le câble RCA/Cinch stéréo. Si cela ne résout
pas le problème, assurez-vous que le câble n’est pas lui-même
endommagé.
32
Votre syntoniseur génère du bruit. L’appareil est proche du syntoniseur. Mettez l’appareil hors tension ou éloignez-le du syntoniseur. —
Le fonctionnement du tiroir de disque
est bruyant.
Le disque est déformé. Utilisez un disque sans la moindre déformation. —
L’écran n’affiche aucune information. La fonction PURE DIRECT est active. Désactivez la fonction PURE DIRECT. 37
Aucun nom de dossier ni nom de fichier
n’apparaît sur l’affichage d’information.
Le nom du dossier ou du fichier contient des caractères autres que le
format alphanumérique d’un octet.
Utilisez exclusivement des caractères alphanumériques d’un octet
pour les noms de dossier et de fichier.
37
La télécommande ne fonctionne pas
correctement.
Les piles sont déchargées. Remplacez toutes les piles. 31
Distance ou angle incorrect. Utilisez la télécommande dans sa zone de portée. 31
Les rayons directs du soleil ou un éclairage direct (provenant d’une
lampe fluorescente à changement de fréquence, etc.) frappent le
capteur de télécommande de l’appareil.
Changez la position de l’éclairage ou de l’appareil. —
Anomalies Causes possibles Solution Page
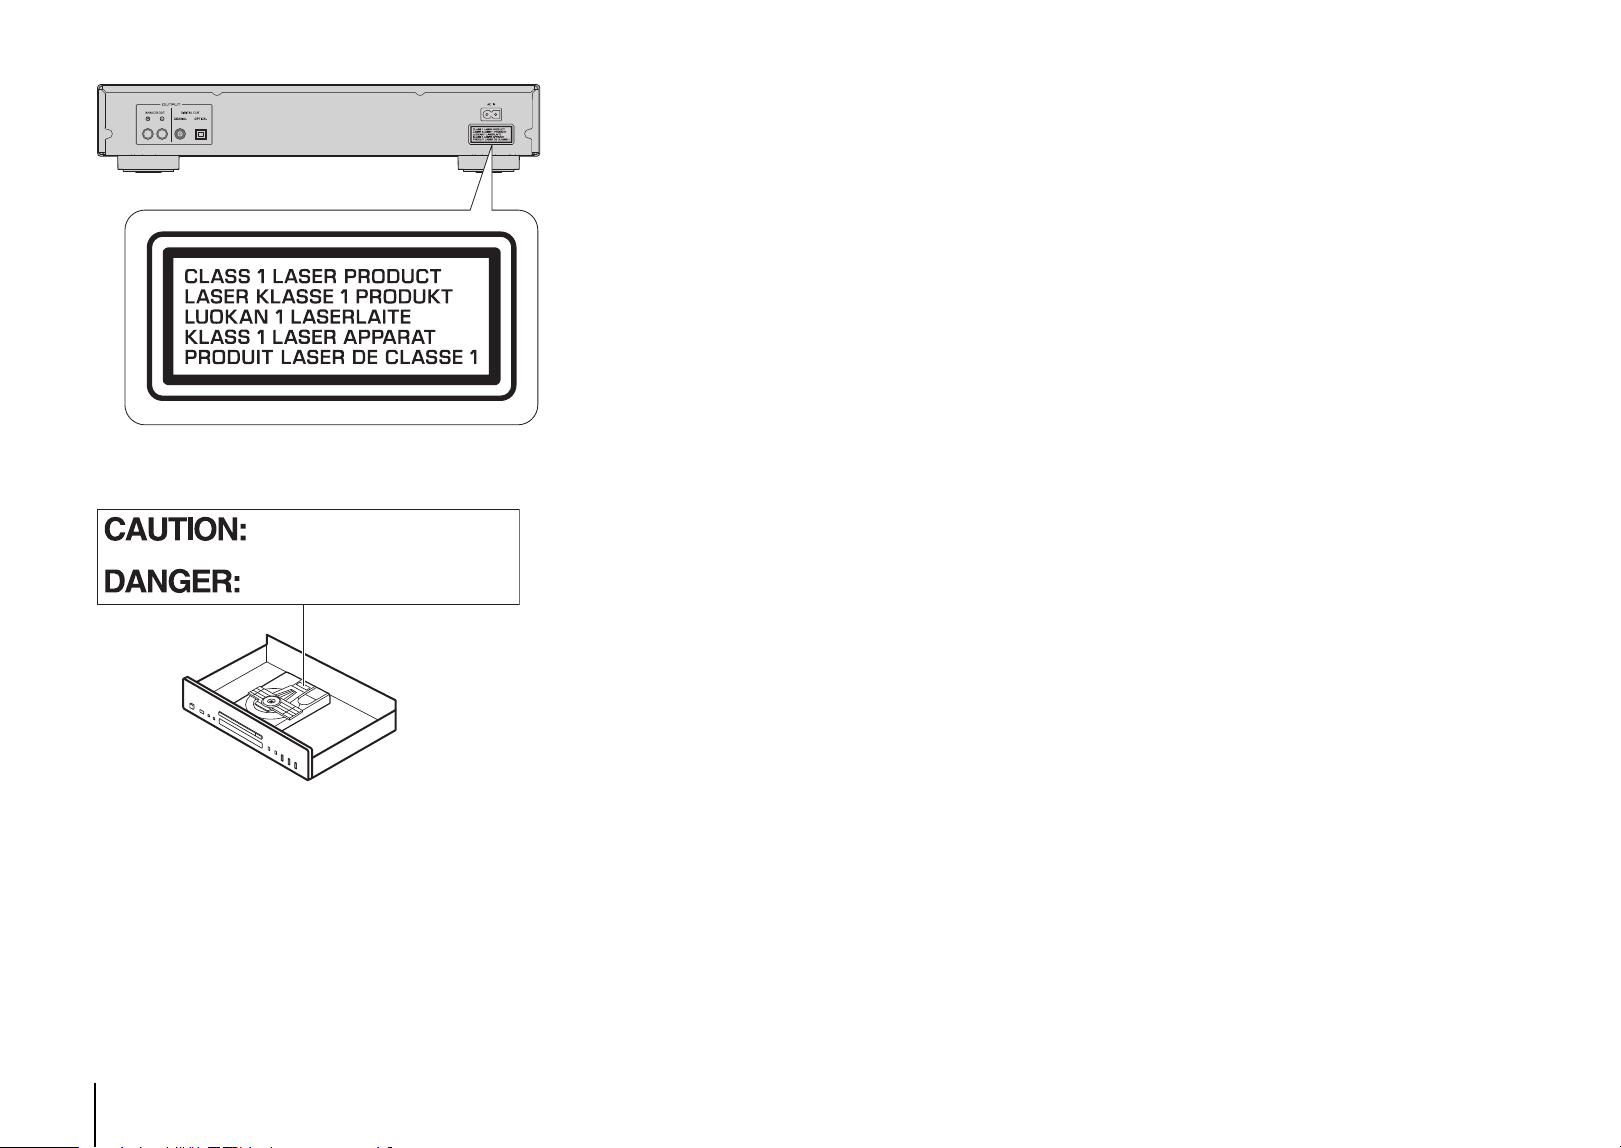
46
Software licenses
This product uses the following software.
Licences de logiciel
Ce produit utilise le logiciel suivant.
FLAC
Copyright © 2000–2009 Josh Coalson
Copyright © 2011–2021 Xiph.Org Foundation
Redistribution and use in source and binary forms, with or without modification, are
permitted provided that the following conditions are met:
- Redistributions of source code must retain the above copyright notice, this list of
conditions and the following disclaimer.
- Redistributions in binary form must reproduce the above copyright notice, this list of
conditions and the following disclaimer in the documentation and/or other materials
provided with the distribution.
- Neither the name of the Xiph.org Foundation nor the names of its contributors may be
used to endorse or promote products derived from this software without specific prior
written permission.
THIS SOFTWARE IS PROVIDED BY THE COPYRIGHT HOLDERS AND
CONTRIBUTORS ``AS IS'' AND ANY EXPRESS OR IMPLIED WARRANTIES,
INCLUDING, BUT NOT LIMITED TO, THE IMPLIED WARRANTIES OF
MERCHANTABILITY AND FITNESS FOR A PARTICULAR PURPOSE ARE
DISCLAIMED. IN NO EVENT SHALL THE FOUNDATION OR CONTRIBUTORS BE
LIABLE FOR ANY DIRECT, INDIRECT, INCIDENTAL, SPECIAL, EXEMPLARY, OR
CONSEQUENTIAL DAMAGES (INCLUDING, BUT NOT LIMITED TO, PROCUREMENT
OF SUBSTITUTE GOODS OR SERVICES; LOSS OF USE, DATA, OR PROFITS; OR
BUSINESS INTERRUPTION) HOWEVER CAUSED AND ON ANY THEORY OF
LIABILITY, WHETHER IN CONTRACT, STRICT LIABILITY, OR TORT (INCLUDING
NEGLIGENCE OR OTHERWISE) ARISING IN ANY WAY OUT OF THE USE OF THIS
SOFTWARE, EVEN IF ADVISED OF THE POSSIBILITY OF SUCH DAMAGE.
INVISIBLE LASER RADIATION WHEN OPEN
AVOID DIRECT EXPOSURE TO THE BEAM
INVISIBLE LASER RADIATION WHEN OPEN
DO NOT STARE INTO BEAM


Yamaha Global Site
https://www.yamaha.com/
Yamaha Downloads
https://download.yamaha.com/
© 2021 Yamaha Corporation
Published 12/2024
IPOD-D0
VHK4270
10-1 Nakazawa-cho, Chuo-ku, Hamamatsu, 430-8650 Japan