
Refrigerator-Freezer
HRF450TG
HRF450TW
HRF450TS
User Manual
2
HRF211TW
Contents
4 Intended use
5 Safety information
Adjust the temperature for Fridge 17
Adjust the temperature for Freezer 17
Before �rst use 5
Installation 5
Daily use 6
Super-Cool function 18
9 Installation
20 Equipment
21 Energy saving tips
22 Care and cleaning
24 Technical data
25 Troubleshooting
14 Product description
15 Control panel
16 Use
3
Thank you
WARNING – Important Safety information
NOTICE-General information and tips
Environmental information
Disposal
Help protect the environment and human health. Put the packaging in
applicable containers to recycle it. Help to recycle waste of electrical and
electronic appliances. Do not dispose appliances marked with this symbol
with the household waste. Return the product to your local recycling facility
or contact your municipal o�ce.
WARNING!
Risk of injury or su�ocation!
Refrigerants and gases must be disposed of professionally. Ensure that the tubing
of the refrigerant circuit is not damaged before being properly disposed of Discon-
nect the appliance from the mains supply. Cut o� the mains cable and dispose of it.
Remove the trays and drawers as well as the door catch and seals, to prevent
children and pets from getting trapped inside the appliance.
Thank you for purchasing a Haier Product.
Please read these instructions carefully before using this appliance. The instructions
contain important information which will help you get the best out of the appliance and
ensure safe and proper installation, use and maintenance.
Keep this manual in a convenient place so you can always refer to it for the safe and
proper use of the appliance.
If you sell the appliance, give it away, or leave it behind when you move house, make sure
you also pass this manual so that the new owner can become familiar with the appliance
and safety warnings.
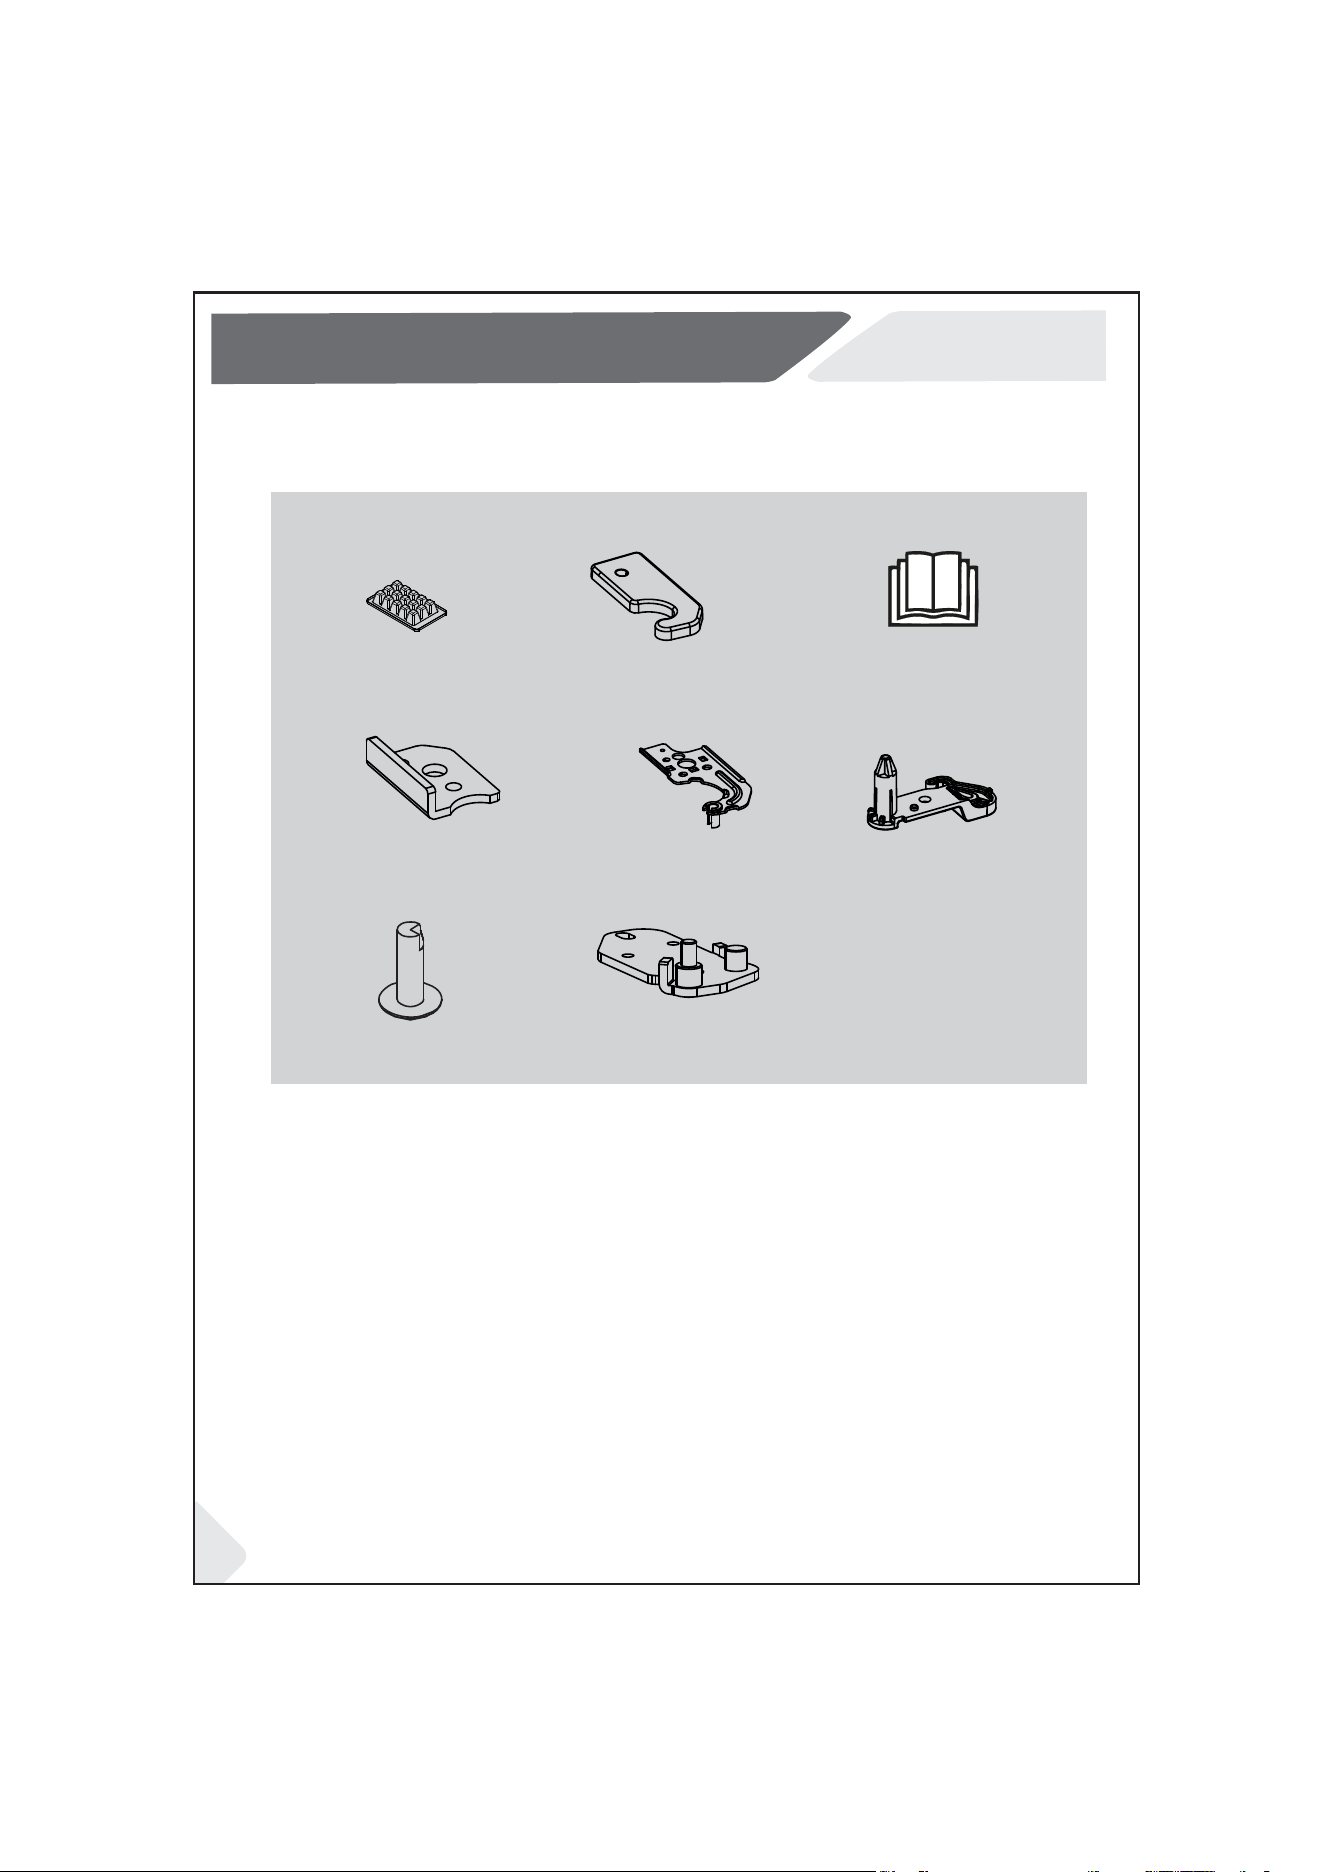
Plastic Stopper Left
Metal Stopper Left
Screw TRS 5*16
Upper Hinge Left Cover
Upper Hinge Left
x2
Ice Tray
x2
x2
User Manual
4
Accessories
Check the accessories and literature in accordance with this list:
Intended use
This appliance is intended to be used in household and similar applications such as
– sta� kitchen areas in shops, o�ces and other working environments;
– farm houses and by clients in hotels, motels and other residential type environments;
– bed and breakfast type environments;
– catering and similar non-retail applications.
Intended use
Bottom Hinge left
5
Before switching on the appliance for the �rst time read the
following safety hints!:
Before �rst use
Make sure there is no transport damage.
WARNING!
Remove all packaging and keep out of children's reach
Wait at least two hours before installing the appliance in order to ensure the
refrigerant circuit is fully e�cient.
Handle the appliance always with at least two persons because it is heavy.
Installation
The appliance should be placed in a well-ventilated place. Ensure a space of at
least 10 cm above and around the appliance.
Never place the appliance in a damp area or location where it might be splashed
with water. Clean and dry water splashes and stains with a soft clean cloth.
Do not install the appliance in direct sunlight or near heat sources(e.g. stoves,
heaters).
Install and level the appliance in an area suitable for its size and use.
Keep ventilation openings in the appliance or in the in-built structure clear of
obstruction.
Make sure that the electrical information on the rating plate agrees with the power
supply. If it does not, contact an electrician.
The appliance is operated by a 220-240 VAC/50 Hz power supply. Abnormal
voltage �uctuation may cause the appliance to fail to start, or damage to the
temperature control or compressor, or there may be an abnormal noise when
operating. In such case, an automatic regulator shall be mounted.
Do not use multi-plug adapters and extension cables
Do not locate multiple portable socket-outlets or portable power supplies at the
rear of the appliance.
Ensure that the power cable is not trapped by the refrigerator. Do not step on the
power cable.
Safety information
6
Safety information
Use a separate earthed socket for the power supply which is easy accessible. The
appliance must be earthed. Only for UK: The appliance's power cable is �tted with
3-cord (grounding) plug that �ts a standard 3-cord (grounded) socket. Never cut
o� or dismount the third pin (grounding). After the appliance is installed, the plug
should be accessible.
WARNING!
Do not damage the refrigerant circuit.
Daily use
This appliance can be used by children aged from 8 years and above and persons
with reduced physical, sensory or mental capabilities or lack of experience and
knowledge if they have been given supervision or instruction concerning use of the
appliance in a safe way and understand the hazards involved.
Children aged from 3 to 8 years are allowed to load and unload, but not allowed to
clean or install the refrigerating appliances.
Keep away children under 3 years of age from the appliance unless they are constantly
supervised.
Children shall not play with the appliance.
If cool gas or other in�ammable gas is leaking in the vicinity of the appliance, turn
o� the valve of the leaking gas, open the doors and windows and do not unplug a
plug in the power cable of the refrigerator or any other appliance.
Notice that the appliance is set for operation at a speci�c ambient range between
10 and 43
O
C
. The appliance may not work properly if it is left for a long period at a
temperature above or below the indicated range.
Do not place unstable articles (heavy objects, containers �lled with water) on top
of the refrigerator, to avoid personal injury caused by falling or electric shock
caused by contact with water
Do not pull on the door shelves. The door may be pulled slant, the bottle rack, may
be pulled away, or the appliance may topple.
Open and close the doors only with the handles. The gap between the doors and
between the doors and the cabinet is very narrow. Do not extend your hands in
these areas to avoid pinching your �ngers. Open or close the refrigerator doors
only when there are no children standing within the range of door movement.
7
Do not store or use in�ammable, explosive or corrosive materials in the appliance
or in the vicinity.
WARNING!
Do not store medicines, bacteria or chemical agents in the appliance. This appli-
ance is a household appliance. It is not recommended to store materials that
require strict temperatures.
Never store liquids in bottles or cans (besides high percentage spirits) especially
carbonated beverages in the freezer, as these will burst during freezing.
Check the condition of food if a warming in the freezer has taken place.
Do not set unnecessarily low temperature in the refrigerator compartment. Minus
temperatures may occur at high settings. Attention: Bottles can burst
Do not touch frozen goods with wet hands (wear gloves). Especially do not eat ice
lollies immediately after removal from the freezer compartment. There is the risk
to freeze or the formation of frost blisters. FIRST aid: keep immediately under
running cold water. Do not pull away!
Do not touch the inside surface of the freezer storage compartment when in
operation, especially with wet hands, as your hands may freeze onto the surface.
Unplug the appliance in the event of a power interruption or before cleaning. Allow
at least 7 minutes before restarting the appliance, as frequent starting may
damage the compressor.
Do not use electrical devices inside the food storage compartments of the
appliance, unless they are of the type recommended by the manufacturer.
Maintenance / cleaning
Make sure children are supervised if they carry out cleaning and maintenance.
Disconnect the appliance from the electrical supply before undertaking any
routine maintenance. Allow at least 5 minutes before restarting the appliance, as
frequent starting may damage the compressor.
Safety information
8
The appliance contains the �ammable refrigerant ISOBUTANE (R600a). Make
sure the refrigerant circuit is not damaged during transportation or installation.
Leaking refrigerant may cause eye injuries or ignite. If a damage has occurred,
keep away open �re sources, thoroughly ventilate the room, do not plug or unplug
the power cords of the appliance or any other appliance. Inform the customer
service. In case of eyes get into contact with the refrigerant, rinse immediately it
under running water and call immediately the eye specialist.
WARNING!
WARNING!
Hold the plug, not the cable, when unplugging the appliance.
Do not clean the appliance with hard brushes, wire brushes, detergent powder, petrol, amyl
acetate, acetone and similar organic solutions, acid or alkaline solutions. Please clean with
special refrigerator detergent to avoid damage.
Do not scrape o� frost and ice with sharp objects. Do not use sprays, electric
heaters like heater, hair dryer, steam cleaners or other sources of heat in order to
avoid damage to the plastic parts.
Do not use mechanical devices or other means to accelerate the defrosting
process, other than those recommended by the manufacturer.
If the supply cord is damaged, it must be replaced by the manufacturer, its service
agent or similarly quali�ed persons in order to avoid a hazard.
Do not try to repair, disassemble or modify the appliance by yourself In case of
repair please contact our customer service.
Eliminate the dust on the back of the unit at least once in the year to avoid hazard
by �re, as well as increased energy consumption.
Do not spray or �ush the appliance during cleaning.
Do not use water spray or steam to clean the appliance.
Do not clean the cold glass shelves with hot water. Sudden temperature change
may cause the glass to break.
Refrigerant gas information
Safety information
The symbol indicates there is a risk of �re since �ammable materials are used. Take care
to avoid causing a �re by igniting �ammable material.
WARNING:Risk of �re/�ammable material
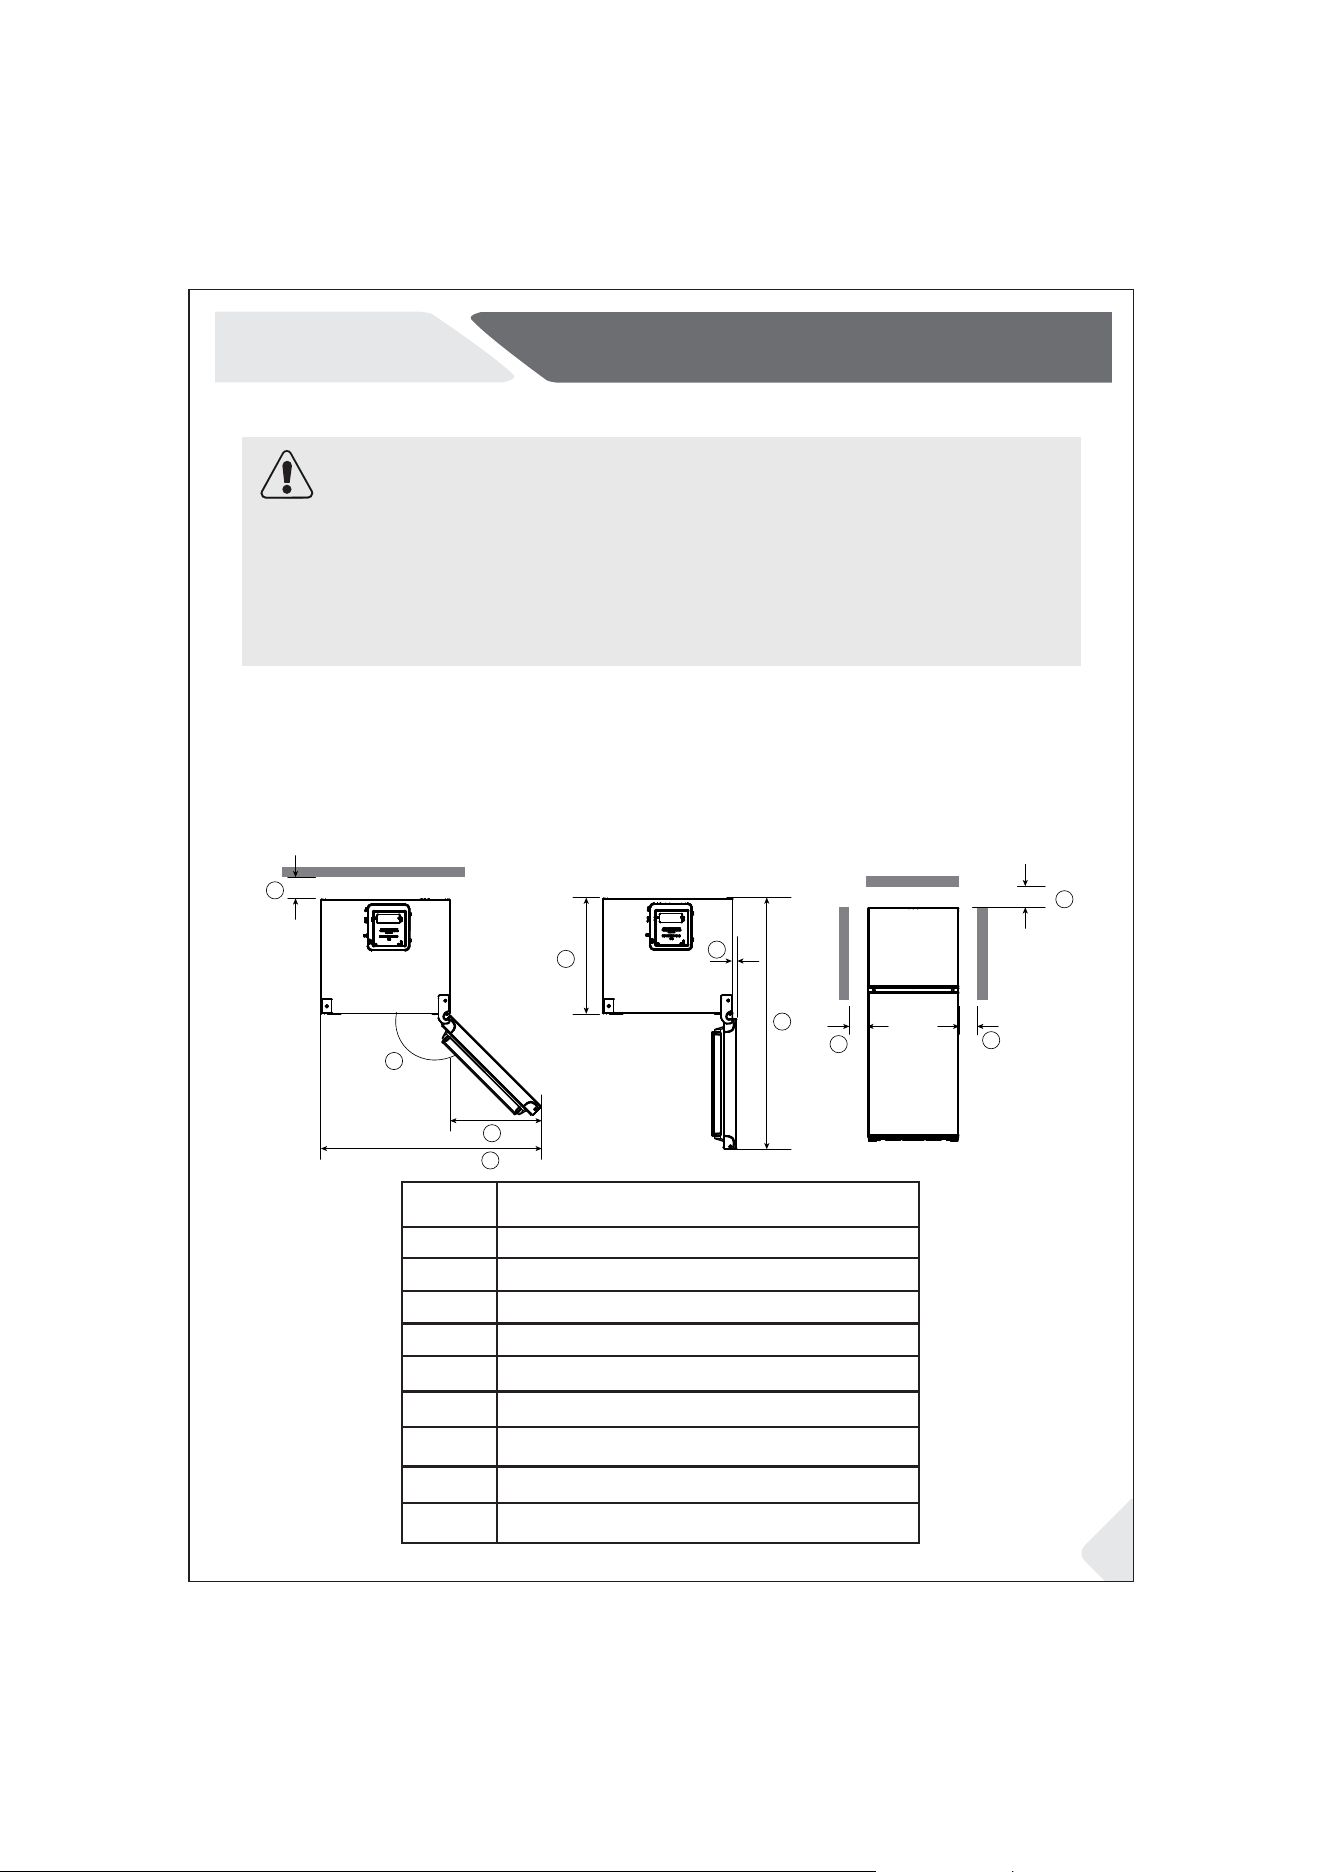
No.
01
02
03
04
05
06
07
08
09
135
1220
620
21
1350
100
50
75 (Recommended)
Dimension (mm)
52
09
09
08
9
Installation
The appliance is heavy. Always handle with at least two persons.
Keep all packaging materials out of children's reach and dispose them in an environ-
mentally friendly manner.
Take the appliance out of the packaging in an environmentally friendly manner.
Remove all packaging materials.
WARNING!
The room temperature should always be between 10
O
C and 43
O
C, since it can influence the
temperature inside the appliance and its energy consumption. Do not install the appliance near other
heat-emitting appliances (ovens, refrigerators) without isolation.
Environmental conditions
Required space when door is opened.(Without cabinet door panel)
Space requirement
Unpacking
01
02
03
05
06
07
04
power supply, socket and fusing are appropriate to the rating plate.
the power socket is earthed and no multi-plug or extension.
the power plug to a properly installed household socket.
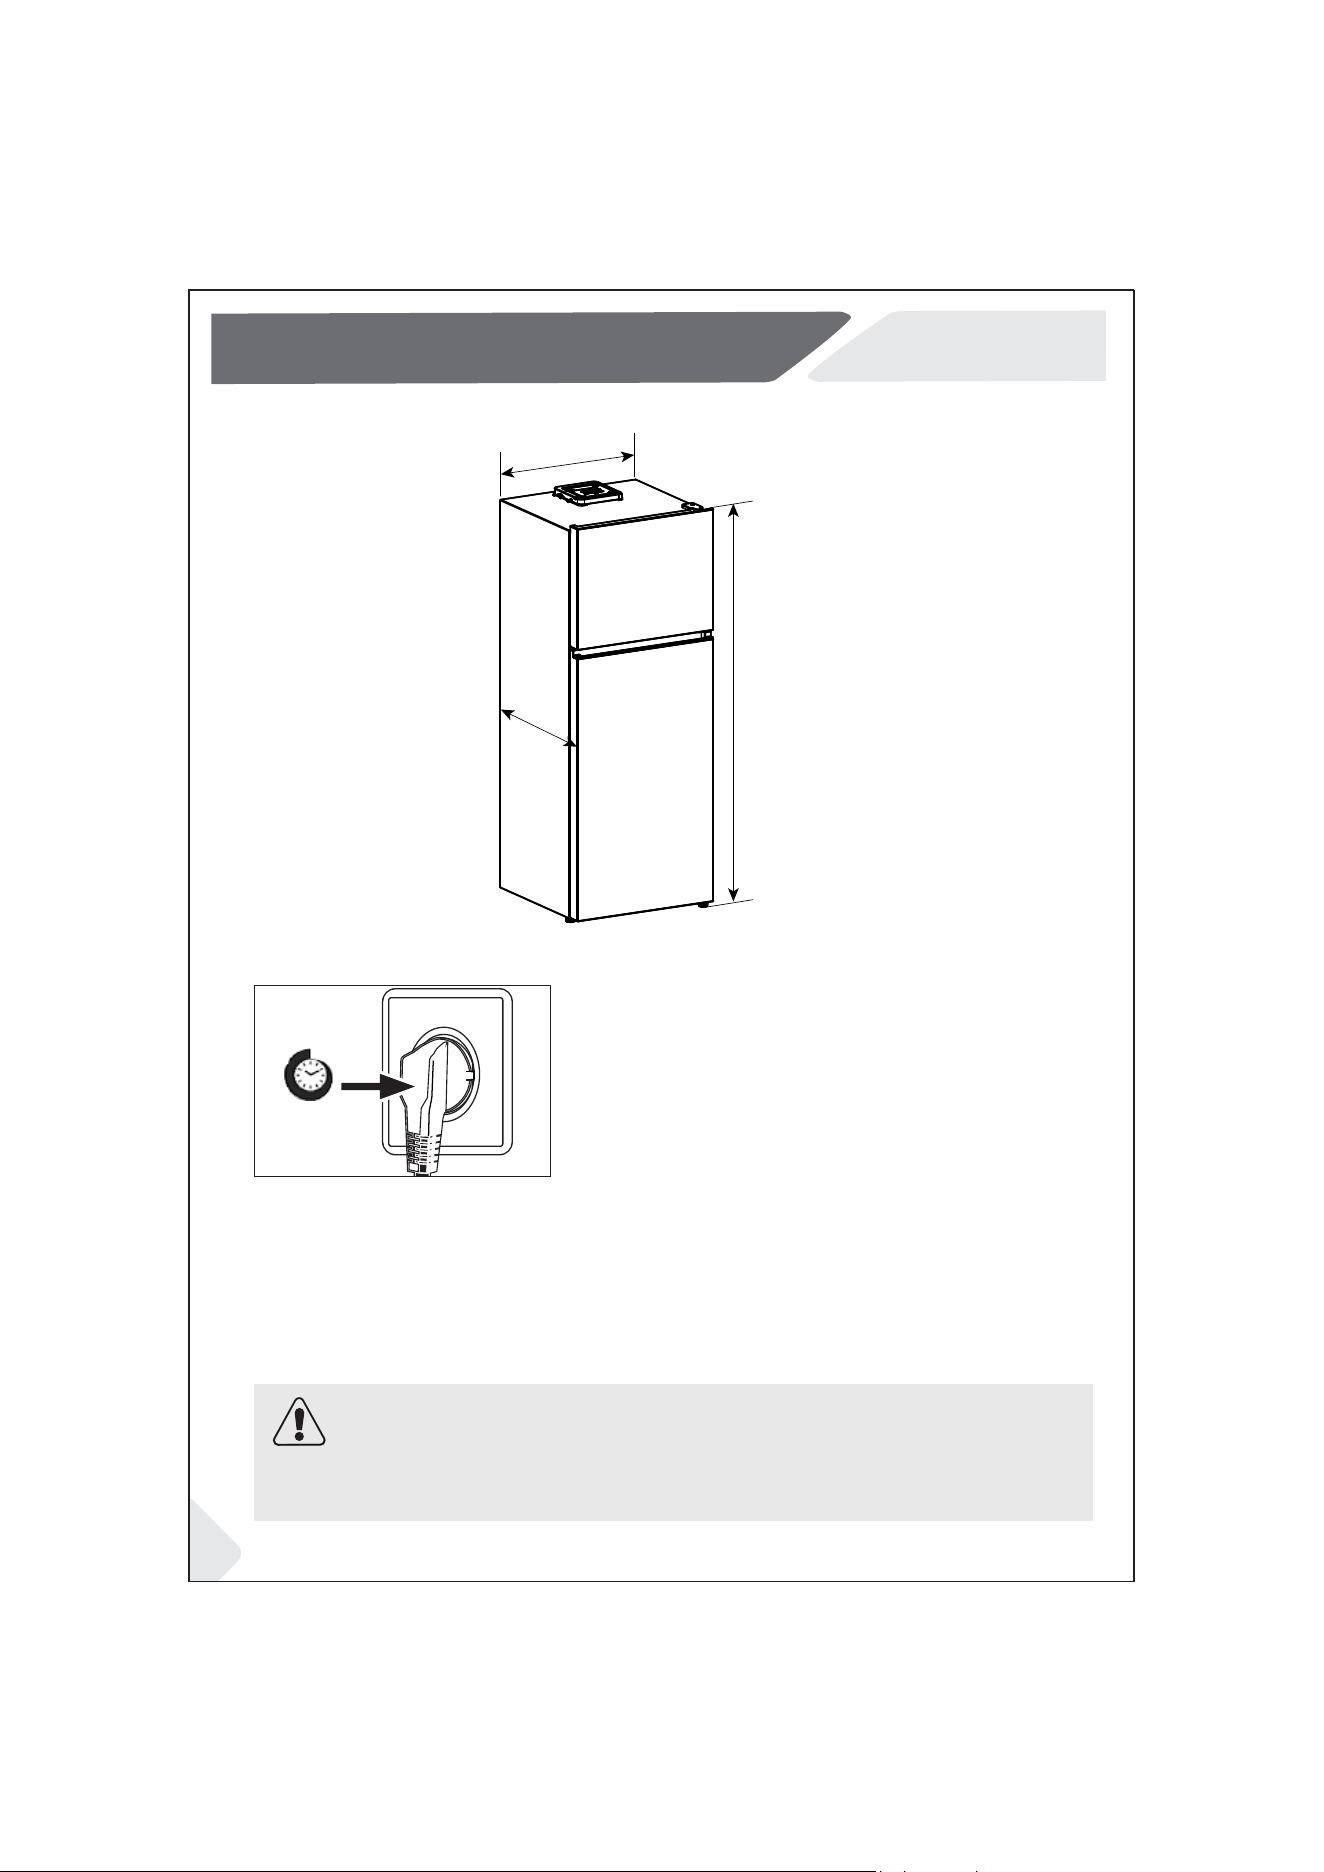
Waiting time
It is recommended to leave the refrigerator unplugged for at
least 2 hours after delivery. This will allow the refrigerator to
stand upright and unplugged for a few hours, which the oil
enough time to drain back into the compressor, ensuring it's
properly lubricated when you �rst turn it on.
10
Installation
2 h
To avoid risks a damaged power cord must be replaced by the customer service (see
warranty card).
WARNING!
Before each connection check if:
Electrical connection
Refrigerator Size(W*D*H): 700x695x1775(mm)
Production Dimension
695
700
1775
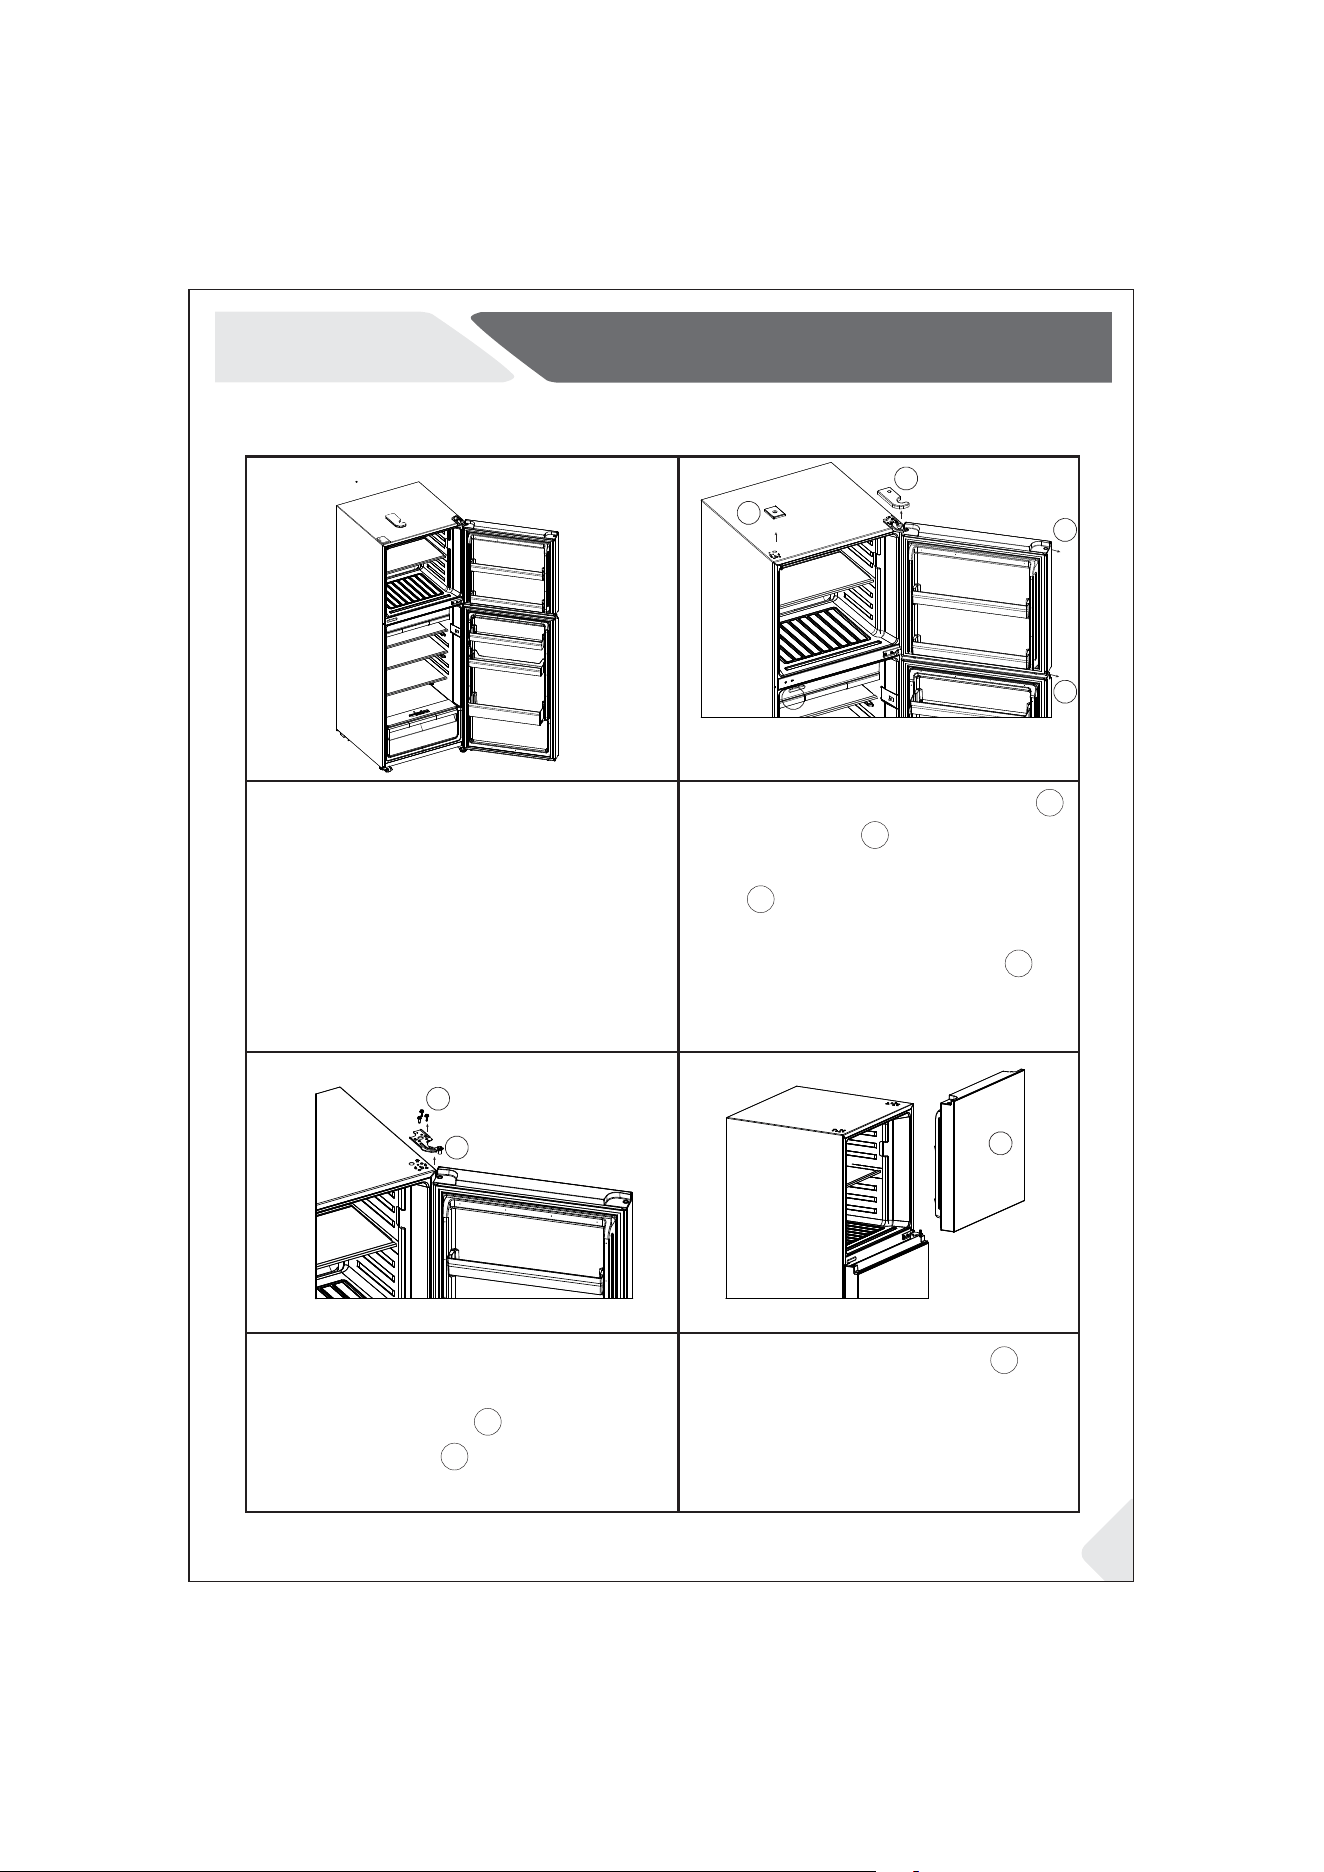
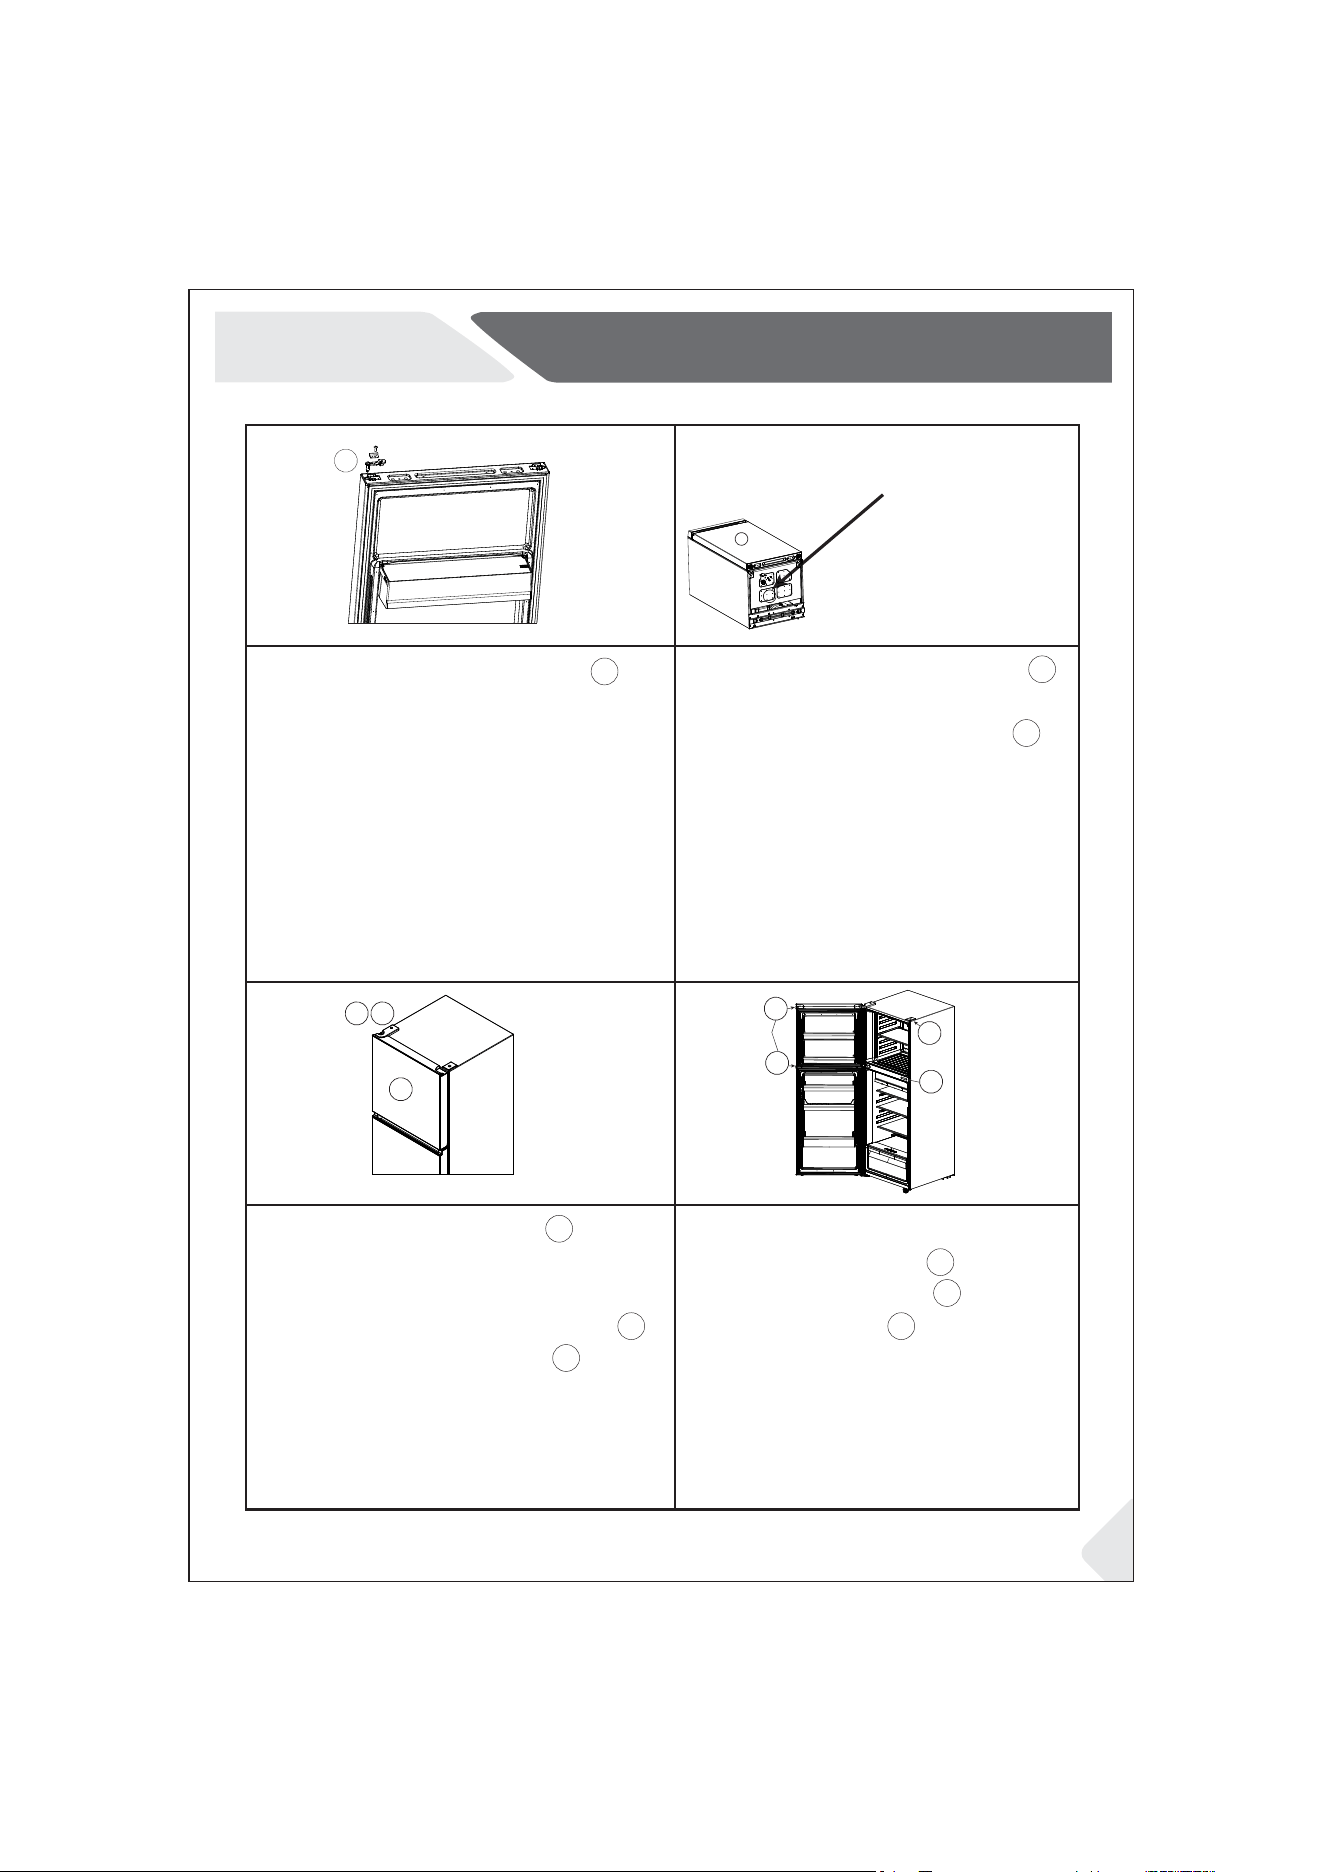
2. Remove the decorative cover 1
and hinge cover 2 on the top of the
product; remove the small hole
plugs 3 on the left side of the
refrigerator door and freezer door;
remove the decorative cover 4 on
the center beam.
DOOR REVERSIBILITY
1. Prepare necessary tools such
as a ratchet wrench, Phillips
screwdriver, or stun gun. Unplug
the power and empty the
refrigerator.
1
2
4. Remove the freezer door 1.3. Use a ratchet wrench or a Phillips
screwdriver to remove the upper
hinge �xing screws 1 and remove
the upper hinge 2 .
1
2
4
3
3
1
11
Installation
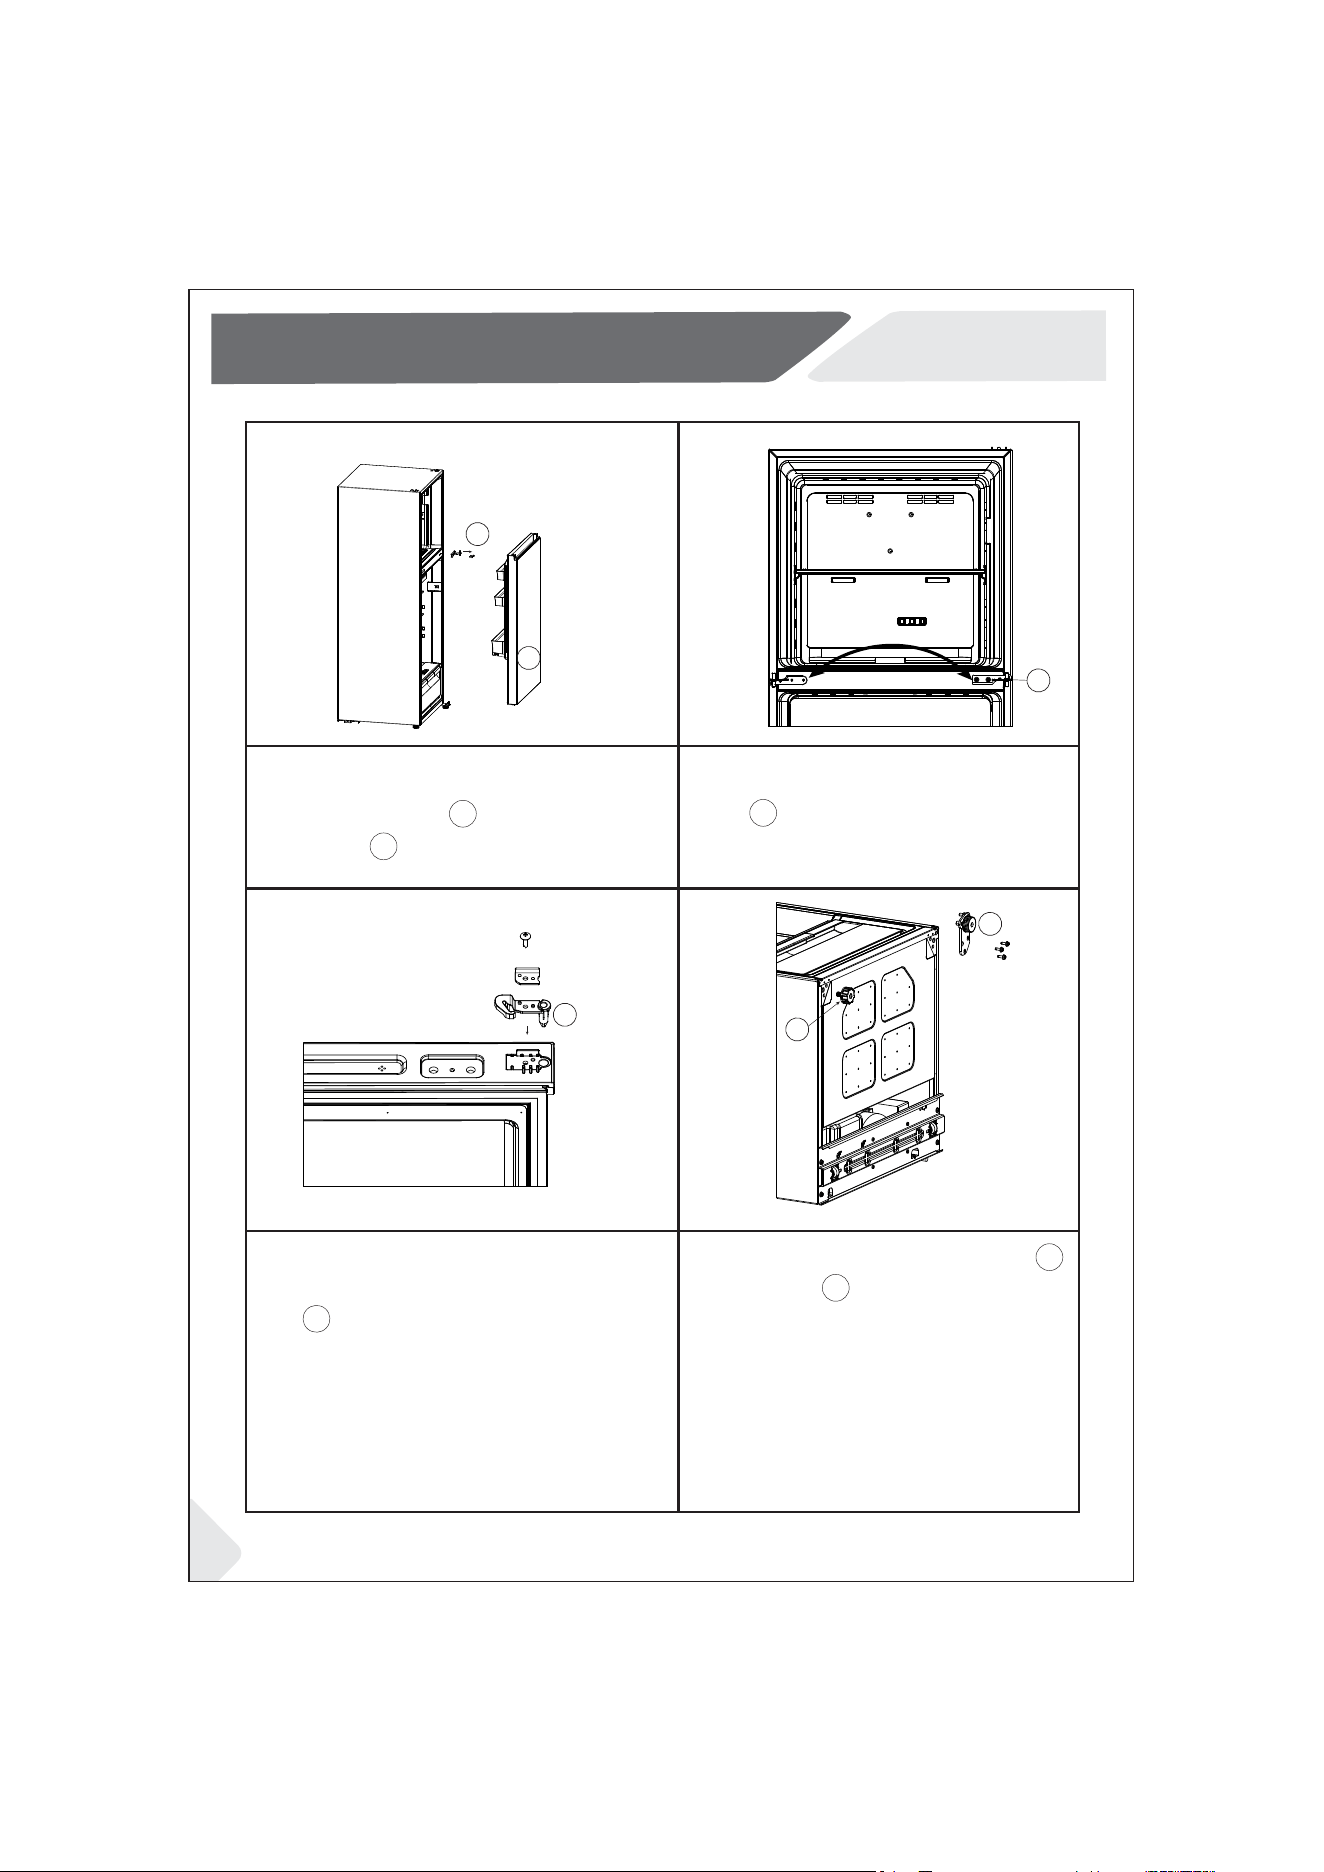
8. Remove the lower right hinge 1
and left foot 2 at the bottom of
the product, keep the lower right
hinge for use, and install the left
foot to the right side.
WARNING: STAND THE PRODUCT
UPRIGHT FOR AT LEAST 12 HOURS
AFTER LAYING DOWN.
5. Use the same method to remove
the middle hinge 1 and the refriger-
ator door 2.
6. Rotate the removed middle
hinge 1
180
O
and install it on the
left side of the box.
7. To prevent scratches, it is recom-
mended to remove the door stop-
per 1 on the right side of the
bottom of the freezer door and
refrigerator door and keep it
together with the upper and lower
hinges on the right side for future
use.
1
1
2
1
1
2
12
Installation
12. Install the decorative cover on
the top of the product 1 , center
beam decorative cover 2 , freezer
door axis hole plug 3 , and refrigera-
tor door axis hole plug symmetri-
cally to their original positions.
Remove the adjustable bottom foot of the lower right
hinge in step 8 and install it onto the lower left hinge
that came with the accessory door swap kit.
WARNING: STAND THE
PRODUCT UPRIGHT FOR
AT LEAST 12 HOURS
AFTER LAYING DOWN.
9 . Install the left door stopper 1 in
the accessory bag on the left side
of the freezer door and the refriger-
ator door according to the
sequence shown in the �gure.
10. Install the refrigerated door 1 to
the cabinet along the middle hinge
axis, install the lower left hinge 2 in
the accessory bag to the left side of
the cabinet, and adjust the side of
the door to be �ush with the side of
the cabinet.
1
32
11.Hang the freezer door 1 back on
the left middle hinge, and adjust the
door side and the cabinet side to be
�ush. Install the upper left hinge 2
and upper left hinge cover 3 in the
accessory bag to the left side of the
countertop with screws.
2
1
3
3
1
2
1
13
Installation
14
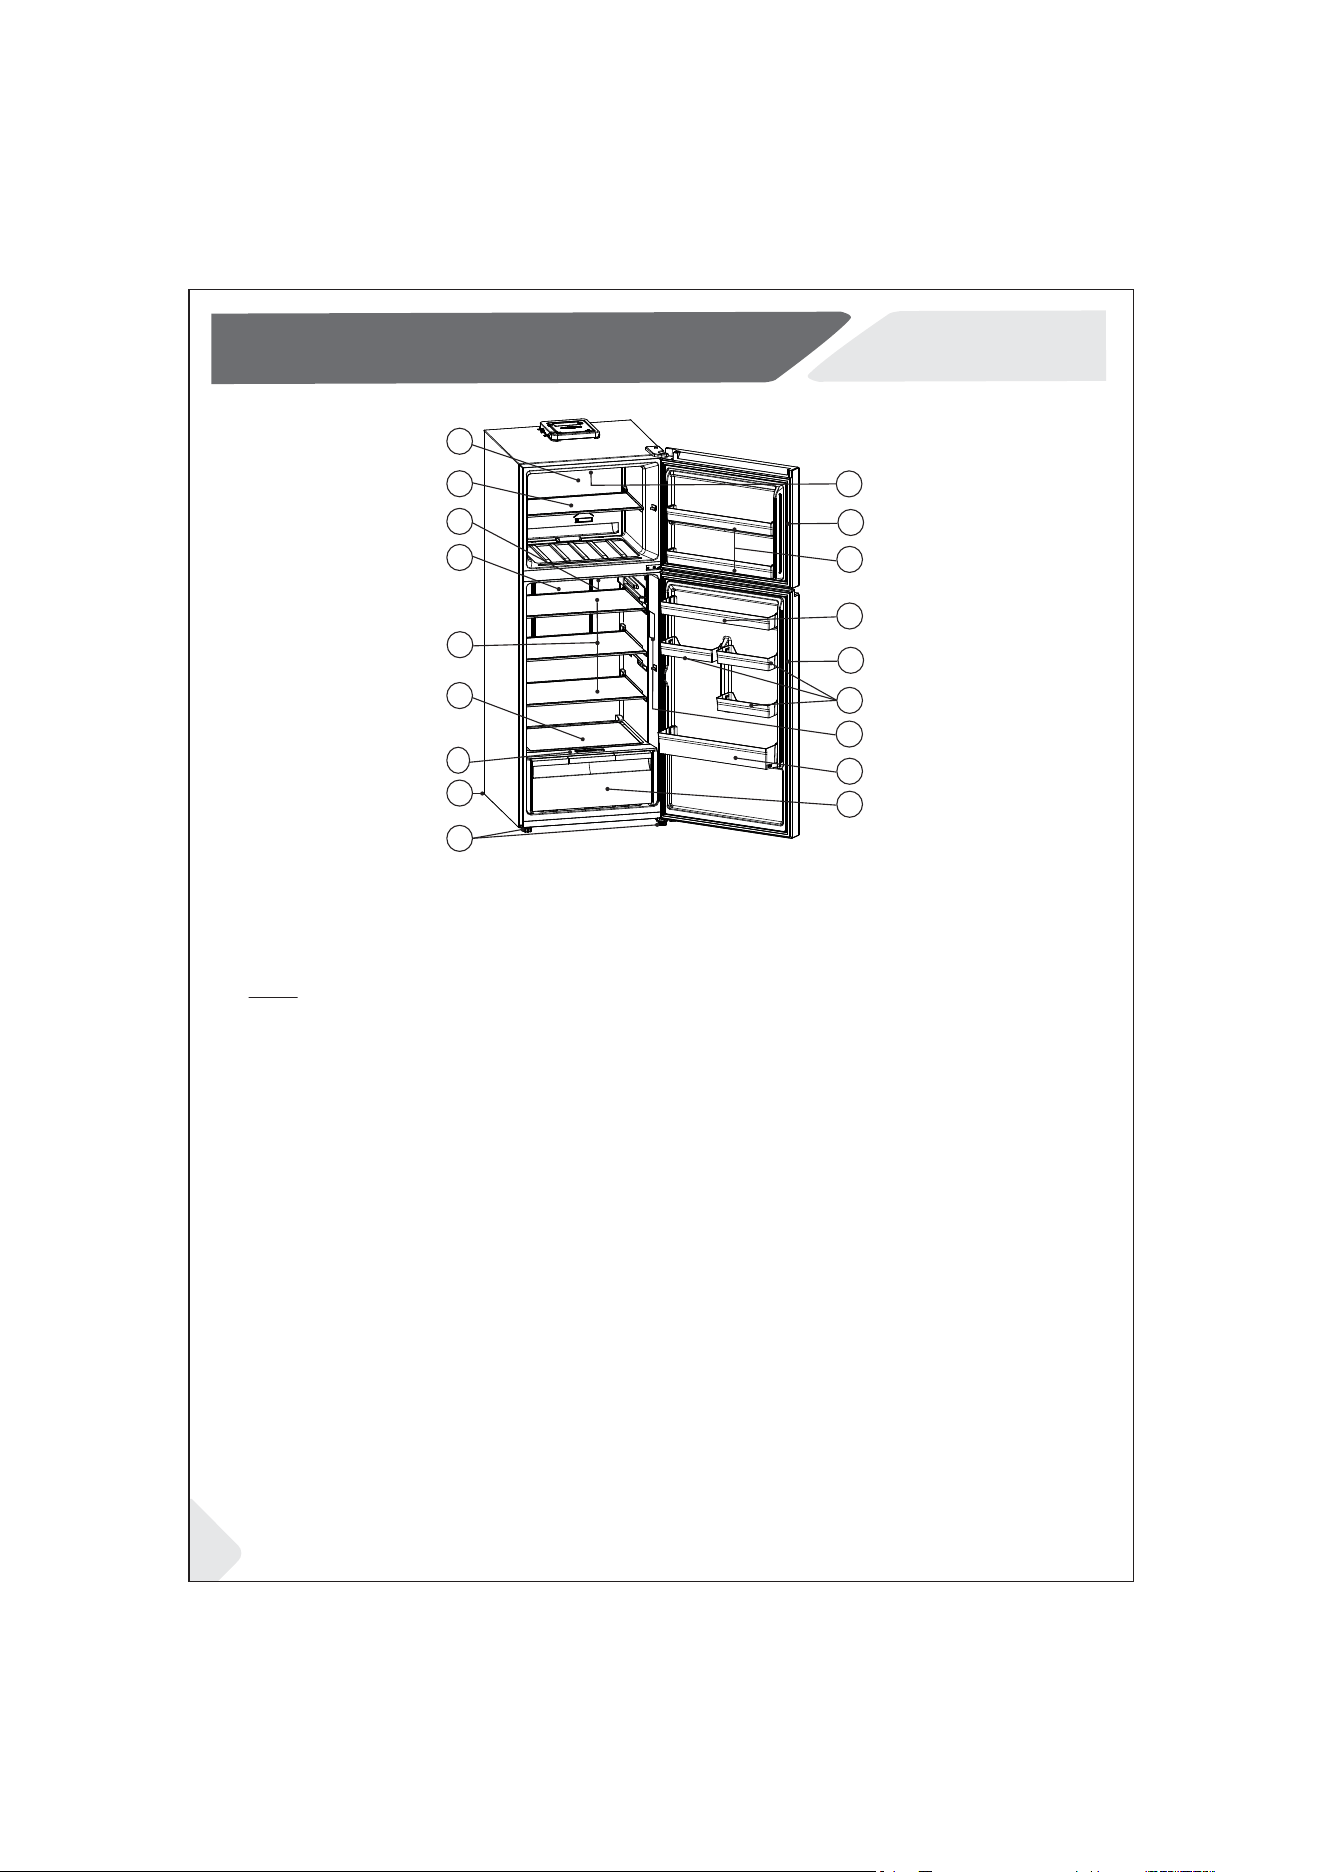
1. FREEZER COMPARTMENT
2. FREEZER GLASS TRAY
3. REFRIGERATOR LED LAMP
4. REFRIGERATOR COMPARTMENT
5. REFRIGERATOR GLASS TRAY
6. CRISPER GLASS TRAY
7. MOISTURE CONTROL SLIDE KNOB
8. DRAIN TRAY
9. LEVELING FEET
10. FREEZER LED LAMP
11. FREEZER RACK
12. REFRIGERATOR RACK UPPER
13. REFRIGERATOR RACK SMALL
14. TEMPERATURE CONTROL
15. BOTTLE RACK
16. CRISPER BOX
17. FREEZER - REFRIGERATOR DOOR GASKET
9
1
5
6
7
4
3
2
8
13
12
16
14
15
11
17
10
17
NOTE: Due to technical changes and diffrent model, some of the illustrations in this manual may differ from your
model.
Product description
15
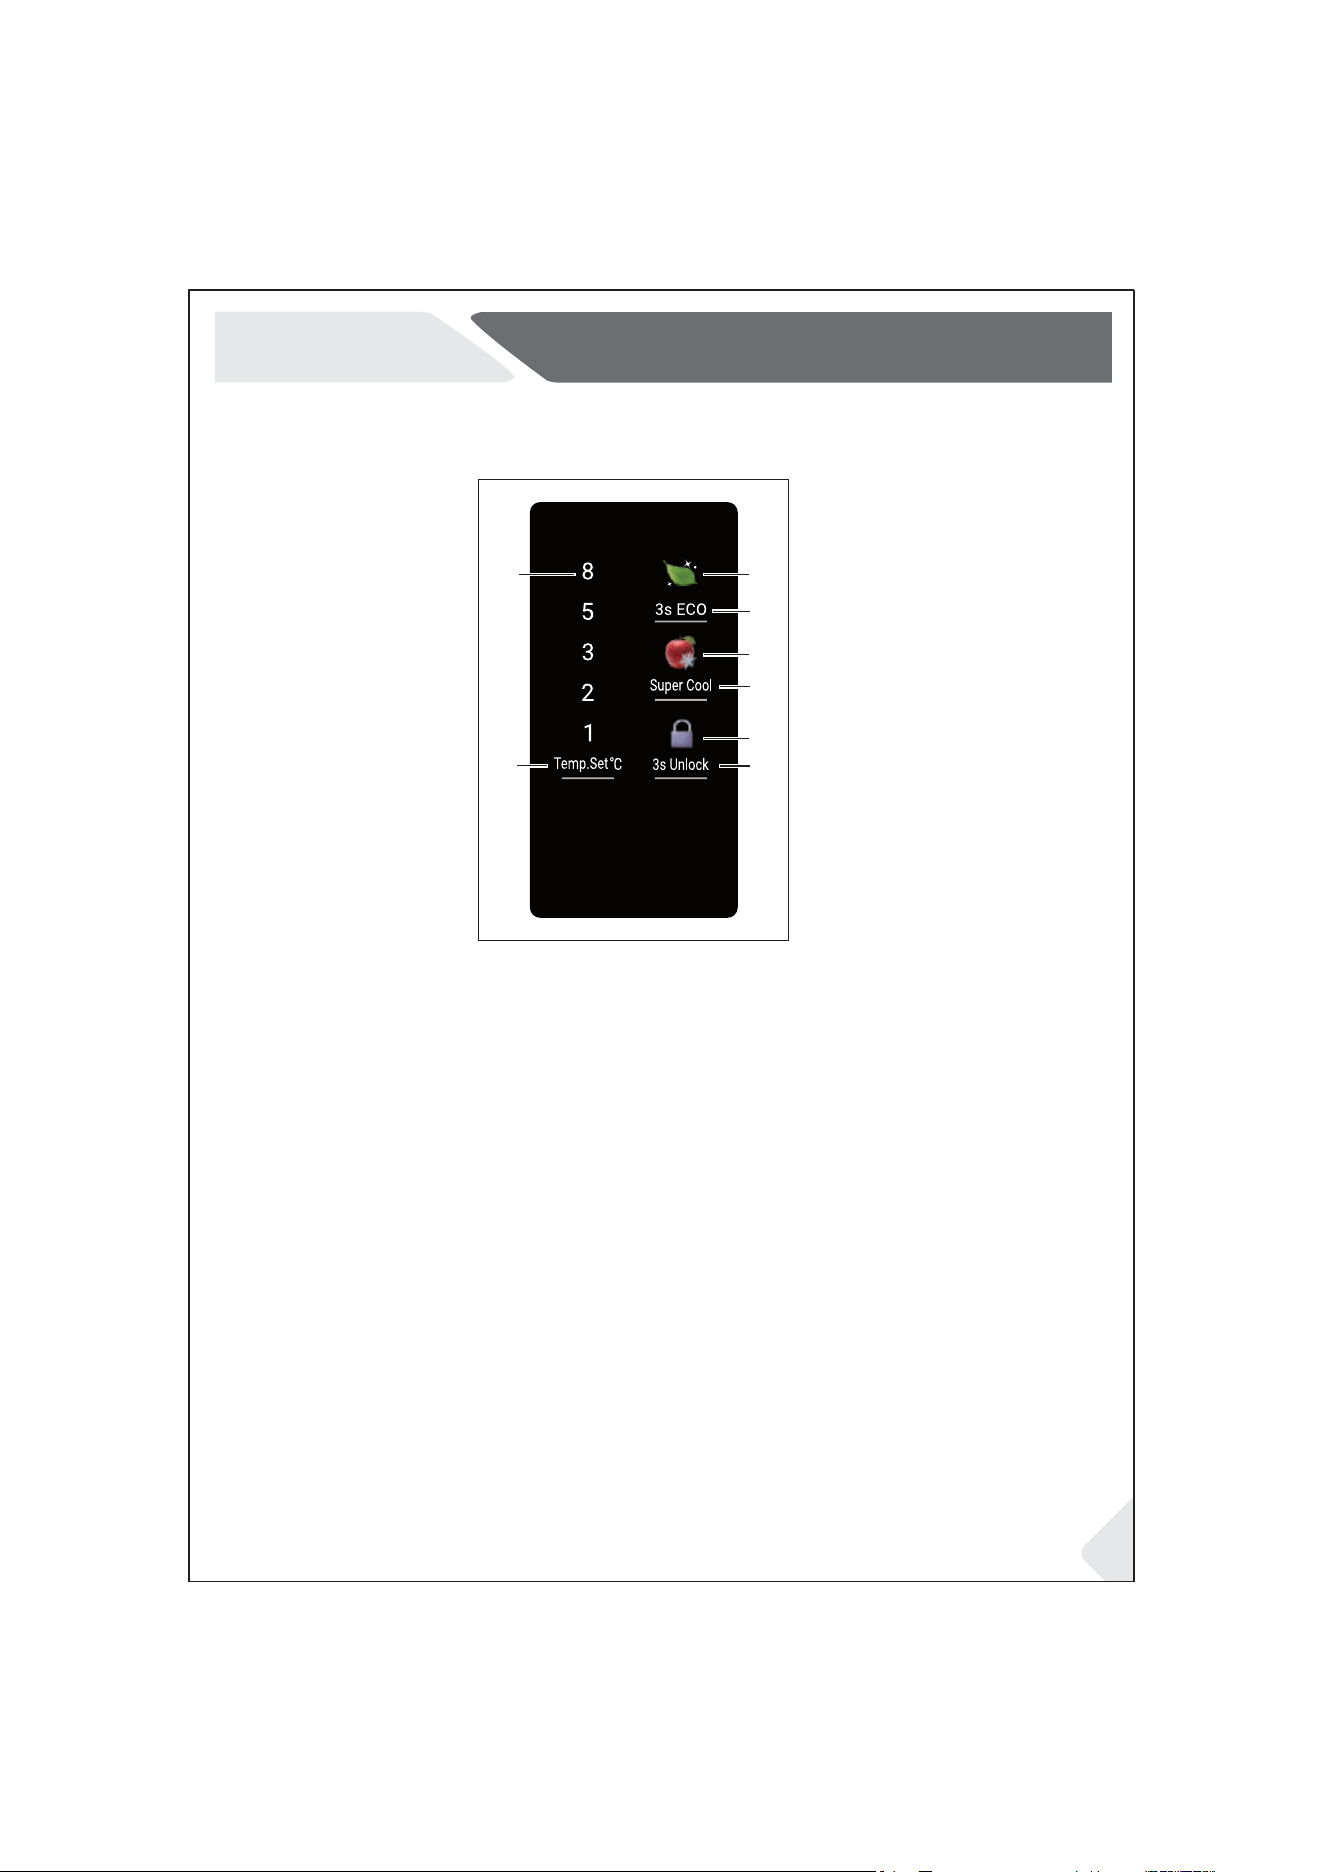
Control Panel
Refrigeration Compartment Control Panel
A B
K2
K1
K3
K4
C
D
BUTTONS
INDICATORS
A. Temperature Display Icon (show refrigeration level)
B. ECO Function Icon.
C. Quick Cooling Function Icon.
D. Lock Function Icon.
There will be a beep after each active key operation.
Notes:
After the refrigeration door is closed for 60 seconds, the indicator light will be o�, display panel in lock
state.
K1. Refrigeration temperature adjustment button: short press to adjust the refrigeration temperature.
K2. ECO function on/o� button: long press for 3 seconds to turn on/o� ECO function.
K3. Quick cooling function on/o� button: short press to turn on/o� quick cooling function;
K4. Lock/Unlock button: Press for 3 seconds to lock/unlock the display panel.
16
Use
When the appliance is switched on after disconnection from the main power supply, it
may take up to 12 hours for the correct temperatures to be reached. Empty the
appliance before switching o�. To switch o� the appliance, pull the power cord out o�
the power socket.
Adjust the temperature
The internal refrigerator & freezer temperatures are in�uenced by the following factors:
Ambient temperature
Frequency of door opening
Amount of stored foods
Installation of the appliance
Before �rst use
Remove all packaging materials, keep them out of children’s reach and dispose
them in an environmentally friendly manner.
Clean the inside and outside of the appliance with water and a mild detergent
before putting any food in it.
After the appliance has been levelled and cleaned, wait for at least 2-5 hours
before connecting it to the power supply.
See Section INSTALLATION.
Precool the compartments at high settings before loading with food.
The refrigerator temperature and freezer temperature are automatically set to
3
O
C
and -18
O
C
respectively. These are the recommended settings. If desired, you
can change these temperatures manually. Please see ADJUST THE TEMPERA-
TURE.
NOTICE!
17
Use
Adjusting the temperature of the Freezer compartment
Purpose
Position
MAX
MED
MIN
FREEZER
- When minimal freezing is required.
- For normal use.
- To freeze foods quickly
- To make ice quickly
Adjusting the temperature of the Refrigerator compartment
When the display panel is on and unlocked, press the "Temp. Set °C" button to adjust the fridge temperature.
The current temperature setting will start �ashing.
Each time you press the "Temp. Set °C" button, the temperature setting will increase to the next level in the
following order: 1 - 2 - 3 - 5 - 8 - 1
O
C.
If you don’t press any buttons for 5 seconds, the �ashing will stop, and the displayed temperature will be saved as
your chosen setting. The screen will continue to show this temperature until it turns o�.
If you press a di�erent button during those 5 seconds, the �ashing will stop, the current temperature will be
saved, and the display will switch to show the new button’s function.
3. REFRIGERATOR TEMPERATURE ADJUSTMENT
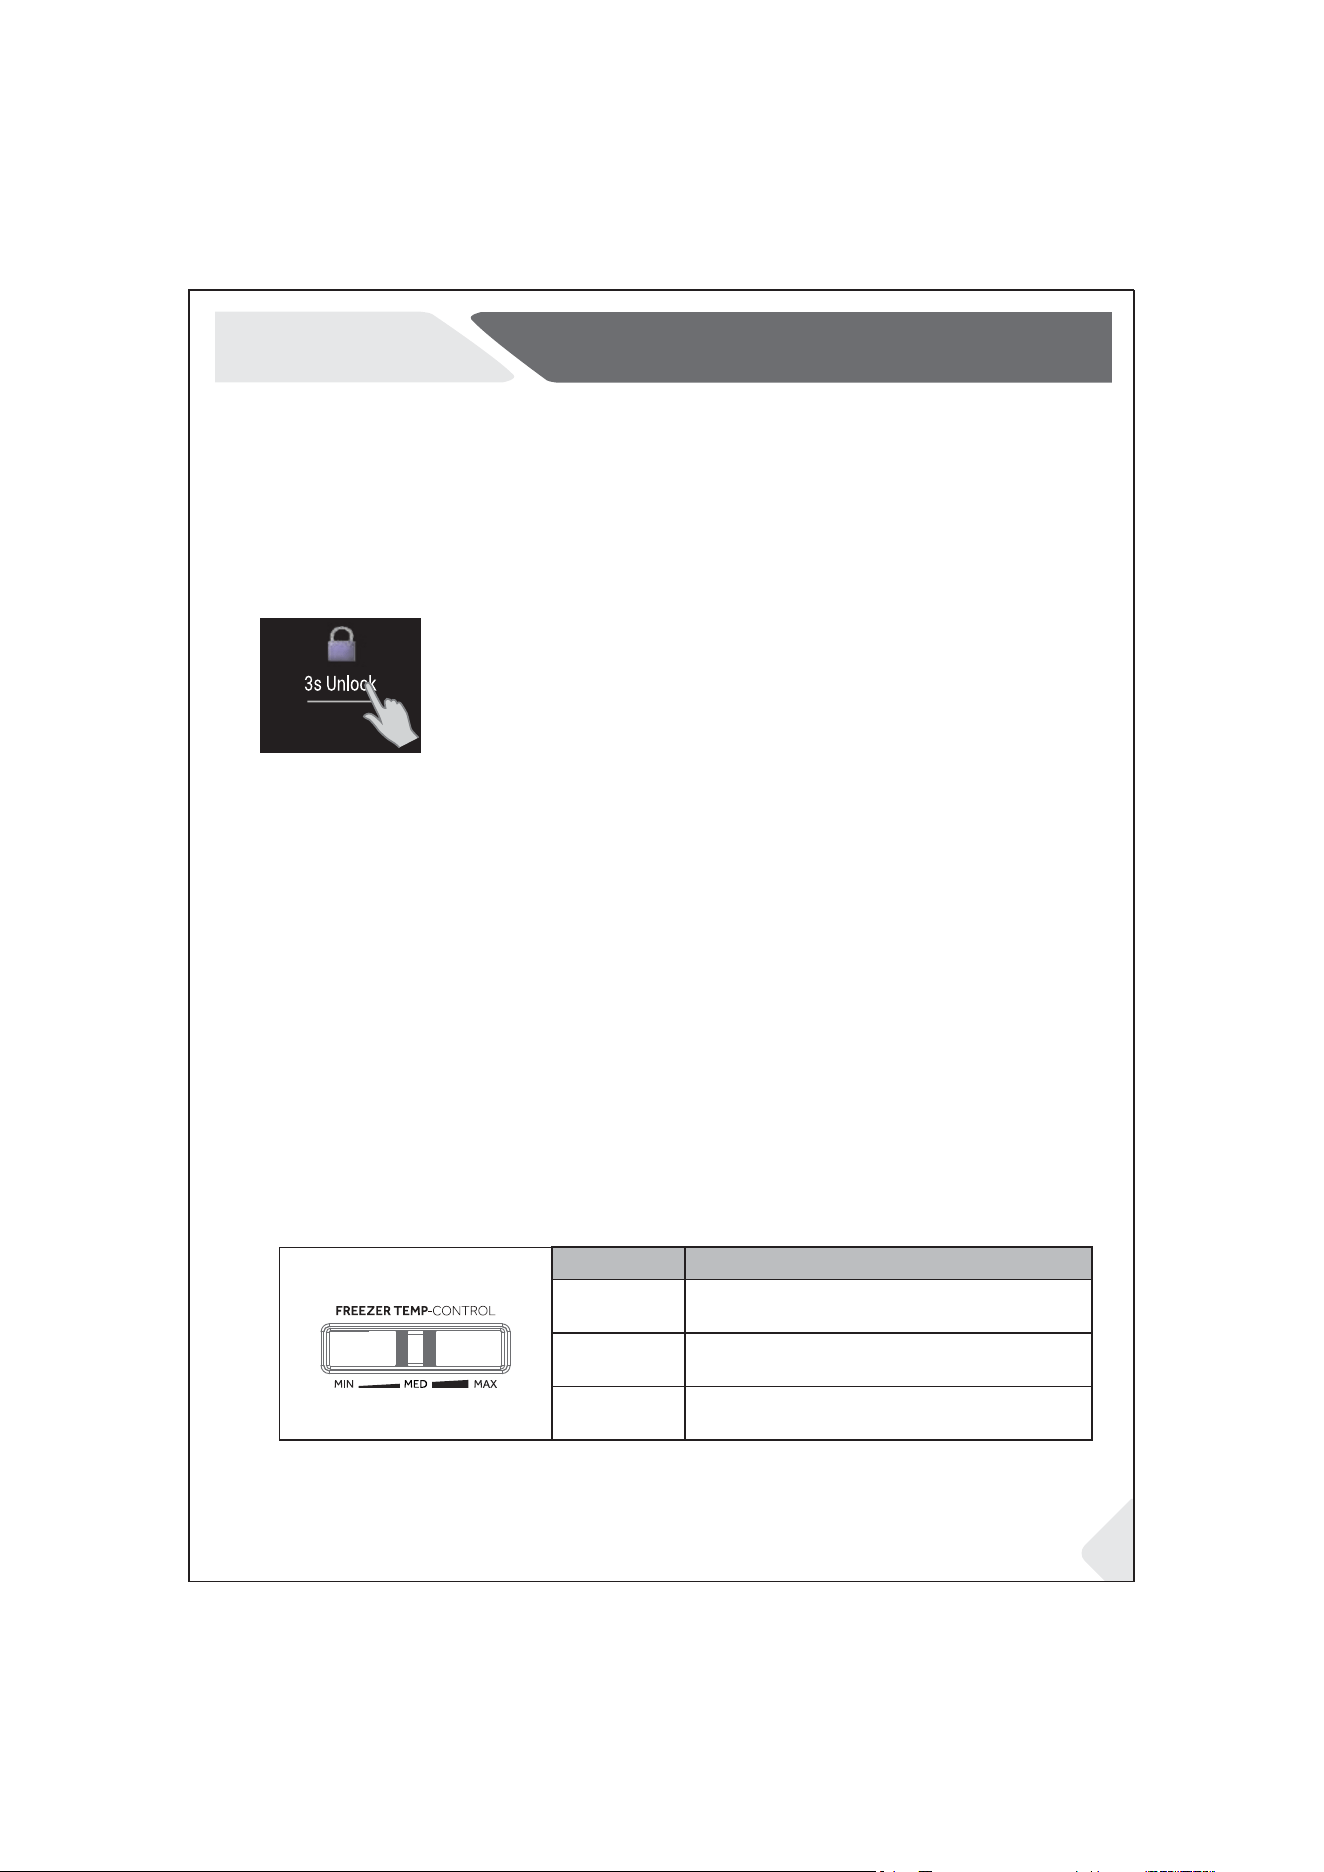
2. LOCK / UNLOCK FUNCTION SETTING:
The control panel will automatically lock after the refrigerator door is
closed and no buttons are pressed for 30 seconds.
To unlock the panel: Touch and hold the “3s Unlock” button for 3
seconds. You’ll hear a sound, and the lock icon will turn o�. The panel is
now unlocked.
To lock the panel again: Touch and hold the “3s Unlock” button for 3
seconds. You’ll hear a sound, and the lock icon will light up. The panel is
now locked.
Note: When the panel is locked, you won’t be able to change the fridge
temperature or use features like quick cooling or ECO mode.
1. FIRST POWERED ON
After the refrigerator is powered on for the first time, the refrigerator compartment is
automatically set to 3
O
C; the human sensing function is turned on; the handle light enters
the "light and agile mode"; when the door is open, the temperature display icon and the
"unlock" function icon light up.
Note: Functions 3 to 9 can only be used when the refrigerator is in the unlocked state.
18
Use
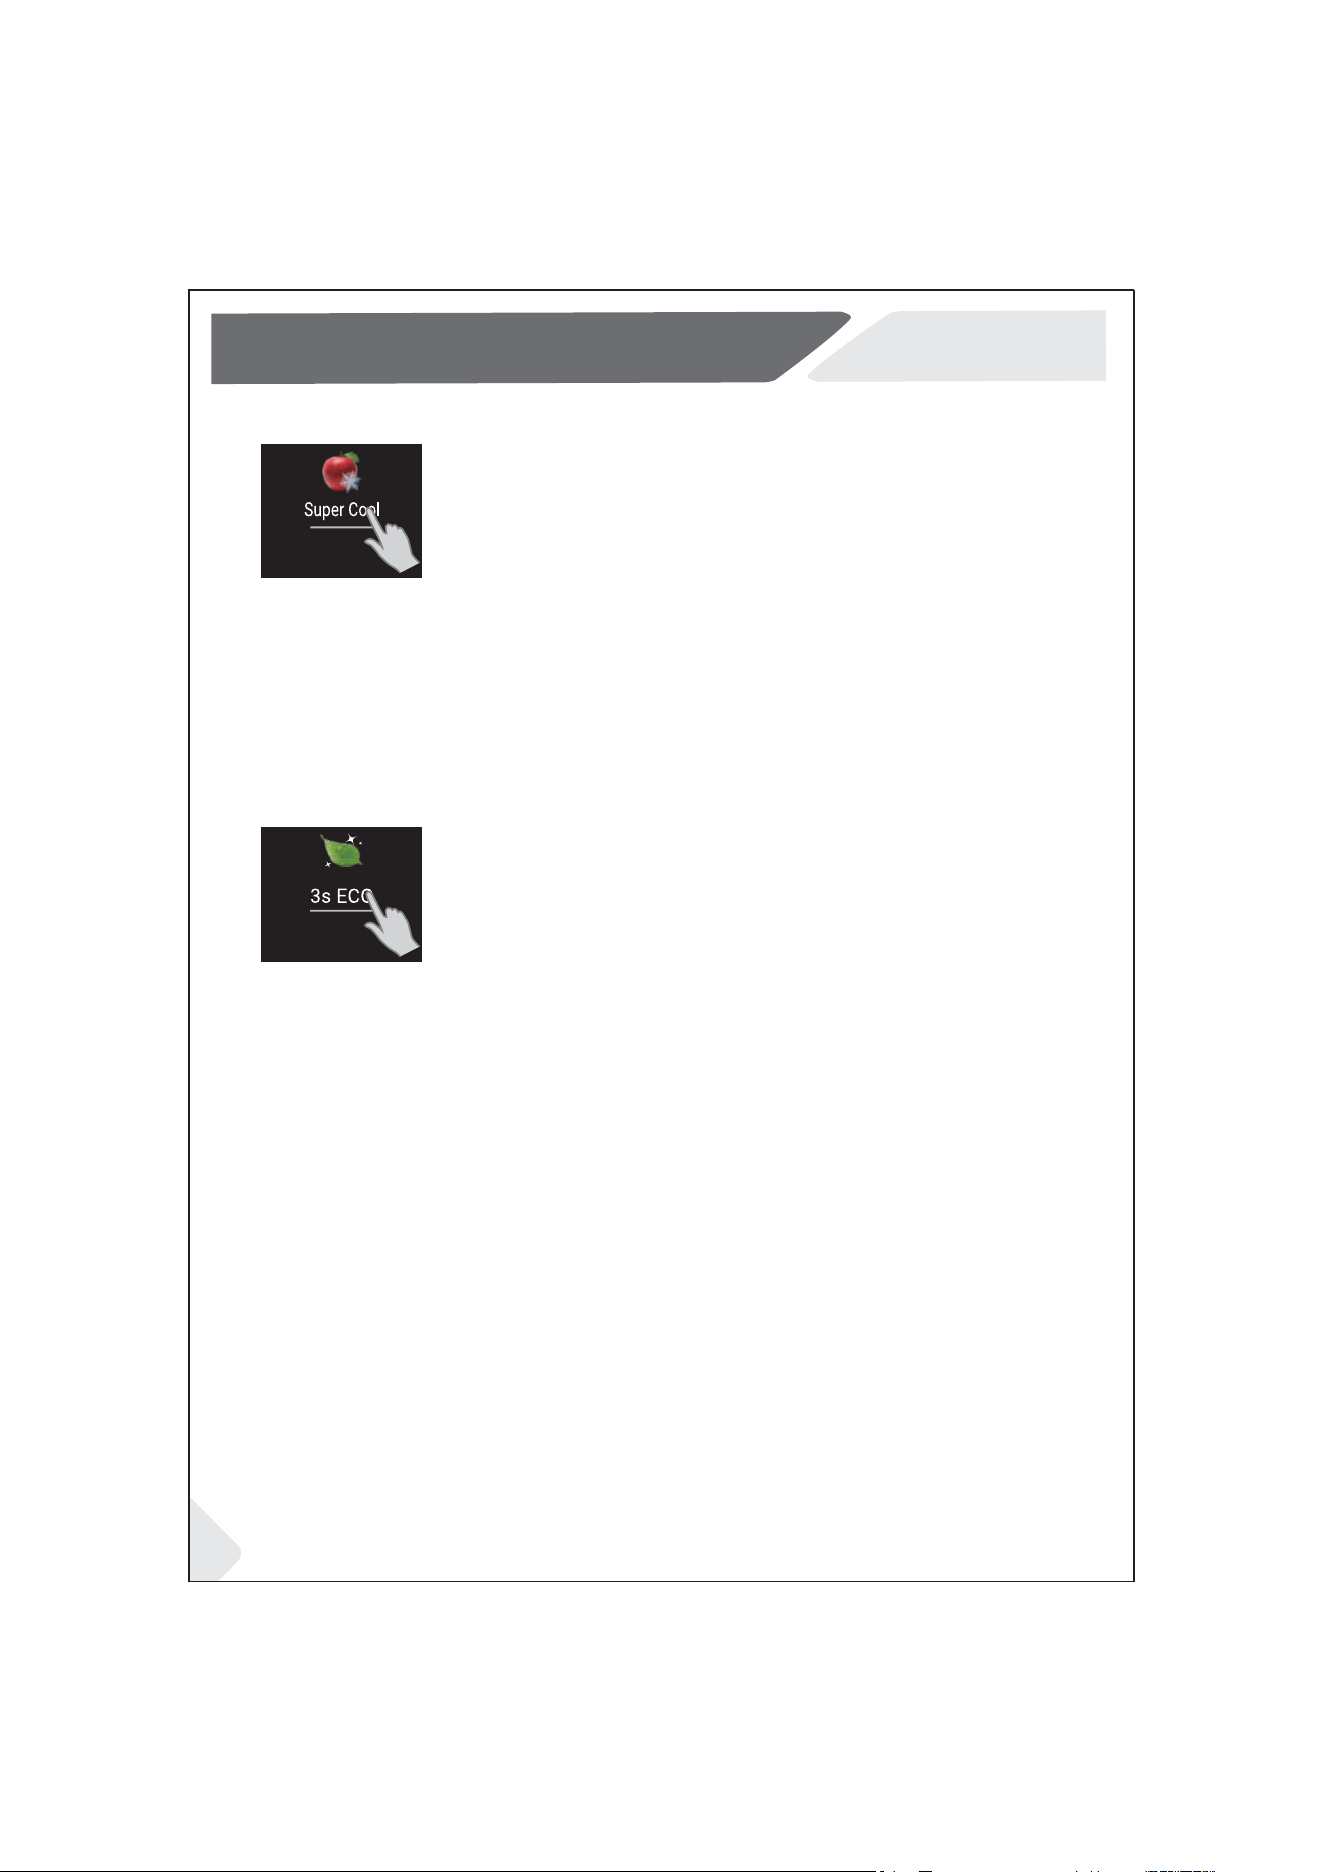
5. POWER SAVING FUNCTION: “ECO”
The ECO function optimizes the refrigerator's operation to reduce energy consump-
tion.
With the panel unlocked, press and hold the “3S ECO” button. The ECO icon will appear
and a beep will sound, indicating that ECO mode is active.
To exit ECO mode, press and hold the “3S ECO” button again. The icon will turn o� and
you’ll hear a beep.
Note: Turning on Quick Cooling will automatically exit ECO mode.
4. QUICK COOLING: “Super Cool”
The Super cool function accelerates the cooling of fresh food and protects the goods
already stored from undesirable warming.
To turn on Quick Cooling, make sure the panel is unlocked. Press the "Super Cool"
button until you hear a beep and the Quick Cooling icon lights up.
To turn it o� manually, press the "Super Cool" button again. The icon will turn o� and
another beep will sound.
Once Quick Cooling is �nished, it will turn o� automatically.
Note: In the quick cooling state, the "Temp.Set
O
C" button cannot be used to adjust the
temperature level; in the quick cooling state, entering the ECO function will exit the quick
cooling function.
6. DOOR OPENING ALARM FUNCTION
When the refrigerator door is open for 3 minutes without closing, a tone will sound.
7. POWER OFF MEMORY FUNCTION
If the refrigerator loses power, it will remember its settings. When power is restored, it will resume operating with the
same temperature and functions that were active before the outage.

19
Use
(Frost Illustration)
Partition Of Freezer Compartment
Note: It is normal for small ice particles to form on the freezer surfaces
if the door is opened frequently, if you are making a lot of ice, or if you
use hot water to make ice. This is not a problem. Simply clean the area
thoroughly when needed.
1. Wrap �sh and smoked meats in moisture-vapor-proof material to prevent transfer of odors.
2. Pre-cool hot foods, wrap them with plastic �lm or put them in the airtight compartment.
3. Wipe the water on the surface of the bottles before storing them.
4. Be sure not to store bottles in the freezer compartment.
5. Do not put vegetables which are likely to freeze towards the rear of the shelves.
6. If planning to keep fresh �sh and meats for a long period, wrap them in freezer paper and store in the
freezer compartment.
FOOD STORAGE
DEODORIZING FEATURE
The refrigerator has a deodorizing feature, however if foods with very strong odors are stored in the product
frequently, this features power will diminish over time.
Defrost will automatically operate, no manual adjustments are required.
1.
This refrigerator uses indirect cooling method.
2. The cool air from the freezer will be circulated by fan to cool the refrigerator.
3. The refrigerator may have frost on the evaporator or freezer compartment but this will reduce when it is
defrosted automatically periodically.
COOLING METHOD
HOW TO DEFROST
20
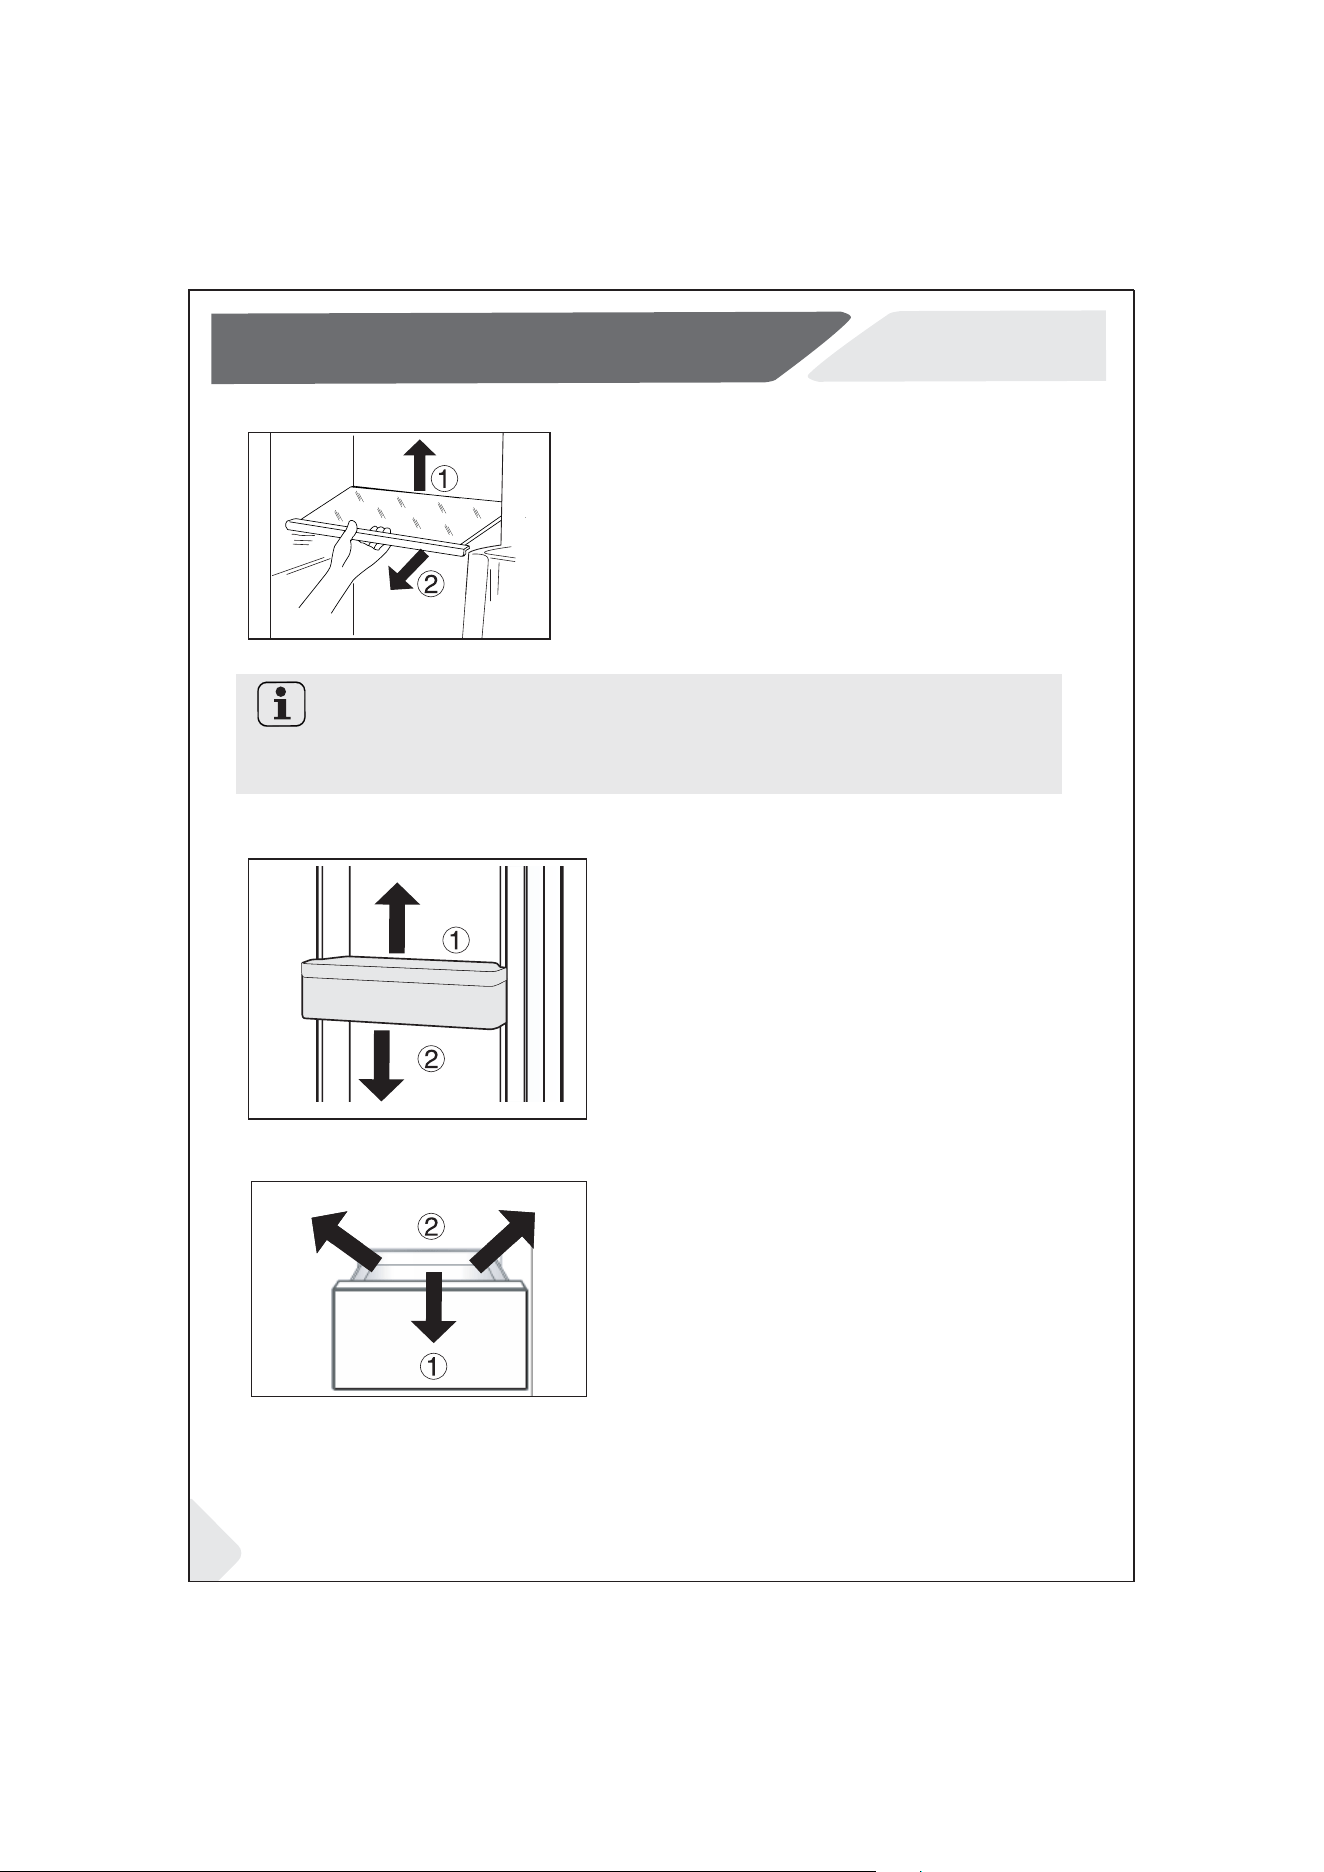
Ensure that all ends of a shelf are level.
NOTICE!
1. The height of the shelves can be adjusted to �t your storage
needs.
1. The door racks can be removed for cleaning:
2. Place hands on each side of the rack, lift upwards and pull
out.
3. In order to insert the door rack, the above steps are carried
out in reverse order.
1. To remove the drawer, pull out to the maximum extent, lift
and remove.
In order to insert the drawer, the above steps are carried out in
reverse order.
The LED interior light turns on when the door is opened. The light is not a�ected by any of the products other
settings.
2. To relocate a shelf, remove it �rst by lifting from the rear and
pulling outwards.
3. To reinstall it, locate the lugs on both sides and push it to the
most rearward position until the rear of the shelf is �xed
Adjustable shelves
Removable door racks/bottle holder
Removable drawer
The Light
1
Equipment
21
Energy saving tips
Do not install the appliance in direct sunlight or in the near of heat sources (e.g.
stoves, heaters).
Avoid unnecessarily low temperatures in the appliance. The energy consumption
increases the lower the temperature in the appliance is set.
Allow warm food to cool down before placing it in the appliance.
Open the appliance door as little and as brie�y as possible.
Do not over�ll the appliance to avoid obstructing the air �ow.
Avoid air within the food packaging.
Keep door seals clean so that the door always closes correctly.
Defrost frozen food in the fridge storage compartment.
Energy Saving Tips
22
Care and Cleaning
2. If there is spilled cream, please remove all the contaminated parts, put into the warm
water about 40
O
C
, then rinse with water, dry and place it back into the fridge.
3. If anything gets stuck between the shelves or drawers, use a small soft bristled
brush to help release it.
Clean the appliance when only little or no food is stored.
The appliance should be cleaned every four weeks for good maintenance and to prevent bad stored food odors.
Cleaning
Disconnect the appliance from the power supply before cleaning.
WARNING!
Do not clean the appliance with hard brushes, wire brushes, detergent powder,
petrol, amyl acetate, acetone and similar organic solutions, acid or alkaline
solutions. Please clean with gentle detergent to avoid damage.
WARNING!
Do not spray the appliance during cleaning.
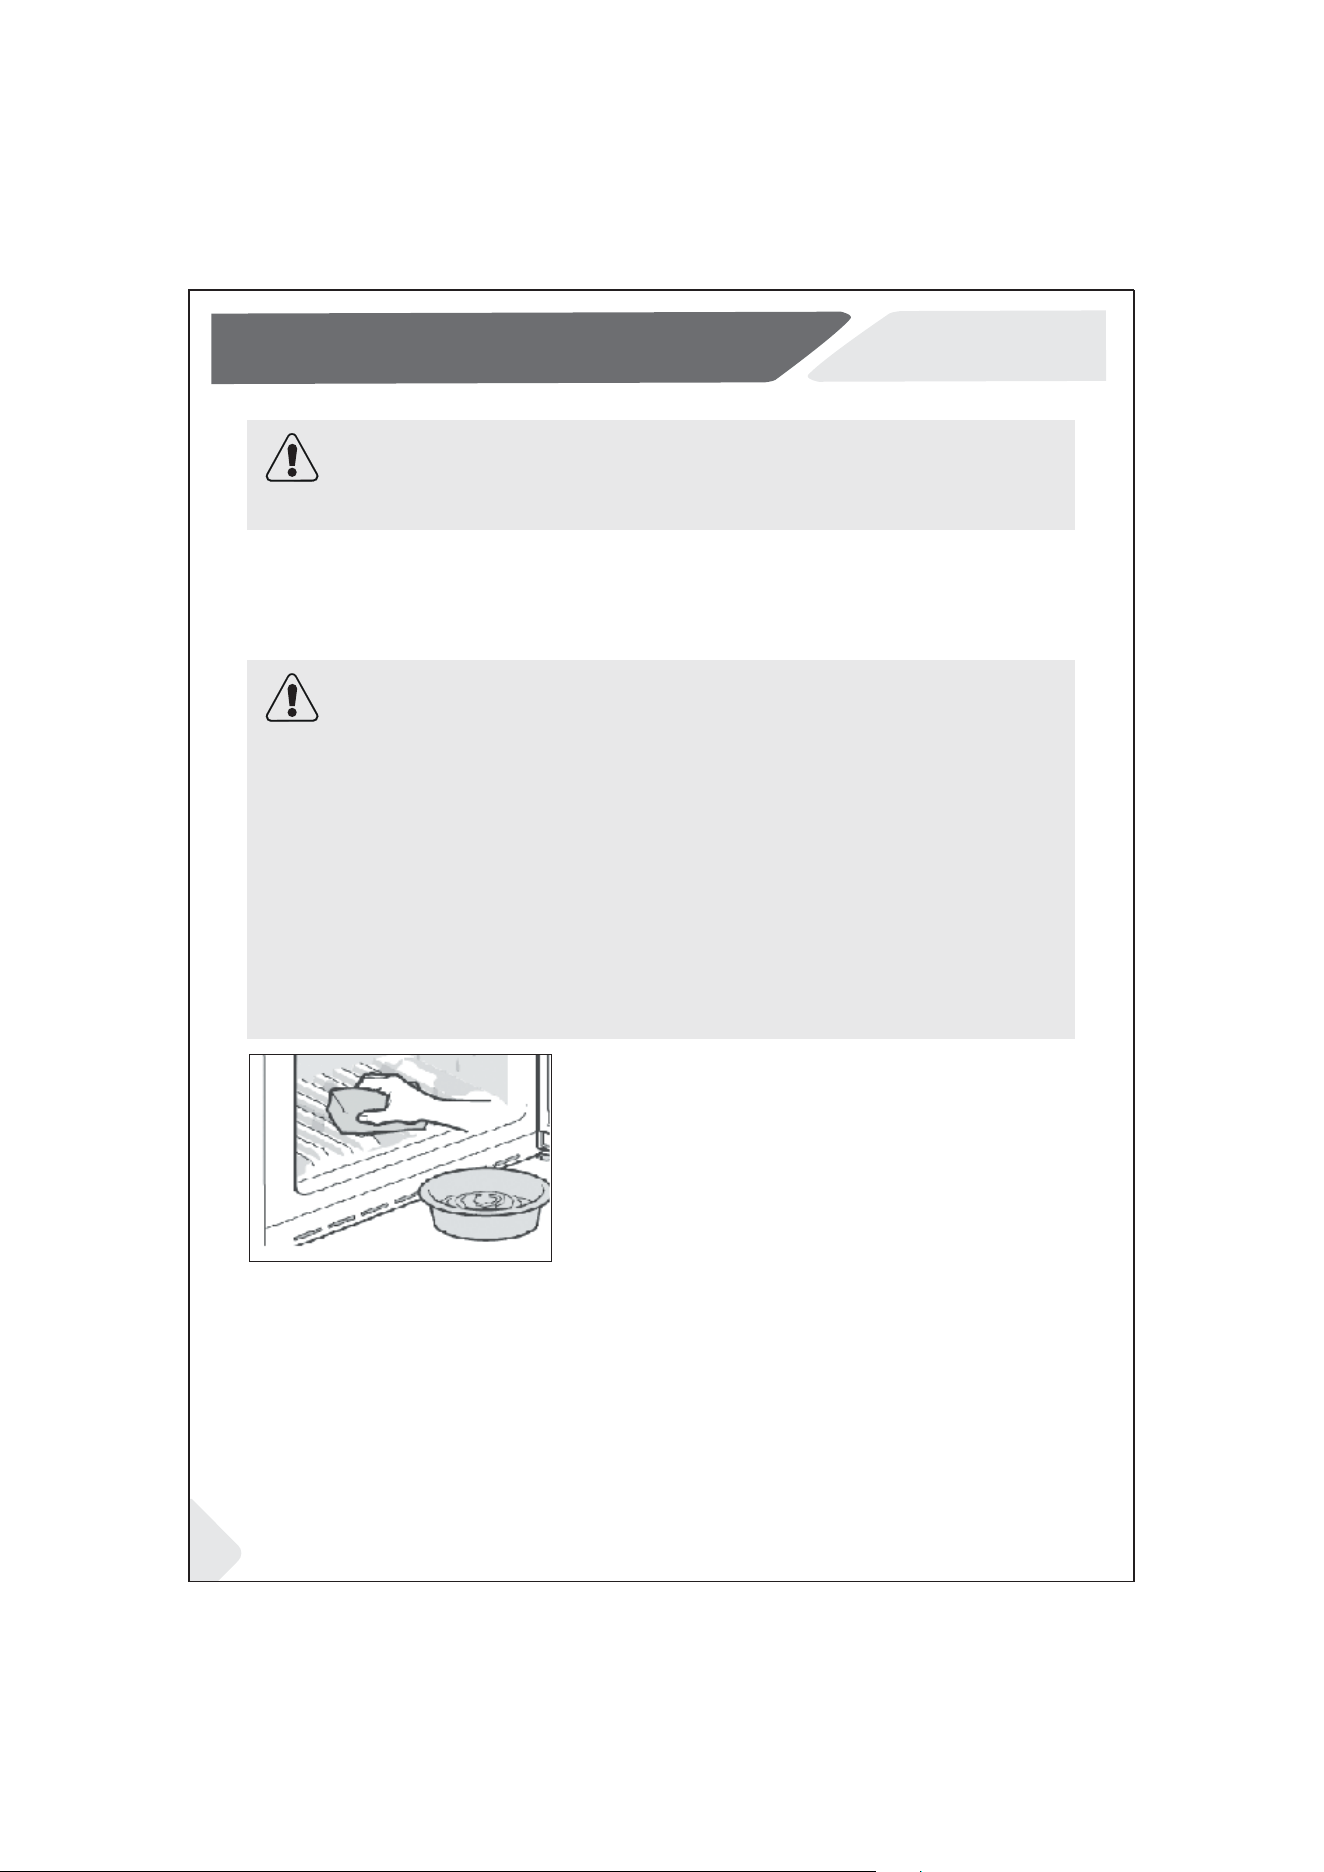
Always keep the door gasket clean.
Clean the interior surfaces and parts with a soft
cloth/sponge and warm water with gentle detergent.
(you may add neutral detergent into the warm water).
1. If there is liquid spilled, remove all the contaminated parts, directly rinse with water,
dry and place it back into the fridge.
Do not use steam to clean the appliance.
Do not clean the cold glass shelves with hot water. Sudden temperature change
may cause the glass to break.
Do not touch the inside surface of the freezer storage compartment, to avoid risk
of injury.
If food has been taken out of the product for a long time during cleaning, check it is
still safe to restore.
Rinse and dry with soft cloth.
Do not clean any of the parts of the appliance in a dishwasher.
Allow at least 5 minutes before restarting the appliance as frequent starting may
damage the compressor.
Defrost will automatically operate, no manual adjustements are required.
Defrosting
If the appliance is not used for an extended period of time:
Take out the food.
Unplug the power cord.
Clean the appliance as described above.
Keep the doors open to prevent the creation of bad odours inside.
Non-use for a longer period
Move the appliance upright wherever possible. If the appliance does need to be trans-
ported lying down, allow it to stand upright for 12hours before turning it on. Failure to do
so can allow oil from the compressor to block the refrigerant gas lines leading to product
failure.
Replacing the LED-lamps
LED-lamp speci�cations:
Refrigerator compartment: 12 V max 2 W
Do not replace the LED lamp yourself, it must only be replaced by either the manufac-
turer or the authorised service agent.
WARNING!
Do not lift the appliance by its handles.
Never place the appliance horizontally on the ground.
WARNING!
Turn the appliance o� only if strictly necessary.
NOTICE!
23
Care and Cleaning
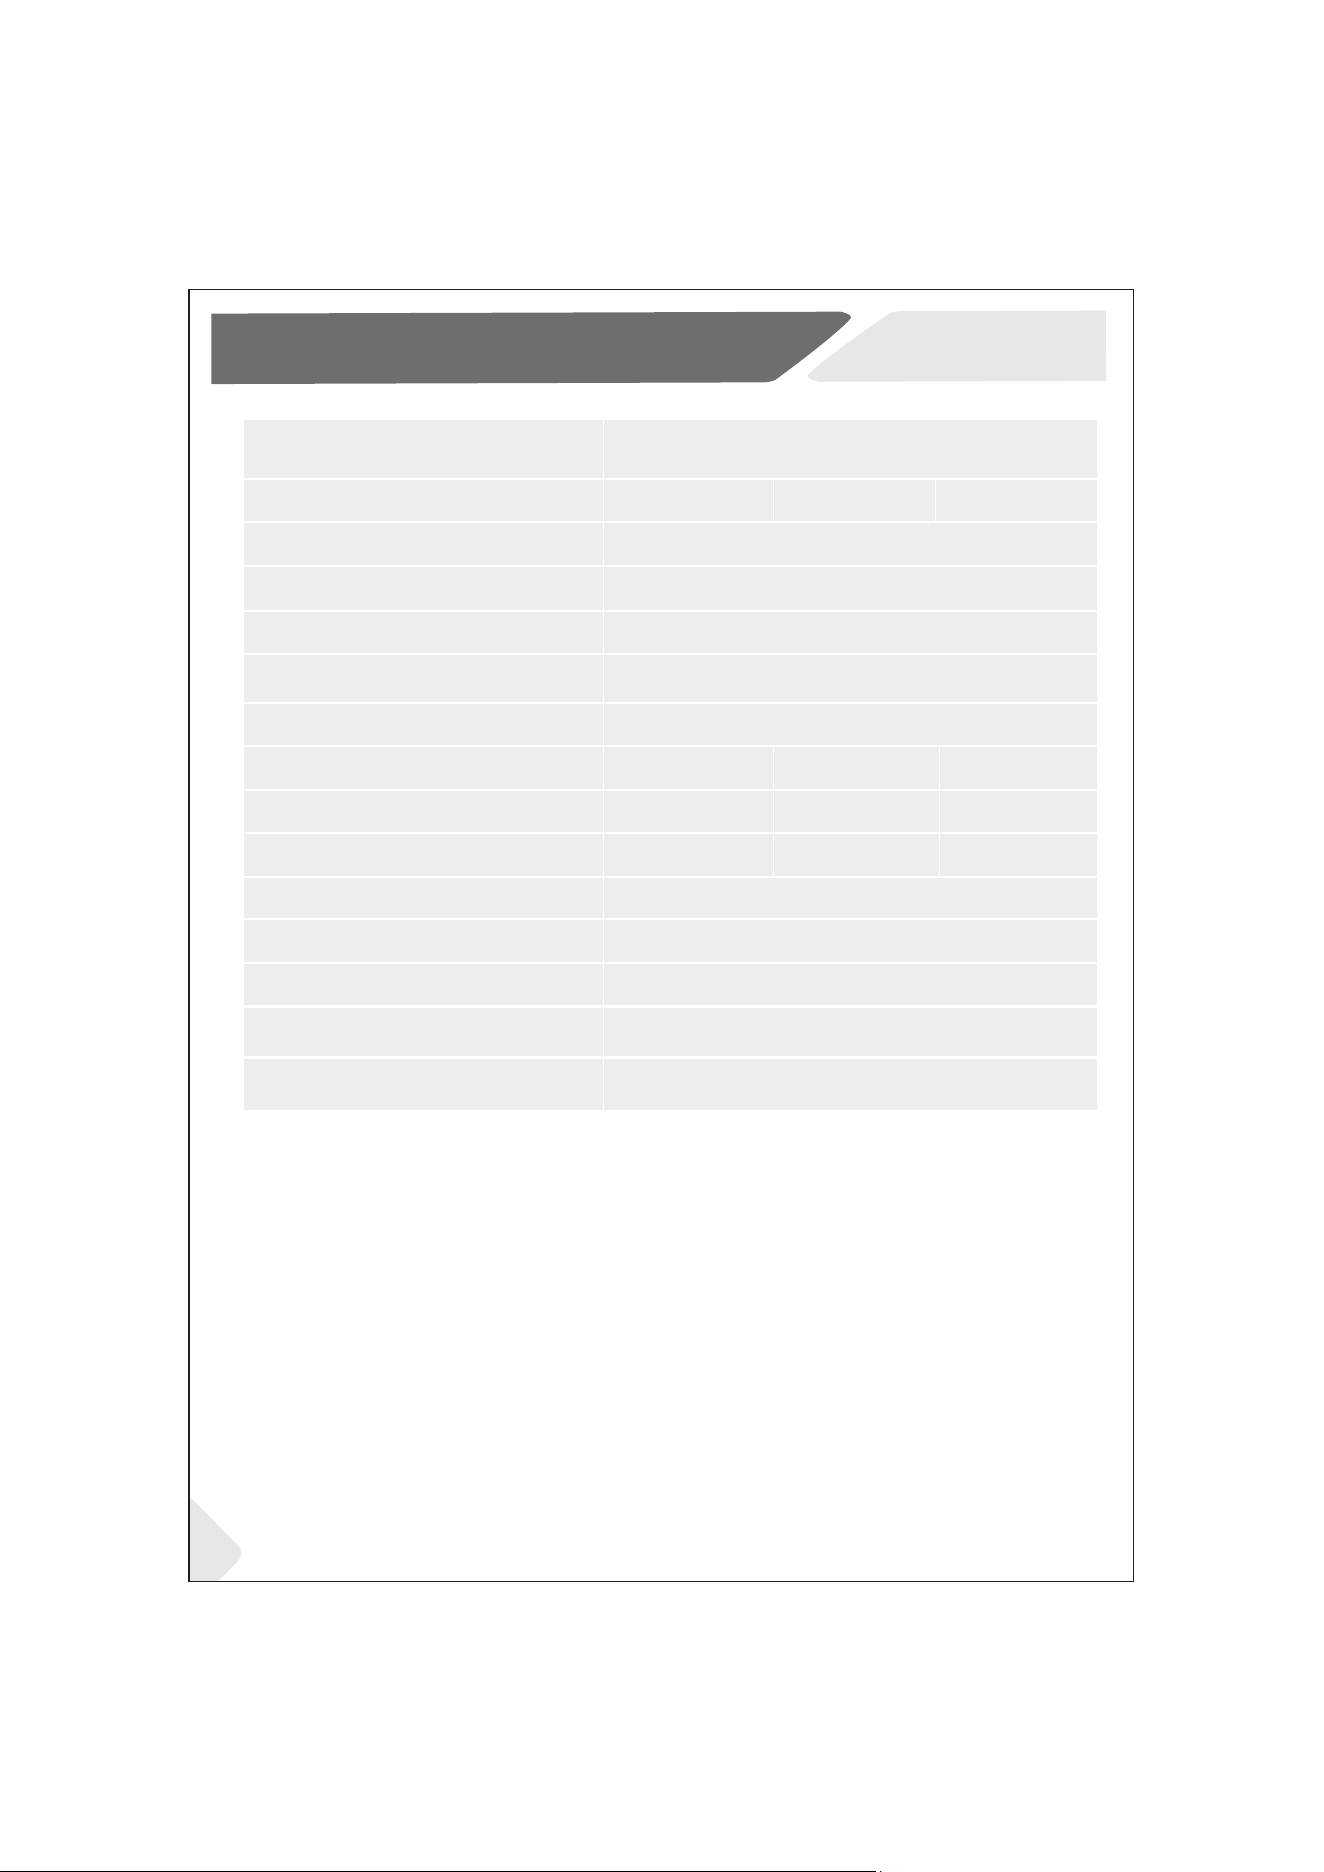
HRF450TG HRF450TSHRF450TW
Trade Mark HAIER
Model
Category of the model
Refrigerator-freezer
Cyclopentane
4.5 Star
5 T
220-240V ~/ 50Hz
695x700x1775 mm
Voltage/frequency
Energy Star
Frost-free system
Product Classi�cation
Total storge volume(L)
443
443
Yes
443
344
344
344
Fresh food compartment Volume(L)
Freezer compartment Volume(L)
Climate class
Refrigerant
T
99
99
R600a 62g
99
Insulation blowing gas
Dimension (DxWxH)
Protection class
I
24
Technical Data
4. Moisture
formation on
the inside of
the
refrigerator
compartment.
• High ambient temperature and humidity.
• Door or drawer is not sealed properly.
• Door or drawer has been opened too
frequently or left open too long.
• Uncovered food or liquids are present.
• Increase the temperature slightly.
• Ensure the door or drawer is sealed properly.
• Reduce door openings.
• Cool food before storing and cover all
containers.
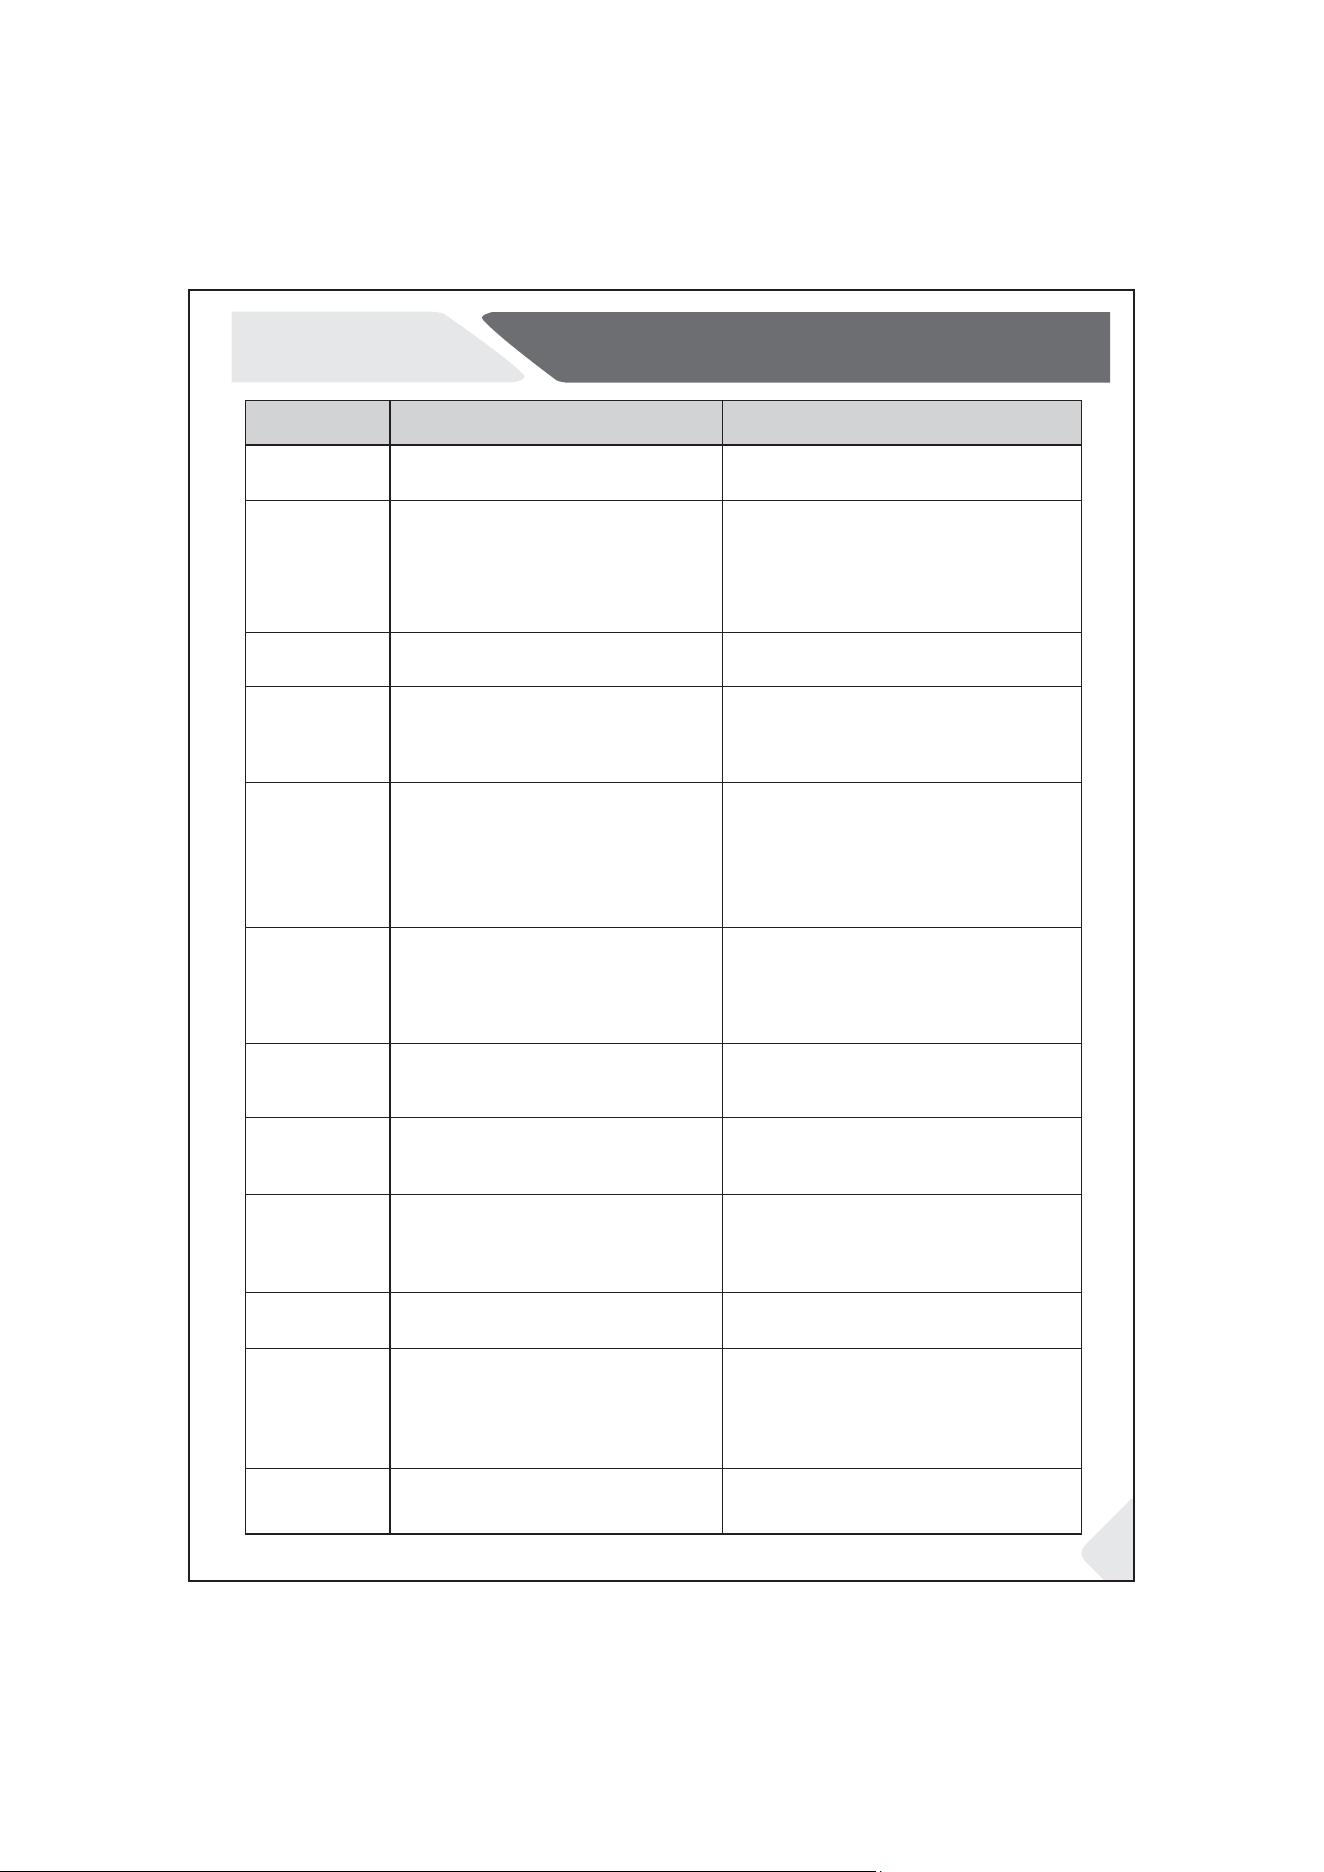
PROBLEM POSSIBLE SOLUTIONPOSSIBLE CAUSE
5. Moisture
accumulates
on the
refrigerators
outside
surface or
between the
doors/door
and
drawer.
• High humidity in the surrounding
environment.
• Warm air is entering due to improper
sealing.
• This may occur in humid conditions and
should reduce as humidity drops.
• Ensure the door or drawer is tightly
closed.
6. Strong ice and
frost in the
freezer
compartment.
• Items are not properly packaged.
• Door or drawer is not tightly closed.
• Door or drawer has been opened too
frequently or for too long.
• Gasket is dirty, worn, or misaligned.
• Internal components are obstructing
closure.
• Package items appropriately.
• Ensure the door or drawer is closed fully.
• Reduce the frequency and duration of door
openings.
• Clean or replace the gasket if necessary.
• Adjust internal components to allow full
closure.
7. The sides of
the cabinet
and door strip
get warm.
• This is normal.
1. The
compressor
does not work.
• The mains plug is not connected.
• The appliance is in the defrost cycle.
• Connect the appliance to the mains power.
• No action required during automatic defrosting.
2. It is not cold
enough inside
the appliance.
• Temperature setting is too high.
• Warm items have been placed inside.
• Too much food is stored.
• Items are packed too closely.
• The door or drawer is not properly
closed.
• The door or drawer has been opened too
frequently or left open too long.
• Lower the temperature setting.
• Allow food to cool before storing.
• Avoid overloading.
• Leave space between items to allow airflow.
• Ensure the door or drawer is closed securely.
• Minimise the frequency and duration of
openings.
3. It is too cold
inside the
appliance.
• Temperature setting is too low.
• The Quick Freezing function is activated
or is running too long.
• Increase the temperature setting.
• Switch off the Quick Freezing function.
10. You will hear a
faint hum.
• The anti-condensation system is working. • This prevents condensation and is normal.
11. The interior
lighting or
cooling
system does
not work.
12. You will hear
an alarm
beep.
• The mains plug is not connected.
• Power supply is interrupted.
• LED lamp is faulty.
•
The temperature is set too low.
• The Quick Freezing function is activated or is
running too long.
• Connect the appliance to the mains power.
• Check the power supply or contact an
electrician.
• Contact service to replace the LED lamp.
•
Reset the temperature.
• Switch off the Quick Freezing function.
8. The appliance
makes
abnormal
sounds.
• The appliance is not level.
• It is in contact with nearby objects.
• Level the appliance using the adjustable feet.
• Remove objects in contact with the
appliance.
9. A slight sound
is to be heard
similar to that
of flowing
water.
• The fridge storage compartment door is
open.
• Close the door or silence the alarm manually.
25
Troubleshooting