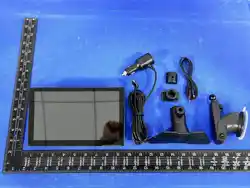
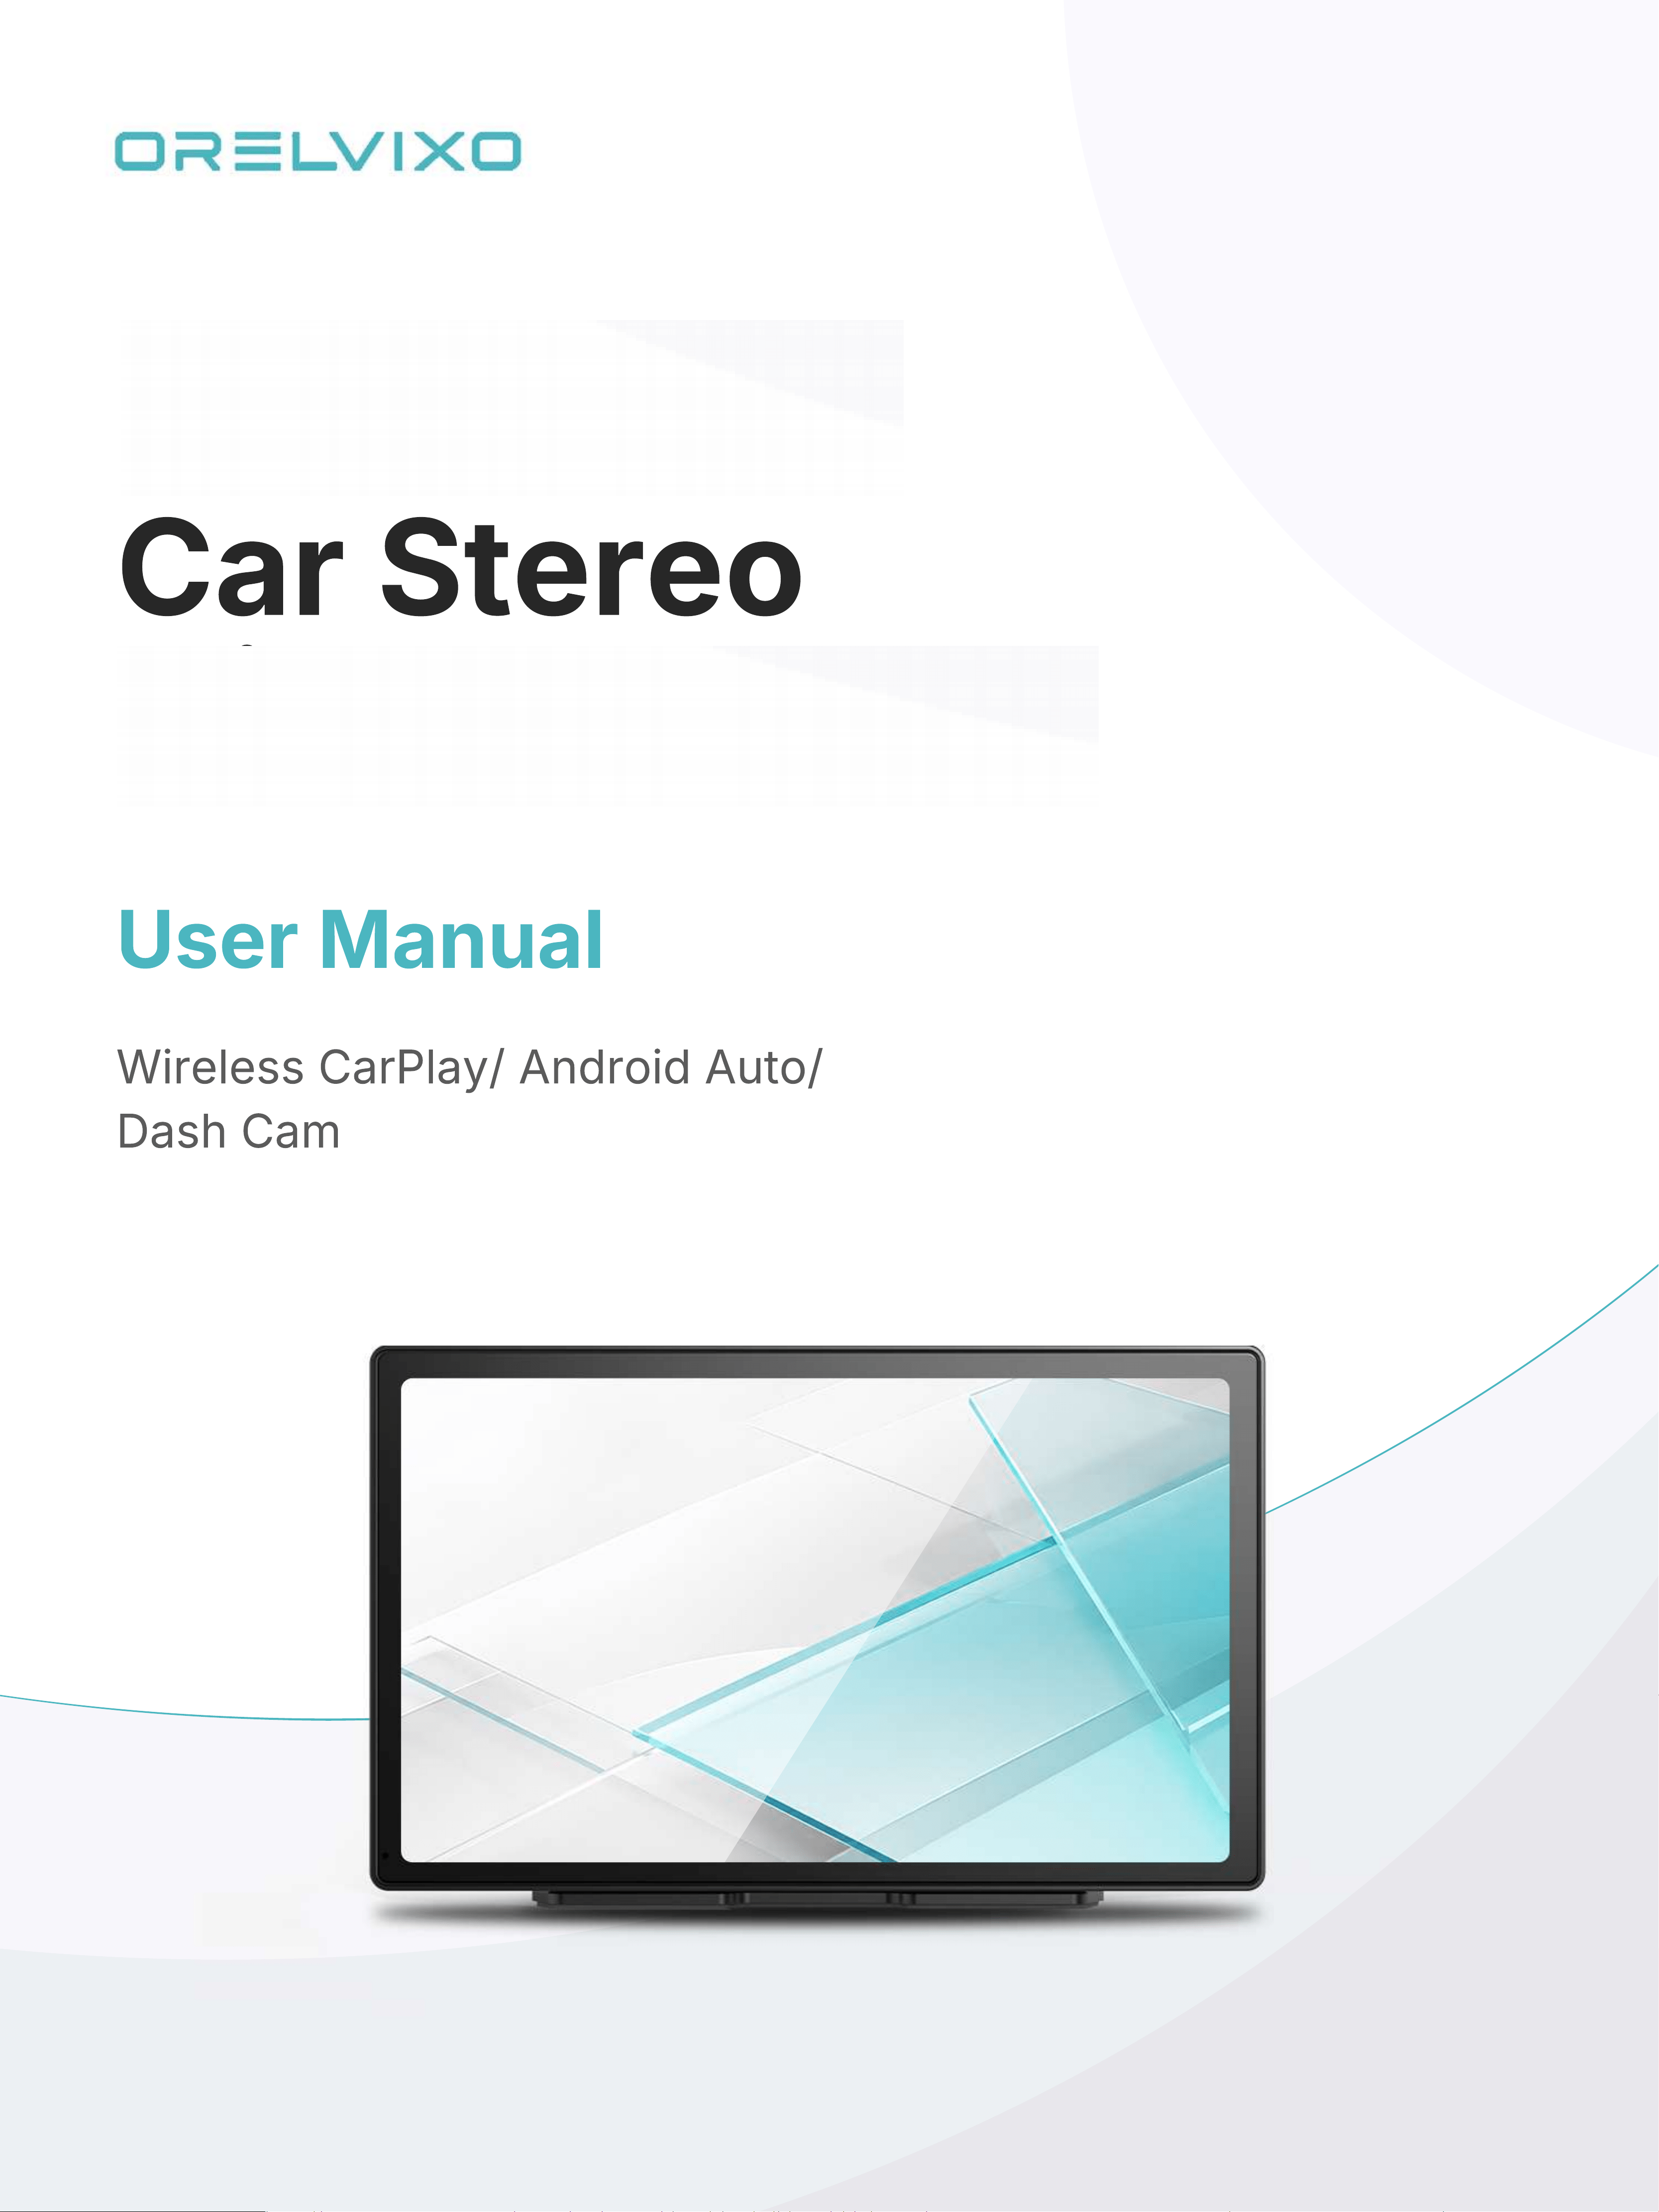
Wireless CarPlay/ Android Auto/
Dash Cam
User Manual
9ʼʼ Portable
Car Stereo
with Dash Cam

Made in China
Thank you for choosing ORELVIXO.
Packing List
························································································01
01
Interface Description
·········································································02
02
Installation Guide
···············································································03
03
Power Connection
··········································································05
04
Main Interface
····················································································06
05
01 Getting Started
CarPlay Connection
···········································································07
06
Android Auto Connection
··································································08
07
AirPlay Connection
············································································09
08
Miracast Connection
·········································································10
09
DVR App Connection
··········································································10
10
02 Phone Connection
DVR Recording Interface Menu
···························································11
11
4 Audio Output Settings
·····································································13
12
Rear Camera Wiring
············································································14
13
Setting Icons
·······················································································15
14
03 Features & Settings
Frequently Asked Questions
······························································17
15
04 Help & Support
CONTENTS
0
1
1
1
1
0
1
2
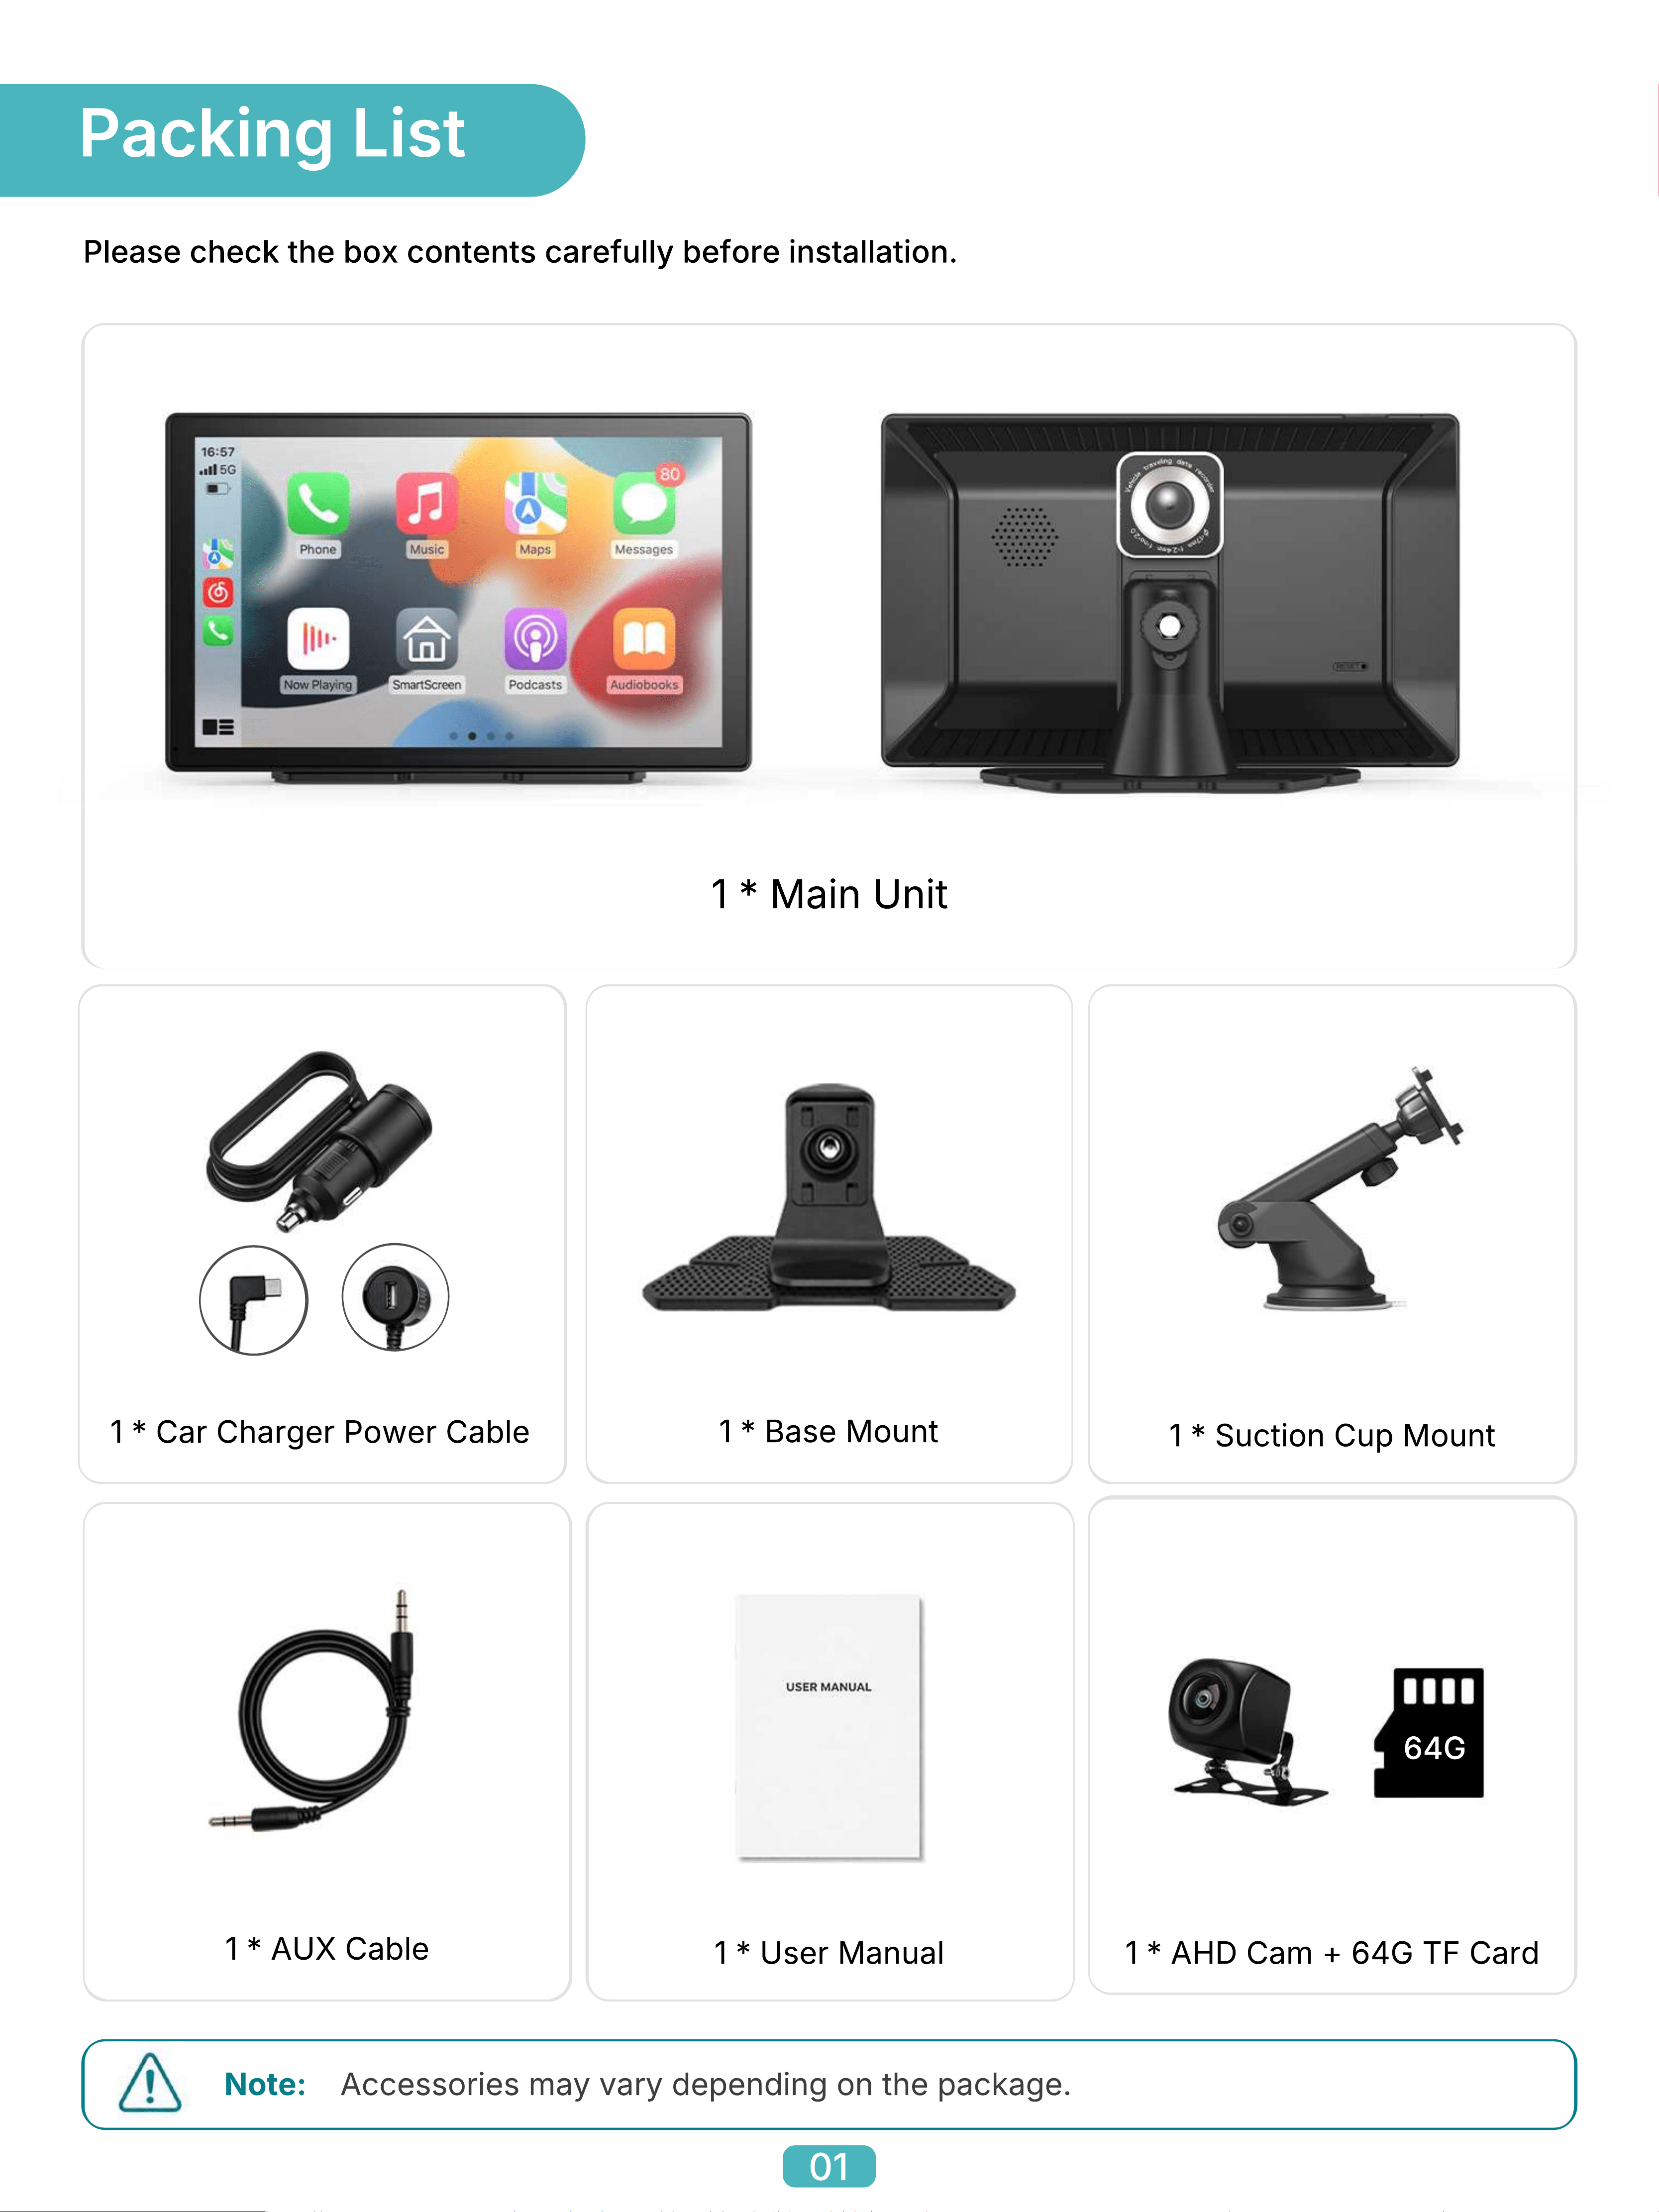
Packing List
Please check the box contents carefully before installation.
Accessories may vary depending on the package.Note:
1 * Main Unit
1 * Car Charger Power Cable
1 * Base Mount
1 * AUX Cable
1 * Suction Cup Mount
1 * User Manual 1 * AHD Cam + 64G TF Card
64G
01
Interface Description
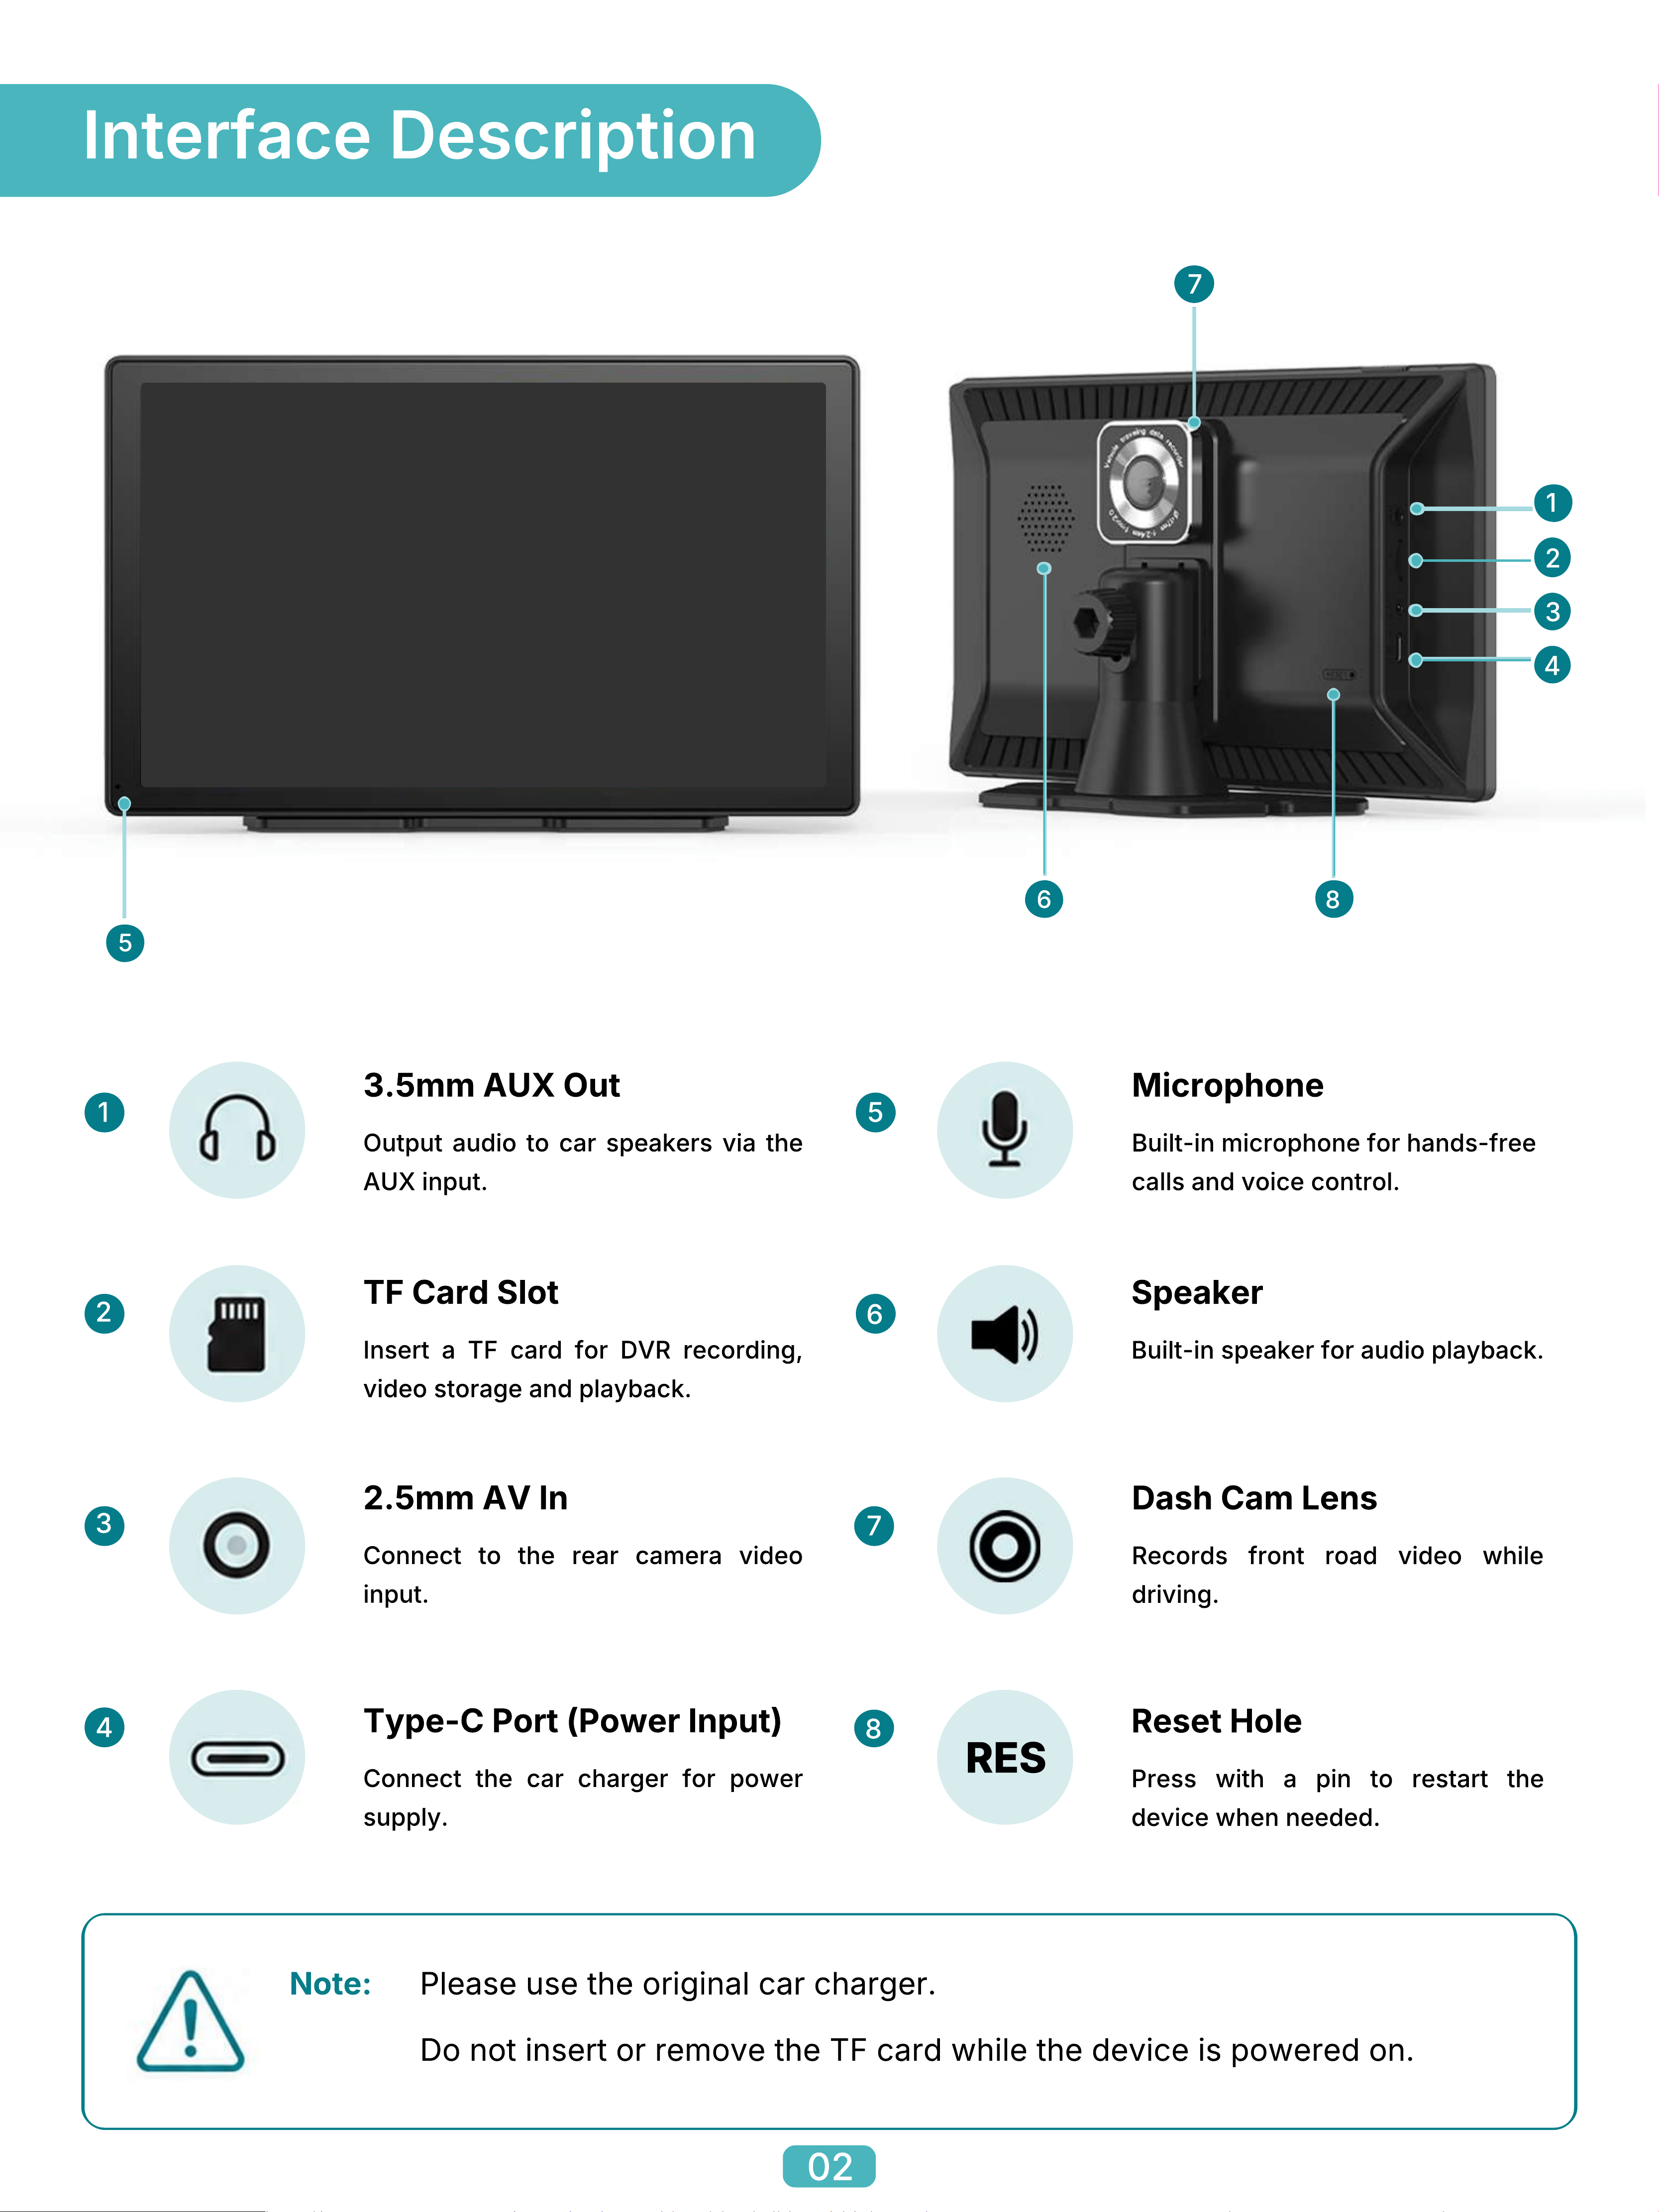
3.5mm AUX Out
1
Output audio to car speakers via the
AUX input.
2
TF Card Slot
Insert a TF card for DVR recording,
video storage and playback.
3
2.5mm AV In
Connect to the rear camera video
input.
Type-C Port (Power Input)
Connect the car charger for power
supply.
4
Microphone
Built-in microphone for hands-free
calls and voice control.
5
Speaker
Built-in speaker for audio playback.
6
Dash Cam Lens
Records front road video while
driving.
7
RES
Reset Hole
Press with a pin to restart the
device when needed.
8
8
7
6
5
4
3
2
1
Please use the original car charger.
Do not insert or remove the TF card while the device is powered on.
Note:
02
Clean the surface before installation to ensure a secure and stable mount.Note:
Installation Guide
Flexible & Adjustable
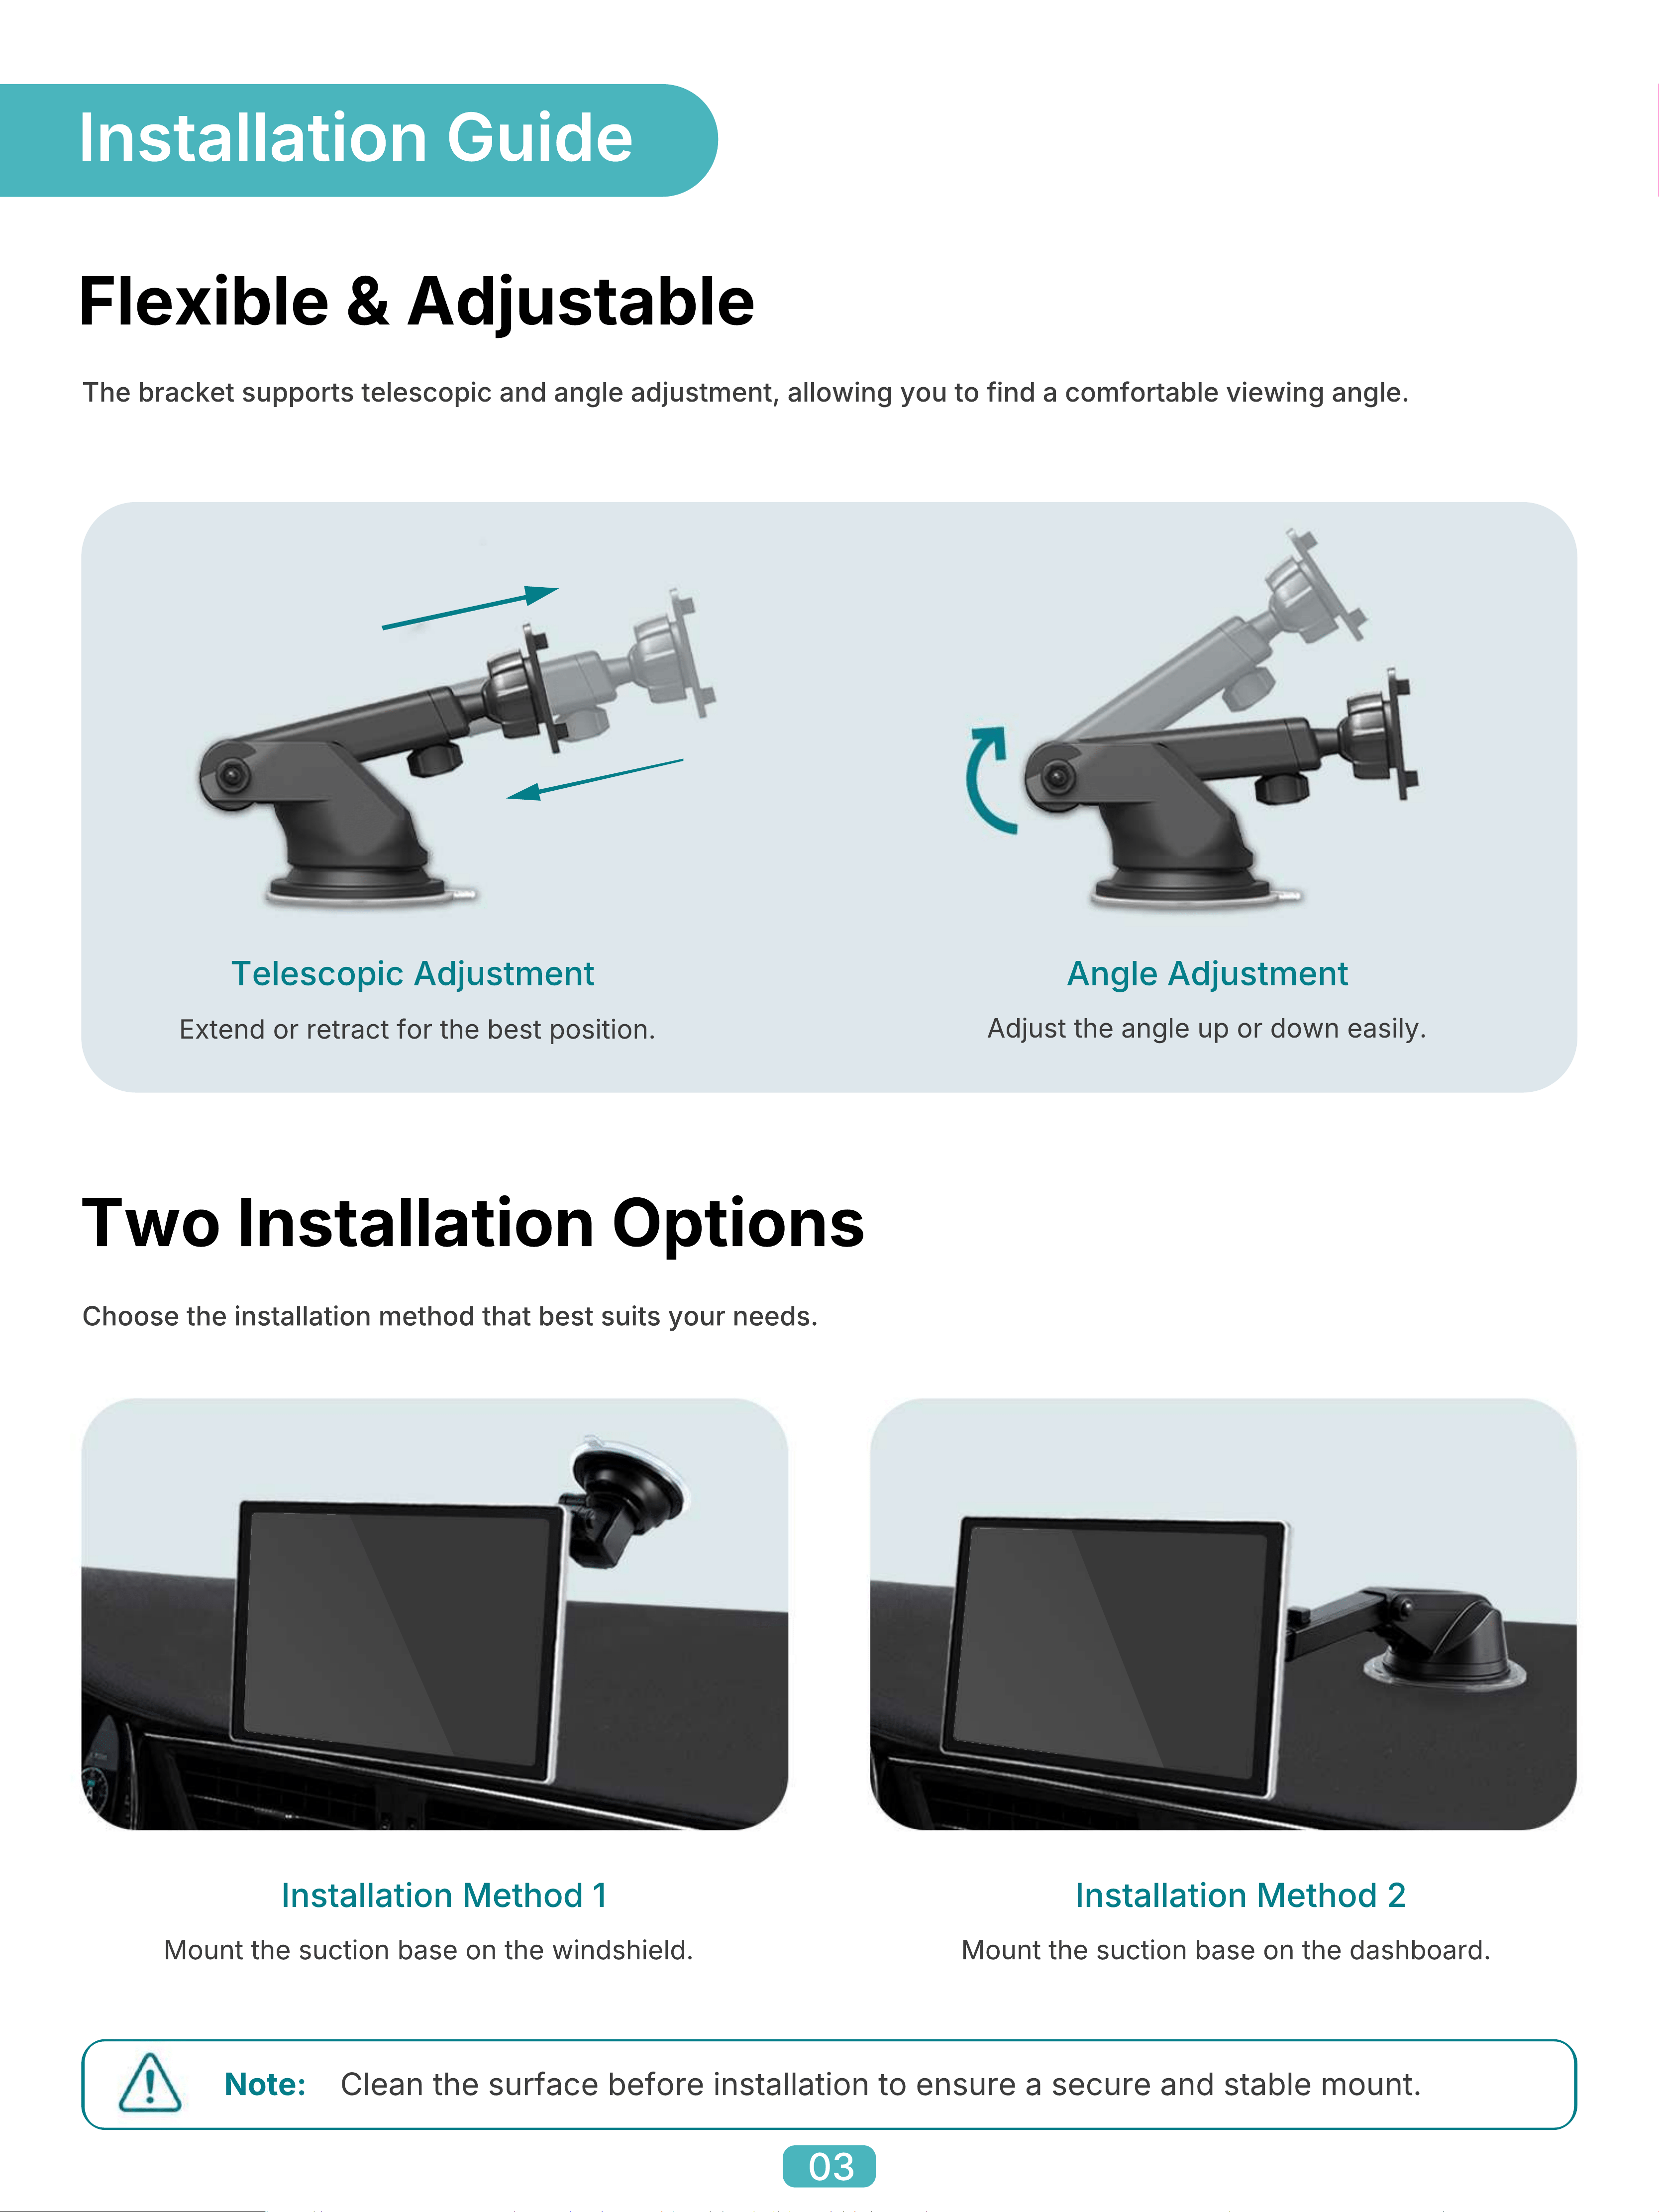
The bracket supports telescopic and angle adjustment, allowing you to find a comfortable viewing angle.
Mount the suction base on the windshield.
Installation Method 1
Mount the suction base on the dashboard.
Installation Method 2
Two Installation Options
Choose the installation method that best suits your needs.
Extend or retract for the best position.
Telescopic Adjustment
Adjust the angle up or down easily.
Angle Adjustment
03
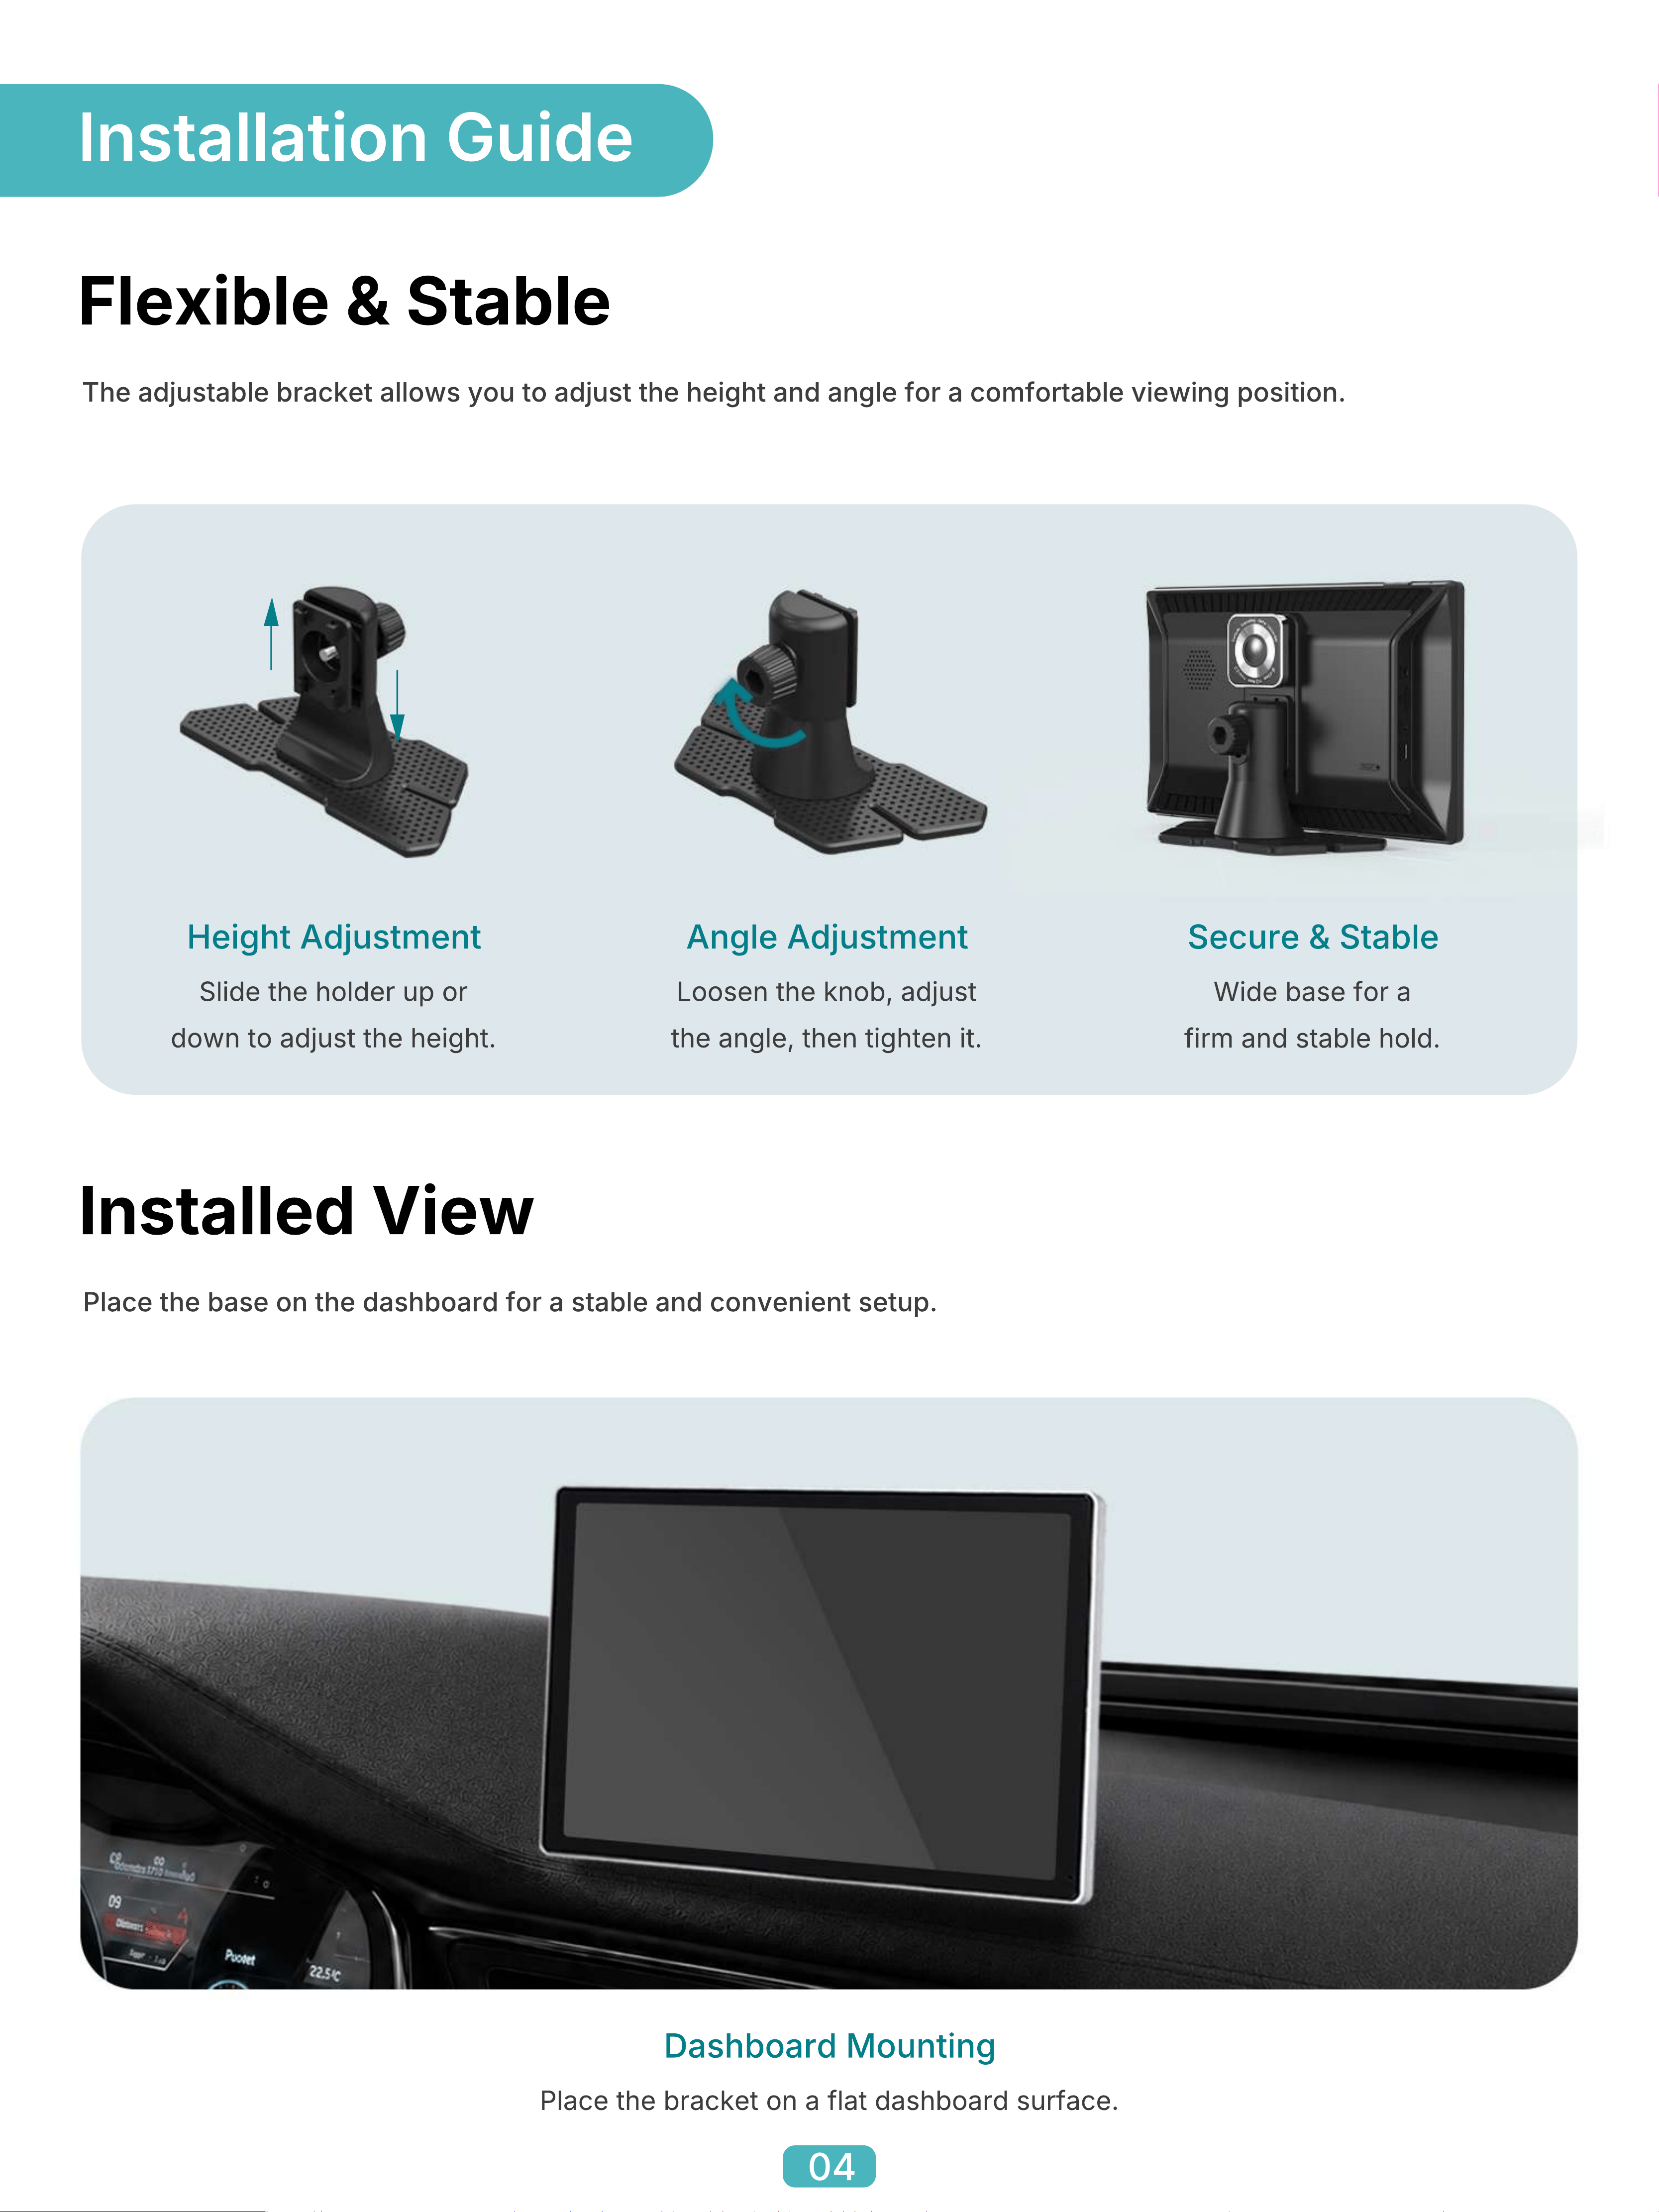
Place the bracket on a flat dashboard surface.
Dashboard Mounting
Place the base on the dashboard for a stable and convenient setup.
Installed View
Installation Guide
Flexible & Stable
The adjustable bracket allows you to adjust the height and angle for a comfortable viewing position.
Slide the holder up or
down to adjust the height.
Height Adjustment
Loosen the knob, adjust
the angle, then tighten it.
Angle Adjustment
Wide base for a
firm and stable hold.
Secure & Stable
04
Use the original car charger power cable to ensure stable power supply and
normal operation.
Notes:
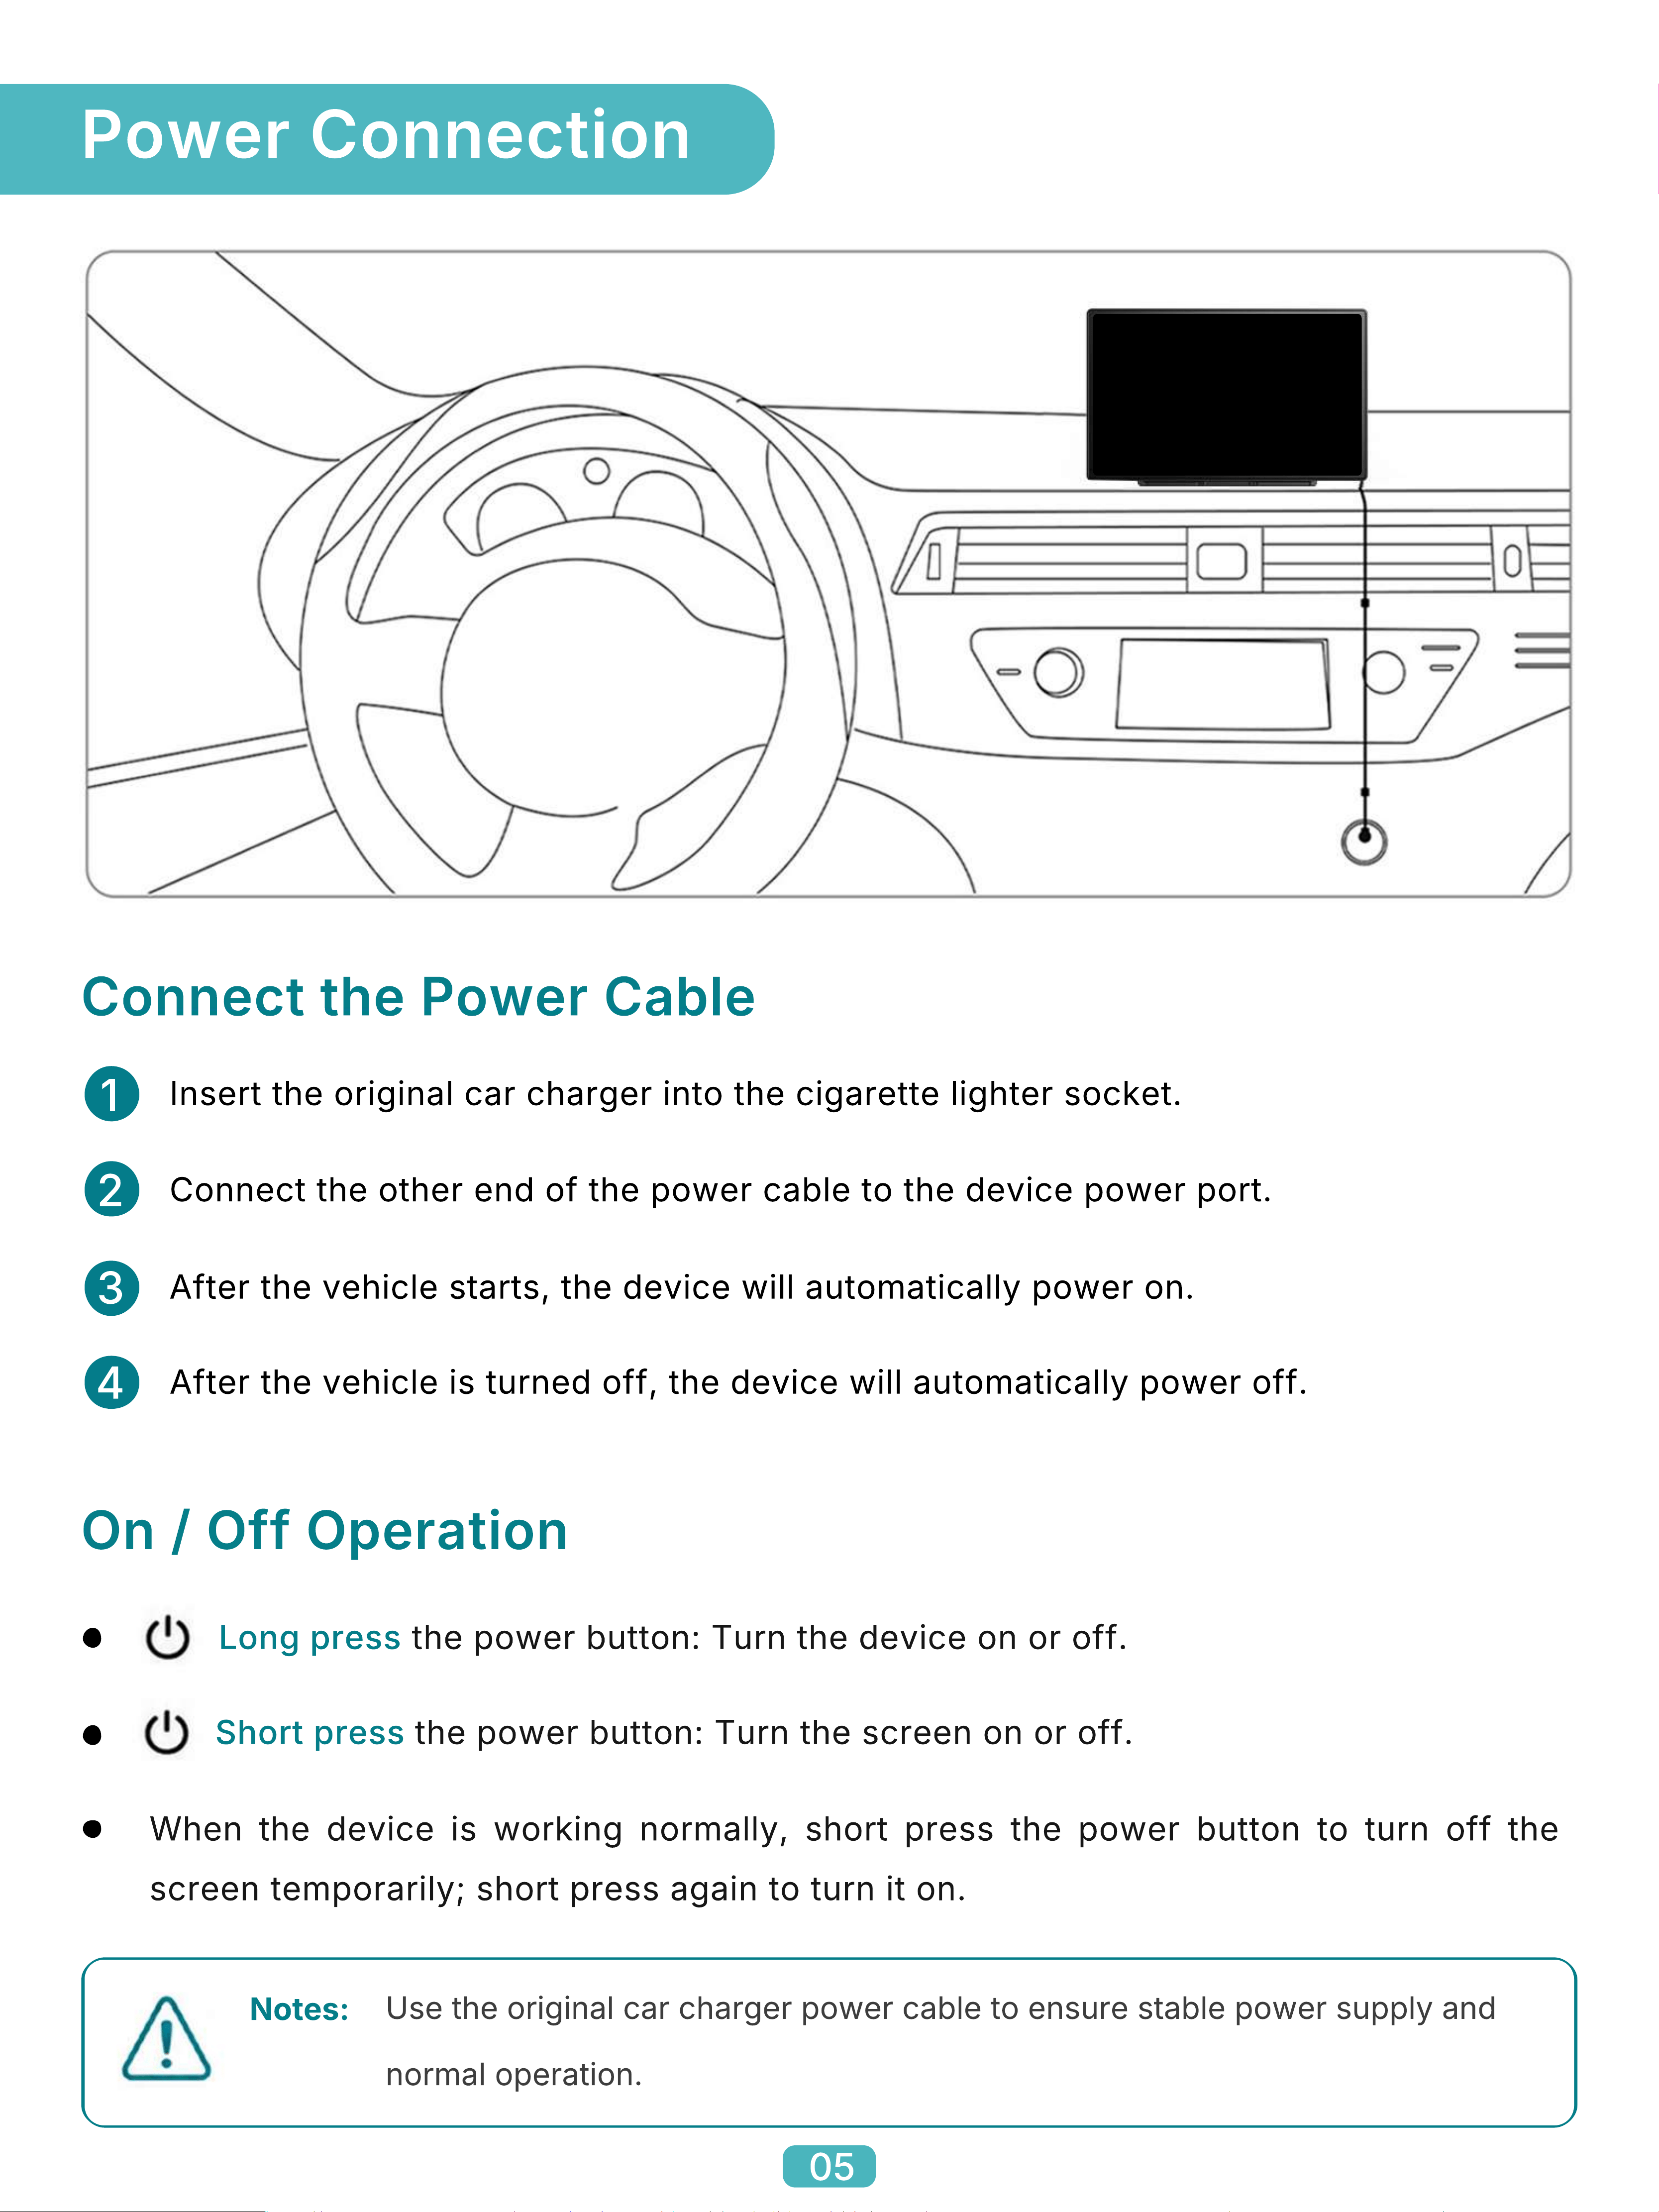
1
Insert the original car charger into the cigarette lighter socket.
2
Connect the other end of the power cable to the device power port.
3
After the vehicle starts, the device will automatically power on.
4
After the vehicle is turned off, the device will automatically power off.
Connect the Power Cable
Long press the power button: Turn the device on or off.
Short press the power button: Turn the screen on or off.
When the device is working normally, short press the power button to turn off the
screen temporarily; short press again to turn it on.
On / Off Operation
Power Connection
05
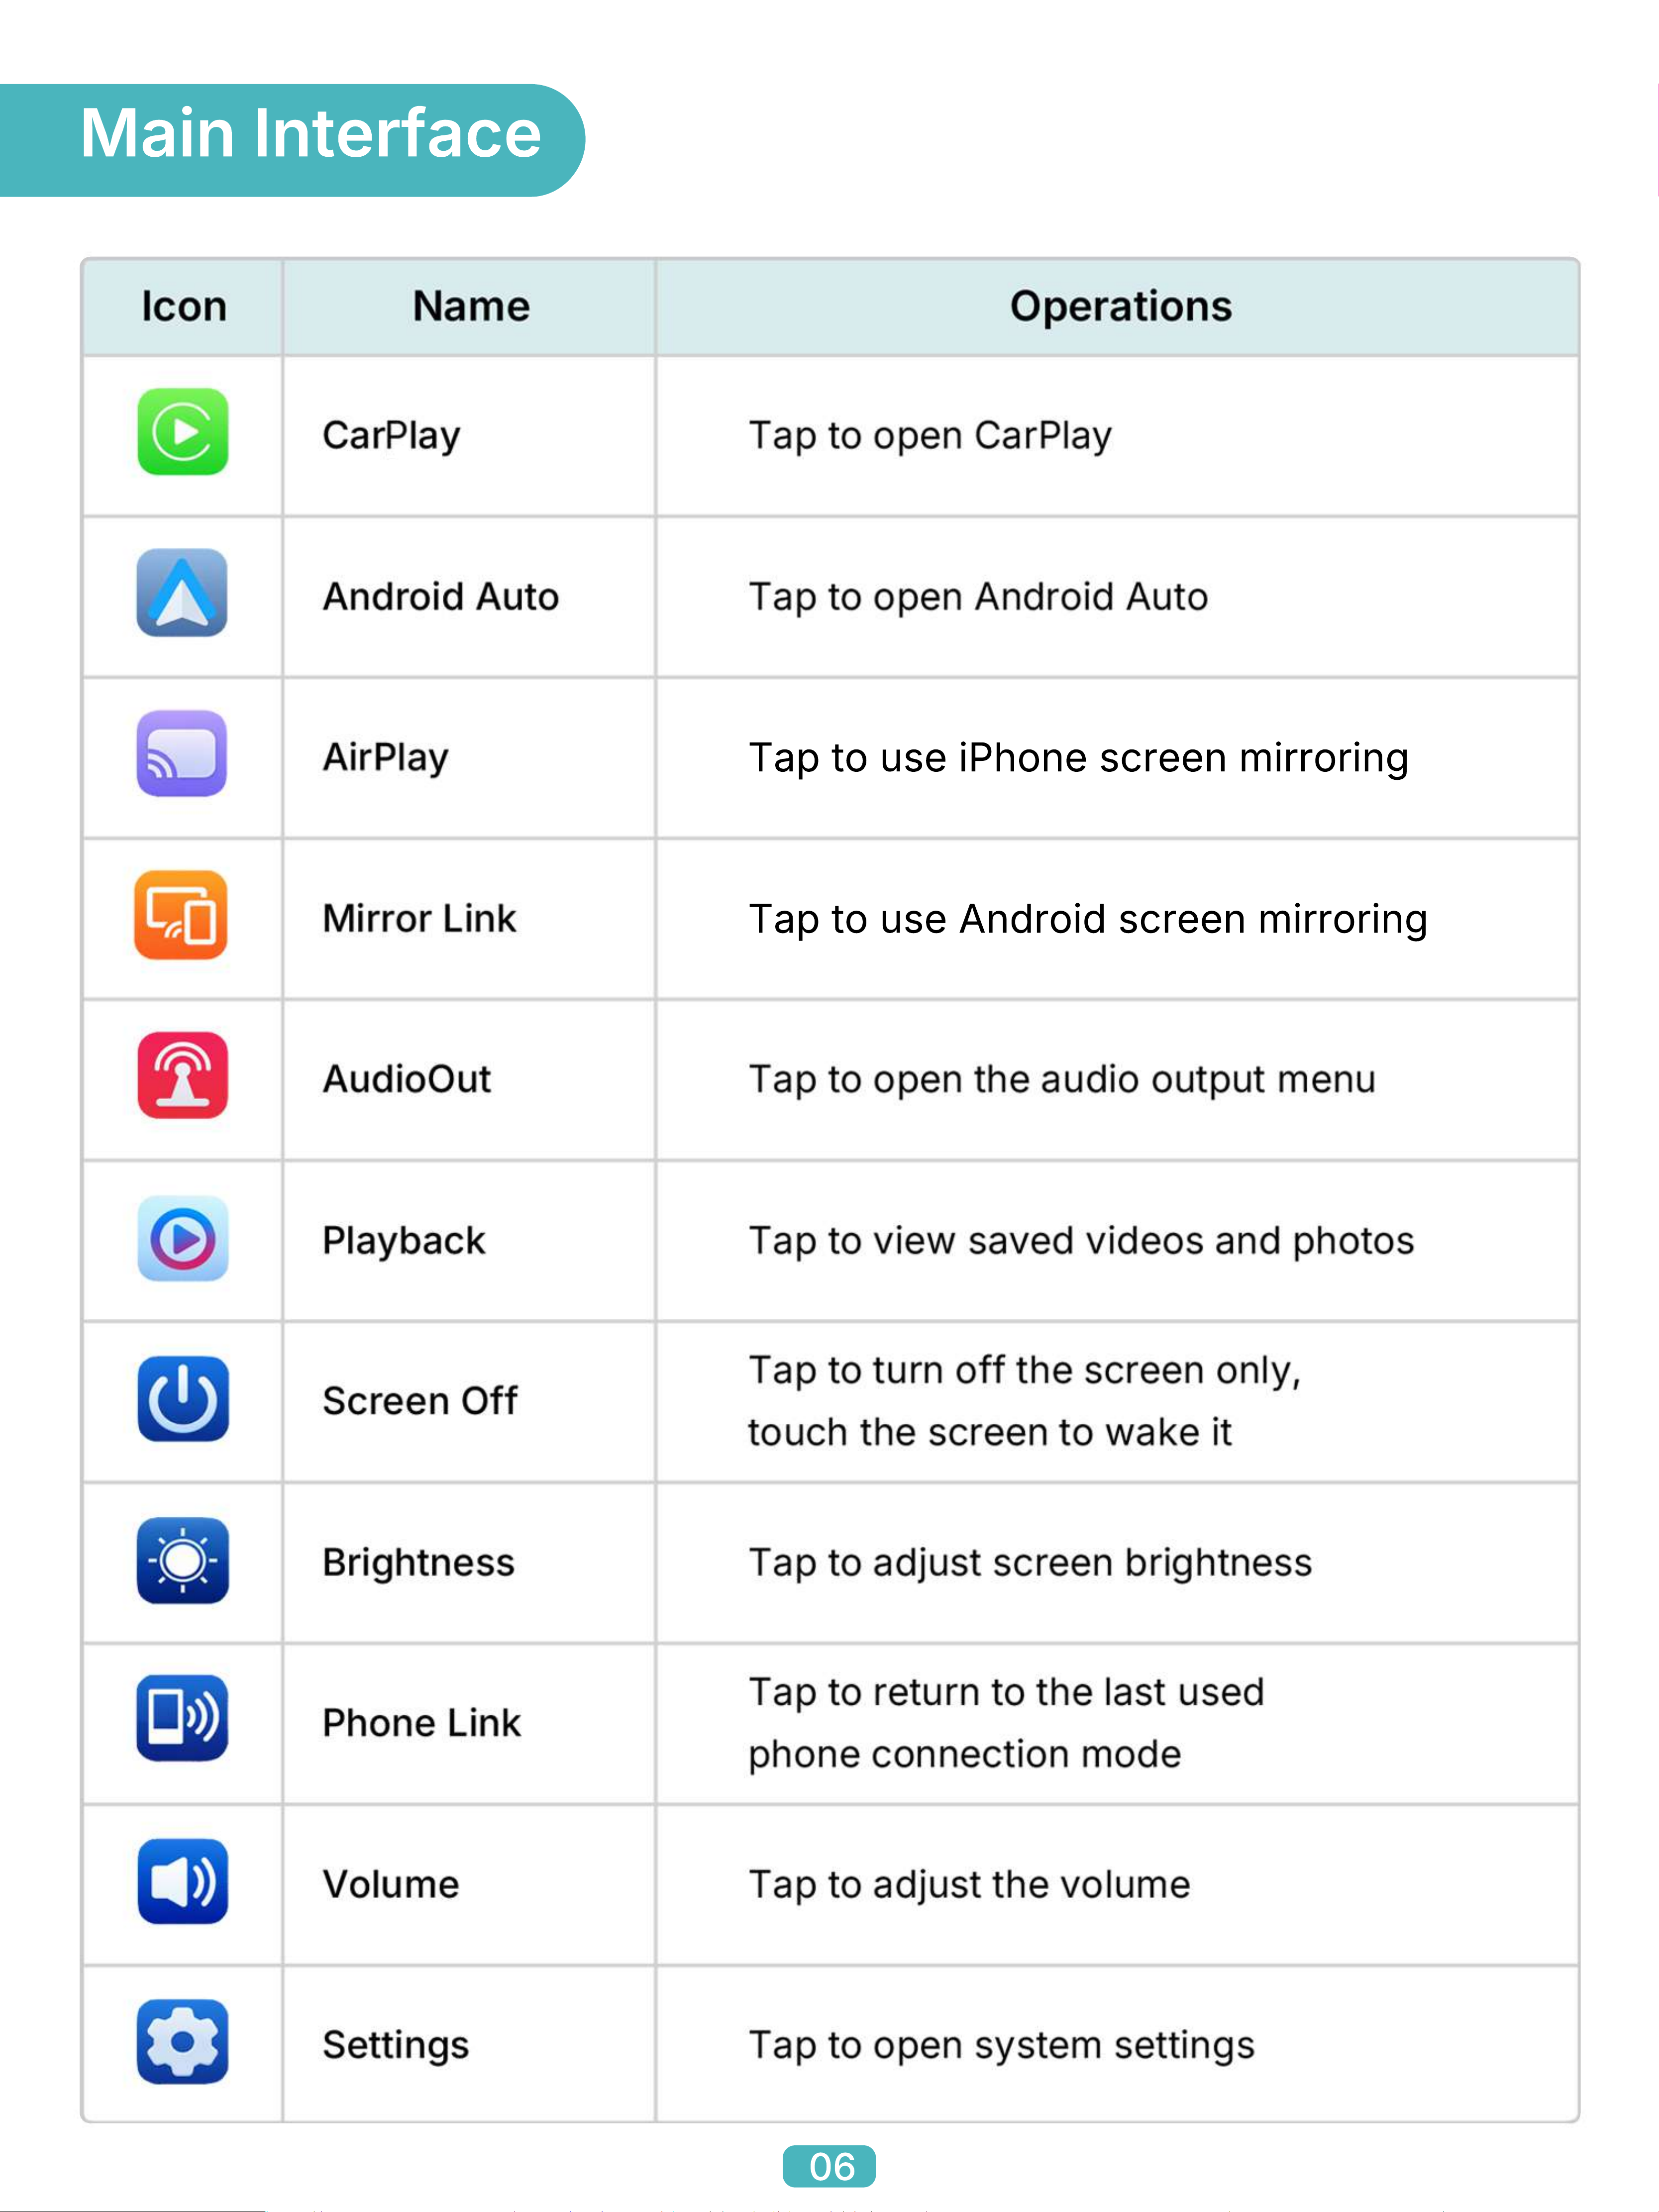
Main Interface
Tap to use iPhone screen mirroring
Tap to use Android screen mirroring
06
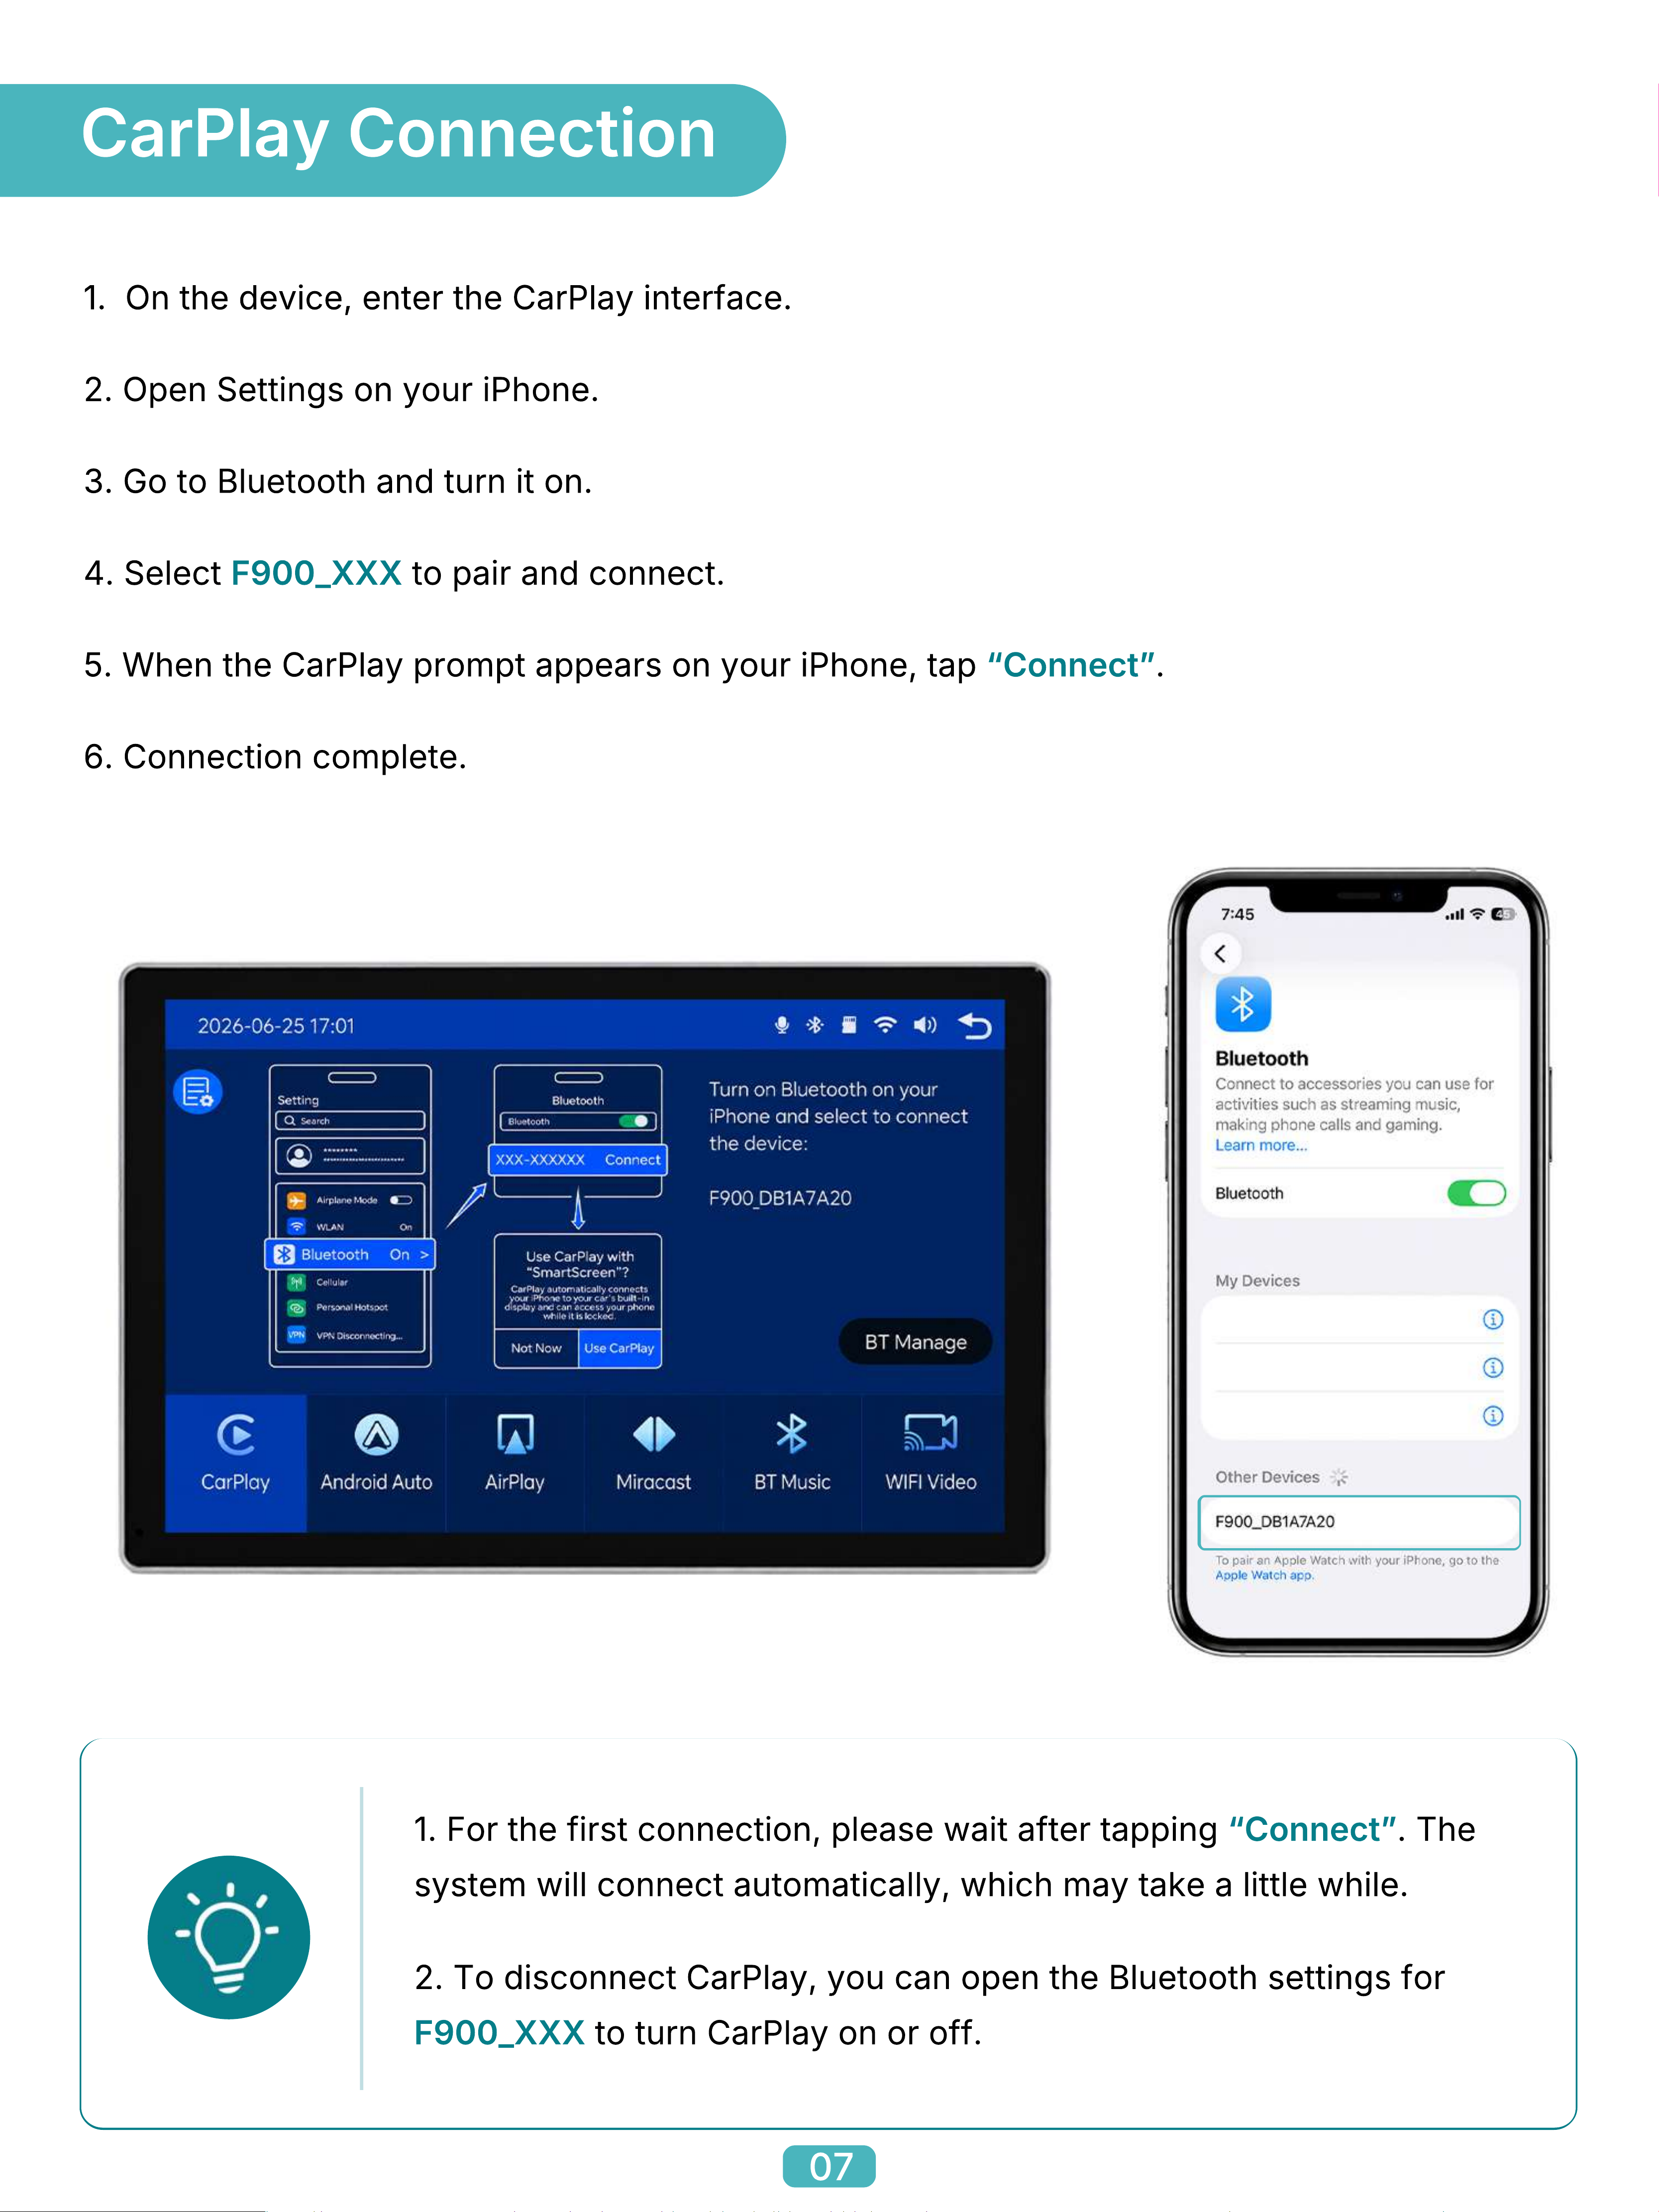
1. On the device, enter the CarPlay interface.
2. Open Settings on your iPhone.
3. Go to Bluetooth and turn it on.
4. Select F900_XXX to pair and connect.
5. When the CarPlay prompt appears on your iPhone, tap “Connectˮ.
6. Connection complete.
2. To disconnect CarPlay, you can open the Bluetooth settings for
F900_XXX to turn CarPlay on or off.
1. For the first connection, please wait after tapping “Connectˮ. The
system will connect automatically, which may take a little while.
CarPlay Connection
07
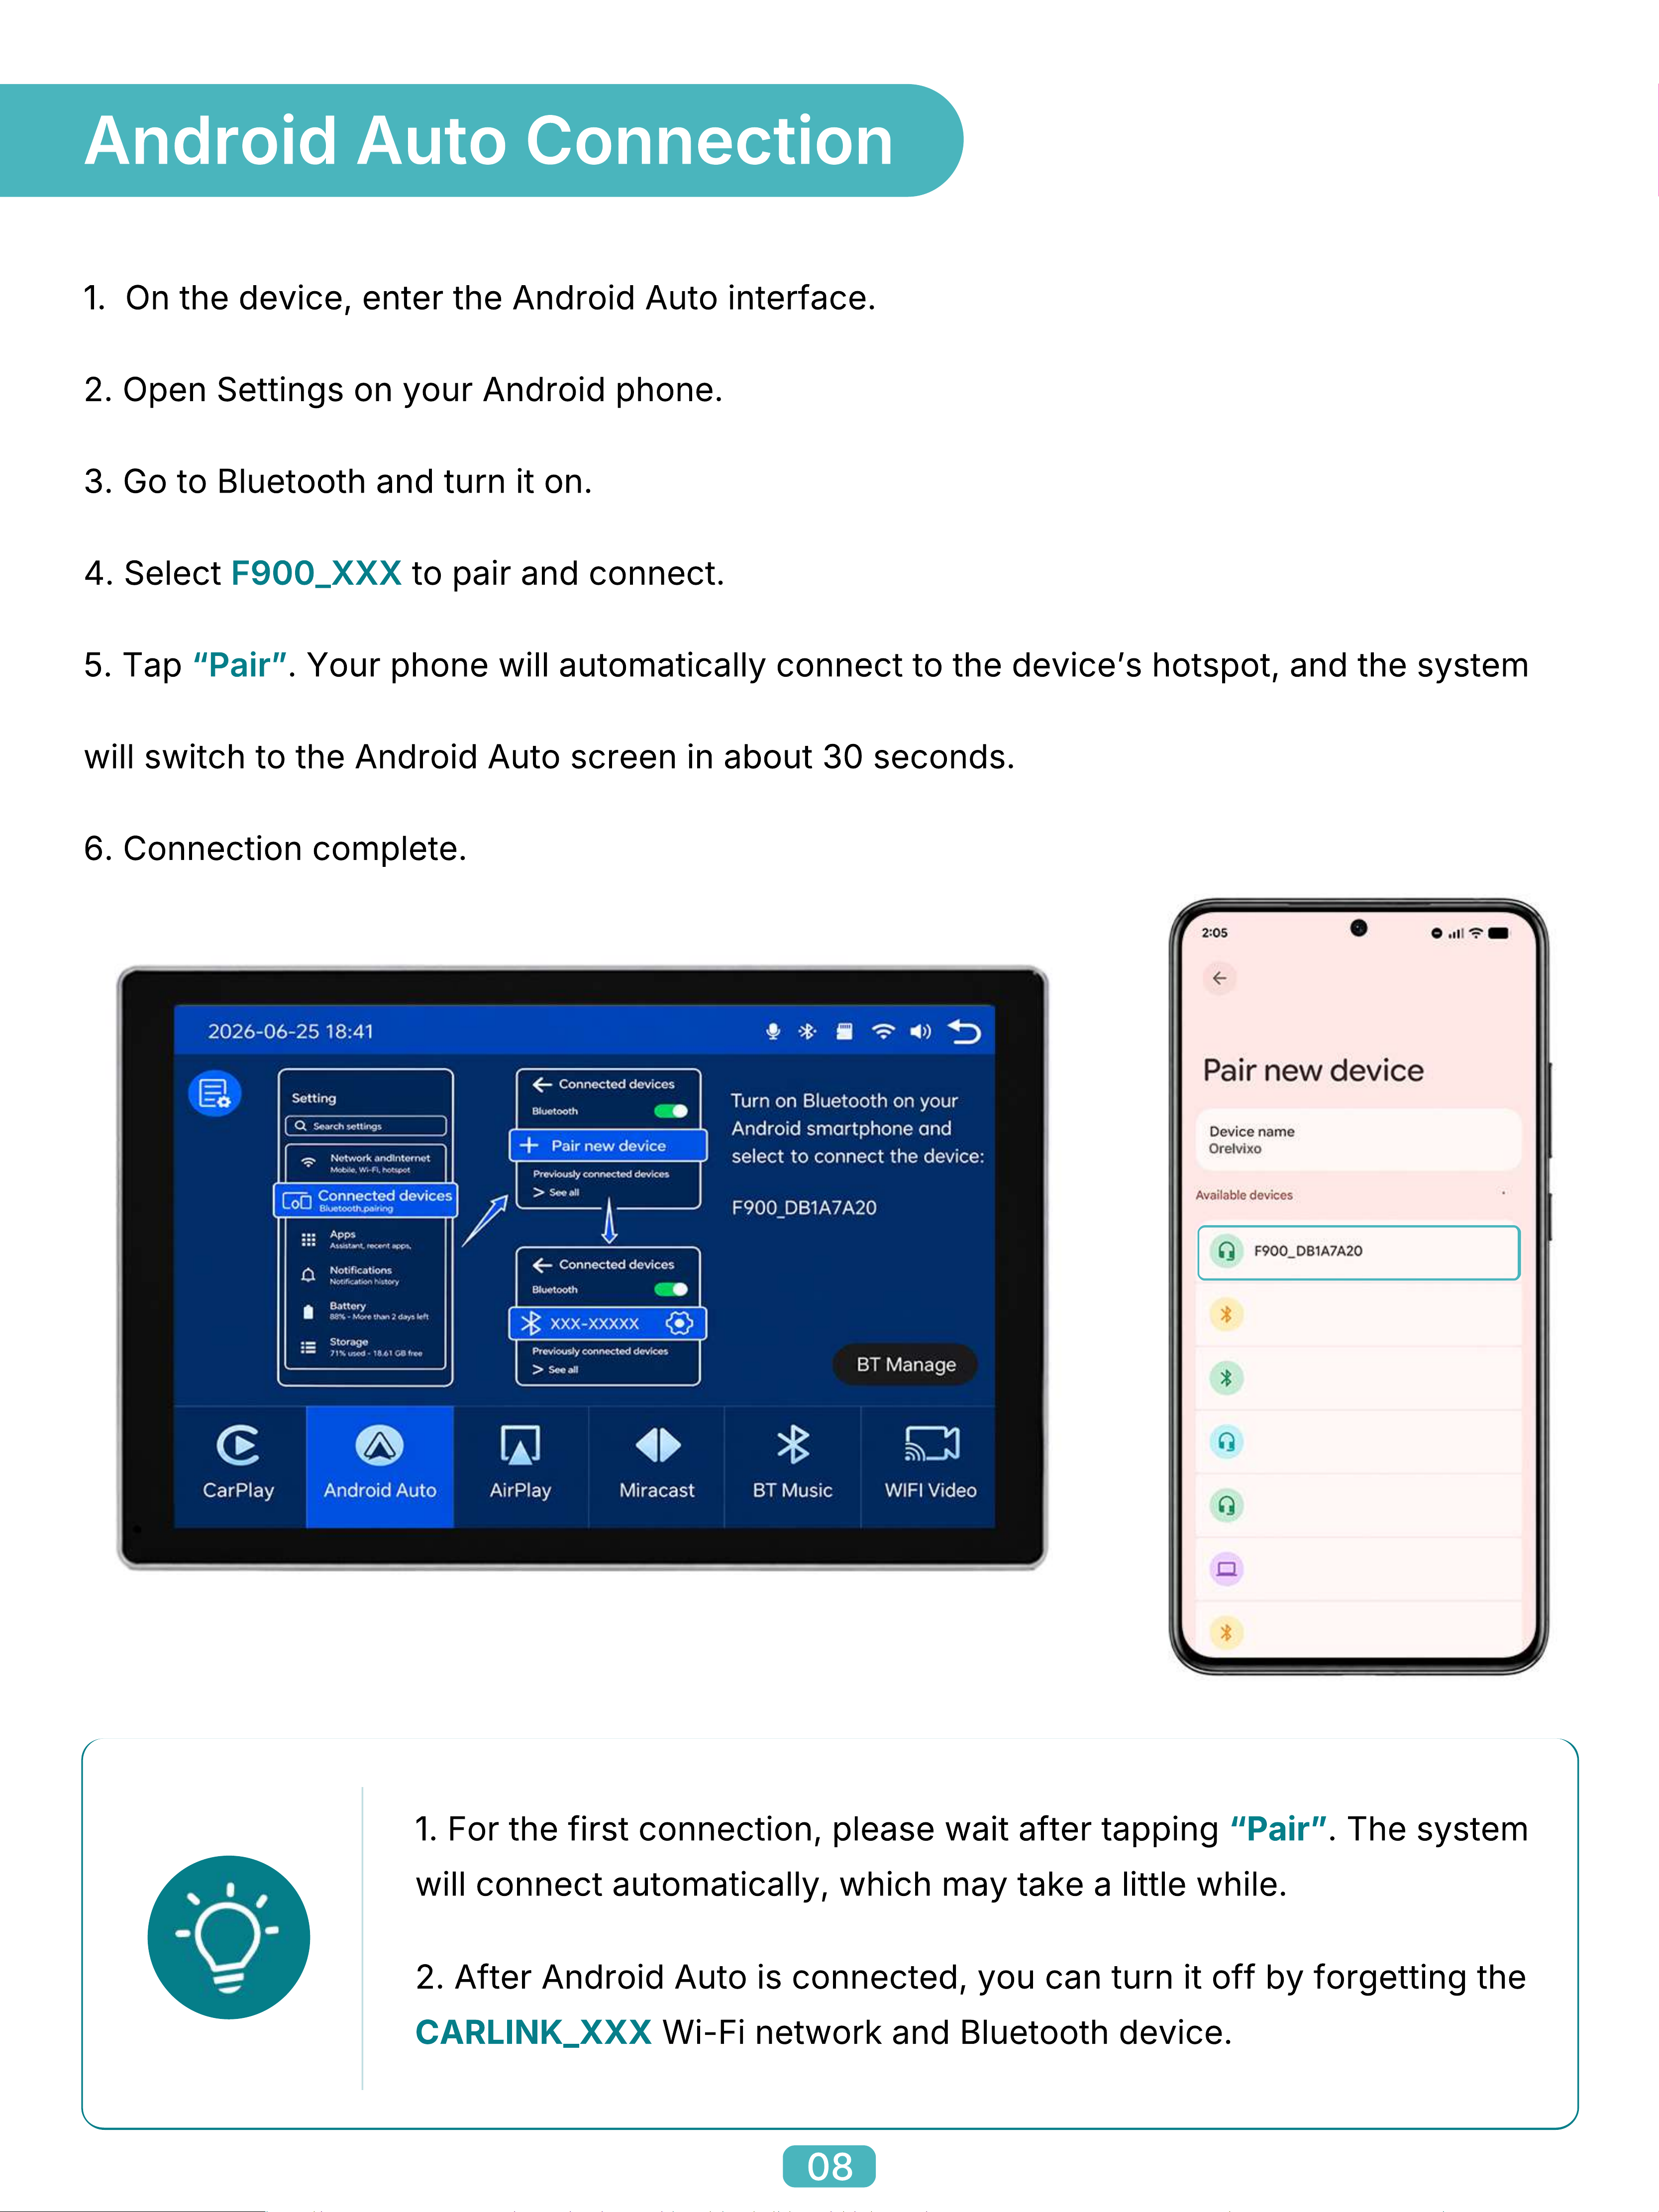
1. On the device, enter the Android Auto interface.
2. Open Settings on your Android phone.
3. Go to Bluetooth and turn it on.
4. Select F900_XXX to pair and connect.
5. Tap “Pairˮ. Your phone will automatically connect to the deviceʼs hotspot, and the system
will switch to the Android Auto screen in about 30 seconds.
6. Connection complete.
6. Connection complete.
1. For the first connection, please wait after tapping “Pairˮ. The system
will connect automatically, which may take a little while.
2. After Android Auto is connected, you can turn it off by forgetting the
CARLINK_XXX Wi-Fi network and Bluetooth device.
Android Auto Connection
08
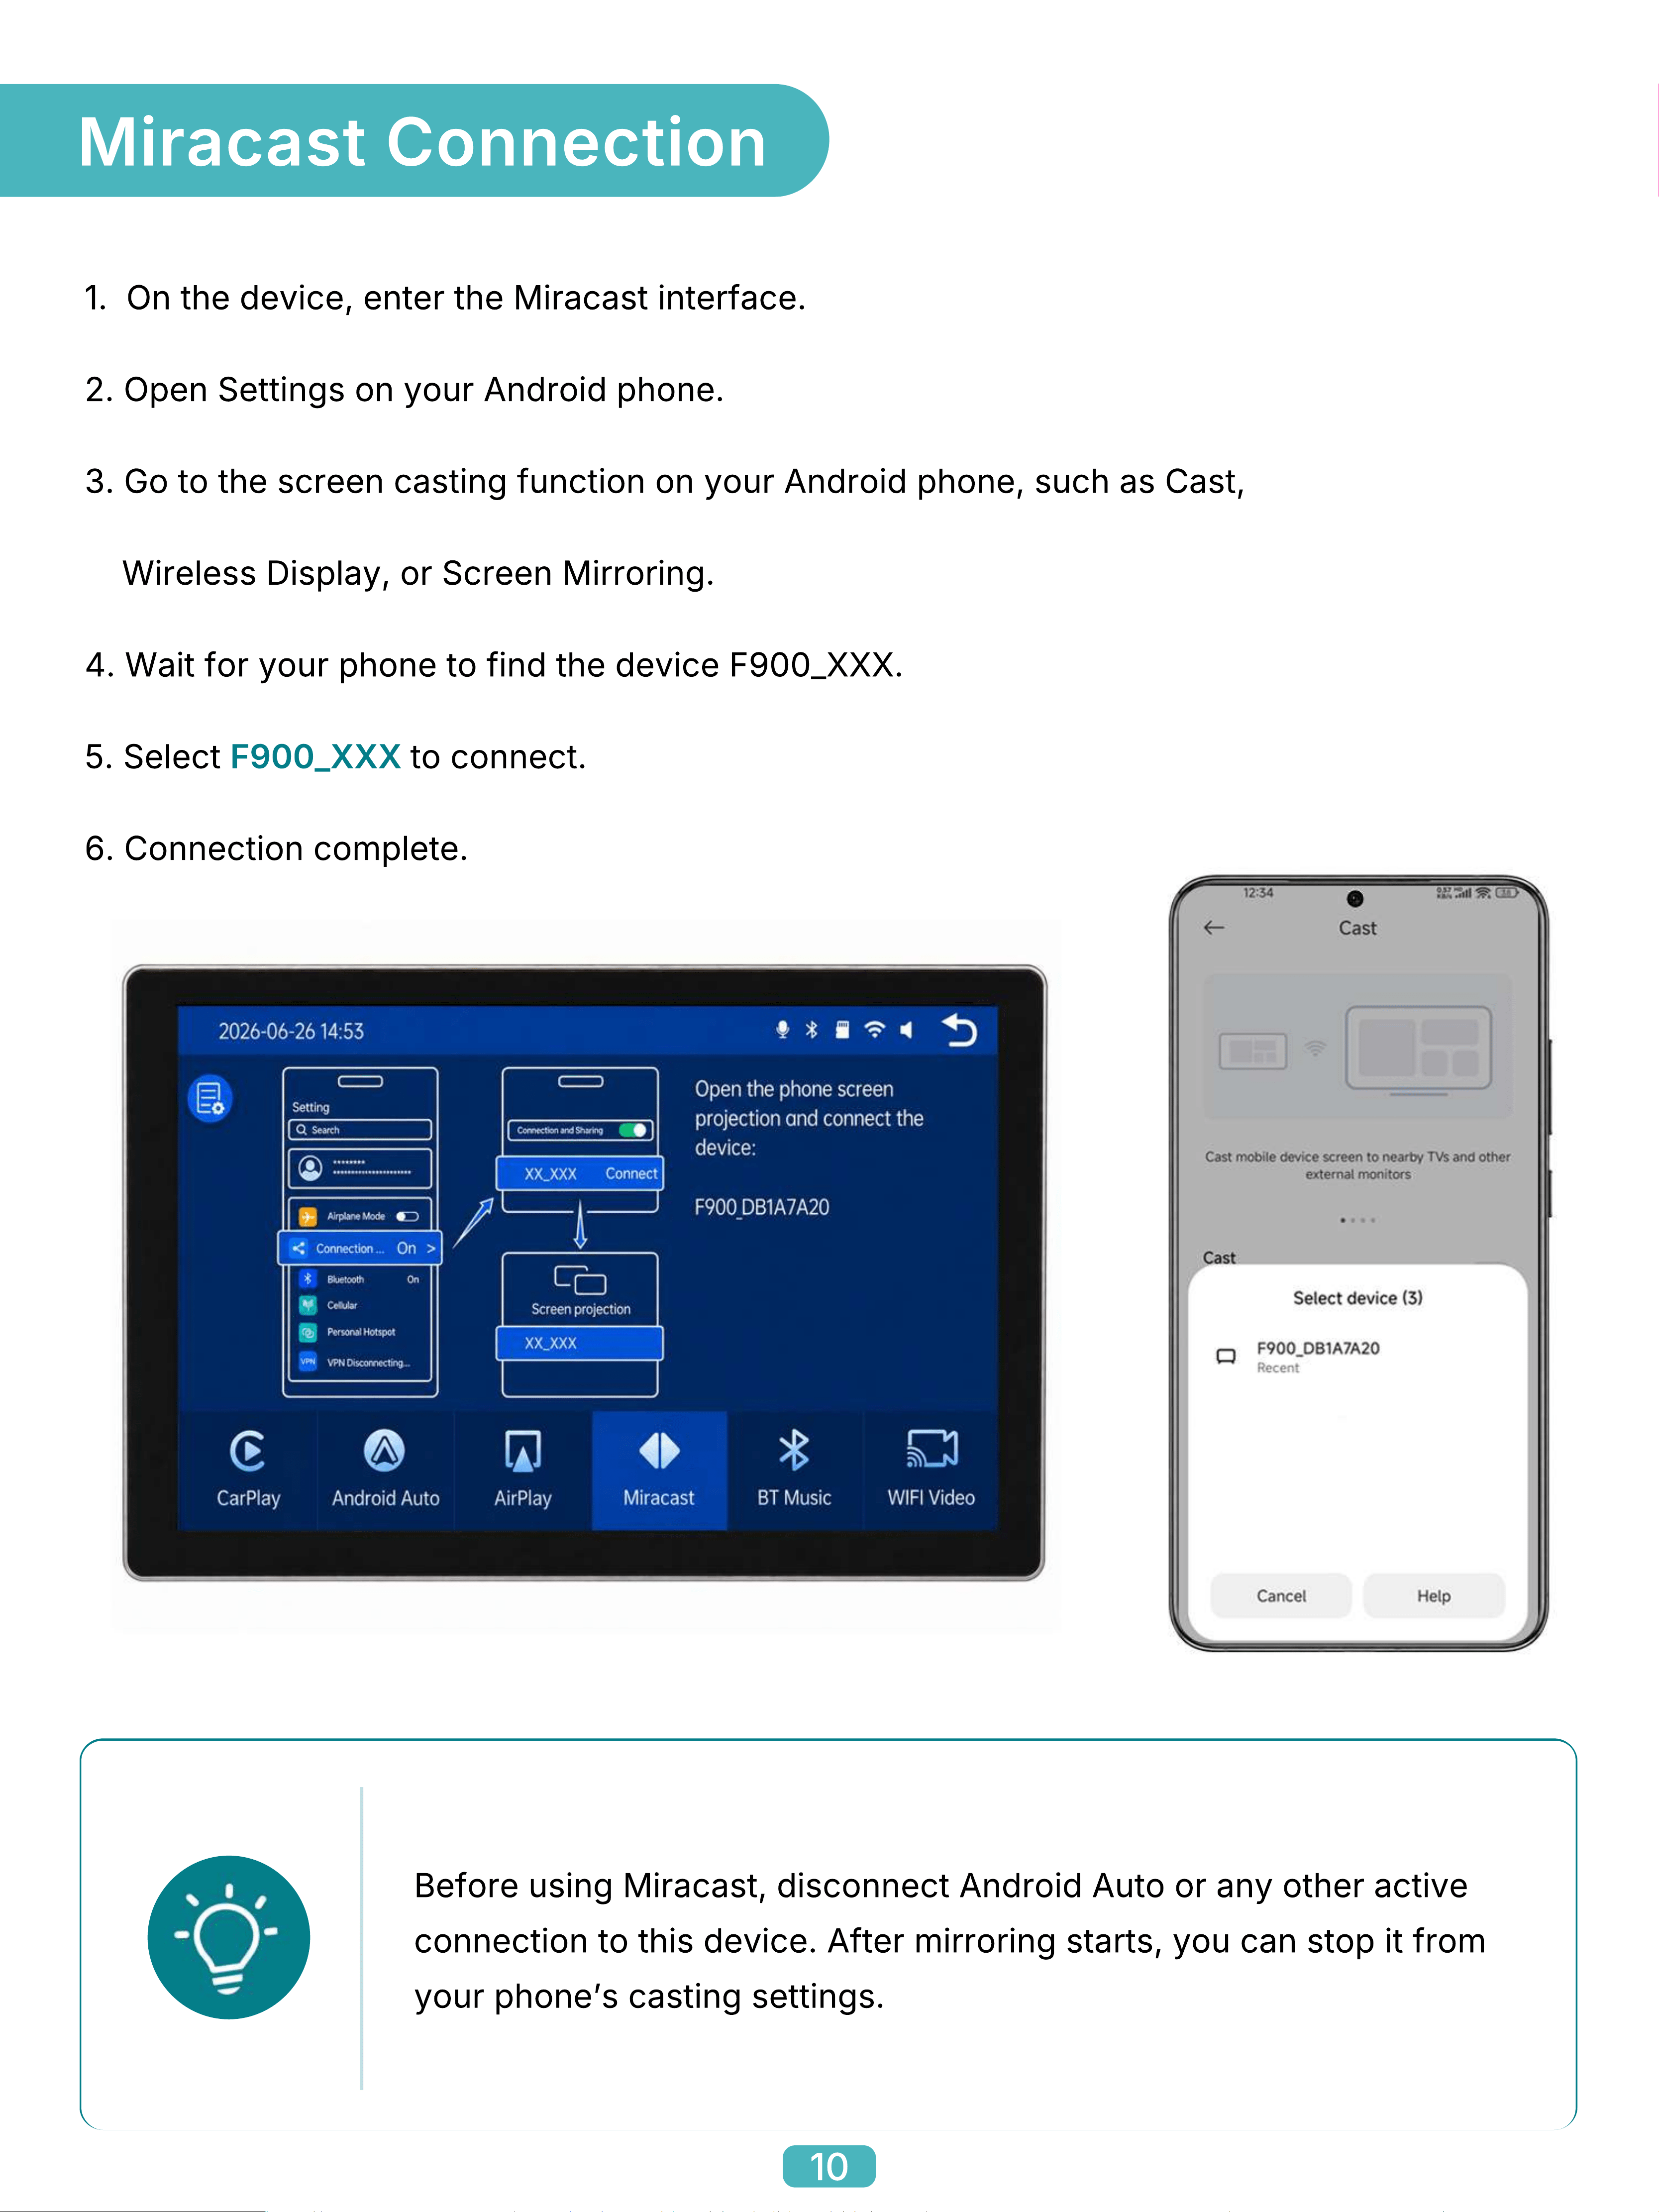
Before using Miracast, disconnect Android Auto or any other active
connection to this device. After mirroring starts, you can stop it from
your phoneʼs casting settings.
1. On the device, enter the Miracast interface.
2. Open Settings on your Android phone.
3. Go to the screen casting function on your Android phone, such as Cast,
Wireless Display, or Screen Mirroring.
4. Wait for your phone to find the device F900_XXX.
5. Select F900_XXX to connect.
6. Connection complete.
6. Connection complete.
Miracast Connection
10
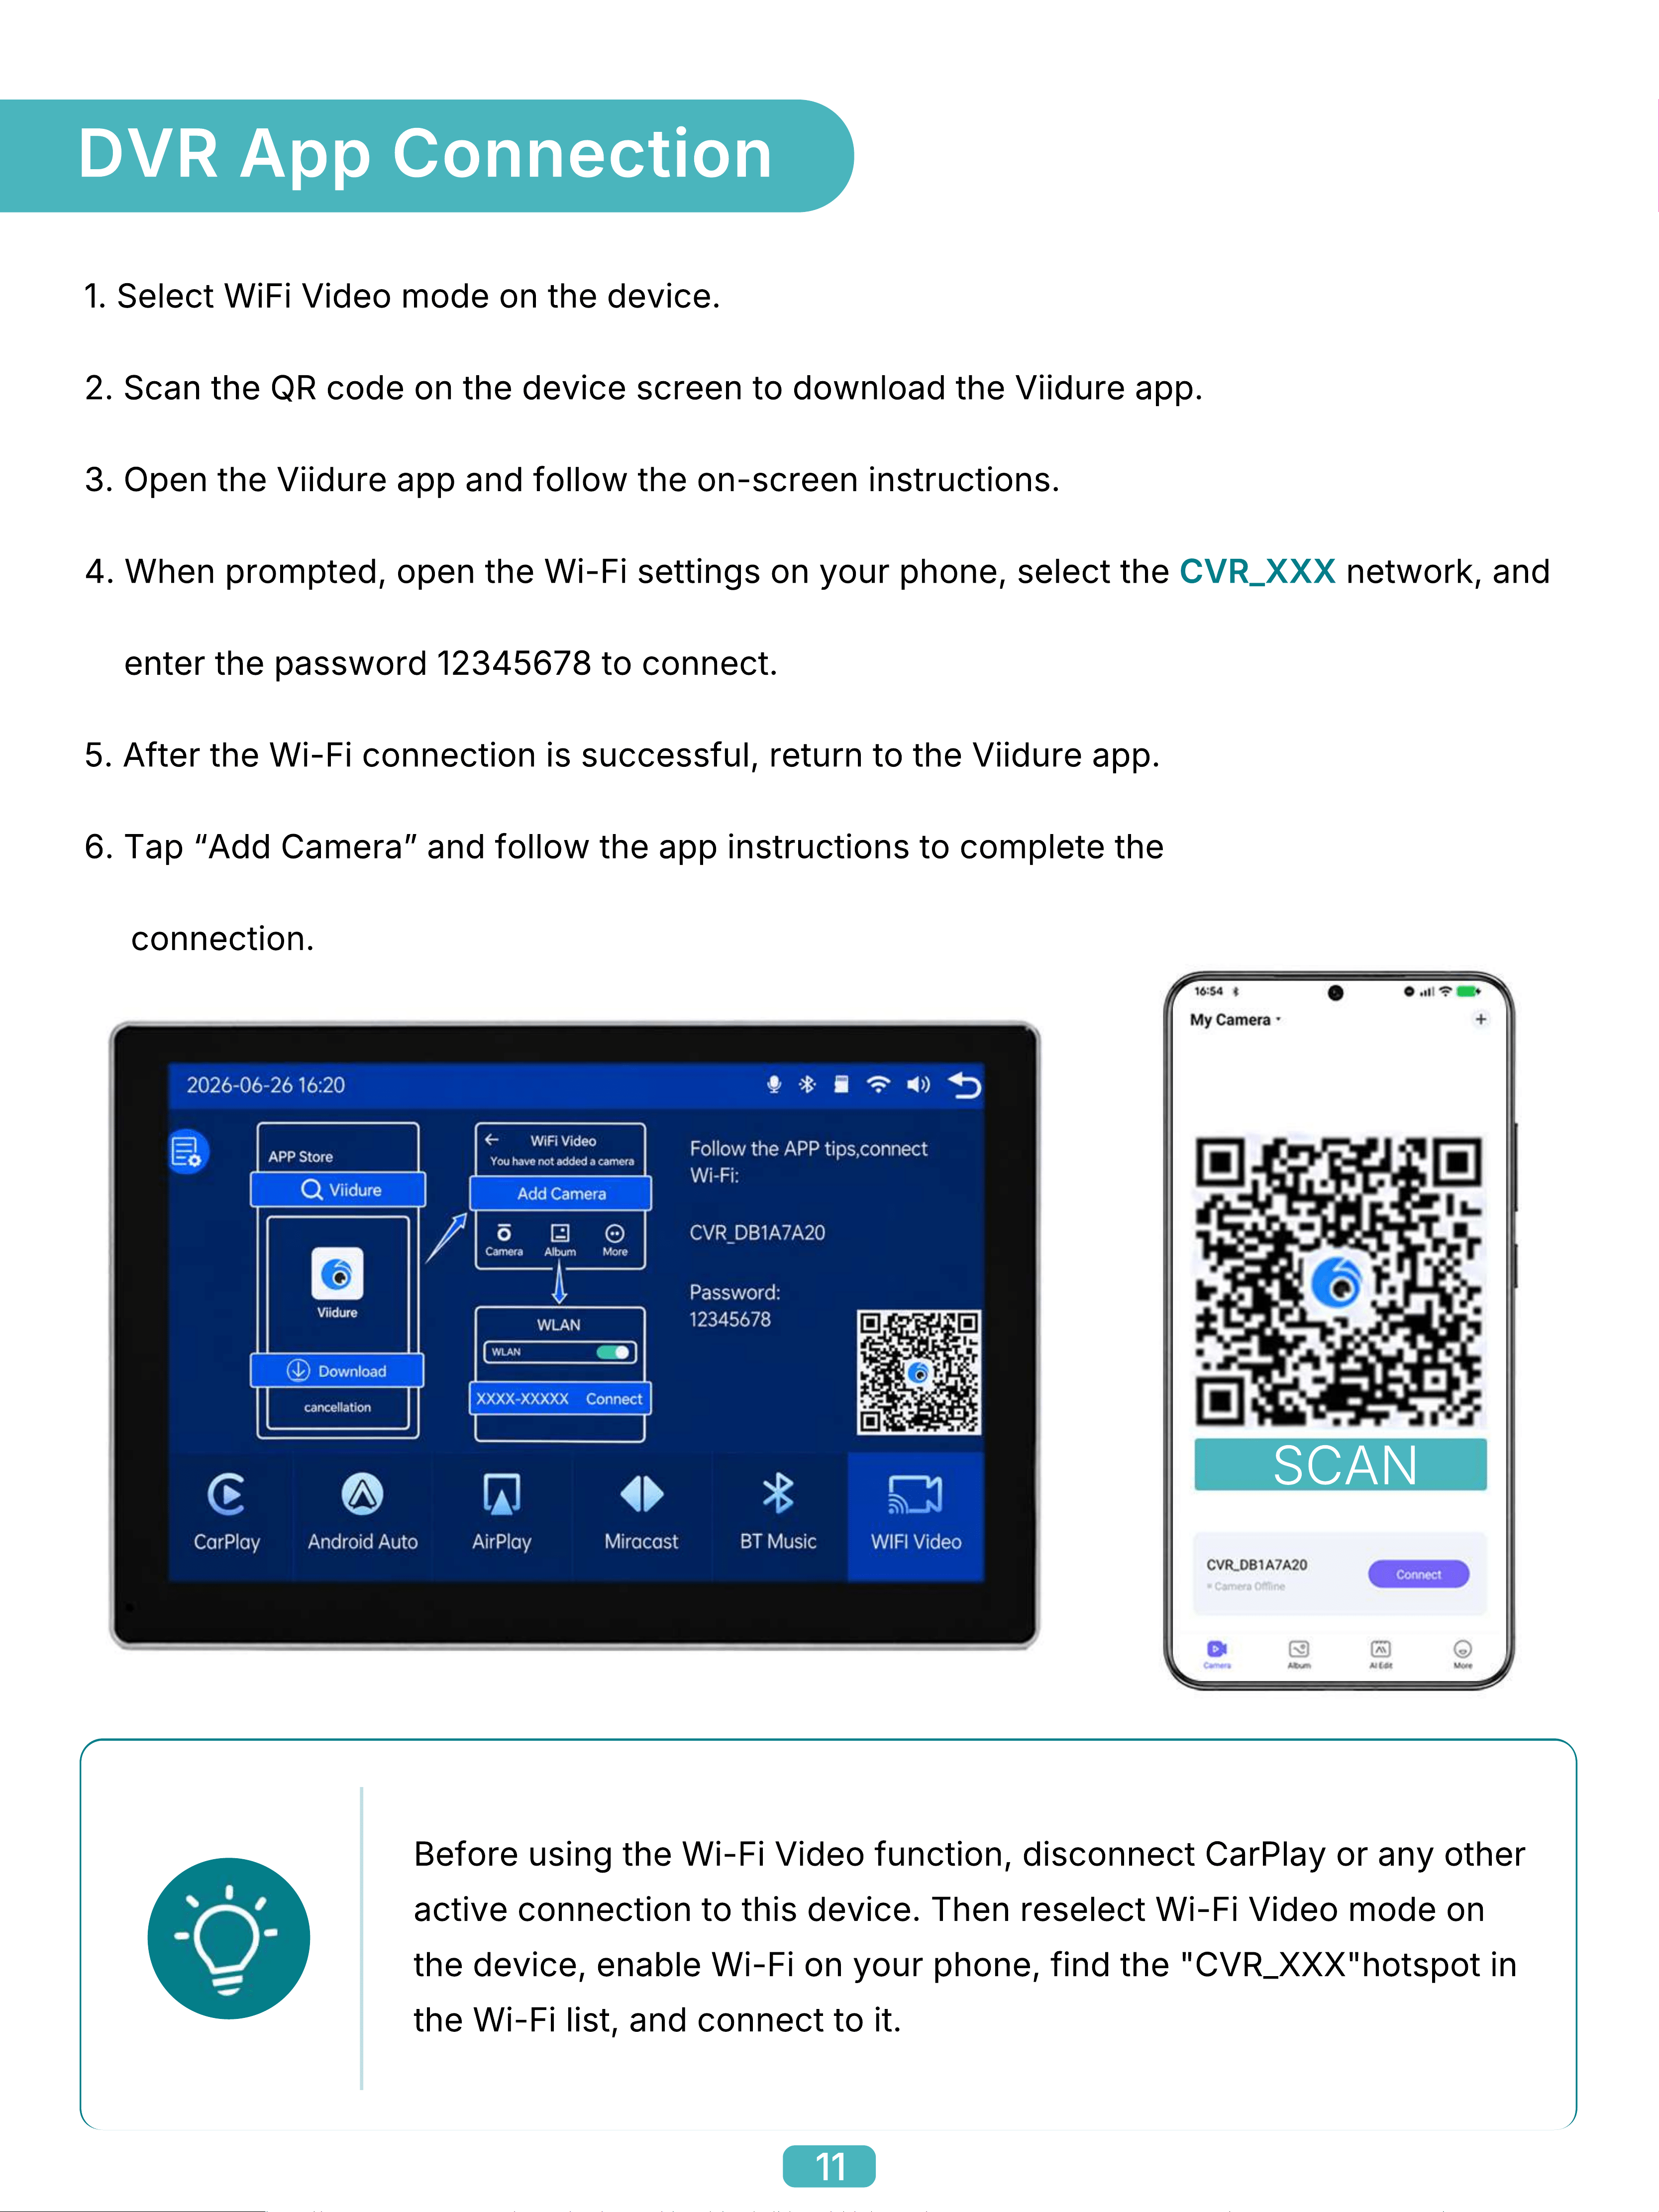
DVR App Connection
SCAN
Before using the Wi-Fi Video function, disconnect CarPlay or any other
active connection to this device. Then reselect Wi-Fi Video mode on
the device, enable Wi-Fi on your phone, find the "CVR_XXX"hotspot in
the Wi-Fi list, and connect to it.
1. Select WiFi Video mode on the device.
2. Scan the QR code on the device screen to download the Viidure app.
3. Open the Viidure app and follow the on-screen instructions.
4. When prompted, open the Wi-Fi settings on your phone, select the CVR_XXX network, and
enter the password 12345678 to connect.
5. After the Wi-Fi connection is successful, return to the Viidure app.
6. Tap “Add Cameraˮ and follow the app instructions to complete the
6. Tap “Add Cameraˮ and follow the app instructions to complete the
connection.
11
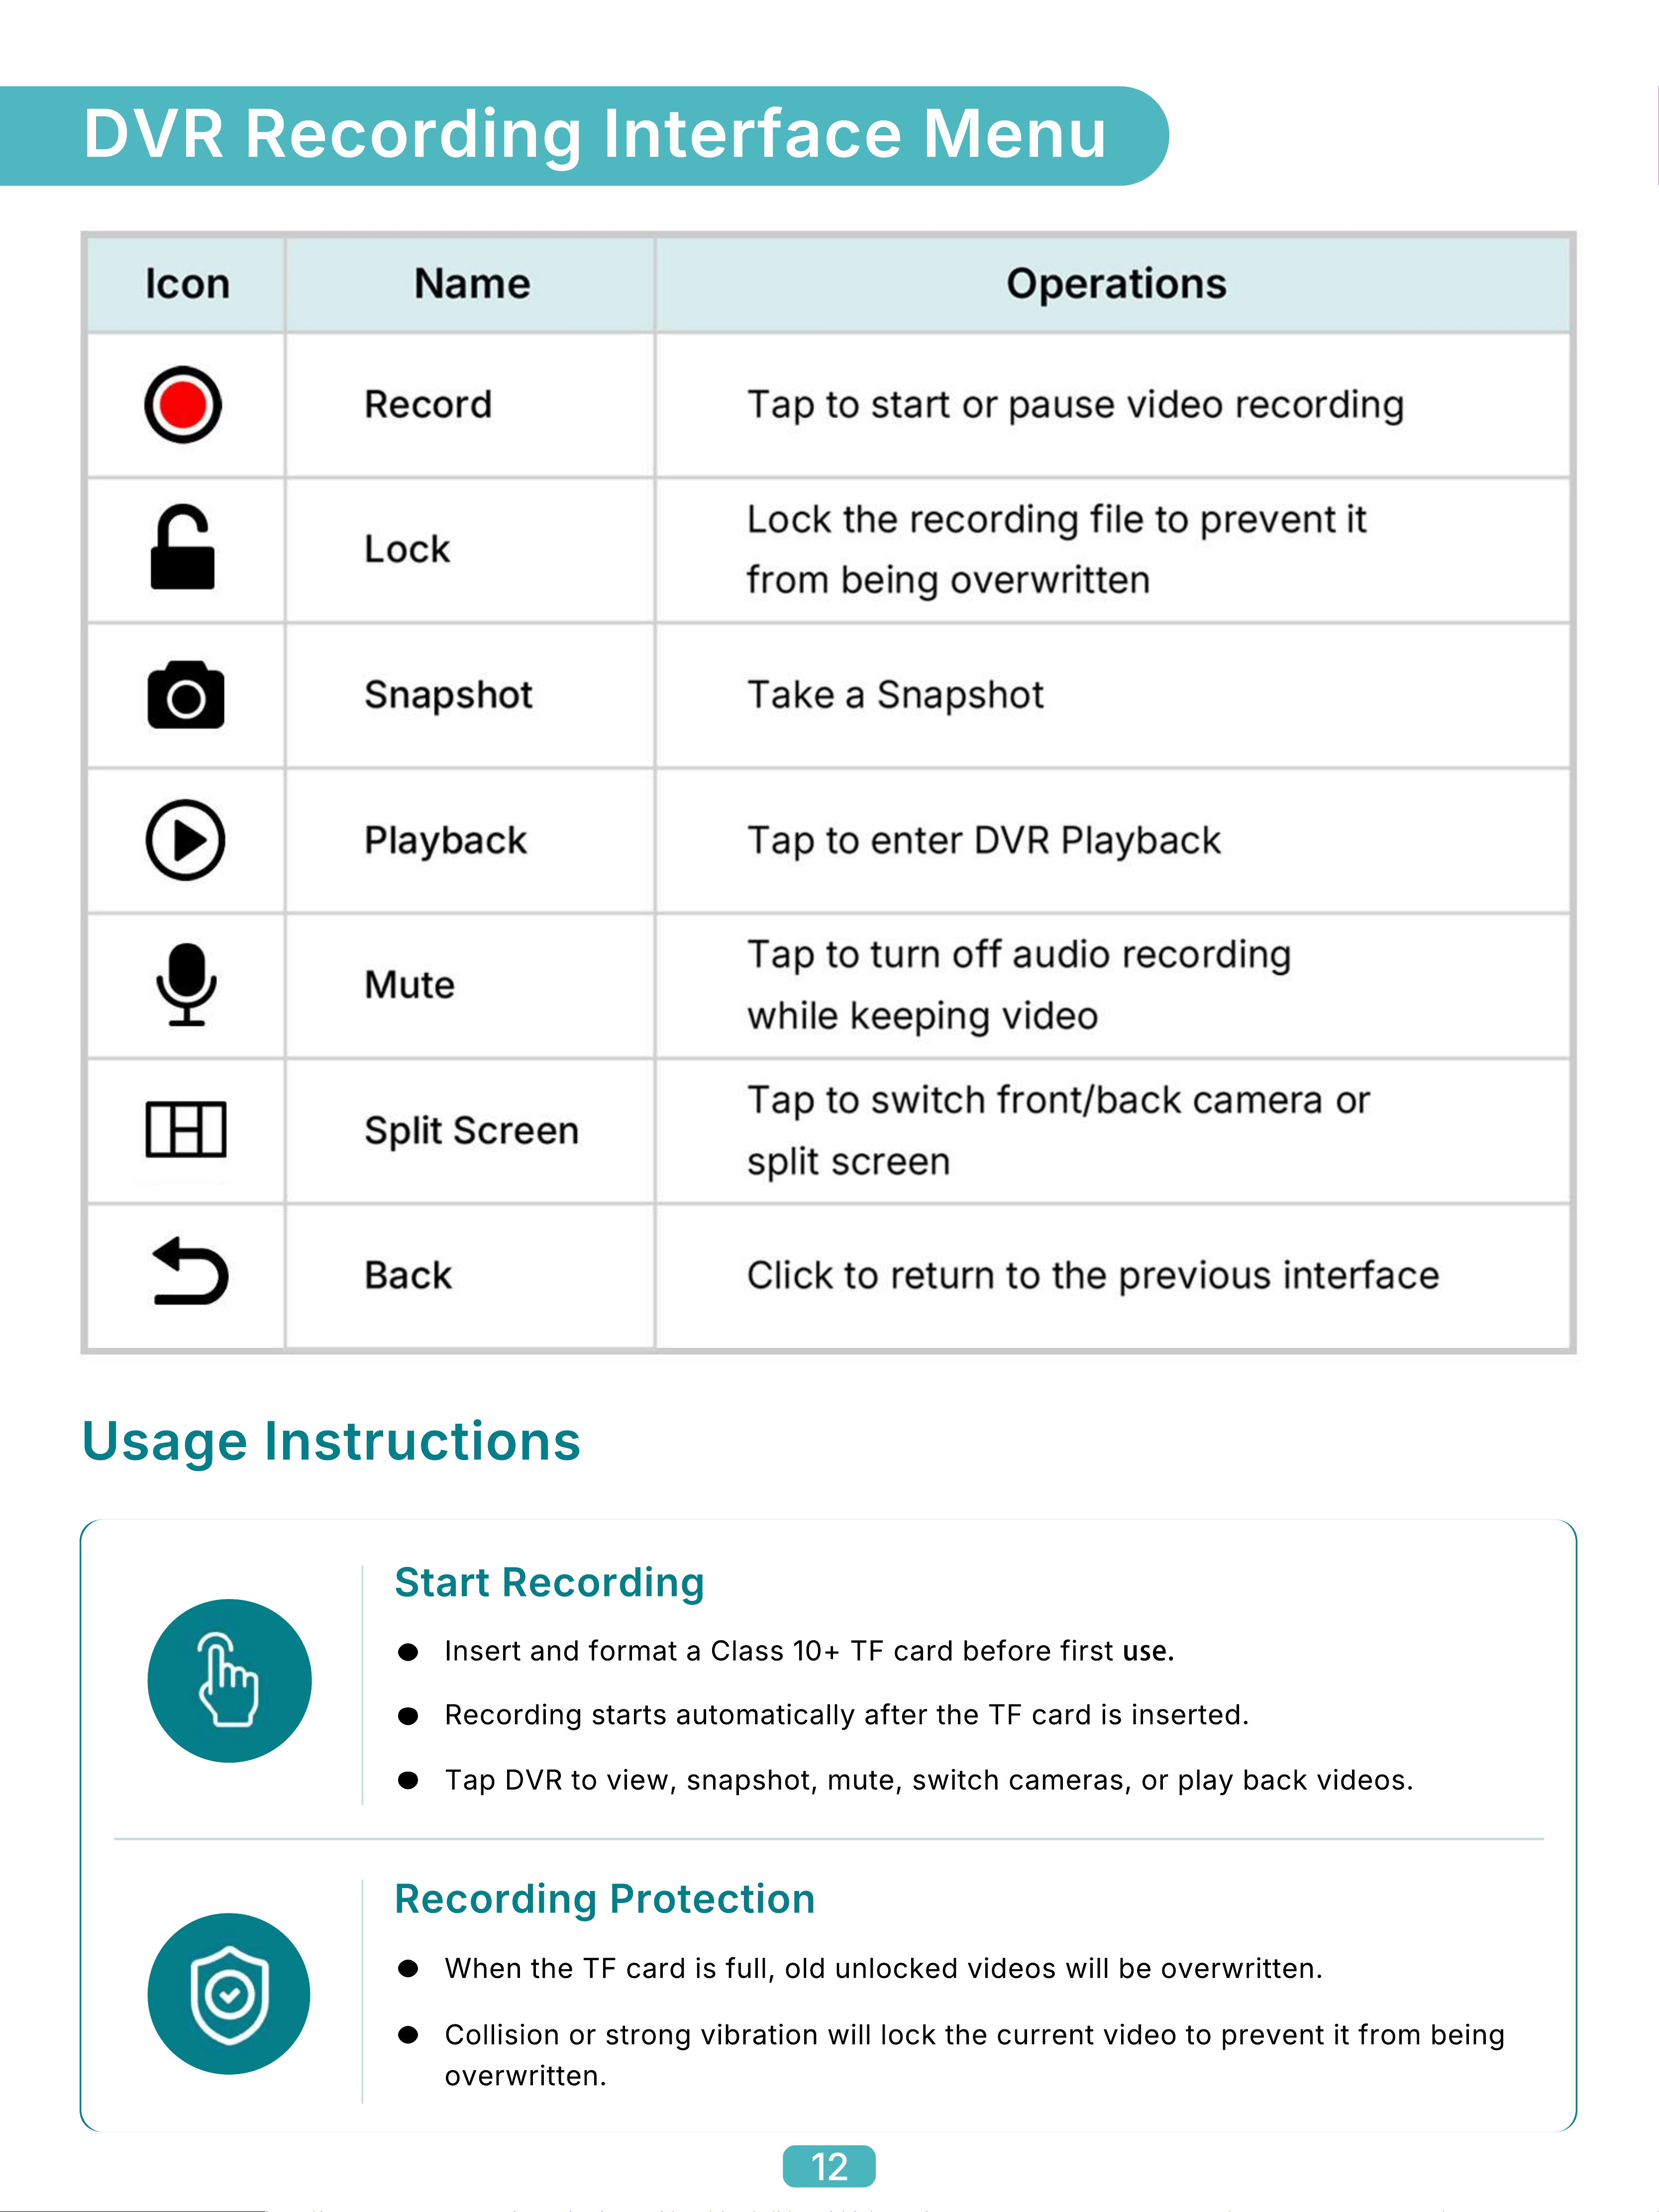
DVR Recording Interface Menu
Usage Instructions
Start Recording
Insert and format a Class 10+ TF card before first use.
Recording starts automatically after the TF card is inserted.
Tap DVR to view, snapshot, mute, switch cameras, or play back videos.
When the TF card is full, old unlocked videos will be overwritten.
Collision or strong vibration will lock the current video to prevent it from being
overwritten.
Recording Protection
12
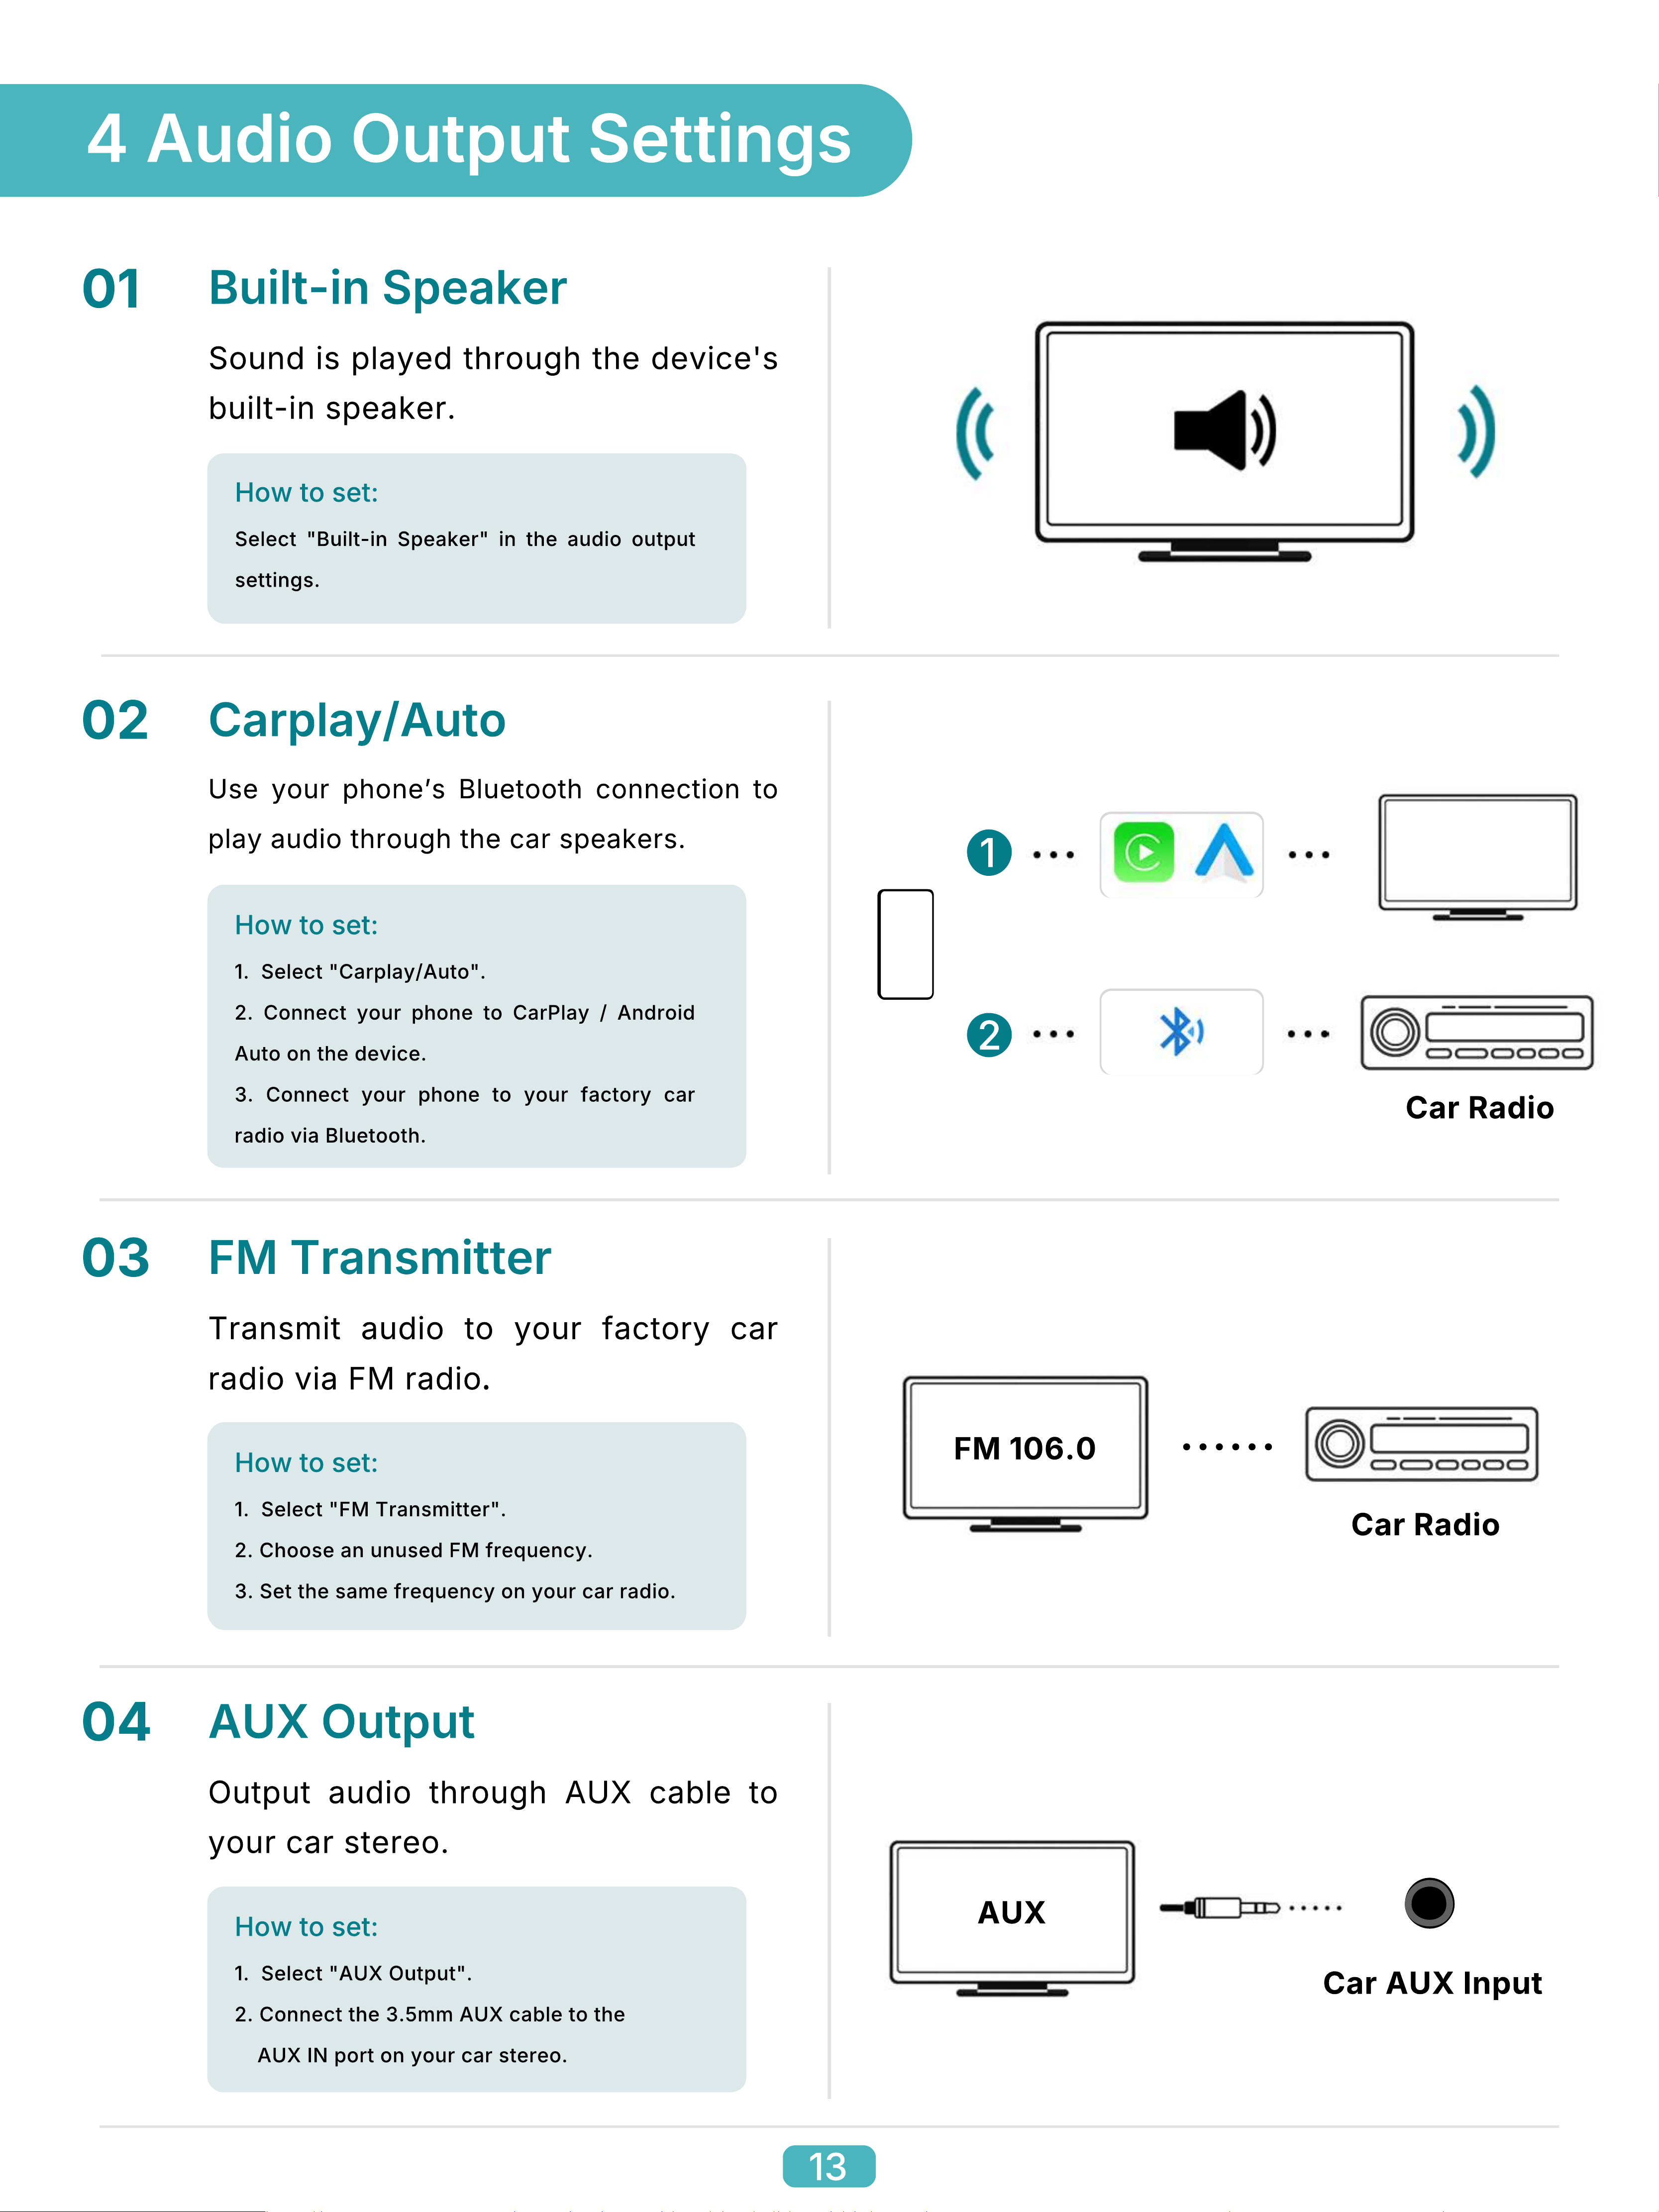
4 Audio Output Settings
Sound is played through the device's
built-in speaker.
Built-in Speaker
01
How to set:
Select "Built-in Speaker" in the audio output
settings.
Use your phoneʼs Bluetooth connection to
play audio through the car speakers.
Carplay/Auto
02
How to set:
1. Select "Carplay/Auto".
2. Connect your phone to CarPlay / Android
Auto on the device.
3. Connect your phone to your factory car
radio via Bluetooth.
1
2
Car Radio
Transmit audio to your factory car
radio via FM radio.
FM Transmitter
03
FM 106.0
......
Car Radio
How to set:
1. Select "FM Transmitter".
2. Choose an unused FM frequency.
3. Set the same frequency on your car radio.
Output audio through AUX cable to
your car stereo.
AUX Output
04
Car AUX Input
AUX
How to set:
1. Select "AUX Output".
2. Connect the 3.5mm AUX cable to the
AUX IN port on your car stereo.
13
C
B
A
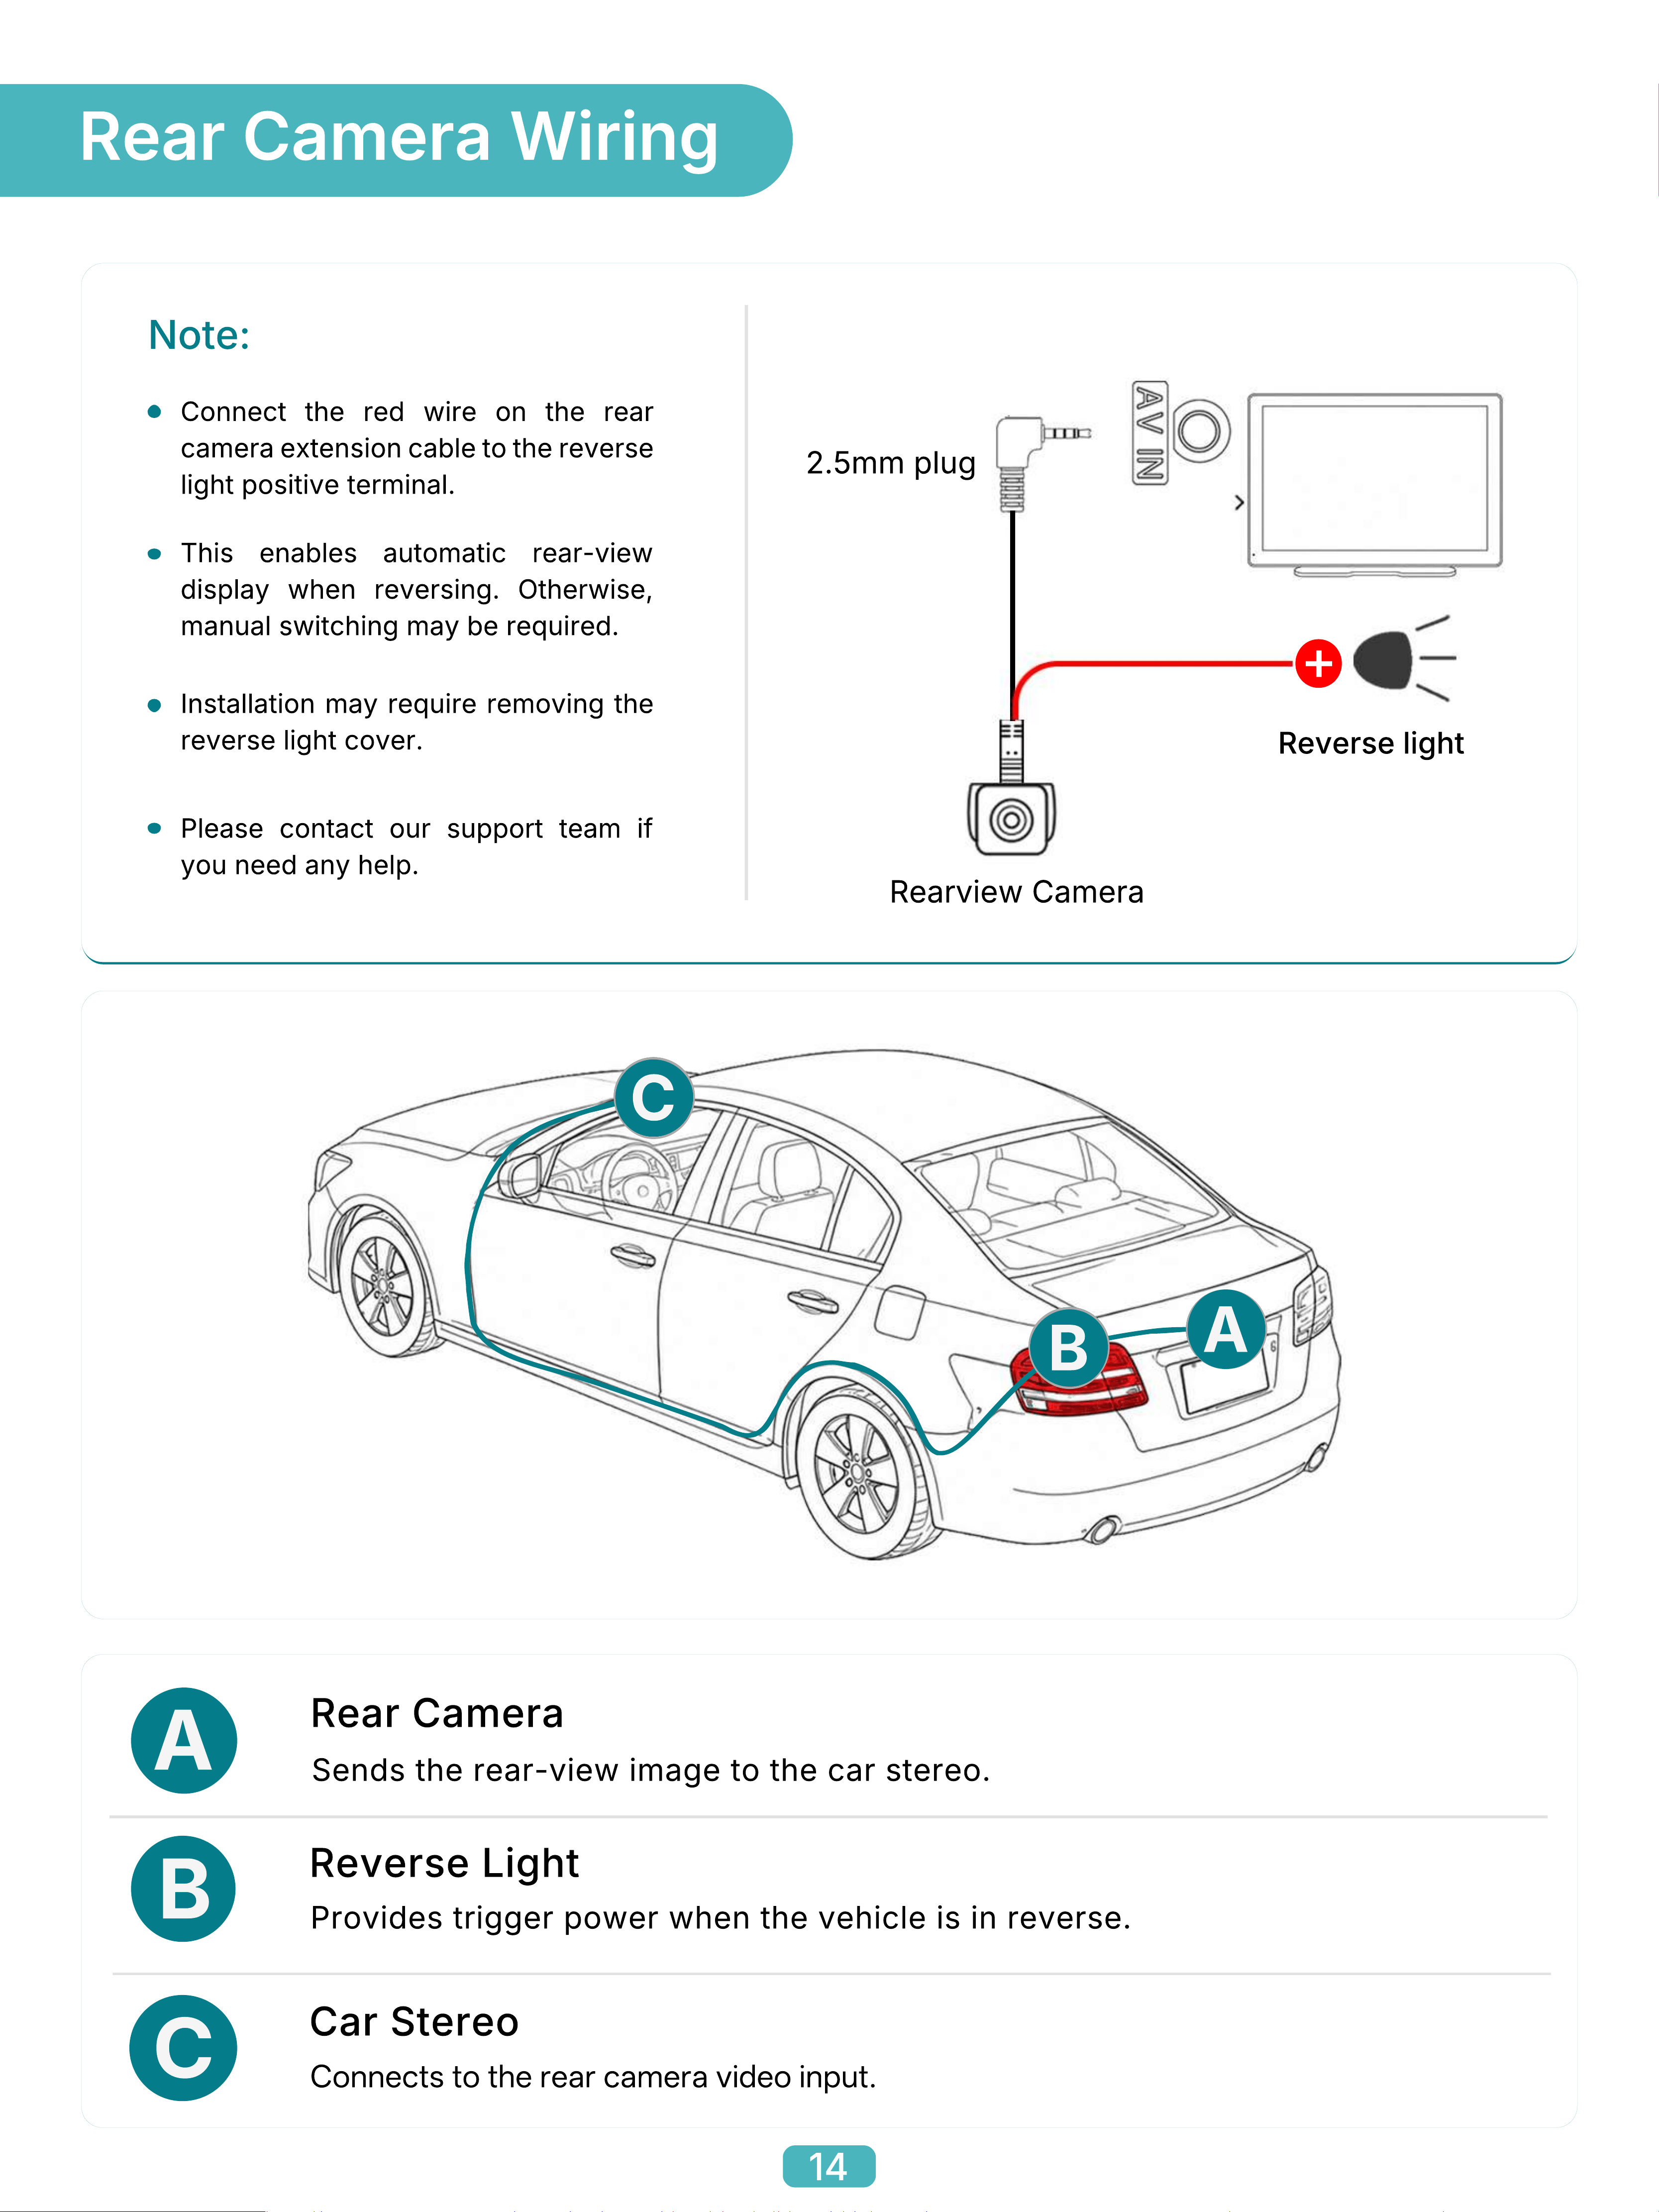
Connects to the rear camera video input.
Car Stereo
Reverse Light
Provides trigger power when the vehicle is in reverse.
Sends the rear-view image to the car stereo.
Rear Camera
2.5mm plug
Reverse light
+
Rearview Camera
Connect the red wire on the rear
camera extension cable to the reverse
light positive terminal.
This enables automatic rear-view
display when reversing. Otherwise,
manual switching may be required.
Installation may require removing the
reverse light cover.
Please contact our support team if
you need any help.
Note:
A
B
C
Rear Camera Wiring
14
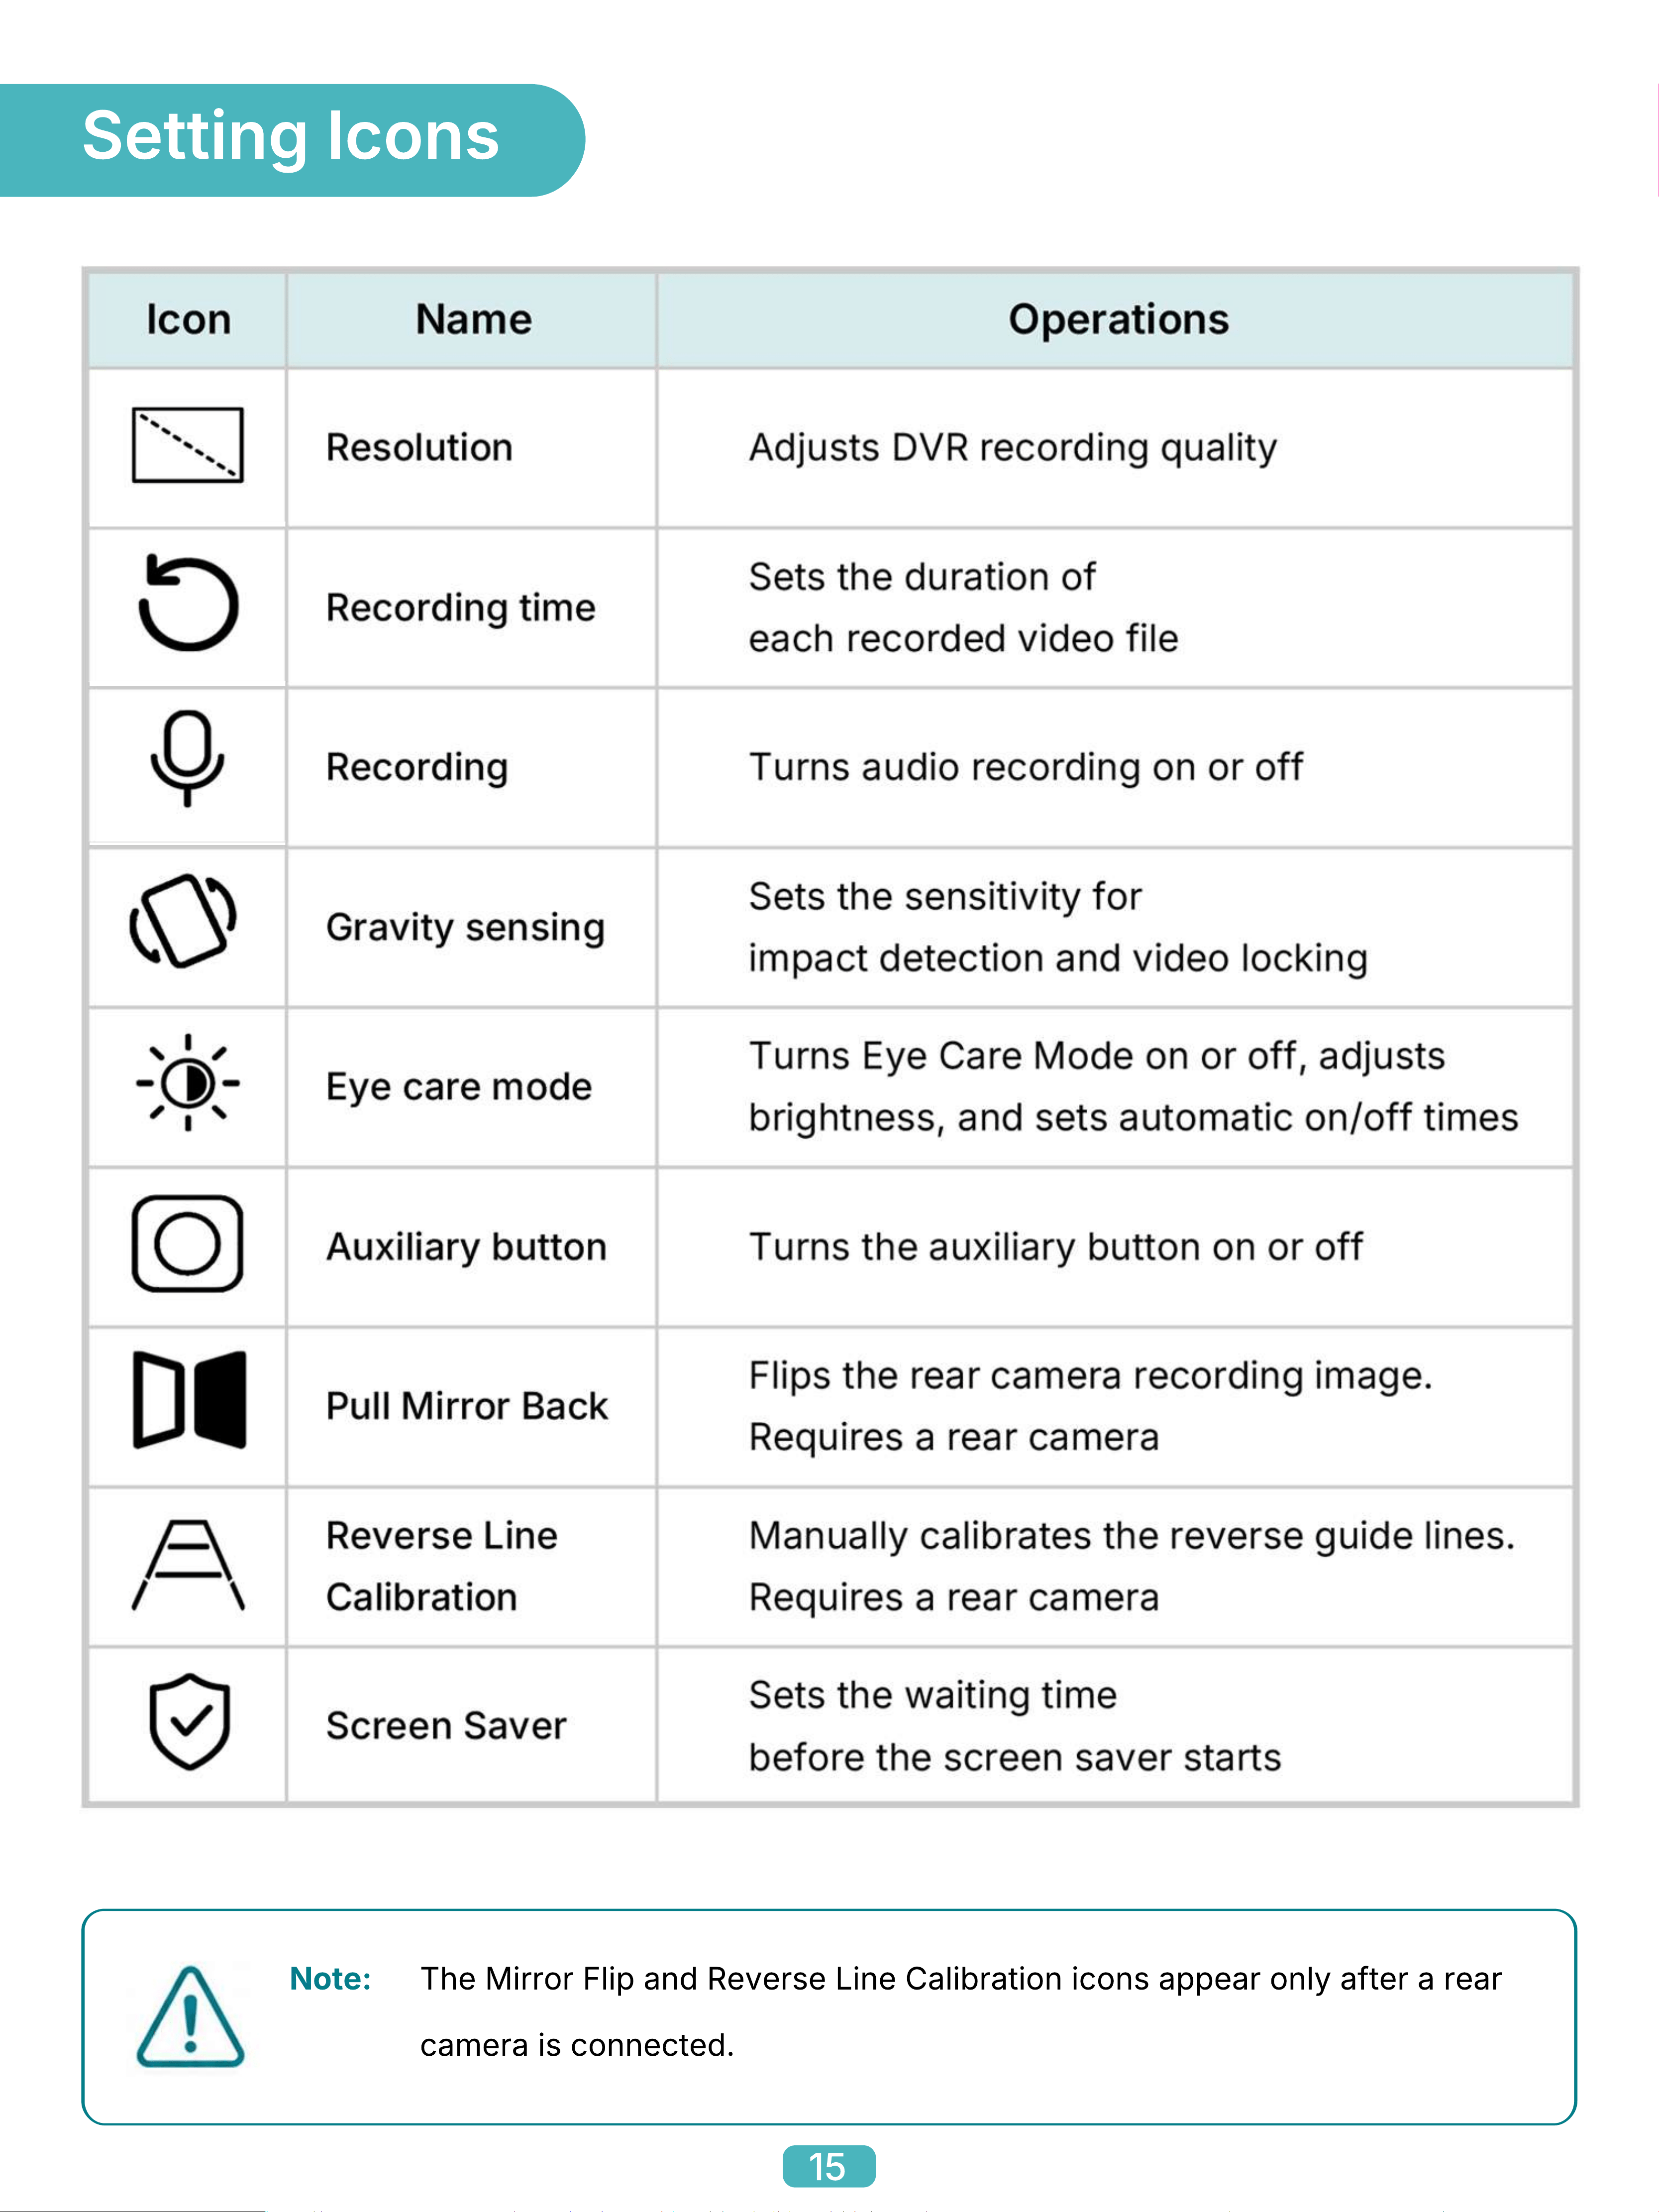
Setting Icons
The Mirror Flip and Reverse Line Calibration icons appear only after a rear
camera is connected.
Note:
15
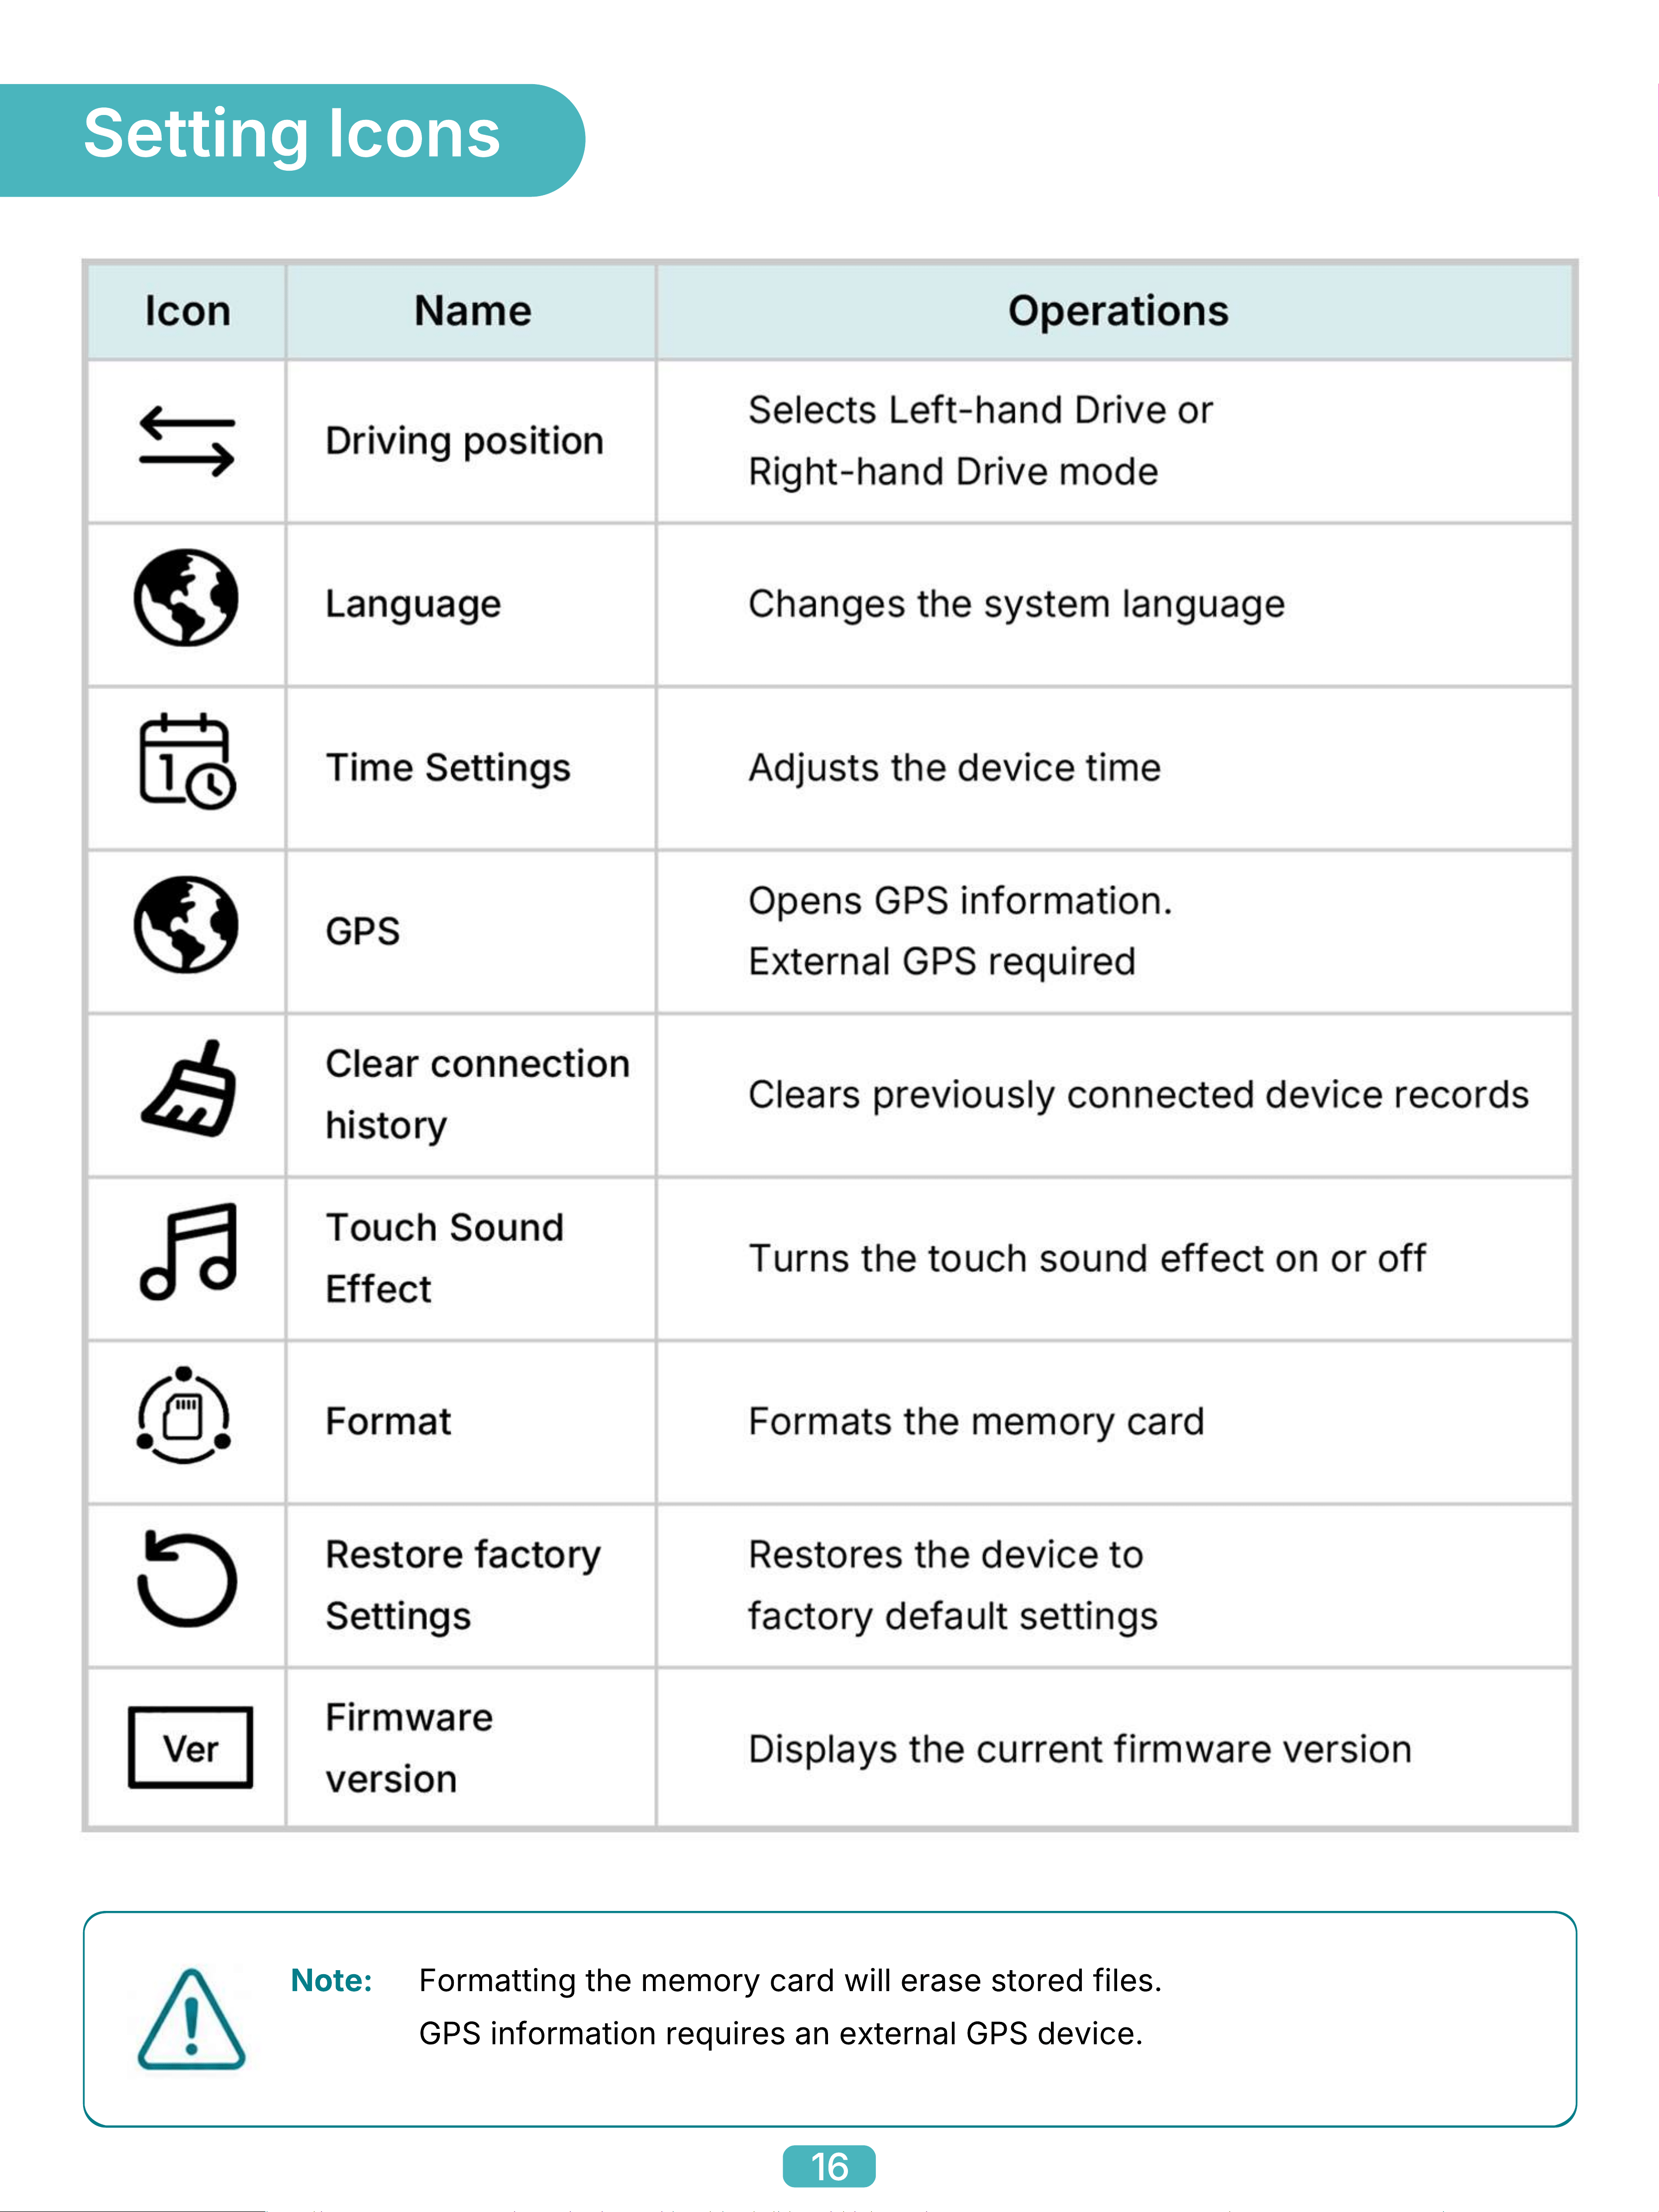
Formatting the memory card will erase stored files.
GPS information requires an external GPS device.
Note:
Setting Icons
16
FAQ
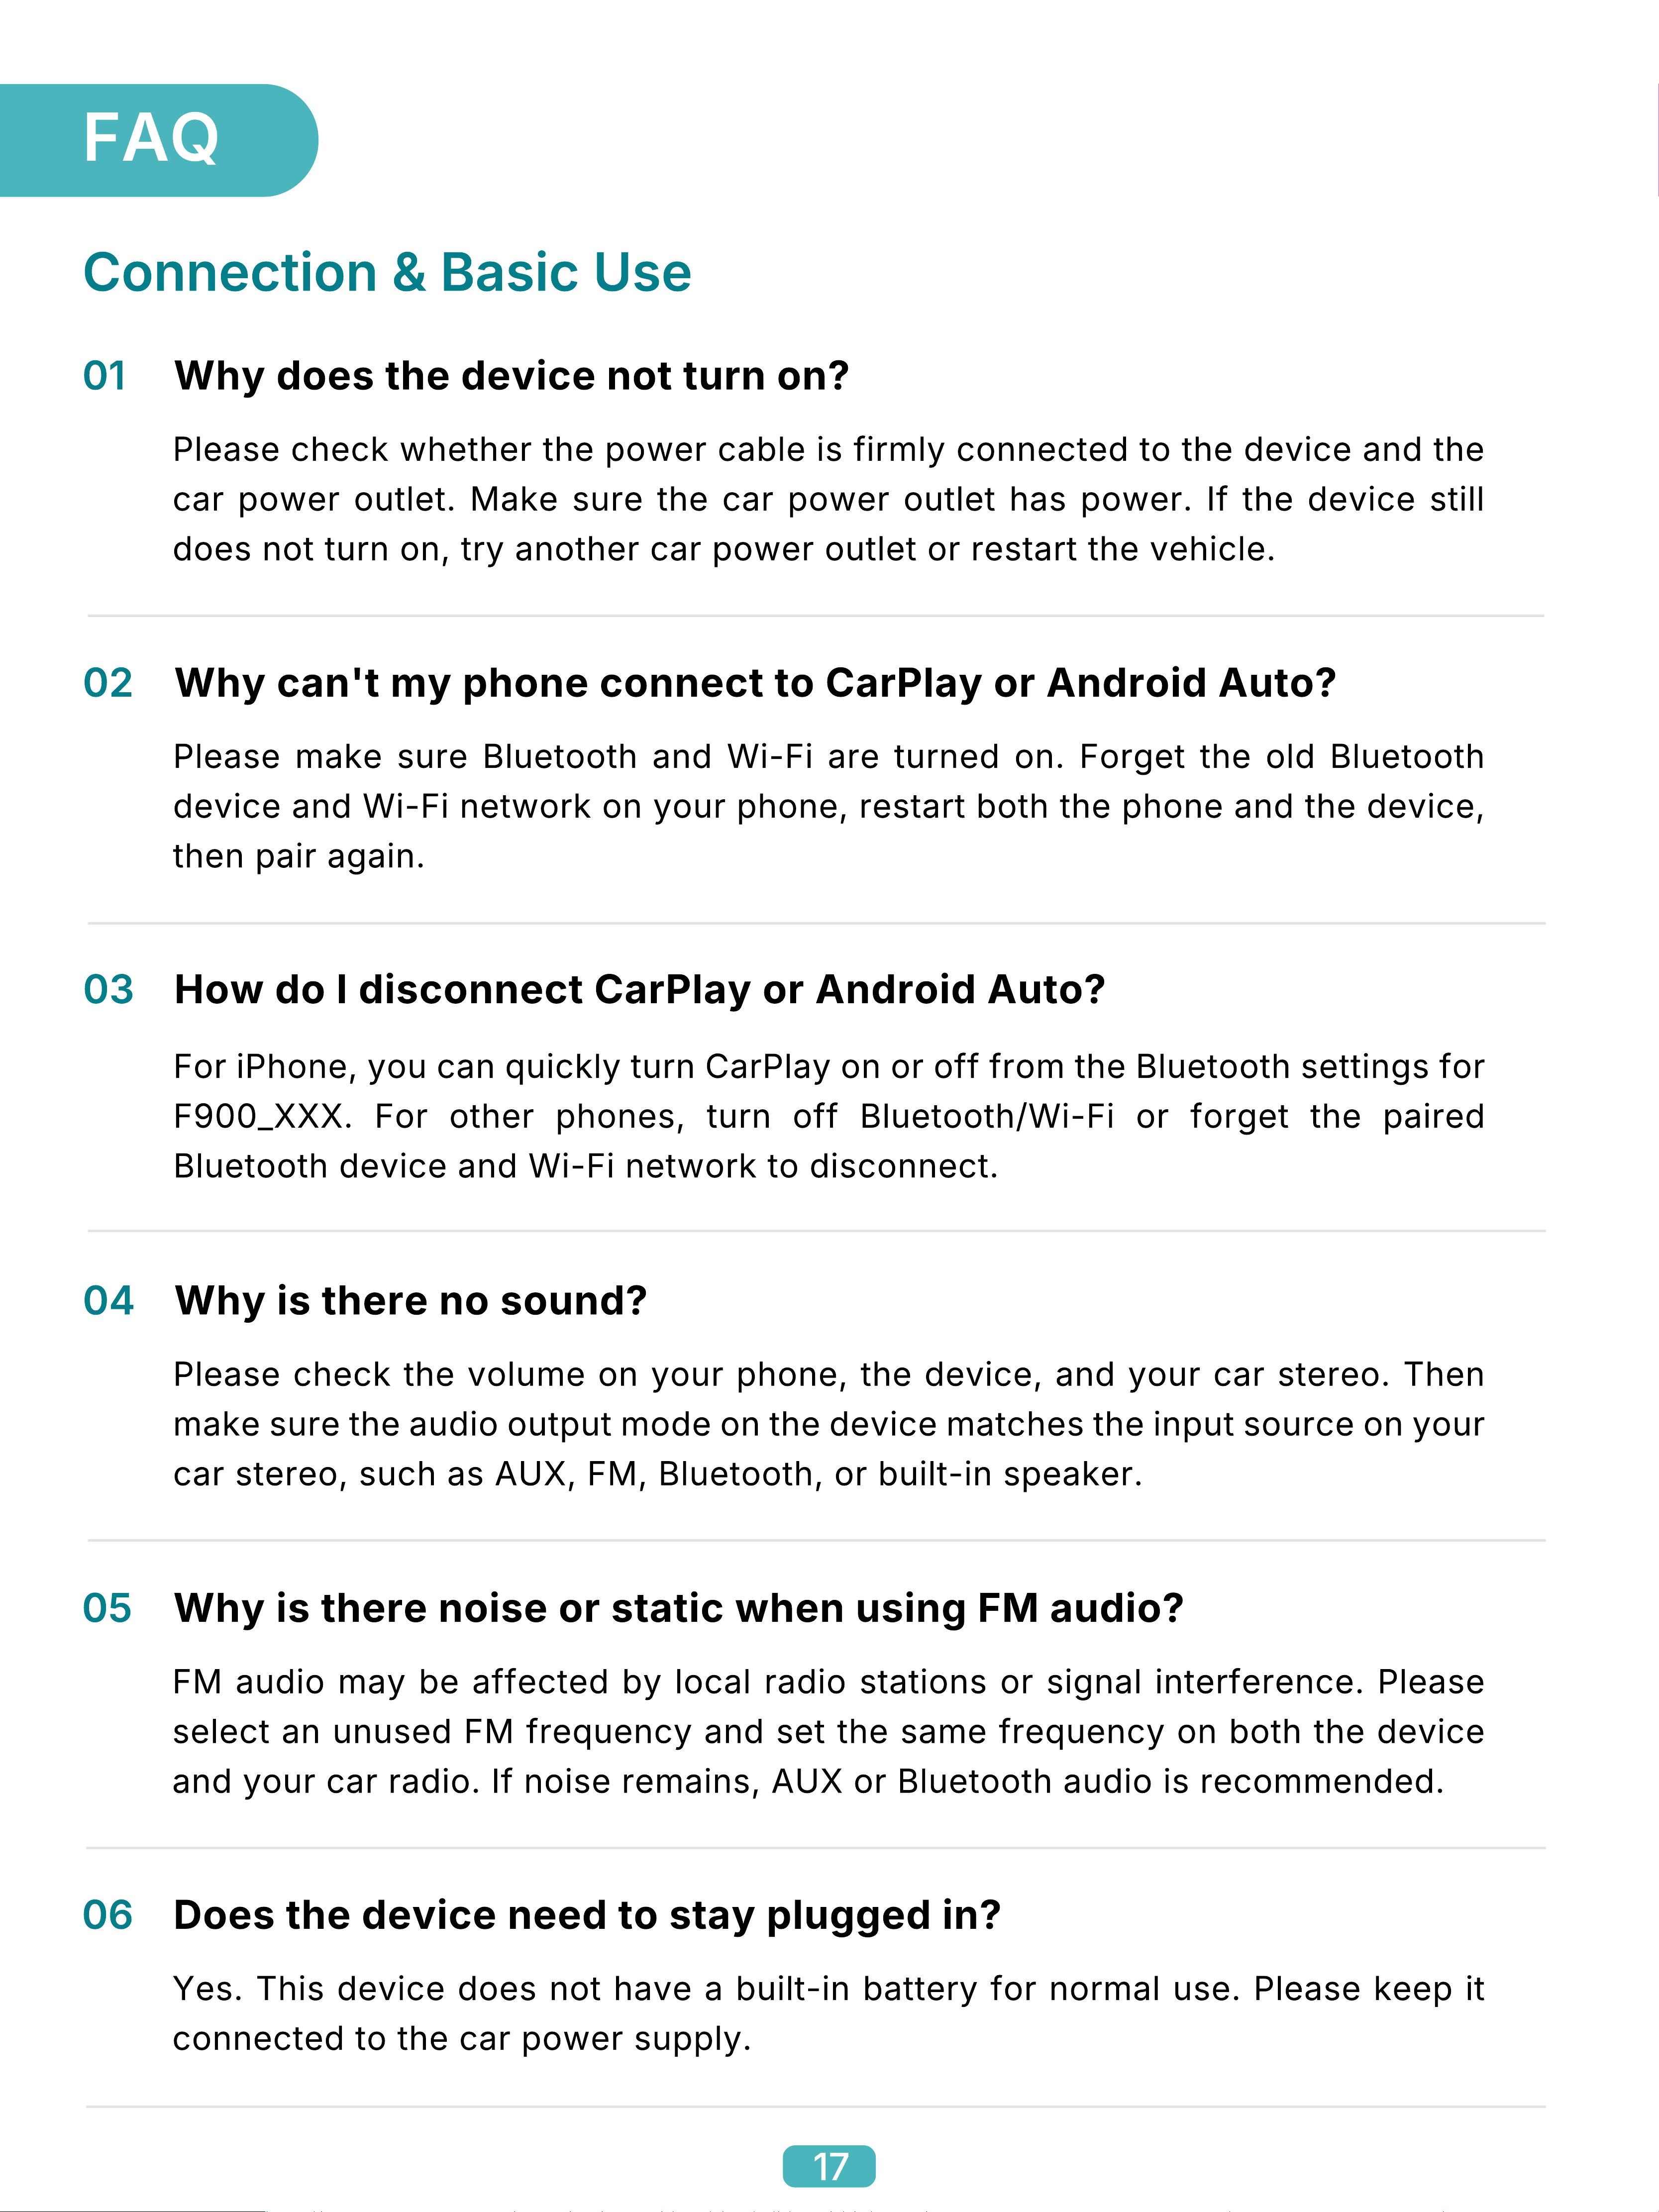
Please check whether the power cable is firmly connected to the device and the
car power outlet. Make sure the car power outlet has power. If the device still
does not turn on, try another car power outlet or restart the vehicle.
Why does the device not turn on?
01
Please make sure Bluetooth and Wi-Fi are turned on. Forget the old Bluetooth
device and Wi-Fi network on your phone, restart both the phone and the device,
then pair again.
Why can't my phone connect to CarPlay or Android Auto?
02
For iPhone, you can quickly turn CarPlay on or off from the Bluetooth settings for
F900_XXX. For other phones, turn off Bluetooth/Wi-Fi or forget the paired
Bluetooth device and Wi-Fi network to disconnect.
How do I disconnect CarPlay or Android Auto?
03
Please check the volume on your phone, the device, and your car stereo. Then
make sure the audio output mode on the device matches the input source on your
car stereo, such as AUX, FM, Bluetooth, or built-in speaker.
Why is there no sound?
04
FM audio may be affected by local radio stations or signal interference. Please
select an unused FM frequency and set the same frequency on both the device
and your car radio. If noise remains, AUX or Bluetooth audio is recommended.
Why is there noise or static when using FM audio?
05
Yes. This device does not have a built-in battery for normal use. Please keep it
connected to the car power supply.
Does the device need to stay plugged in?
06
Connection & Basic Use
17
FAQ
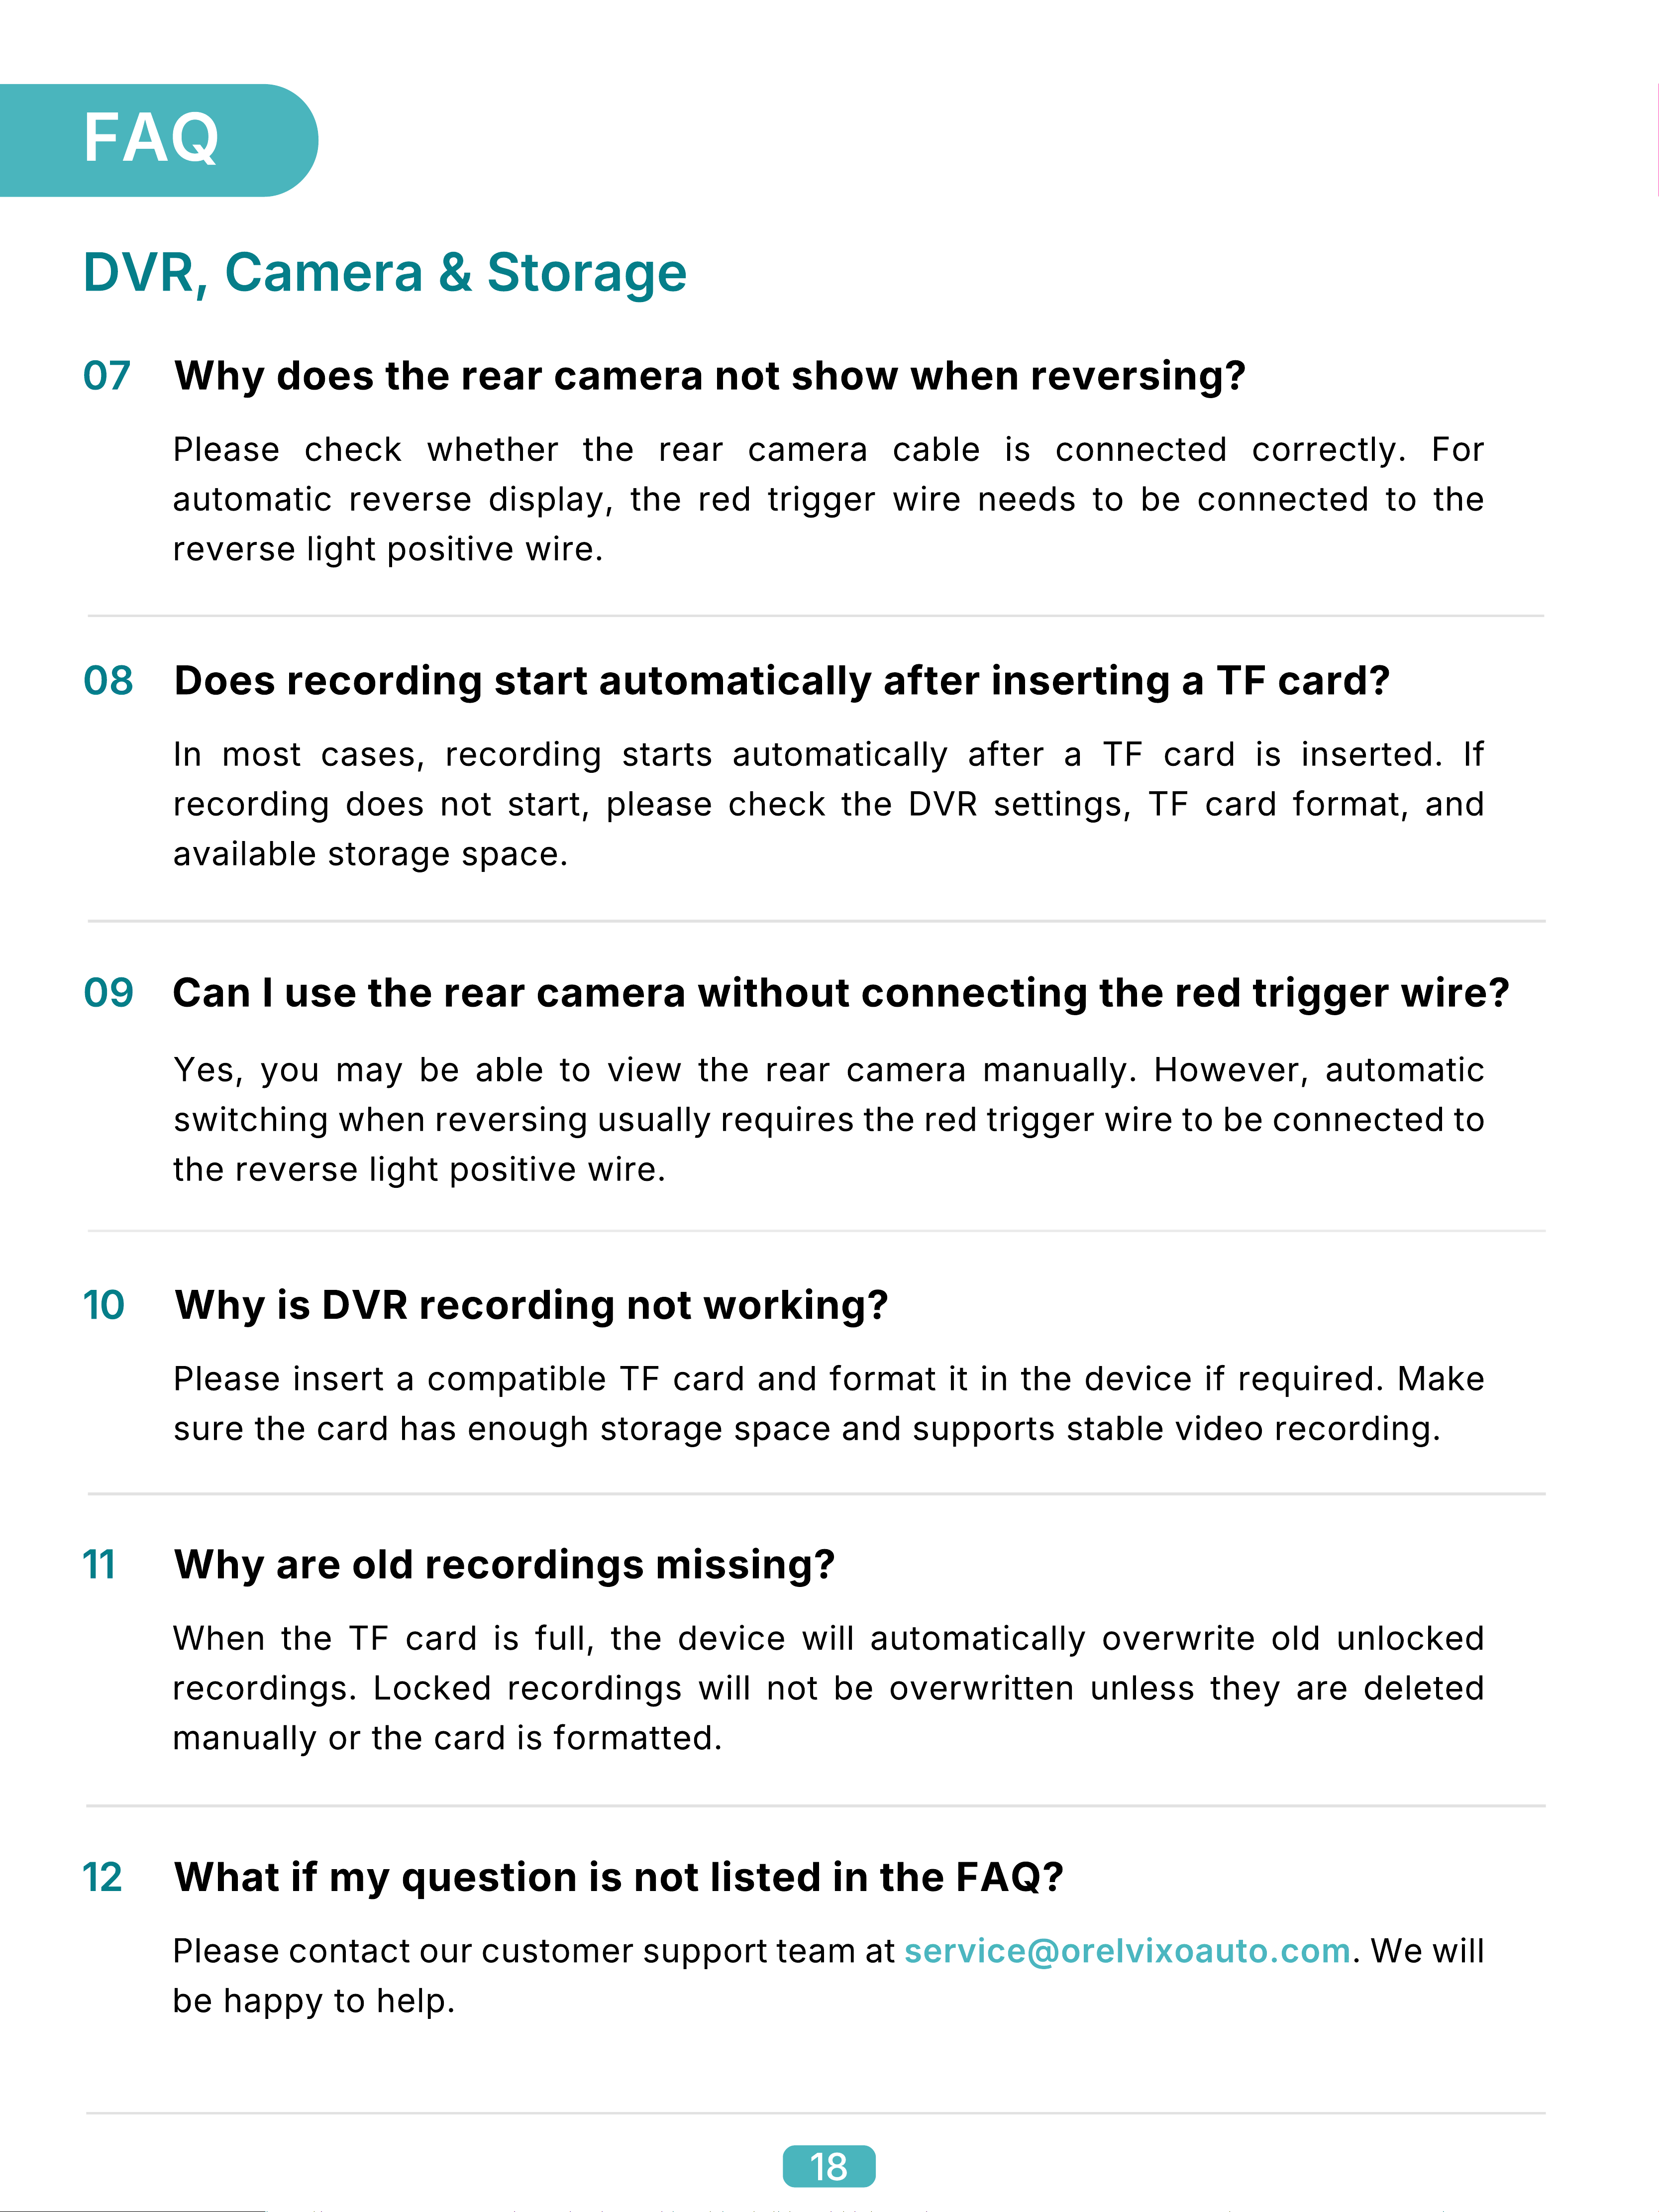
Please check whether the rear camera cable is connected correctly. For
automatic reverse display, the red trigger wire needs to be connected to the
reverse light positive wire.
Why does the rear camera not show when reversing?
07
In most cases, recording starts automatically after a TF card is inserted. If
recording does not start, please check the DVR settings, TF card format, and
available storage space.
Does recording start automatically after inserting a TF card?
08
Yes, you may be able to view the rear camera manually. However, automatic
switching when reversing usually requires the red trigger wire to be connected to
the reverse light positive wire.
Can I use the rear camera without connecting the red trigger wire?
09
Please insert a compatible TF card and format it in the device if required. Make
sure the card has enough storage space and supports stable video recording.
Why is DVR recording not working?
10
When the TF card is full, the device will automatically overwrite old unlocked
recordings. Locked recordings will not be overwritten unless they are deleted
manually or the card is formatted.
Why are old recordings missing?
11
Please contact our customer support team at service@orelvixoauto.com. We will
be happy to help.
What if my question is not listed in the FAQ?
12
DVR, Camera & Storage
18

This device complies with part 15 of the FCC Rules. Operation is subject to the following two conditions: (1) this device may
not cause harmful interference, and
(2) This device must accept any interference received, including interference that may cause undesired operation.
Changes or modifications not expressly approved by the party responsible for compliance could void the user’s authority to
operate the equipment. This equipment has been tested and found to comply with the limits for a Class B digital device,
pursuant to Part 15 of the FCC Rules. These limits are designed to provide reasonable protection against harmful interference
in a residential installation. This equipment generates uses and can radiate radio frequency energy and, if not installed and
used in accordance with the instructions, may cause harmful interference to radio communications. However, there is no
guarantee that interference will not occur in a particular installation. If this equipment does cause harmful interference to radio
or television reception, which can be determined by turning the equipment off and on, the user is encouraged to try to correct
the interference by one or more of the following measures:
‐‐ Reorient or relocate the receiving antenna.
‐‐ Increase the separation between the equipment and receiver.
‐‐Connect the equipment into an outlet on a circuit different from that to which the receiver is connected.
‐‐ Consult the dealer or an experienced radio/TV technician for help.ct.
This equipment complies with the FCC RF radiation exposure limits set forth for an uncontrolled environment. This equipment
should be installed and operated with a minimum distance of 20cm between the radiator and any part of your body.