
1
Version History
No. Date Version Revised Content Editor Reviewer Remarks
1 2026.04.231 V1.0.0 First release Chenwanling

2
Notice to the user
Government law prohibits the operation of unlicensed radio transmitters within
the territories under government control.
Illegal operation is punishable by fine or imprisonment or both.
THANK YOU !
Since 1989, Belfone has been engaged in research and exploration in the field
of radio communication technology for decades, and has a global leading
position in the field of private network communication technology. Based on
research and development design, adapt to the modern complex
communication environment, It is able to customize specific communication
solutions according to different industry characteristics. High-performance,
high-quality products that can control the overall situation, while providing
smart dispatching and command communication.
This manual is applicable to
BP860Ex series

3
Instructions before Use
It’s important for the operator to be aware of and understand hazards common
to the operation of any radio .Please observe the following safety precautions
to prevent radio damage and personal injury. The following precautions shall
be observed during operation, service and repair of this radio.
◆It is recommended to use 1 minute for TX and 4 minutes for RX, when the
radio is used in the transmission mode for many hours continuously, the
radiator and chassis will become hot, allow the rear panel of the radio to
contact a surface of low melting point /low Ignition point.
◆Don’t expose the radio to direct sunlight for a long periods of time. Also,
don’t place the radio on sources of extremely heat, humid, dusty area, or
unstable surfaces.
◆In areas where the use of radio devices is restricted or warned, please obey
the regulation and turn off the radio.
◆Use of the radio while driving may be against traffic laws in some countries,
please check local traffic laws before using the radio while driving.
◆If there is any problems with the radio, please turn the radio off immediately.
Then contact the local dealer/technician.
Do not modify this radio unless
instructed by this manual. Please find a certified technician to repair it.
◆If secondary development is required, please contact BelFone or the local
dealer for technical assistance.
◆Please keep the surface of radio clean and dry. To clean the radio, use a

4
damp fabric soaked in mild washing liquid.
Explosion Proof Introduction Function
Before using the explosion-proof radio, please be sure to follow the relevant
information and safety regulations contained in the following operating
instructions, to ensure safe and reliable operation in the described
environment, avoid possible dangerous consequences or violations of
applicable regulations
Scope of Application
This digital explosion-proof radio conforms to GB/T3836.1-2021 and
GB/T3836.4-2021 standards. It is an intrinsically safe equipment, used in gas

5
environment Zone 1 and Zone 2, equipment category II, explosion-proof
equipment used in other explosive gas environments except coal mine gas
environment, temperature group T4, equipment protection level Gb.
Classification of hazardous areas:
Dangerous
substances
Long term existence
(More than 1000
hours/year)
Exists during normal
operation
(10-1000 hours/year)
Only exists when
abnormal
(Less than 10
hours/year)
Gas
Zone 0
Zone 1
Zone 2
Intrinsic safety devices refer to products that have been approved by
certification authorities and are considered inherently safe, proving that a
specific product meets the applicable intrinsic safety certification standards of
that authority. They can be used in specific hazardous locations, such as
petrochemical enterprises, fuel or chemical production, transportation and
storage sites, cruise ship warehouses, etc. Due to the requirement of intrinsic
safety circuits that sparks and thermal effects generated under specified
experimental conditions cannot ignite the specified explosive gas mixture, it is
currently the safest explosion-proof type.
Failure Warning and Response Measures
When the intrinsic safety or integrity of the radio is compromised, please
immediately stop any operation on the radio and leave the explosion area, and
avoid reuse. The radio must be sent to the manufacturer for inspection. The
security and reliability of radio will be threatened in the following cases:

6
◆There is obvious damage or rupture on the shell.
◆Exceeding the allowed tolerance or threshold values.
◆The nameplate or text on the body is difficult to recognize
◆ The radio exceeds the load limit.
◆ Improper storage.
◆The radio has malfunctioned.
◆The radio is damaged during transportation.
Safety Regulations
Any person using the radio must carefully read and comply with the standard
safety regulations to avoid improper operation or damage to the radio:
◆Explosion proof battery packs cannot be disassembled or replaced in
explosive environments, nor can they be charged;
◆Only use designated chargers to charge batteries outside of hazardous
areas;
◆ Only use accessories designated by the company;
◆Do not bring spare batteries into hazardous areas;
◆External plug-in devices without explosion-proof certification cannot be used
in explosive environments;
◆Do not use the damaged radio, as the damaged antenna may cause slight
burns when contacting the skin;
◆Do not expose the radio to direct sunlight for a long time or place it near the

7
heating device;
◆It is strictly prohibited to bring radio into Zone 0 of dangerous area;
◆It is strictly prohibited to disassemble the radio or replace the battery or
accessories of the radio in dangerous places;
◆It is strictly prohibited to disassemble or modify the radio certified by
explosion-proof testing institutions in any way. Only the original manufacturer
of the radio can carry out modifications within the scope permitted by the
explosion-proof testing institution. Unauthorized modifications will result in the
invalidation of the explosion-proof certification of the radio.
Unpacking and Device Inspection
Note: The following instructions regarding unpacking are only for BelFone’s distributors,
and service agencies or factories authorized by BelFone.
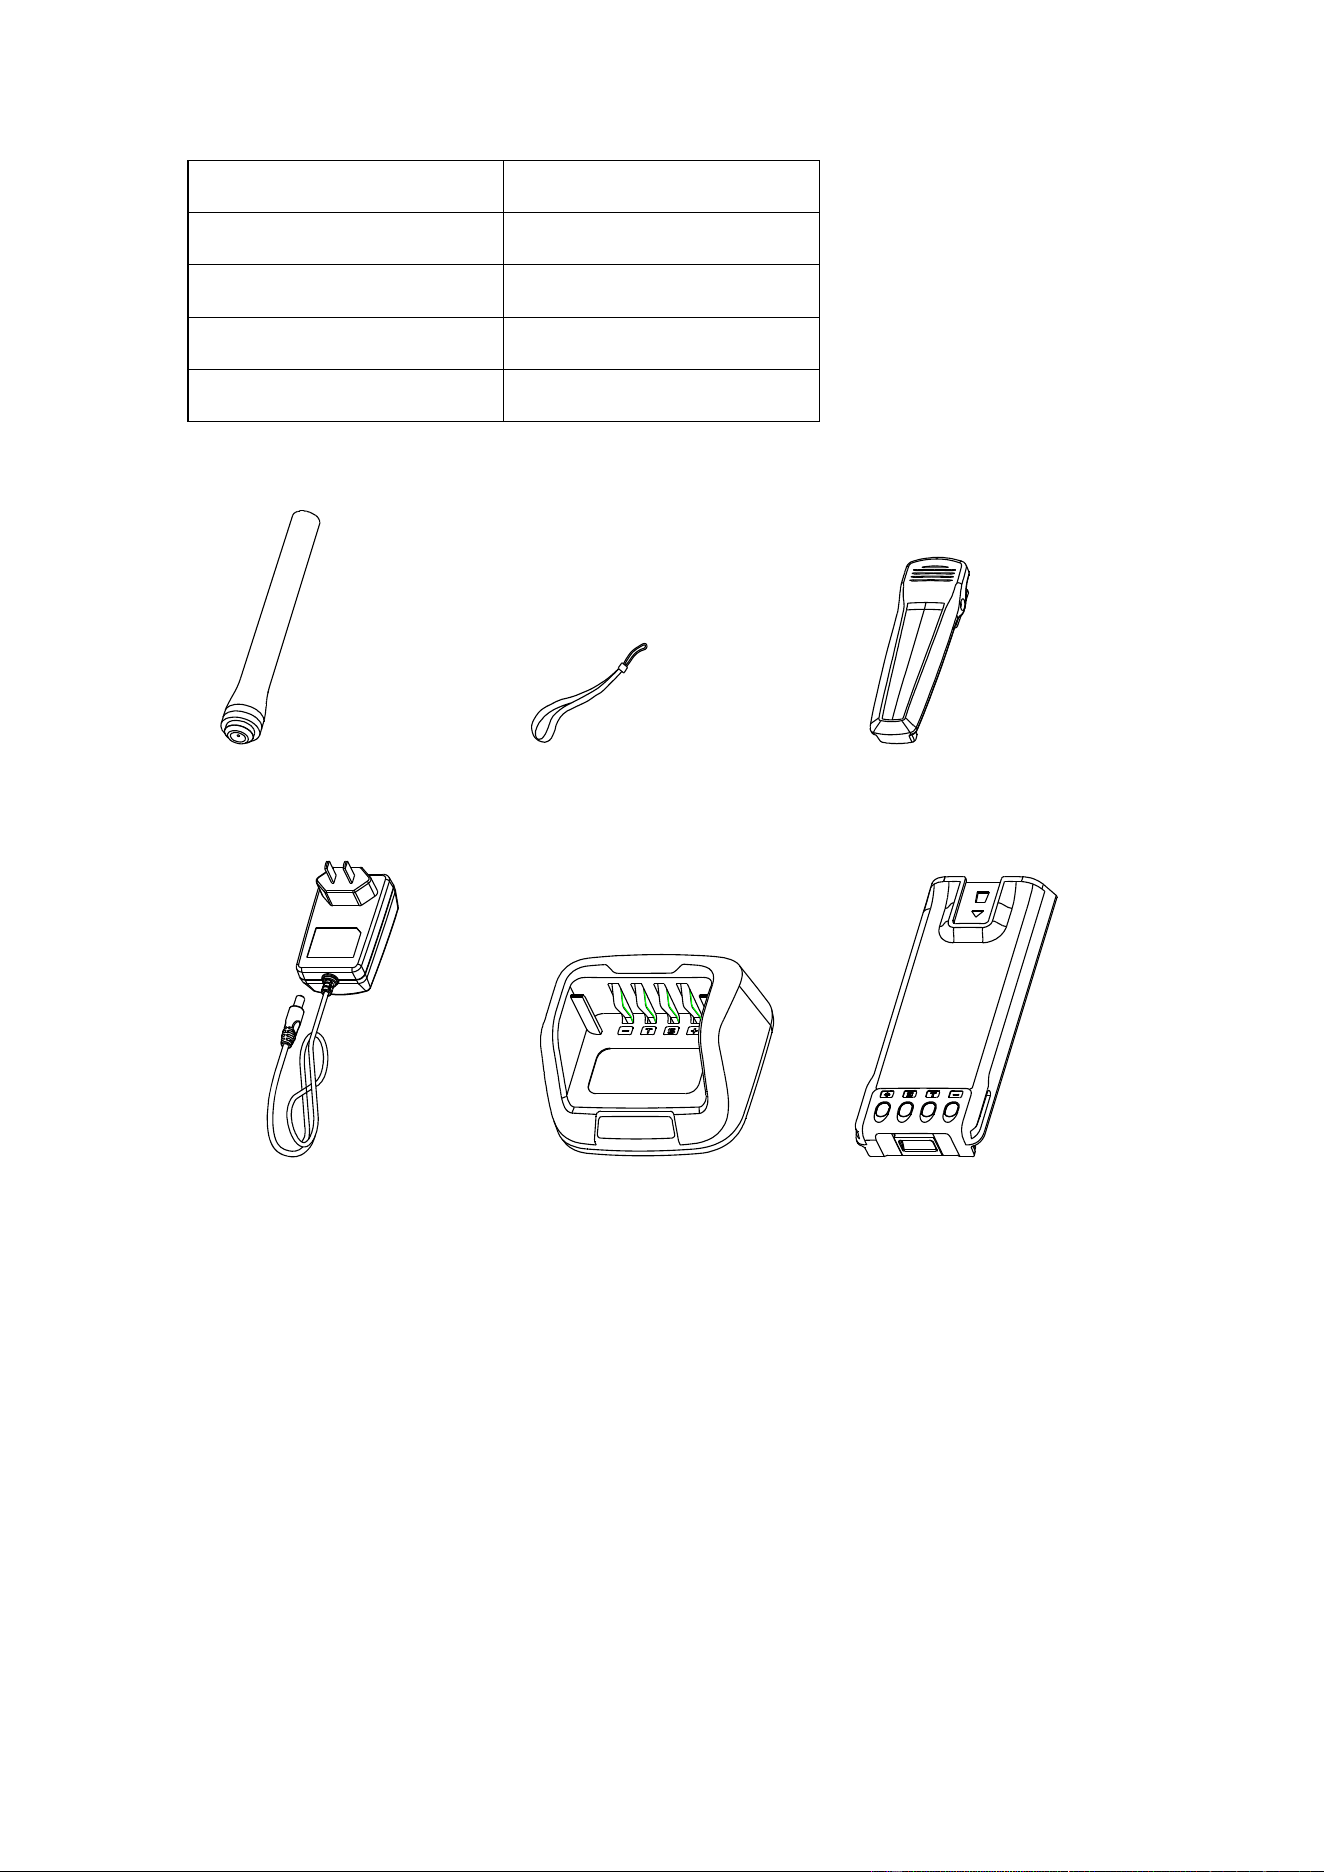
After carefully unpacking the radio, identify the items listed in the table below. If
any items are missing or have been damaged during shipment please contact
dealer or BelFone
immediately
.
Accessories
Items
Quantity
Antenna
1
Strap 1
Belt Clip
1
AC Adapter 1
8
Charger 1
Li-ion Battery 1
User Manual 1
Warranty Card 1
Certificate 1
Antenna
Strap
Belt Clip
AC Adapter
Charger Li-ion Battery
Installation of Accessories
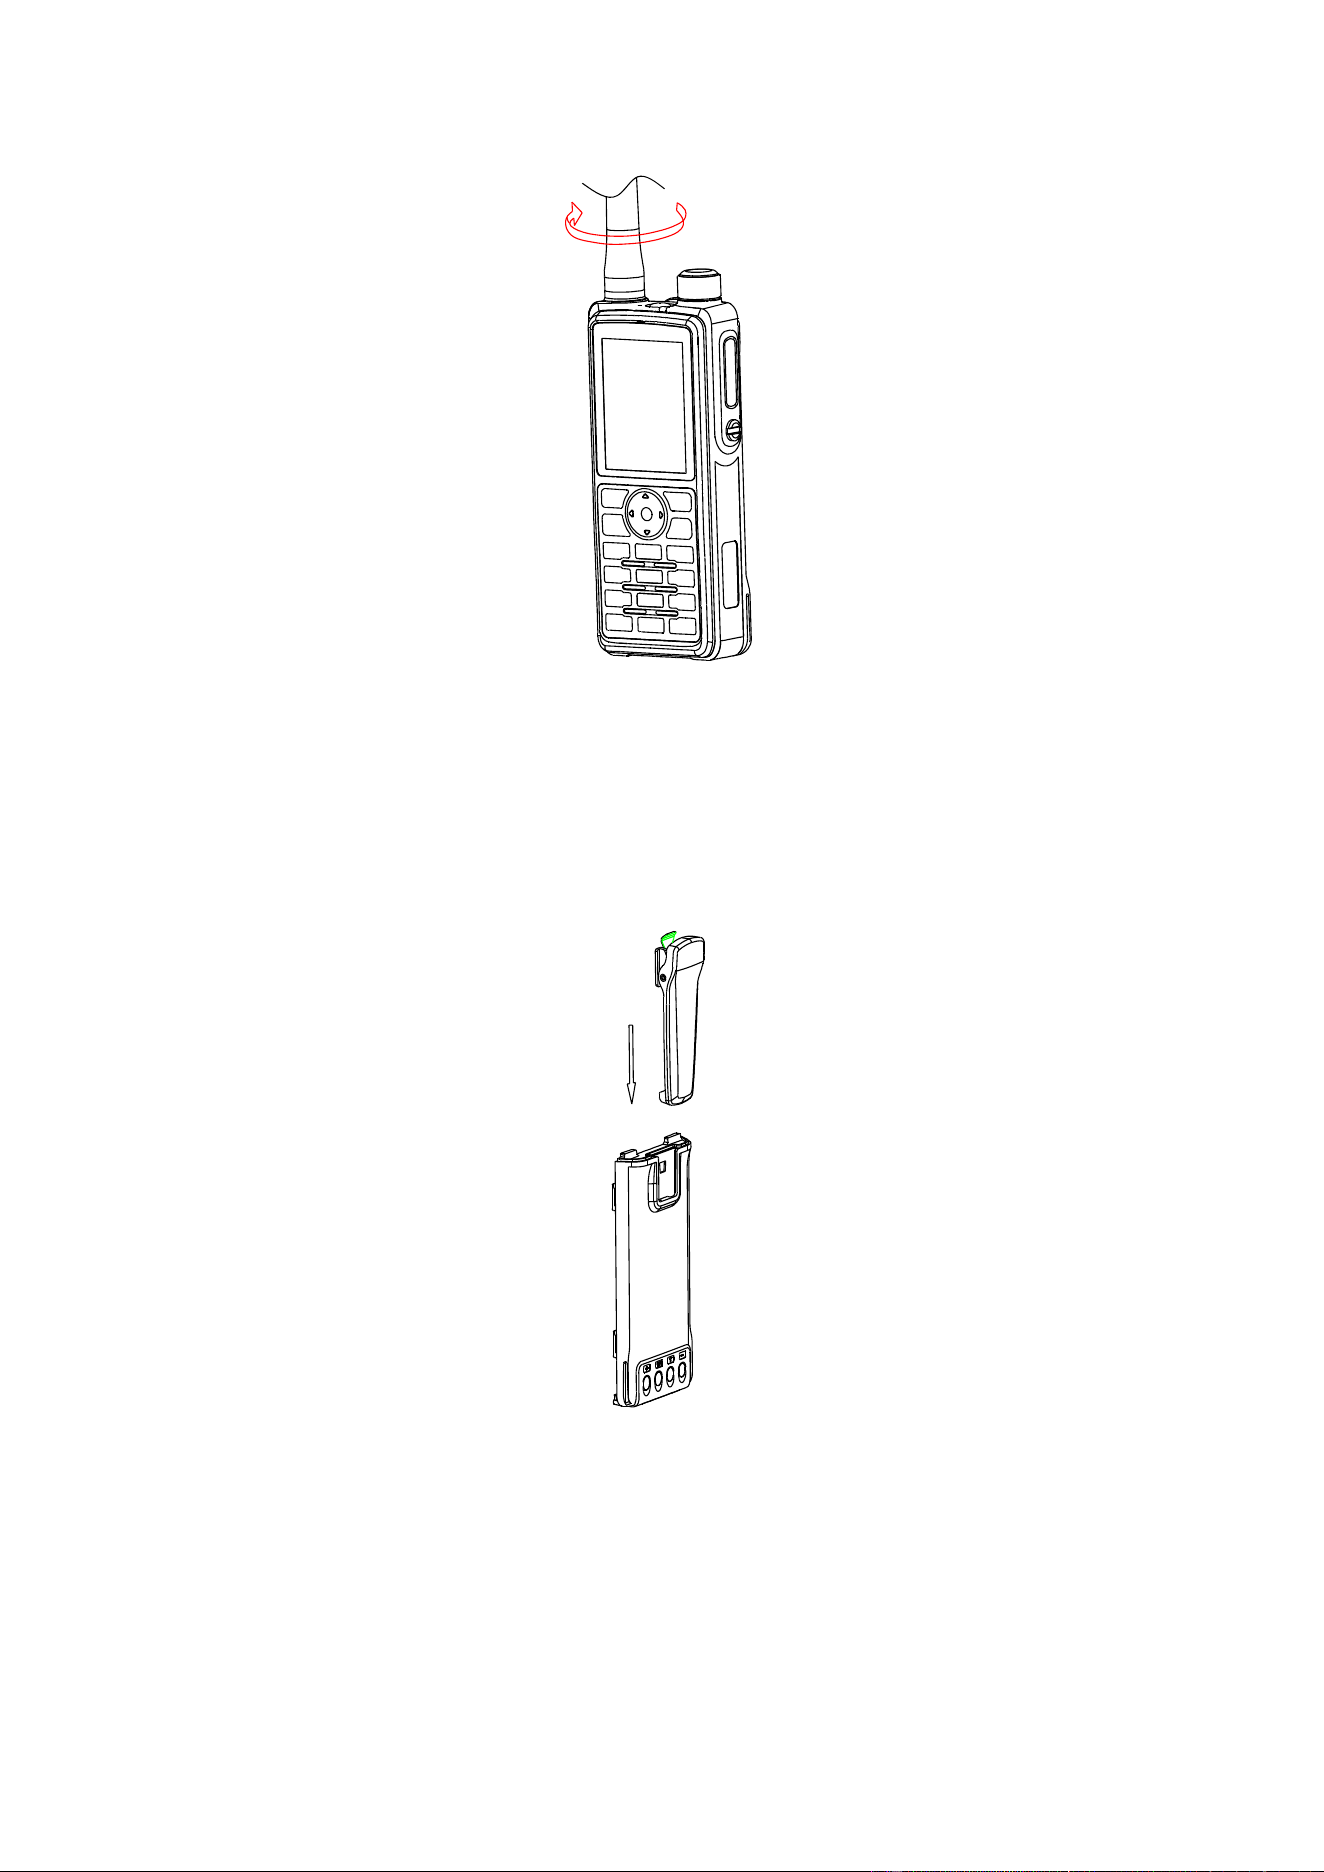
Installation / Removing the antenna
Hold the antenna base, then screw it into the connector on the top of the radio
until fasten.
Turn the antenna anti-clockwise to remove it.
9
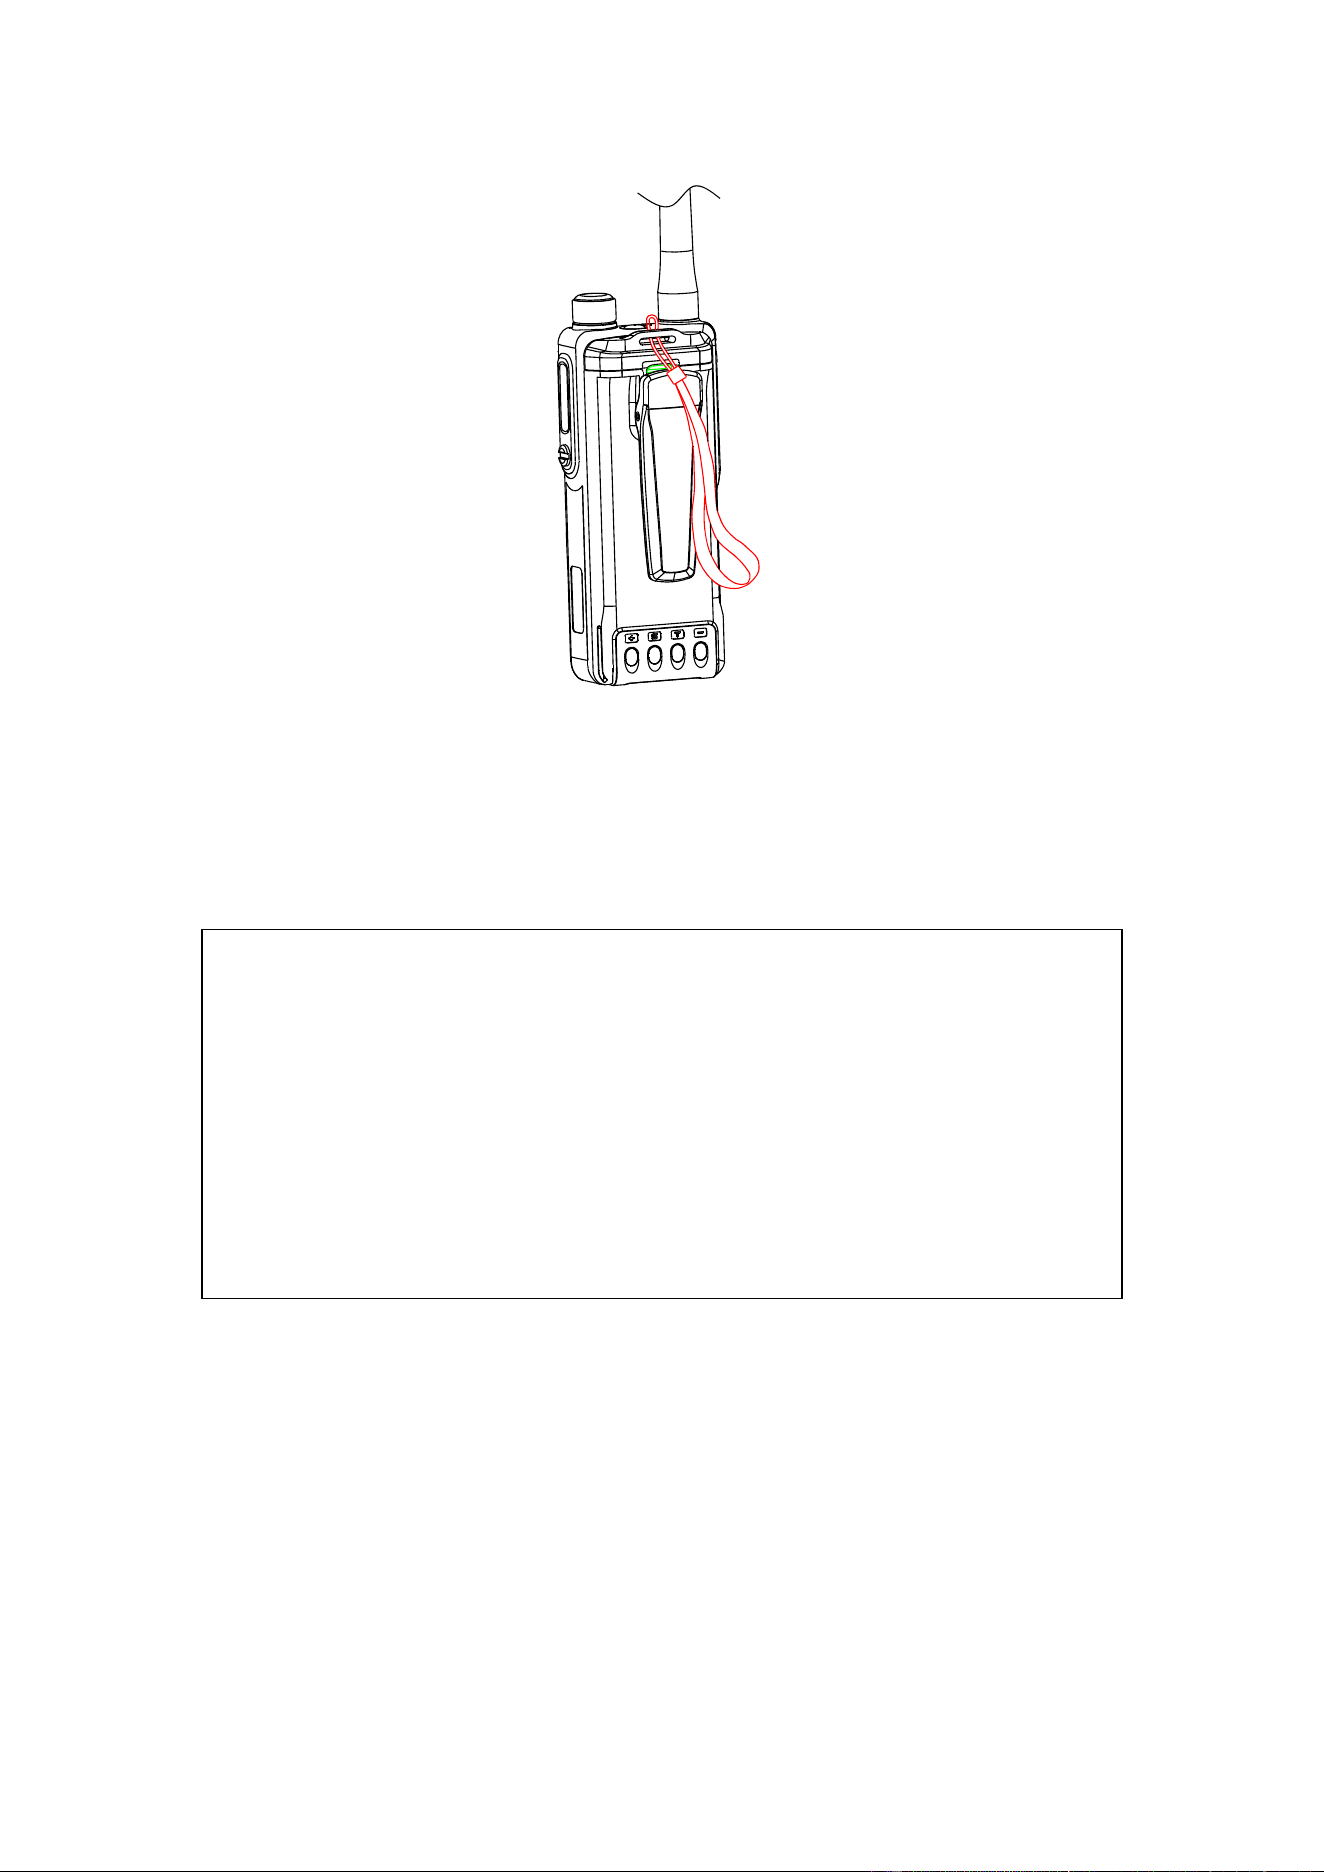
Installation/ Removing the belt clip
Align the belt clip with the groove on the back of the radio and press it down.
Attaching / Removing the strap
Thread the hand strap to the loop back of the radio.
10
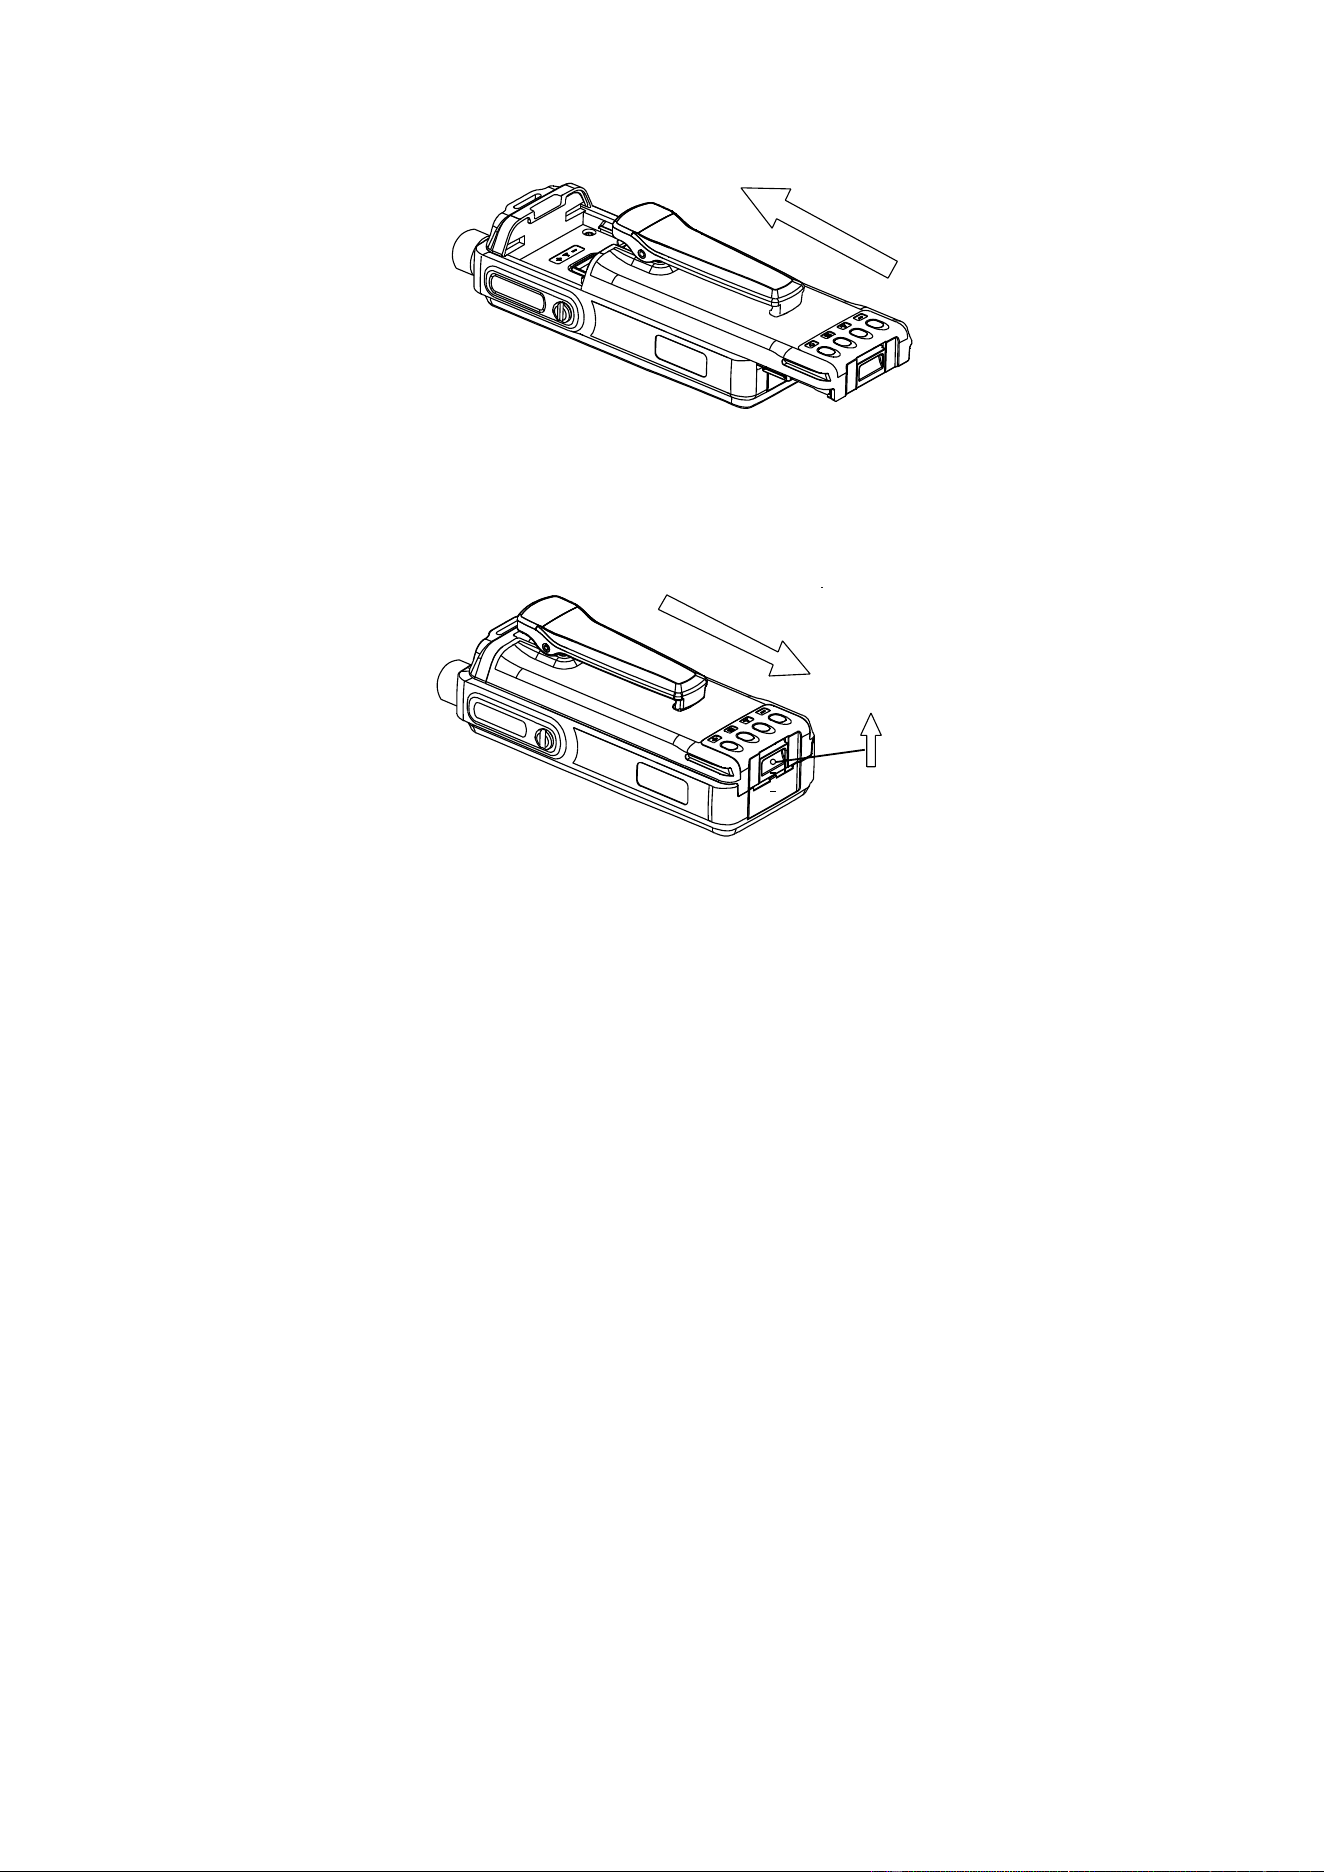
Attaching / Removing the Battery
Match the guides of the battery with the corresponding grooves on the upper
rear of the radio, then press the battery until a click is heard to lock it in place.
Warning!
Don’t short-circuit the battery, which may cause damaged or catch fire;
Never attempt to remove the casing from battery, the battery terminals
may short circuit;
Battery is flammable objects, don’t throw it into fire or don’t use it on
dangerous area.
11
To remove the battery, please turn the power off then press the latch to unlock
the battery and pull the battery away from the radio.
Note: Don’t attach / remove the battery if the radio is powered on.
Battery Information
The new battery hasn’t been fully charged before shipped, please charge more
than 5 hours at the first use. The maximum battery capacity and performance
is achieved after three full charge/discharge cycles. If the battery power runs
lows, please recharge the battery.
Applicable Battery
To reduce the risk of injury, please only use the battery and charger specified
by Belfone, other batteries may burst, causing bodily injury and property
damage.
Battery Tips

12
1. When charging the battery, keep it at a temperature among 5℃—40℃.
Temperature out of the limit may cause battery leakage or damage.
2. Prior to charge a battery with the radio, it is recommended to turn the radio
off.
3. Avoid cut off the power supply or remove the battery during charging.
4. Please ensure that the battery is charged in a dry state before charging.
5. Please change the battery when working time is shorten than normal
performance even if the battery is fully charged.
Extend Battery Life
1. The battery performance will be decreased under 0℃. Please prepare a
spare battery in cold weather. A battery not work properly in a cold
environment does not mean that it is damaged. Please keep the battery
and reconfirm at room temperature.
2. The dust on the battery contact point may cause battery faulty, please
cleaning it by a dry cloth before using.
Battery Storage
1. Fully charge a battery before storing it for a long time, to avoid battery
damage due to over-discharge.
2. Recharge a battery after several months’ storage, to avoid battery capacity
reduction due to over-discharge.(NI-MH batteries:3 months, Li-Ion&
Li-polymer batteries: 6 months)
3. Store the battery in a cool, dry place under room temperature, to reduce
self-discharge.

13
Charging the battery
Use only the charger specified by the manufacturer. The charge indicator
indicates the charging progress.
Charger Status
Charger Indicator
Standby(No-load) Charge Indicator glows green
Battery is charging Charge Indicator glows red
Battery is fully charged Charge Indicator glows green
Charge Steps:
1. Plug the connector of the AC adapter into the AC outlet socket.
2. Place the battery or the radio attached with a battery in the charger.
3. Make sure the battery is connected to the charger, the charging process
initiates when the charger indicator glows red.
4. The charger indicator glows green when the battery fully charged, please
remove the battery then.
Note: While charging the temperature out of the limit the LED indicator of charger will flash
red and green; If battery has damaged or battery is not connected to the charger correctly,
the LED indicator of charger also will flash red and green.
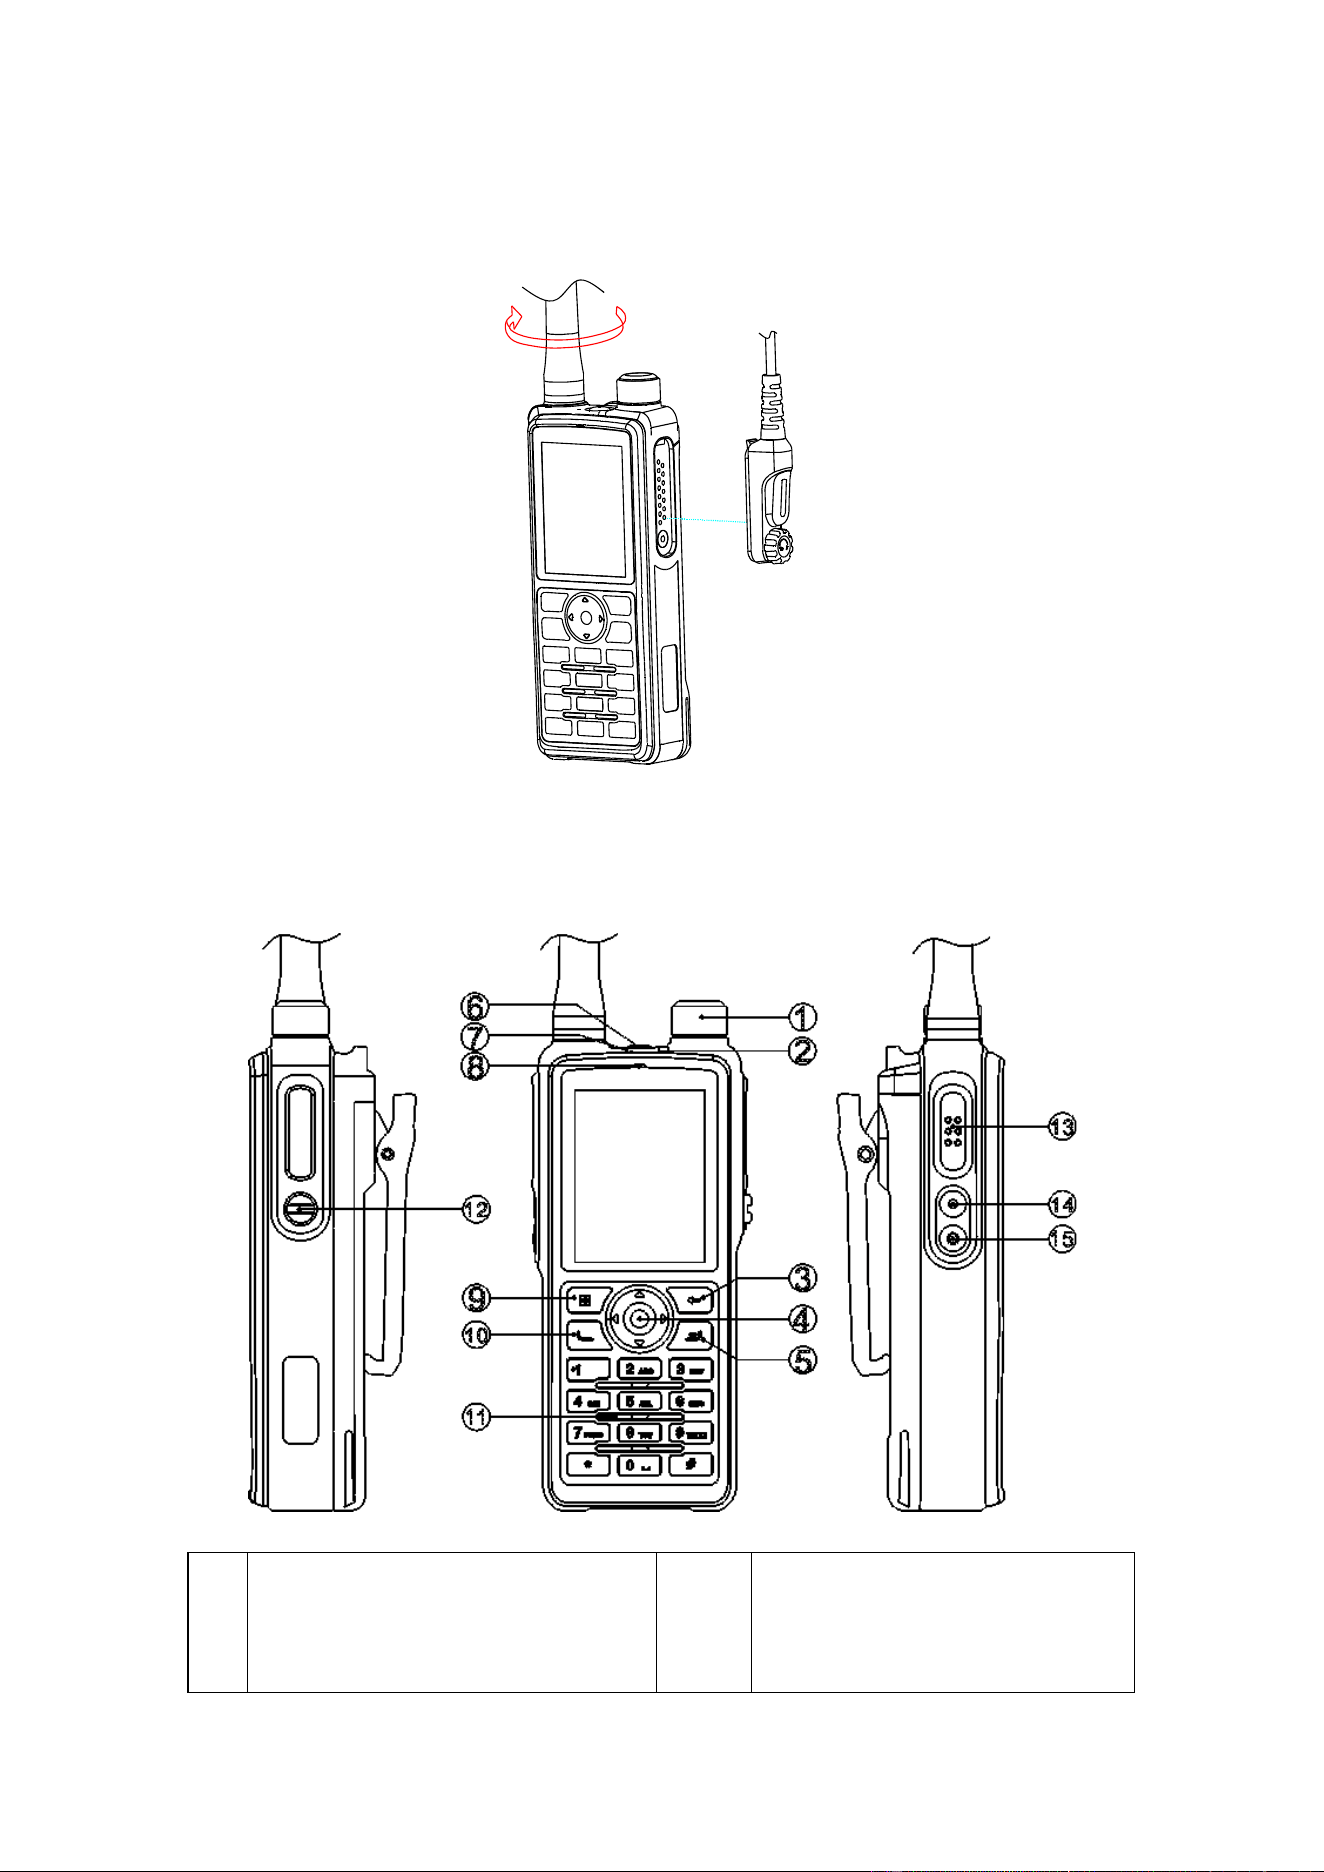
Attaching the speaker/microphone
Rotate the screw of the accessory jacket cover counterclockwise to remove
the accessory jacket cover, then align the plug with the accessory jacket and
14
tighten the screw on the plug.
Getting Acquainted
①
Power switch/volume adjust
keys
⑨
OK key
15
②
LED Indicator
⑩
P1 Key
③
Return Key
○
11
Speaker
④
Direction key
○
12
MIC-SP-USB Port
⑤
P2 Key
○
13
PTT Key
⑥
Orange Button
○
14
Side Button 1
⑦
MIC2 (Duplex mode)
○
15
Side Button 2
⑧
MIC1
Basic Operation
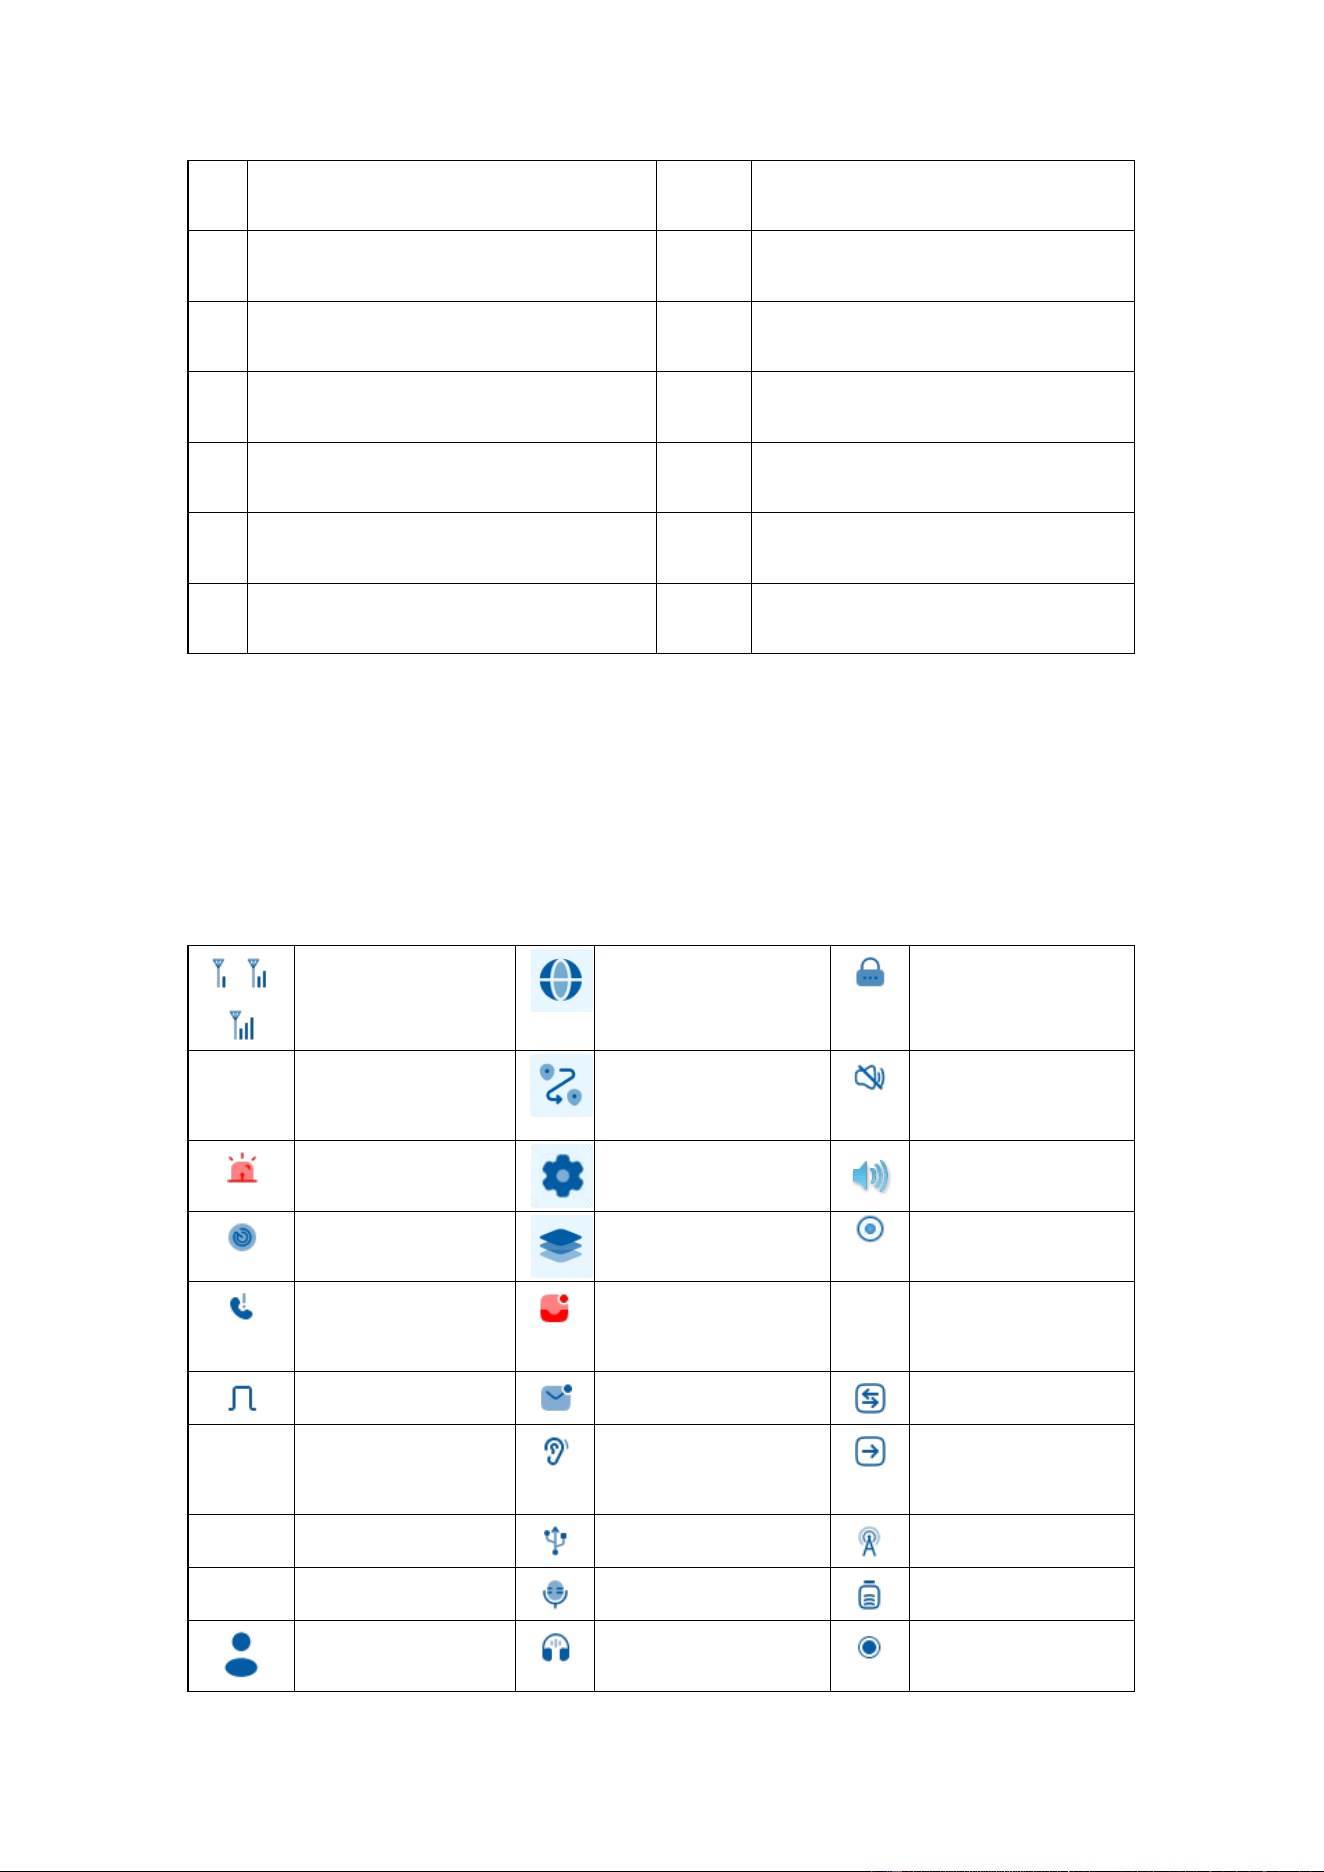
LCD Icons
Signal strength
Site roaming
menu
Keypad locked
Zone menu
All alert tones
disabled
Emergency
Settings menu
Voice call
Scan on
Accessory menu
Recording
Missed call
The inbox/outbox
is full
Digital mode
Unread message
Duplex mode
Monitoring
Half-duplex
mode
Connect to USB
Roaming on
VOX on
Battery level
Private call
Earphone is
Configured
16
connected
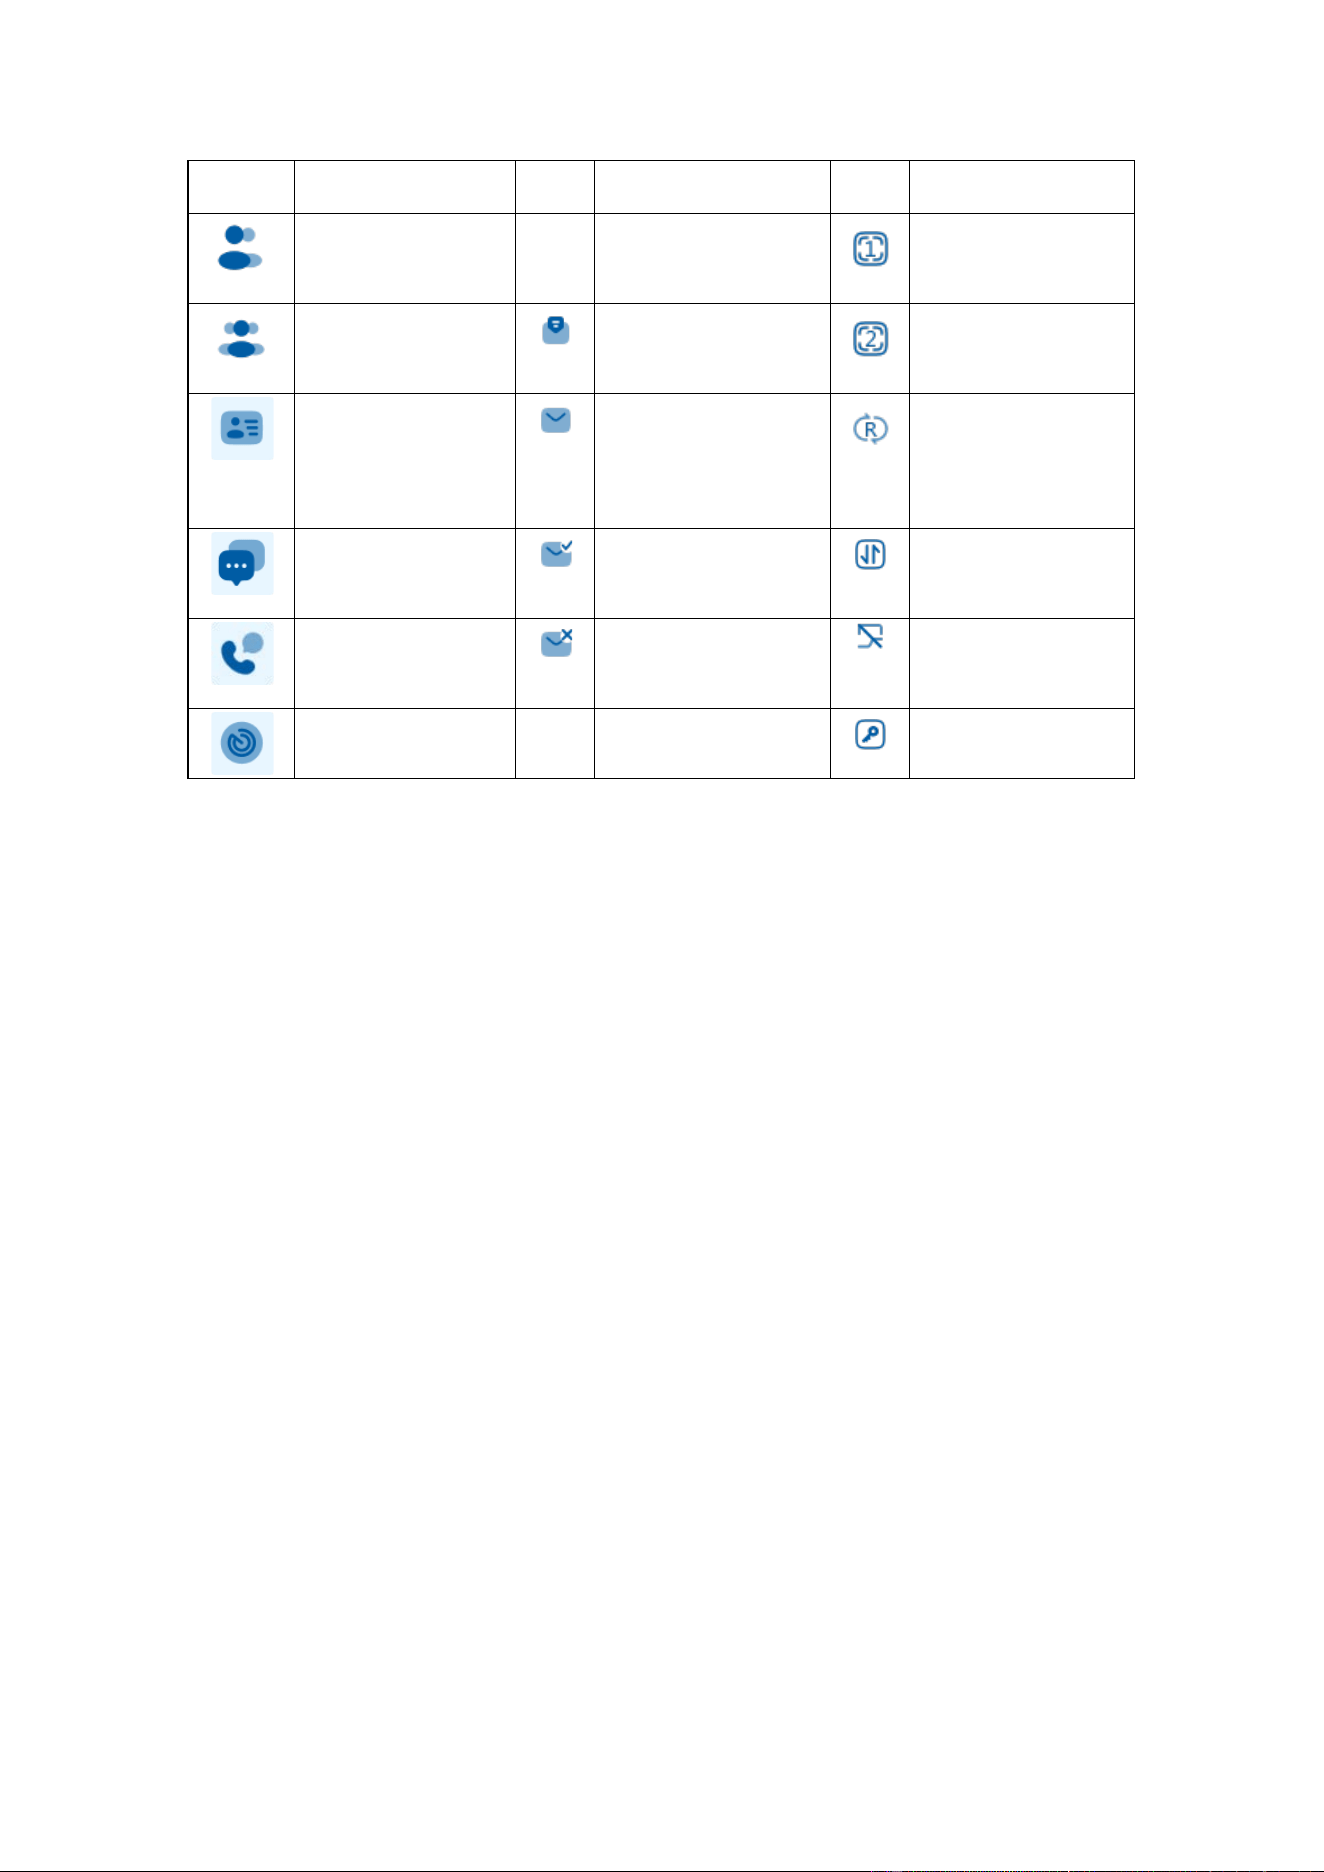
Group call
First priority
scan channel
All call
Message read
Second priority
scan channel
Contacts menu
Message unread
Single
frequency
repeater
SMS menu
Message send
successfully
Ad Hoc mode
Call log menu
Message send
failed
Channel locked
Scanning menu
Encryption on
Turning the power on /off
Long press the power switch/volume adjusting keys about 2 seconds to power
on, the power on tone will sound.
Then long press the power switch/volume adjusting keys about 2 seconds to
power off, the screen displays: power off.
Adjusting the volume
After the radio powered on, short press the power switch/volume adjust keys to
switch the function of the key as volume mode, then rotate it to adjust the
volume level, rotate the knob clockwise to increase the volume, or rotate the
knob anti-clockwise to decrease the volume.
Note: Volume adjustment can only be performed when the default knob function is set as

17
both or only volume by programming software.
Selecting a Channel
Short press the [power switch/volume adjust keys] to switch the function to
channel mode then rotate it to select a channel. Rotate the knob clockwise to
increase the channel number, or rotate the knob anti-clockwise to decrease
the channel number. It can also press the direction key up or down to select a
channel. While all tone alert is enabled ,change channel and a channel
number will sound.
Note: Channel selection can only be performed when the default knob function is set as
both or only channel by programming software.
Select a Zone
The radio supports up to 128 zones, each with a maximum of 64 channels, all
128 zones can support up to 1024 channels. Select a desired zone through
zone menu or set zone selection function to orange button, button 1 or button 2,
then handover zone. While all tone alert is enabled, select zone and a channel
number will sound.
Voice Call
Each digital channel may initiate a private call, a group call or an all call. To
transmit press and hold down the PTT key, LED indication glows red, speak

18
into the microphone (In half duplex mode speak into microphone 1, and in
duplex mode speak into microphone 2), hold the palm microphone
approximately 3 to 4 centimeters away from mouth.
Private Call
If the feature “private call ACK” is enabled, the called needs to press the
answer button before establishing the call
(1)
If a private call contact is preset for current digital channel., press PTT
key to set up the private call;
(2) Enter contacts menu to select the private call number, then press PTT
key to set up the private call;
(3) Enter manual dial menu under contacts menu, or in the home interface
with keyboard allows input, directly input a private call number, then
press PTT key to set up the private call;
(4) Enter call log menu and select the private call number, then press PTT
key to set up the private call;
Group Call
(1) If a group call contact is preset for current digital channel, press PTT
key to set up the group call;
(2) Enter contacts menu to select the group call number, then press PTT
key to set up the group call;

19
(3) Enter contacts menu and go to manual dial menu, input a group call
number, then press PTT key to set up the group call;;
All Call
(1) If an all call contact is preset for current digital channel, press PTT key
to set up the all call;
(2) Enter contacts menu to select the all call number, then press PTT key to
set up the all call;
One Touch Call
In digital mode, users can set 0-9, * and # on the numeric keypad, and set
private, group or all call contacts to the corresponding numeric keys. Long
press the numeric keys to enter the call interface and then press “PTT” to
directly initiate a call.
Duplex Call
The radio supports one-to-one full duplex call which the call initiator and
receiver can simultaneously send and receive voice. Full duplex call only
applies to private call, and the working channels of the transmitter and receiver
must be configured for "voice duplex" working mode.
Reject Stranger Call
On digital mode, if reject strange call feature is enabled, while the call ID not

20
exist in the contacts list, the call cannot be set up. When inputting a strange
number to initiate a call, the radio will prompt that the number does not exist in
the contacts. When a strange number calls in, the LED indicator light turns
green, but there is no voice. (When receiving group calls or all calls, if the
caller's device ID does not exist in the contacts , it cannot be accessed)
Receiving and Calling Back
On digital channel, while a private call is received, press the PTT key within the
hang time to set up the private call and then to talk each other. If there is not
respond to a received private call within the hang time, the radio will display
the missed call icon; while a group call is received, press the PTT key within
the hang time to call back; while an all call is received, it cannot respond to an
all call.
Button Setting
For enhanced convenience, all the buttons in the configuration list can be
programmed, short and Long press of a key can be assigned with different
functions.
Programmable keys are including functions listed below:
No.
Shortcut Keys
Description
1 Undefined Not assigned with any function
2 Emergency On Send emergency information, only set short
press on orange button

21
3 Emergency Off Exit emergency mode, only set long press on
orange button
4 Adjust Squelch Level Switch squelch level as normally open, normal or
tight
5 Alert Call Quick access to Alert Call menu
6 Battery Indicator Quick view battery capacity
7 Call Logs Quick access to Call Logs menu
8 Channel Up Quick select a channel
9 Channel Down Quick select a channel
10 Frequent Contacts Quick access to Frequent Contacts menu
12 Home Screen Quick return to Home Screen
13 Boot Menu List Quick access to Boot Menu List menu
14 Lone Worker On/Off Enable or disable lone worker quickly
15 Man Down On/Off Enable or disable man down quickly
16 Contact List Quick access to Contact List menu
17 Message Quick access to Message menu
18 Monitor On/Off Enable or disable monitor quickly
19 Monitor Momentary Enable or disable transient monitor quickly
20 Keypad Lock Enable or disable keypad lock quickly
21 Squelch Open Enable or disable squelch quickly
22 Transient Squelch
Open
Enable or disable transient squelch quickly
23 Zone Up Quick select a zone
24 Zone Down Quick select a zone
25 Scan Enable or disable scan quickly
26 VOX Enable or disable VOX quickly
27 Encrypt Enable or disable encryption quickly

22
28 Talk Around Enable or disable talk around quickly
29 One Touch Call 1-5 Quick transmit group call/ private call/call alert or
preset SMS
30 Manual Dial Quick access to Manual Dial
31 Covert Mode Enable or disable covert mode quickly
32 Priority Interrupt Interrupt activity of current channel forcibly
33 Preset Channel 1~4 Quick select a preset channel
34 Delete Useless
Channel
Temporarily ignore unused channel activity
35 Vibration Setting Enable or disable vibration quickly
36 Record Sound On/Off Enable or disable record quickly
37 Disconnect Hang up current call quickly
39 Radio Check Quick access to Radio Check menu
40 Remote Monitor Quick access to Remote Monitor menu
41 Radio Disable Quick access to Radio Disable menu
42 Radio Enable Quick access to Radio Enable menu
43 Site Lock Switch Quickly to enable or disable lock site function.
44 Manual Site Roam Quickly to search the available site manually.
45
Single Frequency
Repeater
Quickly to enable or disable Single Frequency
Repeater function.
47 Ad hoc network Quickly to enable or disable ad hoc network
function.
48 Channel Lock Quickly to enable or disable channel lock
function.
49 Noise Reduction Enable or disable noise reduction quickly.
50 Phone Book Quick access to Phone Book menu

23
51 System Status Query On network channel, quickly check the radio
network and position status.
52 Net On/Off Quickly to enable or disable network function.
53 Disable All Switch Quickly to enable or disable the mute function.
54 Board Trans Mode Quick access to Back-to-Back Transmit Mode
menu
Note:
The [orange key] is programmed as the emergency key by default, the short press of [up
arrow key] is programmed as the channel up key by default, the long press of [up arrow
key] is programmed as the zone up key by default; the short press of [down arrow key] is
programmed as the zone down key by default; the long press of [down arrow key] is
programmed as the zone down key by default; the short press of [OK key] is programmed
as the root menu key by default; the short press of [Back key] is programmed as the home
screen key by default;
Features not mentioned above may unsupported temporarily in the radio.
Functions and Operations
Contacts
Contacts list can contain a maximum of 1000 members, including private call,
group call, all call. The contact menu includes frequent contacts, all contacts,
new group or contacts, manual dial options.
1.
Group Call

24
While the contacts type is Group Call, select the menu to view its ID or send
message.
2
. Private Call
While the contact type is Private Call, select the menu to view its detail, send
control service, send message, edit name or number, delete. Control services
are including:
Control Services
Description
Call Alert
Call alert is used for prompting the private receiver to
respond the transmitter if communication is available.
Device Check
This function can check if the target radio is active in the
system without sending any tone alert to the target device.
Remote Monitor
Allow a user to send a "Remote Monitor" request to the
target device via menu. If the request is successful, the
microphone of the target radio will be activated to monitor
its activities.
Device Enable
Allow a user to send "Device enable" command to the
killed radio and revive it.
Device Disable
Allow a user to send the Radio Disable command to a kill a
radio , except remote monitor, all other functions will be
disabled, The radio must be reprogrammed to restore or

25
the radio receive “device enable” command to rivive.
●Edit Name: Modify the name of a private call contact. Press” *” key to delete,
press “#” to switch input method, name input 16 characters at most.
●Edit Number: Modify the number of a private call contact, the available
number range is 1~16776415.(if private call contact is set as channel default
address or call number on one touch call, its unable to edit number)
●Delete: Delete unwanted contacts from the address list, if private call contact
is set as channel default address or call number on one touch call, its unable to
delete.
3. All
Call
While the contacts type is All Call, select the menu to view its ID 16777215.
4.New Group
It allows to create a new group via menu, input the name then press confirm
key to save, and it also allows to add contacts, edit the group name or delete it.
5. New Contact
It allows to add a private call or group call contact to the contact list. Firstly,
input number, the available number range is 1~16776415; then edit name,
press “*” key to delete, press “#” to switch input method, name input 16
characters at most. After adding a contact successfully, it will be found on
contacts list.
6. Manual Dial

26
It allows to manually input the private number or group number for calling. On
manual dial menu, press “*” key can switch input private or group number,
then press PTT key to transmit.
Telephone
On the telephone book, it allows to view telephone contacts list, add new
contacts, and manual dial. Contacts list can store up to 100 telephone contacts,
which can be viewed, edited, or deleted. To make a telephone call, select the
contact list or enter the contact number manually and then press the call out
key to initiate the call. During the telephone conversation, press the number or
symbol on the keyboard directly for secondary dialing.
Note: The telephone function is only supported in the SDC/SVT version.
SMS
1. New SMS
It allows to edit desired text message(255 characters at most) and send it to a
Private Call contact or Group Call contact. When editing a message, press
“# ”key for switching input method, press “
*
” key for deletion and modification,
press direction key to switch input cursor. For non-numeric input method, key
“1” is a symbol key. Key “0” is a space key. After the message is edited, select
a contact from the address list which the message is sent to or manually dial a
number to send. It can also be stored in the draft box.

27
2. Preset SMS
Via programming software, user can save 10 text messages and each
message contains 255 characters at most on preset SMS. The preset SMS
can be temporarily edited before sending or directly sent.
Note: Preset text messages also can be assigned to one touch call, and press the
programmed key to send messages
3. Inbox
The Inbox can save up to 50 received messages. In Inbox the unread
message displays:
, read message displays:
. For each message, it can
perform any of these operations: Reply, Forward and Delete.
4. Outbox
Outbox can save up 20 sent messages. If the message is successful sent, it
displays , and supports forward or delete operations; If the message is failed,
it displays , and supports resend, forward or delete operations.
5. Draft box
Draft box can save up 20 sent messages, it supports edit, send or delete
operations.
Call Logs
1. Outgoing Calls
The radio will record all recent private calls made in digital mode. The
outgoing calls list can save up to 20 private calls, select an entry to view the

28
details or add it to contact list or delete it.
2. Answered Calls
The radio will record all recent private calls received in digital mode. The
answered calls list can save up to 20 private calls, select an entry to view the
details or add it to contact list or delete it.
3.
Missed Call
The radio will record all recent private calls missed in digital mode. The
missed calls list can save up to 20 private calls, select an entry to view the
details or add it to contact list or delete it.
Scanning
1. Scan On/Off
For scan to work, the current channel must be added to the scan list and the
list must contain 2 channels at least. Scanning allows the radio to search the
scan list connected to the current channel to locate qualified channel for
receiving or voicing. If the scan list contains priority channel, the priority
channel will be scanned more frequently than a non-priority channel. If the
scan function is enabled, the icon and scan group name appear on the
home screen and LED indicator flashes red. When activities are detected on a
channel, the radio will stay on the channel to receive current activities and LED
indicator flashes green. If unwanted call is received on the channel, press the
programmed [Nuisance Delete] key to remove the channel from the scan list

29
temporarily. To exit the scanning process, enter scan menu, switch channel or
press the programmed Scan key.
Note:
●
If the channel enables the feature “Auto Scan” via the programming software,
switching to the channel will enter scanning automatically;
●
While programmed key is programmed as Scan on/off, press it to enable scan
feature.
2. View / Edit
Allow a user to view/edit the scan list via menu. A user can view the scan
group members or add a new member to the scan list, the list contain 16
channels at most. Also it allows to edit the members as priority channel,
indicates priority channel 1, indicates priority channel 2, each scan list
may contain two priority channels at most.
Roam
This feature allows the radio communicate between available sites in the IP
Site Connection system. If enabled, the radio can communicate via any site in
the IP Site Connection system, thus ensuring seamless communication in the
system. After the feature enabled, the icon will appear. On roaming
channel, enter roaming menu to enable or disable it, set site lock or unlock,
and start roam automatically.

30
Note: It allows the user to associate one of a scan list or roam list to the current channel,
but not allows to enable both features at the same time.
Zone
The radio supports up to 128 zones, a zone supports 64 channels, totaling
1024 channels support. Enter “Zone” menu to select a desired zone or press
programmed [Zone Up] [Zone Down] key to select a zone.
Note: The radio contains 2 zones at least that you can switch the zone.
Settings
1. Settings
Allow a user to configure basic settings for the radio.
●
Language:
The radio supports two languages: Chinese and English.
●
LED indicator:
Allows a user to enable or disable the LED indicator via menu.
All LED indicators including: TX LED, RX LED, Scan/ Roam LED, Low Battery
LED, Call Hang LED.
●Backlight: Set the backlight parameters, the radio supports three modes: on,
off or automatic. while "automatic on" is selected, the light will become dark
within preset time not operating the key, and the light will keep on all the time
when "on" is selected, the backlight will be disabled when "off" is selected.
●Tone/Alerts: Set tones and tone volume level for the radio, the following
tones can be set:

31
Types
Description
Tone Disable
If tone disable is on, all alerts will be off except emergency
alarm.
Call Out Tone
Off: The radio does not give any tone indication for
transmission.
Digital: The radio gives tone indication for transmission on
digital channel.
Voice End Tone
Set whether the radio will give tone indication when the
radio ends receives voice.
Private Call
Tone
Set whether the radio will give tone indication when the
radio receives a private call.
Group Call
Tone
Set whether the radio will give tone indication when the
radio receives a group call.
Call End Tone
Set whether the radio will give tone indication when the
radio releases PTT key and the hang time expires.
SMS Tone
Set whether the radio will give tone indication when the
radio receives a message.
Call Alert Tone
Set whether the radio will give tone indication when the
radio receives a call alert.
Prior Channel
Tone
Set whether the radio will give tone indication when scan
function is enabled and the radio receives activity on priority
channel.
Keypad Tone
Set whether the radio will give tone indication when key is
pressed.
Channel Tone
Set whether the radio will give tone of channel name when a
channel or a zone is selected.
Low Battery
Set whether the radio will give tone indication when the

32
Tone
radio battery gets low.
Power On/Off
Tone
Set whether the radio will give tone indication when the
radio turns the power on or off.
Emergency
Alarm
Set whether the radio will give tone indication when the
radio transmits or receives emergency information.
●
Vibration:
Enable or disable vibration feature, if it is enabled, the radio will
vibrate for an incoming private call, a new message or a call alert.
Note: The vibration function is an optional feature.
●
VOX:
While this function is enabled, users can enjoy hands-free
communication. The radio will automatically begin transmitting when speaking,
and terminate transmitting when stopping talking with no need of PTT press.
Allow user to set the VOX level and VOX delay via menu. When VOX is on it
indicates : .
Note: The VOX feature is only activated by plugging in a headphone.
●
Keypad Lock:
Allow a user to enable or disable keypad lock via menu. While
Keypad is locked it indicates: , and keypad operation is not allowed . Press
the key "OK +# " to unlock.
Note: The keyboard auto lock delay time can be set the programming software.
●
Man Down:
Enable or disable man down function via settings menu
●
Power-on Password:
If power-on password feature is enabled via
programming software, the password can be modified by this menu. First input
the old password correctly, then input a new password twice to modify the

33
password successfully.
Note: This menu is effective if power on password is set via programming software.
●
Boot Interface:
Allow a user to enable or disable the boot screen via menu. If
the Intro screen is enabled, while the radio is power on, the screen displays
BelFone Logo and device name; while the Intro screen is disable, the screen
only displays device name.
●
Covert Mode
: If enabled, the radio will be totally silent without any UI
indication.
●
Lone Worker:
Enable or disable lone worker function via settings menu
●
Talk Around:
When the repeater malfunctions, or the radio is out of
repeater’s range, communications can be continued in talk around mode.
While enabled, the screen displays: ,by this time TX frequency will be set
the same as to RX frequency. Switching channel, enabling scan feature or
restarting radio will disable the feature.
Note:
To enable this function, TX frequency should be different from RX frequency, and the
channel should be set as allowing talk around on the programming software.
Press the programmed Talk Around key to switch DM mode and RM mode.
●
Channel Lock:
Allow a user to lock the channel via the menu. If channel is
locked , it indicates: , and remains in the current channel, rotating the
channel knob cannot switch to other channels.

34
●
Noise Reduction:
Enable or disable noise reduction function via settings
menu.
●
Set Date and Time:
View real time or modify the time via settings menu.
2. Channel Settings
Channel configure function is used to modify the current channel parameters,
on digital channel, it is allowed to modify Channel Name, Sending Timeout,
RX/TX frequency, Color Code, Slot Selection, Encrypt Setting, TX contacts,
RX Group List, Single Freq Repeater and AD Hoc network.;
●
Channel Name:
Set current channel alias, it contains 16 characters at most.
●
Sending Timeout:
Set current channel TOT, the available time range is 15 to
495(s), the time 0 is off.
●
TX/ RX Frequency:
Set TX or RX frequency of current channel, and only
when current channel displays frequency that this option is available.
●
Subsonic:
Set the RX or TX subsonic type and values of current channel
●
Color Code:
Set current channel color code, the available value range is
0~15, if TDMA direct mode feature is enabled, the color code range is 0~14.
●
Slot Selection:
Set current channel time slot, the available time slot is: Slot 1,
Slot 2, Virtual Cluster TX slot Auto, Virtual Cluster TX slot 1, Virtual Cluster TX
slot 2.
●
Encrypt Setting:
Set the encryption feature of current channel, if enabled, the
icon appears, and encrypt key can be manually typed or select from the

35
encryption key list. When creating a new key, first edit the key name and then
edit the key. The key name consists of Chinese characters, uppercase and
lowercase letters, numbers or symbols, and the key is composed of uppercase
and lowercase letters or numbers. The key length is 10 characters.
●
TX Contacts:
Select a contact from all contacts list as current channel default
address.
●
RX Group List:
Set current channel RX group list.
●
Single Frequency Repeater:
Set current single frequency repeater feature, it
can be enabled or disabled.
●
Ad Hoc Network:
Set current Ad Hoc network feature, it can be enabled or
disabled it.
3. System Info
View the basic information of the radio, including battery status, RSSI, my
number, device name, firmware version, CP version, UI version information.
Accessory
3. Voice Recording
When voice recorder is enabled, it will continuously record all transmitted and
received signals. In the recording list menu, users can view or play the
recording. In the shortcut search menu, the recordings can be searched based
on the call type or date. Also it can be read to the programming software and
played on the PC.

36
Note: Recording is an optional feature.
Emergency
Digital Emergency
In case of an emergency the user can enter emergency mode to ask for help.
For each emergency mode, there are five emergency types and three
emergency modes available.
Emergency Type:
Siren Only:
The transceiver does not send emergency alarm. After the
transceiver enters the emergency status, the siren only sounds locally, and the
icon appears.
Regular:
The transceiver sends emergency alarm but no audio alert, and the
icon appears
.
Silent:
The transceiver sends emergency alarm but no audio/ visual alert, the
speaker will be muted when receiving speech signal.
Silent with voice:
The transceiver sends emergency alarm but no audio/ visual
alert, when receiving speech signal the speaker will turn on to receive call.
Alarm Whistle:
The transceiver sends emergency alarm, and alarm tone
sounds locally.
Emergency Alarm Mode:

37
Emergency Alarm:
The transceiver will exit emergency mode while ACK is
received or the maximum retries expires it will.
Emergency Alarm with Call:
The transceiver will remain in alarm and call mode
while ACK is received or the maximum retries expires, and pressing PTT can
transmit an emergency call.
Only Emergency Call:
The transceiver enters emergency mode and remains
on the emergency call
interface, pressing PTT can transmit emergency all.
1.
Initiating Emergency Alarm:
Short press the orange button which is
programmed as [Emergency On] to send emergency information, LED indicator
glows red, the icon shows in the status bar and LCD displays: Sending
Alarm.
2.
Initiating an emergency call:
When the emergency mode is set as emergency
alarm with call, after entering emergency state, press PTT key to initiate an
emergency call, and the LCD displays: Emergency Call. If the Alarm with call to
follow is enabled via the programming software, user can talk without having to
press PTT key.
3.
Exiting Emergency Alarm:
The transmitter can long
press the orange button
which is programmed as [Emergency Off] to exit emergency state, or if the
emergency alarm retry count is used up, the transceiver will exit alarm mode
automatically in some alarm mode. The receiver can only long
press the
orange button programmed as [Emergency Off] to exit emergency mode.

38
Lone Worker
This function is useful for persons who work alone situation. When the user
encounters an incident and doesn’t press any keys or transmit audio within the
preset period time, the radio will alarm automatically to ask help.
Man Down
When this feature is enabled, the radio will automatically send an alarm for
help if it is positioned aslant or keeps motionless long time. If the trigger type is
set as Only Lean, and the radio tilts to a specified degree within a preset period,
the radio will give alerts. To terminate such alerts, put radio upright otherwise it
will enter Emergency mode; If the trigger type is set as Only Motion Detection,
and the radio stays motionless within a preset period, it will enter Emergency
mode.
Encryption
The encryption feature can encrypt the audio and data to guarantee the
privacy of the communication, via the programming software encryption type
can be set as XOR, enhanced XOR, ARC4 or AES256. XOR and enhanced
XOR encryption only encrypt the audio . If the encrypt feature is enabled, icon
appears, the transmitter and receiver should be set as the same encryption
type and same encryption key, otherwise the receiver cannot get the normal
audio and data.

39
Note: This function is available only in digital operation
TDMA Direct Mode
If enabled, the members in the same group call must use the same slot. One
frequency supports calls in two slots synchronously in order to avoid interfering
communications in the other slot.
Note: This function is available only in digital operation.
Pseudo Trunk
While slot is set as pseudo trunk, and one time slot is already occupied, it can
transmit and receive on the other free time slot. If the pseudo trunk TX time slot
is set as none, both time slot 1 or time slot 2 can transmit; if the pseudo trunk
TX time slot is set as 1, press PTT key to transmit voluntary only in time slot 1;
if the pseudo trunk TX time slot is set as 2, press PTT key to transmit voluntary
only in time slot 2. The TX time slots set is invalid for replying
Note:
In order to guarantee the stability of communication, the transmitter and the
receiver will enable pseudo trunk function at the same time.
Direct Mode with Different Frequency
If direct mode feature is enabled, the radio can transmit with different
frequency directly, only the transmitter and receiver are set direct mode
simultaneously and the TX frequency of the transmitter is the same as the RX
frequency of the receiver can the radio directly communicate in DM mode.

40
Single Frequency Repeater Feature
The radio supports single frequency repeater feature, with this feature enabled,
the icon: appears. The single frequency repeater feature allows the radio
in direct mode to receive services on one time slot and then forwards them on
the other, using the same frequency and code. In this way, the feature
expands the communication coverage and saves frequency resources.
Note:
The voice frame check feature must be ticked of current channel if the single frequency
repeater feature will be enabled;
If the single frequency repeater feature to current channel is enabled, the Ad Hoc network
feature will not be available at the same time.
Ad Hoc Network Feature
The radio allows the user to enable the Ad Hoc network feature to expand the
long distance transmission and coverage of radio’s signal. With this feature
enabled the icon: appears, in this way, the current channel can’t initiate a
confirmed private call or other with acknowledge service.
Note:
The voice frame check feature must be ticked of current channel if the Ad Hoc network
feature will be enabled;

41
If the Ad Hoc network feature to current channel is enabled, the single frequency repeater
feature will not be available at the same time.
Ad hoc network is an optional feature.
Networking Feature
The radio supports registration to the network system, and can adapt to the
Belfone Smart Dispatching Connection(SDC) System or the Smart Virtual
Trunking(SVT) system to realize the interconnection communication under the
networking mode. The network mode can be selected as SDC or SVT mode.
In "SDC" mode, the channel will not support scanning, roaming and normal
digital emergency alarm functions. When the channel is in different receiving
and transmitting frequency, the network mode can be selected as "SVT",
which will not support functions such as scanning, roaming and normal digital
emergency alarms, color codes, etc. Channel slot will be defaulted to pesudo
trunk, transmitting slot defaulted to none, and priority interrupt defaulted to
check.
Note: The network feature is only valid for the SDC/SVT version.
Local Call
The local call can be effective only when the network function is enabled in
digital channel. Check the local call, the call initiated by the radio is forwarded
only under its repeater, and the callback mode during receive hang-up time is

42
based on the type of incoming call (in the networked or not).
Note: The local call feature is only valid for the SDC/SVT version.
Patrol System
Set whether the radio can activate emergency alarm and track monitor function
in online status. When emergency alarm is enabled, the radio will automatically
send voice and position information to the system by pressing the alarm key.
When track monitor is enabled, the radio will continuously send position
information to the system according to the set polling time and minimum
distance.
Note: The patrol system feature is only valid for the SDC/SVT version.
Radio Priority-Based Interrupt
The call priority feature is allowed to interrupt the on-going call on current
forcibly. This means a higher priority call can interrupt other on-going calls with
lower priority to release the channel for itself. There are 4 voice priorities
available, level 1 is lower, level 3 is higher, and emergency call is the highest.
Interrupt feature is divided into priority interrupt manually and priority interrupt
automatically. The emergency priority interrupt, message priority interrupt, kill
priority interrupt, all call priority interrupt belong to priority interrupt
automatically.
●
Priority Interrupt Manually:
Press the programmed [Priority Interrupt] key to

43
terminate the ongoing activity on the current channel forcibly, so as to initiate a
new call or a new service.
●
Priority Interrupt Automatically:
In this way, the priority interrupt is triggered
by the call priority level, if the priority level of current service is higher it will
interrupt the ongoing activity automatically.
●
Emergency Priority Interrupt:
If there is an active call on current channel, and
a user with higher priority level to send emergency service will terminate the
ongoing activity automatically.
●
Message Priority Interrupt:
If there is an active call on current channel, and a
user with higher priority level to send a short message will terminate the
ongoing activity automatically, so as to make sure the message is sent
successfully.
●
Kill Priority Interrupt:
If there is an active call on current channel, and a user
with higher priority level to send kill command will terminate the ongoing
activity automatically, so as to make sure the kill command is sent
successfully.
●
All Call Priority Interrupt:
If there is an active call on current channel, and a
user with higher priority level to initiate an all call will terminate the ongoing
activity automatically.
Note: This function is available only in digital channel.

44
Time Out Timer (TOT)
The purpose of TOT is to prevent any user from occupying a channel for an
extended period. If a channel is busy, the time will be shorter. If the preset time
expires, the radio will generate beep and terminate transmission automatically.
TX Permission
Digital Channel
This feature can restrict the channel to transmit if it is already in use. If
"always" is set, whenever pressing PTT key the radio can transmit directly; If
"color code free" is set, the radio will be unable to transmit on the channel if a
radio with the color code is already in using the channel. If "channel free" is set,
the radio will be unable to transmit on the channel if the channel is already in
use. If the channel is busy, press PTT key a warning tone will sound.
Voice With Location Information
When the transmitter is configured with the "voice with location information"
function, location information will be sent simultaneously with the voice. When
both sides have valid location data, the receiver's communication interface will
display the transmitter's location information.
Noise Reduction
The noise reduction function can filter out environmental noise, accurately

45
obtain human voices in noisy environments, so that the receiver can hear a
clear and loud voice.
Battery Saver
This function allows an idler radio to automatically enter battery saver mode,
which will extend battery service life, but response time may be delayed.
Low Battery Warning
When the battery gets low, LED indicator glows red and there will be a warning
tone: “low battery”,please replace the battery or charge the battery in time,
otherwise the radio will turn off automatically while battery is too low.
Monitor
Press and hold down the programmed [Monitor Momentary] key to activate the
monitor function, release the key to exit monitor mode; or press programmed
[Monitor On/Off] key to enable the monitor feature, the radio will remain on
monitor mode until press it again to exit.
Adjusting the Squelch Level
If two radios are at a close distance and the signals are strong, squelch level
can be adjust higher; If two radios are at a long distance and the signals are
weak, squelch level can be adjust lower, the appropriate squelch level
depends on the ambient RF noise conditions.

46
Compander
This background feature allows higher clarity of signals, avoiding excessive
noise.
Troubleshooting
Phenomena
Solution
1. The radio cannot be
powered on
Remove and reattach the battery ,then power the
radio on.
Recharge or replace the battery.
2 During receiving, the
voice is week,
discontinuous or
totally inactive.
Increase the volume level.
Turn off the radio and reattach the antenna.
Check the battery voltage, if the voltage is low
please recharge or replace the battery.
3. The voice is unclear. Modify the frequency to avoid
be interrupted by
radios using the same frequency.
4 The noise is too loud Move towards other members.
Move to an open and flat area, and restart the
radio.
Stay away from equipment that may cause
interference.
5 Cannot communicate
with other members.
Set TX/RX frequency and signaling to the same
as that of other members.
Move towards other members.
On digital channel, verity the device ID of

47
transmitter and receiver are the same.
6 Cannot locate
position
Move to an open and flat area, and restart the
position feature.
Note: If the above solutions cannot fix the problems, or there are some other queries,
please contact BrlFone or local dealer for more technical support.
Specifications
General
Frequency range UHF:400-480MHz
Channel Capacity 1024
Zones 128
Channel Spacing 12.5KHz
Operating Voltage DC 7.4V(±20%)
Battery Life(5/5/90) Digital 19 hours
Frequency Stability ±0.5ppm
Antenna Impedance 50Ω
Display Screen
LCD screen, 320 * 240 pixels, 262000
colors, 2.4 inches, 10 lines
Weight 359g(include battery)
Recording (optional) ≤24hours
Transmi
tter
RF Output Power 3.5 Watts
4FSK Modulation 12.5kHz only data:7K60FXD
12.5kHz data and audio:7K60FXE

48
Modulation Limiting +/- 2.5kHz @ 12.5kHz;
Conducted Emission -36 dBm≤1GHz/-30 dBm≥1GHz
Adjacent Channel Power ≤-60dB
Audio Response +1/-3 dB
Audio Distortion ≤3%
Digital Voice Coder Type AMBE or Compatible NVOC
Receive
r
Digital Sensitivity 0.22μV /BER5%
Adjacent Channel
Selectivity
[email protected]/70dB@25kHz
Spurious Response
Rejection
[email protected]/25kHz
Audio Response +1/-3 dB
Rated Audio output power 1.0W
Max Audio output power 2.5W
Audio Distortion ≤3%
Conducted Spurious
Emission
-57dBm
Environ
mental
Specific
ations
Operating Temperature -30℃~+70℃
Storage Temperature -40℃—+85℃
ESD (electrostatic
protection level)
IEC61000-4-2(Level 4)
± 8kV (contact discharge)

49
± 15kV (air discharge)
Humidity MIL-STD-810H standard design
Vibration & Shock MIL-STD-810H standard design
Dustproof & waterproof IP68 standard design
Note: All specifications are tested according to applicable standards, and subject to
change without notice due to continuous development.
Statement
This manual is compiled to be accurate and complete for operator’s use. For
any doubt, please contact Belfone. We will give you professional answers. As
radio communication technologies develop rapidly, Belfone reserves the right
to change product design and specification without prior notice to consumers.
FCC Caution:
Any Changes or modifications not expressly approved by the party responsible for
compliance could void the user's authority to operate the equipment.
This device complies with part 15 of the FCC Rules. Operation is subject to the following
two conditions: (1) This device may not cause harmful interference, and (2) this device
must accept any interference received, including interference that may cause undesired
operation.

50
IMPORTANT NOTE:
Note: This equipment has been tested and found to comply with the limits for a Class B digital
device, pursuant to part 15 of the FCC Rules. These limits are designed to provide reasonable
protection against harmful interference in a residential installation. This equipment generates,
uses and can radiate radio frequency energy and, if not installed and used in accordance with
the instructions, may cause harmful interference to radio communications. However, there is
no guarantee that interference will not occur in a particular installation. If this equipment does
cause harmful interference to radio or television reception, which can be determined by turning
the equipment off and on, the user is encouraged to try to correct the interference by one or
more of the following measures:
—Reorient or relocate the receiving antenna.
—Increase the separation between the equipment and receiver.
—Connect the equipment into an outlet on a circuit different from that to which the receiver is
connected.
—Consult the dealer or an experienced radio/TV technician for help.
Safety Information for Radios
Your wireless handheld portable transceiver contains a low power transmitter. When
the talk button is pushed, it sends out radio frequency (RF) signals. The device is
authorized to operate at a duty factor not to exceed 75%. In August 1996, the Federal
Communications Commissions (FCC) adopted RF exposure guidelines with safety
levels for handheld wireless devices.
Important
FCC RF Exposure Requirements: For body-worn operation, this radio has been tested
and meets the FCC RF exposure guidelines when used with accessories supplied or
designated for this product. Use of other accessories may not ensure compliance with
FCC RF exposure guidelines. Use only the supplied antenna. Unauthorized antennas,
modifications or attachments could damage the transmitter and may violate FCC
regulations.
Normal Position
Hold the transmitter approximately 25 mm from your face and speak in a normal
voice, with the antenna pointed up and away.