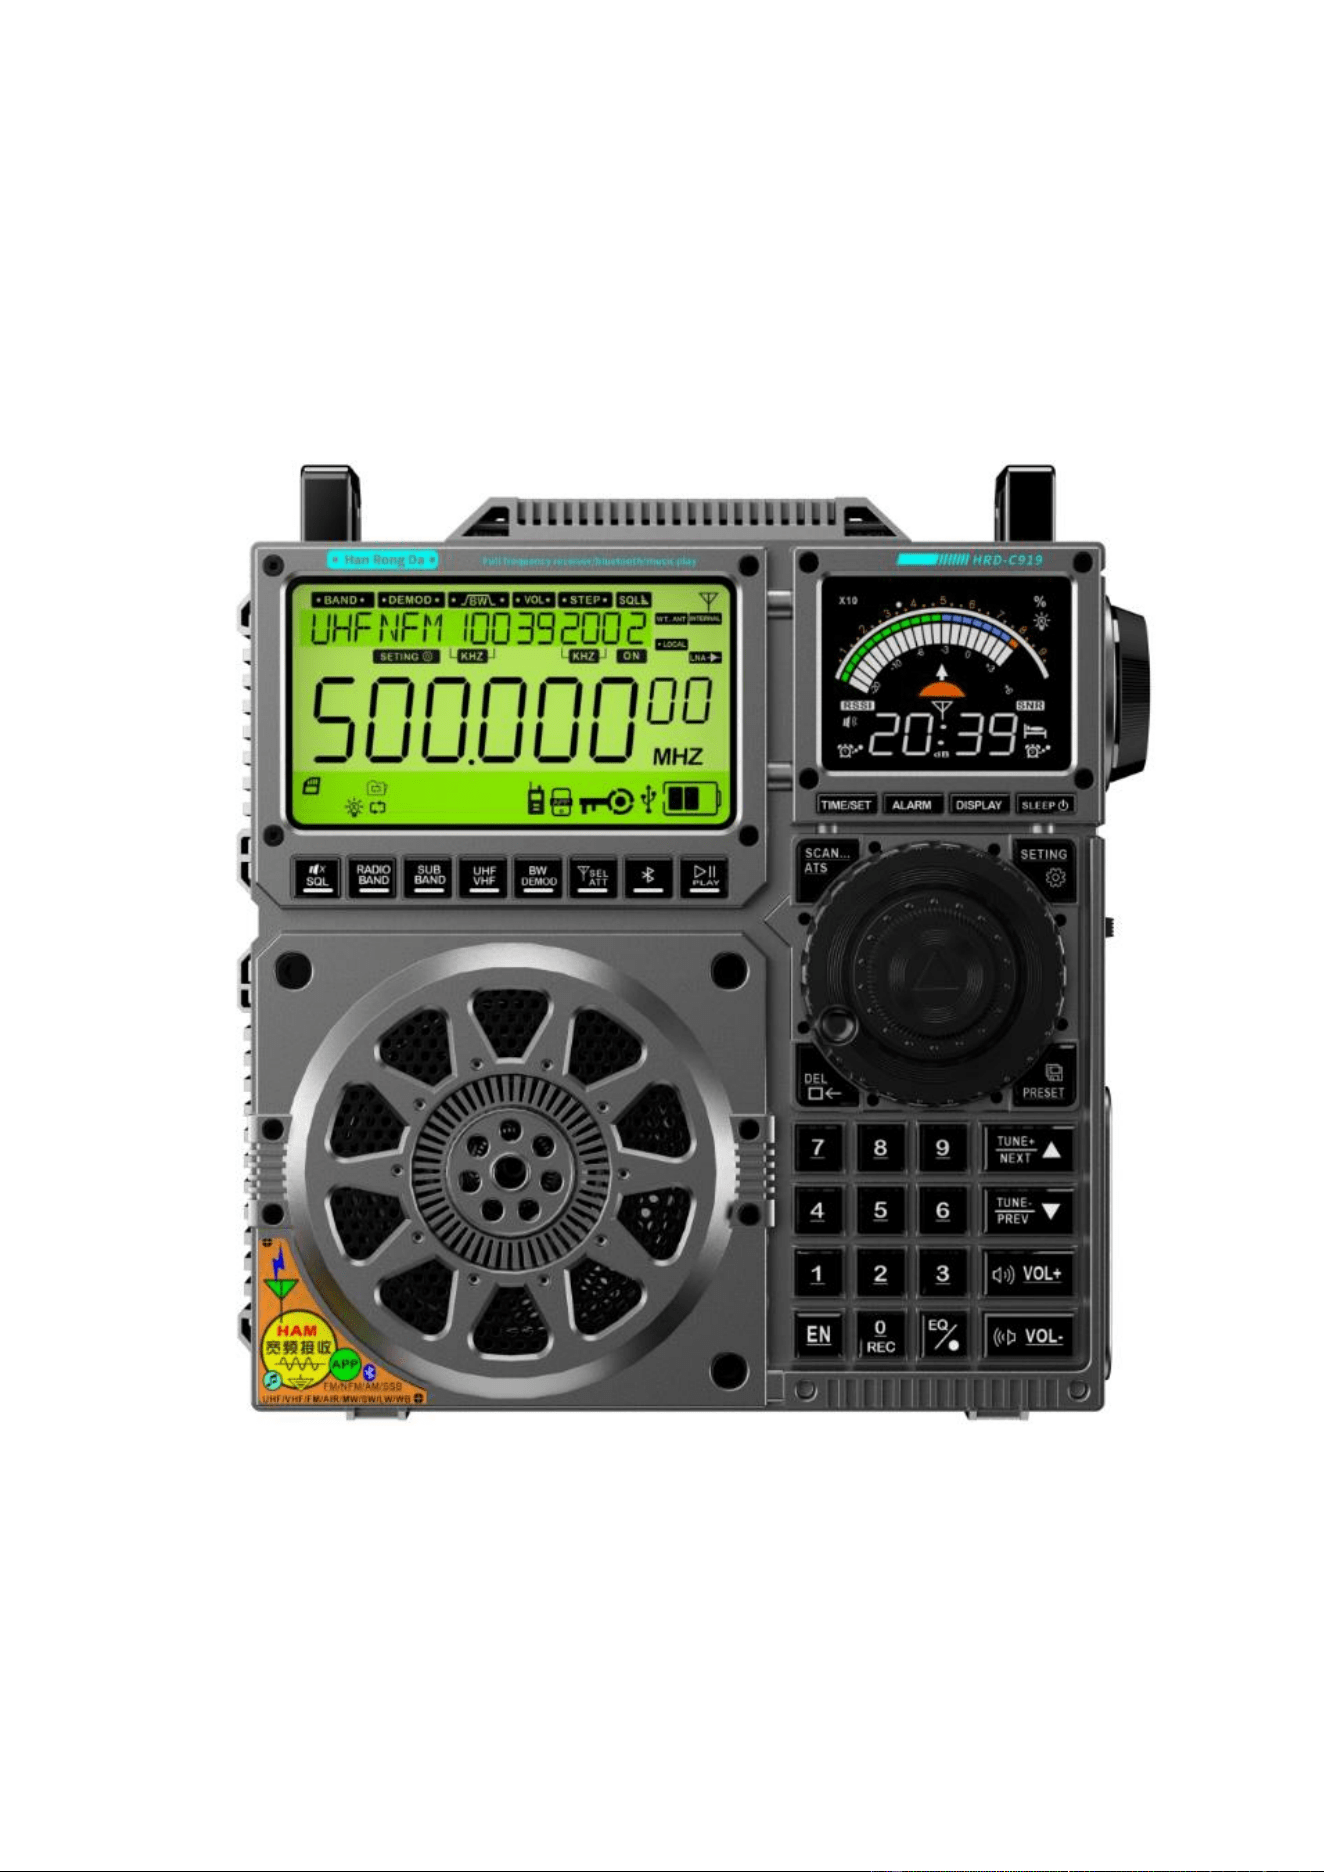
User’s Manual For
Broadband Multi-functional Radio
Bluetooth.TF Card.AUX-in Play.Recorder
APP Intelligent Remote Control
(Model: HRD-C919)
Thank you for buying our product. Before use, please read this manual carefully and keep it properly.
1: Product overview
Our aim in new product R&D has always been continuous innovation and meeting the needs of users.
We hope you like our meticulously crafted C919 radio which will bring more happiness to people who
like to listen to the radio.
This is a broadband multi-functional radio. For more details, please read this manual.

2: Product features
2.1: This product can receive wireless signals of FM, MW, SW, USB , LSB, LW, VHF, UHF, AIR, CB and
WB by means of software programming.
It supports DEMOD mode, BW value, LOCAL, DX, double shuttle quick/slow tuning, MW/SW
magnetic rod antenna receiving, DIY MW/SW loop antenna and so on, showing extremely high
playability.
2.2: This product supports multiple ways of choosing a channel: pressing the number key, shuttle fine
tuning, shuttle quick tuning, number key slow tuning, pressing the number key to choose
automatically and searching and storing a channel automatically.
2.3: This product has two screens of the primary screen (display various working conditions) and the
secondary screen (display the marquee, time, signal intensity, etc.).
The primary screen is FSTN all-sight screen with VA color, giving users better visual effect.
The primary screen is a 3.54inch large screen: (size of window displayed: 82.9mmx45.2mm)
Size of window displayed of the secondary screen: 47.5x35.56mm
2.4: This product supports mobile APP intelligent remote control, realizing intelligent close control of
radio intelligently within 20m.
2.5: This product uses advanced audio technology to realize Bluetooth connection for wireless music play.
2.6: This product supports TF card music play, music play of MP3, WMA, WAV, APE and FLA, and 256G
memory maximally.
2.7: This product uses two 18650 5000mAH lithium batteries which can be replaced and has long time of
endurance.
2.8: AIR has 5 meter waves, SW has 15 meter waves, VHF has 8 meter waves, and UHF has 8 meter
waves, which allows you to switch between frequencies and search you channel quickly.
2.9: FM has 3 frequencies for you to choose and AM has 2 frequencies for you to choose without national
boundary limitation.
1): FM1: 87.5-108MHZ
FM2: 76.0-108MHZ
FM3: 64.0-108MHZ
2): AM frequency receiving range: 522-1710KHZ (step value: 9KHZ):
AM: 520-1710KHZ (step value: 10KHZ)
2.:10: The marquee can be turned on in state of music play, giving you beautiful melody.
2.11: This product has a 3-inch all-band 20W speaker with BASS effect and supports listening with the
earphone, meeting all users’ needs.
2.12: This product supports four modes of play in the state of TF card play:
: (repeat all) , : (repeat one) ,
: (repeat file) , : (random)
2.13: This product supports the function of lock.
2.14: The sleep power-off time can be set as 90, 80, 70, 60, 50, 40, 30, 20 and 10 minutes.
2.15: Two modes of scheduled power-on and scheduled alarm clock can be set. Two sets of time of
scheduled power on and scheduled alarm clock can be set.
2.16: After choosing scheduled power-on, the power-off time after scheduled power-on can be set
2.17: The backlight and backlight display of number key are convenient for you to use in darkness.
2.18: In the mode of receiving, this product has a large memory of storing channels and can store 1,600
channels (FM/MW/SW/VHF/UHF/LW/CB/AIR: 200 channels for each)
2.19: This product supports EQ play.
2.20: This product displays temperature, time and perpetual calendar.
2.21: Adjustable color of display screen, multiple kinds of light ON time, multiple choices of alarm
clock...humanized design increases playability.
2.22: This product supports factory data reset.
3: Packing list
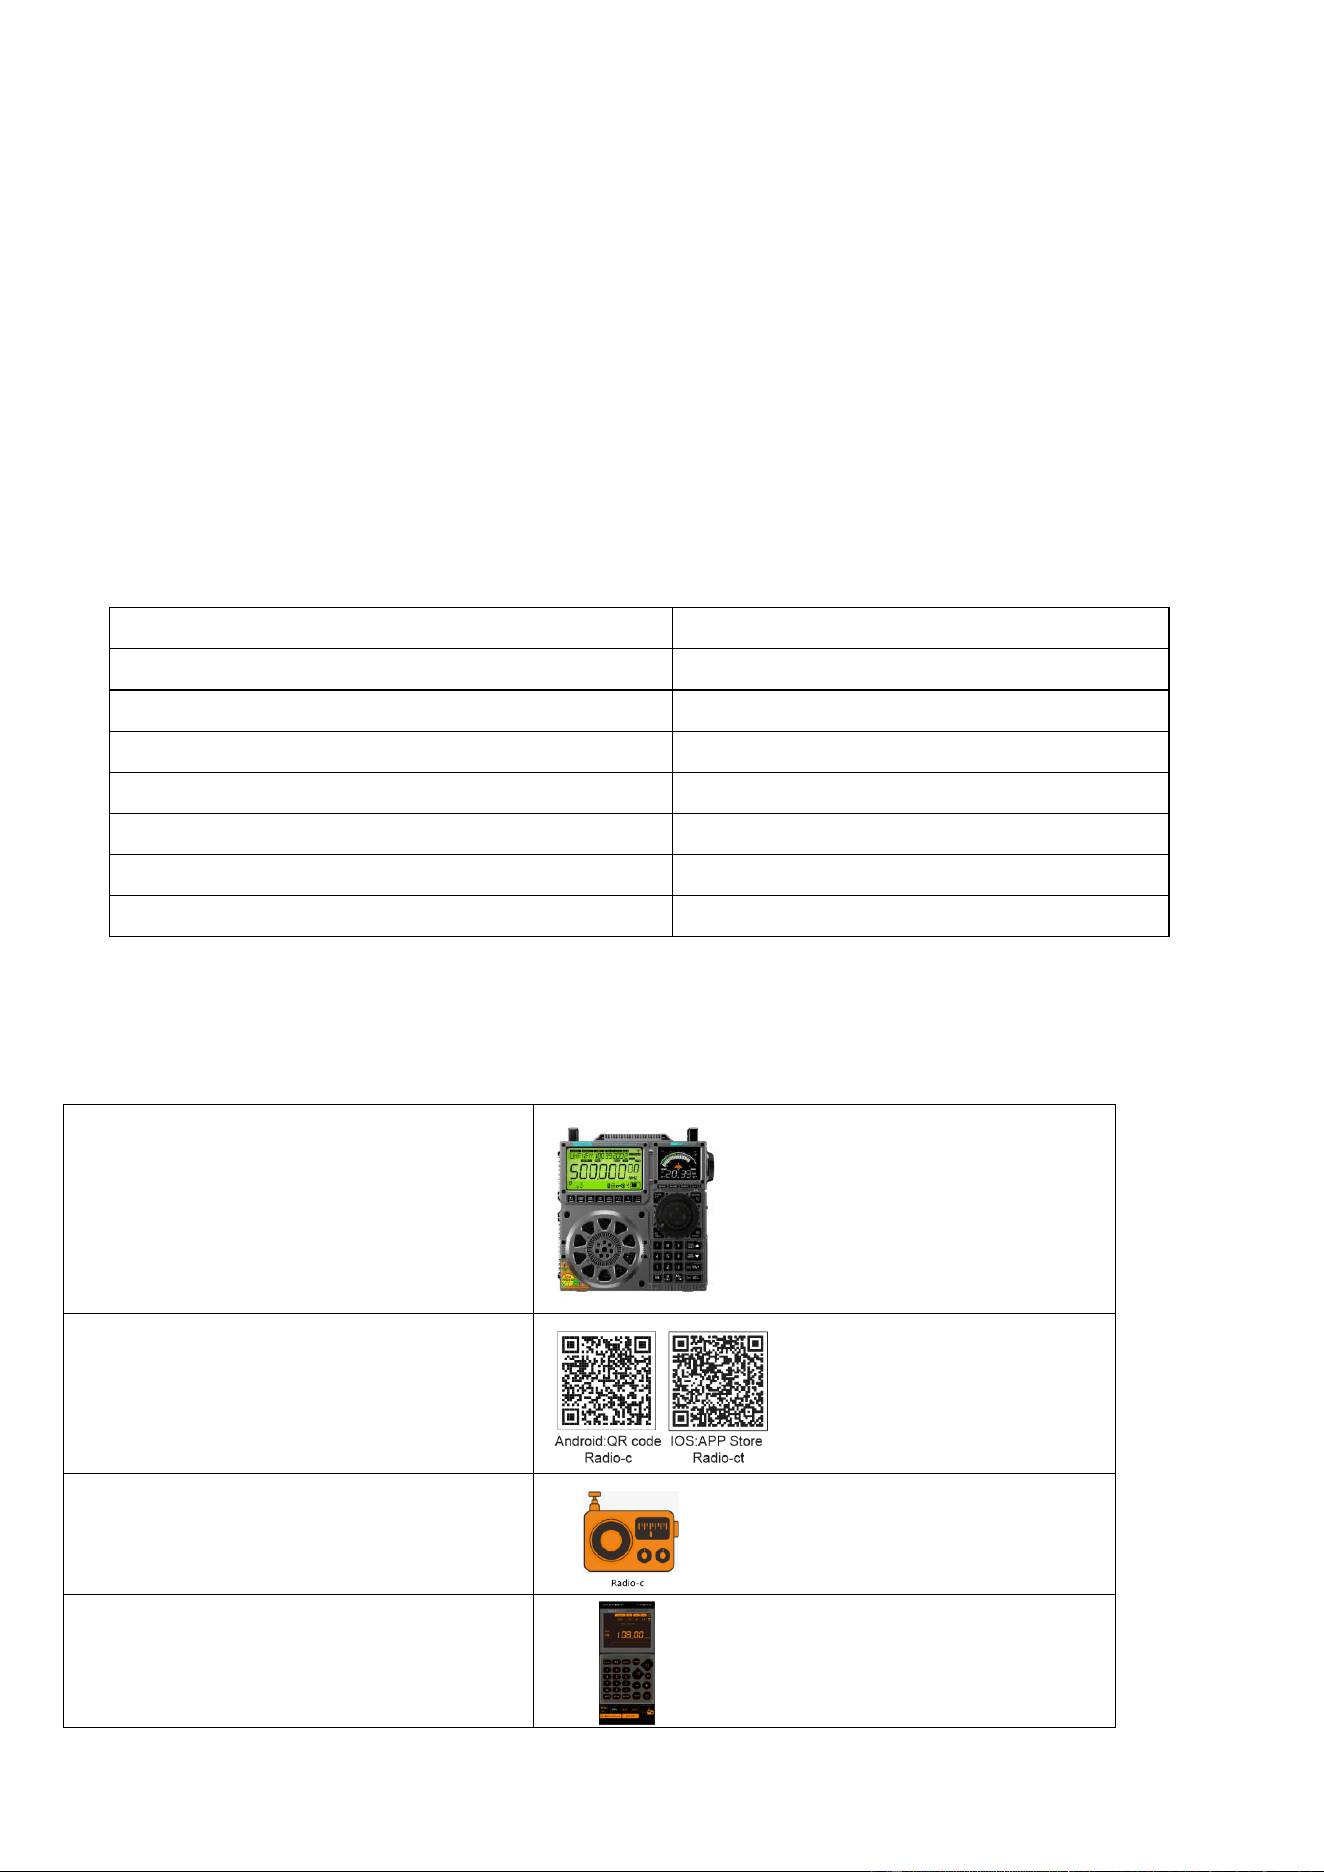
4: Download of mobile APP (see APP Installation on the attached sheet)
Name
Quantity
HRD-C919 high-performance all-band radio
1
String
1
18650 2500mah 3.7V lithium battery
2
USB TYPE-C charging cable
1
User’s Manual
2 (User’s Manual/APP User’s Manual)
Screwdriver
1
Gift packing box
1
Step1:Turn on the radio
Step2:Download the APP
Step3: Install the APP onto the mobile desk
Step 4: Click to enter the APP and click to
connect “HRD-C919-BLE”
To disconnect the APP, long press “ ” to turn off the radio and display the clock, long press
“ ” for 2 seconds to exit the APP after the APP connection symbol “ ” disappears on LCD. You
can also exit the APP in the system menu (For details, please see Section 14 about how to exit the APP).
Fore more functions of APP, please see the attached APP User’s Manual.
5: Functions of buttons
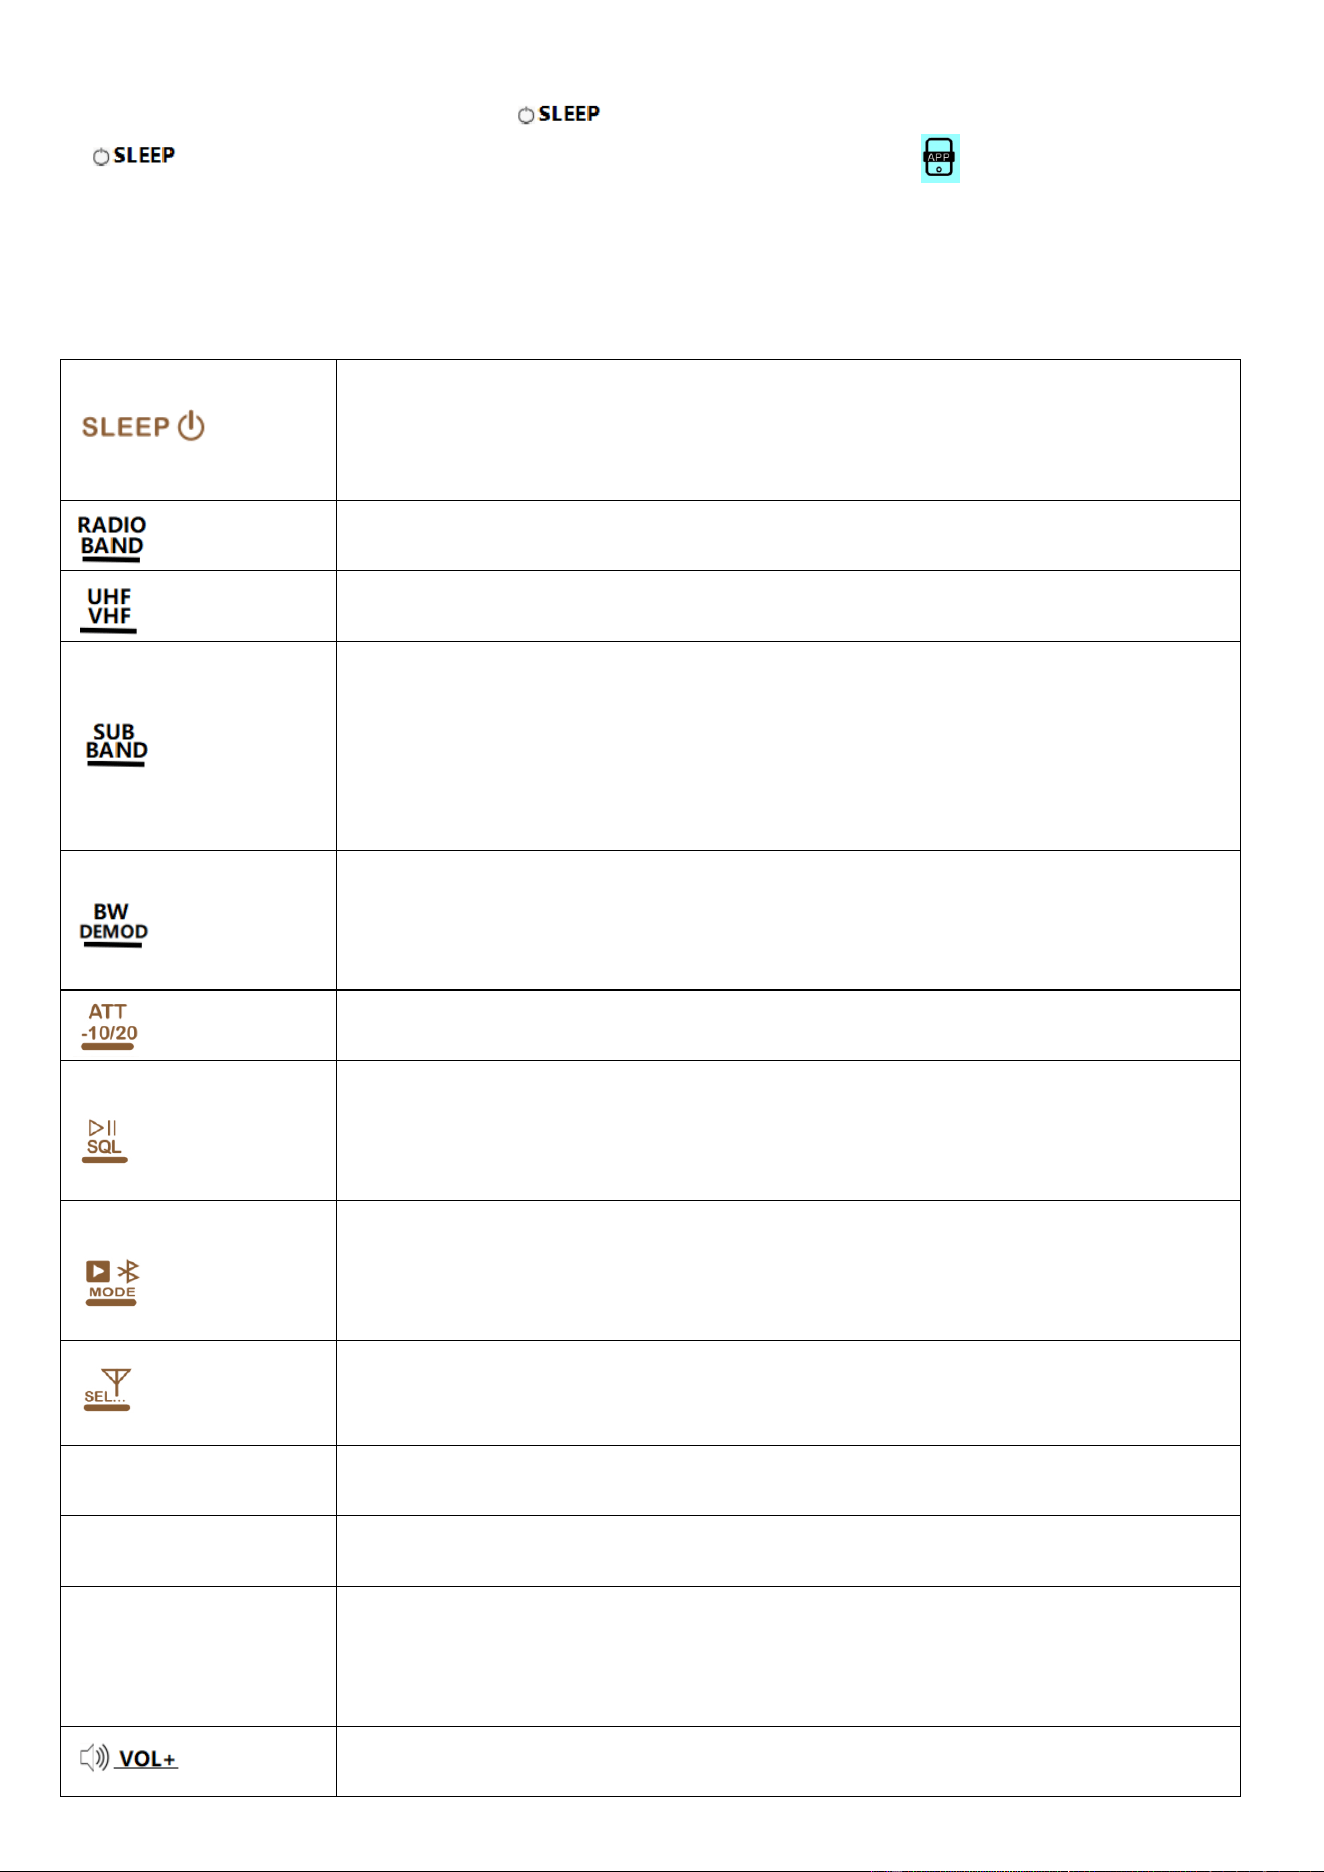
1: ON/OFF: Press any button to turn on the light and show the time. When the
time is displayed, lightly press the button to turn on the radio. In the mode of
receiving, long press the button to turn off the radio (see Section 7.1.1).
2: Long press the button to set the sleep power-off time (see Section 7.1.2).
In the mode of receiving, lightly press this button to switch between FM, MW,
LW and SW.
In the mode of receiving, lightly press this button to switch between VHF, UHF,
AIR, CB and WB.
1: In the mode of FM/AM, lightly press to choose the FM&AM frequency
receiving range. Please see Section 7.3.2/7.3.3.
2: In the mode of SW/UHF/VHF/AIR, lightly press to switch between
SW&UHF&VHF&AIR meter waves (see Section 7.3.5).
3: In the mode of TF card, lightly press to switch between play modes:repeat
all-repeat one-repeat file-random
1: In the mode of any band, press this button to set the bandwidth. See Section
7.3.14.
2: In the mode of FM/SW: long press this button to set the tuning mode. See
Section 7.3.11.
In the mode of FM/SW/UHF/VHF/AIR/CB/WB, press this button to select from
LOCAL and DX mode.
1: When the radio is working, lightly press this button to start/stop the silence
mode.
2: In the mode of VHF/UHF/AIR/CB/SW, long press this button for 2 seconds to
start/stop SQ.
1: When the radio is working, lightly press this button to switch between
Bluetooth, TF and PC and long press it to disconnect Bluetooth.
2: When the radio is turned off and the time is displayed, long press this button to
disconnect APP.
1: Lightly press this button to choose the mode of antenna.
2: Long press this button to choose antenna attenuation (according to the preset
10/20d attenuation. See Section 7.3.10).
TIME/SET
1: Lightly press this button to turn on/off the primary screen light.
2: Set the time. See Section 12.
ALARM
1: Lightly press this button to turn on/off the secondary screen light.
2: Set the alarm clock. See Section 13.
DISPLAY
1: In the mode of time/Bluetooth/TF card, lightly press this button to see the
alarm clock time.
2: In the mode of receiving, lightly press this button to display the time/signal
intensity.
When the radio is working, lightly press/long press to increase the volume.
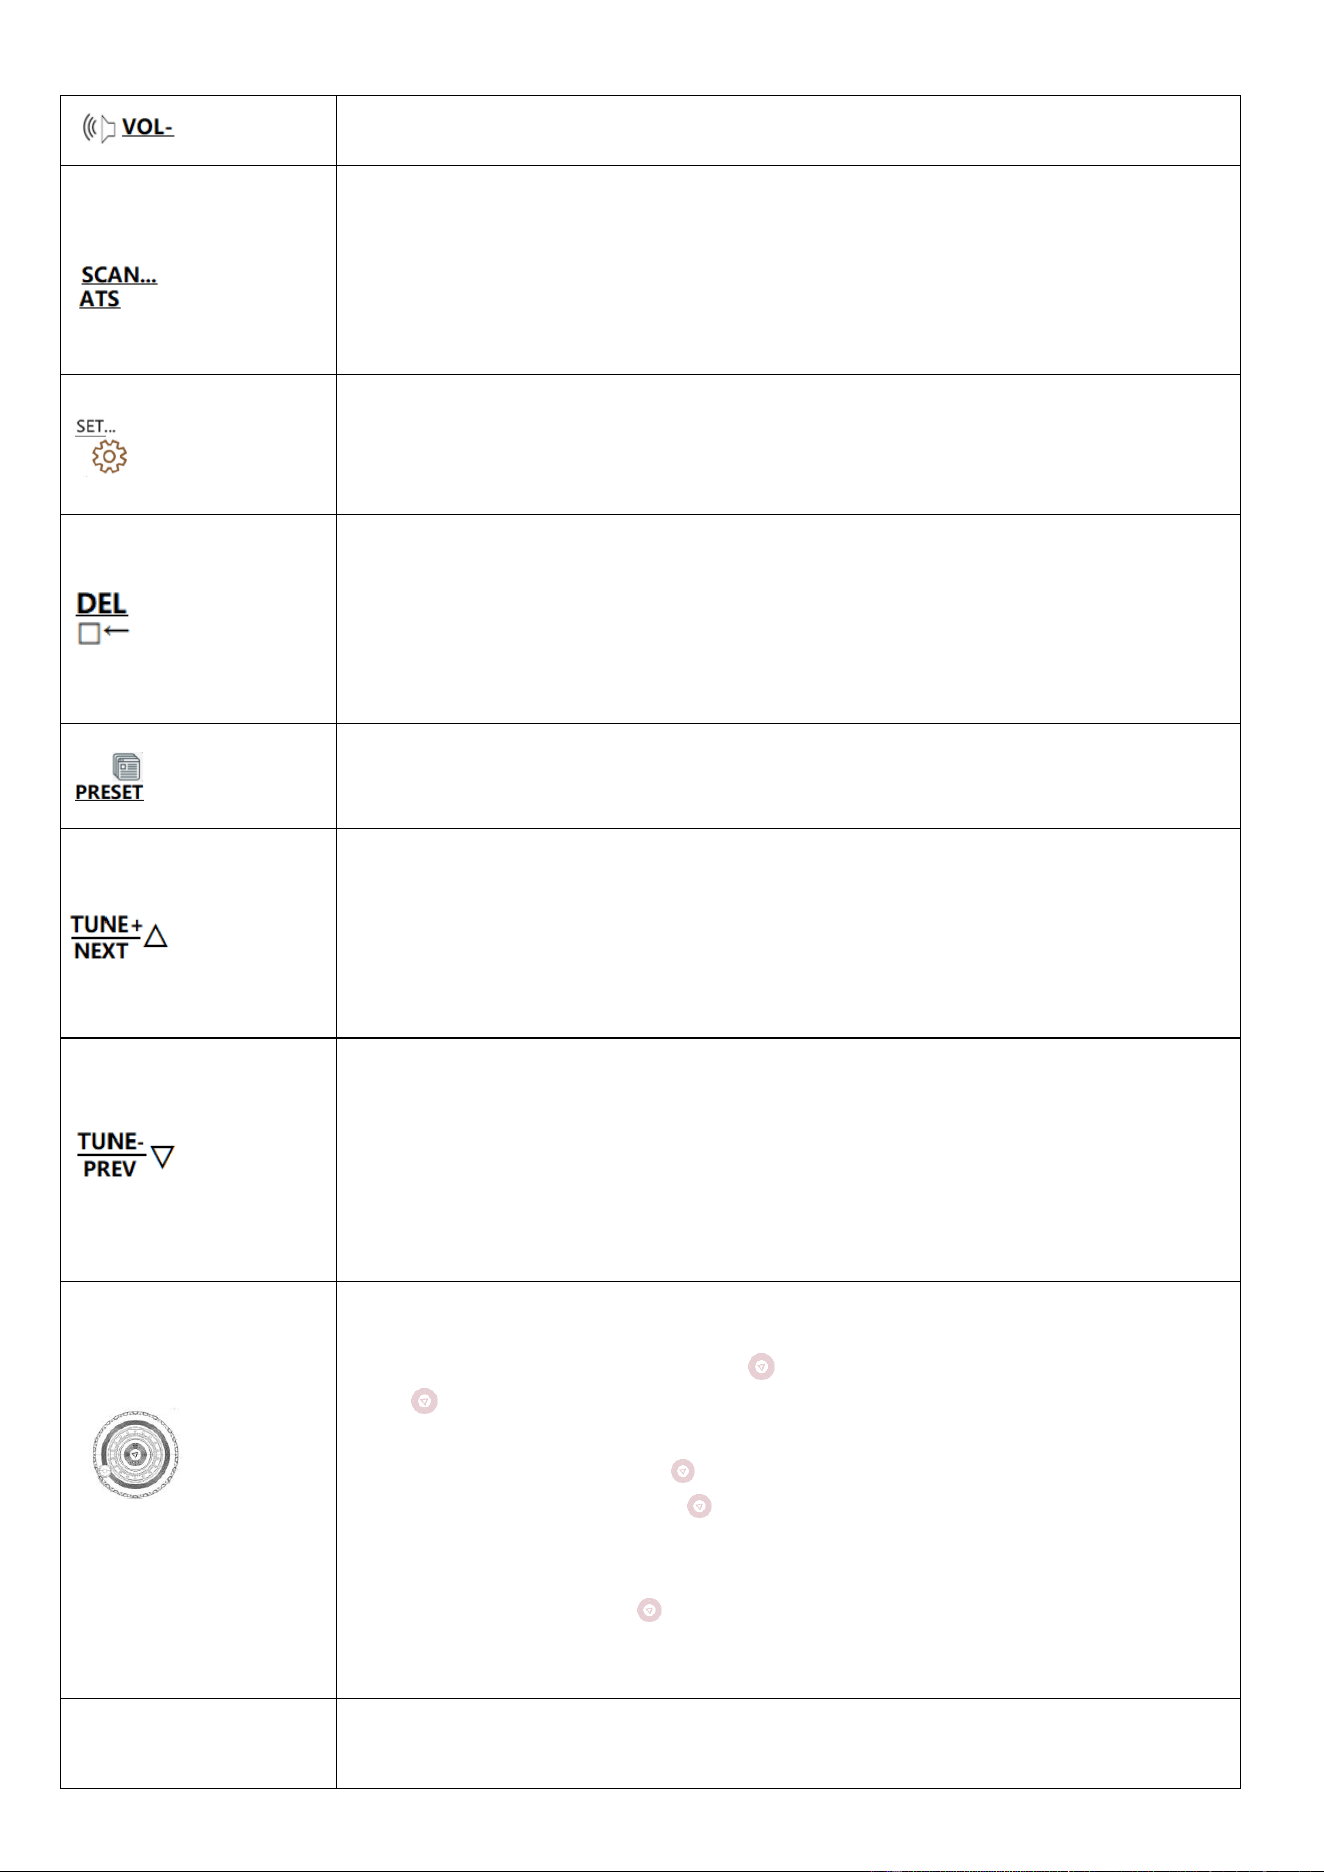
When the radio is working, lightly press/long press to decrease the volume.
1: In the mode of receiving (excluding WB), long press this button for 2 seconds
to automatically search/store a channel.
2: In the mode of VHF/UHF/AIR/CB, lightly press this button to automatically
scan and search a channel, and lightly press is again to exit scanning.
3: In the mode of WB, long press this button for 2 seconds to start/stop automatic
search of WB channels.
1: When the radio is turned on, press this button to enter the menus setting. See
Section 7.3.10.
2: When the time is displayed, press this button to enter the menu setting. See
Section 14.
1: In the mode of receiving, enter the mode of taking a channel and long press this
button for 2 seconds to delete a channel.
2: In the mode of TF card, select the music to be deleted and long press this
button for 2 seconds. When “del” appears on the primary screen, long press this
button again to confirm deletion.
3: When using the number key, press this button to delete.
1: Long press this button for 2 seconds to store a channel, and lightly press it
again to confirm.
2: Lightly press this button to take a channel.
1: In the mode of receiving, lightly press this button to progressively increase the
min step value of frequency at all brands. Long press is for 2 seconds to search
channels up automatically.
2: In the mode of TF card, lightly press this button to play the next music, and
long press it to play fast-forward.
3: In the mode of Bluetooth play: lightly press this button to play the next music.
1: In the mode of receiving, lightly press this button to progressively decrease the
min step value of frequency at all brands. Long press is for 2 seconds to search
channels down automatically.
2: In the mode of TF card, lightly press this button to play the previous music, and
long press it to play fast-backward.
3: In the mode of Bluetooth play: lightly press this button to play the previous
music.
Big and small Shuttle
Button
1: In the mode of receiving, rotate the internal and external shuttle button to select
a receiving frequency.
2: Lightly press the internal button “ ” to change the step value. Lightly press
the “ ” to select the step value needed. Rotate the big shuttle button to
progressively increase/decrease at the min step value of frequency ranges.
3: Rotate the internal button “ ”, the last frequency number flashes. Every time
you lightly press this button“ ” , Digital shift flicker. Rotate the button to
quickly search the target frequency.
4: In the mode of TF card play, rotate the internal and external shuttle button to
select a music and press “ ” to confirm your selection.
5: When setting the time/alarm clock/menu, press this button to set in conjunction
with the task command.
1: In the mode of receiving:
1-1: Select a frequency: it’s not the mode of taking a channel. Lightly press “EN”
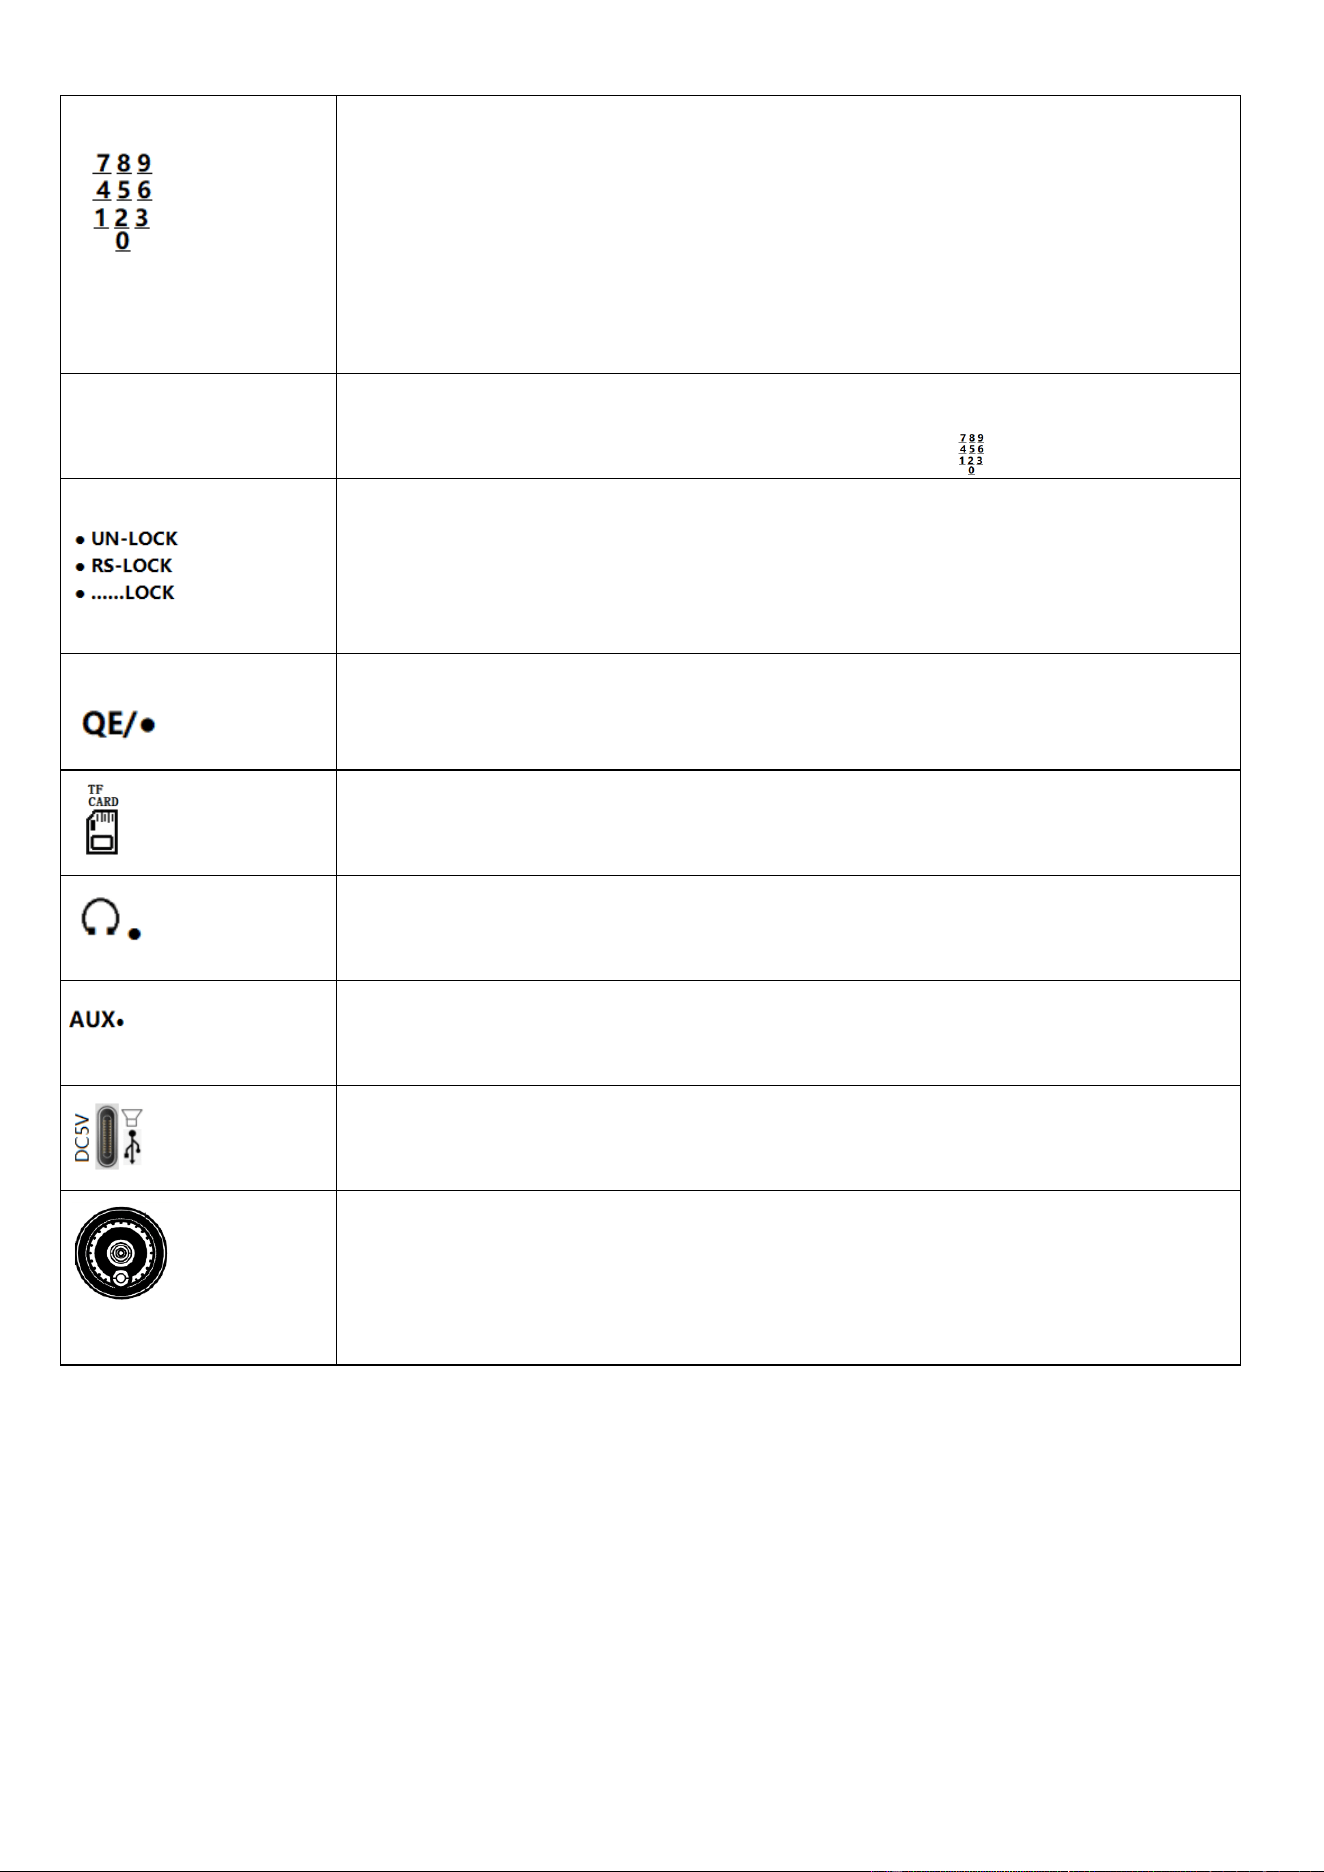
[Number key]
to enter frequency selection with number key and press “EN” to confirm.
1-2: Take a channel: After channels are stored, press “PRESET” to take a
channel. Directly press the number key to take a channel and press “EN” to
confirm.
1-3: Address of manually storing a channel: long press “PRESET” to enter the
mode of manual channel storing. Press the number key to select an address of
channel storing, and lightly press “PRESET” to confirm.
2: In the mode of TF card, lightly press this button and “EN” to select a music.
EN
1: In the mode of receiving, lightly press this button to select a frequency using
the umber key and press it again to confirm.
2: In the mode of TF card, lightly press this button and “ ” to select a music.
[Push lock]
1: Push the switch to the position of “UN” and all keys and knobs are not locked.
2: Push the switch to the position of “RS-LOCK”, and the shuttle knobs are
locked.
3: Push the switch to the position of “......LOCK’ and all keys and knobs are
locked (the state of lock)
When the radio is working, lightly press this button to switch between NORMAL,
POP, ROCK, JAZZ, CLASSIC, COUNTRY, NEWS, VOICE, DAC-ANALOG
AND CW
[Jack of TF card]
When the radio is working, insert the TF card to play the music in TF card first.
[Earphone output]
When the radio is working, insert the 3.5MM earphone to listen to the radio and
cancel the loud speaker.
[Audio input]
When the radio is working, inset the 3.5mm external audio source and play the
music of external source first.
[TYPE-C jack]
1: Charging jack
2: Connect to the audio output jack of computer
3: Connect to the computer with USB cable. Used as the TF card reader.
[On the right of the radio]
When external T-shaped antenna is used in the mode of MW/SW, press this
button to adjust the signal to noise ratio and antenna field intensity. The higher
RSSI and SNR values are, the better.
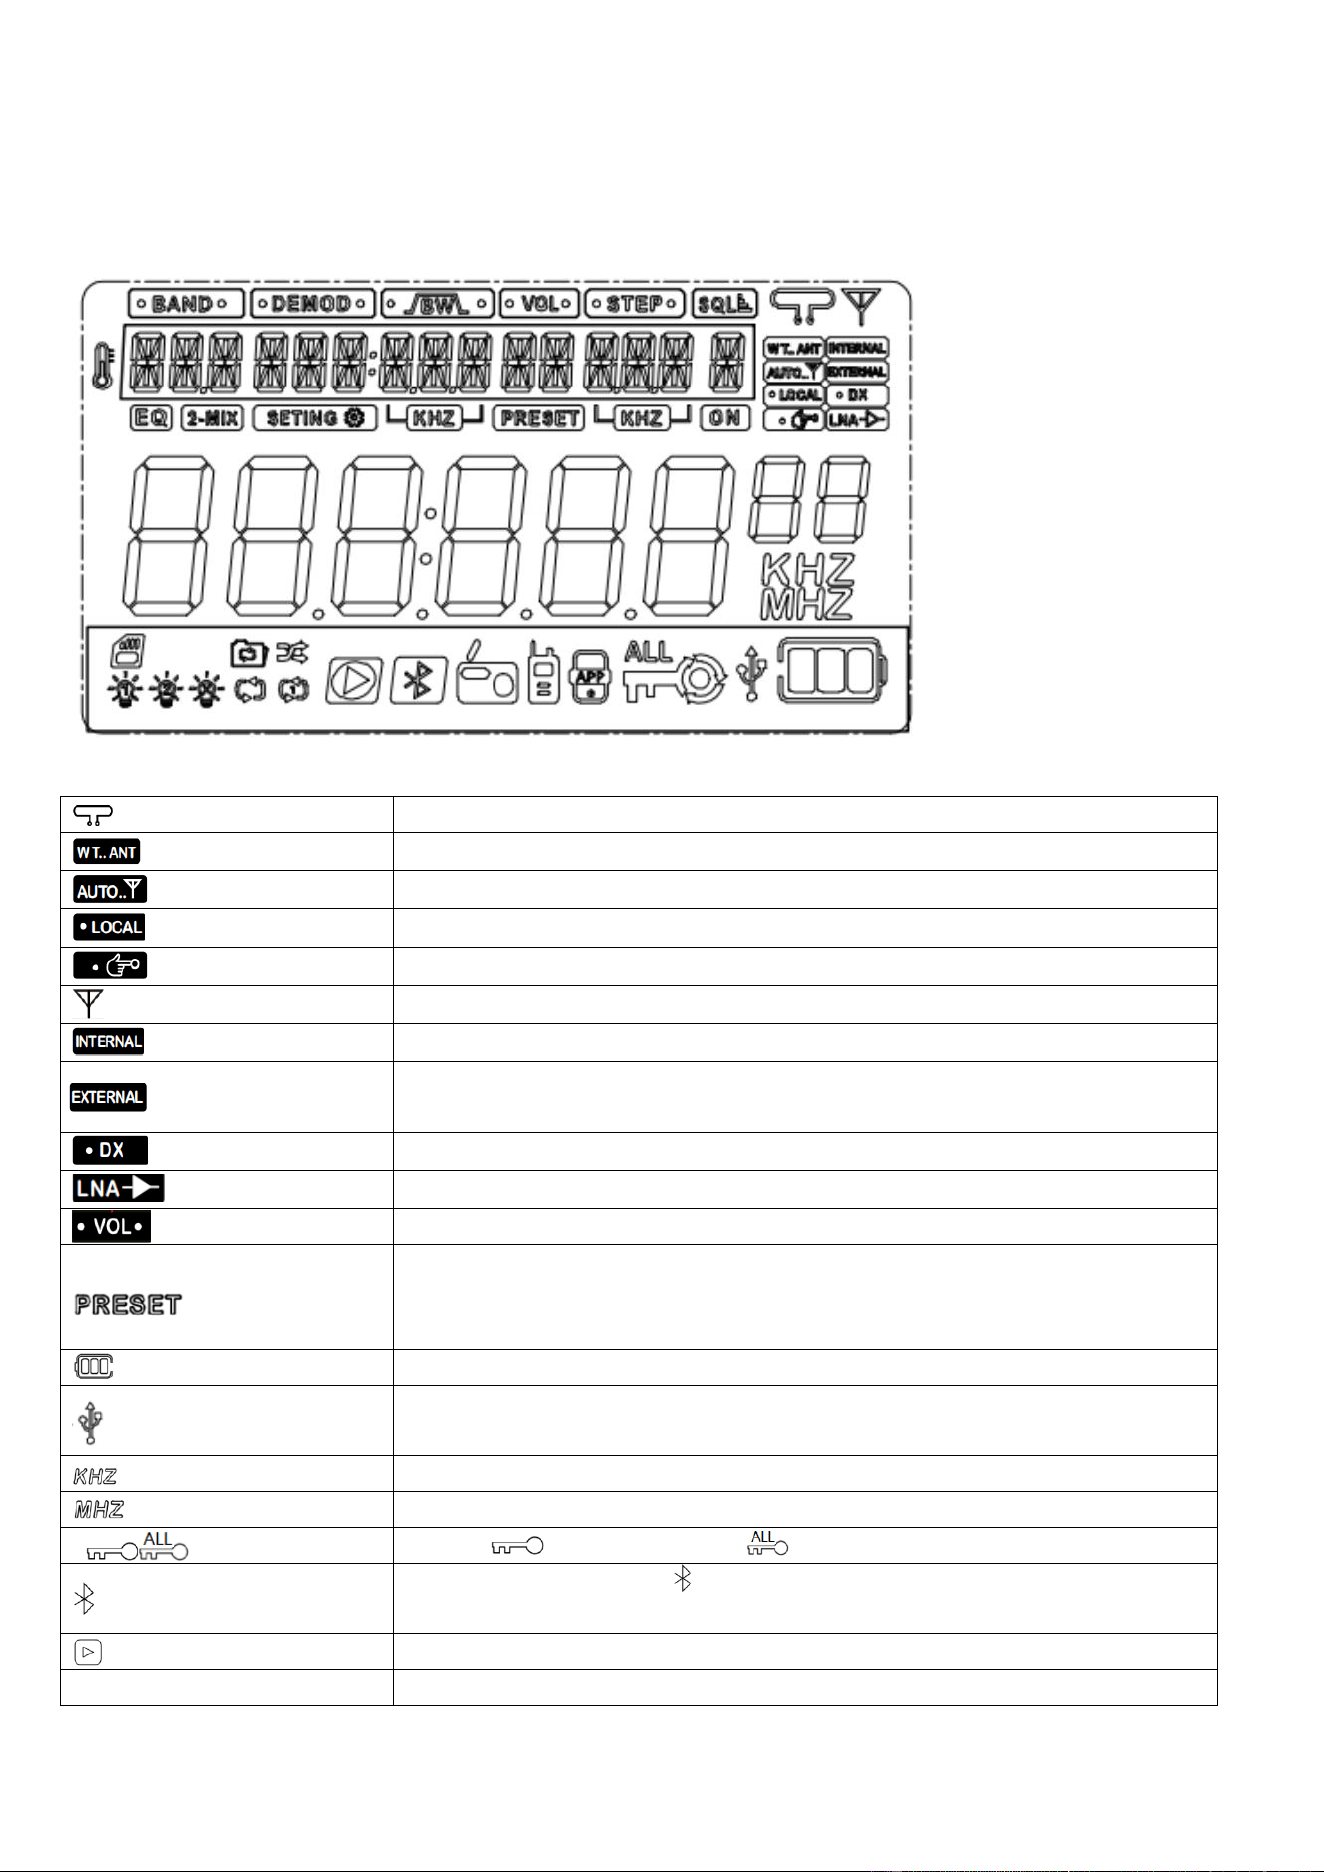
6: Symbols on LCD
6-1: The primary screen
Use of loop antenna (magnetic rod loop antenna)
Use of two-way radio SMA socket input
Automatic antenna mode
Antenna attenuation 10/20dB
Manual antenna tuning
Rod antenna (including the external antenna)
Built-in antenna (including rod antenna/magnetic rod) receiving
External antenna (including WT.AT and external ear antenna input)
receiving
Remote receiving (default)
Use of LNA1 (or setting)
Volume
Search and store a channel automatically
Store a channel manually (character flashing)
Take a channel (character always on)
Battery level
Charging status
Unit
Unit
Lock ( lock the shuttle , locks all)
Bluetooth connection (“ ” means waiting for connection; “always on”
means successful connection)
Bluetooth &TF card play ( means pause, “always on” means play)
ALE
Weather band alarm of North American countries
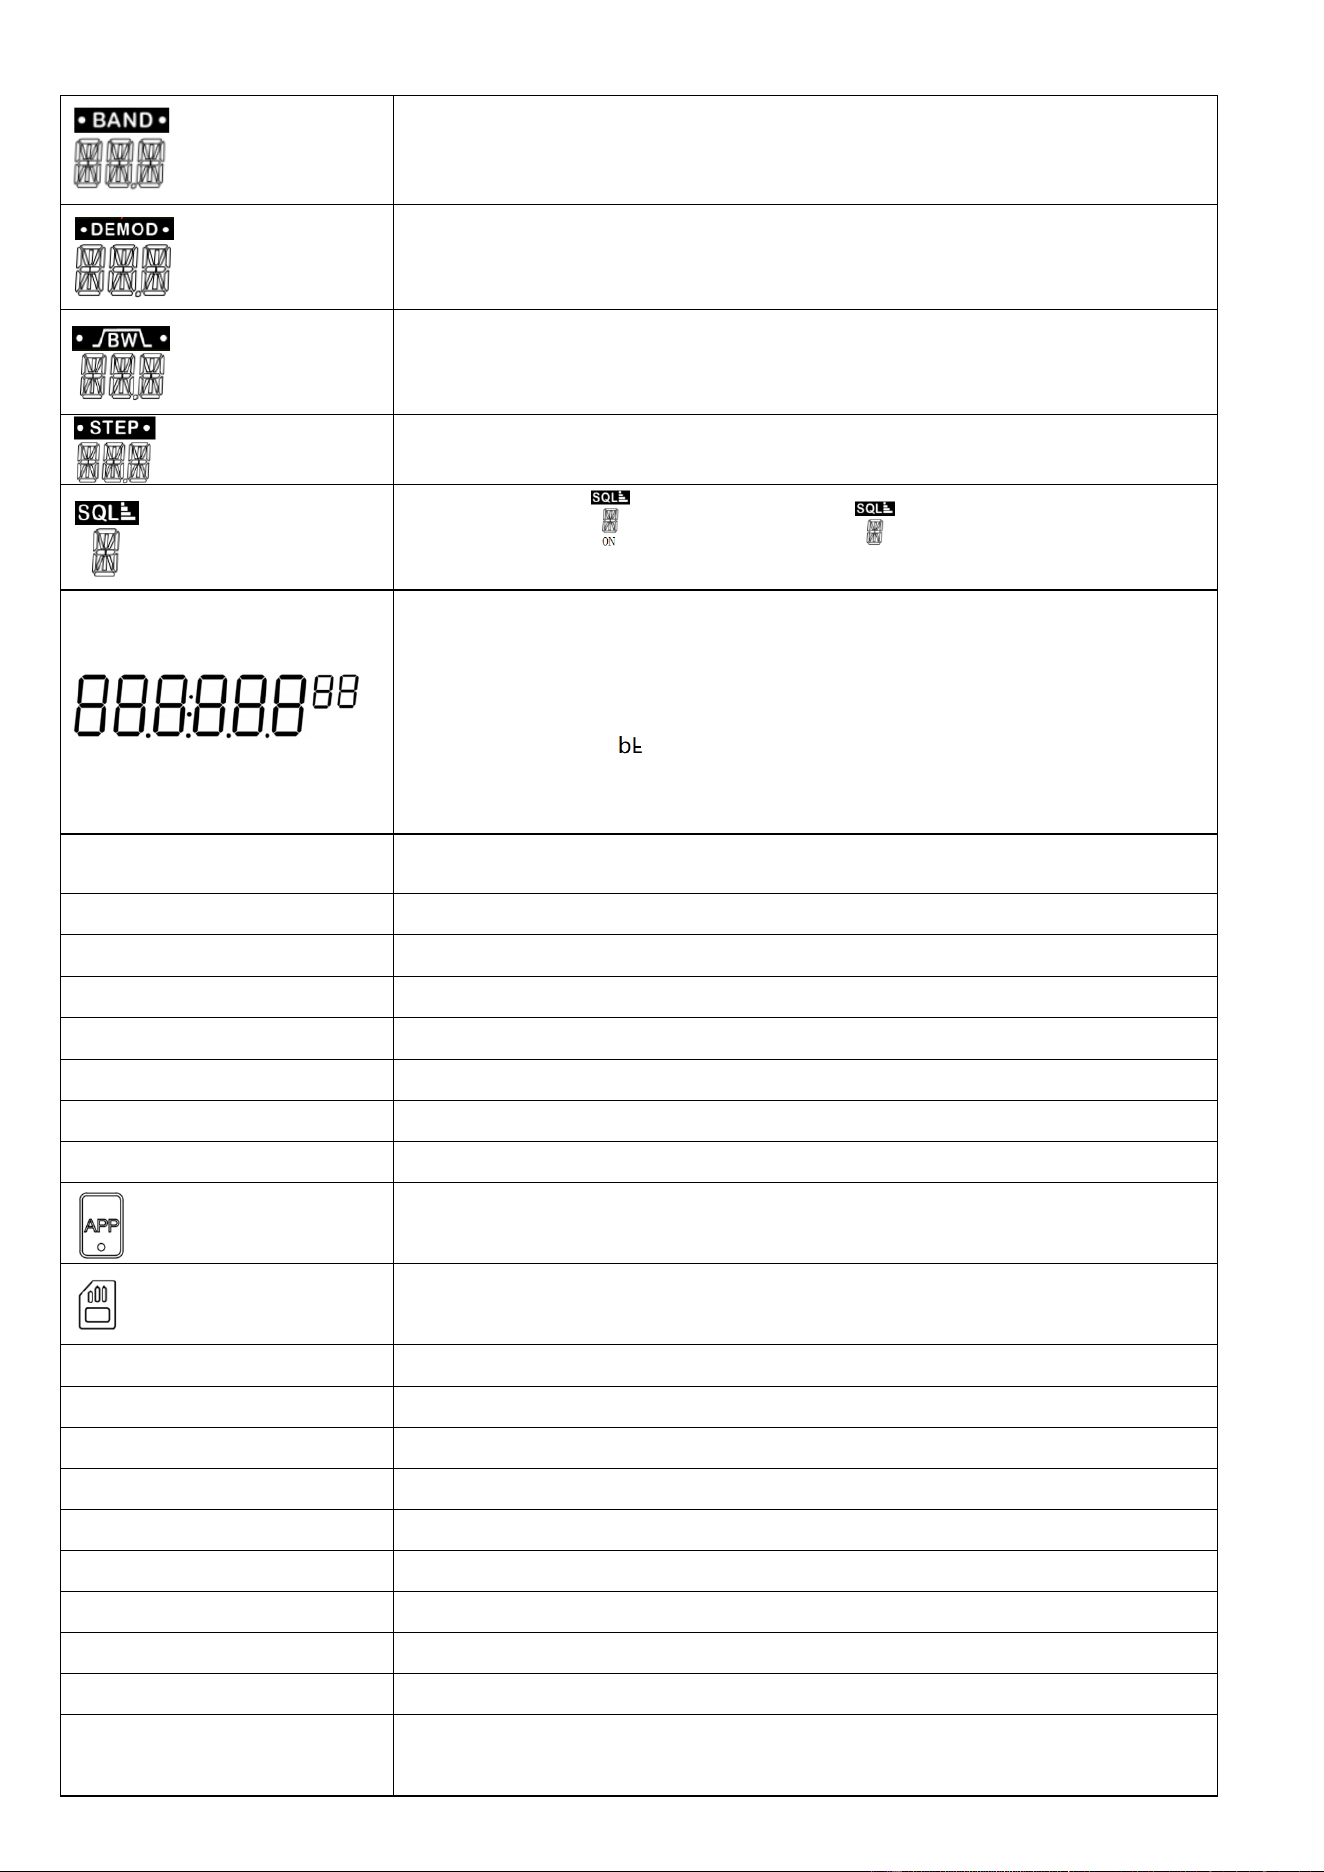
MW; LW; FM; SW; AIR; VHF; UHF; CB; WB
Demodulation mode
Bandwidth
Step value
Squelch level (“ ” squelch is on, “ ” squelch is off)
Standby time: show the time
When the radio is working:
FM mode: show the address of frequency/channel
storing/channel taking
Bluetooth mode, “ ” shows the status of Bluetooth
TF Card mode: show the time of play
Insert the 3.5mm audio cable: AUX shows the external audio input play
A-LCD SETTING
Set the light-on time of primary screen/the color of backlight
B-LCD SETTING
Set the light-on time of secondary screen
B-KEY SETTING
Set the light-on time of button
APP ENABLE
Available APP connection
APP DISABLE
Unavailable APP connection
TIMER DISPLAY
Start the time display or stop the time display on the primary screen
SYSTEM RESET
Factory data reset
VETSION-*-*
Version number
This product is successfully connected to the mobile APP
TF card is inserted
ATT-SETING
Set the receiving of antenna
ANT-CHANNLE
Select the antenna channel
ANT-KEEP-PASS
Keep antenna pass
ANT-LNA1-GAIN
LNA1 antenna channel gain selection
ANT-LNA1-GAIN-L
LNA1 antenna channel low gain
ANT-LNA1-GAIN-H
LNA1 antenna channel high gain
ANT-LNA2-GAIN
LNA2 antenna channel gain selection
ANT-LNA2-GAIN-L
LNA2 antenna channel low gain
ANT-LNA2-GAIN-H
LNA2 antenna channel high gain
ATT-GAIN antenna
attenuation selection
ANT-10DB: antenna attenuation 10DB; ANT-20DB: antenna attenuation
20DB
ANT-LNA1: antenna LNA1
channel
ANT-LPF: antenna LPF channel; ANT-HPF: antenna HPF channel
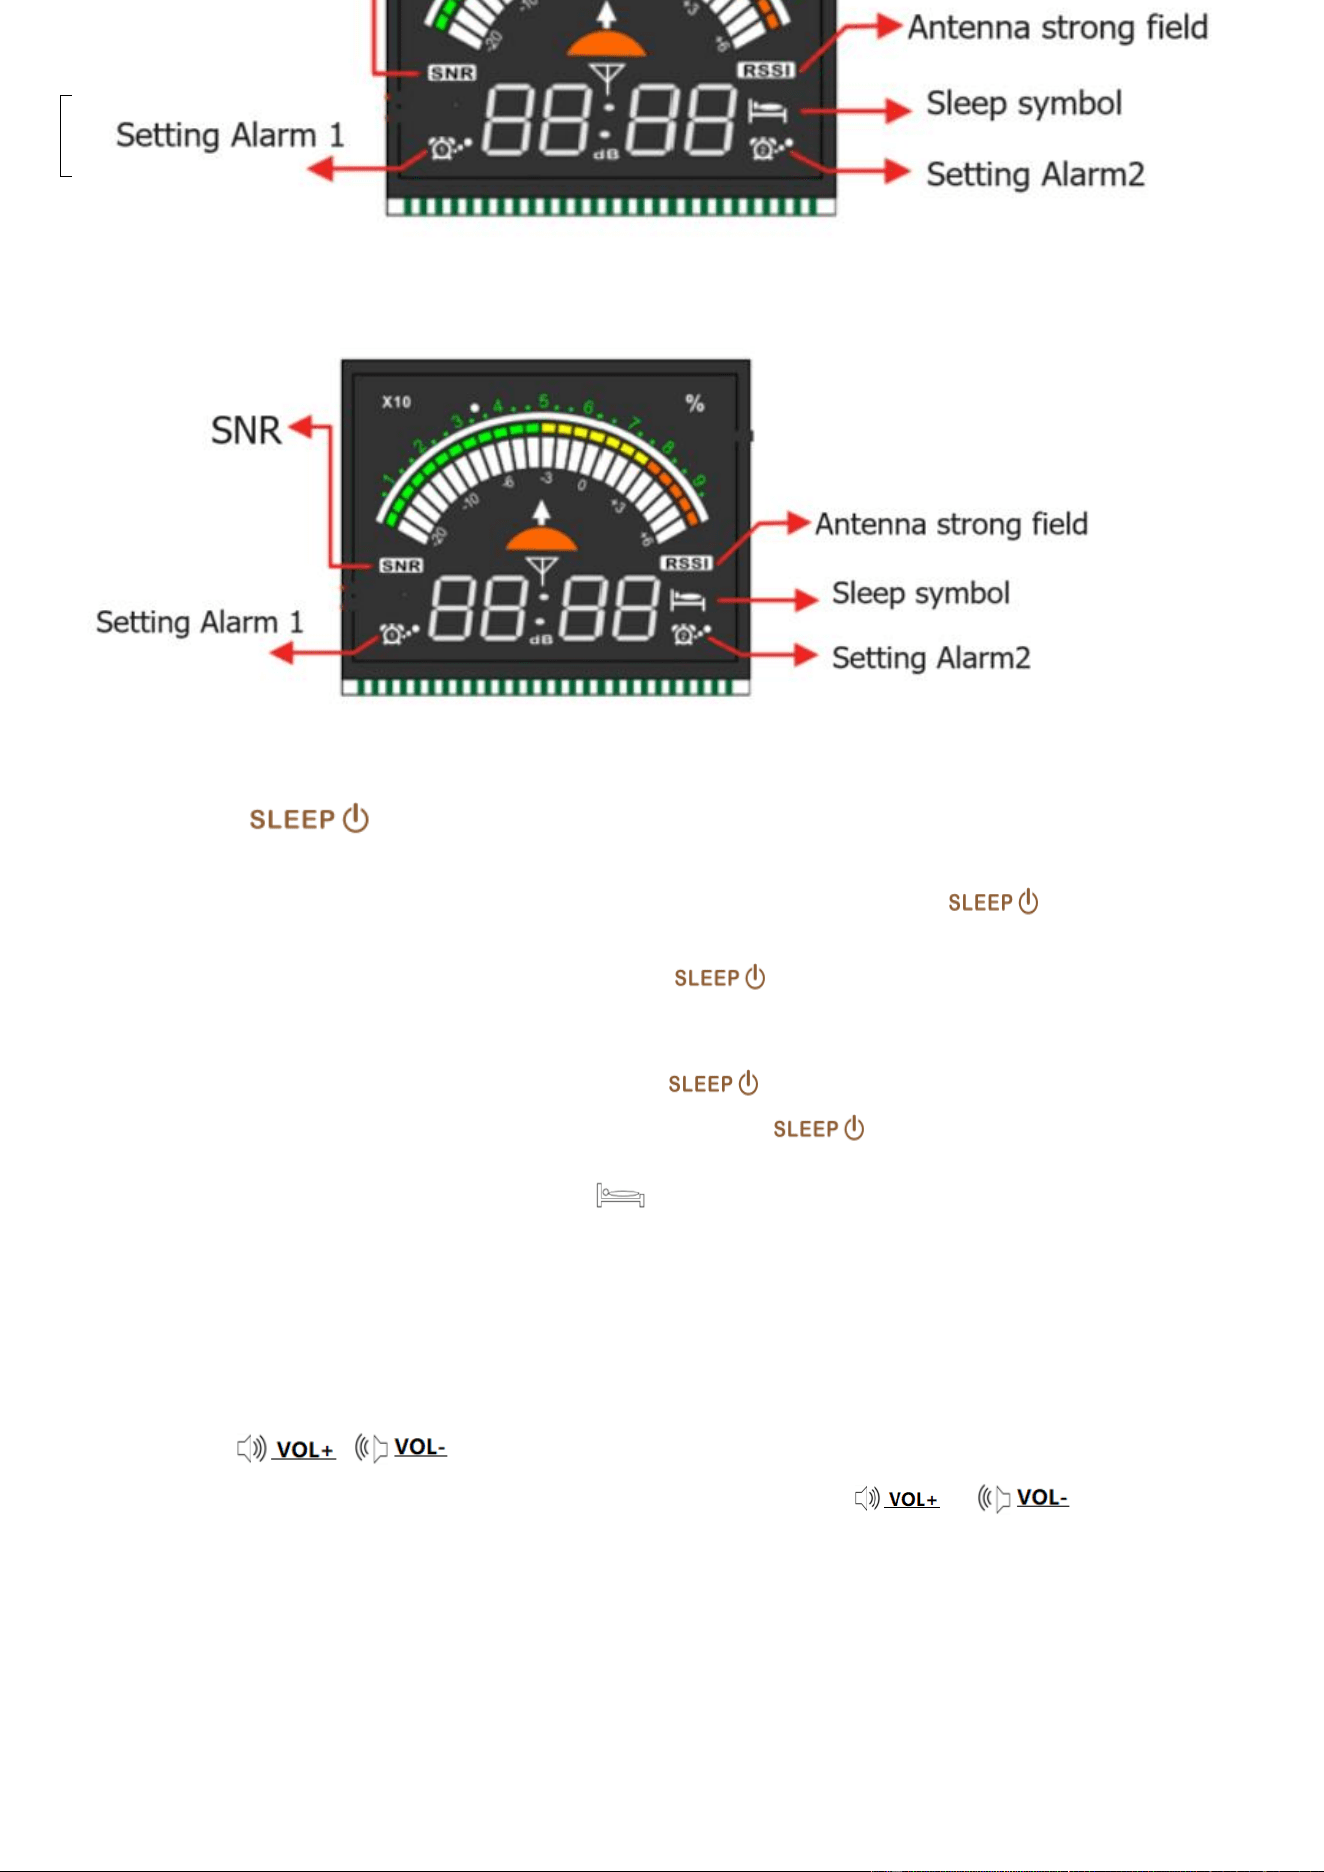
6.2: The secondary screen
7: Functions
7.1 :POWER ON/POWER OFF
7.1.1: ON/OFF: Correctly install two batteries.
Lightly press any key to start the time display, and lightly press [ ] to turn on the
radio.
When the radio is working, long press [ ] for 2 seconds to turn off the radio.
Before using the radio for the firs time, please fully charge the batteries.
7.1.2: Set the sleep time:
When the time is displayed, long press[ ]for 2 seconds to set the sleep time. “90 ”
appears on the secondary screen. Lightly press [ ] to choose the sleep time: 90, 80,
70, 60, 50, 40, 30, 20 and 10 minutes.
After choosing the sleep time, [ ] appears on the secondary screen.
Note: The light of the power button will have different colors in different working states. The
actual object prevails
7.2: Volume adjust.
When the radio is working, lightly press or long press [ & ] to adjust the
volume. Volume level: 00-32.
7.3: Listen to the radio
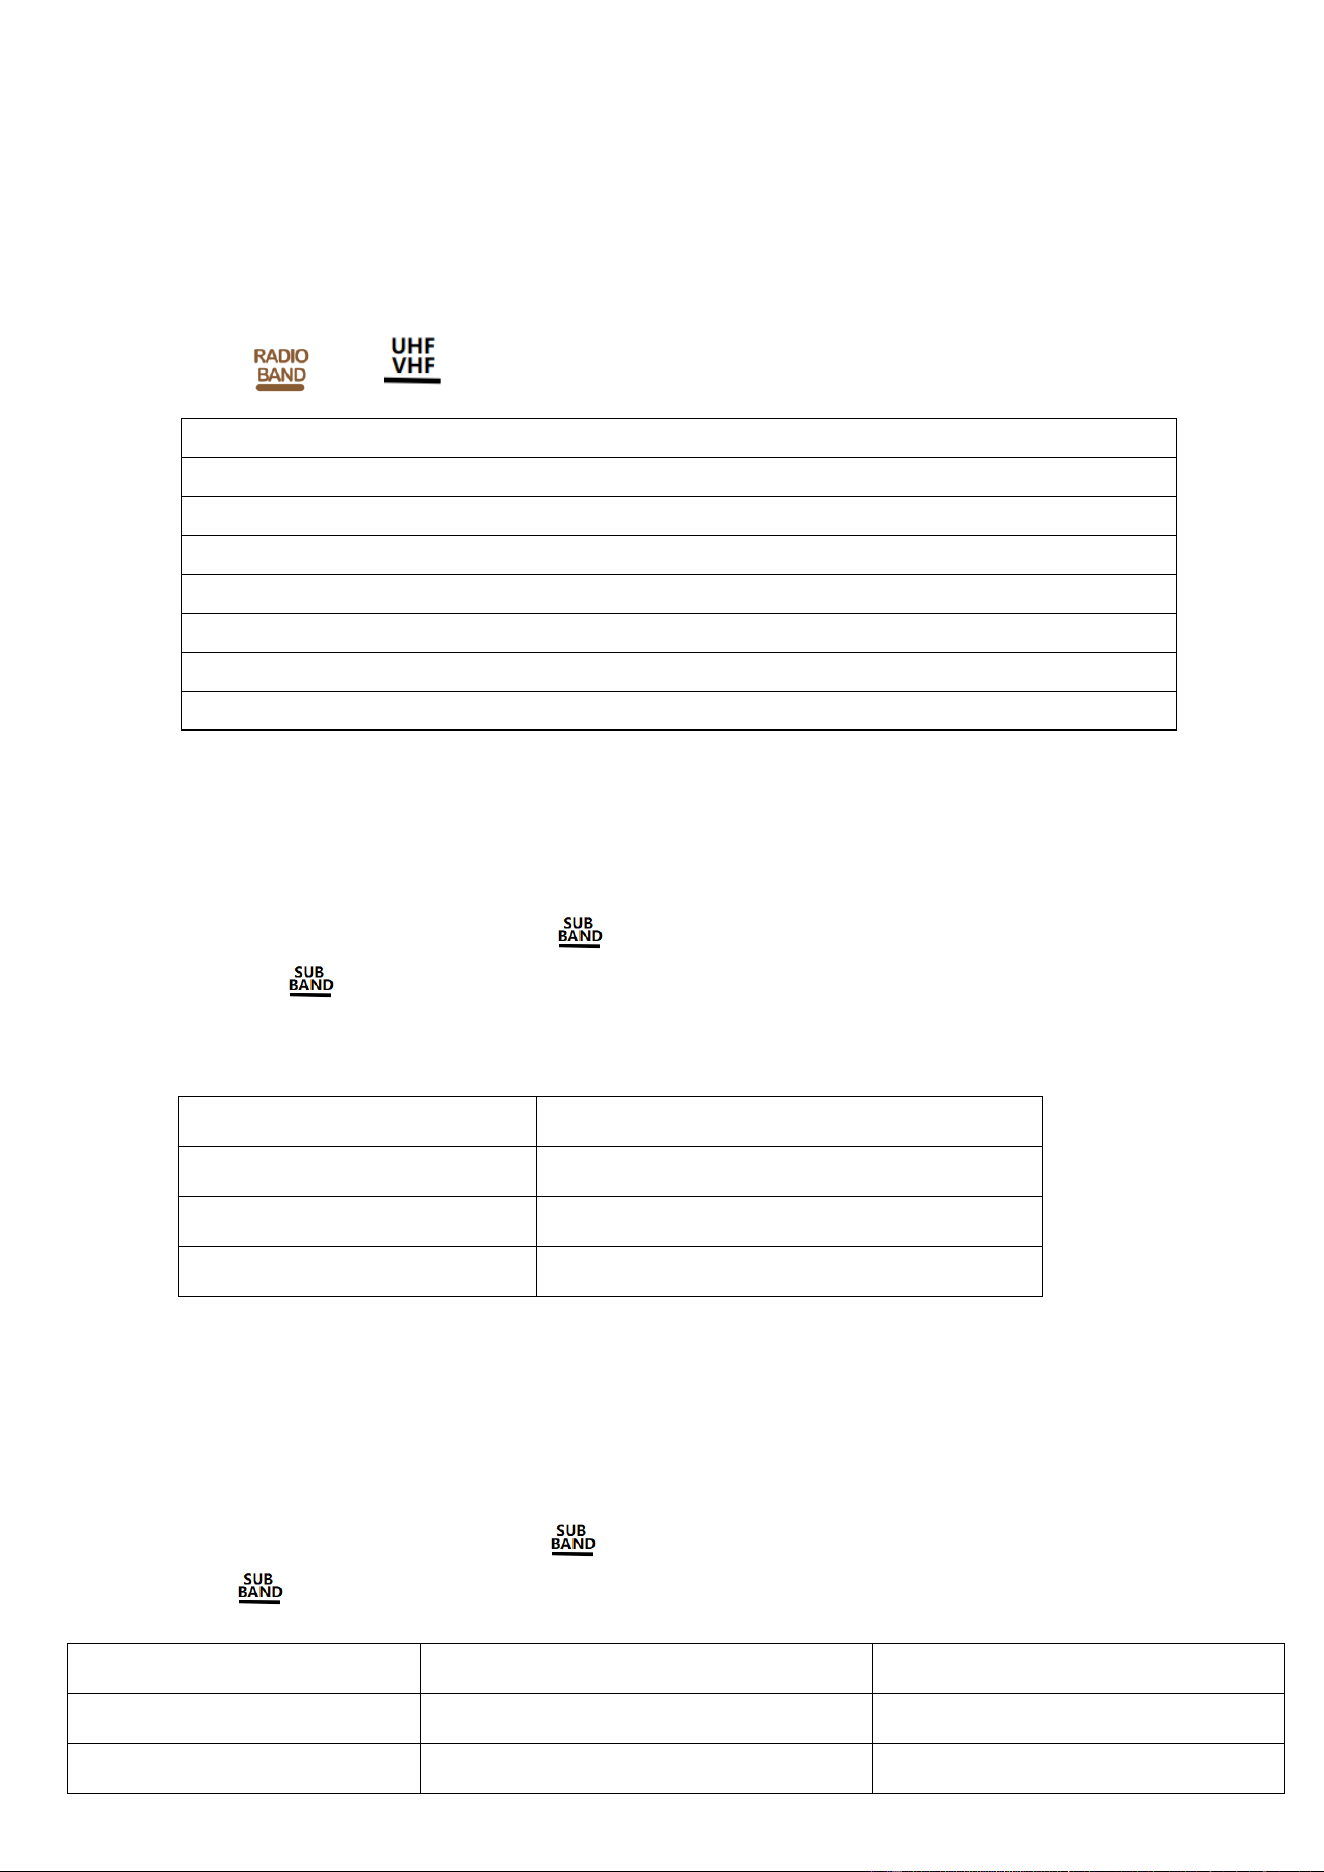
7.3.1: This product can receive the following bands. Lightly press
[ ]&[ ] ” to select a band.
、
7.3.2: FM frequency receiving range can be adjusted as needed
In the mode of FM, lightly press [ ] to show “64.0MHZ” on the primary screen. Continuously
press [ ] to see three number of 64MHZ, 76MHZ and 87.5MHZ on the primary screen in
turn. If 64MHZ is selected, it means the frequency receiving range is 64-108MHZ, and so forth.
You will exit setting automatically after stopping operation. The finally selected frequency range will be
the default one.
7.3.3: MW step value, 9KHZ/10KHZ can be adjusted as needed
In the mode of MW, lightly press [ ] to show “520MHZ” on the primary screen. Continuously
press [ ] to see two number of 520KHZ and 522KHZ on the primary screen in turn.
FM: 64-108MHZ (demodulation mode supports ST/WFM selection)
MW: 520-1710KHZ
SW: 2.3-30.0MHZ (demodulation mode supports AM/LSB/USB) . See Section 7.3.11.
LW: 153-522KHZ
V.UHF: 20-999MHZ
CB: 25-28MHZ
AIR: 118-138MHZ
WB: 162.4-162.55MHZ
Value on the primary screen
The default working frequency range
64MHZ
FM1: 64-108MHZ
76MHZ
FM2: 76-108MHZ
87.5MHZ
FM3: 87.5-108MHZ
Value on the primary screen
The default working frequency range
The default MW step value
522KHZ
522-1710KHZ
9KHZ
520KHZ
520-1710KHZ
10KHZ
You will exit setting automatically after selecting the AM frequency range and stopping operation. The
finally selected frequency range will be the default one.
Note: AM step value is 10KHZIn America, Canada, Mexico and other countries of North America and
South America and is 9KHZ in other countries.
7:3.4: Method of searching channels
Search channels manually using the button/search channels automatically using the button/search and
store channels automatically using the button/the number key/search channels by rotating the shuttle
button.
7.3.4.1: Search channels manually using the button
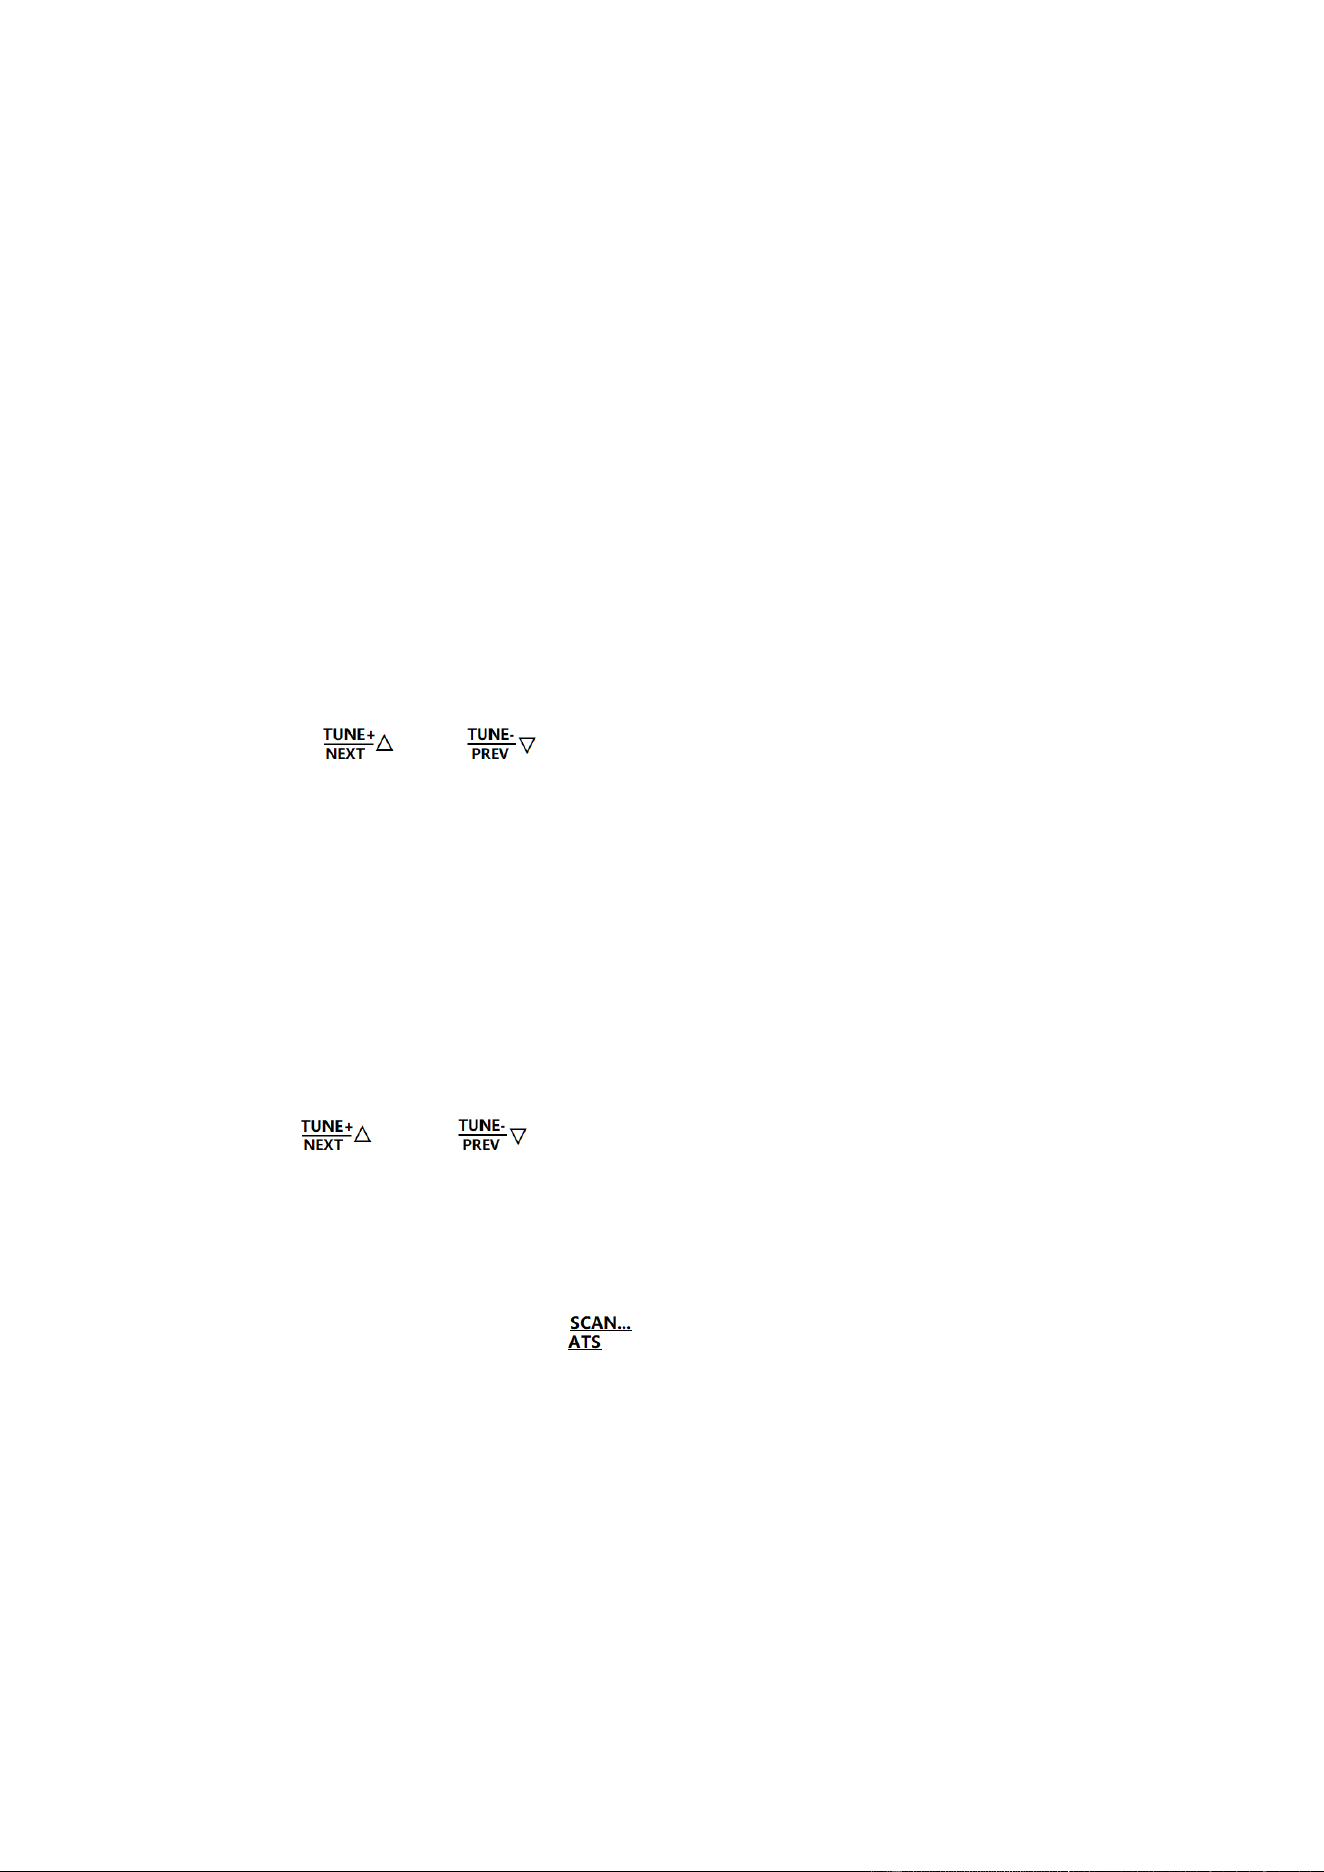
Lightly press [ ] or [ ] to decrease or increase progressively at the minimum step value
of wave band.
FM min step value: 0.1MHZ, VHF min step value: 0.0125MHZ
MW min step value: 9KHZ / 10KHZ UHF min step value: 0.0125MHZ
LW min step value: 9KHZ AIR min step value: 0.025MHZ
SW min step value: 0.005MHZ CB min step value: 0.005MHZ
7.3.4.2: Search channels automatically using the button
Long press [ ] or [ ] for 2 seconds to search channels at the minimum step value of
wave band. Search will stop after finding a channel, and this channel will be played.
7.3.4.3: Search and store channels automatically using the button
In the mode of receiving, long press [ ]for 2 seconds to search and store channels automatically.
In process of automatic search, “PRESET” flashes on the primary screen. After a channel is
successfully found, “CH***” appears on the primary screen, which is the address of storing channels.
After a round of search, search will stop automatically, and the first channel stored will be played.
Every band can store 200 channels, 1,600 channels in total (excluding WB).
Note: the number of channels stored depends on local signal intensity.
7.3.4.4: The shuttle button
In the mode of receiving, rotate the internal and external shuttle button at the front of radio to select a
channel.
----Lightly press the internal button [ ], the step value changes. Lightly press this button to select a
step value. Rotate the big shuttle button [ ] to select the frequency you need clockwise or
anti-clockwise according to the step value selected.
The adjustable step values at all bands:
Band
Step Value
Default Value
FM
10KHZ, 50KHZ, 100KHZ
100KHZ
SW (AM/LSB/USB)
0.01KHZ, 0.02KHZ, 0.1KHZ, 1KHZ, 5KHZ
5KHZ
MW step value is
9KHZ
3KHZ, 9KHZ
9KHZ or 10KHZ
MW step value is
10KHZ
5KHZ, 10KHZ,
LW
3KHZ, 9KHZ
9KHZ
VHF
1KHZ, 5.0KHZ, 6.2KHZ, 7.5KHZ, 12.5KHZ,
25KHZ
12.5KHZ
UHF
1KHZ, 5.0KHZ, 6.2KHZ, 7.5KHZ, 12.5KHZ,
25KHZ
12.5KHZ
AIR
8.3KHZ, 12.5KHZ, 25KHZ
25KHZ
CB
0.01KHZ, 0.02KHZ, 0.1KHZ, 1KHZ, 5KHZ
5KHZ
WB
25KHZ
25KHZ
--Rotate the small shuttle button[ ] , the last frequency number flashes. Lightly press the
internal button[ ], the number flashes. Rotate the small shuttle button to see quick changes at the
position of number flashing until finding the target frequency.
7.3.5: Quick switch between [ ] meter waves
SW, VHF, UHF, and AIR all have meter waves:
Lightly press[ ] and press[ ], [ ] or the shuttle button to quickly find the frequency you need.
7.3.6: Store channels manually
---When the radio is working, find a target frequency with the method in Section 7.3.4. Long
press[ ] for 2 seconds to enter the mode of storing channels. “PRESET ***” flashes on the
primary screen. Lightly press [ ] to confirm.
---Long press[ ]for 2 seconds. “PRESET ***” flashes on the primary screen. Lightly press
[ ] or[ ] to choose an address of storing channels (or the number of channel to be
replaced). Lightly press “’ again to confirm.
---Long press “” for 2 seconds. “PRESET ***” flashes on the primary screen. Lightly press [ ] to
enter the address of storing channels. Lightly press [ ]again to confirm, and now a channel is
stored successfully.
7.3.7: Take channels
After channels are stored with the methods in Section 7.3.4.3 and 7.3.6, lightly press [ ] to enter
the mode of taking channels. When “PRESET CH ***” appears on the primary screen, lightly press
[ ] or[ ]to choose an address of taking channels.
---In the mode of “PRESET” taking channels, you can also use [ ]to enter a valid address of storing
channels, and press “EN” again to confirm the frequency of address of taking channels.
If the number you select is not a valid address of storing channels, “null” appears on the primary screen.
Exit the mode of taking channels: Lightly press “PRESET”, “PRESET” disappears on the primary screen,
which means exiting the mode of taking channels.
Band
Meter Wave
SW
2.3MHZ.3.2MHZ.3.75MHZ.3.9MHZ.4.75MHZ.5.73MHZ.
7.1MHZ.9.25MHZ.11.5MHZ.13.57MHZ. 15.03MHZ. 17.48MHZ. 18.9MHZ.
21.45MHZ. 25.67MHZ (15 meter waves)
VHF
30.0MHZ.42.0MHZ.55.0MHZ.68.0MHZ.100.0MHZ.136.0MHZ, 218.0MHZ.
250.0MHZ (8 meter waves)
UHF
250.0MHZ.320.0MHZ.460MHZ.580.0MHZ.620.0MHZ.730.0MHZ,
800.0MHZ.999.0MHZ (8 meter waves)
AIR
118MHZ.123MHZ.128MHZ. 133MHZ.138MHZ
(5 meter waves)
7.3.8: Delete channels
Select a channel you don’t need according to Section 7.3.7. Long press[ ], then [ ] appears
on the primary screen, which means the channel is deleted.
7.3.9: WB of North America
Lightly press [ ] to switch to WB. Lightly press [ ] or[ ] or rotate the shuttle
button [ ] to choose the weather frequency to receive. Receiving frequencies:
1 - 162.400MHZ, 2 - 162.425MHZ, 3 - 162.450MHZ, 4 - 162.475MHZ,
5 - 162.500MHZ, 6 - 162.525MHZ, 7 - 162.550MHZ
7.3.9.1: Search WB channels automatically
In the mode of WB, long press [ ]for 2 seconds to automatically search WB channels. “ALE”
appears on LCD. In the state of “ALE”, if no WB channel is found, long press[ ]for 2 seconds
again to exit “ALE” automatic search.
(Note: All buttons don’t work in the mode of automatic search. You must use other receiving functions
by long pressing[ ] for 2 seconds to cancel automatic search)
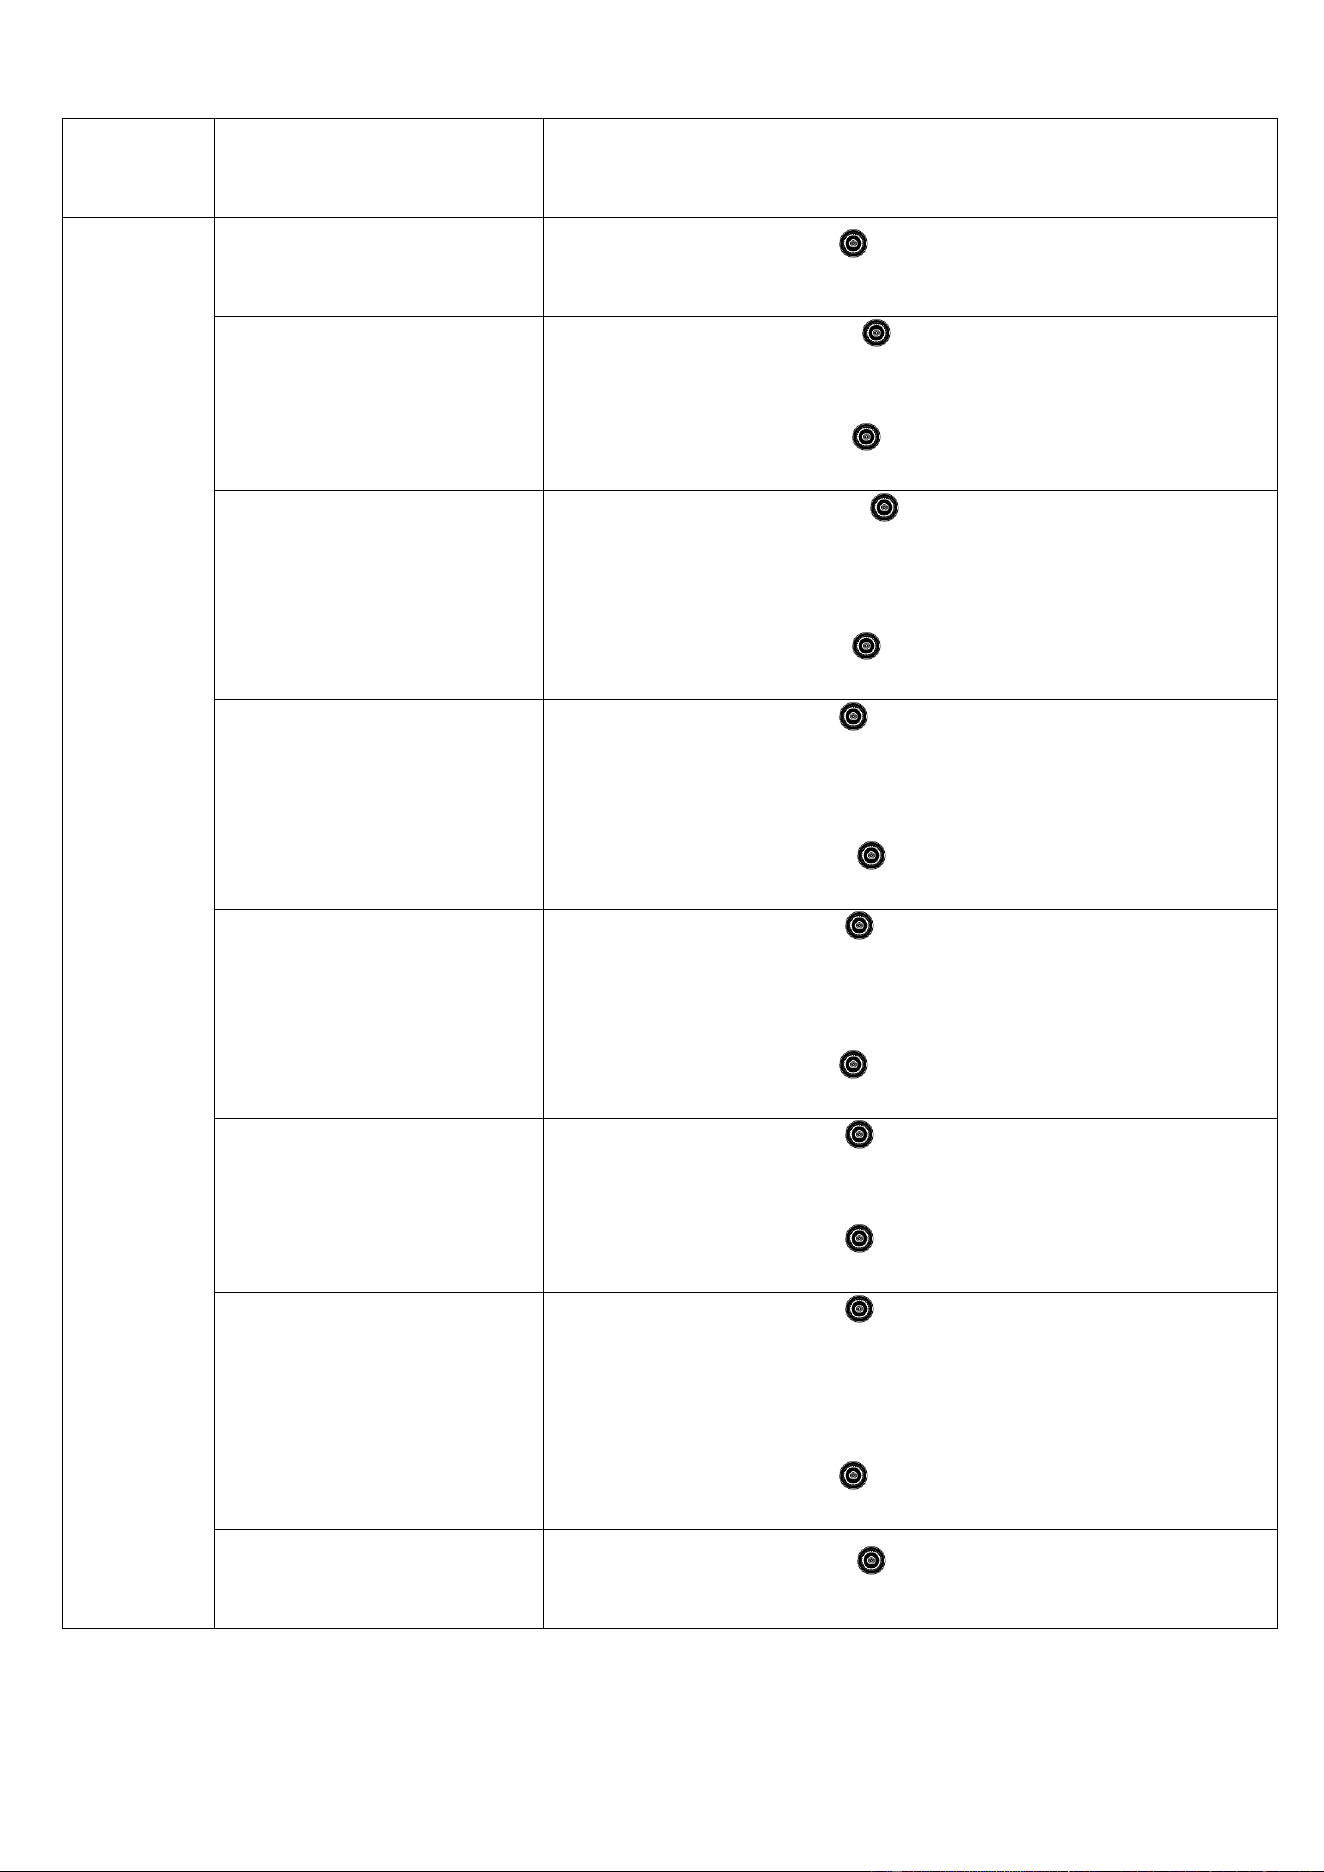
7.3.10: Enter the setting function when the radio is working at all bands
In the mode of receiving, long press[ ] to enter the setting function and enter the main menu.
Rotate the shuttle button [ ]clockwise or anti-clockwise to select in the main menu
Lightly press shuttle button[ ] to enter the sub-menu.
Rotate the shuttle button[ ] clockwise or anti-clockwise to select and lightly press this button to
confirm your selection. “SETTING OK” appears on the primary screen.
Exit setting: In order to exit setting in the mode of sub-menu, long press[ ] to return to the
home page, and lightly press [ ] again to exit.
In order to exit setting in the mode of main menu, directly lightly press [ ]to exit. Or wait for
about 10 seconds, then the system will exit automatically.
Band
Tasks in the main menu
on the primary screen
Select in the sub-menu
FM
ANT-KEEP-PASS
Keep antenna pass
Lightly press the shuttle button[ ]to show “SETTING OK”,
which means setting is finished.
ANT-CHANNLE
Antenna channel selection
Lightly press the shuttle button [ ] to enter the sub-menu to
select:
ANT-HPF (HPF filter)
ANT-LNA1 (LNA1 channel)
Lightly press the shuttle button [ ]to show “SETTING OK”,
which means setting is finished.
ANT-LNA1-GAIN
LNA1 antenna channel gain
selection
Lightly press the shuttle button [ ] to enter the sub-menu and
rotate the button to select:
ANT-LNA1-GAIN-L (LNA1 antenna channel low gain)
ANT-LNA1-GAIN-H (LNA1 antenna channel high gain)
Lightly press the shuttle button[ ] to show “SETTING OK”,
which means setting is finished.
ANT-LNA2-GAIN
LNA2 antenna channel gain
selection
Lightly press the shuttle button [ ] to enter the sub-menu and
rotate the button to select:
ANT-LNA2-GAIN-L (LNA2 antenna channel low gain)
ANT-LNA2-GAIN-H (LNA2 antenna channel high gain)
Lightly press the shuttle button [ ]to show “SETTING OK”,
which means setting is finished.
ATT-GAIN
Antenna attenuation
Lightly press the shuttle button [ ]to enter the sub-menu and
rotate the button to select:
ANT-10DB: antenna attenuation 10DB
ANT-20DB: antenna attenuation 20DB
Lightly press the shuttle button [ ] to show “SETTING OK”,
which means setting is finished.
ANT-DEFAULT
Default antenna
Lightly press the shuttle button [ ] to show “SETTING OK”,
which means setting is finished.
Band
Tasks in the main menu
on the primary screen
Select in the sub-menu
SW/CB/
VHF/UHF/
AIR
ANT-KEEP-PASS
Keep antenna pass
Lightly press the shuttle button[ ] to show “SETTING OK”, which means
setting is finished.
ANT-CHANNLE
Antenna channel selection
Lightly press the shuttle button[ ] to enter the sub-menu to select:
ANT-LPF(HPF filter)
ANT-LNA1(LNA1 channel)
Lightly press the shuttle button[ ] to show “SETTING OK”, which means
setting is finished.
ANT-LNA1-GAIN
LNA1 antenna channel gain
selection
Lightly press the shuttle button [ ] to enter the sub-menu and rotate the
button to select:
ANT-LNA1-GAIN-L (LNA1 antenna channel low gain)
ANT-LNA1-GAIN-H (LNA1 antenna channel high gain)
Lightly press the shuttle button[ ] to show “SETTING OK”, which means
setting is finished.
ANT-LNA2-GAIN
LNA2 antenna channel gain
selection
Lightly press the shuttle button[ ] to enter the sub-menu and rotate the button
to select:
ANT-LNA2-GAIN-L (LNA2 antenna channel low gain)
ANT-LNA2-GAIN-H (LNA2 antenna channel high gain)
Lightly press the shuttle button [ ] to show “SETTING OK”, which means
setting is finished.
ATT-GAIN
Antenna attenuation
Lightly press the shuttle button [ ] to enter the sub-menu and rotate the
button to select:
ANT-10DB: antenna attenuation 10DB
ANT-20DB: antenna attenuation 20DB
Lightly press the shuttle button[ ] to show “SETTING OK”, which means
setting is finished.
SQL-LEVEL
Lightly press the shuttle button [ ] to enter the sub-menu and rotate the
button to select:
SQL-LEVEL 00-01-02-03-04-05-06-07-08-09 (9 squelch levels)
Lightly press the shuttle button [ ]to show “SETTING OK”, which means
setting is finished.
WT-SCAN-MODE
Lightly press the shuttle button [ ] to enter the sub-menu and rotate the
button to select:
WT-SCAN-MODE-FREQ frequency scanning mode
WT-SCAN-MODE-PRESET stored channel scanning mode
Lightly press the shuttle button[ ] to show “SETTING OK”, which means
setting is finished.
ANT-DEFAULT
Default antenna
Lightly press the shuttle button [ ] to show “SETTING OK”, which means
setting is finished.
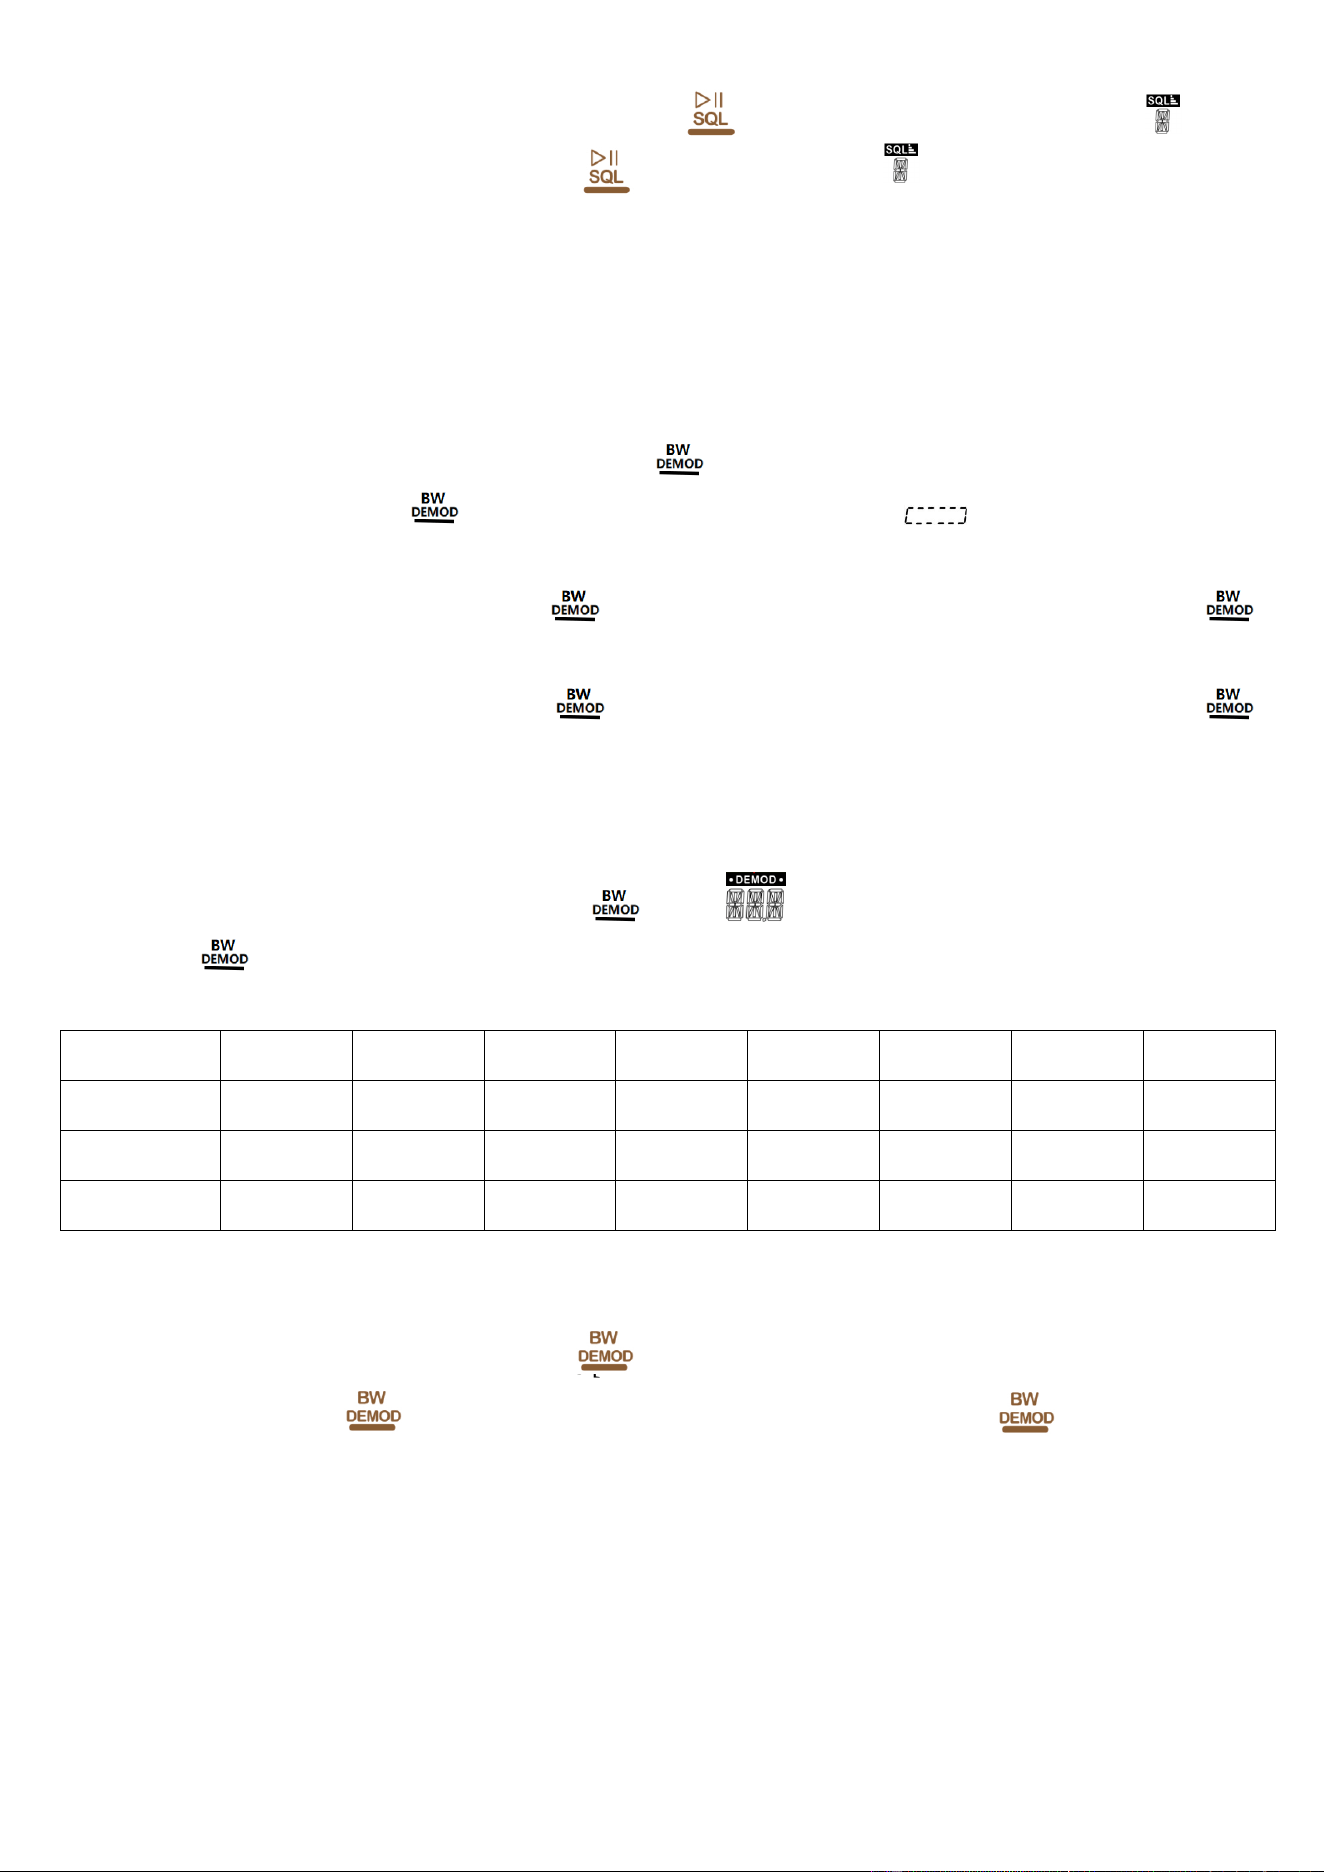
Note: If SQ function is started, long press [ ] for 2 seconds to cancel the function.[ ] shows
0 on the primary screen. Long press [ ]for 2 seconds again, [ ] shows the recovered SQ value
of current SQ.
7.3.11: Demodulation modes of SW
This product supports the following three demodulation modes in the SW receiving mode: AM, LSB
and USB.
In the mode of SW receiving, long press [ ] for 2 seconds, then “AM” flashes on the primary
screen. Lightly press [ ] within 2 seconds, then “USB” flashes. “ ” means searching. About 2
seconds later, it is switched to “USB”.
In the mode of USB, long press[ ] for 2 seconds, then “USB” flashes, and lightly press[ ]
again to switch to “LSB”.
In the mode of LSB, long press [ ]for 2 seconds, then “LSB” flashes, and lightly press [ ]
again to switch to “AM” ordinary receiving mode.
7.3.13: Demodulation modes of other bands
In the mode of receiving, long press [ ], then [ ]flashes on the primary screen. Lightly press
[ ]to select the demodulation mode you need (For demodulation modes of SW, please see
Section 7.3.11). The demodulation modes of all bands are described in the following table:
FM Mode
MW Mode
SW Mode
LW Mode
WB Mode
CB Mode
AIR Mode
VHF Mode
UHF Mode
WFM(MONO)
AM
AM
AM
NFM
AM
AM
NFM
NFM
ST (STEREO)
USB
LSB
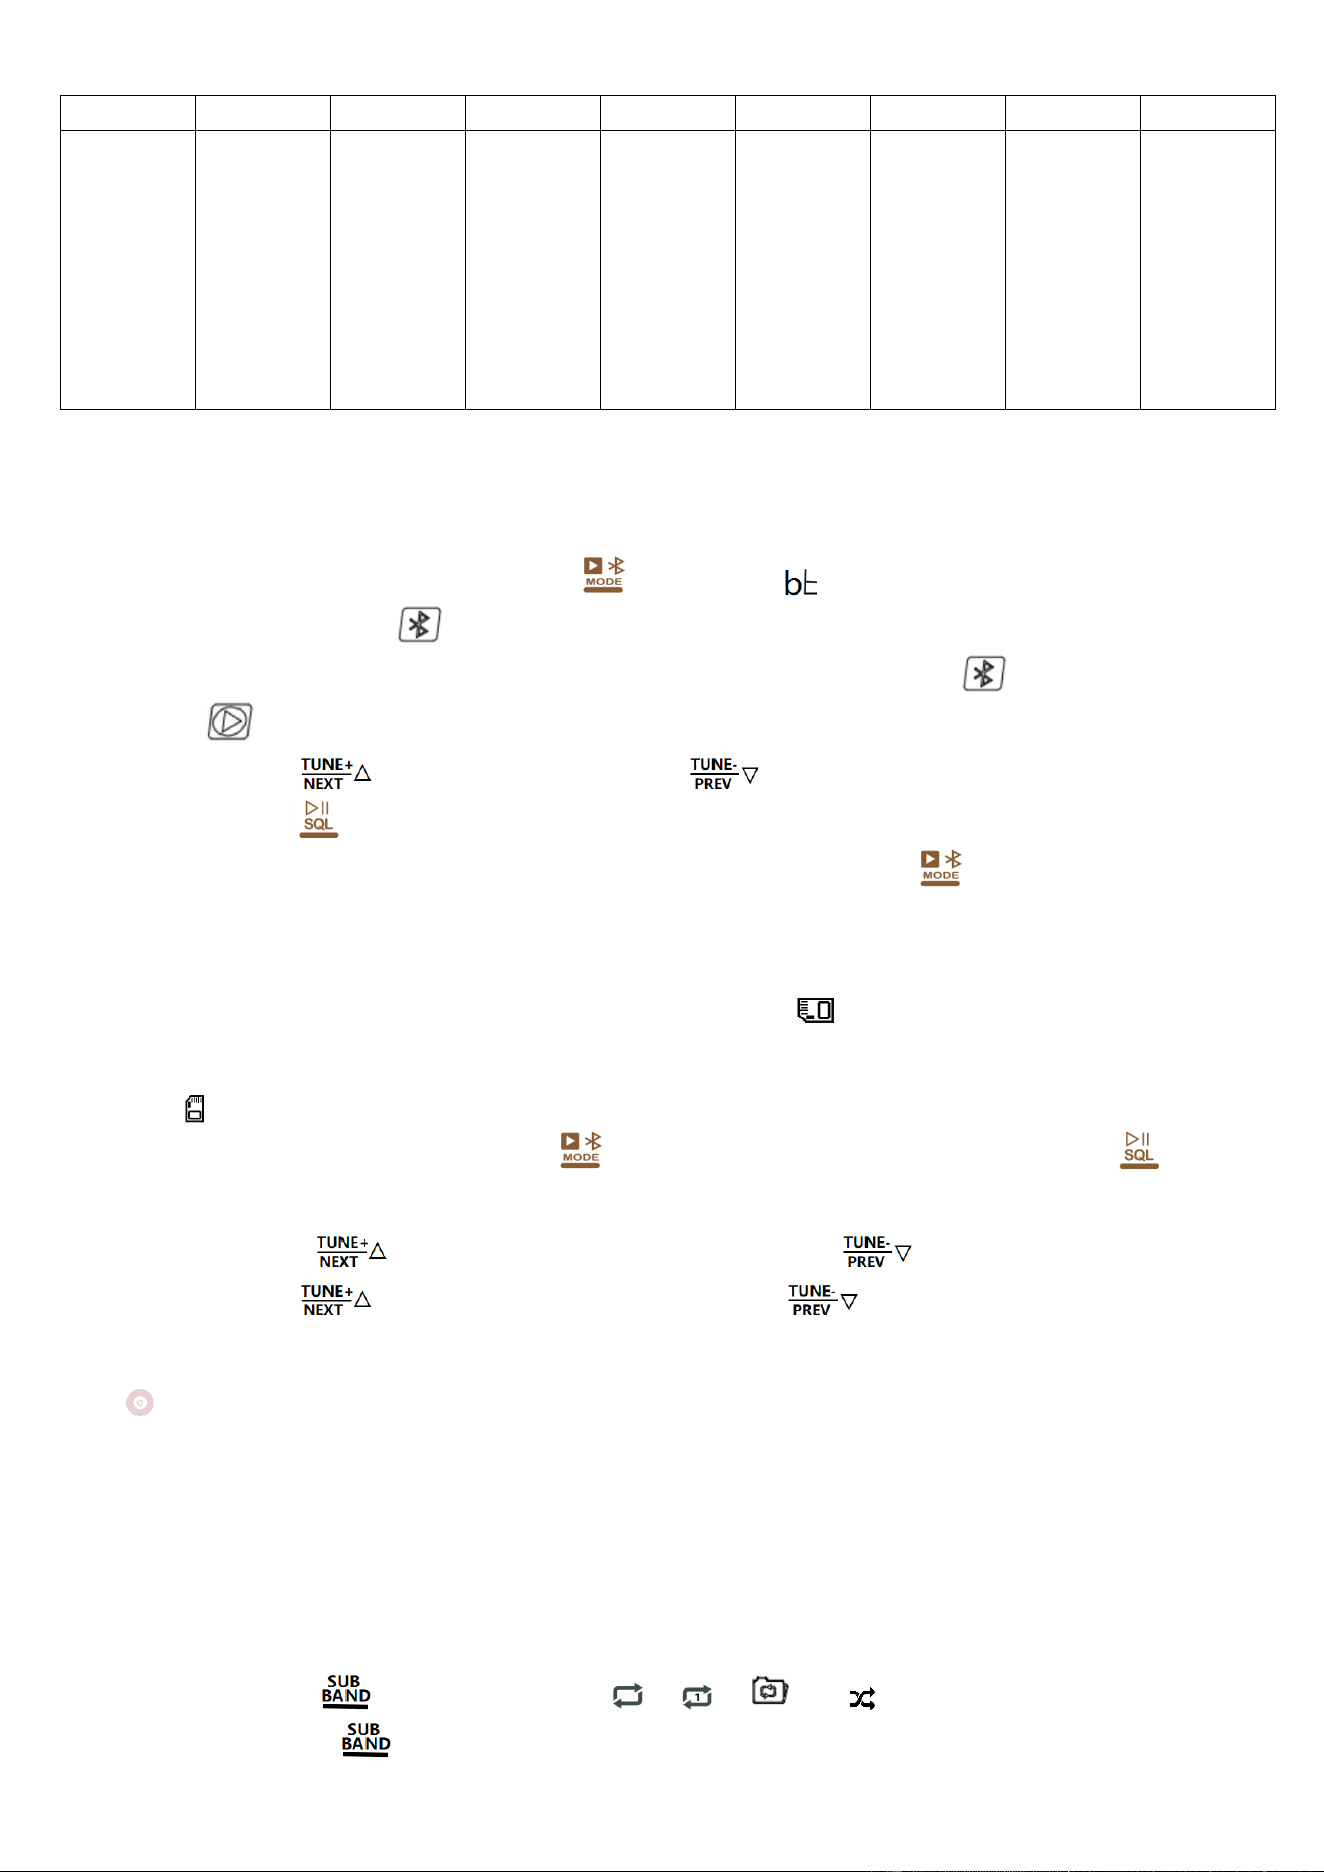
7.3.14: Select the BW bandwidth of all bands
In the mode of receiving, lightly press [ ]to select the BW bandwidth of every band.
Lightly press [ ], “BW” flashes on the primary screen. Lightly press [ ], then the numbers
change in turn. Wait for 2 seconds, then the final choice will be the default one.
BW values can be founded in the following table:
FM Mode
MW Mode
SW Mode
LW Mode
WB Mode
CB Mode
AIR Mode
VHF Mode
UHF Mode
110KHZ
84KHZ
60KHZ
40KHZ
1.0KHZ
1.8KHZ
2.0KHZ
2.5KHZ
3.0KHZ
4.0KHZ
6.0KHZ
1.0KHZ
1.8KHZ
2.0KHZ
2.5KHZ
3.0KHZ
4.0KHZ
6.0KHZ
1.0KHZ
1.8KHZ
2.0KHZ
2.5KHZ
3.0KHZ
4.0KHZ
6.0KHZ
3.0KHZ
1.0KHZ
1.8KHZ
2.0KHZ
2.5KHZ
3.0KHZ
4.0KHZ
6.0KHZ
1.0KHZ
1.8KHZ
2.0KHZ
2.5KHZ
3.0KHZ
4.0KHZ
6.0KHZ
1.7KHZ
2.0KHZ
2.5KHZ
3.0KHZ
3.75KHZ
4.0KHZ
4.25KHZ
4.50KHZ
1.7KHZ
2.0KHZ
2.5KHZ
3.0KHZ
3.75KHZ
4.0KHZ
4.25KHZ
4.50KHZ
8: Bluetooth mode
---Bluetooth name: “HRD-C919”.
---When the radio is working, lightly press[ ] to switch to “ ” mode.
--- The Bluetooth symbol[ ] flashes, which means waiting for connection.
---Turn on Bluetooth and connect to HRD-C919. After successful connection, [ ] is always displayed
and [ ] flashes. Turn on the mobile music player and connect to Bluetooth to play.
--- Lightly press[ ] to play the next music and [ ] to play the previous one.
---Lightly press[ ‖] to switch between pause and play or use your phone to control.
---Disconnect Bluetooth: In the state of Bluetooth connection, long press [ ] to exit.
9: TF card play
---Insert the TF card, lightly push it in place at the direction of [ ] and lightly push it again to take it out.
---In and mode of turning on the radio, the music in the TF card will be played first after inserting the TF
card. [ ] appears on the screen.
---In other working modes, lightly press [ ] to switch to TF card play mode; lightly press [ ] to
switch between pause/play.
---Lightly press[ ] to play the next music, and lightly press[ ] to play the previous music.
Long press [ ] to play fast-forward, and long press [ ] to play fast-backward.
---In the mode of TF card play, rotate the internal and external shuttle button to select music. Lightly press
[ ] to confirm your selection.
---You can also directly enter the valid music number using the number key and lightly press “EN” to play.
---Delete the music in the TF card: Find the music you want to delete using the above three modes, long
press [DEL] for 2 seconds, then “del” appears on the primary screen, and lightly press [DEL] again to
delete it.
---In the mode of TF card play, you can choose the play mode:
Lightly press[ ], current play mode, “ ”, “ ”, “ ” or “ ” appears on the primary screen.
Lightly press [ ], the four symbols appear in turn.
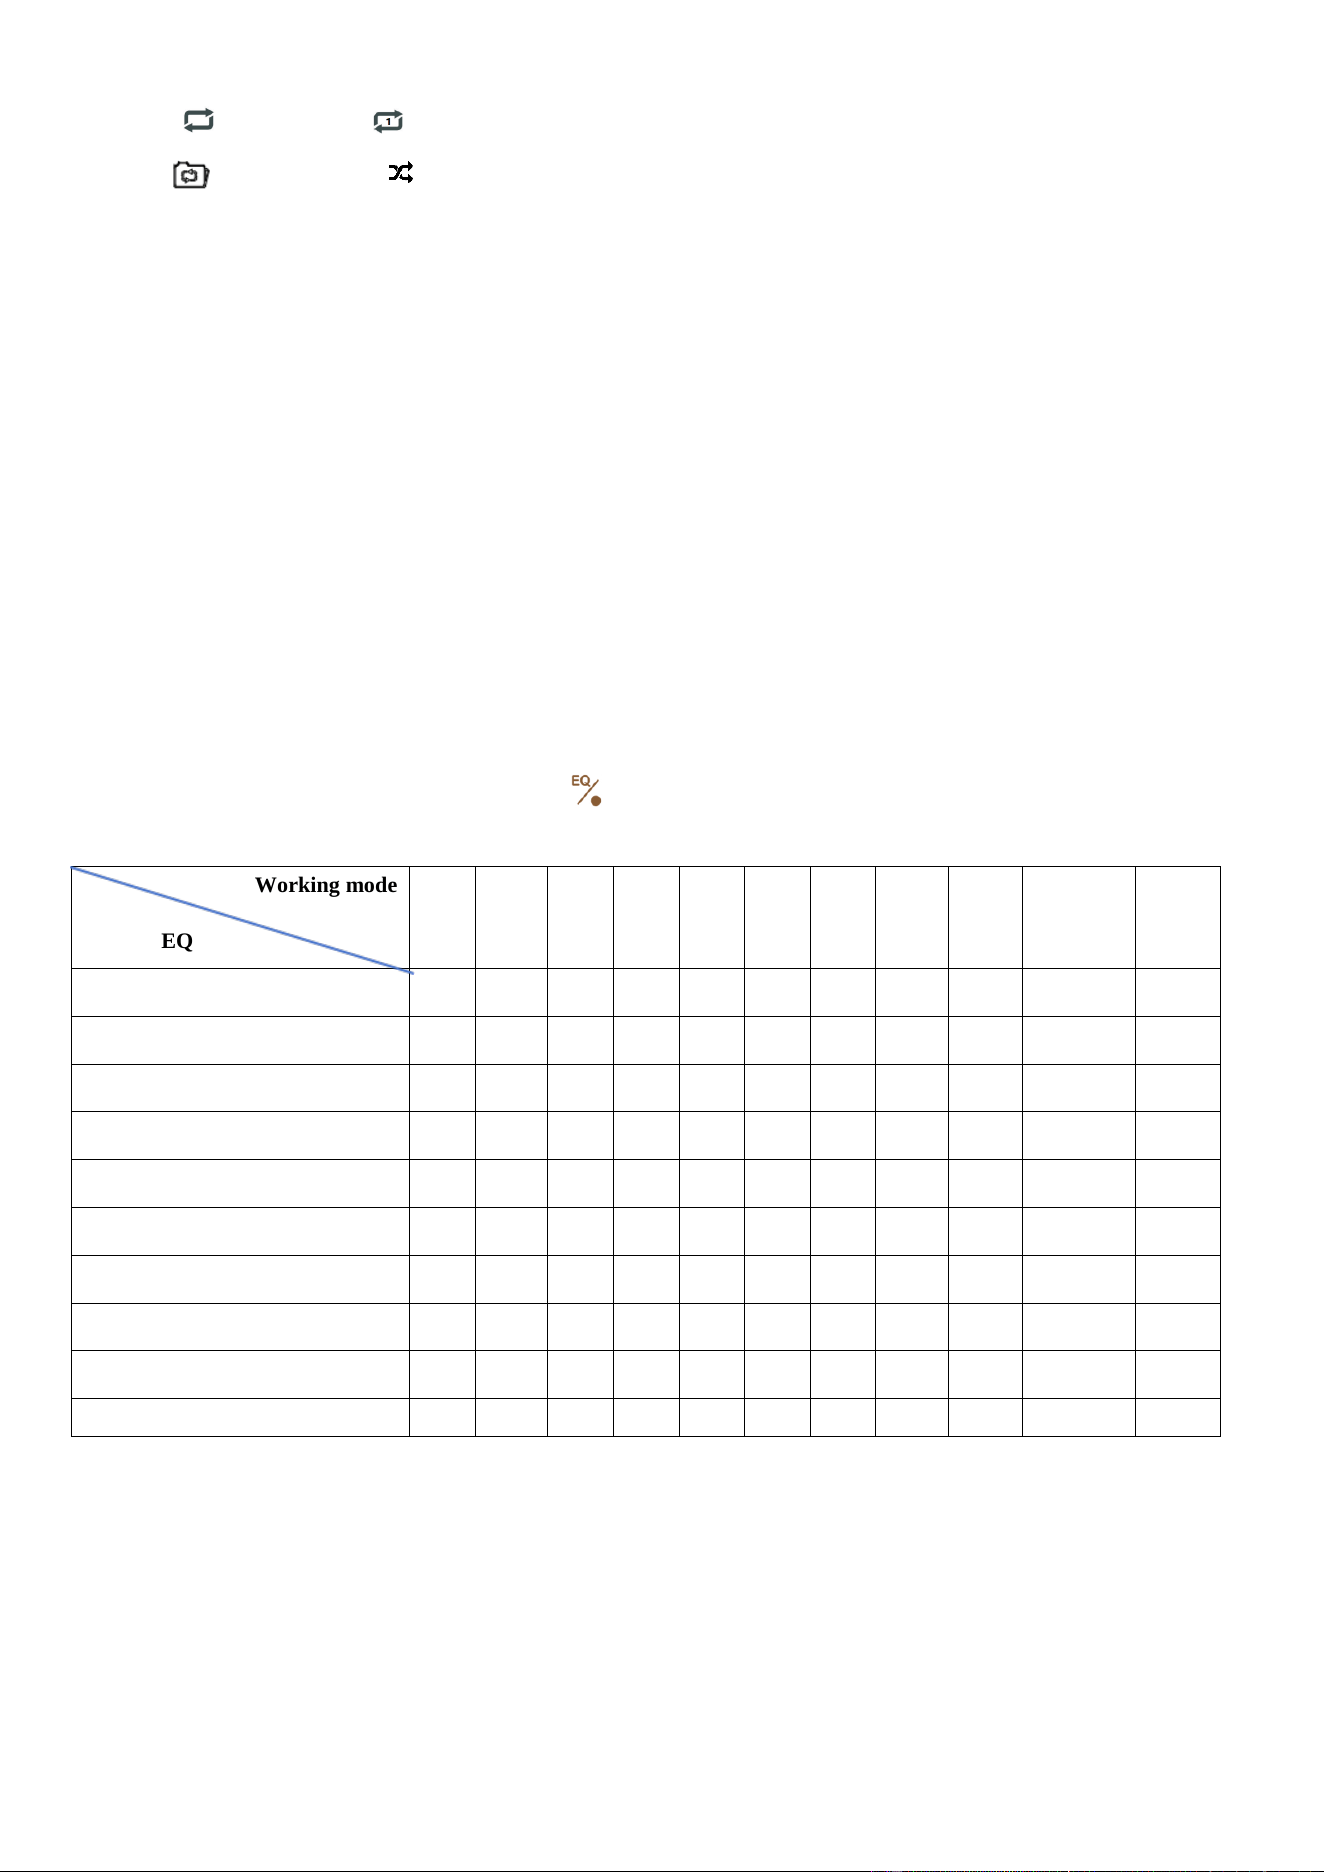
(repeat all) , (repeat one) ,
(repeat file) , : (random)
---TF card supports 256G maximally.
---TF card supports MP3, WMA, WAV, APE and FLAC.
---TF card supports 65,535 files maximally
Note:
When the radio is playing music in TF card mode, in case of sound vibration for reason of music
source, please adjust the volume.
When the radio is receiving in Bluetooth mode, music play fails after inserting the TF card and “0000”
appears. It is possibly caused by music source or maybe the TF card is broken. If the TF card is broken,
please replace it with a new one.
10: EQ effect setting in the mode of Bluetooth and TF card of all bands
In the mode of working, lightly press [ ]to select an EQ effect.
Working mode
FM
MW
SW
LW
WB
CB
AIR
VHF
UHF
BT
Bluetooth
TF
card
EQ
EQ-NORMAL
▅
▅
▅
▅
▅
▅
▅
▅
▅
▅
▅
EQ-POP
▅
▅
▅
▅
EQ-ROCK
▅
▅
▅
▅
EQ-JAZZ
▅
▅
▅
▅
EQ-CLASSIC
▅
▅
▅
▅
EQ-COUNTRY
▅
▅
▅
▅
EQ-NEWS
▅
▅
▅
▅
▅
▅
▅
▅
▅
▅
▅
EQ -VOICE
▅
▅
▅
▅
▅
▅
▅
▅
▅
▅
▅
DAC-ANALOG
▅
▅
▅
▅
▅
▅
▅
▅
▅
EQ -CW
▅
▅
▅
▅
▅
▅
[■] means the EQ effect to be selected in the working mode.
Note: NEWS filter: audio filter: 150-4000HZ
VOICE filter: audio filter: 250-2500HZ
CW filter: audio filter: 500-1100HZ
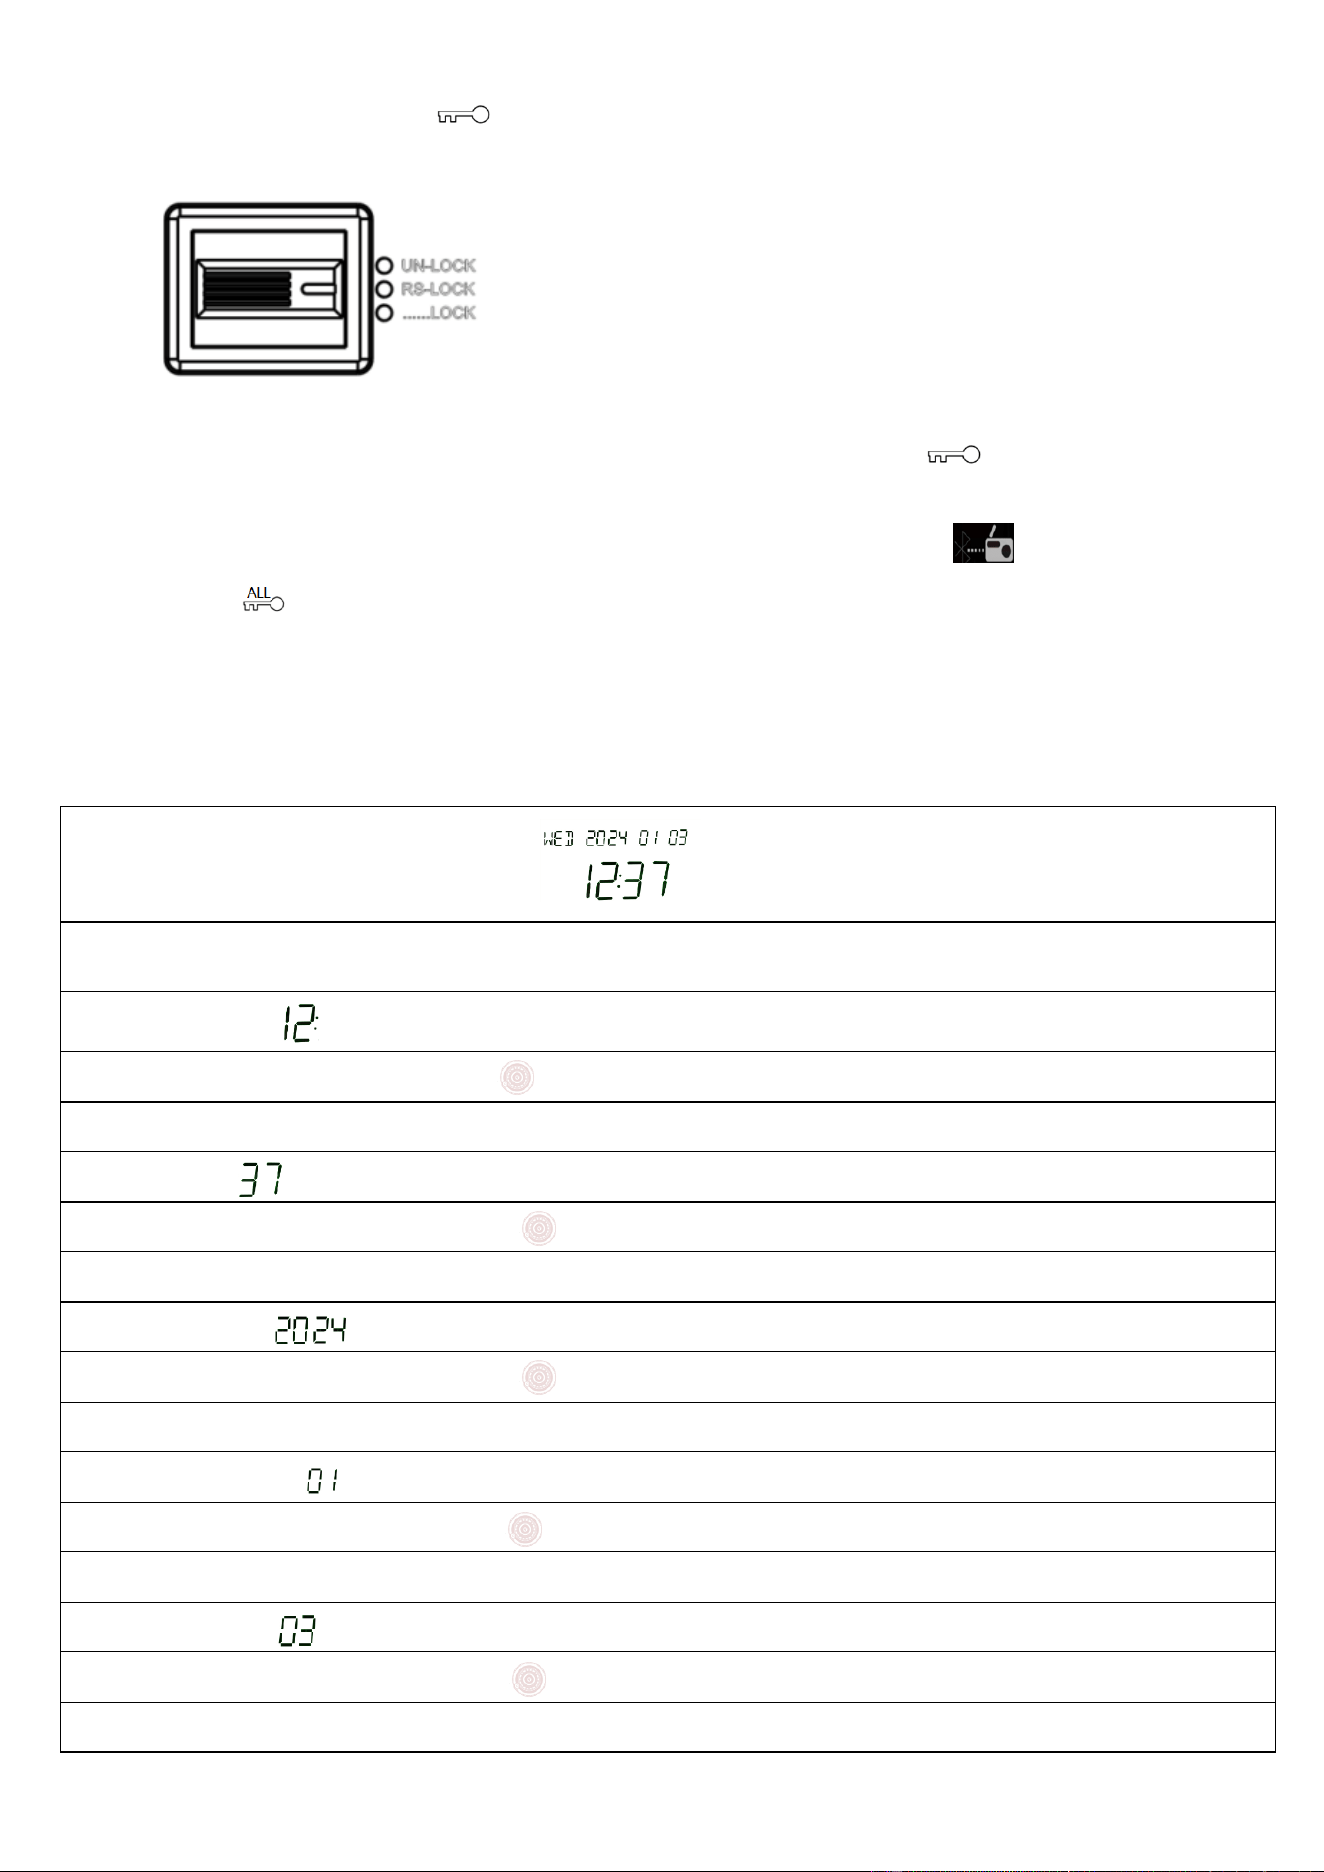
11: Use of the lock button “ ”
The three positions on the right side of radio have the following functions:
[UN-LOCK] means being not locked/unlock.
[RS-LOCK] means only the big and small shuttle buttons are locked. “ ” flashes on the primary
screen.
[......LOCK] means all buttons are locked (APP is not locked. Connect to [ ]. “ALL” of the
symbol “ ” appears in the primary screen. Now all buttons are locked.
12: Set the running time
In the mode of time display, long press [TIME/SET] for 2 seconds to set the running time/date as
follows:
Step1:On the time display state.
Step2:Long press the [TIME/SET]button
Step3:Hour digit [ ]is flashing
Step4:Turn the big/small shuttle knob[ ]to adjust to hour
Step5:Short press [TIME/SET] button
Step6:Minute[ ] digit flashing
Step7:Turn the big/small shuttle knob [ ]to adjust to Minute
Step8:Short press [TIME/SET] button
Step9:Year digit [ ]flashing
Step10:Turn the big/small shuttle knob [ ] to adjust to Year
Step11:Short press [TIME/SET] button
Step12:Month digit[ ] flashing
Step13:Turn the big/small shuttle knob[ ] to adjust to Month
Step14:Short press [TIME/SET] button
Step15:Date digit[ ] flashing
Step16:Turn the big/small shuttle knob[ ] to adjust to Date
Step17:Short press [TIME/SET] button for confirm
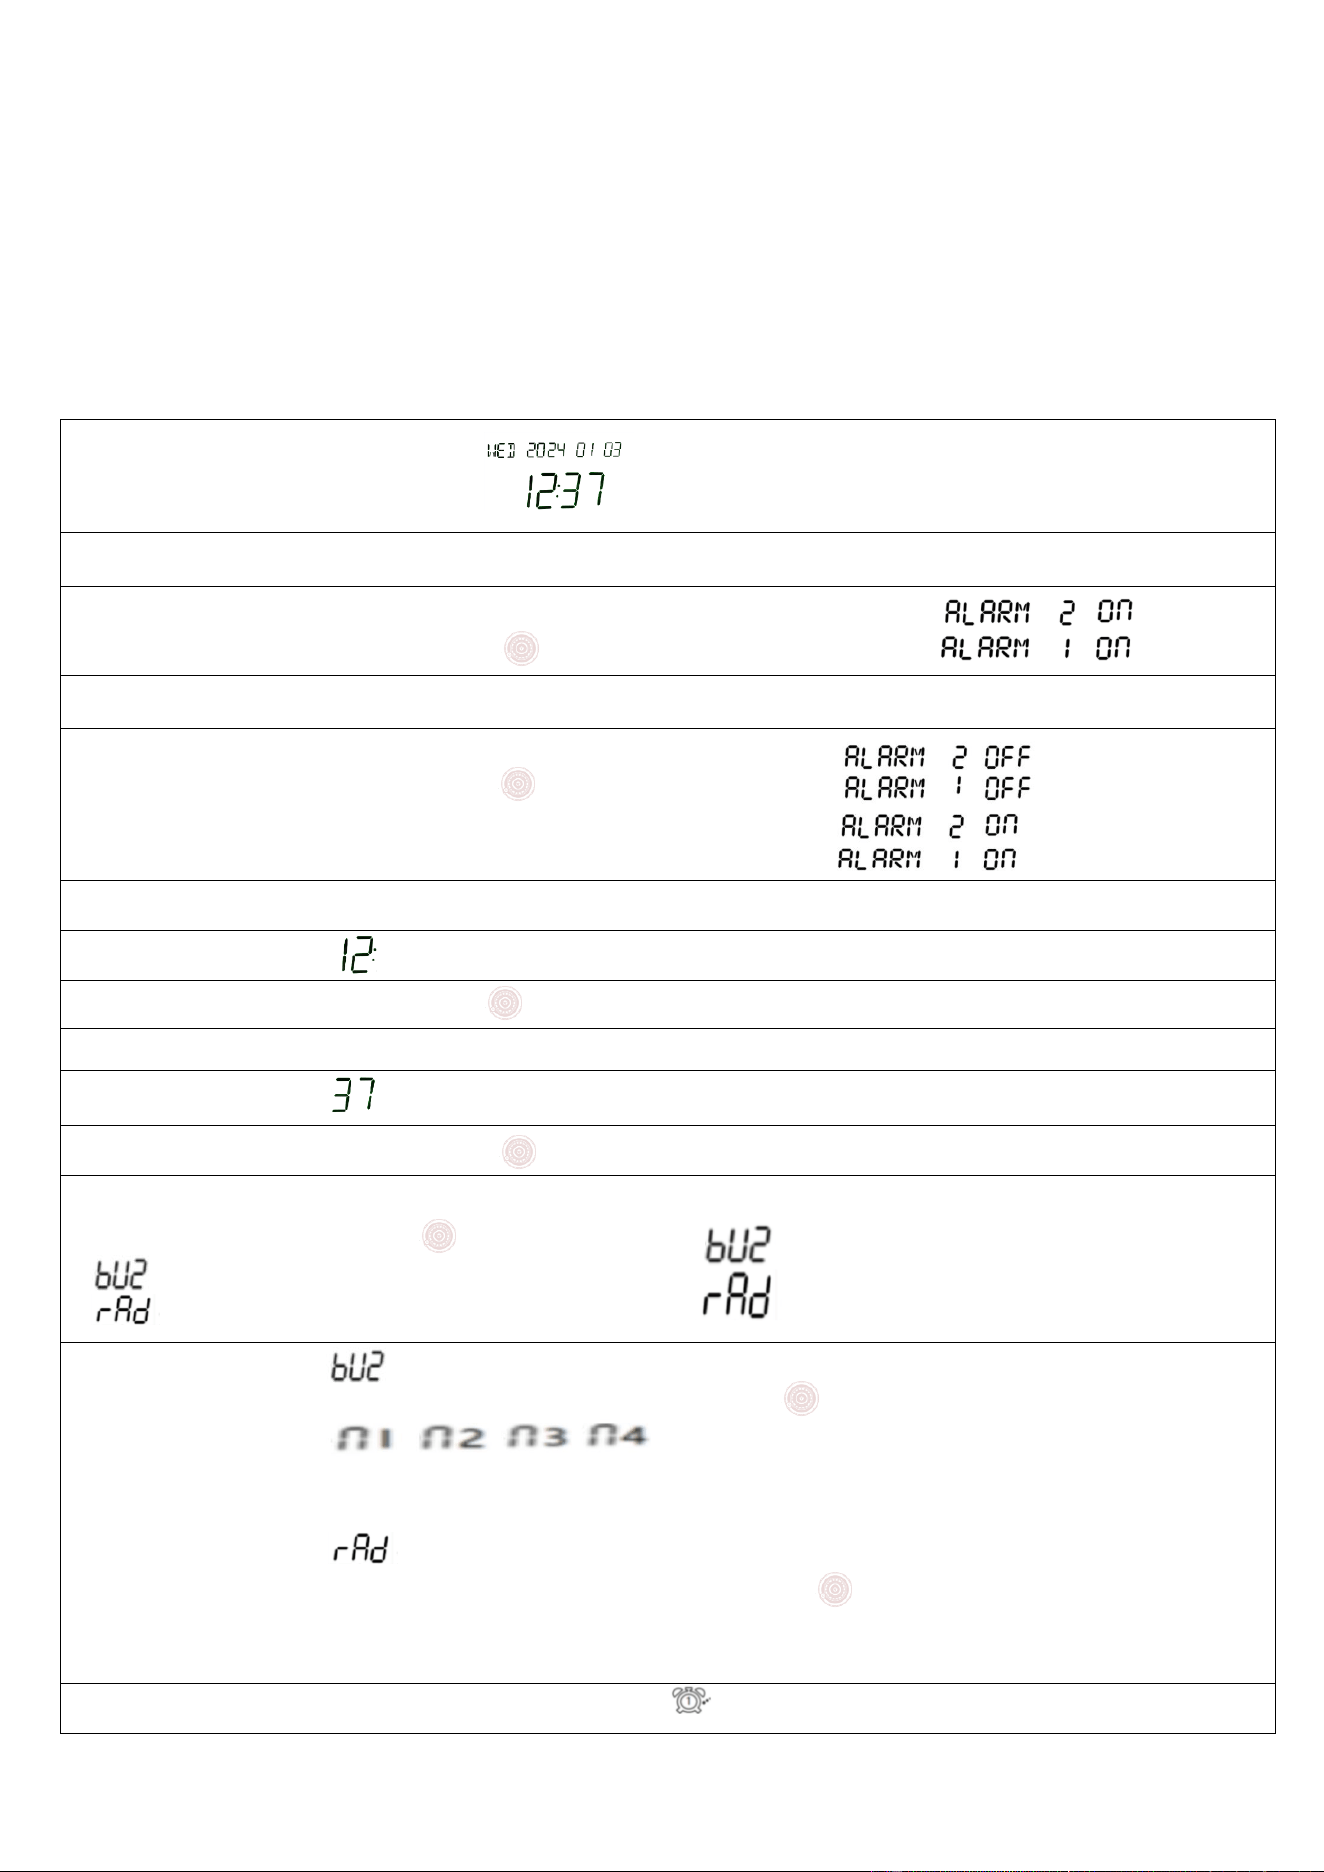
Note: The day of week including MON, TUE, WED, THU, FRI, SAT and SUN will be updated automatically
as the date is updated.
13: Set the alarm clock
After setting the running time as shown in Section 12, in the state of time display, long press
“ALARM” for 2 seconds to set the alarm clock time/scheduled power on
(Two sets of alarm clocks can be set as needed) as follows:
Step1:On the time display state
Step2:Long press [ALARM] button
Step3:When the digit 1 or 2 is flashing
Turn the big/small shuttle knob[ ] to adjust set any set of alarms
Step4:Short press [ALARM] button
Step5:When ON/OFF is flashing
Turn the big/small shuttle knob[ ] to elect
turn on the alarm or turn off the alarm
[ON] is turn on the Alarm.[OFF] is turn off the Alarm.
Step6:After elect [ON] to turn on the Alarm,short press[Alarm]button
Step7:Alarm hour digit[ ] is flashing
Step8:Turn the big/small shuttle knob[ ] to adjust alarm hour.
Step9:Short press[Alarm]button
Step10:Alarm Minute[ ] is flashing
Step11:Turn the big/small shuttle knob[ ] to adjust alarm minute.
Step12:Short press[Alarm]button elect [Alarm time ]or [timed power on time]
Turn the big/small shuttle knob[ ] to elect either one
[ ]symbol is Alarm time.
[ ]symbol is timed power on time
Step13:After elect the [ ]
Short press[Alarm]button,Turn the big/small shuttle knob[ ] to elect
Four ringtones [ ]
Short press[Alarm]button for confirm
After elect the [ ]
Short press [Alarm]button,Turn the big/small shuttle knob[ ] to elect Timed shutdown time after
timed power on.can be elected:10-20-30-40-50-60-70-80-90-FULL (Unit:minute)
If elect FULL(mean the radio will not automatically shut down after automatic power on)
Step14:After setting alarm function.the Alarm symbol[ ] is display on the Second screen.
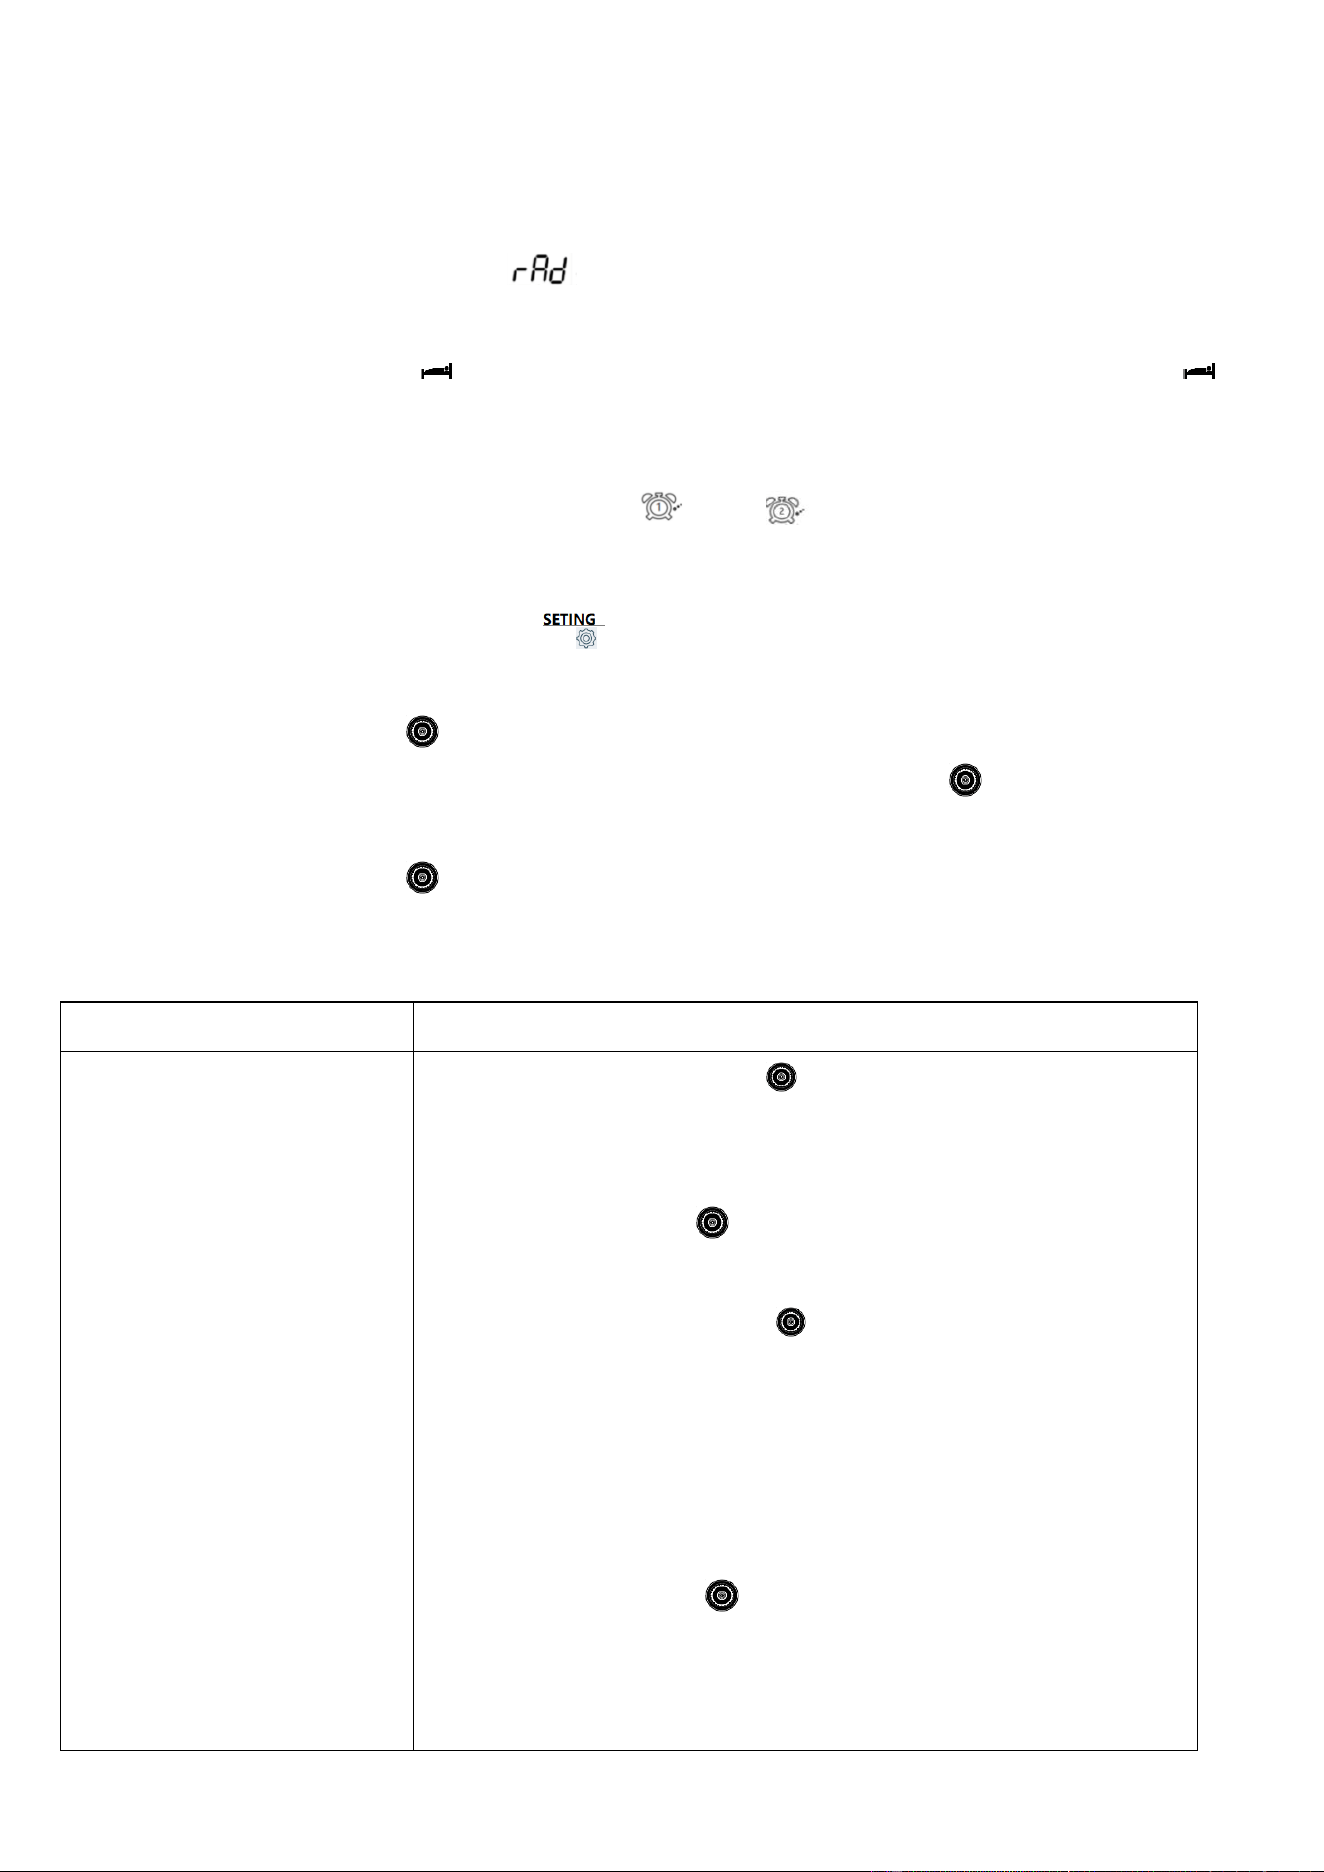
Turn off the alarm clock: select 1 OFF/2 OFF as shown in the above figure.
After selecting OFF, the alarm clock symbol of the secondary screen will disappear.
Note: If scheduled power on [ ] is selected and scheduled power off time of
10-20-30-40-50-60-70-80-90 minutes are selected, the radio will be turned off on schedule, and
the sleep symbol “ ” will appear on the secondary screen. After the radio is turned off, “ ”
will disappear.
※ After setting the scheduled power on and the alarm clock time, in the state of power on or time display,
lightly press [DISPLAY]to check the time of “ ” and “ ”.
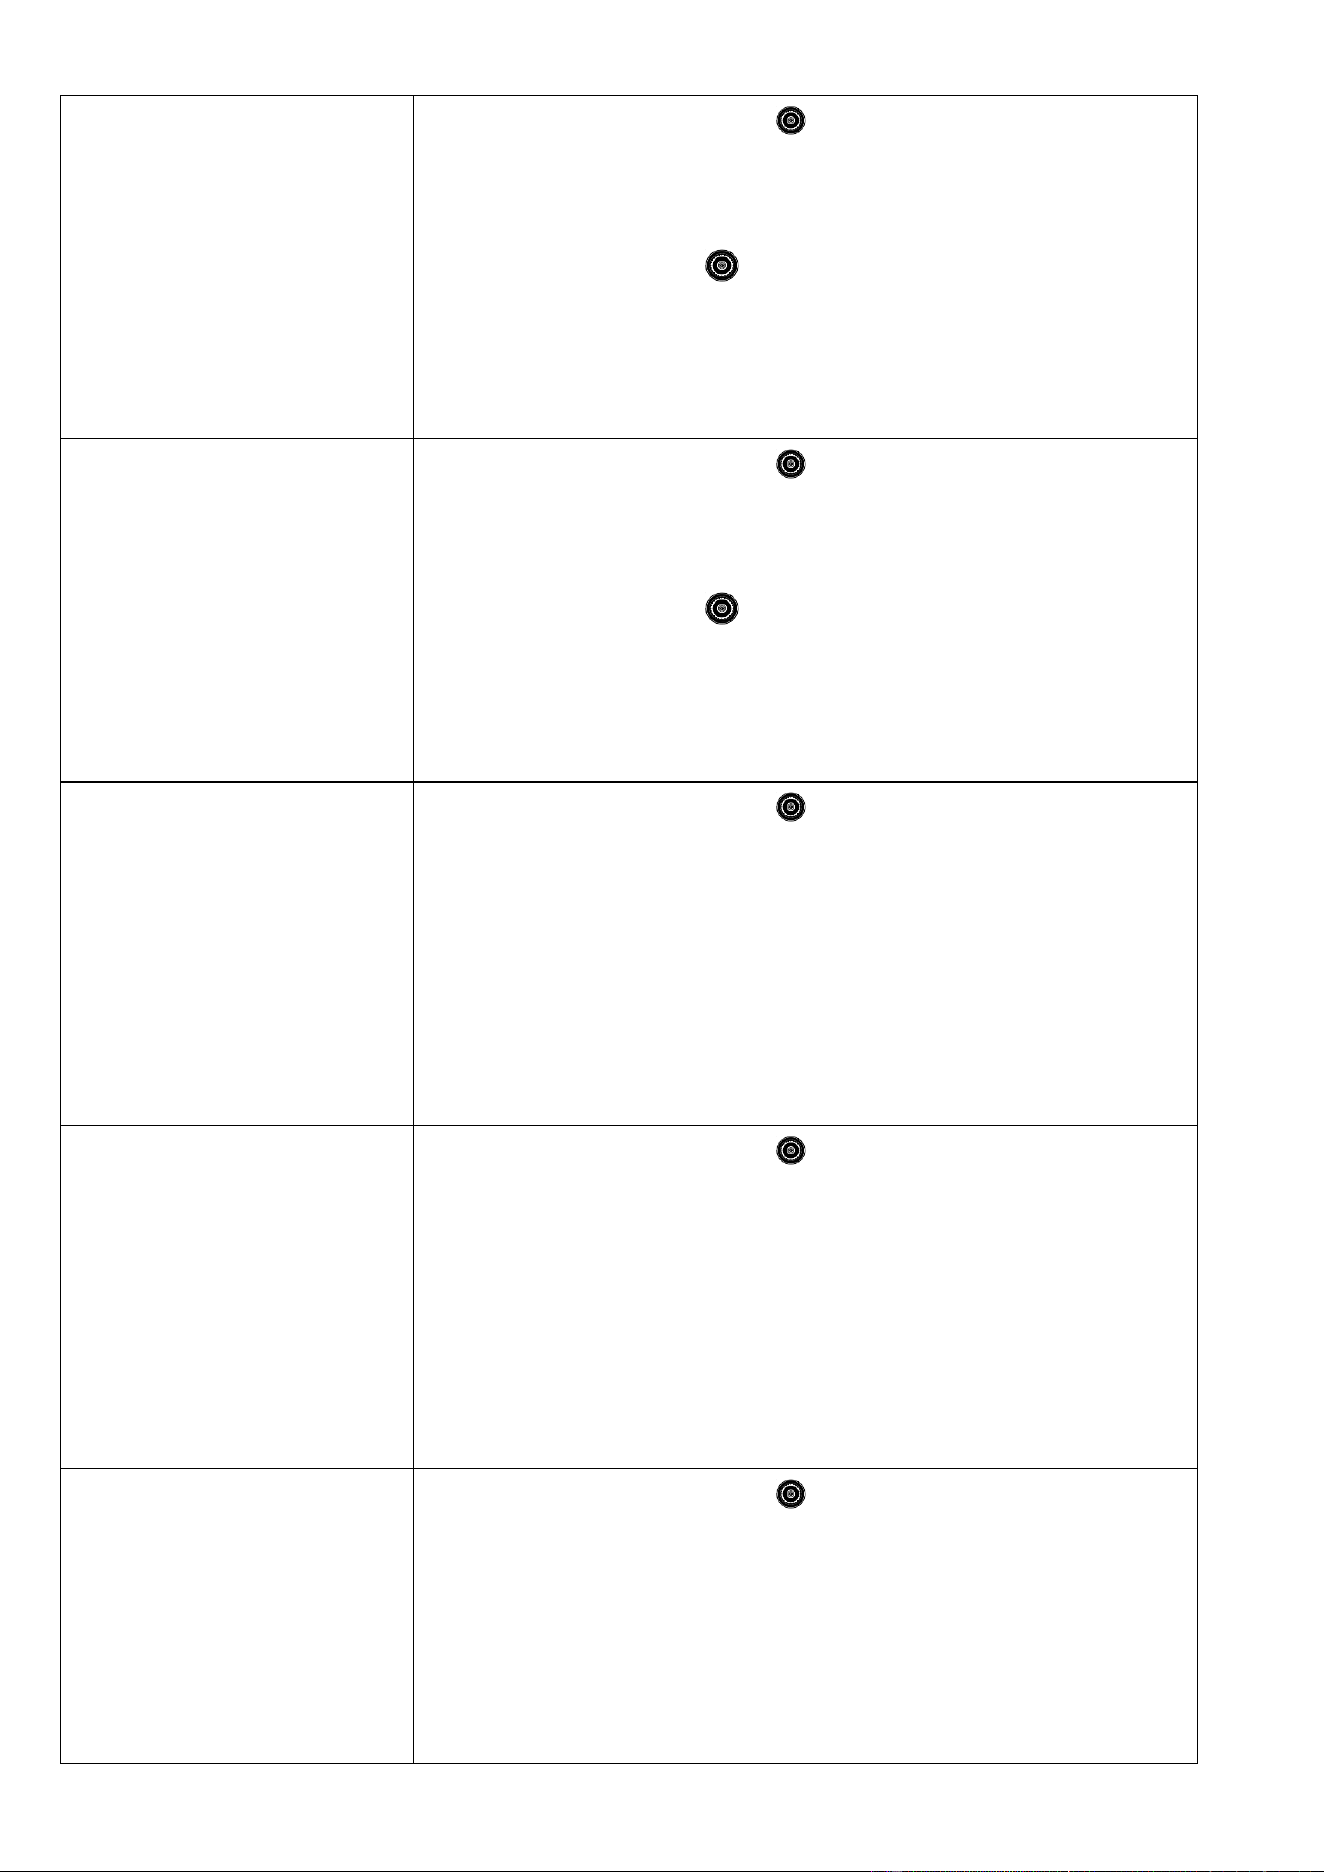
14: In the mode of time, you can set the following content in the menu
In the state of time display, long press “ ” to set functions. Enter the main menu which has the
following options.
Rotate the shuttle button “ ” clockwise or anti-clockwise to select in the main menu.
After selecting the main menu task to be set, lightly press the shuttle button “ ” to select in the
sub-menu.
Rotate the shuttle button “ ” clockwise or anti-clockwise to select the sub-menu task and lightly press
this button to confirm.
The main menu
Sub-menu options
A-LCD SETTING
(Set the backlight
color/light on time of the
primary screen)
Lightly press the shuttle button[ ] to enter the sub-menu to set the
light off time of the primary screen. The time unit is “s”.
1: TIME SET 05-S/06-S/07-S/08-S......30-S/FULL
Rotate the shuttle button[ ] to select the time.
“FULL” means the backlight of the primary screen is always on.
Lightly press the shuttle button “ ” to set the backlight color of the
primary screen:
2: COLOUR SET 1......7
Seven colors for you to choose:
1): Fresh grass green, 2): Elegant brown, 3): Soft blue, 4): Light green,
5): Pure light blue, 6): Luxury purple, 7): Joyful yellow
Rotate the shuttle button “ ” to select the backlight color of the
primary screen.
In case of no operation within 10 seconds, the final choice will be
confirmed automatically. Time display will be recovered.
B-LCD SETTING
(Set the light on time of
the secondary screen)
Lightly press the shuttle button “ ” to enter the sub-menu to set the
light off time of the secondary screen. The time unit is “s”.
1: TIME SET 05-S/06-S/07-S/08-S......30-S/FULL
Rotate the shuttle button “ ” to select the time.
”FULL” means the backlight of the secondary screen is always on.
In case of no operation within 10 seconds, the final choice will be
confirmed automatically. Time display will be recovered.
C-KEY SETTING
(Set the light on time in
working state)
Lightly press the shuttle button “ ” to enter the sub-menu to set the
working state and light on time of button. The time unit is “s”.
1: TIME SET 05-S/06-S/07-S/08-S......30-S/FULL
Rotate the shuttle button “ ” to select the time.
”FULL” means the backlight of the secondary screen is always on.
In case of no operation within 10 seconds, the final choice will be
confirmed automatically. Time display will be recovered.
APP ENABLE
(Connect/disconnect
APP)
Lightly press the shuttle button “ ” to enter the sub-menu and rotate
the button to select:
APP DISABLE----APP doesn’t work (it is helpful for power saving
and interference reduction)
APP ENABLE----APP works normally
In case of no operation within 10 seconds, the final choice will be
confirmed automatically. Time display will be recovered.
TIMER OFF
(Display/off of the
primary screen)
Lightly press the shuttle button “ ” to enter the sub-menu and rotate
the button to select:
TIMER DISPLAY---The time of the primary screen is always
displayed
TIMER OFF--------The time of the primary screen is off
In case of no operation within 10 seconds, the final choice will be
confirmed automatically. Time display will be recovered.
SYSTEM RESET
Lightly press the shuttle button “ ” to enter the sub-menu and rotate
the button to select:
YES---Factory data reset
NO---Factory data reset is abandoned
In case of no operation within 10 seconds, the final choice will be
confirmed automatically. Time display will be recovered.
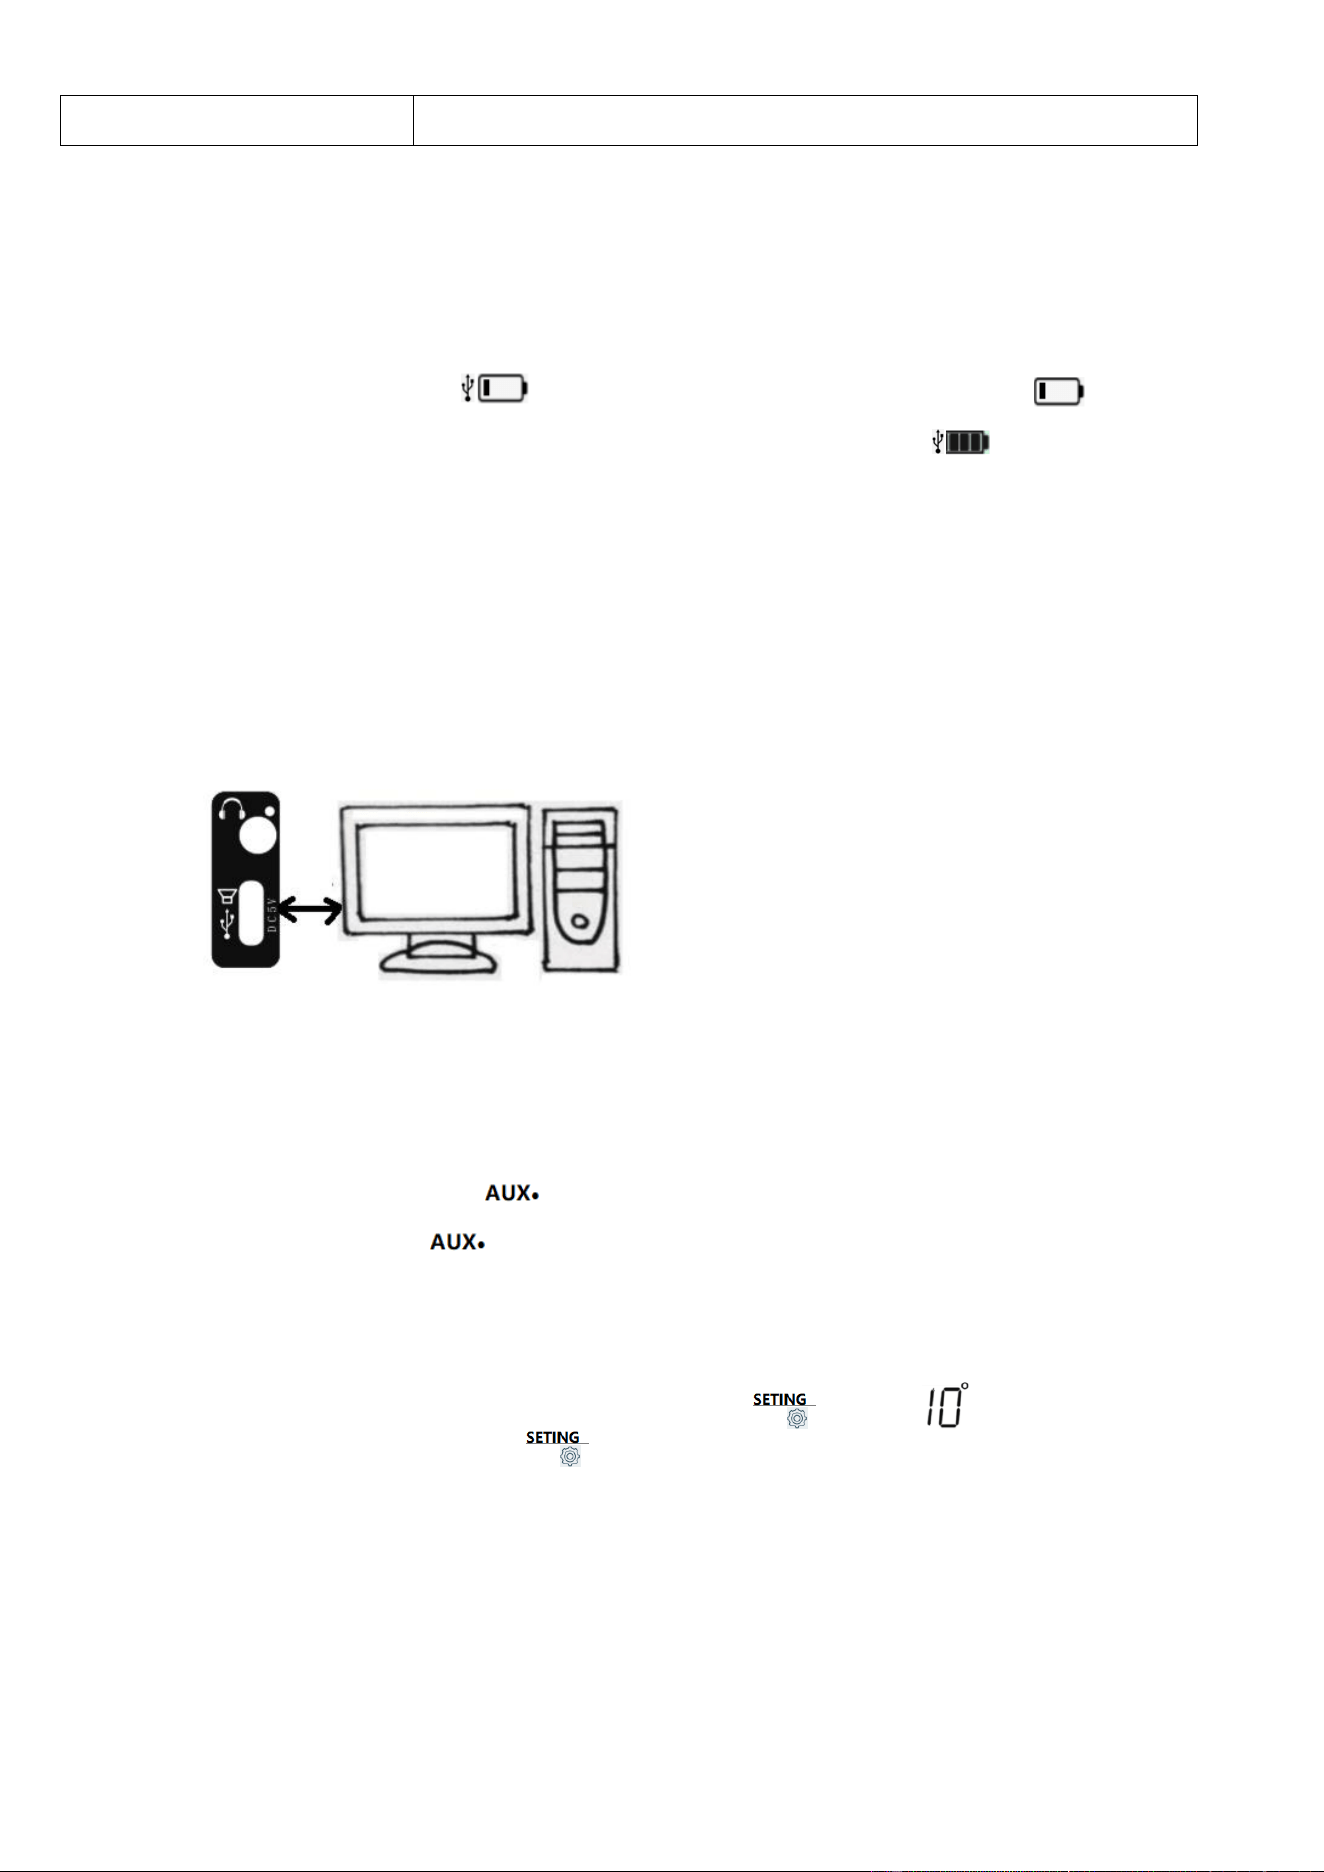
VERSION-***
Version
15: TYPE-C USB charging
This product has overvoltage protection function in charging. Charging voltage: ≦6.2V.
Please use the charging device with output voltage of DC5V/1A-DC3A to charge the batteries.
If the lithium battery is not in use for a long time, please charge it once a month or remove it.
Insert the USB cable, then “ ” appears and the charging indication symbol “ ” flashes on
LCD, which means it’s charging. When the batteries are charged fully, “ ” appears and stops
flashing. The charging time is generally 4-5 hours.
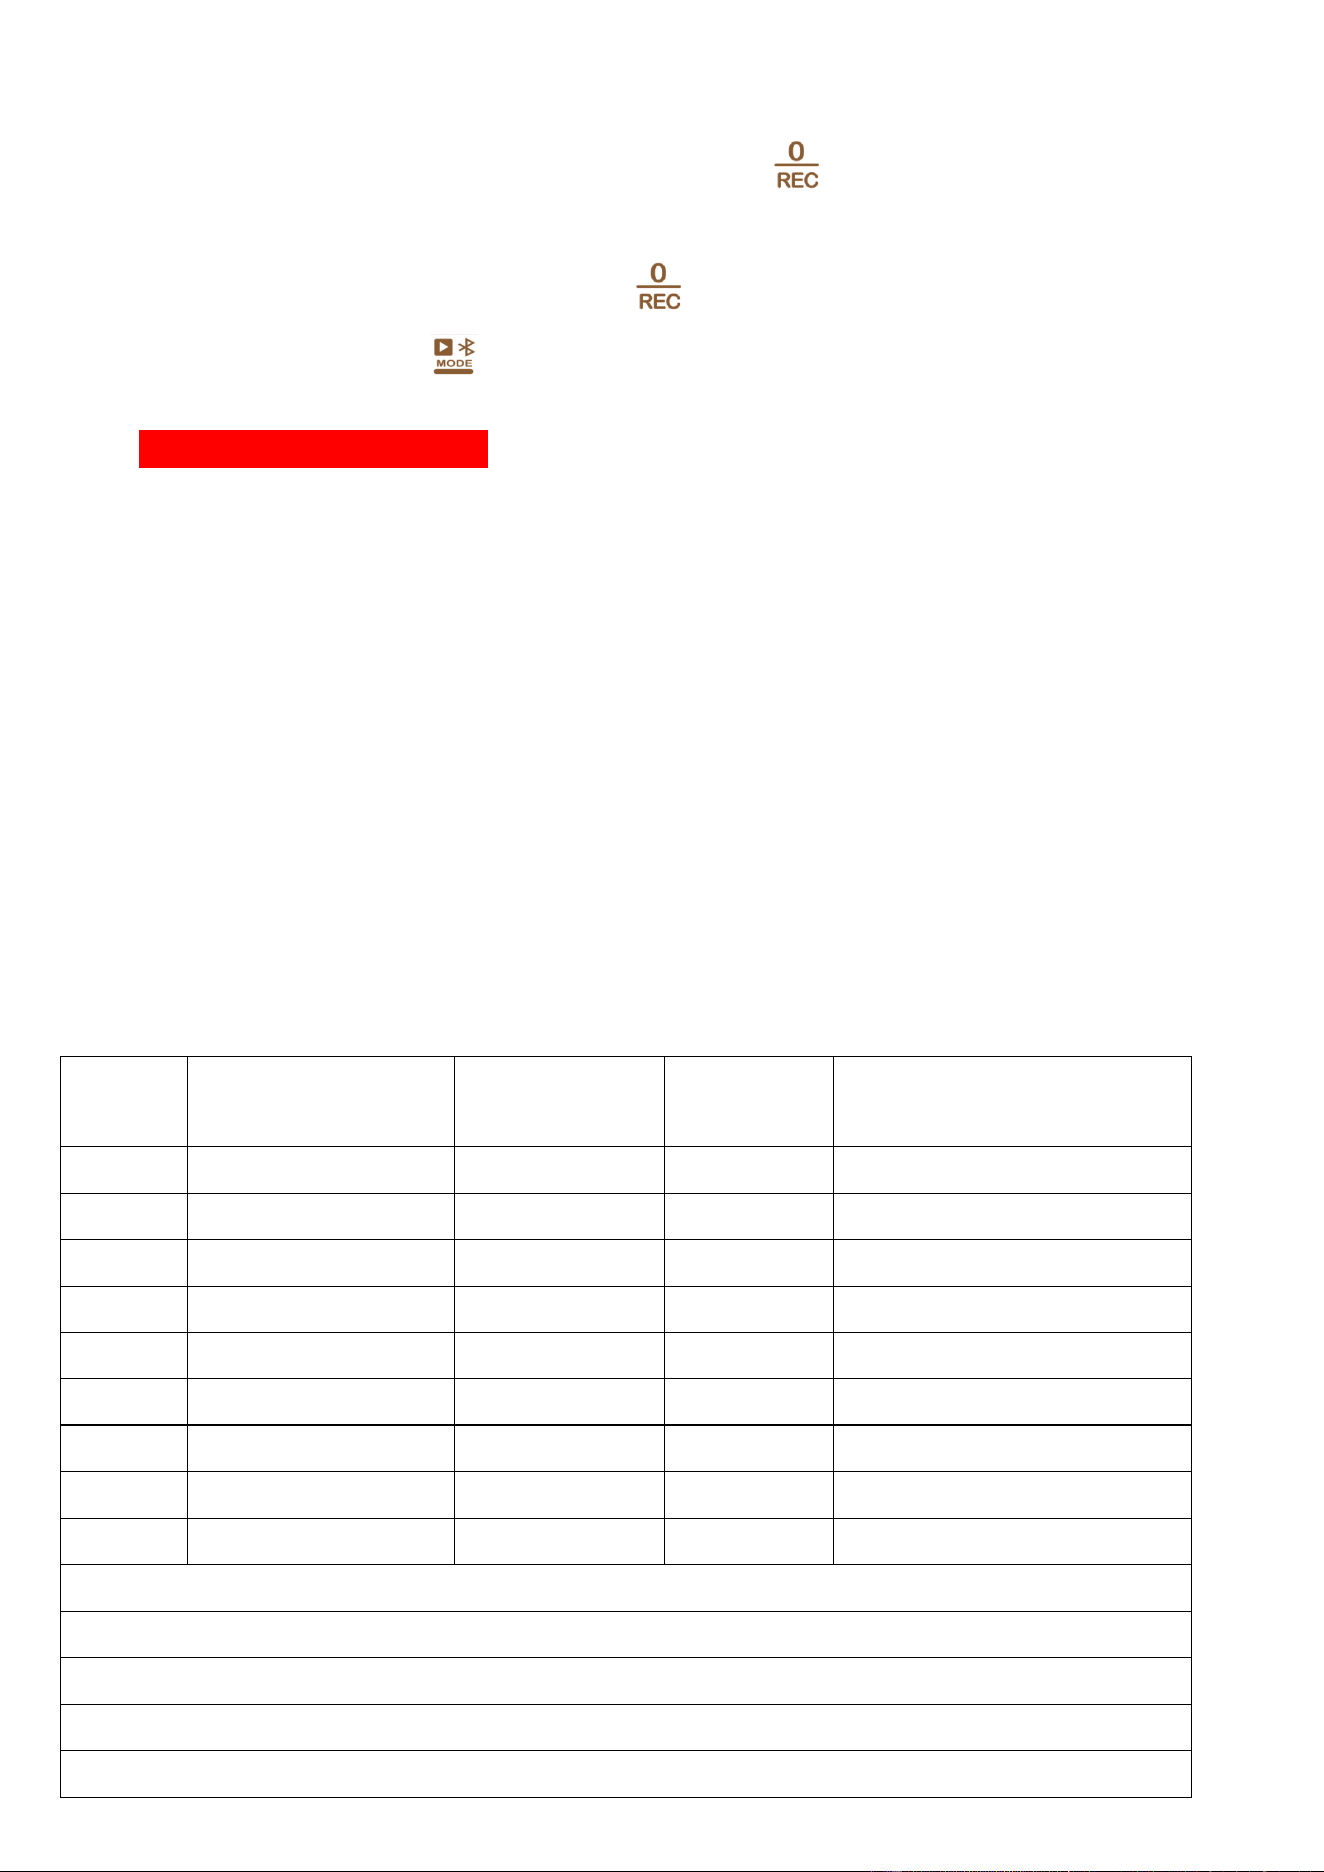
16: Used as a card reader
When the TF card is inserted into the radio, connect the radio to the computer using a USB cable for
file transmission and deletion of files in the TF card.
17: AUX input play
When the radio is turned on, insert the 3.55MM sound source device (such as mobile phone and
computer) into the right jack “ ” of the radio using a 3.5MM audio cable. “AUX” appears on the
primary screen, and the “ ” audio files will be played first.
(Note: We don’t provide the audio cable)
18: Temperature display
In the state of time display or power on, lightly press [ ], then [ ] appears on the left upper
corner of the primary screen. Press [” ]to exit temperature display.
19: Sound recording
When the radio is working, insert the TF card, long press “ ” to record sound, then
“RECORDING” flashes on LCD and the time of sound recording is displayed on the secondary screen.
After sound recording is finished, long press “ ” to exit sound recording.
Take the sound file: Press “ ” to enter the mode of TF card play and select from TF music list.
Note: If no valid TF card or no TF card is inserted, “em” appears on the secondary screen.
Delete the function of sound recording.
20: Antenna
When listening to FM,VHF, UHF, SW, AIR, CB and WB, pull out the antenna, change the length of
antenna, try the direction and find a position with the best receiving effect. *In case of channel chaos
due to strong interference, please shorten the antenna.
Listen to AM and LW: This product uses the built-in magnetic antenna to receive AM. The magnetic
antenna may be affected by direction to receive signals, so you can properly rotate the radio when
listening to AM/LW to find a position with the best receiving effect.
In the mode of receiving, lightly press “DISPLAY” to display “SNR” and “RSSI”.
21: Key technical parameters
Band
Frequency range
Demodulation mode
Receiving
sensitivity
Description
FM
64-108MHZ
WFM/ST
2uV
FM BAND
SW
2.30-30.00MHZ
AM/USB/LSB
20uV
SW BAND/USB/LSB
MW
520-1710KHZ
AM
1mV/m
MW BAND
LW
153-522KHZ
AM
1mV/m
LW BAND
AIR
118-138MHZ
AM
1uV
AIR BAND
CB
25-28MHZ
AM
10dBuV
CITY BAND
VHF
20-250MHZ
NFM
-9dBuV
VHF
UHF
250-999MHZ
NFM
-9dBuV
UHF
WB
162.4-162.55MHZ
NFM
-9dBuV
WB
Speaker: 3inch 3Ω 20W
Number of channels stored: 1,600
Bluetooth version: V5.0
Bluetooth receiving distance: ≤20m
Min operating voltage:
External input voltage: DC5V
Lithium batteries: 3.7v 5000mAh (2500mAhx2)
TF card supports MP3, WMA, WAV, APE and FLAC
TF card supports MP3, WMA, WAV, APE and FLAC maximally
Product dimension: 170x190x85mm
Net weight: 1,090g (including two batteries)
Communication signals of SSB:
Some common communication frequencies of SSB (KHZ)
The frequencies not noted are the frequency of USB
Guangzhou Coast Radio Station: 8716 8782 13107 13149 13182 17398 19772
19793 22735
Tianjin Coast Radio Station: 13092
Shanghai Coast Radio Station: 8773
Yantai Coast Radio Station: 4381 8764 13077 17332
Zhanjiang Coast Radio Station: 2182 6200 6501
Zhoushan Haixiang Shipping Service Company: 12408
Xiamen Coast Radio Station: 4314 8453 12876
American Hawaii Guam Radio Station: 10320 13362 (day) 5765 6350 (night)
Manila Airport: 8942
Iceland Coast Radio Station: 13855
Kuzu Airlines Cargo Weather Station: 8828
Nanhai District Fish-farming Port Administration Bureau Ministry of Agriculture of the PRC:
12215
Zhanjiang Marine and Fishery Bureau: 4925
Beihai Aquatic Products Bureau: 6230
Sanya Marine and Fishery Bureau: 8210
Lianjiang Marine and Fishery Bureau: 4378
Fangchenggang Aquatic Products and Animal Husbandry Bureau: 6300
Danzhou Marine and Fishery Bureau: 13250
Lingao Marine and Fishery Bureau: 7735
International maritime communication bands: 8195-8815 12330-13200
Common frequencies of amateur radio station:
Japanese weather: 9970 13597

Japanese newspaper: 12745
Taiwan weather: 13900
Bands at which strong signals appear frequently of coast stations using Southeast Asian
languages and English:16590-16860
80m 3500-3900
40m 7000-7100 (LSB)
20m 14000-14350
15m 21000-21450
10m 28000-29700
Philippines: 6765
Amateur radio station: 14180
Ham station: 14270
LSB Japanese amateur station: 3569
Telegram station: 12967
Airline: 13281 13284
The frequencies above are used for reference only.
Free channels of civil two-way speaker:
Free channels in China:
1: 409.7500 2: 409.7625
3: 409.7750 4: 409.7875
5: 409.8000 6: 409.8125
7: 409.8250 8: 409.8375
9: 409.8500 10: 409.8625
11: 409.8750 12: 409.8875
13: 409.9000 14: 409.9125
15: 409.9250 16: 409.9375
17: 409.9500 18: 409.9625
19: 409.9750 20: 409.9875
Standard frequencies of European public two-way radio (unit: MHZ)
1: 446.00625 2: 446.01875
3: 446.03125 4: 446.04375
5: 446.05625 6: 446.06875
7: 446.08125 8: 446.9375

Free frequencies of household radio station in America
1: 462.5625 2: 462.5875
3: 462.6125 4: 462.6375
5: 462.6625 6: 462.6875
7: 462.7125 8: 467.5625
9: 467.5875 10: 467.6125
11: 467.6375 12: 467.6625
13: 467.6875 14: 467.7125

FCC Warnning:
This equipment has been tested and found to comply with the limits for a Class B digital device,
pursuant to part 15 of the FCC Rules. These limits are designed to provide
reasonable
protection againstharmful interference in a residential installation. This equipment generates,
uses and can radiateradio
frequency
energy
and,
if
not
installed
and
used
in
accordance
with
the
instructions,
maycause
harmful
interference
to
radio
communications.
However,
there
is
no
guarantee
thatinterference
will
not
occur
in
a
particular
installation.
If
this
equipment
does
cause
harmfulinterference to radio or television reception, which can be
determined by turning the equipmentoff
and
on,
the
user
is
encouraged
to
try
to
correct
the
interference
by
one
or
more
of
thefollowing measures:
•
Reorient or relocate the receiving antenna.
•
Increase the separation between the equipment and receiver.
•
Connect the equipment into an outlet on a circuit different from that to which the receiver is
connected.
• Consult the dealer or an experienced radio/TV technician for help.
Caution:
Any
changes
or
modifications
to
this
device
not
explicitly
approved
by
manufacturer
could void your authority to operate this equipment.
This
device
complies
with
part
15
of
the
FCC
Rules.
Operation
is
subject
to
the
following
two
conditions:
(1)This
device
may
not
cause
harmful
interference,
and
(2)
this
device
must
accept
any
interference received, including interference that may cause undesired operation.
This
equipment
complies
with
FCC
radiation
exposure
limits
set
forth
for
an
uncontrolled
environment.
This
equipment
should
be
installed
and
operated
with
minimum
distance
0cm
between the radiator and your body.