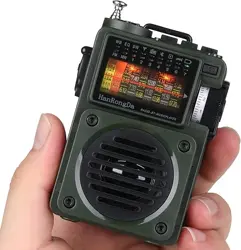
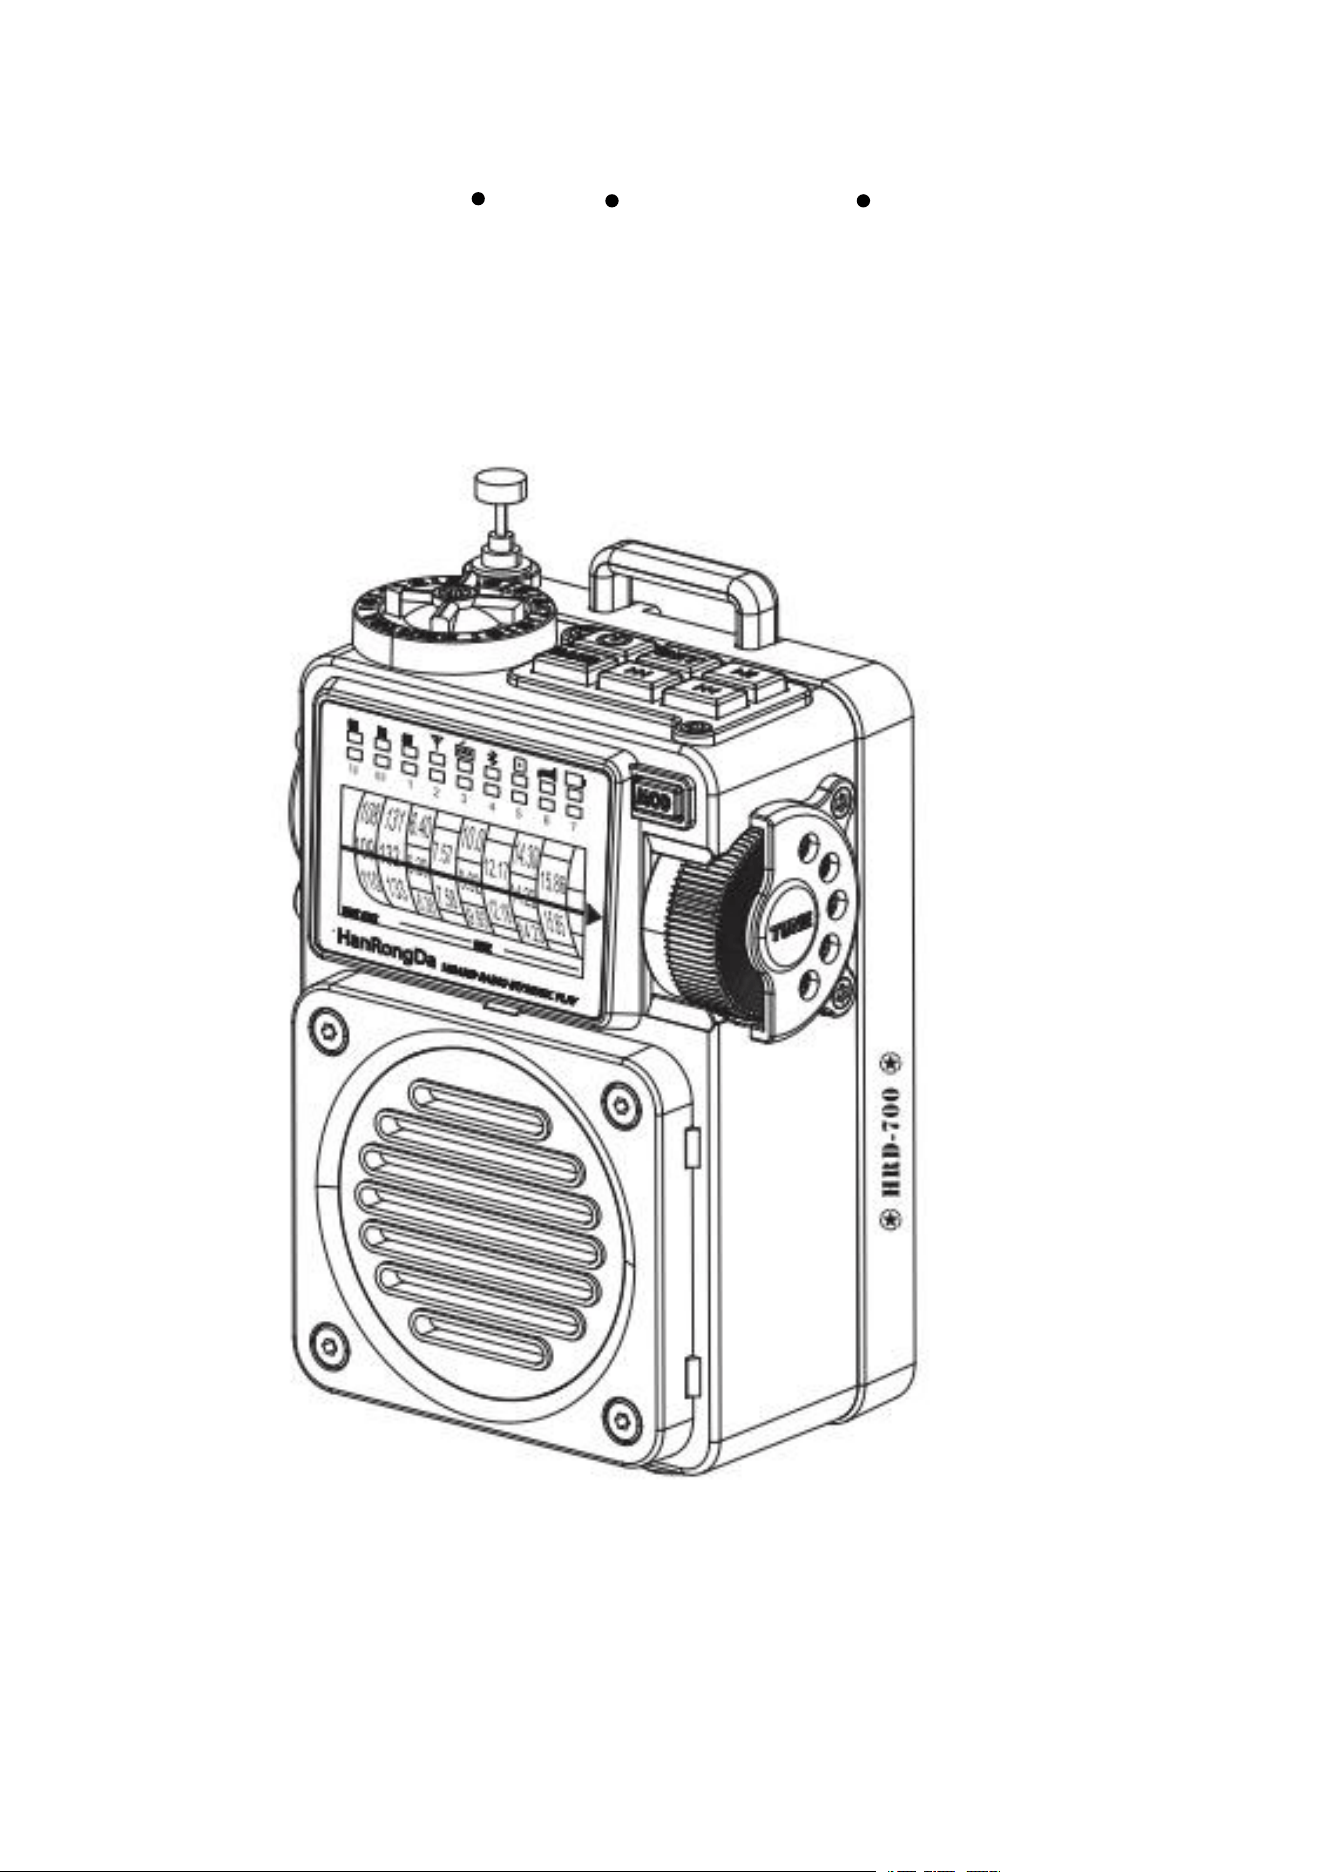
Portable Multimedia Music Player
Full band broadcast reception Bluetooth TF card broadcasting APP Intelligent remote control
Operation Instruction
(Model: HRD-700)
Thank you for your purchase. Please read this operation guide carefully before your usage and keep it properly.

1: Overview of HRD-700 portable multimedia music player
This is a multimedia music player created by our company. It has high fidelity sound quality. We hope that it can bring more
fun to people who love music.
Give radio lovers different experience.
Features of this product:
*This product uses software programming to realize the full-band radio broadcasting reception of FM, medium wave, short
wave, WB (weather band in North America) and ensure good receiving sensitivity.
*This product uses high-tech audio technology. It can be connected with Bluetooth for wireless music transmission and
playback and can support a maximum of 256G TF card music format playback.
* In radio mode, this product supports digital analog tuning/mechanical tuning so as to give users a new experience.
*Tuning key is tuned using coded pulley and can be selected between level 0 and 9.
*“Music spectrum light” mode can be used in all working states, which can bring you into the beautiful music melody
* This product uses BL5C 1000MAH lithium battery, which can ensure long duration life. The battery can be disassembled,
which can extend the service life of the product.
*In Bluetooth and TF card music playback mode, this product supports six kinds of playing audio EQ:
1: NORMAL; 2: POP; 3: ROCK; 4: JAZZ;
5: CLASSIC; 6: COUNTRY
* This product can set the shutdown (sleep) time and you can set 70-60-50-40-30-20-10 minutes of sleep.
*This product uses medium wave for reception and users can choose 9KHZ/10KHZ medium wave step value. There is no
limit of national boundaries.
*The short wave receiving mode of this product is set to seven meter waves for easy use.
*Under radio mode, this product can be set to enable LED backlight lighting. You can turn off the backlight.
*This product can remember 297 stations in radio mode (99 stations per band)
*This product uses a type-c jack to achieve the two-in-one function of charging and headphone output.
* This product supports mobile APP intelligent remote control to increase the playability of the radio. The radio captures a
better signal outside and users can control it with a mobile phone inside.
2: Package Internals
Name
Quantity
HRD-700 portable multimedia music player
1 set
Sling
1 piece
BL5C Lithium Battery (1000MAH 3.7V)
1 piece
USB TYPE-C charging cable
1 piece
Type-c to 3.5mm earphone adapter cable
1 piece
Cloth bag
1 piece
Operation instruction
1 piece
Packaging gift box
1piece
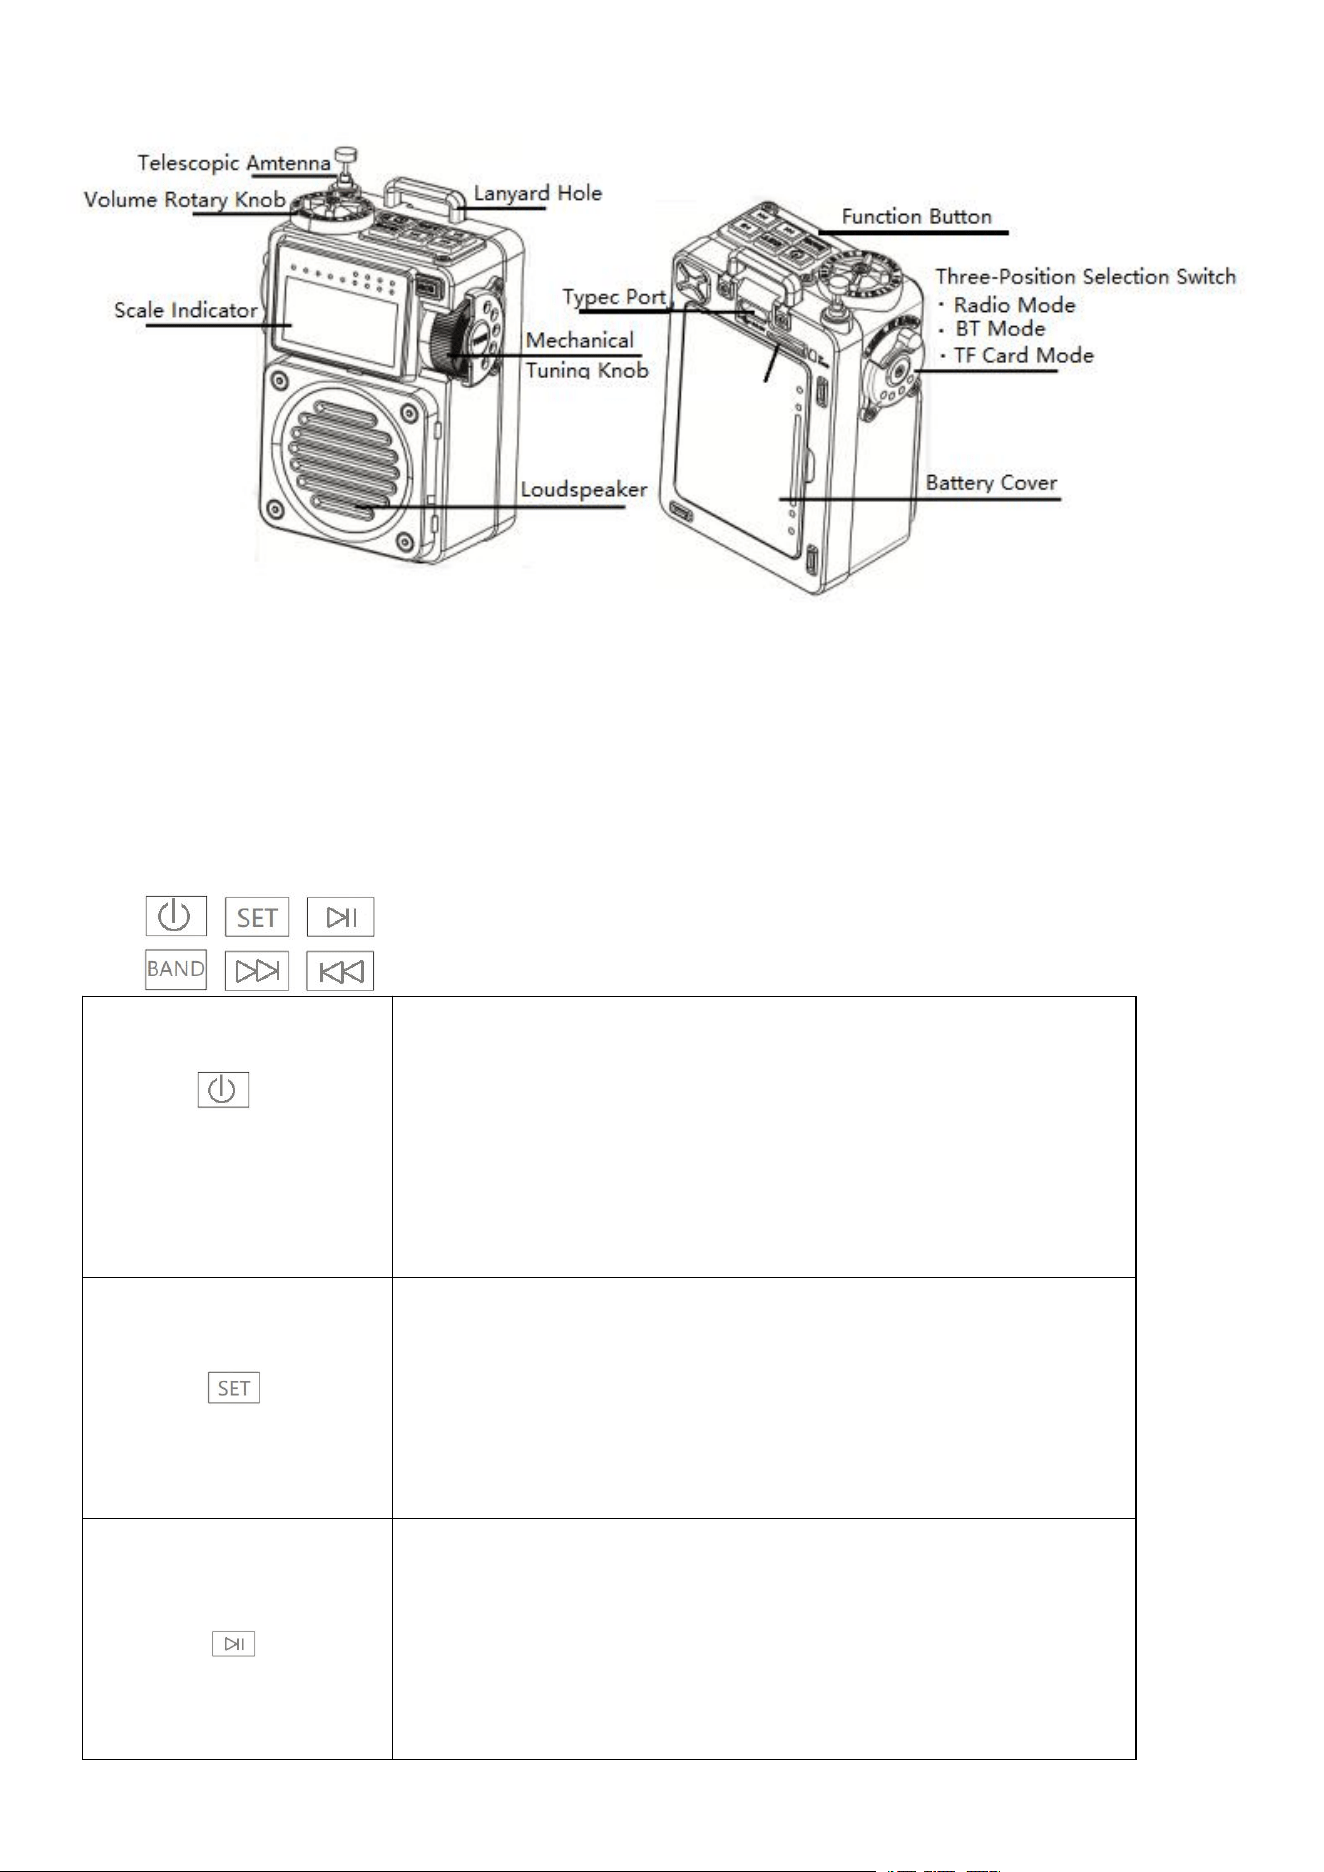
3: Diagram for Appearance Button Functions
4: Introduction to top button functions:
1: Power On/Off:
Long press to turn on the radio
Long press again to turn off the radio
2: Set Sleep Shutdown Timer:
While powered on, lightly press to enter the sleep shutdown timer settings
Each light press selects the shutdown time of 70-60-50-40-30-20-10
(minutes)
1: Set EQ Sound Effects:
Long press to enter EQ sound effect settings, then lightly press to select:
Normal / Pop / Rock / Jazz / Classical / Country (six options)
2: Shortwave and Medium Wave:
In shortwave working mode, lightly press to select medium wave
3: After connecting to the app, long press to exit app reception mode
1: Radio Operation Mode: Press lightly to mute/unmute
Long press to enter full automatic station search and storage
2: Bluetooth/TF Card Playback Mode: Press lightly to pause/play
1: Radio Operation Mode: Switch between FM, AM, SW, and WB bands
2: TF Card Operation Mode: Switch playback modes
3: Bluetooth Operation Mode: Long press to disconnect Bluetooth playback
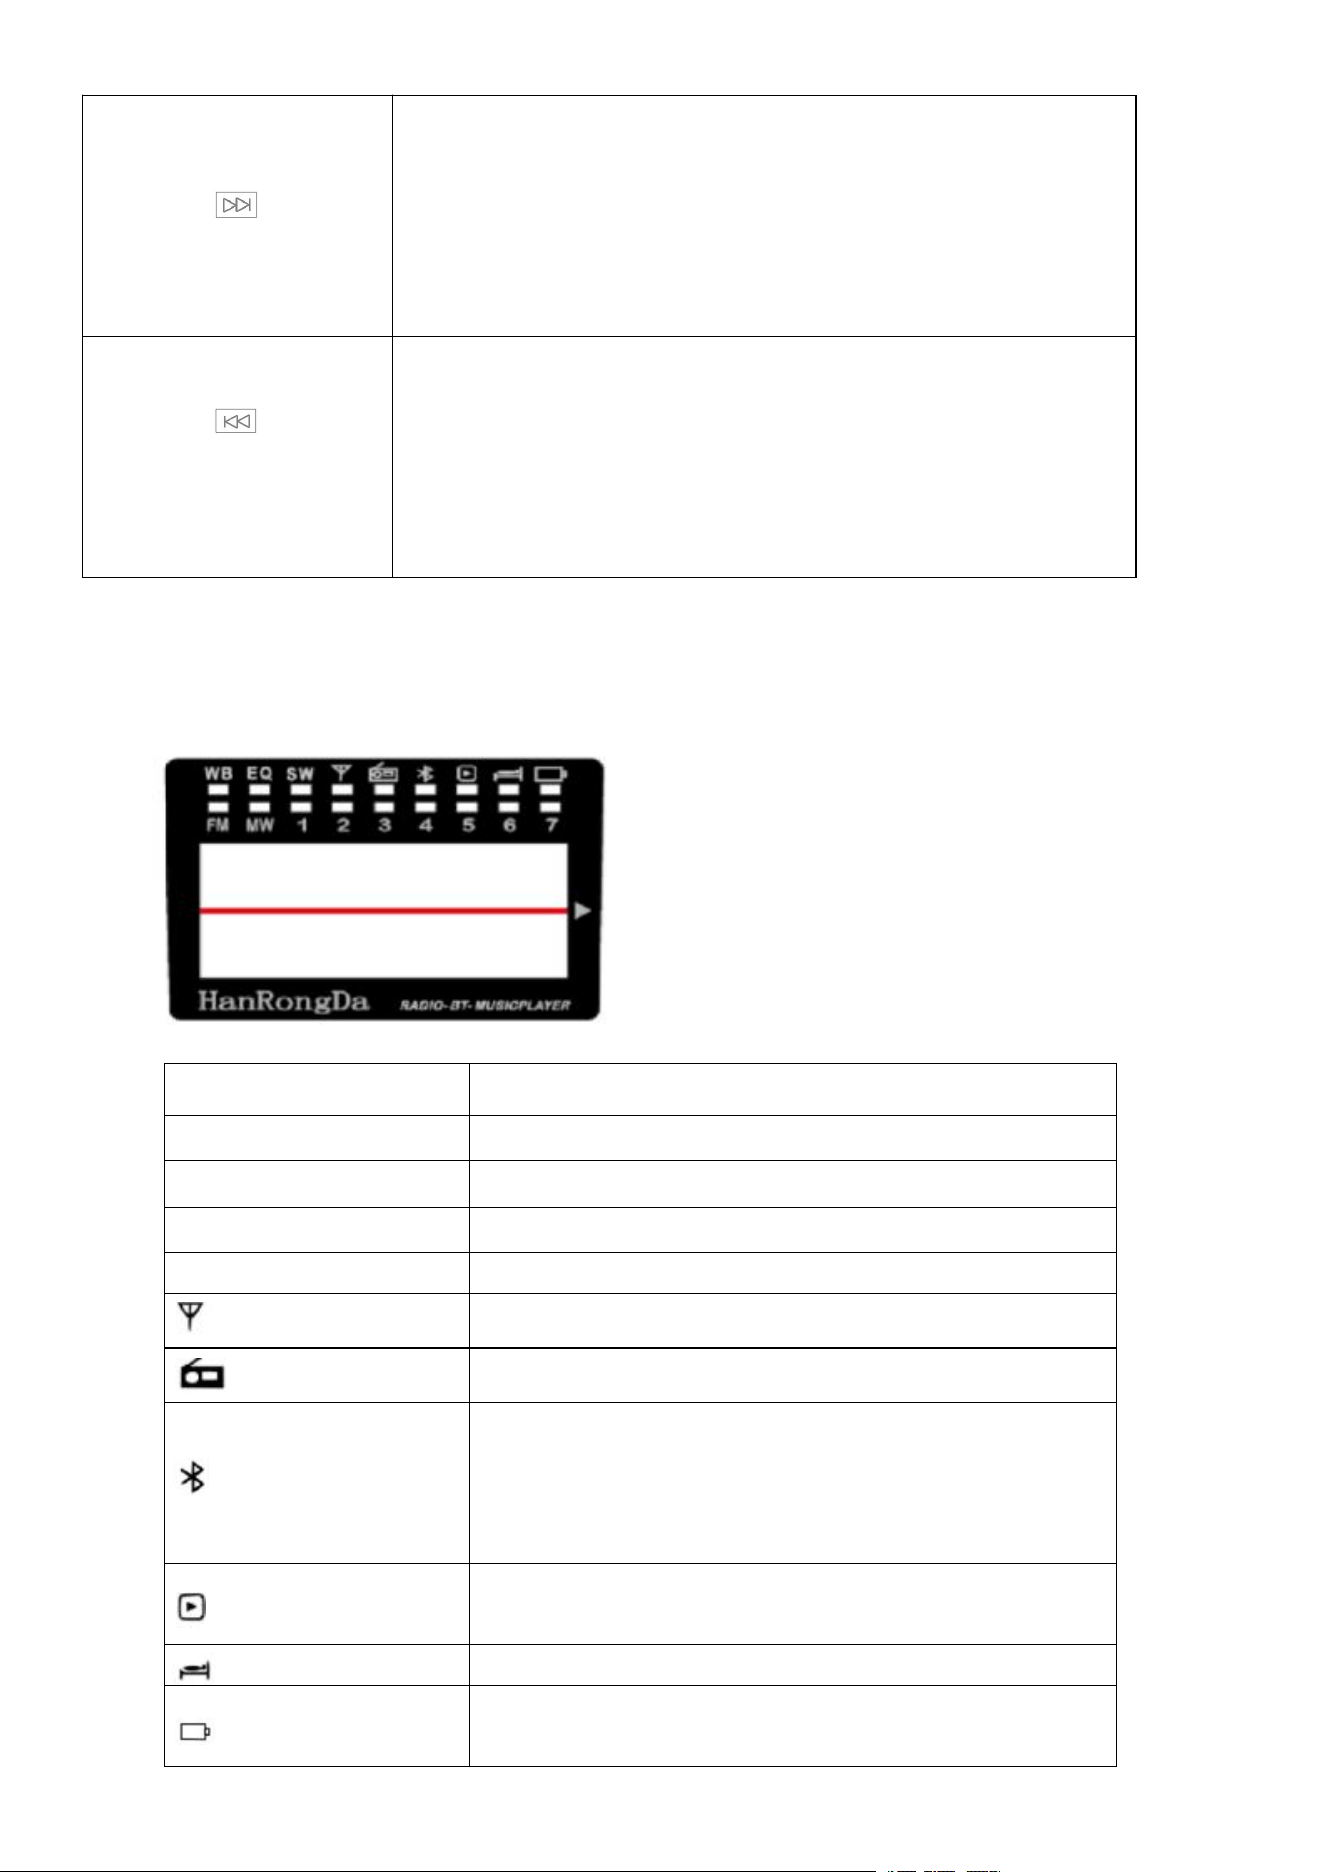
1: Radio Operation Mode: Press lightly to increment station tuning/automatic
station search
2:Music Playback Mode: Next track
3:TF Card Operation Mode: Long press to fast forward
4: In radio operation mode, press lightly to switch between digital tuning and
mechanical tuning modes
1: Radio Operation Mode: Press lightly to decrement station tuning/automatic
station search
2:Music Playback Mode: Previous track
3: TF Card Operation Mode: Long press to rewind
4:In radio operation mode, press lightly to switch between digital tuning and
mechanical tuning modes
5: Product Indicator Light Diagram
FM
Frequency Modulation Receiving Mode
MW
Medium Wave Receiving Mode
SW
Short Wave Receiving Mode
WB
Weather Band Receiving Mode (North America)
EQ
Audio Effect Adjustment Mode
Tuning Signal Indicator
In Digital Tuning Mode
Flashing Indicates Waiting for Bluetooth Connection
Steady Light Indicates Successful Bluetooth Connection
If the device is connected to the app, the Bluetooth indicator will
flash after power-off
Flashing Indicates Waiting to Insert TF Card
Steady Light Indicates TF Card Playback/Pause
Automatic Sleep Shutdown Time Indicator Enabled
Flashing: Charging/Low Battery Indicator
Steady Light: Fully Charged
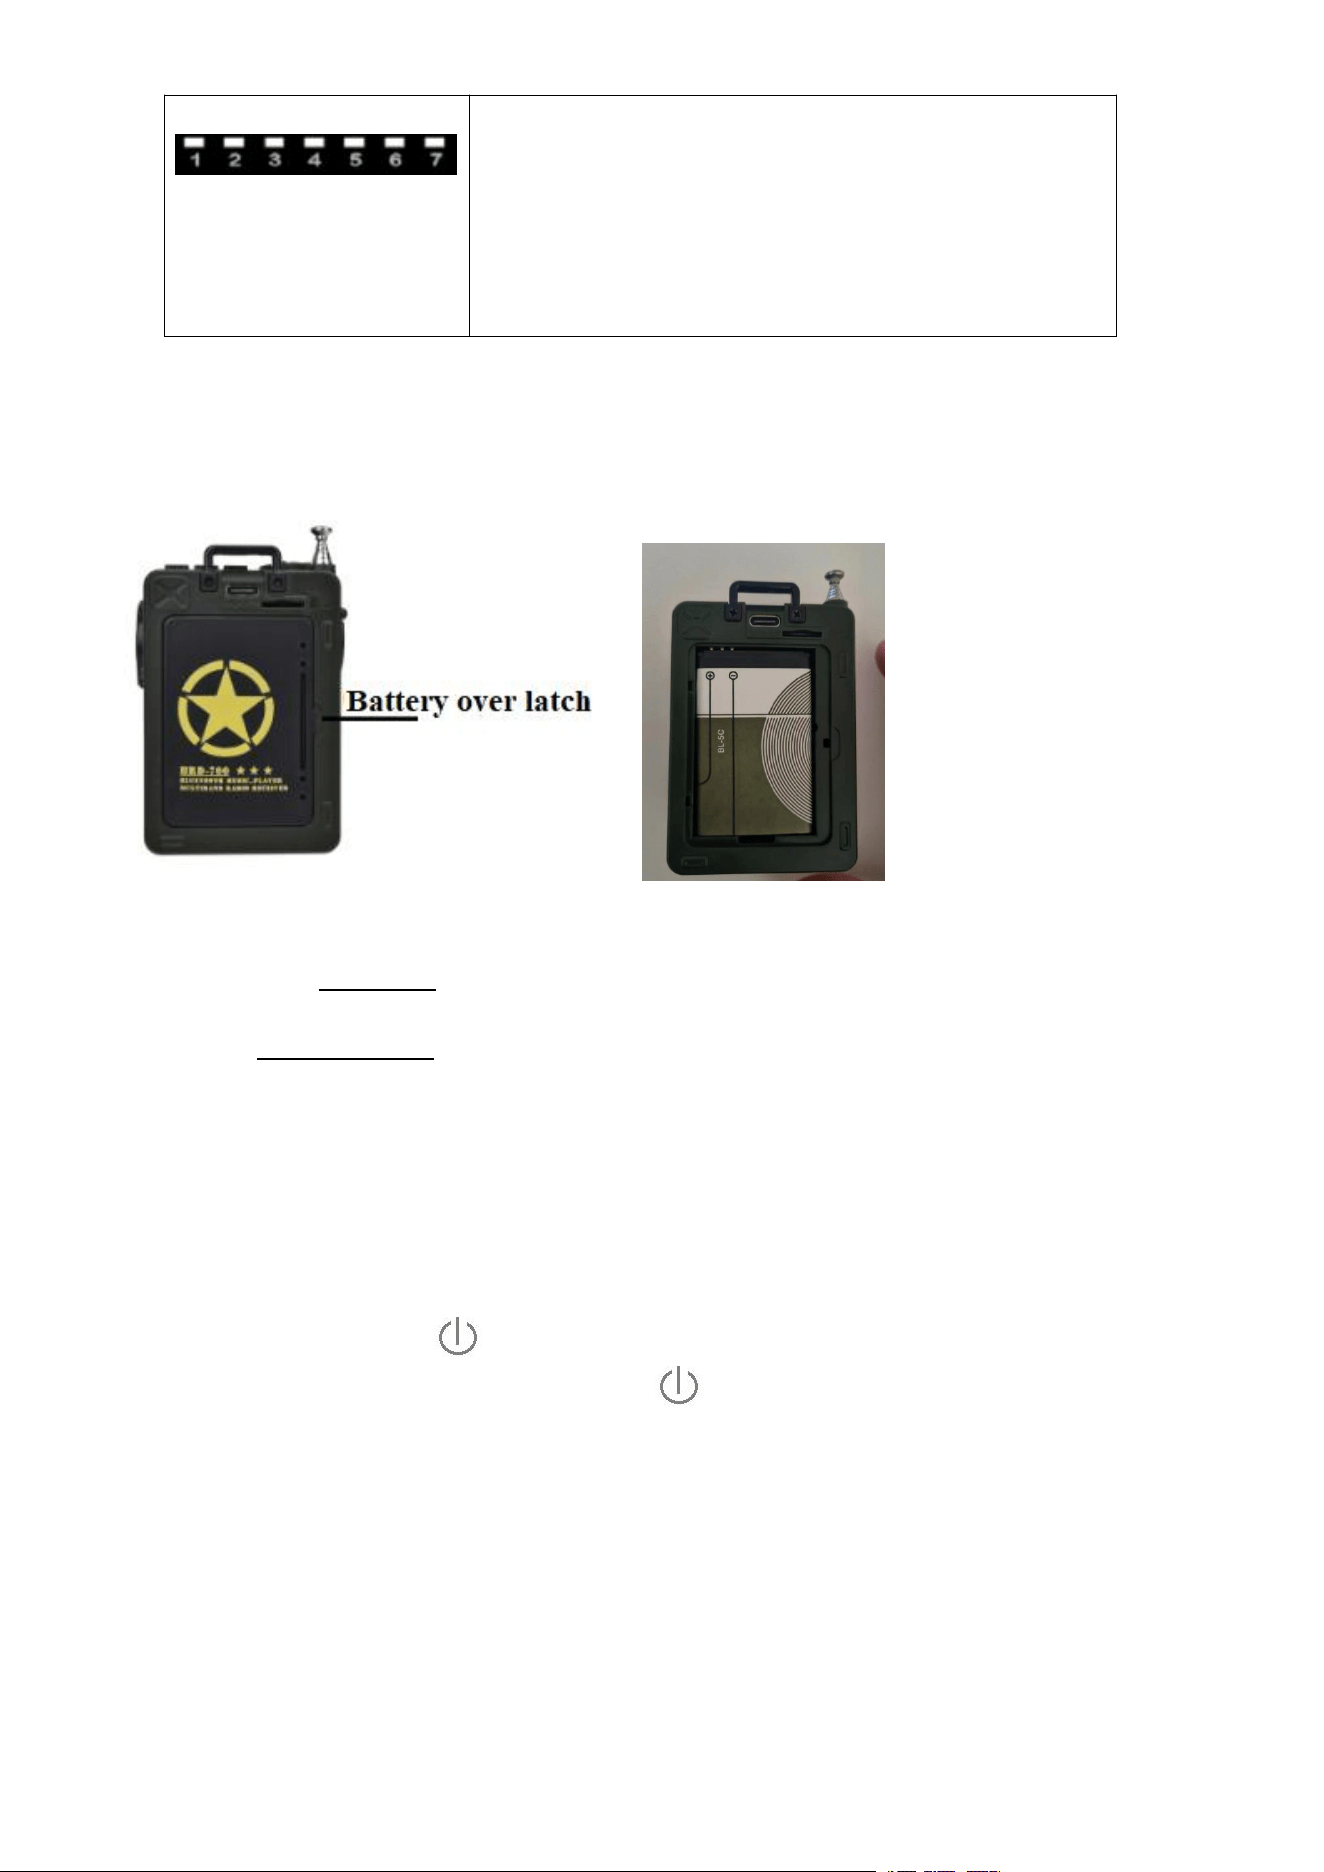
SW Mechanical Tuning Mode: Meter Wave Indicator
WB Working Mode: 7 Weather Frequency Selection
Tuning Mode: Tuning Address Number
EQ Selection: 6 Audio Effect Choices
Playback Mode Selection: 4 Playback Mode Options
Battery Indicator: LED 1-7
6: Inserting/Removing Batteries
Open the battery cover Align the positive and negative terminals of the battery
with the radio. Securely close the battery cover, ensuring the three contacts in the battery compartment
are properly connected
Recommendation: Before first use, it is advised to fully charge the battery.
7:Product Function Introduction
7.1: Power On/Off: Long press the “ ” button for 2 seconds; all lights will flash once in a rocking manner, indicating that
the device is powered on. In power-on mode, long press the “ ” button for 2 seconds to turn off the device.
7.2: The device has three playback modes: RADIO (Radio Mode) / BT (Bluetooth Receiving Mode) / M-PLAY (TF Card
Playback Mode).
On the left side of the device, there are three power settings. Please select the desired function according to your needs
(ensure that the volume knob is turned on before use).
When switched to any working mode, the device will announce in English: "Radio --- Bluetooth mode --- Music."
7.3: Volume Adjustment
Rotate the VOLUME knob clockwise to increase the volume, which can be adjusted to a maximum level of 9. Rotate the
VOLUME knob counterclockwise to decrease the volume. Please adjust the volume appropriately between levels “0-9”
according to your requirements.
7.4: Listening to RADIO Broadcasts:
This device can receive MW (Medium Wave), FM (Frequency Modulation), SW (Short Wave), and WB (Weather Band for
North America). The reception range for each band is as follows:
The factory default is the first option.
Adjustment Method for Medium Wave Step Value 9KHZ/10KHZ:
When the device is powered off, long press the “BAND” button for more than 2 seconds.
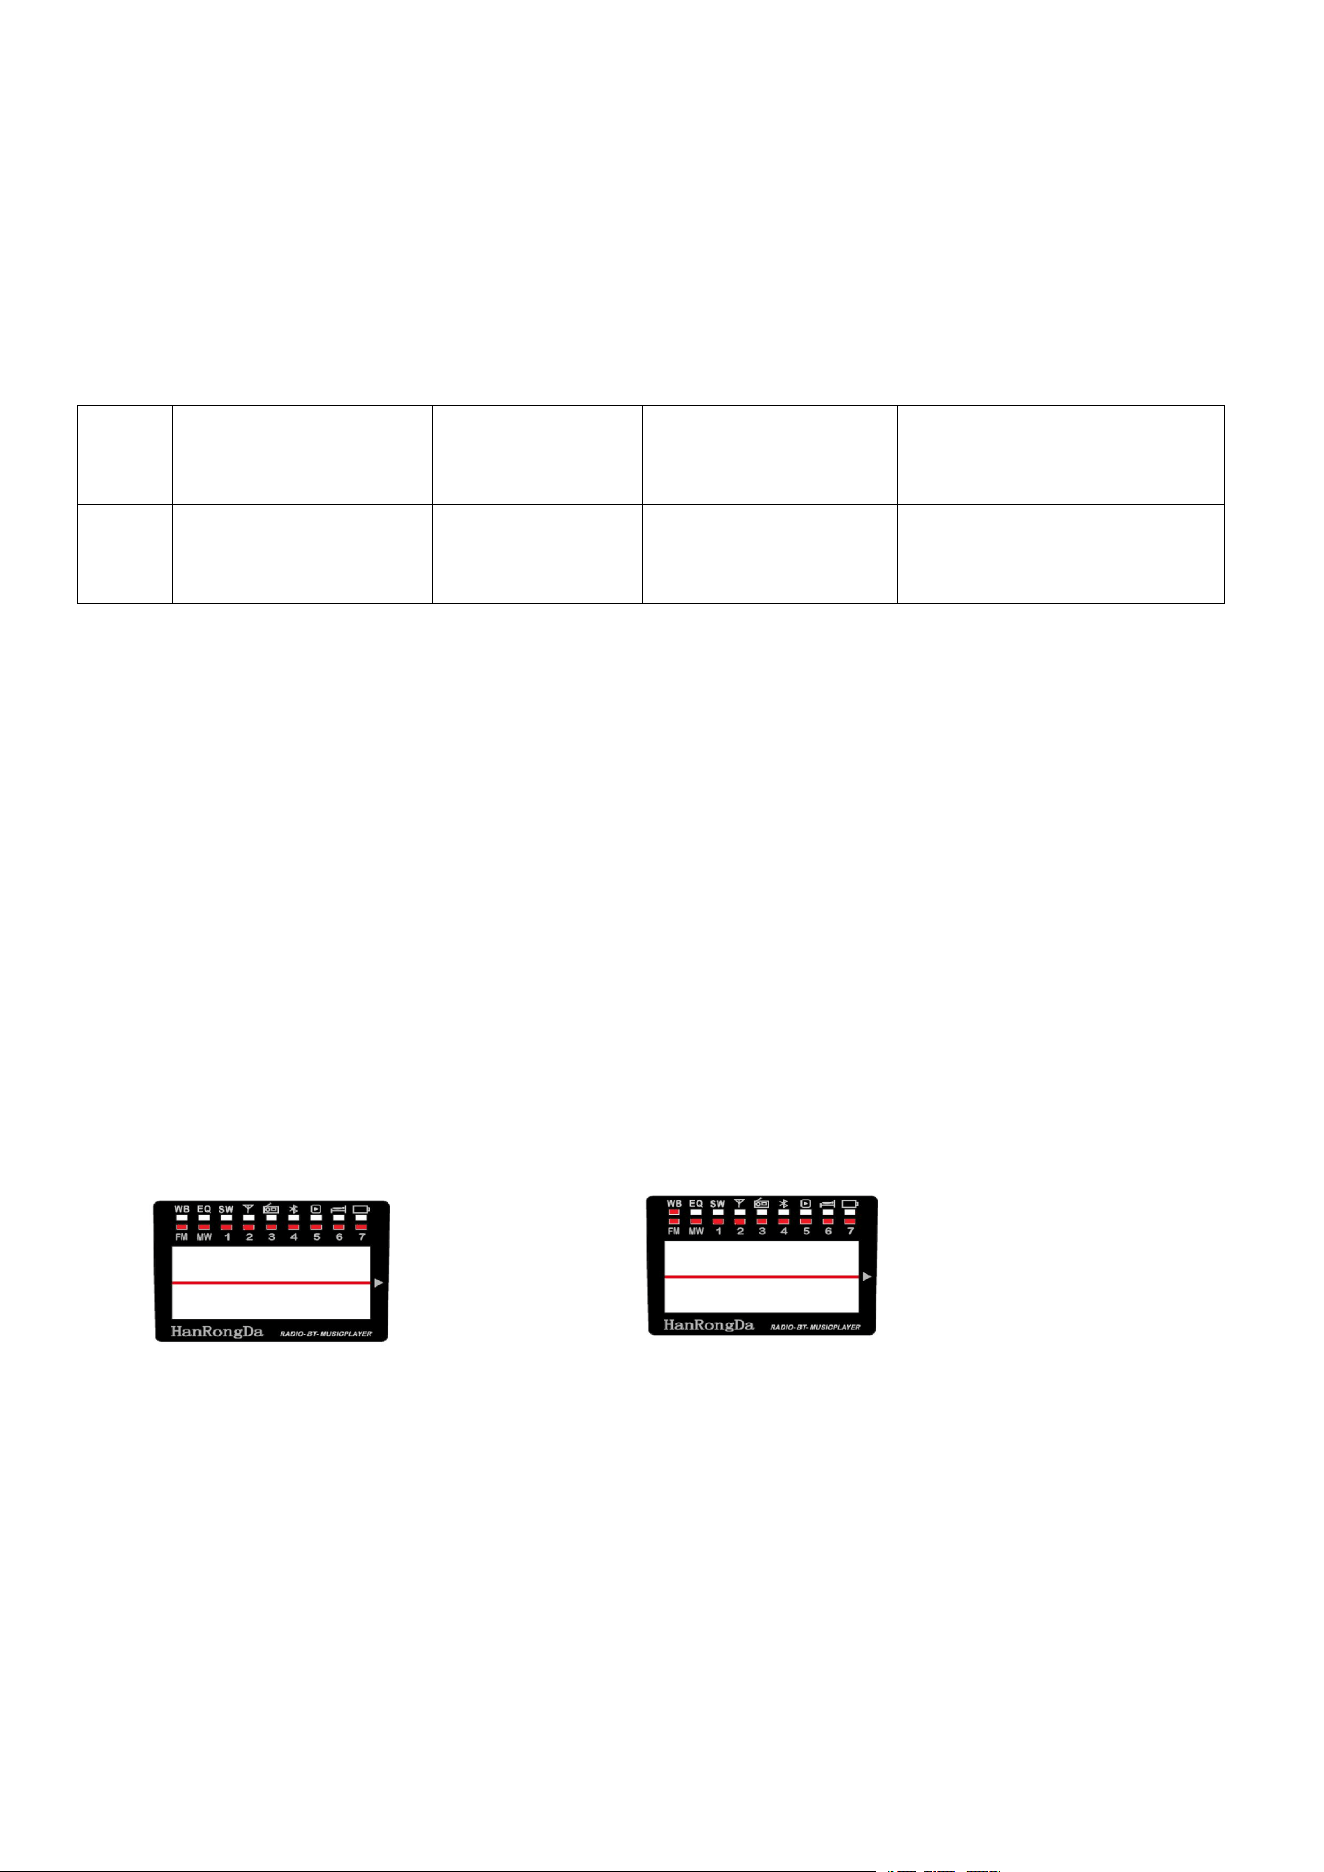
The illumination of 9 lights indicates that the current medium wave step value is 9KHZ,
while the illumination of 10 lights indicates that the current medium wave step value is 10KHZ.
When either 9 or 10 lights are illuminated, a light press of the “BAND” button will switch between AM step values of 9KHZ
and 10KHZ.
Step Value 9KHZ Indicator Diagram: Step Value 10KHZ Indicator Diagram:
Note:
In North American countries such as the United States, Canada, and Mexico, the medium wave step value must be set to
10KHZ. In other countries, the medium wave step value is 9KHZ.
The frequency range for a medium wave step value of 9KHZ is 522-1620KHZ.
The frequency range for a medium wave step value of 10KHZ is 520-1710KHZ.
When listening to FM, SW, or WB bands, please extend the telescopic antenna.
1
MW: 522-1620KHz
(AM step value 9KHz)
FM:76-108MHz
SW:3.2-21.95MHz
WB:162.400-162.550MHz
2
MW: 520-1710KHz
(AM step value 10KHz)
FM:87-108MHz
SW:3.2-21.95MHz
WB:162.400-162.550MHz

7.4.1: Band Switching: In the powered-on state, lightly press the “BAND” button to switch between MW/FM/SW/WB bands.
7.4.2: Station Search Methods: Fully Automatic Search and Storage of Stations, Automatic Search for Stations, and Manual
Station Selection via Mechanical Scroll Wheel
By long-pressing the "SCAN" button, the radio automatically enters the mode for searching and
storing stations. The LED lights numbered 1-7 will indicate progress in a scrolling manner.
Upon completion of one search cycle, the radio will begin playing the first detected station.
The product is capable of storing up to 297 stations, with 99 stations allocable for each of FM,
medium wave, and shortwave bands.
The number of stations that can be stored depends on the signal strength and availability in the
local area.
After completing the search and storage of stations, press the “ ” button to
enter the mode for selecting a radio station.
During station selection, the LED lights numbered 1-7 will display in a binary manner, with the
numbers flashing.
For example: 1, 2, 1&2 (indicating both 1 and 2 are lit), 3, 1&3, 2&3, and so on.
Automatic Station Search: Long press the “ ”or “ ” button to enable the radio to automatically search for
stations with signals, indicated by the sequential lighting of LED lights numbered 1-7.
Stop the search and begin playback upon receiving a signal station.
Mechanical Tuning Method: Slowly turn the tuning knob to search for a station with a signal.
Note: When a station with a signal is found, the signal indicat or light “ ” will illuminate.
7.4.3: Regarding Short Wave Mode
Press the “BAND” button to switch to Short Wave (SW) mode (indicator light is on). Press the “SET” button to switch the
frequency bands:
3.200 MHz, 4.750 MHz, 7.350 MHz, 12.100 MHz, 15.800 MHz, 17.900 MHz, 21.850 MHz.
When switching frequency bands, LED lights 1-7 will illuminate in sequence.
7.4.4: Regarding North American WB Weather Band
Press the “BAND” button to switch to the WB Weather Band. Press the “ ” and “ ” buttons, or turn the
tuning knob to select the corresponding reception frequency points. The LED digital display lights 1-7 indicate the
corresponding reception frequency points:
1: 162.400 MHz, 2: 162.425 MHz, 3: 162.450 MHz, 4: 162.475 MHz,
5: 162.500 MHz, 6: 162.525 MHz, 7: 162.550 MHz.
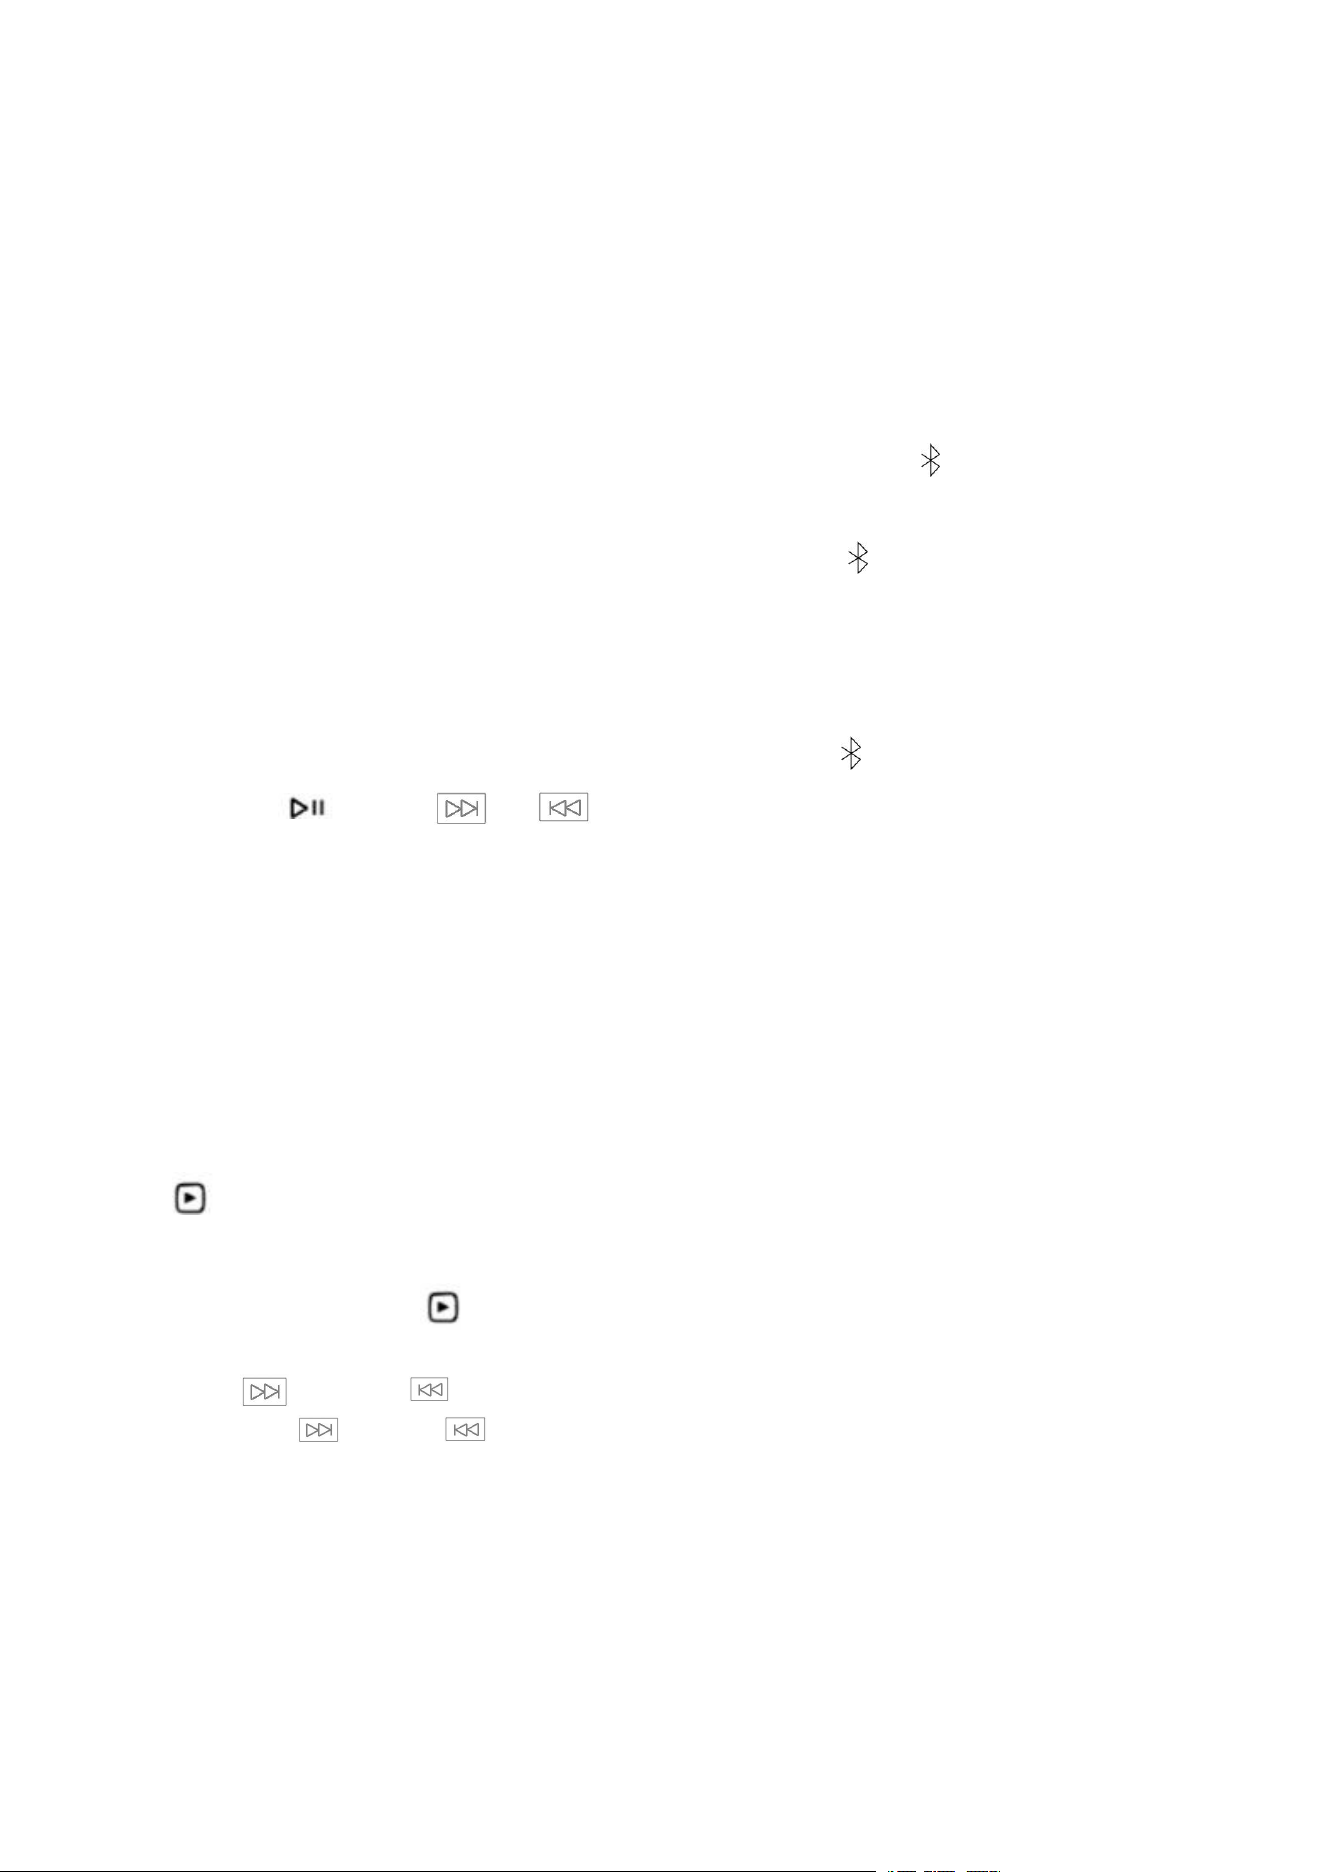
Long press the “▶ ‖” button for 2 seconds to enter the automatic alert “ALERT” mode. In the automatic alert “ALERT” state,
long press the “▶ ‖” button for 2 seconds to exit the automatic alert “ALERT” function.
7.4.5: Enabling the Backlight in Radio Mode
In radio mode, long press the “MOD” button for 2 seconds to turn the LED lighting on or off, facilitating nighttime use.
7.5: Bluetooth Operation:
The Bluetooth connection name for this product is “HRD-700.”
When powered on, set the left-side function switch to the “BT” position. The Bluetooth “ ” indicator light will blink,
indicating that the device is waiting for a connection.
Enable Bluetooth on your mobile phone. Once the connection is successful, the “ ” indicator light will remain on,
signaling a successful Bluetooth connection.
Both the mobile phone and this device can be used to control functions such as volume adjustment and track selection.
After a successful connection, if the device is powered off or the operating mode is changed, it will automatically reconnect
upon power-up without the need for re-pairing. Once connected, the Bluetooth “ ” music symbol will remain lit. At this
point, press the “ ” and “ ” “ ” buttons or start music playback on the device to successfully play
Bluetooth music.
The effective Bluetooth reception distance is up to 10 meters, allowing easy connection to digital devices such as laptops,
mobile phones, and tablets for wireless music transmission.
Long press the “BAND” button to exit Bluetooth mode.
7.6: TF Card Playback Operation:
In the powered-on state, set the function switch on the left side of the device to the “M_PLAY” position.
The “ ” indicator light will blink, indicating that the device is waiting for the TF card to be inserted.
On the back of the device, insert the TF card correctly into the card slot as indicated.
Once the TF card is inserted, the “ ” indicator light will remain on, and MP3 music will begin playing.
Press the “ ” and “ ” keys to select the next or previous track.
Long press the “ ” and “ ” keys for fast forward and rewind playback.
A light press of the “▶ ‖” key will toggle between pause and play.
Note: To properly remove the TF card, gently press the TF card, and it will spring out (please do not pull it outward).
8: Regarding the EQ Sound Effect Selection for Music Playback:
Operating Mode: Press and hold the "SET" button to enter the EQ settings, where six options are available:
The digital indicator lights correspond to the following EQ sound effects:

1: Normal (NORMAL), 2: Pop (POP), 3: Rock (ROCK),
4: Jazz (JAZZ), 5: Classic (CLASSIC), 6: Country (COUNTRY)
If no operation is performed within 3 seconds, the adjusted EQ sound quality will be confirmed, and the EQ indicator light
will turn off.
9: Setting the Automatic Power-off (Sleep) Function:
In the powered-on state, lightly press the “ ” key. The “ ” indicator light and the number lights 1-7 will
illuminate, entering the sleep shutdown setting function
(each illuminated light represents 10 minutes). Press the “SLEEP” key again to select the sleep shutdown time:
70 minutes, 60 minutes, 50 minutes, 40 minutes, 30 minutes, 20 minutes, 10 minutes, or to cancel the sleep shutdown
function.
If no operation is performed within 5 seconds, the last selection will be saved by default. The radio will automatically power
off after reaching the set shutdown time.
10: Type-C Port: Charging & Headphone Combo
10.1 Charging:
In the working state, lightly press the "MOD" key to illuminate the battery indicator light, which displays the battery usage
level. When the battery level indicators "1-7" are off and the " " light is blinking, it indicates that the battery is low. Please
charge the device in a timely manner to avoid affecting normal usage. It is recommended to use a charging device with an
output voltage of DC 5V/1A to DC 3A to prevent damage to the lithium battery or the device.
If the lithium battery will not be used for an extended period, please ensure it is removed and stored separately, and make
sure to charge it once a month.
Use the included power cable to charge the radio. During the charging process, the “ ” indicator light will blink. Once
fully charged, the “ ” indicator light will stop blinking.
The typical charging time is approximately 3-4 hours.
10.2 Using as Headphones:
Using the included Type-C to 3.5mm adapter cable, connect the Type-C end to the device’s Type-C port, and insert your
headphones into the 3.5mm jack (headphones must be purchased separately). This will allow you to listen to the product
through headphones. (Note: After inserting the headphones, please adjust the volume to a moderate level to avoid
damaging the headphones.)
This is a Type-C to 3.5mm connection cable (included as a random accessory).
11: Activating the Music Spectrum Light:
In the power-on state, lightly press the “MOD” button a second time to activate the music spectrum light. The music spectrum
light will flash from high to low and from low to high, changing in response to the melody of the music.
To turn off the music spectrum light, press the “MOD” button again.
12: Using the Antenna:
When listening to SW (shortwave), FM (frequency modulation), and WB (weather band) broadcasts, extend the antenna and
adjust its length and direction to find the optimal reception.
*Note: If experiencing strong radio interference causing cross-talk, shorten the telescopic antenna.
For listening to MW (medium wave) broadcasts, the device uses a built-in magnetic antenna for medium wave reception. The
magnetic antenna has a certain directional capability when receiving signals, so rotating the device may help find the best
reception position for MW.
13: Key Technical Parameters:
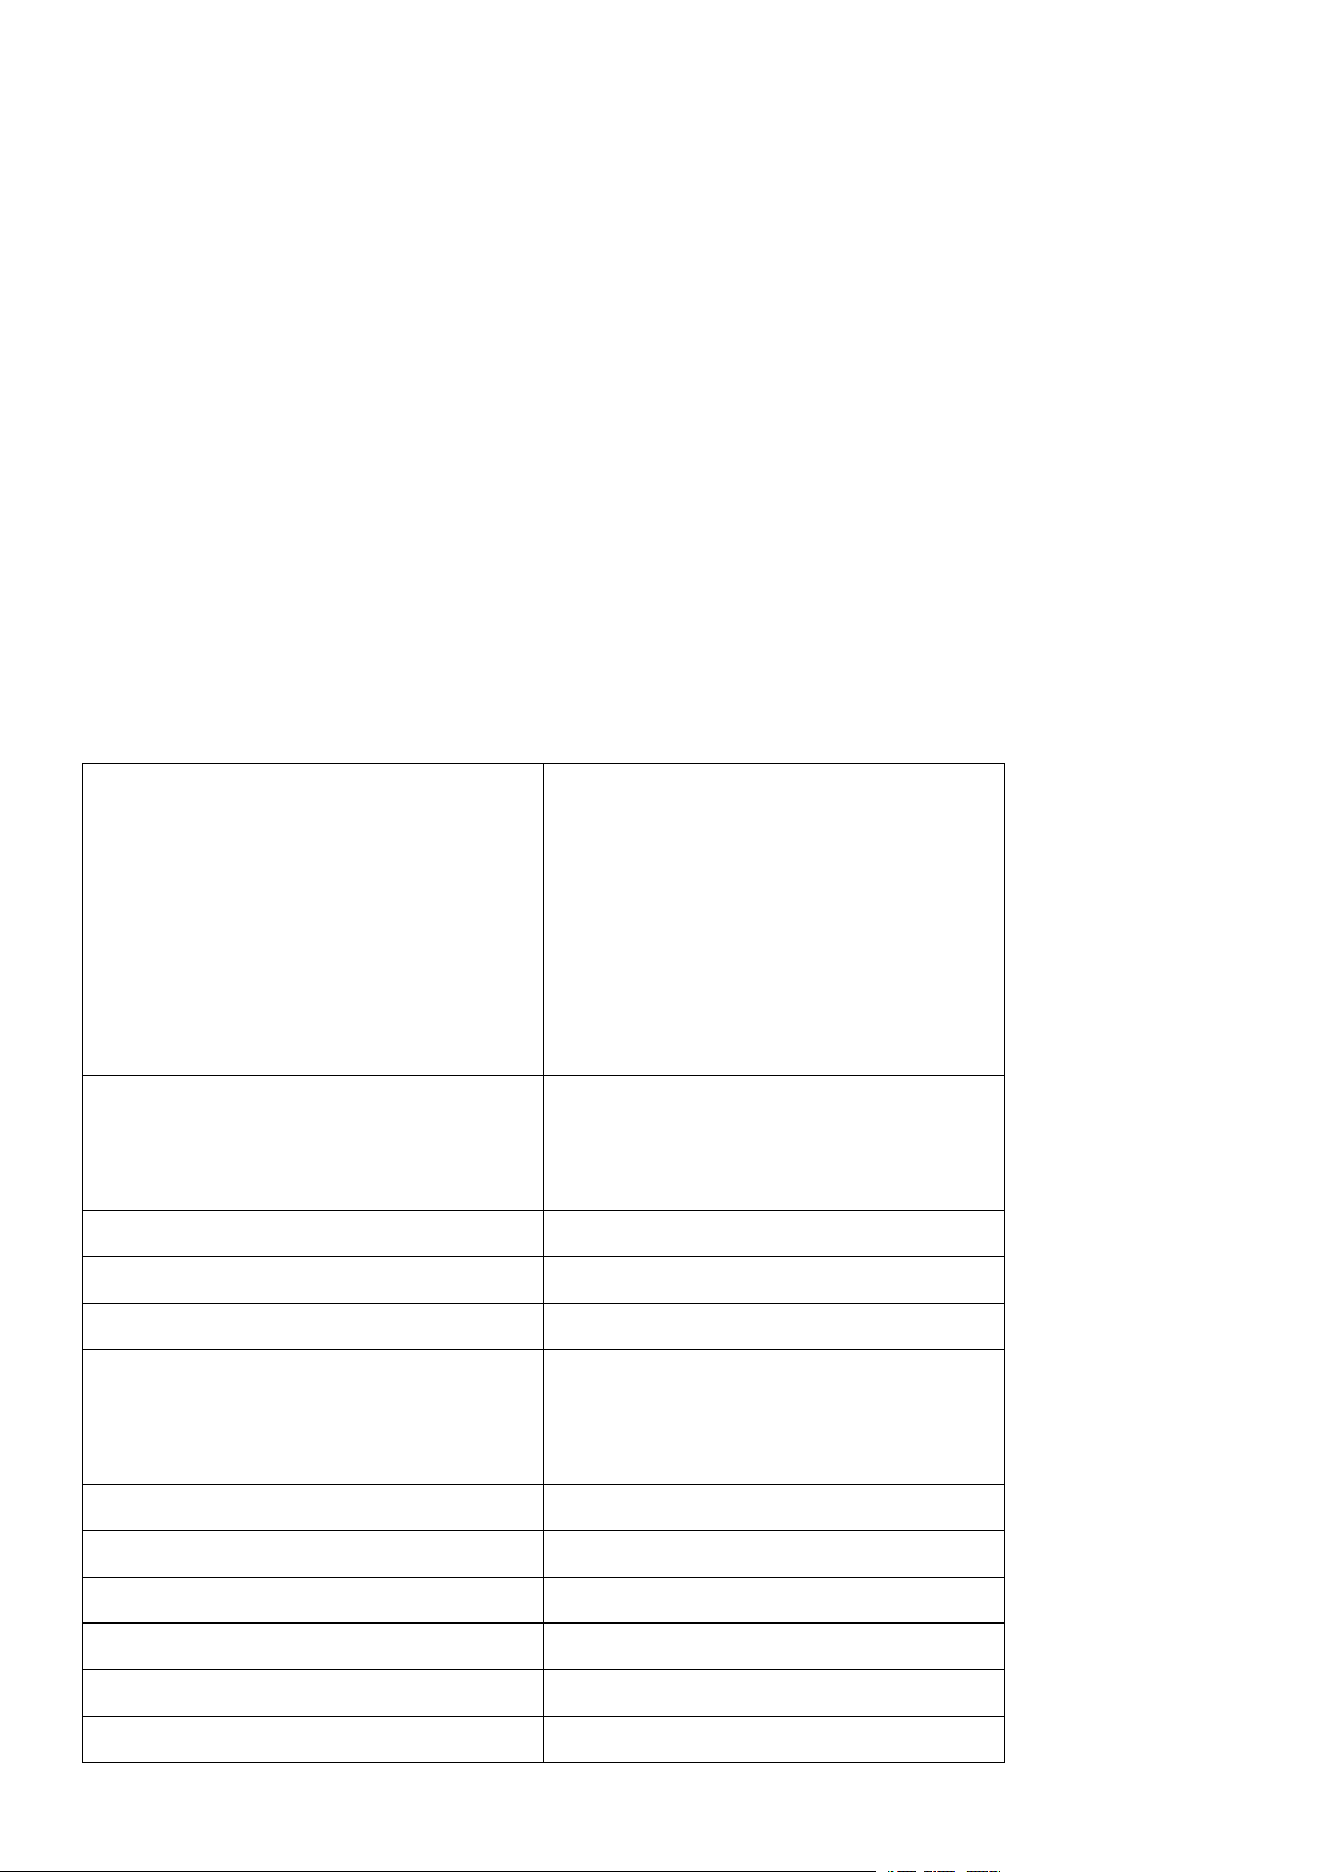
Reception Range
MW:
522-1620KHZ(medium wave step value 9KHZ)
520-1710KHZ(medium wave step value
10KHZ)
FM:76-108MHz
SW:3.2-21.95MHz
WB:162.400-162.550MHZ
Reception Sensitivity
FM:≤8dB
MW:≤86dB
SW≤32dB
Static Current
≤60uA
Maximum Current
≤650MA
Speaker
Ф40mm/4Ω/3W
Signal-to-Noise Ratio
FM:≥40dB
MW:≥30dB
SW:≥40dB
Radio Mode Station Memory
Can store 297 stations (99 per band)
Bluetooth Version
VER 5.1
Bluetooth Reception Distance
≤10 meters
Minimum Operating Voltage:
3.4V
External Input Voltage
DC: 5.0 V
Lithium Battery
BL5C Lithium Battery: 3.7 V, 1000 mAh
TF Card Playback Formats
MP3,WMA,WAV,FLAC,APE
TF Card Maximum Supported Capacity
256G
Tuning Mode
Digital Tuning / Mechanical Tuning (Dual
Use)
Product Dimensions
88x53x37MM
Product Net Weight
100 g
14:Regarding APP connection
14.1: Illustration of Mobile APP Download Instructions:
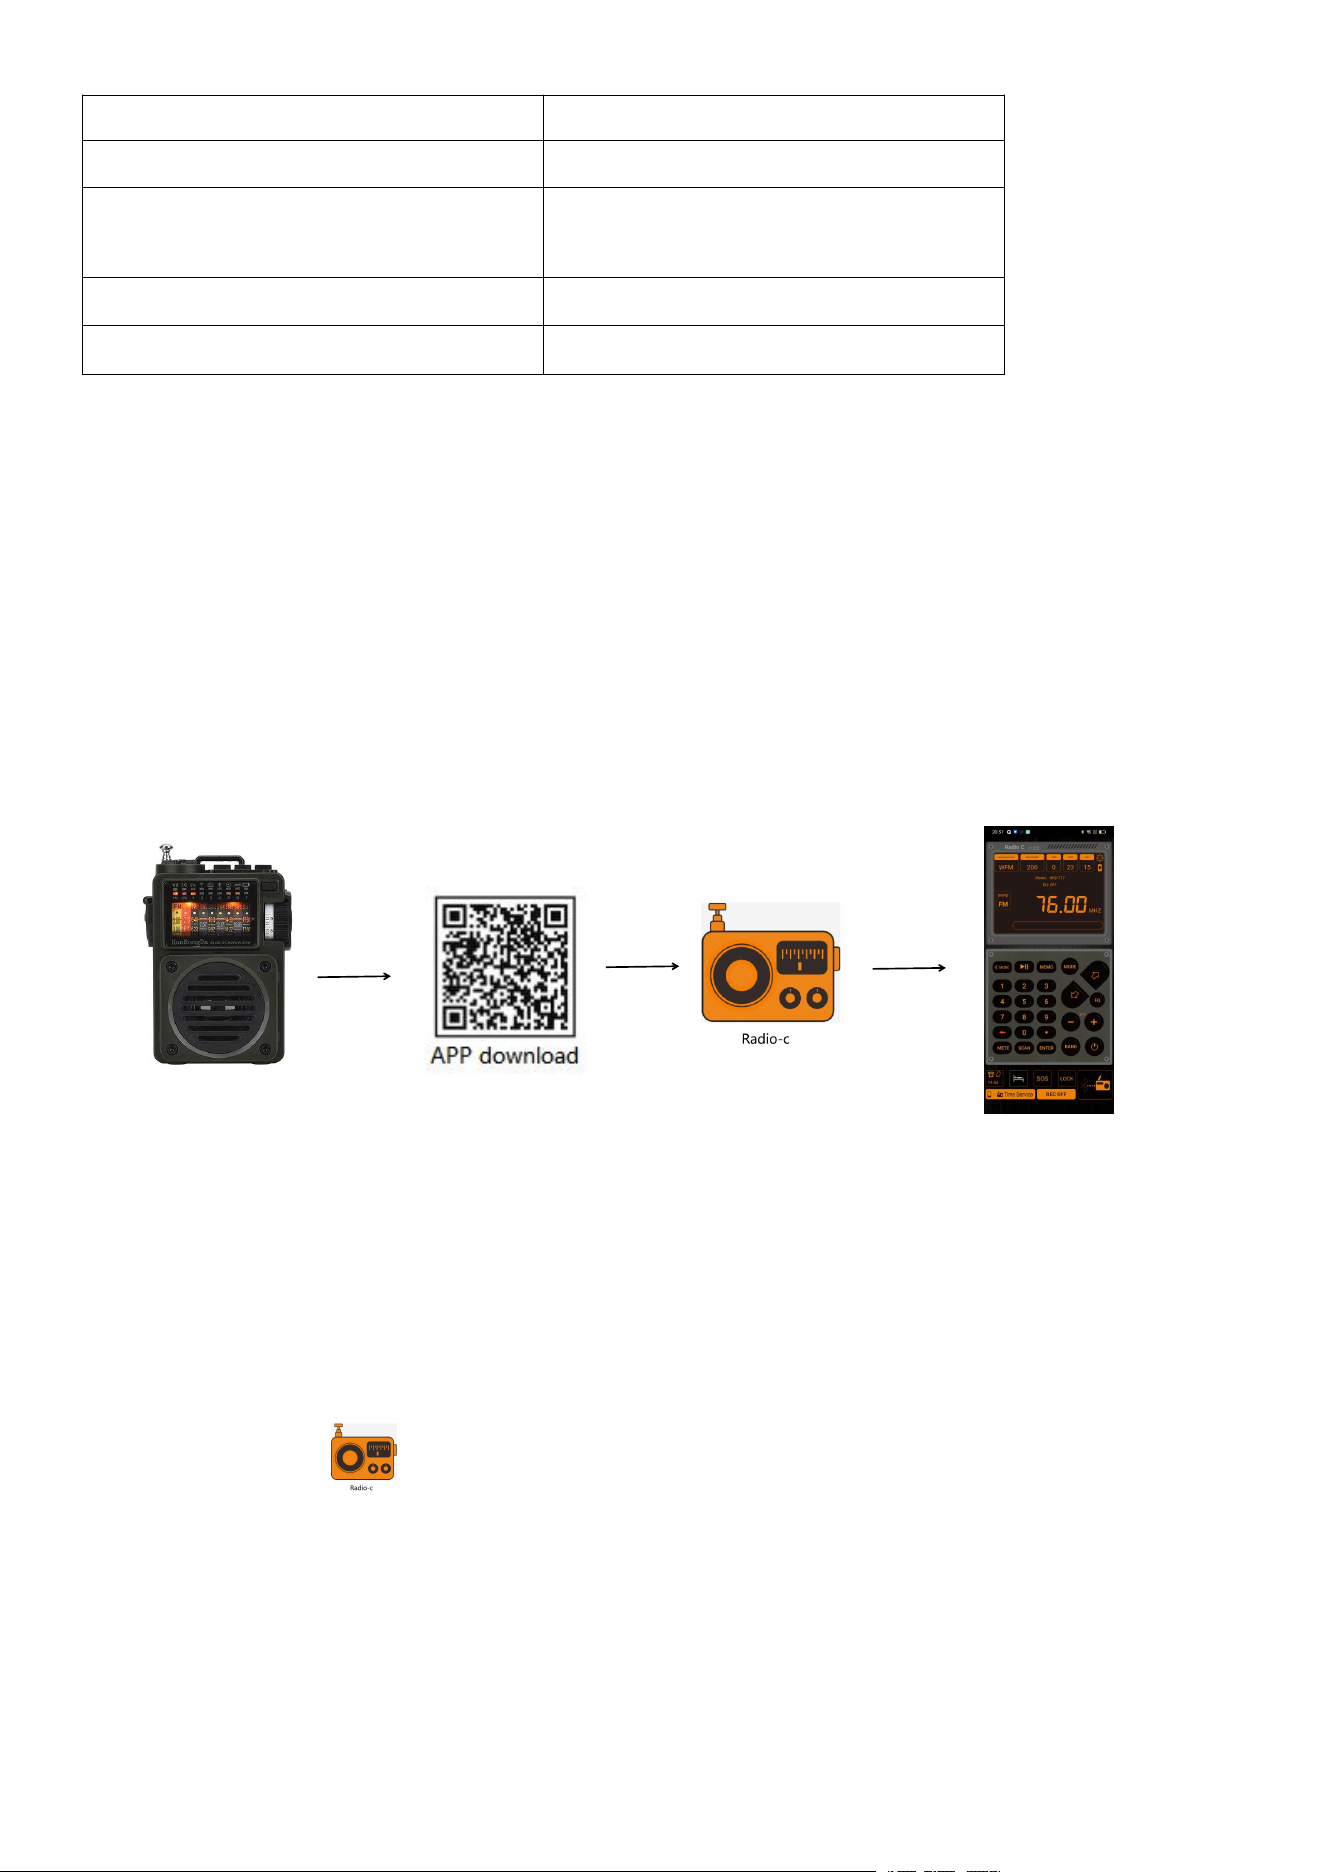
Step 1: Power on the radio
Step 2: Install the APP software
Step 3: Successful installation on the mobile home screen
Step 4: Click to enter APP mode, then select “HRD-700-BLE” and click to connect.
If the radio is connected to the APP and does not exit, after shutting down, the Bluetooth indicator will keep
flashing.
Exit APP connection operation: After shutdown, long press [SET] key, Bluetooth indicator is off, then exit
APP.
14.2: APP Installation
If the Radio-c APP has already been downloaded, there is no need to download it again. You can
directly click to connect to the HRD-700-BLE .
A: For Android and HarmonyOS phones, please scan the following QR code to install the APP.
Android and HarmonyOS phones support installation via the phone's browser to scan the QR code.
For detailed instructions, please refer to [specific instructions14.2.1 ].
B: For Apple devices, please visit the “App Store” and search for “Radio-CT” to download.
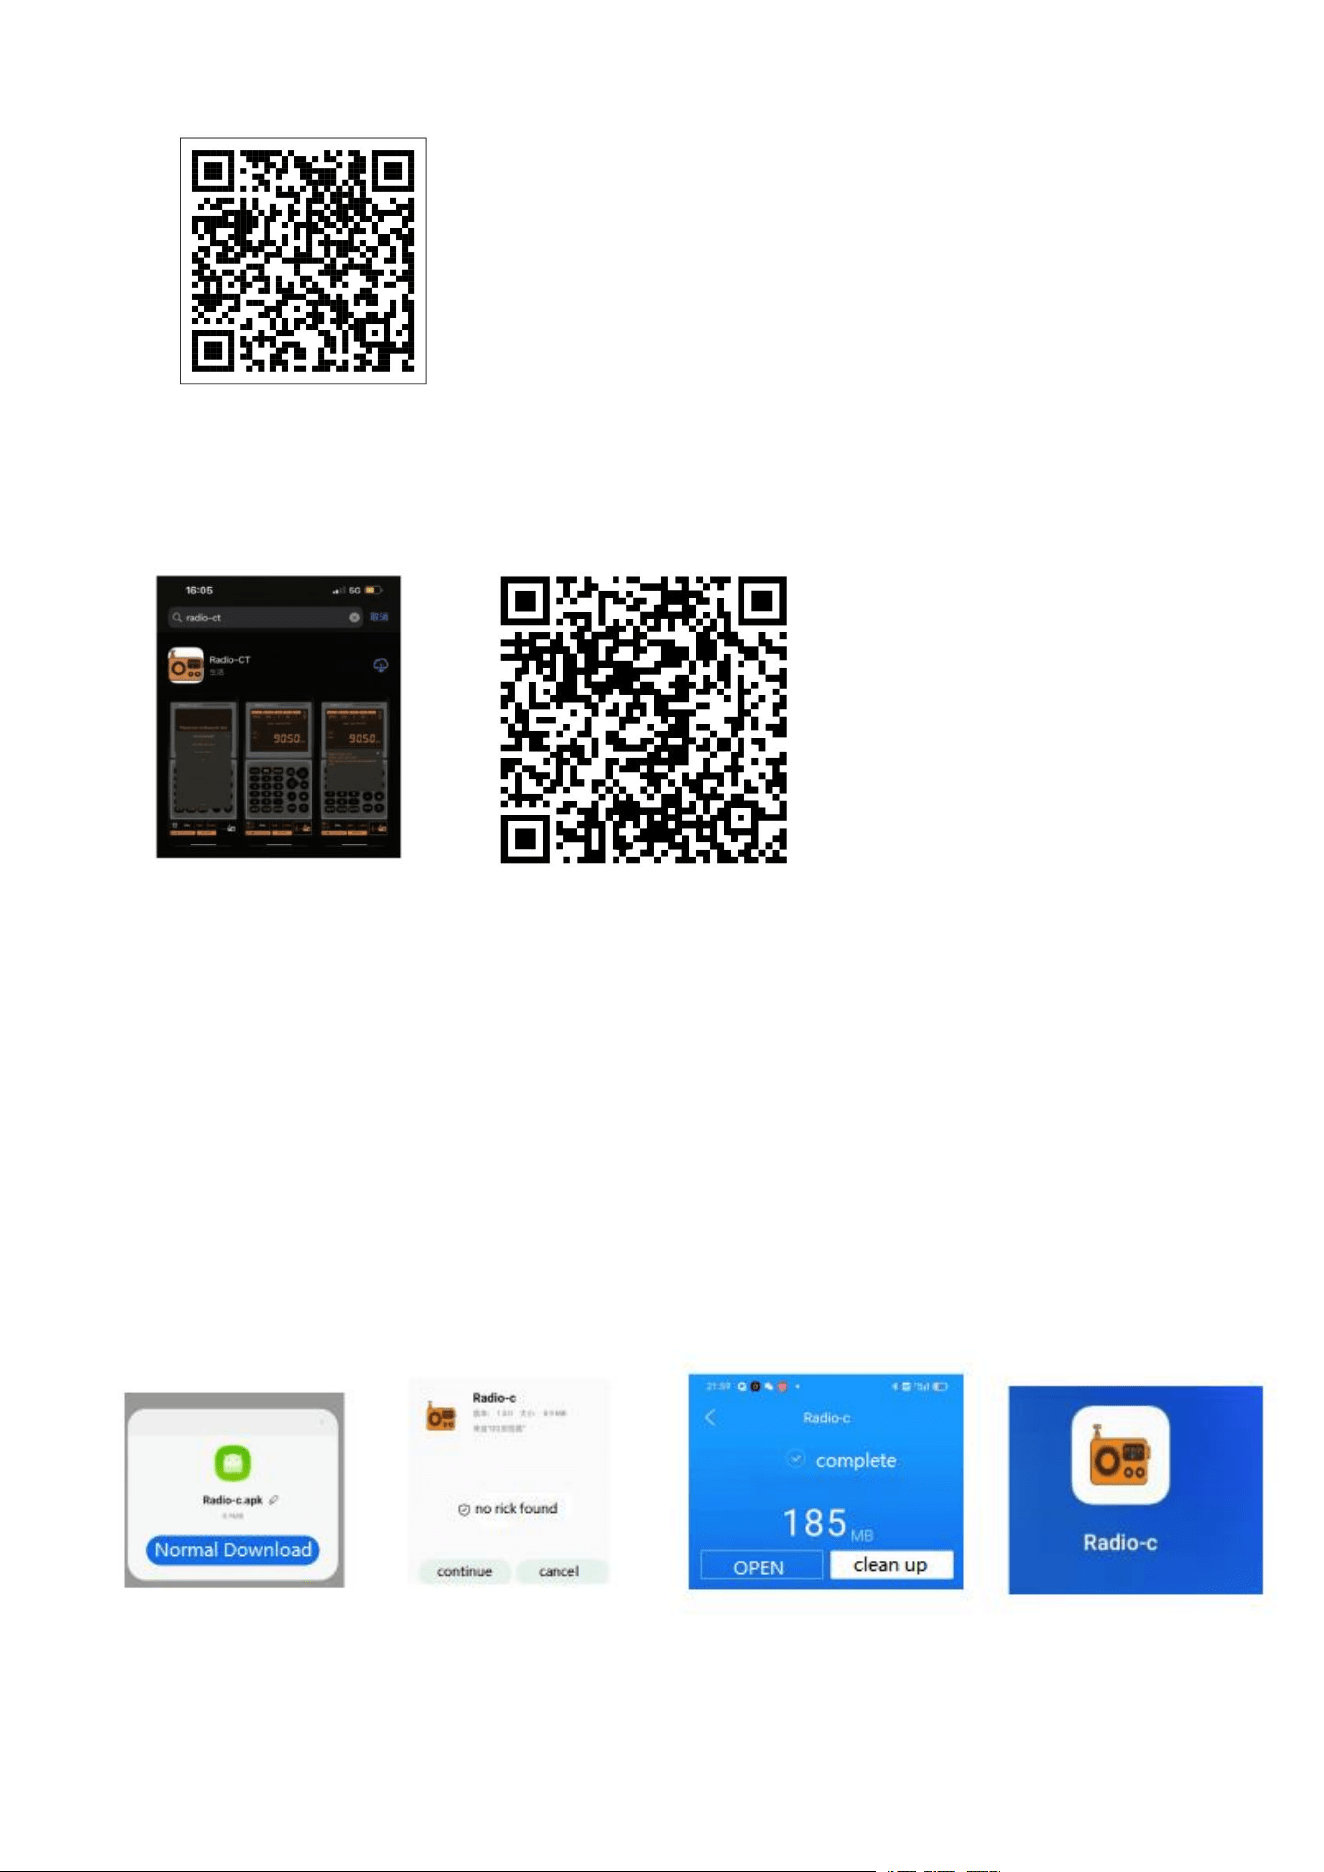
For Android and HarmonyOS phones, please scan this QR code to install the APP.
Apple Devices: You can search for “Radio-CT” in the App Store to download and install. Alternatively,
you can scan the QR code above to access the App Store for downloading.
14.2.1: After enabling the browser to scan the installation QR code for HRD-700, follow the prompts: click
“Download,” then click “Continue Installation.” Once the installation is complete, click “Open Application.”
The APP icon will appear on the mobile home screen.
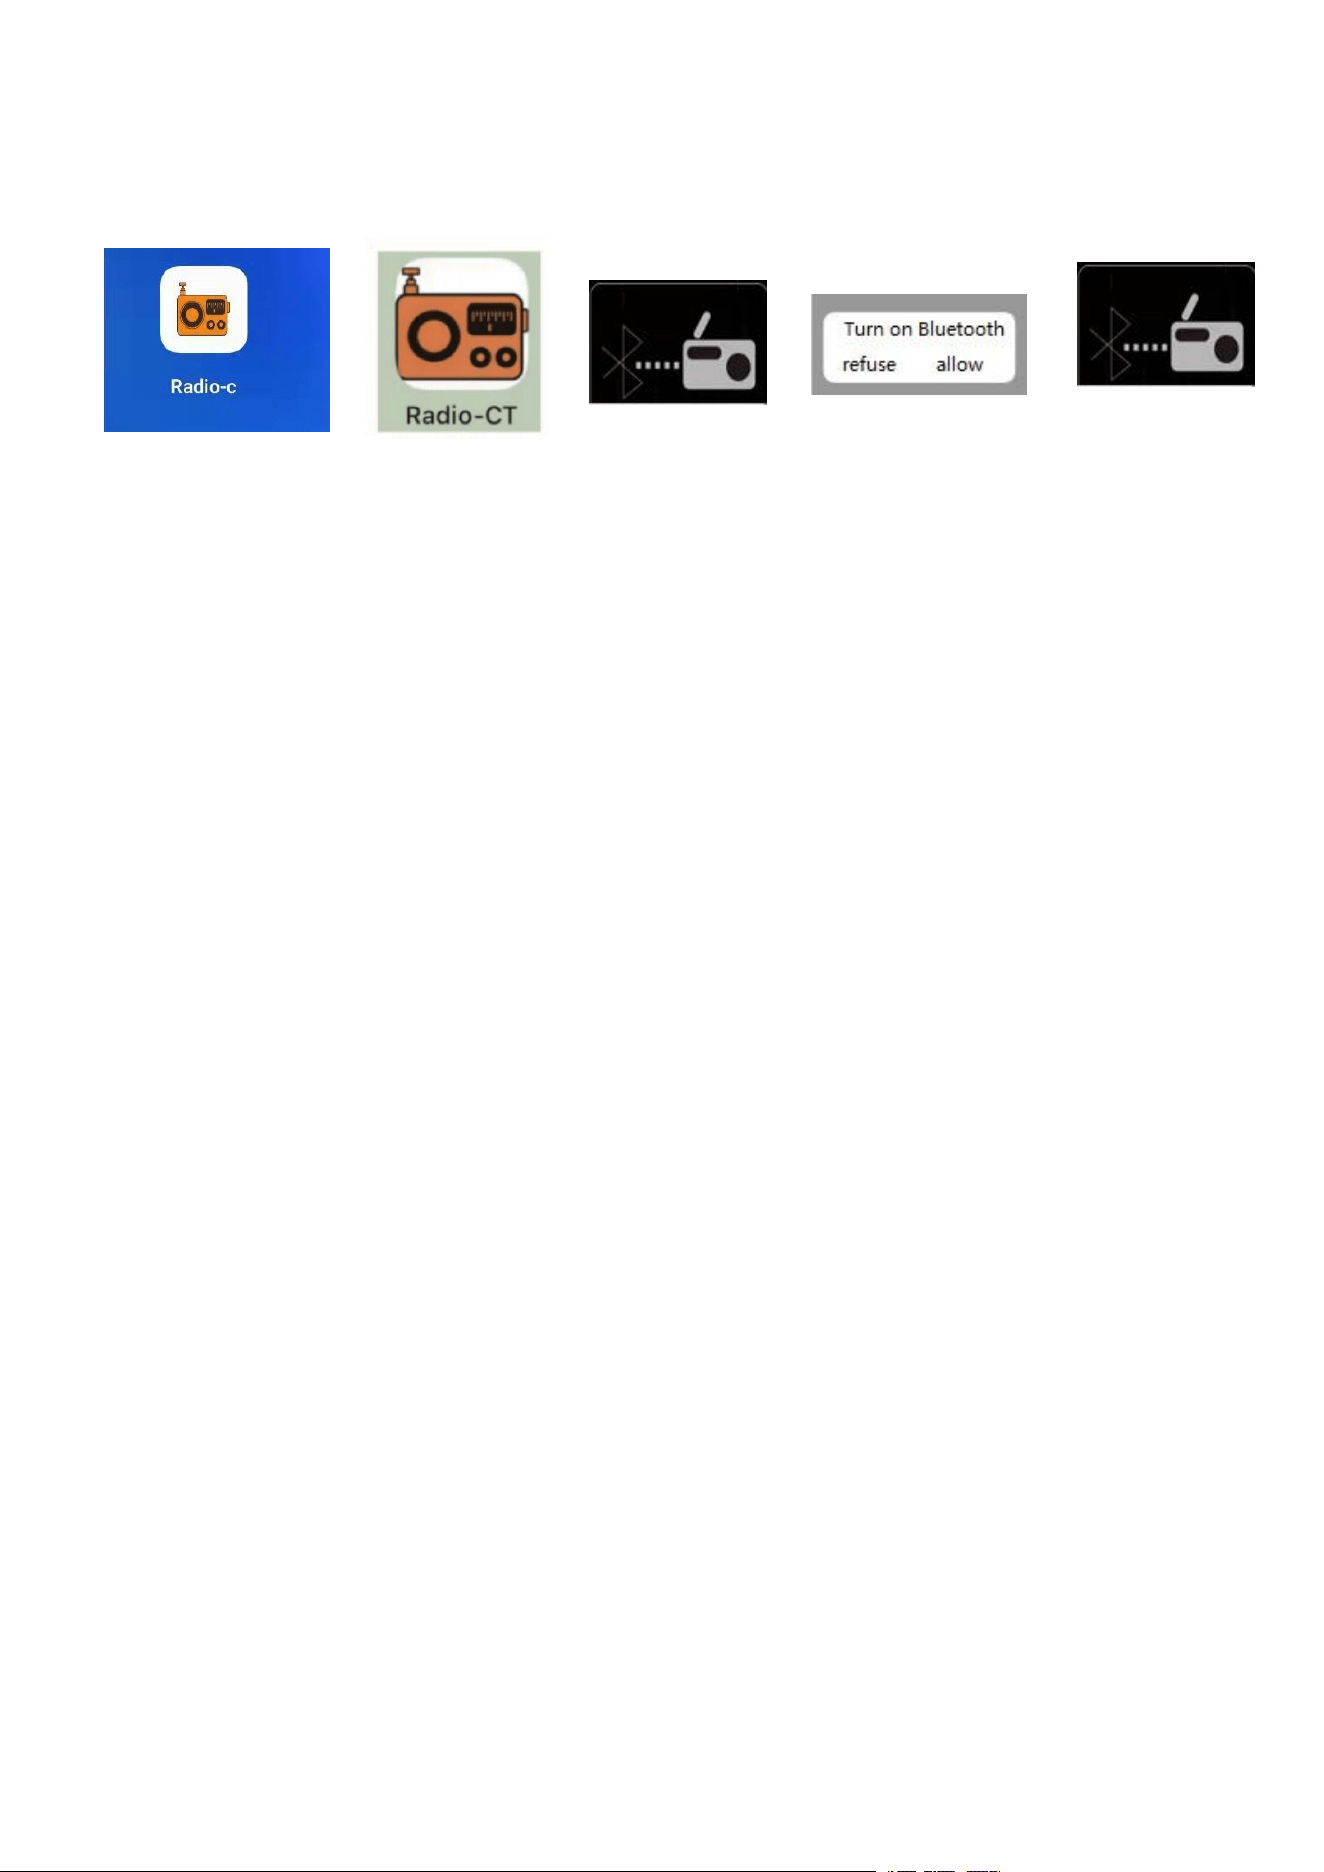
14.3: Entering APP Mode for Use:
Click the APP icon on the mobile home screen to access it. Tap the symbol in the bottom right corner of the APP
interface,
select “Allow,” then click the symbol again. Choose HRD-G18-BLE to establish a successful connection.
Android/HarmonyOS Mobile Apple Mobile Download Desktop Icon
Download Desktop Icon
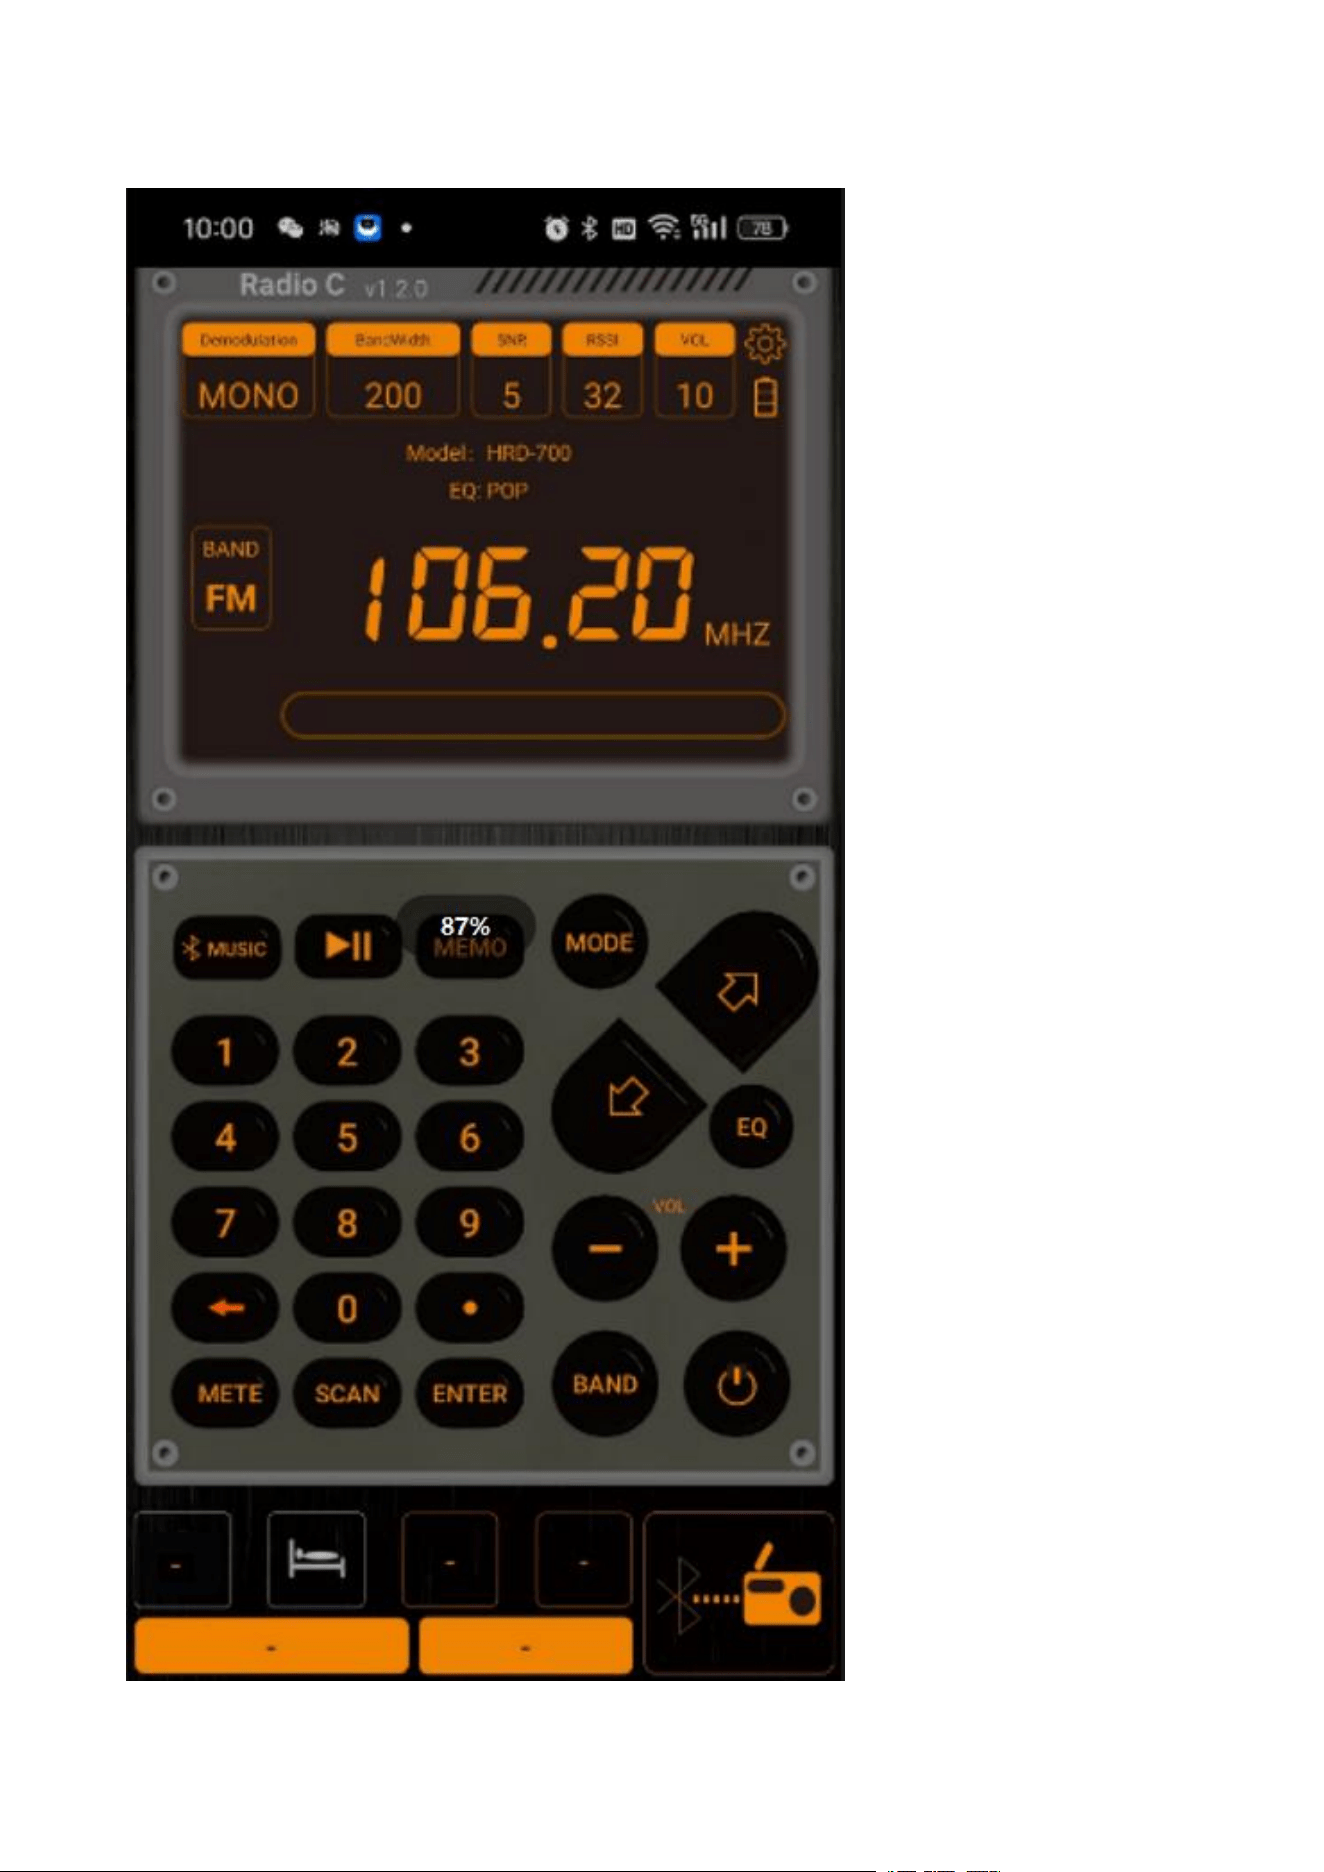
14.4: FM Working Mode Key Function Introduction in the APP
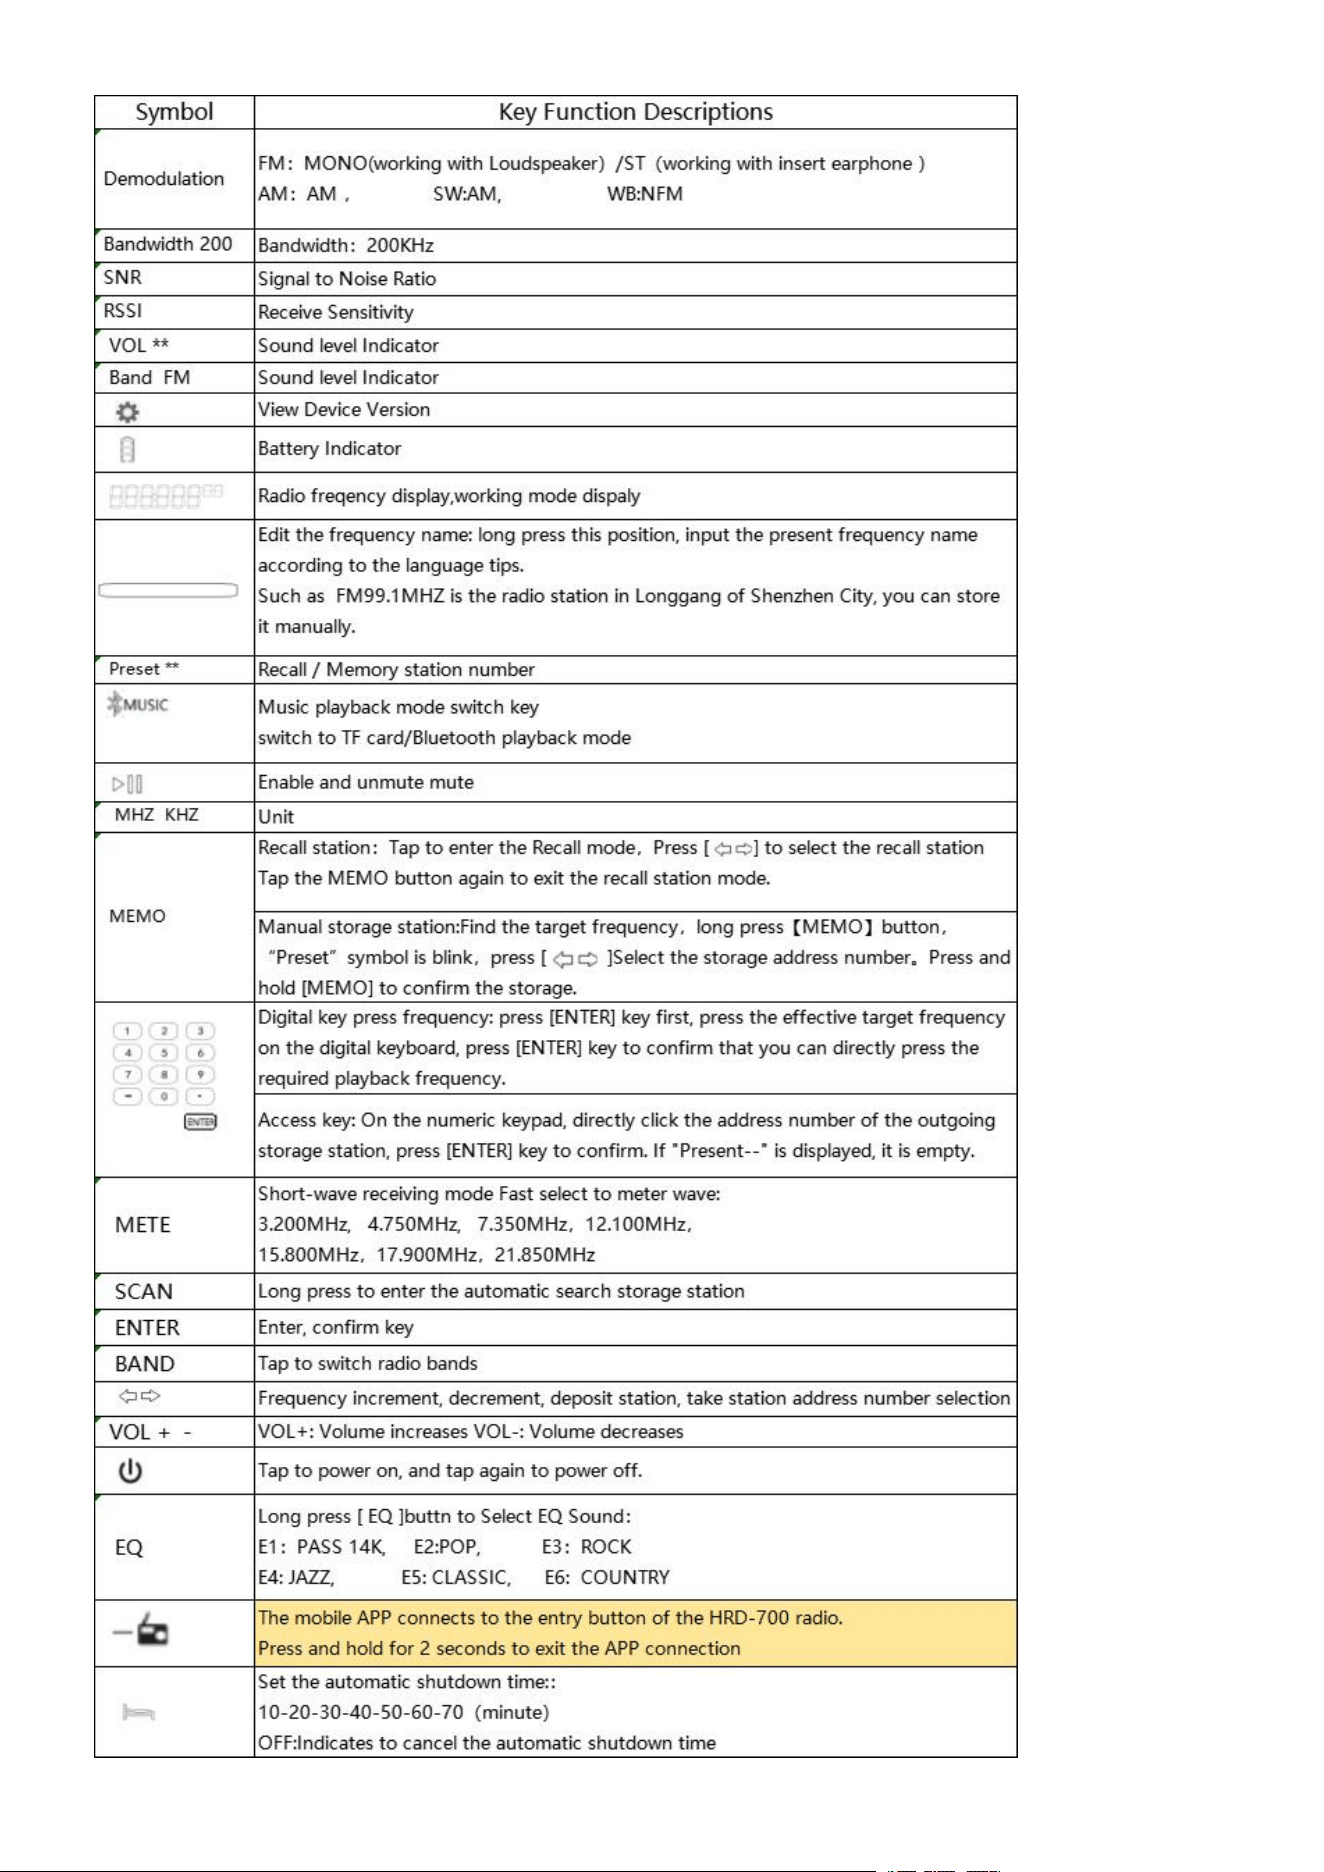
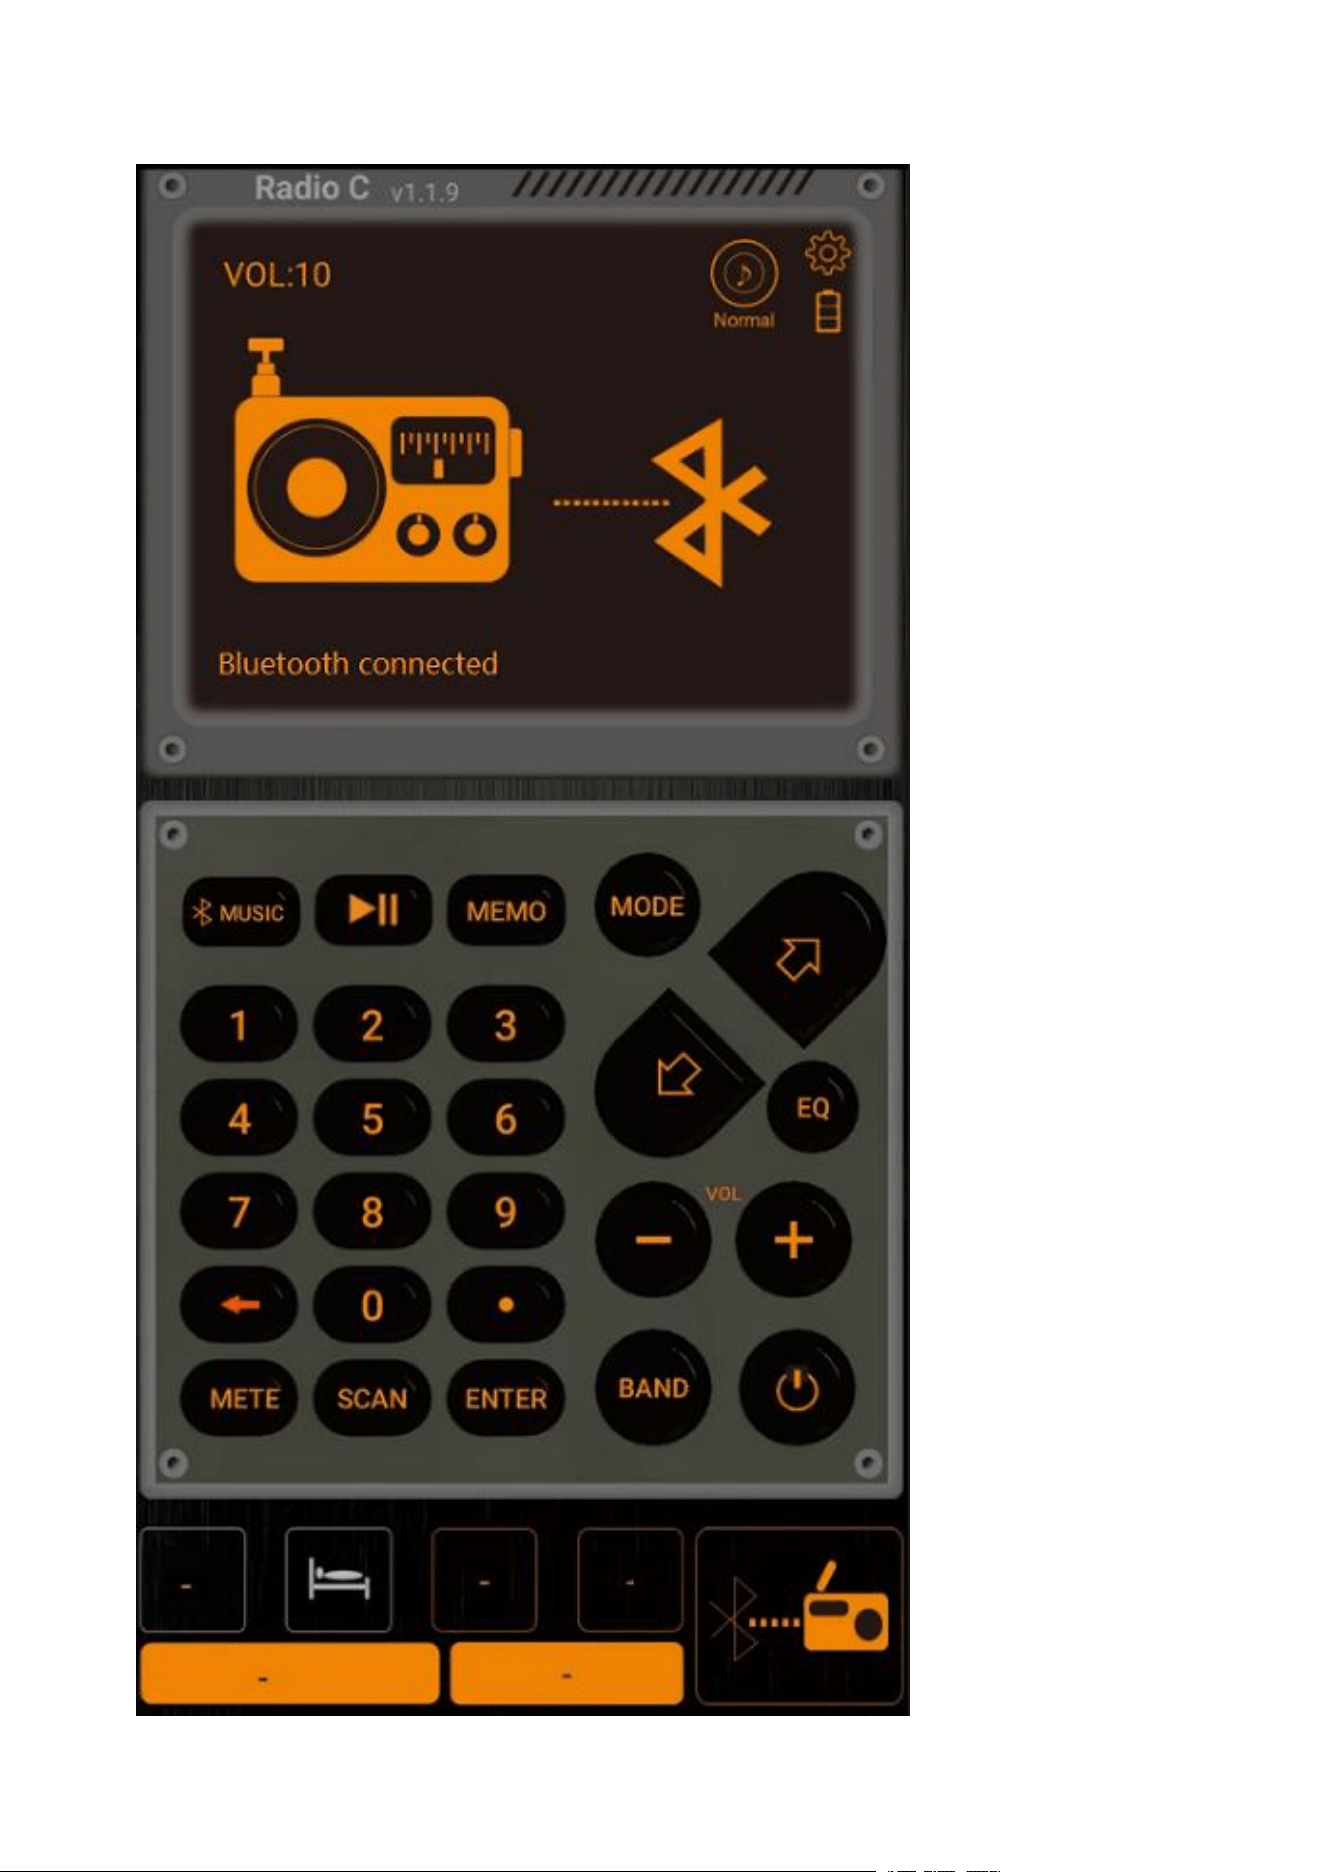
14.5: BT Working Mode Key Function Introduction in the APP
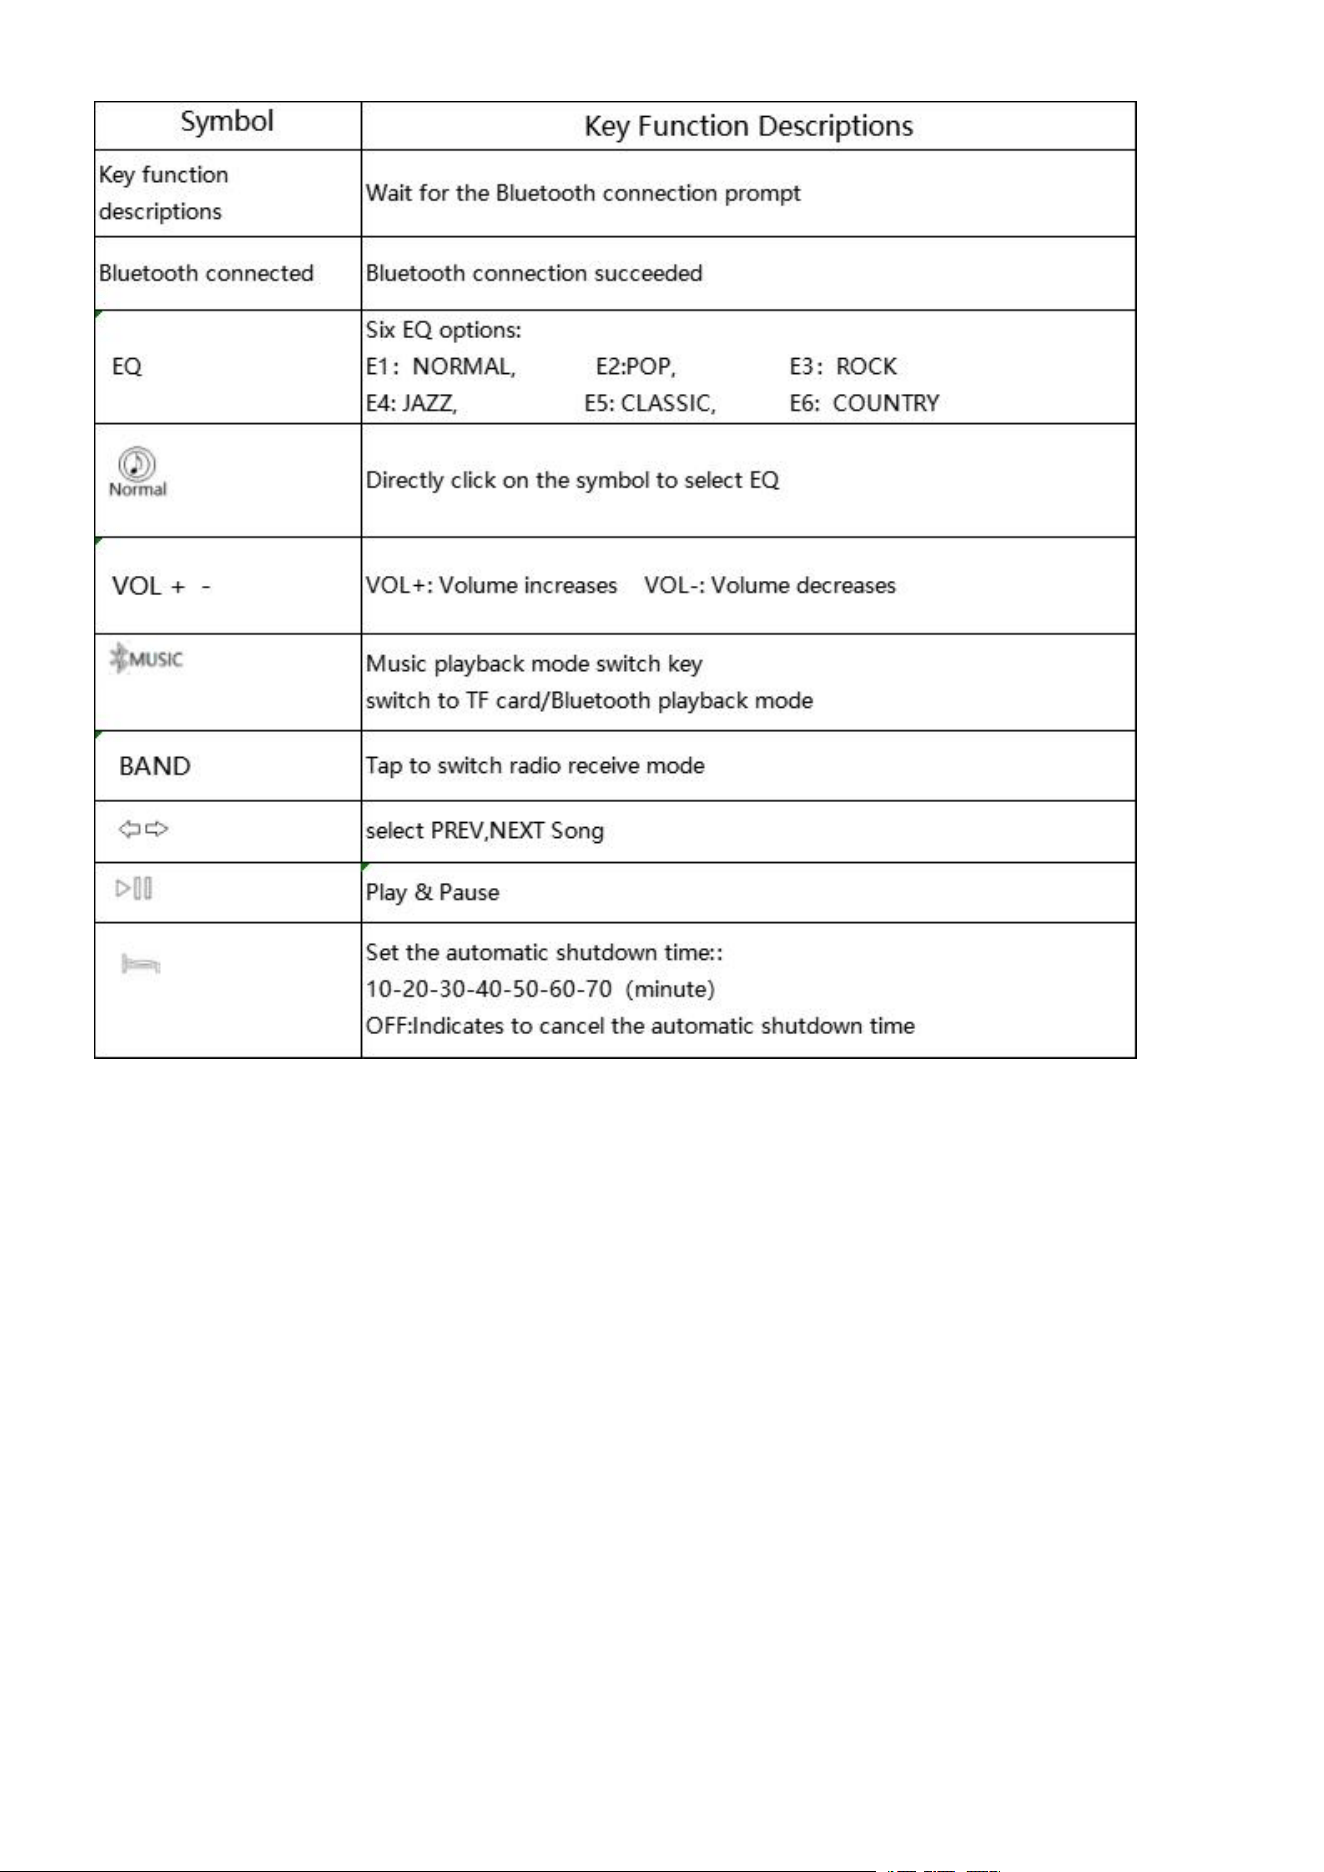
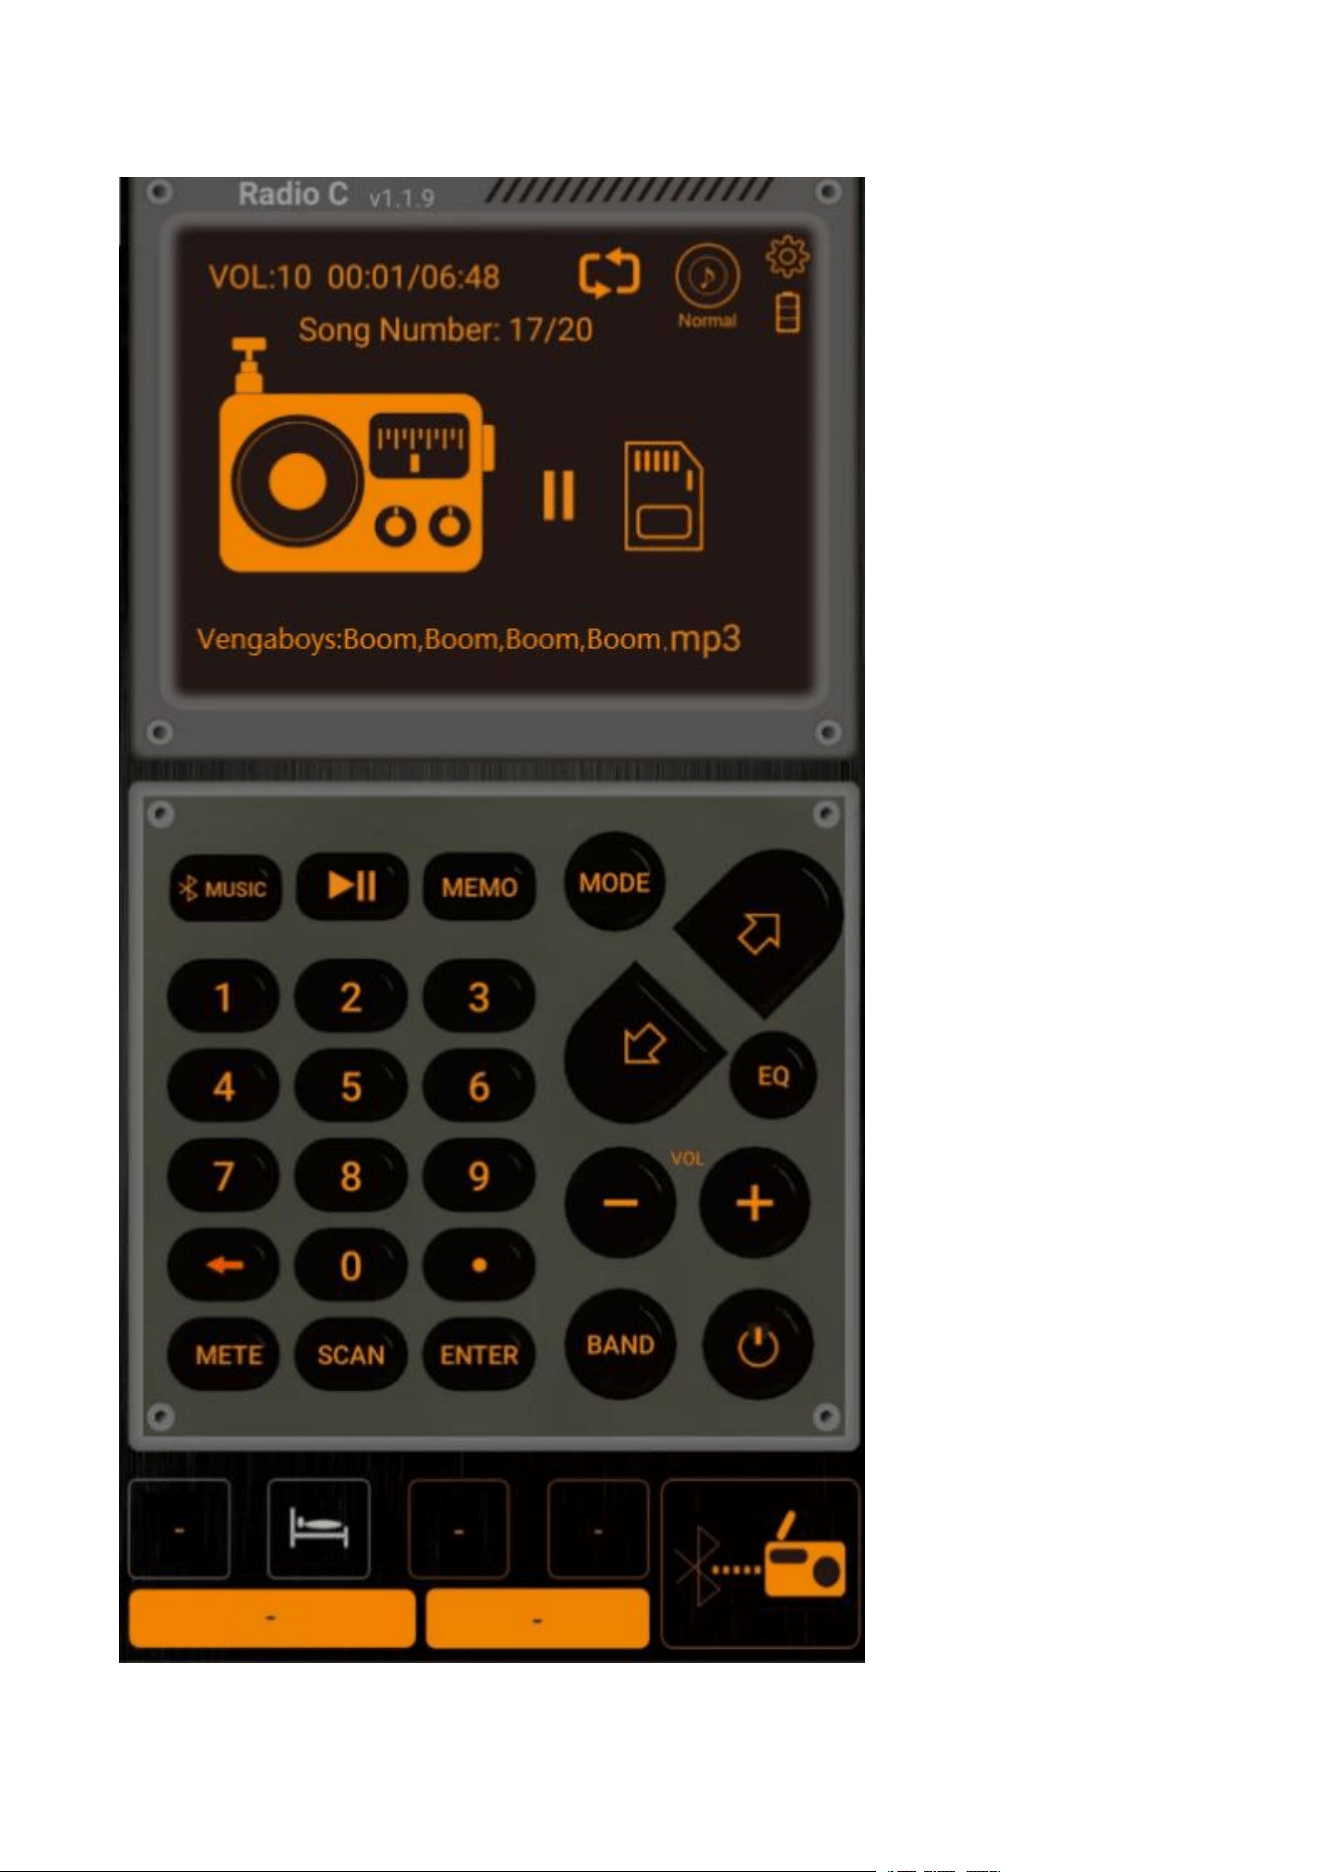
14.6: BT Working Mode Key Function Introduction in the APP
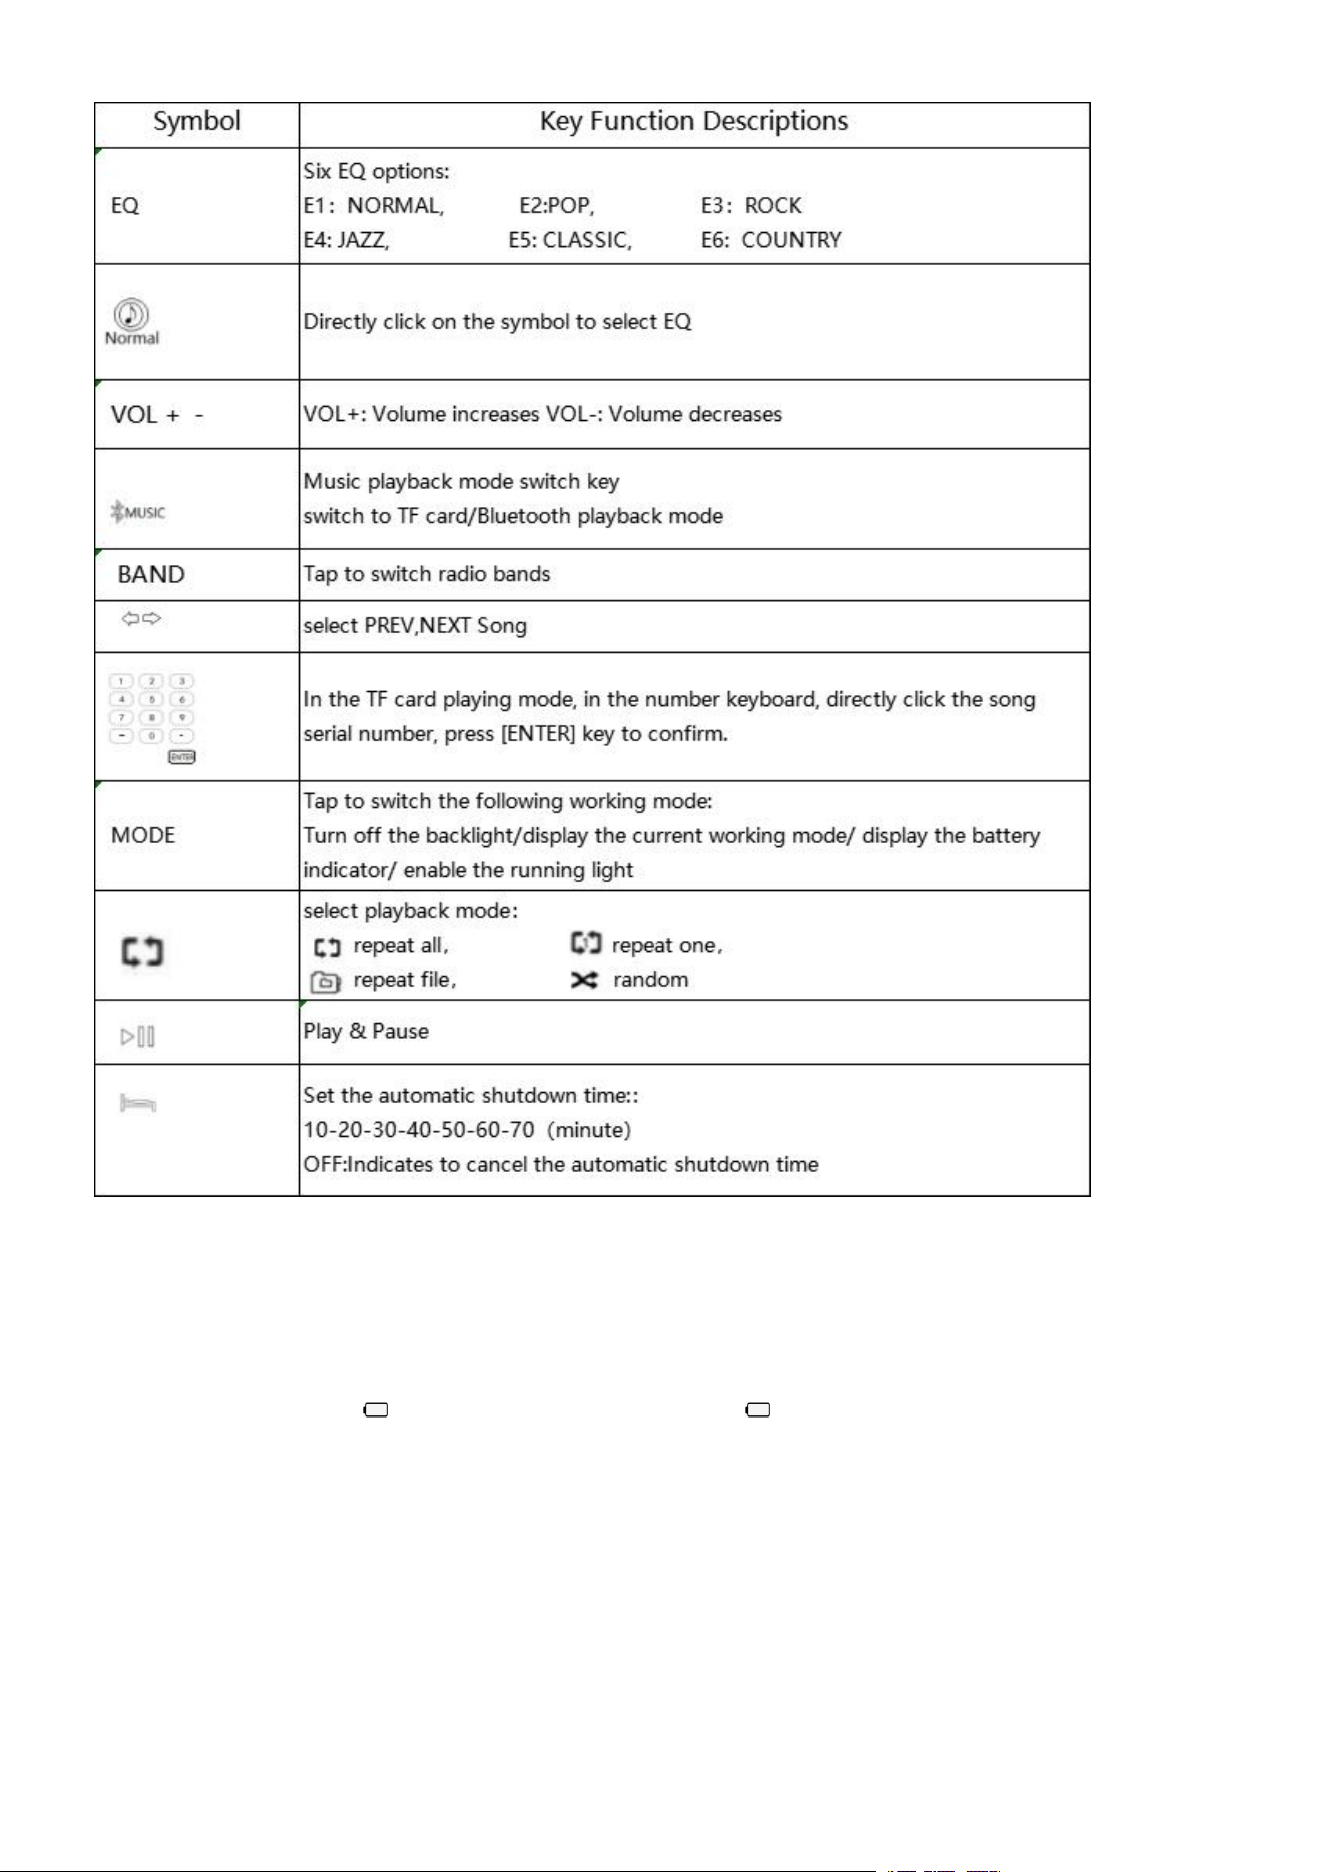
15. Matters needing attention
Please comply with the following safety tips to use this product, ensuring safe and reliable use.
♦ Read and know all safety instructions and use information.
♦ When the battery symbol “ ” appears or the frame of the symbol “ ” flashes, it means low battery level. Please charge
the battery timely to ensure normal use.
♦
Please use the charging device with input voltage of DC5V/1A-DC3A to charge the battery, or the battery or the device will be
probably damaged.
♦ If the radio is not in use for a long time, please charge it once a month.
♦ Keep the product away from rainwater and damp. Do not drop or splash any liquid onto the product.
♦ Keep the product away from high-temperature heat source. Do not bake or blow the product at high temperature.
♦ Avoid direct sunlight for a long time.

FCC Statement:
This device complies with part 15 of the FCC Rules. Operation is subject to the following two conditions: (1) This device
may not cause harmful interference, and (2) this device must accept any interference received, including interference that
may cause undesired operation.
This equipment has been tested and found to comply with the limits for a Class B digital device, pursuant to part 15 of the
FCC Rules. These limits are designed to provide reasonable protection against harmful interference in a residential
installation. This
Equipment generates,uses and can radiate radio frequency energy and,if not installed and used in accordance with the
instructions,may cause harmful interference to radio communications.However,there is no guarantee that interference will
not occur in a Particular installation.If thise quipment does cause harmful interference to radio or television reception, which
can be determined by turning the equipment off and on, the user is encouraged to try to correct the interference by one or
more of the following measures:
—Reorient or relocate the receiving antenna.
—
Increase the separation between the equipment and receiver.
—
Connect the equipment into an outlet on a circuit different from that to which the receiver is connected.
—Consult the dealer or an experienced radio/TV technician for help.
Caution: Any changes or modifications not expressly approved by the party responsible for compliance could void the user's
authority to operate the equipment.
This equipment complies with FCC radiation exposure limits set forth for an uncontrolled environment. This transmitter
must not be co-located or operating in conjunction with any other antenna or transmitter.
REV1.0