USER MANUAL
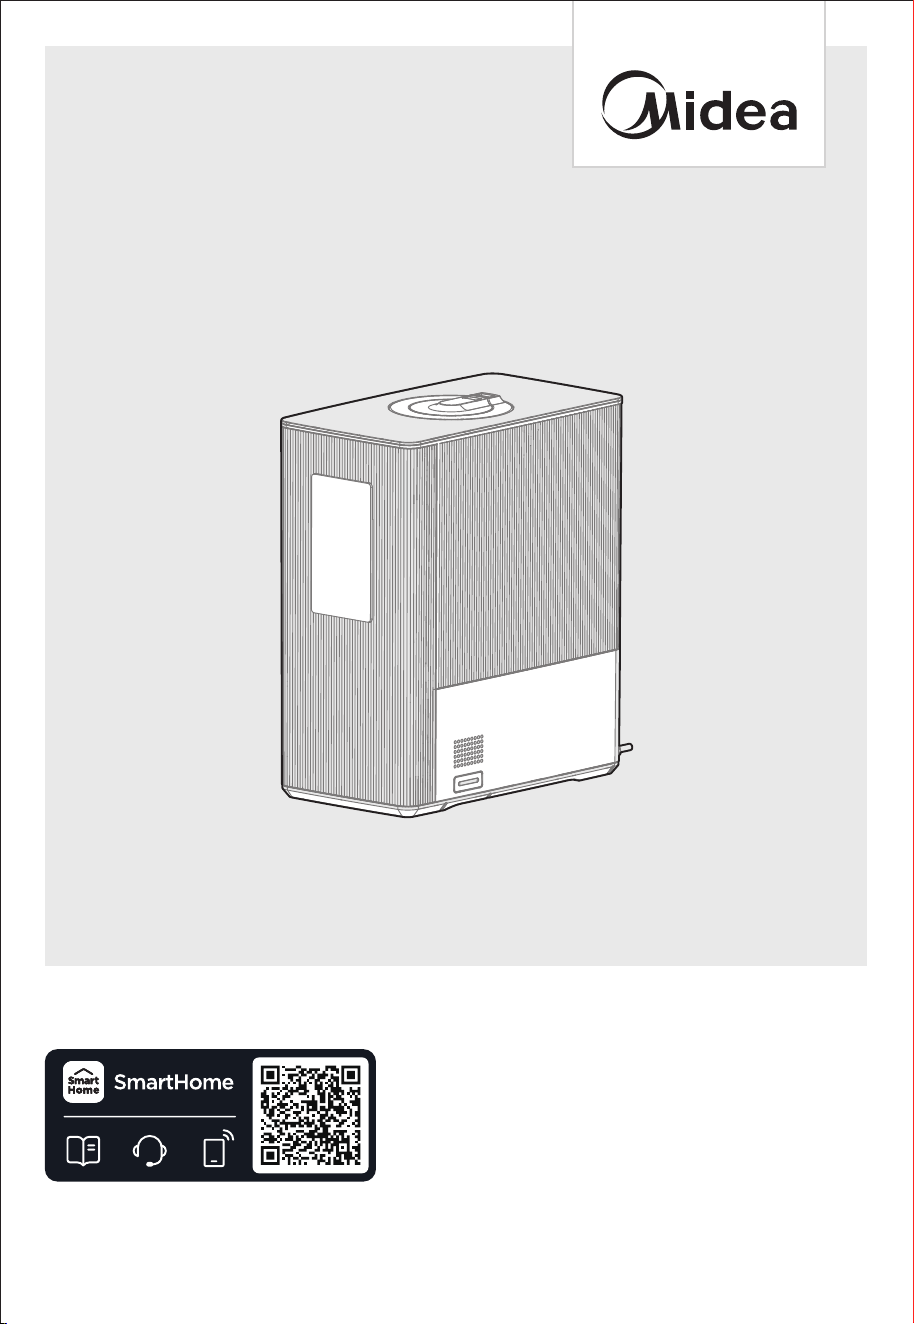
SMART 1.6 GALLON ULTRASONIC
WARM AND COOL MIST HUMIDIFIER
MSU16UW6BW
Warning notices: Before using this product, please read this manual carefully and keep it for future reference.
The design and specifications are subject to change without prior notice for product improvement.
Consult with your dealer or manufacturer for details.
The images in the manual are for illustration purposes only and may not be an exact representation of the
product.

THANK YOU LETTER
Thank you for choosing Midea! Before using your new Midea product, please read
this manual thoroughly to ensure that you know how to operate the features and
functions that your new appliance offers in a safe way.
01
CONTENTS
02
SAFETY INSTRUCTIONS
SPECIFICATIONS
PRODUCT OVERVIEW
OPERATING INSTRUCTIONS
APP SETUP AND OPERATION
CLEANING AND MAINTENANCE
TROUBLESHOOTING
TRADEMARKS, COPYRIGHTS, AND LEGAL STATEMENT
DATA PROTECTION NOTICE
05
06
07
1 7
1 7
1 YEAR LIMITED WARRANTY
1 8
1 6
1 2
1 3
02
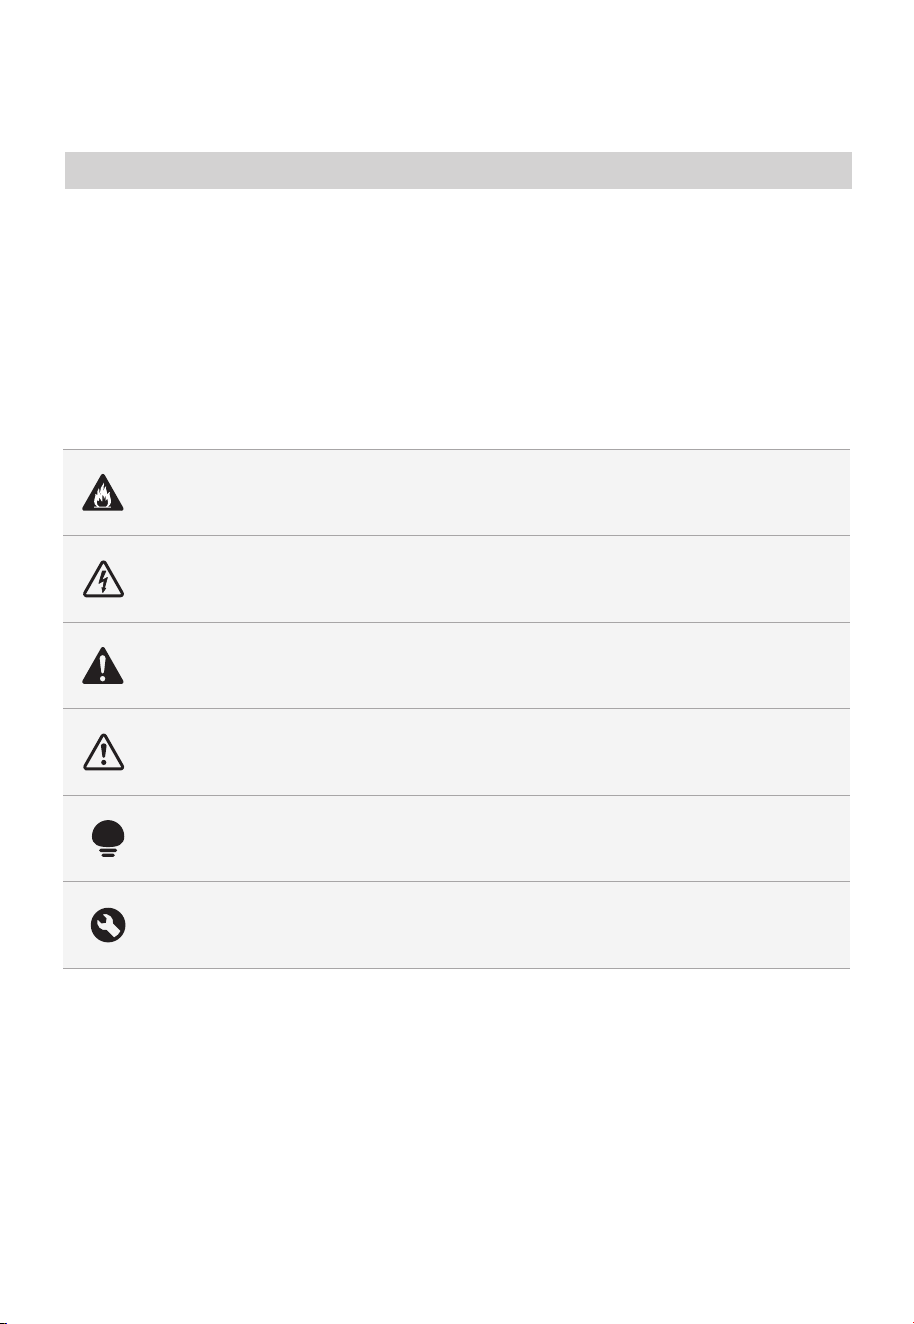
Danger
This symbol indicates that there are dangers to the life and health of
persons due to extremely flammable gas.
Warning of electrical voltage
This symbol indicates that there is a danger to life and health of
persons due to voltage.
Warning
This symbol indicates a hazard with a medium level of risk which, if
not avoided, may result in death or serious injury.
Caution
This symbol indicates a hazard with a low degree of risk which, if
not avoided, may result in minor or moderate injury.
Attention
This symbol indicates important information (e.g. damage to
property), but not danger.
Observe instructions
This symbol indicates that only a service technician should operate and
maintain this appliance in accordance with the operating instructions.
R
the unit, and keep them in the immediate vicinity of the installation site or unit for later use.
ead these operating instructions carefully and attentively befor
e using or commissioning
Intended Use
Explanation of Symbols
SAFETY INSTRUCTIONS
The following safety guidelines are intended to prevent unforeseen risks or damage
from unsafe or incorrect operation of the appliance. Check the packaging and appliance
on arrival to make sure everything is intact and included. If the product is damaged,
please contact the retailer or dealer. For safe use of this appliance, no modifications or
alterations to the appliance are allowed. Unintended use may cause hazards and result
in the loss of warranty.

CAUTION
• Always place the unit on a smooth, flat, lint-free, non-metallic, waterproof and
level surface. Keep it away from direct sunlight.
• Always place the unit 24 inches (60 cm) above the floor and 12 inches (30 cm)
away from the wall, other appliances, or wooden furniture.
• Do not place the unit on a carpet, a towel or wood surface that could block the
vent and may damage the unit.
• To avoid electric shock, do not use wet hands to plug and unplug the unit.
• Do not start the unit when the water tank is empty.
• Do not add any additives into the water tank that are not produced or
recommended by Midea.
• Do not put anything except water into the water tank.
• Do not add water through the mist outlet.
• While the humidifier is operating, do not touch the water inside the unit or
any parts submerged in water.
• Do not cover or block the mist outlet; keep the mist outlet clear at all times.
• Do not replace the power cord without authorization from an authorized
representative.
• Always ensure proper contact between the power cord and outlet.
• Never use this appliance on the same circuit as other appliances.
• Do not place the appliance near a water source.
• Do not disassemble, modify, or repair internal parts without authorization
from a dealer or manufacturer representative.
• Do not climb or sit on the appliance.
• Do not store the appliance near or around flammable items, explosive items,
or heat sources.
• Do not directly flush the humidifier with water.
• Always use the power button to turn off the humidifier before unplugging
the power cord.
• Always use filtered or distilled water. Do not use hard water.
• Please do not use a damaged or worn power cord. Do not replace the
power cord without authorization. If the power cord is damaged, it must be
replaced by the manufacturer, its service department, or a professional from
similar department to avoid danger.
• Power off and unplug the humidifier during thunderstorms.
• During an abnormal phenomenon (like a burnt smell), power off the
humidifier and unplug the power cord.
03
WARNING
READ AND SAVE THESE
INSTRUCTIONS
•
During an abnormal phenomenon (like a burnt smell), power off the
humidifier and unplug the power cord.
After a long period of not using the appliance, clean the water tank according
to the instructions in the Cleaning and Maintenance section before use.
•

04
• To avoid bacterial growth, change the water in the water tank and base
regularly.
• Always unplug the power cord before moving the appliance.
• If the appliance is tilted when filled with water, be sure to unplug the power
cord immediately and send it for inspection.
• The suitable ambient temperature for use of this product: 41°F~104°F, relative
•
humidity: <80% RH (Please use pure water with temperature less than
104°F). A tolerance of 10%RH is applied to the accuracy of the inner
humidity sensor. Each sensor has its own variation in accuracy. Therefore, the
measurement results of different qualified sensors will be different.
Differences in measurement locations can also cause measurement
differences.
Note: During first use, mist may disperse from the bottom of the water tank
for about 20 seconds. This is normal.
• Do not route the power cord under carpeting, furniture, or appliances.
• Do not cover the power cord with throw rugs, runners or similar coverings.
• Do not route cord under furniture or appliances.
• Arrange the power cord away from high traffic areas and where it will not
be tripped over.
• This equipment has been tested and found to comply with the limits for a
Consumer ISM equipment, pursuant to Part 18 of the FCC Rules. These limits
are designed to provide reasonable protection against harmful interference
in a residential installation. This equipment generates, uses, and can radiate
radio frequency energy and, if not installed and used in accordance with the
instructions, may cause harmful interference to radio communications.
However, there is no guarantee that interference will not occur in a particular
installation.
• Please note that any changes or modifications of this product not expressly
approved by the party responsible for compliance could void the user’s
authority to operate the equipment.
• If this equipment does cause harmful interference to radio or television
reception, which can be determined by turning the equipment off and on, the
This Wireless module complies with part 15 of the FCC rules.
Operation is subject to the following two conditions:
(1) This Wireless module may not cause harmful interference, and
(2) This Wireless module must accept any interference received, including
interference that may cause undesired operation.
user is encouraged to try to correct the interference by one or more of the
following measures:
- Reorient or relocate the receiving antenna.
- Increase the separation between the equipment and receiver.
- Connect the equipment into an outlet on a circuit different from that to
which the receiver is connected.
- Consult the dealer or an experienced radio/TV technician for help.
FCC STATEMENT
•

This device complies with Part 18 of the FCC Rules.
Midea America Corporation
Parisippany, NJ 07054
TEL: 1-866-646-4332
•
This equipment complies with FCC radiation exposure limits set forth for an
uncontrolled environment.This equipment should be installed and operated
with aminimum distance of 20cm between the radiator and any part of your
body.
•
05
SPECIFICATIONS
MSU16UW6BWModel
Rated Frequency 60 Hz
Rated Power 200 W
Water Tank Capacity 1.6 gallon
Rated Voltage 120 V~
Dimensions L 11.0" x W 6.1" x H 12.9"
NOTE
The specified design parameters apply to MSU16UW6BW. The measured parameters are
subject to the product. The humidification amount will vary, depending on the
temperature and humidity in the room.
PRODUCT OVERVIEW
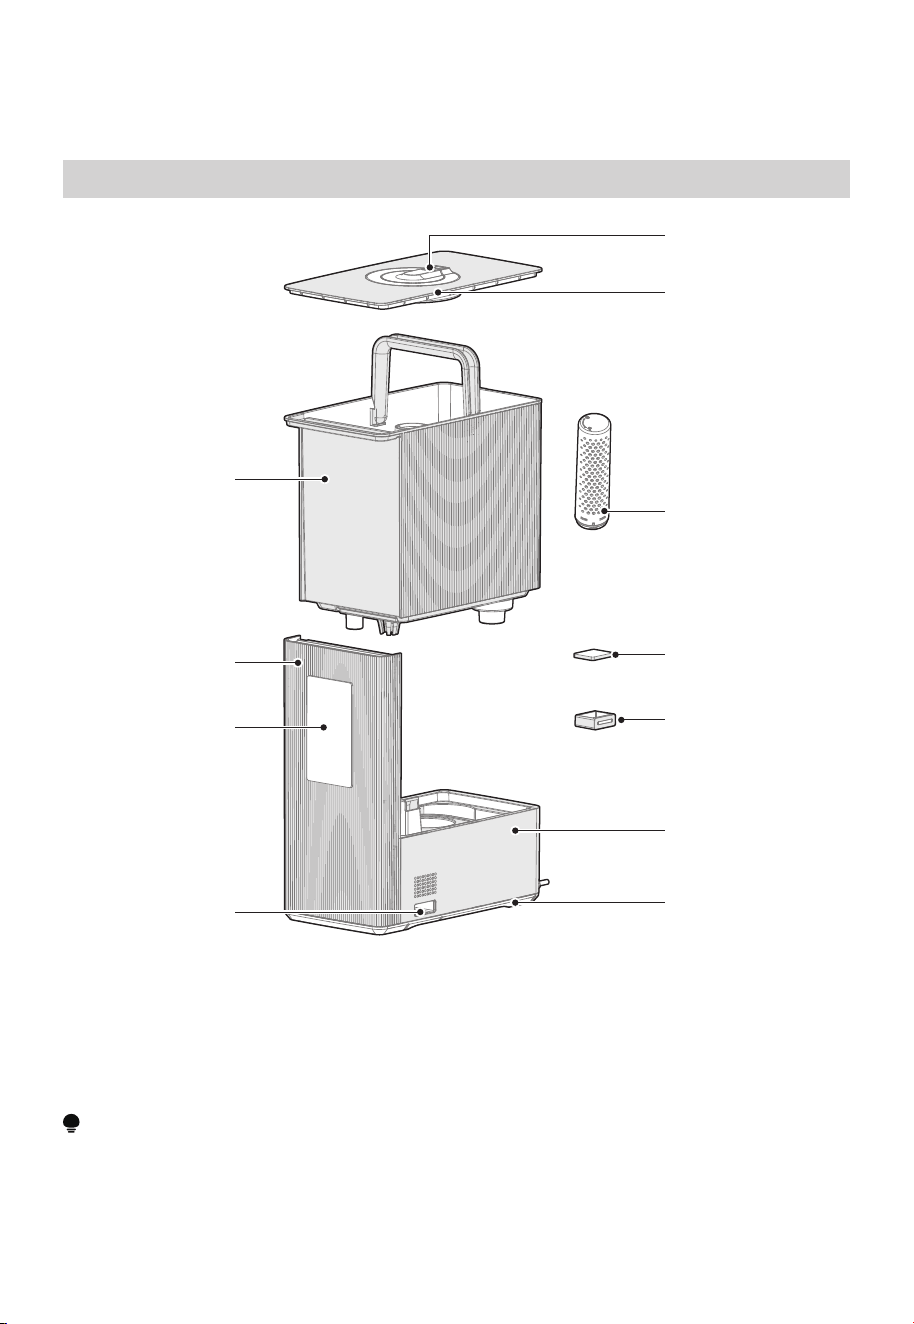
Component Name
Water Tank
Front Panel
Display & Control
Panel
Tank Lid
Bott
Aromatherapy
Box Slot
om Housing
Base
Mist Outlet
Aromatherapy
Sponge
Aromatherapy Box
NOTE
All images in this manual are for illustration purposes only.
The appearance of your actual product may vary.
Filter
06
OPERATING INSTRUCTIONS
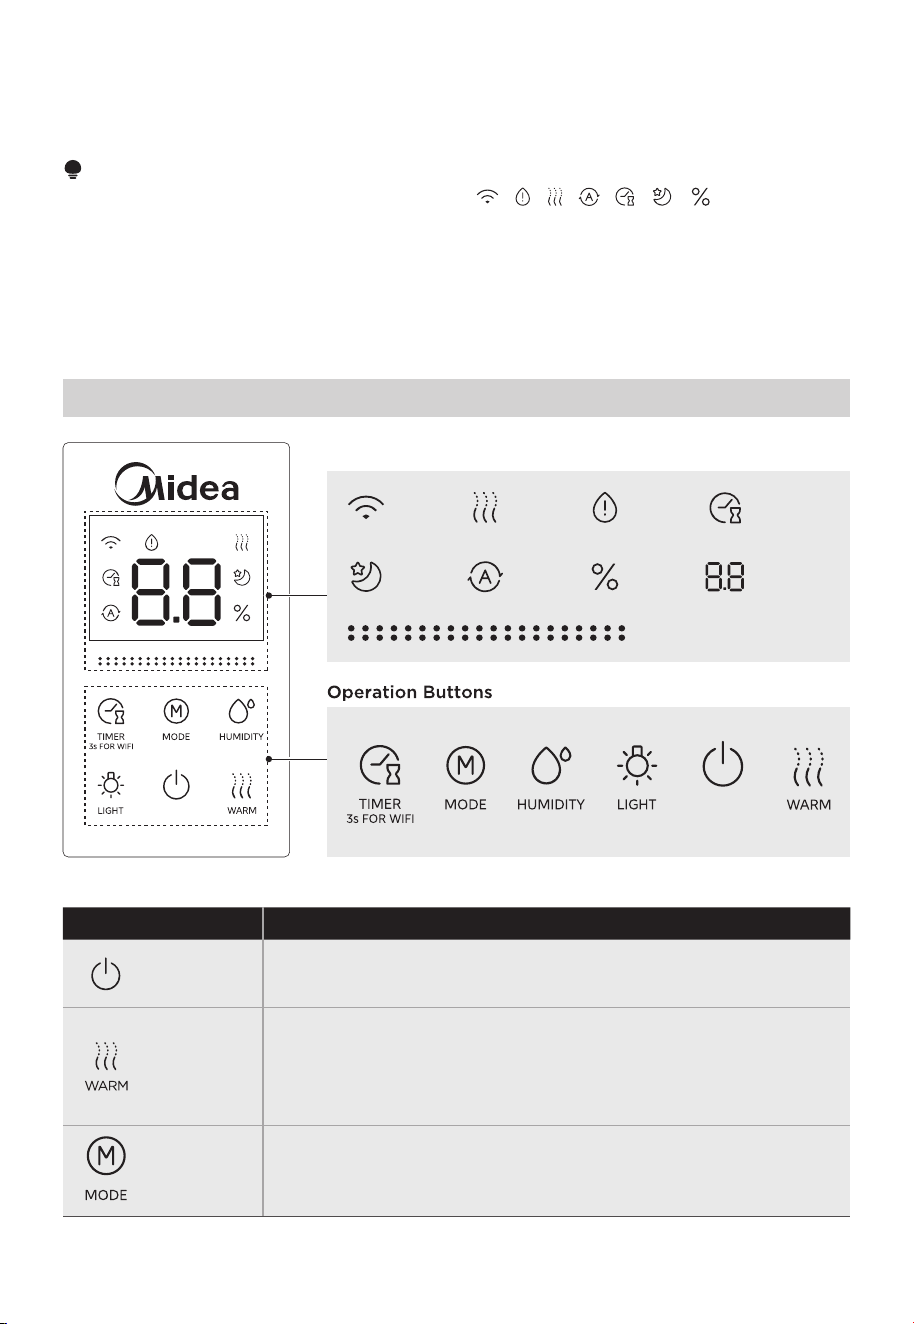
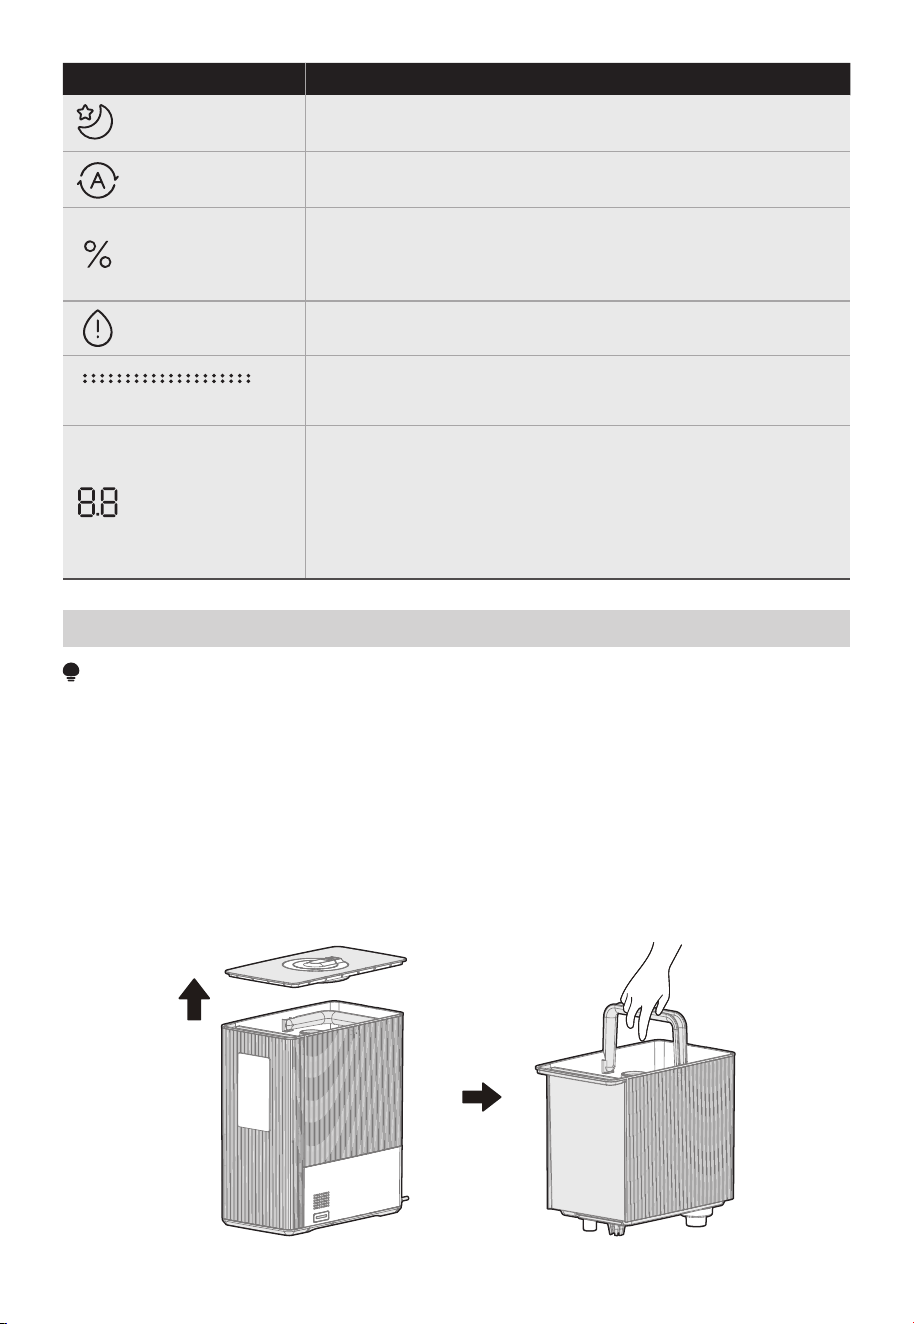
The current environmental humidity will display in % RH (Relative Humidity).
Control Panel
NOTE
•
•
• "--" will flash on the display screen if the water tank is not properly positioned on the base.
• "P1" indicates that water needs to be added to the water tank.
• Press this button to cycle through the available operating modes:
Manual Mode → Auto Mode → Sleep Mode → Manual Mode.
Mode
• Press this button to activate/deactivate Warm Mist mode.
• After powering the humidifier on, press and hold this button for
3 seconds to reset the machine’s working time.
• After cleaning, press and hold this button for 3 seconds to
reset the cleaning reminder.
Button Description
• Press this button to power the humidifier on or return it to
standby mode.
ON/STANDBY
Warm Mist
Indicator Light
Wireless
Network
Sleep
Mode
Warm Mist
Constant
Humidity
Water
Shortage
Humidity
Unit
Timer
Timer/
Humidity
Display
Mist Level
After the unit is plugged in, all display icons ( + + + + + + ) will light up
for approximately 1 second while the ambient light cycles through 7 different colors and
then defaults to yellow.
When the product is powered on, the display will stay illuminated for approximately 60
seconds before turning off. Press any button to turn on the display again.
07
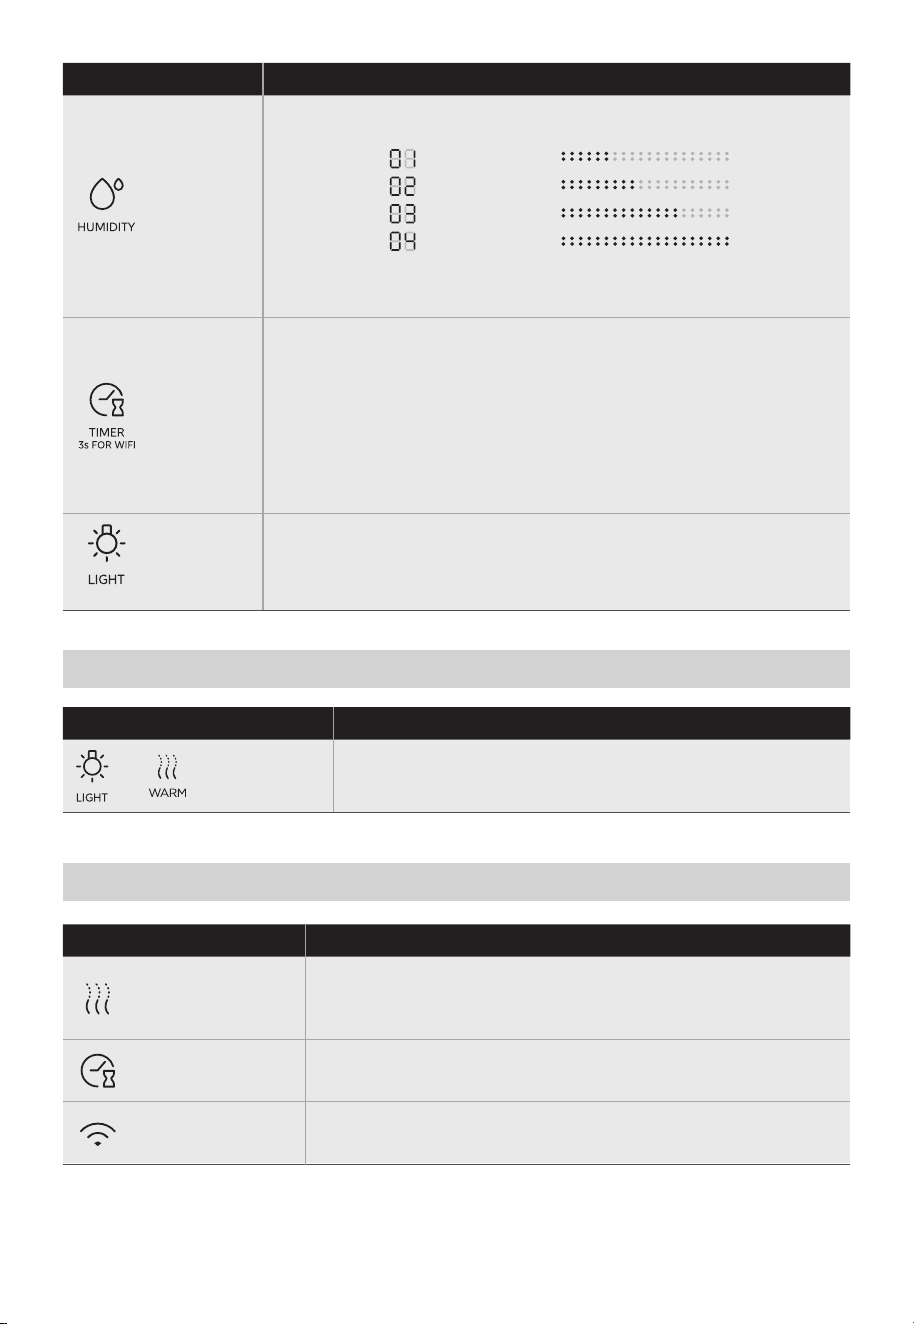
• Lights up when connected to the wireless network.
Wireless Network
Panel Display
Indicator Light Description
• Lights up when the warm mist function is active and
turns off when it is inactive.
• Flashes to indicate that the humidifier must be cleaned.
Warm Mist
• Lights up during timer setup and after a timer is
successfully set.
Timer
Description
Screen
On/Off
Combination Buttons
+
Combination Buttons
Button Description
• In manual mode, press this button to cycle through the
humidity levels:
• Auto and Sleep Mode don't support humidity level adjustments.
Level 01 ( “ ” , LED displays “ ” )
Level 02 ( “ ” , LED displays “ ” )
Level 03 ( “ ” , LED displays “ ” )
Level 04 ( “ ” , LED displays “ ” )
After reaching Level 04, press the Humidity button again to
return to Level 01.
Humidity
• Set Auto-Start Timer:
While in standby mode, press this button to set the auto-start
time in 1-hour increments: 0h (cancel)
→1h→
2h→…→12h→0h.
→1h→
2h→…→12h→0h.
• Set Auto-Shutdown Timer:
While the unit is powered on, press this button to set the auto-
stop time in 1-hour increments: 0h (cancel)
• App Pairing Mode:
When the unit is powered on, press and hold this button for 3
seconds to connect to Wi-Fi.
Timer
• Press and hold this combination of buttons for 3 seconds
to turn the screen on/off.
• Press this button to turn the light on/off.
• Press and hold this button to cycle through different ambient light
colors. The available colors are yellow, pink, red, orange, blue,
green, and cyan.
Ambient
Light
08
Filling the Water Tank
Method A
NOTE
• Always unplug the power cord before filling the water tank with water.
• Never fill the water tank over the maximum indicator line (1.6 gallons/6 liters).
• Do not add water through the mist outlet.
• Never attempt to lift the water tank by the tank cover.
• Do not add any additives (essential oils, perfume, drugs, etc.) to the water.
Only add fragrance oil to the Aromatherapy Box.
• Only use purified, filtered, or distilled water at a temperature below 104°F (40°C).
1
Remove the tank lid from the water tank. Use the handle to lift the water tank straight up.
Indicator Light Description
• When the target humidity is set via the app, the target value
blinks on the display.
• When adjusting the mist level, the selected level blinks on the
display.
• During schedule/timer setup, the set time blinks on the display.
• If an error occurs, the error code blinks on the display (see
the Troubleshooting section).
• Lights up when the humidity value is displayed
normally.
• Lights up when the target humidity is set via the
app while the device is powered on.
Humidity Unit
• Lights up when water shortage is detected and turns
off when sufficient water level is detected.
Water Shortage
• Displays the current humidity level setting.
Humidity Level
Timer/Humidity
Display
• Lights up in Constant Humidity mode and turns off in
other modes.
Constant Humidity
• Lights up in Sleep Mode and turns off in other modes.
Sleep Mode
09
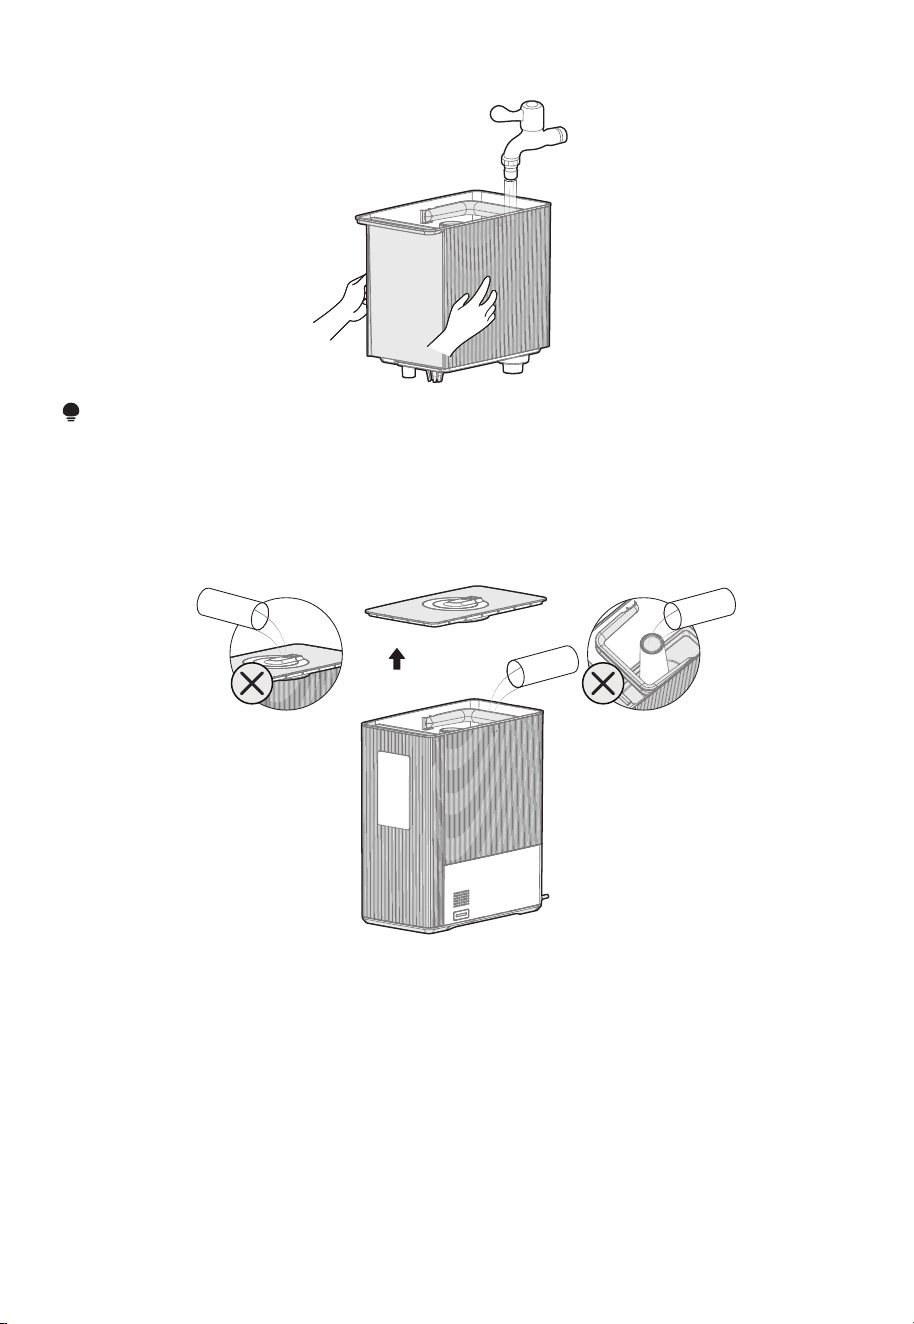
2
Pour cold or warm purified water into the water tank.
NOTE
• After filling the tank, place the water tank back in the base and cover it with the tank lid.
• Make sure the tank lid is fully seated onto the water tank.
Method B
Purified
water
Purified
water
Do not add water
through the mist
outlet.
Do not add water
through the mist
outlet.
Purified
water
• With the water tank placed on the base, remove the lid of the tank and pour purified or
distilled water into the tank.
• Ensure that you do not exceed the maximum capacity of 1.6 gallon/6L.
10
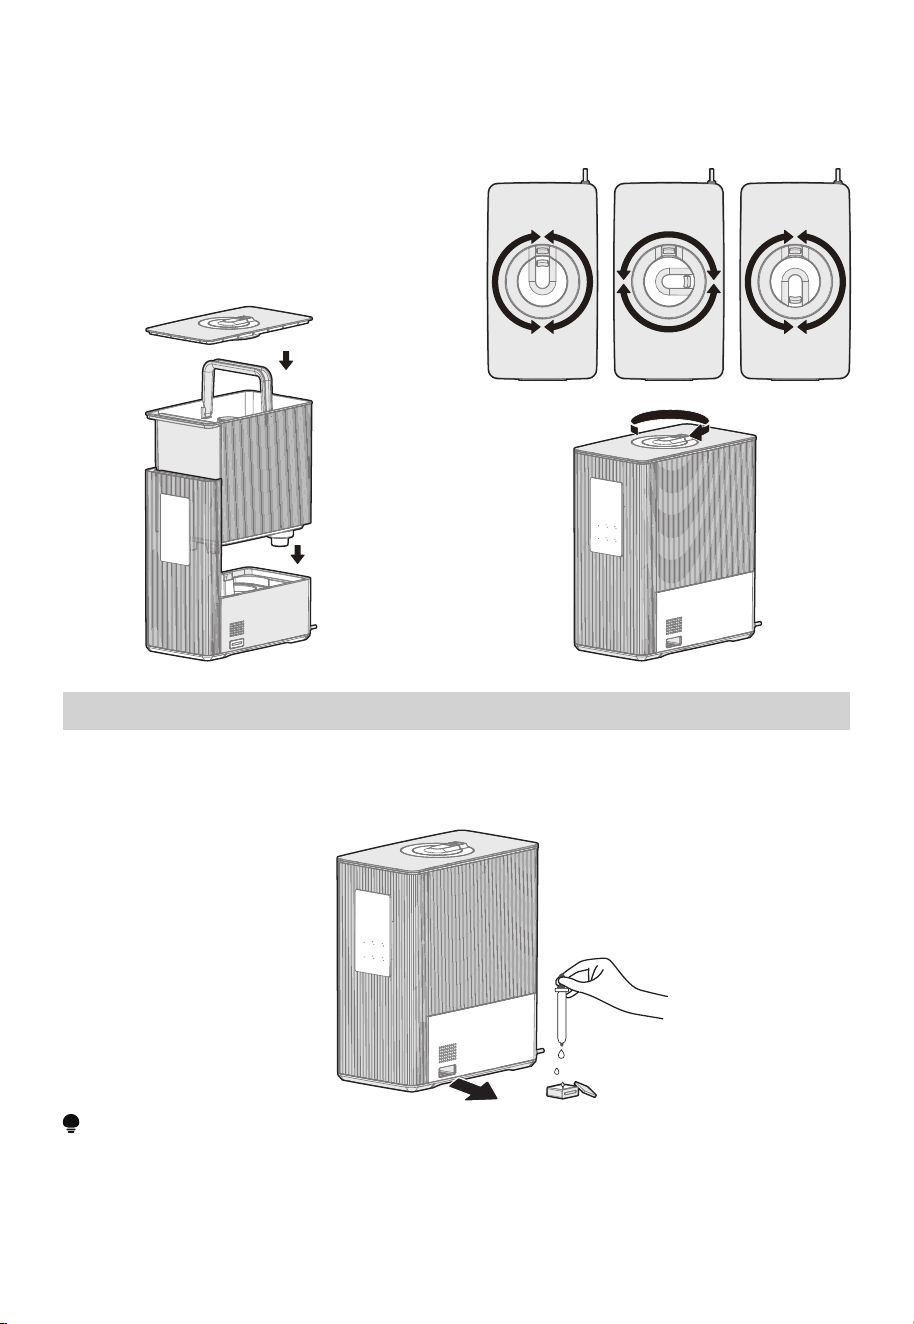
How to Use the Aromatherapy Box
1 Press in and release the aromatherapy box to remove it.
2 Add essential oil to the aromatherapy sponge inside the box.
3 Press the box back in until it clicks into place.
Water Tank Installation
• Place the base on a flat and level
surface to ensure stability. Lower
the water tank into the base,
aligning the tank slot with the
groove on the front panel, and push
it in until it clicks into place.
Mist Direction Adjustment
• The mist outlet rotates 360° and can be
adjusted according to your preference.
Make sure the tank
cover is properly aligned and sits
flush with the water tank when
installed correctly.
NOTE
When the humidifier runs out of water, it will stop working and "P1" will flash on the display.
Add water to the water tank to resume operation.
11
NOTE
• Make sure your devices are powered on and within the range of your mobile phone when you are connecting
your device to the network.
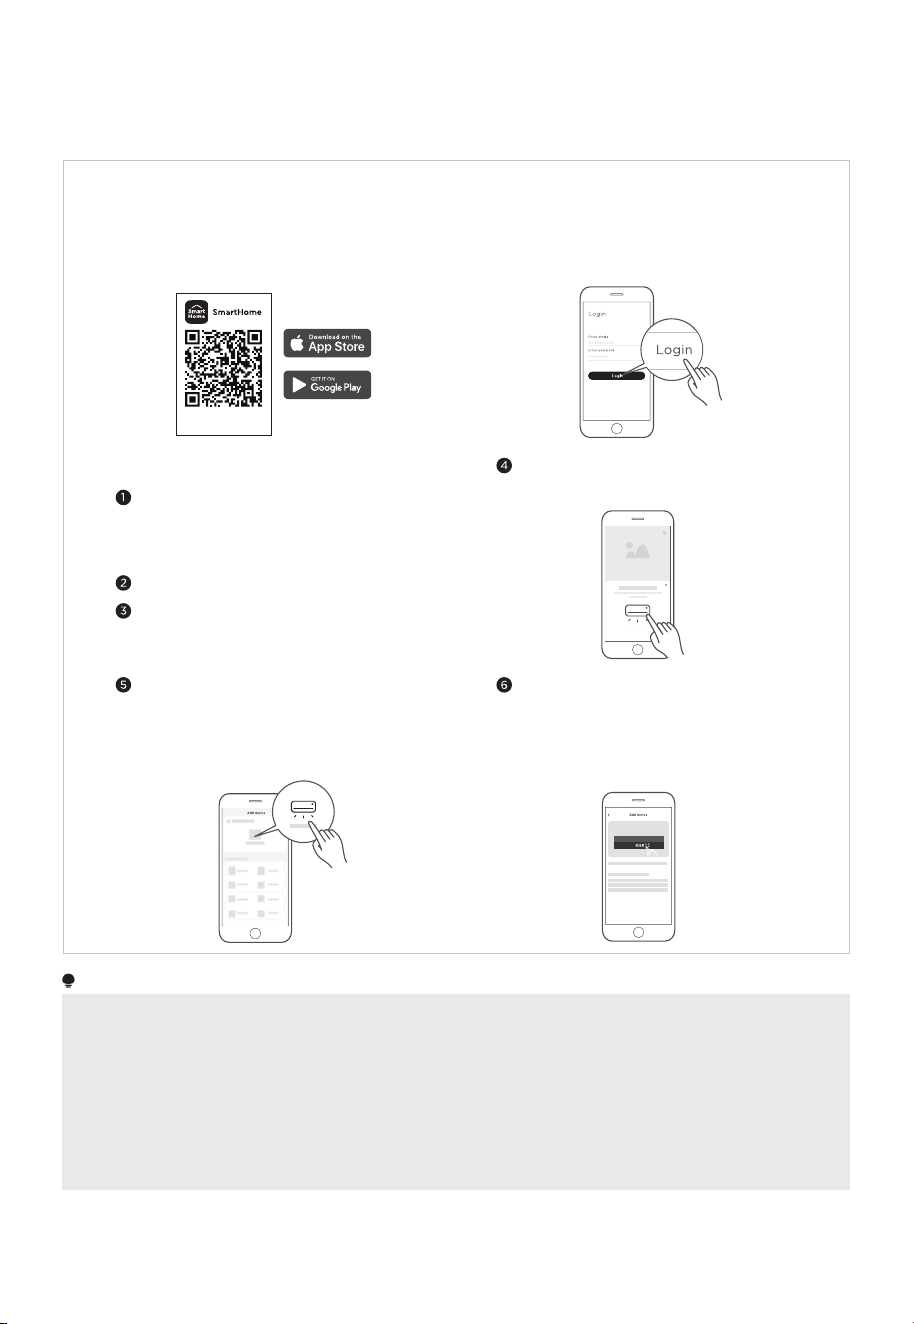
APP SETUP AND OPERATION
Register and log inDownload the SmartHome app
On an app market (Google Play Store, Apple
App Store), search for SmartHome* to find
the SmartHome app. Download and install it on
your phone. You can also download the app by
scanning the QR code below.
Open the SmartHome app, and create a new
account to start (you can also register through
a third-party account) to start. If you already
have an existing account, use the account to
log in.
Power on your device.
Open the SmartHome app on your phone.
Connect your device to SmartHome
Washing machine
Make sure your mobile phone is
connected to a wireless network. If it is
not, go to Settings and enable wireless
networks and Bluetooth.
If the message "Smart devices discovered
nearby" appears, select the device to add it.
If no message appears, select "+" on the
page and select your device in the list of
nearby devices available. If your device is
not listed, add your device manually
by the device category and device model.
Download the app
& activate product
• Connect your mobile phone to a wireless network that doesn't require authentication, such as your home
wireless network. The device cannot connect to any wireless network that requires authentication, such as
public wireless networks in hotels, restaurants, etc.
• Make sure your wireless router supports 2.4 GHz band and turn it on. If you are not sure whether the router
supports 2.4 GHz band, contact the router manufacturer.
• Turn off the WLAN+ (Android) or WLAN Assistant (iOS) function on your mobile phone when connecting your
device to the network.
• If your device needs to be reconnected to the wireless network, select "+" on the app Home page, then add your
device again by the device category and model according to the app instructions.
Connect your device to the wireless network
following the app's instructions. If the
connection fails, refer to the app's guidance
to proceed. If the device is working abnormally,
disconnect the wireless network by unplugging
the power cord.
12
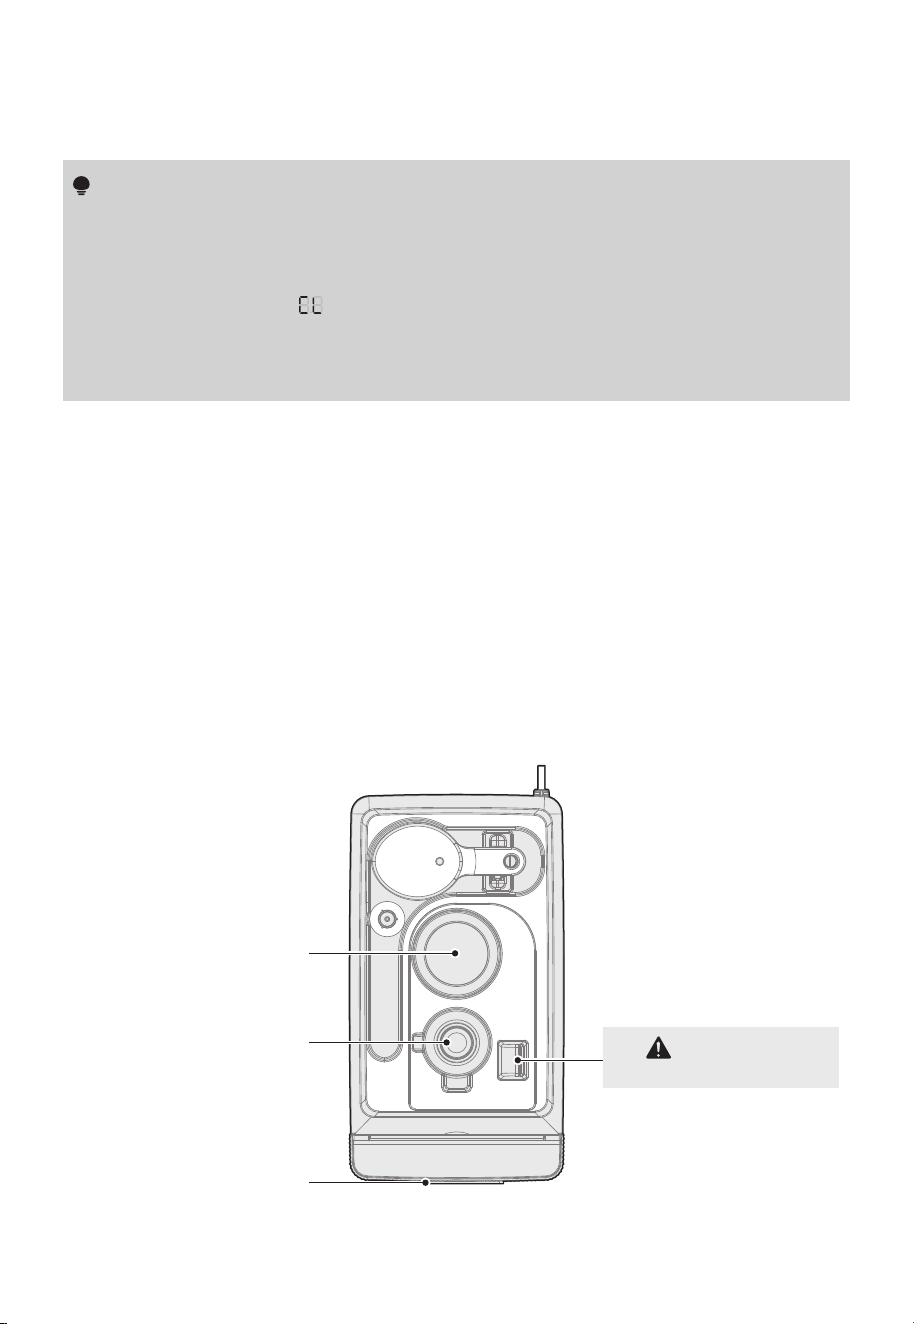
CLEANING AND MAINTENANCE
• Unplug the power cord before cleaning.
•
1. Remove the water tank assembly.
2. Mix ½ tablespoon of white vinegar with 1 cup of water to make to make a
cleaning solution.
3. Pour the cleaning solution onto the atomizing and heating plates.
4. Wait for 30 minutes.
5. Empty the cleaning solution out into a sink drain.
6. Pour 1 cup of water onto the atomizing and heating plates.
7. Empty the water out into a sink drain.
8. Reinstall the water tank assembly.
9. Press and hold the Warm Mist button for 3 seconds to reset the appliance.
• Clean the product regularly to maintain good performance.
Atomizing Piece
Heating Plate
Heating Plate Cover
• After 14 days (336 hrs) of cumulative operation, the humidifier will display a cleaning
reminder and stop functioning. No features can be activated during this time. The
product enters a 60-second self-check before the cleaning reminder appears.
• Cleaning Reminder Indicators
(1) The display shows " " and blinks. The Warm Mist indicator light blinks as well.
(2) All buttons are disabled except for the hot mist button. Press and hold the
Warm Mist button for 3 seconds to reset the humidifier's cleaning reminder.
• After resetting the cleaning reminder, the machine resumes normal functionality.
Do not pour water here
WARNING
Cleaning and Reminder Instructions
Scale and debris must be cleaned from the heating and atomizing plates every 14
days of cumulative operation (336 hours total).
13
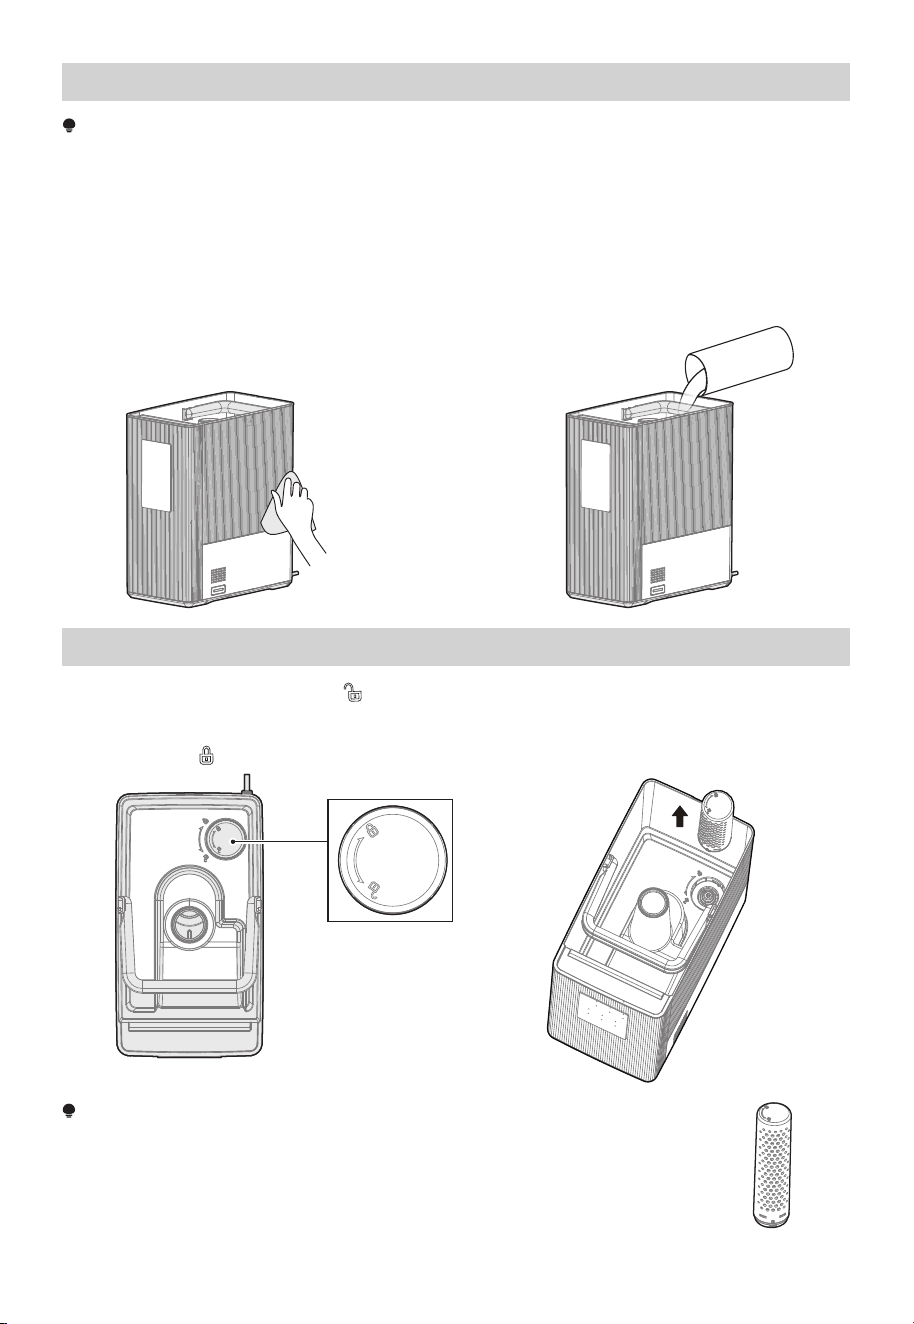
Cleaning the Water Tank
Water Tank Interior
NOTE
Unplug the power cord before cleaning. It is recommended to clean the scale and debris
from the water tank and base at least every 3 days.
Water Tank Exterior
Wipe the exterior with a soft damp cloth
and allow to dry before use.
Use a mild detergent and water solution on
a soft cloth to scrub the interior of the
tank. Rinse the tank and dry thoroughly
before use.
Detergent
Cleaning and replacement of filter element
1. Rotate the knob toward the “ ”(unlock) symbol to release the filter. Gently pull the
filter out and rinse it thoroughly with clean water.
2. Allow the filter to dry completely. Reinsert the filter into its slot, then rotate the knob
toward the “ ”(lock) symbol until the filter is securely in place.
NOTE
Clean the filter every 3-7 days and replace it promptly based on its when
needed, ideally every 2-3 months.
14
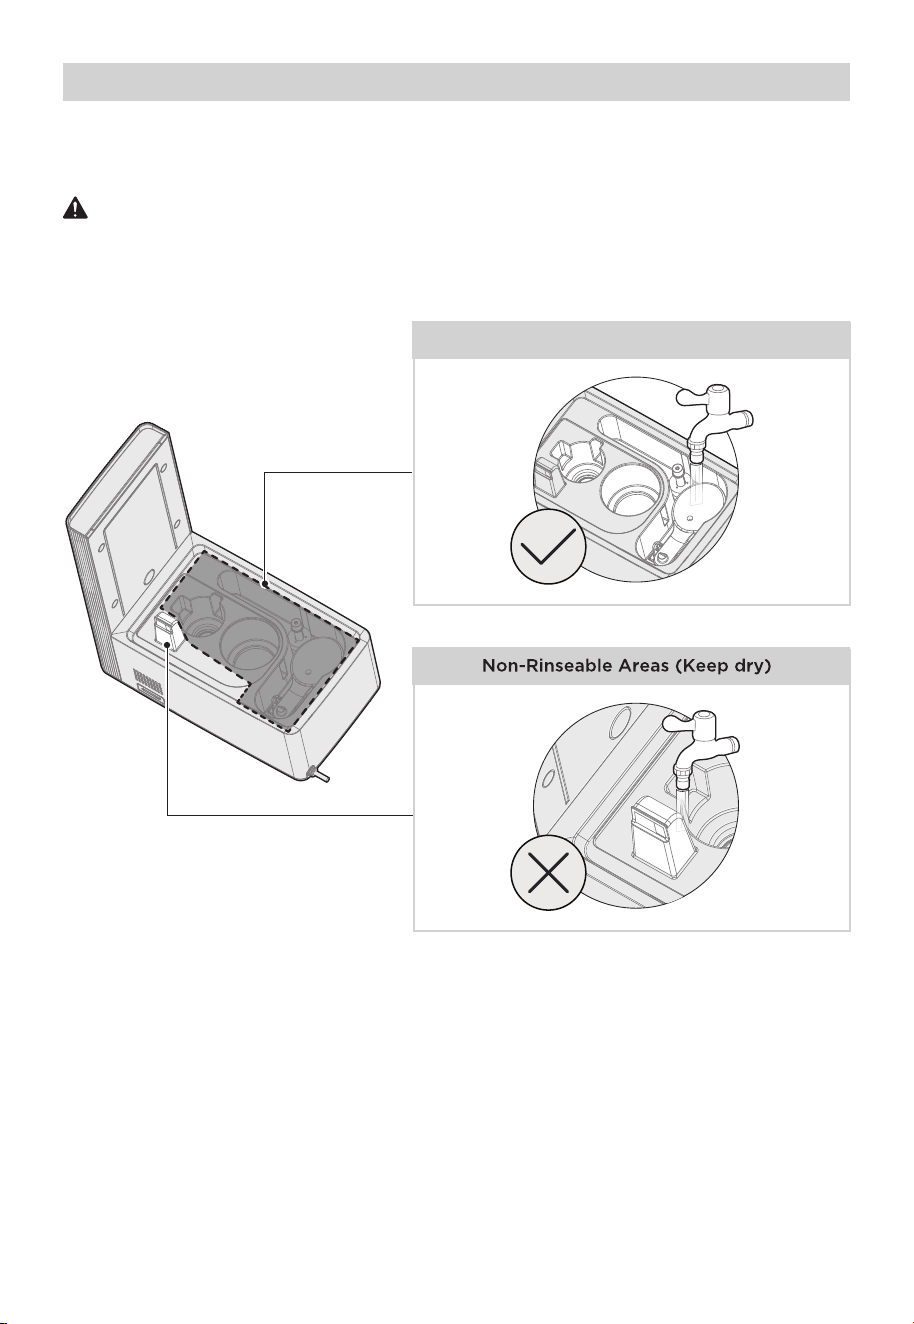
Cleaning the Atomizing and Heating Plates
WARNING
• Do not allow any water to enter the air vent during rinsing; water inside the unit may
cause electric shock.
• Air-dry all components completely before reassembly.
Rinseable Areas (Safe for Water Contact)
To clean the bottom housing, wash it with mild detergent and water. Rinse thoroughly,
ensuring that no water enters the air vent to prevent the risk of electric shock.
15
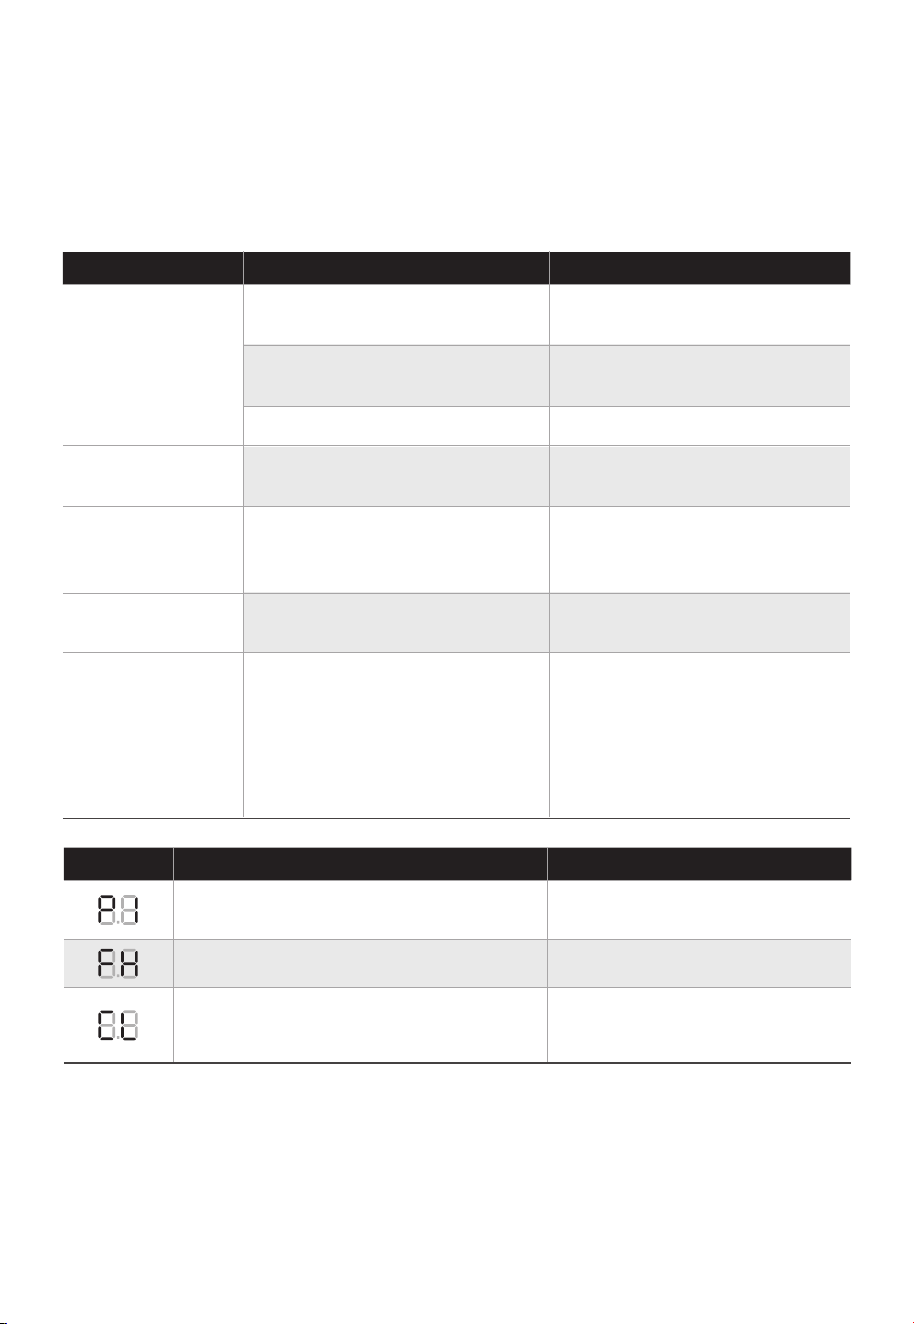
TROUBLESHOOTING
Use the following tables to troubleshoot any issues with your appliance. If none of the
following solutions resolve your issue, the product may be faulty and should be returned
to the manufacturer for repair.
Solution
Cause SolutionProblem
Check whether the plug is
properly inserted into the outlet.
• The plug may not be fully
inserted.
The humidifier
does not work.
• There is no water in the water
tank.
Add water to the tank.
• The water tank is not in place. Make sure the tank is in place.
Mist has a bad
odor.
• The water tank or base is not
clean.
Remove the water tank and
clean it
Humidifier is
emitting a white
dust/residue.
• Using tap water with a high
mineral content, aka “hard
water.”
Clean the water tank and the
base, and use only demineralized
or distilled water.
The water tank
shows a water
shortage, but is
filled with water;
the humidifier
does not work for
a long time.
• The appliance is excessively
tilted at an angle that causes
the water tank sensor to
report a low water level.
Make sure the unit is put on a
solid, flat surface and kept
steady.
There is an
abnormal noise.
•
The appliance is tilted, unstable,
or otherwise not in place.
Make sure that the unit is
placed on a solid, flat surface.
Solution
Possible Reason SolutionsFault Code
• Water shortage warning
Please add water to the water
tank.
• Communication fault
Please contact Midea customer
service.
• Clean reminder
After cleaning, reset the cleaning
reminder to turn off the 'CL'
reminder on the screen.
16

logo, word marks, trade name, trade dress and all versions thereof are
trademarks, copyrights and other intellectual property rights, and all goodwill derived
valuable assets of Midea Group and/or its affiliates (“Midea”), to which Midea owns
The
from using any part of an Midea trademark. Use of Midea trademark for commercial
purposes without the prior written consent of Midea may constitute trademark
infringement or unfair competition in violation of relevant laws.
This manual is created by Midea and Midea reserves all copyrights thereof. No entity or
individual may use, duplicate, modify, distribute this manual in whole or in part, or
bundle or sell with other products without the prior written consent of Midea.
All the described functions and instructions were up to date at the time of printing this
manual. However, the actual product may vary due to improvements in function and design.
TRADEMARKS, COPYRIGHTS,
AND LEGAL STATEMENT
DATA PROTECTION NOTICE
For the provision of the services agreed with the customer,
we agree to comply without restriction with all stipulations of applicable data protection
law, in line with agreed countries within which services to the customer will be delivered,
as well as, where applicable, the EU General Data Protection Regulation (GDPR).
Generally, our data processing is to fulfil our obligation under contract with you and for
product safety reasons, to safeguard your rights in connection with warranty and
product registration questions. In some cases, but only if appropriate data protection is
ensured, personal data might be transferred to recipients located outside of the
European Economic Area.
Further information can be provided upon request by contacting our Data Protection
Officer via [email protected]. To exercise your rights, such as your right to keep
your personal data from being used for marketing purposes, please contact us via
17
1 YEAR LIMITED WARRANTY
Midea America Crop. makes no further warranties or representations, express or
implied except those contained herein. No representative or dealer is authorized to
assume any other liability regarding the
product
. The duration of the implied warranty
granted under State law, including warranties of merchantability and fitness for particular
purpose are limited in duration should the duration of the express warranty grant it
hereunder. Midea America Crop. shall in no event be liable for direct, indirect,
special or consequential damages.
on your product).
Midea America Crop. warrants as limited herein to the original purchaser of retail that
each new product, shall be free of defects in material and workmanship for a period of
one (1) year from the date of delivery. This one (1) year warranty is limited to the
Motor and Electric Element. The date of delivery establishes the warranty period,
should service be required.
In the event of malfunctions or failure of your product, simply deliver or send the
product, postage prepaid along with PROOF OF PURCHASE, within the warranty of
one(1) year, to Midea America Crop.. Midea America Crop. reserves the right to inspect
the claimed defective part or parts to determine if the defect or malfunction complaint is
covered by this warranty. Midea America Crop. shall, within sixty (60) days after receipt
of the product, at its option, repair and/or replace the defective part or parts free of
charge. This warranty shall only cover defects arising from normal usage. Midea America
Crop. assumes no responsability whatsoever if the product should fail during the
warranty period by reason of:
Midea America Corp.
300 Kimball Drive Parsippany, NJ 07054
TEL:1-866-646-4332
18