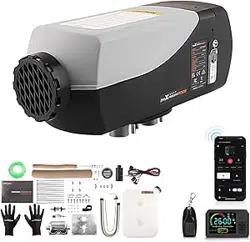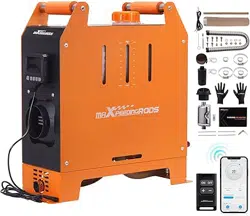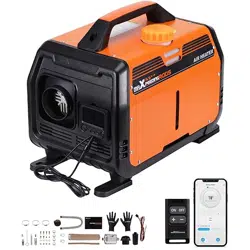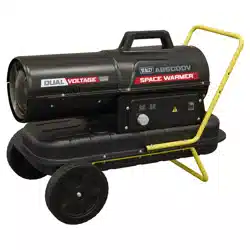
Danger!
Safety Information
•
ONLY use this product in accordance with these instructions and ALL local regulations and
guidelines related to the use of diesel fuel and heating equipment. Failure to do so may expose you
to legal liability and risk serious property damage and severe personal injury, possibly including
death.
•
DO NOT allow children or those unfamiliar with this product to use or install it. Do not use while
under the influence of alcohol, drugs, or any medication that negatively affects your judgment or
reflexes. Keep children and bystanders away during installation.
•
Keep your work site clean and well lit. Cluttered and dark work areas invite accidents.
•
Disconnect the vehicle battery connections before any installation, adjustment, repair, or mainte-
nance.
•
ALWAYS turn off the heater before adding any fuel.
•
ONLY use DIESEL fuel for the heater. The use of low-quality diesel or other type of fuel may result
in malfunctions or even involve risk of fire.
•
ALWAYS use personal protective equipment (PPE) suitable for your task. Always wear ANSI-ap-
proved eye and hand protection while using this product. Nonslip footwear is also highly recom-
mended. Other equipment, such as ear, head, and body protection, may also be necessary
depending on your work and other equipment.
•
Dress properly for the installation of the heater. DO NOT wear loose clothing or jewelry and keep
hair, clothing, gloves, hoses, and tools away from any moving parts.
•
The exhaust pipe must be routed to the outside of the vehicle or to an open outdoor area to prevent
the accumulation of harmful gas in a enclosed space.
•
NEVER operate the heater in a confined space without proper ventilation. This can result in the
buildup of harmful gases and pose a risk to human health. If you experience any symptoms such
as headaches, dizziness, or unconsciousness while operating the heater, immediately stop using
the heater and move to a well-ventilated area. If symptoms persist, seek medical attention prompt-
ly. It is important to take these symptoms seriously and prioritize your health and safety.
•
The heater and its components can become hot during operation. Avoid touching them to prevent
the risk of burns or injury. ALWAYS wait for components to cool down or use protective gear when
handling.
•
ALWAYS install this heater in a spacious compartment away from any combustible or flammable
materials. NEVER use the heater in hazardous locations such as fuel depots, carbon storage, and
timber warehouses.
•
If a fuel leak occurs, turn off the heater IMMEDIATELY and disconnect the fuel line. ONLY use a
trained and licensed technician to repair the leak.
•
Maintain this product. Check for misalignment, binding, wear, or other damage before use. If any
damage is detected, repair or replace the problematic components before further use. Only replace
components with identical parts.
•
*Cotton and sponge have a combustion point of 150°C, paper has a combustion point of 130°C,
fabric has a combustion point of 270°C, and diesel fuel has a combustion point of 220°C. The
temperature of the hot air outlet should not exceed 85°C, while the exhaust pipe outlet temperature
can exceed 270°C.
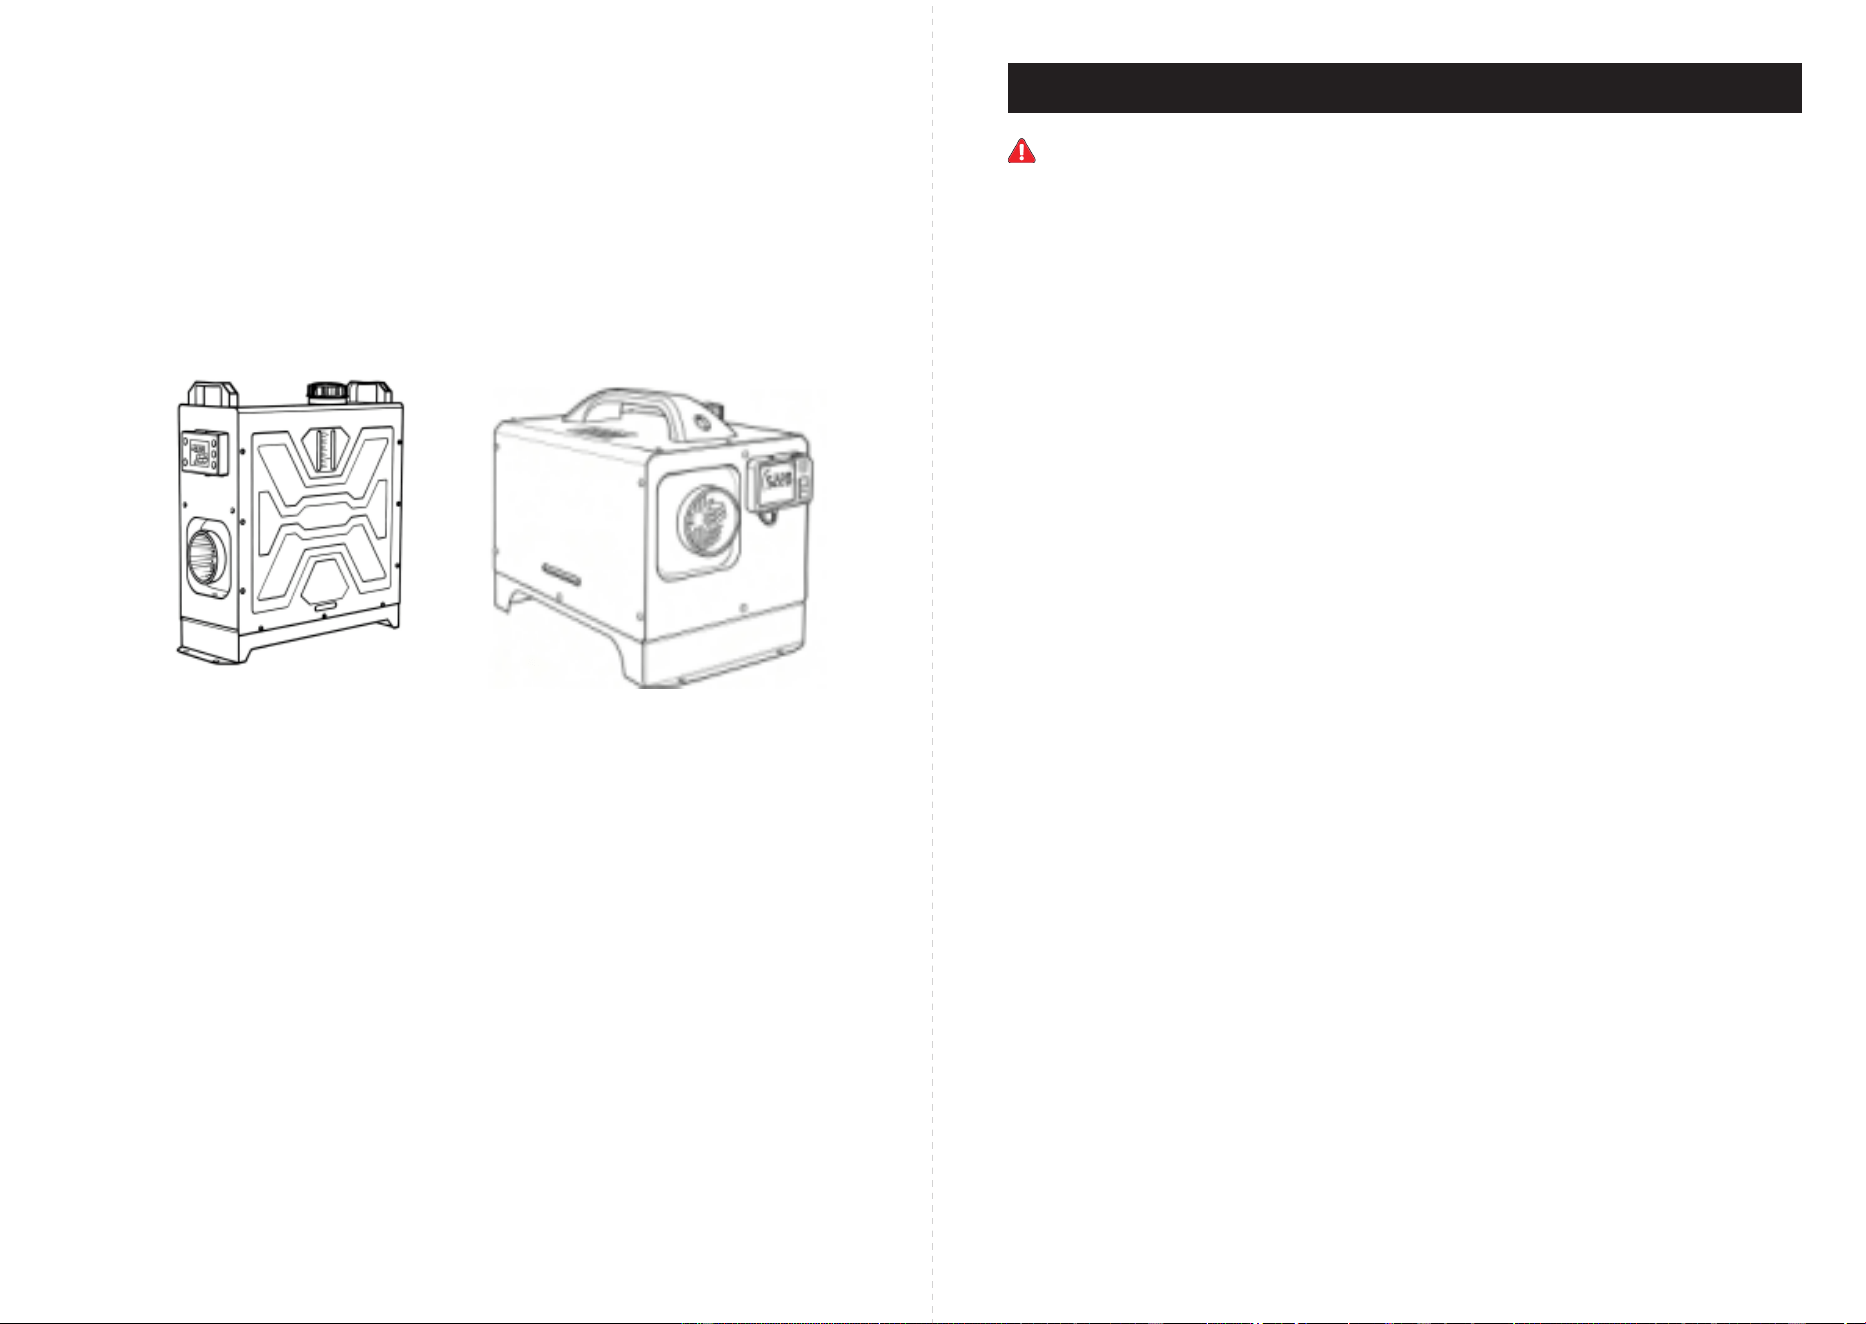
ENGLISH
Read Carefully Before Use
User Manual for
Diesel Heater
Keep for Future Reference
Sicherheitshinweise
Gefahr!
•
•
•
•
•
•
•
•
Verwenden Sie dieses Produkt NUR gemäß den Anweisungen und ALLEN lokalen Vorschriften und
Richtlinien für die Verwendung von Dieselkraftstoff und Heizgeräten. Das Nichtbefolgen kann zu rechtlichen
Konsequenzen führen und erhebliche Sachschäden sowie schwere persönliche Verletzungen, möglicher-
weise mit Todesfolge, nach sich ziehen.
Kinder oder Personen, die mit diesem Produkt nicht vertraut sind, dürfen es nicht verwenden oder installieren.
Verwenden Sie es nicht unter dem Einfluss von Alkohol, Drogen oder Medikamenten, die Ihr Urteilsvermögen
oder Ihre Reflexe negativ beeinflussen. Halten Sie Kinder und Zuschauer während der Installation fern.
Halten Sie Ihren Arbeitsbereich sauber und gut beleuchtet. Unordentliche und dunkle Arbeitsbereiche
erhöhen das Unfallrisiko.
Trennen Sie vor jeder Installation, Einstellung, Reparatur oder Wartung die Batterieverbindungen des Fahrze-
ugs.
Schalten Sie IMMER die Heizung aus, bevor Sie Kraftstoff hinzufügen.
Verwenden Sie nur Dieselkraftstoff für die Heizung. Die Verwendung von minderwertigem Diesel oder
anderen Kraftstoffarten kann zu Fehlfunktionen führen und sogar Brandgefahr darstellen.
Verwenden Sie IMMER persönliche Schutzausrüstung (PSA), die für Ihre Aufgabe geeignet ist. Tragen Sie
immer eine von ANSI zugelassene Augen- und Handenschutzmittel bei Verwendung dieses Produkts.
Rutschfeste Schuhe werden ebenfalls dringend empfohlen. Je nach Ihrer Arbeit und anderen Geräten können
auch andere Schutzausrüstungen wie Gehörschutz, Kopfschutz und Körperschutz erforderlich sein.
Kleiden Sie sich angemessen für die Installation des Heizgeräts. Tragen Sie KEINE locker sitzende Kleidung
oder Schmuck und halten Sie Haare, Kleidung, Handschuhe, Schläuche und Werkzeuge von beweglichen
Teilen fern.
Das Abgasrohr muss nach außen oder in einen offenen Außenbereich geführt werden, um die Ansammlung
von schädlichen Gasen in einem geschlossenen Raum zu vermeiden.
Betreiben Sie das Heizgerät NIE in einem geschlossenen Raum ohne ausreichende Belüftung. Dadurch
können schädliche Gase entstehen und ein Risiko für die menschliche Gesundheit darstellen. Wenn Sie
während des Betriebs des Heizgeräts Symptome wie Kopfschmerzen, Schwindel oder Bewusstlosigkeit
bemerken, beenden Sie sofort die Verwendung des Heizgeräts und gehen Sie an einen gut belüfteten
Bereich. Wenn die Symptome anhalten, suchen Sie umgehend ärztliche Hilfe auf. Nehmen Sie diese
Symptome ernst und geben Sie Ihrer Gesundheit und Sicherheit Vorrang.
Der Heizer und seine Komponenten können während des Betriebs heiß werden. Vermeiden Sie das
Berühren, um das Risiko von Verbrennungen oder Verletzungen zu vermeiden. Warten Sie IMMER, bis die
Komponenten abgekühlt sind, oder verwenden Sie Schutzausrüstung beim Umgang.
Installieren Sie dieses Heizgerät IMMER in einem geräumigen Fach, das sich fern von brennbaren Material-
ien befindet. Verwenden Sie das Heizgerät NIEMALS an gefährlichen Orten wie Kraftstofflagern, Kohlespe-
ichern und Holzlagerhallen.
Bei einem Kraftstoffleck schalten Sie das Heizgerät SOFORT aus und trennen Sie die Kraftstoffleitung.
Lassen Sie ausschließlich geschultes und lizenziertes Fachpersonal das Leck reparieren.
Warten Sie dieses Produkt regelmäßig. Überprüfen Sie vor der Verwendung auf Fehlausrichtung, Blockaden,
Verschleiß oder andere Schäden. Wenn Schäden festgestellt werden, reparieren oder ersetzen Sie die
betroffenen Komponenten vor weiterer Verwendung. Ersetzen Sie Komponenten nur durch identische Teile.
*Cotton and sponge have a combustion point of 150°C, paper has a combustion point of 130°C, fabric has a
combustion point of 270°C, and diesel fuel has a combustion point of 220°C. The temperature of the hot air
outlet should not exceed 85°C, while the exhaust pipe outlet temperature can exceed 270°C.
•
•
•
•
•
•
•
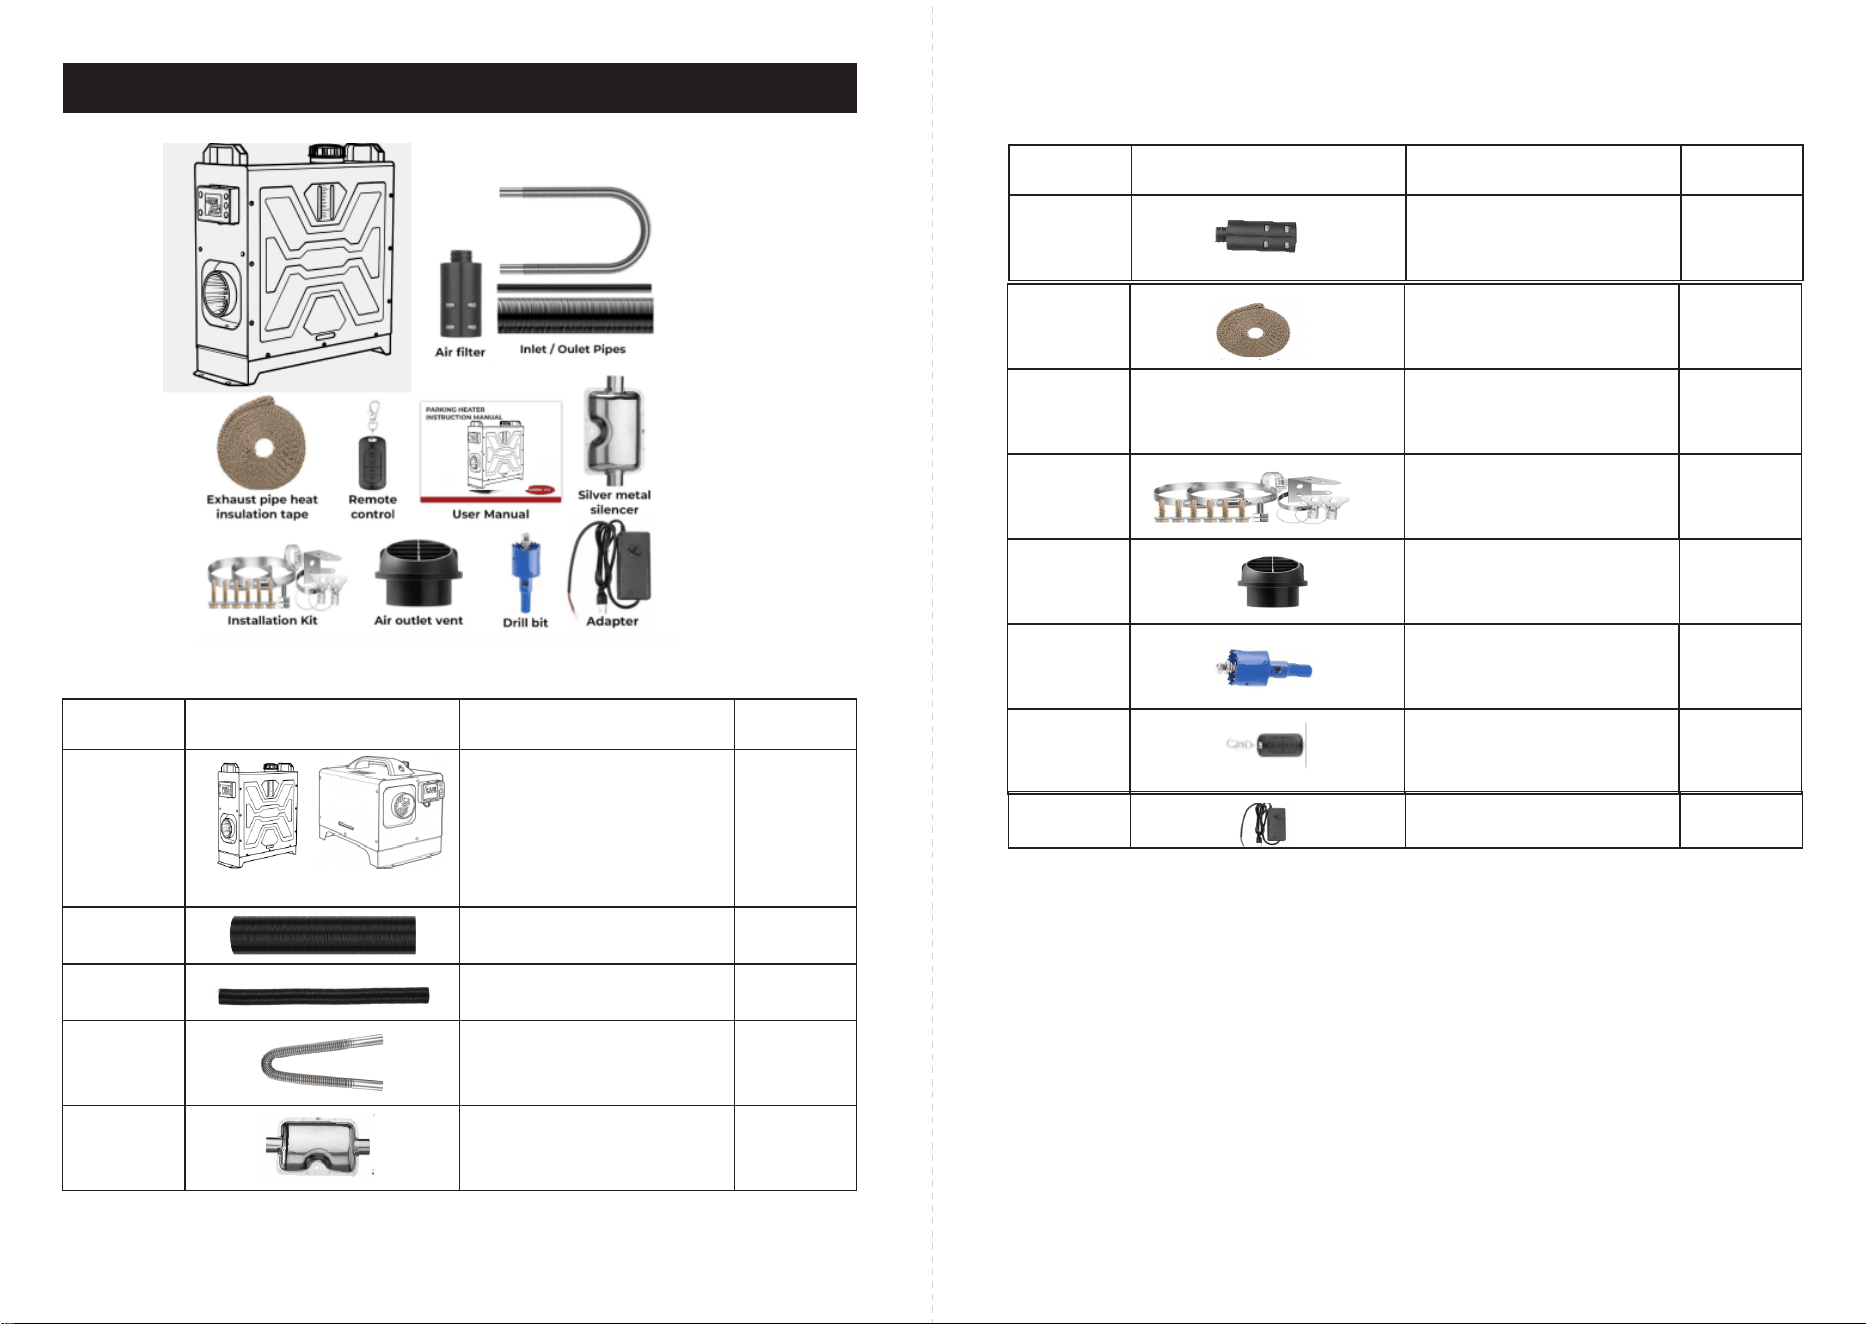
Product ImageNo. Name Qty.
Air Filter 1F
1G
J
1
H
1
I
Remote Control 1
L
1
K
1
adapter
1
M
Product Image No. Name Qty.
Air Inlet Ducting 1C
Exhaust Ducting 1D
Muffler 1E
Air Outlet Ducting 1B
A Main Body 1
Parts List
exhaust pipe heast
insulation tape
use manual
installation kit
air outlet vent
drill bit
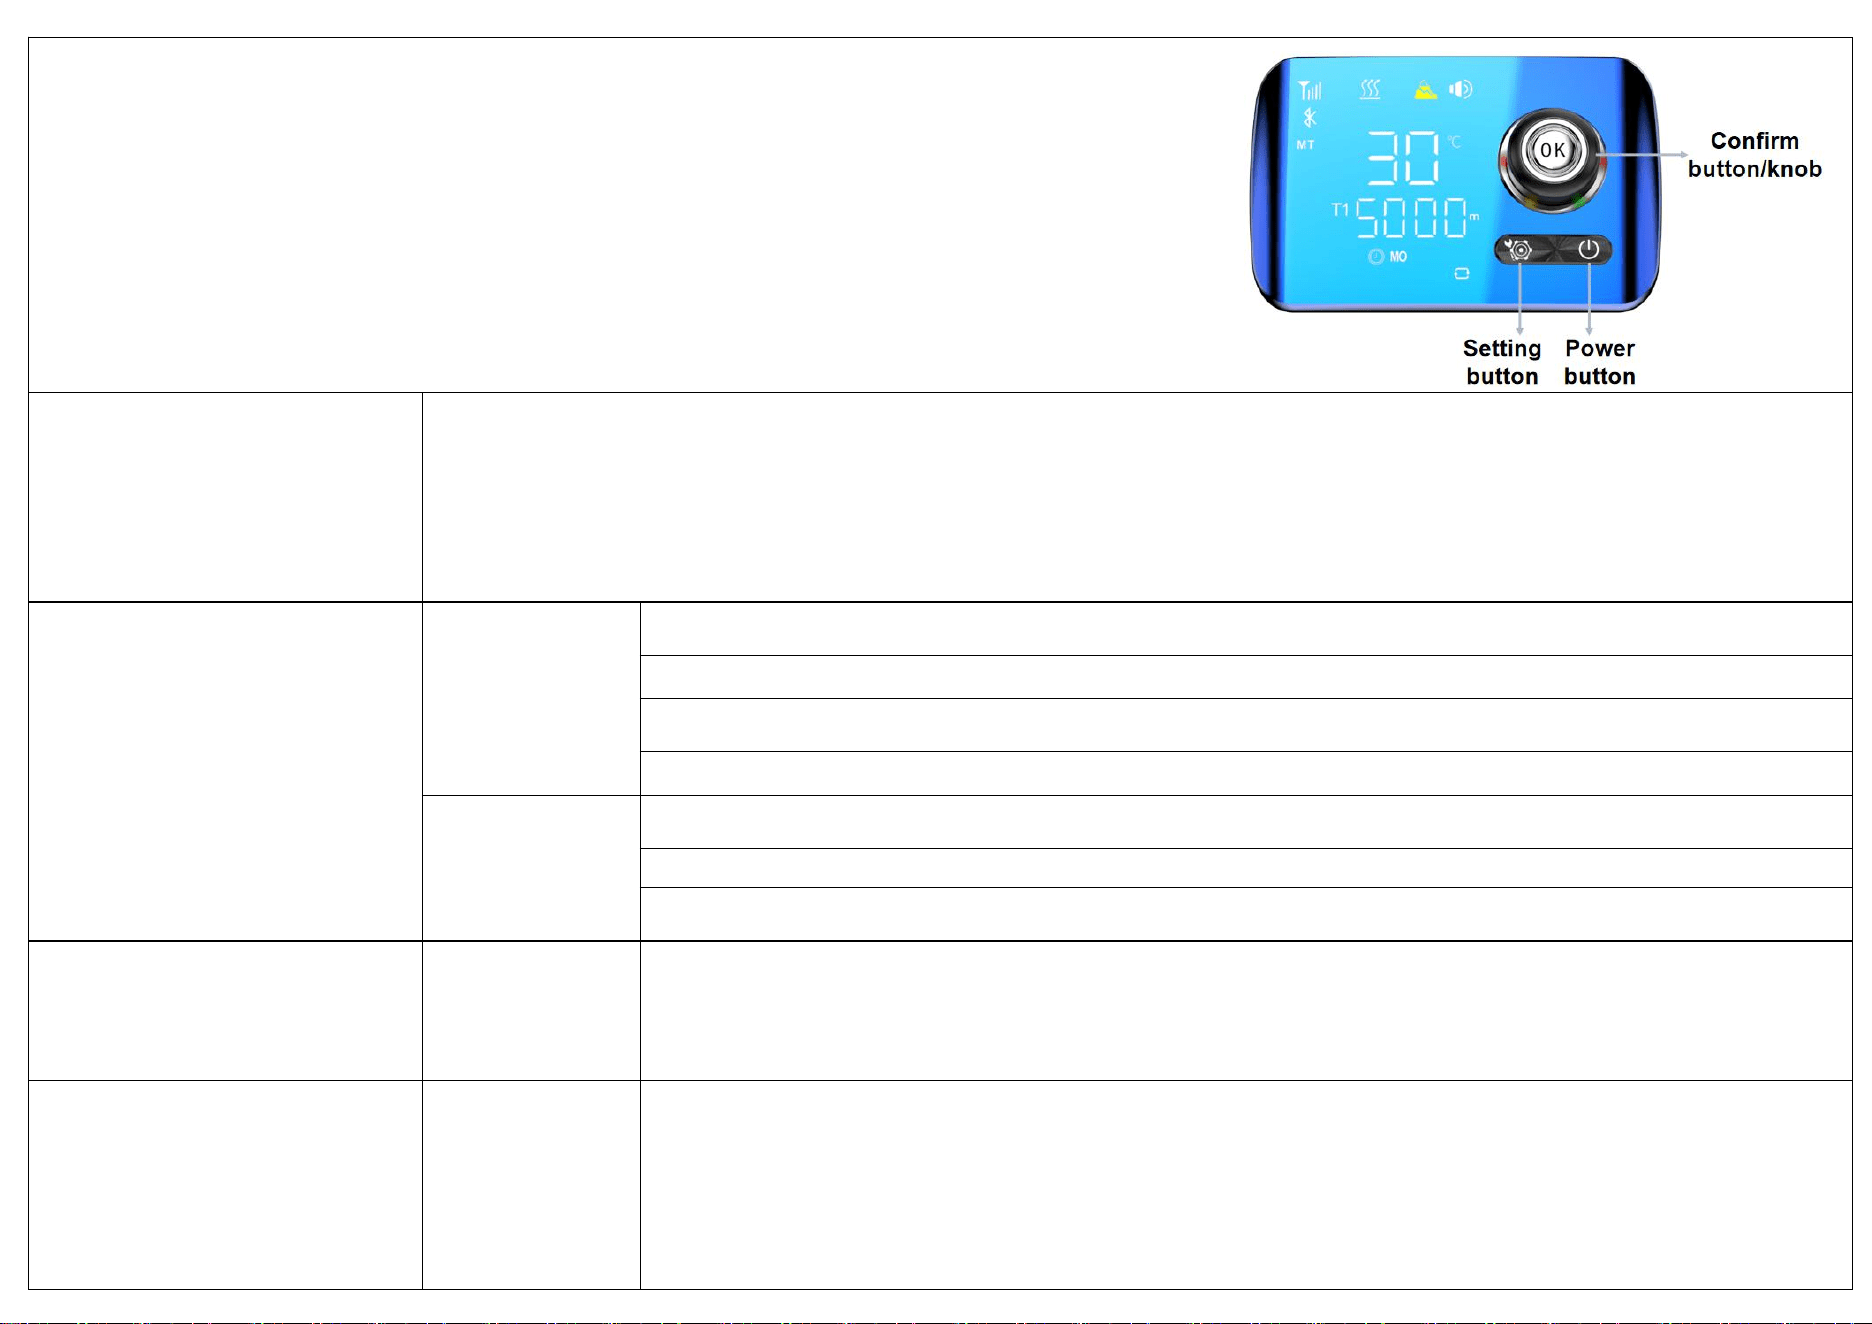
B2018 Bluetooth Operating Manual
(231221_V1.0)
Instructions on displays of the panel
in the standby mode:
After the power-on initialization is completed, check the panel (Turn the knob, with one time for one of the followings) which displays the followings
circularly;
Display of clock → display of shell temperature → display of power supply voltage → display of gear/temperature setting → display of
altitude → display of the failure code in case of a failure
Instructions on button operation
Standby mode
Power button: short press to power on, and the panel displays ON.
Knob: Adjust the temperature/gear.
Setting button: long press for 3 seconds to set parameter.
Confirm button: short press cyclically to switch the displays.
Power on mode
Power button: long press 3 seconds to power off, and the panel displays OFF.
Knob: Adjust the temperature/gear.
Confirm button: short press cyclically to switch the displays.
Instructions on remote control code
matching
Standby mode
Long press the setting button + Counterclockwise knob to enter the remote-control code matching interface, and "-PE-" will be
displayed. Long press the ON/OFF button of the remote control for code matching, and exit after the code matching is
successful or by short pressing the power button. If the button is inactive for 20 seconds, automatically exit;
The remote control icon is always on after the code matching is successful;
Instructions on manual oil pumping
Standby mode
Long press the power button + clockwise knob to enter the manual oil pumping interface, and "020P" will be displayed.
Turn the knob to adjust the oil pumping time (the maximum manual oil pumping time is 120 seconds). Short press the
power button to start/stop oil pumping. Short press the power button to exit or automatically exit after the button is
inactive for 20 seconds;

Instructions on manual gear control
mode/ auto constant temperature
mode
Standby
mode/power on
mode
1. Long press the setting button + clockwise knob to switch the constant temperature mode, and the interface displays
"27
℃
" and flashes; Long press again to switch the manual mode, and the interface will display "P01" (the manual mode
by default);
2. In the power on mode, long press ON button of the remote control for 3 seconds to cyclically switch the manual mode
and constant temperature mode. Each switch must be at least 3 seconds before it can be switched again;
3. In the standby mode, long press OFF button of the remote control for 3 seconds to cyclically switch the manual mode
and constant temperature mode. Each switch must be at least 3 seconds before it can be switched again;
Instructions on temperature
display switching
Power on mode
Degrees Celsius is displayed by default, such as "27℃". In the power-on mode, long press the confirm button for 3
seconds to switch the display of Degrees Fahrenheit, and the interface displays "27 ℉";
At this time, any content related to temperature display will be switched to Fahrenheit display;
Ventilation Mode Operation
Instructions
Standby Mode
Long press the Settings button and Power button for 9 seconds. There will be "ON" indicator flashing on the interface,
indicating that the ventilation mode is activated. Rotate the knob to switch between different levels. For example, if it displays
"-P2-" (Level 1-5). Long press the Power button for 3 seconds to exit the ventilation mode, and the "OFF" indicator will flash
on the interface.
Instructions on parameter setting
(Standby mode)
Level 1
Menu selection
Long press the setting button for 3 seconds to enter the menu, and display "SET8". Turn the knob to switch options, short
press the confirm button to enter the options, short press the power button to save and exit, or automatically exit after the
button is inactive for 20 seconds;
SET1--SET9 can be selected;
SET8
Time setting
After selecting "SET8", short press the confirm button to enter, and the upper row will display "-1-". Turn the knob to
switch Monday-Sunday. Short press the confirm button to switch to the lower row display as "00:00". Turn the knob to
switch the time. Short press the confirm button to switch to the minute display. After the minute is adjusted, short press
the confirm button to jump to the next item (SET9) in the first-level menu or short press the power button for 3 seconds
to save and exit, or automatically exit after the button is inactive for 20 seconds without saving;

SET1-7
Timing setting
Select SET1-7 corresponding to Monday-Sunday in the first-level menu, short press the confirm button to enter, and
"CLS" will be displayed in the upper row. Turn the knob to switch CLS, ON and LON, and short press the confirm
button to confirm;
CLS (Back)
Short press the confirm button to select to return to the previous menu.
ON
(Single timing
startup)
Short press the confirm button to enter the interface of setting single timing startup. Initially, "00:00"
is displayed and the first blank flashes. Turn the knob to change the number, and then short press the
confirm button to enter the next blank. Then short press the confirm button to enter the OFF setting.
OFF
(Single timing
shutdown)
Short press the confirm button to enter the interface of setting single timing shutdown after setting
ON. Initially, "00:00" is displayed and the first blank flashes. Turn the knob to change the number,
and then short press the confirm button to enter the next blank. Then short press the confirm button
to return to the next item in the first-level menu after setting.
LON
(Cycle timing
startup)
Short press the confirm button to enter the interface of setting cycle timing startup. Initially, "00:00"
is displayed and the first blank flashes. Turn the knob to change the number, and then short press the
confirm button to enter the next blank. Then short press the confirm button to enter the LOF setting.
LOF
(Cycle timing
shutdown)
Short press the confirm button to enter the interface of setting cycle timing shutdown after setting
LON. Initially, "00:00" is displayed and the first blank flashes. Turn the knob to change the number,
and then short press the confirm button to enter the next blank. Then short press the confirm button
to return to the next item in the first-level menu after setting.
SET9
Configuration
setting
Password input
Initially, it displays “----” and the first blank flashes. Turn the knob to change the number, and
then short press the confirm button to confirm it to enter the next blank. The subsequent numbers are
set in sequence, and finally short press the confirm button to enter the next setting when the
password is correct.
Parts selection
Display "12V" by default, turn the knob to switch, and you can choose 12V, 24V and AU (automatic
matching). Short press the confirm button to enter the next item;
Power selection
Display "H-5" by default, turn the knob to switch, and you can choose H-8 (8KW), H-5 (5KW) and
L-2 (2KW). Short press the confirm button to enter the next item;
Selection of oil
pump type
Display "22ML" by default, turn the knob to switch, and you can choose 16ML, 22ML and 28ML.
Short press the confirm button to enter the next item;
Language
selection
Display "L-C" by default, turn the knob to switch, and you can choose L-C (Chinese), L-F (foreign
language) and L-0 (mute). Press the confirm button to enter the next item;
Start-stop mode
selection
Display "OFF" by default, turn the knob to switch, and you can choose OFF or ON. Short press the
confirm button to enter the next item;
Start-up time
setting
When the start-stop mode is ON, enter this page, and the default value is 25℃. Turn the knob to
change the number, and short press the confirm button to return to the first item;
Note: After all parameter settings are finished, please press the power button to confirm and save the settings before exiting. No settings will
be saved in case of automatic exit after timeout.
Instructions on voice broadcast
It will report only when the interface is switched or the status is changed; report is not performed during adjustment; report is performed when the
interface stays for more than 1.5s during adjustment;
Note: (Voice button is Off: Long press the Confirm button + Counterclockwise knob);
Bluetooth Connection Instructions
Power On/Standby
Mode
Open the mobile app or WeChat program and navigate to the QR code binding interface.
1. Click on the “Scan QR code” option and scan the corresponding QR code on the panel. If the connection is
successful, it will redirect to the device control interface and prompt that the connection is successful, displaying
specific working parameters.
2.Click on the “Auto-Search Device” option to start automatic searching. If the device is successfully connected, it will
redirect to the device control interface and prompt that the connection is successful, displaying specific working
parameters.
(To disconnect the device, go to the personal center, click on “Device management”, and follow the steps to unbind the
device. Alternatively, long press the Settings button and the Confirm button on the panel for 3 seconds, and the
software will prompt that the Bluetooth is disconnected. For detailed Bluetooth operation instructions, please refer to
the software's personal center.)

Instructions on screen off
Standby mode
The screen will completely turn off after no press for more than 3 minutes.
Power on mode
The screen will turn off after no press for more than 3 minutes If the screen is off, there will be a breathing light prompt and it
will display. Press any button to wake up the screen.
Instructions on failures and how to deal
with them
Under voltage
E-01
The voltage is too low: for 24V, lower than 18V, and for 12V, lower than 10V.
Over voltage
E-02
The voltage is too high: for 24V, higher than 32V, and for 12V, higher than 17V.
Spark plug failure
E-03/F1
Short circuit of spark plug
E-03/F2
Open circuit of spark plug
Oil pump failure
E-04/F1
Short circuit of oil pump
E-04/F2
Open circuit of oil pump
Overheating
E-05
The shell temperature exceeds 260℃. Check whether the air inlet and outlet are blocked.
Motor failure
E-06/F1
Short circuit of fan
E-06/F2
Open circuit of fan
E-06/F3
Fan speed not recognized by Hall sensor
Disconnection
E-07
Check whether the communication cable or plug between the power button and the controller is open or virtually
connected.
Flame failure
E-08
Check whether there is air or wax blockage in the oil circuit, resulting in poor oil supply.
Sensor failure
E-09/F1
Short circuit of case temperature sensor
E-09/F2
Open circuit of case temperature sensor
Ignition failure
E-10
In case of two times of ignition failure, check the reasons such as blocked oil circuit, not smooth oil intake, stuck oil pump
or blocked volatile net due to oil problems.
Failures in ambient
temperature sensors
E-11
Ambient temperature sensors are open or short-circuited.
Controller overheating
E-12
The temperature of the controller exceeds 100℃. Check whether the air inlet and outlet are blocked, or whether the ECU is
damaged.
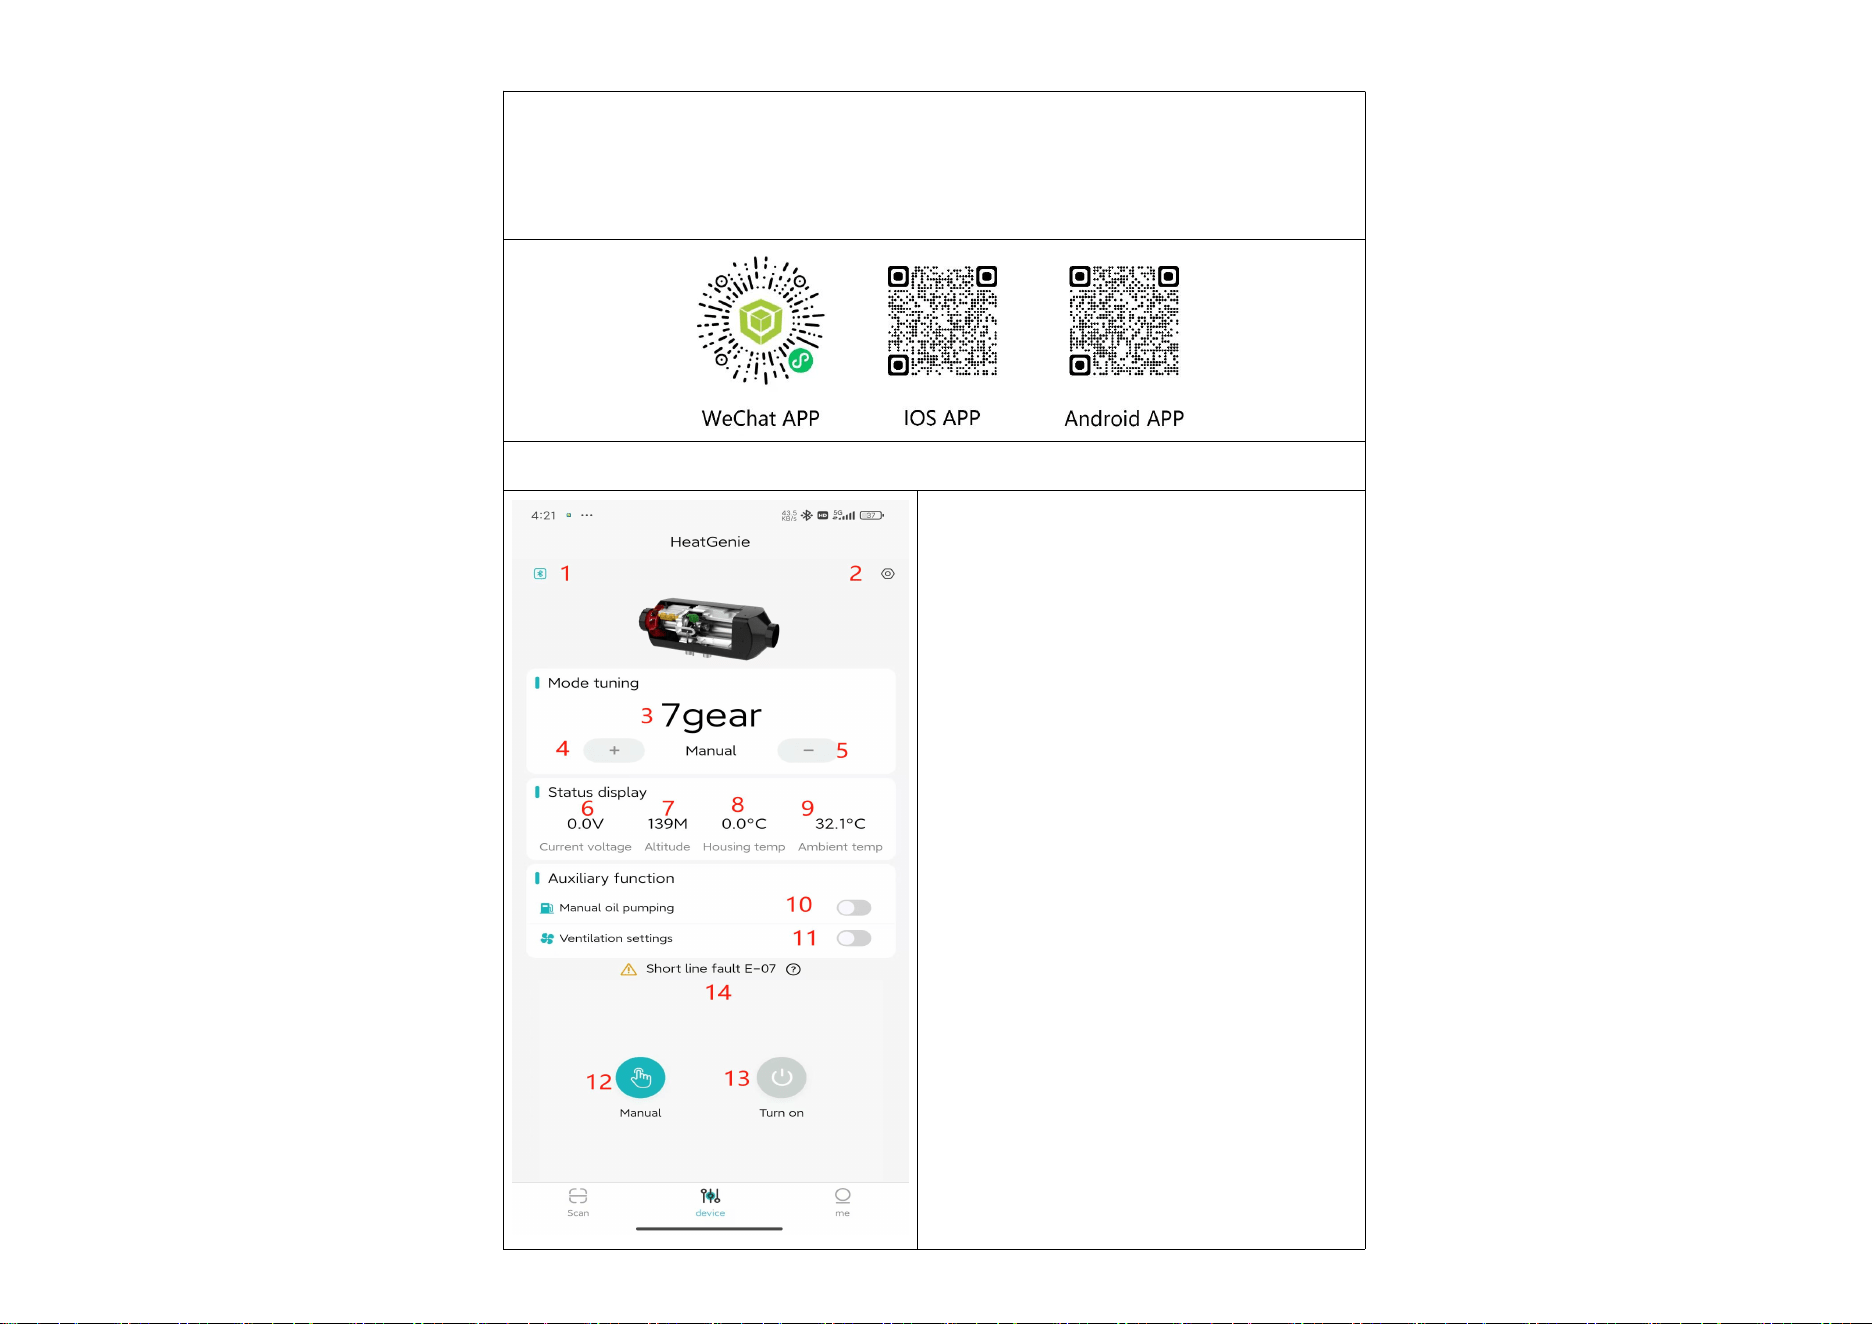
Operation Instructions for the "Heat Genie" APP
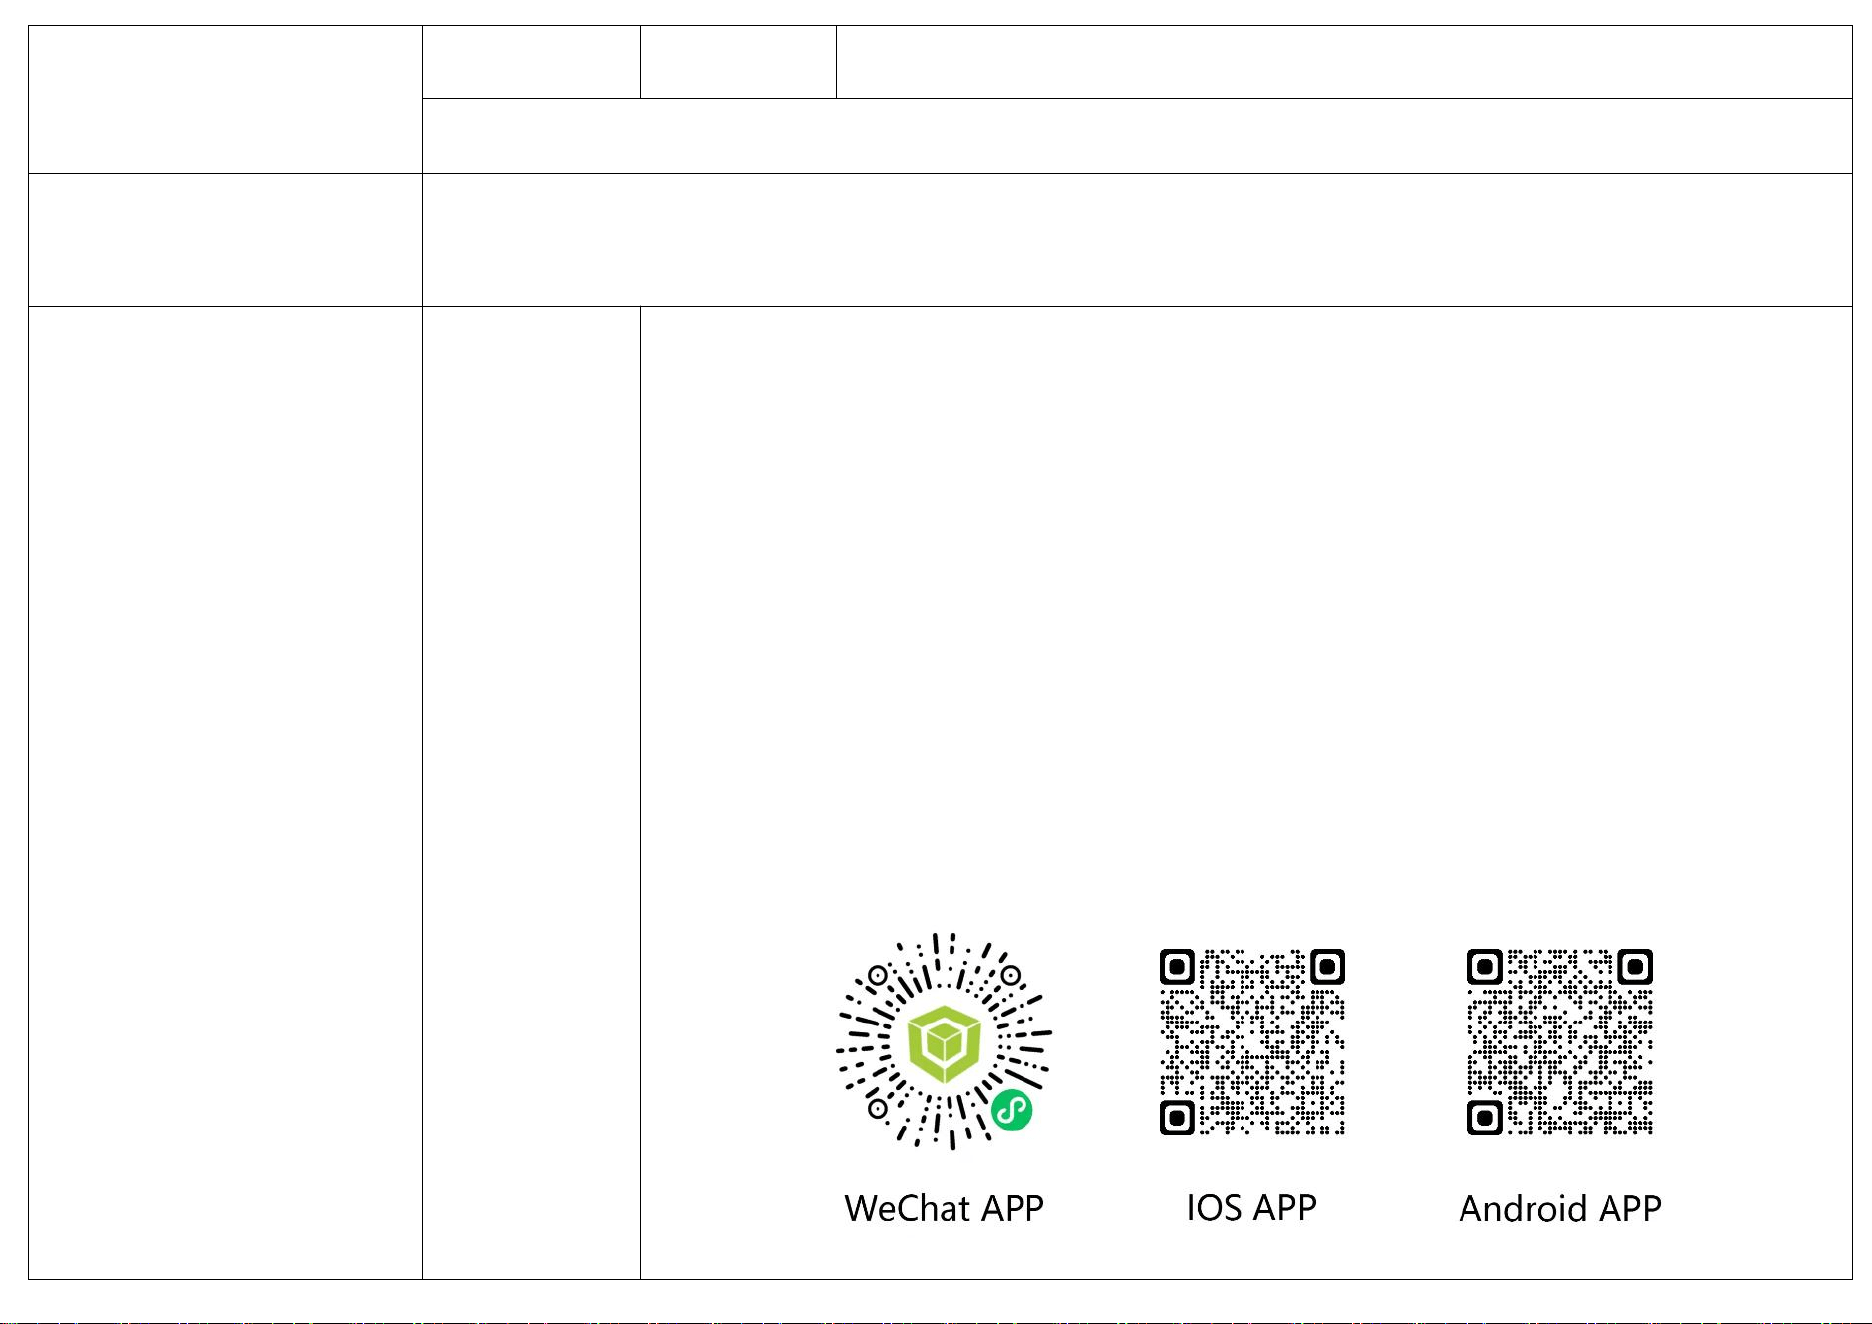
For IOS systems, search "Heat Genie" on the APP Store to download the APP. For Android,
search "Heat Genie" on the Google Play Store or scan the QR code below to download. Then,
follow these steps to connect and control the device with your phone.
1.Activate your phone's Bluetooth, launch the APP and enter the following interface.
1. Bluetooth connection status
2. Advanced settings button
3. Temperature/gear setting
4. "+" button
5. "-" button
6. Voltage
7. Altitude
8. Housing temperature
9. Ambient temperature
10. Manual oil pump button
11. Ventilation mode button
12. Manual/Constant mode toggle
13. Power on/off button
14. Failure code display
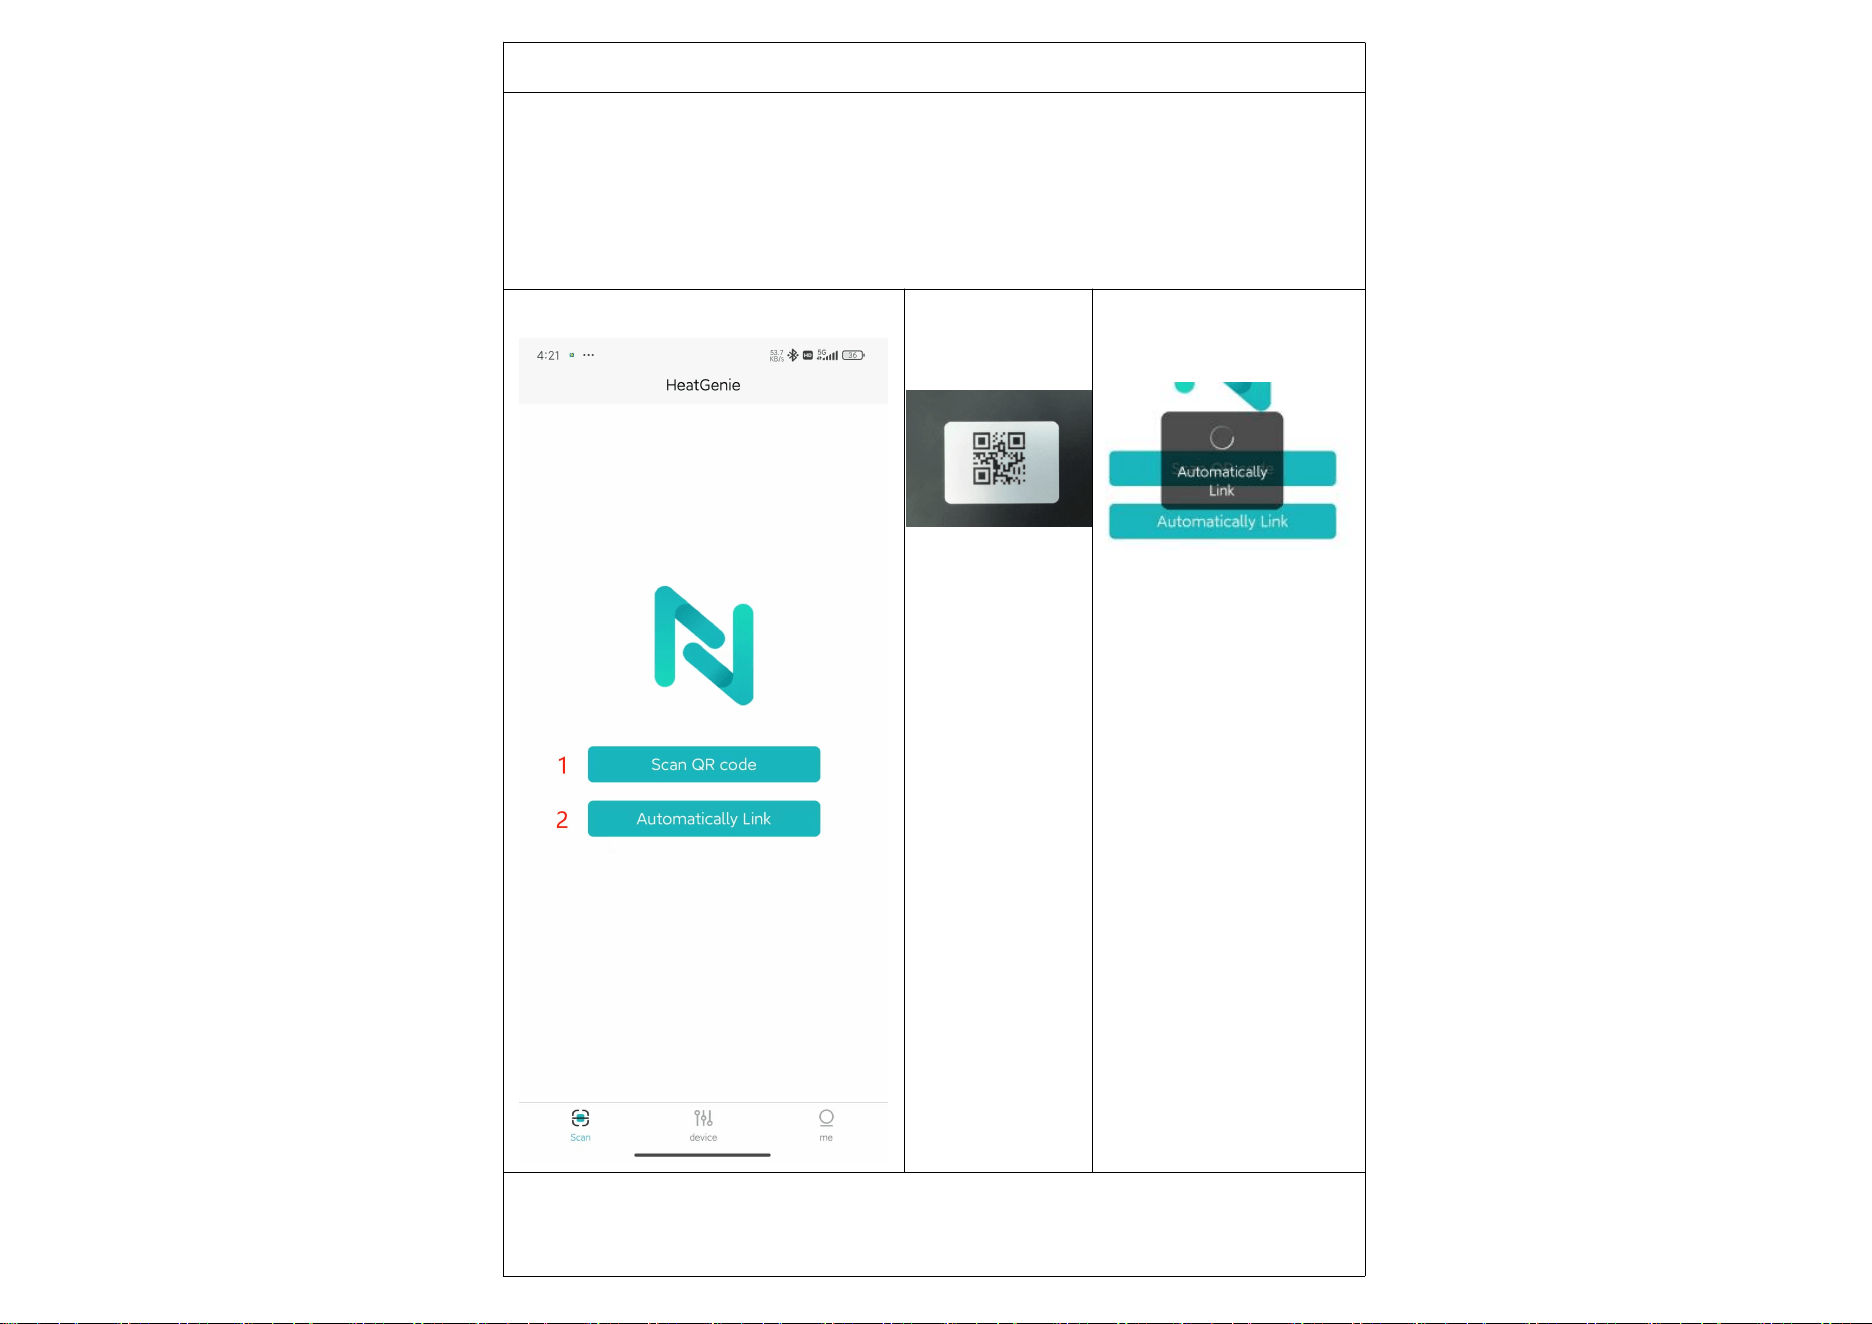
2. Open the APP and enter the main interface.
1.Click on 1 [Scan QR Code] and scan the QR code provided on the back of the panel to
connect via Bluetooth. Recommended for multiple devices.
2.Click on 2 [Automatically Link] for automatic Bluetooth connection. Ideal for single device
use.
Main interface of the program Scan QR Code Automatically Link
If the device is not found, check if another phone is already connected (each device can only
connect to one phone), or power cycle the device and phone Bluetooth, then repeat step 1.
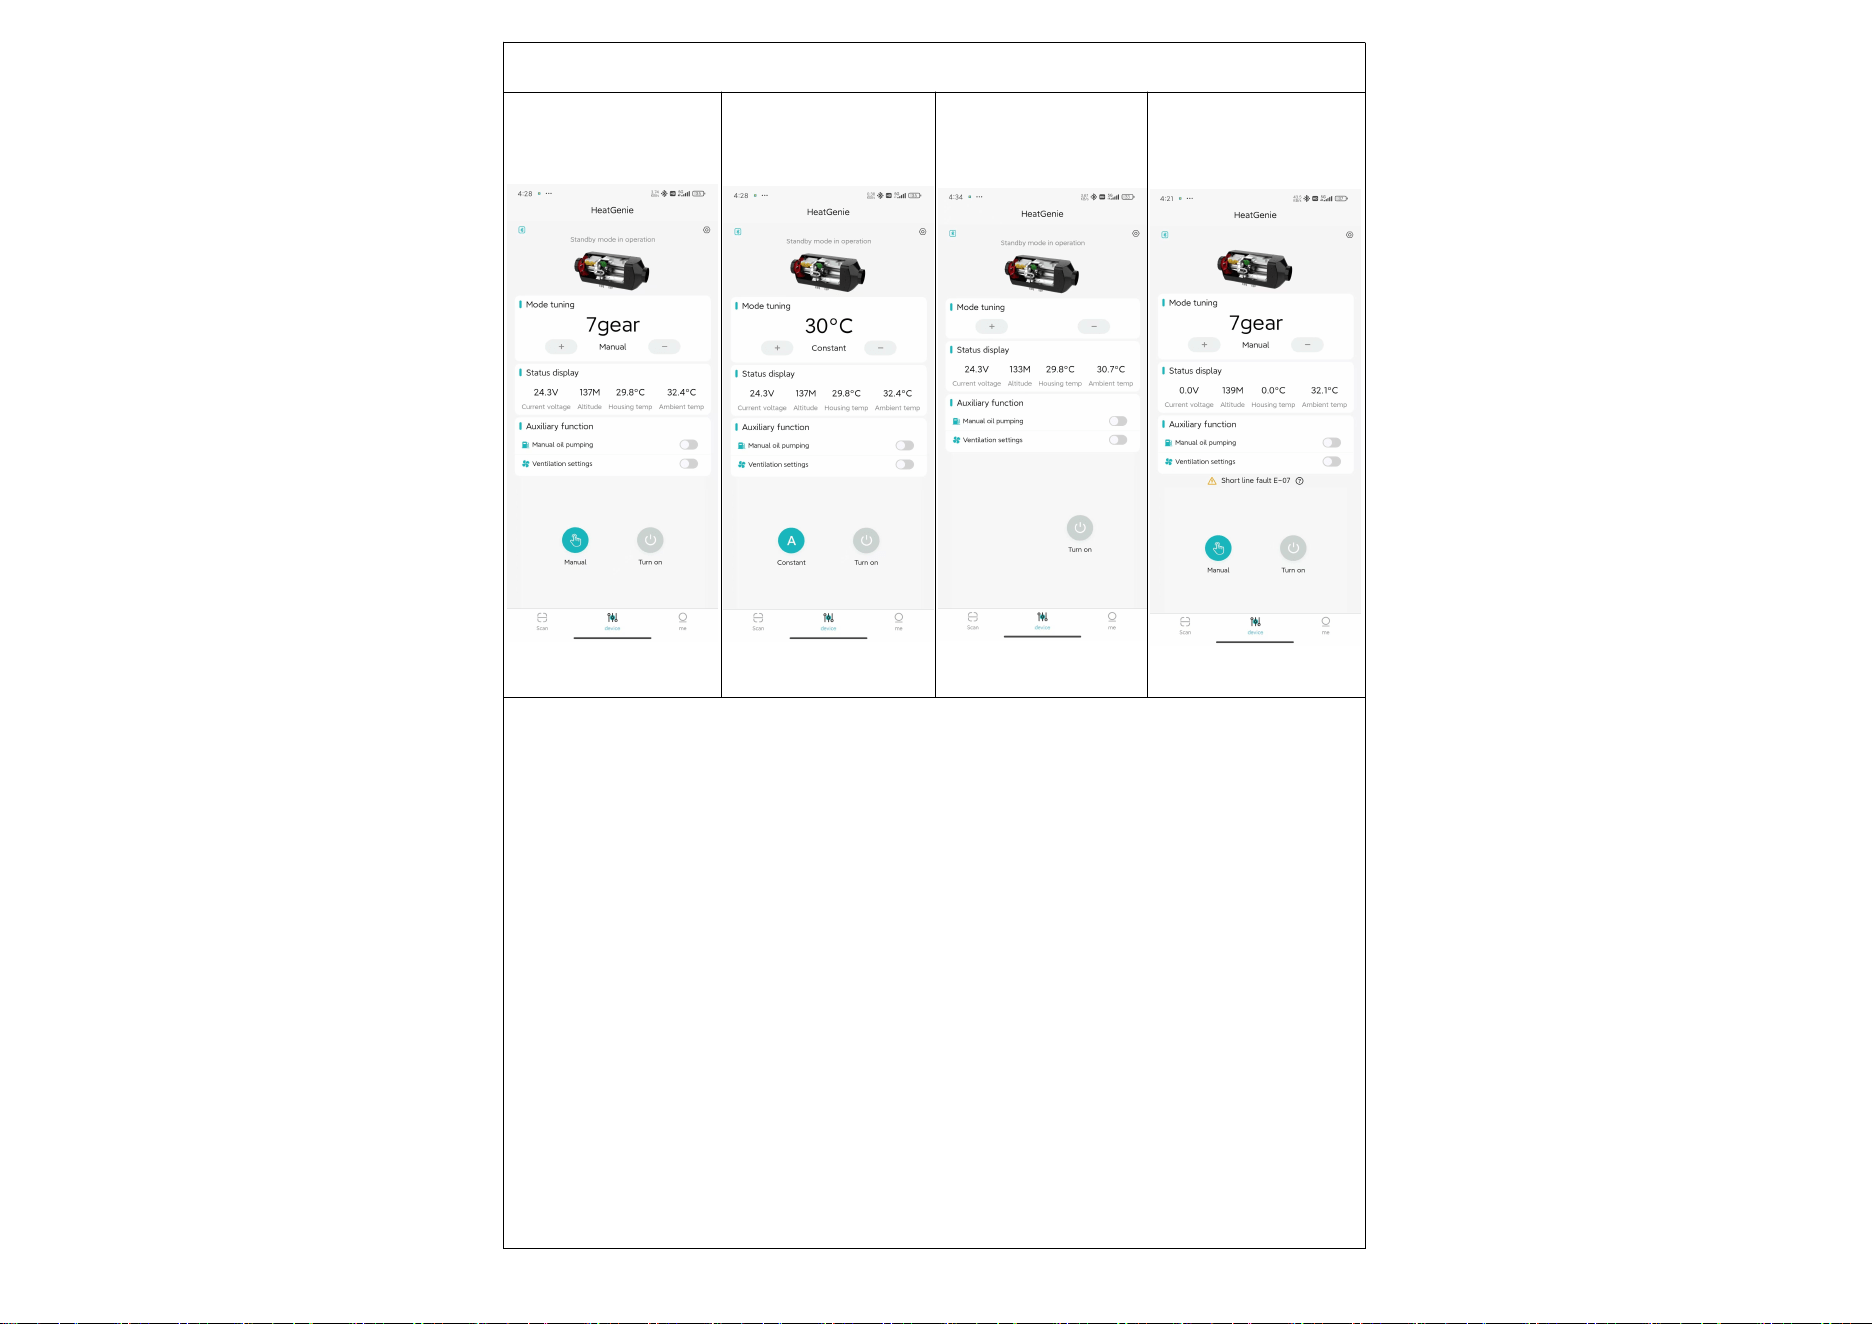
3.After successful connection, the interface will be displayed as shown in the figure below:
1 2 3 4
Power Status Indicators:
1. ( Manual Mode );2. ( Temperature Mode );3. ( Start/Stop Mode );4. ( Fault Indicator )
1)Power On & Operation
In standby mode, press the [Power On/Off Button] to activate the heating function, and the
display will show "Power On Status" as illustrated. Press the [+] button to increase the setting,
and the [-] button to decrease it. Press the [Manual/Constant Mode Switch Button] to toggle
between manual (P1-P10) and constant (10-40°C) modes.
2)Power Off
While powered on, press [Power On/Off Button] to shut down. The device will enter residual
oil combustion and cooling mode.
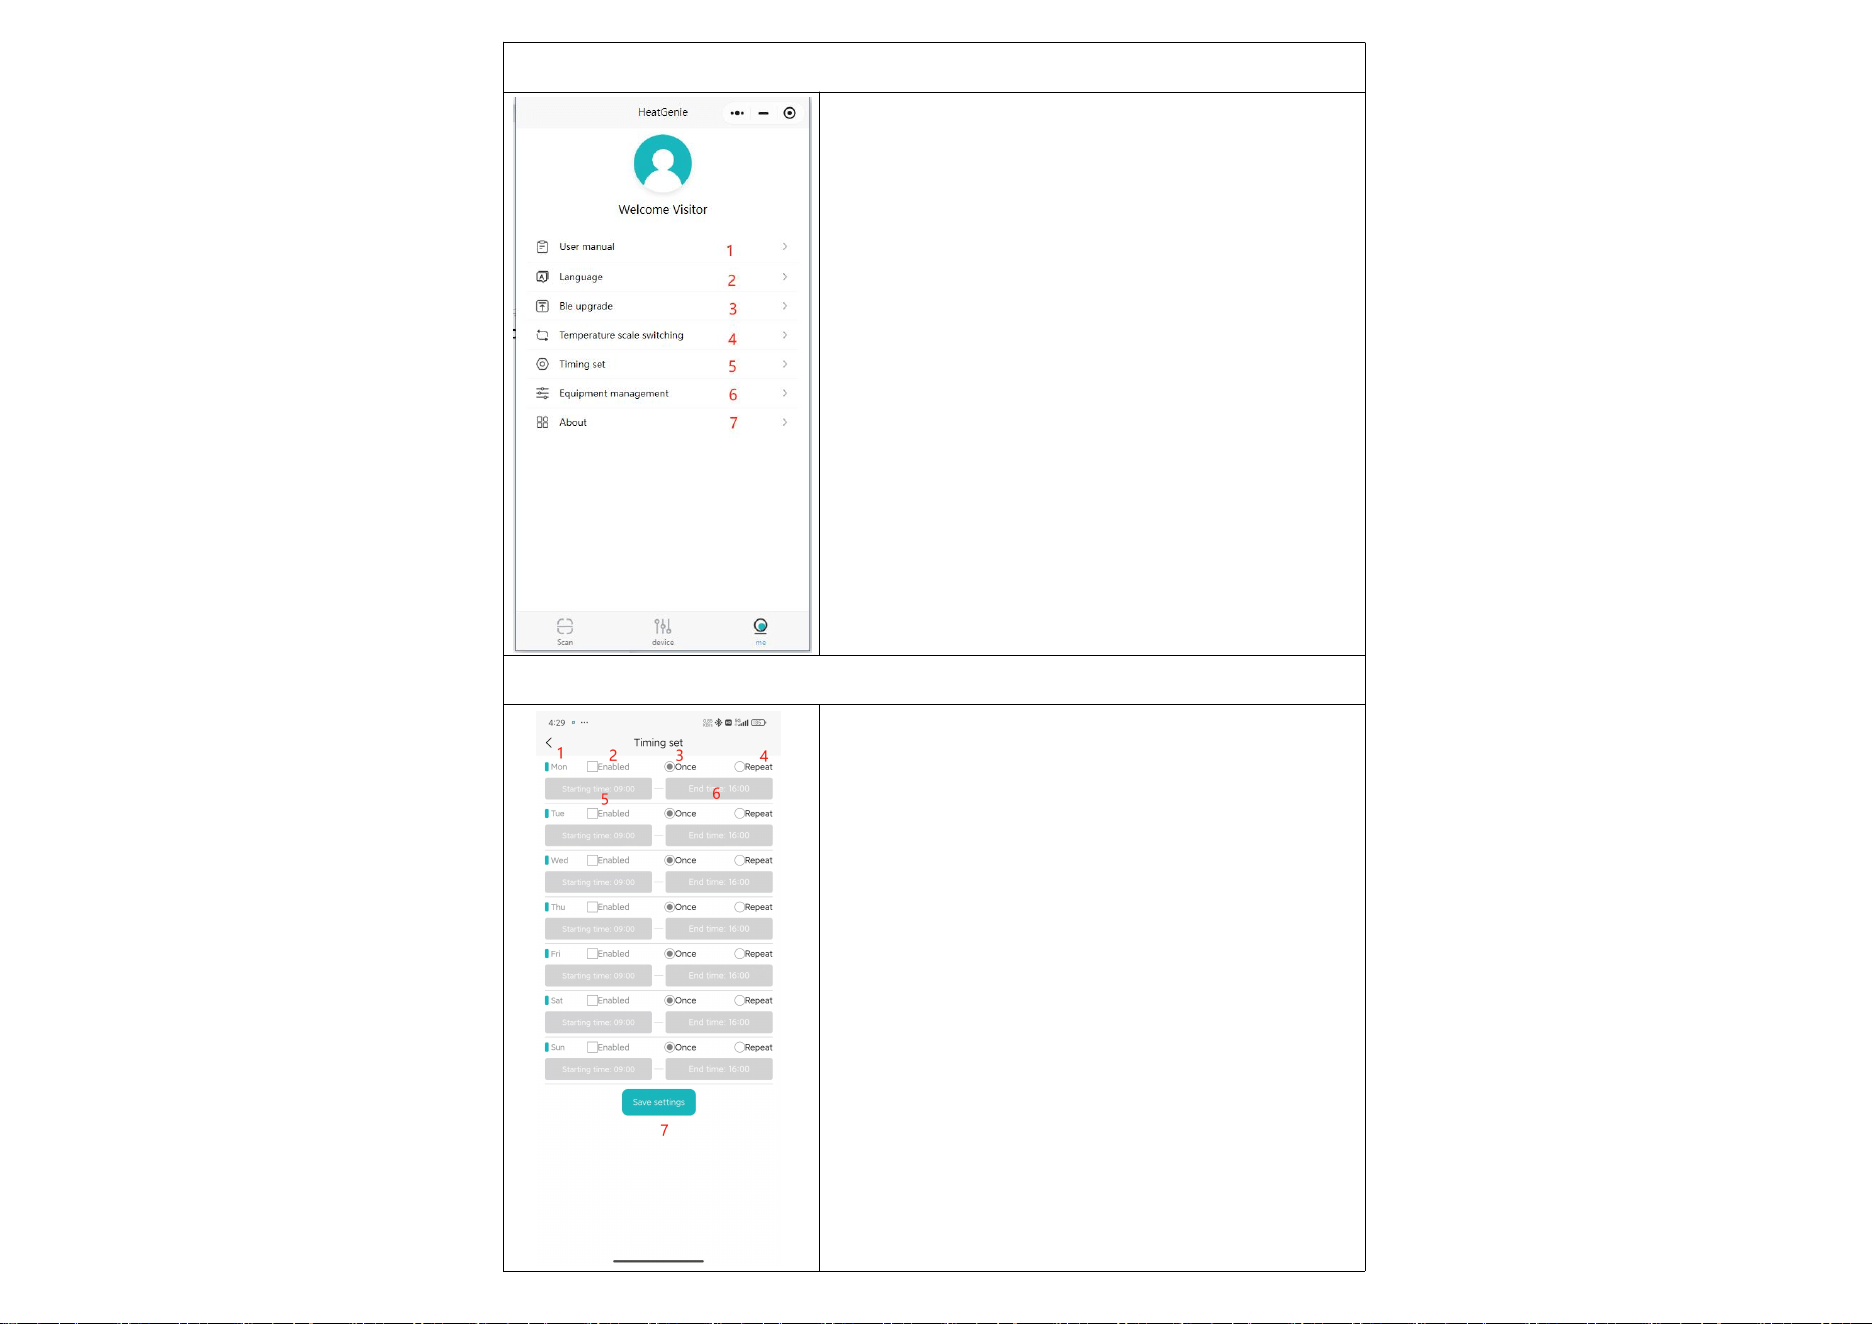
4.Personal Center
1. User Manual: a brief introduction to usage
2.Language: Select from multiple languages.
3.Bluetooth Upgrade: Update Bluetooth firmware.
4.Toggle: Switch between Fahrenheit and Celsius.
5.Timing Set: Schedule power on/off.
6.Device Binding: auto-connect and disconnect feature.
7.About: device information.
5.Page Description of Timing Set
1.Week: Select specific days.
2.Enabled: Activate the timer to execute scheduled tasks on
the selected days.
3.Single Run: Enables the timer to execute once and then
automatically disables it after completion.
4.Repeat Run: Sets the timer to execute weekly at the
specified time, provided the device remains powered on.
5.Starting Time: Configures the scheduled time for
power-on.
6.End Time: Configures the scheduled time for power-off.
7.Save Settings: Confirm settings.
6.Page Description of Auto Start/Stop Function:
The Auto Start/Stop function can only be configured through the panel settings. The APP solely
supports powering the device on/off and viewing the current parameters. It does not allow for
adjusting the start/stop temperatures.
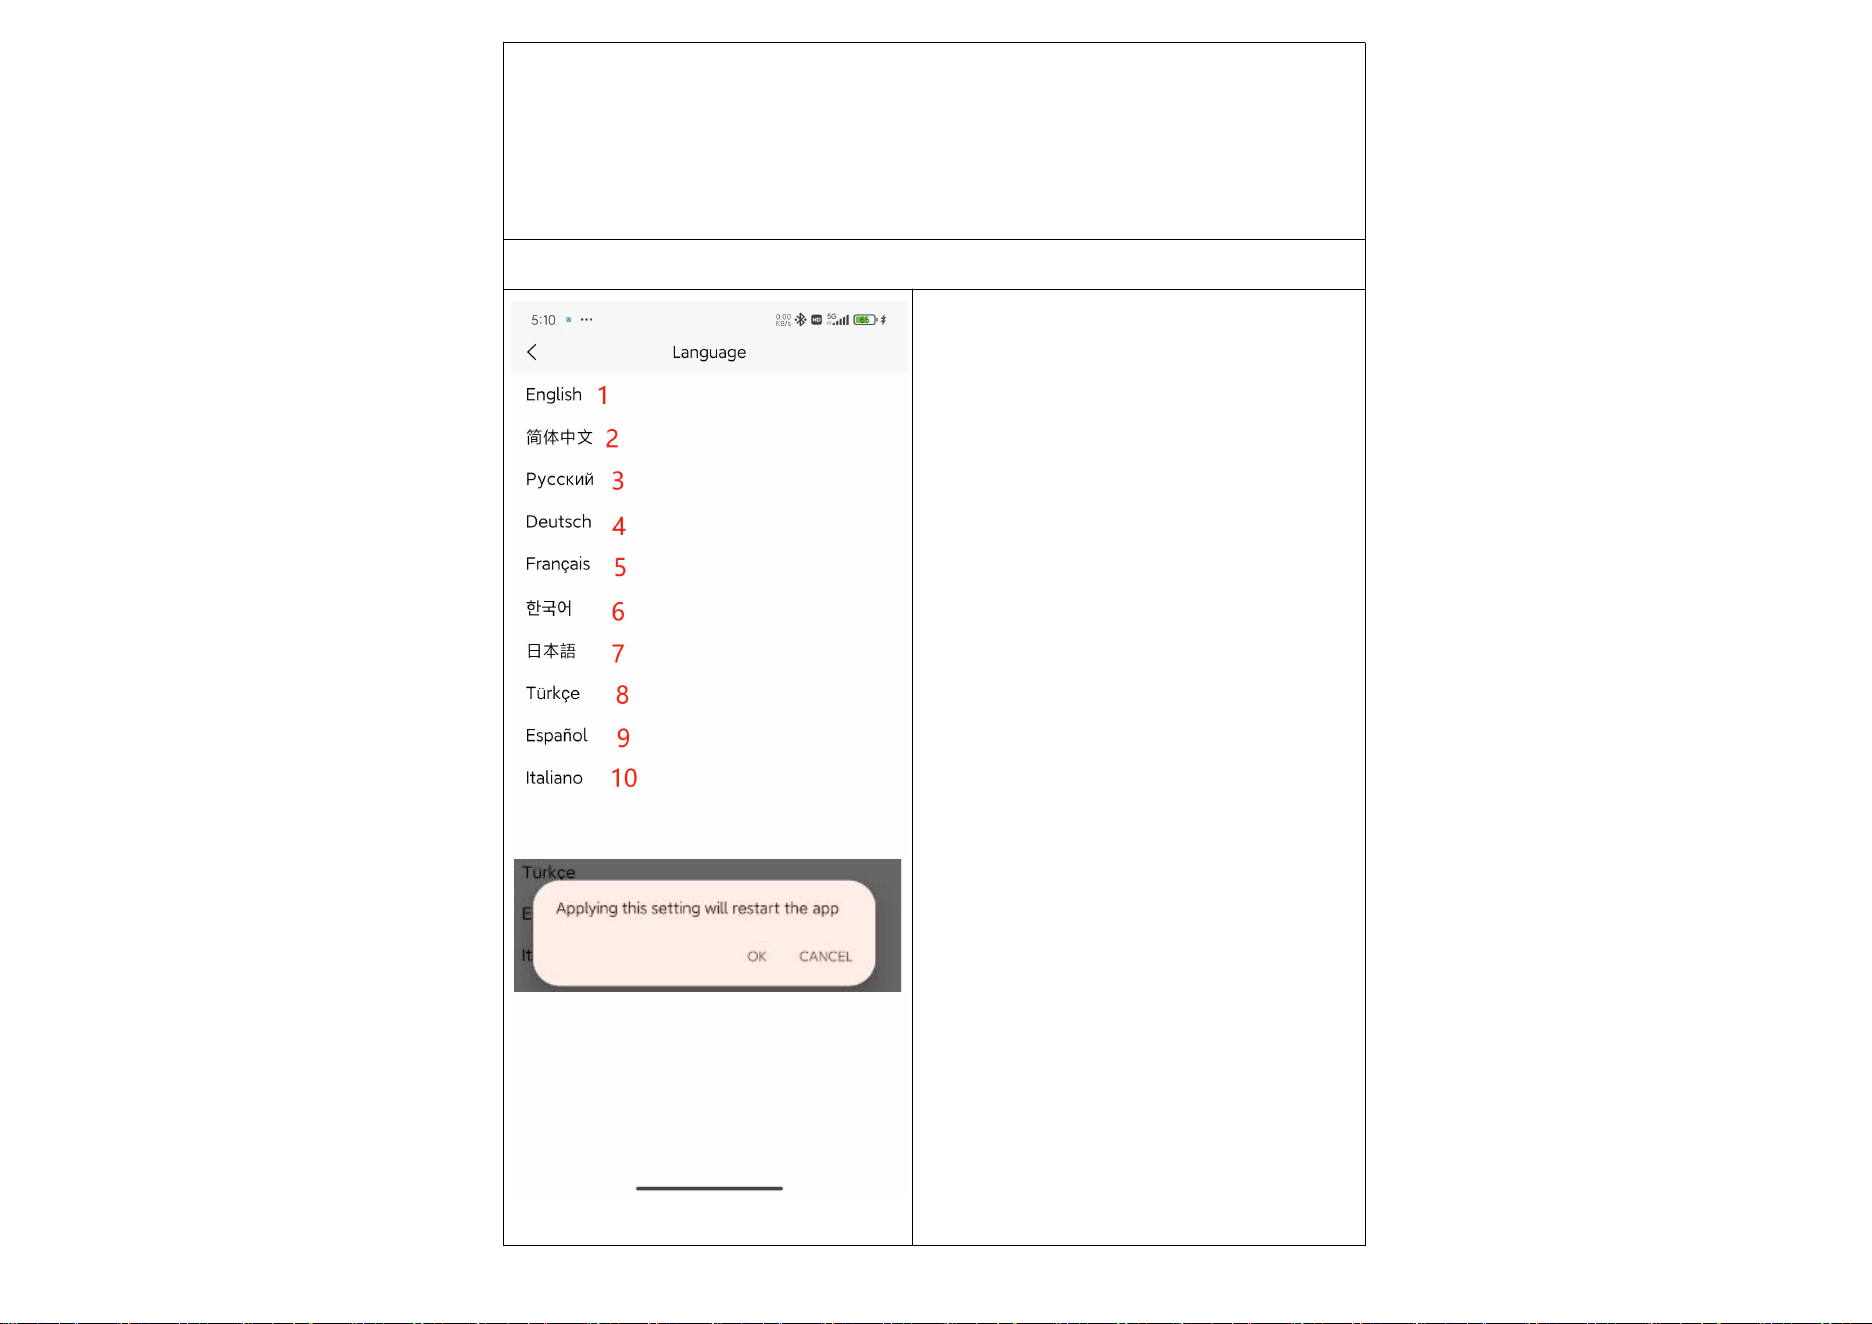
7.Introduction to Language Selection Interface:
1.English
2.Chinese
3.Russian
4.German
5.French
6.Korean
7.Japanese
8.Turkish
9.Spanish
10.Italian
After selecting the desired language, press the
OK button. The APP will automatically restart
and display the selected language. At this point,
you will need to reconnect Bluetooth.
E-5
1. Check if the heating airflow path is clear.
2. Verify if the fan is operating correctly.
3. Inspect if the temperature sensor is
functioning properly.
E-6
1. Check if the impeller is jammed.
2. nspect for any loose connection plugs.
Fan failure
3. Ensure proper gap between the magnet
on the fan wheel and the Hall sensor on
the controller.
E-08
Stall
1. Check if any of the following circum-
stance is being found: low fuel, low-tem-
perature solidification of fuel, fuel pipe
blockage, or fuel pump jamming.
2. Inspect if the intake and exhaust airflow
paths are clear.
3. Ensure sufficient contact between the
housing temperature sensor and the
housing.
4. Check for short-circuit or open circuit on
the harness; check for motor leak electricity.
High-temperature alarm
(Inlet > 50℃;
Housing > 230℃)
E-8
1. If the housing temperature is too high and
the cooling operation fails to cool down the
housing, wait excess of time until the machine
is cooled down and try to power on again.
2.2) Verify if the fuel
injection from the fuel pump
is working properly.
2.3) Inspect if the ignition
plug is damaged.
2.1) Check if the filter next
to the ignition plug is clean,
replace if dirty.
2. If there is
excess amount
of white smoke
in the exhaust.
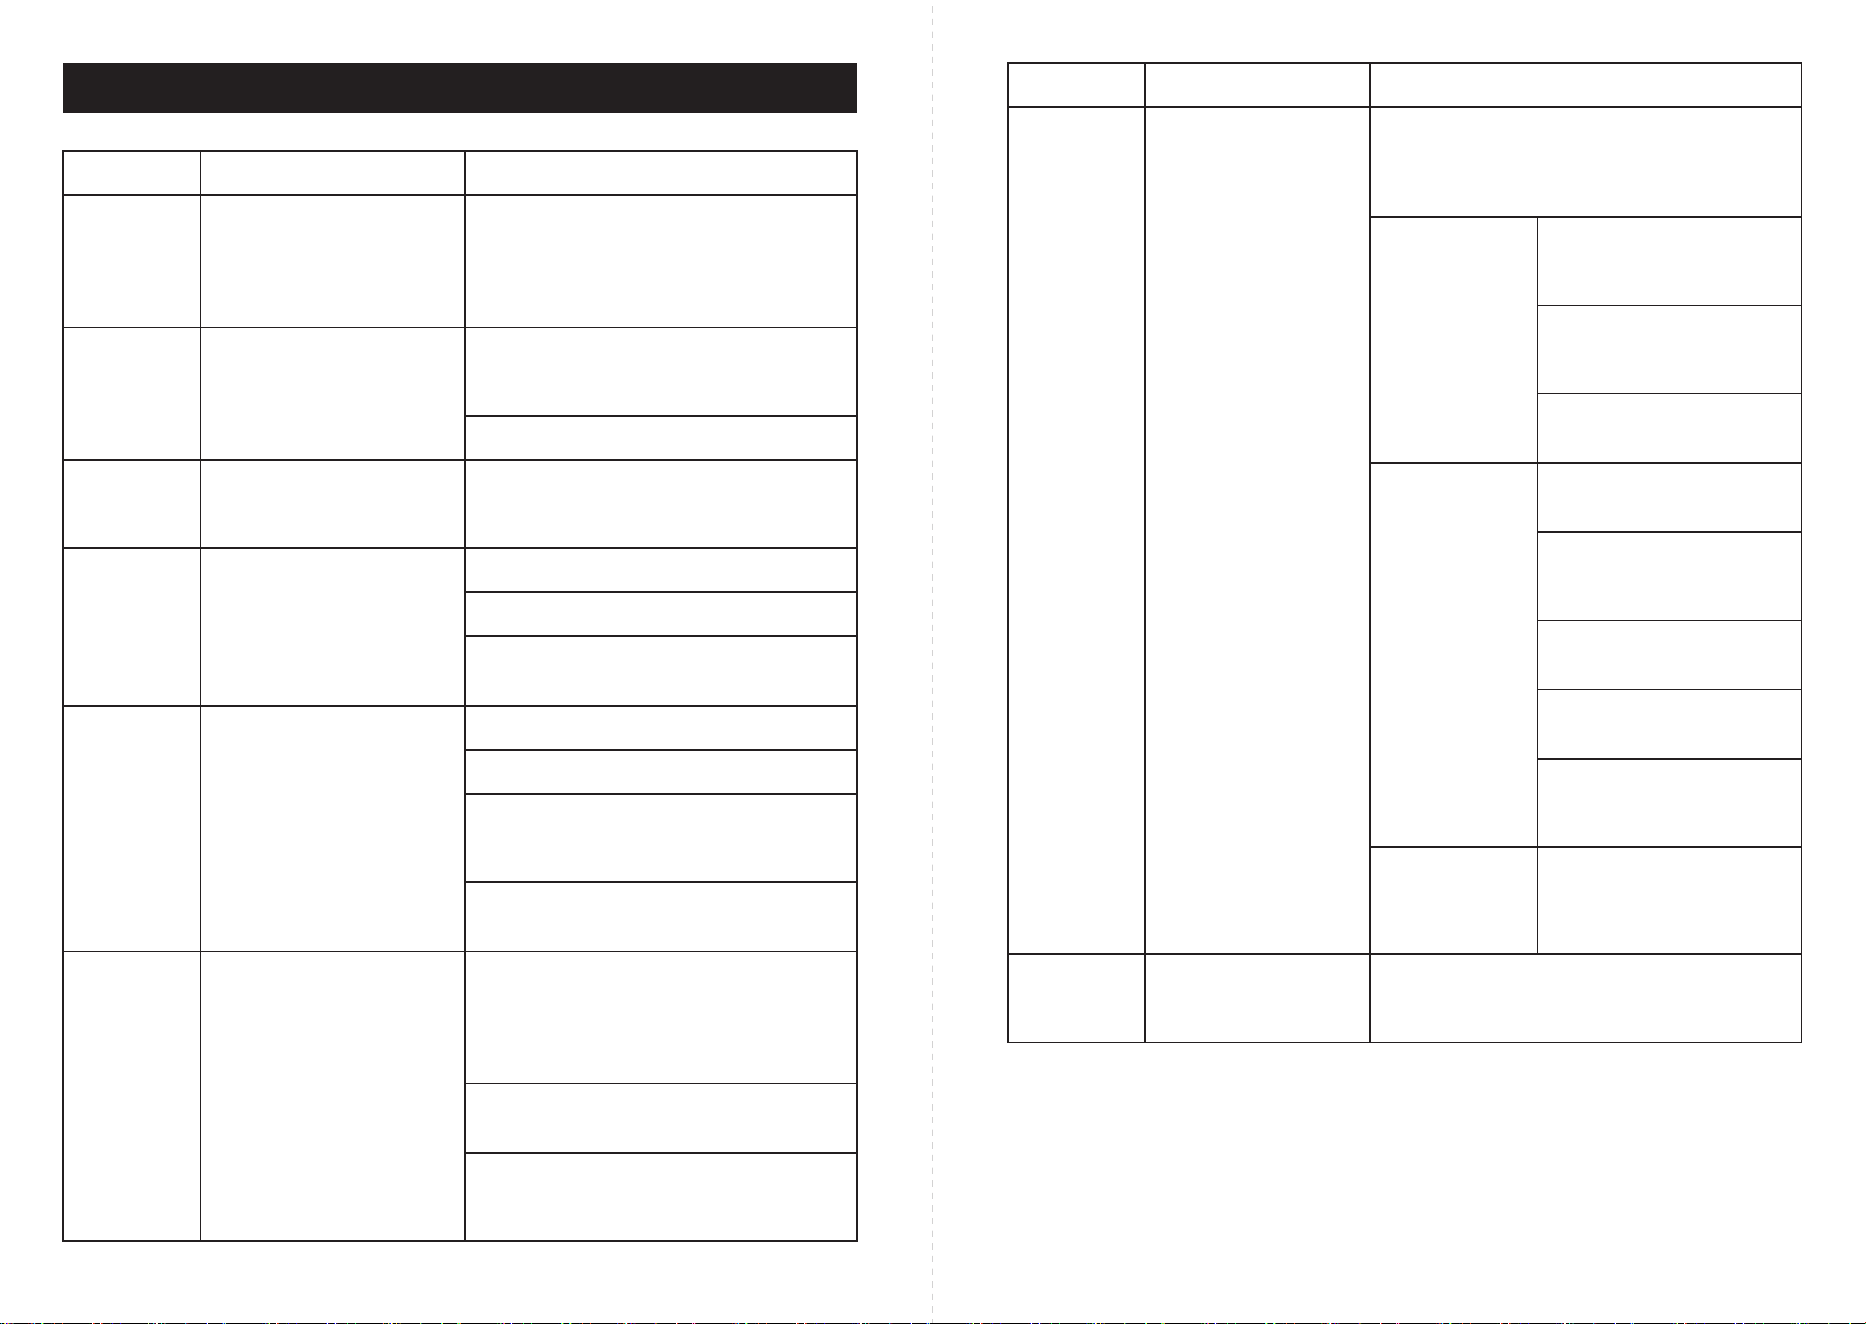
Fault Code TroubleshootingFault Reason
3.1) Check for fuel shortage,
frozen or blocked of fuel pipe.
3.2) Inspect if the fuel
pump is stuck or damaged
and unable to deliver fuel.
3.3) Verify if the air intake
and exhaust blockage.
3.5) Check if the gap
between the internal fan
wheel is too large.
3.4) Check if the ignition
plug is damaged.
Sensor failure
E-9
Check if the temperature sensor harness and
connectors are damaged or loose.
3. If there is a
small amount
of white smoke
or no smoke in
the exhaust.
4.1) Ensure sufficient
contact between the
housing temperature
sensor and the housing.
4. If ignition is
normal but the
ignition failure
fault persists.
Start failure
Troubleshooting
E-2
E-3
Fault Code Troubleshooting
E-4
2. Check if the ignition plug is damaged.
Fault Reason
Power supply
voltage range
Ignition plug failure
Fuel pump failure
Check voltage range (24V: 18-32V, 12V:
9-16V), inspect the battery or generator
for normal operation, and check if the
fuse is broken.
1. Check for loose ignition plug connec-
tors and/or possibly wire short-circuit with
the housing.
Inspect the fuel pump connection harness
and connectors for damage, looseness,
oxidation, short-circuits, or open circuits.
During the installation process or in your day-to-day usage, if you encounter any issues,
please feel free to reach out to our customer service on the purchasing platform. We are
here to assist you and will make every effort to resolve any problems you may have.
Note:
Poorly ventilated exhaust can be fatal. Follow all ventilation maintenance
procedures carefully.
Maintenance
•
•
•
•
•
•
Periodically inspect the electrical connections, if loose connection found, tighten them if necessary.
Regularly check the fuel levels of the fuel tank to ensure there is enough diesel to keep the heater
running. If fuel level is low, top up the tank with diesel, being careful to avoid overfilling.
Clean the air filter regularly by removing it from the heater and tapping it gently against a hard
surface to remove debris. Use a clean cloth or brush to remove smaller dirt or debris. Finally,
reattach the air filter to the heater. It is recommended to clean the air filter every few months during
normal use and more frequently in polluted areas or after heavy use.
Check the fuel pipe and connections for any signs of leaks, such as fuel spots on the floor or a
strong diesel odor. If there are leaks, tighten the connections to prevent further leakage. If you are
unsure how to tighten, consult your vehicle's manual or seek assistance from a trained and
licensed technician.
Check the exhaust pipe regularly for blockages, clearing and cleaning the line if needed.
If the heater has not been used for an extended period, it is important to perform a test run before
actual using. This will ensure that the heater is functioning properly and that there are no leaks or
other issues that could be harmful. To perform a test run, turn on the heater and let it run for a few
minutes while observing the fuel and temperature, and exhaust pipe. If everything appears to be
working correctly, the heater is ready for use. If you notice any issues, such as dirty or broken
components, clean or replace them as needed. For significant issues, seek assistance from a
trained and licensed technician.
Product Warranty
Thank you for choosing our company's product. We adhere to the principle
of emphasizing both quality and reputation, and we provide excellent
after-sales service and technical support to our valued customers.
Product Warranty
1. Our company provides a 12-month free warranty service for the main unit of the product from the
date of receipt. (Excluding non-manufacturing defects)
2. Please note that damages resulting from improper use, expiration of the warranty period, or due to
human factors or natural wear and tear are not covered by the free warranty. However, we under-
stand that accidents happen, and we are here to assist you. If you encounter any issues with your
product, please reach out to us, and we will provide guidance and support to resolve the problem.
3. For product warranty or replacement, please contact the customer service of the purchasing
platform for further assistance.

FCC Statement
This device complies with part 15 of the FCC Rules. Operation is subject to the following two
conditions: (1) This device may not cause harmful interference, and (2) this device must
accept any interference received, including interference that may cause undesired operation.
This equipment has been tested and found to comply with the limits for a Class B digital device,
pursuant to Part 15 of the FCC Rules. These limits are designed to provide reasonable
protection against harmful interference in a residential installation. This equipment generates
uses and can radiate radio frequency energy and, if not installed and used in accordance with
the instructions, may cause harmful interference to radio communications. However, there is
no guarantee that interference will not occur in a particular installation. If this equipment does
cause harmful interference to radio or television reception, which can be determined by turning
the equipment off and on, the user is encouraged to try to correct the interference by one or
more of the following measures:
-- Reorient or relocate the receiving antenna.
-- Increase the separation between the equipment and receiver.
-- Connect the equipment into an outlet on a circuit different from that to which the receiver is
connected.
-- Consult the dealer or an experienced radio/TV technician for help.
Any Changes or modifications not expressly approved by the party responsible for compliance
could void the user's authority to operate the equipment.
This equipment should be installed and operated with a minimum distance of 20cm between
the radiator and your body.
This equipment complies with the FCC radiation exposure limits set forth for an uncontrolled
environment, This transmitter must not be co-located or operating in conjunction with any other
antenna or transmitter.