
Page1Page, of9Page
1.Overview:
To meet Market Demand, For Customer Developed a Bluetooth Controller; Appearance
ElegantSleek, Streamlined Shape, Ergonomic Design; Dedicated Creating A Professional
Wireless Controller, Let You Enjoy Gaming More Effortlessly.
2.Function Description:
2.1 Supports Switch console platform with one-key wake-up function.
2.2 Supports PC (Windows) platform with X-input and D-input modes and switching.
2.3 Supports Android (phone, box, TV) and iOS platforms.
2.4 Supports PS3 platform.
2.5 Supports VS-R console. (VS-R console has no Bluetooth, implemented via receiver's
Xinput mode)
2.6 Built-in 550mAh lithium battery with smart power-saving technology for extended
gaming time.
2.7 Controller supports turbo function.
2.8 Supports sleep and wake-up functions.
2.9 Line-of-sight transmission distance exceeds 7 meters.
Page2Page, of9Page
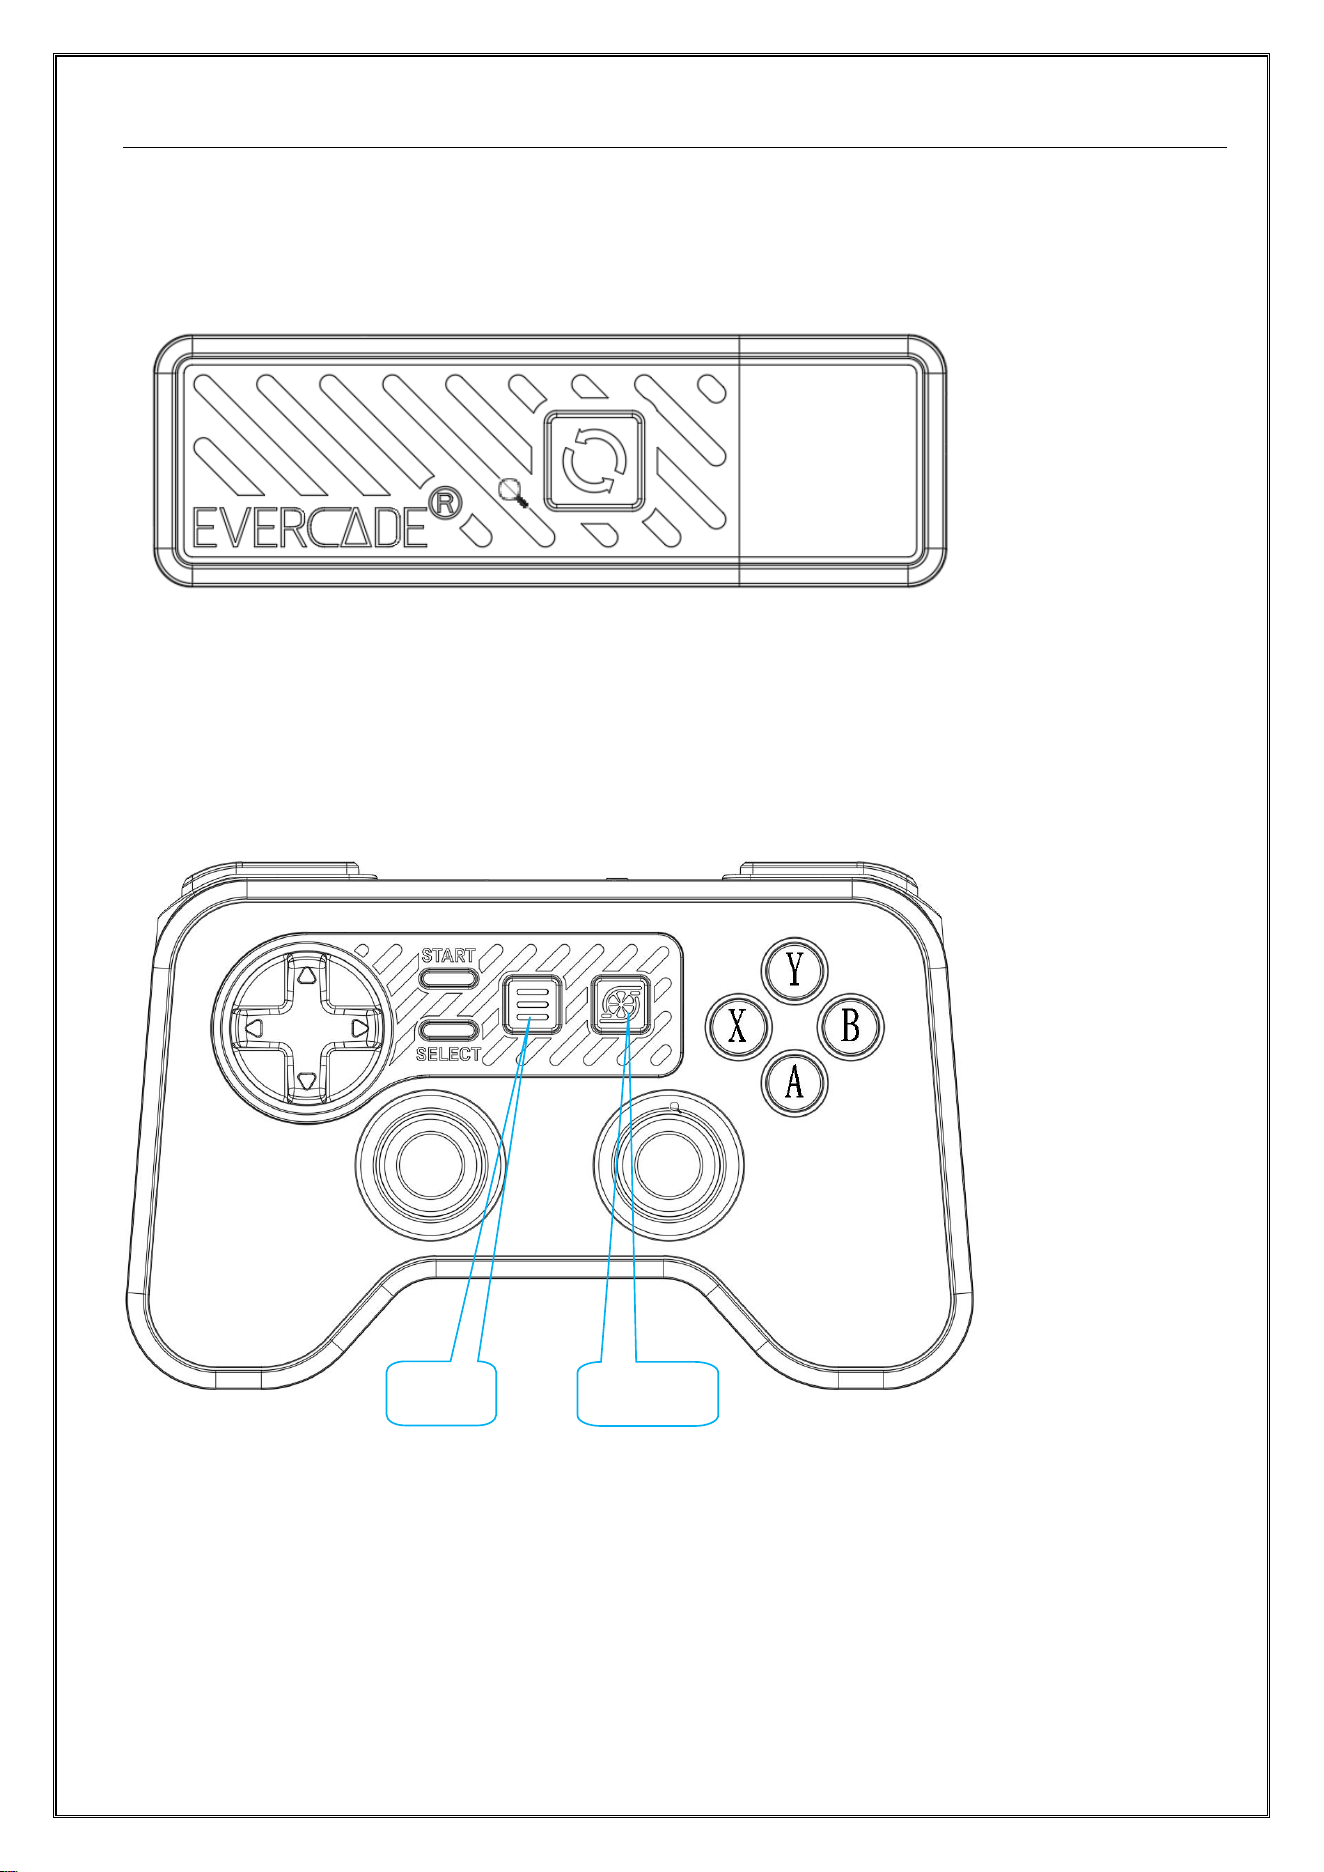
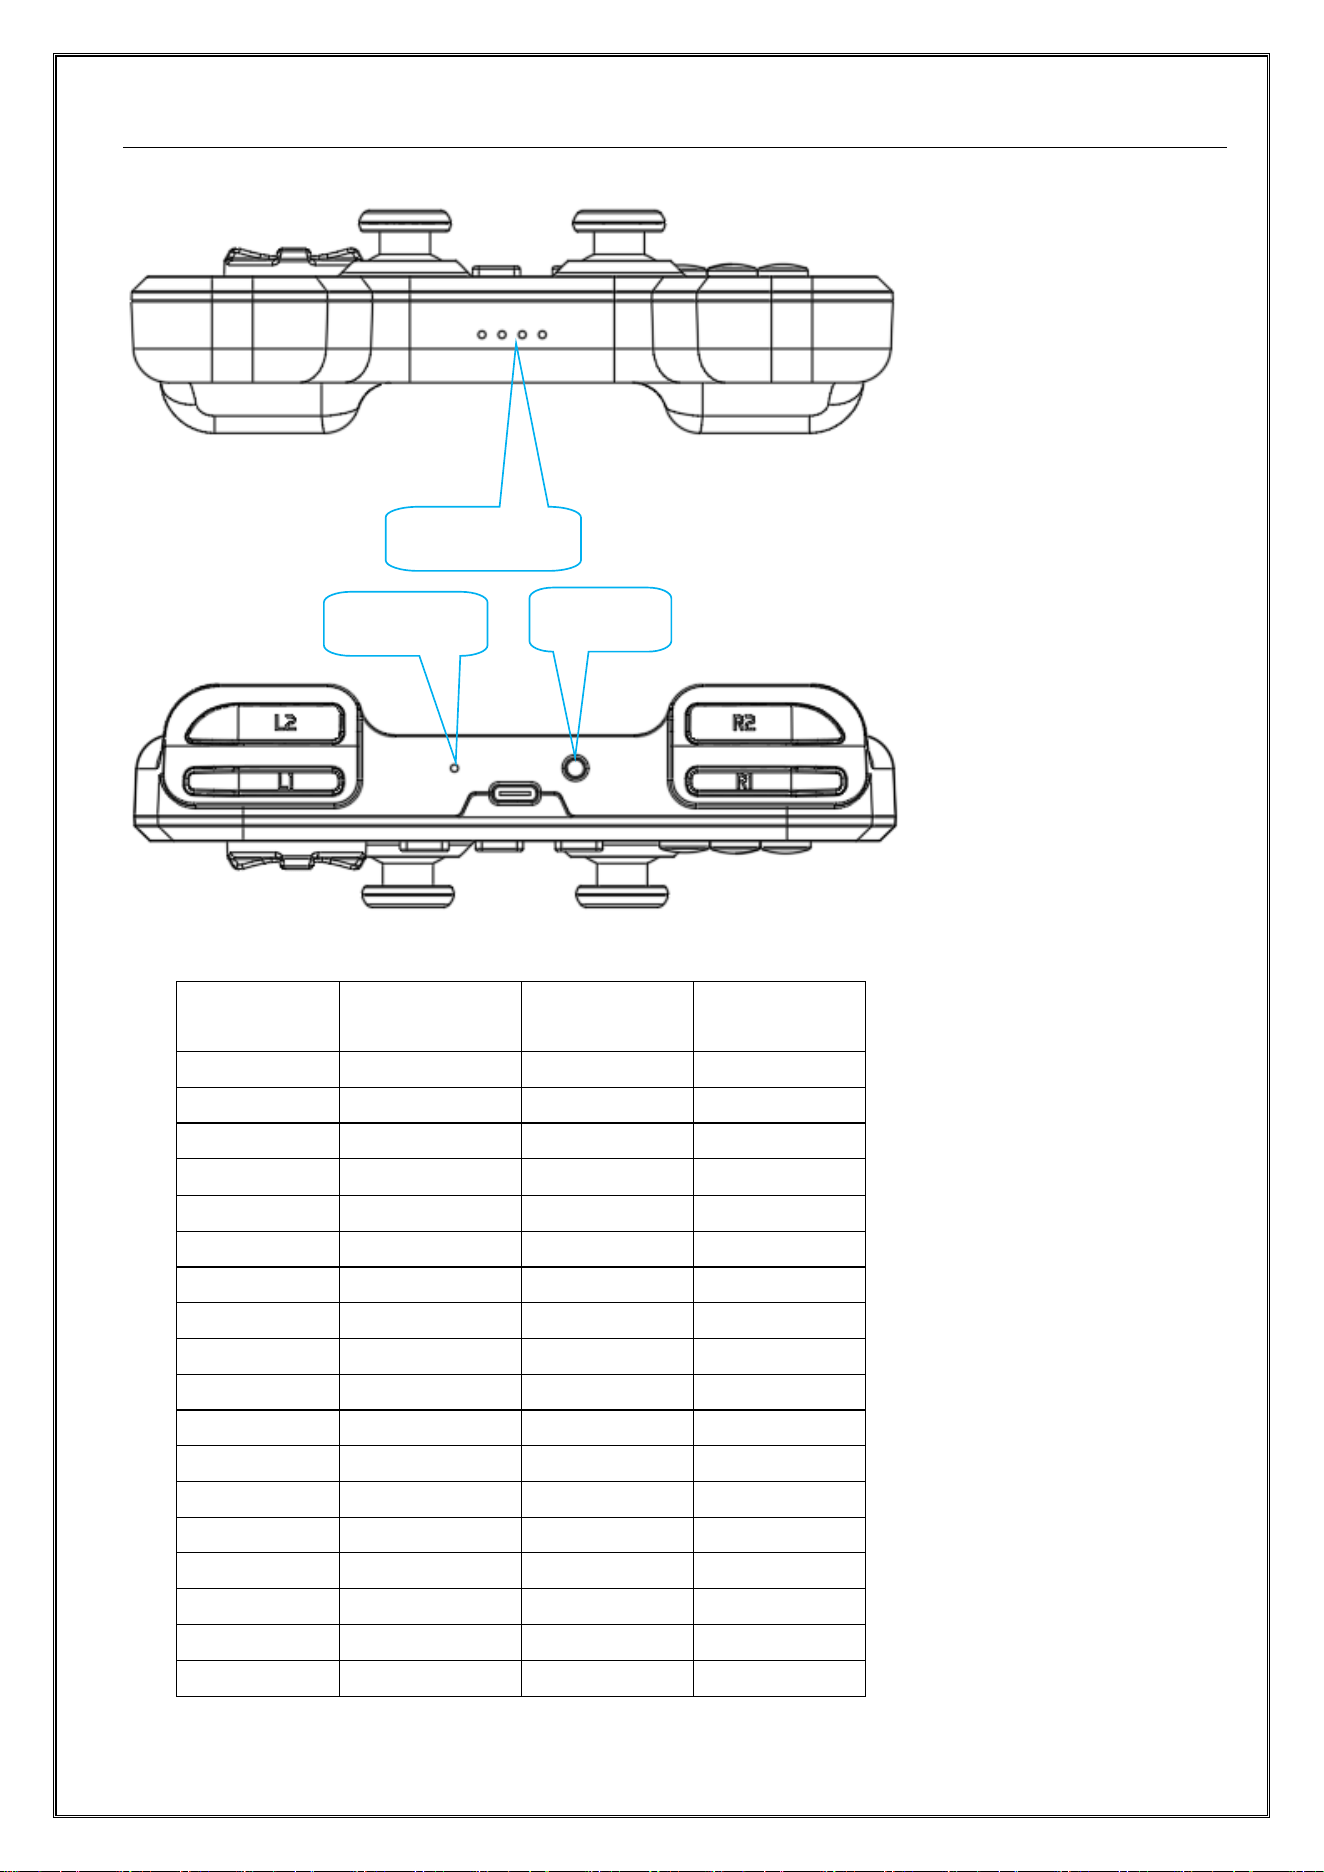
3.Product Diagram:
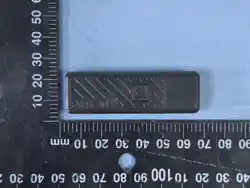
3.1 Receiver Diagram
3.2 Controller Diagram
TURBO
HOME
Page3Page, of9Page
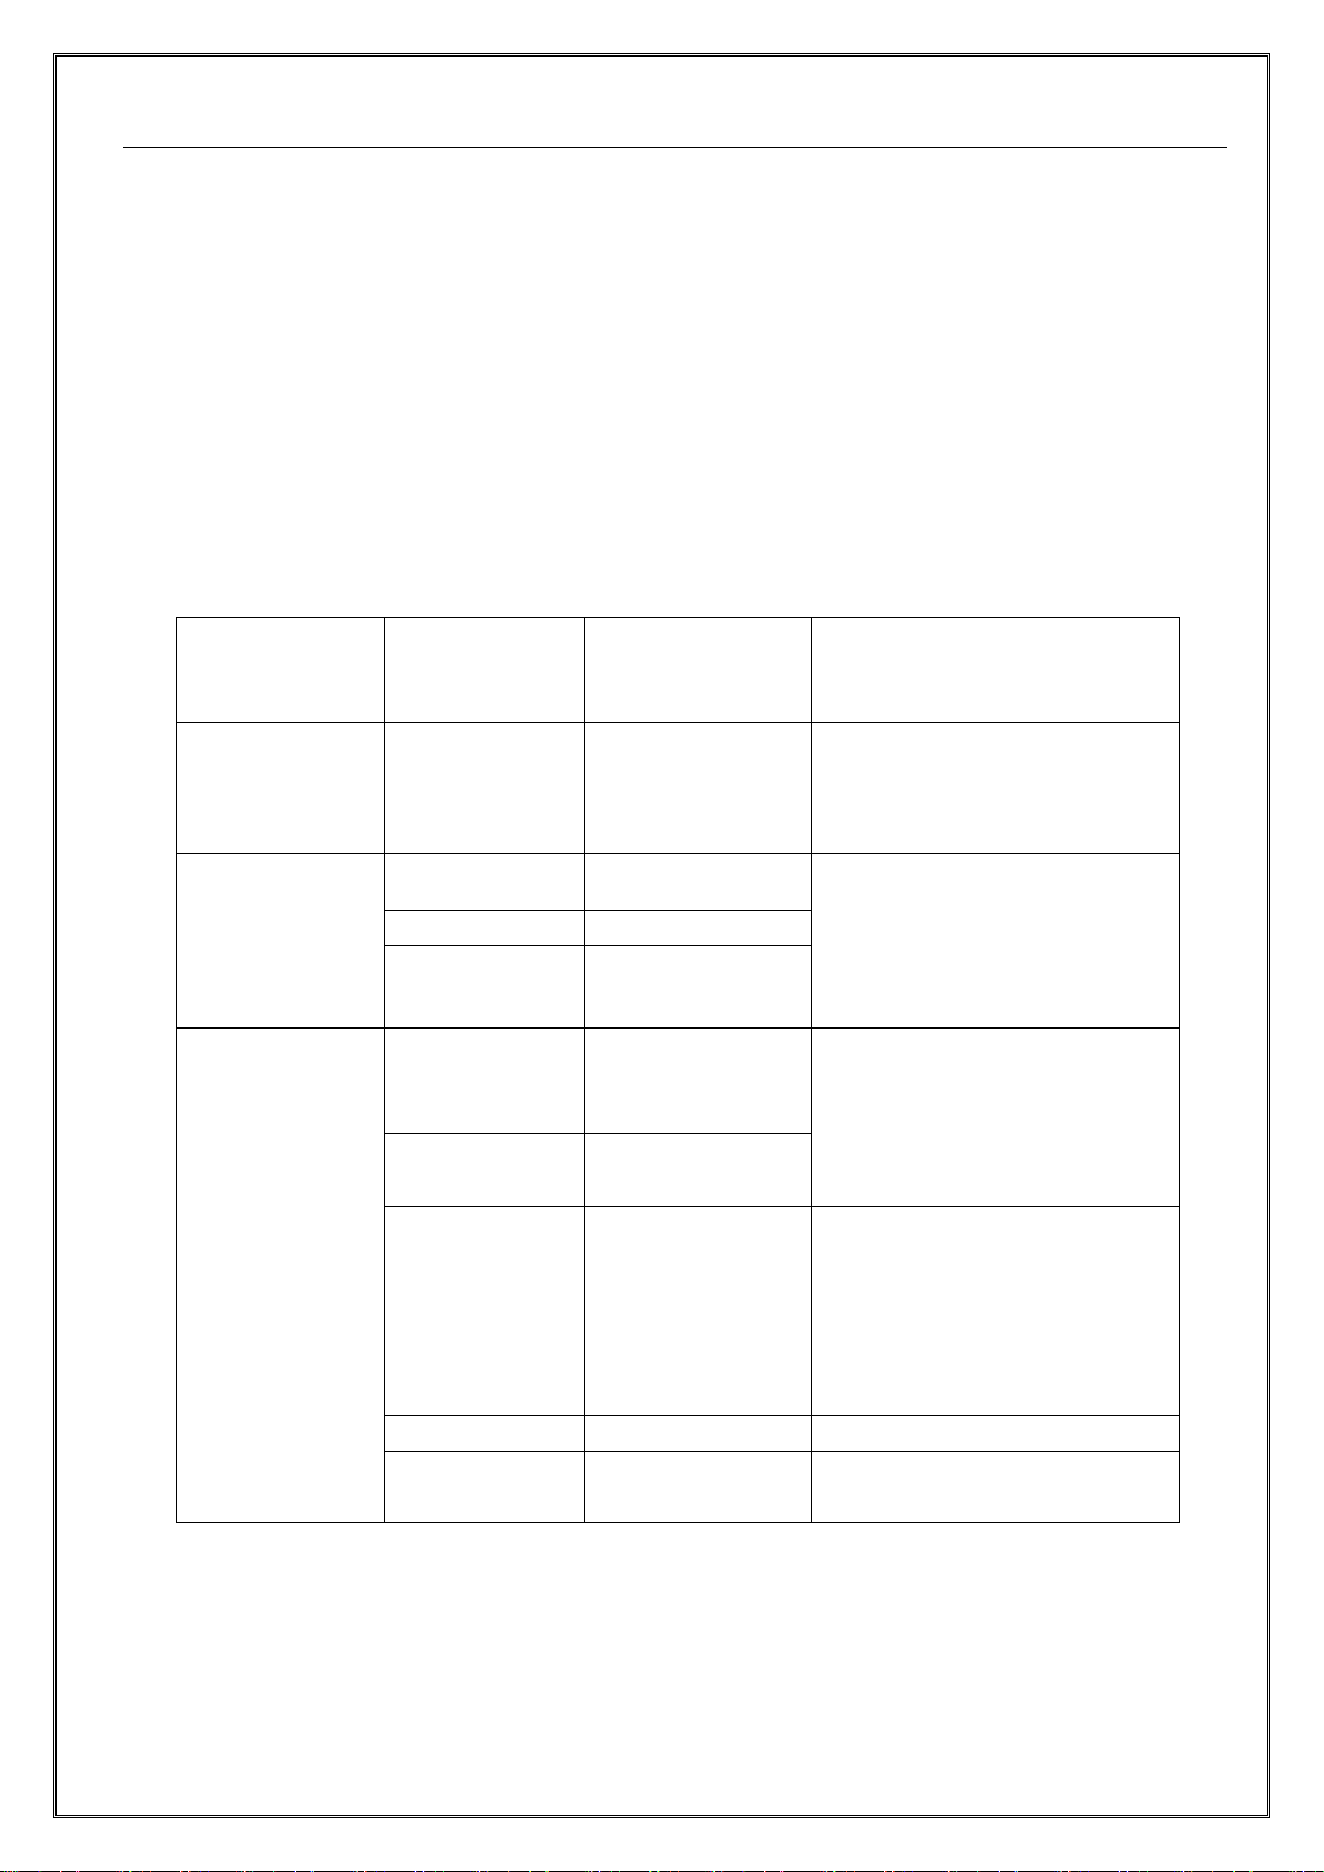
3.2 Key Mapping Table
Controller
Button
NSPlatform
PCPlatform
iOSPlatform
Left Stick
Left Stick
Left Stick
Left Stick
Right Stick
Right Stick
Right Stick
Right Stick
D-Pad
D-Pad
D-Pad
D-Pad
A
A
A
A
B
B
B
B
X
X
X
X
Y
Y
Y
Y
L1
L1
LB
L1
L2
ZL
LT
L2
L3
L3
LSB
L3
R1
R1
RB
R1
R2
ZR
RT
R2
R3
R3
RSB
R3
-
-
SELECT
+
+
START
Pause
TURBO
Screenshot
HOME
HOME
XBOX
HOME
PAIR
Channel
LED1-2-3-4
Power
Indicator
Pair
Switch
Page4Page, of9Page
4.Usage Instructions:
4.2 Power On/Off:
4.2.1 When powering on by long-pressing the START button, the four LED channel indicators show
battery level:
LED1 On --- Battery voltage below 3.55V
LED1+LED2 On --- Battery voltage 3.55V~3.80V
LED1+LED2+LED3 On --- Battery voltage 3.80V~4.00V
LED1+LED2+LED3+LED4 On --- Battery voltage above 4.00V
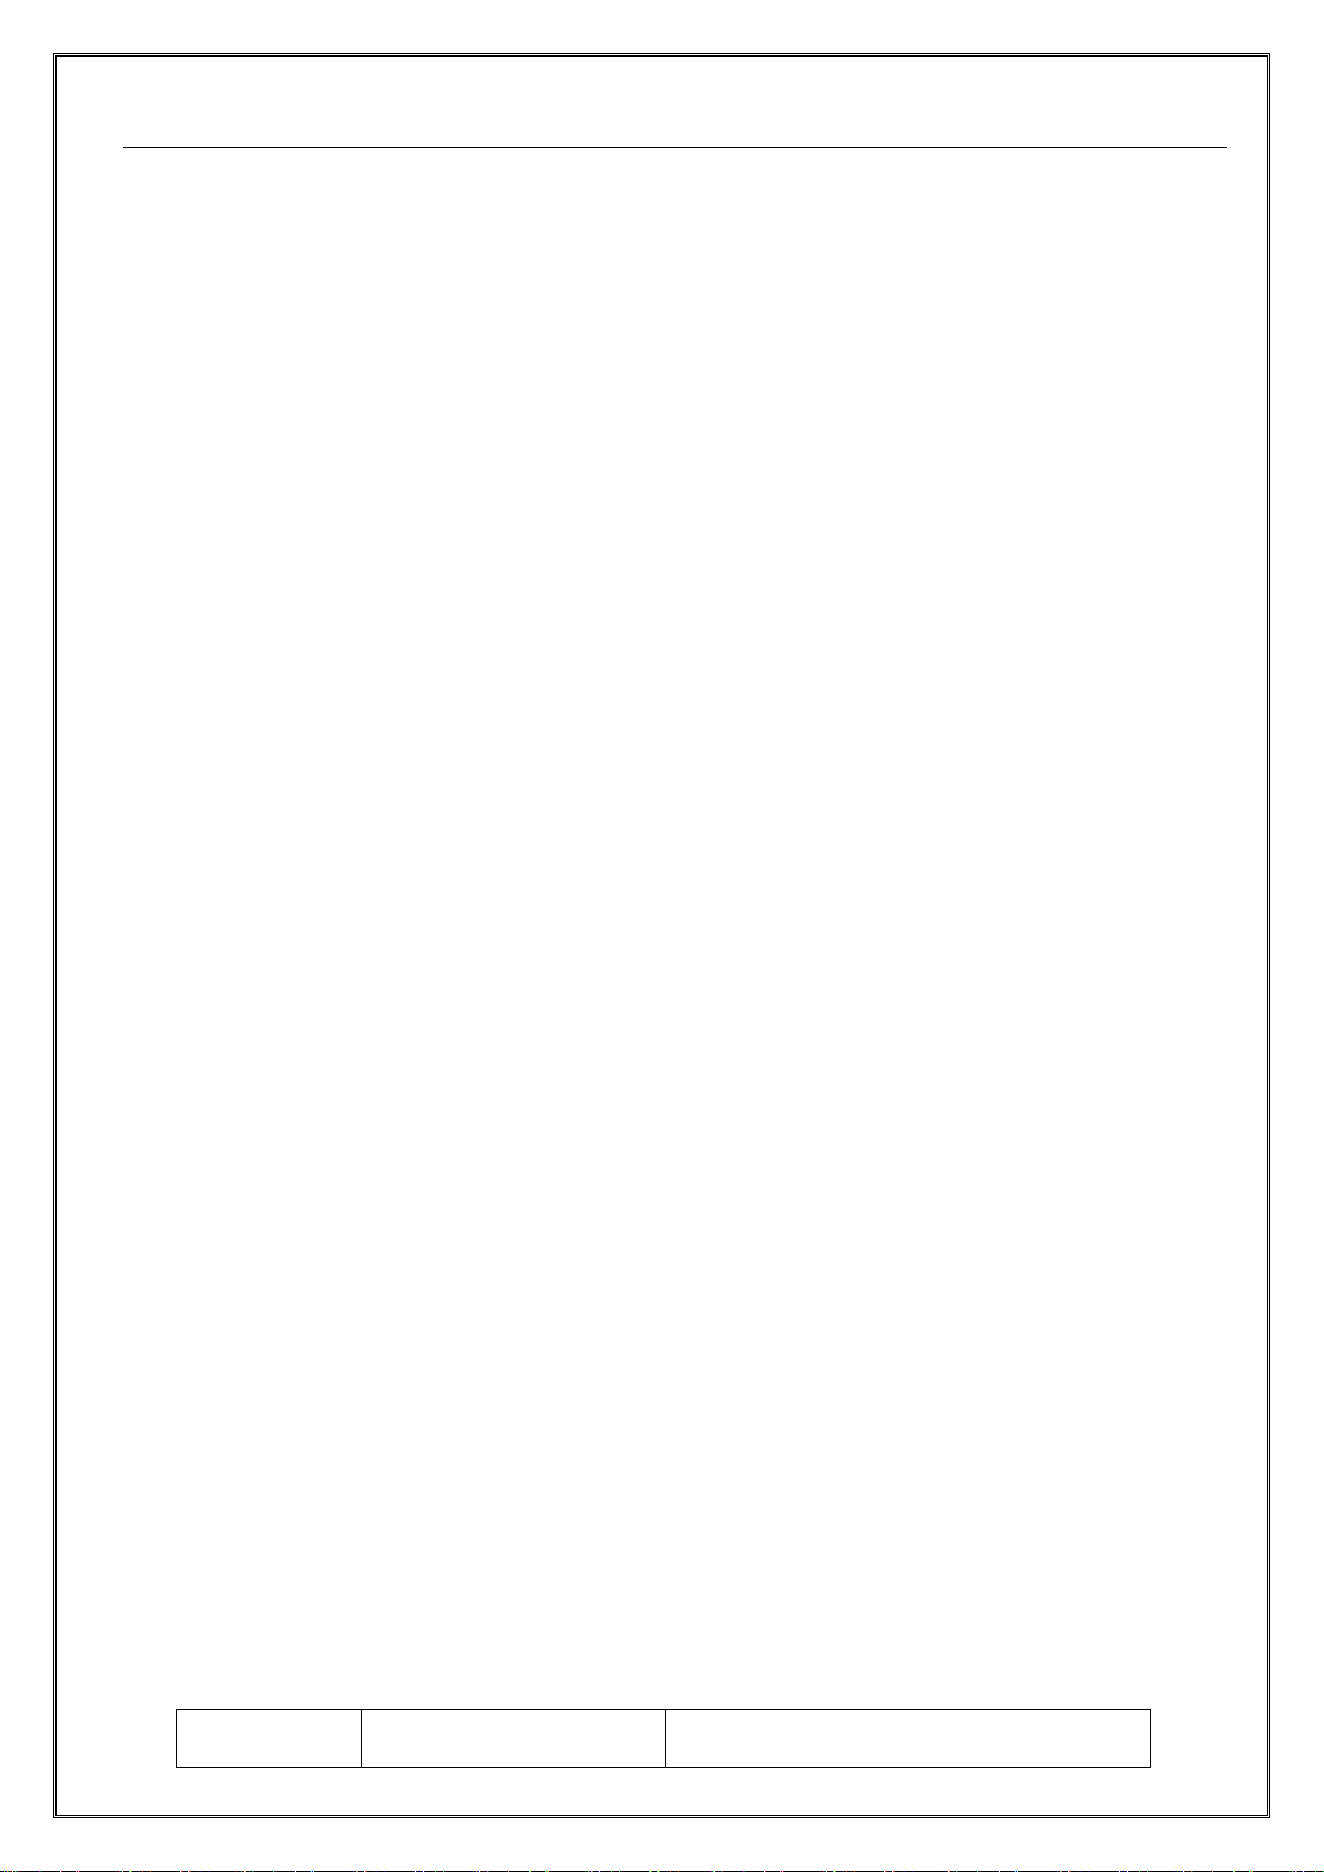
4.2.2 Platform Switching and Channel LED Indicators:
Switch Combo
Key
Platform
Connection
Method
Channel LED
START+X
(Bluetoothxbox)
PC
Bluetooth
LED2Indicator
START+B
(BluetoothPS4 )
(No need
tosupports
PS4Console)
PC
Bluetooth
LED3Indicator
Android
Bluetooth
iOS
Bluetooth
START+Y
(Switch)
Switch Console
BluetoothSwitch
Mode
Switch Mode, Channel LED1LED
Solid
PC
BluetoothSwitch
Mode
PC
Receiver
PC defaults to Xinput, LED2
indicator;
Long-press START+SELECT for 3
seconds to cycle to Dinput,
LED3Indicator; SWITCHMode,
LED1Indicator
VS-R Console
Receiver
VS-R Console, XinputMode
Switch
Receiver
Switch Mode, LED1 indicator.Cannot
switch
(Note: Use Bluetooth Switch mode to connect to the receiver for auto-detection. NS console
defaults to Switch mode; PC defaults to Xinput mode)
4.2.3 Controller Wired Mode:
4.2.3.1 supports Xinput---LED2, Dinput---LED3, SWITCH---LED1
4.2.3.2 PC defaults to Xinput; Long-press START+SELECT for 3 seconds to switch to Dinput and
Page5Page, of9Page
SWITCH mode
4.2.3.3. Auto-detected as Switch mode on Switch console
4.3 PC Usage
4.3.1 Plug the receiver into the PC USB port, press the button on the receiver for 1s, the receiver
indicator flashes rapidly.
4.3.2 When powered off, hold controller START+Y for 1 second to power on, LED 1 flashes.
4.3.3 Long-press pair button for 3 seconds to pair, channel LEDs scroll and flash.After successful
connection, channel LED 1 stays solid.
4.3. 4 For next use, press START button once and the controller will auto-reconnect.
4.4Bluetooth Connection
4.4.1 When powered off, hold controller START+X for 1 second to power on, LED 2 flashes.
4.4.2 Long-press pair button for 3 seconds to pair, channel LEDs scroll and flash.
4.4.3 OpenComputerBluetooth Connection"XboxWireless Controller", After successful connection,
channel LED 2 stays solid.
4.4. 4 For next use, press START button once and the controller will auto-reconnect.
4.6 Switch Console Usage
4.6. 1Tap Settings at the bottom of the Switch home screen to enter [Change Grip/Order] screen.
4.6.2 When powered off, hold controller START+Y for 1 second to power on, LED 1 flashes.
4.6. 3 Long-press pair button for 3 seconds to pair, channel LEDs scroll and flash.After successful
connection, channel LED 1 stays solid.
4.6. 4 For next use, press START button once and the controller will auto-reconnect.
4.7 Connect Android/iOS
4.7.1 When powered off, hold controller START+B for 1 second to power on, LED 3 flashes.
4.7. 2 Long-press pair button for 3 seconds to pair, channel LEDs scroll and flash.
4.7.3 OpenDeviceBluetooth ConnectionWireless Controller,After successful connection, channel
LED 3 stays solid.
4.7.4 For next use, press START button once and the controller will auto-reconnect.
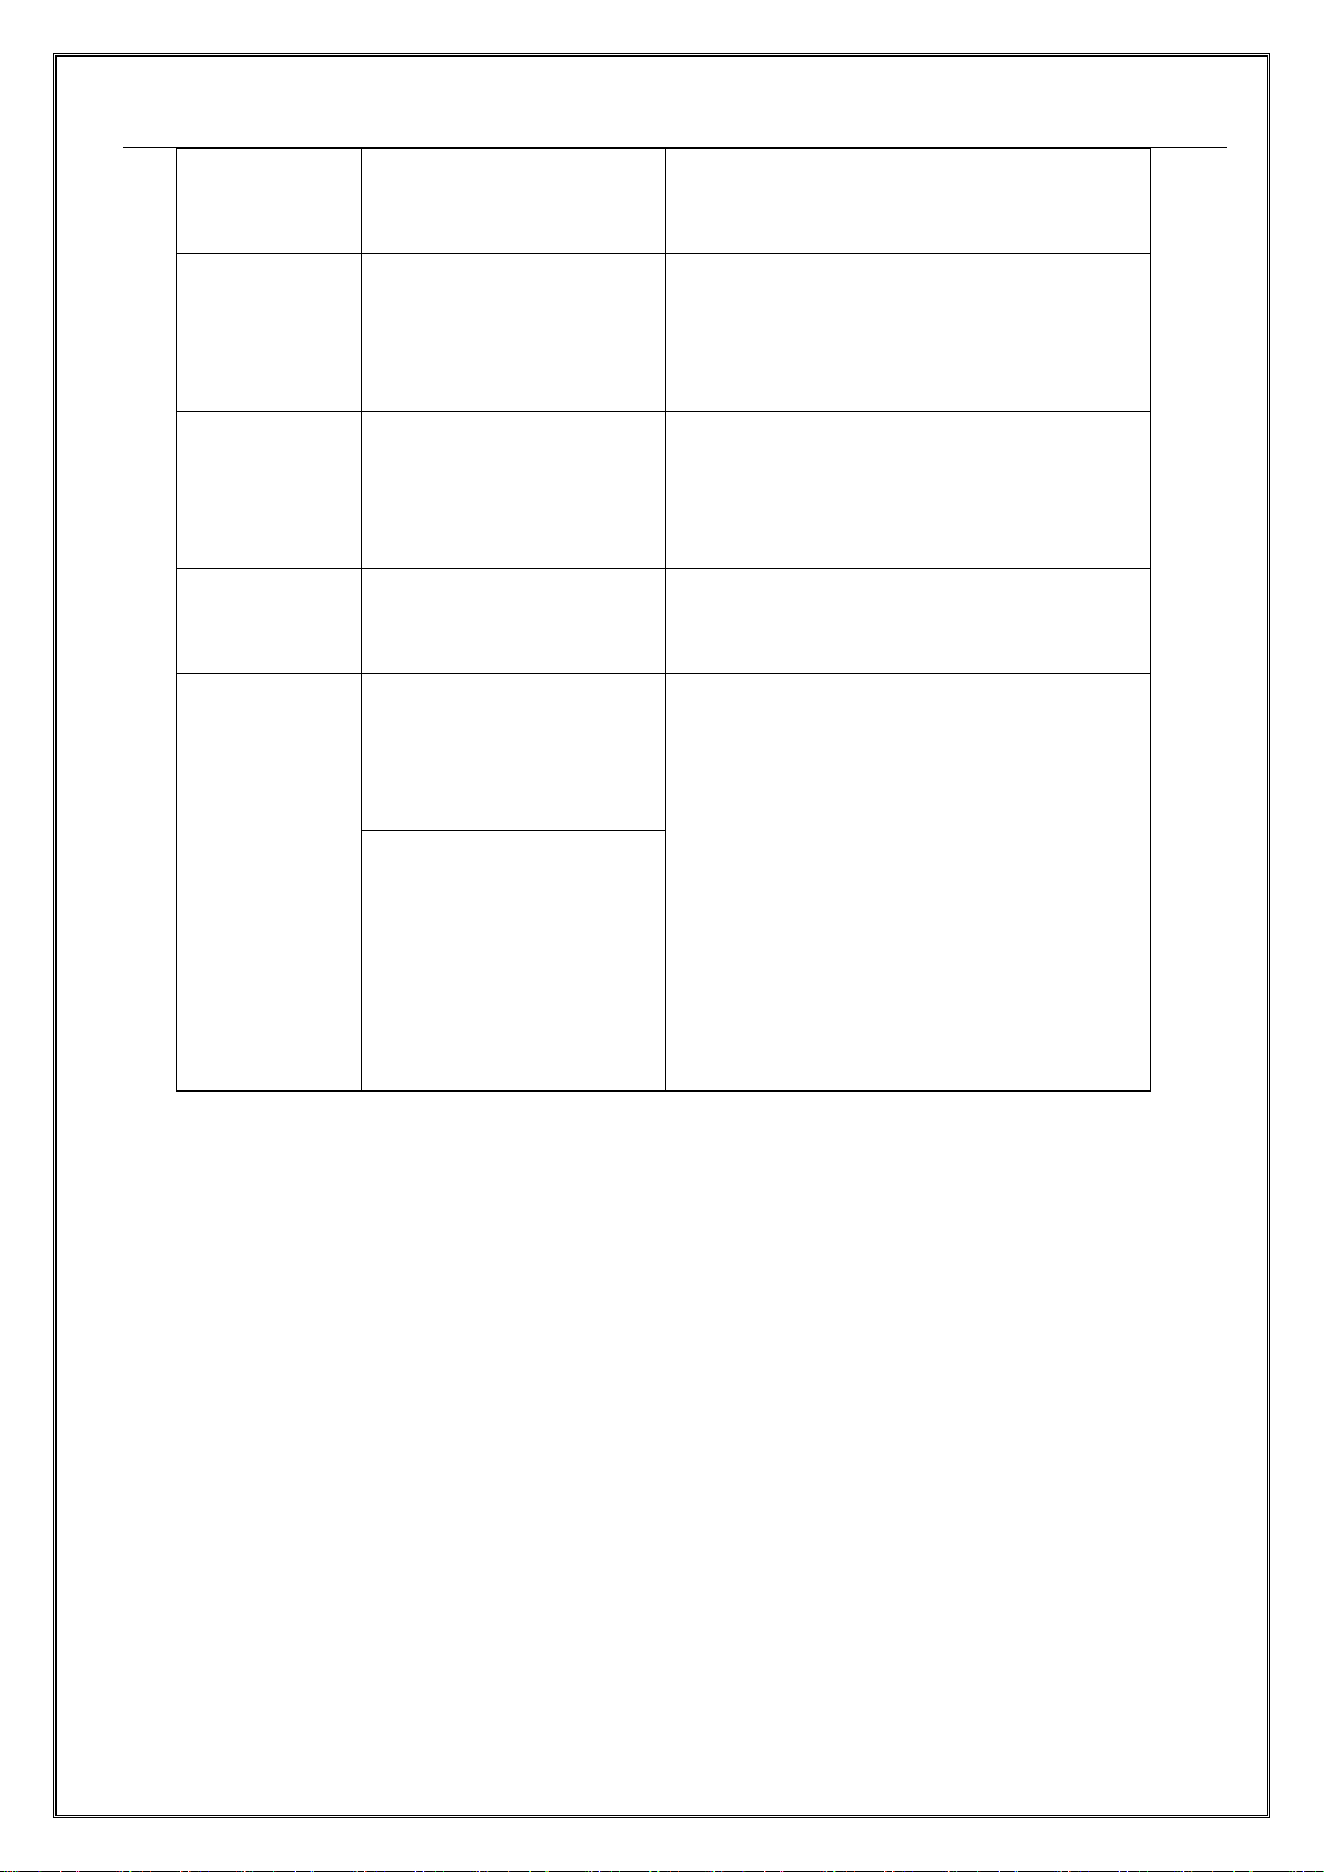
4.8 Turbo (TURBO) Function
Buttons that can be set for TURBO function: A, B, X, Y, LB, RB, LT, RT
Manual Turbo
TURBOButton+
1st
Page6Page, of9Page
Function Button
timeSettingAfterLong-presstheFunction
ButtonwhenTriggerTurbo
Auto Turbo
In the buttonManual
TurboStatestate:TURBO+
Function Button
Page1sttimeSettingAfterPressFunction
ButtonAutoTriggerTurbo
Clear Turbo
In the buttonAuto
TurboStatestate:TURBO+
Function Button
Page2ndtimeSettingAfterCancelFunction
ButtonSetting Turbo
Clear All
Turbo
TURBO+
SELECTLong-press3s
4 LEDsFlash3timeIndicatesCancelall
Function ButtonSetting Turbofunction
Turbo Rate
Adjustment
Increase turbo rate:
TURBO + right stick
right
Default 5time/ sec
5time/ secwhenChannel LED1Flash3time
10time/ secwhenChannel LED 1+2
Flash3time
15 time/ secwhenChannel LED 1+2+3
Flash3time
20time/ secwhenChannel LED 1+2+3+4
Flash3time
Decrease turbo rate:
TURBO + right stick left
4.9 Controller Inner Dead Zone Quick Switch
SimultaneouslyPress[L3+R3]Button5 sec, LED1+LED4Flash3timeIndicatesSuccessfully switched
zero dead zone mode and 10% dead zone mode.
4.10 Stick Square/Circle Adjustment Switch
firstSimultaneouslyHold[L3+R3]Button,
thenPressSTARTButton,LED2+LED3Flash3timeIndicatesSuccessfully switched stick square/circle
adjustment.
4.11 3D Stick Calibration
When the stick drifts or fails to center, use the controller calibration function.
4.11.1 When powered on, simultaneously press controller SELECT+A+Home for 3 seconds to enter
calibration mode, the 4 channel LEDs flash alternately in two groups.
4.11.2 Smoothly rotate both sticks 2-3 turns, ensuring the sticks reach the edges.
4.11.3 whenWillControllerPlace on Level surface,Then pressController
Page7Page, of9Page
STARTButton,ReleaseController Button3secAfterAutoComplete 3D Stick Calibration,
whenControllerRestoreWorking State.
4.12 Reset Function
4.12.1 Hardware Reset: When the controller malfunctions, freezes, or has other abnormalities,
long-press START button for 10 seconds to force power off.
4.12.2 Software Reset: Long-press pair button for 8 seconds, controller restores factory settings,
power indicator flashes for 1 second indicating successful reset, controller enters unlocked state.
4.13 Battery Function
4.13.1 Charging Power: Standard USB 5V voltage, can use phone charger, computer or other USB
interfaces to charge the controller, full charge time is approximately 3 hours.
4.13.2. When the controller wakes from sleep to power-on pairing, channel LEDs briefly indicate
battery level.
4.13.3. When battery is low, the current connection mode channel LED flashes slowly; stays solid
when fully charged.
4.13.4 Charging when powered off: Plug in the charging cable, four LEDs flash; all
four LEDs turn off when fully charged.?
4.13.5 When battery is low, the current mode indicator flashes slowly; charge the
controller promptly.
4.13.6 Power-off voltage: 3.5V .
4.14 Sleep Function
Controller State
Time to Enter Sleep
Reconnect State
60 secNo Connection
First Pairing State
60 secNo Connection
Working State (Default)
5 min No operation or
movement
5.Troubleshooting:
5.1 When unable to power on, the built-in battery may be depleted; use a USB cable to
charge the controller before powering on.
5.2 When the controller unexpectedly freezes or disconnects, keep within reasonable
distance from the device or reconnect.

Page8Page, of9Page
5.3 If you find the stick not centering in Switch games, recalibration is needed.
6.Precautions:
6.1 Avoid strong vibrations; do not disassemble, modify, or repair by yourself.
6.2 Avoid storing in damp, high-temperature, or oily environments.
6.3 Avoid water or other liquids entering the controller, which may affect
functionality.
6.4 Contains battery; do not throw the controller into fire, explosion hazard.
6.5 This product's charging voltage is USB 4.5-5.5V DC; otherwise it may not charge
or may cause damage.
6.6 Children should use this product under adult supervision.
6.7 For quality issues or suggestions, please contact the dealer or after-sales service.

Page9Page, of9Page
FCC Statement
This device complies with part 15 of the FCC Rules. Operation is subject to the
following two conditions: (1) This device may not cause harmful interference, and
(2) This device must accept any interference received, including interference that
may cause undesired operation.
Any Changes or modifications not expressly approved by the party responsible for
compliance could void the user's authority to operate the equipment.
Note: This equipment has been tested and found to comply with the limits for a Class
B digital device, pursuant to part 15 of the FCC Rules. These limits are designed to
provide reasonable protection against harmful interference in a residential
installation. This equipment generates uses and can radiate radio frequency energy and,
if not installed and used in accordance with the instructions, may cause harmful
interference to radio communications. However, there is no guarantee that interference
will not occur in a particular installation. If this equipment does cause harmful
interference to radio or television reception, which can be determined by turning the
equipment off and on, the user is encouraged to try to correct the interference by one
or more of the following measures:
-Reorient or relocate the receiving antenna.
-Increase the separation between the equipment and receiver.
-Connect the equipment into an outlet on a circuit different from that to which
the receiver is connected.
-Consult the dealer or an experienced radio/TV technician for help.
The device has been evaluated to meet general RF exposure requirement.