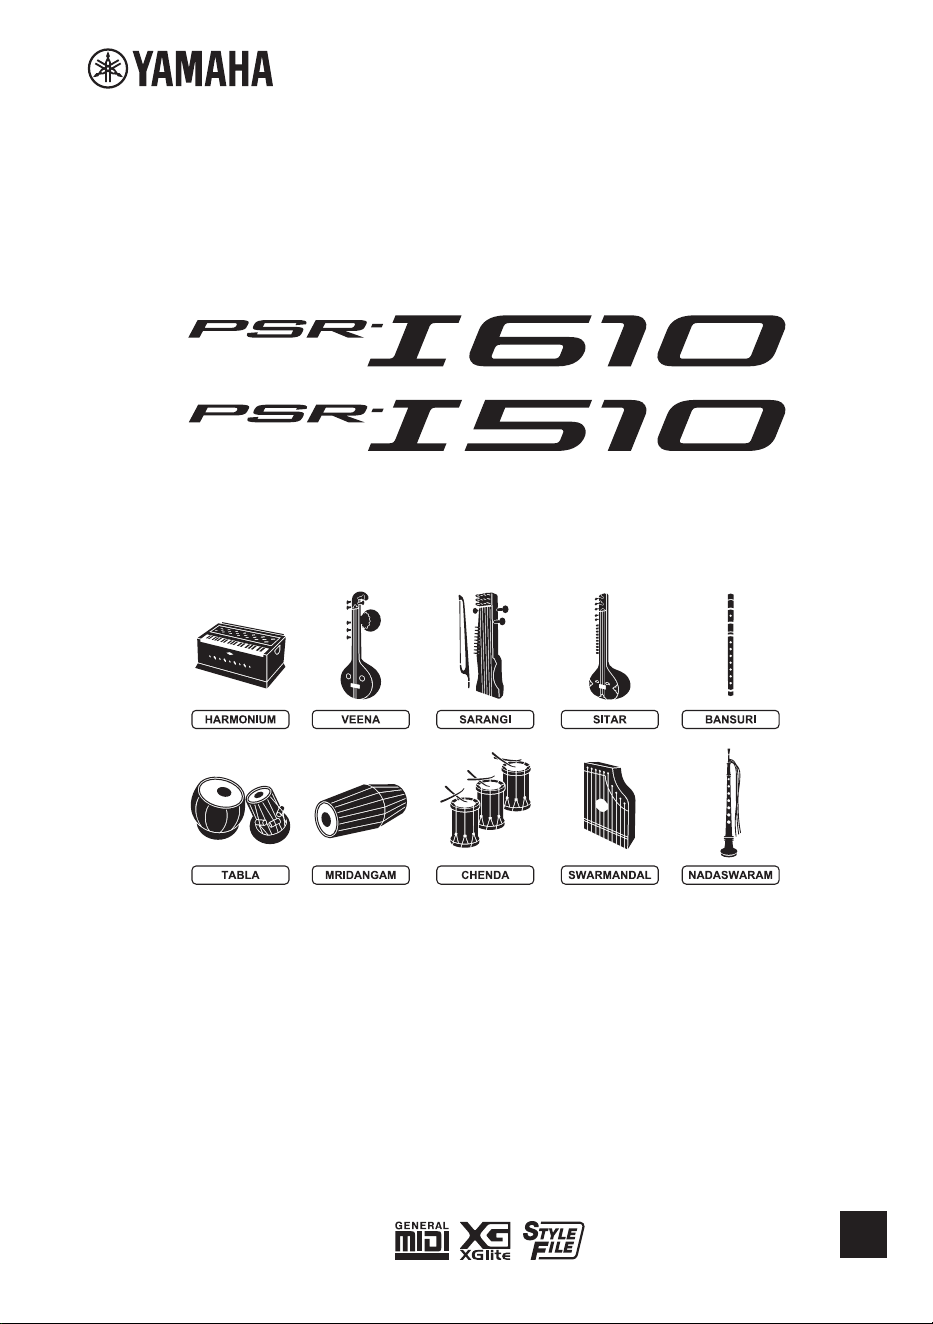

PSR-I610, PSR-I510 Owner’s Manual
2

3
PSR-I610, PSR-I510 Owner’s Manual
The model number, serial number, power
requirements, etc., may be found on or near
the name plate, which is at the bottom of the
unit. You should note this serial number in the
space provided below and retain this manual
as a permanent record of your purchase to aid
identification in the event of theft.
Model No.
Serial No.
(1003-M06 plate bottom en 01)

PSR-I610, PSR-I510 Owner’s Manual
4

5
PSR-I610, PSR-I510 Owner’s Manual
DMI-12 1/3
PRECAUTIONS
PLEASE READ CAREFULLY BEFORE PROCEEDING
Especially in the case of children, a guardian should provide guidance on
how to properly use and handle the product before actual use.
Please keep this manual in a safe and handy place for future reference.
WARNING
Always follow the basic precautions listed below to avoid the possibility of serious injury
or even death from electrical shock, short-circuiting, damages, fire or other hazards. These
precautions include, but are not limited to, the following:
Power supply
• Do not place the power cord near heat sources such as
heaters or radiators. Also, do not excessively bend or
otherwise damage the cord, or place heavy objects on it.
•
Do not touch the product or the power plug during an
electrical storm.
•
Use only the correct voltage specified for the product. The
required voltage is printed on the name plate of the product.
•
Use only the supplied or the specified AC adaptor (page 41)/
power cord/plug.
•
Do not use the supplied AC adaptor/power cord/plug for
other devices.
•
Check the power plug periodically and remove any dirt or
dust which may have accumulated on it.
•
Insert the power plug firmly all the way into the AC outlet.
Using the product when it is not plugged in sufficiently can
cause dust to accumulate on the plug, possibly resulting in
fire or skin burns.
•
When setting up the product, make sure that the AC
outlet you are using is easily accessible. If some trouble or
malfunction occurs, immediately turn off the power switch
and disconnect the plug from the outlet. Even when the
power switch is turned off, as long as the power cord is not
unplugged from the wall AC outlet, the product will not be
disconnected from the power source.
•
Do not connect the product to an electrical outlet using a
multi-plug outlet extender. Doing so can result in lower
sound quality, or possibly cause fire at or around the outlet.
•
When disconnecting the power plug, always hold the plug
itself and not the cord. Pulling by the cord can damage it
and cause electric shock or fire.
•
If not using the product for long periods of time, be sure to
pull the power plug from the AC outlet.
Do not disassemble
• This product contains no user-serviceable parts. Do not
attempt to disassemble the internal parts or modify them
in any way.
Water warning
• Do not expose the product to rain, use it near water or in
damp or wet conditions, or place on it any containers (such
as vases, bottles or glasses) containing liquids which might
spill into any openings or places where water may drop. A
liquid such as water getting into the product may cause fire,
electric shock, or malfunctions.
• Use the AC adaptor indoors only. Do not use it in any wet
environments.
• Never insert or remove a power plug with wet hands.
Fire warning
• Do not place any burning items or open flames near the
product, since they may cause fire.
Batteries
• Do not dispose of a battery in a fire.
• Do not expose the battery to conditions of extreme low air
pressure, cold or heat (such as in direct sunlight or a fire).
Doing so may result in the battery rupturing or exploding,
and cause fire or injury.
• Do not disassemble batteries. Doing so could result in fire,
overheating, rupture, explosion, or leakage, causing burns
or injury.
•
Follow the precautions below. Failure to do so could result in fire,
overheating, leakage, or malfunction causing burns or injury.
– Use the specified battery type (page 41) only.
– Do not use new batteries together with old ones.
– Do not mix batteries of different types (alkaline and
manganese, batteries from different manufacturers, different
battery products from the same manufacturer, etc.).
– Always make sure all batteries are inserted in conformity
with the +/– polarity markings.
– When the batteries run out, or if the product is not to be
used for a long time, remove the batteries from the product.

PSR-I610, PSR-I510 Owner’s Manual
6
DMI-12 2/3
• Do not attempt to recharge batteries that are not designed
to be charged. Doing so could result in rupture or leakage
causing injury, etc.
• If the batteries do leak, avoid contact with the leaked fluid.
If the battery fluid should come in contact with your eyes,
mouth, or skin, wash immediately with water and consult
a doctor. Battery fluid is corrosive and may possibly cause
loss of sight or chemical burns.
• When using rechargeable batteries, follow the instructions
that came with the batteries. Use only the specified charger
device and within the specified charging temperature range
when charging.
Charging with an unspecified charger or at a temperature
outside the range may cause leakage, overheating, rupture,
or malfunction.
• Keep batteries away from children. A child could
accidentally swallow a battery. Failure to observe this may
also cause inflammation due to battery fluid leakage.
•
Do not subject the batteries to mechanical shock or drop.
Failure to comply may result in fire, electric shock, explosion,
malfunction.
• Do not intentionally short the battery. Rupture or fluid
leakage may cause fire or injury.
•
Do not put batteries in a pocket or bag, or carry or store
them together with pieces of metal. Batteries kept in such
condition could short, rupture, or leak, causing fire or injury.
CAUTION
Always follow the basic precautions listed below to avoid the possibility of physical injury to
you or others, or damage to the product or other property. These precautions include, but
are not limited to, the following:
Connections
• Be sure to read the manual of the device to be connected,
and follow the instructions. Failure to observe this may
cause fire, overheating, rupture, or malfunction.
If you notice any abnormality
• If any of the following problems occur, immediately turn off
the power switch and disconnect the power plug from the
outlet. If you are using batteries, remove all batteries from
the product.
Finally have the device inspected by Yamaha service
personnel.
– The power cord or plug becomes frayed or damaged.
– Unusual smells or smoke are emitted.
– Some object, or water has been dropped into the product.
– There is a sudden loss of sound during use of the product.
– Cracks or other visible damage appear on the product.
Location
•
Do not place the product in an unstable position or a
location with excessive vibration, where it might accidentally
fall over, resulting in malfunction and even injury.
• Before moving the product, remove all connected cables,
to prevent damage to the cables or injury to anyone who
might trip over them.
• Use only the stand specified for the product. When
attaching it, use the included screws only. Failure to do so
could result in the product falling over, causing damage to
the product or injury.
Connections
• Before connecting the product to other devices, turn off the
power for all devices. Before turning the power on or off for
all devices, set all volume levels to minimum.
• Be sure to set the volumes of all devices at their minimum
levels and gradually raise the volume controls while playing
the product to set the desired listening level.
Handling
• Do not insert your finger or hand in any gaps on the
product.
• Do not insert foreign materials such as metal or paper into
any openings or gaps of the product. Failure to observe this
may cause fire, electric shock, or malfunctions.
• Do not rest your weight on, or place heavy objects on the
product, and do not use excessive force on the buttons,
switches or connectors.
• Do not use the product or headphones for a long period
of time at a high or uncomfortable volume level, since this
can cause permanent hearing loss. If you experience any
hearing loss or ringing in the ears, consult a physician.
• Remove the power plug from the AC outlet before cleaning
the unit. Failure to observe this may cause electric shock.

7
PSR-I610, PSR-I510 Owner’s Manual
Yamaha cannot be held responsible for damage caused by improper use or modifications to the product, or data that is lost or
destroyed.
Always turn the power off when the product is not in use.
Even when the [ ] (Standby/On) switch is in standby status (display is off), electricity is still flowing to the product at the minimum level.
When you are not using the product for a long time, make sure you unplug the power cord from the wall AC outlet.
NOTICE
To avoid the possibility of malfunction/ damage
to the product, damage to data, or damage to
other property, follow the notices below.
■
Handling
• Do not use this product in the vicinity of a TV, radio, stereo
equipment, mobile phone, or other electric devices.
Otherwise, this product or the other device may generate
noise.
• When you use the product along with an app on your smart
device, such as a smartphone or tablet, we recommend that
you enable “Airplane Mode” on the device to avoid noise
caused by communication.
• Depending on the condition of surrounding radio waves,
the product may possibly malfunction.
• Do not expose the product to excessive dust or vibrations,
or extreme cold or heat (such as in direct sunlight, near a
heater, or in a car during the day) to prevent the possibility
of disfiguration, damage to the internal components or
unstable operation. (Verified operating temperature range:
5° – 40°C, or 41° – 104°F.)
• Do not place vinyl, plastic or rubber objects on the product,
since this might discolor the product.
■
Maintenance
• When cleaning the product, use a soft and dry (or slightly
damp) cloth. Do not use paint thinners, solvents, alcohol,
cleaning fluids, or chemical-impregnated wiping cloths.
■
Saving data
• Some of the data of this product (page 38) are retained
when the power is turned off. However, the saved data may
be lost due to some failure, an operational mistake, etc.
Save your important data onto USB flash drive/an external
device such as a computer. Before using a USB flash drive,
make sure to refer to page 31.
• To protect against data loss through USB flash drive
damage, we recommend that you save your important data
onto spare USB flash drive or an external device such as a
computer as backup data.
DMI-12
3/3
Information
■
About copyrights
• The copyright of the “content”*
1
installed in this product
belongs to Yamaha Corporation or its copyright holder.
Except as permitted by copyright laws and other relevant
laws, such as copying for personal use, it is prohibited
to “reproduce or divert”*
2
without the permission of the
copyright holder. When using the content, consult with a
copyright expert. If you create music or perform with the
contents through the original use of the product, and then
record and distribute them, the permission of Yamaha
Corporation is not required regardless of whether the
distribution method is paid or free of charge.
*1:
The word “content” includes a computer program, audio
data, Accompaniment Style data, MIDI data, waveform
data, voice recording data, music score, and score data, etc.
*2: The phrase “reproduce or divert” includes taking out the
content itself in this product, or recording and distributing
it without changes in a similar manner.
■
About functions/data bundled with the
product
•
Some of the Songs downloaded from the Yamaha product
website have been edited for length or arrangement, and may
not be exactly the same as the original.
■
About the appearance of this product
• This product may appear to have lines or scratches on the
surface.The apparent lines or scratches are called “weld
lines.” They occur during the process of modeling the case
and do not affect the functionality of the product.
■
About this manual
• The illustrations and LCD displays as shown in this manual
are for instructional purposes only.
• Unless indicated otherwise, the illustrations and displays as
shown in this manual are based on the PSR-I610.
• USB Type-C™ and USB-C™ are registered trademarks of USB
Implementers Forum.
• The company names and product names in this manual are
the trademarks or registered trademarks of their respective
companies.
■
About disposal
• When disposing of this product, please contact the
appropriate local authorities.
• Make sure to discard used batteries according to local
regulations.

PSR-I610, PSR-I510 Owner’s Manual
8
Thank you for purchasing this Yamaha Digital Keyboard!
This digital keyboard features a wide variety of sounds and useful functions, especially
designed for playing Indian music.
We recommend that you read this manual carefully so that you can fully take advantage of the
advanced and convenient functions of the instrument.
We also recommend that you keep this manual in a safe and handy place for future reference.
Contents
PRECAUTIONS 5
About the Manuals ............................................................9
Conventions .......................................................................9
Included Accessories .........................................................9
What You Can Do (Basic)..................................................10
What You Can Do (Advanced) .........................................11
Setting Up 12
Power Requirements .......................................................12
Turning the Instrument On/Off .......................................13
Installing the Music Rest .................................................13
Panel Controls and Terminals 14
Basic Operations 19
Selecting the Desired Mode—Style/Riyaz/Song ............19
Home Display ..................................................................19
Selecting Items/Specifying Values...................................20
Playing a Variety of Voices (Instrument Sounds) 21
Selecting a Main Voice .....................................................21
Adding a Layer - Dual Voice .............................................21
Playing Different Voices With the Left and Right Hands
(Split Voice) ............................................................21
Playing with Rhythm and Auto Accompaniment
(Styles) 22
Specifying the Chords Automatically
(Auto Chord Play)...................................................22
Specifying the Chords Yourself ........................................23
Playing with Riyaz 24
Saving/Recalling Your Favorite Settings
(Registration Memory) 25
Saving Panel Settings to Registration Memory ...............25
Recalling Settings Saved to Registration Memory ...........25
Song (MIDI)/Audio Playback and Song Lesson 26
Playing Songs (MIDI Data) ..............................................26
Playing Back an Audio File from a USB Flash Drive..........27
Using the Song Lesson Feature—Three-Step Lesson ......28
Recording Your Performance 29
Recording Methods on this Instrument ..........................29
Recording a New User Song (MIDI Recording) ...............29
Recording (Saving) an Audio File to a USB Flash Drive ....30
Connecting a USB Flash Drive 31
File Operations for a USB Flash Drive ..............................32
Function Settings 33
Basic Procedure for the Function Settings .......................33
Backup and Initialization 38
Data and Settings To Be Backed Up .................................38
Initializing the Instrument ...............................................38
Troubleshooting 38
Specifications 40
Index 42
9
PSR-I610, PSR-I510 Owner’s Manual
About the Manuals
The following documents and instructional materials are available for this instrument.
Supplied with the Instrument
Owner’s Manual (this book)
This provides information on using this instrument and on its basic functions. Read this document first.
Available on the Website
Reference Manual
This provides detailed information on all functions of this instrument.
Data List
This provides lists of Voices, Styles, etc., built into this instrument as well as information about MIDI.
Smart Device Connection Manual
This provides instructions on connecting this instrument to smart devices, such as smartphones and tablets.
MIDI Basics
This contains basic explanations about what MIDI is and can do.
The manuals listed above can be found on the following Yamaha website.
https://manual.yamaha.com/mi/rt/psr-i610/downloads/
Downloading the Song Book
The Song Book can be downloaded free of charge from
“Documents & Data” on the above website. Feel free to use it.
Song Book
Contains music scores for
the preset Songs (excluding
the Demo Songs) of this
instrument.
Video Manuals
These are specially prepared video manuals that show how to use this instrument.
To see the video manuals, visit the following Yamaha website.
https://manual.yamaha.com/mi/rt/psr-i610/videos/
Conventions
WARNING
Indicates a risk of serious injury or death.
CAUTION
Indicates a risk of injury.
NOTICE
Indicates a risk of product failure, damage or malfunction as well as data loss.
NOTE
Indicates additional information that may be useful.
Included Accessories
Owner’s Manual (this book) × 1 Music rest × 1
AC adaptor × 1* Power Cord × 1* (PSR-I610)
* May not be included depending on your area. Check with your Yamaha dealer.

PSR-I610, PSR-I510 Owner’s Manual
10
What You Can Do (Basic)
Use a wide variety of authentic Indian instrument sounds in your performances
page 21
◆
Play using authentic sounds of Indian instruments, such as Harmonium, Sitar, Bansuri, Veena, and
others.
◆
Have instant access to an enormous number of Voices, not only Indian instruments but also piano,
guitar, etc. (PSR-I610: 927 Voices; PSR-I510: 887 Voices).
◆
Layer two Voices together (Dual), or play different Voices independently with your right and left hands
(Split).
Enjoy playing with realistic, full-band accompaniment using
the Auto Accompaniment function (Style)
pages 22, 23
◆
With backing accompaniment patterns available in a variety of genres—diverse Indian music such as
film soundtracks or festival music as well as pop, rock, dance, or Latin.
◆
Featuring not only rhythm but also bass and chord parts, Styles allow you to play and sound like a full
band or orchestra—even by yourself.
◆
Instead of playing chords with your left hand, you can simply play music with just your right hand along
with full chord progressions automatically played with the Auto Chord Play function.
Practice Indian rhythms and melodies using the Riyaz function
page 24
◆
The Riyaz function enables you to practice a wide range of Indian classical music to the rhythm patterns
of Tabla/Mridangam and the Tanpura drone.
Play or practice preset Songs such as Indian Raga or Geetam, etc.
pages 26, 27, 28
◆
Play back or practice using the Lesson feature with a wide variety of preset Songs, such as Indian Raga
or Geetam as well as Western classical piano songs etc. (PSR-I610: 75 Songs; PSR-I510: 65 Songs).
Record and play back your performance (MIDI/Audio)
pages 29, 30
◆
Record your performance onto the instrument itself or save the performance data to a USB flash drive.
◆
Use playback of a recording for practicing or as accompaniment to perform along with.
Save and recall your favorite settings (Registration Memory)
page 25
◆
Save up to 32 panel settings (such as Voices and Styles) to match the music that you wish to play.
◆
Saved Registration Memories can be recalled or switched with a single touch, even while playing,
allowing you to continue your performance smoothly and uninterrupted.

11
PSR-I610, PSR-I510 Owner’s Manual
What You Can Do (Advanced)
Use convenient features to enhance the expression of Indian music performance
◆
Reproduce the special ornamental playing of Indian music by raising and lowering the pitch smoothly
via the portamento function.
◆
Use the panel sustain function to play smoothly with just the right amount of sustain.
◆
Use the volume control via the connected foot controller (sold separately) for crescendo/decrescendo
control while the sound is sustained. (PSR-I610 only)
◆
Vibrato techniques for performing with instruments such as Bansuri, Sarangi, Esraj, Shehnai, Pungi,
Nadaswaram, etc. can be reproduced by using the Modulation wheel. (PSR-I610 only)
Use various functions to alter the sound in authentic or dramatic ways
◆
Realistically reproduce playing techniques for particular instruments, such as tremolo technique of
Santoor and guitar scratch noises. (Super Articulation Lite Voice)
◆
Expand your range of expression by adding effects to your keyboard performance, Style playback, or
microphone input. (DSP1/DSP2)
◆
Apply effects, such as filter, pitch, or modulation, etc., for as long as the dedicated button is held down
while playing. (Motion Effect)
◆
Use the two knobs to dynamically change the sound in real time.
◆
Produce louder and more powerful sound, even with the volume set to maximum. (Mega Boost)
◆
Select an EQ setting to optimize the sound of this instrument for your own personal preferences and
optimum performance. Available types include “India,” which emphasizes the unique characteristics of
Indian instruments, as well as “Bright” and “Mellow,” which change the level of high frequencies for a
brighter or more mellow sound. (Master EQ)
Use a connected microphone
◆
Enjoy singing while performing, or use for talking between performances.
◆
Record (or sample) vocals and external live sounds.
Create original performance material
◆
Import external sounds via Quick Sampling function can add accents to your performance.
◆
Create original loop phrases by overdubbing onto your favorite phrases. (Looper function)
Connect a computer or smart device
◆
Play back song data on this instrument that is stored on your computer or smart device.
◆
Get even greater enjoyment from this instrument by easily recording or sharing audio and video of your
performance or converting the MIDI songs into Style files via using the smart device apps.
] Reference Manual
PSR-I610, PSR-I510 Owner’s Manual
12
Setting Up
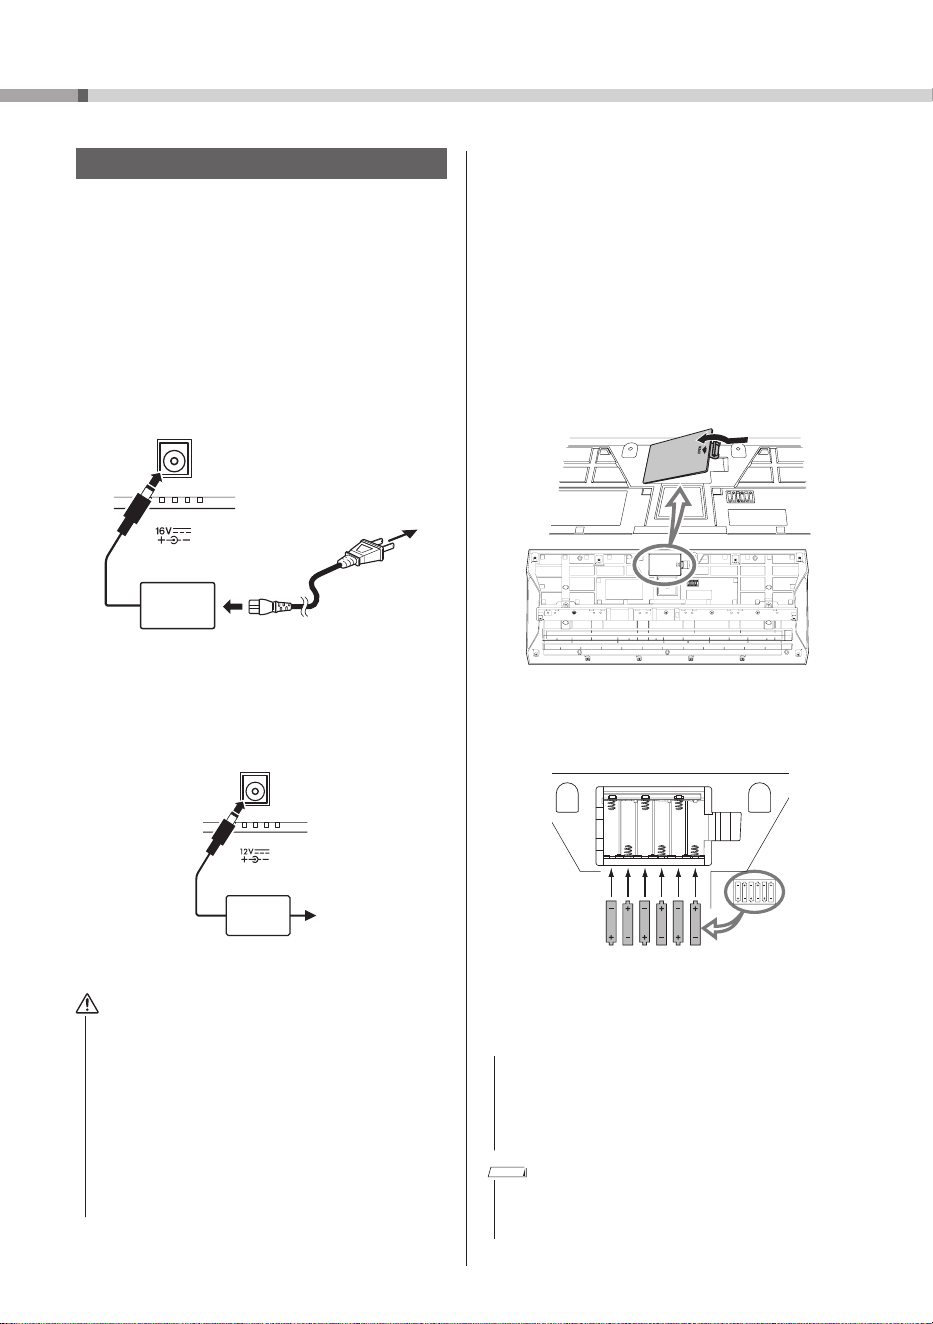
Power Requirements
This instrument can be powered by either the AC
adaptor or batteries; however, Yamaha recommends
using the AC adaptor whenever possible.
Using the AC Adaptor
Before using this instrument, be sure to read the “Power
supply” section (page 5) under “PRECAUTIONS.”
Connect the AC adaptor in the order shown in the
illustration.
PSR-I610
DC IN jack
(page 18)
1
3
AC outlet
AC
adaptor
2
Power cord
The shape of the plug may differ
depending on your area.
PSR-I510
DC IN jack
(page 18)
1
2
AC outlet
AC
adaptor
To disconnect the AC adaptor, reverse the procedure.
WARNING
• If the AC adaptor has a removable plug, be sure to
keep the plug attached to the AC adaptor. Inserting
only the plug into an AC outlet may cause electric
shock or fire.
• If the plug comes off, be careful not to touch the
inner metal parts, and fully insert the plug until
it snaps into place. Also be careful that no dust or
foreign matter gets between the AC adaptor and plug.
Otherwise, electric shock, short circuit or damage
may result. For details on inserting the plug, refer to
the Reference Manual on the website (see page 9).
Using Batteries
This instrument can use AA alkaline (LR6), manganese
(R6) or Ni-MH rechargeable (HR6) batteries. Alkaline
batteries or Ni-MH rechargeable batteries are
recommended for this instrument since other types
may not provide enough power in certain situations.
Before using this instrument, be sure to read the
“Batteries” section (page 5) under “PRECAUTIONS.”
1 Make sure that the instrument is turned off.
2 Open the battery compartment cover, located
on the instrument’s bottom panel.
3 Insert six new batteries, making sure that they
are correctly oriented, as illustrated.
4 Reinstall the compartment cover, making sure
that it locks firmly into place.
NOTICE
• Do not connect or disconnect the DC plug of the AC
adaptor with batteries installed and the instrument
turned on. Otherwise, the instrument will be
temporarily turned off, and any data being recorded
or transferred will be lost.
NOTE
• Power will be automatically drawn from the AC adaptor if
the AC adaptor is connected, even with batteries installed in
the instrument.
13
PSR-I610, PSR-I510 Owner’s Manual
Setting Up
When Using Ni-MH Rechargeable Batteries
After inserting the batteries, change the battery type
in the Function setting display (page 37, Functions
087(PSR-I610)/086(PSR-I510)).
Default setting: Alkaline (alkaline or manganese
batteries)
NOTICE
• An incorrect battery type setting may shorten the
battery life. Be sure to select the correct battery type.
Remaining Battery Power Indicator
You can check it by an icon on the display.
] Reference Manual (see page 9)
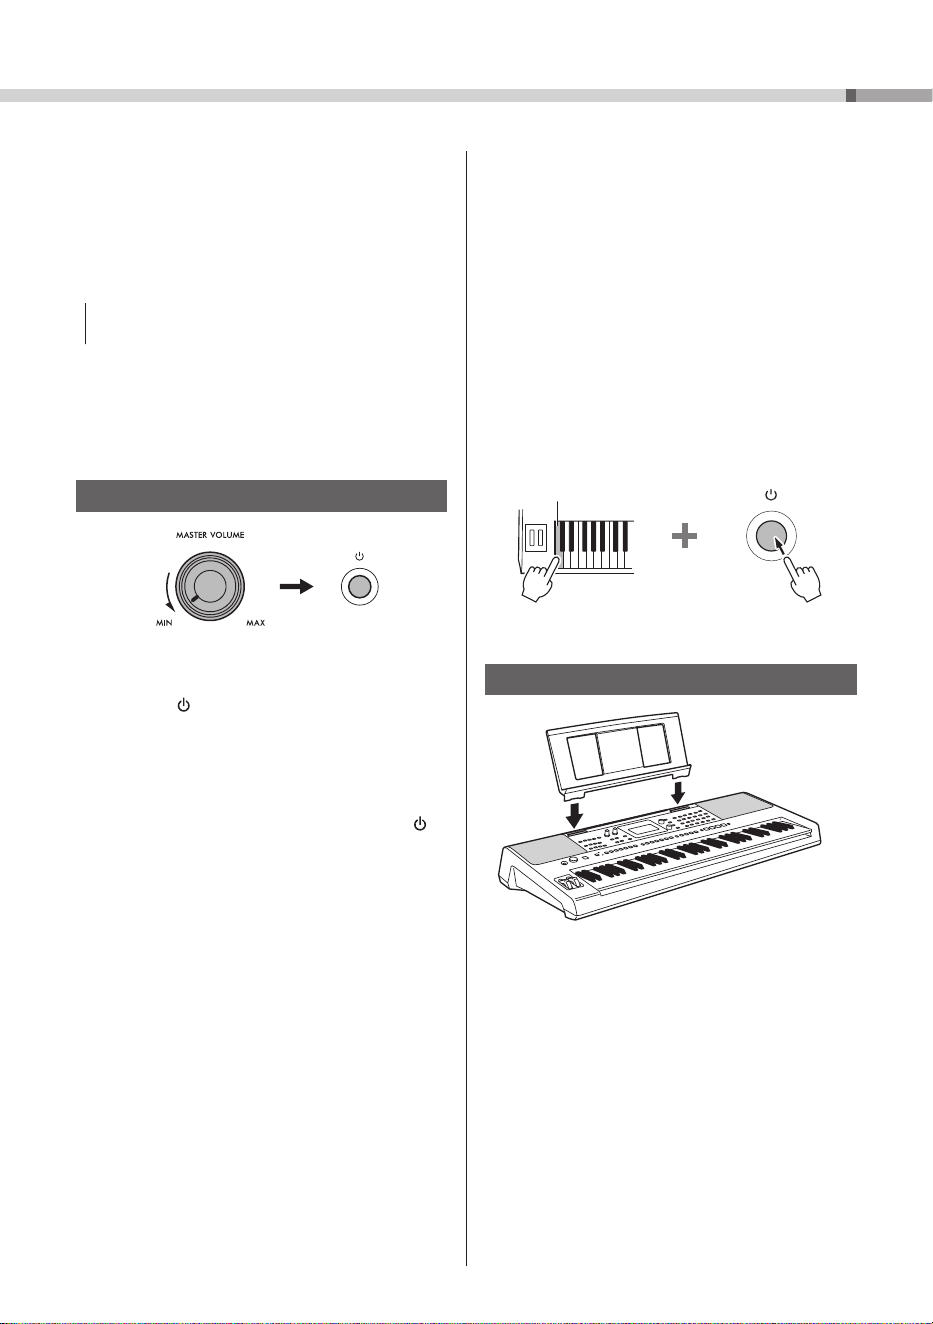
Turning the Instrument On/Off
1
2
1 Turn the
[MASTER VOLUME]
control fully to
the left, to “MIN.”
2 Press the
[ ] (Standby/On) switch to turn on the
instrument.
3 While playing the keyboard, adjust the overall
volume of the instrument by turning the
[MASTER VOLUME]
control.
4 To turn off the instrument, hold down the [ ]
(Standby/On) switch for about 1 second.
Auto Power Off Function
In order to prevent unnecessary power consumption,
this instrument features an Auto Power Off function,
which automatically turns off the instrument if it has
not been operated for a specified period of time. By
default, the amount of time until the instrument is
automatically turned off is set to 15 minutes; however,
you can change the setting (page 37, Functions
086(PSR-I610)/085(PSR-I510)).
Simple Method of Deactivating the Auto
Power Off Function
While holding down the lowest key on the keyboard,
turn on the instrument. This starts the instrument with
the Auto Power Off function deactivated.
Left end of keyboard
Installing the Music Rest
Insert the music rest into
the slots as shown.
PSR-I610, PSR-I510 Owner’s Manual
14
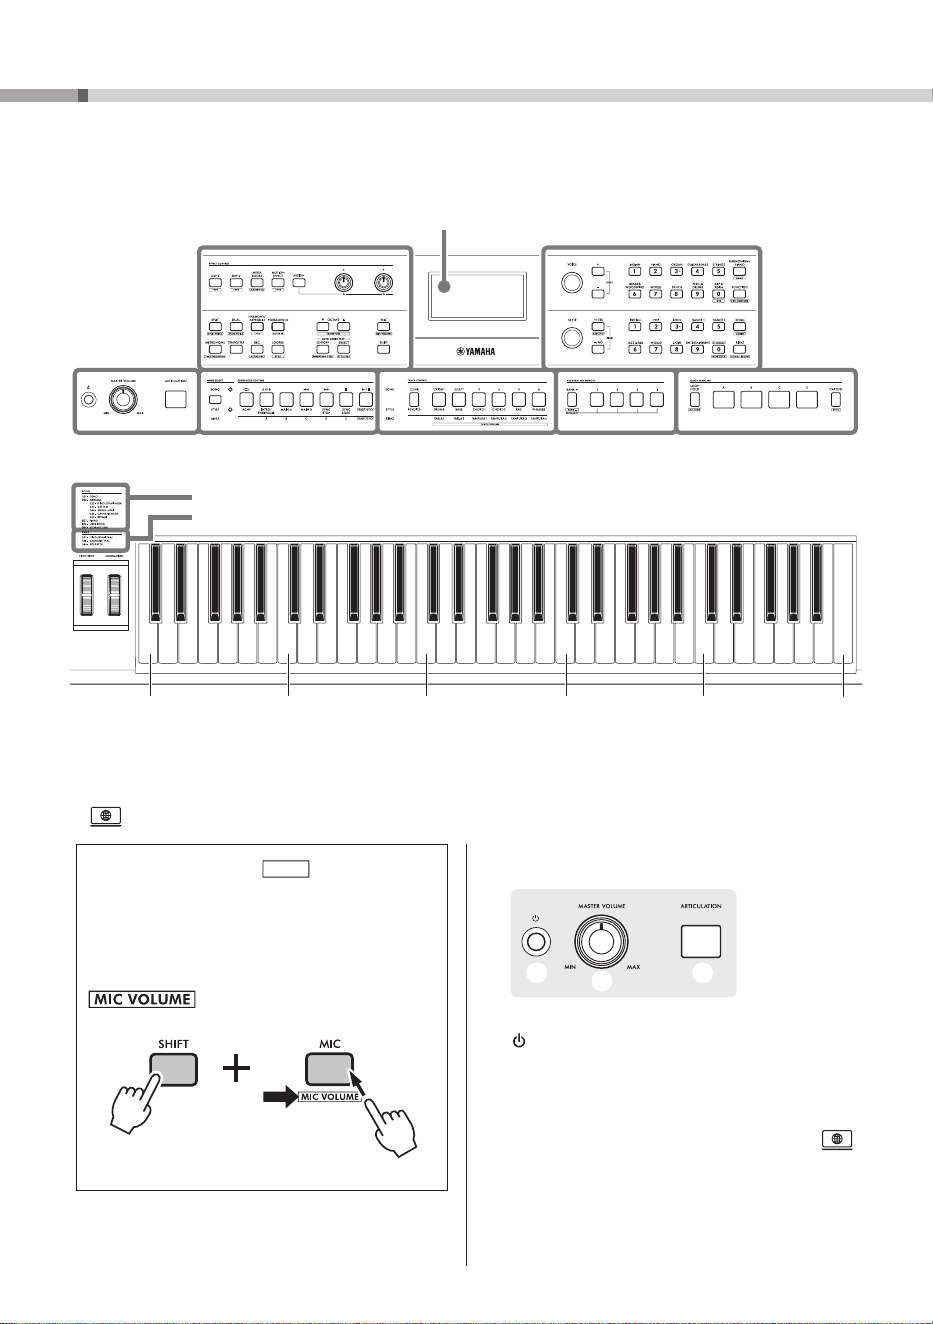
Panel Controls and Terminals
Top Panel
The illustrations and displays as shown in this manual are based on the PSR-I610.
A
q
w
e
q [ ] (Standby/On) switch ....................... page 13
Turns on the instrument or sets it to standby.
w
[MASTER VOLUME]
control ...................page 13
Adjusts the overall volume.
e
[ARTICULATION]
button ............................
Pressing this button while playing the keyboard
reproduces the performance technique specific
to the selected Voice.
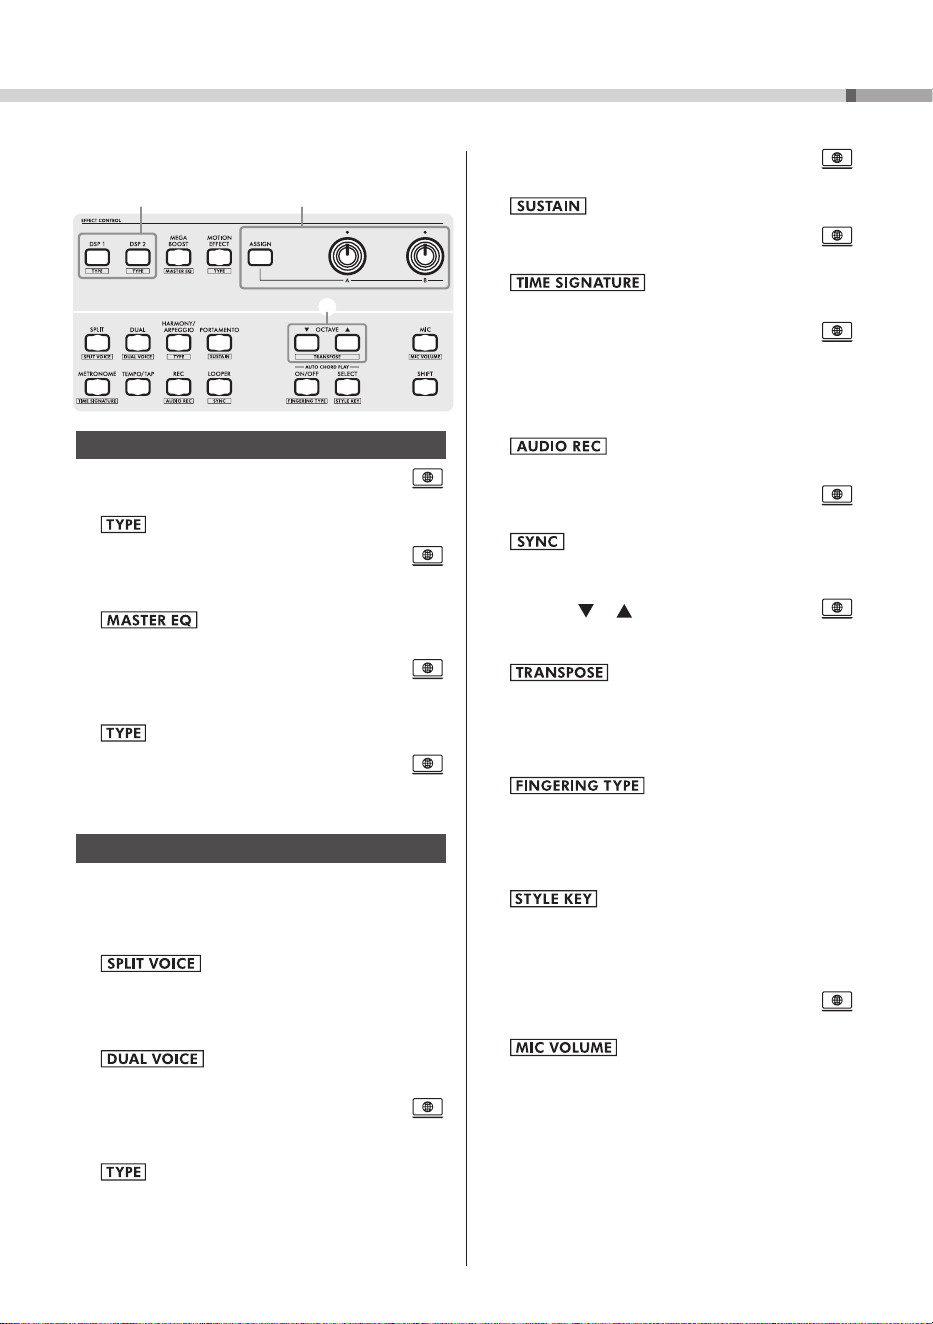
About Button Names in (SHIFT Function)
While holding down the
[SHIFT]
button, press a
button with a box-surrounded name in order to
call up the corresponding Function setting display.
For example, while holding down the
[SHIFT]
button, press the
[MIC]
button to call up the
setting display.
Hold down
AD EFG
CB
Display
(page 27)
As shown, each key of the keyboard has been assigned a specific note number (e.g., 036)
and name (e.g., C1), which are used when specifying various Function settings.
* : Refer to the Reference Manual on the Yamaha website (see page 9).
036
(C1)
048
(C2)
060
(C3)
072
(C4)
084
(C5)
096
(C6)
H
Song category
(page 26)
Riyaz category
(page 24)
15
PSR-I610, PSR-I510 Owner’s Manual
Panel Controls and Terminals
B
t y
i o !0 !1
!2 !3 !4 !5
!9
@0
!7 !8
r u
!6
EFFECT CONTROL
r
[DSP1]
/
[DSP2]
buttons ..............................
Turns the DSP1/DSP2 effects on or off.
: Calls up the effect type selection display.
t
[MEGA BOOST]
button ..............................
Boosts the overall volume of the instrument for
more powerful sound.
:
Calls up the Master EQ type selection
display.
y
[MOTION EFFECT]
button ..........................
Holding down this button adds various dynamic
effects to the sound in real time.
: Calls up the Motion Effect type selection display.
u
[ASSIGN]
button,
[A]/[B]
knobs .................
Allows a function to be assigned to a knob for
controlling the sound in real time.
OTHER CONTROLS (SUCH AS SOUND)
i
[SPLIT]
button .......................................page 21
Divides the entire keyboard into two areas so
that different Voices can be played with your
right and left hands.
: Calls up the Voice selection display
for the left-hand part.
o
[DUAL]
button ........................................ page 21
Layers two different Voices.
: Calls up the selection display for the
layered Voice.
!0
[HARMONY/ARPEGGIO]
button ................
Turns the Harmony or Arpeggio function on
or off.
: Calls up the Harmony or Arpeggio type
selection display.
!1
[PORTAMENTO]
button ..............................
Turns the Portamento function on or off.
: Turns Panel Sustain on or off.
!2
[METRONOME]
button ...............................
Turns the metronome on or off.
: Calls up the metronome time
signature setting display.
!3
[TEMPO/TAP]
button ..................................
Calls up the Tempo setting display.
!4
[REC]
button .......................................... page 29
Records your performance onto the instrument
in MIDI format.
: Records the audio of your
performance to a USB flash drive (page 30).
!5
[LOOPER]
button ........................................
Used for Looper recording and playback.
: Turns on sync for the Looper function in
order to synchronize the playback start timing
with the Style, Song, or Riyaz.
!6 OCTAVE [ ]/[ ] buttons .........................
Shifts the pitch of the Main Voice and Dual
Voice up/down in increments of 1 octave.
: Transposes the overall pitch of the
instrument in semitone increments.
!7
AUTO CHORD PLAY [ON/OFF]
button ... page 22
Turns the Auto Chord Play function on or off,
for automatically playing chords.
: Calls up the Fingering Type
selection display for the chord playing method.
!8
AUTO CHORD PLAY [SELECT]
button ... page 22
Calls up the selection display for the Auto Chord
Play type.
: Calls up the selection display for the
Style Key (key of the Song to be performed).
The Style Key is used with the Auto Chord Play
function or when the Fingering Type is set to
“Smart Chord.”
!9
[MIC]
button ................................................
Switches the microphone type (VOCAL/TALK/MUTE).
: Calls up the Mic volume setting
display.
@00
[SHIFT]
button .......................................page 14
Holding down this button lets you call
up alternate functions for corresponding
panel buttons (that have assigned alternate
functions).
Pressing only this button returns to the home
display (page 27) from any other Function
setting display.
PSR-I610, PSR-I510 Owner’s Manual
16
Panel Controls and Terminals
C
@1 @2
@7
@3
@6 @8
@5
@4
#0
@9
UPPER CONTROLS
@1
[VOICE]
dial .................................... pages 20, 21
Selects the Voice or other parameter in the first
line of the Home display (page 19).
@2
[+]/[−]
buttons ........................................page 20
Selects the Voice or other parameter in the first
line of the Home display (page 19).
To restore the default setting, press the two
buttons simultaneously.
@3 VOICE category buttons ....................... page 20
Selects a Voice category. Enters the
corresponding number when NUM LOCK
@8 is
on.
: Selects the optimum panel settings and Voice
for the currently selected Style.
@4
[HARMONIUM/PIANO]
button ....................
Switches the Main Voice between Harmonium
and Grand Piano.
: Plays back Demo Songs repeatedly.
@5
[FUNCTION]
button ...............................page 33
Calls up the Function setting display.
: Calls up the File Control display
(USB flash drive operations) (page 32).
LOWER CONTROLS
@6
[STYLE]
dial .................................... pages 20, 22
Selects the Style or other parameter in the
second line of the Home display (page 19).
@7
[+/YES]/[−/NO]
buttons .......................... page 20
Selects the Style or other parameter in the
second line of the Home display (page 19).
To restore the default setting, press the two
buttons simultaneously.
: Performs the File Control operation (page
32).
@8 STYLE category buttons .......................page 20
Selects a Style category. Enters the
corresponding number when NUM LOCK is on.
: Turns NUM LOCK on or off (for
entering numbers using the category buttons).
@9
[SONG]
button ....................................... page 26
Calls up the display for selecting a desired Song
for playback.
: Calls up the display for selecting an audio
file on the USB flash drive.
#0 [RIYAZ] button .......................................page 24
Calls up the display for selecting a desired Riyaz
for playback.
: Calls up the Song Lesson display.
D
#3
#1 #2 #4
MODE SELECT
#1 MODE SELECT button ............................ page 27
Switches between Song mode, Style mode, and
Riyaz mode.
SEQUENCER CONTROL
#2
[
]/[ACMP]
buttons
Song mode: Turns repeat playback of a User
Song (page 29) on or off, as well as the Repeat
& Learn function for Song Lesson.
..............
Style mode:
Turns the Auto Accompaniment
function (ACMP) on or off.
.........................page 23
#3 Playback control buttons ..........................
Controls playback of the Song, Style, or Riyaz.
#4
[ ]/[START/STOP] buttons
................................................... pages 22, 24, 27
Starts/stops playback of the Song, Style, or
Riyaz.

17
PSR-I610, PSR-I510 Owner’s Manual
Panel Controls and Terminals
G
#8
#7 #9
QUICK SAMPLING
#7
[LOOP HOLD]
button ..................................
Repeatedly plays back the corresponding
sample when one of pads [A] to [D] is pressed
while this button is held down.
: Stops playback of all samples.
#8 Pads
[A]
to
[D]
.............................................
Plays back the sample assigned to the pad.
#9
[CAPTURE]
button ......................................
Enters the Quick Sampling mode.
: Turns on sync for sample playback in order
to synchronize sample playback with the Style or
Song.
H
PSR-I610 PSR-I510
$0 $0$1
$0
[PITCH BEND]
wheel ..................................
Rotating this wheel upward or downward bends
up or down the pitch of the sound played on
the keyboard.
$1
[MODULATION]
wheel (PSR-I610 only) .......
Applies vibrato effects, etc.
Panel Settings
The panel controls can be used to make the various
settings described here. These instrument settings
are collectively referred to as “panel settings” in this
manual.
E
#5
TRACK CONTROL
#5 TRACK CONTROL buttons ..........................
Turns on/off the corresponding track of the
Song, Style, or Riyaz during playback.
Also removes (CLEAR) individual tracks of a
recorded Song, and changes (REVOICE) the
Voice of the corresponding track of a Style.
: Calls up the display for setting
the volume of each track.
F
#6
REGISTRATION MEMORY
#6 REGISTRATION MEMORY buttons .......page 25
Saves or recalls panel settings
(see box at the bottom right).
PSR-I610, PSR-I510 Owner’s Manual
18
Panel Controls and Terminals
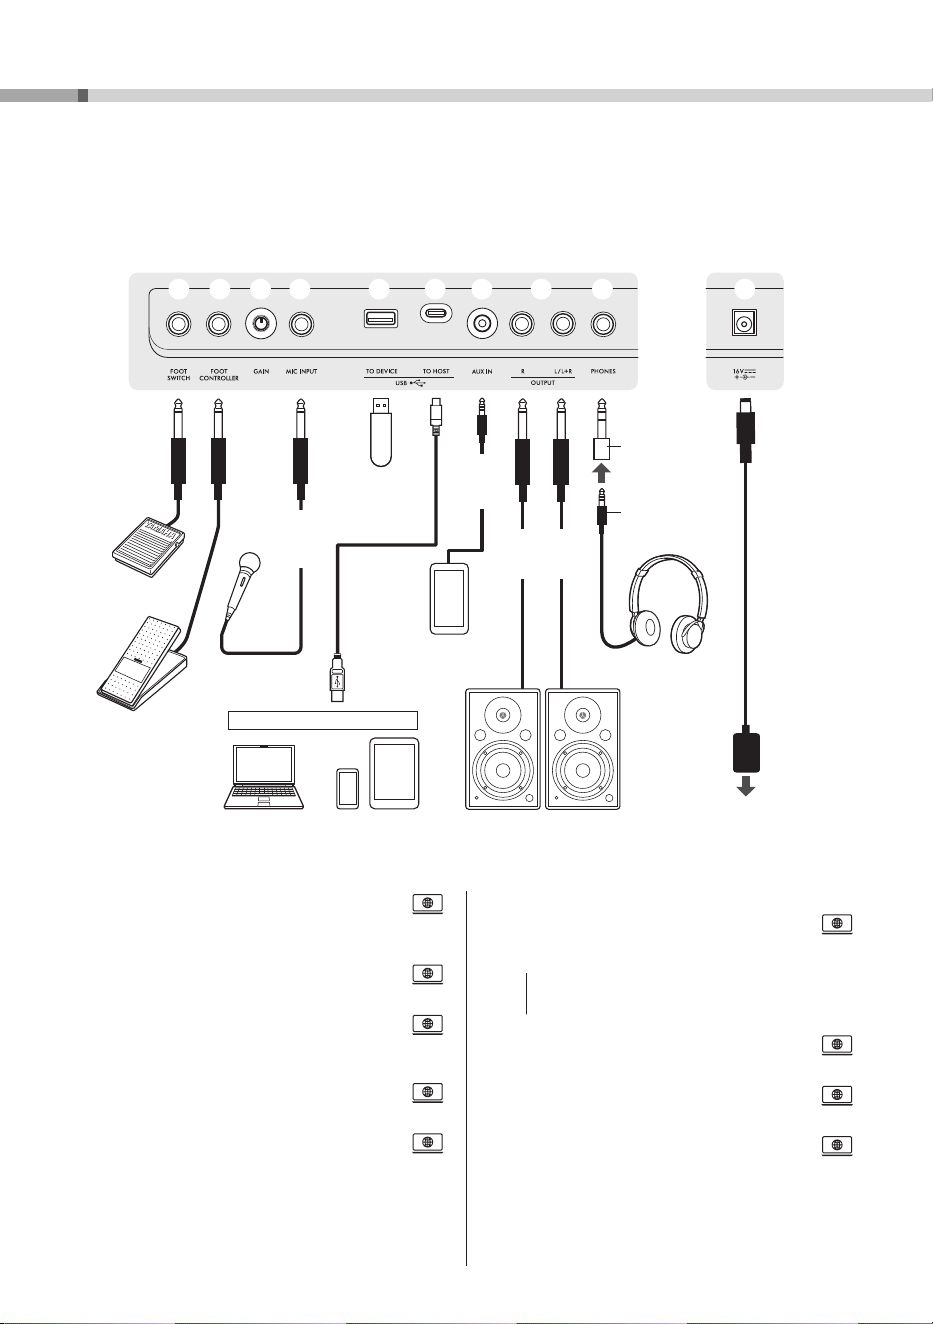
$2
[FOOT SWITCH]
jack ...................................
For connecting a foot switch.
$3
[FOOT CONTROLLER]
jack
(PSR-I610 only) .............................................
For connecting a foot controller.
$4
[GAIN]
knob .................................................
For adjusting the input level of the connected
microphone.
$5
[MIC INPUT]
jack .........................................
For connecting a microphone.
$6
[USB TO DEVICE]
terminal
(USB Type-A)
..
For connecting a USB flash drive.
$7
[USB TO HOST]
terminal (USB Type-C
TM
)
......................................................................
For connecting a computer or a smart device.
NOTICE
• The USB cable must be Type A-C or C-C and less
than 3 meters long.
$8
[AUX IN]
jack................................................
For connecting an audio player.
$9
OUTPUT [L/L+R]
,
[R]
jacks .........................
For connecting powered speakers.
%0
[PHONES]
jack ............................................
For connecting headphones.
%1
DC IN
jack ...............................................page 12
For connecting the AC adaptor.
Rear Panel
Connection Options
The specific cables necessary depend on the device being connected.
The following illustration is of the PSR-I610.
$2 $3 $4 $5 $6 %0 %1$9$8$7
Foot switch
Foot
controller
Microphone,
etc.
Standard
mono
phone
plug
USB flash
drive
Smartphones
and other audio
devices
Stereo
mini
plug
Standard
mono
phone plug
Speakers with
built-in amplifiers
Smart deviceComputer
Converter plug
(3.5 mm
]
6.3 mm)
Stereo mini plug
(3.5 mm)
Headphones
AC outlet
AC
adaptor
+ conversion adaptor, etc.
19
PSR-I610, PSR-I510 Owner’s Manual
Basic Operations
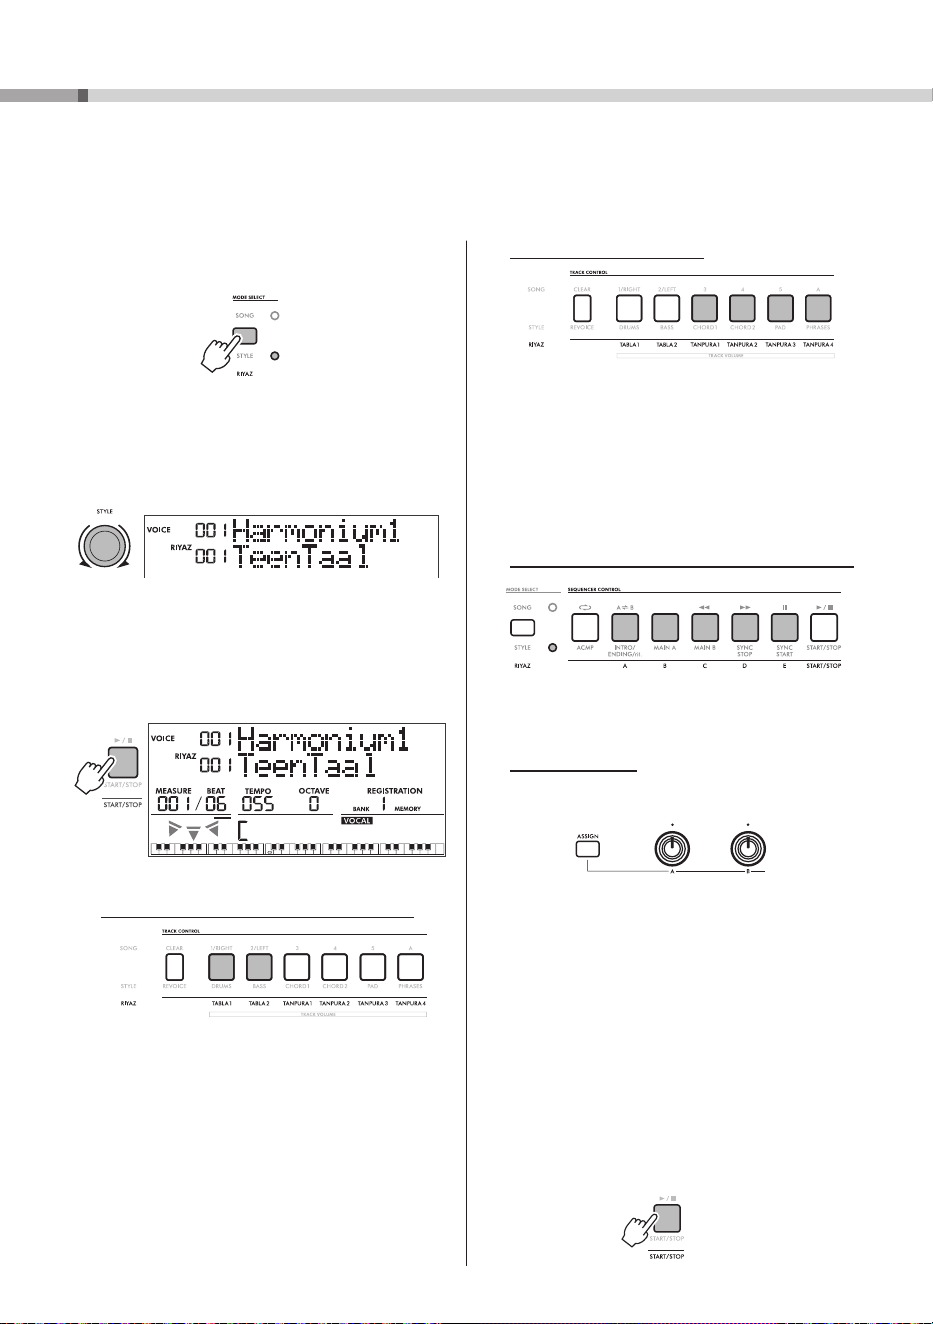
Selecting the Desired Mode—Style/Riyaz/Song
This instrument features three different modes: Style, Riyaz, and Song. Select the desired mode and enjoy
playing this instrument.
• Style mode: Enables the Auto Accompaniment function which automatically adds accompaniment
(rhythm + bass + chords) that matches the chords you play.
• Riyaz mode: Enables looped playback of phrase patterns using authentic Tabla/Mridangam and
Tanpura sounds.
• Song mode: Enables playback of the preset Songs or Song Lesson, and allows recording of your
performance.
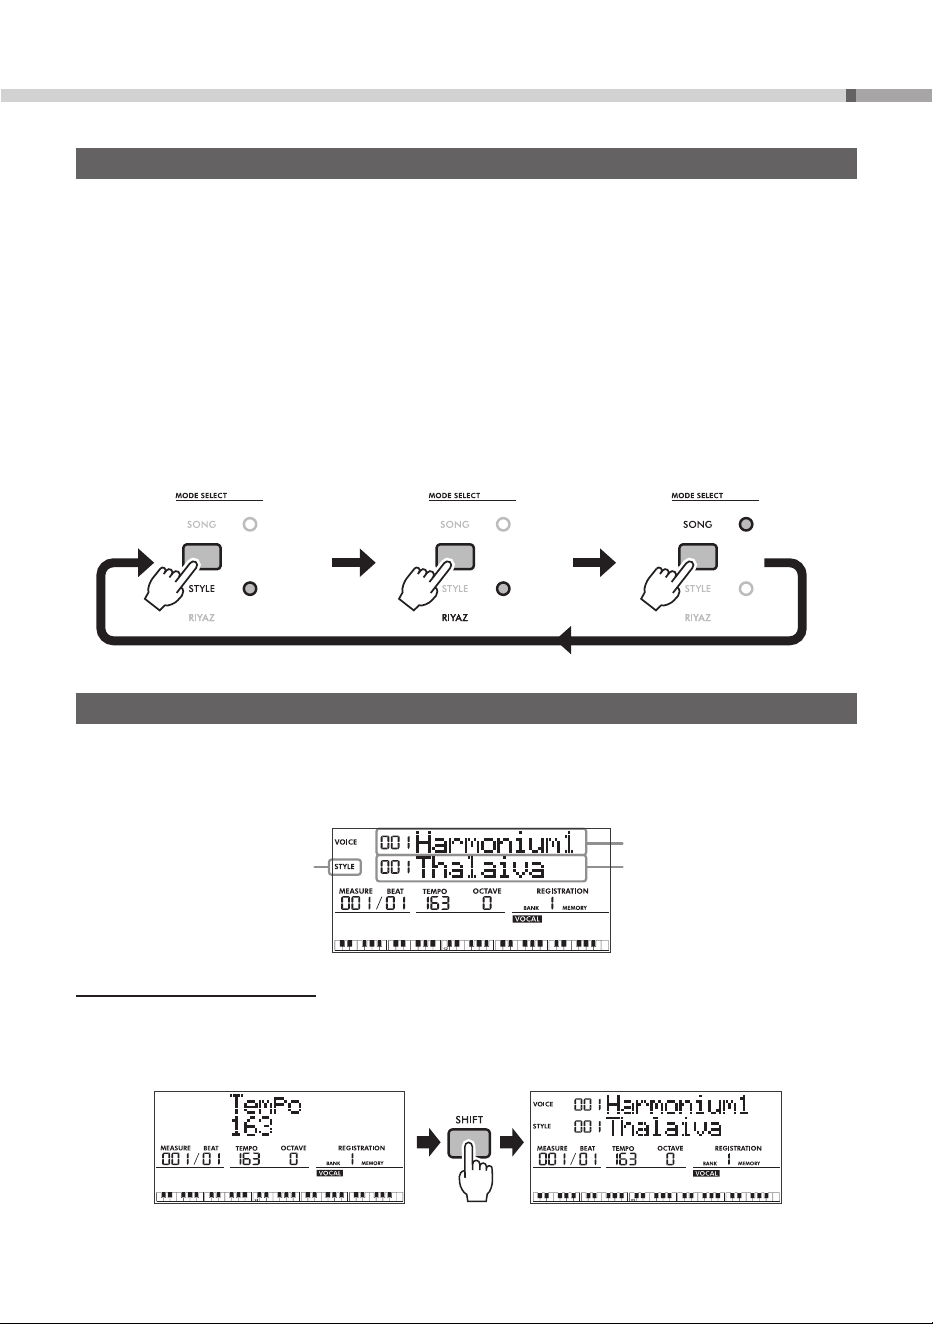
Each time you press the MODE SELECT button, it switches between Style, Riyaz, and Song mode.
Lights up
in orange.
Lights up
in blue.
Lights up
in orange.
Style mode Riyaz mode Song mode
Home Display
This is shown when the instrument is turned on.
In the upper half of the display, the Voice name (VOICE) is shown in the first line while the Style name
(STYLE) is shown in the second line. The left part of the second line shows the current mode (described
above), Style or Song or Riyaz.
The current mode
Voice name
Style name
Returning to the Home Display
To return to the home display from the Function setting display (page 33) or Tempo setting display,
press the
[SHIFT]
button.
Home displayTempo setting display
Example
PSR-I610, PSR-I510 Owner’s Manual
20
Basic Operations
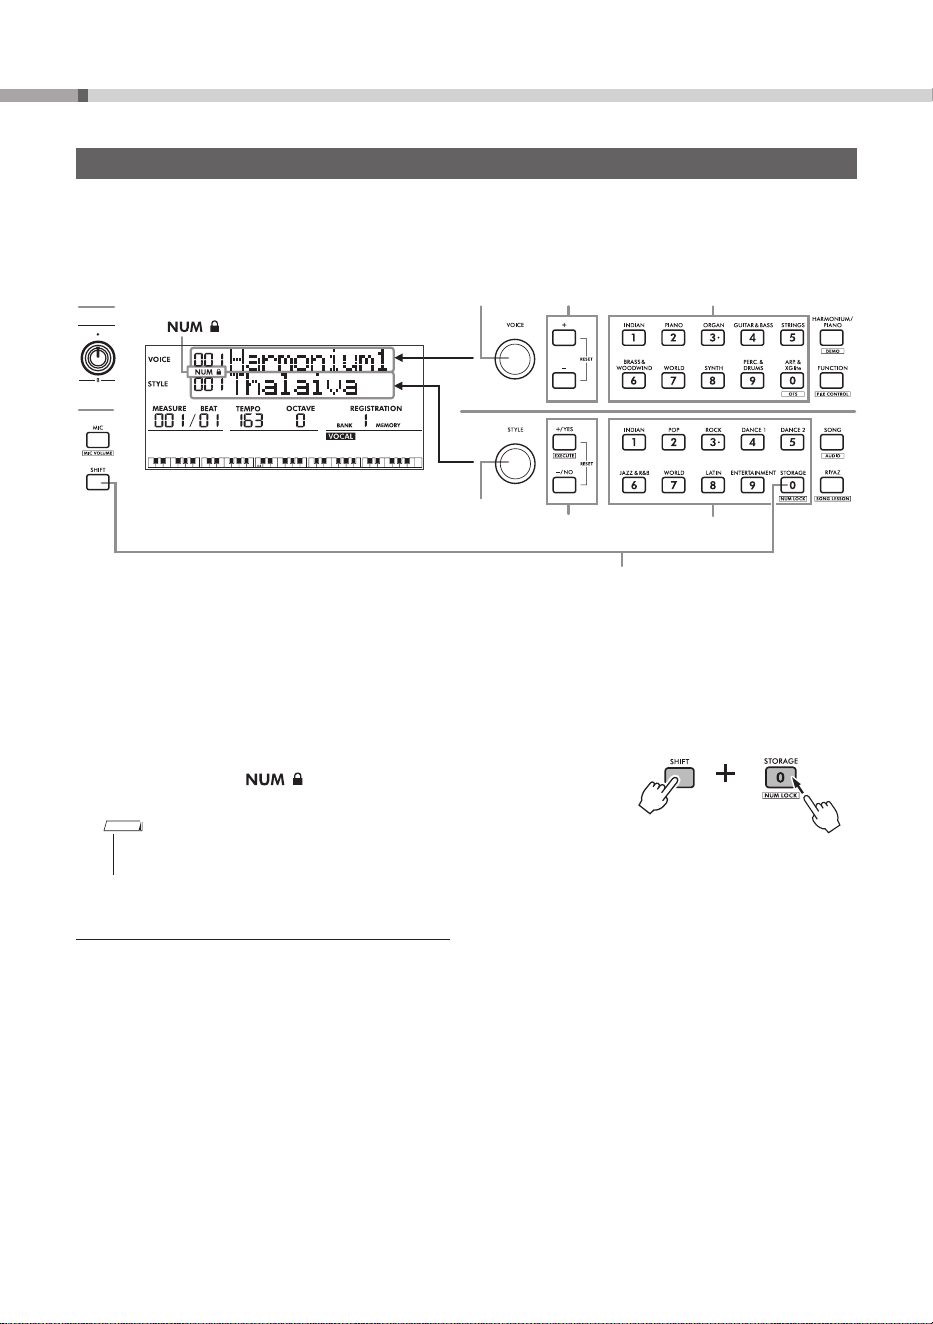
Selecting Items/Specifying Values
The Voice, Style, Song, and Riyaz, as well as Tempo settings, Function settings, etc., can all be specified in
similar ways.
For lists of Voices, Styles, Songs, and Riyaz, refer to the Data List on the website (see page 9).
1
Dial
1
Dial
2
[+/YES]/[−/NO]
buttons
2
[+]/[−]
buttons
3
Category buttons
4
appears
4
Enter numbers
3
Category buttons
The following four methods are available for selecting items or specifying values.
1
Selecting with dials
2
Selecting with the
[+]/[−]
buttons or
[+/YES]/[−/NO]
buttons
3
Selecting with the category buttons (Voice and Style only)
Each press of the category button switches to the next item within the category.
4
Selecting by entering numbers
If the
[STORAGE]
button is pressed while the
[SHIFT]
button is
being held down,
appears in the display, and the category
buttons
[1]
to
[0]
can be used to enter numbers.
NOTE
• With settings other than for Voice, Style, Song, or Riyaz, the
category buttons can be used to enter numbers.
Restoring an Edited Item to the Default Settings
To restore the default settings, simultaneously press the
[+]/[−]
buttons or the
[+/YES]/[−/NO]
buttons.
The Voice or Style, for example, is restored to the 001 setting.
21
PSR-I610, PSR-I510 Owner’s Manual
Playing a Variety of Voices (Instrument Sounds)
You can choose from a variety of Voices other than Piano. Not only can you play just a single Voice (Main
Voice), but you can also layer on a different Voice (Dual Voice), or divide the keyboard in half and play
different Voices with your left and right hands (Split Voice).
Selecting a Main Voice
1 Rotate the
[VOICE]
dial to select the desired
Voice (page 20).
Voice Types
PSR-I610 PSR-I510
001
|
398
001
|
358
Instrument sounds.
399
|
429
359
|
389
Various drum/percussion or SFX
sounds assigned to individual keys.
430
|
469
390
|
429
Used for arpeggio performances.
When one of these is selected, the
Arpeggio function is automatically
turned on.
470
|
927
430
|
887
XGlite Voices, which are simplified
(light) versions of Yamaha’s high-
quality sound source format, “XG.”
000 000
One-Touch Setting (OTS)
Automatically selects the optimum
Voice and panel settings (page 17) for
the currently selected Style (page 22).
NOTE
• For a list of Voice numbers and names, refer to the
Data List on the website (see page 9).
2 Play the keyboard.
Adding a Layer - Dual Voice
1 Press the
[DUAL]
button to turn on the Dual
function.
2 Play the keyboard.
Two Voices are played at the
same time.
3 To turn off the Dual function, press the
[DUAL]
button again.
Changing the Dual Voice
While holding down the
[SHIFT]
button, press the
[DUAL]
button to call up a display where the Dual
Voice can be changed.
Playing Different Voices With the Left
and Right Hands (Split Voice)
The entire keyboard can be divided into two areas
so that different Voices can be played with your
right and left hands.
Split Point…Default setting: 054 (F
#
2)
036
(C1)
048
(C2)
060
(C3)
072
(C4)
084
(C5)
096
(C6)
Plays the Split
Voice
Plays the Main Voice and Dual Voice
Right-hand area
Left-hand area
The division between the left-hand area and right-
hand area is called the “Split Point.” The key at the
Split Point belongs to the left-hand area.
1 Press the
[SPLIT]
button to turn on the Split
function.
The keyboard is divided into left- and right-
hand areas.
2 Play the keyboard.
3 To turn off the Split function, press the
[SPLIT]
button again.
Changing the Split Voice
While holding down the
[SHIFT]
button, press the
[SPLIT]
button to call up a display where the Split
Voice can be changed.
Changing the Split Point
While holding down the
[SPLIT]
button, press the
desired key for the Split Point.
PSR-I610, PSR-I510 Owner’s Manual
22
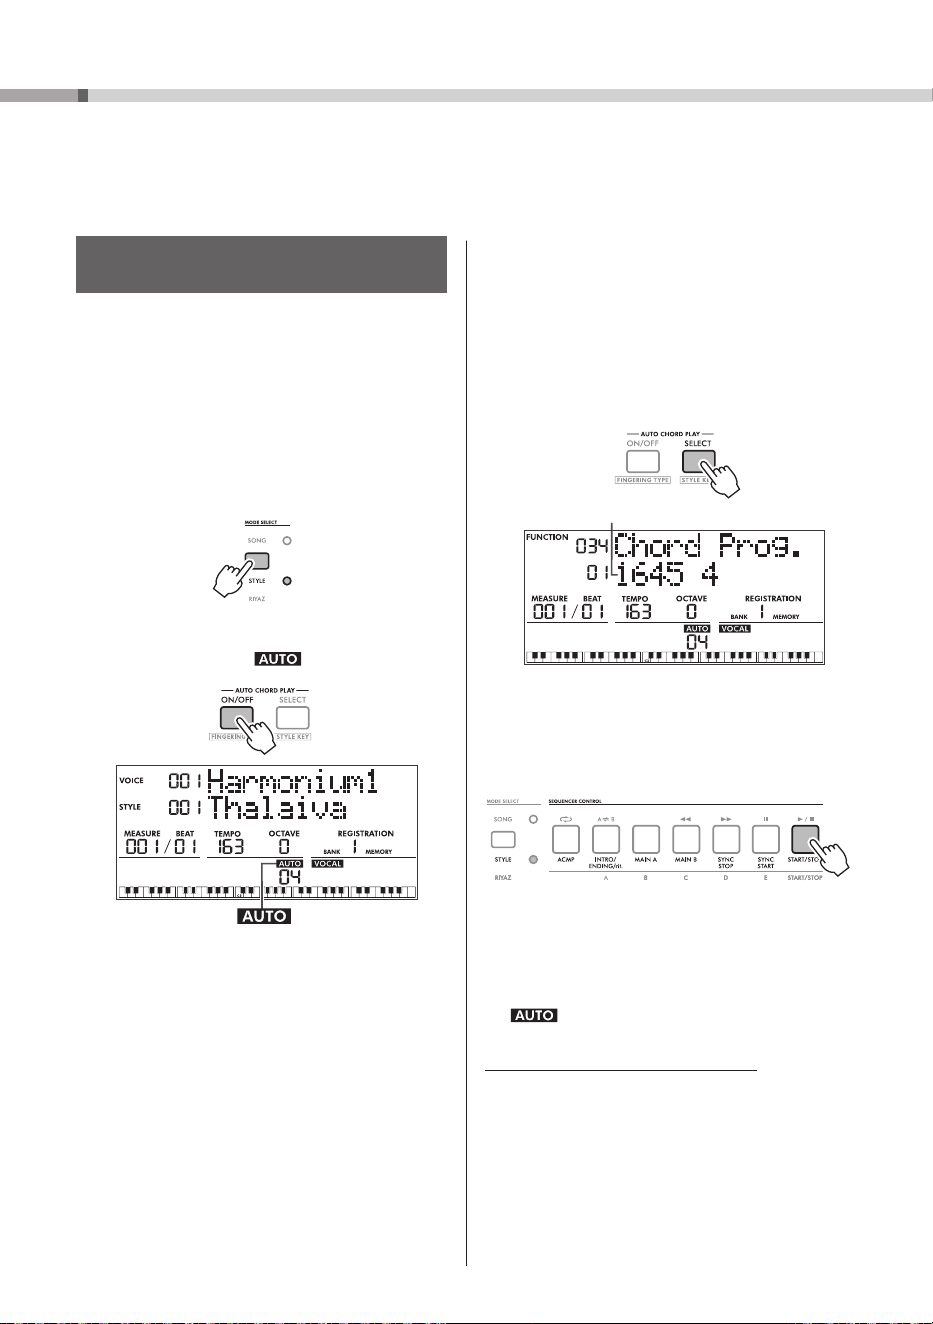
The Auto Accompaniment function (Style) automatically adds accompaniment (rhythm + bass + chords)
that matches the chords you play. Let's get started playing a Style using Auto Chord Play. Next, try playing
the chords yourself.
4 Select the appropriate Auto Chord Play
type for your desired chord progression.
Press the
AUTO CHORD PLAY [SELECT]
button to call up the Function setting display
(page 34, Function 034), and then rotate the
[STYLE]
dial to select the desired type.
For details on the Auto Chord Play types, refer
to the Data List (see page 9).
Auto Chord Play type
5 Press the
[START/STOP]
button.
The chord progression is automatically played
together with an appropriate accompaniment
for the chord.
6 Press the
[START/STOP]
button to stop
playing the Style.
7 To stop Auto Chord Play, press the
AUTO CHORD PLAY [ON/OFF] button.
disappears.
Editing the Auto Chord Play Chords
If the preset Auto Chord Play type doesn’t seem
appropriate for the selected song, you can edit
the chords of Auto Chord Play to better match the
song.
] Reference Manual (see page 9)
Playing with Rhythm and Auto Accompaniment (Styles)
Specifying the Chords Automatically
(Auto Chord Play)
The Auto Chord Play function enables you to
hear and experience chord progressions without
needing to specify the chords yourself. The
chord names appear in the display so that you
can memorize the chord progression or play
the melody with your right hand along with the
accompaniment.
1 Press the
MODE SELECT
button to select the
Style mode.
Lights up in orange.
2 Press the
AUTO CHORD PLAY [ON/OFF]
button to turn on .
appears
3 Rotate the
[STYLE]
dial to select the
desired Style (page 20).
23
PSR-I610, PSR-I510 Owner’s Manual
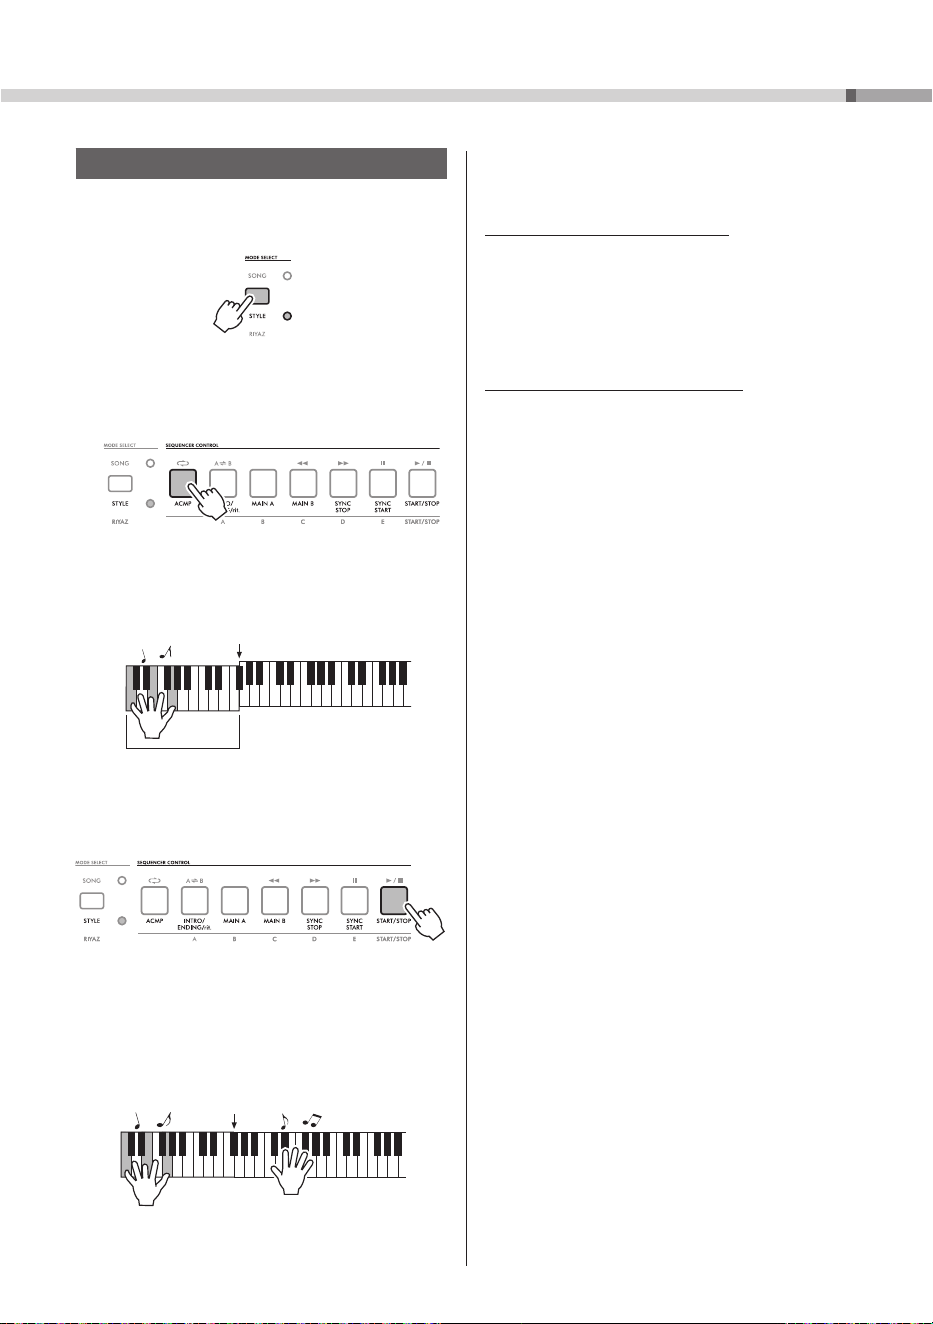
Playing with Rhythm and Auto Accompaniment (Styles)
Specifying the Chords Yourself
1 Press the
MODE SELECT
button to select the
Style mode.
Lights up in orange.
2 Press the
SEQUENCER CONTROL
[ACMP]
button.
The
[ACMP]
button lights up.
The area of the keyboard to the left of the Split
Point becomes the “Auto Accompaniment area”
and only recognizes chords.
Split Point…Default setting: 054 (F
#
2)
Auto Accompaniment area
3 Press the
[START/STOP]
button.
Only the rhythm part starts playing.
4 Try playing a chord in the Auto
Accompaniment area of the keyboard.
The bass and chords can be heard together
with the rhythm part. Try playing different
chords with your left hand and a melody with
your right hand.
5 Press the
[START/STOP]
button to stop
playing the Style.
Using Style Playback Variations
A Style consists of the following sections
(accompaniment patterns): Intro, Main A/B, Auto
Fill, and Ending. By arranging these sections,
you can alter the performance or add an intro or
ending.
] Reference Manual (see page 9)
Changing How Chords Are Played
You can change how chords are played (Fingering
Type): pressing the keys of all notes of the chord
(Multi Finger) or pressing one key to specify the
chord (Smart Chord).
] Reference Manual (see page 9)
PSR-I610, PSR-I510 Owner’s Manual
24
Playing with Riyaz
This instrument provides some phrase patterns (consisting of several measures) using authentic
Tabla/Mridangam and Tanpura sounds with looped playback. In the Riyaz mode, try playing conventional
Indian music—changing keys or creating dynamic sound variations by rotating the knobs.
Adding a Tanpura phrase
Because only one Tanpura track can be turned
on at a time, select and press one of the
desired [TANPURA1]–[TANPURA4] buttons
to add the Tanpura phrase. To turn off the
Tanpura phrase, press the Tanpura button of
the current number.
Changing the Tabla Variation via the [A]–[E] buttons
Press the [A]–[E] buttons to change the
variation of the Tabla.
Using the Knobs
For details about using the Knobs, refer to the
Reference Manual on the website (see page 9).
Knob [A]: Adjusts the tempo of Riyaz playback
within the range of 11–280. Note that the
tempo of Tanpura patterns cannot be changed
by Knob [A].
Knob [B]: Shifts pitches of the Tabla sounds
in half steps. In general, turning left shifts
the pitches down while turning right shifts
the pitches up (depending on the transpose
setting, etc.). This is applied only to the pitched
Tabla sounds. Note that this function does not
affect Tanpura phrases.
4 Press the
[START/STOP]
button to stop
playback.
1 Press the MODE SELECT button to select the
Riyaz mode.
Lights up in blue.
2 Rotate the
[STYLE]
dial to select the
desired Riyaz pattern.
For the Riyaz List, see the front panel or the
Data List on the website (see page 9).
3 Press the
[START/STOP]
button to start
looped playback.
At first, only the Tabla sound plays back.
During playback, enjoy creating dynamic sound
variations via the following operations.
Turning on/off Tabla track 1 and/or track 2
Tabla 1 features the lower pitched part while
Tabla 2 features the higher pitched part.
The current Tanpura button is lit.
25
PSR-I610, PSR-I510 Owner’s Manual
Saving/Recalling Your Favorite Settings (Registration Memory)
The Registration Memory function allows you to save (or
“register”) panel settings (such as Voices and Styles) to
REGISTRATION MEMORY buttons, then instantly recall
custom panel settings with the press of a button. Each of
the eight Banks can comprise settings saved to the four
REGISTRATION MEMORY buttons.
* Parameters with settings that can be saved
to Registration Memory
] Reference Manual (see page 9)
Recalling Settings Saved to Registration
Memory
First, determine the bank number and
Registration Memory number for the
settings that you wish to recall.
1 Press the
[BANK+]
button until the Bank
number (1 to 8) for the settings that you
wish to recall is selected.
Bank number
2 Press the REGISTRATION MEMORY button
(
[1]
to
[4]
) for the settings that you wish
to recall.
Review the settings in the display.
Registration Memory number
Saving Panel Settings to Registration
Memory
1 Specify the desired settings, such as Voices,
Styles, and Riyaz patterns.
2 Press the
[BANK+]
button until the Bank
number (1 to 8) indicated in the display
for the desired settings is selected.
Bank number
3 While holding down the
[BANK+]
button,
press one of the buttons
[1]
to
[4]
.
Hold down
Registration Memory number
The Registration Memory number in the display
flashes. When the settings have been saved,
the Registration Memory number in the display
stops flashing.
NOTICE
• When data is saved to Registration Memory, the
existing data is deleted and overwritten by the
new data. In order to prevent data from being
accidentally deleted, we recommend making a
note of what is saved where.
Up to 32 sets of settings (eight banks of
four each) can be saved.
8 Banks
Memory 1 Memory 3Memory 2 Memory 4
NOTE
• A newly purchased instrument comes with sample settings saved in Banks 1 to 8.
PSR-I610, PSR-I510 Owner’s Manual
26
Song (MIDI)/Audio Playback and Song Lesson
With this instrument, you can play back Songs (MIDI data) and audio files. In addition to simply listening to
playback, you can play the keyboard along with the Song or audio file playback or practice Songs using the
Song Lesson features.
Playing Songs (MIDI Data)
“Song” refers to all MIDI Data that can be played back on this instrument, including recorded User Songs
and commercially available song data. This instrument can play the following Songs.
The Songs (MIDI data) are categorized according to their characteristics.
Song Number
Song Category
PSR-I610 PSR-I510
001–021 001–021
DEMO These demonstration songs showcase the various sounds of the instrument, and give you an
idea of the advanced capabilities of this instrument.
022–056 022–046
ABHYASA HINDUSTANI RAGA (PSR-I610: 022–041, PSR-I510: 022–35):
Practice Songs for studying the traditional raga of Hindustani music.
GEETAM (PSR-I610: 042–043, PSR-I510: 036–37):
These Songs tell you basic melody and rhythm of Carnatic music.
SWARA JATHI (PSR-I610 only: 044–045):
Learn more complex patterns of swaras and rhythmic structures of Carnatic music with
these Songs.
CARNATIC RAGA (PSR-I610: 046–054, PSR-I510: 038–46):
Practice Songs for studying the traditional raga of Carnatic music.
KORVAI (PSR-I610 only: 055–056):
Hear and learn how to develop rhythm patterns in Mridangam performance.
057–075 047–065
PIANO
These include famous pieces from around the world along with well-known piano pieces.
076–085 066–075
USER SONG
Songs you have recorded yourself.
086– 076–
STORAGE/USB
Songs transferred from a computer or Songs in the USB flash drive.
For details on transferring songs from a computer to this instrument, refer to the Reference
Manual (see page 9).
NOTE
• For STORAGE/USB category Songs, numbers are assigned in the following order: Songs transferred from a computer, Songs
contained on a USB flash drive. A Song transferred to this instrument from a computer is inserted in front of the first USB
Song, renumbering the USB Songs accordingly.
• Songs that are larger than 250 KB cannot be played back.
27
PSR-I610, PSR-I510 Owner’s Manual
Song (MIDI)/Audio Playback and Song Lesson
1 Press the
MODE SELECT
button to select the
Song mode.
Lights up
2 Rotate the
[STYLE]
dial to select the Song
that you wish to play back.
Song name
Song number
3 Press the
[
]
button to play back the
Song.
4 To stop playback, press th
e
[
]
button
again.
• Adjusting the Song volume
• Changing the Song tempo
• Muting each Song track
• Playing back a User Song repeatedly
] Reference Manual (see page 9)
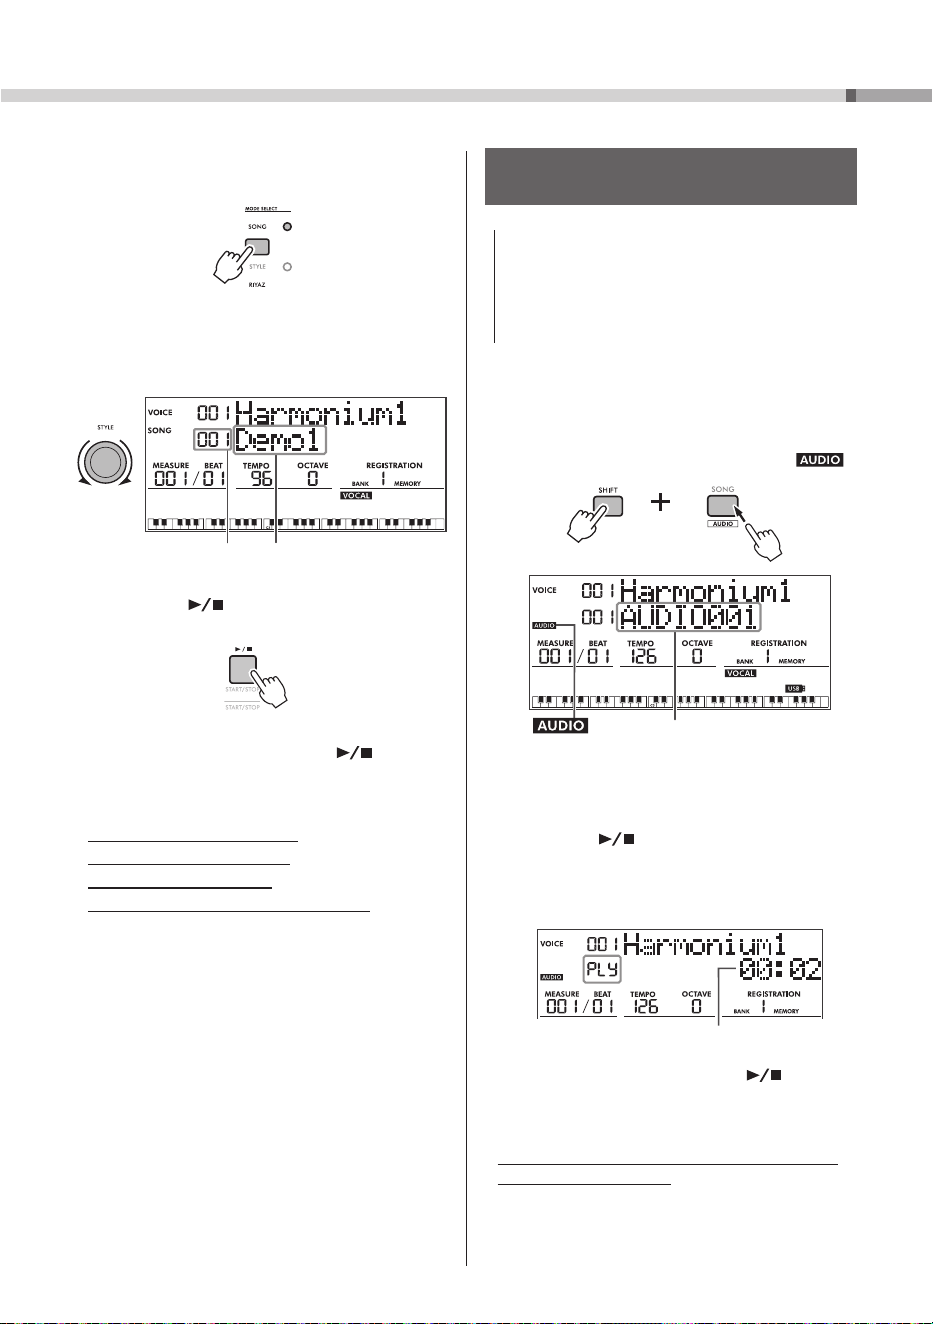
Playing Back an Audio File from a USB
Flash Drive
NOTICE
• Before using a USB flash drive, be sure to read
“Precautions for Using the [USB TO DEVICE] Terminal”
(page 31).
• Do not disconnect the USB flash drive or turn off
the instrument during playback of an audio file.
Otherwise, the data may be damaged.
1 Connect a USB flash drive to the
[USB TO DEVICE]
terminal.
2 While holding down the
[SHIFT]
button,
press the
[SONG]
button to turn on .
Audio file name
appears
3 Rotate the
[STYLE]
dial to select the
desired audio file for playback.
4 Press the
[
]
button to start playback
of the audio file.
During playback, “PLY” and the amount of
elapsed time are shown in the display.
Elapsed time
5 To stop playback, press the
[
]
button
again.
• Messages that appear in the display during
playback of audio files
] Reference Manual (see page 9)
PSR-I610, PSR-I510 Owner’s Manual
28
Song (MIDI)/Audio Playback and Song Lesson
Using the Song Lesson Feature—Three-
Step Lesson
Use these convenient features to practice the
preset Songs and improve your playing skills.
1 Press the
MODE SELECT
button to select the
Song mode.
Lights up
2 Select the desired Song (page 27).
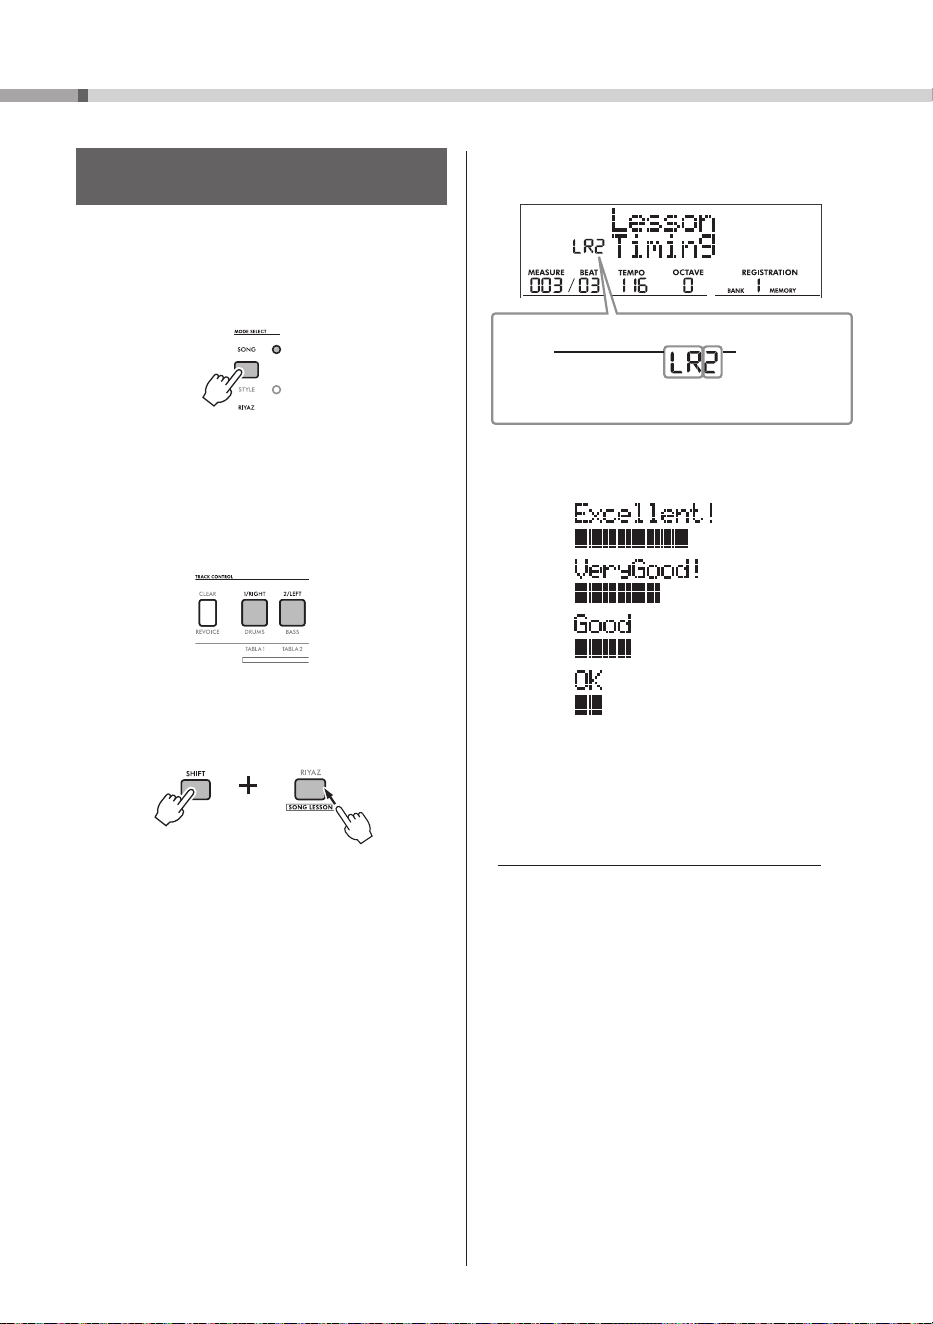
3 Press either or both the [1/RIGHT] and
[2/LEFT] buttons to select the desired
part(s) for practicing.
4 While holding down the [SHIFT] button,
press the [RIYAZ] button to start playback
of the Song Lesson.
While holding down the [SHIFT] button,
pressing the [RIYAZ] button repeatedly
will switch among the Lesson numbers, 1:
Listening, 2: Timing, 3: Waiting, off, and then
back again.
• Lesson 1 (Listening)
Listen to the playback part you will play.
Remember it as best as you can.
• Lesson 2 (Timing)
Learn to play the notes with the correct timing.
Even if you play wrong notes but with the correct
timing, the appropriate notes will sound.
• Lesson 3 (Waiting)
Learn to play the correct notes. The Song pauses
until you play the right note.
The selected part and Lesson number appears
on the display.
Lesson number
1: Listening
2: Timing
3: Waiting
When Lesson playback reaches the end, the
evaluation grade appears on the display.
5 To stop the Lesson, simultaneously hold
down the [SHIFT] button and press the
[RIYAZ] button again.
• Making Practice Perfect— Repeat & Learn
] Reference Manual (see page 9)
Example
Part
LR: Both-hands lesson
R: Right-hand lesson
L: Left-hand lesson
29
PSR-I610, PSR-I510 Owner’s Manual
Recording Methods on this Instrument
This instrument can record your performances in
two different ways.
Song Recording (MIDI Recording)
You can record your performance as MIDI data to
the internal memory. This instrument allows you
to record and erase each track (part) separately,
making editing easy. Songs recorded using this
method are called “User Songs.”
Audio Recording (page 30)
You can save your performance as an audio file in
the WAV format to a USB flash drive. This recorded
audio file can also be played back on computers
and smart devices.
Recording a New User Song
(MIDI Recording)
This section explains how to record a new Song to
the internal memory without specifying a track.
1 Press the
MODE SELECT
button to select the
Song mode.
Lights up
2 Rotate the
[STYLE]
dial to select the User
Song number (PSR-I610: 076–085;
PSR-I510: 066–075) for saving the new
Song.
NOTICE
• If data has already been saved to the selected
User Song number, the corresponding TRACK
CONTROL button lights up. Continuing to record
will delete the existing data and overwrite it
with the new data.
3 Select a mode according to the content
you wish to record.
• When recording only a melody performance:
Song mode
• When recording a performance using a Style:
Style mode
Switch modes
NOTE
• In Style mode, the TRACK CONTROL button
corresponding to the currently selected Style data
lights up.
4 Specify the desired panel settings, such
as the Main Voice (page 21).
5 Press the
[REC]
button to enter Record
Standby mode.
To exit Record Standby mode, press the
[REC]
button again.
6 Play the keyboard or press the
[
]
button to start recording.
7 Press the
[
]
or
[REC]
button to stop
recording.
When recording has been stopped, “Writing!”
appears in the display and the data is saved.
NOTICE
• Never turn off the instrument or unplug the AC
adaptor while “Writing!” is shown. Otherwise,
data may be lost.
8 Press the
[ ]
button to play back the
recorded performance (page 27).
• Limitations when recording
• Recording/Erasing each track (part) separately
• Specifying the number of measures to record
• Deleting a User Song
• Saving a User Song as a MIDI file on a USB
flash drive
] Reference Manual (see page 9)
Recording Your Performance
PSR-I610, PSR-I510 Owner’s Manual
30
Recording Your Performance
Recording (Saving) an Audio File to a USB
Flash Drive
NOTICE
• Before using a USB flash drive, be sure to read
“Precautions for Using the [USB TO DEVICE] Terminal”
(page 31).
NOTE
• When using the audio recording function, be sure to
use the AC adaptor. The audio recording function is not
available when using batteries.
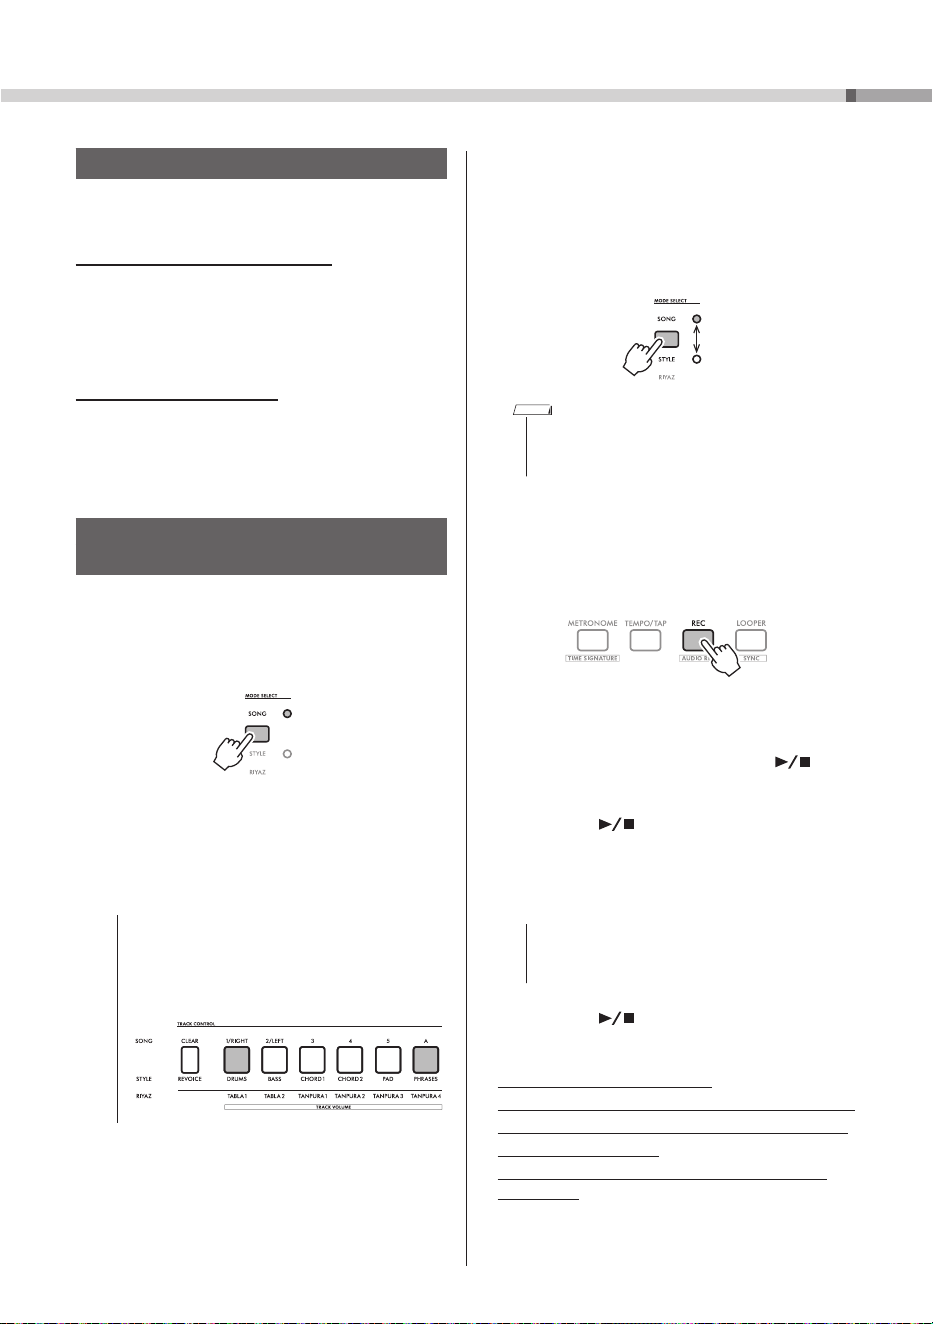
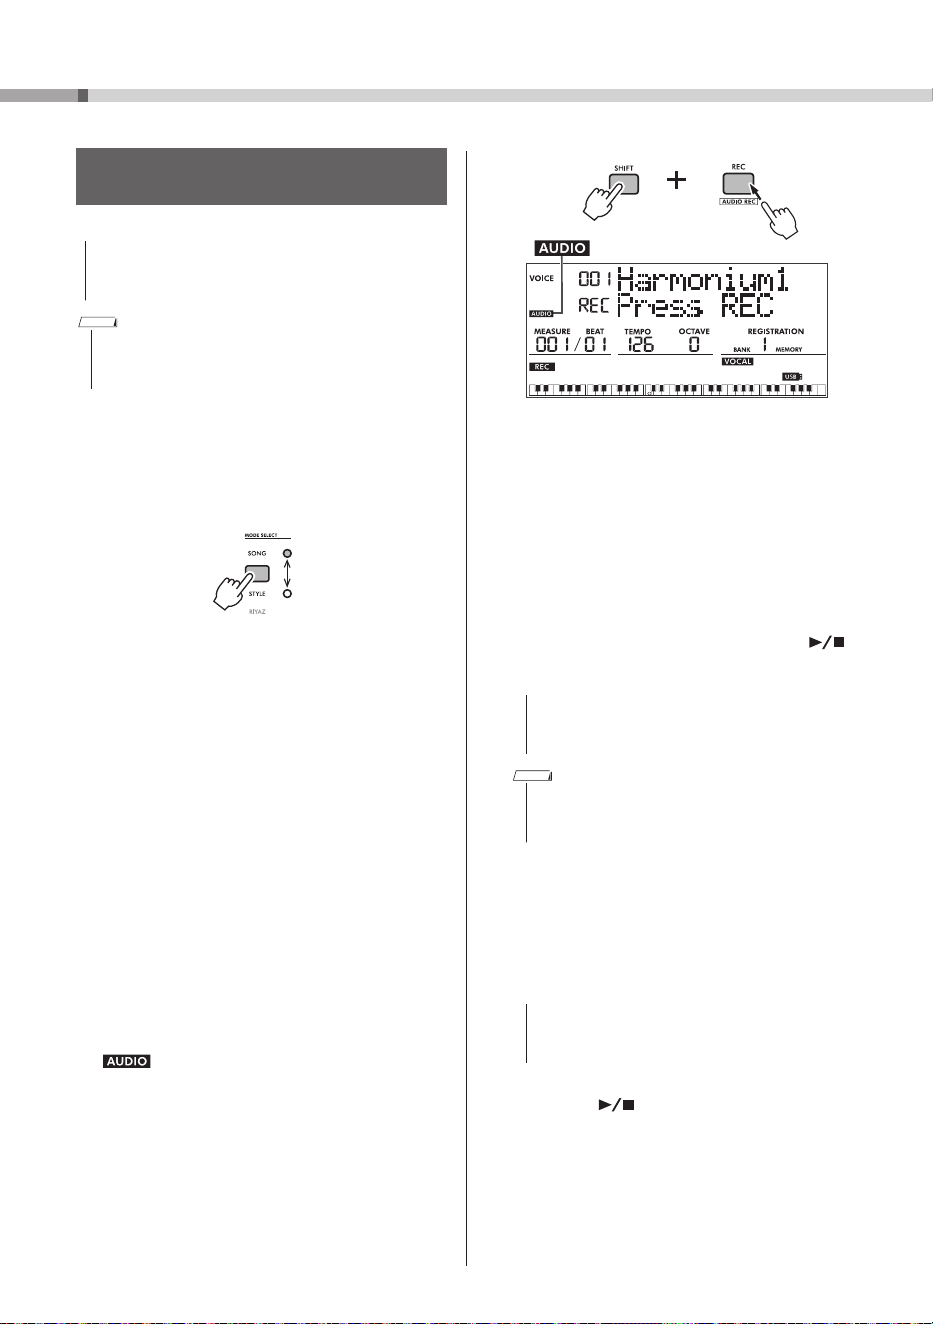
1 Connect a USB flash drive to the
[USB TO DEVICE]
terminal.
2 Press the
MODE SELECT
button to select
one of the modes: Song, Style, or Riyaz.
Switch modes
To record your performance using a Style,
select the Style mode.
3 Specify the desired settings for the
performance that you wish to record.
Depending on the mode selected in step 2,
the data that can be recorded is limited to the
following.
• With Song mode
Keyboard performance, audio input from the
[MIC INPUT]/[AUX IN]/[USB TO HOST]
connectors
• With Style/Riyaz mode
Style/Riyaz, Keyboard performance, audio input
from the [MIC INPUT]/[AUX IN]/
[USB TO HOST] connectors
4 While holding down the
[SHIFT]
button,
press the
[REC]
button to enter Record
Standby mode for audio recording.
appears on the left of the display.
appears
To exit Record Standby mode, while holding
down the
[SHIFT]
button, press the
[REC]
button.
5 Press the
[REC]
button to start recording.
The amount of elapsed time is shown in the
display while recording.
The maximum recording time is 80 minutes
or until the USB flash drive is full, whichever is
shorter.
When recording a Style/Riyaz, press the
[ ]
button to start/stop the Style/Riyaz.
NOTICE
• Do not disconnect the USB flash drive or turn off
the instrument while recording. Otherwise, the
data may be damaged.
NOTE
• For details on the messages that appear in the
display during recording, refer to the Reference
Manual on the website (see page 9).
6 Press the
[REC]
button to stop recording.
“Writing!” appears in the display and the data
is saved. The name of the recorded audio file
will appear as “AUDIO***” (where “***” is a
number).
NOTICE
• Never turn off the instrument or unplug the AC
adaptor while “Writing!” is shown. Otherwise,
data may be lost.
7 Press the
[
]
button to play back the
recorded performance (page 27).

31
PSR-I610, PSR-I510 Owner’s Manual
Connecting a USB Flash Drive
By connecting a USB flash drive (sold separately) to the
[USB TO DEVICE]
terminal, you can save data
created on the instrument, such as User Songs and parameter settings. The saved data can be recalled to
the instrument for future use.
NOTICE
• When performing USB flash drive operations, be sure to use the AC adaptor. Battery power may not last through these
crucial operations. When using certain functions, “Use Adapter” may appear, and the selected function cannot be
used unless the AC adaptor is connected.
NOTE
• To play back data stored on a USB flash drive, refer to “Song (MIDI)/Audio Playback and Song Lesson” (pages 26, 27).
Connecting a USB Device
Insert a plug that matches the shape of the
[USB TO DEVICE]
terminal, paying careful
attention to its orientation.
NOTICE
• Avoid connecting or disconnecting a USB
device during playback, recording and file
management operations (such as saving,
copying, deleting, and formatting), and when
accessing the USB device. Otherwise, this
instrument may stop functioning or the USB
device and the data may become damaged.
• Wait a few seconds between connecting and
disconnecting a USB device (in either order).
• Do not use a cable to connect a USB flash drive.
Precautions for Using the
[USB TO DEVICE]
Terminal
This instrument features a built-in
[USB TO DEVICE]
terminal. When connecting a USB device to the
[USB TO DEVICE]
terminal, be sure to observe the
following.
NOTE
• For more information about the handling of USB
devices, refer to the owner’s manual of the USB
device.
Compatible USB Devices
• USB flash drives
Other USB devices such as a USB hub, computer
keyboard or mouse cannot be used. Compatible
USB devices are listed under “Documents & Data”
on the following website. Be sure to check this
website before purchasing devices.
https://manual.yamaha.com/mi/rt/psr-i610/downloads/
Although USB 1.1 to 3.0 devices can be used with
this instrument, the time required to save data to
or load data from the device will vary depending on
the type of data and the state of this instrument.
NOTICE
• The [USB TO DEVICE] terminal is rated for
maximum 5 V/500 mA. Do not connect a USB
device that exceeds this rating, otherwise this
instrument may become damaged.
PSR-I610, PSR-I510 Owner’s Manual
32
Connecting a USB Flash Drive
File Operations for a USB Flash Drive
NOTICE
• Before using a USB flash drive, be sure to read
“Precautions for Using the [USB TO DEVICE] Terminal”
on page 31.
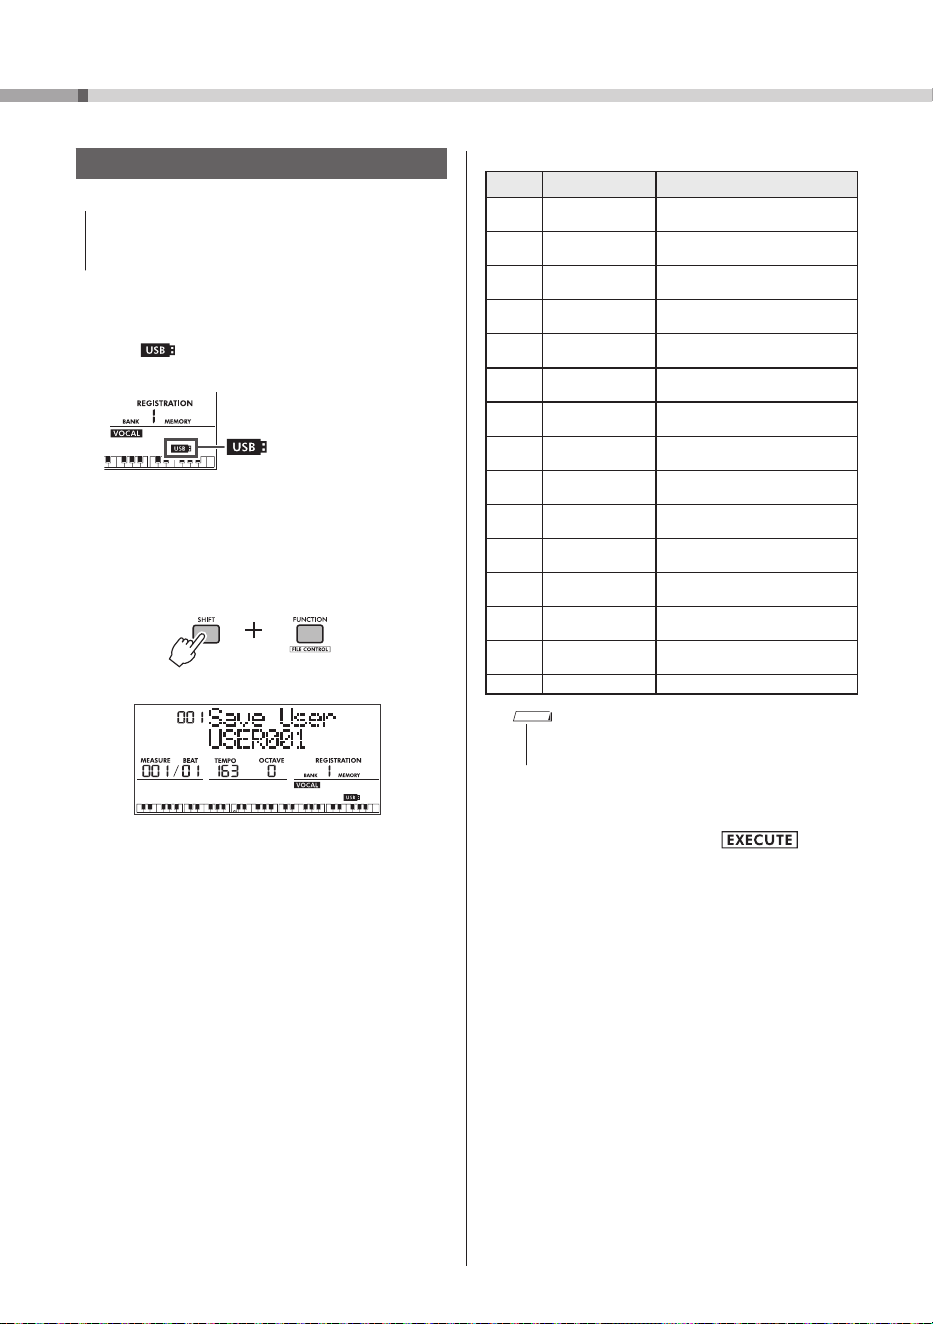
1 Connect a USB flash drive to the
[USB TO DEVICE]
terminal, and make sure
that
appears (lit continuously) in the
lower right of the display.
Preparing to connect (flashing)
]
Connection complete (lit
continuously)
2 While holding down the
[SHIFT]
button,
press the
[FUNCTION]
button to call up
the File Control display.
While holding
down
3 Rotate the
[VOICE]
dial to select an
operation.
If necessary, rotate the [STYLE] dial to select
the data.
List of File Control Operations
Number
Display File Control function
001
Save User
Saving User data (User file) to a
USB flash drive
002
Load User
Loading User data (User file) from
a USB flash drive
003
Delete User
Deleting User data (User file) in a
USB flash drive
004
Load Style
Loading a Style file from a USB
flash drive
005
Save SMF
Saving an SMF file to a USB flash
drive
006
Delete SMF
Deleting an SMF file in a USB flash
drive
007
Delete Audio
Deleting an audio file in a USB
flash drive
008
Save Looper
Saving Looper data to a USB
flash drive
009
Load Looper
Loading Looper data from a USB
flash drive
010
DeleteLooper
Deleting Looper data in a USB
flash drive
011
Save Smpl
Saving a sample to a USB flash
drive
012
Load Smpl
Loading a sample from a USB
flash drive
013
Delete Smpl
Deleting a sample in a USB flash
drive
014
Import WAV
Importing a WAV file from a USB
flash drive as a sample
015
Format
Formatting a USB flash drive
NOTE
• For details on the file control operations, refer to the
Reference Manual on the website (see page 9).
4 While holding down the
[SHIFT]
button,
press the
[+/YES]
button ( ) to
perform the operation.
Depending on the selected operation, it may
be necessary to hold down the
[SHIFT]
button
and press the
[+/YES]
button again to perform
the operation.
5 If the confirmation message “Save OK?”
or “Load OK?” appears, press the
[+/YES]
button.
To cancel the operation, press the
[−/NO]
button.
6 To exit the File Control display, press the
[SHIFT]
button.
33
PSR-I610, PSR-I510 Owner’s Manual
Function Settings
The Function settings provide access to a range of detailed instrument parameters such as Tuning, Split
Point, Voices, and Effects. Find the desired item in the Function List (pages 33–37), and then follow the
instructions below.
Basic Procedure for the Function Settings
1 Press the
[FUNCTION]
button to call up the
Function setting display.
2 Rotate the
[VOICE]
dial until the desired
Function name and number appear.
Function number Function name
Current setting
3 Rotate the
[STYLE]
dial to specify the
setting.
To restore the default setting, simultaneously
press the
[+/YES]
and
[−/NO]
buttons.
Selected setting
4 To exit the Function setting display, press
the
[FUNCTION]
button.
Function List
Function
Number
Function Display Range/Settings
Default
Value
Backup
PSR-
I610
PSR-
I510
General
001 001 Tempo Lock
Tempo Lock
On/Off Off
002 002 Transpose
Transpose
−
12 – +12 0
003 003 Tuning
Tuning
427.0 Hz–453.0 Hz 440.0 Hz
✓
004 004 Pitch Bend Range
PB Range
1–12 2
005 005 Split Point
Split Point
036 (C1)–096 (C6)
054 (F
#
2/G
b
2)
✓
006 006 Touch Response
TouchRespons
1: Soft
2: Medium
3: Hard
4: Off
2: Medium
✓
007 007 Portamento Time
PortamentoTm
0–127 *
Main Voice
008 008 Main Voice Volume
M.Volume
0–127 *
009 009 Octave
M.Octave
−
2 – +2 *
010 010 Pan
M.Pan
L63–L01, C, R01–R63 *
011 011 Reverb Depth
M.Reverb
0–127 *
012 012 Chorus Depth
M.Chorus
0–127 *
013 013 Attack Time
M.Attack
0–127 64
014 014 Release Time
M.Release
0–127 64
PSR-I610, PSR-I510 Owner’s Manual
34
Function Settings
Function
Number
Function Display Range/Settings
Default
Value
Backup
PSR-
I610
PSR-
I510
015 015 Filter Cutoff
M.Cutoff
0–127 64
016 016 Filter Resonance
M.Resonance
0–127 64
Dual Voice
017 017 Dual Voice Volume
D.Volume
0–127 *
018 018 Octave
D.Octave
−
2 – +2 *
019 019 Pan
D.Pan
L63–L01, C, R01–R63 *
020 020 Reverb Depth
D.Reverb
0–127 *
021 021 Chorus Depth
D.Chorus
0–127 *
022 022 Attack Time
D.Attack
0–127 64
023 023 Release Time
D.Release
0–127 64
024 024 Filter Cutoff
D.Cutoff
0–127 64
025 025 Filter Resonance
D.Resonance
0–127 64
Split Voice
026 026 Split Voice Volume
S.Volume
0–127 *
027 027 Octave
S.Octave
−
2 – +2 *
028 028 Pan
S.Pan
L63–L01, C, R01–R63 *
029 029 Reverb Depth
S.Reverb
0–127 *
030 030 Chorus Depth
S.Chorus
0–127 *
Style
031 031 Style Volume
Style Volume
0–127 100
✓
032 032 Fingering Type
Fing. Type
1: Multi Finger
2: Smart Chord
1: Multi Finger
✓
033 033 Style Key
Style Key
FL7–FL1, SP0–SP7
FL7 (7
b
) : C
b
Major/A
b
minor
SP0 (no key signature) : C Major/A minor
SP7 (7
#
) : C
#
Major/A
#
minor
SP0 (no key
signature):
C Major/A minor
034 034 Chord Progression
Chord Prog.
001–145 001
Riyaz
035 035 Riyaz Volume
Riyaz Volume
0–127 100
✓
Song
036 036 Song Volume
Song Volume
0–127 100
✓
037 037 Song Melody Voice
MelodyVcChg
001–927 (PSR-I610)
001–887 (PSR-I510)
**
038 038 Song Transpose
Song Trans
−
12 – +12 0
Looper
039 039 Looper Undo
Looper Undo
1: Last Event (Last recorded
single note)
2: Last Timing (Last recorded
chord)
3: Last Loop (Last recorded loop )
1: Last Event
040 040 Looper Volume
LooperVolume
0–127 100
35
PSR-I610, PSR-I510 Owner’s Manual
Function Settings
Function
Number
Function Display Range/Settings
Default
Value
Backup
PSR-
I610
PSR-
I510
Effects
041 041 Reverb Type
Reverb
Type
01–04: Hall
05: Cathedral
06–09: Room
10–12: Stage
13–15: Plate
16: Off
**
042 042 Reverb Level
Reverb Level
0–127 64
043 043 Chorus Type
Chorus Type
1–3: Chorus
4–6: Flanger
7: Celeste
8: Off
**
044 044 Master EQ Type
Master EQ
1: Standard
2: India
3: Bright 1
4: Bright 2
5: Mellow 1
6: Mellow 2
1: Standard
✓
Microphone
045 045 Microphone Volume
Mic Volume
0–127 Depends on
the mic type
✓
046 046 Pan
Mic Pan
L63–L01, C, R01–R63 Depends on
the mic type
✓
047 047 Reverb Depth
Mic Reverb
0–127 Depends on
the mic type
✓
048 048 Chorus Depth
Mic Chorus
0–127 Depends on
the mic type
✓
Sampling
049 049 Blank Cut
Blank Cut
On/Off On
✓
050 050 Sampling Pad Volume
Sampling Vol
000–127 100
051 051 Sampling Sync
Playback
SamplingSync
On/Off Off
Harmony/Arpeggio
052 052 Harmony/Arpeggio
Type
Harmony/Arp
Harmony Type
001–026
Arpeggio Type
PSR-I610: 027–208
PSR-I510: 027–205
*
053 053 Harmony Volume
Harmony Vol
0–127 *
054 054 Arpeggio Velocity
Arp Velocity
1: Original
2: Key
Depends on
the Arpeggio
type
055 055 Arpeggio Quantize
Arp Quantize
1: Off
2: 1/4
3: 1/8
4: 1/16
Depends on
the Arpeggio
type
PSR-I610, PSR-I510 Owner’s Manual
36
Function Settings
Function
Number
Function Display Range/Settings
Default
Value
Backup
PSR-
I610
PSR-
I510
Pedal
056 056 Foot Switch
Foot Switch
1: Sustain
2: Arpeggio Hold
3: Sustain+Arpeggio Hold
4: Articulation
5: Sostenuto
1: Sustain
057 Foot Controller
Foot Control
1: All
2: Keyboard
1: All
Scale Tuning
058 057 Scale
Scale
1: Equal (equal temperament)
2: Pure Major
3: Pure Minor
4: Bayat (Arabic)
5: Rast (Arabic)
1: Equal
059 058 Base Note
Base Note
01: C, 02: C
#
/D
b
, 03: D, 04: D
#
/E
b
,
05: E, 06: F, 07: F
#
/G
b
, 08: G,
09: G
#
/A
b
, 10: A, 11: A
#
/B
b
, 12: B
01: C
060 059 Tuning Note
Tune Note
01: C, 02: C
#
/D
b
, 03: D, 04: D
#
/E
b
,
05: E, 06: F, 07: F
#
/G
b
, 08: G,
09: G
#
/A
b
, 10: A, 11: A
#
/B
b
, 12: B
01: C
061 060 Individual Tuning
Tune
−
64 – 63 Depends on
the scale
Metronome
062 061 Time Signature
Numerator
Time Sig Top
00–60 **
063 062 Time Signature
Denominator
Time Sig Btm
2 (half note)
4 (quarter note)
8 (eight note)
16 (sixteenth note)
**
064 063 Metronome Volume
MetronomeVol
0–127 100
✓
Lesson
065 064 Lesson Track (R)
R
-
Part
1–16 1
066 065 Lesson Track (L)
L
-
Part
1–16 2
067 066 Your Tempo
Your Tempo
On/Off On
✓
MIDI
068 067 Local Control
LocalControl
On/Off On
069 068 External Clock
Ext Clock
On/Off Off
070 069 Keyboard Out
Keyboard Out
On/Off On
071 070 Style Out
Style Out
On/Off Off
072 071 Song Out
Song Out
On/Off Off
073 072 Initial Send
Initial Send
*** -
37
PSR-I610, PSR-I510 Owner’s Manual
Function Settings
Function
Number
Function Display Range/Settings
Default
Value
Backup
PSR-
I610
PSR-
I510
Audio
074 073 Audio Volume [AUX IN]
Aux In Vol
0–127 50
✓
075 074 Audio Volume
[USB TO HOST]/
[USB TO DEVICE]
USB In Vol
0–127 100
✓
076 075 Audio Loopback
Loopback
On/Off On
✓
077 076 Melody Suppressor
Melody Suppr
On/Off Off
078 077
Melody Suppressor Pan
MelSuppr Pan
L63–L01, C, R01–R63 C
Regist Freeze
079 078 Style Freeze
Style Freeze
On/Off Off
✓
080 079 Transpose Freeze
Trans Freeze
On/Off Off
✓
081 080 Voice Freeze
Voice Freeze
On/Off Off
✓
Storage
082 081 Storage Mode
Storage Mode
On/Off Off
Demo
083 082 Demo Group
Demo Group
1: Demo
2: Preset
3: User
4: Download
5: USB
6: Audio
1: Demo
✓
084 083 Demo Play Mode
DemoPlayMode
1: Normal
2: Random
1: Normal
✓
Speakers
085 084 Speaker
Speaker
1: Phones Sw
2: Speaker On
3: Speaker Off
1: Phones Sw
Power Supply
086 085 Auto Power Off
AutoPowerOff
Disabled,
5/10/15/30/60/120 (minutes)
15 (minutes)
✓
087 086 Battery
Battery
1:
Alkaline (alkaline or manganese
batteries)
2: Ni-MH (rechargeable nickel
metal hydride batteries)
1: Alkaline
(alkaline or
manganese
batteries)
✓
* The appropriate setting is automatically specified for the selected Voice combination.
** The appropriate setting is automatically specified for the currently selected Style/Song/Arpeggio.
*** The Initial Send function sends the instrument’s panel settings to a computer. If the [+/YES] button is pressed
while the Function name is shown, the operation will be immediately performed.
PSR-I610, PSR-I510 Owner’s Manual
38
Backup and Initialization
Data and Settings To Be Backed Up
The following data and settings are automatically
backed up and will be maintained even after the
instrument has been turned off.
Continually Backed Up
• User Songs (page 29)
• Styles loaded from external devices (PSR-I610: Style
No.393–402; PSR-I510: Style No. 383–392)*
• Samples saved to Quick Sampling pads*
• Looper data*
• User chord progression data*
* Refer to the Reference Manual (see page 9).
Backed Up when Turning Off the Power
• Registration Memory (page 25)
• Function settings
Settings of functions with a check mark in the
“Backup” column of the Function List (pages
33–37) are backed up.
Initializing the Instrument
Clearing the backed-up data and settings listed at
left and restoring all instrument settings to their
factory defaults is called “initialization.”
Clearing Backup Data (Backup Clear)
All backed-up data and settings will be restored
their factory defaults.
While holding down the highest white key, press
the
[
]
(Standby/On) switch to turn on the
instrument.
Highest note on the
keyboard (white key)
Clearing Files Transferred from a Computer, etc.
(Flash Clear)
Clearing backed-up data will not clear any files
transferred from a computer or smart device. In
order to clear these files, perform a Flash Clear
operation.
] Reference Manual (see page 9)
Troubleshooting
Problem Possible Cause and Solution
When the instrument is turned on by pressing
the [ ] (Standby/On) switch, a popping sound is
temporarily produced.
This indicates that the instrument is receiving electrical power.
Before turning on the instrument, turn the [MASTER VOLUME]
control to “MIN.”
When the instrument is turned on by pressing the
[
] (Standby/On) switch, the instrument turns off
suddenly and unexpectedly.
This is because the overvoltage protection function has been
activated. If an AC adaptor other than the one specified is used, the
instrument may turn off suddenly and unexpectedly. Use only the
specified AC adaptor (page 41).
When a mobile phone is being used (or ringing)
near this instrument, noise can be heard from the
instrument's speakers and/or headphones.
If a mobile phone is being used (or ringing) near this instrument,
it may produce interference. To prevent this, turn off the mobile
phone or use it further away from the instrument.
The power is automatically turned off. This is caused by the Auto Power Off function (page 13).
Change the time until the instrument is automatically turned off, or
deactivate the function.
No sound is produced when the keyboard is played.
No sound is produced when a Style, Riyaz, or Song
is played back.
Make sure that no headphones or a headphone adaptor is
connected to the [PHONES] jack.
Function 085(PSR-I610)/084(PSR-I510) “Speaker” (page 37) is set to
“3 Speaker Off.” Set it to either “1 Phones SW” or “2 Speaker On.”

39
PSR-I610, PSR-I510 Owner’s Manual
Troubleshooting
Problem Possible Cause and Solution
• The volume is too low.
• The sound quality is poor.
• The Style/Riyaz/Song/Arpeggio stops
unexpectedly or will not play.
• Recorded data, for example, of a Song, is not
played back correctly.
• The LCD display suddenly goes dark, and all panel
settings are reset.
• The instrument turns off when a USB flash drive
is being connected.
The battery is depleted. Replace all batteries with brand new or fully
recharged ones, or use the AC adaptor.
The foot switch (for sustain) seems to produce the
opposite effect.
This happens either because you stepped on the foot switch while
turning on the instrument, or the foot switch was connected/
disconnected while the instrument was on. Turn off the instrument,
and then turn it on again while being careful not to step on the foot
switch.
When playing the keyboard, some keys do not
produce sound when pressed simultaneously.
Furthermore, the sound seems to cut off when
a Style, Riyaz, Song, Arpeggio or the QUICK
SAMPLING pads are being played.
The maximum polyphony (page 40) has been exceeded. If the
maximum polyphony has been exceeded, earlier notes are muted
and subsequent notes are given priority.
The sound quality and volume vary depending on
which key is pressed.
In order to faithfully reproduce the original sound of an instrument,
this instrument has samples of the original instrument across the
range of its keyboard. As a result, some Voices may have different
sound quality and volume depending on their range.
The keyboard performance and playback of a Style/
Riyaz/Song produces an unexpected sound, such
as distortion or excessive reverb, that cannot be
returned to normal.
An unintended setting was made due to operation of the knobs.
Press the [HARMONIUM/PIANO] button to reset the panel settings.
The Style/Riyaz/Song does not start even when the
[START/STOP] button has been pressed. Arpeggio
does not start even if a key is pressed with the
Arpeggio function turned on.
Function 069(PSR-I610)/068(PSR-I510) “External Clock” (page 36)
is set to “On.” Normally, “External Clock” should be set to “Off.”
The volume of a Style/Riyaz/Song is too low. The volume of a Style/Riyaz/Song is too low. The volume levels for a
Style/Riyaz/Song can be set separately (page 34).
Make sure that the volume settings for each function are not too
low.
Style parts other than Rhythm produce no sound. Style (ACMP) is not turned on. Press the SEQUENCER CONTROL
[ACMP] button so that it lights up.
When certain Styles are selected, no rhythm is
played even after the [START/STOP] button has
been pressed.
The selected Style does not include a rhythm part. Turn the
SEQUENCER CONTROL [ACMP] button on and play the left-hand
area on the keyboard to sound the accompaniment part of the
Style.
The instrument does not respond when operated. Function 082(PSR-I610)/081(PSR-I510) “Storage Mode” (page 37)
is set to “On.” Set “Storage Mode” to “Off.”
The Style corresponding to the played chord is not
played back.
The setting for Function 032 “Fingering Type” (page 34) does not
fit how the chords are being played. Check the settings.
For details on playing chords, refer to the Reference Manual on the
website (see page 9).
The setting for Function 005 “Split Point” (page 33) is not correct.
Specify an appropriate setting.
PSR-I610, PSR-I510 Owner’s Manual
40
Specifications
PSR-I610 PSR-I510
Product Name Digital Keyboard
Size/Weight
Dimensions (W x H x D) 992 mm x 136 mm x 404 mm (39-1/16” x 5-3/8” x 15-7/8”)
Weight
7.3 kg (16 lb, 1 oz) (not including batteries) 7.0 kg (15 lb, 7 oz) (not including batteries)
Control
Interface
Keyboard
Number of Keys 61
Touch Response Yes (Soft, Medium, Hard, Off)
Other
Controllers
Pitch Bend Wheel Yes
Modulation Wheel Yes -
Knobs 2
Display
Type LCD (Liquid Crystal Display)
Language English
Panel Language English
Voices
Tone Generator AWM Stereo Sampling
Polyphony (max.) 64
Preset Number of Voices
927
(386 Voices + 43 Drum/SFXKits +
40 Arpeggio Voices + 458 XGlite Voices)
887
(347 Voices + 42 Drum/SFXKits +
40 Arpeggio Voices + 458 XGlite Voices)
Compatibility GM, XGlite
Effects Types
DSP DSP1: 41 + DSP2: 12
Reverb 15
Chorus 7
Master EQ 6
Accompaniment
Styles
Preset
Number of Styles 392 382
Fingering Multi Finger, Smart Chord
Style Control
ACMP ON/OFF, SYNC START, SYNC STOP, START/STOP,
INTRO/ENDING/rit., MAIN (A, B) / Auto Fill, TRACK ON/OFF
External Styles 10
Other
Features
One Touch Setting (OTS)
Yes
Auto Chord Play 135 Chord Progressions + 10 USER Chord Progressions
Compatibility Style File Format (SFF)
Riyaz
Preset
Number of R
i
yaz Patterns
50 40
Number of Variations 5
Other Feature
One Touch Setting (OTS)
Yes
Songs (MIDI)
Preset
Number of Preset Songs
75 65
Recording
Number of Songs 10
Number of Tracks 6 (5 Melody + 1 Style)
Data Capacity Approx. 19,000 notes (total for all 10 Songs)
Format
Playback SMF (Formats 0 & 1)
Recording Original File Format (SMF 0 conversion function)
USB Audio
Recorder
Recording Time (max.) 80 minutes (approx. 0.9 GB) per Song
Format
Playback WAV (44.1 kHz, 16-bit, stereo)
Recording WAV (44.1 kHz, 16-bit, stereo)
Quick Sampling
Sampling Type Oneshot, Loop
Samples (Preset/User) 4
Sampling Time Approx. 9.6 sec
Sampling Sources AUX IN, MIC INPUT, USB audio interface, WAV format files
Sampling Format Original File Format (16-bit, stereo)
Sampling Rate 44.1 kHz
Functions
Voices
Dual Yes
Split Yes
Harmony 26
Arpeggio 182 179
Articulation Yes (29 S.Art Lite Voices) Yes (20 S.Art Lite Voices)
Registration
Memory
Number of Buttons 4 (× 8 banks)
Control Freeze
41
PSR-I610, PSR-I510 Owner’s Manual
Specifications
PSR-I610 PSR-I510
Functions
Lesson Lesson 1–3 (1 Listening, 2 Timing, 3 Waiting), Repeat & Learn
Overall
Controls
Metronome Yes
Tempo Range 11 – 280 (Tap Tempo: 32 – 280)
Transpose
−
12 – 0 – +12
Tuning 427.0 – 440.0 – 453.0 Hz (approx. 0.2 Hz increments)
Octave Button Yes
Scale Type 5
Miscellaneous
HARMONIUM/PIANO Button
Yes
Demo Yes
Melody Suppressor Yes
USB audio interface 44.1 kHz, 16-bit, stereo
Motion Effect 57
Looper Yes
Mega Boost 2 steps (approx. +3 dB, +6 dB)
Storage and
Connectivity
Storage
Internal Memory Approx. 1.72 MB
External Drives USB flash drive
Connectivity
DC IN 16 V 12 V
Headphones Standard stereo phone jack
Microphone Standard mono phone jack
FOOT SWITCH Sustain, Arpeggio Hold, Sustain+Arpeggio Hold, Articulation, Sostenuto
FOOT CONTROLLER Yes (Volume) -
AUX IN Stereo mini jack
OUTPUT Standard stereo phone jacks: L/L+R, R
USB TO DEVICE USB Type-A
USB TO HOST USB Type-C™
Sound System
Amplifiers 12 W × 2 6 W × 2
Speakers 12 cm × 2
Power Supply
Power
Supply
AC Adaptor PA-300C (Output : DC 16 V, 2.4 A )
PA-150 or an equivalent
recommended by Yamaha
(Output : DC 12 V, 1.5 A)
Batteries
Six “AA” size alkaline (LR6), manganese (R6)
or Ni-MH rechargeable (HR6) batteries
Power Consumption
13 W
(When using PA-300C AC adaptor)
13 W
(When using PA-150C AC adaptor)
Standby Power Consumption
0.1 W
(When using PA-300C AC adaptor)
0.3 W
(When using PA-150C AC adaptor)
Auto Power Off Yes (Disabled/5/10/15/30/60/120 minutes)
Included Accessories
• Owner’s Manual (this book)
• Music rest
• AC adaptor: PA-300C
• Power cord
• Owner’s Manual (this book)
• Music rest
• AC adaptor: PA-150 or an
equivalent recommended by
Yamaha
Separately Sold Accessories
(May not be available depending on your area.)
• Headphones: HPH-150, HPH-100,
HPH-50
• Footswitch: FC4A, FC5
• Foot controller: FC7
• AC adaptor: PA-300C
• Keyboard stand: L-2C
• Wireless MIDI Adaptor: UD-BT01
• Subwoofer: KS-SW100
• Keyboard Bag: SC-KB650
• Headphones: HPH-150, HPH-100,
HPH-50
• Footswitch: FC4A, FC5
• AC adaptor: PA-150 or an
equivalent recommended by
Yamaha
• Keyboard stand: L-2C
• Wireless MIDI Adaptor: UD-BT01
• Subwoofer: KS-SW100
• Keyboard Bag: SC-KB650
* The contents of this manual apply to the latest specifications as of the publishing date. To obtain the latest manual, access
the Yamaha website then download the manual file. Since specifications, equipment or separately sold accessories may
not be the same in every locale, please check with your Yamaha dealer.

PSR-I610, PSR-I510 Owner’s Manual
42
Index
A
AC Adaptor ................................ 12
ACMP ......................................... 23
Arpeggio ................................... 35
Articulation ............................... 14
Audio ............................ 26, 27, 37
Audio File ........................... 27, 30
Audio Recording ................ 29, 30
Auto Accompaniment area ..... 23
Auto Chord Play ....................... 22
Auto Power Off ......................... 13
B
Backup ....................................... 38
Battery ....................................... 12
C
Computer .................................. 18
D
Data List ...................................... 9
Demo ......................................... 37
Display ....................................... 19
Dual ........................................... 21
Dual Voice .......................... 21, 34
E
Effect .......................................... 35
F
File Control ................................ 32
Fingering Type .......................... 23
Function ............................. 20, 33
Function List ............................. 33
G
Gain ........................................... 18
H
Harmony ................................... 35
Headphones ............................. 18
Home Display ........................... 19
I
Included Accessories ................. 9
Initialization .............................. 38
K
Knob .......................................... 15
L
Layer .......................................... 21
Listening.................................... 28
Looper ....................................... 34
M
Main Voice .......................... 21, 33
MASTER VOLUME ..................... 13
Mega Boost ............................... 15
Metronome ............................... 36
Microphone ................. 15, 18, 35
MIDI ........................................... 36
MIDI Basics ................................. 9
MIDI Recording ........................ 29
Modulation Wheel ................... 17
Motion Effect ............................ 15
Mridangam ............................... 24
Multi Finger .............................. 23
Music Rest ................................. 13
O
One-Touch Setting ................... 21
OTS ............................................. 21
P
Panel Settings .................... 17, 25
Pitch Bend Range ..................... 33
Pitch Bend Wheel ..................... 17
Power......................................... 12
Q
Quick Sampling ........................ 17
R
Recording .................................. 29
Reference Manual(
) .......... 9
Registration Memory ............... 25
Riyaz........................ 19, 20, 24, 34
S
Sampling ............................ 17, 35
SHIFT ......................................... 14
Smart Chord ............................. 23
Smart Device ............................. 18
Smart Device Connection
Manual ..................................... 9
Song ........................ 19, 20, 26, 34
Song Book ................................... 9
Song Category .......................... 26
Song Lesson ...................... 26, 28
Specifications ............................ 40
Split ..................................... 21, 34
Split Point ........................... 21, 23
Split Voice .................................. 21
Step Lesson ............................... 28
Style ........................ 19, 20, 22, 34
T
Tabla .......................................... 24
Tanpura ..................................... 24
Tempo ........................................ 20
Timing ....................................... 28
Touch Response ....................... 33
Track .......................................... 17
Transpose .................................. 33
Troubleshooting ....................... 38
Tuning ....................................... 33
U
USB Flash Drive ..... 27, 30, 31, 32
User Song.................................. 29
V
Video Manual .............................. 9
Voice ................................... 20, 21
W
Waiting ...................................... 28

43
PSR-I610, PSR-I510 Owner’s Manual
About open source software
The firmware of this product contains open source software. For copyright information and terms of use
for each open source software, access “Documents & Data” on the Yamaha website below:
https://manual.yamaha.com/mi/rt/psr-i610/downloads/
Yamaha Global Site
https://www.yamaha.com/
Yamaha Downloads
https://download.yamaha.com/
© 2025 Yamaha Corporation
Published 12/2025
IPIN-A0
VJC0360
Yamaha Worldwide Representative Offices
For details on the product(s), contact your nearest Yamaha representative or the authorized distributor,
found by accessing the 2D barcode below.
English
Wenden Sie sich für nähere Informationen zu Produkten an eine Yamaha-Vertretung oder einen
autorisierten Händler in Ihrer Nähe. Diese finden Sie mithilfe des unten abgebildeten 2D-Strichodes.
Deutsch
Pour obtenir des informations sur le ou les produits, contactez votre représentant ou revendeur agréé
Yamaha le plus proche. Vous le trouverez à l'aide du code-barres 2D ci-dessous.
Français
Para ver información detallada sobre el producto, contacte con su representante o distribuidor autorizado
Yamaha más cercano. Lo encontrará escaneando el siguiente código de barras 2D.
Español
Untuk detail produk, hubungi perwakilan Yamaha terdekat atau distributor resmi Anda dengan
mengakses barcode 2D di bawah ini.
Bahasa indonesia
Para mais informações sobre o(s) produto(s), fale com seu representante da Yamaha mais próximo ou com
o distribuidor autorizado acessando o código de barras 2D abaixo.
Português
Чтобы узнать подробнее о продукте (продуктах), свяжитесь с ближайшим представителем или
авторизованным дистрибьютором Yamaha, воспользовавшись двухмерным штрихкодом ниже.
Русский
如需有关产品的详细信息,请联系距您最近的 Yamaha 代表或授权经销商,可通过访问下方的二维码找到这些
代表或经销商的信息。
简体中文
如需產品的詳細資訊,請聯絡與您距離最近的 Yamaha 銷售代表或授權經銷商,您可以掃描下方的二維條碼查
看相關聯絡資料。
繁體中文
제품에 대한 자세한 정보는 아래 �D 바코드에 엑세스하여 가까운 Yamaha 담당 판매점 또는 공식 대리점에
문의하십시오.
한국어
https://manual.yamaha.com/mi/address_list/
Head Office/Manufacturer: Yamaha Corporation 10-1, Nakazawa-cho, Chuo-ku, Hamamatsu, 430-8650, Japan
Importer (European Union): Yamaha Music Europe GmbH Siemensstrasse 22-34, 25462 Rellingen, Germany
Importer (United Kingdom): Yamaha Music Europe GmbH (UK) Sherbourne Drive, Tilbrook, Milton Keynes, MK7 8BL, United Kingdom
DMI37_10m