
Room Planner User Guide
2
Contents
About ProVisionaire Cloud (Room Planner) ______________________________________ 4
About Room Planner ........................................................................................................................................................ 4
What you can do with Room Planner .............................................................................................................................. 4
Using Room Planner ........................................................................................................................................................ 5
Room conditions supported by Room Planner ............................................................................................................... 5
Files that can be saved with Room Planner .................................................................................................................... 5
Opening Room Planner / Saving a File ___________________________________________ 6
Opening Room Planner .................................................................................................................................................... 6
1. Access the ProVisionaire Cloud ......................................................................................................................... 6
2. Signing in ............................................................................................................................................................. 6
3. Displaying Room Planner ................................................................................................................................... 7
4. Starting to create a plan ..................................................................................................................................... 8
Top Screen of The Room Planner ....................................................................................................................... 8
Confirmation dialog box for using room image recognition feature ................................................................ 9
5. Creating a plan by using the room image recognition feature (optional) ........................................................ 9
Saving a file ...................................................................................................................................................................... 11
Creating a Plan in Room Planner ________________________________________________ 12
Procedure for creating a plan .......................................................................................................................................... 12
1. Specifying room conditions by following the procedure guide ........................................................................ 12
2. Editing room conditions/arrangement ............................................................................................................... 13
3. Generating the plan ............................................................................................................................................. 14
4. Reviewing the generated plan ............................................................................................................................ 15
Reviewing the simulation of the sound coverage area ...................................................................................... 16
Reviewing the device list ..................................................................................................................................... 17
Exporting the results ........................................................................................................................................... 18
Changing the device quantities (if desired) ....................................................................................................... 19
Specifying room conditions ............................................................................................................................................. 20
Specifying the room size ........................................................................................................................................... 20
Specifying the furniture arrangement ....................................................................................................................... 21
Selecting room requirements .................................................................................................................................... 22
Specifying sound coverage areas ............................................................................................................................. 23
Specifying noise sources and their locations ........................................................................................................... 24
Specifying locations where devices cannot be installed ........................................................................................ 25
Working with Objects ....................................................................................................................................................... 26
Using Advanced Features _______________________________________________________ 28
Creating a plan that supports Voice Lift ......................................................................................................................... 28
About Voice Lift .......................................................................................................................................................... 28
Models that support Voice Lift .................................................................................................................................. 28
Creating a Voice Lift plan ........................................................................................................................................... 28
Using a generated plan to automatically set up a system ............................................................................................. 29
Procedure for setting up by using a plan .................................................................................................................. 29

Room Planner User Guide
3
Step 1. Plan: Creating a plan with Room Planner .............................................................................................. 29
Step 2. Export: Exporting the plan ...................................................................................................................... 30
Step 3. Setup:Automatically setting up with RM-CR ....................................................................................... 30
Details on Screens _____________________________________________________________ 31
Room condition specification screen/procedure guide ................................................................................................. 31
Arrangement Views/Editing Tools .................................................................................................................................. 32
Buttons for plans/proposed devices ............................................................................................................................... 34
Application elements ....................................................................................................................................................... 35
Service elements .............................................................................................................................................................. 35
About this Guide
This guide provides details on using ProVisionaire Cloud -Room Planner.
About the contents of this guide
• All copyrights relating to this software and User Guide are owned by Yamaha Corporation.
• Unauthorized copying or modification of this software or the User Guide in part or in whole is prohibited.
• We assume no responsibility whatsoever for any consequences or subsequent impacts resulting from the use of this
software or User Guide.
• The illustrations and screens in this User Guide are for instructional purposes only.
• The operation and screen examples provided in this User Guide are based on Windows 11.
• For the purpose of improvement, this software and User Guide are subject to change without notice.
The latest version of the User Guide can be downloaded from the ProVisionaire website.
https://www.yamaha.com/2/provisionaire/
Trademarks
• Windows is a registered trademark of Microsoft Corporation in the United States and other countries.
• Other company names and product names mentioned in this guide are trademarks or registered trademarks of their
respective companies.
Room Planner User Guide
4
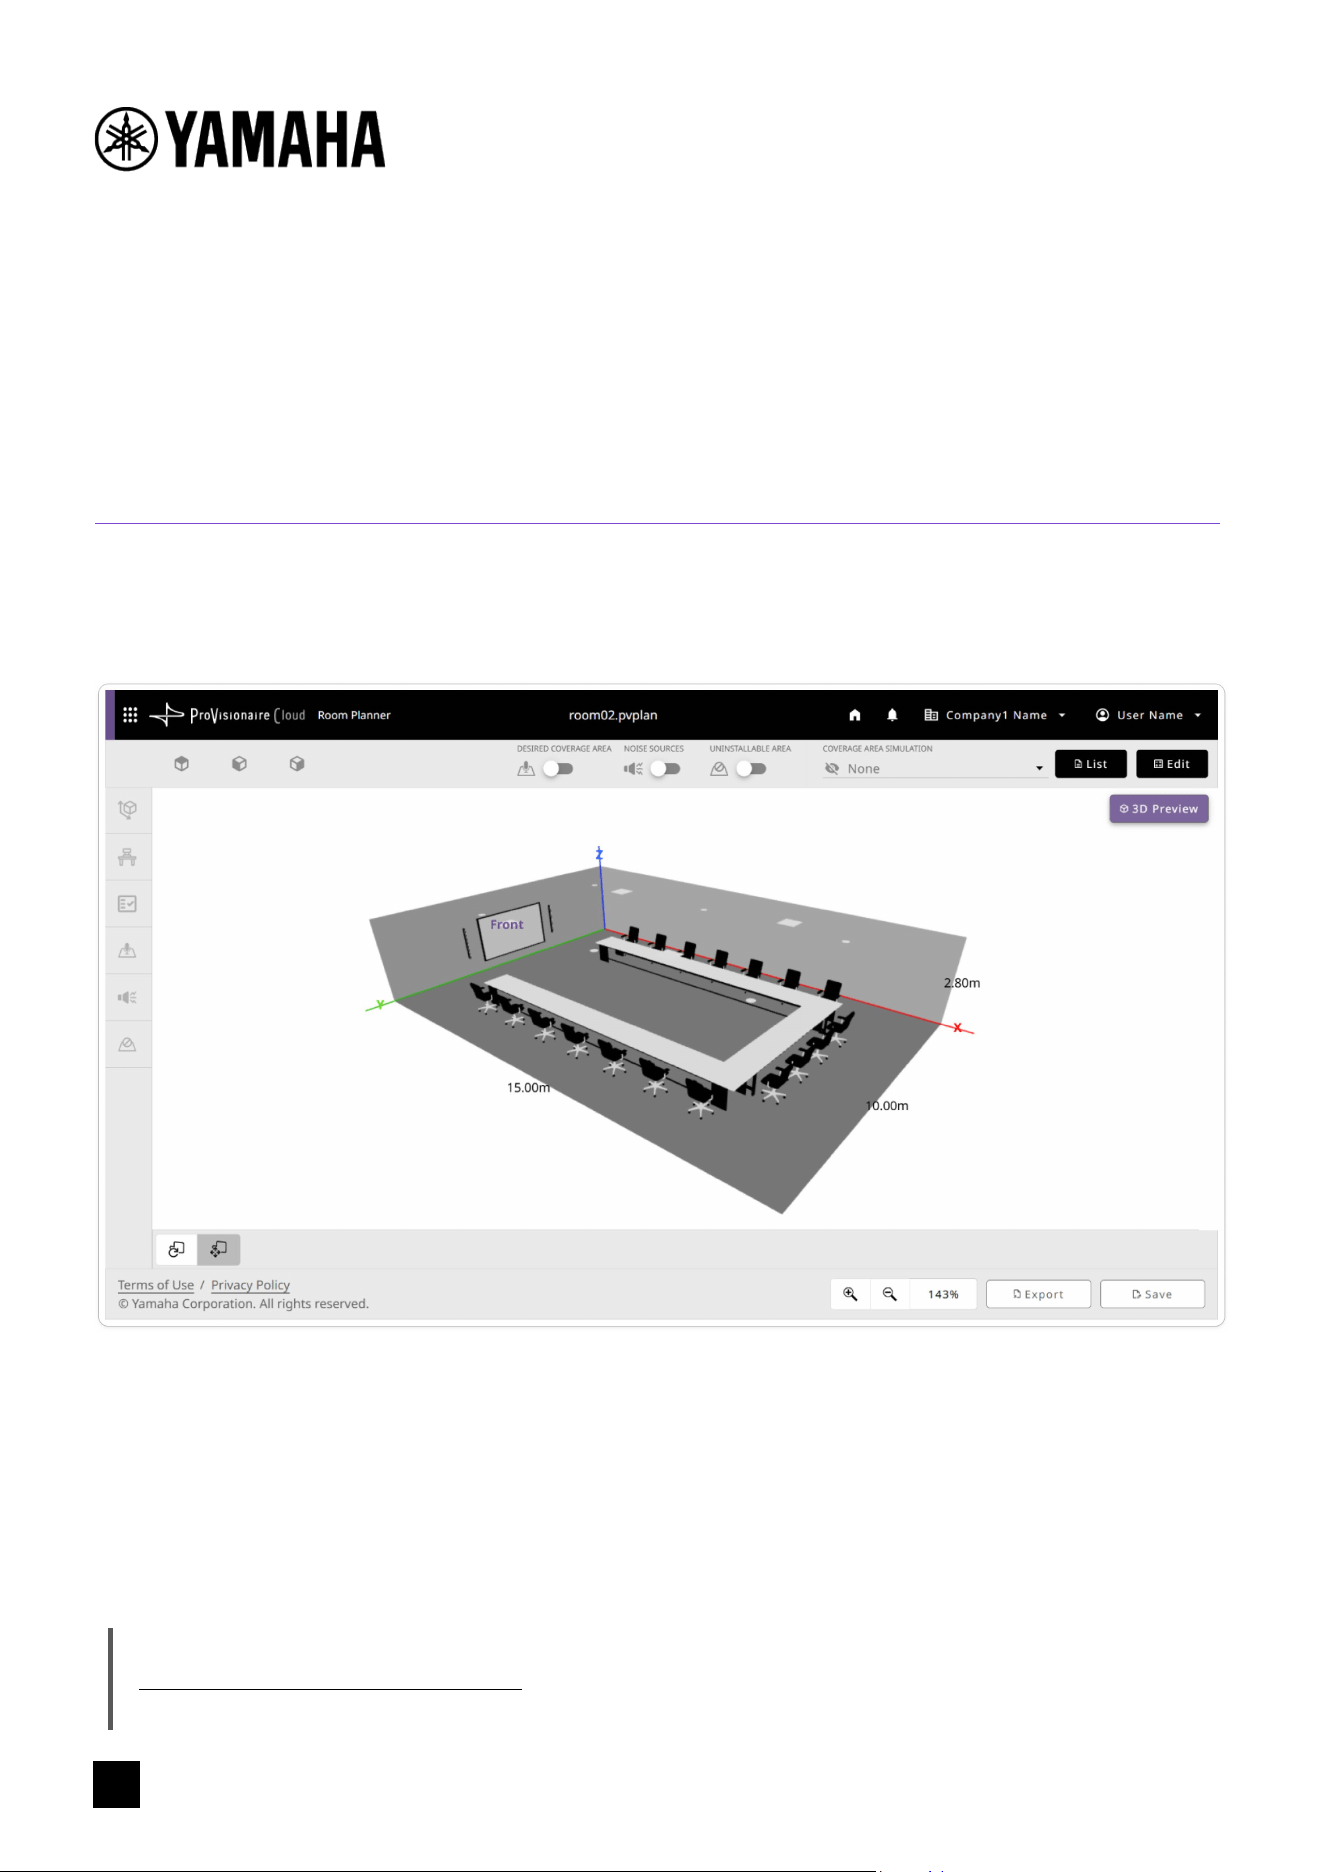
About ProVisionaire Cloud (Room Planner)
About Room Planner
Room Planner of the cloud service ProVisionaire Cloud (hereinafter referred to as Room Planner) efficiently suggests
configurations for sound systems to be installed in conference rooms, seminar rooms, etc. Simply entering the room
dimensions, environment and requirements automatically generates a plan for a sound system using ADECIA (a comprehensive
remote conferencing solution).
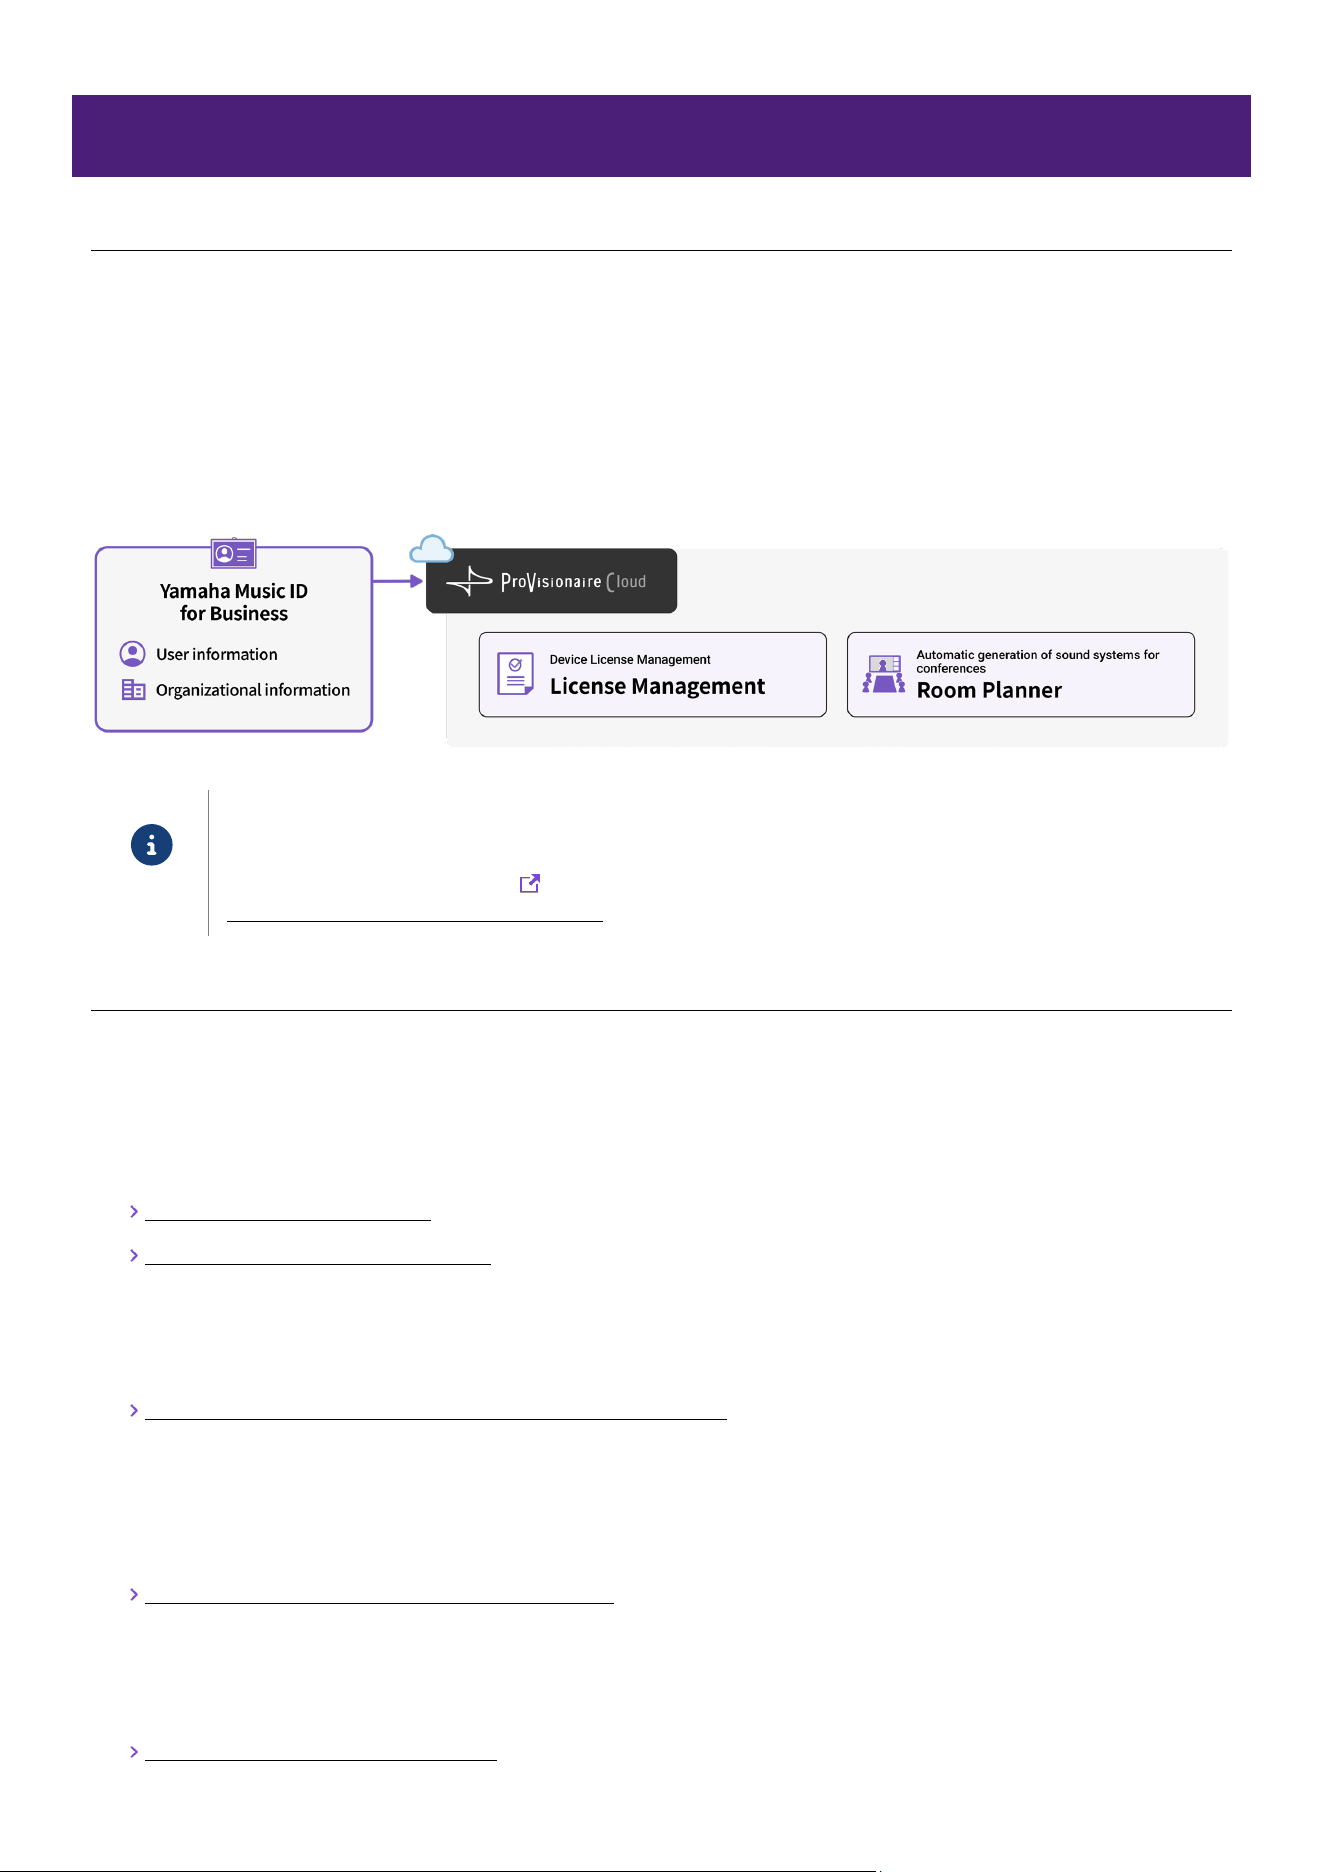
About ProVisionaire Cloud
ProVisionaire Cloud is a cloud service for Yamaha audio devices. You will use your account for Yamaha Music ID for Business
to sign in to ProVisionaire Cloud. For details, refer to the “ProVisionaire Cloud User Guide”.
Note
It is a common ID that can be used for services for corporations and sole-proprietor businesses provided by
Yamaha Corporation and its group companies.
Yamaha Music ID for Business
https://www.yamaha.com/2/music-id-biz/
What you can do with Room Planner
✔ Automatically generate a plan of the appropriate devices and their arrangement based on the room dimensions,
environment and requirements
The room dimensions as well as the locations of existing furniture, obstacles and noise sources to automatically generate a
plan of the devices and their arrangement suitable for that environment. In addition, a sound system that supports Voice Lift
can be generated according to the specified requirements.
Creating a Plan in Room Planner (page 12)
Creating a plan that supports Voice Lift (page 28)
✔ AI-powered room image recognition feature applies room conditions derived from uploaded images
When creating a plan, upload images of the room for AI to recognize the type and arrangement of furniture as well as the
materials of the walls, ceilings and floors in order to help specify the room conditions.
Confirmation dialog box for using room image recognition feature (page 9)
✔ Visualize and review the coverage areas of microphones and speakers
Review the coverage areas of the microphones and speakers as if they were installed according to the plan. This can be
used to justify proposals or to check whether the desired area would be covered if the number of devices or their
arrangement is changed.
Reviewing the simulation of the sound coverage area (page 16)
✔ Automatically set up a system using the generated plan, enabling quick configuration of a conference environment
The plan results automatically generated by Room Planner can be used for automatic setup with the RM-CR signal
processor. Everything from device settings to adjustments will be configured automatically.
Procedure for setting up by using a plan (page 29)
About ProVisionaire Cloud (Room Planner)
Room Planner User Guide
5
✔ Export room conditions and plan results in the PDF format
The PDF file can be used as is or printed on paper for sharing or in a proposal.
Exporting the results (page 18)
Note
Room Planner is continuously being updated in order to add or improve features. View update details from the top
screen of Room Planner.
Using Room Planner
In order to use Room Planner, a Yamaha Music ID for Business account is required. In addition, the user must belong to at least
one organization and one of its projects.
Conditions for using Room Planner of the cloud service ProVisionaire Cloud
• Have a Yamaha Music ID for Business account
• Belong to an organization with Yamaha Music ID for Business
If the above two conditions are not met, refer to “Preparations for Using ProVisionaire Cloud” in the ProVisionaire Cloud
User Guide.
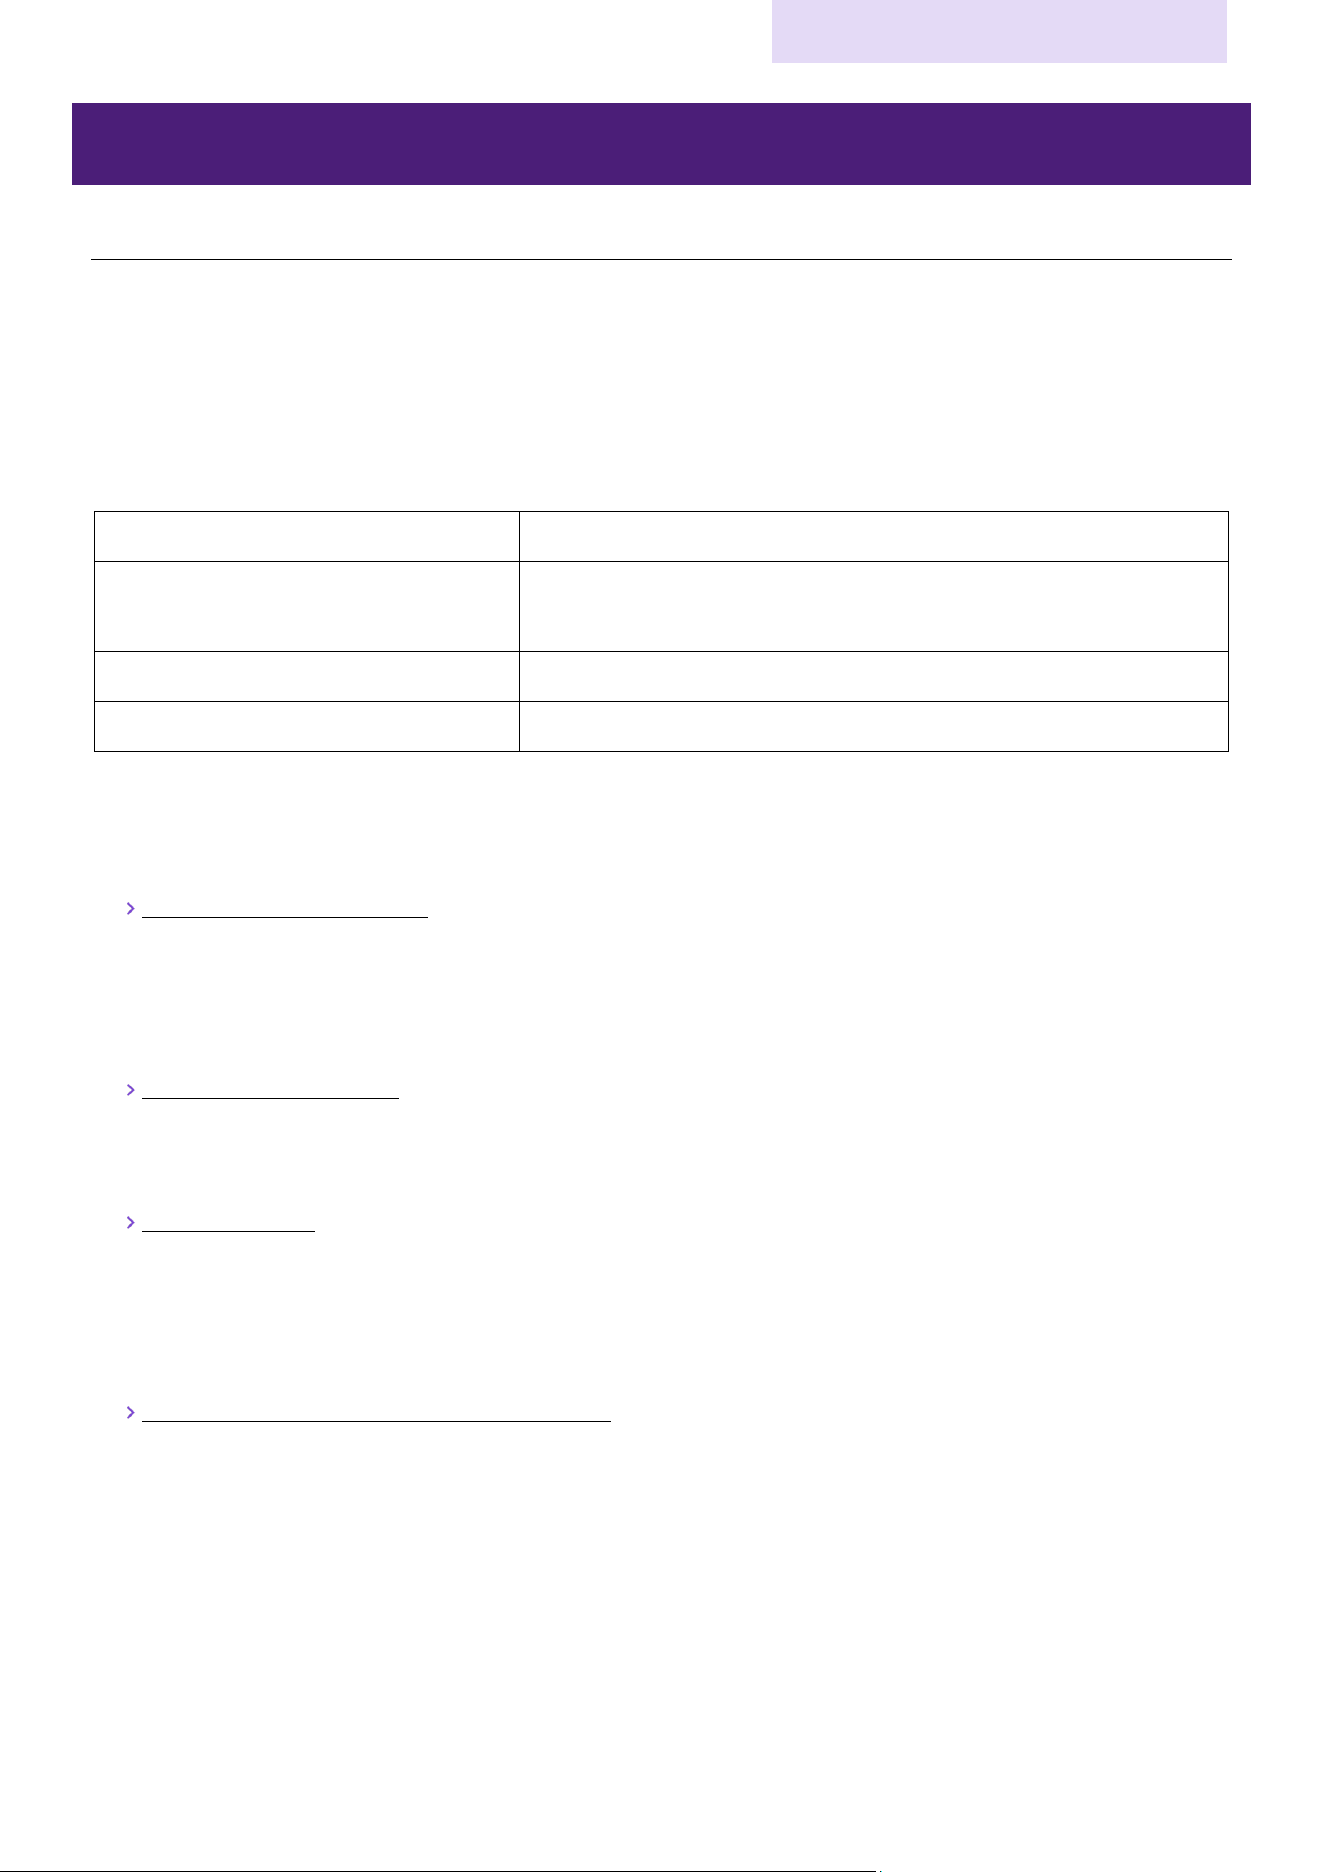
Room conditions supported by Room Planner
The compatible room conditions are listed below.
Room size Minimum dimensions: 2.0 m wide, 2.0 m long, 2.0 m high
Maximum dimensions: 15.0 m wide, 15.0 m long, 4.0 m high
Room shape Cuboid
Files that can be saved with Room Planner
File Extension Description
Plan File pvplan Files containing the room conditions and plan results
• Saved with the [Save] button.
• Can be opened in Room Planner and ProVisionaire Plan.
Saving a file (page 11)
Room Planner Data File for
System Setup
plcf1
System setup file for using the plan results for automatic setup with the
RM-CR signal processor
• Outputted with the [Export] button.
• Used for automatic setup by RM-CR Device Manager.
Exporting the results (page 18)
Design Result File (PDF) pdf Plan results exported in the PDF format
• Outputted with the [Export] button.
Exporting the results (page 18)
Opening Room Planner / Saving a File
Room Planner User Guide
6
Opening Room Planner / Saving a File
Opening Room Planner
In order to use Room Planner, sign in from the sign in screen of ProVisionaire Cloud.
1. Access the ProVisionaire Cloud
1. Open the ProVisionaire Cloud window in the browser.
ProVisionaire Cloud
https://provisionaire.yamaha.com/signin/
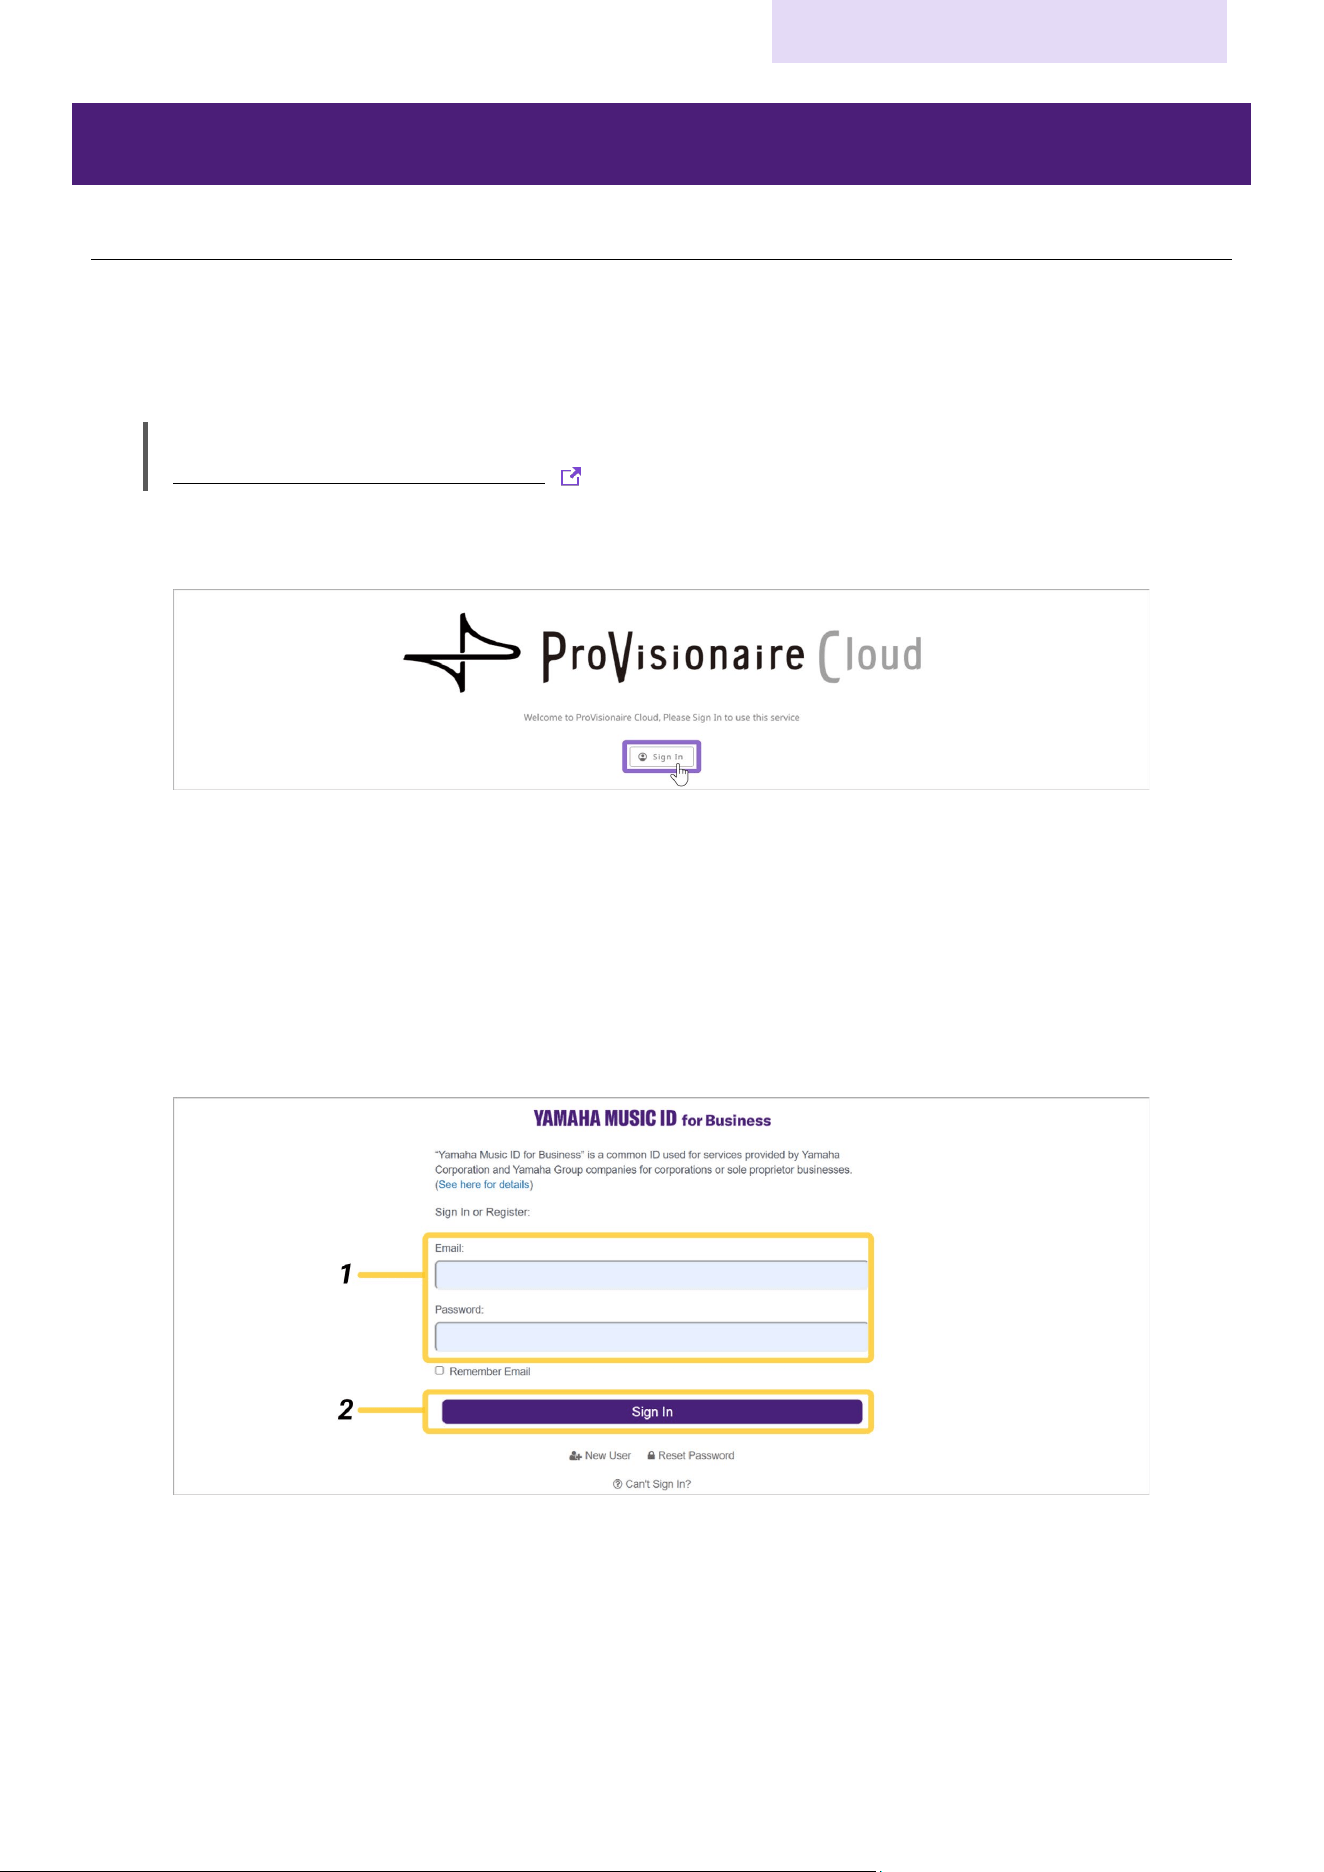
2. Click the [Sign In] button.
ProVisionaire Cloud
The Sign In screen for Yamaha Music ID for Business opens.
2. Signing in
1. Type in the email address and password.
Type in the email address and password for the Yamaha Music ID for Business account. If the password has been lost,
click “Reset Password” to reset the password.
2. Click the [Sign In] button.
Yamaha Music ID for Business:Sign in or Register Screen
A confirmation screen appears. A verification email is sent to the email address that was entered.
Opening Room Planner / Saving a File
Room Planner User Guide
7
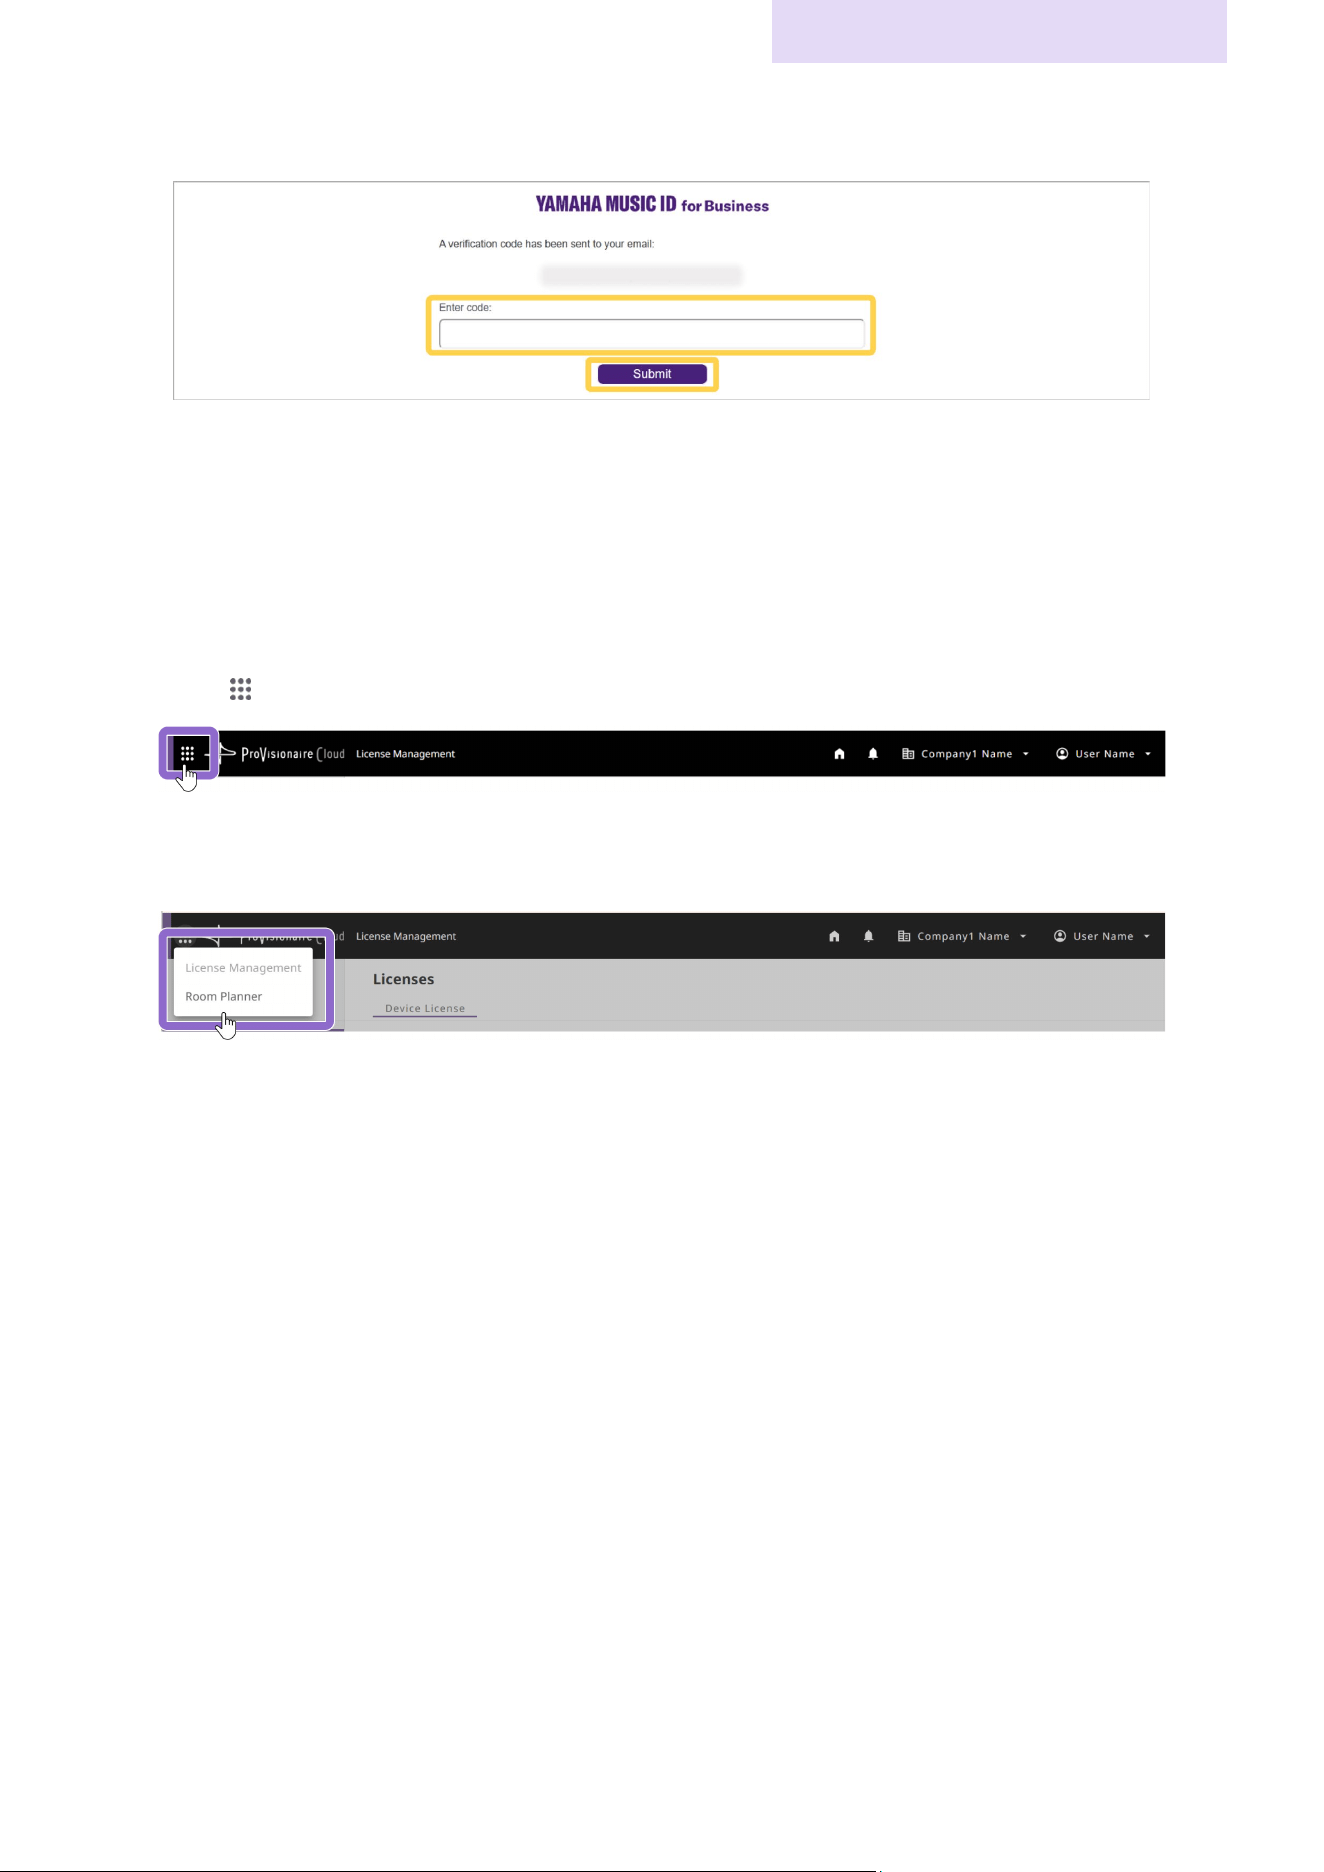
3. In the screen, type the verification code provided in the email, and then click the [Submit] button.
Yamaha Music ID for Business:Confirmation Screen
ProVisionaire Cloud starts.
• When ProVisionaire Cloud first starts: The top screen of License Management appears.
• For the second and subsequent times: The top screen of the feature last used appears.
* License Management: A web service for managing licenses of Yamaha professional audio products
3. Displaying Room Planner
If a screen other than Room Planner is displayed, switch features from the common header of ProVisionaire Cloud.
1. Click (feature selection menu) in the left corner of the header.
A list of features appears.
2. Select [Room Planner].
The top screen of Room Planner appears.
Opening Room Planner / Saving a File
Room Planner User Guide
8
4. Starting to create a plan
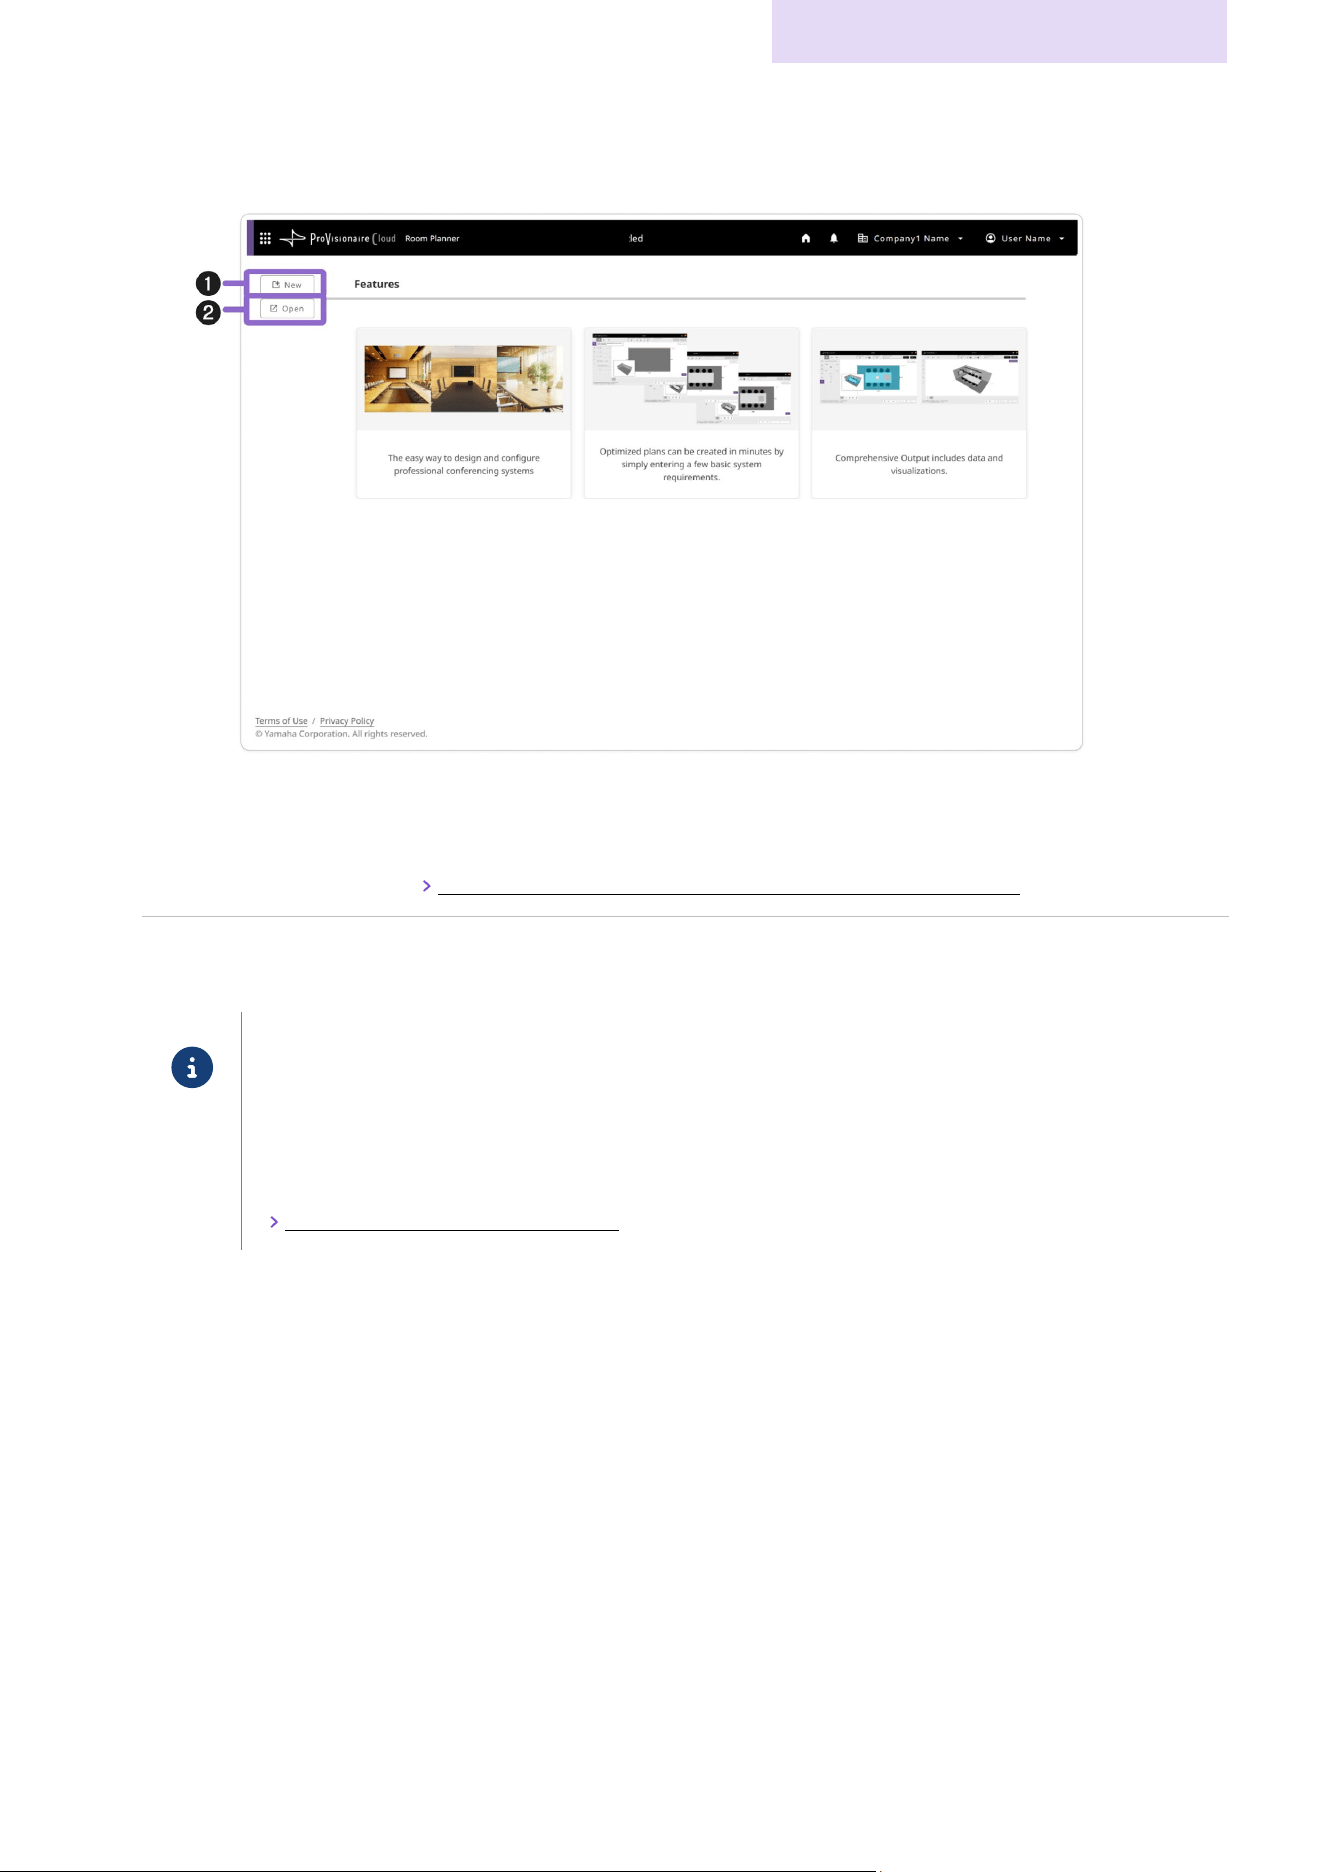
Top Screen of The Room Planner
a [New] button Creates a new plan.
Click the button to display the confirmation dialog box for using the room image
recognition feature.
Confirmation dialog box for using room image recognition feature (page 9)
b [Open] button Creates a plan by resuming a saved file.
The file selection screen appears. Select a file, and then click the [Open] button.
Note
With files of any of the following types, the file is opened in View Mode, and a message appears.
• Files of a version that does not support new features
• Files saved from the results screen (automatically generated)
After a file has been opened in View Mode, editing any of the room conditions cancels View Mode and
switches to the editing screen.
Editing room conditions/arrangement (page 13)
Opening Room Planner / Saving a File
Room Planner User Guide
9
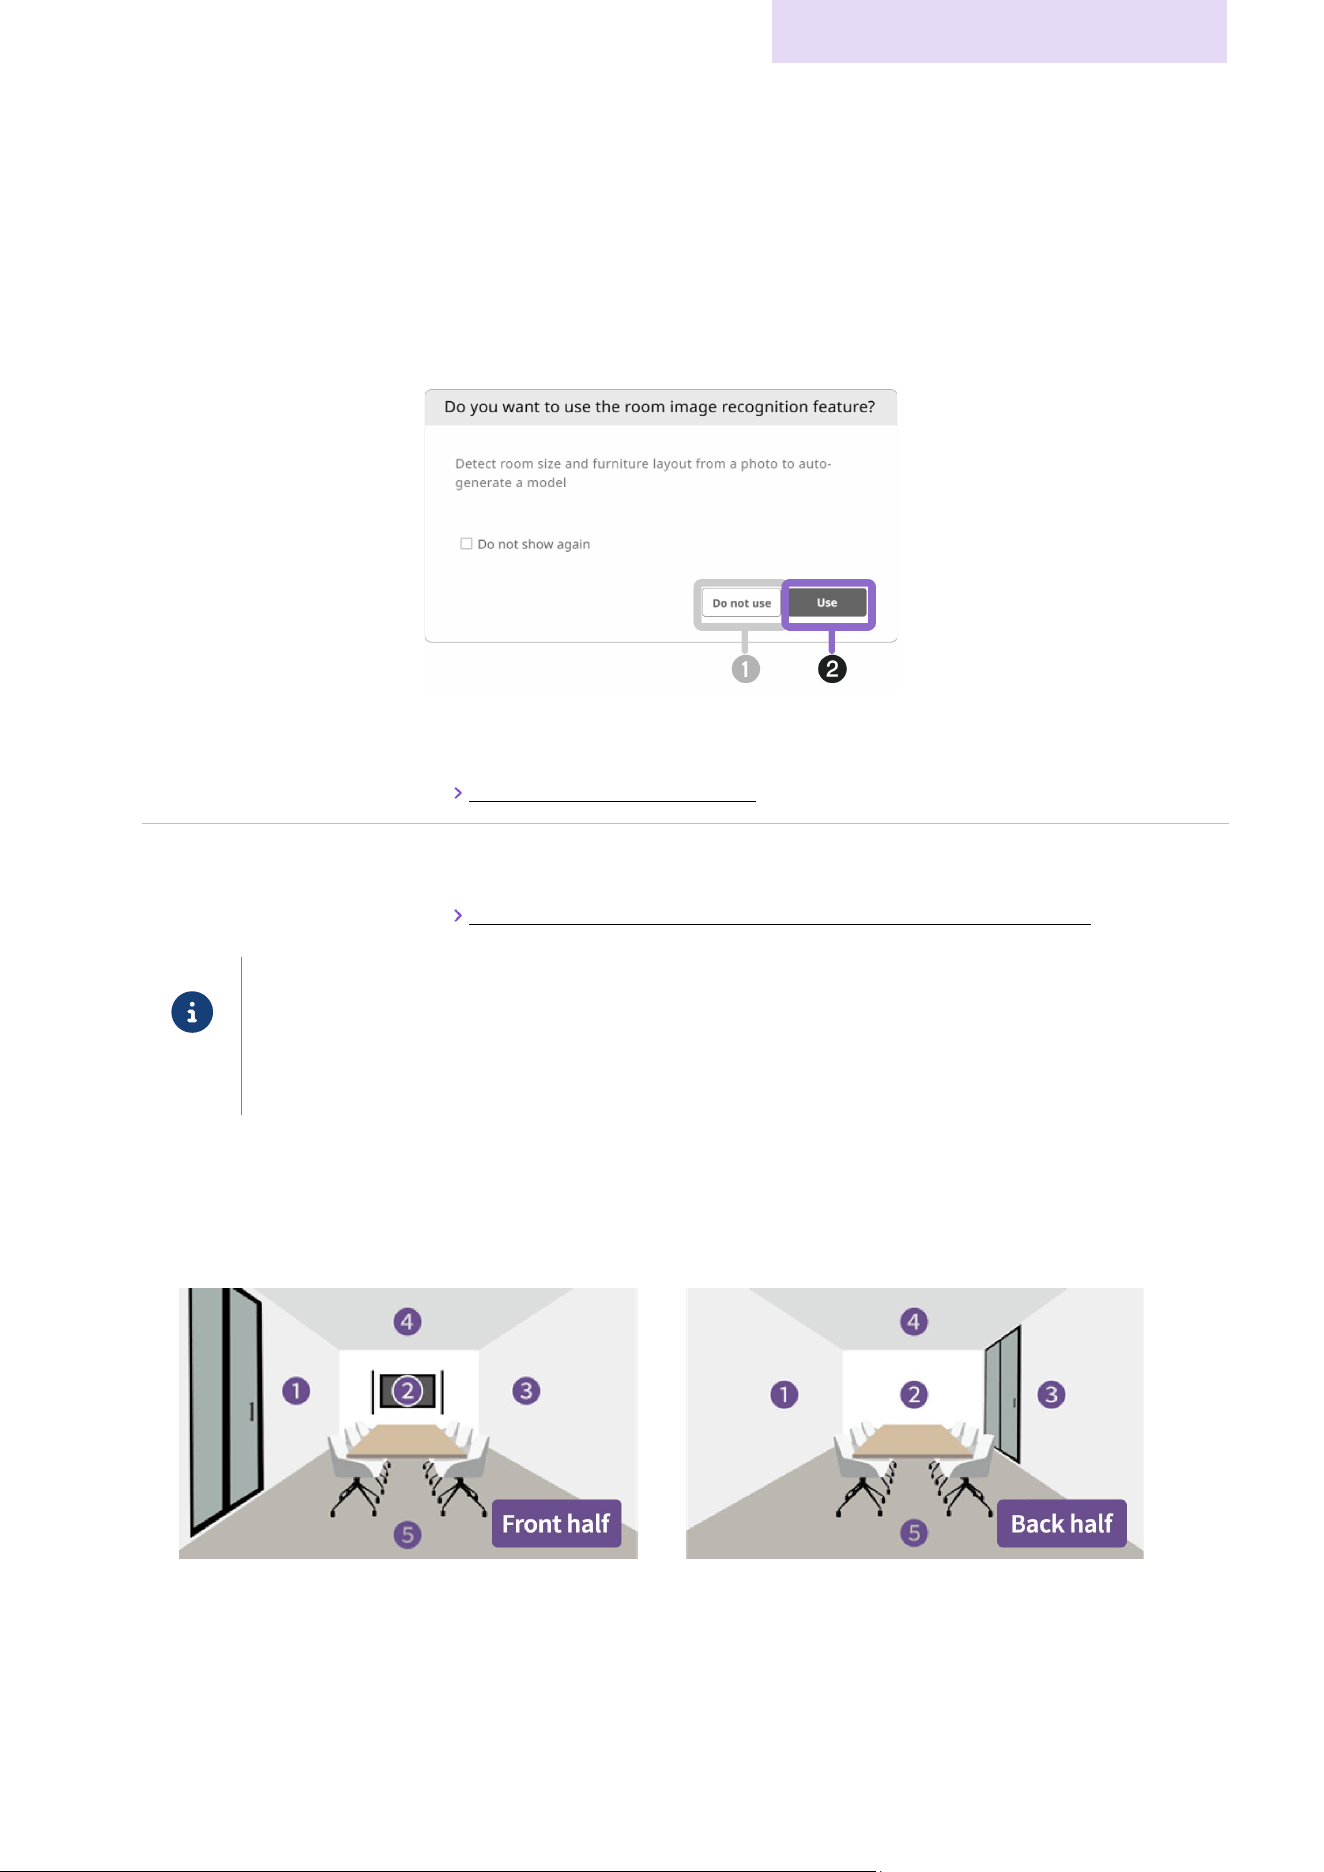
Confirmation dialog box for using room image recognition feature
The room image recognition feature can be used to create a new plan (when the [New] button in the top screen was
clicked).
Room Image Recognition Function
The room image recognition feature uses AI to recognize the type and arrangement of furniture as well as the materials of
the walls, ceiling and floor, based on uploaded images of the room. These are applied to the conditions for the room being
created to help specify the room conditions.
Confirmation Dialog
a [Do not use] Button Click to specify the conditions without using the room image recognition feature.
The new plan screen appears.
Creating a Plan in Room Planner (page 12)
b [Use] Button
Click to create a plan by using the room image recognition feature. For the procedure,
refer to the following.
Creating a plan by using the room image recognition feature (optional)
Note
When not using the room image recognition feature (hiding the dialog box)
If the room image recognition feature will not be used, select the “Do not show again” check box. This dialog
box does not appear next time. To return to displaying the dialog box, click [Settings] on the user menu in the
header, and then switch on [Display the AI-powered room image recognition feature].
5. Creating a plan by using the room image recognition feature (optional)
1. Prepare images for image recognition.
Consider the following when taking photos of the room.
• Please prepare two images: one of the front half of the room and one of the back half.
Although recognition is possible with just one photo, we recommend using multiple photos to improve recognition
accuracy.
• Make sure each image includes all of the following elements:
a Left wall・b Opposite wall・c Right wall・d Ceiling・e Floor
• Images in the JPEG format (.jpg extension) or PNG format (.png extension) can be uploaded.

Opening Room Planner / Saving a File
Room Planner User Guide
10
2. In the confirmation dialog box for using the room image recognition feature, click the [Use] button (b).
Confirmation Dialog
3. Upload images to the upload dialog.
• Upload images by dragging them to the screen or by selecting the files.
• When uploading is finished, click the [Design] button.
Upload Dialog
✔ When image recognition has derived the room conditions, a screen appears, indicating that automatic generation is
finished.
✔ In the new plan screen, continue entering room conditions while checking that there are no errors in those derived by
image recognition.
Creating a Plan in Room Planner (page 12)
Important
AI-generated content may contain errors. Please edit the generated result to match the actual room.
Opening Room Planner / Saving a File
Room Planner User Guide
11
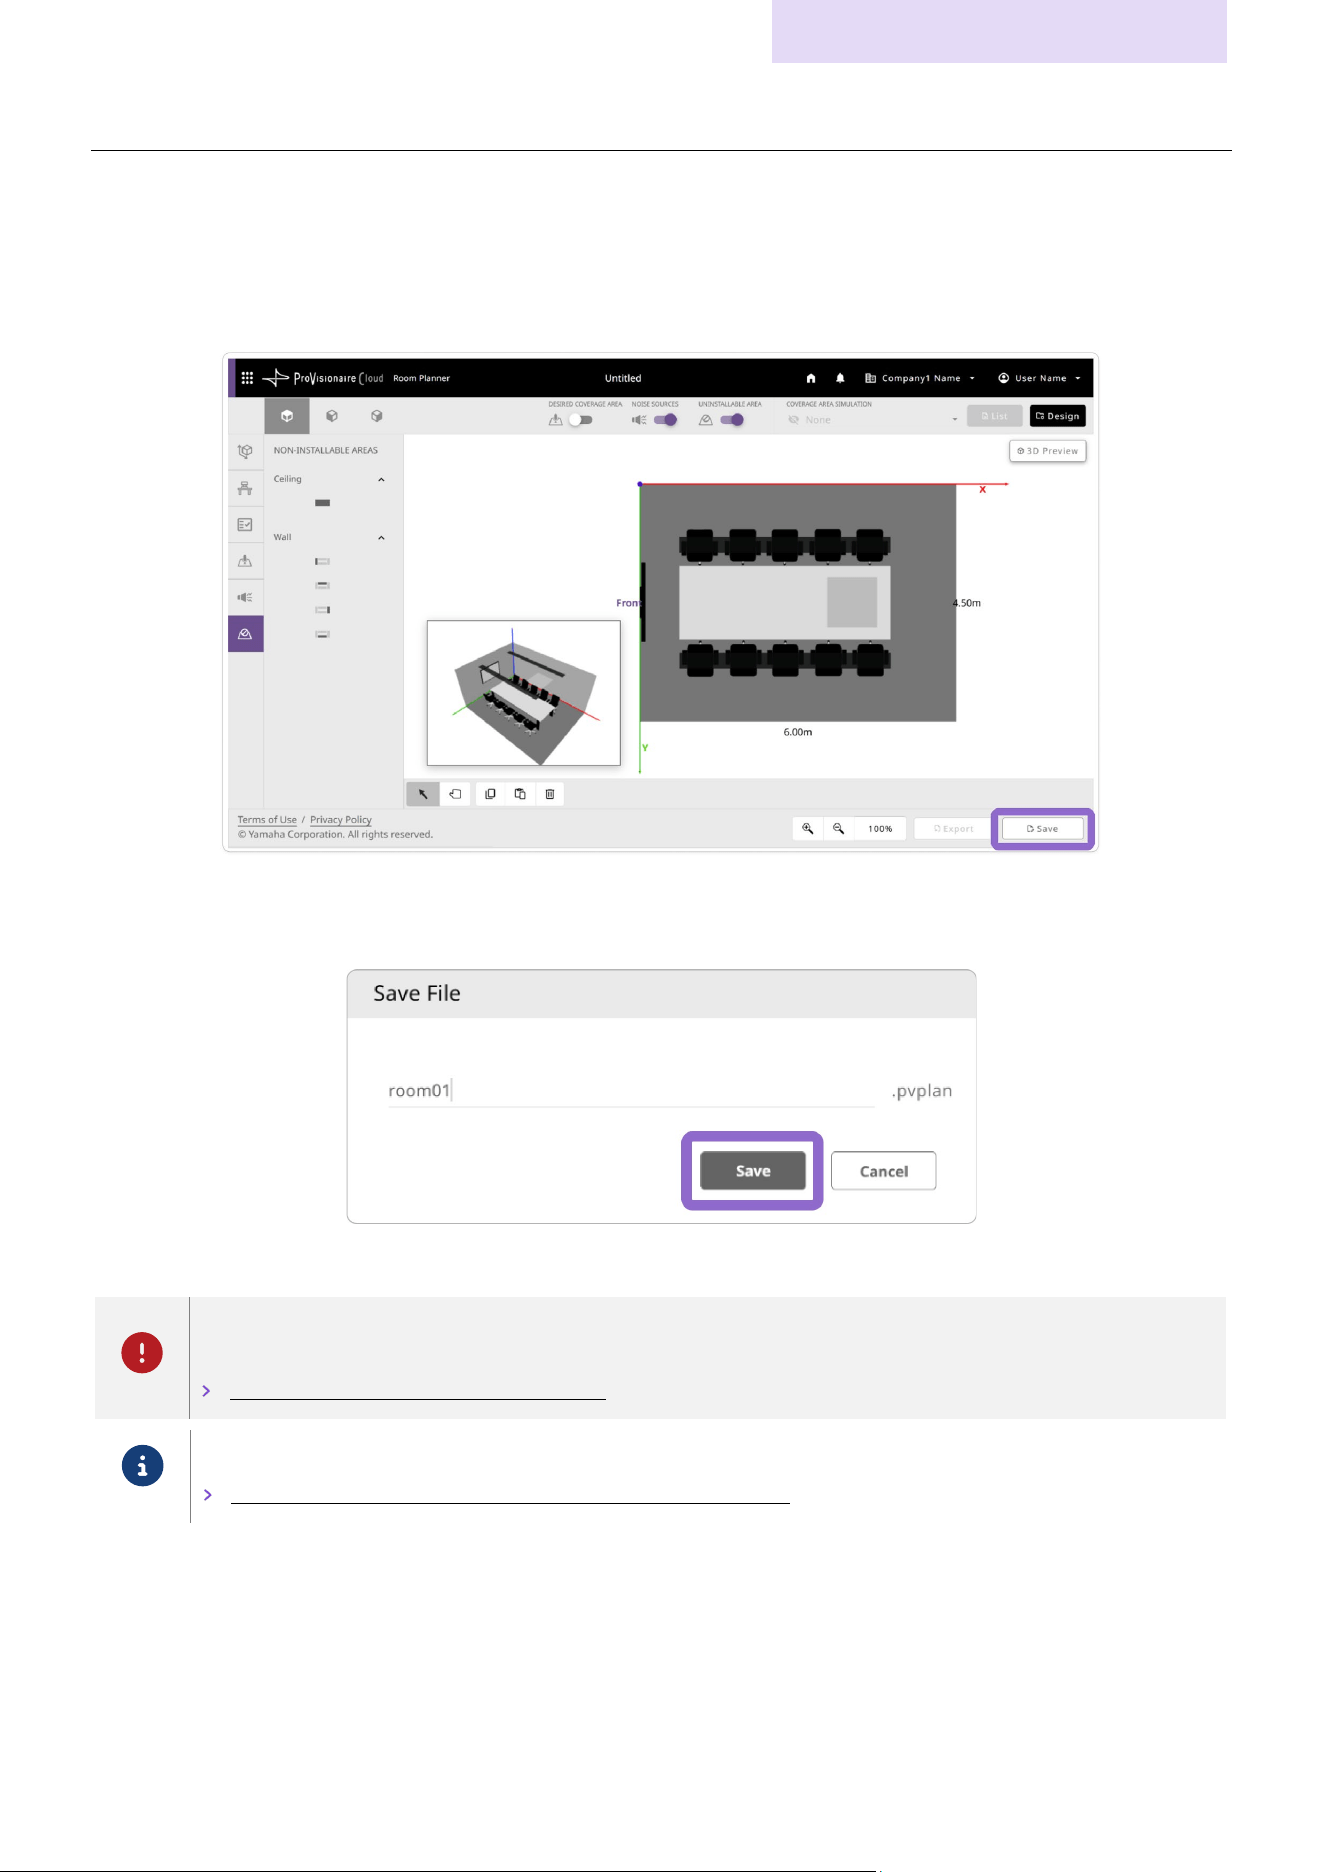
Saving a file
The generated room conditions and settings can be saved to a computer as a plan file (.pvplan extension). The saved plan file
can be opened from the top screen of Room Planner.
Procedure for saving a file
1. Click the [Save] button.
The Save screen appears.
2. In the Save screen, specify the file name, and then click the [Save] button.
✔ The file is saved to the download folder specified in your browser.
Important
Files saved with the [Save] button cannot be used for automatic setup with a signal processor. A Room Planner
data file for system setup can be outputted with the [Export] button.
Files that can be saved with Room Planner (page 5)
Note
The file is saved to the download folder specified in your browser.
1. Specifying room conditions by following the procedure guide (page12)
Creating a Plan in Room Planner
Room Planner User Guide
12
Creating a Plan in Room Planner
Procedure for creating a plan
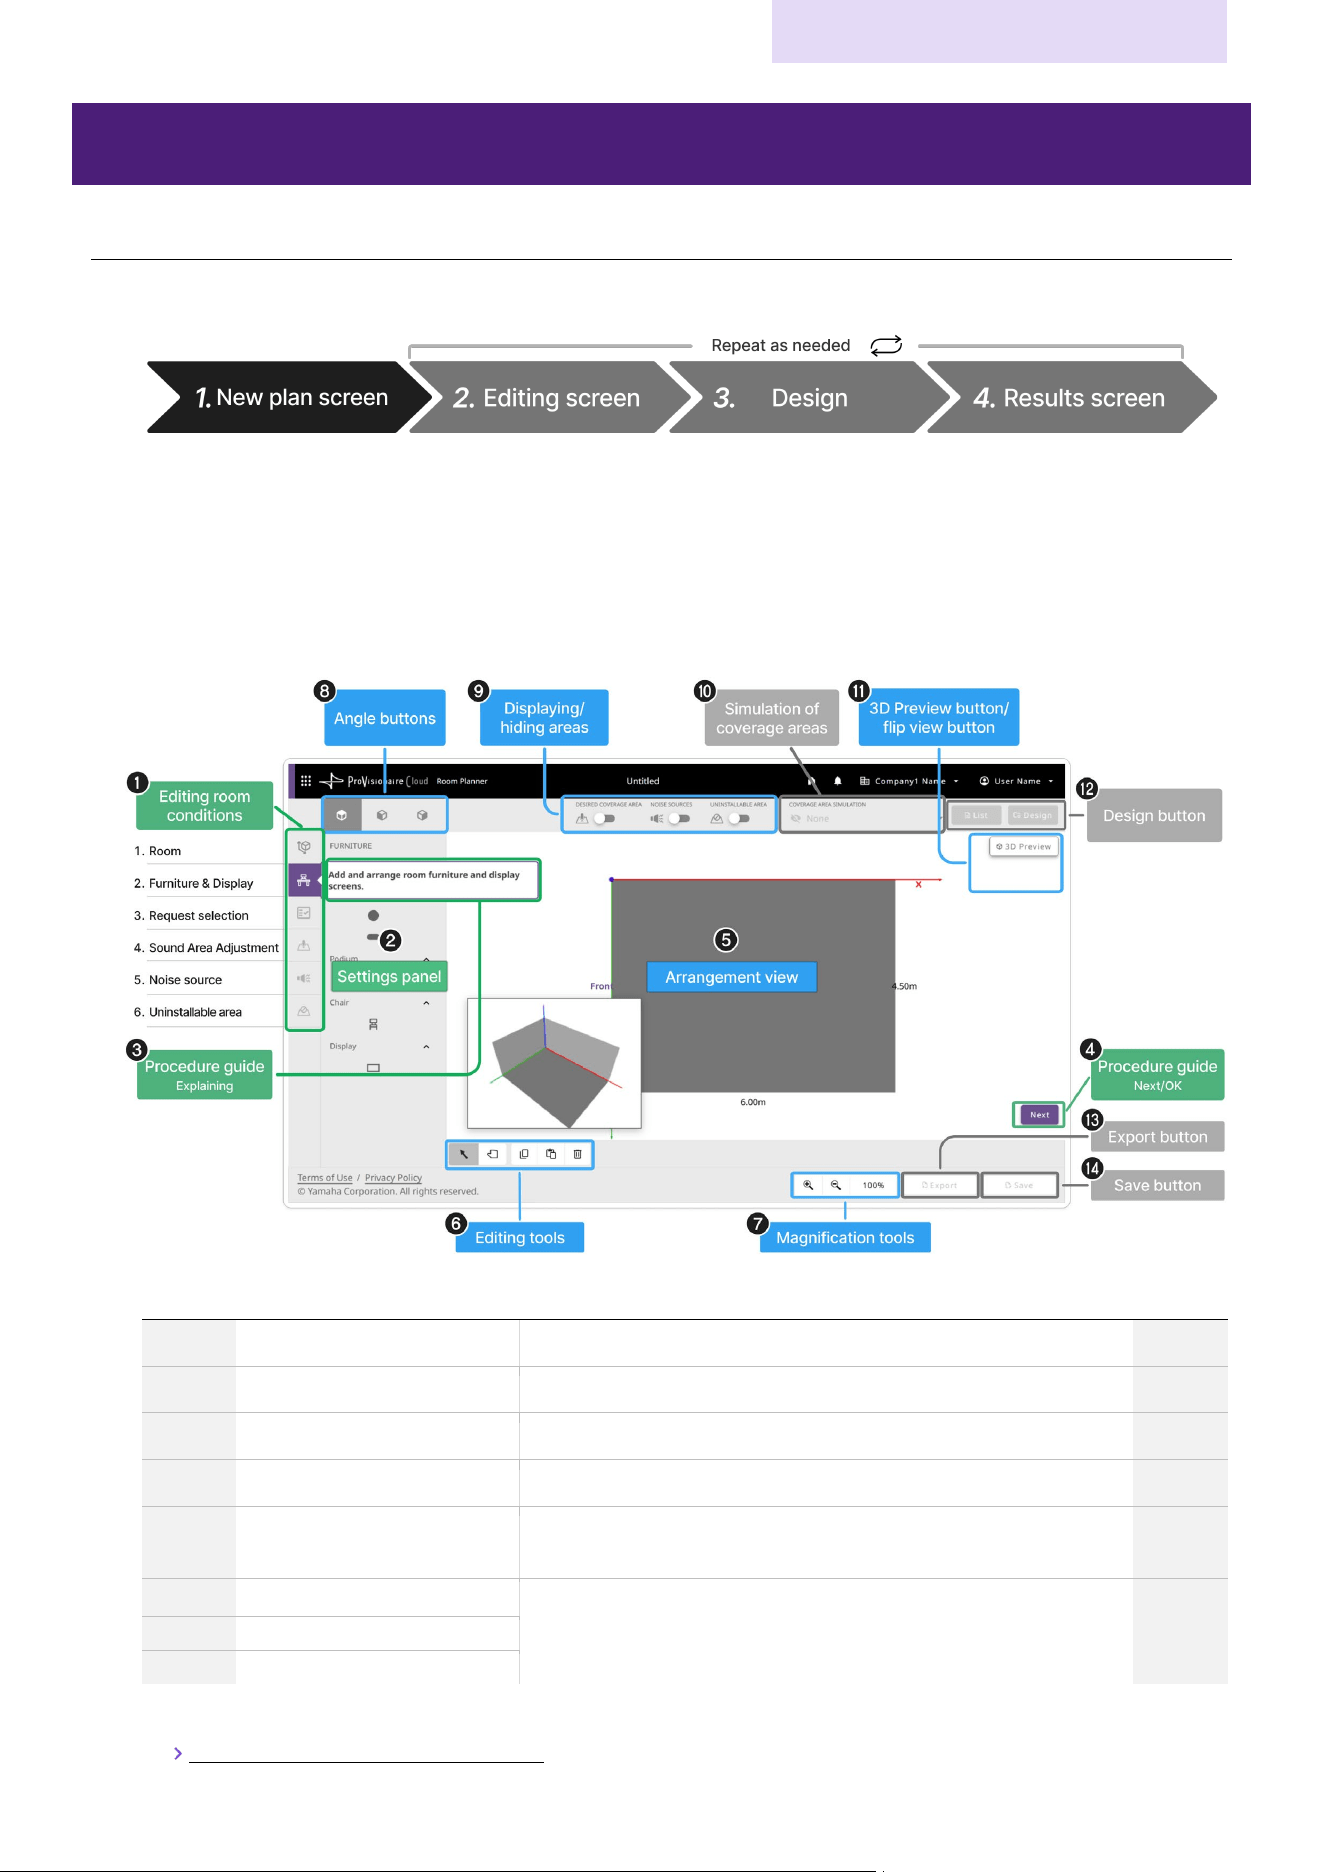
1. Specifying room conditions by following the procedure guide
New plan screen
In the new plan screen, follow the procedure guide to specify the room conditions (a) in the given order. Clicking the
[Next] button (
d) continues to the next condition specification screen. The specified information can be edited later in the
editing screen.
If there is no need to display the procedure guide, click [Settings] on the user menu in the header, and then switch off
[Show instructions on how to use]. Next time, the new plan screen is skipped, and a plan is created from the editing
screen.
No. Item Description
Reference
page
ab
Specify room conditions
Specify the room conditions in the given order.
page 20
cd
Procedure guide
Clicking button
d
continues to the next condition specification screen.
page 31
e
Arrangement view
The conditions specified with
ab
appear in the arrangement view.
page 32
fg
Tools for arrangement view
Use these buttons and tools to adjust the arrangement view.
page 32
hik
Switch display of arrangement
view
Use these buttons to switch the display of the arrangement view.
(j is not available in the new plan screen.)
page 32
l
Design (not available)
A plan cannot be generated, exported or saved in the new plan screen.
m
Export (not available)
n
Save (not available)
✔ After specifying all of the room conditions, click the [OK] button (d) to close the new plan screen.
2. Editing room conditions/arrangement (page 13)
Creating a Plan in Room Planner
Room Planner User Guide
13
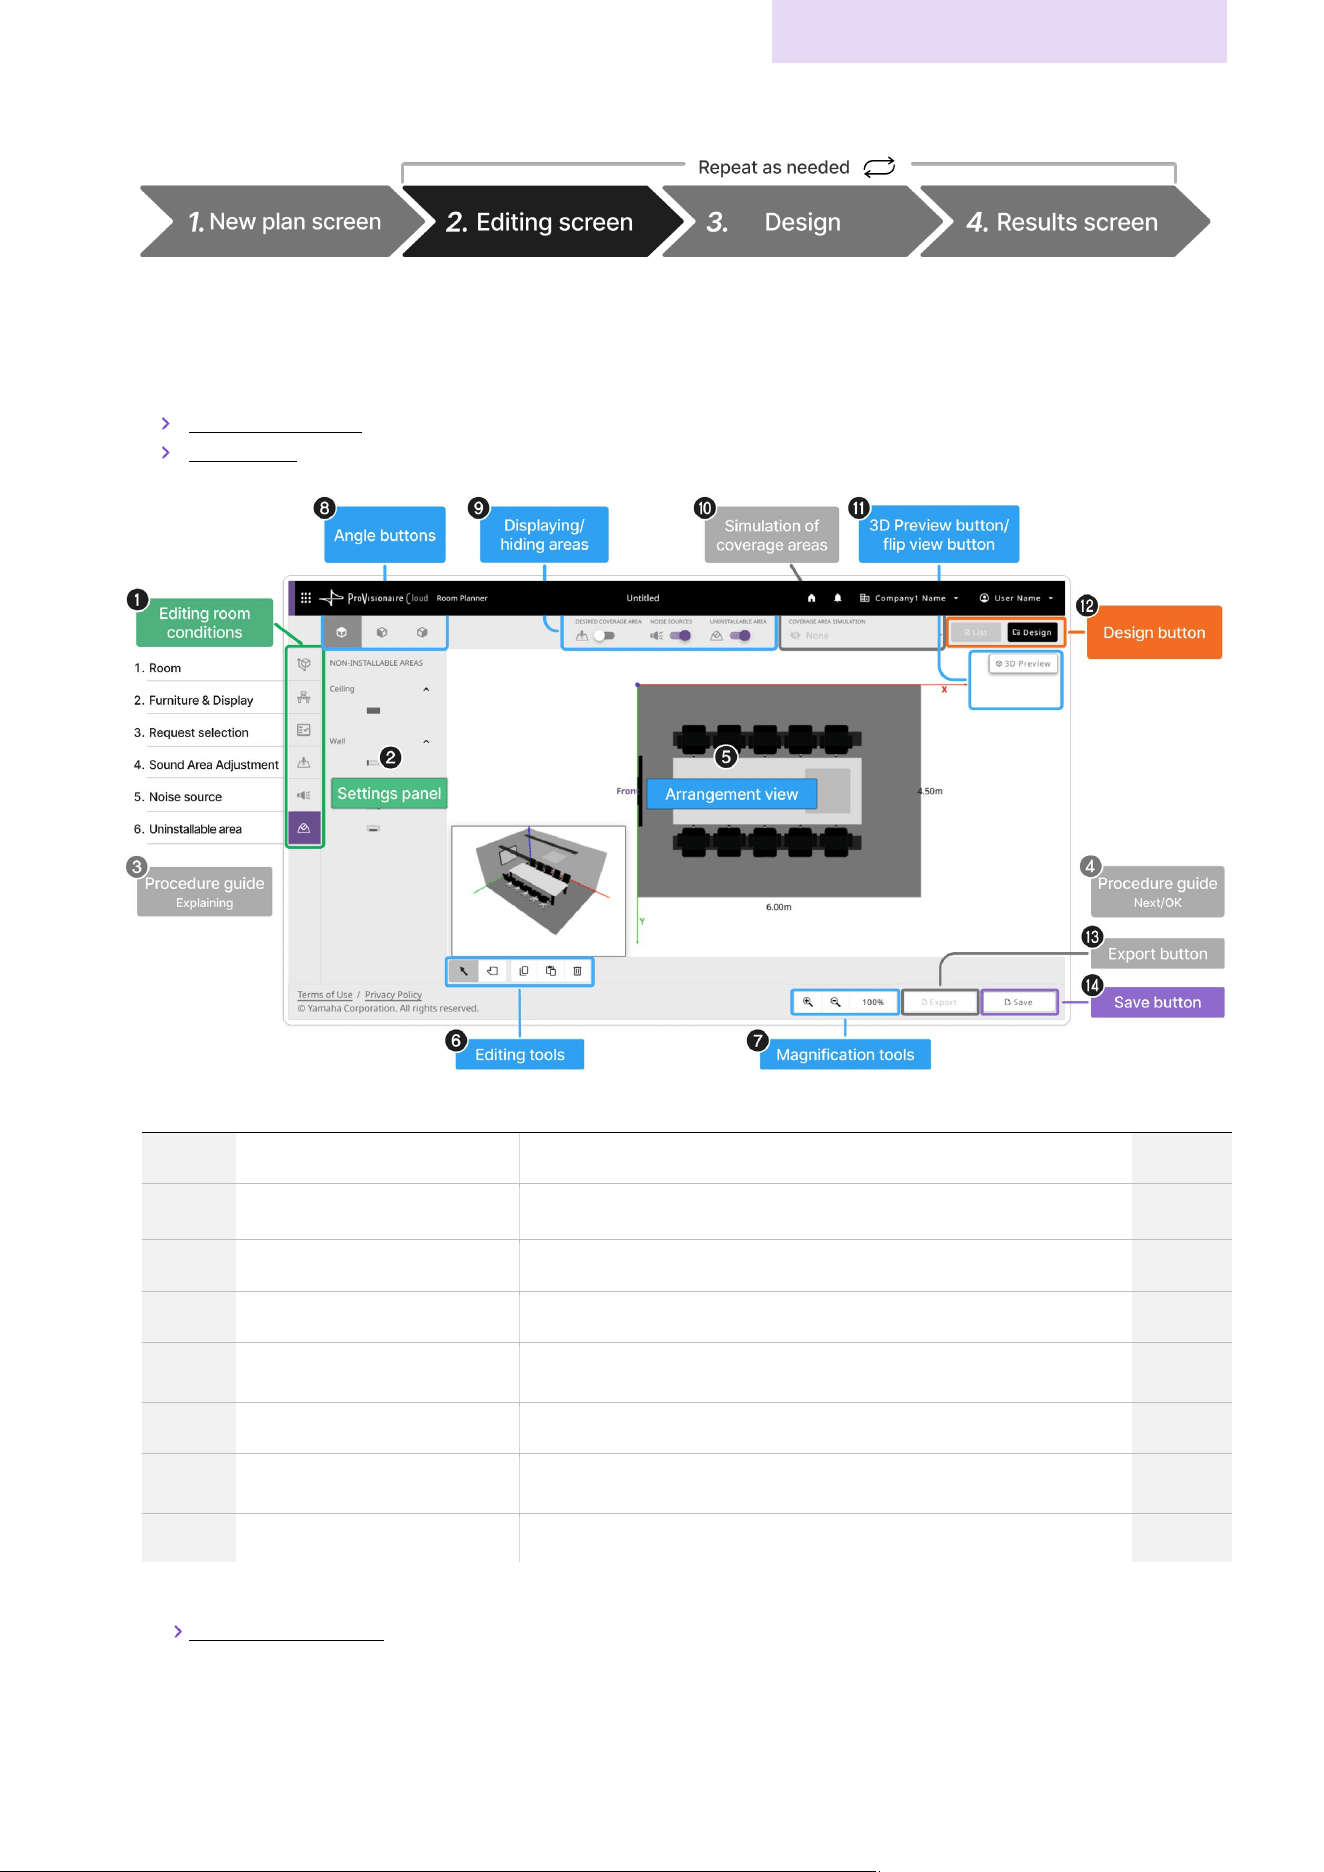
2. Editing room conditions/arrangement
Editing screen
In the editing screen, select an item under Room conditions (a), and then edit the information as desired. If no editing is
required, generate a plan (
l) and save (n) it as is. The following can be performed in the editing screen.
Generating the plan (l) page 14
Saving a file (n) page 11
No. Item Description
Reference
page
ab Edit room conditions
Select the item to be edited, and then edit the information.
page 20
cd
Procedure guide (not
displayed)
The procedure guide does not appear in the editing screen.
e Arrangement view
The conditions specified with ab appear.
page 32
fg Tools for arrangement view
Use these buttons and tools to adjust the arrangement view.
page 32
hik
Switch display of arrangement
view
Use these buttons to switch the display of the arrangement view.
(j is not available in the editing screen.)
page 32
l Design
Automatically generates a plan.
page 14
m Export (not available)
A plan cannot be exported (downloaded in the PDF format) in the
editing screen.
n Save
Saves the file.
page 11
✔ After specifying all of the room conditions, click the [Design] button (l).
3. Generating the plan (page 14)
Creating a Plan in Room Planner
Room Planner User Guide
14
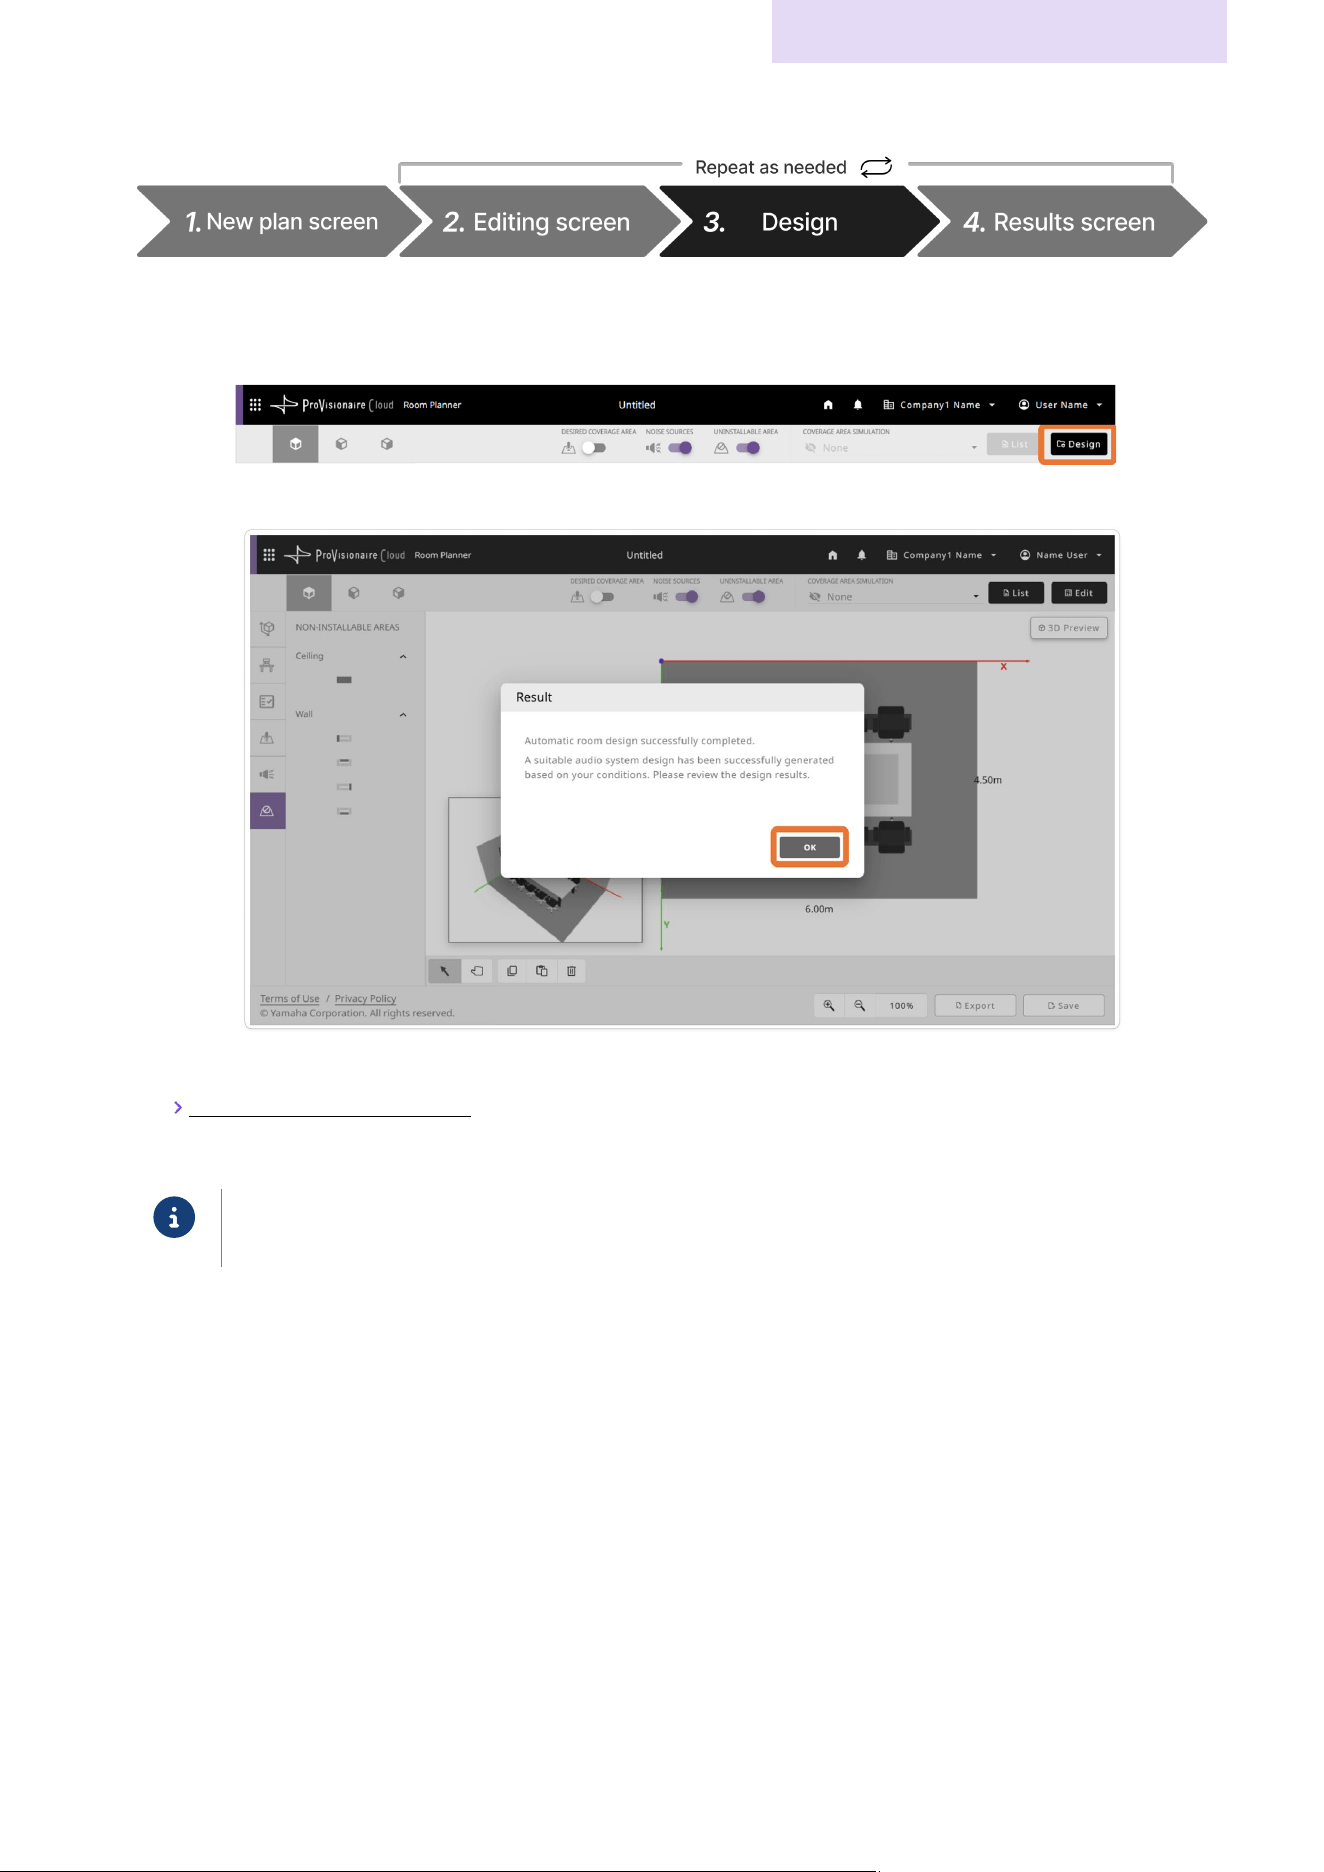
3. Generating the plan
Procedure for generating the plan
Click the [Design] button to start automatically generating the plan.
When the plan has been generated, the plan completed message appears.
✔ Click the [OK] button to display the generated plan.
4. Reviewing the generated plan (page 15)
✔ If a message appeared, edit the room according to the instructions.
Note
Depending on the specified conditions, it may take up to 30 seconds for the plan to be generated.
Creating a Plan in Room Planner
Room Planner User Guide
15
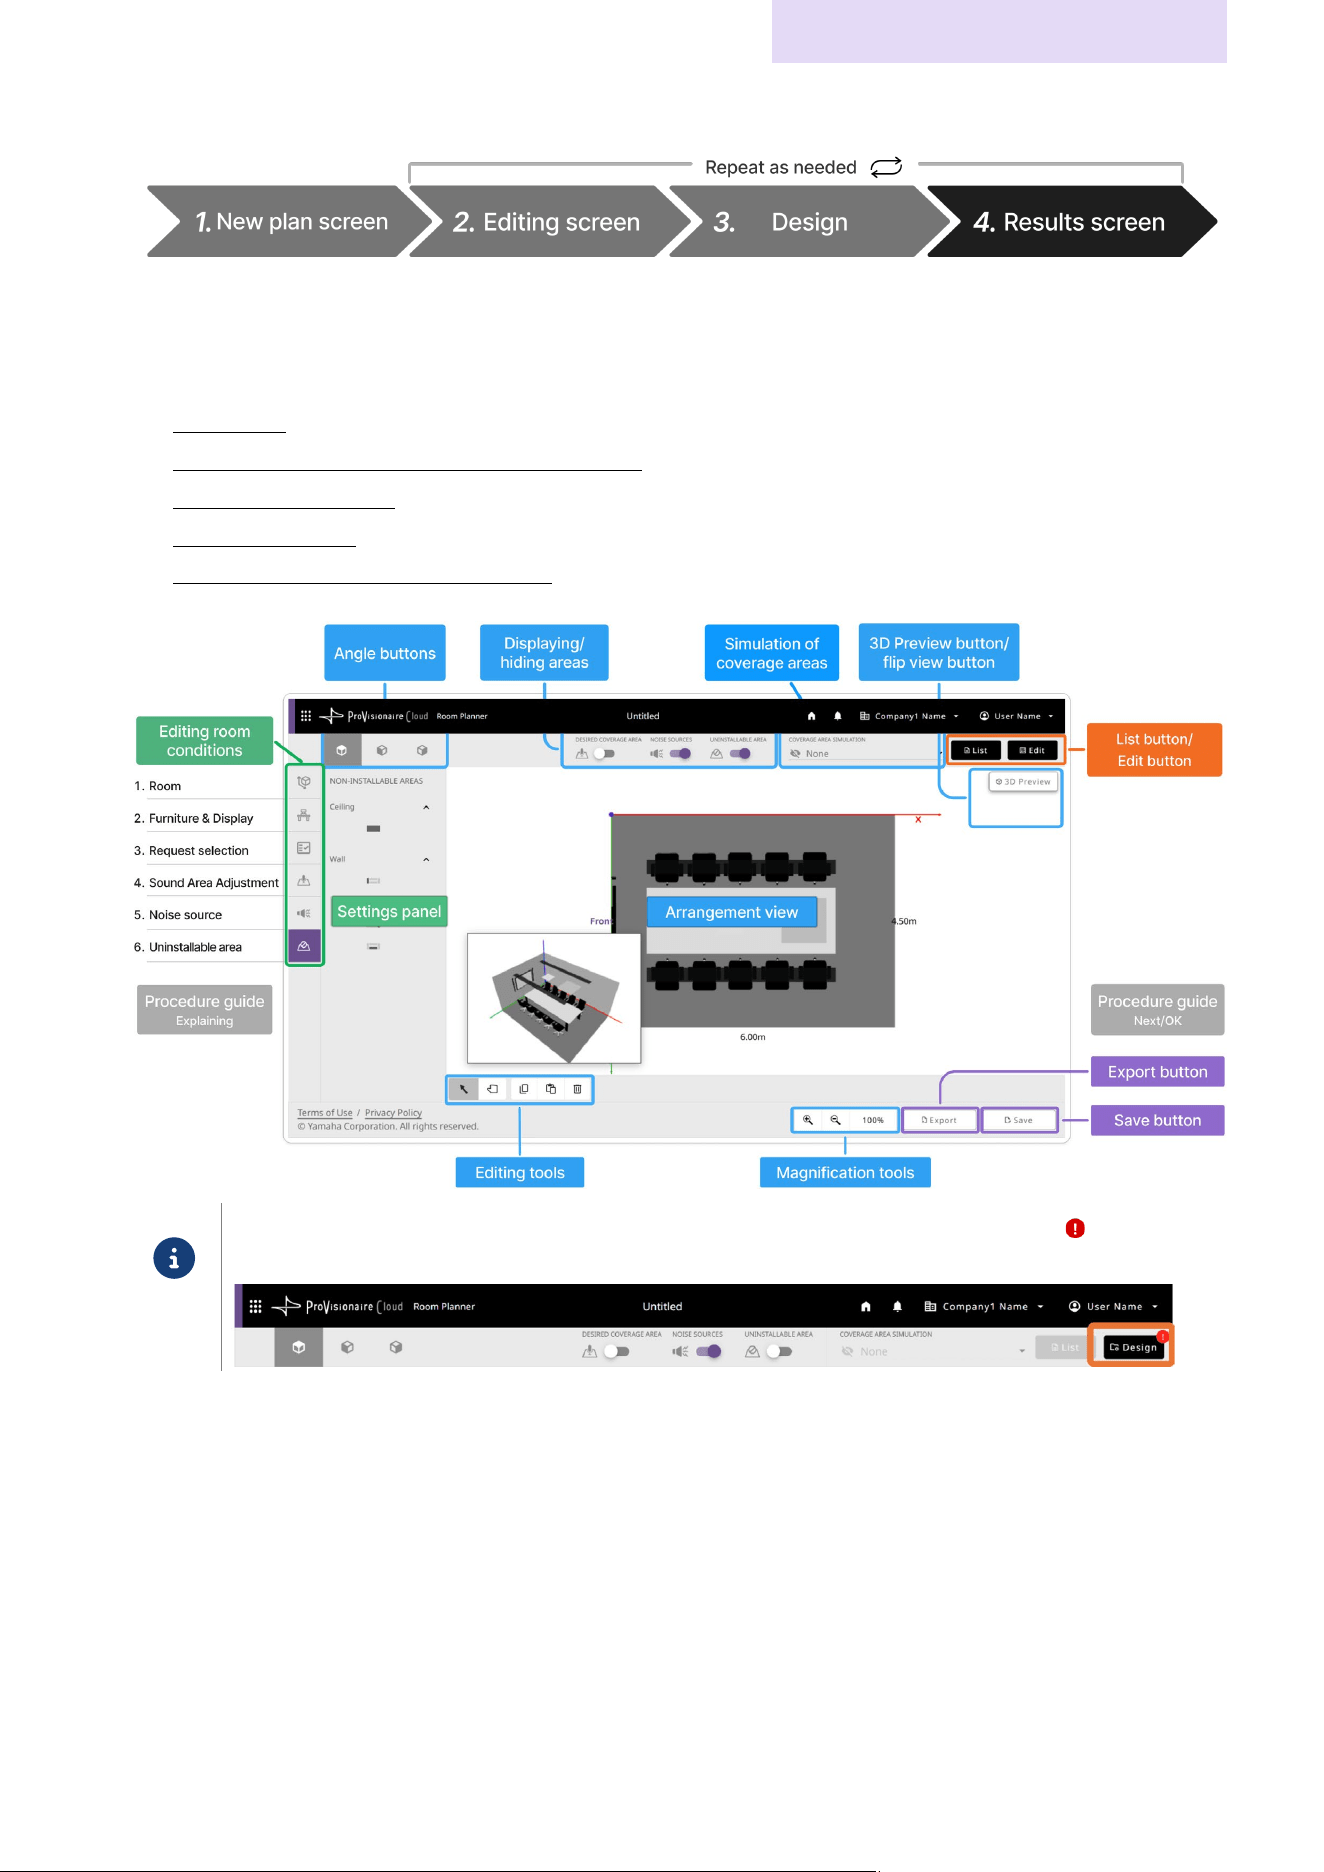
4. Reviewing the generated plan
Results screen
Devices that meet the specified conditions are arranged in the screen. The following can be performed in the results
screen.
• Saving a file (page 11)
• Reviewing the simulation of the sound coverage area (page 16)
• Reviewing the device list (page17)
• Exporting the results (page 18)
• Changing the device quantities (if desired) (page 19)
Note
Return to the editing screen to edit the room conditions or arrangement. A notification badge ( ) will appear on
the [Design] button. To apply the changes to the plan, click the [Design] button to regenerate a plan.

Creating a Plan in Room Planner
Room Planner User Guide
16
Reviewing the simulation of the sound coverage area
The results screen allows you to view a simulation of the coverage areas for the microphones and speakers. Confirm that
the microphone and speaker coverage areas are as desired.
In the [COVERAGE AREA SIMULATION] drop-down list, select the coverage area to be displayed.
None
Displays no coverage area.
Microphone
Displays the microphone coverage area.
Loudspeaker
Displays the speaker coverage area.
For a plan that supports Voice Lift
If the “Voice Lift” check box was selected under “Advanced Settings” of the request selection screen, a voice lift simulation
can also be viewed.
1. In the [COVERAGE AREA SIMULATION] drop-down list, select the coverage area to be displayed.
None
Displays no coverage area.
Microphone
Displays the microphone coverage area.
Loudspeaker
Displays the speaker coverage area.
Speech with Voice Lift
Displays the coverage area of a speaker’s voice amplified by Voice Lift.
Speech without Voice Lift
Displays the audible area of a speaker’s natural voice (human voice).
2. If [Speech with Voice Lift] or [Speech without Voice Lift] was selected:
Specifying the presenter's position to view the coverage area
(presenter) appears in the arrangement view. Drag the presenter to their expected
position to view
how the coverage area changes according to the presenter’s position.
Check for issues in the coverage area with all potential locations.
The presenter can only be positioned at the
(available locations), which appear when the
presenter is dragged.
Creating a Plan in Room Planner
Room Planner User Guide
17
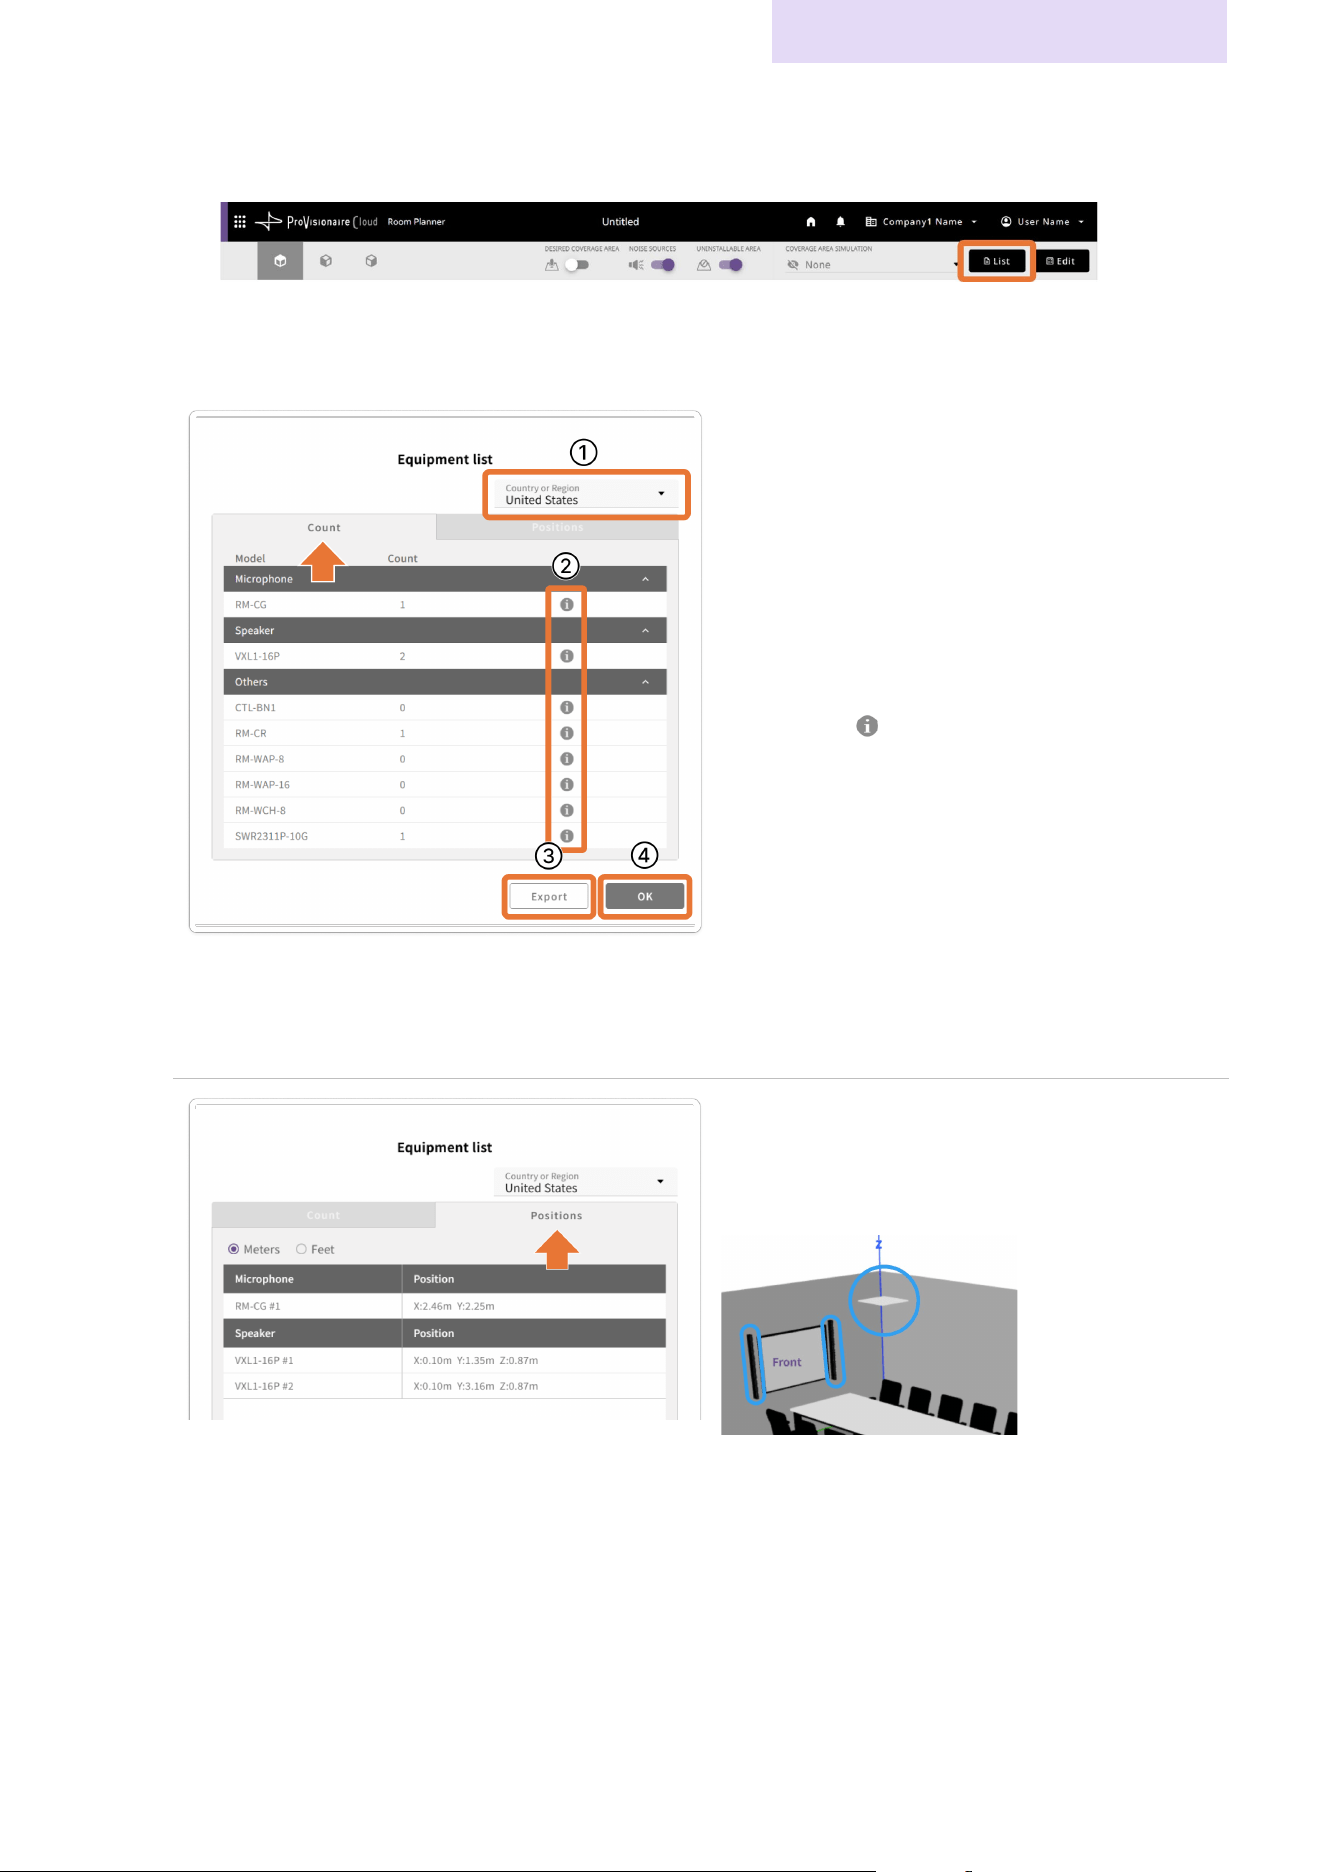
Reviewing the device list
1. Click the [List] button.
An equipment list appears.
2. Review the information proposed by the automatically generated plan.
[Count]tab
On the [Count] tab, the devices with their quantities are
listed by type.
Reviewing device details
a Review the information proposed by the
automatically generated plan.
b Specify your location from the [Country or Region]
list in the top right of the screen.
c Click the (information) mark in the row of the
model number to open the desired product
website of the specified country or region.
* If a product is not sold in the selected region, a label
appears indicating that the product is unavailable.
Exporting the results in the PDF format
d Click the [Export] button to download the room
conditions and plan results as a PDF file.
Closing the list
e Click the [OK] button to close the device list.
[Positions]tab
On the [Positions] tab, the location of each device is
listed.An image of the device arrangement can be
viewed in the arrangement view.

Creating a Plan in Room Planner
Room Planner User Guide
18
Exporting the results
After the plan has been generated, the [Export] button becomes available, and the plan results can be exported.
Clicking the [Export] button displays a dialog box where the type of file to be exported can be selected.
Design Result File (PDF) Exports the room conditions and plan results as a PDF file.
Room Planner Data File for System
Setup (.plcf1)
Exports a Room Planner data file for system setup.
When using the generated plan for automatic setup with the RM-CR signal
processor, use this file in the setup wizard.
Using a generated plan to automatically set up a system (page 29)
Note
The file is saved to the download folder specified in your browser.
Creating a Plan in Room Planner
Room Planner User Guide
19
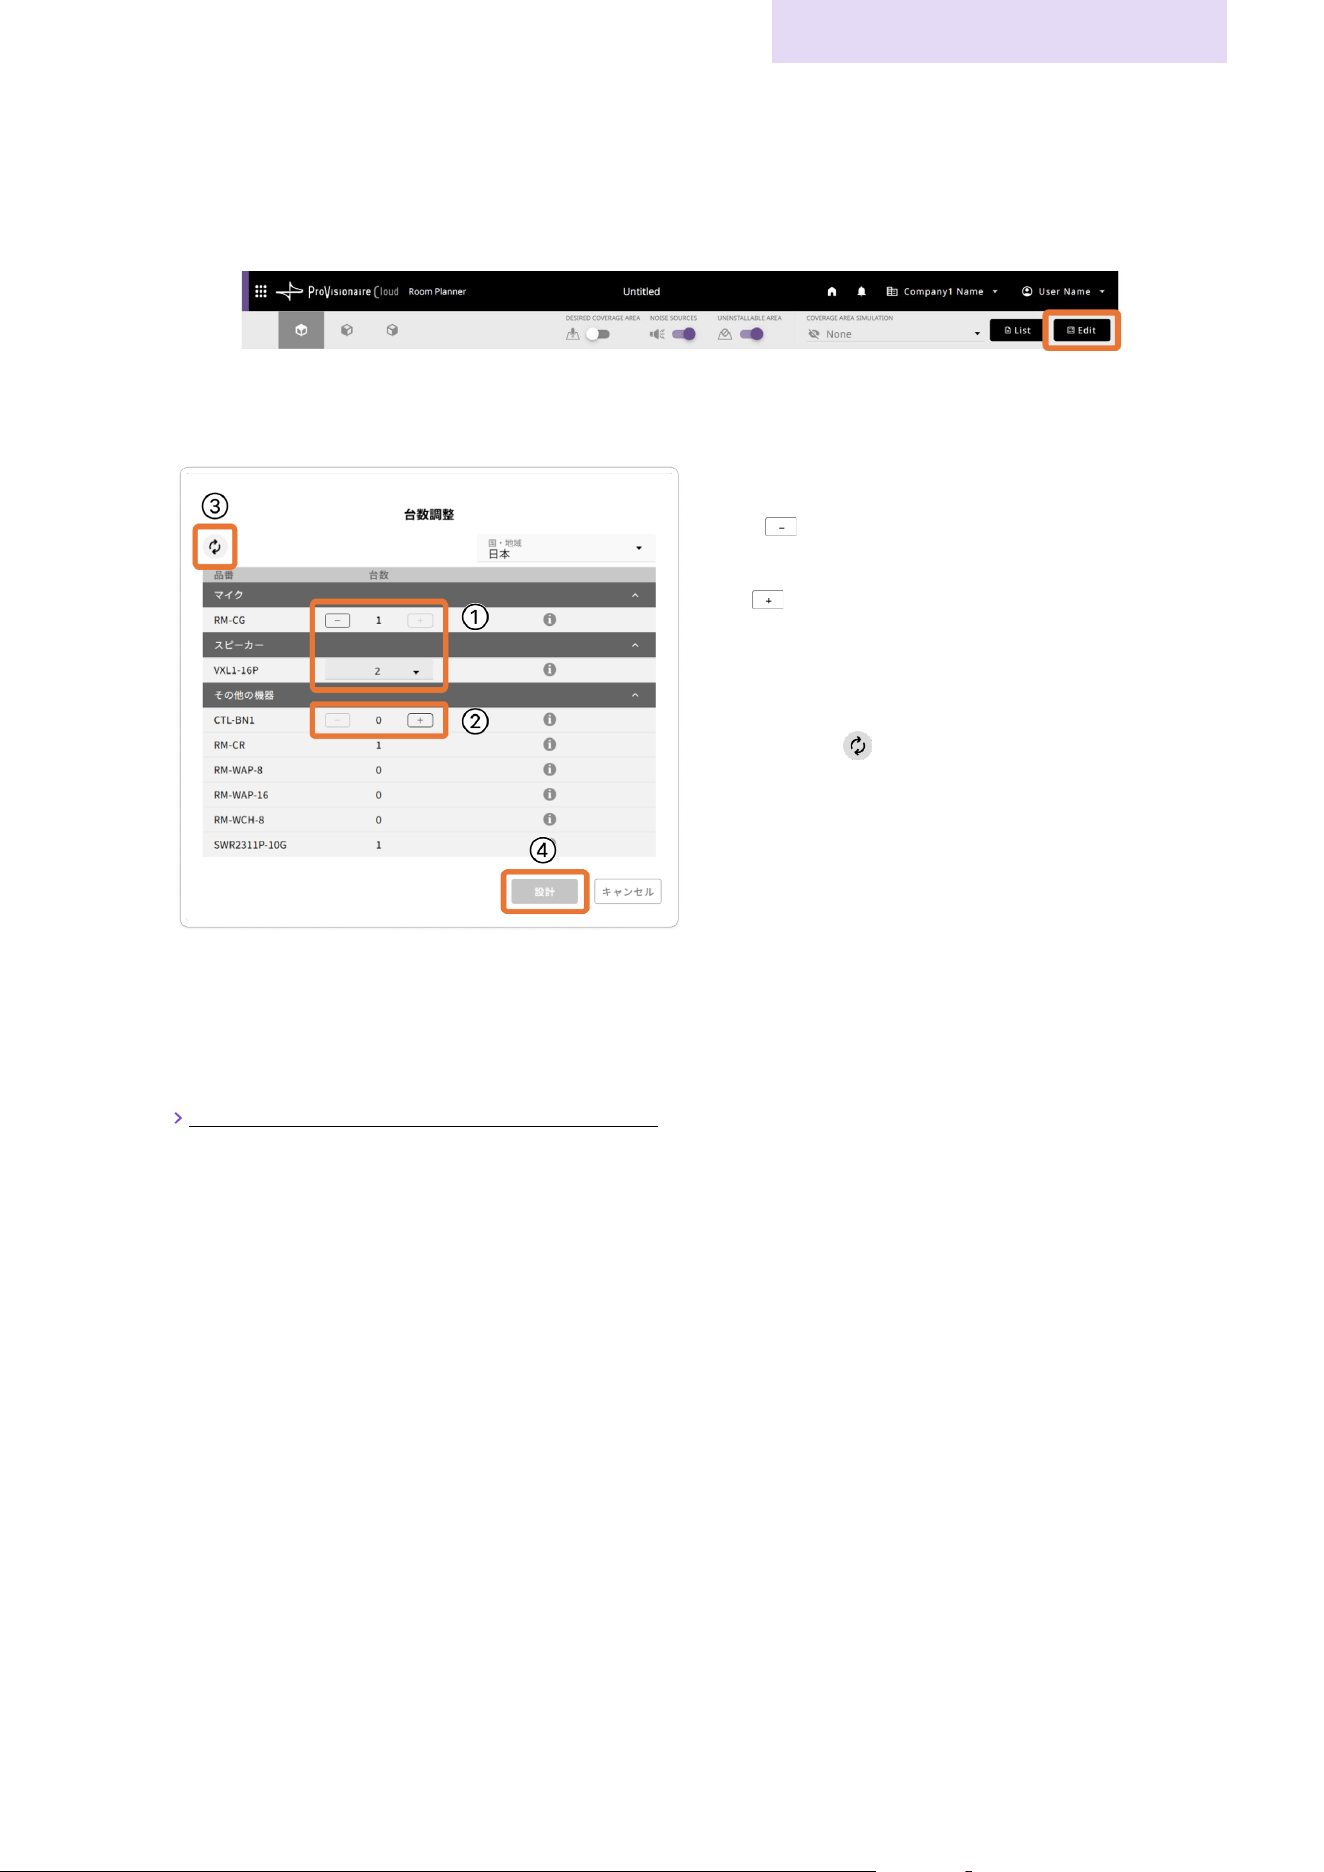
Changing the device quantities (if desired)
If the automatically generated plan results in a large number of devices, the quantity of each device can be reduced, and
then the plan can be regenerated.
1. Click the [Edit] button.
The Edit screen appears.
2. In the Edit screen, change the quantities of the devices.
Changing the quantity of a device
a A (minus) button or drop-down list appears
beside devices whose quantity can be reduced.
b A (plus) button appears beside devices that are
not included in the plan but can be added.
Reverting to the device quantities of the original
plan
c Clicking the (reset) button reverts any changed
quantities to those in the original plan.
Redesigning
If the device quantities have been changed, the [Design]
button becomes available.
3. In the Edit screen, click the [Design] button (d)to regenerate a plan with the changed quantities.
✔ When the plan has been generated, a results screen with the changed quantities appears.
✔ Make sure that the sound coverage areas meet your needs.
Reviewing the simulation of the sound coverage area (page 16)
Creating a Plan in Room Planner
Room Planner User Guide
20
Specifying room conditions
This provides details on specifying the room conditions.
Icon Items to be specified
Items to be
specified
Specifying the room size Page 20
Specifying the furniture arrangement Page 21
Selecting room requirements Page
22
Specifying sound coverage areas Page
23
Specifying noise sources and their locations Page
24
Specifying locations where devices cannot be installed Page
25
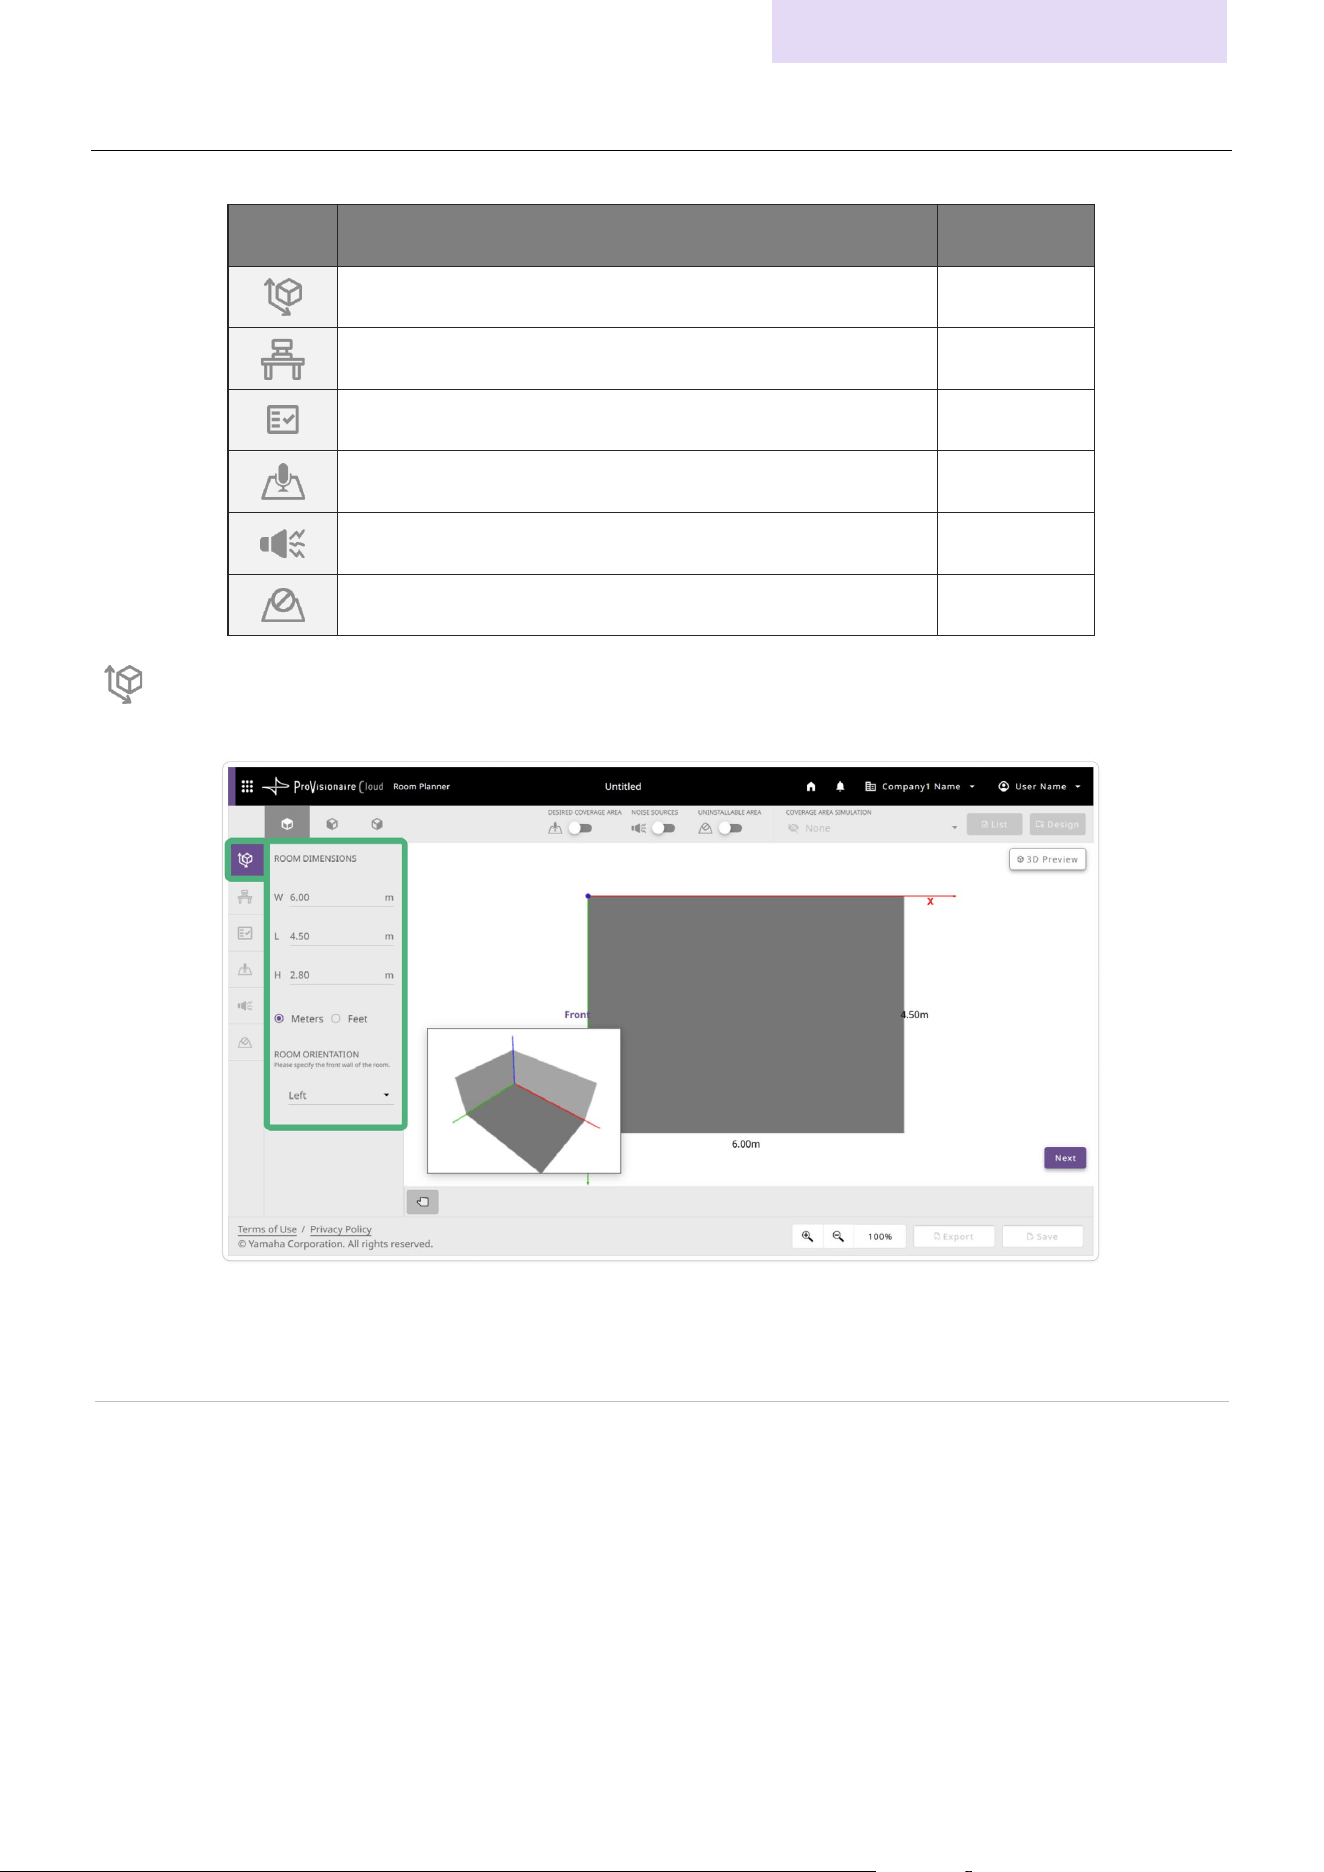
Specifying the room size
Specify the size and front of the room.
Room specifications
Room dimensions Specify the width, length and height. Select “Meters” or “Feet” as the units for the entered values.
Room orientation Select which side of the arrangement view is the front (where the display, etc., is installed). What
side is selected as the front affects the automatically generated plan for the microphones and
speakers.
Creating a Plan in Room Planner
Room Planner User Guide
21
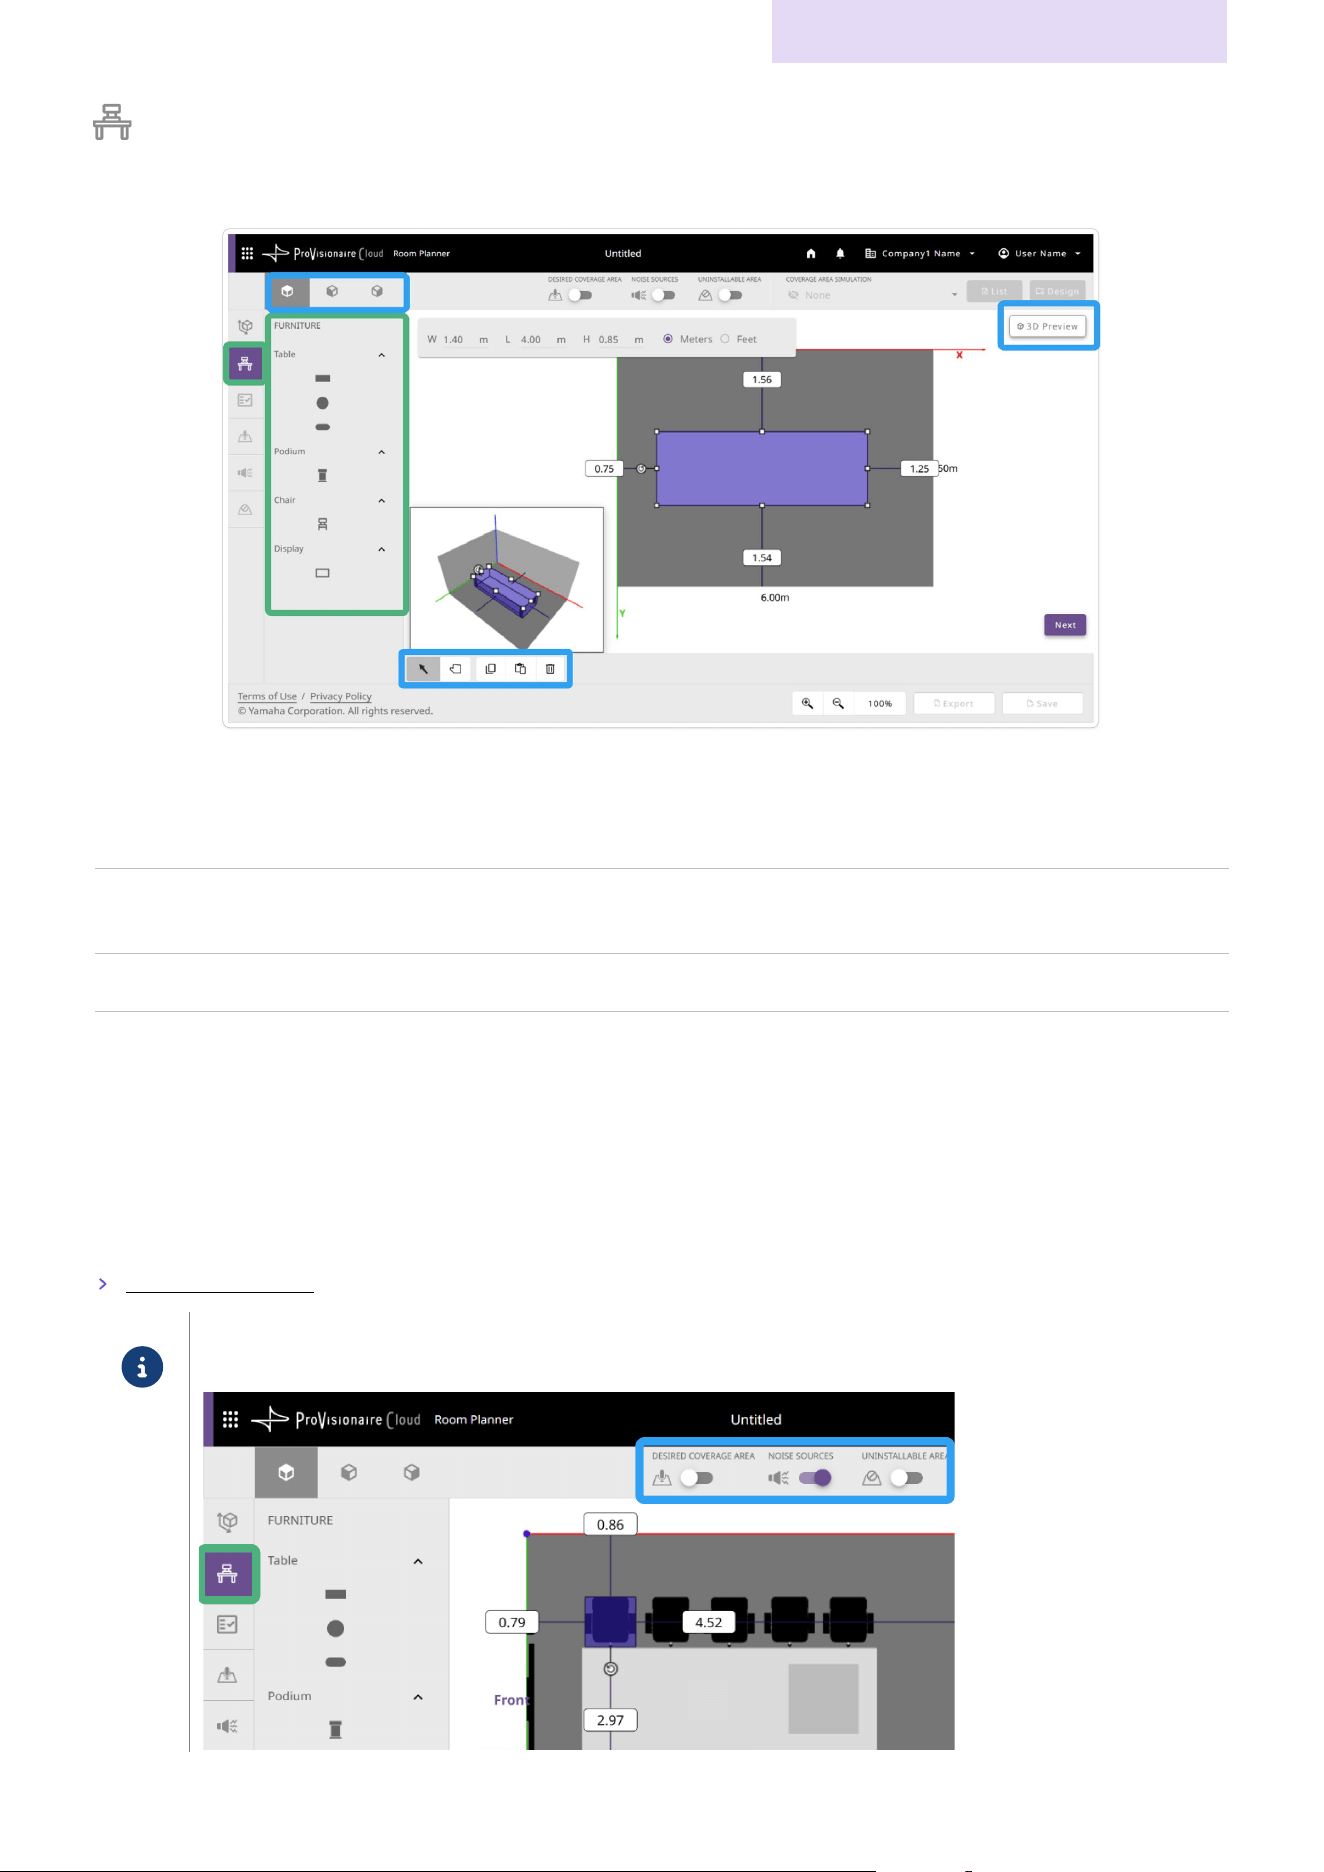
Specifying the furniture arrangement
Arrange the furniture as it is in the room. Specify the size and location of furniture.
Furniture types
Table Click the icon that matches the shape of your table to add it.
Chair Adds a chair. When automatically simulating the sound coverage area, the listeners’ positions are
assumed according to the location and orientation of the chairs.
Display Adds a display. The installation height will also need to be adjusted.
Podium Adds a podium. When automatically simulating the sound coverage area, the presenter’s position is
assumed to be at the podium.
Procedure for specifying the furniture arrangement
Clicking the icon for furniture to be arranged places the furniture in the floor corner of the room (origin of the X and Y axes in the
arrangement view). Specify the size and location. If the device, for example, a display, is not installed on the floor, change the
room view angle, and then specify the device’s installation height. For details, refer to “Working with Objects”.
Working with Objects (page 26)
Note
Furniture can only be rearranged in the furniture screen.
Furniture in the furniture screen can more easily be rearranged by hiding the various areas.
Creating a Plan in Room Planner
Room Planner User Guide
22
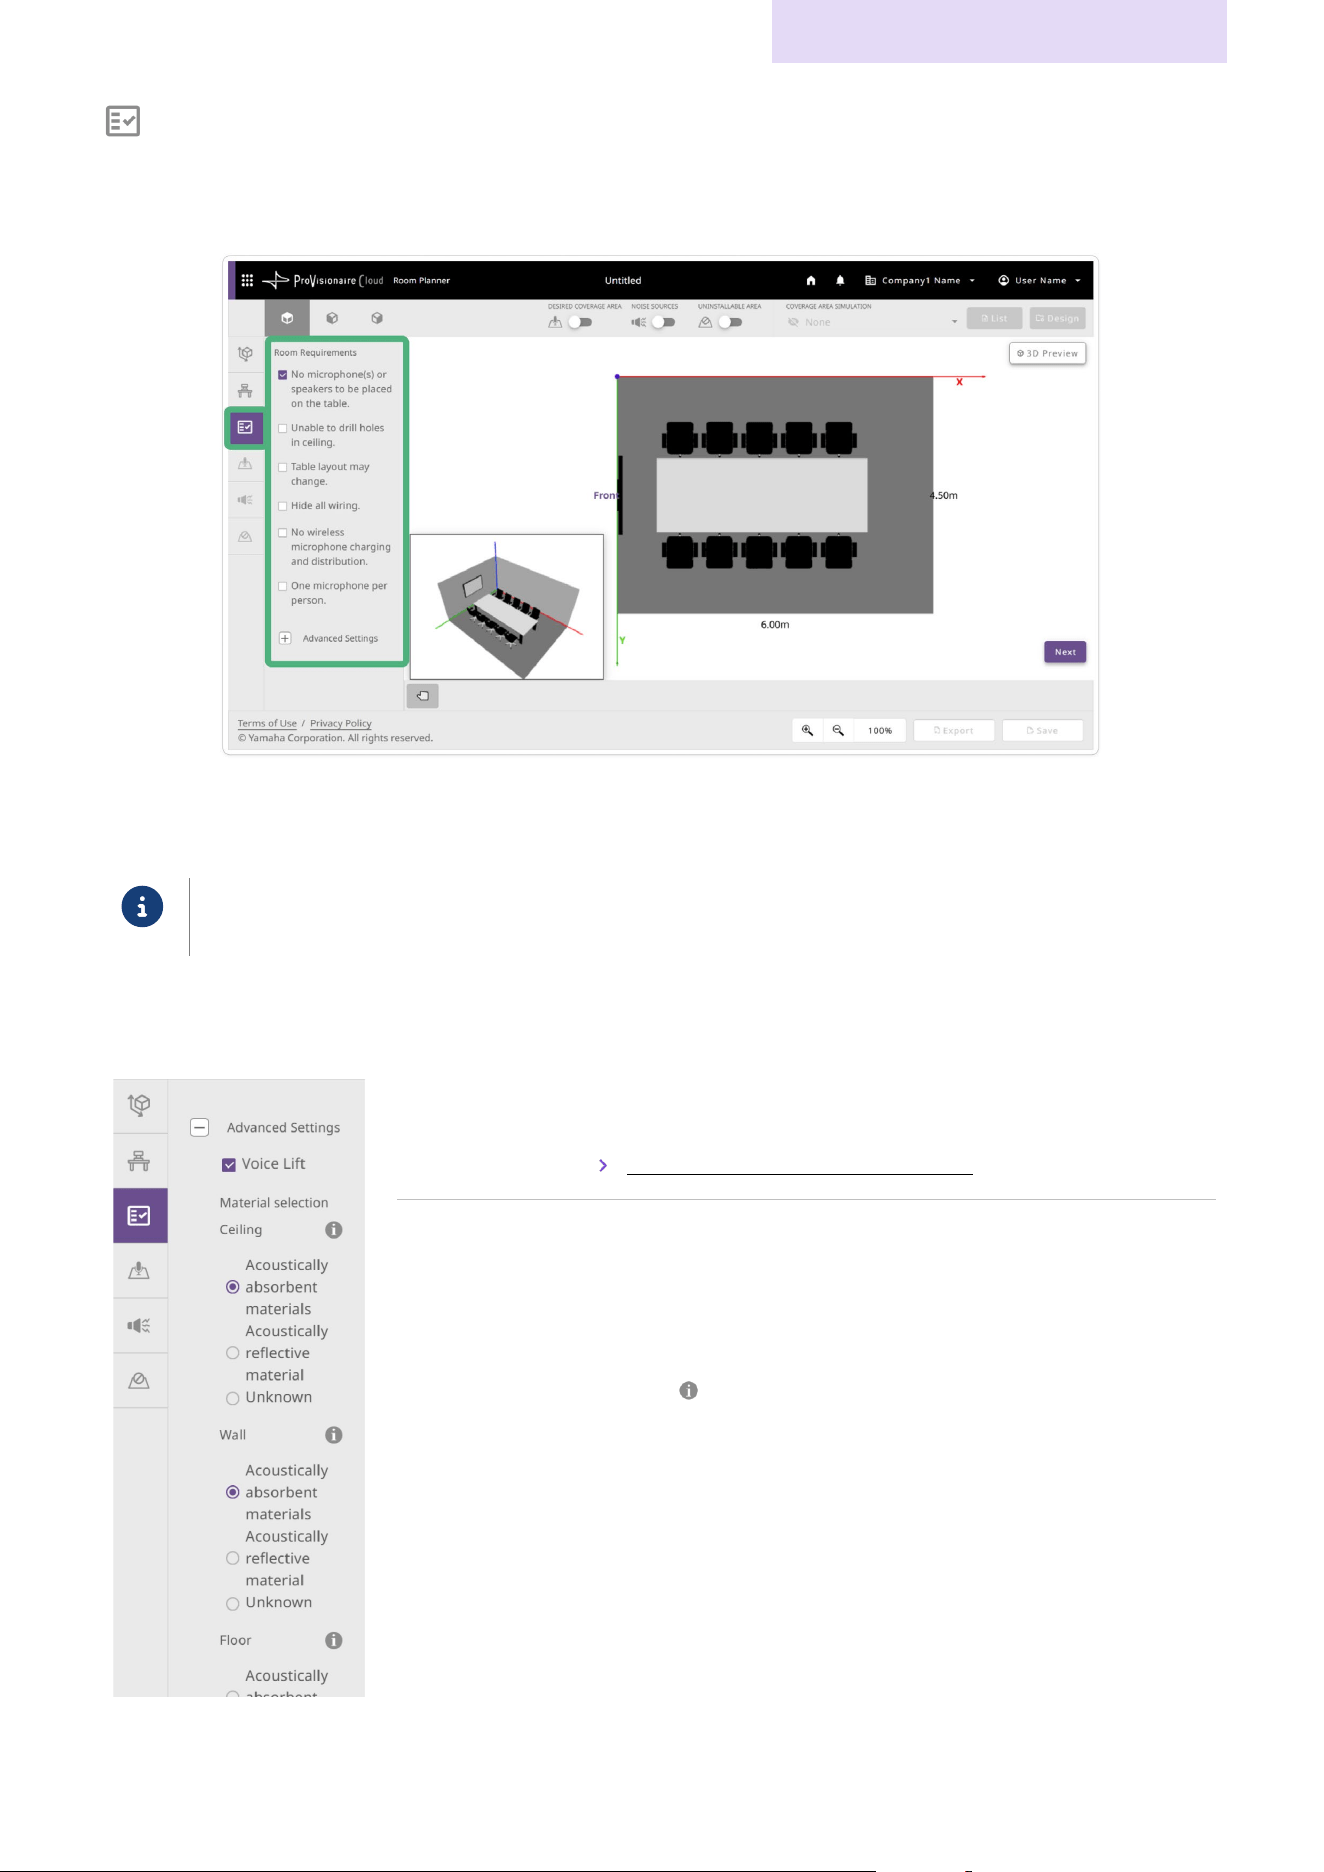
Selecting room requirements
Select the requirements for arranging the devices. The application automatically selects the devices most suitable for the
selected requirements. When designing a plan that supports Voice Lift, select the appropriate setting in this screen.
Room Requirements
Select the check box for any additional requirements (multiple selections can be made).
Note
The generated plan may not always be able to address all of the selected requirements.
Advanced Settings
Expand the “Advanced Settings” list to specify detailed settings.
Voice Lift Select the “Voice Lift” check box in order to design a plan that
supports Voice Lift.
Creating a plan that supports Voice Lift (page 28)
Material
selection
This appears when the “Voice Lift” check box was selected. Select
whether the ceiling, walls and floors are made of sound-absorbing
materials.
If the room image recognition feature was used, materials
recognized by AI are selected.
Click the (information) mark to display material examples for
each item.
Creating a Plan in Room Planner
Room Planner User Guide
23
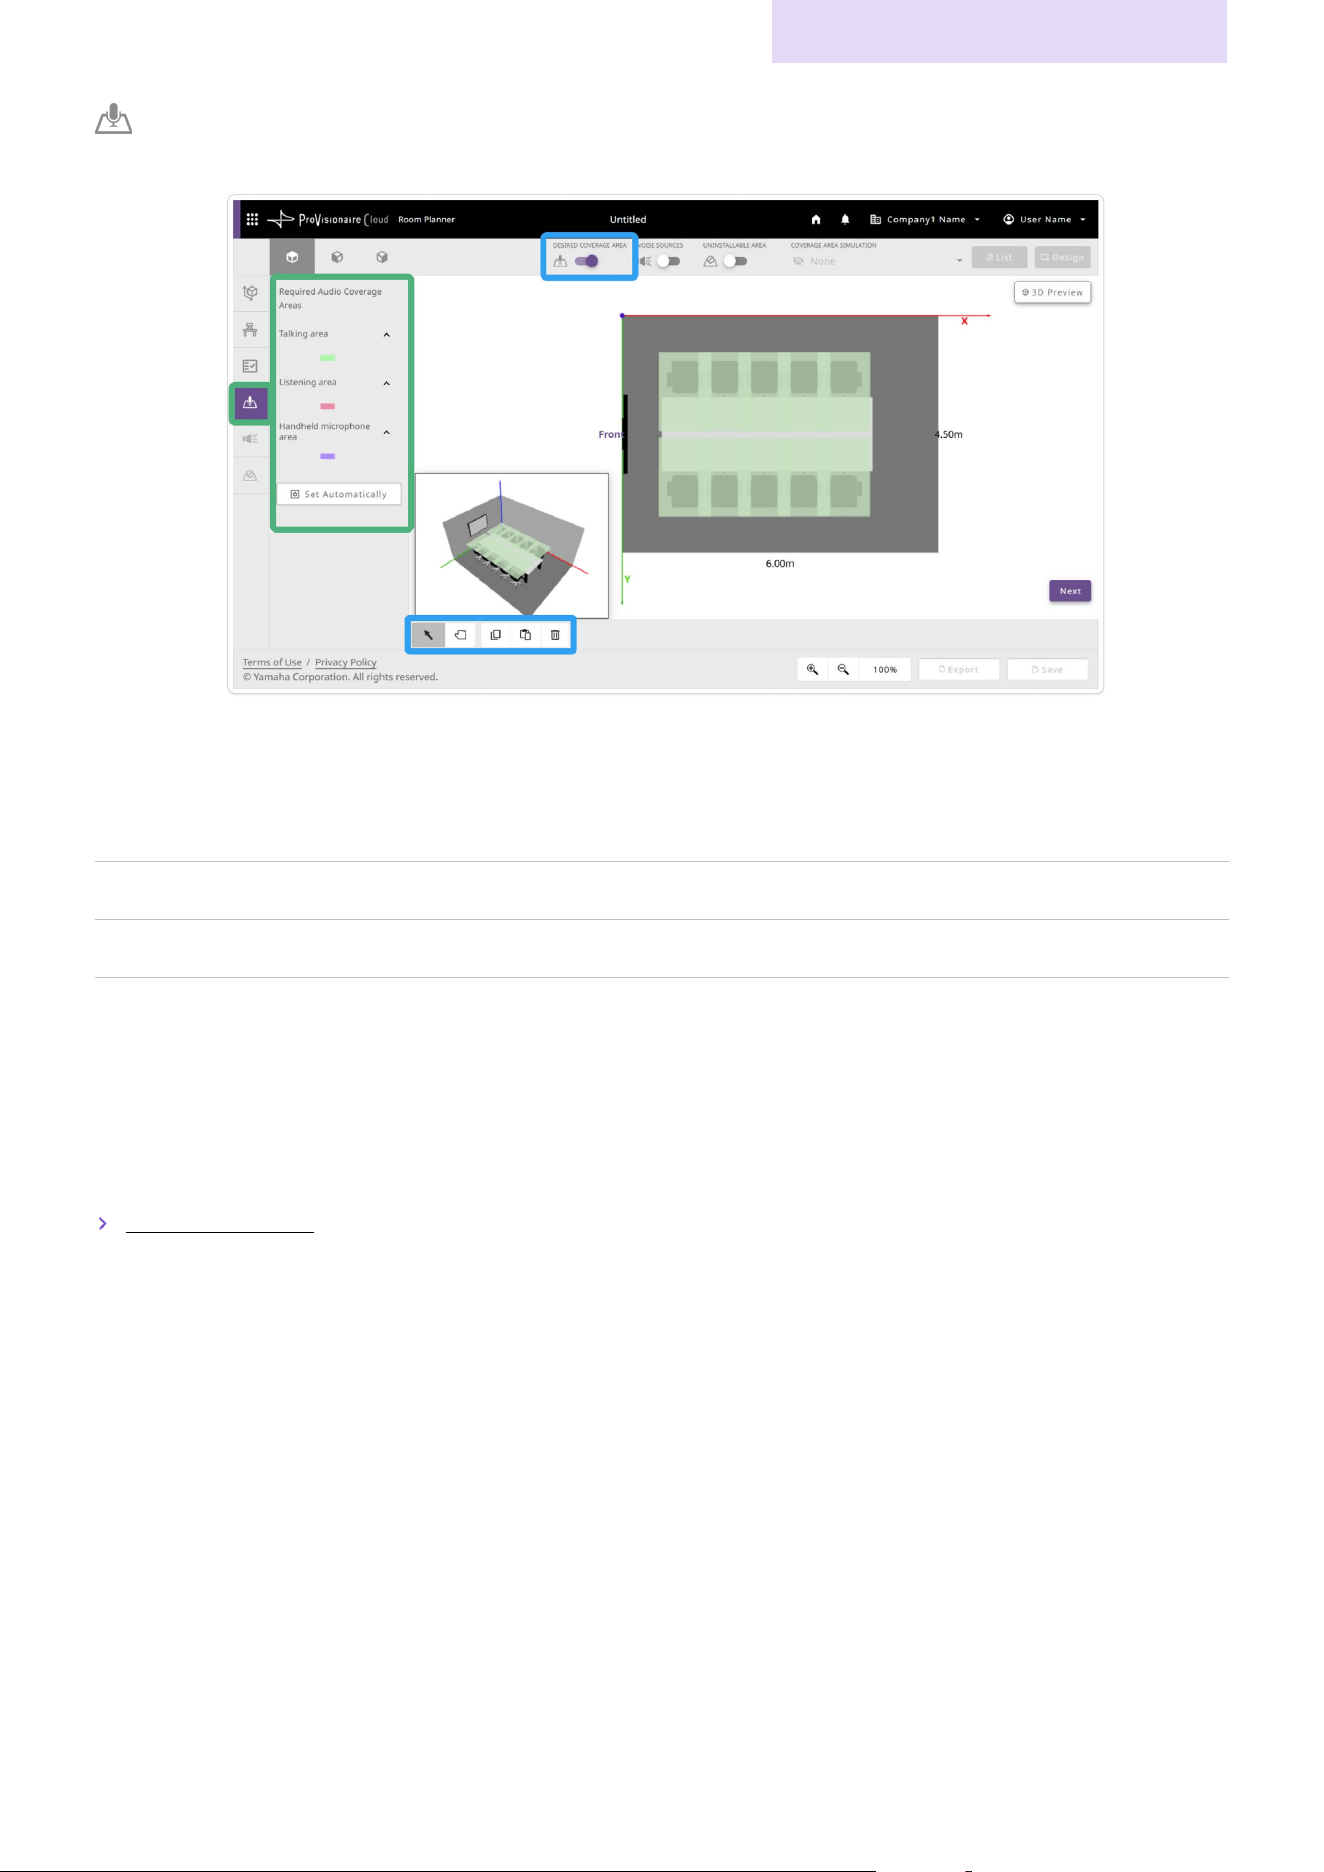
Specifying sound coverage areas
Specify the areas to be covered by the microphones and speakers.
Area types
Discussion area Specifies the area where the speaker will be (area to be covered by the microphones
and loudspeakers).
Observer area Specifies the area where the listeners will be (area to be covered by the loudspeakers).
Handheld microphone area Specifies the location where the handheld microphone is to be used.
Set Automatically Click the [Set Automatically] button to automatically specify the coverage areas.
Procedure for specifying coverage areas
The first time that this screen is displayed the coverage areas are automatically arranged according to the chair locations.
Change the areas to be covered by either modifying an automatically specified area or by deleting an area and specifying a new
one in the desired location. For details, refer to “Working with Objects”.
Working with Objects (page 26)
Creating a Plan in Room Planner
Room Planner User Guide
24
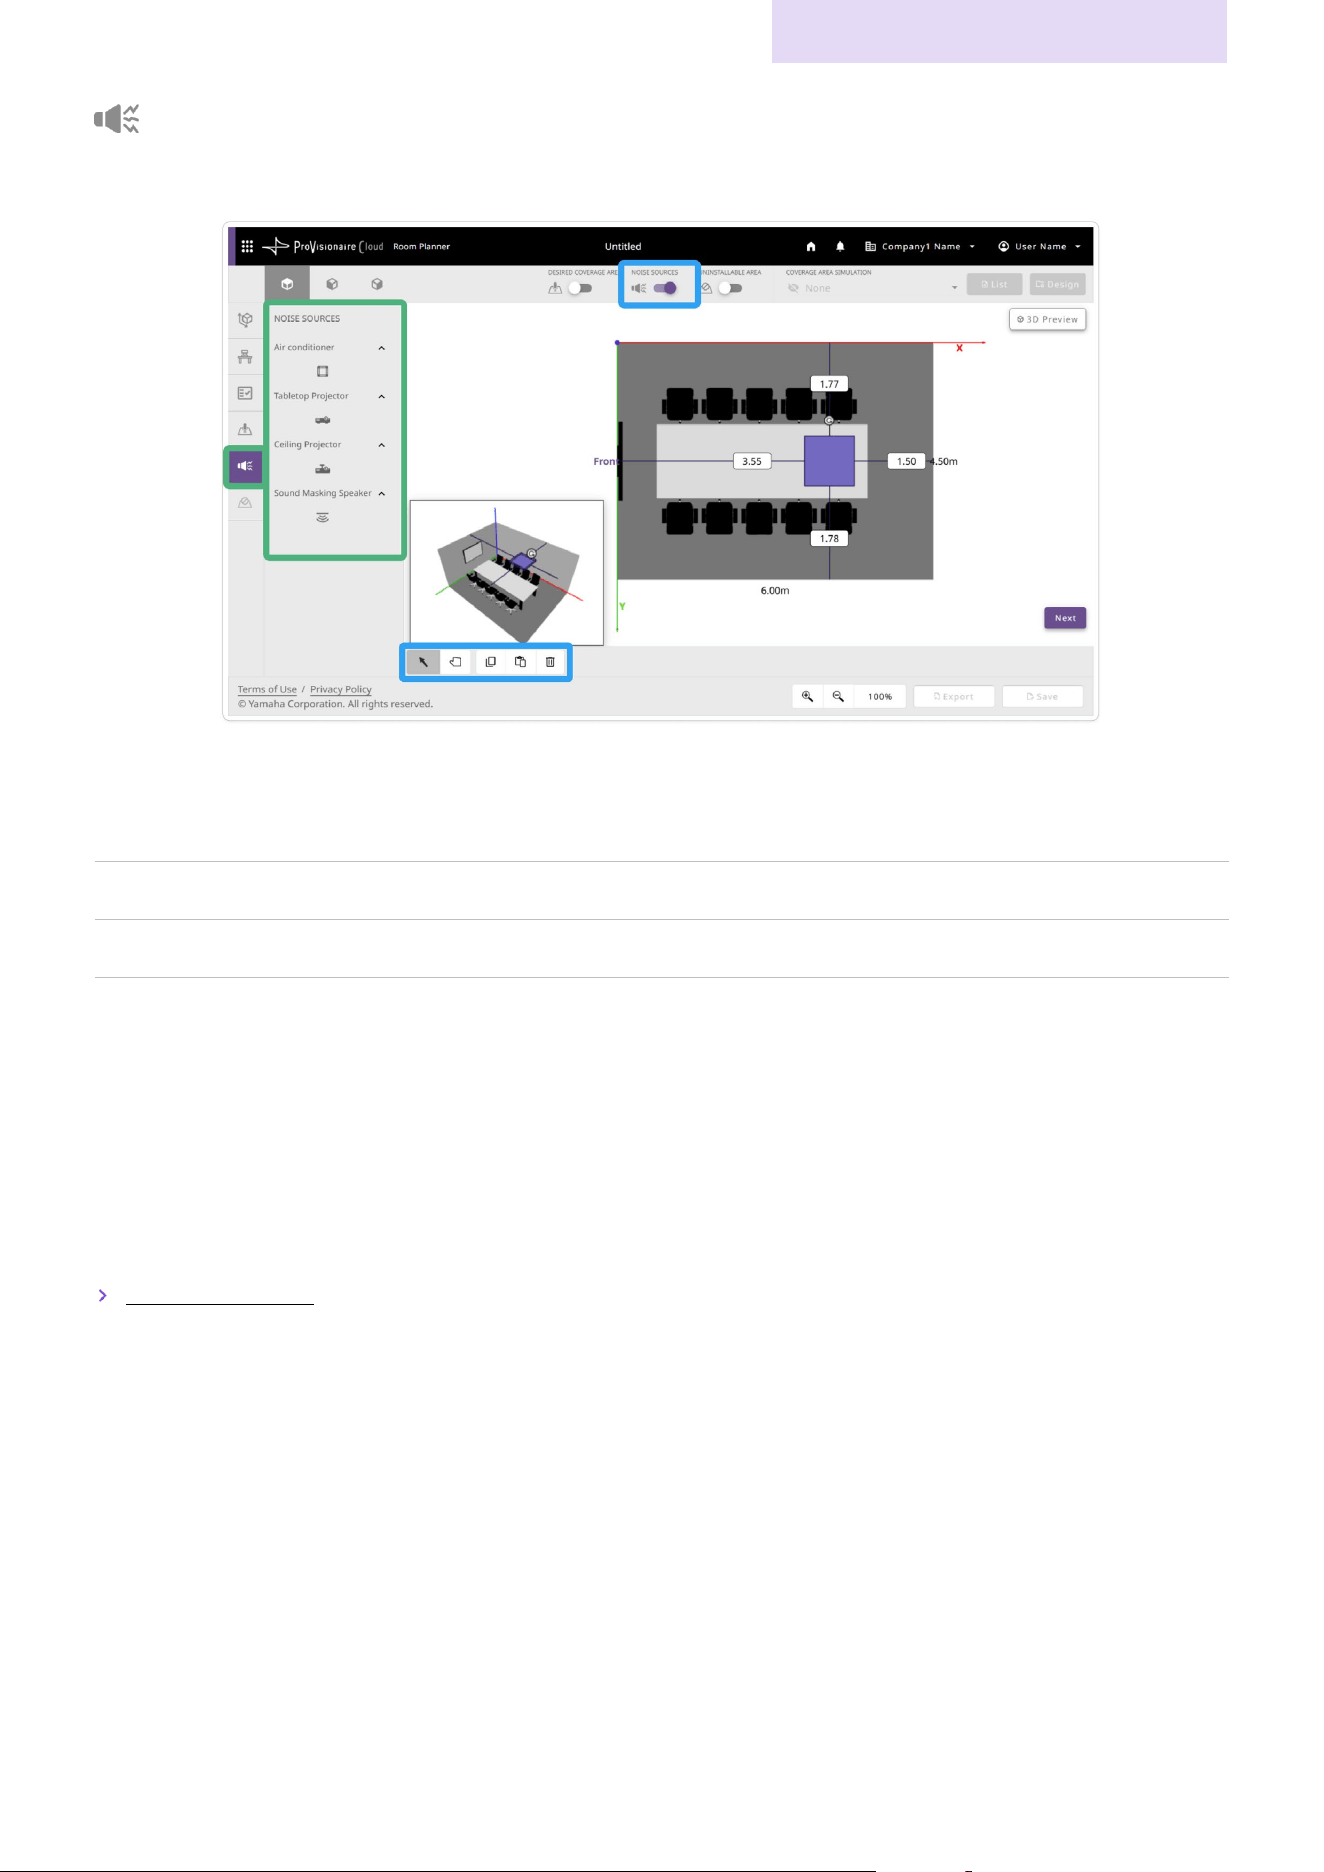
Specifying noise sources and their locations
If there is any noise-producing equipment in the room, specify its type and location. Specified noise sources affect the
automatically generated plan for the microphones and speakers.
Noise source types
Air conditioner Arranges the object on the ceiling.
Tabletop Projector Arranges the object on top of a desk.
Ceiling Projector Arranges the object on the ceiling.
Sound Masking Speaker Arranges the object on the ceiling.
A sound-masking speaker is a device that emits a masking sound to make it difficult
to hear surrounding conversations.
Procedure for specifying the arrangement of noise sources
Clicking the icon for a noise source places it in the corner of the room (origin of the X and Y axes in the arrangement view).
Specify the location.
For details, refer to “Working with Objects”.
Working with Objects (page 26)
Creating a Plan in Room Planner
Room Planner User Guide
25
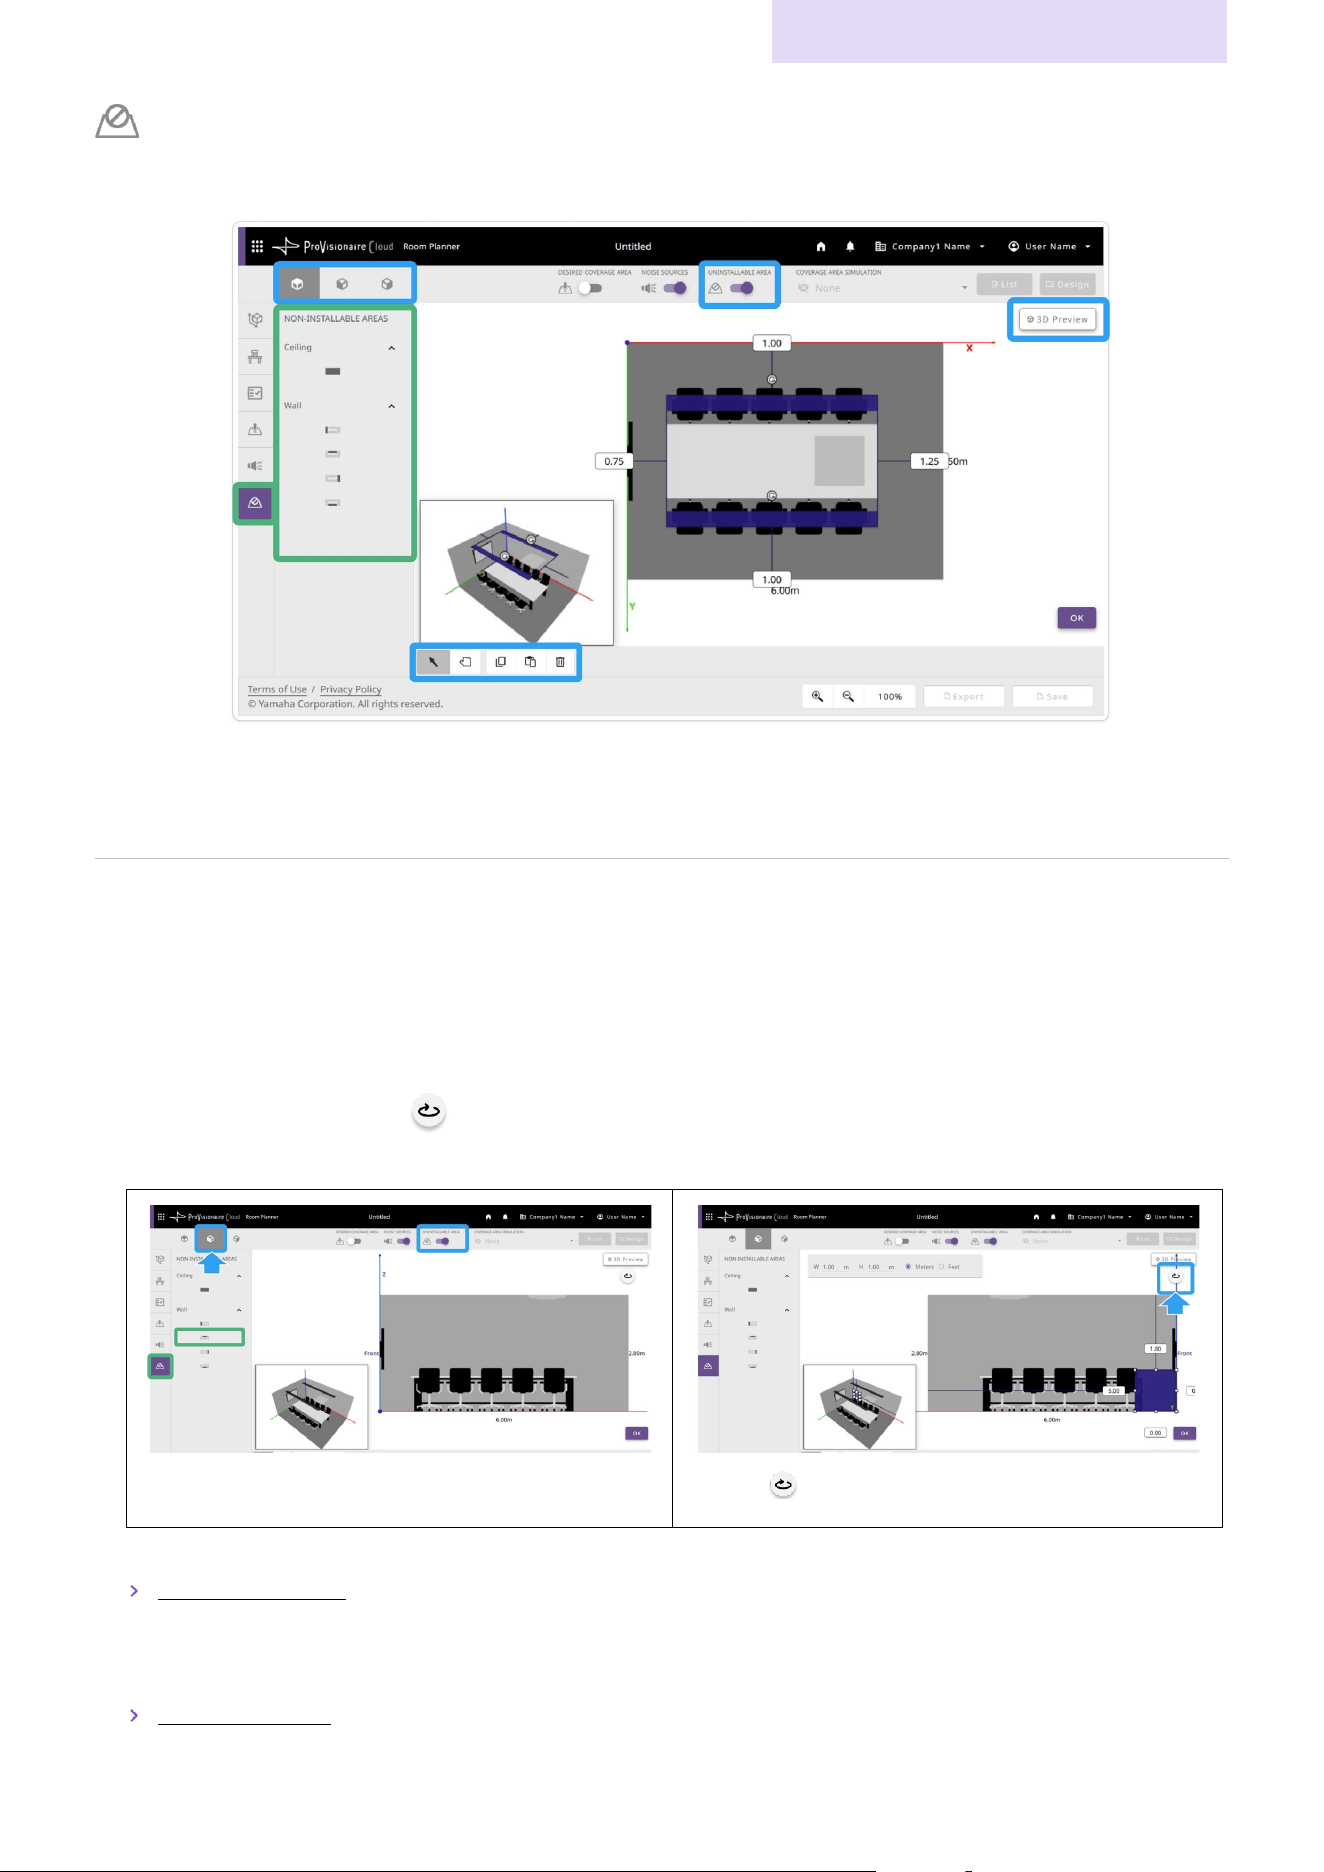
Specifying locations where devices cannot be installed
If there are locations on the ceiling or wall where microphones or speakers cannot be installed (because of lighting, air
conditioning, windows, etc.), specify those locations as non-installable areas.
Non-installable area types
Ceiling Specifies a non-installable area on the ceiling.
Wall Specifies a non-installable area on a wall. Click the icon for the wall where the area is to be specified.
Procedure for specifying non-installable areas
• Clicking the [Ceiling] icon under “NON-INSTALLABLE AREAS” places the object in a ceiling corner of the room.
• Clicking a [Wall] icon under “NON-INSTALLABLE AREAS” places the object in the corner of the selected wall (origin of the X
and Y axes). These objects can only be viewed and modified while viewing them from the wall on which they are placed.
Use the angle buttons and the (flip view) button to view the object.
Example: When placed on the far wall
Select the side view angle (the wall facing you is displayed).
Click the (flip view) button to flip the view and display the
object.
• For details on editing objects, refer to “Working with Objects”.
Working with Objects (page 26)
✔ In the new plan screen: After specifying non-installable areas, click the [OK] button. This completes the procedure guide,
and the plan can be edited.
Generating the plan (page 14)
Creating a Plan in Room Planner
Room Planner User Guide
26
Working with Objects
Furniture, devices and areas are arranged by editing their objects in the arrangement view.
Use the selection tool to edit objects.
For details on using other buttons and tools, refer to the pages providing details on the corresponding
screen.
Details on Screens: Arrangement Views/Editing Tools (page 32)
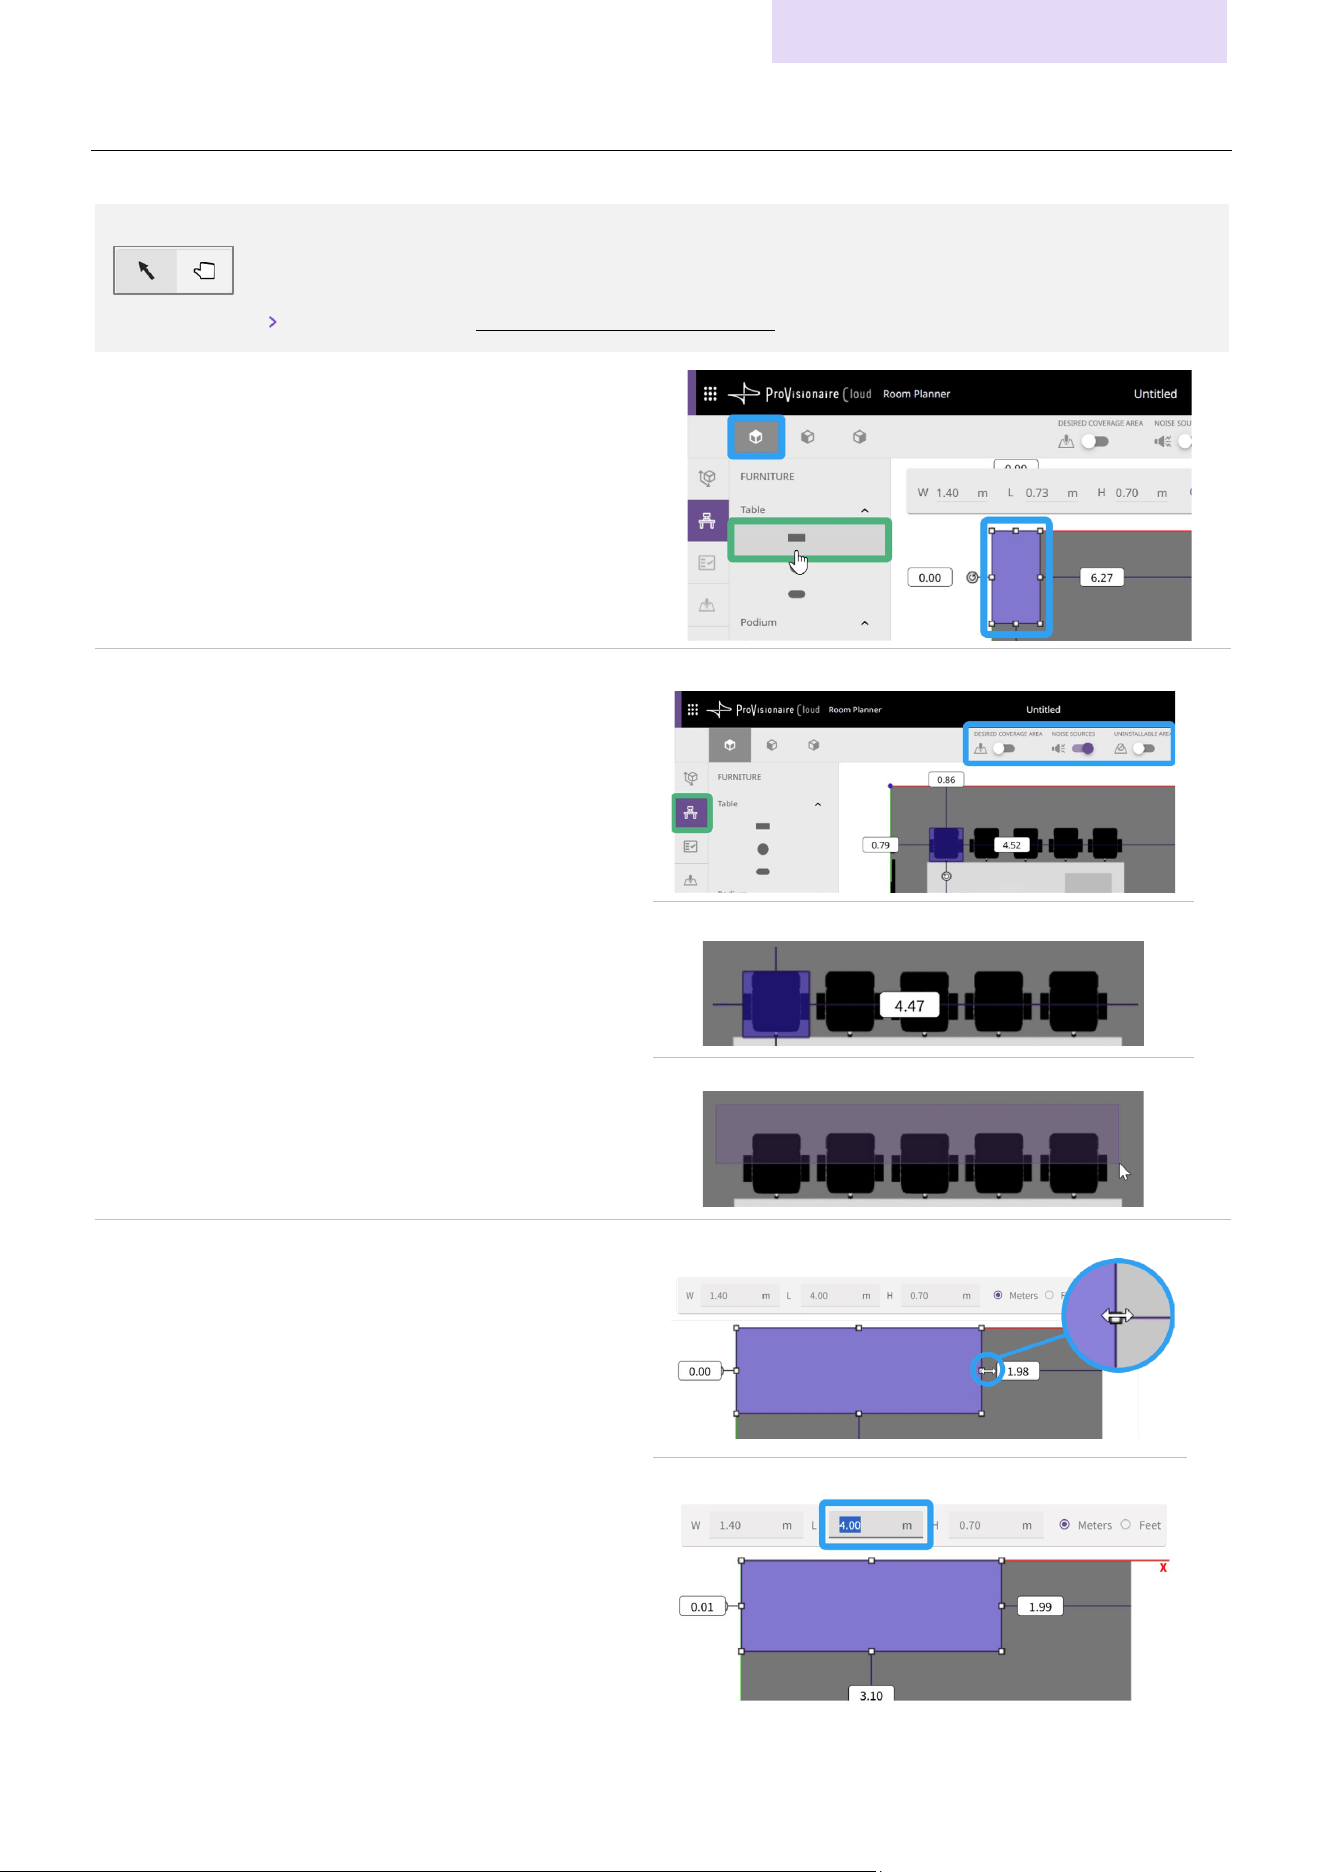
Arranging objects
1.
Select the top view angle.
2.
Clicking an icon in the settings panel places the
corresponding object in the top left of the room in the
arrangement view.
Selecting objects
Select the object to be edited.
Display the condition screen for the object to be edited.
(For example, furniture can only be arranged and selected
from the furniture screen.)
Select in one of the following ways:
To select one object:
•
Place the mouse pointer over an object and, when the
object changes color, click the object.
To select multiple objects:
•
While holding down the Ctrl key, click the objects to be
selected.
•
Drag the mouse pointer over all objects to be selected in
order to select them all.
To edit the furniture arrangement, display the furniture screen.
Click an object after it changes color.
Select multiple objects at the same time.
Specifying the object size
When an object whose size can be specified is selected, a
settings bar appears.
Specify the size in one of the following ways:
To r
esize with the mouse:
•
Move the mouse pointer over a point in the object, and,
when the arrow appears, drag the point to resize the
object.
To s
pecify values in the settings bar:
•
Specify values by directly entering them into the settings
bar.
•
Since an object is resized from its center point, it cannot be
enlarged if it is against a wall. In that case, try enlarging the
object with the mouse or moving it away from the wall
before specifying values.
Resize with the mouse.
Specify values in the settings bar.
Creating a Plan in Room Planner
Room Planner User Guide
27
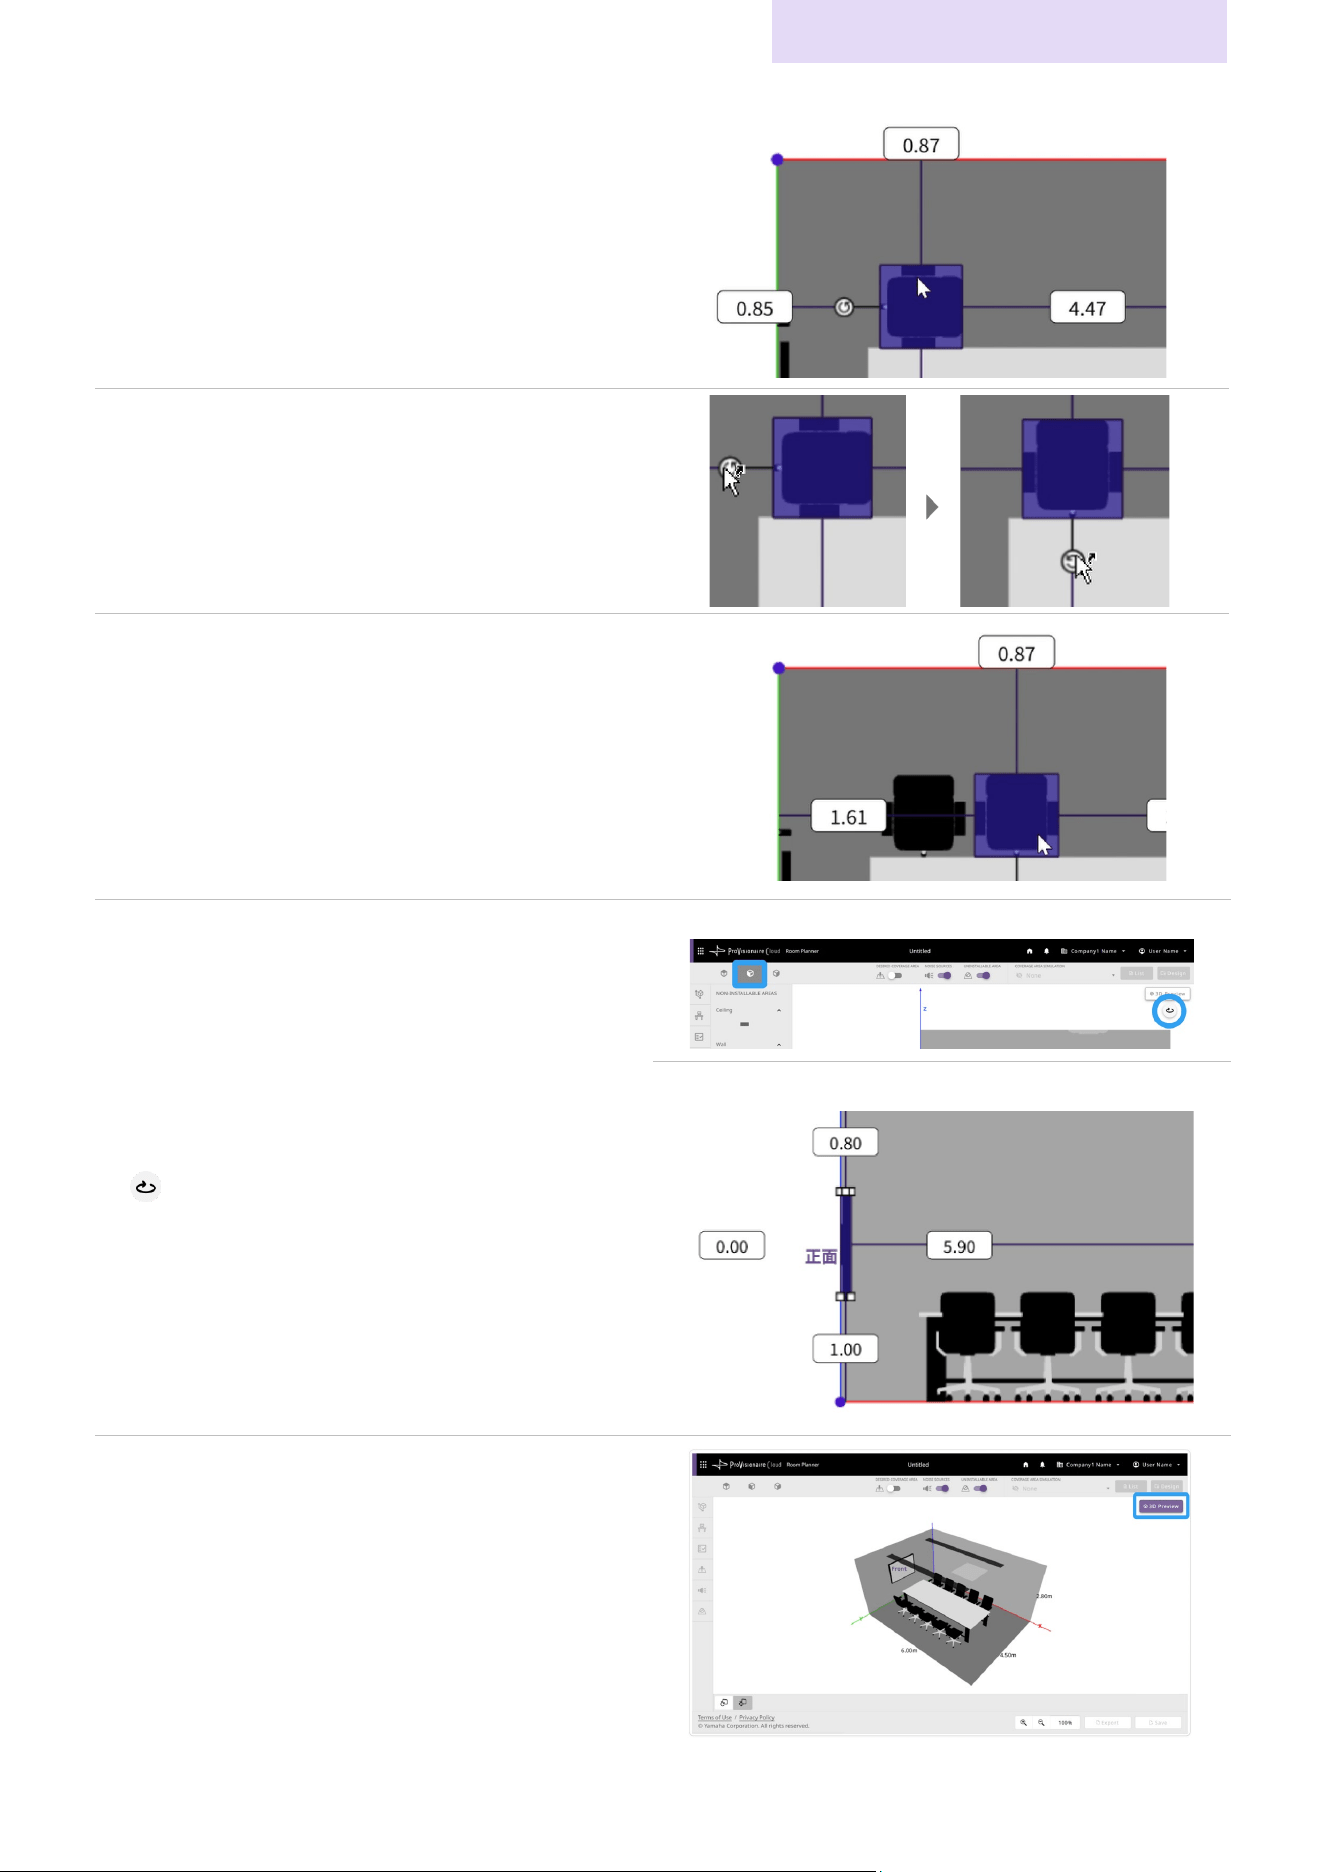
Adjusting the object location
Select an object, and adjust its location according to the actual
room arrangement.
•
The distances between the selected object and the walls
and ceiling appear.
•
Move an object by dragging it with the mouse or by using
the arrow keys on the keyboard.
Rotating objects (that can be rotated)
When an object that can be rotated is selected, a rotation
handle appears. When the mouse pointer is moved over the
rotation handle, an arrow appears. Drag the rotation handle to
rotate the object.
Duplicating objects
If multiple copies of the same object are needed, copy and
paste the object to create as many as needed. After the pasted
object is placed in the top left of the room in the arrangement
view, its position can be edited.
Switching the view angle in order to
specify the
object arrangement height
The height must be specified for objects that are not attached
to the floor or ceiling. Specify the height by using the side or
front/back view angles.
•
When using a side, front or back view angle, only objects
placed on the wall facing you can be viewed and edited.
•
View objects placed on the opposite side by clicking the
(flip view) button to flip the view.
Switching the view angle.
Specify the height.
Displaying a 3D preview
Click the [3D Preview] button to display a 3D preview.
•
Drag the arrangement view to rotate the room up to 360
degrees.
Using Advanced Features
Room Planner User Guide
28
Using Advanced Features
Creating a plan that supports Voice Lift
ProVisionaire Plan can design sound systems that support Voice Lift. The plan is automatically designed with the optimal
arrangement of microphones and speakers for Voice Lift.
About Voice Lift
Voice Lift amplifies and adjusts the speaker’s voice picked up by a microphone, then uses multiple ceiling speakers to ensure
that the voice is heard naturally and clearly by all participants in the room, even within large spaces.
Models that support Voice Lift
Signal Processor RM-CR
Ceiling Microphone
Wireless Microphone
RM-CG
RM-WGS RM-WGL
Ceiling Speaker VXC2P
Microphone Access Point RM-WAP-8 RM-WAP-16
* Use firmware version 3.0.0 or later. Versions 2.8.0 or earlier do not support auto setup of Voice Lift.
Creating a Voice Lift plan
1. Specify all room conditions.
Creating a Plan in Room Planner (page 12)
Specify all room conditions.
In order to create a plan that supports Voice Lift, the “Voice Lift” check box under “Advanced Settings” of the request
selection screen must be selected. In addition, select whether the ceiling, walls and floors are made of sound-absorbing
materials.
Selecting room requirements (page 22)
2. Generate the plan
After specifying all of the room conditions, click the [Design] button to automatically generate the plan.
Generating the plan (page 14)
3. View the results screen to confirm that the coverage areas are as desired.
In the [COVERAGE AREA SIMULATION] drop-down list, select [Speech with Voice Lift] or [Speech without Voice Lift] to view
the effect of Voice Lift on the simulation when Voice Lift is used or not used.
If necessary, edit the room conditions, and then regenerate the plan.
Reviewing the simulation of the sound coverage area (page 16)
✔ To use a generated Voice Lift plan for automatic setup, refer to the next section.
Using Advanced Features
Room Planner User Guide
29
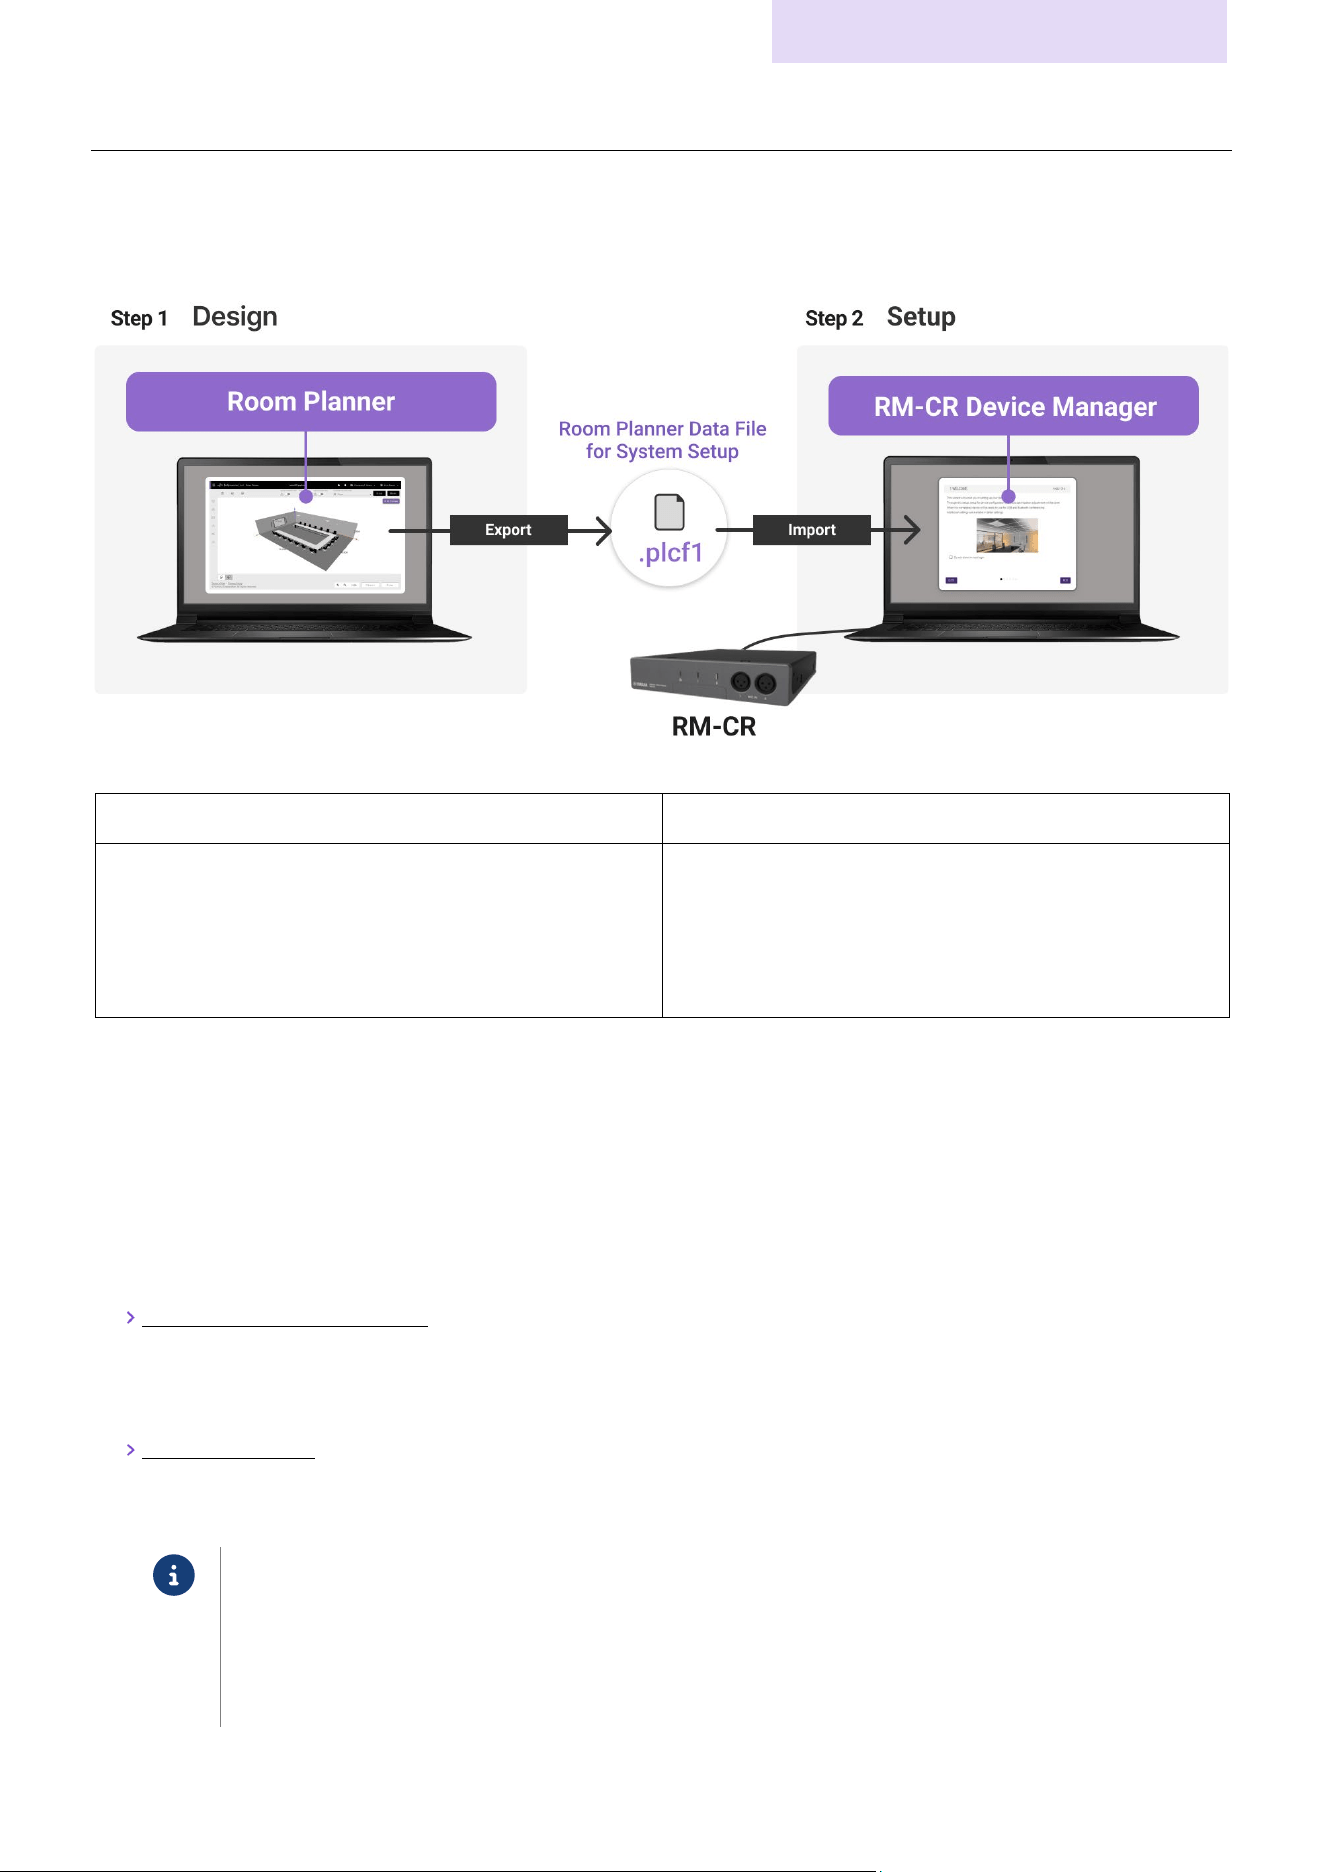
Using a generated plan to automatically set up a system
The plan results generated by Room Planner can be exported as a Room Planner data file for system setup (.plcf1 extension),
then used for automatic setup with the RM-CR signal processor. Simply install and connect the devices according to the plan,
and then use RM-CR Device Manager to follow the AUTO SETUP wizard in order to automatically configure and adjust the
devices.
Room Planner RM-CR Device Manager
1.
Specify all room conditions.
2. Generate the plan
3. Review the generated plan in the results screen.
4. Export the Room Planner data file for system setup.
5.
Install and connect devices.
6. Open the RM-CR setup screen.
7. Import the Room Planner data file for system setup.
8. Set up according to the on-screen instructions.
Procedure for setting up by using a plan
Step 1. Plan: Creating a plan with Room Planner
Start Room Planner, and then create a plan.
For a plan that supports Voice Lift:
For Step 1., refer to the procedure “Creating a Voice Lift plan” on the previous page to create the plan.
1. Specify all room conditions.
Creating a Plan in Room Planner (page 12)
2. Generate the plan
After specifying all of the room conditions, click the [Design] button to automatically generate the plan.
Generating the plan (page 14)
In order to use a Voice Lift plan for automatic setup, the message “Voice lift can achieve sufficient volume enhancement.”
must appear in the generated plan.
Note
If a warning appears, indicating that the full benefits of Voice Lift are not being utilized, try changing the room
conditions according to the instructions provided.
• If the Room Planner data file for system setup is exported as is, automatic setup will be possible, but the
Voice Lift audio settings will not be specified automatically.
• RM-CR Device Manager can be used to manually configure the audio settings.
Using Advanced Features
Room Planner User Guide
30
3. Review the generated plan in the results screen.
In the [COVERAGE AREA SIMULATION] drop-down list, select the coverage area to be displayed. If necessary, edit the room
conditions.
Reviewing the simulation of the sound coverage area (page 16)
Step 2. Export: Exporting the plan
4. Save the generated plan as a Room Planner data file for system setup.
Click the [Export] button, and then select [Output Room Planner Data File for System Setup] to export the data.
Exporting the results (page 18)
Step 3. Setup:Automatically setting up with RM-CR
Use the Room Planner data file for system setup (exported with Room Planner) for automatic setup with the RM-CR signal
processor.
5. Install and connect the devices according to the plan.
Install and connect the devices according to the Room Planner design results.
For connection details, refer to the RM-CR Reference Manual.
* Use firmware version 3.0.0 or later. Versions 2.8.0 or earlier do not support auto setup of Voice Lift.
6. Start RM-CR Device Manager.
On the computer connected to RM-CR, start the RM-CR Device Manager, and then click the [AUTO SETUP] button to start up
the AUTO SETUP wizard. In the import window, import the Room Planner data file for system setup (.plcf1 extension)
exported in Step 1.
7. Set up according to the on-screen instructions.
✔ After setup is finished, adjust the settings in RM-CR Device Manager, if necessary.
For setup details, refer to the RM-CR Reference Manual.
Details on Screens
Room Planner User Guide
31
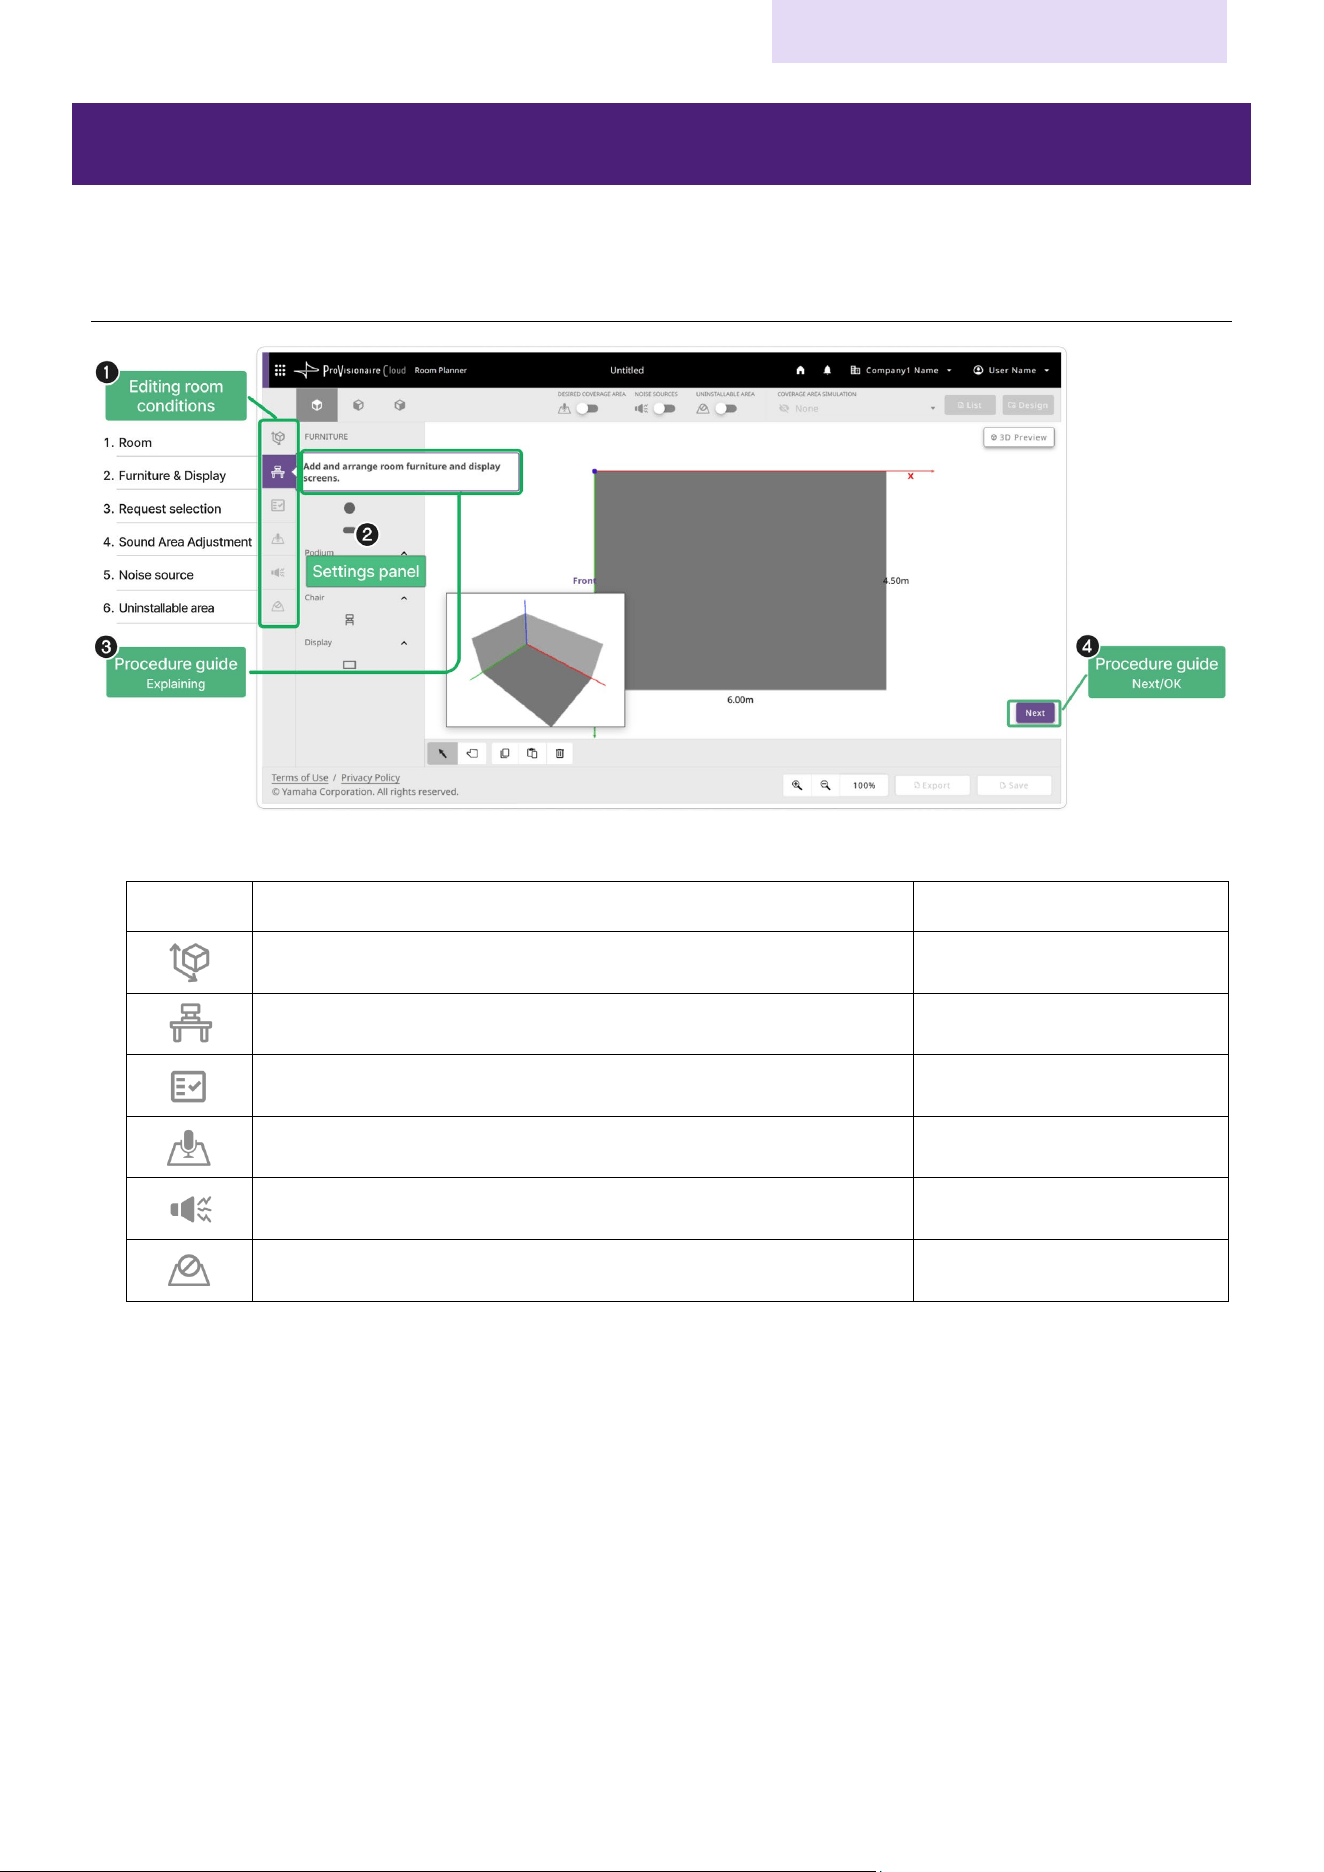
Details on Screens
This section provides details about each screen. Refer to this as needed.
Room condition specification screen/procedure guide
a Room conditions
Icon Items to be specified Reference page
Specifying the room size Page
20
Specifying the furniture arrangement Page 21
Selecting room requirements Page 22
Specifying sound coverage areas Page
23
Specifying noise sources and their locations Page
24
Specifying locations where devices cannot be installed Page 25
b Settings panel
Displays items that can be specified for the selected room condition.
c Procedure guide (displayed only in new plan screen)
Details appear, explaining what to do in this screen.
d Procedure guide button (displayed only in new plan screen)
Clicking the [Next] button continues to the next screen. The procedure guide is finished when the information for all room
conditions has been specified in the given order.
Details on Screens
Room Planner User Guide
32
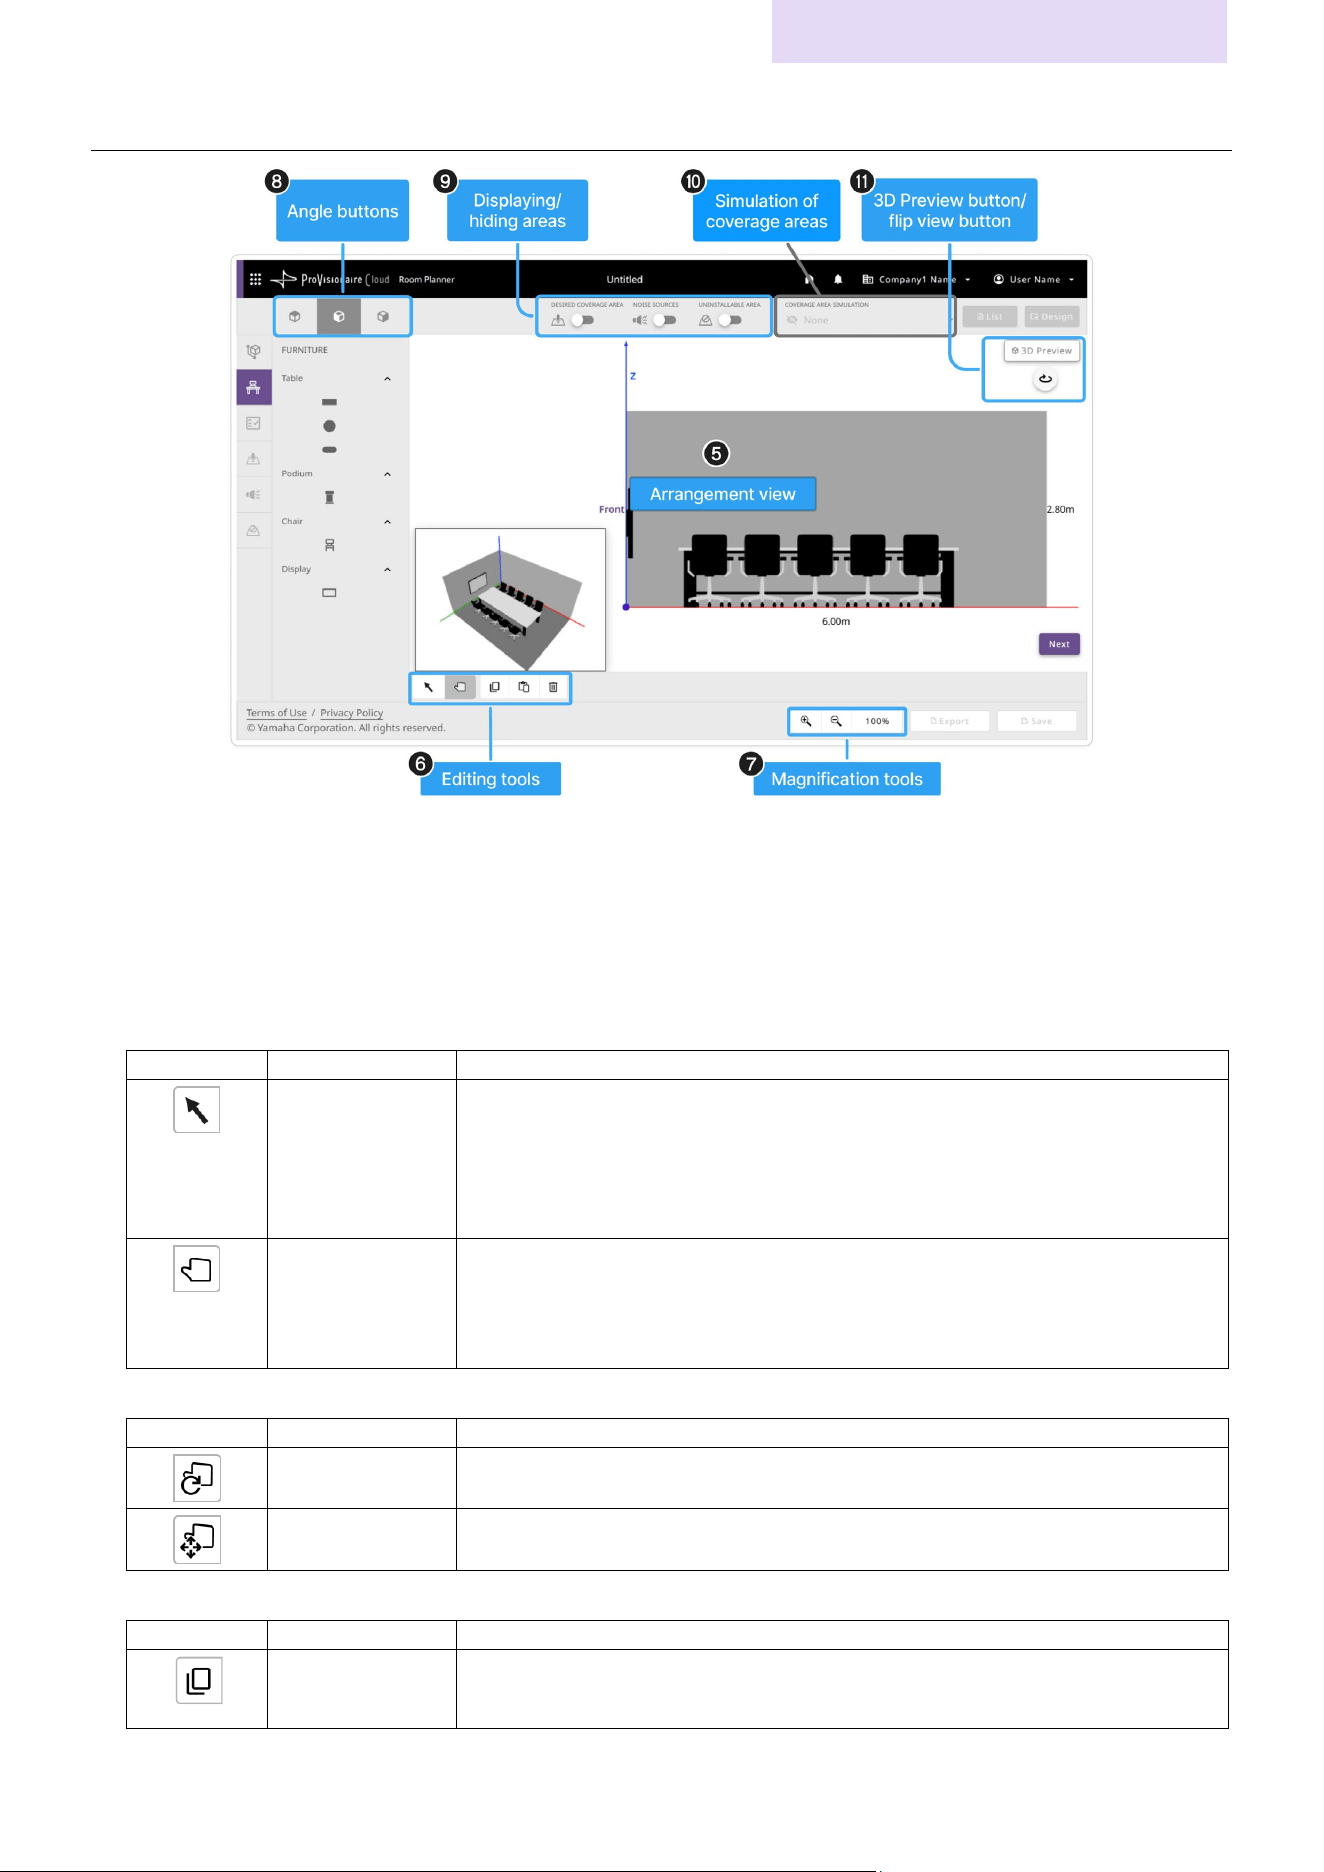
Arrangement Views/Editing Tools
e Arrangement view
Displays the room arrangement and coverage areas.
A 3D preview appears in the lower left. Drag the 3D preview to move it anywhere within the arrangement view.
f Editing tools
Use to move and edit objects in the arrangement view (e).
Move tools
Button
Function
Description
Selection tool Selects objects in the arrangement view.
• Clicking this button changes the mouse pointer to an arrow.
• Move the selected object by dragging it with the mouse or by using the arrow
keys on the keyboard.
Hand tool Navigates the canvas.
• Clicking this button changes the mouse pointer to a hand.
• Drag the canvas to navigate it.
Move tools * Displayed only in 3D preview (k)
Button
Function
Description
Rotate Drag the 3D preview to rotate it up to 360 degrees.
Move Navigates (up, down, left or right) the 3D preview of the room.
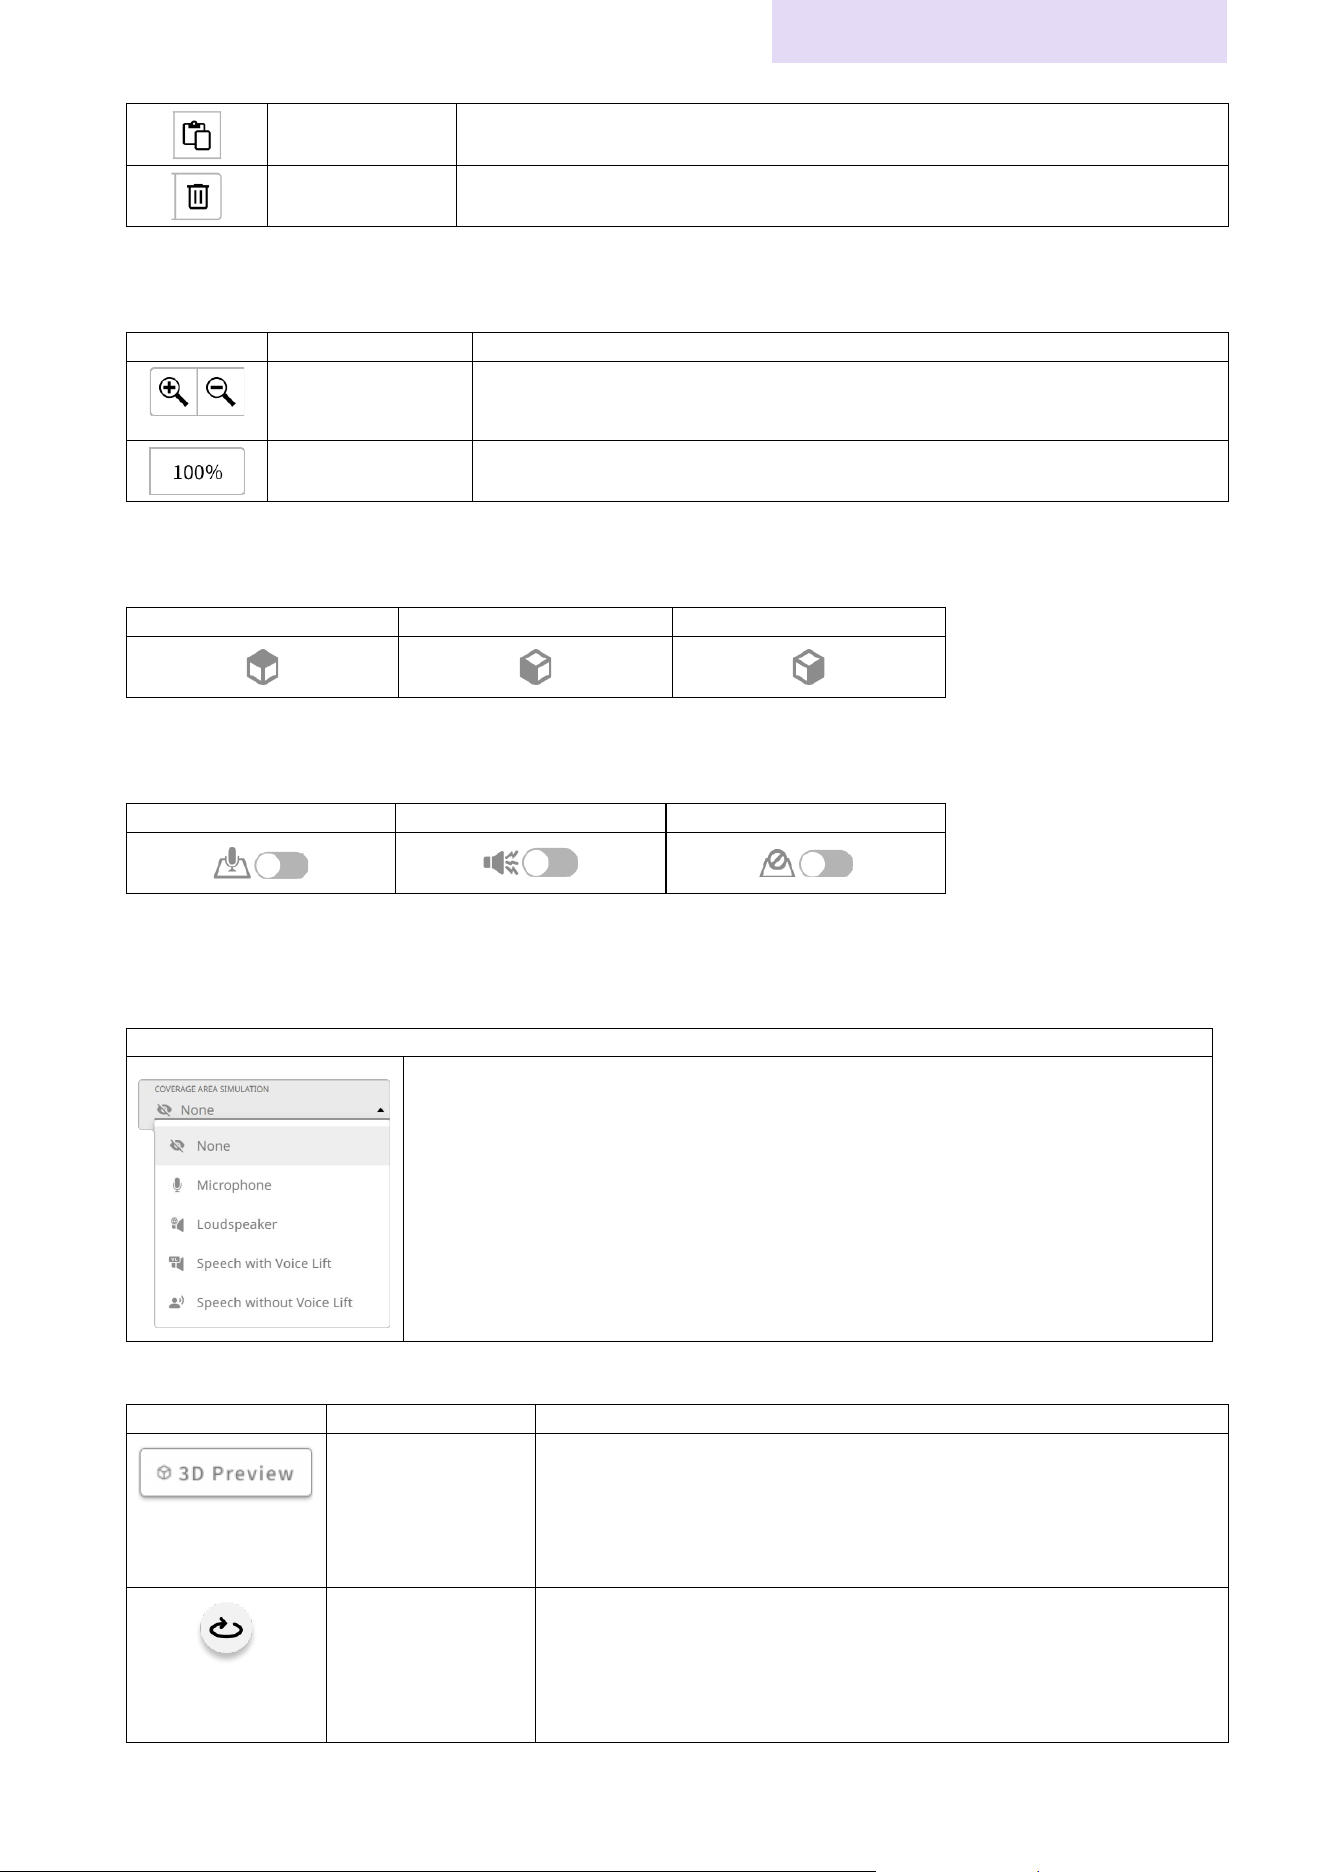
Operation tools * Displayed only in the screen for editing objects
Button
Function
Description
Copy
Clicking this tool while an object is selected copies the object. Copied objects are
deleted when a different room condition is selected.
Details on Screens
Room Planner User Guide
33
Paste Pastes the copied object.
Delete Deletes the selected object.
g Magnification tools
Use to zoom in on or out of the arrangement view (e)
Button
Function
Description
Zoom in/out
Zooms in on or out of the displayed room. Each press of the button changes the
magnification by 10%.
Magnification ratio Displays the magnification ratio.
h Angle buttons
Use to change the angle at which the room is displayed in the arrangement view (e).
Top view angle
Side view angle
Back view angle
i Displaying/hiding areas
Use these toggles to display/hide the following areas.
Coverage areas
Noise sources
Non-installable areas
j Simulation of coverage areas
Use these toggles to display/hide the simulation of the coverage areas for the microphones and speakers. Only the coverage
area for either the microphones or the speakers can be displayed.
Coverage Area Simulation
None: Displays no coverage area.
Microphone: Displays the microphone coverage area.
Loudspeaker: Displays the speaker coverage area.
This appears when the “Voice Lift” check box was selected.
Speech with Voice Lift: Displays the coverage area of a speaker’s voice amplified by
Voice Lift.
Speech without Voice Lift: Displays the audible area of a speaker’s natural voice
(human voice).
k [3D Preview] button/flip view button
Button
Function
Description
Enlarge/reduce 3D
preview
Displays the 3D preview within the entire arrangement view.
Clicking this button again returns the 3D preview to its normal size.
The 3D preview cannot be moved when it is displayed within the entire
arrangement view.
Flip view Flips the view to display the opposite side of the room.
This button is available only when the side view or back view angle
button (
h) has been selected.
Objects arranged on a wall are visible only when the wall is facing you.
Details on Screens
Room Planner User Guide
34
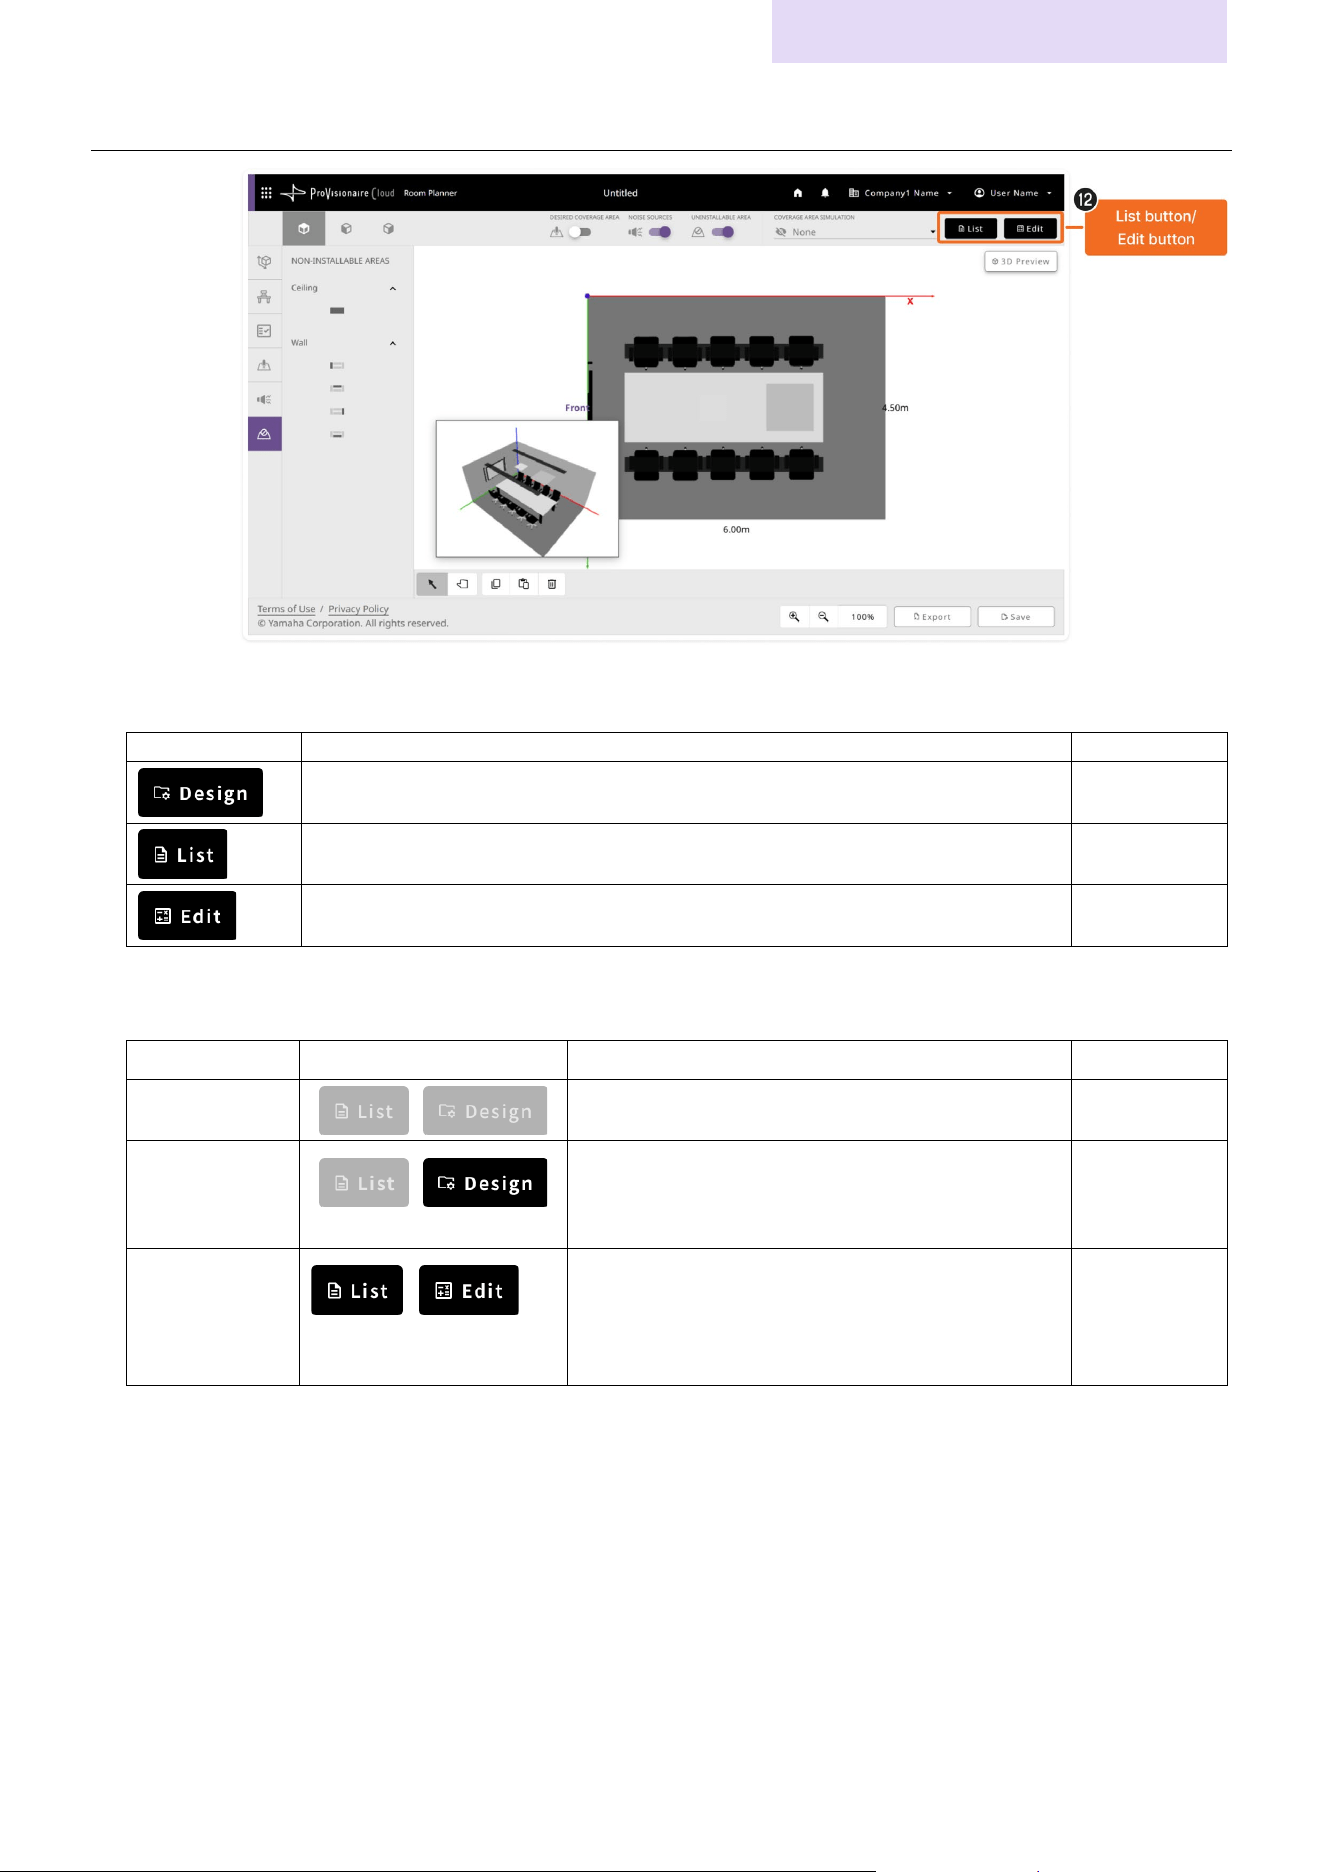
Buttons for plans/proposed devices
l [Design] button/[List] button/[Edit] button
Button functions
Button
Description
Reference page
Automatically generates a plan from the specified room conditions. Page 14
Displays a list of the proposed devices from the generated plan. Page 17
Displays a screen where the quantities of the proposed devices can be changed. Page 19
The buttons that appear differ depending on the screen.
Displayed buttons
Screen Displayed buttons Description
Reference page
New plan screen
Neither is available.
Page
12
Editing screen
A plan can be generated. After the plan in the editing
screen has been generated, the results screen
appears.
Page
13
Results screen
The list of devices can be displayed, and their
quantities can be changed. After the device quantities
have been changed and the [Design] button is clicked,
the editing screen appears again.
Page 15
Details on Screens
Room Planner User Guide
35
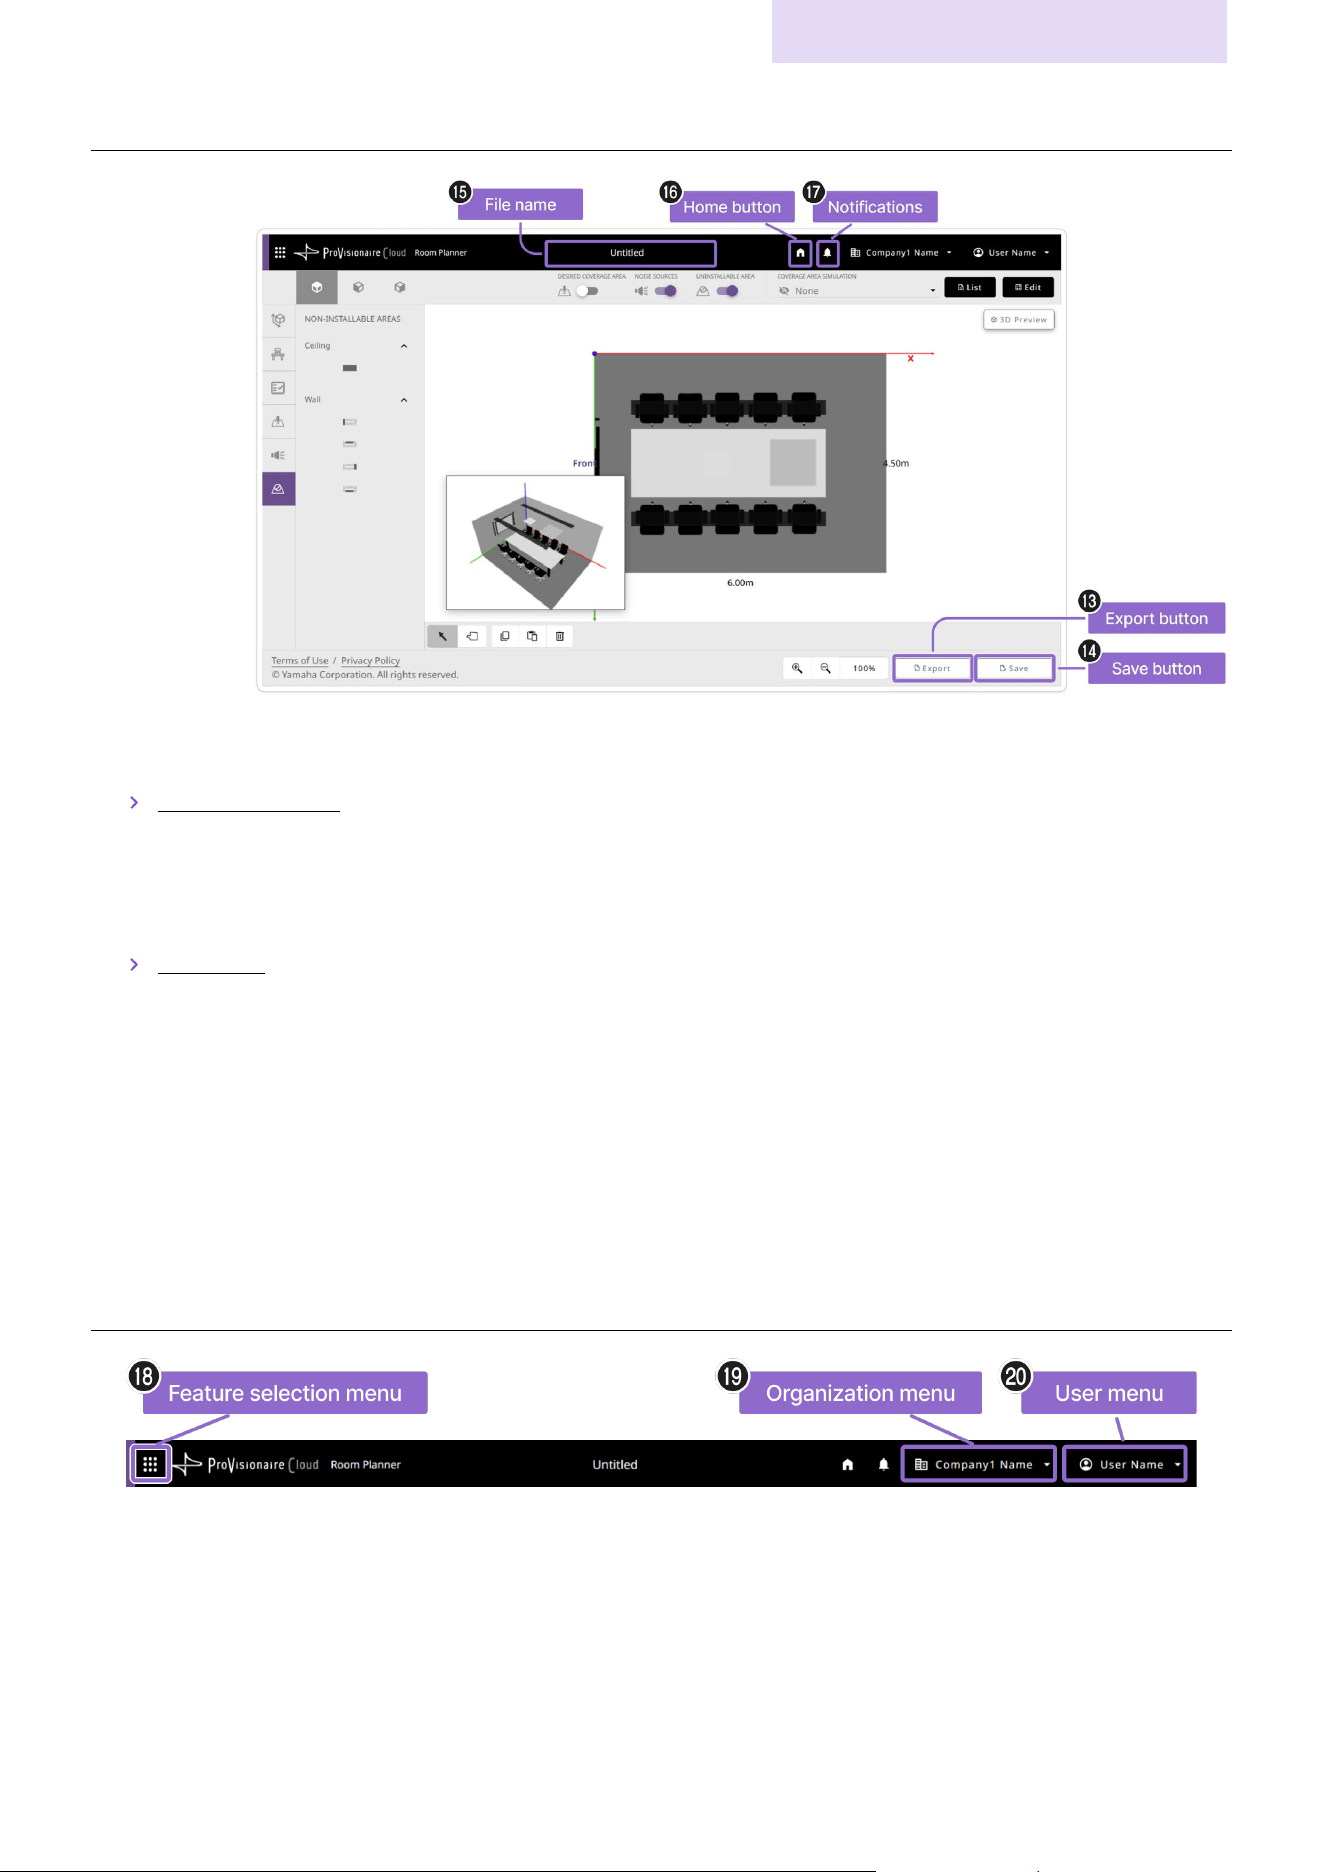
Application elements
m [Export]button
Exports the room conditions and plan results in the PDF format.
Exporting the results (page 18)
n [Save] button
Saves the plan. The saved plan file can be opened from the top screen.
* A plan in the new plan screen cannot be saved. Specify all room conditions, and then close the new plan screen.
Saving a file (page 11)
o File name
Displays the file name of the plan.
p Home button
Returns to the top screen.
q Notifications
Displays ProVisionaire Plan notifications.
Service elements
r Feature selection menu
Switches between ProVisionaire Cloud service features.
s Organization menu
Displays the Organization name and allows you to perform organization-related operations when clicked.
t User menu
Displays your name and allows you to perform account-related operations when clicked.

© 2025 Yamaha Corporation
Published 12/2025
YJ-A0