We strongly recommend you to read the user guide completely before you install.
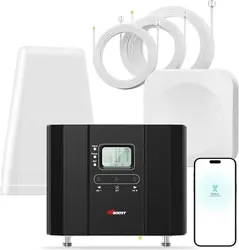
HiBoost 10K Smart Link provides 2 options of booster installation,
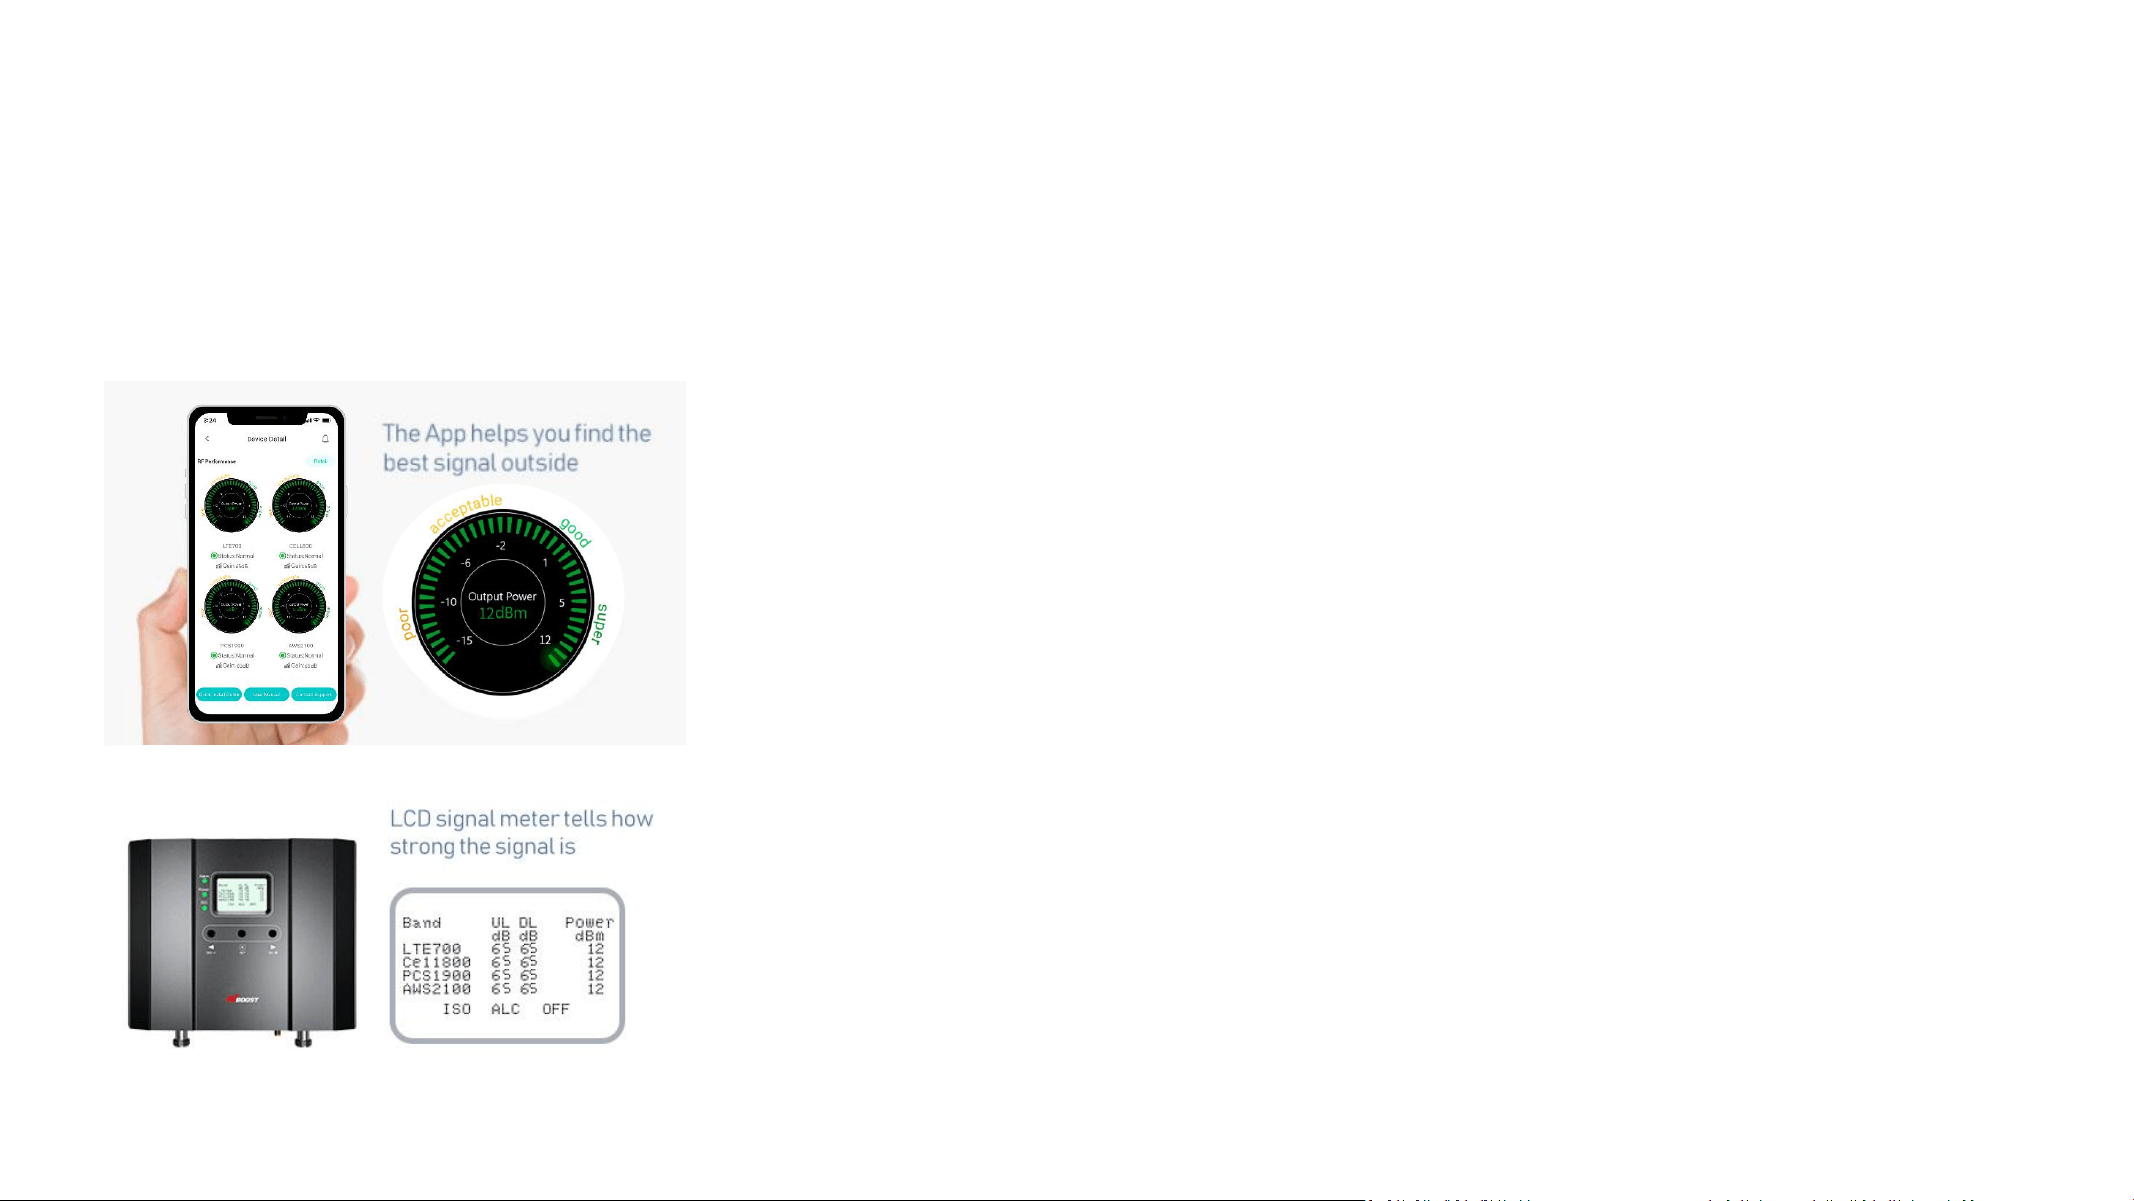
APP and LCD installation ways are unique methods provided by HiBoost.
2. LCD assisted installation,
SECOND CHOICE From Page 20~32
It can achieve the same precise effect as App guidance.
But it may need two people and the installation process is a little cumbersome.
1.App assisted installation,
FIRST CHOICE From Page 6~19
It’s more convenient and many work could be done by ONE person, and the
most important is that the obtained signal can be very precise.
Quick Install Guide

Then why has HiBoost spent extra big efforts and costs to design APP and LCD signal meters to help you install?
Out of the various reasons, the most important reason is that we would like you, our valuable client, to get the maximum
output power from the booster system in order to get optimal signal reception for all your mobile devices.
As it is known and a big thanks, FCC makes signal boosters legal in 2014 so that every body can install and benefit from
the signals
But FCC regulations do limit the gain and output power of all consumer boosters to low values in order to avoid any
interference to the cell towers
Furthermore FCC stipulates that any improper install should trigger immediately further reduction of the booster’s
already-limited gain and power to protect the towers.
Therefore, you can understand how important you need to find the perfect outside signal from the tower and how
important to squeeze every last gain and power from the booster, even 1dB more power is so precious when you suffer
from no signals.
HiBoost App & LCD signal meters will help you to fine tune the best power and get as much cover of your spaces.
Quick Install Guide
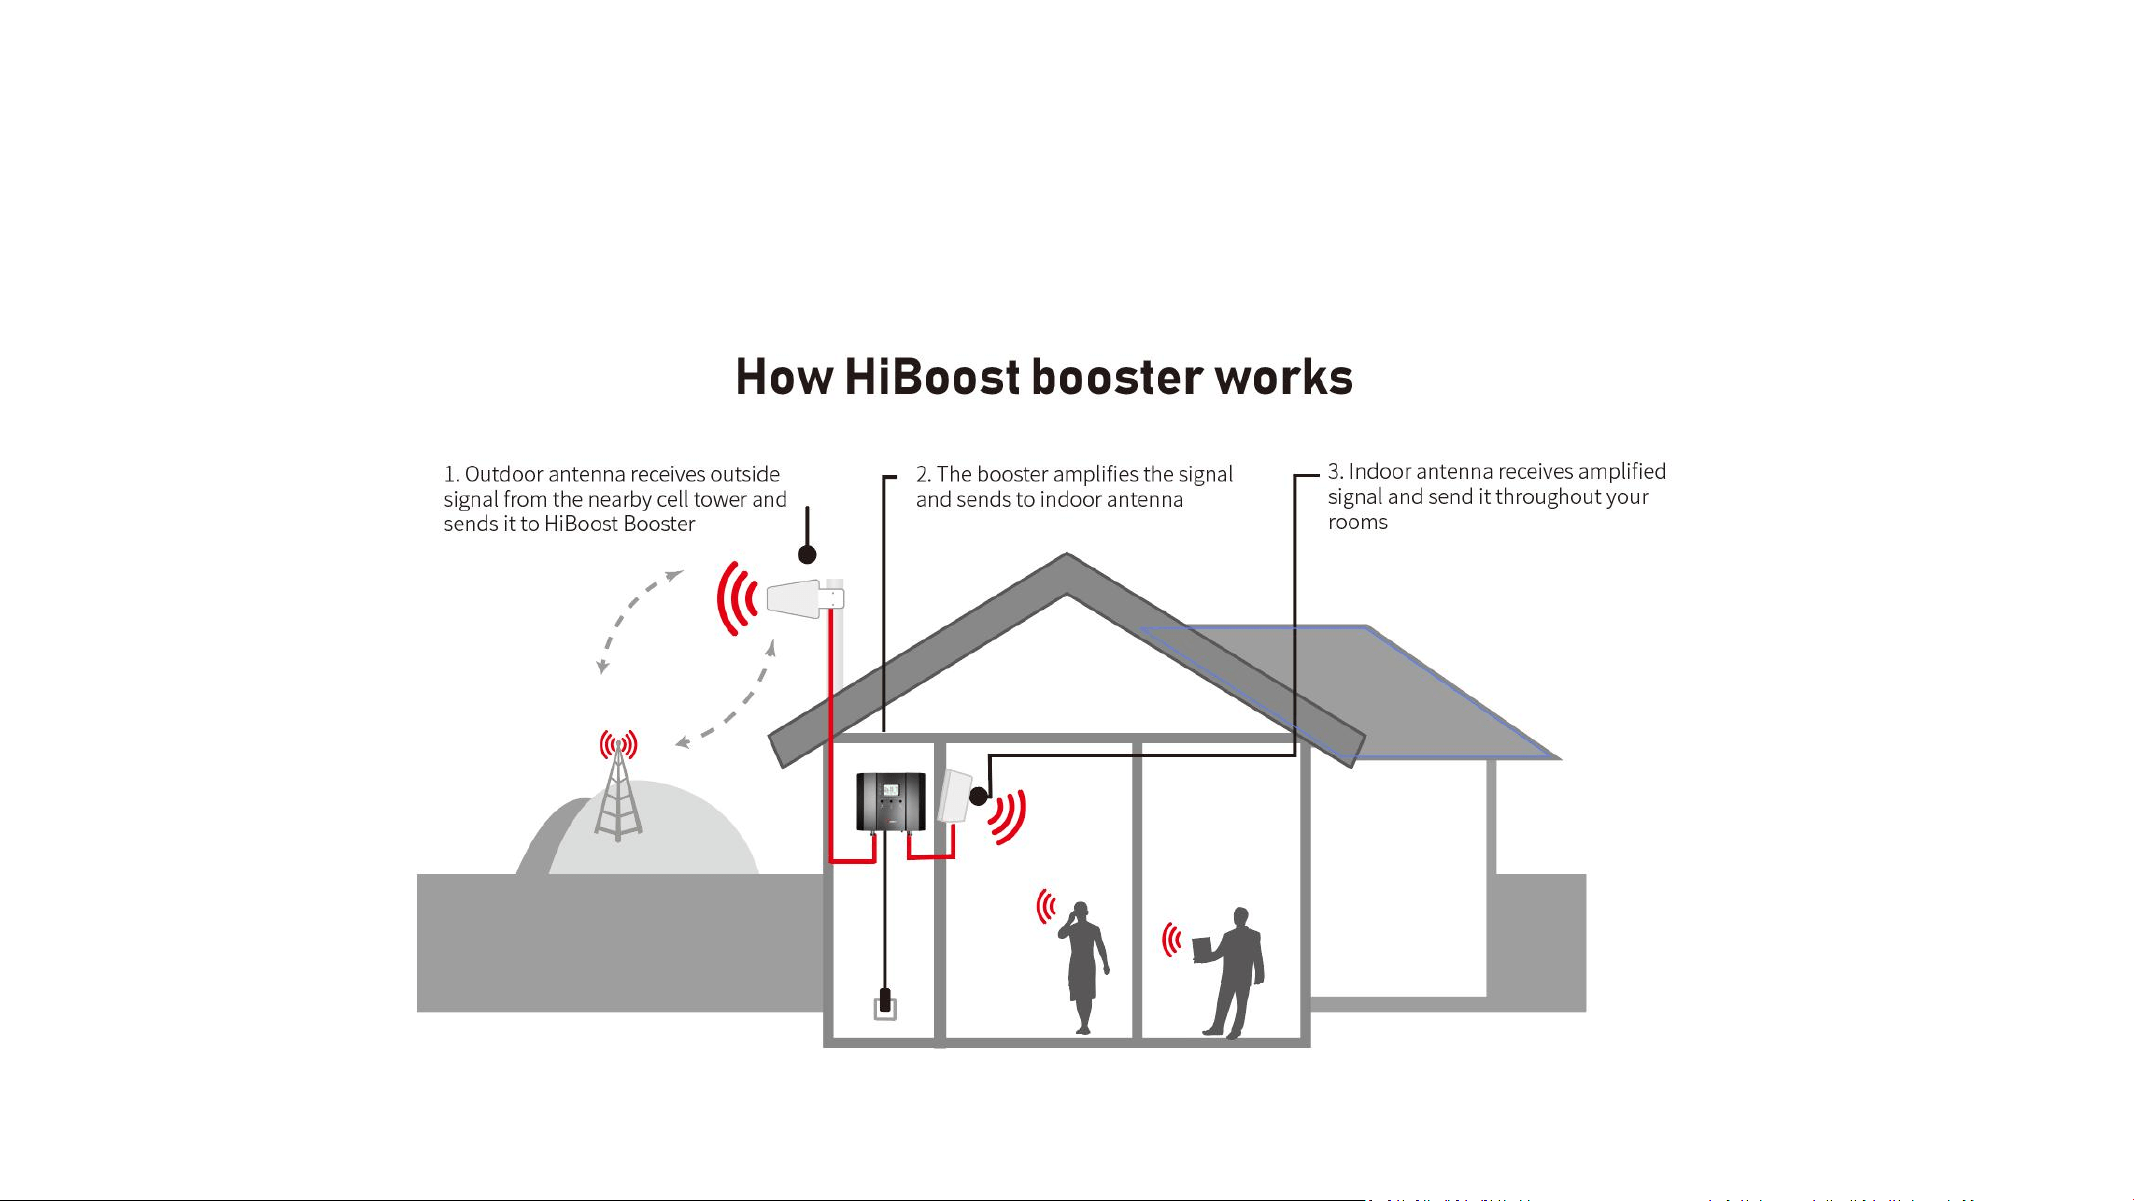
General Working Principle:
Before we start any of the two ways, please allow us to spend 3 pages to make you understand how the booster
system works for you.
※ Please do spend sometime to read it fully, as it is crucial to get full bars for your rooms.
Quick Install Guide
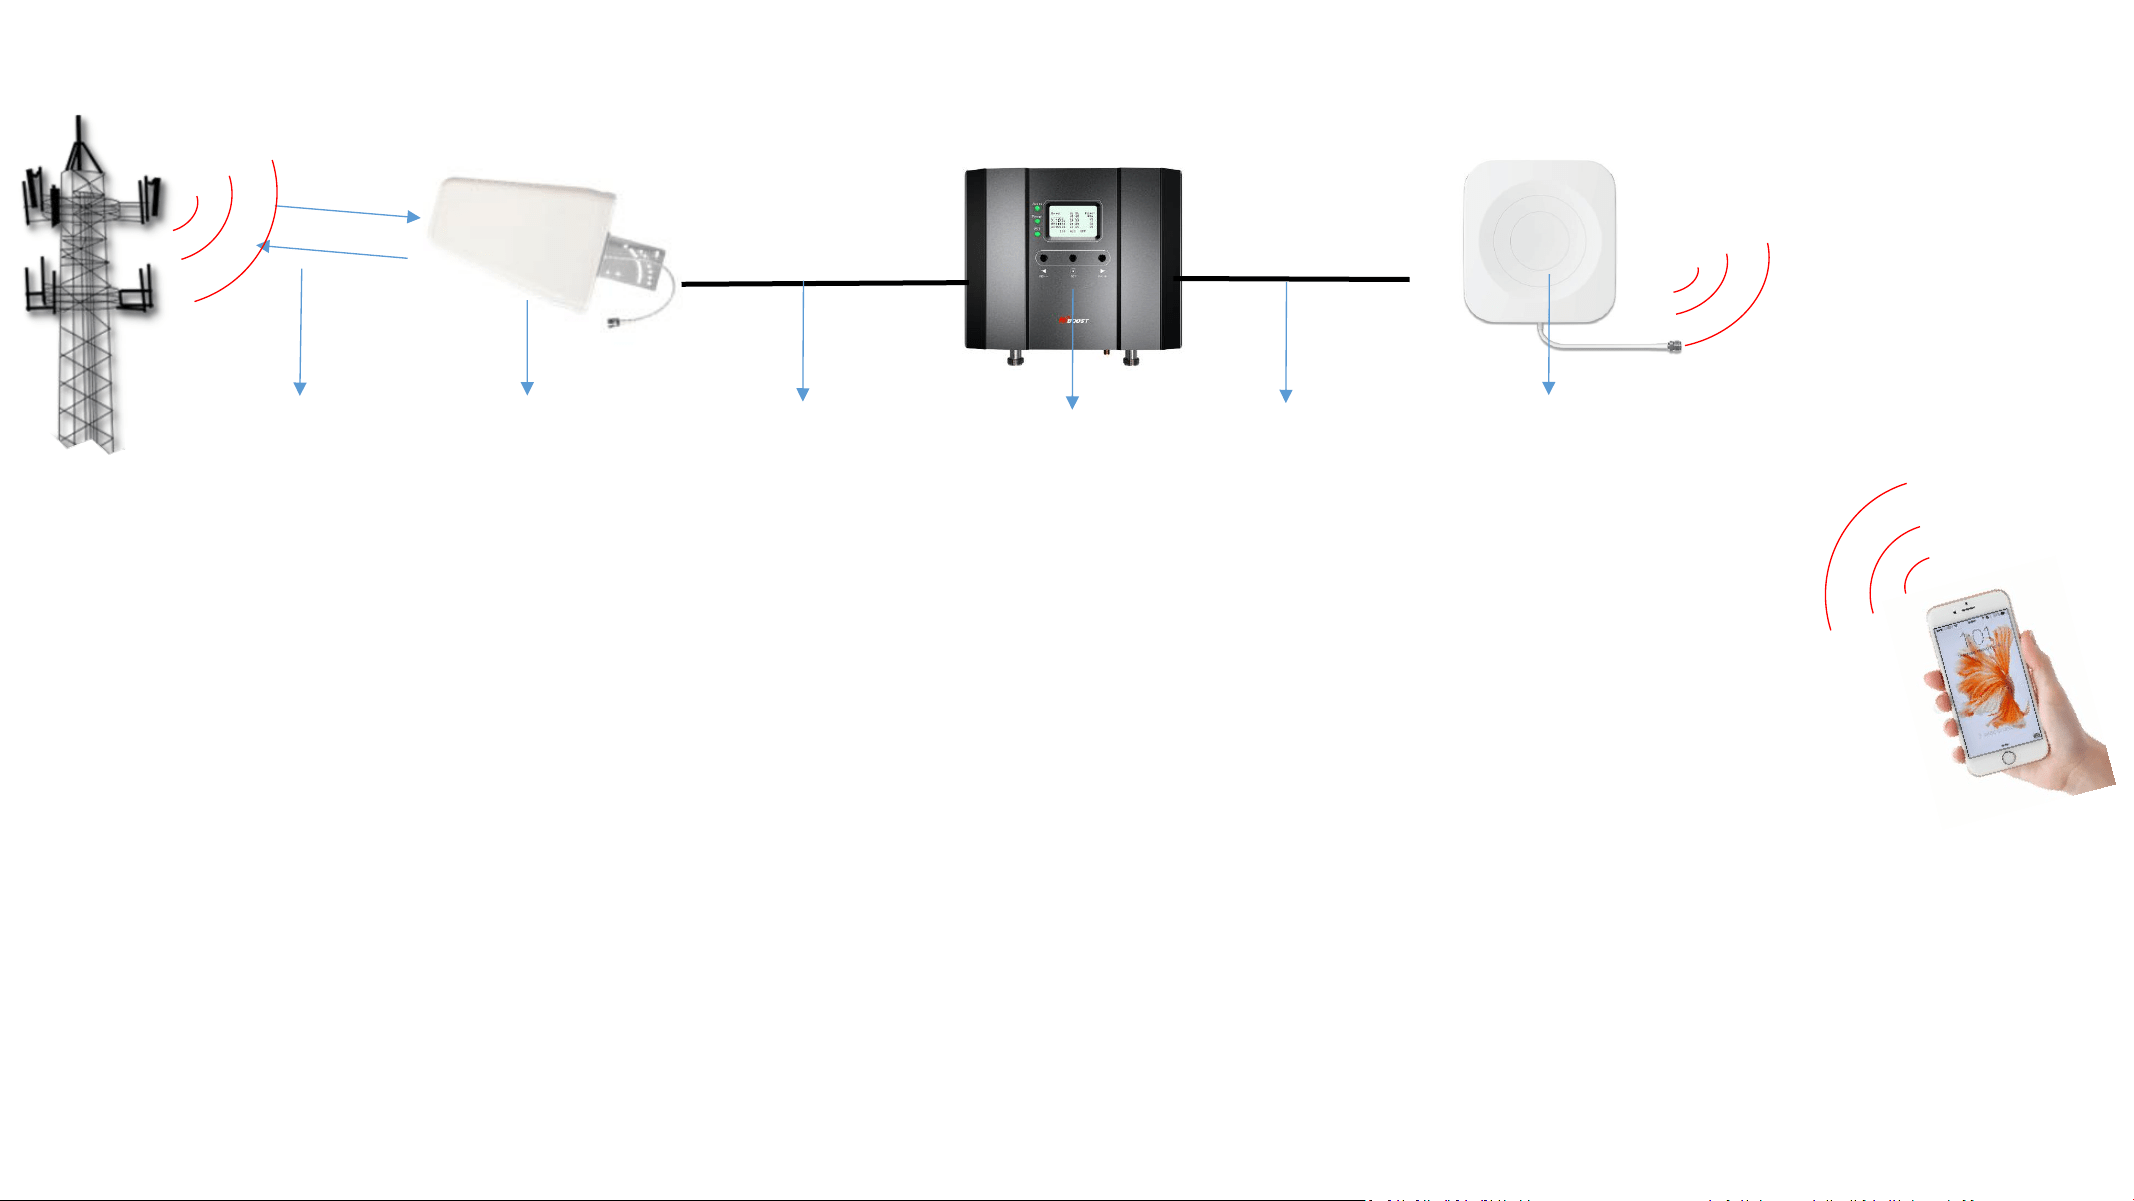
Working Principle in Formula
+ (Booster Gain)
= System Output Power
(Outside Signal)
+ (Indoor Antenna Gain)
+ (Outdoor Antenna Gain)
- (Indoor Cable Loss)
- (Outdoor Cable Loss)
Out of the Formula:
Outside Signal: To be received by outdoor antenna from cell tower
Outdoor Antenna Gain: The gain of outdoor antenna
Outdoor Cable Loss: The loss of the outdoor cable
Booster Gain: The actual working gain of the booster
Indoor Cable Loss: The loss of the indoor cable
Indoor Antenna Gain: The gain of indoor antenna
For example:
-70dBm + 11dBi - 4.5dB + 65dB - 2dB + 7dBi = 6.5dBm (System Output Power)
Since the figures in Black color are fixed when you finish the purchase, thus the RED figures of
1. Outside Signal and 2. Booster Gain
will play a vital role in reaching the best output power during the install, especially when we know the FCC limits the booster system values.
So the user guide is focused on:
1. Getting the best outside signal.
2. Keeping the maximum booster gain.
Quick Install Guide
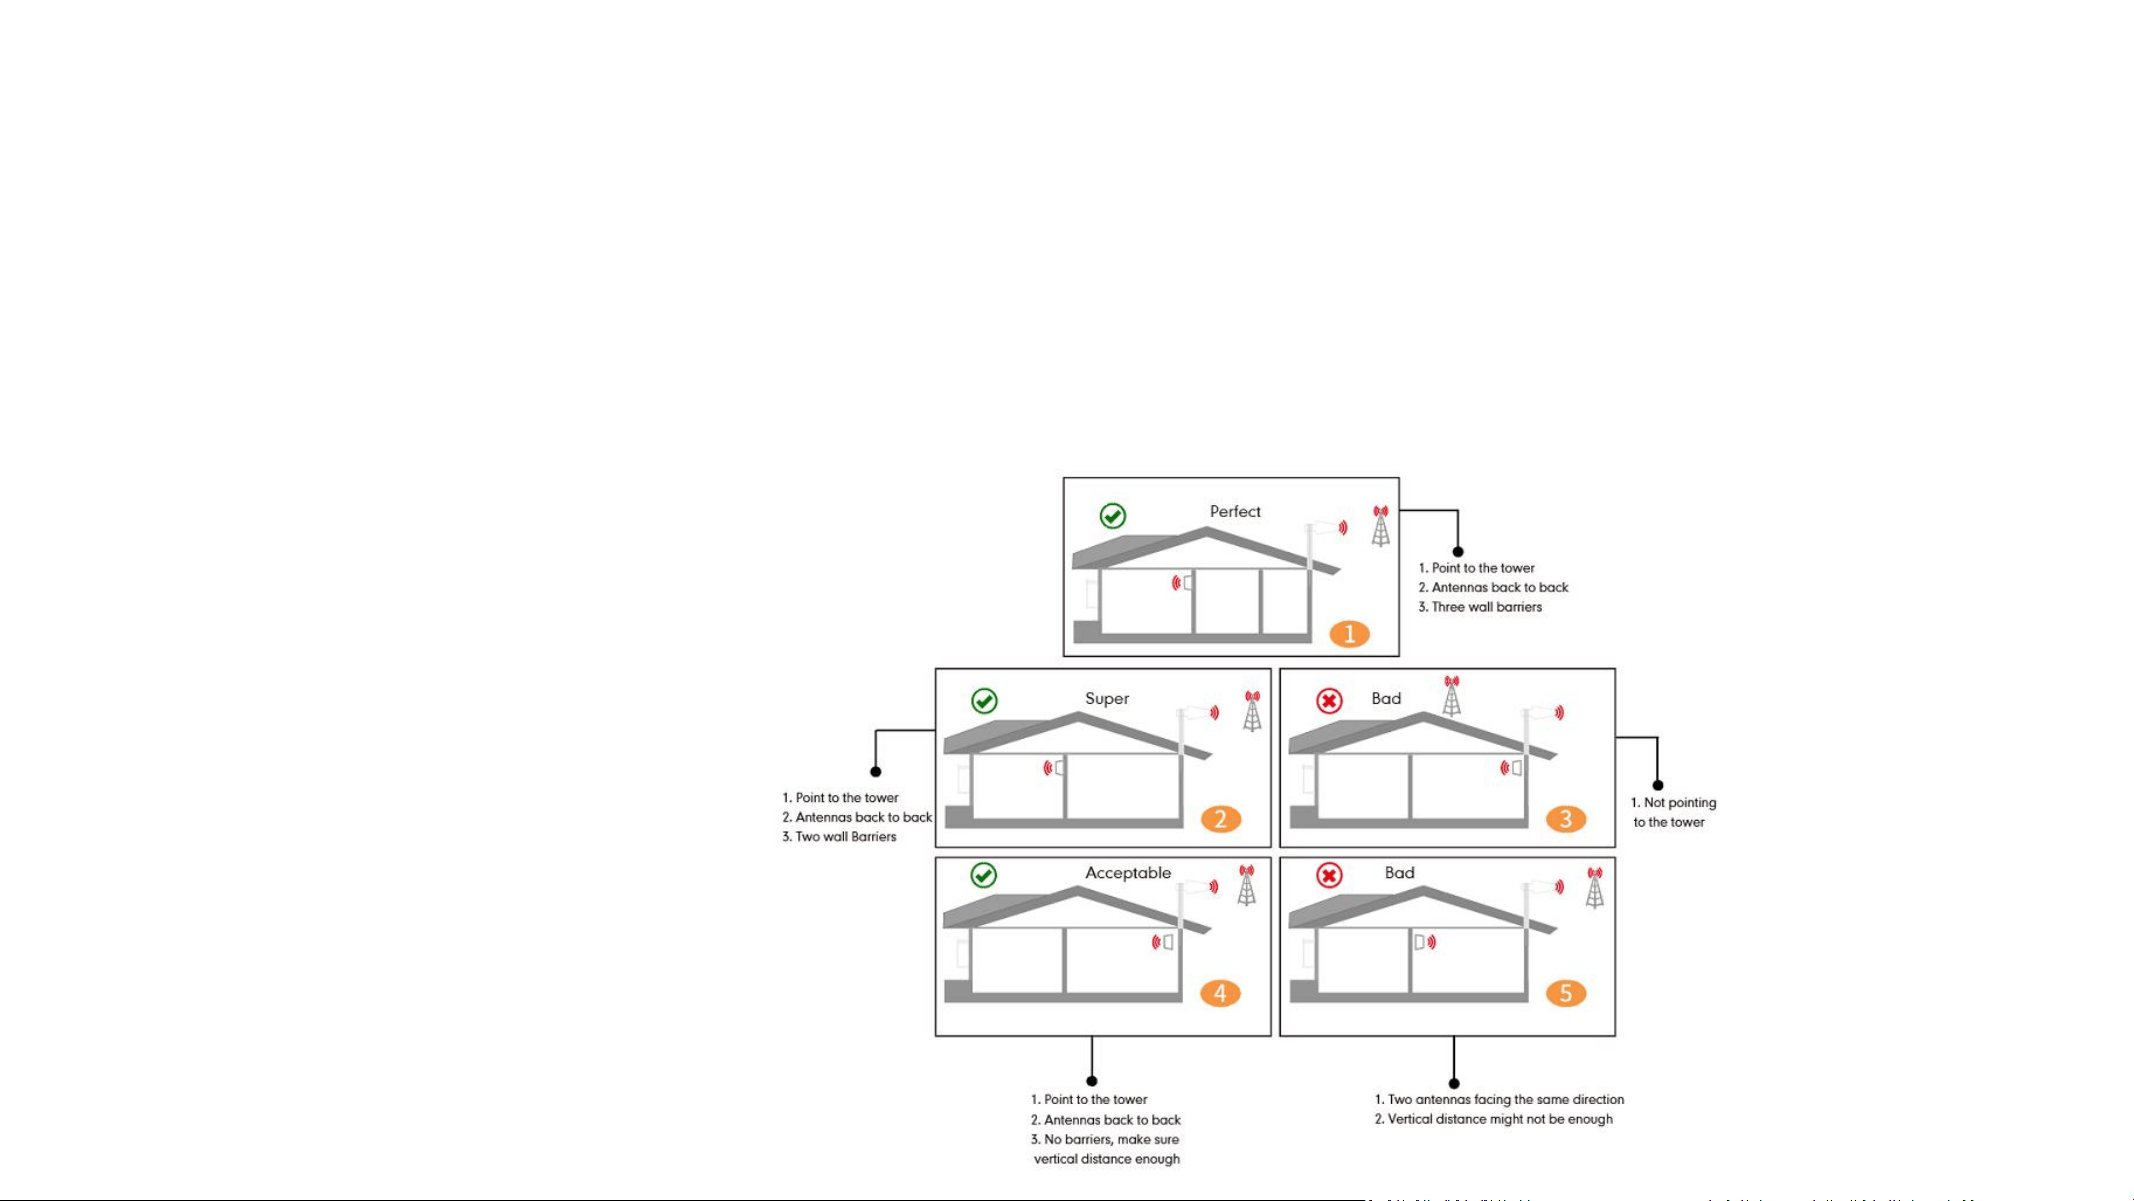
More notes on how to keep the maximum booster gain.
The loop back from the outdoor antenna to the indoor antennas will reduce the gain, so the principle to keep the maximum booster gain is to avoid the
loop back from the outdoor antenna to the indoor antennas.
Measures can be taken to avoid the loop back
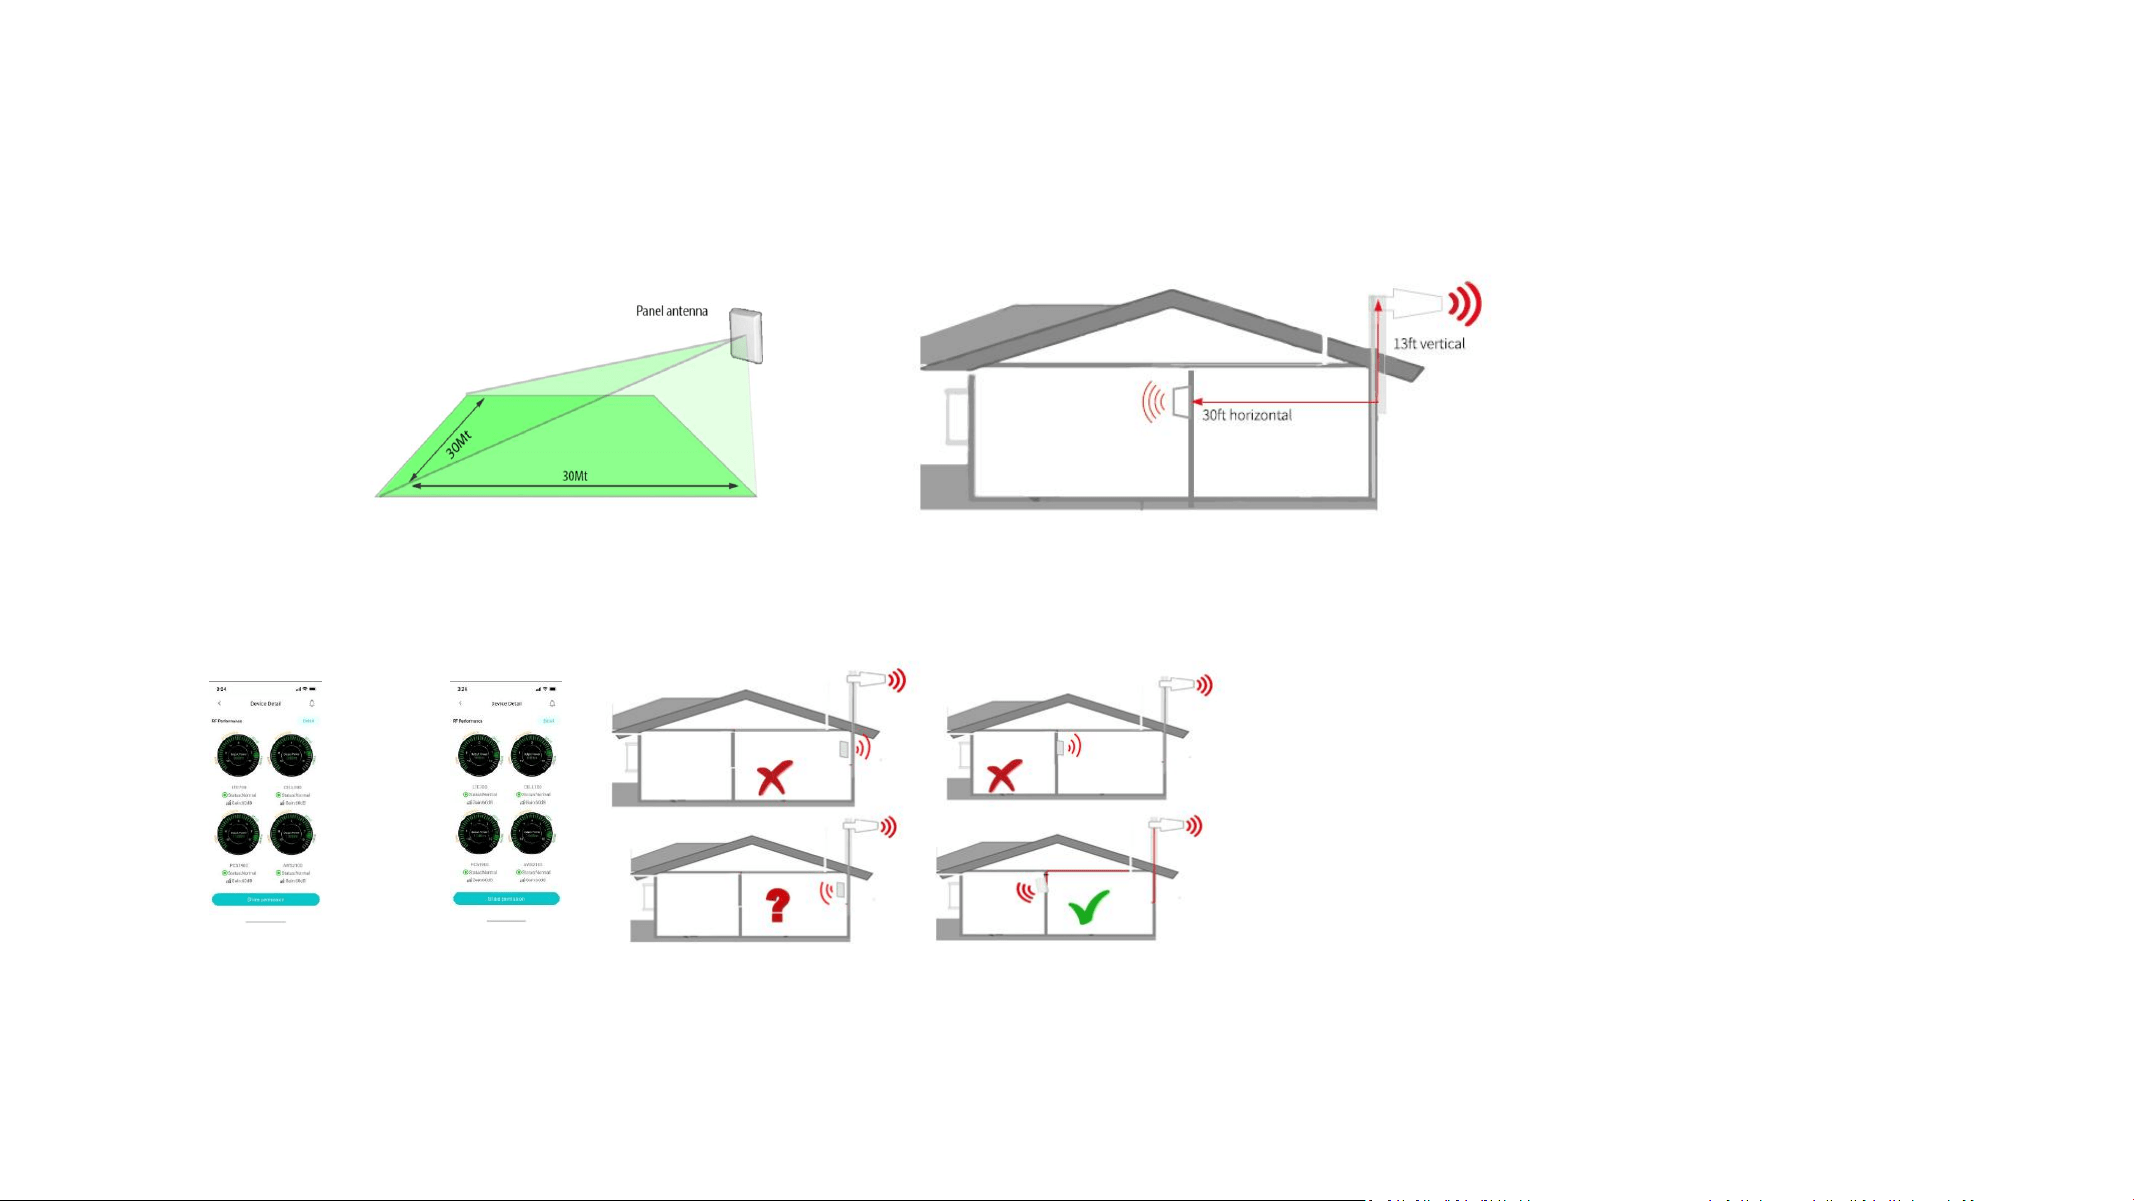
1) Increase the distance between the outdoor and indoor antennas, generally the same vertical distance generates more loss than horizontal, and to follow
easily, a Typical Required Distance Between Outdoor and Indoor Antennas Over 30 feet(10 meters) horizontal distance or 13 feet (4 meters) vertical distance.
2) The outdoor and indoor antennas shall be back to back
3) Use barriers between the indoor and outdoor antennas
※ Please note that it is not a must to be 10 meter horizontal or 4 meter vertical. The basic principle is to isolate the outdoor and indoor antennas to avoid
the loop back. So if you have enough barriers, for example, it will also work.
Here are some good and bad solutions for your reference.
Quick Install Guide
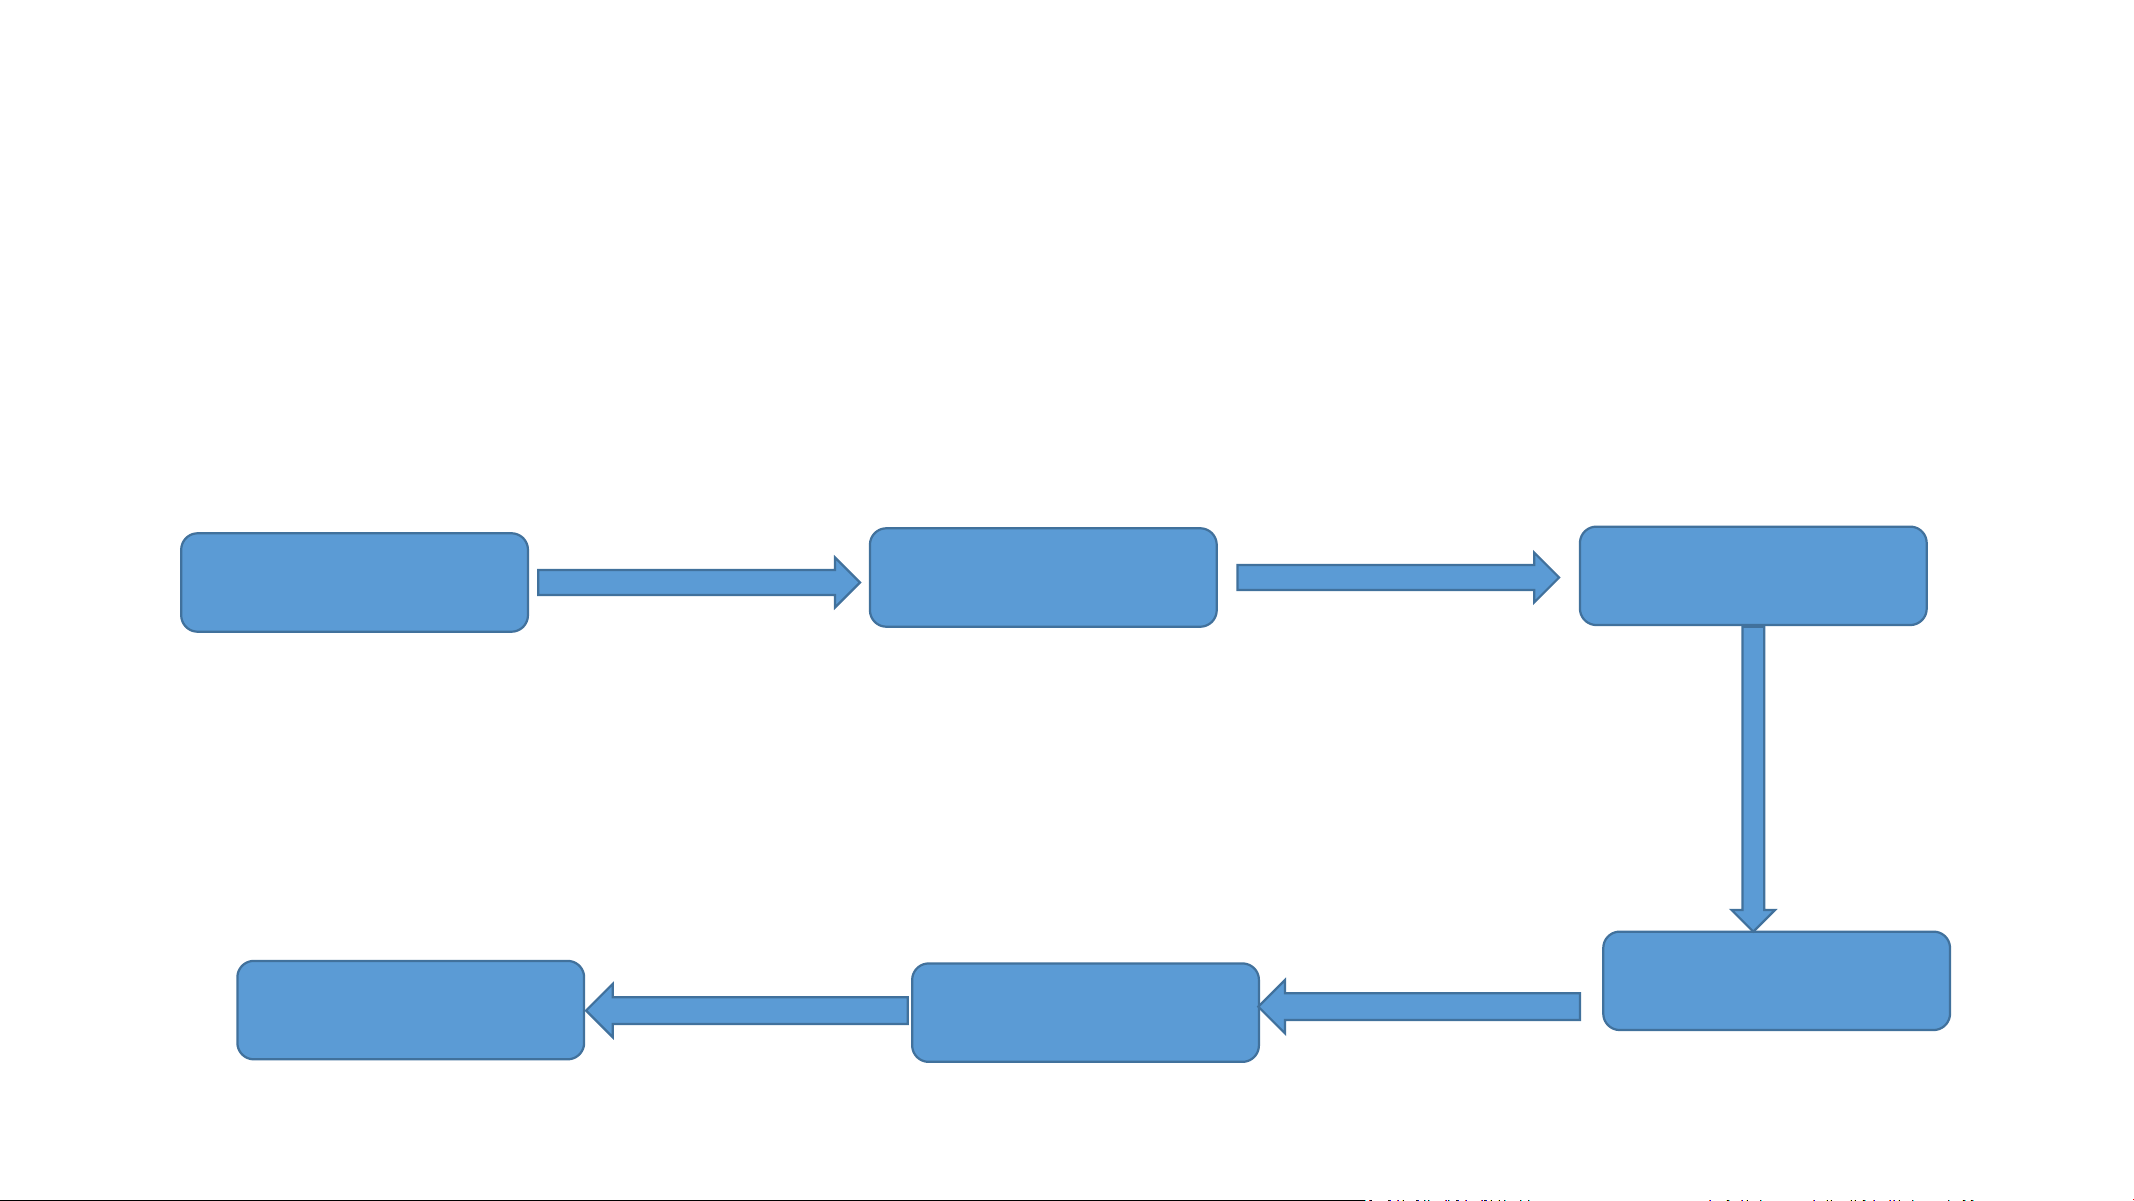
1 Now let’s start by the APP assisted installation
1. Download 3
rd
Party App
2. Download “Signalsupervisor”
and connect with booster
3. Seek best outside signal and
install outdoor antenna
4. Fine tune indoor antenna
for best coverage and avoid
the loop back
5. Fix the cables and booster
Flow chart of APP Assisted Installation
6. Final test and enjoy the
mobile services
Quick Install Guide-APP
Step 1: Download the 3rd Party Mobile Apps
We are going to use 3
rd
party APPs:
1. To find the cell tower location
2. To test the signal strength and quality
There are a variety of resources available online: Opensignal,
Cell mapper, Network cell info lite, etc.
Please download them beforehand over Android and / or iOS:
※ You can use either of them to your favor. Here we are using Opensignal and Network Cell Info Lite as first two
choices.
Quick Install Guide-APP
Step 2: Download Signal Supervisor APP and connect the booster
Download the
Signalsupervisor App,
register ID and booster.
1) Search “Signal Supervisor” on Google Play/ App Store, or scan the left QR Code to
download.
2) Register on the Signal Supervisor APP.
3) Switch on the booster
* The Bluetooth/WiFi antenna is built in, there is no need to connect outdoor or indoor
antennas at this moment.
4) Click “Add Device” to register the booster into the APP. And we recommend WiFi
connection because the Bluetooth connection can’t go beyond 30ft.
Remark: Due to the phone types and the WiFi router types, there are few cases though rare
that the booster won’t be linked successfully to the signal supervisor app, even after our
technical support. In such case:
* Please kindly switch to use LCD signal meter to assist your install and will have the same
result. And Bluetooth/WiFi disconnection won’t influence the booster working status at all.
* Or please use different phone or change your WiFi router if you really want remote monitor.
Please contact our tech support and we will see what the best arrangements can be for you.
Quick Install Guide-APP
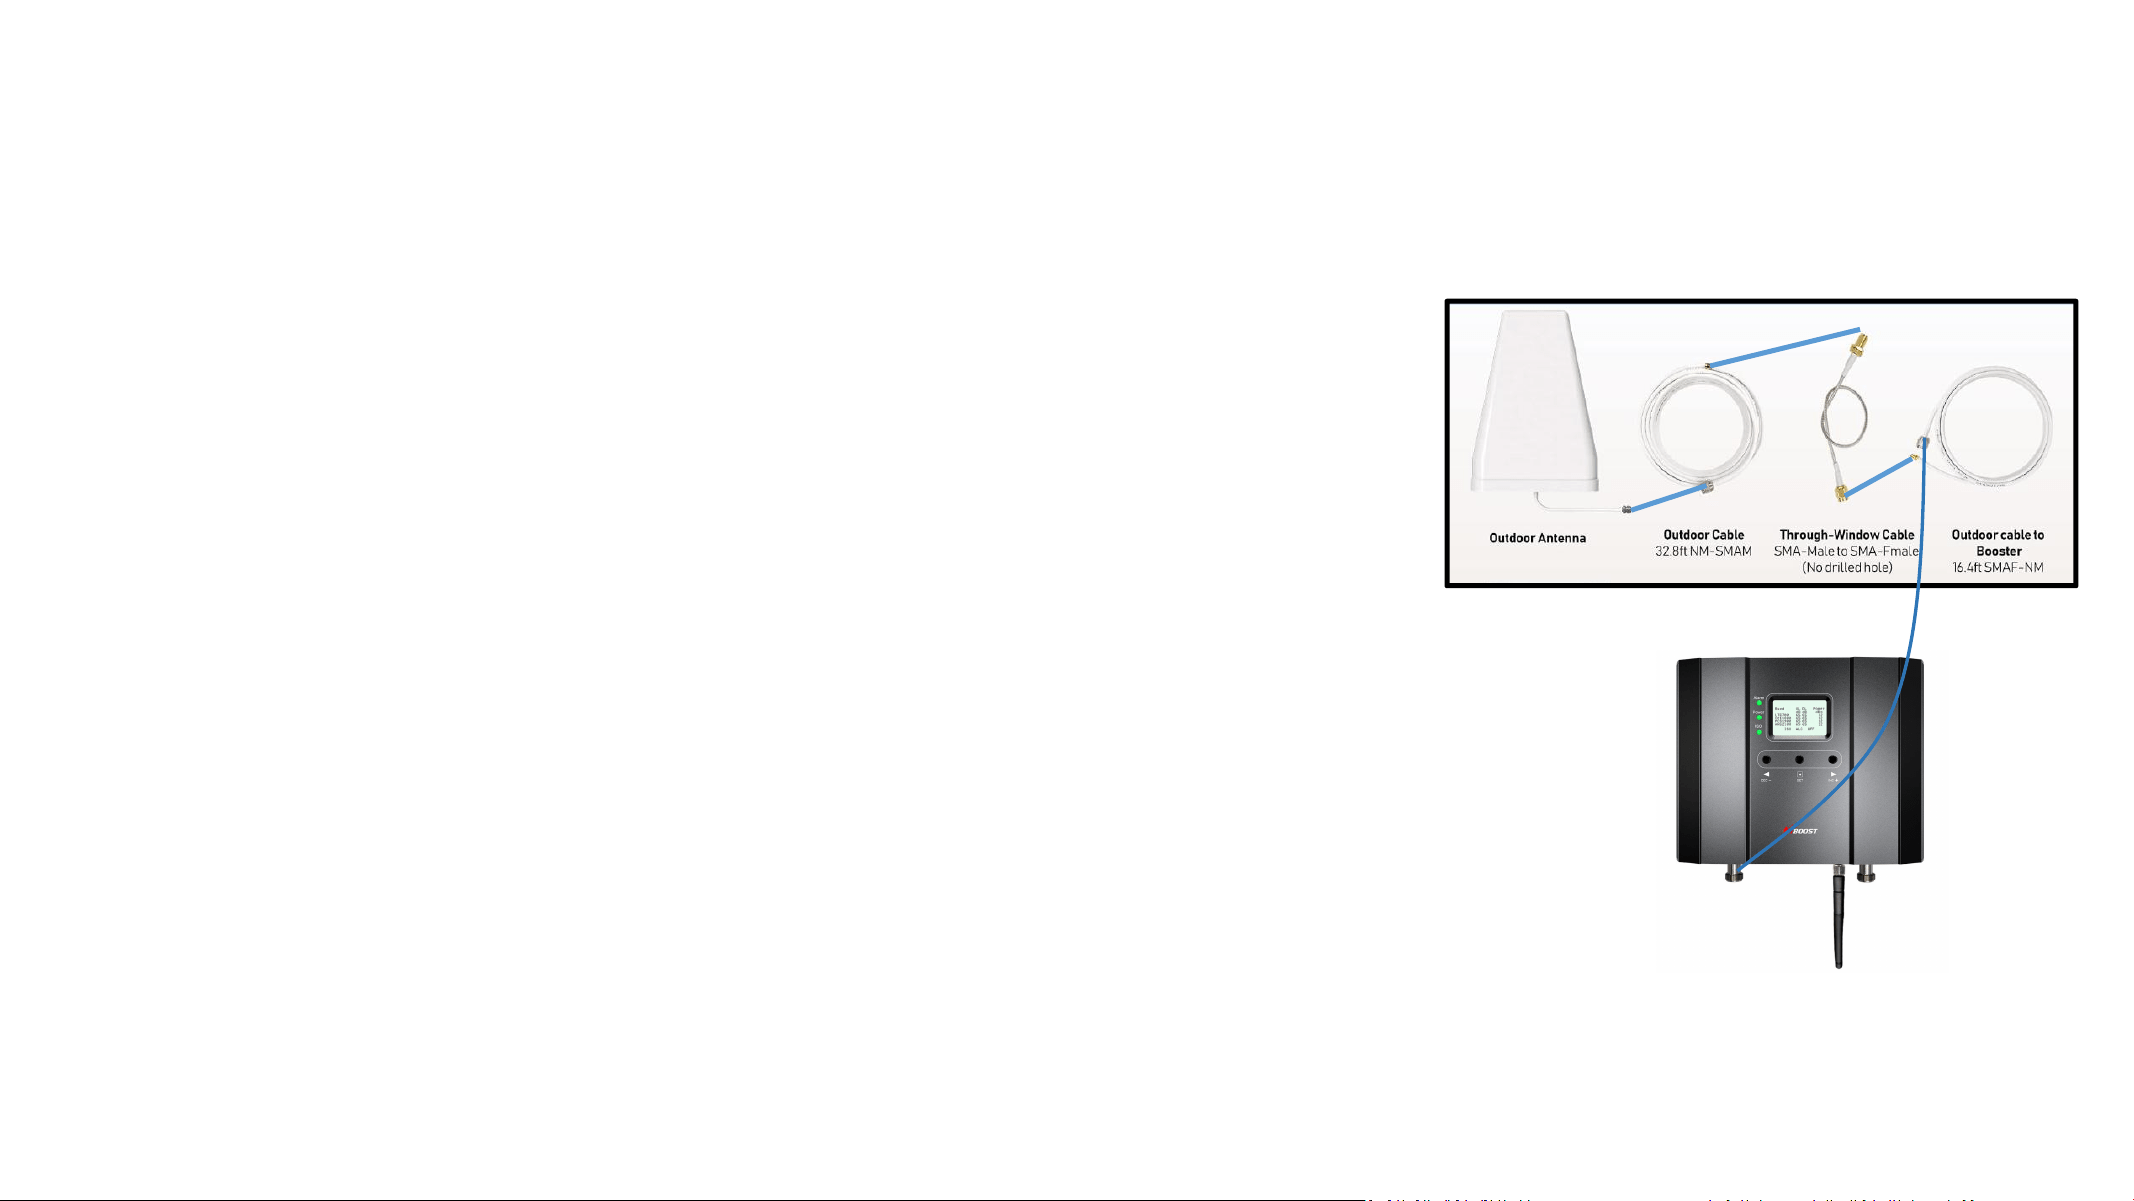
Step 3: Look for best outside signal and install outdoor antenna
The performance of the booster system is heavily dependent on the successful installation of the outdoor antenna
3.1 Connect the booster with outdoor antenna
1) Put the booster near to the location you would like to install in the future, or a place with power
outlet temporarily.
2) Connect the booster with Bluetooth/WiFi antenna.
3) Switch on the booster and make sure the signal supervisor app links with it smoothly.
4) Connect the 16.4ft cable with the booster’s outdoor port. The booster supports hot plug.
5) Then connect the window cable with 16.4ft cable and pull the window cable outside and connect
it with 32.8ft cable. In case window cable is not needed, connect the 16.4ft cable with 32.8ft cable
directly.
5) Connect the other side of 32.8ft cable with the outdoor antenna.
Notes:
* It is a must not to connect indoor antenna at this moment as it will influence the outside signal finding.
* Please place the booster outdoor within 30ft to the possible location of outdoor antenna if there is only
Bluetooth connection. This is to ensure the App links to the booster.
Quick Install Guide-APP
Outdoor port Indoor port
Bluetooth/WiFi
Antenna
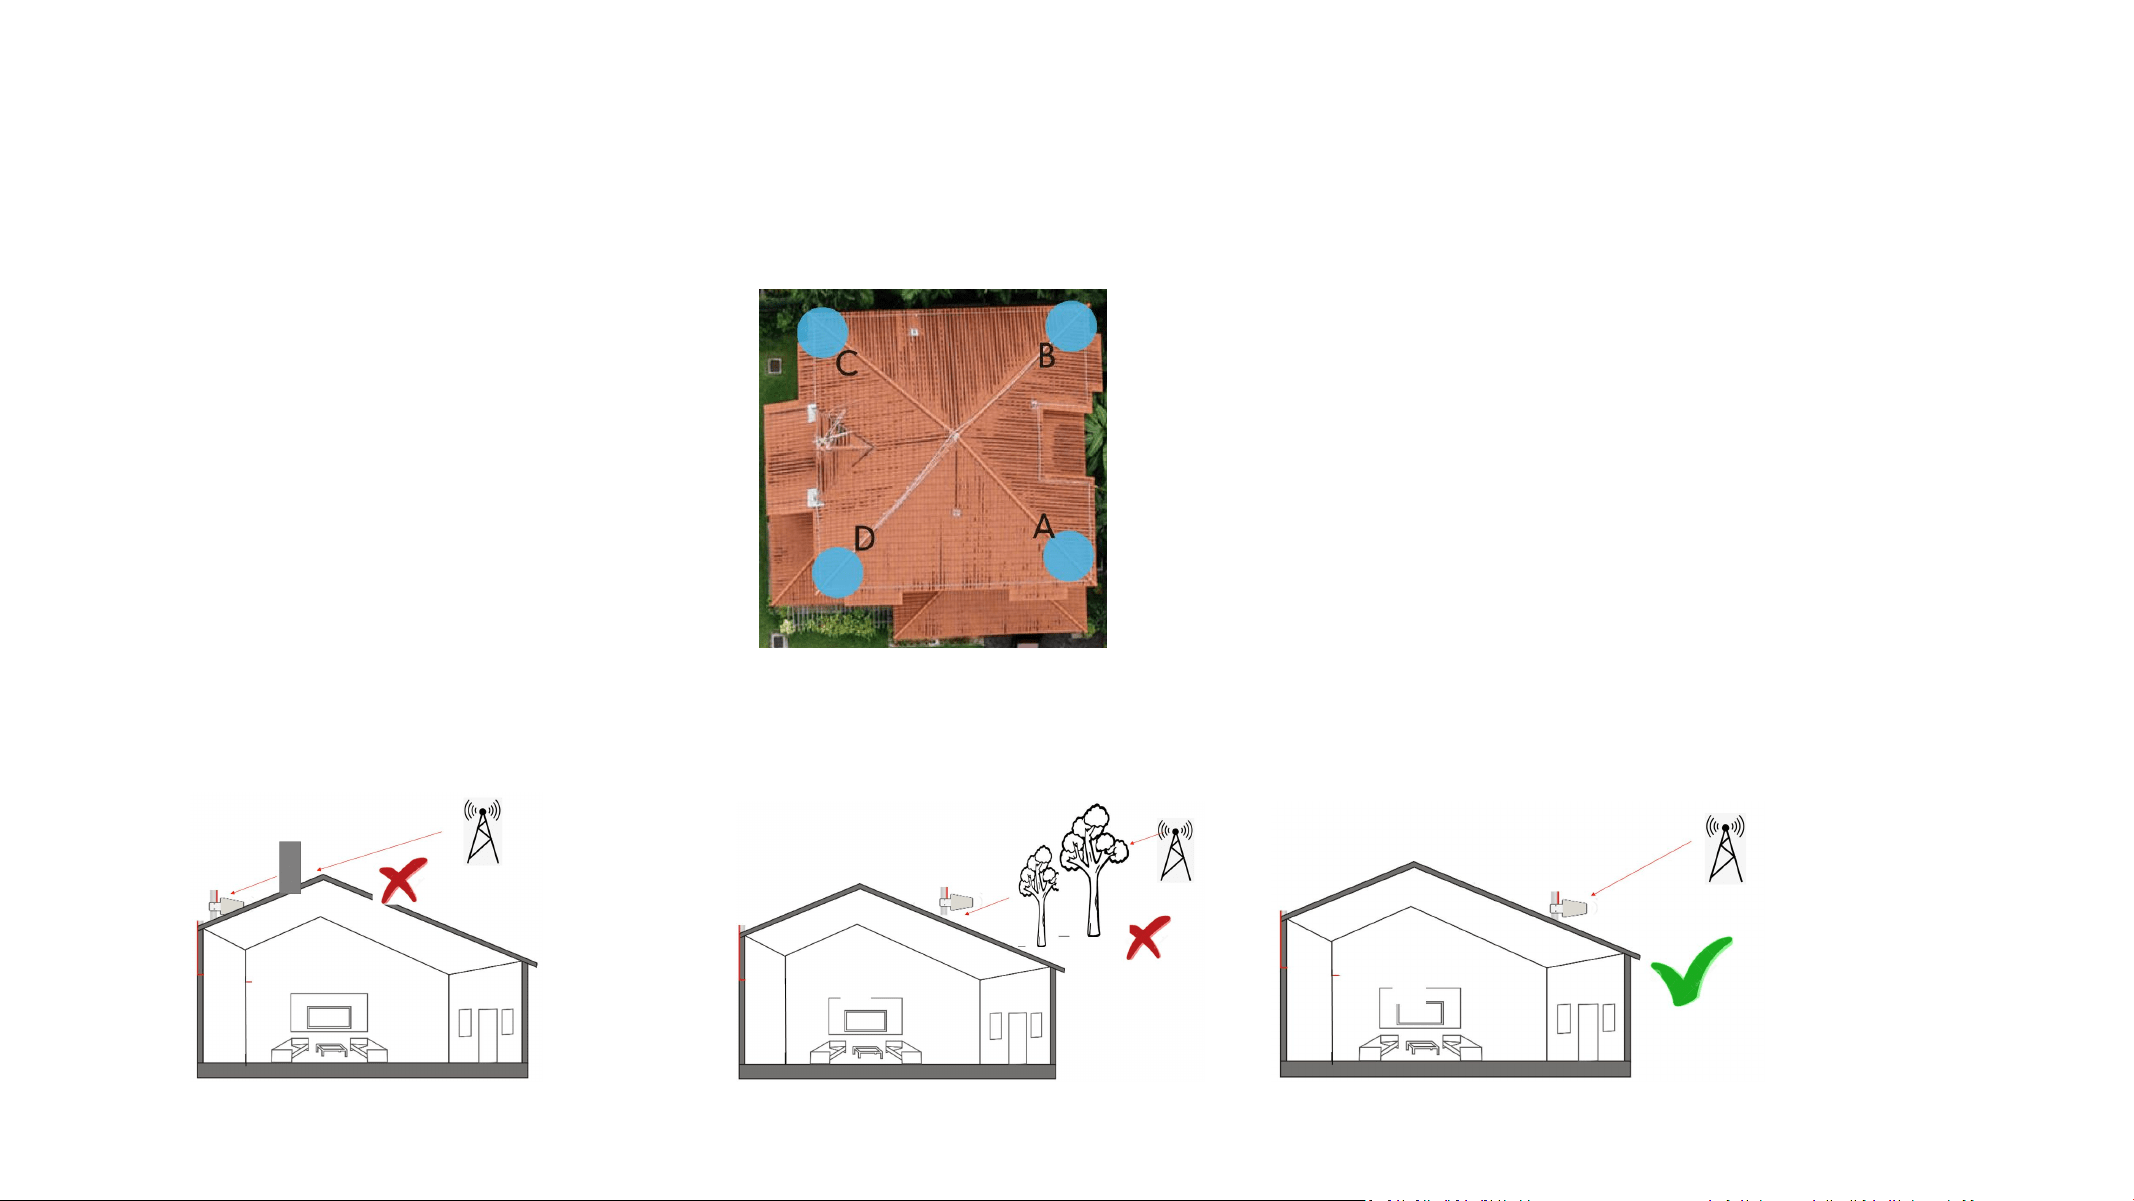
3.2 Select the possible location for outdoor antenna.
Bring your mobile phone with the APPs and the outdoor antenna to the location where the best outside signal can be found.
The outdoor antenna is recommended to be at the four corners or high end of the roof, or attic.
Step 3: Look for best outside signal and install outdoor antenna
The outdoor antenna needs to maintain a clear line of sight with the cell tower. And it is necessary to avoid the roof or other
stuffs from blocking the outdoor antenna.
Quick Install Guide-APP
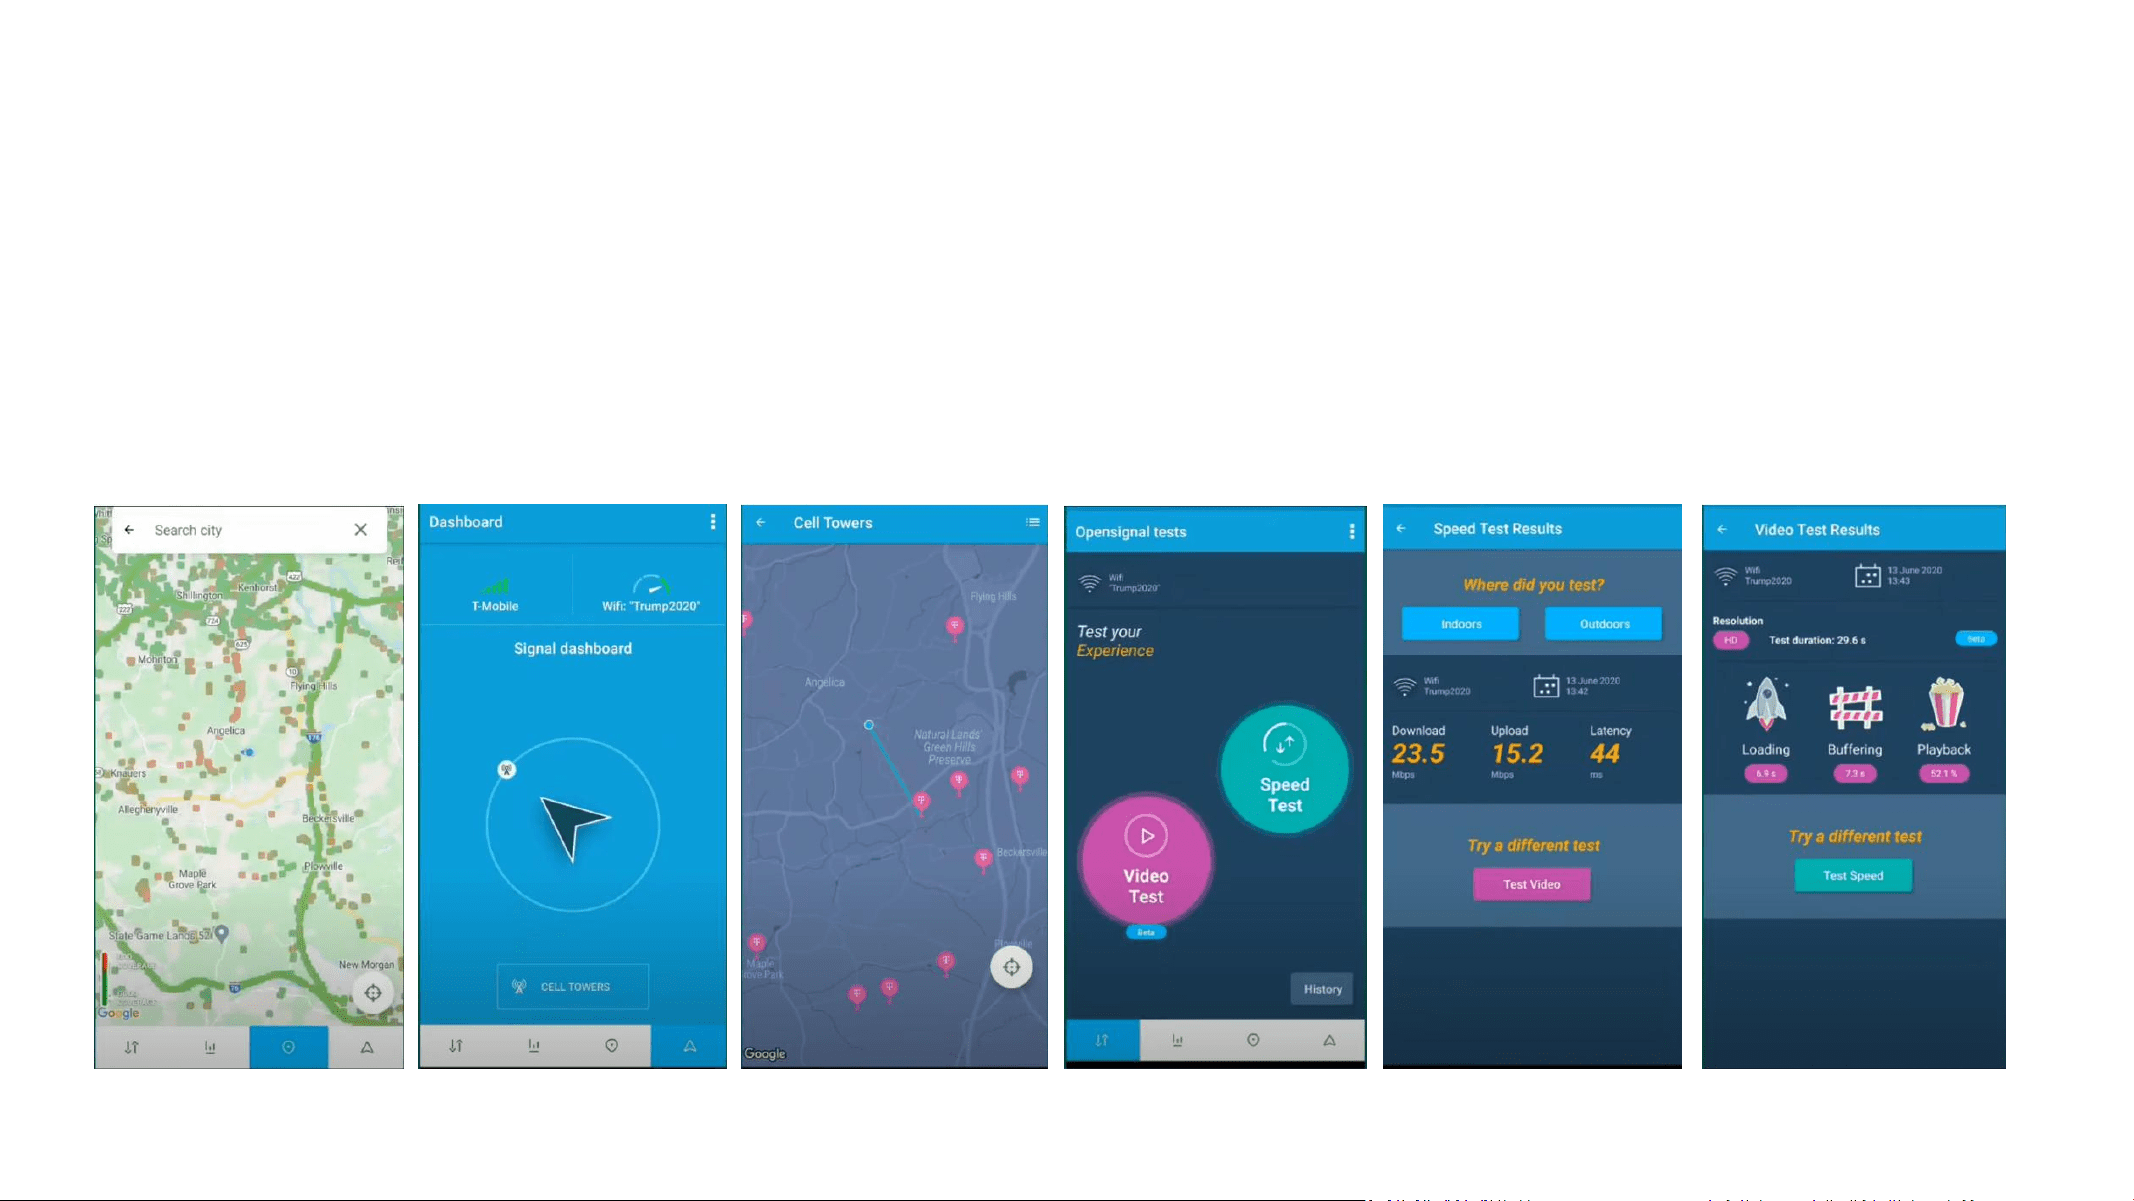
3.3 Use 3rd party APP to locate the tower(s)
Now open “Opensignal”, use it to detect the approximate position of the nearby cell tower.
1) Insert your detail address in “Search city” box. (following figure 1)
2) Enter signal dashboard, and click “CELL TOWERS”. Then zoom in map to find best one, it will show a blue line with your place which
means your cellphone connected one. (following figure 2&3)
3) When you find such location, check the strength, test voice and data speed. A good signal shall not only be strong, but also be clear
in voice and fast in data speed. (following figure 4-6)
*Notes: Just remember that strength and quality are two separate issues. A poor quality “strong” signal can be next to useless,
but a clean signal of two bars might be all your device needs.
Figure 1 Figure 2 Figure 3 Figure 4 Figure 5
Figure 6
Quick Install Guide-APP
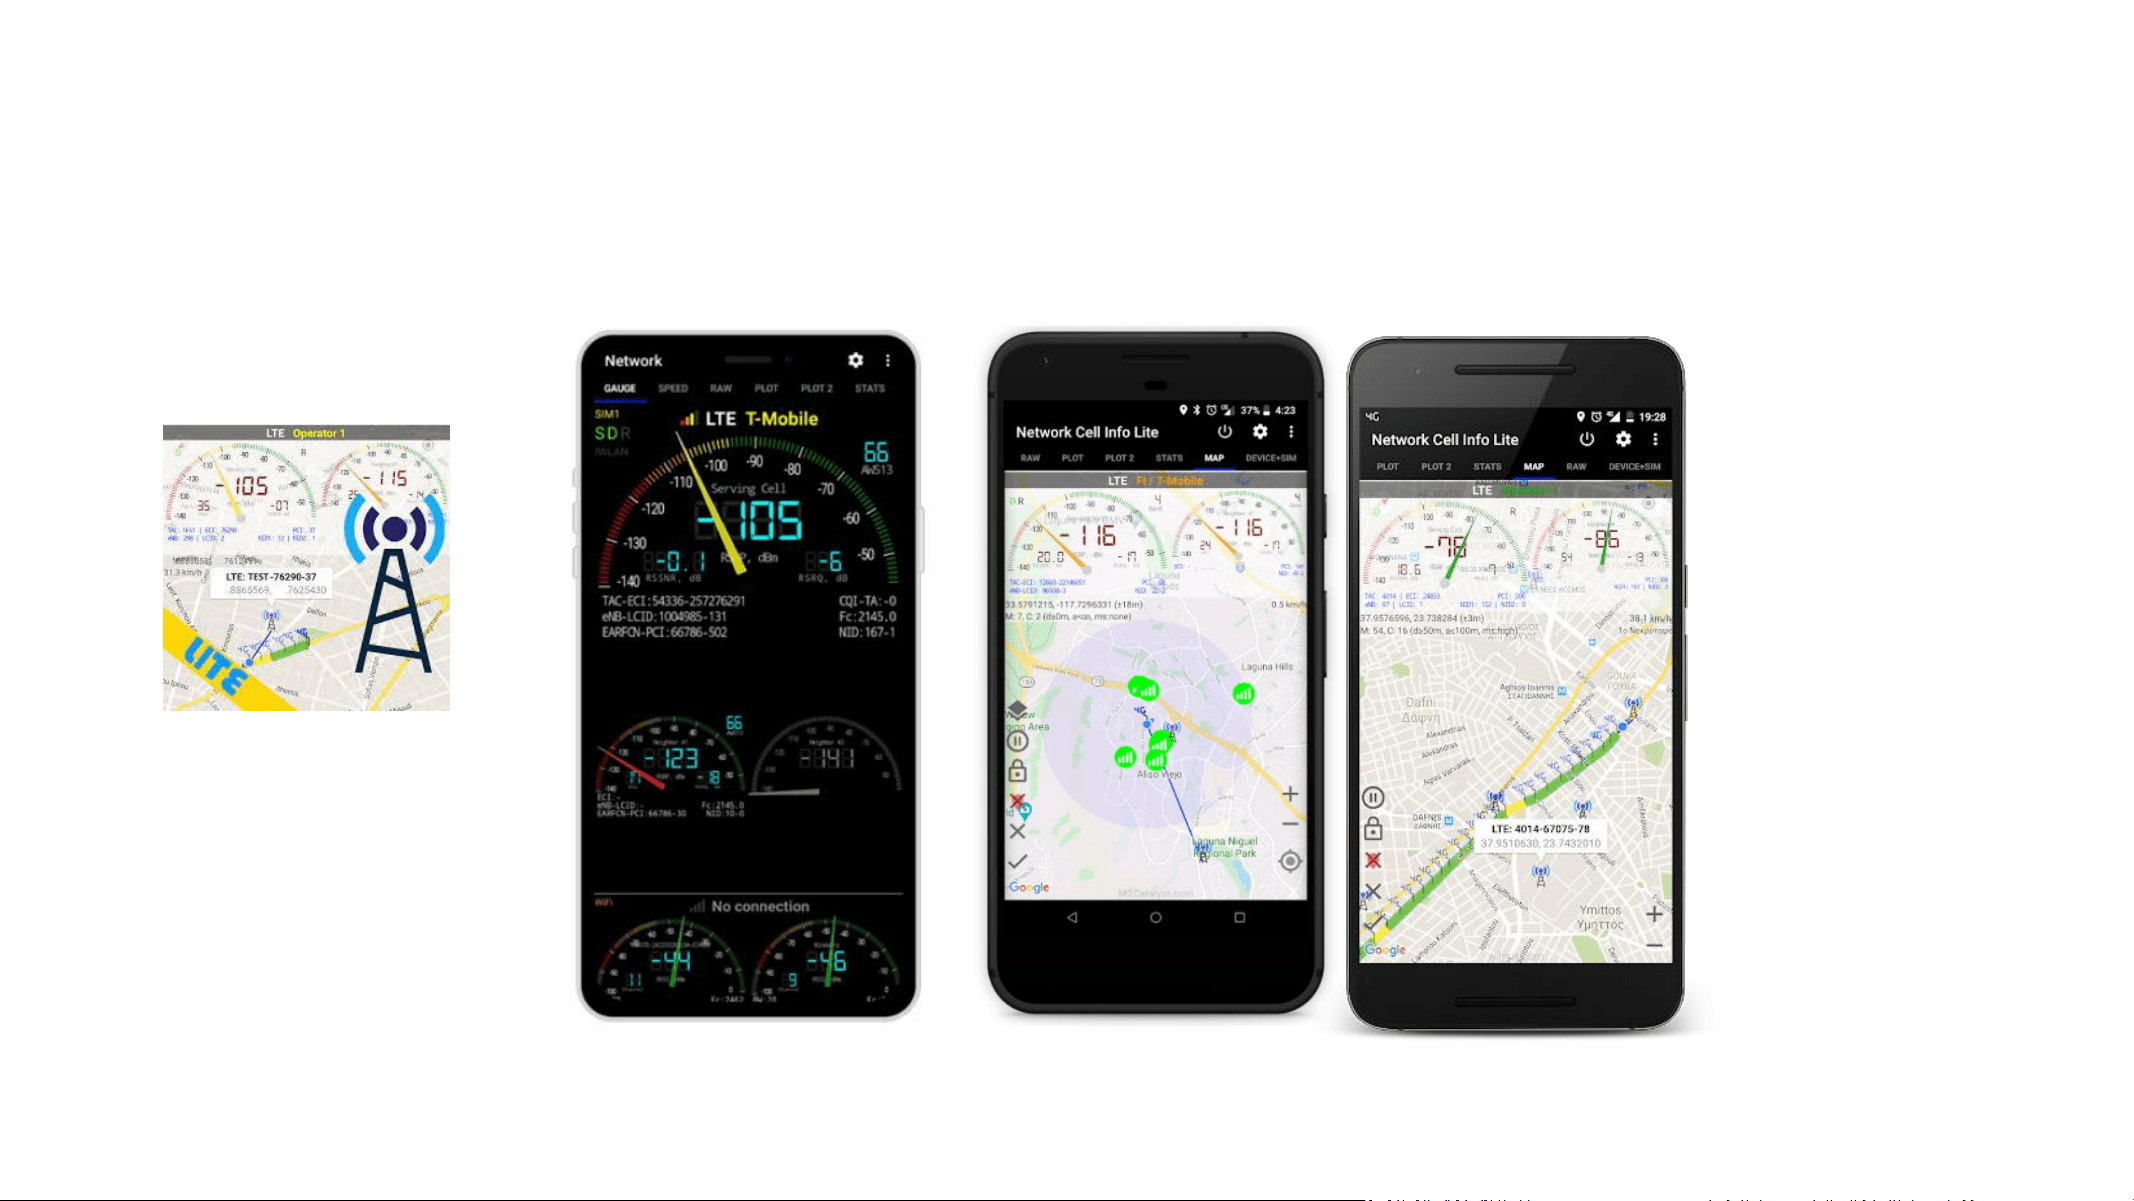
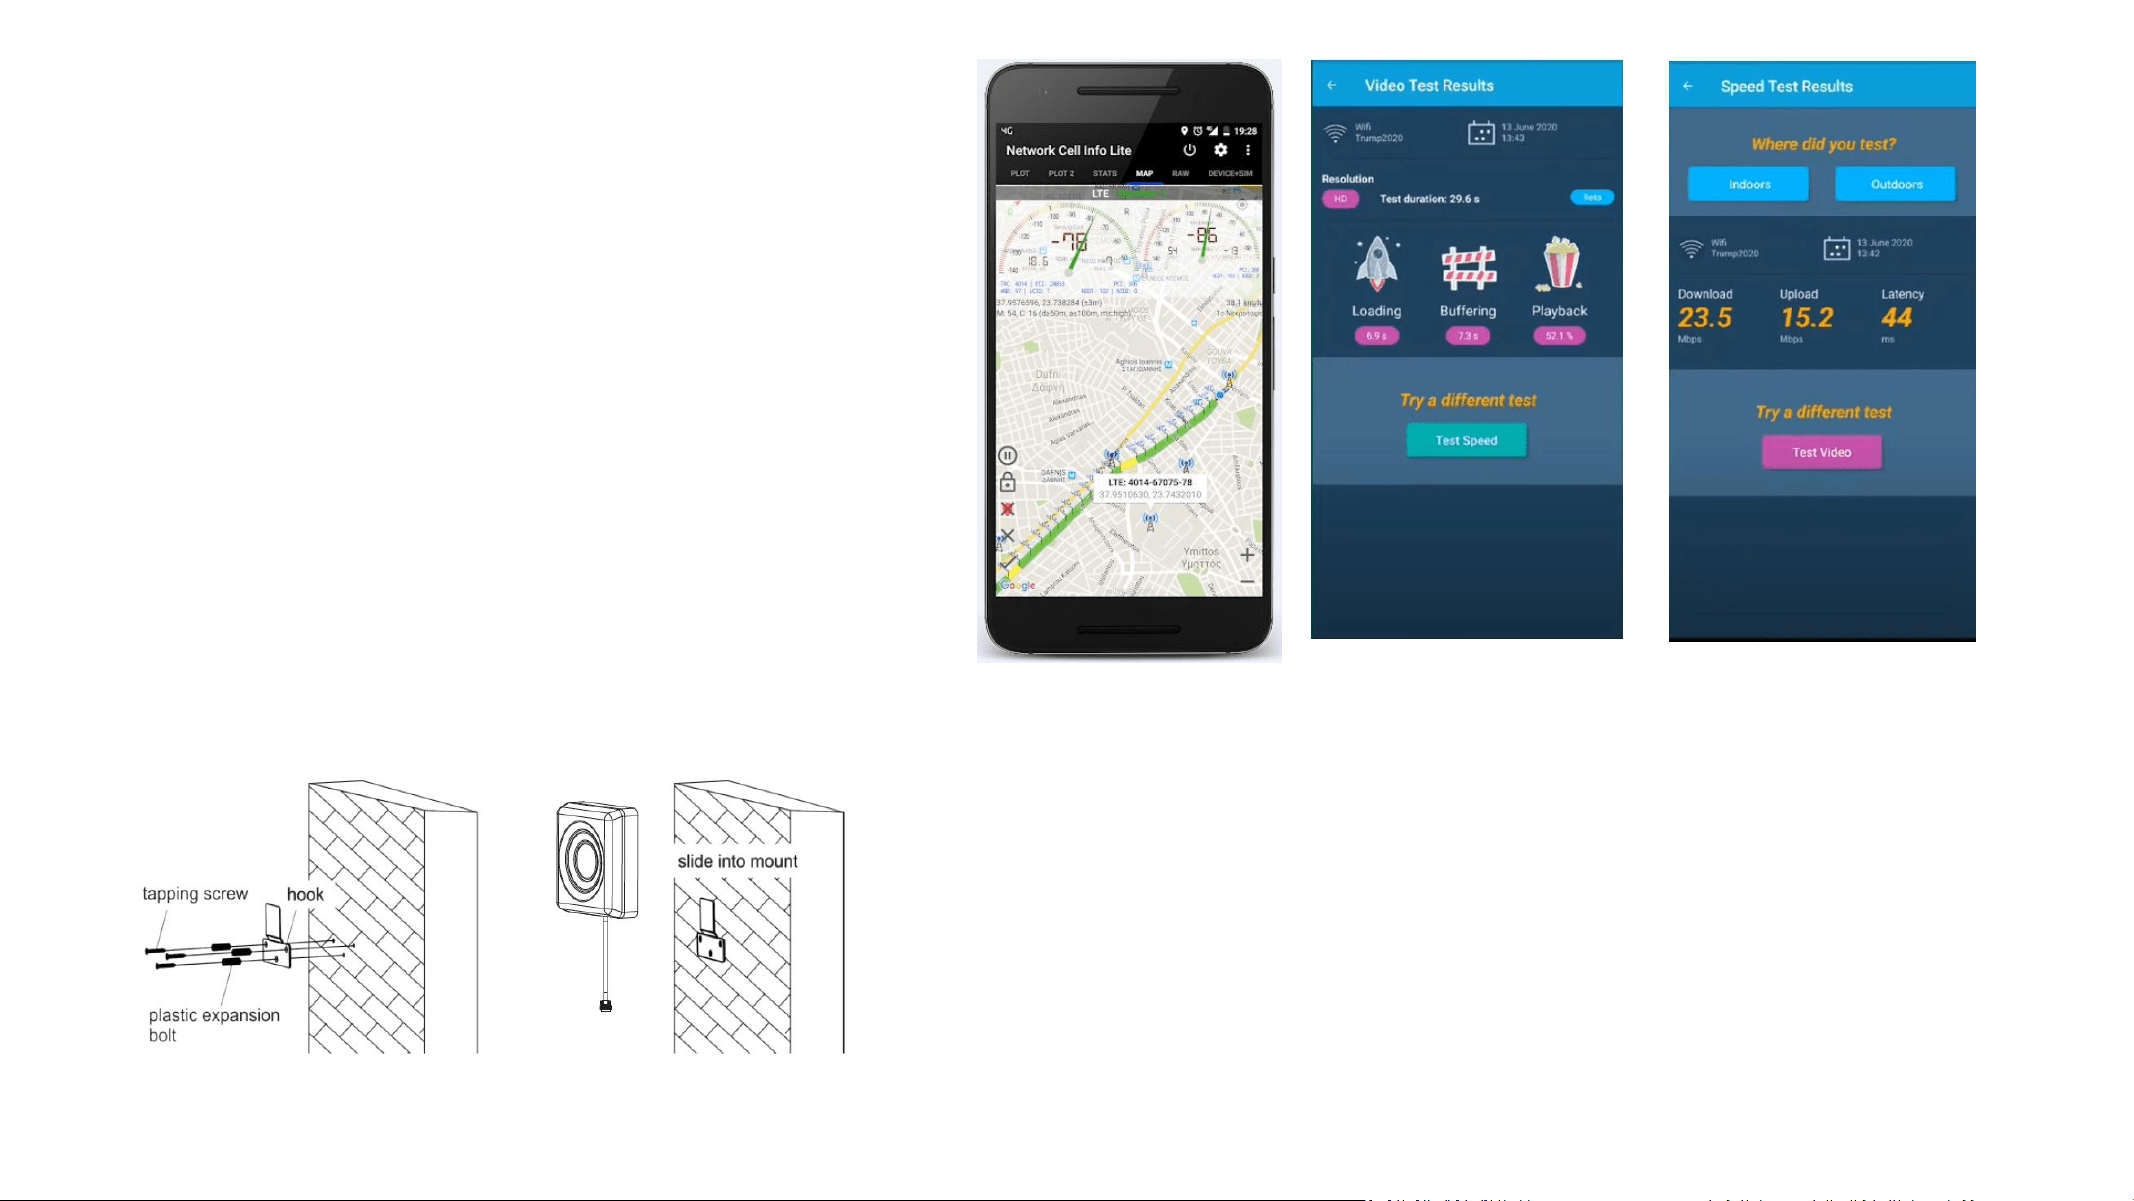
You can also use the “Network Cell Info Lite” to locate the tower and measure the signal strength before & after install.
The good point of Network Cell Info Lite is that you can see the signal levels.
But it seems to be only available for Android.
Network Cell Info Lite
Quick Install Guide-APP
The reason to test your internet speed is to make sure you'll be
able to stream high-bandwidth movies, like those from Netflix,
Hulu, Amazon, and other providers. If your internet speed is too
slow, you'll get choppy video or regular buffering.
Your signal strength is going to be a good indicator of how fast you
can download and stream, but for voice, it’s more like “Can I make a
call, or not?” If you can make a call you should not care how many
bars you have, as long as the call goes through and everyone can
hear everyone. Looking at bars is just going to make you cranky.
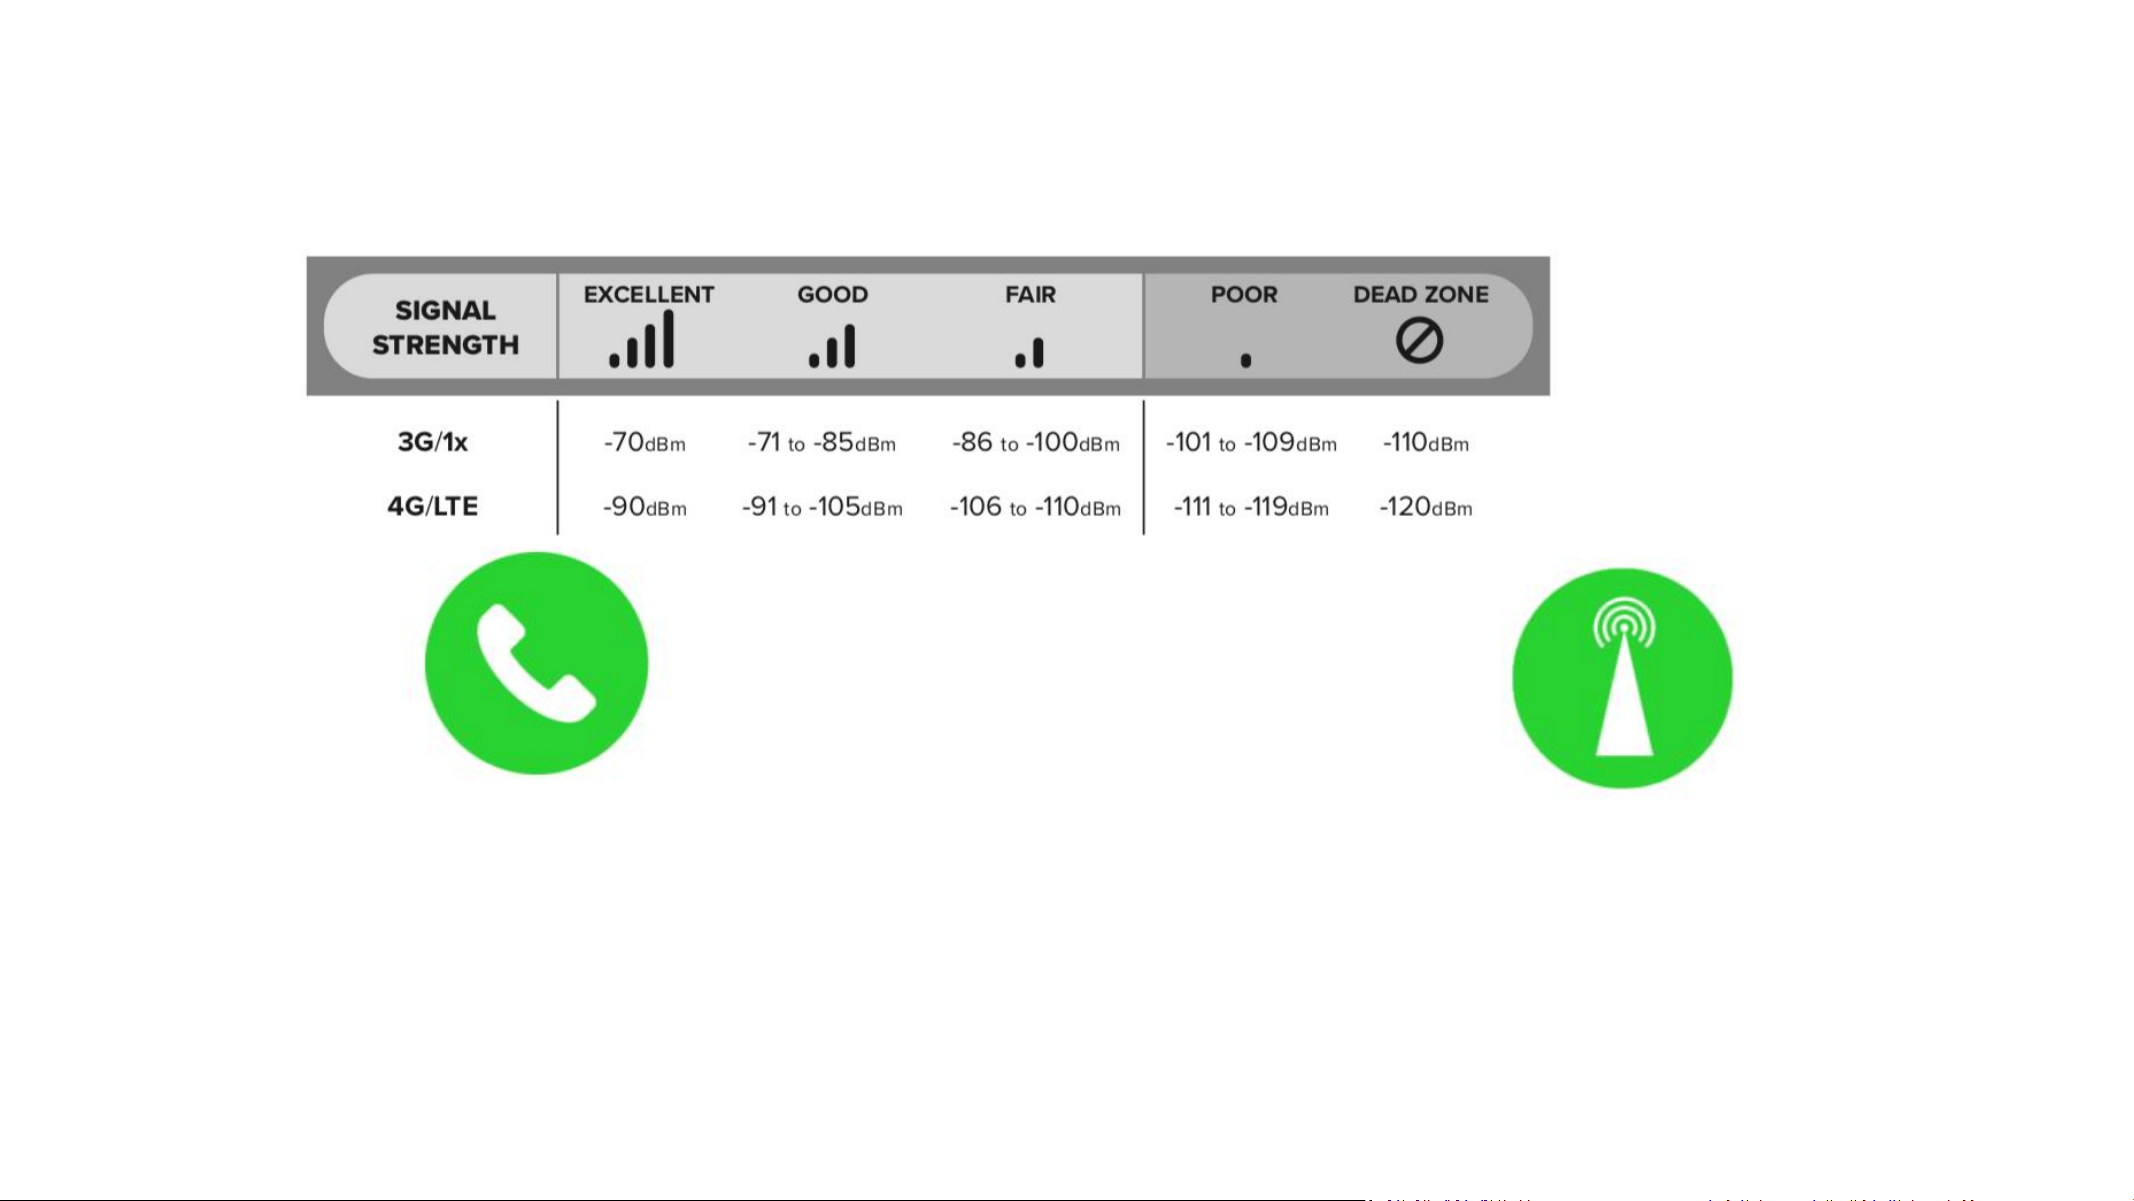
3.3 Use 3rd party APP to locate the tower(s)
The signal strength requested by the booster system is as below.
Quick Install Guide-APP
3.4 Look for the best location and direction of outdoor antenna
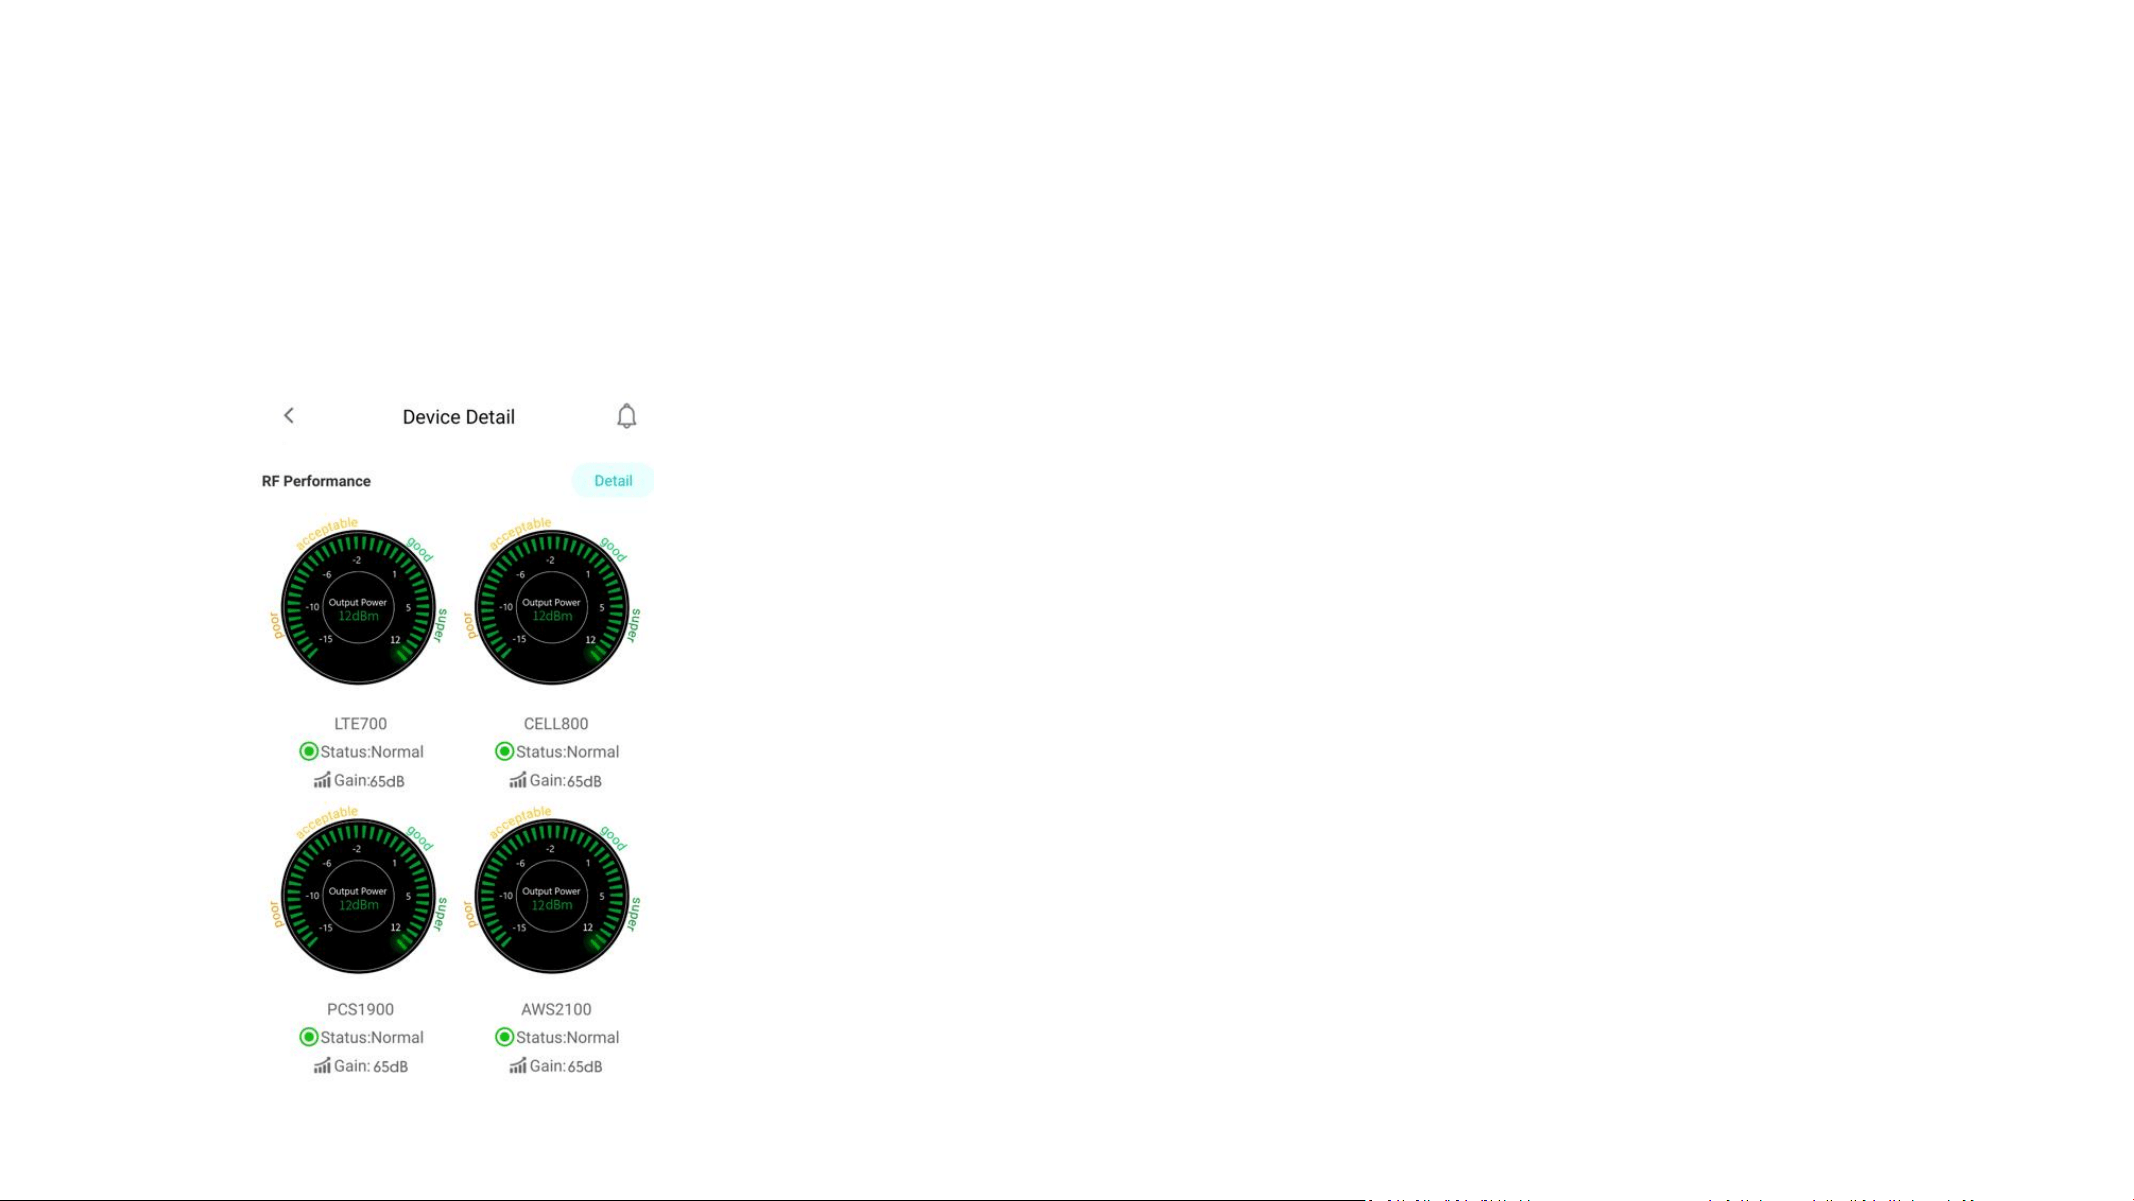
After the tower is located, please pick up outdoor antenna and point to the tower and adjust its direction precisely
Watch the signal gauge of Signal Supervisor App as it will show the booster’s best output power when you get the strongest outside signal.
Target: Try to get the highest possible output power for each band and try to make 2-3 gauges turn green.
1) You can either look at the signal meter value, 12dBm is the best
2) Or you can look at the signal description, Super is the best
Fix the outdoor antenna direction when you get the best output power.
Professional Tips:
• Keep in mind that it is normal for the output values may vary dynamically between 1-3 dB
• To optimize the signal for one carrier, point the outdoor antenna towards the closest cell phone tower
designated to that carrier
• To optimize the signal for more than one carrier, point the outdoor antenna between multiple towers
• Make sure to slowly turn the antenna while taking the readings so the booster has time to adjust the
reading
• Test and install the antenna at the same height where power outputs and gain values reach the boosters
maximum capacity
• If you can’t get a good output power, which is even below poor, most probably the install will fail.
Either please find a new place to find good signal again, or drop the install.
Quick Install Guide-APP
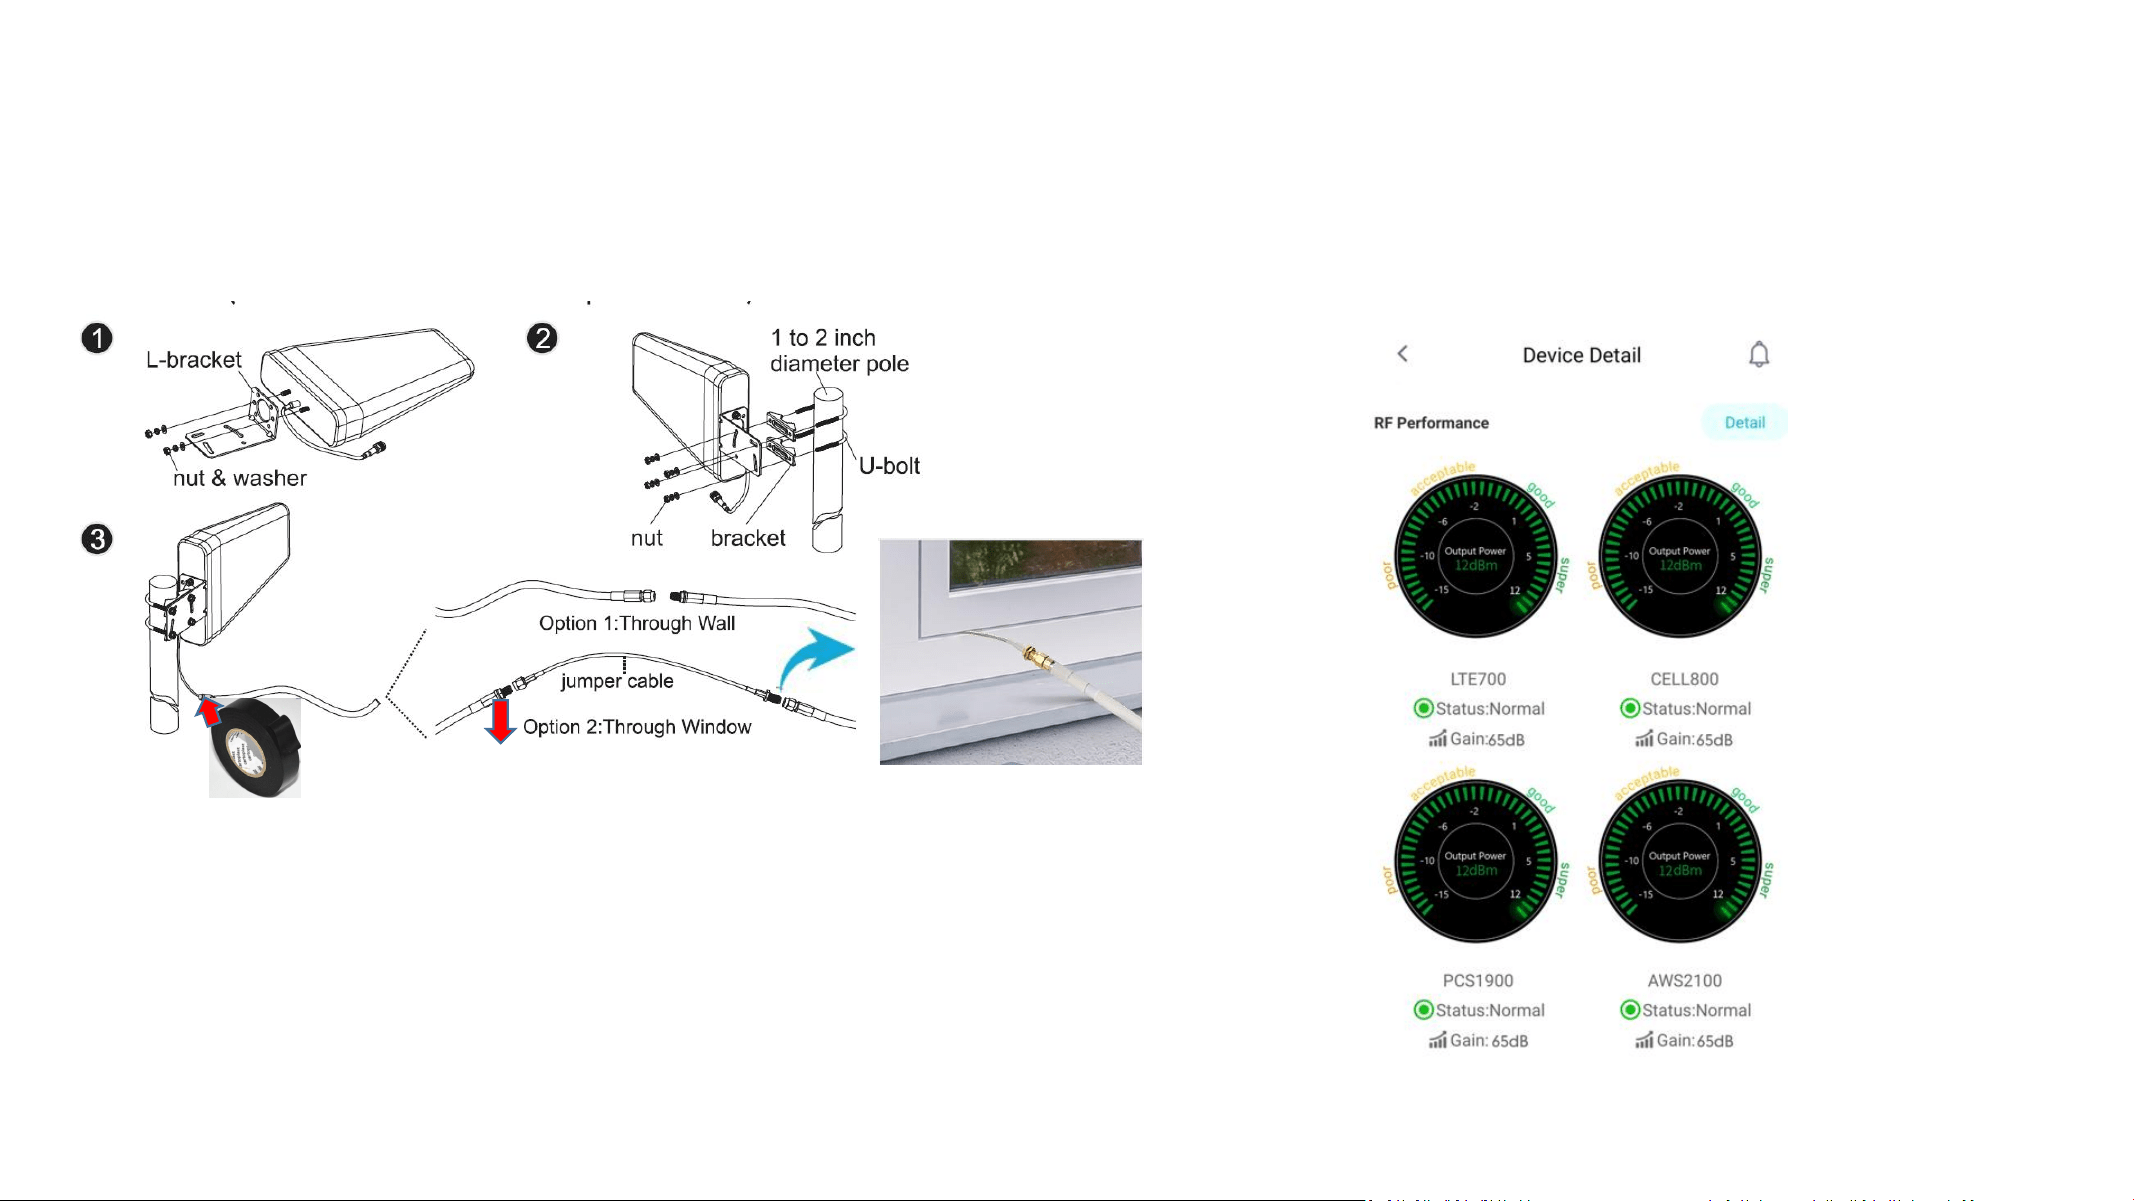
The connector of the cable connection part must be glued with black
waterproof glue to prevent long-term signal drop and reduce signal loss!
3.5 Fix outdoor antenna
Now install the outdoor antenna firmly
3.6 Reconfirm that the signal on signal gauge is the best!
Please do take screen shot for future comparison during indoor antenna install.
What you are going to be paying attention to here, is the gain values. If you have
Interference between your indoor and outdoor antennas, then the booster will
lower the gain and these values will decrease.
Quick Install Guide-APP
Step 4: Install the indoor antenna
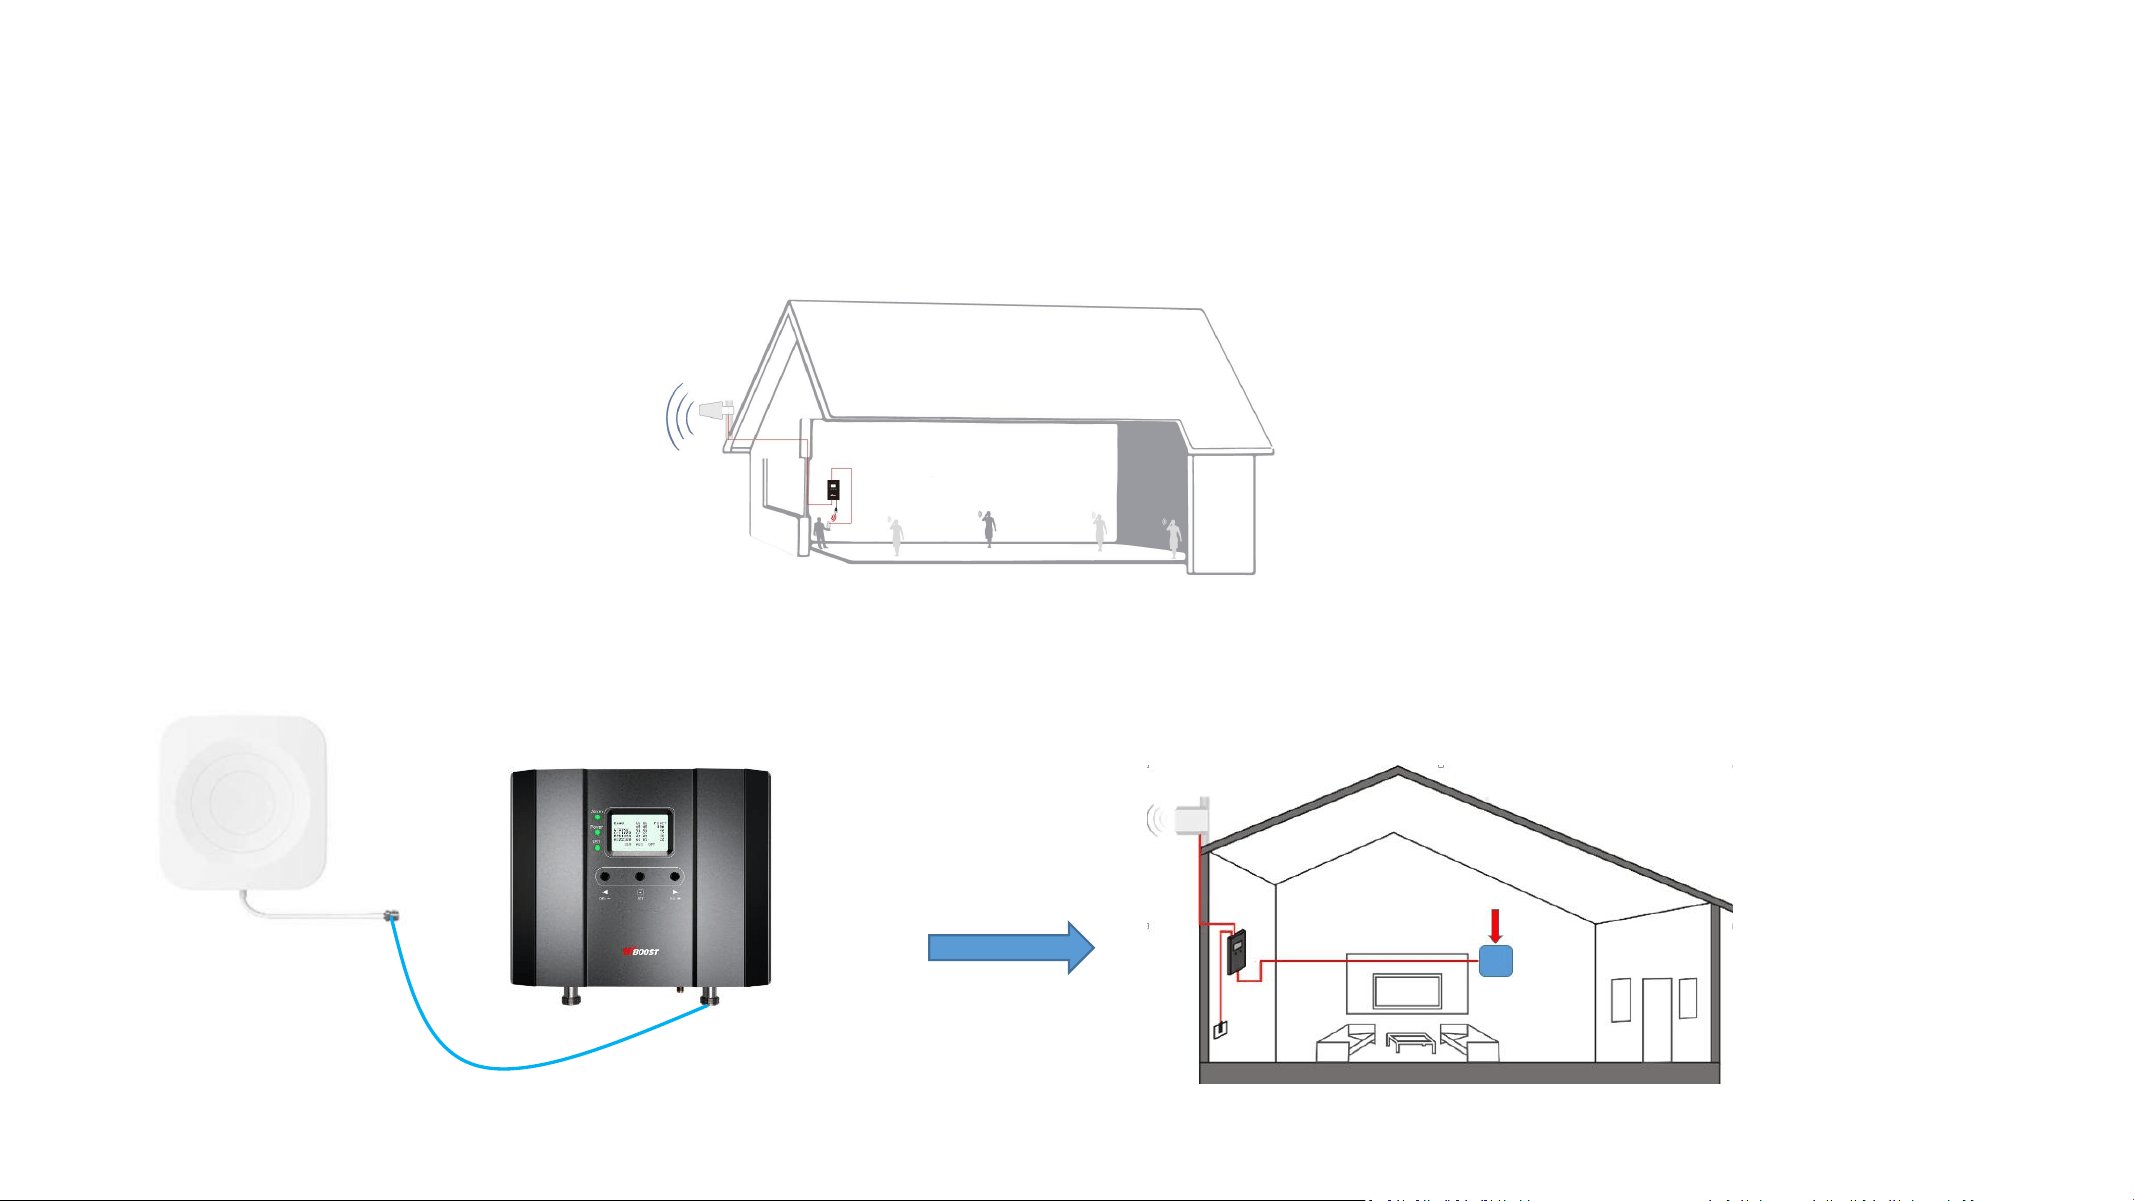
4.1 Now it’s turn to install the indoor antenna
Note: It is better to have two personals at this stage. One can go around to find the best place for indoor antenna. While the other can
walk around to make tests all over to make sure every spot is covered with stable and high quality signal.
4.2 Connect the indoor antenna with the booster by indoor cable, and switch on the booster
Connecting
Find a proper location
Outdoor port
Indoor port
Indoor antenna
Quick Install Guide-APP
4.3 Find the proper location for indoor antenna
1) Determine the location according to the antenna’s radiation pattern. The radiation pattern is 80° horizontal and 70° vertical.
So try to make sure the space will fall into its radiation pattern.
2) After finding the location, hold it there, and watch the gain and power on the App’s signal gauge, they shall keep the same or very nearby with the
screen shot taken during outdoor antenna install. This is to avoid the loop back between outdoor and indoor antennas, please move the indoor
antenna till you get unchanged or slightly changed gain and power. This step is quite crucial for the booster’s best performance.
Again the tips to avoid the loop back
• Increase the distance between the outdoor and indoor antennas
• The outdoor and indoor antennas shall be back to back
• Use barriers between the indoor and outdoor antennas
Two requests of indoor antenna install
A. Radiation shall be good enough to cover whole space
B. Loop back shall be avoided
=
Quick Install Guide-APP
4.4 Signal Quality test
After finding such a location, hold the indoor antenna there
and ask the other person to walk back and forth, and use the
3
rd
party app to test the signal strength, voice, and data.
We recommend you to test the signal strength, the voice
quality and data speed.
*Notes Again: Just remember that strength and quality are two
separate issues. A poor quality “strong” signal can be next to
useless, but a clean signal of two bars might be all your device
needs.
If the test is good, then congratulations, the indoor antenna position has been successfully found. Please install the indoor antenna
Quick Install Guide-APP
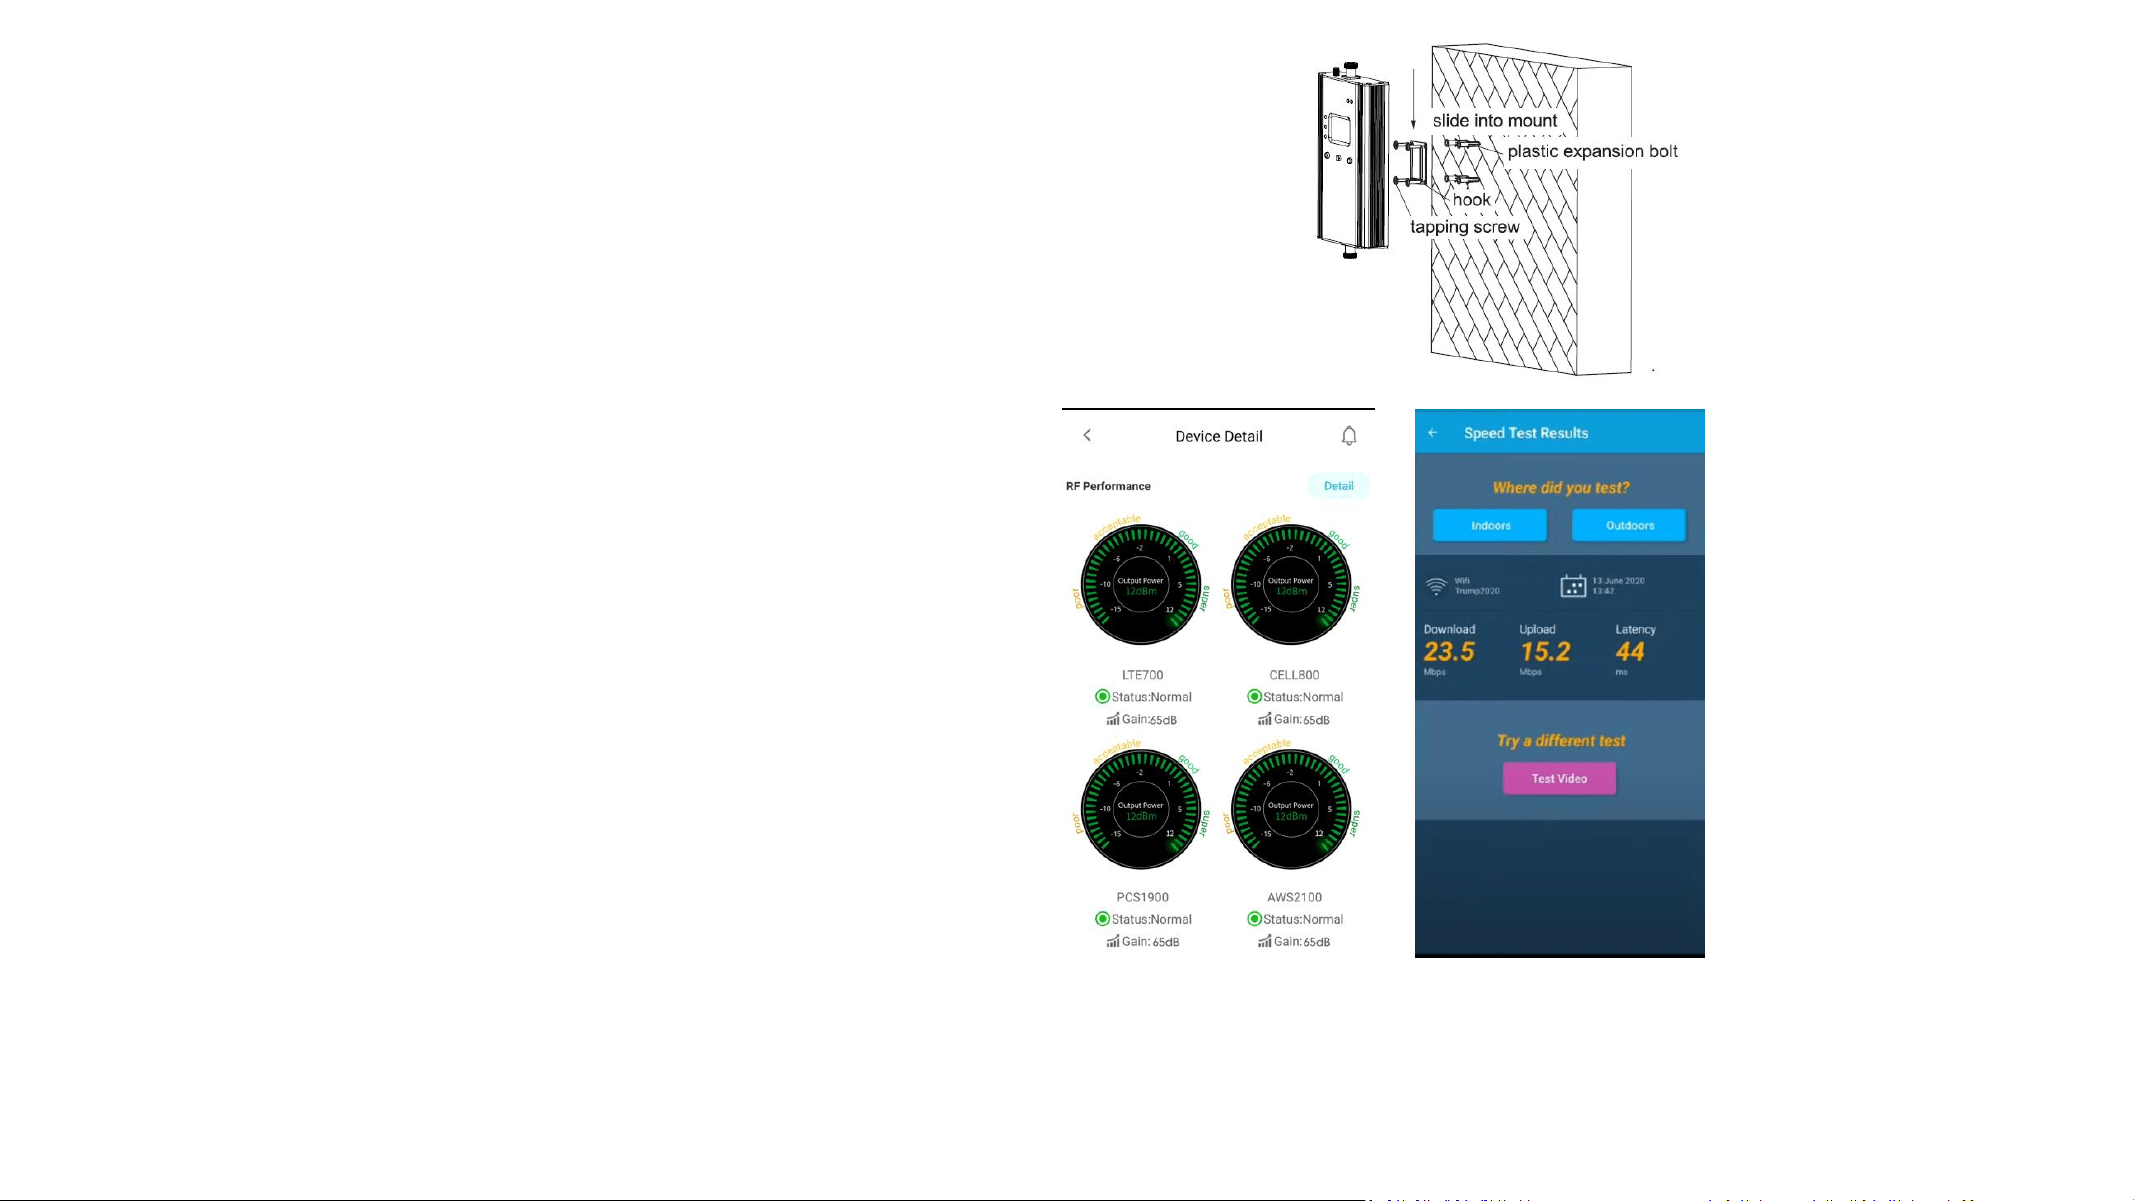
Test again the performance after installation done
a. First make sure the Signal gauge value is unchanged
from the outdoor antenna install.
b. Test by a third-party app, calls and network data are
smooth in most indoor signal coverage areas.
Step 5: Install the booster and the cables
Mount the signal booster in a dry and cool area, and it
shall be easily accessible for maintenance.
And run the cables neatly, please do use the water-proof
tape to protect all outside connections from the weather
a. Now everything is completed and please start to enjoy the mobile services.
b. If the result is not satisfactory or you want to be better, you may repeat the whole or part of the process to improve.
c. Please contact us: Signalsupervisor App online support, Phone and Email in case you have any problems.
Quick Install Guide-APP
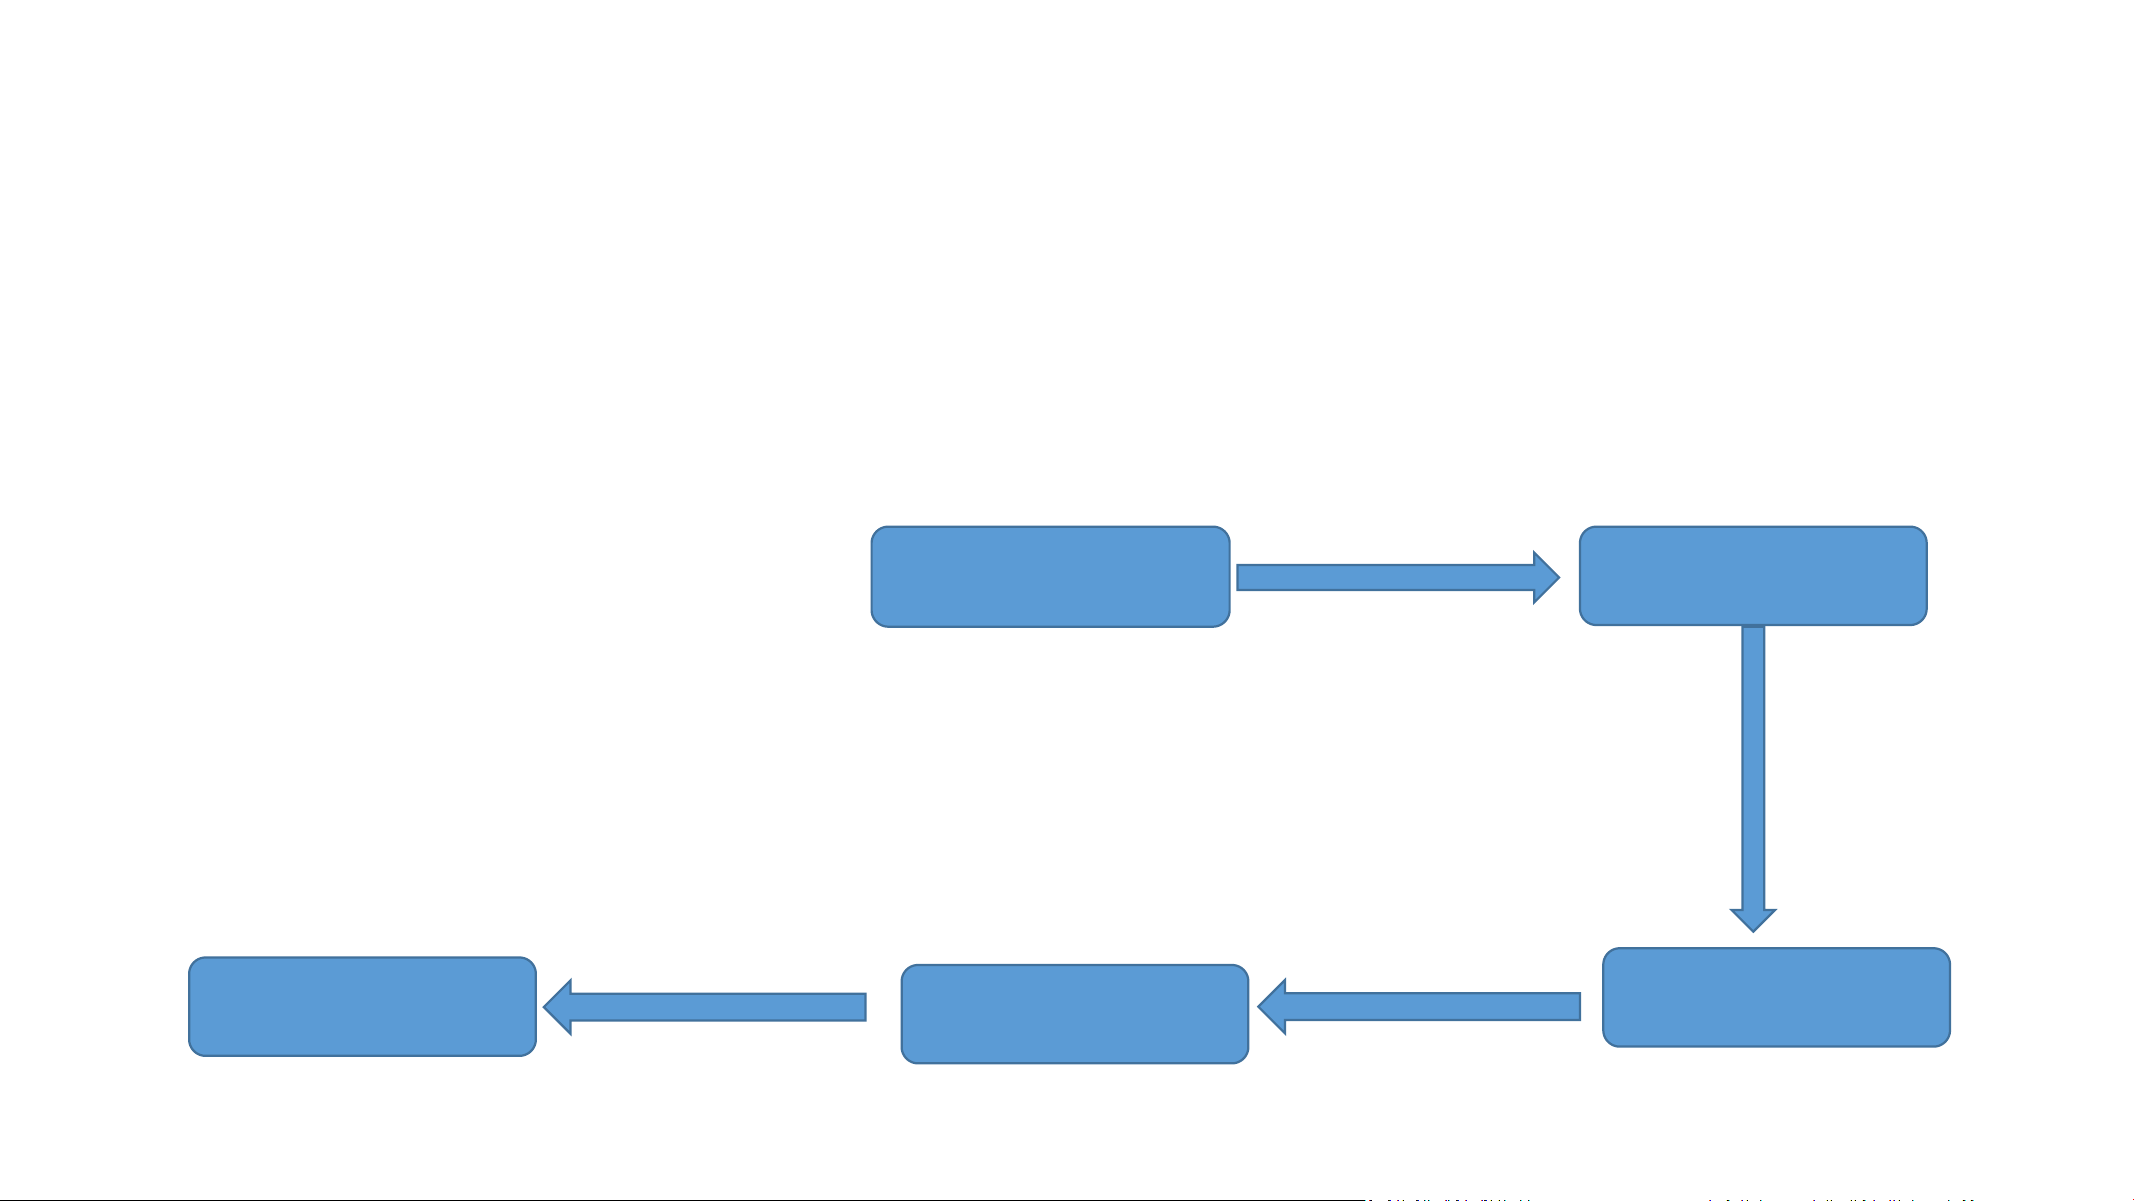
2 Now let’s start by the LCD assisted install
1. Download 3
rd
Party App
2. Seek best outside signal and
install outdoor antenna
3. Fine tune indoor antenna
for best coverage and avoid
the loop back
4. Fix the cables and booster
Flow chart of LCD Assisted Install
5. Final test and enjoy the
mobile services
Quick Install Guide-LCD
Step 1: Download the 3rd Party Mobile Apps
We are going to use 3
rd
party APPs:
1. To find the cell tower location
2. To test the signal strength and quality
There are a variety of resources available online: Opensignal,
Cell mapper, Network cell info lite, etc.
Please download them beforehand over Android and / or iOS:
※ You can use either of them to your favor. Here we are using Opensignal and Network Cell Info Lite as first two
choices.
Quick Install Guide-LCD
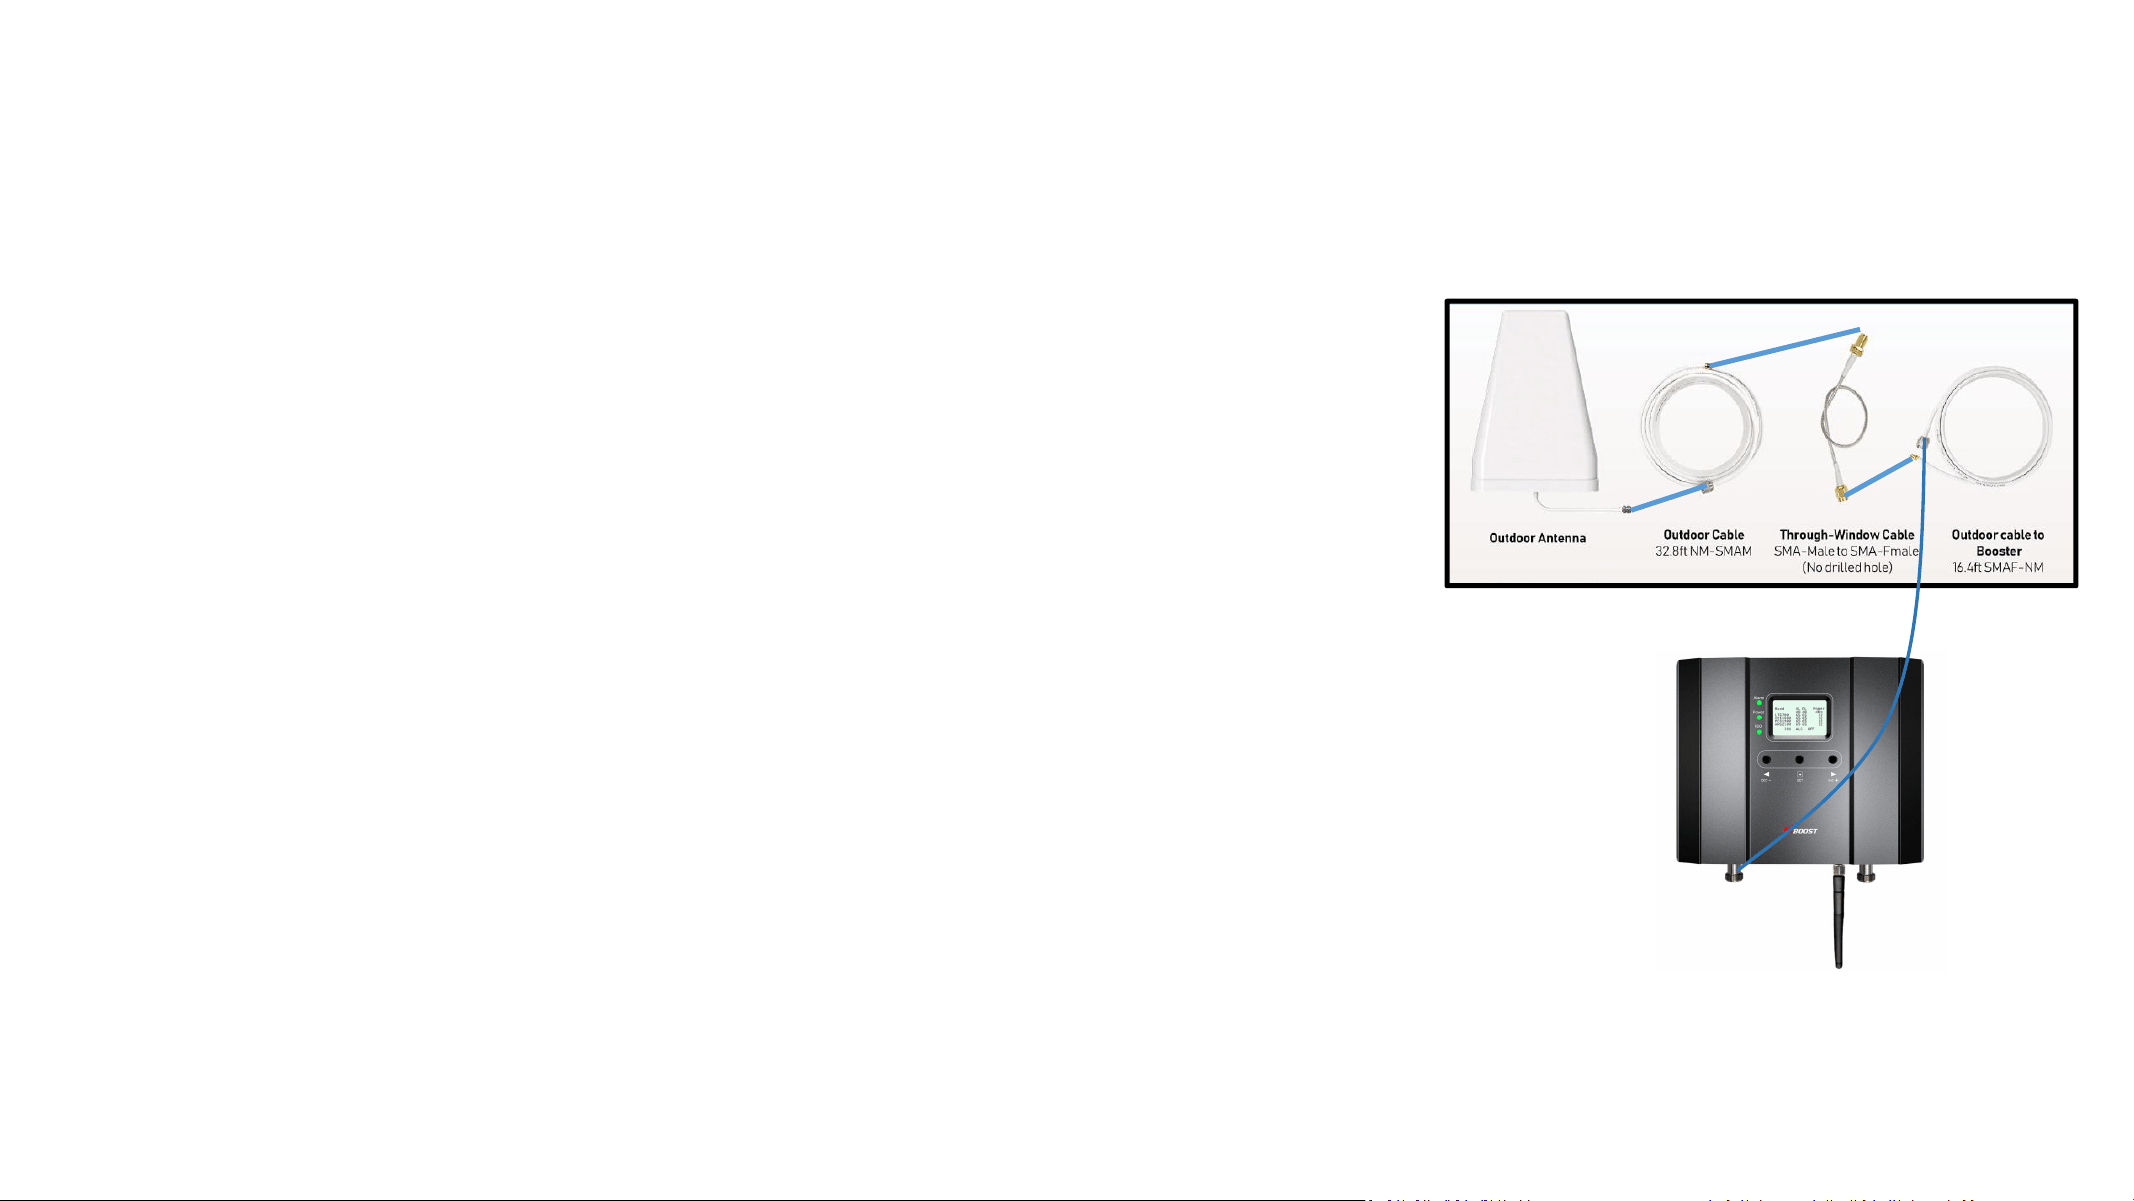
Outdoor port Indoor port
Bluetooth/WiFi
Antenna
Step 2: Install the outdoor antenna
2.1 Connect the booster with outdoor antenna
1) Put the booster near to the location you would like to install in the
future, or a place with power outlet temporarily.
2) Connect the booster with Bluetooth/WiFi antenna.
3) Switch on the booster.
4) Connect the 16.4ft cable with the booster’s outdoor port. The booster
supports hot plug.
5) Then connect the window cable with 16.4ft cable and pull the window
cable outside and connect it with 32.8ft cable.
In case window cable is not needed, connect the 16.4ft cable with
32.8ft cable directly.
6) Connect the other side of 32.8ft cable with the outdoor antenna.
Notes:
It is a must not to connect indoor antenna at this moment as it will
influence the outside signal finding.
Quick Install Guide-LCD
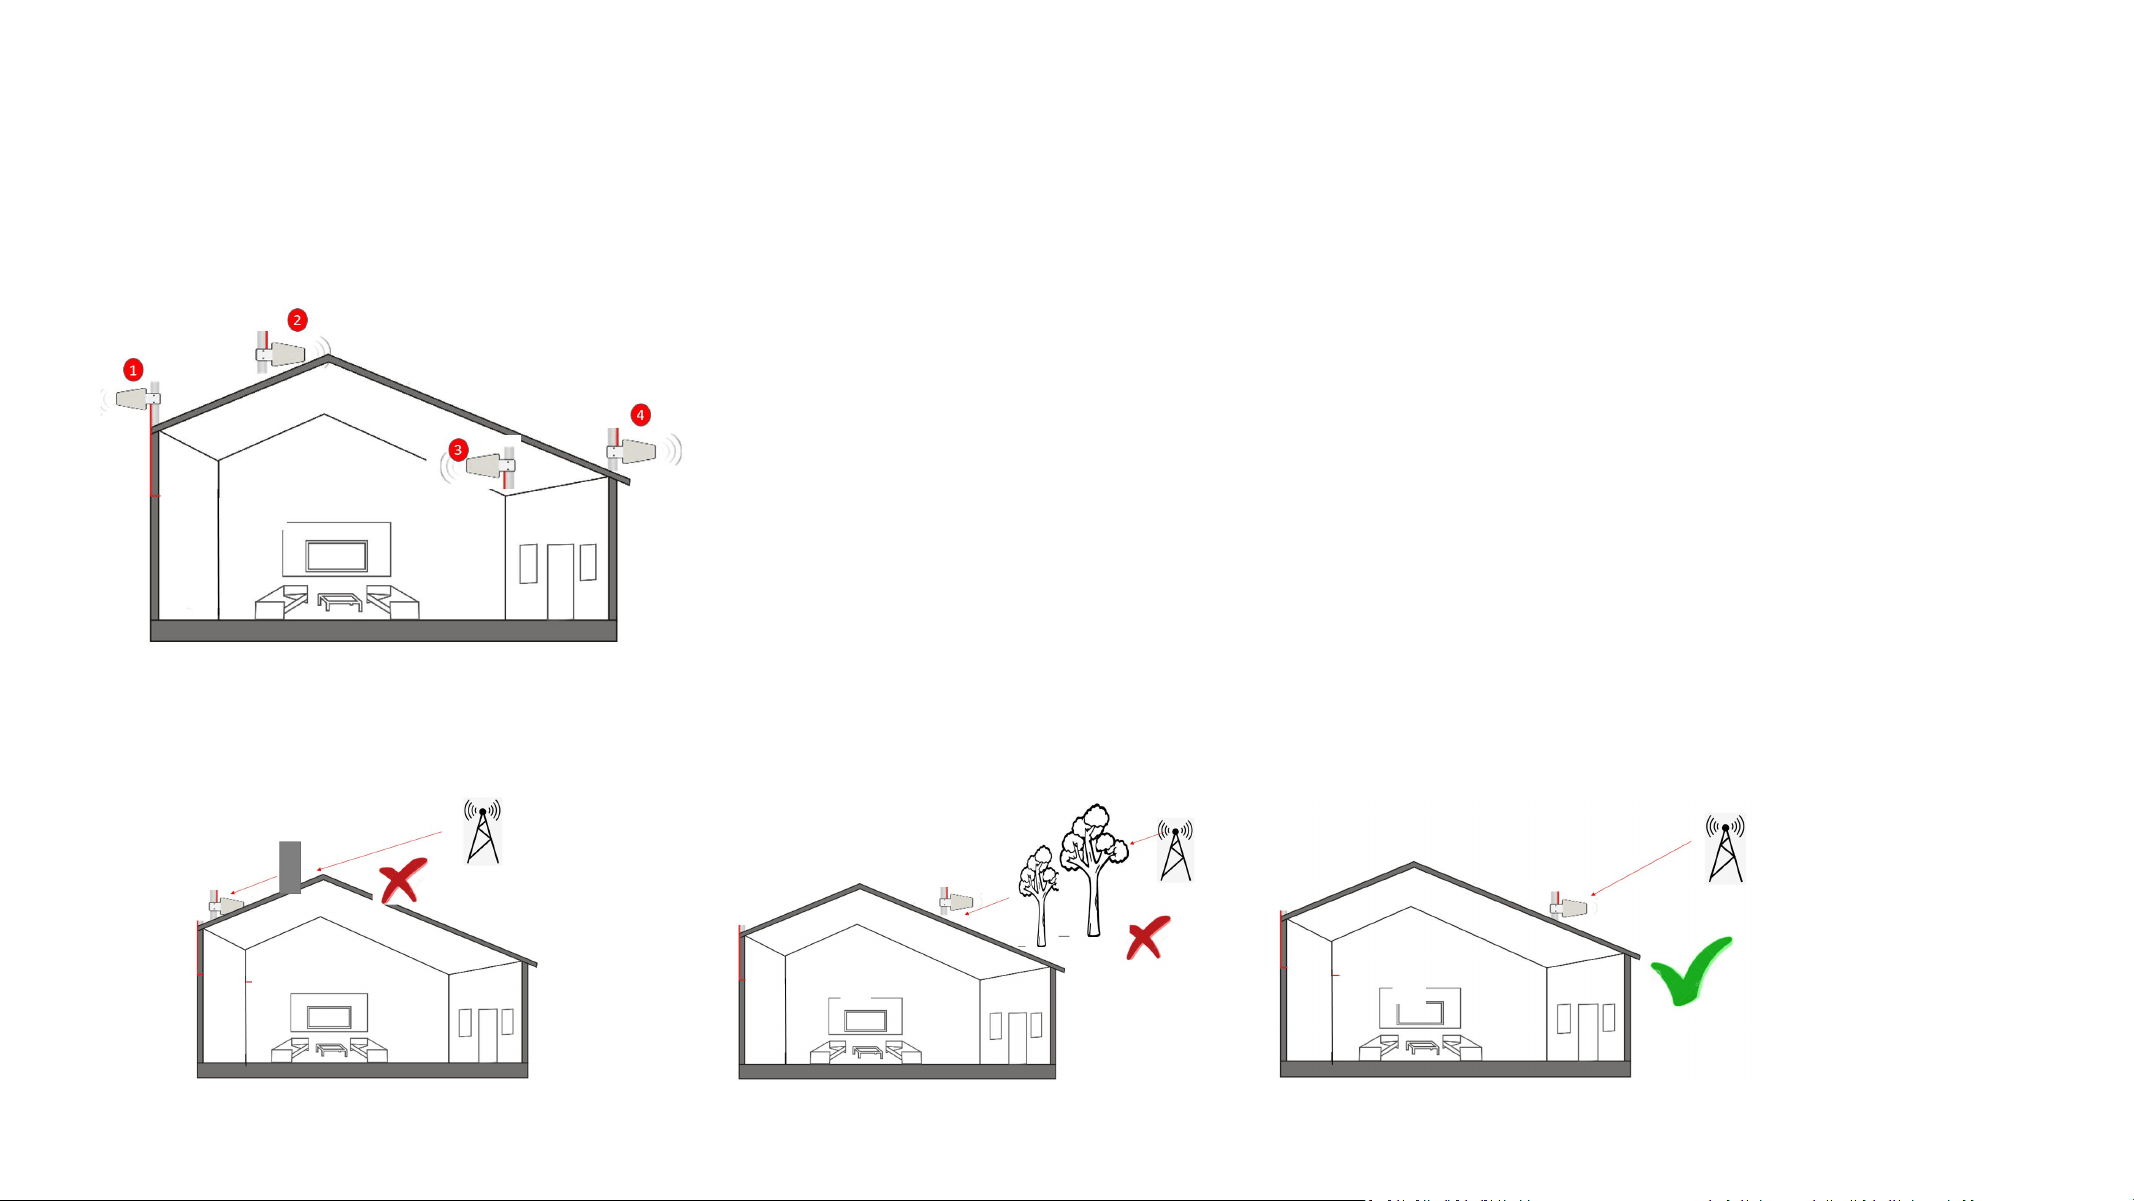
2.2 Select the possible location for the outdoor antenna.
Bring your mobile phone with the 3
rd
party APPs and the outdoor antenna to the location where the best outside signal can
be found. The outdoor antenna is recommended to be at the four corners or high end of the roof, or attic.
Step 2: Install outdoor antenna
The outdoor antenna needs to maintain a clear line of sight with the cell tower. And it is necessary to avoid the roof or other
stuffs from blocking the outdoor antenna.
Quick Install Guide-LCD
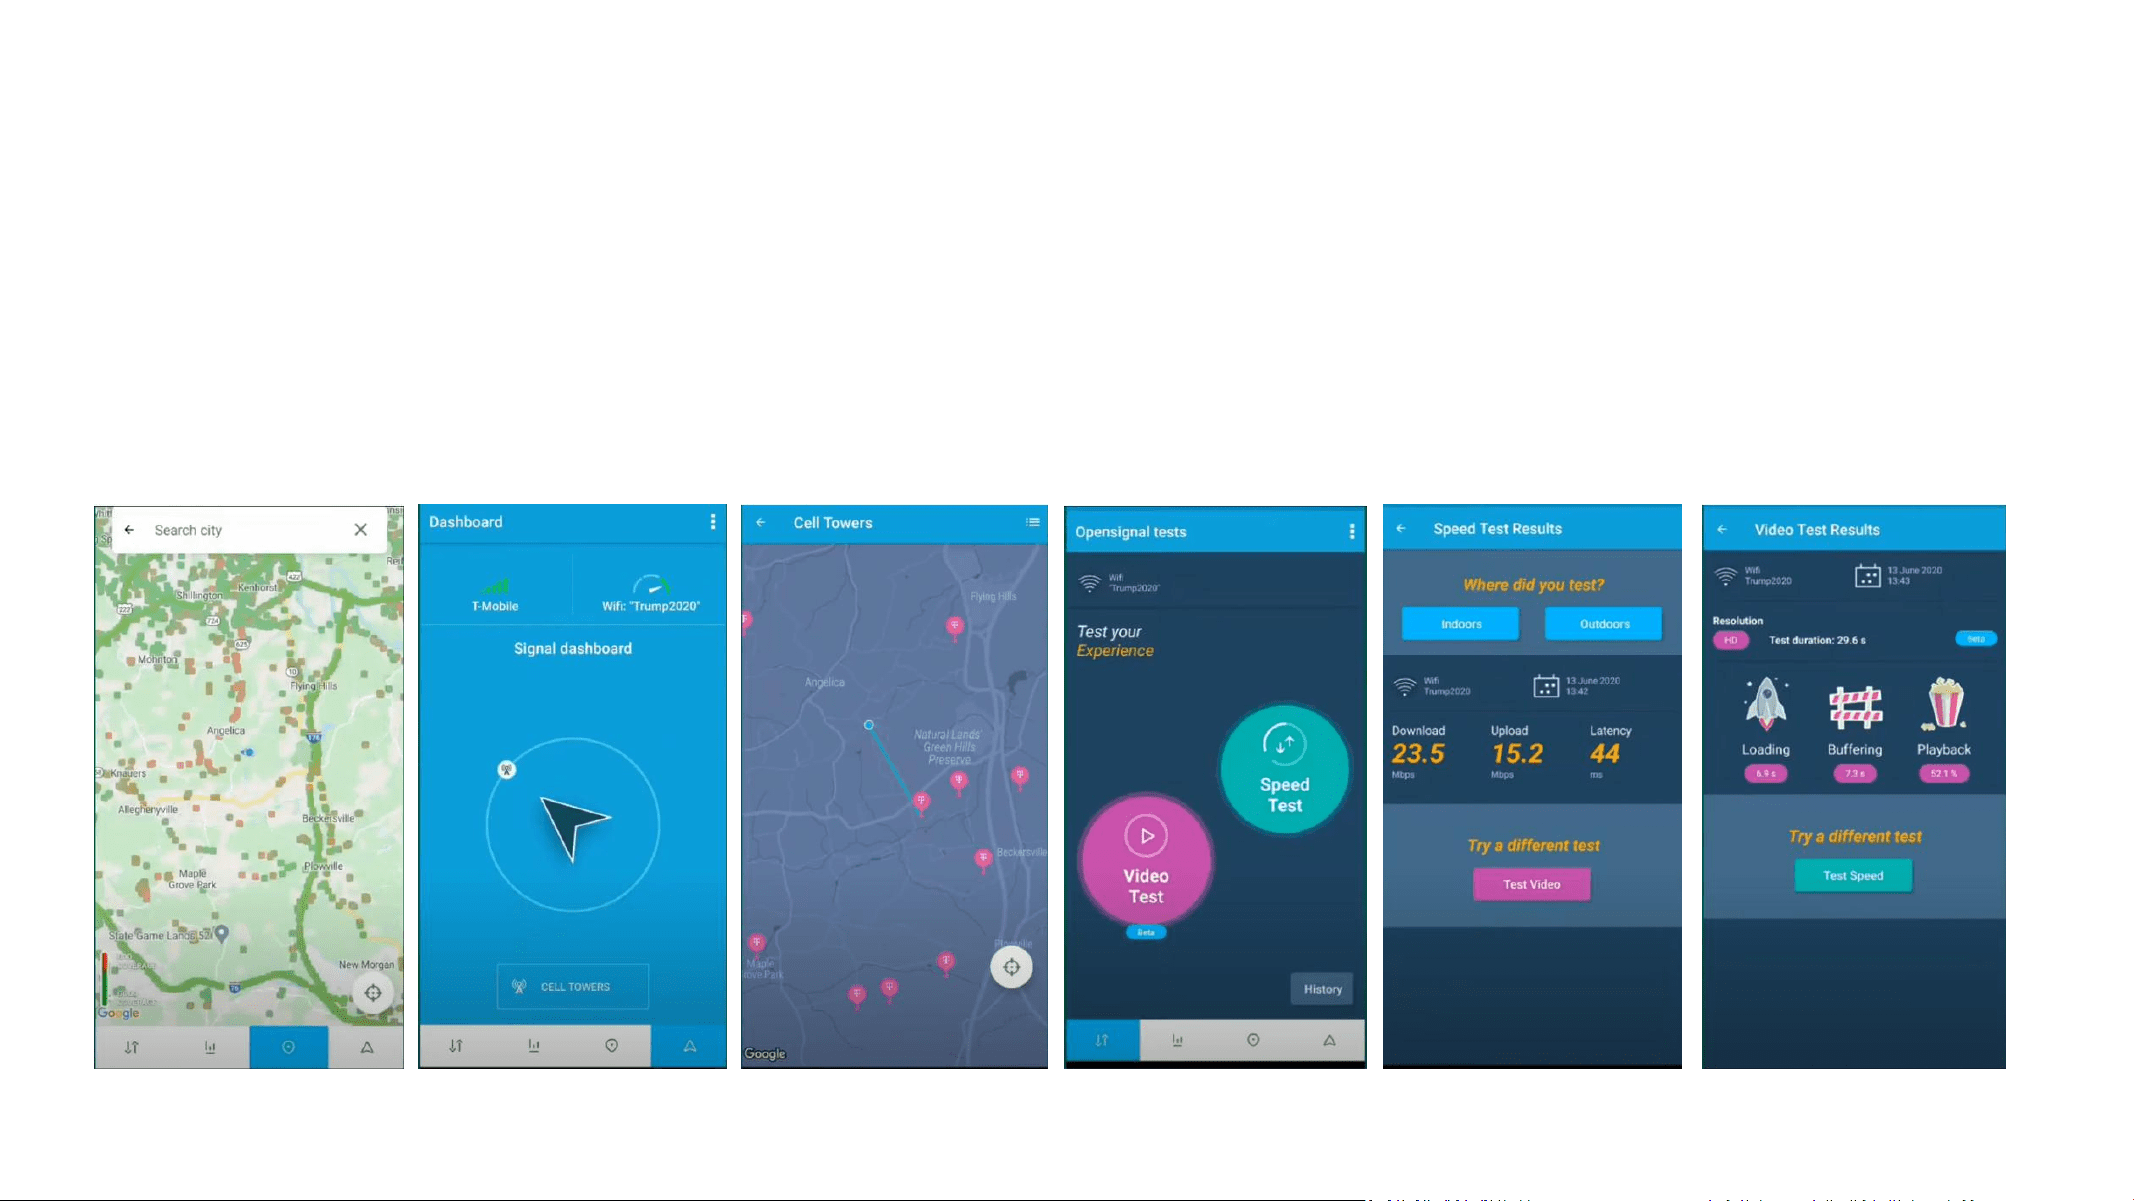
3.3 Use 3rd part APP to locate the tower(s)
Now open “Opensignal”, use it to detect the approximate position of the nearby cell tower.
1) Insert your detail address in “Search city” box. (following figure 1)
2) Enter signal dashboard, and click “CELL TOWERS”. Then zoom in map to find best one, it will show a blue line with your place which
means your cellphone connected one. (following figure 2&3)
3) When you find such location, check the strength, test voice and data speed. A good signal shall not only be strong, but also be clear
in voice and fast in data speed. (following figure 4-6)
*Notes: Just remember that strength and quality are two separate issues. A poor quality “strong” signal can be next to useless,
but a clean signal of two bars might be all your device needs.
Figure 1 Figure 2 Figure 3 Figure 4 Figure 5
Figure 6
Quick Install Guide-LCD
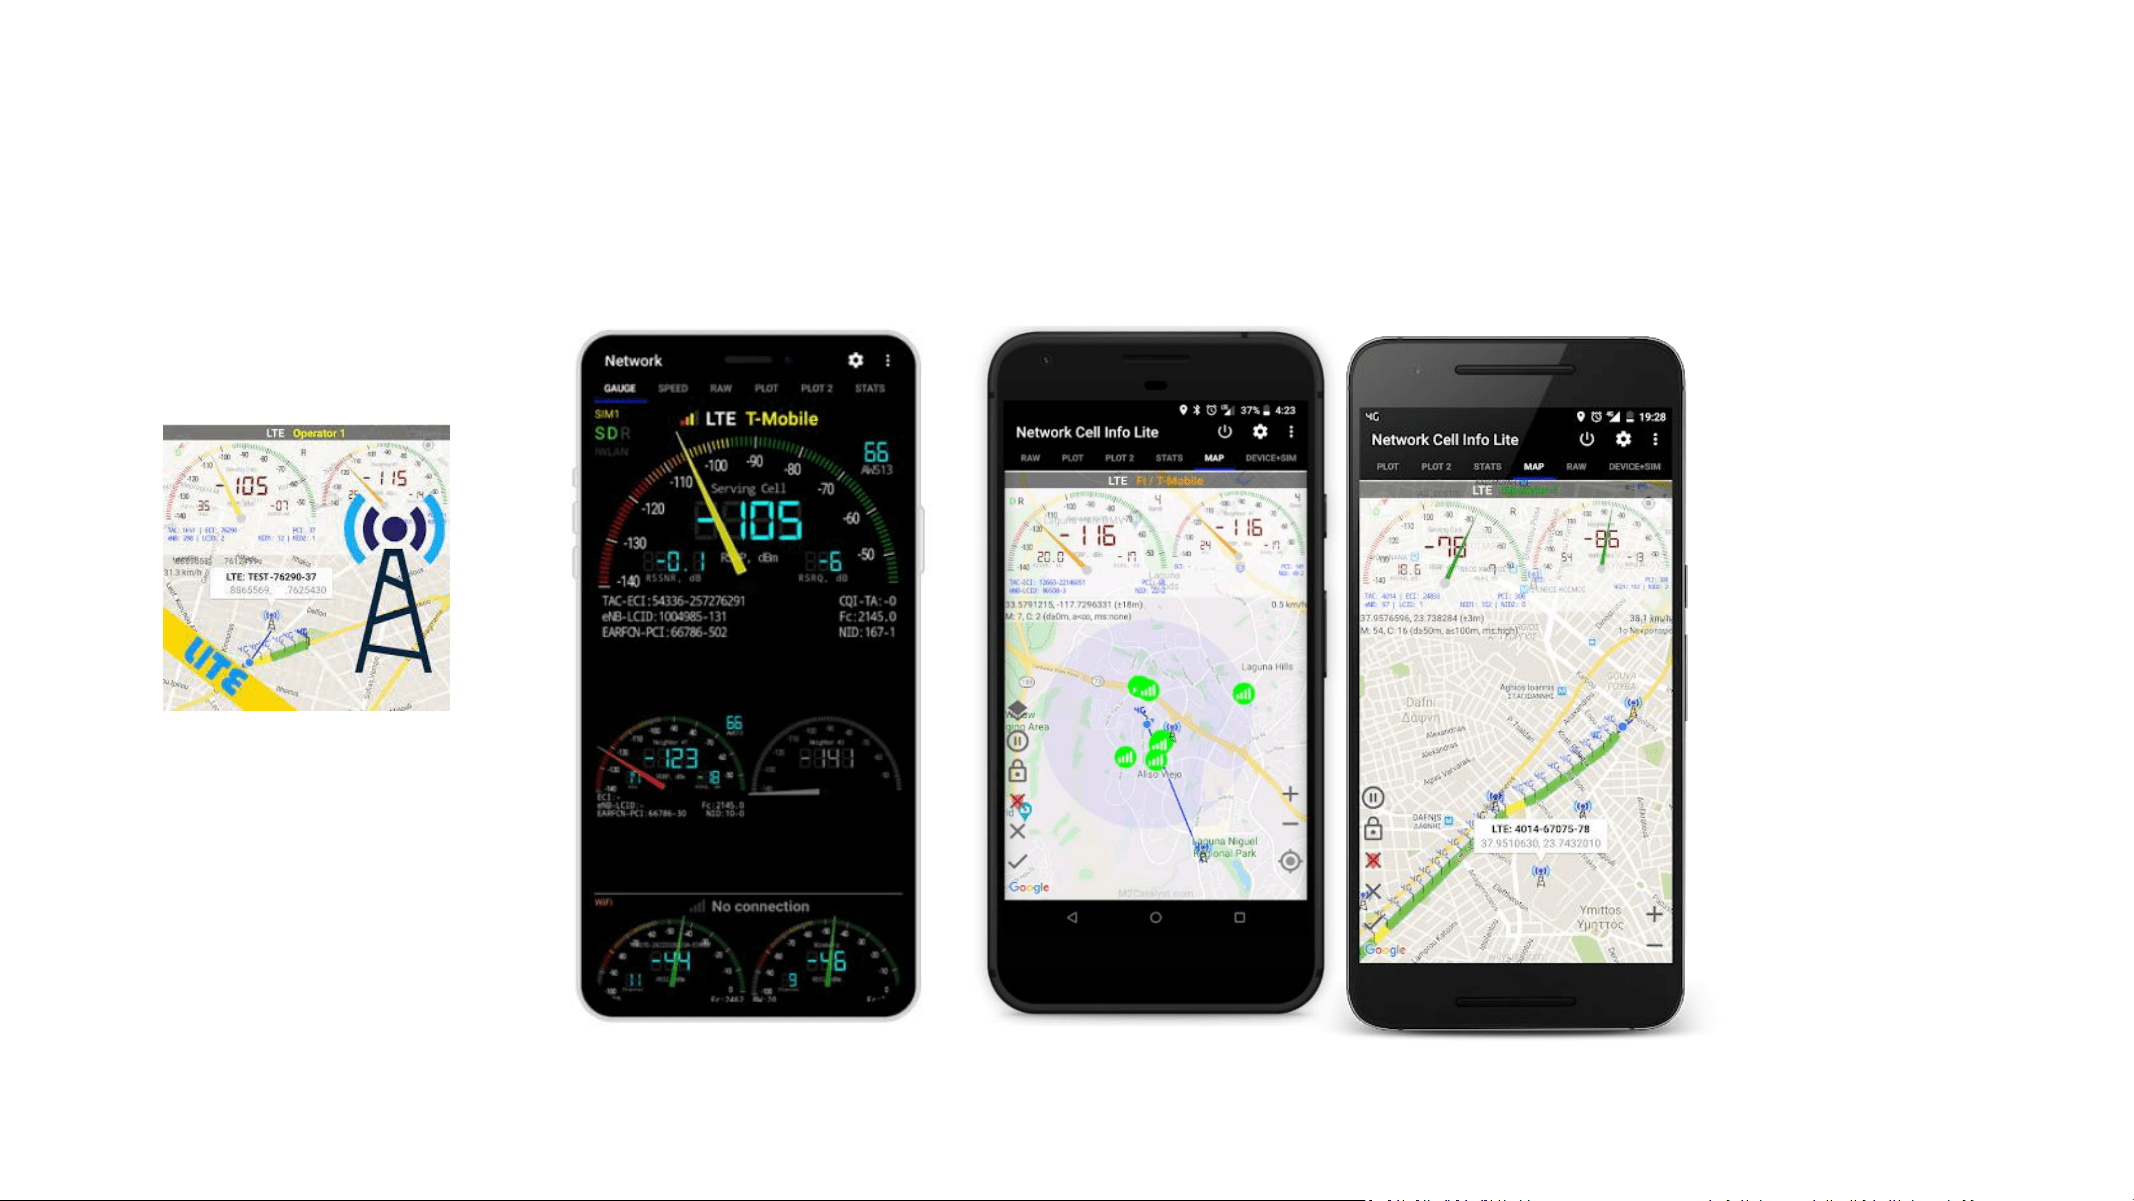
You can also use the “Network Cell Info Lite” to locate the tower and measure the signal strength before & after install.
The good point of Network Cell Info Lite is that you can see the signal levels.
But it seems to be only available for Android.
Network Cell Info Lite
Quick Install Guide-LCD
The reason to test your internet speed is to make sure you'll be
able to stream high-bandwidth movies, like those from Netflix,
Hulu, Amazon, and other providers. If your internet speed is too
slow, you'll get choppy video or regular buffering.
Your signal strength is going to be a good indicator of how fast you
can download and stream, but for voice, it’s more like “Can I make a
call, or not?” If you can make a call you should not care how many
bars you have, as long as the call goes through and everyone can
hear everyone. Looking at bars is just going to make you cranky.
3.3 Use 3rd part APP to locate the tower(s)
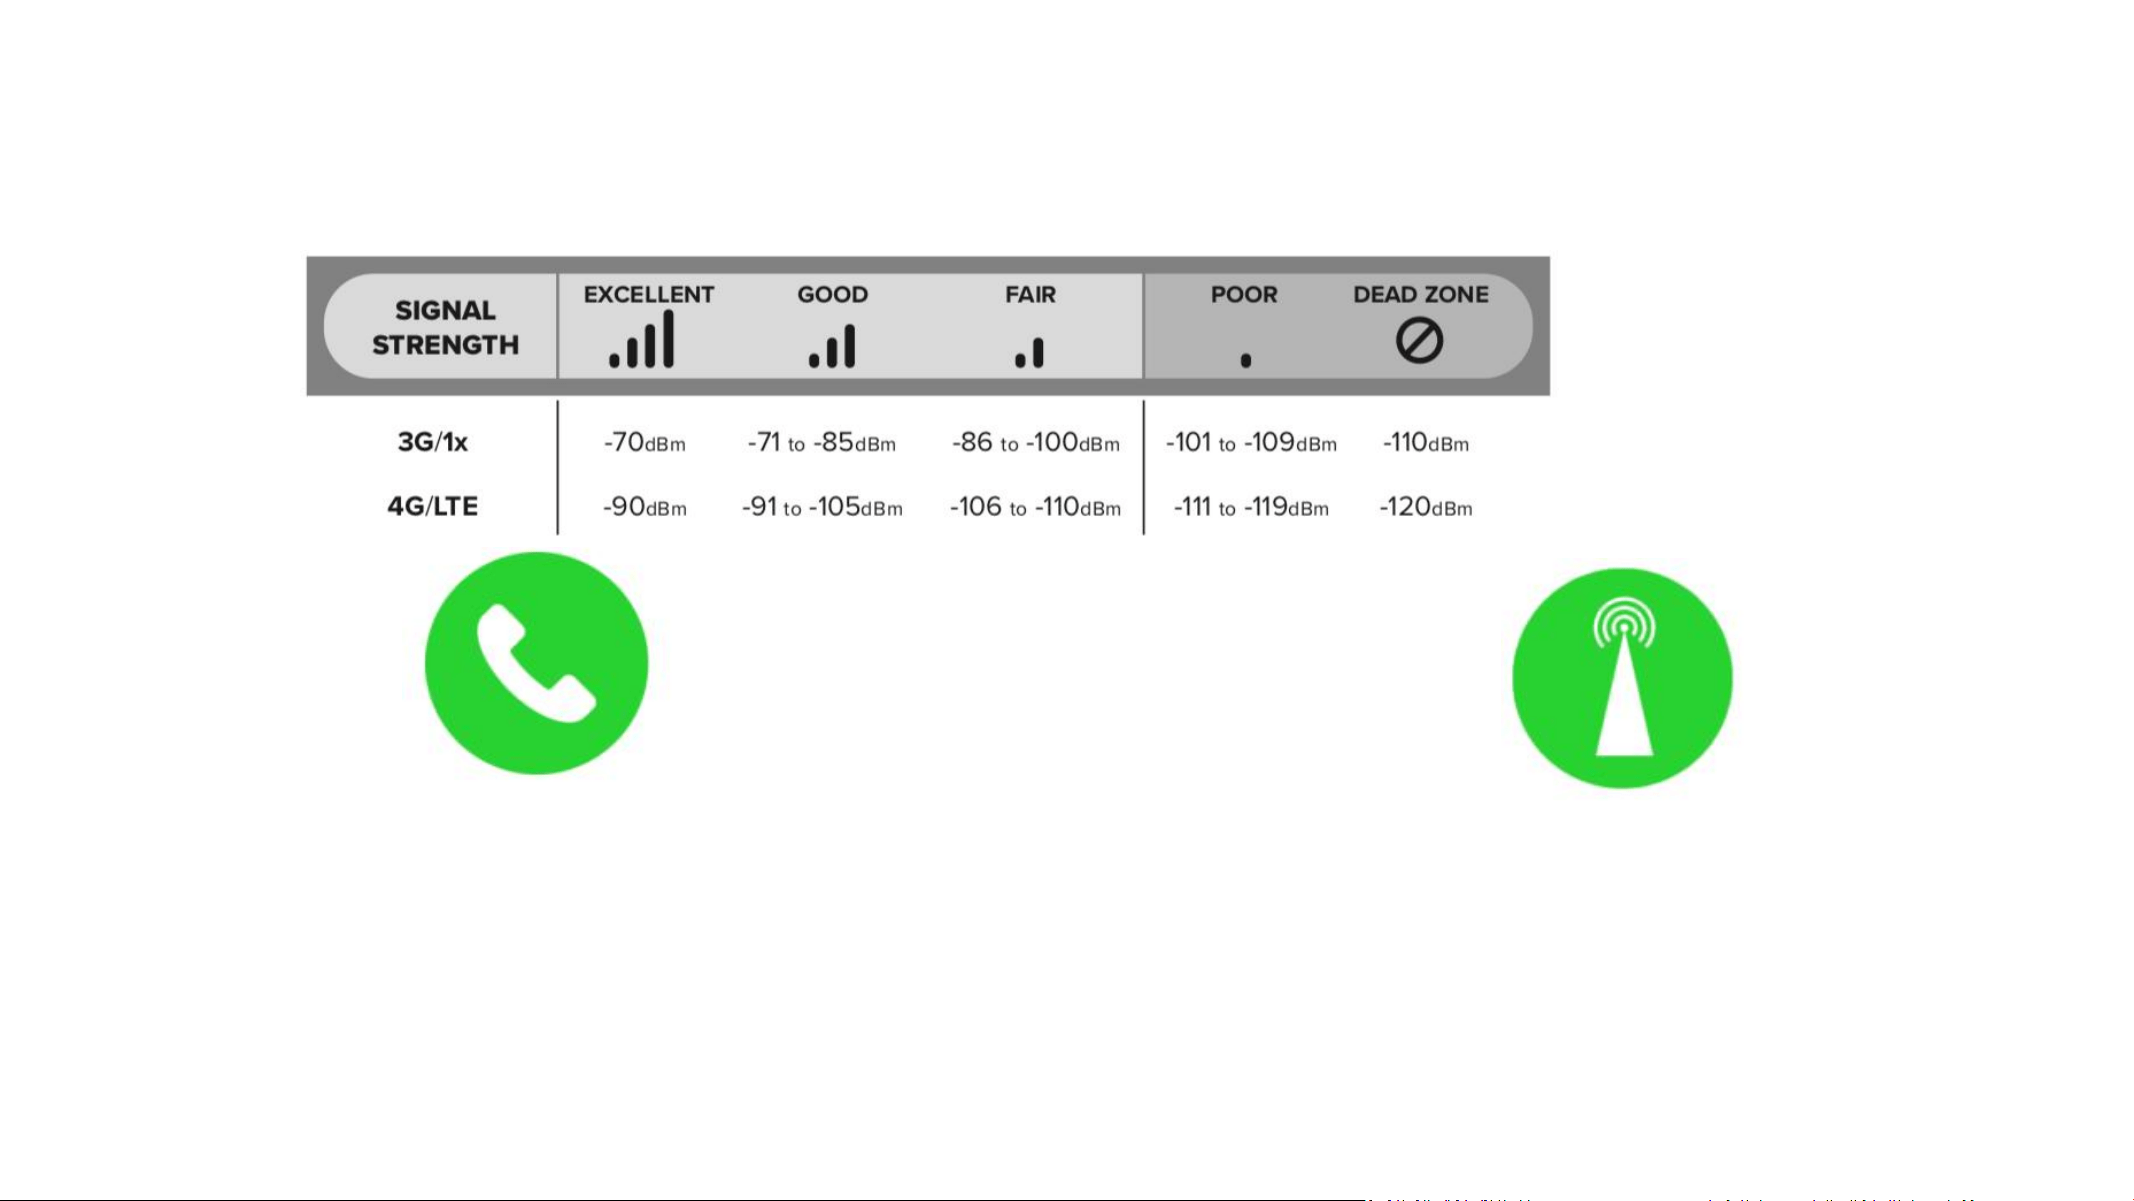
The signal strength requested by the booster system is as below.
Quick Install Guide-LCD
2.4 Look for the best location and direction of outdoor antenna
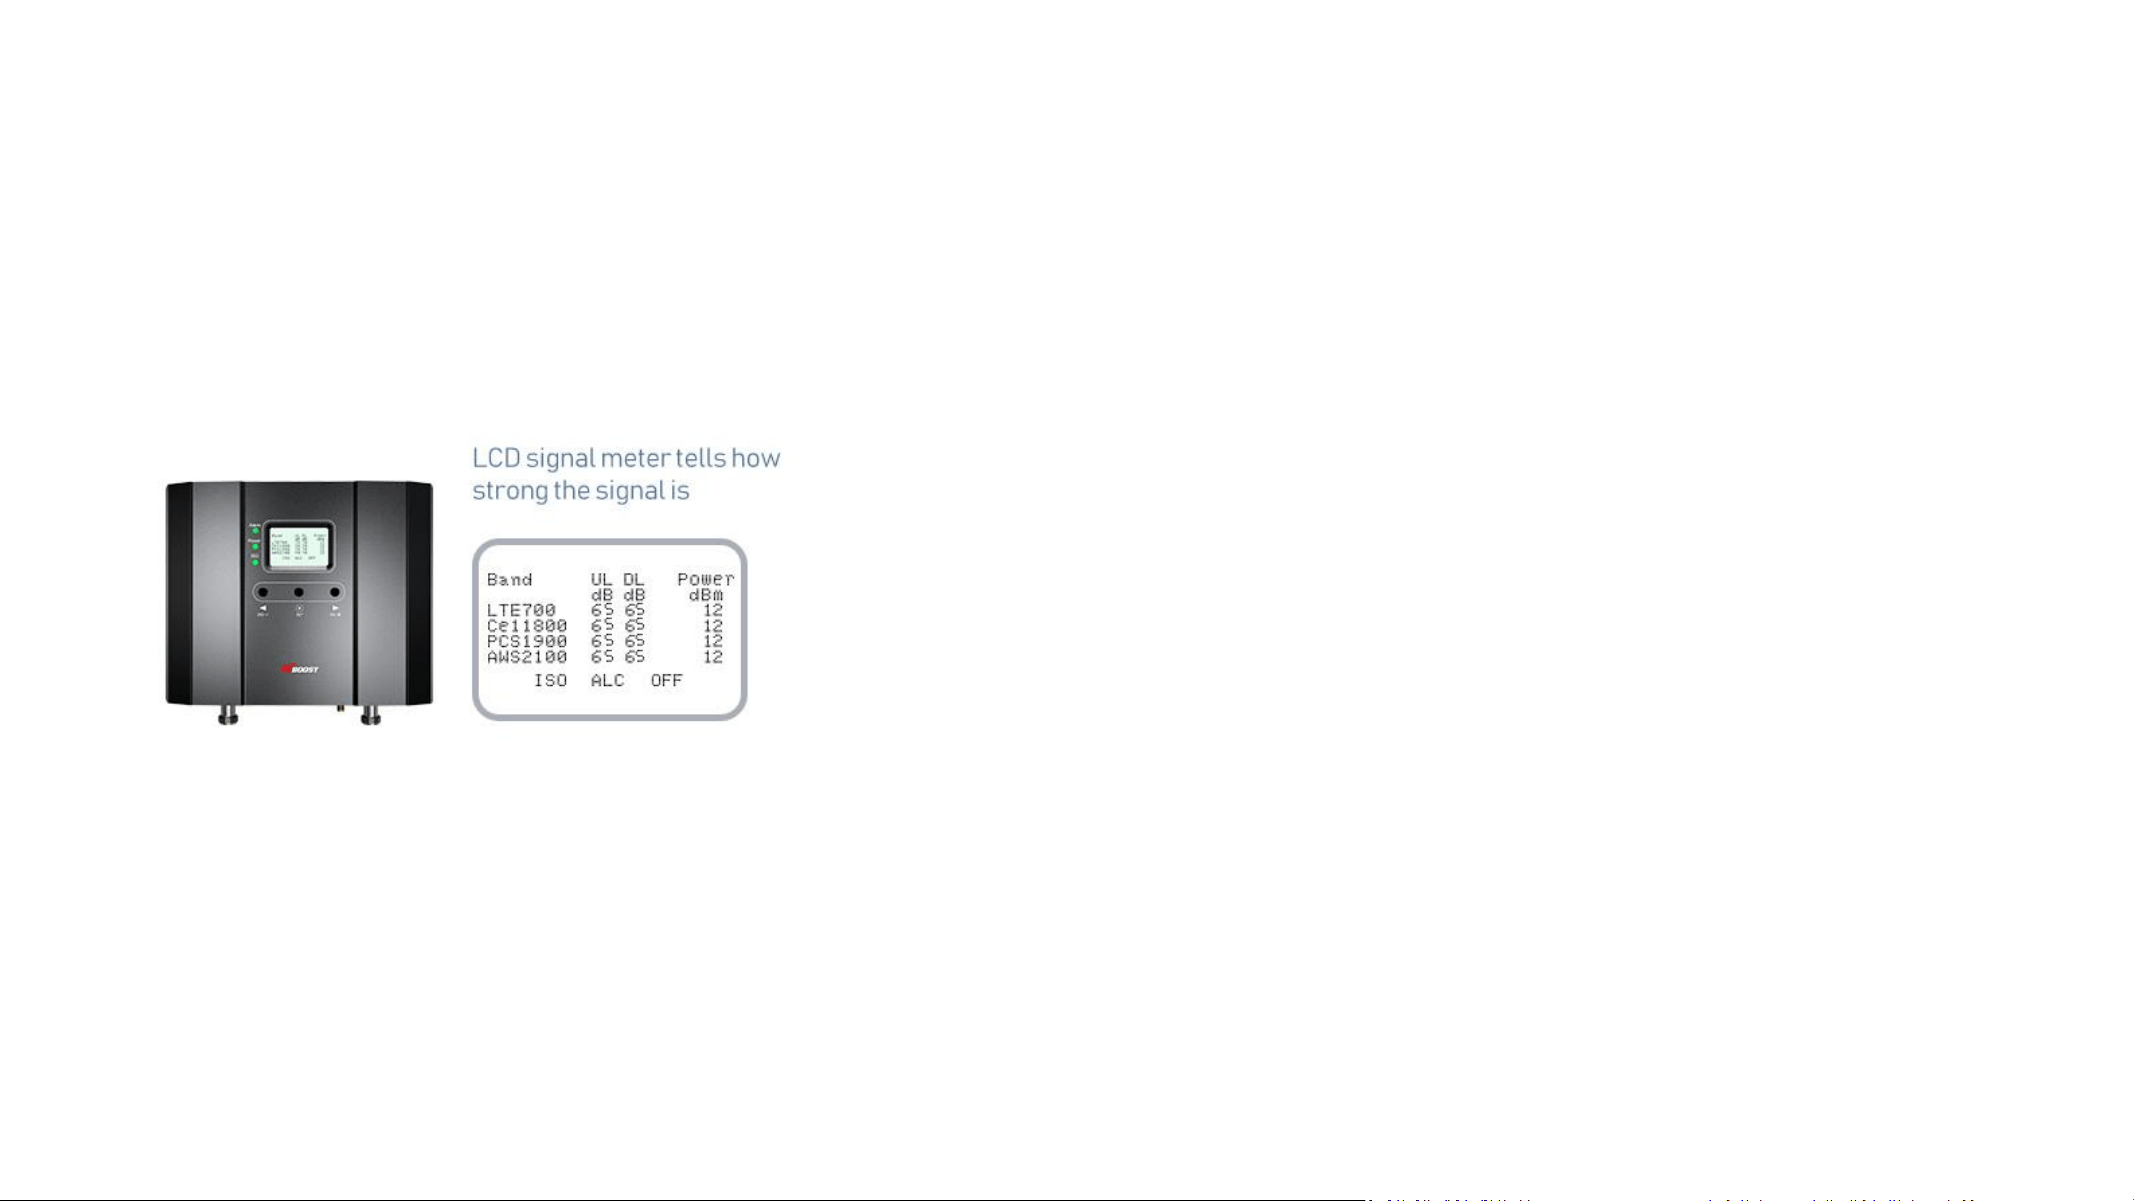
Now pick up the outdoor antenna and point to above cell tower and adjust its position precisely, ask your partner to watch the LCD signal gauge
to get a strongest possible output signal.
You can either look at the signal meter value, 12dBm is the best
Notes: The output power level in the signal meter is the level for each of the two indoor antennas.
The LCD signal meter shows the actual output power of the booster.
Fix the outdoor antenna direction when you get the best output power
Professional Tips:
• Keep in mind that it is normal for the output values may vary dynamically between 1-3 dB
• To optimize the signal for one carrier, point the outdoor antenna towards the closest cell phone tower designated to that carrier •
To optimize the signal for more than one carrier, point the outdoor antenna between multiple towers
• Make sure to slowly turn the antenna while taking the readings so the booster has time to adjust the reading
• Test and install the antenna at the same height where power outputs and gain values reach the boosters maximum capacity
• If you can’t get a good output power, which is even below poor, most probably the install will fail. Either please find a new
place to find good signal again, or drop the install.
Quick Install Guide-LCD
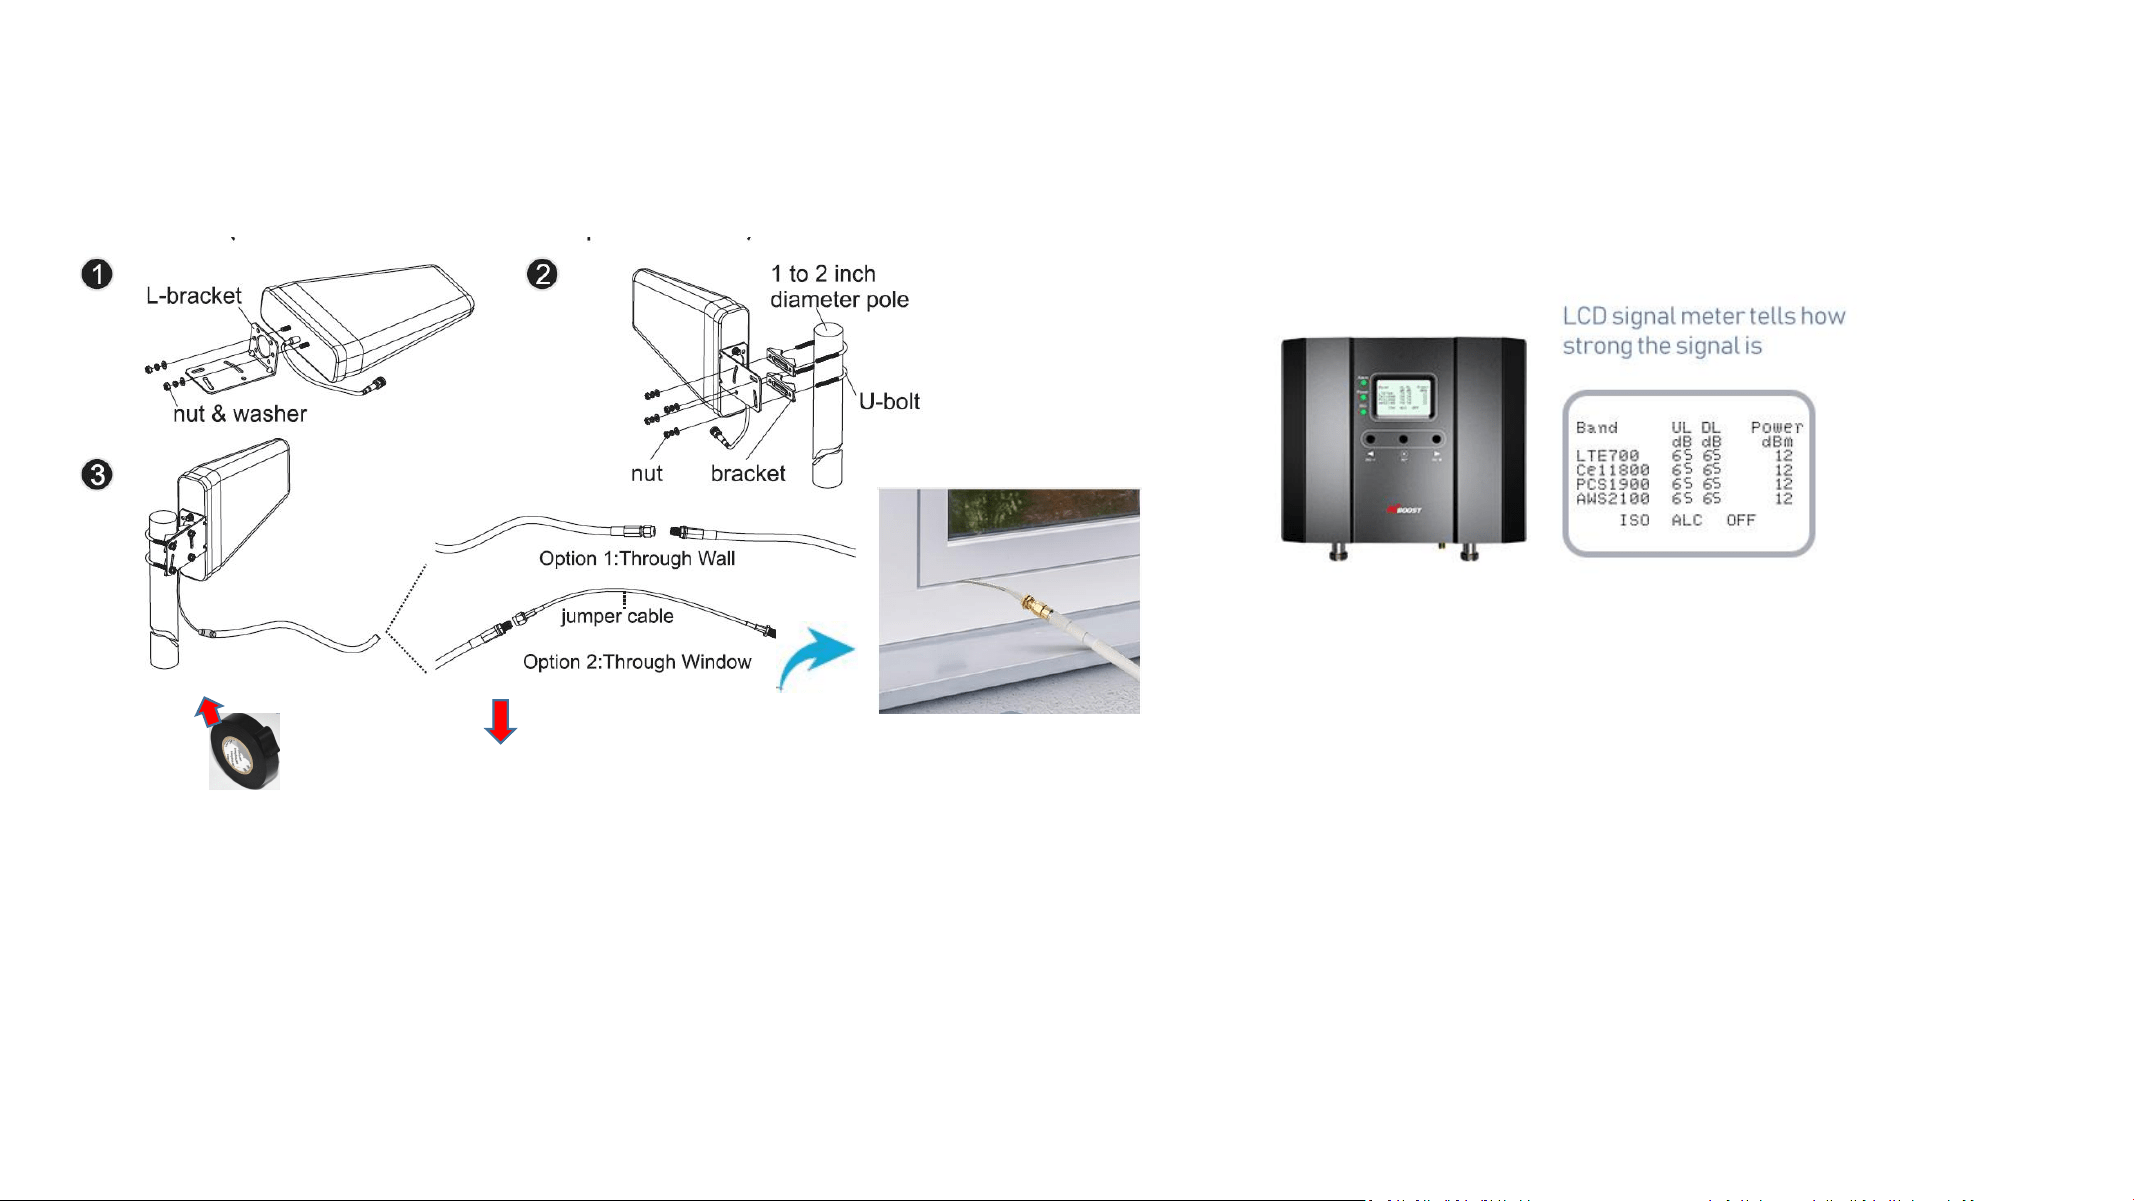
The connector of the cable connection part must be glued with black
waterproof glue to prevent long-term signal drop and reduce signal loss!
2.5 Fix outdoor antenna
Now install the outdoor antenna firmly
2.6 Reconfirm that the signal on LCD signal meter is the best!
And take photo of LCD signal meter for future comparison
during indoor antenna install.
Quick Install Guide-LCD
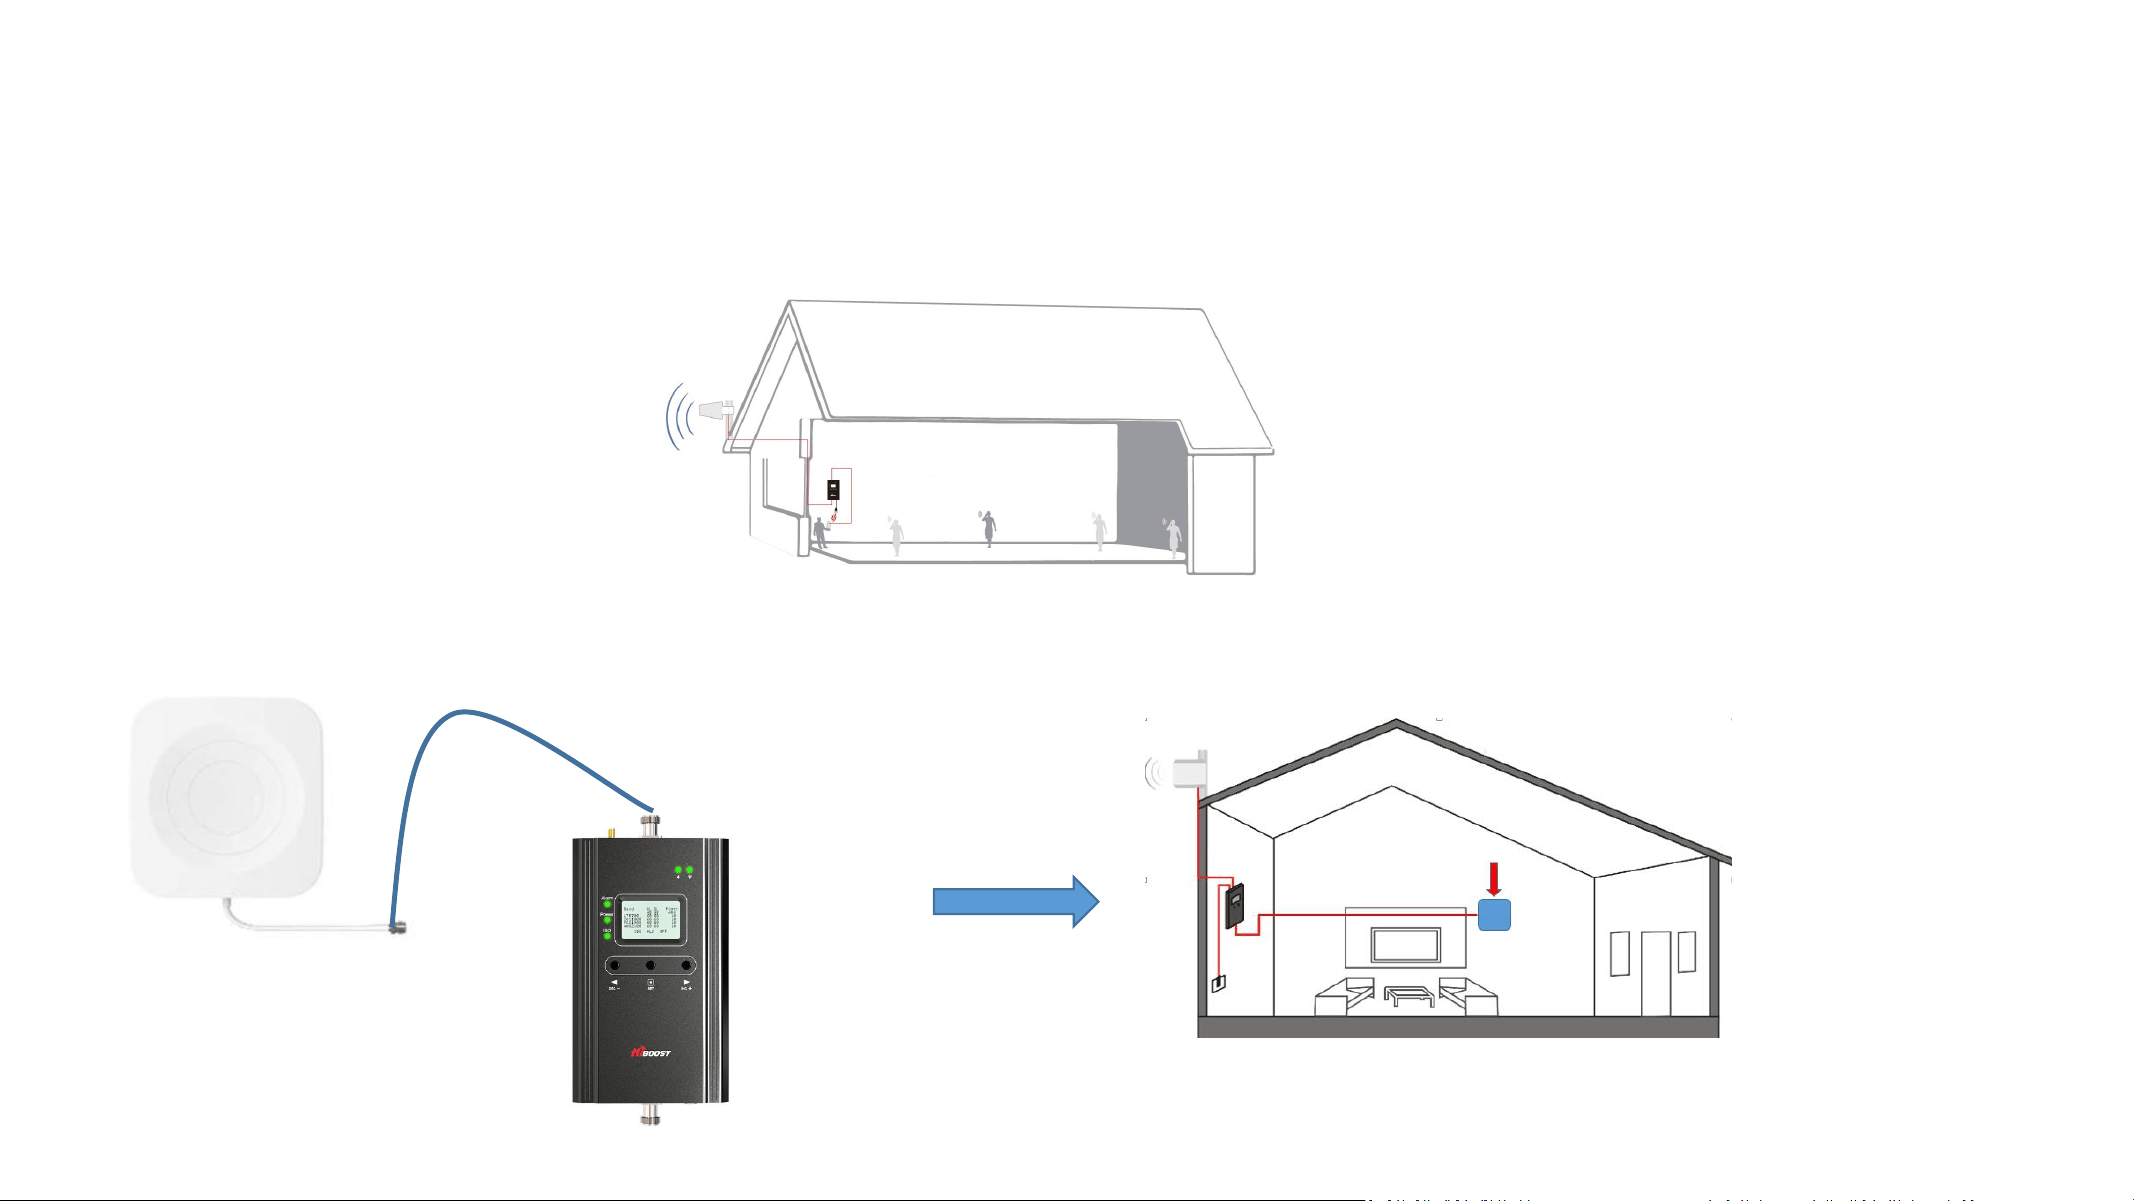
Step 3: Install the indoor antenna
3.1 Now it’s turn to install the indoor antenna
Note: It is better to have two personals at this stage. One can go around to find the best place for indoor antenna. While the other can
walk around to make tests all over to make sure every spot is covered with stable and high quality signal.
3.2 Connect the indoor antenna with the booster by indoor cable, and switch on the booster
Connecting
Find a proper location
Outdoor port
Indoor port
Bluetooth/WiFi
Antenna
Indoor antenna
Quick Install Guide-LCD
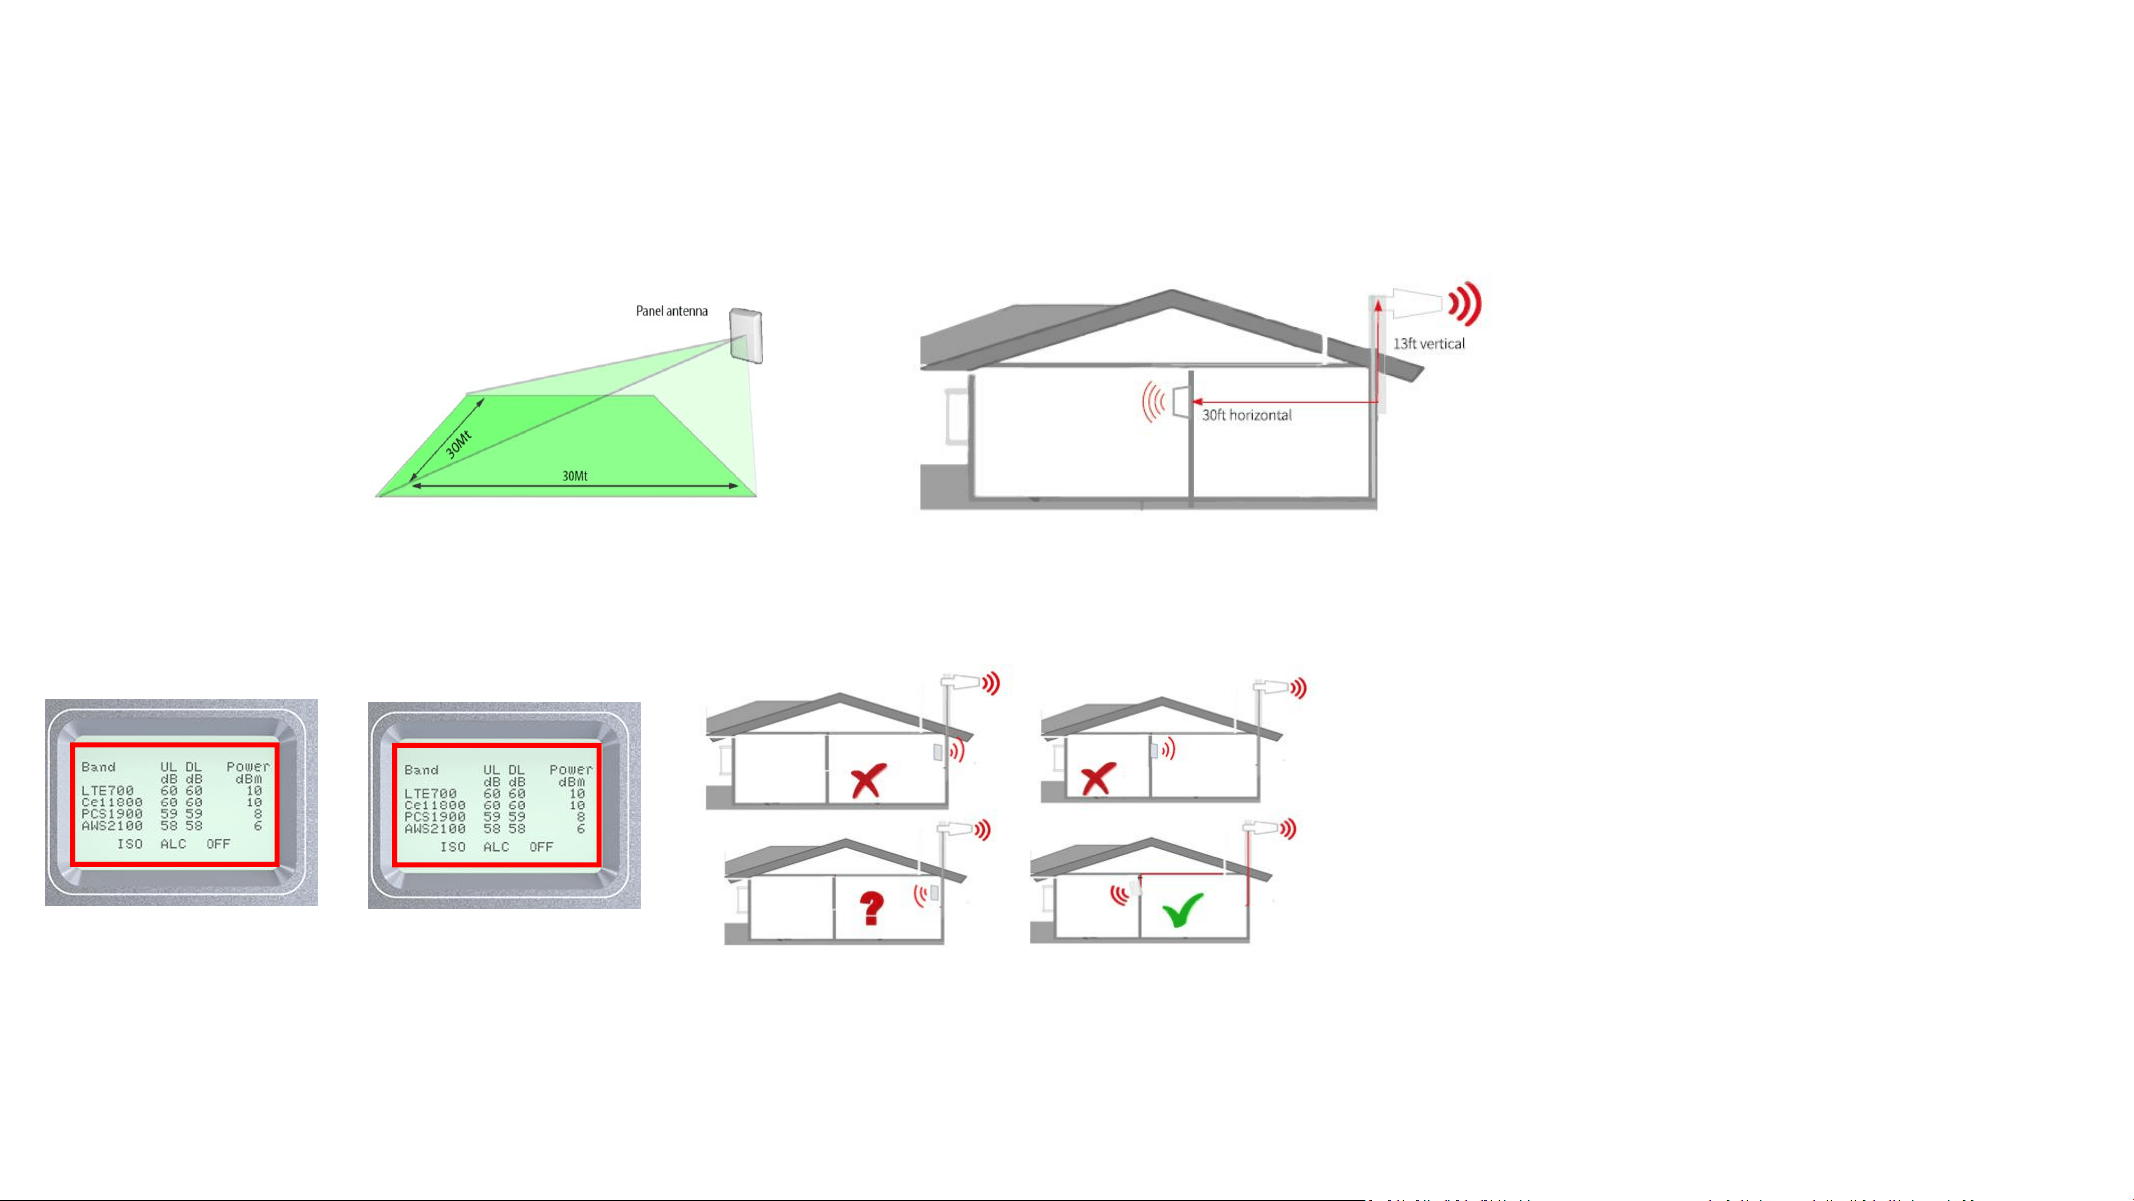
3.3 Find the proper location for indoor antenna
1) Determine the location according to the antenna’s radiation pattern. The radiation pattern is 80° horizontal and 70° vertical.
So try to make sure the space will fall into its radiation pattern.
2) After finding the location, hold it there, and ask the other person to compare the gain and power on LCD signal meter, they shall keep the same or
very nearby with the photo taken during outdoor antenna install. This is to avoid the loop back between outdoor and indoor antennas, please move
the indoor antenna till you get unchanged or slightly changed gain and power. This step is quite crucial for the booster’s best performance.
Again the tips to avoid the loop back
• Increase the distance between the outdoor and indoor antennas
• The outdoor and indoor antennas shall be back to back
• Use barriers between the indoor and outdoor antennas
Two requests of indoor antenna install
A. Radiation shall good enough to cover whole space
B. Loop back shall be avoided
=
Quick Install Guide-LCD
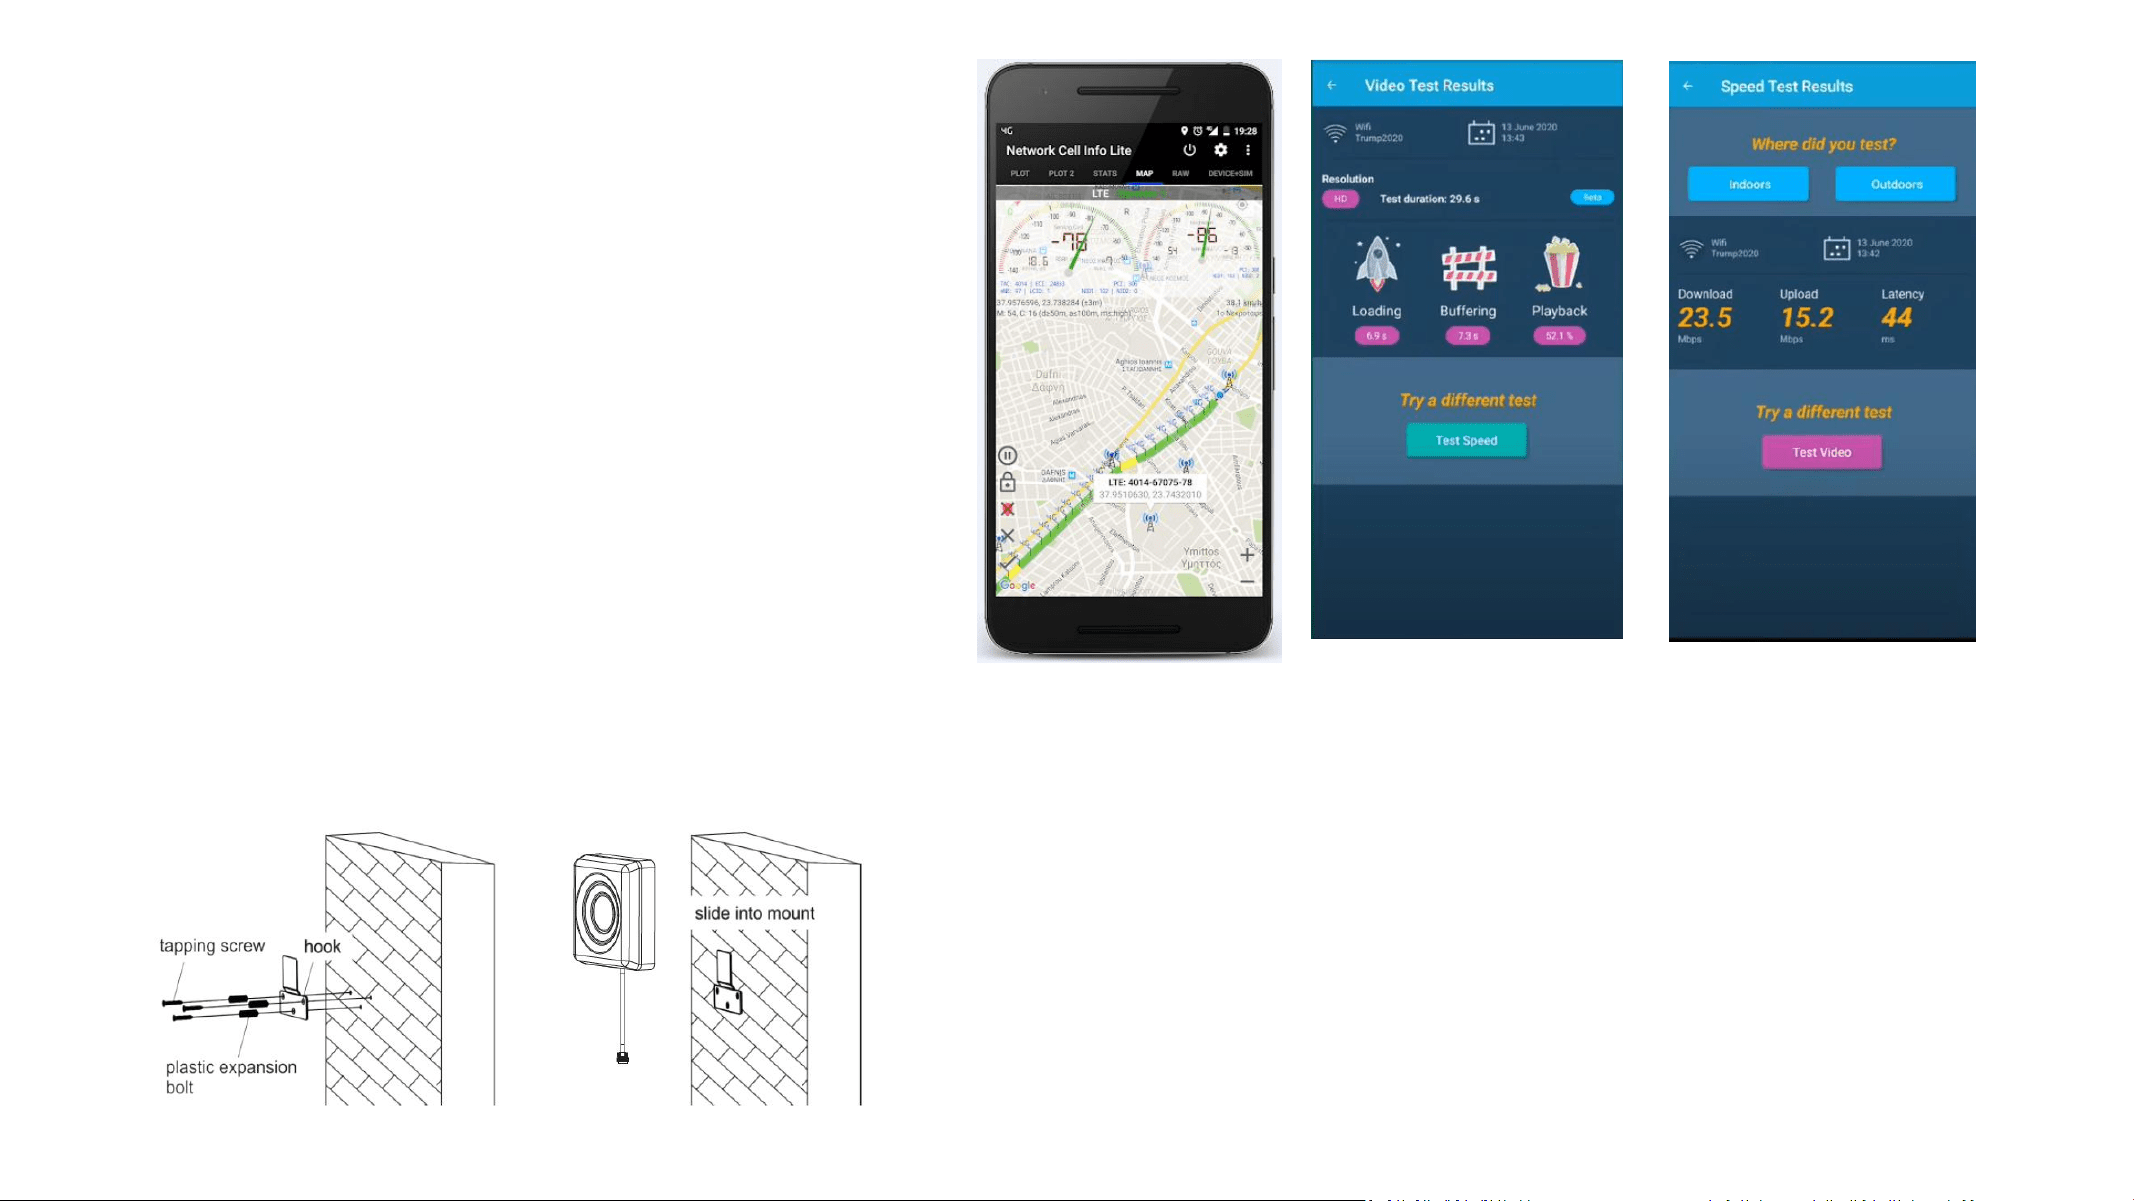
3.4 Signal Quality test
After finding such a location, hold the indoor antenna there
and ask the other person to walk back and forth, and use the
3
rd
party app to test the signal strength, voice, and data.
We recommend you to test the signal strength, the voice
quality and data speed.
*Notes Again: Just remember that strength and quality are two
separate issues. A poor quality “strong” signal can be next to
useless, but a clean signal of two bars might be all your device
needs.
If the test is good, then congratulations, the indoor antenna position has been successfully found. Please install the indoor
antenna.
Quick Install Guide-LCD
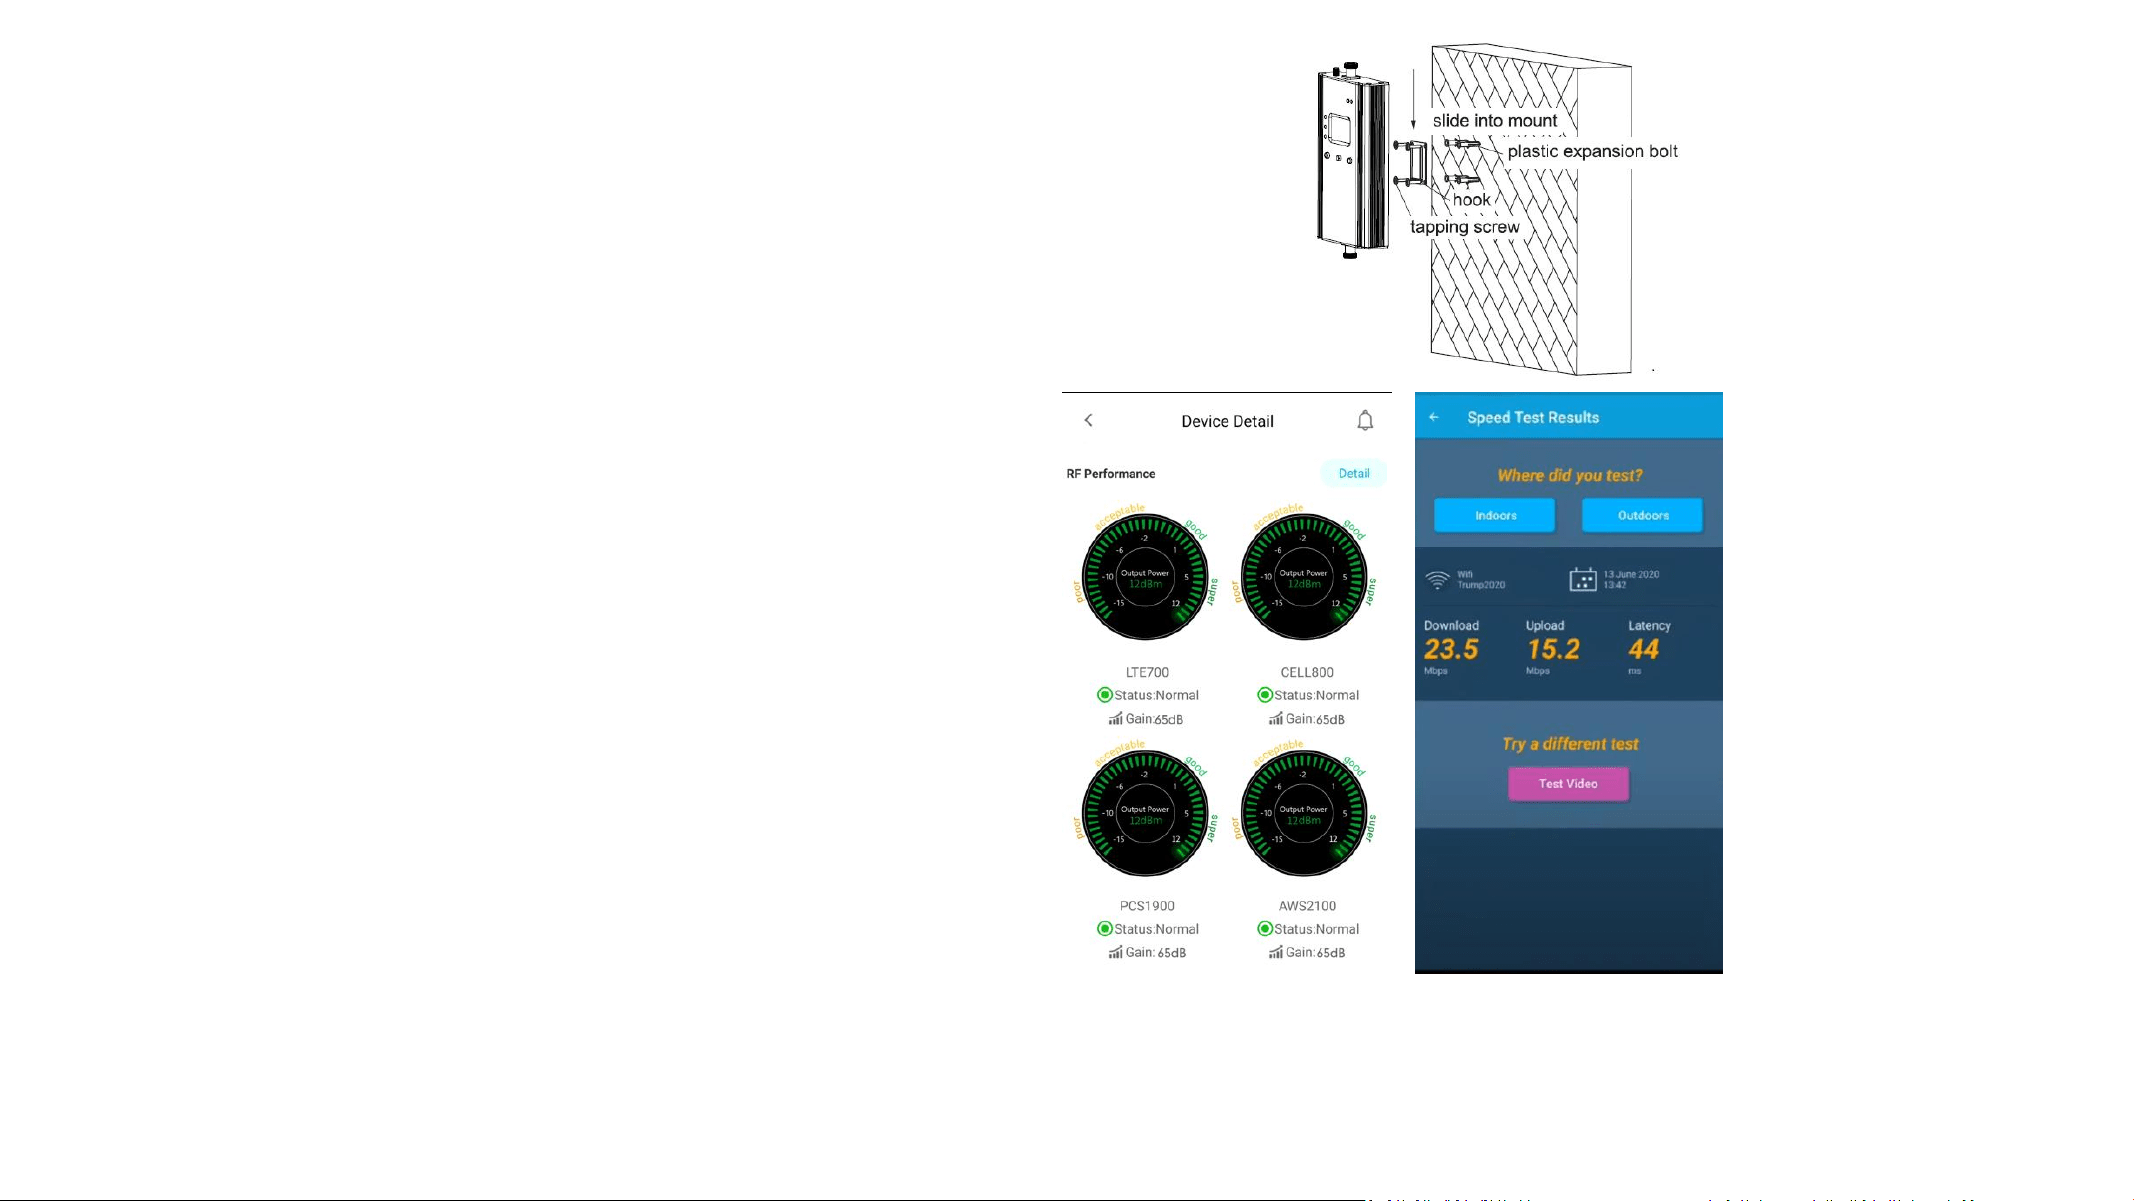
Test again the performance after installation done
a. First make sure the Signal gauge value is unchanged
from the outdoor antenna install.
b. Test by a third-party app, calls and network data are
smooth in most indoor signal coverage areas.
Step 4: Install the booster and the cables
Mount the signal booster in a dry and cool area, and it
shall be easily accessible for maintenance.
And run the cables neatly, please do use the water-proof
tape to protect all outside connections from the weather
a. Now everything is completed and please start to enjoy the mobile services.
b. If the result is not satisfactory or you want to be better, you may repeat the whole or part of the process to improve.
c. Please contact us: Signalsupervisor App online support, Phone and Email in case you have any problems.
Quick Install Guide-LCD