
G1
product
manuals

catalogue
1.PackingList01........................................................................... 01
2.ProductInstallationandFolding...............................………………………………………………………………… 02
3.ProductStructureIntroduction 03................................................ 03
4. Product Icon Introduction 04.................................................................. 04
5. Product Usage 05...................................................................... 05
6. Product Features 06...................................................................... 06
7. APP Introduction 07........................................................................ 07
8. Product Parameters 10............................................................ 10
9. Product Warranty 1........................................................... 1
1
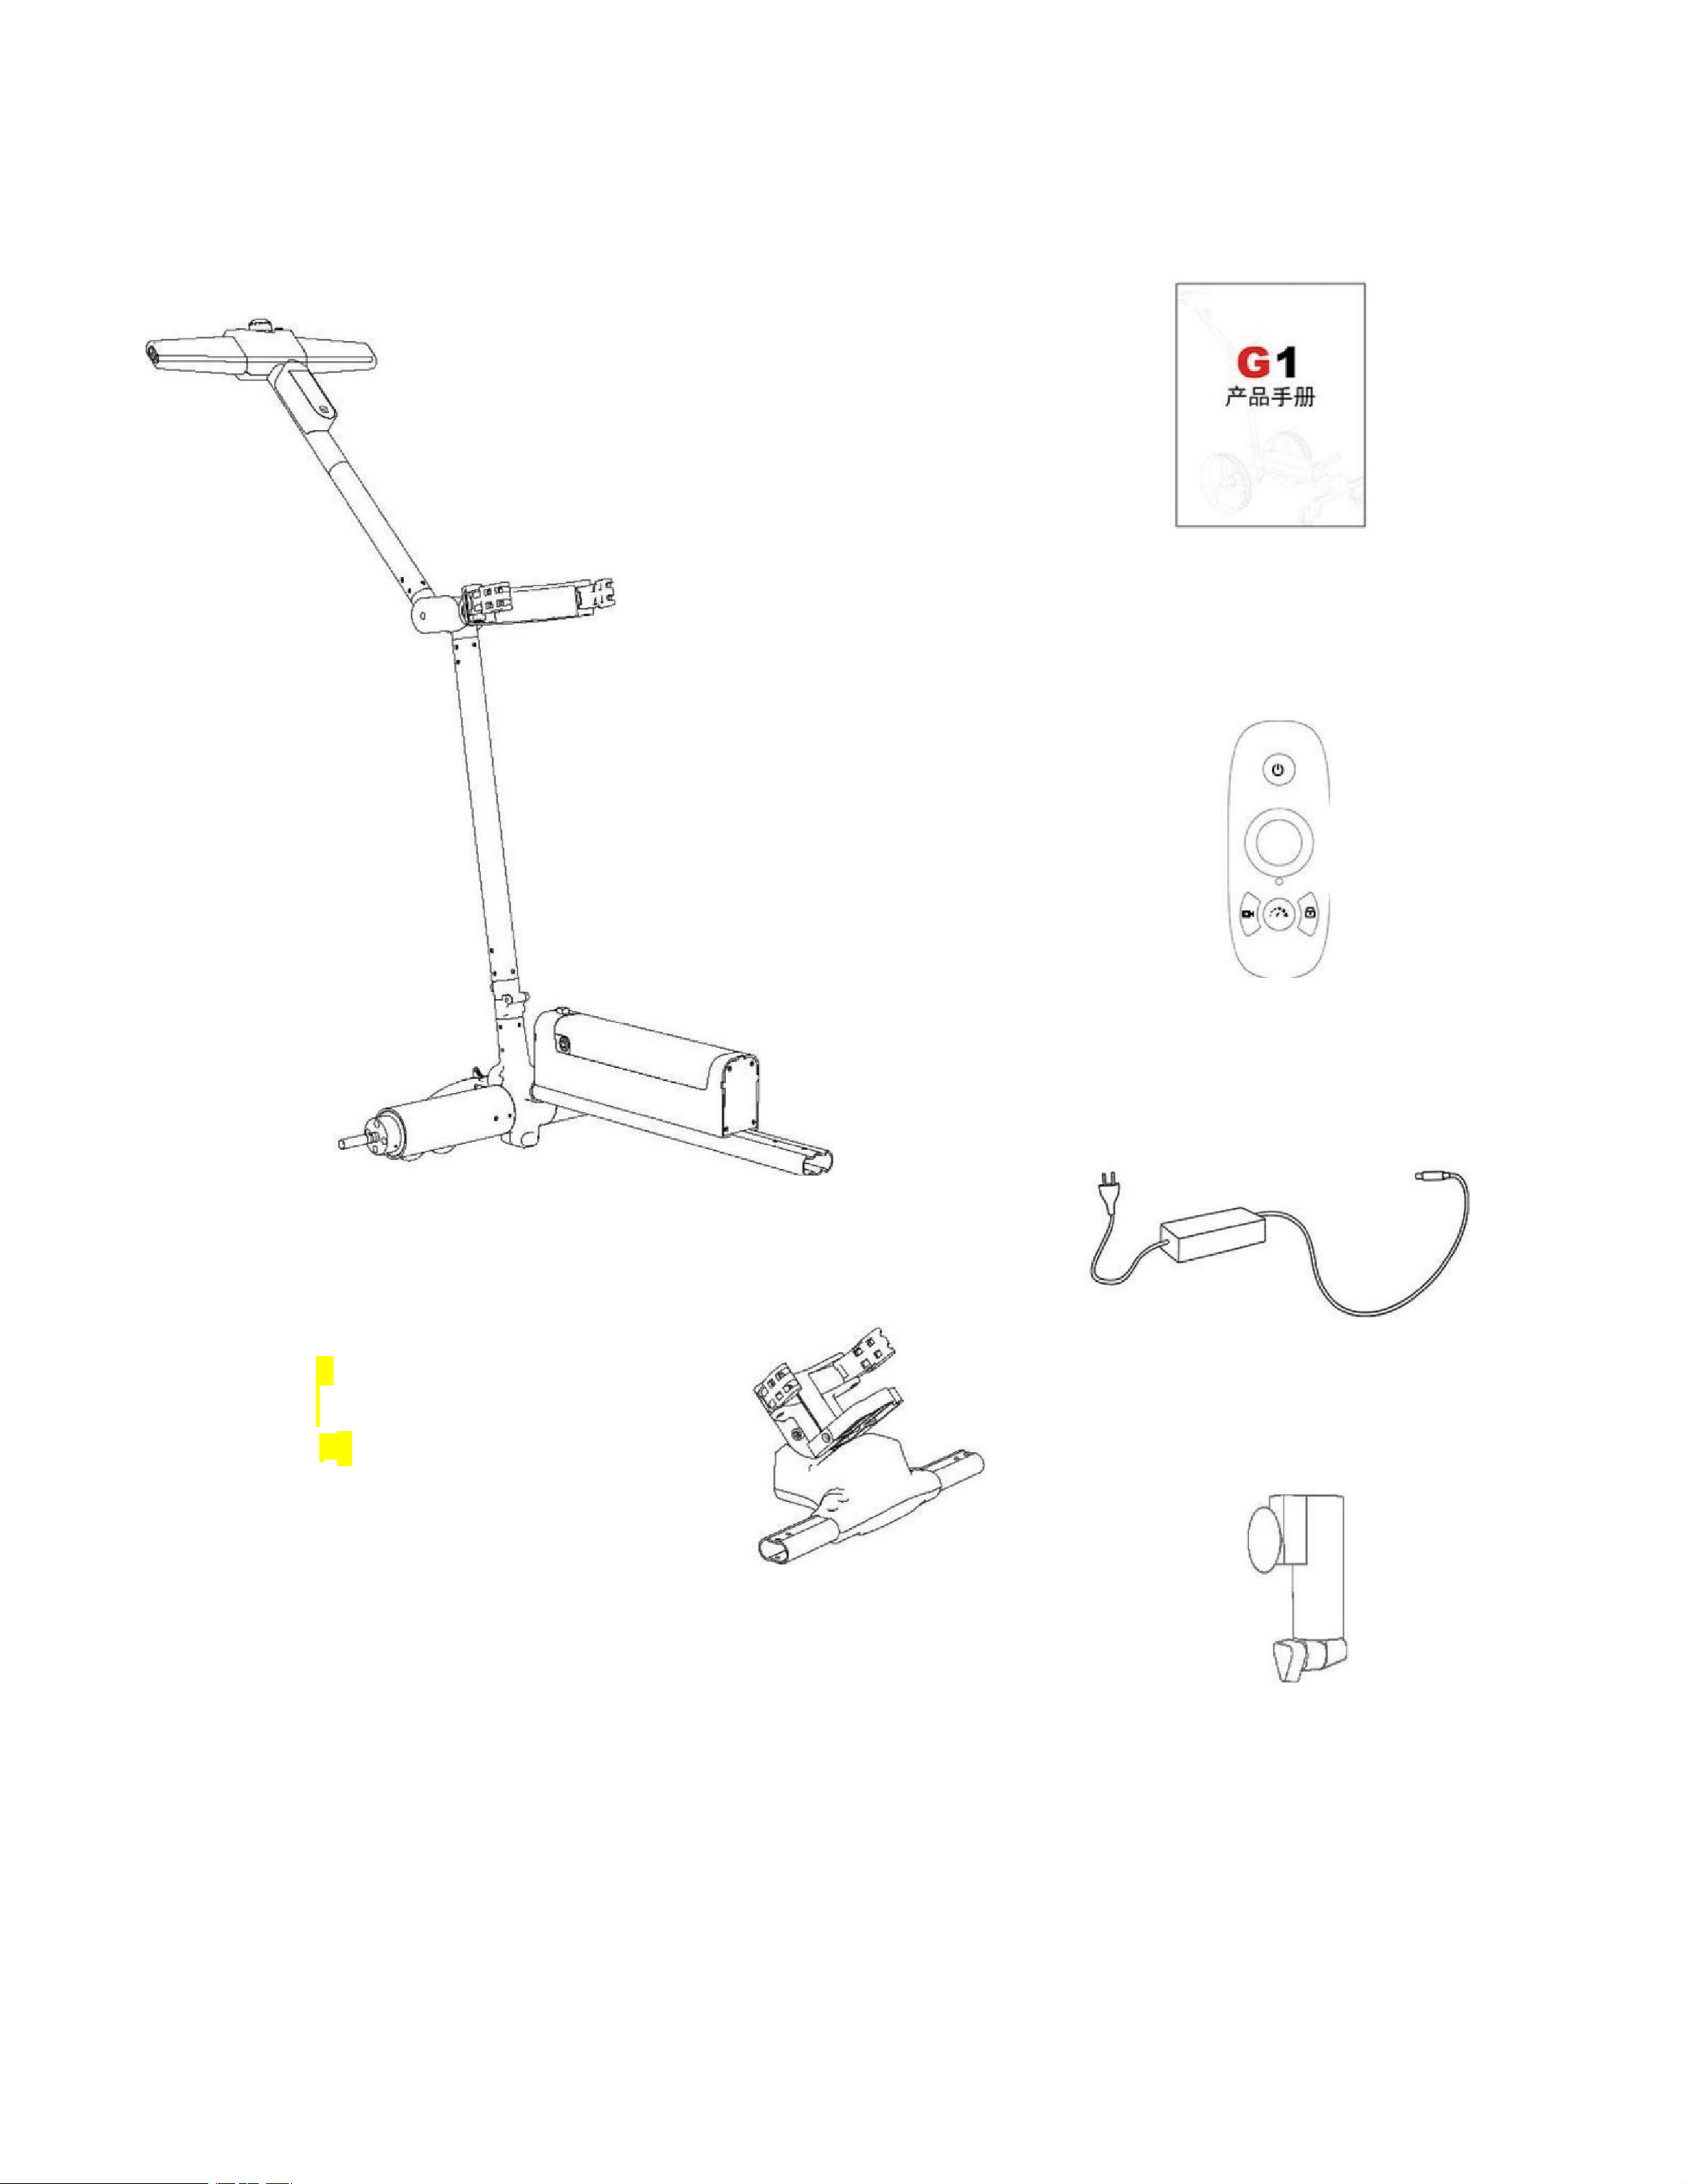
1. Packing list
1. Ball bag car ×1
IT
I n o t h e r w o r d s
TT
bent
Oculomotor
2. Product
Manual ×1
3. Remote control
×1
4. Charger ×1
5. Tool kit ×1 6. Ball bag cart head ×1 7. Umbrella stand ×1 5.
Tool kit ×1 6. Ball bag cart head ×1 7. Umbrella stand ×1 5. Tool
kit ×1 6. Ball bag cart head ×1 7. Umbrella stand ×1
i.e.,
educationa
Objec
tive
Obje
Qu
Mao

1
8. Motor wheels ×2 9. Universal wheels ×2 10. Storage bag ×1 8.
Motor wheels ×2 9. Universal wheels ×2 10. Storage bag ×1 8.
Motor wheels ×2 9. Universal wheels ×2 10. Storage bag ×1
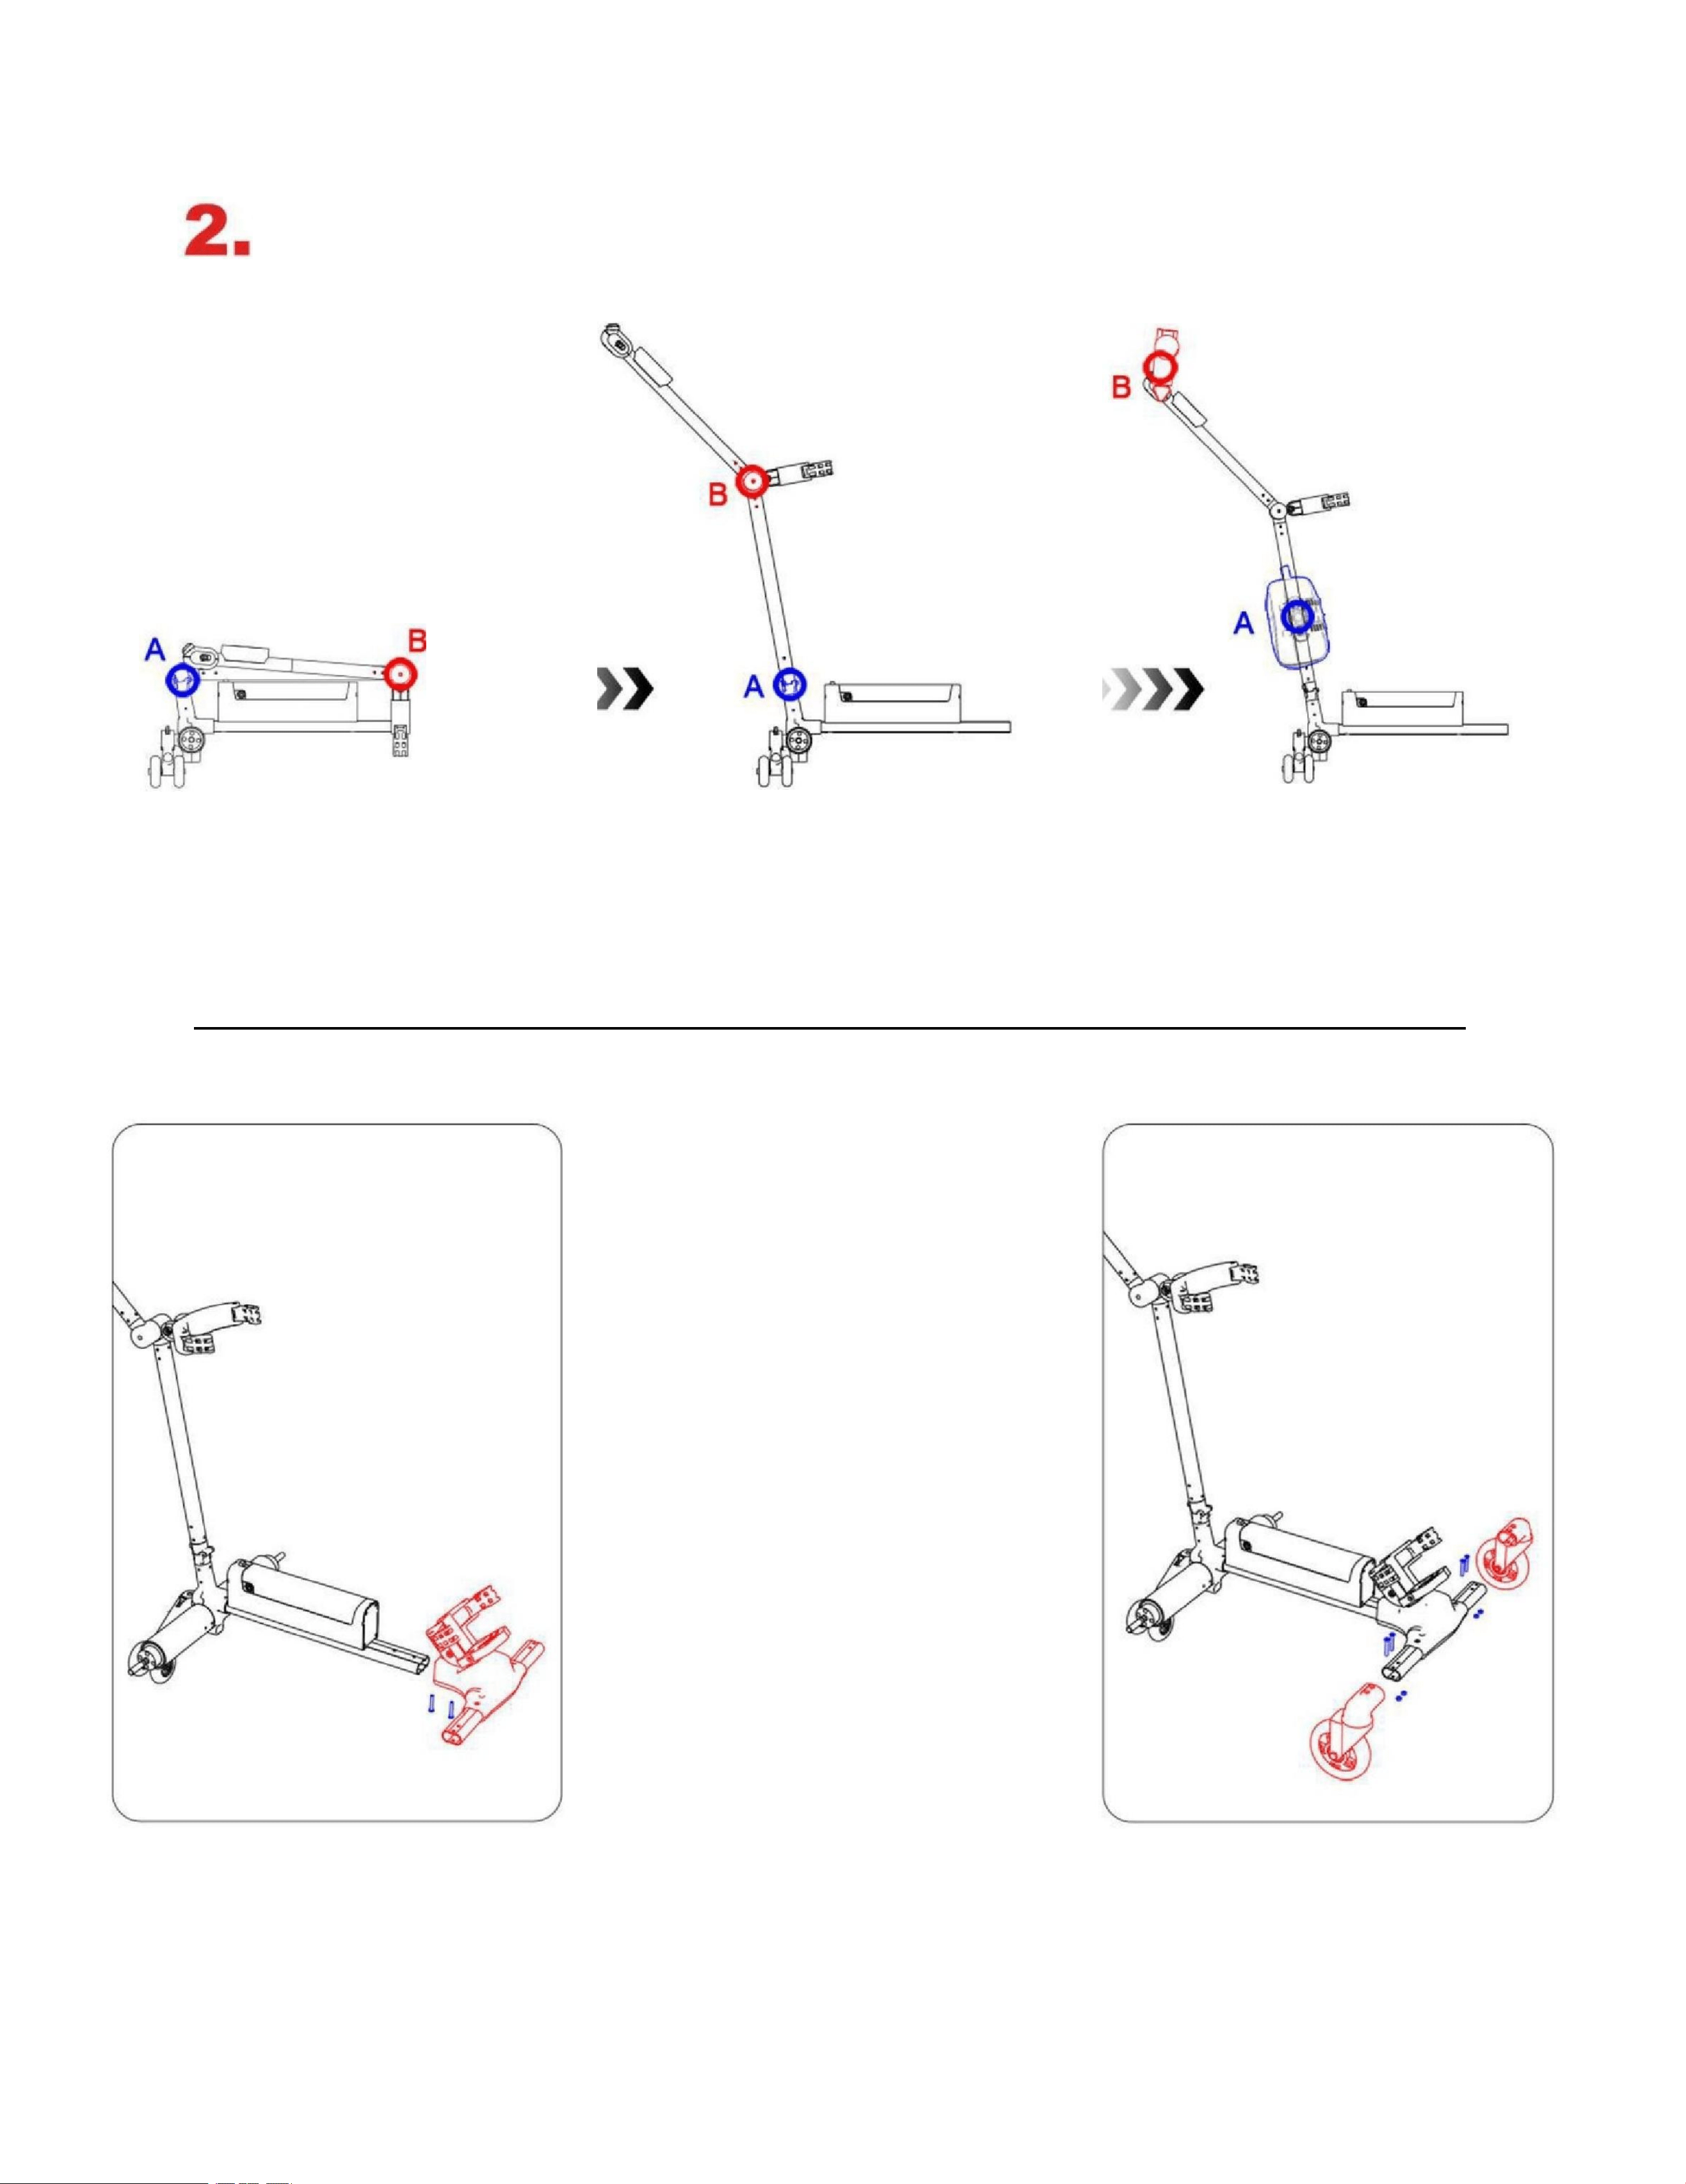
2
Product installation and folding
1. Prioritize opening the A-folded joint, followed
by the B-folded joint, to unfold the upper part of
the cart.
2. Take out the provided storage bag and attach it
to the corresponding magnetic position on the
ball cart using magnetic clips, then assemble it
with the umbrella bracket on the handle side.
3. Remove the two supplied
M5×35 hex socket cup head
bolts from the vehicle
underbody to secure the
front end.
4. Remove the included left
and right swivel wheels, and
secure them to the vehicle
head using two M5×35 hex
2
socket cup heads and hex nuts
on each side.
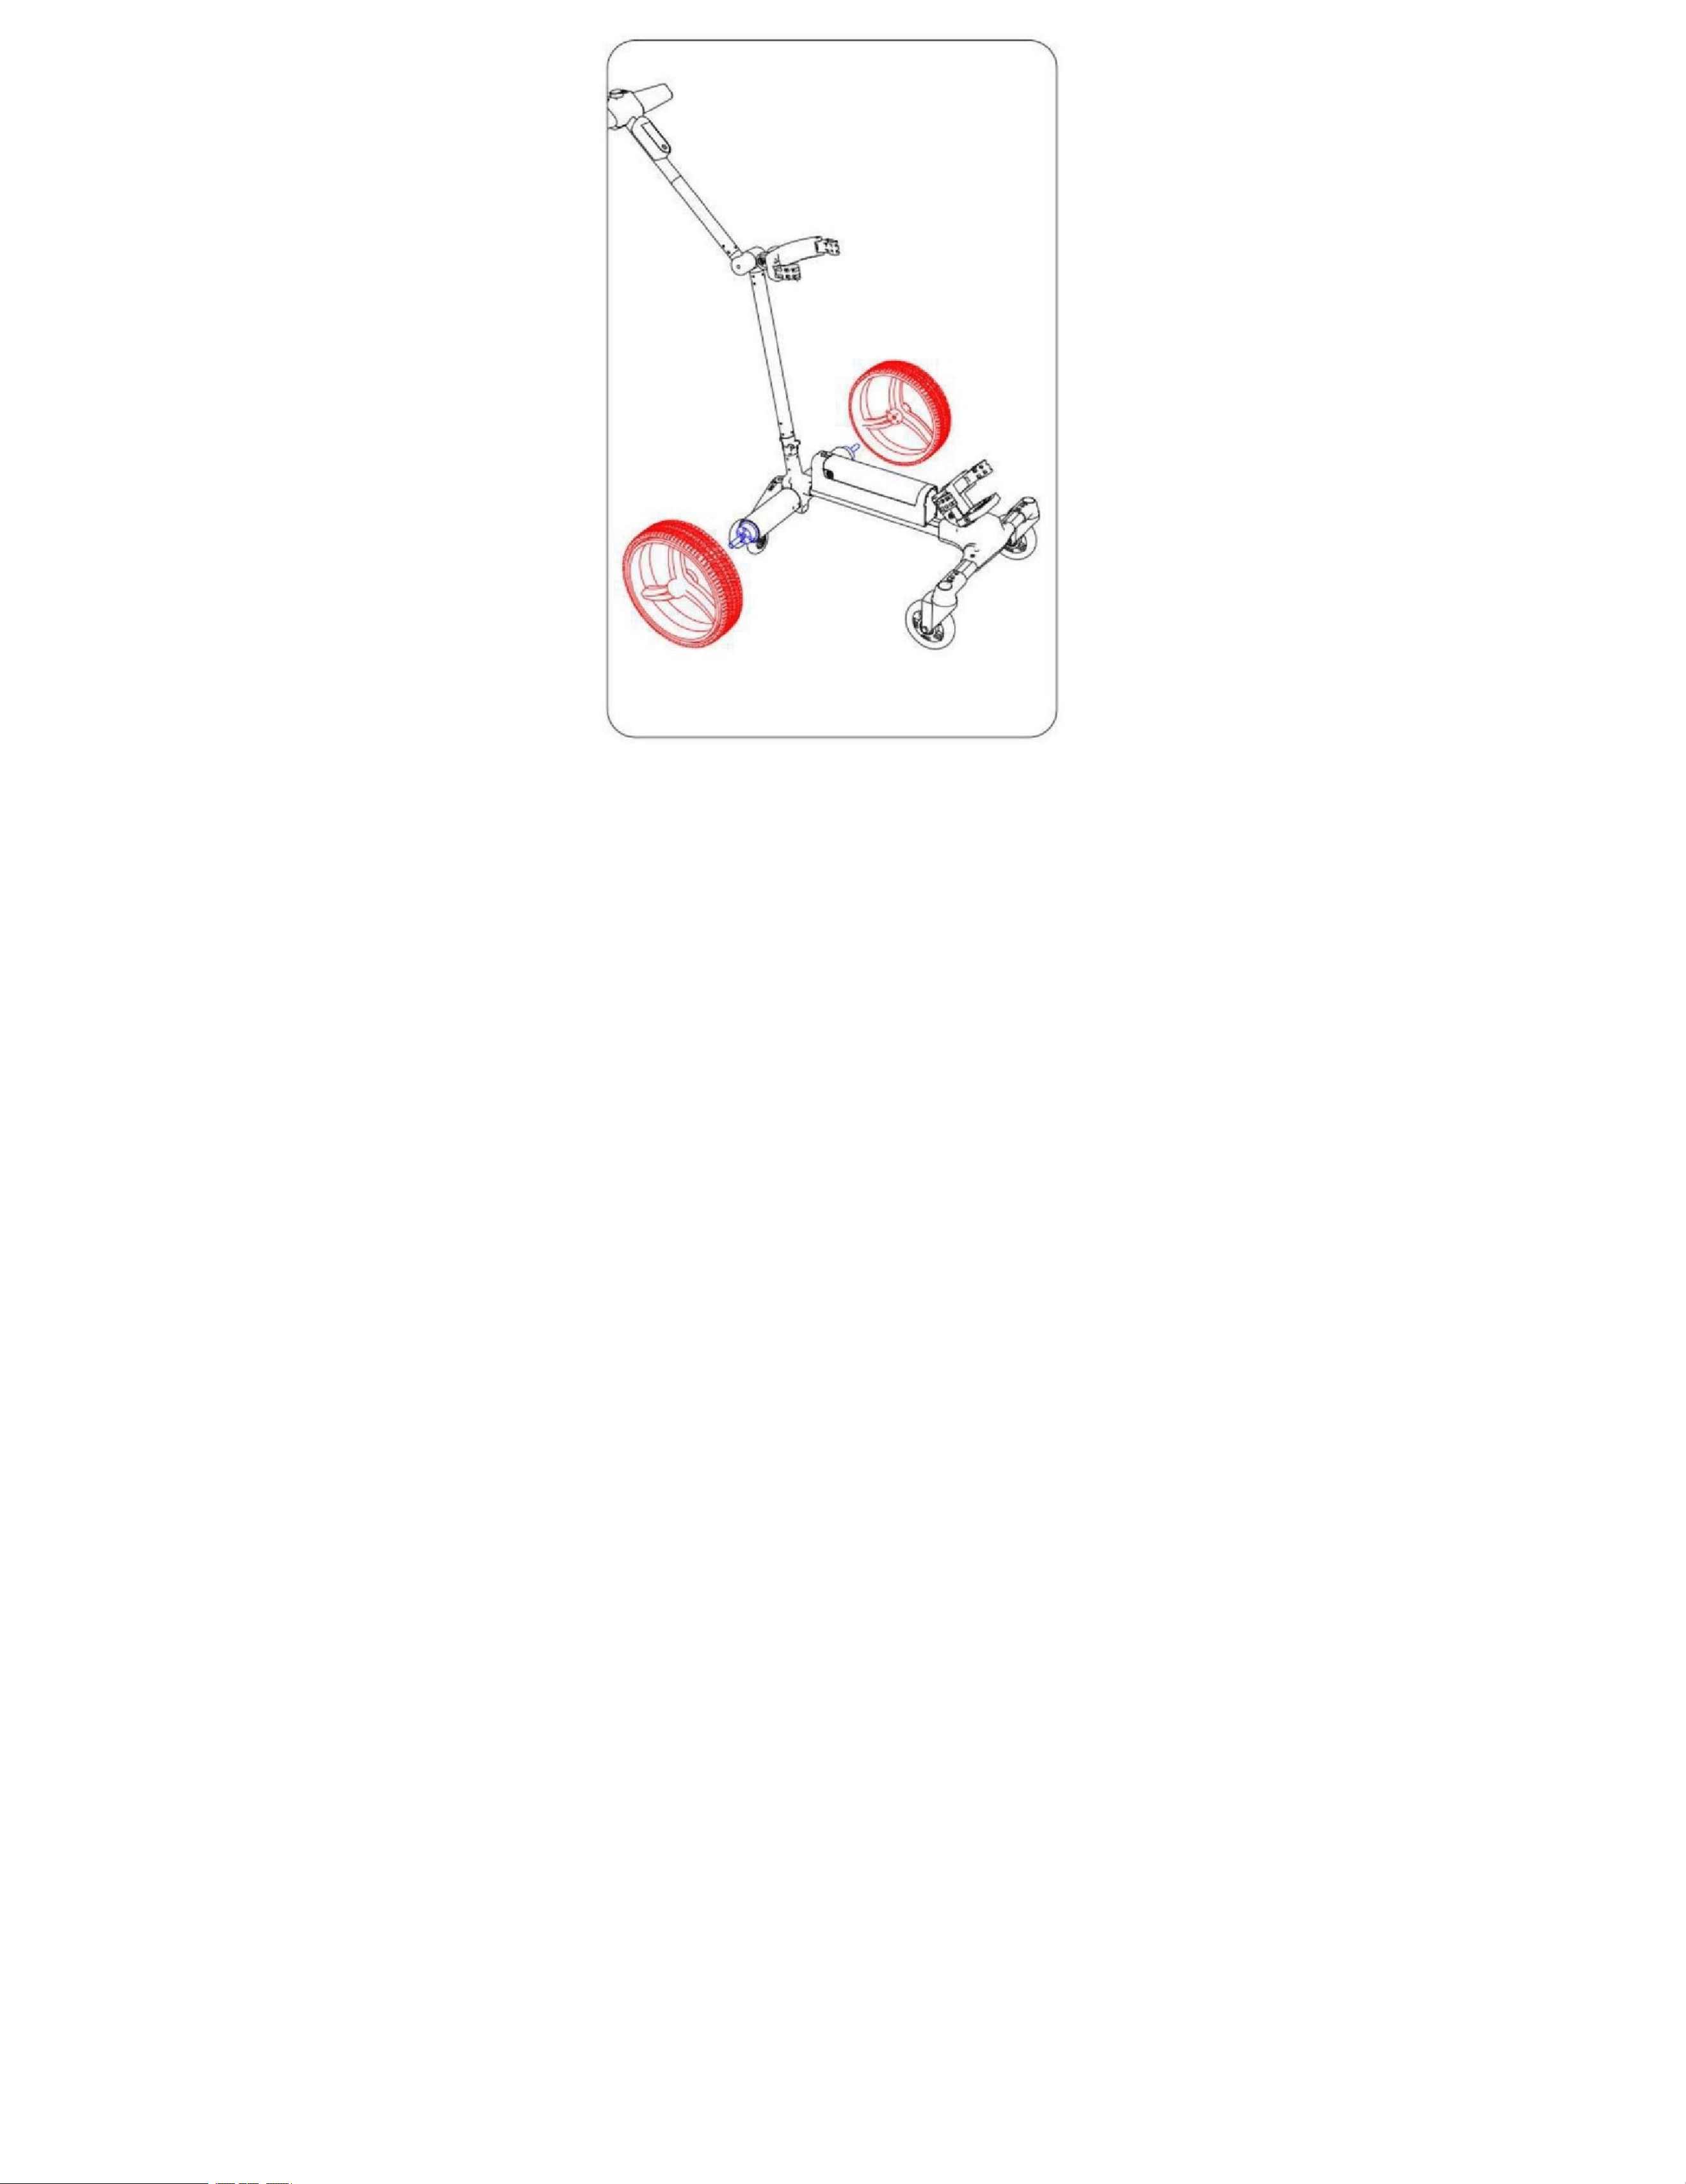
5. The motor wheel is equipped
with a quick-release structure,
which can be secured by
aligning with the locking
position.
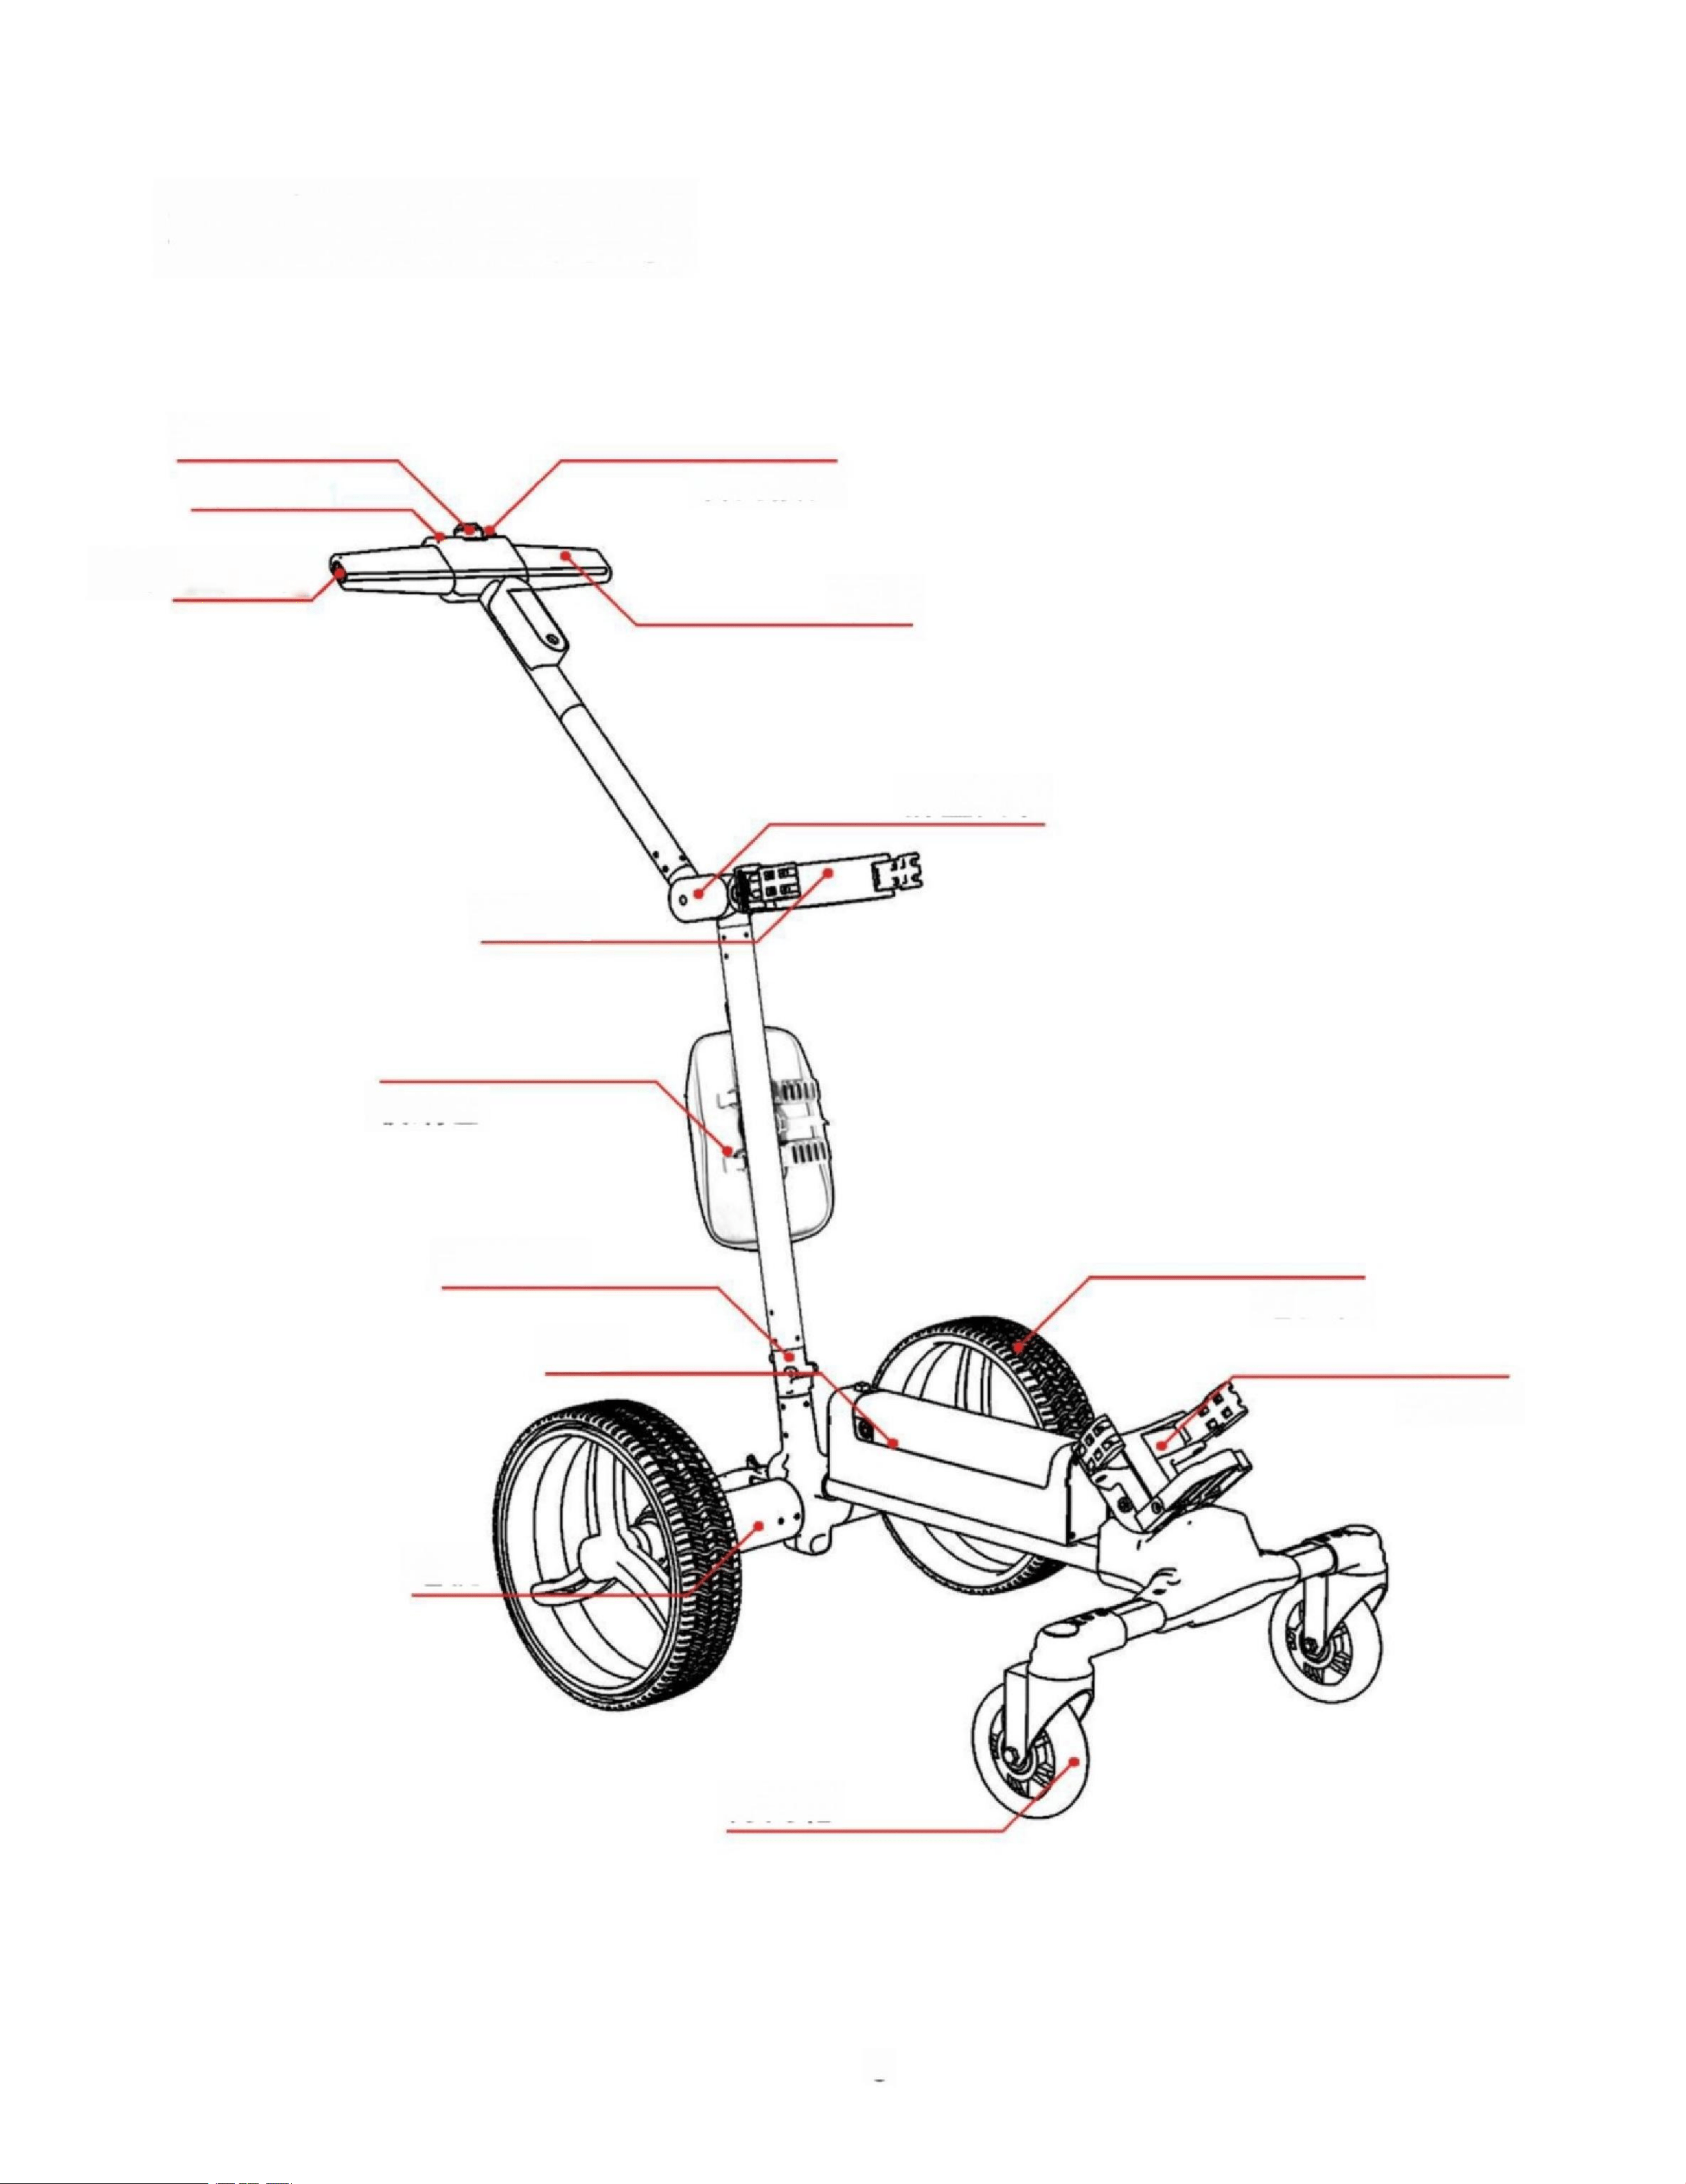
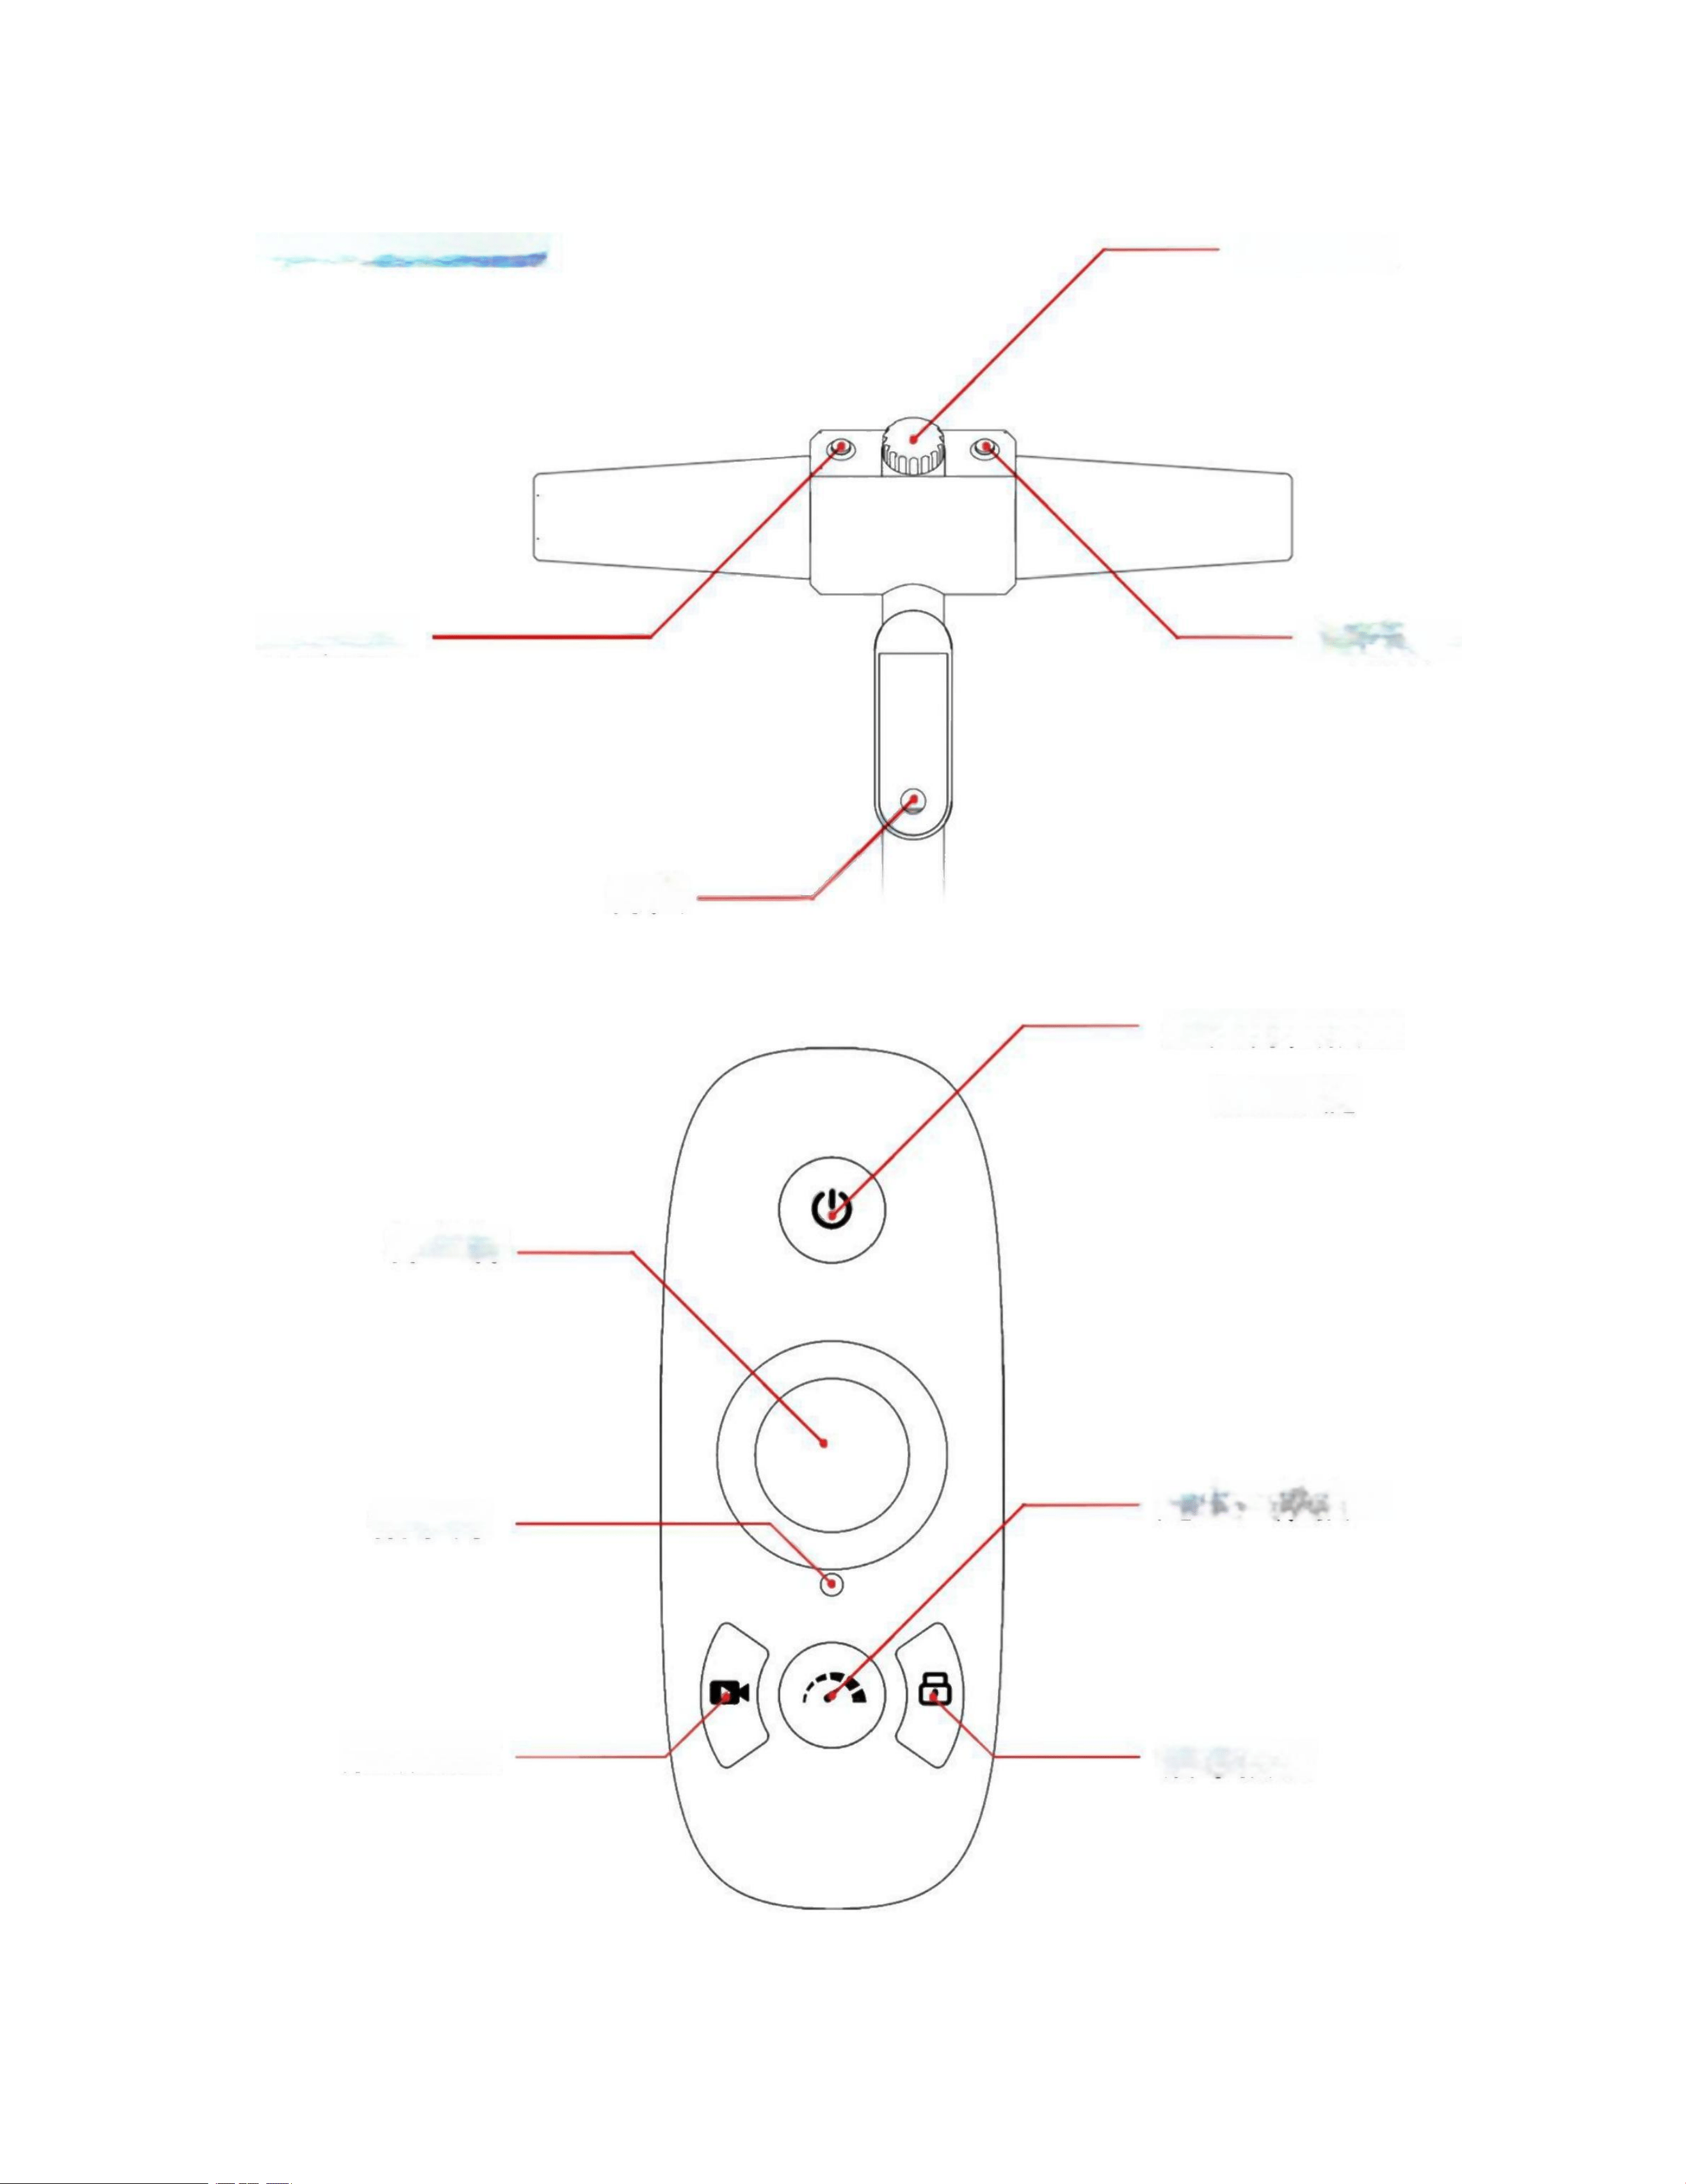
3. Product Structure Introduction
Steering knob
Steering wheel steering button Steering wheel steering button Steering wheel steering
button Steering wheel steering button
Umbrella bracket hole position
handrail
Folding joint
sphincter pouch
storage bag
Folding joint
Motor wheel
cell
sphincter pouch
any power-generating or power-driven machine
Omni-directional wheel
3
4
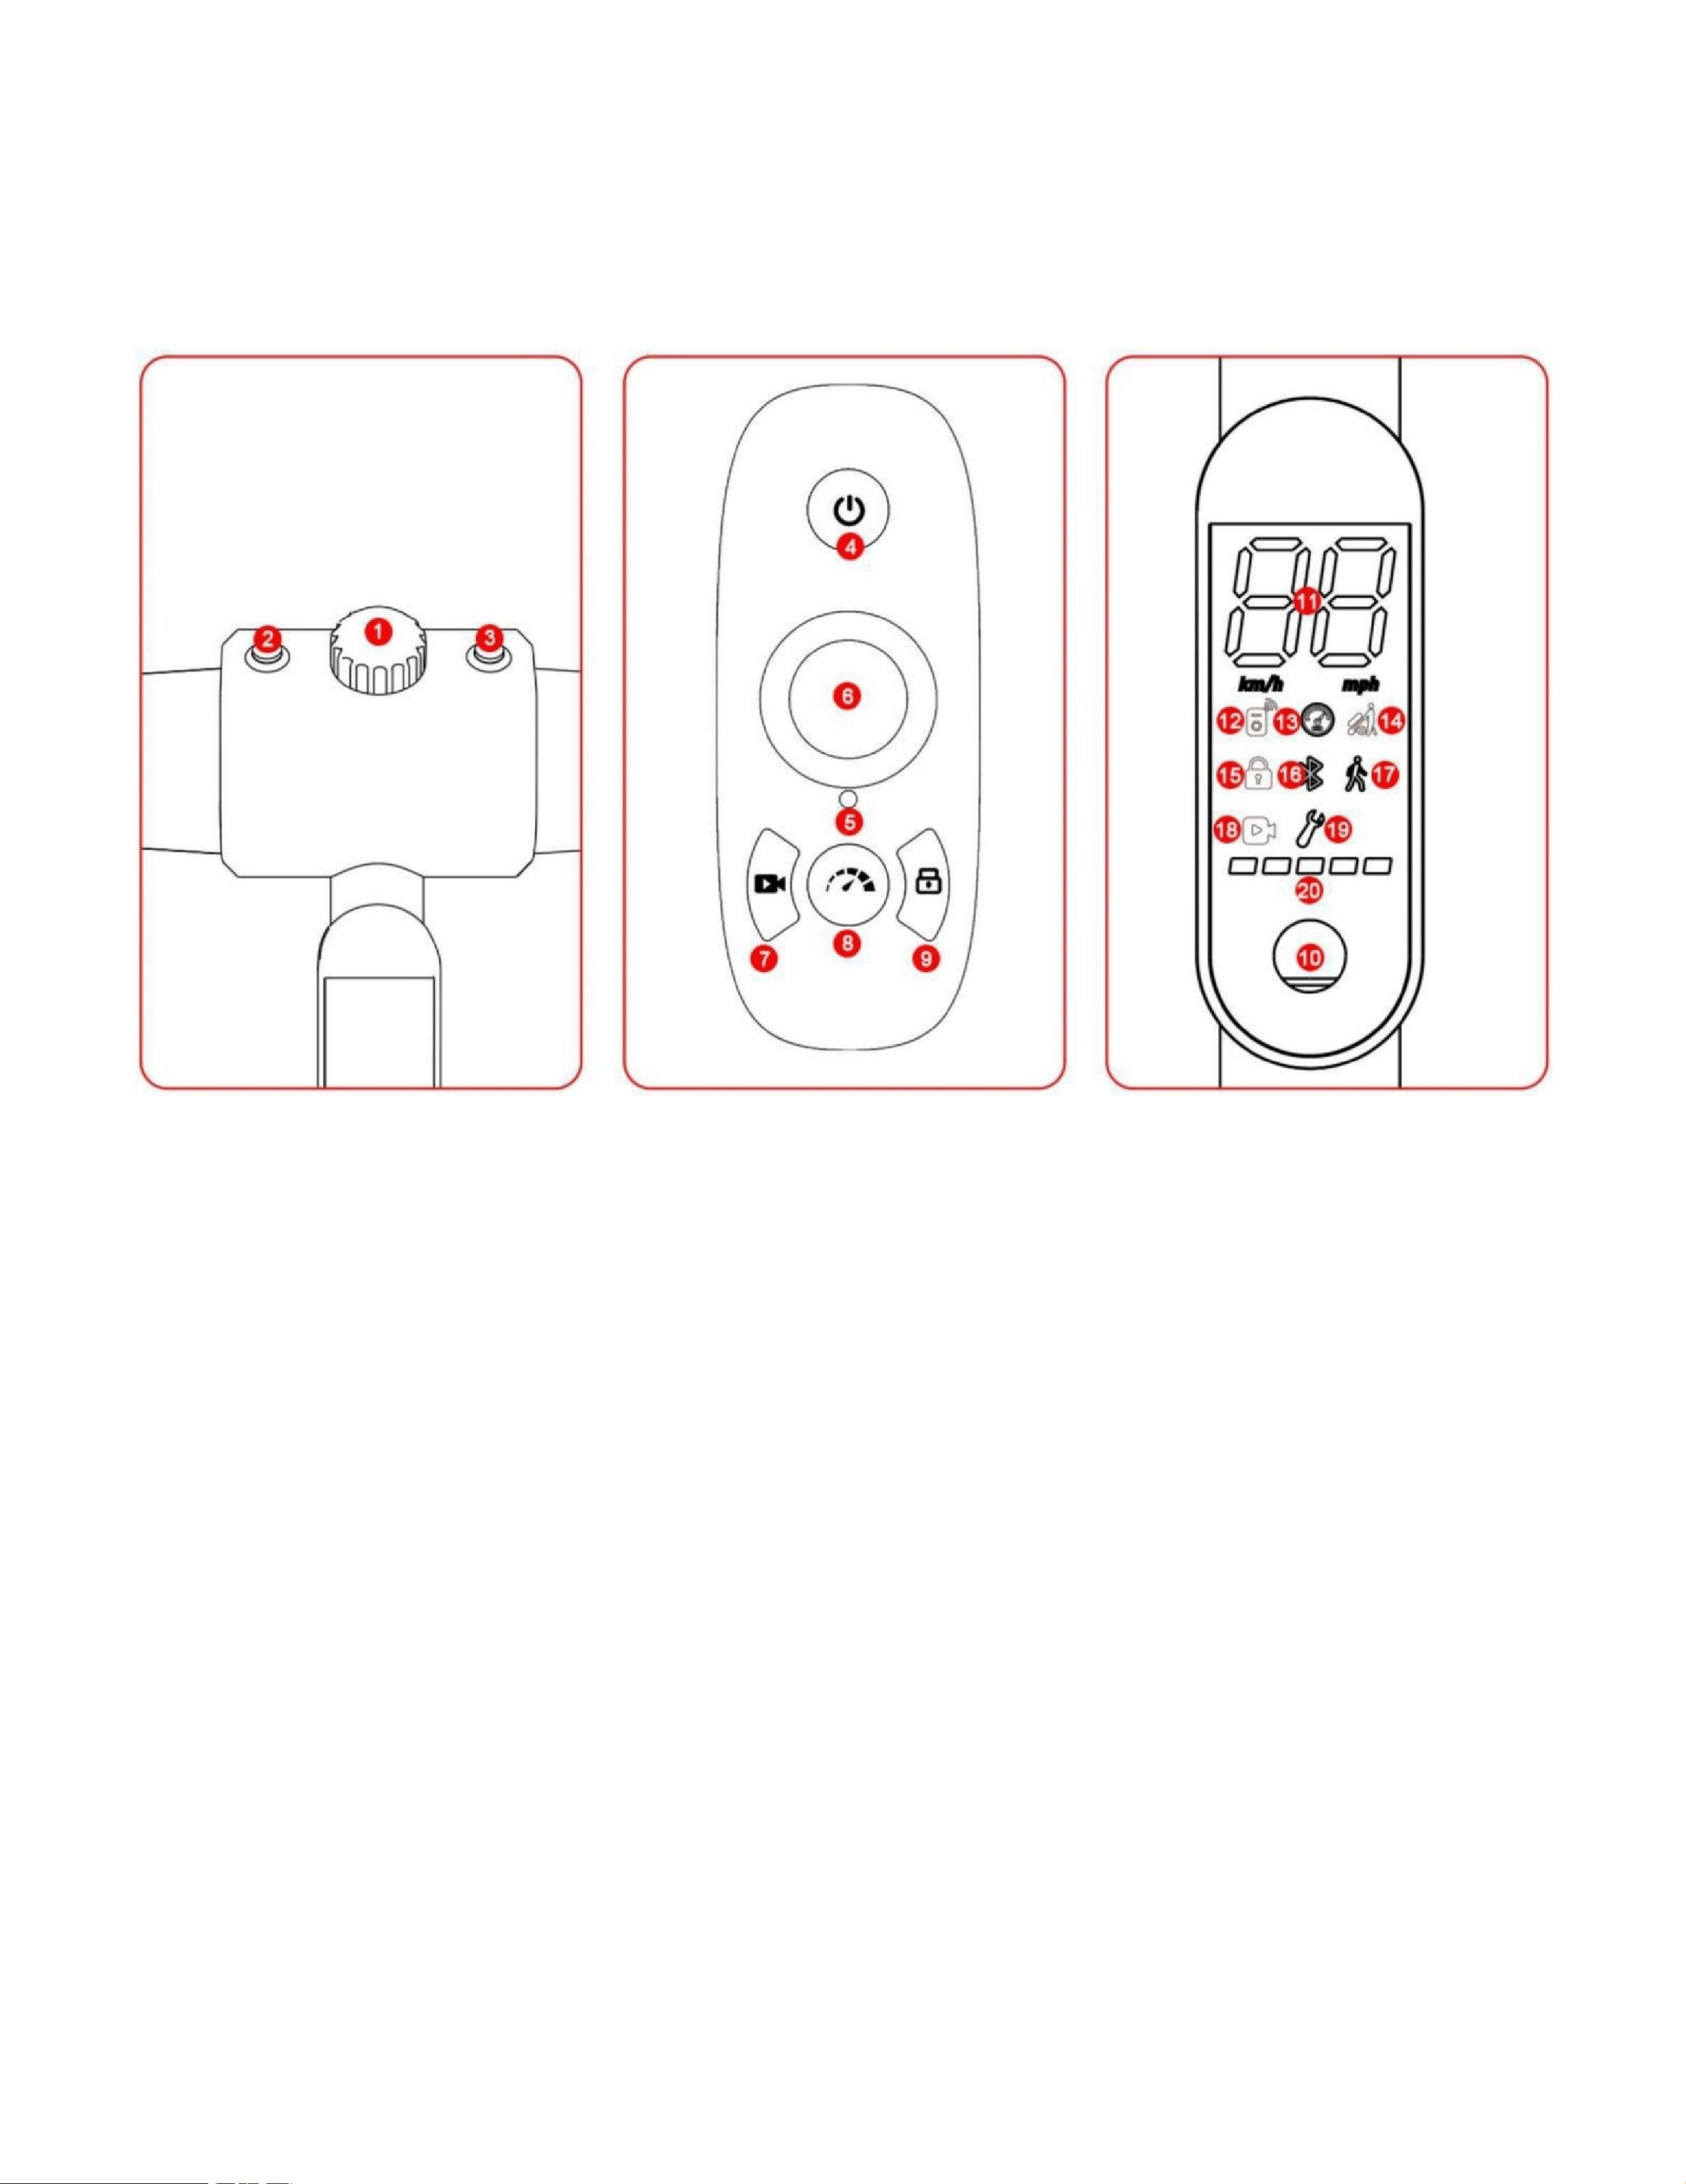
4. Product icon introduction
1. Boosting knob 4. Remote control switch 10. Power-on button 1. Boosting knob 4. Remote
control switch 10. Power-on button 1. Boosting knob 4. Remote control switch 10. Power-on
button
2. Right turn button 5. Indicator light 11. Speed display 2. Right turn button 5. Indicator light
11. Speed display 2. Right turn button 5. Indicator light 11. Speed display
3. Left turn button 6. Steering wheel 12. Remote control mode 3. Left turn button 6. Steering
wheel 12. Remote control mode 3. Left turn button 6. Steering wheel 12. Remote control mode
7. Video recording button 13. Cruise control 7. Video
recording button 13. Cruise control
8. Cruise control button 14. Push mode 8. Cruise control
button 14. Push mode
9. Locking button 15. Locking 9. Locking button 15.
Locking
16. Bluetooth
17. Push mode
18. Video
19. Fault light

4
20. Power display
5
5. Product Usage
Turn right button
switch
controller
pilot lamp
Capture button
Steering
knob
Left turn button
Remote
control
switch key
home key
Cruise control
button
Locking button
6
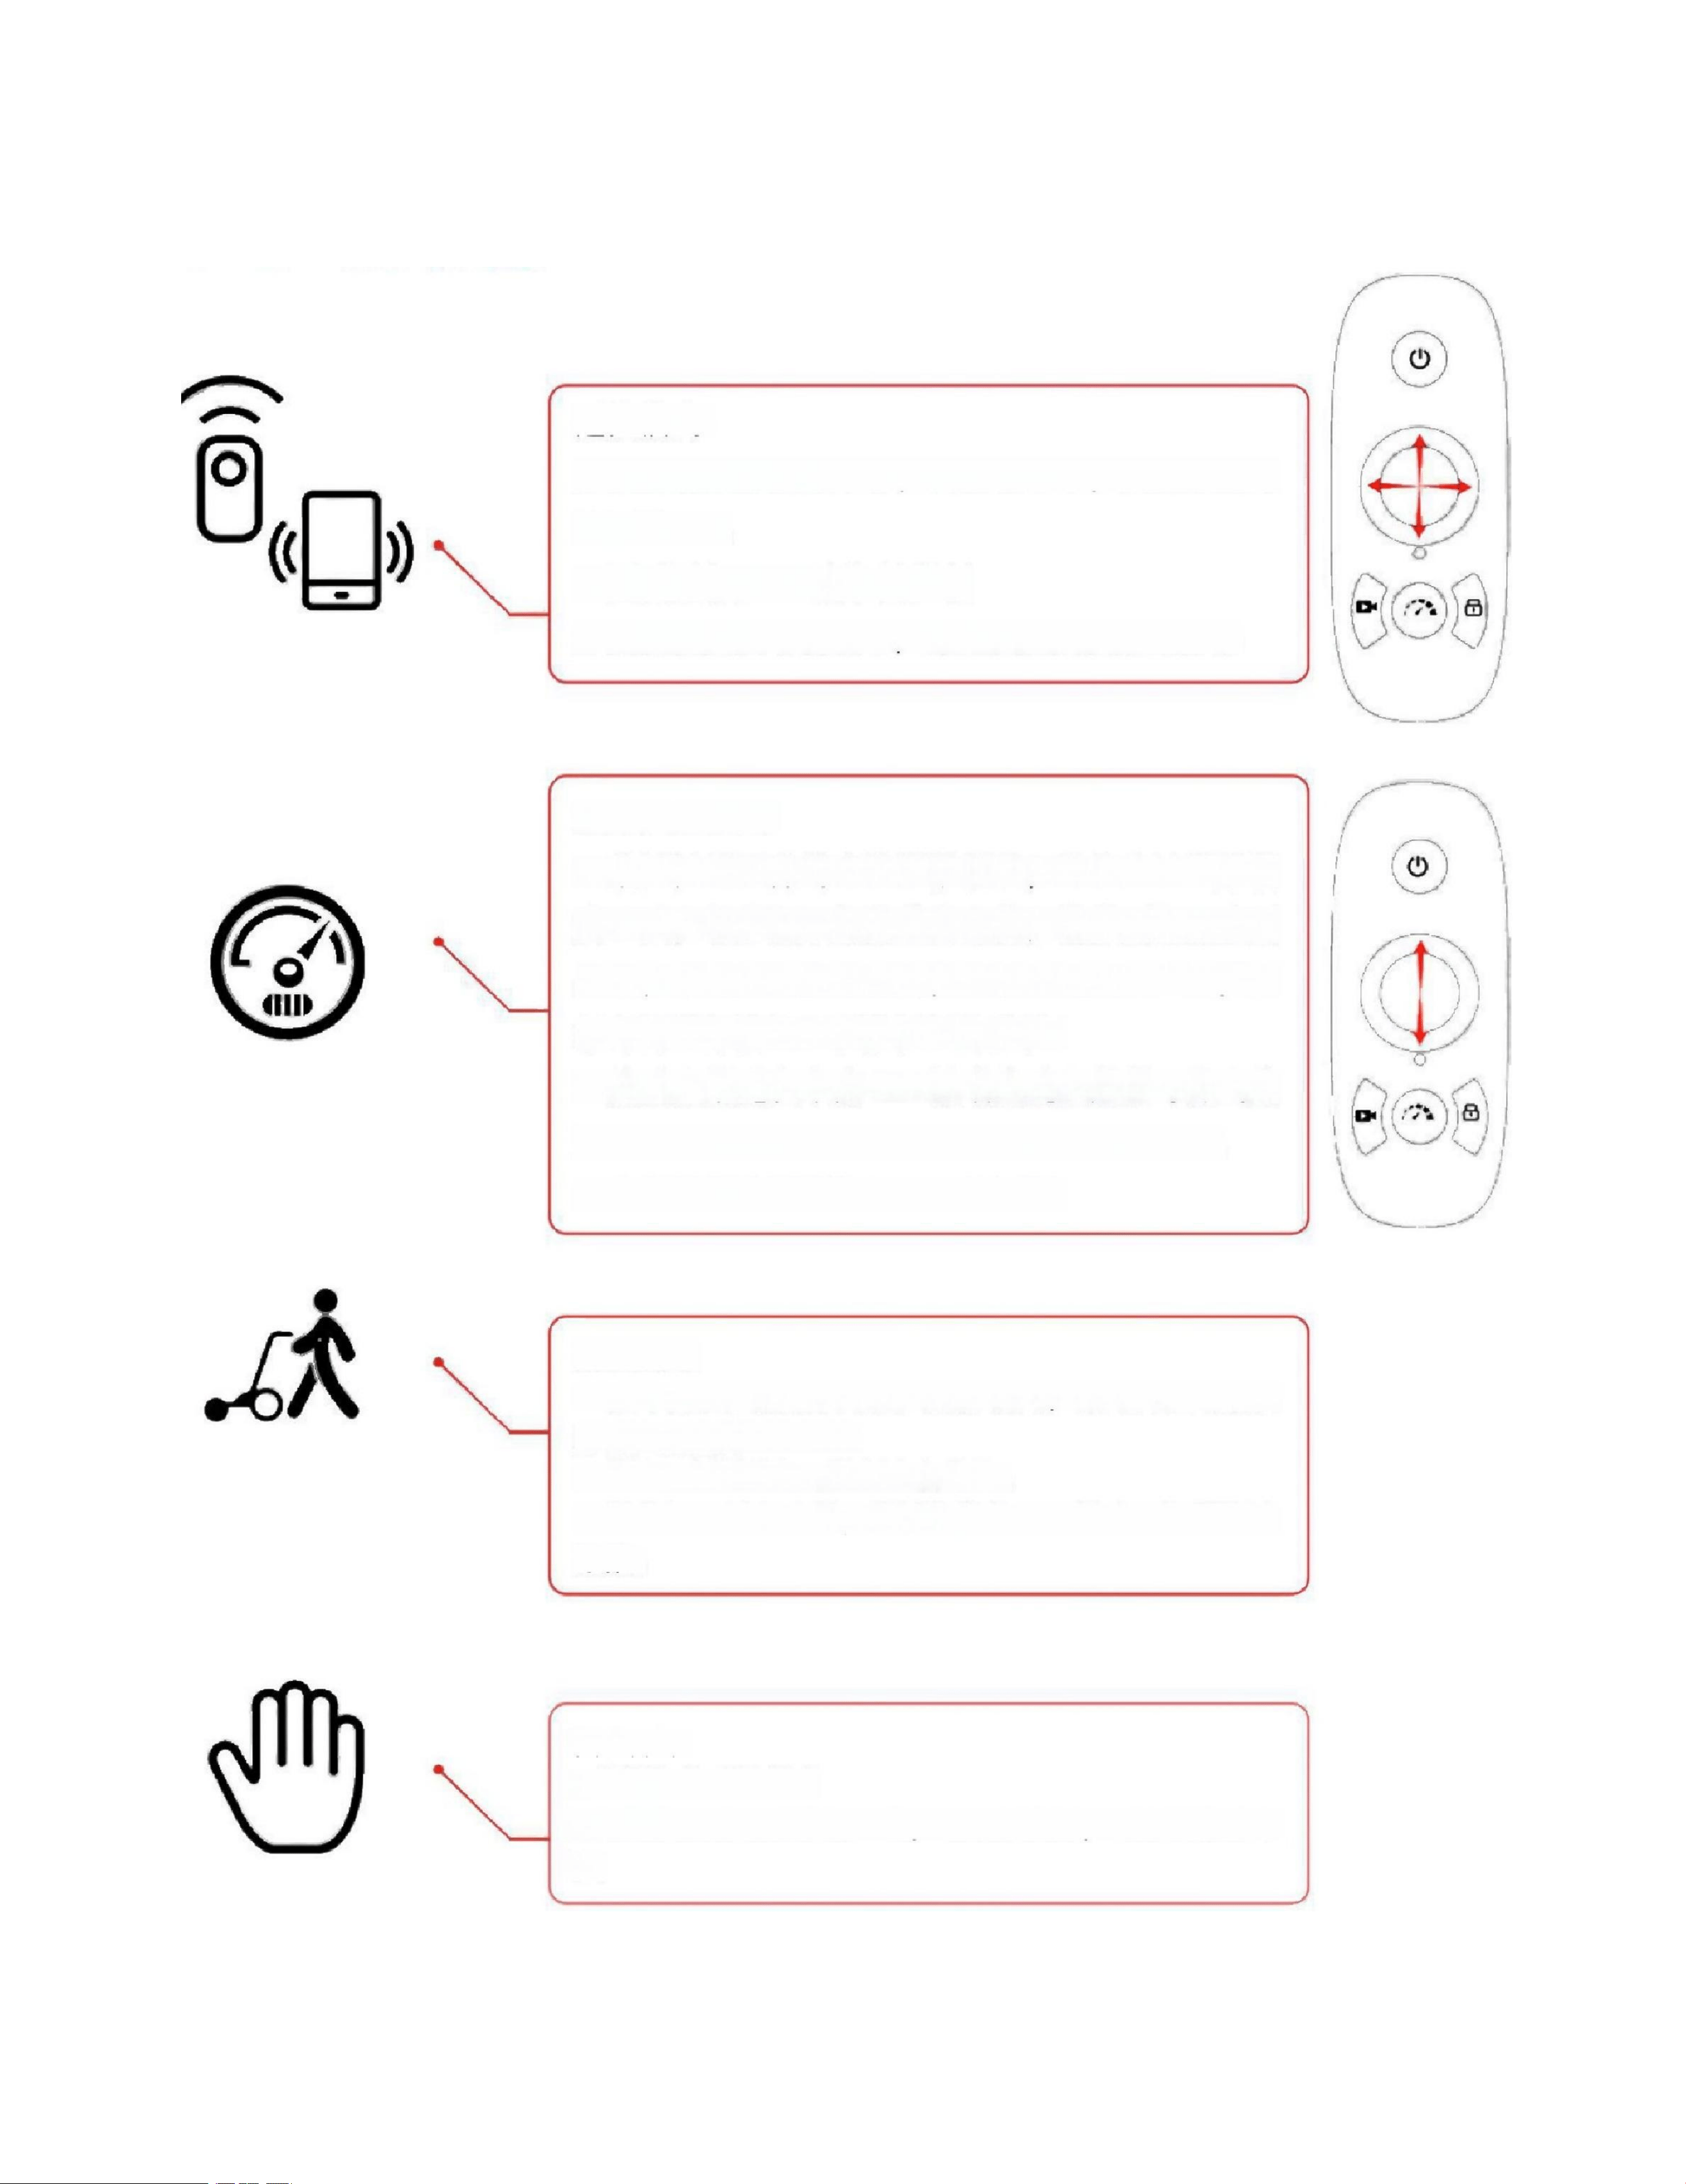
6. Product Features
Remote control mode:
a. The remote control connects to the vehicle via
Bluetooth, with a maximum range of 70 meters at
current power settings.
b. Circular remote control for easy 360-degree control
c. The remote-controlled acceleration can be adjusted, with a
maximum remote-controlled speed of 7 km/h.
Cruise control mode:
a. Press the cruise control button located below the
remote control to activate Cruise Control Mode 1.
The status indicator light will remain blue. Push the
throttle lever forward to accelerate to Mode 2,
where the indicator light will flash slowly in blue.
Further forward movement will engage Mode 3,
with the indicator light flashing rapidly in blue.
Pushing the lever backward will downshift the
vehicle.
b. During cruise control operation, pressing the
Home button or cruise control button will exit the
cruise control mode and automatically switch to
remote control mode to prevent coasting.
c. The cruise control speed ranges from 1 to 7 km/h and is adjustable.
Boos t mode:
a. The push mode can be activated by turning the knob at the
front of the vehicle. Turning the knob clockwise accelerates the
vehicle, with a speed range of 1–7 km/h.
b. Th e button s on bot h sid es of th e knob can contr ol left and ri g ht steerin g.
c. To exit the boost mode, press the knob or press the home
button on the remote control to remotely deactivate the boost
function.

6
Pu s h mode :
a. Easily switch between push modes
b. Remove one section of the quick-release motor wheel to disconnect it
from the motor, allowing easy vehicle propulsion.
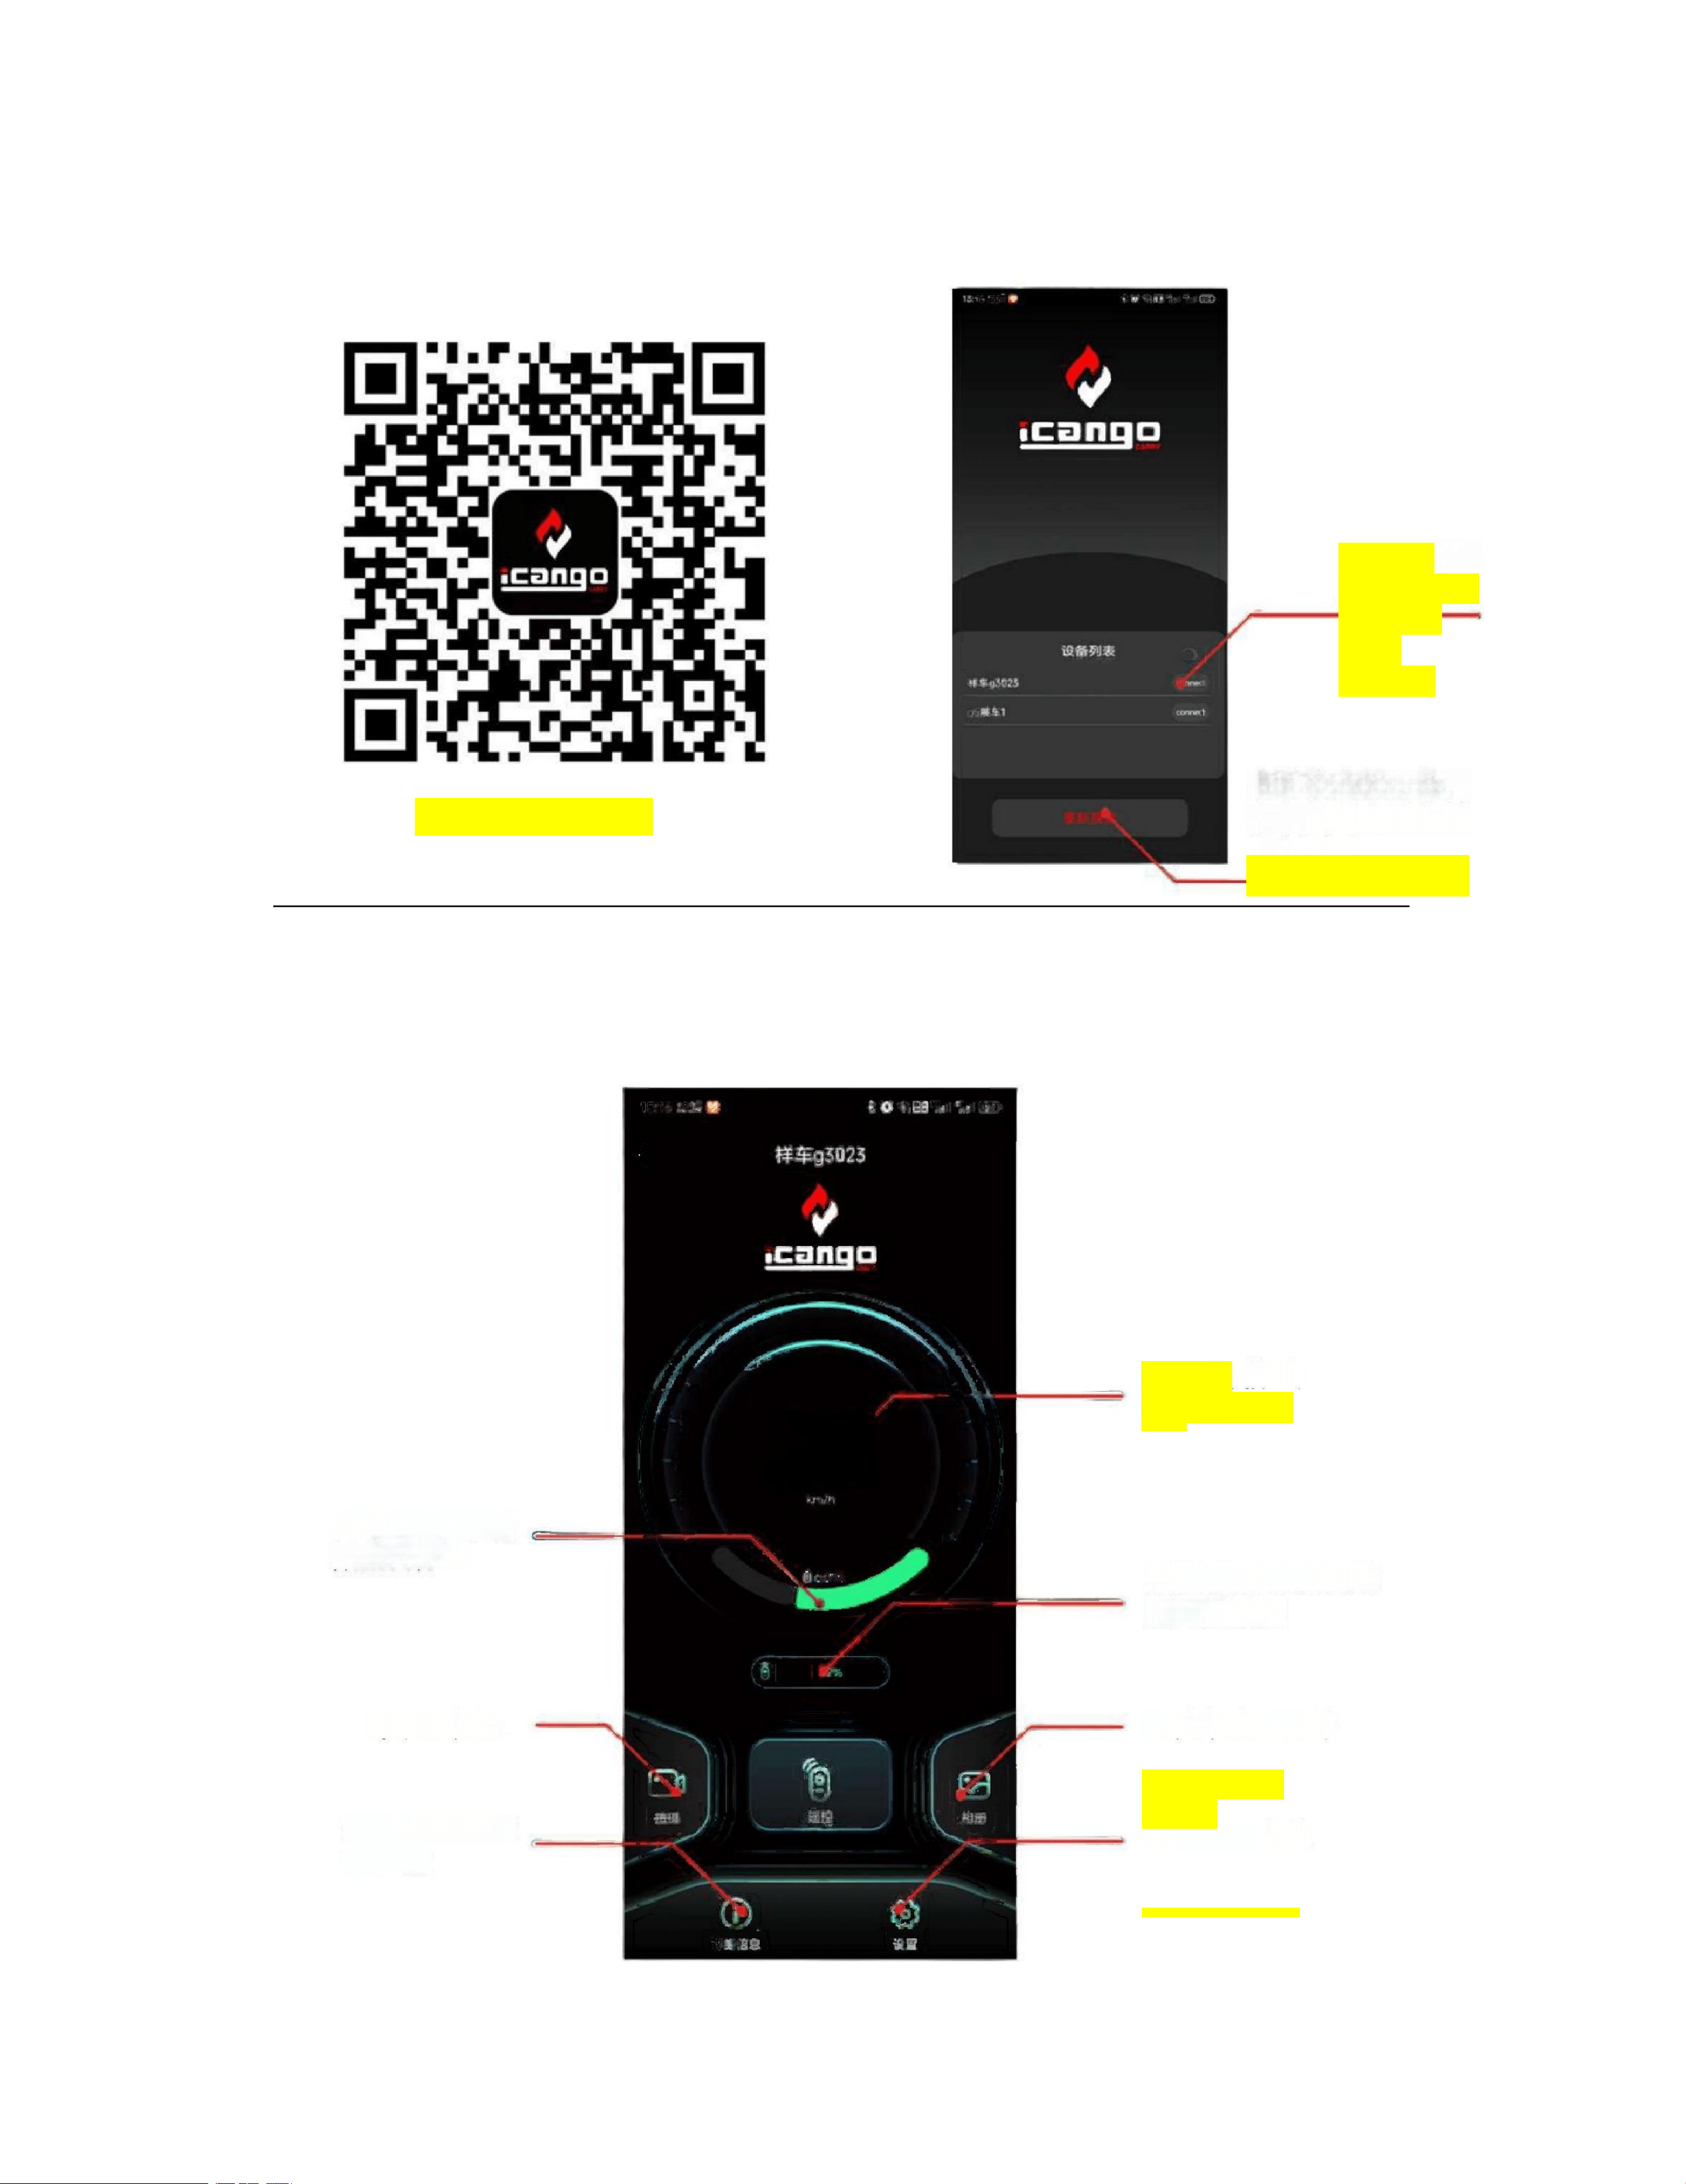
7. APP Introduction
Click to
connect and
enter the
main
interface
The search results
will display the car
0.0
Display battery
storage data
percentage
Remote control
pairing and battery
display of remote
control
Video recording is available
View different
data
parameters
(Android/IOS)
Display
current speed
data
View stored
photos
Data Settings

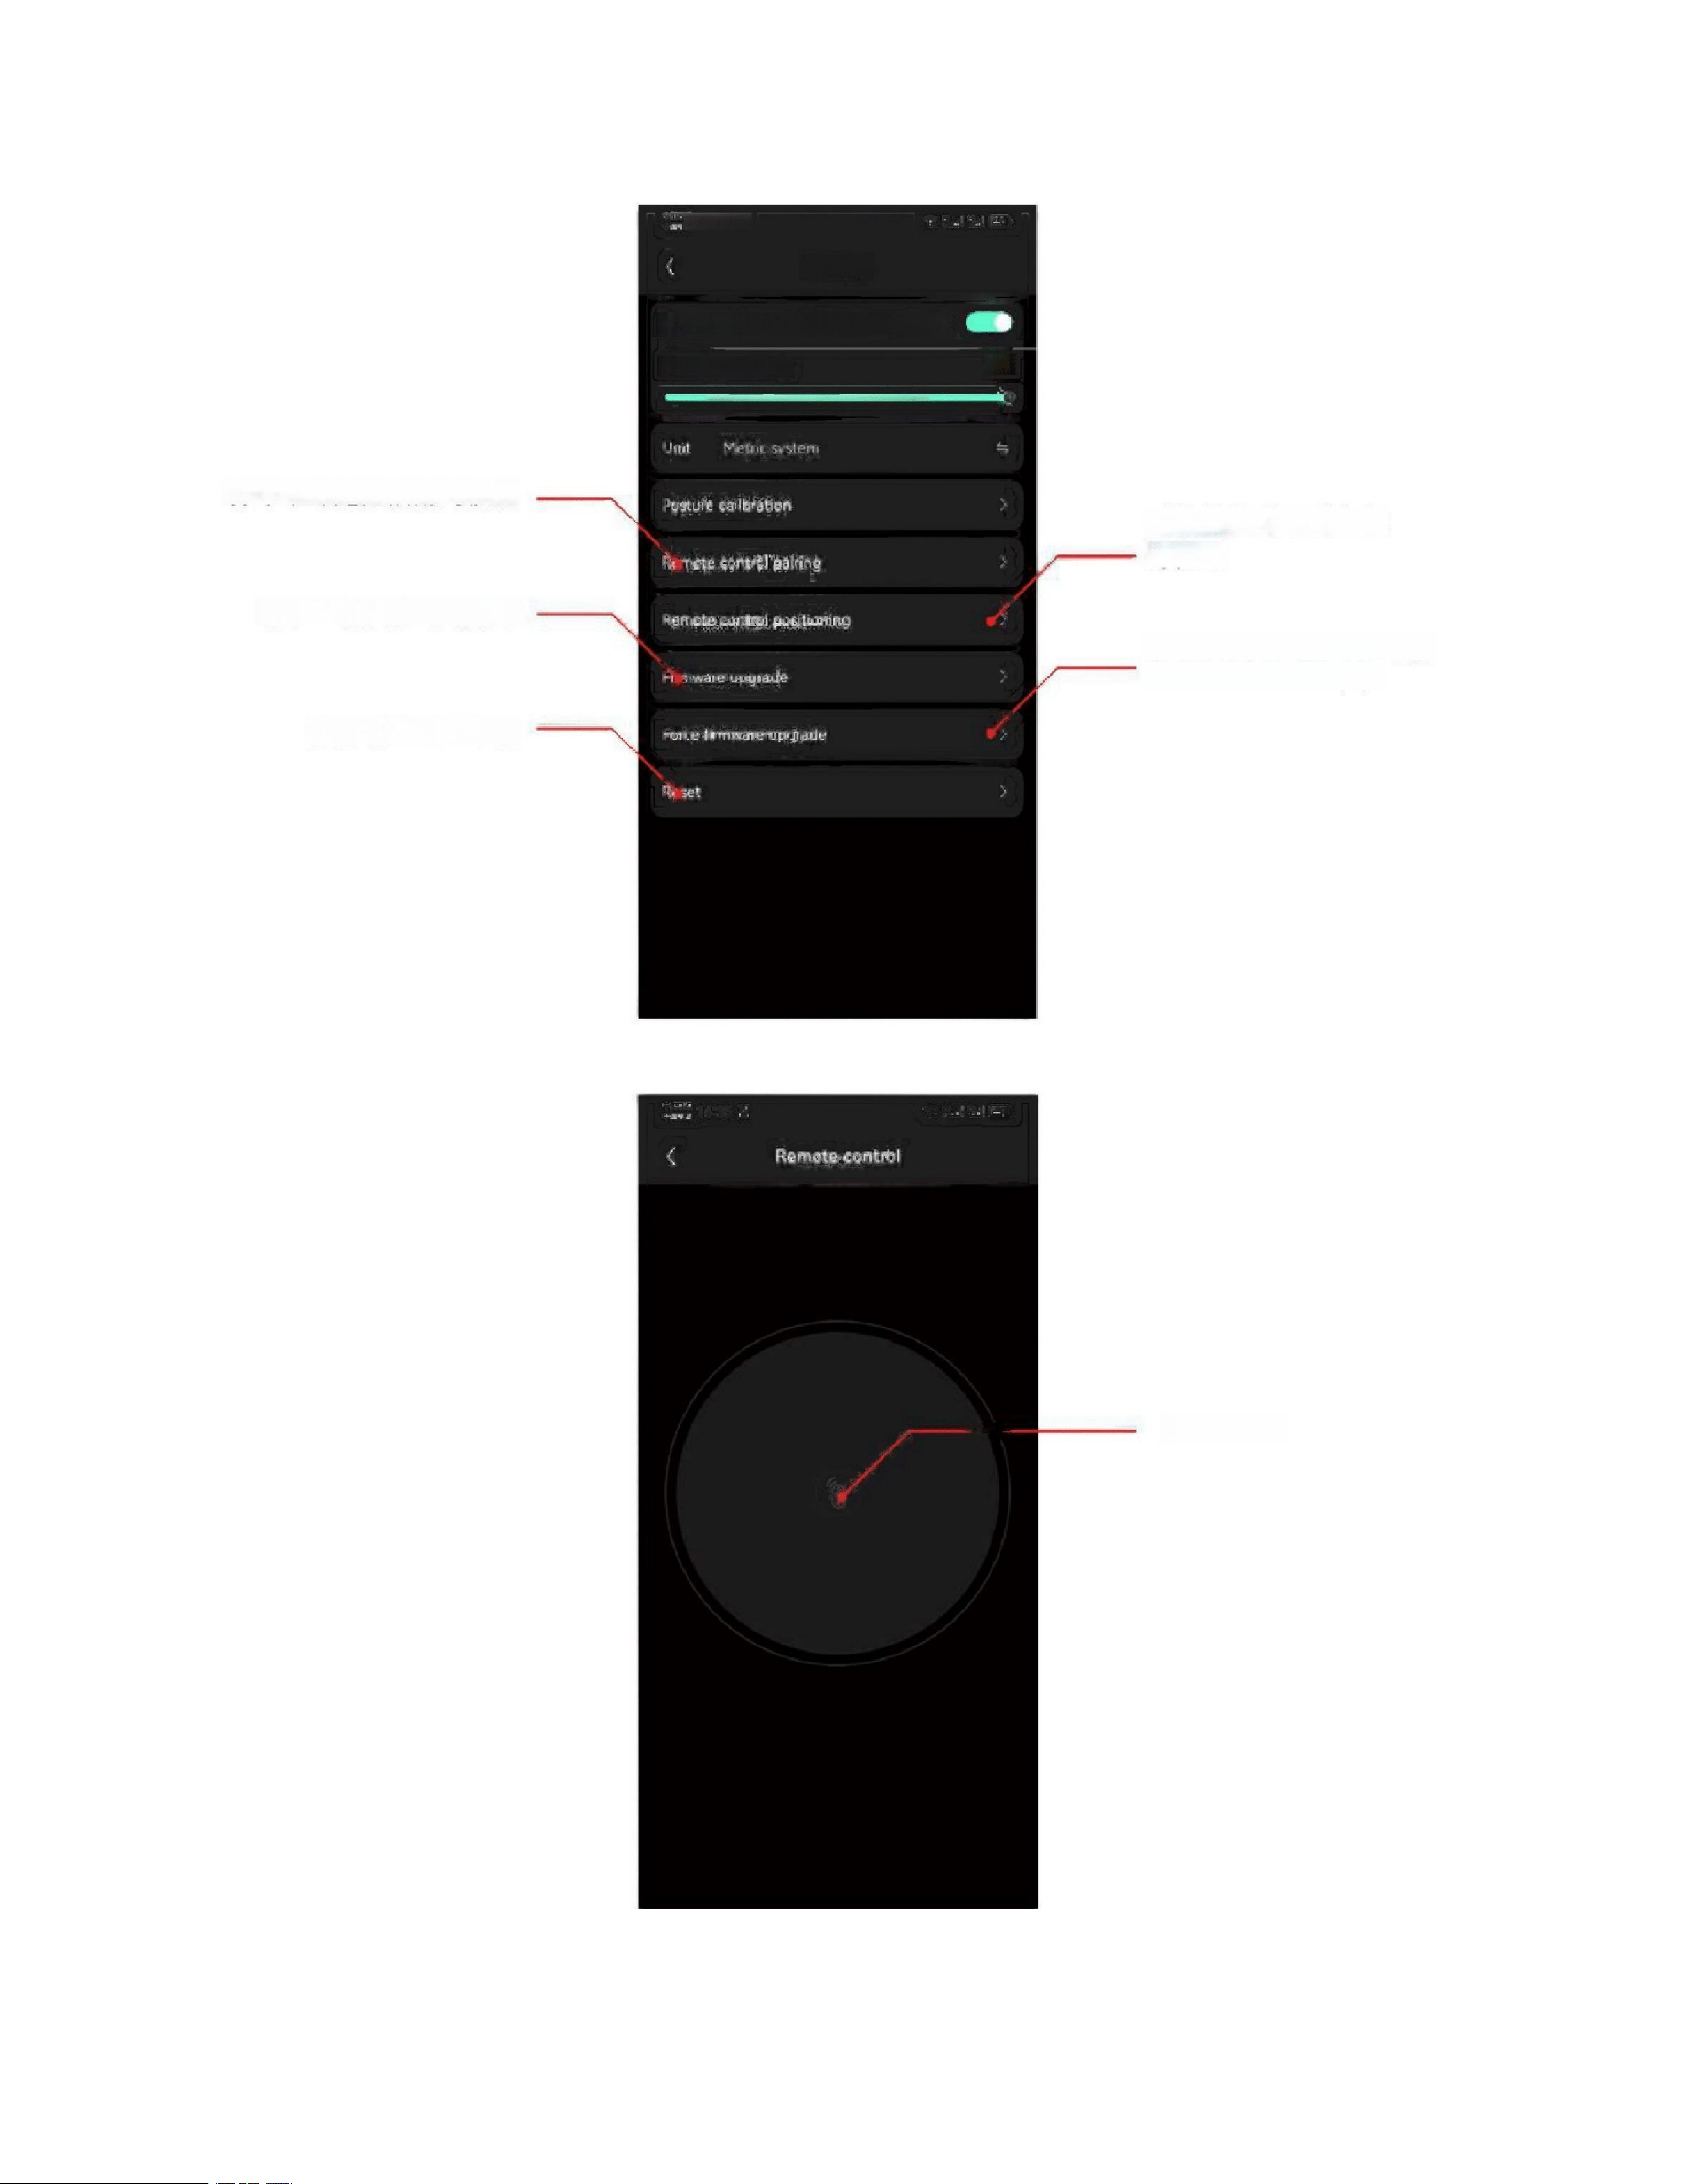
8
Summarize all used
mileage data
Summarize all usage time data
View the time of
this event data
Remote control power
display percentage
Temperature Display on the Body of a Spherical Child Car
Voltage display
Bluetooth current
version data
Current version of the
remote control
You can rename Bluetooth
Adjustable following
distance between golf cart
and rider
Radar tracking angle adjustment
Driving acceleration
control
Adjustment of ball rack steering sensitivity
Fixed range and
9
16:35 Rhyme
Settings
Automatic adjustment of steering sensitivity
Steering sensitivity 100 100
Pair the ball car with the remote control
Remote Positioning
of a Spherical
Caddie Cart
You can check the firmware upgrade status
The forced firmware
upgrade option can provide
exceptions for firmware
upgrades.
Reset software settings options
APP joystick

10
8. Product Specifications
Product
Name
Foldable
Size
Expand size
Unfolded size |
Packaged size
Battery size
Battery weight
Net weight
/ Gross
weight
Weight
after quick
disassembl
y Number
of wheels
Front wheel type
Removable
battery,
cruising
speed
Motor
power,
Battery
specificat
ions,
Battery
range,
Remote
control range
Battery charging time
Remote control range,
Hill-climbing capability,
Remote control speed,
Material composition,
Driving mode, Control
mode, APP interface,
Storage method

10
G
1
E
l
e
c
t
r
i
c
G
o
l
f
C
a
r
t
9
0
0
*
6
0
0
*
3
8
0
m
m
900*600*11
60MM
620*590*30
MM
665*600*40
0MM
2
7
8
*
6
1
*
6
4
M
M
1
.
5
K
G
14.9KG
10.35KG
5
Dual swivel casters
yes
1KM/H~7KM/H
Brushless motor 80W*2
2
5
.
2
V
,
7
.
8
Ah, 36
holes
54 holes
The remote control lasts
approximately 3.5 hours, and the
battery lasts about 4 hours with
70M battery capacity.
20°
2~7 km/h (adjustable)
ABS+PC, aluminum alloy,
nylon, rubber, rear-wheel
drive
Push, Boost, Cruise Control,
Remote Control for
Android/iOS
Foldable & quick-release (motorized
wheels, auxiliary legs, battery)

11
Product Warranty
The G1 ball cart and charger come with a 12-month warranty from the date of purchase. This
warranty covers manufacturing defects arising from normal use and is exclusively applicable
to new G1 ball carts. Braking incidents caused by accidental damage, misuse, or improper
operation are not covered. The warranty is non-transferable. Unless otherwise specified, used
carts are not eligible for warranty coverage.
The cart battery is covered by a 12-month warranty. If the battery fails within the
first 12 months, it will be replaced free of charge. All accessories are covered by a
12-month warranty from the date of purchase.
If you require warranty-covered services, please contact us. Keep your sales receipt or
packing list as proof of purchase. Our after-sales team will diagnose the issue and send
replacement parts to you. Note that any parts replaced free of charge during the warranty
period will not be eligible for new warranty coverage.
If the customer cannot replace the parts themselves, keep all original packaging materials to
return the cart for repair. All carts must be returned in their original packaging. If
replacement parts are required but not covered by warranty, the customer will bear all costs.
warn :
When operating the ball cart, it is essential to open the rear auxiliary wheel storage
compartment and retract the auxiliary wheels when lifting. The ball cart possesses
certain water-crossing capabilities, allowing safe use during light rainfall
conditions. However, the handcart is not waterproof. If entering hazardous water
bodies such as ponds or lakes, the battery and circuit board may be damaged. This
incident is not covered under the warranty plan.
Precautions:
1. When using a cart, heavy objects must not be hung on the handle;
2. If insurmountable obstacles are encountered during use, remove the cart;
11
3. Manual assistance for pushing or pulling may be required when walking on steep
slopes.
4. If the cart is not used during winter, remove the batteries and store them in an
environment above 10°C to
Extend the service life of batteries.
This device complies with part 15 of the FCC Rules. Operation is subject to the following two conditions: (1) This device may not
cause harmful interference, and (2) this device must accept any interference received, including interference that may cause
undesired operation.
NOTE: This equipment has been tested and found to comply with the limits for a Class B digital device, pursuant to Part 15 of the
FCC Rules. These limits are designed to provide reasonable protection against harmful interference in a residential installation. This
equipment generates, uses and can radiate radio frequency energy and, if not installed and used in accordance with the instructions,
may cause harmful interference to radio communications. However, there is no guarantee that interference will not occur in a
particular installation. If this equipment does cause harmful interference to radio or television reception, which can be determined by
turning the equipment off and on, the user is encouraged to try to correct the interference by one or more of the following
measures:
-- Reorient or relocate the receiving antenna.
-- Increase the separation between the equipment and receiver.
-- Connect the equipment into an outlet on a circuit different from that to which the receiver is connected.
-- Consult the dealer or an experienced radio/TV technician for help.
Changes or modifications not expressly approved by the party responsible for compliance could void the user's authority to operate
the equipment.
This equipment complies with the FCC RF radiation exposure limits set forth for an uncontrolled environment. This equipment
should be installed and operated with a minimum distance of 20cm between the radiator and any part of your body.