Brand: amzchef
Model: DL-P1208
120V~ 60Hz 1700W
USER
MANUAL
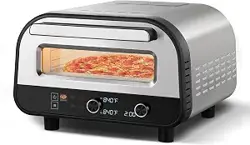
Smart Pizza Oven

Welcome to the Amzchef Family!
Cheers to you for owning a new Amzchef product!
We are devoted to making high-quality kitchen, home, and personal
care products for all our customers. As a respected manufacturer, all our
products adhere to rigorous standard, safety, and functionality.
We are dedicated to offering exceptional customer service, which is why
we provide a 1-year warranty on this product to guarantee your
satisfaction for years to come.
If you have questions or need assistance, please get in touch with us
via our website: www.iamzchef.com, or email: [email protected].
Problem + order number + a photo or a video attached in the email
would help us solve the problem better and faster.
Your thoughts and suggestions matter to us, so please don't hesitate to
email them at [email protected].
The Amzchef Team
PLEASE READ INSTRUCTIONS CAREFULLY BEFORE ASSEMBLY
RETAIN THIS MANUAL FOR FUTURE REFERENCE

Table of contents
Safety Precautions
Please read this manual carefully. Please keep the instruction and installation manual as well as
the appliance certificate in a safe place for later use or for subsequent owners.
Safety Precautions
Cleaning & Maintenance
Troubleshooting
Error Codes
Technical Specification
• This appliance is intended for private domestic use and the household environment only. The
appliance must only be used for the preparation of food and beverages. The cooking process
must be supervised. A short cooking process must be supervised without interruption. Only use
the appliance in enclosed spaces.
• Warnings and important instructions appearing in this guide are not meant to cover all possible
conditions and situations that may occur. Common sense, caution, and care must be exercised
when installing, maintaining, or operating your appliance.
• This appliance is intended for use up to a maximum height of 2000 meters above sea level.
• This appliance may be used by children over the age of 8 years old and by persons with reduced
physical, sensory or mental capabilities or by persons with a lack of experience or knowledge if
they are supervised or instructed by a person responsible for their safety how to use the appliance
safely and have understood the associated hazards.
• Before using the smart pizza oven for the first time, remove and safely discard any packing
materials and promotional labels.
• This appliance is intended for household use only.
• DO NOT use outdoors. Do not use it in any type of moving vehicles or store it outdoors. Misuse
can lead to injury.
• DO NOT touch hot surfaces. Use handle or knobs.
• Close supervision is necessary when the appliance is used near children.
• Eliminate the risk of choking for young children by removing and safely disposing of the protective
cover fitted on the power plug.
• DO NOT operate oven with a damaged cord or plug, or after the appliance malfunctions, or has
been damaged in any manner. Contact the agent for examination, repair, or adjustment.
• DO NOT place the appliance on or near a hot gas or electric burner, or in a heated oven.
• DO NOT let the cord hang over the edge of the table or counter, or touch hot surfaces.
• DO NOT place the appliance near the edge of a countertop or table.
• Ensure the surface where the appliance is placed is stable, level, heat-resistant, and clean.
• Ensure adequate space around the appliance. A minimum space of 4 in (10 cm) is required.
• Avoid using or positioning the oven on a cloth-covered surface, near curtains, or other flammable
materials. A fire may occur if the pizza oven comes into contact with or is covered by flammable
materials such as curtains, draperies, walls, tablecloths, and plastics while operating.
Initial Use
Operating Insturction
Getting to Know Your Appliance
Cooking Guideline
1
3
5
6
8
11
12
13
13
1

• DO NOT use the appliance without the included pizza stone.
• DO NOT use the appliance for other than its intended use.
• DO NOT place cardboard, plastic, paper, or other flammable materials inside the pizza oven.
• Oven and pizza stone retain heat long after use. Do not attempt to handle a hot stone. Do not
attempt to move the oven until fully cooled.
• To avoid burns, only use a suitable peel to insert and remove pizzas from the oven. When baking
pan pizzas, use oven mitts to handle the pan, and place the pan on heatproof material.
• The oven exterior gets very hot. Do not place items on top or lean items against the sides or door.
• Excess flour and burnt food on the stone can ignite at high temperatures. If this happens, keep
the door closed and the flames will extinguish themselves. If flames are not extinguished within 15
seconds, unplug the unit.
• If the pizza is left excessive time in high temperature, it may be ignited. If this happens, keep the
door closed and the flames will extinguish themselves. Shut down the appliance, do not remove
the pizza until the oven fully cooled.
• For high temperature cooking functions (over 750°F), it’s advisable to keep a close eye on the
pizza oven as your food can quickly become over-done and eventually ignite.
• DO NOT cover any part of the pizza oven with metal foil, as it may cause overheating and pose
risks of electrical and fire damage.
• Refrain from leaving the door open for extended periods.
• To disconnect, press the power button, then remove the plug from the wall outlet after the fan,
which continues to work for 15 minutes, has completely turned off.
• Allow your pizza oven to rest after it has been “on” in a two-hour period.
• The use of accessories and attachments not recommended or supplied with the pizza oven may
cause injuries.
• Use extreme caution when removing the included pizza pan or pizza stone, as they may be
extremely hot. Do not place cooking utensils, roasting pans, or dishes on the glass door.
• We recommend using the dedicated pan with the pizza oven, although other suitable cast
iron/carbon steel pans that fit are also acceptable.
• DO NOT use non-stick or coated pans in the oven.
• Exercise caution when using stainless steel pans, as they may discolor at high temperatures.
• Do NOT use any type of lid in the pizza oven or on top of any pan.
• Avoid inserting oversized food or metal utensils into the pizza oven, as they may create a fire or
risk of electric shock.
• Always use the suitable pizza peel for inserting a pizza into the cavity, unless cooking a pan pizza,
to prevent direct contact with the oven.
• Unplug from outlet when not in use and before cleaning. Allow to cool before putting on or taking
off parts, and before cleaning the appliance.
• DO NOT clean the oven with metal scouring pads, as pieces can break off and touch off and
touch electrical parts, creating a risk of electric shock.
• Keep the power cord of this oven and those of nearby appliances clear of the oven housing.
• This appliance is equipped with a power cord that has a grounding wire with a grounding plug.
The appliance must be grounded using a 3-hole properly grounded outlet. In the event of an
electrical short circuit, grounding reduce the risk of electrical shock.
• Never cut or remove the third (ground) prong from the power cord or use an adapter under any
circumstances.
• Long detachable power supply cords or extension cords may be used if care is exercised in their
use.
• To avoid electric shock, never immerse the cord, plug, or the product in water or any other liquids.
2
This pizza oven is equipped with a short power supply cord to minimize the risk of personal injury
or property damage caused by pulling, tripping, or entanglement with a longer cord. If an
extension cord is necessary, please follow these guidelines:
1. Ensure the marked electrical rating of the cord set or extension cord is equal to or greater than
the electrical rating of the appliance.
2. If the appliance is of the grounded type, the extension cord should be a grounding-type 3-wire
cord; and
3. Arrange the cord so it does not drape over the countertop or tabletop, preventing children from
pulling on it or accidental tripping.
This appliance must be grounded. In the event of an electrical short circuit, grounding reduces the
risk of electric shock by providing an escape wire for the electric current. To protect against
electrical shock, this appliance is equipped with a cord having a 3-prong grounding-type plug for
insertion into a proper grounding-type electrical outlet.
SHORT CORD INSTRUCTIONS
GROUNDING INSTRUCTION
Getting to Know Your Appliance
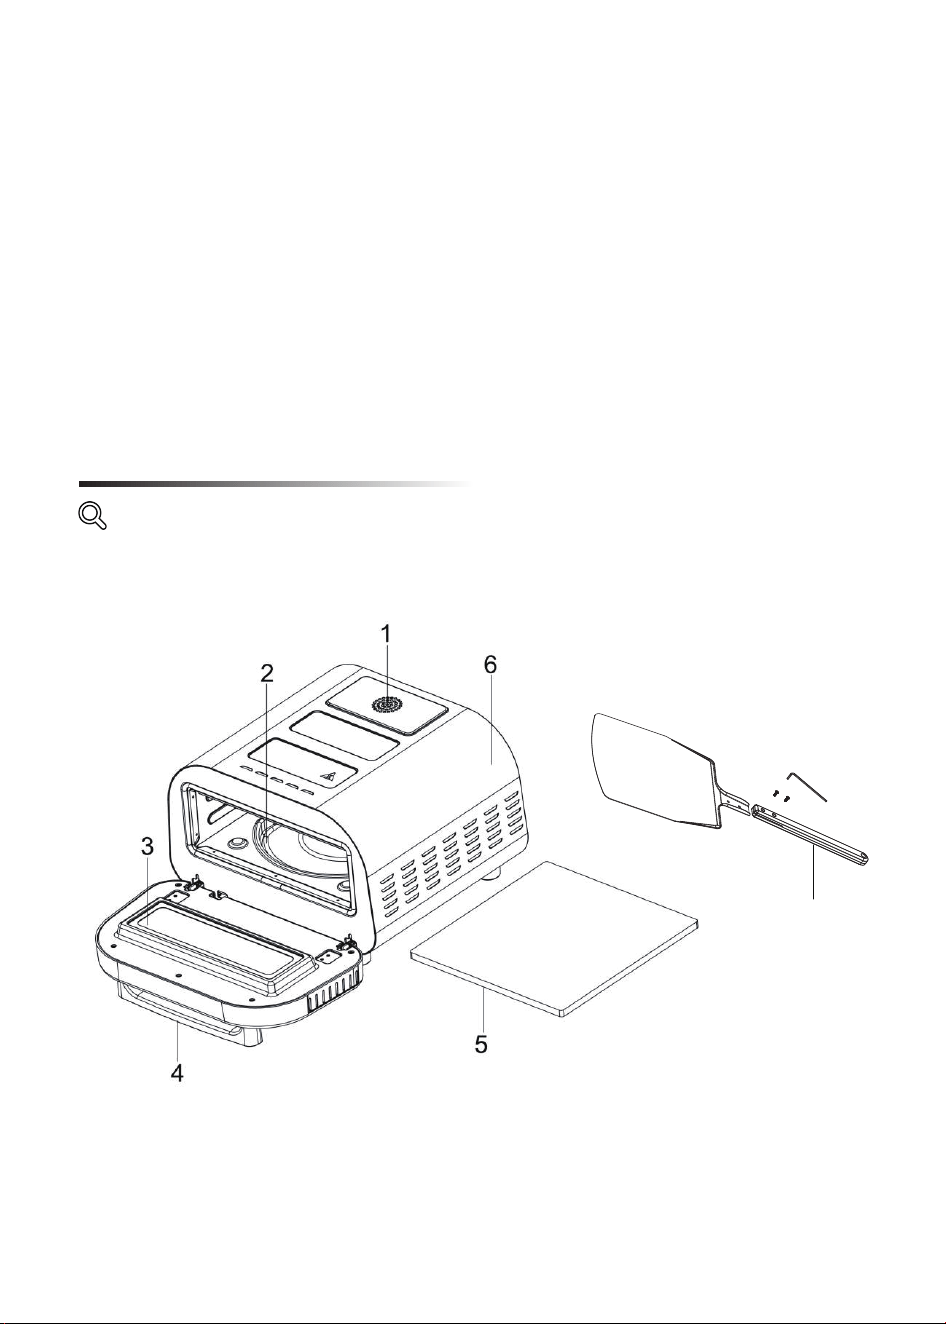
OVERVIEW
1. Cooling Fans
2. Lower heating element
(The Upper one is not shown)
3. Double glazed window
4. Door handle
5. Pizza stone
6. Housing
7. Pizza peel
(with 2 screws and 1 Allen Wrench)
7
3
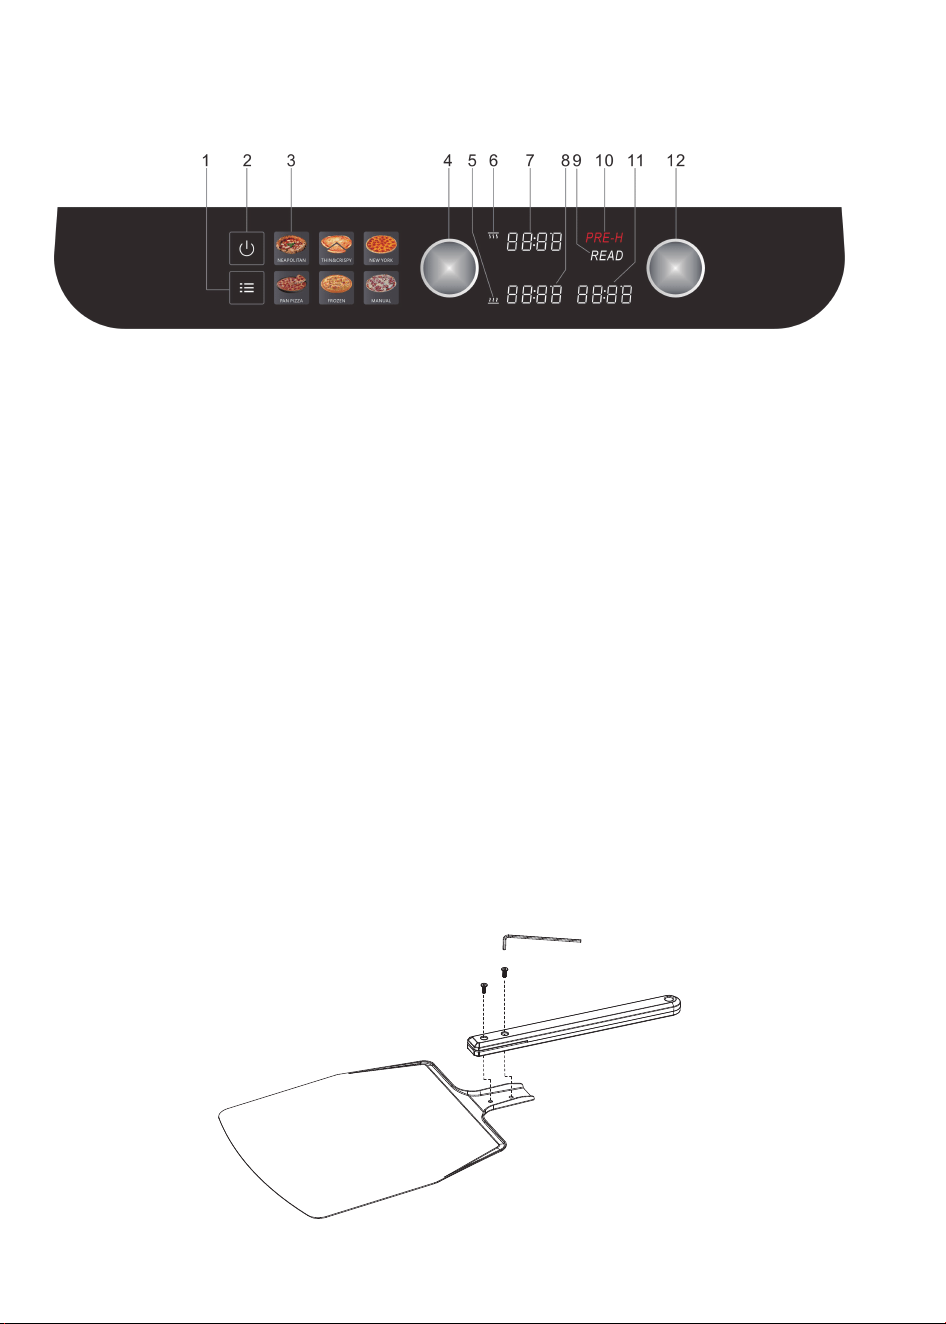
CONTROL PANEL
PIZZA PEEL
1. To change the temperature of the upper or lower heating component, press the
Temperature Adjustment Knob and rotate it, then press once more to set the
temperature for the other element.
2. To adjust the countdown, rotate the Countdown Adjustment Knob; when the oven is
preheated, press Countdown Adjustment Knob will begin countdown.
Assemble the pizza peel with the
screws and Allen Wrench supplied.
1. Function button
2. Power button
3. Function menu
4. Temperature adjustment knob¹
5. Icon of Lower heating temperature
6. Icon of Upper heating temperature
7. Upper heating temperature
8. Lower heating temperature
9. Ready prompt
10. Preheating prompt
11. Countdown time
12. Countdown adjustment knob²
4
1. Remove all packaging materials and any transport protection, such as plastic, paperboard and
EPE foam inserts. Keep packaging materials away from children – risk of suffocation! Dispose of
the packaging materials according to the relevant local waste disposal regulations.
2. Read and remove any stickers on the appliance except for the rating label, which should remain
on the appliance.
3. Assemble the peel, if which is included: screw the handle into the peel unit, follow the
instructions attached.
4. Wipe down the exterior of the oven and the pizza stone with a damp cloth and allow them to dry
completely.
Caution: Washing-up liquid may damage the stone. Please do not rinse the pizza stone with
water or soak it in water as this may shorten the life of the pizza stone.
5. Put the pizza stone into the oven, making sure to push it to the end of the cavity.
6. The plug may be protected by a cover. Remove the cover. Make sure that the cover is disposed
of immediately. If swallowed, there is a risk of suffocation, especially for children and animals.
7. Inspect the appliance for damage. If there is visible damage, do not operate the appliance;
instead, contact Customer Services.
8. Before first use, the empty appliance must be heated for 25 minutes to remove any production
residues. Make sure that the room is well ventilated during this time.
9. Insert the plug into a power socket.
10. A short beep sounds, the control panel lights and then go off again. The power button still lights
with white color. Press the power button once.
11. The control panel lights and default on NEAPOLITAN. The display shows the temperature
“840°F” and the time “2:00”.
12. Press the Power button, and the pizza oven will start preheating. This takes approx. 22 minutes.
13. When the process is complete, a beep sounds three times. The temperature stop flash.
14. Now switch off the appliance with the power button and let it cool down. The cooling fans will
continue to run for some time.
15. The appliance is now ready for use.
The appliance and th pizza stone are very hot during and after operation!
Avoid contact with hot surfaces of the appliance!
Keep children away from the appliance!
Do not remove the pizza stone from the pizza oven! Unless it’s completely
cooled.
To eliminate any protective substances from the heating elements, run the oven empty for 25
minutes. Ensure proper ventilation in the area, as the pizza oven may emit vapor. These vapors
are safe and will not negatively impact the oven’s performance.
Initial Use
Function
Temperature
Cooking time
NEAPOLITAN
840°F
Approx. 22 minutes
5
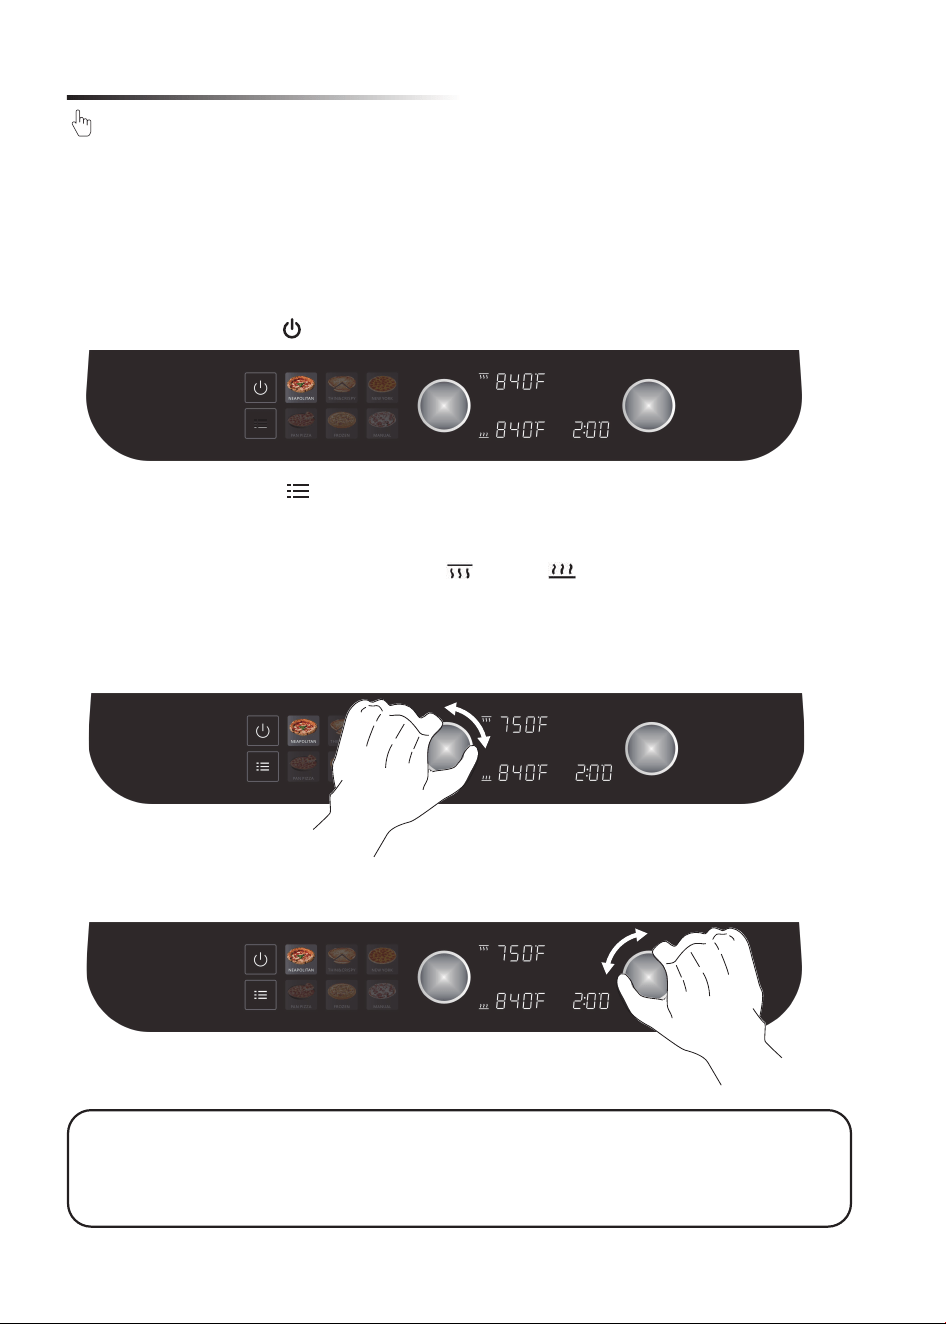
1. Insert the pizza stone into the pizza oven cavity.
2. Plug your pizza oven into a supported GFCI outlet.
3. Press the Power button to turn on the pizza oven.
- The control panel will automatically shut down after 2 minutes of inactivity, as long as the
oven is not in operation.
- If the control panel remains inactive for more than two hours, the oven will turn off.
- After the oven is shut down, the cooling fan will continue to run for 15 minutes.
4. Use the Function button to select a desired pizza style.
5. Option to adjust the preset of the function:
- Adjust temperature of the upper or lower heating component:
Press the left knob to select either the upper or lower heating component.
As the icon flashes, rotate the knob to adjust the temperature of the relevant heating
component.
After that, to change the temperature setting of another heating component, press the knob
again.
- Adjust countdown:
Rotate the right knob to adjust countdown.
Note: If the appliance is powered on but no settings have been input for more than 2 minutes,
the control panel will shut down. You will need to turn the appliance on again before cooking.
Due to the extremely high temperatures, place the pizza oven in a well-ventilated area as it will
emit smoke when cooking.
Operating Insturction
6
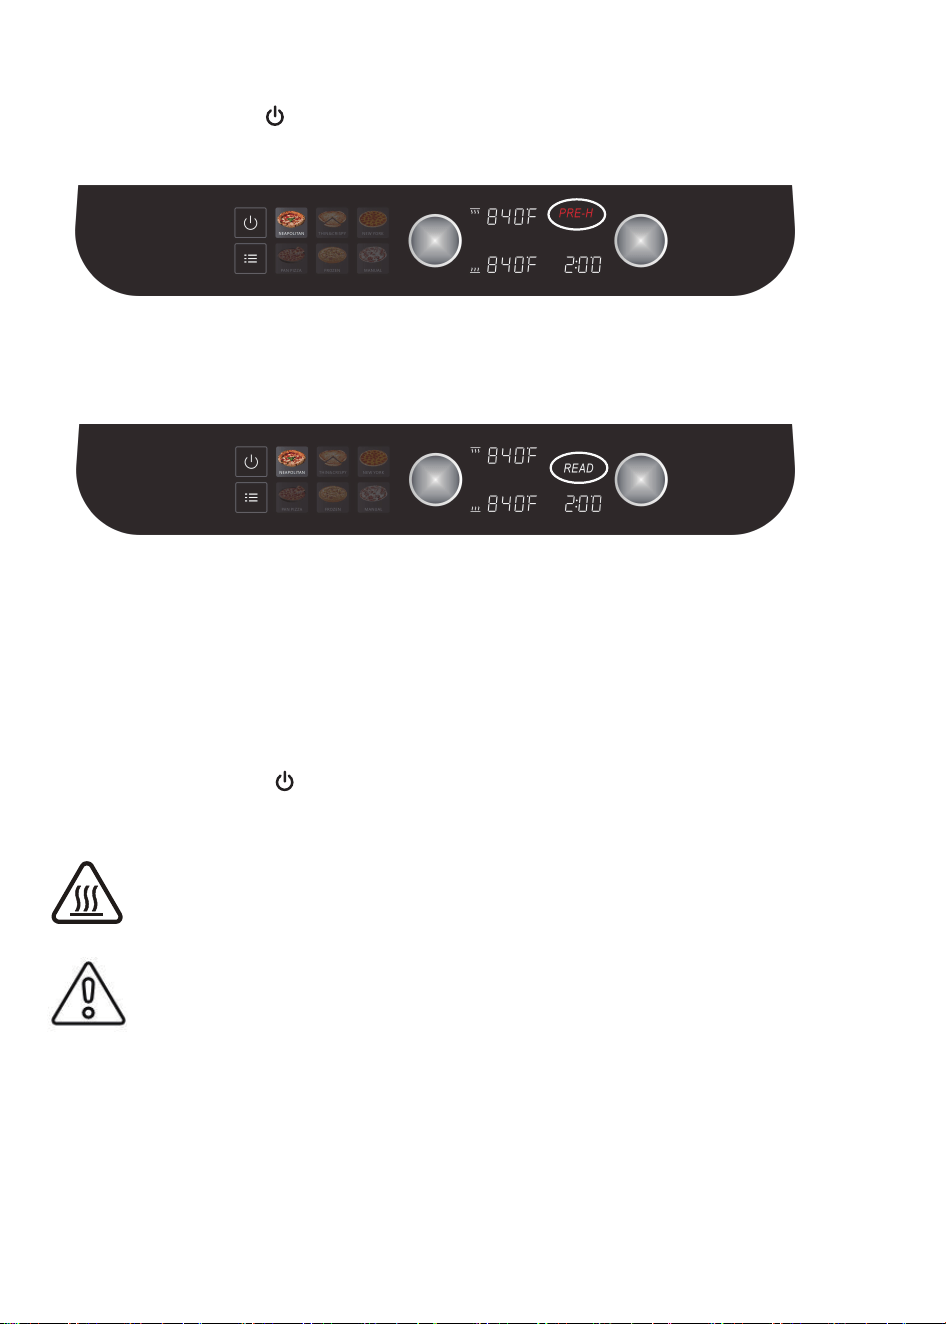
6. Press the Power button to start. The pizza oven will begin the preheating process, and the
Preheating Prompt (“PRE-H”) will be solid.
Note: During the preheating process, the countdown function is not available.
7. When both the upper and lower temperatures reach the preheating temperate, the Preheating
Prompt (“PRE-H”) will disappear, and the Ready Prompt (“READ”) will be solid.
Note: The pizza oven takes approx. 22 minutes to reach maximum temperature of 840°F (with the
pizza oven inserted).
8. You can now launch your first pizza. Use the pizza peel to transfer it straight onto the pizza
stone. Do not use the peel when using the pizza pan. Close the oven door.
9. Press the right knob to start the countdown. The suggested cooking duration will appear based
on the chosen pizza type, but you have the option to modify it prior to cooking to suit your
preference.
10. At the end of the cooking cycle, the oven will emit a beep and reset the timer. Take out your
pizza and enjoy every bite.
11. Press the Power button to turn off the oven, and the cooling fan will continue to operate for
an additional 15 minutes.
NOTE: Make sure the pizza oven is preheated before placing the pizza in the cavity. If
cooking multiple pizzas, allow a 3-4 minute interval after finishing the previous one.
- Excess flour and burnt food on the stone can ignite at high temperatures. If this
happens, keep the door closed and the flames will extinguish themselves. If flames
are not extinguished within 15 seconds, unplug the unit.
- If the pizza is left excessive time in high temperature, it may be ignited. If this
happens, keep the door closed and the flames will extinguish themselves. Shut down
the appliance, do not remove the pizza until the oven fully cooled.
- For high temperature cooking functions (over 750°F), we recommend you monitor
and stay to this pizza oven as your food can quickly become over-done and
eventually ignite.
- After cooking, to protect the internal electrical components, do not unplug the plug
immediately. Let the oven cool completely, and then unplug from the wall.
- Do not block the ventilation slots in the top, bottom and side panel.
- Do not remove the pizza stone from the pizza oven, unless it's completely cooled.
7
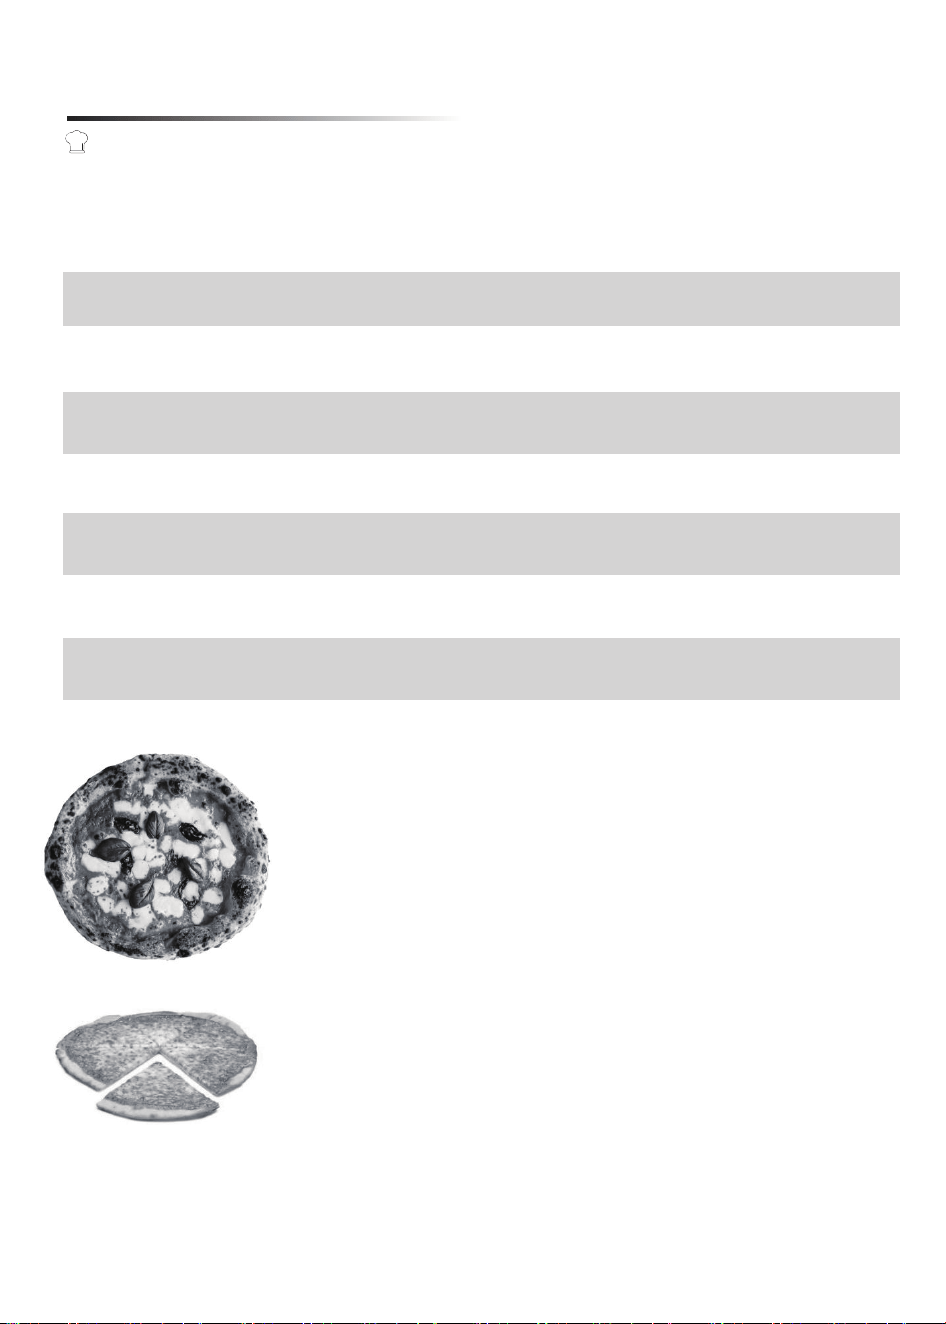
Below are the preset temperature and countdown settings, along with the customizable
countdown intervals for every function:
Cooking Guideline
Pizza Styles
(Recommended: 90 seconds - 2 minutes)
Achieve authentic Neapolitan pizza results at home!
Extremely high heat.
Expect a cooked but malleable crust with distinct blisters and charring
(leopard spotting).
¹ Brick oven references specific heat performance characteristics that
replicate that of a wood fired brick oven.
NEAPOLITAN PIZZA “BRICK OVEN” ¹
(Recommended: 5-7 minutes)
This dough is rolled out thinly which gives the pizza a crisp result. The
topping should be right to the edge and the sauce can be spread to the
very outside of the pizza.
THIN & CRISPY PIZZA
Function
Upper
Heater
Lower
Heater
Temp.
Range
Default
Countdown
Countdown
Range
NAPOLITIAN
840°F
450°C
840°F
450°C
390-840°F
200-450°C
2 minutes
1-10 minute(s)
NEW YORK
475°F
245°C
520°F
270°C
175-840°F
80-450°C
8 minutes
1-20 minute(s)
FROZEN
475°F
245°C
400°F
205°C
175-840°F
80-450°C
16 minutes
1-20 minute(s)
THIN &
CRISPY
520°F
270°C
625°F
330°C
175-840°F
80-450°C
6 minutes
1-10 minute(s)
PAN PIZZA
430°F
220°C
645°F
340°C
175-840°F
80-450°C
12 minutes
1-30 minute(s)
MANUAL
750°F
400°C
750°F
400°C
175-840°F
80-450°C
2 minutes
1-30 minute(s)
8
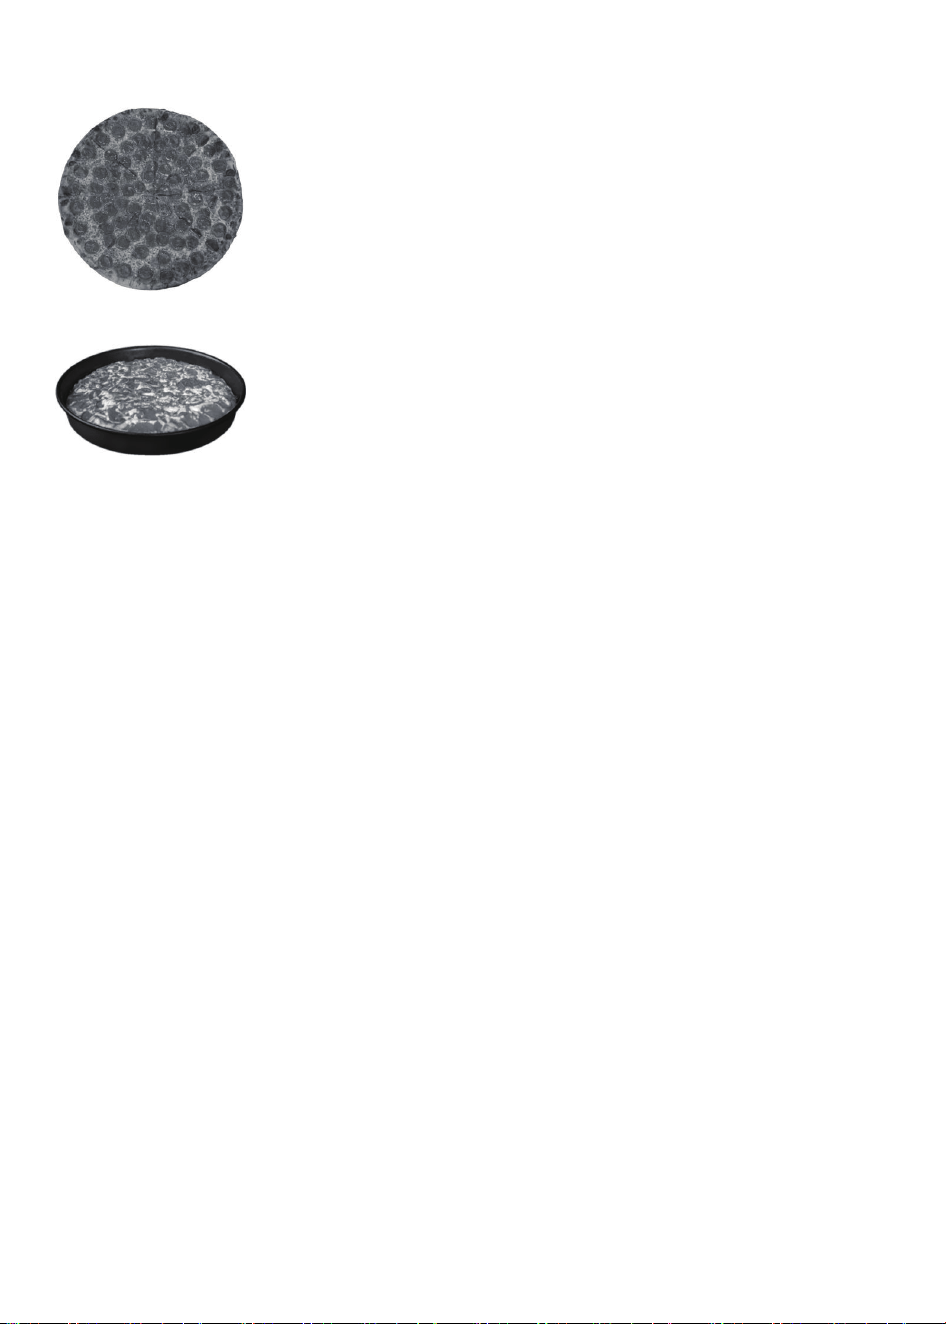
NOTE: The peel needs to remain cool and clean to prevent the dough from sticking. Do not sit
the peel under the pizza oven, while waiting to load the pizza onto its surface.
(Recommended: 7-8 minutes)
The heat profile has been designed to achieve the iconic New York style
pizza. The toppings and crust should be evenly browned and the pizza
should have a chewy mouth-feel.
NEW YORK PIZZA
(Recommended: 12-15 minutes)
Amazing crunchy base, fluffy dough, and plenty of toppings with sauce
almost to the edge. This setting requires the use of the pan provided with
your pizza oven.
For a crispier crust, you can consider par baking your dough before
applying sauces and toppings.
PAN PIZZA
(Recommended: 15-20 minutes)
Great frozen pizza results. You can adjust the temperature to match what is on the package of your
pizza.
FROZEN PIZZA
(Recommended: 2-3 minutes)
Extremely intense heat. Ideal for cooking charred vegetables.
You can adjust temperature and time.
Note that the cooking time can vary depending on the type of vegetable being cooked.
Here are some excellent tips for making homemade pizza:
1. Choose high-quality “00” flour and fresh ingredients for your pizza. “00” flour is an Italian-style, finely
milled flour that is considered the gold standard for pizza dough.
2. Stretch the dough into a thin base, leaving a one-centimeter-wide space around the edge to form a
crust that will puff up when exposed to high heat.
3. When cooking at lower temperatures and longer durations, keep an eye on New York, Manual, and
PAN pizzas. If needed, rotate them midway through baking to ensure even cooking.
4. Allow a few minutes between pizzas for the oven temperature to recover. The temperature display
will be solid and no longer flashing when it’s ready.
5. Avoid using excess flour, as it can burn on the stone, resulting in a bitter taste and yellow
discoloration on the pizza’s base. Excessive flour also increases the risk of smoke and potential fire
in the oven after removing the pizza.
MANUAL (750°F / 400°C)
PIZZA & PEEL TIPS
9

1. Make sure your peel, dough, and ingredients are within reach before starting. Cold dough is too
springy; dough that is too warm is too loose. Stretch your pizza base at room temperature and use
the included pizza peel to launch it into your Pizza Oven.
2. Don’t forget the flour! Your hands and work area should be generously floured prior to working with
the dough. Sprinkling flour, semolina, or cornmeal on your peel can help avoid the pizza base from
sticking.
3. Check for holes or tears in the pizza base before adding your toppings. If sauce gets between the
dough and the peel, the dough may stick and refuse to slide into the oven.
4. Give the peel a gentle shake to make sure the dough moves freely before adding any toppings. If it
doesn’t slide around, add a little more flour beneath your base.
5. Keep your toppings light. Don’t add too much sauce or too many toppings, or they’ll weigh your pizza
down and make it harder to launch into your oven.
6. Be efficient. Ensure your oven is fully heated and prepared before adding toppings to your pizza to
reduce the chances of it becoming sticky.
7. If your pizza sticks, use the “hovercraft technique” to loosen it up. Lift the dough’s edge and blow
gently underneath the base to form air pockets and distribute flour to the sticky spots. Adding extra
flour, semolina, or cornmeal beneath your pizza can help to release the dough.
HOW TO LAUNCH PIZZA INTO YOUR PIZZA OVEN
Neapolitan, New York
1. Place a proofed dough ball (it should be airy and stretchable) on a lightly floured work surface. Flour
the top of the dough to prevent sticking when stretching. If the dough resists stretching, allow it to
rest longer.
2. Leaving a 1” border of airy dough around the rim of the ball for Neapolitan, or a or 1/2” border for
New York (this will become the outer crust), press the dough ball with your fingertips, flattening out
the center (the goal is to remove the air in this section while maintaining the air in the crust).
3. Pick the dough up with two hands, holding it just inside the outer crust. Begin rotating the dough
circle while gently stretching for one or two rotations.
4. Transfer the dough to the back of your hands and gently stretch the dough until a 10-12” round is
formed. At this point the center should be an even thickness. Make sure the dough is not sticky when
handling, or it will also stick to the peel.
5. Lay the dough on the floured peel if needed, make small adjustments to fix the circle, and top as
desired.
Thin&Crispy
1. Place the proofed dough ball on a floured surface and dust the top of the dough with flour to prevent
sticking.
2. Gently flatten the dough with your hands.
3. Using a rolling pin, roll the dough to your desired size, rolling from the center out in every direction to
keep a circular shape.
4. Lay the dough on the floured peel if needed, make small adjustments to fix the circle, and top as
desired.
HOW TO STRETCH THE DOUGH
10
Cleaning your oven mainly means cleaning the stone, and since heat is the best way to clean it, it's a
largely hands-off process.
1. After each pizza, gently brush the stone clean of flour and debris with a long-handled, wire-bristled
brush. A wood handle is less likely than plastic to melt from the heat. Do not scrub the stone with the
brush.
2. After the oven has run the full cool-down cycle, slide the stone out of the oven and gently brush off any
ash or burnt debris. If needed, flip the stone over to brush off the underside.
3. Do NOT get the stone wet or immerse it in water, which could damage the stone. The stone is
NOT dishwasher safe.
4. Do NOT apply oil to the stone.
5. If necessary, brush or wipe any ash or debris out of the oven interior once the oven is fully cooled.
Alternatively, a vacuum with a nozzle attachment can be used to remove ash from the oven. Do NOT
use oven cleaning sprays or metal scouring pads.
6. Wipe down the glass viewing window with paper towels to remove grease. For more thorough cleaning,
use soapy water to clean the window but make sure the unit is completely dry before using it again.
7. It is important to remove as much food debris/stuck-on food from the stone as possible to minimize
smoking. If the stone has stuck-on food so that the dough can no longer make good contact with it, flip
the stone over so the stuck-on food is on the underside, then return it to the oven and bake the stone
alone in the oven at 840°F for 22 minutes (use the preheating process). This allows the stuck-on food
to burn off the stone. After the baking cycle, allow the cool-down cycle to run fully.
8. To clean the peel: Wash it in soapy water; rinse and dry well. If needed, use a plastic scrubbing sponge
to remove stubborn stuck-on food, but do not use metal scouring pads.
The peel is not dishwasher safe.
9. Store the stone in the oven in between uses, and only remove it to flip it or during cleaning. The stone
is fragile and sensitive to quick temperature changes.
10. The stone and oven interior may become discolored with use over time, but the discoloration will not
affect performance. You can use either side of the stone for baking.
Cleaning & Maintenance
Note:
- Before cleaning, be sure the oven is unplugged and the interior is cool.
- Wear rubber gloves when cleaning the appliance.
Pan Pizza
1. Grease the bottom and sides of the pan.
2. Starting with un-proofed dough, place the dough ball in the center of the pan. Cover with plastic wrap
and let rise until airy, at least 1 hour for room-temperature dough; refrigerated dough will take 2-3
hours.
3. Using your fingertips, gently press the dough so it fills the bottom of the pan. Be careful not to press
too much air out of the dough; the air keeps the finished pizza crust fluffy. If you like, press some of
the dough up the edges of the pan to form a high crust.
4. Gently lift up the sides of the dough and ensure there are not large air pockets on the bottom that
may bake unevenly.
5. Top as desired and bake.
11

Troubleshooting
Problem Possible causes What to do
The pizza oven does
not turn on.
The power cord may
not be plugged in, or
it has poor contact
Make sure your product is plugged into a
functional outlet.
Uncooked pizza sticks
to peel
Not enough flour on
bottom; pizza sat too
long on peel; too
much topping weight
Be sure dough is well-floured on the bottom.
Build pizza right before it goes in the oven and
go light on the toppings; do not let the topped
pizza sit on the peel for more than a minute or
two, or it will start to stick. Use quick, short
movements to pull the peel back after placing
the pizza on the stone.
Raw base/top of pizza
too dark
Too much heat on
top. This can
particularly happen
to pan pizzas or
other thick foods if
they are very close
to the top heating
element.
Reduce upper temp. and/or increase lower
temp.
Pizza is burnt
Temperature too
high
Cook for a longer time at a lower temperature.
Not all pizzas need the highest heat. On
Neapolitan pizza, which does use very high
heat, some char is desirable.
Undercooked base
Stone isn’t hot
enough
Be sure the READ prompt indicator is on before
putting pizza in oven. If the stone still isn't hot
enough, increase the Lower Temp.
Food catches on fire
Food is overcooked;
excess flour or
baked-on on stone
If food ignites, DO NOT open the door. The
flames will extinguish themselves. Prevent fires
by staying near the oven and removing food
when done, and by cleaning stone in between
uses.
Smoke comes out of
the oven
It’s normal due to
high temperature
To reduce smoke, try using less flour on the
pizza peel.
The above is the judgment and inspection of common failures.
Please do not attempt to disassemble the unit yourself to prevent any potential dangers or damage to the
appliance.
If the problem persists, please contact the after-sales service.
12
If an abnormality comes up, the oven will display the corresponding error codes.
Please do not attempt to disassemble the unit yourself to prevent any potential dangers or damage to the
appliance.
Error Codes
Technical Specification
Code Possible causes Measures
E1
The upper heating component
sensor is open-circuit.
Contact the after-sales service.
E2
The lower heating component
sensor is open-circuit.
E3
Five minutes after the cooking
starts, the upper temperature
sensor fails to detect the cavity
temperature
Contact the after-sales service.
Contact the after-sales service.
E5
Internal communication failure
between power board and control
board
Contact the after-sales service.
E4
Five minutes after the cooking
starts, the lower temperature
sensor fails to detect the cavity
temperature
Contact the after-sales service.
Manufacturer: Zhongshan Dalian Electrical Industrial Co., Ltd.
Add.: No.39 Feiyue Road, Nantou, Zhongshan, Guangdong, China
Contact: Emily Tel: +1 (838) 910 8317 E-Mail: [email protected]
Model
Voltage
Rated power
Cavity size (L×W×H)
Pizza stone size (L×W×H)
Product size (L×W×H)
DL-P1208
120V~ 60Hz
1700W
350mm×331mm×110mm
13.78”×13.03”×4.33”
320mm×320mm×12mm
12.60”×12.60”×0.48”
476mm×432mm×290mm
18.74”×17.01”×14.42”
Dimensions may vary due to improvement. We may change specifications and
designs without prior notice.
5016609
13