Keep these instructions for future
reference. If the equipment changes
ownership, be sure this manual
accompanies equipment. Please refer to
the SAFETY INSTRUCTIONS for important
safety information prior to using this oven
Owner’s Manual
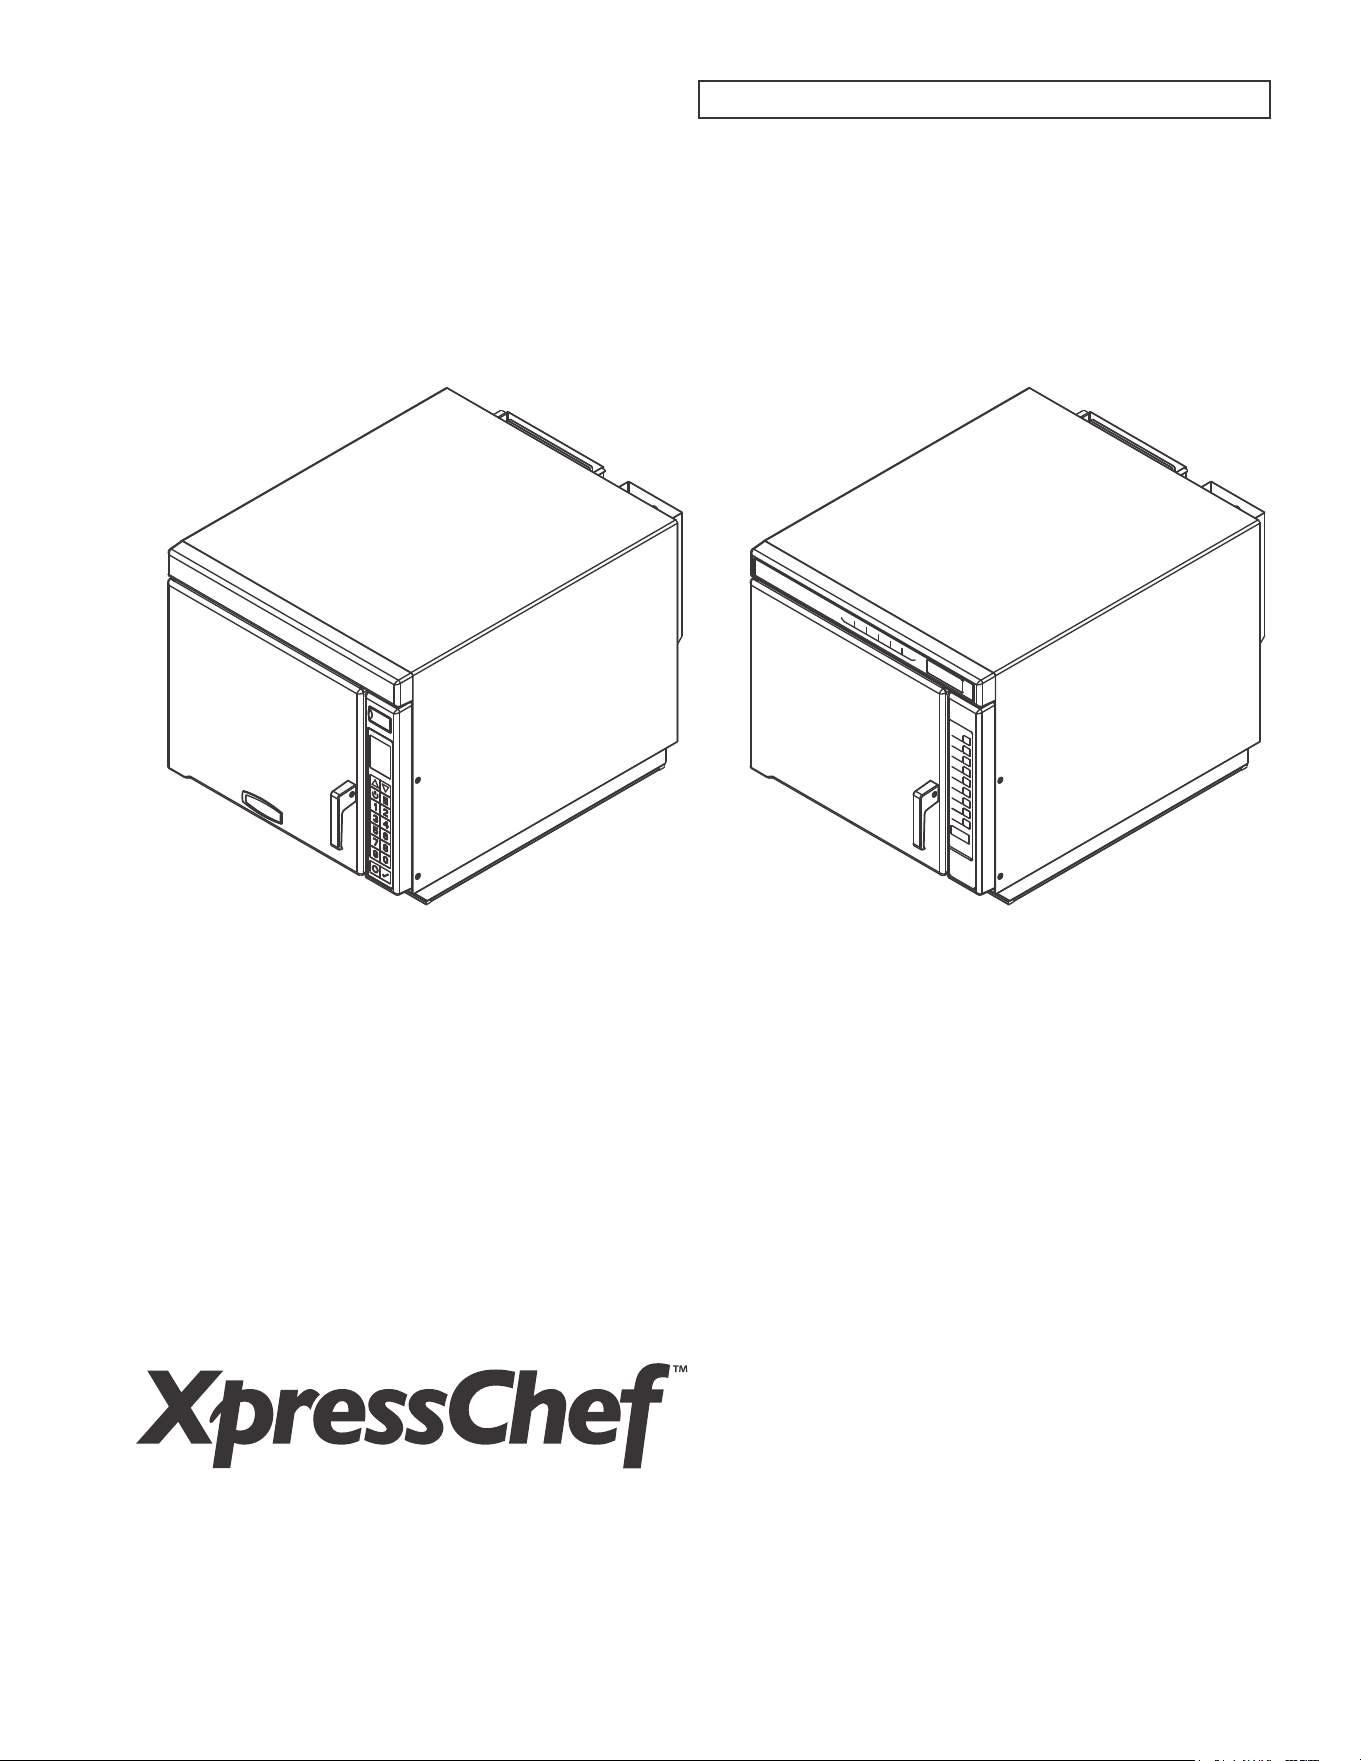
HIGH SPEED COMMERCIAL COMBINATION OVEN
This document covers XpressChef™ 2c, JET, and ACE Series
TABLE OF CONTENTS
Model Identication ............................................................... 2
Online Oven Resources ........................................................ 2
Important Safety Instructions ...............................................3
Grounding & Installation .......................................................5
Cooking Tips .......................................................................... 6
Style 1
Oven & Control Panel Features ���������������������������������������������7
Cooking & Programming Features ����������������������������������������8
General Oven Screens ����������������������������������������������������������9
General Oven Operation������������������������������������������������������10
Manual Cook Mode�������������������������������������������������������������� 11
Operating Preset Recipe Keypads ��������������������������������������12
Edit Recipe Screens ������������������������������������������������������������13
Edit Recipe Mode ����������������������������������������������������������������14
Edit Recipe Mode: Folders ��������������������������������������������������15
Microwave-Only Mode ��������������������������������������������������������� 16
USB Flash Drive ������������������������������������������������������������������17
User Options ������������������������������������������������������������������������ 18
Style 2
Oven & Control Panel Features �������������������������������������������19
Cooking & Programming Features ��������������������������������������20
Displays �������������������������������������������������������������������������������21
Basic Operation & Cooking��������������������������������������������������22
Programming & USB Flash Drive ����������������������������������������23
User Options ������������������������������������������������������������������������ 24
Care & Cleaning ................................................................... 25
Before Calling for Service...................................................26
STYLE 1 STYLE 2
©2020 ACP, Inc.
Cedar Rapids, IA 52404
Page 2 of 26
Part No. 20000611
Original Instructions
Model Identication
Any questions or to locate an authorized ACP servicer, call
ACP ComServ Service Support�
• Inside the U�S�A� or Canada, call toll-free at
866-426-2621�
• Outside the U�S�A� and Canada, call 319-368-8195�
• Email: commercialservice@acpsolutions�com
Warranty service must be performed by an authorized ACP
servicer� ACP also recommends contacting an authorized
ACP servicer, or ACP ComServ Service Support if service is
required after warranty expires�
When contacting ACP, provide product information� Product
information is located on oven serial plate� Record the
following information:
Model Number: _________________________________
Manufacturing Number: ___________________________
Serial or S/N Number: ____________________________
Date of purchase: _______________________________
Dealer’s name and address: _______________________
______________________________________________
______________________________________________
Keep a copy of sales receipt for future reference or in case
warranty service is required�
Online Oven Resources
ACP PROGRAMMING APPLICATION
Download and install the ACP Programming Application to create, edit, and customize menu and display
settings for your oven, using a desktop computer or tablet�
To download the latest and greatest version of the ACP Programming Application
please visit acpsolutions.com/oven-programming/
Before using your oven, please take the time to read the Safety Instructions which shipped with the oven�
Information herein is subject to change without notice� Errors are subject to correction�
For the most recent product literature, please visit acpsolutions.com/product-literature/

©2020 ACP, Inc.
Cedar Rapids, IA 52404
Page 3 of 26
Part No. 20000611
Original Instructions
SAVE THESE INSTRUCTIONS
PRECAUTIONS TO AVOID POSSIBLE EXPOSURE TO
EXCESSIVE MICROWAVE ENERGY
A� DO NOT attempt to operate this oven with the door open since open door operation can result in harmful exposure to
microwave energy� It is important not to defeat or tamper with the safety interlocks�
B� DO NOT place any object between the oven front face and the door too allow soil or cleaner residue to accumulate on sealing
surfaces�
C� DO NOT operate the oven if it is damaged� It is particularly important that the oven door close properly and that there is no
damage to the:
1� door (bent)
2� hinges and latches (broken or loosened)
3� door seals and sealing surfaces�
D� The oven should not be adjusted or repaired by anyone except properly qualied service personnel.
1� READ all instructions before using equipment�
2� READ AND FOLLOW the specic “PRECAUTIONS
TO AVOID POSSIBLE EXPOSURE TO EXCESSIVE
MICROWAVE ENERGY” on this page�
3� This equipment MUST BE GROUNDED� Connect only
to properly GROUNDED outlet. See “ GROUNDING /
EARTHING INSTRUCTIONS”�
4� Install or locate this equipment ONLY in accordance with
the installation instructions in this manual�
5� Liquids or other foods, must NOT be HEATED in sealed
containers since they are liable to explode�
6� Eggs in their shell and whole hard-boiled eggs should NOT
be HEATED in microwave ovens since they may explode
even after microwave heating has ended�
7� Use this equipment ONLY for its intended use as described
in this manual� DO NOT use corrosive chemicals or vapors
in this equipment. This type of oven is specically designed
to heat, cook, or dry food� It is not designed for industrial or
laboratory use�
8� This appliance is NOT intended for use by
persons(including children) with reduced physical, sensory
or mental capabilities, or lack of experience and knowledge,
unless they have been given supervision or instruction
concerning use of the appliance by a person responsible for
their safety
9� CHILDREN SHOULD BE SUPERVISED to ensure that they
DO NOT play with the appliance
10� Failure to maintain the oven in a clean condition could
lead to deterioration of the surface that could adversely
aect the life of the appliance and possibly result in a
hazardous situation;
11� See door cleaning instructions on page 25 of this
product safety manual�
12� DO NOT heat baby bottles in oven� Baby food jars shall be
open when heated and contents stirred or shaken before
consumption, in order to avoid burns�
13� DO NOT operate this equipment if it has a damaged
cord or plug, if it is not working properly, or if it has been
damaged or dropped�
14� This equipment, including power cord, must be serviced
ONLY by qualied service personnel. Special tools are
required to service equipment� Contact nearest authorized
service facility for examination, repair, or adjustment�
15� DO NOT cover or block louvers or other openings on
equipment�
16� DO NOT store this equipment outdoors� DO NOT use this
product near water – for example, near a kitchen sink, in a
wet basement, a swimming pool, or a similar location�
17� DO NOT immerse cord or plug in water�
18� Keep cord AWAY from HEATED surfaces�
19� DO NOT let cord hang over edge of table or counter�
20� For commercial use only�
When using electrical equipment, basic safety precautions should be followed to reduce the risk of burns, electrical shock,
re, or injury to persons including the following.
IMPORTANT SAFETY INSTRUCTIONS
⚠
RECOGNIZE THIS SYMBOL AS A SAFETY MESSAGE
⚠
WARNING

©2020 ACP, Inc.
Cedar Rapids, IA 52404
Page 4 of 26
Part No. 20000611
Original Instructions
To avoid risk of re in the oven cavity:
A� DO NOT overcook food� Carefully attend oven when
paper, plastic, or other combustible materials are placed
inside the oven, due to the possibility of ignition�
B� Remove wire twist-ties from paper or plastic bags before
placing bag in oven�
C� If materials inside the oven ignite, keep oven door
CLOSED, turn oven o and disconnect the power cord,
or shut o power at the fuse or circuit breaker panel.
D� DO NOT use the cavity for storage� DO NOT leave
paper products, cooking utensils, or food in the cavity
when not in use�
Liquids such as water, coee, or tea are able to be
overheated beyond the boiling point without appearing
to be boiling due to surface tension of the liquid� Visible
bubbling or boiling when the container is removed from
the microwave oven is not always present� THIS COULD
RESULT IN VERY HOT LIQUIDS SUDDENLY BOILING
OVER WHEN A SPOON OR OTHER UTENSIL IS
INSERTED INTO THE LIQUID� To reduce the risk of injury
to persons:
i� DO NOT overheat the liquid�
ii� Stir the liquid both before and halfway through heating it�
iii� DO NOT use straight-sided containers with narrow necks�
iv� After heating, allow the container to stand in the
microwave oven for a short time before removing the
container�
v� Use extreme care when inserting a spoon or other utensil
into the container�
1� DO NOT deep fat fry in oven� Fat could overheat and be
hazardous to handle�
2� DO NOT cook or reheat eggs in shell or with an unbroken
yolk using microwave energy� Pressure may build up and
erupt� Pierce yolk with fork or knife before cooking�
3� Pierce skin of potatoes, tomatoes, and similar foods before
cooking with microwave energy� When skin is pierced,
steam escapes evenly�
4� DO NOT operate equipment without load or food in oven
cavity�
5� Microwave popcorn should not be popped in oven�
6� DO NOT use regular cooking thermometers in oven� Most
cooking thermometers contain mercury and may cause an
electrical arc, malfunction, or damage to oven�
7� DO NOT use metal utensils in oven�
8� DO NOT use aluminum foil in oven
9� Never use paper, plastic, or other combustible materials
that are not intended for cooking�
10� When cooking with paper, plastic, or other combustible
materials, follow manufacturer’s recommendations on
product use�
11� DO NOT use paper towels which contain nylon or other
synthetic bers. Heated synthetics could melt and cause
paper to ignite�
12� DO NOT heat sealed containers or plastic bags in oven�
Food or liquid could expand quickly and cause container
or bag to break� Pierce or open container or bag before
heating�
13� To avoid pacemaker malfunction, consult physician or
pacemaker manufacturer about eects of microwave
energy on pacemaker�
14� An authorized servicer MUST inspect equipment annually�
Record all inspections and repairs for future use�
To avoid personal injury or property damage, observe the following:
SAVE THESE INSTRUCTIONS
⚠
CAUTION
⚠
WARNING
⚠
WARNING
©2020 ACP, Inc.
Cedar Rapids, IA 52404
Page 5 of 26
Part No. 20000611
Original Instructions
Grounding/Earthing Instructions
Oven MUST be grounded. Grounding reduces risk of electric shock
by providing an escape wire for the electric current if an electrical
short occurs� This oven is equipped with a cord having a grounding
wire with a grounding plug� The plug must be plugged into an outlet
that is properly installed and grounded�
Consult a qualied electrician or servicer if grounding instructions are not completely understood,
or if doubt exists as to whether the oven is properly grounded�
Do not use an extension cord.
If the product power cord is too short, have a qualied electrician install a three-slot receptacle. This oven should be plugged
into a separate circuit with the electrical rating as provided in product specications (available at www.acpsolutions.com) and
the oven’s serial plate / rating label� When the oven is on a circuit with other equipment, an increase in cooking times may be
required and fuses can be blown�
EXTERNAL EQUIPOTENTIAL EARTHING TERMINAL (export only)
Equipment has secondary earthing terminal� Terminal provides external earthing connection used in addition to earthing
prong on plug� Located on outside of oven back, terminal is marked with symbol shown at right
Installation
Unpacking Oven
• Inspect oven for damage such as dents in door or inside oven cavity�
• Report any dents or breakage to source of purchase immediately�
Do not attempt to use oven if damaged.
• Remove all packing materials from oven interior�
• If oven has been stored in extremely cold area, wait a few hours before
connecting power�
Radio Interference
• Microwave operation may cause interference to radio, television� Reduce or
eliminate interference by doing the following:
• Clean door and sealing surfaces of oven according to instructions in
“Care & Cleaning” section�
Oven Placement
• Do not install oven next to or above source of heat, such as pizza oven
or deep fat fryer� This could cause oven to operate improperly and could shorten
life of electrical parts�
• Do not block or obstruct oven lters. Allow access for cleaning.
• Install oven on level counter-top surface�
• If provided, place warning label in a conspicuous place close to oven�
• Outlet should be located so that plug is accessible when oven is in place�
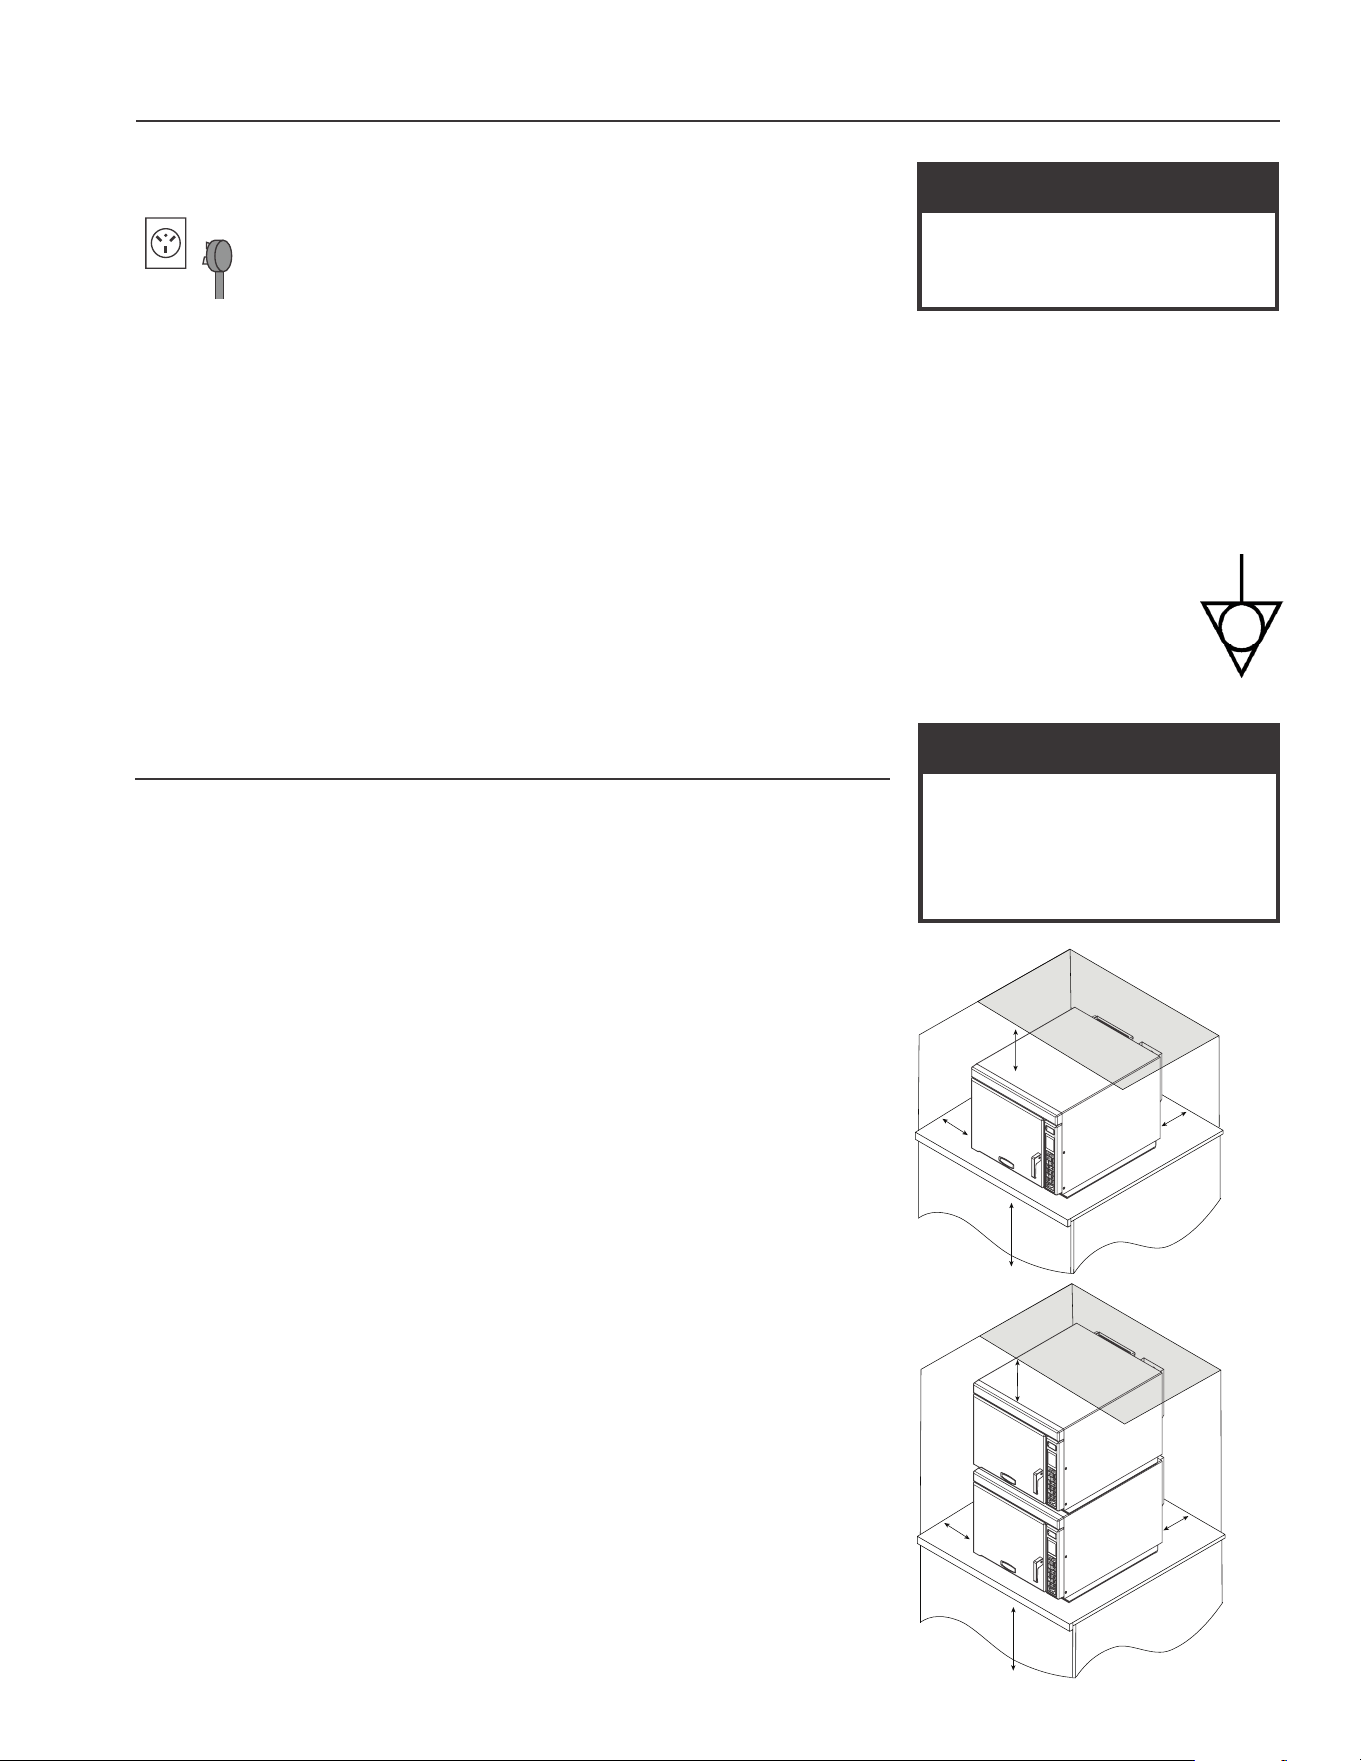
OVEN CLEARANCES
A� Allow at least 4” (10 cm) of clearance around top of oven. Proper air ow around
oven cools electrical components. With restricted air ow, oven may not operate
properly and life of electrical parts is reduced�
B� There is not an installation clearance requirement for the back of the oven�
C� Allow at least 1” (2�54 cm) of clearance around sides of oven�
D� Install oven so oven bottom is at least 3 feet (91.5 cm) above oor.
⚠
WARNING
Excessive Weight Hazard
Use two or more people to move
and install oven� Failure to do so can
result in back or other injury
⚠
WARNING
To avoid risk of electrical shock or
death, this oven must be grounded
and plug must not be altered�
Grounding & Installation
A
D
B
C
A
D
B
C
A
D
B
C
A
D
B
C
©2020 ACP, Inc.
Cedar Rapids, IA 52404
Page 6 of 26
Part No. 20000611
Original Instructions
Cooking Tips
Oven Temperature
• Oven can be preheated to the
following temperature range:
• STYLE 1 Models: 200°– 475°F
(95°– 250°C)
• STYLE 2 Models: 150°– 475°F
(65°– 250°C)
• The most frequently used oven
temperature is 475°F (250°C)�
• Use only one temperature for all
your menu items to avoid cooking
inconsistency�
• Reduced oven temperature may be
needed for baking or if product is
cooked for an extended period of time�
Microwave Settings
• 11 dierent power levels (0% lowest
to 100% highest) control intensity of
microwave energy�
• Microwave energy cooks the food
and increases the internal food
temperature�
• Food containing high water, fat and
salt content raises its temperature
faster with high microwave power
level�
• Decreasing microwave power is
recommended when product is thick
and takes longer to cook to avoid
drying out food�
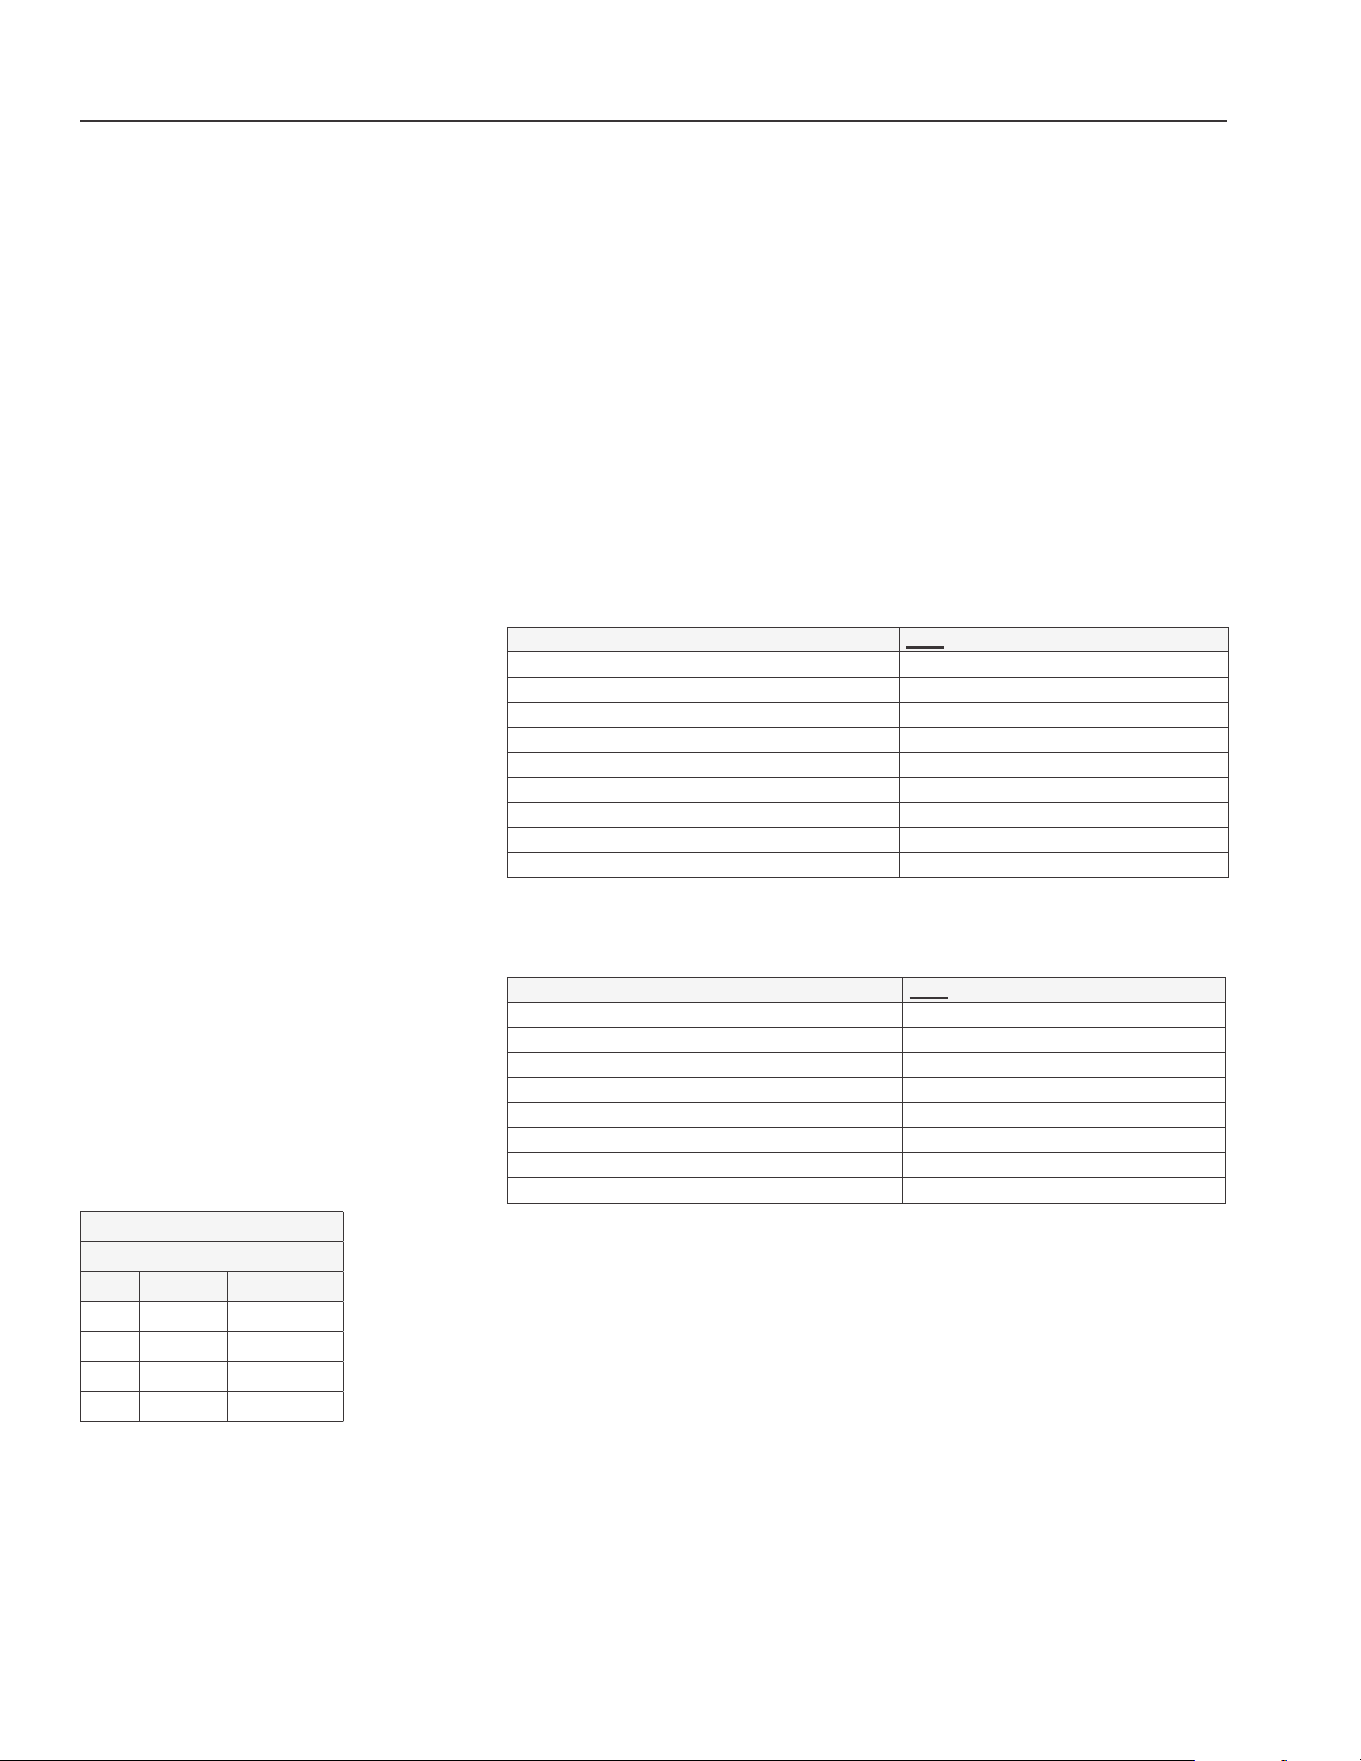
Stage Cooking
Allows operator to use up to four dierent
cooking cycles or stages consecutively
without repeated input from the operator�
Stage cooking aids in retaining the quality
of frozen and delicate foods� It can be set to
defrost food initially, then cook it, and then
nish with more toasting/browning.
Note: Combined total cook time
cannot exceed 20:00
Example: Pizza
Total Cook Time:3:45
Temperature: 475°F (250°C)
STAGE TIME % MW POWER
1 1:00 80%
2 1:30 30%
3 1:15 50%
4 - -
Stage one thaws and begins cooking
process. Stage two continues cooking
process without drying out pizza crust. Stage
three increases the internal temperature of
the pizza.
Best Practices
• Remove food from oven at end of cycle. Items will be hot when nished cooking. Use oven
mitt, tongs, or pizza paddle to safely remove items from oven�
• Place cookware in center of oven rack, not touching oven sides�
• Clean oven daily� See "Care & Cleaning" on page 25 of this manual for full instructions�
• For easier cleaning, use non-stick liner kit accessory and replace whenever you encounter
excessive peeling or wear� (Item# TL12)
• Style 1 Models: Use magnetic air lter accessory to enhance ltering of ne particulates that
may be in the air with select installations/applications� (Item# AF10)
Cooking Utensils and Containers
ONLY use accessories that are both high temperature oven-safe and microwave-safe�
FOR CONVECTION AND/OR COMBINATION COOKING:
• Maximum metal pan height: 1½ inches (38mm)� Assure pans do not contact oven or door
surfaces during cooking�
• Dierent types of metal conduct heat at dierent speeds. Aluminum heats faster than stainless
steel�
• Line pans with parchment paper for easy removal of food after heating and cleaning�
RECOMMENDED NOT RECOMMENDED
Parchment Paper Aluminum and/or metal foil
Non-Stick Baskets (TB10/S, SB10/S, MB10S) Grocery bags
Pizza Stone (ST10C) Recycled paper
Panini Grill Accessory (JR10) Lead crystal
Drip Tray/Griddle (DR10) Newspapers
1/4-size Aluminum Sheet Pan (height ≤ 1½ in. (38mm)) Metallic trimmed china
12in (30cm) Pizza Screen Plastic wrap
Ceramic Dish
High-temperature glass
FOR MICROWAVE
-
ONLY COOKING:
• Do NOT use cooking containers or covers with metal content� This includes all metal and
enameled metal-core ware, foil, and metal-trimmed containers�
RECOMMENDED NOT RECOMMENDED
Glass/Ceramic Aluminum and/or metal foil
Parchment Paper Grocery bags
Non-Stick Baskets (TB10/S, SB10/S, MB10S) Recycled paper
Lead crystal
Newspapers
Metal
Metallic trimmed china
Plastic wrap
Available Oven Accessories
• Non-Stick Baskets (Item#s:TB10/S, SB10/S, MB10S): Aids in browning and crisping of food�
Makes cleanup easier�
• Pizza Stone(Item#: ST10C): Aids in crisping and browning breads and pizzas� Preheat pizza stone
for 30-35 minutes to heat thoroughly�
• Panini Grill Accessory (Item#: JR10): Aids in adding grill marks on a product� Preheat grill plate for
15 minutes to heat thoroughly�
• Drip Tray/Griddle (Item#: DR10): Makes cleanup easier� Aids in crisping and browning� Preheat
griddle for 15 minutes to heat thoroughly�
• Oven Paddle (Item#: PA10): Aids in safe removal of food from the oven�
• Non-Stick Liner Kit (Item#: TL12): Makes cleanup easier and protects oven interior�
• Oven Floor Liner (Item#: OV10): Makes cleanup easier�
• Oven Rack (Item#: RA14): Replacement stainless steel interior oven rack
• Magnetic Air Filter (Item#: AF10): Removable/cleanable magnetic air lter. Enhances ltering of
ne particulates that may be in the air with select installations/applications(for STYLE 1 Models)
• ACP Oven Cleaner (Item#s:CL10 (US), CL10W (EU))
• ACP Oven Shield Protectant (Item#s: SH10 (US), PR10W (EU))
©2020 ACP, Inc.
Cedar Rapids, IA 52404
Page 7 of 26
Part No. 20000611
Original Instructions
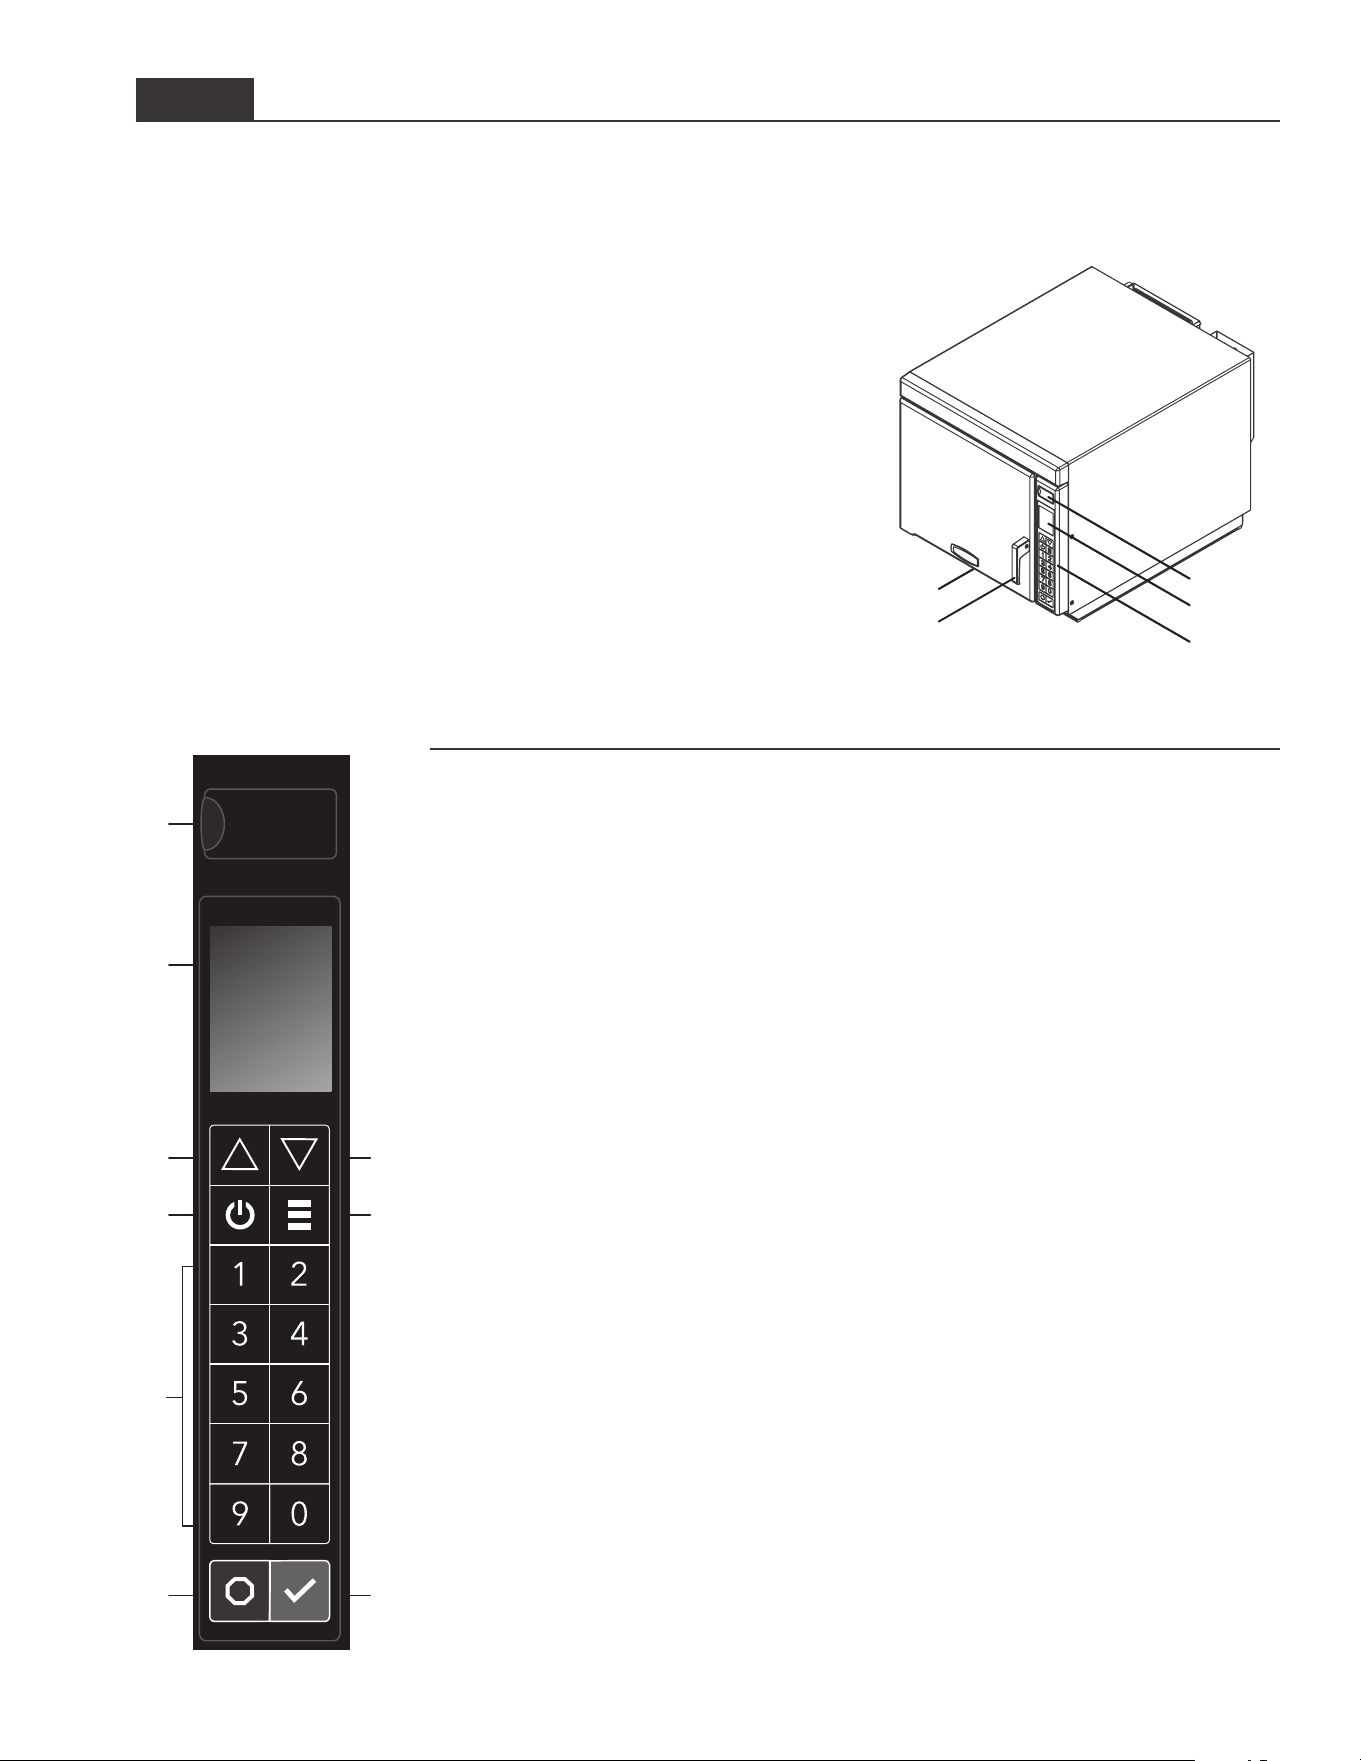
Oven Features
(1) USB PORT / PROTECTIVE COVER
(2) DISPLAY
(3) CONTROL PANEL
(4) DOOR HANDLE
Ergonomically designed for one handed "Lift and Pull" operation�
(5) AIR INTAKE FILTER (not pictured)
Non-removable air intake lter.
(i) Optional Accessory: Magnetic Air Filter (Item# AF10)
Removable/cleanable magnetic air lter. Enhances ltering of ne
particulates that may be in the air with select installations/applications
(6) OVEN RACK (not pictured)
The oven is equipped with a removable stainless steel oven rack� 2 available
installation positions�
(7) UNIT SERIAL NUMBER (not pictured)
Located inside the door and on the back of the oven�
STYLE 1 Oven & Control Panel Features
Note: There are multiple styles of controls. Choose the control that matches unit. Control panel coloring may vary by model
Control Panel Features
(A) USB PORT
Standard USB ash drive compatible. Allows for import/export of recipes and user options, and to
update rmware.
(B) DISPLAY
2�8” (71 mm) Color LCD Display
(C) UP KEYPAD
Scrolls up through editable elds and pages.
(D) DOWN KEYPAD
Scrolls down through editable elds and pages.
(E) POWER ON/OFF KEYPAD
Preheats oven� Begins cool-down process�
(F) MENU KEYPAD
Opens Main Menu screen to access features including: adjust preheat temperature; edit recipes;
manual cook mode; adjust date/time settings; change user options; load menu les; enter service
mode; and/or activate microwave-only cooking�
(G) NUMBER KEYPADS
Used to operate preset recipes; enter settings; and navigate through display�
(H) STOP/RESET KEYPAD
Interrupts operation, and/or exits modes and menus�
(I) START/OK KEYPAD
Begins cooking in Manual Time Entry Mode� Restarts an interrupted cooking cycle� Used to save
settings and entries�
(D)
(I)
(F)
(G
)
(H
)
(B
)
(C
)
(E
)
(A
)
(1)
(2)
(4)
(5)
(3)
©2020 ACP, Inc.
Cedar Rapids, IA 52404
Page 8 of 26
Part No. 20000611
Original Instructions
STYLE 1 Cooking & Programming Features
STAGE COOKING
Allows operator to use up to four dierent cooking cycles or stages consecutively
without repeated input from the operator� For example, stage cooking can be set to
defrost food initially, then cook it, and then nish with more toasting/browning.
PRESET RECIPE KEYPADS
Oven can store between 10 to 100 recipes in memory�
Available quantity varies based on “Digit Entry” User Option.
Note: To change Digit Entry options, see “User Options” section in this manual.
DIGIT ENTRY USER OPTION AVAILABLE RECIPES
Single Digit
10 recipes (0-9)
(10 total recipes)
Double Digit
100 recipes (00-99)
(100 total recipes)
Folders
10 folders (0-9)
10 recipes per folder (0-9)
(100 total recipes)
QUANTITY PROMPT
(
SELECT MODELS
)
Note: Only available when factory option
ALLOW QUANTITY PROMPT is enabled and
Quantity Prompt is enabled in User Options
Allows operator to select preset recipe
keypad(s) for a menu item, followed by the
quantity of items to be heated� Cook times
and settings can be customized for each
recipe in quantities 1-9�
Cooking Energies and Options
CONVECTION ENERGY
Convection cooking utilizes both a convection element and fan to
evenly distribute heated air throughout the oven cavity� The circulating
air surrounds food in an envelope of evenly heated air� Consistent
temperatures cook food evenly and reduce cooking time� By default,
convection power is enabled� While enabled, oven will maintain a
minimum convection temperature of 200°F (95°C) to ensure drier air
and more even cooking�
MICROWAVE ENERGY
Microwave cooking uses high frequency energy waves to heat the
food� When cooking, microwave energy causes food molecules to
move rapidly� This rapid movement between the food molecules
creates heat, which cooks the food�
Oven generates microwave energy while cooking screen countdowns
and displays power level greater than 0%.
Convection-Only Cooking
To operate with convection-only, use cook
settings with 0% microwave power level.
Combination Cooking:
Convection with Microwave
The combination of both energies uses the
speed of microwave energy and browning
of convection cooking to yield high quality
food faster� To operate with combination
cooking, set convection temperature
between 200°– 475°F (95°– 250°C)� and set
microwave power level between 10 – 100%.
Microwave-Only Cooking
Microwave-Only mode allows operator to
disable convection power and cook using
only microwave energy� To operate with
microwave-only, see page 16�
Programming Features
Methods of Cooking & Programming
COOKING WITH PRESET RECIPE KEYPADS
Allows operator to quickly activate saved cooking sequences using 1-2 keypad strokes
MANUAL COOKING
Allows operator to heat without changing the preset recipe keypads
MANUALLY EDIT/CREATE NEW PRESET RECIPES
Allows operator to use keypads to edit preset recipes and/or create new recipes for customized cooking�
USB MENU IMPORT AND EXPORT
Allows operator to import and export recipe settings and user options using a standard USB ash drive
ACP PROGRAMMING APPLICATION
Allows operator to create and edit recipe settings and user options on a computer�
For detailed instructions, please visit: www.acpsolutions.com/oven-programming
©2020 ACP, Inc.
Cedar Rapids, IA 52404
Page 9 of 26
Part No. 20000611
Original Instructions
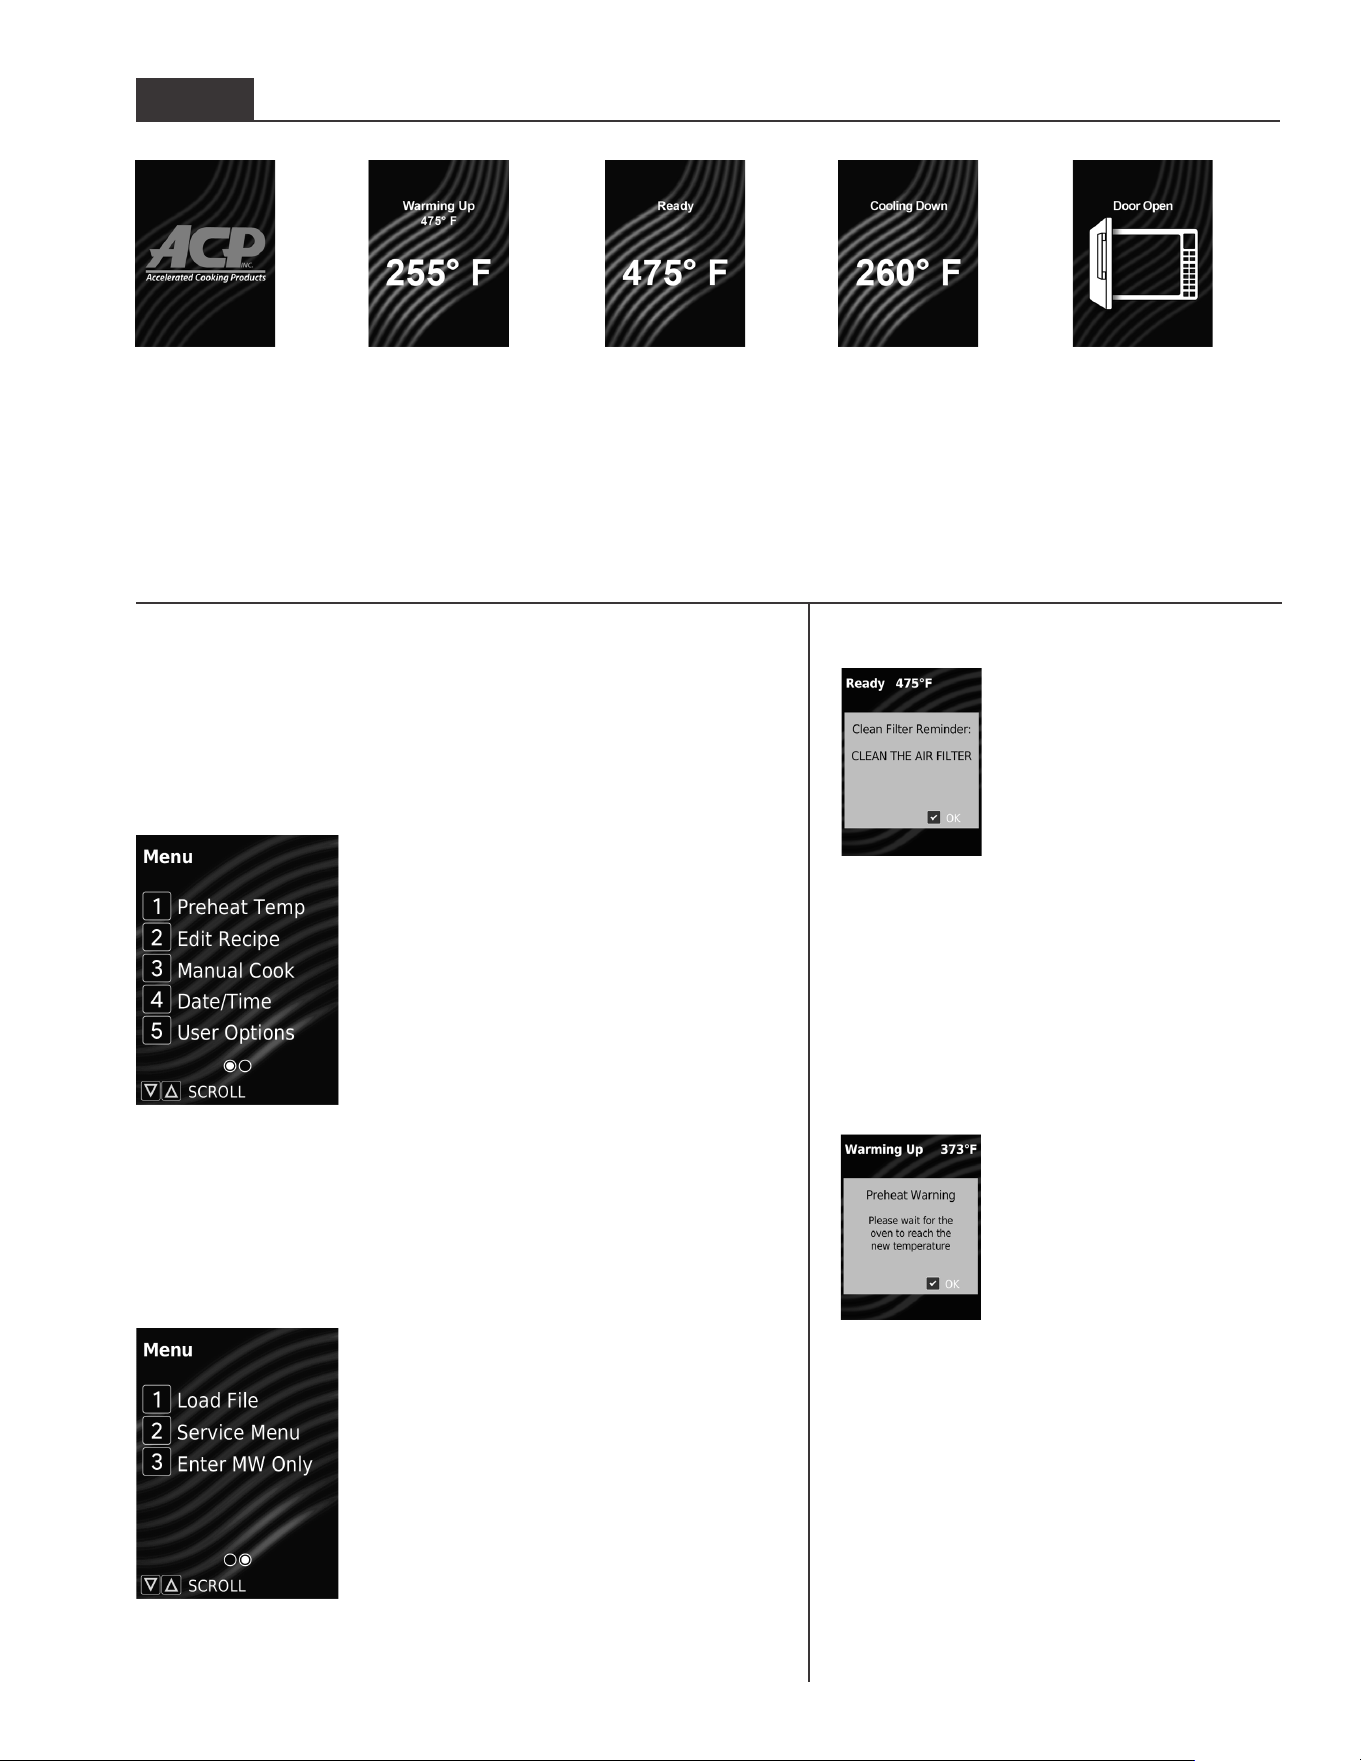
Menu
Press MENU (☰) keypad to access list of menu features and functions�
To scroll between pages: Press UP/DOWN (▲▼) keypads. To access
features, press corresponding number keypad�
Note: If PIN Code is enabled, your unique 4 digit pin code will be required to
access MENU screen
STYLE 1 General Oven Screens
MENU
-
PAGE 1 OF 2
"Menu" Page 1
(1) PREHEAT TEMPERATURE
Allows the operator to change the preheat
temperature between 200°– 475°F
(95°– 250°C)�
(2) EDIT RECIPE
Allows the operator to edit or create new
preset recipes/folders for customized cooking�
(3) MANUAL COOK
Allows the operator to heat without changing
the preset recipe keypads�
(4) DATE/TIME
Allows the operator to set Date and Time
settings for their local time�
(5) USER OPTIONS
Allows the operator to customize various oven
settings�
MENU
-
PAGE 2 OF 2
"Menu" Page 2
(1) LOAD FILE
Allows the operator to upload recipe settings
and user options using a standard USB ash
drive�
(2) SERVICE MENU
Allows authorized service technicians to
access usage data, troubleshoot, and update
rmware.
Note: Service PIN code required for access.
(3) ENTER MW ONLY
Allows operator to disable convection power
and cook using only microwave energy�
WARMING UP
Indicates oven is
preheating� Target preheat
temperature is displayed
above the current rising
temperature�
STANDBY READY
Indicates oven is ready to
operate� The operator may
press keypads to begin
preset recipes or MENU
keypad for more options�
COOLING DOWN
Indicates oven is cooling
down� Will display
until oven reaches
internal temperature of
200°F (95°C)�
DOOR OPEN
Clean Filter Reminder (optional)
Air lters and vents must be
cleaned regularly to prevent
overheating of oven�
When enabled, clean lter
reminder message will display
once the designated time period
has lapsed�
Complete steps to "Clean Air
Filter" on page 25� Cleaning
the air lters will not shut o message. Message
will automatically stop displaying after 24 hours�
To clear the message, Press START/OK keypad�
Note: To adjust frequency of Clean Air Filter Reminder,
see “User Options” section in this manual.
Preheat Warning (optional)
If “Preheat Warning” is
enabled, and oven temperature
diers from default preheat
temperature, the control will
interrupt cook cycle and display
warning message, "Please wait
for the oven to reach the new
temperature."
To exit warning, press START/OK keypad� Once
oven has preheated to desired temperature, you
may begin cook cycle�
Note: To enable/disable Preheat Warning, see
“User Options” section in this manual.
©2020 ACP, Inc.
Cedar Rapids, IA 52404
Page 10 of 26
Part No. 20000611
Original Instructions
Interrupt Operation
Press STOP/RESET keypad
to interrupt operation� Display
continues to show countdown time�
Close door and press START/OK
keypad to resume oven operation�
Cancel Mistakes
If oven is not cooking, press STOP/
RESET keypad to clear display�
If oven is cooking, press STOP/
RESET keypad twice to stop and
clear display�
STYLE 1 General Oven Operation
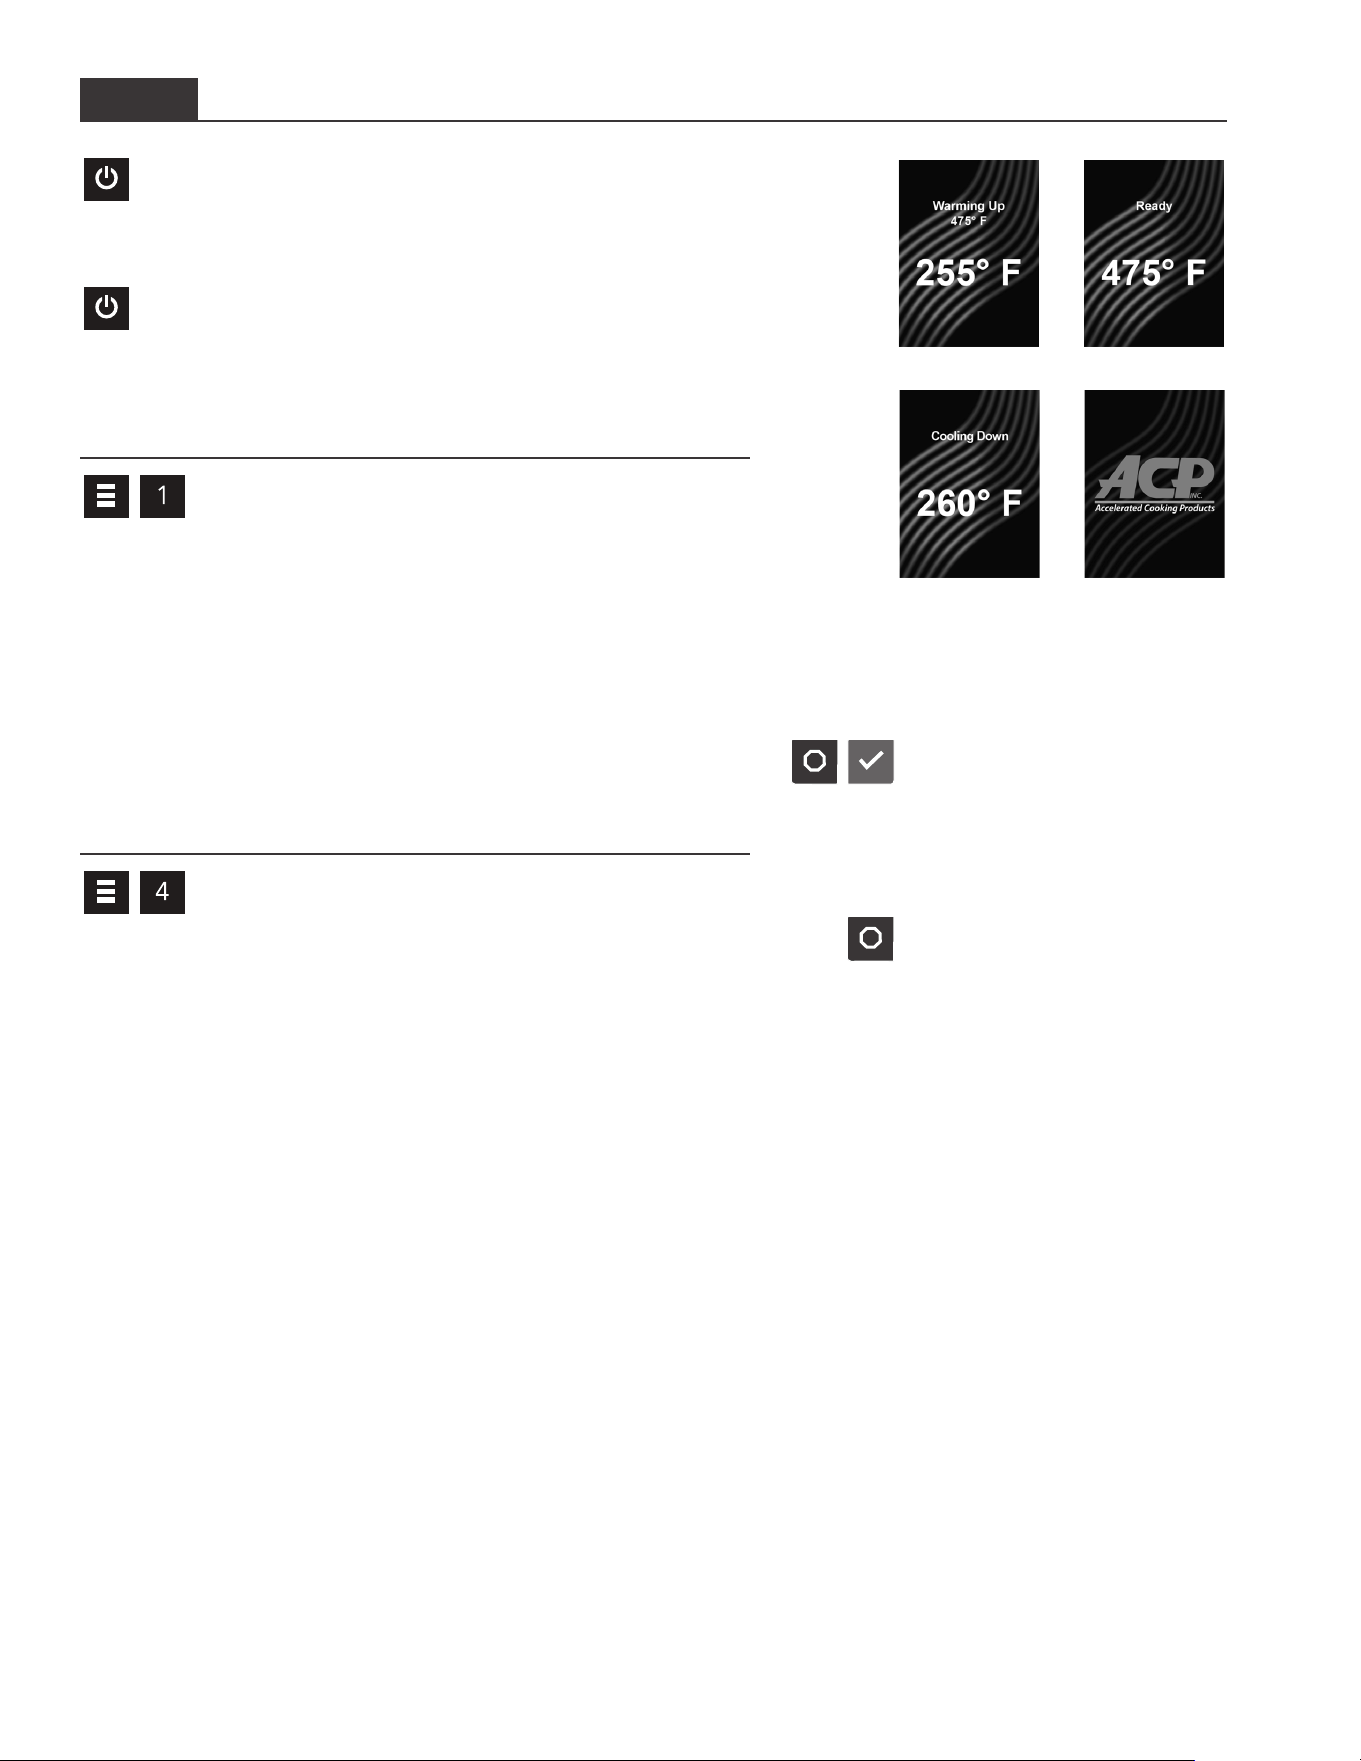
Power-ON Oven, Preheat
Press POWER ON/OFF (⏻) keypad to begin preheating�
WARMING UP screen will display� READY screen will display
once oven reaches the specied preheat temperature.
Power-OFF Oven, Cool-Down
Press POWER ON/OFF (⏻) keypad to begin cooling down the
oven� COOLING DOWN screen will display and oven fan will
continue to run� STANDBY screen will display once temperature is
below 200°F (95°C)�
Edit Oven Preheat Temperature
This oven can be set to a preheat temperature between
200°– 475°F (95°– 250°C)� It is recommended to set to the most commonly
used temperature for the oven� Factory default setting is 475°F (250°C)�
1� Press MENU (☰) keypad�
• If prompted, enter PIN Code and press START/OK keypad�
• MENU screen will display�
2� Press number "1" keypad to access "Preheat Temp"�
• PREHEAT TEMP screen will display�
3� Press number keypads to enter desired temperature�
4� To save changes: Press START/OK keypad�
5� To discard changes: Press STOP/RESET keypad�
Set Date and Time
This oven maintains a data log which is used to diagnose and
troubleshoot errors� An accurate date and time are important for the data
log� To set date and time:
1� Press MENU (☰) keypad�
• If prompted, enter PIN Code and press START/OK keypad�
• MENU screen will display�
2� Press number "4" keypad to access "Date/Time"�
• DATE AND TIME screen will display�
3� To edit date and time elds: Press corresponding number keypad�
• Active editable eld is highlighted in red.
• Editable elds include:
(1) Day
(2) Month
(3) Year
(4) Hours
(5) Minutes
(6) AM/PM/24
4� Press UP/DOWN (▲▼) keypads to scroll to correct setting per eld.
5� To save and exit: Press START/OK keypad�
6� To discard changes: Press STOP/RESET keypad�
COOLING DOWN STANDBY
WARMING UP READY
©2020 ACP, Inc.
Cedar Rapids, IA 52404
Page 11 of 26
Part No. 20000611
Original Instructions
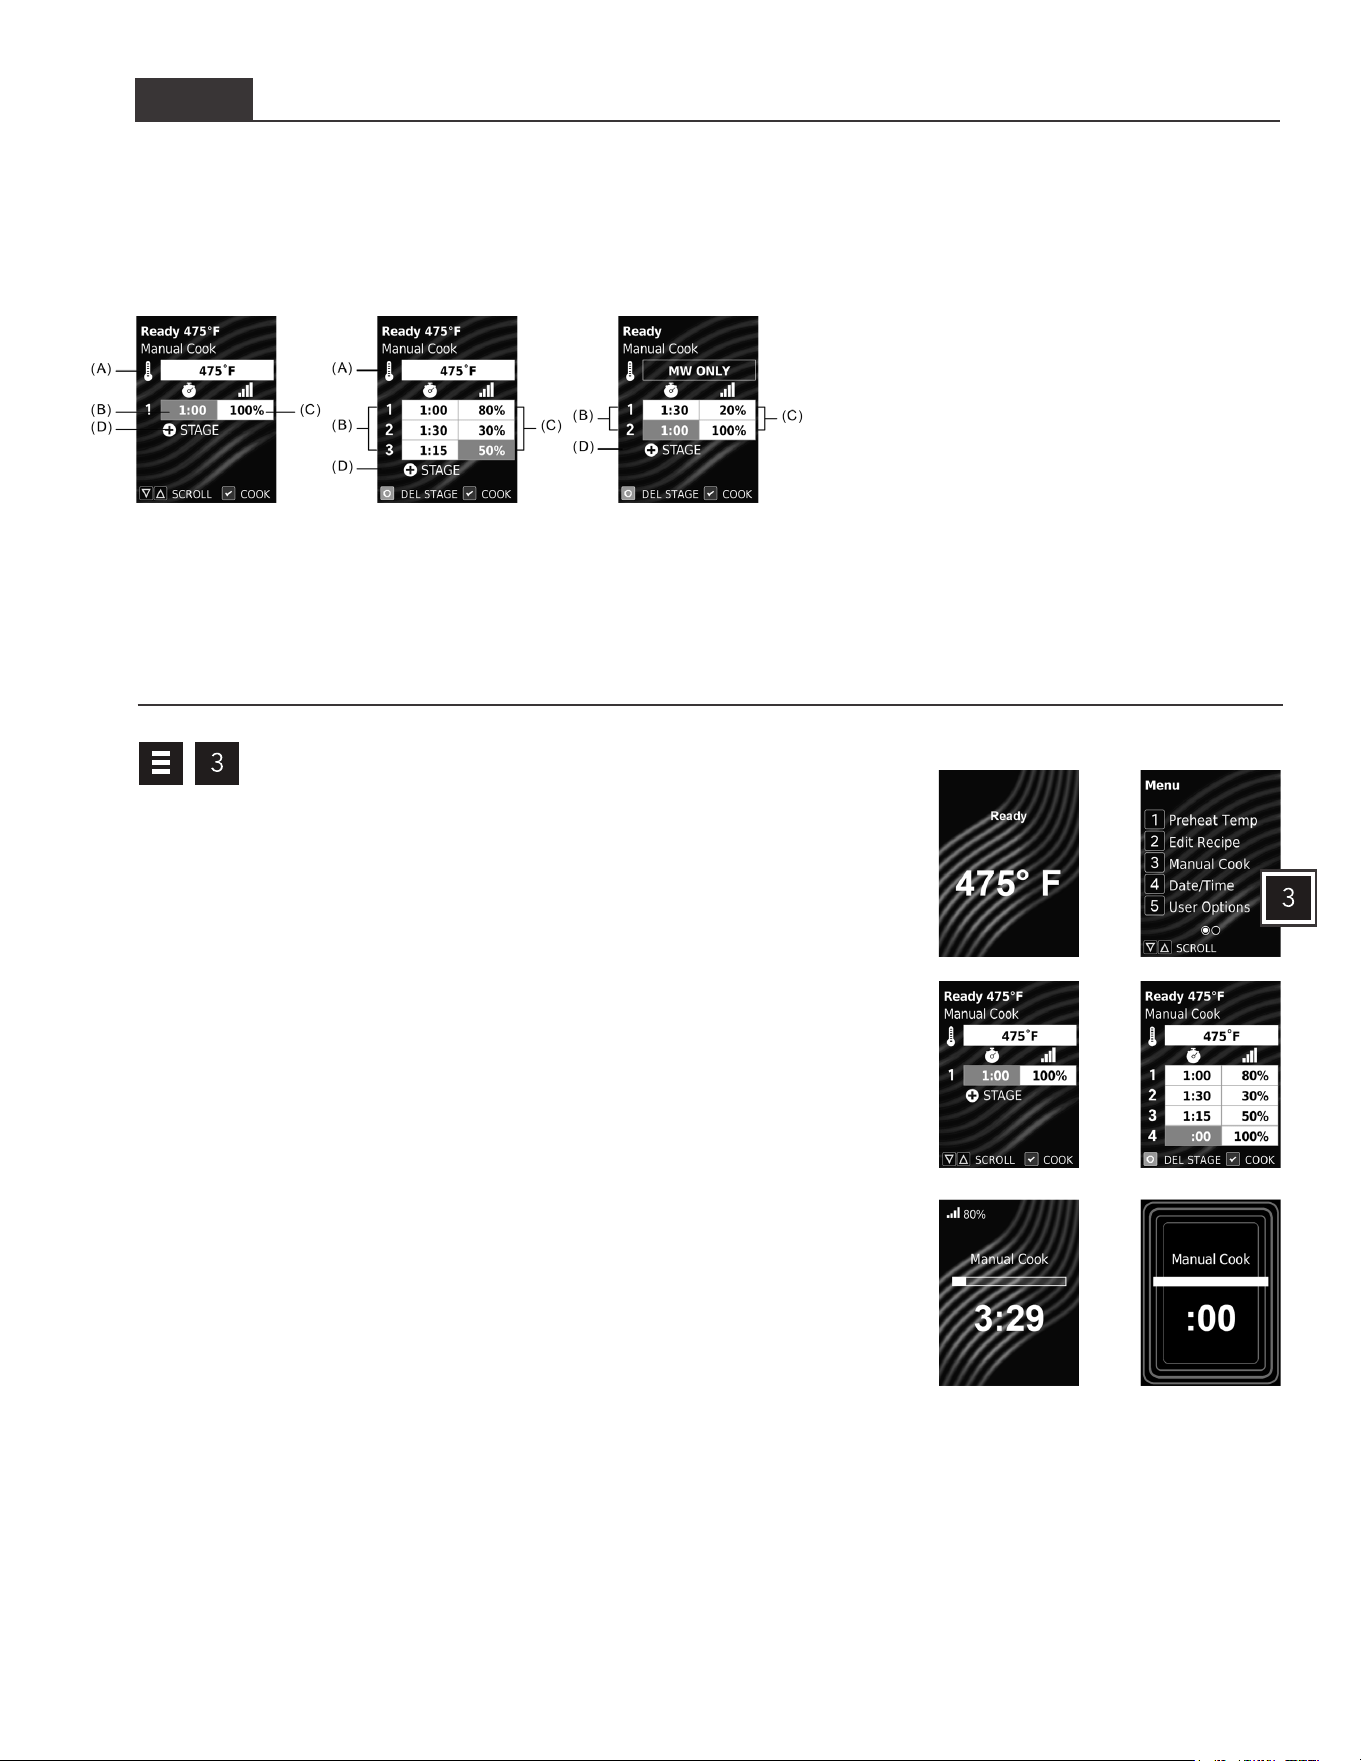
Manual Cook Screens
MANUAL COOK ENTRY
Displays while operator is entering cook settings in Manual Cook mode�
Active editable eld is highlighted in red.
To navigate to editable elds: Press UP/DOWN (▲▼) keypads.
STYLE 1 Manual Cook Mode
1
3 6
7 8
"Manual Cook" Editable Fields:
(A) OVEN TEMPERATURE**
Between 200°– 475°F (95°– 250°C)� Defaults to
oven preheat temperature�
(B) COOK TIME
(
PER STAGE
)
Combined total cook time cannot exceed 20:00�
(C) %MW POWER LEVEL
(
PER STAGE
)
Percent microwave power from 0-100% in 10%
increments (keypad "0" = 0%, keypad “1”=10%,
keypad “2”=20%,etc.)
For 100% power level, press any number keypad
twice�
(D) ADD A STAGE
Up to four stages can be entered�
Manual Cooking
Allows operator to heat without changing the preset recipe keypads�
Note: Oven must be preheated before combination or convection cooking.
From READY or DOOR OPEN screen:
1� Open oven door, place food in oven, and close door�
• READY screen will display�
2� Press MENU (☰) keypad�
• If prompted, enter PIN Code and press START/OK keypad�
• MENU screen will display�
3� Press number "3" keypad to access "Manual Cook"�
• MANUAL COOK ENTRY screen will display�
4� To navigate to editable elds: Press UP/DOWN (▲▼) keypads.
• Active editable eld is highlighted in red.
• Editable elds include:
◦ Oven Temperature**
◦ Cook Time (per stage)
◦ %MW Power Level (per stage)
◦ Add a Stage
5� Press number keypads to enter desired settings per eld.
6� To add additional cooking stages: Press DOWN (▼) keypad until “+ STAGE”
is highlighted�
• A new row of Cook Time and %MW Power Level elds will display
• Repeat steps 4–6 for each additional stage�
7� Press START/OK keypad to begin cooking�
• Oven operates and display counts down cooking time�
8� At the end of the cooking cycle, the oven beeps� Oven interior and cooking dish
will be hot� Carefully remove food from oven�
** If Microwave-Only Mode is enabled, then Oven Temperature will read "MW ONLY" and will not be an
editable field. See page 16 for details.
MANUAL COOK ENTRY
1 cooking stage used.
Stage1CookTimeeldis
highlighted/editable.
MANUAL COOK ENTRY
3 cooking stages used.
Stage3PowerLeveleldis
highlighted/editable.
MANUAL COOK ENTRY
In MW-Only Mode**.
2 cooking stages used.
Stage2CookTImeeldis
highlighted/editable.
2
©2020 ACP, Inc.
Cedar Rapids, IA 52404
Page 12 of 26
Part No. 20000611
Original Instructions
Operating Preset Recipe Keypads
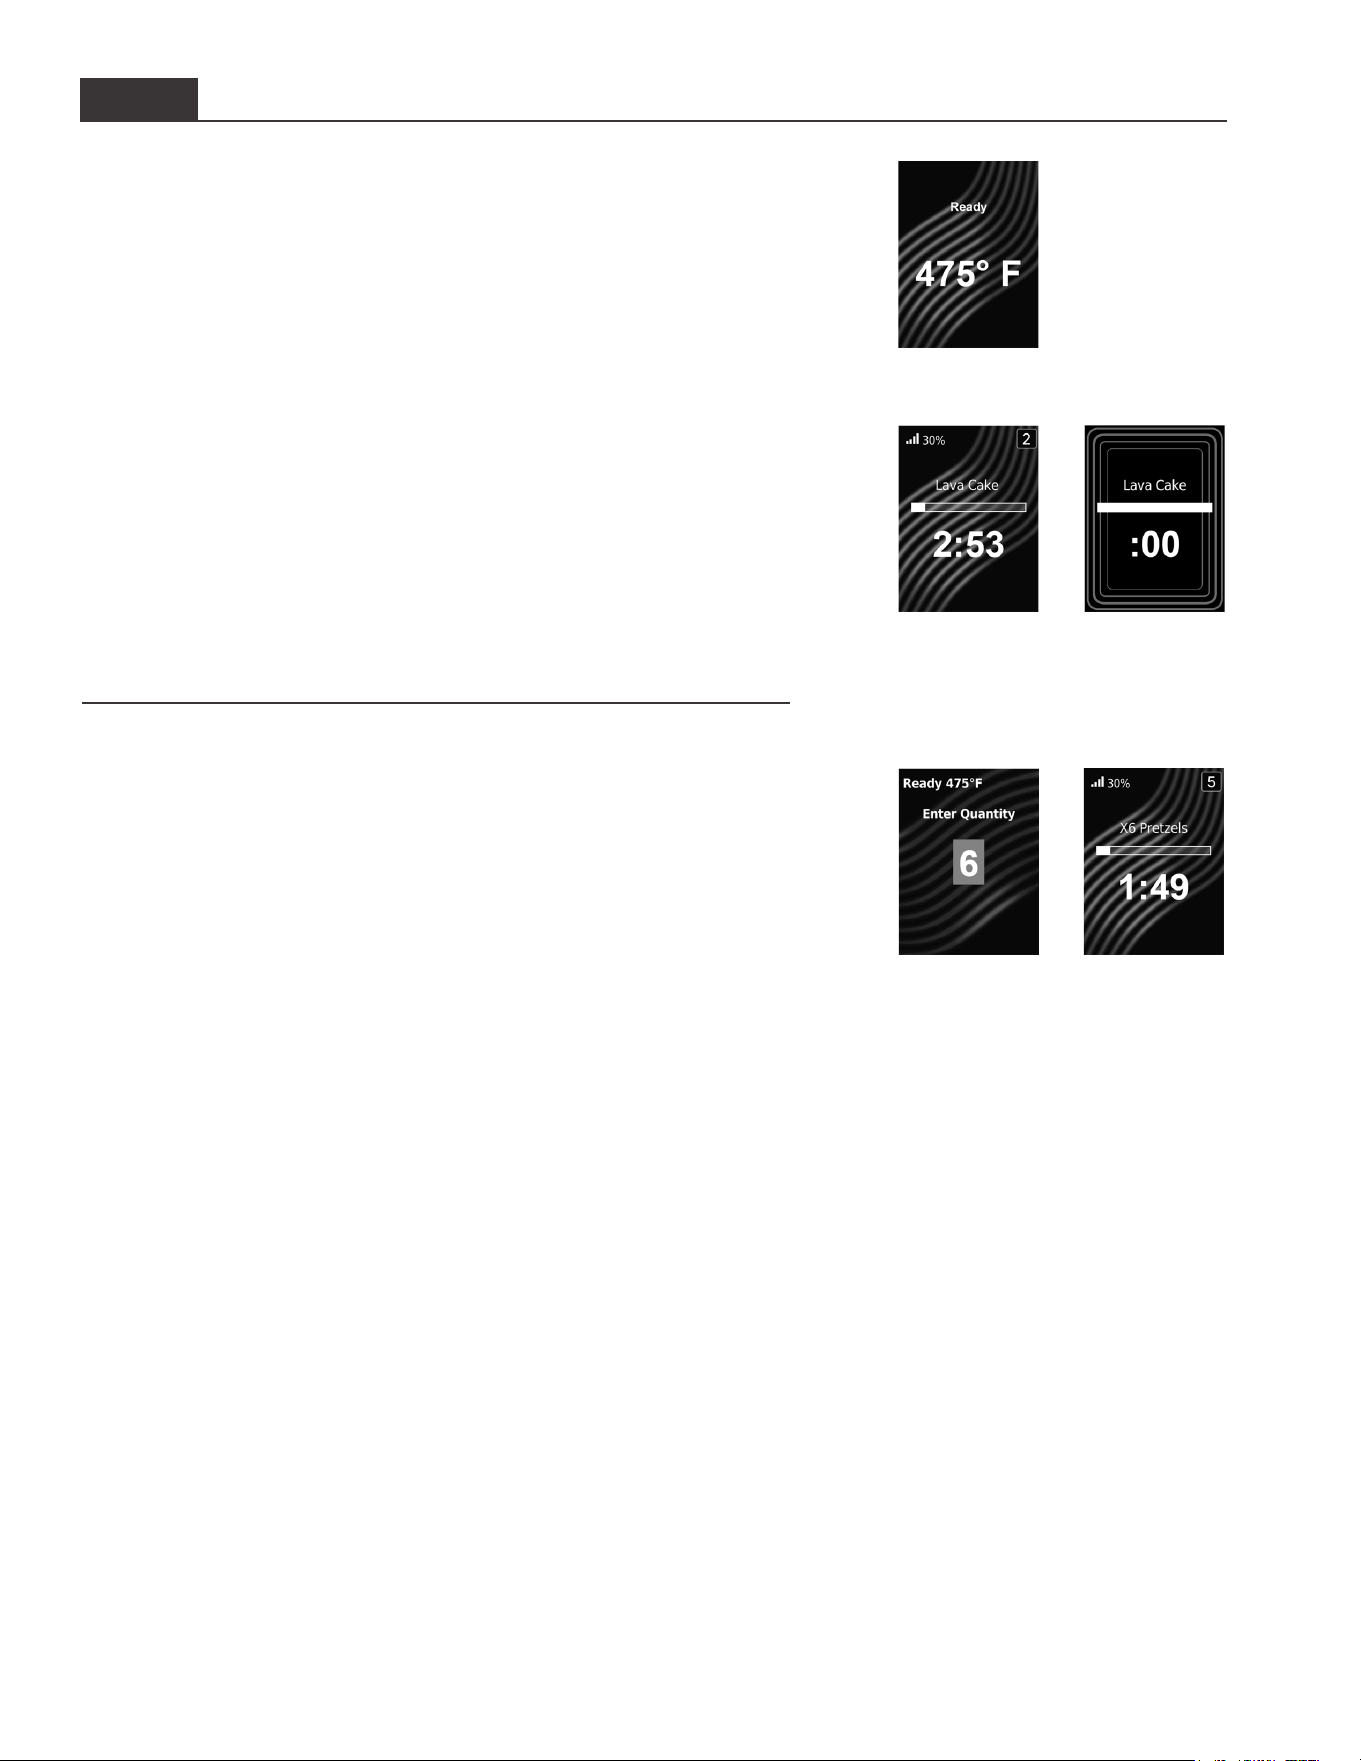
This oven can store up to 10 or 100 recipes in memory� To heat using a preset
recipe, press number keypad(s)� Oven will start to heat automatically�
Note: Oven must be preheated before combination or convection cooking.
From READY or DOOR OPEN screen:
1� Open oven door, place food in oven, and close oven door�
• READY screen is displayed�
2� Press desired number keypad(s):
• Single Digit Keypad Cooking: Press a single keypad (0-9)�
• Double Digit Keypad Cooking: Press two keypads, in order, of the double
digit number for the desired recipe (00-99)�
• Folders: Press one keypad to open folder (0-9), followed by keypad for
desired recipe (0-9)�
Note: To change Digit Entry option see "User Options" section in this manual
3� Oven operates and time counts down�
• Display shows recipe name, and counts down cooking time�
• If additional cooking time is required, press preset keypad(s) before or after
cooking cycle ends�
4� At the end of the cooking cycle, the oven beeps� Oven interior and cooking
dish will be hot� Carefully remove food from oven�
Operating Preset Recipe Keypads with
Quantity Prompt (select models)
Allows operator to select preset recipe keypad(s) for a menu item, followed by
the quantity of items to be heated (1-9)�
1� Press desired number keypad(s)�
• ENTER QUANTITY screen is displayed�
2� Enter desired quantity using keypad 1-9�
• Display shows the recipe name and counts down cooking time�
• Quantity is displayed before the recipe name� (X1, X2, X3, etc�)
STYLE 1 Operating Preset Recipe Keypads
21
1
3 4
©2020 ACP, Inc.
Cedar Rapids, IA 52404
Page 13 of 26
Part No. 20000611
Original Instructions
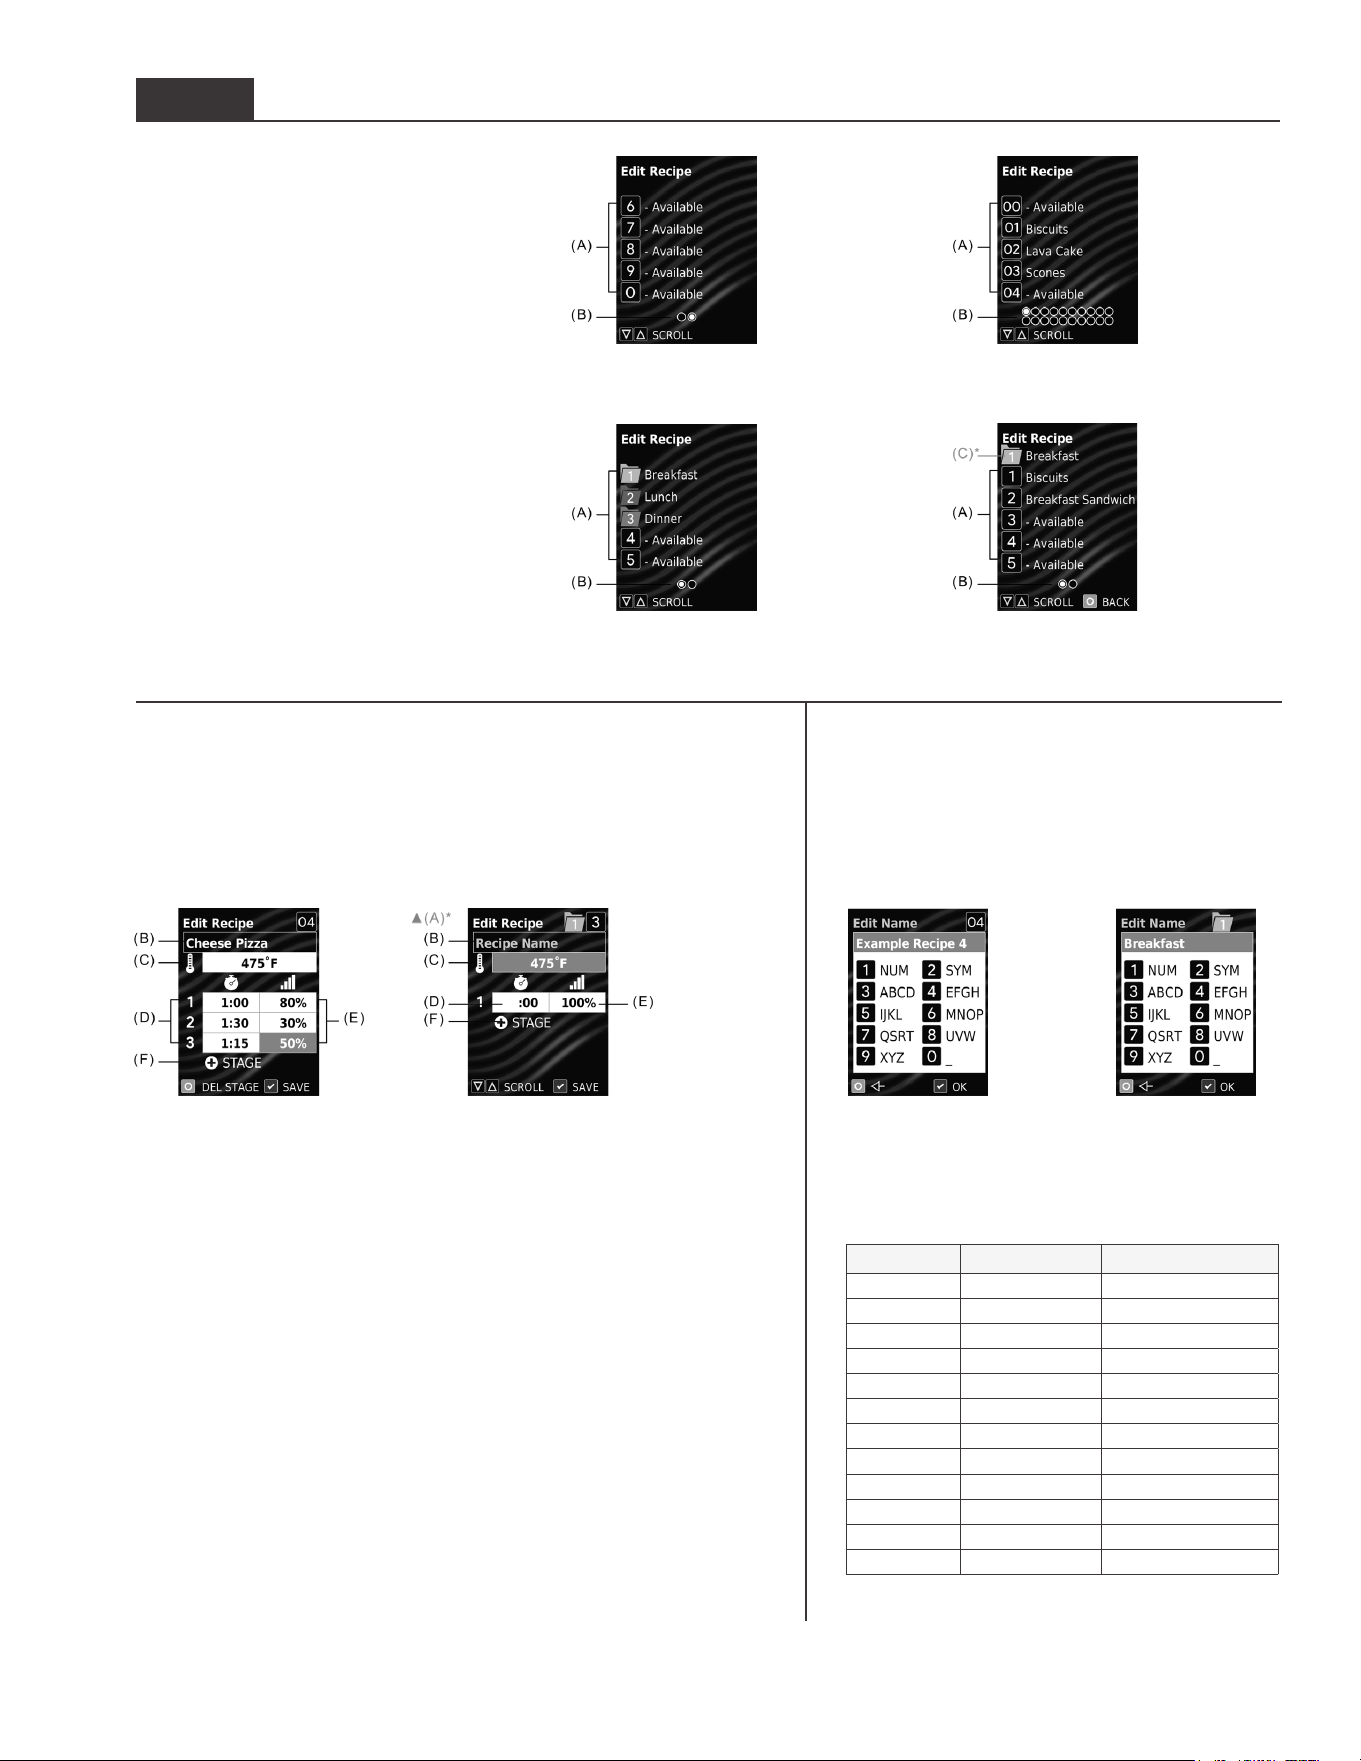
Edit Name Screens
Displays while editing name of recipe or folder*�
Operator may press number keypads to enter
a name� To cycle through available characters:
Press same keypad within 1 second�
STYLE 1 Edit Recipe Screens
“Edit Name" Keypad Functions
KEYPAD DESCRIPTION TEXT FUNCTION
1 NUM 1234567890
2 SYM .,&!?’()/~@#$%^*-+
3 ABCD ABCDabcd
4 EFGH EFGHefgh
5 IJKL IJLKijlk
6 MNOP MNOPmnop
7 QRST QRSTqrst
8 UVW UVWuvw
9 XYZ XYZxyz
0 _ (space)
START OK (save and exit)
STOP <- (backspace)
Edit Recipe List Screens
Indicates oven is entering "Edit Recipe"
mode� The operator may press keypads to
open recipe and/or folder locations�
Note: Screens may vary based on Digit Entry
option in "User Options"
(A) RECIPE/FOLDER LOCATIONS
Numbers represent programmed recipes and
available memory locations� Unused locations
are labeled “- Available.” Operator may press
keypad(s) to view and edit locations�
(B) MULTIPLE PAGES
Radio button icons indicate page number�
Operator may press UP/DOWN (▲▼)
keypads to scroll between pages�
(C) PARENT FOLDER LOCATION
If folder location is opened, the contents of
the selected folder are displayed� Parent
folder location is displayed above the rst
recipe on each page�
Edit Recipe Entry Screens
Displays while a recipe or folder location is open�
Stored location is represented by number at top right corner of screen�
Active editable eld is highlighted in red.
To navigate to editable elds, press UP/DOWN (▲▼) keypads.
EDIT FOLDER NAME*
Folders Digit Entry.
Location "1" shown.
EDIT RECIPE NAME
Double Digit Entry.
Location "04" shown.
EDIT RECIPE LIST
Double Digit Entry.
Page 1 of 20 shown.
EDIT RECIPE LIST
Single Digit Entry.
Page 2 of 2 shown.
EDIT RECIPE LIST
Folders Digit Entry.
Folder 1 is open.
Folder 1 contents shown.
Page 1 of 2 shown.
EDIT RECIPE LIST
Folders Digit Entry.
Top level.
Page 1 of 2 shown.
EDIT RECIPE ENTRY
Double Digit Entry.
Recipe Location "04" shown.
Stage3PowerLeveleldis
highlighted/editable.
"Edit Recipe Entry" Editable Fields:
(A) MAKE FOLDER/ FOLDER NAME*
See "Edit Recipe Mode: Folders" on page 15 for details�
(B) RECIPE NAME
See "Edit Name Screens" section�
(C) OVEN TEMPERATURE
Between 200°– 475°F (95°– 250°C)� Defaults to oven preheat temperature�
(D) COOK TIME
(
PER STAGE
)
Combined total cook time cannot exceed 20:00�
(E) %MW POWER LEVEL
(
PER STAGE
)
Percent microwave power from 0-100% in 10% increments
(keypad "0" = 0%, keypad “1”=10%, keypad “2”=20%,etc.)
For 100% power level, press any number keypad twice.
(F) ADD A STAGE
Up to four stages can be entered�
EDIT RECIPE ENTRY
Folders Digit Entry.
Recipe Location "3" within Folder "1" shown.
OvenTemperatureeldishighlighted/editable.
* Make Folder and Folder Name are only available when User Options>Digit Entry>Folders is enabled and location is in top level (0-9) of Edit Recipe List.
See page 15 for details.
©2020 ACP, Inc.
Cedar Rapids, IA 52404
Page 14 of 26
Part No. 20000611
Original Instructions
STYLE 1 Edit Recipe Mode
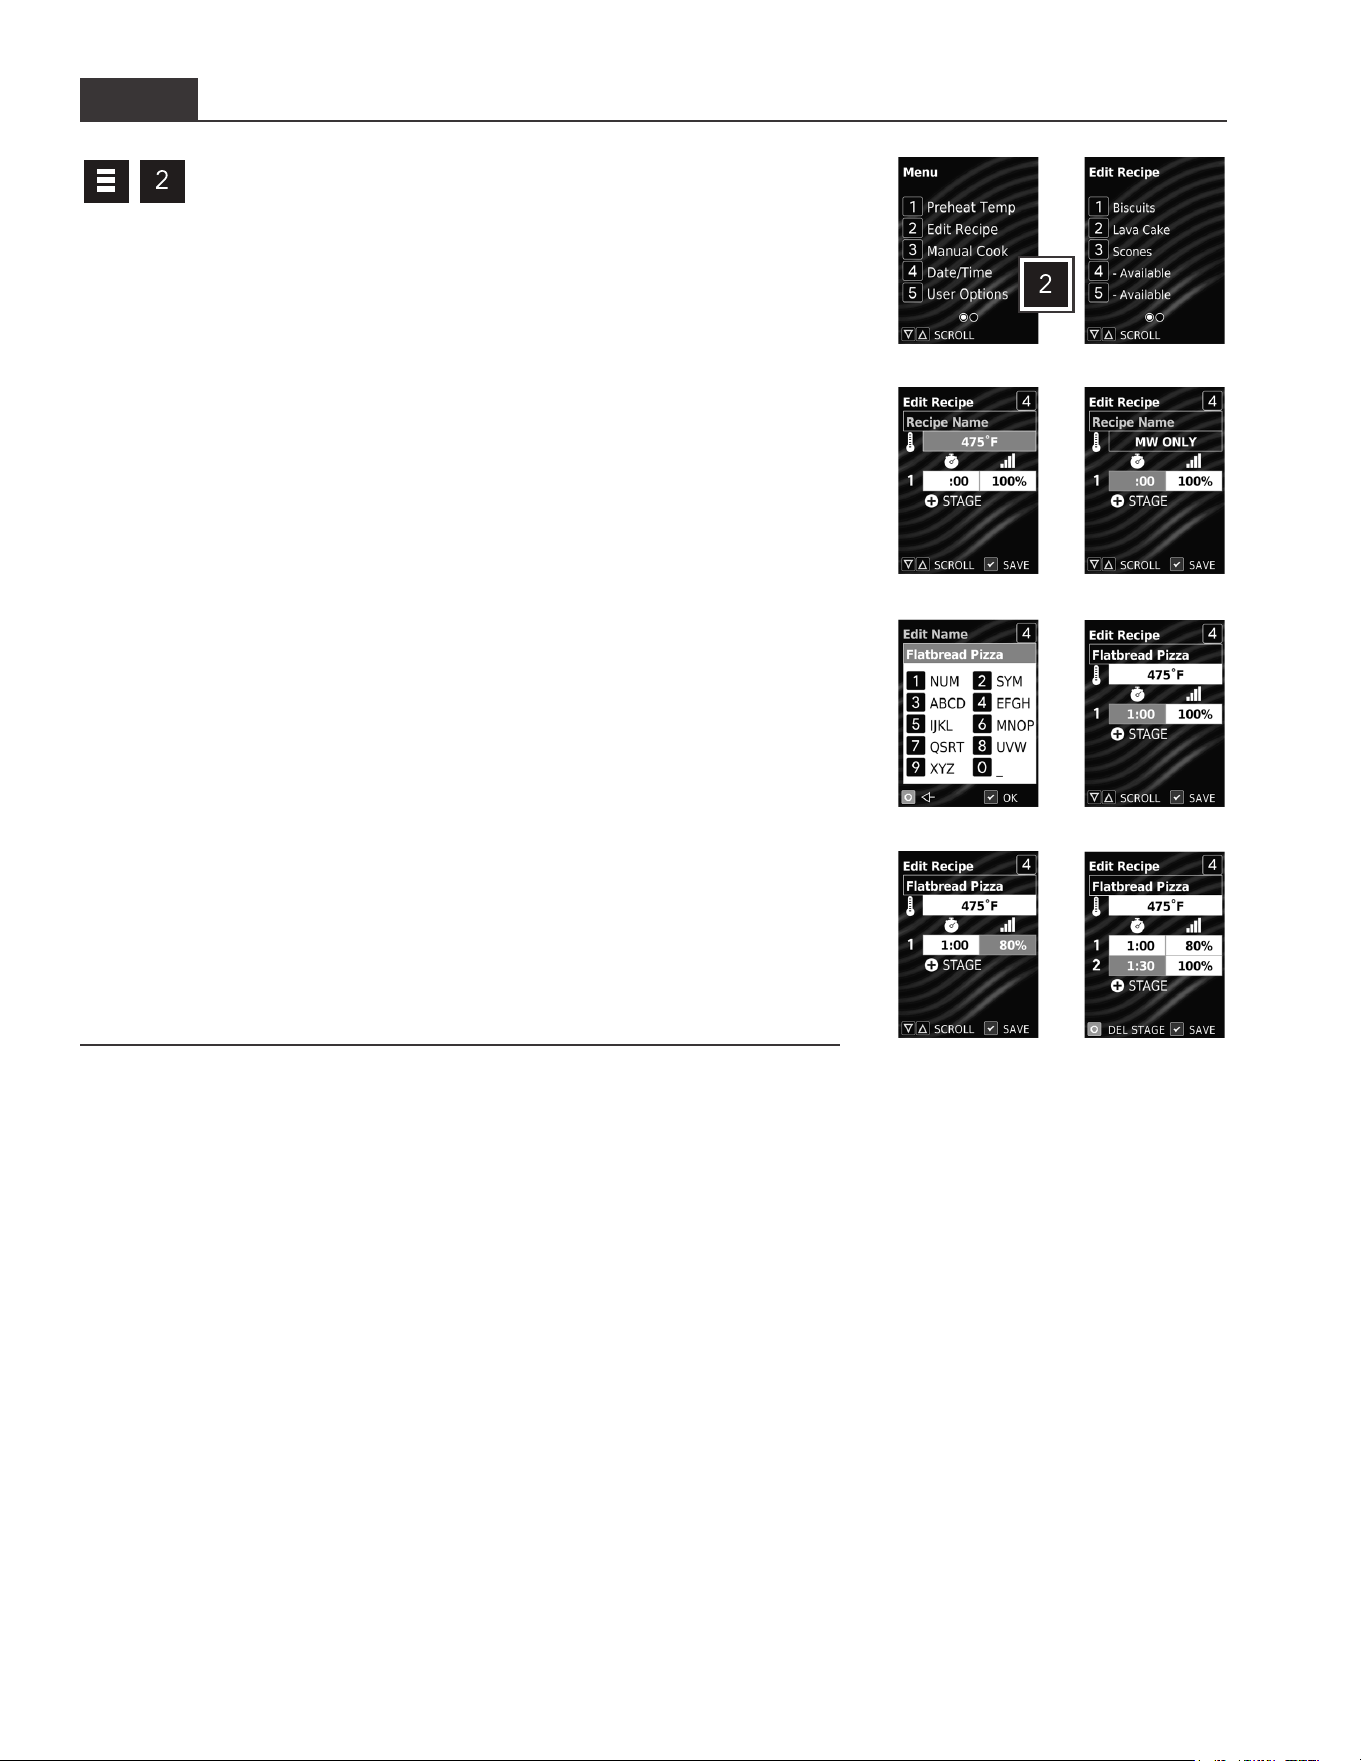
Edit or Create New Recipes
Allows the operator to edit or create new preset recipes/folders for
customized cooking� This oven can be programmed to store up to 10
or 100 preset recipes in memory�
1� Press MENU (☰) keypad�
• If prompted, enter PIN Code and press START/OK keypad�
• MENU screen will display�
2� Press number "2" keypad to access "Edit Recipe"�
• EDIT RECIPE LIST screen is displayed with list of preset recipes, folders,
and/or available locations�
• To scroll between pages of recipes: Press UP/DOWN (▲▼) keypads.
3� Press number keypad(s) to open the desired recipe/folder location�
• EDIT RECIPE ENTRY screen will display�
4� To navigate to editable elds: Press UP/DOWN (▲▼) keypads.
• Active editable eld is highlighted in red.
• Editable elds include:
◦ Make Folder and Folder Name*
◦ Recipe Name
◦ Oven Temperature**
◦ Cook Time (per stage)
◦ %MW Power Level (per stage)
◦ Add a Stage
5� Press number keypads to enter desired settings per eld.
6� To add additional cooking stages:
Press DOWN (▼) keypad until “+ STAGE” is highlighted.
• A new row of Cook Time and %MW Power Level elds will display.
• Repeat steps 4–6 for each additional stage�
7� To save and exit: Press START/OK keypad�
8� To discard changes: Press STOP/RESET keypad�
* Make Folder and Folder Name are only available when User Options>Digit Entry>Folders is enabled and
location is in top level (0-9) of Edit Recipe List. See page 15 for details.
** If Microwave-Only Mode is enabled, then Oven Temperature will read "MW ONLY" and will not be an
editable field. See "Microwave-Only Mode" section on page 16 for details.
Edit or Create New Recipes with Quantity Prompt
(select models)
Cook times and settings can be customized for each recipe in quantities 1-9�
To edit the settings of a specic recipe/quantity:
1� Complete steps 1–3 in "Edit or Create New Recipes"�
• ENTER QUANTITY screen is displayed�
2� Enter desired quantity using keypad 1-9�
• EDIT RECIPE ENTRY screen will display�
• Quantity is displayed before the recipe name� (X1, X2, X3, etc�)
3� Complete steps 4–7 in "Edit or Create New Recipes"�
4-5
4-5
2
4-5
6
Stage 1, %MW Power Stage 2, Cook Time
Edit Recipe Name Stage 1, Cook Time
Default In MW-Only Mode**
3
1
©2020 ACP, Inc.
Cedar Rapids, IA 52404
Page 15 of 26
Part No. 20000611
Original Instructions
STYLE 1 Edit Recipe Mode: Folders
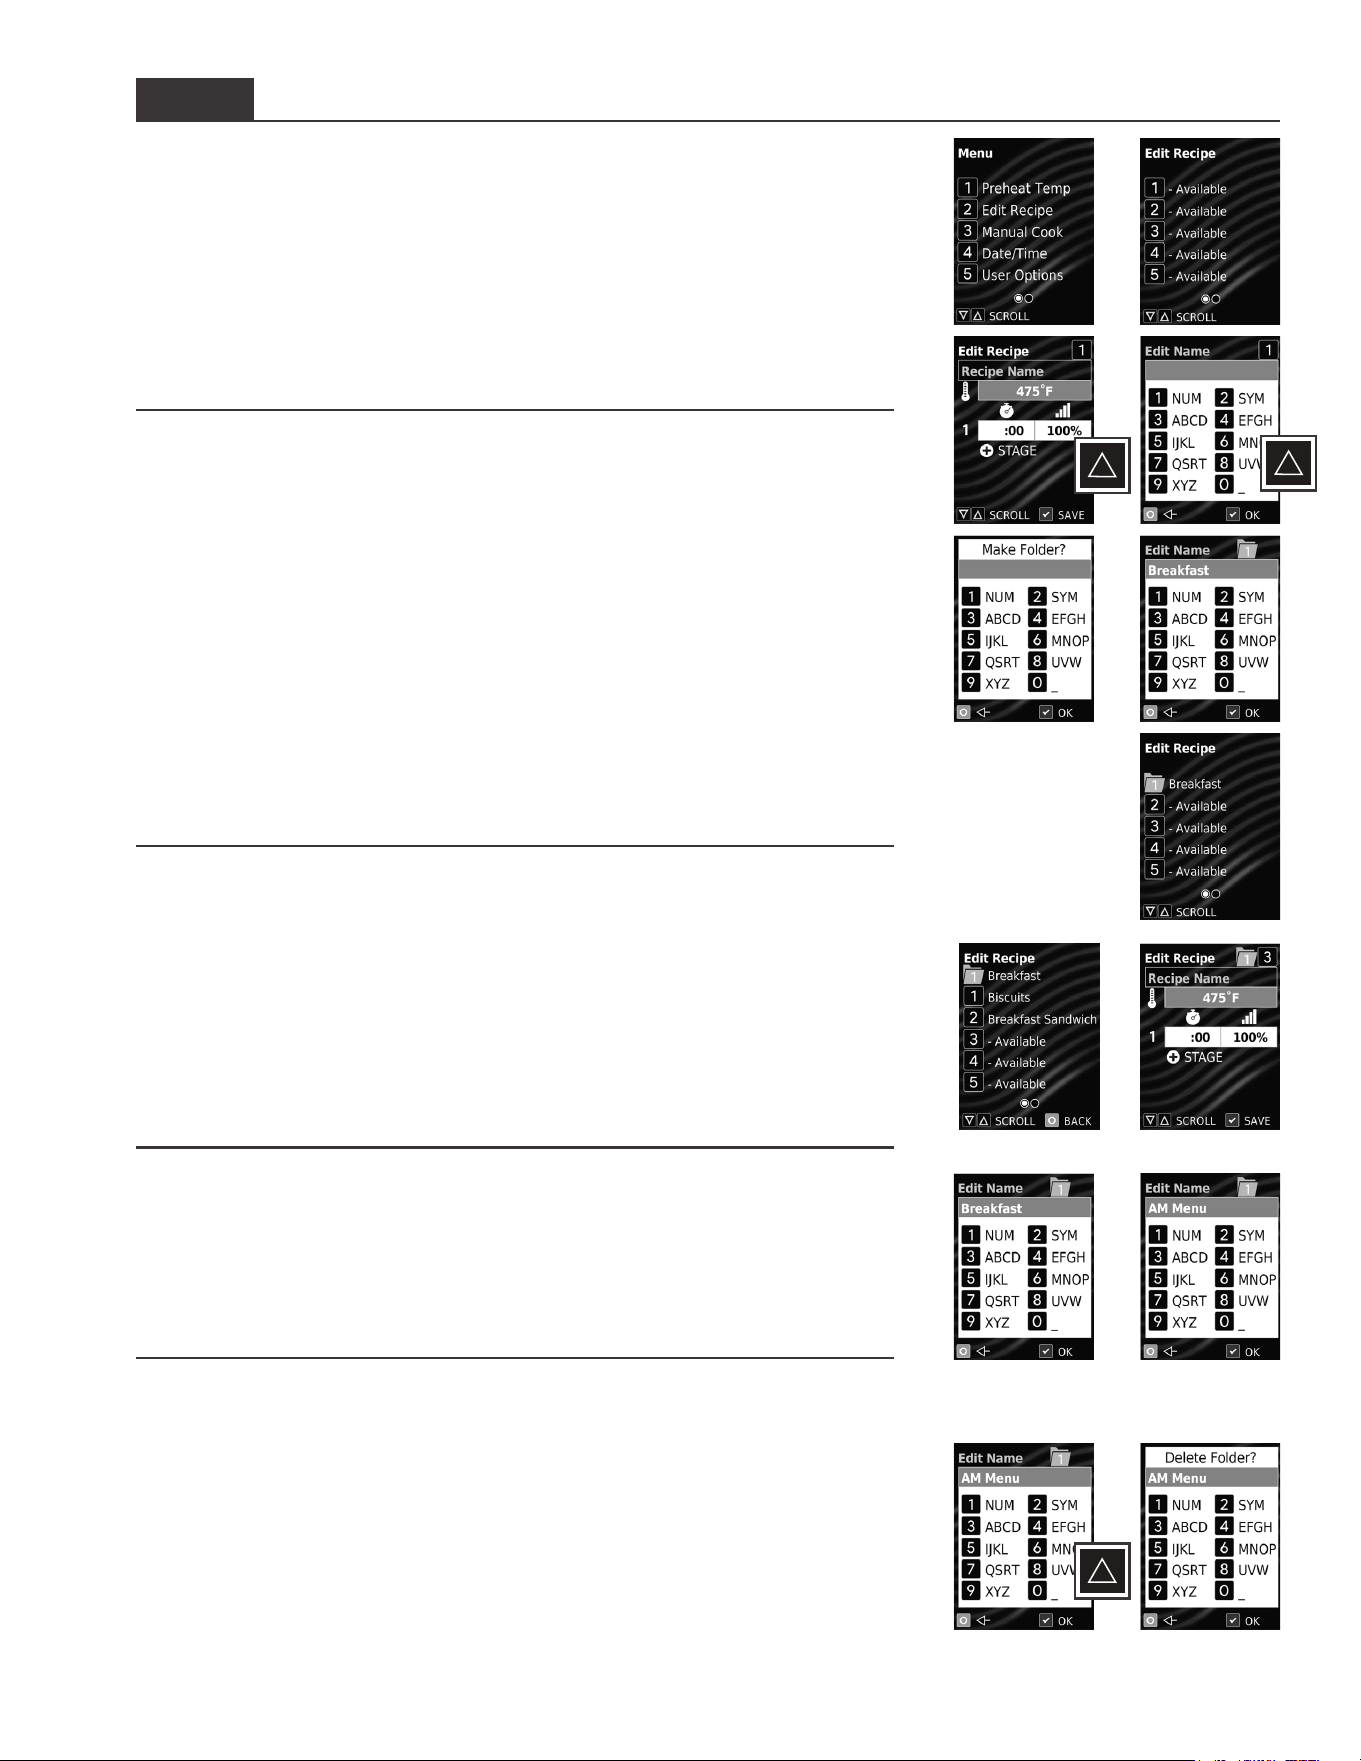
Allows operator to organize recipes in folders� Folders can only be located in the top
level (0-9) of EDIT RECIPE LIST� Folders cannot be created within folders�
Note: FoldersmustrstbeenabledinUserOptions>DigitEntry>Folders.
Navigate Existing Folders
From EDIT RECIPE LIST screen:
• To open folder: Press number keypad to open the desired folder�
• To exit folder: Press STOP/RESET keypad�
Create New Folders
1� Press MENU (☰) keypad�
2� Press number "2" keypad to access "Edit Recipe"�
• EDIT RECIPE LIST screen will display�
• To scroll between pages of recipes: Press UP/DOWN (▲▼) keypads.
3� Press a number keypad to open the desired recipe/folder location�
• EDIT RECIPE ENTRY screen will display�
4� Press UP (▲) keypad to navigate to Recipe Name eld.
• EDIT RECIPE NAME screen will display�
5� To make folder: Press UP(▲) keypad to access MAKE FOLDER screen.
• MAKE FOLDER screen will display�
• Press START/OK keypad to make folder�
• EDIT FOLDER NAME screen will display�
6� To enter folder name: Press number keypads to enter folder name�
7� To save folder: Press START/OK keypad�
• Folder will now be visible on EDIT RECIPE LIST screen�
Edit or Create New Recipes Within Folders
1� Complete steps 1–2 in "Create New Folders" section above�
2� Press a number keypad to open the desired folder location�
• EDIT RECIPE LIST screen is displayed with contents of the selected folder� Parent
folder location is displayed above the rst recipe on each page.
• To scroll between pages of recipes: Press UP/DOWN (▲▼) keypads.
3� Press a number keypad to open the desired recipe location within the folder�
• EDIT RECIPE ENTRY screen is displayed, with parent folder location displayed to
the left of the current recipe location�
4� To create recipe: Complete steps 4–7 in "Edit or Create New Recipes" on page 14�
Edit Folder Name
From EDIT RECIPE LIST screen:
1� Press and hold number keypad of corresponding folder�
• EDIT FOLDER NAME screen will display�
2� Press number keypads to edit folder name�
3� To save changes and exit folder: Press START/OK keypad�
Delete Folder
Caution: Deleting a folder will make its contents inaccessible.
From EDIT RECIPE LIST screen:
1� Press and hold number keypad to corresponding folder�
• EDIT FOLDER NAME screen will display�
2� Press UP (▲) keypad.
• DELETE FOLDER screen is displayed�
3� To delete folder: Press START/OK keypad�
4� Press START/OK keypad again to exit EDIT RECIPE NAME screen�
5� To save changes and exit: Press START/OK keypad�
32
1 2
1 2
5
6
7
3
4
1 2
©2020 ACP, Inc.
Cedar Rapids, IA 52404
Page 16 of 26
Part No. 20000611
Original Instructions
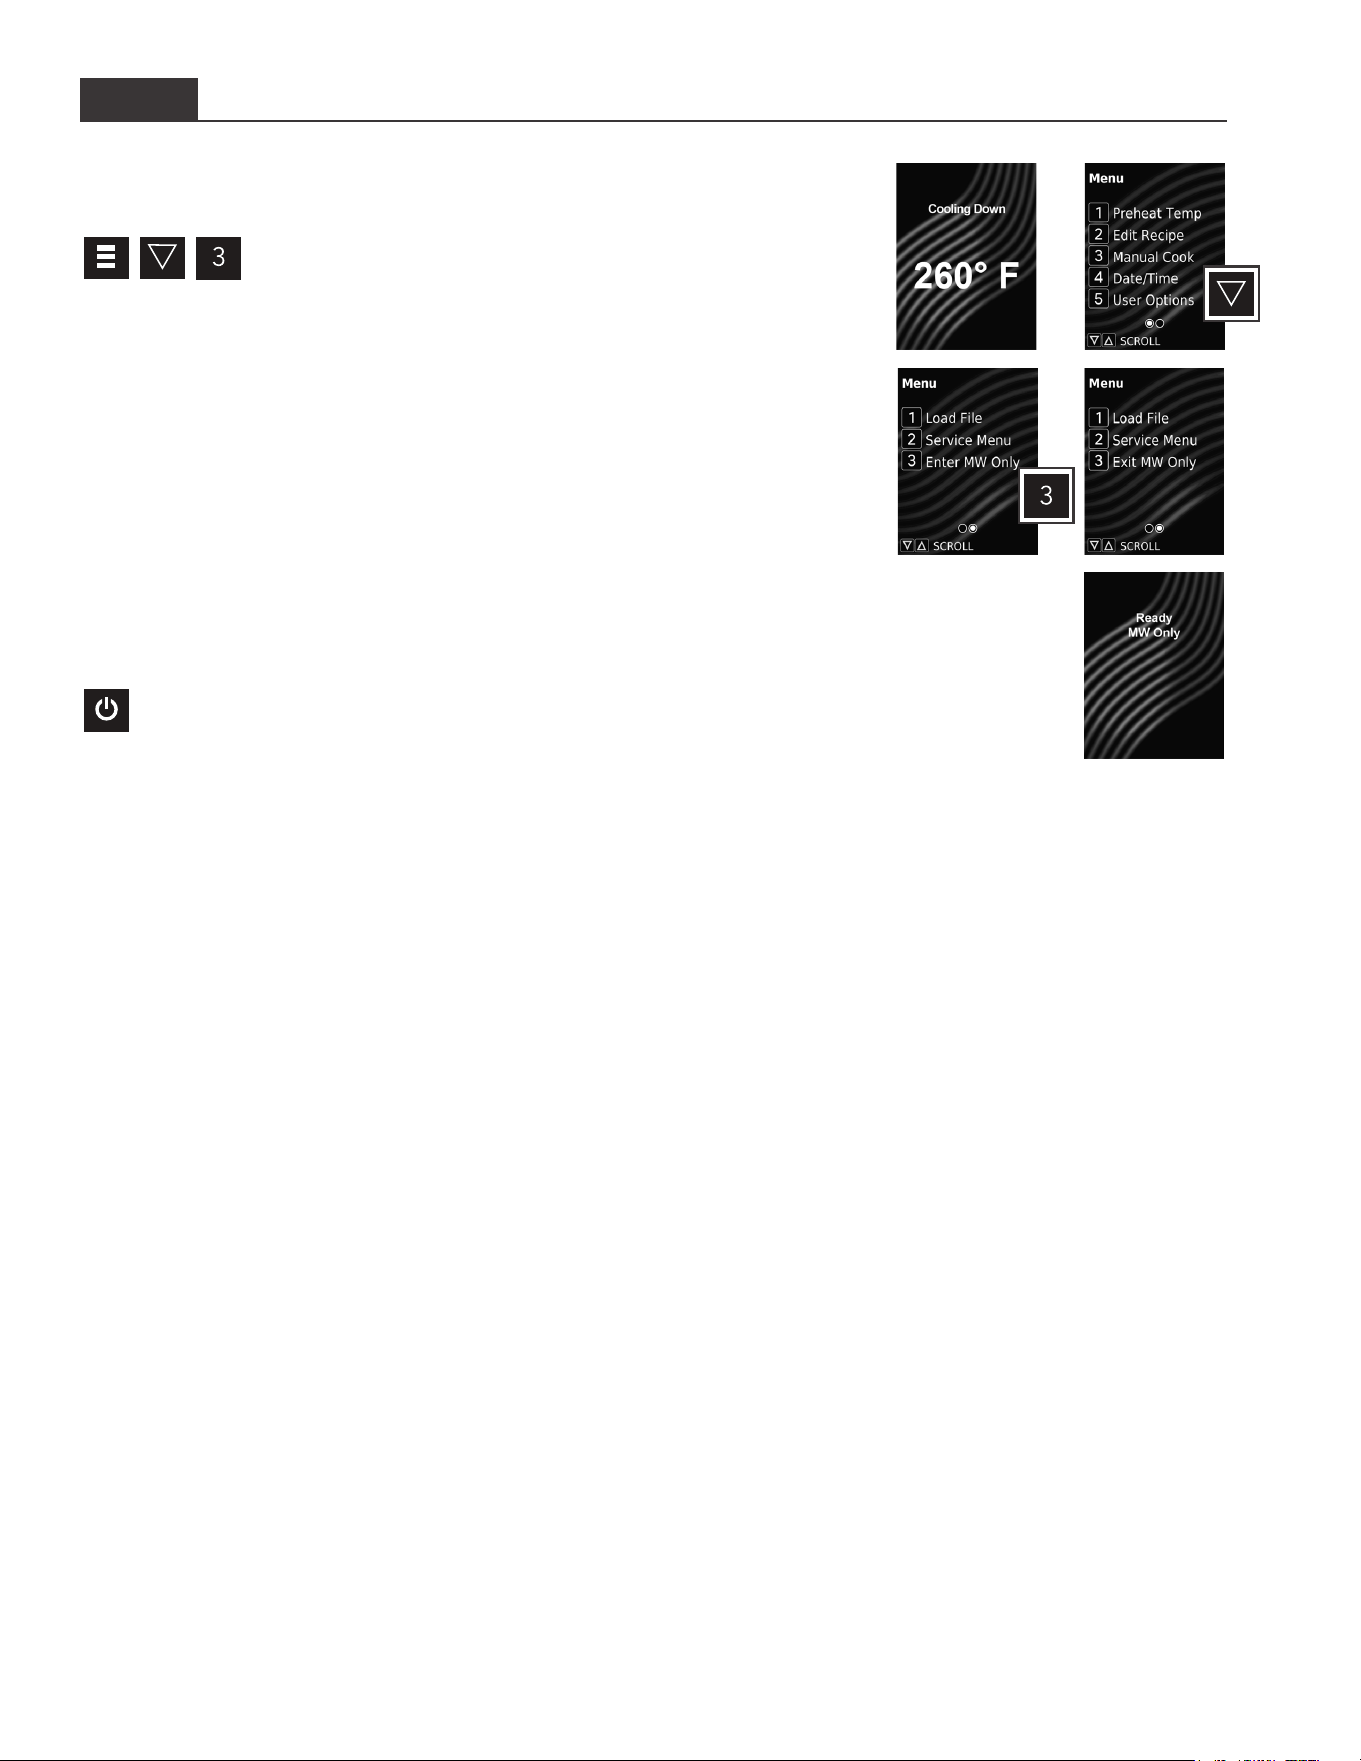
STYLE 1 Microwave-Only Mode
Microwave-Only Mode (MW-Only Mode) allows operator to disable convection power
and cook using only microwave energy�
Enter MW-Only Mode
Oven must cool-down before microwave-only mode can be
enabled�
1� If oven is preheated, Press POWER ON/OFF (⏻) keypad to begin cooling-down
the oven�
• COOLING DOWN screen will display until oven temperature is below 200°F (95°C)�
• Once cooled, STANDBY screen will display�
2� Press MENU (☰) keypad�
• If prompted, enter PIN Code and press START/OK keypad�
• MENU screen will display�
3� Press DOWN (▼) keypad to scroll to second page of MENU.
4� Press number "3" keypad to activate "Enter MW Only"�
• Oven will now be in Microwave Only Mode�
• "Enter MW Only" item on MENU screen will change to "Exit MW Only"�
5� To exit MENU: Press STOP/RESET keypad�
• READY: MW ONLY screen is displayed�
Exit MW-Only Mode
Press POWER ON/OFF (⏻) keypad to exit microwave-only mode and begin
preheating the oven� WARMING UP screen displays� READY screen will
display once oven reaches the specied preheat temperature.
Manual Cook in MW-Only Mode
1� Oven must be in MW-Only Mode rst. See "Enter MW-Only Mode"�
2� Complete steps in "Manual Cooking" on page 11.
• Oven Temperature will read "MW ONLY" and will not be an editable eld.
Operating Preset Recipe Keypads in MW-Only Mode
This oven can store up to 10 preset "MW-Only" recipes in memory�
1� Oven must be in MW-Only Mode rst. See "Enter MW-Only Mode"�
2� Complete steps in "Operating Preset Recipe Keypads" on page 12�
Edit Recipe in MW-Only Mode
This oven can be programmed to store up to 10 preset "MW-Only" recipes in memory�
1� Oven must be in MW-Only Mode rst. See "Enter MW-Only Mode"�
2� Complete steps in "Edit or Create New Recipes" on page 14.
• Oven Temperature will read "MW ONLY" and will not be an editable eld.
1 2
43
5
©2020 ACP, Inc.
Cedar Rapids, IA 52404
Page 17 of 26
Part No. 20000611
Original Instructions
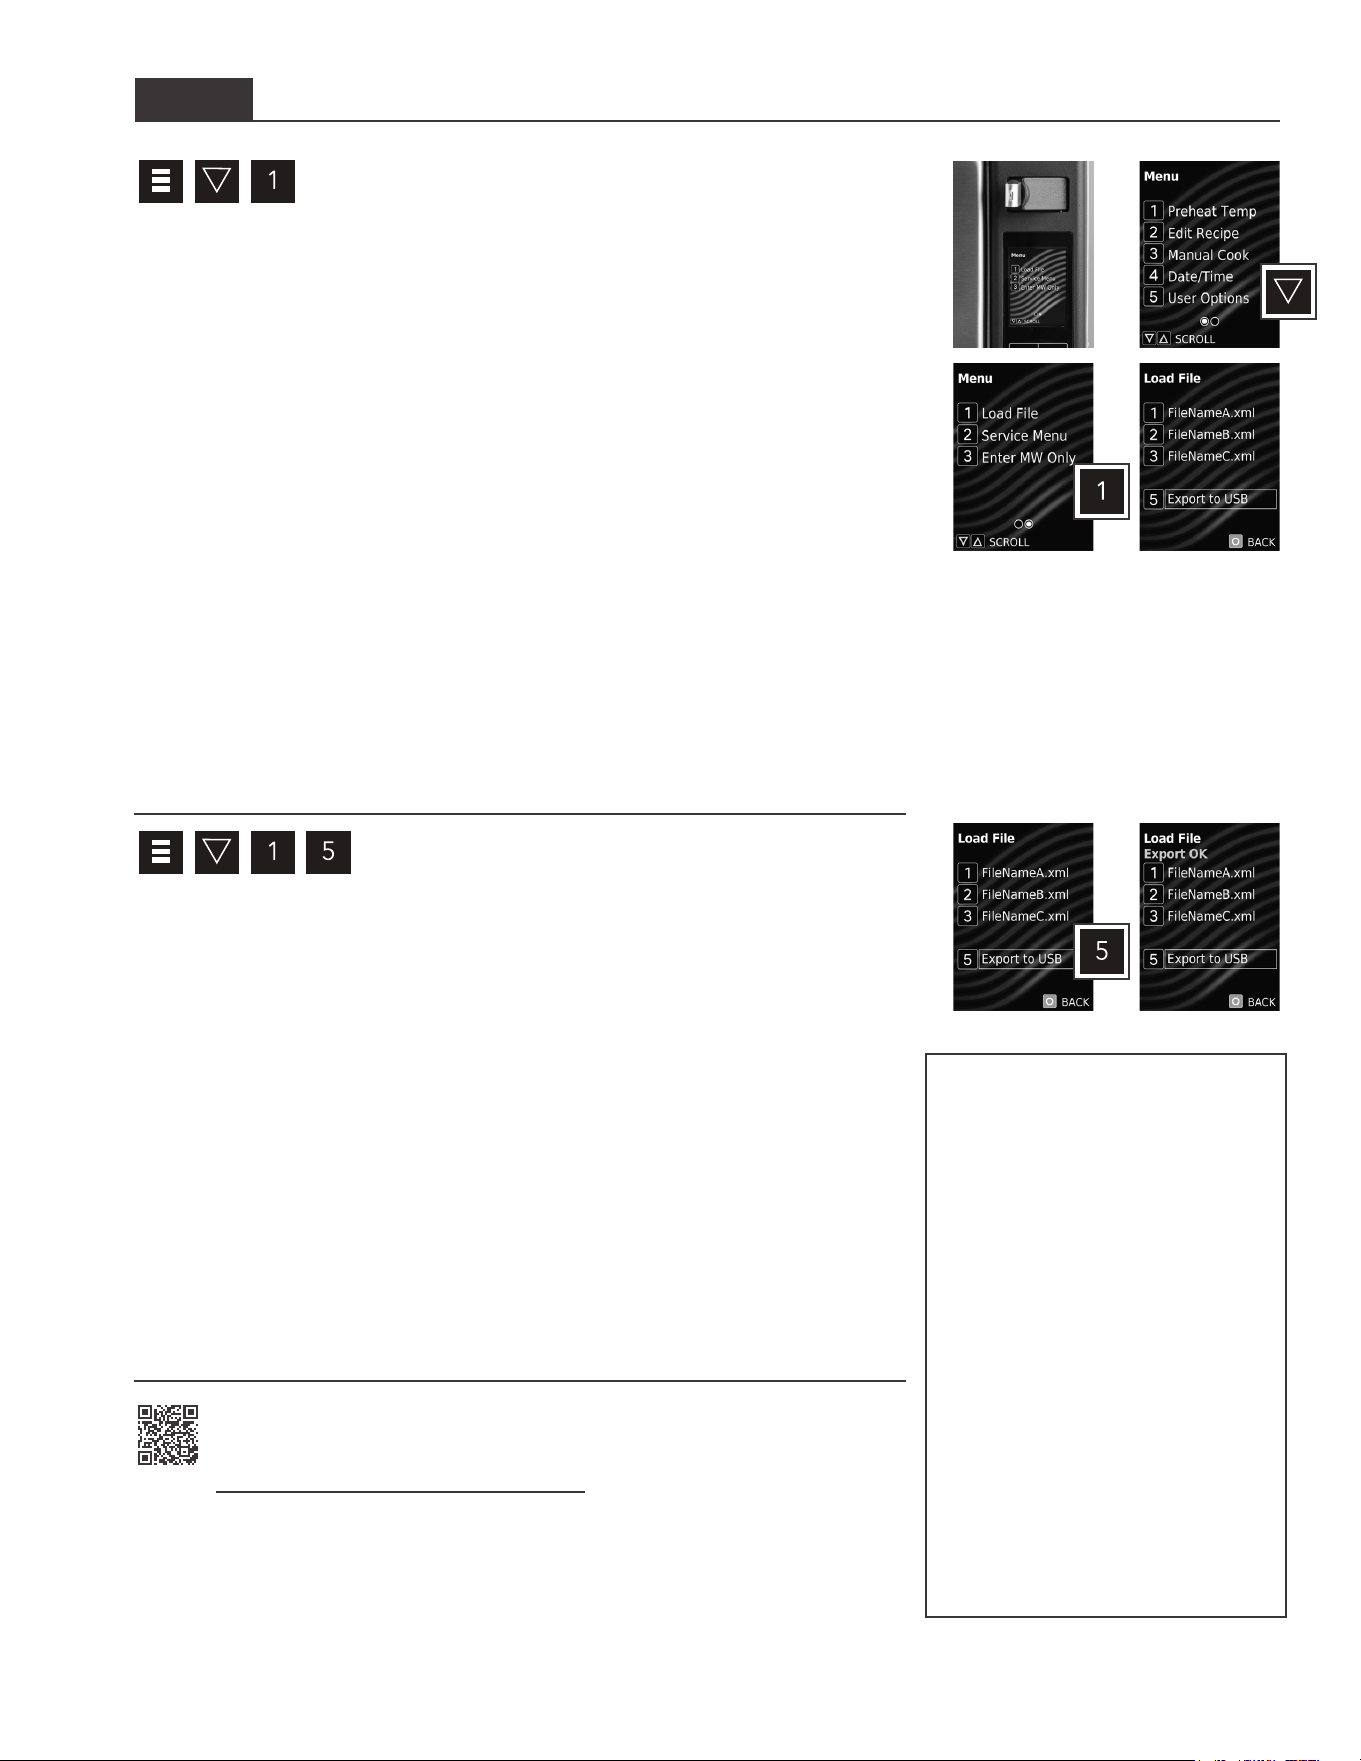
STYLE 1 USB Flash Drive
Import Menu from USB Flash Drive
Note: Menulemustbe.XMLformat.Menulemustbesavedattheroot
directoryoftheashdrive,andcannotbelocatedinsideanyfolders.
1� Flip open USB port protective cover. Insert ash drive into the USB port.
2� Press MENU (☰) keypad�
• If prompted, enter PIN Code and press START/OK keypad�
• MENU screen will display�
3� Press DOWN (▼) keypad to scroll to second page of MENU.
4� Press number "1" keypad to access "Load File"�
• LOAD FILE screen displays with list of .XML les on the root directory of the ash
drive, and an option to "Export to USB"�
• If more than 4 recipes les are on the ash drive: Press UP/DOWN (▲▼) keypads to
scroll through pages of les.
5� To load a le: Press corresponding number keypad.
• If upload was successful: "Loaded OK" will display� Settings and menu items will be
loaded on the oven�
• If upload failed: "Error Loading" will display�
6� Press STOP/RESET keypad to exit� Remove USB Flash Drive�
TROUBLESHOOTING:
USB ash drive must be inserted prior to selecting "Load File."
• Press STOP/RESET keypad to exit LOAD FILE screen. Insert ash drive and retry transfer.
If the error persists: Open USB ash drive on computer and verify that menu le is in .XML
format and saved in the root directory of the ash drive. Retry transfer.
If the error persists: Unplug oven from outlet and plug-in oven� Retry transfer�
Export Menu to USB Flash Drive
1� Flip open USB port protective cover. Insert ash drive into the USB port.
2� Press MENU (☰) keypad�
• If prompted, enter PIN Code and press START/OK keypad�
• MENU screen will display�
3� Press DOWN (▼) keypad to scroll to second page of MENU.
4� Press number "1" keypad to access "Load File"�
• LOAD FILE screen displays with list of .XML les on the root directory of the ash
drive, and an option to "Export to USB"�
5� Press number "5" keypad to access "Export to USB"� Oven will begin to export to
USB ash drive.
• If export was successful: "Export OK" will display� Settings, menu items, and oven
usage data will be loaded on USB Flash Drive�
• If export failed: "Export Failed" will display�
6� Press STOP/RESET keypad to exit� Remove USB Flash Drive�
TROUBLESHOOTING:
USB ash drive must be inserted prior to selecting "Export to USB."
• Insert ash drive and retry transfer.
ACP Programming Application
For larger, and more complex menus, it may be more manageable to create and edit
menus using the ACP Programming Application� For detailed instructions, please visit:
www.acpsolutions.com/oven-programming/
OPEN MENU IN ACP PROGRAMMING APPLICATION
Note: For more details, please see ACP Programming Application User Guide online
1� Insert ash drive into USB port on computer.
2� Open ACP Programming Application�
3� Select “File”,“Open.” Navigate to ash drive. Select and open menu le (.XML format).
1 2
43
54
Update Firmware
Note: Firmwarelesmustbeloaded
onUSBashdrive.Mustbesavedat
therootdirectoryoftheashdrive,and
cannot be located inside any folders.
1� Flip open USB port protective
cover. Insert ash drive into the
USB port�
2� Press MENU (☰) keypad�
3� Press DOWN (▼) keypad to
scroll to second page of MENU�
4� Press number "2" keypad to
access "Service Menu"�
• PIN Code prompt appears�
5� Press keypads 1-3-5-7-9 to enter
SERVICE MENU�
6� Press and hold number "7"
keypad for 3 seconds to initiate
rmware update.
TROUBLESHOOTING:
If rmware fails to load: Press and hold
STOP/RESET keypad while plugging in
the oven�
©2020 ACP, Inc.
Cedar Rapids, IA 52404
Page 18 of 26
Part No. 20000611
Original Instructions
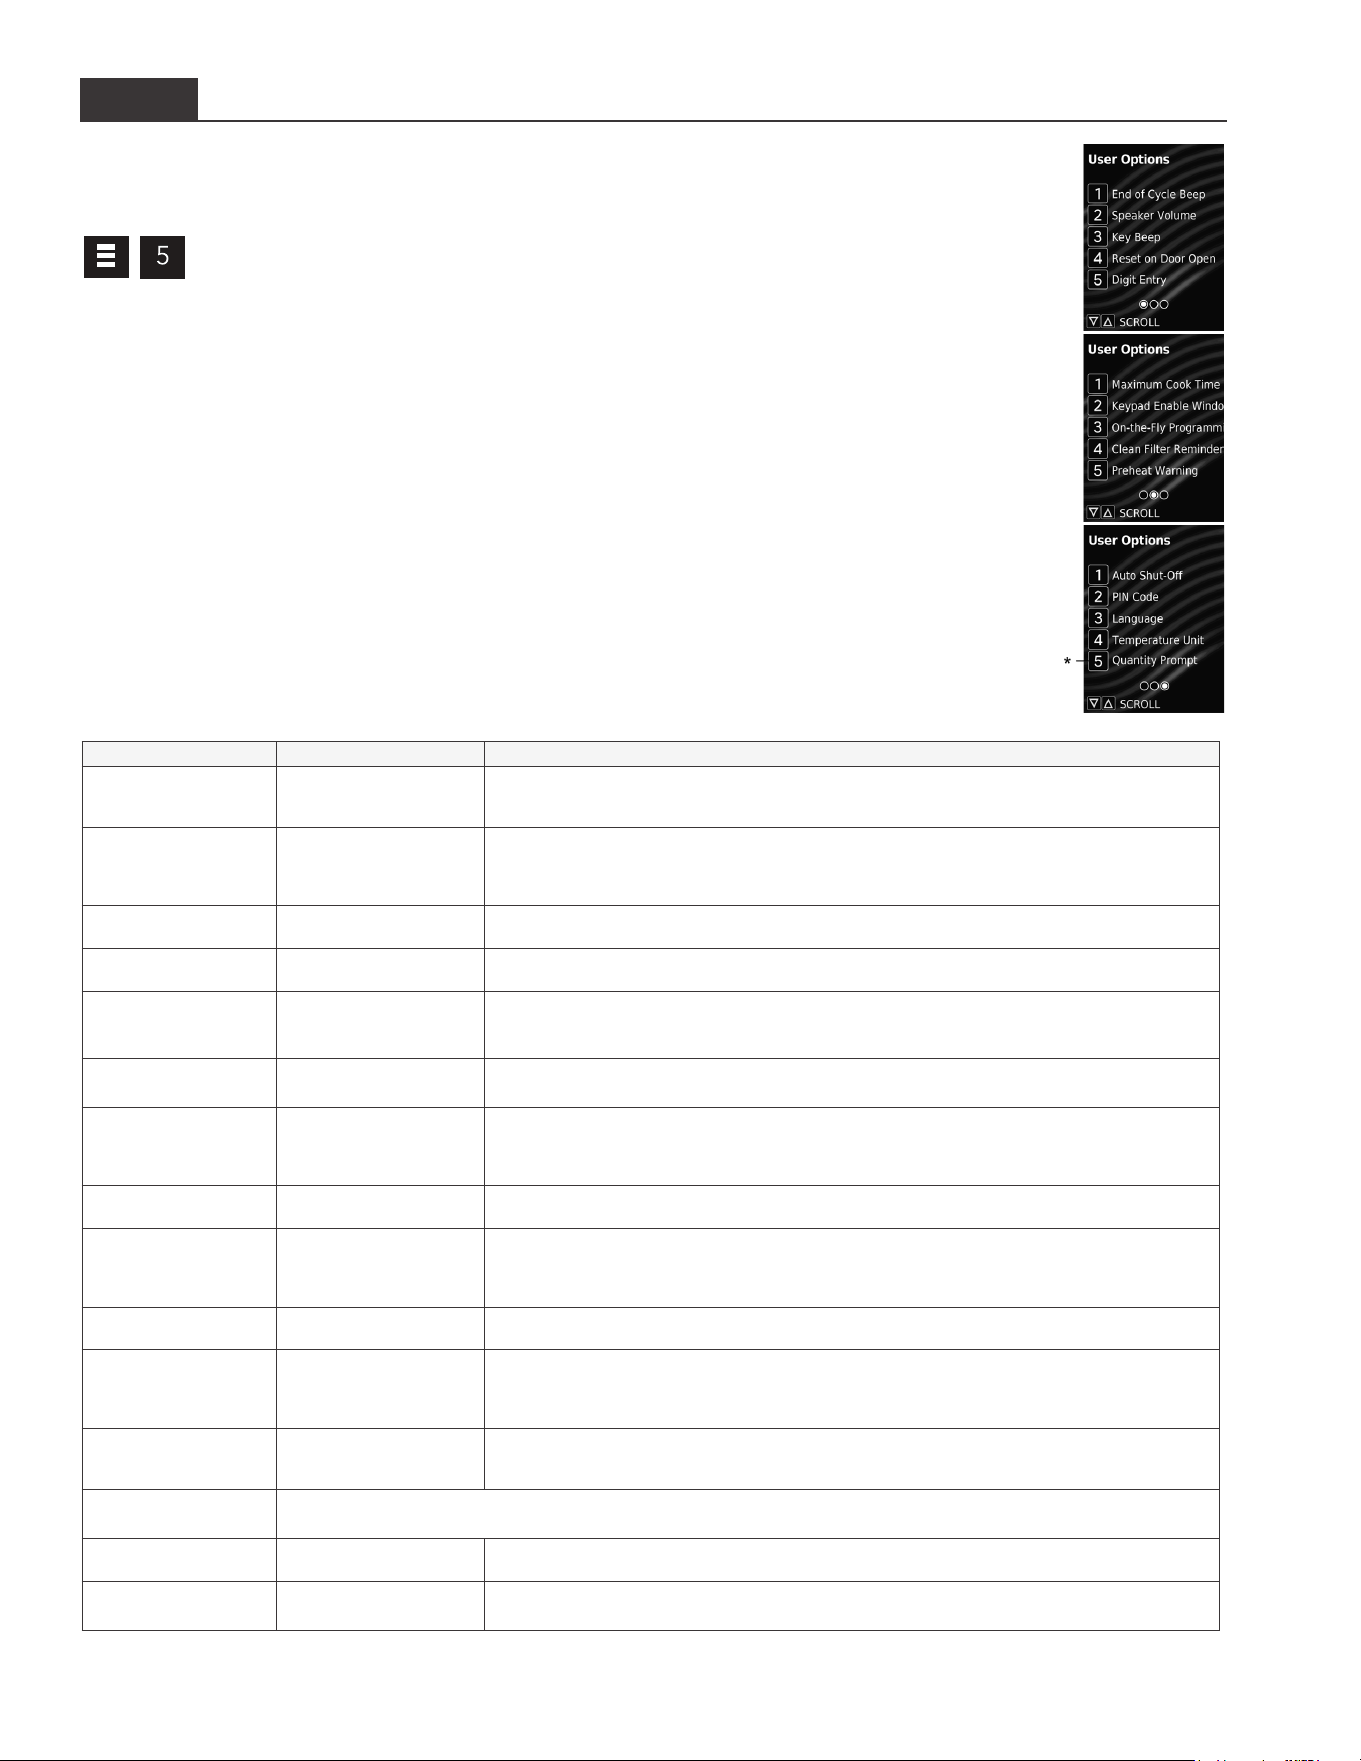
STYLE 1 User Options
There are several options you can change to customize the operation of the oven�
Options are shown below� The factory setting is shown in bold type.
Access and Modify User Options
1� Press MENU (☰) keypad�
• If prompted, enter PIN Code and press START/OK keypad�
• MENU screen will display�
2� Press number "5" keypad to access "User Options"�
• USER OPTIONS screen will display with list of customizable settings�
• To scroll between pages of settings: Press UP/DOWN (▲▼) keypads.
3� To access available options for a setting: Press corresponding number keypad�
• The currently selected option is highlighted in red�
4� To change a setting: Press corresponding number keypad�
• The newly selected option is highlighted in red�
5� To save changes: START/OK keypad�
6� To exit: Press STOP/RESET keypad�
STANDARD DEFAULT PER MODEL
(
FACTORY SETTINGS IN BOLD
)
Factory setting may vary by model
SETTING DISPLAYED OPTIONS DESCRIPTION
End of Cycle Beep 3 Seconds
Continuous
Burst
3 second continuous beep
Continuous beep until door is opened
5 beep bursts until door is open
Speaker Volume O
Low
Medium
High
Sets volume to o
Sets volume to low
Sets volume to medium
Sets volume to high
Key Beep O
On
Prevents beep when keypad is pressed
Allows beep when keypad is pressed
Reset on Door Open End Cook Cycle
Pause Cook Cycle
Cancels heating time count down after door is opened during cycle�
Allows oven to resume heating time countdown after door is opened during cycle
Digit Entry
Single Digit
Double Digit
Folders
Allows 10 (0-9) preprogrammed recipes
Allows 100 (00-99) preprogrammed recipes
Allows 10 folders (0-9), each with 10 preprogrammed recipes
Maximum Cook Time
10 minutes
20 minutes
Allows 10 minutes of heating time
Allows 20 minutes of heating time
Keypad Enable Window 15 seconds
30 seconds
1 minute
2 minutes
15 seconds after oven door is opened, keyboard disabled
30 seconds after oven door is opened, keyboard disabled
1 minute after oven door is opened, keyboard disabled
2 minutes after oven door is opened, keyboard disabled
On-the-Fly Programming O
On
Disables pushing any additional keypads during a cook cycle
Allows pushing additional keypads to add or change time in the middle of a cook cycle
Clean Filter Reminder O
Every 7 Days
Every 30 Days
Every 90 Days
Oven will not display “Clean Filter Message”
Oven will display “Clean Filter Message” every 7 days
Oven will display “Clean Filter Message” every 30 days
Oven will display “Clean Filter Message” every 90 days
Preheat Warning Enabled
Disabled
Oven will display warning message if recipe temperature does not match oven temperature
Oven will not display temperature warning message
Auto Shut-O Never
2 Hours
4 Hours
8 Hours
Oven will not automatically shut-o
After 2 hours of inactivity, oven will automatically shut-o
After 4 hours of inactivity, oven will automatically shut-o
After 8 hours of inactivity, oven will automatically shut-o
PIN Code O
On
Set PIN Code
PIN Code not required to access Menu or User Options
PIN Code required to access Menu and User Options
PIN Code required� Create new 4 digit PIN Code
Language
Chinese (Mandarin), Danish, Dutch, English, Filipino, French, German, Greek, Italian, Japanese, Korean, Norwegian, Polish,
Portuguese, Romanian, Russian, Spanish, Swedish, Ukrainian, Vietnamese
Temperature Unit Fahrenheit
Celsius
Temperatures are displayed in Fahrenheit for 60Hz models
Temperatures are displayed in Celsius for 50Hz models
Quantity Prompt**
On
O
Prompts the user for portion quantity multiplier (1-9) upon selecting a preset recipe
Allows user to cook individual portions
** Available on select models only. (Only displayed in User Options menu if factory option is enabled)
©2020 ACP, Inc.
Cedar Rapids, IA 52404
Page 19 of 26
Part No. 20000611
Original Instructions
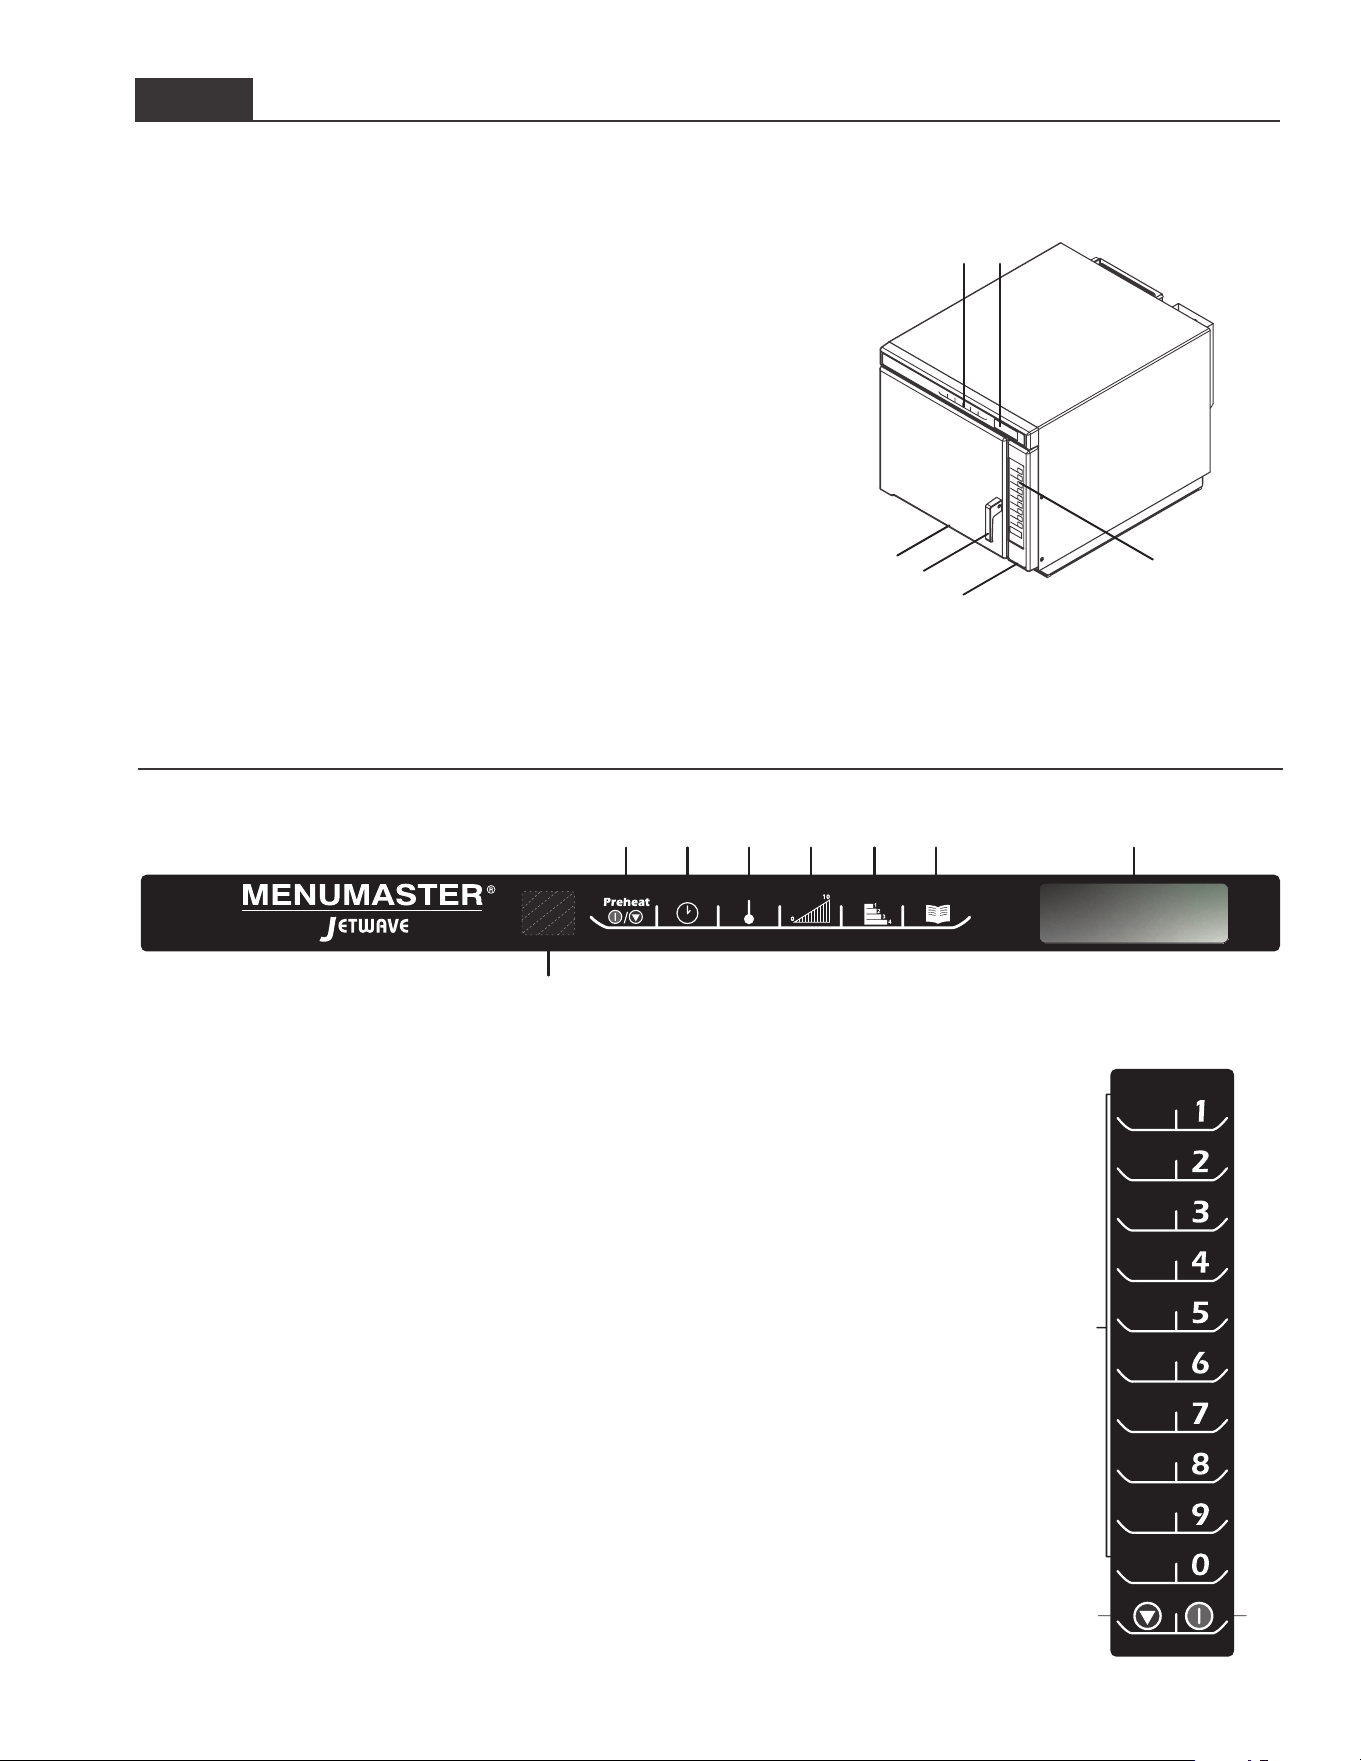
STYLE 2 Oven & Control Panel Features
(H)
(A) (B) (C) (D) (E) (F) (G)
TM
(A) PREHEAT ON/OFF KEYPAD
Preheats oven� Begins cool-down process�
(B) TIME ENTRY KEYPAD
Use to enter cooking time for either manual entry or
programming modes�
(C) TEMPERATURE ENTRY KEYPAD
Use to enter oven temperature�
(D) POWER LEVEL KEYPAD
Use to set microwave power level between 0% to 100% in
10% increments (keypad "0" = 0%, keypad “1”=10%, keypad
“2”=20%,etc.). For 100% power level, press any number keypad
twice�
(E) STAGE KEYPAD
Use in manual cooking and/or programming modes to add
additional cooking stages� Up to four stages can be entered�
(F) PROGRAM SAVE KEYPAD
Use to access, create, edit, and save settings for preset cooking
programs; oven preheat temperature; and user options�
(G) DISPLAY
LED-backlit LCD�
(H) HIDDEN KEYPAD
Use to access user options�
(I) NUMBER KEYPADS
Used to operate preset cooking
programs and enter settings�
(J) STOP/RESET KEYPAD
Interrupts a cooking sequence
in progress; clears out any
remaining time; and also ends
a programming or user option
cycle� When the Stop/Reset pad
is used to end a programming or
option change, the changes are
discarded�
(K) START/OK KEYPAD
Begins cooking in Manual
Time Entry Mode� Restarts an
interrupted cooking cycle� Used
to save settings and entries�
Note: There are multiple styles of controls. Choose the control that matches unit.
Control panel branding and coloring may vary by model
(I)
(J
) (K
)
SIDE CONTROL PANEL
Oven Features
(1) TOP CONTROL PANEL
(2) DISPLAY
(3) SIDE CONTROL PANEL
(4) AIR INTAKE FILTER (not pictured)
Removable/cleanable magnetic air lter
(5) DOOR HANDLE
Ergonomically designed for one handed "Lift and Pull" operation�
(6) USB PORT (not pictured)
Standard USB ash drive compatible. Allows for import/export of programmed
settings and user options�
(7) OVEN RACK (not pictured)
The oven is equipped with a removable stainless steel oven rack� 2 available
installation positions�
(8) UNIT SERIAL NUMBER (not pictured)
Located inside the door and on the back of the oven�
(1)(2)
(3)
(5)
(4)
(6)
Control Panel Features
TOP CONTROL PANEL

©2020 ACP, Inc.
Cedar Rapids, IA 52404
Page 20 of 26
Part No. 20000611
Original Instructions
STYLE 2 Cooking & Programming Features
Programming Features
STAGE COOKING
Allows operator to use up to four dierent cooking cycles or stages consecutively without repeated input from the operator. For
example, stage cooking can be set to defrost food initially, then cook it, and then nish with more toasting/browning.
PRESET PROGRAM KEYPADS
(
DIGIT ENTRY
)
The oven can of store either 10 or 100 cooking programs in memory�
A. Single Digit Keypad Cooking
From the factory, the oven is programmed to store 10 cooking programs (0-9)� Each keypad begins a cooking program�
B. Double Digit Keypad Cooking
The oven control can be changed to store up to 100 cooking programs (00-99)� Each entry will be assigned a double digit
number, for example 01, 05, or 20� When using the double keypad programming, two keypads must be pressed to start the
cooking cycle�
Note: To set control to Double Digit Entry, see “User Options” section in this manual.
Cooking Energies and Options
CONVECTION ENERGY
Convection cooking utilizes both a convection element and fan to
evenly distribute heated air throughout the oven cavity� The circulating
air surrounds food in an envelope of evenly heated air� Consistent
temperatures cook food evenly and reduce cooking time� By default,
convection power is enabled� While enabled, oven will maintain a
minimum convection temperature of 150°F (65°C) to ensure drier air
and more even cooking�
MICROWAVE ENERGY
Microwave cooking uses high frequency energy waves to heat the
food� When cooking, microwave energy causes food molecules to
move rapidly� This rapid movement between the food molecules
creates heat, which cooks the food�
Oven generates microwave energy while cooking screen countdowns
and displays power level greater than 0%.
Convection-Only Cooking
To operate with convection-only, use cook
settings with 0% microwave power level.
Combination Cooking
Convection with Microwave
The combination of both energies uses the
speed of microwave energy and browning
of convection cooking to yield high quality
food faster� To operate with combination
cooking, set convection temperature between
150°F (65°C) – 475°F (250°C)� and set
microwave power level between 10 – 100%.
Microwave-Only Cooking
Microwave-Only mode allows operator to
disable convection power and cook using
only microwave energy� To operate with
microwave-only, see "Microwave-Only
Manual Operation" and "Microwave-Only
Preset Keypad Operation" on page 22 �
Methods of Cooking & Programming
COOKING WITH PRESET PROGRAM KEYPADS
Allows operator to quickly activate saved cooking sequences using 1-2 keypad strokes
MANUAL COOKING
Allows operator to heat without changing the preset program keypads
MANUAL PROGRAMMING MODE
Allows operator to use keypads to edit preset programs and/or create new programs for customized cooking�
USB MENU UPLOAD
Allows operator to load program settings and user options using a standard USB ash drive
ACP PROGRAMMING APPLICATION
Allows operator to create and edit program settings and user options on a computer�
For detailed instructions, please visit: www.acpsolutions.com/oven-programming
©2020 ACP, Inc.
Cedar Rapids, IA 52404
Page 21 of 26
Part No. 20000611
Original Instructions
Preheat Warnings
The combination oven has two optional temperature
warnings� Warnings sound with a three beep signal when a
programmed recipe keypad is pressed� Available warnings
include:
• A warning when the preheat temperature does not match
the preprogrammed temperature of a cooking sequence�
• A warning when the actual oven cavity temperature is not
to preheat temperature, such as when the oven is rst
started�
To override the warning and begin a cooking cycle: Press
START/OK keypad�
Note: To change Preheat Temperature Warnings, see “User Options”
section in this manual.
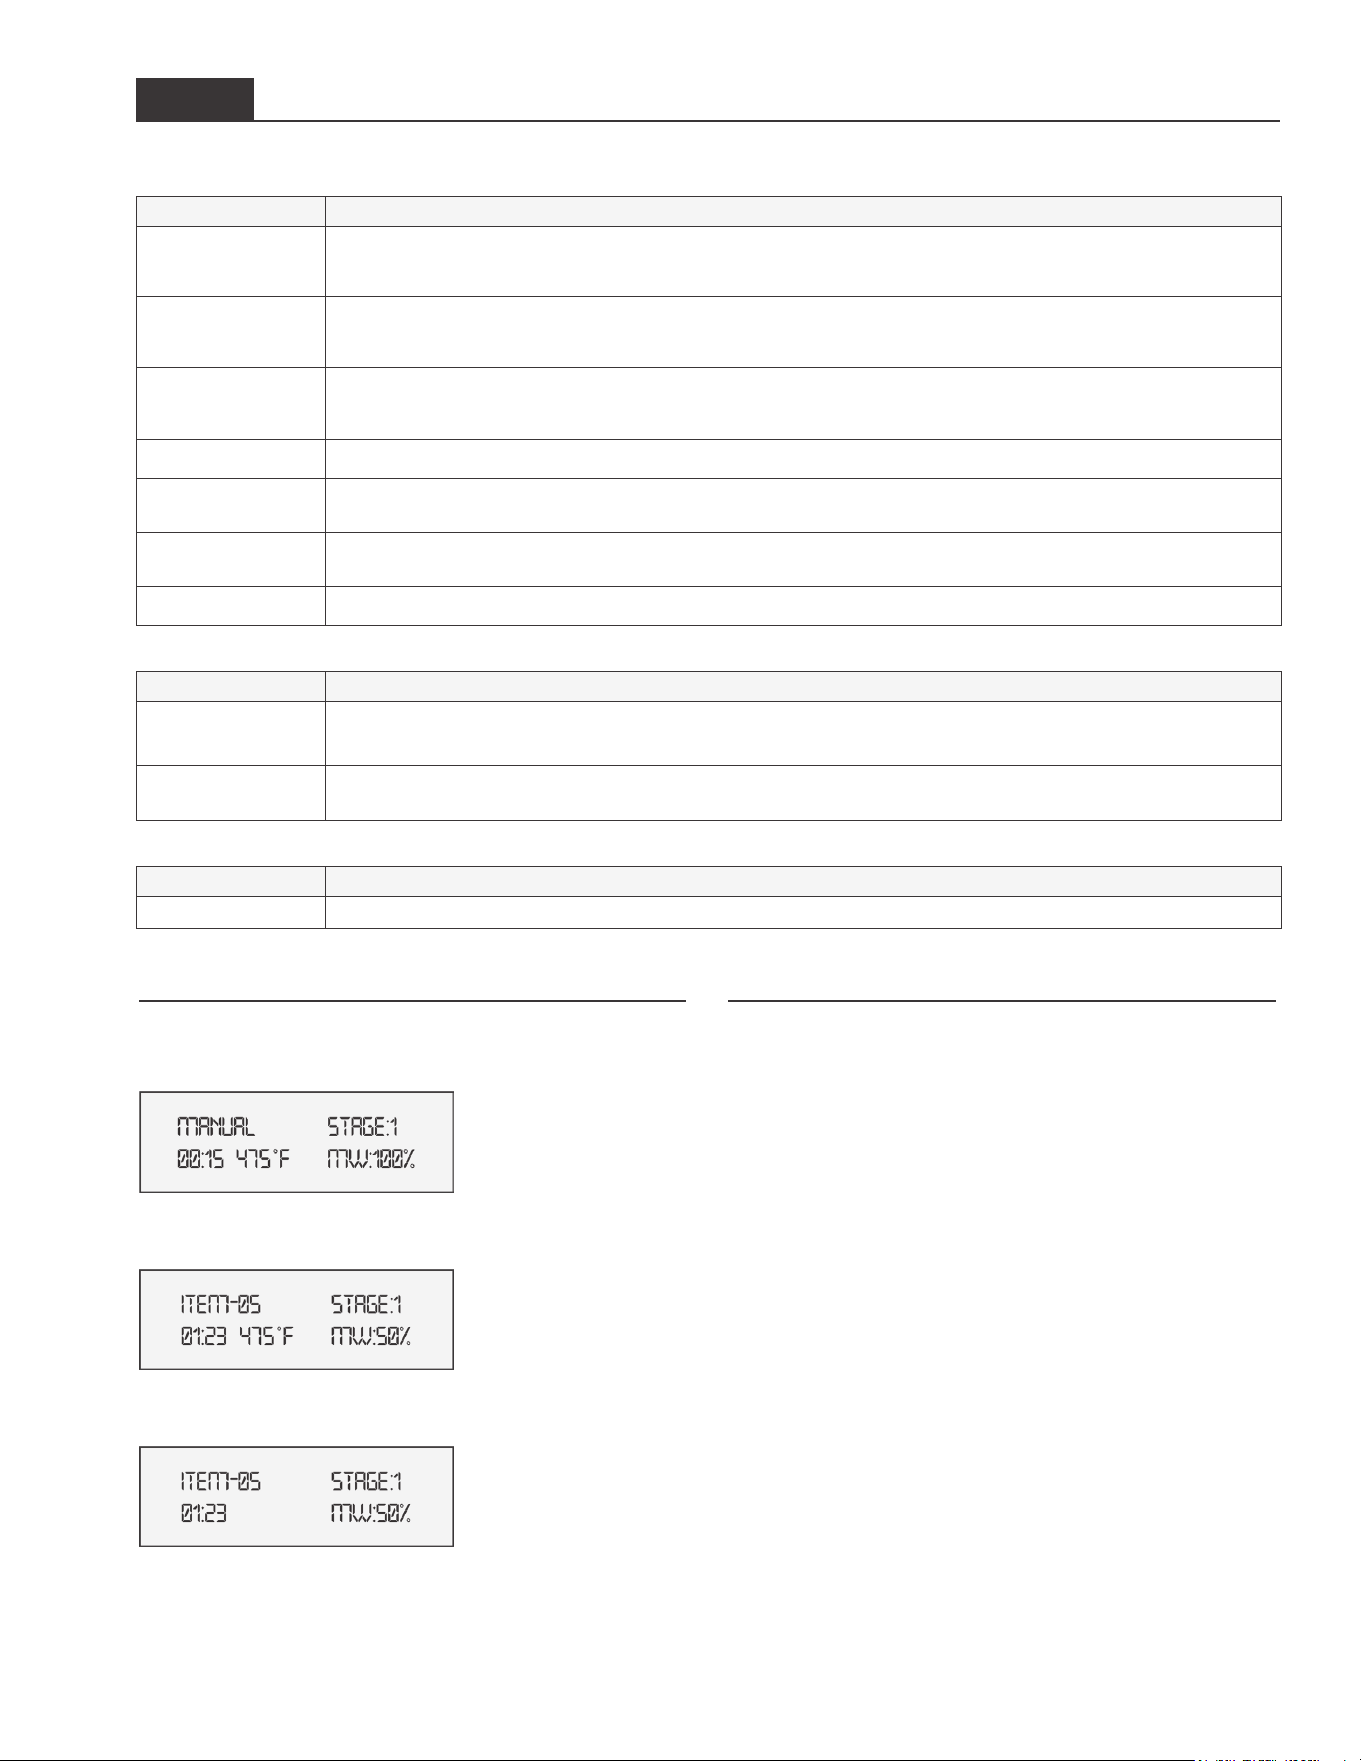
Example Cooking Displays
Cooking Displays
STYLE 2 DESCRIPTION
STANDBY or
Press Preheat
"STANDBY" displays when oven is turned o; after the oven is plugged in, the door is opened, and then shut.
Oven Preheating
475°F
"Oven Preheating 475°F or 250°C" displays when oven is turned on and is warming up to the selected preheat
temperature� Oven Preheating also ashes when a cooking sequence can be started or programmed.
Ready
475°F
"Ready 475°F or 250°C" displays when oven has reached preheat temperature and is ready to cook�
Ready also ashes when a cooking sequence can be started or programmed.
Note: Oven will shutdown after two hours of inactivity.
00:00
Displays cooking time� If stage cooking is programmed, total cooking time is displayed�
MW 50%
"MW __%" displays the current microwave power level. 100% is the highest setting, and 0% is lowest (no microwave
energy used)�
ITEM-05
"ITEM-__" displays the single or double digit entry location of a programmed cooking sequence when using a
programmed pad�
Stage 1
"STAGE _"displays the stage number (1 through 4) the oven is at in the cooking sequence�
Programming Displays
STYLE 2 DESCRIPTION
Enter Program
to Add/Review:
Displays when oven is in programming mode�
Stage 1
Displays stage number during cooking or when programming a specic cooking stage. Stage number
(1 through 4) indicates the stage that is being used�
USB Display
STYLE 2 DESCRIPTION
USB
Displays when keypad 5 is pressed and held, and transfer to/from USB ash drive is ready.
STYLE 2 Displays
MANUAL COOKING
PREPROGRAMMED ITEM
PREPROGRAMMED ITEM IN MICROWAVE
-
ONLY MODE

©2020 ACP, Inc.
Cedar Rapids, IA 52404
Page 22 of 26
Part No. 20000611
Original Instructions
Power-On, Preheat
Press PREHEAT ON/OFF keypad to begin preheating� OVEN
PREHEATING screen displays� READY screen will display once oven
reaches the specied preheat temperature.
Edit Oven Preheat Temperature
This oven can be set to a preheat temperature between 150°– 475°F
(65°– 250°C)� It is recommended to set to the most commonly used
temperature for the oven� Factory default setting is 475°F (250°C)�
1� Press PROGRAM SAVE keypad�
2� Press TEMPERATURE ENTRY keypad
3. Press number keypads to enter desired preheat temperature.
• Temperature must be entered in 5°F (5°C) increments� If not, the
temperature will automatically change to the nearest 5°F (5°C)�
4� Preheat temperature is changed�
Manual Cooking Mode
Allows operator to heat without changing the preset program keypads�
Note: Oven must be preheated before combination or convection cooking.
From READY or DOOR OPEN screen:
1� Open oven door, place food in oven, and close door�
• “READY” will display.
2� To enter Cooking Time: Press TIME ENTRY keypad�
• Press number keypads to enter cook time�
3� To edit Cooking Temperature: Press TEMPERATURE ENTRY
keypad�
• Press number keypads to enter desired cooking temperature�
4� To edit Microwave Power Level: Press POWER LEVEL keypad�
• Press number keypads to enter % microwave power
("0"=0%,“1”=10%, “2”=20%,etc.). For 100% microwave power level,
press any number keypad twice�
• For Convection-Only cooking: Press "0" keypad to set 0% MW power.
5� To add additional cooking stages: Press STAGE keypad�
• Repeat steps 2, 4, and 5 for each additional stage�
• Up to four stages can be entered�
6� Press START/OK keypad to begin cooking�
• Oven operates and display counts down cooking time�
7� At the end of the cooking cycle, the oven beeps� Oven interior and
cooking dish will be hot� Carefully remove food from oven�
MICROWAVE
-
ONLY MANUAL OPERATION
Note: MicrowaveOnlymustrstbeenabledinUserOptions>MicrowaveOnly.
Allows operator to heat using only microwave energy, and without changing
the preset program keypads�
• Enable Microwave Only user option� See "User Option" section in this
manual for instructions�
• After User Option>Microwave Only is enabled, complete steps 1–2 and 4–7
in "Manual Cooking Mode" section�
Operating Preset
Program Keypads
To heat using a preset program, press
number keypad(s)� Oven will start to heat
automatically�
Note: Oven must be preheated before
combination or convection cooking.
From READY or DOOR OPEN screen:
1� Open oven door and place food in
oven� Close door�
• “READY” will display.
2� Select the keypad(s) for the desired
preprogrammed cooking sequence�
• Single Digit Keypad Cooking:
Press a keypad (0-9)
• Double Digit Keypad Cooking:
Press two keypads, in order, of the
double digit number for the desired
cooking sequence�(00-99)
3� Oven begins cooking and displays
preset cooking program, total
cooking time, cooking temperature,
percentage of microwave power, and
stage�
4� At the end of the cooking cycle,
the oven beeps� Oven interior and
cooking dish will be hot� Carefully
remove food from oven�
MICROWAVE
-
ONLY PRESET KEYPAD
OPERATION
Note: MicrowaveOnlymustrstbeenabledin
User Options> Microwave Only.
Allows operator to heat using only
microwave energy and using preset
program keypads�
• Enable Microwave Only user option� See
"User Option" section in this manual for
instructions�
• After User Option>Microwave Only
is enabled, complete steps 1-4 in
"Operating Preset Program Keypads"
section�
STYLE 2 Basic Operation & Cooking
©2020 ACP, Inc.
Cedar Rapids, IA 52404
Page 23 of 26
Part No. 20000611
Original Instructions
STYLE 2 Programming & USB Flash Drive
Programming Mode
Allows operator to assign cook times, power levels, and stage
cooking to the number keypads� From READY or DOOR
OPEN screen:
1� Press PROGRAM SAVE keypad�
• Programming mode begins�
• "Enter Program to Add/Review:" will display�
2� Select the keypad(s) to change or review the program
cooking sequence�
• Single Digit Keypad Cooking: Press a keypad (0-9)�
• Double Digit Keypad Cooking: Press two keypads, in
order, of the double digit number for the desired cooking
sequence (00-99)�
3� To enter Cooking Time: Press TIME ENTRY keypad�
• Press number keypads to enter cook time�
4� To edit Cooking Temperature: Press
TEMPERATURE ENTRY keypad�
• Press number keypads to enter desired cooking
temperature�
5� To edit Microwave Power Level: Press POWER LEVEL
keypad�
• Press number keypads to enter % microwave power
("0"=0%,“1”=10%, “2”=20%,etc.). For 100% microwave
power level, press any number keypad twice�
• For Convection-Only cooking: Press "0" keypad to set
0% MW power
6� To add additional cooking stages: Press STAGE
keypad�
• Repeat steps 3, 5, and 6 for each additional stage�
• Up to four stages can be entered�
7� To save the cooking program: Press PROGRAM SAVE
keypad�
8� To discard changes: Press STOP/RESET keypad�
USB Programming
Allows operator to import or export program settings and user
options using a standard USB ash drive.
Oven must be in Standby mode (Preheat must be OFF) �
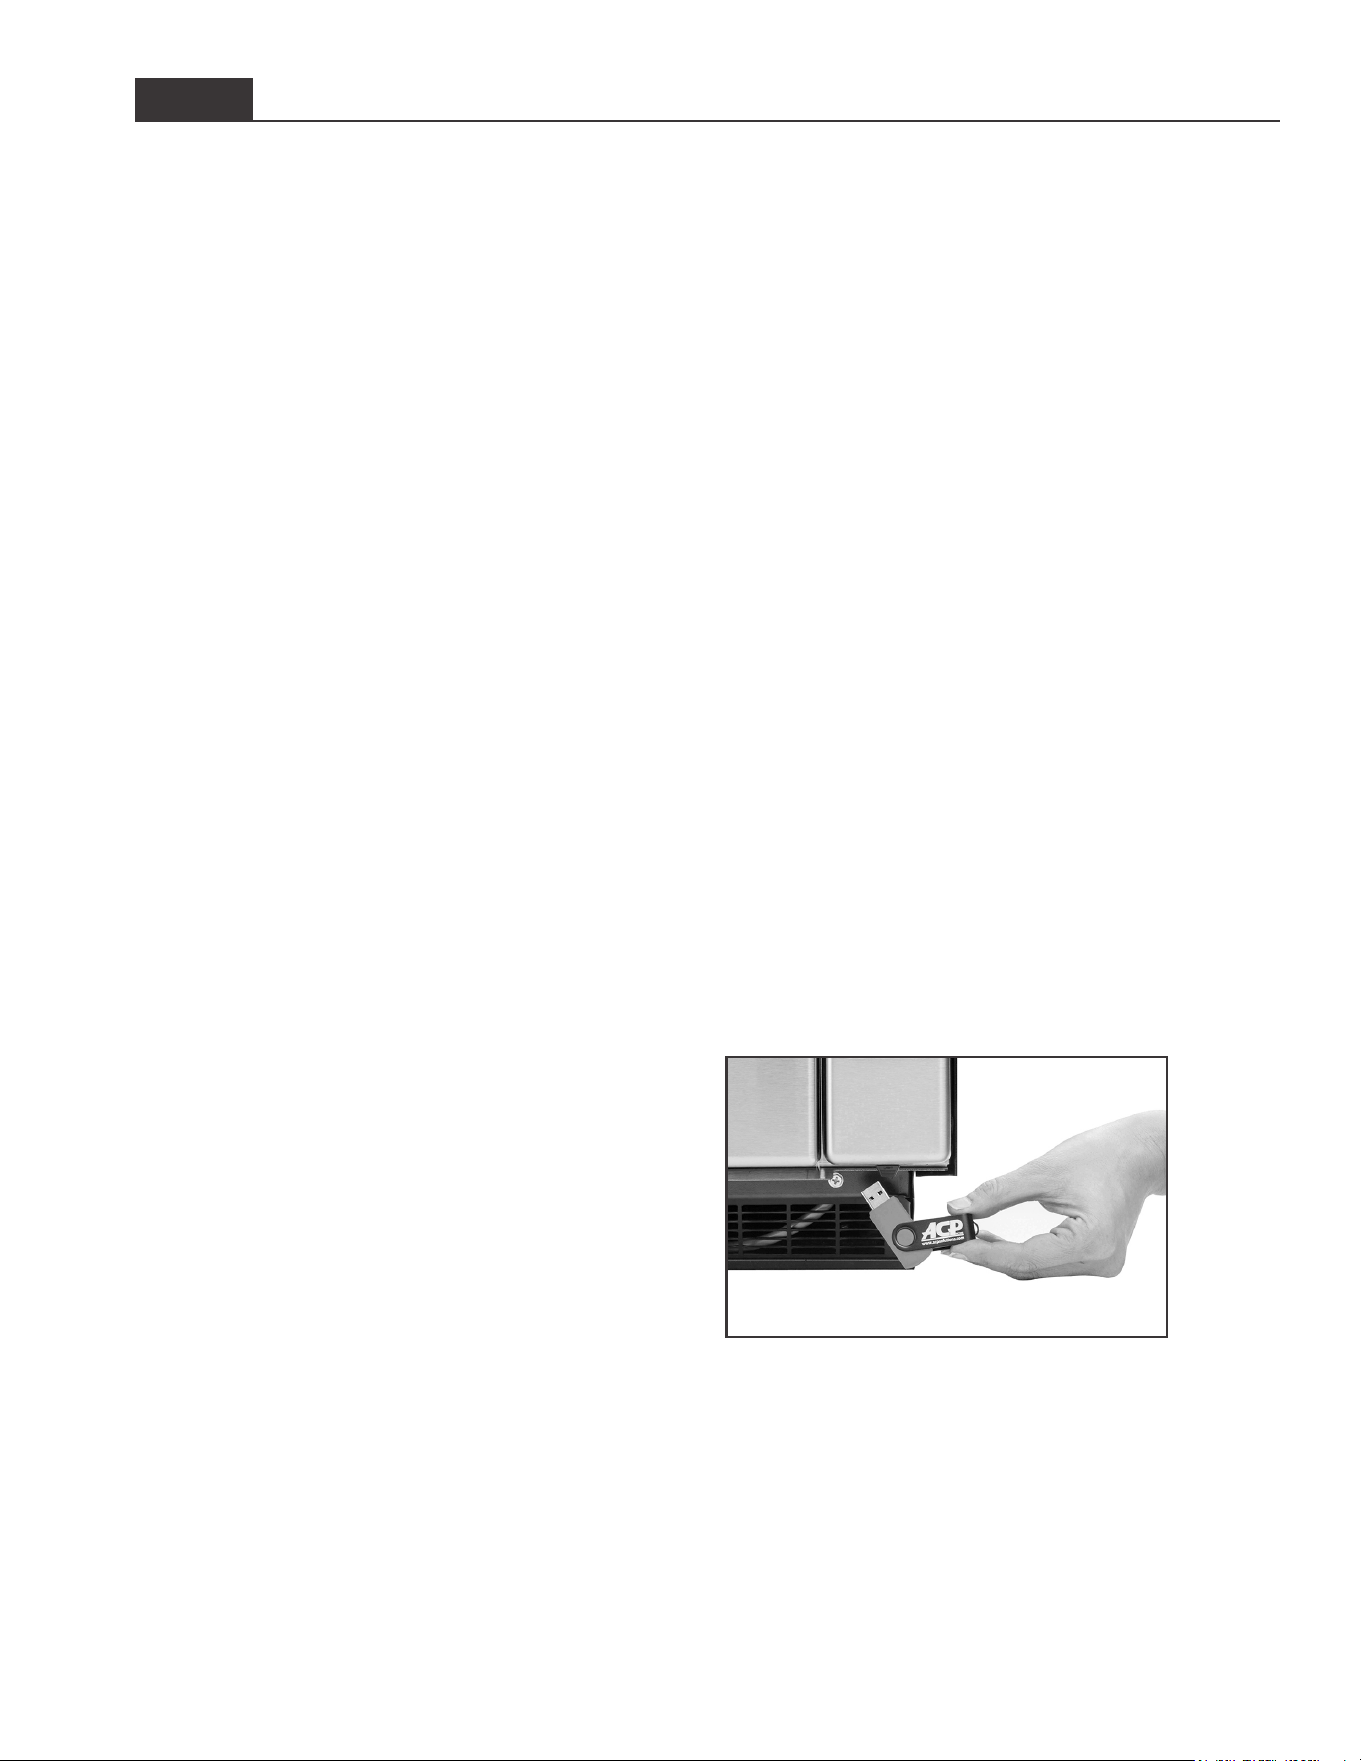
1� Remove protective USB cover from bottom of vertical
keypad�
2� Insert ash drive into the USB port, located below the
vertical keypad�
3� Open oven door�
4� Press and hold number "5" keypad until "USB" appears in
the display�
a� To Import Menu from USB ash drive to Oven:
◦ Press number "1" keypad�
◦ “USB TO OVEN” will display.
b� To Export Menu from Oven to USB ash drive:
◦ Press number "2" keypad�
◦ “OVEN TO USB” will display.
5� Press START/OK keypad to begin transfer�
• “LOADING” will display for approximately 10 seconds.
• "DONE" will display and oven will beep once transfer is
complete�
6� Press STOP/RESET keypad to exit� Remove USB Flash
Drive�
TROUBLESHOOTING / ERROR CODES:
• NO USB: Remove ash drive from USB and reinsert ash
drive into USB� Retry transfer�
• RESET OVEN: Unplug oven from outlet and plug-in oven�
Retry transfer�
USB Port located below control panel
©2020 ACP, Inc.
Cedar Rapids, IA 52404
Page 24 of 26
Part No. 20000611
Original Instructions
There are several options you can change to customize the
operation of the oven� Options are shown below�
The factory setting is shown in bold type.
STYLE 2 User Options
STANDARD DEFAULT PER MODEL
(
FACTORY SETTINGS IN BOLD
)
Factory setting may vary by model
KEYPAD SETTING DISPLAYED OPTIONS DESCRIPTION
1
Double Digit Entry
Disabled
Enabled
Allows 10 (0-9) preprogrammed pads.
Allows 100 (00-99) preprogrammed pads�
2
Manual Time Entry
Disabled
Enabled
Manual time entry/cooking not allowed
Manual time entry/cooking allowed
3
Reset on Door
Open
Disabled
Enabled
Opening oven door does not reset oven back to ready mode.
Opening oven door does resets oven back to ready mode�
4
Keybeep
Keybeep On
Keybeep O
Keys beep when pressed
Keys do not beep when pressed
5
Keybeep Volume
O
Low
Medium
High
Keybeep volume OFF�
Keybeep volume LOW�
Keybeep volume MEDIUM�
Keybeep volume HIGH.
6
End of Cook
Signal
Solid Beep
3 Second Beep
4 Beeps Once
4 Beeps Repeating
Food done signal is a continuous beep until reset by user�
Food done signal is a three second beep.
Food done signal is four beeps, once�
Food done signal is four beeps, four times�
7
Keypad Active
15 seconds
30 seconds
60 seconds
120 seconds
Always
Keypad time entry window is 15 seconds�
Keypad time entry window is 30 seconds�
Keypad time entry window is one minute.
Keypad time entry window is two minutes�
Keypad time entry window is always active�
8
Preheat Warnings
Disabled
Program Warning Only
Preheat Warning Only
Both
Both temperature warnings o.
Warning only when preheat temperature does not match preprogrammed temperature
Warning only when actual oven cavity temperature is not to preheat temperature�
Both temperature warnings on�
TEMPERATURE
ENTRY KEYPAD
Temperature Scale
Fahrenheit
Celsius
Temperatures are displayed in °Fahrenheit for 60Hz models�
Temperatures are displayed in °Celsius for 50Hz models�
STAGE KEYPAD
Clean Filter
Message
Frequency
Disabled
Weekly
Monthly
Quarterly
Oven will not display “Clean Filter Message”
Oven will display “Clean Filter Message” every seven (7) days.
Oven will display “Clean Filter Message” every thirty (30) days.
Oven will display “Clean Filter Message” every ninety (90) days.
POWER LEVEL
KEYPAD
Microwave Only
Disabled
Enabled
Oven will not operate in “Microwave Only” mode.
Oven will operate in “Microwave Only” mode.
*Factory setting may vary by model
Access and Modify User Options
From READY or DOOR OPEN screen:
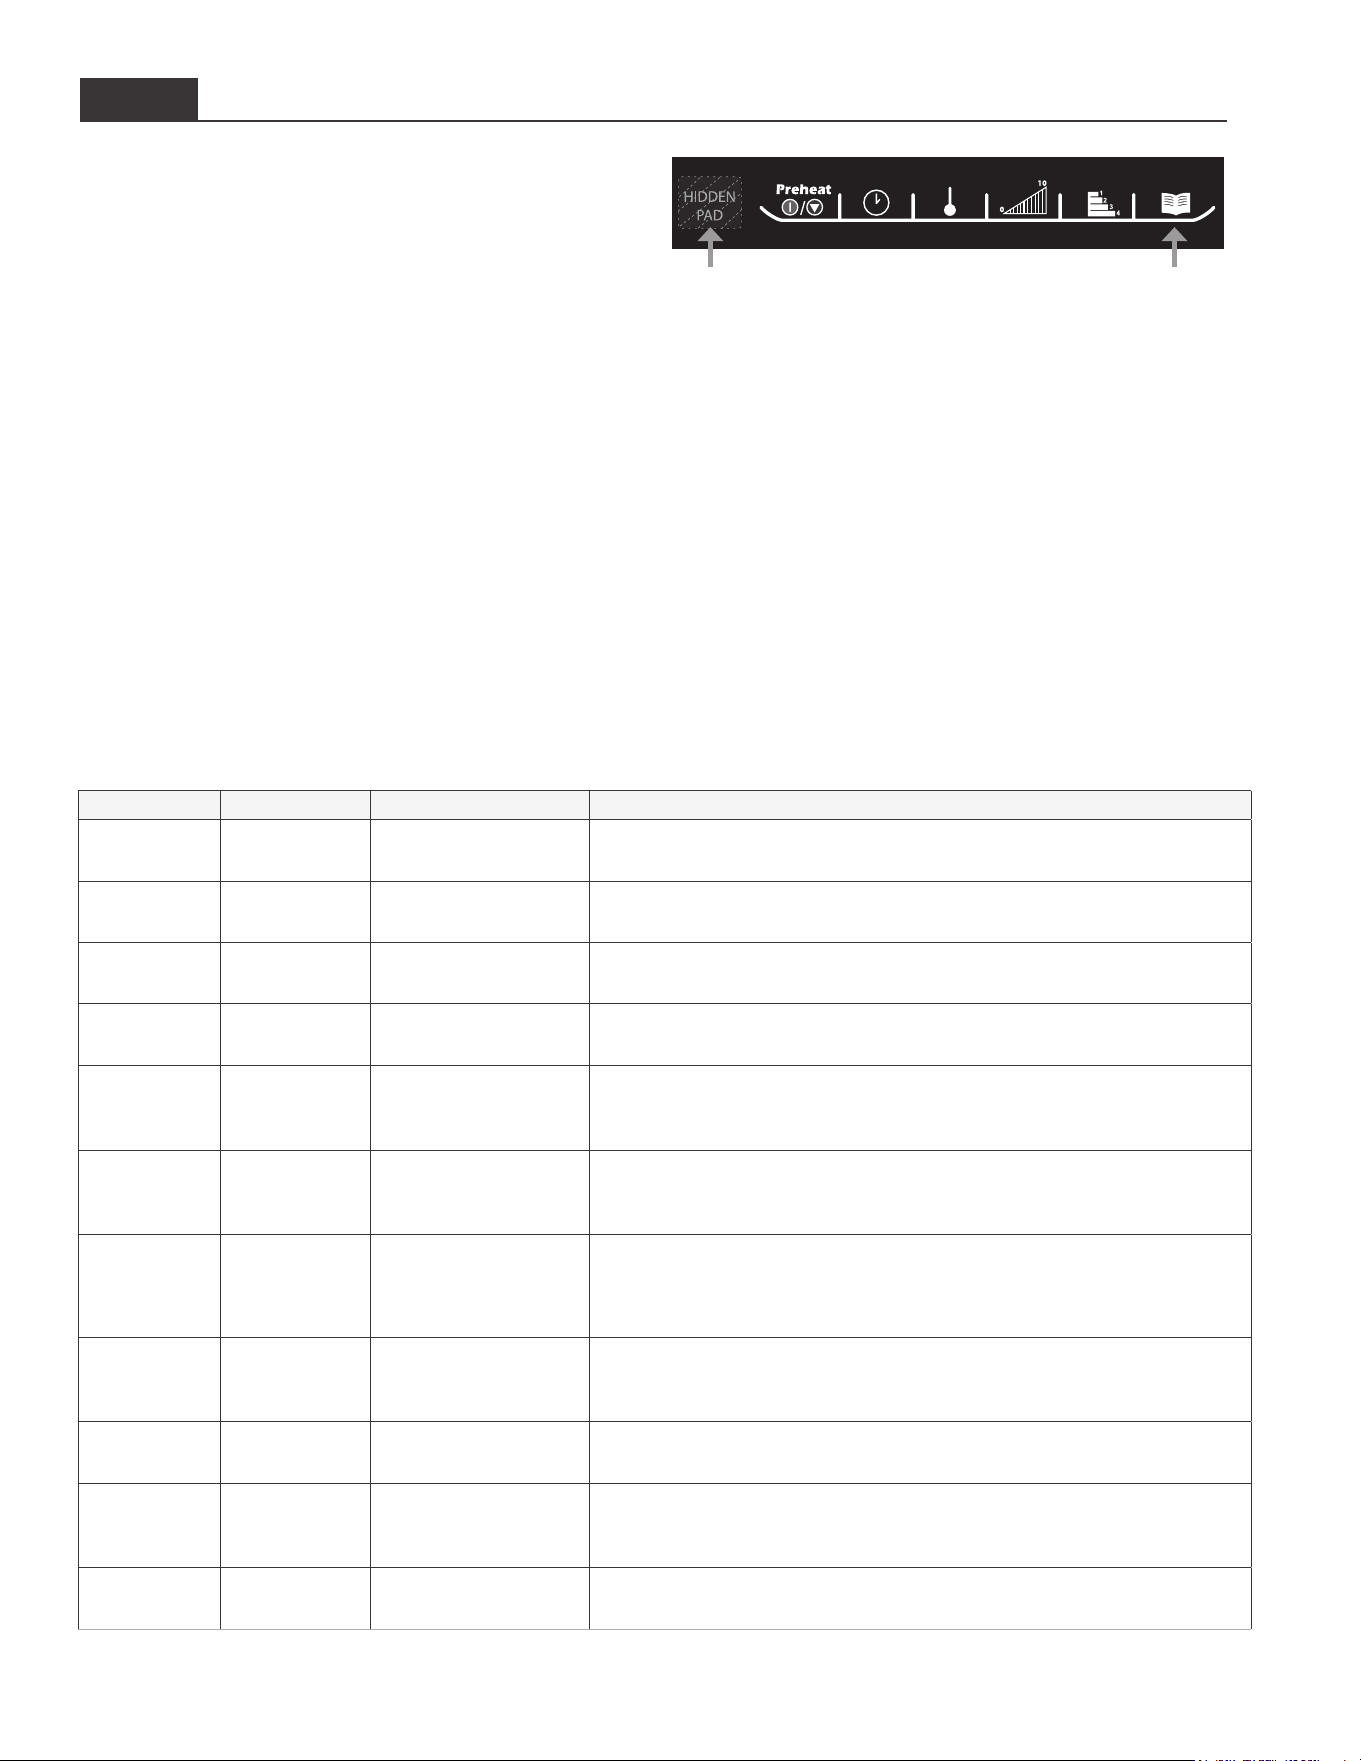
1� Press hidden keypad�
• Hidden keypad is unmarked and located to the direct left of Preheat On/O keypad.
• Nothing will be displayed when hidden keypad is pressed�
2� Press PROGRAM SAVE keypad�
• The rst user option will display. Oven is now in options mode.
3� Press number keypad that corresponds to setting�
• See table below for keypads/settings/options�
• Setting and the currently selected option will display�
4� Press numeric keypad again to toggle through list of options for the keypad/setting�
• Each time keypad is pressed, the displayed option will change�
• Changes take aect after keypad is pressed.
• Press PROGRAM SAVE keypad to save changes�
5� Press STOP/RESET keypad to exit, or open and close oven door�
Hidden Keypad
Program Save
©2020 ACP, Inc.
Cedar Rapids, IA 52404
Page 25 of 26
Part No. 20000611
Original Instructions
Care & Cleaning
⚠
WARNING
To avoid electrical shock which can
cause severe personal injury or death,
unplug power cord or open circuit
breaker to oven before cleaning�
To prevent burns, handle utensils,
rack, accessories, and door with
care� Allow oven, utensils, rack, and
accessories to cool before cleaning�
Oven, utensils, and accessories
become hot during operation
Wear protective gloves and protective
glasses when cleaning the oven�
Failure to maintain the oven in a clean
condition could lead to deterioration of
the surface that could adversely aect
the life of the appliance and possibly
result in a hazardous situation�
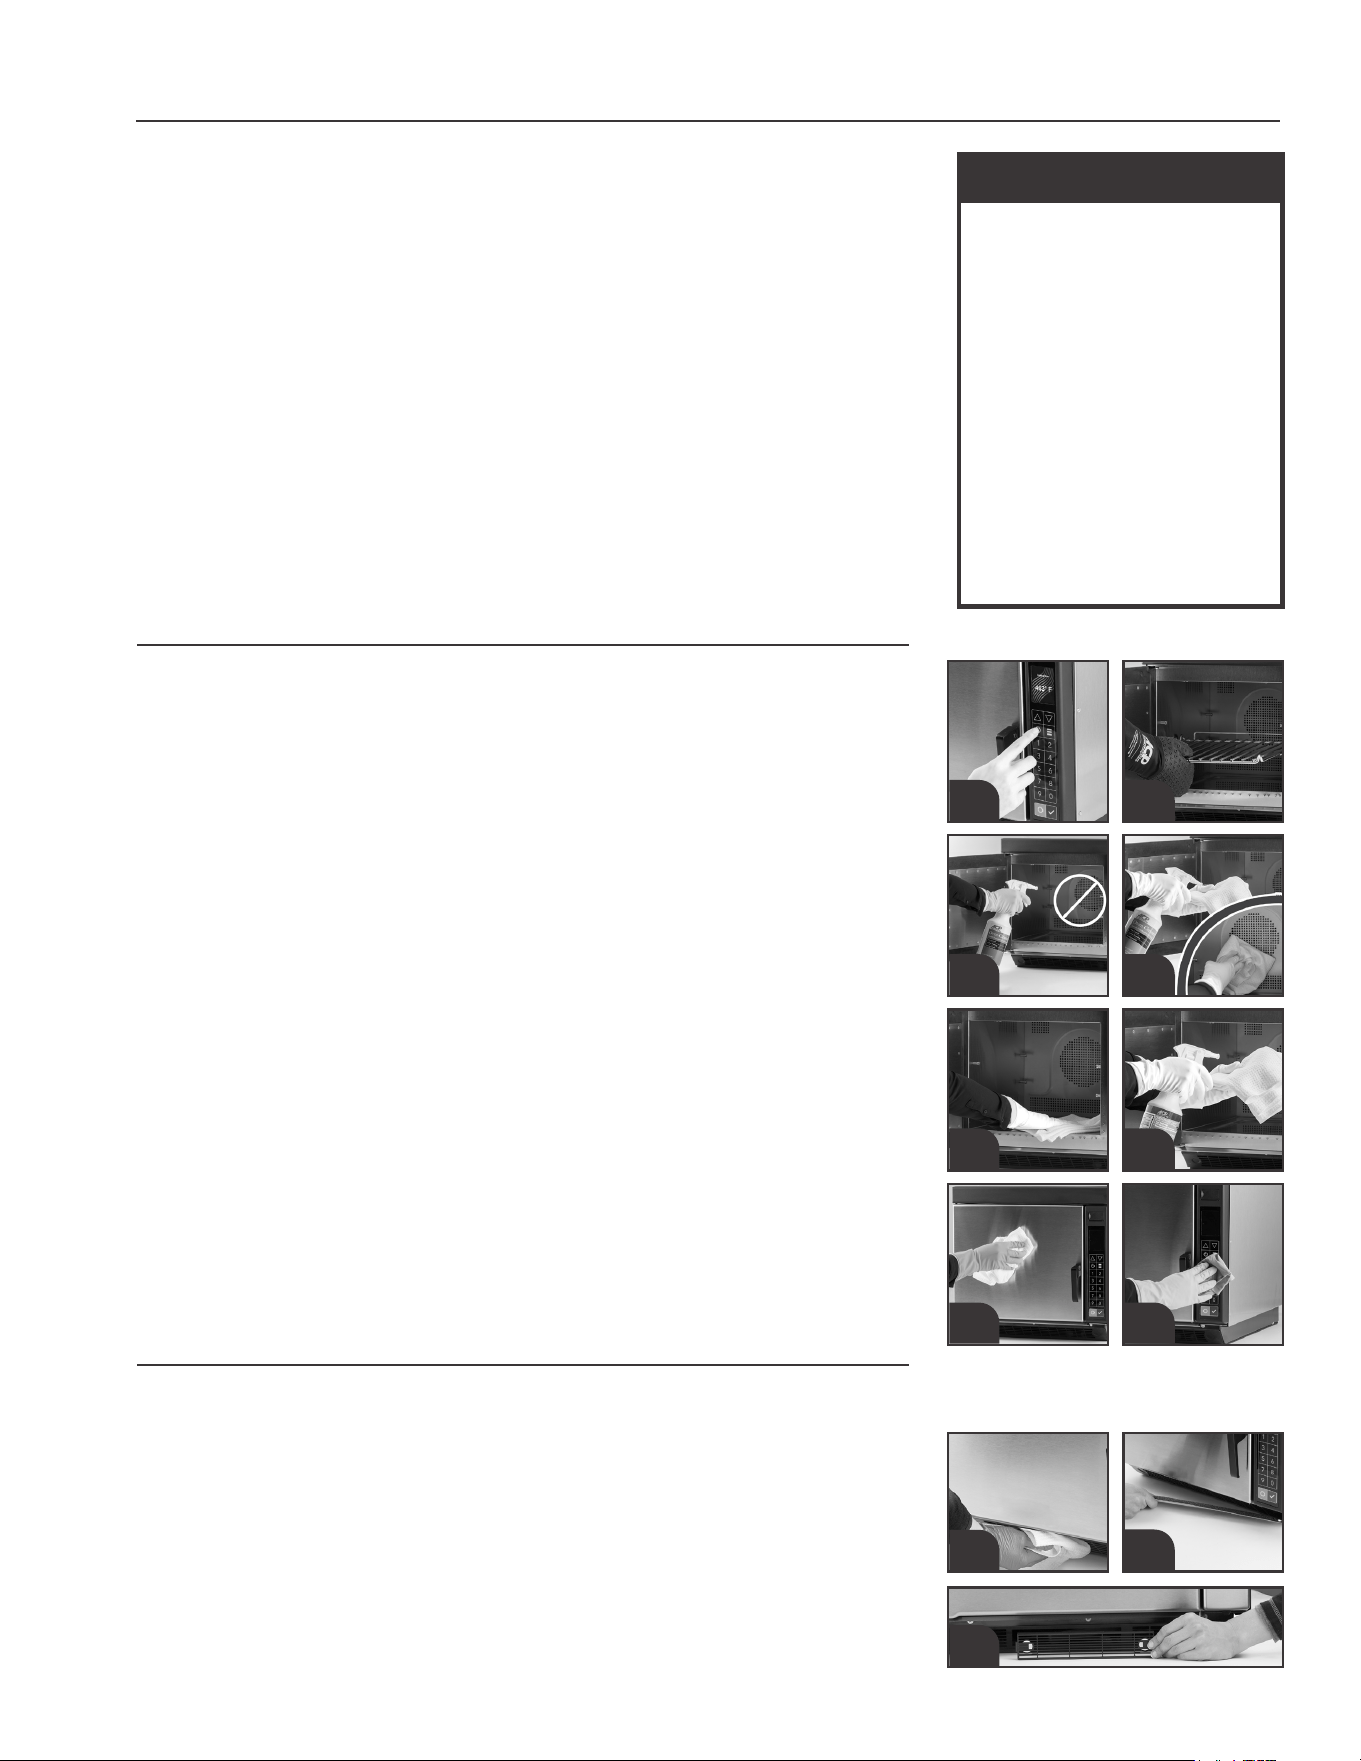
Convection and microwave energies are attracted to any food source in the oven� Moisture, spills,
and grease can aect heating performance and may cause oven damage. To prevent damage to
oven, clean oven frequently and remove any food debris� Follow the recommendations below�
⚠
CAUTION: NOT FOLLOWING APPROVED OVEN CLEANING INSTRUCTIONS
MAY VOID YOUR OVEN WARRANTY.
⚠
Do NOT use abrasive cleaners or cleaners containing ammonia, citrus, phosphates, chlorine,
sodium or potassium hydroxide (lye)� The use of caustic cleaning products or those containing
ammonia, citrus, phosphates, chlorine, sodium or potassium hydroxide (lye) can damage critical
oven parts� Use of unapproved cleaning agents will void the terms of warranty�
⚠
Do NOT use water pressure type cleaning systems�
⚠
ALWAYS unplug oven before cleaning�
RECOMMENDED CLEANING SUPPLIES:
Damp towel, plastic scouring pad, ACP Oven Cleaner (Item CL10 (US), Item CL10W (EU)),
ACP Oven Shield Oven Protectant (Item SH10 (US), Item PR10W (EU)), mild liquid dishwashing
detergent, rubber gloves, safety glasses, microber cloth.
FOR A NEW OVEN, BEFORE USING IT FOR THE FIRST TIME:
When oven is clean, spray damp towel with ACP Oven Shield Protectant and wipe all interior
surfaces� Do not remove ACP Oven Shield Protectant� Turn oven on and preheat to start cooking�
Daily Care and Cleaning
PREPARE OVEN
1� Press Power ON/OFF keypad to power-o oven. The fan will run to cool the oven
interior faster� Allow oven to cool down to 200°F (95°C) (Approximately 10–15 minutes
with the door open and 45–60 minutes with the door closed)�
2� Once cooled, carefully remove oven rack and other accessories from the cavity�
CLEAN OVEN RACK AND ACCESSORIES
3� Clean the oven rack with liquid dishwashing detergent such as Dawn®, and a non-
abrasive sponge or soft bristle brush� Allow to air-dry�
4� For other accessories, please refer to instructions included in original packaging�
CLEAN OVEN INTERIOR
5� Remove baked-on particles using a plastic scouring pad�
6� APPLY OVEN CLEANER:
⚠
Do NOT spray cleaning solution directly onto back-wall perforations�
a� Spray oven inner door, sides, and oor with ACP Oven Cleaner.
Allow to soak 2–5 minutes�
b� Spray damp towel with ACP Oven Cleaner and wipe oven inner back-wall�
7� CLEAN AND WIPE OVEN INTERIOR: Wipe the oven interior using a damp clean towel�
Rinse towel and wring dry� Repeat 2–3 times to remove remaining cleaner and debris�
8� APPLY OVEN SHIELD: When oven is clean, spray damp towel with ACP Oven Shield
Protectant and wipe all interior surfaces� Do not remove ACP Oven Shield Protectant�
9� Reinstall oven rack in oven�
CLEAN OVEN EXTERIOR
10� CLEAN EXTERIOR DOOR AND SURFACES with a clean cloth, sponge or nylon pad; using a
mild detergent and warm water solution�
11� CLEAN CONTROL PAD AND SCREEN with a dry or damp microber cloth.
⚠
Do NOT use Windex or other harsh chemicals� Do NOT spray liquid on the screen�
Weekly Cleaning
CLEAN AIR FILTER
Air lter is located below oven door.
A� FOR OVENS WITH NON-REMOVABLE AIR FILTER:
Wipe louvers using a damp clean towel�
B� FOR OVENS WITH MAGNETIC/REMOVABLE AIR FILTER:
Remove magnetic air lter. Wash lter in a mild detergent solution made with warm water.
Rinse and dry thoroughly. Reinstall lter on the oven base.
For STYLE 1 ovens with AF10 accessory, see image B-1.
For STYLE 2 ovens, see image B-2
1 2
6a 6b
7 8
10 11
A
B-1
B-2
©2020 ACP, Inc.
Cedar Rapids, IA 52404
Page 26 of 26
Part No. 20000611
Original Instructions
Before Calling for Service
OVEN
STYLE
SYMPTOM POSSIBLE CAUSE
All Oven fan turns on while oven is not
preheating or cooking�
Normal operation
Oven does not operate Conrm oven is plugged in.
Check fuse or circuit breaker�
Conrm oven is plugged into dedicated circuit.
Conrm oven is on grounded and polarized circuit. Contact electrician to conrm.
“CLEAN FILTER” shows in display. This is normal and will appear for 24 hours�
• Complete steps to "Clean Air Filter" on page 25.
• To clear the message, Press START/OK keypad�
If oven does not accept entries
when keypad is pressed
Make sure oven is on and preheated�
Open and close oven door� Press keypad again�
Check User Option>Digit Entry�
Style 1 "EXCEEDS MAXIMUM COOK
TIME" shows in display�
Total cook time exceeds the maximum allowable�
• Check cook times per stage�
• Check User Option>Maximum Cook Time�
“INVALID ENTRY” shows in
display�
PIN Code entered is incorrect, or cook time is zero or unset�
• Correct entry� Retry�
"OVEN HOT!" shows in display� Cavity temperature exceeded the limit�
• Wait for 30 minutes for cavity to cool down�
If error continues to show in display: Unplug oven, wait for 1 minute� Plug-in oven�
If the error persists, please call for service�
"ERROR 7: RTD OUT OF RANGE"
shows in display�
RTD was exposed to momentary spike�
• Unplug oven, wait for 1 minute� Plug-in oven�
If the error persists, please call for service�
"ERROR 5: STUCK KEY" shows
in display�
A keypad is actuated continuously or there is an issue with the keypad�
• Ensure the keypad is not in contact with anything�
If the error persists, please call for service�
Style 2 Oven operates intermittently or
"HOT" shows in display�
Check air lter and discharge areas for obstructions.
If oven malfunctions or shows:
ERROR!
Error Code: 1
(example)
Oven control is equipped with a self-diagnostic system� Self-diagnostic system alerts you if there
is an error or problem� When electronic control signals a problem, follow steps listed below�
• Record number shown� (Example: "Error Code: 1")
• Unplug oven, wait for 1 minute� Plug-in oven�
If code does not reappear, continue with normal use of the oven�
If the error persists, please call for service� Do not use oven until contacting the ACP
Servicer�
Record all inspections and repair for future reference�
⚠
WARNING
To avoid electrical shock which can cause severe personal injury or death, do not remove outer case at any time� Only an
authorized servicer should remove outer case�
This is a Class A product� In a domestic environment this product may cause radio interference in which case the user may be
required to take adequate measures�
email: [email protected]
For full product documentation visit:
www.acpsolutions.com
24/7 ComServ Contact: