
©COPYRIGHT AVPRO GLOBAL HOLDINGS 2025
1
User Manual

Table of Contents
Table of Contents ............................................................................................................ You Are Here
Important Safety Instructions .............................................................................................................. 3
Introduction ............................................................................................................................................. 5
Features ................................................................................................................................................... 5
What’s in the box .................................................................................................................................... 5
Specifications .......................................................................................................................................... 6
Front and Rear Panel Overview .......................................................................................................... 7
Quick Start Guide ................................................................................................................................... 8
Network Setup ........................................................................................................................................ 9
Digital Audio Inputs ............................................................................................................................... 9
Navigating the Web GUI ...................................................................................................................... 10
Main ...................................................................................................................................................10
System Settings ................................................................................................................................11
Input Setup ....................................................................................................................................... 12
Speaker Config ................................................................................................................................ 14
Network Settings .............................................................................................................................15
Firmware Update ..................................................................................................................................16
Speaker Layouts .................................................................................................................................... 17
Internet Connectivity and Control .....................................................................................................18
Connecting Without a Network .................................................................................................... 18
Diagnostics and Troubleshooting ......................................................................................................19
Maintenance .........................................................................................................................................20
Support ................................................................................................................................................... 23
Related Products ..................................................................................................................................24
Warranty ................................................................................................................................................ 25
Acknowledgments ...............................................................................................................................26
©COPYRIGHT AVPRO GLOBAL HOLDINGS 2025
2

1. Read these instructions.
2. Keep these instructions.
3. Heed all warnings.
4. Follow all instructions.
5. Do not use this apparatus near water.
6. Clean only with a dry cloth.
7. Do not block any ventilation openings. Install in accordance with the manufacturer’s
instructions.
8. Do not install near any heat sources such as radiators, heat registers, stoves, or other
apparatus (including amplifiers) that produce heat.
9. Protect the power cord from being walked on or pinched, particularly at plugs, conve-
nience receptacles, and the point where they exit from the apparatus.
10. Only use attachments/accessories specified by the manufacturer
11. Unplug this apparatus during lightning storms or when unused for long periods of time.
12. Refer all servicing to qualified service personnel. Servicing is required when the appa-
ratus has been damaged in any way, such as power-supply cord or plug is damaged,
liquid has been spilled or objects have fallen into the apparatus, the apparatus has
been exposed to rain or moisture, does not operate, or has been dropped.
13. This apparatus shall not be exposed to dripping or splashing, and no object filled with
liquids, such as vases or glasses, shall be placed on the apparatus.
Caution: To reduce the risk of electric shock, do not remove the top cover. There are no
user-serviceable parts inside. Refer servicing to qualified personnel.
This Equipment has been tested and found to comply with the limits for a Class B digital
device, pursuant to part 15 of the FCC rules.
Important Safety Instructions
©COPYRIGHT AVPRO GLOBAL HOLDINGS 2025
3

Important Safety Instructions
These limits are designed to provide reasonable protection against harmful interference in
a residential installation.
This equipment generates, uses, and can radiate radio frequency energy and, if not in-
stalled and used in accordance with the instructions, may cause harmful interference to
radio communications. However, there is no guarantee that interference will not occur in a
particular installation.
If this equipment does cause harmful interference to radio or television reception, which
can be determined by turning the equipment o and on, the user is encouraged to try to
correct the interference by one or more of the following measures:
• Reorient or relocate the receiving antenna.
• Increase the separation between the equipment and the receiver.
• Connect the equipment into an outlet on a circuit dierent from that to which the re-
ceiver is connected.
• Consult the dealer or an experienced radio/TV technician for help.
CAUTION: Changes or modifications to this device not expressly approved by AudioControl
Inc. could void the user’s authority to operate the equipment under FCC rules.
Recycling notice: If the time comes and this apparatus has fulfilled its destiny, do not throw
it out into the trash. It has to be carefully recycled for the good of mankind, by a facility
specially equipped for the safe recycling of electronic apparatii. Please con-
tact your local or state recycling leaders for assistance in locating a suitable
nearby recycling facility. Or, contact us and we might be able to repair it for
you.
©COPYRIGHT AVPRO GLOBAL HOLDINGS 2025
4

• The Axis10
• 5V 2A USB power adapter
• European Adapter
• USB-A to USB-C Cable
• Mounting Brackets
• Mounting Screws
What’s in the box
• Best in class audio processing
• HDMI eARC input
• Digital Optical and Coax inputs
• Dolby Atmos & DTS HD Surround Sound formats
• Full IP control integration
• Easy to navigate web interface
Features
Thank you and congratulations for the purchase of your AudioControl Axis10, multi-channel
eARC Dante encoder with stereo downmix channels
Introduction
©COPYRIGHT AVPRO GLOBAL HOLDINGS 2025
5

Audio
Frequency Response 20 - 20kHz
Supported Sample Rates 44.1kHz, 48kHz, 88.2kHz, 96kHz
Supported Bit Depths 16, 24, 32
Latency Configurable 1, 2, 5ms
Audio Connections
eARC input 1 HDMI audio only input
Digital Audio Input 1 Optical TOSLINK and 1 Coax S/PDIF
Dante Network Audio 1 RJ-45
Power
USB Type-C Power Adapter
Input 100-240VAC, 50/60Hz, 0.5A
Output 5VDC, 2A
PoE via Dante RJ-45 802.3af PoE
Dimensions
Height 1.1 in. (28 mm)
Width 5.7 in. (145 mm)
Depth 4.65 in. (118 mm)
Weight 0.5 lbs (0.23 kg)
Drink of the Day Coee, black as midnight on a moonless night
Specifications
©COPYRIGHT AVPRO GLOBAL HOLDINGS 2025
6
192.168.1.249
eARC 30
1 2
3 4 5 6 7
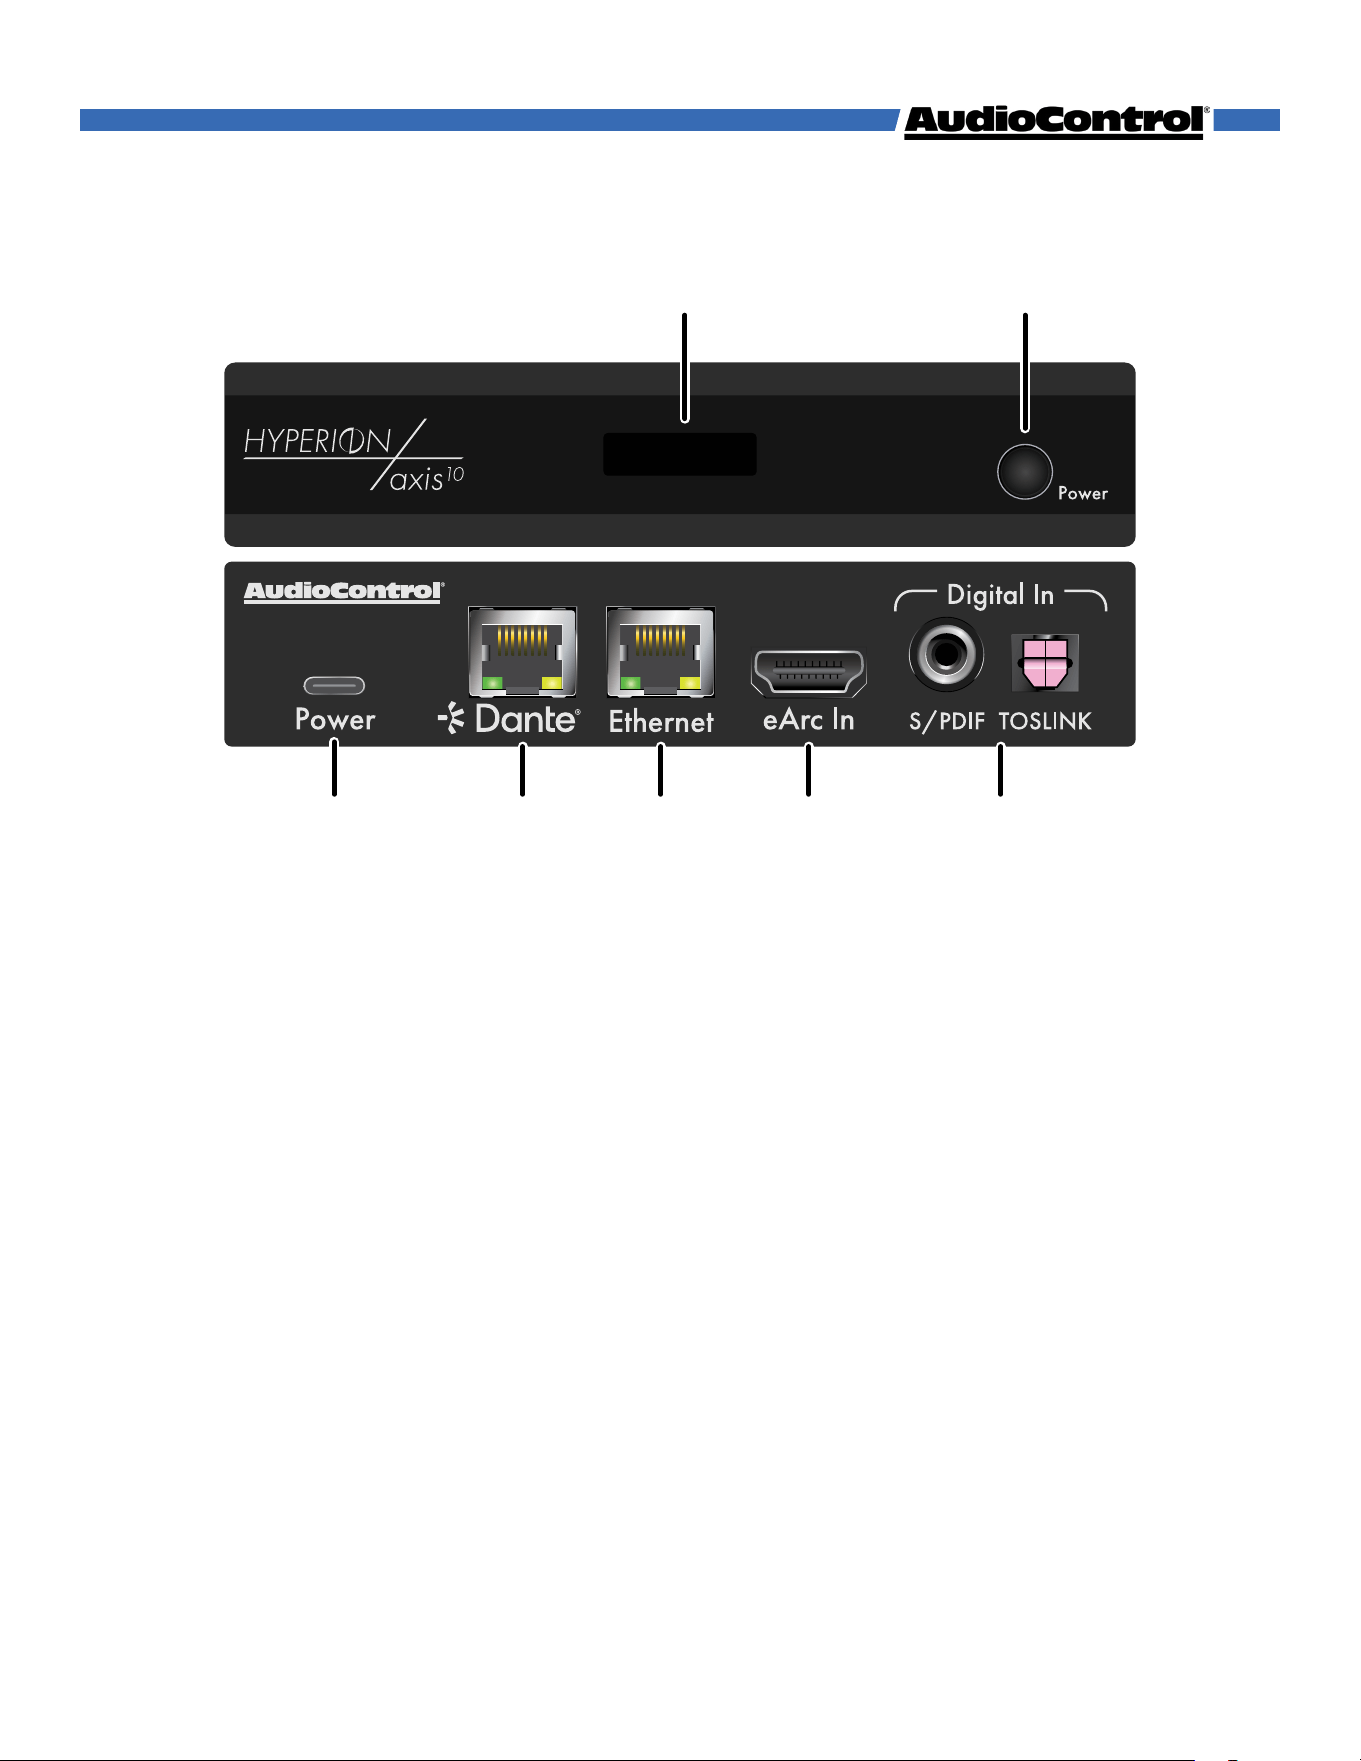
Front and Rear Panel Overview
1. LED Info Screen - Displays status information about the Axis10
Displays current device IP address
While holding the power button, the display indicate you can release the button
device is ready to turn o, or ready to be reset.
2. Power button - Toggles the Axis10 standby state
Press once while the Axis10 is in standby to power it on
Hold for 2 seconds while the devices is on to enter standby
Hold for 10 seconds to factory reset the device
3. DC/5V - USB Type-C female connector port
Connects to DC 5V 1A power supply with USB-A to USB-C Cable
4. Dante - 8-pin RJ-45 female connector port
Encoded Dante digital audio output port
Connects to network switch with CAT5e (or better) cable
Powers device on if connected to PoE switch
5. Ethernet - 8-pin RJ-45 female connector port
Connect to network switch with CAT5e (or better) cable
6. eARC In - HDMI port eARC input
Connects to the audio source device (TV or AV Receiver)
7. Digital In - Digital TOSLINK and S/PDIF input ports
©COPYRIGHT AVPRO GLOBAL HOLDINGS 2025
7
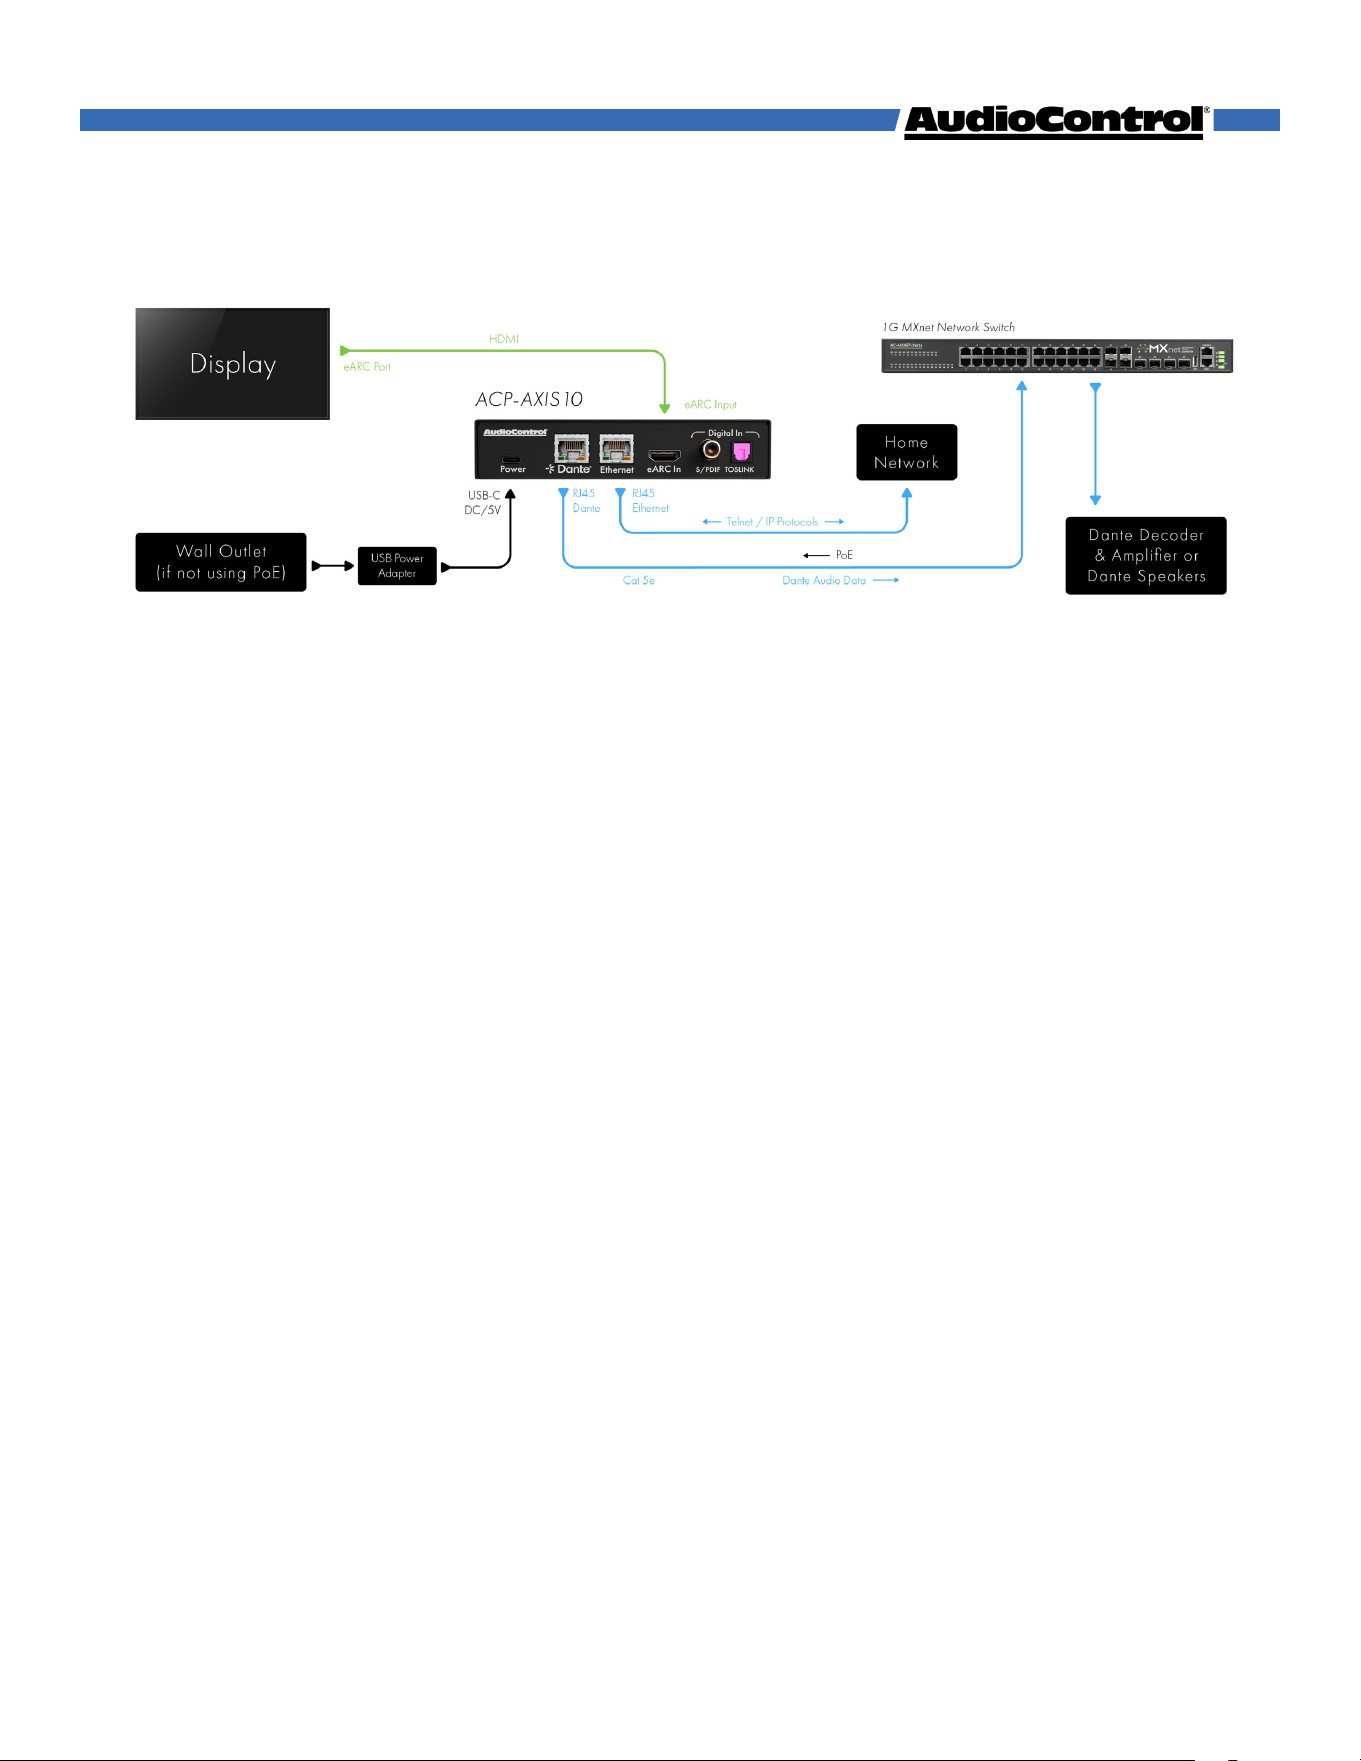
Quick Start Guide
Once the Axis10 is powered on and connected to the network, it will automatically be dis-
covered on the network using the Dante Controller software
1. Connect the Axis10 to power, either by connecting the RJ-45 port to a PoE enabled port
on a network switch, or by connecting the provided USB-A to USB-C cable between the
power supply and the Axis10’s USB-C power input, and connecting the power supply to
a suitable power outlet.
2. If not utilizing PoE, connect the Dante port to a network using a CAT5e (or better) cable.
3. Connect the Ethernet port to a network using a CAT5e (or better) cable.
4. Connect the eARC source device via HDMI cable to the eARC input of the Axis10.
5. On a computer, open the Dante Controller software. The Axis10 will automatically be
discovered, and audio streams can then be routed to their desired endpoints.
6. Access the Axis10’s web interface for additional configuration (see Network Setup).
©COPYRIGHT AVPRO GLOBAL HOLDINGS 2025
8

Network Setup
Once connected to the network, the Axis10 will automatically obtain an IP address for web
GUI access and Dante if a DHCP server is available. If an IP address is not automatically
obtained, will fall back to an automatic IP (see the Internet Connectivity section for more
details).
The Axis10 will display its current IP address on the front panel LED screen.
To set a static IP address, open the web GUI by entering the current IP address into your
favorite web browser. Navigate to the Network settings tab, turn o DHCP, enter your
desired IP information, and click Apply. The device will restart, and be accessible at the new
address.
A static IP address can also be set for the Dante port on this page.
Digital Audio Input
Though there are two ports, there is only 1 digital input on the Axis10, utilizing either the
optical TOSLINK or coax S/PDIF input. If both inputs are connected to a source, the Axis10
will default to the coax input. The coax would need to be disconnected to allow audio to
play through the Axis10 from the TOSLINK input.
Digital audio inputs have priority over the eARC input. When audio is detected on the
digital input, the Axis10 will automatically switch to that input. After 10 seconds of no audio
streaming to the digital input, the Axis10 will switch back to eARC input.
Dante Output Channels
The Axis10 outputs 10 Dante streams: 8 individual speaker channels, and 2 stereo downmix
channels. The front left and right speaker channels and the stereo downmix channels are
always enabled, and the other speaker channels can be enabled or disabled.
This allows for dierent configurations depending on the speakers being used in the install.
©COPYRIGHT AVPRO GLOBAL HOLDINGS 2025
9
Access the Axis10’s web GUI by entering the IP address into your browser of choice.
The IP address is displayed on the front panel LED screen when the unit powers on.
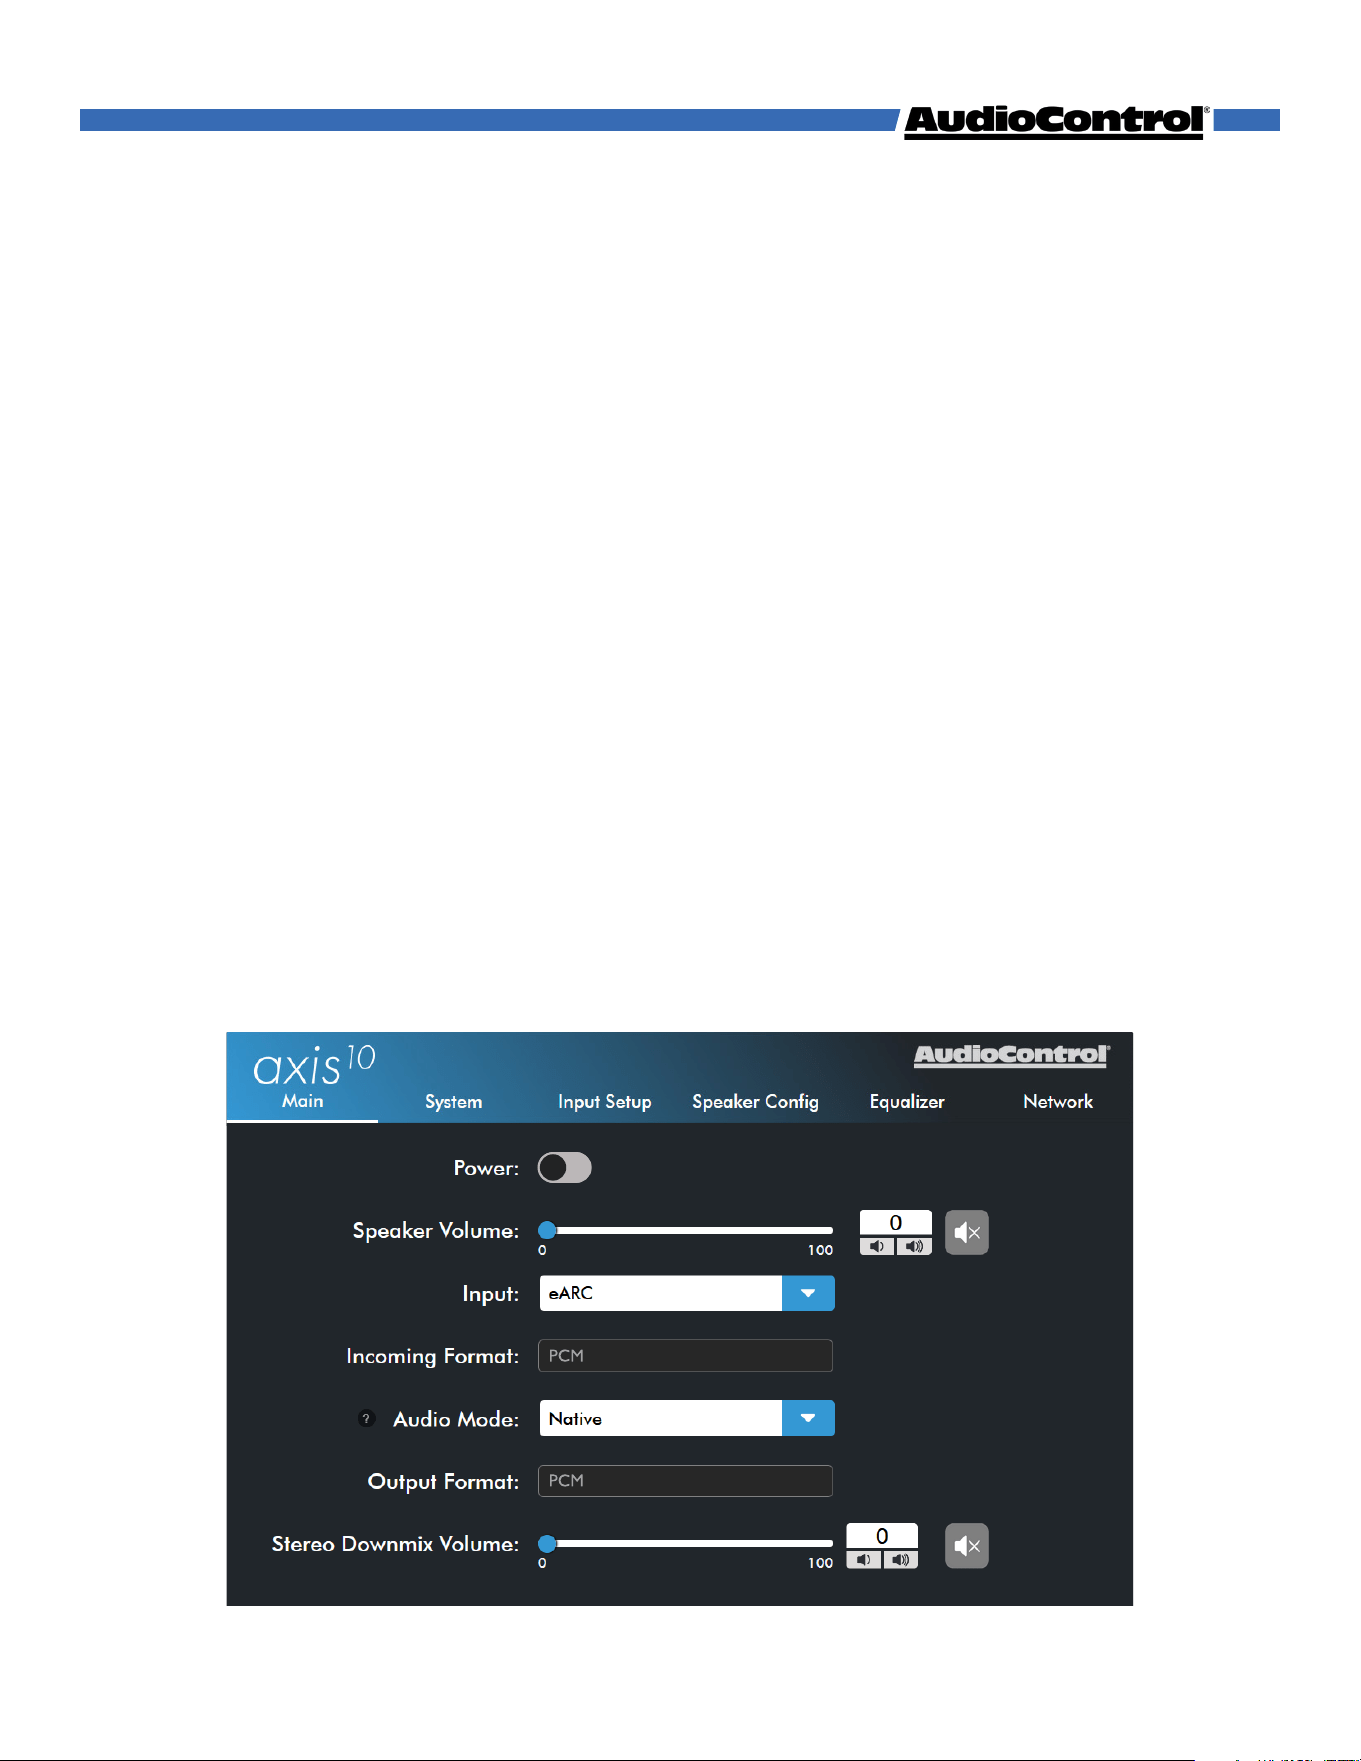
Main
The Main page hosts all the basic controls of the unit.
Power - Toggle the unit on or put it into standby.
Speaker Volume - Control the volume and toggle the mute state of the speaker outputs.
Input - Select the input source.
Incoming Format - Displays information about the incoming audio signal.
Audio Mode - Sets the upmix mode for stereo signals, and sets the decode mode for multi-
channel signals. This will automatically assign itself based on the incoming audio signal, but
can be changed to stereo or multi-channel stereo.
Output Format - Displays the decode or upmix mode applied to the output.
Downmix Volume - Control the volume and toggle the mute state of the stereo downmix
outputs.
Note: This setting will be disabled if “Volume Defeat” is enabled in the System Settings.
Navigating the Web GUI
©COPYRIGHT AVPRO GLOBAL HOLDINGS 2025
10
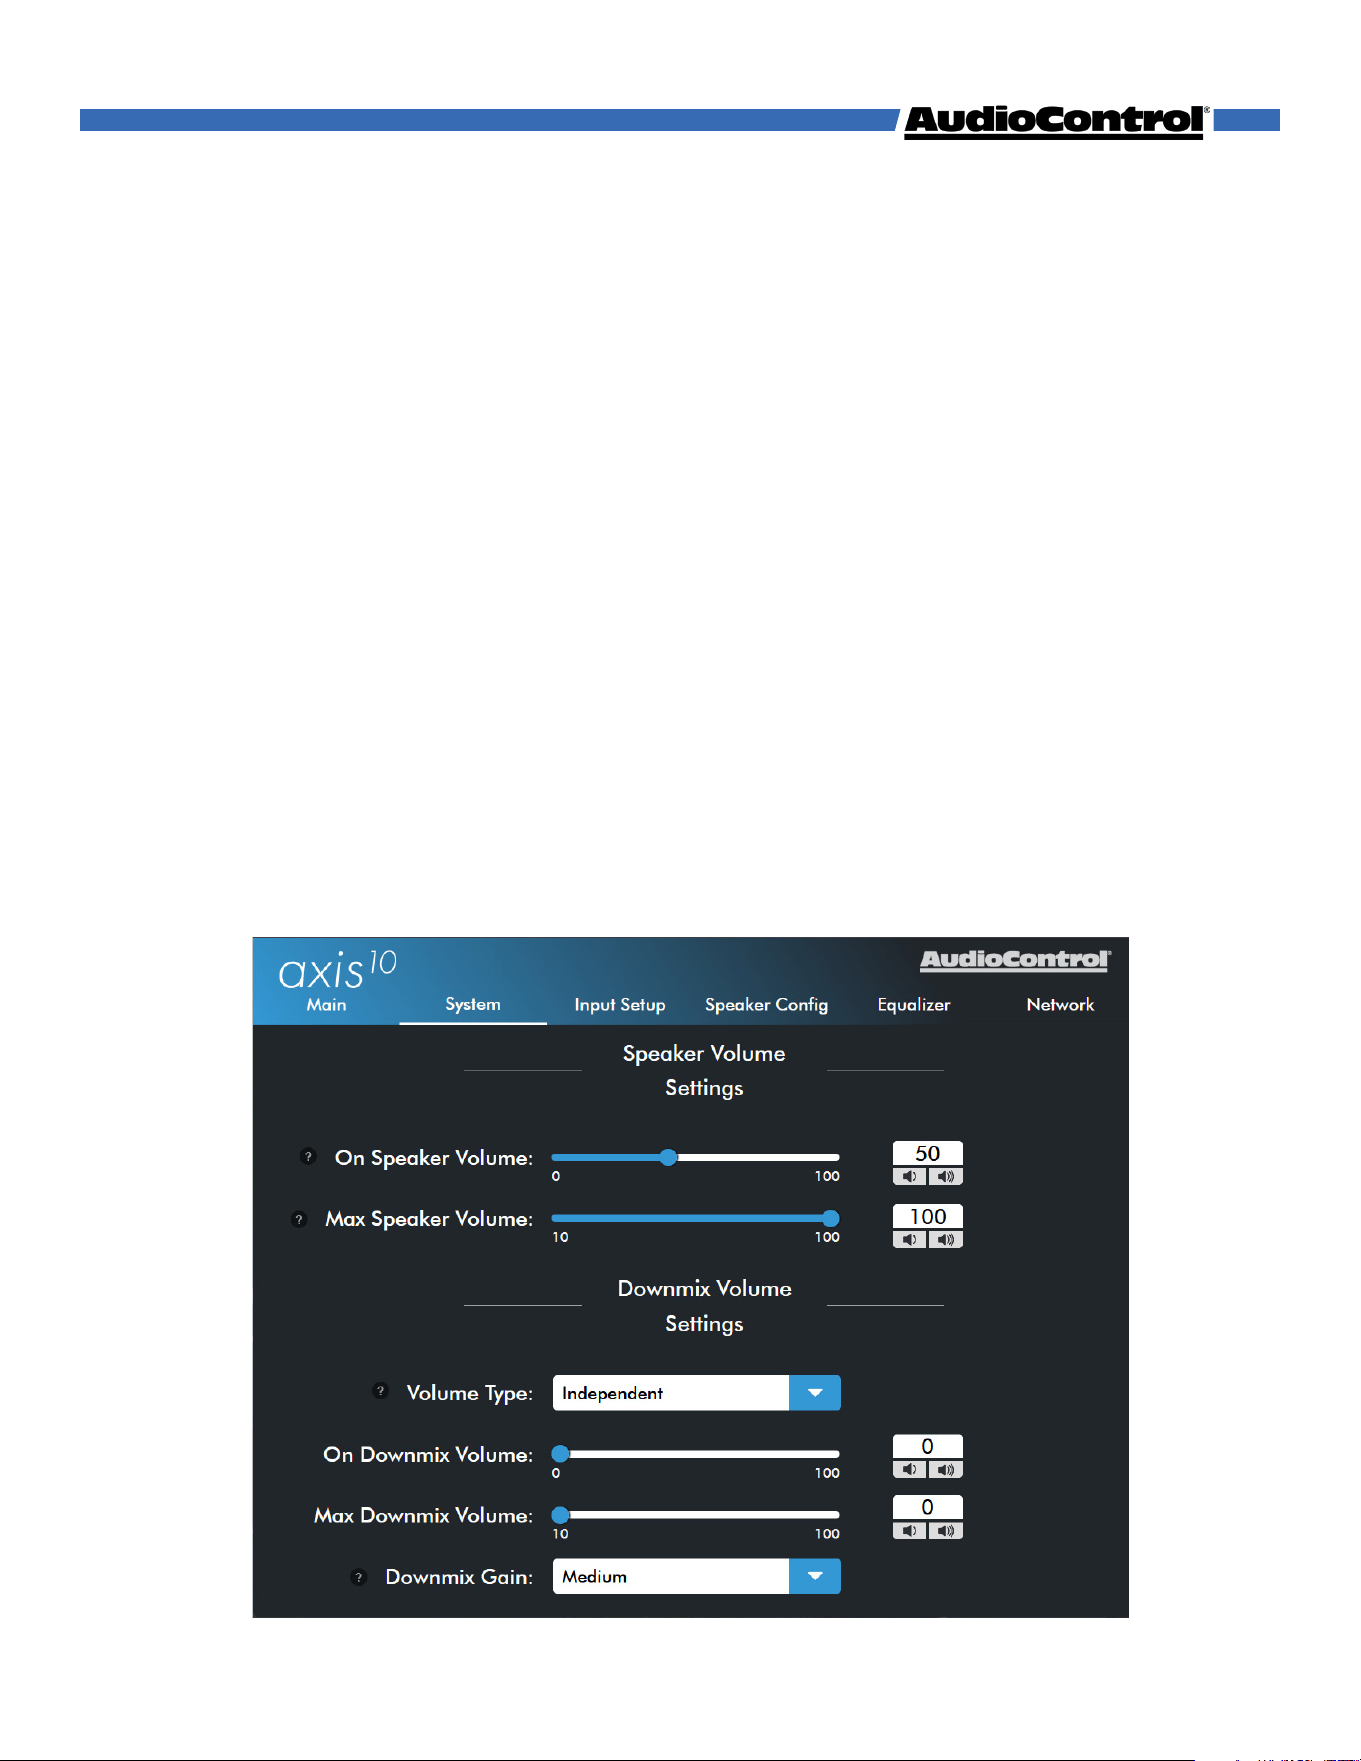
System Settings
The settings on this page apply to the global functions of the Axis10.
On Speaker Volume - Sets the default volume level for the Axis10. By setting this parameter,
the Axis10 will always return to this set value when powered on.
Max Speaker Volume - Sets a maximum limit on how high the user can increase the
volume, helpful if you need to protect smaller speakers (or your ear drums).
Volume defeat - When enabled, defeats volume control for the Downmix output on the
Axis10 so volume controls can be used from the source or audio endpoint.
On Downmix Volume - Sets the default volume level for the downmix output whenever the
Axis10 is powered on.
Max Downmix Volume - Sets a maximum limit on how high the user can increase the
volume for the downmix output.
Downmix Gain - Adjusts the output level of the downmix channels. When listening to the
downmixed channels, if the output is too loud or quiet, this is the parameter to adjust.
Navigating the Web GUI
©COPYRIGHT AVPRO GLOBAL HOLDINGS 2025
11
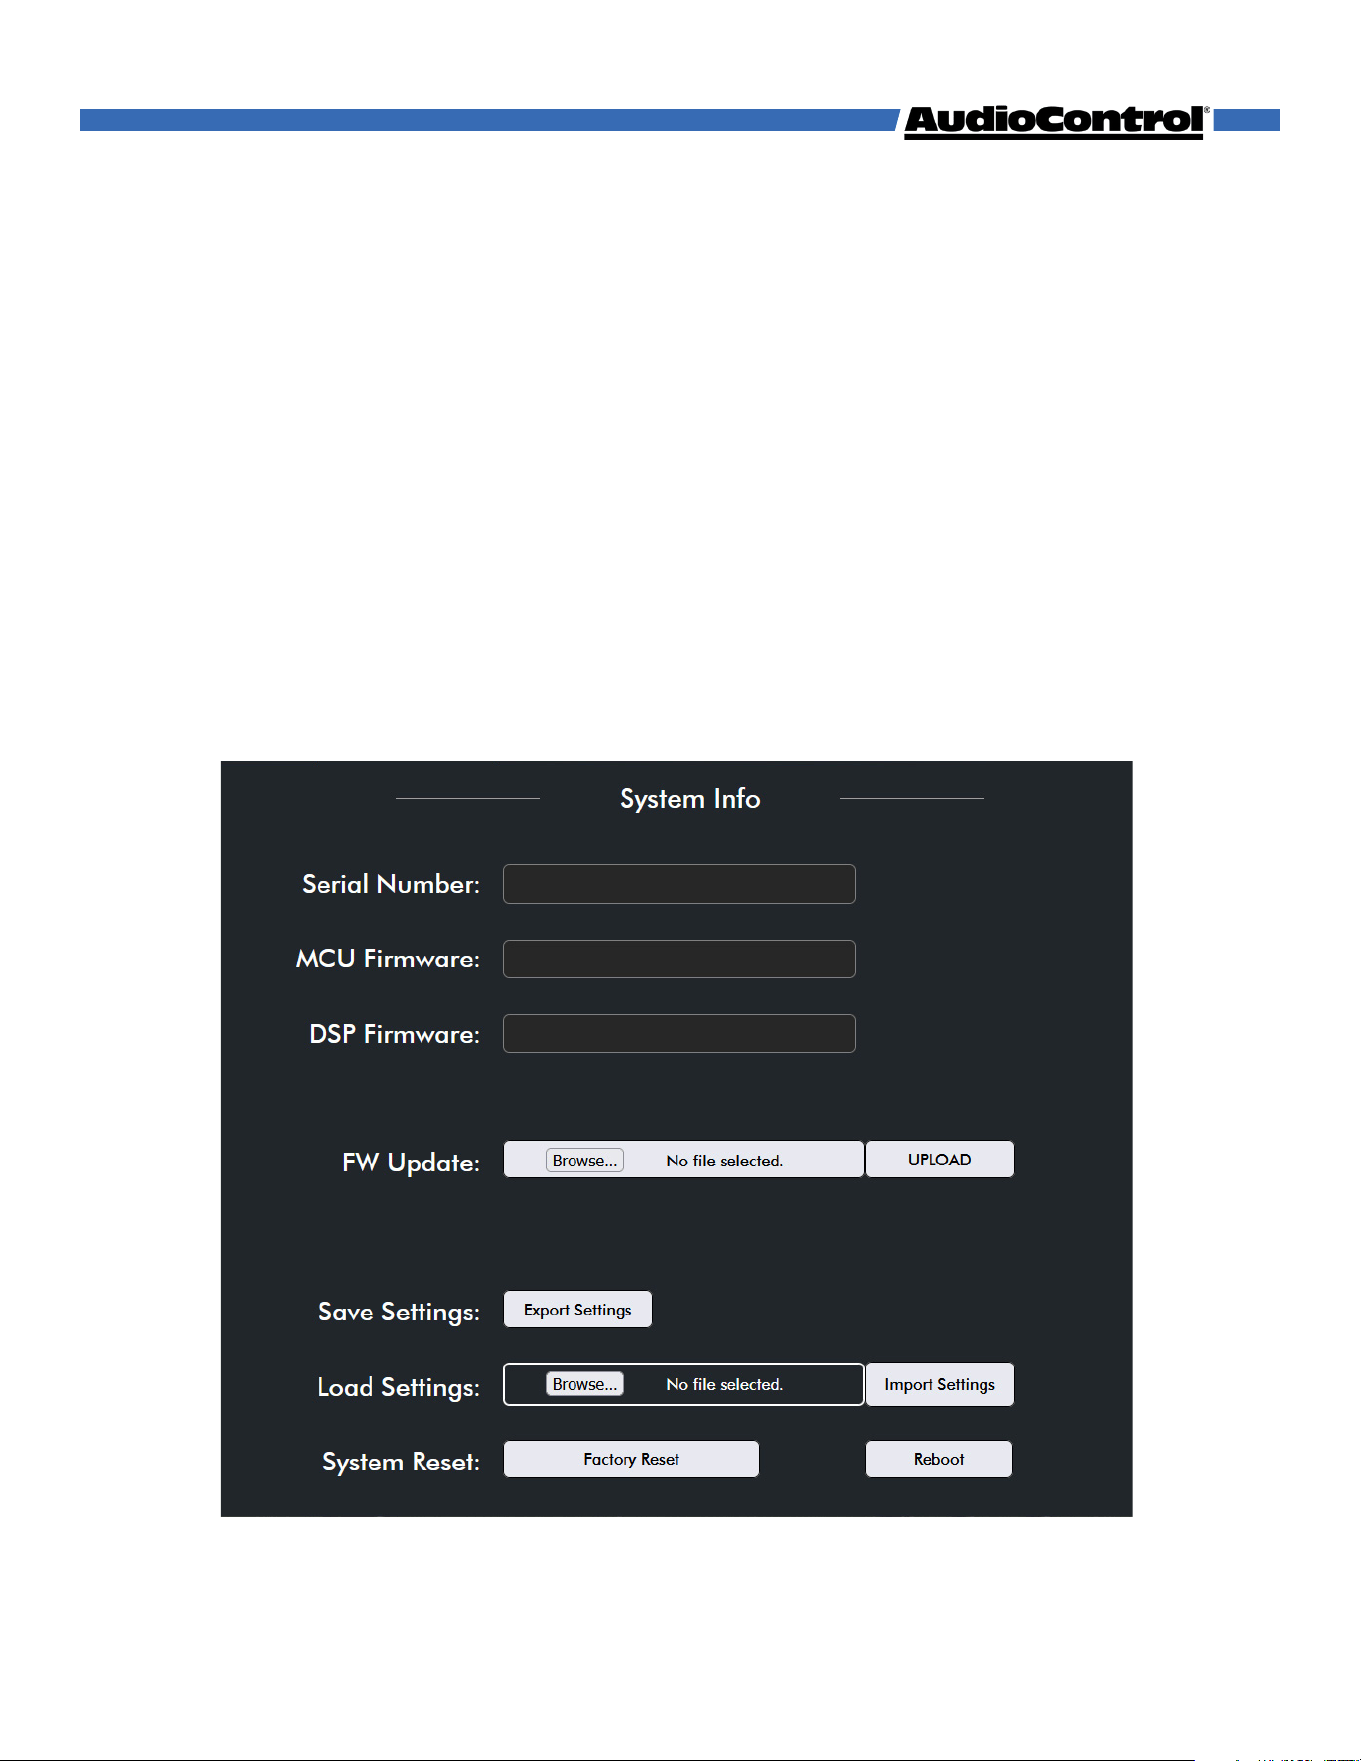
Navigating the Web GUI
Serial Number - Displays this unit’s serial number
MCU & DSP Firmware - Displays the Axis10’s current firmware versions.
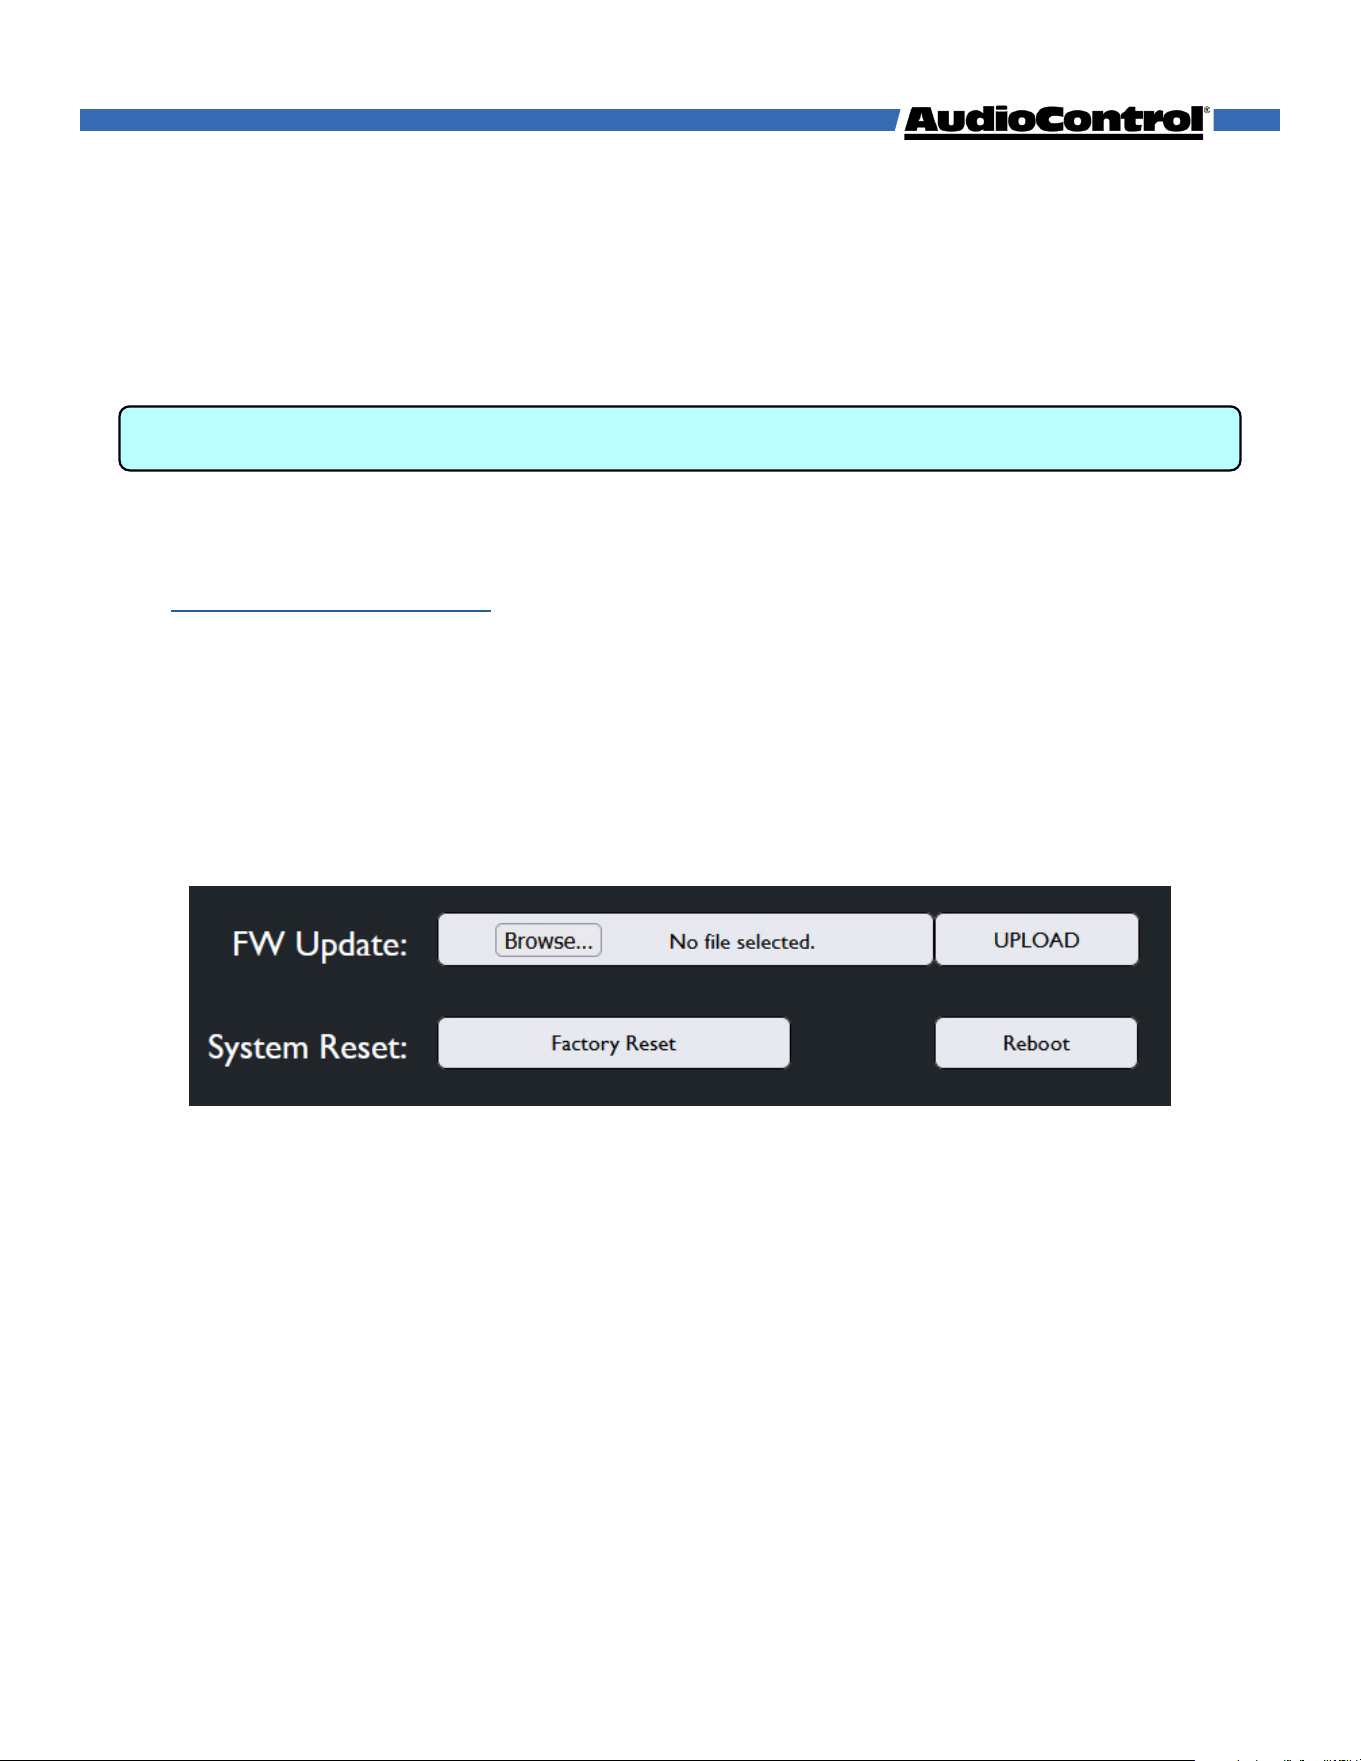
Update - Allows you to manually update the Axis10’s firmware using a file saved locally on
your computer.
Save Settings - Download a configuration file to your device with all current settings on
the Axis10.
Load Settings - Upload an Axis10 configuration file to change all settings on the Axis10.
System Reset - The Factory Reset button will restore the Axis10 to it’s default settings. The
reboot button will turn the Axis10 o, and wake it back up.
©COPYRIGHT AVPRO GLOBAL HOLDINGS 2025
12

Navigating the Web GUI
Input Setup
In this menu, you can change settings that only aect specified inputs.
2-Channel Mode - Set the default upmix mode when the input receives a stereo signal.
Multi-Channel Mode - Sets the default surround mode when the input receives a multi-
channel signal.
Available Audio Modes:
Last Mode - The input defaults to whichever setting was used the last time a multi-channel
signal was received on this input.
Native - Leaves the incoming signal untouched, passing it through without alteration.
2-Channel Stereo
All-Channel Stereo
Dolby Surround
Dolby Mode - Like Dolby Surround with the addition of Dolby’s virtualization technology.
Gain - Sets the reference level for these inputs. For the
analog input, this sets the input sensitivity
• Low — 0 dB
• Medium — -6 dB
• High — -12 dB (we promise, this makes it louder)
Dynamic Range Control - Allows the user to ensure a
consistent volume level when receiving either a Dolby or
DTS encoded signal.
Volume Defeat - [Only available for the Digital Input]
Defeats volume control on the Axis10 when the digital
input is active, allowing for the use of the source’s
volume controls.
Caution: If volume defeat is engaged when an input
with a fixed volume level is being streamed to the
input, it’s gonna get loud!
©COPYRIGHT AVPRO GLOBAL HOLDINGS 2025
13
Navigating the Web GUI
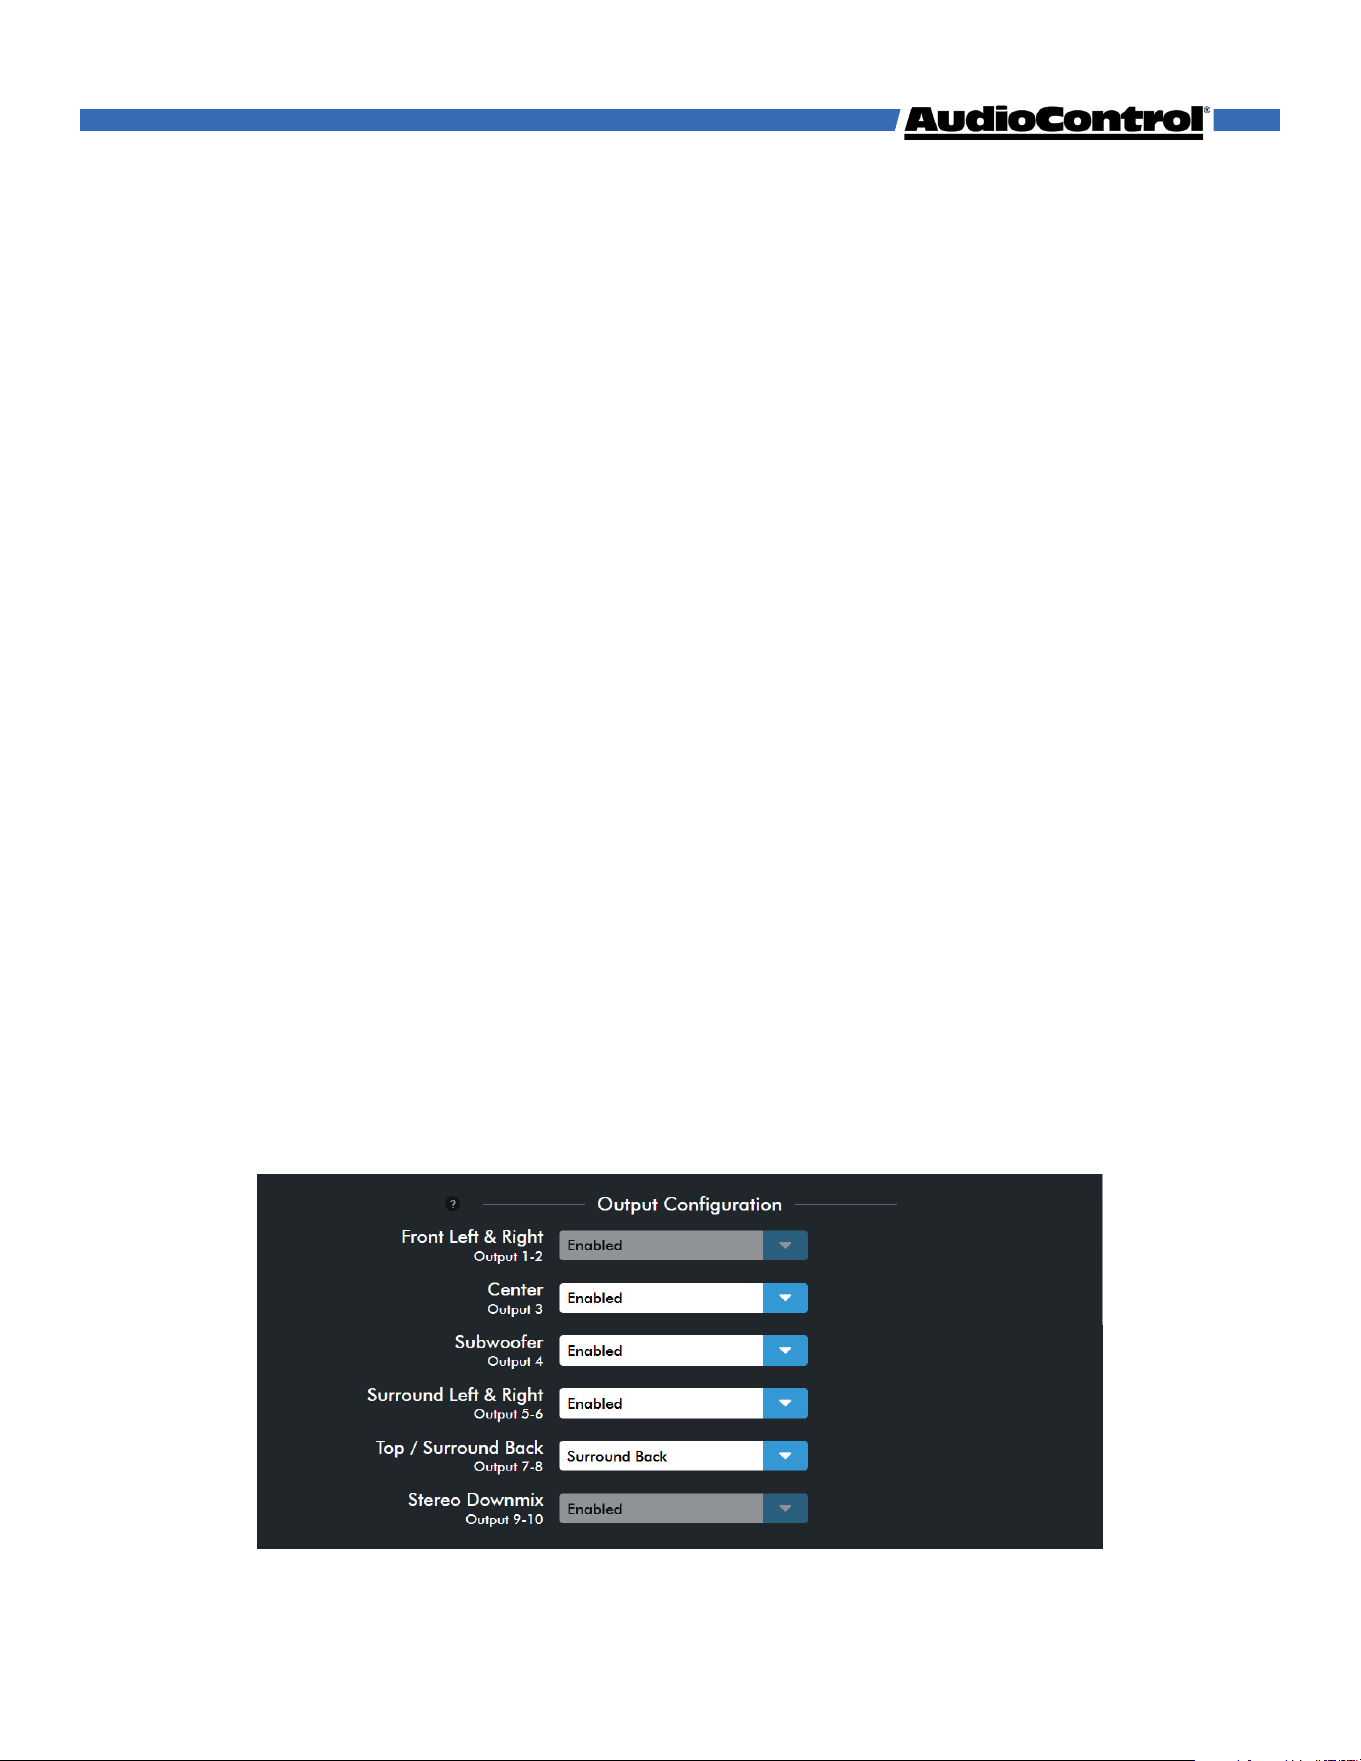
Speaker Config
This menu allows you to configure speaker types on your Axis10.
Output Configuration - Enable or disable the dierent speaker channels for use in Dante
Controller software.
The Axis10 has 10 outputs, 8 speaker channels and 2 stereo downmix channels
• Outputs 1 & 2 - Front Left & Right (always enabled)
• Output 3 - Center
• Output 4 - Subwoofer
• Outputs 5 & 6 - Surround Left & Right
• Outputs 7 & 8 - choose between:
Surround Back Left & Right Height Front Left & Right
Top Middle Left & Right Dolby Enabled* Left & Right
• Outputs 9 & 10 - Stereo Downmix Left & Right (always enabled)
The Center, Surround, Top/Surround Back, and Subwoofer channels can all be enabled or
disabled to fit the needs of the sound system.
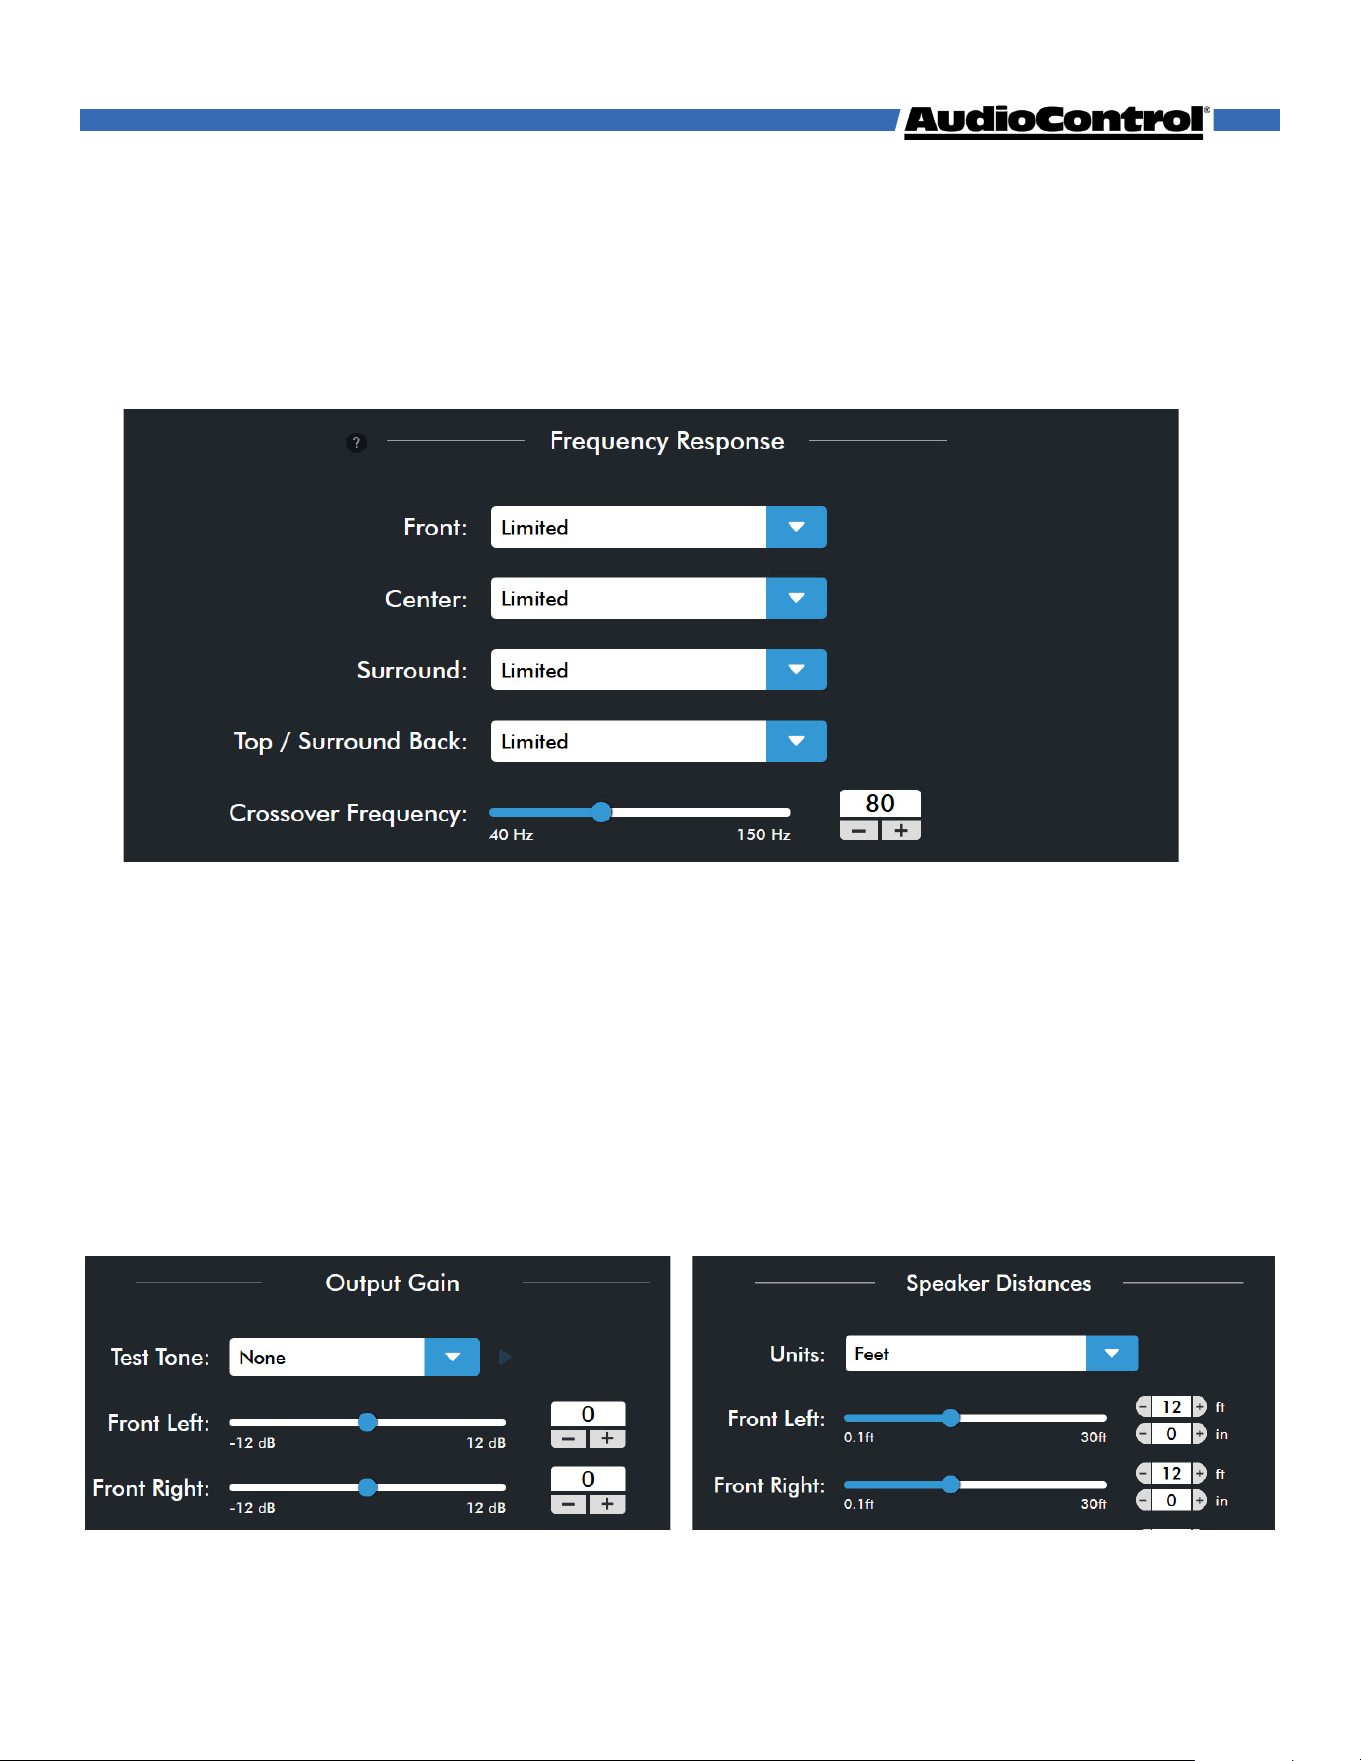
Frequency Response - Choose whether each set of outputs are full range or have a limited
frequency response.
Full range - The output channel will pass all frequencies.
Limited - The output will have a high-pass crossover determined by the Crossover
Frequency Slider.
The subwoofer output always has a low-pass filter applied.
*Dolby Enabled refers to a specific type of up-firing speaker that reflects audio o the ceiling to
mimic an in-ceiling speaker.
©COPYRIGHT AVPRO GLOBAL HOLDINGS 2025
14
Navigating the Web GUI
Crossover Frequency - Sets the value of the low-pass filter for the subwoofer output and
the high-pass filter for all speakers set to Limited. The crossover can be adjusted from 40
Hz to 240 Hz.
Test Tone - Select an output from the dropdown menu and press the play button (▶) to
output pink noise to the selected output. Press the Pause Button (II) to stop the test tone.
Output Gain - Adjust the gain for each output independently. The gain can be adjusted
from -12 dB to +12 dB.
Speaker Distances - Set the distance from selected channels to the listening position.
You can set whether the measurement calculated in feet or meters. The distance can be
adjusted from 0.1 ft (0.03 m) to 30 ft (9 m).
©COPYRIGHT AVPRO GLOBAL HOLDINGS 2025
15
Navigating the Web GUI
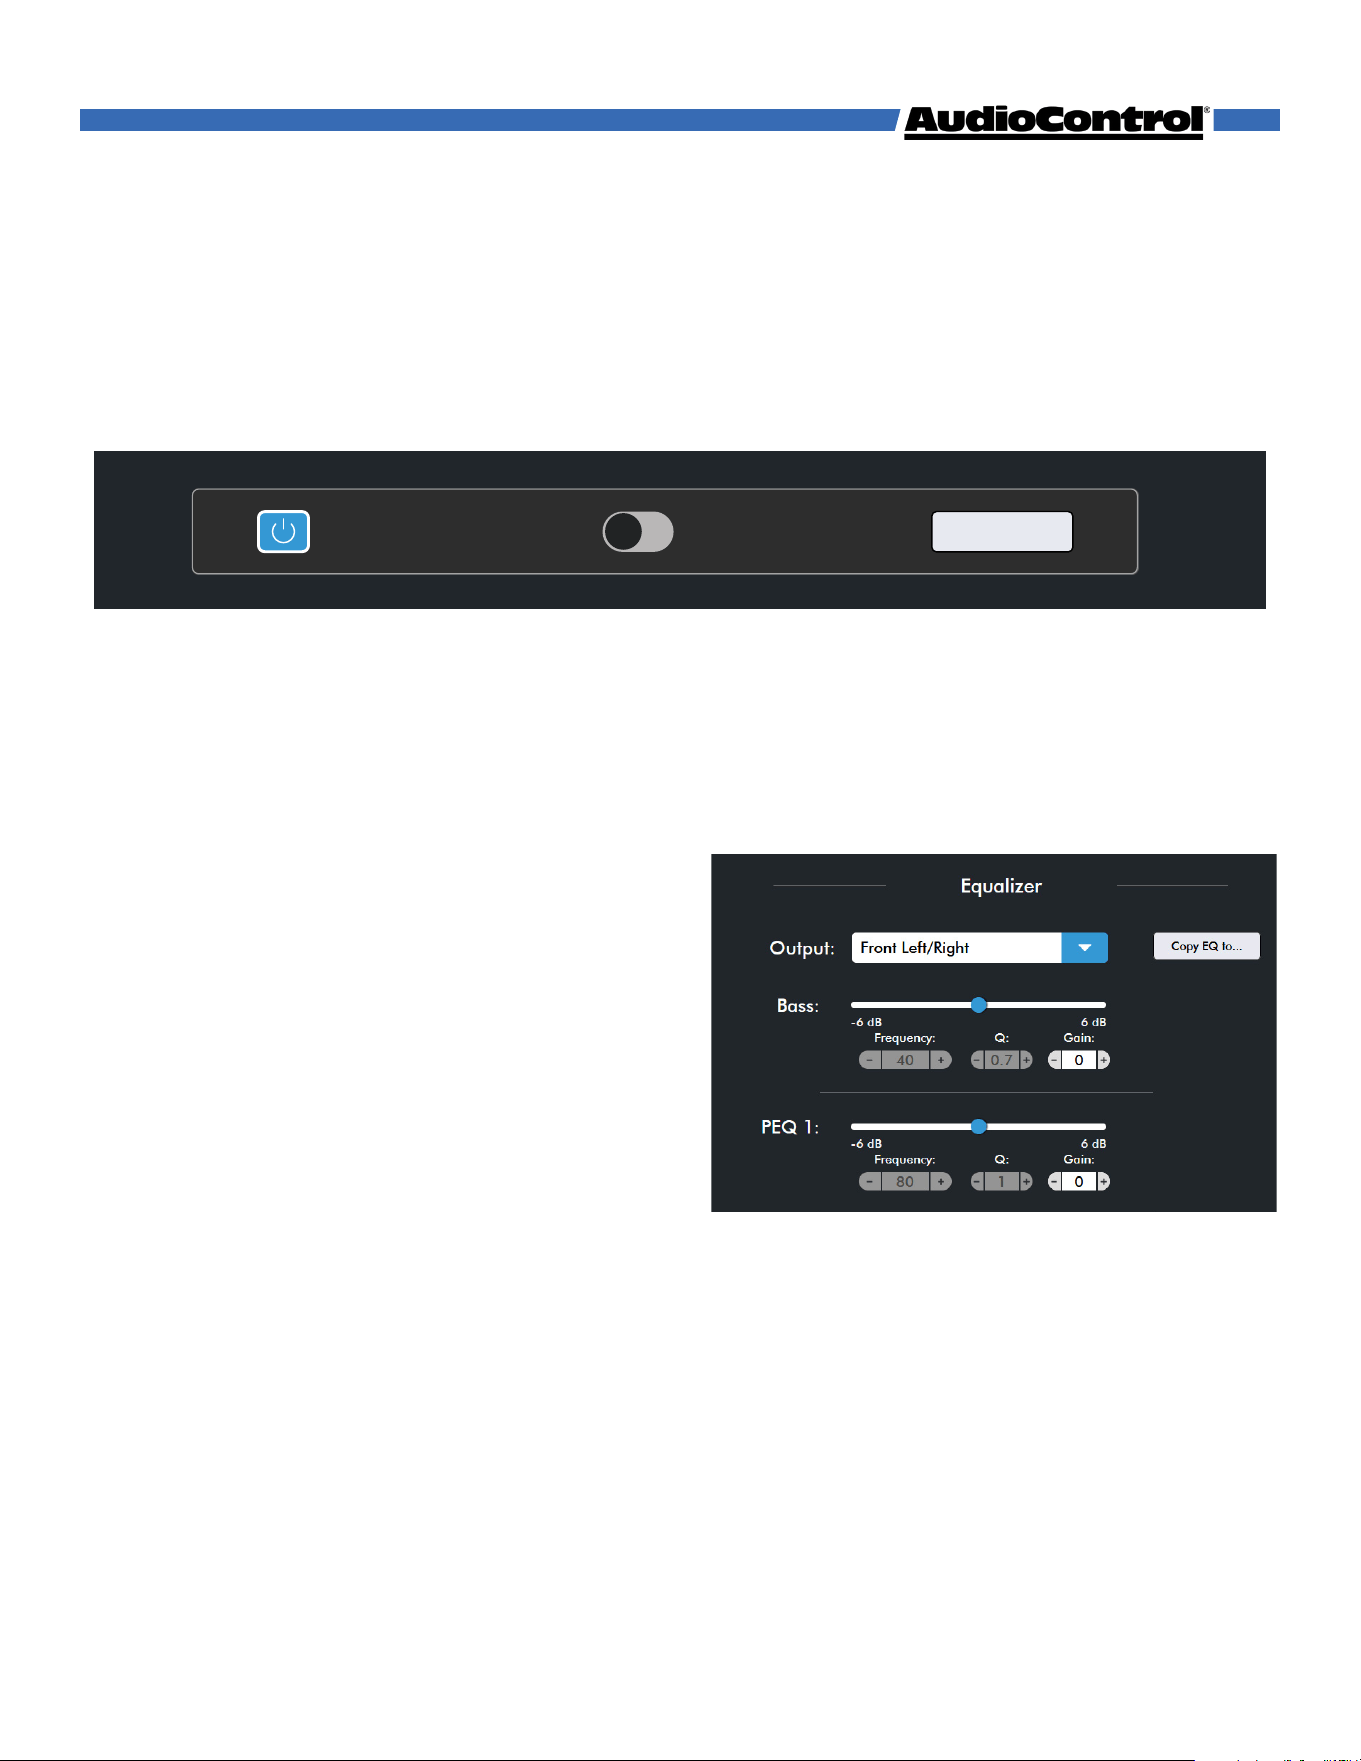
Equalizer
The Axis10 oers an 8-band equalizer for tuning each set of outputs, using either graphic
or parametric equalization.
At the top of the page are the EQ settings.
EQ On/O - This button allows you to quickly turn the EQ curve on and o.
Graphic/Parametric Switch - Toggles between the Graphic or Parametric EQ type.
The Graphic EQ lets you tune the system using 8 pre-defined frequencies.
The Parametric EQ lets you adjust which frequencies are being tuned, and the Q factor
for each frequency.
Flatten EQ - Resets all EQ values to default (in
case you accidentally tuned the room too well).
Output - Select the output you want to tune.
Each set of outputs can have their own EQ
curve.
Copy Eq to... - Allows you to copy the current
EQ curve and apply it to one or more other
outputs.
EQ Controls - The Equalizer has 8 controls: a low-shelf (labeled “Bass”), a high-shelf
(labeled “Treble”), and six peaking filters (labeled “PEQ 1-6”). The slider & gain number box
control the gain level of each EQ filter.
Gain - The slider and gain number box control the gain level adjustment for each EQ
filter.
Frequency - When the EQ is set to Parametric, change which frequency is being
adjusted. Select a frequency from 5 to 20,000 Hz.
Q - When the EQ is set to Parametric, adjust the Q factor for the selected EQ. A low Q
aects a wide range of frequencies centered around the selected frequency, and a
high Q aects a narrower range. Select a Q from 0.3 to 20.
EQ On
Graphic Parametric
Flatten EQ
Copy EQ to...
©COPYRIGHT AVPRO GLOBAL HOLDINGS 2025
16
Navigating the Web GUI
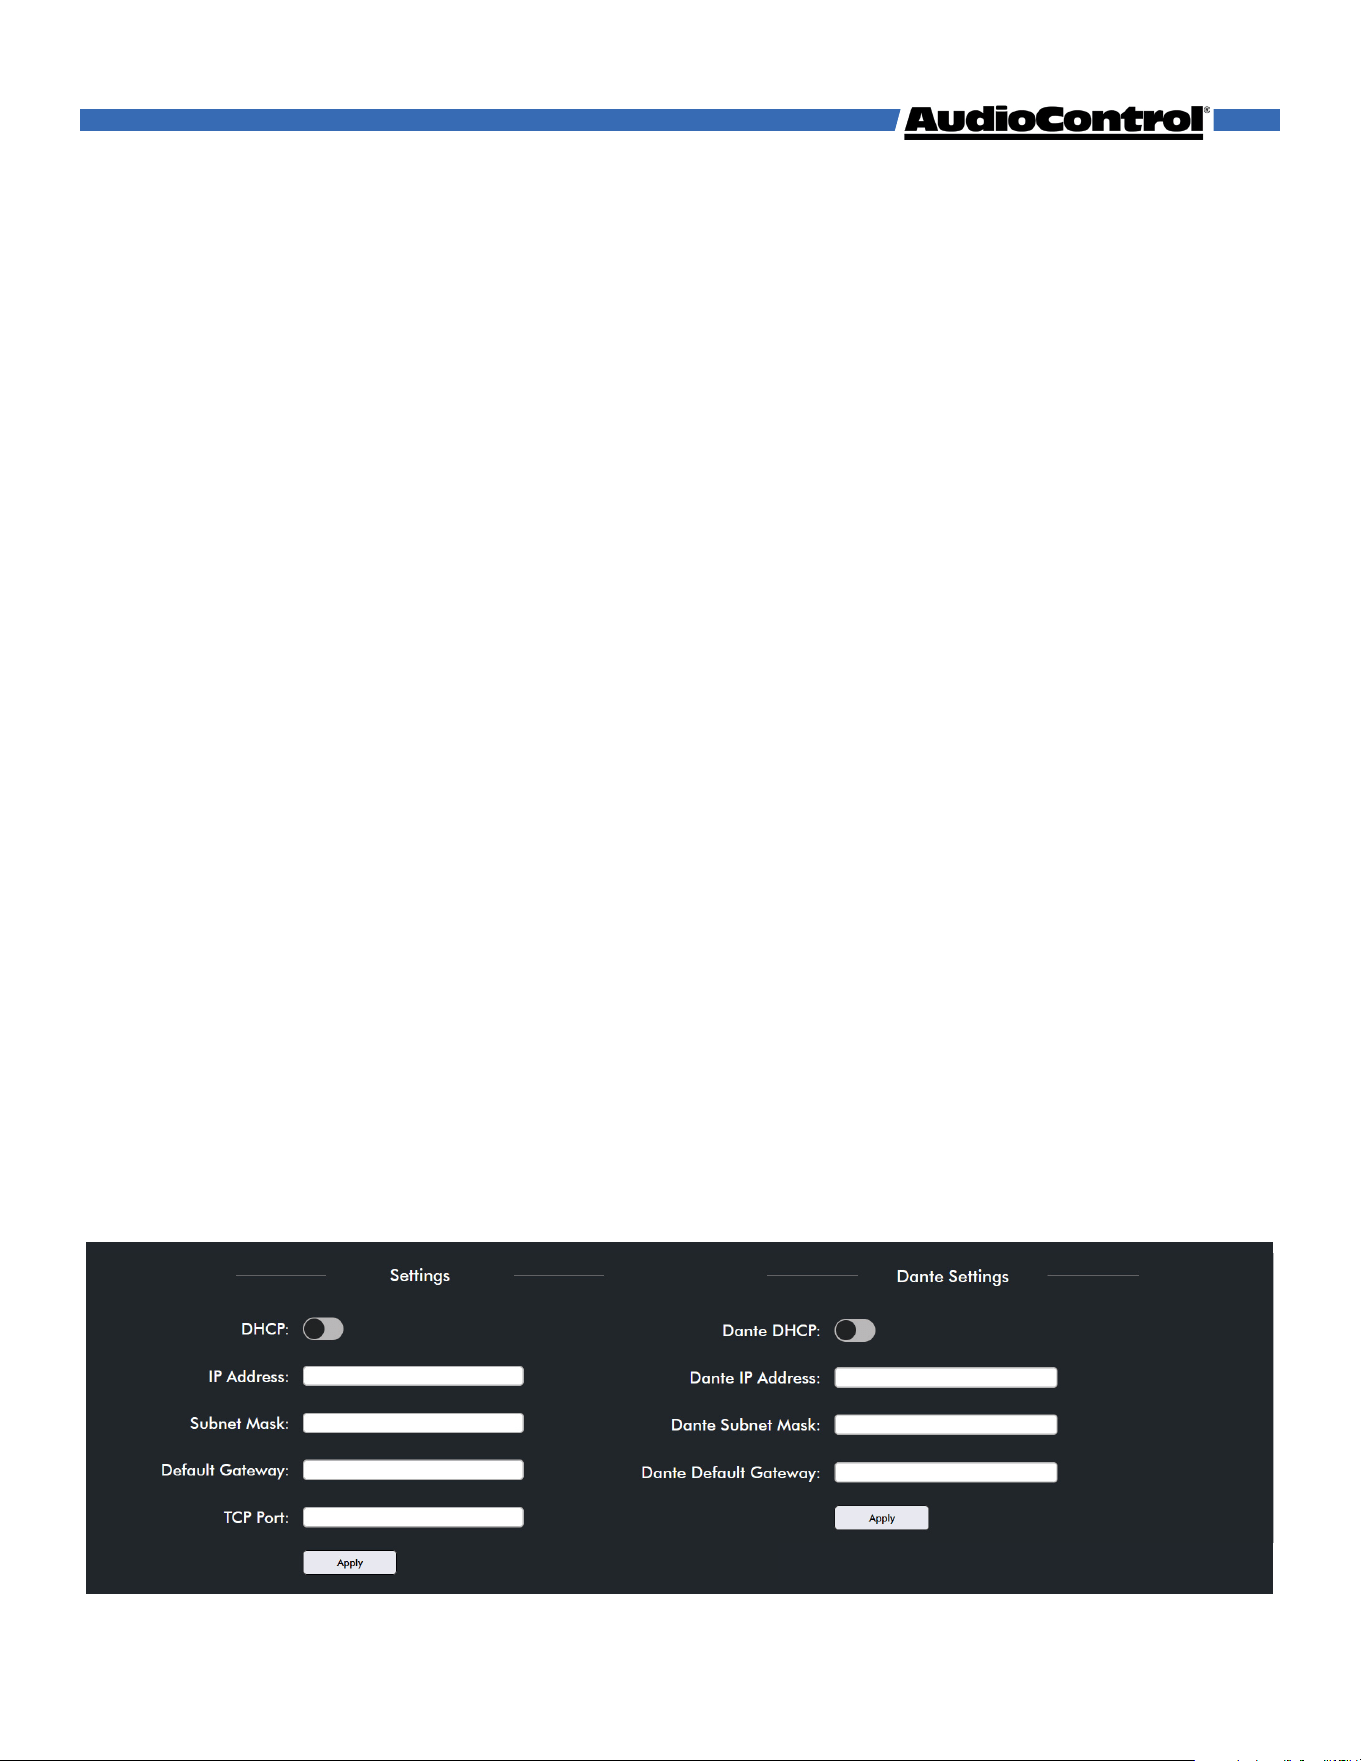
Network Settings
Here you can set an automatic or static IP address for your Axis10. By default, the Axis10 will
automatically pick up an IP address if there is a DHCP server on the network.
Device Information - Displays the unit’s Host Name and MAC Address. The host name can
be typed into a browsers address bar as an alternative method for accessing the web GUI.
Settings - This section allows you to configure the IP settings for the Axis10.
Dante Settings - This section allows you to configure the unit’s Dante IP settings.
DHCP - Set DHCP on or o. DHCP is enabled by default. Turn o DHCP to set a static IP.
IP Address - Displays the current IP address for the Axis10. Type the new IP address here if
you’re using a static IP. Double check all network devices to make sure a dierent device is
not using your IP address.
When setting a static IP address, you will need to know the desired Subnet Mask and
Default Gateway. If you do not know these, leave DCHP on and contact your network
administrator.
TCP Port - Use this field to change the TCP port from its default to a port of your choosing.
If the Axis10 is not receiving IP commands, confirm your control system is using the TCP
port assigned here.
Once your static IP settings are established, click the Apply button to save these settings.
The Axis10 will reboot when new IP settings are applied.
©COPYRIGHT AVPRO GLOBAL HOLDINGS 2025
17
Our dedicated team of engineers is always working to improve the quality of our products,
and ensure it will last in your system for as long as possible. As such, firmware updates will
be available occasionally when improvements are needed. It’s always recommended to
keep the firmware up to date, so be sure to check for updates regularly.
How To Update:
1. Download the latest firmware from your Axis10’s product page on
www.audiocontrolpro.com
2. Extract the files from the .zip folder
3. Open the Axis10’s web interface by typing the unit’s IP address or Host Name into your
web browser of choice.
4. In the web interface, go to the System Settings menu, scroll down to Firmware Update,
and click Browse.
5. In the file browser window, navigate to and select the MCU firmware file you just
downloaded.
6. Click Upload to begin the firmware update. This process may take a few minutes. When
finished, the unit will reboot.
7. Refresh the page, return to the System Settings menu, scroll down to Firmware Update,
and click Browse.
8. Now, navigate to and select the DSP firmware file, then click Upload.
9. The update may take up to 5-10 minutes.
10. When the update is finished the page will refresh, and the version number will be
updated.
Firmware Update
Notice: There are 2 firmware files required for an update, an MCU and a DSP firmware.
©COPYRIGHT AVPRO GLOBAL HOLDINGS 2025
18

Speaker Layouts
2.x 3.x 4.x 5.x 7.x 2.x.2 3.x.2 5.x.2
2-Channel Stereo
✓
All-Channel Stereo
✓ ✓ ✓ ✓ ✓ ✓ ✓ ✓
DD
✓ ✓ ✓ ✓
DD+
✓ ✓ ✓ ✓ ✓ ✓ ✓ ✓
DTHD
✓ ✓ ✓ ✓ ✓ ✓ ✓ ✓
Atmos
✓ ✓ ✓ ✓ ✓ ✓ ✓ ✓
Dolby Surround
✓ ✓ ✓ ✓ ✓ ✓ ✓ ✓
Dolby Mode
✓ ✓ ✓ ✓ ✓ ✓ ✓ ✓
DTS
✓ ✓ ✓ ✓
Speaker Layout →
Listening Mode ↓
Below is a guide detailing the dierent speaker layouts possibilities on the Axis and how
certain audio formats will output audio with those layouts.
All listening modes are compatible with every speaker layout, but some speakers may be
silent depending on the format. For example, in a 5.1.2 system, Dolby Digital (DD) content
will play perfectly fine, but the two height channels will be silent because standard DD
does not upmix to those speaker channels.
©COPYRIGHT AVPRO GLOBAL HOLDINGS 2025
19
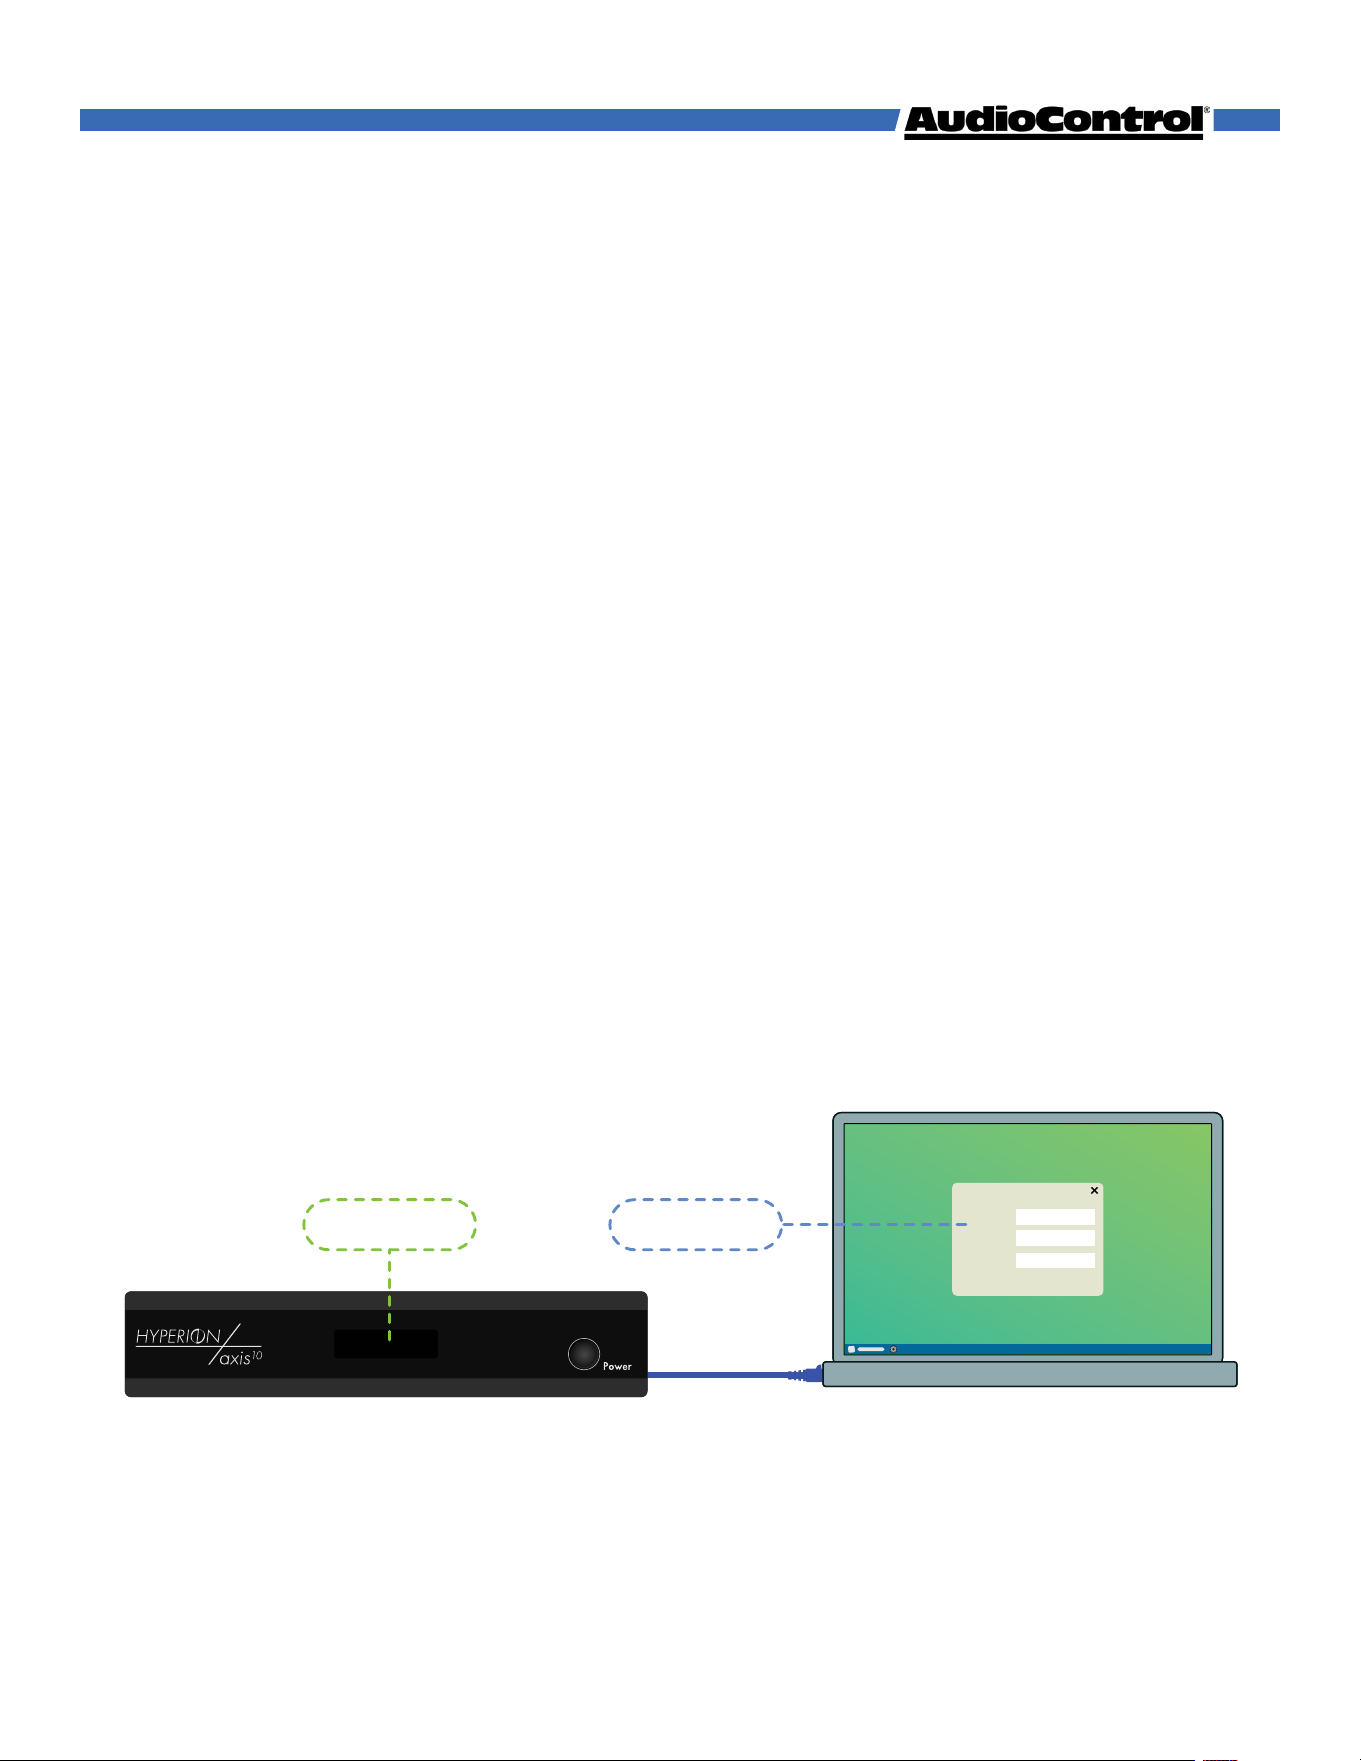
Access the Axis10’s web interface, connect the device’s Ethernet port to a network switch or
router using a CAT5e or better cable.
If a DHCP server is enabled on your network, the Axis10 will obtain an IP address and
display it on the front panel screen. If the display is o, tap the power button to wake it up.
Open a web browser, enter the IP address, and the web interface will open!
Connecting Without a DHCP Server
If DHCP isn’t enabled on your network, or you’d like to setup the Axis10 without connecting
it to the local network, the Axis10 can be connected directly to a computer by plugging a
CAT 5 (or better) cable from the Axis10’s Ethernet port to your computer’s.
After a minute without obtaining an IP address, the Axis10 will default to an APIPA address,
displayed on the front panel.
Set the computer’s IP address to fit in the same subnet as the Axis10’s default IP address:
For example, 169.254.[0-255].[0-255] (make sure the last number is not the same as the
number on the Axis10). Open your browser, enter the Axis10’s IP address, and the web
interface will open.
When finished, reset your computer’s IP settings back to how they were before.
If you are unsure how to set your computer’s IP address to connect directly to the Axis10,
contact your network administrator or look for a guide online, the process varies between
operating systems.
Internet Connectivity and Control
eARC 30
169.254.0.32
eARC 30
169.254.0.42
IP Address
Subnet
Gateway
255.255.0.0
169.254.0.1
169.254.0.42
IP Address
Subnet
Gateway
255.255.0.0
169.254.0.1
169.254.0.42
IP Address
Subnet
Gateway
255.255.0.0
169.254.0.1
169.254.0.30 169.254.0.42
©COPYRIGHT AVPRO GLOBAL HOLDINGS 2025
20
To transmit audio steams from the Axis10 to one or more Dante end points, it’s
recommended to download the Dante Controller software from Audinate.
https://www.getdante.com/support/software-downloads/#dante-controller
Using the Software
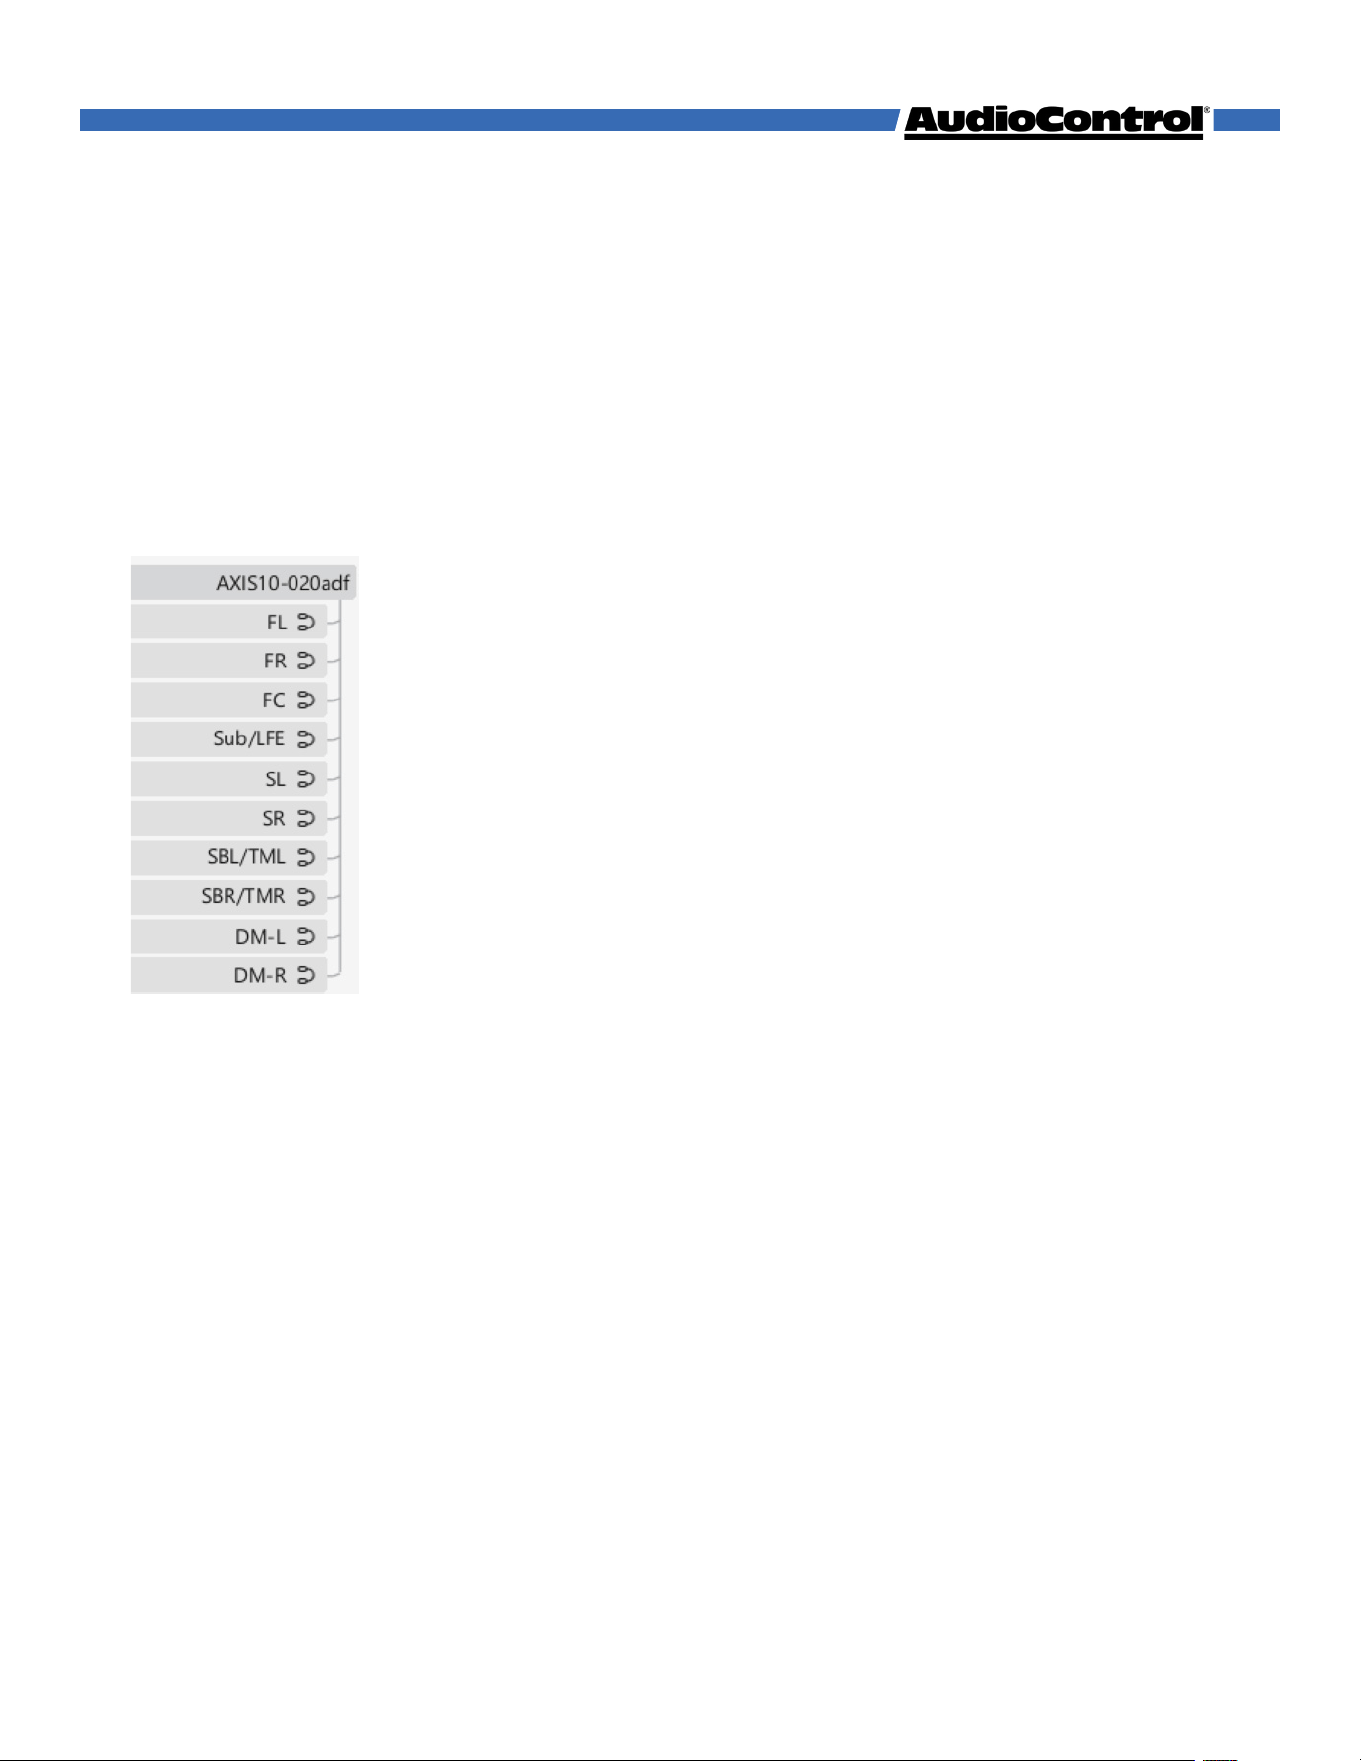
Once Dante Controller is installed and opened, it will display a grid of all the transmitting
and receiving Dante devices on the network. The Axis10 transmits 10 audio channels.
Axis10’s Transmit Channels:
Note: Front Left & Right, and Downmix Left & Right are always enabled, all other channels
will need to be enabled or disabled in the web GUI on the Speaker Config page.
Route these channels to your desired endpoints, and stream audio or use the Axis10’s built-
in test tones to make sure audio is routed correctly.
Dante Device Settings
Double clicking the device name in Dante Controller gives you access to additional
information and device-specific settings. For example, you can turn on AES67 for the Axis10
if you plan to use it.
For more information, check out the video tutorials on www.getdante.com, or check out
our knowledge base at support.audiocontrolpro.com.
Using Dante Controller
FL - Front Left
FR - Front Right
FC - Front Center
Sub/LFE - Subwoofer/LFE
SL - Surround Left
SR - Surround Right
Surround Back, Top Middle, Height Front, or Dolby Enabled
Left & Right, depending on setting in Speaker Config page.
SBL/TML
SBR/TMR
DM-L - Downmix Left
DM-R - Downmix Right
}
©COPYRIGHT AVPRO GLOBAL HOLDINGS 2025
21

There are no lights on the Axis10
• Pressing the power button on the front panel should wake the Axis10.
• If using the USB-C power input, verify that the power supply is plugged into a live AC
outlet, and the USB-A to USB-C cable is connected to the power supply.
• If using PoE, verify the ethernet cable is connected from the Axis10 Dante port to a PoE
enabled port on a network switch.
The audio doesn’t match the video
• Confirm that you are on the correct input.
• Switch to a dierent audio mode.
Audio sound is poor or distorted
• Verify speaker configuration settings matches your speakers.
• Verify that all interconnect cables are fully seated in their ports. Disconnect and
reconnect them to ensure a good connection.
• Consider upgrading from wax cylinder to vinyl record.
No Audio from the TV
• Check your TV’s sound settings to ensure that the eARC channel or Digital output is
enabled.
The Axis10 is not coming out of standby
• Remove power from the Axis10 and disconnect all inputs and outputs. Let the amp sit
without power for at least 5 minutes, then reconnect power.
The Axis10 is not appearing on the network
• Connect the Axis10’s Ethernet port directly to a computer and try accessing the default
IP address: 192.168.1.249
• If there was an issue setting up the static IP address, press and hold the Power button
for 10 seconds to factory reset the Axis10.
The coee’s gone cold
• Time to put on a fresh pot!
Diagnostics and Troubleshooting
©COPYRIGHT AVPRO GLOBAL HOLDINGS 2025
22

• Ensure adequate ventilation to allow this product to operate eciently.
• Repair of the equipment should only be carried out by qualified professionals.
• Only use this product in a dry environments. Do not allow any liquids or harmful
chemicals to come into contact with this product.
• Clean the unit with a soft dry cloth.
• Rotate tires every 6 months.
Maintenance
Before returning any item to AudioControl, you must obtain a return authorization.
If your product needs service, please contact a trusted and trained AudioControl tech
support representative, either by email or phone. We will assist with troubleshooting, and
verify if there is anything wrong with the system that would require it to be returned to our
factory.
Contact tech support at
Phone: +1 (425) 775-8461
Email: techsupport@audiocontrolpro.com
If you are in need of support, a trusted friend is a good place to start.
Support
©COPYRIGHT AVPRO GLOBAL HOLDINGS 2025
23
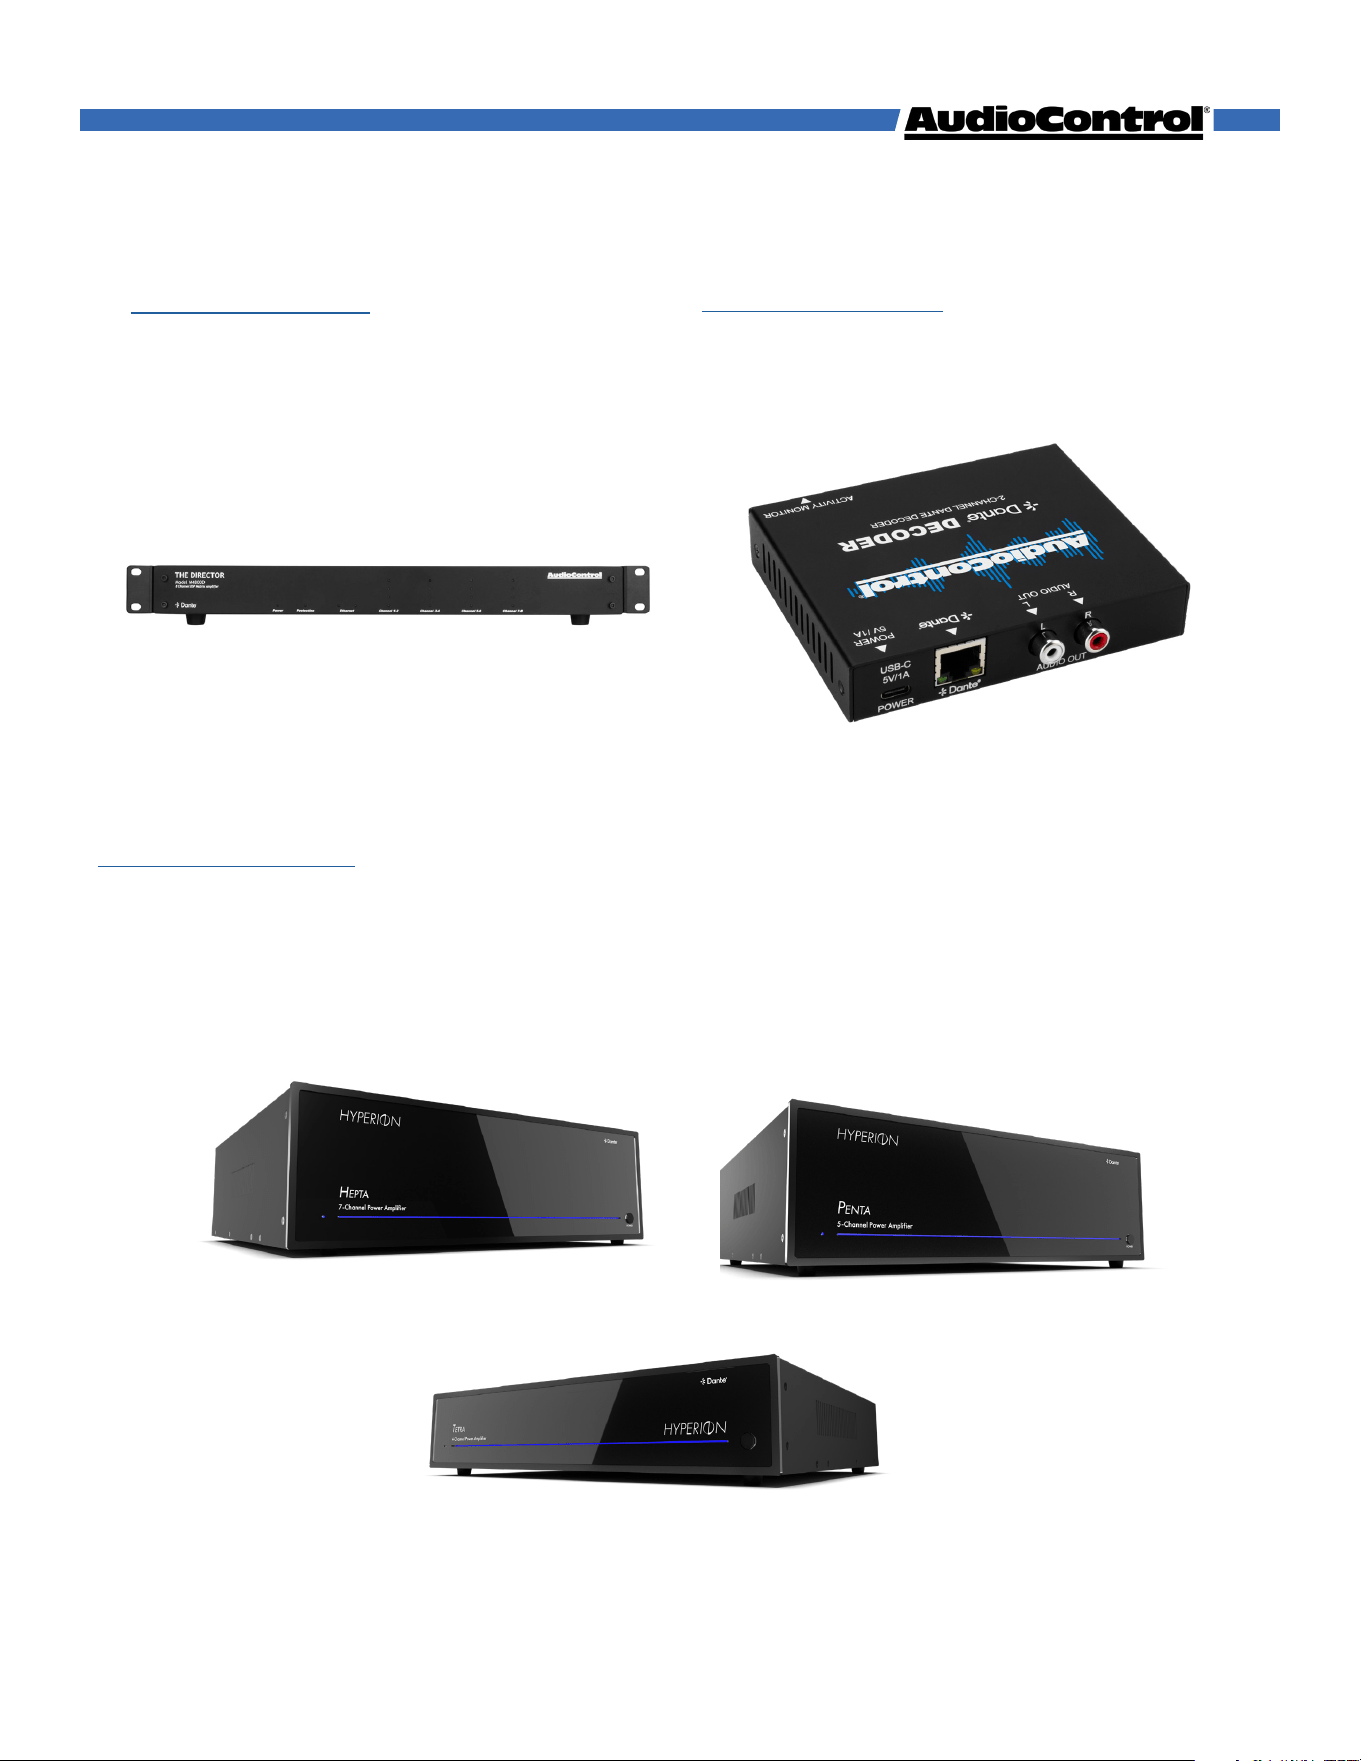
AudioControl Dante Decoder
ACP-DANTE-D-POE
• Receives audio from the Dante network
to output to another device in the system.
• Perfect for the Stereo Downmix channels.
Director M4800D
ACP-DMZ-M4800D
• 8 channel DSP matrix amplifier with
Dante
• Perfect pairing with AXIS10 for stereo
zone expansion.
Related Products
AudioControl Premium Amplifer
Tetra - Penta - Hepta
• Dante-enabled for seamless network
integration
• Sleek look matches any Hyperion install
• Less cables, easier installation
©COPYRIGHT AVPRO GLOBAL HOLDINGS 2025
24

We at AudioControl understand that warranties can be scary, but fear not! This warranty
is designed to make you rave about us to your friends. It looks out for you, and keeps you
from taking your AudioControl product to a friend who’s “good with electronics” for repairs.
Our warranty covers products purchased from all authorized AudioControl dealers,
installers, and direct purchases. Products are guaranteed to be free from manufacturing
defects. This 5-year warranty period keeps you covered under the following conditional
conditions:
1. You must keep your sales receipt for proof of purchase showing when and from whom
the unit was bought. Always keep a physical or digital copy handy.
2. The product must have originally been purchased from an authorized AudioControl
dealer. You do not have to be the original owner, but you do need a copy of the original
sales receipt or invoice.
3. You cannot let anyone other than (A) the AudioControl factory or (B) someone
authorized in writing by AudioControl to service the product. If anyone other than A or B
messes with the receiver, this voids the warranty.
4. The warranty is void if the serial number is altered or removed, or if the product has
been used improperly.
Improper, unwarranted use of the product includes: physical damage (do not use the
Axis10 as a step stool or a coaster); improper connections (120v into the eARC input can fry
the poor thing); sadistic things. This is the best product we know how to build, but if you use
it help you practice ax throwing, something will break.
Assuming you conform to the rules listed here, we get the option of fixing your original unit,
or replacing it with a new one.
Warranty
©COPYRIGHT AVPRO GLOBAL HOLDINGS 2025
25

Acknowledgments
Dolby Atmos
Dolby, Dolby Atmos, and the double-D symbol are registered trademarks
of Dolby Laboratories Licensing Corporation. Manufactured under license
from Dolby Laboratories. Confidential unpublished works. Copyright ©
2012-2025 Dolby Laboratories. All rights reserved.
DTS
®
Digital Surround™
FOR DTS PATENTS, SEE HTTP://XPERI.COM/DTS-PATENTS/.
MANUFACTURED UNDER LICENSE FROM DTS, INC. AND ITS AFFILIATES.
DTS, THE DTS LOGO, AND DIGITAL SURROUND ARE REGISTERED
TRADEMARKS OR TRADEMARKS OF DTS, INC. AND ITS AFFILIATES IN
THE UNITED STATES AND/OR OTHER COUNTRIES. © DTS, INC. AND ITS
AFFILIATES. ALL RIGHTS RESERVED.
HDMI™, the HDMI™ logo and High-Definition Multimedia Interface are
trademarks or registered trademarks of HDMI Licensing LLC.
Listening Modes →
©COPYRIGHT AVPRO GLOBAL HOLDINGS 2025
26

©COPYRIGHT AVPRO GLOBAL HOLDINGS 2025
27