Easy Setup Guide
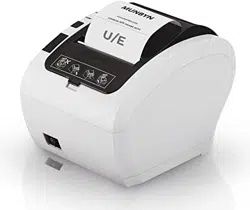
IMP002 Receipt Printer
IMP002
Version 1.00

support +16502062250
2
Contents
3
4
5
5
6
6
8
8
9
10
10
10
13
19
19
20
21
21
21
23
1.0. Introduction
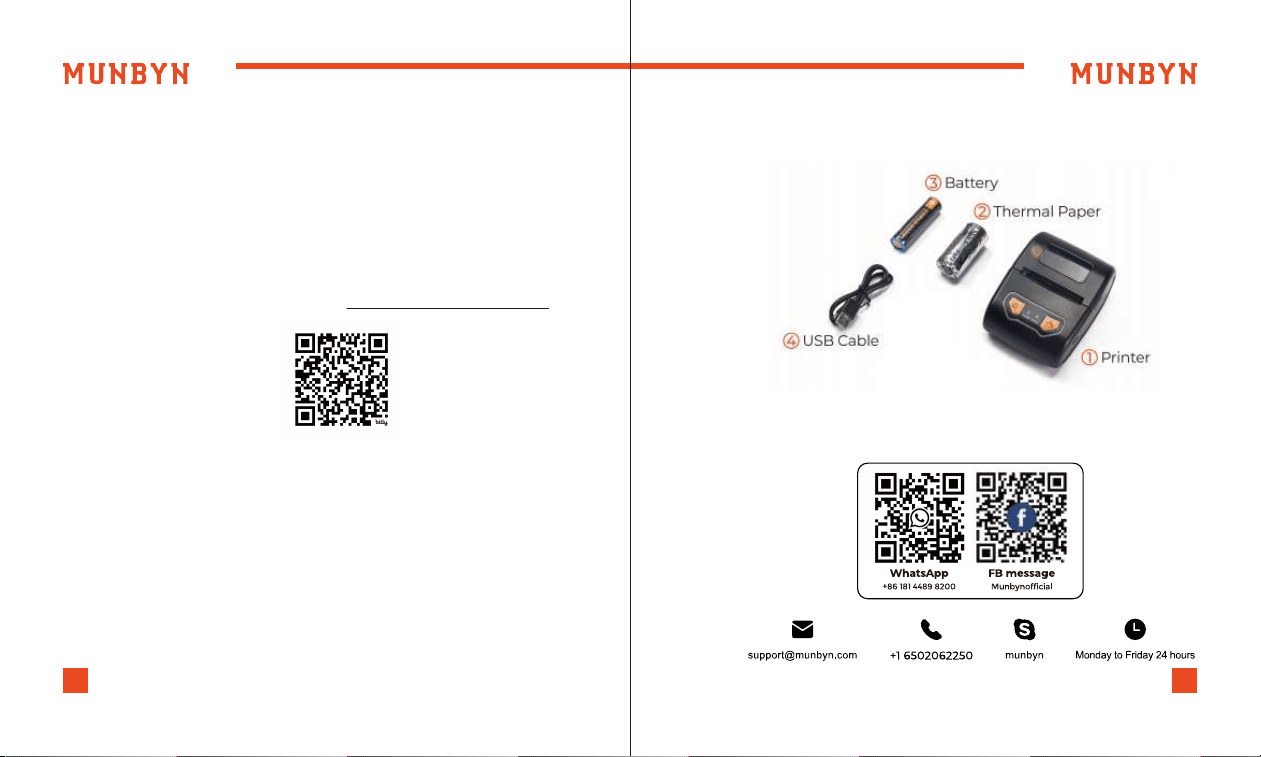
2.0. Check the Packing List
3.0. Overview
3.1. Printer Overview
3.2. Function of the button
3.3. Indicator light status
3.4. Prepare before using
3.4.1 Li-ion battery installation
4.0. Paper Loading
5.0. Initial Setup
5.1 Set Up the IMP002 for First Use on Android
5.1.1 How to Connect a Bluetooth Printer?
5.1.2 How to connect a Bluetooth printer to
Loyverse POS for printing order receipts?
5.2 Set Up the IMP002 for First Use on Windows
5.2.1 Download Windows Driver
5.2.2 USB Interface
5.3 Set Up the IMP002 for First Use on MacBook
5.3.1 Download MacBook Driver
5.3.2 USB Interface
5.4 Set Up the IMP002 for First Use on ChromeOS
5.4.1 Download Ubuntu Driver
5.4.2 USB Interface
6.0 Contact us
7.0 FCC Statement
------------------------------------------------
------------------------------------------
------------------------------------------------
-----------------------------------------------------
---------------------------------------------------
-----------------------------------------------------
-----------------------------------------------------
----------------------------------------
------------------------------------------------
------------------------------------------------
------------------
----------------------
----------------------
----------------
-------------------------------------
-----------------------------------------------------
----------------
--------------------------------------
-----------------------------------------------------
-------------
23
23
29
29
-----------------------------------------
-----------------------------------------------------
------------------------------------------------
------------------------------------------------
support +16502062250support +16502062250
43
1.0. Introduction 2.0. Check the Packing List
This document introduces the setup procedure for the IMP002.
Please read the instructions before using the printer.
In case of omission or damage, don't hesitate to contact us via
the contact details below.
For further instructions, please refer to the IMP002 Thermal
Printer manual.
IMP002 Thermal Printer Manual: munbyn.biz/002userManual
Notice: When dealing with links that require attention to
case-sensitive letters and numbers, it's important to be mindful
of the exact casing used in the link.
Printer
1
Thermal Paper
2
Battery
3
Power Adapter
5
USB Cable
4
support +16502062250support +16502062250
65
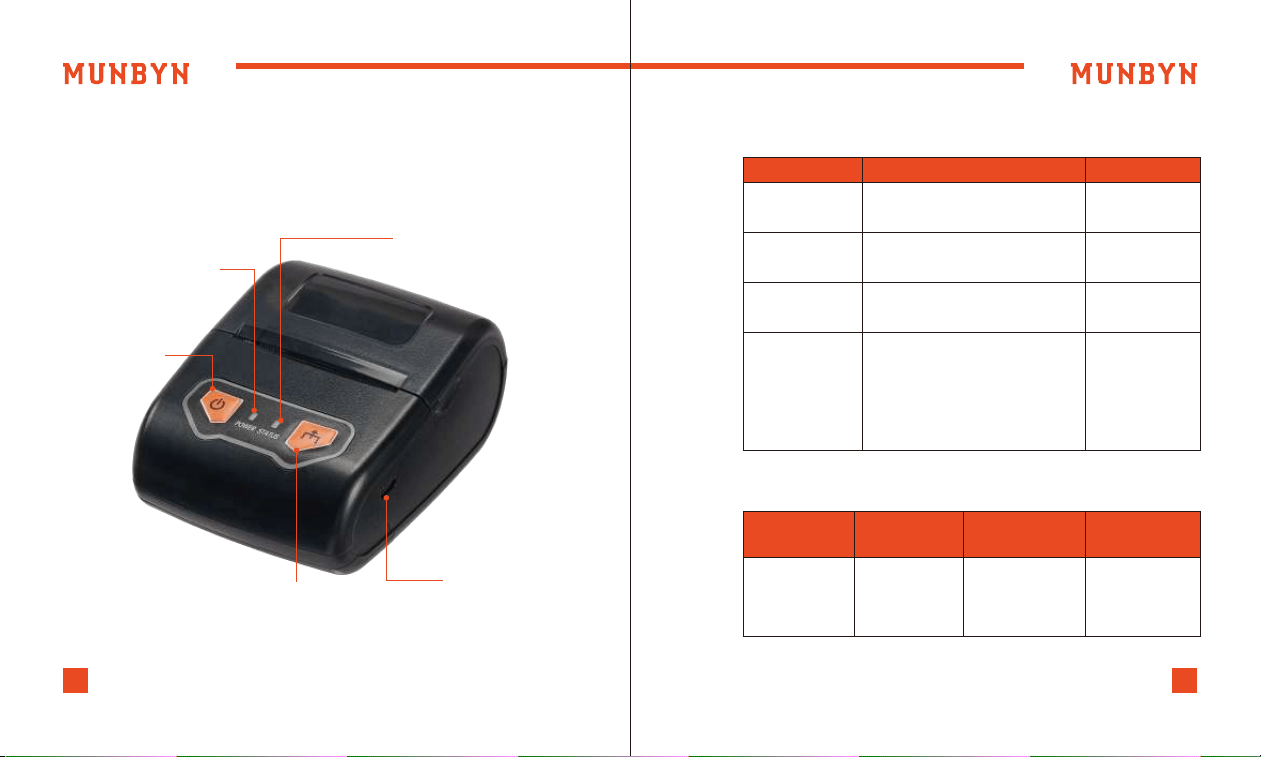
3.0. Overview
3.1. Printer Overview
3.2. Function of the button
3.3. Indicator light status
Button Picture Functions
Power button Turn on
Hold the button for two seconds
until you hear two beep
Power button Turn off
Hold the button for two seconds
until you hear one beep
Feed button Paper output
Click
Power button &
Feed button
Print self-test
paper
In the shutdown state, hold
down the FEED button on the
printer first, then press the
Power button until you hear two
beeps and see the status light
flash red, then release your hand
Power
Indicator Light
Status
IndicatorLight
Status Situation
Green
/
Light (The status
indicator light is
off when the
power is ready)
Standby
(Bluetooth not
connected)
Power indicator light
Power button
Feed button
USB interface
Status indicator light
support +16502062250support +16502062250
87
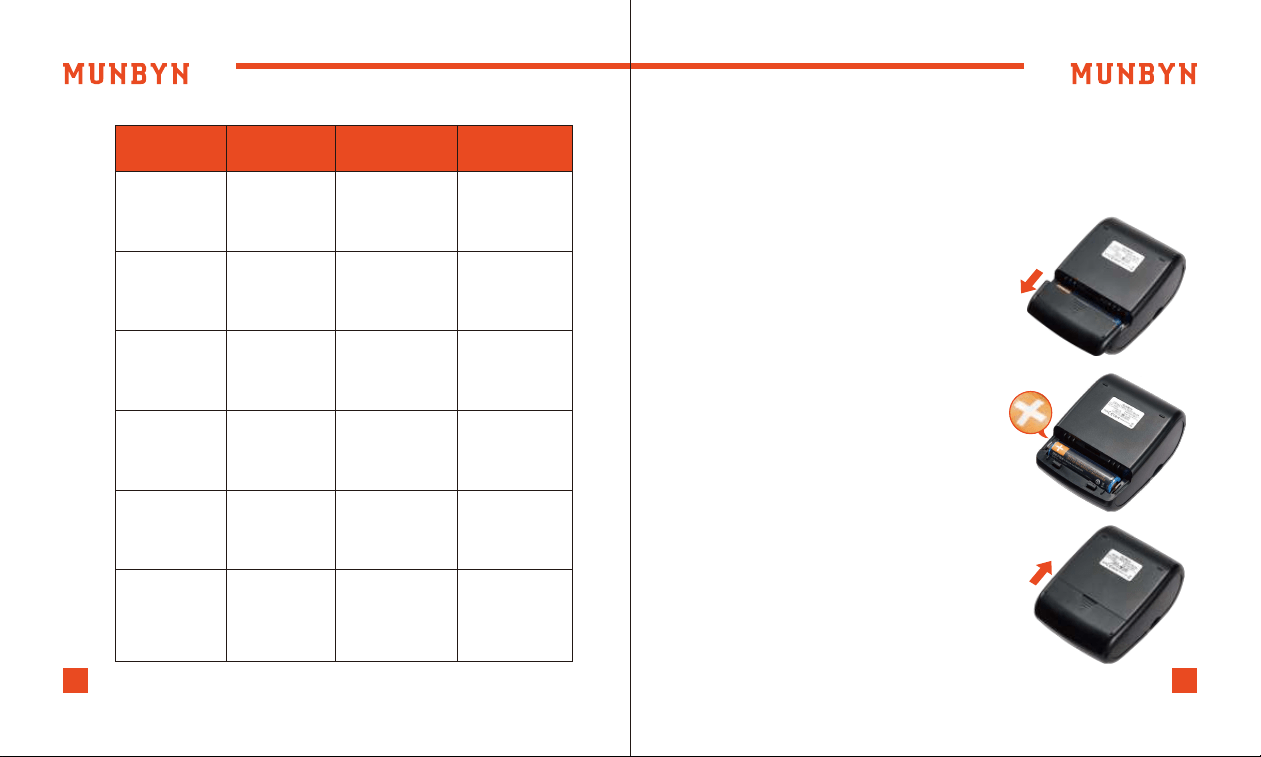
Li-ion battery installation
(1) Refer to the picture, push the battery
cover in the direction of the arrow.
(2) Put the battery in the battery slot.
Notice: Install the positive pole to the
left-do not install it backwards.
(3)Close the battery case.
3.4.
3.4.1.
Prepare before using
Power
Indicator Light
Status
IndicatorLight
Status Situation
Green
Charging
/
Flash
Green
/
Light always on
Printing or the
power is fully
charged in
power on mode
Green
Standby
(Bluetooth
connected)
Green
Light
Green
Out of paper
Red
Flashing Red
and the printer
beeps
(500ms/time)
Green
Cover is
not closed
Red
Flashing Red
and the printer
beeps
(500ms/time)
Green
Red
Flashing Red
(200ms/time)
Printer head is
overheated.
Printer startup
over-tempera-
ture protection
support +16502062250support +16502062250
109
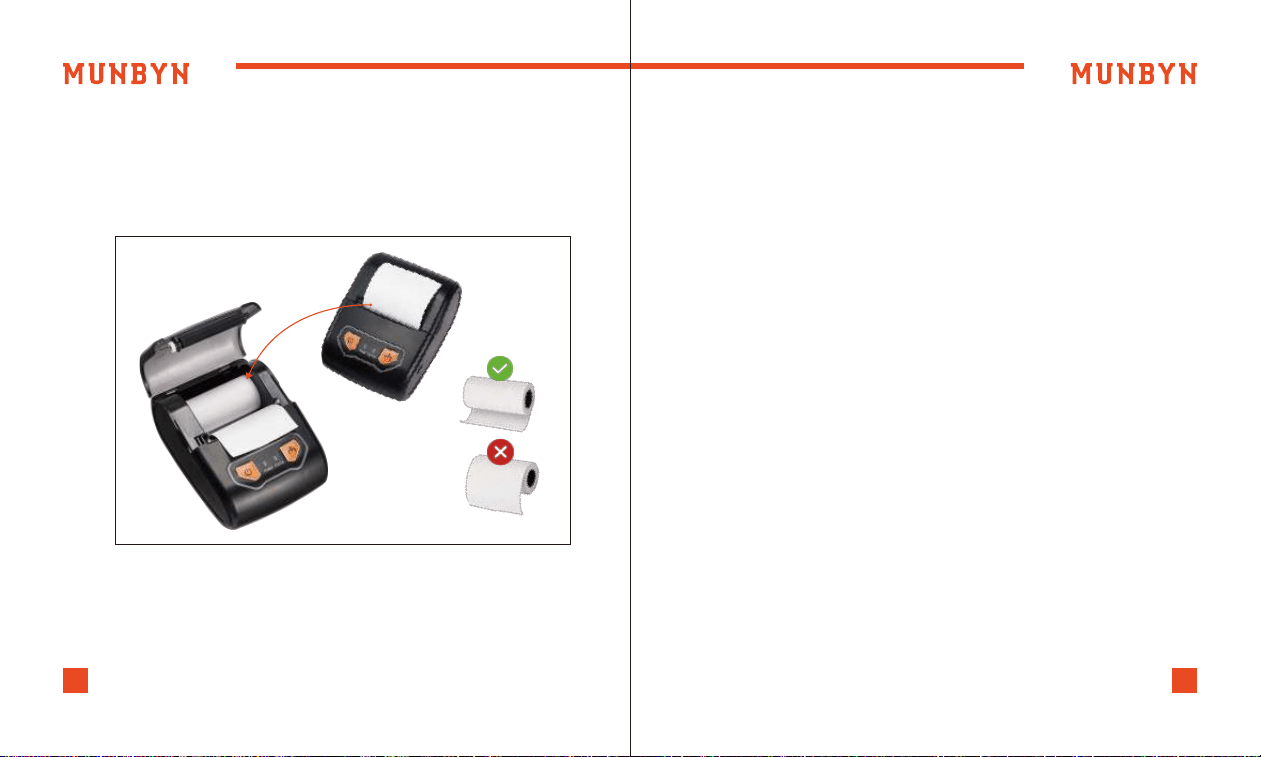
4.0. Paper Loading 5.0. Initial Setup
5.1.
5.1.1.
Set Up the IMP002 for First Use on Android
(1) Pry open the hood from the grooves on both sides and then
open the lid.
(2) Load a paper roll in the direction shown in the illustration.
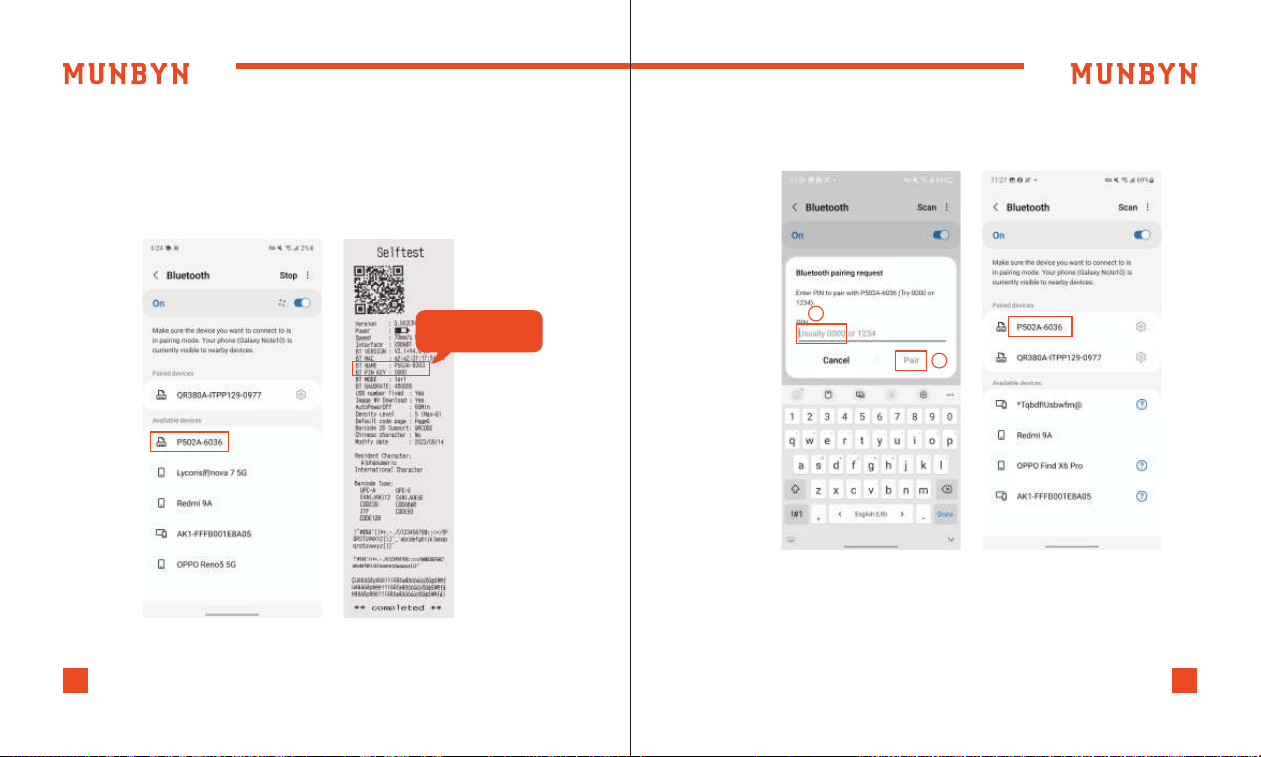
Before connecting to the Bluetooth printer, you need to print a
self-test page to view the machine's Bluetooth name and
connection password. (For details on the self-test page, refer to
Figure 5-2. For printing the self-test page method, refer to
section 3.2).
How to Connect a Bluetooth Printer?
(1) Put the thermal paper into the printer and press the printer
power button to turn on the printer.
(3) Pull the end of the paper out a little and push down the
printer's top cover to close.
Notice: If the device remains idle for 1 hour, it will automatically
shut down. This feature is designed to reduce battery consump-
tion during prolonged standby mode.
support +16502062250support +16502062250
1211
(2) Turn on the Bluetooth on your phone. Search Bluetooth
device [P502A-6036] and connect it.
Notice: The suffix digits (last 4 digits) of the device's Bluetooth
name are different primarily to distinguish the situation when
multiple devices are used for printing.
(3) Enter pairing code [0000] and click [Pair]. Then the mobile
phone is successfully connected to the printer via Bluetooth.
Figure 5-1 Select Bluetooth
Figure 5-3 Connect Bluetooth
Enter “0000”
1
2
BT NAME: P502A-6303
BT PIN KEY: 0000
support +16502062250support +16502062250
1413
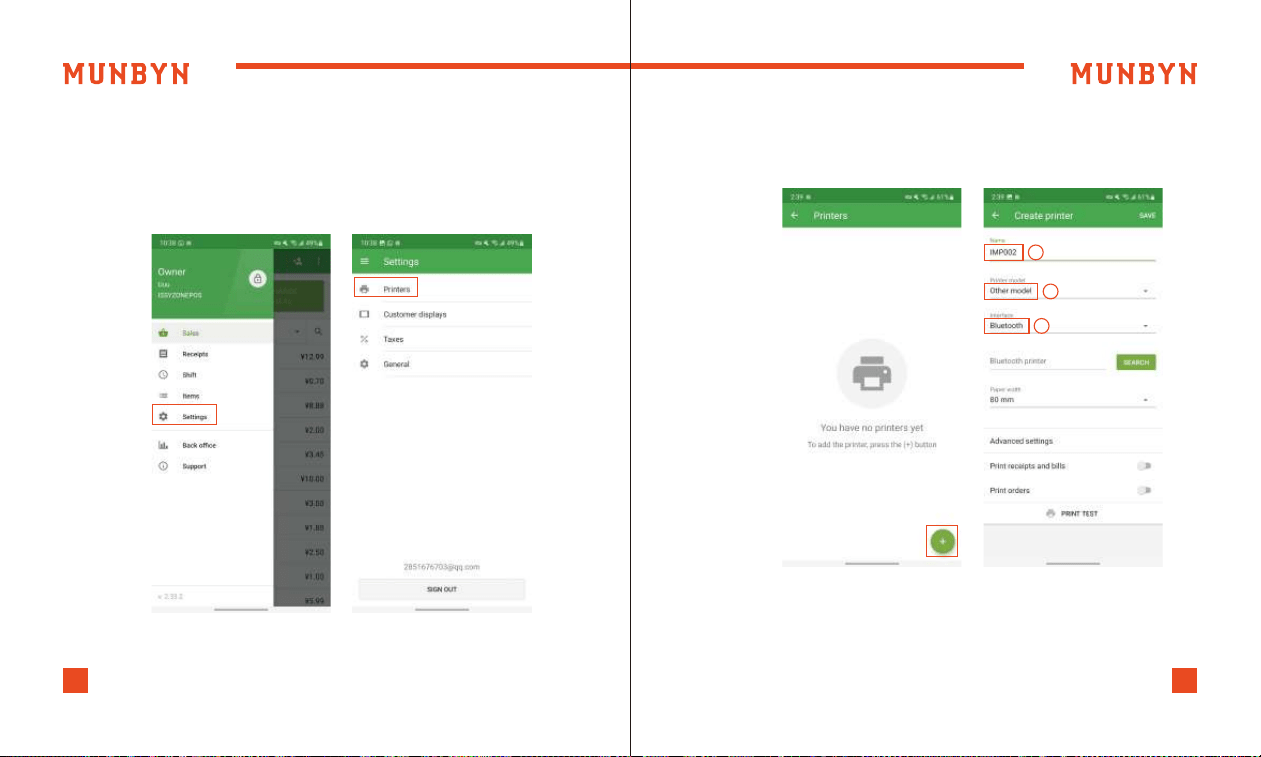
5.1.2. How to connect a Bluetooth printer to Loyverse POS for
printing order receipts?
(3) Click on the [+] button in the bottom right corner to add a
printer. The printer's name can be anything you like. Printer
model, select [Other model] → [Interface], select [Bluetooth].
(1) Turn on the Bluetooth on your phone. Search Bluetooth
device [P502A-6036] and connect it.
(2) Run [Loyverse POS] and set printer from [Setting] →[Printers].
Figure 5-4 Setting Printer
Figure 5-5 Add Printer
1
2
3
support +16502062250support +16502062250
1615
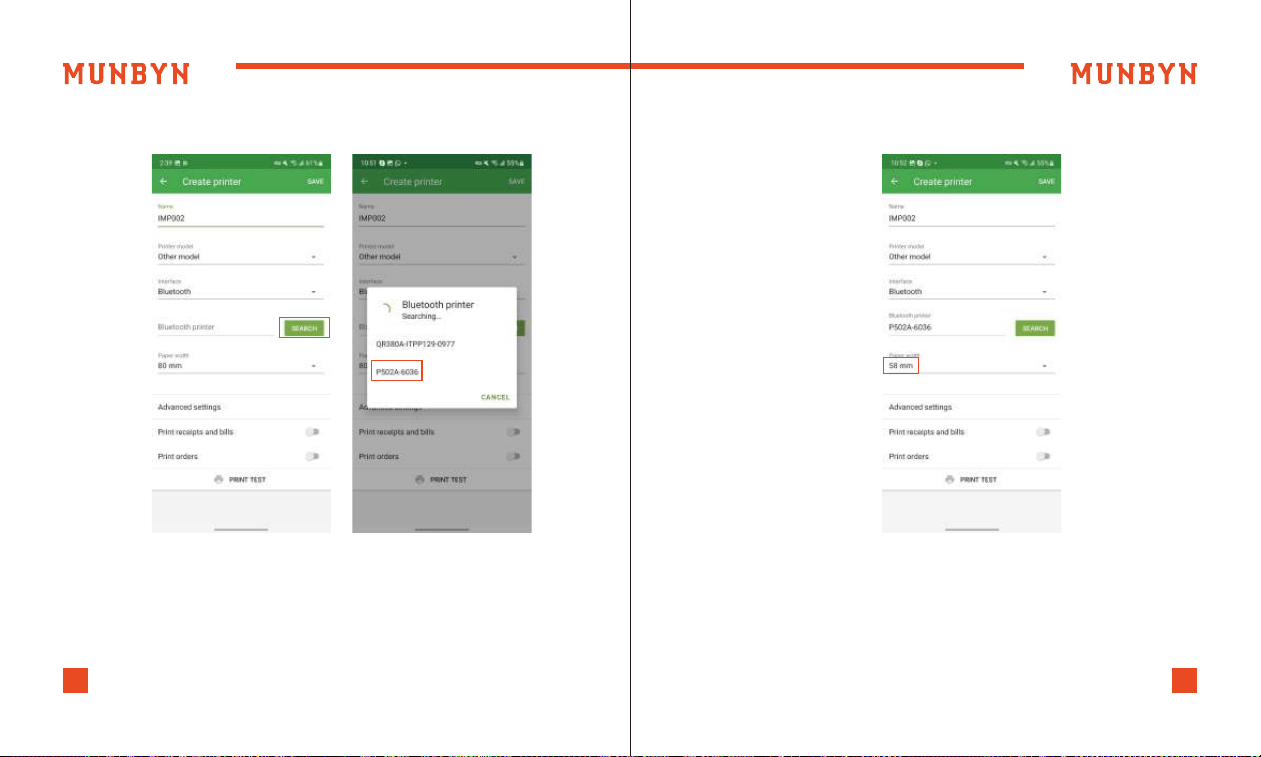
(4) Click [SEARCH] and select [P502A-6036] connection.
Figure 5-6 Search Bluetooth Printer Figure 5-7 Paper Width
(5) Paper width, select [58mm].
support +16502062250support +16502062250
1817
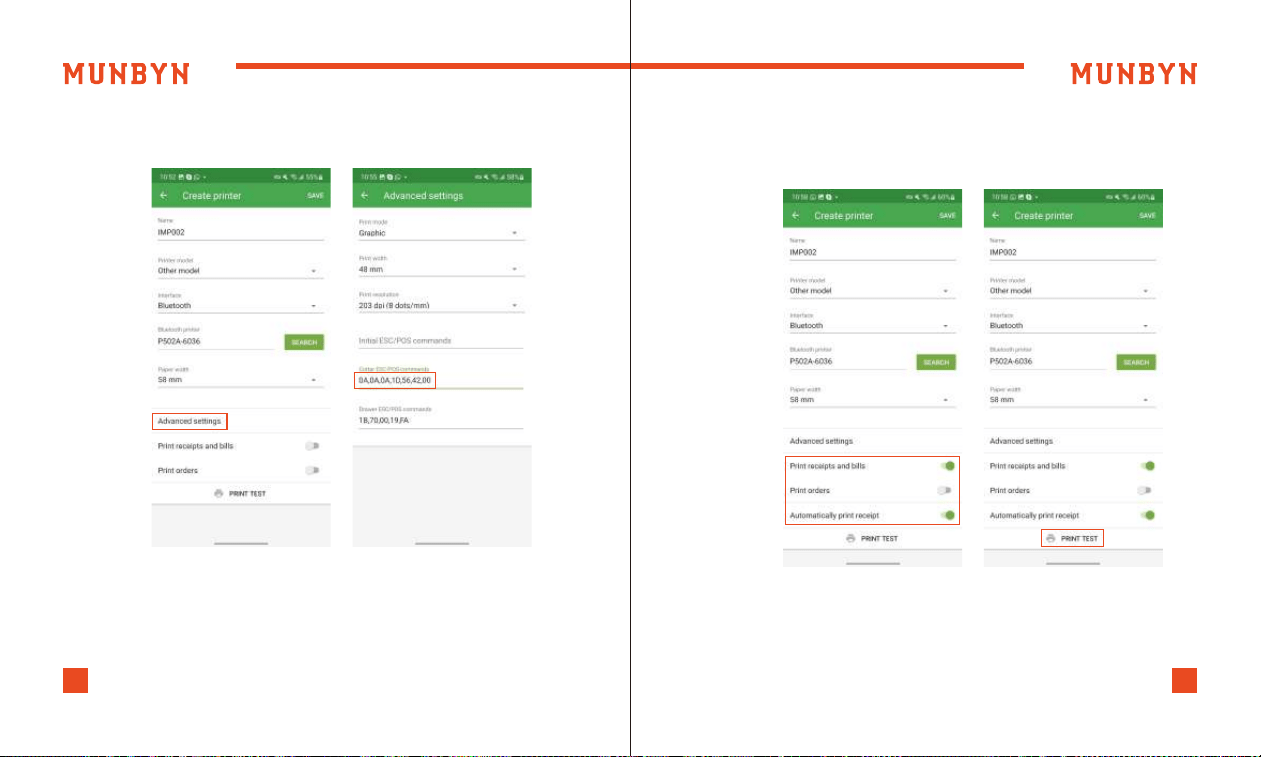
(6)From [Advanced setting], set [Cutter ESC/POS commands],
input [0A,0A,0A,1D,56,42,00].
Figure 5-8 Advance Setting
(7) Turn on two selections: [Print receipts and bills], [Automati-
cally print receipts]. Then, you can [PRINT TEST] at the bottom.
Connection is successful.
Figure 5-9 Print Test
support +16502062250support +16502062250
2019
Connect the Loyverse POS to print order receipt accordding to
the video.
You can get the driver by clicking the link below to download
the driver.
Driver download: munbyn.biz/002driverW
Setting tool download: munbyn.biz/002WTool
Only supports USB connection.
Notice: When dealing with links that require attention to
case-sensitive letters and numbers, it's important to be mindful
of the exact casing used in the link.
Demo video: munbyn.biz/002loyverse
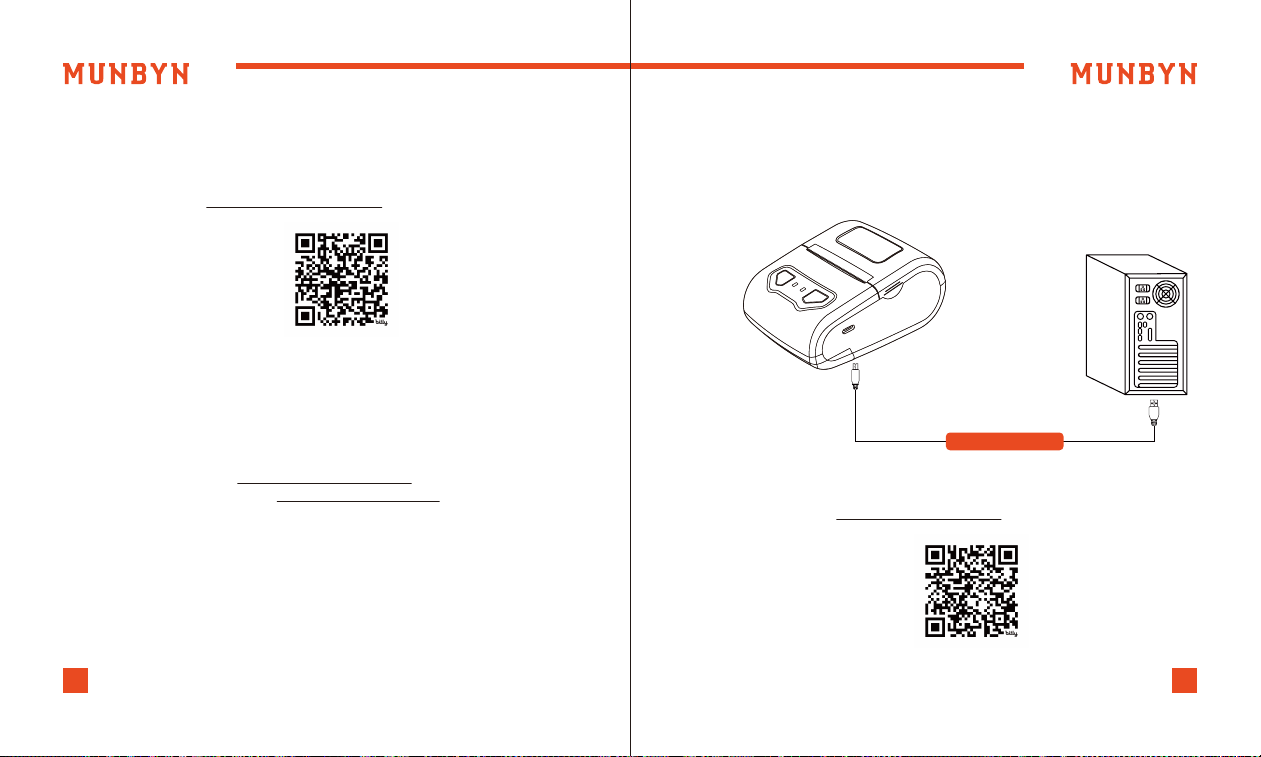
5.2. Set Up the IMP002 for First Use on Windows
5.2.1. Download Windows Driver
1) Connect the printer to the power outlet via the power cord.
2) Connect the printer to your Windows computer via USB.
3) Place the thermal paper into the printer and power it on.
Open the downloaded driver and install it.
Demo video: munbyn.biz/002windU
5.2.2. USB Interface
USB Interface
support +16502062250support +16502062250
2221
5.3. Set Up the IMP002 for First Use on MacBook
5.3.1. Download MacBook Driver
5.3.2. USB Interface
You can get the driver by clicking the link below to download
the driver.
Driver download: munbyn.biz/MACD
Only supports USB connection.
Open the downloaded driver and install it.
Demo video: munbyn.biz/002macU
1) Connect the printer to the power outlet via the power cord.
2) To connect the printer to your Mac, plug one end of the USB
cable into your Mac's USB port and the other end into the
printer. Use a USB-A to USB-C adapter for Macs with a USB-C
port if needed.
3) Place the thermal paper into the printer and power it on.
USB Interface
support +16502062250support +16502062250
2423
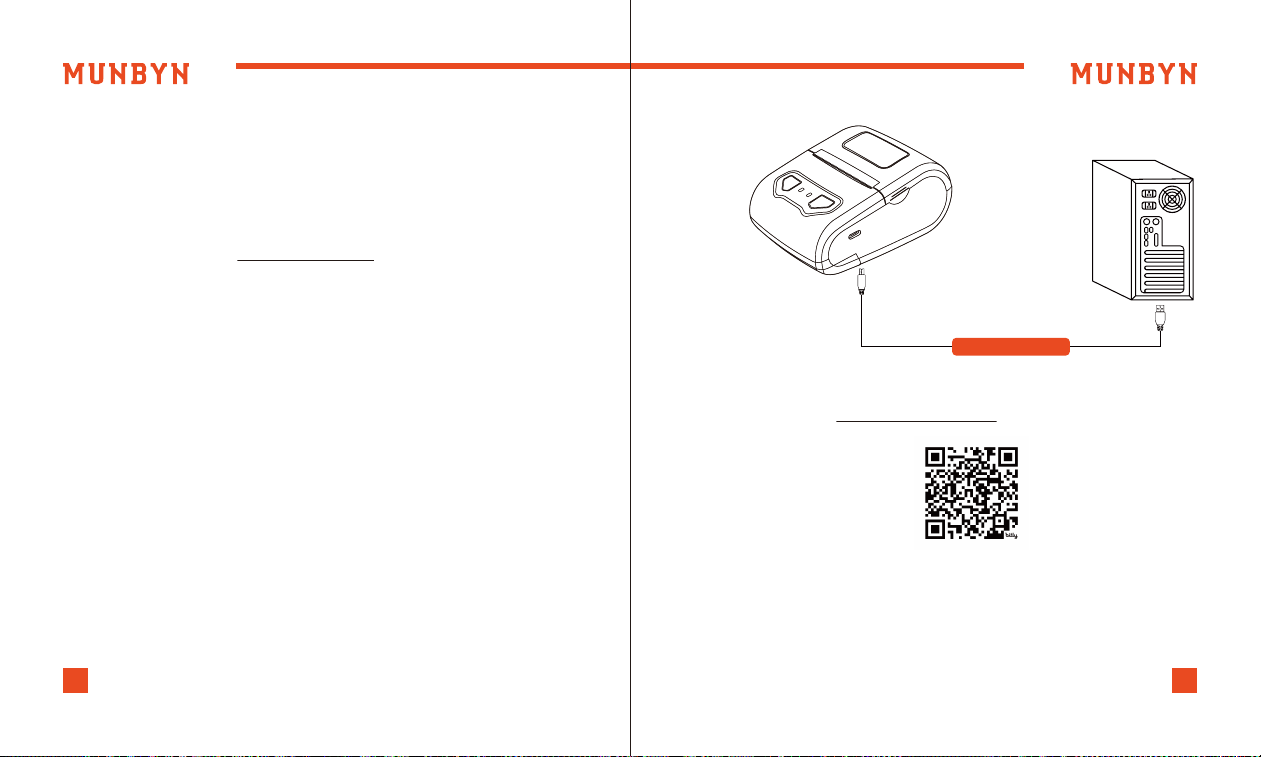
5.4. Set Up the IMP002 for First Use on ChromeOS
5.4.1. Download Chromeos Driver
5.4.2. USB Interface
You can click the link below to download the driver.
Driver download link: munbyn.biz/002chromeos
Only supports USB connection.
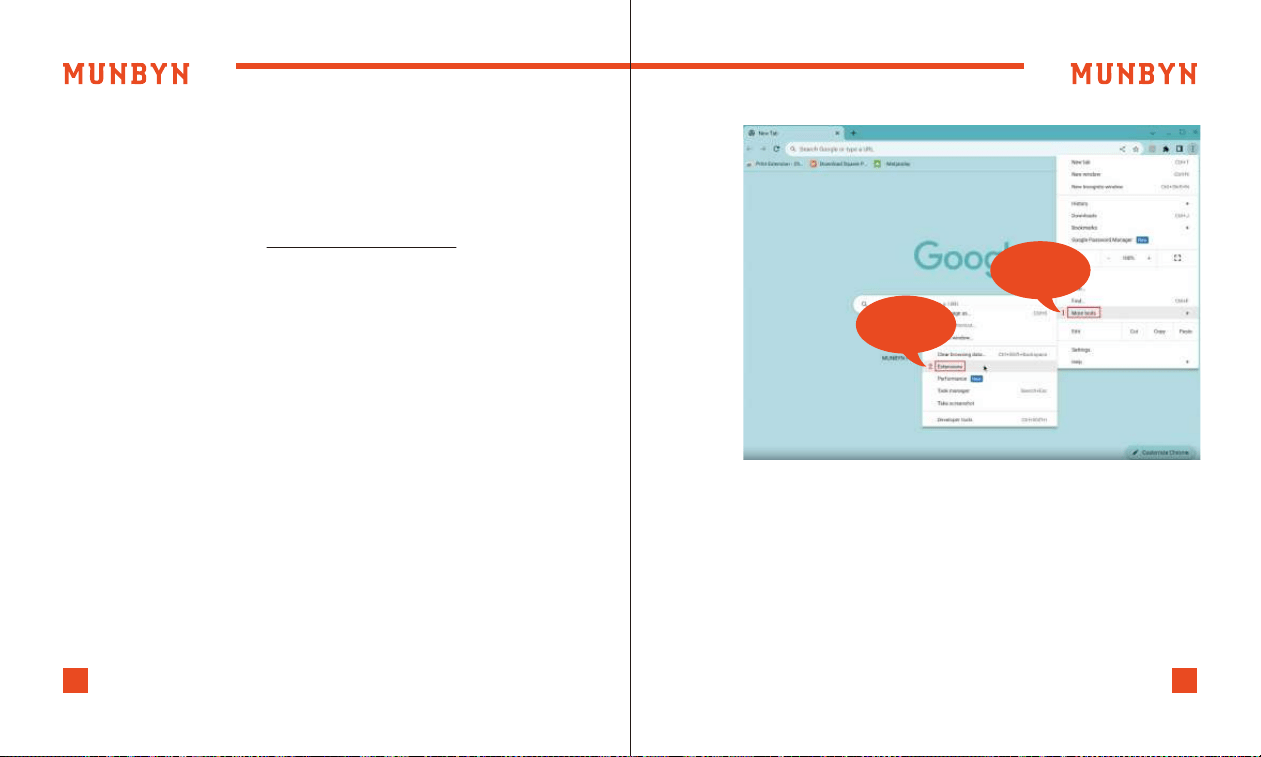
1) To install the [POS Printer Manager] extension and connect
your ticket printer, you need to add the extension in your
browser.
Specific steps are as follows:
a. Open the browser and click on the three dots in the top right
corner of the browser menu. Select [More tools], and select
[Extensions].
1. More tools
2. Extensions
support +16502062250support +16502062250
2625
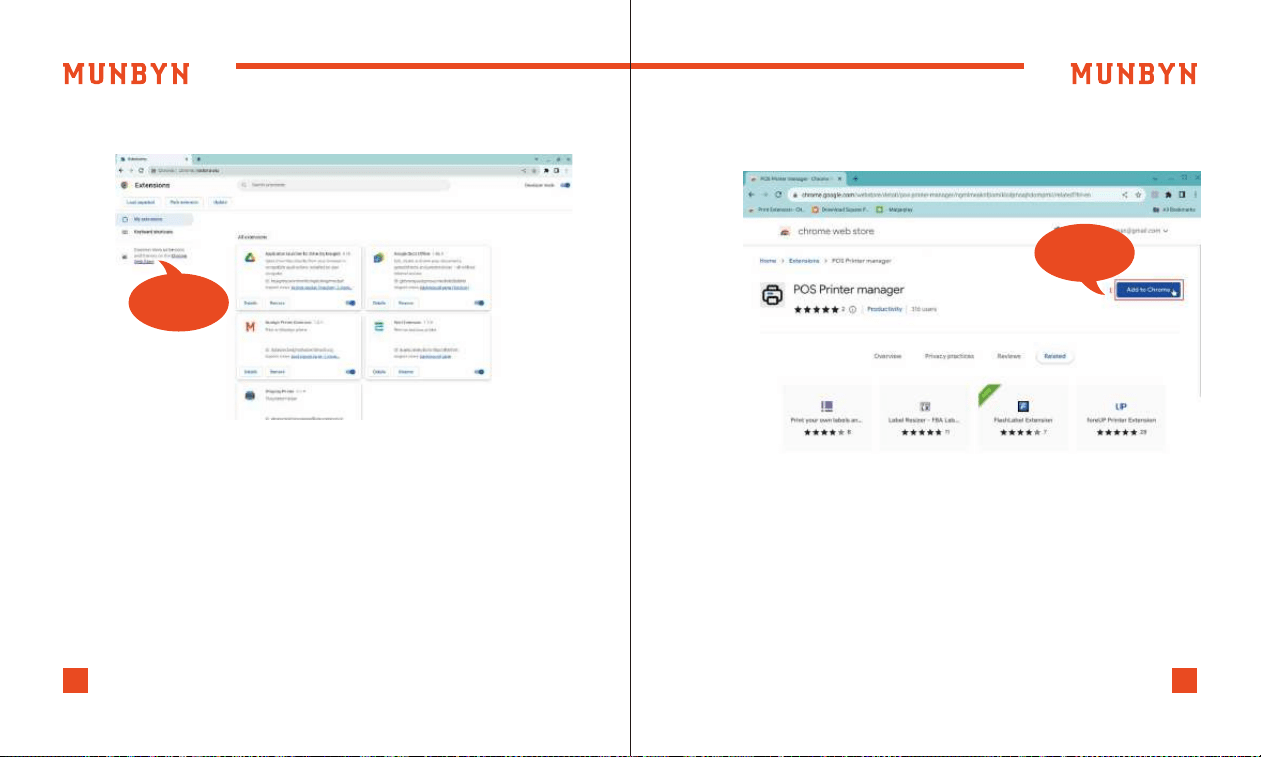
b. Click [Chrome Web Store].
Chrome Web
Store
c. Search [POS Printer manager] on Google Store and click [Add
to Chrome].
1. Add to
Chrome
support +16502062250support +16502062250
2827
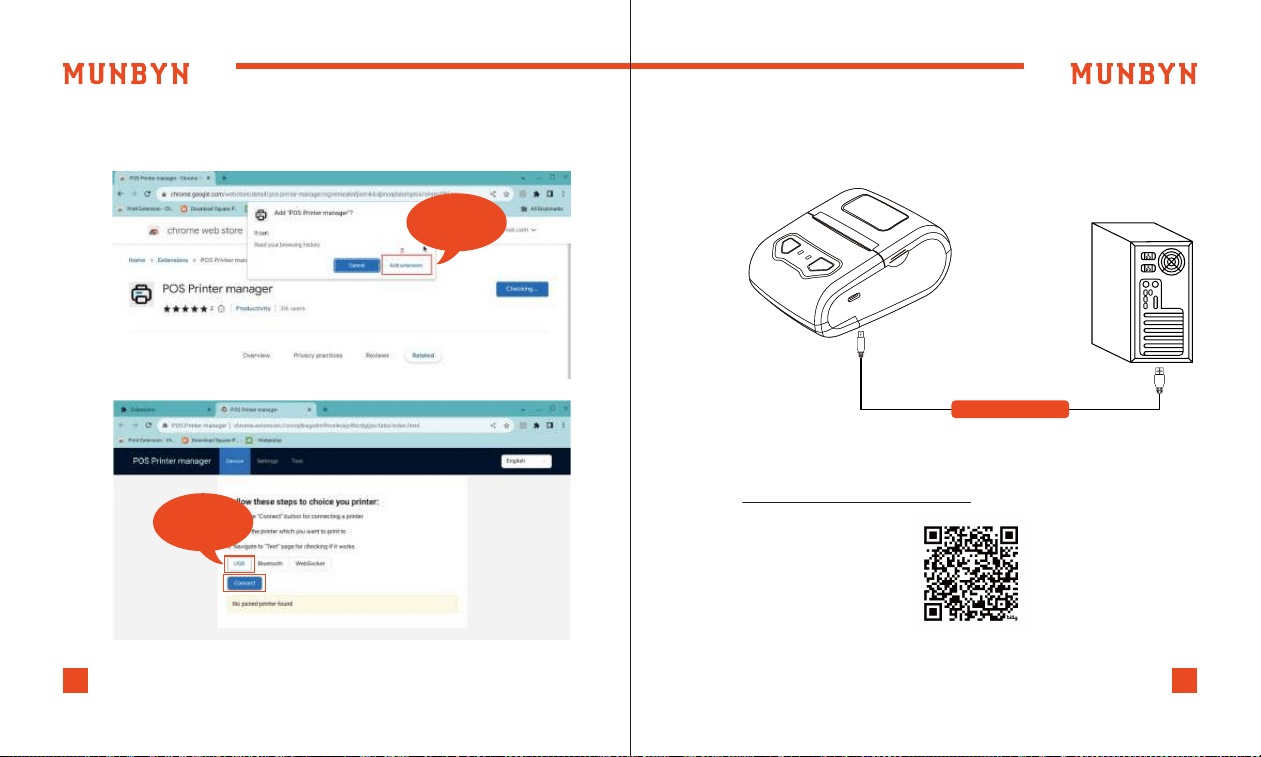
d. Click [Add extension]. You can now see the installed [POS
Printer manager] extension program on the page.
2. Add
extension
USB
Connect
2) Connect the printer to the power outlet via the power
cord,and connect the printer to your ChromeBook computer via
USB. Place the thermal paper into the printer and power it on.
Connect the printert accordding to the video.
ChromeOS Connection System demo video:
munbyn.biz/002chromeosvideo
USB Interface

support +16502062250support +16502062250
3029
MUNBYN provides 18 months warranty and lifetime free service.
If you encounter any issues with the product, don't hesitate to
contact the MUNBYN team to receive troubleshooting tips or a
prompt replacement.
Email: [email protected] (24-7 online support)
Website: www.munbyn.com (how-to videos and online FAQ)
WhatsApp: +86 18144898200
Phone: +1 6502062250
6.0. Contact us
Changes or modifications not expressly approved by the party
responsible for compliance could void the user's authority to
operate the equipment.
This equipment has been tested and found to comply with the
limits for a Class B digital device, pursuant to Part 15 of the FCC
Rules. These limits are designed to protect reasonably against
harmful interference in a residential installation. This equipment
generates uses and can radiate radio frequency energy and, if
not installed and used in accordance with the instructions, may
cause harmful interference to radio communications. However,
7.0. FCC Statement
there is no guarantee that interference will not occur in a
particular installation. if this equipment does cause harmful
interference to radio or television reception, which can be
determined by turning the equipment off and on, the user is
encouraged to try to correct the interference by one or more of
the following measures:
-- Reorient or relocate the receiving antenna.
-- Increase the separation between the equipment and receiver.
-- Connect the equipment to an outlet on a circuit different
from that to which the receiver is connected.
-- Consult the dealer or an experienced radio/TV technician for
help.
This device complies with part 15 of the FCC rules. Operation is
subject to the following two conditions (1) this device may not
cause harmful interference, and (2) this device must accept any
interference received, including interference that may cause
undesired operation.
This equipment complies with FCC radiation exposure limits set
forth for an uncontrolled environment.
support +16502062250support +16502062250
3029
MUNBYN provides 18 months warranty and lifetime free service.
If you encounter any issues with the product, don't hesitate to
contact the MUNBYN team to receive troubleshooting tips or a
prompt replacement.
Email: support@munbyn.com (24-7 online support)
Website: www.munbyn.com (how-to videos and online FAQ)
WhatsApp: +86 18144898200
Phone: +1 6502062250
6.0. Contact us
Changes or modifications not expressly approved by the party
responsible for compliance could void the user's authority to
operate the equipment.
This equipment has been tested and found to comply with the
limits for a Class B digital device, pursuant to Part 15 of the FCC
Rules. These limits are designed to protect reasonably against
harmful interference in a residential installation. This equipment
generates uses and can radiate radio frequency energy and, if
not installed and used in accordance with the instructions, may
cause harmful interference to radio communications. However,
7.0. FCC Statement
there is no guarantee that interference will not occur in a
particular installation. if this equipment does cause harmful
interference to radio or television reception, which can be
determined by turning the equipment off and on, the user is
encouraged to try to correct the interference by one or more of
the following measures:
-- Reorient or relocate the receiving antenna.
-- Increase the separation between the equipment and receiver.
-- Connect the equipment to an outlet on a circuit different
from that to which the receiver is connected.
-- Consult the dealer or an experienced radio/TV technician for
help.
This device complies with part 15 of the FCC rules. Operation is
subject to the following two conditions (1) this device may not
cause harmful interference, and (2) this device must accept any
interference received, including interference that may cause
undesired operation.
This equipment complies with FCC radiation exposure limits set
forth for an uncontrolled environment.