
Software Manual
ITPP047 Thermal Printer
2.10

Page2of78
ITPP047 Thermal Printer Windows Software Manual
Version 2.00

Page3of78
ITPP047 Thermal Printer Windows Software Manual
Version 2.00
Version History
Date
By
Changes
Version
2021-1-9
Ace
Installation, Tool Guide
1.00
2021-6-5
James
Add the Chromebook Installation
Add the Square Installation
Fix some errors of Wi-Fi connection
1.01
2021-7-15
James
Update the Square Installation
Update the Printer Test V5.1C
1.02
2021-10-18
James
Add the 1.0 Overview Section
Update the 2.0 installation and uninstallation Section
Add the 3.0 Windows Printer Settings Section
Update the 4.0 "Printer Test V5.1C" Setting Tool
Section
2.00
2022-1-6
Chuy
Upgrade the Printer Installation Mode
Change the Wi-Fi Setting Mode
Upgrade printer Settings
Add Uninstallation
2.01
2022-1-25
Chuy
Modify the titles of section 3.0 and 2.3 to change
wireless network connection to STA and Wi-Fi direct
connection to AP.
Section 2.3 exchange order between STA mode and AP
mode.
Safety popup prompts to add images.
"bill paper" becomes "thermal paper".
Correct incorrect syntax for annotations.
All text and serial numbers are top.
Section 3.0 adds mobile phone shutdown data and
auto-switch network settings.
Refresh the content.
Section 1.0 adds contact information.
"Chapter" changed to "section".
Modify section 2.3 Hyperlink.
2.02
2022-2-8
Chuy
Correct the wrong grammar.
Replace pictures.
Added remarks on uninstalling and reinstalling the
upgrade system.
2.03
2022-2-23
Chuy
Add video links
2.10

Page4of78
ITPP047 Thermal Printer Windows Software Manual
Version 2.00
Content
Version History ......................................................................................................................................................3
1.0. Overview .................................................................................................................................................. 6
2.0. Installation ............................................................................................................................................... 7
2.1. Install Printer via USB .............................................................................................................................. 7
2.1.1. Before Installing USB Printer .............................................................................................................. 7
2.1.2. Install a USB Printer ............................................................................................................................ 7
2.2. Install Printer via LAN ............................................................................................................................10
2.2.1. Before Installing a LAN Printer ......................................................................................................... 10
2.2.2. Install a LAN Printer .......................................................................................................................... 11
2.2.3. Install Multiple LAN Printers ............................................................................................................ 15
2.3. Install Printer via Wi-Fi (Wi-Fi Function Printers) ................................................................................ 17
2.3.1. STA Mode .......................................................................................................................................... 17
2.3.2. AP Mode ............................................................................................................................................ 21
2.4. Install Printer via Bluetooth (Bluetooth Function Printers) .................................................................... 25
2.4.1. Before Installing Bluetooth Printer .................................................................................................... 25
2.4.2. Install a Bluetooth Printer .................................................................................................................. 27
2.5. Install Printer via Serial ...........................................................................................................................29
2.5.1. Before Installing Serial Printer ...........................................................................................................29
2.5.2. Install a Serial Printer .........................................................................................................................30
3.0. Wi-Fi Setting (Wi-Fi Function Printers) .............................................................................................33
3.1. STA Mode ...............................................................................................................................................33
3.1.1. IP Address Automatic Setting Mode ..................................................................................................33
3.1.2. IP Address Manual Setting Mode ...................................................................................................... 41
4.0. Uninstallation ........................................................................................................................................ 50
4.1. Delete Print Pool Job ...............................................................................................................................50
4.2. Delete Printer .......................................................................................................................................... 51
4.3. Uninstall Driver .......................................................................................................................................51
5.0. Windows Printer Settings .....................................................................................................................57
5.1. Print Setting .............................................................................................................................................57
5.1.1. Cash Drawer Selection ....................................................................................................................... 57
5.1.2. Cutter Selection .................................................................................................................................. 58
5.1.3. Printing Density ................................................................................................................................. 58
5.1.4. Printing Alarm ....................................................................................................................................59
5.1.5. Paper Feed After ................................................................................................................................ 59
5.2. Page Setting .............................................................................................................................................60
5.2.1. Page Setting ........................................................................................................................................60
5.2.2. Rotation .............................................................................................................................................. 60
5.2.3. Mirror ................................................................................................................................................. 61
5.2.4. Inverse ................................................................................................................................................ 61
5.2.5. Factory Reset ......................................................................................................................................62
5.2.6. Reset Setting .......................................................................................................................................62
5.2.7. Print Self Test .....................................................................................................................................63
6.0. "Printer Test V5.1C" Setting Tool ......................................................................................................64
6.1. Common Functions ................................................................................................................................. 64
6.1.1. Communication Port Selection .......................................................................................................... 64
6.1.2. Printer Type ........................................................................................................................................65
6.1.3. Ethernet Port Setting (NET Setting) .................................................................................................. 65

Page5of78
ITPP047 Thermal Printer Windows Software Manual
Version 2.00
6.1.4. Print …………………………………………………………………………………………………65
6.1.5. Cut Paper ............................................................................................................................................ 65
6.1.6. Open Cash drawer .............................................................................................................................. 66
6.1.7. Traditional Font Test ..........................................................................................................................66
6.1.8. Driver Print .........................................................................................................................................66
6.1.9. Advanced Common Setting ............................................................................................................... 66
6.1.10. Language Switching ...........................................................................................................................70
6.2. Uncommon Functions ............................................................................................................................. 70
6.2.1. Parallel Port Setting (LPT Set) ...........................................................................................................70
6.2.2. Serial Port Setting (COM Set) ............................................................................................................71
6.2.3. Number of the Copies ........................................................................................................................ 71
6.2.4. HEX Data ........................................................................................................................................... 71
6.2.5. Printing Content ................................................................................................................................. 71
6.2.6. Automatically Sending, Cycle, CutPaper ...........................................................................................71
6.2.7. Firmware Update ................................................................................................................................72
6.2.8. Factory default ................................................................................................................................... 72
6.2.9. Advanced Uncommon Setting ........................................................................................................... 72

Page6of78
ITPP047 Thermal Printer Windows Software Manual
Version 2.00
1.0. Overview
This document describes the Windows setup instructions and the configuration for the ITPP047.
Please read this manual before using the printer.
Scan the QR code for Facebook online chat
Contact us
MUNBYN provides 18 months warranty and lifetime free service.
If you encounter any issues with the product, please contact the MUNBYN team to promptly receive
troubleshooting tips or a replacement.
Email: support@munbyn.com (24-7 online support)
Website: www.munbyn.com (how-to videos, warranty details)
WhatsApp
:
+8617817881067
Page7of78
ITPP047 Thermal Printer Windows Software Manual
Version 2.00
2.0. Installation
Note: To use the ITPP047 in a Windows environment, you need to install this printer driver in advance.
1) Get the Windows driver from the link: http://u.pc.cd/mcictalK or the provided USB Flash Drive.
2) If your system is updated, please uninstall the driver before installing it. Please refer to section 4.0 for
detailed driver uninstallation.
2.1. Install Printer via USB
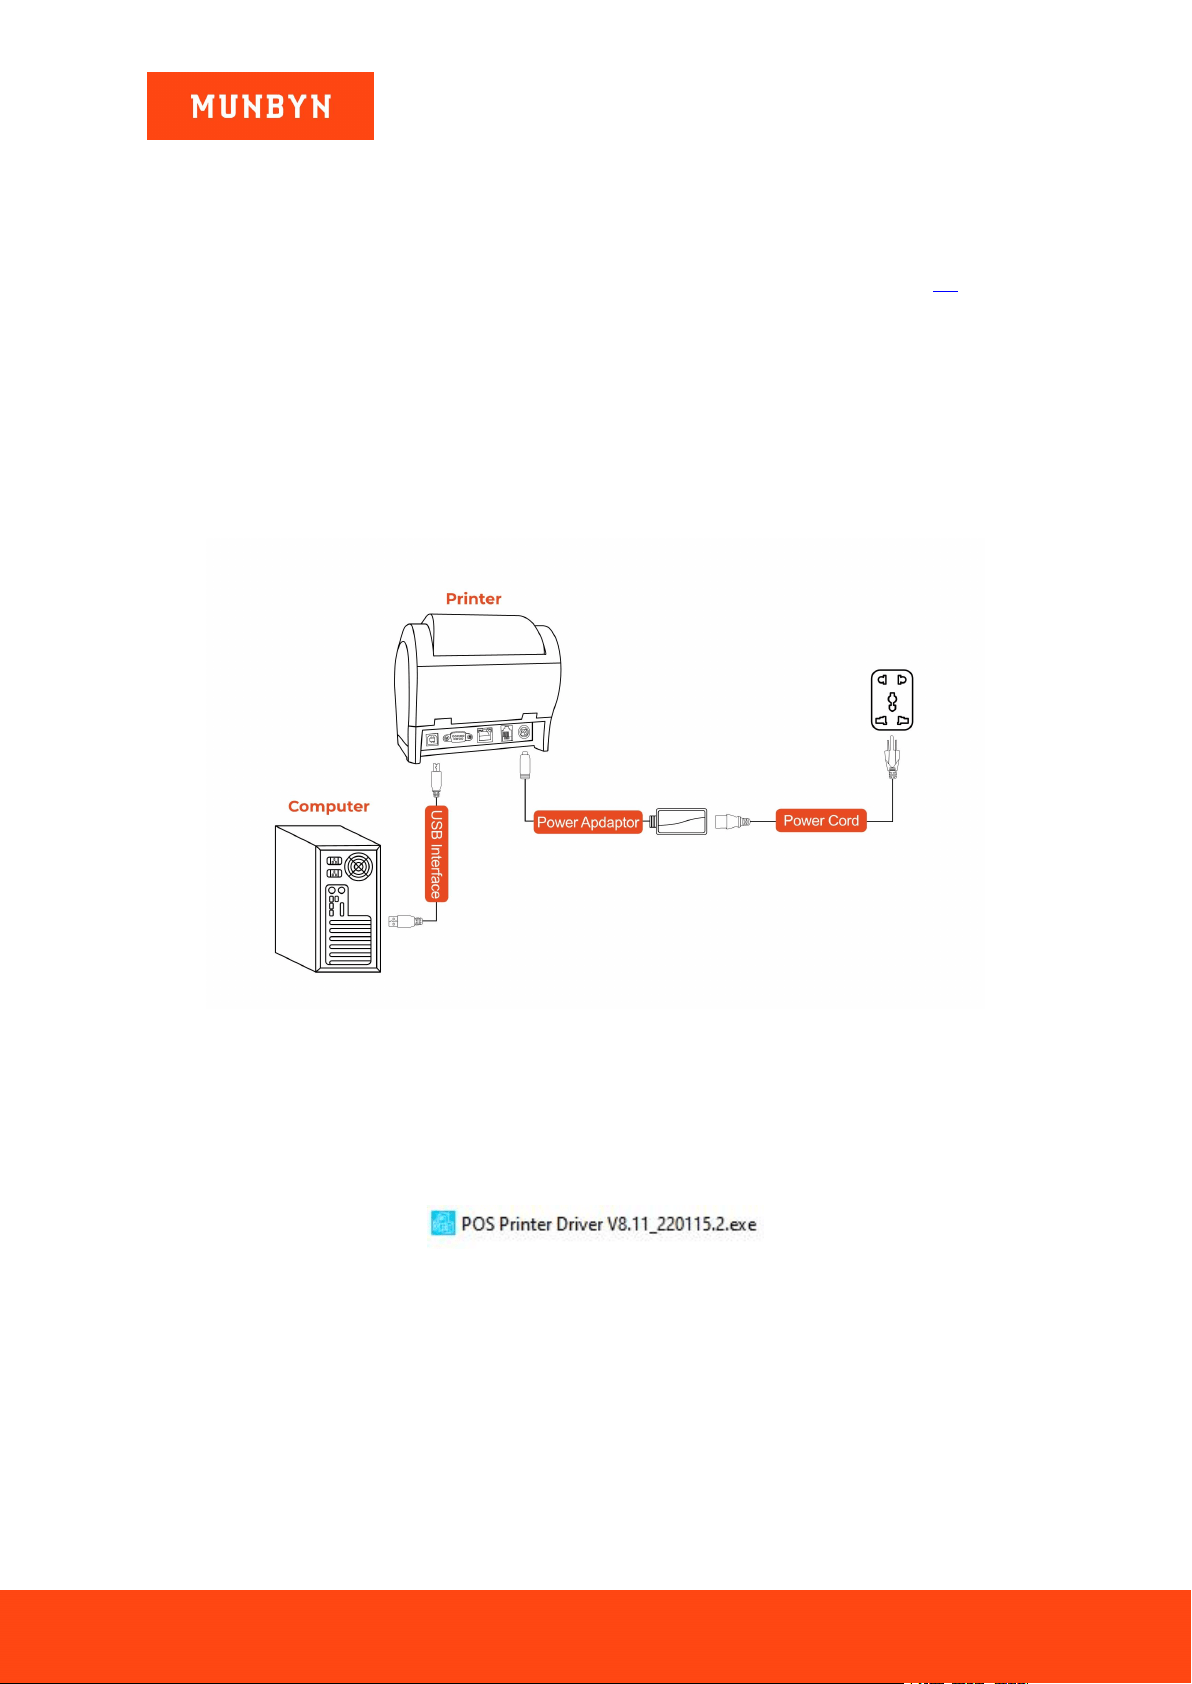
2.1.1. Before Installing USB Printer
1) Connect the printer to the power outlet via the power cord.
2) Connect the printer to your Windows computer via USB.
3) Place the thermal paper into the printer and power it on.
Figure 2- 1 Connection Diagram
Demo video: http://u.pc.cd/BIqrtalK
2.1.2. Install a USB Printer
1) Double click "POS Printer Driver V8.xx.exe".
Figure 2- 2 Installation Package
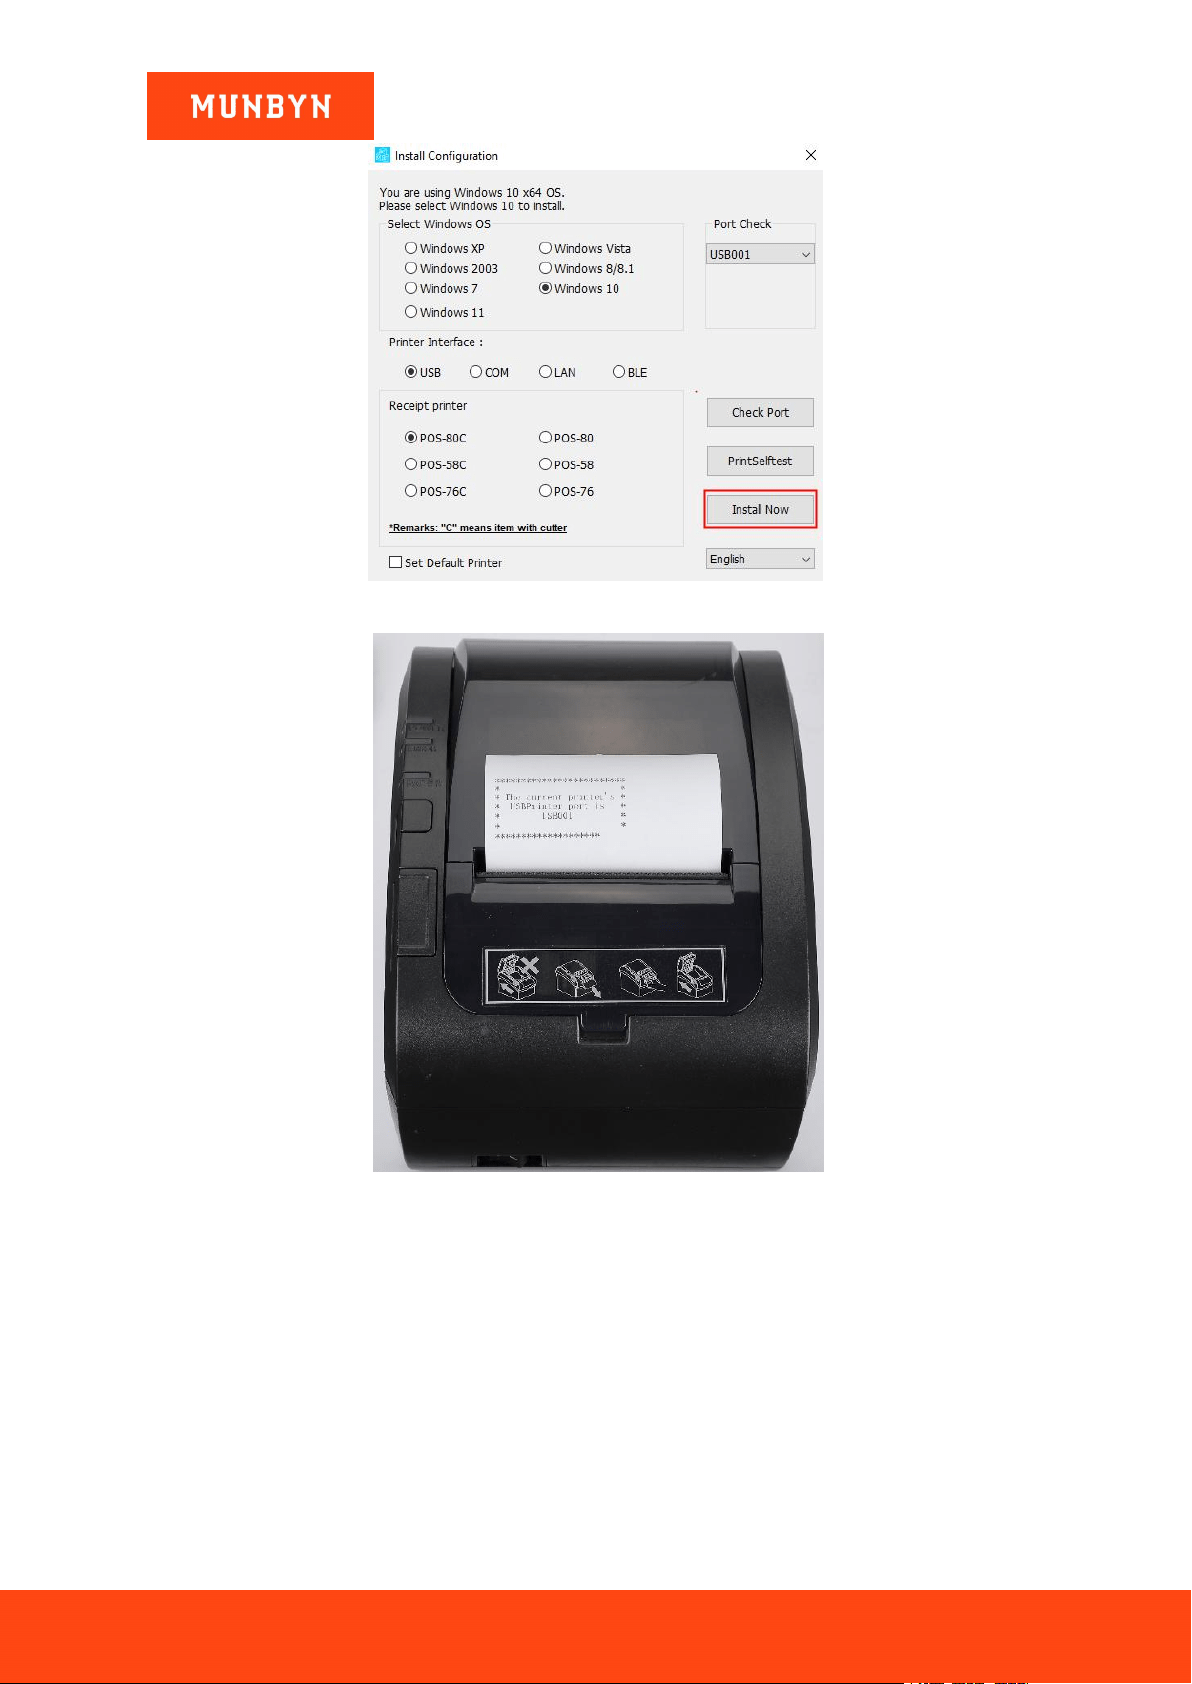
2) Click "Install now", the printer will automatically print out a USB port detection ticket.
Page8of78
ITPP047 Thermal Printer Windows Software Manual
Version 2.00
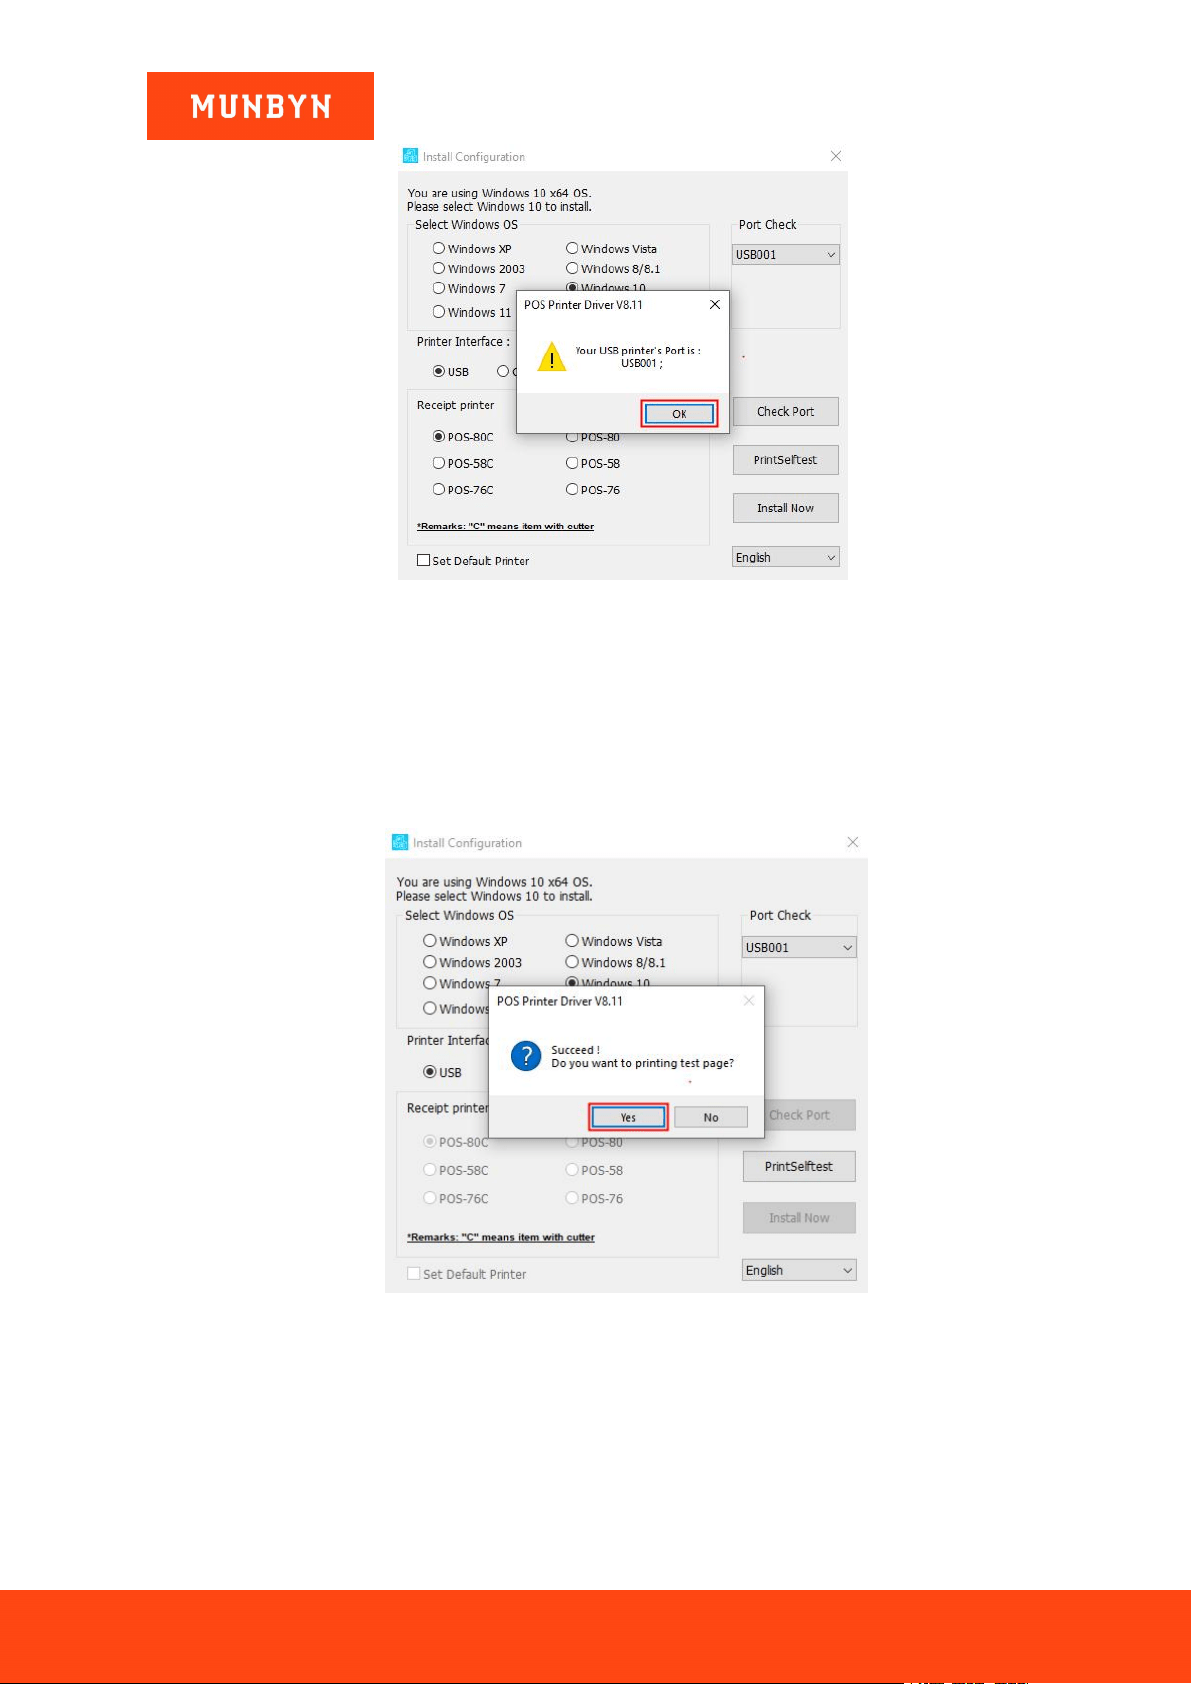
Figure 2- 3 Install Interface
Figure 2- 4 USB Port Detection Ticket
3) The USB printer port number will be displayed in the computer window, click "OK".
Page9of78
ITPP047 Thermal Printer Windows Software Manual
Version 2.00
Figure 2- 5 Display USB Port
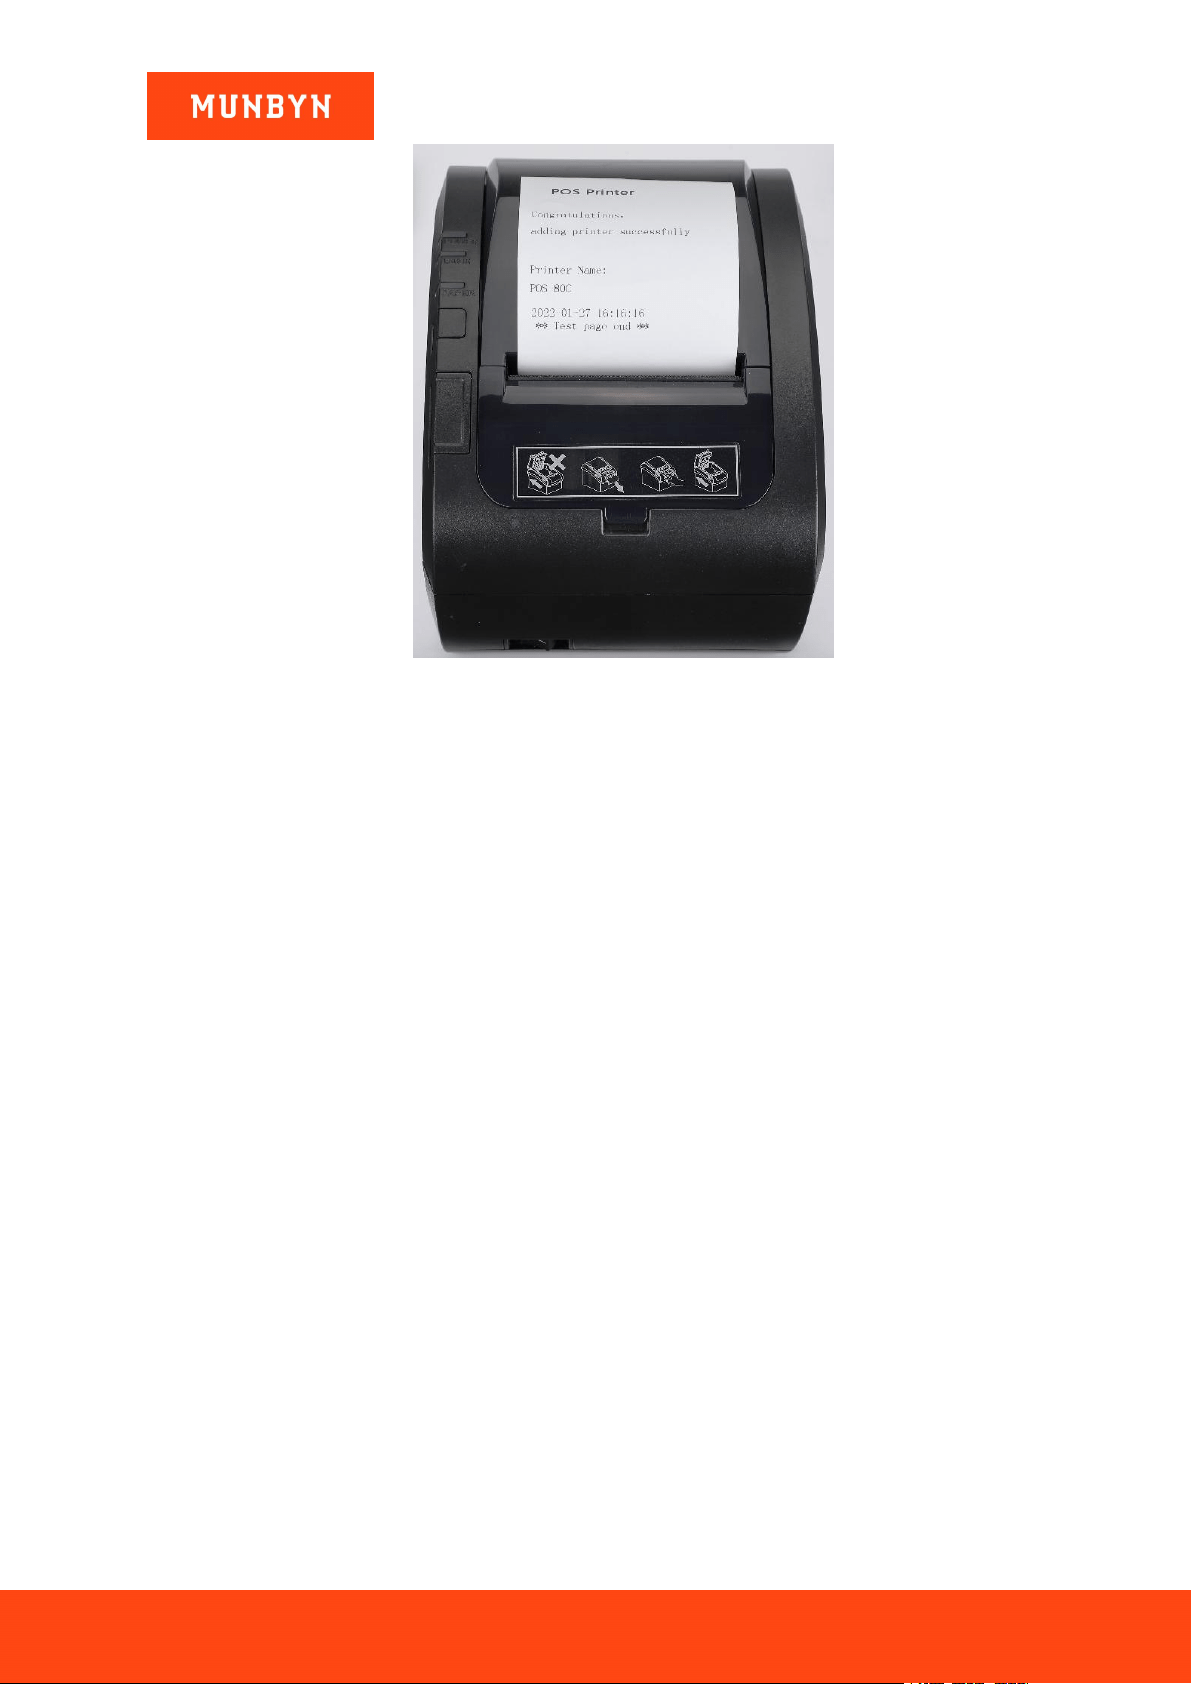
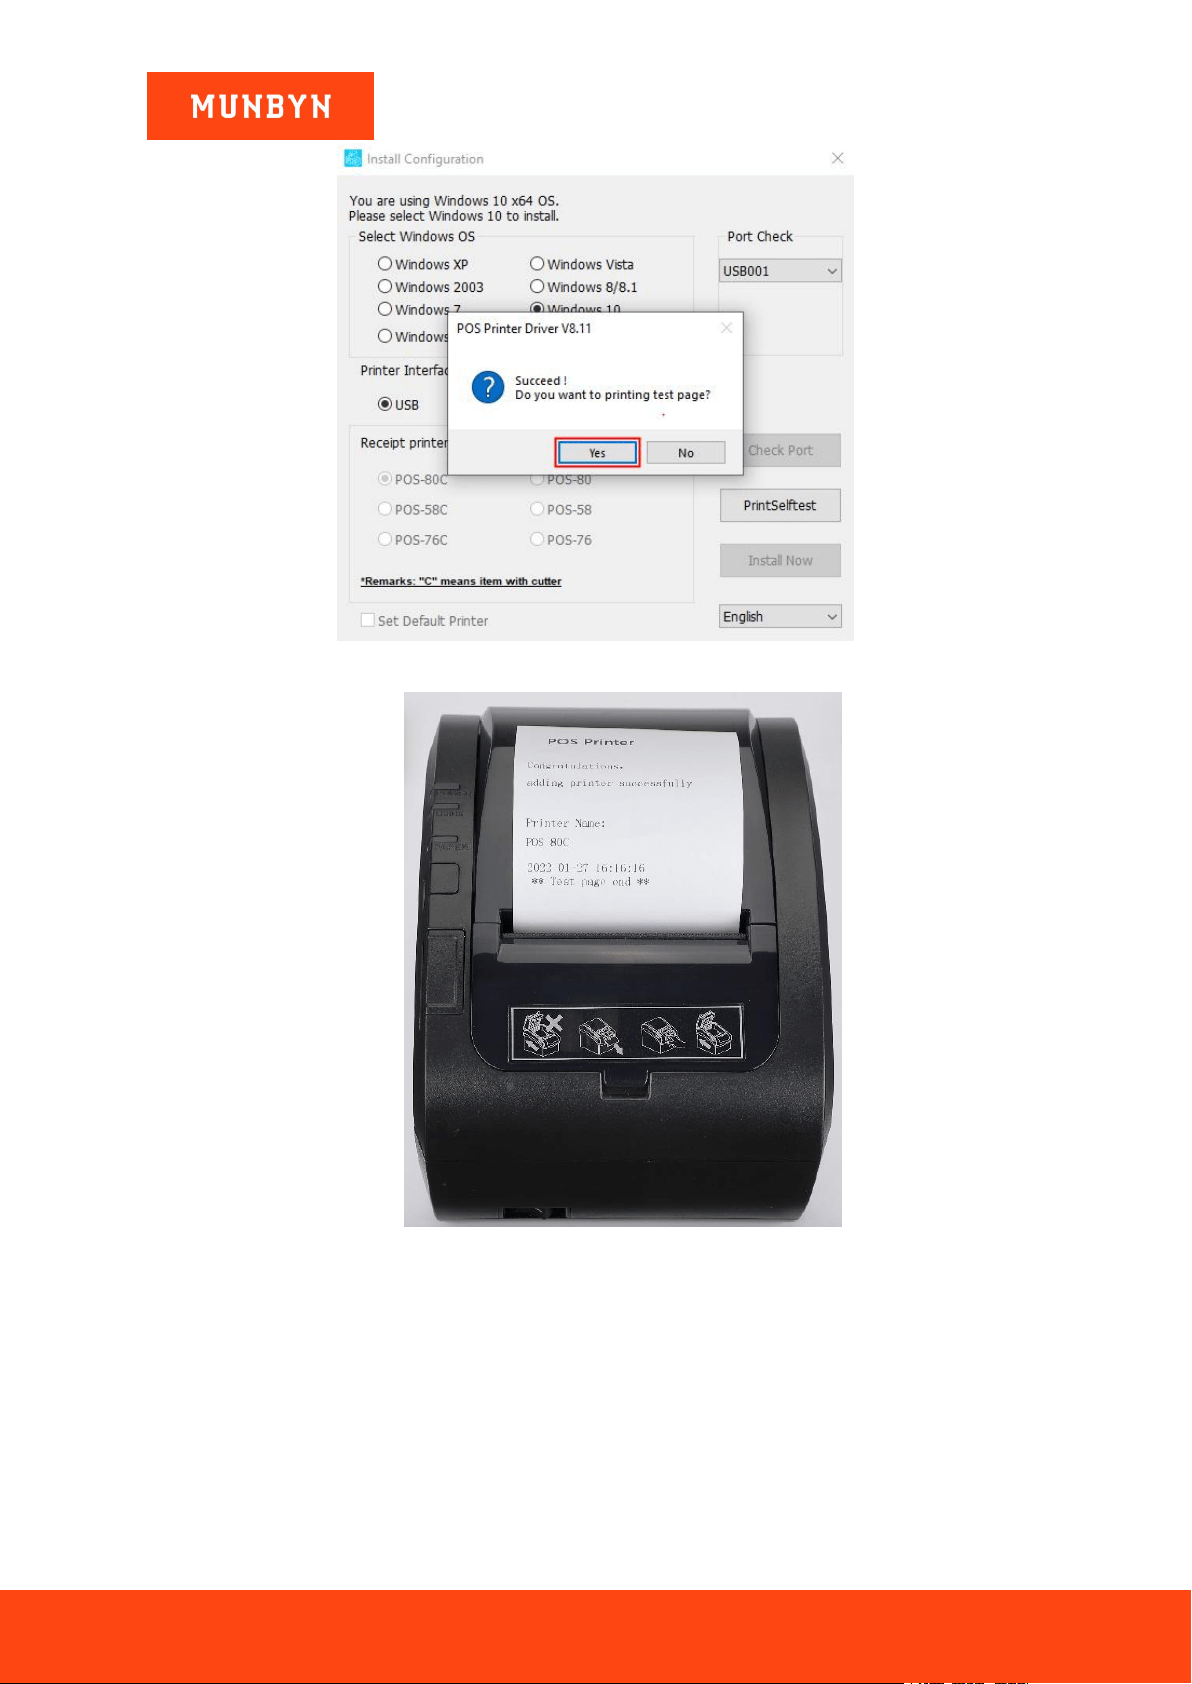
4) The driver will automatically pop up a small window. Click "Yes", the printer will print out a "POS Printer"
test page, indicating that the printer is ready.
Note: After the installation, the computer will automatically open an FQA document. If you encounter any
problems during use, you can read the FAQ document first.
Figure 2- 6 Successful Installation
Page10of78
ITPP047 Thermal Printer Windows Software Manual
Version 2.00
Figure 2- 7 "POS Printer" Test Page
Demo video:http://u.pc.cd/enX
2.2. Install Printer via LAN
2.2.1. Before Installing a LAN Printer
1) Connect the printer to the power outlet through the power cord, put the thermal paper into the printer, and
turn on the printer and the computer.
2) Prepare a router and two network cables. Connect one end of the first cable to the Internet and the other end
to an available port on your router. Connect one end of the second network cable to a port on the printer, and
then connect the other end of the cable to an available port on the router.
3) Connect the computer to the router. There are two ways to connect your computer to the router, as shown
below. Please choose either one.
a. Connect the computer to the router with a network cable. Please see the picture below.

Page11of78
ITPP047 Thermal Printer Windows Software Manual
Version 2.00
Figure 2- 8 Connection Diagram
Demo video: http://u.pc.cd/o1hctalK
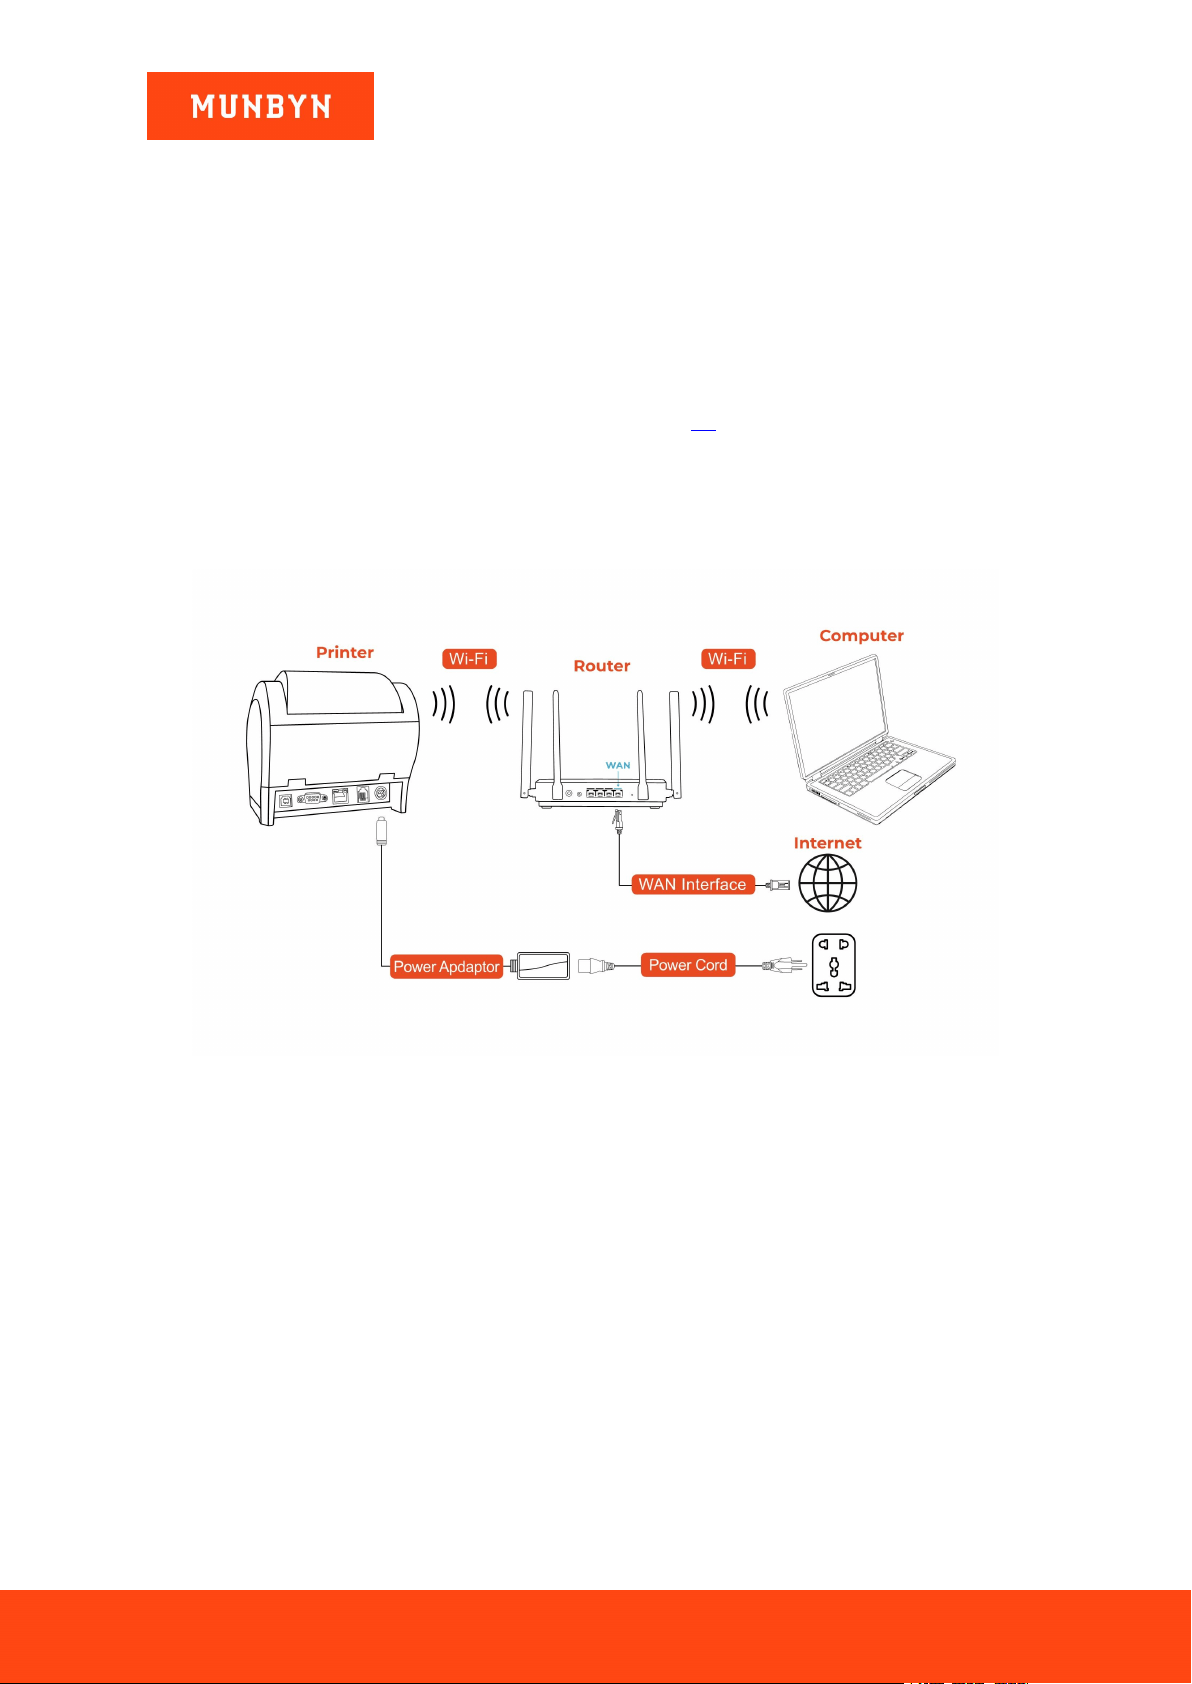
b. The computer is connected to the wireless router. Please see the below picture.
Figure 2- 9 Connection Diagram
Demo video: http://u.pc.cd/3nc
2.2.2. Install a LAN Printer
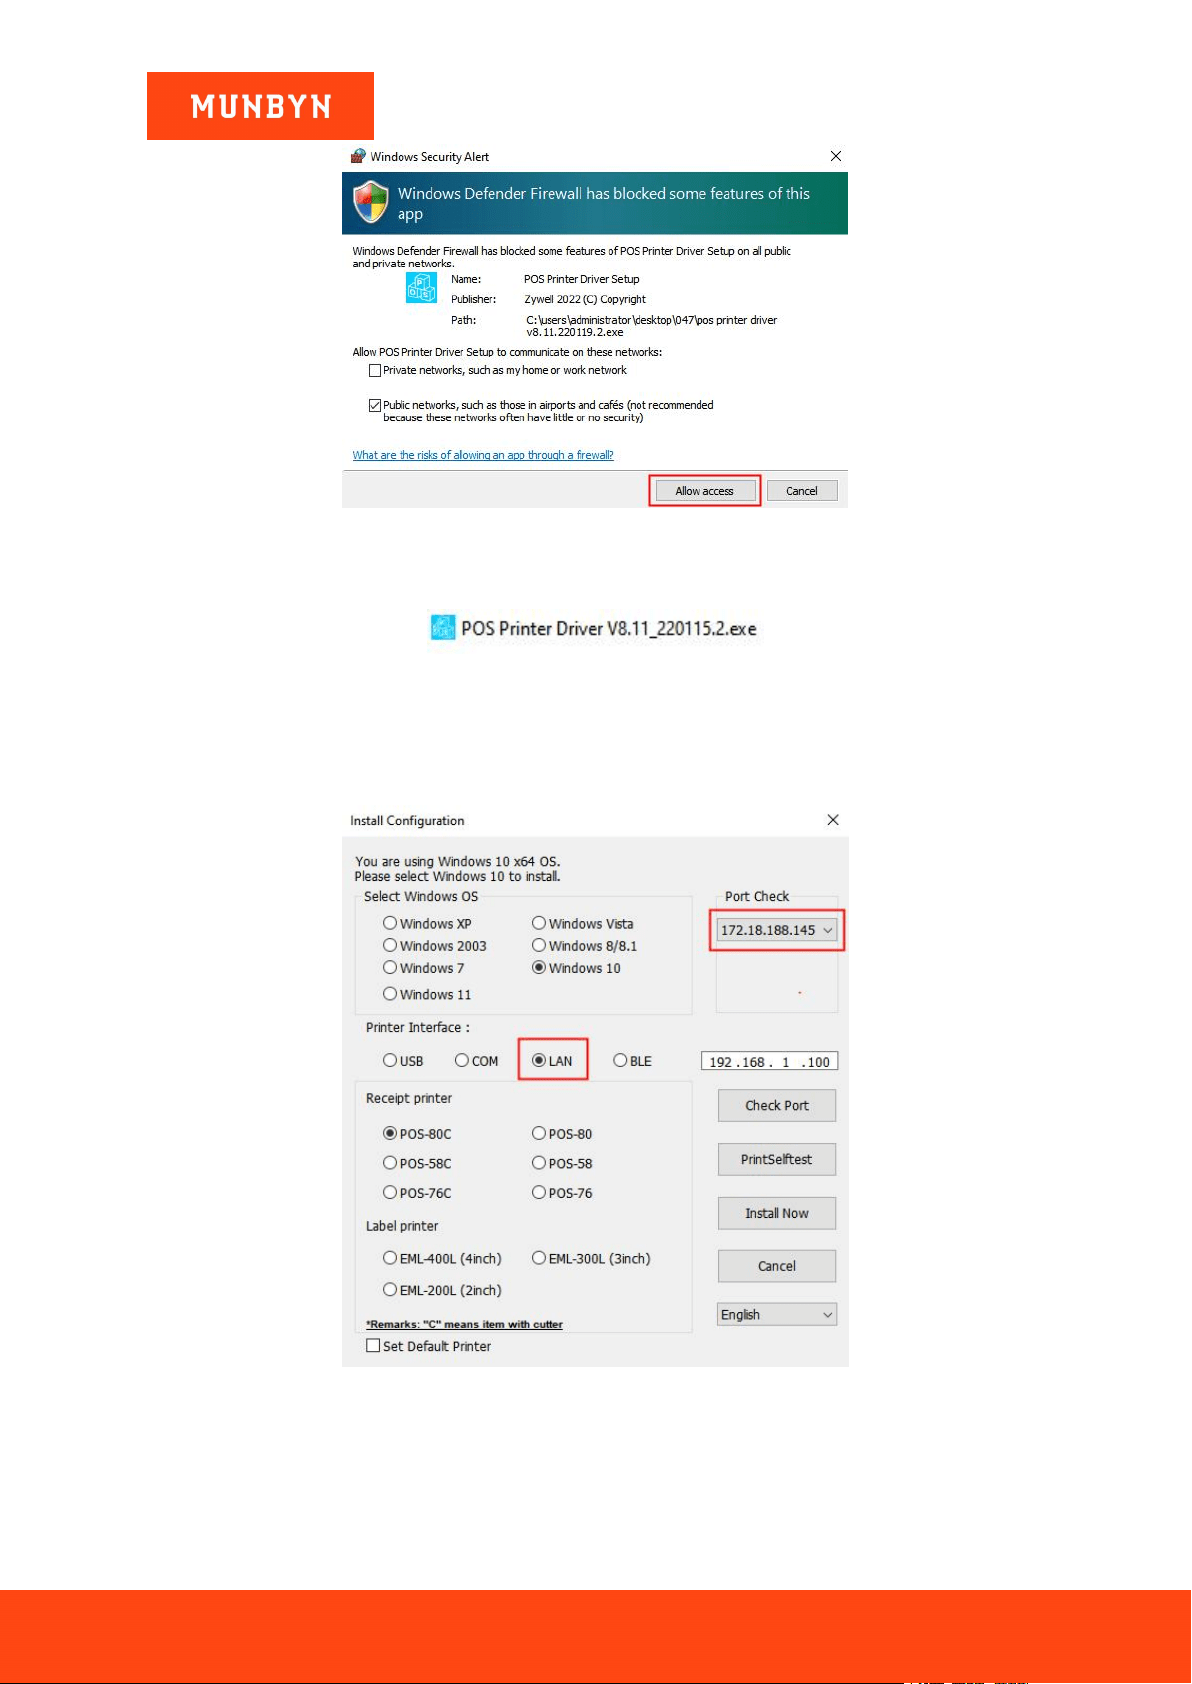
Note: During installation, a Windows Security Alert may pop up, showing that Windows Defender Firewall has
blocked some features of this app. Please click "Allow access". This driver has been fully tested on all current
versions of Windows.
Page12of78
ITPP047 Thermal Printer Windows Software Manual
Version 2.00
Figure 2- 10 Windows Security Alert
1) Double click "POS Printer Driver V8.xx.exe".
Figure 2- 11 Installation Package
2) Select "LAN" and wait about 10 seconds, then the printer IP address will be displayed in "Port Check".
Note: If you cannot find your printer's IP address, please check whether your network connection between the
printer and your computer is correct. Close and reopen the program and restart the printer.
Figure 2- 12 Driver Installation Interface
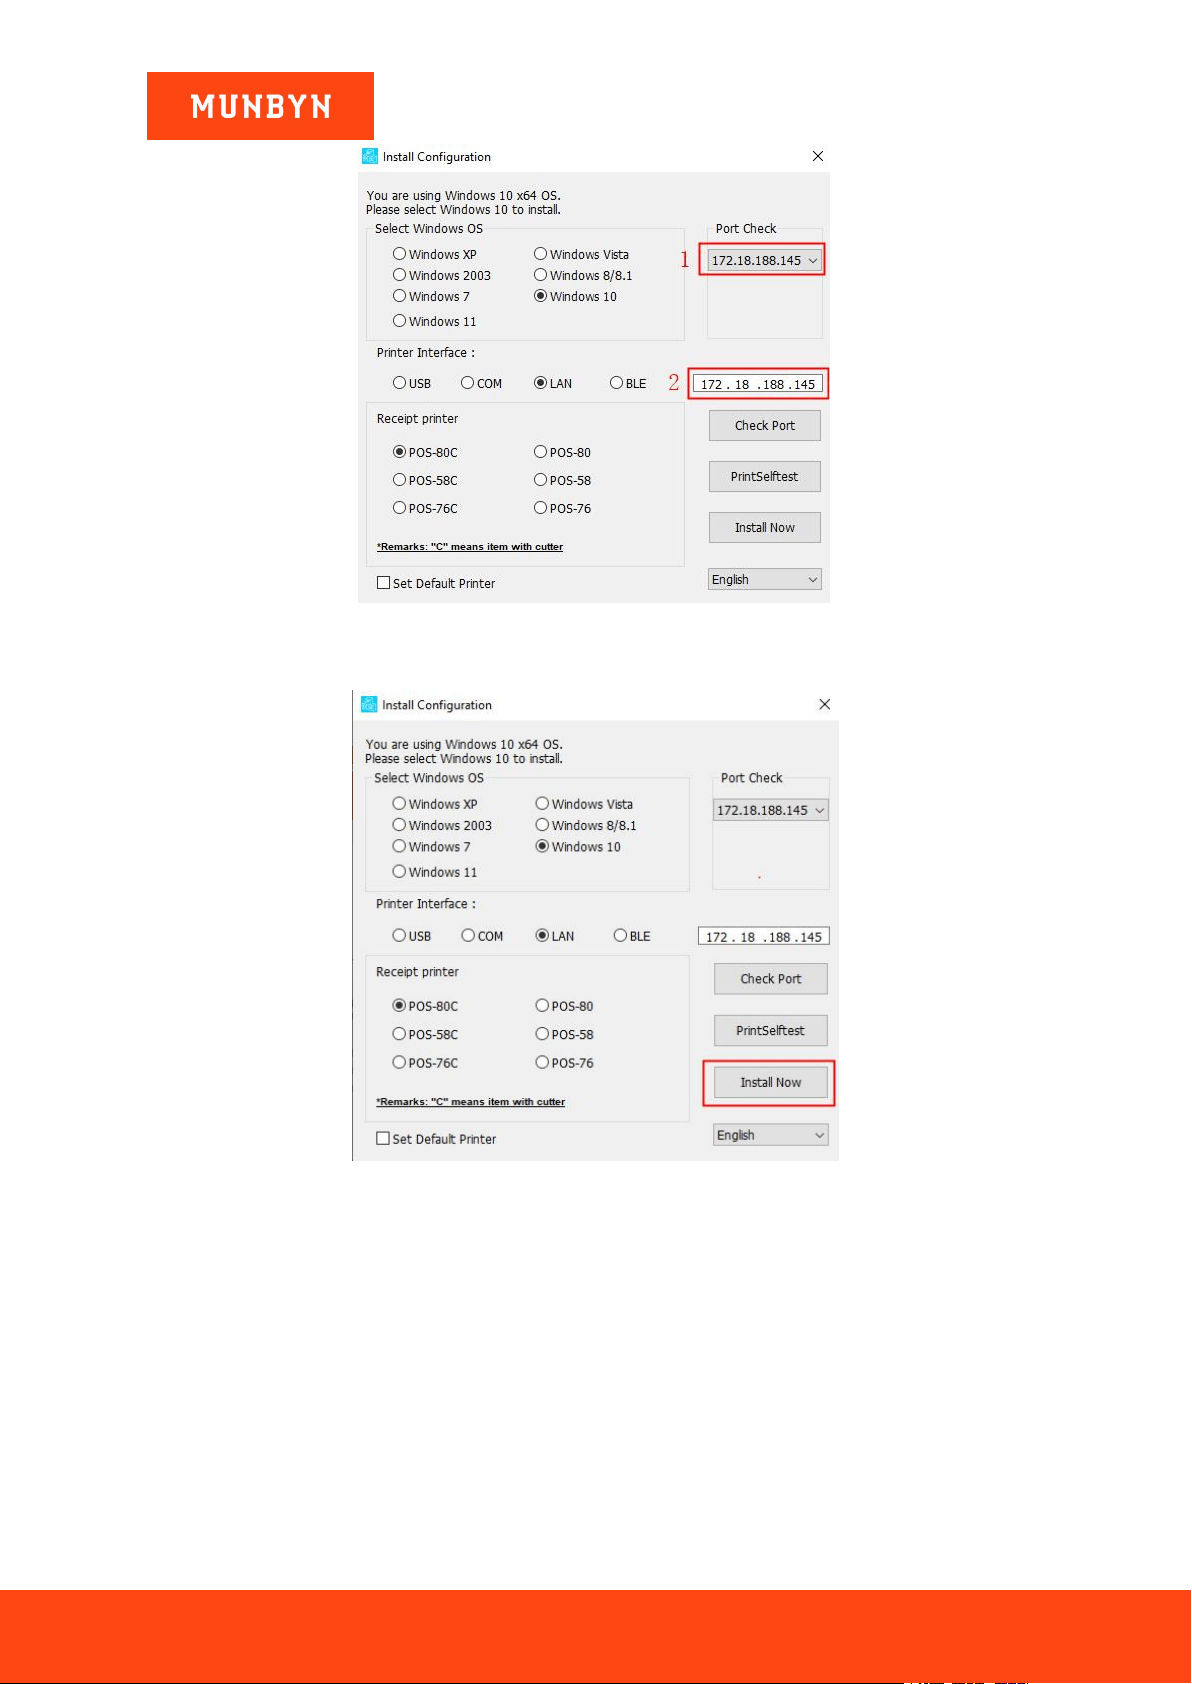
3) Click the IP address displayed by the "Port Check", the IP displayed in the white box is the same as the IP
address you selected above, then click the "Install Now".
Page13of78
ITPP047 Thermal Printer Windows Software Manual
Version 2.00
Figure 2- 13 Driver Installation Interface
4) Click "Install Now", the printer will automatically print out a LAN port detection ticket.
Figure 2- 14 Driver Installation Interface
Page14of78
ITPP047 Thermal Printer Windows Software Manual
Version 2.00
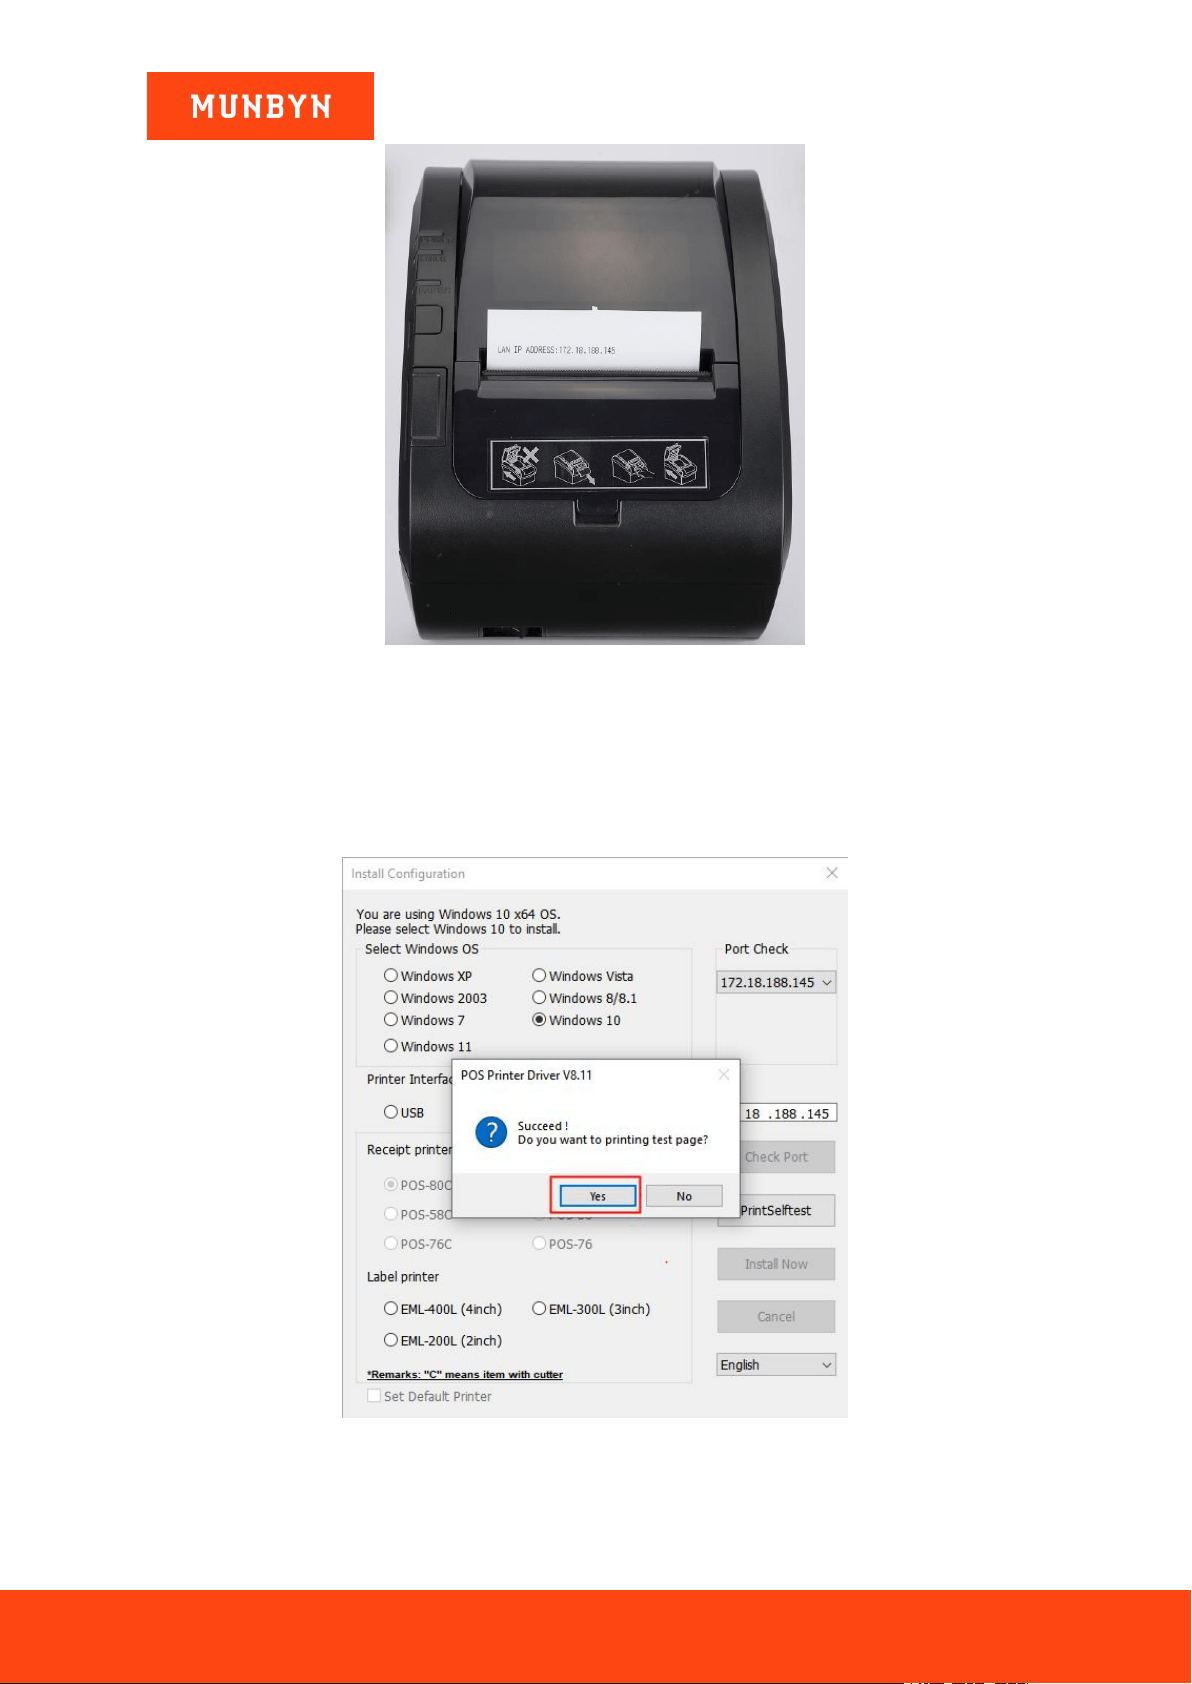
Figure 2- 15 LAN Port Detection Ticket
5) The driver will automatically pop up a small window. Click "Yes", the printer will print out a "POS Printer"
test page, indicating that the printer is ready.
Note: After the installation, the computer will automatically open an FQA document. If you encounter any
problems during use, you can read the FAQ document first.
Figure 2- 16 Successful Installation
Page15of78
ITPP047 Thermal Printer Windows Software Manual
Version 2.00
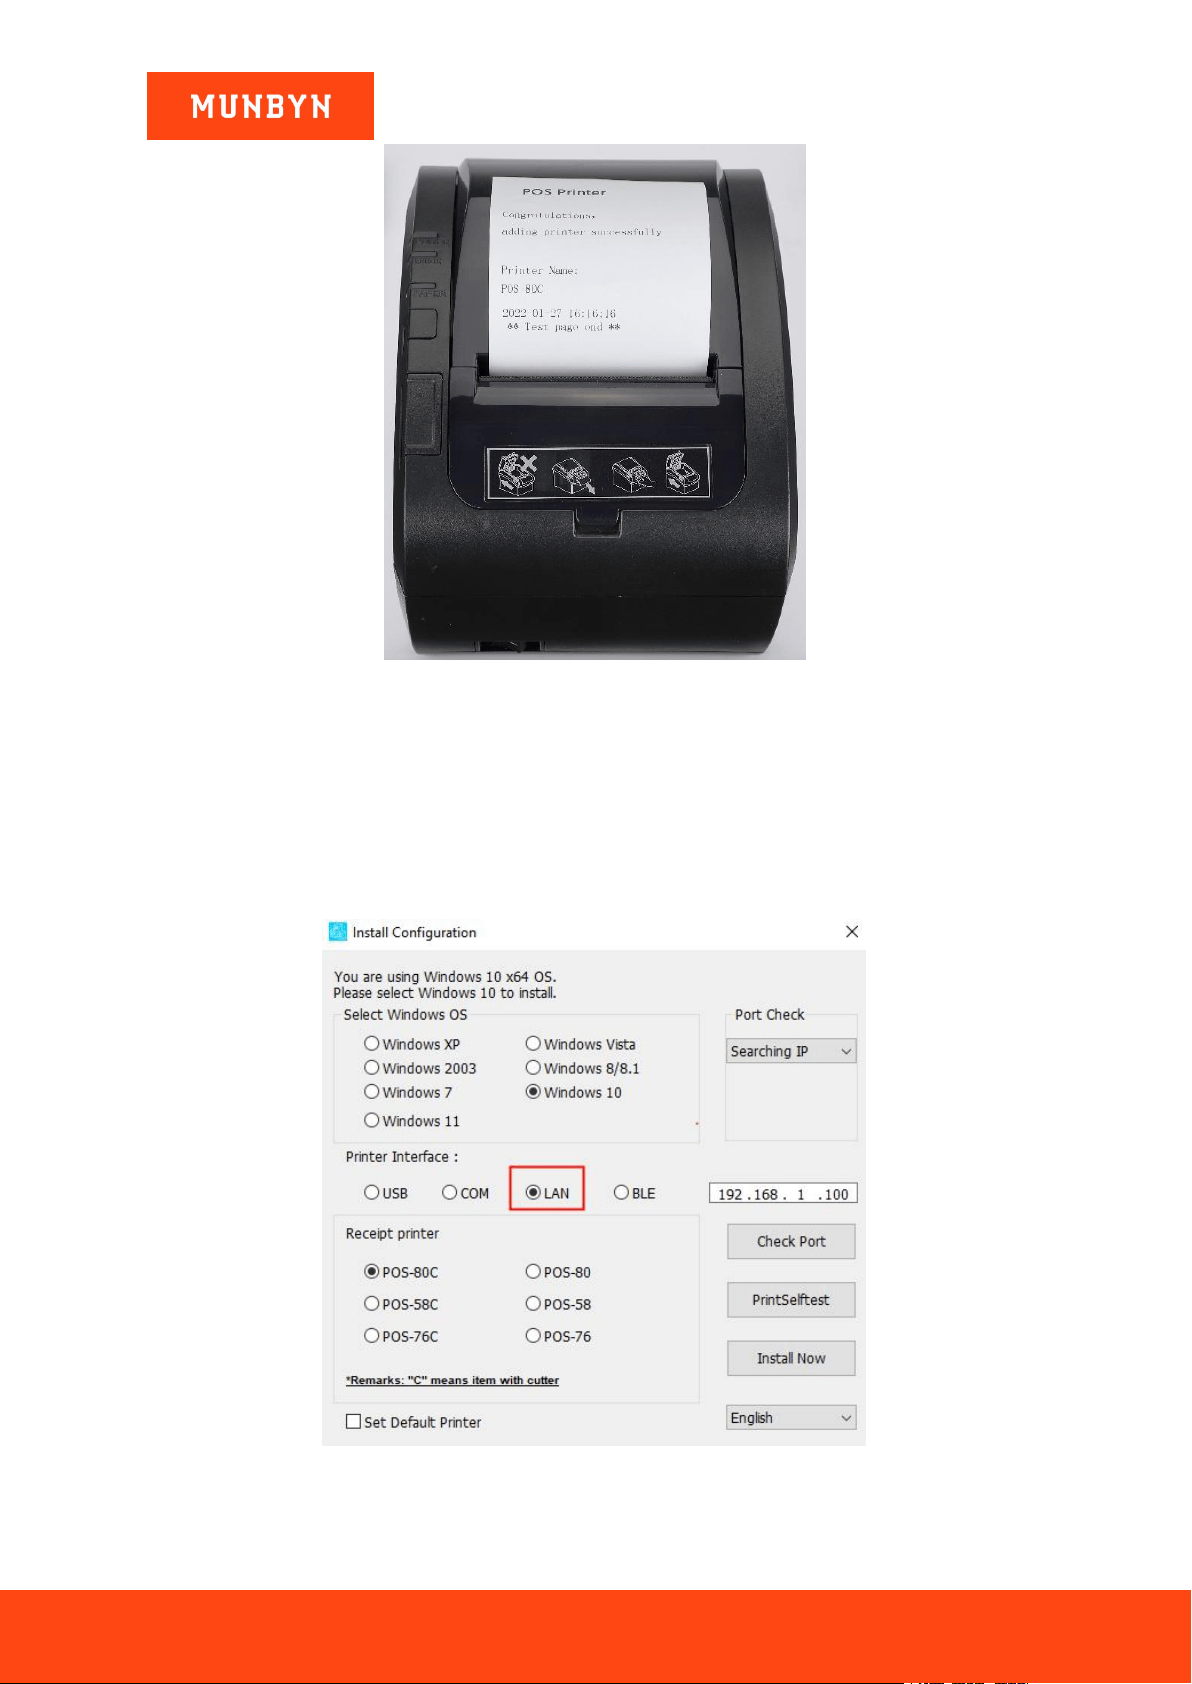
Figure 2- 17 "POS Printer" Test Page
Demo video:
http://u.pc.cd/rmD
2.2.3. Install Multiple LAN Printers
Note: If you need to add other LAN printers, please use the method below to add them.
1) Select "LAN" and wait about 10 seconds.
Figure 2- 18 Driver Installation Interface
2) Turn off the printer, press and hold the FEED button to turn on the printer, and release it when you hear a
Page16of78
ITPP047 Thermal Printer Windows Software Manual
Version 2.00
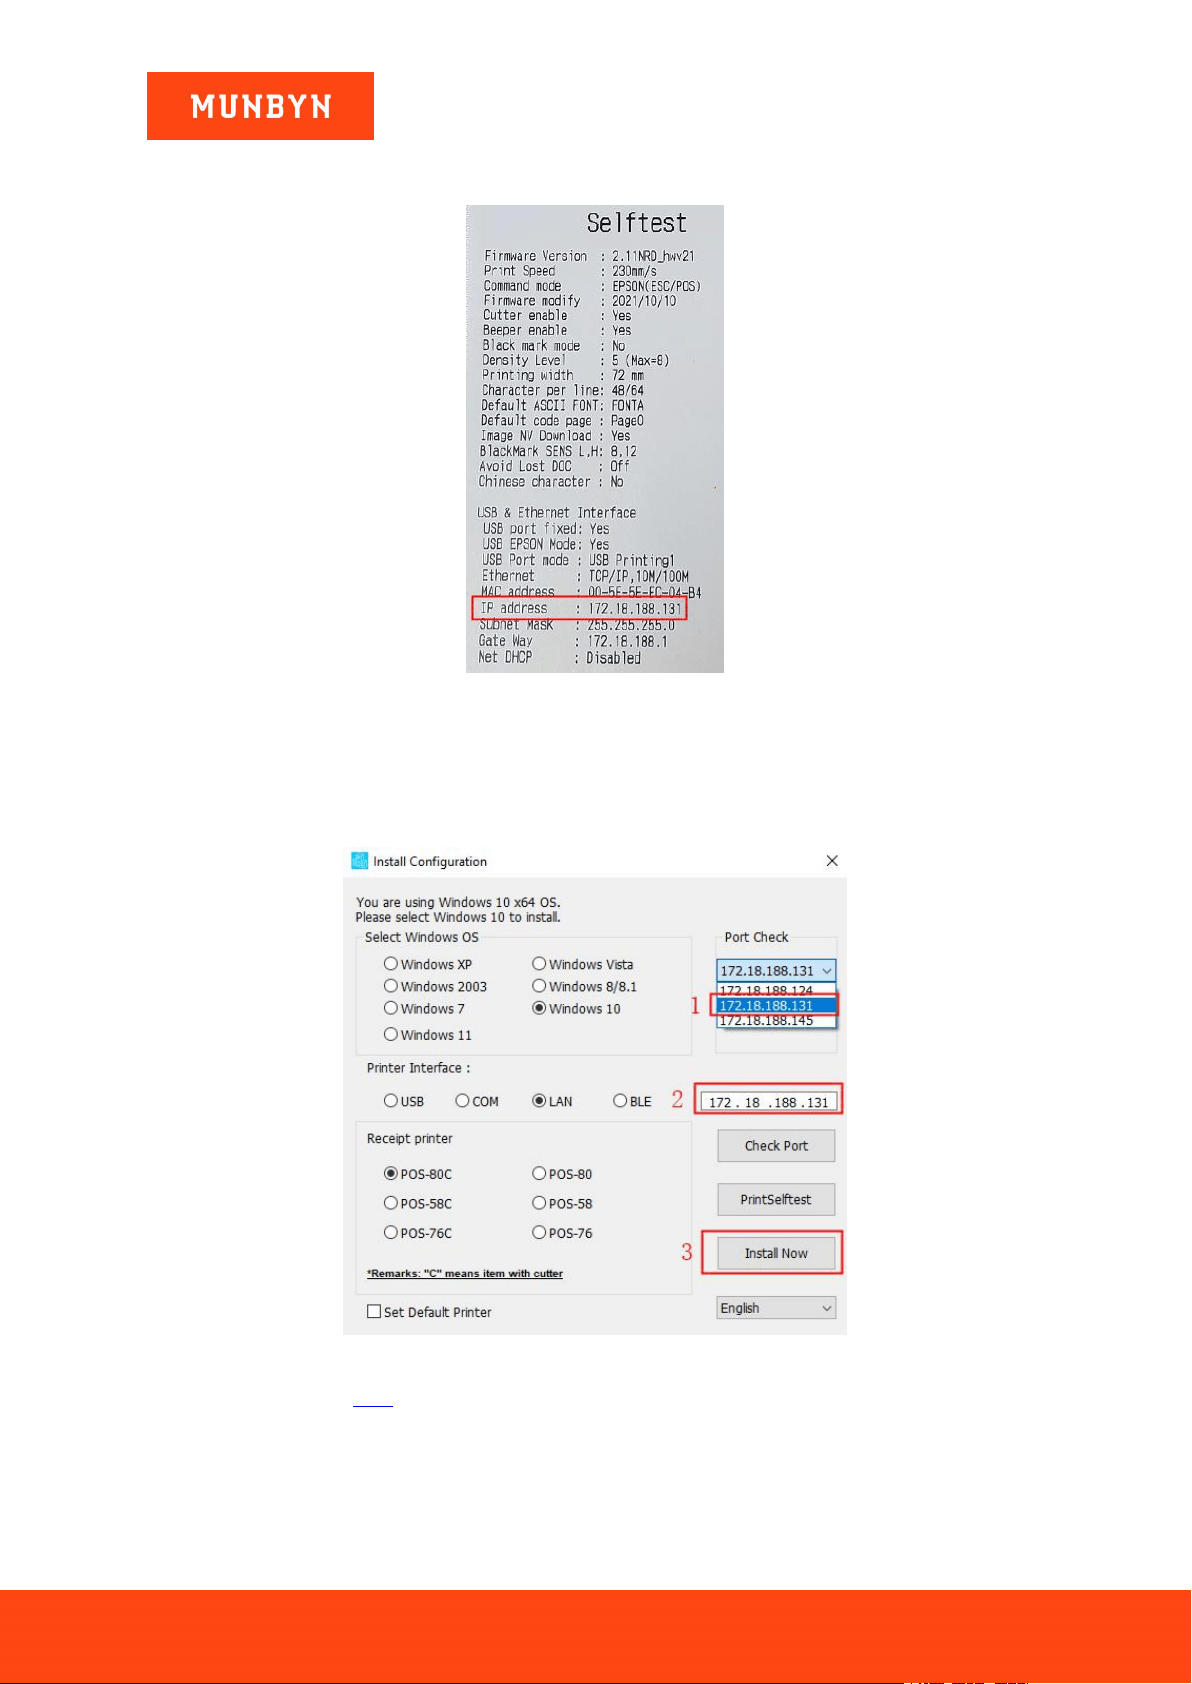
beep. The printer will automatically print a self-test page on which you can then check the IP address of the
printer.
Figure 2- 19 Printer Test Page
3) Click the IP address the same as the test page displayed by the "Port Check", the IP displayed in the white
box is the same as the IP address you selected above, then click the "Install Now".
Note: If you cannot find your printer's IP address, please check whether your network connection between the
printer and your computer is correct. Close and reopen the program and restart the printer.
Figure 2- 20 IP Detection
4) Please refer to section 2.2.2, step 5.
Demo video: http://u.pc.cd/07X7
Page17of78
ITPP047 Thermal Printer Windows Software Manual
Version 2.00
2.3. Install Printer via Wi-Fi (Wi-Fi Function Printers)
2.3.1. STA Mode
You can connect the printer to your computer through a wireless router. With this connection, your computer
can access the Internet normally.
2.3.1.1. Before Installing Printer in STA Mode
1) Connect the printer to the power outlet through the power cord, put the thermal paper into the printer, and
turn on the printer and the computer.
2) Connect the Wi-Fi printer to the network. Please refer to section 3.0 for detailed settings.
3) Connect the computer to the router. There are two ways to connect your computer to the router, as shown
below. Please choose either one.
Note: Step 2 and Step 3 must use the same router.
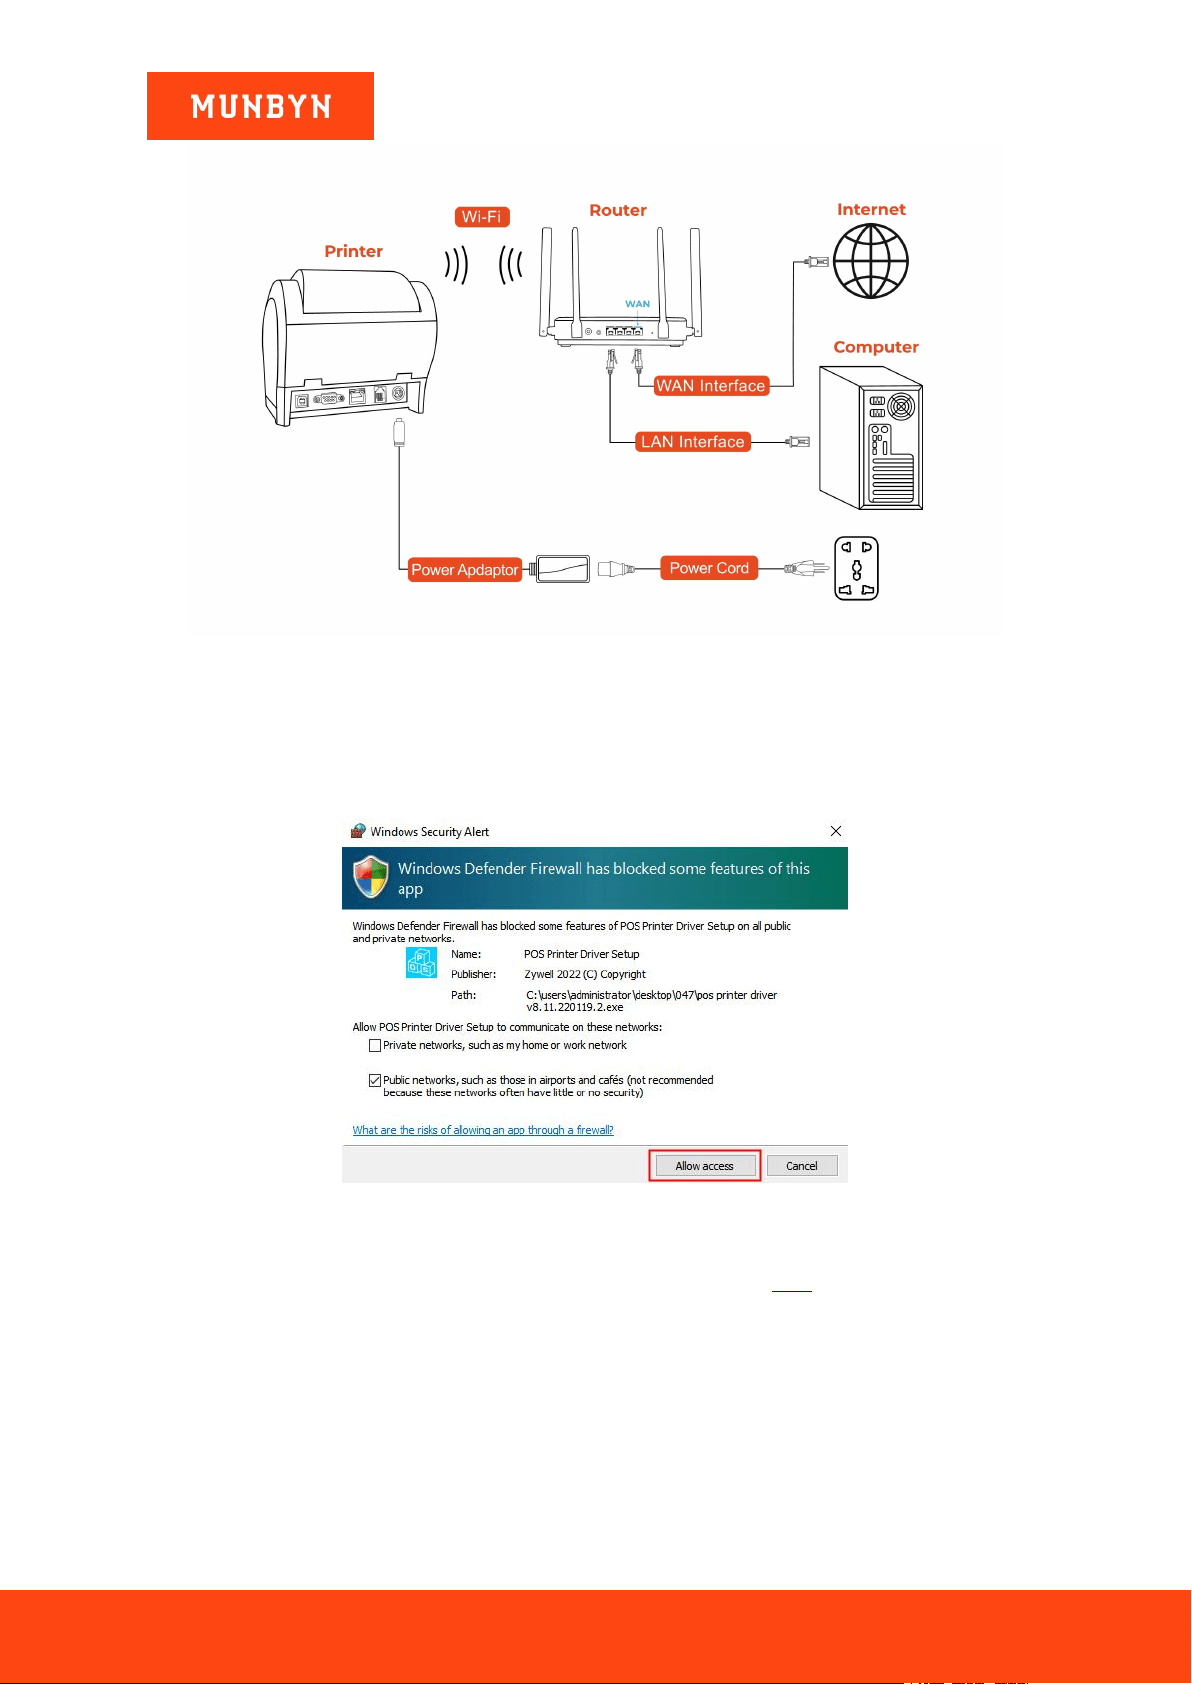
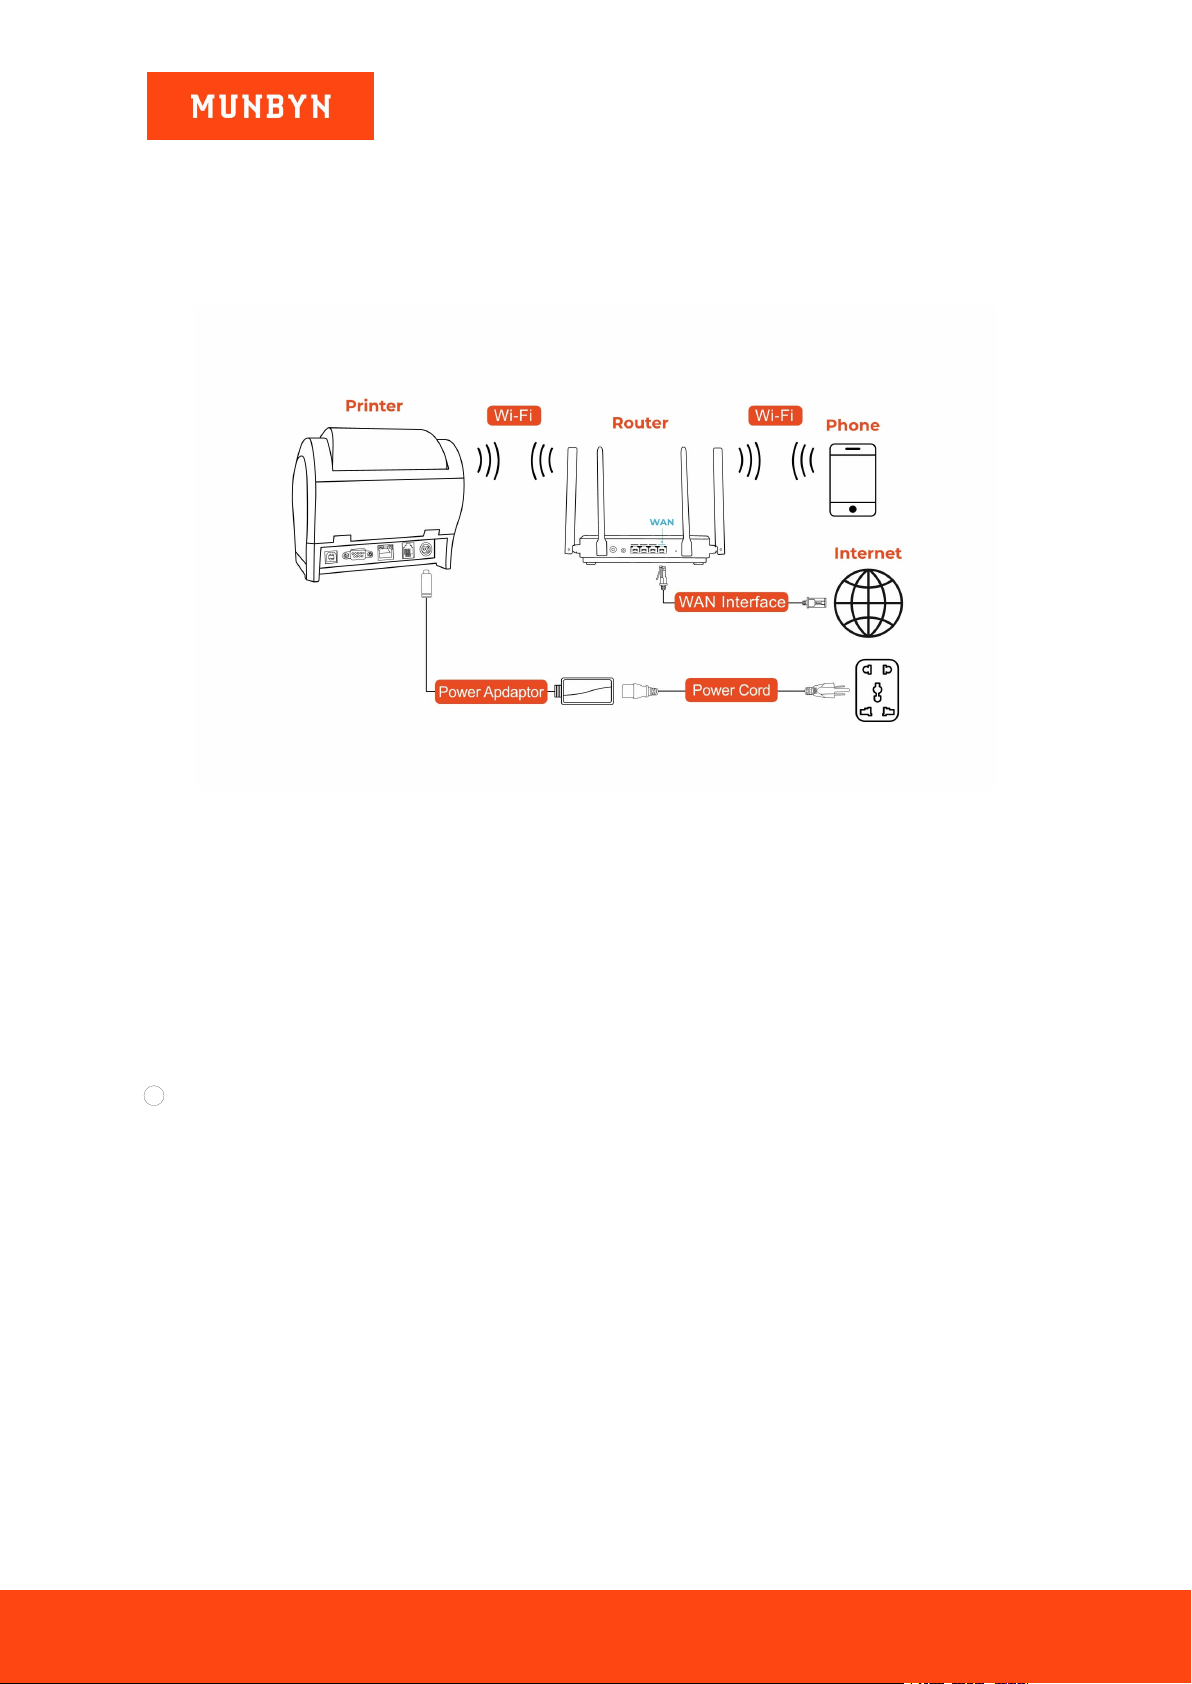
a. The computer is connected to the wireless router. Please see the picture below.
Figure 2- 21 Connection Diagram
b. Connect the computer to the router with a network cable. Please see the picture below.
Page18of78
ITPP047 Thermal Printer Windows Software Manual
Version 2.00
Figure 2- 22 Connection Diagram
2.3.1.2. Install a Printer in STA Mode
Note: During installation, a Windows Security Alert may pop up, showing that Windows Defender Firewall has
blocked some features of this app. Please click "Allow access". This driver has been fully tested on all current
versions of Windows.
Figure 2- 23 Windows Security Alert
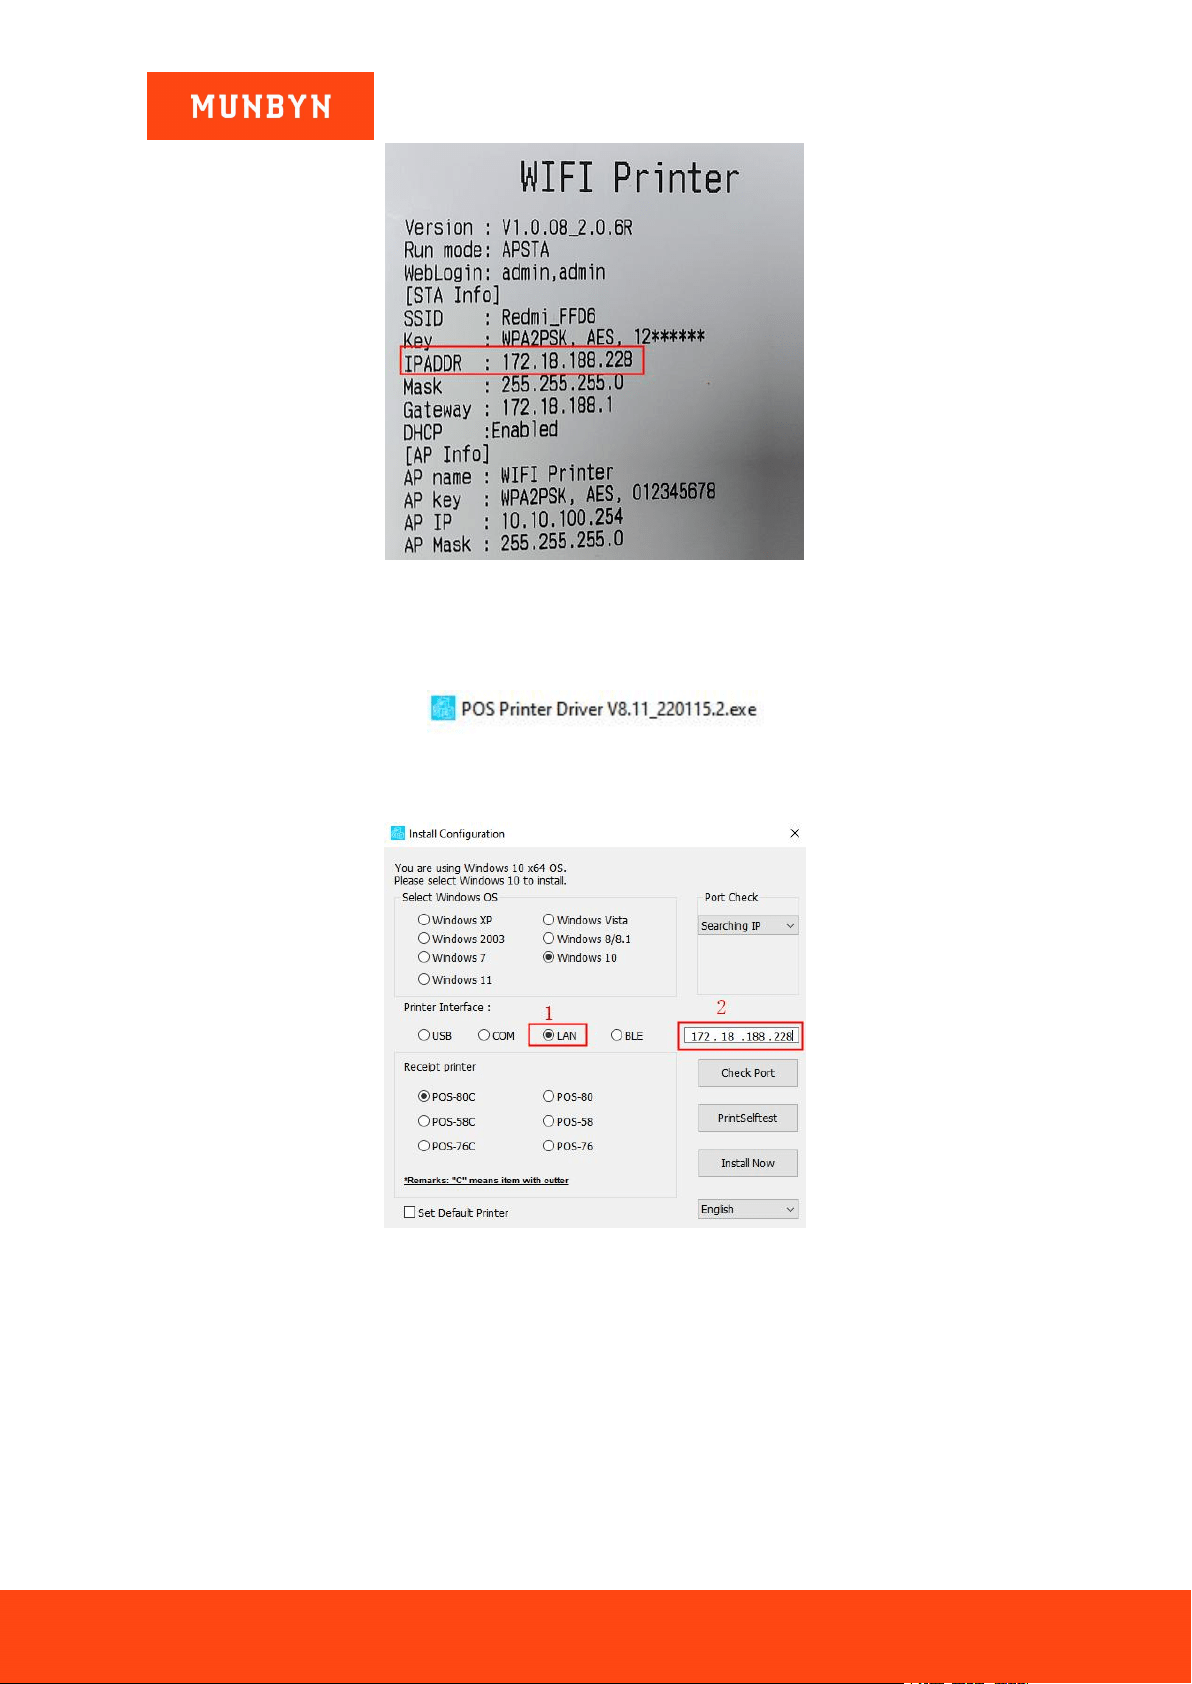
1) Print the Wi-Fi printer page and check the IP address on that page.
Note: For how to print the Wi-Fi printer page, please refer to step 2 in section 2.2.3.
Page19of78
ITPP047 Thermal Printer Windows Software Manual
Version 2.00
Figure 2- 24 Wi-Fi Printer Page
2) Double click "POS Printer Driver V8.xx.exe".
Figure 2- 25 Installation Package
3) Select "LAN" and enter the IP address displayed on the Wi-Fi printer page in step 1 in the white box.
Figure 2- 26 Driver Installation Interface
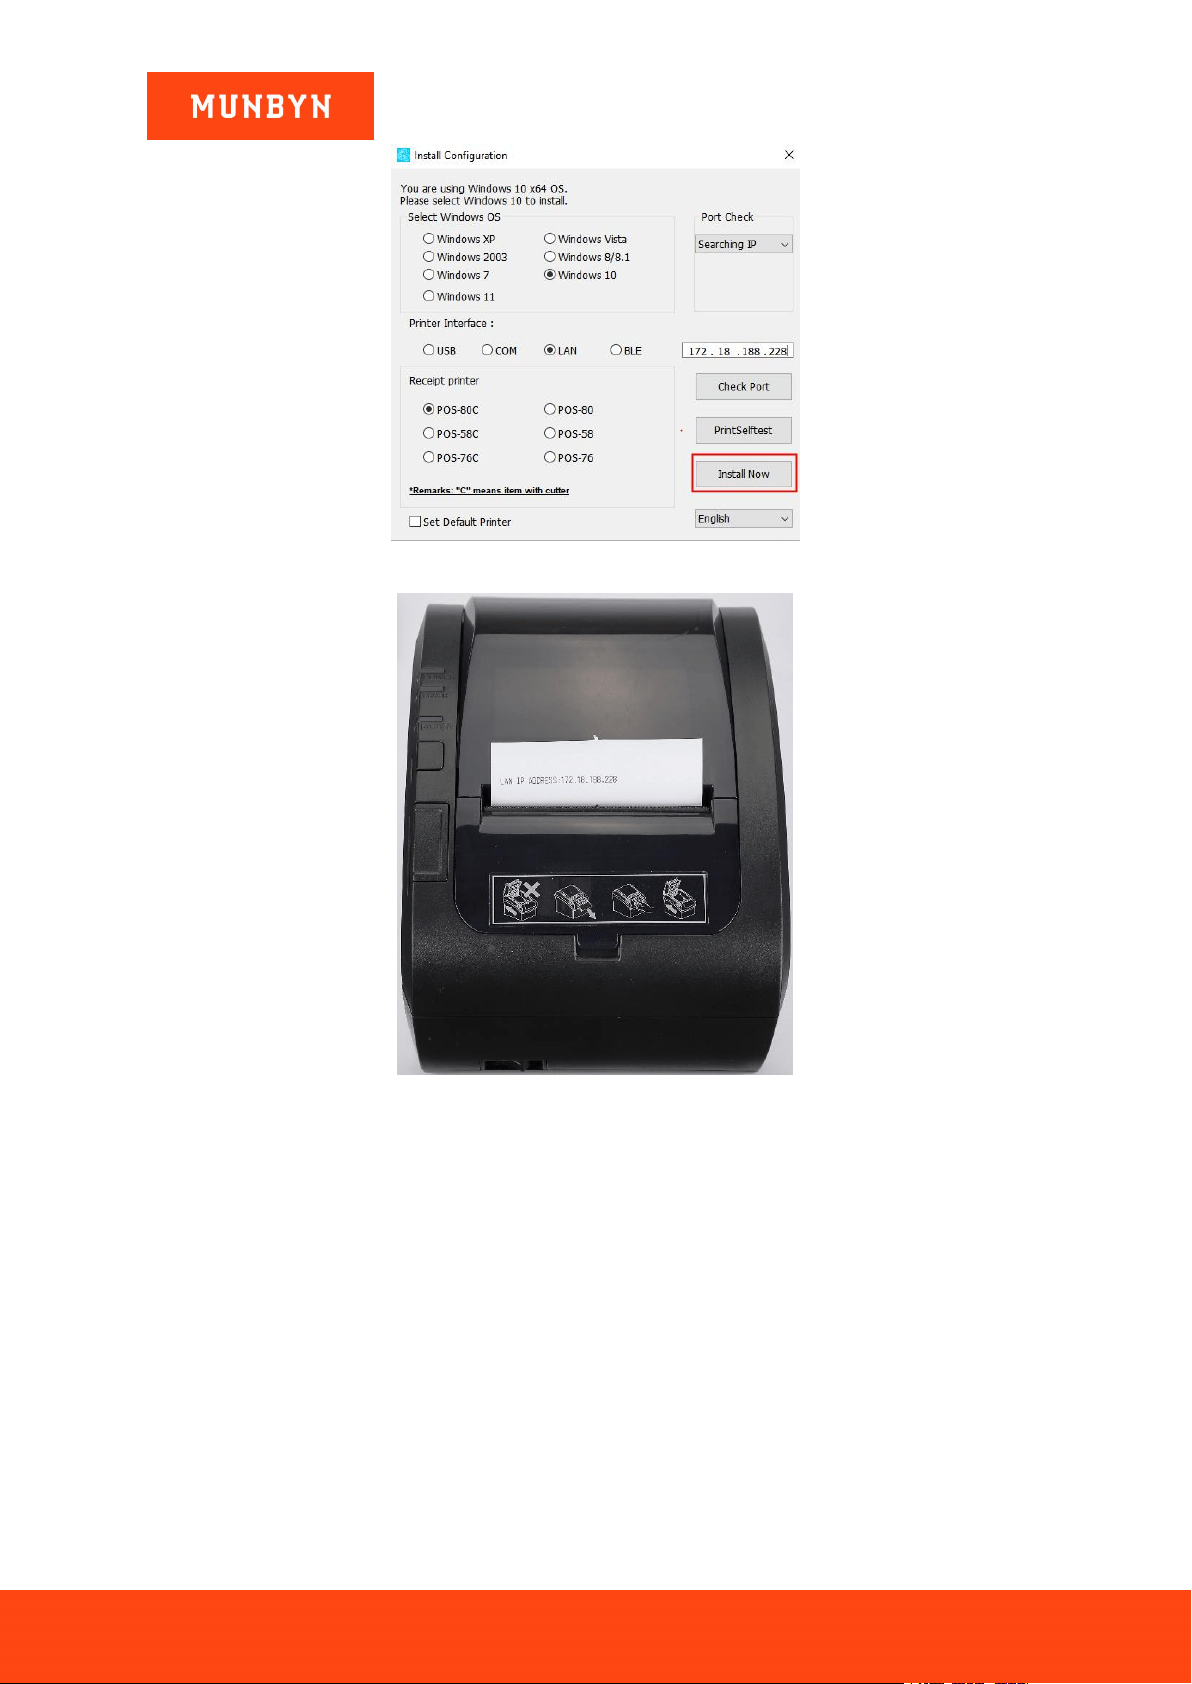
4) Click "Install Now", the printer will automatically print out a LAN port detection ticket.
Page20of78
ITPP047 Thermal Printer Windows Software Manual
Version 2.00
Figure 2- 27 Driver Installation Interface
Figure 2- 28 LAN Port Detection Ticket
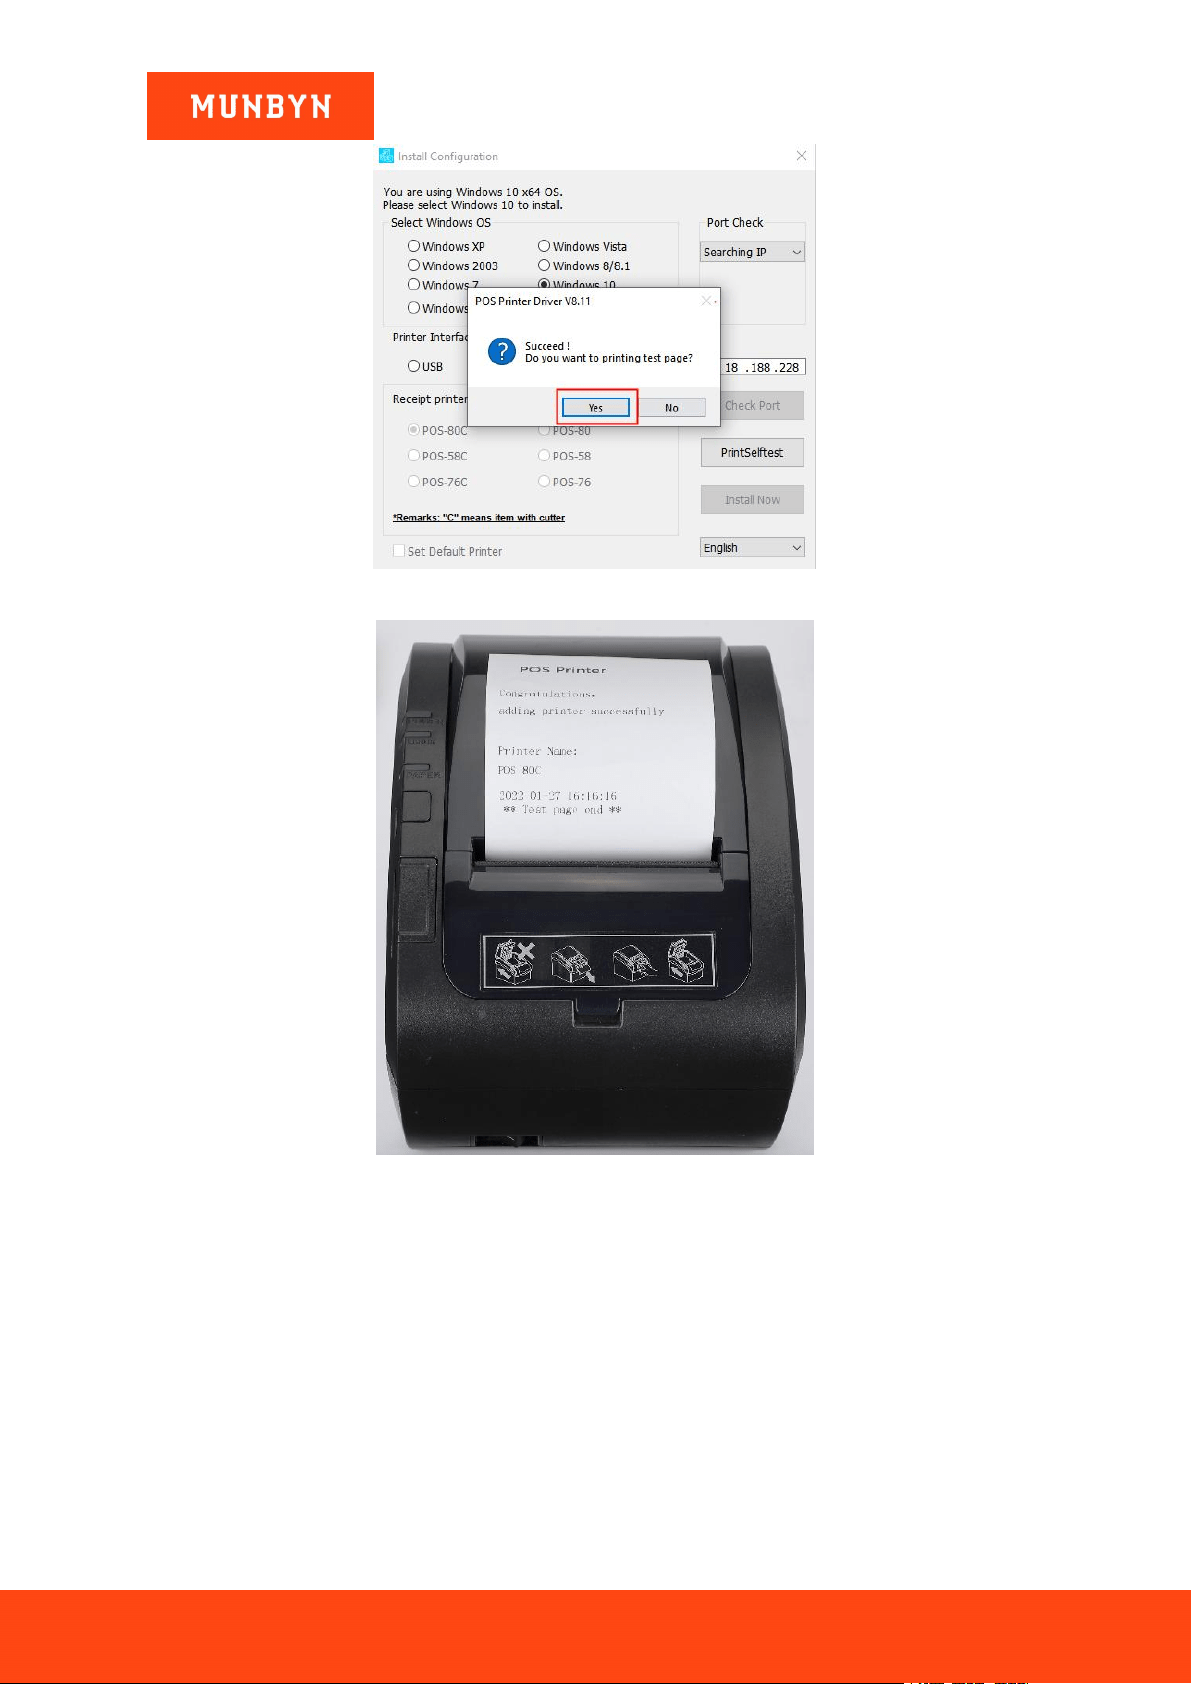
1) The driver will automatically pop up a small window. Click "Yes", the printer will print out a "POS Printer"
test page, indicating that the printer is ready.
Note: After the installation, the computer will automatically open an FQA document. If you encounter any
problems during use, you can read the FAQ document first.
Page21of78
ITPP047 Thermal Printer Windows Software Manual
Version 2.00
Figure 2- 29 Successful Installation
Figure 2- 30 "POS Printer" Test Page
Demo video: http://u.pc.cd/L9IctalK
2.3.2. AP Mode
You can connect your computer to a wireless network printer without a router. With this connection method,
your computer will not be able to access the Internet.
2.3.2.1. Before Installing Printer in AP Mode
1) Connect the printer to the power outlet through the power cord, put the thermal paper into the printer, and
turn on the printer and the computer.
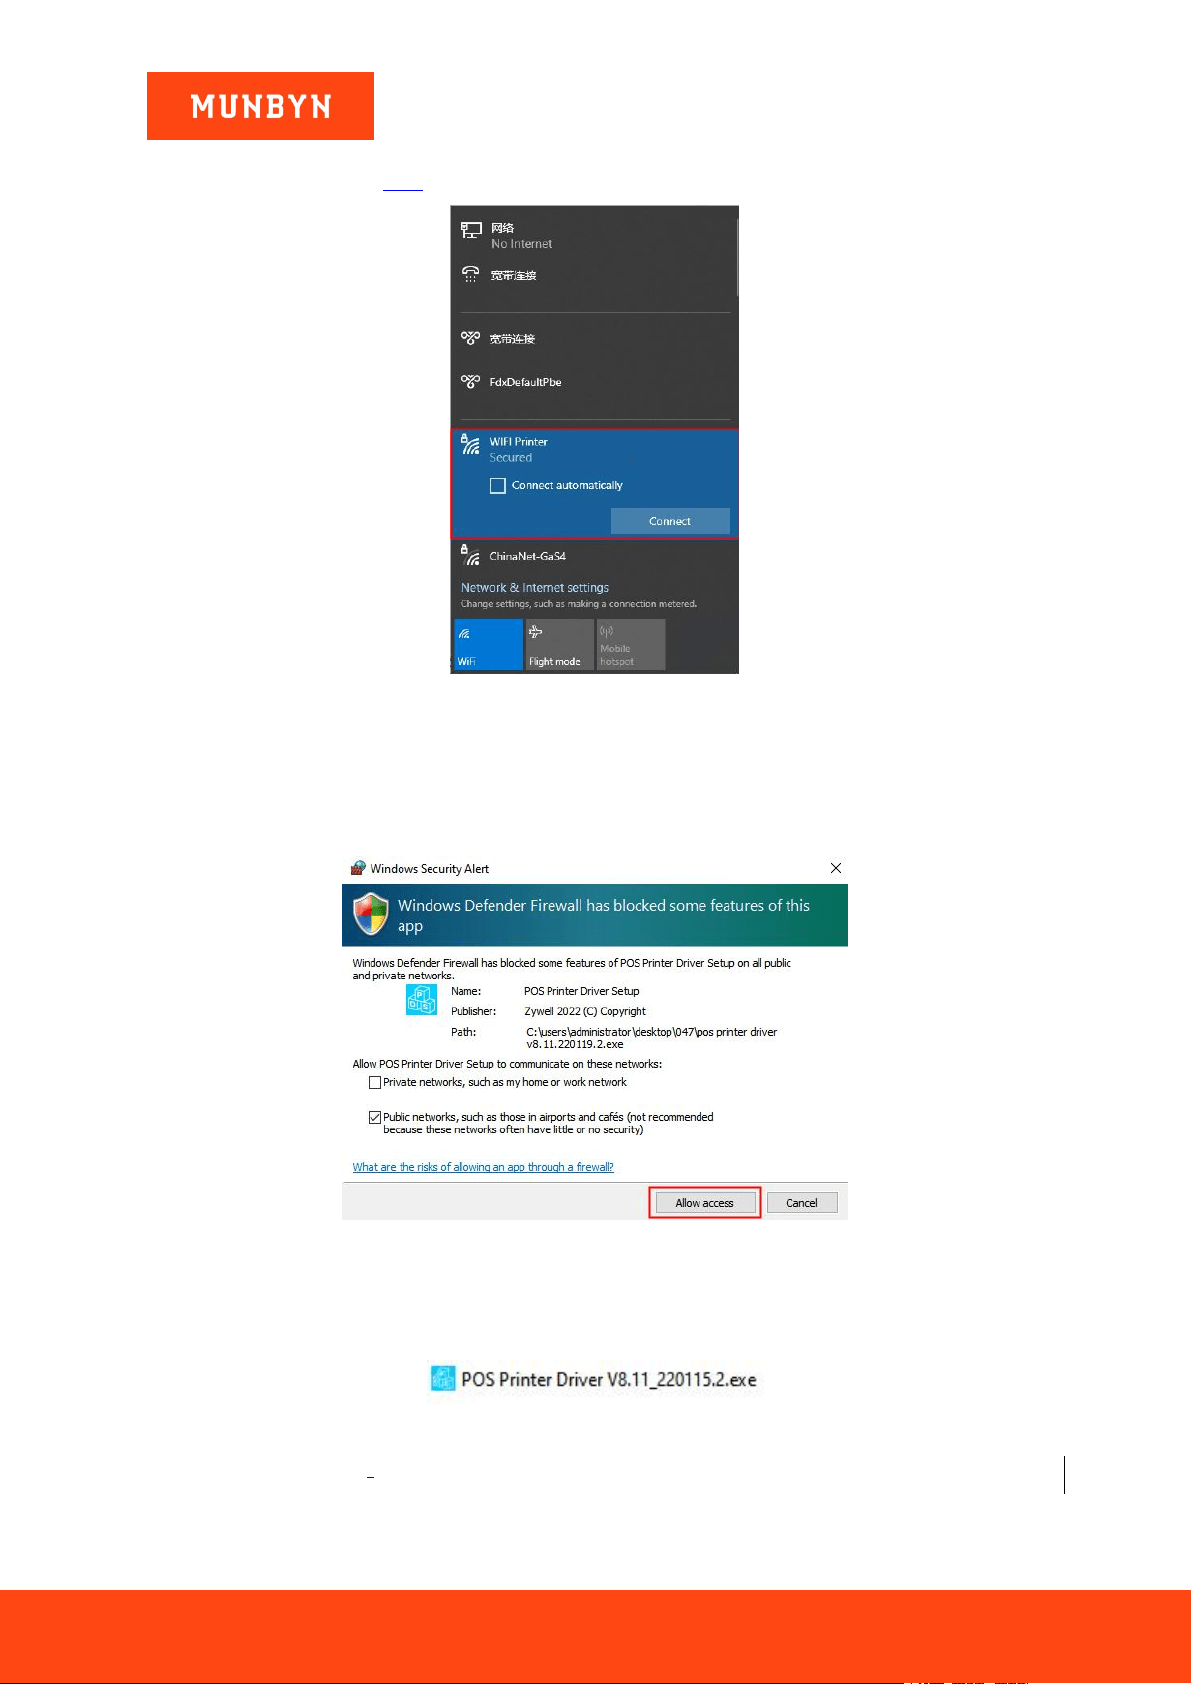
2) Connect the computer to printer Wi-Fi.
Wi-Fi name: WIFI Printer Password: 012345678
Page22of78
ITPP047 Thermal Printer Windows Software Manual
Version 2.00
Note: If you have changed the Wi-Fi name or password, you can print the self-test page to view the Wi-Fi
information. Refer to Section 2.2.3, step 2 for how to print the Wi-Fi printer page.
Figure 2- 31 Connect the Wi-Fi
2.3.2.2. Install a Printer in AP Mode
Note: During installation, a Windows Security Alert may pop up, showing that Windows Defender Firewall has
blocked some features of this app. Please click "Allow access". This driver has been fully tested on all current
versions of Windows.
Figure 2- 32 Windows Security Alert
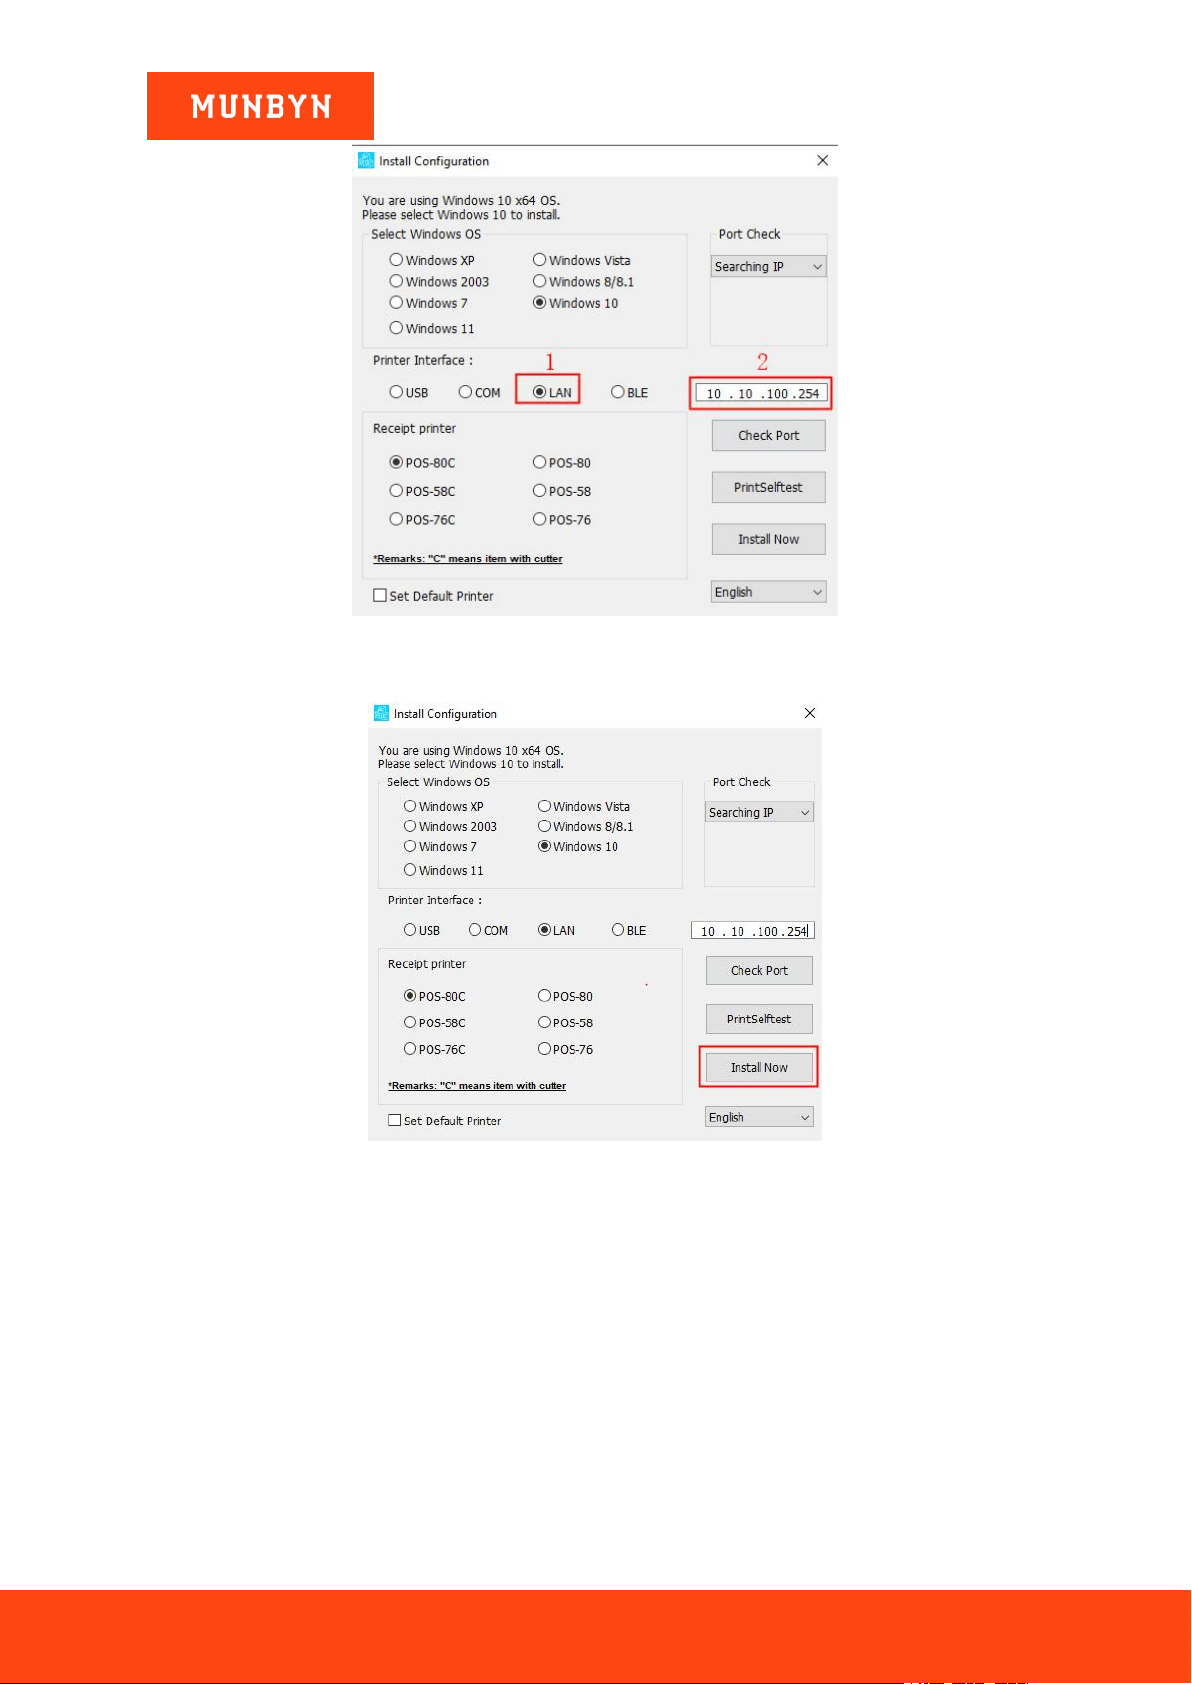
1) Double click "POS Printer Driver V8.xx.exe".
Figure 2- 33 Installation Package
2) Select "LAN" and enter [10.10.100.254] in the white box.
Page23of78
ITPP047 Thermal Printer Windows Software Manual
Version 2.00
Figure 2- 34 Driver Installation Interface
3) Click "Install Now", the printer will automatically print out a LAN port detection ticket.
Figure 2- 35 Driver Installation Interface
Page24of78
ITPP047 Thermal Printer Windows Software Manual
Version 2.00
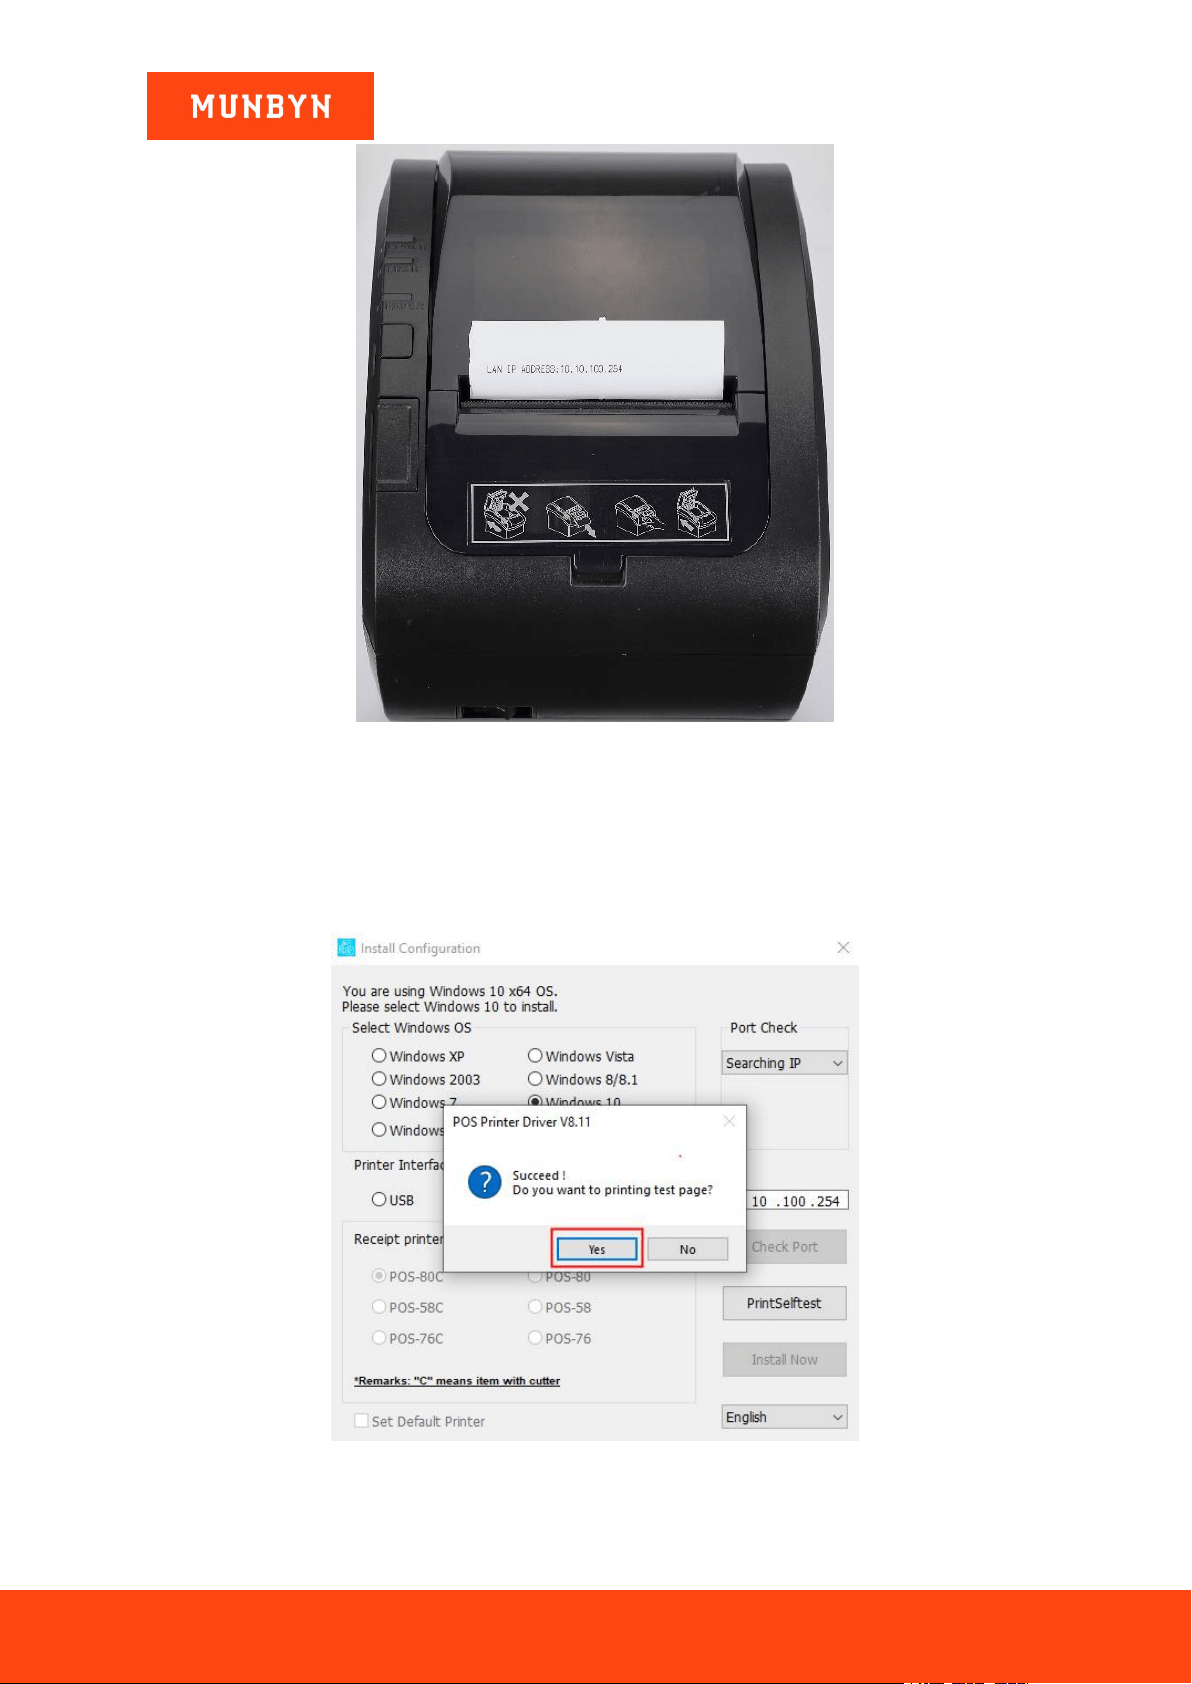
Figure 2- 36 LAN Port Detection Ticket
4) The driver will automatically pop up a small window. Click "Yes", the printer will print out a "POS Printer"
test page, indicating that the printer is ready.
Note: After the installation, the computer will automatically open an FQA document. If you encounter any
problems during use, you can read the FAQ document first.
Figure 2- 37 Successful Installation
Page25of78
ITPP047 Thermal Printer Windows Software Manual
Version 2.00
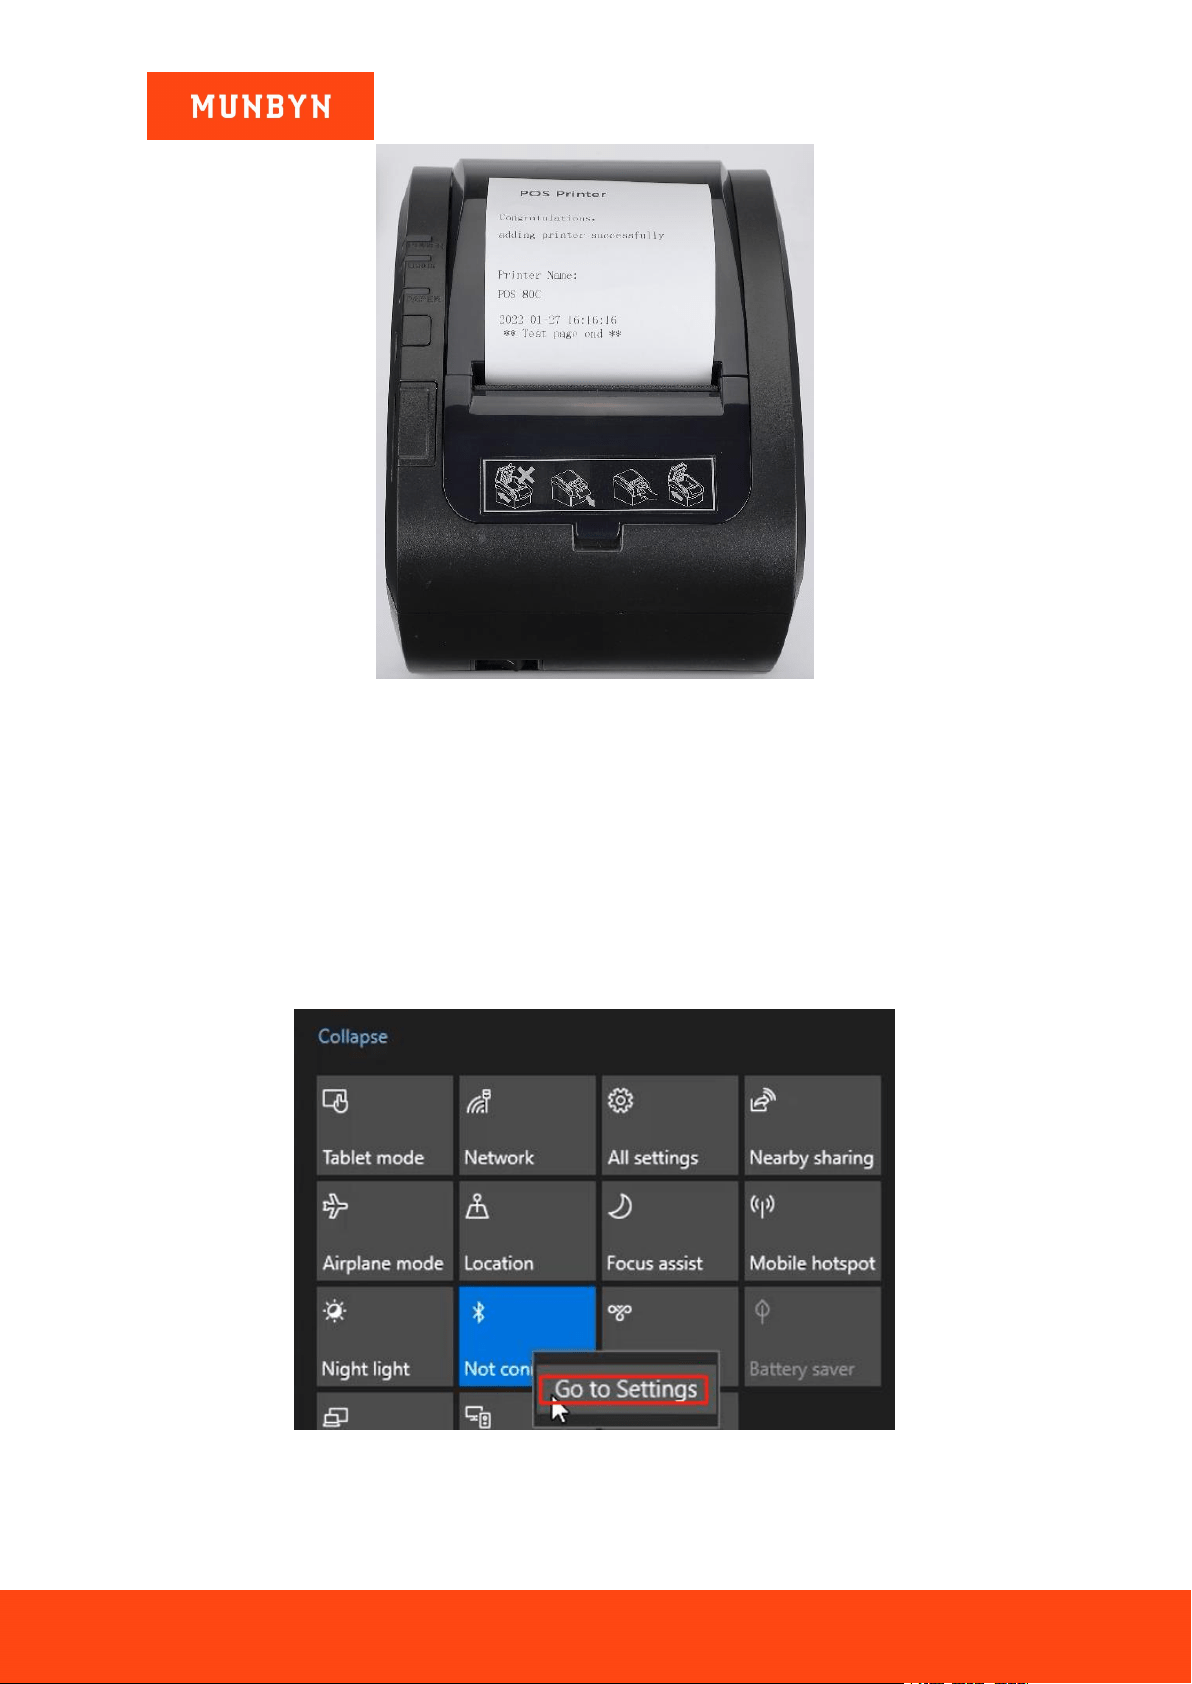
Figure 2- 38 "POS Printer" Test Page
Demo video:
http://u.pc.cd/VTyrtalK
2.4. Install Printer via Bluetooth (Bluetooth Function Printers)
2.4.1. Before Installing Bluetooth Printer
1) Connect the printer to the power outlet through the power cord, put the thermal paper into the printer, and
turn on the printer and the computer.
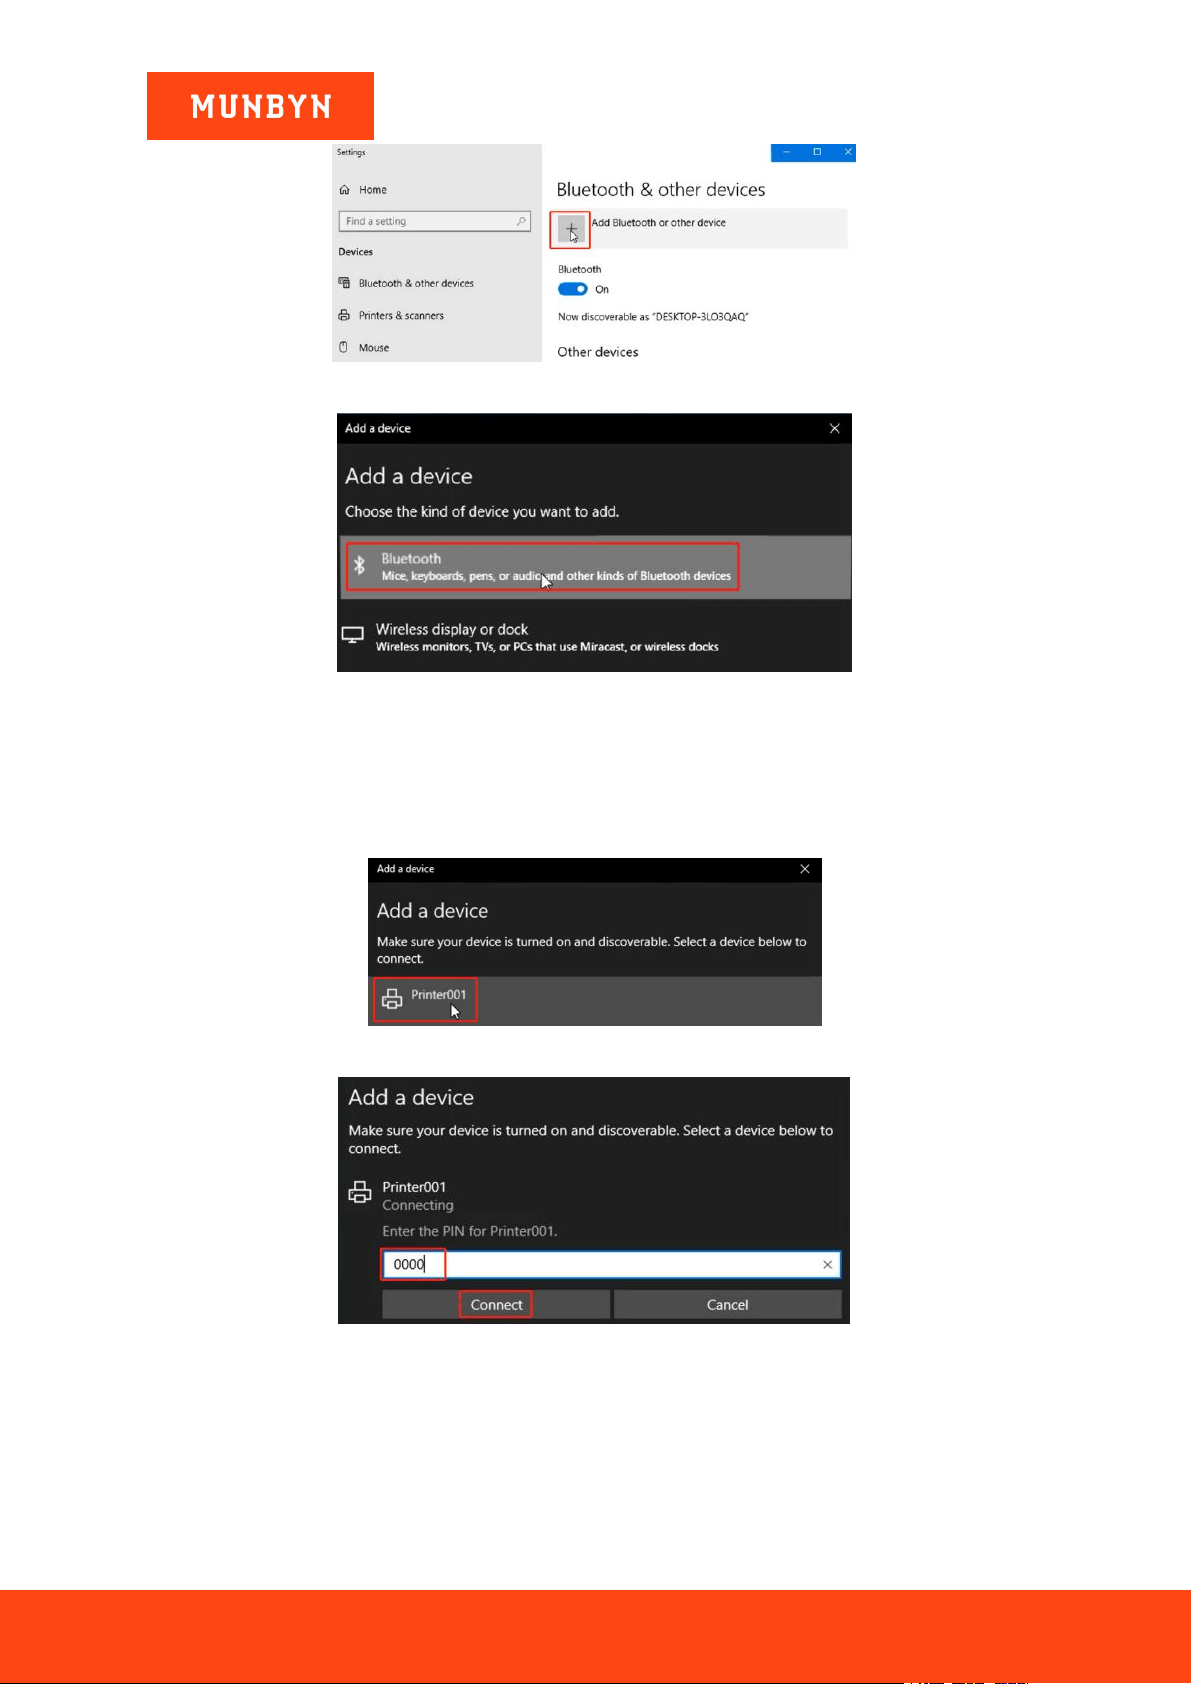
2) Connect the printer Bluetooth to your computer.
a. Click the Bluetooth icon and go to Settings.
Figure 2- 39 Bluetooth Settings
b. Click "+" and choose Bluetooth.
Page26of78
ITPP047 Thermal Printer Windows Software Manual
Version 2.00
Figure 2- 40 Bluetooth Settings
Figure 2- 41 Bluetooth Settings
c. Choose "Printer001" and enter the PIN code "0000".
Note: If you have changed the Bluetooth name or password, you can print the self-test page to view the
Bluetooth information. Refer to Section 2.2.3, step 2 for how to print the Bluetooth printer page.
Figure 2- 42
Figure 2- 43 PIN Code "0000"
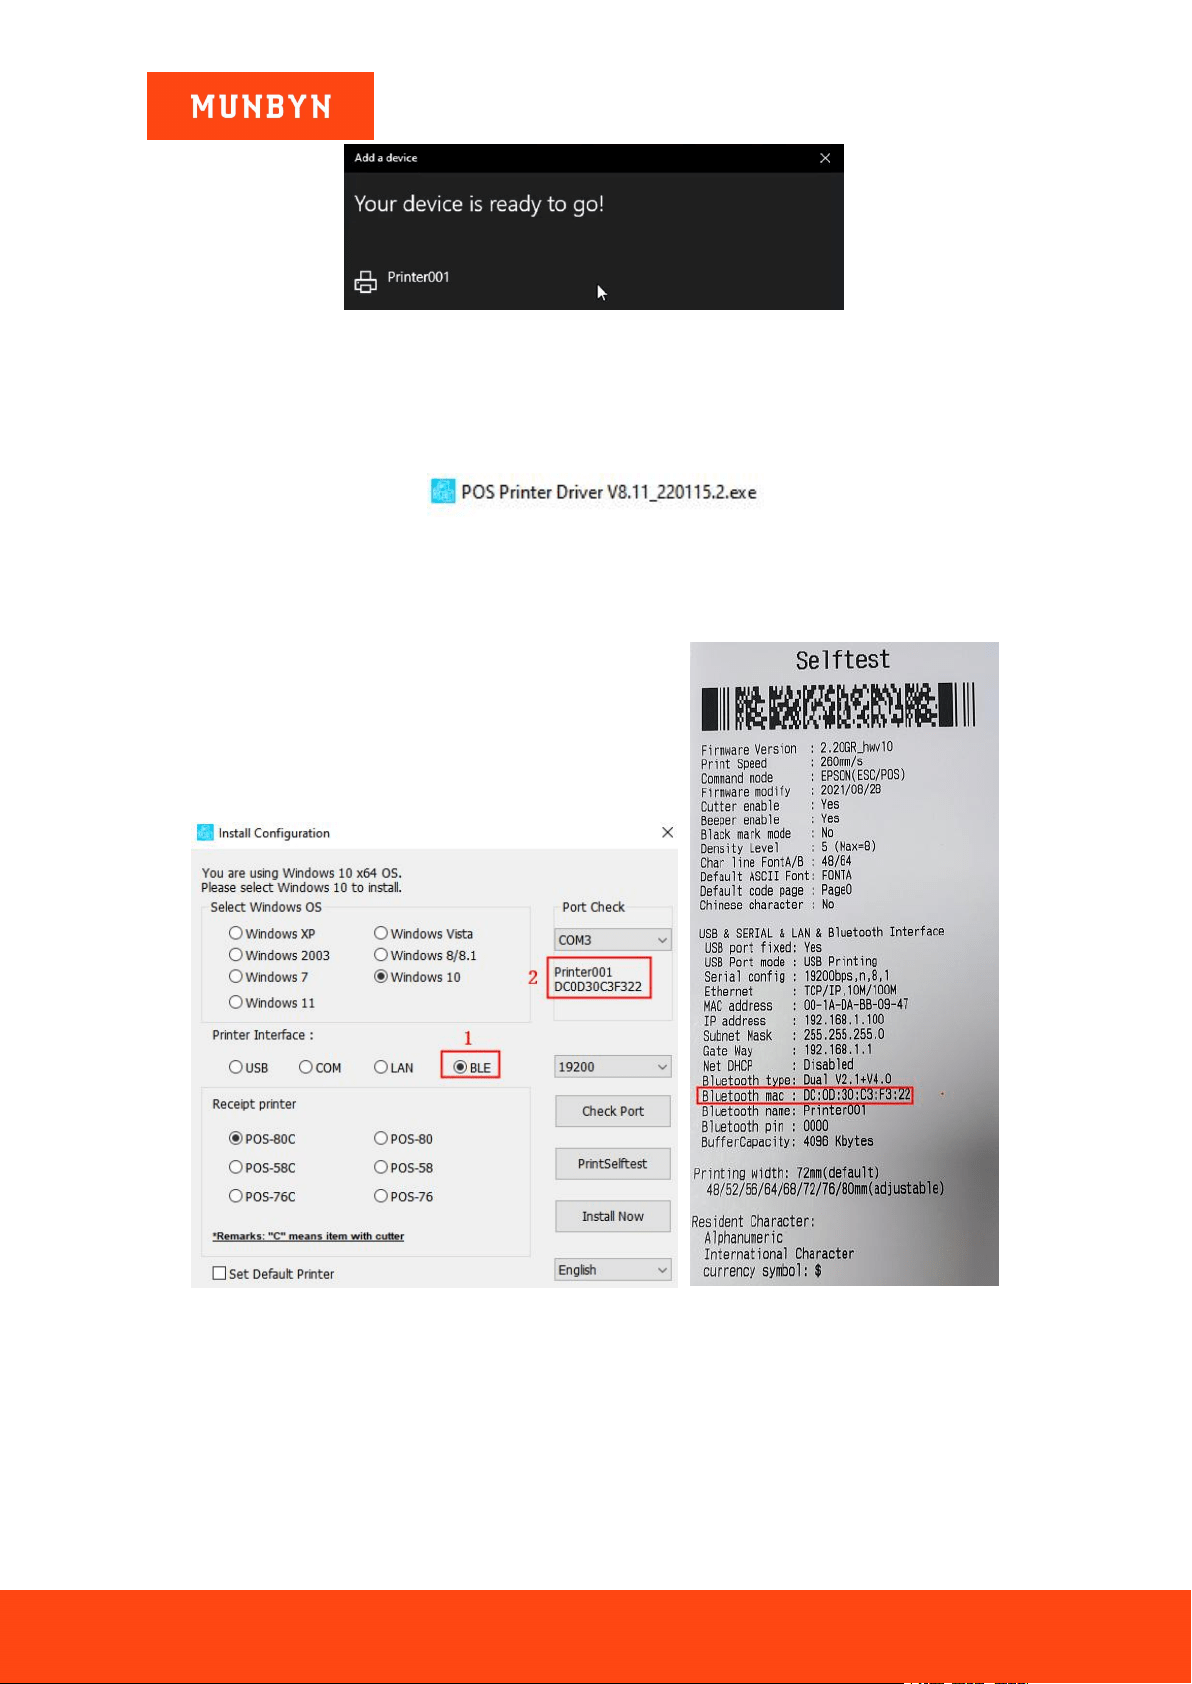
d. The Bluetooth connection is successfully.
Page27of78
ITPP047 Thermal Printer Windows Software Manual
Version 2.00
Figure 2- 44 Successful connection interface
2.4.2. Install a Bluetooth Printer
1) Double click "POS Printer Driver V8.xx.exe".
Figure 2- 45 Installation Package
2) Select "BLE" and your printer's Bluetooth mac address will be displayed on the "Port Check".
Note: You can print the self-test page and check the Bluetooth mac address of the printer.
Figure 2- 46 Driver Installation Interface Figure 2- 47 Self Test Page
3) Click "Install Now", the printer will automatically print out a Bluetooth port detection ticket.

Page28of78
ITPP047 Thermal Printer Windows Software Manual
Version 2.00
Figure 2- 48 Driver Installation Interface
Figure 2- 49 Bluetooth Port Detection Ticket
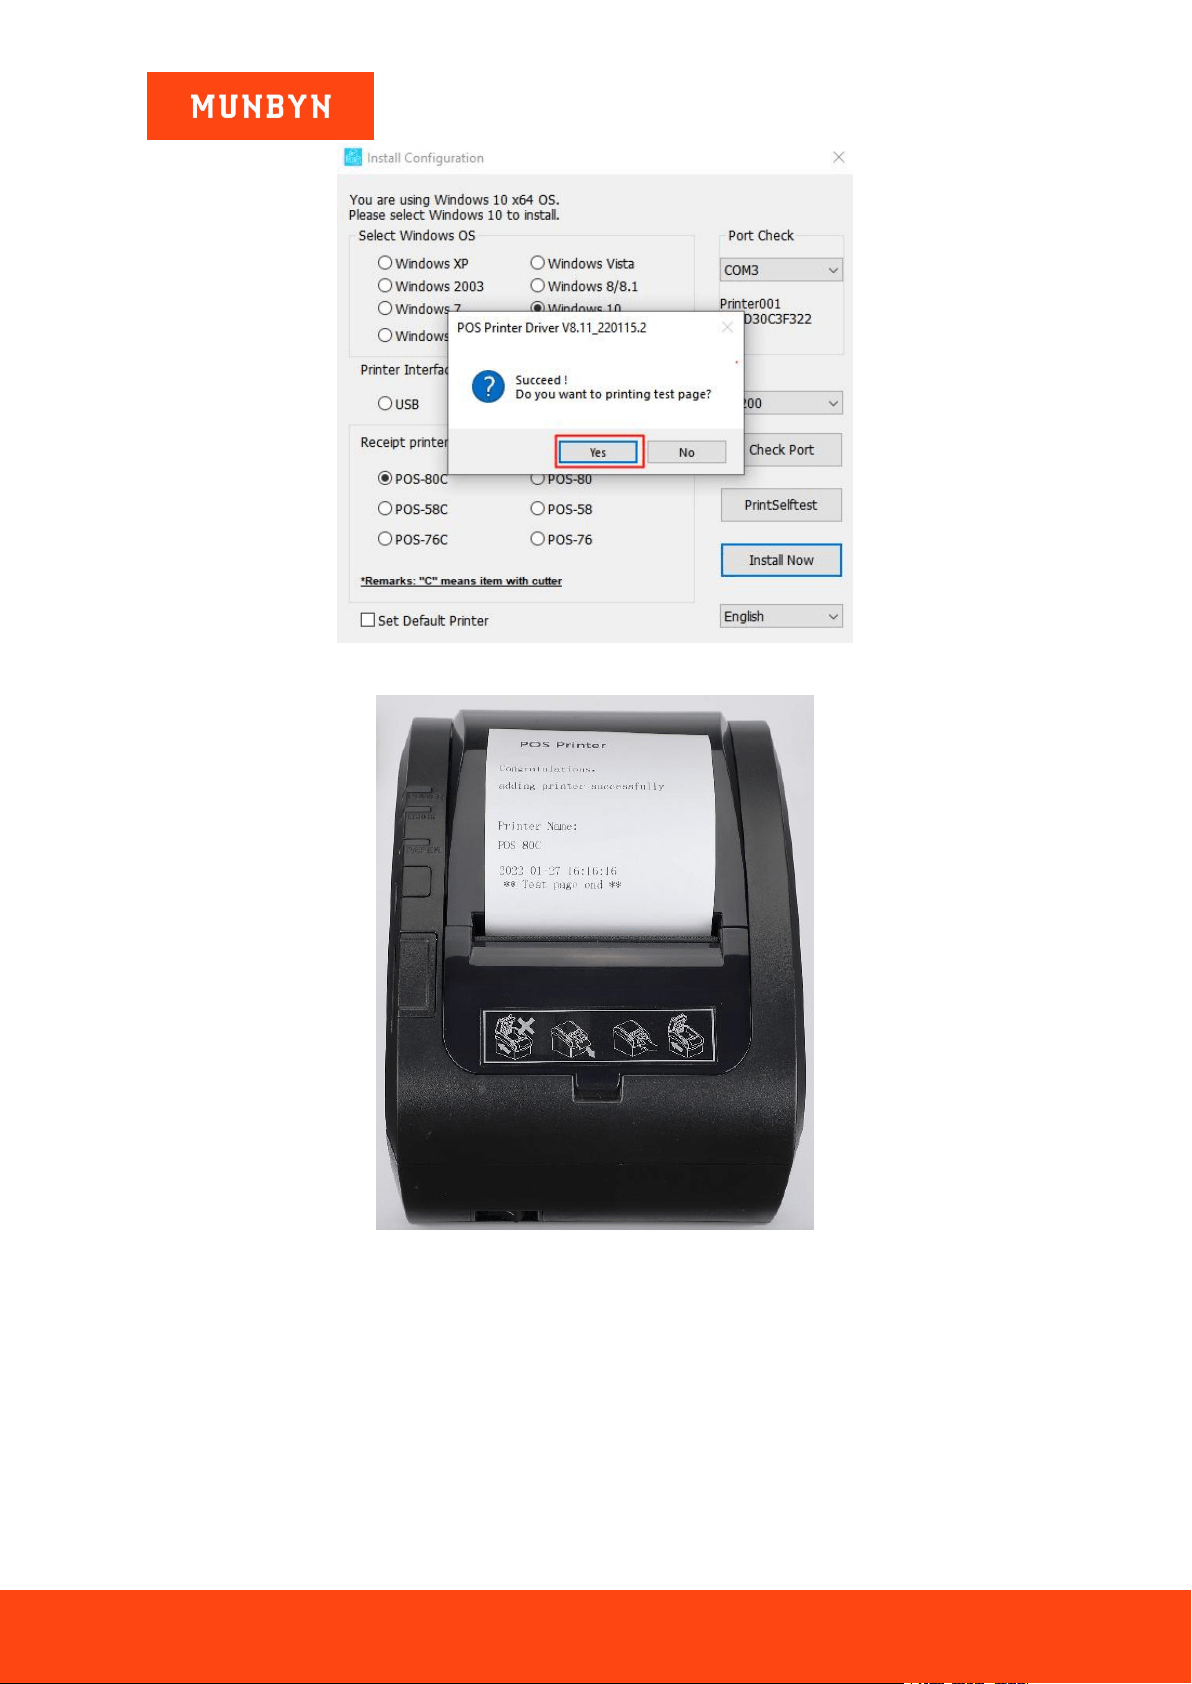
4) The driver will automatically pop up a small window. Click "Yes", the printer will print out a "POS Printer"
test page, indicating that the printer is ready.
Note: After the installation, the computer will automatically open an FQA document. If you encounter any
problems during use, you can read the FAQ document first.
Page29of78
ITPP047 Thermal Printer Windows Software Manual
Version 2.00
Figure 2- 50 Successful Installation
Figure 2- 51 "POS Printer" Test Page
Demo video:
http://u.pc.cd/5KUrtalK
2.5. Install Printer via Serial
2.5.1. Before Installing Serial Printer
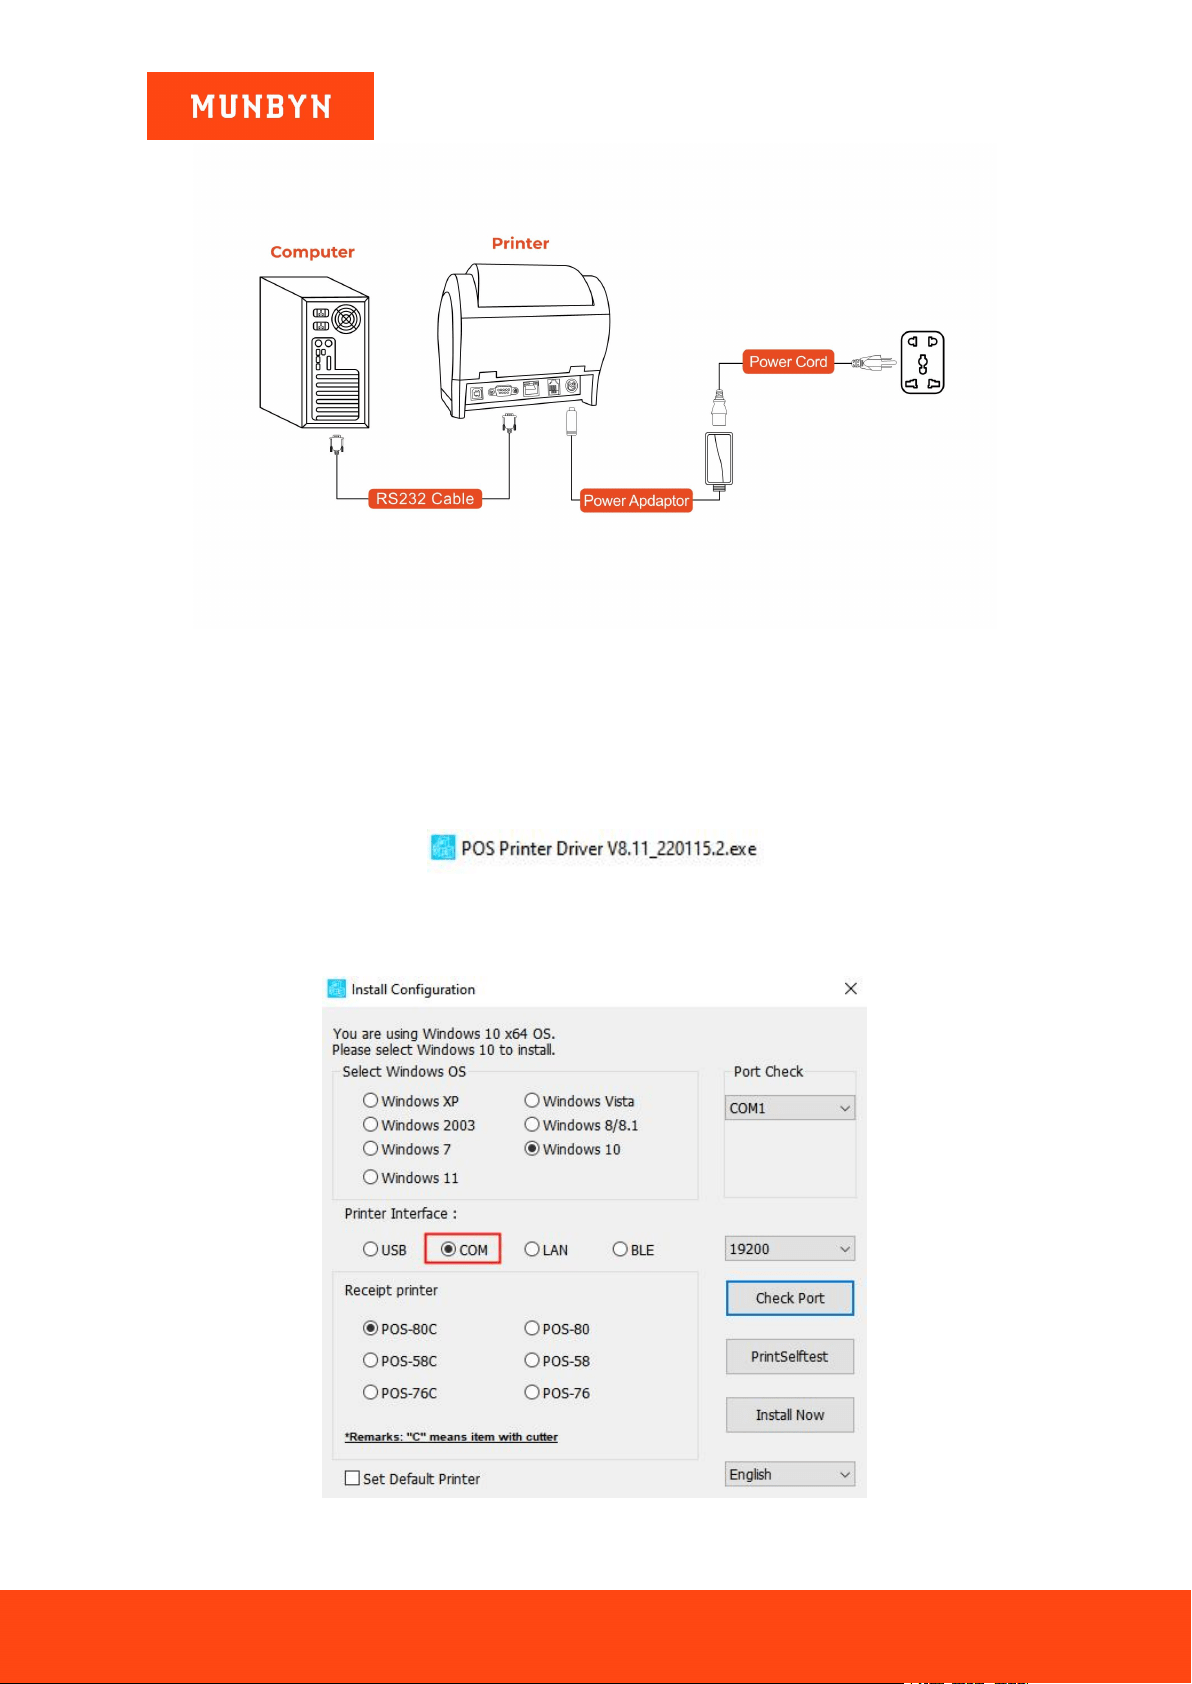
1) Connect the printer to the power outlet through the power cord, put the thermal paper into the printer, and
turn on the printer and the computer.
2) Connect the printer to your Windows computer via a serial cable.
Page30of78
ITPP047 Thermal Printer Windows Software Manual
Version 2.00
Figure 2- 52 Installation Diagram
Demo video:
http://u.pc.cd/Ybh
2.5.2. Install a Serial Printer
1) Double click "POS Printer Driver V8.xx.exe".
Figure 2- 53 Installation Package
2) Select "COM".
Figure 2- 54 Driver Installation Interface
Page31of78
ITPP047 Thermal Printer Windows Software Manual
Version 2.00
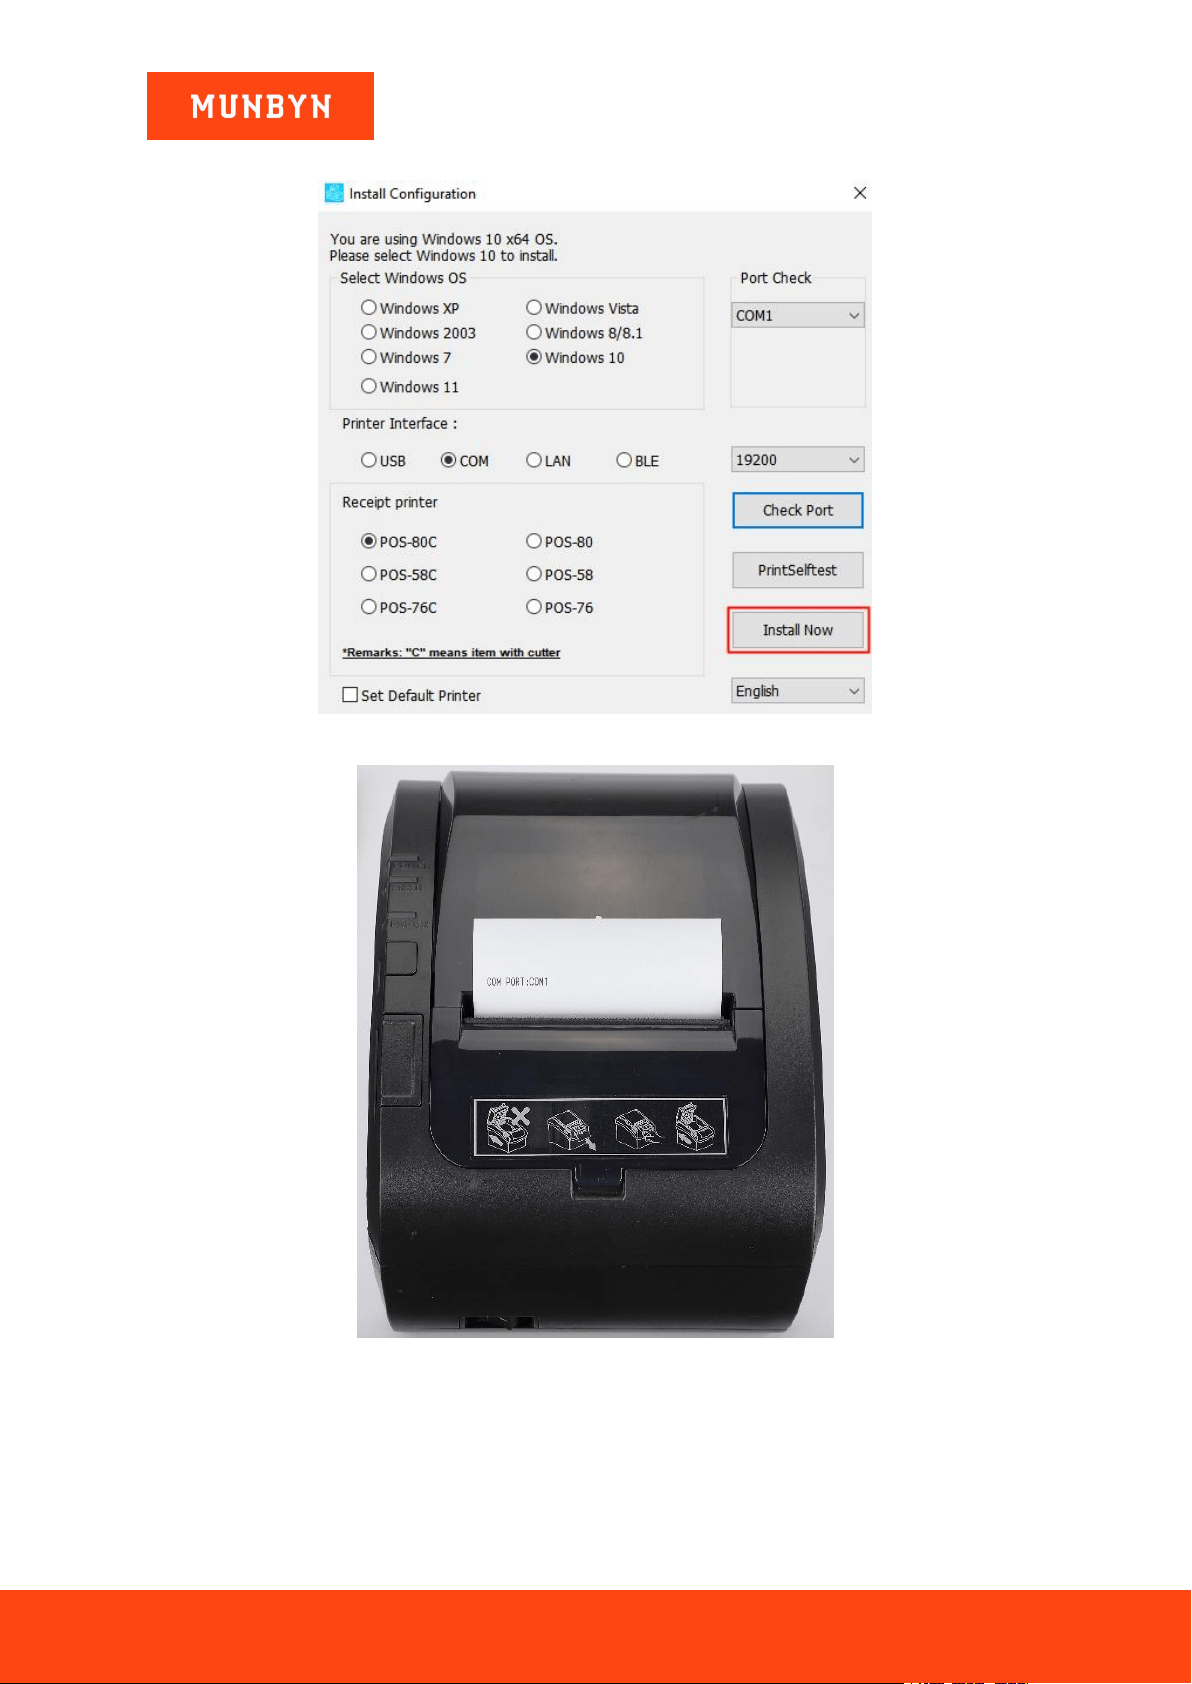
3) Click "Install now", the printer will automatically print out a serial port detection ticket.
Figure 2- 55 Driver Installation Interface
Figure 2- 56 Serial Port Detection Ticket
4) The driver will automatically pop up a small window. Click "Yes", the printer will print out a "POS Printer"
test page, indicating that the printer is ready.
Note: After the installation, the computer will automatically open an FQA document. If you encounter any
problems during use, you can read the FAQ document first.
Page32of78
ITPP047 Thermal Printer Windows Software Manual
Version 2.00
Figure 2- 57 Successful Installation
Figure 2- 58 "POS Printer" Test Page
Demo video: http://u.pc.cd/ISortalK
Page33of78
ITPP047 Thermal Printer Windows Software Manual
Version 2.00
3.0. Wi-Fi Setting (Wi-Fi Function Printers)
3.1. STA Mode
Note: Prepare a router and a network cable, and connect the network cable to the router.
Figure 3- 1 Connection diagram
3.1.1. IP Address Automatic Setting Mode
Note: The setup steps are simple. After the setup is completed, the wireless network IP address obtained by the
printer is not fixed but dynamic.
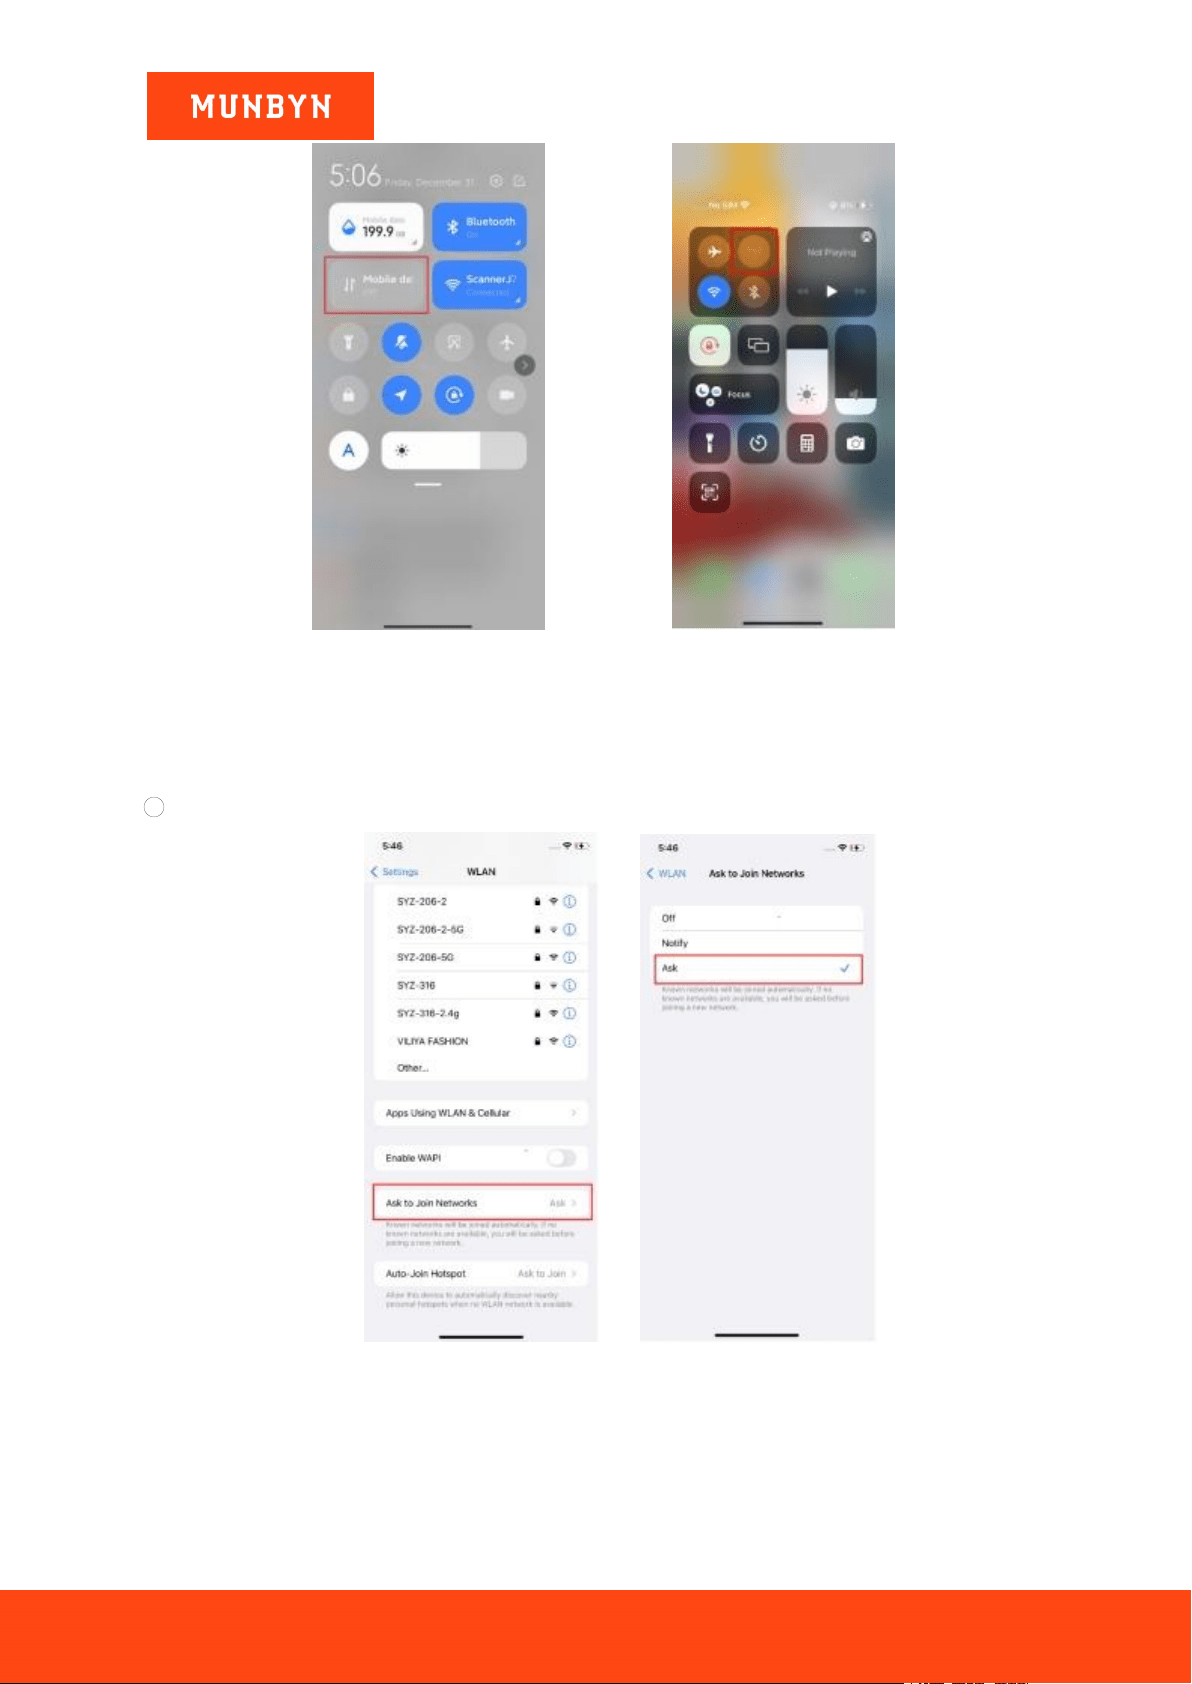
Before connecting the device to the printer Wi-Fi, turn off the device's data and Wi-Fi auto-connect features. If
these two features are not turned off, the device may automatically switch to another network after connecting to
the printer Wi-Fi, causing the printer to fail to connect.
The operation is as follows:
1 Close device data.
Page34of78
ITPP047 Thermal Printer Windows Software Manual
Version 2.00
Figure 3- 2 Android Close Date Figure 3- 3 iOS Close Date
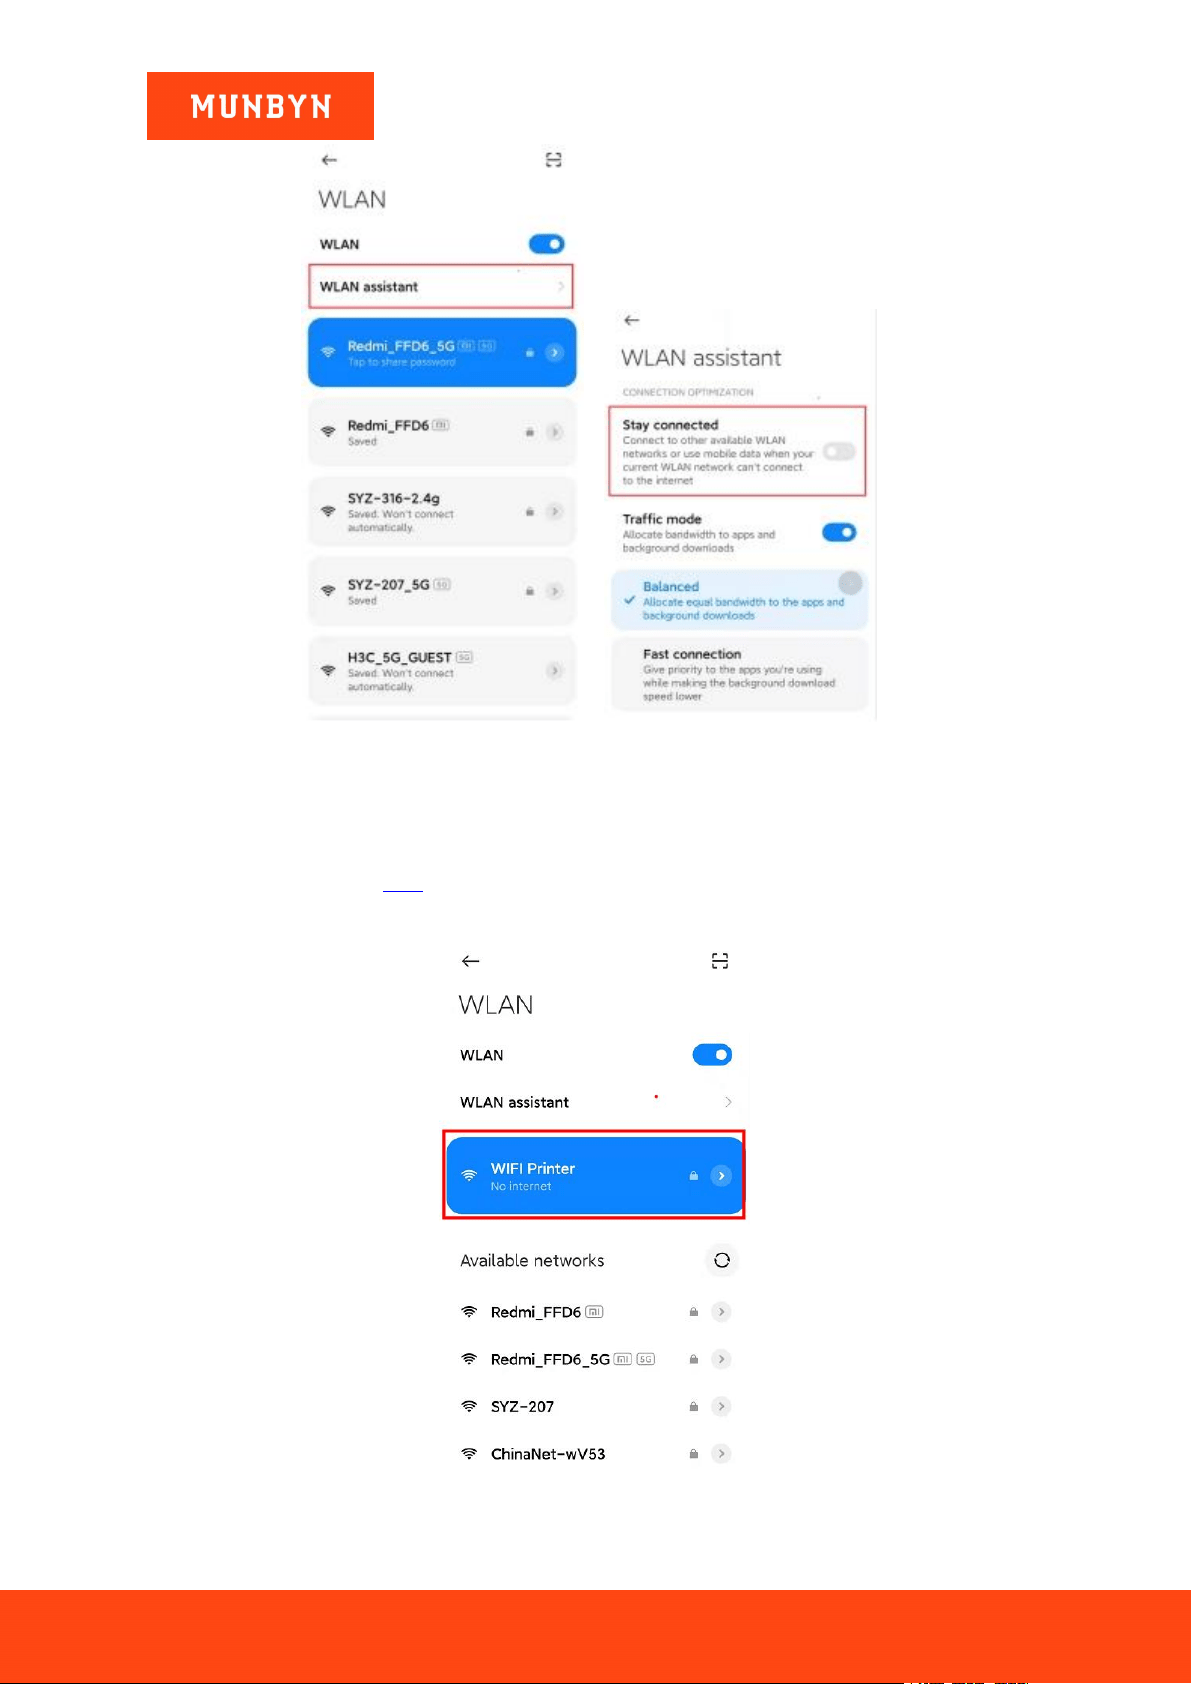
2 Turn off Wi-Fi automatic connection function.
Figure 3- 4 iOS Wi-Fi Ask to Join Networks
Page35of78
ITPP047 Thermal Printer Windows Software Manual
Version 2.00
Figure 3- 5 Android Wi-Fi Assistant
1) Connect the device to printer Wi-Fi.
Wi-Fi name: WIFI Printer Password: 012345678
Note: If you have changed the Wi-Fi name or password, you can print the self-test page to view the Wi-Fi
information. Refer to Section 2.2.3, step 2 for how to print the Wi-Fi printer page.
Figure 3- 6 Connect the Wi-Fi
Page36of78
ITPP047 Thermal Printer Windows Software Manual
Version 2.00
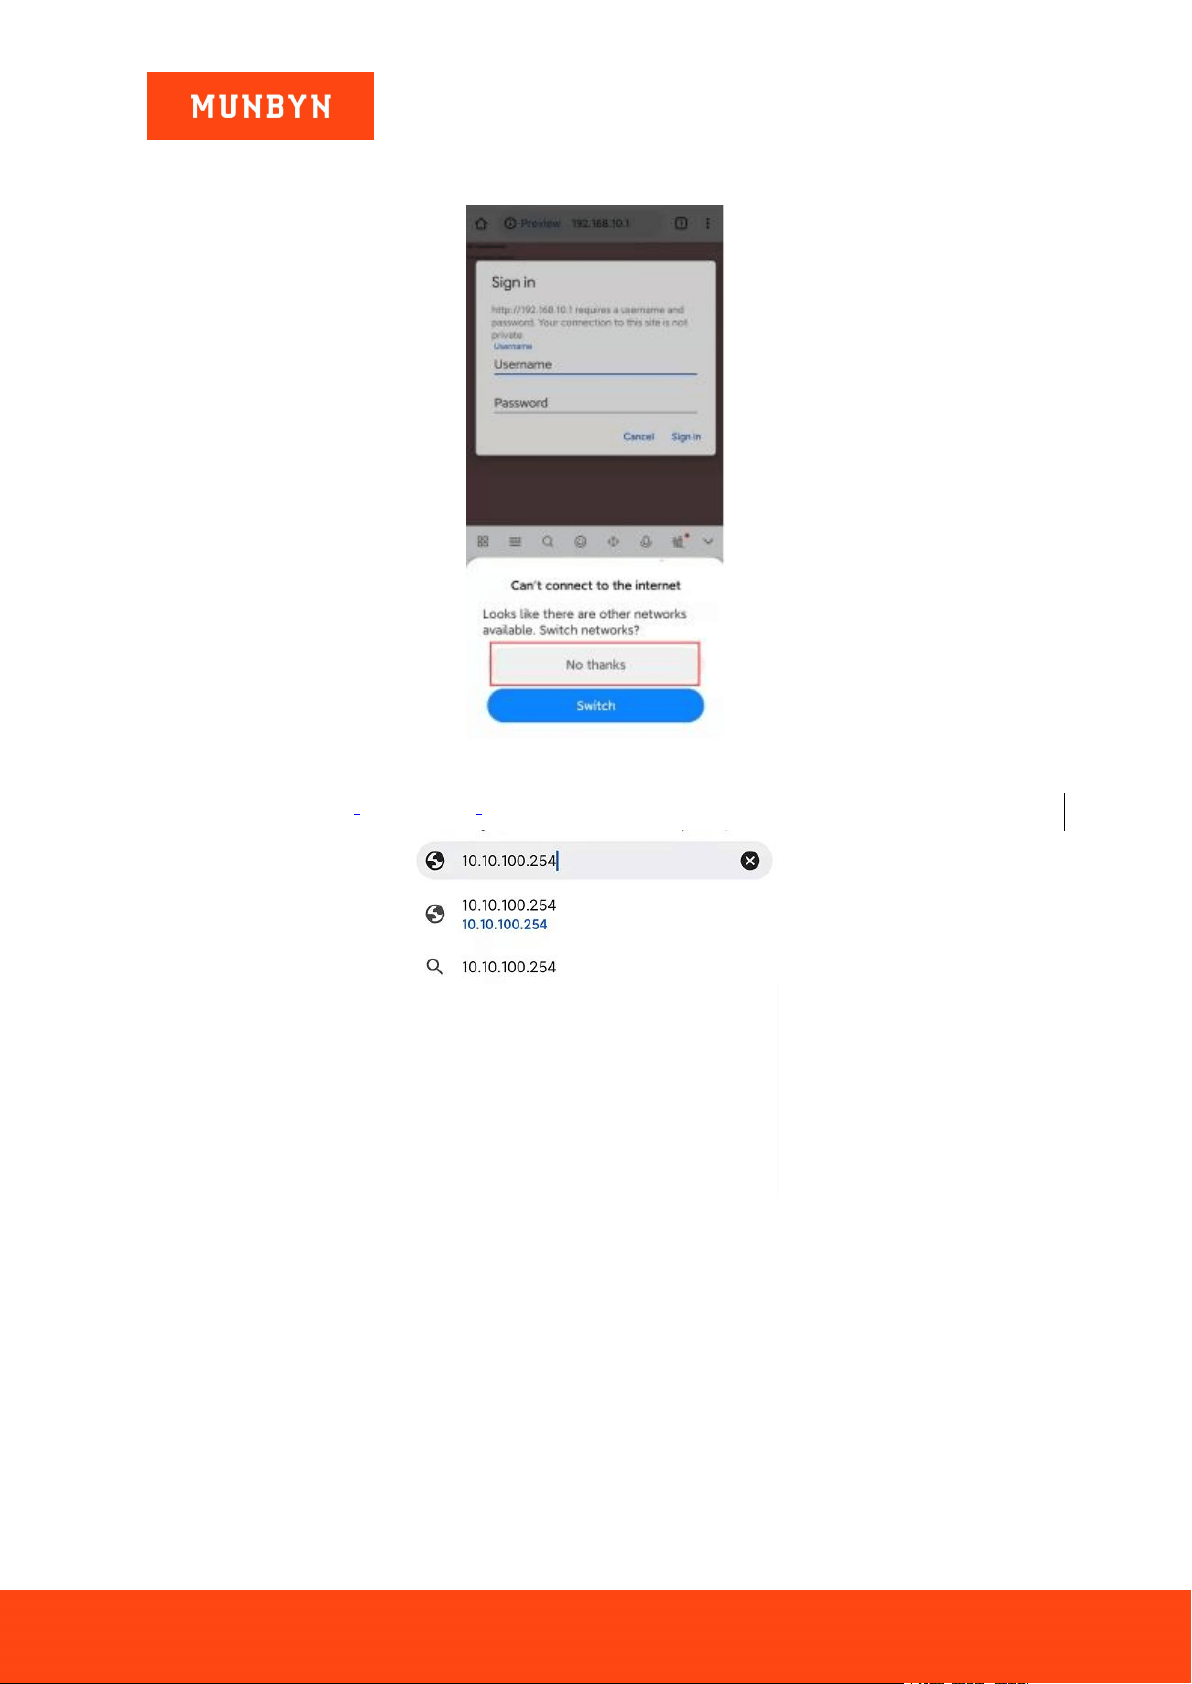
Notes: After connecting to the printer Wi-Fi, if the device prompts whether to switch to another network, select
No.
Figure 3- 7 Network Switching Prompt
2) Open a browser, enter [10.10.100.254].
Figure 3- 8 Enter the IP Address
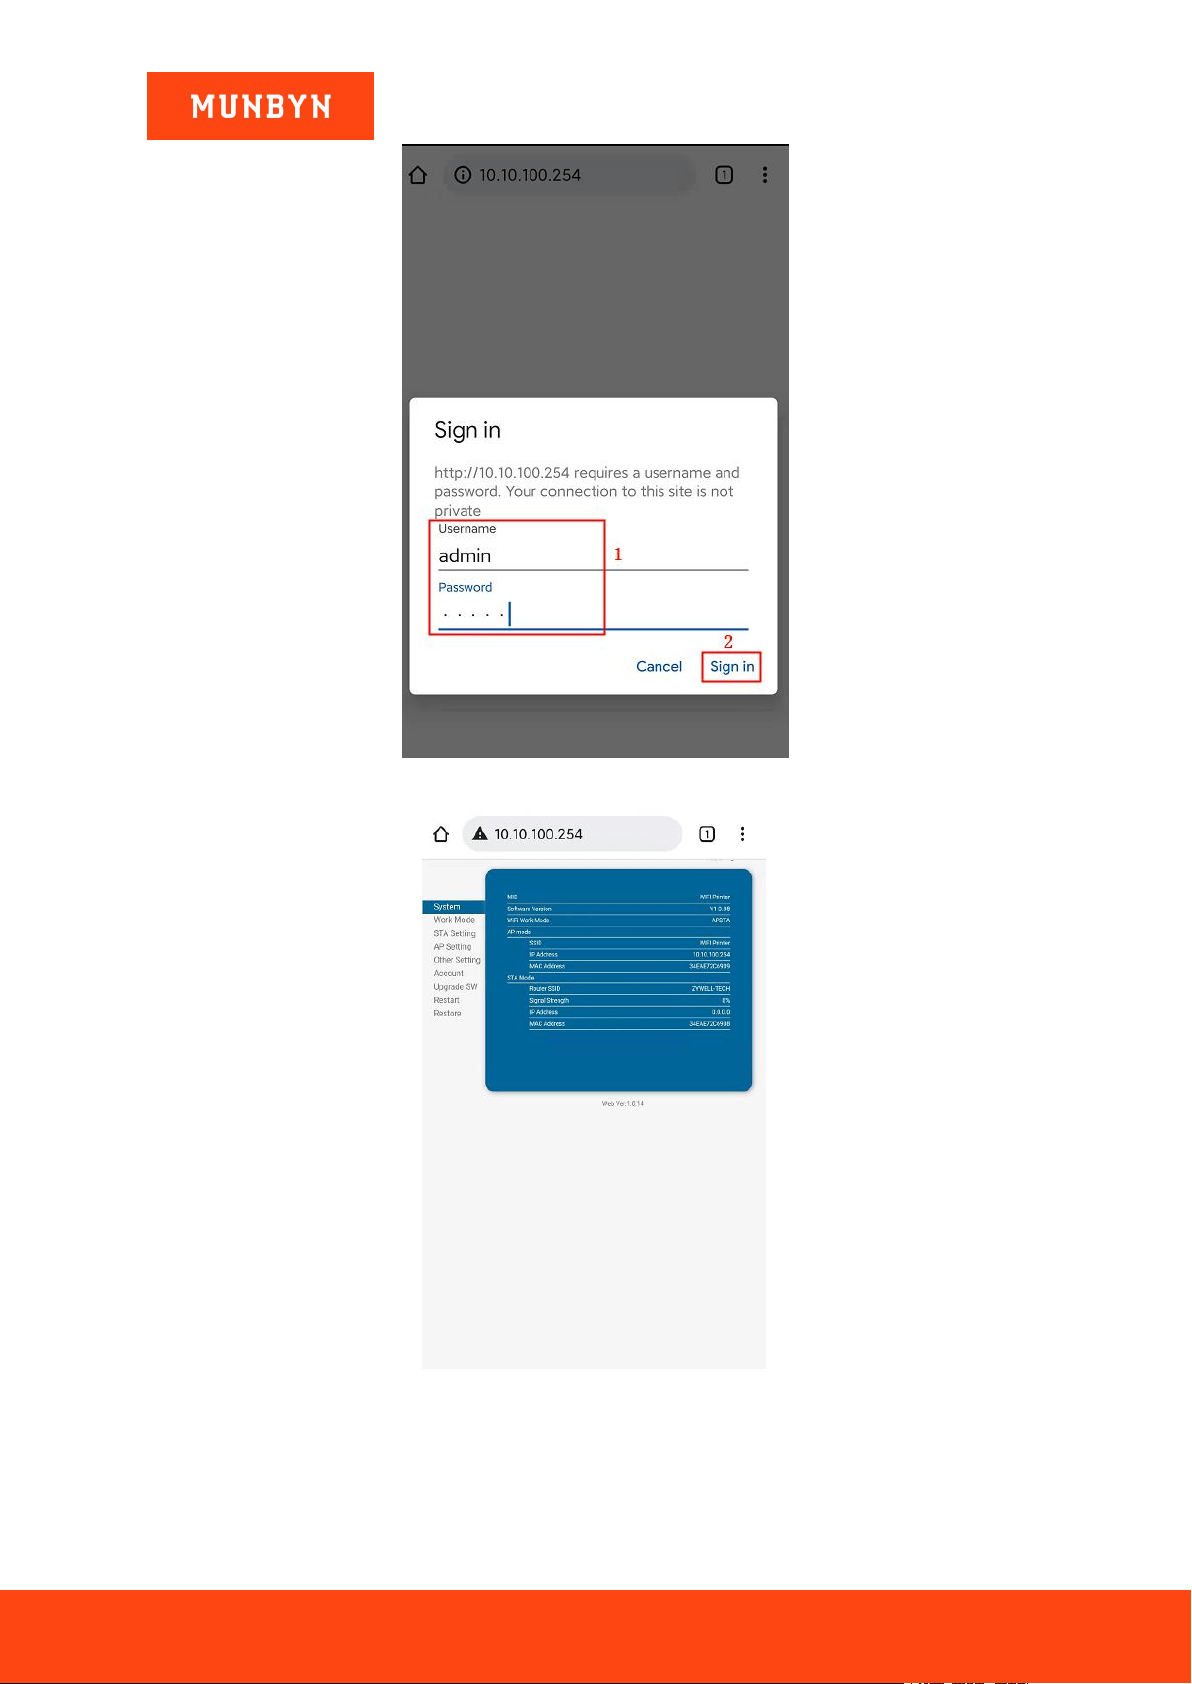
3) The "Sign in" interface will pop up automatically. Enter your username and password, click "Sign in". Your
browser will automatically jump to the printer's Wi-Fi setting.
Username: admin Password: admin
Page37of78
ITPP047 Thermal Printer Windows Software Manual
Version 2.00
Figure 3- 9 Sing in
Figure 3- 10 Wi-Fi Setting
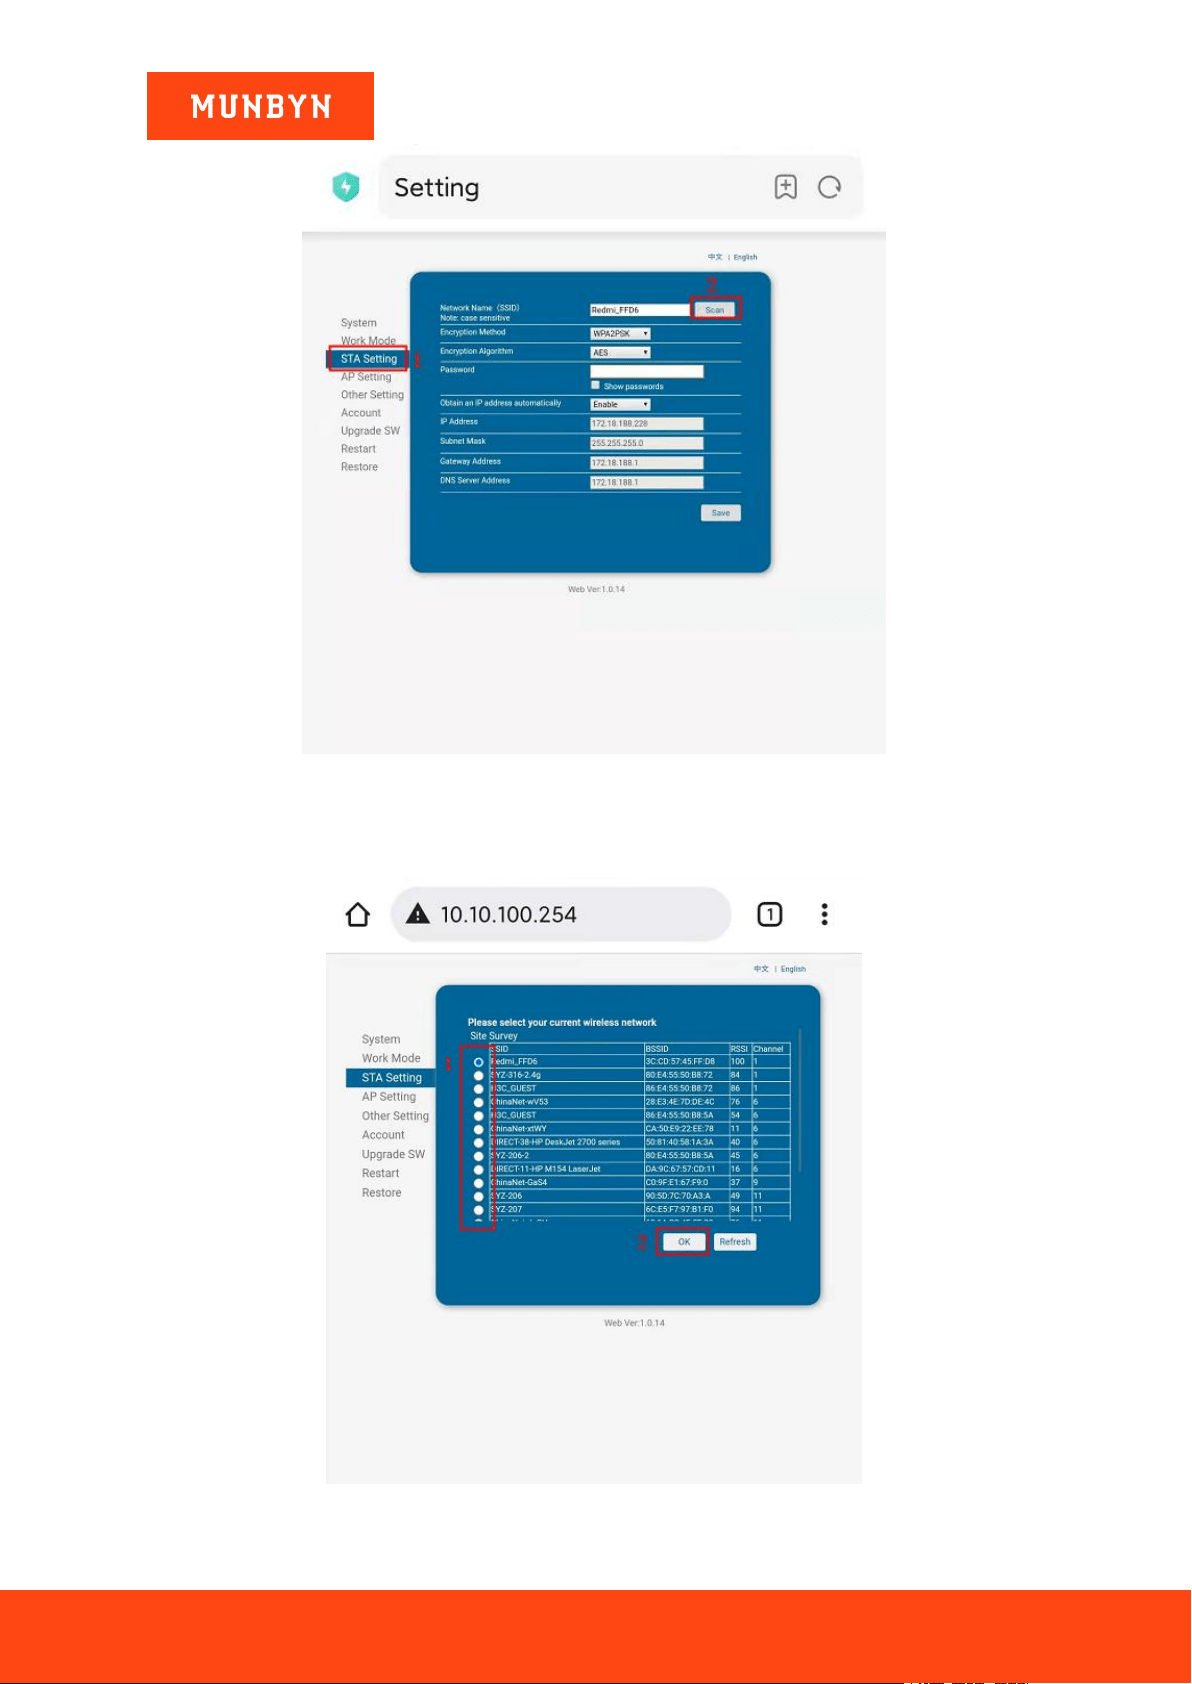
4) Click "STA Setting", then click "Scan".
Page38of78
ITPP047 Thermal Printer Windows Software Manual
Version 2.00
Figure 3- 11 Wi-Fi Setting
5) Enter the wireless network configuration interface, select your wireless network, and click "OK".
Note: If this interface does not have your wireless network, please click "Refresh" and search again.
Figure 3- 12 Wi-Fi Setting
Page39of78
ITPP047 Thermal Printer Windows Software Manual
Version 2.00
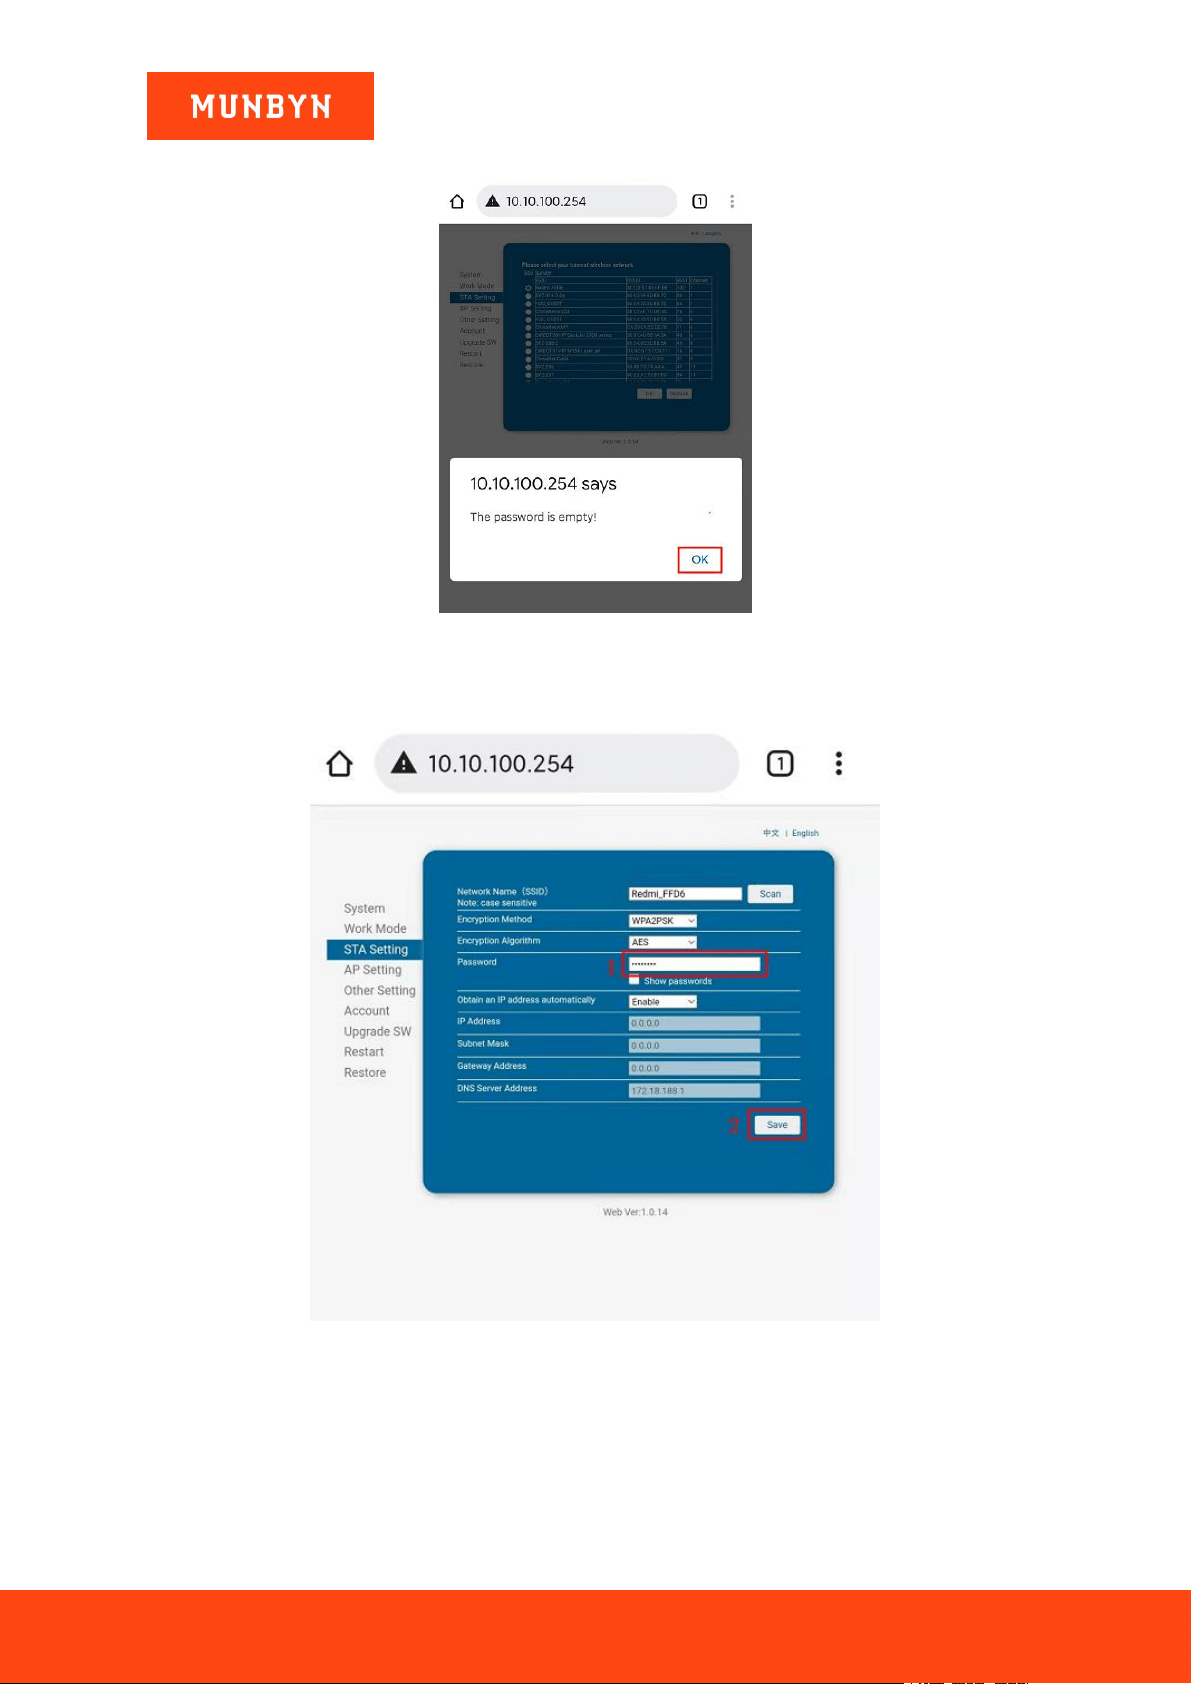
6) The prompt interface pops up "The password is empty!". Click "OK".
Figure 3- 13 Prompt Interface
7) Once you are automatically redirected to the "STA Setting" interface, enter the password of your chosen
wireless network and click "Save".
Figure 3- 14 Wi-Fi Setting
8) The interface "Saved Successfully!" pops up automatically. Click "Restart".

Page40of78
ITPP047 Thermal Printer Windows Software Manual
Version 2.00
Figure 3- 15 Wi-Fi Setting
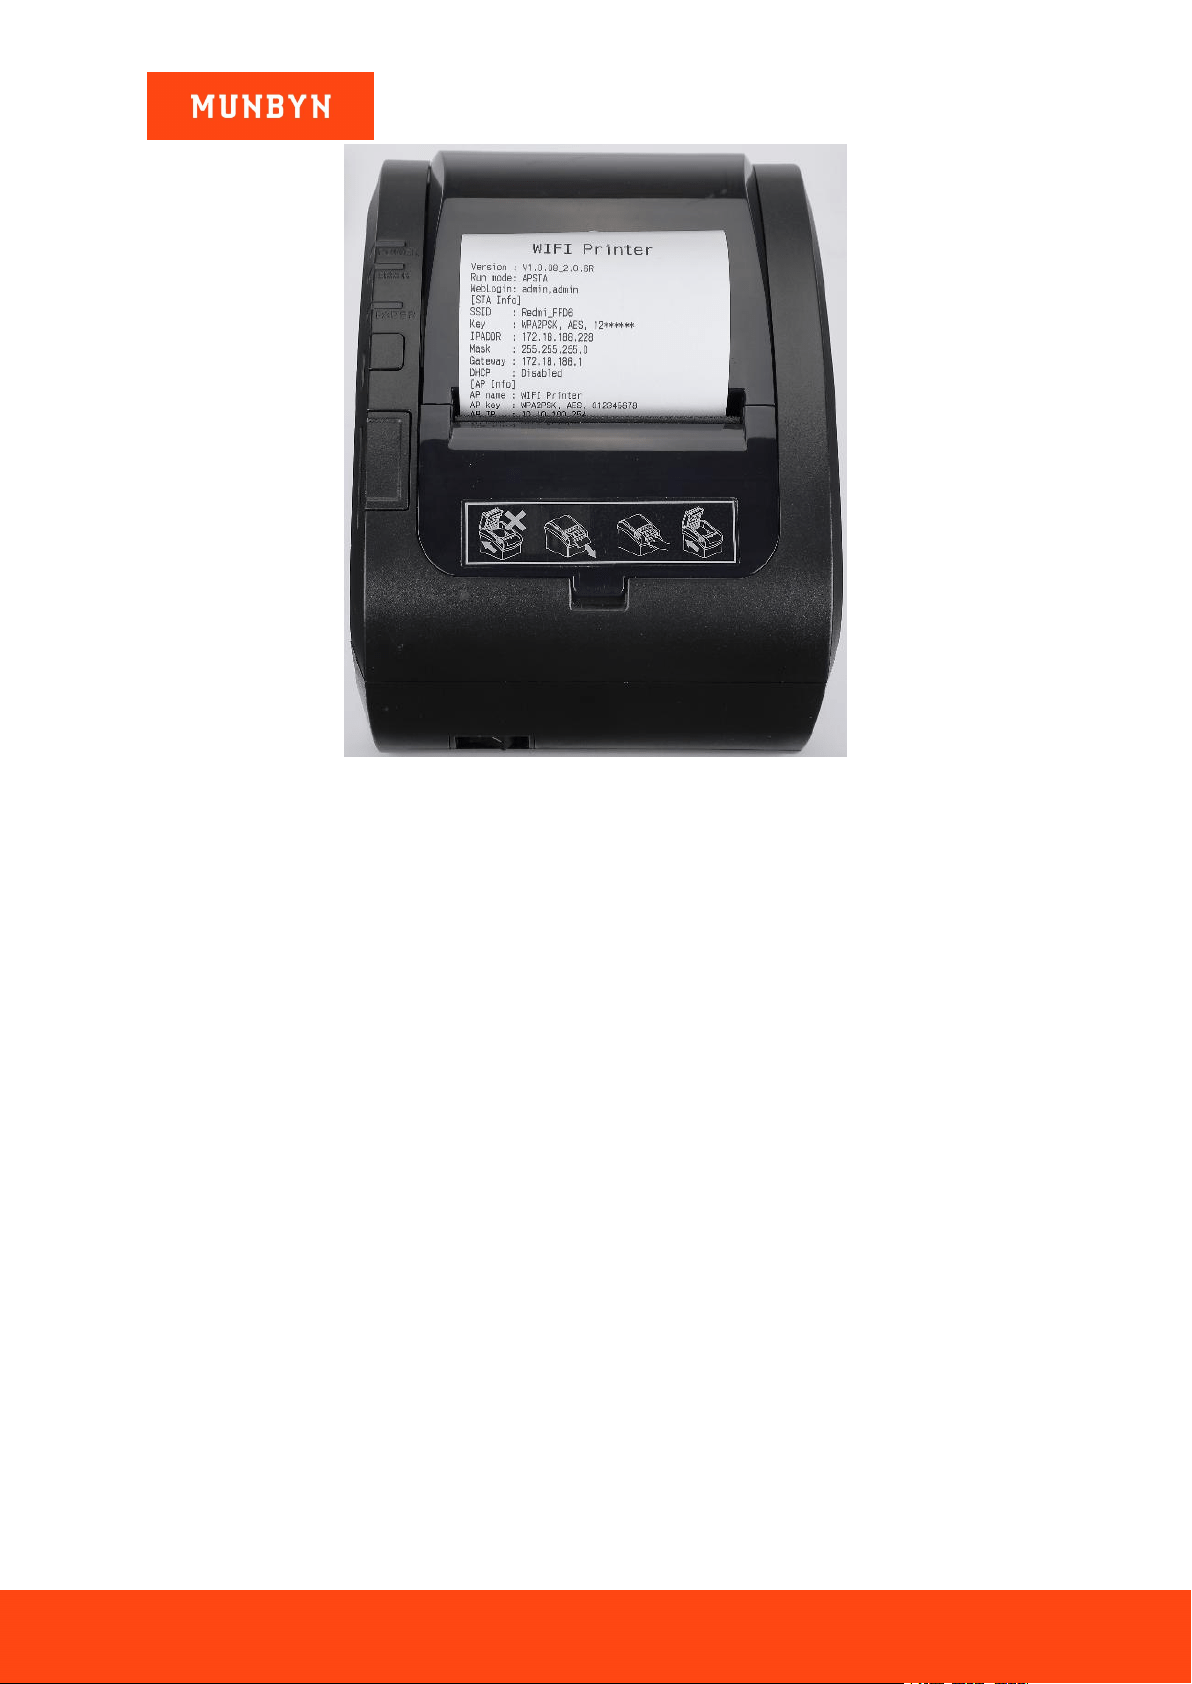
9) The interface "Rebooting Successful!" pops up. Wait about 10 seconds. The printer will automatically print a
Wi-Fi page which means the wireless network configuration of the printer is successful.
Figure 3- 16 Wi-Fi Setting
Page41of78
ITPP047 Thermal Printer Windows Software Manual
Version 2.00
Figure 3- 17 Wi-Fi Page
Demo video: http://u.pc.cd/PCX7
3.1.2. IP Address Manual Setting Mode
Note: This setup requires manually setting the printer's wireless network IP address. After the setup is complete,
the printer obtains a fixed IP address for the wireless network.
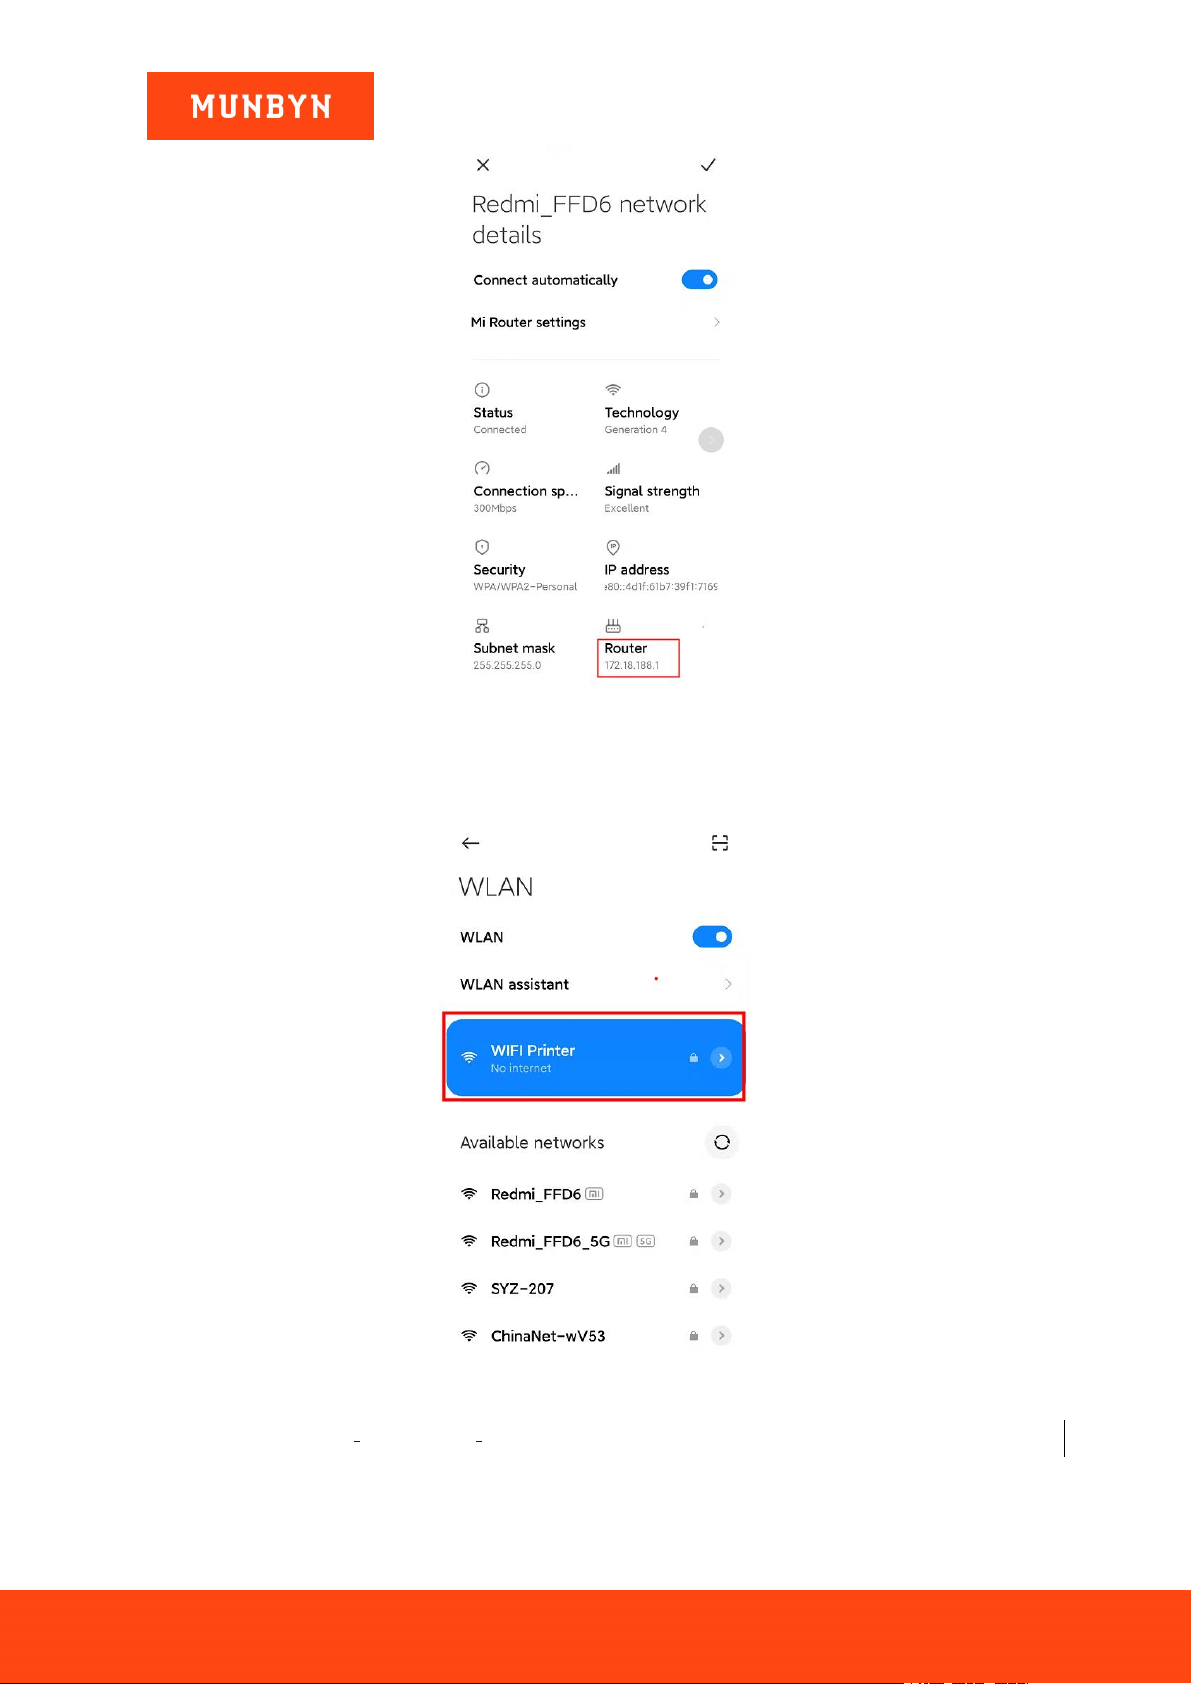
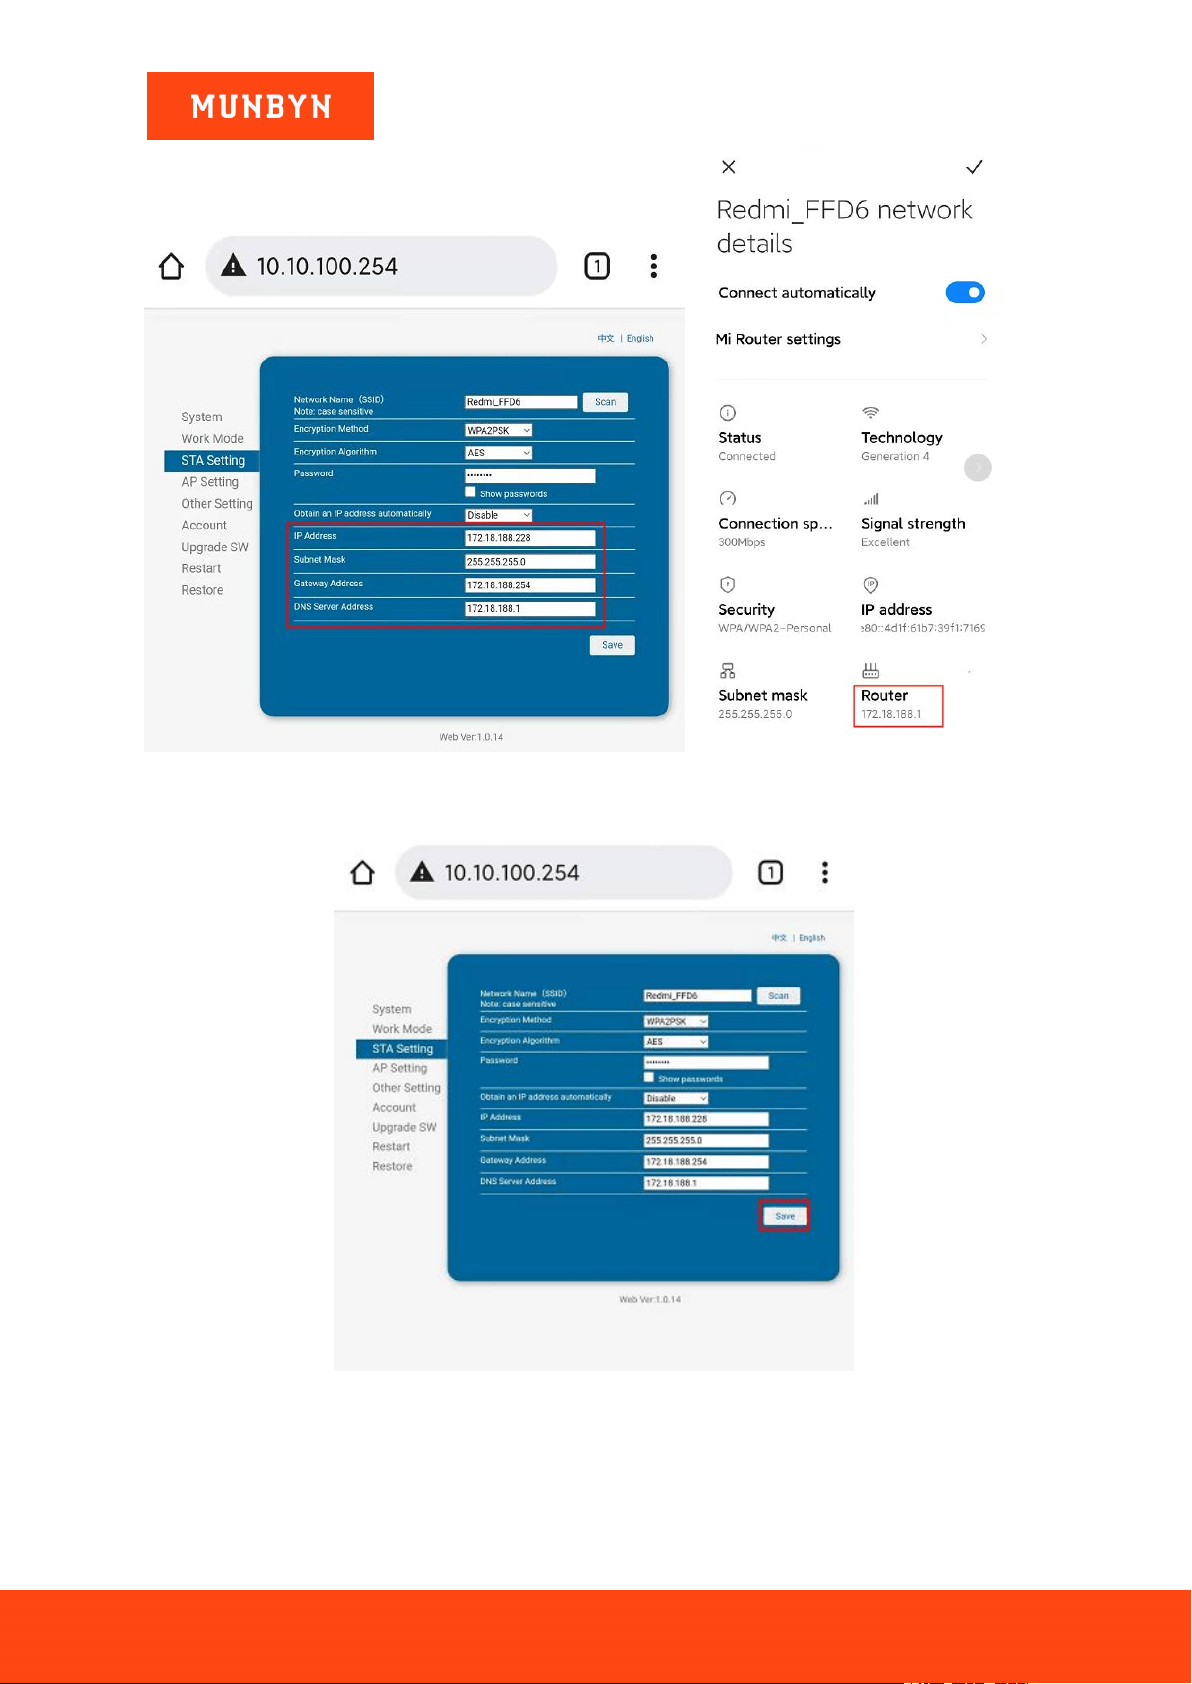
1) Connect the device to the router wireless network and check the router IP address.
Page42of78
ITPP047 Thermal Printer Windows Software Manual
Version 2.00
Figure 3- 18 Network Details
2) Connect the device to printer Wi-Fi.
Wi-Fi name: WIFI Printer Password: 012345678
Figure 3- 19 Connect Printer Wi-Fi
3) Open a browser, enter [10.10.100.254].

Page43of78
ITPP047 Thermal Printer Windows Software Manual
Version 2.00
Figure 3- 20 Enter the IP Address
4) The "Sign in" interface will pop up automatically. Enter your username and password, click "Sign in". Your
browser will automatically jump to the printer's Wi-Fi setting.
Username: admin Password: admin
Figure 3- 21 Sign in

Page44of78
ITPP047 Thermal Printer Windows Software Manual
Version 2.00
Figure 3- 22 Wi-Fi Setting
5) Click "STA Setting", then click "Scan".
Figure 3- 23 Wi-Fi Setting
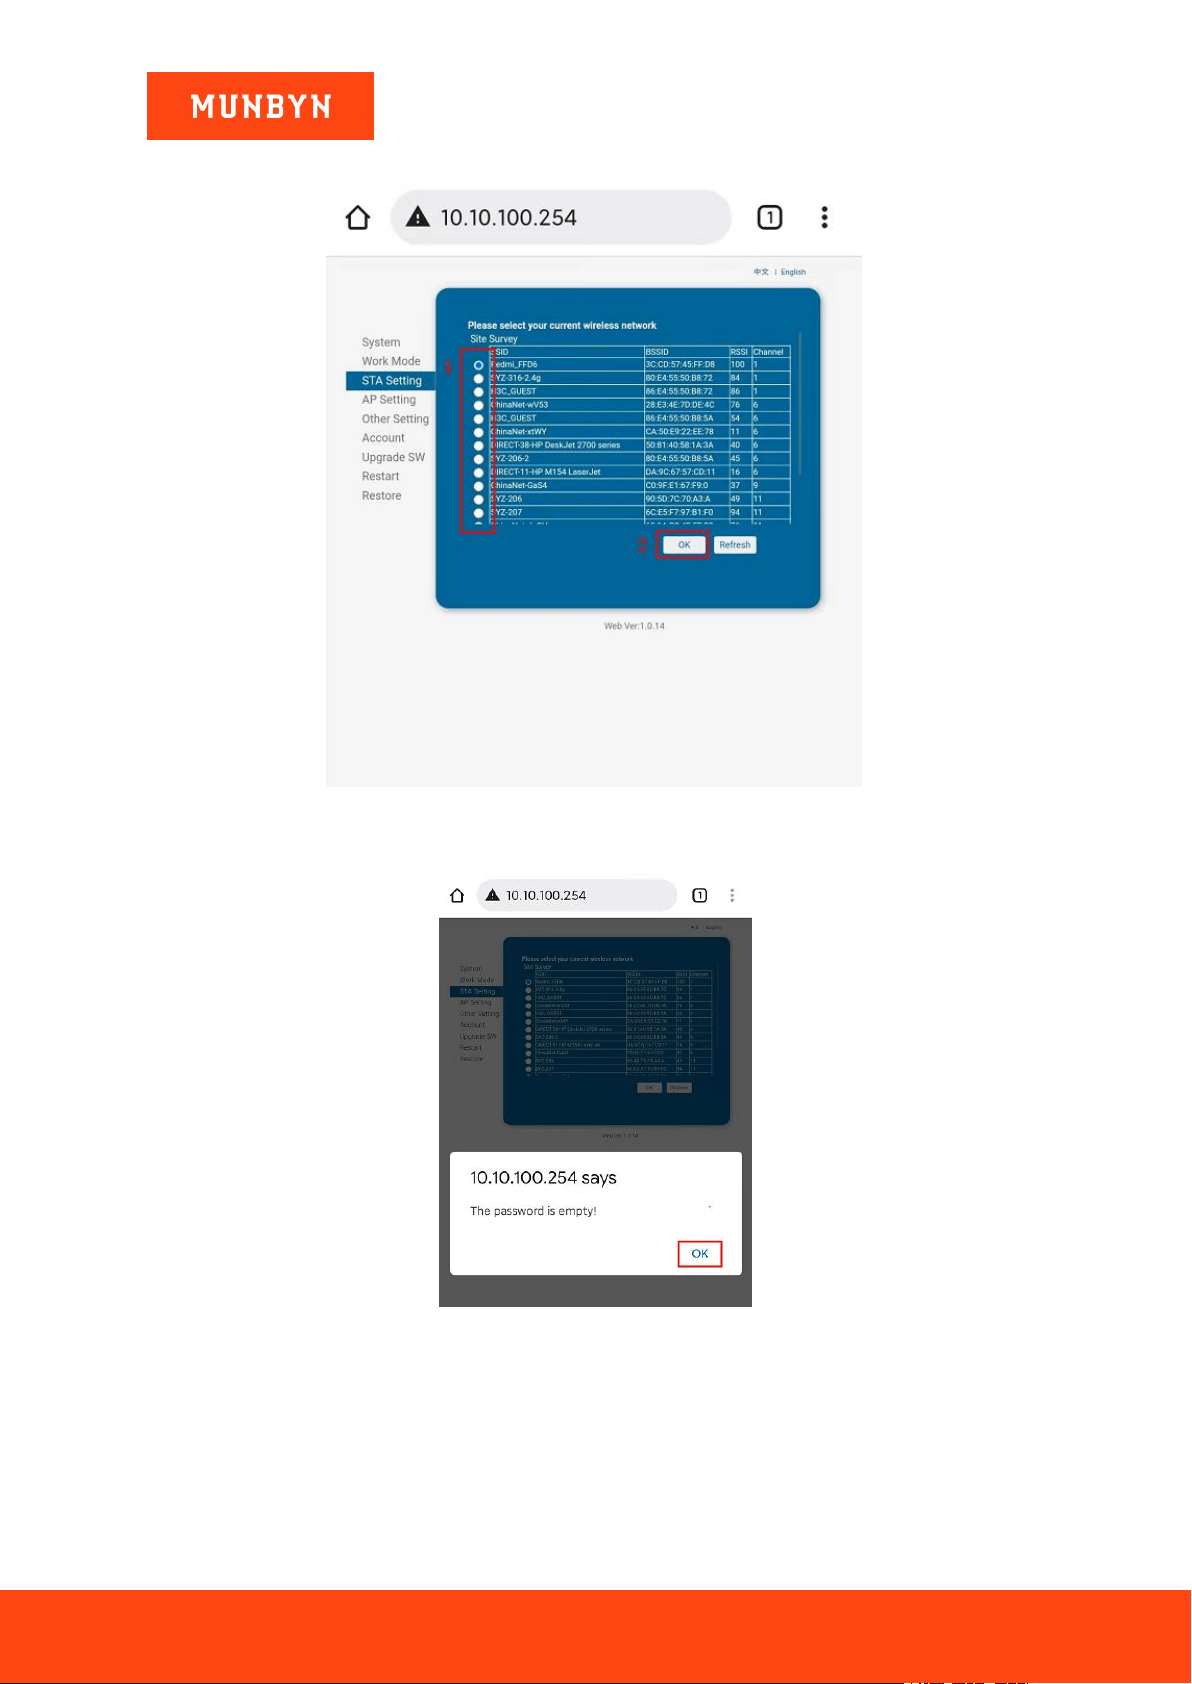
6) Enter the wireless network configuration interface, select your wireless network, and click "OK".
Page45of78
ITPP047 Thermal Printer Windows Software Manual
Version 2.00
Note: If this interface does not have your wireless network, please click "Refresh" and search again.
Figure 3- 24 Wi-Fi Setting
7) The prompt interface pops up "The password is empty!". Click "OK".
Figure 3- 25 Prompt Interface
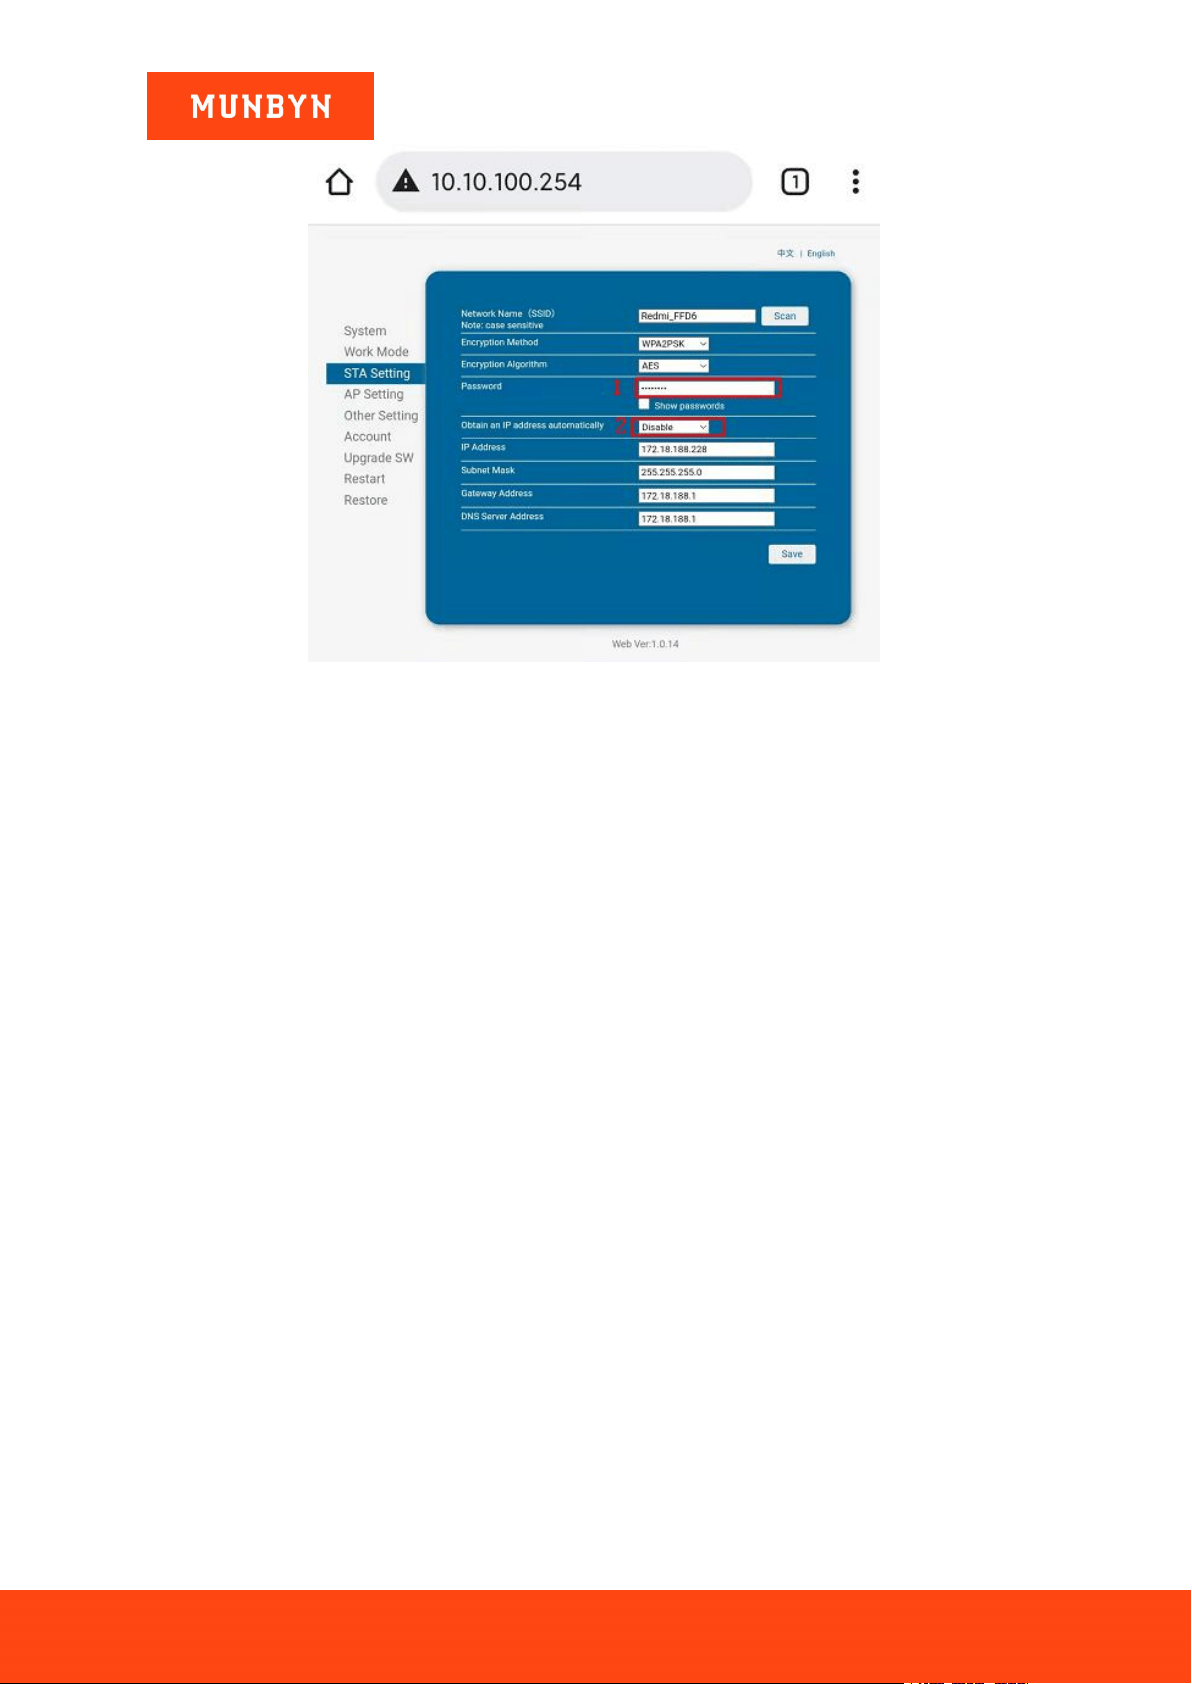
8) Automatically jump to the "STA Setting" interface. Enter the password for the wireless network of your
choice and select "Disable" in the "Obtain an IP address automatically" field.
Page46of78
ITPP047 Thermal Printer Windows Software Manual
Version 2.00
Figure 3- 26 Prompt Interface
9) Set IP address.
IP Address: the top three numbers are the same as the first three digits of the router IP address, the last digit can
fill any of the 3-253.
Subnet Mask: 255.255.255.0.
Gateway Address: The top three numbers are the same as the first three digits of the router IP address, and the
last digit is 254 (x.x.x.254).
DNS Server Address: The top three numbers are the same as the first three digits of the router IP address, and
the last digit is 1 (x.x.x.1).
Note: Please refer to step 1 to check the Router IP address.
For example: The IP address of the router is 172.18.188.1. The IP address is 172.18.188.228(The range is
3-253). The Subnet Mask is 255.255.255.0, and the Gateway Address is 172.18.188.254. The DNS server
address is 172.18.188.1. Please see the picture below.
Page47of78
ITPP047 Thermal Printer Windows Software Manual
Version 2.00
Figure 3- 27 Wi-Fi Setting Figure 3- 28 Network Details
10)Click "Save".
Figure 3- 29 Wi-Fi Setting
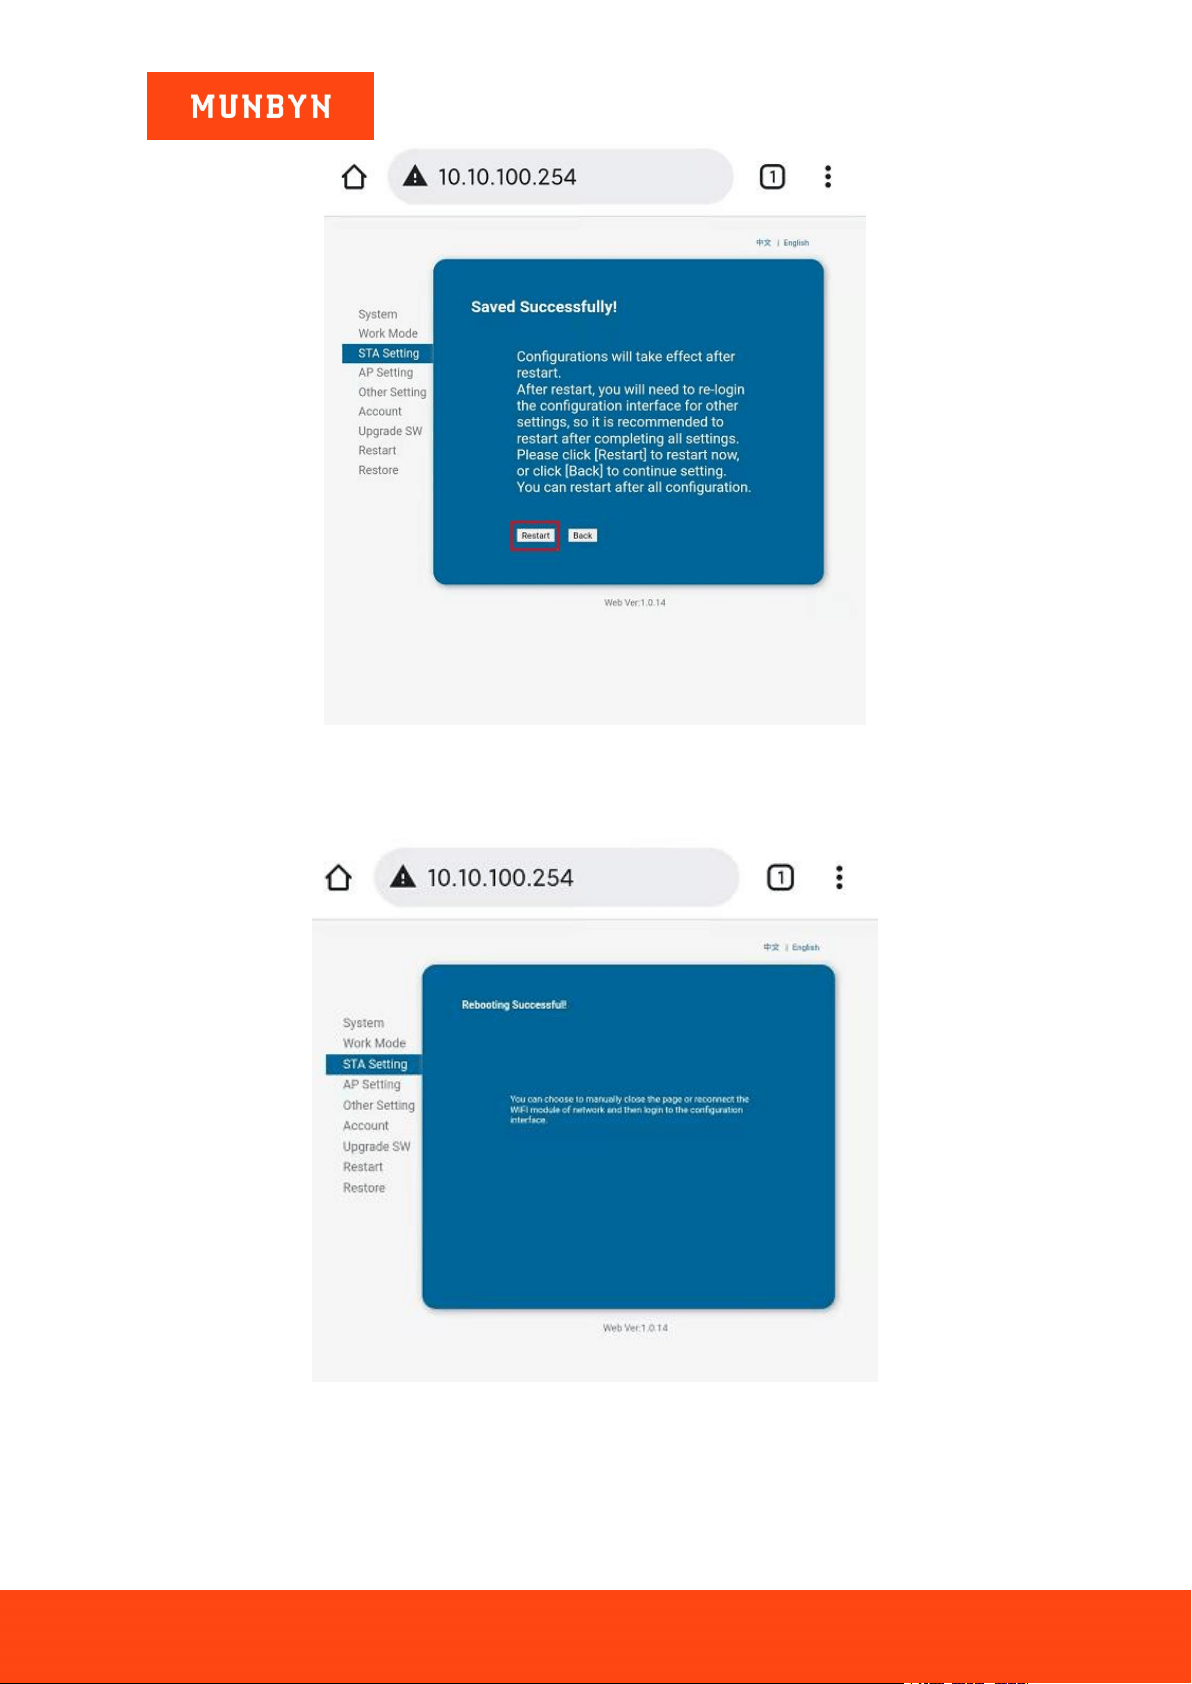
11)The interface "Saved Successfully!" pops up automatically. Click "Restart".
Page48of78
ITPP047 Thermal Printer Windows Software Manual
Version 2.00
Figure 3- 30 Wi-Fi Setting
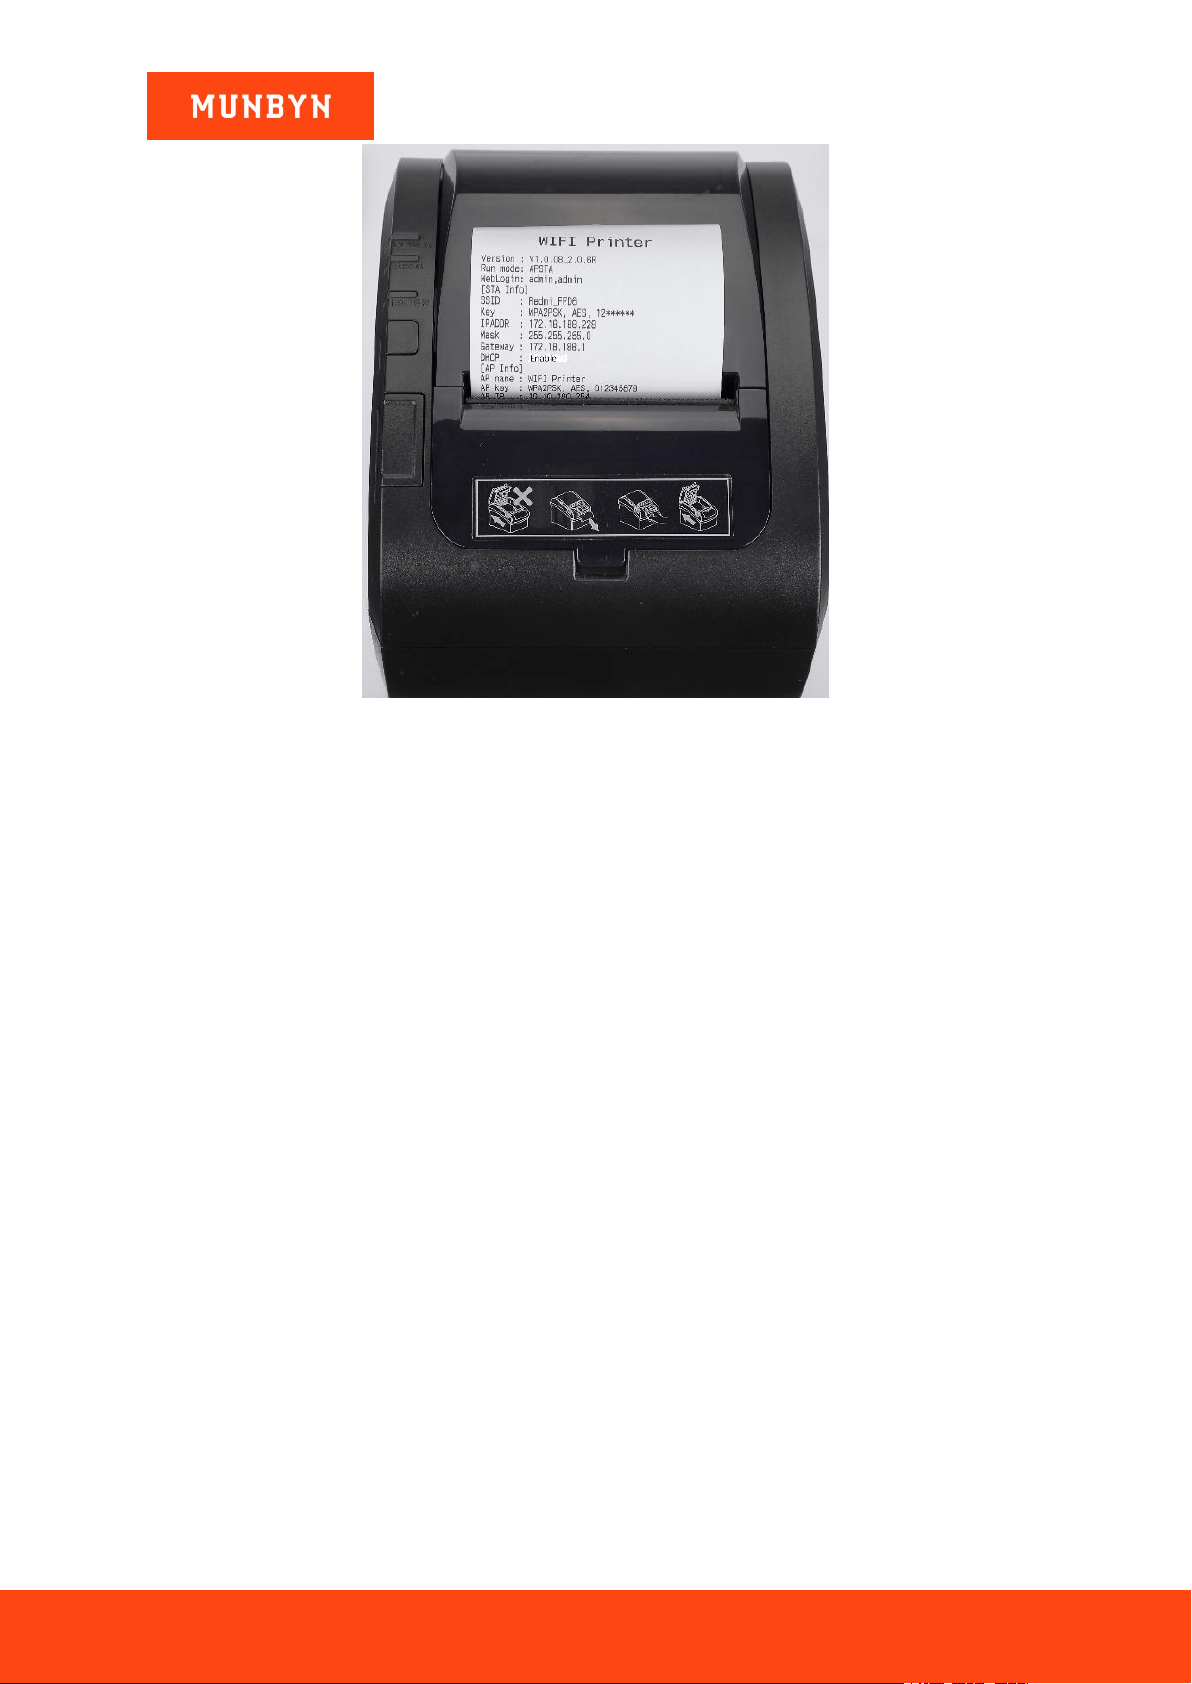
12)The interface "Rebooting Successful!" pops up. Wait about 10 seconds. The printer will automatically print a
Wi-Fi page which means the wireless network configuration of the printer is successful.
Figure 3- 31 Wi-Fi Setting
Page49of78
ITPP047 Thermal Printer Windows Software Manual
Version 2.00
Figure 3- 32 Wi-Fi Printer Page
Demo video: http://u.pc.cd/2cArtalK
Page50of78
ITPP047 Thermal Printer Windows Software Manual
Version 2.00
4.0. Uninstallation
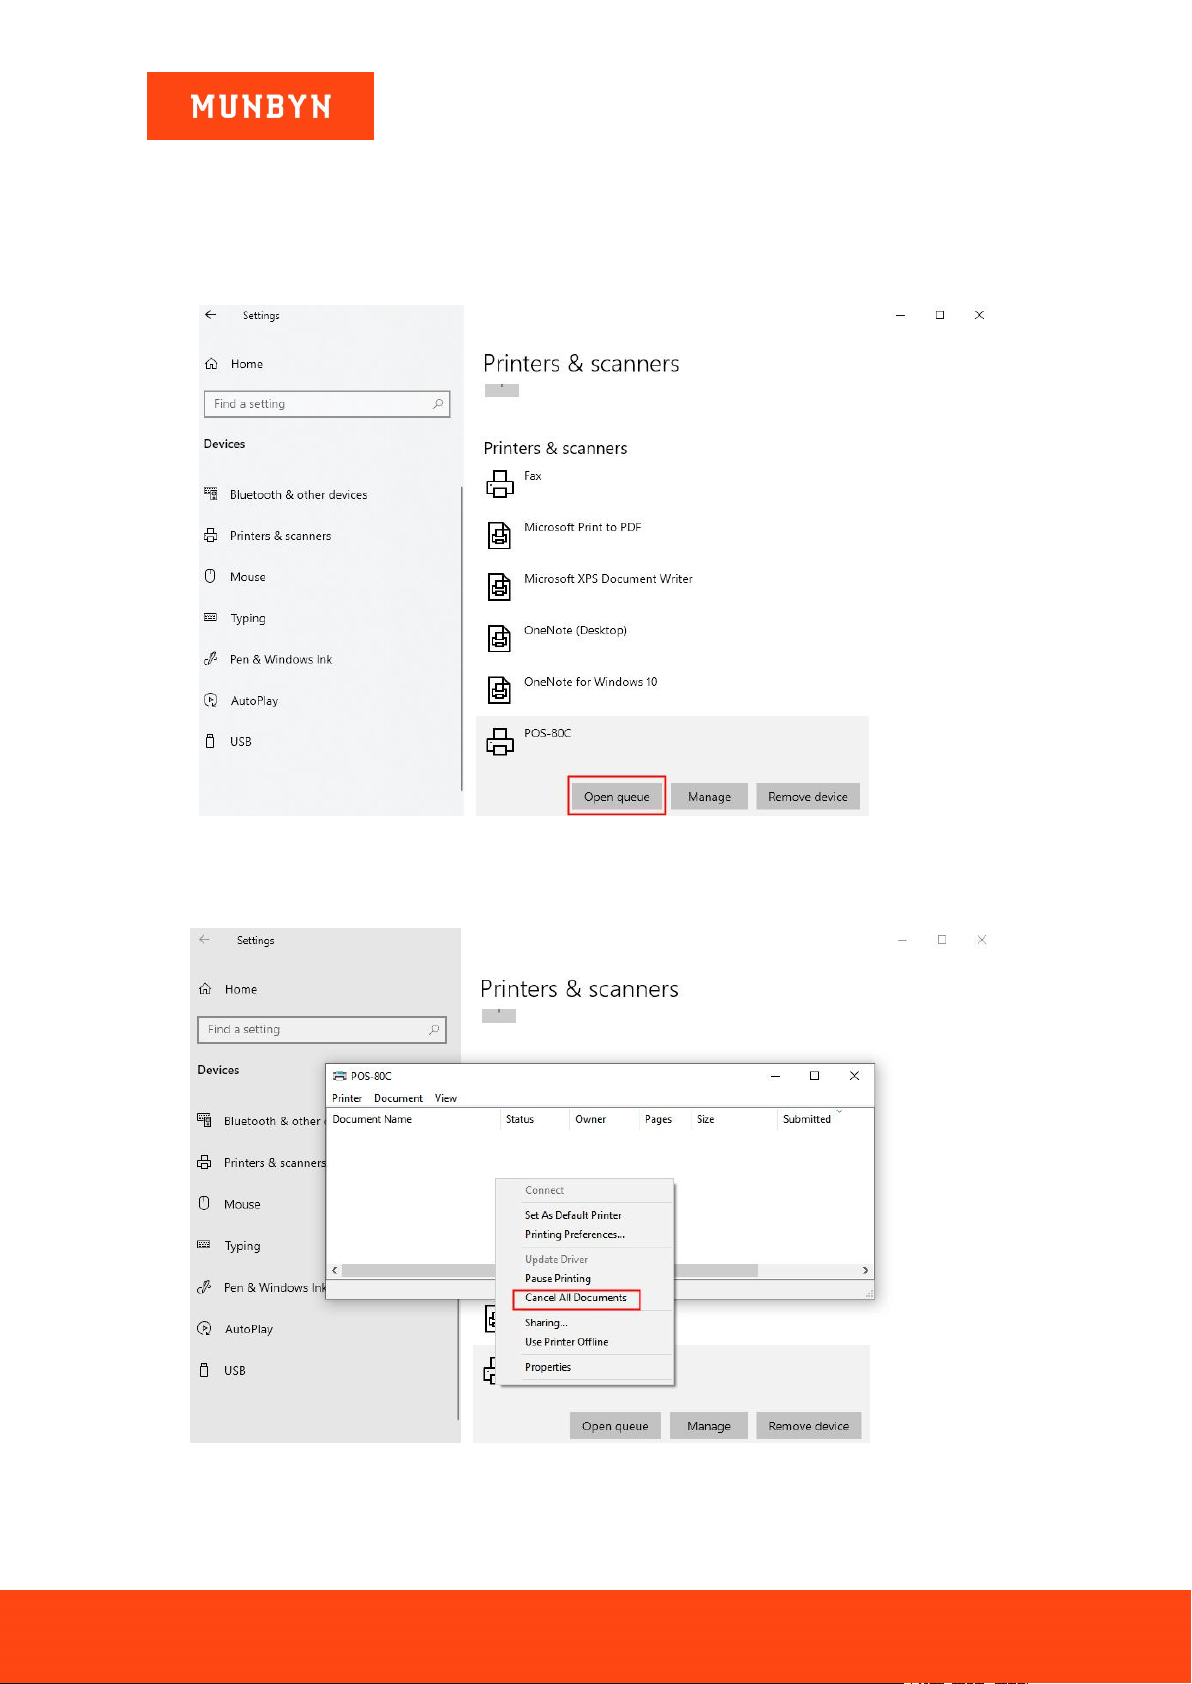
4.1. Delete Print Pool Job
1) Click "POS-80C" and choose "Open queue".
Figure 4- 1 Control Panel
2) Check the printer for print jobs. If not, continue to the next step. If so, right-click in the print pool and click
the "Cancel all Documents" to delete jobs.
Figure 4- 2 Control Panel
Page51of78
ITPP047 Thermal Printer Windows Software Manual
Version 2.00
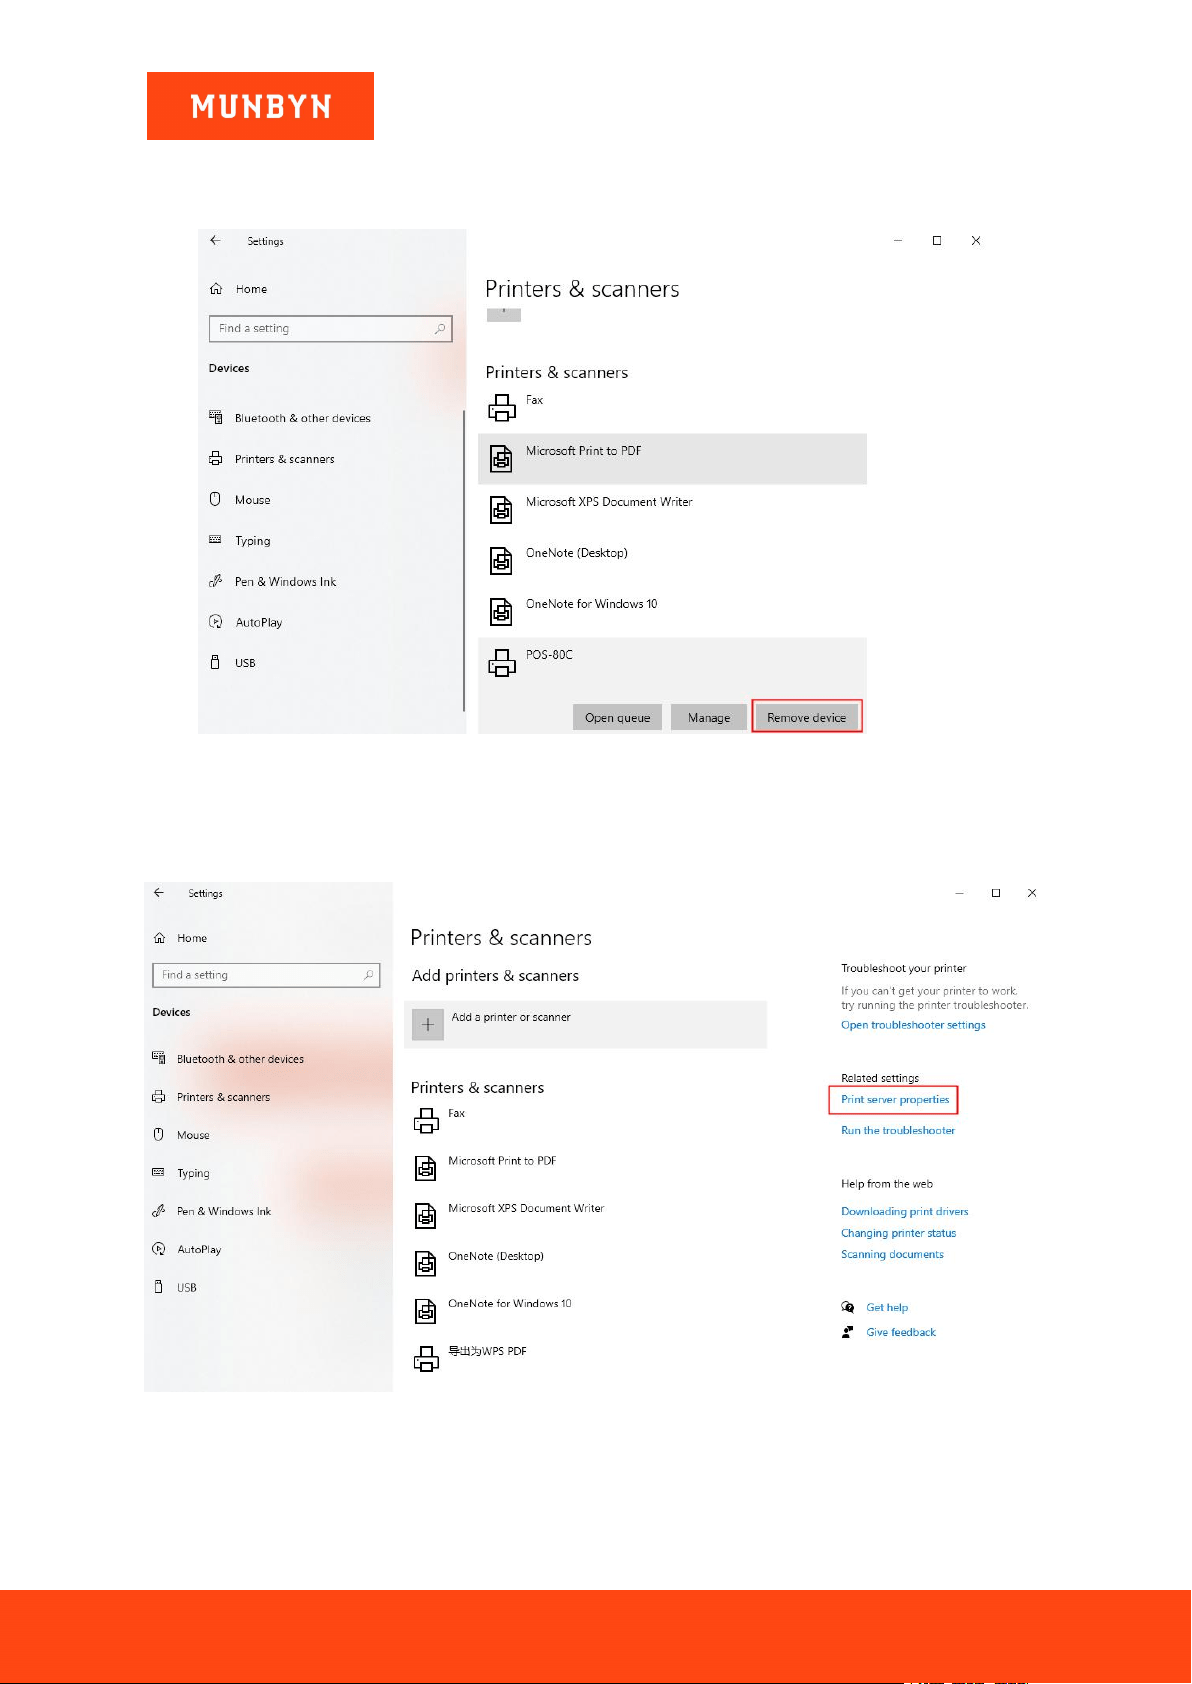
4.2. Delete Printer
1) Click "POS-80C" and choose "Remove device".
Figure 4- 3 Control Panel
4.3. Uninstall Driver
1) Click "Print server properties".
Figure 4- 4 Control Panel
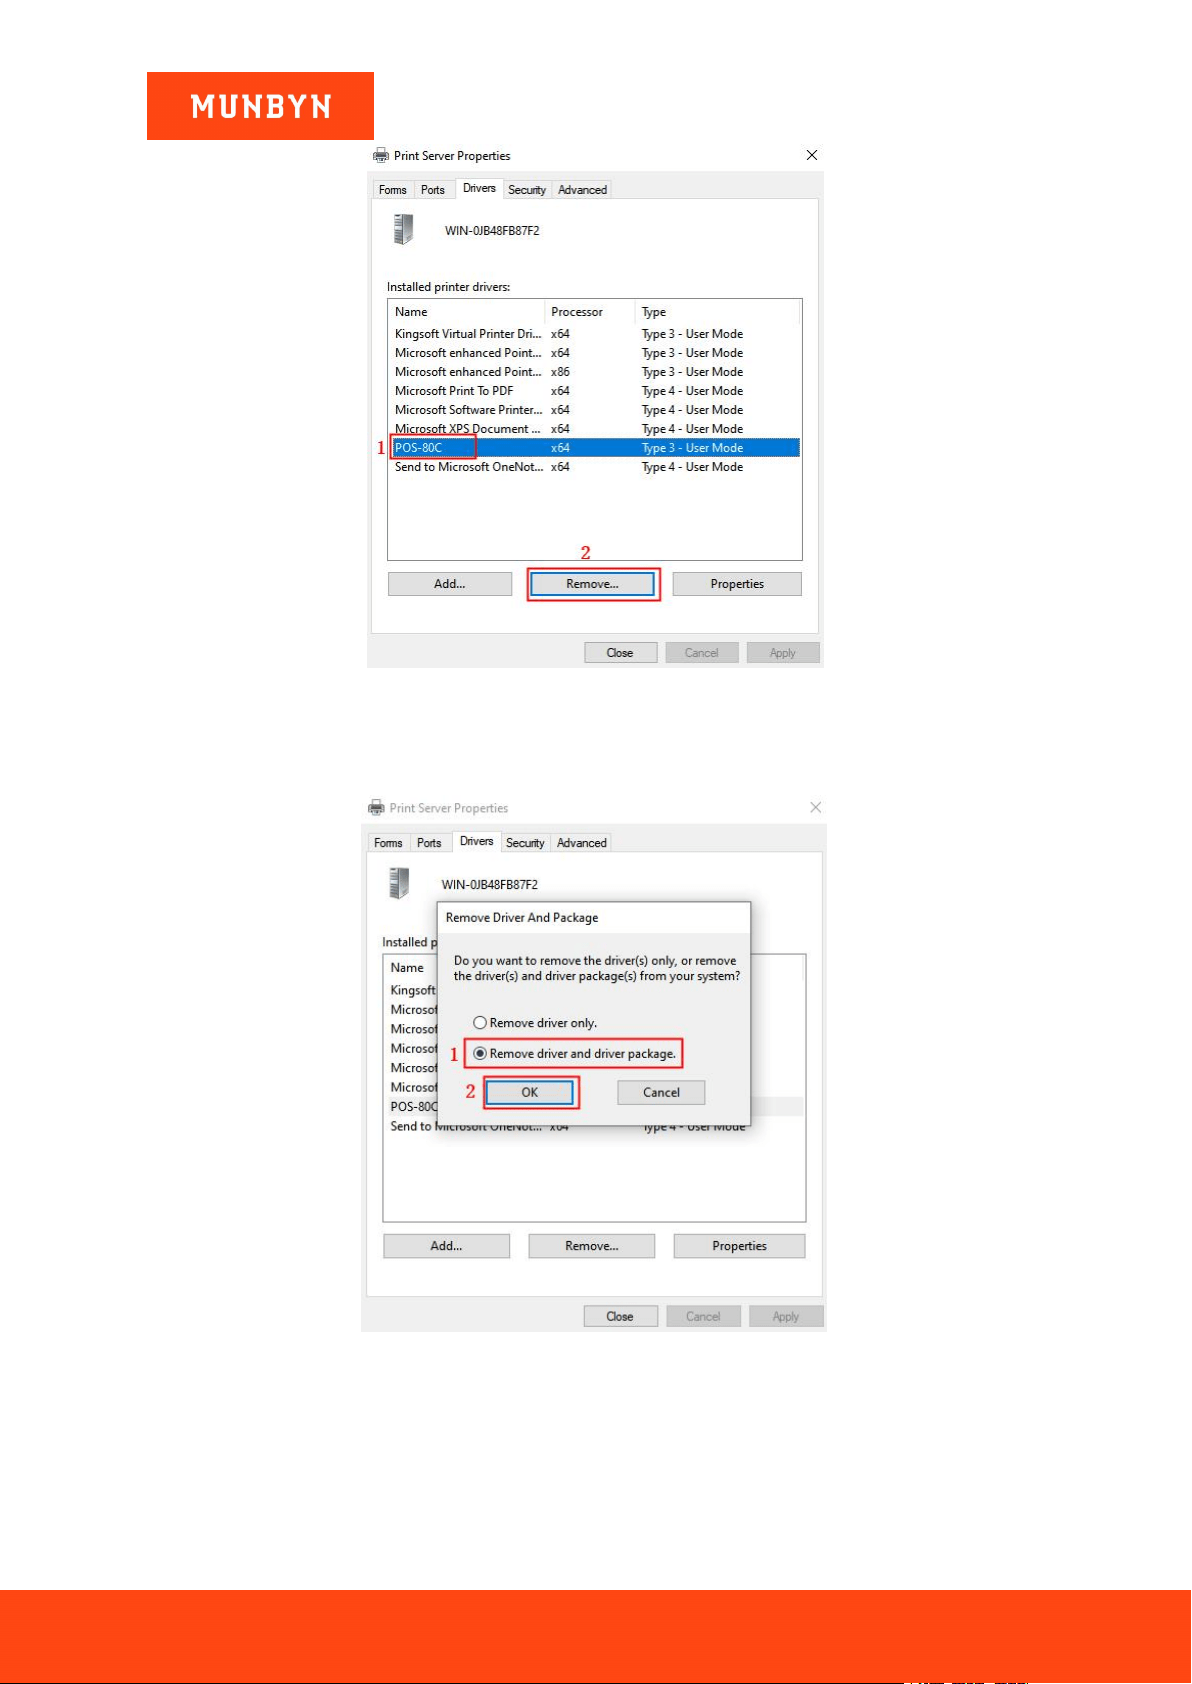
2) Select "POS-80C", then click "Remove".
Page52of78
ITPP047 Thermal Printer Windows Software Manual
Version 2.00
Figure 4- 5 Print Server Properties
3) Select "Remove driver and driver package", then click "OK".
Figure 4- 6 Print Server Properties
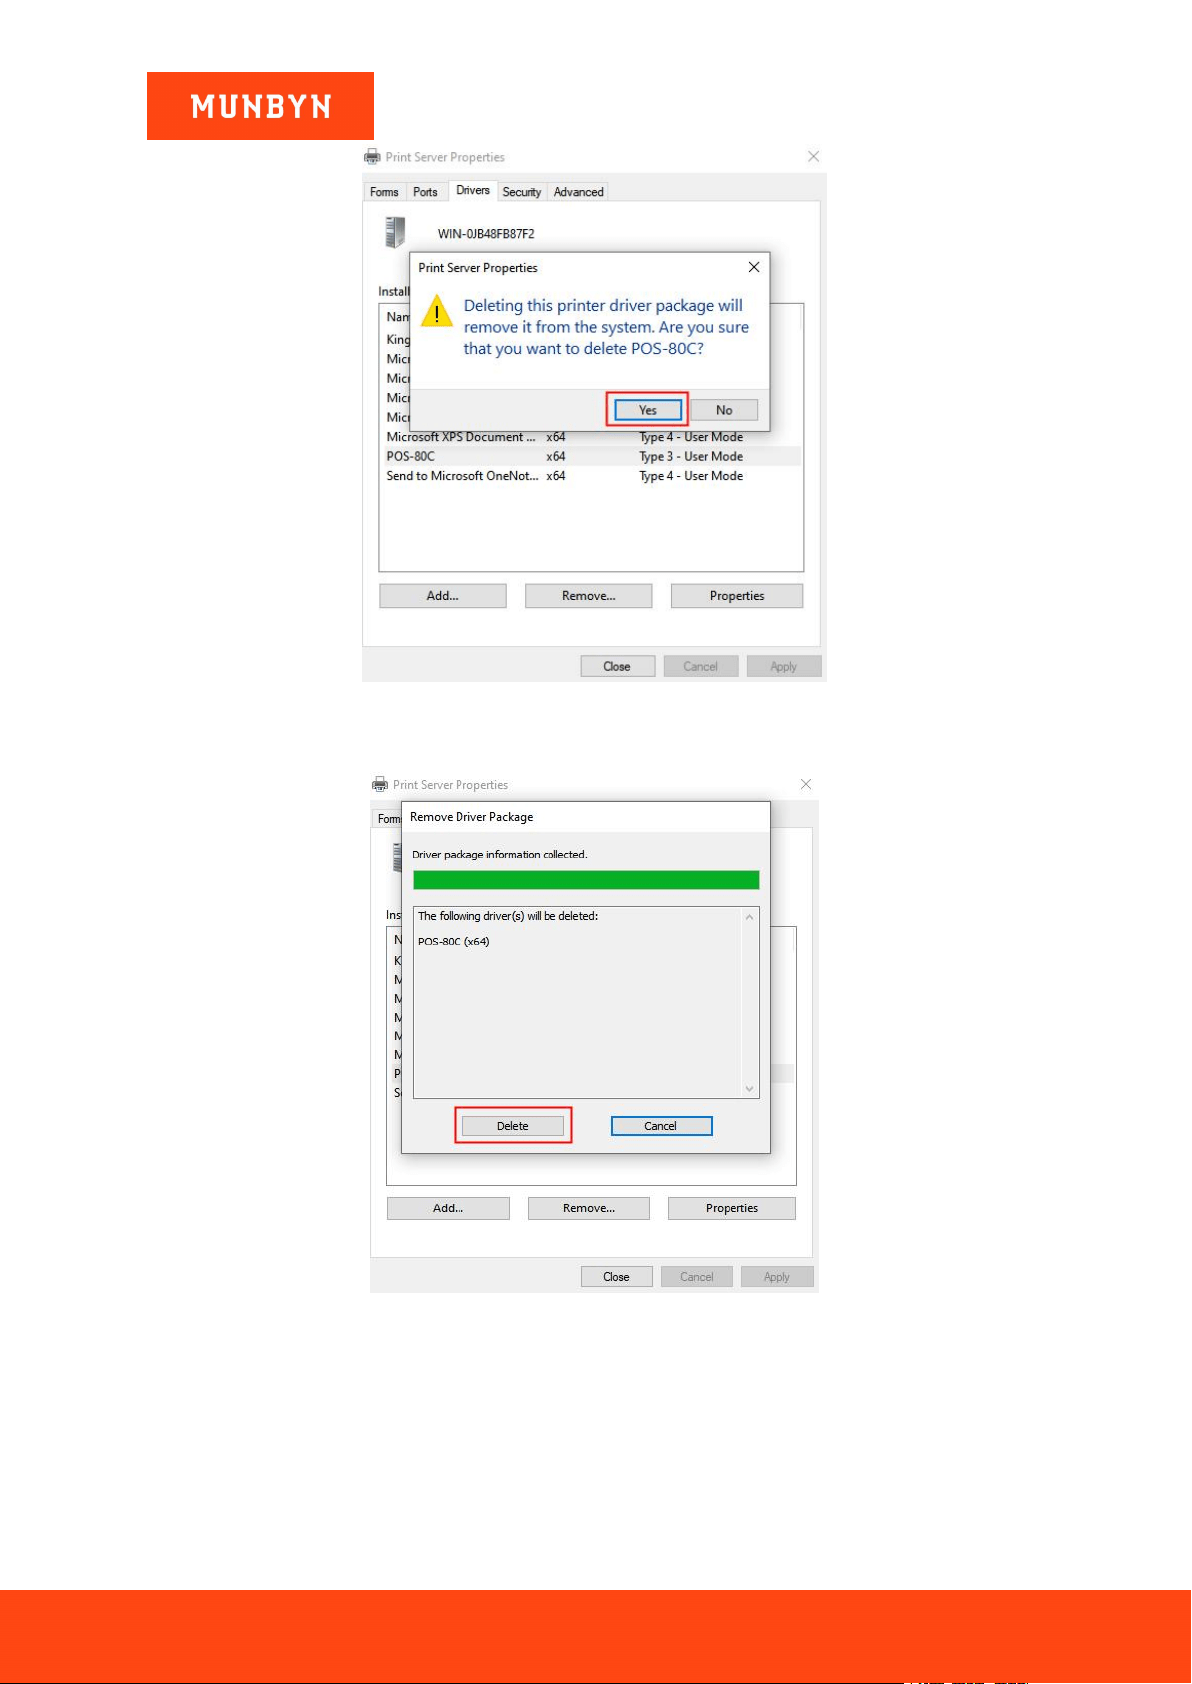
4) Click "Yes".
Page53of78
ITPP047 Thermal Printer Windows Software Manual
Version 2.00
Figure 4- 7 Print Server Properties
5) Click "Delete".
Figure 4- 8 Print Server Properties
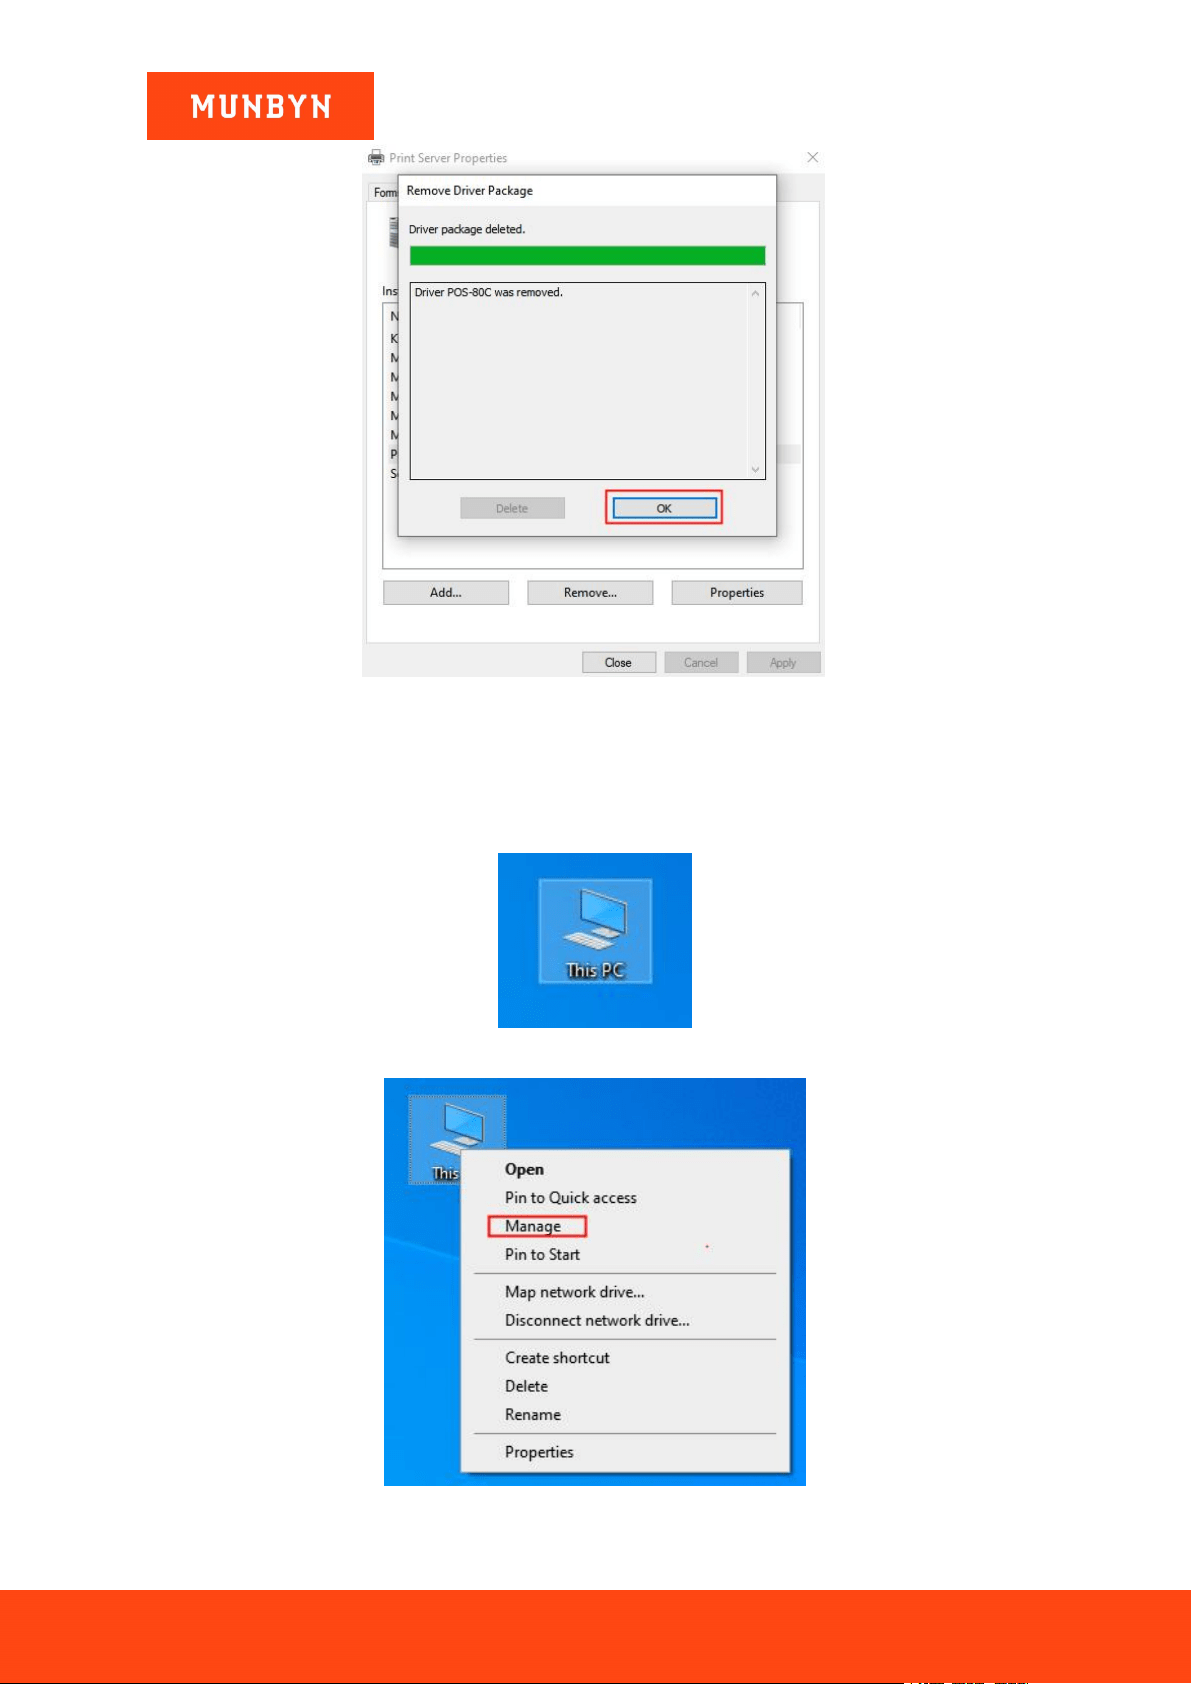
6) Click "OK" to complete the driver uninstallation.
Page54of78
ITPP047 Thermal Printer Windows Software Manual
Version 2.00
Figure 4- 9
Print Server Properties
Note: If you encounter the prompt of "The driver is in use and cannot be uninstalled" when uninstalling the
driver, please check whether the printer has been deleted. Then restart the printer service according to the
following steps. And then uninstall the driver again.
a. Right click the PC icon and select the "Manage".
Figure 4- 10 PC Icon
Figure 4- 11 Choose Manage
Page55of78
ITPP047 Thermal Printer Windows Software Manual
Version 2.00
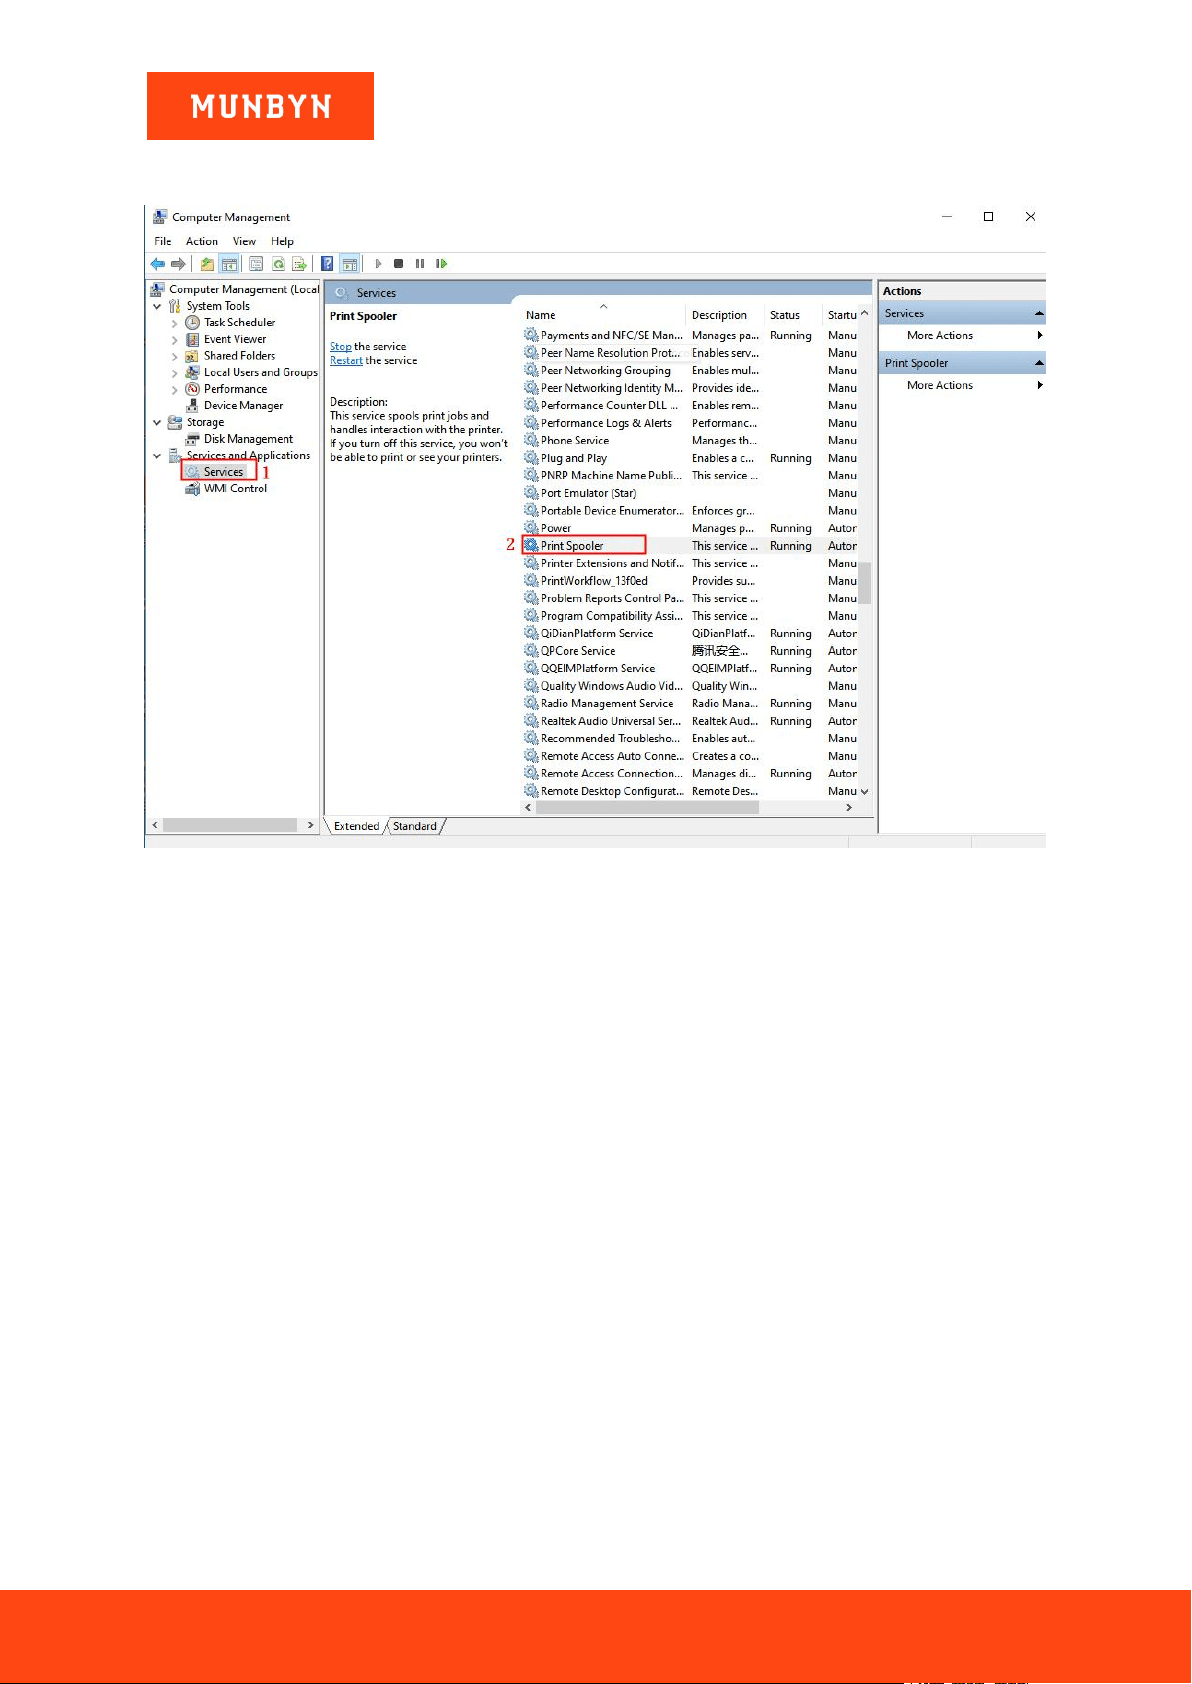
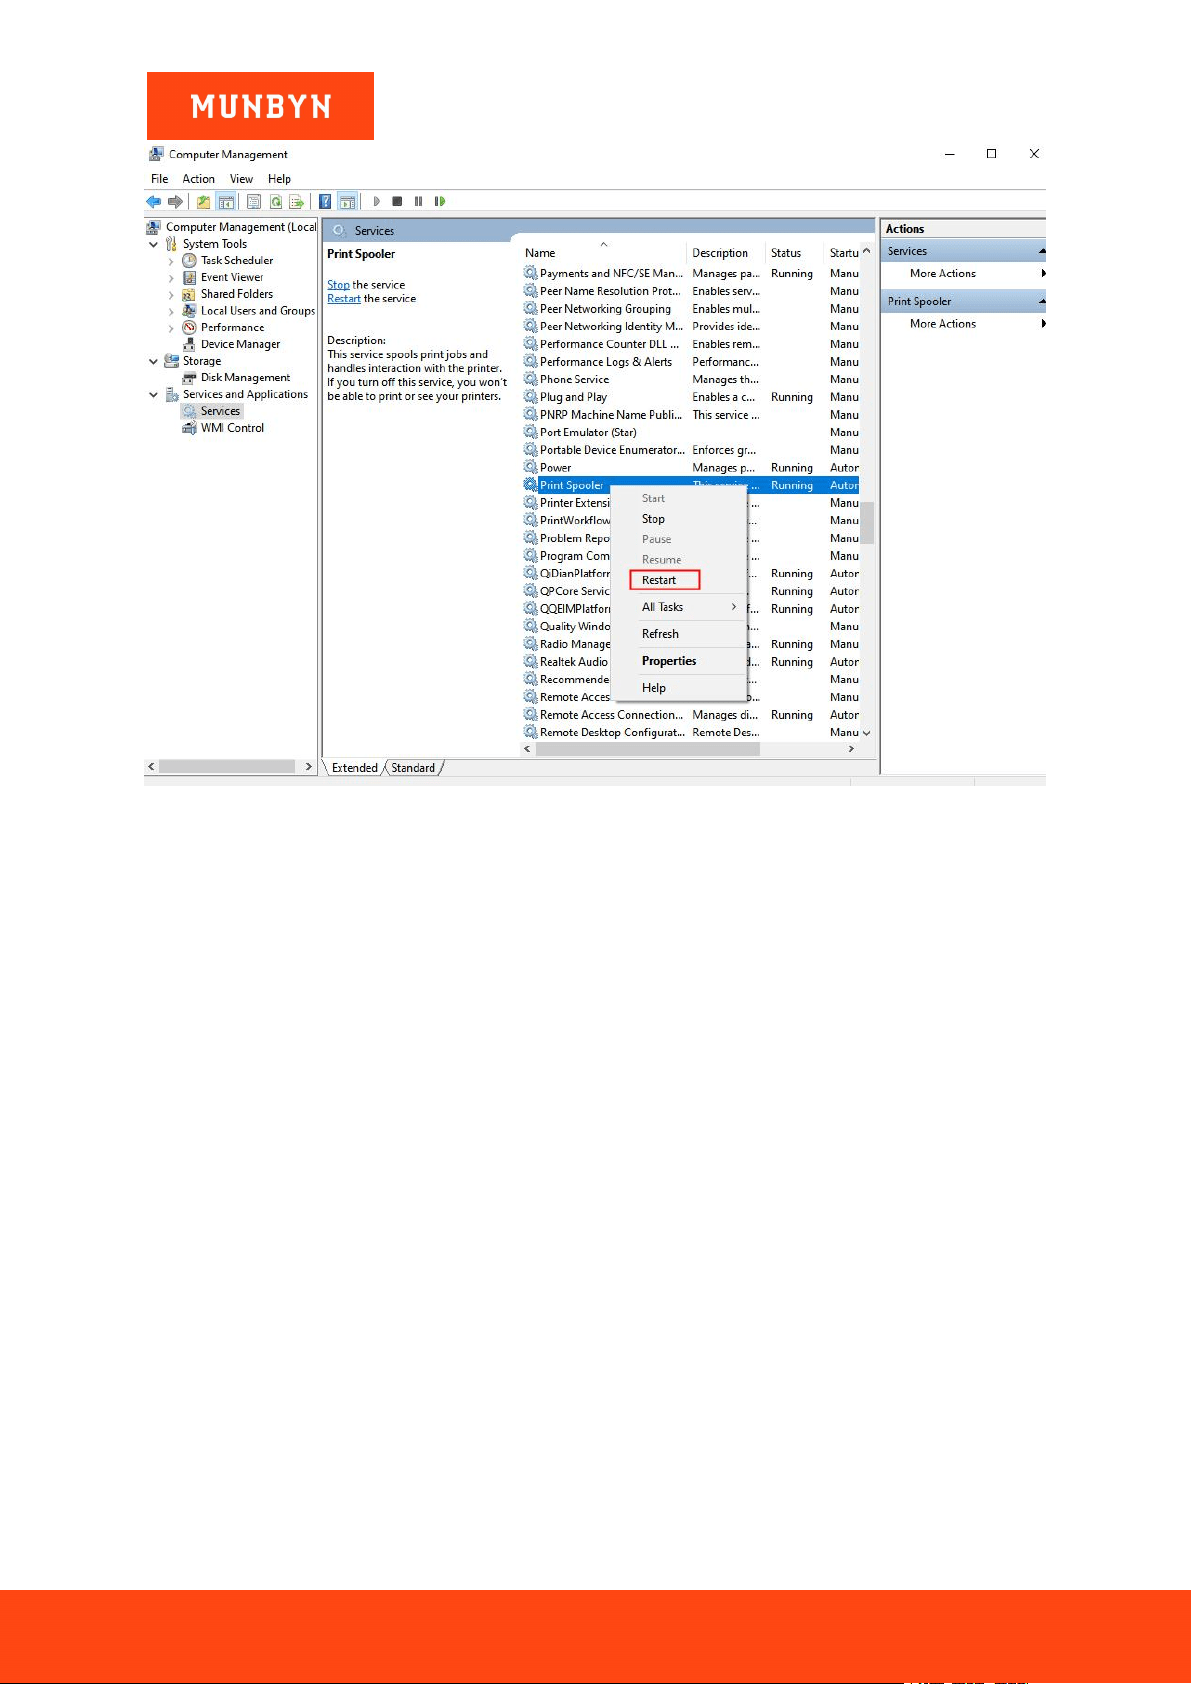
b. Click "Service", then select "Print Spooler", right-click the mouse to choose the "restart". Wait about 5
seconds. Then the printing server is restarted successfully.
Figure 4- 12 Computer Management
Page56of78
ITPP047 Thermal Printer Windows Software Manual
Version 2.00
Figure 4- 13 Computer Management
Demo video:
xxxxxx

Page57of78
ITPP047 Thermal Printer Windows Software Manual
Version 2.00
5.0. Windows Printer Settings
Notes: Please refer to section 2.0 and add a printer.
1) Right click "POS-80C" and choose "Manage".
Figure 5- 1 Control Panel
2) Click "Printing preferences", enter POS-80C Printing preferences.
Figure 5- 2 Device Settings
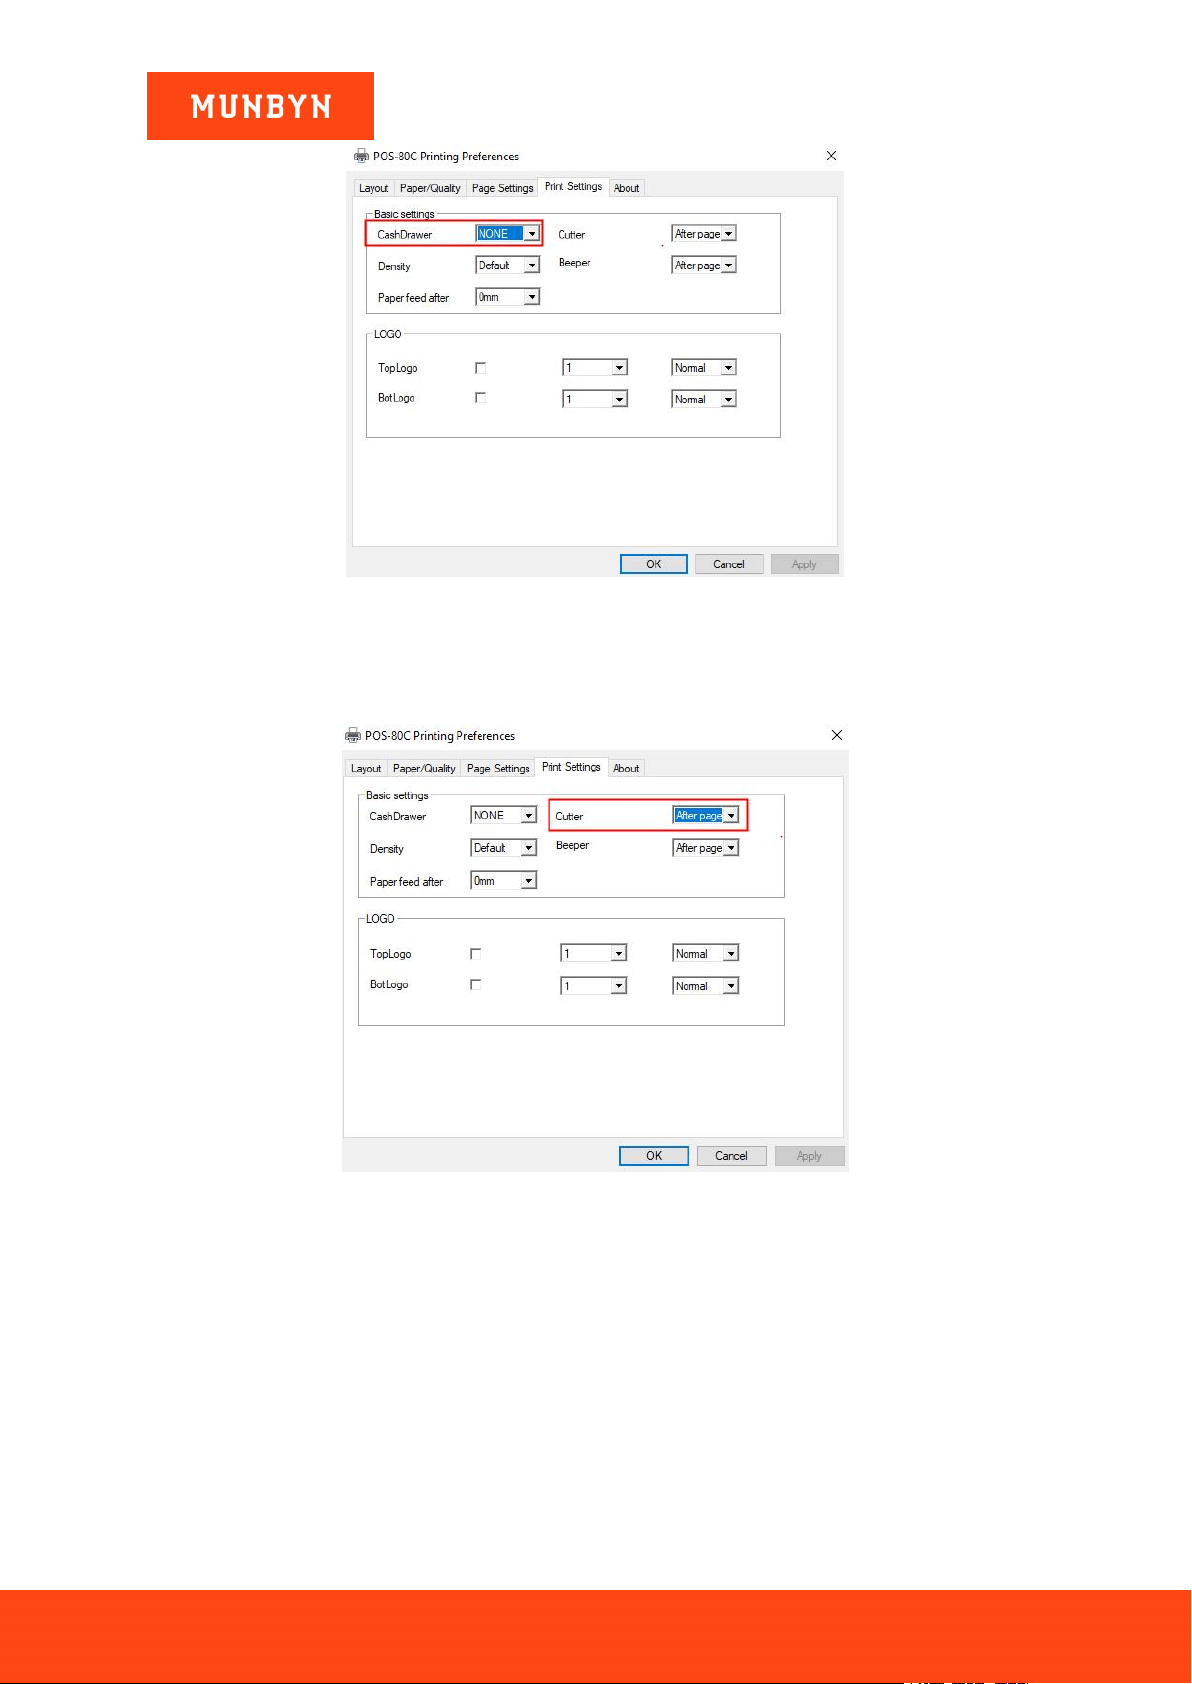
5.1. Print Setting
5.1.1. Cash Drawer Selection
Set the cash drawer open action.
Page58of78
ITPP047 Thermal Printer Windows Software Manual
Version 2.00
Figure 5- 3 Cash Drawer Select
5.1.2. Cutter Selection
Set the printer automatic paper cutting function.
Figure 5- 4 Cutter Select
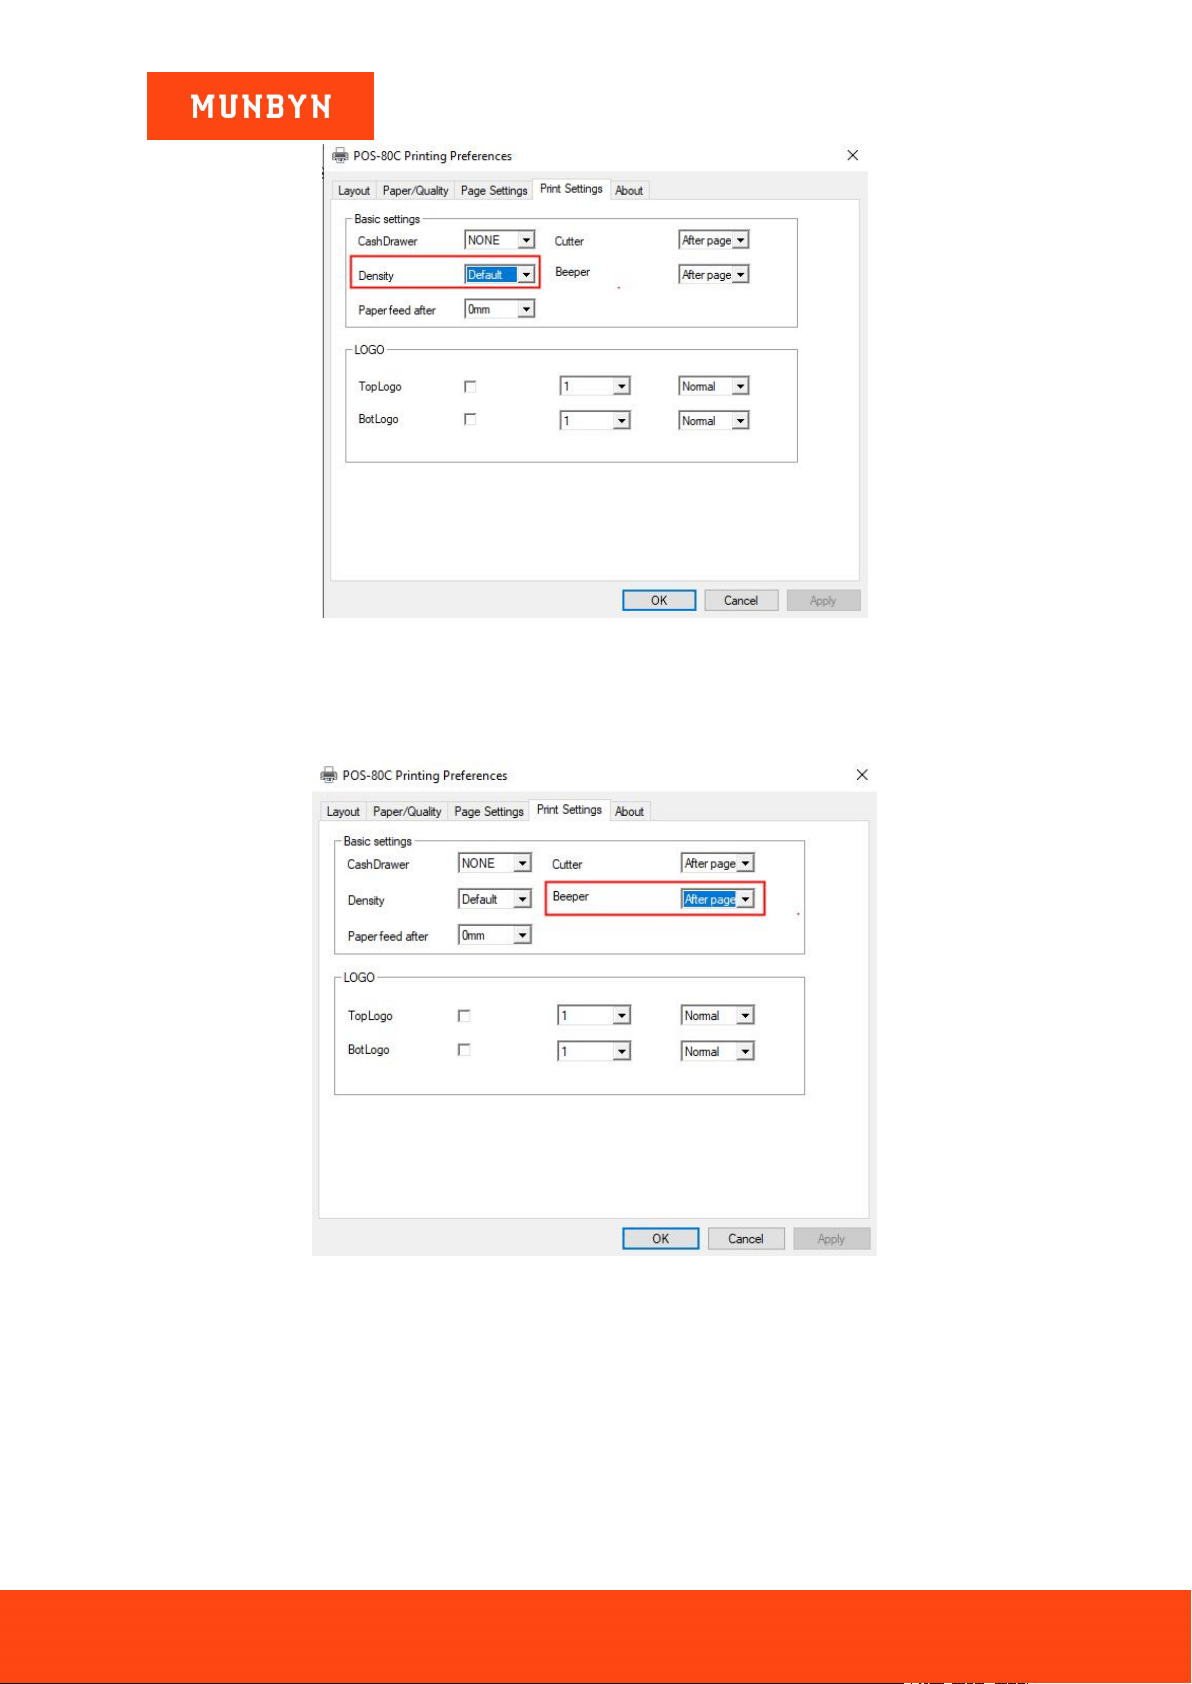
5.1.3. Printing Density
Set the print density. The higher the level, the darker the print.
Page59of78
ITPP047 Thermal Printer Windows Software Manual
Version 2.00
Figure 5- 5 Printing Density
5.1.4. Printing Alarm
Set the printer alarm sound on or off.
Figure 5- 6 Printing Alarm
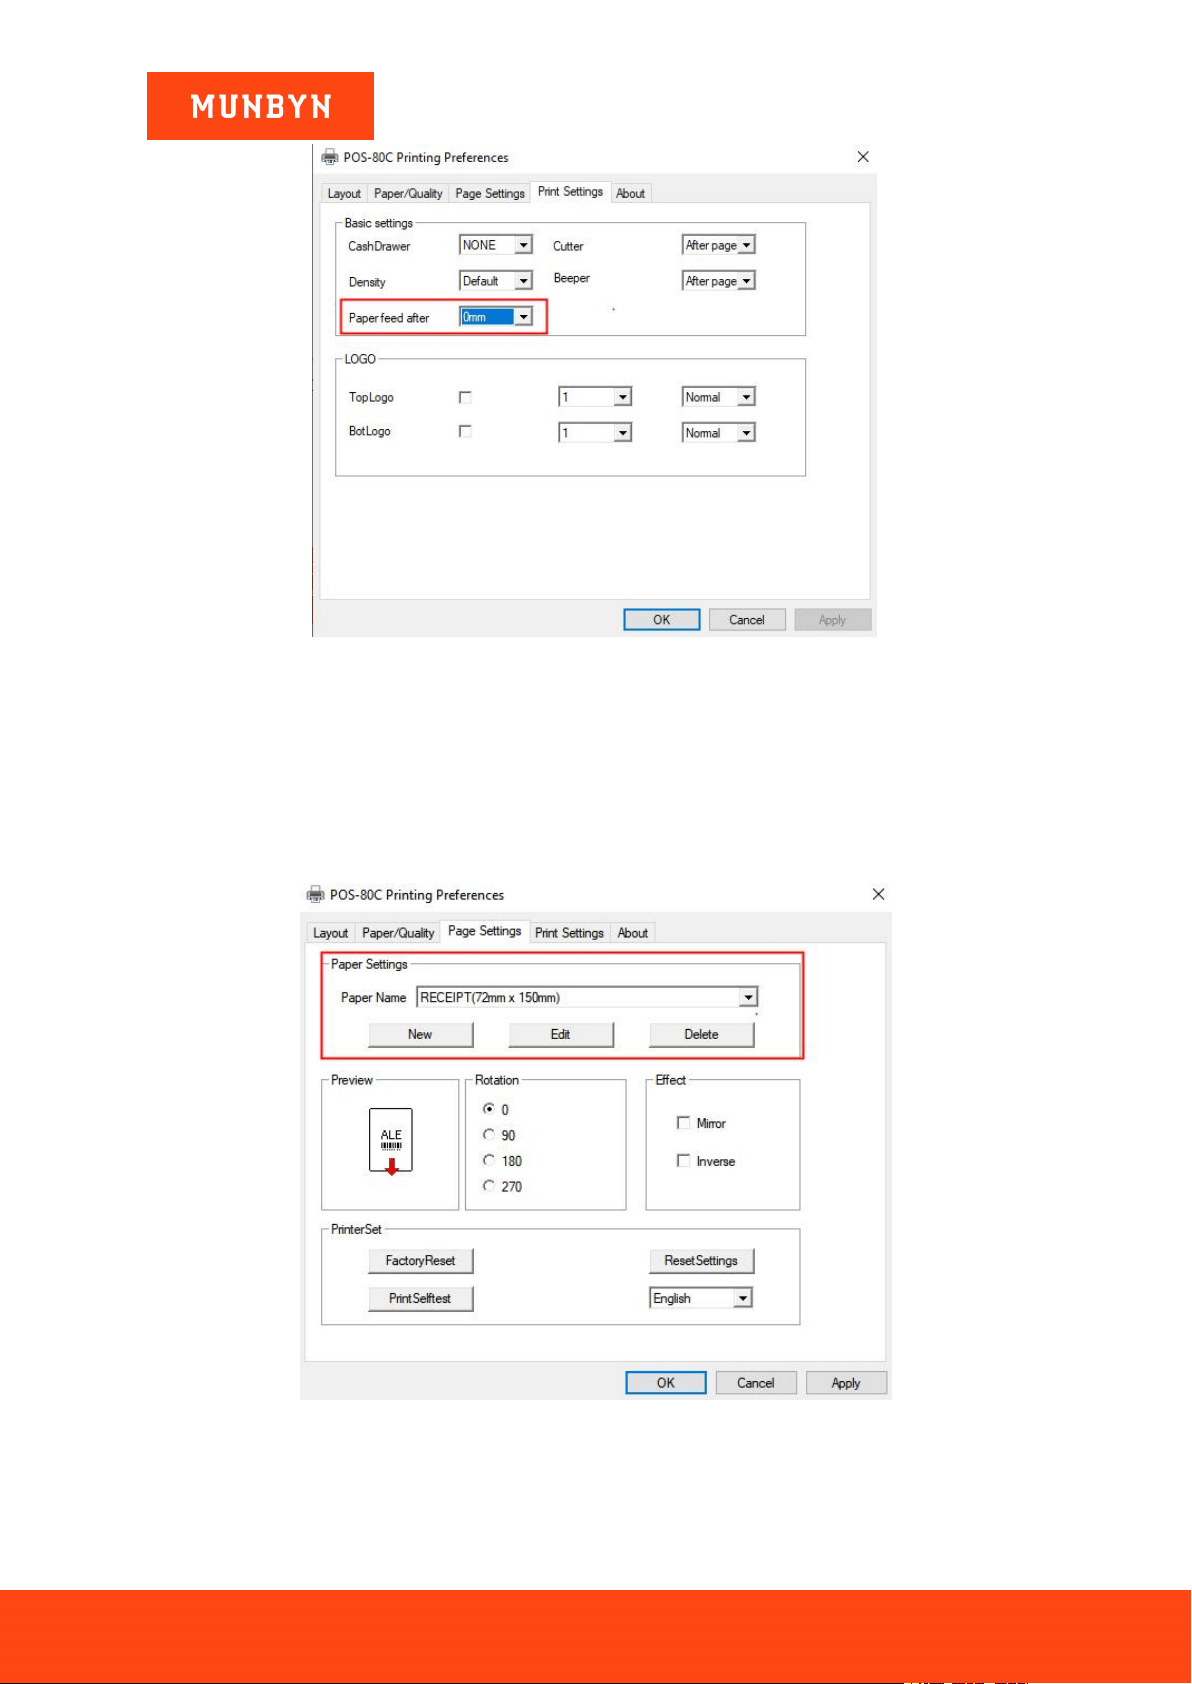
5.1.5. Paper Feed After
Create more blanks at the bottom of the receipt.
Page60of78
ITPP047 Thermal Printer Windows Software Manual
Version 2.00
Figure 5- 7 Feed Paper Setting
5.2. Page Setting
5.2.1. Page Setting
Select the paper size you want or customize the paper size.
Figure 5- 8 Page Setting
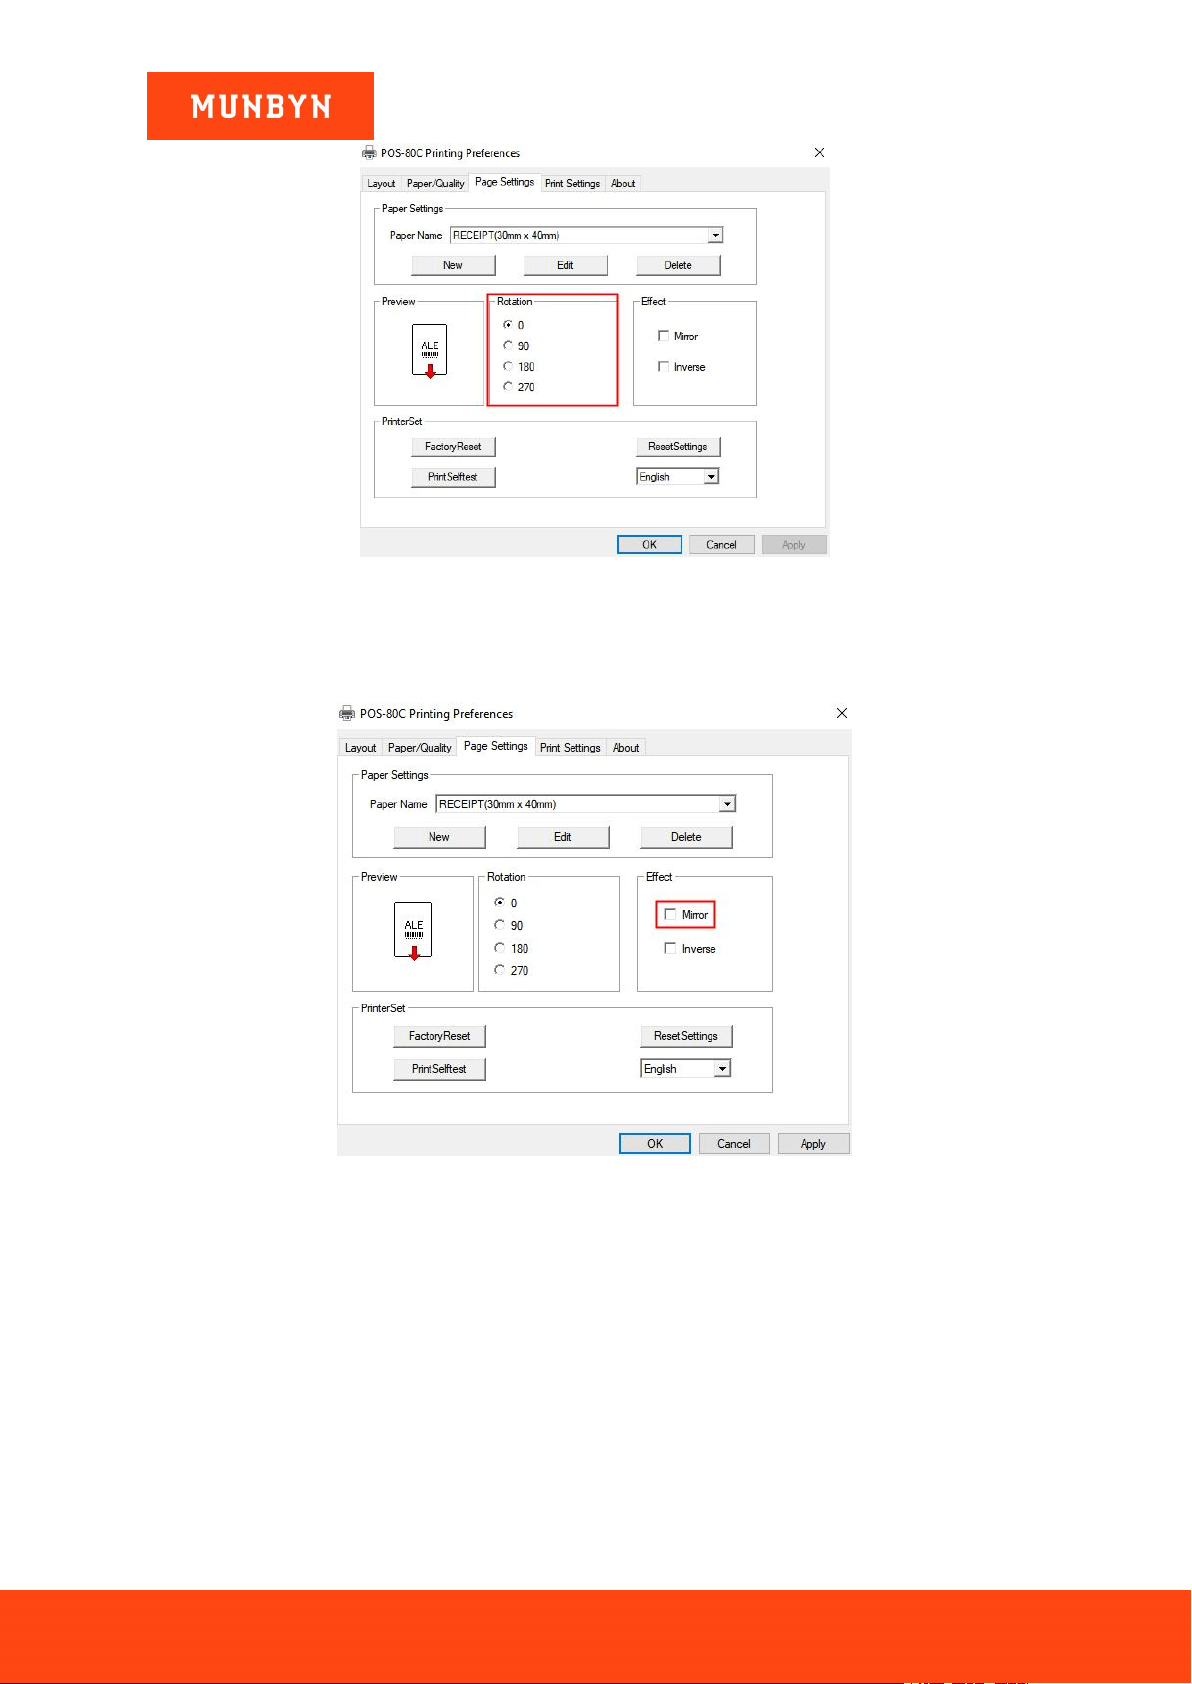
5.2.2. Rotation
Change the printing image orientation.
Page61of78
ITPP047 Thermal Printer Windows Software Manual
Version 2.00
Figure 5- 9 Rotation Setting
5.2.3. Mirror
The image printed is opposite to the image in the preview.
Figure 5- 10 Mirror Setting
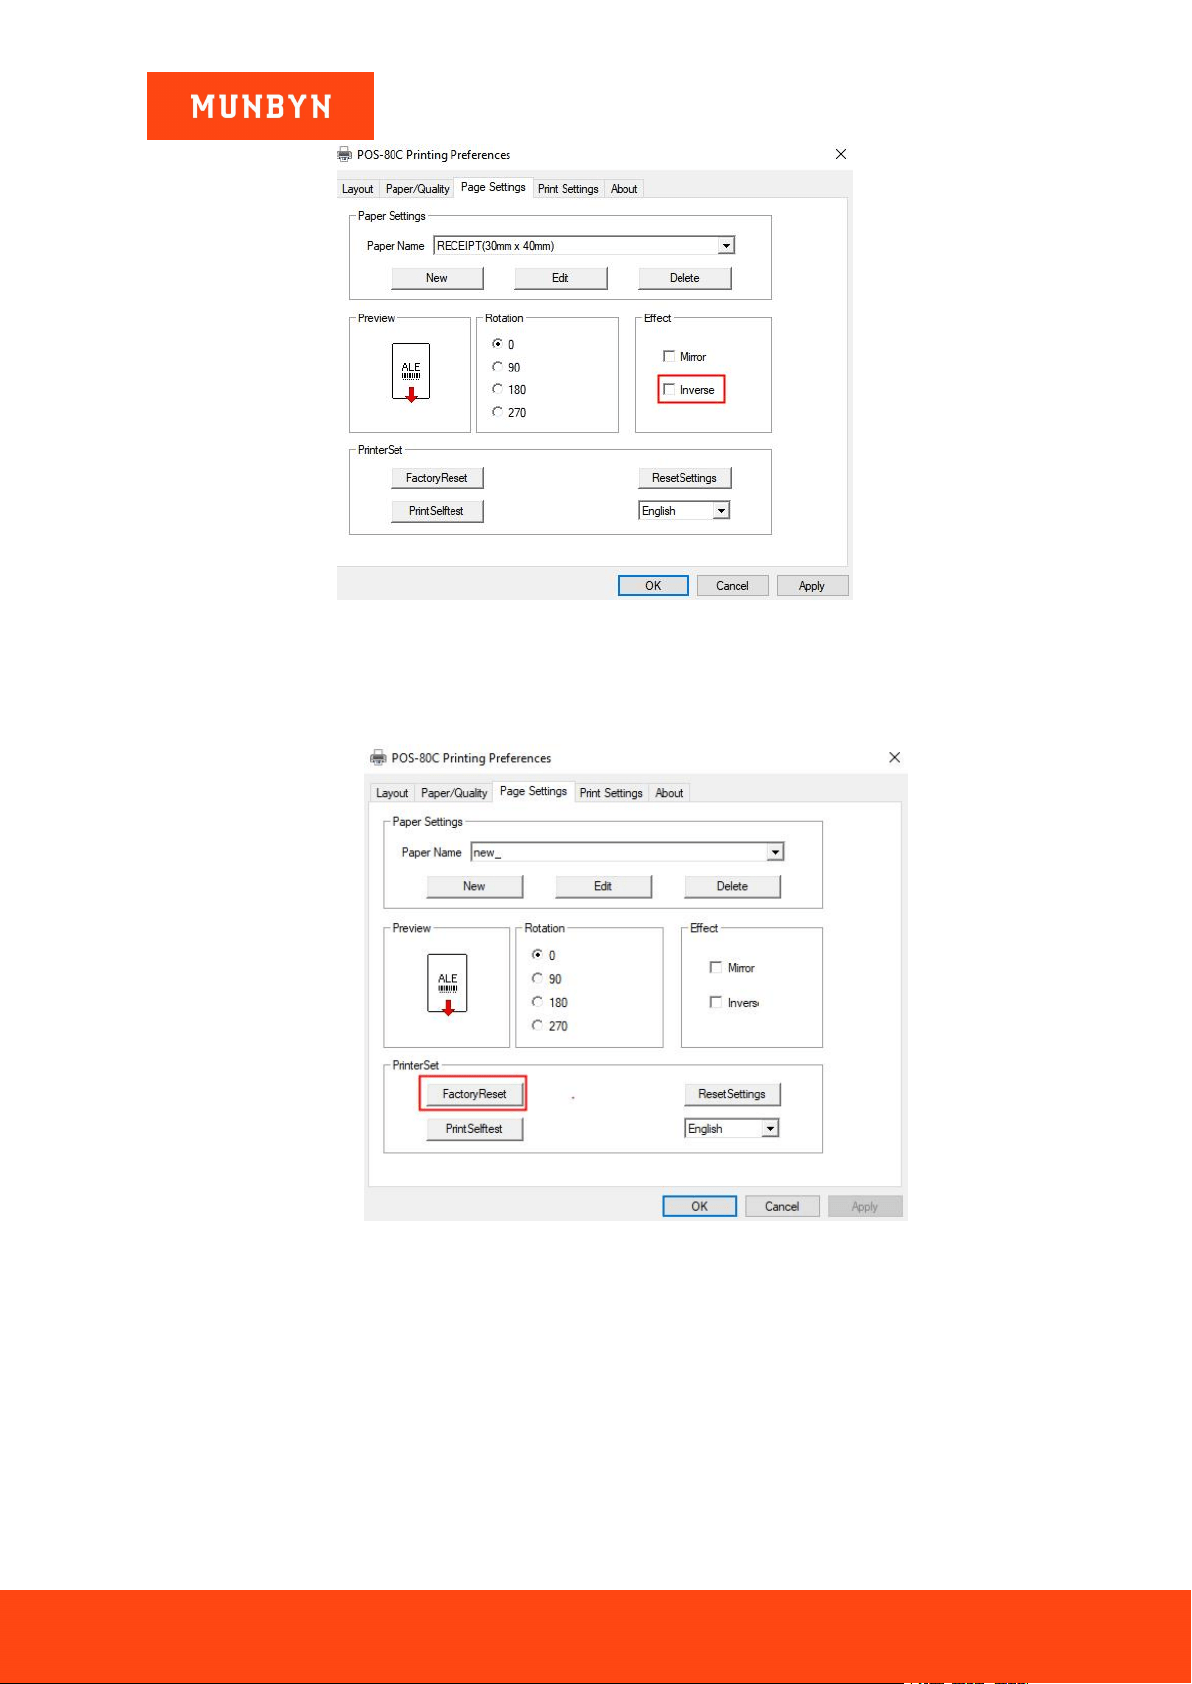
5.2.4. Inverse
The image printed by the preview black part is white, and the image printed by the white part is black.
Page62of78
ITPP047 Thermal Printer Windows Software Manual
Version 2.00
Figure 5- 11 Inverse Setting
5.2.5. Factory Reset
Restore the printer to factory settings.
Figure 5- 12 Factory Reset
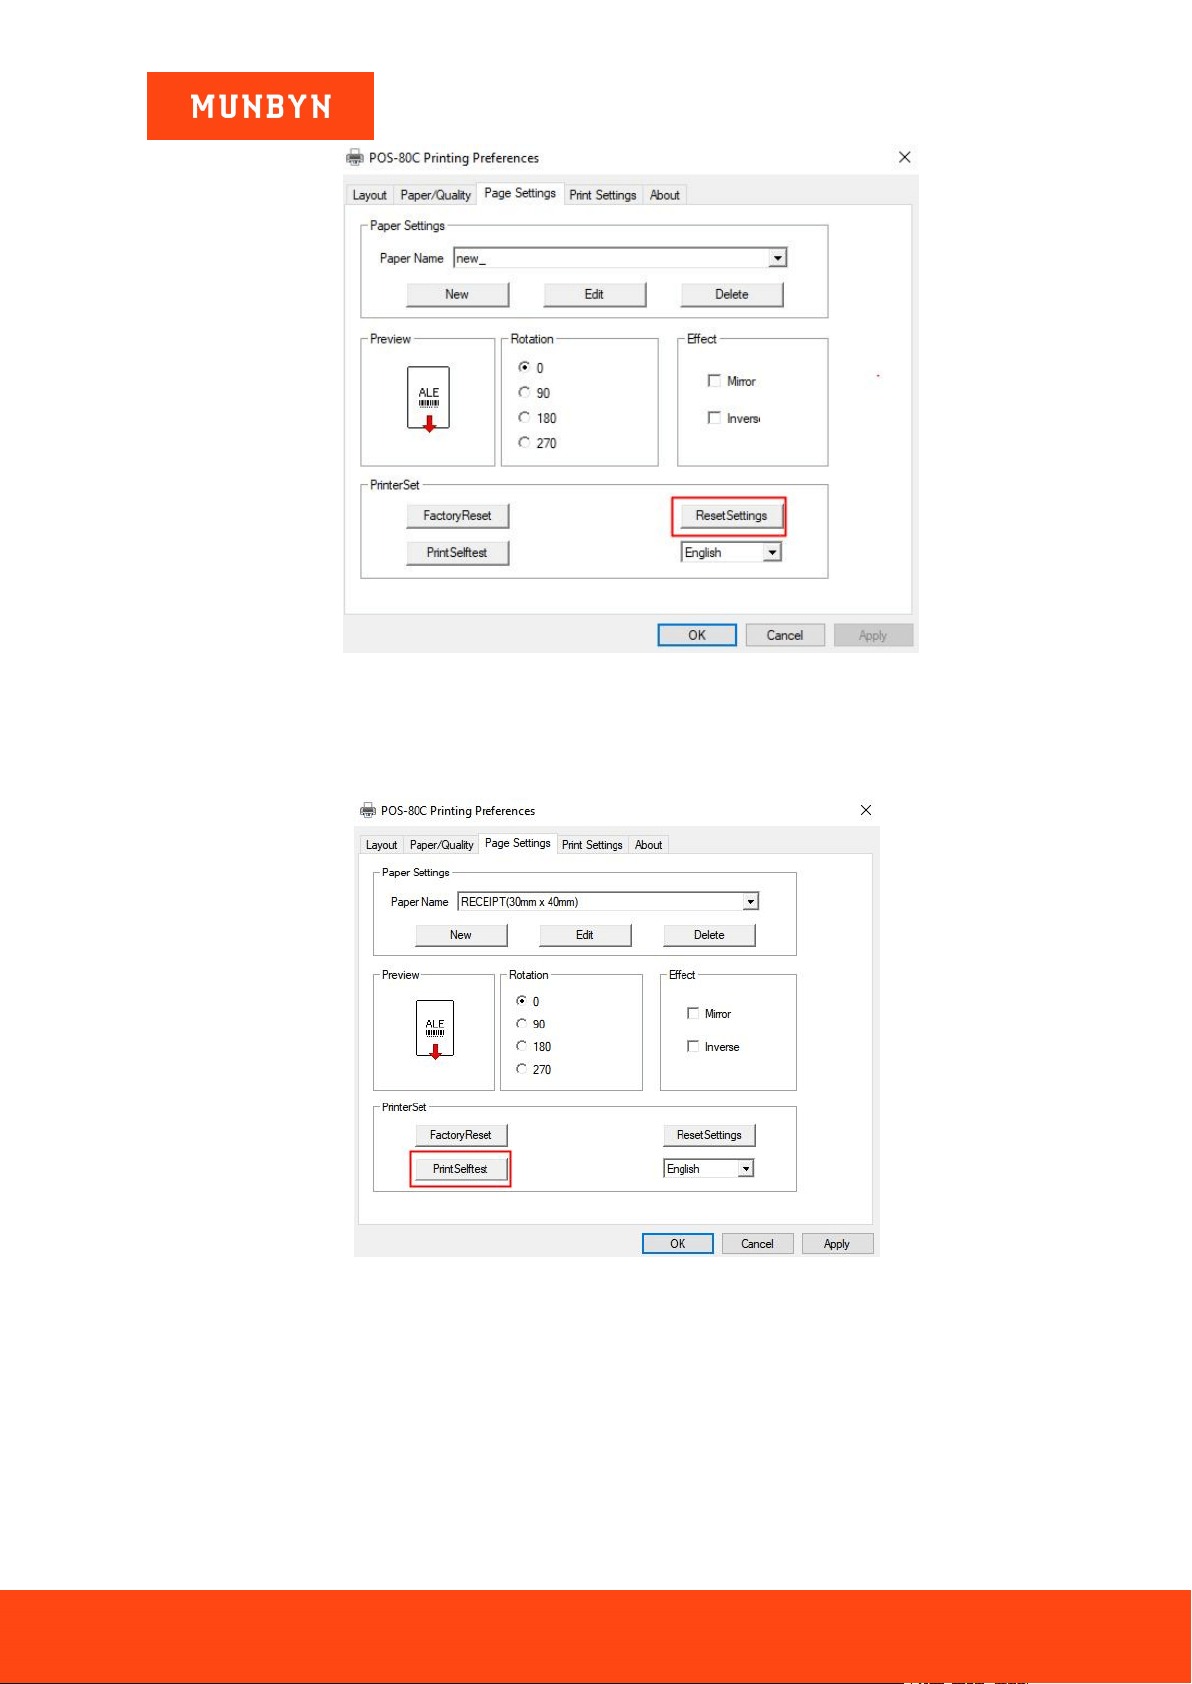
5.2.6. Reset Setting
Restore the printer properties interface to the default value.
Page63of78
ITPP047 Thermal Printer Windows Software Manual
Version 2.00
Figure 5- 13 Reset Setting
5.2.7. Print Self Test
Print a printer self-test page.
Figure 5- 14 Print Self Test
Page64of78
ITPP047 Thermal Printer Windows Software Manual
Version 2.00
6.0. "Printer Test V5.1C" Setting Tool
This section will introduce the tool settings in detail.
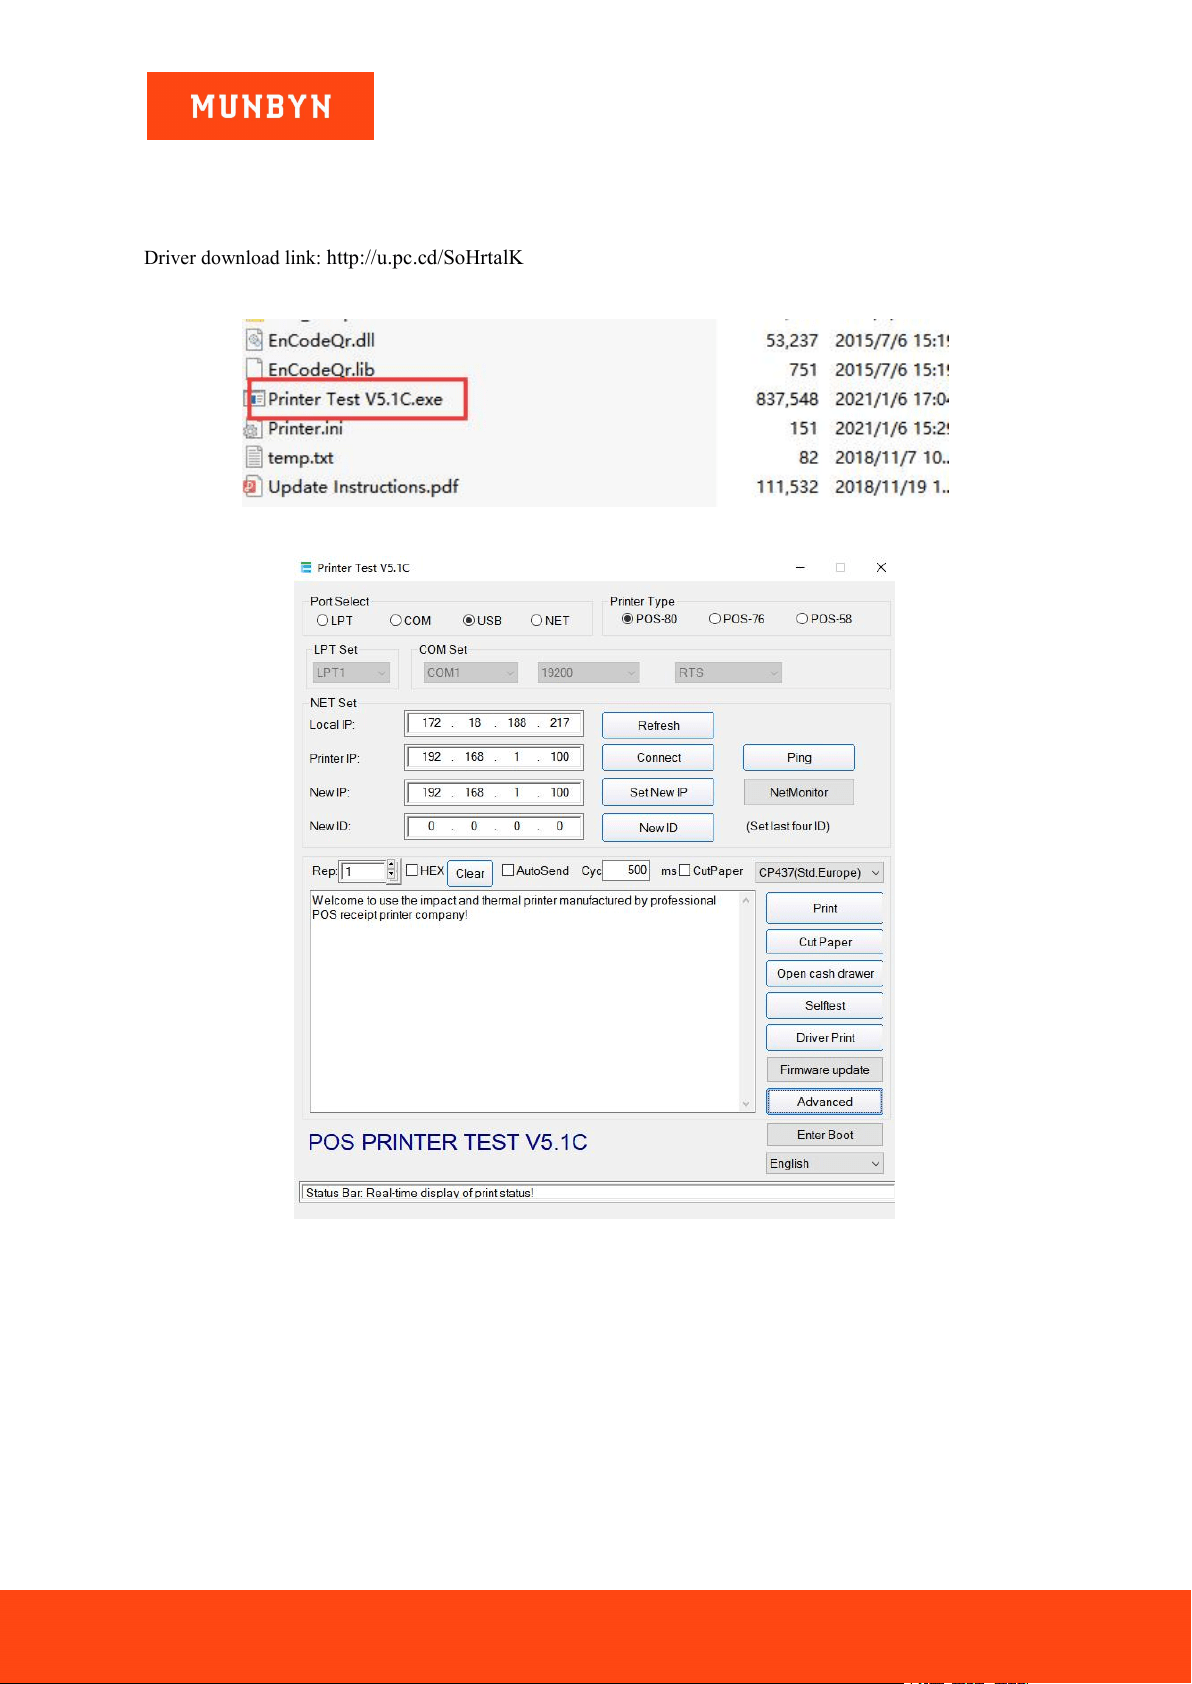
Driver download link: http://u.pc.cd/SoHrtalK
1) Unzip the file and click "Driver CD" → "Tools" → "Printer Test V5.1C.exe".
Figure 6- 1 Printer Test V5.1C
Figure 6- 2 Setting Interface
6.1. Common Functions
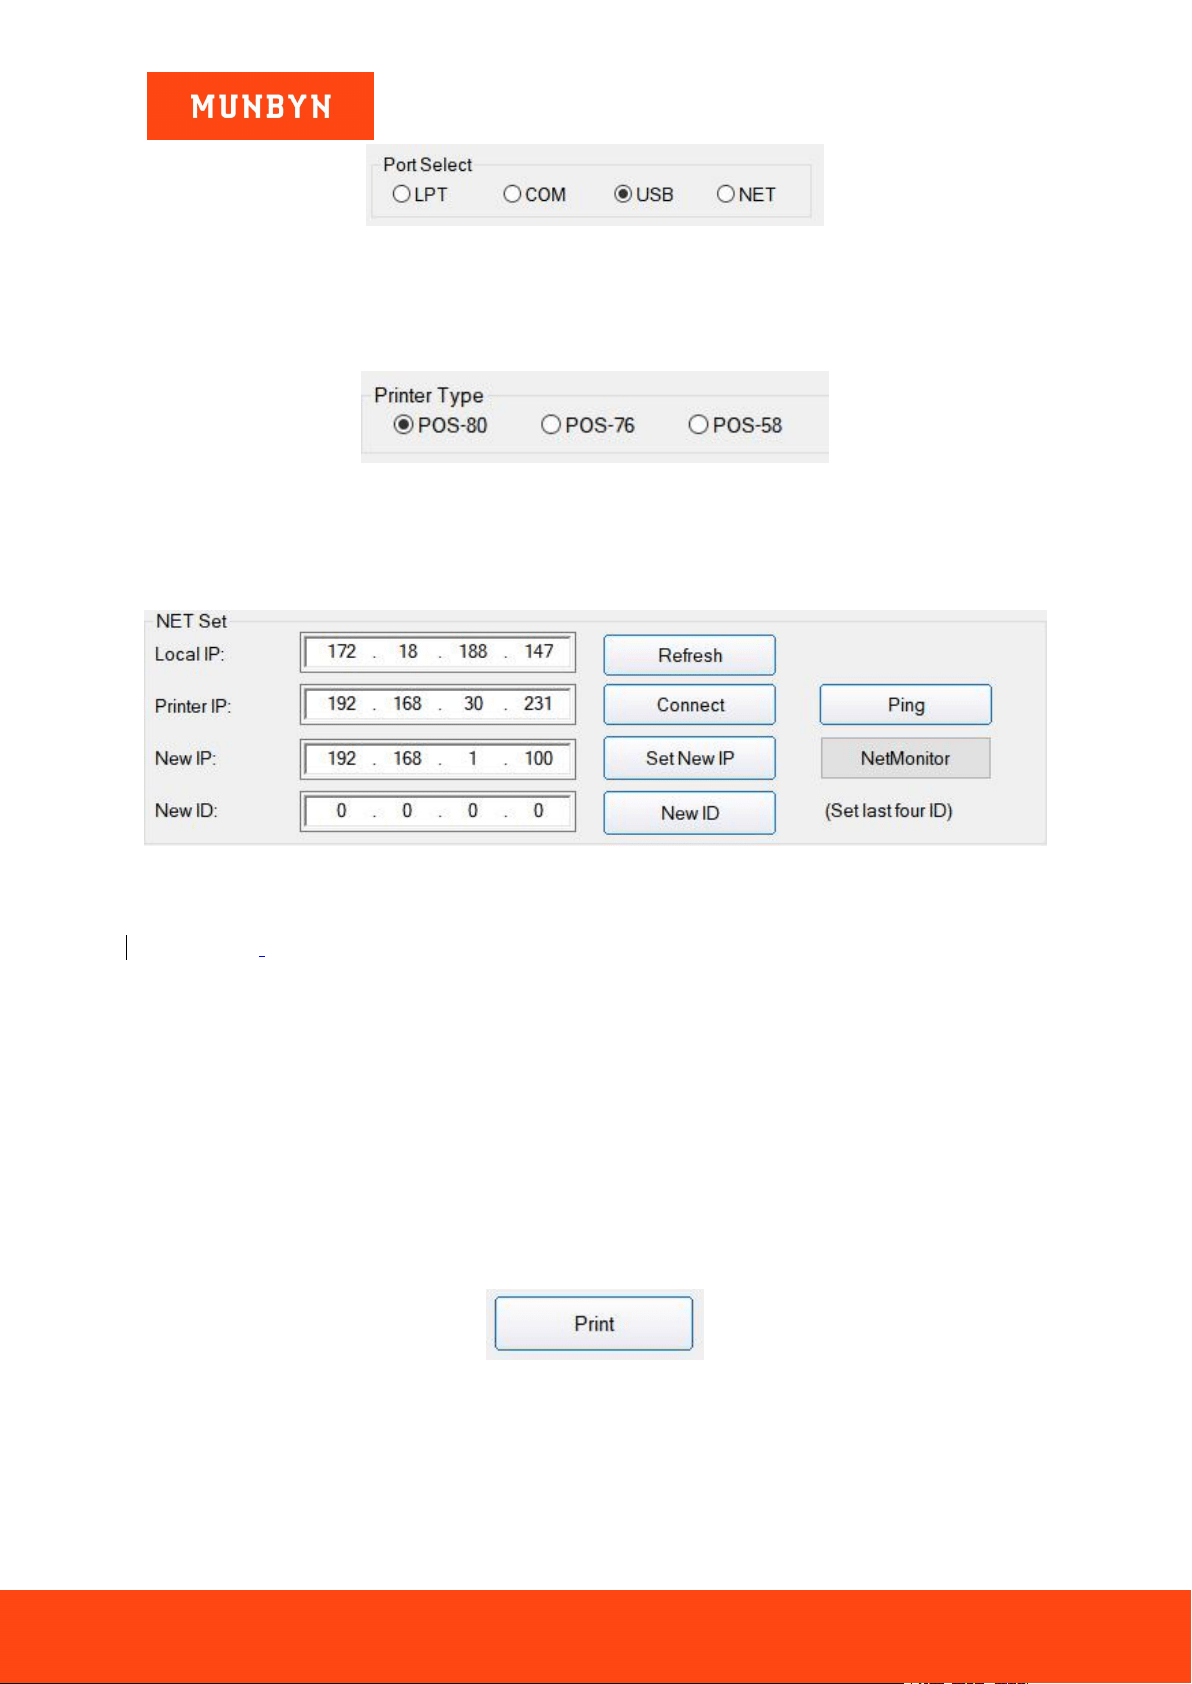
6.1.1. Communication Port Selection
Contain parallel port, serial port, USB port, and Ethernet port.
Page65of78
ITPP047 Thermal Printer Windows Software Manual
Version 2.00
Figure 6- 3 Port Select
6.1.2. Printer Type
Default is POS-80
Figure 6- 4 Printer Type
6.1.3. Ethernet Port Setting (NET Setting)
Change the IP address of the Ethernet port printer through Ethernet port Settings.
Figure 6- 5 NET Setting
"Local IP"--- computer local IP address which can be added automatically or by clicking the "refresh" button.
"Printer IP"--- printer current IP address, its detailed information can be seen on a self-test page, only suitable
for Ethernet port printers.
"New IP address"--- set the new IP address.
The Printer IP address shall be in the same network segment as the connected computer to realize
intercommunication. And it can’t conflict with the IP address of other devices.
"New ID address"--- the printer ID address is change by new ID address (Printer ID address must be an only
address within a network).
"Net Monitor"---Monitor printer status through the network (NET port available).
6.1.4. Print
Print the information and data in the "content" edit box.
Figure 6- 6 Print Button
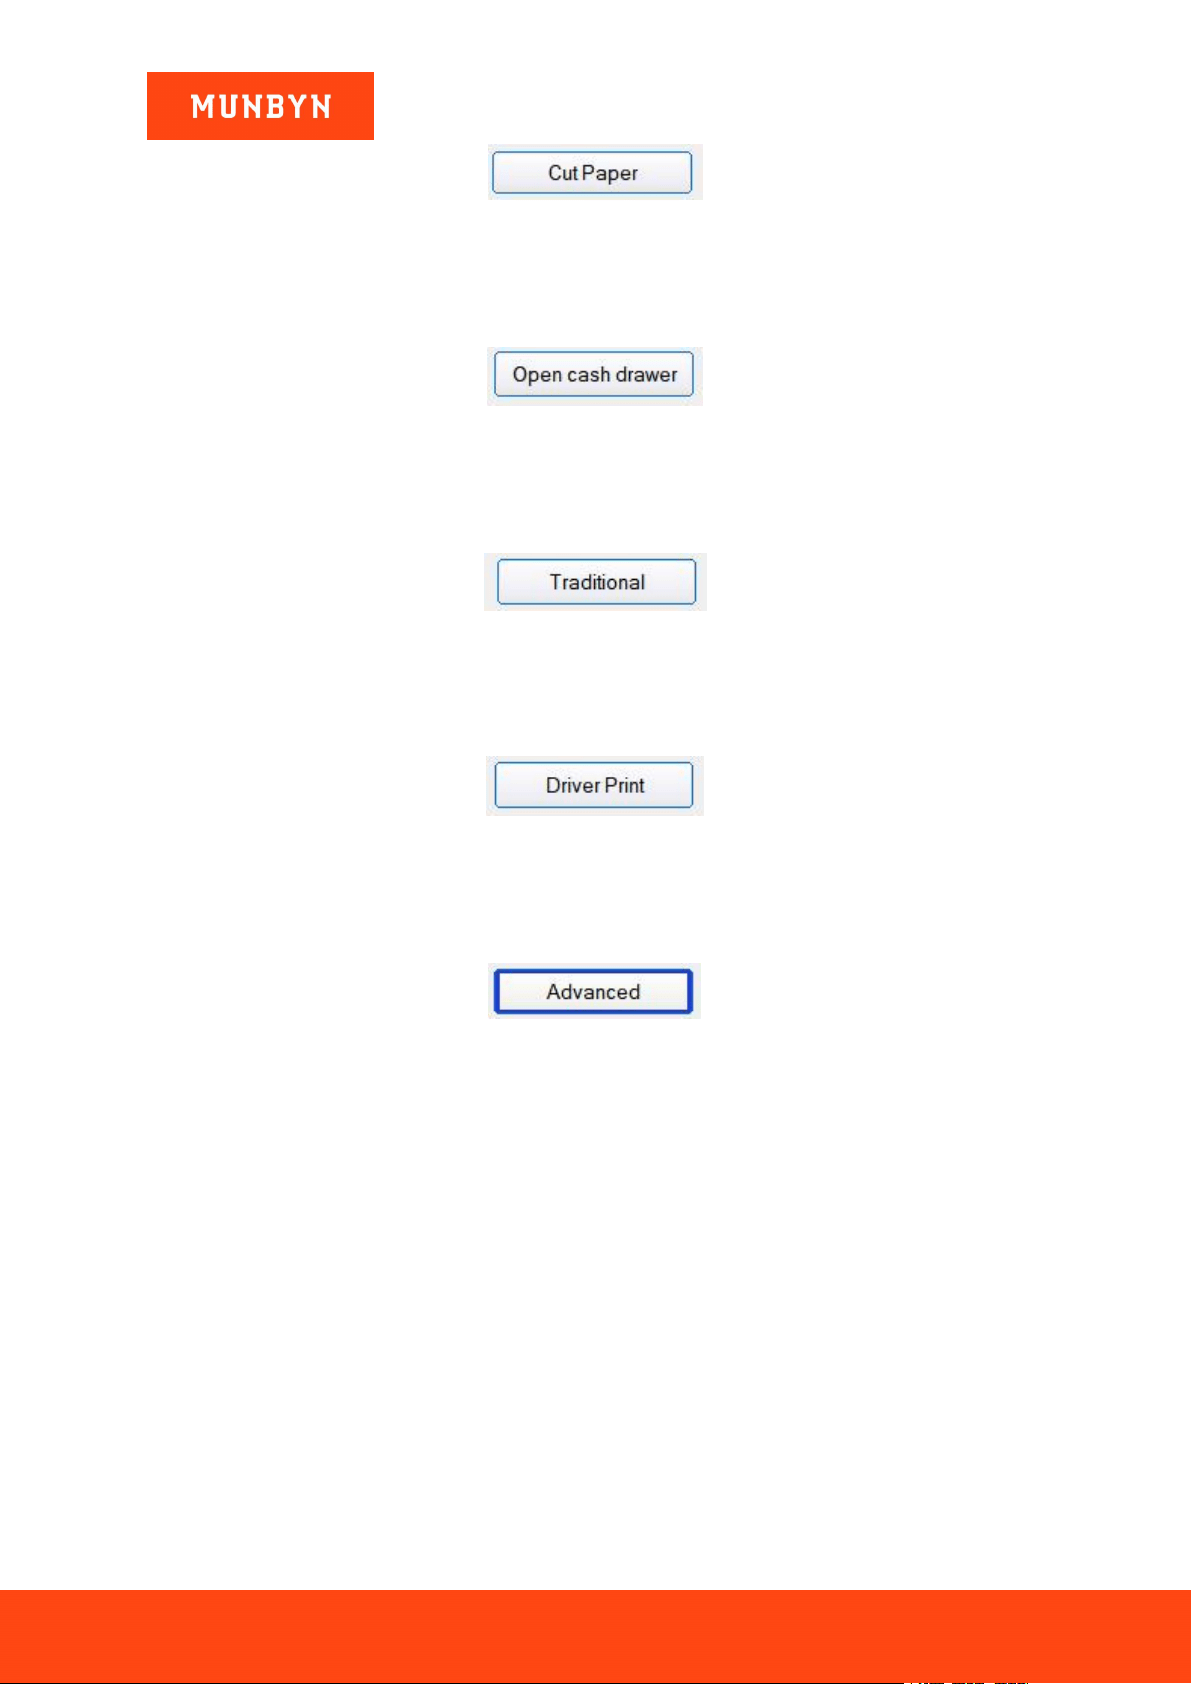
6.1.5. Cut Paper
Paper cutting action.
Page66of78
ITPP047 Thermal Printer Windows Software Manual
Version 2.00
Figure 6- 7 Cut Paper
6.1.6. Open Cash drawer
Test the cash drawer function.
Figure 6- 8 Cash Drawer Setting
6.1.7. Traditional Font Test
Used to test traditional font printing.
Figure 6- 9 Traditional Font Test
6.1.8. Driver Print
Test the Driver installation is successful or not.
Figure 6- 10 Driver Print
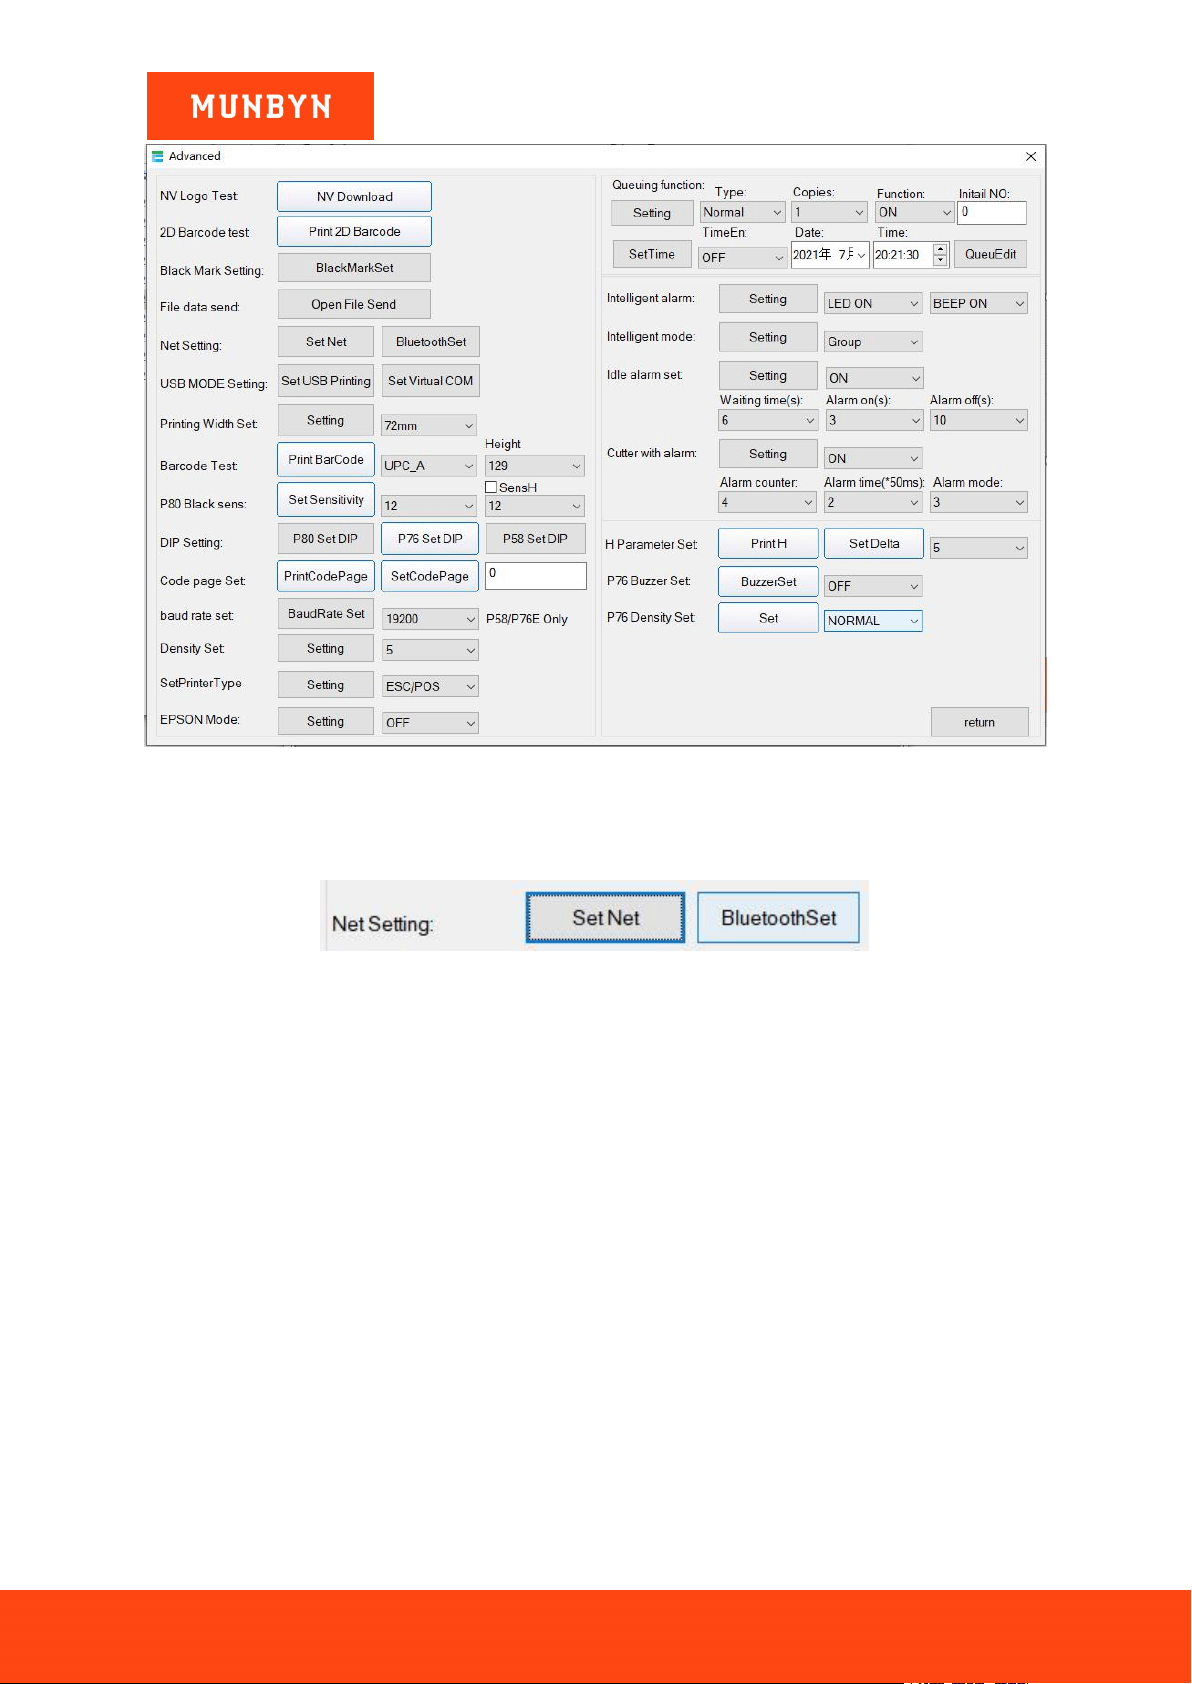
6.1.9. Advanced Common Setting
1) Click the "Advanced" button to set up more functions for printing tests, as described below.
Figure 6- 11 Advanced Button
Page67of78
ITPP047 Thermal Printer Windows Software Manual
Version 2.00
Figure 6- 12 Advanced Settings
6.1.9.1. Network Setting
It includes "Net Setting" and "Bluetooth Setting".
Figure 6- 13 Network Setting
Page68of78
ITPP047 Thermal Printer Windows Software Manual
Version 2.00
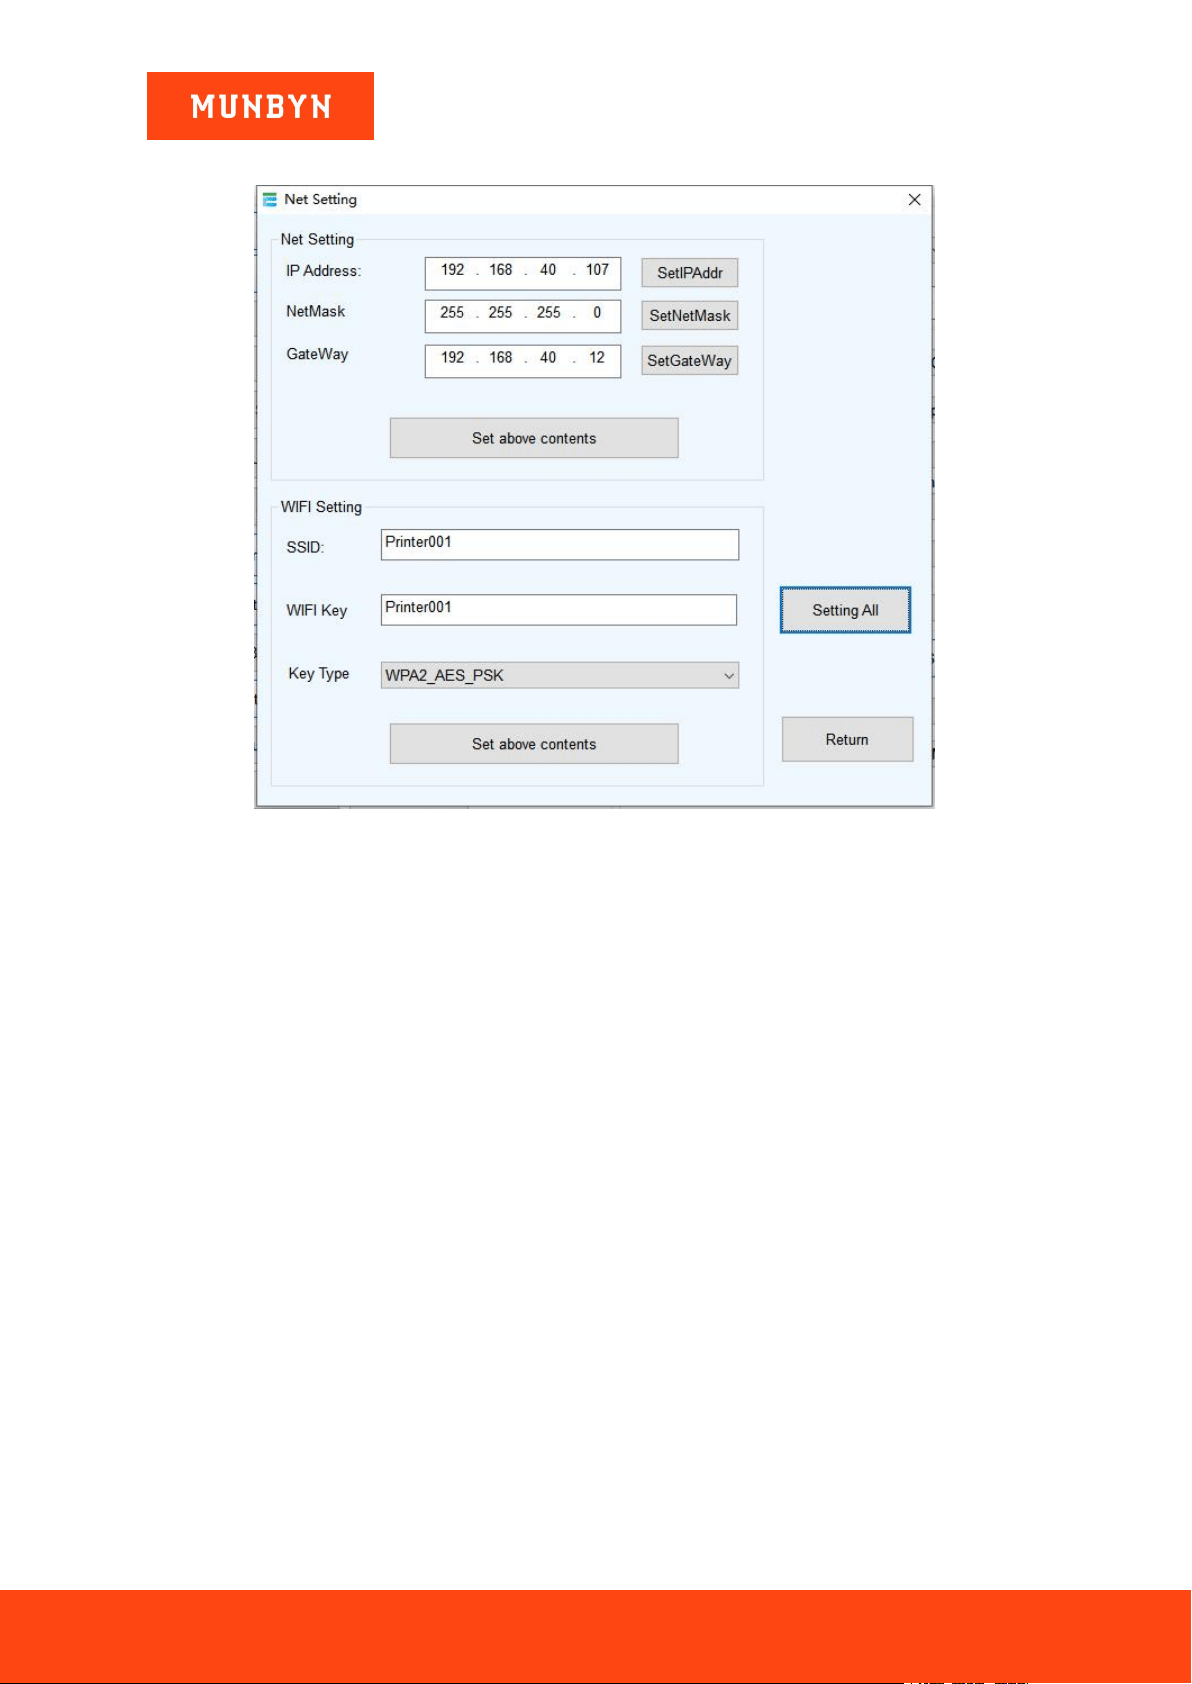
6.1.9.2. Net Setting
Figure 6- 14 Net Setting
a) Set up the printer IP address.
b) Set up the Subnet Mask.
c) Set up the Gateway.
d) WI-FI SSID address settings.
Note: the SSID address is the name of your Wireless Router .
e) WI-FI password settings.
Note: the password of the Wireless Router.
f) Encryption type of WI-FI SSID settings.
Note: the encryption type of the Wireless Router. For example, if the encryption type of the Router (SSID) is:
WPA_TKIP_AES_PSK, then this information should be selected in the tab of "SSID Encryption type".
g) After filling in the above information, click on the "Setting All" option. The printer will make a "BEEP"
sound indication. Then restart the printer.
Page69of78
ITPP047 Thermal Printer Windows Software Manual
Version 2.00
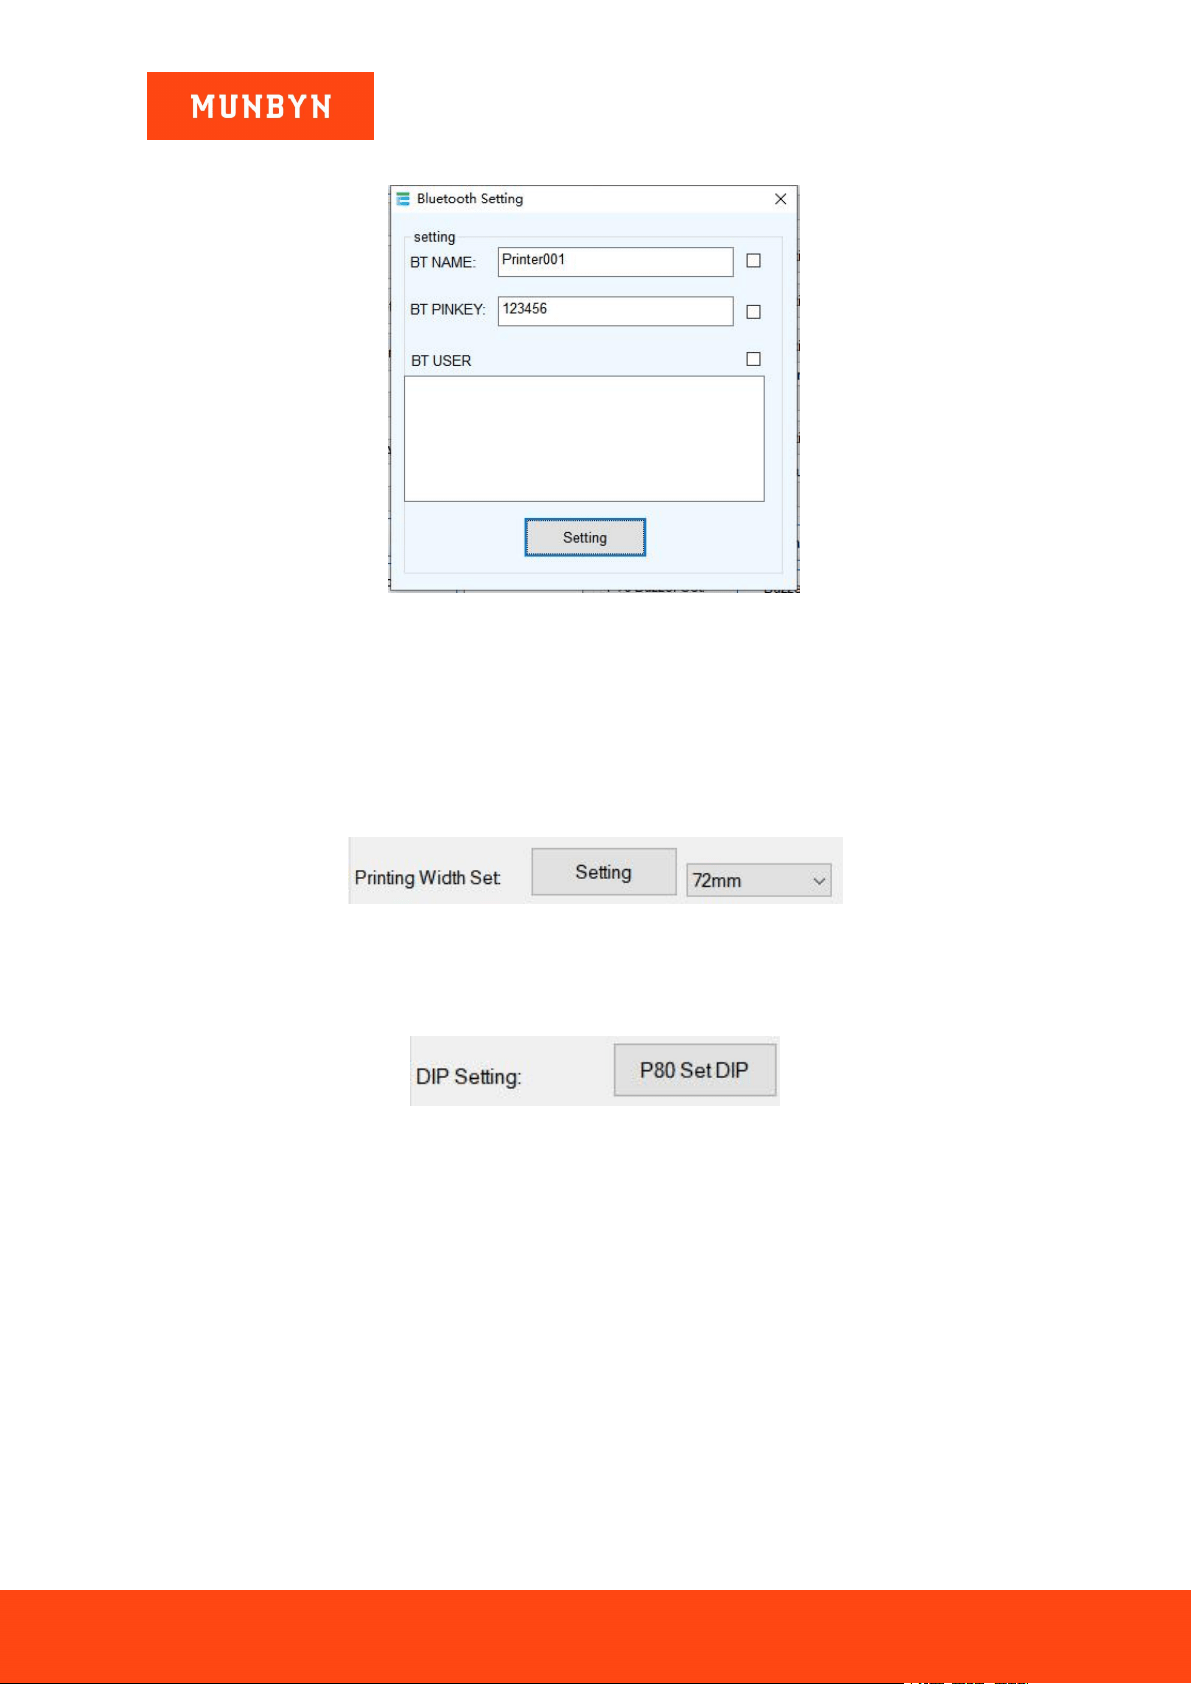
6.1.9.3. Bluetooth Setting
Figure 6- 15 Bluetooth Setting
a) Set up the Port name of the Bluetooth Printer (the Factory Default BT NAME is "Printer001").
b) Set up the Password of the Bluetooth Printer (the Factory Default BT PINKEY is "123456").
c) After finishing the above settings, click "Setting" to finish the settings of Bluetooth printer.
6.1.9.4. Printing Width Set
Change the printing width to 48/52/56/58/64/68/72/76/80mm.
Figure 6- 16 Printing Width Set
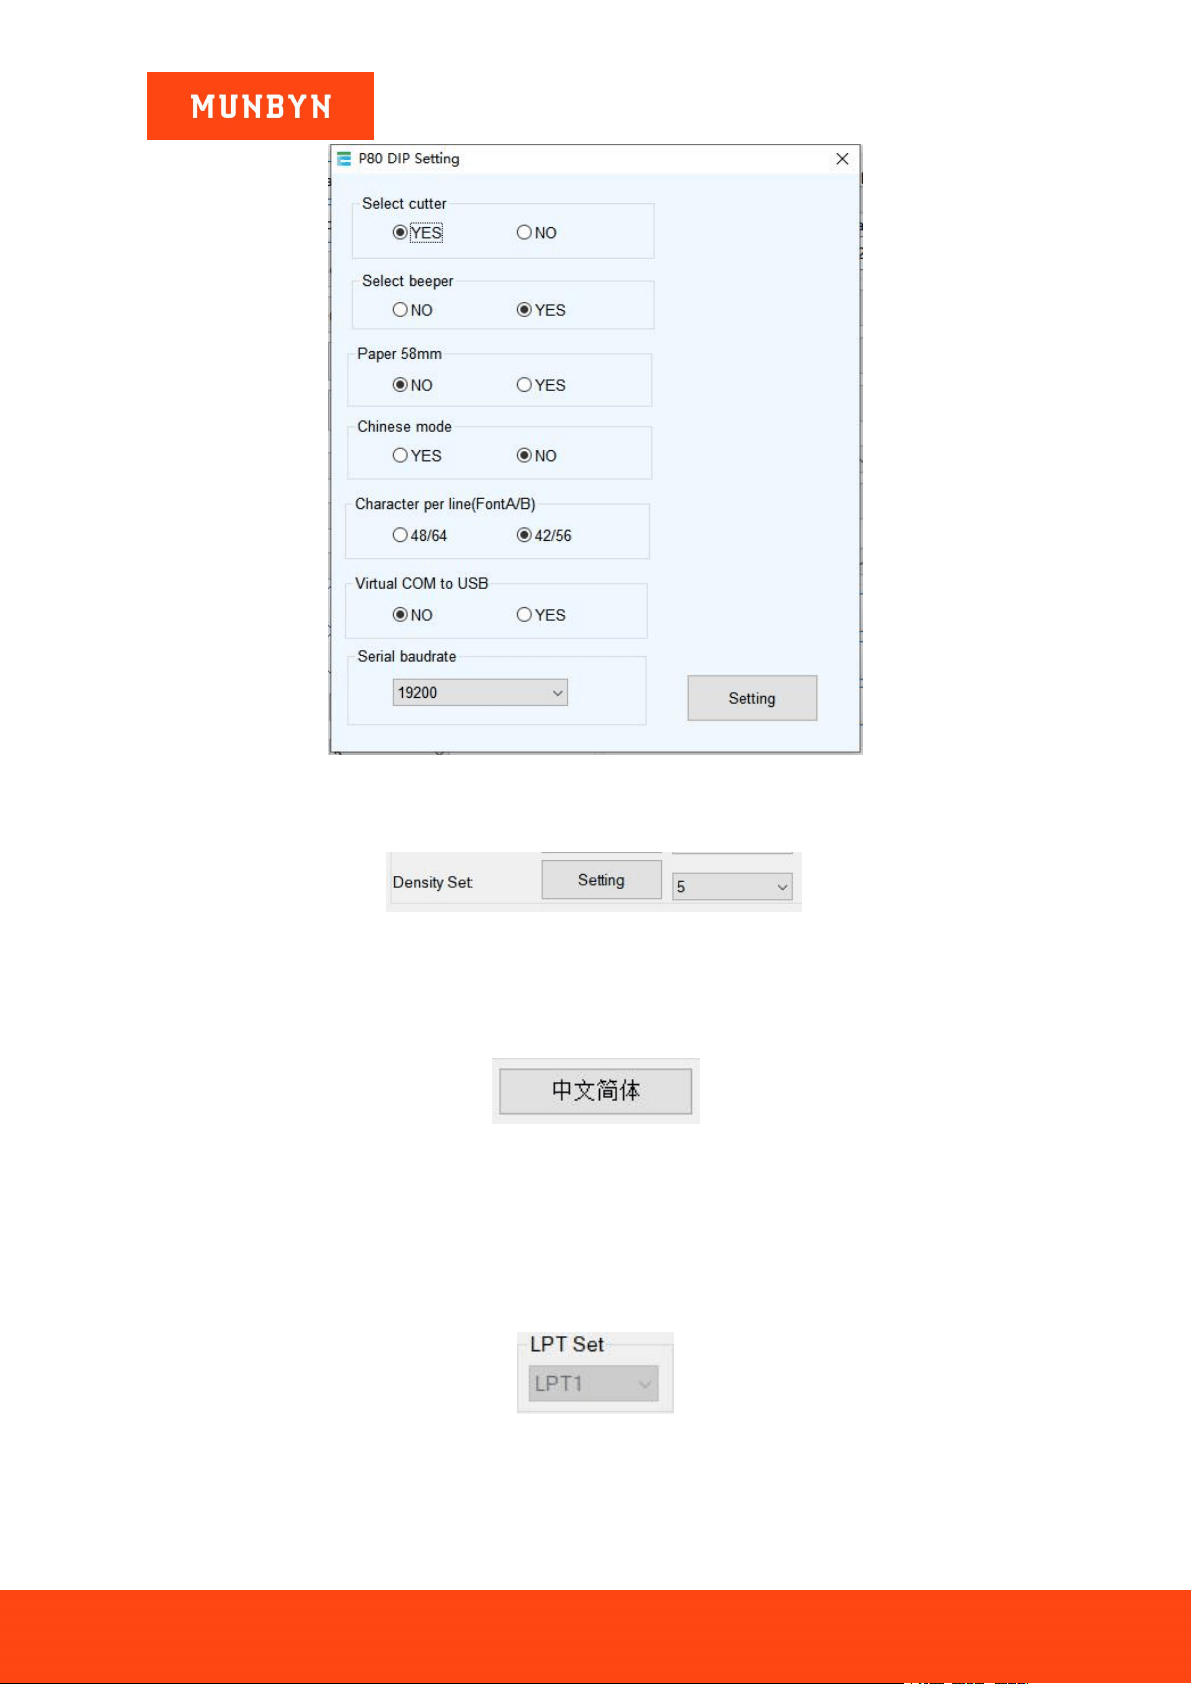
6.1.9.5. DIP Switches Setting
P80 Set DIP (only for machines without DIP switches on the bottom).
Figure 6- 17 DIP Switches Setting
Page70of78
ITPP047 Thermal Printer Windows Software Manual
Version 2.00
Figure 6- 18 DIP Switches Settings
6.1.9.6. Density Set
Figure 6- 19 Density Set
6.1.10. Language Switching
Switch English and Chinese.
Figure 6- 20 Language Switching
6.2. Uncommon Functions
6.2.1. Parallel Port Setting (LPT Set)
Parallel port Settings is consistent with the computer and will be automatically selected.
Figure 6- 21 LPT Set
Page71of78
ITPP047 Thermal Printer Windows Software Manual
Version 2.00
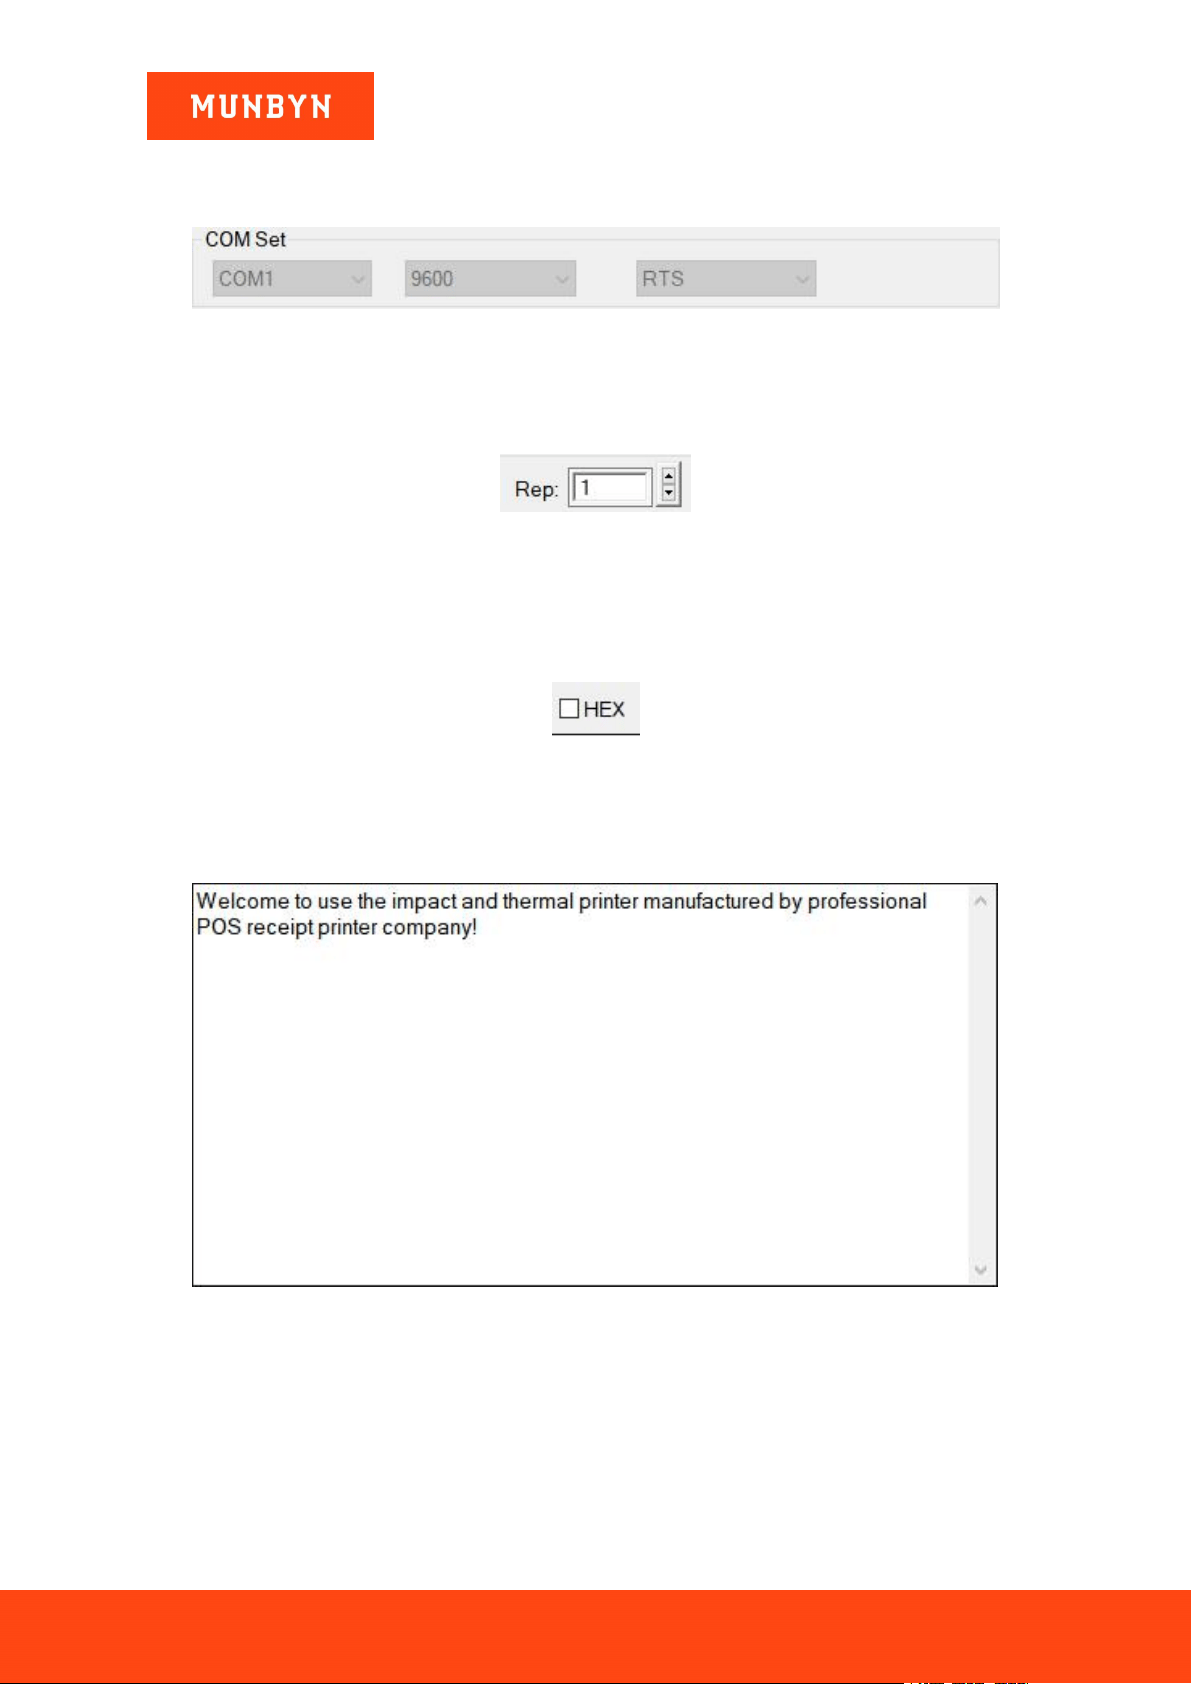
6.2.2. Serial Port Setting (COM Set)
Serial port settings: set the serial port number, baud rate, flow.
Figure 6- 22 COM Set
6.2.3. Number of the Copies
It refers to the printing quantity of the repeat print of the test content.
Figure 6- 23 Number of the Copies
6.2.4. HEX Data
After selecting the print content, only hexadecimal transmission can be entered. (Mainly used to send commands
to the printer).
Figure 6- 24 HEX Data
6.2.5. Printing Content
Edit the printing content and send data by clicking the "Print" button.
Figure 6- 25 Input Box
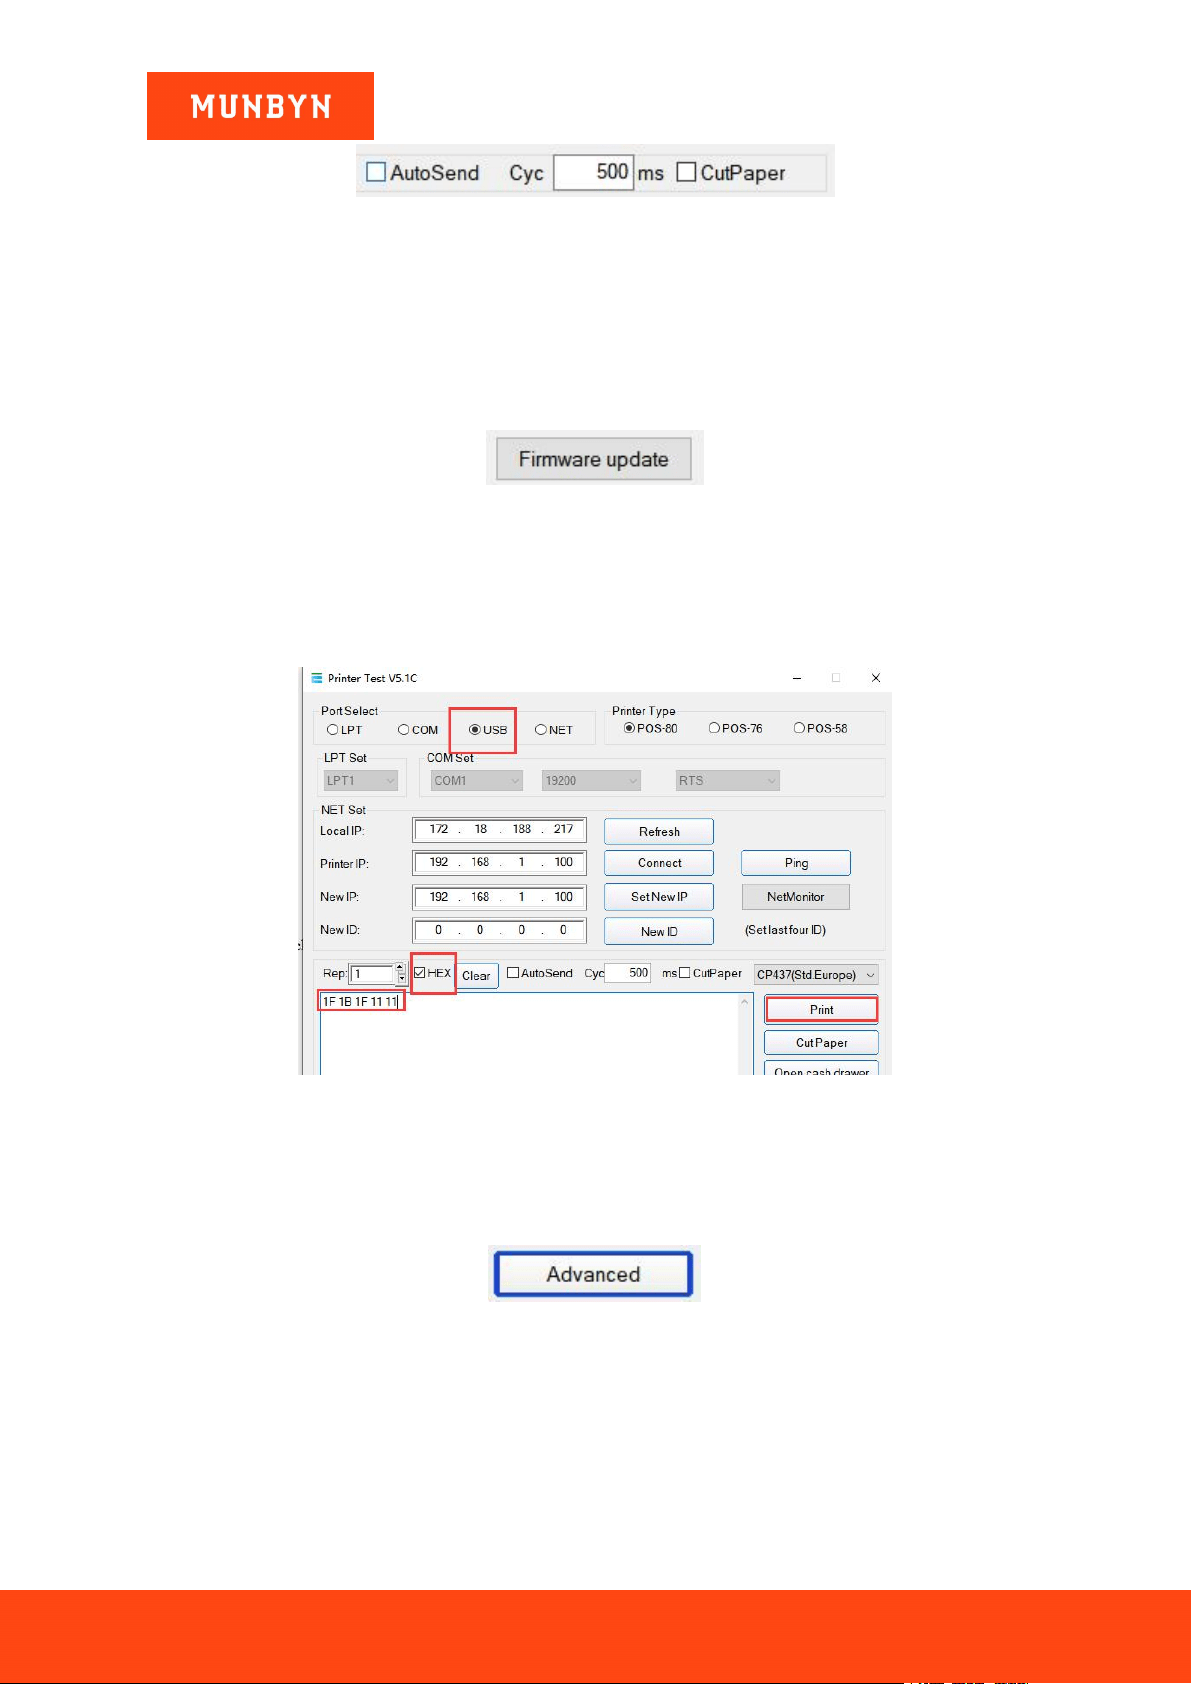
6.2.6. Automatically Sending, Cycle, CutPaper
"Automatically sending": Click the "Auto Send" button and the software will automatically send the data in
the printing content column to the printer.
"Cycle": cycle time to send data automatically.
"CutPaper": The printer will automatically do paper cutting work after the cycle time.
Page72of78
ITPP047 Thermal Printer Windows Software Manual
Version 2.00
Figure 6- 26 Automatically Sending, Cycle, CutPaper
6.2.7. Firmware Update
Notes: Firmware upgrades are not performed under normal circumstances. If you have special needs, please
contact our technical support team.
Select the firmware BIN file. The two LEDs on the printer will flash at the same time during the update, do not
turn off the power of the printer.
Figure 6- 27 Firmware Update
6.2.8. Factory default
Connect the printer to the computer by a USB cable.
Open "Printer Test V5.1C", clear the input field and check "HEX", enter "1F 1B 1F 11 11", and click "Print".
Figure 6- 28 Factory default
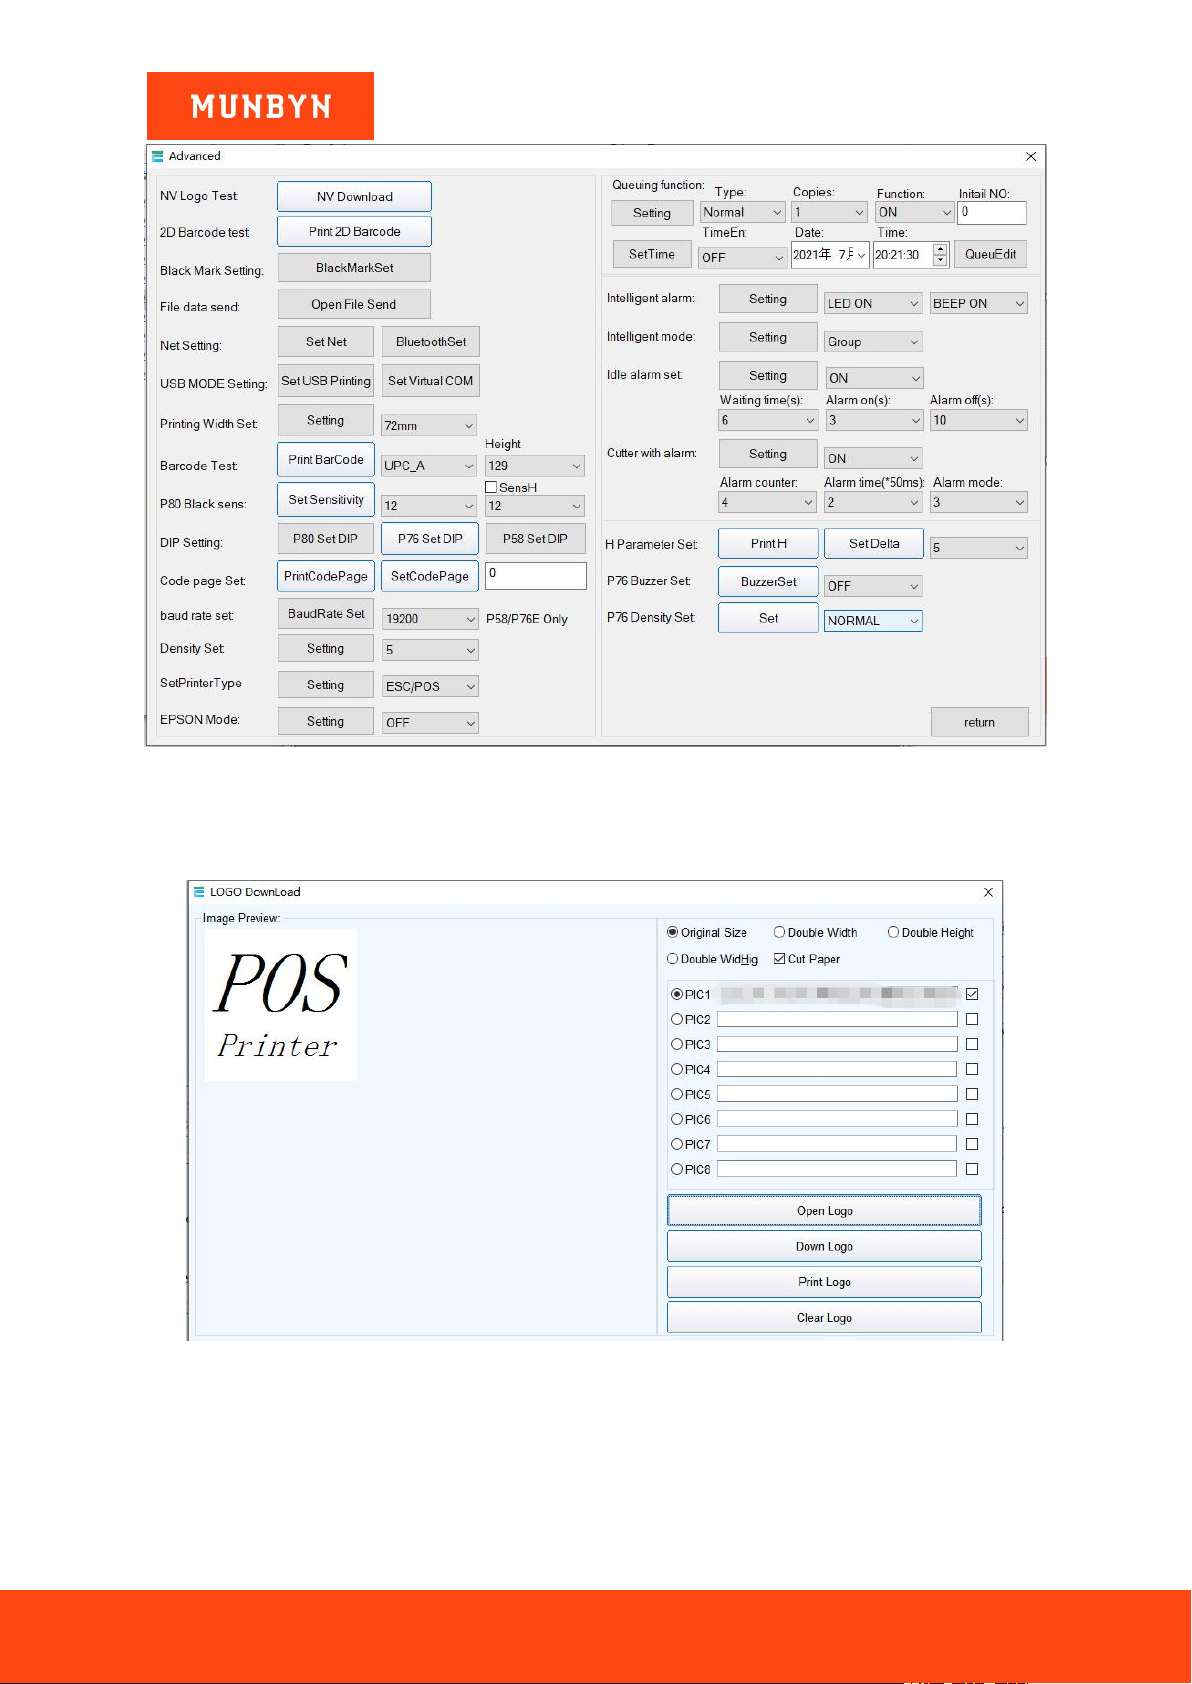
6.2.9. Advanced Uncommon Setting
1) Click the "Advanced" button to set up more features for the print test. The following is the detailed
introduction.
Figure 6- 29 Advanced Button
Page73of78
ITPP047 Thermal Printer Windows Software Manual
Version 2.00
Figure 6- 30 Advanced Settings
6.2.9.1. NV Logo Test
1) Click the "NV Download "button. The menu below will pop up.
Figure 6- 31 NV Logo Test
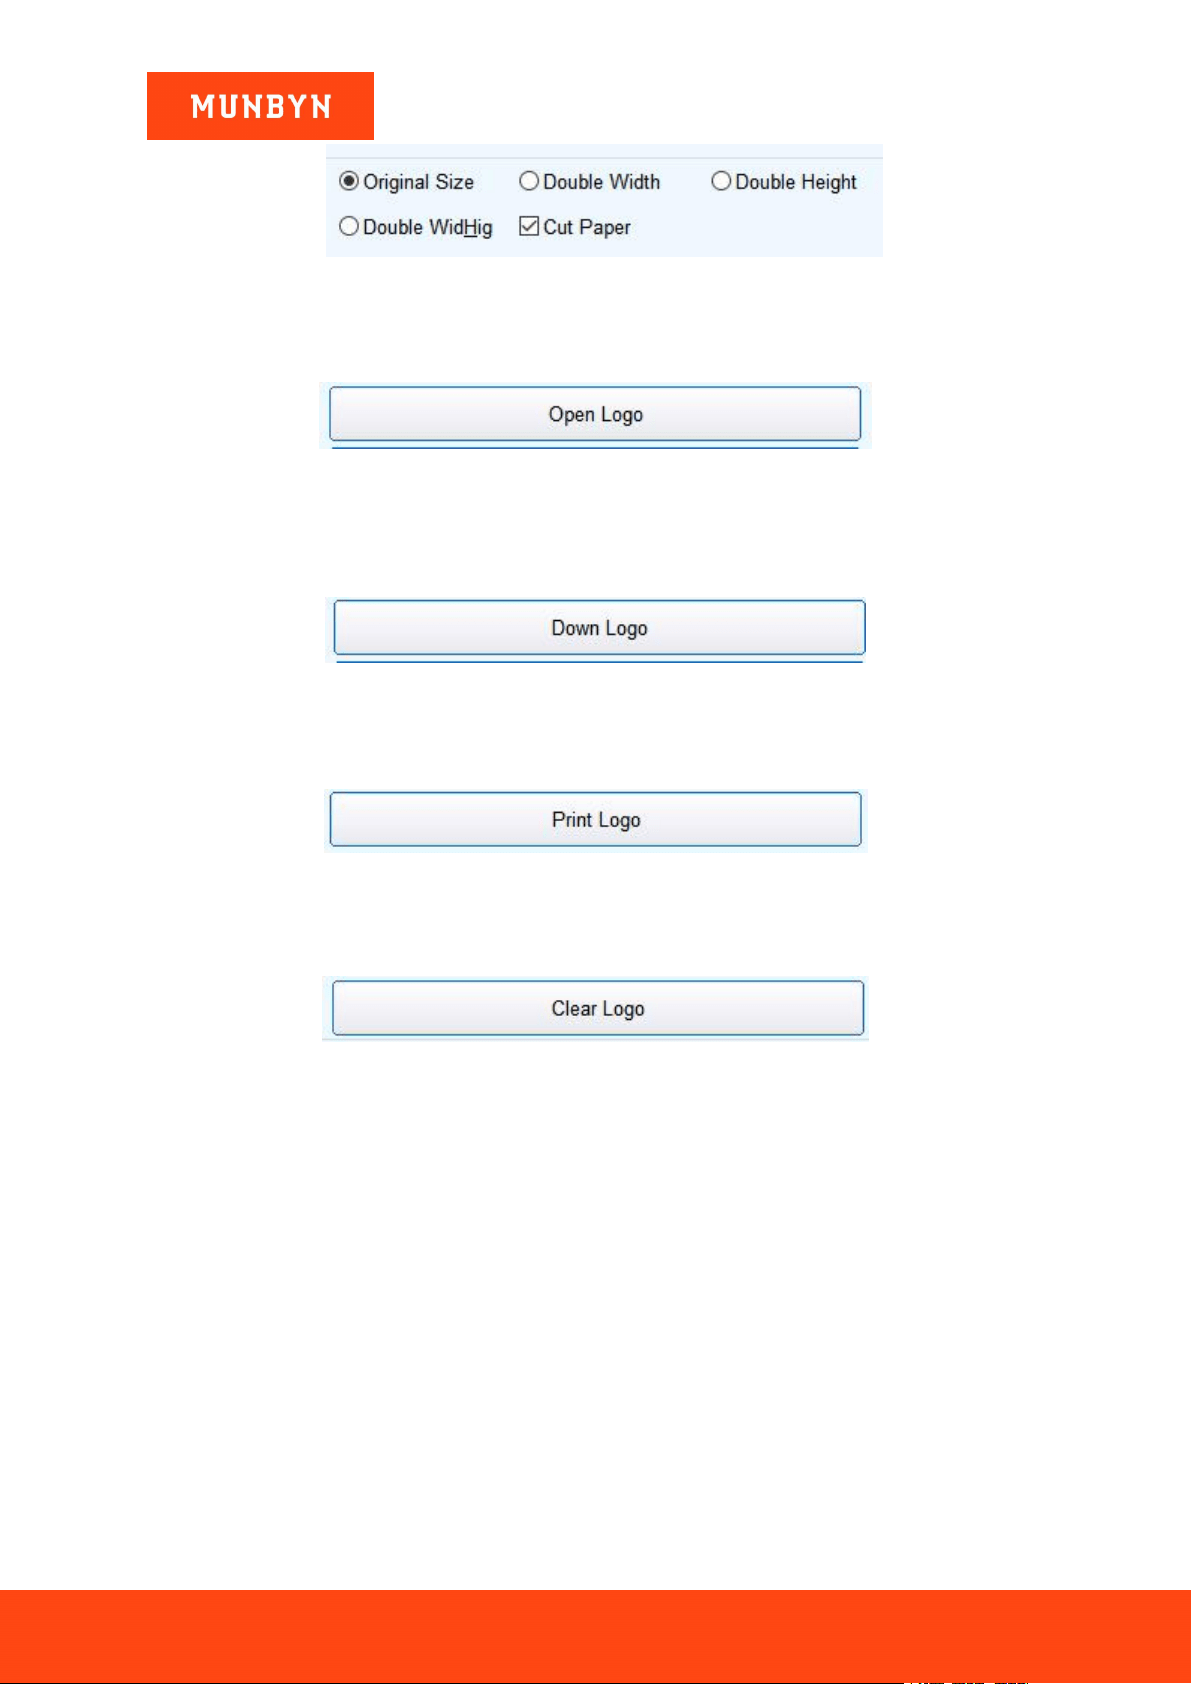
2) Size requirement and function selection of paper cutting of NV LOGO printing.
Page74of78
ITPP047 Thermal Printer Windows Software Manual
Version 2.00
Figure 6- 32 NV LOGO Settings
a) Open Logo:
Click and select the BMP format picture or the "LOGO" file you want to print.
Figure 6- 33 Open Logo
b) Download NV Logo:
After the BMP format file is open, click the download button. The file will be downloaded to the printer. Print
the file content by clicking "Down Logo" button.
Figure 6- 34 Down Logo
c) Print Logo:
Click "Print Logo" button to complete the "LOGO" image printing.
Figure 6- 35 Print Logo
d) Clear Logo:
Remove the downloaded "NV LOGO".
Figure 6- 36 Clear Logo
e) Multi NV LOGO Menu:
Show current NV LOGO
Page75of78
ITPP047 Thermal Printer Windows Software Manual
Version 2.00
Figure 6- 37 NV LOGO Menu
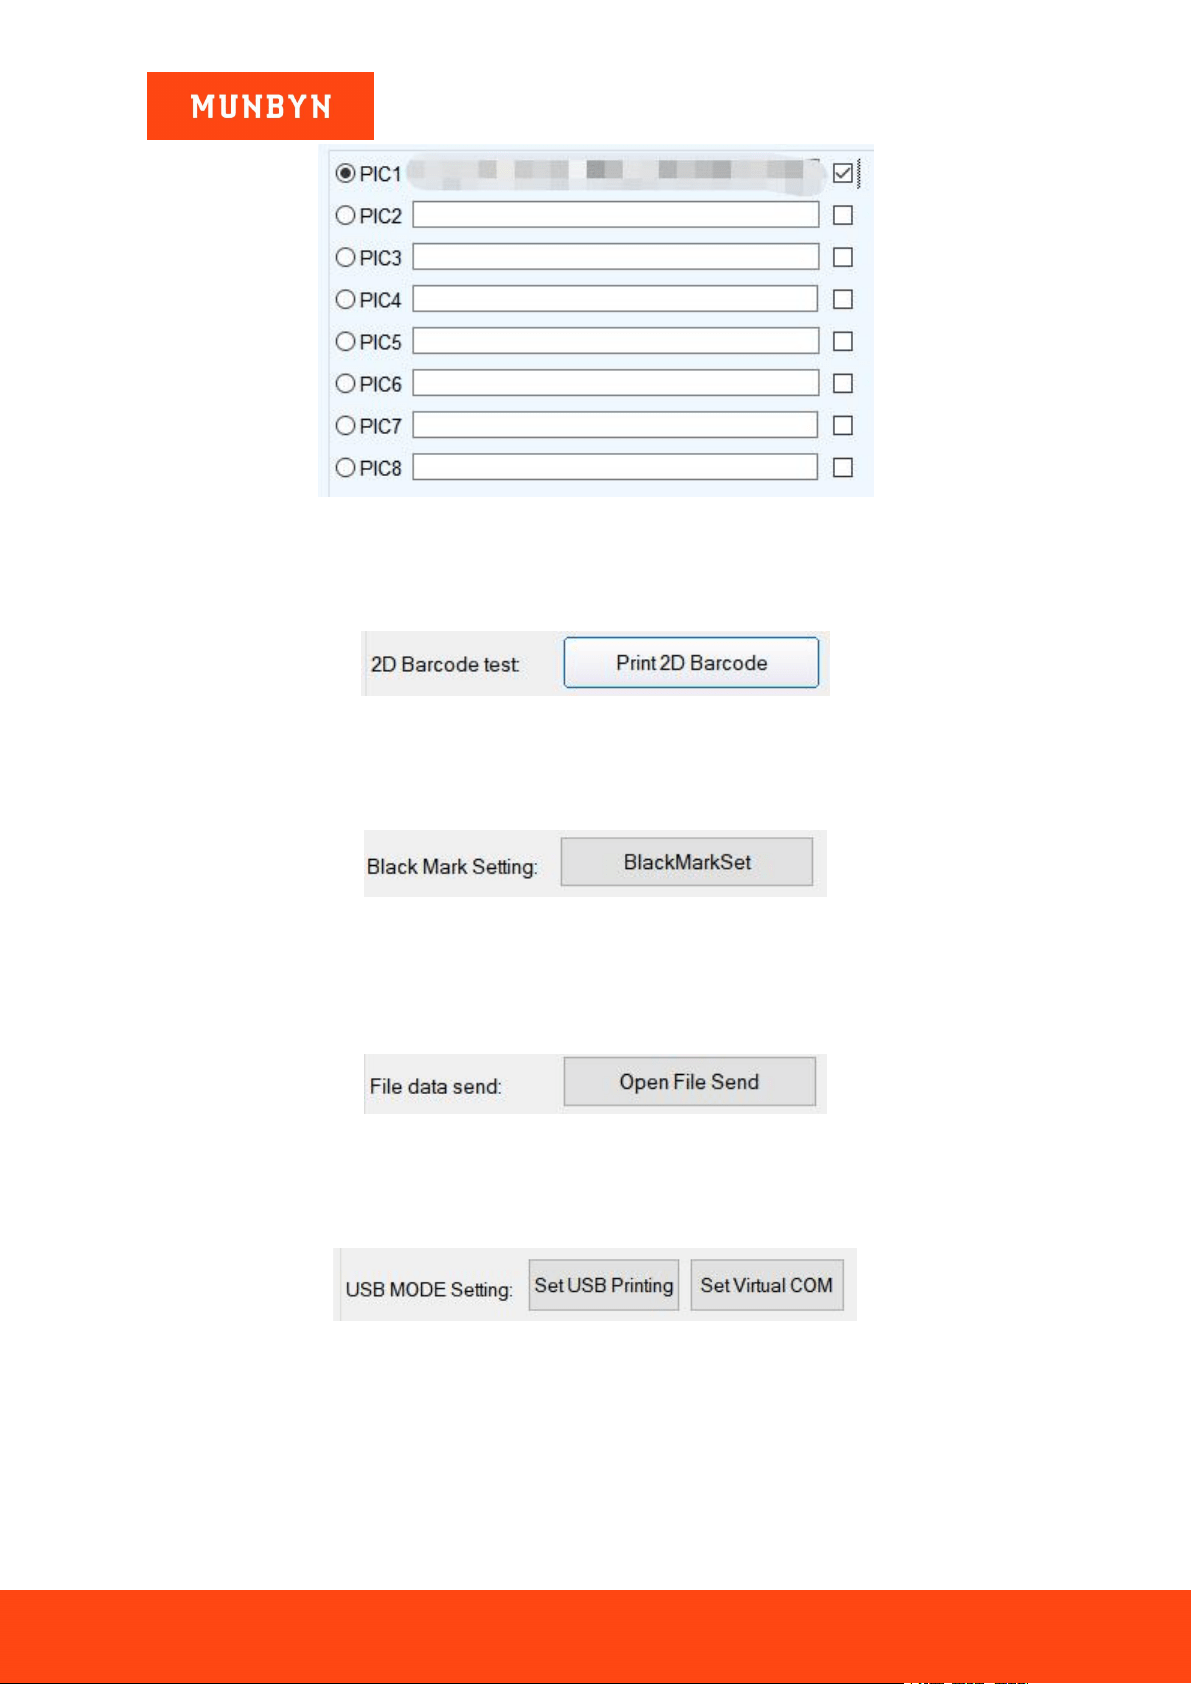
6.2.9.2. 2D Barcode Testing
Edit and print test of two-dimension codes.
Figure 6- 38 2D Barcode Testing
6.2.9.3. Black Mark Setting
To set special paper printing with black marks.
Figure 6- 39 Black Mark Setting
6.2.9.4. File Data Send
Choose and open the TXT format file in the pop-up dialog box, and then the printer will print the contents of the
file.
Figure 6- 40 File Data Send
6.2.9.5. USB Mode Setting
Mode Setting of printer USB port includes USB Printing and Virtual COM. USB mode switches.
Figure 6- 41 USB Mode Setting
6.2.9.6. Barcode Test
Choose a variety of barcode types and heights to test the print with a total of nine kinds of one-dimensional code
choices.

Page76of78
ITPP047 Thermal Printer Windows Software Manual
Version 2.00
Figure 6- 42 Barcode Test
6.2.9.7. P80 Black Sens
The adjustment of black mark sensitivity Settings for 80 series machines according to different black mark
paper. Valid only when the black mark function set is on.
Figure 6- 43 P80 Black Sens
6.2.9.8. Code Page Set
Enter the code page number (all the code pages listed on the self-test page), then click the "SetCodePage" button.
Click the "PrintCodePage" button to view the setup code.
Figure 6- 44 Code Page Set
6.2.9.9. Baud Rate Set (Only for P58 and P76E Machines)
Figure 6- 45 Baud Rate Set
6.2.9.10. Uncommon Setting
Please contact our technical support team for more details.
Figure 6- 46 Uncommon Settings
6.2.9.11. Return
Return to the former directory.

Page77of78
ITPP047 Thermal Printer Windows Software Manual
Version 2.00
Figure 6- 47 Return Button

Page78of78
ITPP047 Thermal Printer Windows Software Manual
Version 2.00
Scan the QR code for Facebook online chat
Contact us
MUNBYN provides 18 months warranty and lifetime free service.
If you encounter any issues with the product, please contact the MUNBYN team to promptly receive
troubleshooting tips or a replacement.
Email: support@munbyn.com (24-7 online support)
Website: www.munbyn.com (how-to videos, warranty details)
WhatsApp:+8617817881067