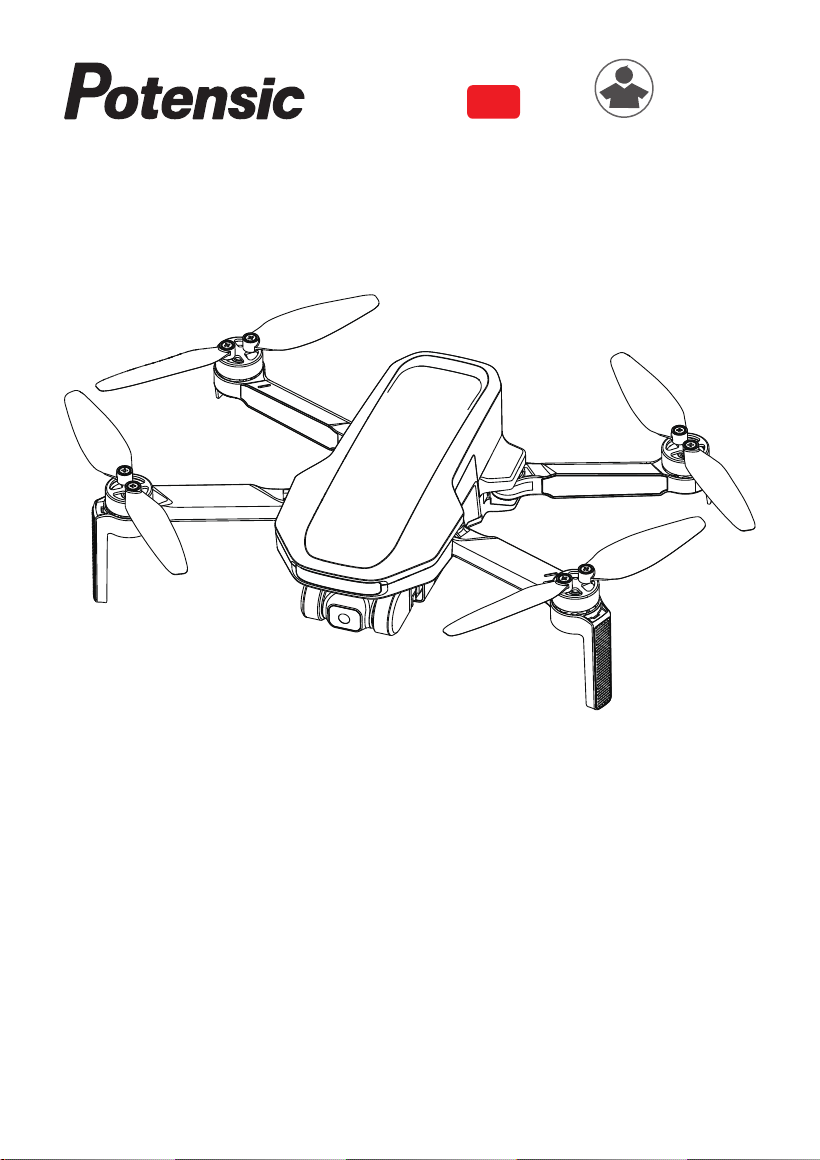
User Manual
DANGER
Only suitable
for ages 16+
Email: [email protected]
Email: [email protected]
Email: [email protected]
Email: [email protected]
Email: [email protected]
Email: [email protected]
Email: [email protected]
Web: www.potensic.com
FB: www.facebook.com/Potensic
SE
Atom
V02. 23. 12
16+

Contents
01
02
02
02
02
03
03
03
03
03
04
04
04
05
06
07
07
08
09
09
09
10
11
13
14
14
15
15
16
17
19
20
21
21
22
26
26
26
26
26
27
27
28
29
30
31
32
32
1. Disclaimer & Precautions
1.1 Disclaimer
1.2 Safety Precautions
1.3 Warning & Prompts
2. Reading Tips
2.1 Symbols
2.2 Suggestions of Use
2.3 Tutorial Video/Download App
2.4 Registration & Help
2.5 Technical Terms
3. Overview
3.1 Introduction
3.2 Drone Diagram
3.3 Remote Controller Diagram
3.4 Preparing the Drone
3.5 Preparing the Remote Controller
3.6 Charging/Startup and Shutdown
4. Drone
4.1 Positioning
4.2 Downward Vision System
4.3 Drone Status Indicator
4.4 Smart Battery
4.5 Propellers
4.6 Flight Data
4.7 Single Axis Gimbal Camera
5. Remote Controller
5.1 Overview
5.2 Control Stick Mode
5.3 Function
5.4 Antenna Angle
5.5 Remote Controller Calibration
6. PotensicPro App
6.1 App Homepage
6.2 Flight Interface
7. Flight
7.1 Requirements of Flight Environment
7.2 Precautions of Flight
7.3 Connection
7.4 Flight Modes
7.5 Compass Calibration
7.6 Beginner Mode
7.7 Takeoff/Landing/Hovering
7.8 Smart Flight
7.9 Return(RTH)
7.9 Emergency Stop
8. Appendix
8.1 Specification & Parameters

1. Disclaimer & Precautions
1.1 Disclaimer
1.2 Safety Precautions
Keep away from obstacles and crowds
Keep the product away from crowds, high-rise buildings and high-voltage cables, and avoid using it in severe
weather such as wind, rain and thunder, in order to keep the safety of the user and the crowds, for the product
may have uncertain flying speed, status, and potential hazards.
Keep off moisture
Keep the product off moisture to avoid an anomaly or damage due to humidity of precise electronic components
and mechanical parts inside it.
Safe operation
The product may be exposed to higher risk when user feels tired or lacks of energy and experience. Please refit or
repair the product with the original parts to keep safety. Please operate and use the product within the allowed
range and make sure to follow the local safety rules.
Keep away from high-speed revolving parts
While the product’s propellers are revolving at a high speed, keep it away from the crowds and animals to avoid
scratch or disturbance. Do not touch the revolving propellers with hands.
Keep away from heat source
Keep the product away from heat and high-temperature exposure to avoid the anomaly, deformation and even
damage, for it is made of metal, fiber, plastic and electronic elements.
02
01. Please properly keep the package and manual which contain important information.
02. User should avoid personal and property losses when using the product.
03. Neither the Company nor our dealers bear any liability for the proper losses and personal injuries due to
users.
04. Debug and install the product in strict accordance with the Manual’s steps. Keep a distance of over 1~2m
from others while using the product, to avoid injury when the product crashes into people’s heads, faces, and
bodies.
05. The product should be assembled by an adult. Users aged below 16 should not handle the product alone.
The battery should be charged under the supervision of an adult and by avoiding inflammables.
1.3 Warning & Prompts
Drones are products that are potentially dangerous and relatively complex to operate. Please be sure to read the
full User Manual to ensure that you understand the basic knowledge of the drone and are familiar with the basic
functions before usage. It is recommended to use it in GPS mode in an open outdoor area for the first time to get
familiar with the operation.
Please follow the Manual’s operation instructions and precautions strictly, in order to use the product safely and
correctly.
Users aged under 16 should be accompanied by an adult while using the product. Please keep the product out of
children’s reach.
For any direct or indirect loss (including but not limited to property loss and personal injury) due to user’s failure in
following the Manual’s safety operation, the Company disclaims any responsibility and does not provide warranty
services.
Do not dismantle any part except for propellers, or refit the product and attach other items on it without official
guidance; otherwise, user will be responsible for any consequences arising from violations.
For any problems in usage, operation and maintenance, please feel free to contact our local dealer or the
Company.
Potensic reserves the final interpretation rights of this document and related product documents, and is subject to
change without notice. Please visit https://www.potensic.com for the latest information.
2. Reading Tips
2.1 Symbols
Prohibited
Important
Operation & use prompts
Technical Terms and reference information
2.2 Suggestions of Use
1. User is highly suggested to watch the tutorial video and Quick Operation Guide before consulting the Manual.
2. Make sure to read Disclaimer & Precautions first when consulting the Manual.
2.3 Tutorial Video / Download App
Scan the QR code on the right and you can:
1. Download PotensicPro App (hereinafter referred to as "the App").
2. Watch the tutorial videos.
3. Access the latest User Manual.
4. Learn about the frequently asked questions(FAQ)
2.4 Registration & Help
Make sure to register a personal account in App before the first flight, in order to get a better use experience.
Steps of Registration
Please fill in your E-mail, and password, check the protocol, and click “Register”. You can log in to the system
after registration.
(Note: Keep the mobile phone online during registration)
Help
Thanks for purchasing the Atom SE drone. Please read the Manual carefully.
Please contact our support team at [email protected] if anything needs help, when requesting an
after-sales service, it is required to submit the order ID and details of the issues.
03
06. Keep the product out of children’s reach to avoid eating it by mistake, for it contains small parts.
07. Do not use the product on the road or in water to avoid an accident.
08. It is forbidden to dismantle or refit the product, except for the propellers; otherwise, an anomaly may occur.
09. Please recharge the intelligent battery with a USB charger that conforms to FCC/CE standards.
10. The remote controller has a built-in 3.7V lithium battery which needs no replacement.
11. Do not short-circuit or squeeze the battery to avoid explosion.
12. Do not short-circuit, break down or throw battery in fire or place it in a hot place (in fire or near an electric
heater).
13. Keep a safe distance from the propellers which are revolving at a high speed; do not use the product in
crowds to avoid scratch or injury.
14. Do not use the product in places with strong magnetic field, such as near high-voltage cable, buildings that
contain metals, automobiles and trains; otherwise, the product can be disturbed.
15. Please do master local laws and regulations, to avoid violation of regulations.
16. Stop using the remote controller within the radio control period and region of national departments as
specified, in order to conform to the requirements for magnetic environment of aeradio.
17. Avoid low-altitude flight above water surface.
18. Keep it away from airport, airline and other no-fly zone.
2.5 Technical Terms
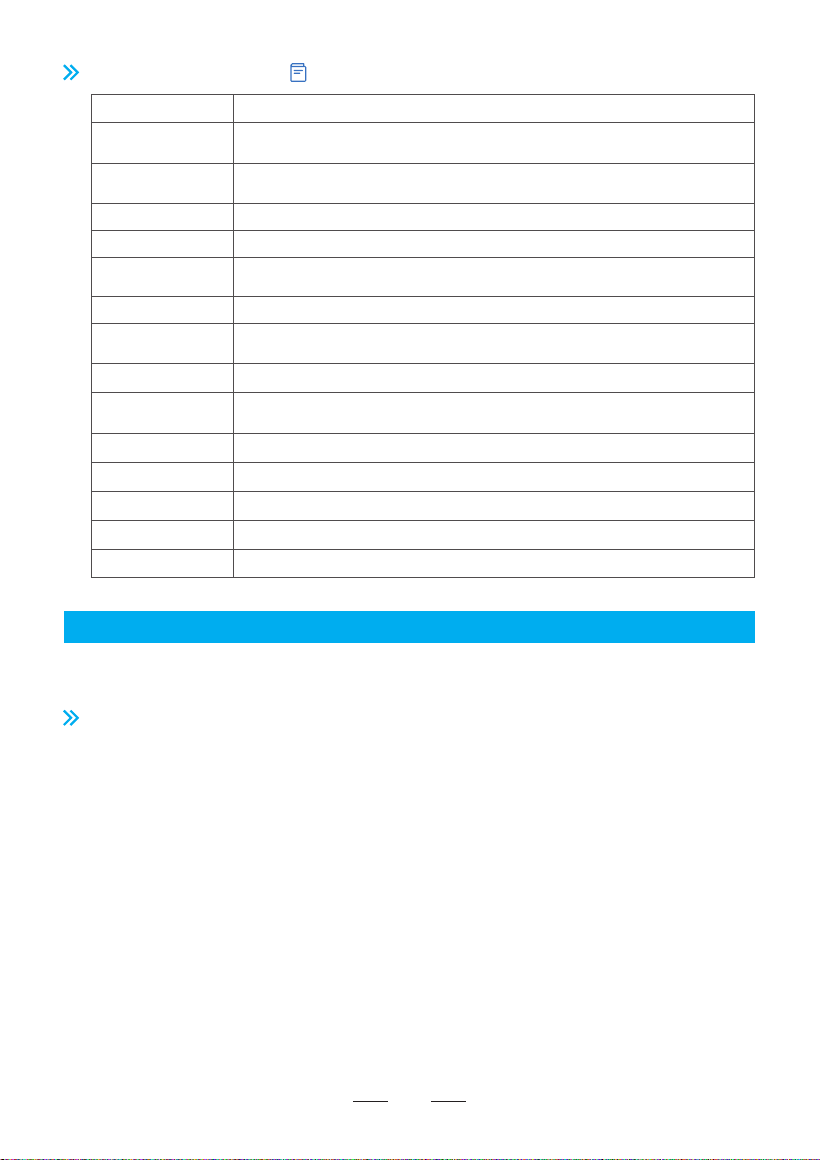
IMU (inertial measurement unit), the most important core sensor of the drone.
TOF (time of flight), the period from transmission and receiving of detection infrared
signal, in order to determine the target distance.
The sensor system, which lies at the bottom of the drone and consists of camera and
TOF module.
High-accuracy positioning, which is realized through Downward Vision System.
Identify direction for geomagnetic sensor and the drone.
Atmospheric pressure sensor, which enables the drone to determine the altitude
through atmospheric pressure.
Switch the drone motor from static status to idle running.
Once unlocked, the motor will start revolving at a fixed speed, but it has insufficient
lifting force to take off.
The drone will return to HOME point automatically based on GPS positioning.
Electronic Image Stabilization; the camera will detect the data of high-frequency
vibration and eliminate picture flutter through algorithm.
Position of the drone camera.
Ascend or descend the drone.
Fly the drone to front or back.
Fly the drone to left or right.
Enable self-rotation of the drone to left or right.
IMU
TOF (Time of Flight)
Downward Vision
System
Vision Positioning
Compass
Barometer
Lock/unlock
Idling
Auto return
EIS
Drone head
Throttle control stick
Pitch control stick
Roll control stick
Yaw control stick
3. Overview
This chapter introduces the functional characteristics of Atom SE, as well as the component
name of the drone and the remote controller.
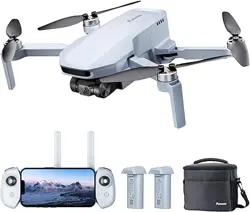
With foldable arms and weight below 250g, the product is portable, and easy to use. The product
is equipped with a vision positioning system, to realize precise hovering at low altitude indoor
and outdoor environment. Meanwhile, the product is equipped with a GPS sensor to realize
positioning and auto return. With 1/3" Sony CMOS image sensor, the product can shoot
4K/30FPS HD video and 1.2-megapixel pictures. Atom SE uses self-developed ShakeVanish
electronic stabilization technology to make the picture clear and stable.
By using the brand new PixSync 2.0™ 2.4G digital image transmission technique, the Atom SE
remote controller can realize 4 km communication distance and 720P HD image transmission
maximally at ideal conditions. Open the pull-type and the foldable remote controller to contain
your mobile device. Connect the remote controller and mobile device with USB data cable, to
operate and set the product through App and display HD image transmission picture. The built-in
lithium battery of the remote controller can work for approx. 2.3h maximally.
Atom SE uses proprietary SurgeFly™ flight control technology, with a maximum horizontal flight
speed of 16m/s (52ft/s), a maximum flight time of about 31 minutes, and the ability to withstand
winds of up to level 5.
3.1 Introduction
04
Test conditions of the max. flight time: Fly at an even speed of 5m/s at 25°C and in breezeless
condition.
Test conditions of the max. transmission distance: Measured at an open and no-interference
environment, with a flight height of 120m, and without considering the return of the drone.
Power consumption will increase considerably when the drone is returning against the wind. If you
receive a prompt of encountering strong wind from the App, please make sure to lower the flight
altitude and return in time to ensure safety of the drone.
Pre-Flight Checklist:
1. Pay attention to the local weather forecast and make sure it is suitable for flying the drone.
2. Make sure the battery is fully charged.
3. Make sure the firmware is updated to the latest version.
4. Make sure the flight environment is open and free of interference.
5. Before takeoff, make sure the battery is secured and the buckle pops out correctly, and no deformed propellers
and loose screws.
6. Power on the drone on open and level ground, wait for the drone to enter GPS Mode before takeoff, and pay
attention to the HOME point.
05
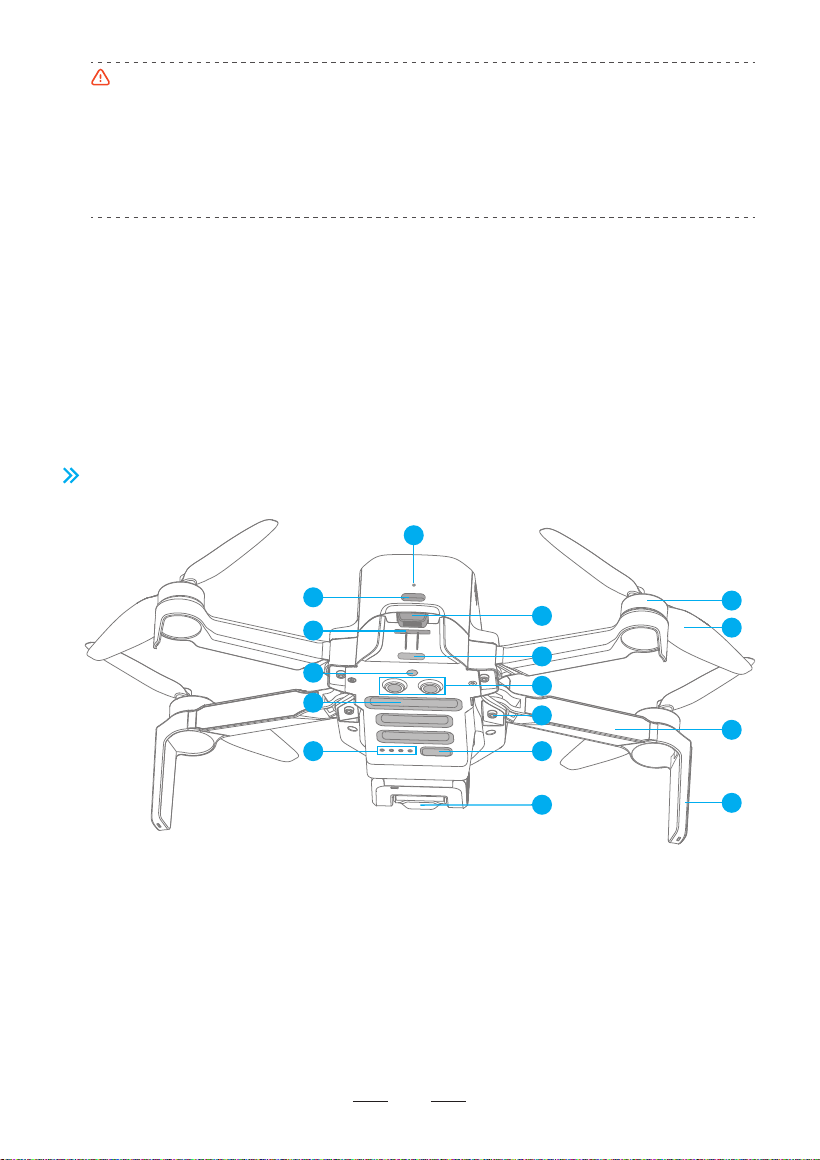
3.2 Drone Diagram
1. Charging indicator
2. TYPE-C charging port
3. Battery buckle
4. SD card slot
5. Tail indicator
6. Monocular visual module
7. TOF module
8. Bottom cooling hole
9. Power indicator
10. Power/frequency pairing button
11. Integrated single-axis gimbal camera
12. Brushless motor
13. Propeller
14. Arm
15. Antenna tripod
16. Arm shaft
4
9
1
5
7
12
13
14
15
16
8
10
11
2
3
6
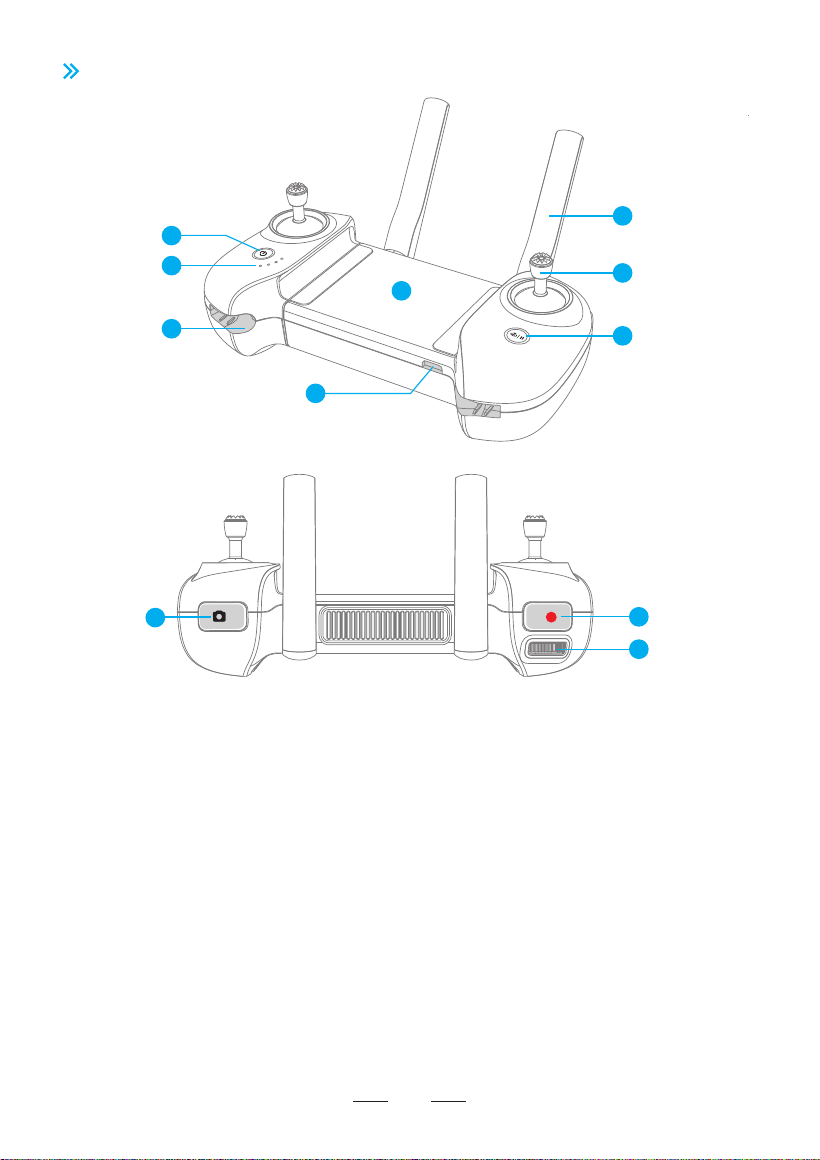
1. Power button
Long press it for 2s to power on/off.
2. Power indicator
Indicate the power level or other status
of the remote controller
3. Control stick slot
One slot respectively at the left and right
side, which are used to store the sticks
4. TYPE-C interface
To charge the remote controller/connect
mobile device
5. RTH / Pause button
Long press for 1s to return to HOME
point automatically
Short press it to pause auto flight
6. Control stick
7. Foldable double antennas
8. Installation position of mobile device
To place mobile device.
9. Shoot button
Short press it to shoot one picture
10. Record button
Short press it to start/stop recording
11. Thumbwheel
Dial the thumbwheel horizontally to control
the tilt of the gimbal.
3.3 Remote Controller Diagram
9
11
10
4
8
6
7
5
2
3
1
06
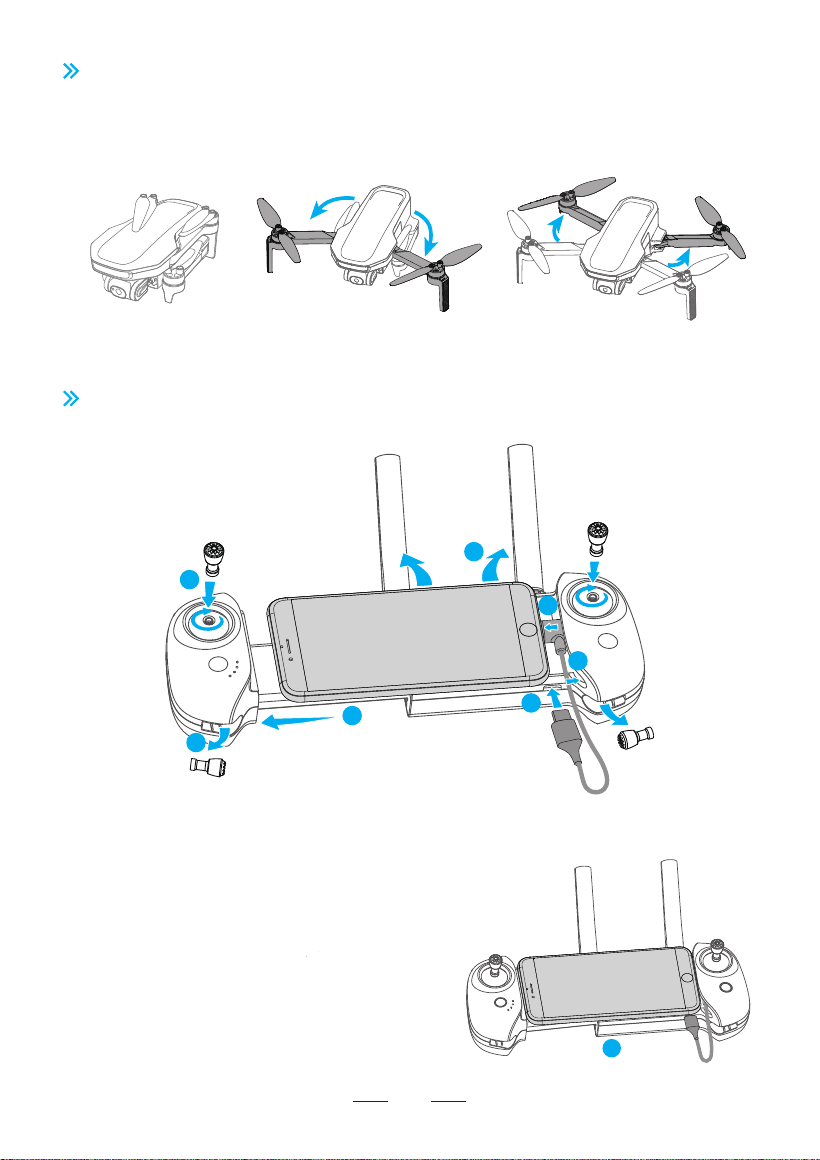
1. Unfold the antenna.
2. Connect your mobile phone to the USB cable.
3. Insert the part of your mobile phone with the
USB cable into the slot of the remote controller.
4. Pull and open the remote control with both
hands and fix your mobile phone stably.
5. Connect the other end of the USB cable to the
remote controller.
6. Take out the sticks.
7. Screw in both control sticks clockwise.
8. Installation completed.
3.4 Preparing the Drone
The product is delivered under folded status. Please unfold it as follows:
3.5 Preparing the Remote Controller
Installation of mobile phone and control stick
1. Unfold the front arm before the rear arm.
2. Unfold the propeller blades.
1
2
3
5
4
6
7
8
07
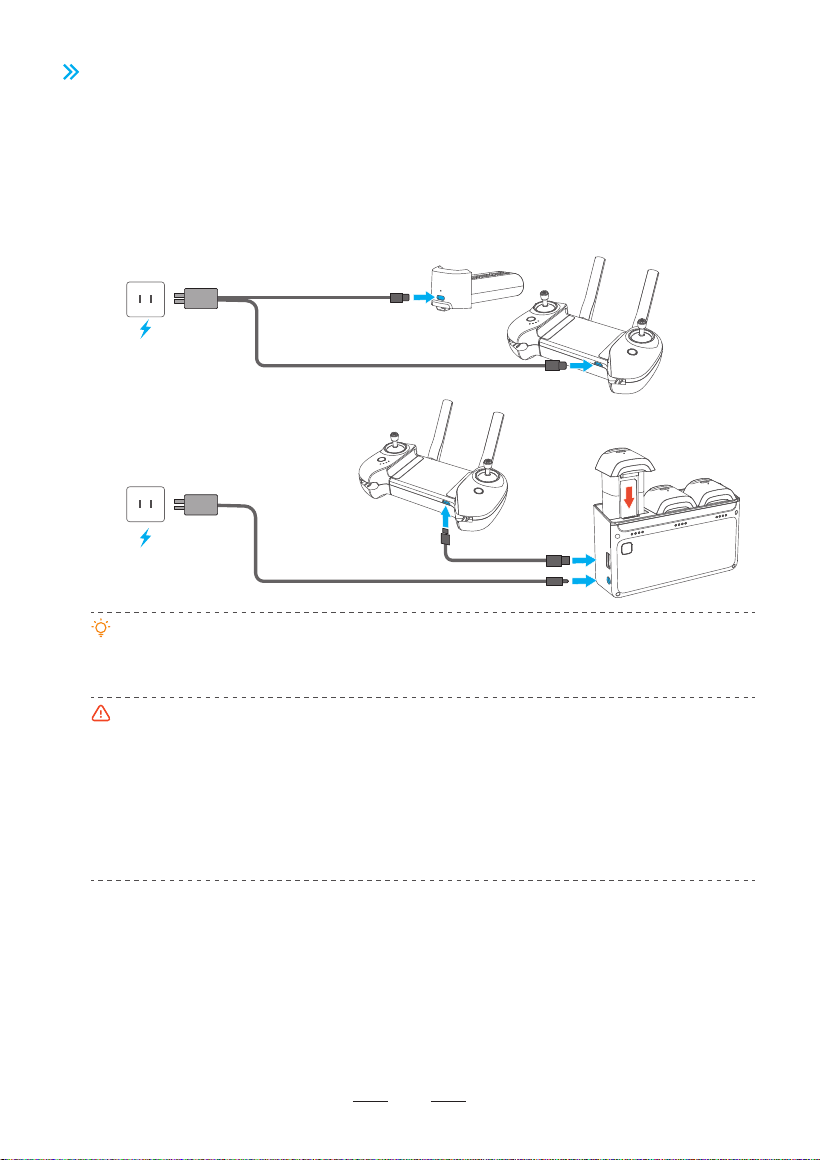
3.6 Charging / Startup and Shutdown
Startup
Drone: Make sure the battery is inserted in the battery bin, short press and then long press the power button
until all indicators are on, and then release the button to start up.
Remote controller: Long press the “Power” button until all indicators are on, and then release the button to
finish startup.
Shutdown
Drone: Short press and then long press the power button of the drone until all indicators are on, and then
release the button to shut down.
Remote controller: Long press the power button until all indicators are off, and then release the button to shut
down.
The shortest charging period is approx. 1h 25min through the type-C charging port. Make sure your
charger supports 5V/3A output in order to achieve this charging speed.
User is suggested to charge the battery through the Parallel Charging HUB, in order to charge 3
batteries quickly at the same time.
It is suggested to remove the battery from the drone to charge for the sake of safety; otherwise, the
drone won't power on if the battery is being charged in the drone.
If the charging cable is connected while the drone is on, it will power off automatically and the
charging will continue.
The battery may become too hot after use; do not charge it until it cools down; otherwise, charging
can be rejected by the smart battery.
Charge the battery on a trimonthly basis to maintain the activity of the cell.
Please connect the original cable or any cable that supports over 3A current to the type-C port;
otherwise, it may cause charging failure or battery damage.
When receiving a new drone battery, it is required to charge it to wake it up, otherwise the drone
won't start. Connect the TYPE-C charging port of the battery and a USB charger to the AC
power supply to finish a one-time charging (USB charger is not included in the package. User
can use the charger that conforms to FCC/CE specification to charge the battery). The red
indicator will stay on during charging, and turn off automatically after charging is done. Users
can charge the battery with the Parallel Charging HUB if a fly expansion kit is purchased. For
more details, please refer to the Uer's Manual of Parallel Charging HUB. The Parallel Charging
HUB can also charge the remote controller.
08
Mode 2
Mode 1
4. Drone
The product consists of a flight control system, a communication system, a positioning system, a
power system and a smart flight battery. This chapter sets down the functions of all parts of the drone.
4.1 Positioning
Atom SE adopts Potensic's new SurgeFly™ flight control technology, which supports the
following two positioning modes:
GPS positioning: Provide precise positioning and navigation to the drone; support precise
hovering, smart flight and auto return.
Vision positioning: It can realize high-precision positioning at a low altitude based on the
Downward Vision System. The visual positioning can be realized without a GPS signal, so that
the product can be used indoors.
How to switch: The flight control system will switch automatically according to the environment
of the drone. If both the GPS and lower visual system fail, the flight control will be switched to
attitude mode, under which, the drone fails to realize stable hovering and the user needs to
correct the flight gesture manually through the control stick.
The difficulty of drone handling will be increased greatly in the attitude mode; make sure to
master the behaviors and operation of the drone in this mode before using this mode; avoid
flying the drone at a long distance, to avoid risks due to failed judgment of drone gestures.
In visual positioning, smart flight is not supported and flight speed will be restricted.
The difficulty of controlling the drone will increase dramatically in ATTI Mode so make sure to master
the operation of the drone in this mode. Always keep the drone within sight in order to avoid risks in
case of failed judgment of the drone's attitude and direction.
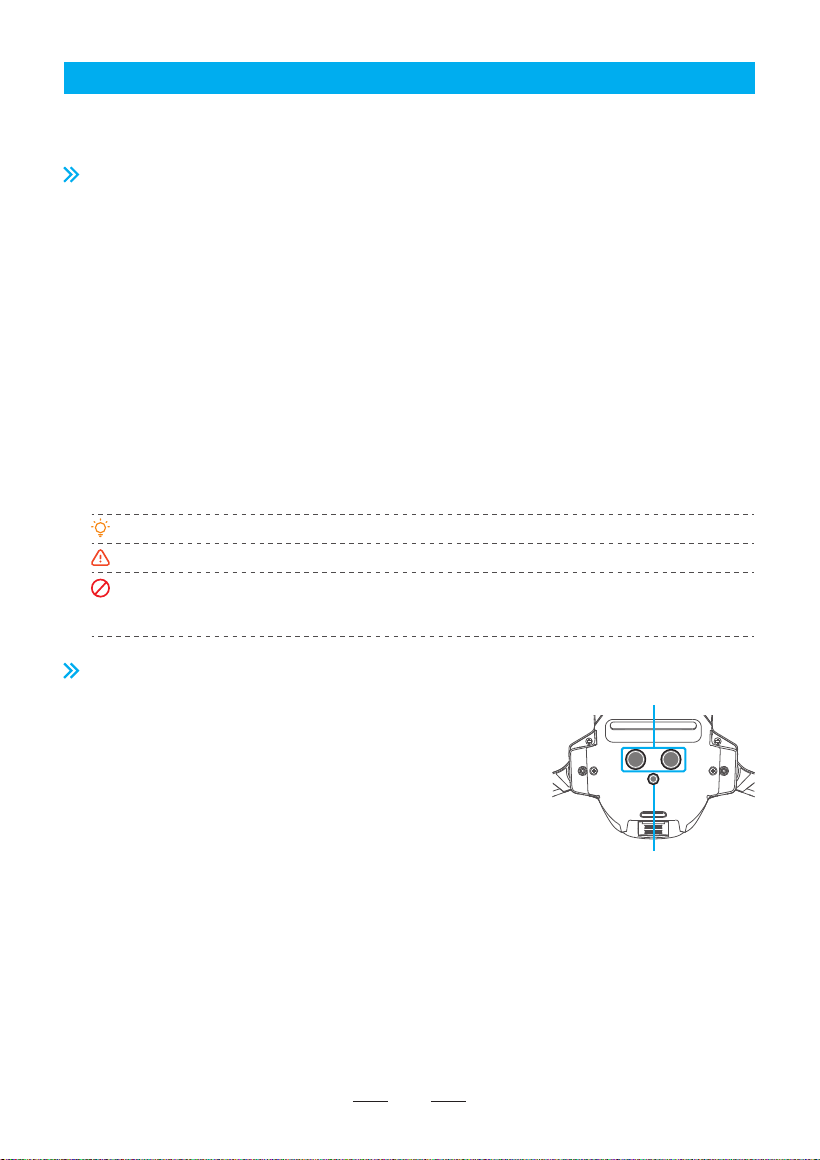
4.2 Downward Vision System
The Atom SE is equipped with a downward vision system, it is
located beneath the drone. The Downward Vision System
consists of a monocular camera and a TOF module. The TOF
module includes a transmitter tube and a receiver tube, it can
precisely calculate the fly height above the ground by
calculating the infrared signals transmission and receiving time.
In combination with the monocular camera, the system can
help achieve high-precision positioning at low altitudes.
Detection Fileds
The Downward Vision System works best when the drone is at an altitude of 0.3 to 5 m, and its operating range
is 0.3 to 10 m.
When GPS is unavailable, the Downward Vision System is enabled if the surface has a discernable surface and
sufficient light. The Downward Vision System works best when the drone is at an altitude of 0.3 to 5 m. If the
drone’s altitude is above 5 m, the Vision System may be affected, so extra caution is required.
How to use
The Downward Vision System has enabled automatically if the positioning conditions are satisfied. The drone tail
indicator blinks cyan twice, which indicates the Downward Vision System is working.
Speed limit: To ensure positioning accuracy and flight safety during visual positioning flight, the drone will actively
limit its flight speed.
User can also switch to attitude mode in App.
TOF Module
Monocular Camera
09
Visual positioning is only an auxiliary flight function, please always pay attention to the changes in
the flight environment and positioning mode, and do not rely too much on the automatic judgment
of the aircraft. Users need to control the remote at all times and be prepared to operate the aircraft
manually at any time.
The Vision System cannot work properly in any of the following situations
1. Pure-color surface.
2. Surface with strong reflection, such as smooth metal surfaces.
3. Transparent object surface, such as water surface and glass.
4. The moving texture, such as running pets and moving vehicles.
5. Scenarios with drastic change of light; For example, the drone flies to outdoor space with strong
light from indoor space.
6. Places with weak or strong light.
7. The surface with highly repetitive texture, such as floor tile with the same texture and small size,
and highly consistent strip pattern.
For the sake of safety, please check the camera and TOF transceiver tube before the flight, and clean
it with a soft cloth if there is any dirt, dust, or water on it;
Contact Potensic Support if there is any damage to the Vision System.
10
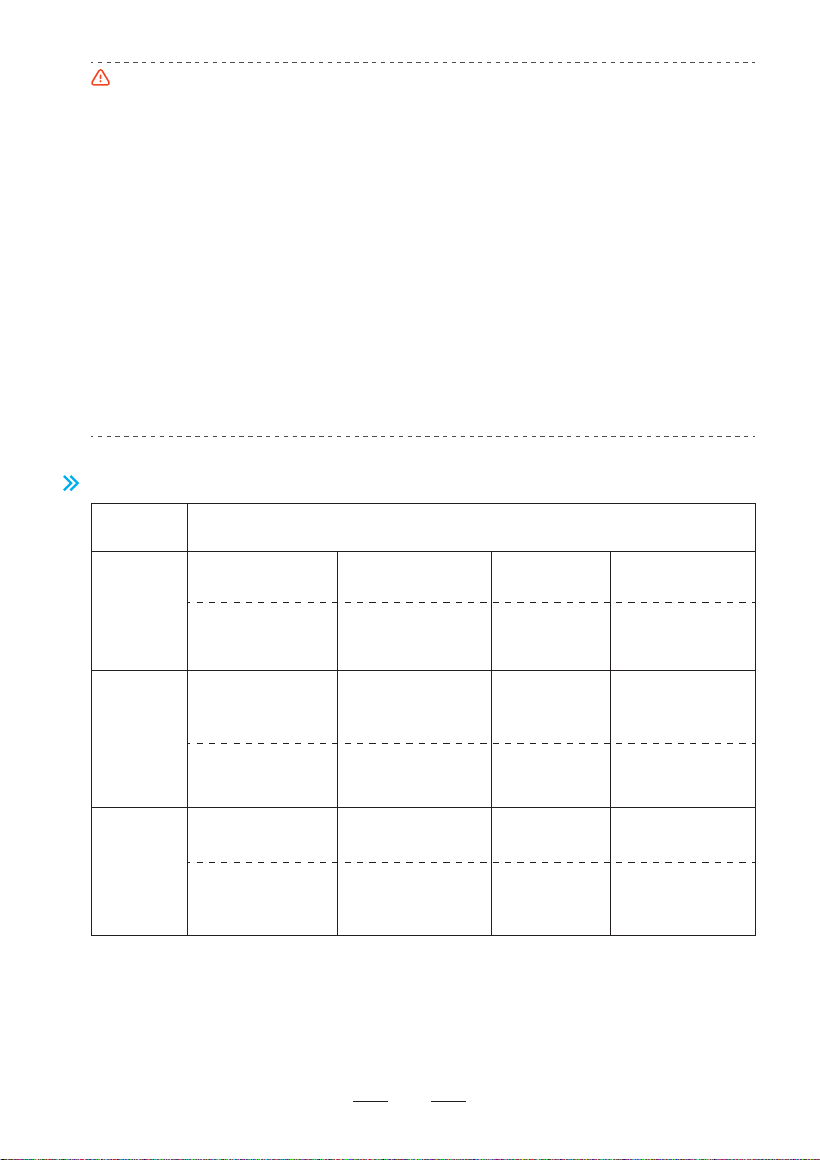
4.3 Drone Status Indicator
Startup / Shutdown in progress: Green indicator is solid on
Flight
status
GPS positioning Vision positioning Attitude mode Return
Indicator flashes
slowly in green
Indicator flashes
slowly in cyan
Indicator
flashes slowly
in blue
Indicator
flashes slowly
in red
Warning &
Error
Remote controller
has no connection
with the drone
(communication lost)
Low battery Sensor error
Emergency stop
of propeller
Indicator is in
solid blue
Indicator flashes
quickly in red
Indicator is
in solid red
Indicator repeatedly
lights up shortly in red
then goes off long
Upgrade &
calibration
Compass calibration
(horizontal)
Compass calibration
(vertical)
Frequency
pairing mode
Upgrade
mode
Indicator has
alternative flashing
between red and green
Indicator has alternative
flashing between blue
and green
Indicator flashes
quickly in green
Indicator flashes
quickly in blue
Start-up/
Shut-down
7.2V
TYPE-C: 5V/3A
Parallel Charging HUB: 8V/2.2A x 3
2500mAh
8.4V
Model: DSBT02A
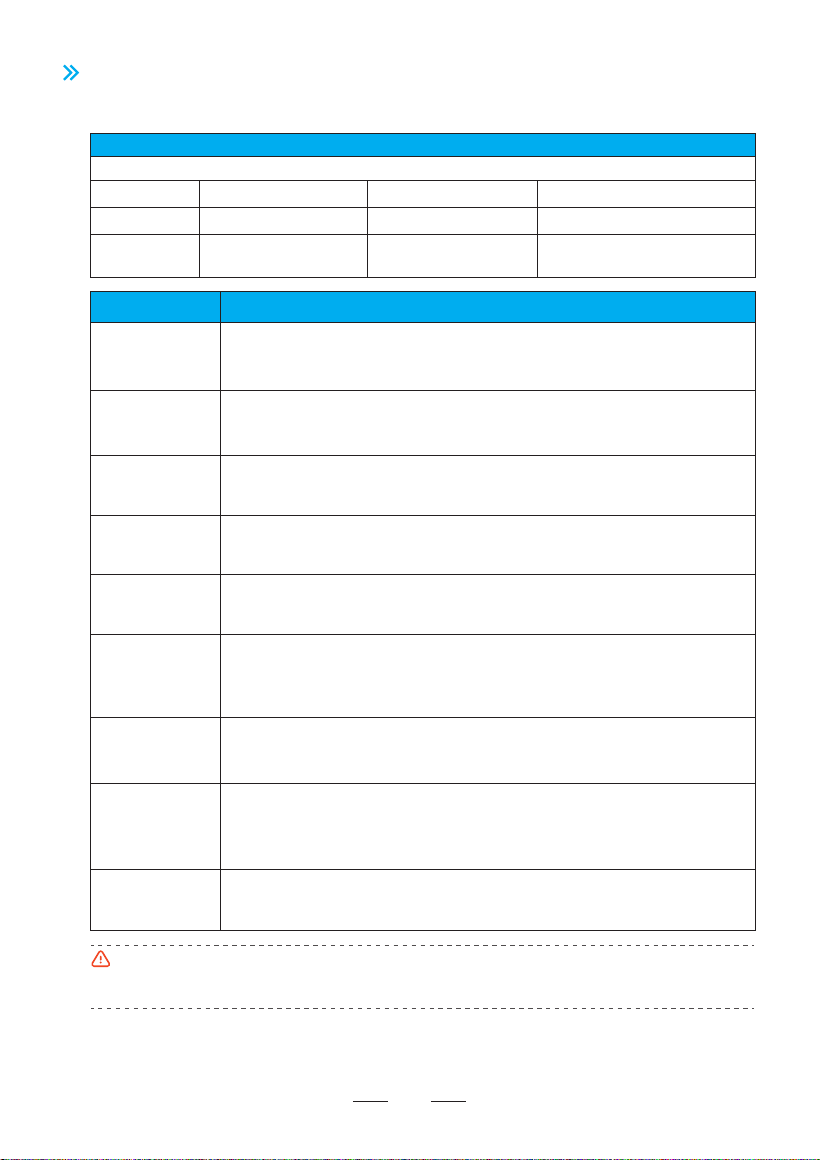
4.4 Smart Battery
4.4.1 Function
Atom SE smart battery is mounted with high-energy cell and advanced BMS. The details are as follows:
Basic Parameters
Cell Qty.
Rated Voltage
Charging Mode
2 series
TYPE-C/
Parallel Charging HUB
Battery Capacity
Charge Completion Voltage
Max. Charge Current
Balance
protection
Self-discharge
protection
Overcharge
protection
Temperature
protection
Intelligent
current limiting
of charging
Over-discharge
protection
Short-circuit
protection
Battery health
monitoring
Communication
function
Balance cell voltage automatically to guarantee battery health.
If the battery is fully charged and left idle, it will slowly self-discharge to 50%-70%
after 5 days to protect the battery cells.
Charging will stop once battery is fully charged, otherwise the battery can be
damaged by overcharging.
Please pay attention to your charging environment, otherwise charging will be
stopped automatically when battery temperature is below 0°C or above 40°C.
When charging current is too high, the battery will restrict current automatically in
order to protect the battery.
In non-flight status, the battery will cut off power supply automatically to avoid
over-discharge when battery is discharged to a certain level; at this time, the
battery will enter sleep status. It is suggested to charge the battery ASAP.
When the drone short-circuit is detected by the battery, the power supply will be
cut off automatically to protect the battery and the drone.
The BMS will monitor the battery health condition, prompt battery damage in App
in case of cell damage, cell voltage unbalance or other battery errors, to remind
user to replace the battery in time.
The battery can communicate with the the drone in real time. User can view the
information in App, such as battery circulation times and real-time electric quantity.
If the battery is not used for a long time, it needs to be charged every three months to ensure its
health.
Please store the battery in a cool, dry place where children cannot touch it.
11
Function Description
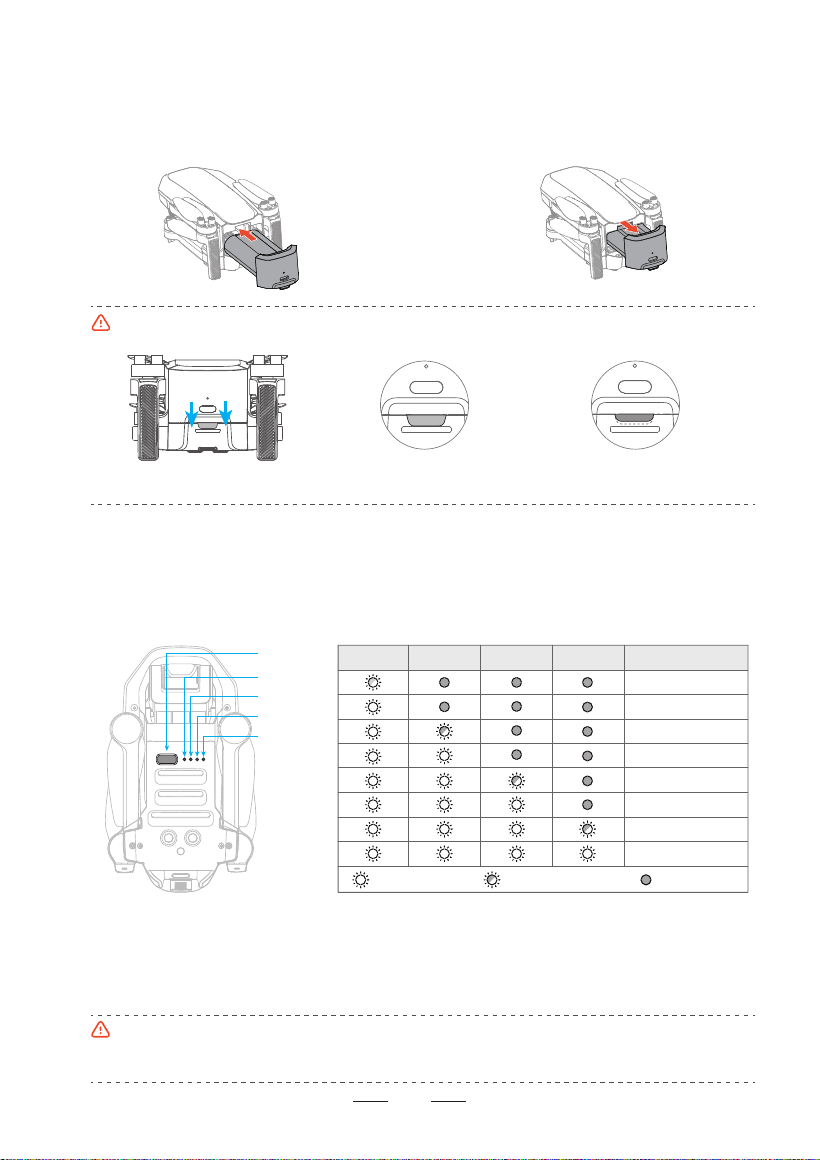
4.4.2 Battery Installation & Removal
Installation:
Push the battery into the product’s battery bin
horizontally as shown in picture below, the battery
buckle is bounced and locked when hearing “click”
sound.
Buckle is not in position,
which may result in the
battery falling during flight.
Make sure to power off the product
before removing the battery.
4.4.3 Charging
See 3.6 for charging method
4.4.4 View Power Level
Once the battery is inserted in the drone, short press the power button to view the power level of
smart battery, as shown in the picture below:
0%~25%
25%~30%
30%~50%
50%~55%
97%~100%
80%~97%
75%~80%
55%~75%
LED 1 LED 2 LED 3 LED 4 Current power level
Indicator is flashing Indicator is offIndicator is on
The discharge capacity will be weakened greatly and flight duration will reduce at a low temperature,
which is normal.
Avoid long-term running at a low temperature, otherwise, the battery life can be shortened.
Once the battery is inserted, make sure the battery buckle is bounced properly. This step is highly
important and related to flight safety.
Power Button
LED 1
LED 2
LED 3
LED 4
Buckle is in position, safe
Removal:
Firstly, press the buckle of smart battery, hold
the upper cover of battery to pull out the battery.
4.4.5 Operation Instructions of Smart Battery at High/low Temperature
When the battery temperature is <5°C, the App will prompt a low temperature warning of the battery, and the
battery needs to be preheated before flying.
When the battery temperature is >60°C, the App will prompt a high temperature warning of the battery, and the
drone will not be able to fly.
12
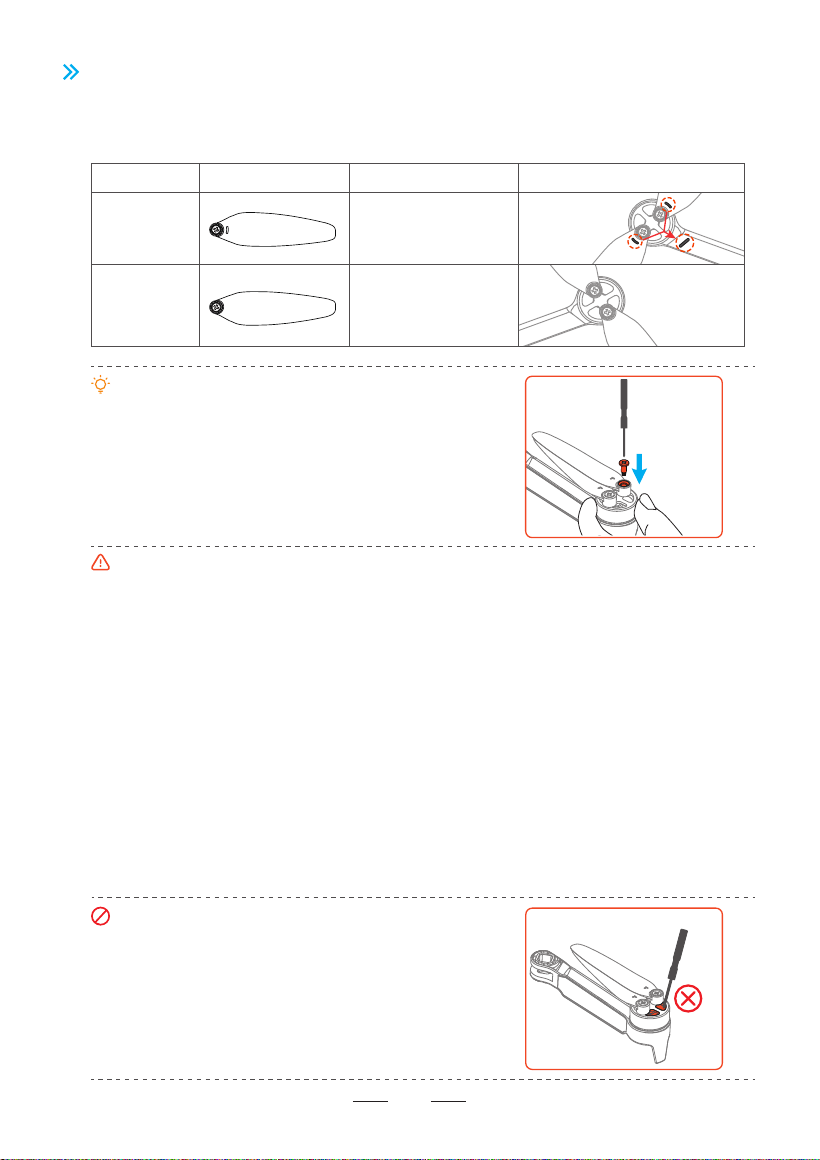
4.5 Propellers
There are two types of Atom SE propellers, which are designed to spin in different directions.
Marks are used to indicate which propellers should be attached to which motors, the two blades
attached to one motor are the same.
Propeller
Marked
propeller
Install the marked
propeller blades on
marked arm
Unmarked
propeller
Install the unmarked
propeller blades on
unmarked arm
Installation Instructions Schematic Diagram of Installation
Use the the screwdriver from the package to
mount the propellers.
Hold the motor to remove the propeller blades
easier.
Make sure you attach the marked propellers to the motors of the arm with marks and the unmarked
propellers to the motors of the arm without marks. Otherwise the drone will be unable to fly.
If a propeller is broken, remove the two propellers and screws on the corresponding motor and
discard them. Use two propellers from the same package. DO NOT mix with propellers in other
packages.
Propeller blades are sharp. Handle with care. DO NOT squeeze or bend the propellers during
transportation or storage.
Purchase the propellers separately if necessary.
Stay away from the rotating propellers and motors to avoid injuries.
Please check the propeller blades immediately if there are any jitters or speedless in flight, and
timely replace the propellers if it's damaged or deformed.
Make sure the motors are mounted securely and rotating smoothly. Land the drone immediately if a
motor is stuck and unable to rotate freely. Stop flying the drone and contact support if there is any
abnormal sound with the motor.
Make sure that the propellers are installed securely before each flight. Check to make sure the
screws on the propellers are tightened.
When mount or remove the propellers, do not
put the screwdriver or other foreign materials
inside the motors, or the motor may be
damaged.
13
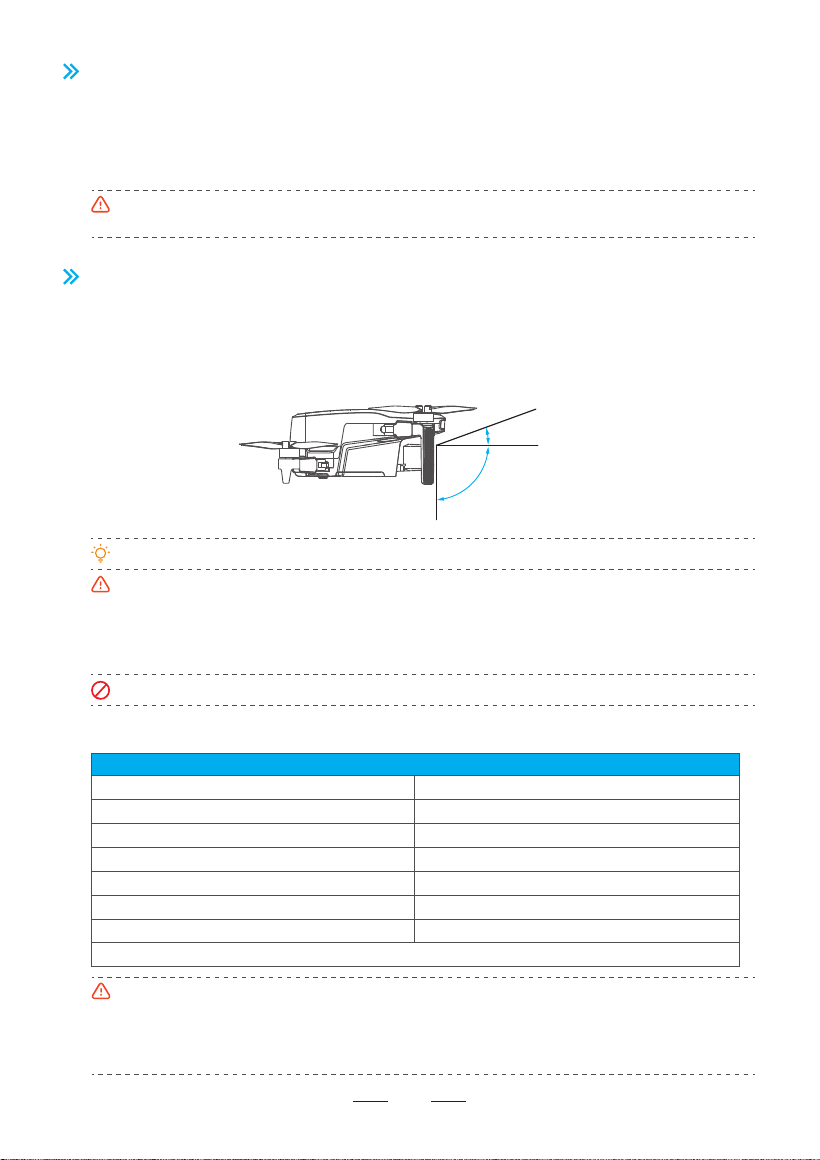
4.7 Single Axis Gimbal Camera
4.7.1 Single Axis Gimbal
The Atom SE camera is mounted with a single-axis gimbal, to adjust pitch angle freely from +20°
to -90° (horizontal direction is 0°).
The angle of the gimbal can be adjusted by scrolling the left thumbwheel of the remote controller.
The gimbal will be recovered to -9° automatically after each startup.
Avoid collision and moving the lens by force, for the gimbal contains precise parts.
Make sure the gimbal has no foreign matters and lens is free from dirt before takeoff.
The gimbal is connected to the drone through elastic and shock absorption support, to eliminate
camera vibration. Do not pull the gimbal by force. For any damage of shock absorption support,
please timely contact the after-sales department for repairing.
Do not bind or paste any object on the gimbal. Otherwise, it may damage the drone.
4.7.2 Camera
Sensor brand: SONY
Effective pixel: 12MP
FOV: 118°
ISO range: 100~6400
Memory: Micro SD card
Picture size: 12MP
Video specification: 4K@30fps; 2.7K@30fps; 1080P@60/30fps
Video format: MP4
Sensor size: 1/3"
Aperture: F2.2
Focus range: 3m ~ ∞
Shutter range: 1/30~1/25,000s
Shooting distortion: < 1% (after calibration)
Picture format: JPG/JPG+RAW(DNG)
Code: H.264
Basic Parameters
Do not touch the lens after recording for a long period of time to avoid scald.
Do not record video when the drone is not flying; otherwise the drone will trigger overheat
protection.
The sensor will crop out the edges at 1080P/60fps, it's simply capturing a central section of what the
full-frame sensor would capture, and FOV is about 66°.
0°
20°
-90°
4.6 Flight Data
Atom SE supports recording of flight data. User can view the data in App.
“Flight record” can display the basic data for each flight of user.
“Flight log” can record the detailed flight data of user. For any abnormal circumstance in flight,
user can report it in App and, if necessary, upload the flight log to seek for assistance.
All flight data are stored in user’s mobile device. No flight data will be acquired by the Company,
except for the data uploaded by user to the cloud platform.
14
5. Remote Controller
4.7.3 Image Storage
The videos and pictures recorded by Atom SE will be stored in SD card, instead of App or user’s
album. Make sure to insert SD card prior to flight. Otherwise, it is unable to record and shoot.
(SD card is not included in the product’s pack list!)
User can preview and download the videos and pictures (the drone and the remote controller
should be connected) in App.
SD Card Requirements
File format: FAT32, exFAT
Capacity: 4G-256G
Speed requirements: It is suggested to use SD card above U1 (UHS Speed Class 1) or C10
(Class 10)
The video downloaded from App is just 720P resolution used in video transmission. Please read SD
card with computer or other device in order to acquire videos of higher definition.
The recording can be terminated due to slow write-in when using the U1/C10 SD cards of certain
brands.
If important data are stored in your SD card, please backup them properly.
Do not insert or unplug the SD card when the product is powered on. It may lead to data damage or
loss, or even SD card damage when inserting or unplugging SD card during video recording.
Potensic does not bear responsibility for any loss due to user’s misoperation of SD card.
5.1 Overview
Potensic Atom SE is equipped with the DSRC02A Remote controller, which boasts Potensic
long-range PixSync 2.0™ image transmission technology, offering a maximum transmission
range of 4km/13,123ft and 720p when displaying video from the drone to PotensicPro on your
mobile device. Easily control the drone and camera using the onboard buttons. The detachable
control sticks make the remote controller easier to store. Thanks to the 2.4Ghz dual band
antenna, in a wide-open area with no electromagnetic interference, PixSync 2.0™ smoothly
transmits video feed at up to 720p at a max altitude of 120m.
The built-in battery has a capacity of 3000mAh and a maximum run time of 2.3 hours. There is a
USB C port for device connection. The remote controller charges the mobile device with a
charging ability of 500mA@5V.
15
When used with different drone hardware configurations, the remote controller will automatically
select the corresponding firmware version for updating and support the following transmission
technologies enabled by the hardware performance of the connected drone models:
a. Atom SE: PixSync 2.0™ b. Atom: PixSync 3.0™
16
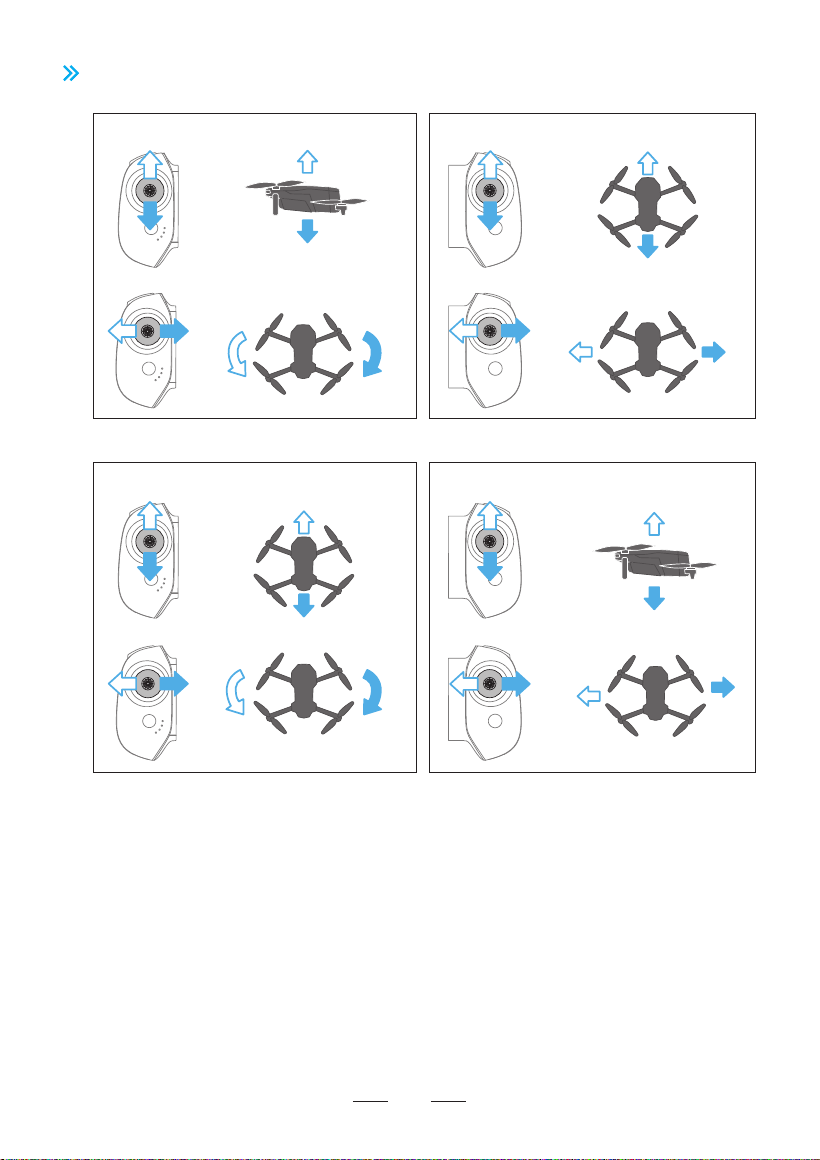
Mode 1 (Left Hand Throttle)
Left stick Right stick
Left Right
Up
Down
Turn left Turn right
Forward
Backward
Left
Right
Up
Down
Forward
Backward
Turn left Turn right
Mode 2 (Right Hand Throttle)
5.2 Control Stick Mode
Left stick Right stick
5.3 Function
5.3.1 Function List
1. Connect the USB Charger to the USB C charging port.
2. The battery is being charged when power indicator starts flashing.
3. Charging is completed when 4 LED indicators are solid on and data cable
can be removed.
Charge
Recharge
mobile phone
When a mobile device is connected, the remote controller automatically
charges devices with a charging ability of 500mA@5V.
Indicator function See 5.3.2
Flight control See 5.2
One-key return
See 7.9
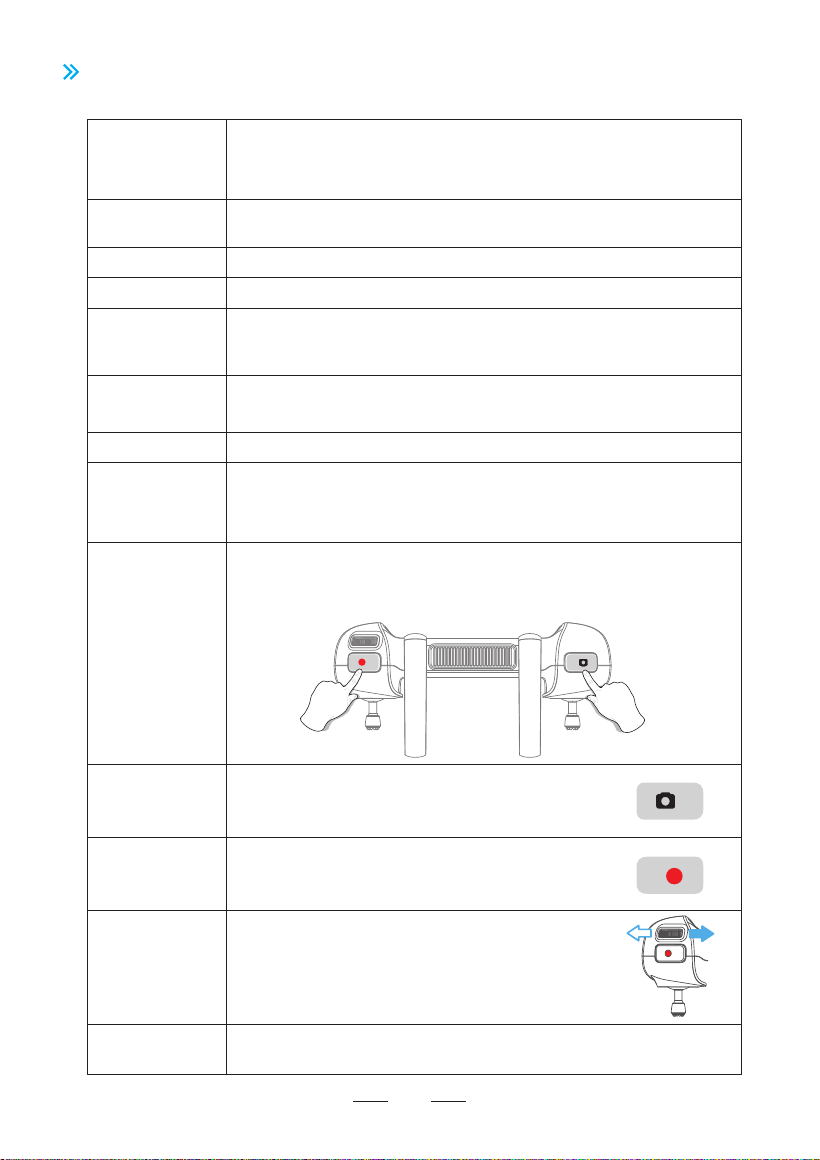
Emergency stop
For any emergency situtaions during the flight, press “Shoot” and “Record”
button for 2s at the same time till the remote controller beeps, the drone will
stop running and fall down.
Shoot
Short press it to shoot one picture
When camera is in video recording mode, short press it
to switch to shoot mode
Record video
Short press it to start/stop video recording
When camera is in shooting mode, shot press it to switch
to video recording mode
Gimbal Dial
Dial it to the right to increase the pitch angle
(head up)
Dial it to the left to decrease the pitch angle
(head down)
Remote controller
frequency pairing
See 5.3.3
Low battery prompt
When power level of the remote controller is lower than 10%, the remote
controller will have a “beep” sound every second.
Auto shutdown
The product will shut down automatically if the remote controller has no
connection and operation for 20mins.
Pause
If the drone is performing a Smart Flight like Circle Flight or auto landing,
press once to make the drone brake and hover in place. Press again to
cancel it and regain the control of the drone.
17
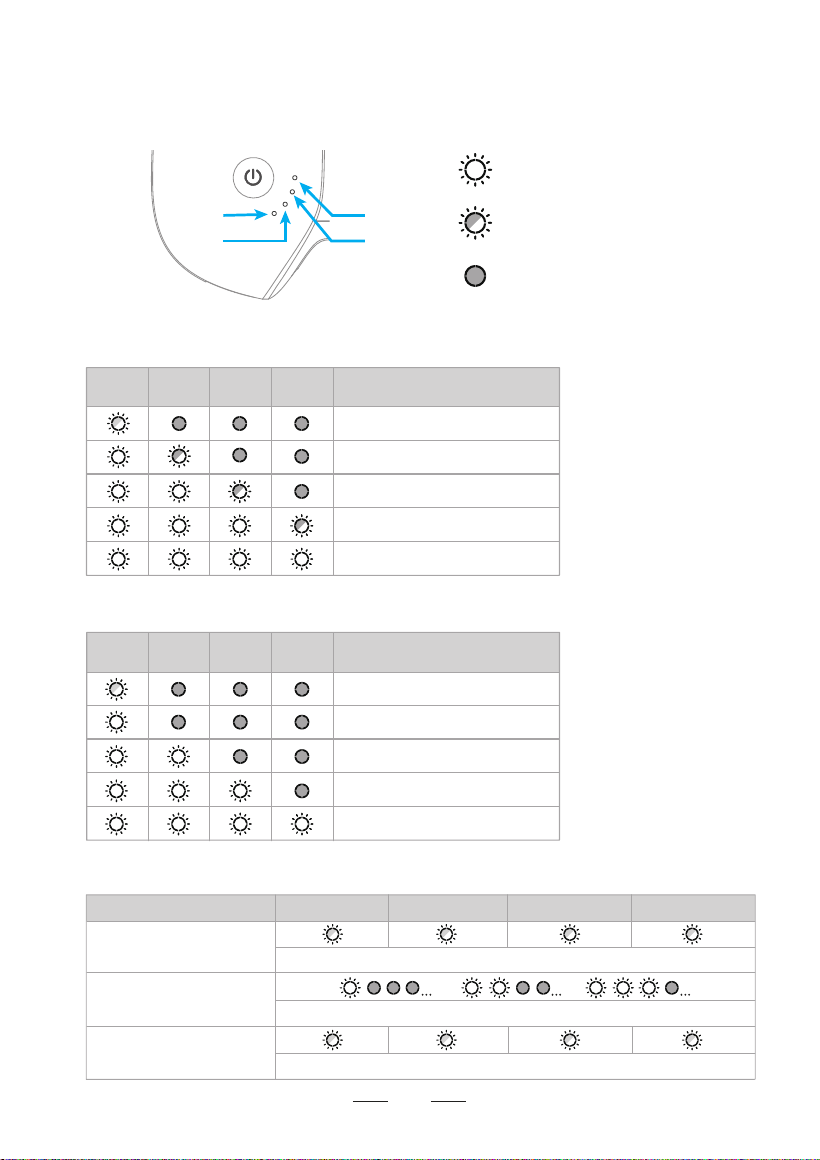
0%~25%
99%~100%
75%~99%
Current power level of battery
25%~50%
50%~75%
LED 1 LED 2 LED 3 LED 4
LED 1 LED 2 LED 3 LED 4
Indicator is flashing
Indicator is off
Indicator is on
5.3.2 Indicator
As shown in the picture below, the remote controller is fitted with 4 white LED indicators to
indicate the power level and other status.
Charging indication
0%~10%
75%~100%
50%~75%
10%~25%
25%~50%
LED 1 LED 2 LED 3 LED 4
Power indication (in use)
Status indication
Frequency pairing
Upgrade mode
Start calibration
Flashing slowly at the same time
Flashing slowly at the same time
Turning on sequentially
Current power level of battery
18
LED 1
LED 2 LED 3
LED 4
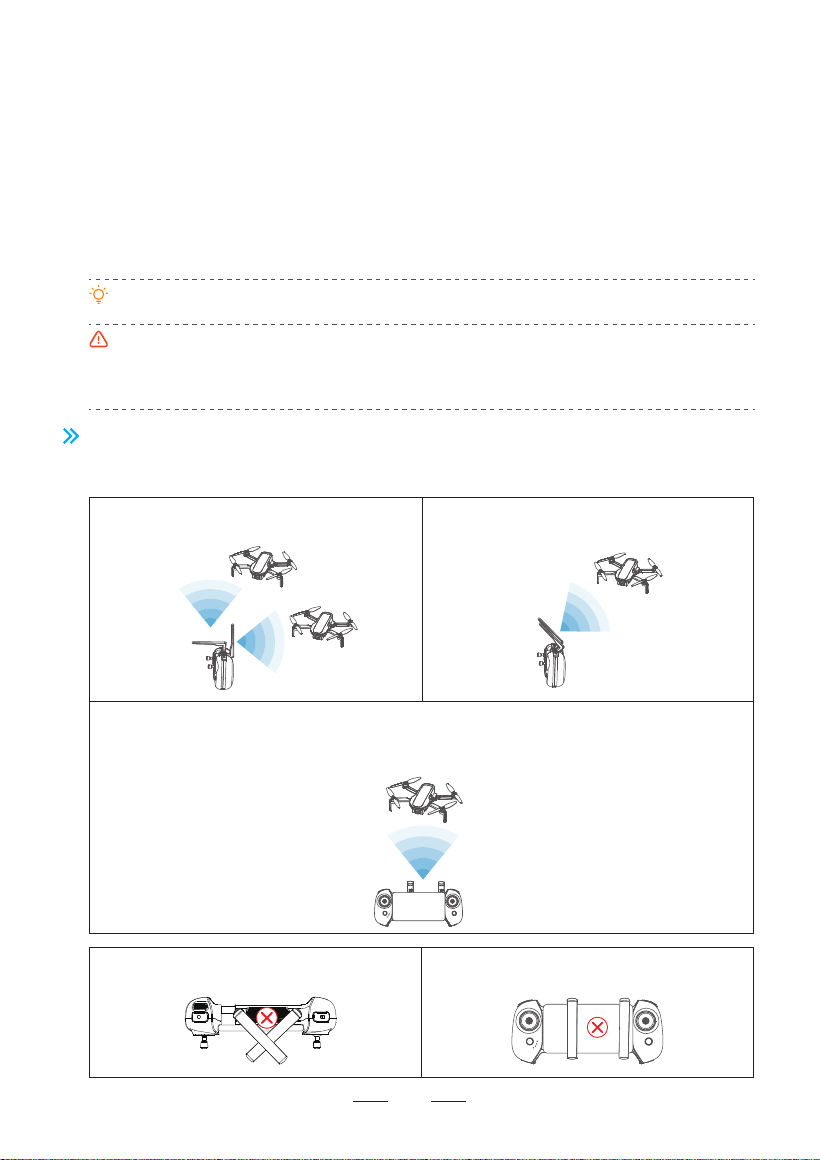
5.4 Antenna Angle
Adjust the antenna angle along with the changes of drone height and distance, to ensure the
best communication status of the remote controller.
1. Power on the remote controller and connect it with the mobile phone, launch PotensicPro App, tap Settings
and select “Re-pair the drone” to enter the frequency pairing interface.
2. After powering on the drone, long press the“Power”button until the drone indicator flashes quickly in green;
now the drone is ready for frequency pairing.
3. Wait for about 7s, the remote controller beeps once to indicate frequency pairing is successful and the flight
interface of the App will show realtime video transmission.
5.3.3 Remote Controller Function
The Atom SE drone and the remote controller can be used immediately after startup since they
have passed frequency pairing before delivery. If a new remote controller or drone is used for
the first time, user must conduct frequency pairing for them as follows prior to use:
Make sure the remote controller is within 1m of the drone during frequency pairing, and there is no
2.4G frequency interference.
If frequency pairing fails, check if there are interferences nearby, or other drones are also in
frequency pairing mode, or the remote controller is too far away or blocked. Eliminate the problems
above and try again.
Do not relocate or operate the remote controller and the drone during frequency pairing.
19
Wider communication angle is ensured at a
close distance in this mode.
Keep both antennas pointing directly towards
the drone to acquire a longer transmission
distance.
When the drone is right above the remote controller, the transmission signal is weakened
drastically due to poor antenna angle. Please lower the flight altitude or fly the drone horizontally
for some distance with the antenna pointing at the drone as much as possible as shown in the
picture.
Do not cross the antenna in any case. Do not press the antenna on your mobile
device in any case.
20
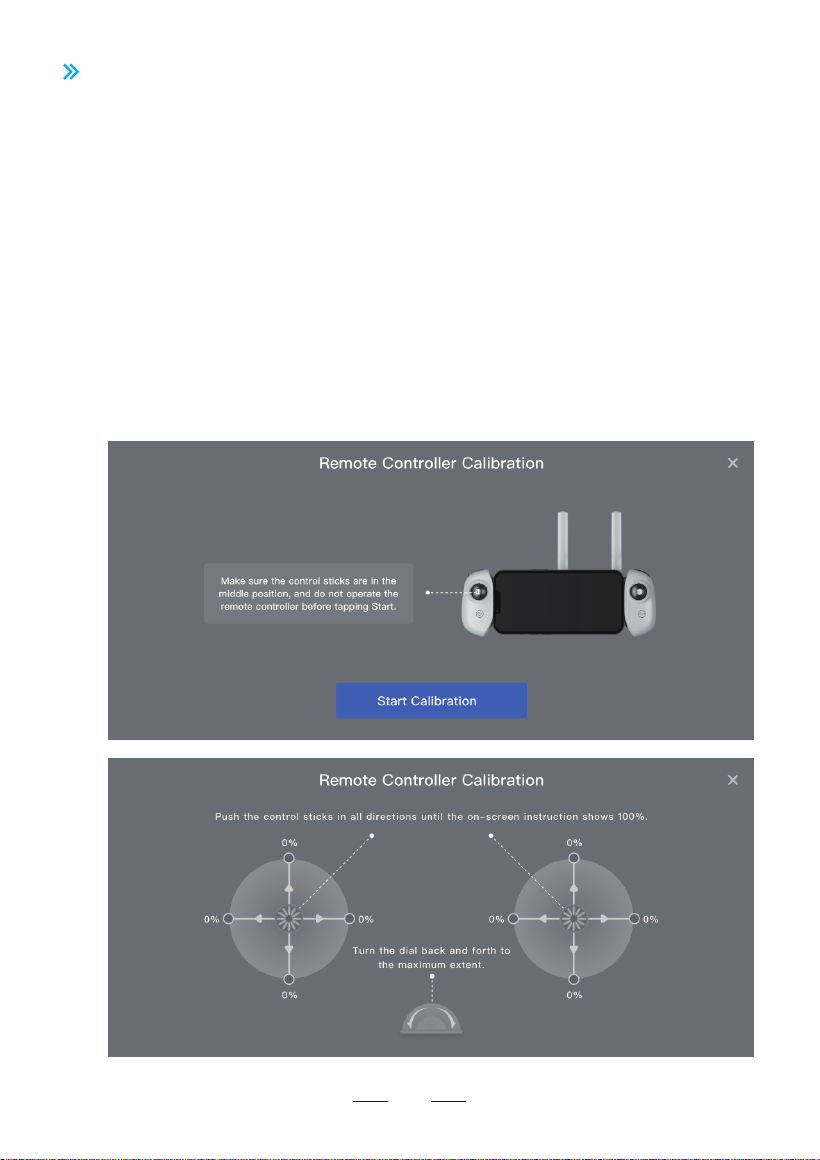
5.5 Remote Controller Calibration
5.5.1 When to perform remote controller calibration
1. When the drone drifts automatically in one direction without any toggling of the control sticks.
2. When the drone automatically and continuously rotates in one direction.
3. When the control sticks are over-sensitive or lack sensitivity.
5.5.2 Calibration Procedure
1. Turn on the remote controller, and connect the mobile device, tap Settings in App, select
“Remote Controller Calibration”
2. Make sure the control sticks are in the middle position and do not operate it before tapping to
start the calibration.
3. Tap “Start Calibration”, then follow the on-screen instructions and toggle the sticks in all
directions until 100% is displayed in App interface, and then maximum toggle the thumbwheel
back and forth.
4. When App prompts “Calibration Succeeded”, the remote controller calibration is completed.
6. PotensicPro App
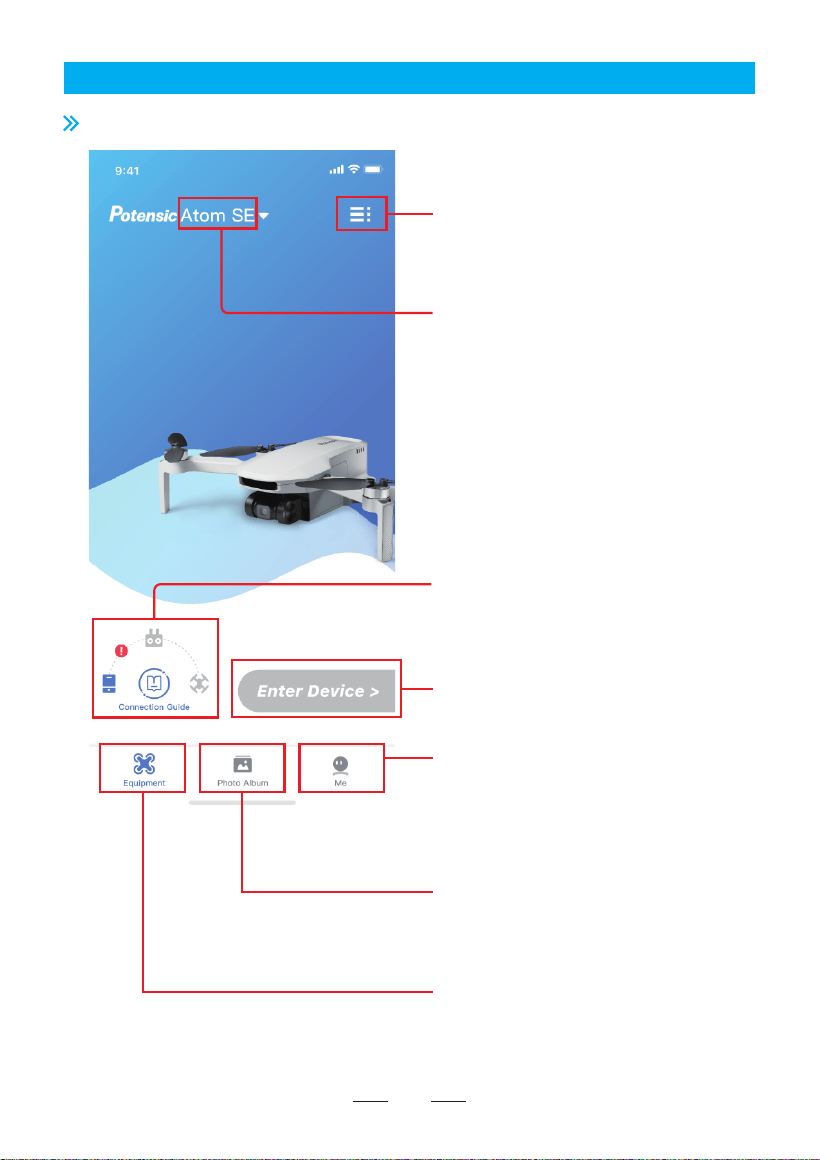
6.1 App Homepage
Tap to choose the corresponding
model. The drone model will be
matched automatically if user has
connected the remote controller to
the mobile phone
Tap to view the flight logs and
Potensic Academy
Tap to enter the flight interface
Display connection status
Homepage of App
Photo album in App (Connect the
drone to see the contents in the
drone SD card)
Me: Report a problem, modify
account info, browse User
Agreement, find the missing drone,
close account and other settings
21
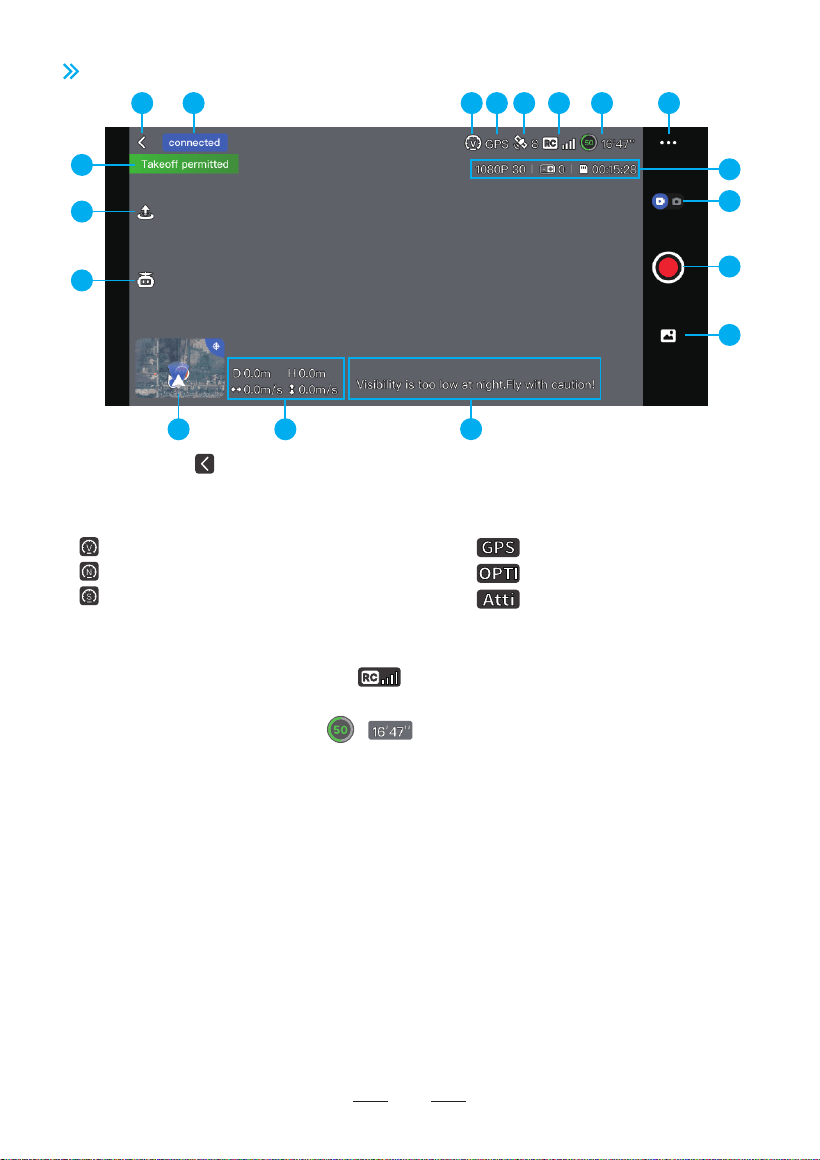
3. Flight mode:
8. Settings
Tap to view information about Safety, Calibration, Control, Camera and About.
Safety
Switch on or off Beginner Mode: If switched on, the drone will be confined to fly in a cylindrical space with a radius
of 30 m and a height of 30 m and restricted to fly only in Video Mode.
Set measurement system (Metric or Imperial) and speed (Video/Normal/Sport)
Set minimum return altitude and virtual fence.
Battery information: check the temperature, current, voltage and others of the smart battery. Calibration
This sector includes compass calibration, remote controller calibration and drone re-pairing.
Control
Remote Controller Settings: Tap to switch control stick mode (Mode 1: Left Hand Throttle; Mode 2: Right Hand
Throttle)
Camera
General Settings: Tap to set white balance, gridlines, segmental recording, etc. Tap to check Micro-SD card
capacity and format.
Other Settings: Tap to set watermarks in photos.
About
View device information, firmware information, App version, etc.
1. Return button: 2. Navigation prompt bar:
Tap to return to the homepage Display drone status and flight mode
22
6.2 Flight Interface
4. Positioning mode:
5. GPS status:
7. Power level of the smart battery:
Normal
Sport
Video
Attitude mode, no positioning
Vision positioning
GPS positioning
Display the strength of video transmission connection signal between the drone and the remote controller
6. Signal quality of video transmission:
Display GPS signal status and quantity of satellites searched
Estimated Remaining Flight Time
3
5
7
9
15 14
13
16
17
18
1 2
10
12
11
6 8
4
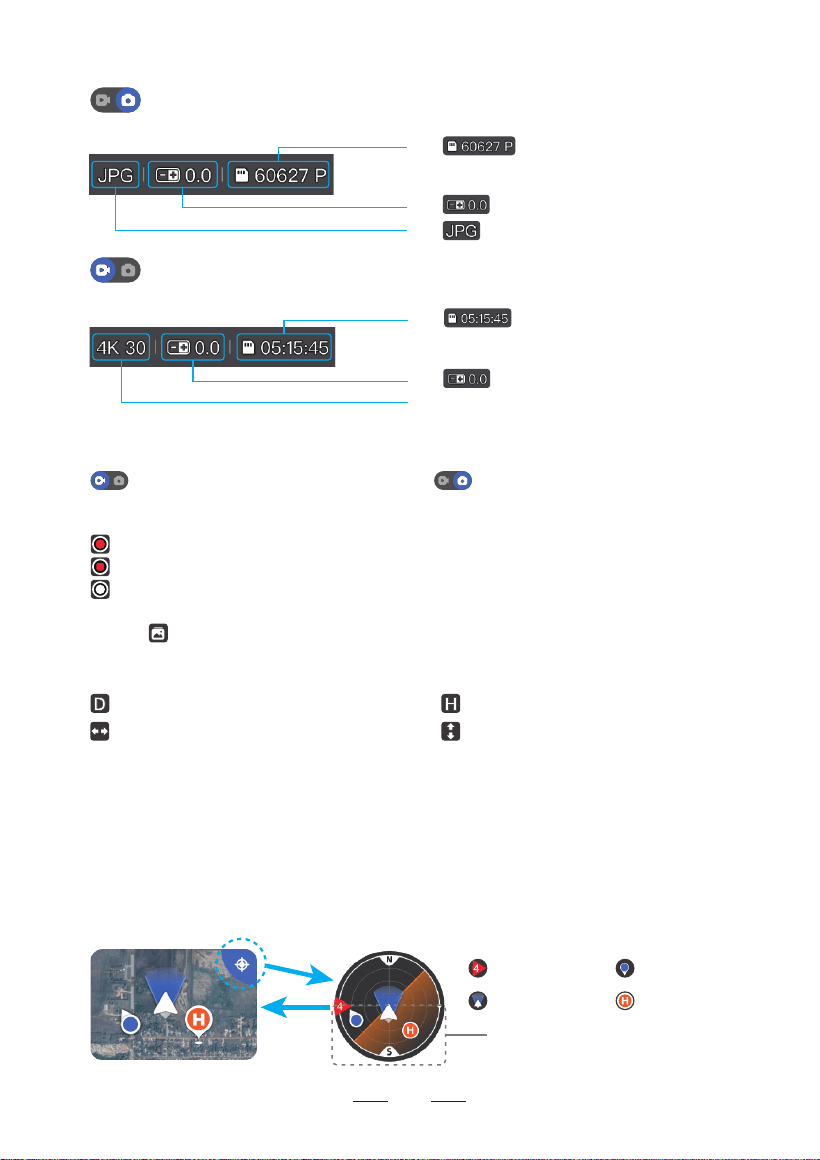
10. Shooting Information Display/Settings:
11. Shoot/Record button:
Video recording mode, tap to start video recording
12. Album:
13. Display flight speed and distance
Flight speed of the drone Ascent/descent speed of the drone
15. Attitude Indicator/Thumbnail map
Shooting mode, tap to shoot picture
Video recording in progress, tap to cancel
to switch from shooting to video recording to switch from video recording to shooting.
Horizontal distance from the drone to HOME point Relative height from the drone to HOME point
Preview or download shot videos or pictures in SD card.
Tap the upper right corner to switch to Attitude Indicator Mode
Tap thumbnail map to switch to full-screen map
Drone
Remote controller
HOME point
Drone tilt angle
Wind Speed Scale
9. Shooting Information Display/Settings
23
Photo Mode: displays photo format, EV (exposure value) and the remaining numbers of photos
or the available capacity of the current microSD card.
Tap to switch between the display of the
remaining numbers of photos or the available capacity
of the current microSD card.
Tap to set EV.
Tap JPG to set photo format to JPG or RAW+JPG.
Video Mode: displays video resolution, EV (exposure value) and the remaining video recording
time or the available capacity of the current microSD card.
Tap 4K 30 to set video resolution and frame rate.
4K: 30fps 2.7K: 30fps 1080P: 60/30fps
Tap to switch between the display of the
remaining video recording time or the available capacity
of the current microSD card.
Tap to set EV.
14. Flight Safety and Technical Tips
Users can turn on/off Flight Safety and Tips in App Settings -> Safety. After turning it on, flight-related
tips or suggestions will be displayed on the lower right side of the flight interface.
24
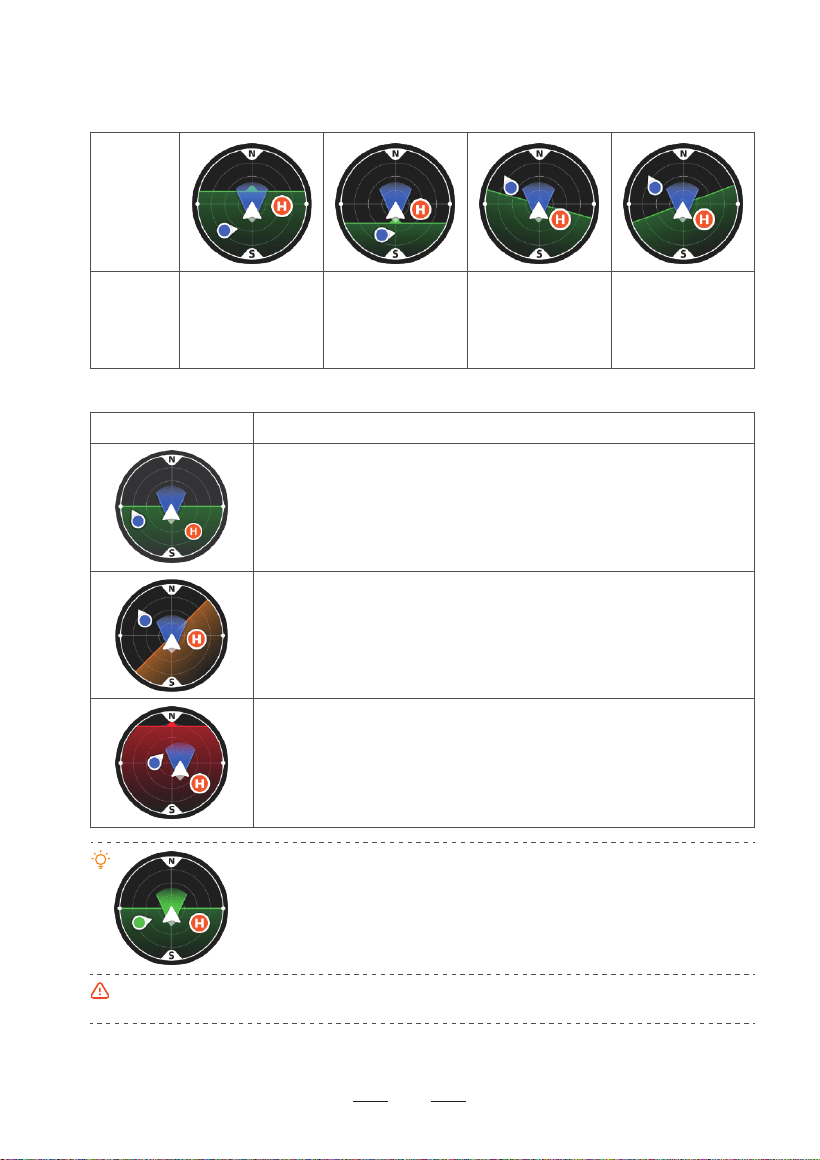
Different colors of the attitude indicator:
Legend Description
Green indicates that the drone is flying at a relatively small tilt angle,
and optimal video quality can be achieved.
Yellow indicates that the drone is flying at a relatively large tilt angle,
and the video quality may be reduced.
Red indicates that the drone is flying at a very large tilt angle. If the
attitude indicator frequently turns red during flight, the drone may be
encountering strong winds and the video quality can be compromised.
Please fly the drone back and land it as soon as possible.
When the icons of the drone and the remote controller both turn green, it
indicates that the remote controller is facing the drone which guarantees
the optimal communication signal.
After the drone is powered on and enters GPS mode, the current GPS
coordinates will be updated as the HOME point. Pay attention to the update
prompt of the HOME point.
When the drone takes off in OPTI mode and then enters GPS mode, the HOME point is no longer the
take-off point. Pay attention to the return safety.
Legend
Tilting
direction of
the drone
Tilt forward:
the horizon line tilts
towards the upper
half of the attitude
indicator
Tilt backward:
the horizon line tilts
towards the lower
half of the attitude
indicator
Tilt to the right:
the horizon line tilts
towards the right
side
Tilt to the left:
the horizon line tilts
towards the left
side
The attitude indicator displays information of drone direction, tilt angle, remote controller direction,
HOME point and more.
The attitude indicator can show the angle and direction of the drone in real time as follows:
17. One-key takeoff, landing/return
The App will display different buttons based on drone status. Tap to initiate one-key takeoff, landing or
return.
Tap to unlock, take off and hover at a height of 1.2m
Make sure to fully charge the mobile device prior to flight, because the power of the mobile device
will be consumed even if it is charged by the remote controller.
Mobile cellular data is required when using the PotensicPro App. Please contact your wireless carrier
for data charges.
While using the App, make sure to read and master the pop-up prompts and warning information of
App to know the current status of the drone.
It is recommended to replace any outdated mobile device which may have a negative impact on user
experience of App and lead to potential dangers. For any poor user experience and safety problems
due to the use of an outdated mobile device, Potensic does not bear any liability.
18. Display important information or status of drone
Tap to land or auto return.
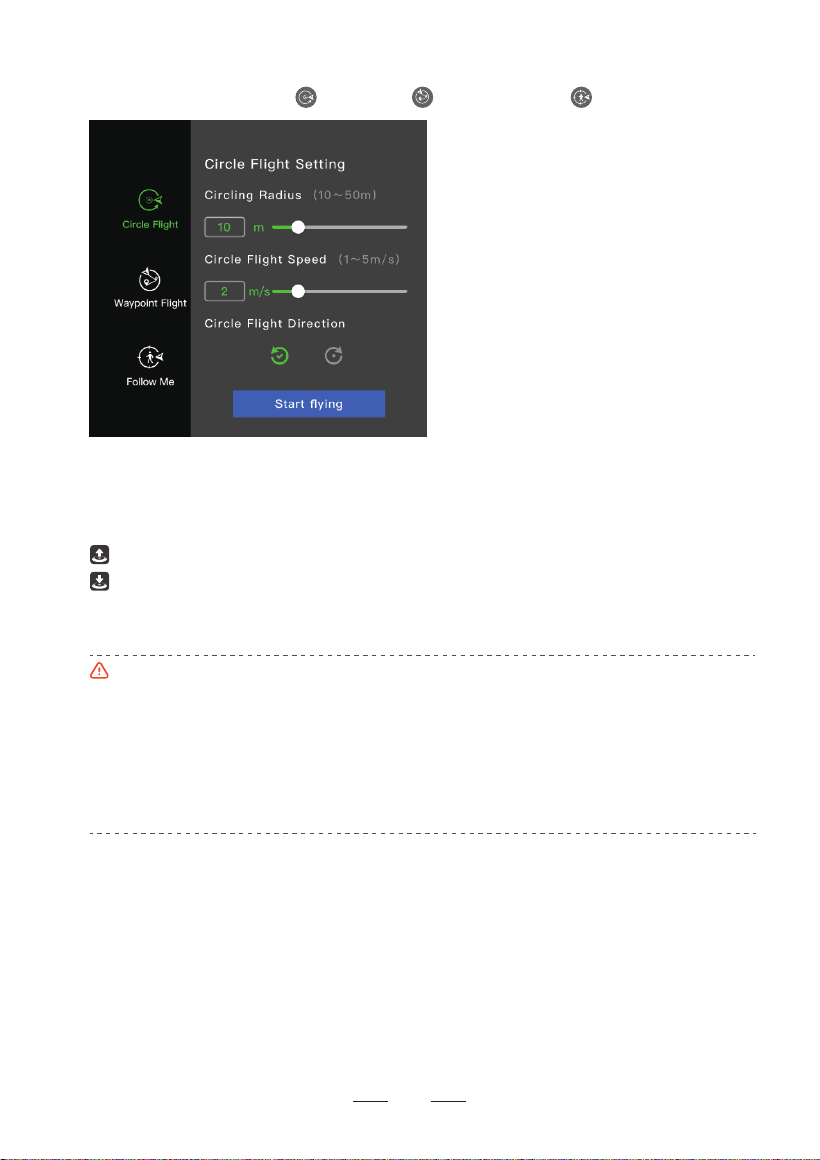
Intelligent Flight Modes include Circle Flight, Waypoint Flight and Follow-Me Flight.
25
16. Intelligent Flight Modes
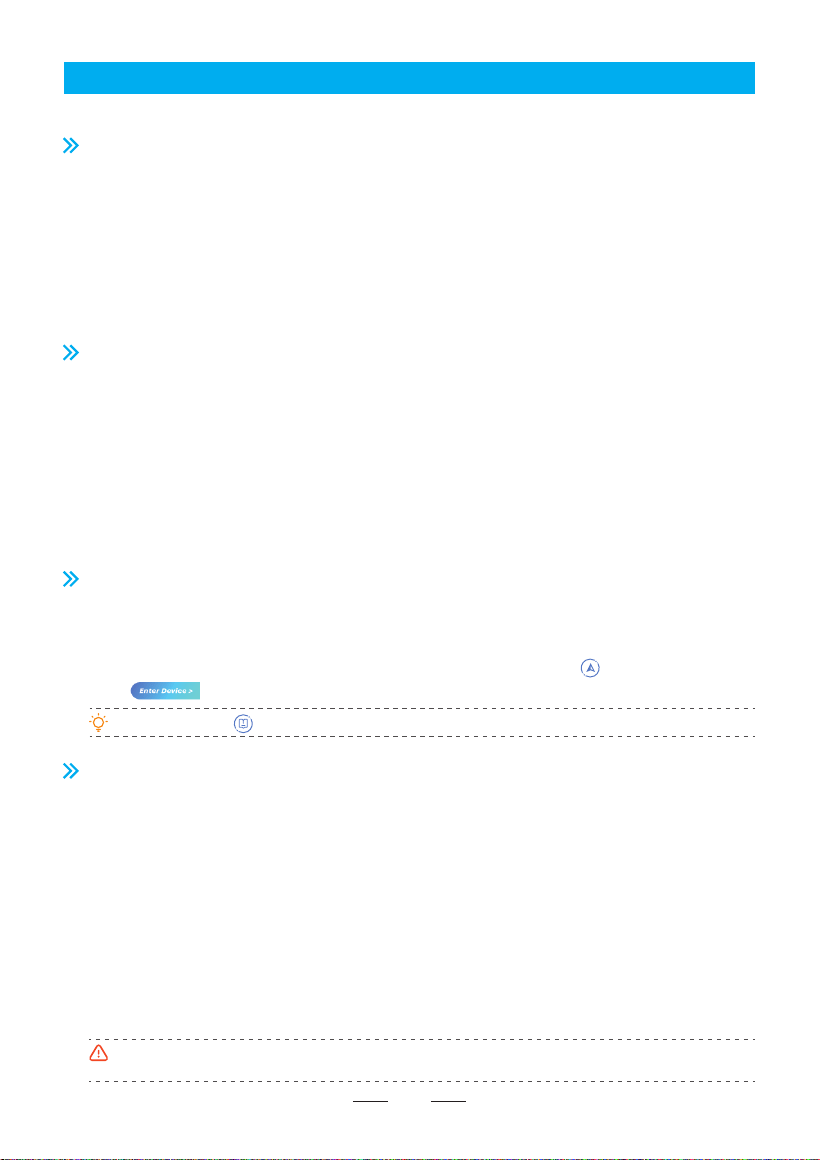
Please follow the steps below:
1. Please finish the steps in “3.5 Preparing the Remote Controller” and turn on the remote control.
2. Please finish the steps in “3.4 Preparing the drone” and turn on the remote control.
3. Launch App to view the connection status. Connection is finished when it shows .
4. Tap to enter the flight interface.
This chapter introduces safe flight practices and requirements.
7.1 Requirements of Flight Environment
1. Do not use the product in severe weather, such as gale, rain, snow and fog.
2. Only fly in open areas. Tall structures and large metal structures may affect the accuracy of the onboard
compass and GPS system and result in positioning failure. It is recommended to keep the drone at least 5m
away from structures.
3. Control the product within your sight and keep away from the obstacles and crowds.
4. Do not use the product in places with high-voltage power lines, telecommunication base station or launching
tower, to avoid interference of the remote controller.
5. Please use the product with caution when altitude is over 3,000m for the flight performance can be affected
when the performance of drone battery and power system is weakened due to environment factor.
7.2 Precautions of Flight
1. Check if the remote controller, intelligent flight battery and mobile device are fully recharged.
2. Check if the drone is intact and propellers are installed correctly.
3. Check if the camera is working normally after power-on.
4. Check if App is running normally.
5. Check if SD card is inserted and make sure camera is clean.
6. Make sure the drone takes off on flat and hard surface, instead of sandstone or bush; the drone may fail to be
unlocked if it has major vibration.
7. Please be careful when the done takes off on surface of moving objects, such as running vehicle and ship.
8. GPS positioning and waypoint flight will be disabled in the south and north polar.
9. Do not use the product in extreme cold or hot place to avoid hazards.
7.3 Connection
7.4 Flight Mode
Atom SE has three flight modes-Video/Normal/Sport, which can be switched via the App.
Video Mode
Ascent speed: 2m/s, descent speed: 1.5m/s, flight speed: 6m/s
The system will enter beginner mode by default when using the drone for the first time, and the flight mode will
be limited at beginner mode.
Normal Mode
Ascent speed: 4m/s, descent speed: 3m/s, flight speed: 10m/s
The beginner mode can be quit after the flight operation is mastered, and the normal mode will be entered by
default. This is the common mode.
Sport Mode
Ascent speed: 5m/s, descent speed: 4m/s, flight speed: 16m/s
Video mode is recommended in aerial photography. Sport mode is recommended if you would like to get a
speedy flight experience. Please pay more attention in Sport Mode flights as the the responsiveness of the drone
significantly increases in Sport mode.
The maximum speed and braking distance of the drone significantly increase in Sport Mode. A
minimum braking distance of 30 m (100 ft) is required in windless conditions to ensure safety.
It is advised to tap and follow the animated guide to operate for first-time users.
26
7. Flight
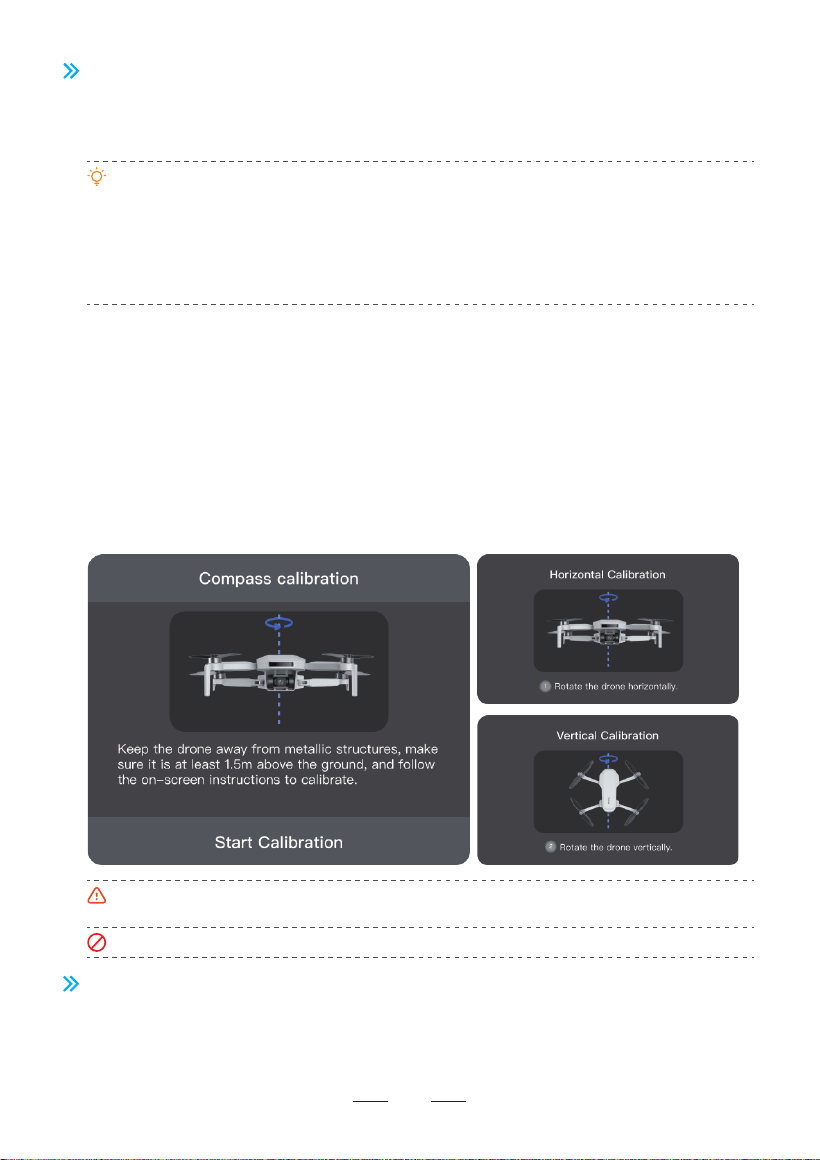
7.5 Compass Calibration
7.5.1 Scenarios Requiring Compass Calibration
1. Compass calibration is required for first time using.
2. Flying at a location further than 31 miles (50 km) away from the location the drone was last flown.
DO NOT calibrate the compass in locations where magnetic interference may occur such as close to
magnetite deposits or large metallic structures such as metal mines, steel reinforced basements,
bridges, cars, or scaffolding.
DO NOT carry objects that contain ferromagnetic materials such as mobile phones near the drone
during calibration.
Make sure the drone is at least 1m above the ground during the calibration.
It is not necessary to calibrate the compass when flying indoors.
7.5.2 Calibration Procedure
When you get the prompt “Calibration failed” in the App repeatedly, change the location and try the
calibration procedure again.
Do not calibrate compass while arms are folded.
7.6 Beginner Mode
The drone is automatically set to Beginner Mode for first-time use. In beginner mode:
1. The flight distance and height will be restricted at 0~30m
2. The speed level will be restricted at Video mode
3. The beginners are suggested to learn and master the drone in beginner mode
27
Choose an open area to carry out the following procedure.
1. When calibration is required, the App will pop up the calibration interface automatically, just
tap “Start calibration”, and the tail indicator will alternatively flash in red and green.
2. Hold the drone horizontally and rotate it 360° till the app shows vertical calibration, and the tail
indicator will alternatively flash blue and green.
3. Hold the drone vertically and rotate it 360° around a vertical axis till the App prompts the
calibration completed.
You can also trigger compass calibration manually in the App: Settings-Calibration-Compass
Calibration.
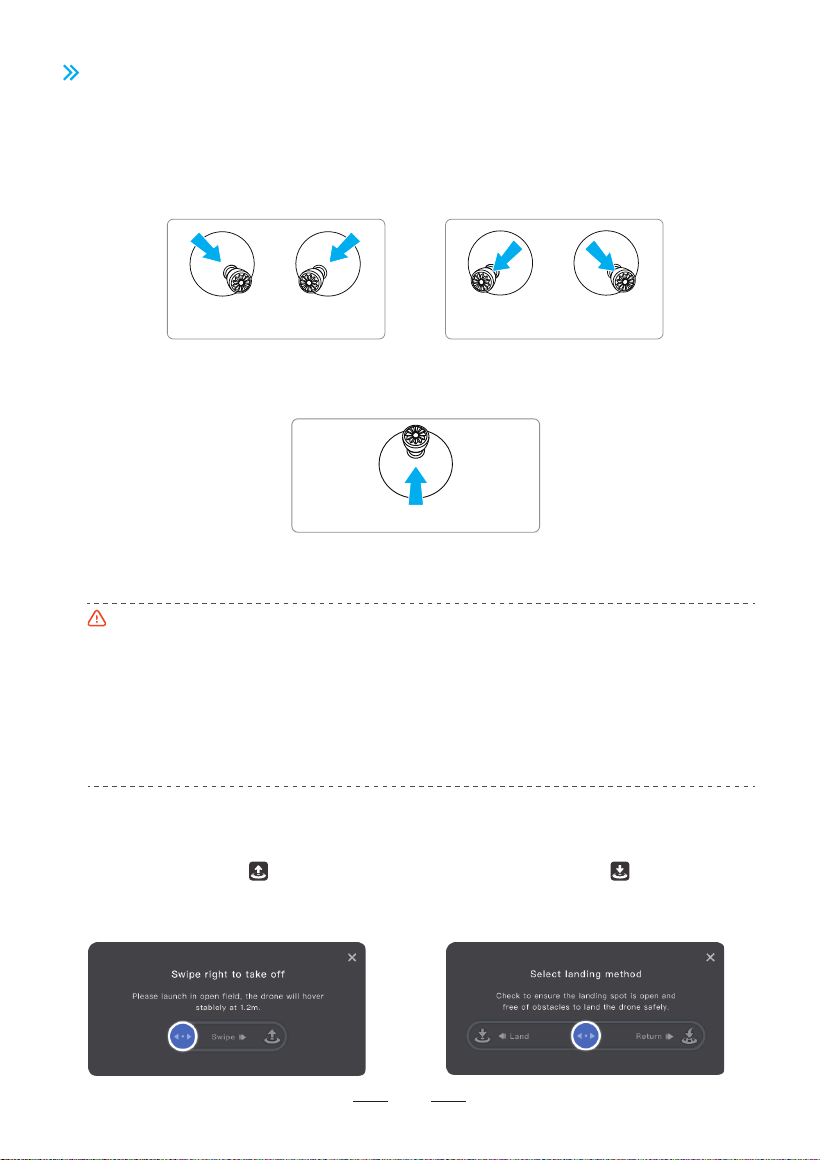
One-key landing
Tap one-key landing button in App, then
swipe left in the pop-up window to land the
drone, or swipe right to start returning.
7.7 Takeoff/Landing/Hovering
7.7.1 Manual Takeoff/Landing
Step 1: Start the motors
Use a combination stick command to start the motors. Push both sticks to the bottom inner or outer corner
depending on your control stick mode to start the motors. Release both sticks simultaneously once the motors
are spinning.
Take off from stable and level surface, do not take off from or land on the palm or by hand.
It is not suggested to take off at low battery, for it may affect the battery service life. Please handle it
with caution and undertake the corresponding consequences if forced takeoff is required.
When the drone is not in a level and stationary condition, stay at least 5 m away from the drone, and
push both sticks to the bottom inner corner for 2 seconds to forcibly unlock the motors.
Keep the distance over 0.5m between the drone and ground, for it may fail to enter good hovering
status due to air flow when it is close to the ground.
If the drone fails to be locked after landing due to anomaly, pull down the throttle control stick to the
limit position for 3s and the drone will be locked by force.
Landing
Pull the throttle control stick until the drone lands on ground. Release the throttle control stick when the motors
are no longer spinning.
7.7.2 One-key Takeoff / Landing
One-key takeoff
Tap one-key takeoff button in App, then swipe
right in the pop-up window to start the drone
automatically then ascend to the height of 1.2m
and maintain hovering.
Throttle control stick
Left
control stick
Right
control stick
Left
control stick
Right
control stick
or
Takeoff
Step 2: Push throttle control stick to take off
Push the throttle control stick upwards gently as shown in the picture, release the control stick when the drone
leaves ground and it will keep hovering.
28
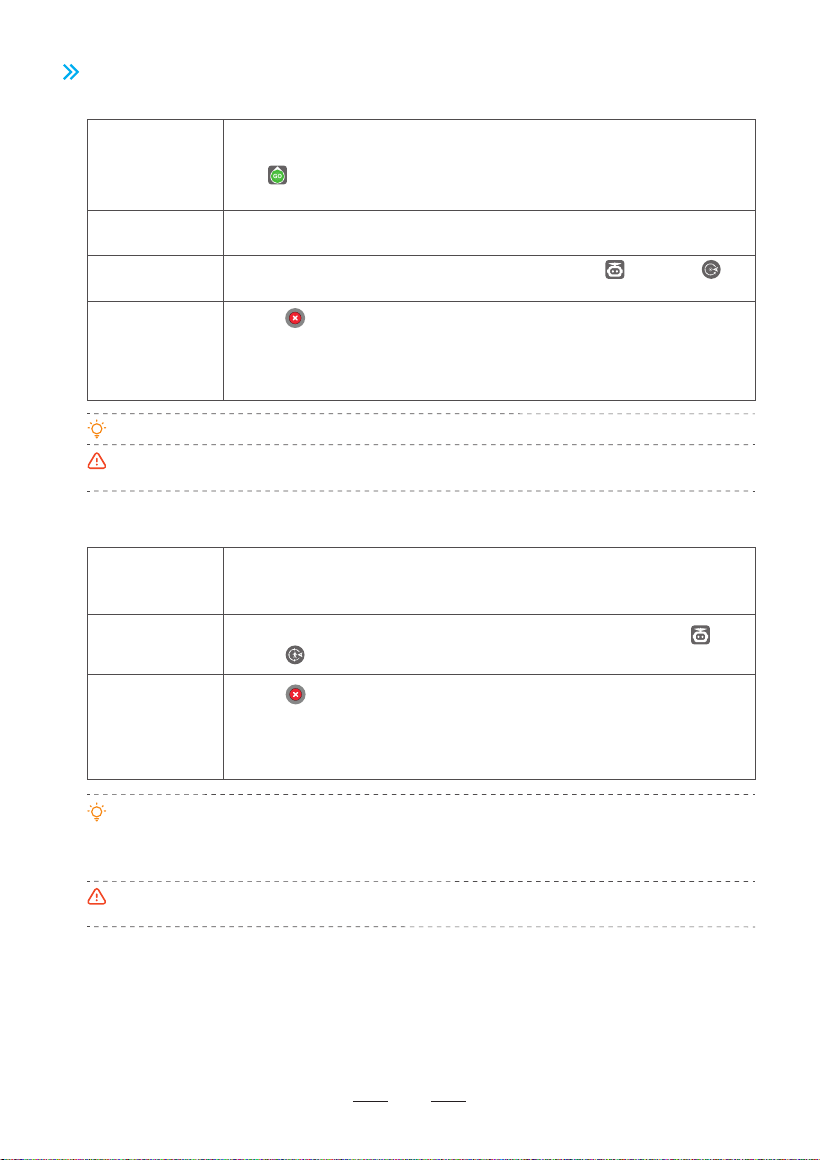
1. Tap on the left to exit Circle Flight.
2. Move a control stick to stop Circle Flight. The drone will hover in place.
3. Short press the RTH/Pause button on the remote controller to stop Circle
Flight. The drone will hover in place.
1. Tap on the left to exit Follow Me Flight.
2. Move a control stick to stop Follow Me Flight. The drone will hover in place.
3. Short press the RTH/Pause button on the remote controller to stop Follow
Me Flight. The drone will hover in place.
When GPS signal is normal and flight height is ≥5m, tap and select
in App.
7.8 Smart Flight
Description
Description
How to start
How to exit
How to start
How to exit
7.8.1 Circle Flight
Adjustable
parameter
Start circle flight, the drone will fly forwards by taking the current position
as circle center until it reaches the starting point of circle flight; When user
tap in App, the drone will fly around the circle at a set speed and
direction.
User can set the radius,speed and direction of the Circle Flight in Circle
Flight Setting.
When circle flight is enabled, the drone will ascend to 5m automatically if its height is less than 5m.
Make sure there’s no obstacle in the radius of circle flight and use the product with caution, for the
drone does not support obstacle avoidance function.
When follow me flight is enabled, the drone will ascend to 5m automatically if its height is less than
5m.
The follow accuracy depends on the quality of the drone GPS signal and positioning accuracy of
user’s mobile device.
The follow me flight depends on the positioning of user’s mobile device. The positioning authority
of App is required, or this function is disabled.
7.8.2 Follow Me Flight
Once follow me flight is enabled, the drone will follow User’s mobile device at
the current distance; The flight height and yaw can be adjusted during follow
me flight.
When GPS signal is strong and horizontal flight distance is 5-50m, tap and
select in App.
GO
29
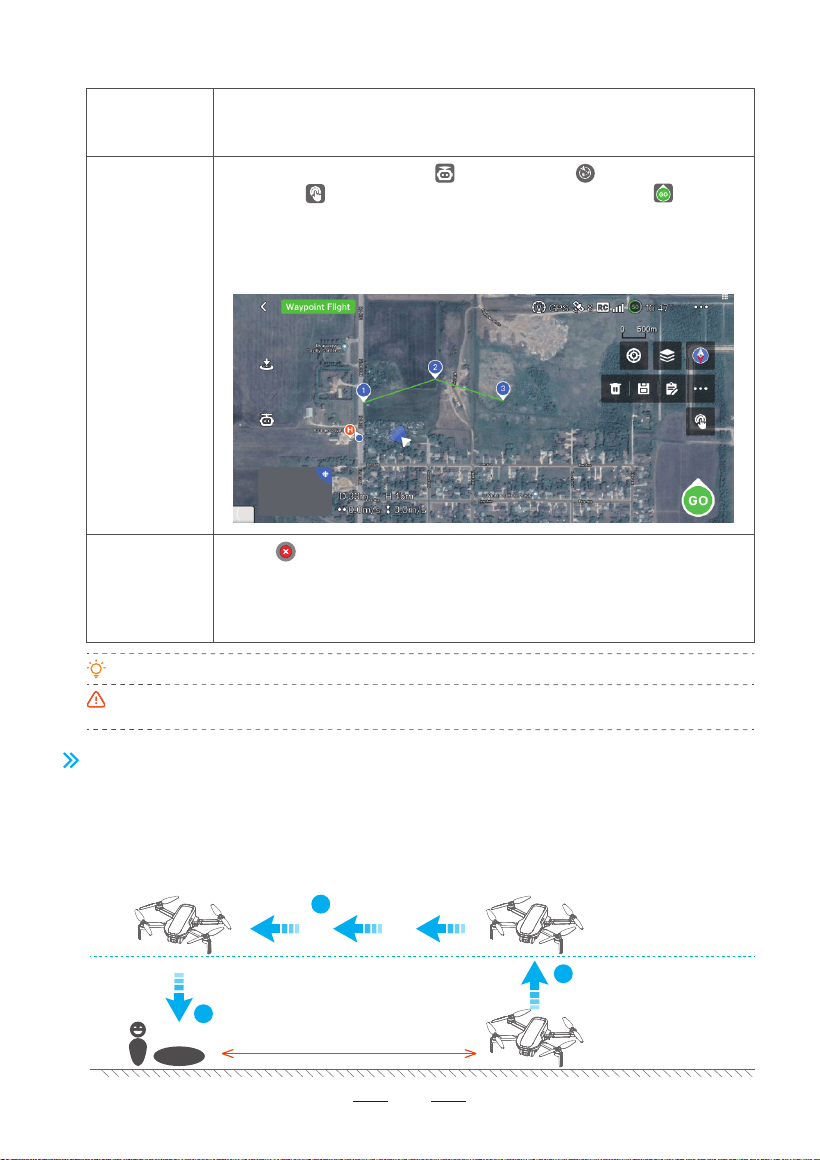
7.9 Return(RTH)
The return consists of three steps, as follows:
During the waypoint flight, you can adjust the flight altitude by moving the throttle stick.
During the waypoint flight, once reaches the virtual fence, the drone will exit the waypoint flight and
hover in place.
1. Ascent: The drone ascends to the set return altitude (this step is skipped if the drone's altitude is already higher
than the return altitude).
2. Level flight: The drone maintains a straight flight at the set altitude towards the home point.
3. Landing: Once it reaches the home point, the drone will automatically land and stop its propellers.
Return to Home (RTH) The drone must be in GPS mode
>20m
Return ascent
If Drone altitude ≥ return
altitude, start from step 2
Return altitude = Your settings
Return flight
Landing
H
1
2
3
1. Tap on the left to exit Waypoint Flight.
2. Move a control stick(Except the throttle stick) to stop Waypoint Flight. The
drone will hover in place.
3. Short press the RTH/Pause button on the remote controller to stop Waypoint
Flight. The drone will hover in place.
Description
How to exit
How to start
7.8.3 Waypoint Flight
When waypoint flight function is enabled, User can freely set 1 or multiple
waypoint coordinates in App map, and the drone will fly over the corresponding
coordinates according to the sequence of set waypoint coordinates.
30
When GPS signal is strong, tap in App and select to enter Waypoint
Flight. Tap in the map to pin multiple waypoints, after that tap to start
Waypoint Flight.
User can set 2-30 waypoints; The figure in waypoint icon indicates the flight
sequence. Meanwhile, User can delete certain waypoints, save current Waypoint
Flight route data, or choose from the saved waypoint flights route data.
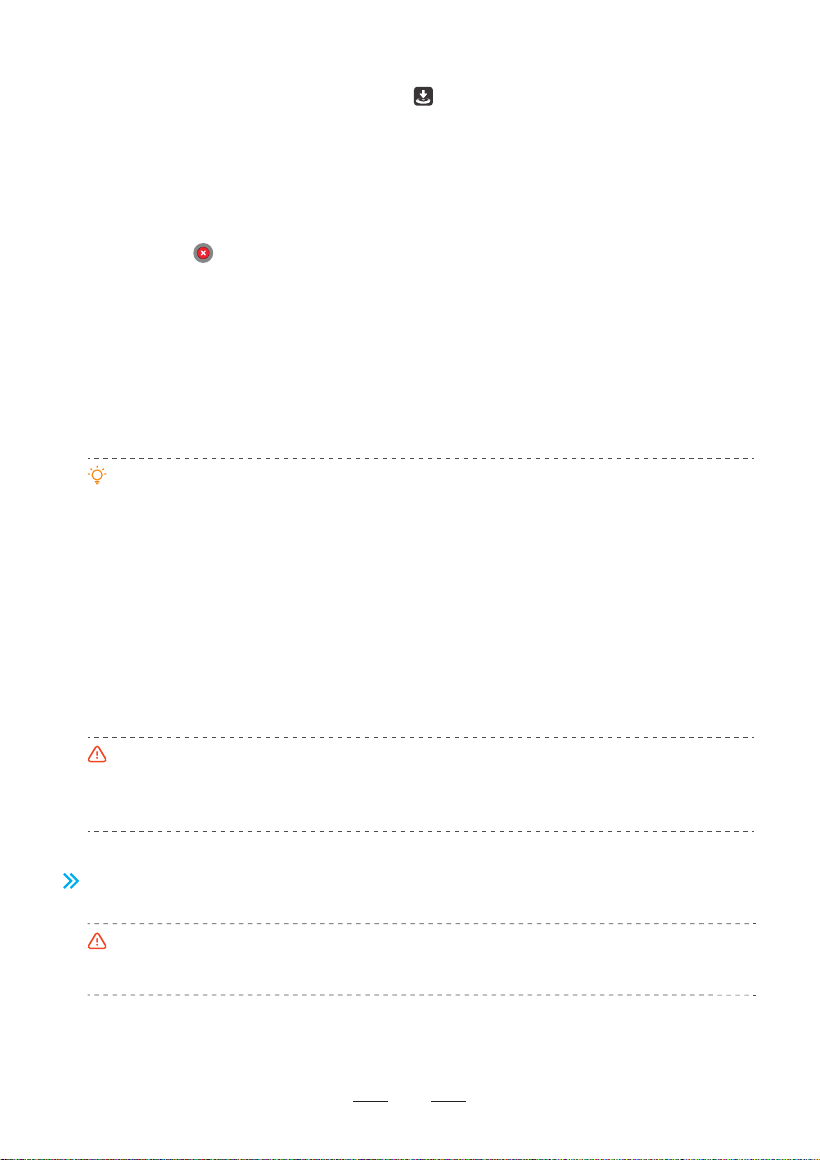
Method 1: Tap on the left of App to exit RTH.
Method 2: Briefly press the return button on the remote controller to exit RTH.
One key RTH: Press and hold the RTH button on the remote controller for 1s or tap in App
to pop up the menu, then swipe right to start the return (see 7.7.2).
Auto RTH: When either the drone battery level is low, the signal between the drone and the
remote controller is lost or the drone is experiencing other abnormalities, Auto RTH will be
triggered.
To ensure the safety of return flight, please set the appropriate return altitude in the app according
to the flight environment.
During the return course, users can still adjust the flight altitude by adjusting the throttle.
The drone will return when it is within 20m of the HOME point, and the return height will be 5m.
Please pay attention to safety.
Tall buildings or obstacles can block the transmission signal and cause signal loss. Do not fly
behind buildings beyond the return height, otherwise the drone will collide with obstacles and crash
during the return. If the drone enters ATTI mode due to GPS failure or GPS signal interference, it will
not be able to return. During the return process, strong headwinds may be encountered. Lowering
the flight altitude appropriately can help reduce power consumption. If the power is insufficient, the
drone will perform a forced landing in place. Please pay attention to the prompts in PotensicPro
App. Do not initiate the return when there are obstacles overhead, such as tall trees, otherwise the
drone may crash during the climb.
Please pay attention to return safety, because the drone does not support obstacle avoidance and
may crash when colliding with obstacles during the return course.
For any GPS signal anomaly in communication loss return, the drone will maintain hovering at ATTI
mode, until GPS signal is strong enough and the return will resume.
7.10 Emergency Stop
See 5.3.1 Emergency stop for the detailed operation method.
Emerency stop function is designed for preventing injuring pedestrians or damaging the valuables
by propeller blades in case of drone failure. Please use it with caution, because stopping the motors
mid-flight will cause the drone to crash.
31
How to RTH
How to exit the RTH
RTH Requirements
The drone must take off in GPS mode and successfully record the HOME point.
If the drone takes off in OPTI mode and switches to GPS mode mid-flight, it will not be able to
return to the takeoff point.
Please pay attention to the location of the HOME point on the map and the prompts in
PotensicPro App.

8. Appendix
8.1 Specification & Parameters
32
Model: DSDR04B
Model: DSRC02A
Capacity: 2500mAh
Voltage: 7.2V
Battery Type: Li-ion 2S
Takeoff Weight: < 249g (the takeoff weight includes
battery and propeller blades)
Folded Size: 88x143x58mm
Unfolded Size (propeller blades included):
300x242x58mm
Unfolded Size (propeller blades excluded):
210x152x58mm
Diagonal Distance: 219mm
Max Speed (Sport Mode): Ascent speed: 5m/s;
Descent speed: 4m/s; Flight speed: 16m/s
Max Wind Speed Resistance: 38km/h (Level 5)
Operating Temperature: 0°C~40°C
GNSS: GPS+GLONASS+Galileo+BeiDou
Operating Frequency: 2.400~2.4835GHz
Transmission Power: 2.4GHz: < 24dBm
Hovering Accuracy Range: Vertical: ±0.1m (with Vision
Positioning), ±0.5m (with GPS Positioning)
Horizontal Flight: ±0.3m (with Vision Positioning), ±1.5m
(with GPS Positioning)
Extra Payload: Not supported
Max hovering time: 28 mins (indoor hovering)
Downward Vision System
Lens Tilt Range: +20°~-90°
CMOS: 1/3"
Effective Pixel: 12MP
ISO Range: 100~6400
Electronic Shutter Speed: 1/30s~1/25000s
FOV: 118°
Aperture: F2.2
Photo Resolution: 4608*2592
Image Format: JPG/JPG+RAW(DNG)
Video Resolution: 4K@30fps; 2.7K@30fps; 1080P@60fps;
1080P@30fps;
Video Format: MP4 (H.264)
Max Video Bitrate: 40Mbps
Supported File System: FAT 32, exFAT
Type Of Supported Storage Card: Micro SD card; 4~256GB
SD card transmission speed ≥class10 or U1 standard
Operation Frequency: 2.402~2.483GHz
Max Transmission Distance (unobstructed, free
of interference): 4km
Operating Temperature: 0°C~40°C
Battery: 3000mAh, lithium battery, 1S
Transmitter Power (EIRP): 2.4GHz: ≤20dBm
Charging Interface: TYPE-C
Charging Specification: 5V/1A
Video Transmission System: PixSync 2.0™
Image Transmission Quality: 720P
Latency (depending on environment and mobile device):
200ms
Supported Mobile Device Size: Length: 170mm, Width:
100mm, Thickness: 6.5mm~8.5mm
Energy: 18Wh
Battery Weight: 103g
Working Temperature: 0°C~40°C
1. Pure-color surface
2. Surface with strong reflection, such as smooth metal surface
3. Transparent object surface, such as water surface and glass
4. Moving texture, such as running pets
5. Scenarios with drastic change of light; for example, the drone flies to outdoor space with strong light from indoor space
6. The places with weak or strong light
7. The surface with repeating identical patterns or textures, such as floor tile with the same texture and size
8. The surface with highly consistent strip pattern
Drone
Camera
Hovering range: 0.3~5m(ideal environment); Available at 0.3~10m.
Remote Controller
Smart Flight Battery
Unavailable scenarios of vision positioning:
Model: DSBT02A
Changes or modifications not expressly approved by the party responsible for compliance could void the
user’s authority to operate the equipment.
This device complies with Part 15 of the FCC Rules. Operation is subject to the following two conditions:
(1) This device may not cause harmful interference, and
(2) This device must accept any interference received, including interference that may cause undesired
operation.
Note: This equipment has been tested and found to comply with the limits for a Class B digital device,
pursuant to Part 15 of the FCC Rules. These limits are designed to provide reasonable protection against
harmful interference in a residential installation. This equipment generates, uses, and can radiate radio
frequency energy, and if not installed and used in accordance with the instructions, may cause harmful
interference to radio communications. However, there is no guarantee that interference will not occur in a
particular installation. If this equipment does cause harmful interference to radio or television reception,
which can be determined by turning the equipment off and on, the user is encouraged to try to correct the
interference by one or more of the following measures:
– Reorient or relocate the receiving antenna.
– Increase the separation between the equipment and receiver.
– Connect the equipment into an outlet on a circuit different from that to which the receiver is connected.
– Consult the dealer or an experienced radio/TV technician for help.
This equipment complies with FCC radiation exposure limits set forth for an uncontrolled environment. This
equipment should be installed and operated with a minimum distance of 20cm between the radiator & your
body. This transmitter must not be co-located or operating in conjunction with any other antenna or
transmitter.
DANGER
Only suitable
for ages 16+
WARNING:
COUNTRY OF ORIGIN: CHINA
NOT SUITABLE FOR
CHILDREN UNDER 3 YEARS
DUE TO SMALL PARTS
Address: 5th Floor, Building 7, Hongfa High-tech Park, Keji 4th
Road, Shiyan Street, Baoan District, Shenzhen
Warning: The product should only be used by adults and children over 16 years. Adult supervision is required for
children under 16 years.
Hinweis: Dieses Produkt ist für die Erwachsene und die Kinder ab 16 Jahren. Die Kinder unter 16 Jahren müssen
von Erwachsenen beaufsichtigt werden.
Avertissement: Ce produit est destiné aux adultes et aux enfants de plus de 16 ans. Les enfants de moins de 16 ans
doivent être surveillés par des adultes.
Avvertimento: Questo prodotto è destinato all'uso per i adulti e bambini di età superiore ai 16 anni. I bambini di età
inferiore ai 16 anni devono essere sorvegliati da un adulto.
Advertencia: Este producto es para adultos y niños mayores de 16 años. Los niños menores de 16 años deben ser
supervisados por adultos.
警告: この製品は、大人と16歳以上の子供には使用対象です。16歳未満の子供は大人の監視が必要です。
Drone FCC ID: 2AYUO-DSDR04B
Remote controller FCC ID: 2AYUO-DSRC02A
Manufacturer: Shenzhen Deepsea Excellence Technology Co., Ltd.
16+
EC REP: E-CrossStu GmbH. Mainzer Landstr.69,60329 Frankfurt am Main
UK REP: SUQ CO., LTD. Unit G1, Capital House 61 Amhurst Road, London,
United Kingdom, E8 1LL
MADE IN CHINA
214-113197