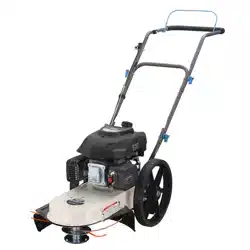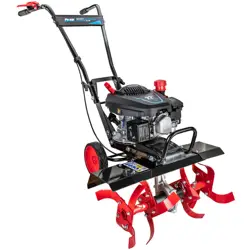
Model PTG1121
22 Inch Front Tine Tiller
OPERATOR’S MANUAL
Warning: The Engine Exhaust from this product contains chemicals known to
the State of California to cause cancer, birth defects or other reproductive harm.
866-591-8921
STOP
DO NOT RETURN TO STORE!
HAVE QUESTIONS OR NEED SERVICE?
Table of Contents
Safety Information ............................. . . . . . 2
Pre-Assembly ................................ .
. . . . .6
Planning Assembly .......................... . .
. . . . 6
Tools Required .............................. .
. . . . .6
Hardware Included .............
.............. . . . . . .6
Package Contents ...............
............ . . . . . .6
Assembly ................
.......... . . . . . . ..... . . . . 7
Operation ................
................. . . . . . . . 9
Maintenance ...............
................. . . . . . .14
Care, Cleaning and Storage ..
................... . . . . . 17
T
roubleshooting .............................. . . . . . 18
Service Parts ..
.............................. . . . . . .19
Safety Information
GENERAL SAFETY
Read this operator’s manual carefully in its entirety before
attempting to assemble this machine. Read, understand,
and follow all instructions on the machine and in the
manual(s) before operation. Keep this manual in a safe
place for future and regular reference and for ordering
replacement parts.
□
□
□
□
DANGER: Indicates an imminently hazardous situation
which, if not avoided, will result in death or serious injury.
WARNING: Indicates a potentially hazardous situation
which, if not avoided, could result in death or serious injury.
CAUTION: Indicates a potentially hazardous situation
which, if not avoided, may result in minor or moderate injury.
IMPORTANT: Indicates operation or maintenance
information which is important but not hazard-related.
NOTICE: Indicates a practice not related to personal injury which,
if not avoided, may result in property damage.
Be completely familiar with the controls and the proper use
of this machine before operating it.
□
Regularly inspect the tiller. Make sure parts are not bent,
damaged, or loose.
□
Use this equipment for its intended purpose only.
□
Operate the unit only with guards, shields, and other safety
items in place and working correctly.
□
□
Service the unit only with authorized or approved replacement
parts.
Complete all unit maintenance and adjustments according to
the instructions in this manual.
□
To prevent accidental starting when setting up, transporting,
□
Be thoroughly familiar with the controls and the proper use
of the tiller before starting. Know how to stop the engine
quickly.
To help avoid tiller tines contact or a thrown object
injury, stay in operator zone behind handles and keep
children, bystanders, helpers and pets at least 75 feet from
tiller while it is in operation. Stop machine if anyone enters
area.
Always wear safety glasses or safety goggles during
operation and while performing an adjustment or repair
to protect your eyes. Thrown objects which ricochet can
cause serious injury to the eyes.
Wear sturdy, rough-soled work shoes and close-fitting
pants and shirts. Shirts and pants that cover the arms
and legs and steel-toed shoes are recommended. Never
operate this machine while barefoot, in sandals, or in
slippery or lightweight (e.g. canvas) shoes.
2

Safety Information (continued)
GENERAL SAFETY
□
□
□
□
□
□
□
□
□
□
□
□
□
□
□
□
□
□
□
Do not put hands or feet near or under rotating parts. Keep
clear of discharge area at all times as the rotating tines
can cause injury.
Never operate the tiller without proper shields,
guards, control lever or other safety protective devices in
place and working.
Never operate the tiller with damaged safety devices.
Failure to do so can result in personal injury.
Familiarize yourself with all the safety and operating decals
on this equipment.
Thoroughly inspect the area where the tiller is to be used
and remove all foreign objects. Your equipment can propel
small objects at high speed causing personal injury or
property damage.
Check that all nuts and bolts are tight and equipment is in
good condition before each use.
Never allow children or young teenagers to operate the tiller.
Only allow responsible individuals, who are familiar with the
instructions, to operate the tiller.
Do not operate the tiller while under the influence of alcohol
or drugs.
The control lever is a safety device. Never attempt to
bypass its operation. Doing so makes the safety device
inoperative and may result in personal injury through
contact with the rotating tines. The control lever
must operate easily in both directions and automatically
return to the disengaged position when released.
Do not put hands or feet near or under rotating parts.
Operate only in daylight or in good artificial light. Walk, never
run.
□ Never operate
on or
crossinggravel drives, walks, or roads.
Stay alert for hidden hazards or traffic.
Exercise caution to avoid slipping or falling. Always be sure
of your footing; keep a firm hold on the handle and walk;
never run. Never operate the tiller at high transport speeds
on slippery surfaces.
If the equipment should start to vibrate abnormally, stop
the engine and check immediately for the cause. Vibration
is generally a warning of trouble.
Never leave the tiller unattended when the engine is running.
Stop the engine and make sure all moving parts have
stopped. Remove the wire from the spark plug.
Muffler and engine become hot and can cause a burn. Do
not touch.
Do not run the engine indoors or inside a closed area. The
exhaust fumes are dangerous, containing CARBON
MONOXIDE, an ODORLESS AND DEADLY GAS.
Watch for holes, roots, bumps, or other rough ground. Tall
grass can hide obstacles.
Always look behind and down and use caution when using
reverse or pulling the tiller towards you.
□
Always start the tiller on the level surface.
□
Only use parts and accessories made for this machine by
the manufacturer. Failure to do so can result in personal
injury.
□
When starting engine, pull cord slowly until resistance
is felt, then pull rapidly. Rapid retraction of starter cord
(kickback) will pull hand and arm toward engine faster than
you can let go. Broken bones, fractures, bruises or sprains
could result.
□
Disengage clutch lever and stop engine before leaving the
tiller in operating position. Wait until the tines come to a
complete stop before removing debris or making any
adjustments to the tiller.
□
Do not attempt to till hard soil, till too deep or till at too fast
a rate that can overload the tiller.
□
Gasoline is extremely flammable, and gasoline vapors can
explode if ignited. Handle with care.
□
Gasoline must be stored in an approved fuel container – usually
5 gallons or less.
3

Safety Information (continued)
GENERAL SAFETY
□
□
Tragic accidents can occur if the operator is not alert to the
presence of children. Children are often attracted to the tiller.
They do not understand the dangers. Never assume that children
will remain where you last saw them.
□
□
□
□
□
□
□
□
□
Always be sure of your footing. A slip and fall can cause
serious personal injury. If you feel you are losing your
balance, release the control lever immediately and the
tine will stop rotating.
Do not till near drop-offs, ditches or embankments, you
could lose your footing or balance.
Keep children out of the tilling area and under watchful
care of a responsible adult other than the operator.
Be alert and turn tiller off if a child enters the area.
Before and while moving backwards, look behind and
down for small children.
Use extreme care when approaching blind corners,
doorways, shrubs, trees, or other objects that may obscure
your vision of a child who may run into the tiller.
Keep children away from hot or running engines. They can
suffer burns from a hot muffler.
Never allow children to operate this machine.
To avoid personal injury or property damage, use extreme
care in handling gasoline. Gasoline is extremely flammable
and the vapors are explosive. Serious personal injury can
occur when gasoline is spilled on yourself or your clothes,
which can ignite. Wash your skin and change clothes
immediately.
Use only an approved gasoline container.
Never fill containers inside a vehicle or on a truck or trailer
bed with a plastic liner. Always place containers on the
ground away from your vehicle before filling.
CHILDREN SAFETY
□
Keep the nozzle in contact with the rim of the fuel tank or
container opening at all times until fueling is complete. Do
not use a nozzle lock-open device.
□
Extinguish all cigarettes, cigars, pipes and other sources
of ignition.
□
Never fuel machine indoors because flammable vapors will
accumulate in the area.
□
Never remove gas cap or add fuel while engine is hot or
running. Allow engine to cool at least two minutes before
refueling.
□
Never over fill fuel tank. Fill tank to no more than 1 inch
below bottom of filler neck to allow for fuel expansion.
□
Replace gasoline cap and tighten securely.
□
If gasoline is spilled, wipe it off the engine and equipment.
Move machine to another area. Wait 5 minutes before
starting engine.
□
Never store the machine or fuel container near an open
flame, spark or pilot light as on a water heater, space
heater, furnace, clothes dryer or other gas appliances.
□
To reduce fire hazard, keep machine free of grass, leaves,
or other debris build-up. Clean up oil or fuel spills and
remove any fuel soaked debris.
□
Allow machine to cool at least 5 minutes before storing.
□
Never run an engine indoors or in a poorly ventilated area.
Engine exhaust contains carbon monoxide, an odorless
and deadly gas.
□
If situations occur which are not covered in this manual,
use care and good judgement. Contact Customer Support
for assistance or the name of the nearest service dealer.
SAFETY WHILE SERVICING
Safe Handling Of Gasoline:
4

Safety Information (continued)
GENERAL SAFETY
□
Check the tines and engine mounting bolts at frequent
intervals for proper tightness. Also, visually inspect tines
for damage. Replace with the original equipment
parts only.
Use of parts which do not meet the original equipment
specifications may lead to improper performance and
compromise safety!
□
Keep all nuts, bolts, and screws tight to be sure the
equipment is in safe working condition.
□
Never tamper with safety devices.
□
After striking a foreign object, stop the engine,
Thoroughly inspect the tiller for any damage.
Repair the damage before starting and operating the tiller.
□
Inspect tiller components, guards and shields regularly;
repair or replace as necessary.
Do not change the engine’s governor setting or over-speed
the engine.
□
Check fuel line, tank, cap, and fittings frequently for cracks
or leaks. Replace if necessary.
□
Do not crank engine with spark plug removed.
□
□
Maintain or replace safety and instruction labels.
Follow proper disposal laws and regulations. Improper
disposal of waste fluids and materials can harm the environment.
5
Pre-Assembly
PLANNING ASSEMBLY
Place box on a level surface. Remove all items from box. Make sure all items listed on the package contents list are included and not
damaged.
TOOLS REQUIRED
PACKAGE CONTENTS
HARDWARE INCLUDED
NOTE: Hardware is not shown to actual size.
Part Description Quantity
A
B
Tiller Body/Upper Handle 1
B Dust Cover 2
Part Description Quantity
E Tines
D
Tiller Protective Shield
End Caps
2
2
C Face Plate 1
F
Secondary Tine
2
G
Depth Regulator
1
H
Use And Care Guide
1
Part Description Quantity
AA
Bolt M6x16
Bolt M8x38
6
BB
CC
Nut M6
2
6
Flat Washer 8×24×2
DD
4
Bolt M8x35
EE
4
Nut M8
FF
4
Part Description Quantity
D Pin
GG
HH 4
2
Cable Clip II 1
Wing Nut JJ 2
Washer GB93 8.1*2.1 KK 2
Cotter PinLL 1
H
Safety goggles
Adjustable Funnel
wrench
AA DD FFBB CC
E
DC
F
HH II JJ
EE
GG
A
KK
LL
G
Flat Washer 8*20*2
MM
Clevis PinMM 1
6
Assembly
Assembling the Rear Wheels
□ Pull the rear wheel downward so that the rear wheel can
rotate freely, then lift the rear wheel bracket to the
proper position. The rear wheel bracket will
automatically attach with the spring. See Figure 1-1.
□
□
Attach the upper handle to the lower bracket on the main
body of the tiller. Properly align the holes and then secure
with the M8x38 bolt (CC), the flat washer (DD), and the
wing nut (JJ).
Align the face plate (C) holes on the upper part of the
handle. Insert the M8x35 bolt (EE) and flat washer (DD),
use the nut (FF) to secure. See Figure 1-2.
Figure 1-2
3
1
Assembling the Upper Handle
2
4
Assembling the Tines
Assembling the Depth Regulator
proper height, and then lock the depth regulator (G) with a
clevis pin (MM)
□ Insert
the depth regulator to the holder, choose the
and cotter pin (LL). See Figure 1-3.
□ Insert the dust covers (B), the tines (E), and the secondary tines (F),
onto the drive shaft in sequence and lock tines with the D Pins (HH).
Make sure the tines and the secondary tines are facing the correct
direction as per the illustration below. See Figure 1-4.
NOTICE: This tiller is shipped without gasoline or oil in the engine.
Add gasoline and oil BEFORE operating your machine.
Figure 1-1
Figure 1-3
HH
F
B
E
Figure 1-4
GG
FF
EE
C
II
DD
JJ
CC
FF
KK
EE DD
Rear Wheel
G
MM
LL
7
Assembly (continued)
Assembling the Front Protective
Shield
□
Align holes on the protective shield end caps (D) to the
main protective shield, and secure with M6x16 bolts (AA)
and M6 nuts (BB). See Figure 1-5
5
WARNING: Make sure the tiller protective shield is
installed in place before starting the machine.
Protective Shield
BB
Figure 1-5
D
AA
8
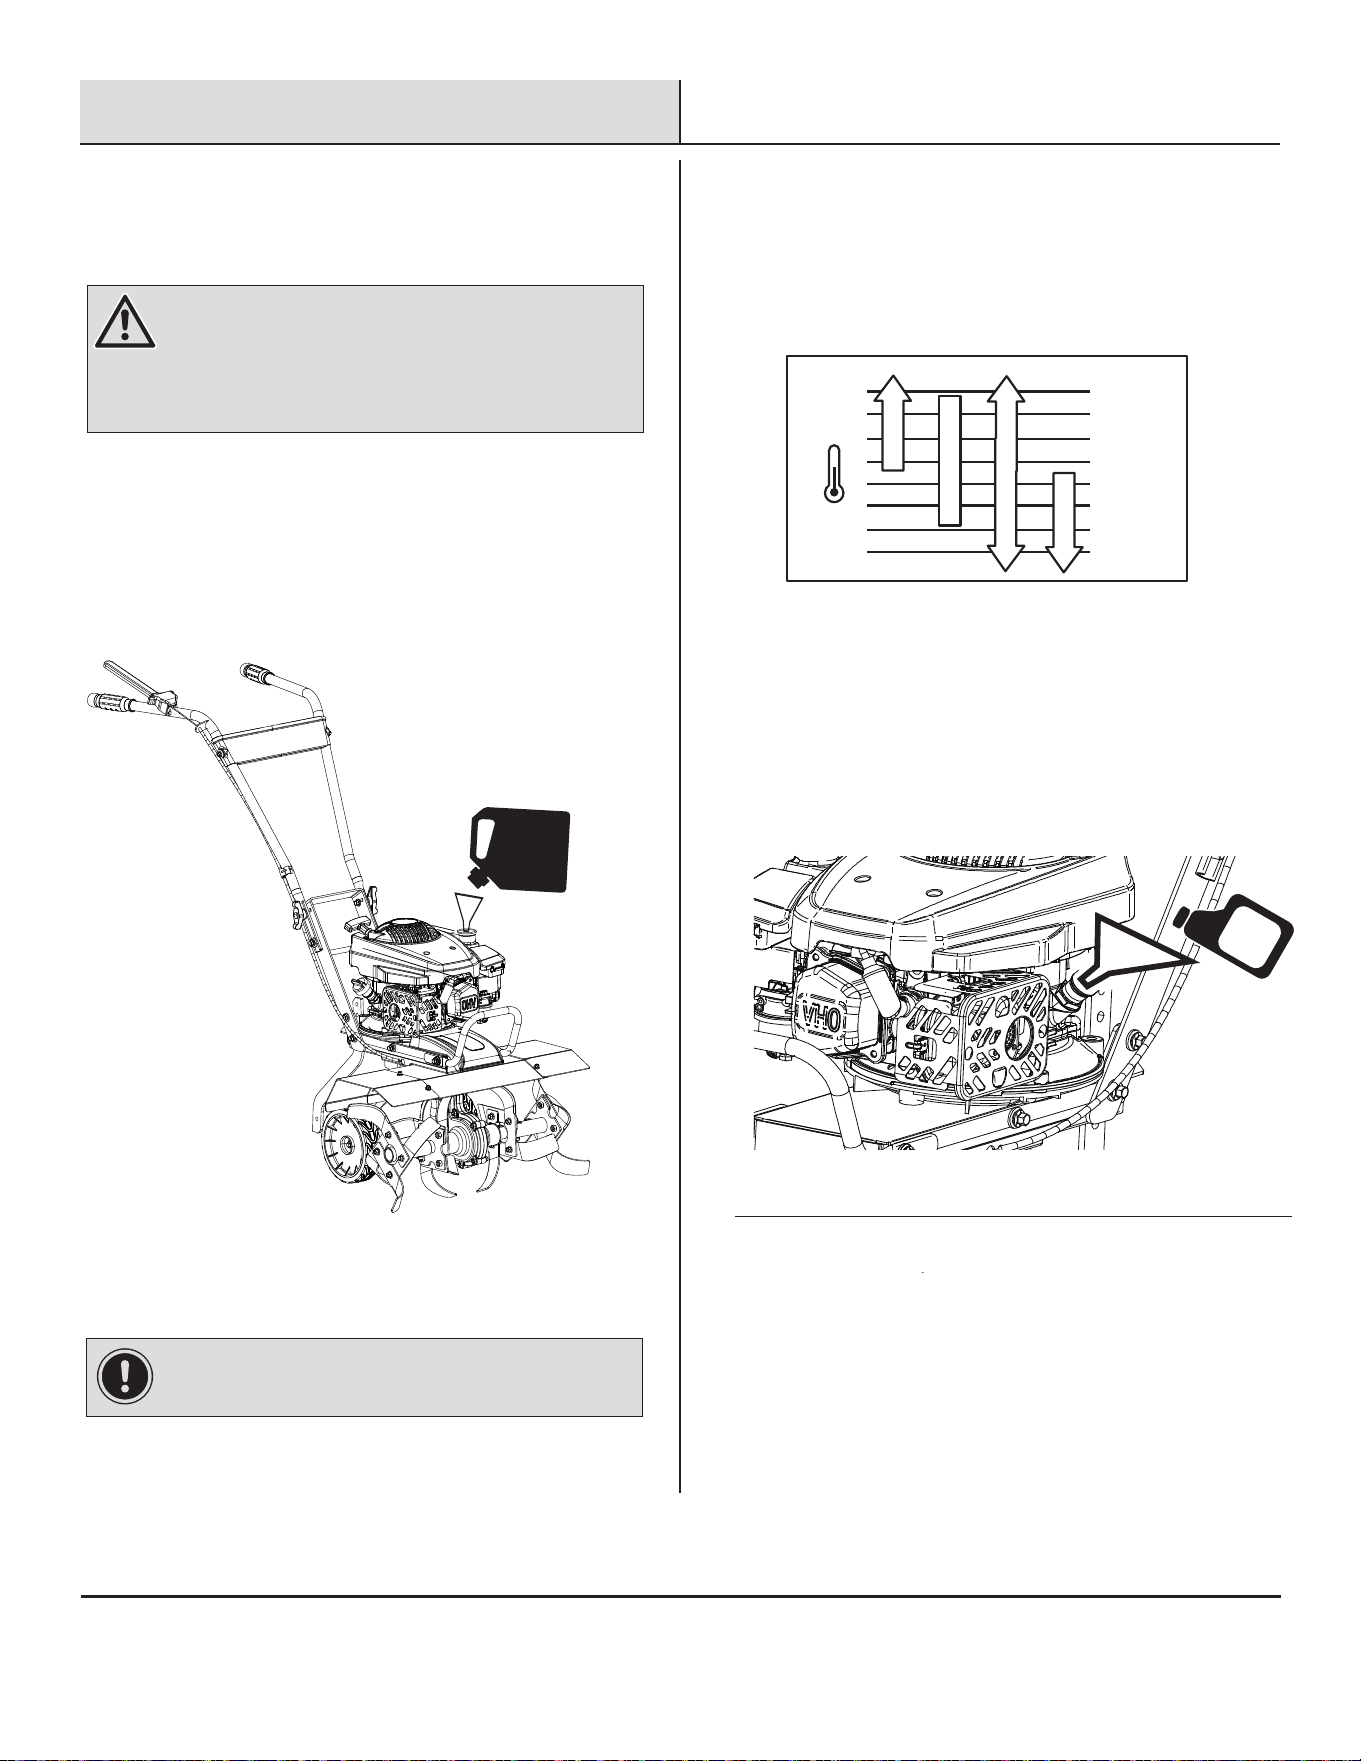
Operation
Adding Gas and Oil
□
□
Remove gas cap. Place funnel securely into the gas tank
opening and add fuel. Do not top off the filler neck.
Secure the gas cap and wipe off any excess fuel.
See Figure 1-6.
□
Place the tiller on a level surface.
□
Remove the oil filler cap. Place a funnel securely into the
crankcase opening and add oil. Do not top off the oil. Check
dipstick to confirm there is an adequate amount of oil.
□
Secure the oil cap and wipe off any excess oil.
See Figure 1-7.
□
Do not use additives.
□
Outdoor temperatures determine the proper oil viscosity for
the engine. Use the chart to select the best viscosity for the
outdoor temperature range expected.
1
WARNING: Use extreme care when handling gasoline.
Gasoline is extremely flammable and the vapors are
explosive. Never fuel the machine indoors or while the
engine is hot or running. Extinguish cigarettes, cigars,
pipes and any other sources of ignition.
IMPORTANT: Use only Regular Fuel.
Figure 1-6
Figure 1-7
86
68
50
32
14
-4
-22
0
-10
-20
-30
°C
40
30
20
10
°F
104
SAE 30
10W-30
SYNTHETIC 5W-30
5W-30
OIL
GAS
9
Operation (continued)
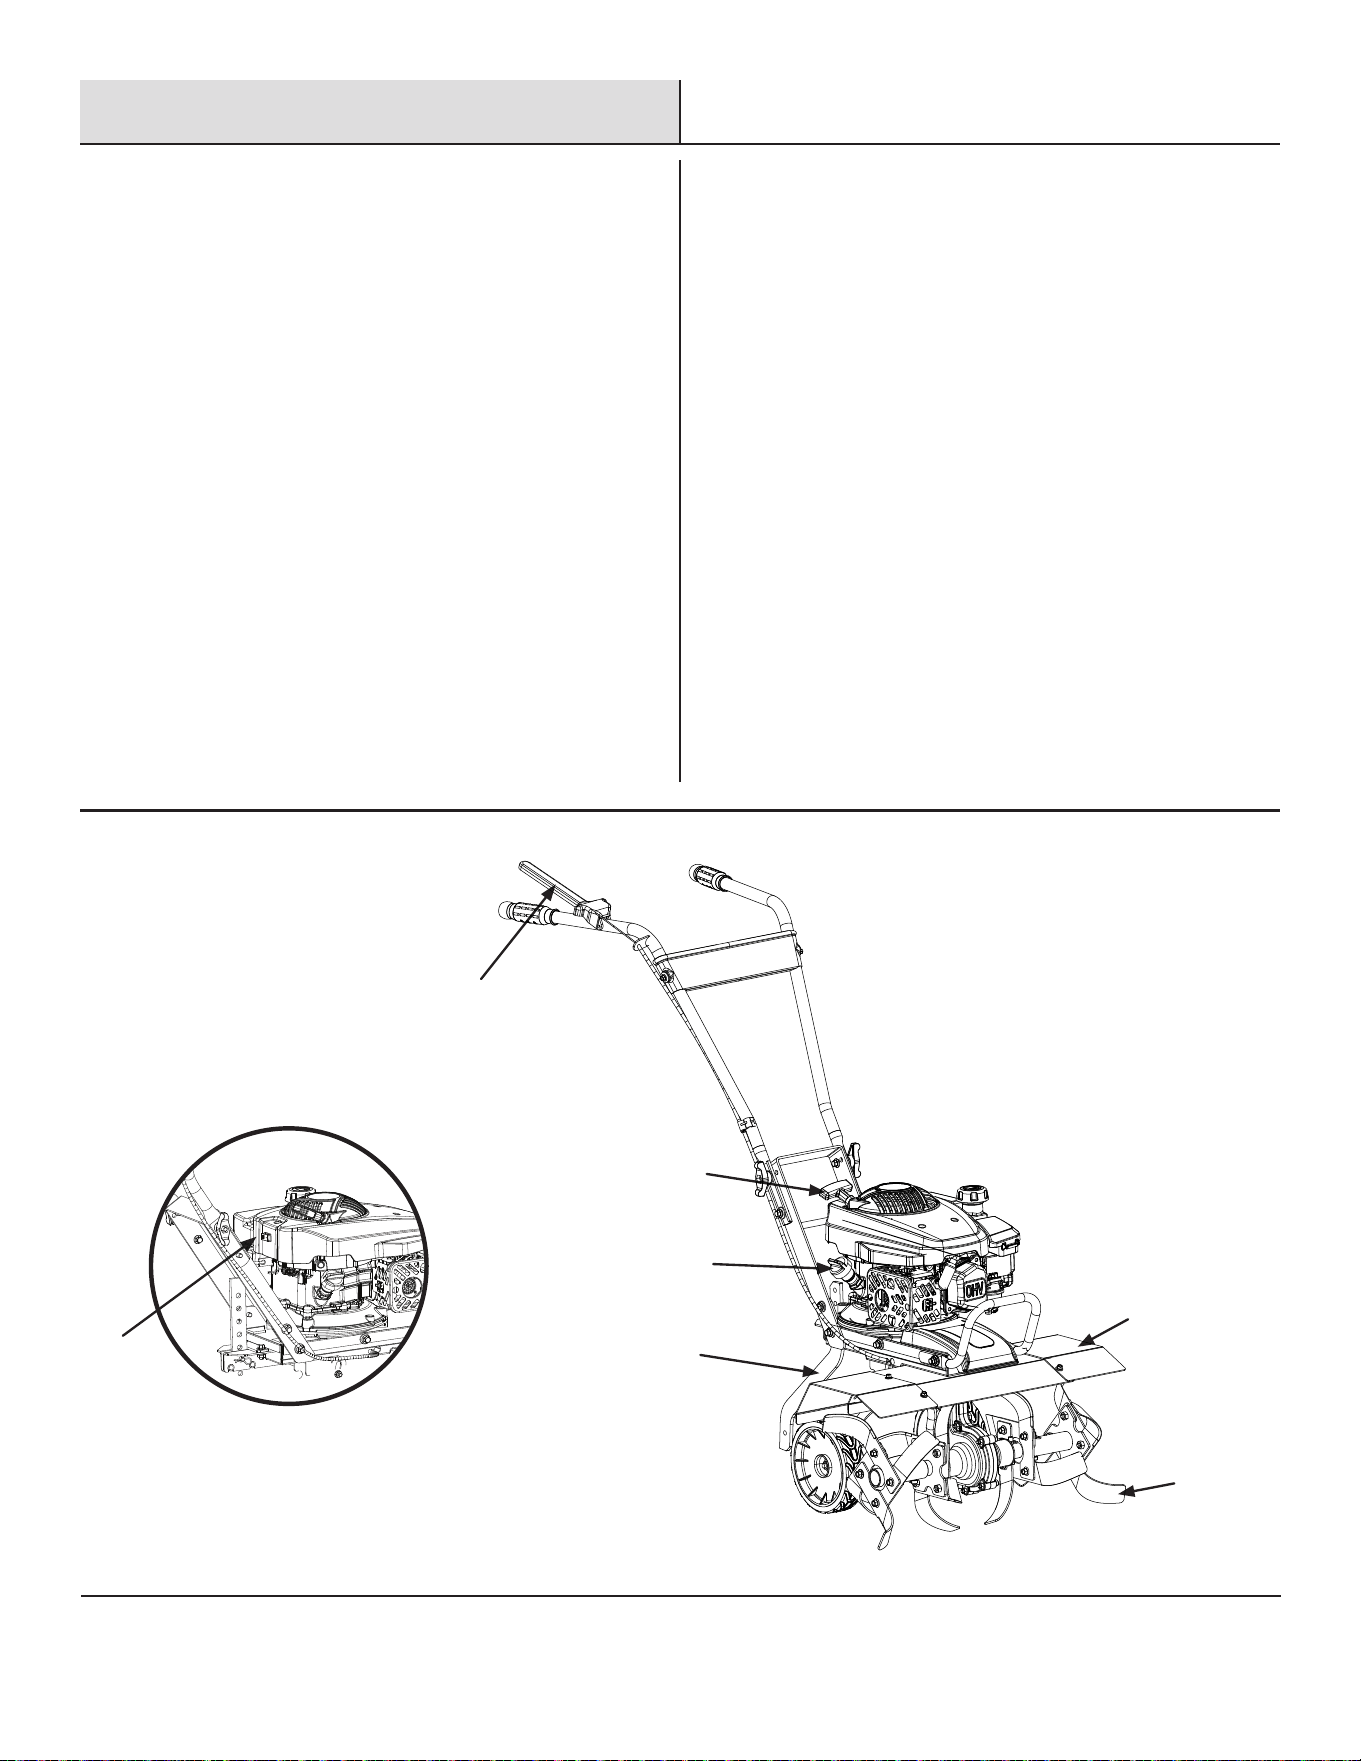
Controls and Features
RECOIL STARTER
□
TILLER PROTECTIVE SHIELD
CLUTCH LEVER
The recoil starter is attached at the top the engine
handle. Stand behind the unit and pull the recoil starter
rope until resisteance is felt, let it retract, then put it
out swiftly. Repeat until engine start.
□
□
The tiller protective shield is located in the top and rear of
the tiller.and it is used to shield you from debris being thrown.
The forward lever located on the upper handle controls the
tiller's action to start the tine rotation.
ON/OFF SWITCH
□
The On/Off switch is needed to start and stop the tiller.
2
DEPTH REGULATOR
TINES
□
□
In hard compacted soil, the depth regulator helps restrain the
tiller's forward motion. In looser soil, it controls how deeply the
tines can dig into the ground.
The tines and secondary tines are the are rotating metal blades
that dig into the soil.
OIL DIPSTICK
□
Located on the engine, the opening for the oil dipstick is used
to add oil. The oil dipstick is used to measure the amount of oil
in the crankcase. This tiller does not come with oil. Oil must be
added before operating the tiller.
On/Off
Switch
Recoil Starter
Oil Dipstick
Forward
Depth Regulator
Protective Shield
Tines
10
Operation (continued)
Pre-Start Inspection
□
□
Make sure all protective shielf are in place and all nuts
and bolts are secure.
□
Check oil level in engine crankcase. Add oil if necessary.
□
Check the gasoline supply. Fill the fuel tank no closer
than 1 inch from the top of the tank to provide space for
expansion.
□
Be sure the spark plug wire is attached and the spark
plug is tightened securely.
□
Check the depth regulator lever position.
□
Examine underneath and around engine for signs of
oil or fuel leaks.
□
Inspect the fuel hoses for tightness and fuel seepage.
□
Look for signs of engine damage.
□
Remove excessive debris from muffler area and
recoil starter.
□
Always set the wheels in tilling position before starting
engine.
□
Always put depth regulator in the upper transport
position before starting engine..
COLD STARTS
Press the primer bulb 3 times.
□
□
Stand behind the unit and pull the recoil starter rope
until
resisteance is felt, let it retract, then put it out swiftly. Repeat until
engine start.
RESTARTING A WARM ENGINE
□
Put the On/Off switch located on the back of the engine
in the On position.
Pull the recoil starter lightly until resistance is felt, and then
pull rapidly.
3
WARNING: Gasoline is highly flammable and must be
handled with care. Never fill the tank when the engine is hot
or running. Always move outdoors to fill tank.
Starting the Tiller
4
CAUTION: Do not start your tiller until you have
read this manual that came with your tiller, including the
tiller controls and safety sections. If you have read the
manual, follow the steps below to start your tiller. Always
perform this pre-start checklist before starting the engine.
CAUTION: Be sure the clutch lever is disengaged
to prevent sudden uncontrolled movement when the engine
starts. The forward lever is engaged by squueez e in the
lever and disengaged by releasing the lever.
DANGER: Always keep hands and feet clear of rotating
machine parts.
Primer Bulb
STOP
I
11
□ Remo
ve the engine switch to on.

Operation (continued)
□
Switching off the Tiller
To stop the engine at any time, turn the engine On/Off
switch to the Off position.
□
Engages the tines forward.
□ Sq ueez e
the Clutch lever toward the
handlebar
engages the tines. Releasing the lever stops the
tines and brings the tiller to a complete stop.
5
Tilling
Insert the clevis and cotter pin to secure depth
□
Adjust the depth regulator to desired tilling depth.
regulator to desired depth. See Figure 1-8.
□
Sq ueez e the clutch level to engage the tines and make
the tiller move forward.
6
WARNING: Raise depth regulator up one hole at a time,
testing tiller operation after each raise. Raising depth
regulator too high can result in loss of control of tiller!
WARNING: Temperature of muffler and nearby areas
can be extremely hot. Avoid these areas. Do not move choke
control to stop engine, as backfire or engine damage may
occur. To stop wheels and tines at any time, release clutch
levers to neutral position. Always release
drive safety control levers ALWAYS STOP
THE ENGINE before adjusting the depth of the regulator lever.
Drive Safety Control Levers
7
NOTICE: You can slow the tiller’s forward advance at any time
by putting slight downward pressure on the handlebars. You can stop
the tiller by releasing the clutch lever.
Figure 1-8
CLUTCH LEVER
IMPORTANT: Practice operating the controls and
tiller with tines out of ground before beginning to till.
It is important that you know how to use the tiller
properly, keep control at all times, stop the tines and
wheels from turning, and stop the engine if necessary.
If you do not know how to do these things, read the
controls, adjustments and safety sections before
proceeding.
(1)
(2)
(3)
12
Operation (continued)
Adjusting the Handle Height
□
To adjust the handle height, remove upper handle
hardwares (CC)(DD)(JJ), and loosen lower hardware (FF
& EE)
8
JJ
Figure 1-9.
Tilling Tips
10
□
The key to successful tilling is to begin with a shallow cut
on the first pass, and then work an inch or two deeper on
each successive pass.
□
Tilling depth will vary with ground conditions.
□
When beginning to till in unbroken ground or in extremely
hard soil, start depth regu;lartor at the highest position. This will
allow for shallow tilling. With the depth regulator in this position,
make several light passes over
the area to be tilled. Reset for deeper depths with successive
passes.
□
If tiller jumps or skids uncontrollably, lower the depth
regulator.
This will allow for shallower tilling. Hold firmly to the handlebars
to control sudden movements.
□
If roots, vines, or other materials clog or jam
the tines, stop the engine, and clean the debris.
CULTIVATING
□
Plant rows on 20 - 22 in. centers for consistant tilling.
□
Start the depth regulator lever to one of the highes
positions.This will allow for shallow cultivation necessary
to turn over weeds, and break up a
the soil.
This will allow for shallow cultivation necessary to turn
over weeds, and break up and aerate
the soil.
CAUTION: Before adjusting the handle bar, place the tiller
on firm level ground to prevent the handle from collapsing
accidentally.
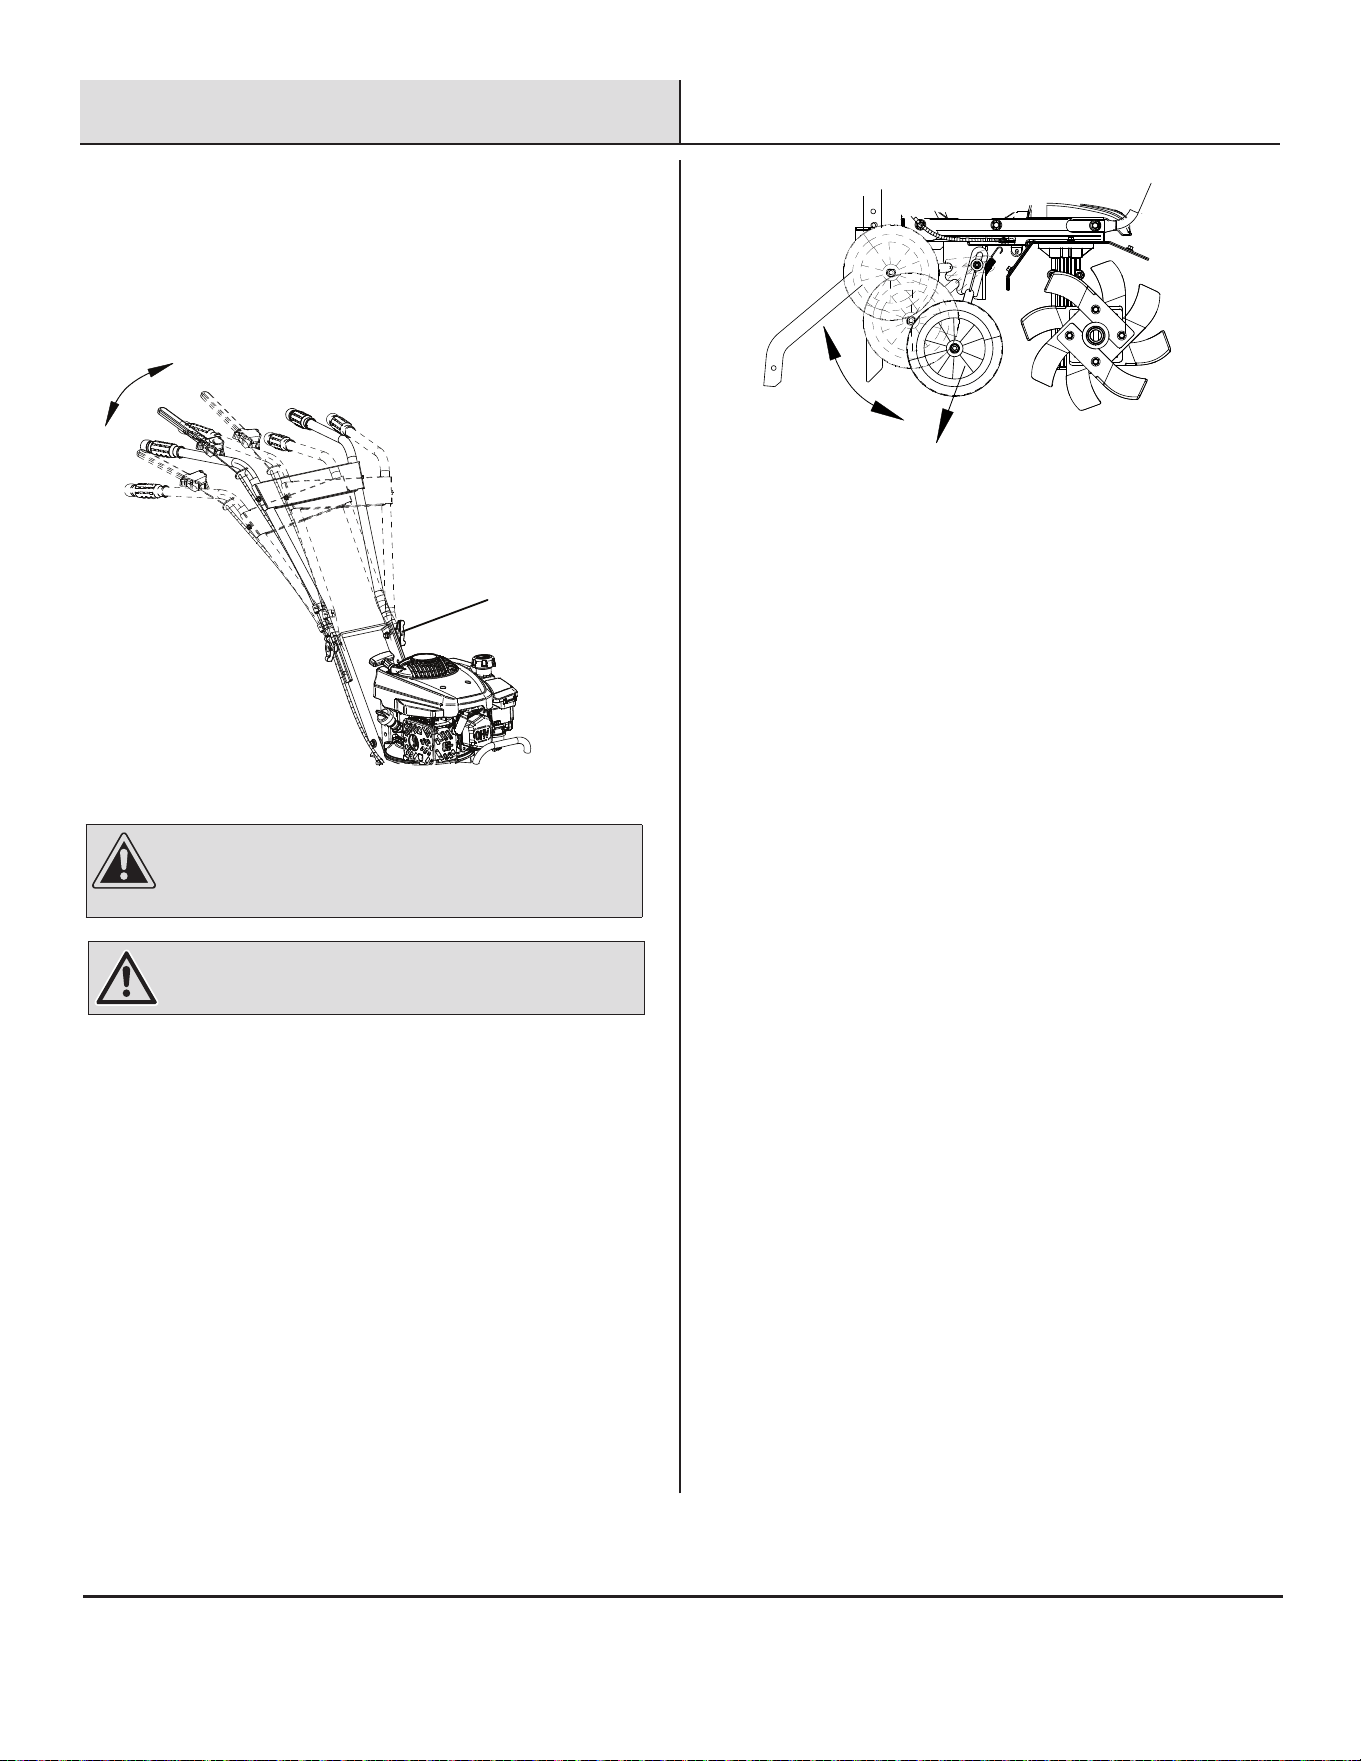
(1) Pull the rear wheel downward
(2) lift the rear wheel up to proper position
13
Important: When tining, you can adjust the wheel height to adapt differe
nt soils.
9
Adjusting the rearwheel
.
②
①
□
Move the wheel
c
arridge down, to allow transportation
over pavement. R
aise the tiller wheels back up for tining.
WARNING: K eep a firm grip on the upper handle,
and do not allow it to move freely.

Maintenance
□
□
□
□
□
□
□
□
□
□
The warranty on this tiller does not cover items
that have been subjected to operator abuse or negligence.
To receive full value from warranty, operator must
maintain the tiller as instructed here.
Changing of engine-governed speed will void engine
warranty.
□
All adjustments should be checked before each use.
season.
Periodically check all fasteners and make sure these are
tight.
Good maintenance is your responsibility.
Follow good shop practices.
Keep service area clean and dry.
Use adequate light for the job at hand.
Make sure the engine is off before you begin any
maintenance or repairs.
□
Be sure there is adequate ventilation whenever you operate
the engine to avoid carbon monoxide poisoning.
□
Never operate the engine in a closed building.
□
Let the engine and exhaust system cool before touching.
□
Do not run the engine unless instructed to do so.
□
Read the instructions before you begin, and make sure you
have the tools and skills required.
□
To reduce the possibility of fire or explosion, follow all
previous saty warinings for gasoline.
□ Never use gasoline as a cleaning solvent.
Lubricate the wheels at least once a season with light oil (or
motor oil). If the wheels are removed for any reason, lubricate
the surface of the axle bolt and inner surface of the wheel with
light oil.
Always use personal protection devices such as eye, hand and
hearing protectors when performing any service or
maintenance.
□
Frequently check tiller tines. They should be free of damage and
cracks and securely fastened in place.
Always observe safety rules when performing any
□
Where replacement parts are necessary for periodic maintenance
and servicing, use only OEM replacement parts for repair and
replacement to restore your equipment to original specifications.
□
The manufacturer and/or distributor will not be responsible for
injuries or damages caused by use of unapproved parts and/or
accessories.
□
A first aid kit should be kept readily accessible while performing
maintenance on this equipment.
maintenance.
14

Maintenance (continued)
□
Your tiller has been designed and produced by a leading manufacturer of outdoor power equipment to provide you with
years of reliable operation. Keeping your tiller in top running condition will prolong its life, and maintain optimum performance.□
Please read this normal care schedule, and note the recommended care operating intervals to extend the life of your tiller.
*Service more frequently when used in dusty areas.
MAINTENANCE SCHEDULE
Before Each UseMaintenance Operation
Engine Oil
Air Filter
Tine Shaft
Wheel Axle Shaft
First
Month or
20 Hours
Every
3 Months
or
50 Hours
Every
6 Months
or
100 Hours
Every
Year or
300 Hours
Check Level
Change
Check
Clean
Replace
Clean
Lubricate
Spark Plug
Clean Adjust
Fuel Strainer
Clean
Fuel Line
Check Every 2 Years (Replace if necessary)
√
√
√
√
√
√
√
√* √*
√ √
WARNING: Use only genuine replacement parts. Other
parts may damage the tiller or result in injury.
15
Maintenance (continued)
□
CHECK OR FILL ENGINE CRANKCASE
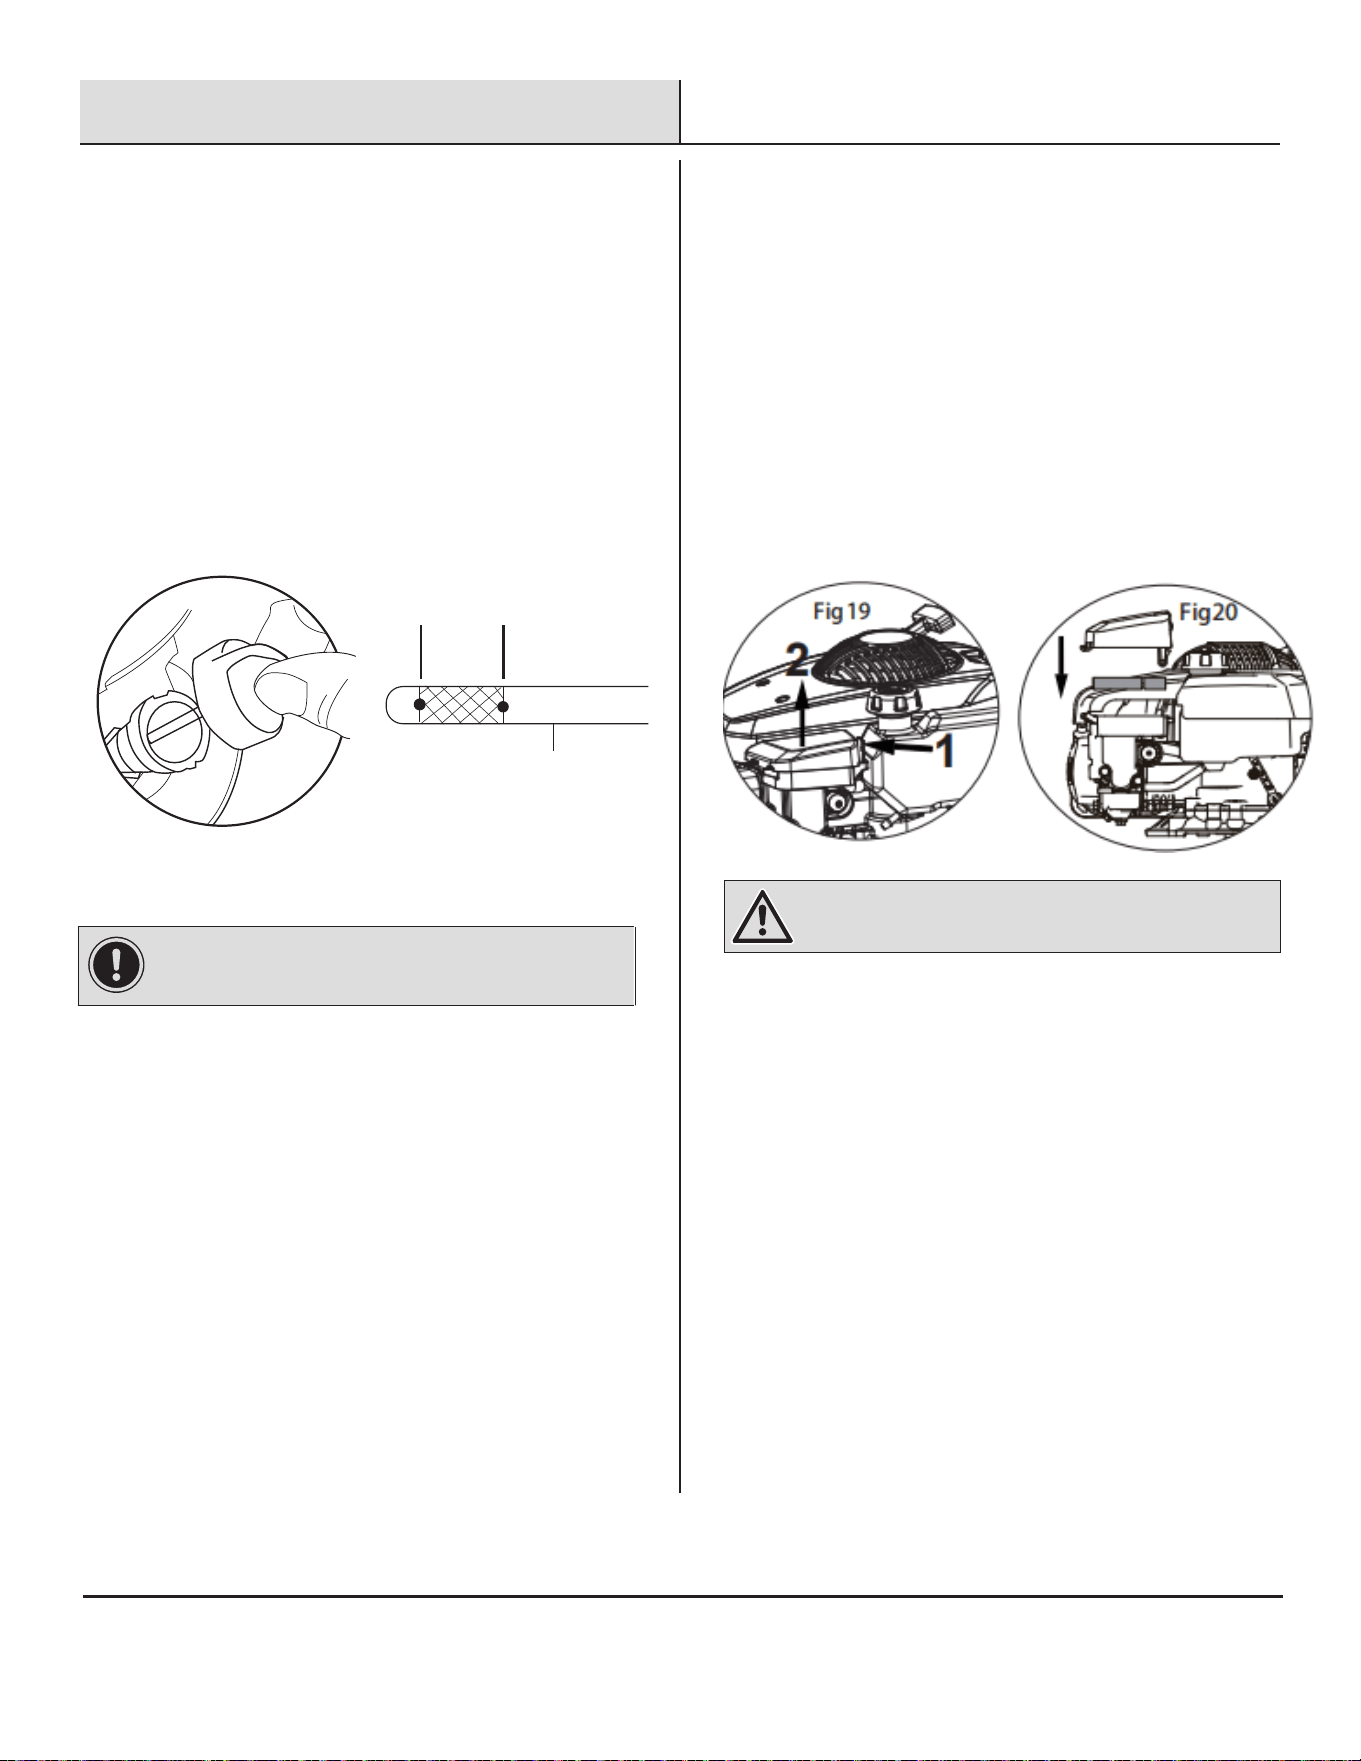
1.Clean the top of the oil fill and the area around it.
2.Add the appropriate type of oil until the oil level is at the
properlevel. S AE 10W-30 oil is recommended for general
use.
Check engine oil level daily and add as needed. R emove
and cl ean the dipstick. R einsert the dipstick but do not
screw it back in. R emove the dipstick and verify the oil is
at the correct level.
3. When the engine oil is at the correct level, reinstall the
dipstick and screw it down until it is sealed。
Always check oil level before starting engine.
IMPORTANT: Engine is shipped from factory without oil. You
must add engine oil before starting engine.
L
Oil
Level
16
Oil Dipstick
Cleaning Air Filter
1.R emove the air cleaner outside cover.
2.S eparate all filter elements from the air filter housing
3. I f the filter elements are dirty, clean them in a solution of hot,
soapy water. S queez e the solution through the filter elements
until they are clean.
4 .Place the cleaned filter elements in a clean, absorbent towel,
then squeez e the elements repeatedly until most of the water is
gone. Allow the filter elements to air-dry thoroughly before
replacement.
5. R einstall the filter elements in the correct location and reinstall
the air cleaner outside cover, and snap the latch into place.
WARNING: N ever run the engine without the air filter
element installed.

Care, Cleaning and Storage
□
Drain fuel system completely or add fuel stabilizer to prevent
fuel from gumming up during extended storage period.
□
While engine is still warm, drain the oil from the engine.
Refill with fresh oil of the recommended grade.
□
Clean external surfaces, engine and cooling fan.
□
Remove spark plug, pour one teaspool of engine oil into spark
plug hole.
□
Reinstall spark plug.
□ Store tiller in a suitable location.
Follow the steps below to prepare your tiller for storage.
CLEAN TINE AXLE SHAFT
17
□ Remove the D pins, tines and secondary tines. Inspect for
damage, remove debris. Clean and lubricate the tine shaft
with fresh engine oil. Reassemble in reverse order.

Troubleshooting
Problem SolutionCause
The engine is difficult
to start.
□
Add fresh fuel.
Turn the engine switch On.
Move the choke lever to the On position.
Attach spark plug wire to the spark plug.
Remove spark plug and inspect. Replace if necessary.
Take the tiller to an authorized service center to clean
the carburetor.
Remove and clean the air filter.
Drain and clean the fuel tank. Fill with fresh fuel.
The engine is out of fuel.
The engine switch is Off.
The engine is not primed.
The spark plug wire is disconnected.
The spark plug is fouled.
The carburetor is dirty.
The air filter is clogged.
The fuel is contaminated.
□
smoking excessively,
running very "rough,"
running erratically, or
The engine is
running poorly.
Problems may include
not maintaining full
speed.
□
Add engine oil.
Check engine oil, and add or drain engine oil if necessary.
Remove spark plug, inspect or replace if necessary.
Remove and clean air filter.
Drain and clean the fuel tank. Fill with fresh fuel.
Take the tiller to an authorized service center to clean
the carburetor.
The tiller produces
excessive vibration
and noise.
□
Tighten all fasteners.
Refer to The Engine is Experiencing Problems section
(above).section (above).
The tines will not
rotate.
□
□
Remove debris from around tines.
Replace tine bolts and nuts.
The engine will not stop.
□
□
There is debris interfering with the tines.
□ Tines are
loose.
Make sure the clutch lever is functioning apporpporiately
Replace the On/Off switch.The On/Off switch is not working properly.
□
□
The tines do not cut
properly.
Refer to the “Install the Tines” section.The tines are assembled incorrectly.
□
The engine stalls
frequently.
□
Till at a moderate pace. Make multiple passes.
□
The tilling speed / depth is too fast for conditions.
□
□
□
□
□
□
There are loose parts.
□
Refer to The Engine is running poorly
□
□
There is no engine oil in the crankcase.
□
The engine oil is not at proper level.
□
The spark plug is fouled.
□
The air filter is clogged.
□
The fuel is contaminated.
□
The carburetor is dirty
□□
□□
□□
□□
□□
□
□
□
□
18
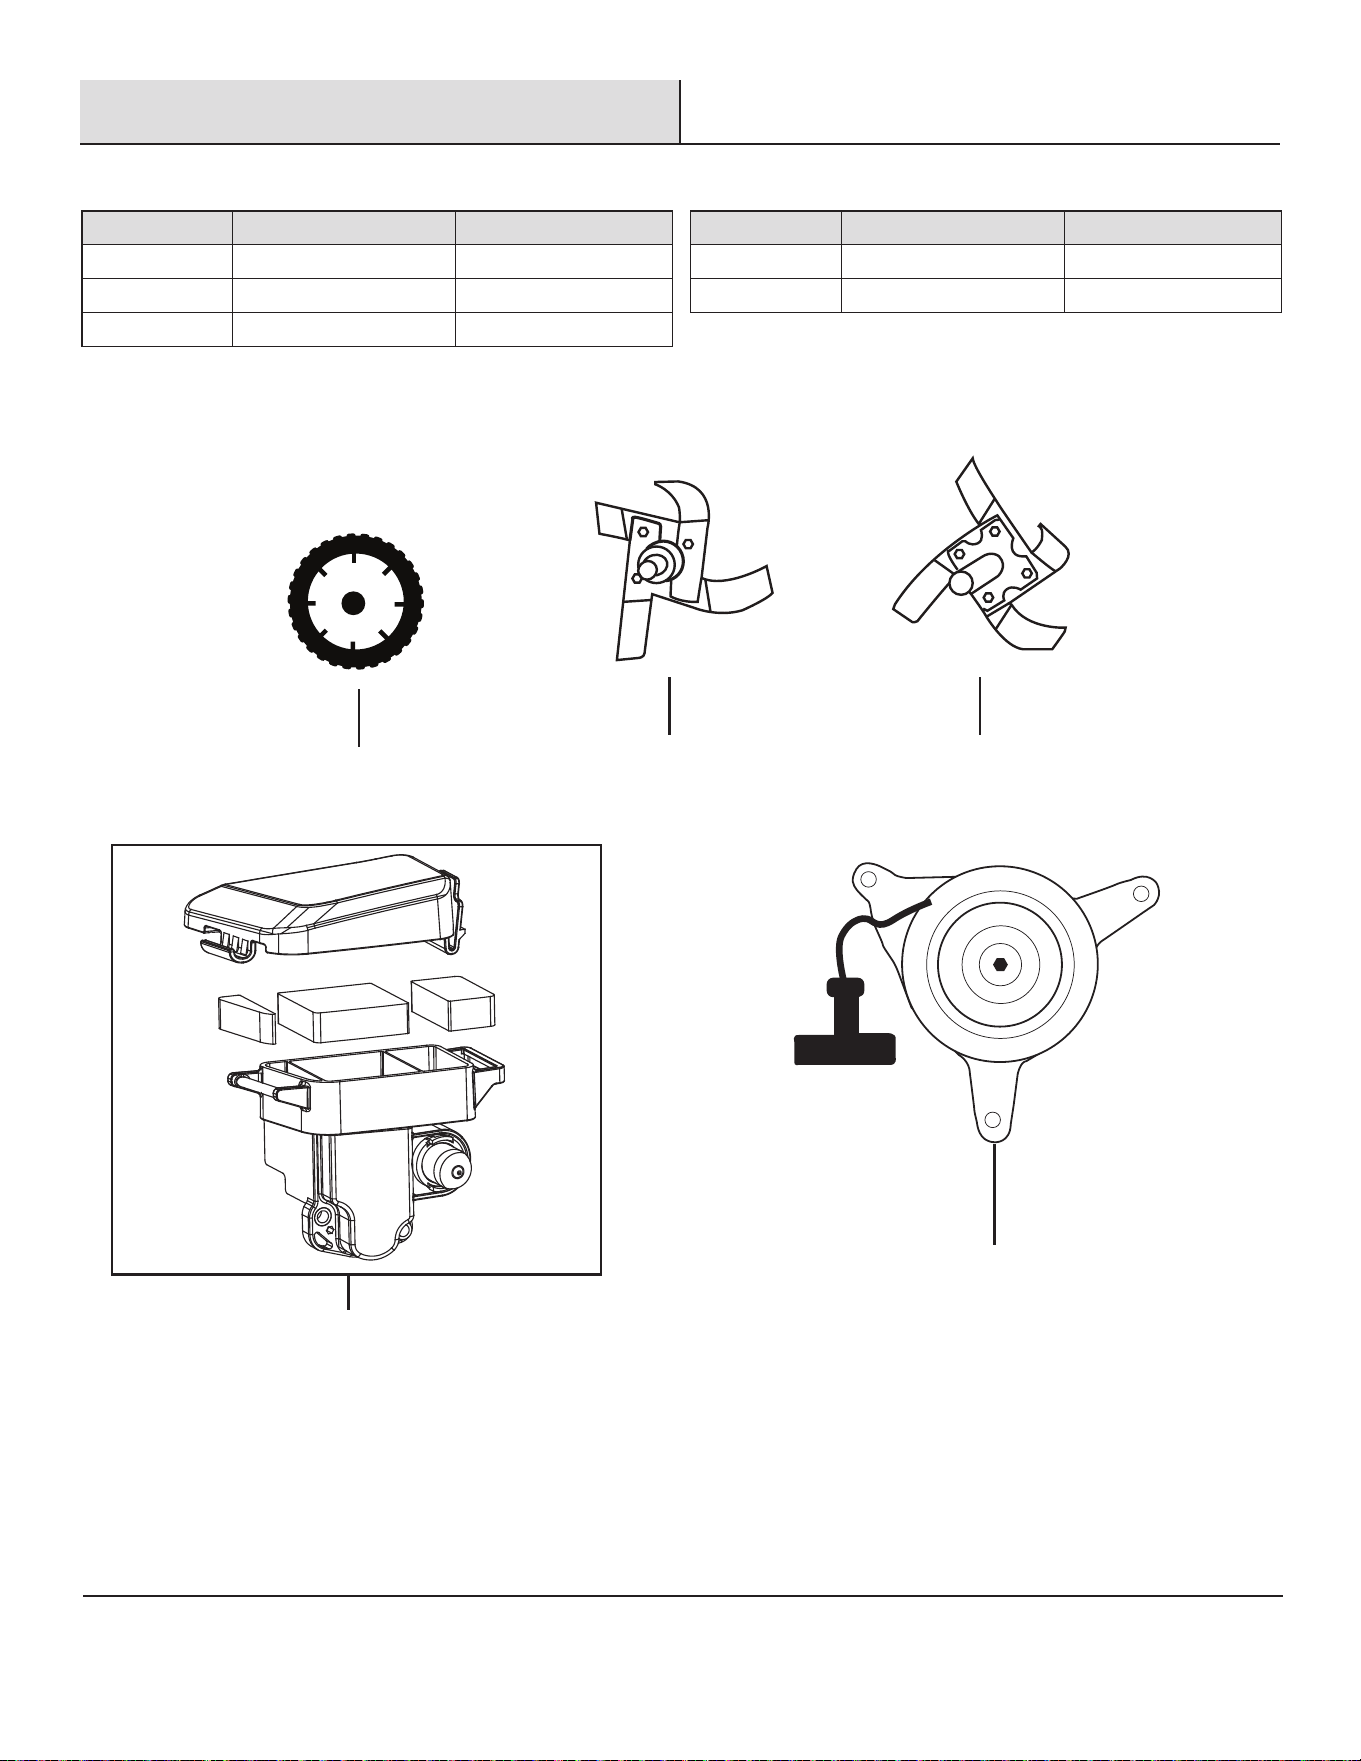
Service Parts
Part Description Quantity
NN Tine 2
OO Secondary Tine 2
MM Wheel 2
Part Description Quantity
PP Air Filter Assembly 1
QQ Recoil 1
Air Filter Assembly
Recoil
Tine Secondary TineWheel
19