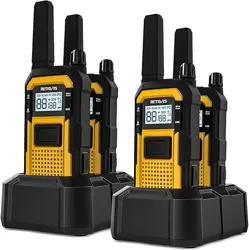
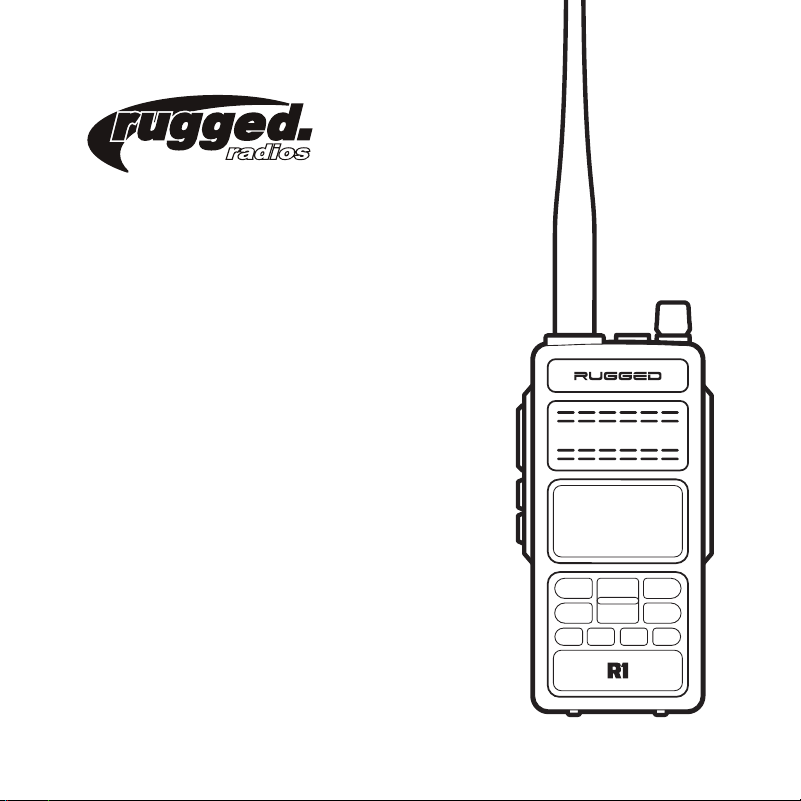
R1
USER MANUAL VERSION 1.0.2
2
Safety: This radio generates RF electromagnetic energy during transmit mode. This radio is designed for and
classified as “Occupational Use Only,” meaning it must be used only during the course of employment by individuals
aware of the hazards, and the ways to minimize such hazards. This radio is NOT intended for use by the “General
Population” in an uncontrolled environment. This radio has been tested and complies with the FCC RF exposure limits
for “Occupational Use Only”. In addition, this radio complies with the following Standards and Guidelines with regard to
RF energy and electromagnetic energy levels and evaluation of such levels for exposure to humans: FCC OET Bulletin
65 Edition 97-01 Supplement C, Evaluating Compliance with FCC Guidelines for Human Exposure to Radio Frequency
Electromagnetic Acids. American National Standards Institute (C95.1-1992), IEEE Standard for Safety Levels with
Respect to Human Exposure to Radio Frequency Electromagnetic Fields, 3 kHz to 300 GHz. American National
Standards Institute (C95.3-1992), IEEE Recommended Practice for the Measurement of Potentially Hazardous
Electromagnetic Fields— RF and Microwave. The following accessories are authorized for use with this product. use
of accessories other than those (listed in the instruction) specified may result in RE exposure levels exceed the FCC
requirements for wireless RE exposure. To ensure that your exposuree to RF electromagnetic energy is within the
FCC allowable limits for occupational use, always adhere to the following guidelines: DO NOT operate the radio without
a proper antenna attached, as this may damage the radio and may also cause you to exceed FCC RF exposure limits.
A proper antenna is the antenna supplied with this radio by the manufacturer or antenna specifically authorized by the
manufacturer for use with this radio. DO NOT transmit for more than 50% of total radio use time. Transmitting more
than 50% of the time can cause FCC RF exposure compliance requirements to be exceeded. The radio is transmitting
when the ‘TX indicator’ lights up red. You can cause the radio to transmit by pressing the PTT switch. ALWAYS keep
the antenna at least 2.5 cm (1 inch) away from the body when transmitting and only use the provided belt-clip to
ensure FCC RF exposure compliance requirements are not exceeded. To provide the recipients of your transmission
the best sound quality, hold the antenna at least 5 cm (2 inches) from your mouth, and slightly off to one side. The
information outlined in this manual provides the user with the information needed to make him or her aware of RF
exposure and what to do in order to assure this radio is operated safely within the FCC exposure limits.
Electromagnetic Interference/Compatibility During Transmission: Your radio generates RF energy that can
possibly cause interference with other devices or systems. To avoid such interference, turn off the radio in areas
where signs are posted to do so. DO NOT operate the transmitter in areas that are sensitive to electromagnetic
radiation such as hospitals, aircraft, and blasting sites.
Occupational/Controlled Use: The radio transmitter is used in situations in which persons are exposed as
consequence of their employment provided those persons are fully aware of the potential for exposure and can
exercise control over their exposure.
SAFETY

3
To program your radio and to access advanced features, visit
rtsystemsinc.com
or contact them at 800-921-4834

4
User Safety Information
Package Includes
Charging Your Battery Pack
Charging Preparation
Charging Operation
Accessories Connections
Battery Pack
Belt Clip
Ext. Mic/Speaker
Getting Acquainted
Front Panel Operation
Side Panel Operation
Getting Acquainted
Operation
Menu
Settings Expanded
Messages Expanded
Specifications
General
Transmitter
Receiver
Notes
05
06
07
07
08
09
09
09
09
10
10
11
12
12
14
16
19
21
21
21
22
23
CONTENTS

5
• Please read the following brief instructions, non-compliance with these rules may
cause danger or violate the law.
• Obey the local government regulation before using this radio, improper use may violate
the law and be punished.
• Turn off the radio before entering flammable or explosive areas.
• Do not charge or change the battery in flammable or explosive areas.
• Turn off the radio before getting close to the blasting zone or detonator areas.
• Do not use radio whose antenna is damaged, touching of damaged antenna will cause
heat injury.
• Do not attempt to open the radio; the maintenance work should be done by technical
expert only.
• To avoid troubles caused by electromagnetic interference or electromagnetic
compatibility, please turn off the radio in places where the banner displays “Do not use
wireless equipment”, such as hospitals and other healthcare locations.
• In vehicles, do not put the radio within the area of airbag deployment.
• Do not store the radio under the direct sunshine or in hot areas.
• When you transmit with the radio, do keep away from its antenna for 5cm at least.
• If the radio appears defective or starts to smoke, please shut off its power immediately
and contact your local dealer.
• Do not transmit too long, for the radio may heat and cause injury.
USER SAFETY INFORMATION

6
• R1 handheld radio
• Antenna
• Rechargeable Li-ion Battery
• USB charging cable / power adapter
• Belt Clip
Please check if any damage to the package when you receive it. Carefully unpack the
transceiver. We recommend that you check the items listed in the following table. If any
items are missing or damaged during shipment, please contact with your local dealer
immediately.
PACKAGE INCLUDES

7
CHARGING YOUR BATTERY PACK
Precaution: The supplied battery pack of this radio is a high-performance Li-ion with 7.4V
standard voltage 2000mAh high capacity in a very compact package. Under normal use,
the battery pack may be used for approximately 500 charge cycles and more, after which
operating time maybe expected to decrease. If you have an old battery pack which is
displaying capacity which has become diminished, you should replace the pack with a new
one.
Warning: When the conductive metals such as jewelry, keys, or decorative chains touch the battery terminals, all the
batteries are likely to cause damage to the items or personal injury. These conductive metals may form a short circuit and
generate heat. Handle the battery carefully, especially when placed in a pocket or metallic container.
• Do not short-circuit the battery terminals or expose to fire. Do not disassemble the
battery.
• Charge the battery between 32°F and 113°F. The battery cannot normally be charged
beyond this temperature range.
• Turn off the transceiver when you charge it. Transmitting with the transceiver in
charge will affect its normal charge.
• Do not unplug the Power Adapter or battery when it is charging.
• If the battery does not last its normal charge, it means that the battery is depleted,
change the battery pack.
• Do not charge when the battery or the radio is wet. Dry it with a cloth and wait for it to
be fully dry before charging to avoid any danger.
CHARGING PREPARATION
8
CHARGING YOUR BATTERY PACK
Battery Tips
• The battery is not fully charged at the factory, please charge it before using it.
• Charge and discharge the battery two or three times, the battery capacity will reach
the best condition. When the battery capacity is low, please charge or change the
battery.
• If the battery lasts a short time, even if it is fully charged, the battery is depleted,
please contact your local dealer to buy a new battery.
After installing the battery pack, if the battery icon shows [ ], it means that the battery
pack is out of power. Please charge it.
CHARGING OPERATION
Charging indicator light conditions:
Indicator Display Status
Red Charging
Green Completed

9
ACCESSORIES CONNECTIONS
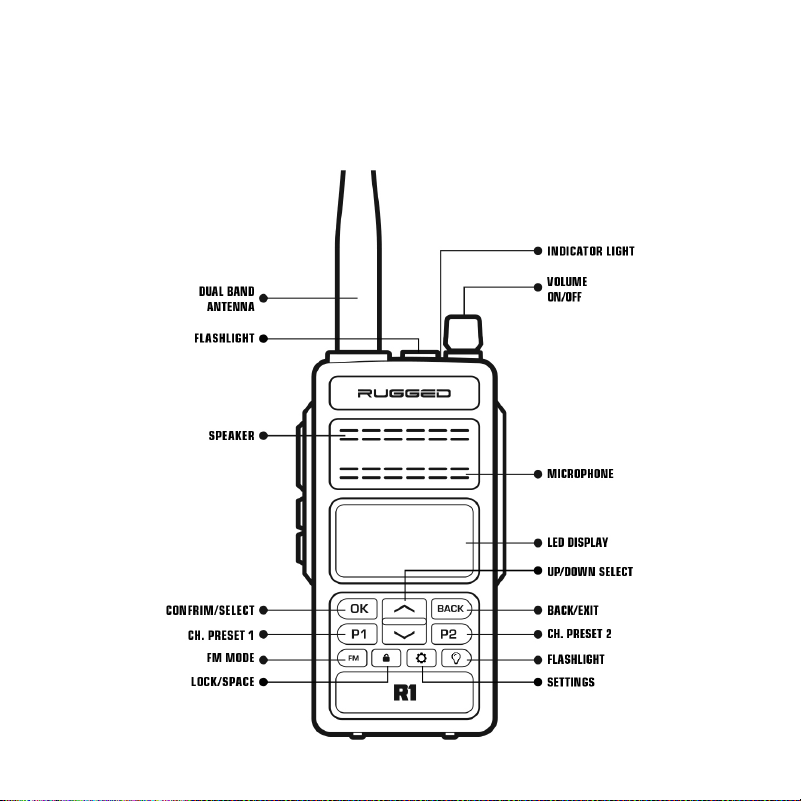
1. Align the two grooves of battery and the guide rail on the back of the aluminum shell,
ensure full contact and in parallel, then push the battery up to the radio base along the
rail on the back of the aluminum shell, until the battery latch locks up.
2. To remove the battery, please make sure the radio is off, push the battery latch down,
and make sure the radio and battery is on the releasing state, and then push the
battery out from the radio.
BATTERY PACK
Align the two holes of belt clip and the two holes of the radios, fix them with the supplied
M2.5x5 screws. Loosen the screw set to remove belt clip.
BELT CLIP
EXTERNAL MICROPHONE/SPEAKER
Open the cover of the microphone/speaker jack and insert the microphone/speaker plugs
into the jack.
• Using the external headset or mic/speaker will affect the water-tightness
performance of radio.
10
GETTING ACQUAINTED
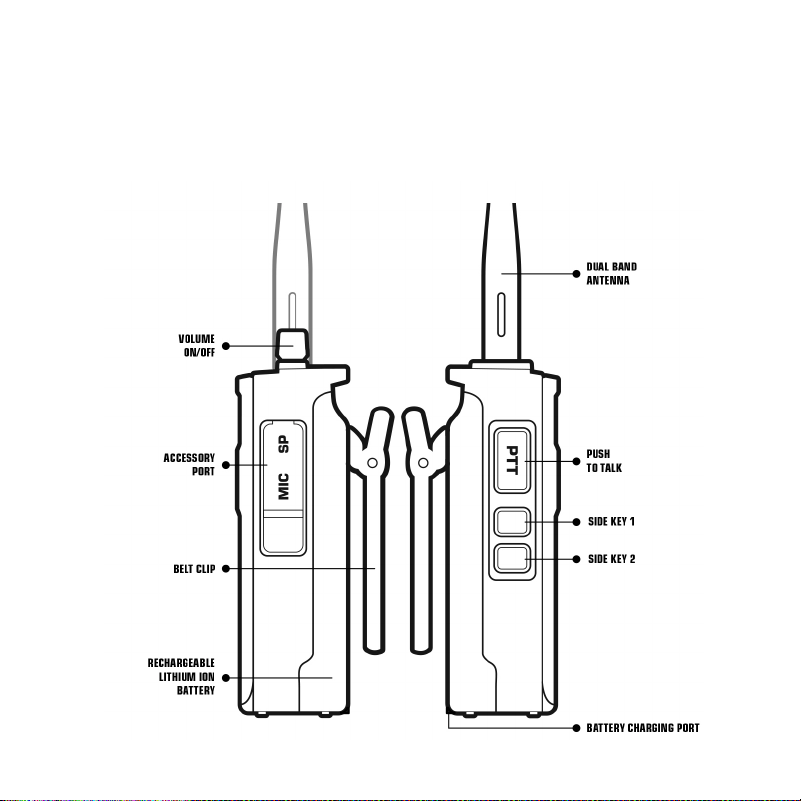
FRONT PANEL OPERATION
11
SIDE PANEL OPERATION
GETTING ACQUAINTED

12
OPERATION
GETTING ACQUAINTED
2-PIN MIC/ACCESSORY PORT
The jack provides connection points for microphone input, audio output, and program cable.
PUSH-TO-TALK (PTT)
Press it to transmit and release it to receive after your transmission is completed.
CHANGING CHANNELS
Use [ ] to scroll through the channels until you have reached your desired channel. To
avoid accidental changes, always lock.
FLASHLIGHT
Hold [ ] and quick-press [ ] to turn flashlight on and off.
SETTINGS
Long-press [ ] to open settings menu. When dual monitor is activated, quick-press [ ] to
switch between channel A and channel B.
SIDE KEY 1
Press and hold to view battery voltage.
SIDE KEY 2
Press and hold to monitor a channel by temporarily changing the squelch to zero allowing
you to hear very weak signals.

13
BACK
Exit
LOCK
Long-press to lock and unlock the radio.
P1 SETTING
Channel 1 in active zone.
P2 SETTING
Channel 2 in active zone.
OK
Confirm
FM RADIO MODE
Long-press [FM] to activate FM radio mode. Use [ ] to scroll through the channels until
you have reached your desired channel. Quick-press [BACK] to exit FM radio mode.
GETTING ACQUAINTED
OPERATION
14
GETTING ACQUAINTED
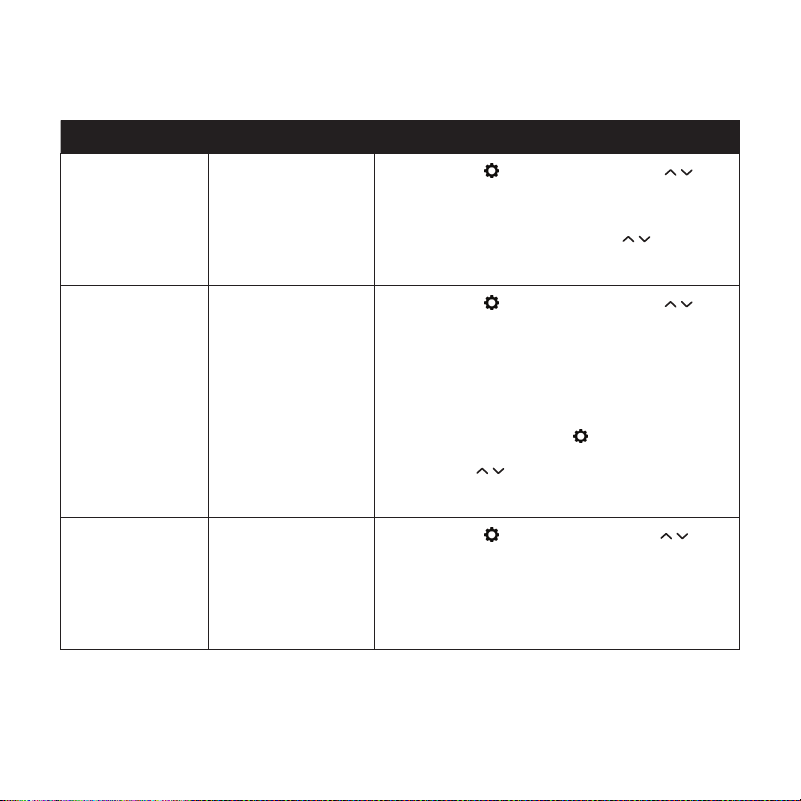
MENU
Menu Item Function Operation
Zone Selection
Select your active
zone.
Long-press [ ] to open menu. Use [ ]
to scroll to Zone and press [ OK ] to accept.
Press [ OK ] to select On. Use [ ] to scroll
to desired zone and press [ OK ] to accept.
Scan
Scan for signals in
every channel in
the current zone.
Long-press [ ] to open menu. Use [ ]
to scroll to SCAN and press [ OK ] to accept.
Press [ OK ] to select On.
To exit scan, long-press [ ] to open settings
menu. Use [ ] to scroll to SCAN and press
[ OK ] to accept. Press [ OK ] to select Off.
Message
(Only Shown
When Selected
Zone is Digital)
Send, receive,
and manage text
messages.
Long-press [ ] to open menu.Use [ ] to
scroll to Message and press [ OK ] to accept
15
GETTING ACQUAINTED
MENU
Menu Item Function Operation
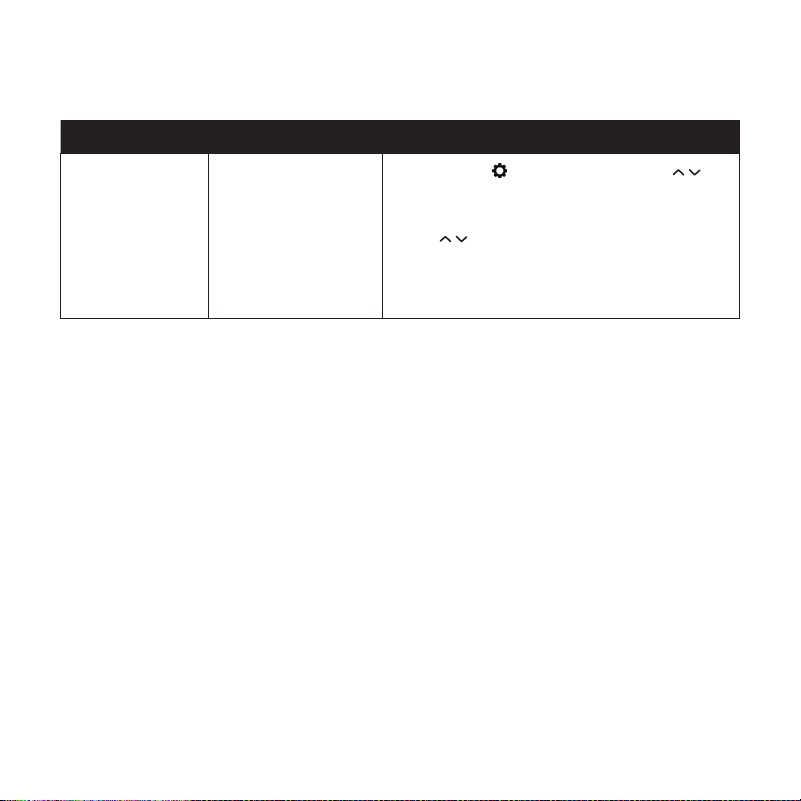
Setting
Access Radio
Settings and Radio
Info.
Long-press [ ] to open menu. Use [ ] to
scroll to Setting and press [ OK ] to accept.
Use [ ] to scroll to Radio Settings,
for settings, or Radio Info, for firmware
information. Press [ OK ] to accept.
16
GETTING ACQUAINTED
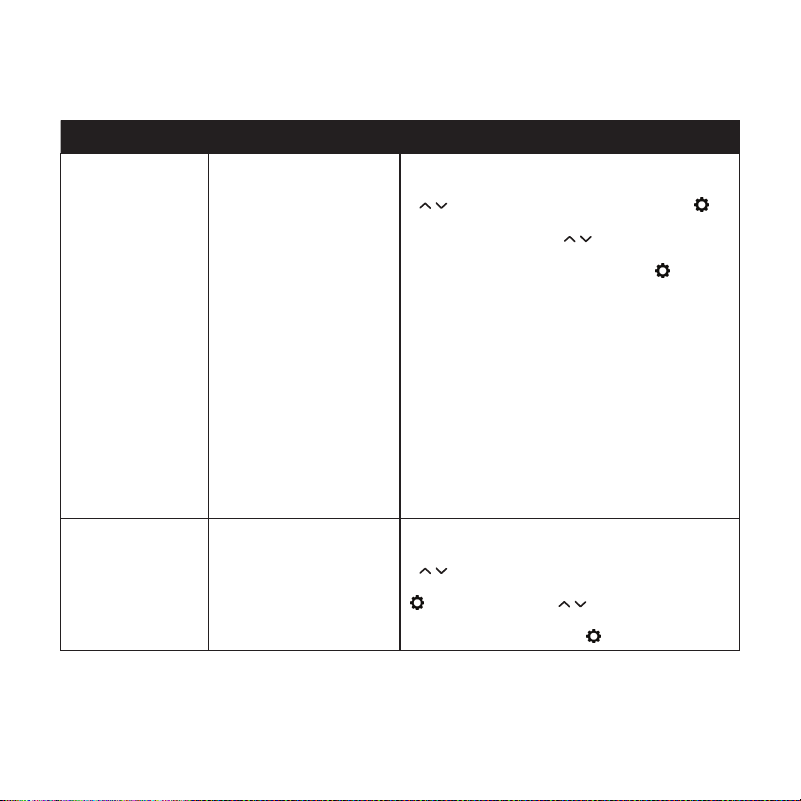
SETTINGS EXPANDED
Menu Item Function Operation
Squelch
Squelch system
allows you to mute
the background noise
when no signal is being
received. Not only is
the Squelch system
“standby” operation
more pleasant, it also
significantly reduces
battery current
consumption.
When in the Settings menu, use
[ ] to scroll to Squelch and press [ ]
to accept. Use the [ ] to scroll to the
desired Squelch level and press [ ] to
accept.
Dual Monitor
Dual Monitor will allow
you to monitor two
channels at once.
When in the Settings menu, use
[ ] to scroll to Dual Monitor and press [
] to accept. Use [ ] to select Turn On
or Turn Off then press [ ] to accept.
17
GETTING ACQUAINTED
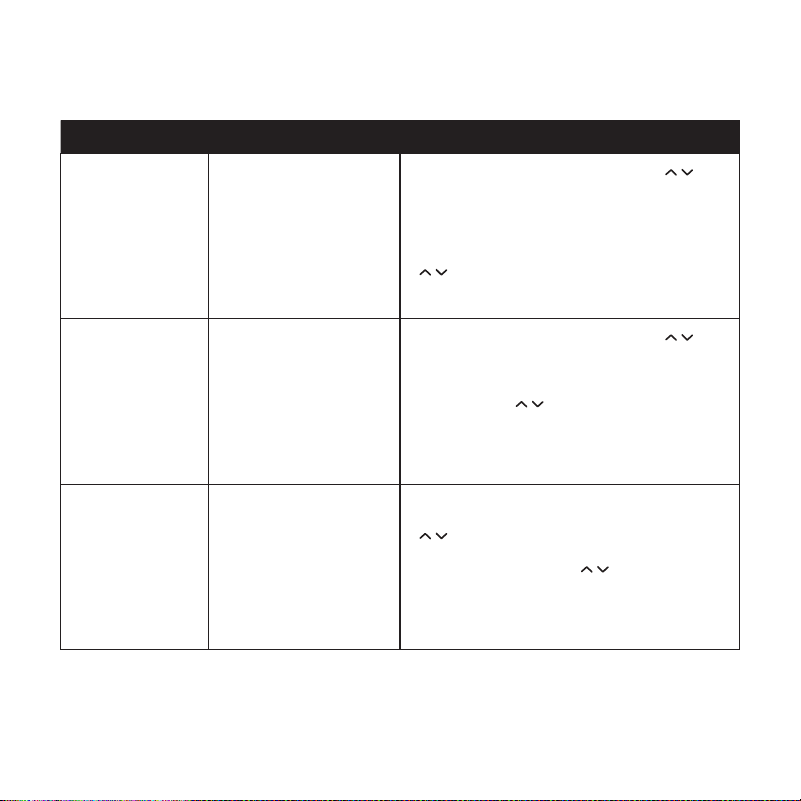
SETTINGS EXPANDED
Menu Item Function Operation
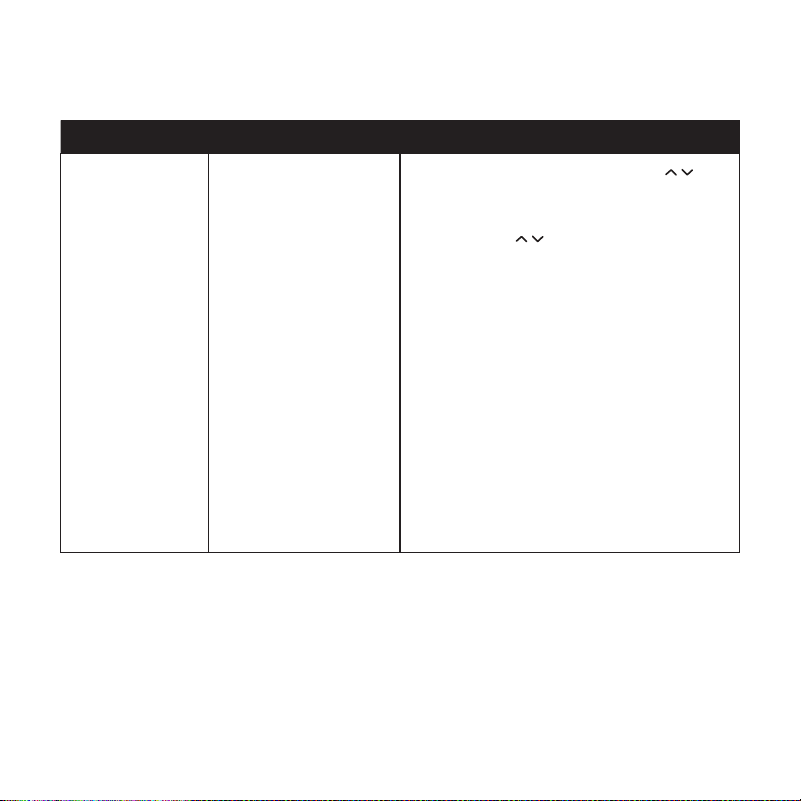
Beeps
Enable or disable
tones.
When in the Settings menu, use [ ] to
scroll to Beeps and press [ OK ] to accept.
Select All Tone press [ OK ] to accept. Use
[ ] to select On or Off and press [ OK ]
to accept.
Backlight
Set the Backlight
setting.
When in the Settings menu, use [ ]
to scroll to Backlight and press [ OK ] to
accept. Use [ ] to select the desired
backlight setting and press [ OK ] to
accept.
Auto Lock
Choose whether
to lock the radio
keypad manually or
automatically.
When in the Settings menu, use the
[ ] to scroll to Auto Lock and press
[ OK ] to accept. Use [ ] to select:
Manual, 5S, 10S, or 15S and press [ OK ]
to accept.
18
GETTING ACQUAINTED
SETTINGS EXPANDED
Menu Item Function Operation
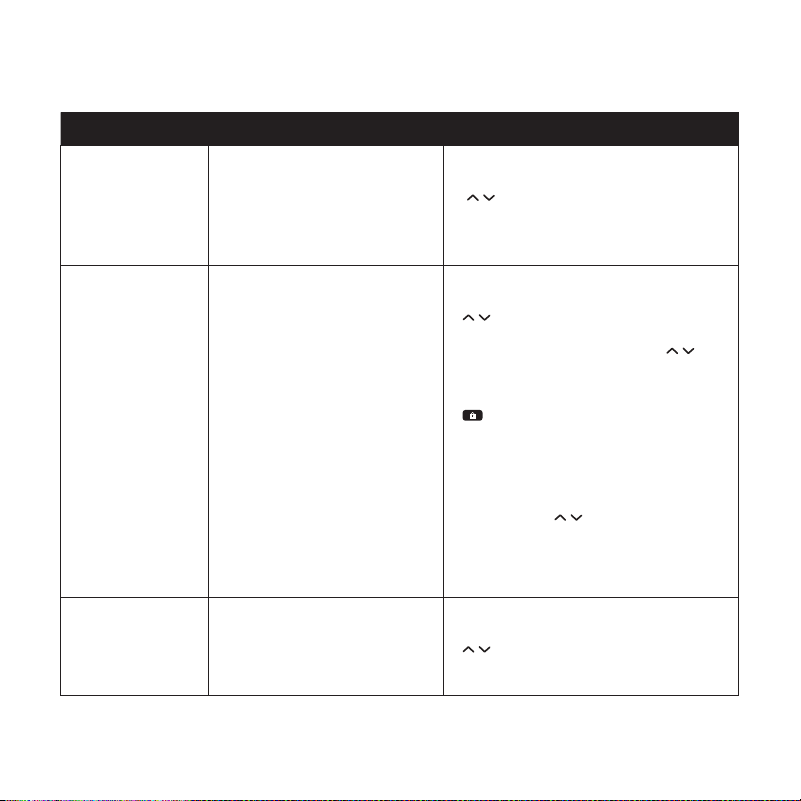
Mic Level
Adjust microphone
sensitivity.
When in the Settings menu, use [ ]
to scroll to Mic Level and press [ OK ] to
accept. Use [ ] to select the desired
microphone sensitivity level and press
[ OK ] to accept.
Default sensitivity setting is 2.
Analog: 0 is the least sensitive setting and
6 is the most sensitive setting.
Digital: 0 is the least sensitive setting and
4 is the most sensitive setting.
19
GETTING ACQUAINTED
MESSAGES EXPANDED
Menu Item Function Operation
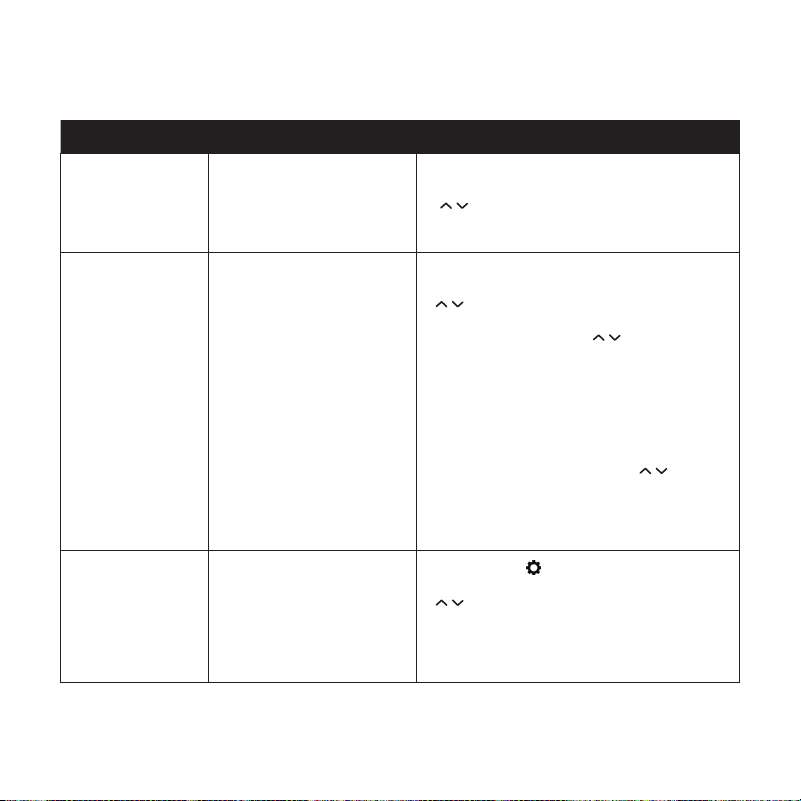
Inbox
All recieved text messages
will be stored here.
When in the Messages menu, use
[ ] to scroll to Inbox and press
[ OK ] to accept.
New Message
Write and send text
messages.
When in the Messages menu, use
[ ] to scroll to New Message and
press [ OK ] to accept. Use [ ] to
select your symbols or letters. Use
[ ] to advance spaces and [ BACK
] to backspace. Review the drafted
text message then press [ OK ] to
accept. Use [ ] to select Send,
Save, or Clear then press [ OK ] to
accept.
Outbox
All sent text messages will
be stored here.
When in the Messages menu, use
[ ] to scroll to Outbox and press
[ OK ] to accept.
20
GETTING ACQUAINTED
MESSAGES EXPANDED
*Enabled via software available from RT Systems.
Menu Item Function Operation
Draft
All text messages saved
as draft will be stored
here.
When in the Messages menu, use
[ ] to scroll to Draft and press [ OK
] to accept.
Quick Text
Choose from
pregrogammed text
messages to send
or send your own
programmed quick
texts.*
When in the Messages menu, use
[ ] to scroll to Quick Text and press
[ OK ] to accept. Use [ ] to scroll
to the desired, preprogramed, text
message and press [ OK ] to accept.
Review the selected text message then
press [ OK ] to accept. Use [ ] to
select Send, Save, or Clear then press
[ OK ] to accept.
Message
(Only Shown
When Selected
Zone is Digital)
Send, receive, and
manage text messages.
Long-press [ ] to open menu. Use
[ ] to scroll to Message and press
[ OK ] to accept
21
SPECIFICATIONS
GENERAL
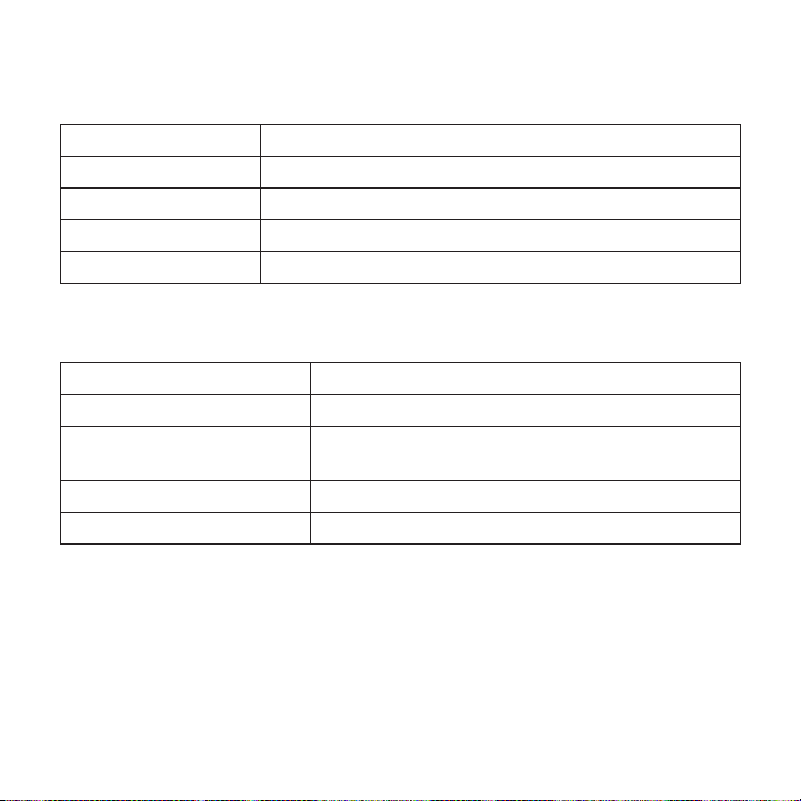
Frequency Range 136-174 & 400-480MHz
Operating voltage DC 7.4 V ±10%
Operating temperature -10
o
C to +40
o
C
Antenna Impedance 50Ω
Duty cycle 5/5/90%
TRANSMITTER
RF Output Power ≤5 W /1W
FM Modulation [email protected]
4FSK Digital Mode
[email protected] (Date only)
[email protected] (Date +Voice)
Spurious Emission -36dBm<1GHz , -30dBm>1GHz
Adjacent Channel Power 60dB @ 12.5KHz
22
RECEIVER
Receive Sensitivity 0.25μV (12dB SINAD)
Channel spacing 12.5KHz
Adjacent Channel Selectivity ≥55dB
Inter Modulation and Rejection ≥55dB
Conducted Spurious Emission ≤-57dB
Rated Audio Power Output 1W @16 Ωs
Rated Audio Distortion ≤5%
SPECIFICATIONS

23
NOTES

WWW.RUGGEDRADIOS.COM