GB
Version 1
U7HD
02
GB
1
4 5 6 7 9 10 11 12 138
2 3
14
15
16
17
18 2019
03
GB
HD Radio™ Technology manufactured under license from
iBiquity Digital Corporation, a subsidiary of Xperi Inc., U.S.
and Foreign Patents. For patents see https://xperi.com/
hd-radio-patents/. Xperi, HD Radio, HD, and ‘ARC’ logos
and their respective logos are trademarks or registered
trademarks of Xperi Inc. and its subsidiaries in the United
States and other countries.
The Bluetooth
®
word mark and logos are registered
trademarks owned by Bluetooth SIG, Inc. and any use of
such marks by SANGEAN ELECTRONICS INC. is under
license.
1. Important safety instructions
1. Read these instructions.
2. Keep these instructions.
3. Heed all warnings.
4. Follow all instructions.
5. Do not use this apparatus near water.
6. Clean only with dry cloth.
7. Do not block any ventilation openings. Install in
accordance with the manufacturer’s instructions.
8. Do not install near any heat sources such as radiators,
heat registers, stoves, or other apparatus (including
ampliers) that produce heat.
9. Do not defeat the safety purpose of the polarized or
grounding type plug. A polarized plug has two blades
with one wider than the other. A grounding type plug
has two blades and a third grounding prong. The wide
blade or the third prong are provided for your safety. If
the provided plug does not t into your outlet. Consult
an electrician for replacement of the obsolete outlet.
10. Protect the power cord from being walked on or
pinched particularly at plugs, convenience receptacles,
and the point where they exit from the apparatus.
11. Only use attachments / accessories specied by the
manufacturer.
12. Use only with the cart, stand, tripod,
bracket, or table specified by the
manufacturer, or sold with the apparatus.
When a cart is used, use caution when
moving the cart / apparatus combination
to avoid injury from tip-over.
13. Unplug this apparatus during lightning storms or when
unused for long periods of time.
14. Refer all servicing to qualified service personnel.
Servicing is required when the apparatus has been
damaged in any way, such as power-supply cord or
plug is damaged. liquid has been spilled or objects
have fallen into the apparatus, the apparatus has
been exposed to rain or moisture, does not operate
normally, or has been dropped.
15. To Reduce the Risk of Fire or Electric Shock, Do not
Expose This Appliance To Rain or Moisture.
16. The Shock Hazard Marking and Associated Graphical
Symbol is provided on the rear of unit.
17. Apparatus shall not be exposed to dripping or
splashing and no objects filled with liquids, shall be
placed on the apparatus.
18. Excessive sound pressure on ear- and headphones
could impair the hearing ability. Higher setting that idle
on the equalizer leads to higher signal voltages on the
output for ear and headphones.
19. The power plug should be close to the radio, and
easy to be approached that during the emergency, to
disconnect the power from the radio, just unplug the
power plug from the AC power slot.
20. Where the MAINS plug or an appliance coupler is
used as the disconnect device, the disconnected
device shall remain readily operable.
21. The batteries shall not be exposed to excessive heat
such as sunshine, re or the like.
22. This apparatus is provided with protection against
splashing water and dust ingress (IP65).
For United States:
Cautions to the user
The changes or modifications not expressly approved by
the party responsible for compliance could void the user’s
authority to operate the equipment.
RF exposure statements
Radiation Exposure Statement:
The product comply with the FCC portable RF exposure
limit set forth for an uncontrolled environment and are
safe for intended operation as described in this manual.
The further RF exposure reduction can be achieved if the
product can be kept as far as possible from the user body
or set the device to lower output power if such function is
available.
Note:
This equipment has been tested and found to comply with
the limits for a Class B digital device, pursuant to part 15
of the FCC Rules.
These limits are designed to provide reasonable
protection against harmful interference in a residential
installation. This equipment generates, uses and can
radiate radio frequency energy and, if not installed and
used in accordance with the instructions, may cause
harmful interference to radio communications.
However, there is no guaranty that interference will not
occur in a particular installation. If this equipment does
cause harmful interference to radio or television reception,
which can be determined by turning the equipment
off and on, the user is encouraged to try to correct the
interference by one or more of the following measures:
● Reorient or relocate the receiving antenna.
● Increase the separation between the equipment and
receiver.
● Connect the equipment into an outlet on a circuit
dierent from that to which the receiver is connected.
● Consult the dealer or an experienced radio / TV
technician for help.
04
GB
CAUTION:
These servicing instructions are for use by qualified
service personnel only. To reduce the risk of electric
shock, do not perform any servicing other than that
contained in the operating instructions unless you are
qualified to so.
Important information about charging and
using rechargeable batteries
1. Recharge the batteries in any case at least every 2
months, or as needed.
2. Make sure the Battery Select switch inside the battery
compartment is set to the “NiMH” position.
3. Put the batteries in the compartment while paying
attention to the correct polarity of the batteries (+ and -).
4. First use: Charge new batteries in one continuous,
uninterrupted, charge until they are full. This first
charge may take longer than normal. For longer
battery life it is advised to always recharge in one
continuous, uninterrupted charge until batteries are full
and to not recharge again when the batteries are still
full, to avoid damaging the unit.
5. New batteries will only reach their full capacity after
some time of use (several charge and discharge
cycles).
6. Leave the complete group of batteries in place inside
the radio and do not use these batteries or a few
of them for other purposes. This will result in a mix
of (fully) charged and (partly) empty batteries. This
can seriously damage the batteries and radio when
recharged.
7. It is advised to only charge batteries at room
temperatures between 5 degrees C – 35 degrees C.
In lower or higher temperatures full charge cannot be
achieved.
8. Depending on the capacity of the batteries, charging
from “empty” to “full” can take several hours, even up
to 10 hours or more.
9. Do not charge batteries when the radio is hot or
exposed to heat or heat sources.
10. It is advised to clean the metal contacts of the
batteries and of the charger inside the radio.
11. Do not use a mix of old and new rechargeable
batteries.
12. Do not use a mix of rechargeable and non-
rechargeable batteries.
13. Do not use a mix of full and empty rechargeable
batteries.
14. Do not use batteries that have a different mAh
capacity.
15. Do not use damaged, deformed or leaking batteries.
16. Battery level indicator is an approximate indication
only and can vary with battery type that is used.
17. Batteries can become hot during charging.
18. In cold conditions the capacity of batteries will
become much lower than when used at normal room
temperature.
19. Batteries (even when supplied with the radio), as
being consumables, do not fall under the warranty
conditions of the radio.
20. Batteries should not be disposed of by incineration
and with household waste.
21. Disposable batteries should be taken to a suitable
recycling center if possible.
22. Caution: Danger of explosion if battery is incorrectly
replaced. Replace only with the same or equivalent
type.
23. It is advised to use rechargeable NiMH batteries of
model number LEXEL / D10000 or non-rechargeable
size “D” batteries or the same specifications of the
consumer grade, non-rechargeable carbon-zinc or
alkaline batteries.
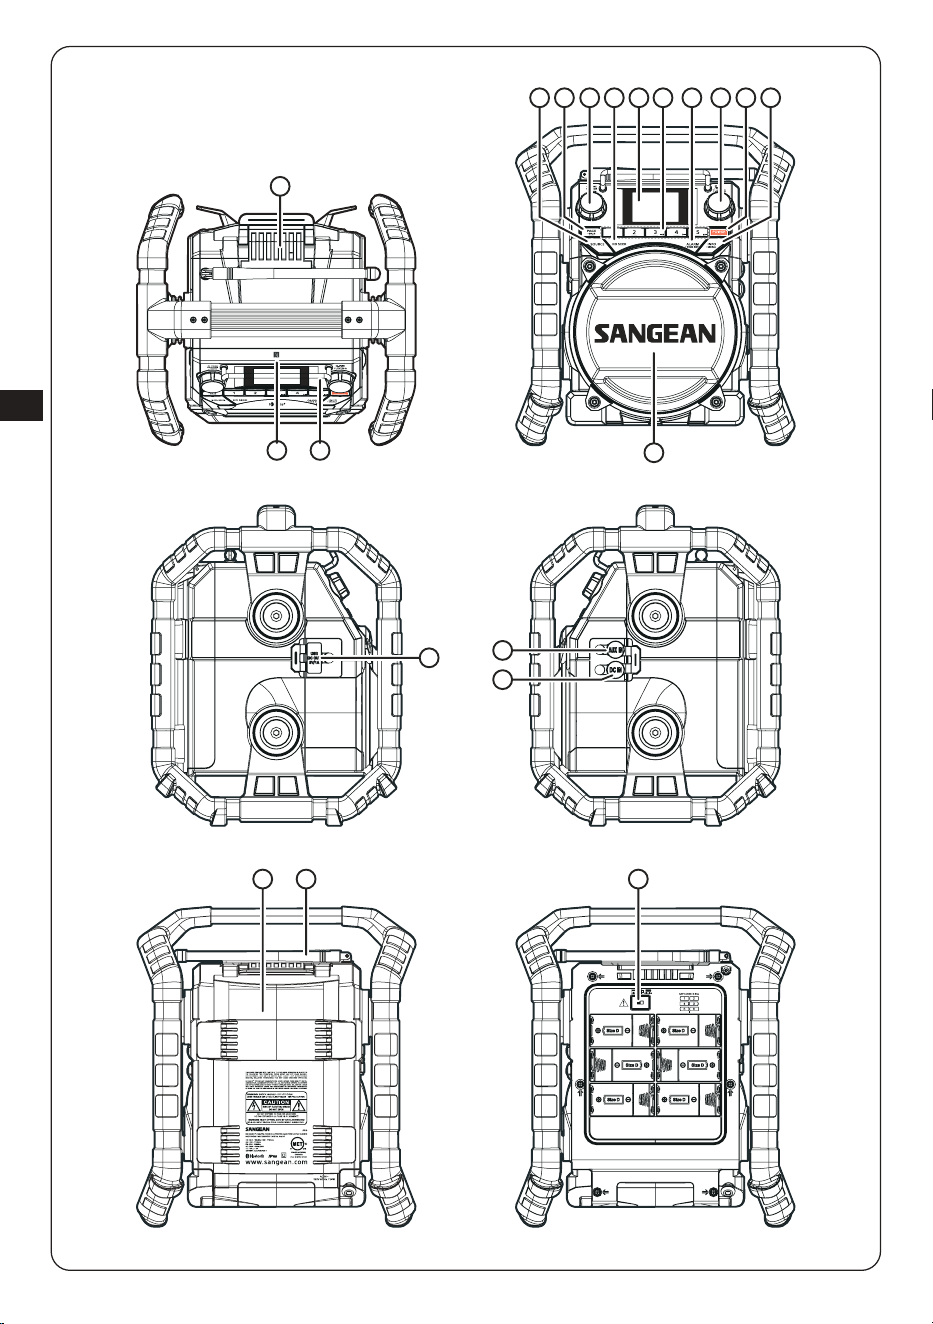
2. Introduction
Overview of the main unit
1
Battery compartment locking mechanism
2
NFC detection area
3
Display protection bar
4
Source button
5
Page / Bluetooth pairing button
6
Tone / Volume button
7
HD Seek button
8
LCD Display
9
Preset buttons
Preset 1 button
Preset 2 button
Preset 3 / Previous track / Rewind button
Preset 4 / Play / Pause button
Preset 5 / Next track / Fast forward button
10
Alarm / Time Set button
11
Seek / Select / Tuning button
12
Power button
13
Info / Menu button
14
Speaker
15
USB charging port
16
AUX IN socket
17
DC IN socket
18
Battery compartment
19
FM antenna
20
Battery switch
3. Getting started
Positioning the radio
After unpacking the radio from the box, follow these
guidelines to find a suitable location for the radio:
05
GB
● Place the radio on a at, even surface such as a table.
● Do not place the radio near heat sources.
● Make sure there is sucient space available around the
radio for proper ventilation.
● Avoid placing the radio near appliances that can
interfere with Bluetooth reception.
Powering the radio
The U7HD can be powered using the AC power cord or
by using 6 x D size Alkaline or NiMH batteries.
Note: If the radio is turned on and there is no sound
output for 15 minutes, it will automatically turn off.
If needed, press and release the Power button to turn the
radio back on.
Battery operation
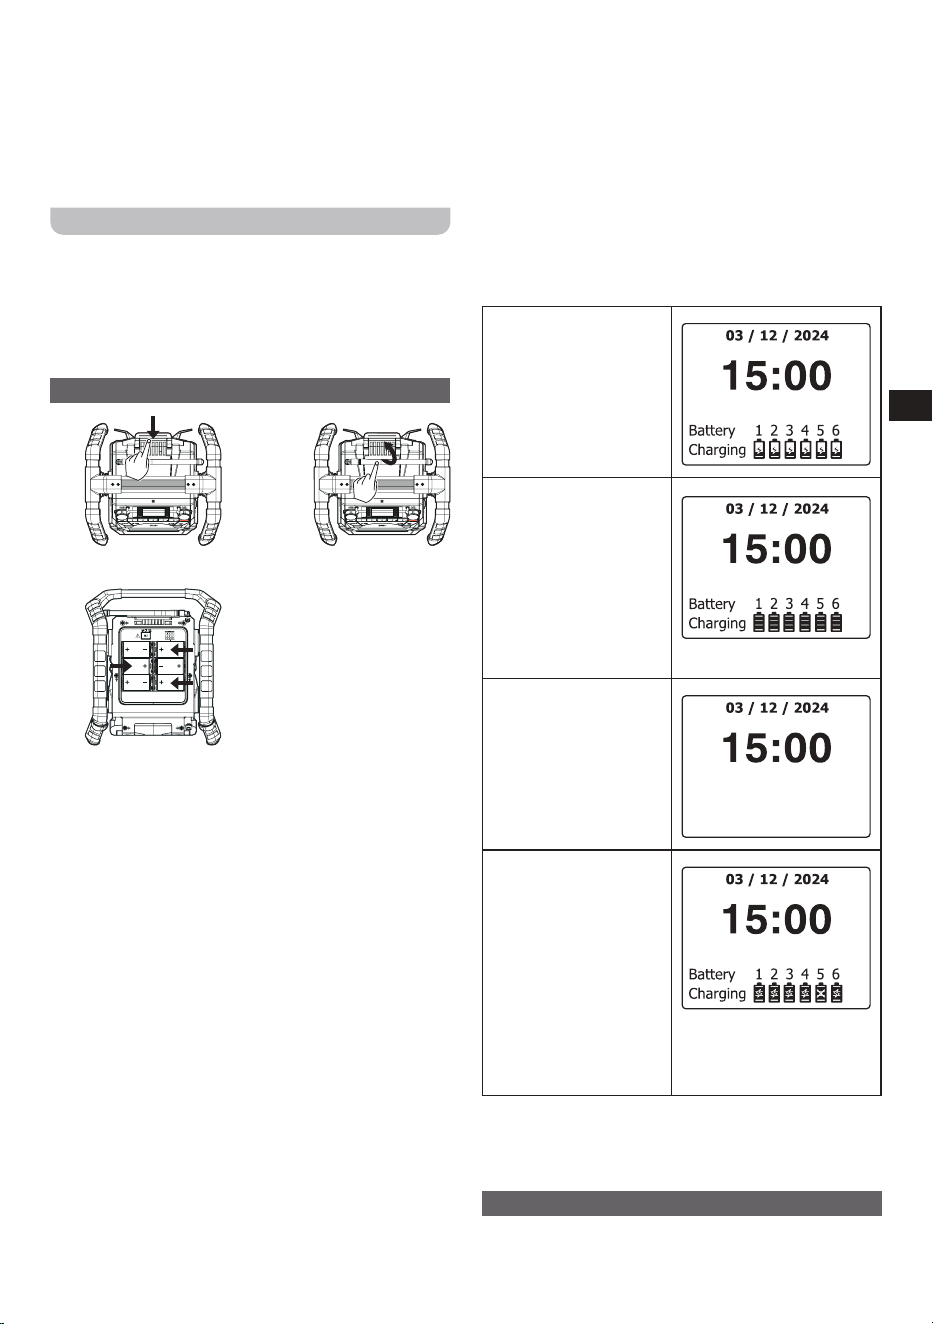
1. 2.
3.
The U7HD can be powered using 6 D size Alkaline or
NiMH batteries. The difference between these two types
of batteries is that Alkaline batteries cannot be recharged,
while NiMH batteries can be recharged. Insert the
batteries into the radio using these steps:
1. Push the latch at the back of the locking mechanism up
to unlock the locking mechanism.
2. After unlocking the locking mechanism, the front of
the mechanism will move towards the front of the
radio and can now be lifted. Lift the front of the locking
mechanism all the way up and then push it towards the
back of the radio to open the battery compartment.
3. Before inserting the batteries, make sure the battery
switch inside the battery compartment is placed in the
correct position (Alkaline or NiMH, corresponding to
your batteries).
4. Insert 6 x D size batteries into the battery compartment
with polarities as shown in the diagram inside the
battery compartment.
5. Close the battery compartment and lock the locking
mechanism by following steps 1 to 3 in reverse order.
When the radio is battery-powered, a battery indicator
will be shown in the top right corner of the radio’s display.
Replace or recharge batteries in time to make sure the
radio can be used without any interruption. In order to
recharge NiMH batteries, the radio must be connected to
the wall outlet using its power cable, and the radio must
be turned off.
Only NiMH batteries can be recharged. Always make sure
the battery switch inside the radio’s battery compartment
is in the correct position. If any Alkaline batteries have
been inserted into the battery compartment and the
battery switch is set in the NiMH position, or if batteries
have been inserted with reverse polarity, the radio will not
charge the batteries.
When charging batteries in the standby mode, the battery
indicator indicates the charging status:
The battery indicator
on the right will be
shown when charging
is in progress. A n
animation inside the
batteries indicates that
the batteries are being
charged.
The battery indicator on
the right will be shown
when the charging
process is completed.
The charging animation
is no longer being played
and the bars inside the
batteries indicate that
they have been fully
charged.
No battery indicator
will be shown when
there are no / missing
batteries in the battery
compartment or if
batteries have been
inserted with reverse
polarity.
The indicator on the right
will be shown when a
battery is detected as
faulty / damaged. A
cross will appear in the
battery icon under the
corresponding battery
number.
In this case, replace
the battery with a NiMH
battery that is in proper
working condition.
Note: Reduced power, distortion and a “stuttering sound”
or an empty battery symbol flashing on the radio’s display
are all signs that the batteries need to be replaced or
recharged.
AC operation
Before connecting the plug of the U7HD’s power cable to
a wall socket, please ensure that the voltage that the wall
socket supplies is within the supported range printed at

06
GB
the back of the radio’s battery compartment (120V~60Hz).
If this is the case, unwind the power cable from the AC
cable hook and insert the plug of the power cable into
the wall socket. If no wall socket with a matching voltage
range is available, an AC adapter with 12V / 1.2A (not
included) can be used and connected to the DC IN socket
of the radio.
If the radio is connected to the wall outlet, it will not
use any battery power and it can charge rechargeable
(NiMH) batteries that have been installed in the battery
compartment and USB devices that have been connected
to the USB charging port in the standby mode. When the
radio is not being used, use the AC cable hook to store
the radio’s power cord.
Note: If the radio is disconnected from the power source
and no batteries have been installed in the battery
compartment, the time and date will have to be set again.
This will be indicated by the “Change Clock” setup screen
on the radio’s display. Use the Tuning button to set the
time and date.
Navigating and using the radio menu
The radio menu can be opened from any mode, including
the standby mode.
To open the radio menu, press and hold the Info / Menu
button for 2-3 seconds until a beep is heard, then release
the button. The menu will appear on the radio’s display.
Next, rotate the Tuning button to select one of the menu
items, then press and release the Tuning button to
confirm your choice. While in the radio menu, press the
Info / Menu button at any time to close the menu.
The list below gives an overview of the default options
that can be selected when the menu is opened from the
standby mode. If the menu is opened from any of the
other radio modes, it will feature these options alongside
additional options specific to the selected mode. These
items will be listed in the section belonging to that specific
mode later in this manual.
[Change Clock]: Select this option to set the radio’s time
and date.
[Set 12 / 24 hour]: Select this option to choose between
the 12-hour and the 24-hour time format.
[Alarm]: Select this option to configure the alarms of the
radio. The U7HD features 2 alarms that can independently
be set and enabled or disabled. Refer to the section
“Setting and operating the alarms” in chapter 8 for more
information on how to configure the alarms.
[Set Sleep Time]: Select this option to configure the
radio’s sleep timer. The available options are [15 mins],
[30 mins], [45 mins], [60 mins], [90 mins], [120 mins],
[150 mins], and [180 mins]. After selecting a time, the
radio’s display will show the sleep time indicator and the
radio will turn off after the selected time has elapsed.
[Power On Dimmer]: Select this option to configure
the display brightness when the radio is turned on. The
available options are [Off] and [1]-[3].
[Standby Dimmer]: Select this option to configure the
display brightness when the radio is in standby mode.
The available options are [Off] and [1]-[3]. This setting
will only apply when the radio is connected to the mains.
When the radio is battery powered, the standby dimmer
will automatically be turned off, regardless of this setting,
to save battery power.
[Language]: Select this option to configure the language
in which the radio menus are displayed. The available
languages on the U7HD are [English] and [Español].
[Alert]: Select this option to enable or disable the radio’s
Emergency Alerts feature and defining a location for
Emergency Alerts using a state / county code or a zip
code.
[Alert Volume]: Select this item set the volume level for
Emergency Alerts. The alert volume can be set from [1]-
[32].
[EA History]: Select this option to see the last 5
Emergency Alerts that have been received.
[Factory Reset]: Select this option to reset the radio to
the default settings. Please note that selecting this item
and subsequently selecting [Yes] will reset the radio to its
factory settings and all information stored on the radio will
be deleted. This includes all settings and preset stations
stored in the radio’s memory.
[Host Version]: Select this option to view the radio’s
software version.
Note: If the radio receives no input for about 20 seconds
while in the menu, it will automatically exit the menu and
any changes to settings that were note saved will be lost.
Setting the time and date
To set the radio’s time and date, follow these steps:
1. Press and hold the Alarm / Time Set button for 2-3
seconds, then release it. Alternatively, open the radio
menu by pressing and holding the Info / Menu button
for 2-3 seconds until a beep is heard, then release it,
and select [Change Clock] to start setting the time and
date.
2. Rotate the Tuning button to select the desired hour
(the radio is using the 12-hour time format, keep
rotating Tuning button past the 12 o’clock hour to switch
between AM and PM), then press and release the
Tuning button to set the hour.
3. Rotate the Tuning button to select the desired
minutes, then press and release the Tuning button to
set the minutes.
4. The radio will now allow you to set the date. Rotate the
Tuning button to select the desired month, then press
and release the Tuning button to set the month.
5. Rotate the Tuning button to select the desired
day, then press and release the Tuning button to set
the day.
6. Rotate the Tuning button to select the desired
year, then press and release the Tuning button to set
the year.
7. After the time and date are set, the new time will
be displayed at the top of the radio’s display and the
radio will return to the selected mode.
Note: The time and date can also be set automatically
when receiving an FM radio station using RDS / RBDS
data and a CT signal. In this case, the option [RBDS
Auto CT] will be set to [Manual] and, as a result, the time
will no longer be automatically updated when the radio

07
GB
is tuned into an FM station using RDS / RBDS with CT
signals. Refer to the section “Additional items in the radio
menu” in chapter 4 for more information.
4. The AM / FM radio modes
Tuning into AM / FM stations
To tune into AM / FM radio stations, follow these steps:
1. Turn on the radio by pressing the Power button.
2. Select the AM radio mode or the FM radio mode by
repeatedly pressing the Source button.
3. Rotate the Tuning button clockwise or
counterclockwise and then press and release the
Tuning button to automatically scan for the next station
with a higher or lower frequency respectively.
4. After a station has been found, rotate the Tuning
button to ne-tune the frequency, if needed.
5. Rotate the Volume button clockwise or
counterclockwise to respectively increase or decrease
the volume as needed.
6. Repeat the steps 3 and 4 to tune into other radio
stations.
Notes:
(1) Before selecting the FM radio mode and tuning into
stations, make sure that the FM region is congured
correctly (refer to the next section in this chapter), that
the radio is placed in a good location, and that the
antenna at the back of the radio has been put in the
upright position.
(2) The radio’s built-in AM antenna should provide
sucient reception for normal listening. If AM reception
is poor, try rotating the radio for better reception.
(3) When the end of the frequency band is reached the
radio will resume tuning from the opposite end of the
frequency band.
Tuning into HD Radio™ stations
The U7HD is equipped with HD Radio Technology and is
capable of tuning into HD Radio stations on the AM / FM
band. To tune into digital HD Radio stations, follow these
steps:
1. Turn on the radio by pressing the Power button.
2. Select the AM / FM radio mode by repeatedly pressing
the Source button.
3. Rotate the Tuning button clockwise or
counterclockwise and then press the HD Seek button
to automatically scan for the next HD Radio station with
a higher or lower frequency respectively.
4. If more than one Multicast stations are found on the
same frequency, the radio will display the current
Multicast station and indicate more Multicast stations
are available by adding a plus symbol behind the
Multicast station number. “HD1+” for example, indicates
that the radio is tuned into Multicast station 1 and that
one or more Multicast stations are available on the
same frequency. Rotate and press the Tuning button
to switch between different Multicast channels on the
same frequency.
5. Rotate the Volume button to increase or decrease the
volume as needed.
6. Repeat steps 3 and 4 to tune into other HD Radio
stations.
Additional items in the radio menu
Both the AM radio menu and the FM radio menu contain
several additional items. Below is a list of these items for
each of the two modes.
AM radio
In the AM radio mode, the radio’s menu features two
additional items specific to this mode:
[Tuning Region]: Select this item to configure the radio’s
region for AM radio stations. The available options are as
follows:
● Region A, 522-1710 kHz, steps of 9kHz (Europe,
Australia).
● Region B, 520-1710 kHz, steps of 10kHz (US, Mexico,
Canada).
[HD Radio APS]: Select this item to automatically scan
for and preset HD Radio stations on the AM band. Refer
to the section “Automatically presetting HD Radio stations”
below for more information.
FM radio
In the FM radio mode, the radio menu features four
additional items specific to this mode:
[Tuning Region]: Select this option to configure the
radio’s region for FM radio stations. The available options
are as follows:
● Region A, 87.5-108.0 MHz, steps of 100kHz (US, most
countries).
● Region B, 87.5-107.9 MHz, steps of 200kHz (Mexico,
Canada).
● Region C, 87.5-108.0 MHz, steps of 50kHz (most
countries).
● Region D, 76.0-108.0 MHz, steps of 100kHz (Brazil,
Japan).
[HD Radio APS]: Select this item to automatically scan
for and preset HD Radio stations on the FM band. Refer
to the section “Automatically presetting HD Radio stations”
in this chapter for more information.
[RBDS Auto CT]: Select this item and set it to [Auto] to
allow the radio to automatically set its clock time when
it is tuned into an FM station using RDS / RBDS with
CT signals. Select [Manual] to ignore these signals and
set the clock time manually as described in the previous
chapter.
[Force Mono]: Select this item to enable or disable stereo
playback for FM broadcasts. Select [Mono] to force the
radio to play FM broadcasts in mono, or select [Stereo] to
allow the radio to play FM broadcasts in stereo. Forcing
mono may reduce hiss that can be audible when listening
to weak FM signals.
Note: The radio will display a stereo indicator when an
FM stereo broadcast is being played.

08
GB
Presetting AM / FM radio stations
The U7HD features 4 pages each containing 5 presets (for
a total of 20 presets) for both AM and FM radio stations.
To manually store a station as a preset on either band,
follow these steps:
1. Turn on the radio by pressing the Power button.
2. Select the AM / FM radio mode by repeatedly pressing
the Source button and tune into the required station as
previously described.
3. Select the desired preset page by repeatedly pressing
the Page button. The radio will show the selected page
and the 5 stations that have been stored on the page
on its display.
4. Press and hold the Preset button (1-5) of the
desired preset number for 2-3 seconds. The radio will
show a message indicating that the radio station has
been saved as a preset, for example “Preset P2 M4
stored” to indicate that the radio station has been stored
on page 2 as preset number 4.
5. Repeat this procedure as needed for the remaining
presets. Preset stations cannot be deleted, but they can
be overwritten by storing a new station on an already
used preset.
Recalling presets
To recall a preset, follow these steps:
1. Turn on the radio by pressing the Power button.
2. Select the AM / FM radio mode by repeatedly pressing
the Source button.
3. If the preset station was previously saved on the first
preset page, directly press the corresponding Preset
button (1-5). Otherwise, repeatedly press the Page
button to select the required page and use the Tuning
button to select the preset or press the corresponding
Preset button (1-5) after selecting the page.
4. The radio will now play the selected preset and the
radio station’s frequency will be displayed on the radio’s
display.
Showing station information on the display
RDS (Radio Data System) status
Your radio has a range of display options when in FM
mode.
Repeatedly press the Info / Menu button to cycle
through the following information on the radio’s display:
● Radio text
● Program type
● Signal strength
● Date
Note: The radio only displays information when there is
information available. If no RDS information is available,
the radio will be unable to display the program service (e.g.
station name), scrolling text and program type information.
HD Radio™ status
Press and release the Info / Menu button to cycle
through the various options.
● Radio text
● Program type
● Signal strength
● Date
Note: Some of the information in the list above may
only be available when the radio is tuned into HD Radio
stations or FM radio stations using RDS / RBDS.
5. The Bluetooth mode and TWS feature
In order to stream Bluetooth music to your radio, you need
to pair your Bluetooth device with your U7HD. Pairing
creates a ‘bond’ so two devices can recognize each other.
Pairing your Bluetooth device for the first
time
The radio can be paired to Bluetooth devices using
standard Bluetooth pairing or using NFC (Near Field
Communication) if your Bluetooth device supports NFC.
Below are the instructions for pairing your radio and
Bluetooth device using either method.
Standard Bluetooth pairing
To pair your Bluetooth device with the U7HD using
standard Bluetooth pairing, follow these steps:
1. Turn on the radio by pressing the Power button.
2. Repeatedly press the Source button to select the
Bluetooth mode. The radio’s display will rst show the
Bluetooth symbol and then the message “BT Pairing”.
The Bluetooth indicator at the bottom of the radio’s
display will blink to indicate that the radio is available for
Bluetooth pairing.
3. Enable Bluetooth on your Bluetooth device (refer to the
manual of the Bluetooth device if you are unsure about
how to enable Bluetooth).
4. Go to the Bluetooth list on your Bluetooth device and
select the device named “U7HD”.
Note: On some Bluetooth devices with Bluetooth
version 2.1 or earlier, you might be requested to enter a
passcode. If this is the case, enter the passcode “0000”.
5. After the devices have paired and connected, a
conrmation tone will be played on the radio, the radio’s
display will show the name of the connected Bluetooth
device, and the Bluetooth indicator in the bar at the
bottom of the radio’s display will stay lit. You can now
play music on your Bluetooth device and stream the
music through the radio’s speaker.
Bluetooth pairing using NFC
If your Bluetooth device supports NFC, pairing your
Bluetooth device with the radio is a bit easier:
1. Enable NFC on your Bluetooth device and make sure
the device’s screen is turned on and unlocked to allow
NFC to work.

09
GB
2. Gently touch the NFC detection area of the radio with
your Bluetooth device. The radio will automatically
switch to the Bluetooth mode to indicate it has detected
the Bluetooth device
.
The Bluetooth device will ask for
permission to pair with the radio
if this is the rst time
that the devices are being paired.
3. Allow the Bluetooth device to pair with the radio.
4. After the devices have paired and connected, a
conrmation tone will be played on the radio, the radio’s
display will show the name of the connected Bluetooth
device, and the Bluetooth indicator in the bar at the
bottom of the radio’s display will stay lit. You can now
play music on your Bluetooth device and stream the
music through the radio’s speaker.
5. To disconnect your Bluetooth device, simply
touch the NFC detection area of the radio again with
the device. The Bluetooth icon will then start ashing,
indicating that your radio is discoverable for pairing
again.
Notes:
(1) If 2 Bluetooth devices are pairing for the rst time, both
must search for your radio, it will show its availability
on both devices. However, if one device links with this
unit rst, then the other Bluetooth device won’t nd it
on the list.
(2) If you take your Bluetooth device out of range, the
connection between your device and the radio will be
temporarily disconnected. Your radio will automatically
reconnect if the Bluetooth device is brought back
into range. Be aware that during the period of
disconnection, no other Bluetooth device can pair or
link with your radio.
(3) If “U7HD” shows up in your Bluetooth device list, but
your Bluetooth device cannot connect with it, please
delete the item from your list and pair your Bluetooth
device with the radio again following the steps
described previously.
(4) The effective operation range between the radio
and the paired Bluetooth device is approximately 10
meters (30 feet). Any obstacle between the system
and the device can reduce the operational range.
(5) Bluetooth connectivity performance may vary
depending on the connected Bluetooth device. Please
refer to the Bluetooth capabilities of your device before
connecting it to your radio. Not all features may be
supported, depending on the Bluetooth device used.
(6) With some mobile phones, making / receiving
calls, text messages, e-mails or any other activities
unrelated to audio streaming may mute the Bluetooth
audio streaming or even temporarily disconnect
from your device. Such behavior is a function of the
Bluetooth device and does not indicate a problem with
your U7HD.
(7) The NFC feature can be used while the radio is in
standby mode. In this case, when the Bluetooth device
touches the NFC detection area on the radio, the radio
will automatically turn on and switch to the Bluetooth
mode.
Audio playback in the Bluetooth mode
When you have successfully connected your radio with
the chosen Bluetooth device you can start to play your
music using the controls on your connected Bluetooth
device.
1. The volume of Bluetooth playback can be controlled
both on your Bluetooth device and on the radio using
the Volume button.
2. Playback can also be controlled both using the controls
on your Bluetooth device and the controls on the radio.
Press the radio’s Play / Pause button to start / pause
playback, press the Next track button or Previous
track button to skip to the next or previous track
respectively, or press and hold the Fast forward button
or Rewind button to fast forward or rewind within a
track and release the button when the desired point is
reached.
Note: Not all player applications or devices may respond
to all of these controls.
Bluetooth display options
If your connected Bluetooth device can provide
information from the track being played, repeatedly press
the Info / Menu button to cycle through the following
information on the radio’s display:
● Track title
● Artist
● Album
● Date
Please note that the availability of information depends on
the specific media format.
Additional items in the radio menu
In the Bluetooth mode, the radio menu features one
additional item specific to this mode:
[Forget Device]: Select this item and then select [Yes] to
have the radio forget all previous Bluetooth devices it has
paired with.
[TWS]: Select this item to use the radio’s TWS (True
Wireless Stereo) feature. More information about this
feature can be found in the “The TWS feature” section
below.
Audio playback from a previously paired
Bluetooth device
The U7HD can memorize up to 6 sets of paired Bluetooth
devices. Once more than 6 devices are memorized, the
earliest device with which the radio was paired will be
overwritten in the radio’s memory.
If your Bluetooth source device has previously paired with
the U7HD previously, the radio will still remember your
Bluetooth device and attempt to reconnect with the device
that was last connected.

10
GB
Disconnecting your Bluetooth device
Press and hold the Bluetooth pairing button for 2-3
seconds to disconnect the radio from your Bluetooth
device. Alternatively, you can also press the Source
button to select any mode other than Bluetooth mode or
turn off Bluetooth on your Bluetooth device to disconnect.
If you disconnect using the Bluetooth device while the
radio is in the Bluetooth mode, a confirmation tone will
be played, and the radio’s Bluetooth indicator will start
blinking again to indicate that the radio is available for
pairing.
The TWS feature
You can use the radio’s TWS (True Wireless Stereo)
feature to connect your radio to a second U7HD radio and
play music via Bluetooth through two speakers.
Setting up the rst speaker
Make sure that the radio that acts as the first speaker is in
Bluetooth mode and available for pairing (not connected
to a Bluetooth device).
Setting up the second speaker
Make sure that the radio that acts as the second speaker
is in Bluetooth mode and not connected to a Bluetooth
device.
1. Press and hold the Info / Menu button for 2-3 seconds
to open the menu of the Bluetooth mode.
2. Rotate the Tuning button to select [TWS] and press
the Tuning button to conrm.
3. Rotate the Tuning button to select [Pair] and press the
Tuning button to conrm.
4. After the speakers have successfully connected,
the first speaker will display “Lead Stereo”, while the
second speaker will display “Follow Stereo”.
Notes:
(1) Set up the second speaker within 1 minute of the rst
one, otherwise the setting of the rst speaker will be
cancelled.
(2) When both speakers are connected to a Bluetooth
device, the TWS function cannot be set.
Audio playback using TWS
While using the TWS feature, audio playback can be
controlled on either speaker or on the Bluetooth device.
The controls are identical to the controls in the Bluetooth
mode, for more information refer to the section “Audio
playback in the Bluetooth mode” above.
Note: In the TWS mode, the volume, bass, treble,
and loudness settings are synchronized between both
speakers, so when one of these settings is changed on
either of the speakers, it will also be changed on the other.
Switching the TWS audio mode
When using the TWS feature, each of the speakers can
be configured as a left speaker, a right speaker or a stereo
speaker. Follow these steps to configure the TWS audio
mode:
1. Press and hold the Info / Menu button for 2-3 seconds
then release to open the menu of the Bluetooth mode.
2. Rotate the Tuning button to select [TWS], then press
and release the Tuning button to conrm.
3. Rotate the Tuning button to select [L / R], then press
and release the Tuning button to conrm.
4. Rotate the Tuning button and select [Left], [Right], or
[Stereo], then press and release the Tuning button to
conrm.
● [Stereo] mode: Both speakers play the same sound
(default setting).
● [Left] / [Right] mode: One speaker plays the sound
on the left channel, while the other speaker plays
the sound on the right channel for stereo playback
between the speakers.
Disconnecting the TWS connection
To disconnect the TWS connection between two speakers,
follow these steps:
1. Press and hold the Info / Menu button for 2-3 seconds
then release to open the menu of the Bluetooth mode.
2. Rotate the Tuning button to select [TWS], then press
and release the Tuning button to conrm.
3. Rotate the Tuning button to select [Cancel], then
press and release the Tuning button to conrm.
7. The AUX IN mode
Using the auxiliary input socket
You can listen to the sound of an external device through
the U7HD’s speaker. To do this, follow these steps:
1. Connect the external device (such as iPod, MP3 player
or CD player) to the radio’s AUX IN socket using a
3.5mm audio cable (not supplied).
2. Make sure both the radio and the external device are
turned on.
3. Repeatedly press the Source button to select the AUX
IN mode.
4. The audio output of the external device will now be
played through the speaker of the U7HD. Adjust the
volume on the external device to ensure an adequate
volume level and then use the radio’s Volume button
as needed to adjust the volume to a comfortable level.
8. Other Features
Setting and operating the alarms
The U7HD features 2 alarms, which can be set in any of
the radio’s modes.
Setting alarms
To set an alarm, follow these steps:
1. Press and release the Alarm / Time Set button or,
alternatively, press and hold the Info / Menu button for
2-3 seconds and select [Alarm] from the radio’s main
menu.

11
GB
2. The radio’s display will show whether alarm 1 and alarm
2 have been enabled and, if so, show the time at which
the alarm will activate. To change the setting for alarm 1
or alarm 2, select the alarm, then press and release the
Tuning button.
3. Select the [Enable] option to congure when the alarm
should be activated. After enabling the alarm, you can
choose [Daily], [Once], [Weekdays], [Weekends] or
[O].
4. Select the [TIME] option to configure the time of the
alarm. Rotate the Tuning button to select the hour and
minutes for the alarm and press the Turning button to
conrm your selection.
5. Select the [Source] option to configure the alarm
source. The available options are [Buzzer], [AM] and
[FM]. If [Buzzer] is chosen in this step, proceed to
step 8.
6. If [AM] or [FM] is chosen in step 6, the menu will
include the [Preset] option. This option is by default
set to the last listened radio station. It can be changed
into any of the preset radio stations by selecting it using
the Tuning button and changing it to one of the radio
presets in the radio’s memory.
7. Next, the alarm volume must be configured. Select
[Volume] and rotate the Tuning button to select the
desired alarm volume from [1] to [7], and press the
Tuning button to conrm your choice.
8. Finally, the [Save] option should be selected to save
your settings. After the [Save] option has been selected
using the Tuning button, the radio display will show a
message indicating that the alarm has been saved (e.g.
“Alarm 1 Saved”).
Snoozing or stopping alarms
When an alarm is activated, it will start softly and gradually
increase in level (Humane Wake System) and remain
active for 60 minutes.
An alarm indicator will be shown on
the left side of the radio’s display. Alarms can be stopped
by pressing Power button, or snoozed for 5 minutes
by pressing or rotating any other button. The remaining
snooze time will be shown on the radio’s display.
For AM / FM radio alarms, the Volume button can be
used to control the alarm’s volume.
Setting the sleep timer
The U7HD also features a sleep timer, which can be set
by following these steps:
1. Press and hold the Info / Menu button for 2-3 seconds
then release, use the Tuning button to select [Set
Sleep Time] from the radio’s main menu.
2. Rotate the Tuning button to select the desired sleep
time (15-180 minutes), then press and release the
Tuning button to conrm the sleep time.
3. After setting a sleep timer, the sleep indicator and
remaining time of the sleep timer will be shown on the
radio’s display.
4. To cancel a sleep timer, repeat step 1 and select [O]
in step 2.
Configuring the Emergency Alerts feature
Emergency Alerts (EA) is a warning system used by
broadcasters to notify listeners about potential hazardous
situations related to extreme weather, floods, and
infrastructure failures, amber alerts (child abductions), and
more.
The U7HD must be in a location that allows for adequate
reception of audio and data services and tuned into
a station that provides the Emergency Alerts. When
Emergency Alerts are enabled, the Emergency Alerts
feature allows audio and text-based alerts to be played or
displayed by the radio.
Alerts can awaken the radio from standby mode when it is
powered using the AC IN or DC IN socket.
Enabling Emergency Alerts
Emergency Alerts can be enabled in any of the radio’s
modes by following these steps:
1. Press and hold the Info / Menu button for 2-3 seconds
until a beep is heard, then release it. The menu will
appear on the display.
2. Rotate the Tuning button to select [Alert], then press
and release the Tuning button to conrm your choice.
3. Rotate the Tuning button to select [On], then press
and release the Tuning button to conrm your choice.
4. The radio will now ask if you want to dene a location.
Select [On] to dene a location, so that the radio will
only show local Emergency Alerts. Alternatively, select
[O] to skip dening a location, so all the alerts that are
broadcast within the radio’s range will be received. If
[O] is selected, conguring this feature is completed
and the remaining steps can be skipped.
5. The radio will now allow you to select a location preset.
The U7HD has 10 location presets that allow you to
easily switch between locations. Rotate the Tuning
button to select the desired location preset, then press
and release the Tuning button to conrm your choice.
6. Next, rotate the Tuning button to select either of the
following options to provide location data:
● [State / County]: After selecting and confirming
this option, rotate and press the Tuning button to
subsequently select and conrm a state and a county,
and proceed to step 7.
● [Zip]: After selecting and confirming this option,
rotate and press and release the Tuning button to
enter the digits of a US ZIP code one by one from left
to right, and proceed to step 7.
● [O]: After selecting and conrming this option, the
current preset is disabled. You can now proceed to
step 7.
7. Finally, rotate the Tuning button to select [Save] to
save the congured settings. Then press and release
the Tuning Button. The radio will display the message
“Saved” to indicate that the settings have been saved.
If you do not want to save the settings, press the Info /
Menu button instead to close the radio menu.
12
GB
Snoozing and ignoring Emergency Alerts
Once an Emergency Alert is triggered, it will remain on the
display until the user snoozes or ignores the Emergency
Alert by pressing a button. An Emergency Alert can be
snoozed for 10 minutes by pressing any of the radio’s
buttons other than the Power button, while it can be
ignored for 12 hours by pressing the Power button.
Emergency Alerts that have been snoozed or ignored
can still be viewed in [EA History] in the radio menu. If a
new Emergency Alert is received, however, the snooze or
ignore will be cancelled immediately.
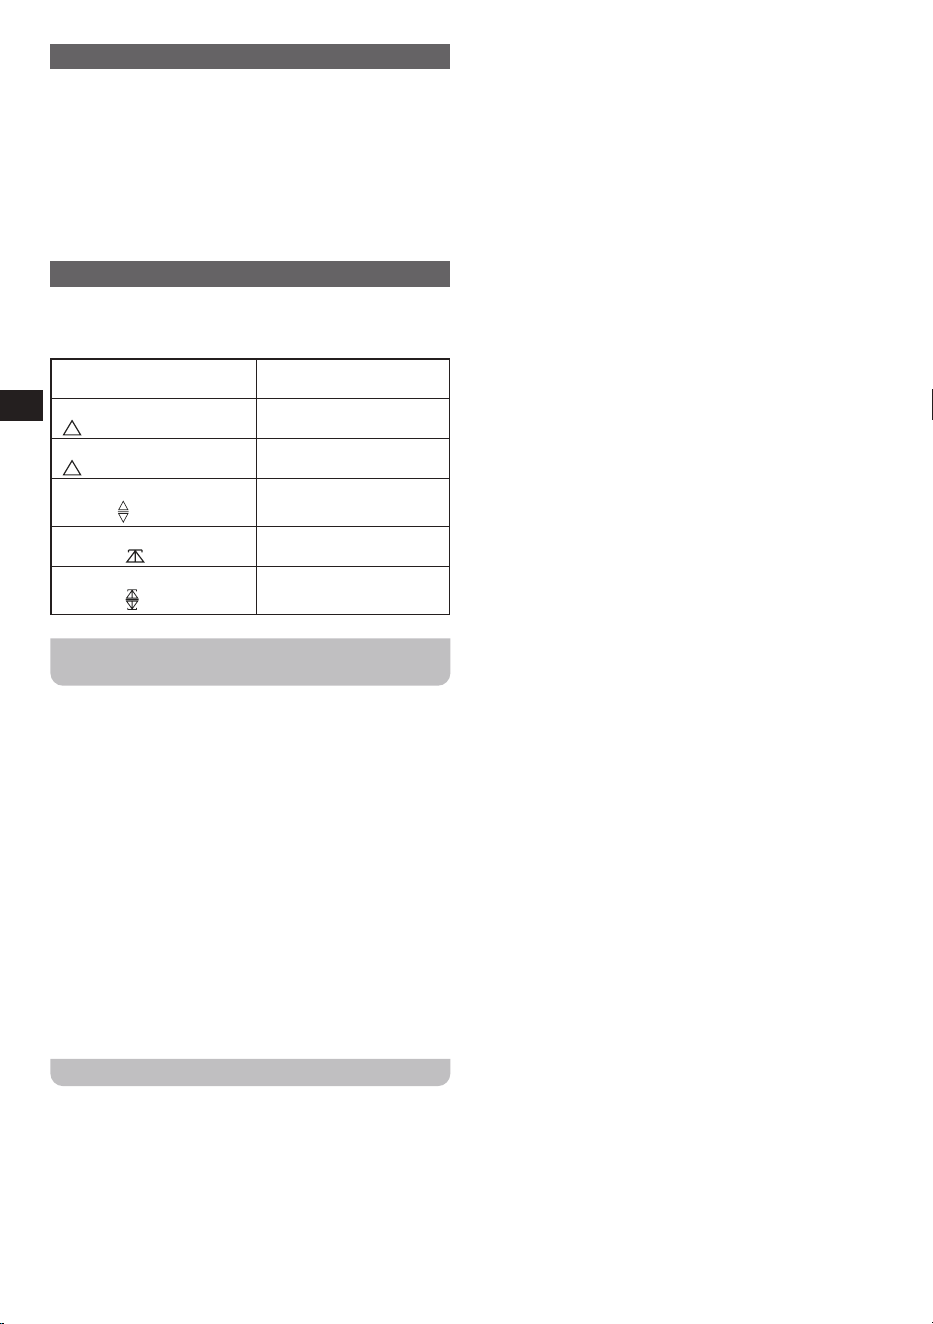
Alert indicator
In several circumstances, the U7HD will display an alert
indicator in the text display area on the radio’s display.
Below is a list of the possible values of the alert indicator:
Exclamation mark (!)
Emergency Alerts feature
is disabled
Steady up-pointing triangle
(
)
Current station supports
Emergency Alerts
Flashing up-pointing triangle
(
)
Emergency Alerts
message “ignored”
Alternating up- down
triangle (
)
Emergency Alerts
message “snoozed”
Flashing up-pointing test
indicator (
)
Test Alerts message OK
and “ignored”
Alternating up-down test
indicator (
)
Test Alerts message OK
and “snoozed”
Setting the bass and treble levels and the
loudness feature
The U7HD allows you to configure the bass and treble
level of audio playback and comes with a loudness
feature to provide a sound boost. The features can be set
by following these steps:
1. Turn on the radio by pressing the Power button.
2. Press the Volume button to enter the menu for setting
the bass and treble levels, and loudness feature.
3. Rotate the Volume button to select [Loudness],
[Bass], or [Treble] and press the Volume button to
conrm your choice.
4. If [Bass] or [Treble] was selected in the previous step,
rotate the Volume button to select the desired level
(from [-5] to [5]) and then press the Volume button
to confirm, or if Loudness was selected, rotate the
Volume button to select [On] or [O] and then press
the Volume button to conrm.
Using the USB charging port
The U7HD is equipped with a USB charging port which
can be used for charging iPhones, smartphones or
similar devices. The charge time may vary and, in some
cases, it may take longer to charge than when using the
manufacturers charging unit supplied with the device.
Note: USB devices can only be charged when the radio is
powered using the AC IN or DC IN socket, the radio is in
standby mode and the radio is not charging any batteries.
If the radio is charging NiMH batteries, the charging of
USB devices will be temporarily suspended and will be
resumed once the NiMH batteries are fully charged.
IMPORTANT:
● The USB charging port has an output power of 5V / 1A.
It does not support external hard disk drives, and some
mobile phones or electronic devices.
● The USB charging port may not supply power to some
USB devices.
● Do not connect a power source to the USB charging
port. Otherwise, there is a risk of re. The USB port is
only intended for charging lower voltage devices.
● Do not insert a nail, wire, etc. into the USB charging
port. Otherwise, a short circuit may cause smoke or re.
● Do not connect the USB charging port to a USB port
of your PC, as it is highly possible that it may cause
damage to both units.
● Never use the USB charging port in rainy or moist
conditions to prevent moisture from entering the radio.
13
GB
8. Specifications
Frequency Coverage
FM 87.50-108 MHz
AM
520-1710 kHz (10kHz / step)
522-1710 kHz (9kHz / step)
AC Power AC 120V / 60Hz / 24W
Batteries 6 x UM-1 (D size)
Approx. Battery life
Speaker=100mW
The battery life is approx. 40hours when using alkaline battery
(12000mAh) / 4hours a day.
DC IN 12V / 1.2A center pin positive
Bluetooth
Bluetooth specification Bluetooth
®
Ver 5.0
Profile Support A2DP, AVRCP1.6
Bluetooth Audio CODEC SBC
Transmitting Power Specification Power Class 2
Line of sight range 10 meters / 30 feet
Output Power
4W 10% T.H.D. @ 100Hz @ DC battery 9V
7W 10% T.H.D. @ 100Hz @ AC 120V
Aux in socket 3.5mm diameter, stereo jack to be mixed as monaural
Input sensitivity 300m Vrms at output 7W @ 100Hz
Input impedance 47kohm
Maximum supplying power of USB socket 5V / 1A
Speaker unit 6.5inches 8ohm 15W, full range
Antenna system
FM bended spring antenna
AM built-in ferrite antenna
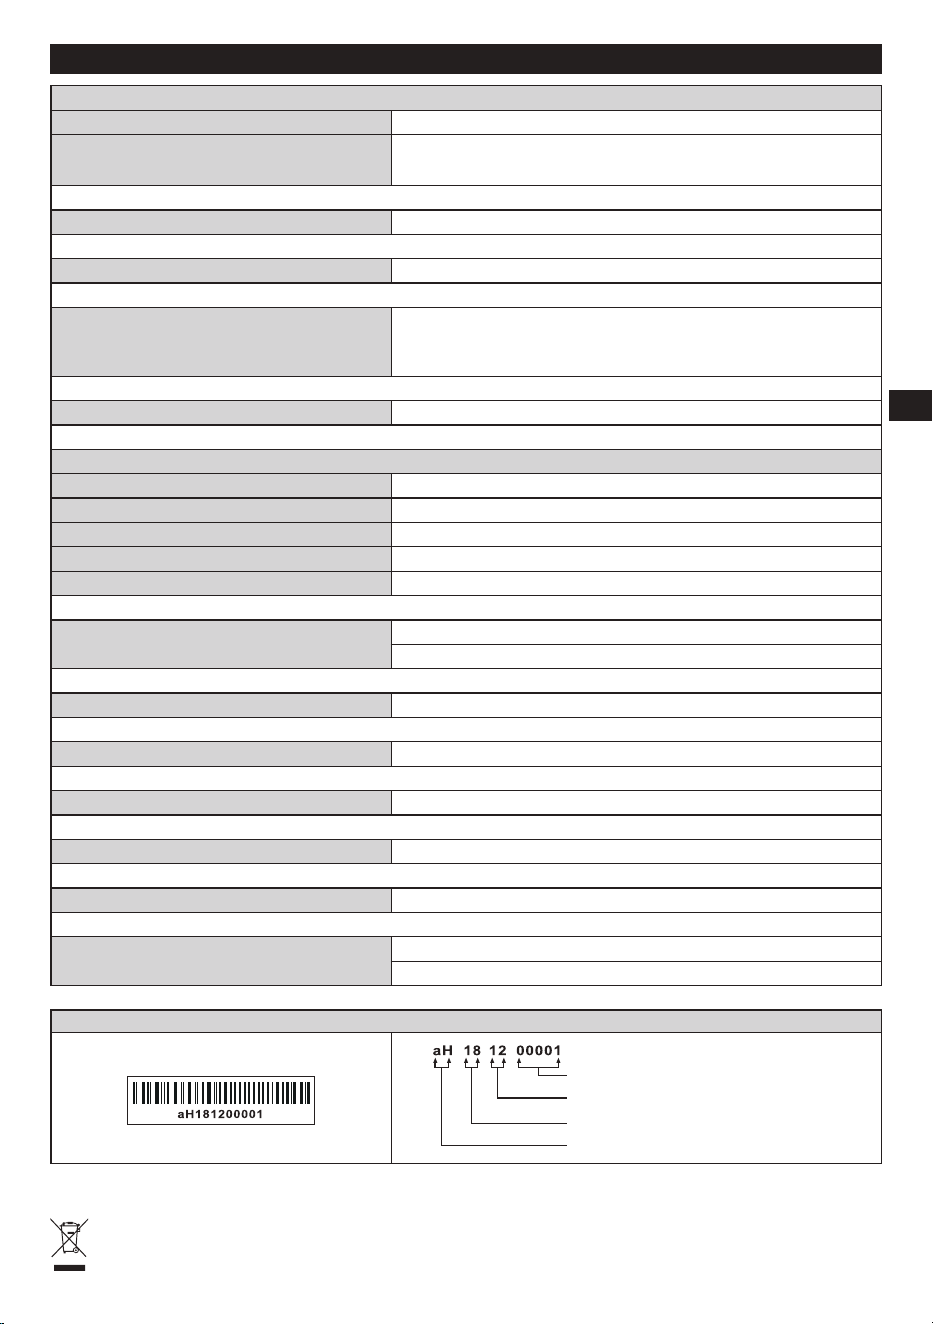
※ The barcode label on the product is defined as below:
Serial number
Production month
Production year
Product code
Sangean reserves the right to amend the specifications without notice.
RECYCLING This product bears the selective sorting symbol for Waste electrical and electronic equipment
(WEEE). This means that this product must be handled pursuant to European directive 2012/19/EU in order to be
recycled or dismantled to minimize its impact on the environment.