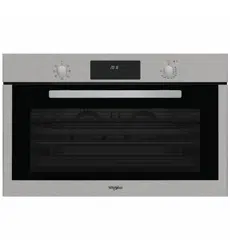
Model: WS91V9KPX

FREESTANDING COOKER
USE AND CARE GUIDE
Dear user,
Thank you for choosing our products. We are sure you will find your new appliance a pleasure
to use. Before you use the appliance, we recommend that you read through these instructions
carefully and retain them for future reference. Design and specification may change due to
product development, no prior notice will be given.
Table of Contents
IMPORTANT SAFETY INSTRUCTI
3
7
14
20
29
32
31
O
NS
INSTALLATIONS
OPERATING INSTRUCTIONS
OVEN FUNCTIONS
CLEANING & MAINTENANCE
TROUBLESHOOTING
AFTER-SALES SERVICE
2
IMPORTANT SAFETY INSTRUCTIONS
SAFETY INSTRUCTIONS TO BE READ AND OBSERVED
Before using the appliance, read these safety instructions. Keep them nearby for future
reference.These instructions and the appliance itself provide important safety warnings, to be
observed at all times. The manufacturer declines any liability for failure to observe these safety
instructions, for inappropriate use of the appliance or incorrect setting of controls.
To maintain the efficiency and safety of this appliance, only call the authorised service
centers and always use original spare parts.
Toddlers (0-3 years) should be kept away from the appliance. Young children (3-8 years)
should be kept away from the appliance unless continuously supervised. Children above 8
years old and people with reduced physical, sensory or mental capabilities or lack of experience
and knowledge can use this appliance only if they are supervised or have been given
instructions on safe use and understand the hazards involved. Children must not play with the
appliance. Cleaning and user maintenance must not be carried out by children without
supervision.
WARNING: The appliance and its accessible parts become hot during use. Care should be
taken to avoid touching heating elements. Children less than 8 years of age must be kept away
unless continuously supervised.
Never leave the appliance unattended during food drying. If the appliance is suitable for
probe usage, only use a temperature probe recommended for this oven.
Keep clothes or other flammable materials away from the appliance, until all the components
have cooled down completely. Always be vigilant when cooking foods rich in fat, oil or when
adding alcoholic beverages. Use oven gloves to remove pans and accessories. At the end of
cooking, open the door with caution, allowing hot air or steam to escape gradually before
accessing the cavity so as to prevent burns. Do not obstruct hot air vents at the front of the oven.
Exercise caution when the oven door is in the open or down position, to avoid hitting the door.
When handling the appliance, always use the provided handles recessed into the sides of
the oven to prevent harming people or damaging the appliance itself.
Heat will be generated when it is working. Caution must be exercised to avoid touching the
heating element.
Use oven gloves to place cookware in the oven or when removing it.
3

Always grip the oven door handle in the center as the extremities of the same may be hot
due to any hot air leaks
Make sure the knobs are in the
0 position when the appliance is not in use.
PERMITTED USE
CAUTION: The appliance is not intended to be operated by means of an external switching
device, such as a timer, or separate remote controlled system. This appliance is intended to be
used in household and similar applications such as: staff kitchen areas in shops, offices and
other working environments; farm houses; by clients in hotels, motels, bed & breakfast and
other residential environments.
No other use is permitted (e.g. heating rooms). This appliance is not for professional use. Do
not use the appliance outdoors.
Do not store explosive or flammable substances (e.g. gasoline or aerosol cans) inside or
near the appliance.
INSTALLATION
The appliance must be handled and installed by two or more persons. Use protective gloves
to unpack and install.
Installation, including water supply (if any), electrical connections and repairs must be carried
out by a qualified technician. Do not repair or replace any part of the appliance unless
specifically stated in the user manual. Keep children away from the installation site. After
unpacking the appliance, make sure that it has not been damaged during transport. In the event
of problems, contact the dealer or your nearest After-sales Service. Once installed, packaging
waste (plastic, styrofoam parts etc.) must be stored out of reach of children. The appliance must
be disconnected from the power supply before any installation operation. During installation,
make sure the appliance does not damage the power cable preventing catching fire or electric
shock. Only activate the appliance when the installation has been completed.
Carry out all cabinet cutting operations before fitting the appliance and remove all wood chips
and sawdust. Do not obstruct the minimum gap between the worktop and the upper edge of the
oven. Do not remove the oven from its polystyrene foam base until the time of installation.
After installation, the bottom of the appliance must no longer be accessible.
Do not install the appliance behind a decorative door.
4

ELECTRICAL WARNINGS
The rating plate is on the front edge of the oven (visible when the door is open).
It must be possible to disconnect the appliance from the power supply by unplugging it if the
plug is accessible, or by a multi-pole switch installed upstream of the socket in accordance with
the wiring rules and the appliance must be earthed in conformity with national electrical safety
standards.
Do not use extension leads, multiple sockets or adapters. The electrical components must
not be accessible to the user after installation. Do not use the appliance when you are wet or
barefoot. Do not operate this appliance if it has a damaged power cable or plug, if it is not
working properly, or if it has been damaged or dropped.
If the supply cord is damaged, it must be replaced with an identical one by the manufacturer,
its service agent or similarly qualified persons in order to avoid a hazard and electric shock.
Incase of replacement of power cable, contact an authorised service centre.
CLEANING AND MAINTENANCE
WARNING: Ensure that the appliance is switched off and disconnected from the power
supply before performing any maintenance operation; never use steam cleaning equipment -
risk of electric shock.
Do not use harsh abrasive cleaners or metal scrapers to clean the door glass since they can
scratch the surface, which may result in shattering of the glass.
Ensure the appliance is cooled down before any cleaning or maintenance to prevent burns.
WARNING: Switch off the appliance before replacing the lamp.
5
TECHNICAL SPECIFICATIONS
Specifications
90cm Ceramic Freestanding Cooker
Supply Voltage & Frequency 220-240V AC 50-60Hz
Usable Capacity
133L
Oven Input Power 3000-3600W
Ceramic Hob Input Power 7500-8900W
Net Weight (kg)
72
Gross Weight (kg)
81
Product Dimensions (mm)
900 (W) x 600 (D) x 900 (H)
Technical specifications can be changed without prior notice to improve product quality.
The values provided with the appliance or its accompanying documents are laboratory readings
in accordance with the respective standards. These values may differ depending on the use
and ambient conditions.
Maximum Rated Power Input
10500-12500W
6

INSTALLATIONS
INSTALLATION REQUIREMENTS
THIS COOKER MUST BE INSTALLED BY A QUALIFIED INSTALLER IN ACCORDANCE
WITH LOCAL REGULATIONS.
IMPORTANT: CONTACT AN AUTHORISED SERVICE AGENT FOR INSTALLATION OF
YOUR APPLIANCE!
P
ositioning
1. Make sure that there are no combustible or flammable materials, such as curtains, in the
vicinity off installation.
2. Furniture and cabinets surrounding the cooker must be of material resistant to temperature
greater than 100°C.
3. Surrounding furniture, cabinets and extractor fans shall be positioned in accordance with the
diagram shown in the figure.
4. There must be a least 20mm of free space between the back wall and the rear of the appliance
to allow for ventilation and air circulation.
5. If fitted, the extractor fan must be at least 650mm above Radiate Ceramic. If no fans in fitted
the minimum distance between the Radiate Ceramic and any cabinet or other structure must be
750mm.
7
Product Dimensions
Product Dimensions mm
A) Overall width of the freestanding oven 900
B) Overall height of the freest anding oven (from the flo or
to top of the cooktop, excluding the optional
backguard)
916
C) Overall depth of the freestanding oven (excluding
handles and knobs)
600
D) Height o f the freestanding oven chassis (ie. excluding
the adjustable feet)
900
E) Depth of the open oven door to the front of t he
freestanding oven
470
8
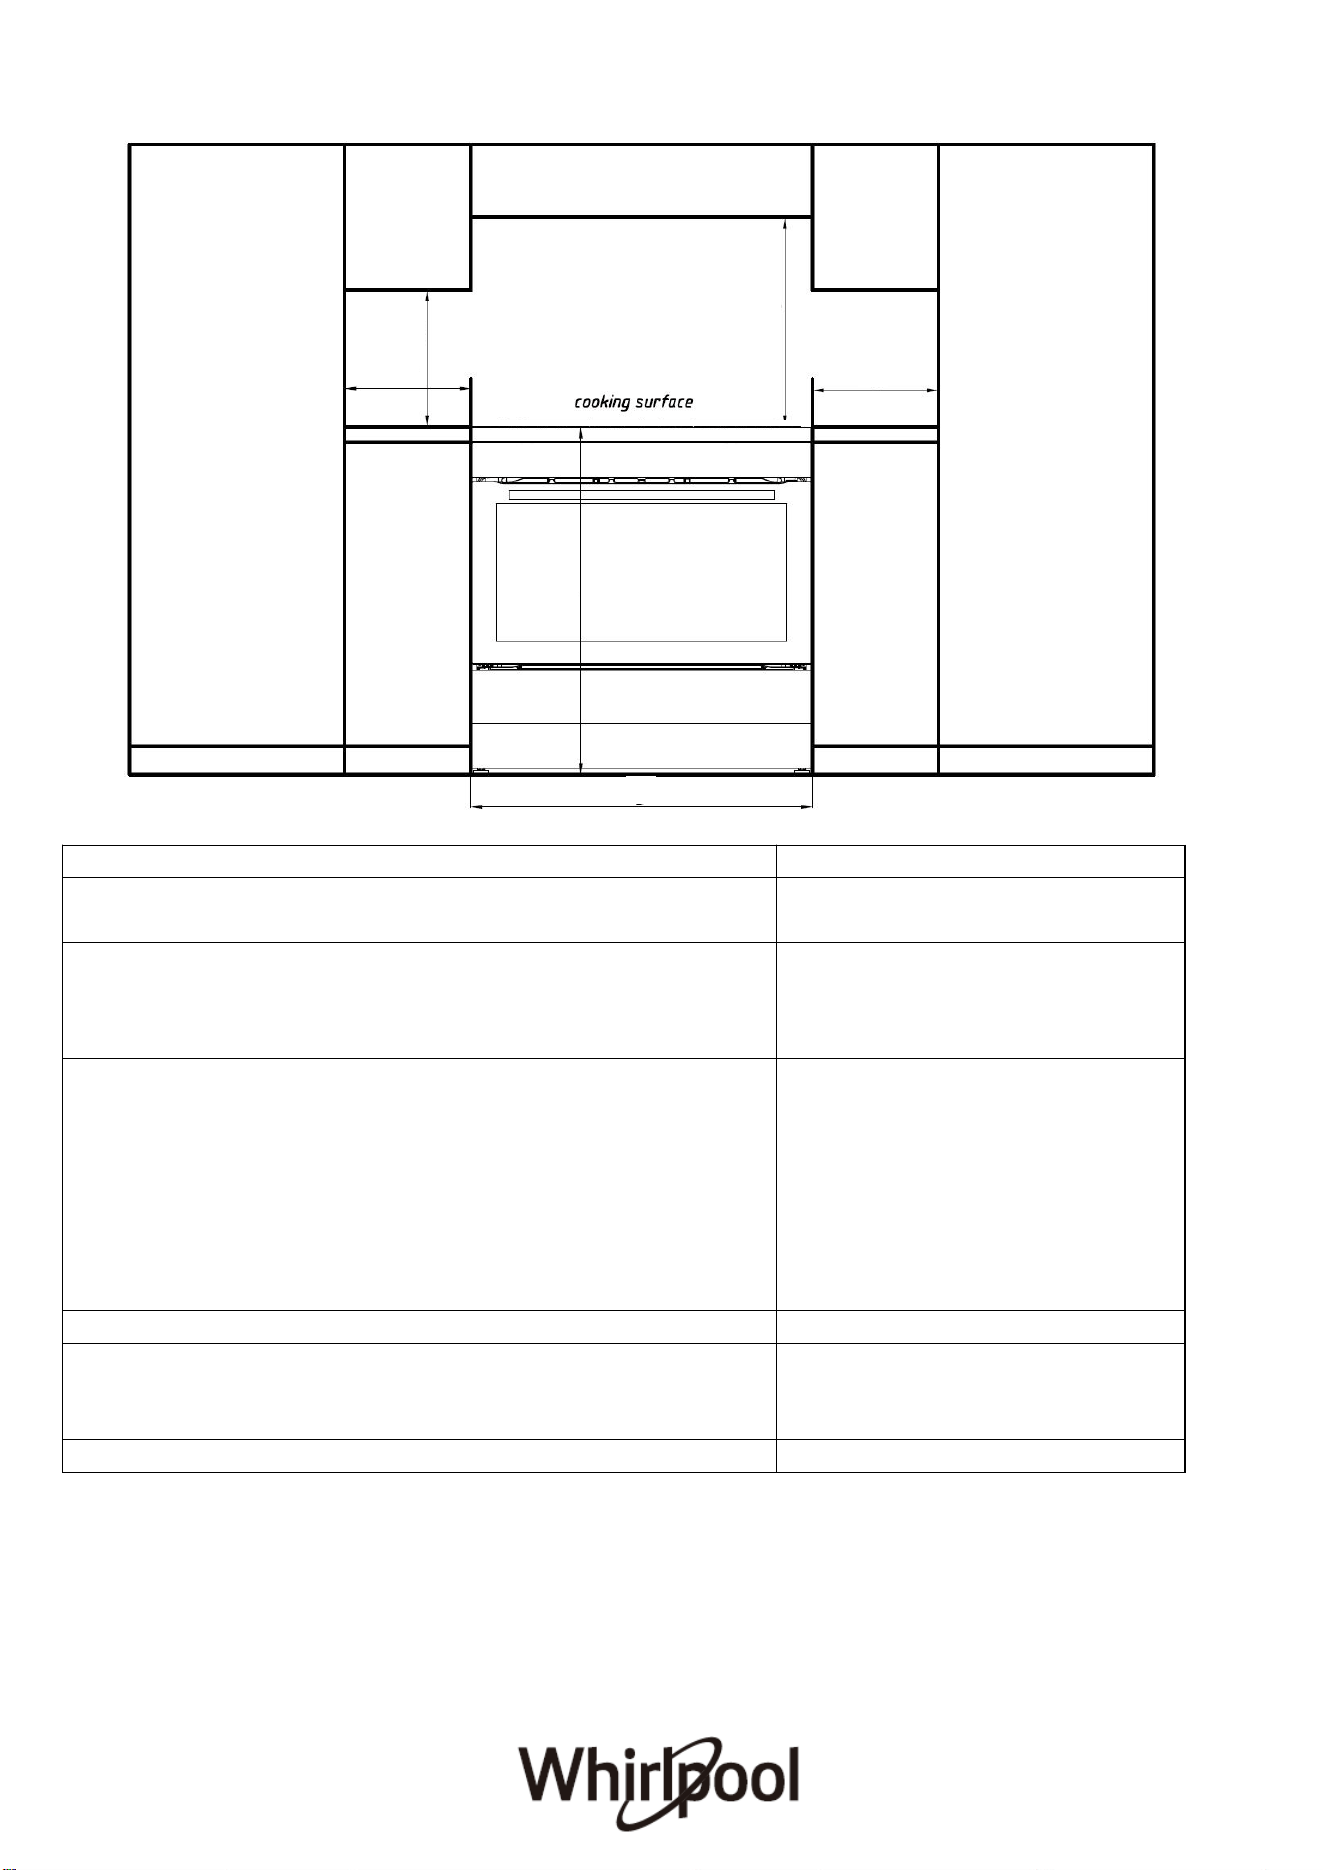
FREESTANDING OVEN CLEARANCES
Product Dimensions
MM
A) Minimum vertical distance between benchtop and
cabinet extending above the counter
450
B) Minimum clearance from left and right hand edge of
the freestanding oven to the nearest combustible
surface*
200
C) Minimum clearance from the top of the burner cap
(cooking surface) to:
·
Overhead cabinet centered above the cooktop
(combustible/unprotected)*
·
Overhead cabinet centered above the cooktop
(non-combustible/protected)*
· Ventilation hood centered above the cooking
surface
650
450
750
D) Width of cabinetry opening
900
E) Maximum height of cabinetry immediately adjacent to
the freestanding oven (from floor to countertop)**
946
F) Maximum depth from wall to cabinetry face
600
9
C
A
E
D
B
B
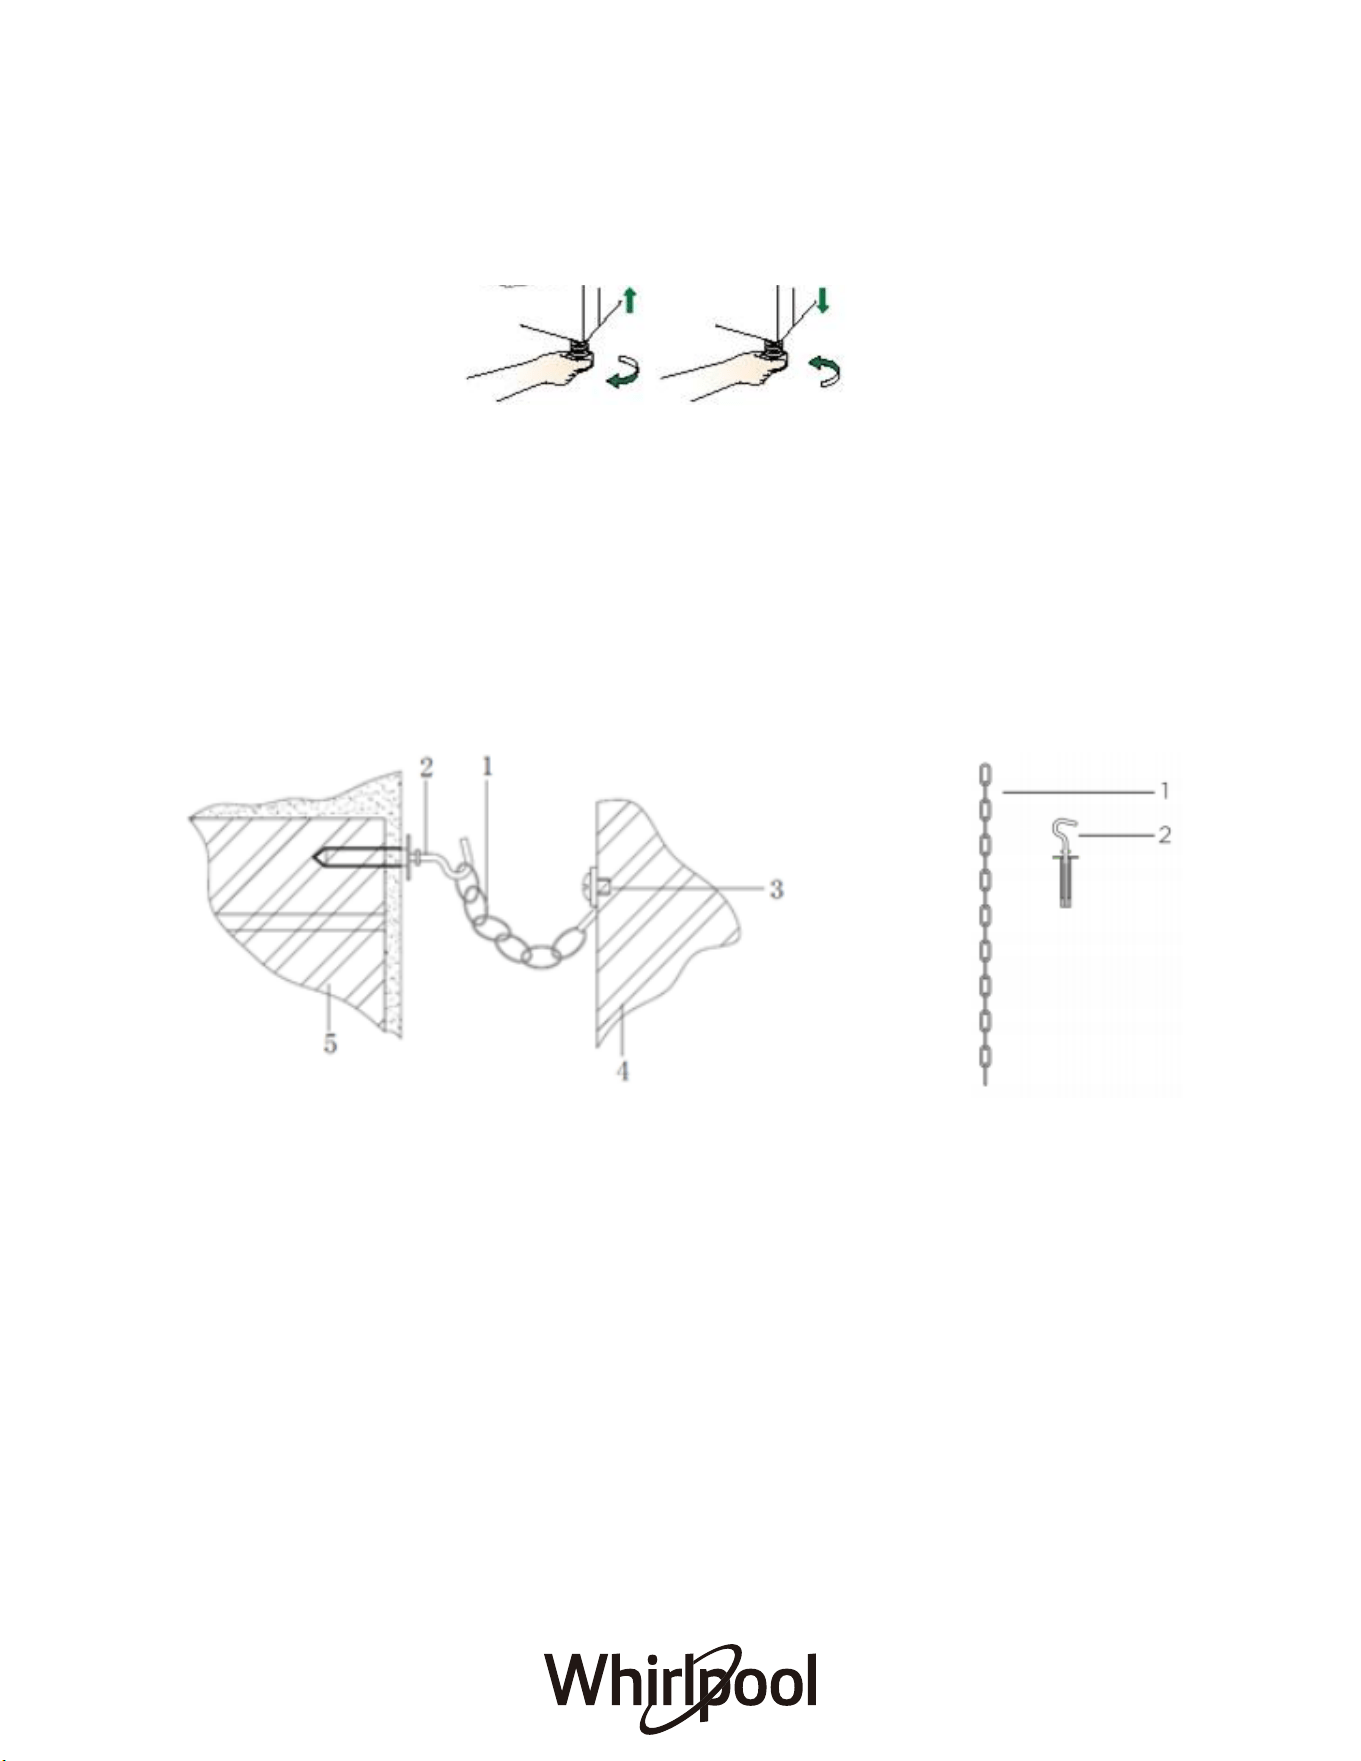
Levelling feet
The height and level of the appliance can be adjusted by rotating the feet located
underneath the appliance at each corner. Rotate the feet to decrease or increase the height.
Safety chain
The appliance must be secured against overbalancing by using the supplied two safety
chains on your oven.
Fasten hook (1) by inserting a wall plug into the kitchen wall (5) and connect safety chain (3)
to the hook via the locking mechanism (2).
1 Safety chain(supplied and mounted to oven)
2
3
4
Stability hook
Chain attachment for the rear cooker
Rear of the cooker
Kitchen wall
5
10

Fitting on a Power Supply Cable
Connecting appropriate power supply / terminal board / connector block:
•
• Remove the wire clamp screw.
• Fasten the wires beneath the corresponding screw heads.
• Fasten cable clamp and close the cover of the terminal board.
Warning: Connect the power cord must be in accordance with the instructions listed in the table below
L N E Wire cross-sectional
area(mm2) Connection mode
1N-
Min4 Min4 Min4
Connecting the supply cable to the mains
Install an approved circuit breaker with a minimum contact opening of 3 mm, between the
appliance and the mains fuse box. The circuit breaker should be sized according to the load and
should comply with current regulations (the earth wire should not be interrupted by the circuit
breaker).
The supply cable should be positioned so that it does not reach a temperature of more than 50 °C
with respect to the room temperature, anywhere along its length Before switching fuse ON in
meter-box check:
•
11

•
•
•
•
Earth continuity.
The supply system is regularly grounded, according to the regulations in force. The socket or the
After carrying out the connection to the mains, check the supplying cable does not come into
contact with parts subject to heating.
Never use reductions, shunts, adaptors which can cause overheating or burning.
omnipolar switch can easily be reached after the installation of the oven.
The electrical safety of this appliance can only be guaranteed if the cooker
is correctly installed and earthed, in compliance with regulations on electrical installations.
• The electrical capacity of the system and sockets will support the maximum power of the
appliance, as indicated on the data plate.
•
All Upright cookers must comply to local regulations to Australian Stanadrd N S
00 uidelines alified Electrician will have a copy of these guides that MUST be
adhered to.
The cooker MUST BE installed and serviced only by an authorised person.
A certificate of compliance must be supplied by installer and is to be kept by the customer.
The packing materials must be removed before you install the cooker.
You must follow the installation instructions in this booklet.
The surrounding kitchen cabinets MUST BE able to withstand 95°C. We will not accept
responsibility
for damage caused by installation in to kitchen cabinets which cannot withstand 95°C.
The appliance must not be installed in a corner. It must be installed at least 100mm from the side
wall.
The flexible pipe for gas models must have sufficient loops so the cooker can be moved for service.
The vents; openings and air spaces MUST NOT be blocked.
The anti-tilt floor bracket must be installed to avoid accidental tipping.
The stability bolt must be installed to avoid accidental moving.
You must not pull the cooker by the door handles.
Power socket, if provided for gas models, and electricity isolation switch for electric models and
gas models without a 20A plug, is to be installed in an accessible position near the cooker (but not
behind cooker).
If the supply cord or cable is damaged, it must be replaced by an approved service agent or a
similarly qualified person in order to avoid a hazard.
If this cooking range is to be connected to a new or upgraded electrical installation, then it
must be connected to the supply by a supply cord fitted with:
an appropriately rated plug that is compatible with the socket-outlet fitted to the final
subcircuit in the fixed wiring that supplies this cooking range; or
an appropriately rated installation male connector that is compatible with the installation
female connector fitted to the final sub-circuit in the fixed wiring that supplies this cooking
range. (*New Zealand only)
12
ENVIRONMENTALLY-FRIENDLY DISPOSAL
●
The packing box may be fully recycled as confirmed by the recycling symbol.
Follow local disposal regulations. Keep potential hazardous packaging
(plastic bags, polystyrene, etc.) out of the reach of children.
●
This appliance is marked according to the European directive 2012/19/EU on
Waste Electrical and Electronic Equipment (WEEE). By ensuring this product is
disposed of correctly, you will help prevent potential negative consequences for the
environment and human health, which could otherwise be caused by
inappropriate waste handling of this product.
●
The symbol on the product, or on the documents accompanying the
product, indicates that this appliance may not be treated as household
waste. Instead, it shall be handed over to the applicable collection point for
the recycling of electrical and electronic equipment.
●
Disposal must be carried out in accordance with local environmental
regulations for waste disposal.
●
For more detailed information about treatment, recovery and recycling of this product,
please contact your local city office, your household waste disposal service or the shop
where you purchase the product.
●
Before scrapping, cut off the mains cord so that the appliance cannot be connected to
the mains.
13
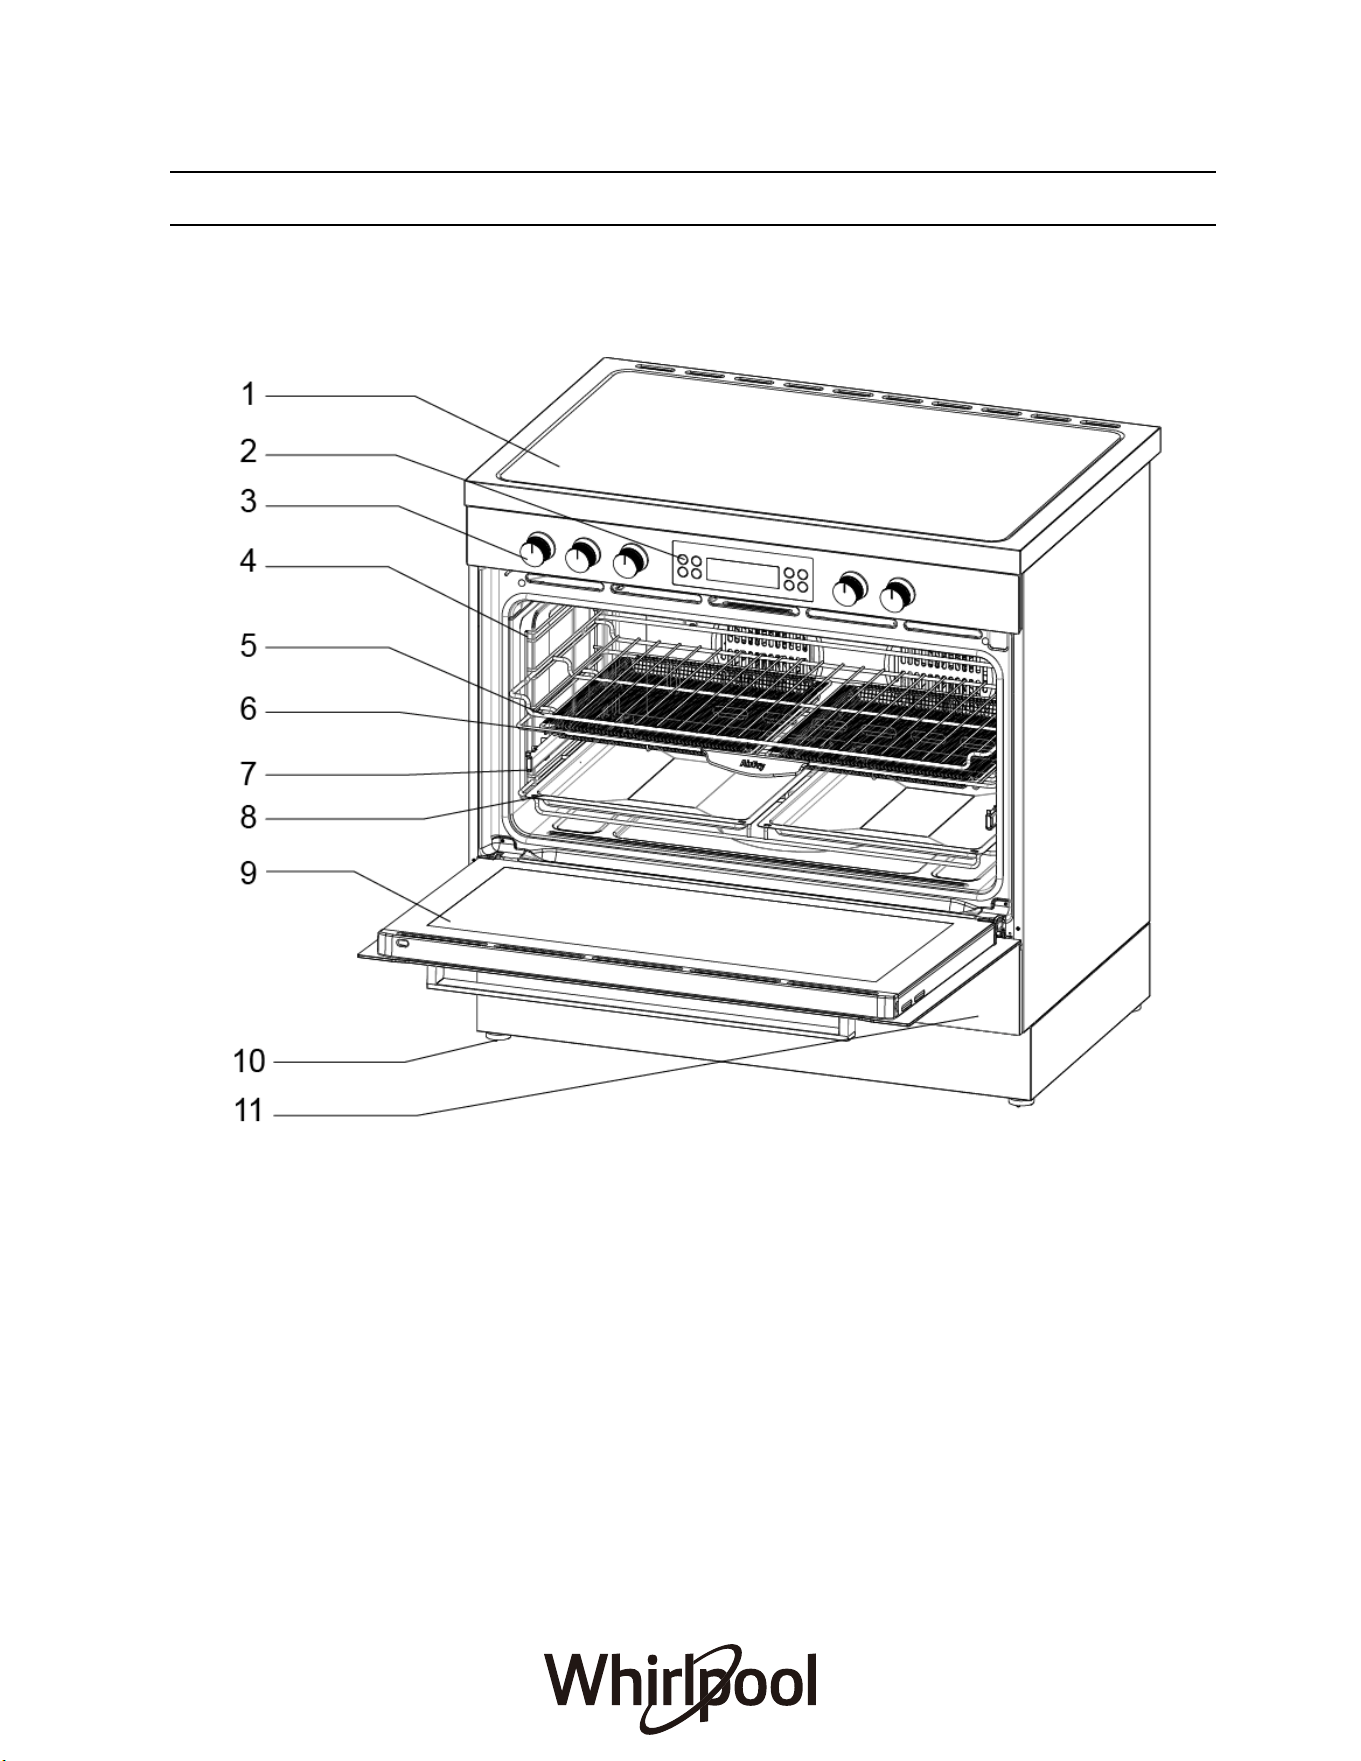
Model: WS91V9KPX
1. Ceramic Hob
2. Oven Control Panel
3. Ceramic Control Panel
4. Guide Bracket
5. Shelf
1
1. S
torage compartment
10
. A
nti-Slip Feet
7
. Telescopics Runner
6. Air Fry Basket
8. Baking Tray
9. Oven Door
OPERATING INSTRUCTIONS
14
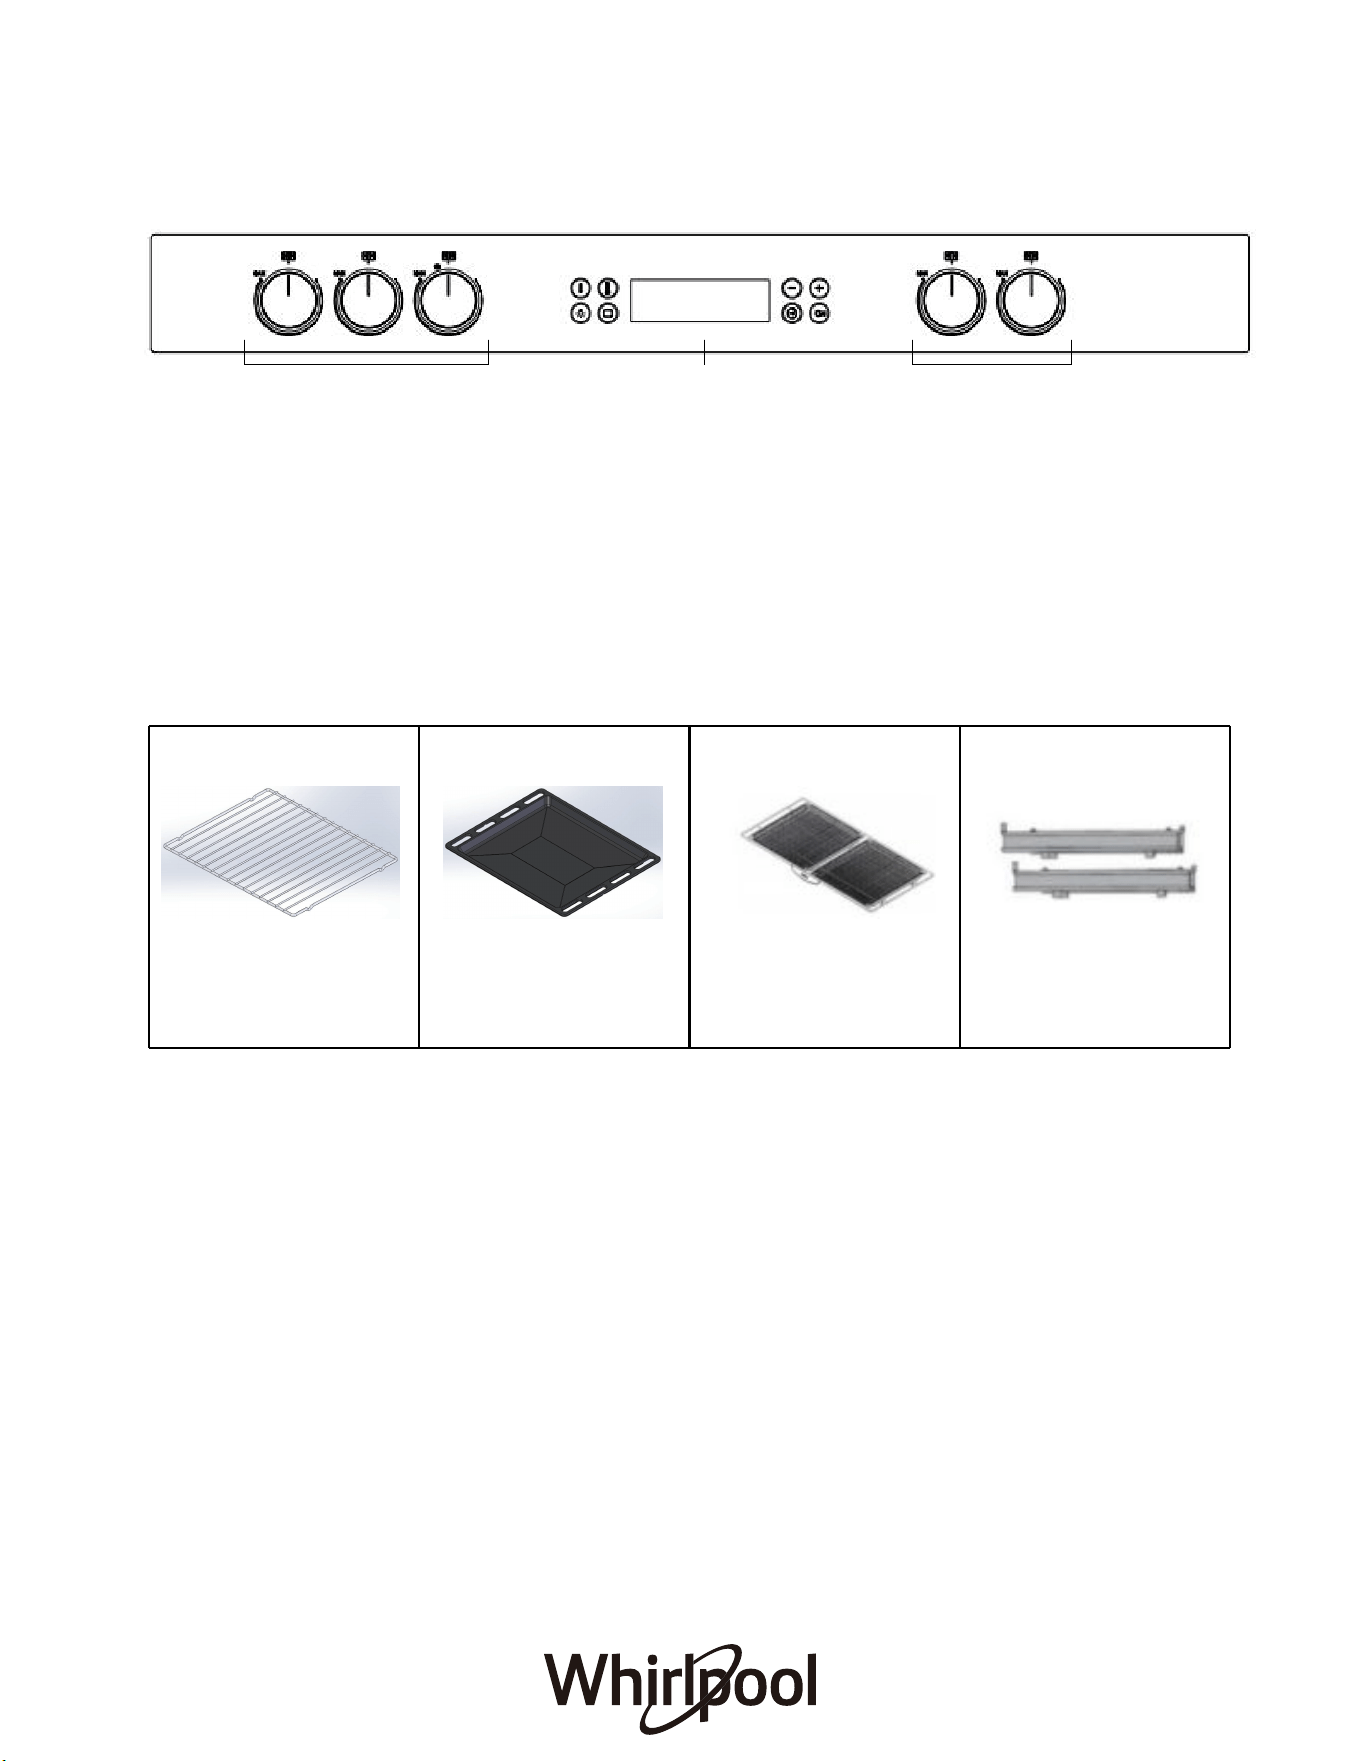
1 2 3
15
FITTING THE TELESCOPIC RAILS
ACCESSORIES
CONTROL PANEL
1 & 3. Ceramic Cooktop Power Control
2. Oven Control
Remove the shelf guides from the oven and remove the protective plastic from the sliding
Adjust desired power level of each ceramic cooktop cooking zone.
Control oven power on/off, temperature and function settings, lamp, etc.
Wire Shelf x 1
Use to cook food or as a Use for cooking all bread Use the Air Fry basket for To facilitate inserting or
removing accessoriesfrozen food such as chips,
wedges or chicken nuggets.
and pastry products, but
also for roasts, fish en
papillote, etc.
support for pans, cake tins
and other ovenproof items
of cookware.
Baking Tray x 1 Air Fry Basket x 1 Telescopic Rails x 1 pair
runners. Fasten the upper clip of the runner to the shelf guide and slide it along as far as it
will go. Lower the other clip into position. To secure the guide, press the lower portion of the
clip firmly against the shelf guide. Make sure that the runners can move freely, Repeat these
steps on the other shelf guide on the same level.
aluminum foil on the hot ceramic
the control.
COOKTOP SAFETY
16
Ceramic Hob
Hob Care
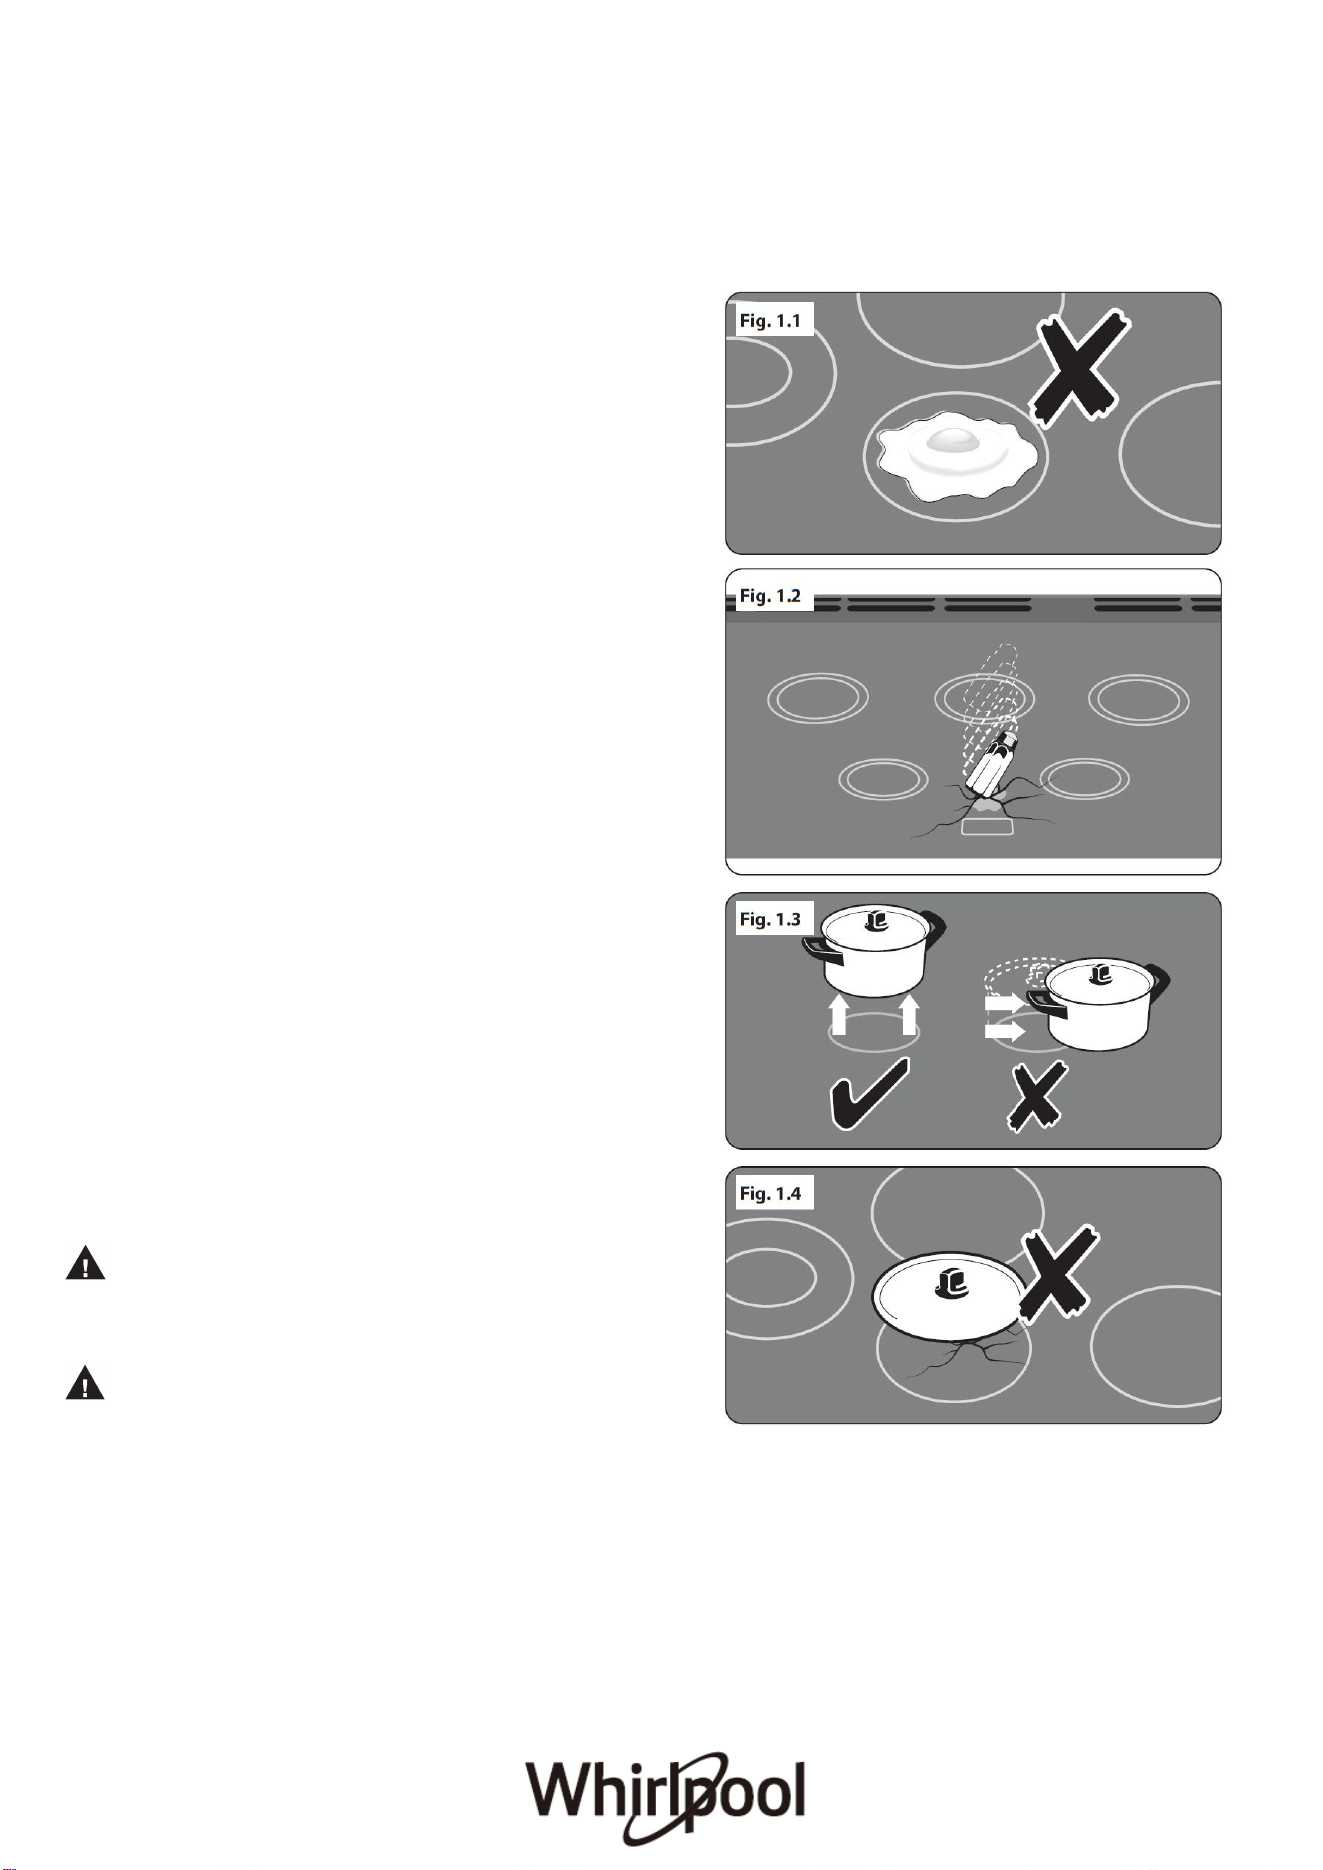
NEVER cook food directly on the hob sur face Fig. 1.1.
DO NOT use the hob surfac e as a cutting boa rd.
DO NOT leave utensils , f oods tuf fs or c ombustible items on
the hob when it is not in use (e.g. tea towels, frying pans
containing oil).
DO NOT place plastic or alum inium f oil, or plas tic containers,
on the hob.
DO NOT leave the hob zones switched on unl es s bei ng used
for cooking.
NEVER allow anyone to climb or stand on the hob.
DO NOT stand or rest hea vy obj ects on the hob. Al though
the ceramic surfac e is very s
trong,
a sharp blow or sharp
falling object (e.g. a s alt cellar) m ight cause the surface to
crack or break Fig. 1.2.
Should a crack appear in the surface, disconnect the
appliance immediately f rom the supply and arrange for
its repair.
Always LIFT pans off the hob. Sliding pans may cause marks
and scratches Fig. 1.3. Always turn the control to the OFF
position before removinga pan.
DO NOT place anything betwe en the base of the pan and the
hob surface (e.g. asbes tos mats, aluminium foil, Wok stand).
Take care NO T TO PLA CE HOT LIDS onto the Hob s
urface.
Lids that have been used to cover a hot pan can “stick” or
create a “vacuum ” effect to the Glass Hob. Shoul d this occur,
DO NOT attempt to lift the lid off the glas s s urfac e, this may
damage the glass. Instead s lid e the lid to the edge of the hob
surface and rem ove, tak ing care not to scratch the hob surface.
Alternatively wait until the lid has c ooled to room temperature,
the vacuum has been releas ed, then rem ove the lid by lifting it
from the hob surface Fig. 1.4.
Take c are NOT to place metallic objects such as
knives, forks, spoons and lids on the hob surfac e since
they can get hot.
The appliance is not intende d to be operated by
means of external timer or separated remote-control
system.
Care should be taken that no water seeps into the appliance.
Avoid heating an empty pan. Doing so may damage both the
hob and pan.
DO NOT use abrasive cleaners/pads, oven aerosols/pads or
stain removers on the surface.
17
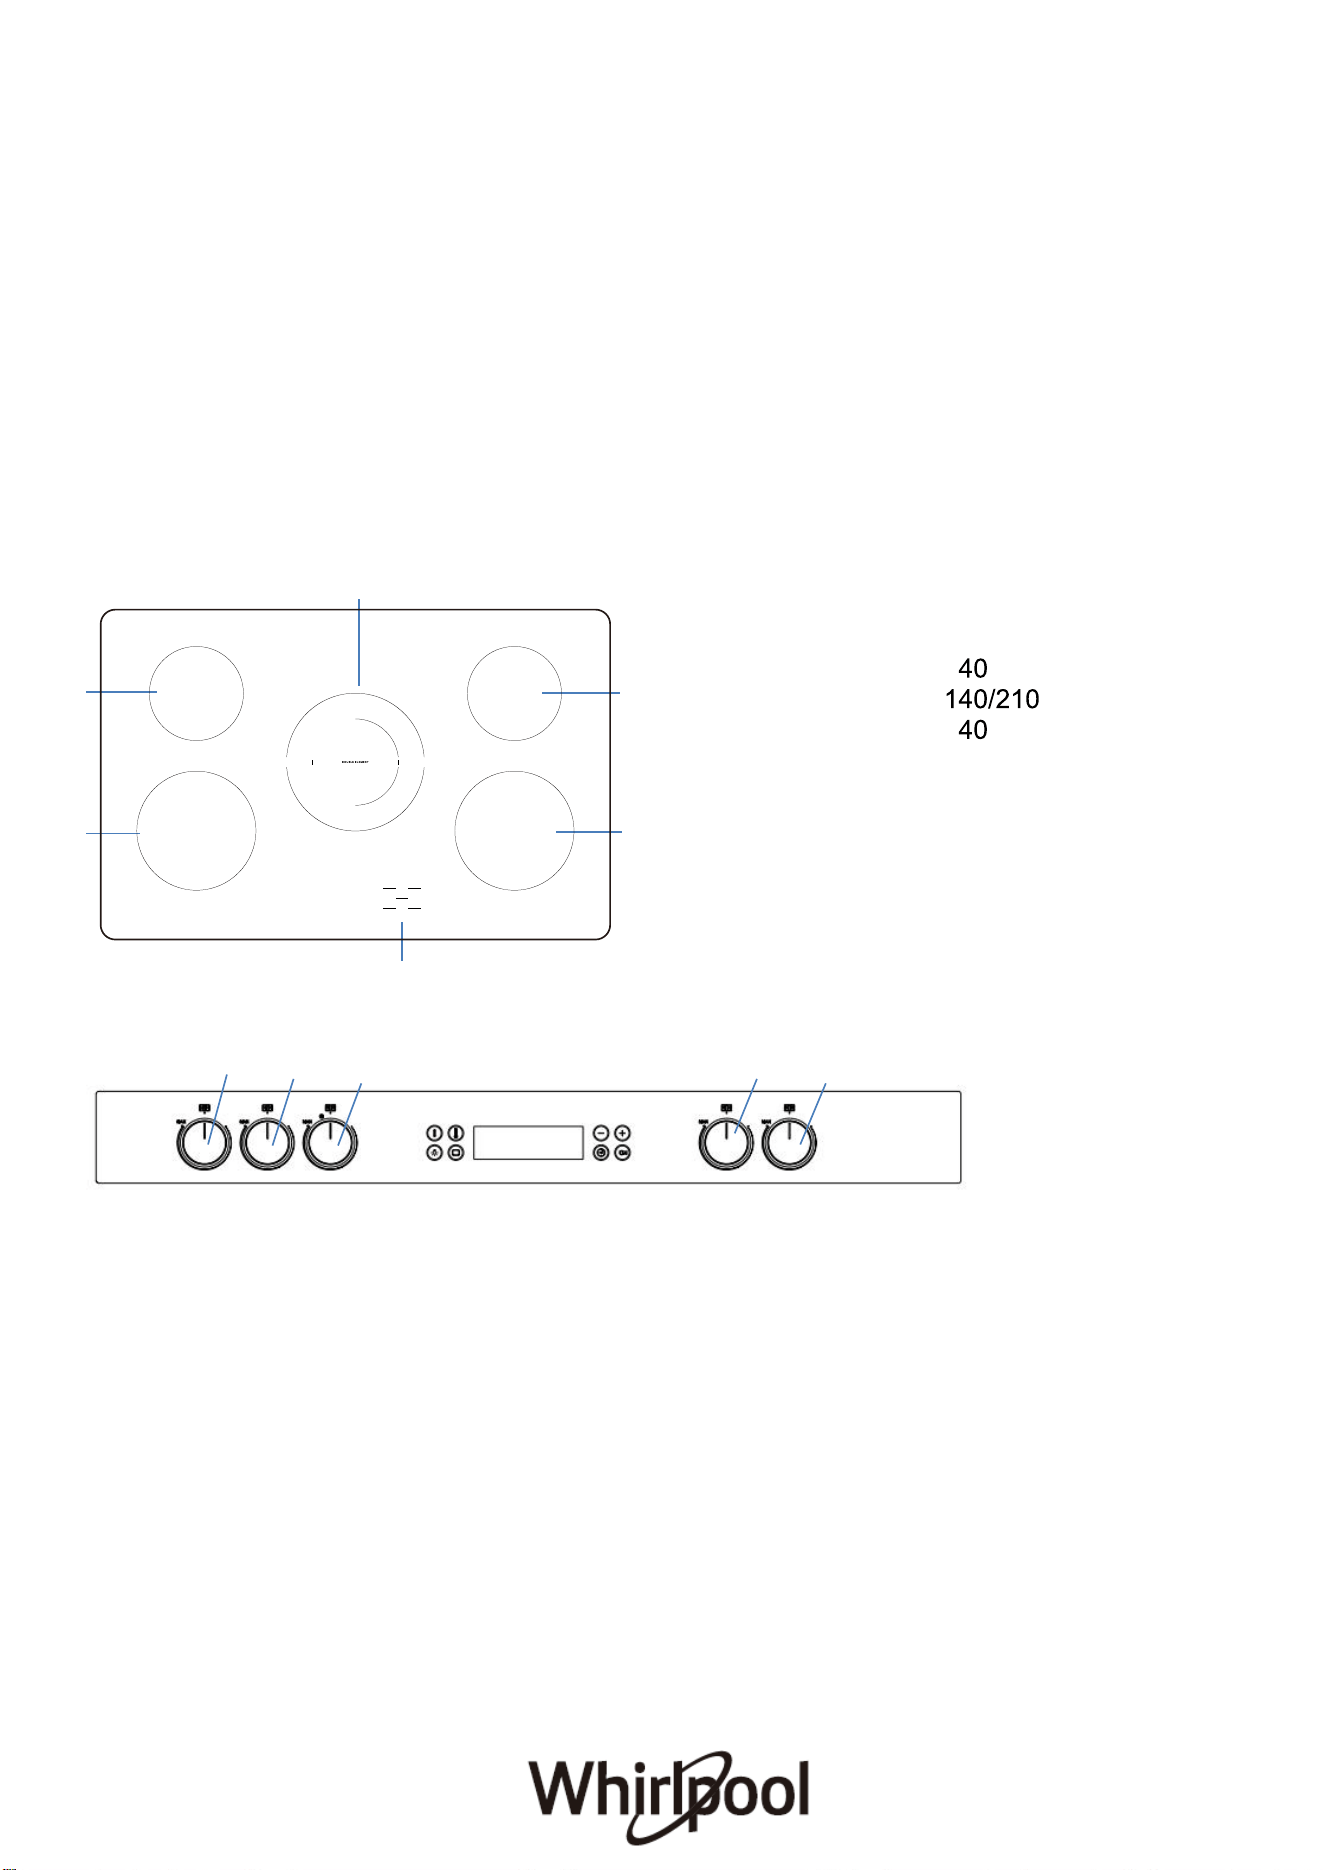
The Control Panel
1. Zone 1 Diameter: 180 mm,1800W
2.
Zone 1 Diameter: 1 mm,1200W
3. Zone 2 Diameter: mm,1000/2200W
4. Zone 1 Diameter: 1 mm,1200W
5. Zone 1 Diameter: 180 mm,1800W
6. Power & residual heat warning lights
1
2
6
3
4
5
1.
Front left burner
2. Rear left burner
3. Central burner
4.
Rear right burner
5. Front right burner
1 2 3 4 5
18
We recommend that you avoid wiping any surface unit areas until they have cooled and the residual heat
indicator has gone out. Sugar spills are the exception to this (see ‘Cleaning your Hob’). After cleaning, use a dry
cloth or paper towel to remove any cleaning cream residue.
Cleaning
The ceramic surface should be washed after use in order to prevent it from becoming scratched or dirty.
In the interests of hygiene and safety, the hob should be kept clean at all times as a build up in fats and other
foodstuffs could result in a fire.
Clean only the parts listed in this guide.
Clean with caution. If a wet sponge or cloth is used to wipe spills on a hot surface,
be ca
reful to avoid steam burns.
Some cleaners can produce noxious fumes if applied to a hot surface.
Product Overview
Heat Settings
The exact setting will depend on several factors, including your cookware and the amount you are cooking.
Experiment with the ceramic hob to find the settings that best suit you.
Use and care
Description ofsymbols
Ingle cooking zones
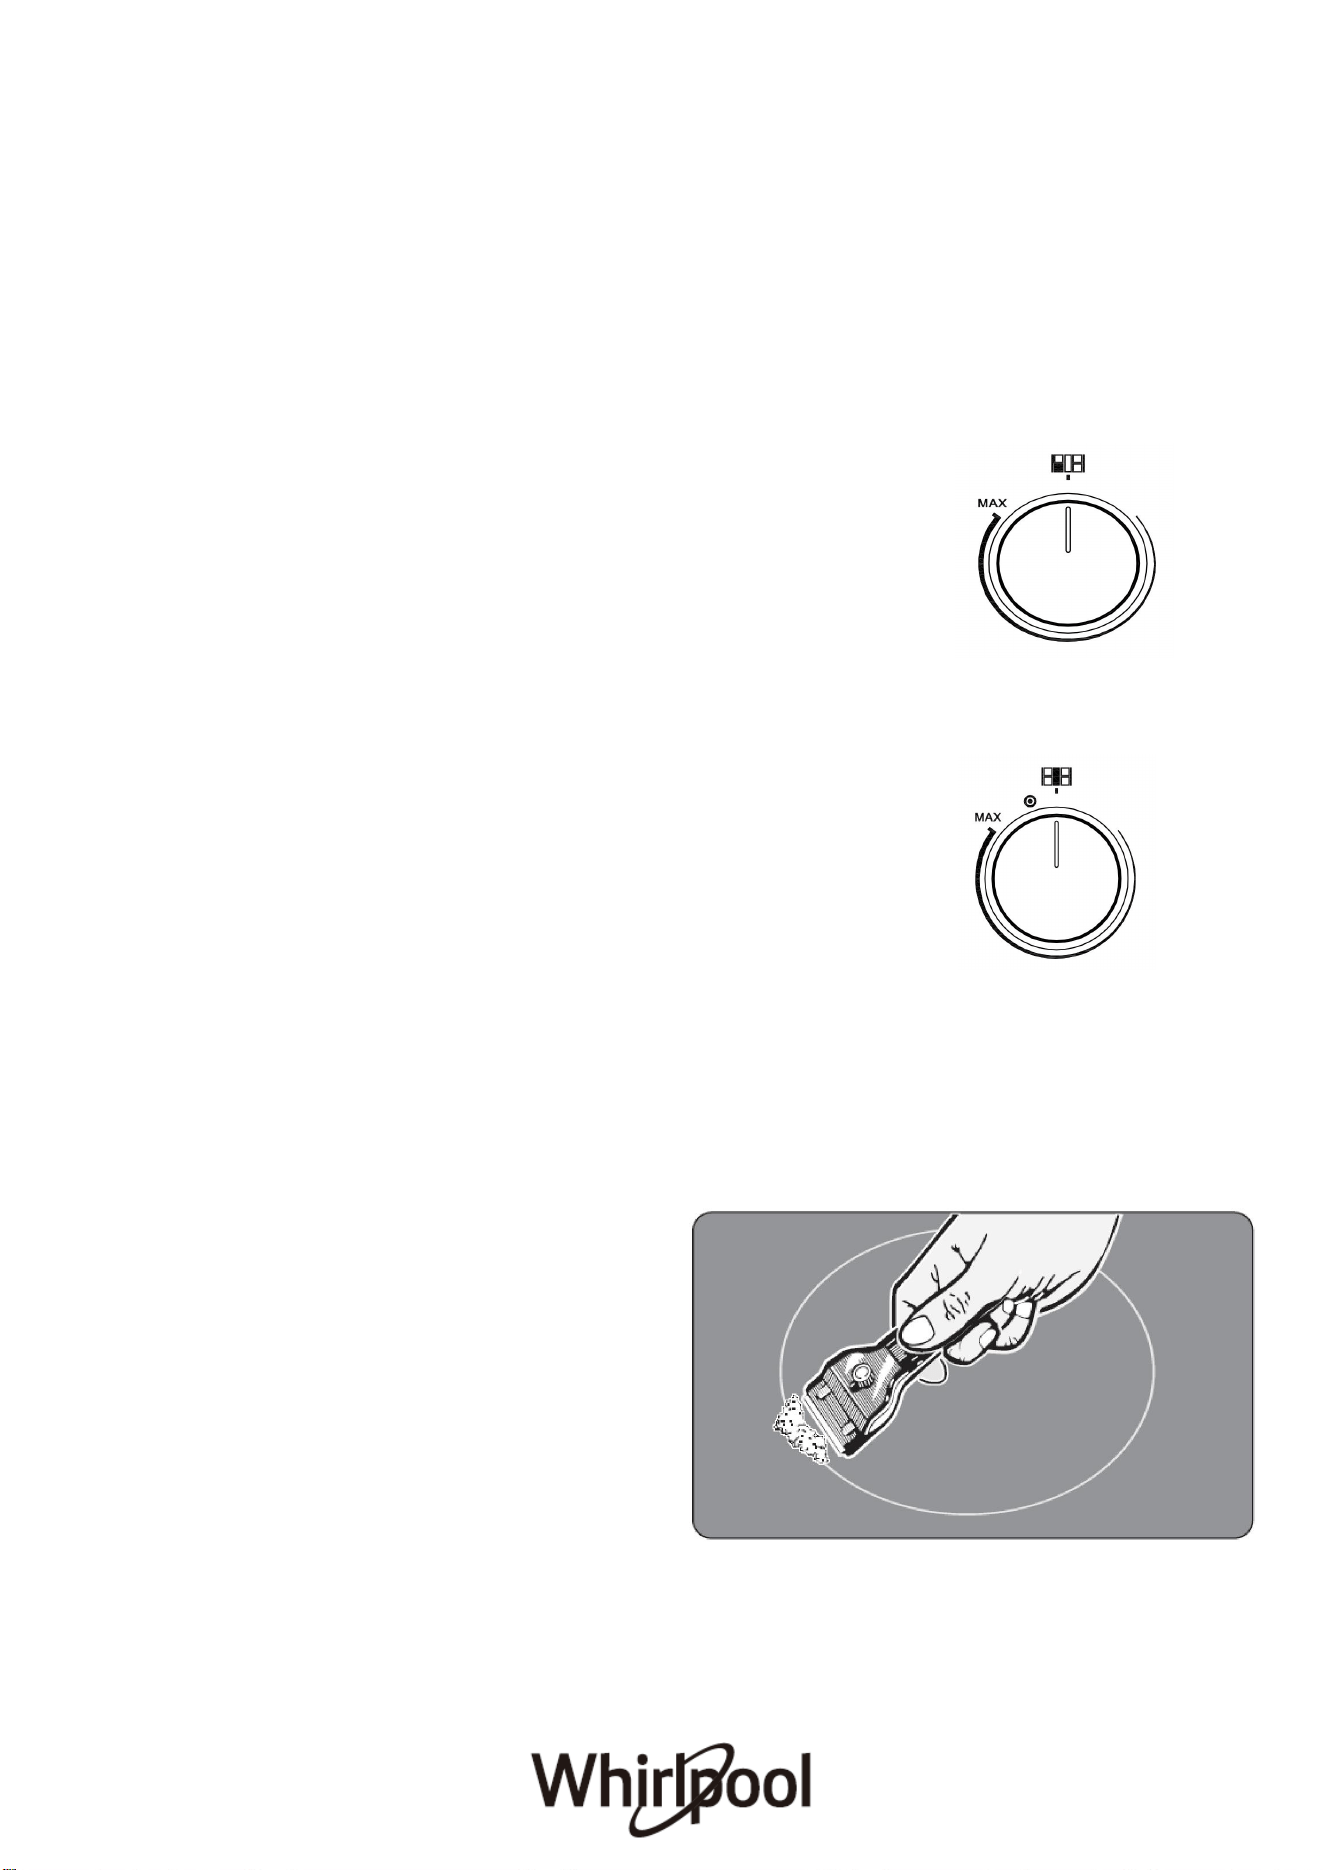
Turn the control knob to the desired position (low to high).
Adjustment is continuous so the cooking zone will operate at any
intermediate knob setting between low & high. Once the cooking
zone is hot, the LED corresponding to the zone illuminates.
You can switchff the cooking zone by turning the knob, in either
direction, to the off position.The residual heat warning light
remains illuminated when the temperature of the ceramic glass
surface is hot and it will switch off once the surface temperature
as cooled.
Dual cooking zones
Turn the control knob clockwise to the desired position between low
and halfway as shown on the diagram on B. The inner
cooking zone will heat and the outer cooking zone is off.
Adjustment is continuous so the cooking zone will operate at any
intermediate knob setting between low & halfway. Once the inner
cooking zone is hot, the lamp corresponding to the zone
luminates.
To operate the outer cooking zone, turn the knob past the half way
setting.Both inner and outer cooking zones will operate.
Adjustment is continuous so the both zones will operate at any
ntermediate knob setting between halfway & max. For highest
setting with both zones operating, turn the knob past max, to the
detent position (between max & ). To reduce heat setting, but
continue to operate both zones, turn the knob anywhere between
maximum and halfway setting.
To return to operating the inner cooking zone only, turn the knob
anticlockwise to between halfway and low.
CLEANING AND MAINTENANCE
Before any intervention, disconnect the power supply
of the device.
C l e a n i n g the ceramic cooktop
The cooktop should be regularly cleaned; preferably after
every use, once the residual heat warninglights have gone off.
Smudges from aluminum-bottom pans can be easily cleaned
off with a clothdampened in vinegar.
Remove any burnt residues after cooking with the scraper;
rinse with water and wipedry with a clean cloth. Regular use
of the scraper considerably reduces theneed for chemical
detergents for the daily cleaning of the cooktop.Never use
abrasive or corrosive detergents (e.g. cleaning powders,
oven sprays,spot-removers, wire sponges).
NEVER USE A STEAM JET TO CLEAN THE APPLIANCE.
Control Knob
(Cooktop Burners)
A
B
19
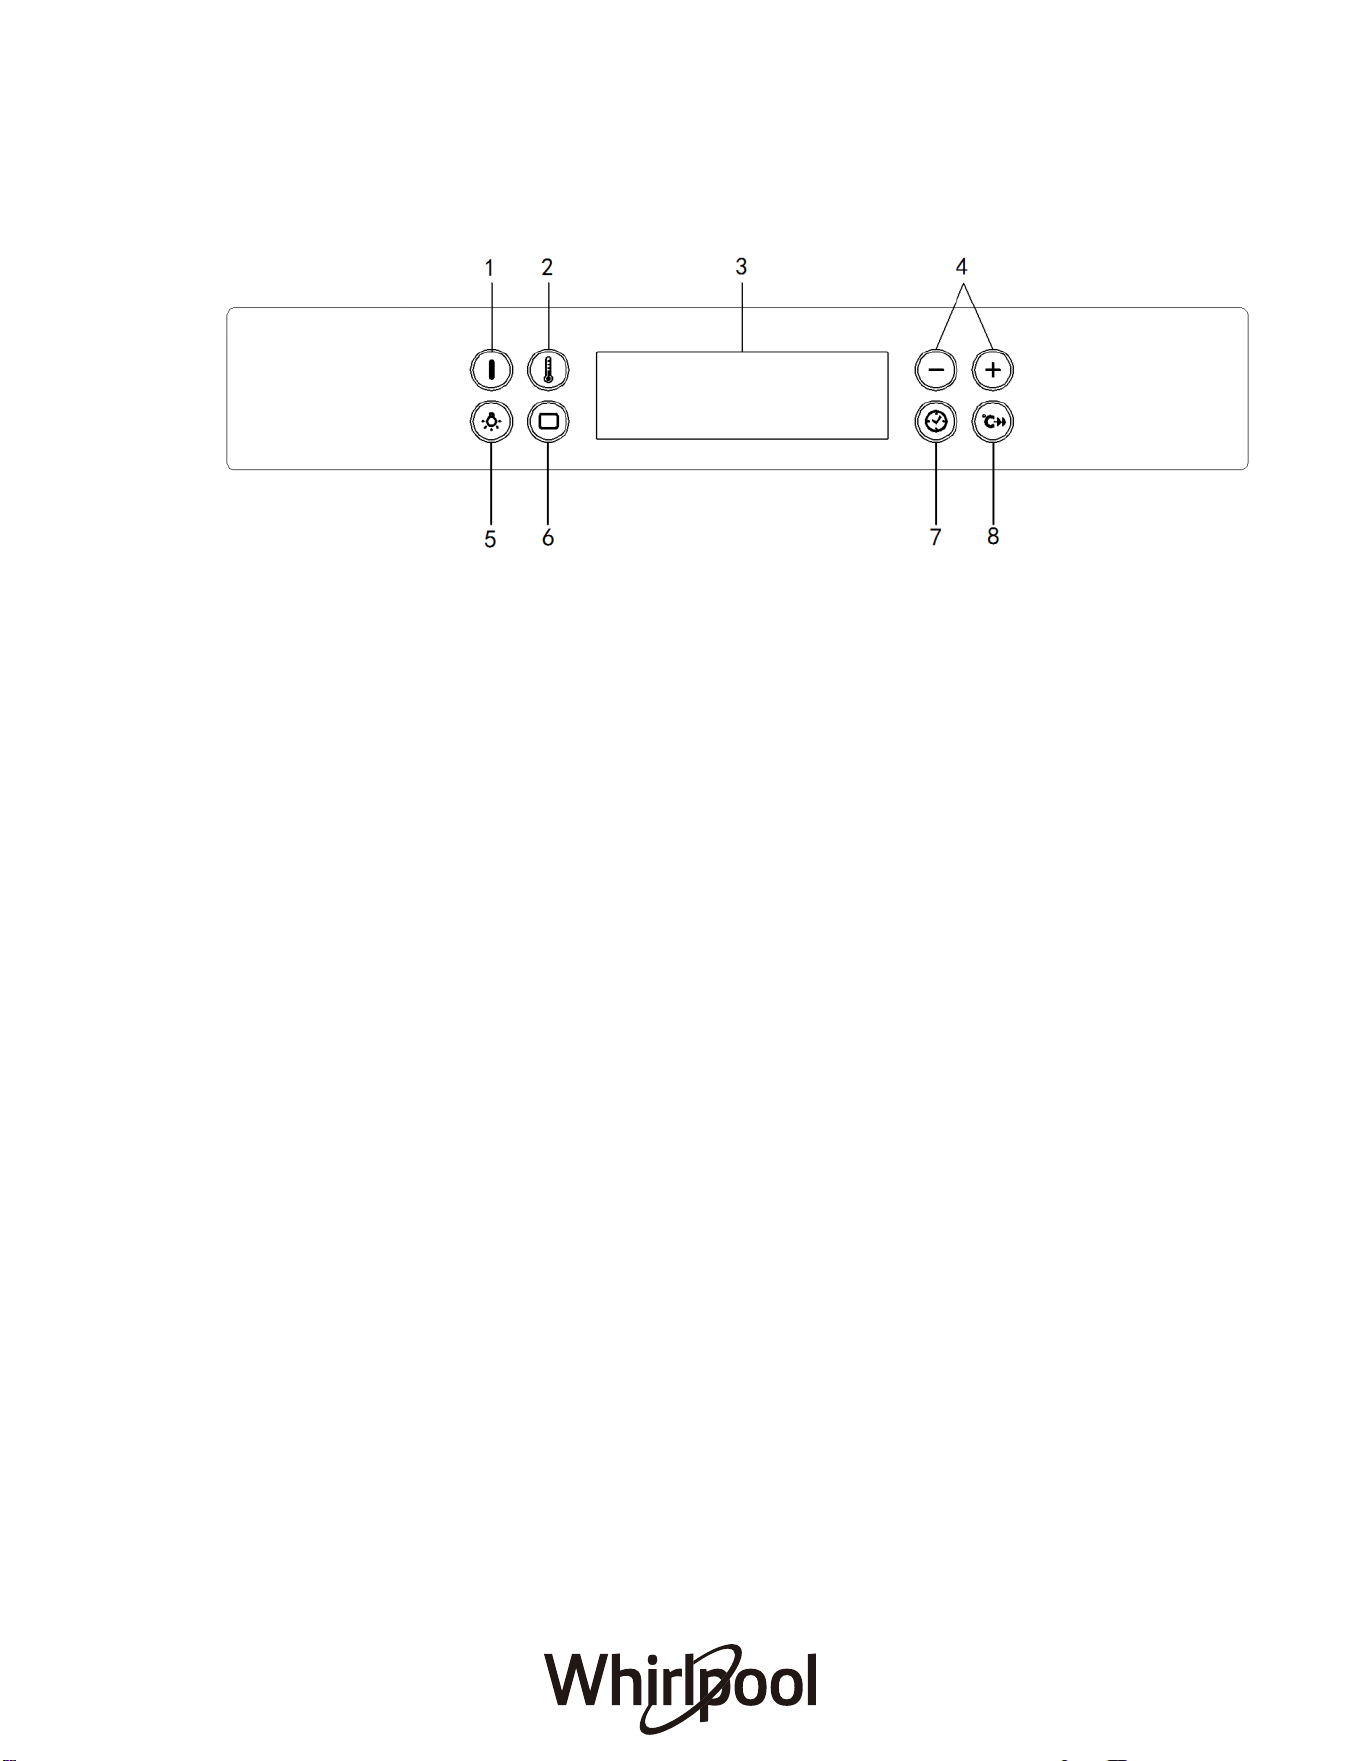
Oven Control Panel
1. On/Off Button
For switching the oven on
and off for stopping an
active function.
2. Temperature Button
For accessing the
temperature you require
when activating functions.
3. Display
Shows the current settings
of the appliance
4. Navigation Button
For increasing/decreasing
the settings or values of a
function
5. Lamp Button
With the oven switched on,
press to turn the oven
compartment lamp on or off.
6. Function Button
For access to the functions and
menus.
7. Time Button
For accessing the cooking time
settings, delayed start and
timer. For displaying the time
when the oven is off.
8. Fast Preheat
For preheating the oven quickly.
20
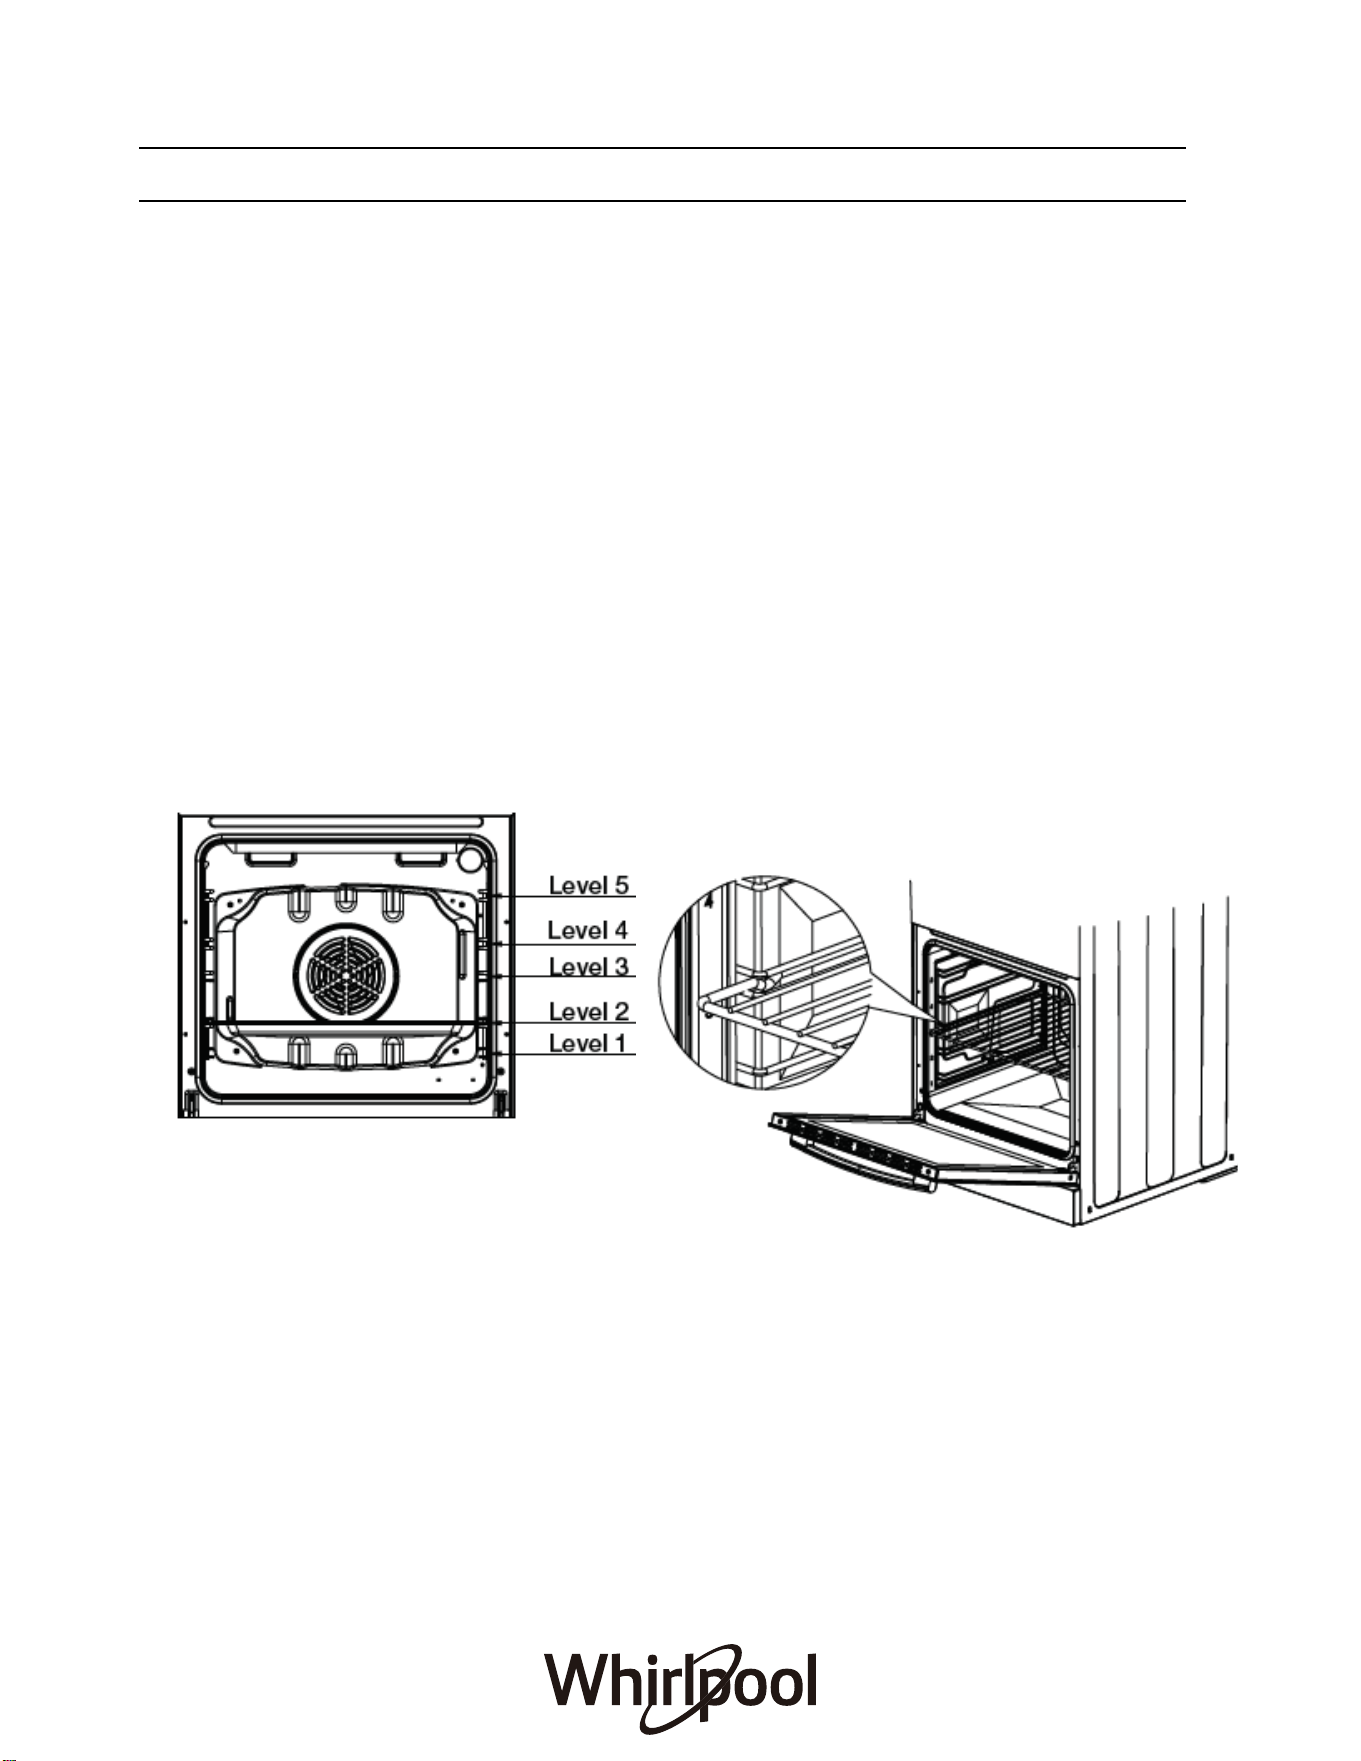
Oven shelf positions Fitting oven shelves
• The main oven has 5 shelf positions to
choose from. Position 1 is the position at
the bottom of the oven and position 5 is
located at the highest point of the oven.
• The 5 position side rack system can
house both the standard oven shelves
and baking tray.
• Ensure shelf orientation is correct (refer picture).
• The shelf has a safety bar fitted to reduce the risk
of dishes sliding off the shelf, this is the rear of the
shelf.
• Slide into oven at an angle until raised back of
shelf is past the stop on side runners.
• Lower front of shelf and push in until stop is
reached.
Note: The top ledge is not a shelf position
Oven Safety Warnings
• Always follow the instructions for putting the shelves and side racks into the oven, to avoid
accidents.
• Do not line the oven with foil, it will damage the enamel.
• Do not place cookwares or anything else on the bottom of conventional oven model as trapped
heat will damage the oven.
• Do not touch the hot surfaces or heating elements inside the oven.
• Do not use the oven door as a shelf.
• Do not push down on the open oven door.
• Do not place shelves on top of upper most shelf runner as there are no stops for shelf withdrawal.
Please wipe out the oven interior prior to operation with warm soapy water and polish dry with a
soft clean cloth.
HEAT THE OVEN
A new oven may release odours that have been left behind during manufacturing: this is completely
normal. Therefore, before starting to cook food, we recommend heating the empty oven in order to
remove any possible odours. Remove any cardboard or transparent film from the oven and remove
any accessories from inside it. Heat the oven to 250°C for about half an hour. The oven must be
empty during this time. Follow the instructions for setting the function correctly.
Please note: We recommend ventilating the room after using the appliance for the first time.
FIRST TIME USE
21
FIRST TIME USE
SET THE TIME
You will need to set the time when you switch on the appliance for the first time. The display will
show “12:00”. You can only set the clock when the oven is in standby mode.
Press ˄ or ˅ to set the current hour and press the “ ” button. The two digits for the minutes
will flash on the display. Press ˄ or ˅ to set the minutes and press “time icon” to confirm.
HEAT THE OVEN
A new oven may release odours that have been left behind during manufacturing: this is
completely normal. Therefore, before starting to cook food, we recommend heating the empty
oven in order to remove any possible odours. Remove any cardboard or transparent film from
the oven and remove any accessories from inside it. Heat the oven to 200 ℃
for about an hour.
The oven must be empty du
ring this time. Follow the instructions for setting the function
correctly.
Please note: We recommend ventilating the room after using the appliance for the first time.
FUNCTIONS & DAILY USE
FUNCTIONS
CONVENTIONAL
Uses upper and bottom heating element
Select a temperature between 30 °C and 260 °C.
For cooking any kind of dish on one shelf only.
CONVECT BAKE
Uses top and bottom heating elements, together with the fan.
Constant heat distribution throughout the cavity.
Select a temperature between 30 °C and 260 °C.
Recommended for cooking pre packaged food quickly. Best results when
cooking, refer to “Practical Cooking Advice”.
FORCED AIR
Uses the heating element from the rear and the fan to ensure delicate even
heat distribution throughout the oven.
Select a temperature between 30 °C and 260 °C.
Ideal for baking and cooking delicate food on 3 shelves at the same time.
Recommended for cakes that need to rise, cream puffs, sweet and savory
biscuits, savory puffs, swiss rolls, small portions of vegetables au gratin, etc.
PIZZA
Uses forced air and bottom heating elements making it perfect for baking
pizza. The fan and heating element works together to circulate hot air
For even cooking and melting toppings, while the bottom heating element
ensures a crispy base.
22
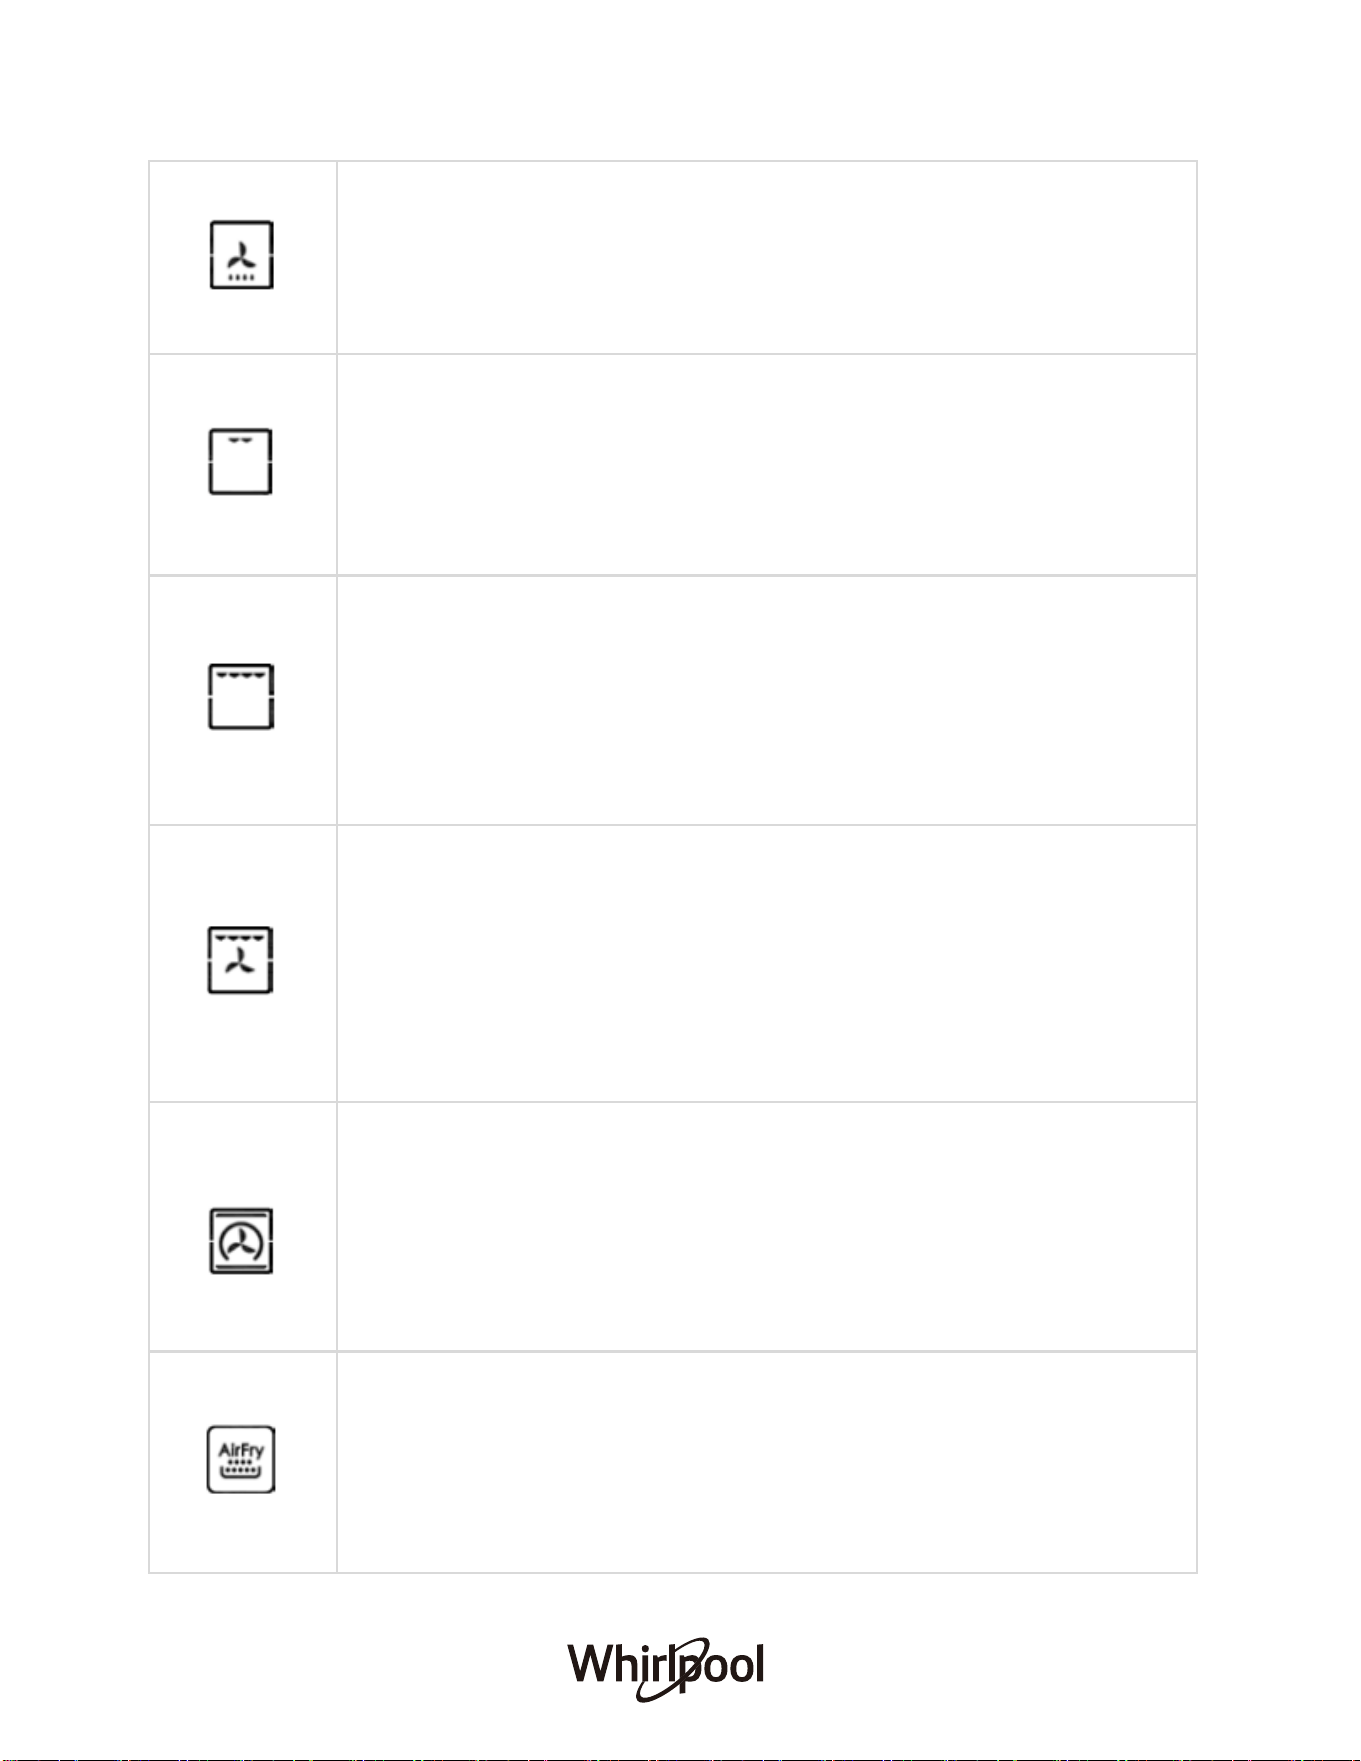
DEFROST
Bottom heating with fan to circulate the air at room temperature.
To speed up defrosting of food especially delicate food (eg. ice cream, cakes,
cream, custard desserts, fruit cakes).
For defrosting meat, fish and bread, it is recommended to use “Forced Air”
mode (Temperature: 30 °C and 260 °C) to accelerate the process.
GRILL
Uses radiant heat from powerful upper element.
Select a temperature between 80 °C and 230 °C .
Recommended for grilling tender cuts of meat, steak, chops, sausages, fish,
cheese toasts.
Preheat the grill for 3 mins to get the best results. Slide the grill dish into
either of the 2 spaces within the upper pairs of support rails.
MAXI GRILL
Uses direct radiant heat from 2 powerful upper elements. Cook faster than a
normal “Grill”.
Select a temperature between 80 °C and 230 °C .
Recommended for grilling tender cuts of meat, steak, chops, sausages, fish,
cheese toasts.
Preheat the grill for 3 mins to get the best results. This will help seal in the
natural juices of the meat for a better flavour.
TURBO GRILL
Uses top central heating and fan.
Select a temperature between 80 °C and 230 °C
Grill element turns on and off to maintain the set temperature while the fan
circulates the heat air. Keep the door closed to ensure food is fully cooked.
Recommended for large cuts of meat.
Put the food on the 2nd or 3rd rack from the bottom. Put the deep tray on the
lowest shelf to collect the oil or juice.
It is not required to turn the food over when using this mode.
MULTI-COOK
Uses the top and circle heating elements together with the fan.
Select a temperature between 50 °C and 260 °C .
Able to cook various dishes at the same time with the same cooking
temperatures. A maximum of 2 racks can be used at the same time.
Recommended for dishes requiring a gratin finish or those requiring
prolonged cooking times (eg. lasagna, baked pasta, roast chicken, potatoes,
etc.), cooking fish, vegetable-based side dishes and baking leavened cakes.
AIR FRY
Uses the top and circle heating elements together with the fan.
To be used with the air fry basket.
Select a temperature between 150 °C and 230 °C.
Advanced convection cooking function without having to turn the food, giving
crispy great tasting results in a shorter time without all the oil.
Suitable for french fries, chicken wings and nuggets.
23
DELICATE COOK
Uses bottom heating element and fan.
Select a temperature between 50 °C and 230 °C.
Suitable for pastries, cakes and non-dry sweets in baking tins. Excellent
results are also obtained in cooking requiring above all heat from the bottom.
Recommended to put the food on a low level.
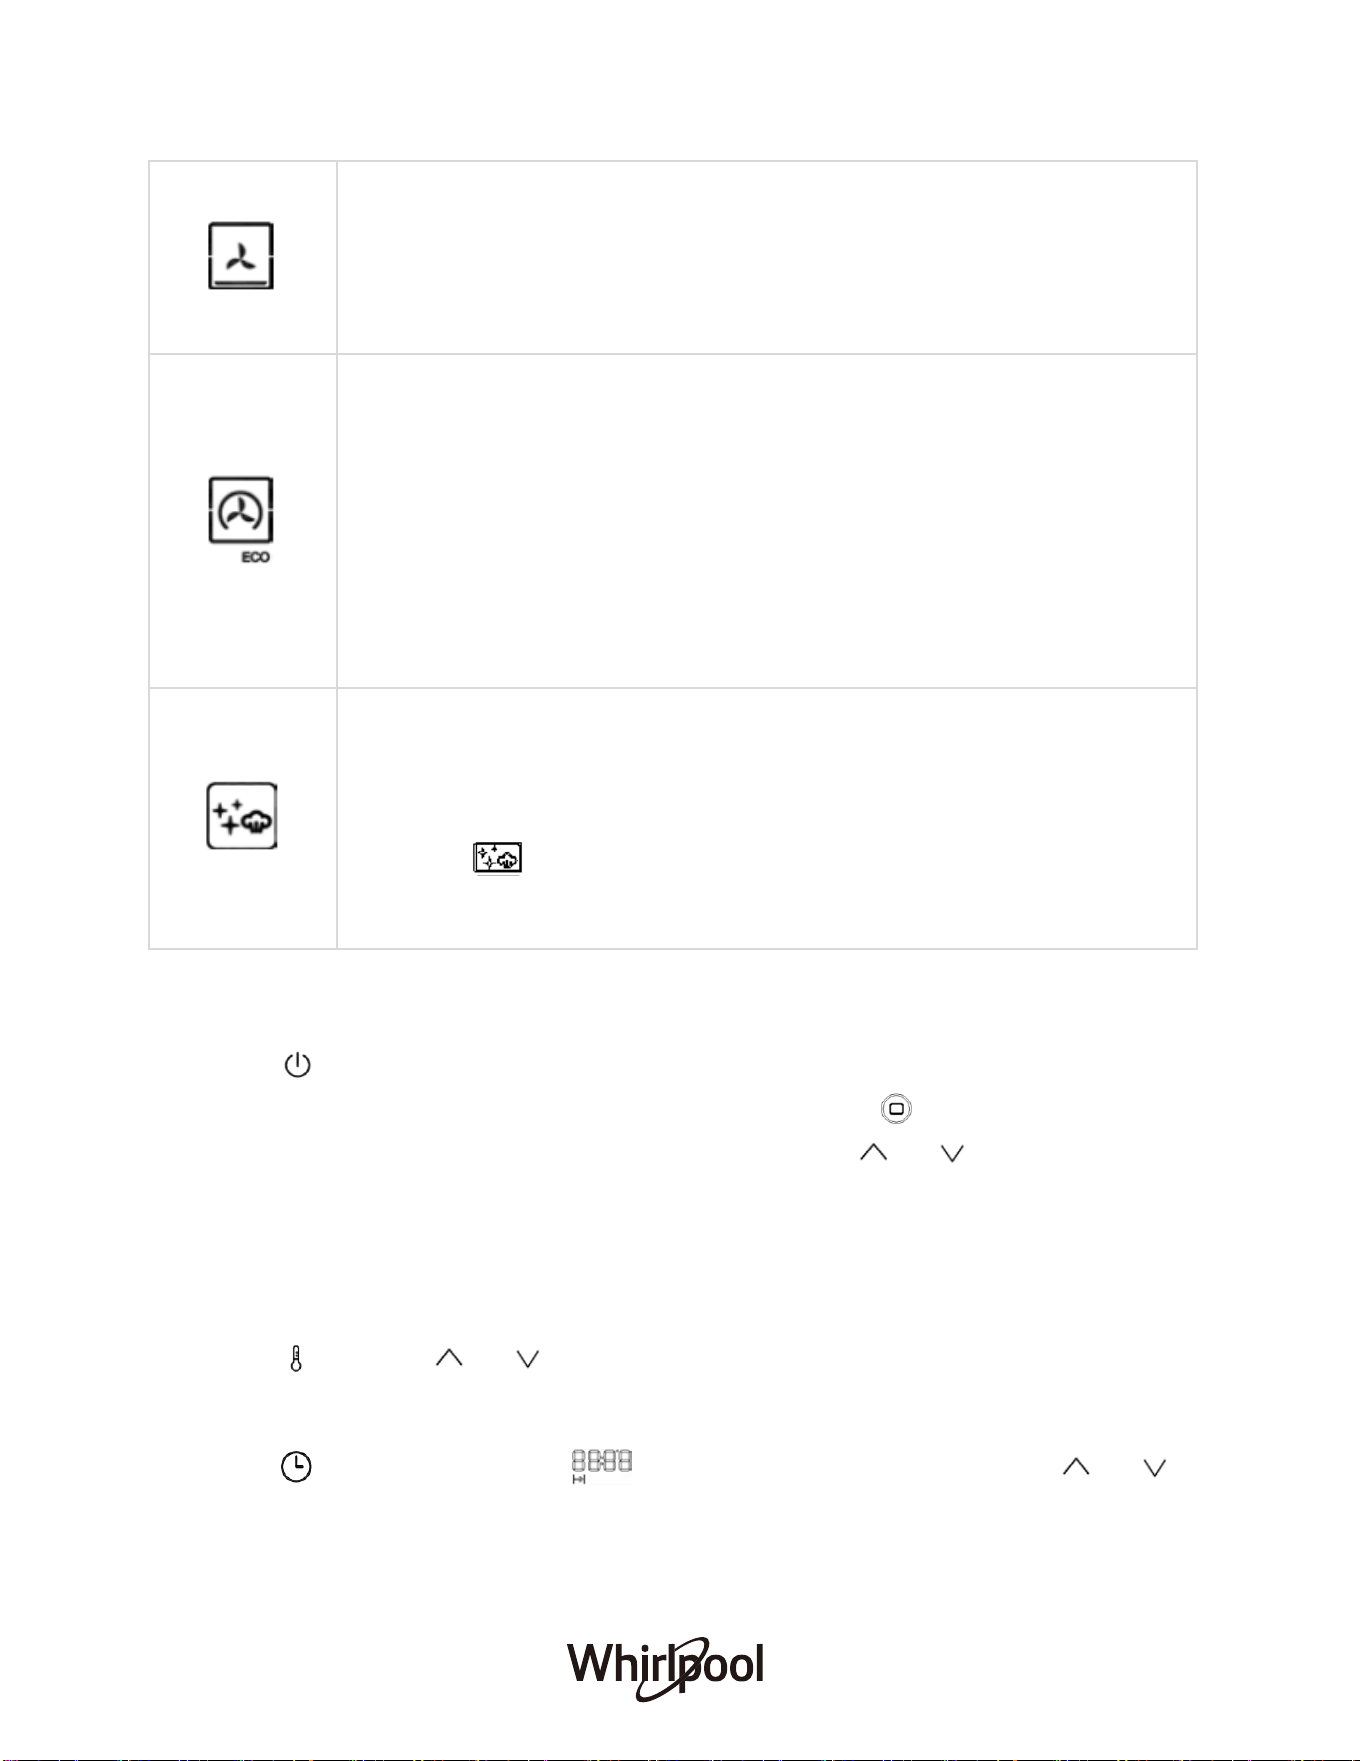
ECO FORCED AIR
Uses the rear heating element and fan.
Food is prevented from drying out excessively by gentle, intermittent air
circulation.
Select a temperature between 40 °C and 230 °C.
When this ECO function is in use, the light will remain switched off during
cooking. To use the ECO cycle and therefore optimise power consumption,
the oven door should not be opened until the food is completely cooked.
For baking an
d cooking delicate foods-especially cakes that need to rise-and
for the preparation of certain tartlets on 3 shelves at the same time.
SMART CLEAN
The action of steam released during this special low-temperature cleaning
cycle allows dirt and food residues to be removed with ease.
Remove all accessories from the oven when activating the Smart Clean
function. Pour 150ml of drinking water on the bottom of the oven then set the
function to and temperature to 220°C. Set time to 20-30 minutes. Allow
it to cool and wipe with a wet cloth.
Note: Activate the func
tion when the oven is cold.
DAILY USE
1. SELECT A FUNCTION
Press to switch on the oven: the display will show the last running main function or the
main menu. The functions can be selected by pressing the To select an item from a
menu (the display will show the first available item), press or to select the desired
one.
2. SET A FUNCTION
After having selected the function you require, you can change its settings.
TEMPERATURE/GRILL LEVEL
Press then press or to change its setting.
DURATION
Press several times until the begins to flash on the display. Press or to
change its setting, the oven will automatically start to work after 3 seconds flash.
24

In many functions, once you have set a cooking time you can delay starting the function by
programming its end time.
Press several times until the begins to flash on the display. To set the time you
want cooking to end, press or to set the required time, then the oven will
automatically start to work after 3 seconds flash. Place the food in the oven and close the
door: The function will start automatically after the period of time that has been calculated
in order for cooking to finish at the time you have set.
3. PREHEATING
It shall have beep sound after preheating finished.
4. CHILD LOCK
To lock the control panel, press and at the same time and hold for 3 seconds, the
will appear on the display. Do this again to unlock the control panel. Please note: This
function can also be activated during cooking. For safety reasons, the oven can be
switched off at any time by pressing .
5. FAVORITES
If you would like to save a function as a favorite and store the current settings for future use,
select the function, temperature and cook time/end time (if necessary) and then press and
hold the button for 2 seconds until an audible signal sounds. Please note: The
previously saved setting will be overwritten when a new setting is saved.
To call up the function you have saved at a later time, press and hold the for 3
seconds into the memory function. An audible signal will sound, which indicates that the
favorites is set.
Press and hold the button for another 3 seconds, the memory function is obtained.
Wait for another 5 seconds to open the memory function.
25
END TIME (START DELAY)
COOKING TABLE
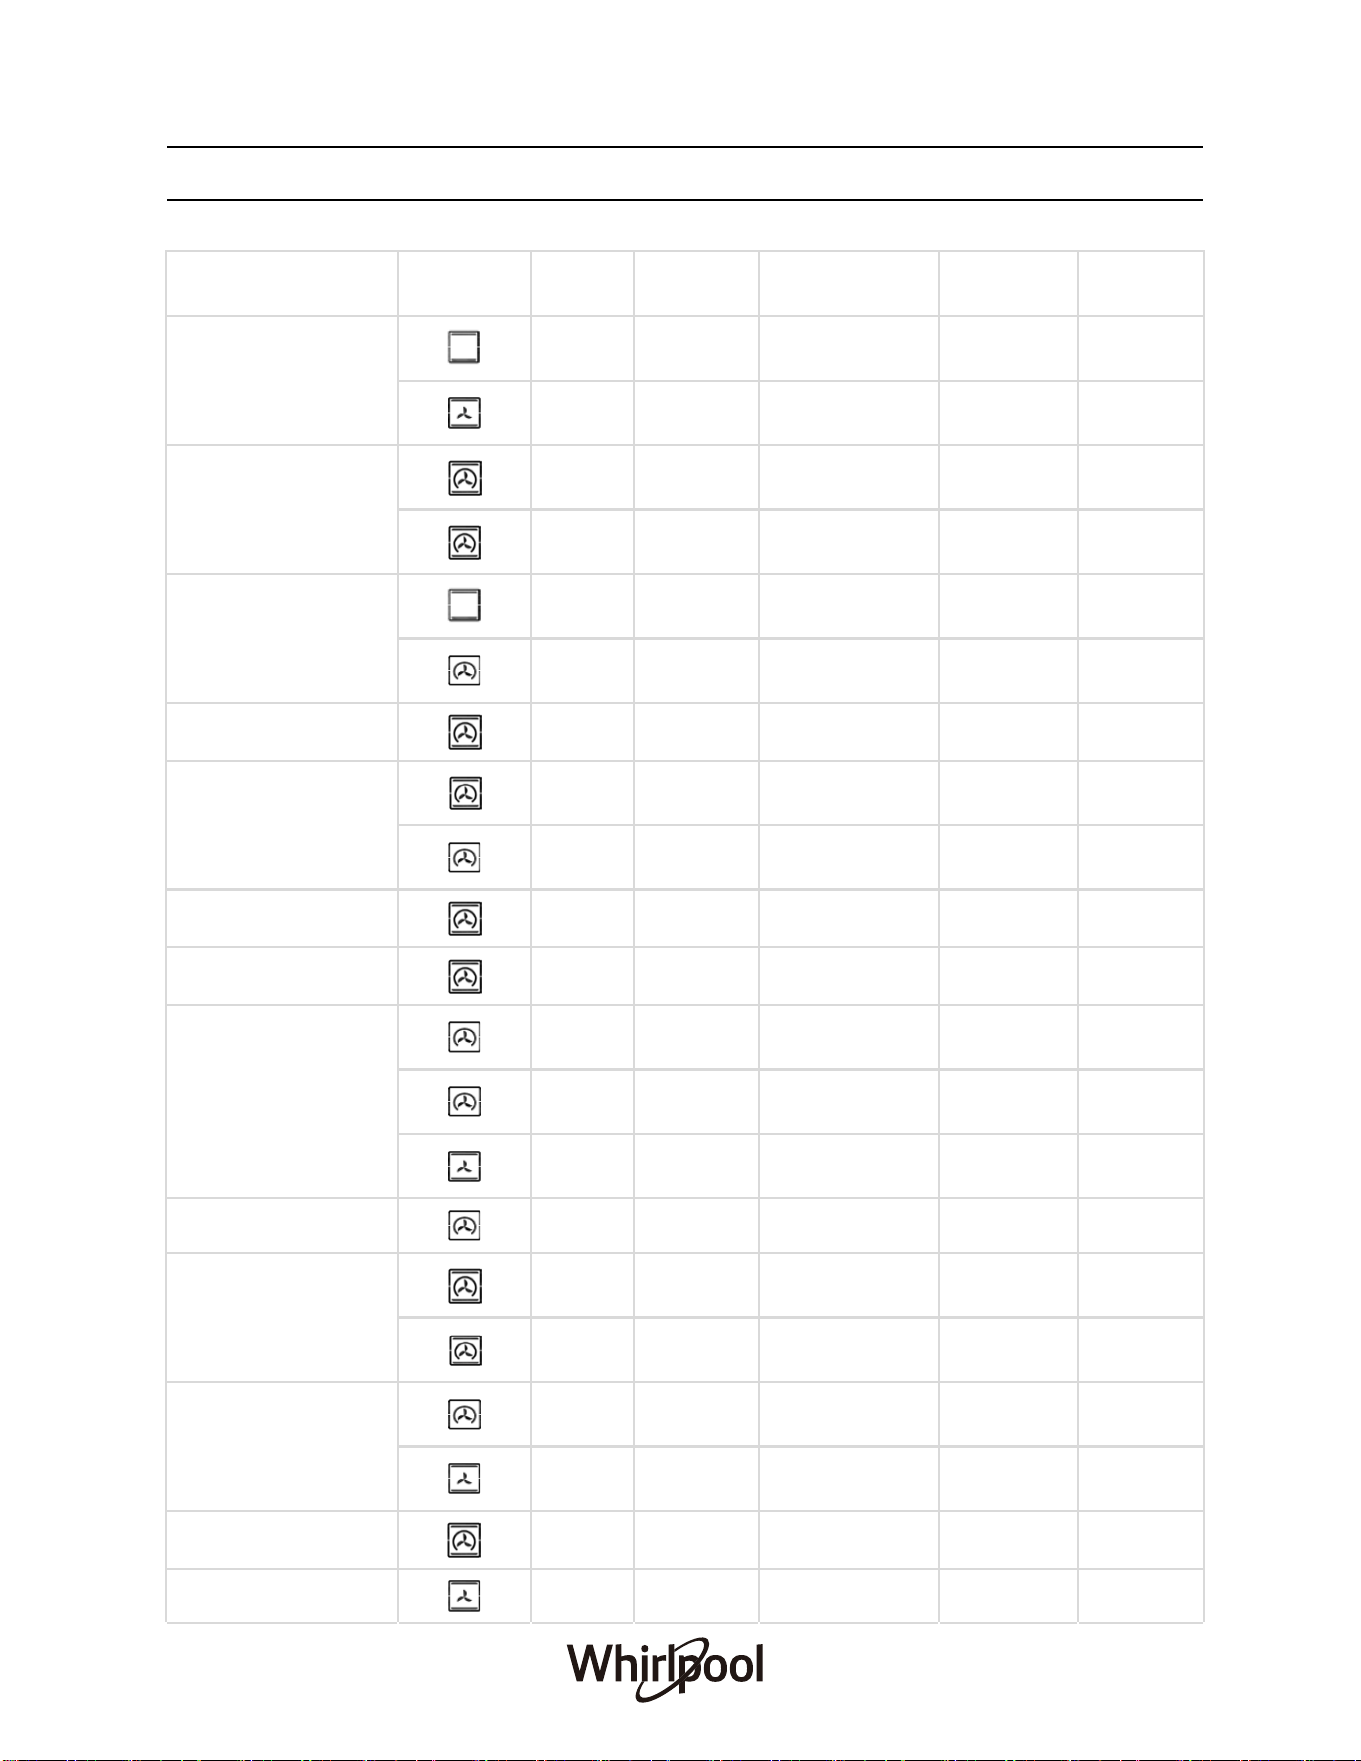
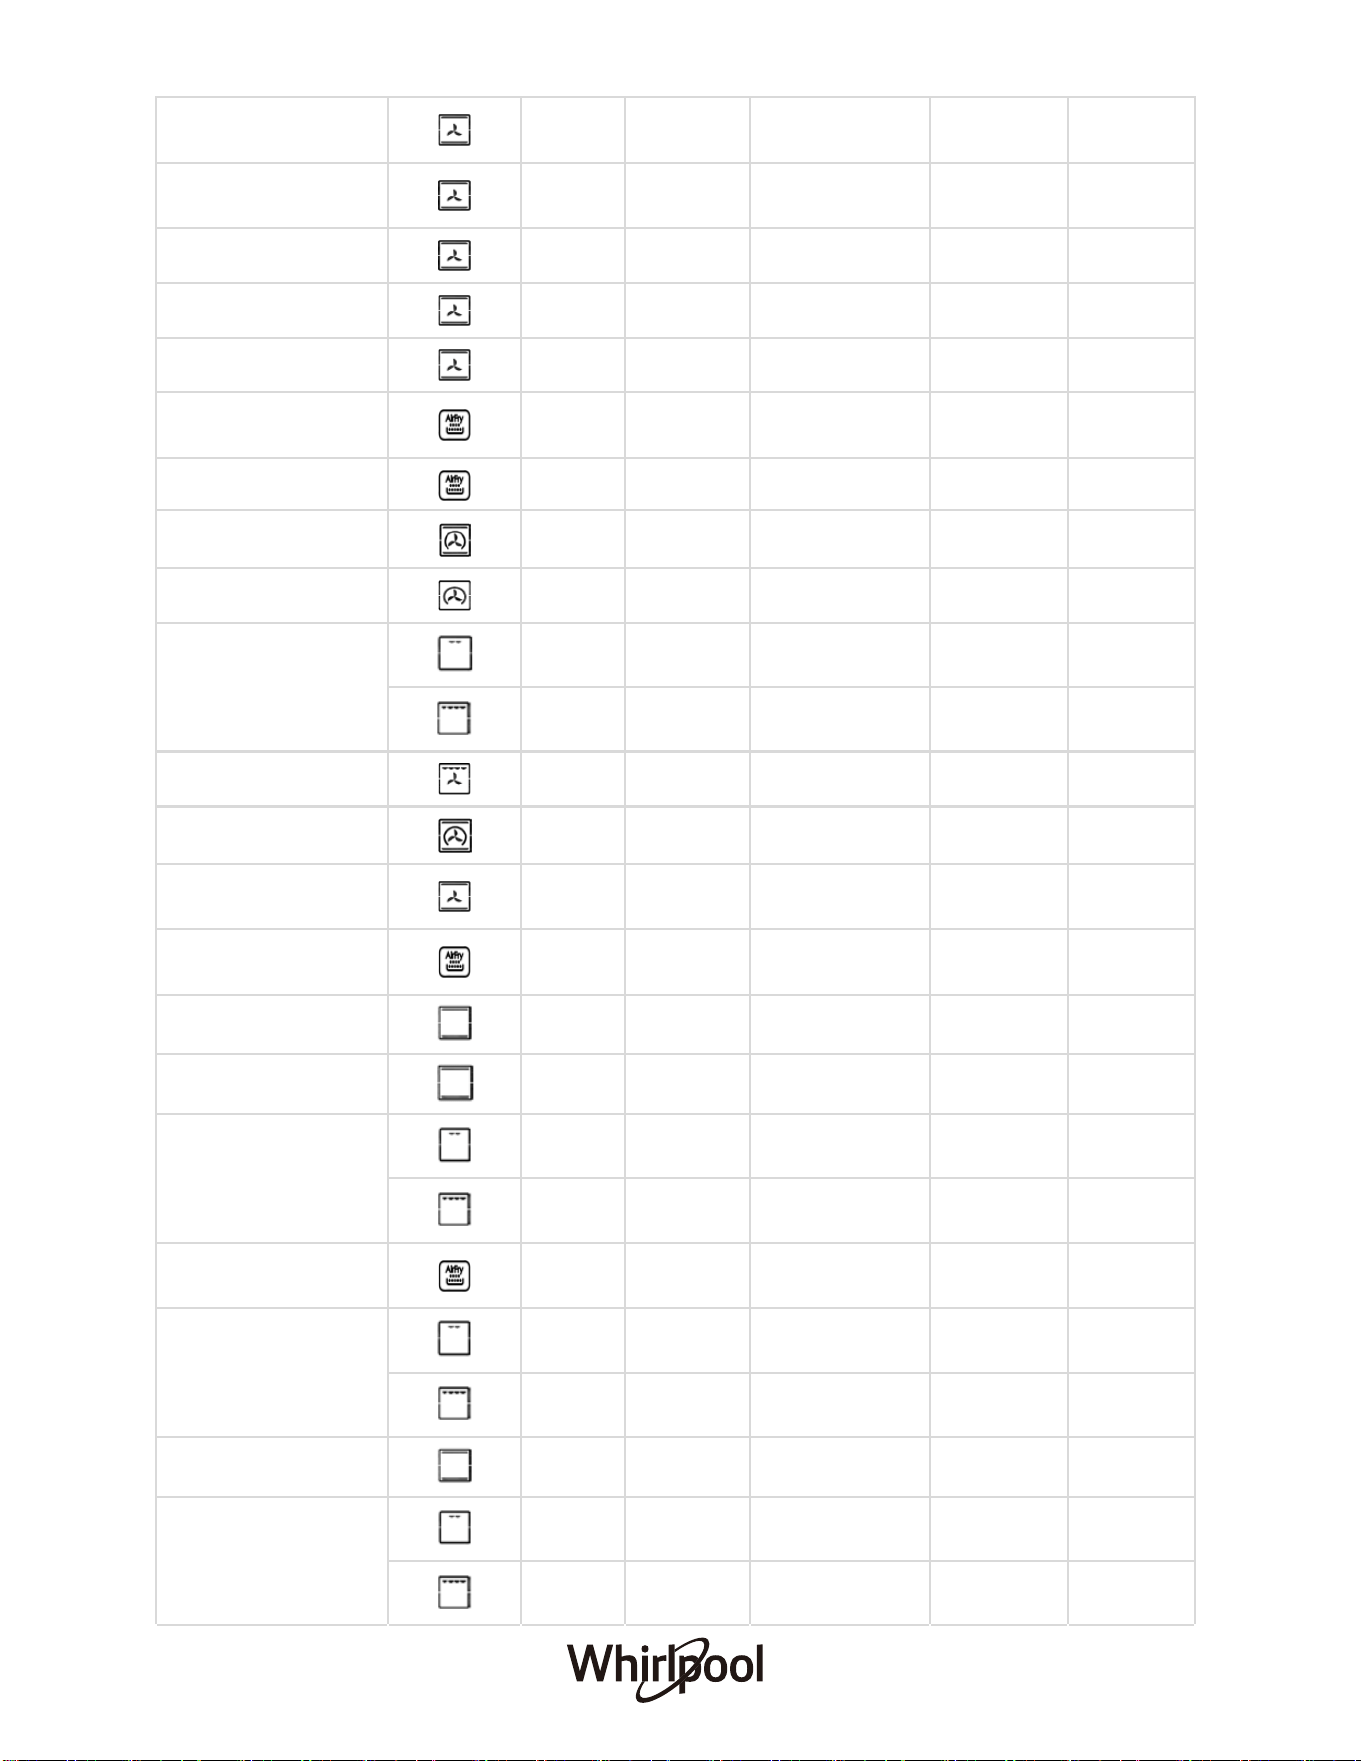
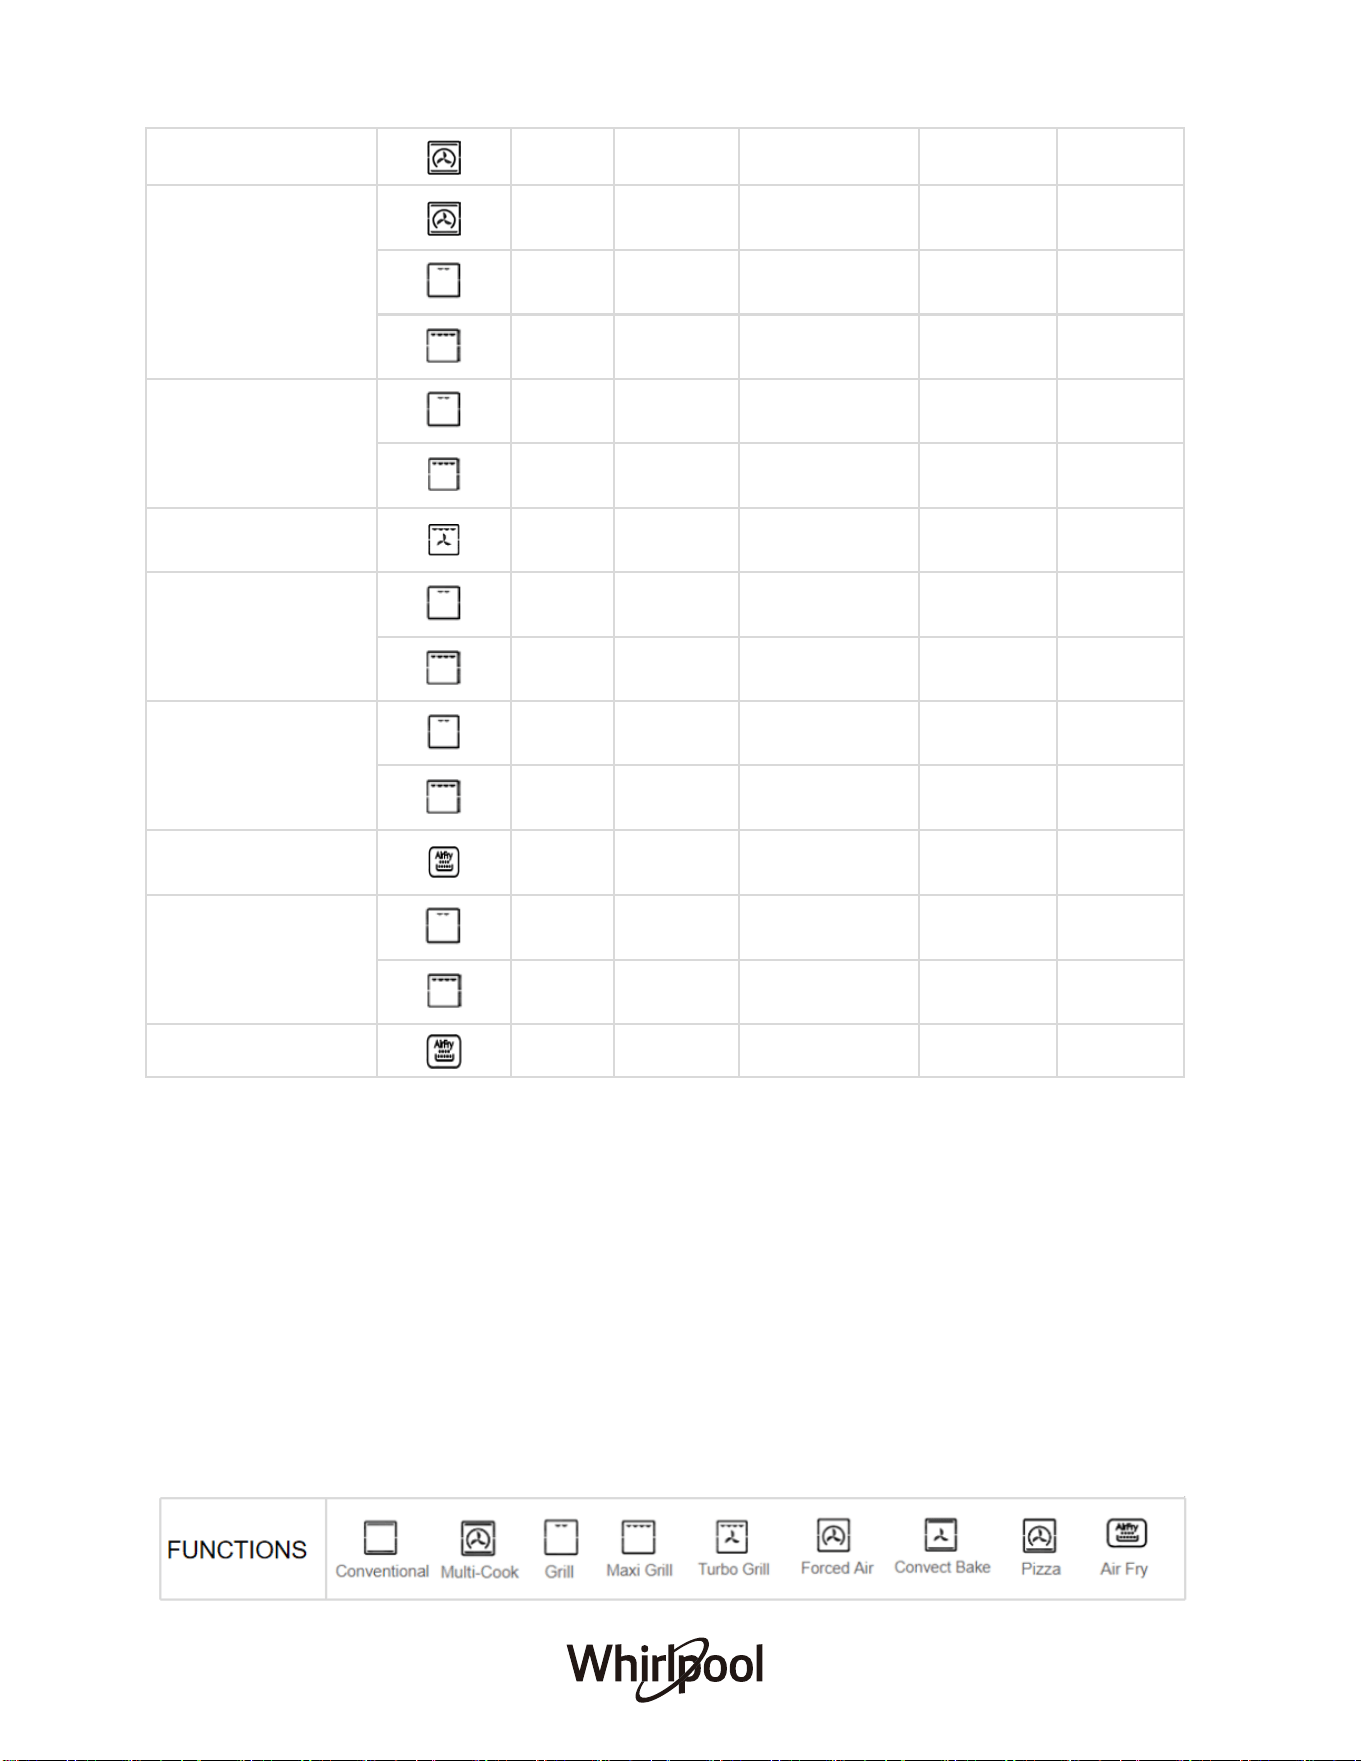
FOOD CATEGORIES FUNCTION
WEIGHT
(KG)
PREHEAT
(MIN)
TEMPERATURE
( ℃)
DURATION
(MIN)
LEVEL
Biscuits (Short Pastry)
- 15 180 15-20 3
0.3 - 200 15-18 2
Biscuits (on multi-level
racks)
0.5 10 180 10-15 2-4
0.7 15 180 20-25 1-3-5
Tarts
1 15 180 30-35 3
0.5 15 180 20-30 3
Savory Pies 1.5 15 200 25-30 3
Sponge Cake (on 1 rack)
0.5 10 170 15-20 2
0.5 15 160 25-30 3
Sponge Cake (on 2 racks) 1 10 170 20-25 2-4
Plum Cake 1 10 170 40-50 2
Fruit Cakes 1 15 180 40-45 2/3
26
0.7 15 180 40-50 3
0.6 - 180 45 2
Small Cakes 0.6 15 190 20-25 2-4
Cream Puffs (on multi-
level racks)
0.5 10 190 20-25 2-4
0.7 15 180 20-25 1-3-5
Cheese Puffs
0.4 15 190 20-25 2-4
0.2 - 210 10-12 2
Pizza (on 2 racks) 1 15 220 15-20 2-4
Frozen Pizza 0.3 - 250 12 2
Frozen Zucchini and
Prawn Pie
0.4 - 200 20 2
Frozen Country Style
Spinach Pie
0.5 - 220 30-35 2
Frozen Golden Rolls 0.4 - 180 25-30 2
Frozen Chicken Morsels 0.4 - 220 15-20 2
Frozen Lasagna 0.5 - 200 35 2
Frozen Chicken
Nuggets/Crumbed Fish
1 5 230 15 3
Frozen Chips 1 5 220 15 3
Lasagna 1 10 200 30-35 3
Stuffed Pancakes 1.2 15 200 30-35 2-4
Toasted Sandwiches
- 5 Max 2-3 4
- 5 200 2-3 4
Grilled Chicken 1.5 5 200 55-60 3
Roast Chicken + Potatoes 1 10 180 60-75 2-4
Pre-cooked Chicken
Wings
0.4 - 200 20-25
27
Chicken Drumettes/wings
(with dry rub)
1 5 230 15 3
Duck 1 15 200 65-75 3
Roast Veal or Beef 1 15 200 70-75 3
Veal Steak
1 5 Max 15-20 4
1 5 200 15-20 4
Scotch Fillet Steak (seared
first)
1 5 220 8 3
Cutlets
1 5 Max 15-20 4
1 5 200 15-20 4
Pork Roast 1 15 200 70-80 3
Hamburgers
1 5 Max 7-10 4
1 5 200 7-10 4
Lamb 1 10 180 50-60 2
Mackerel
1 10 180 30-35 2
1 5 Max 15-20 4
1 5 200 15-20 4
Soles and Cuttlefish
1 5 Max 8-10 4
1 5 200 8-10 4
Cuttlefish 1.5 5 200 30-35 3
Squid and Prawn Kebabs
1 5 Max 6-8 4
1 5 200 6-8 4
Cod Fillet
1 5 Max 10 4
1 5 200 10 4
28
Fresh Barramundi Fillet
(with crumb)
1 5 230 15 3
Grilled Vegetables
1 5 Max 10-15 3/4
1 5 200 10-15 3/4
Potatoes cut into wedges 0.5 5 230 14 3
*Cooking durations are approximate and may vary according to personal taste.
*When cooking with Grill or Turbo Grill, a deep tray must always be placed on the 1st rack from the bottom.
HOW TO READ THE COOKING TABLES
The tables list: recipes, if preheating is needed, temperature (°C), grill level, cooking time
(minutes) and level suggested for cooking. Cooking times start from the moment food is placed
in the oven, excluding preheating (where required). Cooking temperatures and times
are
approximate and depend on the amount of food and the type of accessory used. Use the lowest
recommended values to begin with and, if the food is not cooked enough, move on to higher
values. Use the accessories supplied and preferably dark-coloured metal cake tins and oven
trays. You can also use pans and accessories in pyrex or stoneware, but bear in mind that
cooking times will be slightly longer. To obtain the best res
ults, carefully follow the advice given
in the cooking table.

CLEANING & MAINTENANCE
Make sure the oven has cooled down before carrying out any maintenance or cleaning. Do not
use steam cleaners. Do not use wire wool, abrasive scourers or abrasive/corrosive cleaning
agents, as these could damage the surfaces of the appliance. Wear protective gloves. The oven
must be disc
Remove all spilt food with a razor blade scraper while the hotplate is still warm -NOT HOT.
Note: Do not use abrasive sponges or scourers, oven sprays or stain removers on ceramic hotplates.
These may damage, scratch or stain the ceramic cooktop. Any pitting, staining or scratching will not
be covered by warranty.
When the ceramic hotplate has cooled, wipe clean with dishwashing detergent on a damp cloth.
If aluminum foil, plastic items or foods with a high sugar content (e.g. jam, tomatoes, carrots, etc.)
melt on the glass, use the razor blade scraper to remove immediately before the ceramic hotplate
has cooled down completely,otherwise pitting of the surface may occur.
onnected from the mains before carrying out any maintenance work.
EXTERIOR SURFACES
COOKTOP SURFACES
Clean surfaces with a damp
microfiber c
loth. If they are very dirty, add a few drops of pH -
neutral detergent. Finish off with a dry cloth. Do not use corrosive or abrasive detergents. If any
of these products inadvertently comes into contact with the surfaces of the appliance, clean
immediately with a damp microfiber cloth.
INTERIOR SURFACES
After every use, leave the oven to cool and then clean it, preferably while it is still warm, to
remove any deposits or stains caused by food residues. To dry any condensation that has
29
formed as a result of cooking foods with a high water content, leave the oven to cool completely
and then wipe it with a cloth or sponge. Activate the “Smart Clean” function for optimum
cleaning of internal surfaces. Clean the glass in the door with a suitable liquid detergent.
ACCESSORIES
Soak the accessories in a washing-up liquid solution after use, handling them with oven gloves
if they are still hot. Food residues
can be removed using a washing-up brush or a sponge.
REMOVING AND REFITTING THE DOOR
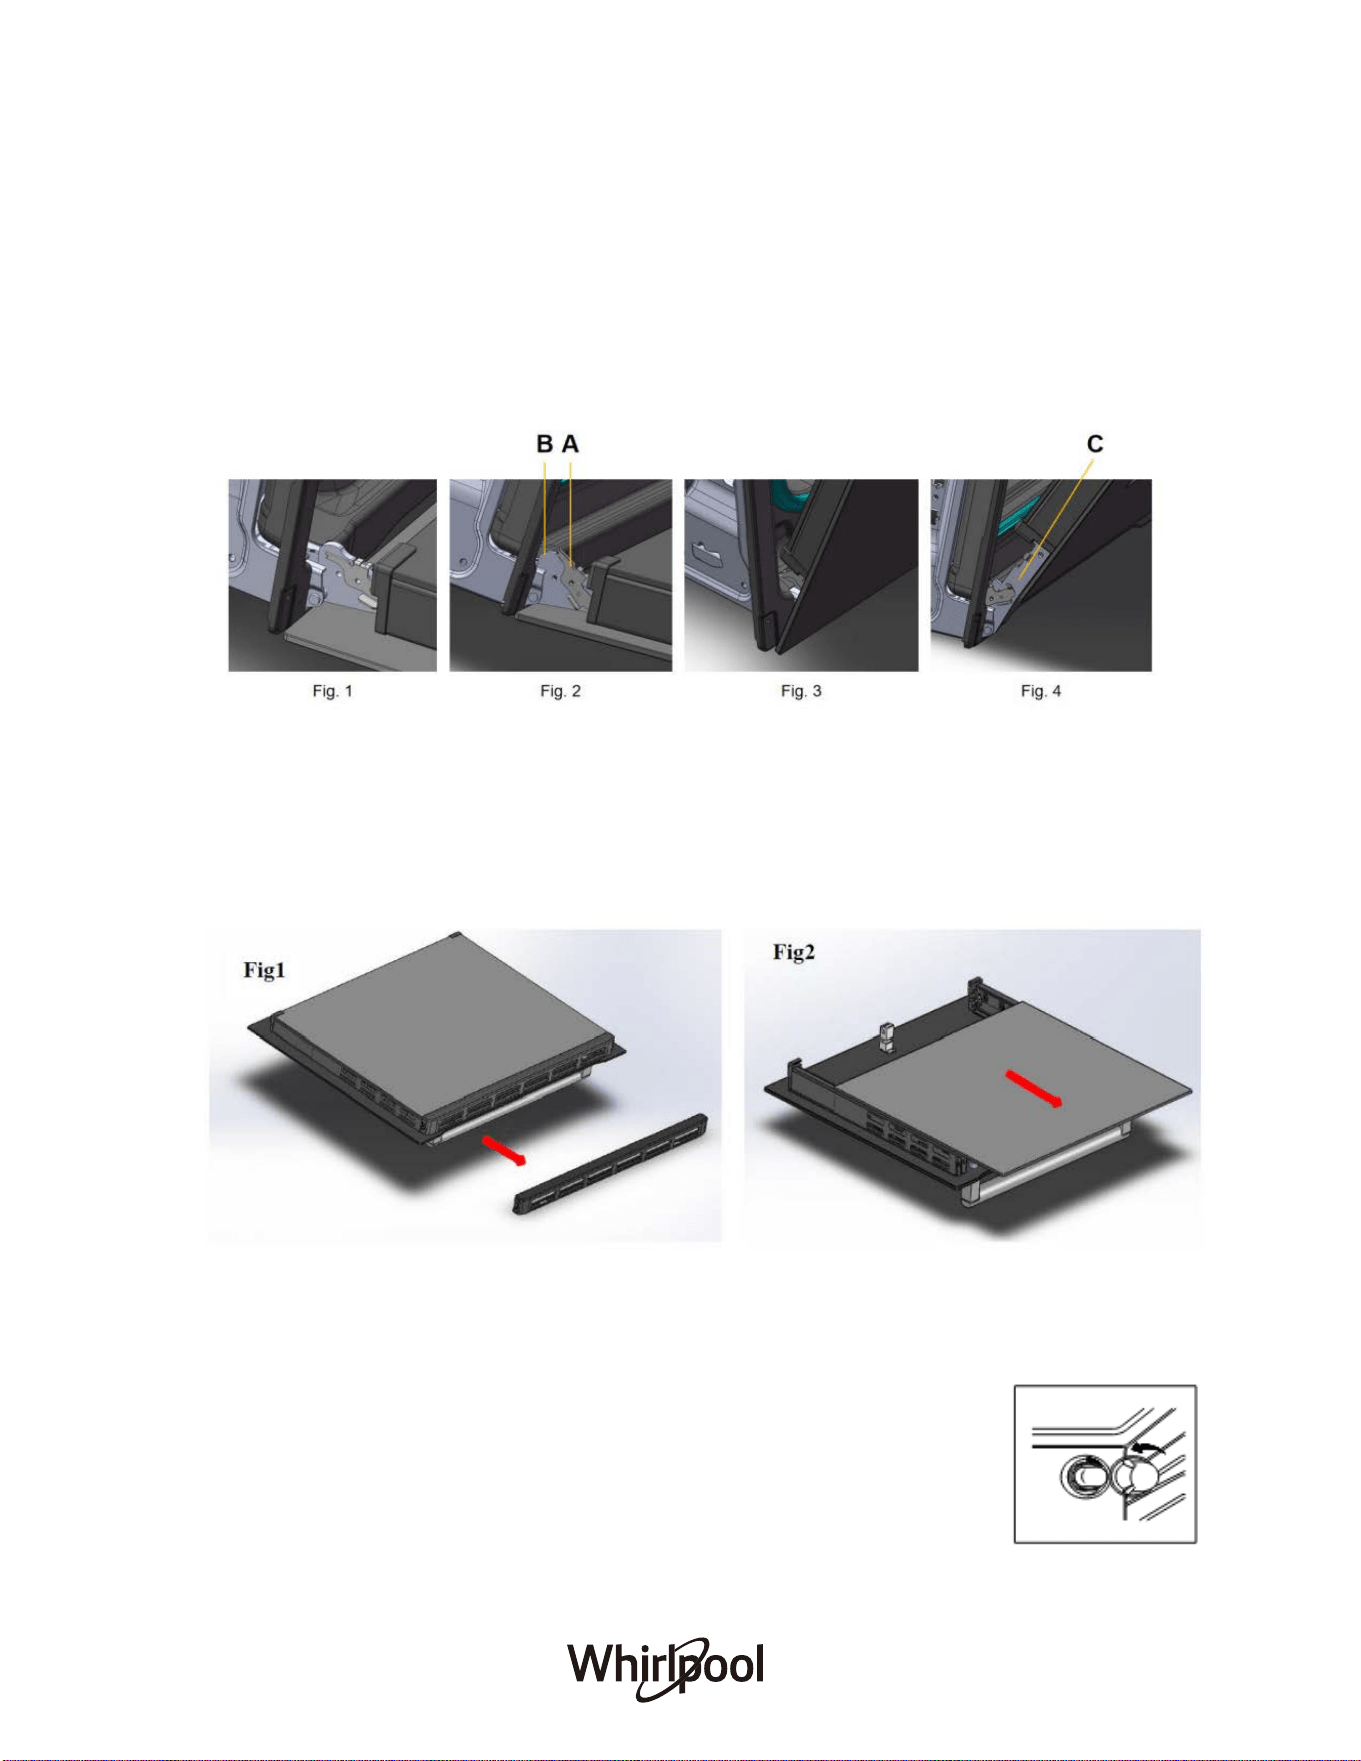
To remove the oven door for better access to the oven when cleaning, follow the below:
1. Open the door fully (Fig. 1)
2. Lift up and turn the latch A situated on each of the two hinges (Fig. 2)
3. Hold the door as shown in Fig. 3 and close the door gently until latch A of the two hinges
are hooked to part B of the door (Fig. 4)
4. Grip the door on the two external sides and close it like Fig. 3 & 4
5. Withdraw the hinge hooks
from their location following arrow C (Fig. 4)
6. To refit the door, repeat the above steps in reverse order
REMOVING THE INNER PANE OF GLASS
● Remove the seal G by unscrewing the 2 bolts (Fig. 1)
● Gently pull out the inner pane of glass (Fig. 2)
● Clean the glass with an appropriate cleaner. Dry thoroughly, and place on a soft surface.
Now you can clean the inside of the outer glass.
30
REPLACING THE LAMP
Disconnect the oven from the power supply, remove the cover from the light, replace the bulb
and fit the cover back on the light. Reconnect the oven to the power supply. Do not use the
oven until the light cover has been refitted.
Please note: Only use 25W/220-240V, G9 type. The bulb used in the
product is specifically designed for domestic appliances and is not suitable
for general room lighting within the home. Light bulbs are available from our
Aft
er-sales Service.
TROUBLESHOOTING
What to do if…
Causes/Solutions
Oven does not heat up
● Oven may not be switched on. Switch the oven
on.
● The clock may not be set. Set the clock.
● Check to see if the required settings have been
applied.
● A household fuse may have blown or a circuit
breaker may have tripped. Replace the fuses
or reset the circuit. If this happens repeatedly,
call an authorised electrician.
A noise can be heard after a cooking
programme
Cooling fan remains switched on after the end of a
cooking programme.
The lighting is not working
● Disconnect the appliance from the electricity
supply: Switch off and unplug at the socket, or
disconnect the fuse, or switch off at the isolator
as appropriate. Turn the lamp glass cover anti-
counterclockwise to remove it.
● Remove the metal ring and clean the glass
cover.
● Replace the lamp with a new G9 lamp.
● Attach the metal ring to the glass cover.
● Install the glass cover.
Cakes and biscuits are browning
unevenly
There will always be a slight unevenness. If
browning is very uneven, check that the correct
temperature is set and that the correct shelf level is
used.
“HE1” A fault code appears in the
display
Temperature sensor error. Contact local after-sales
service centre.
31
AFTER-SALES SERVICE
To receive complete assistance, please register your product in your local market. Call the
number shown on the warranty booklet or follow the website’s instructions on:
Australia: www.whirlpool.com.au
New Zealand: www.whirlpool.co.nz
When contacting our Client After-sales service, always specify:
● A brief description of fault;
● The type and exact model of the appliance;
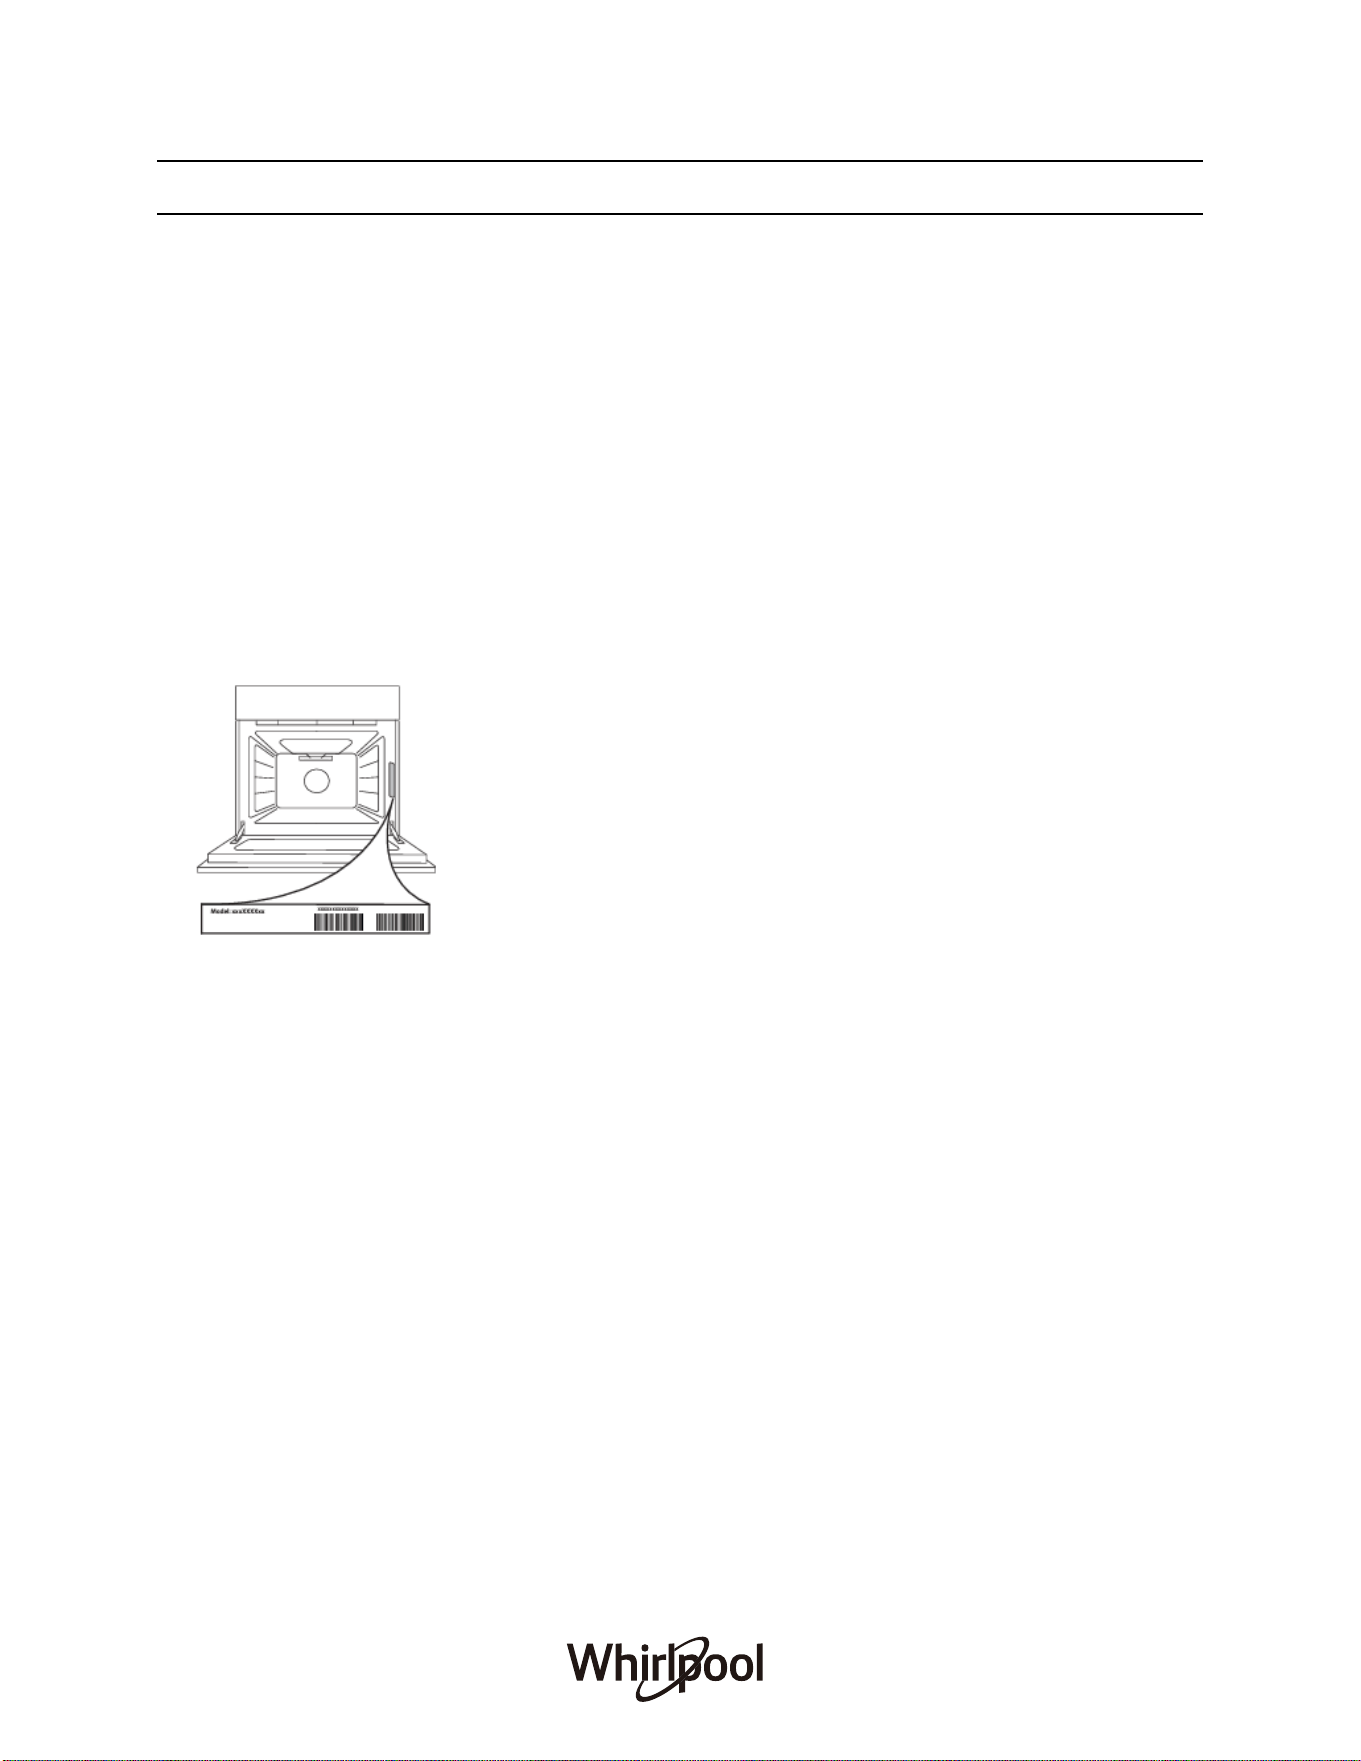
● The serial number (on the rating plate located at the front edge of the oven; visible when
the door
is open);
● Your full address;
● Your telephone number
32

33

34

35
REGISTER YOUR PRODUCT ONLINE
For Australia Market For New Zealand Market
Scan QR Code to visit
www.whirlpool.com.au
to register your product warranty online.
Scan QR Code to visit
www.whirlpool.co.nz
to register your product warranty online.
This QR Code is only applicable to Australia.
You can download the user manual by
● Visiting our website www.whirlpool.com.au
● Contacting our Customer Service Center at 1300 363 344
This QR Code is only applicable to New Zealand.
You can download the user manual by
● Visiting our website www.whirlpool.co.nz
● Contacting our Customer Service Center at 0800 442 584
Whirlpool® Registered Trademark/TM Trademark of Whirlpool group of companies
All rights reserved - http://www.whirlpool.com.au
- http://www.whirlpool.co.nz
EN