Read and follow all safety rules and operating instructions before using this product.
WAR N I N G
Owner' s Ma n u a l
TOLL-FREE HELPLINE: 1-866-523-5218
WAR N I N G
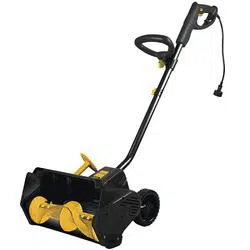
Electric Dethatcher
060-3864-2

Table of Contents
Technical Data
FOR USE WITH YARDWORKS REPLACEMENT TINES 060-6115-8 SOLD SEPERATELY
2
Technical data..............................................................................................................................2
General safety rules...................................................................................................................3-4
Specific safety rules for dethatcher ..............................................................................................5
Symbols.....................................................................................................................................6
Electrical information.................................................................................................................7-8
Know your dethatcher...................................................................................................................9
Assemby....................................................................................................................10-11
Operation and adjustments...................................................................................................12-14
Replacing Spring Tines.........................................................................................................15-16
Troubleshooting..........................................................................................................................17
Maintenance...............................................................................................................................18
Warranty ....................................................................................................................................19
Parts breakdown.........................................................................................................................20
Parts list......................................................................................................................................21
MODEL NUMBER........................................................................................................060-3864-2
MOTOR........................................................................................................120V AC, 60 Hz, 10 A
SPEED..........................................................................................................................3,700 RPM
DETHATCHING PATH............................................................................................. 14" (35.6 cm)
WEIGHT.........................................................................................................27 lb 10 oz (12.5 kg)
CSA................................................................................................................................... 218549

3
WARNING:
General Safety Rules
TO AVOID MISTAKES THAT COULD CAUSE SERIOUS INJURY,
DO NOT PLUG IN THE DETHATCHER UNTIL THE FOLLOWING STEPS HAVE
BEEN READ THOROUGHLY.
Safety is a combination of common sense, staying alert, and knowing how to use
your dethatcher.
1. READ and become familiar with this entire instruction manual. LEARN the tool’s
applications, limitations, and possible hazards.
2. AVOID DANGEROUS CONDITIONS. DO NOT use in wet or damp areas or expose
to rain.
3. DO NOT use in the presence of flammable liquids or gases.
4. KEEP BYSTANDERS AT A SAFE DISTANCE. NEVER allow children near the tool.
5. DRESS FOR SAFETY. DO NOT wear loose clothing, gloves, neckties, or jewellery
(rings, watches, etc.) when operating tool. Loose clothing can get caught and pull
you into moving parts.
6. ALWAYS WEAR EYE PROTECTION.
7. ALWAYS remove the power cord plug from the electric outlet when making
adjustments, changing parts, or cleaning.
8. AVOID ACCIDENTAL START-UPS. Make sure the power switch is in the OFF
position before plugging in the power cord.
9. DO NOT abuse the power cord. Do not use it to carry the tool. Keep cord away from
heat, oil, sharp edges, or moving parts. Replace damaged cords immediately; they
may create a shock or fire hazard.
10. NEVER LEAVE A RUNNING TOOL UNATTENDED. Turn the power switch to
OFF. Do not leave the tool until it has come to a complete stop.
11. DO NOT OVERREACH. Keep proper footing and balance at all times.
12. DISCONNECT TOOLS. Disconnect tools from their power supplies when not in
use, prior to servicing and when changing accessories such as blades, etc.
SAVE THESE SAFETY INSTRUCTIONS
4
General Safety Rules
WARNING:
ONLY USE IDENTICAL REPLACEMENT PARTS WHEN SERVIC-
ING. TOLL-FREE HELPLINE: 1-866-523-5218.
13. MAINTAIN TOOLS PROPERLY. ALWAYS keep tools clean and in good working
order.
14. CHECK FOR DAMAGED PARTS. Check for proper alignment of moving parts,
binding, breakage, or any other conditions that may affect the tool’s operation.
Any part that is damaged should be properly repaired or replaced before use.
15. CLEAN AND FREE OF OIL OR GREASE. To clean the tool, always use a clean
cloth when cleaning. Do not use solvents, brake fluids, gasoline, or other
petroleum products to clean the tool, as they may damage plastic parts.
SAVE THESE SAFETY INSTRUCTIONS
ALWAYS WEAR EYE PROTECTION.
This tool can eject foreign objects into your eyes, posing the risk of
permanent eye damage. ALWAYS wear safety goggles (not
glasses). Ordinary eyeglasses have only impact-resistant lenses-
they are NOT safety goggles.

5
Specific Safety Rules for Dethatcher
1. Do not use the dethatcher in the rain or in moist, wet conditions.
2. Do not work close to the edge of swimming pools or garden ponds.
3. Please observe any local noise restrictions.
4. Always wear eye protection.
5. Wear a dust mask. Soil mixed with fertilizers may cause harmful chemicals to be
inhaled.
6. Wear hearing protection.
7. Ensure that people and pets are at least 100' (30.4 m) away from dethatcher while
in use.
8. Do not use the maximum dethatching depth setting, allow tines to wear down, start
in the highest setting and adjust as tines wear down.
9. Replace worn or damaged parts only with identical replacement parts.
10. Ensure that work area is free of slippery spots or excessive quantities of stone.
11. Do not dethatch on slopes greater than 15 degrees.
SAVE THESE SAFETY INSTRUCTIONS
6
Symbols
n
o
SYMBOL NAME DESIGNATION/EXPLANATION
V Volts Voltage
A Amperes Current
Hz Hertz Frequency (cycles per second)
W Watts Power
min Minutes Time
Alternating Current Type of current
Direct Current Type or a characteristic of current
No Load Speed Rational speed, at no load
Class II Construction Double-insulated construction
/min Per Minute Revolutions, strokes, surface speed, orbits etc.,
per minute
Wet Conditions Alert Do not expose to rain or use in damp locations
Read The Operator’s Manual To reduce the risk of injury user must read and
understand operator’s manual before using this
product.
Eye Protection Wear eye protection when operating this equipment.
Ricochet Thrown objects can ricochet and result in personal
injury or property damage.
Sharp Blade Danger – Keep hands and feet away from blade.
Operating on a slope Do not mow a slope that has an angle of greater
than 15°.
Keep Bystanders Away Keep all bystanders at least 50 ft. away.
Some of the following symbols may be used on this product. Please study them and
learn their meaning. Proper interpretation of these symbols will allow you to operate
the product better and safer.
7
WARNING:
Electrical Information
USE PROPER CIRCUIT PROTECTION TO AVOID THE RISK OF
ELECTRICAL SHOCK, FIRE OR DAMAGE TO THE TOOL. THE DETHATCHER IS
WIRED AT THE FACTORY FOR 120 V OPERATION. CONNECT TO A 120 V, 15 A
CIRCUIT AND USE A 15 A TIME-DELAYED FUSE OR CIRCUIT BREAKER.
REPLACE A CUT, WORN OR DAMAGED POWER CORD IMMEDIATELY TO
AVOID SHOCK OF FIRE.
WARNING:
TO AVOID INJURY, USE ONLY IDENTICAL REPLACEMENT
PARTS WHEN SERVICING THE DETHATCHER.
TOLL-FREE HELPLINE: 1-866-523-5218.
WARNING:
TO AVOID ELECTRIC SHOCK:
1. Use only identical replacement parts when servicing a tool with double insulation.
Servicing should be performed by a qualified technician.
2. Do not use in wet or damp areas or expose to rain.
WARNING:
DOUBLE INSULATION DOES NOT TAKE THE PLACE OF
NORMAL SAFETY PRECAUTIONS WHEN OPERATING THIS TOOL.
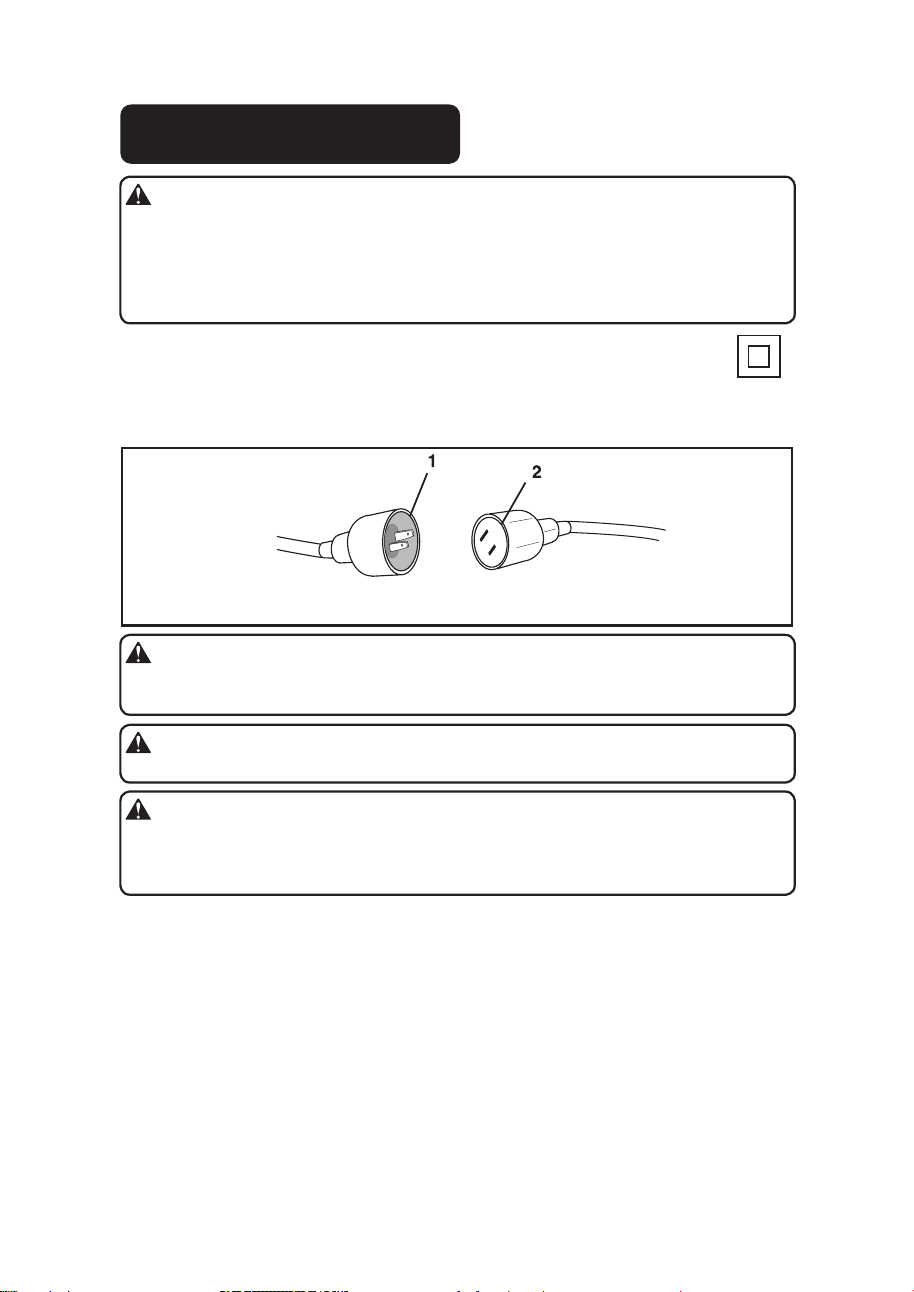
This dethatcher has a plug that looks like the one shown in Fig. 1.
The dethatcher is double insulated to provide a dual thickness of insulation between
you and the tool’s electrical system. All exposed metal parts are insulated from
internal motor components using protective insulation.
DO NOT MODIFY THE PLUG PROVIDED. If it will not fit the outlet, have the proper
outlet installed by a qualified electrician.
DOUBLE INSULATED
Fig. 1
1) 2-prong plug
2) Extension cord
8
Electrical Information
WARNING:
ALTHOUGH THIS TOOL IS DOUBLE INSULATED, THE EXTEN-
SION CORD AND OUTLET MUST STILL BE GROUNDED WHILE IN USE TO
PROTECT THE OPERATOR FROM ELECTRICAL SHOCK.
WARNING:
THIS DETHATCHER IS FOR OUTDOOR USE ONLY. DO NOT
EXPOSE TO RAIN OR USE IN DAMP LOCATIONS.
USE THE PROPER EXTENSION CORD. Make sure your extension cord is in good
condition. When using an extension cord, be sure to use one of heavy enough gauge
to carry the current your product will draw. An undersized cord will cause overheat-
ing. The table below shows the correct size to use depending on cord length and
nameplate ampere rating. If in doubt, use the next heavier gauge.The smaller the
gauge number, the heavier the cord.
Make sure your extension cord is properly wired and in good electrical condition.
Always replace a damaged extension cord or have it repaired by a qualified techni-
cian before use. Keep extension cords away from sharp objects, excessive heat and
damp or wet areas.
Use a separate electrical circuit for tools. This circuit should not be less than #12 wire
and should be protected with a 15 A time delayed fuse. Before connecting the motor
to the power line, make sure the switch is in the OFF position and the electric current
is rated the same as the current stamped on the motor nameplate. Running at a
lower voltage will damage the motor.
SAVE THESE SAFETY INSTRUCTIONS
GUIDELINES FOR USING EXTENSION CORDS
Minimum Gauge for Extension Cords (AWG)
(when using 120 V only)
Ampere Rating Total Length of Cord in Feet (meters)
More Than Not More Than 25' (7.6 m) 50' (15 m) 100' (30.4 m) 150' (45.7 m)
0 6 18 16 16 14
6 10 18 16 14 12
10 12 16 16 14 12
12 16 14 12 Not Recommended
9
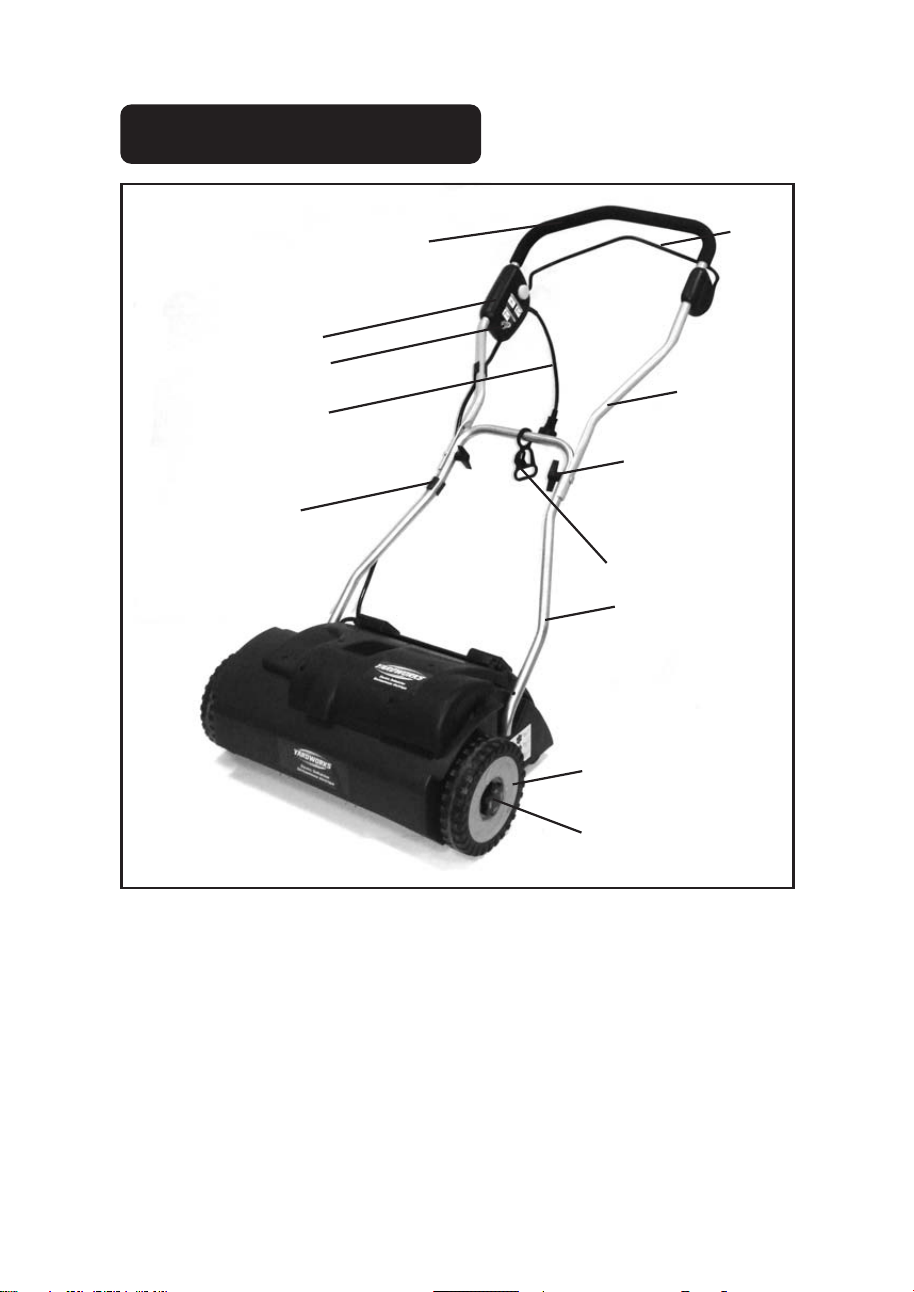
Know Your Dethatcher
1. Power switch
2. Electrical cord
3. Cable clip
4. Upper handle
5. Knob
6. Lower handle
7. Wheel
8. 4-position depth adjustment knobs
9. Cord retainer
10. Handle bar
11. Trigger switch
12. Circuit breaker
(Accessories: REPLACEMENT TINES 060-6115-8)
Fig. 2
1
10
2
12
3
4
11
5
6
9
7
8
10
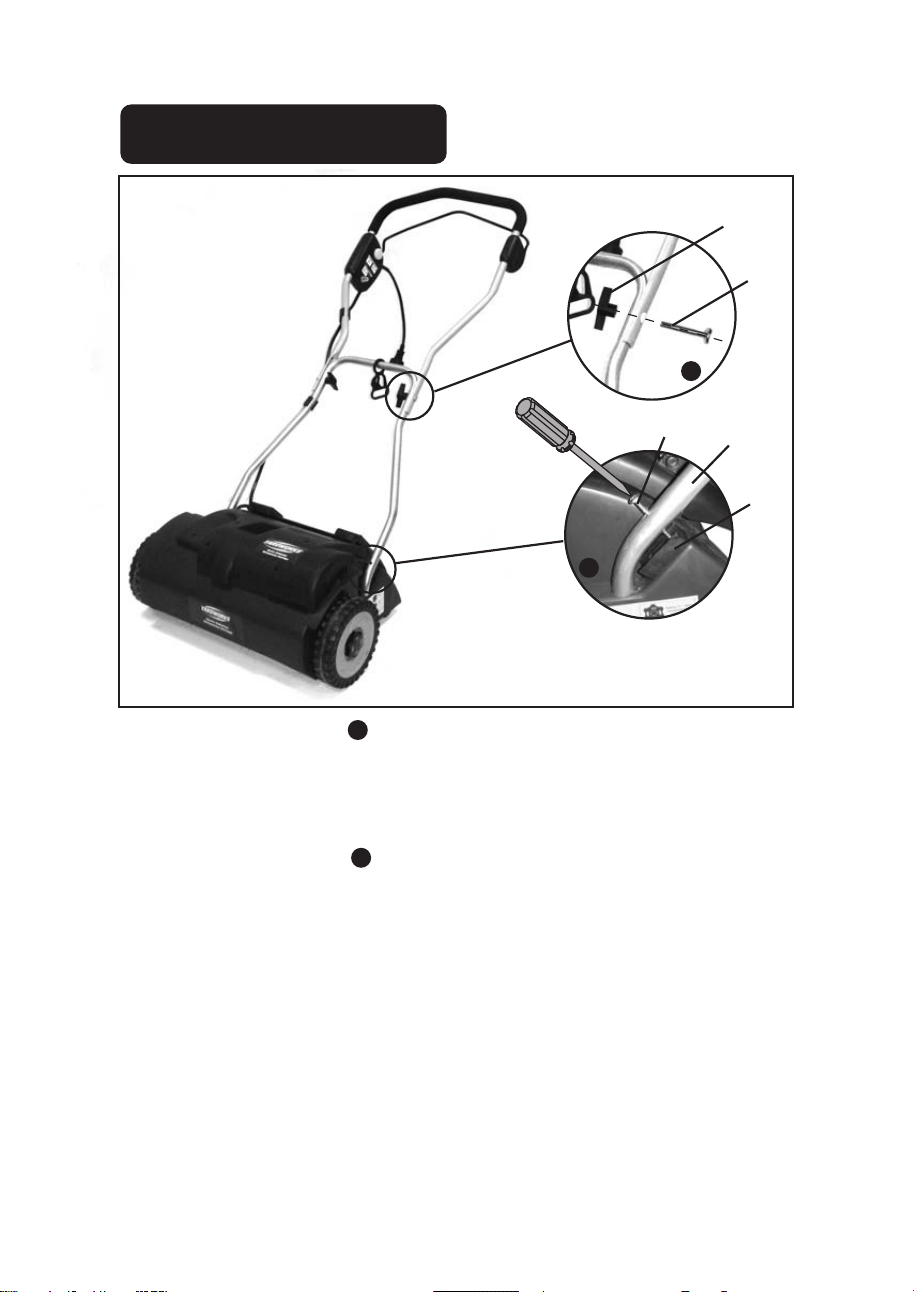
Assembly
WARNING:
If any parts are damaged or missing, do not operate this product
until the parts are replaced. Failure to heed this warning could result in serious
personal injury.
WARNING:
Disconnect the dethatcher from the power supply until assembly is
complete. Failure to comply could result in accidental starting and possible serious
personal injury.
WARNING:
Do not attempt to modify this product or create accessories not
recommended for use with this product. Any such alteration or modification is
misuse, and could result in a hazardous condition leading to possible serious
personal injury.
UNPACKING
This product requires assembly.
• Carefully remove the product and any accessories from the box. Make sure that all
items listed in the packing list are included.
• Inspect the product carefully to make sure no breakage or damage occurred during
shipping.
• Do not discard the packing material until you have carefully inspected and
satisfactorily operated the product.
• If any parts are damaged or missing, please call 1-866-523-5218 for assistance.
PACKING LIST
Dethatcher
Replacement tines (060-6115-8)
Owner's Manual
11
Assembling handles
Installing the lower handle
1. Insert the lower handle (2) into the housing hole. Place rubber pad (1) between the
housing and lower handle.
2. Using the supplied screws (3), fasten the lower handle to the housing using a star-
shaped screwdriver, not supplied.
Installing the upper handle
1. Position the upper handle so the holes line up with the lower handle holes.
2. Insert the supplied hex bolt (1) through the hole from the outside of the handle bar.
3. Thread the knob (2) onto the hex bolt to tighten securely into place.
Fig. 3
2
2
3
1
1
1
2
2
1
12
Operation and Adjustments
STARTING AND STOPPING THE DETHATCHER (Fig. 4)
Fig. 4
1
2
Bale
Power
button
Circuit
breaker
Plug
connector
Starting the Dethatcher:
• Plug the dethatcher into an approved outdoor extension cord.
• Press and hold the Power button (1). This makes the bale switch operational.
• Pull the bale switch (2) upward to the handlebar to operate.
Stopping the Dethatcher:
• Release the bale.
CIRCUIT BREAKER (Fig. 4)
This dethatcher is equipped with a circuit breaker in order to protect the supply circuit
from short-circuit overloads.
Follow these steps if the switch pops out:
1. Release the trigger switch, and allow the dethatcher to stop and cool down for a
minute.
2. Press the circuit breaker in order to reset it. Resume operation (See Figure 4).
Follow these steps if the switch pops out again shortly after the first time:
1. Allow the dethatcher to stop and cool down for 15 to 30 minutes.
2. After the dethatcher has cooled down, press the circuit breaker in order to reset it.
Resume operation.
If the circuit breaker does not stay in, or if it continues to pop out during operation,
contact the Toll-Free Helpline, at 1-866-523-5218.
IMPORTANT: Prior to dethatching the lawn, the lawn should be mowed to a
height of approx. 2" (0.05 m). Doing this will lengthen the life span of the tines and
prevent unnecessary motor overload on the dethatcher.
13
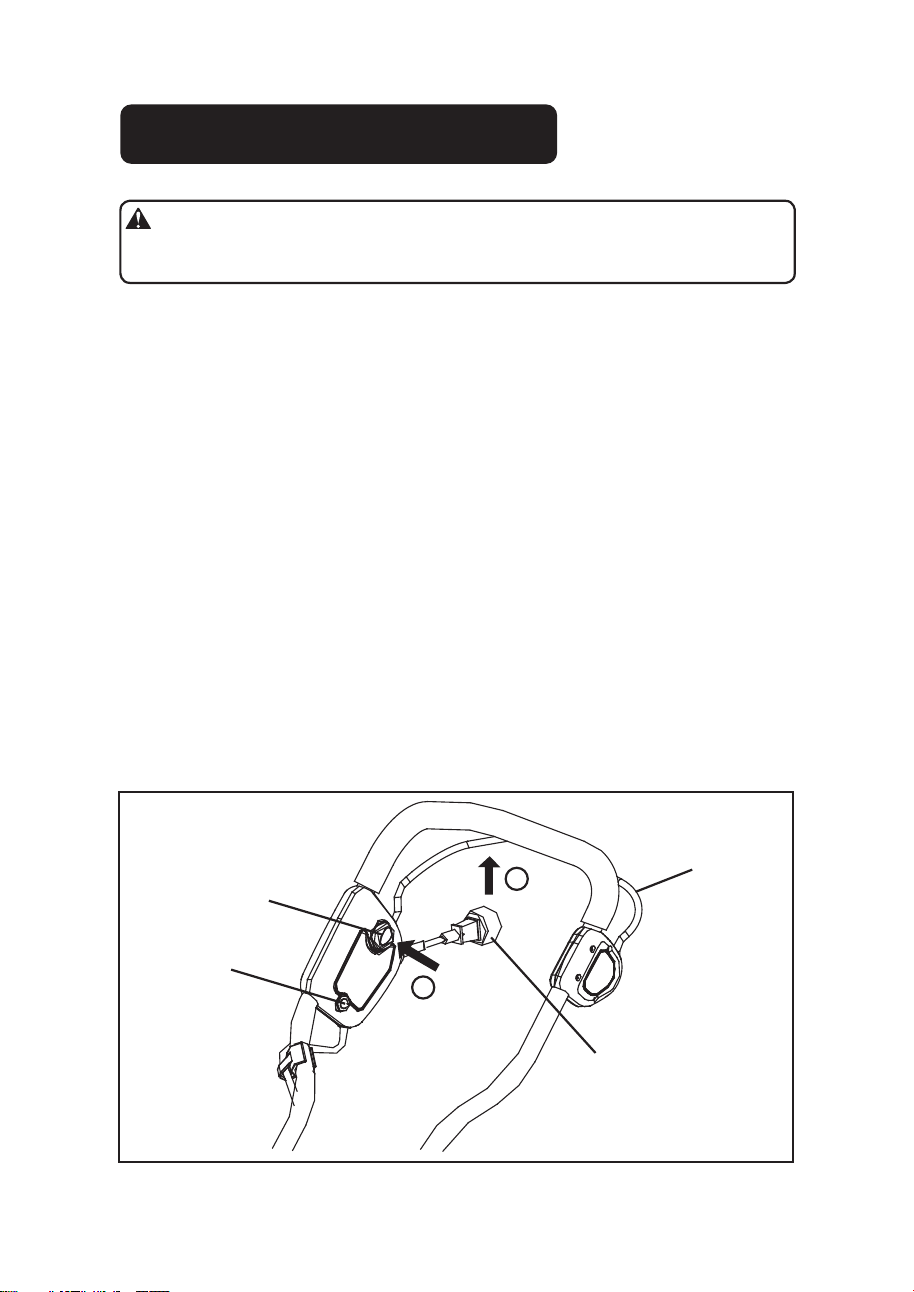
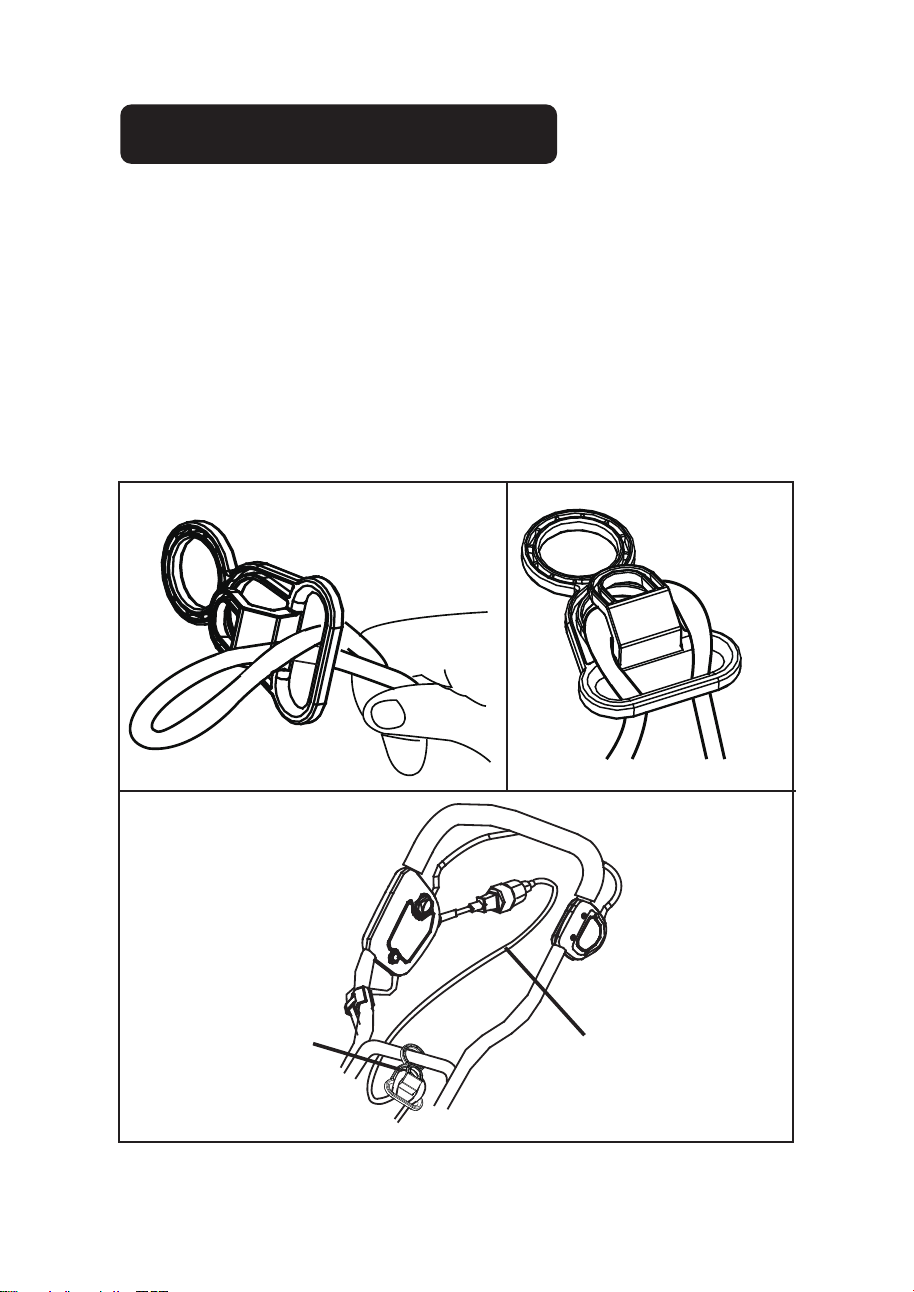
Operation and Adjustments
USING THE CORD RETAINER (Fig. 5)
Fig. 5
This dethatcher is equipped with a cord retainer in order to prevent the extension cord
from disconnecting from the power cord while the mower is in use. The cord retainer
hangs from the cord guide bar.
NOTE: Do not plug the extension cord into the outlet until it has been connected to the
cord retainer and plugged into the mower.
To use the cord retainer:
• Fold the extension cord in order to forming a tight loop near the retainer.
• Push the loop through the bottom hole in the retainer.
• Slide the loop over the retaining clip, and pull down until the cord is secured.
Extension cord
Cord retainer
14
Operation and Adjustments
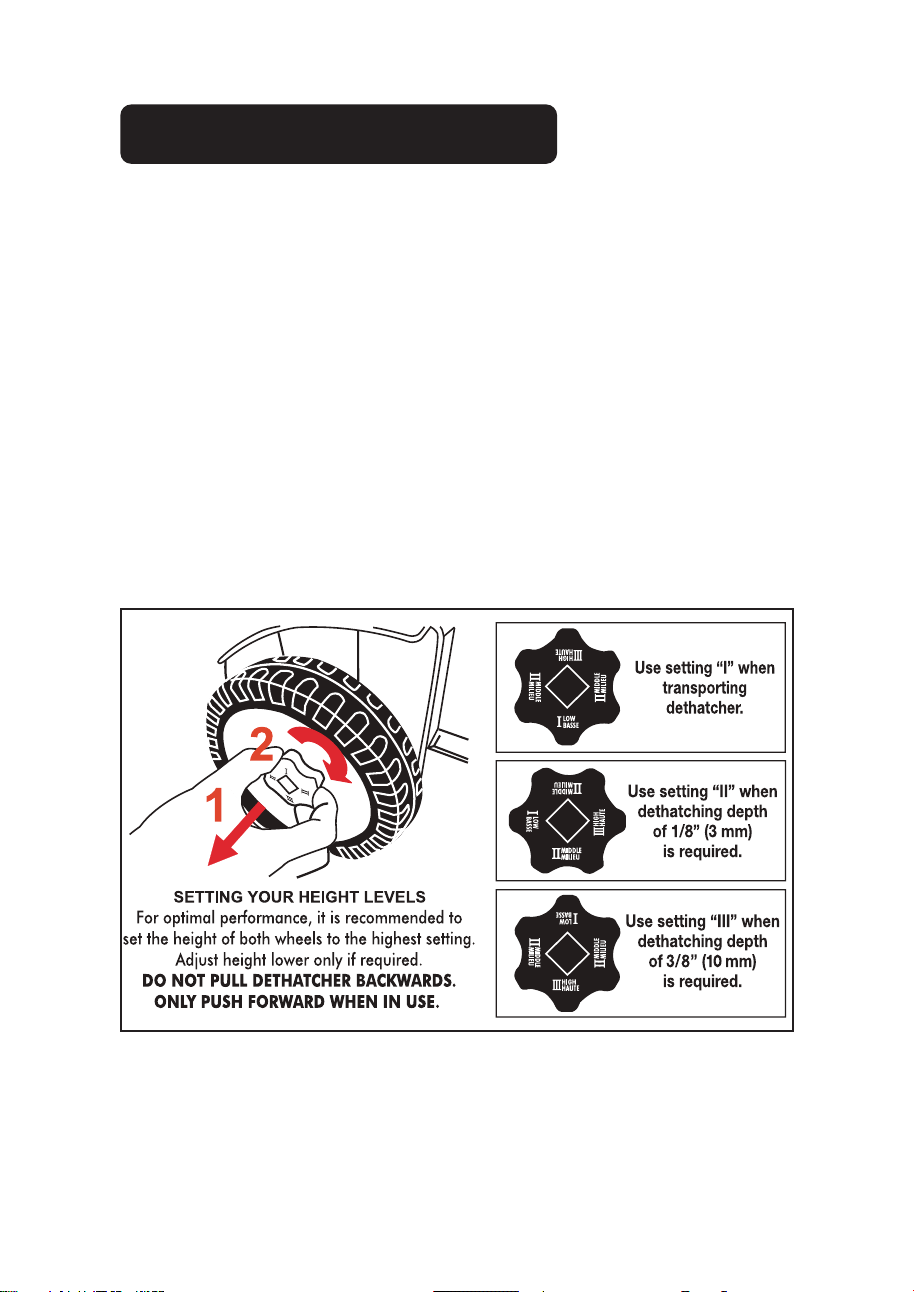
ADJUSTING THE DETHATCHER DEPTH (Fig. 6)
CAUTION: BEFORE YOU ADJUST THE DETHATCHER DEPTH, TURN OFF THE
POWER, UNPLUG THE TOOL AND ENSURE THE MOTOR HAS STOPPED.
1. The dethatcher depth is adjusted by turning the hubcaps. You can choose from
three different depth settings by pulling out and turning hubcaps.
2. When setting “I” is at the bottom, the high setting is locked in. The dethatcher
depth is approx 1 mm above the ground. Select depth setting “I” when transporting
the dethatcher.
3. When setting “II” is at the bottom, the middle setting is locked in. The dethatcher
depth is approx 1/8” (3 mm).
4. When setting “III” is at the bottom, the low setting is locked in. The dethatcher
depth is approx 3/8” (10 mm).
CAUTION: THE HUBCAPS MUST BE FIRMLY LOCKED INTO PLACE! AT THE
BEGINNING IT IS BEST TO SELECT DEPTH SETTING ”I” AT THE START. YOU
CAN THEN SWITCH TO SETTING "II" WHEN THE DETHATCHER SPIKES HAVE
BECOME WORN.
Fig. 6
15
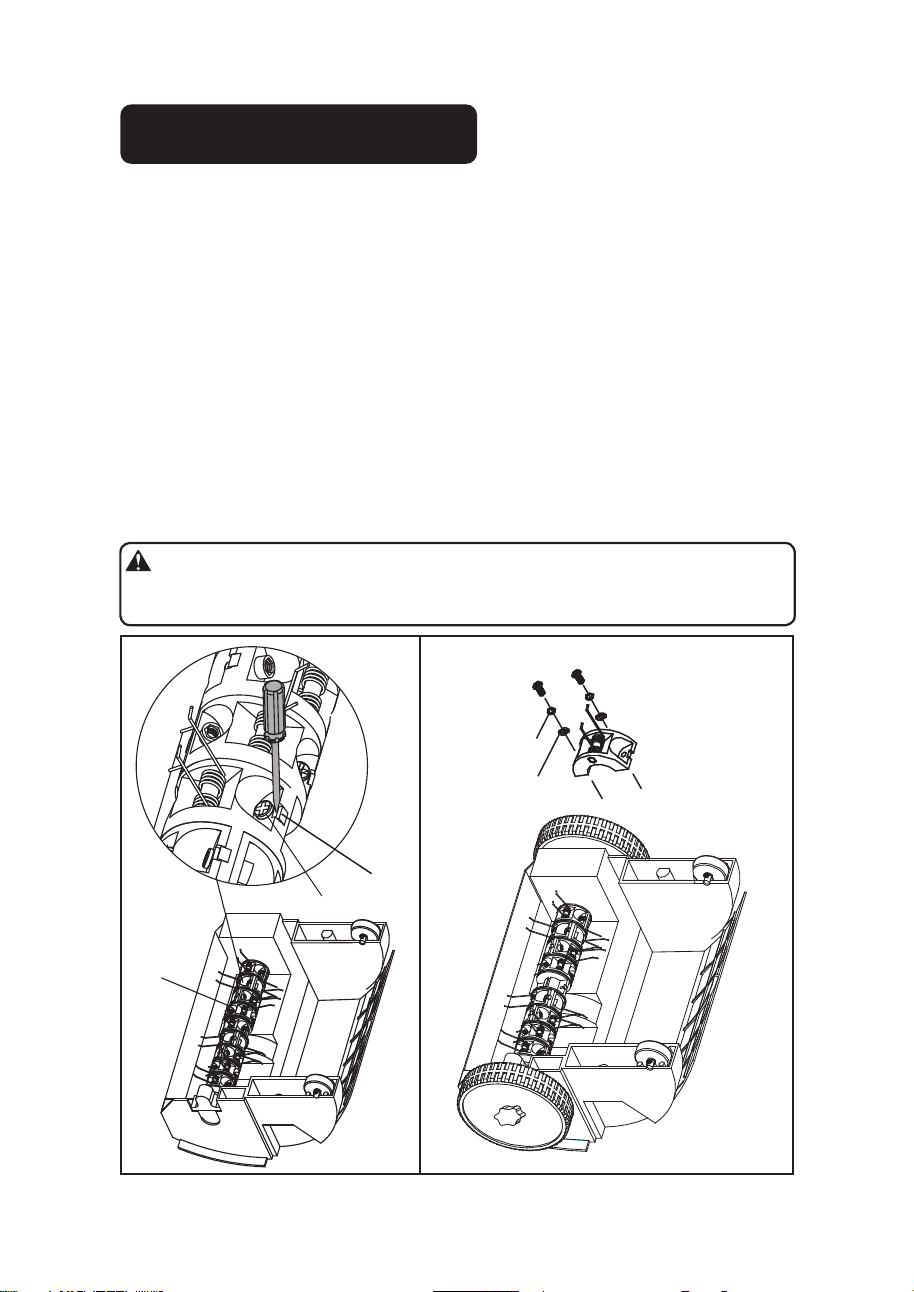
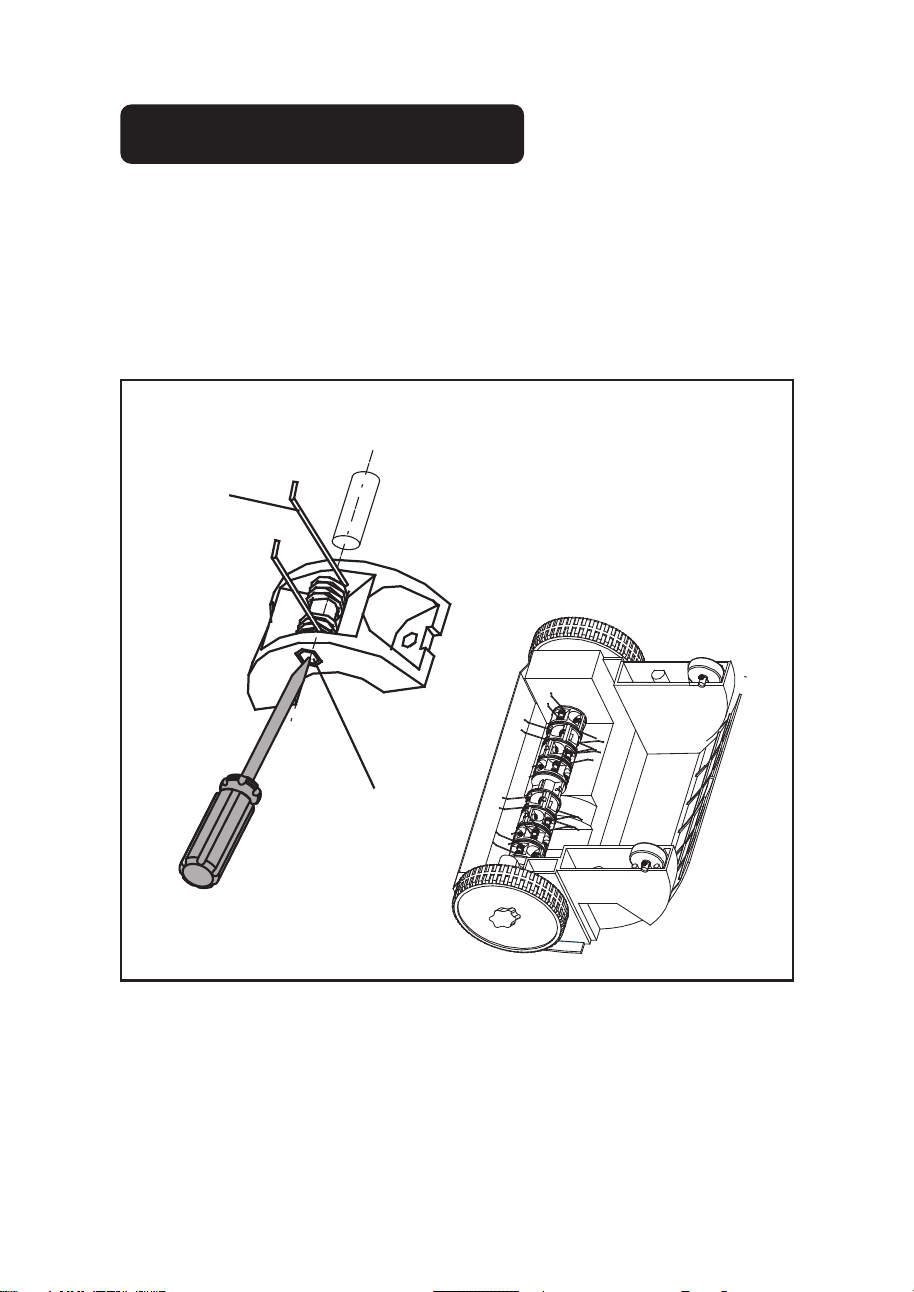
Replacing spring tines
The dethatcher cylinder can cause injuries! Prior to making adjustments, unplug unit
and wait until the dethatcher cylinder has stopped. Wear heavy-duty work gloves when
making adjustments. If the dethatcher cylinder is not yet worn but individual springs
have broken, these must be replaced. Only identical replacement springs may be
used. Toll-free helpline: 1-866-523-5218.
REPLACING THE INDIVIDUAL TINES (Fig. 7-8)
1. Disconnect dethatcher from power source.
2. Turn the dethatcher over.
3. Remove the two star-shaped screws (1), flat washer (2) and lock washer (3) which
secure the tine casing and remove the two nuts on the opposite side with a
star-shaped screwdriver.
4. Press the locker (4) on the edge of the shaft with a slotted screwdriver to seperate
the tine casing from the shaft.
5. Replace the worn or broken tines with a new one.
YARDWORKS REPLACEMENT TINES 060-6115-8
6. Fasten the the tine casing back together using the flat washer and lock washer in the
order and placement which they were previously removed.
1
4
2
3
WARNING:
All the screws to mount the halves of the tine holder must have flat
washer (2) and lock washer (3) on their threads, to prevent screws from loosening
during usage.
Fig. 7 Fig. 8
16
Replacing individual tines
REPLACING THE TINES (Fig. 9)
1. Remove the tine cartridge as demonstrated on page 15.
2. Secure tine cartridge on a workbench.
3. Push out the pin using a screwdriver (Not Supplied). This may require the use of a
rubber mallet if more strength is required.
4. Remove and discard the worn/broken tines.
5. Replace the tine into position and slide the pin back into place pressing the pin
against a solid surface to pressure it back into place.
YARDWORKS REPLACEMENT TINES 060-6115-8.
Fig. 9
Pin
Spring

17
Troubleshooting
Problem Possible Cause Common Solutions
Abnormal noise.
Clattering in the unit.
Whistling sound.
Whistling sound. Cog belt slipping. Contact an authorized service
centre.
Motor will not start. Faulty cable. The
conductor cross-section
of the extension cable
may be too low.
Contact your electrician.
Motor cuts out
because blocking
protection has been
activated.
If you have any problem with this Yardworks tool, please contact our TOLL-FREE
helpline at 1-866-523-5218
Blocked by foreign
objects.
Dethatcher depth is too
low. Cylinder has been
adjusted for wear without
actual wear to the tines.
The grass is too tall.
1. Switch off the motor, remove
the plug from the socket and
wait until the dethatcher has
stopped rotating.
2. Remove the foreign objects.
3. After approx.1 minute, switch
on the dethatcher.
1. Let the motor cool down.
2. Set depth adjustment
correctly.
Mow the lawn before dethatch-
ing.
Dethatching results
are not satisfactory.
Spring tine wear.
Cog belt faulty.
Lawn has grown too tall.
Adjust the dethatcher cylinder.
Contact an authorized service
centre.
Mow the lawn before using the
dethatcher.
Foreign objects on the
dethatcher cylinder are
hitting the dethatcher.
Foreign objects blocking
the dethatching cylinder.
1. Switch off the dethatcher,
remove the power cord from
the outlet and wait until the
cylinder has stopped rotating.
2. Remove foreign objects.
3. Check the dethatcher
immediately.

18
Maintenance
DANGER! The dethatcher cylinder can cause injuries.
Prior to maintenance, unplug from the power source and wait until the dethatcher
cylinder has stopped. Wear heavy-duty gloves for performing maintenance. The lawn
dethatcher should be cleaned after each use.
Risk of injury and physical damage!
Do not clean the lawn dethatcher under running water (particularly under high
pressure).
Do not use hard or pointed objects for cleaning the lawn dethatcher.
To save space, the lawn dethatcher can be folded up for storage by releasing the
wing nuts. Take care during this process that the power cable does not become
trapped.
Store the lawn dethatcher in a dry, closed room to which children cannot gain access.
1. Switch off the motor, unplug from the power source and wait until the aerator
cylinder stops.
2. Move the depth adjustment knob to the highest position and lift the lawn
dethatcher when transporting it over sensitive surfaces, e.g., tiles.
3. Always clean the bottom of the dethatcher after each use and before storage.
4. Carefully inspect all tines and cartridges for damage and replace when required.
This device must not be disposed of with normal household waste; it must be
disposed of in accordance with local regulations.

19
Warranty
For TWO YEARS from the date of purchase within Canada, YARDWORKS
®
CANADA
will, at its option, repair or replace for the original purchaser, free or charge, any part or
parts that are found to be defective in material or workmanship.
• 7-day over-the-counter replacement for initial defects for unused product (RA #
required for used product)
• 2-year repair warranty
This warranty does not cover:
1. Any part that has become inoperative due to misuse, commercial use, abuse,
neglect, accident, improper maintenance, or alteration; or
2. The unit, if it has not been operated and/or maintained in accordance with the
Owner's Manual; or
3. Normal wear;
4. Routine maintenance items such as lubricants, tines;
5. Normal deterioration of the exterior finish due to use or exposure.
How to Obtain Service: Warranty service is available by calling the Toll-Free Helpline,
at 1-866-523-5218. YARDWORKS
®
CANADA will not accept the return of a complete
unit unless prior written permission has been extended by YARDWORKS
®
CANADA.
Transportation Charges: Transportation charges for the movement of any power
equipment unit or attachment are the responsibility of the purchaser. The purchaser
must pay transportation charges for any part submitted for replacement under this
warranty, unless such return is requested, in writing, by YARDWORKS
®
CANADA.
Other Warranties: All other warranties, whether express or implied, including any
implied warranty of merchantability, are limited in their duration to that set forth in this
express limited warranty. The provisions as set forth in this warranty provide the sole
and exclusive remedy of YARDWORKS
®
CANADA's obligations arising from the sale
of its products.
YARDWORKS
®
CANADA will not be liable for incidental or consequential loss or
damage.
Imported by YardWorks Canada, Toronto, Canada M4S 2B8
20
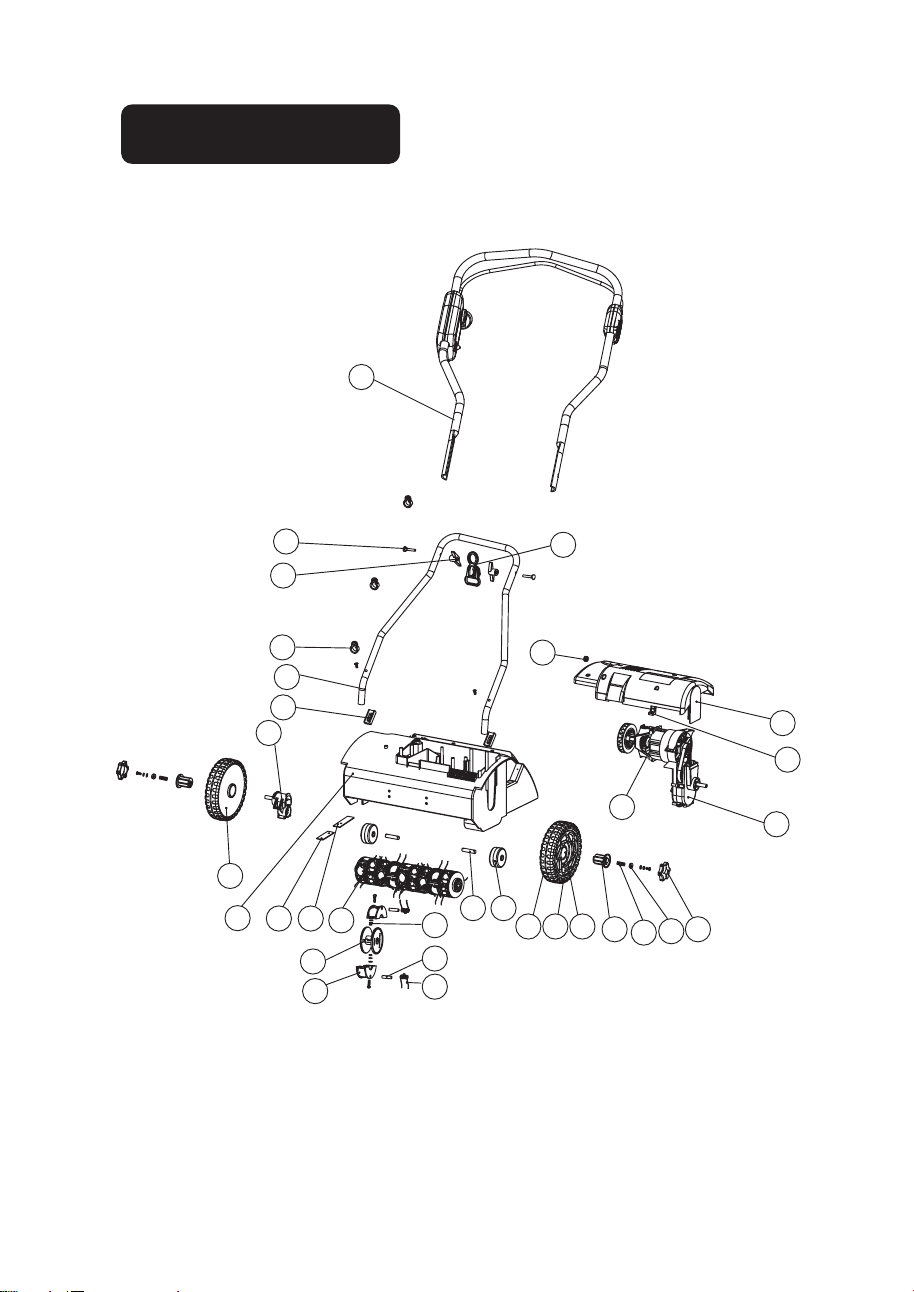
Parts breakdown
16
4
7 8
10
2122
2425
23
15
17
18
19
20
5-1
5-2
5-3
5-4
5-5
11 12
26
9
13
14
2
3
1
8
5
6

21
Parts list
No. Model Num. Qty Description
1
2
3
4
5
6
7
8
9
10
11
12
13
14
15
16
17
18
19
20
21
22
23
24
25
26
60-3864-1
60-3864-2
60-3864-3
60-3864-4
60-3864-5
5-1
60-3864-5-1
5-2
60-3864-5-2
5-3
60-3864-5-3
5-4
60-3864-5-4
5-5
60-3864-5-5
60-3864-6
60-3864-7
60-3864-8
60-3864-9
60-3864-10
60-3864-11
60-3864-12
60-3864-13
60-3864-14
60-3864-15
60-3864-16
60-3864-17
60-3864-18
60-3864-19
60-3864-20
60-3864-21
60-3864-22
60-3864-23
60-3864-24
60-3864-25
60-3864-26
1
1
1
1
1
18
18
18
18
18
1
2
2
1
2
2
2
2
2
1
1
2
2
2
3
2
2
1
1
1
1
Housing
Cover for motor
Motor assy.
Tines assy.
Tine
Gear case assy.
Base for tine
Tine cartridge
Pin
Bolt, nut and washer
Bracket for tines assy.
Tire for front wheel
Front wheel
Bush for front wheel
Shaft for high adjustment
High adjustment knob
Spring for high adjustment
Baffle for high adjustment spring
Lower handle
Upper handle assy.
Rubber cushion
Knob
Bolt
Hang for power cord
Rear wheel assy.
Shaft for rear wheel
Ringer for power cord
Big cover
Little cover
Support for motor
Cord retainer