

Page 2
Contents
Introduction
Using this manual ................................................................................................................... 4
Legend............................................................................................................................................................4
ASD-STE100.....................................................................................................................................................4
References......................................................................................................................................................4
Installation
Getting started ....................................................................................................................... 5
Description
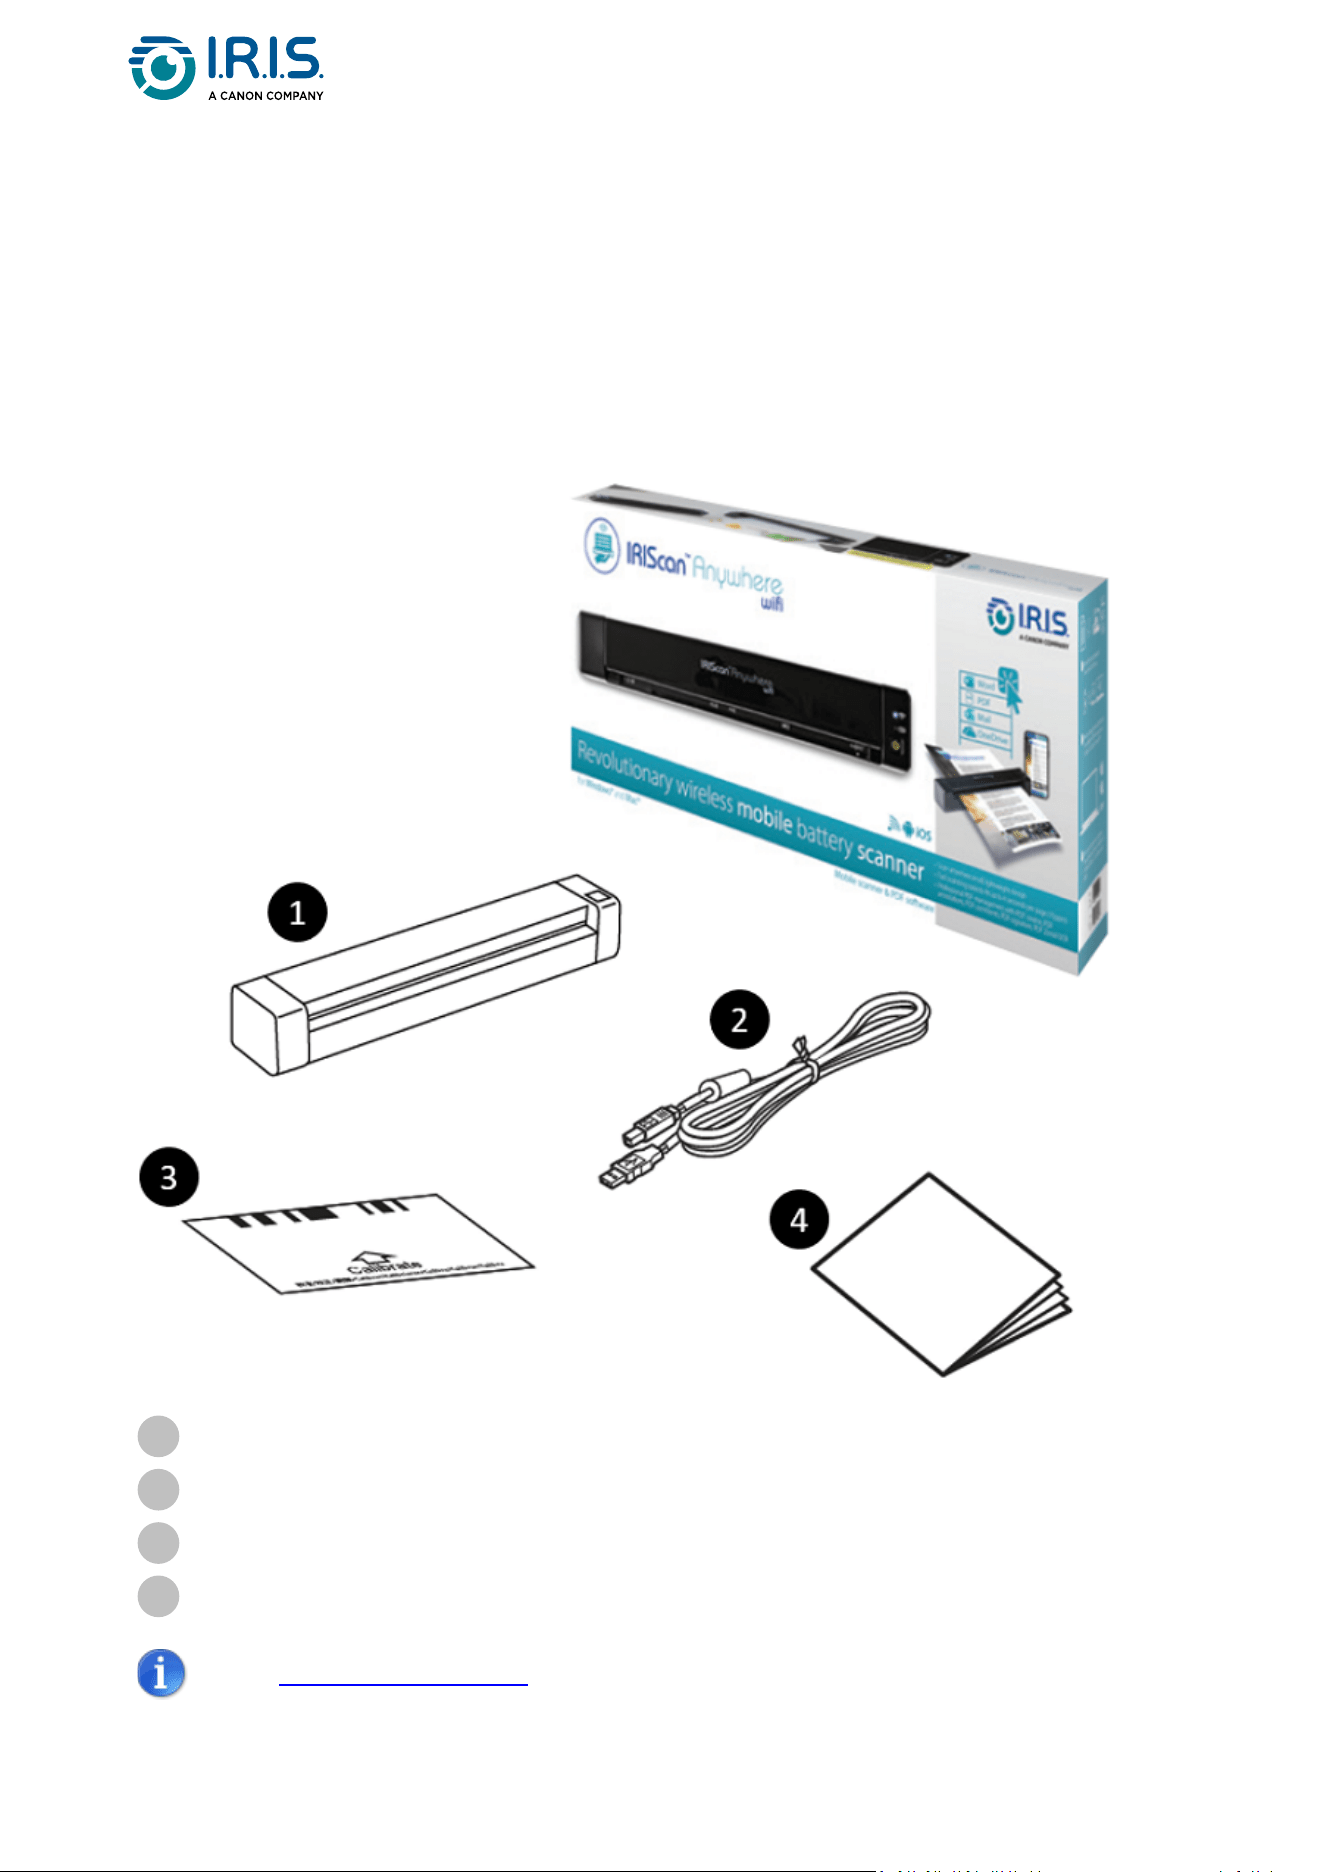
Package content ..................................................................................................................... 9
Upper front view.................................................................................................................. 10
Upper rear view.................................................................................................................... 11
Control panel........................................................................................................................ 12
Specifications ....................................................................................................................... 14
Stand-byandOFFtimes ...............................................................................................................................14
Supported connections.................................................................................................................................14
Scanner specifications...................................................................................................................................15
Wi-Fi specifications .......................................................................................................................................15
Operation
How to place a document ..................................................................................................... 17
How to place a plastic card................................................................................................... 18
How to connect to Wi-Fi....................................................................................................... 19
How to scan.......................................................................................................................... 21
With cable and Capture Tool.........................................................................................................................21
WithcableandButtonManager(Windows®) ..............................................................................................21
With cable and TWAIN-compatible software................................................................................................22
With Wi-Fi and Capture Tool.........................................................................................................................22
WithWi-FiandButtonManager(Windows®)...............................................................................................22
With Wi-Fi and TWAIN-compatible software................................................................................................23
How to enter the scanner settings via your browser.............................................................. 24
How to use the IRIScan™ app on Android®............................................................................ 26
How to use the IRIScan™ app on iOS®................................................................................... 30
How to reset Wi-Fi settings ................................................................................................... 35
Maintenance
Calibrate the scanner ............................................................................................................ 36
Clean the scanner ................................................................................................................. 38
Troubleshooting
FAQ....................................................................................................................................... 40
Troubleshooting.................................................................................................................... 43
Clear error conditions ...................................................................................................................................43
Remove a paper jam .....................................................................................................................................43
Correct wrong cropping ................................................................................................................................44
Clear Wi-Fi connection..................................................................................................................................44
We are here for you .............................................................................................................. 46
Safety
Disclaimer............................................................................................................................. 47

Page 3
Precautions........................................................................................................................... 48
Safety instructions ................................................................................................................ 49
Legal information .....................................................................................................50
Page 4
1.
2.
Introduction
Using this manual
Legend
AWARNINGinformsyouofdanger,harm,orconsequencesthatexist.
ACAUTIONadvisesyoutoactwithcare.
ANOTEtellsyouanadditionalinformationthatisgoodtoknow.
ASD-STE100
ThismanualappliesasmuchaspossibletheASD-STE100specification(Simplifiedtechnical
English).Gotohttps://www.asd-ste100.orgformoredetails.
References
User manual of Capture Tool.
User manual of Button Manager v2.
Available from our web site: Product resources.

Page 5
1.
2.
3.
Installation
Getting started
Step 1: Remove the protective tapes
Remove the protective tapes from the scanner and the inside of the document feeder, as
shownbelow.
Step 2: Charge the device
Itisbesttochargethedevicefor4-5 hours before starting the device.
Make sure that the scanner is stopped.
Connect the USB-C connector of the charging cable to the scanner's USB-C port.
ConnecttheUSBconnectorofthechargingcabletoyourcomputer'sUSBport.
During the charging of the device, the red battery indicator is permanently lit. When
charging is complete, the light comes in green.
Do not start the scanner while the charging of the battery is in progress.

Page 6
Step 3: Install and run Software
You must have administrator rights on your computer to install software.
To download each software, go to Download Center.
Depending on your operating system, this product comes with a set of applications that
we ask you to install in the following order:
Order Software name Description Platform
1. Cardiris™ Business card scanning software. Windows®
2.
Readiris™ PDF
(trial version)
OCR and conversion software with focus on
PDF editing and conversion.
Windows® or
macOS®
3. Readiris™ OCR and conversion software.
Windows® or
macOS®
4.
IRIScan™
Anywhere
software (or
Capture Tool)*
TheCaptureToolalsoactsasaTWAIN driver
foranyTWAIN-compatiblesoftware.
Windows® or
macOS®
5.
Button Manager
v2*
Send your scanned documents to your
favorite software applications and Cloud
destinations,attheclickofabuttonin
Button Manager or the press of the button
onthescanner.
Windows®
6.
Virtual Scanner
Link (VSL)*
"Relay" application that lets you use the
scanner without the cable.
Windows® or
macOS®
* Points 4, 5 and 6 are combined in a single installation..
On a mobile device, this product comes with one app called IRIScan-PDF scanner.
(Download it from Google Play on Android® or from App Store on iOS®)
Once you have downloaded and installed all the software, run Capture Tool, which is the
IRIScan™ Anywhere software and TWAIN driver.
For more details about each software, refer to the respective user manuals that are
available from our web site: Product resources.
ThescannerdrivercontainsaTWAIN,andaWIAdriver.Aftertheinstallationof
the scanner driver is completed, this scanner allows you to scan via a TWAIN,
or a WIA interface. Start your TWAIN-compatible image-editing software to
select a TWAIN or WIA user interface. Alternatively, you can also start
Microsoft’sScannerandCameraWizardtoscanviaaWIAuserinterface.
Page 7
1.
2.
3.
4.
1.
2.
3.
4.
Step 4: Connect to the computer
Connect the USB-C connector of the charging cable to the scanner's USB-C port.
ConnecttheUSBconnectorofthechargingcabletoyourcomputer'sUSBport.
The computer detects a new USB device and shows a "New hardware detected"
message.
When the Finish dialog box appears, select the Finish button.
Step 5: Start the device
Pressthepowerbuttontostartthedevice.ThepowerLEDfirstflashes,thenremains
green.
Step 6: Place a document
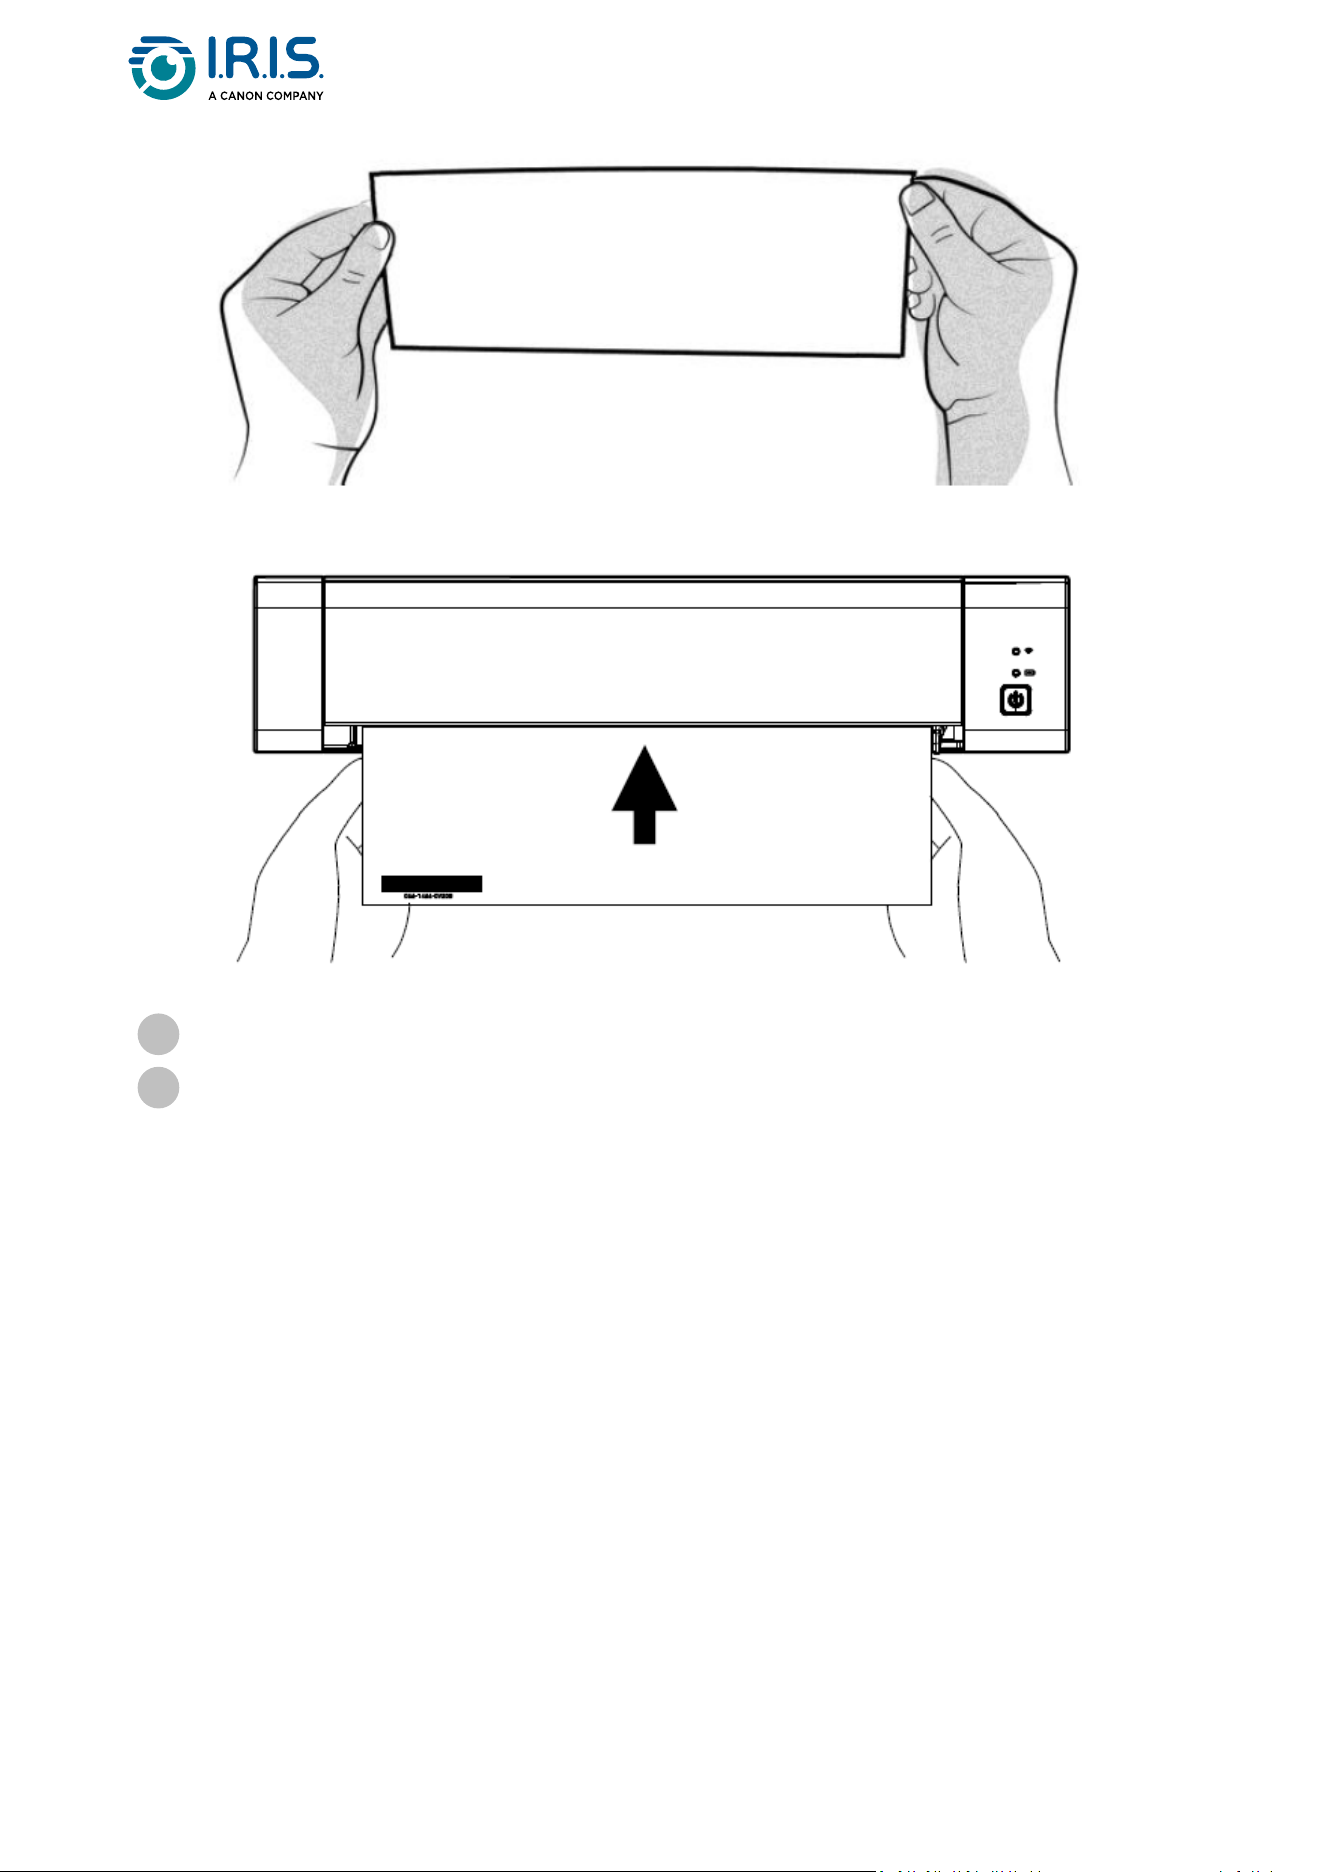
Align the original document to the left edge of the feed slot.
Puttheoriginaldocumentface up into the feed slot.
Gently push the original document into the feed slot.
Move the paper guide to the right edge of the original document to ensure correct
alignment during the scanning.
Page 8
•
•
•
•
Step 7: Scan
GotoHow to scan.
European Union Regulatory Notice
Products bearing the CE marking comply with the following EU Directives:
Low Voltage Directive 2014/35/EC
EMC Directive 2014/30/EC
Restriction of the use of certain hazardous substances (RoHS) Directive 2011/65/EU
RED (Radio Equipment Directive) (2014/53/EC)
This product satisfies the Class B limits of EN55032, EN55035, and safety requirements of
EN62368-1.
ThisdeviceiscertifiedasClass1LEDproduct.
Page 10
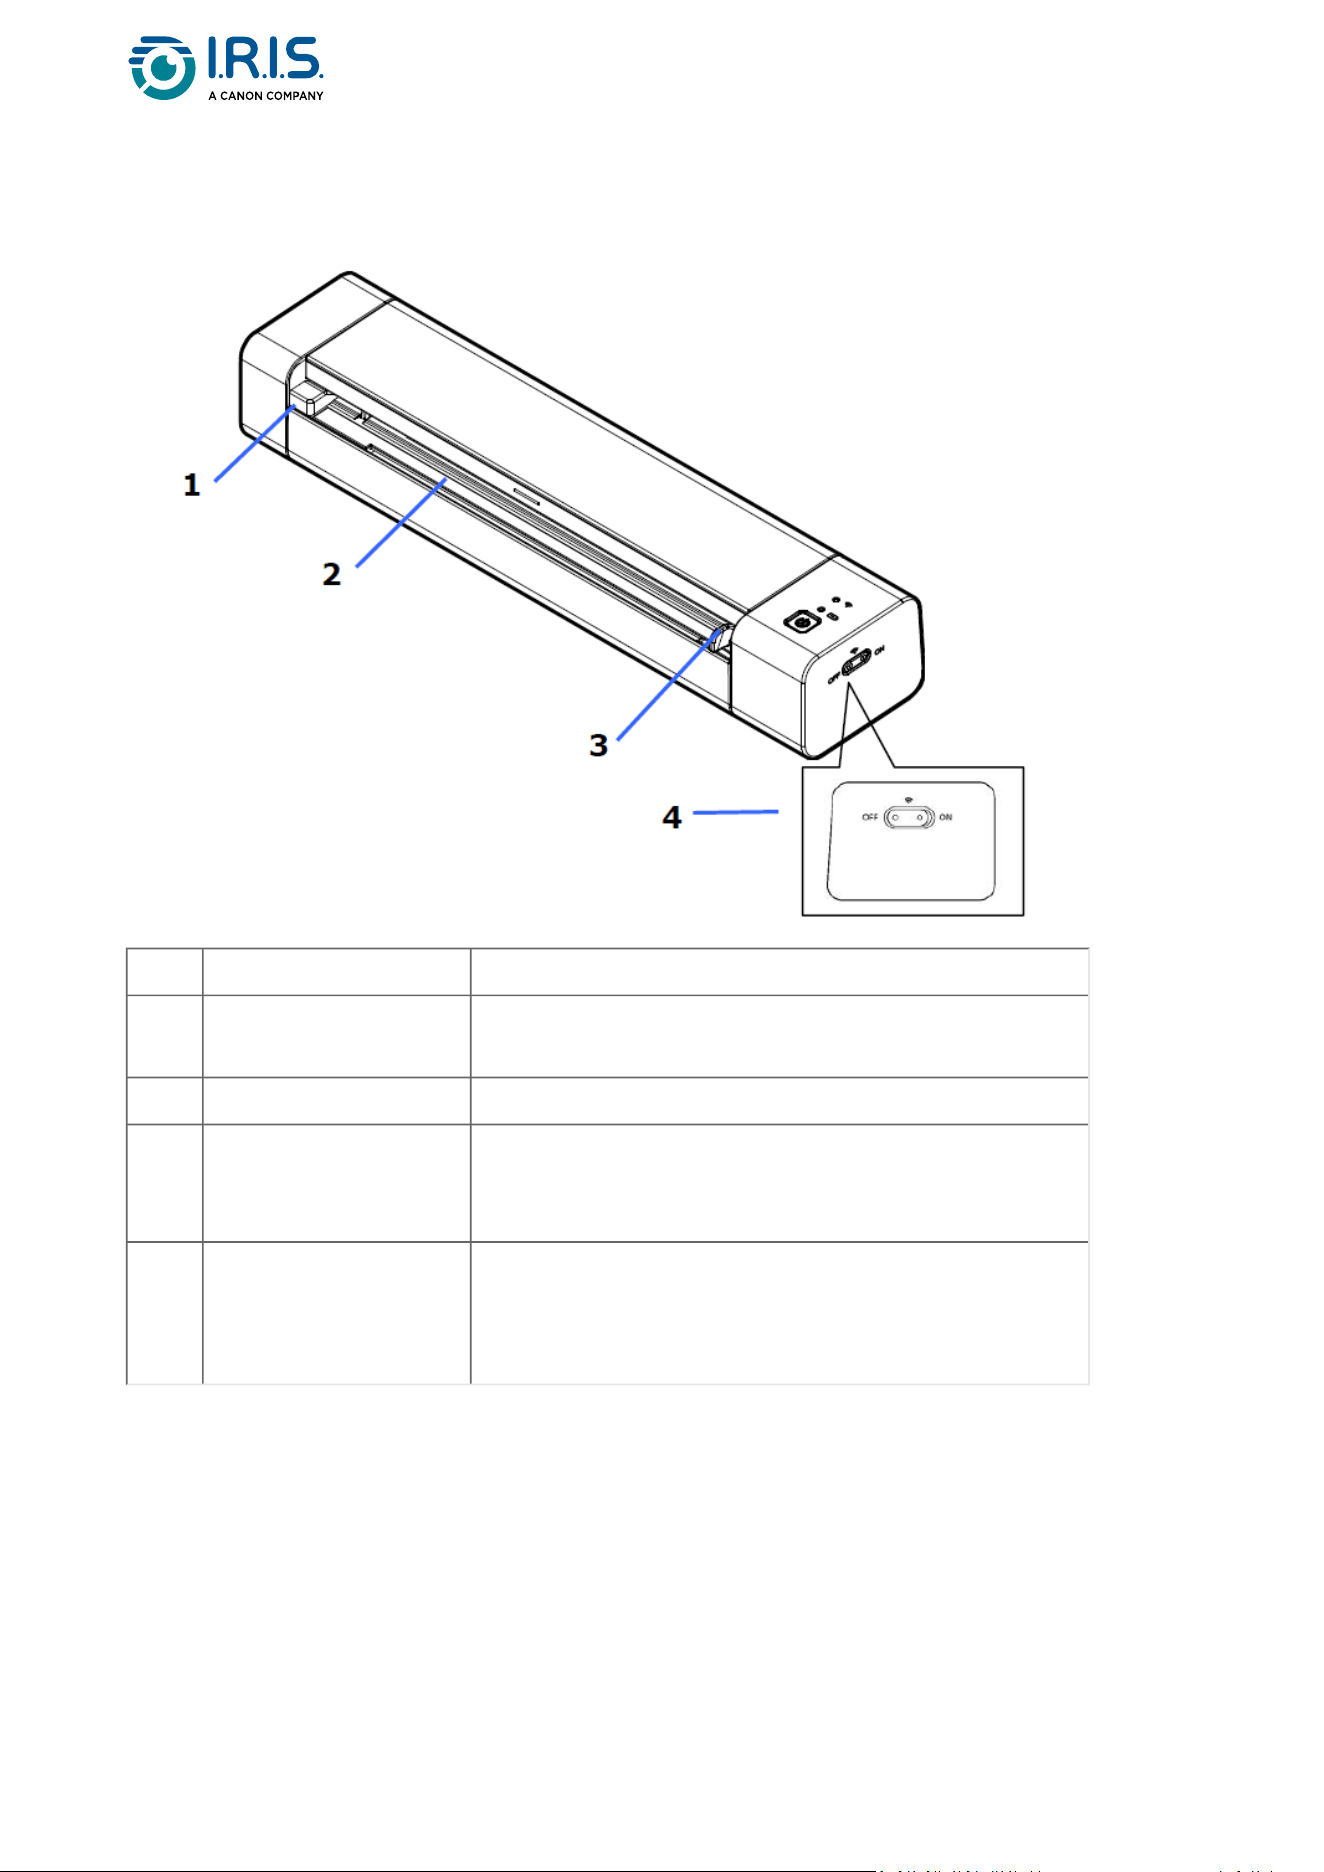
Upper front view
Item Name Description
1 Left edge of feed slot
Put the original document in the feed slot, printed
side up and aligned with the left edge.
2 Feed slot Put the original document into the feed slot.
3 Paper guide
Move the paper guide to the right edge of the
original document to ensure correct alignment
during the scanning.
4 Wi-Fi switch
Set the Wi-Fi connection to ON or OFF.
Refer to the Operation chapter for more
information on Wi-Fi settings.
Page 11
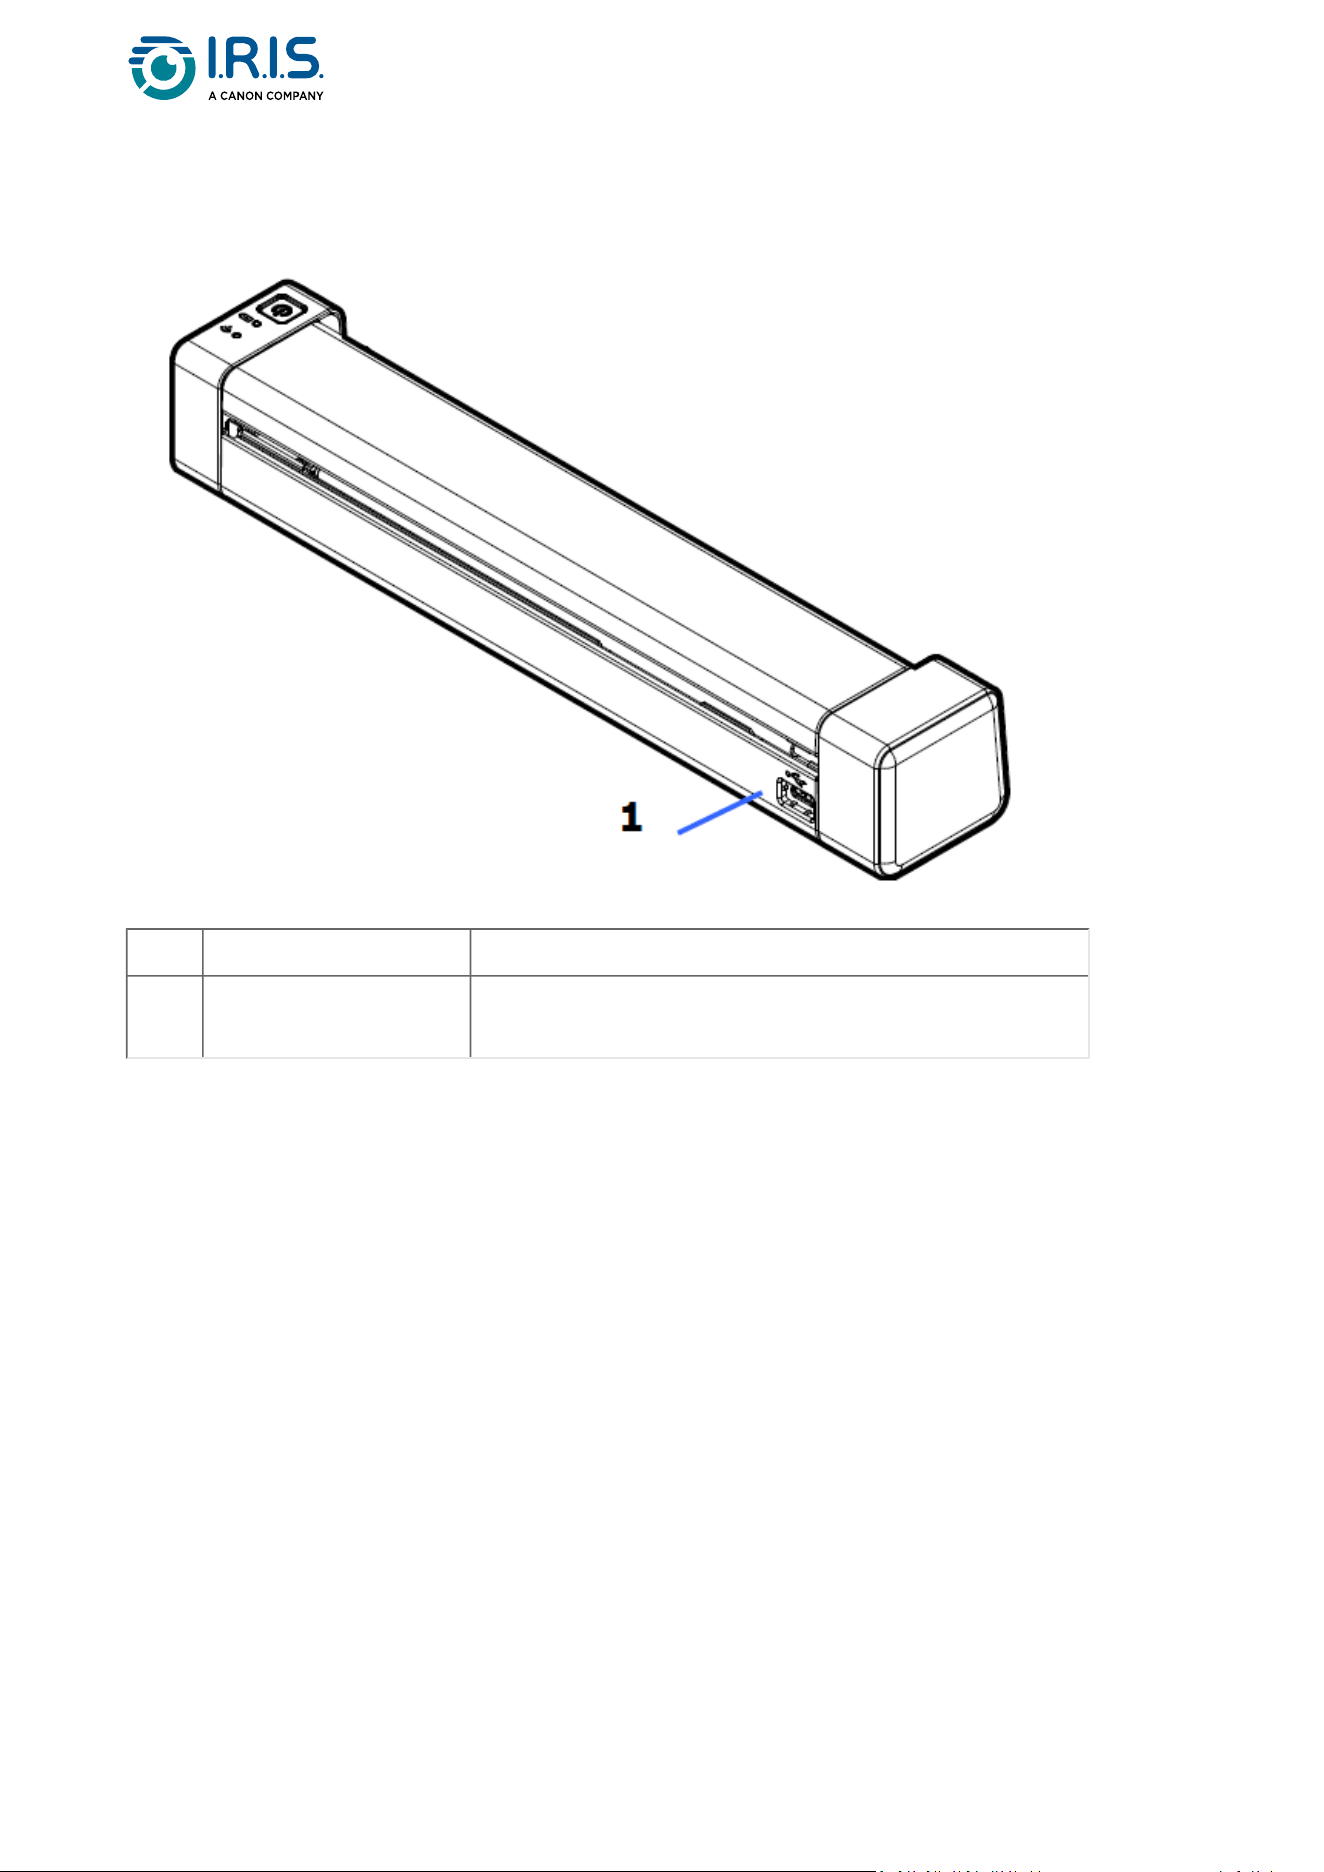
Upper rear view
Item Name Description
1 USB Type-C
Connect the USB-C connector of the charging cable
to the scanner's USB-C port.
Page 12
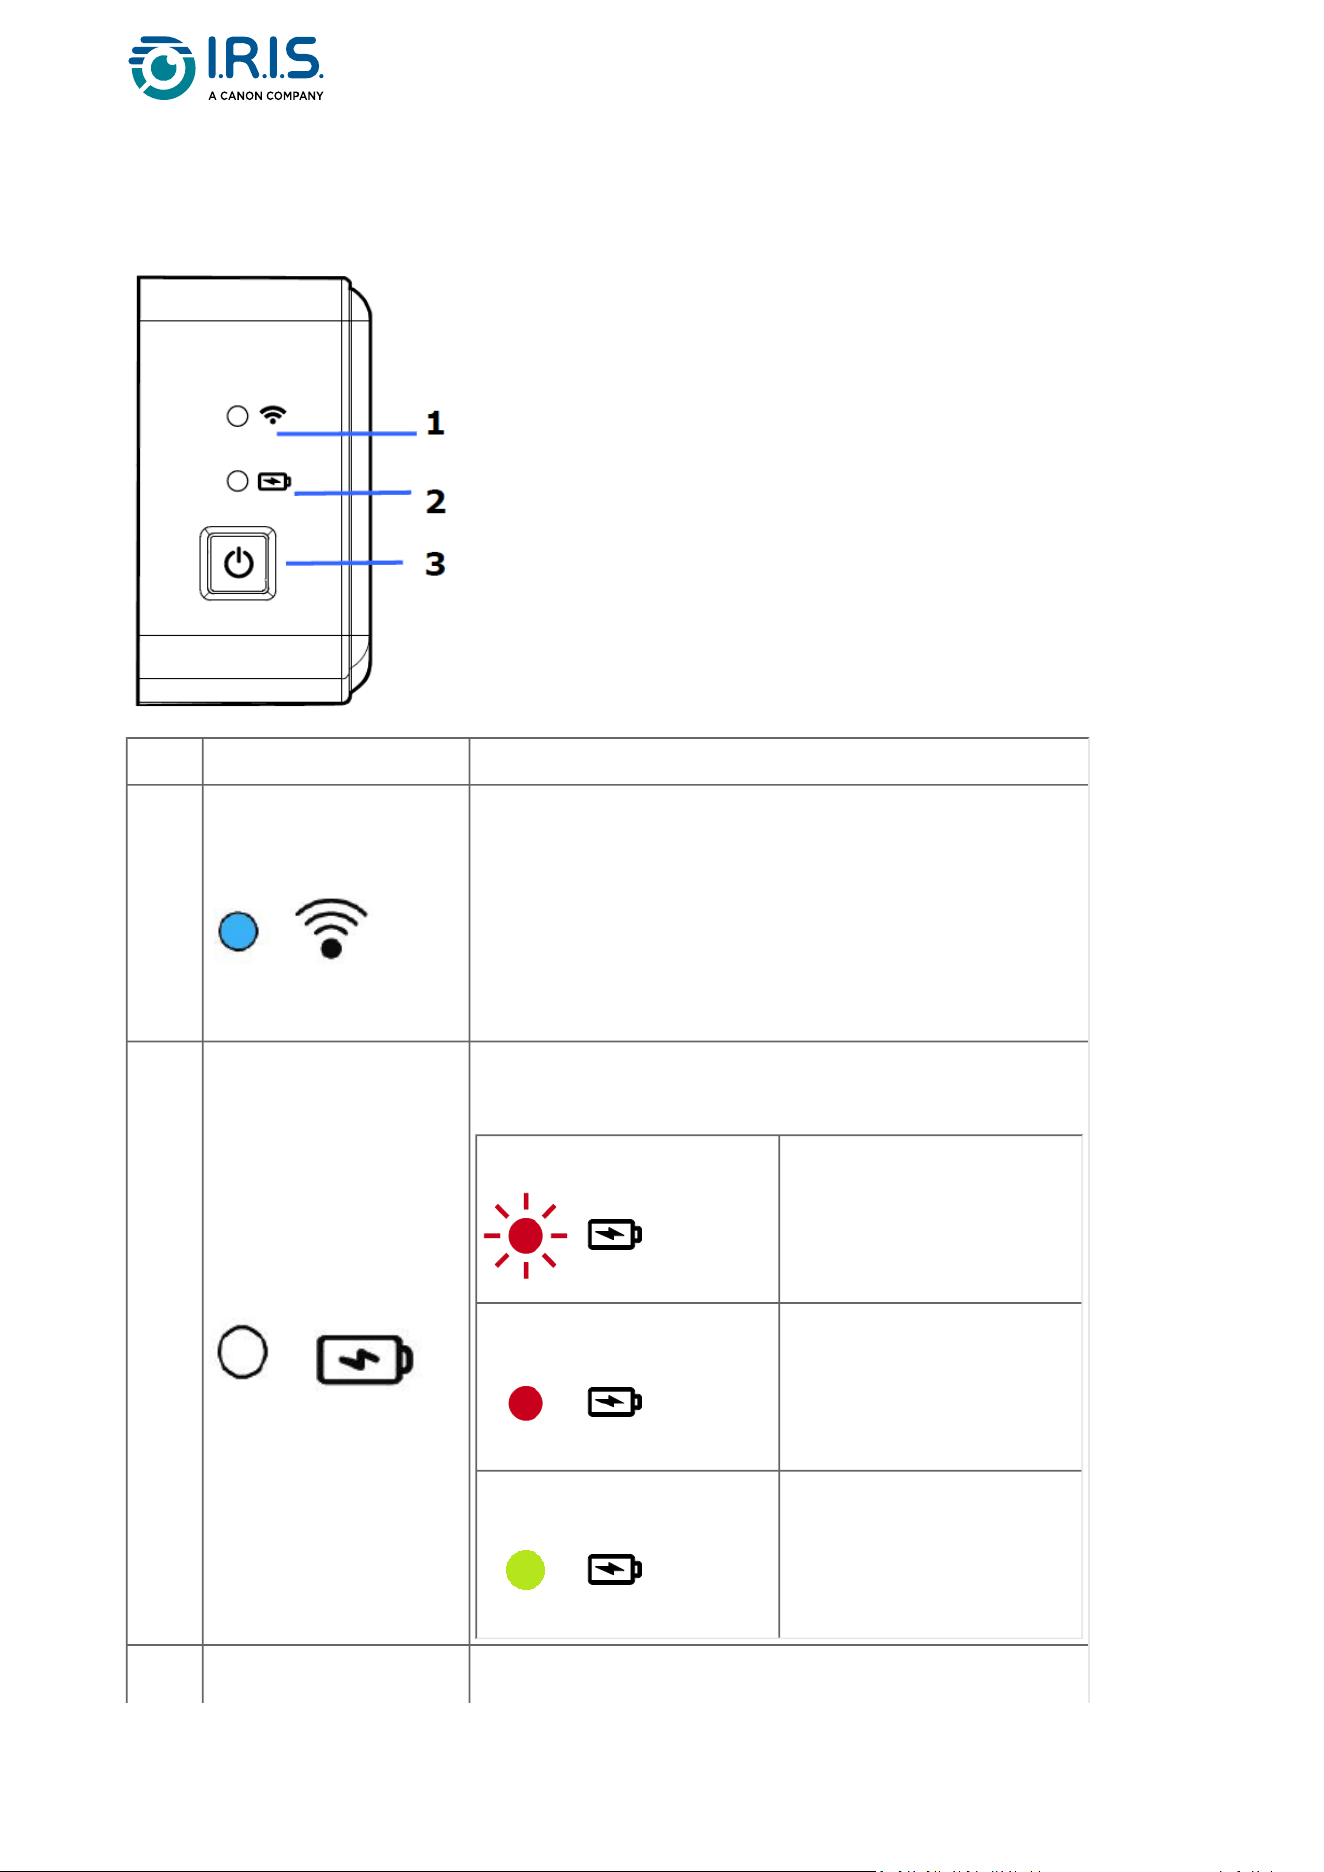
•
Control panel
Item Name Description
1
Wi-Fi LED
The blue LED that flashes shows that the Wi-Fi
connection in Access point mode is in progress.
The blue LED permanently lit shows that the Wi-Fi
connection in Access point mode is successful.
Refer to the Operation chapter for more
information on Wi-Fi settings.
2
Battery LED
The LED light shows the power status of the
battery.
Red flashes
Low battery
Red
Charge in progress
Green
Charge is completed
3 Power/Scan button Press the power button to start the device.
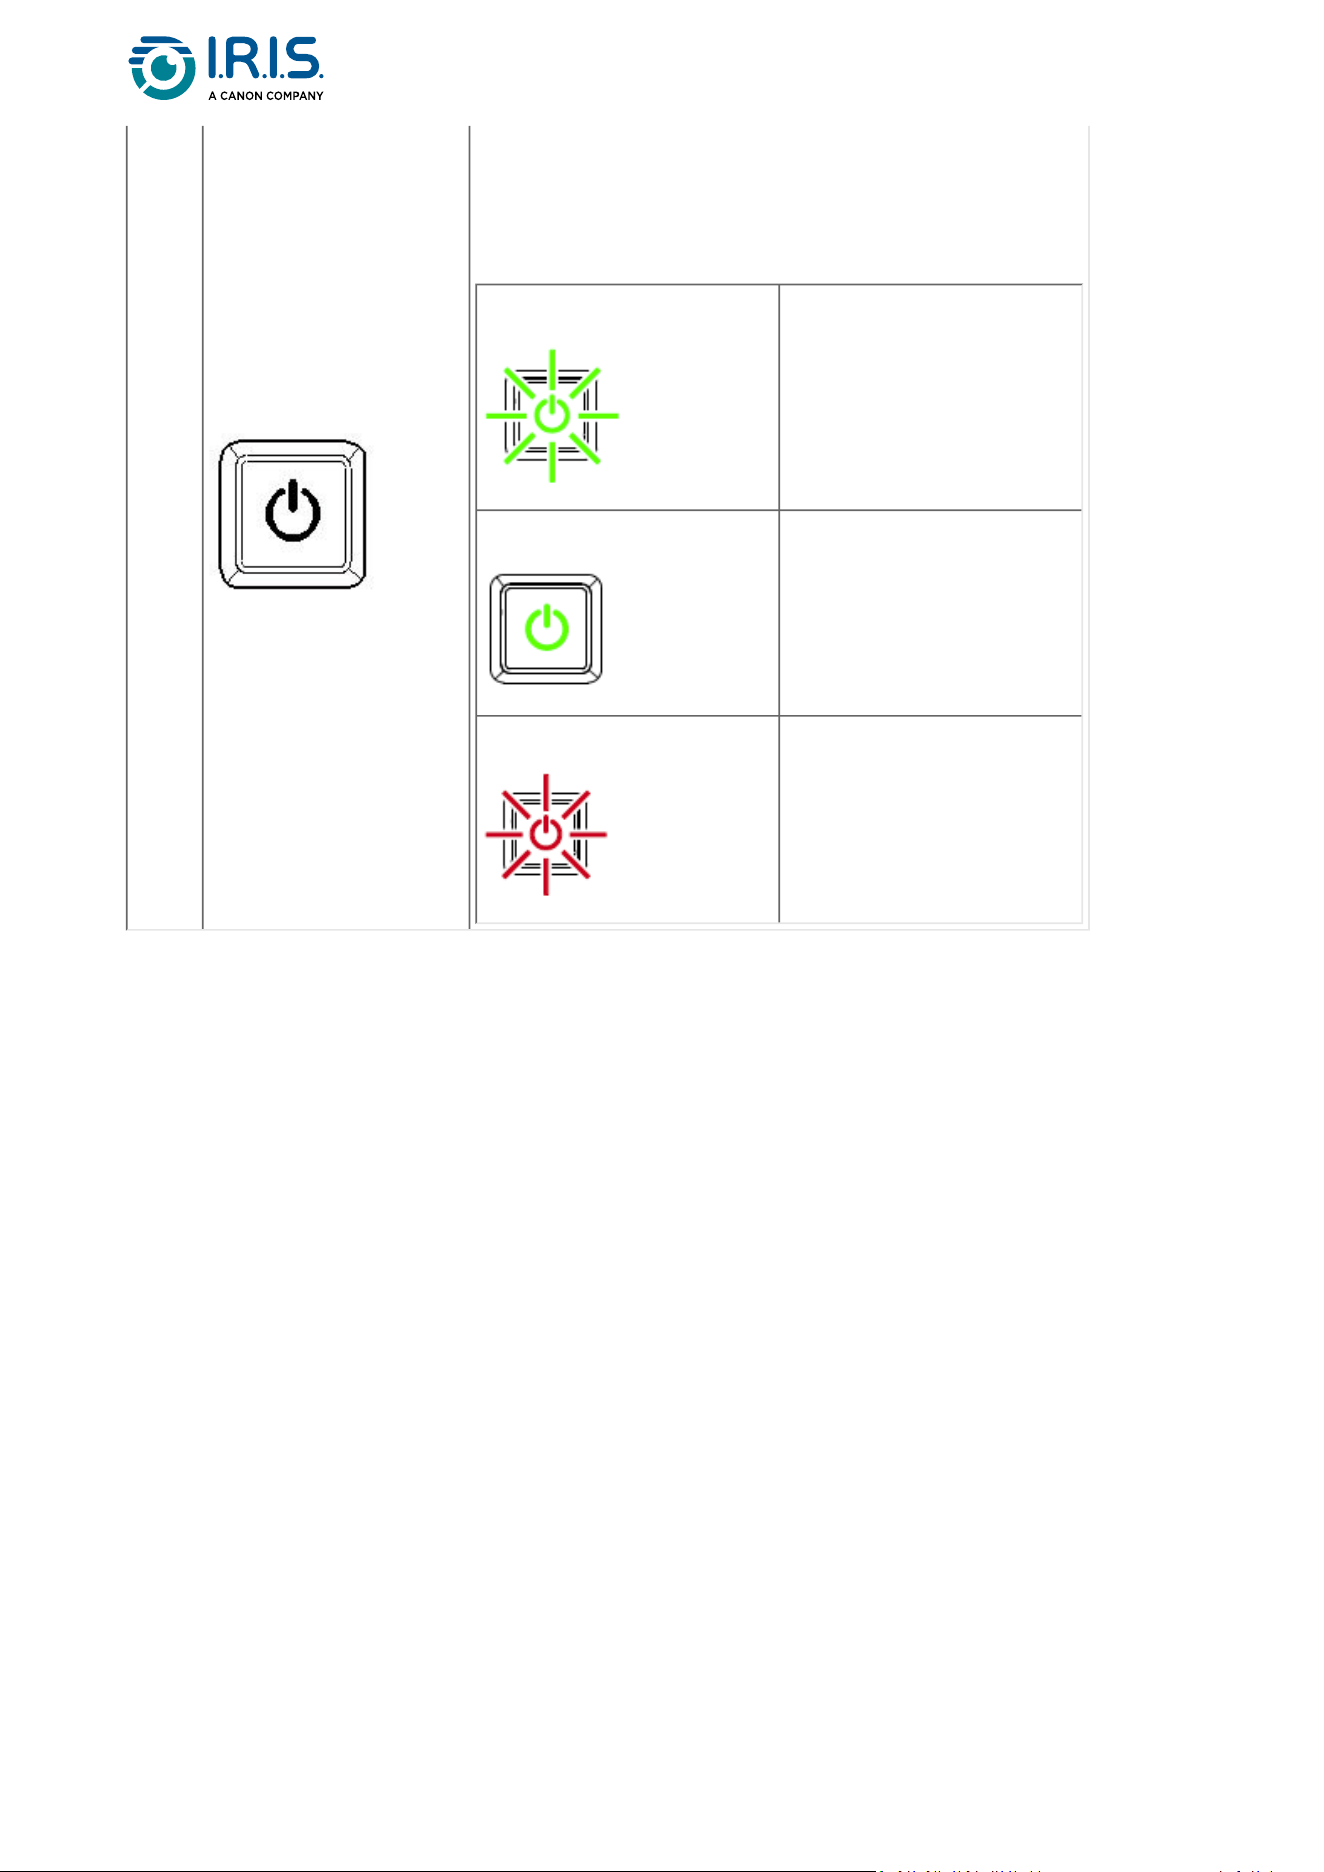
Page 13
•
•
Press and hold the power button for 3
seconds to stop the device.
Press the scan button to start a scan
Color legend:
Green flashes
The scanner is in power-
saving mode.
Press the Power button
to wake up from
standby.
Green
The scanner is ready to
scan.
Red flashes
An error has occurred.
Page 14
Specifications
Stand-by and OFF times
If powered by USB cable If powered by battery
Stand-by mode N/A after 10 min
Automatic power-off after 60 min after 15 min
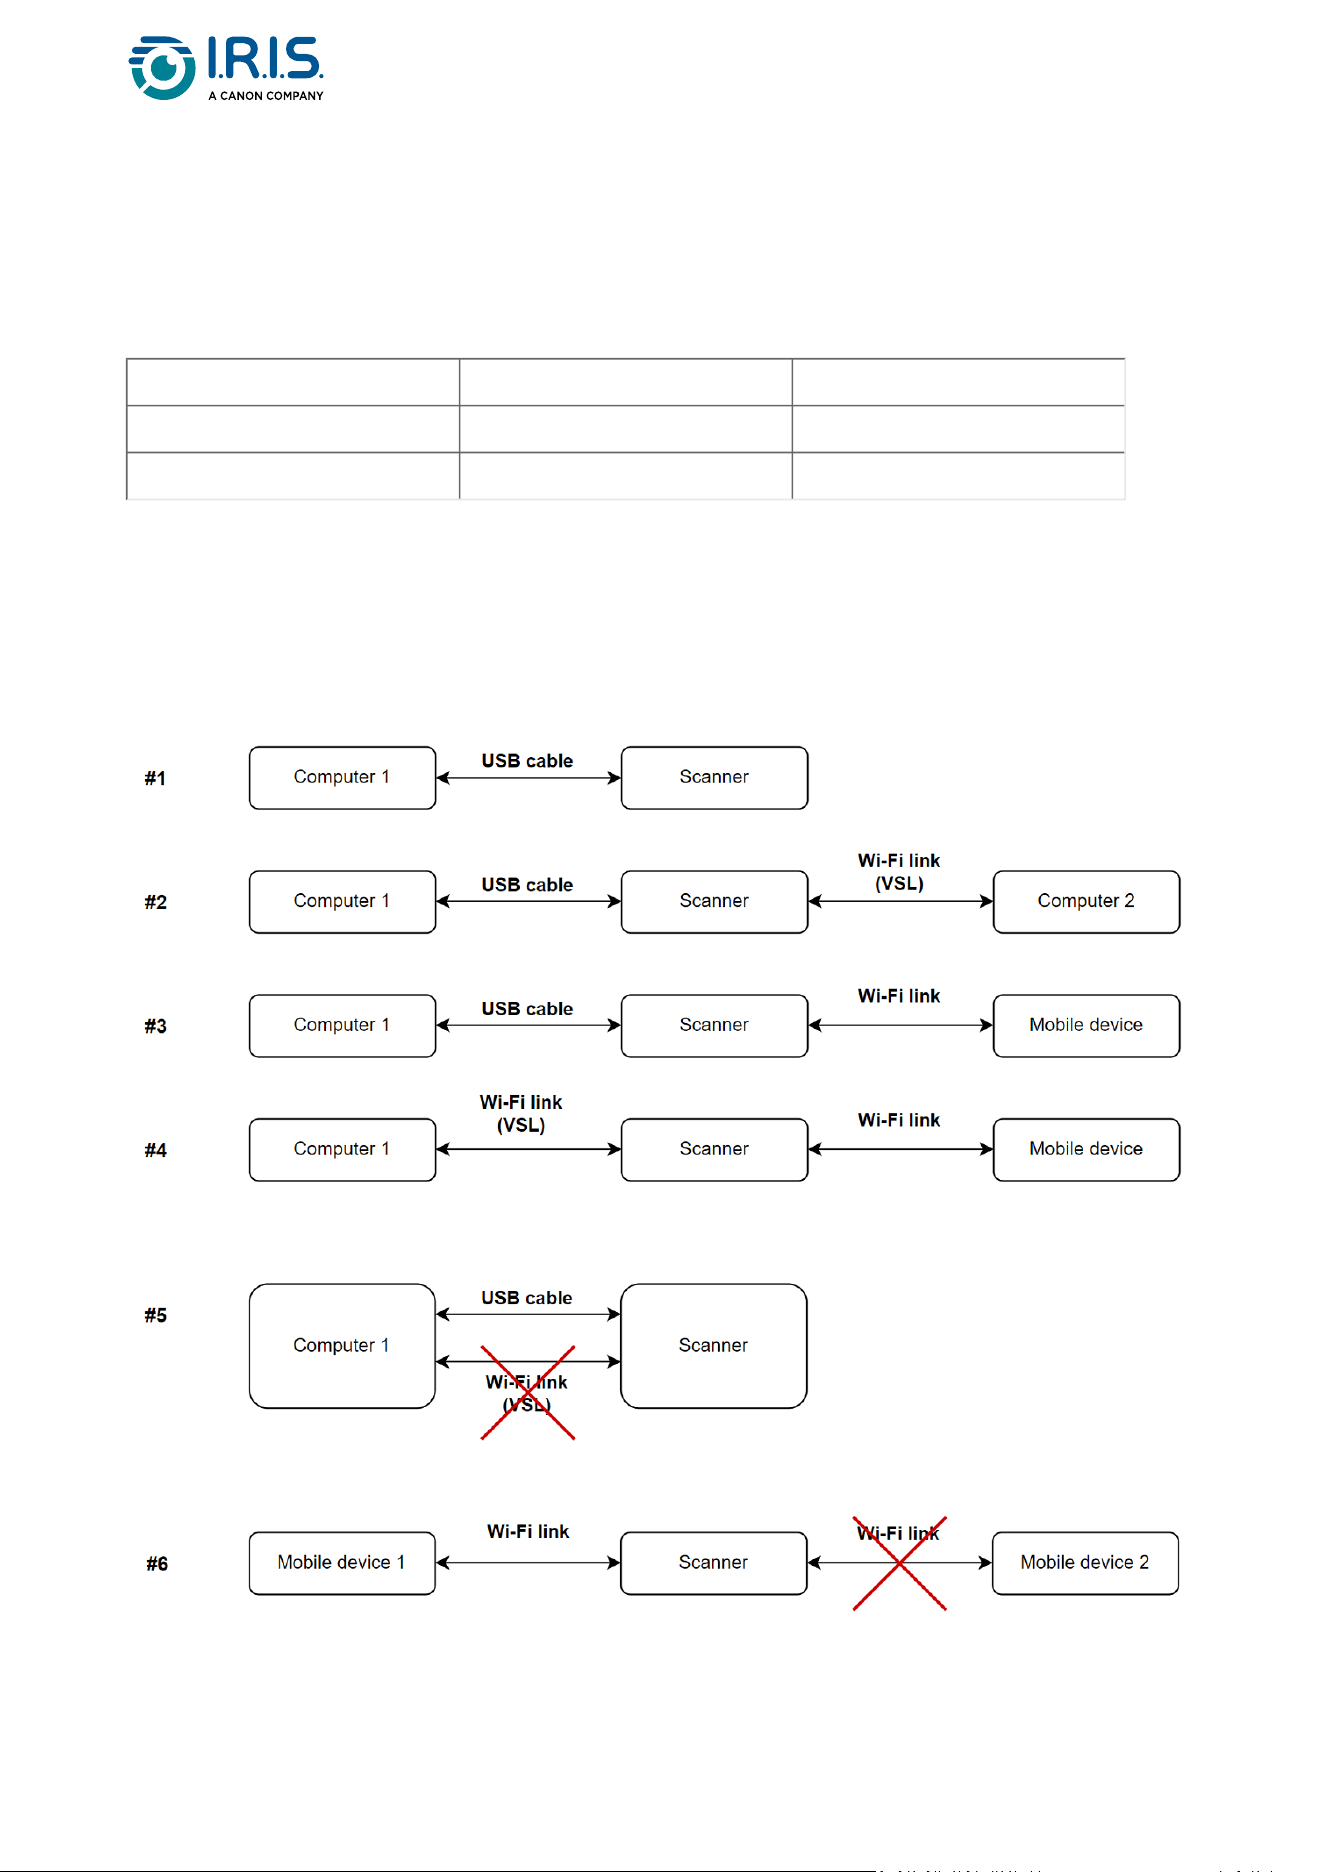
Supported connections
Can support
Cannot support

Page 15
Scanner specifications
All specifications are subject to change without notice.
Model number
FF-2111B (simplex scanner)
FF-2112B (duplex scanner)
Image Technology Contact Image Sensor (CIS)
Optical Resolution 600 dpi
Color Modes Black & White/Gray/Color
Max. Paper Size 8.5”x14”(widthxlength)
Min. Paper Size: 2.0”x2.9”(widthxlength)
Paper Weight 52 ~ 105 g/m²
ID Card Thickness Up to 0.8 mm
Interface
USB 2.0 Type-C
Wireless 802.11 b/g/n
Power Battery (Li-ion18650, 3.6V/2750mAh)
Operating
Temperature
10ºC ~ 35ºC
Humidity 15%~85% RH
Dimensions:
(HxWxD)
294 x 67 x 47 mm (simplex scanner)
312 x 66 x 49 mm (duplex scanner)
Weight
Approx. 480g (simplex scanner)
Approx. 600g (duplex scanner)
Wi-Fi specifications
Model: CF-811AC
Main chipset RTL8811CU
Host interface USB 2.0
Frequency range 2.4GHz & 5.8GHz
Wi-Fi standard
EEE 802.11a
IEEE 802.11b
IEEE 802.11g

Page 16
IEEE 802.11n
IEEE 802.11ac
Security
WPA-PSK/WPA2-PSK
WPA/WPA2
WEP
Operating
System
Windows 10, 11
macOS 11, 12 or higher
Page 17
Operation
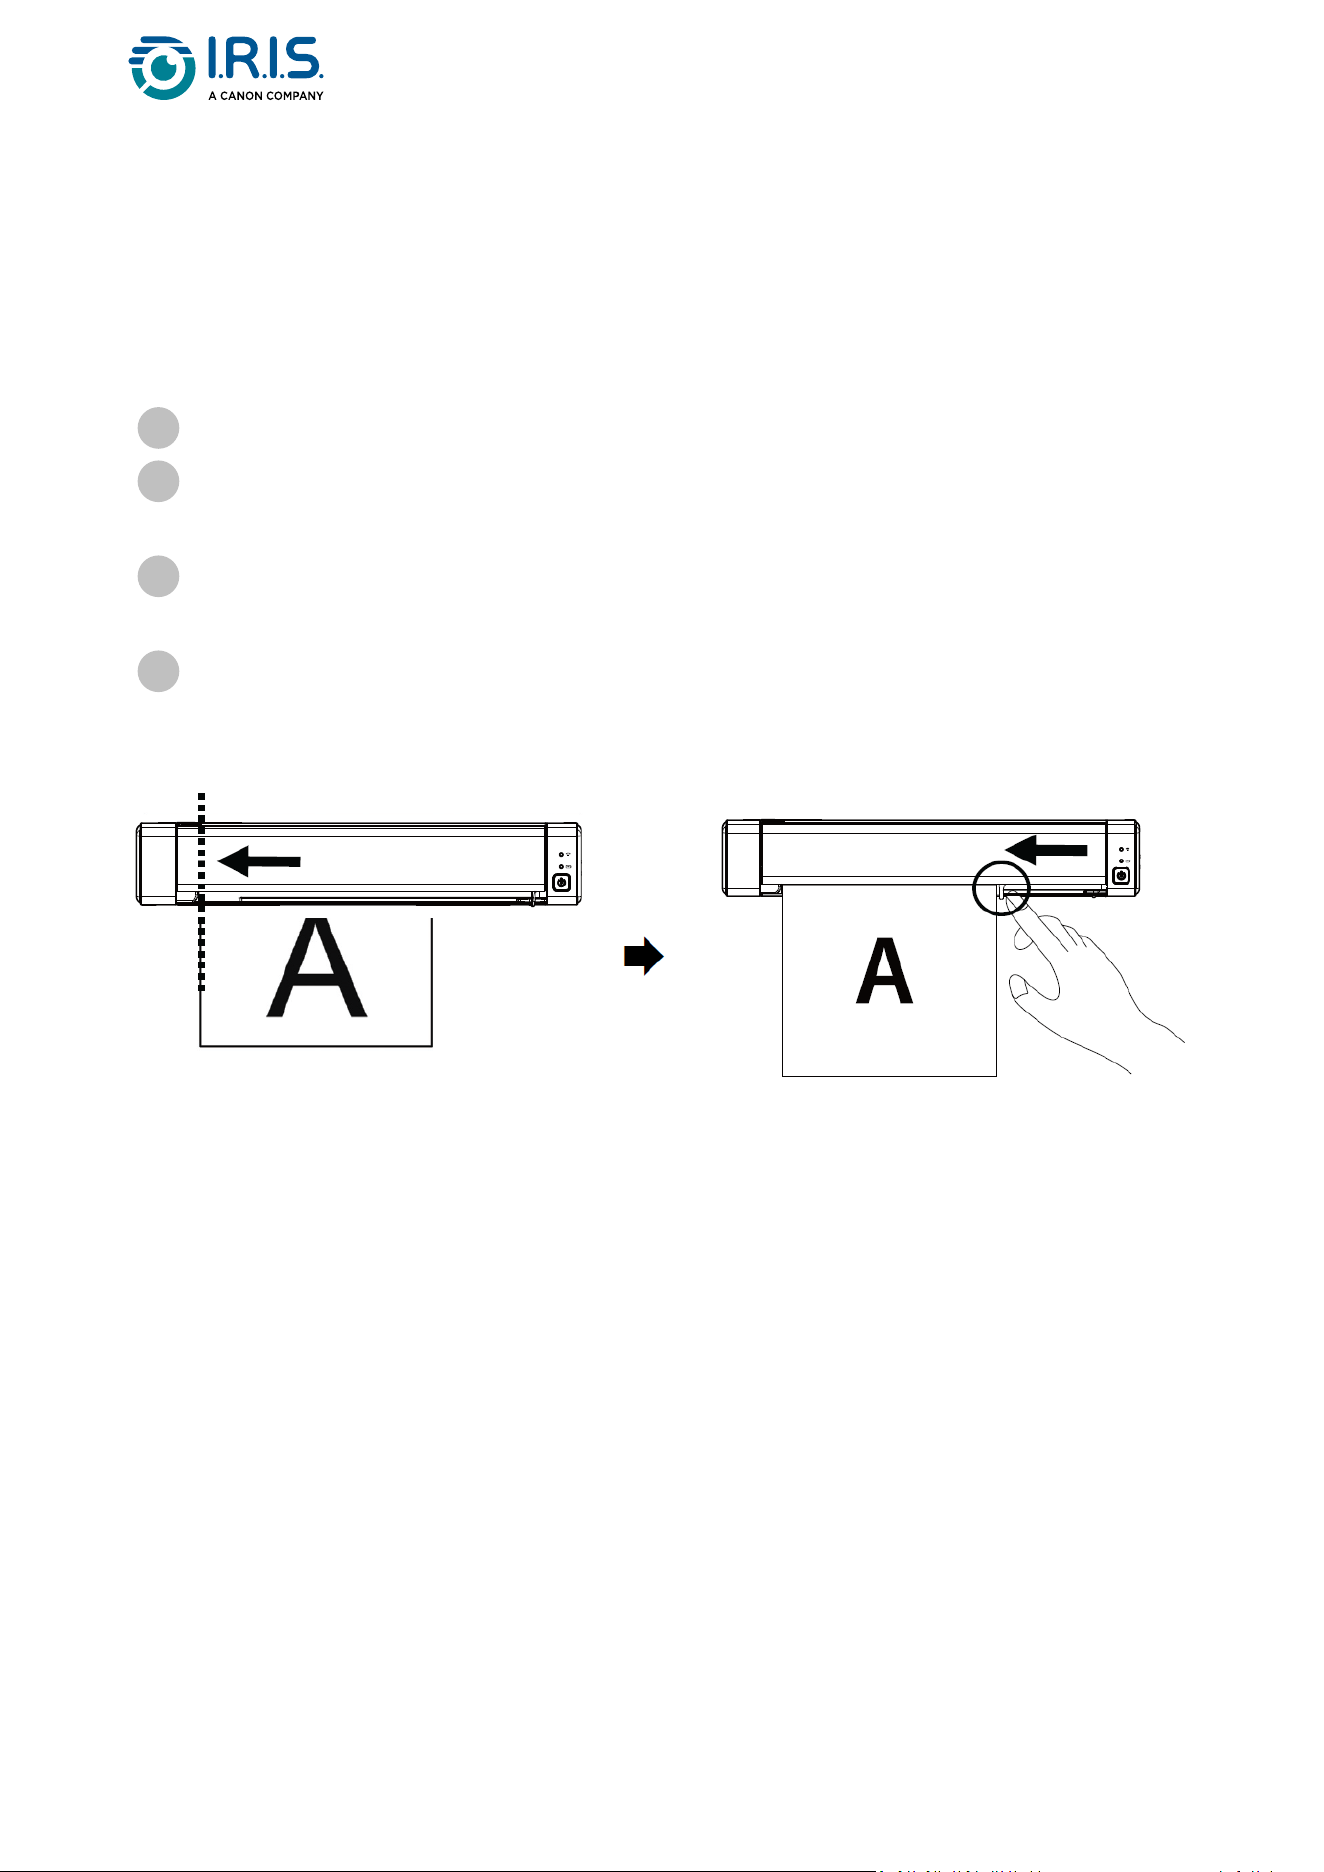
How to place a document
Align the original document to the left edge of the feed slot
1
Installtheoriginaldocumentface up into the feed slot.
Install only one page at a time, put the next one only when the previous one is done.
2
Let go of the page when it begins to slide into the slot.
Ifyoupushtoofar,thetopofyourimagewillbecutoff.
3
Move the paper guide to the right edge of the original document to ensure correct
alignment during the scanning.
4

Page 18
How to place a plastic card
Refer to the Troubleshooting section if you have problems with cropping.
Align the original plastic card to the left edge of the feed slot.
1
Puttheoriginalplasticcardface up.
2
Install the card at an angle (30°), not horizontally, to ensure that the feed wheel grips
the card securely.
Install only one plastic card at a time
3
Let go of the card when it begins to slide into the slot.
Ifyoupushtoofar,thetopofyourimagewillbecutoff.
4
Page 19
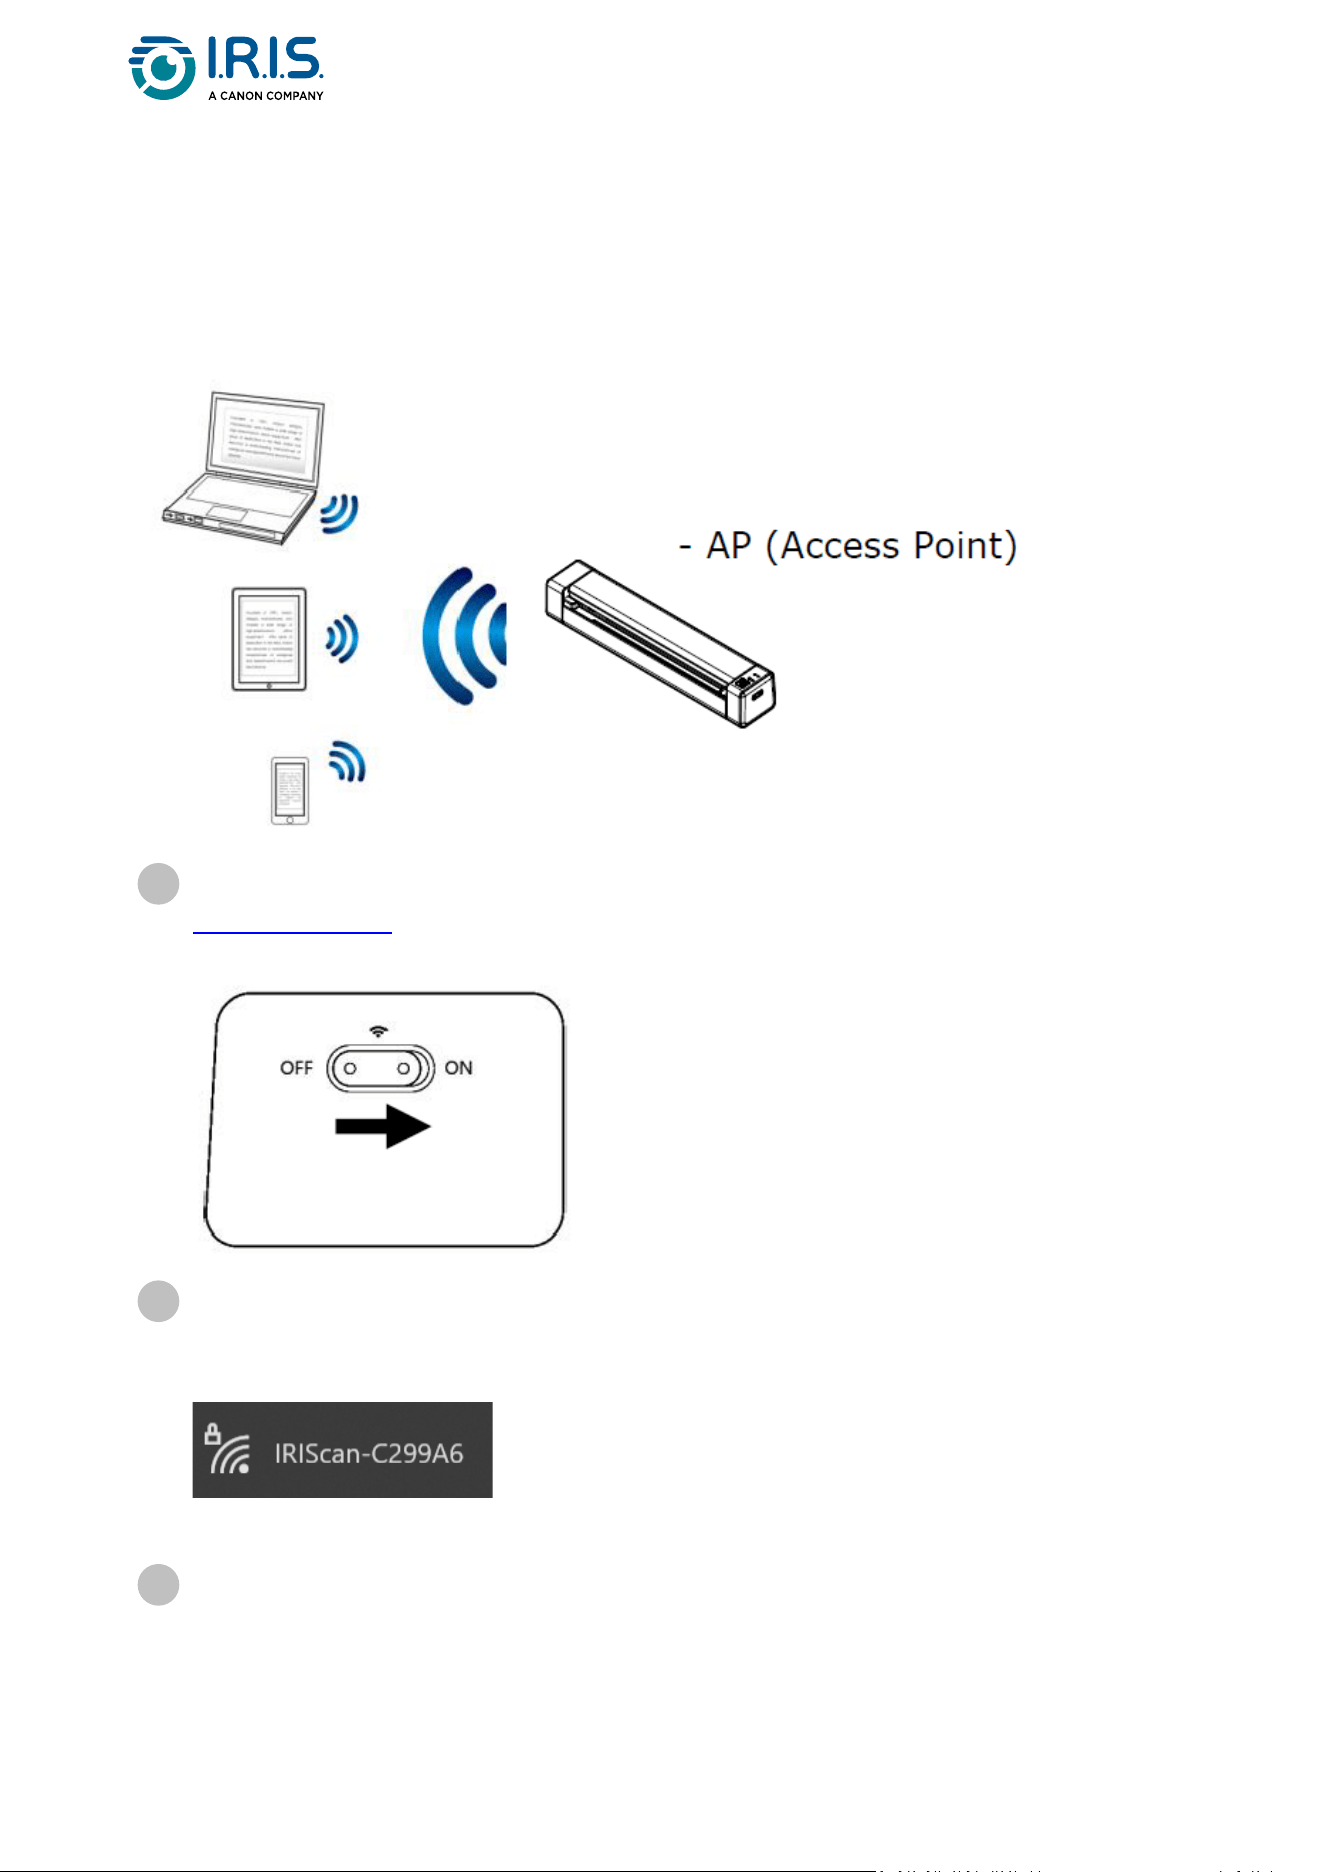
How to connect to Wi-Fi
The scanner works as an Access Point (AC).Youcanconnectyourcomputeroryourmobile
devicestothescannerviaWi-Fiwithouttheneedforanadditionalaccesspoint.(No
Internet access)
To set the Wi-Fi connection to ON, slide the Wi-Fi switch to the ON position (See
Upper front view).
If the connection is successful, the Wi-Fi LED comes on permanently in blue.
1
On your computer or mobile devices (network settings), make sure that IRIScan-xxxx
has been selected as the wireless network name (xxxx shows the last four digits of
the Mac address on the back of the scanner).
Connect.
2
Enter the default password:12345678.
The scanner and your device are now connected via Wi-Fi.
3


Page 21
How to scan
Make sure that you do steps 1 to 6intheGetting startedsectionbeforeyou
startascan.
With cable and Capture Tool
Multi-feed is supported, and you can set the scan interval length in Capture Tool > Setup >
Paper tab > Feeding > Transport timeout (default is 15 sec).
With cable and Button Manager(Windows®)
Start the Capture Toolapplication.For more details on this tool, refer to its user
manual.
1
ClicktheScanbutton intheCaptureTool.
2
TheconvertedfileshowsintheleftpaneloftheCapturetool.
3
The Button Manager application is launched automatically when the scanner is
connected to the computer. The Button Manager icon is shown in the Windows
systemtray,inthebottomrightcornerofthecomputerscreen.
For more details on the Button Manager application, refer to its user manual.
1
Press the Scan button inthescannercontrolpanel(theapplicablescansettings
arethoselastsavedintheButtonPanel)ORclickthebuttonofyourchoiceinthe
Button Panel.
2
Theconvertedfileopensintheselectedapplication.
3

Page 22
With cable and TWAIN-compatible software
With Wi-Fi and Capture Tool
With Wi-Fi and Button Manager(Windows®)
Start the TWAIN-compatible software you selected (examples: Adobe Acrobat, or
ImageCapture(ICA)undermacOS).
1
Lookforthescanoptioninthatsoftware(example:Insert...fromscanner).Follow
the instructions on the screen.
2
Click Scan in the application.
3
Theconvertedfileopensintheselectedapplication.
4
ConnecttoWi-Fi(SeeHow to connect to Wi-Fi).
1
Start the Virtual Scanner Link (VSL) application and make sure the scanner is
connected. If the link to the scanner is broken, click Refresh, wait for the scanner to
show, select it, and click Connect.
2
Start the Capture toolapplication.For more details on this tool, refer to its user
manual.
3
ClicktheScanbutton intheCaptureTool.
4
Theconvertedfileopensintheselectedapplication.
5
ConnecttoWi-Fi(SeeHow to connect to Wi-Fi).
1
Start the Virtual Scanner Link (VSL) application and make sure the scanner is
connected. If the link to the scanner is broken, click Refresh, wait for the scanner to
show, select it, and click Connect.
2
The Button Manager application is launched automatically when the scanner is
connected to the computer. The Button Manager icon is shown in the Windows
systemtray,inthebottomrightcornerofthecomputerscreen.
For more details on the Button Manager application, refer to its user manual.
3

Page 23
With Wi-Fi and TWAIN-compatible software
To find out how to scan with the IRIScan™-PDF app (mobile application), refer
toHowtousetheIRIScan™apponAndroid.
Press the Scan button inthescannercontrolpanel(theapplicablescansettings
arethoselastsavedintheButtonPanel)ORclickthebuttonofyourchoiceinthe
Button Panel.
4
Theconvertedfileopensintheselectedapplication.
5
ConnecttoWi-Fi(SeeHow to connect to Wi-Fi).
1
Start the Virtual Scanner Link (VSL) application and make sure the scanner is
connected. If the link to the scanner is broken, click Refresh, wait for the scanner to
show, select it, and click Connect.
2
Start the TWAIN-compatible software you selected (examples: Adobe Acrobat, or
ImageCapture(ICA)undermacOS).
3
Lookforthescanoptioninthatsoftware(example:Insert...fromscanner).Follow
the instructions on the screen.
4
Click Scan in the application.
5
Theconvertedfileopensintheselectedapplication.
6
Page 24
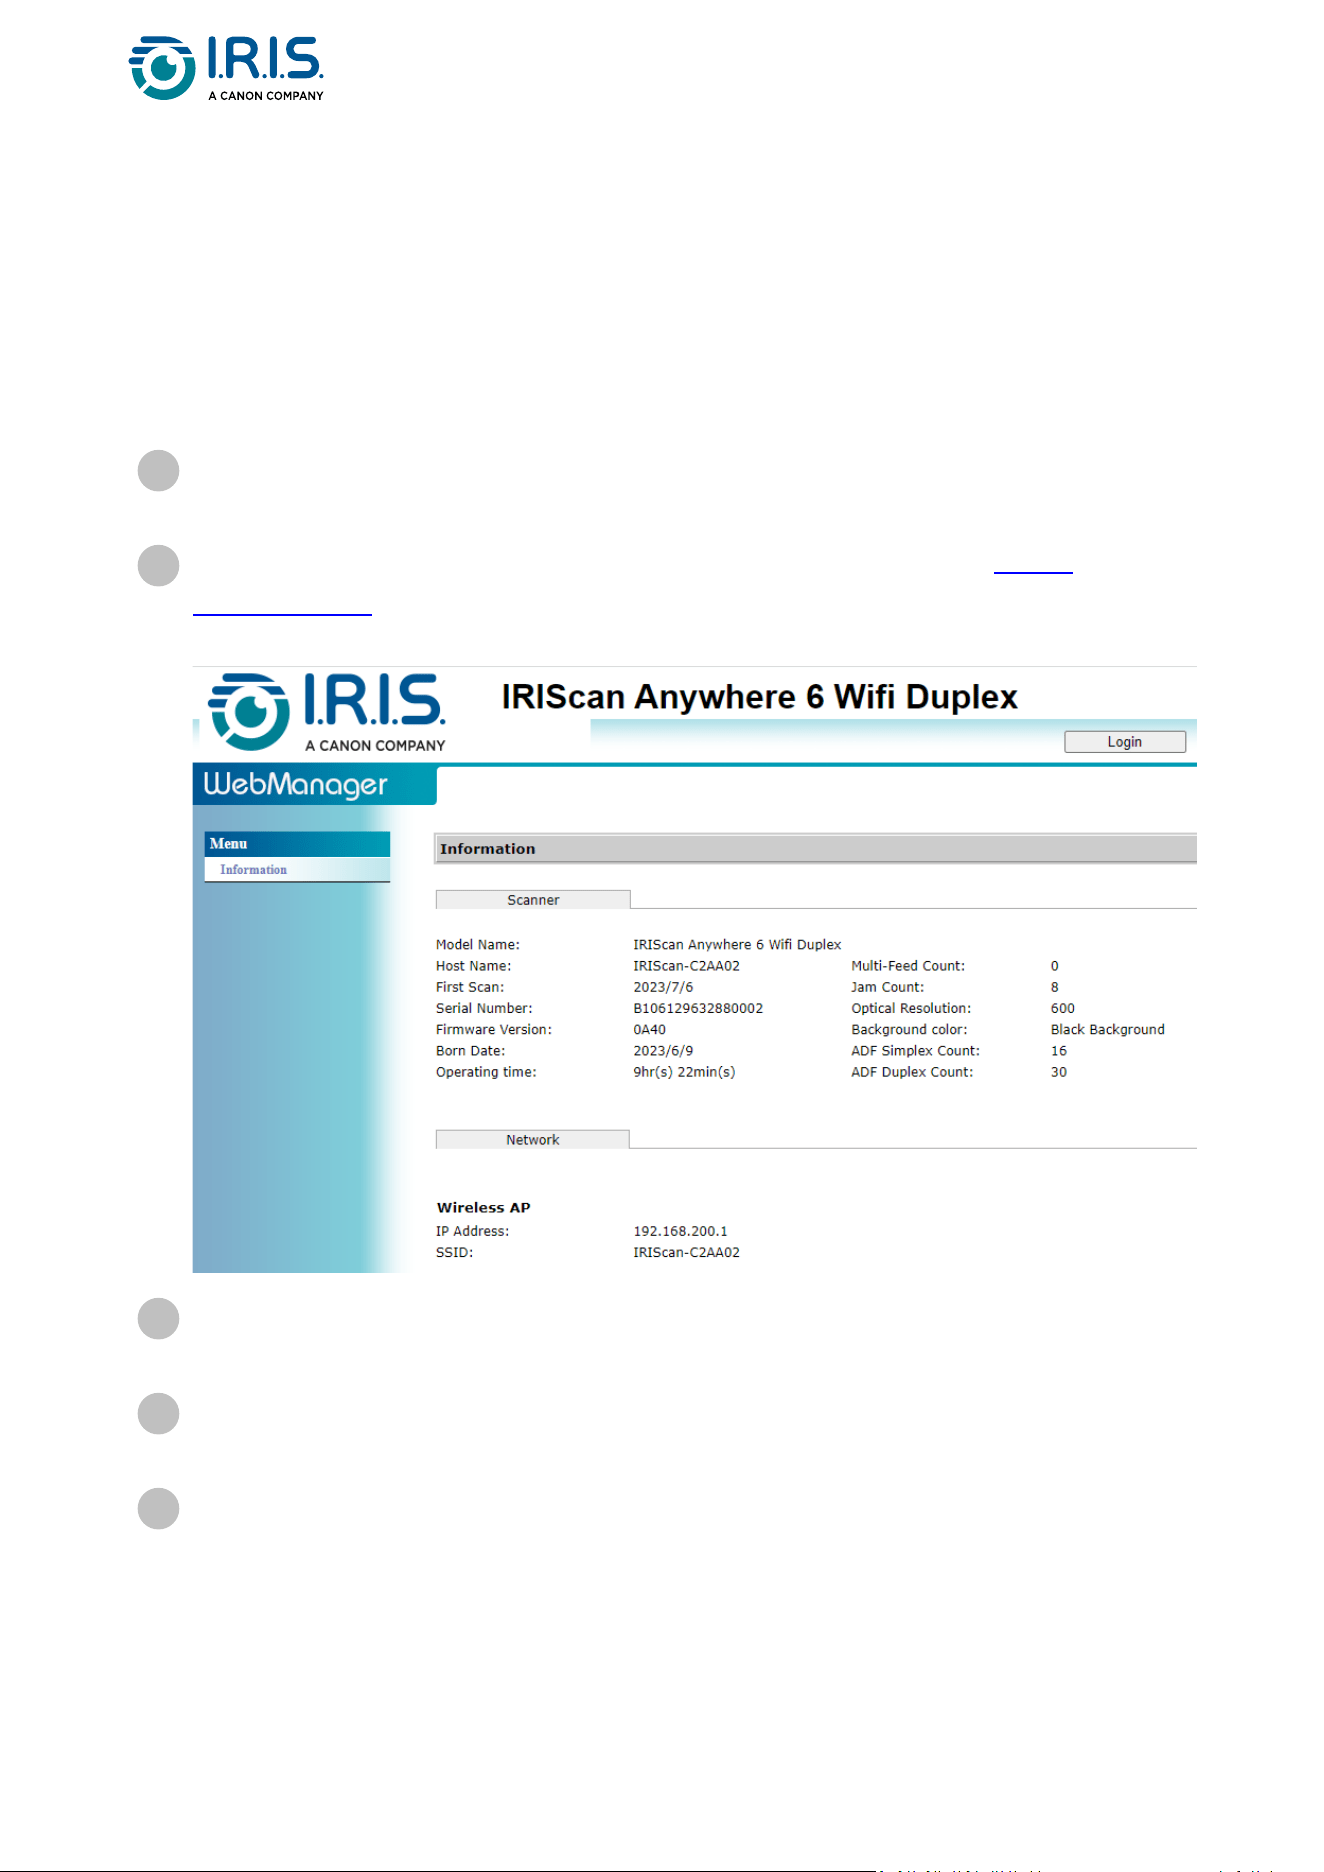
How to enter the scanner settings via your
browser
You can use a web interface to administrate your scanner settings (example: name or
protection).
ConnectyourscannertoacomputerviaWi-Fi.Thetwodevicesarenowconnected
point-to-point.
1
OpenabrowseronyourcomputerandentertheprimaryIPaddresshttp://
192.168.200.1/.Youcanseetheinformationmenuaboutthehardwareandabout
thewirelessAccessPoint.
2
Click Login (button in the upper right corner of the window). A login window is
shown.
3
Enter the primary login name: admin, and the primary password:admin.ClickOK.
Younowhaveaccesstothe'Webmanager'interface.
4
1.
Onceyouareloggedin,twoadditionaltabsareavailablefromtheleftmenu.
thedevicemanagementtab.Youcanchangeyourloginandpasswordtothis
web interface.
5

Page 25
2. thenetworkmanagementtab.Youcanchangethenameofyourscanner(SSID)
andaddprotection.Followtheon-screensteps.
Save yourchanges.
6
Page 26
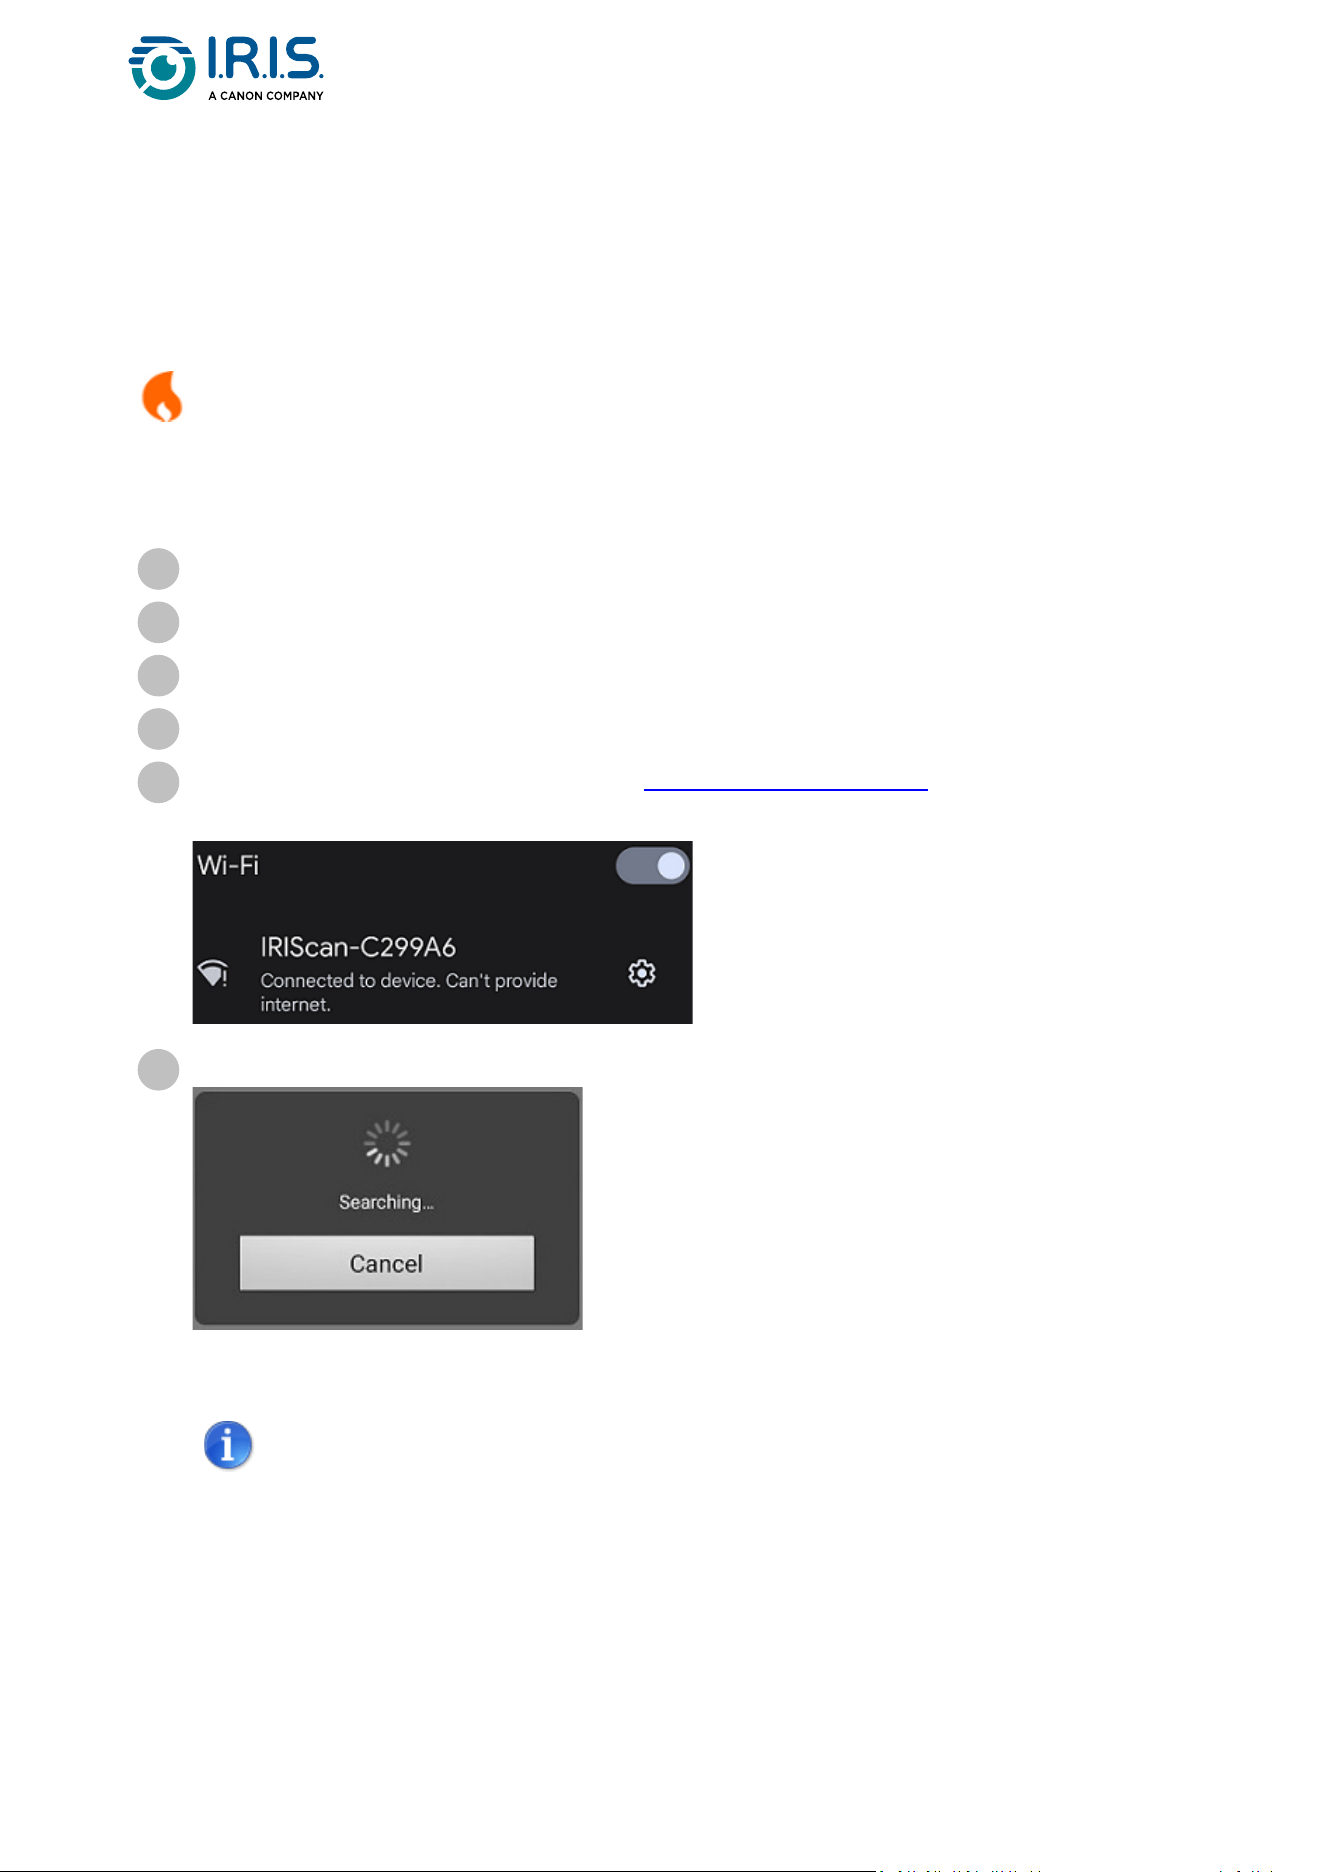
How to use the IRIScan™ app on Android®
The IRIScan™-PDF scannerappisamobileapplicationavailableonAndroid®.
The app is available on Android from Android® 11.
YoucanscandocumentsdirectlytoyourmobiledeviceviatheIRIScan™-PDF scanner app.
Download the app from Google Play (Android®).
1
Install it.
2
Set the Wi-Fi connectiononyourscannertoON.
3
Enable the Wi-Fi function on your mobile device (see Network settings).
4
ConnecttotheIRIScan™network(seeHow to connect to Wi-Fi).Whenthe
connection to the scanner is successful, "Connected" is shown on your screen.
5
Start the IRIScan™-PDF scannerapp.Theappissearchingforthescanner.
•
•
If the search window is not shown, you can also do a manual
search via the three-dot menu (1) > Search scanner.
If the app asks you to allow access to the device's location, select
the answer of your choice.
Once the scanner is connected, a message appears to let you know the application is
ready to scan.
6
Page 27
Theappinterfacelookslikethis:
1. Three-dot menu
2. Scan options
3. File list
4. Scan button
•
•
Select the Scan options (2):
Resolution (DPI number): 300 DPI is the default value.
Paper size:auto-sizeisthedefaultvalue,itletsthescannerdetectthepaper
size automatically. The abbreviations LTR stand for 'Letter' and LGL for 'Legal'.
7
Page 28
•
•
•
Output format:PDFisthedefaultvalue.JPEGorTIFformatsarealsoavailable.
JPEGformatdoesnotsupportB/Wcolormode.TheTIFformatsupportsB/W
color mode only.
Simplex or Duplex: depending on your scanner model, the scan mode is shown.
Color mode: color is the default value. Gray or black and white (B/W) are also
available.
•
•
•
•
•
•
Select the three-dot menu (1) to access the following options:
Refresh: refresh the screen.
Settings: open the general and scanner settings.
Wi-Fi settings: open the Wi-Fi settings of your mobile device.
Search scanner: connect or reconnect to your scanner if the "Scanner not
found" message is shown.
About: see version information of the app.
Register Now: register as an IRIS user to get free support. You are redirected to
our web site.
8
Place a document in the scanner (see How to place a document).
9
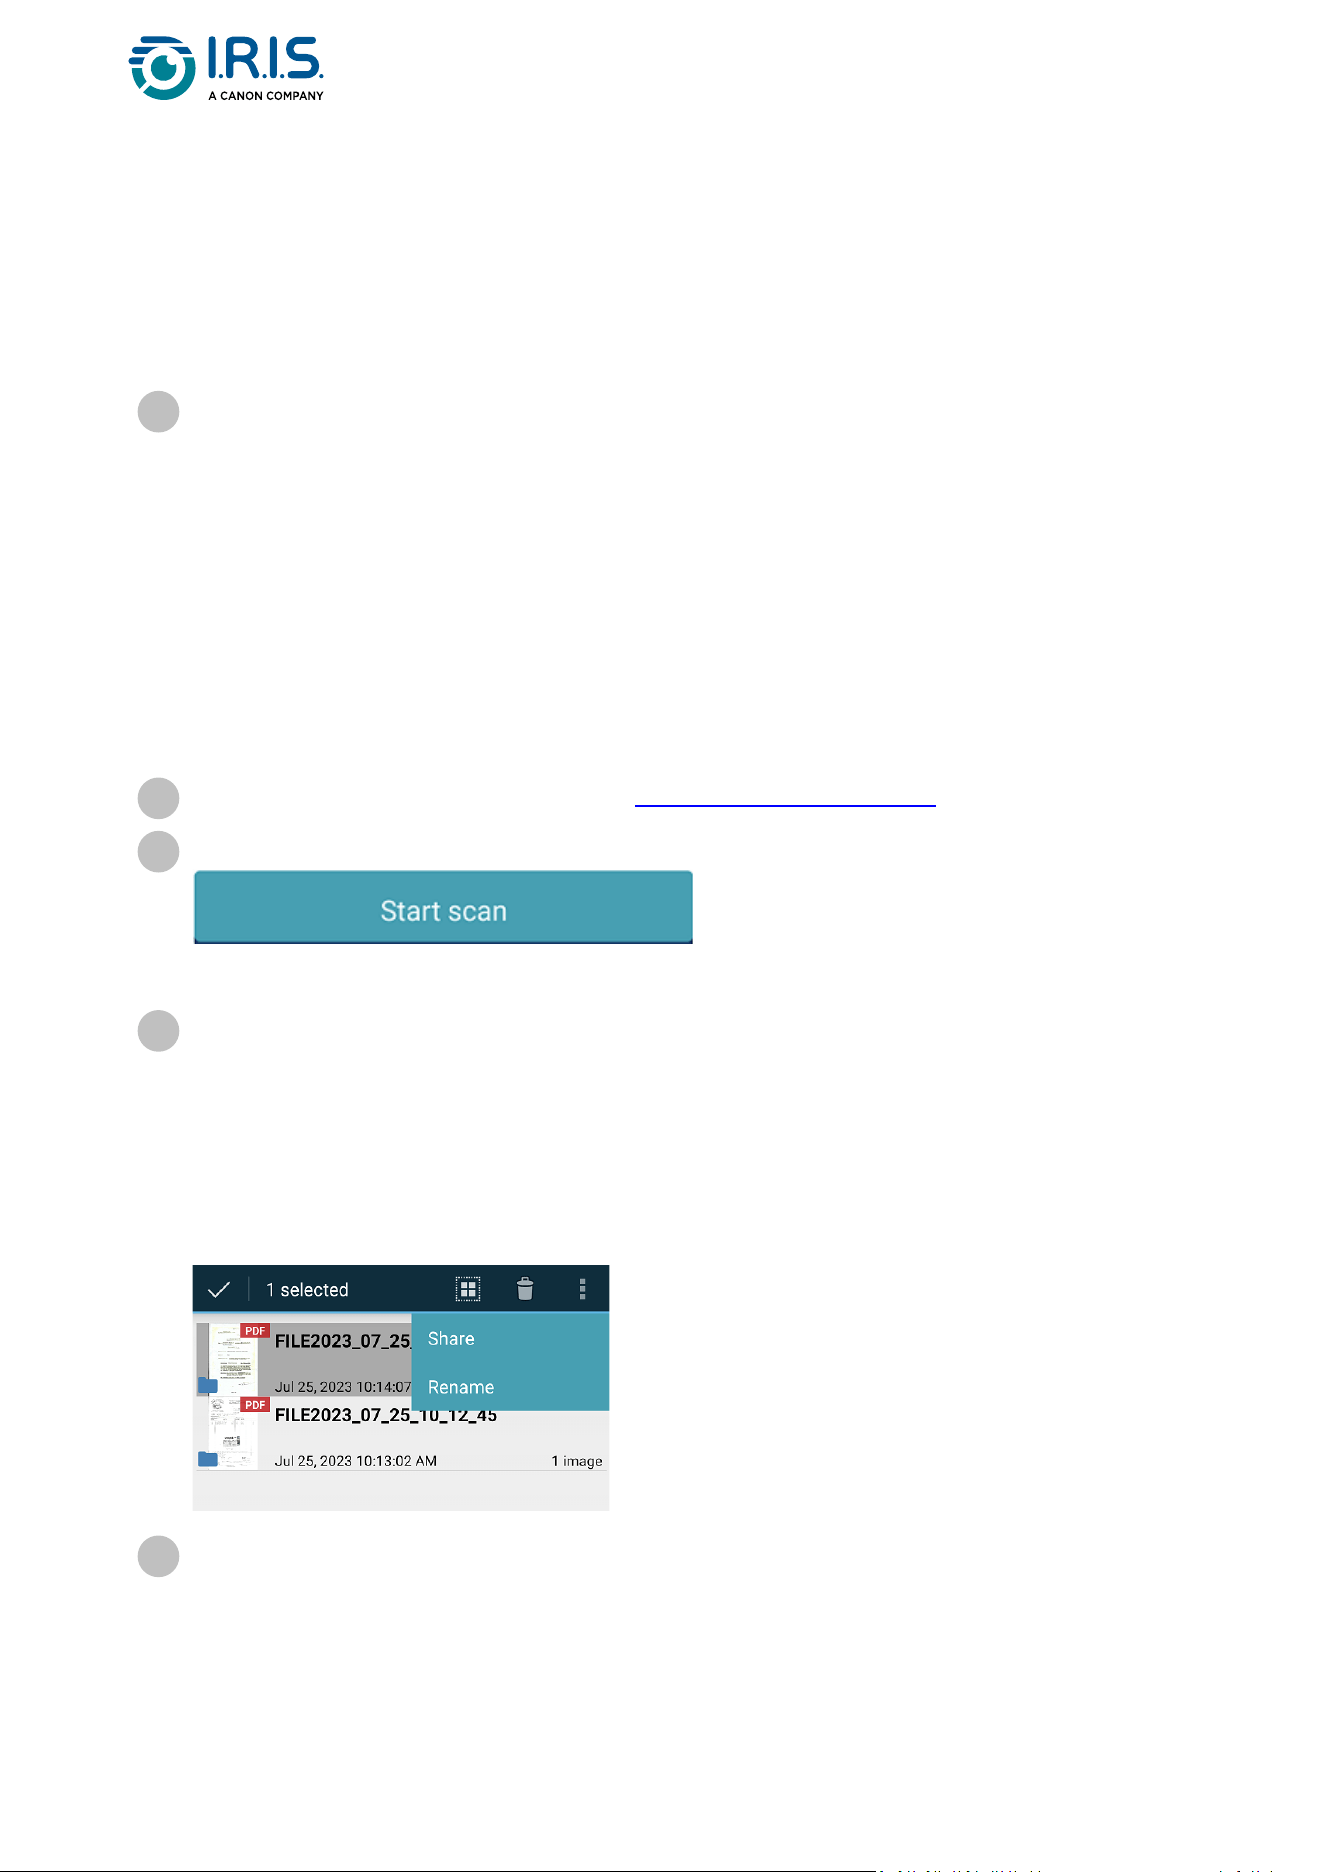
Select Start scan (4) in the app.
The new file shows on the screen of the app, in the File list (3).
10
•
•
•
In the File list (3), select and hold the file for one second to have access to:
Bin icon: delete the file.
Share: select the three-dot menu and select Share. It opens the share screen of
your mobile device.
Rename: select the three-dot menu and select Rename. You can enter a new
name for your selected file via the text field that is shown.
11
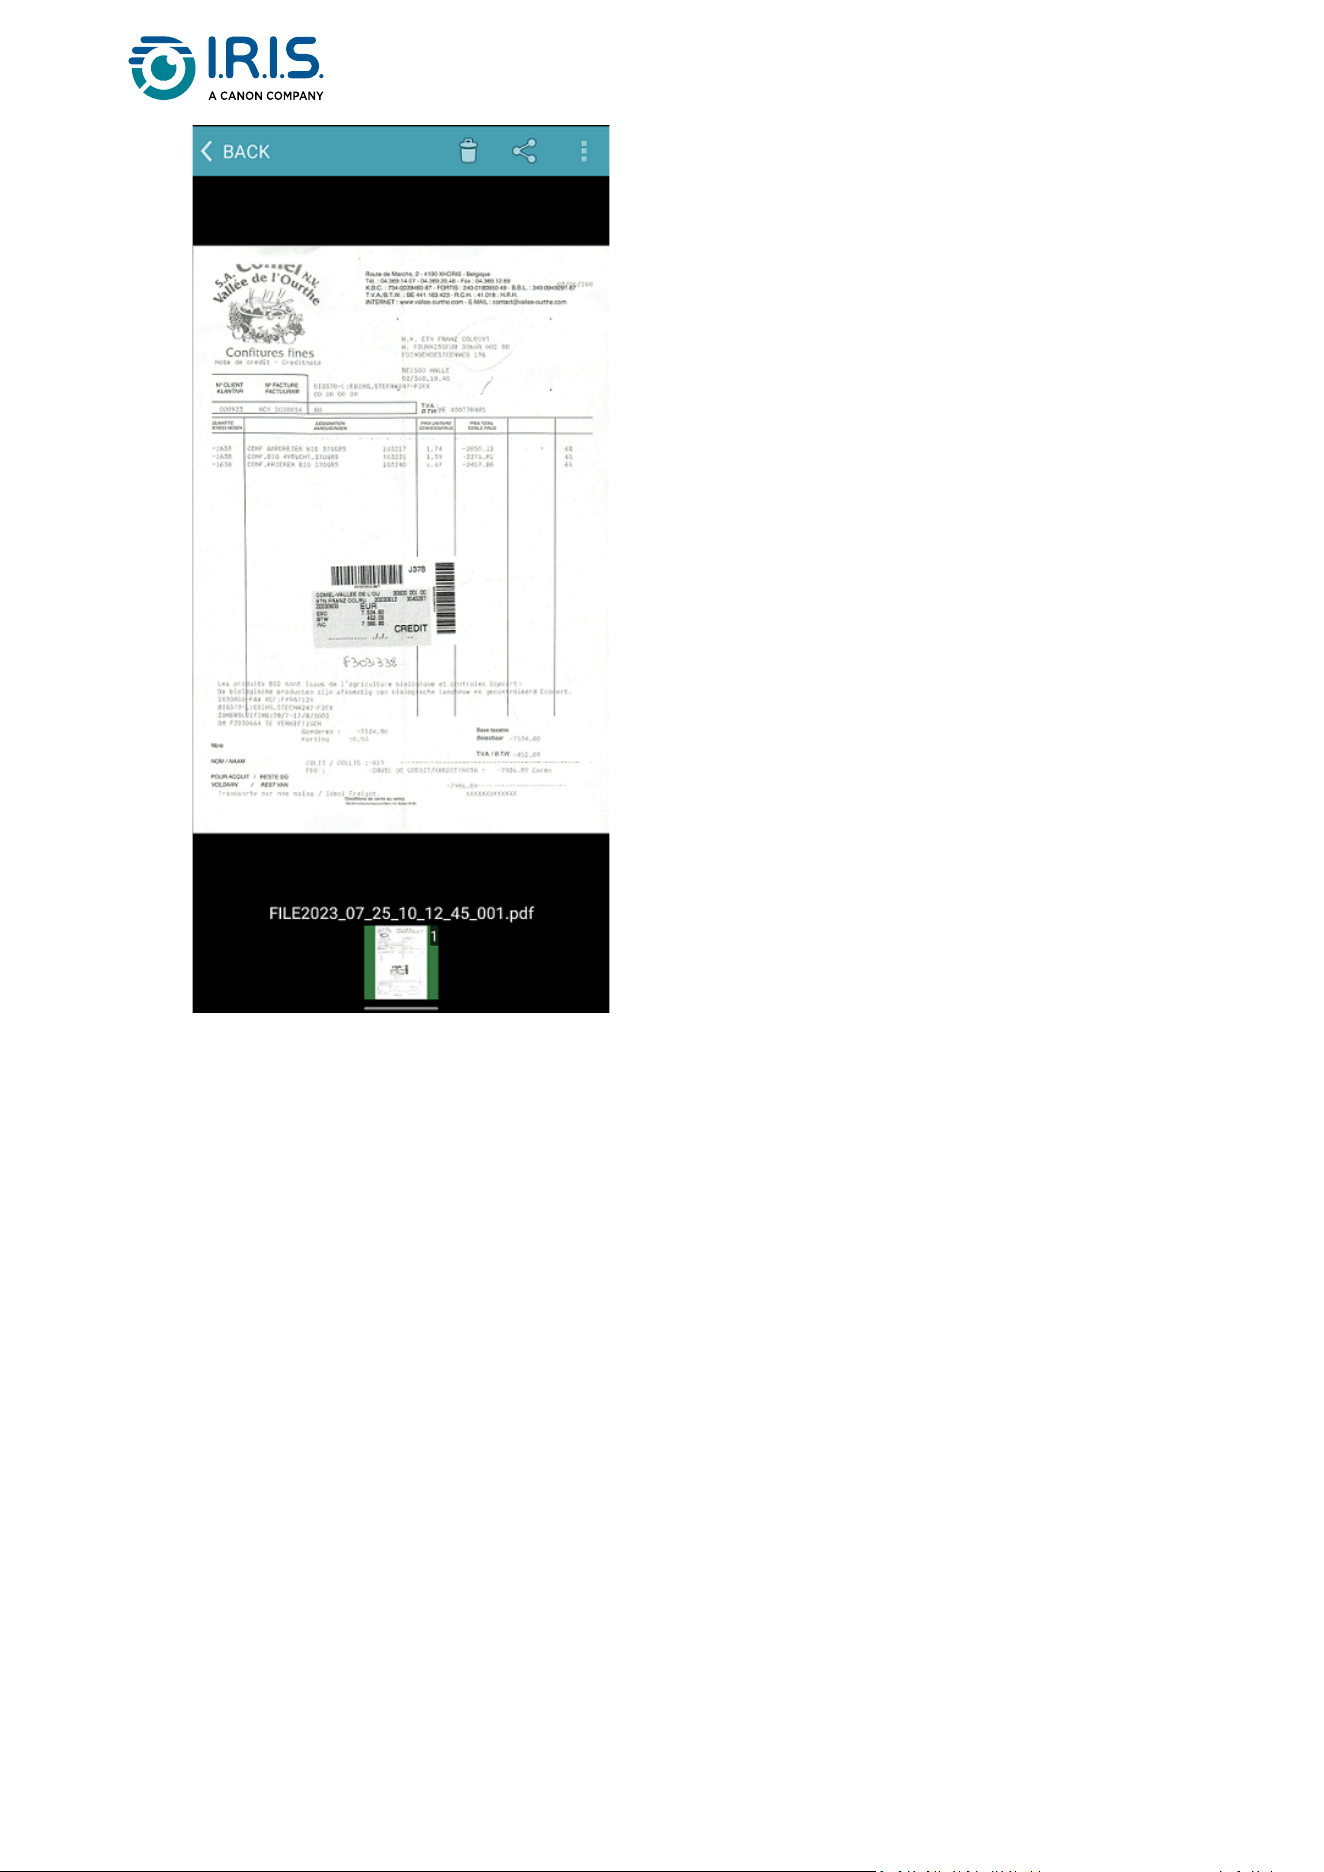
Select a file in the File list (3) to open it in a new screen with new options.
12
Page 29
•
•
•
Bin icon: delete the file.
Share icon: open the share screen of your mobile device.
Open with...: select the three-dot menu and select Open with... A list of
possible apps opens.
Select < BACK to go back to the main screen.
Page 30
How to use the IRIScan™ app on iOS®
The IRIScan™-PDF scannerappisamobileapplicationavailableoniOS®.
YoucanscandocumentsdirectlytoyourmobiledeviceviatheIRIScan™-PDF scanner app.
Download the app from the Apple Store (iOS®).
1
Install it.
2
Set the Wi-Fi connectiononyourscannertoON.
3
Enable the Wi-Fi function on your mobile device (see Wi-Fi settings).
4
ConnecttotheIRIScan™network(seeHow to connect to Wi-Fi).Whenthe
connection to the scanner is successful, a tick appears next to the scanner name.
5
Start the IRIScan™-PDF scannerapp.Theappissearchingforthescanner.
Oncethescannerisconnected,theappinterfacelookslikethis:
6
Page 31
1. Three-dot menu
2. Scan options
3. File list
4. Scan button
•
•
•
•
•
Select the Scan options (2):
Resolution (DPI number): 300 DPI is the default value.
Paper size:auto-sizeisthedefaultvalue,itletsthescannerdetectthepaper
size automatically. The other options are Legal, Letter, and A4.
Output format:PDFisthedefaultvalue.JPEGorTIFformatsarealsoavailable.
JPEGformatdoesnotsupportB/Wcolormode.TheTIFformatsupportsB/W
color mode only.
Simplex or Duplex: depending on your scanner model, the scan mode is shown.
Color mode: color is the default value. Gray is also available.
7
•
•
•
Select the three-dot menu (1) to access the following options:
Setting: you can select the user interface language and set two options for
naming your scan: prefix and time format.
Wi-Fi: shortcut to access your mobile device's Wi-Fi settings.
Scanner: see scanner information.
8
Page 32
•
•
About: see version information of the app.
Register Now: register as an IRIS user to get free support. You are redirected to
our web site.
Place a document in the scanner (see How to place a document).
9
Select Scan (4) in the app.
The new file shows on the screen of the app, in the File list (3).
10
Page 33
•
•
IfyouclickSelect in the title bar, you can select one file, Select all files, or Cancel file
selection, and you have access to two options:
Delete: delete the selected file(s).
Share: open the share screen of your mobile device.
11
Page 34
•
•
•
•
•
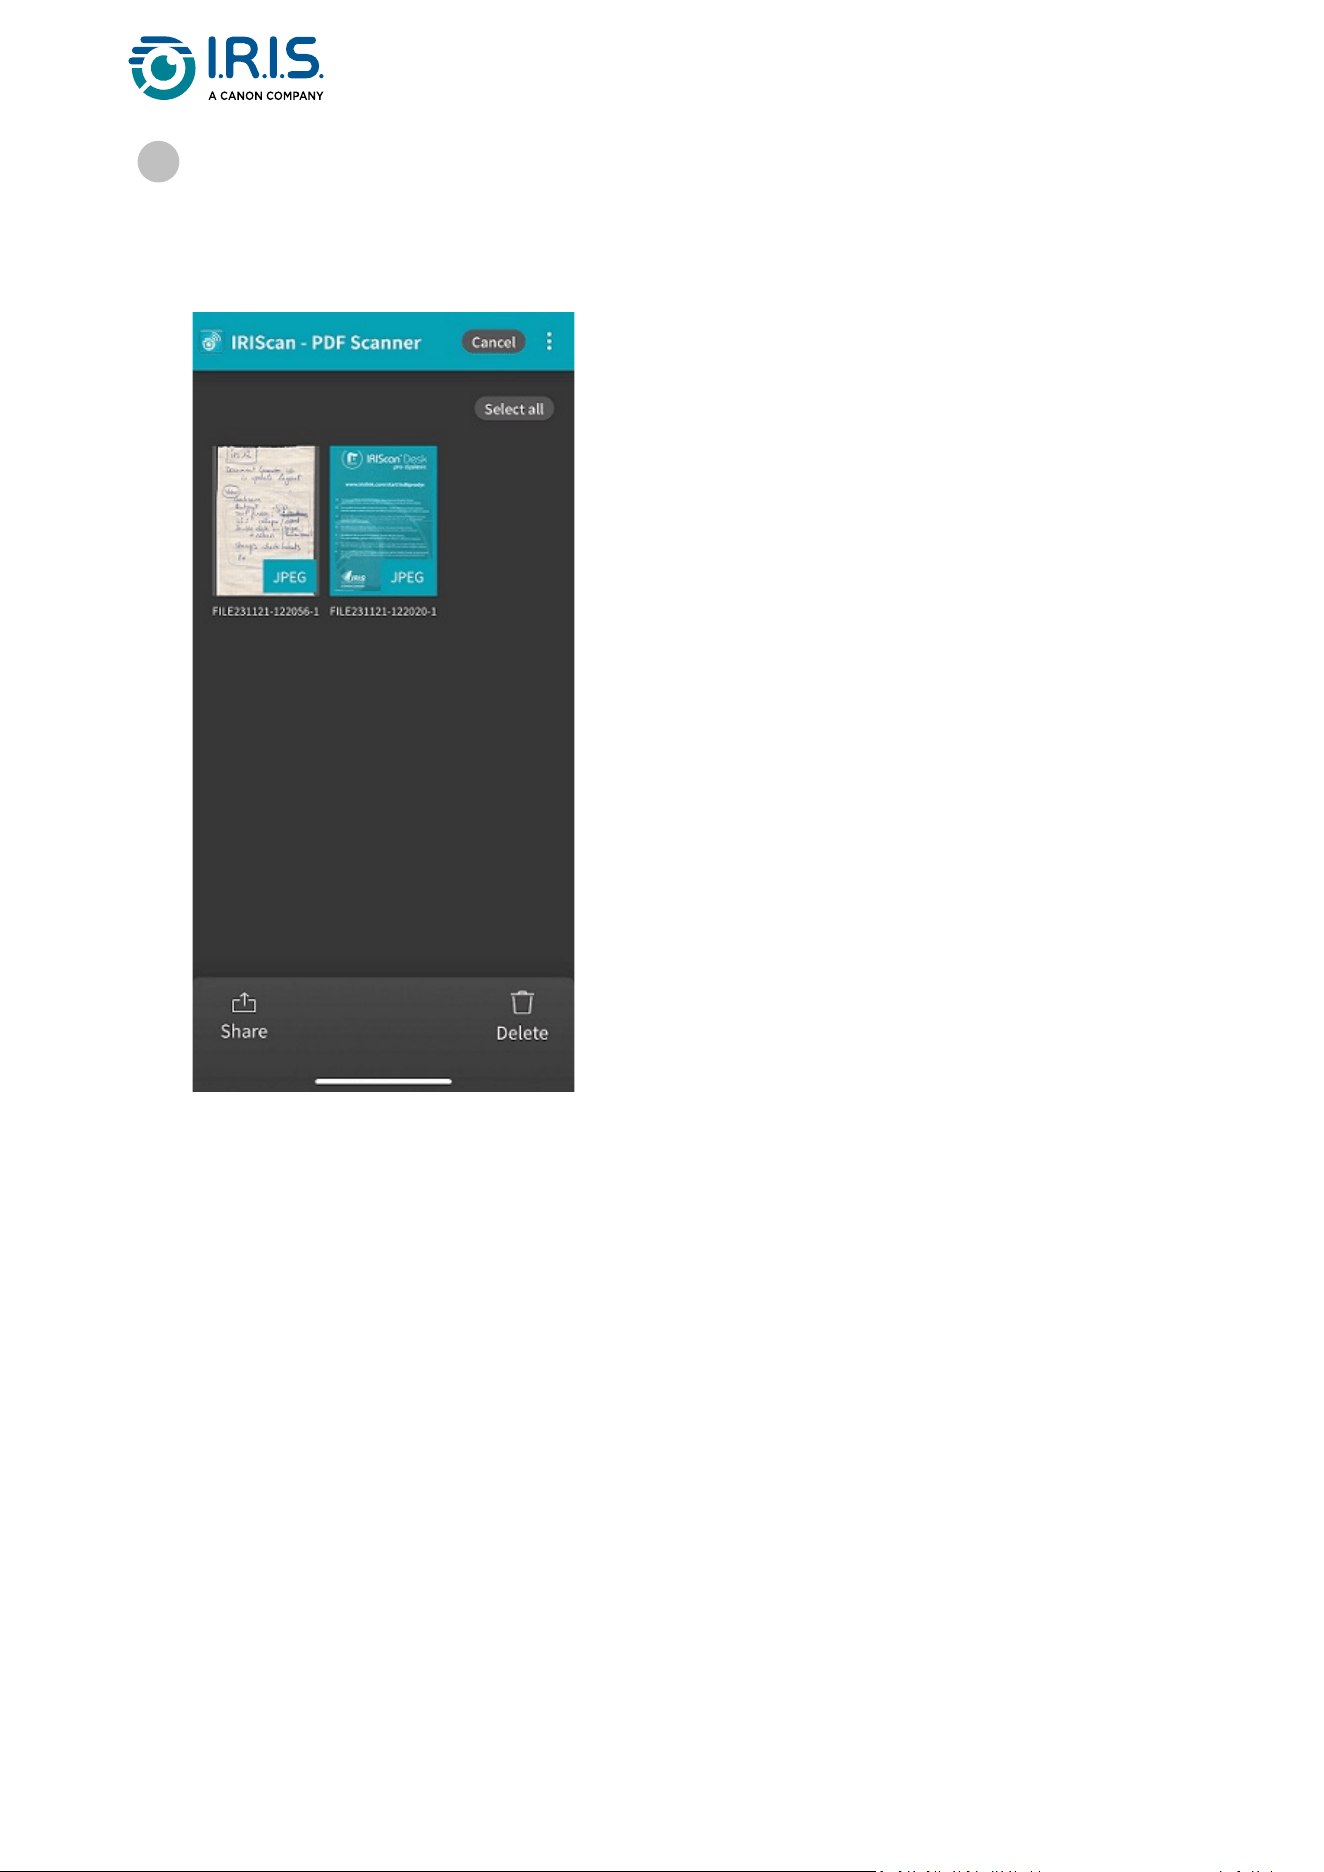
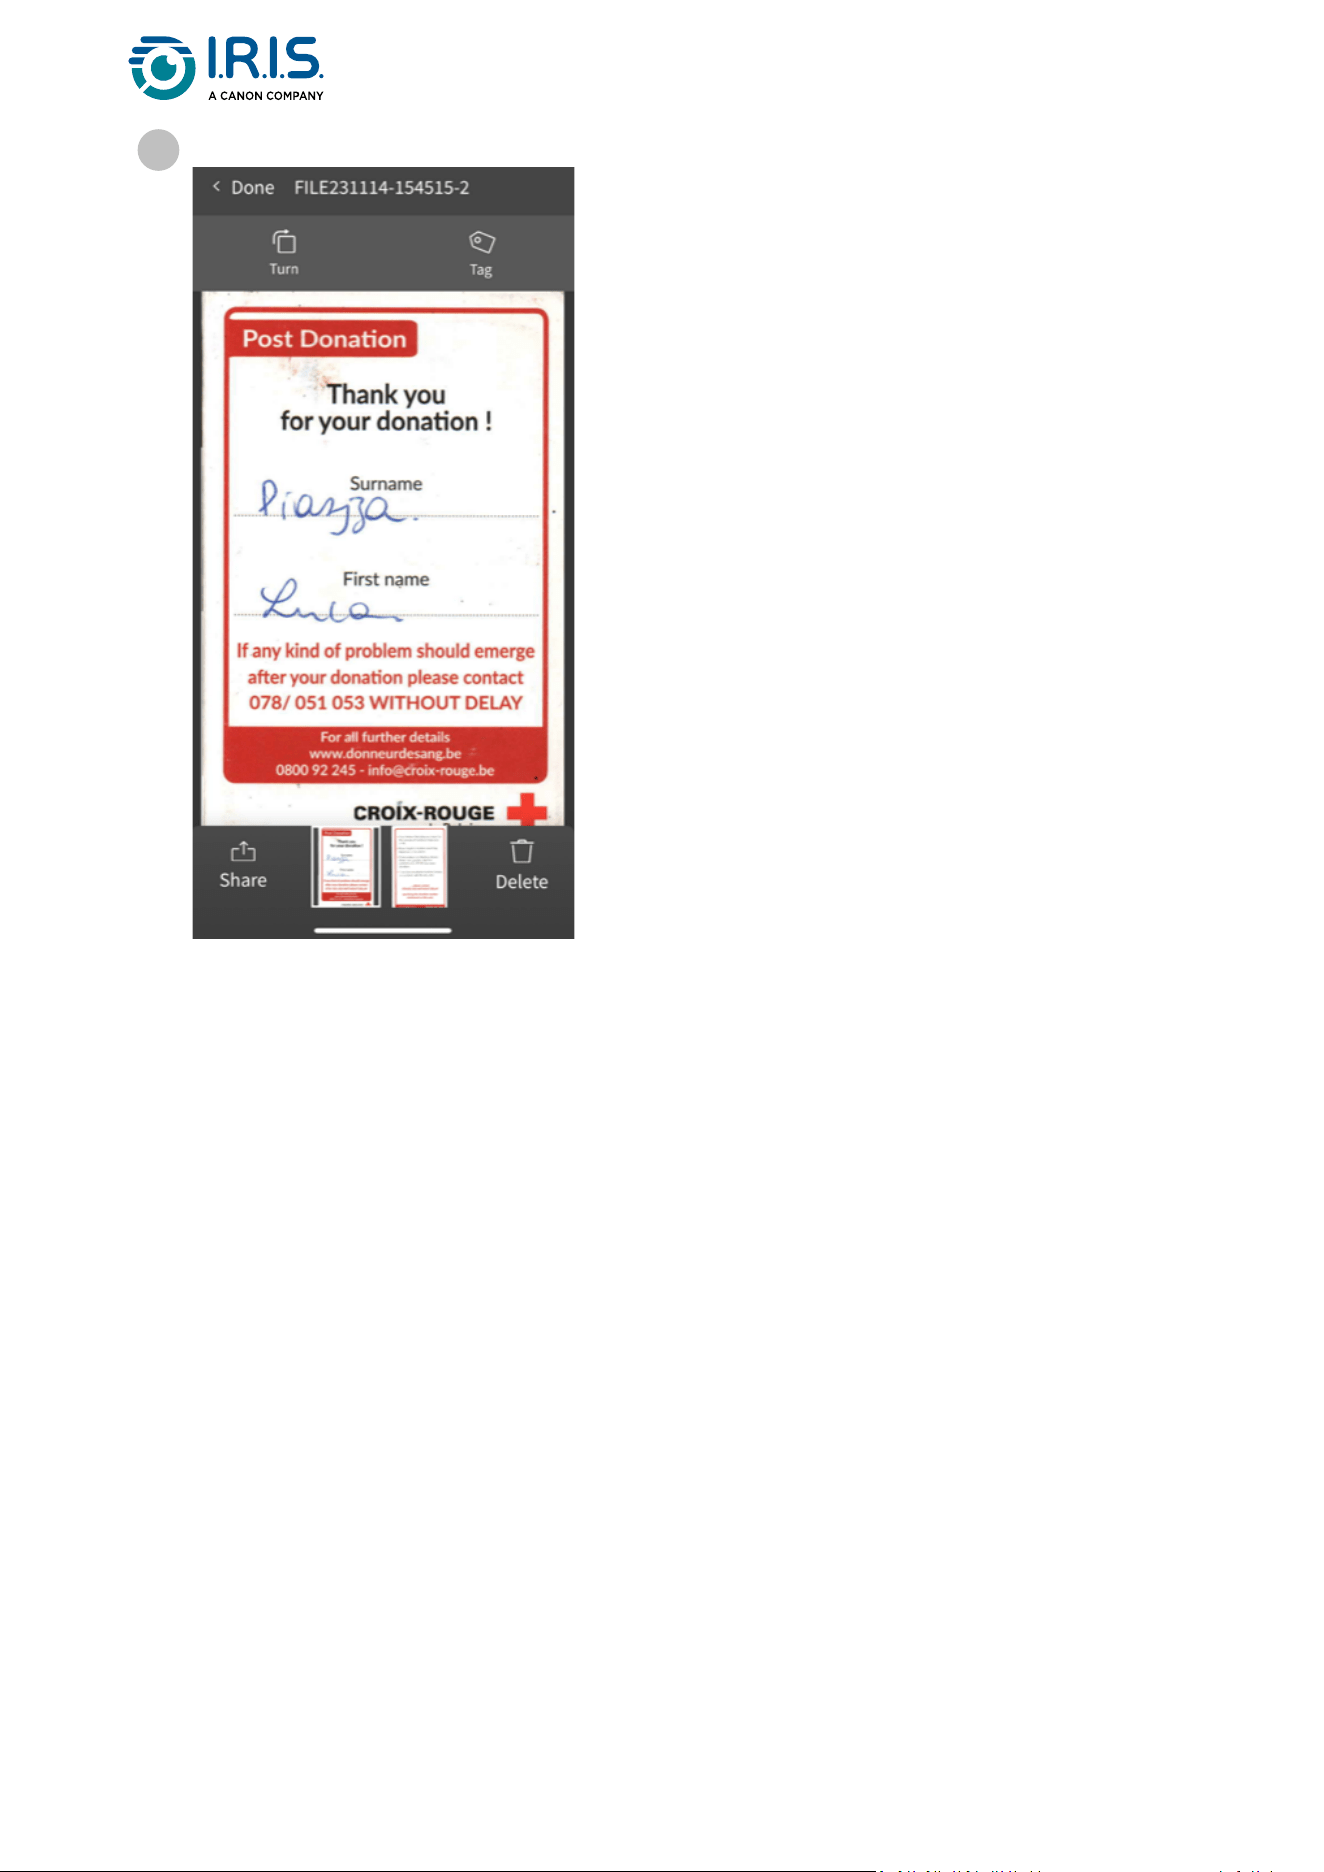
Select a file in the File list (3) to open it in a new screen with new options.
Turn to rotate the page (clockwise).
Tag: can add a tag to the document (as metadata).
Delete the file.
Share: open the share screen of your mobile device.
Select < Done to go back to the main screen.
12

Page 35
How to reset Wi-Fi settings
To reset Wi-Fi settings to factory defaults (if you have forgotten your password, for
example), do the following:
SeeHow-to video.
ConnecttoWi-Fi(SeeHow to connect to Wi-Fi).
1
Set the Wi-Fi switch to OFF and ON again three times in succession.
The red LED flashes during the reset.
When the light is green again, the Wi-Fi settings have been reset.
2

Page 36
Maintenance
Calibrate the scanner
Calibrate if the scanned image appears blurred, if the color appears abnormal (for example
darker than normal), after more than 8,000 scans, or if the scanner was unused for a long
time. The calibration process resets the Contact Image Sensor to restore color accuracy and
sharpness.
•
•
•
•
Use only the calibration sheet supplied to calibrate the scanner. If you
use a different sheet for calibration, it may result in cropping failure.
Keep the calibration sheet for future use, as re-calibration may be
necessary.
Do not stop the calibration sequence or try to stop the device while it is
calibrating.
Prevent the calibration sheet from getting dusty and damaged. Dirt can
invalidate the calibration card or have an effect on the calibration results.
Start the scanner.
1
Start the Capture Tool software on your computer (Start>Programs> Capture Tool).
The Select Scanner Model dialog box is shown.
2
Select your driver type and scanner model.
3
Click OK. The Capture Tool dialog box is shown.
4
Click the "Setup" button to prompt the TWAIN user interface.
5
Click the "Settings" tab and then click the "Calibration" button. An "Insert calibration
sheet" dialog box appears.
6
Hold the edges of the calibration sheet (included) and place it with the text face up
and the white area feeding first to the feeder of the scanner as shown.
7
Page 37
Click OK on the "Insert calibration sheet" dialog box to start calibrating the scanner.
8
Wait until calibration is complete.
9
Page 38
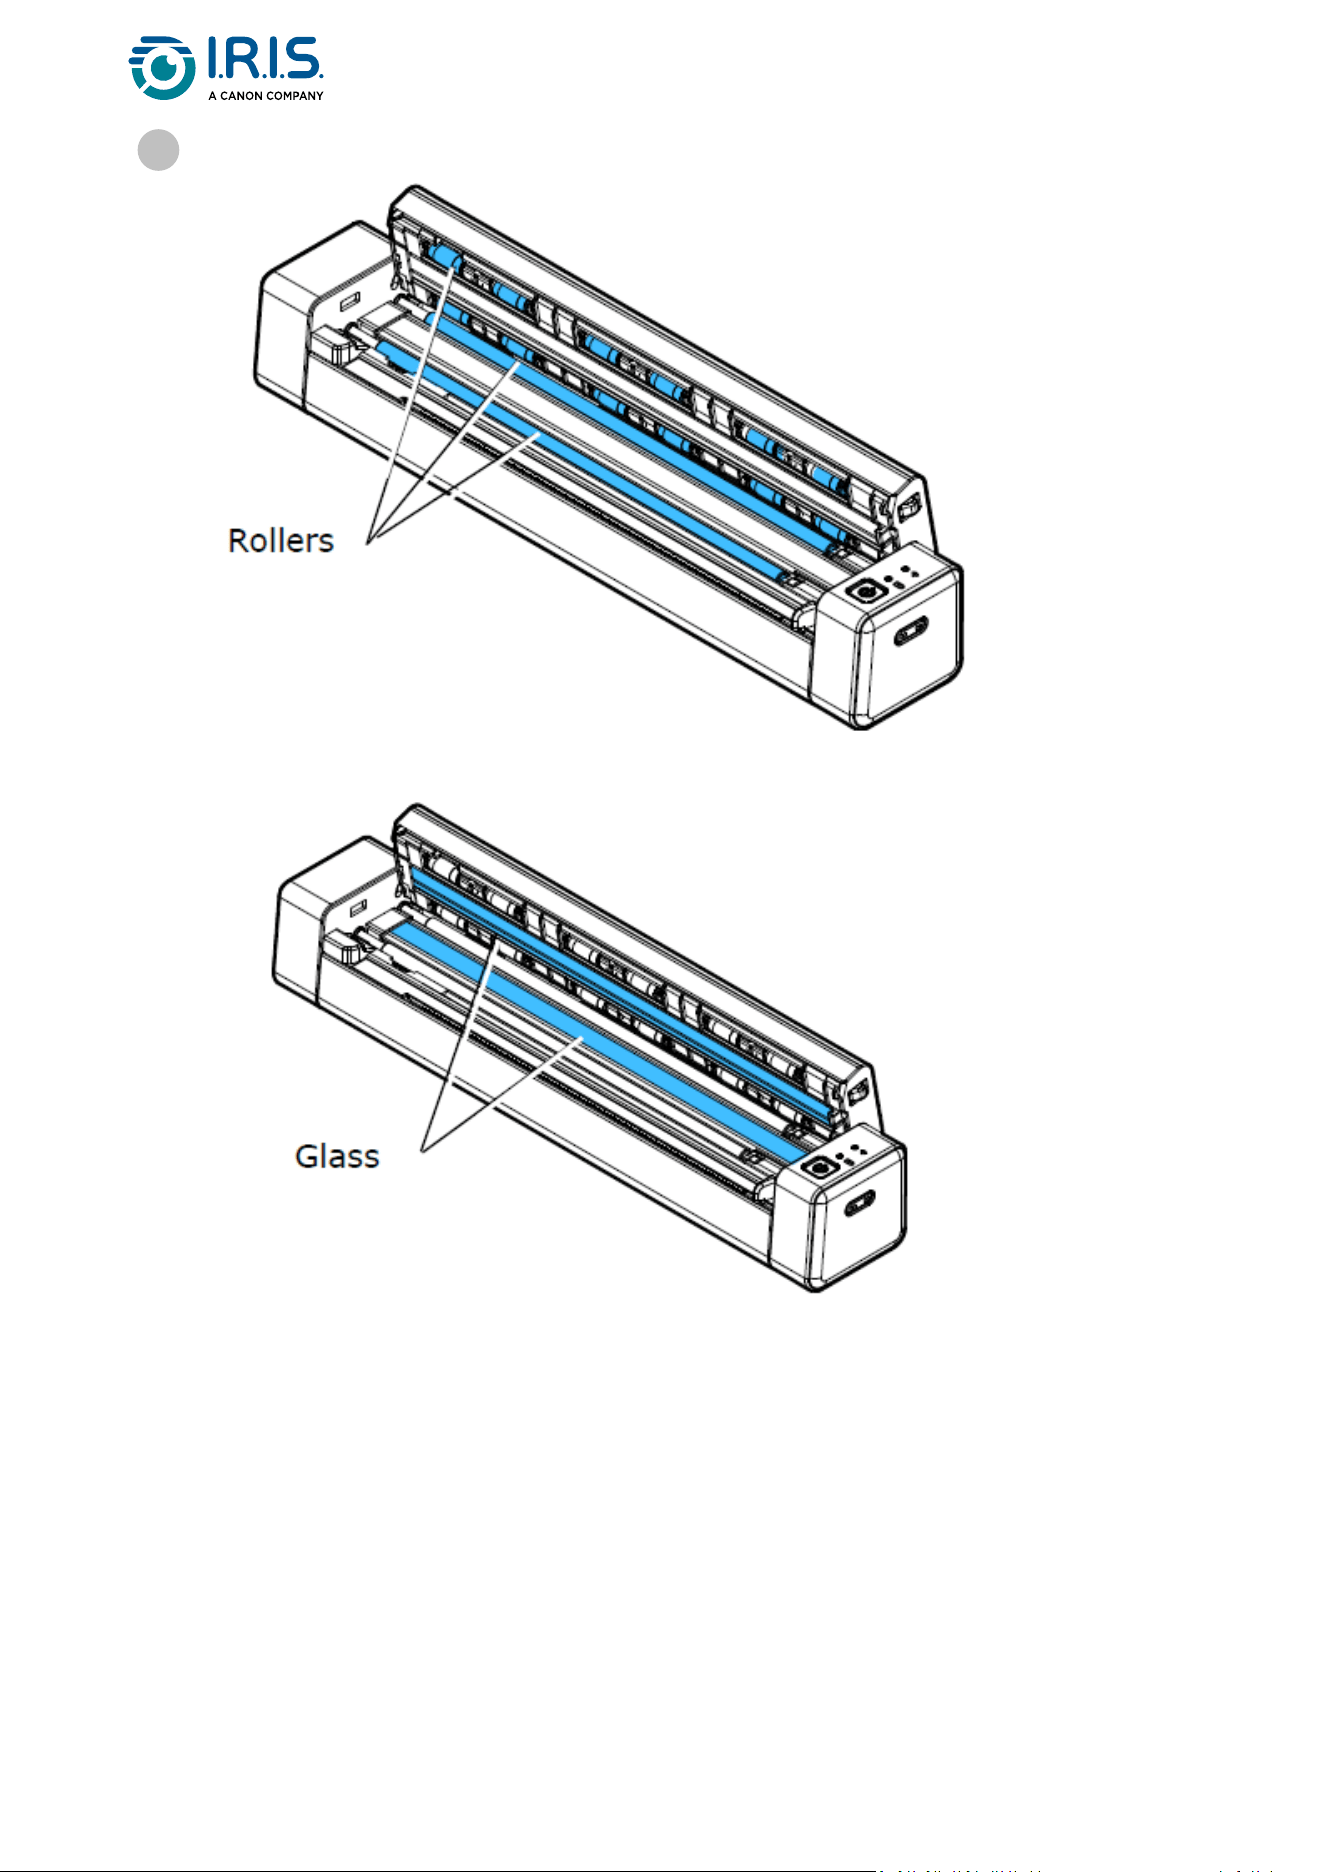
Clean the scanner
To maintain the quality of the scanned image and avoid dust build-up, we recommend that
you clean the scanner (outer casing and feed rollers) approximately every 200 scans, or if
vertical lines or stripes show on the scanned image.
Do not use solvents or corrosive liquids (alcohol, kerosene, etc.) to clean any
part of the scanner. It may permanently damage the plastic material.
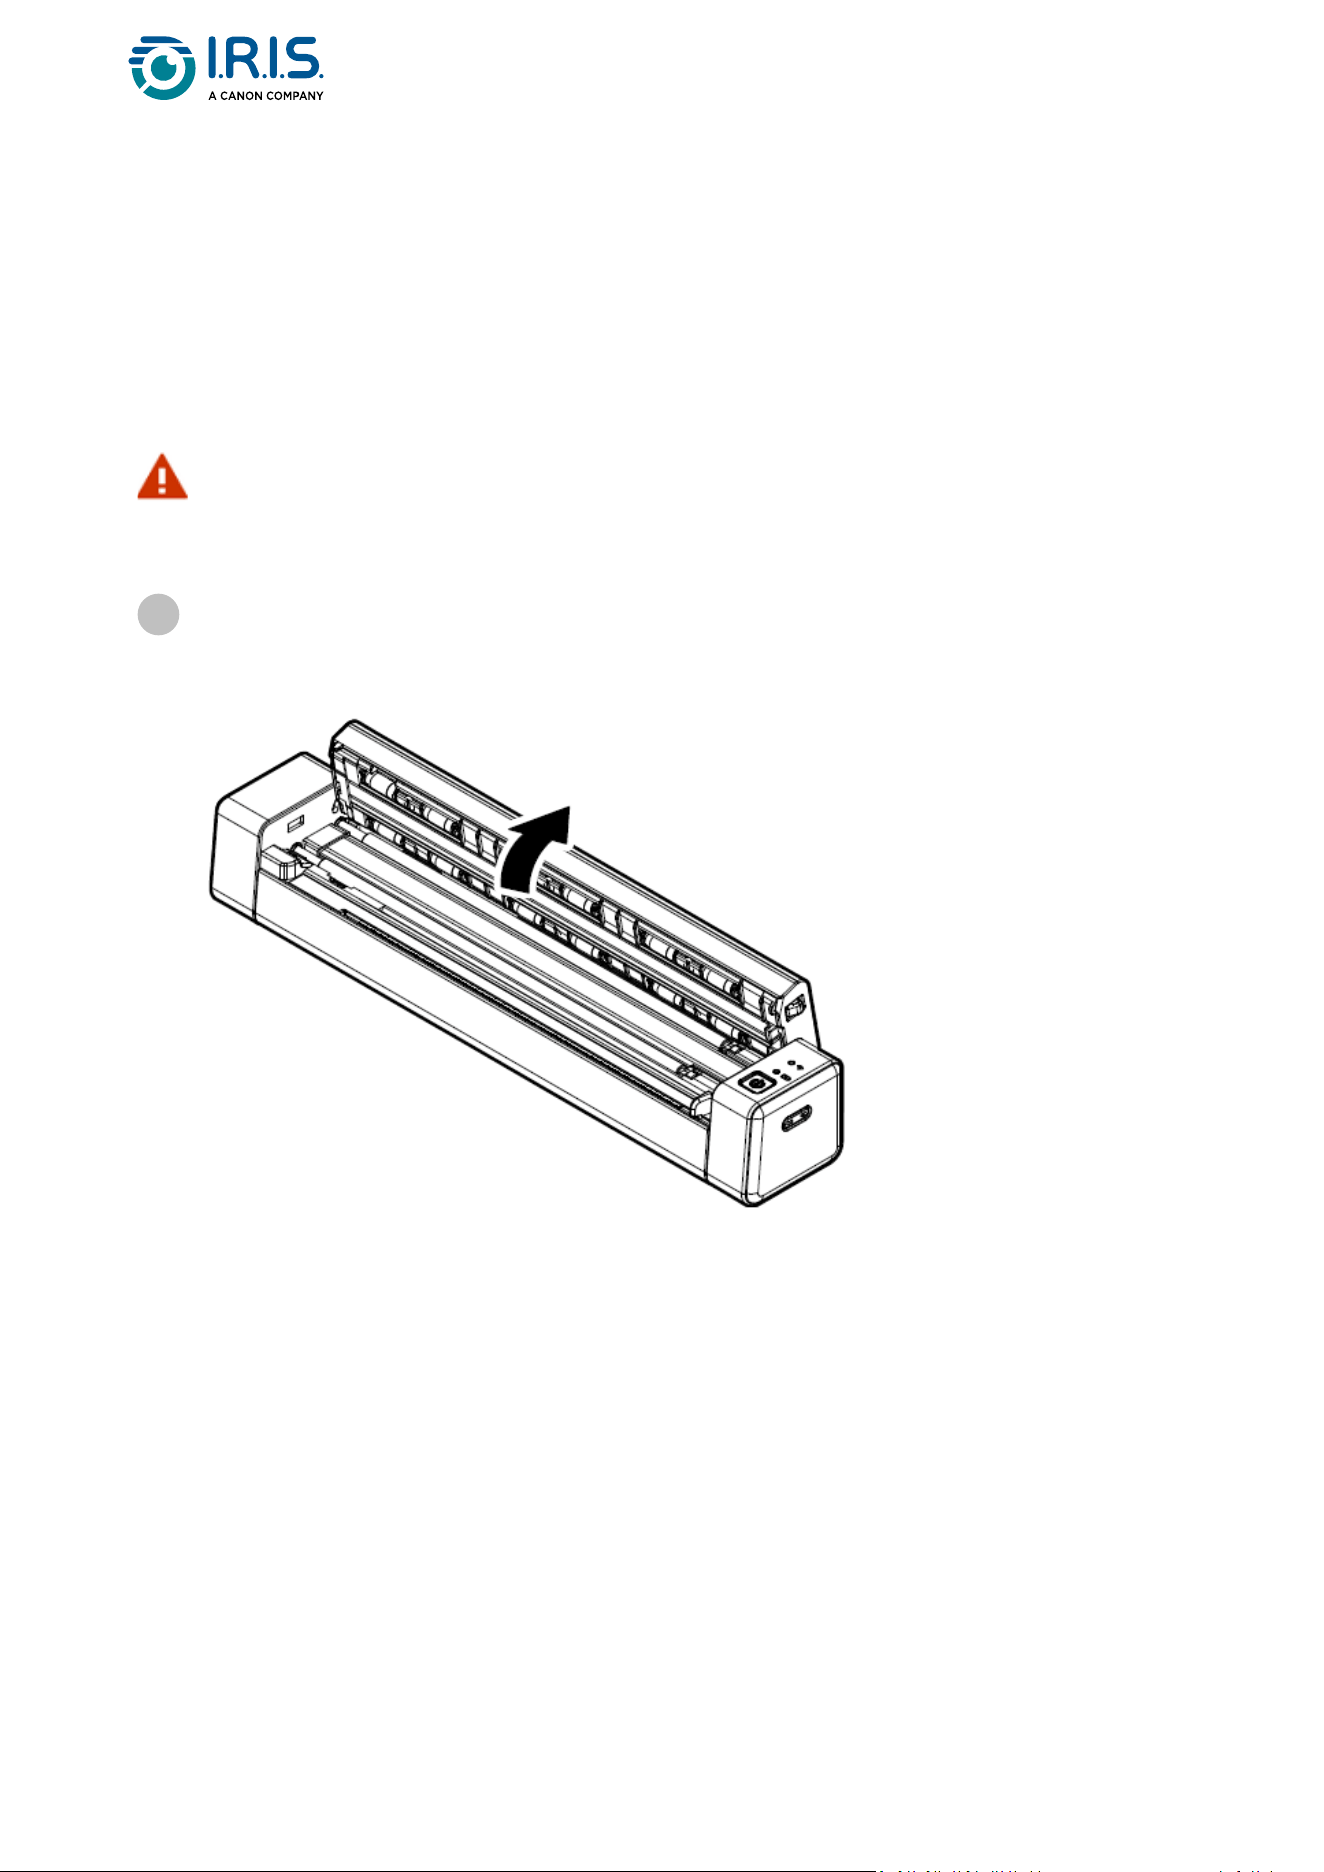
Open the cover by holding the scanner with one thumb on the feeder and the other
thumb on the cover. Press your thumb carefully and firmly against the feeder, then lift
the cover. The top of the scanner now detaches from the bottom.
1
Page 39
Gently wipe the scanner glass, feed rollers and CIS cover with the cleaning cloth.
2

Page 40
Troubleshooting
FAQ
Question Why won't my scanner start?
Answer
Make sure that the USB cable is properly connected to the scanner and the
computer
Question
Why doesn't my computer recognize my scanner when connected via USB
cable?
Answer
Make sure that the cable connection is correct and secure. Restart the
computer if necessary.
Question Is it normal for the scanner to be warm?
Answer
It is normal for the scanner to become slightly warm after prolonged use.
However, if you notice any strange smells coming from the scanner, or if it
feels too hot to the touch, stop it immediately.
Question Why are there strange lines on the scanned document?
Answer
Examine the following points:
1. Does the original have any scratches or is it clean?
2. Remove any stains or dust from the original before scanning.
3. Clean the rollers and glass with the cleaning cloth supplied.
Question Why is my scanned image always too dark?
Answer
Examine the following points:
1. Calibrate the scanner.
2. Adjust your monitor to sRGB in the color profile of your computer's
display settings.

Page 41
Question
Why are the "auto-crop" and "deskew" functions deactivated when I select
an optical resolution of 600 dpi?
Answer
Since auto-cropping and deskewing consume a lot of system memory, we
suggest that if you wish to run the auto-cropping and deskew functions,
select an optical resolution of fewer than 600 dpi to avoid an error message.
Question What should I do if the scan button flashes rapidly and no scan is possible?
Answer
Examine the following points:
1. Is there a jam in the feeder? Stop the scanner, then restart it to continue
feeding sheets. If the paper is still jammed, open the cover and carefully
remove the paper.
2. Is the cover open? Make sure the cover is closed.
3. Have you inserted the next original before scanning the previous original?
Stop the scanner, then restart it, and try again. Make sure that you scan the
next original only after you have finished scanning the previous one.
4. Does the length of the original exceed the maximum acceptable size?
Question What should I do if my mobile device crashes after scanning?
Answer
Examine the following points:
1. On your mobile device, go to Settings > About my phone > RAM
expansion. Expand RAM.
2. If it is not possible to expand RAM on your mobile device, refer to a third-
partyappthatcouldhelpyoudoso.
Wi-Fi mode
Question Why can't I see the name of the scanner's Wi-Fi network (SSID)?
Answer
Make sure that you slid the Wi-Fi switch to the ON position and that the Wi-
Fi LED is lit. If the Wi-Fi access point is still in countdown mode, wait until
the blue Wi-Fi LED lights up completely.
Question Will the battery drain faster when Wi-Fi mode is ON?
Answer
Yes, when Wi-Fi mode is ON, the scanner automatically stops as normal. It is
therefore advisable to stop Wi-Fi mode when images have been
downloaded to your computer.

Page 42
Question
Why can't I connect to my e-mail or other websites/programs after I
disconnect from the scanner's Wi-Fi network?
Answer
To resume your normal Wi-Fi connection, make sure that you reconnect
your computer, tablet, or phone to your usual local Wi-Fi network when you
are finished with the scanner connection.
Page 43
Troubleshooting
Clear error conditions
If an error occurs during scanning, the power/scan button LED flashes red. Refer to the
following table to eliminate error situations.
The number of
times the red
LED flashes
Description How to restore
4 (continued) Paper jam
Remove the paper and try again.
The red LED will not stop flashing
unless the paper is removed.
6 (continued) Cover open
Close the cover and try again. The
red LED will not stop flashing
unless the cover has been closed.
If the battery charge is below 25%, the battery LED flashes red. Recharge the
battery to avoid possible incomplete scanned images or other operating
problems.
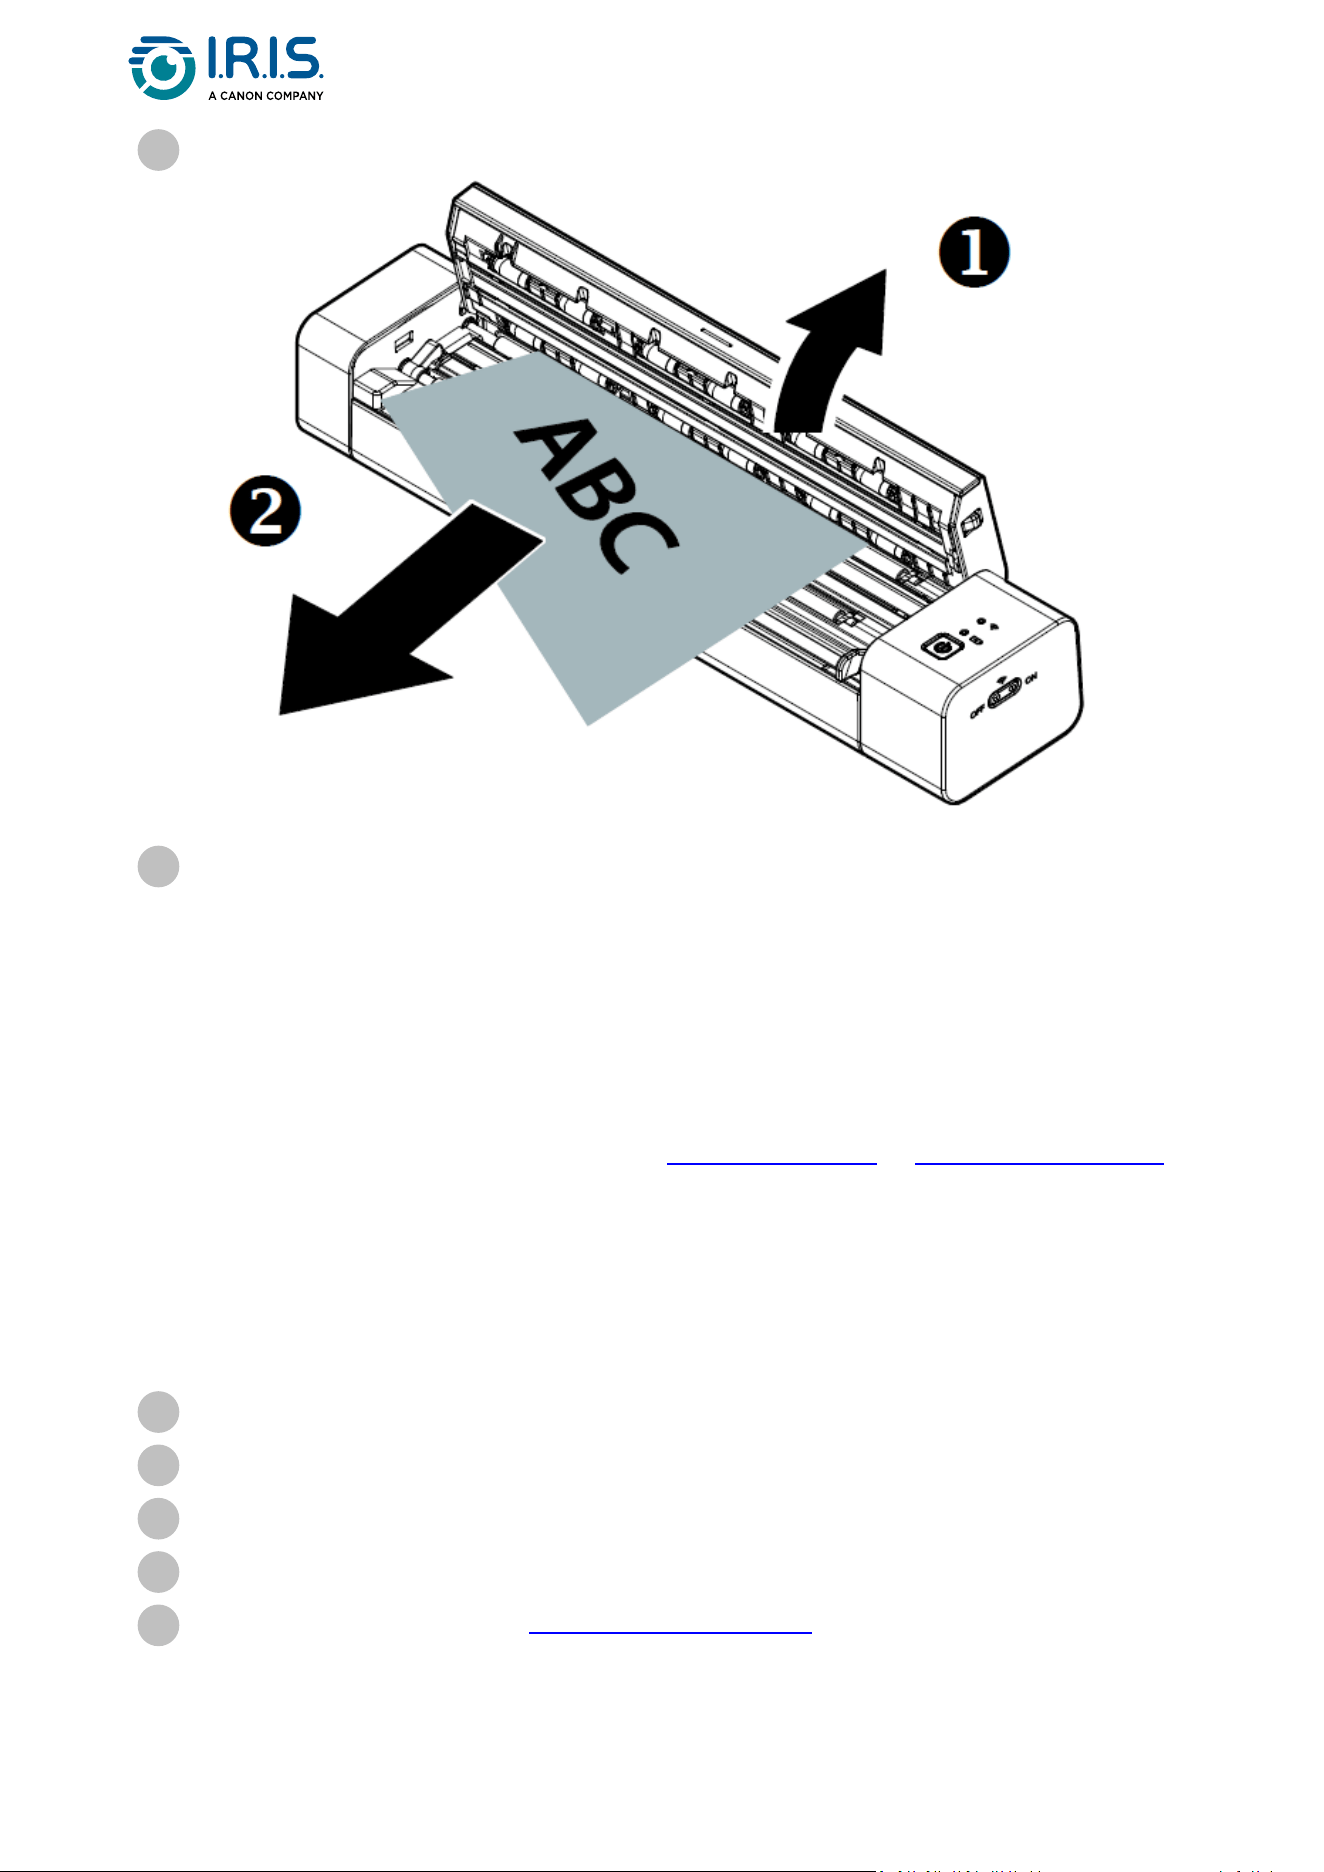
Remove a paper jam
Open the cover by holding the scanner with one thumb on the feeder and the other
on the cover. Press your thumb carefully and firmly against the feeder, then lift the
cover. The top of the scanner now detaches from the bottom.
1
Page 44
Correct wrong cropping
If the cropping results are not satisfactory (for example, the result is A4 size for an ID card
and the sheet is blackened), make sure that you apply the cleaning procedure or the
calibratingprocedureofthescanner.RefertoClean the scannerorCalibrate the scanner.
Clear Wi-Fi connection
If the password prompt window does not show, this can mean that there is a conflict with
previousnetworkconnections.Dothefollowingstepstocleartheconnectionhistory:
Remove the paper.
2
Close the cover and replace the document.
3
Stop the scanner.
1
On the computer, go to Wi-Fi settings > manage known networks.
2
Select old scanner connections one by one and select Forget.
3
Restart the scanner.
4
ConnecttoWi-Fiagain.(SeeHow to connect to Wi-Fi)
5

Page 45
Clearing the Wi-Fi connection also applies to your mobile device in the event
of a conflict between different scanners. You need to forget the previous
scannerinyourconnectionhistorytoconnecttothenewone.


Page 47
1.
2.
Safety
Disclaimer
Read the user manual carefully before use, and operate strictly in accordance with
thecontentofthemanual.
This product isnot waterproof.Donotuseinsplashwaterorotherenvironments
wherewatercouldentertheproduct.Youareresponsibleforanydamagecausedby
water ingress.

Page 48
1.
2.
3.
4.
5.
6.
7.
8.
9.
Precautions
Place the scanner close enough to the computer for the interface cable to reach it
easily.
When connecting this scanner to a computer or other device with a cable, ensure the
correct orientation of the connectors. Each connector has only one correct
orientation. Inserting a connector in the wrong orientation may damage both devices
connected by the cable.
Keep the scanner out of direct sunlight. Exposure to direct sunlight or excessive heat
can damage the device.
Do not put the scanner in a damp or dusty place.
Put the scanner on a flat, even surface. Tilted or uneven surfaces can cause
mechanical or paper feed problems.
Never attempt to disassemble, modify, or repair the scanner or any of its components
yourself.
Take care not to drop the scanner or expose it to physical impacts.
Keep the AC power cord/USB cable out of the reach of children to avoid risk of injury.
Keep the scanner box and packing materials for shipping purposes.

Page 49
•
•
•
•
•
•
•
•
Safety instructions
Never handle the scanner with damp or wet hands, in nomadic mode, or when used
as a fixed unit.
Other than placing a mini SD card or new batteries in the openings provided for the
purpose and indicated on the scanner, do not insert objects into any opening as they
may touch dangerous voltage points or short out parts and lead to a risk of
electrocution.
Use only the USB cable that came with your device and avoid abrasions, cuts, fraying,
crimping, and kinking. Using any other USB cable could cause fire, electrical shock, or
injury.
If the product overheats or produces smoke or an unusual odor, discolors or becomes
deformed in an abnormal way, immediately turn off the scanner, remove the
batteries where applicable, and disconnect the cables. Stop using the scanner and
contact your dealer or IRIS customer support to receive instructions on the procedure
to follow.
Do not place or store the scanner outdoors, in a car, near heat sources, in locations
that are dusty, damp or exposed to impact, vibration, condensation, high
temperatures, sunlight, strong light, or rapid changes in temperature or humidity.
Never disassemble, modify, or attempt to repair the device or device option by
yourself, except as specifically explained in the device's documentation. This could
cause fire, electrical shock, or injury.
Radio waves from this product may adversely affect the operation of other devices,
such as medical equipment, measuring instruments in airplanes, or automatically
controlled devices, such as pacemakers, automatic doors, or fire alarms, and any
otherdevicethatissensitivetoradiowaves.Whenusingthisproductnearsuch
devices or inside a medical facility, follow the directions marked on the devices
concerned and the instructions for authorized staff members at the facility, and
follow all posted warnings and directions on the device to avoid causing an accident.
Unplug the device and the USB cable before cleaning.

Page 50
Legal information
Copyright
© 2023 I.R.I.S. SA. All Rights Reserved.
I.R.I.S.ownsthecopyrightstotheIRIScan™Anywhereandtothispublication.
The product described in this document is furnished under a license agreement which
states the terms of use of this product. The software may be used or copied only in
accordance with the terms of that agreement. No part of this publication may be
reproduced, transmitted, stored in a retrieval system, or translated into another language
without the prior written consent of I.R.I.S.
Documentation version 1.0 - Product version 6 Simplex
The information contained in this document is the property of I.R.I.S. Its content is subject
to change without notice and does not represent a commitment on the part of I.R.I.S. Any
modification, error correction, or feature updates made in the actual software may have
not been timely updated in this user manual. You may refer to the software itself for more
accurate details. Any misprints, translation error, or inconsistency with existing software,
will be updated timely.
This manual uses fictitious names for purposes of demonstration; references to actual
persons, companies, or organizations are strictly coincidental.
Trademarks
IRIScan™AnywherelogoandIRIScan™AnywherearetrademarksofImageRecognition
Integrated Systems S.A. (I.R.I.S. SA)
OCR ("Optical Character Recognition"), Linguistic technology, ICR ("Intelligent Character
Recognition") technology, MICR ("Magnetic Ink Character Recognition") technology, BCR
("Bar Code Reading") technology, OMR (Optical Mark Recognition), iHQC ("intelligent High
Quality Compression") technology and HQOCR ("High Quality OCR") technology by I.R.I.S.
Windows® is a registered trademark of Microsoft Corporation in the United States and
other countries.
Mac® and macOS® are trademarks of Apple Inc., registered in the U.S. and other countries
and regions.
Android® is a trademark of Google LLC.
IOS® is a trademark or registered trademark of Cisco in the U.S. and other countries and is
used under license.
All other products mentioned in this documentation are trademarks or registered
trademarks of their respective owners.

Page 51
•
•
•
•
•
•
•
•
FCC Radio Frequency Interference Statement
This equipment has been tested and found to comply with the limits for a Class B digital
device, pursuant to Part 15 of the FCC Rules. Operation is subject to the following two
conditions: (1) this device may not cause harmful interference, and (2) this device must
accept any interference received, including interference that may cause undesired
operation.TheFCCClassBlimitsaredesignedtoprovidereasonableprotectionagainst
harmful interference in a residential installation. This equipment generates, uses and can
radiate radio frequency energy and, if not installed and used in accordance with the
instructions, may cause harmful interference to radio communications.
However, there is no guarantee that interference will not occur in a particular installation. If
this equipment does cause harmful interference to radio or television reception, which can
be determined by turning the equipment off and on, the user is encouraged to try to
correcttheinterferencebyoneormoreofthefollowingmeasures:
Reorient or relocate the receiving antenna.
Increase the separation between the equipment and receiver.
Connect the equipment into an outlet on a circuit different from that to which the
receiver is connected.
Consult the dealer or an experienced radio/ TV technician for help.
European Union Regulatory Notice
Products bearing the CE marking comply with the following EU Directives:
Low Voltage Directive 2014/35/EC
EMC Directive 2014/30/EC
Restriction of the use of certain hazardous substances (RoHS) Directive 2011/65/EU
RED (Radio Equipment Directive) (2014/53/EC)
This product satisfies the Class B limits of EN55032, EN55035, and safety requirements of
EN62368-1.
ThisdeviceiscertifiedasClass1LEDproduct.

Page 52
Disposal of Waste Equipment by Users in Private Households in the European Union
This symbol on the product or on its packaging indicates that the product cannot be
disposed of with your other household waste. Instead, it should be sent to appropriate
facilities for recovery and recycling in an effort to protect human health and the
environment. For more information about where you can drop off your waste equipment
forrecycling,pleasecontactyourlocalcityoffice,yourhouseholdwastedisposalserviceor
the shop where you purchased the product.
I.R.I.S. SA/NV
rue du Bosquet 10, B-1348 Louvain-la-Neuve
+32 (0) 10 45 13 64 - www.iriscorporate.com