
E S S E N T I A L S FOR LIFE
User
Manual
MODEL
GGSBFCH56W
V 1.1 | 0626
Hot & Cool Bladeless
Circulation Fan

2
Welcome Congratulations on purchasing
your new Bladeless Circulation Fan!
The Sôlt brand is proudly
distributed within Australia
by Residentia Group Pty Ltd.
Please refer to the warranty card at the rear of this manual
for information regarding your product’s parts and labour
warranty, or visit us online at www.residentia.group
At Residentia Group, we are customer obsessed and our
Support Team are there to ensure you get the most out
of your appliance. Should you want to learn more about
your Fan features, and importantly taking care
of your appliance when cleaning, our Support Team are
here to help.
You can use our online Support Centre at anytime by
visiting http://support.residentiagroup.com.au, or you can
contact us via calling us on 1300 11 HELP (4357).
It is important that you read through the following use and
care manual thoroughly to familiarise yourself with the
installation and operation requirements of your appliance
to ensure optimum performance.
Again, thank you for choosing an Sôlt appliance and we
look forward to being of service to you.
Kind Regards,
The Residentia Team
Residentia Group
—
Head Office.
165 Barkly Ave
Burnley
Victoria 3121
Australia
—
ACN.
600 546 656
—
Online.
residentia.group
Sôlt
—
Online.
www.solt.house
—
Instagram.
/solt.house
—
Facebook.
/solt.appliances
3
Sôlt recommends the use of original spare parts. When contacting our customer service team,
please ensure that you have the following information at hand (which can be found on your
appliances’ rating plate).
— Model Number
— Serial Number
T . 1300 11 4357 | E. support@residentiagroup.com.au
Customer Care
Contents 2 Welcome
4 Important Safety Warnings
6 Operating Instructions
8 Battery Installation & Advice
9 Troubleshooting
10 Maintenance and Cleaning
11 Technical Specifications
12 Purchase Details
14 Warranty Information

4
SAFETY INSTRUCTIONS
• Before using the appliance, carefully read the
instructions in this manual.
• The manufacturer is not responsible if an
incorrect installation and use causes injuries and
damages.
• Always keep the instructions with your appliance
for future reference.
• To avoid the risk of fire, electric shock, and
personal injury, you must strictly follow these
safety requirements and any relevant Australian
electrical regulations.
WARNING: To prevent any damages to your
and others’ life or property, you have to follow
the safety notes.
GENERAL USE & ENVIRONMENT
• Indoor Use Only: This product is only suitable
for dry, indoor environments and must not be
used outdoors.
• This appliance is intended to be used in
household and other residential type of
environments only.
• Do not use the appliance unless fully assembled
with the base securely attached.
• Do not place the fan on uneven surfaces, carpet
edges, bedding or unstable flooring where the
appliance may tip over.
• Water Hazards: Do not use this heater in the
immediate surroundings of a bath, a shower, or
a swimming pool. Never immerse the machine
in water.
• Safe Placement: Always use this heater on a
horizontal and stable surface. It is prohibited to
use it in places where hanging objects are likely
to fall, or on unstable surfaces where it can easily
be knocked over.
• Clearances: Keep the heater more than 1.5
metres away from any fire source or ignition
source, and avoid direct sunlight.
• WARNING: Fire Risk: To reduce the risk of fire,
keep textiles, curtains, or any other flammable
material a minimum distance of 1 metre from the
air outlet.
• Hazardous Areas: Do not use the fan near
inflammable, explosive, heated, easily deformed,
discoloured, or deteriorated objects. It is also
prohibited to use it in places with severe dust.
• Animals & Plants: It is strictly forbidden to use
this machine as a heating or incubation device
for animals and plants.
CHILDREN & VULNERABLE PEOPLE SAFETY
WARNING: Risk of suffocation, injury
or permanent disability.
• This appliance is not intended for use by persons
(including children) with reduced physical,
sensory or mental capabilities, or lack of
experience and knowledge, unless they have
been given supervision or instruction concerning
use of the appliance by a person responsible for
their safety.
• Children should be supervised to ensure that
they do not play with the appliance.
• Keep all packaging away from children.
• The remote control contains batteries. Keep
batteries away from children. Swallowing
batteries may result in serious injury or death.
INSTRUCTIONS FOR SAFE OPERATION
• Do Not Cover: For heaters marked "Do not
cover", you must never cover the heater to avoid
overheating and fire hazards.
• WARNING: Small Rooms: Do not use this heater
in small rooms when they are occupied by
persons not capable of leaving the room on their
own, unless constant supervision is provided.
• Burn Risk: To avoid burning, do not let exposed
skin directly touch the surface of the air outlet
while the heater is running.
• Foreign Objects: It is strictly prohibited to insert
fine wire or any other foreign matter into any
pore of the machine to avoid electric shock.
• Timers & Programmers: This product must
not be used with an external program, timer,
or any other device that connects the power
automatically, as this creates a fire hazard if the
machine is covered or improperly placed.
• Removing Guards: Ensure that the fan is
switched off from the supply mains before
removing any guards.
• This appliance must be used in accordance
with Australian household electrical safety
expectations.
• Never insert fingers, pencils, or any other foreign
object through the grille when fan is running.
• Disconnect fan when moving from one location
to another.
• Be sure fan is on a stable surface when
operating to avoid overturning.
• Do not use outdoors, in bathrooms, near open
windows during rain, or in damp environments.
• Never insert objects into air outlets.
• Disconnect before cleaning, moving or storage.
• Do not operate with a damaged cord or plug.
• Place on a stable, level surface.
• Do not use with external speed controllers or
timers unless supplied with the product.
Important Safety Warnings

5
INSTALLATION
• Remove all the packaging.
• Do not assemble or use a damaged appliance.
• Keep packaging away from children and dispose of electrical products through local e-waste collection
facilities.
ELECTRICAL CONNECTION
WARNING: Caution, risk of fire and electrical shock!
• DO NOT use the fan near a window, rain may create electrical hazard.
• Operate from a 220V~, 50Hz power supply.
• If the supply cord is damaged, it must be replaced by manufacturer or its service agent or a similarly
qualified person in order to avoid a hazard.
• To ensure your safety, power plug must be inserted into an earthed three-pole socket. Check carefully
and make sure that your socket is properly and reliably earthed.
• To protect against the risk of electrical shock, do not immerse the unit, cord or plug in water or other
liquid.
• When the appliance is not in use and before cleaning, unplug the appliance from the outlet.
• Before plugging the unit in, ensure the rated voltage marked on the product matches your home's
power supply.
• The heater must not be located immediately below or pressed against a power socket. It must be
equipped with a certified fixed socket that matches the rated working current of the plug. Using mobile
multi-purpose sockets (power boards) is strictly prohibited, as is sharing the socket with other high-
power electrical appliances.
• Cord Management: Do not pull directly on the power cord to move the unit. When in use, the power
cord should be placed behind the body; placing it in front will cause it to overheat, damage the cord,
and cause safety accidents.
• Turning On/Off: Do not plug or unplug the power cord to turn the machine on and off; always use the
power switch.
• Loose Plugs: If the plug comes loose from the socket or becomes too hot, consult a qualified electrician
to replace the wall socket.
MAINTENANCE & CLEANING
WARNING: Risk of injury or damage to the unit.
• Prior cleaning unplug the fan.
• Do not disassemble or open the rotor guard to clean the rotor blades.
• When the appliance is not in use and before cleaning, unplug the appliance from the outlet.
• Clean the appliance with a moist soft cloth.
Only use mild soaps and thoroughly remove soap film with a dry cloth.
• Do not use abrasive products, abrasive cleaning pads, solvents or metal objects.
• Do not use gasoline, thinner or similar products
as a cleaner.
• Do not allow water or any other liquid into the motor housing or interior parts.
WARNING: Only authorised technicians can carry out repairs.
Note: Your appliance requires little maintenance. If you are experiencing issues, do not try to resolve the
issue or fault by yourself. If you appliance requires maintenance:
• Power off the appliance using the Power button.
• Switch off the appliance at the power outlet
and remove the plug.
• Contact our customer service team.
PRODUCT DISPOSAL
• Disconnect the appliance from the mains supply.
• Cut off the mains cable and discard it.
• Dispose of used batteries at a safe disposal
drop off.
6
4
5
3
1
2
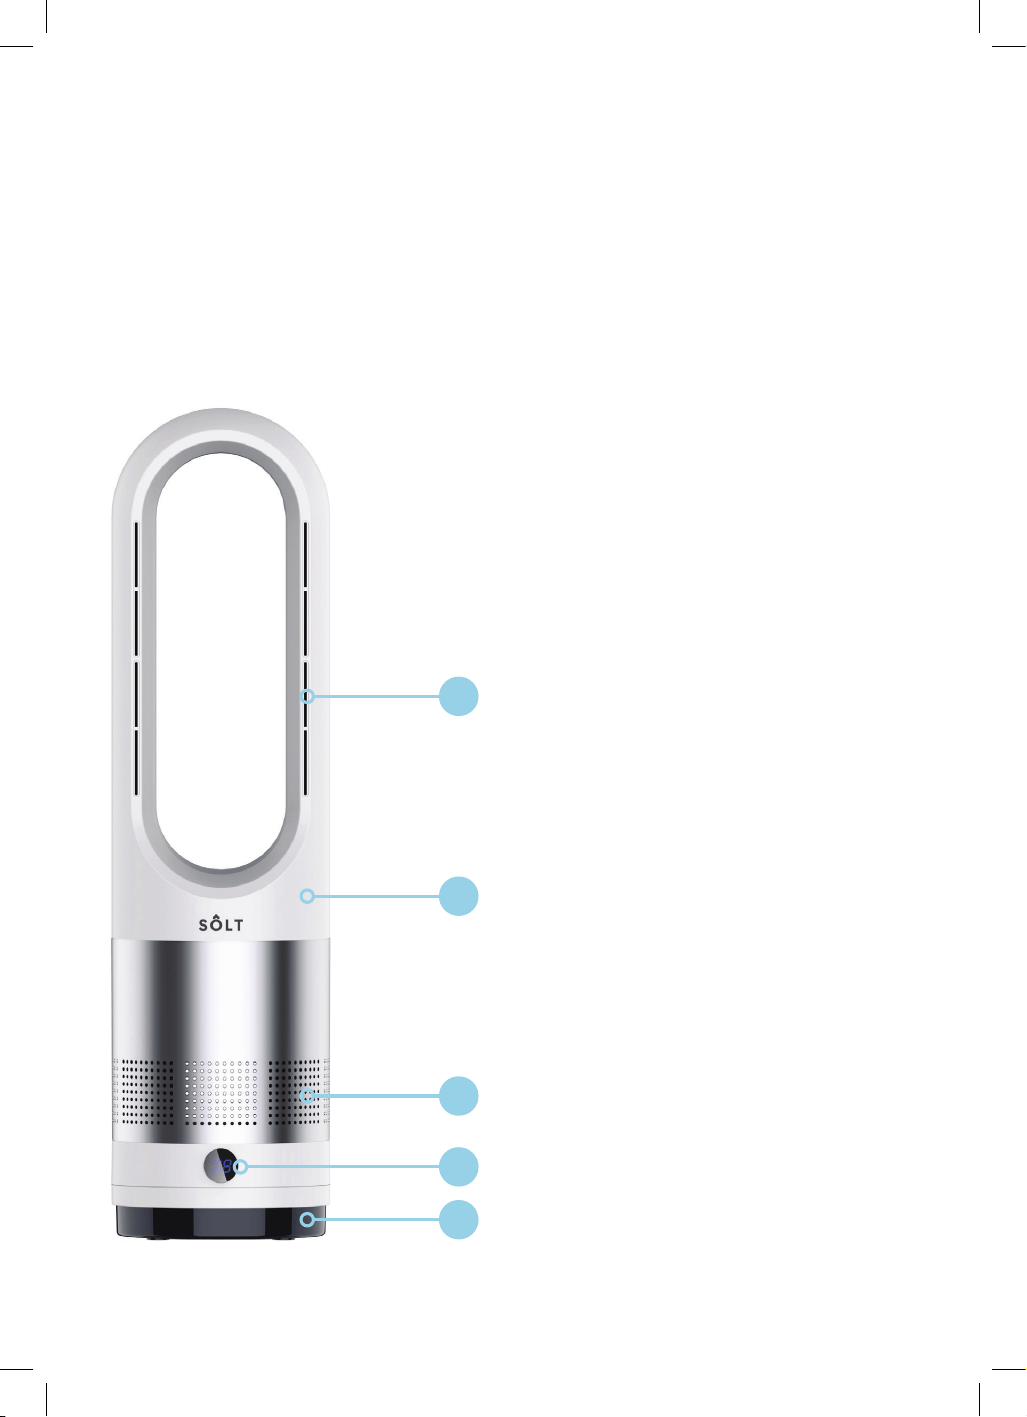
Note: The images in this user manual are for
explanatory purposes only. Your Fan may
appear slightly different.
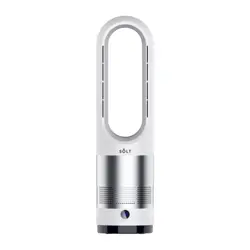
PRODUCT OVERVIEW
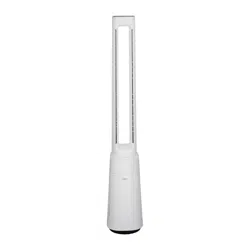
1. Air Outlet
2. Fan Body
3. Air Intake
4. LED Screen / Touch Key
5. Base
Included by not shown:
• Remote Control
• Power Cord
CONTROL FUNCTIONS
• Start-Up: Plug it in at the wall. An alert will
sound indicating that the unit has entered
standby mode with the digital screen turned
off (black).
• Cool Mode: While in standby, press the touch
key to turn on cool mode. After a power cut,
it defaults to speed level 5. Otherwise, the fan
remembers the last speed setting you used.
• Adjusting Cool Speed: Press the touch key to
cycle through speed levels 1 to 8.
• Heating Mode: From standby, press and hold
the touch key for 1 second. The digital screen will
flash, indicating you are in heating mode.
• Adjusting Heat Speed: In heating mode, press
the touch key to cycle through heating gears
1 to 3.
• Turning Off & Cool Down: Press and hold the
touch key while running to shut down.
IMPORTANT: If you were using the heater, the
internal heating tube will keep running at a low
speed for 30 seconds to safely cool down. Do not
unplug the power cord from the wall during this
cool-down phase!
• Auto-Dimming Screen: If you haven't pressed
anything for 30 seconds while the fan is running,
the digital display will automatically turn off.
• Tilt Safety (Dumping Protection): If the fan
accidentally gets knocked over while in heating
mode, it will automatically shut off the heat.
In cool mode, tipping over has no effect.
Operating Instructions
7
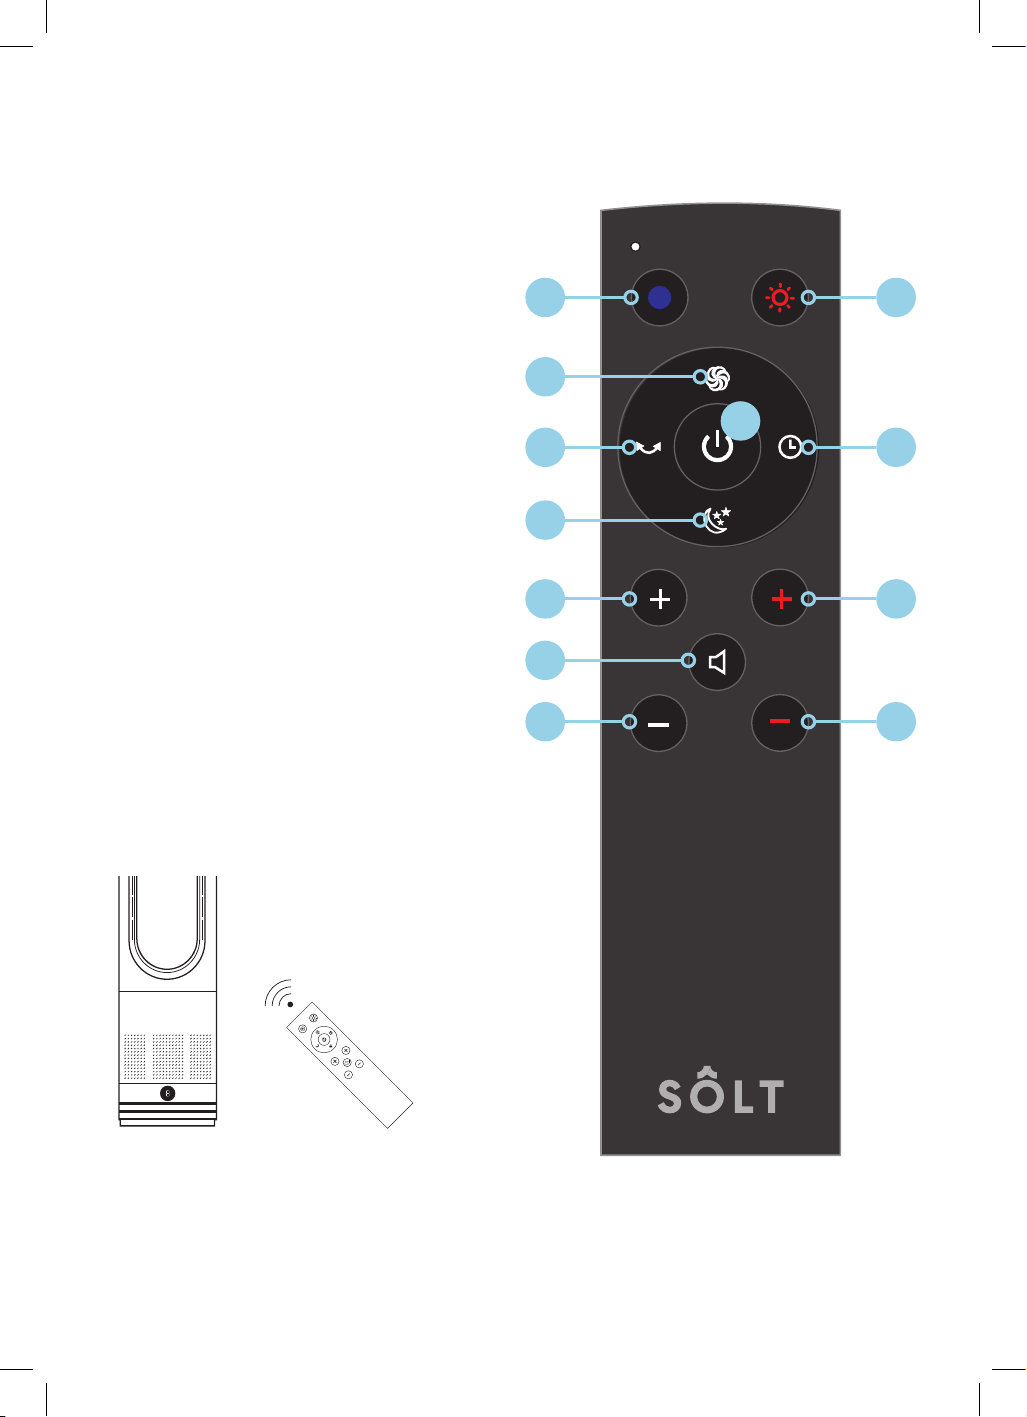
REMOTE CONTROL OPERATION
1. Power: In standby, press the power button
to start cool mode. Press again to return to
standby. First time use defaults to speed 5;
afterwards, it remembers your last setting.
2. Cool Mode: If you're in heating mode, press
this to switch straight to cool wind. Use the
white keys to adjust the breeze.
3. Hot Mode: If you're in cool mode, press this
to switch to heating (the screen will flash).
Use the red keys to adjust the heat.
4. Strong Wind: Instantly jumps to the maximum
wind speed. The screen will display "H".
5. Oscillation: Press once to activate the 80° head
swing. Press again to stop it.
6. Timing Operation: Press to set an automatic
shut-off timer from 0 to 9 hours. Setting it to "0"
cancels the timer. A little dot on the top left of
the screen will flash when the timer is active.
7. Sleep Wind: Drops the fan down to the
quietest, lowest wind speed.
The screen will display "L".
8. Temperature Increase (White +Key): Adjust the
cool wind speed from 1 to 8. (These buttons are
invalid in heating mode).
9. Temperature Decrease (White –Key): Adjust
the cool wind speed from 1 to 8. (These buttons
are invalid in heating mode).
10. Speed Increase (Red +Key): Adjust the heating
speed from 1 to 3. (These buttons are invalid in
cool mode).
11. Speed Decrease (Red –Key): Adjust the heating
speed from 1 to 3. (These buttons are invalid in
cool mode).
12. Mute: Press once to turn off the button sound
prompts. Press again to turn the sound back on.
3
6
10
11
2
4
7
12
8
9
5
1
When using the remote control to operate, need
to point the remote control signal receiver on the
display screen, so that the remote control signal
can reach the best.
● When the machine is running, press one turn on and shake your head again.
Timing operation
●Press this key to enter timing mode 0-9 hours cycle setting 0 means cancel timing. The dot on
the upper left corner of the digital tube flashes to indicate the timing state.
Strong Wind Key
●Press the strong mode button the wind reached the maximum, digital display H.
Sleep Wind
●Press the sleep mode button the wind reached the minimum, digital display L.
When using the remote control to o
perate, need to point the remote control signal receiver on
the display screen, so that the remote control signal can reach the best.
Note:
Thefollowing issues may occur while operating the remote control due to overlapping
frequencies
- When using th e remote control for this fan,other applianc es may activate.
-When using remote controls from other appliances theHot+Cool bladeless Fan may also activate.
-The remote control can not turn off the fan completely. Please u n
plug the fan when not in use.
4. installation location and precautions
●Please place the Hot+Cool bladeless fan in a horizontal position for use. Do not place it in an
unstable place. If there is a slope, the soft surface will avoid damage or failure caused by the
tipping of the cool and warm bladeless fan.
●Please do not use in hot and humid place (such as bathroom, kitchen).
●In the use, to avoid the air inlet is blocked, please stay away from the place with curtains, to
avoid the ob
ject blocked the air inlet machine can not work.
●Do not place objects within 1 meter in front of the ai r outlet, otherwise the effect of blowing
will be weakened.
5. Battery installation method and fault analysis and
8
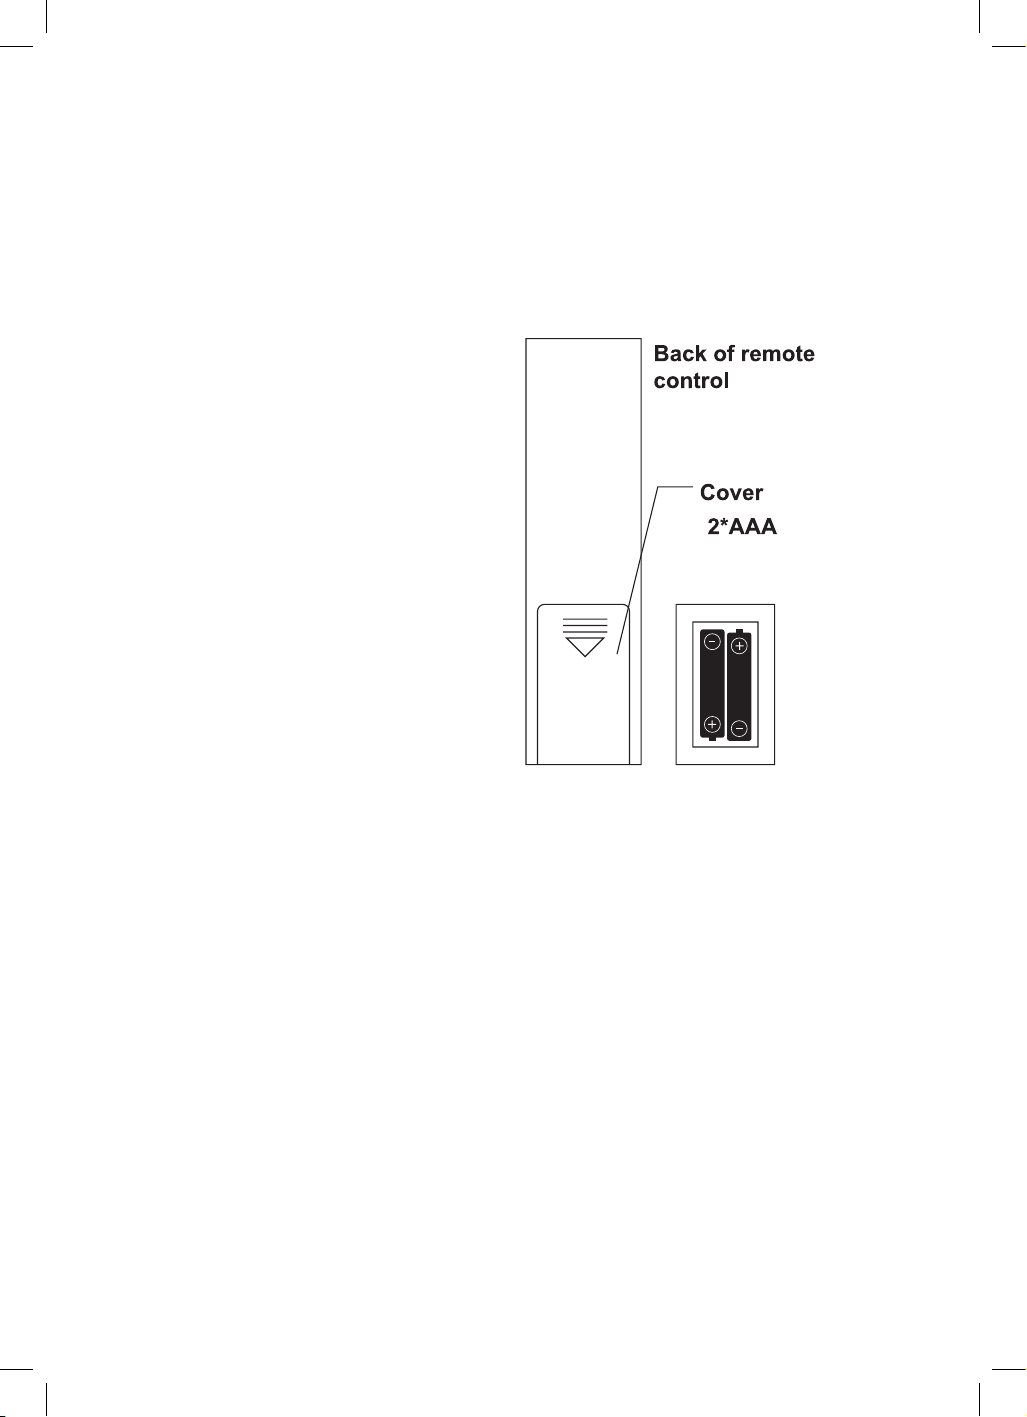
BATTERY INSTALLATION
• Open the cover on the back of the remote
control.
• Insert two new AAA dry cell batteries.
• Make sure the positive (+) and negative (-) ends
are facing the correct way for proper polarity.
• Close the cover securely.
SAFETY & BATTERY CARE
• Keep batteries strictly out of the reach of
children.
• Do not mix different types of batteries, or mix old
and used batteries with new ones.
• Non-rechargeable batteries must not be
recharged.
• If using rechargeable batteries, you must remove
them from the remote before charging them.
• Do not short-circuit the supply terminals.
• Remove exhausted batteries straight away and
dispose of them safely.
• If you are not going to use the remote for a long
period, remove the batteries.
EMERGENCY & DISPOSAL
• Emergency: If you suspect a battery has been
swallowed, seek medical advice immediately.
• Disposal: Dispose of dead batteries in
accordance with your local laws and regulations.
Note: Because remote controls use overlapping
frequencies, you might find that using this remote
accidentally triggers other appliances in your
home, or another remote might turn this fan on.
Also, the remote control cannot completely turn off
the fan. Please unplug it from the wall when not
in use.
Battery Installation & Advice

9
DEVICE DOES NOT WORK WHEN PLUGGED IN
• Verify the plug is properly inserted into the power socket.
• Press the power button to turn the unit on.
• Check whether the display screen is on or off.
WEAK AIR VOLUME
• Check if the air outlet is blocked.
• Confirm the fan is set to the highest level.
• Replace the filter.
REMOTE CONTROL DOES NOT WORK
• Check that the batteries are inserted correctly.
• Insert new batteries.
UNABLE TO OPERATE NORMALLY AFTER A POWER FAILURE
• Unplug the unit from the power point and plug it back in.
IMPORTANT NOTICE:
If the fault remains unresolved after trying these methods, please contact customer service immediately.
Do not attempt to disassemble, repair, or install the device yourself.
CUSTOMER SERVICE CONTACT DETAILS:
• Phone: 1300 11 4357
• Email: support@residentiagroup.com.au
Troubleshooting
10
MAINTENANCE AND SERVICE
• This appliance is designed with no user-serviceable parts and requires minimal upkeep.
• Do not attempt to perform repairs yourself. Contact qualified service professionals for any required
maintenance.
• The fan is permanently lubricated and does not need any additional lubrication for its entire lifespan.
SAFETY PRECAUTIONS
• Always remove the plug from the power point before performing any maintenance.
• Never handle the plug with wet hands, as this could result in injury or an electric shock.
• Do not splash or apply water directly to the unit while cleaning to prevent electric shock or short circuits.
• If the power cord becomes damaged, it must be replaced by the manufacturer to avoid any safety
hazards.
ROUTINE CLEANING
• If the unit becomes dirty, wipe it down carefully with a damp cloth.
• For easier cleaning, apply a neutral detergent to the damp cloth. Wipe the surface, remove any
remaining soap residue with a fresh damp cloth, and then thoroughly wipe the area with a dry cloth.
DUST & PLUG MAINTENANCE
• Prevent dust from building up on the unit, as this can negatively impact the product's performance. A
vacuum cleaner can be used to safely remove dust from the appliance.
• With long-term use, dust and moisture can accumulate between the plug and the power point, which
creates a fire hazard. Periodically pull out the plug and wipe it clean with a dry cloth.
DISPOSAL
This product must not be disposed of via normal household waste after its service life, but must be taken
to a collection station for the recycling of electrical and electronic devices. The symbol on the product, the
operating instructions or the packaging indicate such disposal procedures. The materials are recyclable
in accordance with their respective symbols. By means of re-use, material recycling or any other form of
recycling old appliances you are making an important contribution to the protection of our environment.
Please ask your local council where your nearest disposal station is located.
Maintenance and Cleaning
11
Technical Specifications
Below outlines the technical specifications for your Hot & Cool Bladeless Circulation Fan.
Model GGSBFCH56W
Power Supply 220V~, 50Hz
Rated Power 20–1200W
Decibel ≤ 60dB
Air Volume 620L/S
Cool Wind Max Speed 5800 RPM
Cool Wind Rated Power 20W
Heating Max Speed 5600 RPM
Heating Max Power 1200W
Oscillation (Head Swing) 80°
Timer Range 0–9
Cable Length 1.5m
Net Weight 2.0kg
Dimensions (W × D × H mm) 140 × 140 × 560 mm
12
For future reference, please record the following information which can be found
on the rating plate and the date of purchase which can be found on your sales invoice.
STORE DETAILS
STORE NAME
|
ADDRESS
|
TELEPHONE
|
PURCHASE DATE
|
PRODUCT DETAILS
MODEL NO.
|
SERIAL NO.*
|
Purchase Details
13
Attach your receipt
to this page

14
Warranty Information
WARRANTY TERMS & CONDITIONS
BLADELESS CIRCULATION FANS
This document sets out the terms and conditions
of the product warranties for Residentia Group
Appliances. It is an important document. Please
keep it with your proof of purchase documents in a
safe place for future reference should you require
service for your Appliance.
1. IN THIS WARRANTY
(a) ‘acceptable quality’ as referred to in clause
10 of this warranty has the same meaning
referred to in the ACL;
(b) ‘ACL’ means Trade Practices Amendment
(Australian Consumer Law) Act (No.2) 2010;
(c) ‘Appliance’ means any Residentia Group
product purchased by you accompanied by
this document;
(d) ‘ASR’ means Residentia Group authorised
service representative;
(e) ‘Residentia Group’ means Residentia Group
Pty Ltd of 165 Barkly Ave, Burnley VIC 3121,
ACN 600 546 656 in respect of Appliances
purchased in Australia;
(f ) ‘major failure’ as referred to in clause 10
of this warranty has the same meaning
referred to in the ACL and includes a
situation when an Appliance cannot be
repaired or it is uneconomic for Residentia
Group, at its discretion, to repair an
Appliance during the Warranty Period;
(g) ‘Warranty Period’ means:
(i) where the Appliance is used for
personal, domestic or household
use (i.e. normal single family use)
as set out in the instruction manual,
the Appliance is warranted against
manufacturing defects for 24
months, following the date of original
purchase of the Appliance;
(h) ‘you’ means the purchaser of the Appliance
not having purchased the Appliance for
re-sale, and ‘your’ has a corresponding
meaning.
2. This warranty only applies to Appliances
purchased and used in Australia and is in
addition to (and does not exclude, restrict,
or modify in any way) any
non-excludable statutory warranties in
Australia.
3. During the Warranty Period Residentia
Group or its ASR will, at no extra charge
if your Appliance is readily accessible for
service, without special equipment and
subject to these terms and conditions, repair
or replace any parts which it considers to be
defective. Residentia Group or its ASR may
use remanufactured parts to repair your
Appliance. You agree that any replaced
Appliances or parts become the property
of Residentia Group. This warranty does
not apply to light globes, batteries, filters or
similar perishable parts.
4. Parts and Appliances not supplied by
Residentia Group are not covered by
this warranty.
15
5. You will bear the cost of transportation,
travel and delivery of the Appliance to and
from Residentia Group or its ASR. If you
reside outside of the service area, you will
bear the cost of:
(a) travel of an authorised representative;
(b) transportation and delivery of the Appliance
to and from Residentia Group or its ASR,
in all instances, unless the Appliance is
transported by Residentia Group or its ASR,
the Appliance is transported at the owner’s
cost and risk while in transit to and from
Residentia Group or its ASR.
6. Proof of purchase is required before you can
make a claim under this warranty.
7. You may not make a claim under this
warranty unless the defect claimed
is due to faulty or defective parts or
workmanship. Residentia Group is not liable
in the following situations (which are not
exhaustive):
(a) the Appliance is damaged by:
(i) accident
(ii) misuse or abuse, including failure to
properly maintain or service
(iii) normal wear and tear
(iv) power surges, electrical storm
damage or incorrect power supply
(v) incomplete or improper installation
(vi) incorrect, improper or inappropriate
operation
(vii) insect or vermin infestation
(viii) failure to comply with any additional
instructions supplied with the
Appliance;
(b) the Appliance is modified without authority
from Residentia Group in writing;
(c) the Appliance’s serial number or warranty
seal has been removed or defaced;
(d) the Appliance was serviced or repaired by
anyone other than Residentia Group, an
authorised repairer
or ASR.
8. This warranty, the contract to which it
relates and the relationship between you
and Residentia Group are governed by the
law applicable where the Appliance was
purchased.
9. To the extent permitted by law, Residentia
Group excludes all warranties and liabilities
(other than as contained in this document)
including liability for any loss or damage
whether direct or indirect arising from your
purchase, use or non use of the Appliance.
10. For Appliances and services provided
by Residentia Group in Australia, the
Appliances come with a guarantee by
Residentia Group that cannot be excluded
under the Australian Consumer Law. You
are entitled to a replacement or refund
for a major failure and for compensation
for any other reasonably foreseeable loss
or damage. You are also entitled to have
the Appliance repaired or replaced if the
Appliance fails to be of acceptable quality
and the failure does not amount to a major
failure. The benefits to you given by this
warranty are in addition to your other rights
and remedies under a law in relation to the
Appliances or services to which the warranty
relates.
11. At all times during the Warranty Period,
Residentia Group shall, at its discretion,
determine whether repair, replacement or
refund will apply if an Appliance has a valid
warranty claim applicable to it.
12. Missing parts are not covered by warranty.
Residentia Group reserves the right to assess
each request for missing parts in a case by
case basis. Any parts that are not reported
missing in the first week after purchase will
not provide free of charge.
13. To enquire about claiming under this
warranty, please follow these steps:
(a) carefully check the operating instructions,
user manual and the terms of this warranty;
(b) have the model and serial number
of the Appliance available;
(c) have the proof of purchase (e.g. an invoice)
available;
(d) telephone the numbers shown below.
14. You accept that if you make a warranty
claim, Residentia Group and its ASR may
exchange information in relation to you
to enable Residentia Group to meet its
obligations under this warranty.
IMPORTANT
Before calling for service, please ensure that the
steps in point 13 have been followed.
Telephone contacts
► Service: Please call 1300 11 HELP (4357)
► Spare Parts: Please call 1300 11 SPARE (7727)
Our goods come with guarantees that cannot be excluded under the
Australian Consumer Law. You are entitled to a replacement or refund
for a major failure and for compensation for any other reasonably
foreseeable loss or damage. You are also entitled to have the goods
repaired or replaced if the goods fail to be of acceptable quality
and the failure does not amount to a major failure.
The Australian Consumer
Law requires the inclusion
of the following statement
with this warranty:

16
T. 1300 11 4357
E. support@residentiagroup.com.au
E S S E N T I A L S FOR LIFE
An initiative by
Residentia Group
www.solt.house