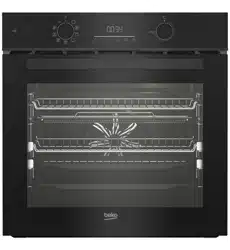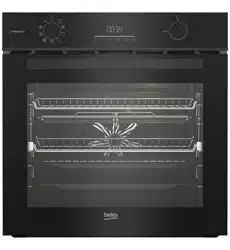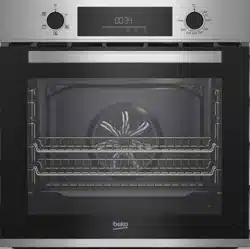
Built-in Oven
User Manual
Forno incassato
Manuale Utente
RBIM19200AVD
385442202/ EN/ İT/ R.AB/ 11/07/23 09:22
7791686710
EN
İT
EN / 2
Welcome!
Dear Customer,
Thank you for choosing the Beko product. We want your product, manufactured with high
quality and technology, to offer you the best efficiency. Therefore, carefully read this
manual and any other documentation provided before using the product.
Keep in mind all the information and warnings stated in the user’s manual. This way, you
will protect yourself and your product against the dangers that may occur.
Keep the user’s manual. If you give the product to someone else, give the manual with it.
The warranty conditions, usage and troubleshooting methods for your product are
provided in this manual.
The symbols and their descriptions in the user’s manual:
Hazard that may result in death or injury.
Important information or useful usage tips.
Read the user’s manual.
Hot surface warning.
NOTICE
Hazard that may result in material damage to the product or its environment.

EN / 3
Table of Contents
1 Safety Instructions........................ 4
1.1 Intended Use.................................. 4
1.2 Child, Vulnerable Person and Pet
Safety .............................................
4
1.3 Electrical Safety............................. 5
1.4 Transportation Safety ................... 6
1.5 Installation Safety.......................... 7
1.6 Safety of Use ................................. 7
1.7 Temperature Warnings ................. 8
1.8 Accessory Use............................... 8
1.9 Cooking Safety .............................. 8
1.10 Maintenance and Cleaning Safety 9
2 Environmental Instructions.......... 10
2.1 Waste Directive.............................. 10
2.1.1 Compliance with the WEEE Dir-
ective and Disposing of the
Waste Product ...........................
10
2.2 Package Information..................... 10
2.3 Recommendations for Energy
Saving.............................................
10
3 Your product ................................. 11
3.1 Product Introduction ..................... 11
3.2 Product Control Panel Introduc-
tion and Usage...............................
11
3.2.1 Control Panel.............................. 12
3.2.2 Introduction of the oven control
panel ...........................................
12
3.3 Oven operating functions.............. 12
3.4 Product Accessories..................... 13
3.5 Use of Product Accessories ......... 14
3.6 Technical Specifications............... 17
4 First Use......................................... 18
4.1 First Timer Setting......................... 18
4.2 Initial Cleaning ............................... 18
5 Using the Oven.............................. 19
5.1 General Information on Using the
Oven ...............................................
19
5.2 Operation of the Oven Control
Unit .................................................
19
6 General Information About Bak-
ing...................................................
21
6.1 General Warnings About Baking
in the Oven .....................................
21
6.1.1 Pastries and oven food ............. 22
6.1.2 Meat, Fish and Poultry ............... 24
6.1.3 Grill .............................................. 25
6.1.4 Test foods................................... 26
7 Maintenance and Cleaning........... 27
7.1 General Cleaning Information....... 27
7.2 Cleaning Accessories.................... 29
7.3 Cleaning the Control Panel............ 29
7.4 Cleaning the inside of the oven
(cooking area)................................
29
7.5 Easy Steam Cleaning..................... 29
7.6 Cleaning the Oven Door................. 30
7.7 Removing the Inner Glass of The
Oven Door.......................................
31
7.8 Cleaning the Oven Lamp ............... 32
8 Troubleshooting ............................ 33
EN
IT
EN / 4
1 Safety Instructions
• This section includes the
safety instructions necessary
to prevent the risk of personal
injury or material damage.
• If the product is handed over
to someone else for personal
use or second-hand use pur-
poses, the user’s manual,
product labels and other relev-
ant documents and parts
should also be given.
• Our company shall not be held
responsible for damages that
may occur if these instructions
are not observed.
• Failure to follow these instruc-
tions shall void any warranty.
• Always have the installation
and repair works made by the
manufacturer, the authorised
service or a person that the im-
porter company shall desig-
nate.
• Use original spare parts and
accessories only.
• Do not repair or replace any
component of the product un-
less it is clearly specified in the
user’s manual.
• Do not make technical modific-
ations on the product.
1.1 Intended Use
• This product is designed to be
used at home. It is not suitable
for commercial use.
• Do not use the product in gar-
dens, balconies or other out-
doors. This product is intended
to be used in households and
in the staff kitchens of shops,
offices and other working en-
vironments.
• CAUTION: This product
should be used for cooking
purposes only. It should not be
used for different purposes,
such as heating the room.
• The oven can be used to de-
frost, bake, fry and grill food.
• This product should not be
used for heating, plate heating,
drying by hanging towels or
clothes on the handle.
1.2 Child, Vulnerable
Person and Pet Safety
• This product can be used by
children 8 years of age and
older, and people who are un-
derdeveloped in physical, sens-
ory or mental skills, or who
have lack of experience and
knowledge, as long as they are

EN / 5
supervised or trained about the
safe use and hazards of the
product.
• Children should not play with
the product. Cleaning and user
maintenance should not be
performed by children unless
there is someone overseeing
them.
• This product should not be
used by people with limited
physical, sensory or mental ca-
pacity (including children), un-
less they are kept under super-
vision or receive the necessary
instructions.
• Children should be supervised
to ensure that they do not play
with the product.
• Electrical products are danger-
ous for children and pets. Chil-
dren and pets must not play
with, climb on, or enter the
product.
• Do not put objects that chil-
dren may reach on the
product.
• CAUTION: During use, the ac-
cessible surfaces of the
product are hot. Keep children
away from the product.
• Keep the packaging materials
out of the reach of children.
There is a hazard of injury and
suffocation.
• When the door is open, do not
put any heavy objects on it or
allow children to sit on it. You
may cause the oven to tip over
or damage the door hinges.
• For the safety of children, cut
the power plug and make the
product inoperable before dis-
posing the product.
1.3 Electrical Safety
• Plug the product into a groun-
ded outlet protected by a fuse
that matches the current rat-
ings indicated on the type la-
bel. Have the grounding install-
ation made by a qualified elec-
trician. Do not use the product
without grounding in accord-
ance with local / national regu-
lations.
• The plug or the electrical con-
nection of the product should
be in an easily accessible
place (where it will not be af-
fected by the flame of the
hob). If this is not possible,
there should be a mechanism
(fuse, switch, key switch, etc.)
on the electrical installation to
which the product is connec-
ted, in compliance with the
electrical regulations and sep-
arating all poles from the net-
work.
EN
IT

EN / 6
• The product must not be
plugged into the outlet during
installation, repair, and trans-
portation.
• Plug the product into an outlet
that meets the voltage and fre-
quency values specified on the
type label.
• If your product does not have a
power cable, only use the
power cable described in the
"Technical specifications" sec-
tion.
• Do not jam the power cable un-
der and behind the product. Do
not put a heavy object on the
power cable. The power cable
should not be bent, crushed,
and come into contact with
any heat source.
• The rear surface of the oven
gets hot when it is in use.
Power cords must not touch
the back surface, connections
may be damaged.
• Do not jam the electric cables
into the oven door and do not
pass them over hot surfaces.
Otherwise, cable insulation
may melt and cause fire as a
result of short circuit.
• Use original cable only. Do not
use cut or damaged cables or
intermediate cables.
• If the power cable is damaged,
it must be replaced by the
manufacturer, an authorized
service or a person to be spe-
cified by the importer company
in order to prevent possible
dangers.
• CAUTION: Before replacing
the oven lamp, be sure to dis-
connect the product from the
mains supply to avoid the risk
of electric shock. Unplug the
product or turn off the fuse
from the fuse box.
If your product has a power
cable and plug:
• Do not plug the product into an
outlet that is loose, has come
out of its socket, is broken,
dirty, oily, with risk of water
contact (for example, water
that may leak from the
counter).
• Never touch the plug with wet
hands! Never unplug by pulling
on the cable, always pull out by
holding the plug.
• Make sure that the product
plug is securely plugged into
the outlet to avoid arcing.
1.4 Transportation
Safety
• Disconnect the product from
the mains before transporting
the product.

EN / 7
• The product is heavy, carry the
product with at least two
people.
• Do not use the door and / or
handle to transport or move
the product.
• Do not put other items on the
product and carry the product
upright.
• When you need to transport
the product, wrap it with
bubble wrap packaging mater-
ial or thick cardboard and tape
it tightly. Secure the product
tightly with tape to prevent the
removable or moving parts of
the product and the product
from getting damaged.
• Check the overall appearance
of the product for any damage
that may have occurred during
transportation.
1.5 Installation Safety
• Before the product is installed,
check the product for any dam-
age. If the product is damaged,
do not install it.
• Do not install the product near
heat sources (radiators,
stoves, etc.).
• Keep the surroundings of all
ventilation ducts of the
product open.
• To prevent overheating, the
product should not be installed
behind decorative doors.
1.6 Safety of Use
• Ensure that the product is
switched off after every use.
• If you will not use the product
for a long time, unplug it or
turn off the fuse from the fuse
box.
• Do not operate defective or
damaged product. If any, dis-
connect the electricity / gas
connections of the product
and call the authorized service.
• Do not use the product if the
front door glass is removed or
cracked.
• Do not climb on the product to
reach anything or for any other
reason.
• Never use the product when
your judgement or coordina-
tion is impaired by the use of
alcohol and/or drugs.
• Flammable objects kept in the
cooking area may catch fire.
Never store flammable objects
in the cooking area.
• The oven handle is not a towel
dryer. When using the product,
do not hang towels, gloves or
similar textiles on the handle.
• The hinges of the product door
move when opening and clos-
ing the door and might jam.
When opening / closing the
door, do not hold the part with
the hinges.
EN
IT

EN / 8
1.7 Temperature Warn-
ings
• CAUTION: The accessible
parts of the product will be hot
during use. Care should be
taken to avoid touching the
product and heating elements.
Children under the age of 8
should not be brought close to
the product without an adult.
• Do not place flammable / ex-
plosive materials near the
product, as the edges will be
hot while it is operating.
• As steam may be exhaled,
keep away while opening the
oven door. The steam may
burn your hand, face and / or
eyes.
• During operation, the product
may become hot. Care should
be taken to avoid touching hot
parts, inside of the oven and
heating elements.
• Always use heat resistant oven
gloves while placing food in
the hot oven, or removing the
food from the hot oven, etc.
1.8 Accessory Use
• It is important that the wire
grill and tray are placed prop-
erly on the wire shelves. For
detailed information, refer to
the section "Usage of ac-
cessories".
• Accessories can damage the
door glass when closing the
product door. Always push the
accessories to the end of the
cooking area.
1.9 Cooking Safety
• Be careful when using alco-
holic drinks in your dishes. Al-
cohol evaporates at high tem-
peratures and may cause fire
since it can ignite when it
comes into contact with hot
surfaces.
• Food waste, oil, etc. in the
cooking area may catch fire.
Before cooking, remove such
coarse dirt.
• Food Poisoning Hazard: Do not
let food sit in oven for more
than 1 hour before or after
cooking. Otherwise it may
cause food poisoning or dis-
eases.
• Do not heat closed tins and
glass jars in the oven. The
pressure that would build-up in
the tin/jar may cause it to
burst.
• Place the greaseproof paper in
a cookware or on the oven ac-
cessory (tray, wire grill, etc.)
with food and place it in the

EN / 9
preheated oven. Remove any
excessive pieces of
greaseproof paper hanging
from the accessory or con-
tainer to avoid the risk of
touching the oven heater ele-
ments. Never use greaseproof
paper at an oven temperature
higher than the maximum use
temperature specified on the
greaseproof paper you are us-
ing. Never place greaseproof
paper on the oven base.
• Do not place baking trays,
dishes or aluminium foil dir-
ectly onto the bottom of the
oven. The accumulated heat
might damage the bottom of
the oven.
• Close the oven door during
grilling. Hot surfaces may
cause burns!
• Food not suitable for grilling
carries a fire hazard. Grill only
food that is suitable for heavy
grill fire. Also, do not place the
food too far in the back of the
grill. This is the hottest area
and fatty foods may catch fire.
1.10 Maintenance and
Cleaning Safety
• Wait for the product to cool be-
fore cleaning the product. Hot
surfaces may cause burns!
• Never wash the product by
spraying or pouring water on it!
There is the risk of electric
shock!
• Do not use steam cleaners to
clean the product as this may
cause an electric shock.
• Do not use harsh abrasive
cleaners, metal scrapers, wire
wool or bleach materials to
clean the oven front door
glass / (if present) oven upper
door glass. These materials
can cause glass surfaces to be
scratched and broken.
• Always keep the control panel
clean and dry. A damp and
dirty surface may cause prob-
lems in operating the func-
tions.
EN
IT
EN / 10
2 Environmental Instructions
2.1 Waste Directive
2.1.1 Compliance with the WEEE Dir-
ective and Disposing of the
Waste Product
This product complies with EU WEEE Dir-
ective (2012/19/EU). This product bears a
classification symbol for waste electrical
and electronic equipment (WEEE).
This product has been manu-
factured with high quality parts
and materials which can be re-
used and are suitable for recyc-
ling. Therefore, do not dispose
of the waste product with nor-
mal domestic and other wastes at the end
of its service life. Take it to a collection
point for the recycling of electrical and elec-
tronic equipment. You can ask your local
administration about these collection
points. Disposing of the appliance properly
helps prevent negative consequences for
the environment and human health.
Compliance with RoHS Directive:
The product you have purchased complies
with EU RoHS Directive (2011/65/EU). It
does not contain harmful and prohibited
materials specified in the Directive.
2.2 Package Information
Packaging materials of the product are
manufactured from recyclable materials in
accordance with our National Environment
Regulations. Do not dispose of the pack-
aging waste with the household or other
wastes, take it to the packaging material
collection points designated by the local
authorities.
2.3 Recommendations for Energy
Saving
According to EU 66/2014, information on
energy efficiency can be found on the
product receipt supplied with the product.
The following suggestions will help you use
your product in an ecological and energy-ef-
ficient way:
• Defrost frozen food before baking.
• In the oven, use dark or enamelled con-
tainers that transmit heat better.
• If specified in the recipe or user’s manual,
always preheat. Do not open the oven
door frequently during baking.
• Turn off the product 5 to 10 minutes be-
fore the end time of baking in prolonged
bakings. You can save up to 20% electri-
city by using residual heat.
• Try to cook more than one dish at a time
in the oven. You may cook at the same
time by placing two cookers on the wire
rack. In addition, if you cook your meals
one after the other, it will save energy be-
cause the oven will not lose its heat.
EN / 11
3 Your product
3.1 Product Introduction
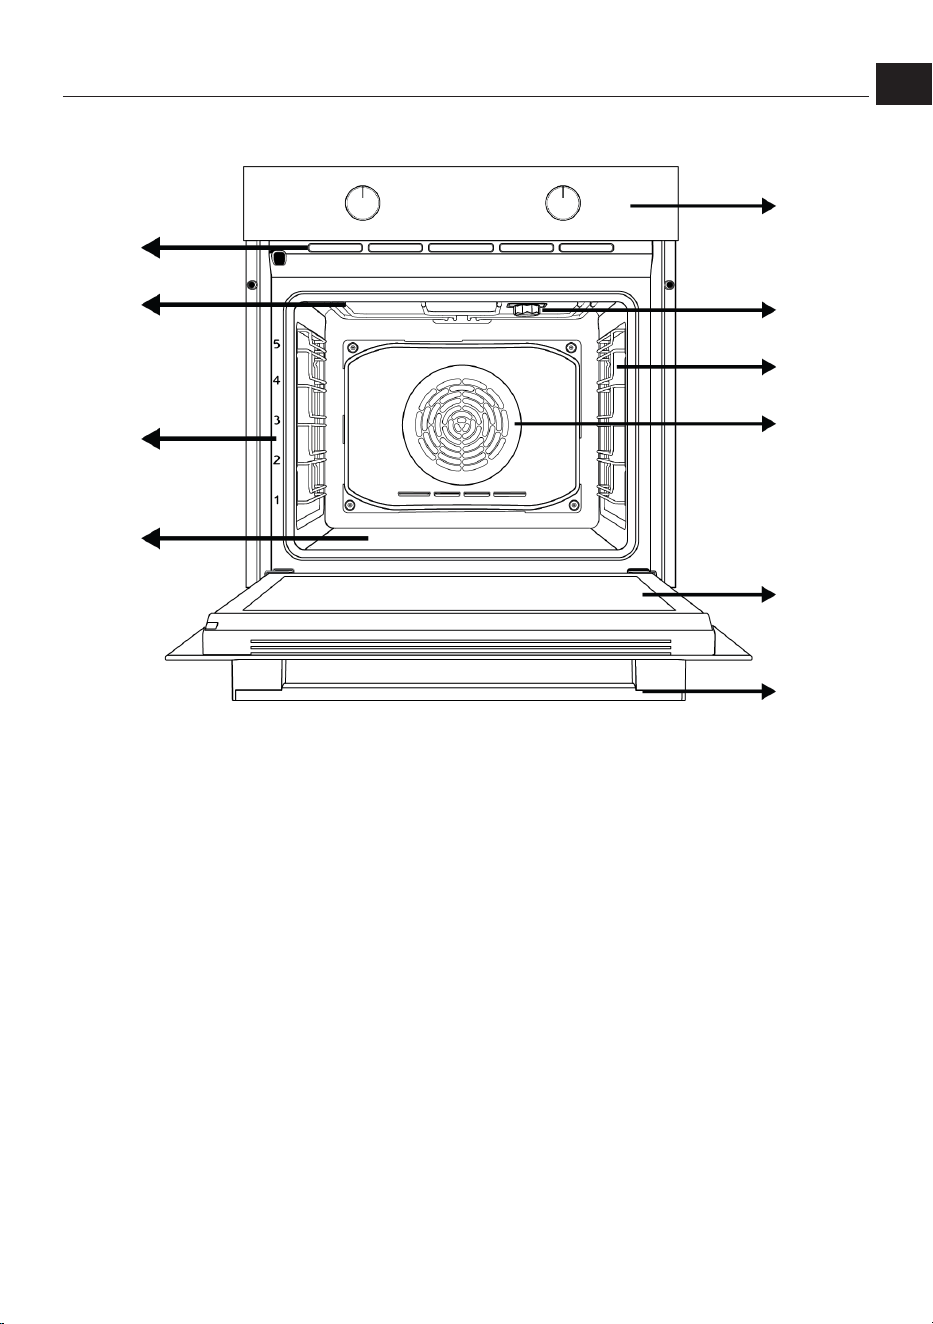
1
2
3
4
5
6
7
8
9
10
*
**
1 Control panel 2 Lamp
3 Wire shelves 4 Fan motor (behind the steel plate)
5 Door 6 Handle
7 Lower heater (under the steel plate) 8 Shelf positions
9 Upper heater 10 Ventilation holes
*
Varies depending on the model. Your product
may not be equipped with a lamp, or the type and
location of the lamp may differ from the illustra-
tion.
**
Varies depending on the model. Your product
may not be equipped with a wire rack. In the im-
age, a product with wire rack is shown as an ex-
ample.
3.2 Product Control Panel Introduc-
tion and Usage
In this section, you can find the overview
and basic uses of the product's control
panel. There may be differences in images
and some features depending on the type
of product.
EN
IT
EN / 12
3.2.1 Control Panel
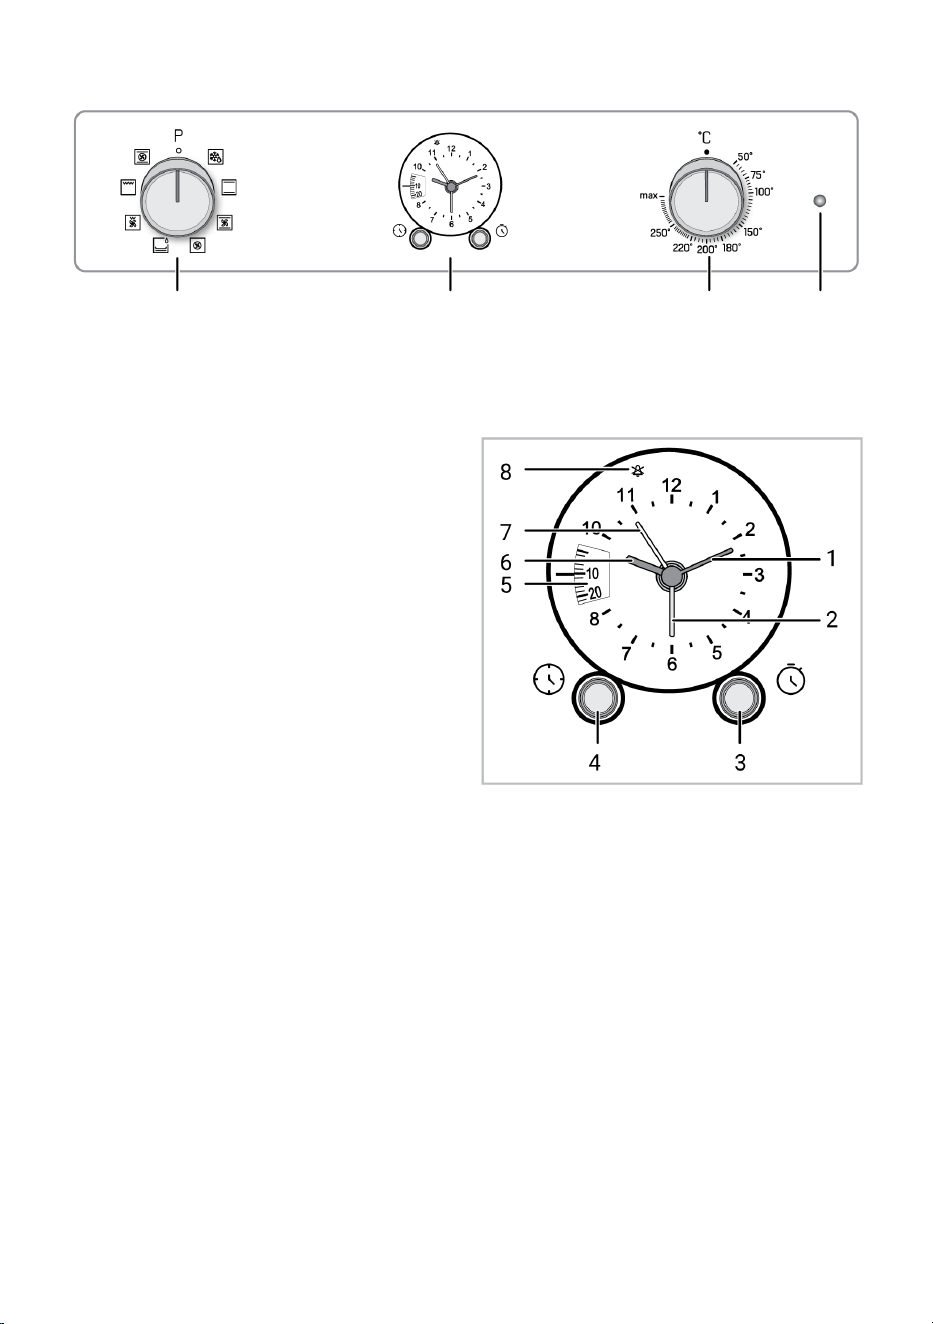
1 2 3 4
1 Function selection knob 2 Timer
3 Temperature knob 4 Thermostat lamp
If there are knob(s) controlling your
product, in some models this/these knob(s)
may be so that they come out when pushed
(buried knobs). For settings to be made
with these knobs, first push the relevant
knob in and pull out the knob. After making
your adjustment, push it in again and re-
place the knob.
3.2.2 Introduction of the oven control
panel
Function selection knob
You can select the oven operating func-
tions with the function selection knob. Turn
left / right from closed (top) position to se-
lect.
Temperature knob
You can select the temperature you want to
cook with the temperature knob. Turn
clockwise from the closed (top) position to
select.
Oven inner temperature indicator
You can understand the oven interior tem-
perature from the temperature lamp. The
thermostat lamp is located on the control
panel. The thermostat lamp turns on when
the product starts to operate, and the ther-
mostat lamp turns off when it reaches the
set temperature. When the temperature in-
side the oven drops below the set temper-
ature, the thermostat lamp turns on again.
Timer
1 Minute hand (Golden yellow)
2 Cooking start indicator (orange)
3 Cooking time/finish time adjustment knob
4 Time of day adjustment button
5 Baking time indicator
6 Hour hand (Golden yellow)
7 Alarm clock hand (yellow)
8 Alarm cancellation symbol
3.3 Oven operating functions
On the function table, the operating func-
tions you can use in your oven and the
highest and lowest temperatures that can
be set for these functions are shown. The
order of the operating modes shown here
may differ from the arrangement on your
product.
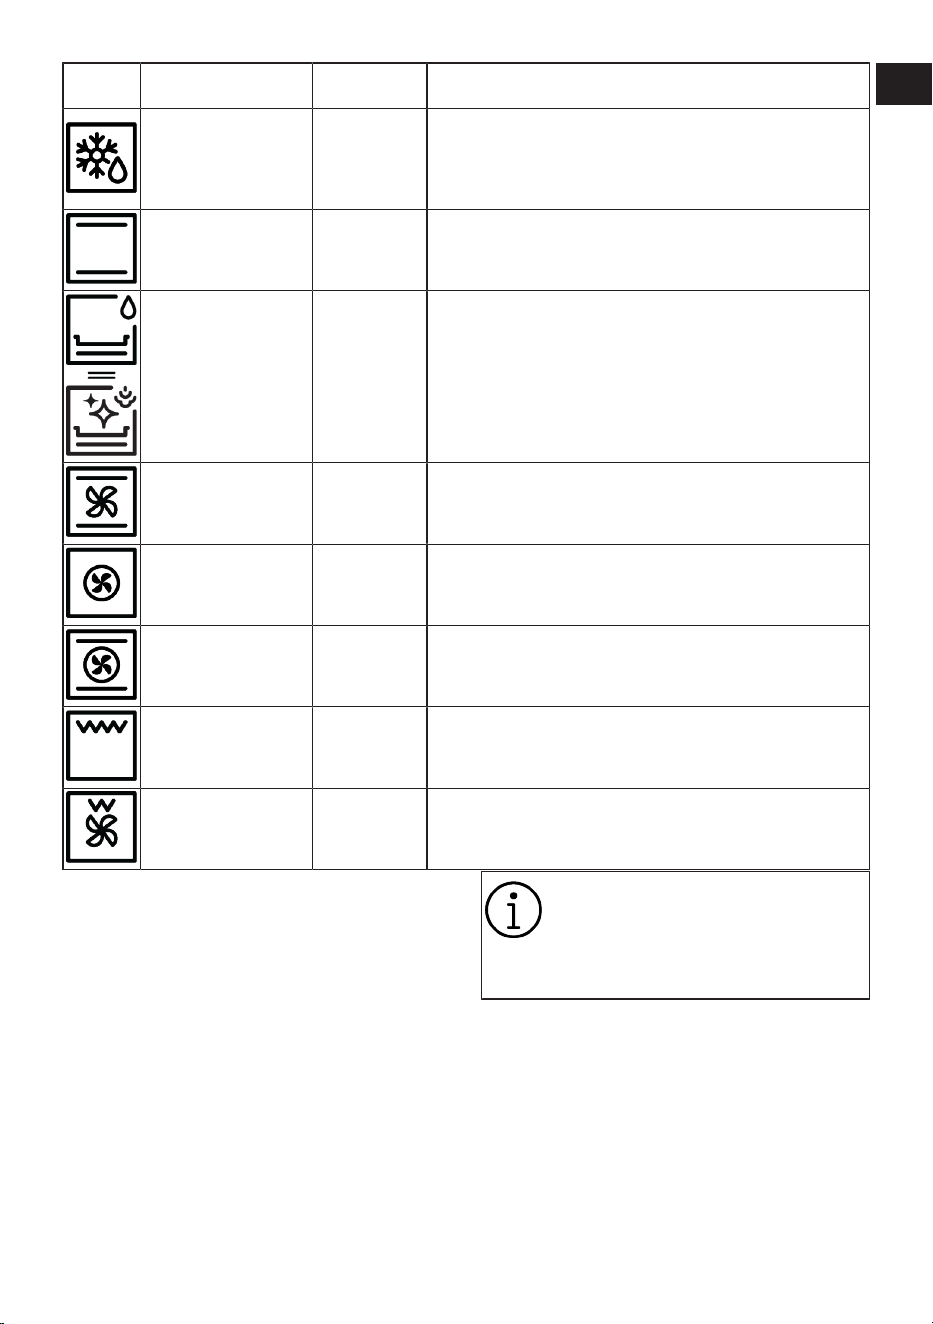
EN / 13
Function
symbol
Function description
Temperature
range (°C)
Description and use
Operating with fan -
The oven is not heated. Only the fan (on the back wall) oper-
ates. Frozen food with granules is slowly defrosted at room
temperature, cooked food is cooled. The time required to de-
frost a whole piece of meat is longer than for foods with
grains.
Top and bottom heat-
ing
*
Food is heated from above and below at the same time. Suit-
able for cakes, pastries or cakes and stews in baking moulds.
Cooking is done with a single tray.
Bottom heating *
Only lower heating is on. It is suitable for foods that need
browning on the bottom. This function should also be used for
easy steam cleaning.
Fan assisted bottom/
top heating
*
The hot air heated by the upper and lower heaters is distributed
equally and rapidly throughout the oven with the fan. Cooking
is done with a single tray.
Fan Heating *
The hot air heated by the fan heater is distributed equally and
rapidly throughout the oven with the fan. It is suitable for multi-
tray cooking at different shelf levels.
"3D" function *
Upper heating, lower heating and fan heating functions oper-
ate. Each side of the product to be cooked is cooked equally
and quickly. Cooking is done with a single tray.
Full grill *
The large grill on the oven ceiling works. It is suitable for
grilling in large amounts.
Fan assisted low grill *
The hot air heated by the small grill is quickly distributed into
the oven with the fan. It is suitable for grilling smaller amounts.
* Your product operates in the temperature
range specified on the temperature knob.
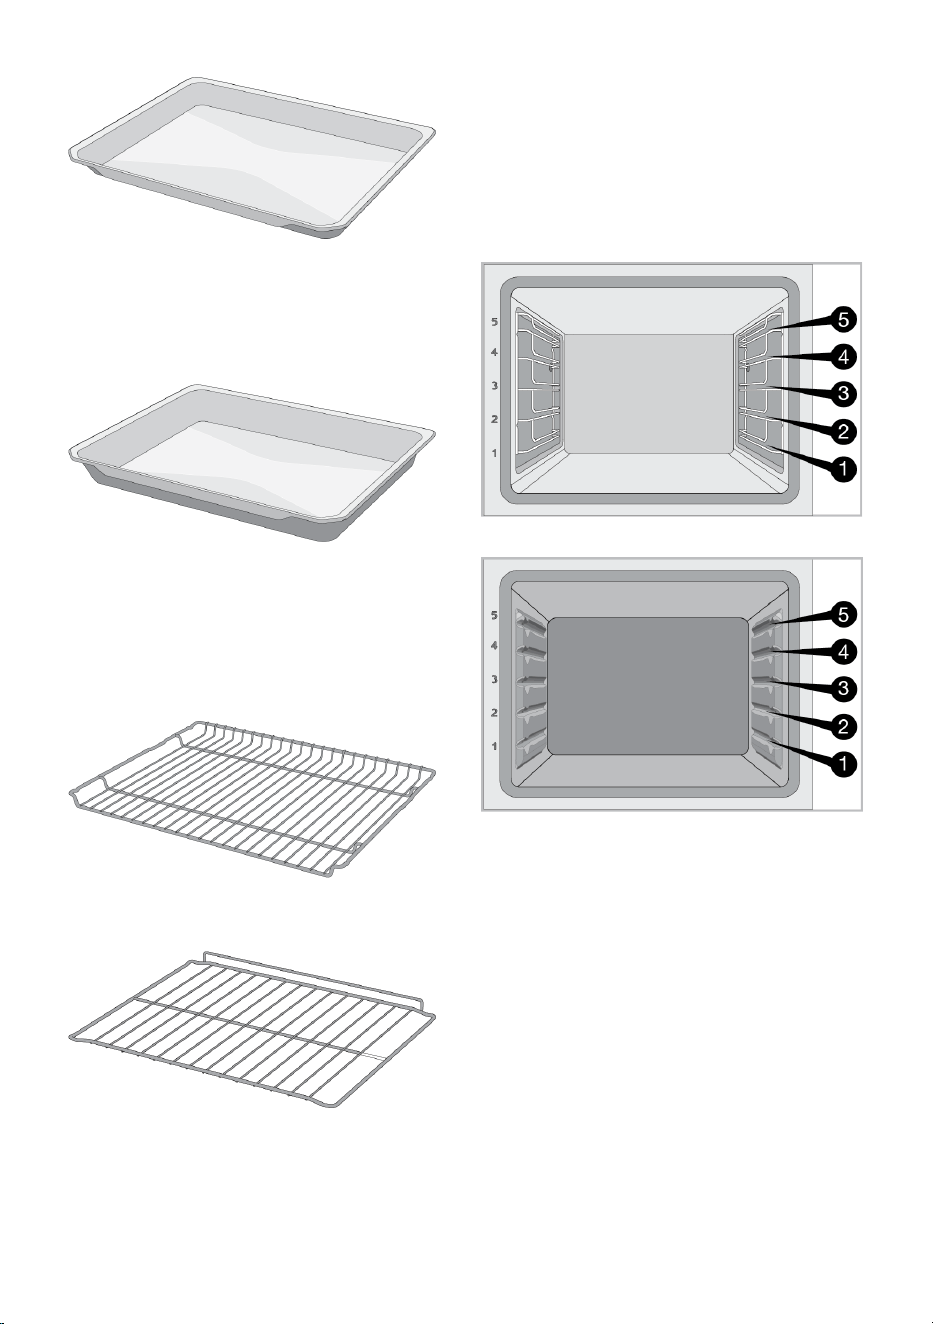
3.4 Product Accessories
There are various accessories in your
product. In this section, the description of
the accessories and the descriptions of the
correct usage are available. Depending on
the product model, the supplied accessory
varies. All accessories described in the
user’s manual may not be available in your
product.
The trays inside your appliance
may be deformed with the effect of
the heat. This has no effect on the
functionality. Deformation disap-
pears when the tray is cooled.
Standard tray
It is used for pastries, frozen foods and fry-
ing large pieces.
EN
IT
EN / 14
Deep tray
It is used for pastries, frying large pieces,
juicy food or for the collection of flowing
oils when grilling.
Wire grill
It is used for frying or placing the food to be
baked, fried and stewed on the desired
shelf.
On models with wire shelves :
On models without wire shelves :
3.5 Use of Product Accessories
Cooking shelves
There are 5 levels of shelf position in the
cooking area. You can also see the order of
the shelves in the numbers on the front
frame of the oven.
On models with wire shelves :
On models without wire shelves :
Placing the wire grill on the cooking
shelves
On models with wire shelves :
It is crucial to place the wire grill on the
wire side shelves properly. While placing
the wire grill on the desired shelf, the open
section must be on the front. For better
cooking, the wire grill must be secured on
the wire shelf’s stopping point. It must not
pass over the stopping point to contact
with the rear wall of the oven.
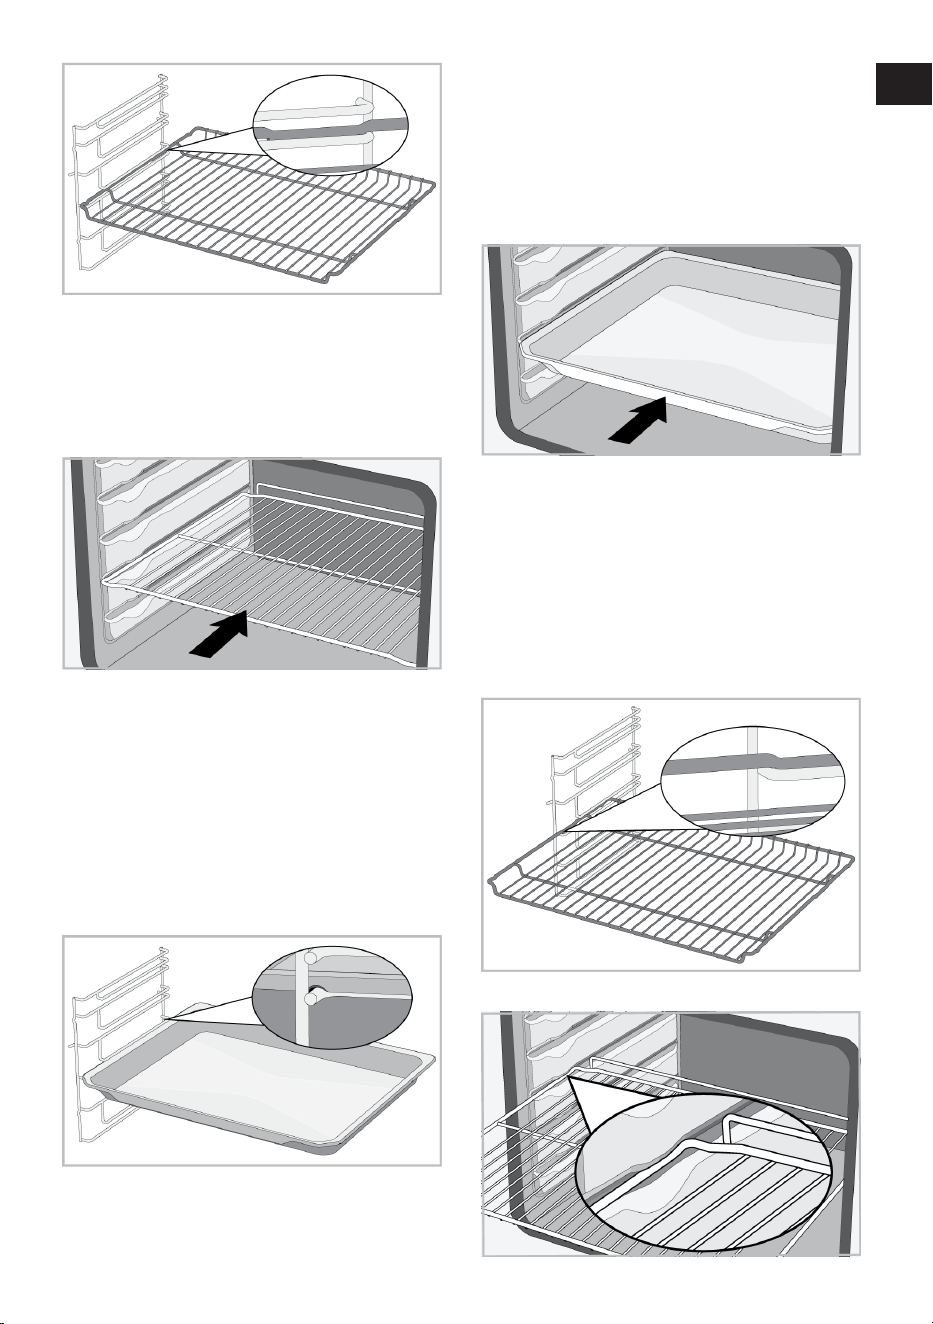
EN / 15
On models without wire shelves :
It is crucial to place the wire grill on the
side shelves properly. The wire grill has one
direction when placing it on the shelf. While
placing the wire grill on the desired shelf,
the open section must be on the front.
Placing the tray on the cooking shelves
On models with wire shelves :
It is also crucial to place the trays on the
wire side shelves properly. While placing
the tray on the desired shelf, its side de-
signed for holding must be on the front. For
better cooking, the tray must be secured on
the stopping socket on the wire shelf. It
must not pass over the stopping socket to
contact with the rear wall of the oven.
On models without wire shelves :
It is also crucial to place the trays on the
side shelves properly. The tray has one dir-
ection when placing it on the shelf. While
placing the tray on the desired shelf, its
side designed for holding must be on the
front.
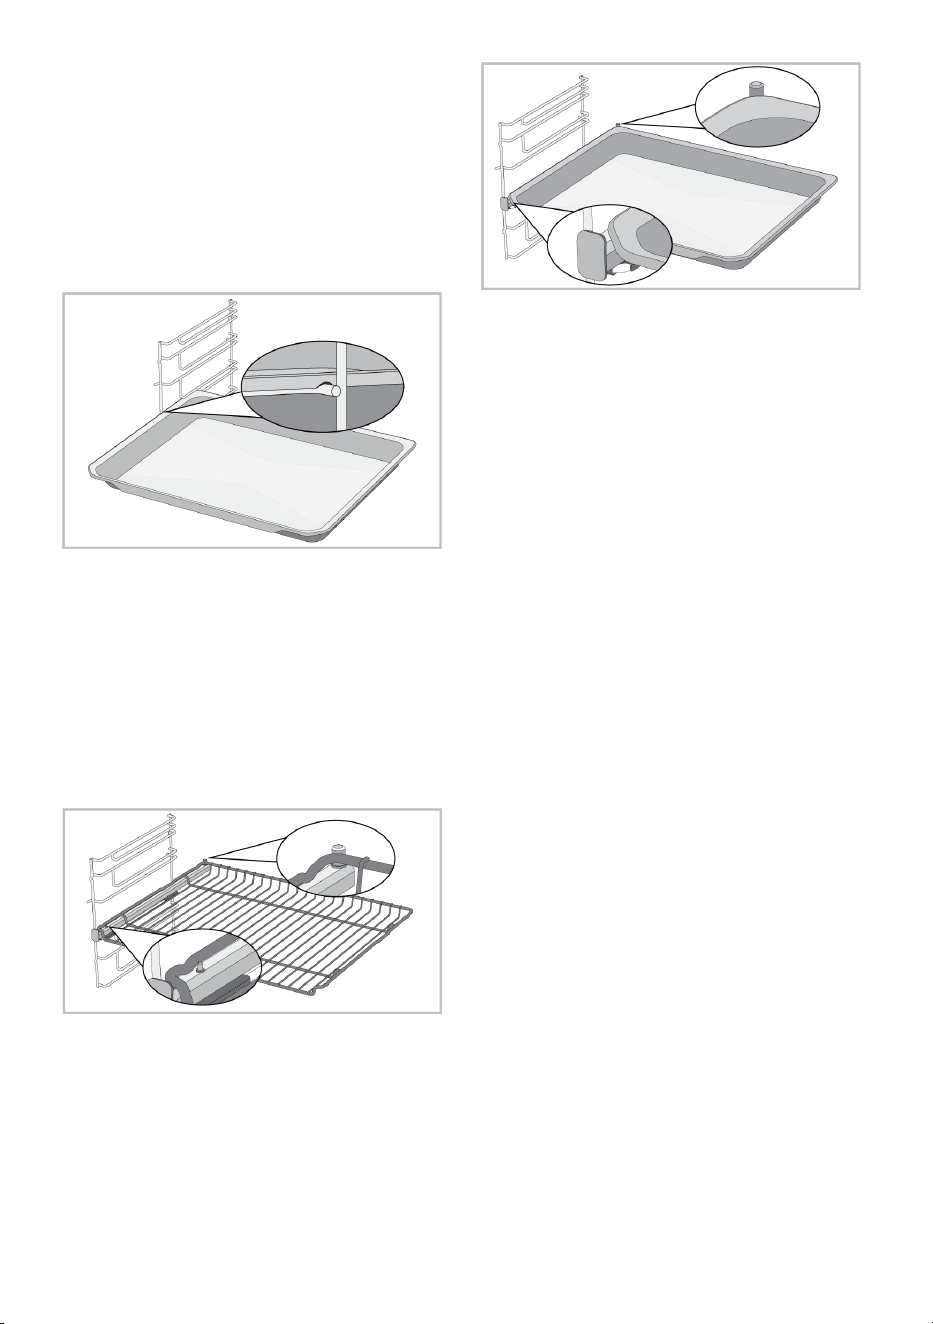
Stopping function of the wire grill
There is a stopping function to prevent the
wire grill from tipping out of the wire shelf.
With this function, you can easily and safely
take out your food. While removing the wire
grill, you can pull it forward until it reaches
the stopping point. You must pass over this
point to remove it completely.
On models with wire shelves :
On models without wire shelves :
EN
IT
EN / 16
Tray stopping function - On models with
wire shelves
There is also a stopping function to prevent
the tray from tipping out of the wire shelf.
While removing the tray, release it from the
rear stopping socket and pull it towards
yourself until it reaches the front side. You
must pass over this stopping socket to re-
move it completely.
Proper placement of the wire grill and tray
on the telescopic rails-On models with
wire shelves and telescopic models
Thanks to telescopic rails, trays or the wire
grill can be easily installed and removed.
When using trays and wire grills with the
telescopic rail, care should be taken that
the pins on the front and back of the tele-
scopic rails, rest against the edges of the
grill and the tray (shown in the figure).
EN / 17
3.6 Technical Specifications
General specifications
Product external dimensions (height/width/depth) (mm) 595 /594 /567
Oven installation dimensions (height / width / depth)
(mm)
590 - 600 /560 /min. 550
Voltage/Frequency 220-240 V ~; 50 Hz
Cable type and section used/suitable for use in the
product
min. H05VV-FG 3 x 1,5 mm2
Total power consumption (kW) 2,6
Oven type Multifunction oven
Basics: Information on the energy label of home type electrical ovens is given in accordance with the EN 60350-1 /
IEC 60350-1 standard. The values are determined in Top and bottom heating or (if present) Fan assisted bottom/top
heating functions with the standard load.
Energy efficiency class is determined in accordance with the following prioritization depending on whether the relev-
ant functions exist on the product or not. 1-Eco fan heating , 2-Fan Heating , 3-Fan assisted low grill , 4-Top and bot-
tom heating.
Technical specifications may be changed without prior notice to improve the qual-
ity of the product.
Figures in this manual are schematic and may not exactly match your product.
Values stated on the product labels or in the documentation accompanying it are
obtained in laboratory conditions in accordance with relevant standards. Depend-
ing on operational and environmental conditions of the product, these values may
vary.
EN
IT
EN / 18
4 First Use
Before you start using your product, it is re-
commended to do the following stated in
the following sections respectively.
4.1 First Timer Setting
Always set the time of day before
using your oven. If you do not set it,
you cannot cook in some oven
models.
Timer
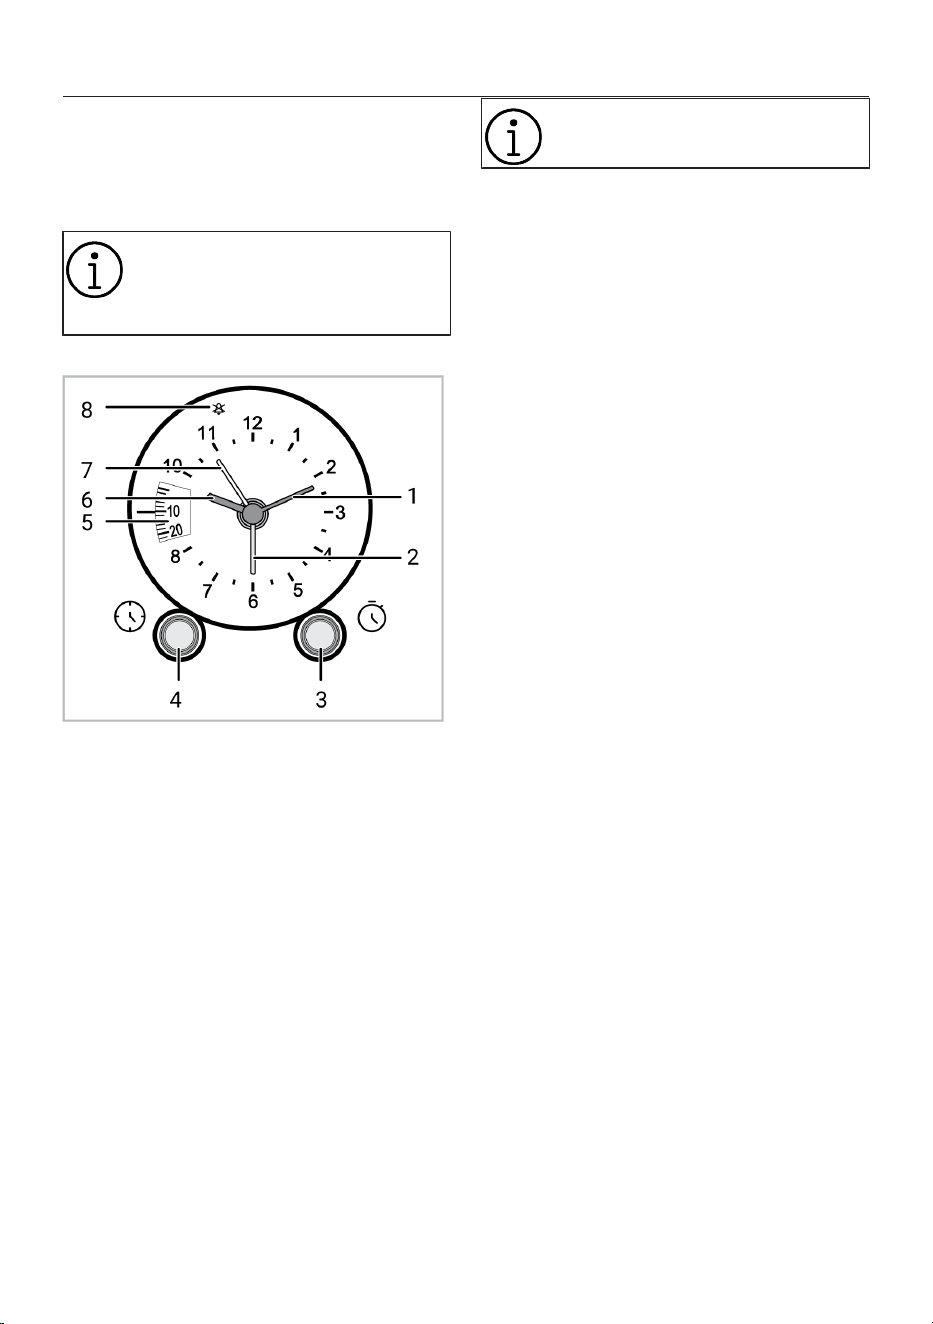
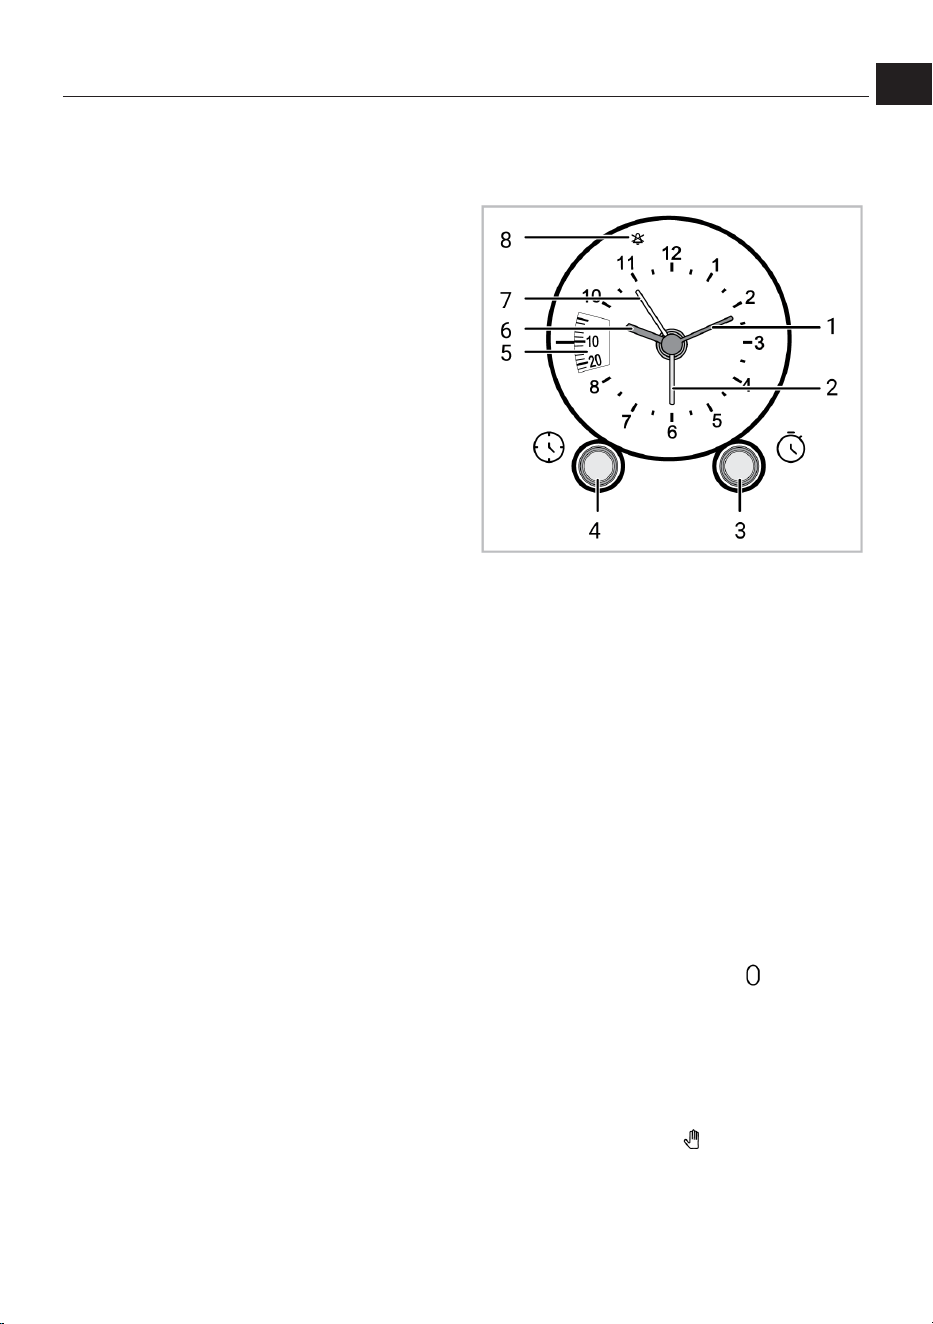
1 Minute hand (Golden yellow)
2 Cooking start indicator (orange)
3 Cooking time/finish time adjustment knob
4 Time of day adjustment button
5 Baking time indicator
6 Hour hand (Golden yellow)
7 Alarm clock hand (yellow)
8 Alarm cancellation symbol
To set the time of day:
1. Pull the time of day adjustment knob (4)
slightly towards yourself, twist it clock-
wise until the time of the day is adjusted
and then release it.
ð When you release the knob, the time of
day is set.
Never twist the knob counterclock-
wise while it is pulled.
4.2 Initial Cleaning
1. Remove all packaging materials.
2. Remove all accessories from the oven
provided with the product.
3. Operate the product for 30 minutes and
then, turn it off. This way, residues and
layers that may have remained in the
oven during production are burned and
cleaned.
4. When operating the product, select the
highest temperature and the operating
function that all the heaters in your
product operate. See “Oven operating
functions [}12]”. You can learn how to
operate the oven in the following sec-
tion.
5. Wait for the oven to cool.
6. Wipe the surfaces of the product with a
wet cloth or sponge and dry with a cloth.
Before using the accessories:
Clean the accessories you remove from the
oven with detergent water and a soft clean-
ing sponge.
NOTICE: Some detergents or cleaning
agents may cause damage to the surface.
Do not use abrasive detergents, cleaning
powders, cleaning creams or sharp objects
during cleaning.
NOTICE: During the first use, smoke and
odour may come up for several hours. This
is normal and you just need good ventila-
tion to remove it. Avoid directly inhaling the
smoke and odours that form.
EN / 19
5 Using the Oven
5.1 General Information on Using the
Oven
Cooling fan ( It varies depending on the
product model. It may not be available
on your product. )
Your product has a cooling fan. The cooling
fan is activated automatically when neces-
sary and cools both the front of the product
and the furniture. It is automatically deac-
tivated when the cooling process is fin-
ished. Hot air comes out over the oven
door. Do not cover these ventilation open-
ings with anything. Otherwise, the oven
may overheat. The cooling fan continues to
operate during oven operation or after the
oven is turned off (approximately 20-30
minutes). If you cook by programming the
oven timer, at the end of the baking time,
the cooling fan turns off with all functions.
The cooling fan running time cannot be de-
termined by the user. It turns on and off
automatically. This is not an error.
Oven lighting
The oven lighting is turned on when the
oven starts baking. In some models, the
lighting is on during baking, while in some
models it turns off after a certain time.
5.2 Operation of the Oven Control
Unit
Timer
1 Minute hand (Golden yellow)
2 Cooking start indicator (orange)
3 Cooking time/finish time adjustment knob
4 Time of day adjustment button
5 Baking time indicator
6 Hour hand (Golden yellow)
7 Alarm clock hand (yellow)
8 Alarm cancellation symbol
Manual cooking by selecting temperature
and oven operating function
ü You can cook by making a manual con-
trol (at your own control) without set-
ting the cooking time by selecting the
temperature and operating function
specific to your food.
1. Turn knob 3 clockwise to " " symbol on
the cooking time display.
2. Pull the knob (3) towards yourself
slightly and align start of cooking
pointer (orange) (2) with hour hand (6).
3. Release the knob (3) and turn it clock-
wise to bring onto “ ” symbol in cook-
ing time display.
4. Put your dish into the oven.
EN
IT

EN / 20
5. Select the operating function you want
to cook with the function selection
knob.
6. Set the temperature you want to cook
with with the temperature knob.
ð Your oven will start operating im-
mediately at the selected function
and temperature, and the temper-
ature lamp will light up. When the
temperature inside the oven
reaches the set temperature, the
temperature lamp turns off. The
oven does not switch off automat-
ically after starting cooking. You
have to control cooking yourself
and turn it off.
7. To turn off the oven when your cook-
ing is complete: Turn the function se-
lection and temperature knobs to the off
(upper) position. Turn knob 3 clockwise
to " " symbol on the cooking time dis-
play.
Cooking by setting the cooking time;
ü You can have the oven turn off auto-
matically at the end of the time by se-
lecting the temperature and operating
function specific to your food and set-
ting the cooking time on the timer.
1. Turn knob 3 clockwise to " " symbol on
the cooking time display.
2. Set the desired cooking time on the
cooking time display by turning the knob
3 clockwise.
Maximum time that can be set for
end of cooking is 180 minutes. Pro-
gram will be cancelled in case of
power failure. You must reprogram
the oven.
3. Put your dish into the oven.
4. Select the operating function you want
to cook with the function selection
knob.
5. Set the temperature you want to cook
with the temperature knob.
ð Your oven will start operating im-
mediately at the selected function
and temperature, and the temper-
ature lamp will light up. When the
temperature inside the oven
reaches the set temperature, the
temperature lamp turns off. A
warning tone sounds and the oven
stops cooking.
6. To switch off the oven when the
cooking time is complete: Turn the
function selection and temperature
knobs to the off (upper) position. Turn
knob 3 clockwise to " " symbol on the
cooking time display.
To set the cooking end time to a later time;
ü By selecting the temperature and oper-
ating function specific to your meal,
you can set the cooking time and the
cooking end time to a later time, allow-
ing the oven to start and turn off auto-
matically.
1. Turn knob 3 clockwise to " " symbol on
the cooking time display.
2. Set your cooking start time with the
cooking start pointer (2) (orange) by
pulling the knob 3 towards you.
3. Release the knob 3.
4. Set the desired cooking time on the
cooking time display by turning the knob
3 clockwise.
5. Put your dish into the oven.
6. Select the operating function you want
to cook with the function selection
knob.
7. Set the temperature you want to cook
with the temperature knob.
ð When the cooking start time
comes, the oven starts working im-
mediately at the selected function
and temperature and the temperat-
EN / 21
ure lamp lights up. When the tem-
perature inside the oven reaches
the set temperature, the temperat-
ure lamp turns off. When the cook-
ing time comes to an end, a warn-
ing tone will sound and the oven
will stop cooking.
8. To switch off the oven when the
cooking time is complete: Turn the
function selection and temperature
knobs to the off (upper) position. Turn
knob 3 clockwise to " " symbol on the
cooking time display.
Using the clock as an alarm
You can use the clock of the product for
any warning or reminder apart from the
cooking programme. The alarm clock has
no influence on the functions of the oven. It
is only used as a warning. For example, this
is useful when you want to turn food in the
oven at a certain point of time. Alarm clock
will give a signal once the time you set is
over.
Maximum alarm time can be 55
minutes.
Setting the alarm clock
1. Adjust the alarm clock hand (yellow) (7)
to the desired hour on the dial by turning
the time of day adjustment knob (4) to
the right or left.
ð Alarm will be heard at the end of the
set time.
Turning off the alarm
1. As soon as the alarm is heard, turn knob
(4) to right or left to move the alarm
clock hand (yellow) (7) onto the alarm
cancel symbol “ ” in order to turn off
the alarm.
6 General Information About Baking
You can find tips on preparing and cooking
your food in this section.
Plus, this section describes some of the
foods tested as producers and the most
appropriate settings for these foods. Ap-
propriate oven settings and accessories for
these foods are also indicated.
6.1 General Warnings About Baking in
the Oven
• While opening the oven door during or
after baking, hot-burning steam may
emerge. The steam may burn your hand,
face and/or eyes. When opening the oven
door, stay away.
• Intense steam generated during baking
may form condensed water drops on the
interior and exterior of the oven and on
the upper parts of the furniture due to the
temperature difference. This is a normal
and physical occurrence.
• The cooking temperature and time values
given for foods may vary depending on
the recipe and amount. For this reason,
these values are given as ranges.
• Always remove unused accessories from
the oven before you start cooking. Ac-
cessories that will remain in the oven
may prevent your food from being
cooked at the correct values.
• For foods that you will cook according to
your own recipe, you can reference sim-
ilar foods given in the cooking tables.
• Using the supplied accessories ensures
you get the best cooking performance.
Always observe the warnings and inform-
ation provided by the manufacturer for
the external cookware you will use.
• Cut the greaseproof paper you will use in
your cooking in suitable sizes to the con-
tainer you will cook. Greaseproof papers
that are overflowing from the container
can create a risk of burns and affect the
quality of your baking. Use the
greaseproof paper you will use in the
temperature range specified.
• For good baking performance, place your
food on the recommended correct shelf.
Do not change the shelf position during
baking.
EN
IT

EN / 22
6.1.1 Pastries and oven food
General Information
• We recommend using the accessories of
the product for a good cooking perform-
ance. If you will use an external cook-
ware, prefer dark, non-sticking and heat
resistant ware.
• If preheating is recommended in the
cooking table, be sure to put your food in
the oven after preheating.
• If you will cook by using cookware on the
wire grill, place it in the middle of the wire
grill, not near the back wall.
• All materials used in making pastry
should be fresh and at room temperat-
ure.
• The cooking status of the foods may vary
depending on the amount of food and the
size of the cookware.
• Metal, ceramic and glass moulds extend
the cooking time and the bottom sur-
faces of pastry foods do not brown
evenly.
• If you are using baking paper, a small
browning can be observed on the bottom
surface of the food. In this situation, you
may have to extend your cooking period
by approximately 10 minutes.
• The values specified in the cooking
tables are determined as a result of the
tests carried out in our laboratories. Val-
ues suitable for you may differ from
these values.
• Place your food on the appropriate shelf
recommended in the cooking table. Refer
to the bottom shelf of the oven as shelf
1.
Tips for baking cakes
• If the cake is too dry, increase the tem-
perature by 10°C and shorten the baking
time.
• If the cake is moist, use a small amount
of liquid or reduce the temperature by
10°C.
• If the top of the cake is burnt, put it on
the lower shelf, lower the temperature
and increase the baking time.
• If the inside of the cake is cooked well,
but outside is sticky, use less liquid, de-
crease the temperature and increase the
cooking time.
Hints for pastry
• If the pastry is too dry, increase the tem-
perature by 10 °C and shorten the cook-
ing time. Wet the dough sheets with a
sauce consisting of milk, oil, egg and
yoghurt mixture.
• If the pastry is getting cooked slowly,
make sure that the thickness of the
pastry you have prepared does not over-
flow the tray.
• If the pastry is browned on the surface
but the bottom is not cooked, make sure
that the amount of sauce you will use for
the pastry is not too much at the bottom
of the pastry. For an even browning, try to
spread the sauce evenly between the
dough sheets and the pastry.
• Bake your pastry in the position and tem-
perature appropriate to the cooking table.
If the bottom is still not browned enough,
place it on a bottom shelf for the next
cooking.
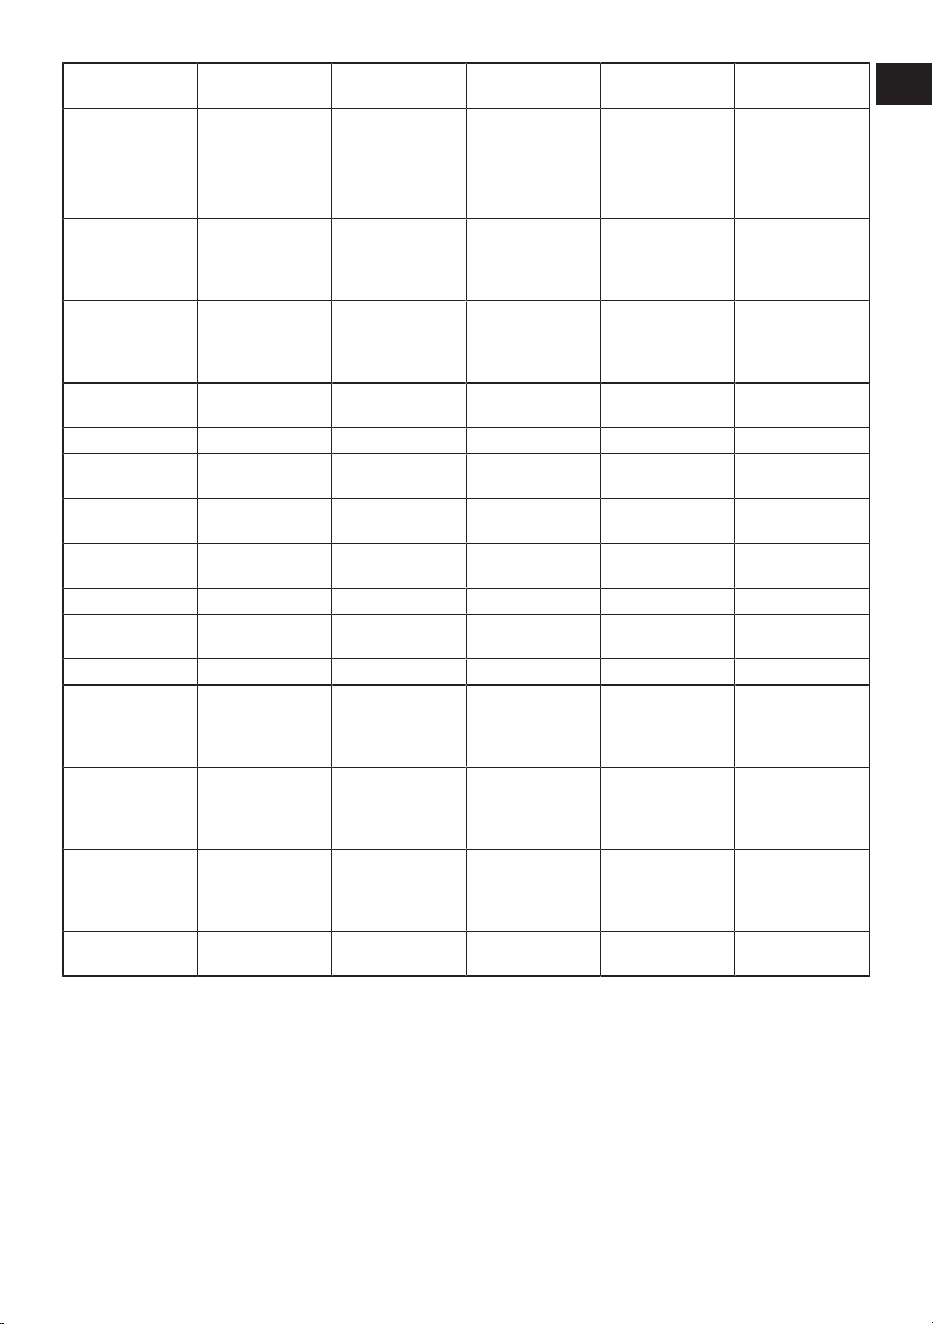
Cooking table for pastries and oven foods
Suggestions for baking with a single tray
Food Accessory to be
used
Operating func-
tion
Shelf position Temperature (°C) Baking time
(min) (approx.)
Cake on the tray Standard tray *
Top and bottom
heating
3 180 30 … 40
Cake in the mould
Cake mould on
wire grill** **
Fan Heating 2 180 30 … 40
Small cakes Standard tray *
Top and bottom
heating
3 160 25 … 35
EN / 23
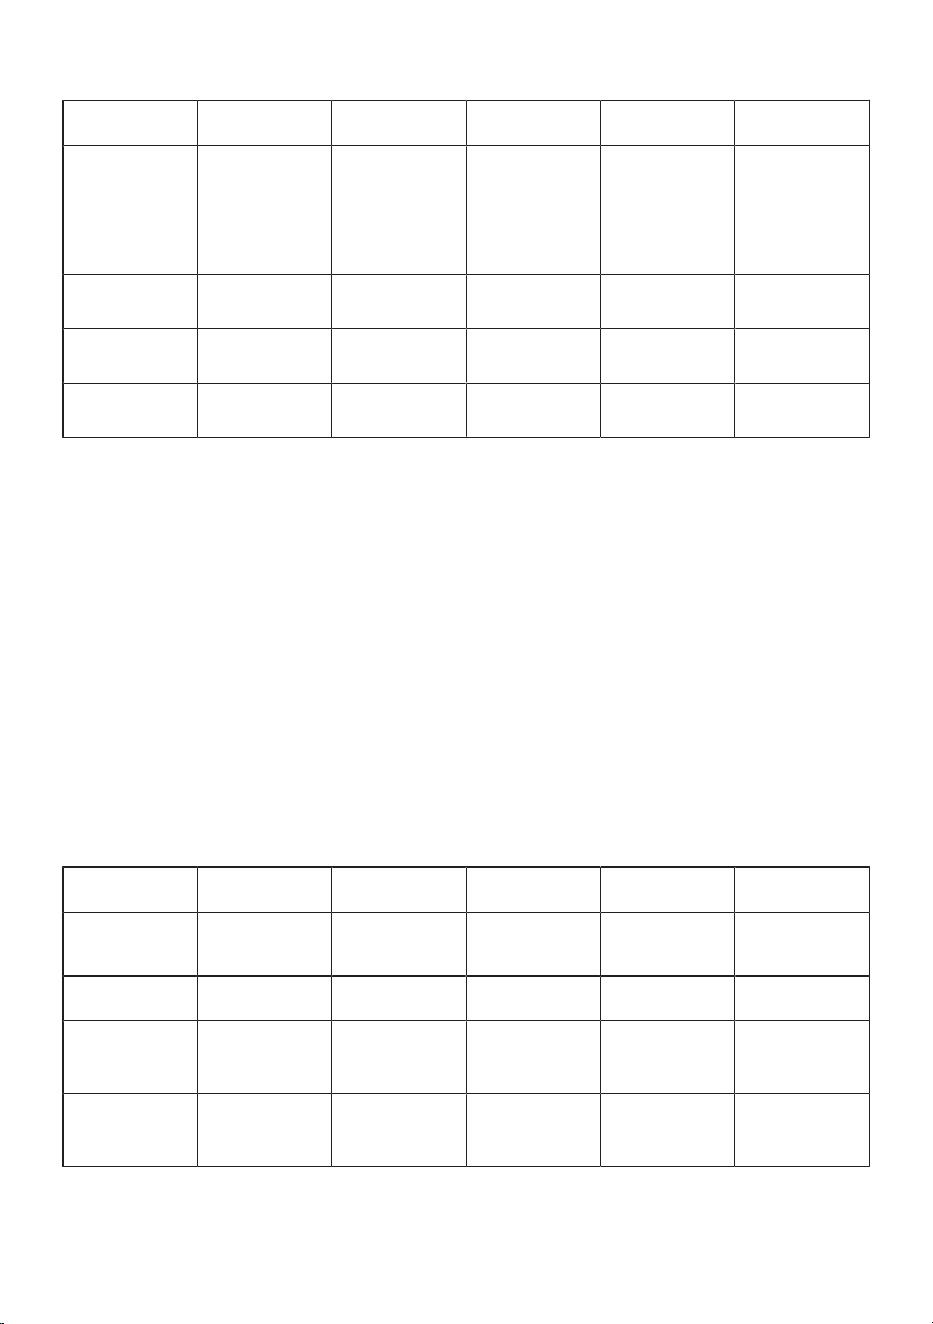
Food Accessory to be
used
Operating func-
tion
Shelf position Temperature (°C) Baking time
(min) (approx.)
Small cakes Standard tray * Fan Heating
On models with
wire shelves : 3
On models
without wire
shelves : 2
150 25 … 35
Sponge cake
Round springform
pan, 26 cm in dia-
meter on wire
grill** **
Top and bottom
heating
2 160 30 … 40
Sponge cake
Round springform
pan, 26 cm in dia-
meter on wire
grill** **
Fan Heating 2 160 30 … 40
Cookie Pastry tray *
Top and bottom
heating
3 170 25 … 35
Cookie Pastry tray * Fan Heating 3 170 20 … 30
Pastry Standard tray *
Top and bottom
heating
2 200 35 … 45
Pastry Standard tray *
Fan assisted bot-
tom/top heating
2 200 35 … 45
Bun Standard tray *
Top and bottom
heating
2 200 20 … 30
Bun Standard tray * Fan Heating 3 180 20 … 30
Whole bread Standard tray *
Top and bottom
heating
3 200 30 … 40
Whole bread Standard tray * Fan Heating 3 200 30 … 40
Lasagne
Glass / metal
rectangular con-
tainer on wire grill
**
Top and bottom
heating
2 or 3 200 30 … 40
Apple pie
Round black
metal mould, 20
cm in diameter on
wire grill **
Top and bottom
heating
2 180 50 … 70
Apple pie
Round black
metal mould, 20
cm in diameter on
wire grill **
Fan Heating 2 170 50 … 70
Pizza Standard tray *
Top and bottom
heating
2 200 … 220 10 … 20
EN
IT
EN / 24
Suggestions for cooking with two trays
Food Accessory to be
used
Operating func-
tion
Shelf position Temperature (°C) Baking time
(min) (approx.)
Small cakes
2-Standard tray *
4-Pastry tray *
Fan Heating 2 - 4
On models with
wire shelves :150
On models
without wire
shelves :140
On models with
wire shelves : 25
… 40
On models
without wire
shelves : 30 … 45
Cookie
2-Standard tray *
4-Pastry tray *
Fan Heating 2 - 4 170 25 … 35
Pastry
1-Standard tray *
4-Pastry tray *
Fan Heating 1 - 4 180 35 … 45
Bun
2-Standard tray *
4-Pastry tray *
Fan Heating 2 - 4 180 20 … 30
Preheating is recommended for all food.
*These accessories may not be included with your product.
**These accessories are not included with your product. They are commercially available accessories.
6.1.2 Meat, Fish and Poultry
The key points on grilling
• Seasoning it with lemon juice and pepper
before cooking whole chicken, turkey and
large pieces of meat will increase cook-
ing performance.
• It takes 15 to 30 minutes more to cook
boned meat than fillet by frying.
• You should calculate about 4 to 5
minutes of cooking time per centimetre
of the meat thickness.
• After the cooking time is expired, keep
the meat in the oven for approximately
10 minutes. The juice of the meat is bet-
ter distributed to the fried meat and does
not come out when the meat is cut.
• Fish should be placed on the medium or
low level shelf in a heat resistant plate.
• Cook the recommended dishes in the
cooking table with a single tray.
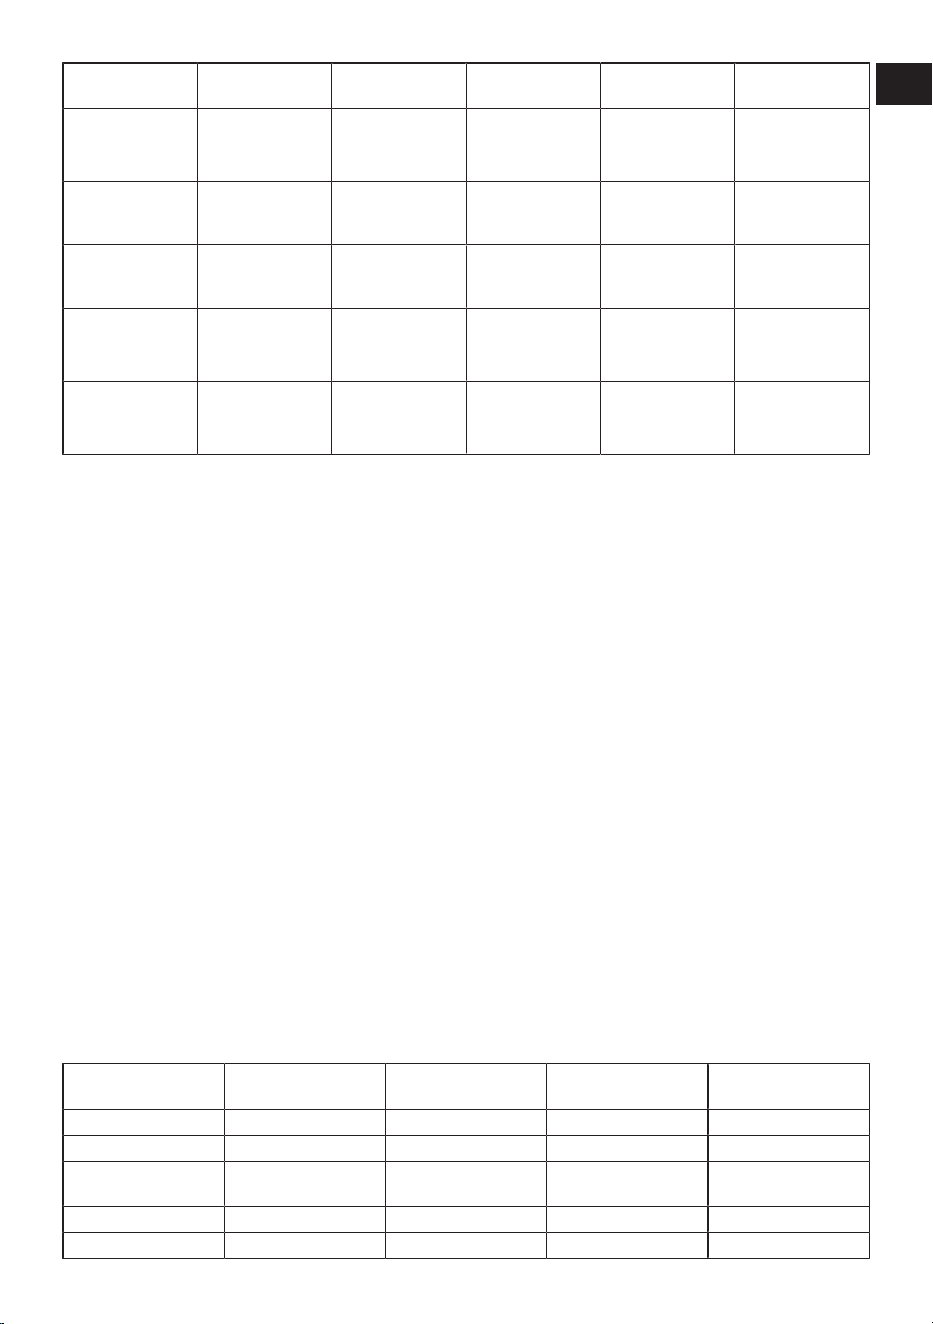
Cooking table for meat, fish and poultry
Food Accessory to be
used
Operating func-
tion
Shelf position Temperature (°C) Baking time
(min) (approx.)
Steak (whole) /
Roast (1 kg)
Standard tray *
Fan assisted bot-
tom/top heating
3
15 mins. 250/
max, after 180 …
190
60 … 80
Lamb's shank
(1,5-2 kg)
Standard tray *
Fan assisted bot-
tom/top heating
3
15 mins. 250/
max, after 170
110 … 120
Fried chicken
(1,8-2 kg)
Wire grill *
Place one tray on
a lower shelf
Fan assisted bot-
tom/top heating
2
15 mins. 250/
max, after 190
60 … 80
Fried chicken
(1,8-2 kg)
Wire grill *
Place one tray on
a lower shelf
Fan Heating 2 200 … 220 60 … 80
EN / 25
Food Accessory to be
used
Operating func-
tion
Shelf position Temperature (°C) Baking time
(min) (approx.)
Fried chicken
(1,8-2 kg)
Wire grill *
Place one tray on
a lower shelf
"3D" function 2
15 mins. 250/
max, after 190
60 … 80
Turkey (5.5 kg) Standard tray *
Fan assisted bot-
tom/top heating
1
25 mins. 250/
max, after 180 …
190
150 … 210
Turkey (5.5 kg) Standard tray * "3D" function 1
25 mins. 250/
max, after 180 …
190
150 … 210
Fish
Wire grill *
Place one tray on
a lower shelf
Fan assisted bot-
tom/top heating
3 200 20 … 30
Fish
Wire grill *
Place one tray on
a lower shelf
"3D" function 3 200 20 … 30
Preheating is recommended for all food.
*These accessories may not be included with your product.
**These accessories are not included with your product. They are commercially available accessories.
6.1.3 Grill
Red meat, fish and poultry meat quickly
turns brown when grilled, holds a beautiful
crust and does not dry out. Fillet meats,
skewer meats, sausages as well as juicy
vegetables (tomatoes, onions, etc.) are par-
ticularly suitable for grilling.
General warnings
• Food not suitable for grilling carries a fire
hazard. Grill only food that is suitable for
heavy grill fire. Also, do not place the
food too far in the back of the grill. This
is the hottest area and fatty foods may
catch fire.
• Close the oven door during grilling.
Never grill with the oven door open.
Hot surfaces may cause burns!
The key points of the grill
• Prepare foods of similar thickness and
weight as much as possible for the grill.
• Place the pieces to be grilled on the wire
grill or wire grill tray by distributing them
without exceeding the dimensions of the
heater.
• Depending on the thickness of the pieces
to be grilled, the cooking times given in
the table may vary.
• Slide the wire grill or the wire grill tray to
the desired level in the oven. If you are
cooking on the wire grill, slide the oven
tray to the lower shelf to collect the oils.
The oven tray you will slide should be
sized to cover the entire grill area. This
tray may not be supplied with the
product. Put some water into the oven
tray for easy cleaning.
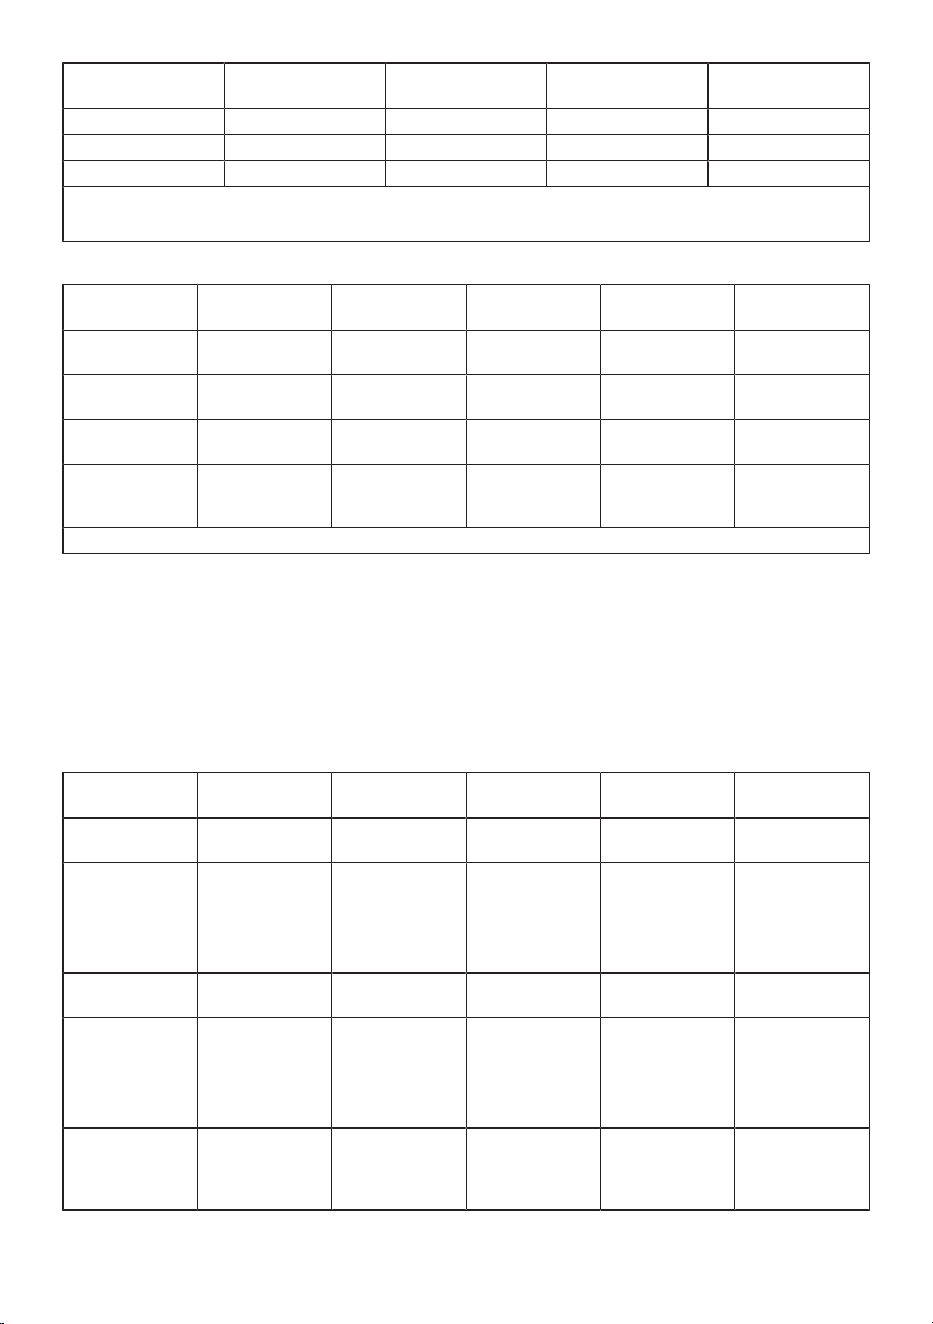
Grill table
Food Accessory to be
used
Shelf position Temperature (°C) Baking time (min)
(approx.)
Fish Wire grill 4 - 5 250 20 … 25
Chicken pieces Wire grill 4 - 5 250 25 … 35
Meatball (veal) - 12
amount
Wire grill 4 250 20 … 30
Lamb chop Wire grill 4 - 5 250 20 … 25
Steak - (meat cubes) Wire grill 4 - 5 250 25 … 30
EN
IT
EN / 26
Food Accessory to be
used
Shelf position Temperature (°C) Baking time (min)
(approx.)
Veal chop Wire grill 4 - 5 250 25 … 30
Vegetable gratin Wire grill 4 - 5 220 20 … 30
Toast bread Wire grill 4 250 1 … 4
It is recommended to preheat for 5 minutes for all grilled food.
Turn pieces of food after 1/2 of the total grilling time.
Fan assisted low grill
Food Accessory to be
used
Operating func-
tion
Shelf position Temperature (°C) Baking time
(min) (approx.)
Fish Wire grill
Fan assisted low
grill
4 200 30 … 35
Chicken pieces Wire grill
Fan assisted low
grill
4 250 25 … 35
Meatball (veal) -
12 amount
Wire grill
Fan assisted low
grill
4 250 30 … 40
Steak (whole) /
Roast (1 kg )
Wire grill - Place
one tray on a
lower shelf
Fan assisted low
grill
3
15 mins. 250,
after 180 … 190
90 … 110
Do not preheat the dishes recommended in this grill chart.
6.1.4 Test foods
• Foods in this cooking table are prepared
according to the EN 60350-1 standard to
facilitate testing of the product for con-
trol institutes.
Cooking table for test meals
Suggestions for baking with a single tray
Food Accessory to be
used
Operating func-
tion
Shelf position Temperature (°C) Baking time
(min) (approx.)
Shortbread (sweet
cookie)
Standard tray *
Top and bottom
heating
3 140 20 … 30
Shortbread (sweet
cookie)
Standard tray * Fan Heating
On models with
wire shelves :3
On models
without wire
shelves :2
140 15 .. 25
Small cakes Standard tray *
Top and bottom
heating
3 160 25 … 35
Small cakes Standard tray * Fan Heating
On models with
wire shelves : 3
On models
without wire
shelves : 2
150 25 … 35
Sponge cake
Round springform
pan, 26 cm in dia-
meter on wire
grill** **
Top and bottom
heating
2 160 30 … 40
EN / 27
Food Accessory to be
used
Operating func-
tion
Shelf position Temperature (°C) Baking time
(min) (approx.)
Sponge cake
Round springform
pan, 26 cm in dia-
meter on wire
grill** **
Fan Heating 2 160 30 … 40
Apple pie
Round black
metal mould, 20
cm in diameter on
wire grill **
Top and bottom
heating
2 180 50 … 70
Apple pie
Round black
metal mould, 20
cm in diameter on
wire grill **
Fan Heating 2 170 50 … 70
Suggestions for cooking with two trays
Food Accessory to be
used
Operating func-
tion
Shelf position Temperature (°C) Baking time
(min) (approx.)
Small cakes
2-Standard tray *
4-Pastry tray *
Fan Heating 2 - 4
On models with
wire shelves :150
On models
without wire
shelves :140
On models with
wire shelves : 25
… 40
On models
without wire
shelves : 30 … 45
Shortbread (sweet
cookie)
2-Standard tray *
4-Pastry tray *
Fan Heating 2 - 4 140 15 … 25
Preheating is recommended for all food.
*These accessories may not be included with your product.
**These accessories are not included with your product. They are commercially available accessories.
Grill
Food Accessory to be
used
Shelf position Temperature (°C) Baking time (min)
(approx.)
Meatball (veal) - 12
amount
Wire grill 4 250 20 … 30
Toast bread Wire grill 4 250 1 … 4
It is recommended to preheat for 5 minutes for all grilled food.
Turn pieces of food after 1/2 of the total grilling time.
7 Maintenance and Cleaning
7.1 General Cleaning Information
General warnings
• Wait for the product to cool before clean-
ing the product. Hot surfaces may cause
burns!
• Do not apply the detergents directly on
the hot surfaces. This may cause per-
manent stains.
• The product should be thoroughly
cleaned and dried after each operation.
Thus, food residues shall be easily
cleaned and these residues shall be pre-
vented from burning when the product is
used again later. Thus, the service life of
the appliance extends and frequently
faced problems are decreased.
• Do not use steam cleaning products for
cleaning.
EN
IT

EN / 28
• Some detergents or cleaning agents
cause damage to the surface. Unsuitable
cleaning agents are: bleach, cleaning
products containing ammonia, acid or
chloride, steam cleaning products, de-
scaling agents, stain and rust removers,
abrasive cleaning products (cream clean-
ers, scouring powder, scouring cream,
abrasive and scratching scrubber, wire,
sponges, cleaning cloths containing dirt
and detergent residues).
• No special cleaning material is needed in
the cleaning made after each use. Clean
the appliance using dishwashing deter-
gent, warm water and a soft cloth or
sponge and dry it with a dry cloth.
• Be sure to completely wipe off any re-
maining liquid after cleaning and immedi-
ately clean any food splashing around
during cooking.
• Do not wash any component of your ap-
pliance in a dishwasher.
Inox - stainless surfaces
• Do not use acid or chlorine-containing
cleaning agents to clean stainless-inox
surfaces and handles.
• Stainless-inox surface may change col-
our in time. This is normal. After each op-
eration, clean with a detergent suitable
for the stainless or inox surface.
• Clean with a soft soapy cloth and liquid
(non-scratching) detergent suitable for
inox surfaces, taking care to wipe in one
direction.
• Remove lime, oil, starch, milk and protein
stains on the glass and inox surfaces im-
mediately without waiting. Stains may
rust under long periods of time.
• Cleaners sprayed/applied to the surface
should be cleaned immediately. Abrasive
cleaners left on the surface cause the
surface to turn white.
Enamelled surfaces
• After each use, clean the enamel sur-
faces using dishwashing detergent,
warm water and a soft cloth or sponge
and dry them with a dry cloth.
• If your product has an easy steam clean-
ing function, you can make easy steam
cleaning for light non-permanent dirt.
(See “Easy Steam Cleaning [}29]”.)
• For difficult stains, an oven and grill
cleaner recommended on the website of
your product brand and a non-scratching
scouring pad can be used. Do not use an
external oven cleaner.
• The oven must cool down before clean-
ing the cooking area. Cleaning on hot sur-
faces shall create both fire hazard and
damage the enamel surface.
Catalytic surfaces
• The side walls in the cooking area can
only be covered with enamel or catalytic
walls. It varies by model.
• The catalytic walls have a light matte and
porous surface. The catalytic walls of the
oven should not be cleaned.
• Catalytic surfaces absorb oil thanks to its
porous structure and start to shine when
the surface is saturated with oil, in this
case it is recommended to replace the
parts.
Glass surfaces
• When cleaning glass surfaces, do not use
hard metal scrapers and abrasive clean-
ing materials. They can damage the
glass surface.
• Clean the appliance using dishwashing
detergent, warm water and a microfiber
cloth specific for glass surfaces and dry
it with a dry microfiber cloth.
• If there is residual detergent after clean-
ing, wipe it with cold water and dry with a
clean and dry microfiber cloth. Residual
detergent may damage the glass surface
next time.
• Under no circumstances should the
dried-up residue on the glass surface be
cleaned off with serrated knives, wire
wool or similar scratching tools.
EN / 29
• You can remove the calcium stains (yel-
low stains) on the glass surface with the
commercially available descaling agent,
with a descaling agent such as vinegar or
lemon juice.
• If the surface is heavily soiled, apply the
cleaning agent on the stain with a sponge
and wait a long time for it to work prop-
erly. Then clean the glass surface with a
wet cloth.
• Discolorations and stains on the glass
surface are normal and not defects.
Plastic parts and painted surfaces
• Clean plastic parts and painted surfaces
using dishwashing detergent, warm wa-
ter and a soft cloth or sponge and dry
them with a dry cloth.
• Do not use hard metal scrapers and ab-
rasive cleaners. They may damage the
surfaces.
• Ensure that the joints of the components
of the product are not left damp and with
detergent. Otherwise, corrosion may oc-
cur on these joints.
7.2 Cleaning Accessories
Do not put the product accessories in a
dishwasher unless otherwise stated in the
user’s manual.
7.3 Cleaning the Control Panel
• When cleaning the panels with knob-con-
trol, wipe the panel and knobs with a
damp soft cloth and dry with a dry cloth.
Do not remove the knobs and gaskets un-
derneath to clean the panel. The control
panel and knobs may be damaged.
• While cleaning the inox panels with knob
control, do not use inox cleaning agents
around the knob. The indicators around
the knob can be erased.
• Clean the touch control panels with a
damp soft cloth and dry with a dry cloth.
If your product has a key lock feature, set
the key lock before performing control
panel cleaning. Otherwise, incorrect de-
tection may occur on the keys.
7.4 Cleaning the inside of the oven
(cooking area)
Follow the cleaning steps described in the
"General Cleaning Information" section ac-
cording to the surface types in your oven.
Cleaning the side walls of the oven
The side walls in the cooking area can only
be covered with enamel or catalytic walls. It
varies by model. If there is a catalytic wall,
refer to the “Catalytic surfaces” section for
information.
If your product is a wire shelf model, re-
move the wire shelves before cleaning the
side walls. Then complete the cleaning as
described in the "General Cleaning Informa-
tion" section according to the side wall sur-
face type.
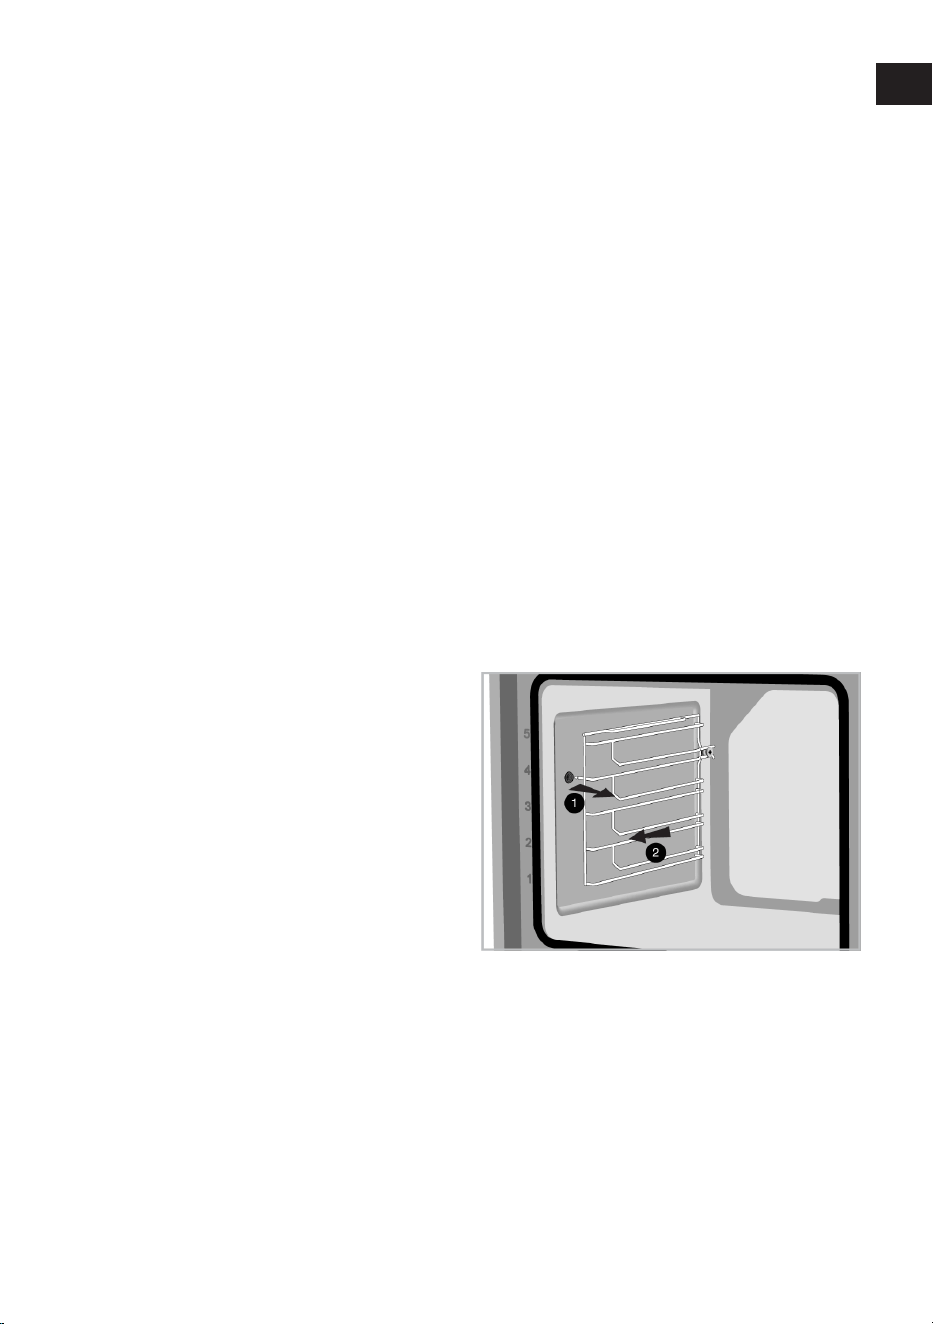
To remove the side wire shelves:
1. Remove the front of the wire shelf by
pulling it on the side wall in the opposite
direction.
2. Pull the wire shelf towards you to re-
move it completely.
3. To reattach the shelves, the procedures
applied when removing them must be
repeated from the end to the beginning,
respectively.
7.5 Easy Steam Cleaning
This allows cleaning of the dirt (not remain-
ing for a long time) that is softened by the
steam inside the oven and by the water
droplets condensed in the internal surfaces
of the oven easily.
1. Remove all accessories inside the oven.
EN
IT
EN / 30
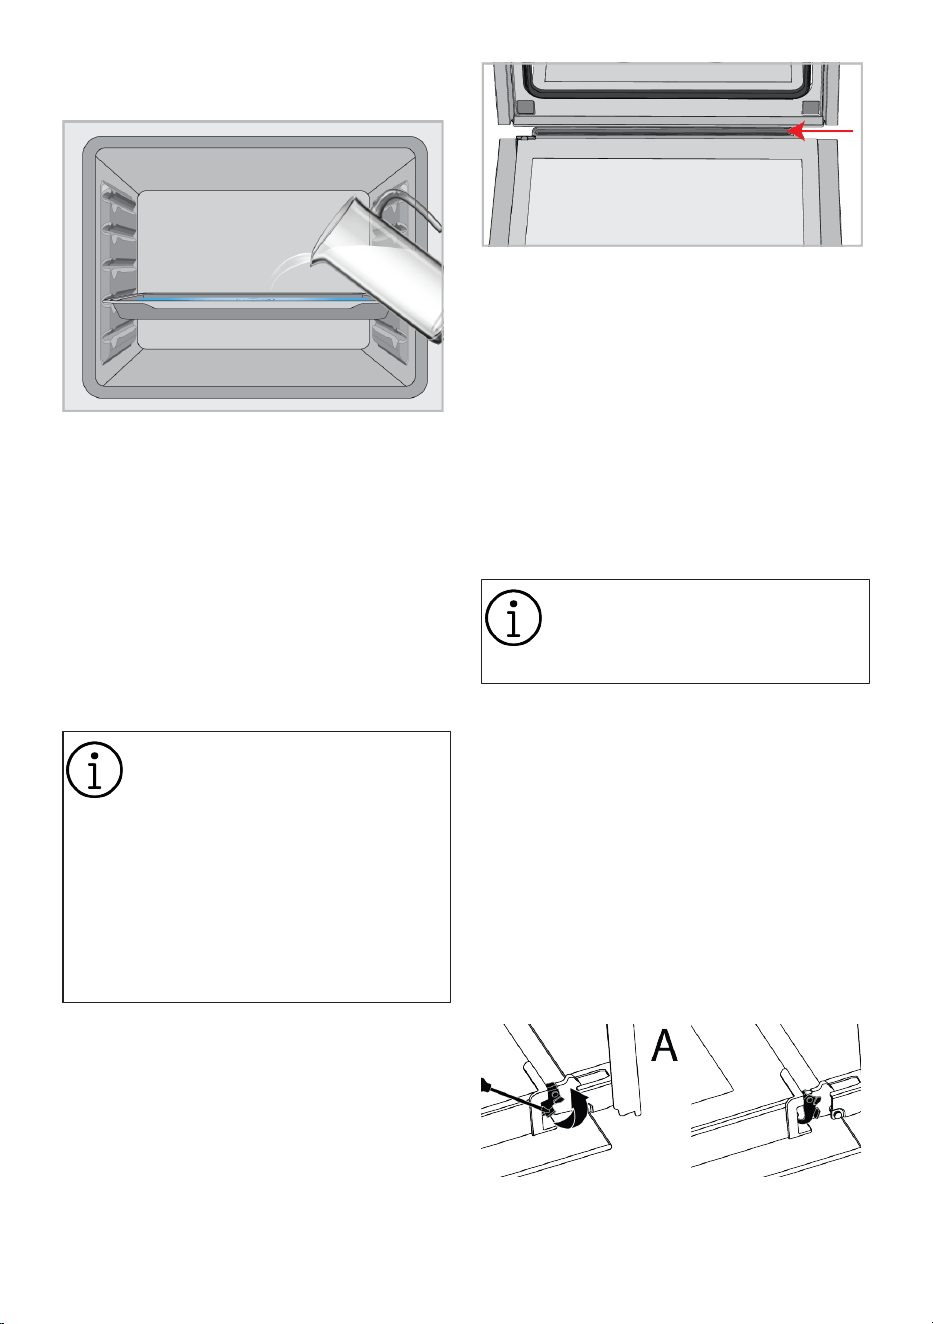
2. Add 500 ml water into the tray and place
it on the 2nd shelf of the oven.
3. Set the oven to the easy steam cleaning
operating mode and operate it at 100°C
for 15 minutes.
Immediately open the door and wipe the
oven interiors with a wet sponge or cloth.
Steam will be released when opening the
door. This may pose a risk of burns. Be
careful when opening the door.
For stubborn dirt, clean the product using
dishwashing detergent, warm water and a
soft cloth or sponge and dry it with a dry
cloth.
In the easy steam cleaning func-
tion, it is expected that the added
water evaporates and condenses
on the inside of the oven and the
oven door in order to soften the
light dirt formed in your oven. Con-
densation formed on the oven door
may drip around when the oven
door is opened. As soon as you
open the oven door, wipe off the
condensation.
(It varies depending on the product model.
It may not be available on your product.)
After the condensation inside the oven,
puddle or moisture may occur in the pool
channel under the oven. Wipe this pool
channel with a damp cloth after use and dry
it.
7.6 Cleaning the Oven Door
You can remove your oven door and door
glasses to clean them. How to remove the
doors and windows is explained in the sec-
tions "Removing the oven door” and "Re-
moving the inner glasses of the door".
After removing the door inner glasses,
clean them using a dishwashing detergent,
warm water and a soft cloth or sponge and
dry them with a dry cloth. For lime residue
that may form on the oven glass, wipe the
glass with vinegar and rinse.
Do not use harsh abrasive cleaners,
metal scrapers, wire wool or bleach
materials to clean the oven door
and glass.
Removing the oven door
1. Open the oven door.
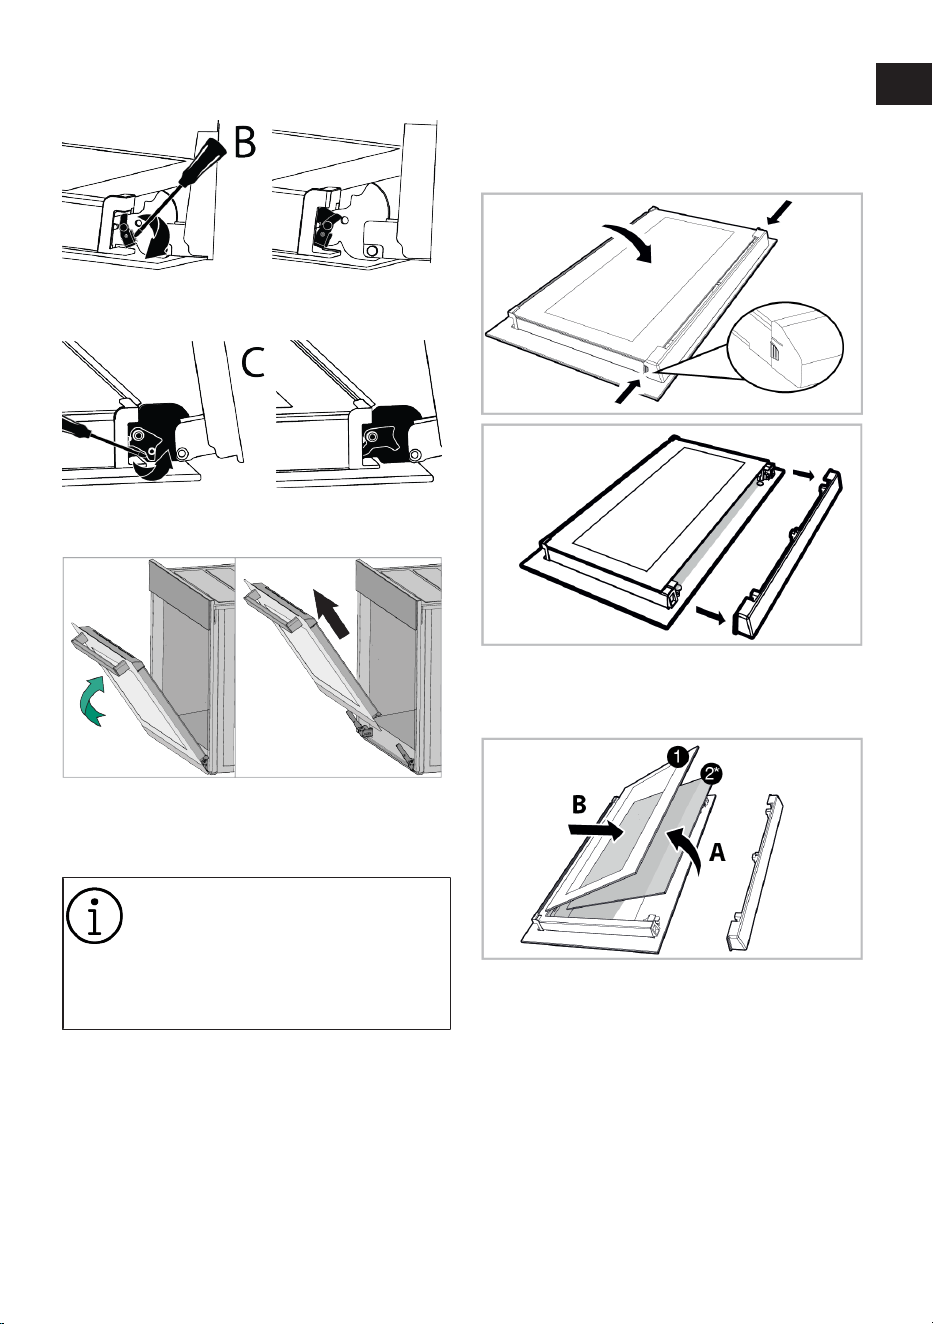
2. Open the clips in the front door hinge
socket on the right and left by pushing
them downwards as shown in the fig-
ure.
3. Hinge types vary as (A), (B), (C) types
according to the product model. The fol-
lowing figures show how to open each
type of hinge.
4. (A) type hinge is available in normal
door types.
EN / 31
5. (B) type hinge is available in soft closing
door types.
6. (C) type hinge is available in soft open-
ing/closing door types.
7. Get the oven door to a half-open posi-
tion.
8. Pull the removed door upwards to re-
lease it from the right and left hinges
and remove it.
To reattach the door, the proced-
ures applied when removing it must
be repeated from the end to the be-
ginning, respectively. When in-
stalling the door, be sure to close
the clips on the hinge socket.
7.7 Removing the Inner Glass of The
Oven Door
Inner glass of the product's front door may
be removed for cleaning.
1. Open the oven door.
2. Pull the plastic component, attached on
the upper section of the front door, to-
wards yourself by simultaneously push-
ing on the pressure points on both sides
of the component and remove it.
3. As shown in the figure, gently lift the in-
nermost glass (1) towards “A” and then,
remove it by pulling towards “B”.
1 Innermost glass 2* Inner glass (it may
not be available for
your product)
4. If your product has an inner glass (2), re-
peat the same process to detach it (2).
5. The first step of regrouping the door is
to reassemble the inner glass (2). Place
the bevelled edge of the glass to meet
the bevelled edge of the plastic slot. (If
EN
IT
EN / 32
your product has an inner glass). Inner
glass (2) must be attached to the plastic
slot closest to the innermost glass (1).
6. While reassembling the innermost glass
(1), pay attention to place the printed
side of the glass on the inner glass. It is
crucial to place the lower corners of the
innermost glass (1) to meet the lower
plastic slots.
7. Push the plastic component towards the
frame until a "click” sound is heard.
7.8 Cleaning the Oven Lamp
In the event that the glass door of the oven
lamp in the cooking area becomes dirty;
clean using dishwashing detergent, warm
water and a soft cloth or sponge and dry
with a dry cloth. In case of oven lamp fail-
ure, you can replace the oven lamp by fol-
lowing the sections that follow.
Replacing the oven lamp
General Warnings
• To avoid the risk of electric shock before
replacing the oven lamp, disconnect the
product and wait for the oven to cool. Hot
surfaces may cause burns!
• This oven is powered by an incandescent
lamp with less than 40 W, less than 60
mm in height, less than 30 mm in dia-
meter, or a halogen lamp with G9 sockets
with less than 60 W power. Lamps are
suitable for operation at temperatures
above 300 °C. Oven lamps are available
from Authorised Services or licensed
technicians. This product contains a G
energy class lamp.
• The position of the lamp may differ from
that is shown in the figure.
• The lamp used in this product is not suit-
able for use in the lighting of home
rooms. The purpose of this lamp is to
help the user see food products.
• The lamps used in this product must
withstand extreme physical conditions
such as temperatures above 50 °C.
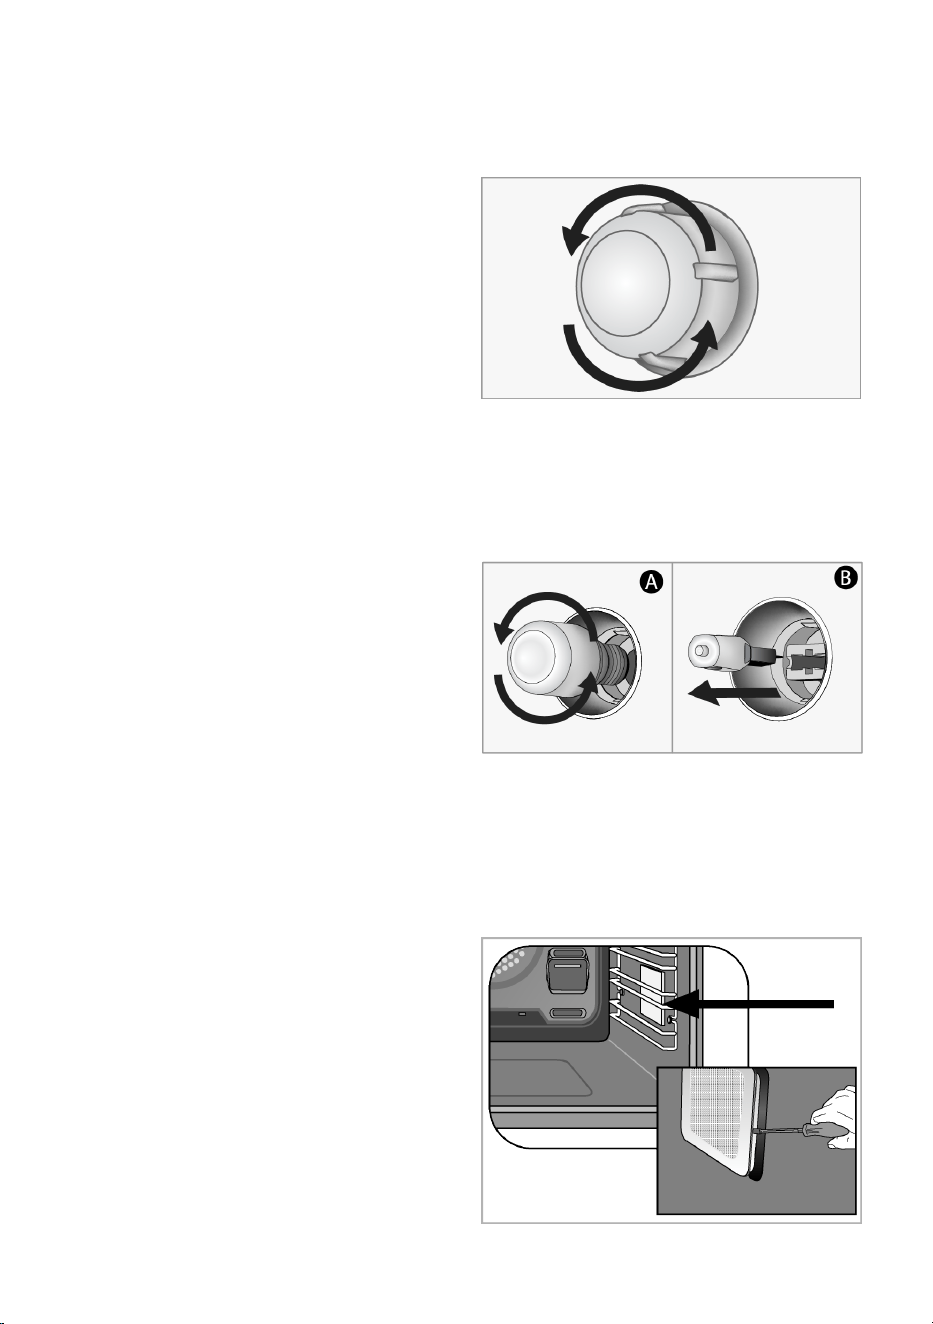
If your oven has a round lamp,
1. Disconnect the product from the electri-
city.
2. Remove the glass cover by turning it
counter clockwise.
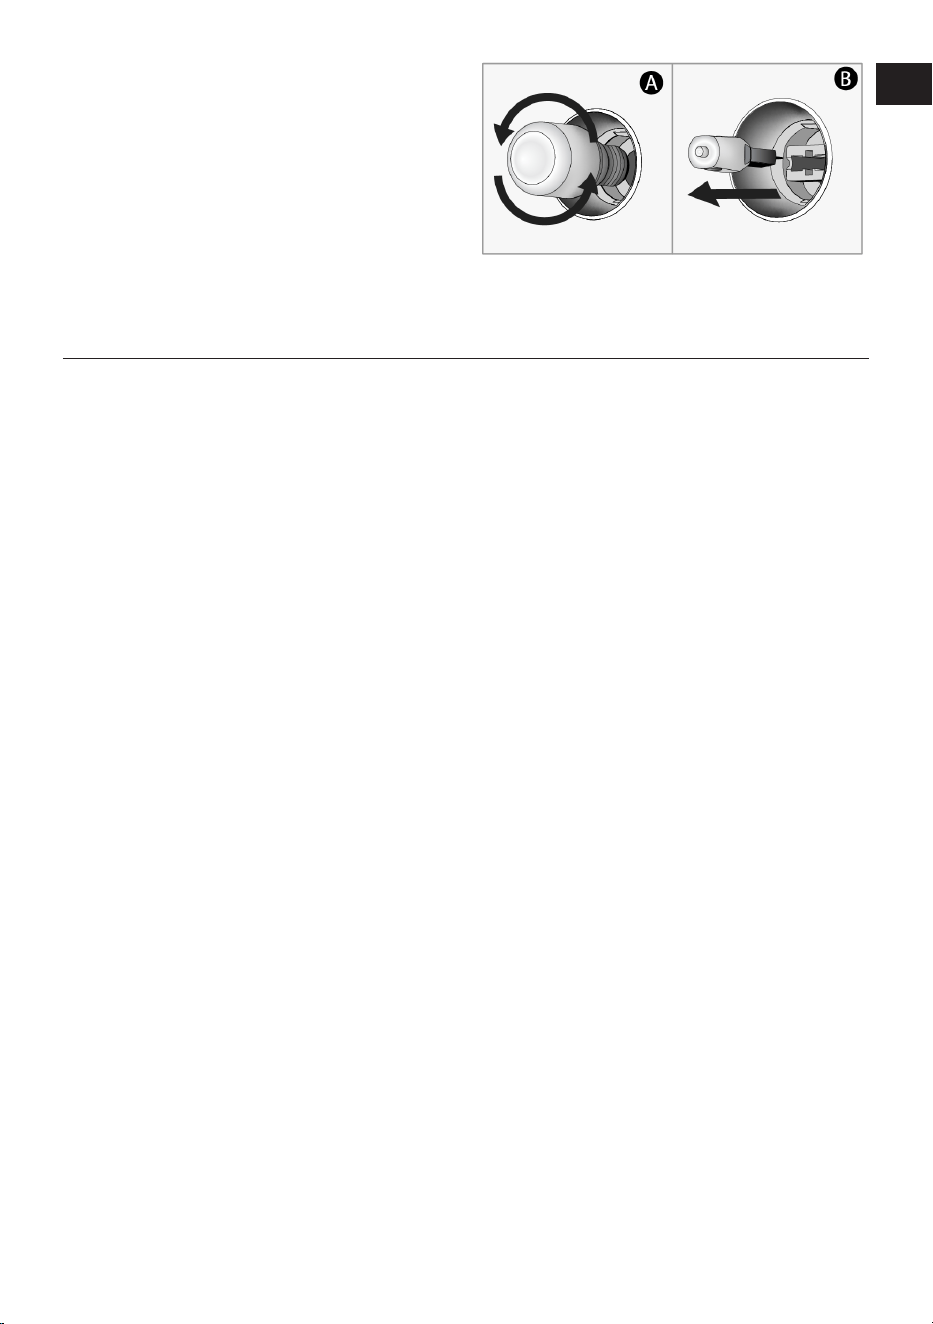
3. If your oven lamp is type (A) shown in
the figure below, rotate the oven lamp
as shown in the figure and replace it
with a new one. If it is type (B) model,
pull it out as shown in the figure and re-
place it with a new one.
4. Refit the glass cover.
If your oven has a square lamp,
1. Disconnect the product from the electri-
city.
2. Remove the wire shelves according to
the description.
EN / 33
3. Lift the lamp's protective glass cover
with a screwdriver. Remove the screw
first, if there is a screw on the square
lamp in your product.
4. If your oven lamp is type (A) shown in
the figure below, rotate the oven lamp
as shown in the figure and replace it
with a new one. If it is type (B) model,
pull it out as shown in the figure and re-
place it with a new one.
5. Refit the glass cover and wire shelves.
8 Troubleshooting
If the problem persists after following the
instructions in this section, contact your
vendor or an Authorized Service. Never try
to repair your product yourself.
Steam is emanated while the oven is work-
ing.
• It is normal to see vapour during opera-
tion. >>> This is not an error.
Water droplets appear while cooking
• The steam generated during cooking
condenses when it comes into contact
with cold surfaces outside the product
and may form water droplets. >>> This is
not an error.
Metal sounds are heard while the product
is warming and cooling.
• Metal parts may expand and make
sounds when heated. >>> This is not an
error.
The product does not work.
• Fuse may be faulty or blown. >>> Check
the fuses in the fuse box. Change them if
necessary or reactivate them.
• The appliance may not be plugged to the
(grounded) outlet. >>> Check if the appli-
ance is plugged in to the outlet.
• (If there is timer on your appliance) Keys
on the control panel do not work. >>> If
your product has a key lock, the key lock
may be enabled, disable the key lock.
Oven light is not on.
• Oven lamp may be faulty. >>> Replace
oven's lamp.
• No electricity. >>> Ensure the mains is
operational and check the fuses in the
fuse box. Change the fuses if necessary
or reactivate them.
Oven is not heating.
• The oven may not be set to a specific
cooking function and/or temperature.
>>> Set the oven to a specific cooking
function and/or temperature.
• No electricity. >>> Ensure the mains is
operational and check the fuses in the
fuse box. Change the fuses if necessary
or reactivate them.
EN
IT
IT / 34
Benvenuto!
Gentile cliente,
Grazie per aver scelto il prodotto Beko . Vogliamo che il tuo prodotto, realizzato con alta
qualità e tecnologia, ti offra la massima efficienza. Quindi, prima di utilizzare il prodotto
leggere con attenzione il presente manuale e qualsiasi altra documentazione fornita in do-
tazione.
Tieni sempre a mente tutte le informazioni e le avvertenze riportate nel manuale d'uso. In
questo modo proteggerai te stesso e il tuo prodotto dai possibili pericoli.
Conserva il manuale d’uso. Qualora cedessi il prodotto a un'altra persona, ti invitiamo a
consegnare anche il manuale. Le condizioni di garanzia, l'uso e i metodi di risoluzione dei
problemi per il vostro prodotto vengono indicati nel presente manuale.
I simboli e le loro descrizioni nel manuale dell'utente:
Pericolo che potrebbe causare morte o lesioni.
Informazioni importanti e consigli utili per l’utilizzo.
Leggi il manuale dell’utente.
Avvertenza: superficie calda.
AVVISO
Pericolo che può causare danni materiali al prodotto o all'ambiente.

IT / 35
Indice
1 Istruzioni relative alla sicurezza .. 36
1.1 Uso previsto................................... 36
1.2 Sicurezza di bambini, persone di-
sabili e animali domestici .............
36
1.3 Sicurezza elettrica......................... 37
1.4 Sicurezza in fase di trasporto....... 39
1.5 Installazione in sicurezza.............. 39
1.6 Utilizzo in sicurezza....................... 39
1.7 Avvertenze sulla temperatura....... 40
1.8 Uso degli accessori....................... 40
1.9 Sicurezza nella cottura.................. 41
1.10 Maintenance and Cleaning Safety 41
2 Istruzioni relative all’ambiente..... 42
2.1 Direttiva sui rifiuti .......................... 42
2.1.1 Conformità con la direttiva
WEEE e smaltimento del pro-
dotto di scarto............................
42
2.2 Informazioni sull'imballaggio ....... 42
2.3 Consigli per risparmiare energia .. 42
3 Il prodotto ...................................... 44
3.1 Presentazione del prodotto .......... 44
3.2 Introduzione e utilizzo del pannel-
lo di controllo del prodotto ...........
44
3.2.1 Pannello di controllo.................. 45
3.2.2 Introduzione al pannello di con-
trollo del forno............................
45
3.3 Funzioni operative del forno......... 45
3.4 Accessori del prodotto.................. 46
3.5 Uso degli accessori del prodotto . 47
3.6 Specifiche tecniche....................... 50
4 Primo utilizzo................................. 51
4.1 Prima impostazione del timer ...... 51
4.2 Pulizia iniziale................................ 51
5 Utilizzo del forno........................... 52
5.1 Informazioni generali sull'uso del
forno...............................................
52
5.2 Funzionamento dell’unità di con-
trollo del forno ...............................
52
6 Informazioni generali sulla cottu-
ra ....................................................
54
6.1 Avvertenze generiche sulla cottu-
ra nel forno.....................................
54
6.1.1 Pasticcini e alimenti da forno ... 55
6.1.2 Carne, pesce e pollame ............. 57
6.1.3 Grill .............................................. 58
6.1.4 Alimenti di prova ........................ 60
7 Manutenzione e pulizia ................. 61
7.1 Informazioni generiche per la pu-
lizia..................................................
61
7.2 Accessori per la pulizia ................. 63
7.3 Pulizia del pannello di controllo.... 63
7.4 Pulizia dell'interno del forno (area
di cottura).......................................
63
7.5 Pulizia a vapore facile.................... 63
7.6 Pulire lo sportello del forno........... 64
7.7 Rimuovere il vetro interno dello
sportello del forno..........................
65
7.8 Pulizia della lampada del forno .... 66
8 Risoluzione dei problemi .............. 67
EN
IT
IT / 36
1 Istruzioni relative alla sicurezza
• Questa sezione contiene istru-
zioni di sicurezza necessarie a
prevenire rischi di lesioni per-
sonali o danni alle cose.
• Se il prodotto viene consegna-
to a un altro utente per uso
personale o di seconda mano,
è necessario provvedere a con-
segnare anche il manuale
d'uso, le etichette del prodotto
e gli altri documenti e parti per-
tinenti.
• La nostra azienda non è re-
sponsabile dei danni collegabi-
li al non rispetto di queste
istruzioni.
• Il mancato rispetto di queste
istruzioni invaliderà anche
qualsiasi garanzia.
• Far sempre eseguire i lavori di
installazione e riparazione dal
produttore, dal servizio di assi-
stenza autorizzato o da una
persona specificata dall'impor-
tatore.
• Utilizzare solo ricambi e acces-
sori originali.
• Non riparare o sostituire alcun
componente del prodotto, a
meno che non sia chiaramente
specificato nel manuale d’uso.
• Non effettuare modifiche tec-
niche al prodotto.
1.1 Uso previsto
• Questo prodotto è progettato
per essere usato in casa. Non
è utilizzabile per scopi com-
merciali.
• Non utilizzare il prodotto in
giardini, balconi o altri ambien-
ti all’aperto. Questo prodotto è
destinato ad essere utilizzato
nelle abitazioni e nelle cucine
del personale di negozi, uffici e
altri ambienti di lavoro.
• AVVERTENZA:Questo prodot-
to deve essere usato unica-
mente per cuocere. Non do-
vrebbe essere usato per altri
scopi come riscaldare un am-
biente.
• Il forno può essere utilizzato
per scongelare, cuocere, frig-
gere e grigliare il cibo.
• Questo prodotto non deve es-
sere usato per riscaldare, ri-
scaldare la piastra, asciugare
asciugamani o vestiti appen-
dendoli alla maniglia.
1.2 Sicurezza di bambi-
ni, persone disabili e
animali domestici
• Questo prodotto può essere
utilizzato da bambini dagli 8
anni in su e da persone che
non sono in grado di sviluppa-

IT / 37
re le proprie capacità fisiche,
sensoriali o mentali, o che non
hanno esperienza e conoscen-
za, purché siano sorvegliati o
addestrati sull'uso sicuro e sui
pericoli legati all’uso del pro-
dotto.
• I bambini non devono giocare
con il prodotto. Gli interventi di
pulizia e manutenzione non
vanno eseguiti dai bambini a
meno che non siano supervi-
sionati da una persona adulta.
• Questo prodotto non deve es-
sere utilizzato da persone con
capacità fisiche, sensoriali o
mentali limitate (inclusi i bam-
bini), a meno che non siano te-
nute sotto controllo o non rice-
vano le necessarie istruzioni.
• Sorvegliare i bambini per evita-
re che giochino con il prodotto.
• I dispositivi elettrici sono peri-
colosi per i bambini e gli ani-
mali domestici. I bambini e gli
animali domestici non devono
giocare, salire o entrare nel for-
no.
• Non mettere sul forno oggetti
che i bambini potrebbero rag-
giungere.
• AVVERTENZA: Durante l'uso,
le superfici accessibili del pro-
dotto sono calde. Tenere i
bambini lontano dal forno.
• Tenere i materiali da imballag-
gio fuori dalla portata dei bam-
bini. Si rischiano lesioni e sof-
focamento.
• Quando lo sportello è aperto,
non metterci sopra oggetti pe-
santi e non lasciare che i bam-
bini ci si siedano sopra. Si po-
trebbe provocare il ribaltamen-
to del forno o danneggiare le
cerniere dello sportello.
• Per la sicurezza dei bambini,
prima di smaltire il prodotto,
tagliare la spina di alimentazio-
ne e rendere il prodotto inutiliz-
zabile.
1.3 Sicurezza elettrica
• Collegare il prodotto a una pre-
sa dotata di messa a terra pro-
tetta da uno fusibile del valore
indicato dall'etichetta. Fare in
modo che la messa a terra
venga eseguita da un elettrici-
sta qualificato. In conformità
con le normative locali/nazio-
nali, non utilizzare il prodotto
senza messa a terra.
• La spina o il collegamento elet-
trico del prodotto deve essere
in un luogo facilmente accessi-
bile (non influenzato, per
esempio, dalla fiamma di un
piano cottura). Qualora ciò non
fosse possibile, sull'impianto
elettrico al quale il prodotto è
collegato dovrebbe essere pre-
EN
IT

IT / 38
sente un meccanismo (fusibi-
le, interruttore, commutatore,
ecc.) nel rispetto delle norme
elettriche e che separi tutti i
poli dalla rete.
• Il prodotto non deve essere
collegato alla presa di corrente
durante l'installazione, la ripa-
razione e il trasporto.
• Inserire il prodotto in una presa
conforme ai valori di tensione
e frequenza specificati nella
targhetta d’identificazione.
• Se il prodotto non dispone di
un cavo di alimentazione, ser-
virsi unicamente del cavo di
alimentazione descritto nella
sezione “Specifiche tecniche”.
• Non inceppare il cavo di ali-
mentazione sotto e dietro il
prodotto. Non appoggiare og-
getti pesanti sul cavo di ali-
mentazione. Il cavo di alimen-
tazione non deve essere piega-
to, schiacciato e non deve ve-
nire a contatto con alcuna fon-
te di calore.
• Quando è in uso, la superficie
posteriore del forno diventa
calda. I cavi di alimentazione
non devono dunque toccare la
superficie posteriore, i collega-
menti potrebbero danneggiar-
si.
• Non incastrare i cavi elettrici
nello sportello del forno e non
passarli su superfici calde. In
caso contrario, l'isolamento
dei cavi potrebbe fondersi e
causare incendi a causa di un
corto circuito.
• Utilizzare solo il cavo originale.
Non utilizzare cavi tagliati o
danneggiati o cavi intermedi.
• Se il cavo di alimentazione è
danneggiato, al fine di preveni-
re possibili pericoli, deve esse-
re sostituito dal produttore, da
un servizio autorizzato o da
una persona da specificare da
parte dell'azienda importatrice.
• AVVERTENZA: Prima di sosti-
tuire la lampada del forno, per
evitare scosse elettriche, assi-
curarsi di scollegare il prodotto
dalla rete elettrica. Scollegare
il prodotto o spegnere il fusibi-
le dalla scatola dei fusibili.
Se il prodotto è dotato di cavo di
alimentazione e spina:
• Non inserire il prodotto in una
presa di corrente che sia allen-
tata, che sia uscita dalla sua
cavità, che sia rotta, sporca,
oleosa, con rischio di contatto
con l'acqua (ad esempio, ac-
qua che potrebbe fuoriuscire
dal contatore).
IT / 39
• Non toccare la presa con le
mani umide! Non scollegare
mai tirando il cavo, estrarre
sempre la presa.
• Per evitare la formazione di ar-
chi elettrici, assicurarsi che la
spina del prodotto sia salda-
mente inserita nella presa di
corrente.
1.4 Sicurezza in fase di
trasporto
• Scollegare il prodotto dalla re-
te elettrica prima di trasportar-
lo.
• Il prodotto è pesante, è consi-
gliato il trasporto del prodotto
con almeno due persone.
• Per trasportare o spostare il
prodotto non utilizzare lo spor-
tello e/o la maniglia.
• Non mettere altri oggetti sul
prodotto e trasportare il pro-
dotto in posizione verticale.
• Quando si deve trasportare il
prodotto, avvolgerlo con mate-
riale da imballaggio a bolle
d'aria o cartone spesso e le-
garlo con del nastro adesivo.
Per evitare che le parti rimovi-
bili o mobili del prodotto e il
prodotto stesso si danneggino,
fissare saldamente il prodotto
con del nastro adesivo.
• Controllare l'aspetto generale
del prodotto per eventuali dan-
ni che potrebbero essersi veri-
ficati durante il trasporto.
1.5 Installazione in sicu-
rezza
• Prima di installare il prodotto,
controllare che non sia dan-
neggiato. Se è danneggiato,
non procedere alla sua installa-
zione.
• Non installare il prodotto vici-
no a fonti di calore (radiatori,
stufe, ecc.).
• Tenere aperti i dintorni di tutti i
condotti di ventilazione del
prodotto.
• Per evitare il surriscaldamento,
il prodotto non deve essere in-
stallato dietro porte decorati-
ve.
1.6 Utilizzo in sicurezza
• Assicurarsi che il prodotto ven-
ga spento dopo ogni utilizzo.
• Se non si utilizza il prodotto
per un lungo periodo di tempo,
scollegarlo o spegnere il fusibi-
le dalla scatola dei fusibili.
• Non utilizzare il prodotto difet-
toso o danneggiato. Se presen-
ti, scollegare i collegamenti
elettricità/gas del prodotto e
chiamare il servizio di assi-
stenza autorizzato.
EN
IT

IT / 40
• Non utilizzare l'apparecchiatu-
ra se il vetro dello sportello an-
teriore è stato rimosso o si è
incrinato.
• Non salire sul prodotto per rag-
giungere qualcosa o per qual-
siasi altro motivo.
• Non utilizzare mai il prodotto
quando il vostro giudizio o la
vostra coordinazione sono
compromessi dall'uso di alcol
e/o droghe.
• Gli oggetti infiammabili tenuti
nell’area di cottura potrebbero
prendere fuoco. Non conserva-
re mai oggetti infiammabili
nell’area di cottura.
• La maniglia del forno non è un
asciugamano. Quando si utiliz-
za il prodotto, non appendere
asciugamani, guanti o tessuti
simili alla maniglia.
• Le cerniere dello sportello del
prodotto si muovono quando
si apre e si chiude la porta e
potrebbero bloccarsi. Quando
si apre/chiude lo sportello, non
tenere la parte con le cerniere.
1.7 Avvertenze sulla
temperatura
• AVVERTENZA: Le parti acces-
sibili del prodotto saranno cal-
de durante l'uso. Fare attenzio-
ne a non toccare il prodotto e i
suoi elementi riscaldanti. I
bambini di età inferiore agli 8
anni non dovrebbero avvicinar-
si al prodotto se non accompa-
gnati da un adulto.
• Non posizionare materiali in-
fiammabili/esplosivi vicino al
prodotto, in quanto i bordi du-
rante il funzionamento saran-
no caldi.
• Poiché il vapore può essere
espirato, tenerlo lontano men-
tre si apre lo sportello del for-
no. Il vapore potrebbe provoca-
re bruciature a mani, viso e/o
occhi.
• Durante il funzionamento il
prodotto potrebbe surriscal-
darsi. Fare attenzione a non
toccare le parti calde, l'interno
del forno e gli elementi riscal-
danti.
• Usare sempre guanti da forno
resistenti al calore quando si
mette il cibo nel forno caldo, o
si toglie il cibo dal forno caldo,
ecc.
1.8 Uso degli accessori
• È importante che il grill in filo
metallico e il vassoio siano po-
sizionati correttamente sui ri-
piani in filo metallico. Per infor-
mazioni dettagliate, consultare
la sezione "Uso degli acces-
sori".

IT / 41
• Gli accessori possono danneg-
giare il vetro dello sportello
quando lo si chiude. Spingere
sempre gli accessori all'estre-
mità dell’area di cottura.
1.9 Sicurezza nella cot-
tura
• Prestare attenzione quando si
usano bevande alcoliche nei
piatti. L'alcol evapora a tempe-
rature elevate e può causare
incendi, dato che può incen-
diarsi quando entra in contatto
con superfici calde.
• Gli scarti di cibo, l'olio, ecc. nel-
la zona di cottura potrebbero
prendere fuoco. Prima della
cottura, rimuovere lo sporco in
eccesso.
• Pericolo di avvelenamento da
cibo: Non lasciare il cibo nel
forno per più di 1 ora prima o
dopo la cottura. In caso con-
trario, si potrebbero causare in-
tossicazioni alimentari o ma-
lattie.
• Non riscaldare lattine e barat-
toli di vetro chiusi nel forno. La
pressione che si accumulereb-
be nella lattina/barattolo po-
trebbe causarne lo scoppio.
• Posizionare nel forno preriscal-
dato della carta oleata in una
pentola o sull'accessorio da
forno (vassoio, grill a filo, ecc.).
Per evitare che tocchino ele-
menti del riscaldatore, rimuo-
vere eventuali pezzi eccessivi
di carta oleata appesi all'ac-
cessorio o al contenitore. Non
utilizzare mai carta anti-grasso
a una temperatura del forno
superiore alla temperatura
massima di utilizzo specificata
sulla carta anti-grasso utilizza-
ta. Non mettere mai carta olea-
ta sulla base del forno.
• Non collocare teglie, piatti o fo-
gli di alluminio direttamente
sul fondo del forno. Il calore
accumulato potrebbe danneg-
giare il fondo del forno.
• Durante la cottura alla griglia,
chiudere lo sportello del forno.
Le superfici calde potrebbero
causare ustioni!
• Gli alimenti non adatti alla cot-
tura al grill determinano un ri-
schio di incendio. Grigliare so-
lo cibi adatti alla cottura al
grill. Inoltre, non mettere il cibo
troppo in fondo (internamente)
al grill. Questa è la zona più
calda e i cibi grassi potrebbero
prendere fuoco.
1.10 Maintenance and
Cleaning Safety
• Attendere che il prodotto si raf-
freddi prima di pulirlo. Le su-
perfici calde potrebbero causa-
re ustioni!
EN
IT
IT / 42
• Non lavare il prodotto spruz-
zando o versandovi acqua! C'è
rischio di scossa elettrica!
• Non utilizzare pulitori a vapore
per pulire il prodotto, poiché
ciò potrebbe causare una
scossa elettrica.
• Per pulire il vetro anteriore del-
lo sportello del forno/(se pre-
sente) il vetro superiore dello
sportello del forno, non utiliz-
zare detergenti abrasivi ag-
gressivi, raschietti metallici,
pagliette d’acciaio o candeggi-
na. Questi materiali possono
causare graffi e rotture delle
superfici di vetro.
• Mantenere sempre pulito e
asciutto il pannello di control-
lo. Una superficie umida e
sporca può causare problemi a
livello di funzionamento delle
funzioni.
2 Istruzioni relative all’ambiente
2.1 Direttiva sui rifiuti
2.1.1 Conformità con la direttiva WEEE
e smaltimento del prodotto di
scarto
Questo prodotto è conforme alla direttiva
WEEE dell'UE (2012/19/EU). Questo prodot-
to porta un simbolo di classificazione per la
strumentazione elettrica ed elettronica di
scarto (WEEE).
Questo prodotto è stato realiz-
zato con componenti di alta
qualità e materiali che possono
essere riutilizzati e sono idonei
a essere riciclati. Pertanto, al
termine del suo ciclo di vita uti-
le, non smaltire il prodotto con i normali ri-
fiuti domestici e altri rifiuti. Portare il pro-
dotto ha un centro di raccolta per il riciclag-
gio delle apparecchiature elettriche ed elet-
troniche. Chiedere alla propria amministra-
zione locale informazioni su questi punti di
raccolta. Lo smaltimento corretto dell'appa-
recchio aiuta a prevenire conseguenze ne-
gative per l'ambiente e la salute umana.
Conformità con la direttiva RoHS:
Il prodotto acquistato è conforme con la Di-
rettiva UE RoHS (2011/65/EU). Non contie-
ne materiali dannosi e proibiti e indicati nel-
la Direttiva.
2.2 Informazioni sull'imballaggio
I materiali che compongono l'imballaggio
del prodotto sono realizzati a partire da ma-
teriali riciclabili in conformità con le nostre
Normative Ambientali Nazionali. Non smal-
tire i rifiuti di imballaggio con i rifiuti dome-
stici o altri rifiuti, portarli presso i punti di
raccolta del materiale di imballaggio indica-
ti dalle autorità locali.
2.3 Consigli per risparmiare energia
Secondo l'UE 66/2014, le informazioni
sull'efficienza energetica si trovano sullo
scontrino/ricevuta forniti con il prodotto.
I suggerimenti seguenti aiuteranno a utiliz-
zare il prodotto in modo ecologico ed effi-
cace dal punto di vista energetico.
• Scongelare i cibi congelati prima della
cottura.
• Nel forno, utilizzare contenitori scuri o
smaltati che trasmettono meglio il calo-
re.

IT / 43
• Se specificato nella ricetta o nel manuale
utente, preriscaldare sempre. Non aprire
lo sportello del forno frequentemente du-
rante la cottura.
• Nella cottura prolungata, spegnere il pro-
dotto da 5 a 10 minuti prima del termine
della cottura. In questo modo è possibile
risparmiare fino al 20% di elettricità utiliz-
zando solo il calore residuo.
• Provare a cucinare nel forno più di un
piatto alla volta. Si potrà cucinare con-
temporaneamente mettendo due pentole
sulla griglia. Inoltre, se si cucinano i pasti
uno dopo l'altro, si risparmia energia per-
ché il forno non perde il suo calore.
EN
IT
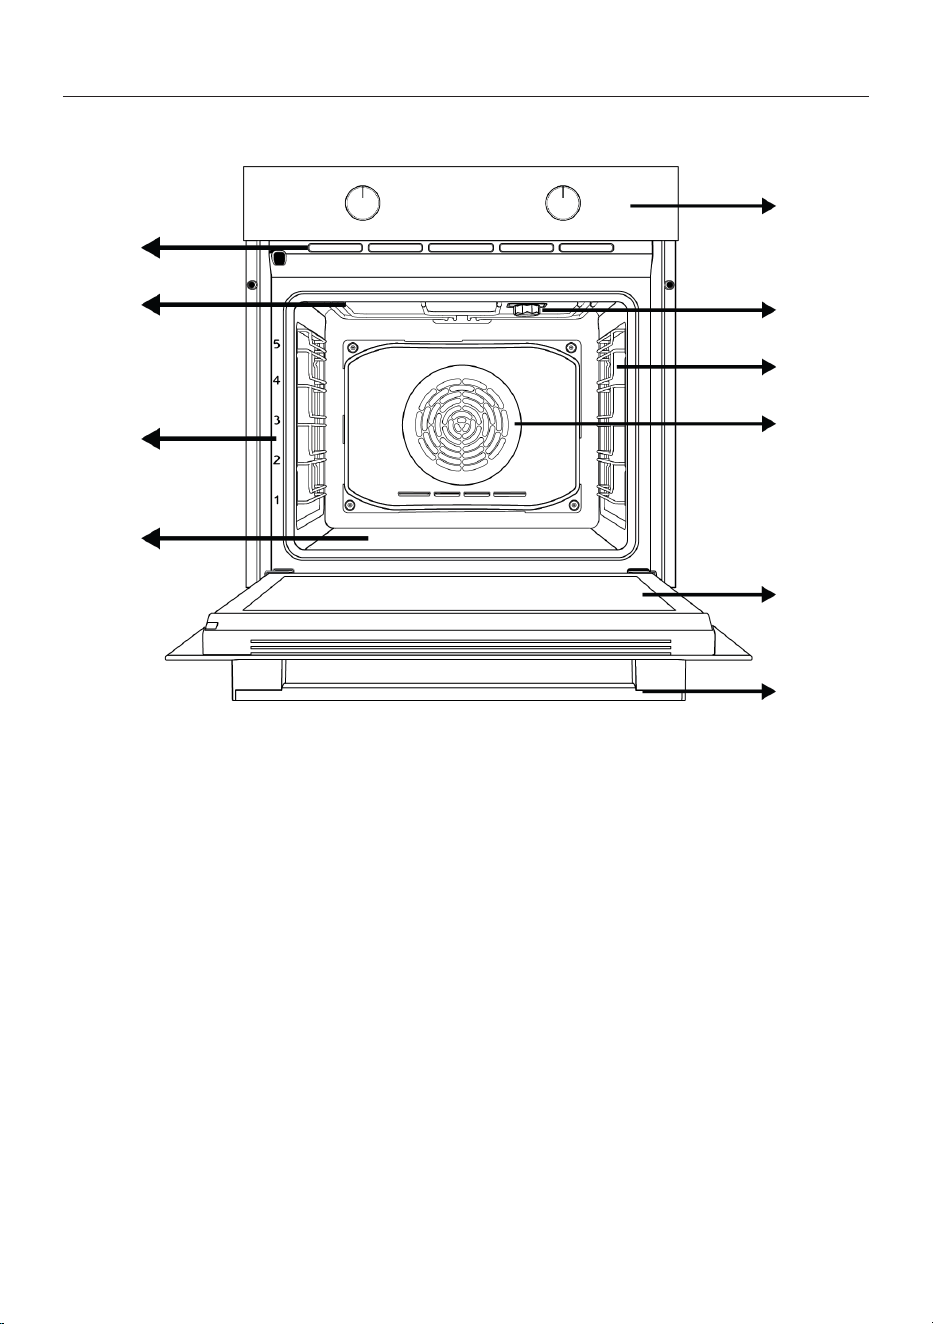
IT / 44
3 Il prodotto
3.1 Presentazione del prodotto
1
2
3
4
5
6
7
8
9
10
*
**
1 Pannello di controllo 2 Lampada
3 Ripiani a filo 4 Motorino ventola (dietro alla piastra
in acciaio)
5 Sportello 6 Maniglia
7 Riscaldatore inferiore (sotto la pia-
stra d'acciaio)
8 Posizioni del ripiano
9 Riscaldatore superiore 10 Fori di ventilazione
*
Varia a seconda del modello. Il proprio prodotto
potrebbe non avere una lampada, o il tipo e la po-
sizione della lampada potrebbero differire dall'il-
lustrazione.
**
Varia a seconda del modello. Il proprio prodotto
potrebbe non essere dotato di griglia. Nell'imma-
gine, viene mostrato come esempio un prodotto
con griglia.
3.2 Introduzione e utilizzo del pannel-
lo di controllo del prodotto
In questa sezione è possibile trovare la pa-
noramica e gli usi di base del pannello di
controllo del prodotto. A seconda della ti-
pologia di prodotto, ci potrebbero essere
differenze nelle immagini e in alcune delle
funzionalità o caratteristiche presentate.
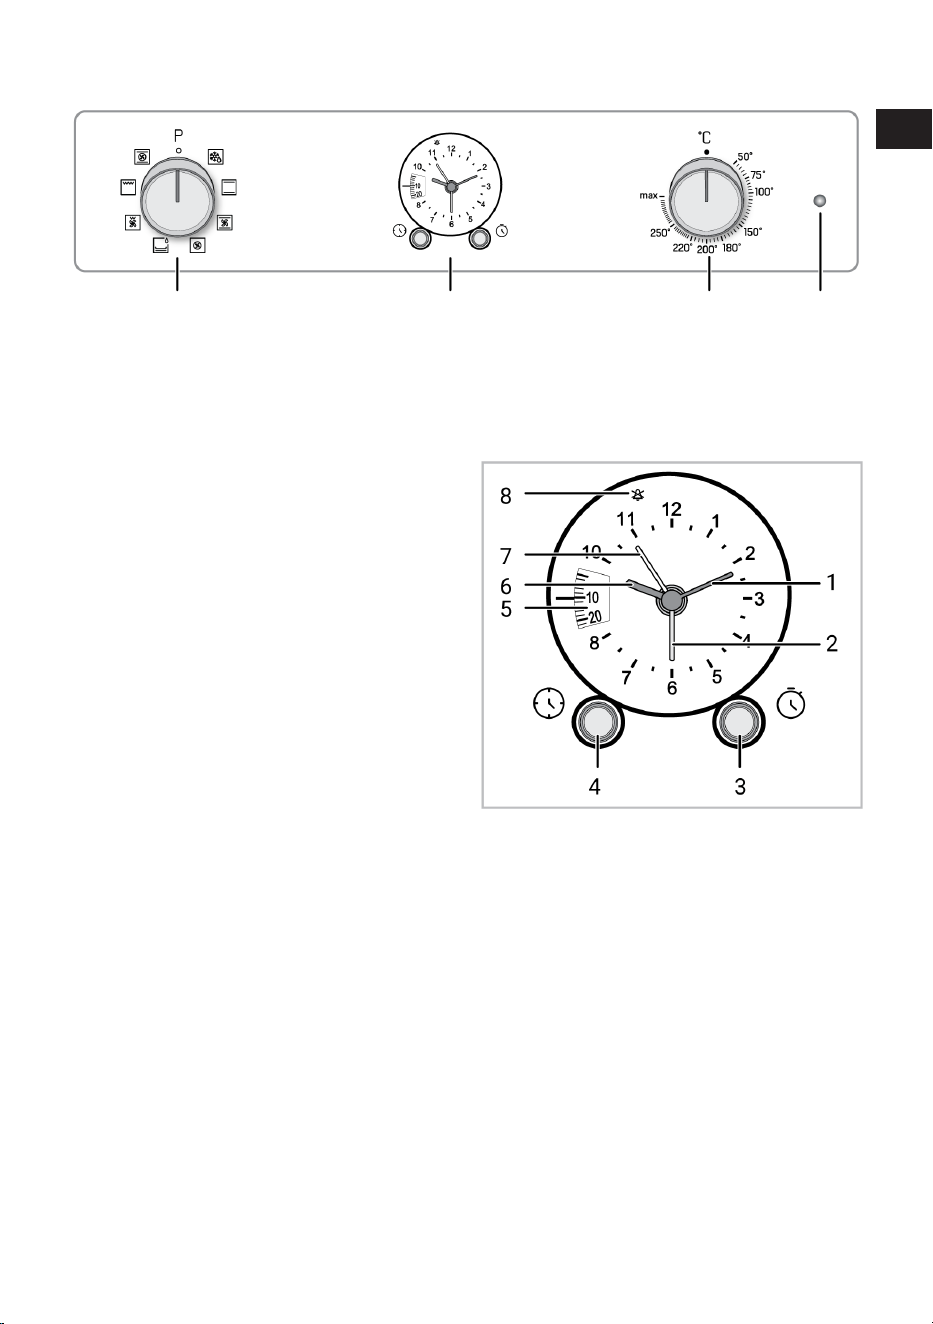
IT / 45
3.2.1 Pannello di controllo
1 2 3 4
1 Manopola selezione funzione 2 Timer
3 Manopola di selezione della tempera-
tura
4 Lampada termostato
Se ci sono delle manopole che controllano
il prodotto, in alcuni modelli queste mano-
pole possono essere tali da uscire quando
vengono premute (manopole a scompar-
sa). Per effettuare le impostazioni con que-
ste manopole, spingere prima la relativa
manopola ed estrarla. Dopo aver effettuato
la regolazione, premerla di nuovo per riposi-
zionarla.
3.2.2 Introduzione al pannello di con-
trollo del forno
Manopola di selezione delle funzioni
È possibile selezionare le funzioni operative
del forno tramite la manopola di selezione
funzioni. Girare a sinistra/destra dalla posi-
zione chiusa (in alto) per selezionare.
Manopola della temperatura
È possibile selezionare la temperatura che
si desidera cucinare con la manopola della
temperatura. Ruotare in senso orario dalla
posizione chiusa (in alto) per selezionare.
Indicatore di temperatura interna del forno
È possibile conoscere la temperatura inter-
na del forno dalla spia della temperatura.
La spia del termostato si trova sul pannello
di controllo. La spia del termostato si ac-
cende quando il prodotto inizia a funziona-
re e la spia del termostato si spegne quan-
do raggiunge la temperatura impostata.
Quando la temperatura all'interno del forno
scende al di sotto della temperatura impo-
stata, la spia del termostato si riaccende.
Timer
1 Lancetta piccola (oro)
2 Inizio della cottura (arancione)
3 Manopola di regolazione ora di cottura/fine cottu-
ra
4 Manopola di regolazione ora del giorno
5 Display tempo di cottura
6 Lancetta dell’ora (oro)
7 Lancetta sveglia (gialla)
8 Simbolo di annullamento della sveglia
3.3 Funzioni operative del forno
Nella tabella delle funzioni sono indicate le
funzioni operative utilizzabili del forno e le
temperature massime e minime configura-
bili per queste funzioni. L'ordine delle mo-
dalità operative qui riportate potrebbe diffe-
rire da quello del proprio prodotto.
EN
IT
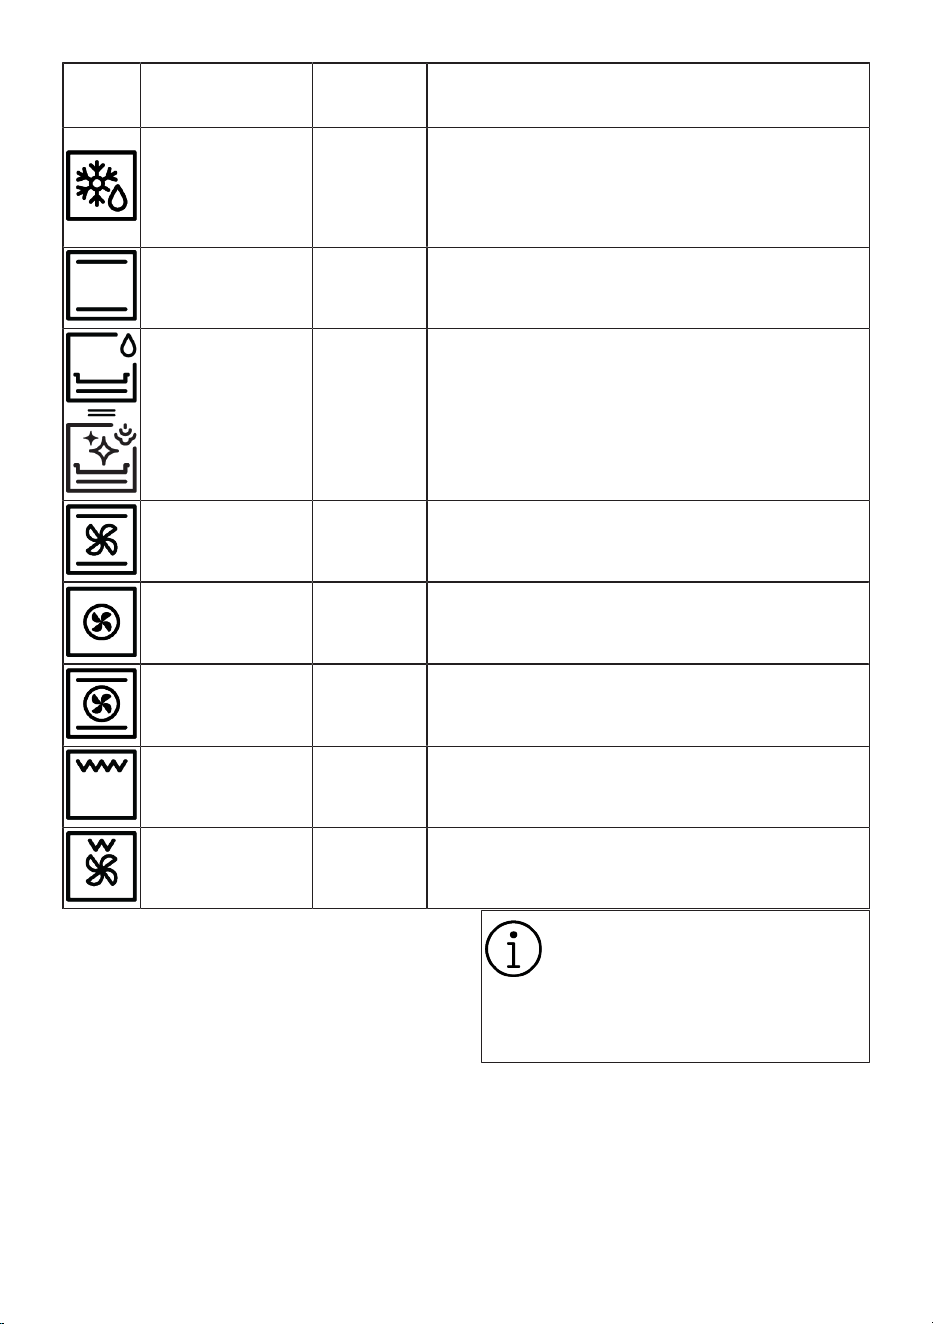
IT / 46
Simbolo
della fun-
zione
Descrizione della fun-
zione
Intervallo di
temperatura
(°C)
Descrizione e utilizzo
Funzionamento con
ventola
-
Il forno non si riscalda. Funziona solo la ventola (sulla parete
posteriore). Il cibo congelato con i granuli viene scongelato
lentamente a temperatura ambiente, il cibo cotto viene raffred-
dato. Il tempo necessario per scongelare un pezzo intero di
carne è maggiore di quello necessario per gli alimenti con ce-
reali.
Riscaldamento superio-
re e inferiore
*
Il cibo viene riscaldato dall'alto e dal basso contemporanea-
mente. Adatta per torte, pasticcini o torte e stufati in stampi da
forno. La cottura viene effettuata con un solo vassoio.
Riscaldamento inferio-
re
*
È acceso solo il riscaldamento inferiore. È adatto per alimenti
che necessitano di rosolatura sulla parte inferiore. Questa fun-
zione dovrebbe essere utilizzata anche per una facile pulizia a
vapore.
Riscaldamento a vento-
la superiore/inferiore
*
Grazie alla ventola, l'aria calda riscaldata dai riscaldatori supe-
riore e inferiore viene distribuita equamente e rapidamente in
tutto il forno. La cottura viene effettuata con un solo vassoio.
Riscaldamento ventola *
Grazie alla ventola, l'aria calda riscaldata dal riscaldatore supe-
riore viene distribuita equamente e rapidamente in tutto il for-
no. È adatta per la cottura a più vassoi e con diversi livelli di ri-
piano.
Funzione "3D" *
In questo caso, sono in funzione il riscaldamento superiore,
quello inferiore e il riscaldamento con ventola. Ogni lato
dell’alimento da cuocere viene cotto in modo uguale e veloce.
La cottura viene effettuata con un solo vassoio.
Grill completo *
Funziona il grill grande sulla parte superiore del forno. Adatta
per grigliare grandi quantità di cibo.
Girarrosto con grill bas-
so
*
Grazie alla ventola, l'aria calda riscaldata dal grill più piccolo
viene distribuita rapidamente in tutto il forno. Adatta per gri-
gliare quantità ridotte di cibo.
* Il prodotto funziona nell'intervallo di tem-
peratura specificato sulla manopola della
temperatura.
3.4 Accessori del prodotto
Il prodotto è dotato di vari accessori. Que-
sta sezione contiene la descrizione degli
accessori e del loro corretto utilizzo. A se-
conda del modello, l'accessorio fornito po-
trebbe variare. Non tutti gli accessori de-
scritti nel manuale d'uso potrebbero essere
disponibili sul proprio prodotto.
I vassoi all’interno dell’elettrodome-
stico potrebbero deformarsi a cau-
sa del calore. Ciò non influisce sulla
funzionalità. La deformazione
scompare quando il vassoio viene
raffreddato.
Vassoio standard
Viene utilizzato per la pasticceria, per i sur-
gelati e per la frittura di grandi pezzi.
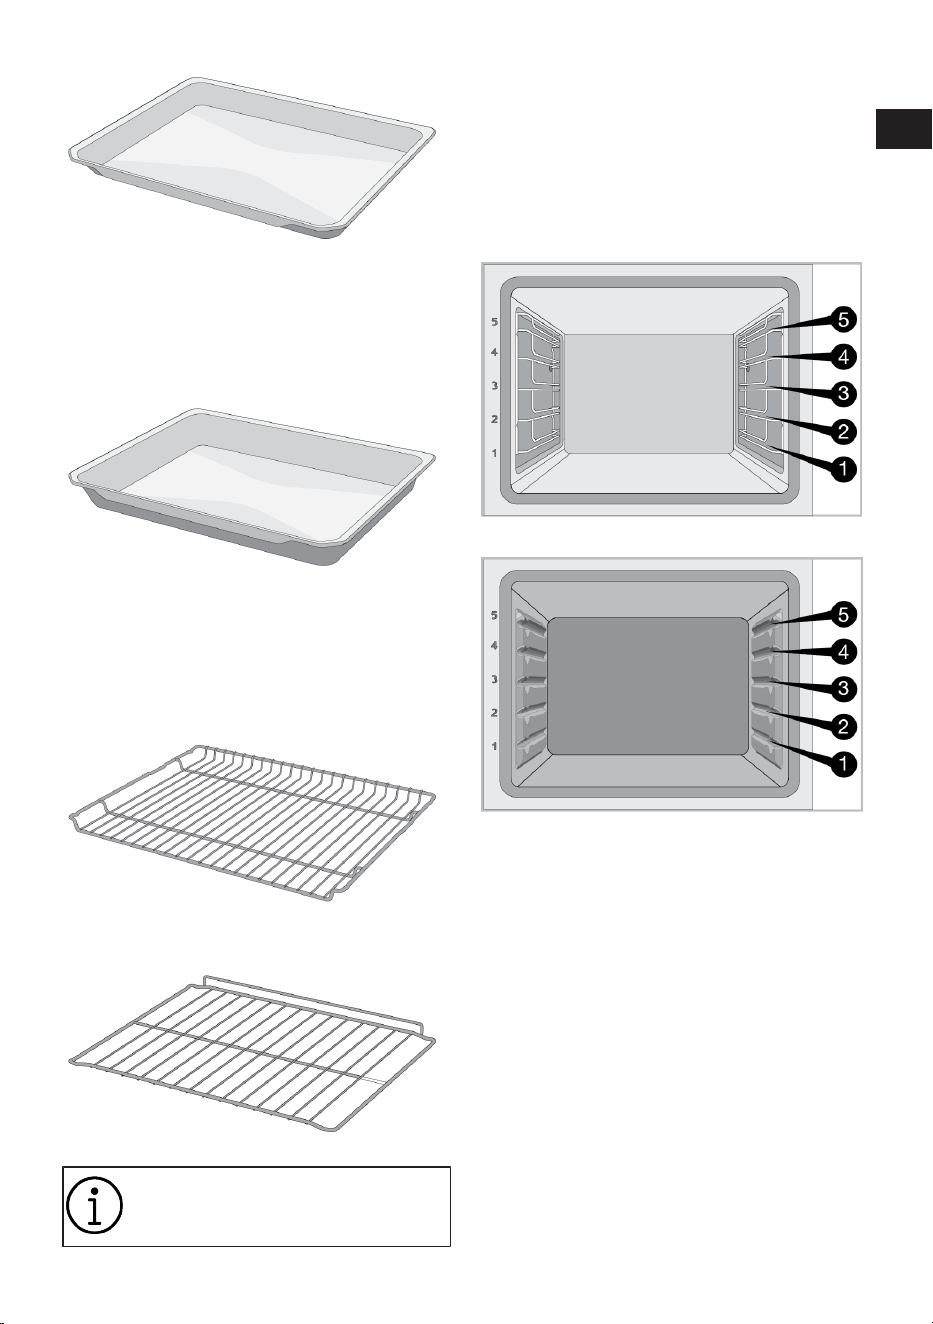
IT / 47
Vassoio profondo
Viene utilizzato per la pasticceria, per frig-
gere pezzi grossi, cibi succosi o per la rac-
colta di oli fluenti durante la cottura alla gri-
glia.
Grill a filo
Viene utilizzato per friggere o per mettere il
cibo da cuocere, friggere e stufare sul ripia-
no desiderato.
Su modelli con ripiani in filo metallico :
Su modelli senza ripiani in filo metallico :
Si consiglia di non utilizzare vassoi
e griglie a contatto diretto con gli
alimenti.
3.5 Uso degli accessori del prodotto
Ripiani da cottura
Nell’area di cottura ci sono 5 livelli di posi-
zionamento dei ripiani. È possibile anche
vedere l'ordine dei ripiani nei numeri sul fra-
me anteriore del forno.
Su modelli con ripiani in filo metallico :
Su modelli senza ripiani in filo metallico :
Posizionamento del grill a filo sui ripiani
da cottura
Su modelli con ripiani in filo metallico :
è fondamentale posizionare correttamente
il grill a filo sui ripiani laterali in filo metalli-
co. Quando si posiziona il grill a filo sul ri-
piano desiderato, la sezione aperta deve
trovarsi sul lato anteriore. Per una migliore
cottura, il grill a filo deve essere fissato sul
punto di arresto del ripiano a filo. Non deve
passare sopra il punto di arresto a contatto
con la parete posteriore del forno.
EN
IT
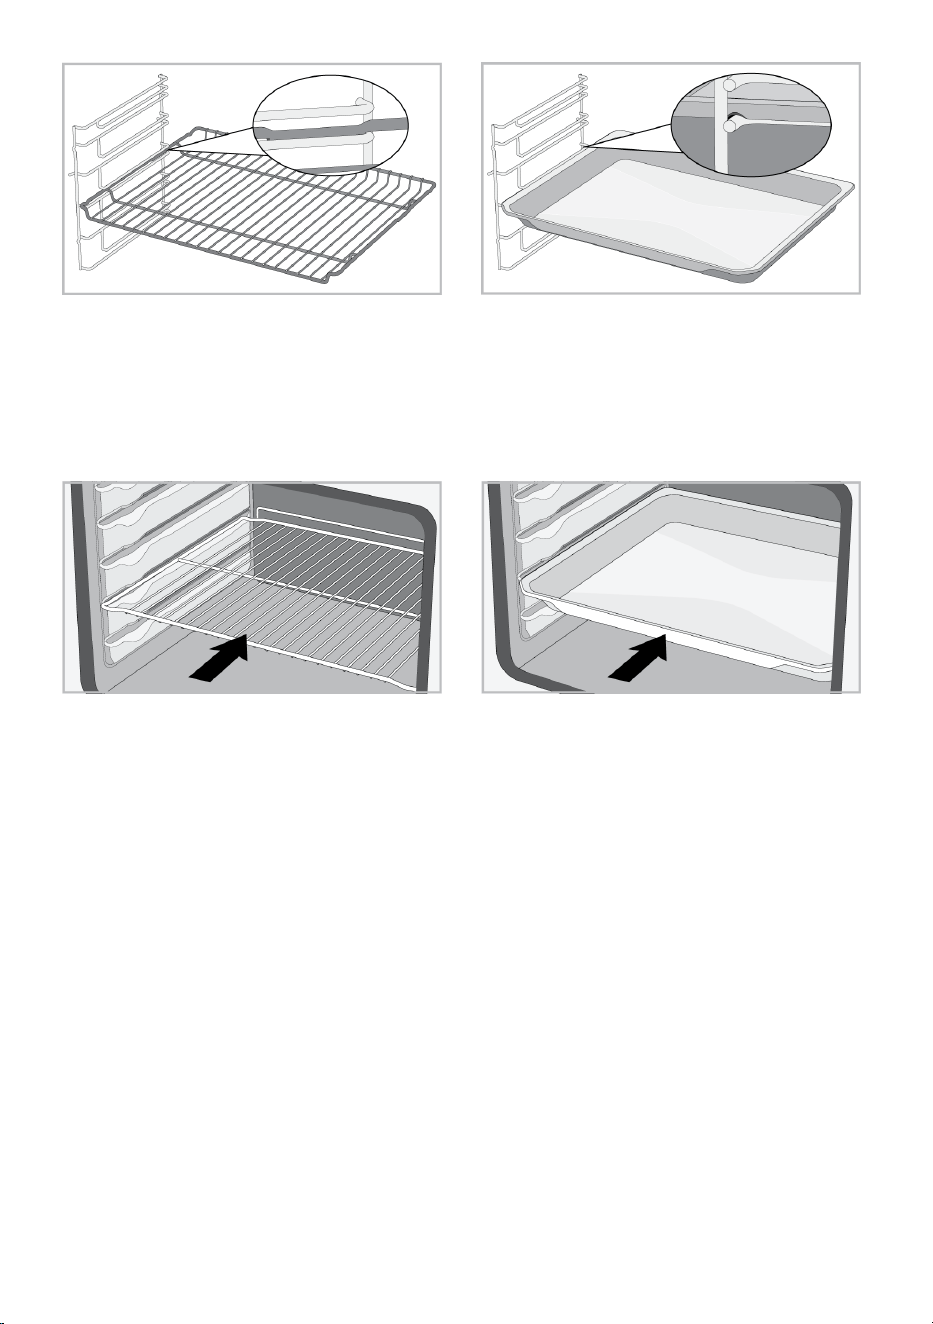
IT / 48
Su modelli senza ripiani in filo metallico :
è fondamentale posizionare correttamente
il grill a filo sui ripiani laterali. Il grill a filo
può essere posizionato sul ripiano in una
sola direzione. Quando si posiziona il grill a
filo sul ripiano desiderato, la sezione aperta
deve trovarsi sul lato anteriore.
Posizionamento del vassoio sui ripiani da
cottura
Su modelli con ripiani in filo metallico :
è fondamentale posizionare correttamente
i vassoi sui ripiani laterali in filo metallico.
Quando si posiziona il vassoio sul ripiano
desiderato, il lato designato per la sua tenu-
ta deve trovarsi frontalmente. Per una mi-
gliore cottura, il vassoio deve essere fissa-
to sulla presa di arresto sul ripiano a filo.
Non deve passare sopra la presa di arresto
a contatto con la parete posteriore del for-
no.
Su modelli senza ripiani in filo metallico :
è fondamentale posizionare correttamente
i vassoi sui ripiani laterali. Il vassoio può es-
sere posizionato sul ripiano in una sola di-
rezione. Quando si posiziona il vassoio sul
ripiano desiderato, il lato designato per la
sua tenuta deve trovarsi frontalmente.
Funzione di arresto del grill a filo
Per evitare che il grill a filo si rovesci ed
esca dal ripiano in filo metallico, è prevista
una funzione di arresto. Questa funzione
permette di estrarre il cibo in modo sempli-
ce e sicuro. Mentre si rimuove il grill a filo,
si può tirarlo in avanti fino a raggiungere il
punto di arresto. Per rimuoverlo completa-
mente, è necessario passare sopra tale
punto.
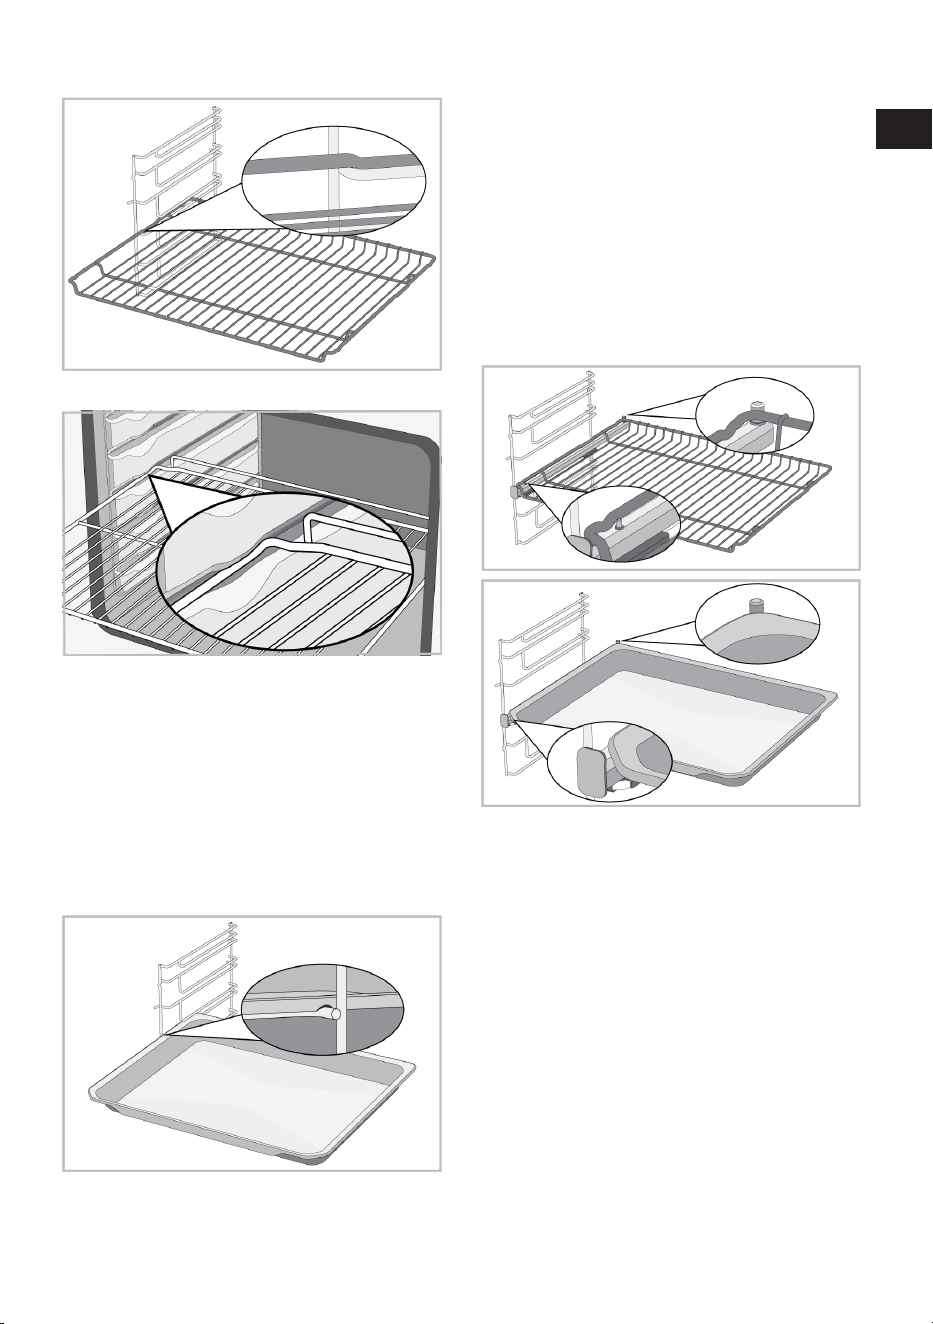
IT / 49
Su modelli con ripiani in filo metallico :
Su modelli senza ripiani in filo metallico :
Funzione di arresto del vassoio - Su mo-
delli con ripiani in filo metallico
Per evitare che il vassoio si rovesci ed esca
dal ripiano in filo metallico, è prevista una
funzione di arresto. Durante la rimozione
del vassoio, sganciarlo dalla presa di arre-
sto posteriore e tirarlo verso di sé fino a
raggiungere il lato anteriore. Per rimuoverlo
completamente, è necessario passare so-
pra questa presa di arresto.
Posizionamento corretto del grill a filo e
del vassoio sulle guide telescopicheSu
modelli con ripiani in filo metallico e gui-
de telescopiche
Grazie alle guide telescopiche, i vassoi o il
grill a filo possono essere facilmente instal-
lati e rimossi. Quando si utilizzano vassoi e
grill a filo con guida telescopica, occorre fa-
re attenzione che i perni, sulla parte anterio-
re e posteriore delle guide telescopiche,
poggino contro i bordi del grill e del vassoio
(come mostrato in figura).
EN
IT
IT / 50
3.6 Specifiche tecniche
Specifiche generiche
Dimensioni esterne del prodotto (altezza/larghezza/pro-
fondità)(mm)
595 /594 /567
Dimensioni di installazione del forno (altezza/larghezza/
profondità)(mm)
590 - 600 /560 /min. 550
Tensione/Frequenza 220-240 V ~; 50 Hz
Tipo di cavo e sezione utilizzati/adatti all'uso nel prodot-
to
min.H05VV-FG 3 x 1,5 mm2
Consumo energetico totale (kW) 2,6
Tipo di forno Forno multifunzione
Informazioni principali: Le informazioni sull'etichetta energetica dei forni elettrici di tipo domestico sono fornite in
conformità alla norma EN 60350-1/IEC 60350-1. I valori sono determinati nelle funzioni Riscaldamento superiore e
inferiore o (se presente) Riscaldamento a ventola superiore/inferiore con carico standard.
La classe di efficienza energetica viene determinata in base alla seguente priorità, a seconda che le funzioni rilevan-
ti esistano o meno sul prodotto. 1-Riscaldamento ventola eco , 2-Riscaldamento ventola , 3-Girarrosto con grill bas-
so , 4-Riscaldamento superiore e inferiore.
Le specifiche tecniche possono essere modificate senza preavviso per migliorare
la qualità del prodotto.
Le figure in questo manuale utente sono schematiche, e potrebbero non corrispon-
dere esattamente al prodotto.
I valori indicati sulle etichette del prodotto o nella documentazione che lo accom-
pagna sono ottenuti in condizioni di laboratorio in conformità alle norme vigenti.
Questi valori potrebbero variare a seconda delle condizioni di funzionamento e am-
bientali.
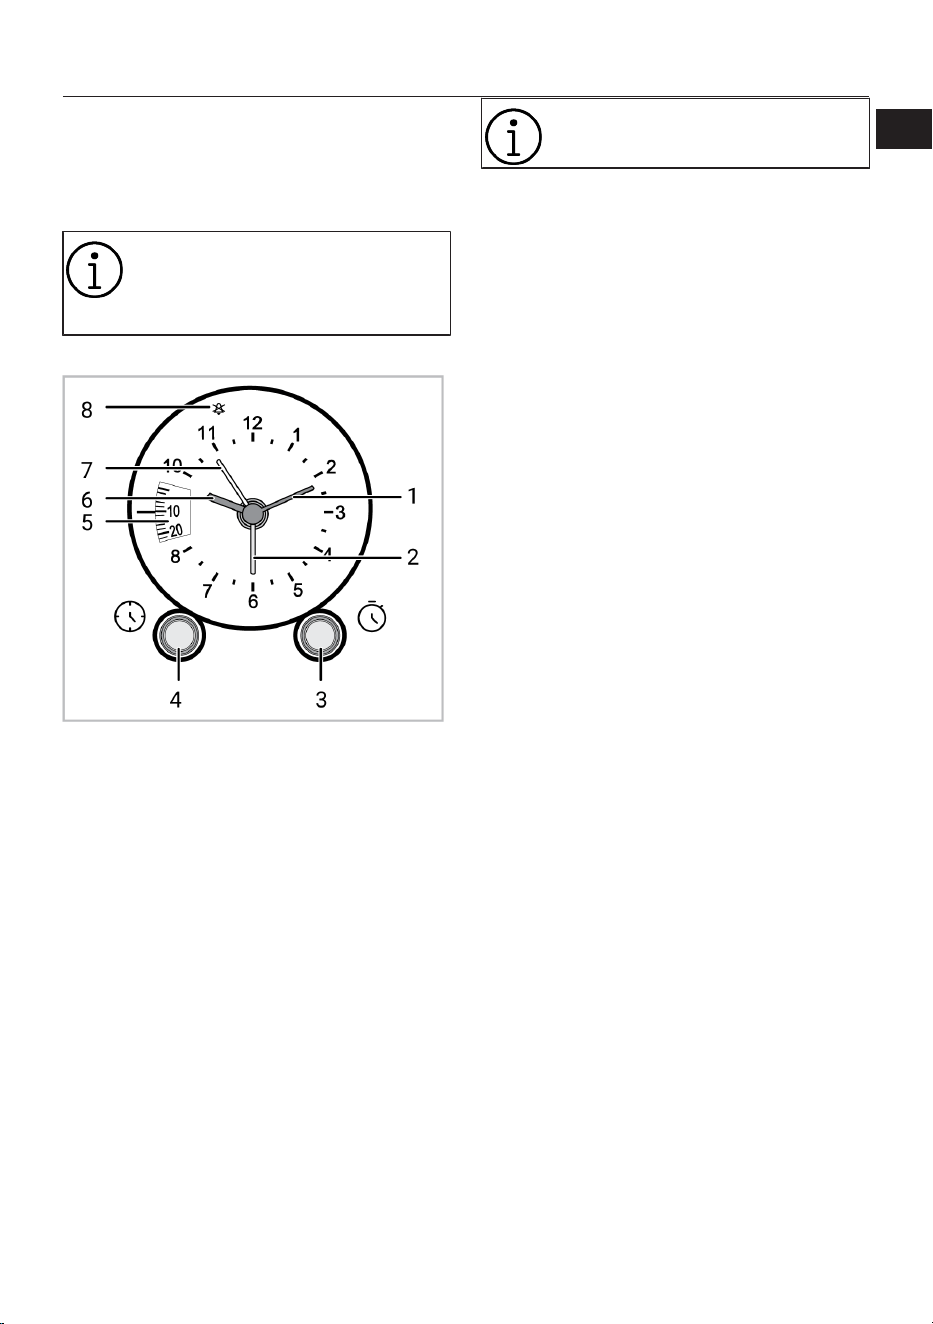
IT / 51
4 Primo utilizzo
Prima di iniziare ad utilizzare il prodotto, si
raccomanda di procedere come segue e in-
dicato nelle seguenti sezioni.
4.1 Prima impostazione del timer
Prima di utilizzare il forno, imposta-
re sempre l'ora del giorno. Se non la
si imposta, con alcuni modelli di
forno non sarà possibile cucinare.
Timer
1 Lancetta piccola (oro)
2 Inizio della cottura (arancione)
3 Manopola di regolazione ora di cottura/fine cottu-
ra
4 Manopola di regolazione ora del giorno
5 Display tempo di cottura
6 Lancetta dell’ora (oro)
7 Lancetta sveglia (gialla)
8 Simbolo di annullamento della sveglia
Per impostare l'ora del giorno:
1. Tirare leggermente verso di sé la mano-
pola di regolazione dell'ora (4), ruotarla
in senso orario fino a regolare l'ora e
quindi rilasciarla.
ð Quando si rilascia la manopola, l'ora
del giorno è impostata.
Non ruotare mai la manopola in
senso antiorario mentre è tirata.
4.2 Pulizia iniziale
1. Rimuovere tutti i materiali dell'imballag-
gio.
2. Rimuovere dal forno tutti gli accessori
forniti e presenti all'interno del prodotto.
3. Far funzionare il prodotto per 30 minuti
e poi spegnerlo. In questo modo, i resi-
dui e gli strati che potrebbero essere ri-
masti nel forno durante la sua fabbrica-
zione vengono bruciati e puliti.
4. Durante il funzionamento del prodotto,
selezionare la temperatura più alta e la
funzione che attiva tutti i riscaldatori del
prodotto. Vedere “Funzioni operative del
forno [}45]” Nella seguente sezione è
possibile apprendere come far funziona-
re il forno.
5. Attendere il completamento del raffred-
damento.
6. Pulire le superfici del prodotto con un
panno o una spugna umida e asciugare
con un panno.
Prima di utilizzare gli accessori:
Pulire gli accessori che saranno stati rimos-
si dal forno con acqua detergente e una
spugna morbida.
AVVISO: Alcuni detergenti o agenti deter-
genti potrebbero danneggiare la superficie.
Non utilizzare detergenti abrasivi, polveri
detergenti, creme detergenti o oggetti ap-
puntiti durante la pulizia.
AVVISO: Durante il primo utilizzo, il fumo e
l'odore potrebbero risalire per diverse ore.
Questo è normale e si necessita solo di una
buona ventilazione per rimuoverli. Evitare di
inalare direttamente il fumo e gli odori ema-
nati.
EN
IT
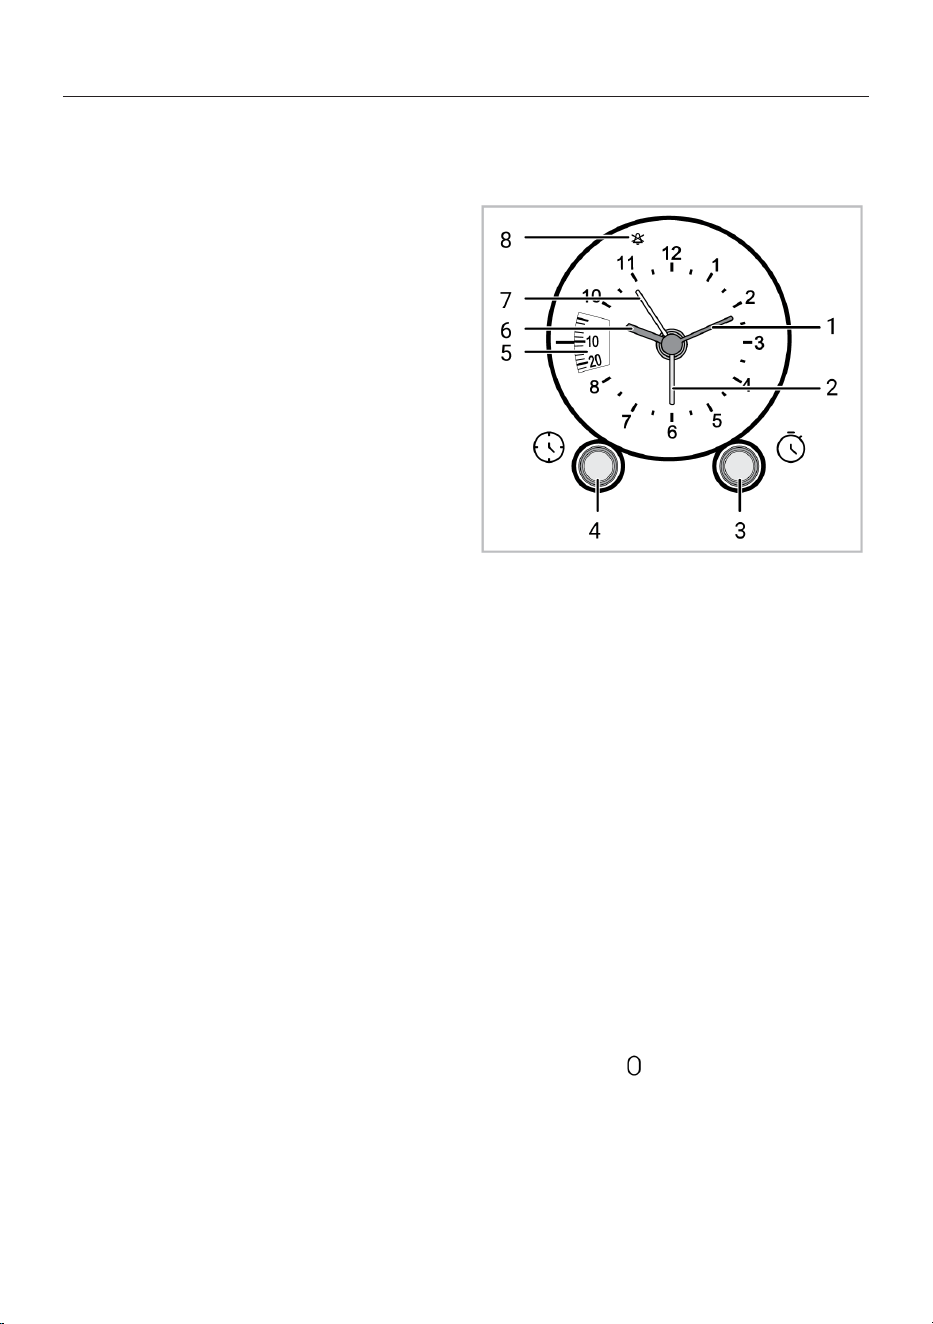
IT / 52
5 Utilizzo del forno
5.1 Informazioni generali sull'uso del
forno
Ventola di raffreddamento Varia a secon-
da del modello di forno. Potrebbe non
essere disponibile sul proprio prodotto.
Il prodotto è dotato di una ventola di raf-
freddamento. La ventola di raffreddamento
si attiva automaticamente quando neces-
sario e raffredda sia la parte anteriore del
prodotto che i mobili. Viene automatica-
mente disattivata al termine del processo
di raffreddamento. Dallo sportello del forno
esce aria calda. Non coprire assolutamente
queste aperture di ventilazione. In caso
contrario, il forno potrebbe surriscaldarsi.
La ventola di raffreddamento sarà attiva sia
durante il funzionamento del forno sia dopo
lo spegnimento dello stesso (circa 20-30
minuti). Se si cucina programmando il ti-
mer del forno, alla fine del tempo di cottura,
la ventola di raffreddamento si spegne con
tutte le funzioni. Il tempo di funzionamento
della ventola di raffreddamento non può es-
sere determinato dall'utente. Si accende e
si spegne automaticamente. Questo non è
un errore.
Illuminazione del forno
La luce del forno si accende quando il forno
inizia la cottura. In alcuni modelli la luce è
accesa anche durante la cottura, mentre in
altri si spegne dopo un certo periodo di
tempo.
5.2 Funzionamento dell’unità di con-
trollo del forno
Timer
1 Lancetta piccola (oro)
2 Inizio della cottura (arancione)
3 Manopola di regolazione ora di cottura/fine cottu-
ra
4 Manopola di regolazione ora del giorno
5 Display tempo di cottura
6 Lancetta dell’ora (oro)
7 Lancetta sveglia (gialla)
8 Simbolo di annullamento della sveglia
Cottura manuale selezionando la tempera-
tura e la modalità di funzionamento del
forno
ü Si può cuocere effettuando un control-
lo manuale (sotto il proprio controllo),
senza impostare il tempo di cottura,
selezionando la temperatura e la fun-
zione operativa specifica per i propri
alimenti.
1. Ruotare la manopola 3 in senso orario
sul simbolo " " sul display del tempo di
cottura.
2. Tirare la manopola (3) leggermente ver-
so di sé e allineare il puntatore di inizio
cottura (arancione) (2) con la manopola
ore (6).

IT / 53
3. Rilasciare la manopola (3) e ruotarla in
senso orario per portare sul simbolo “
” nella visualizzazione del tempo di cot-
tura.
4. Mettere il piatto nel forno.
5. Selezionare la funzione di funzionamen-
to che si desidera cuocere con la mano-
pola di selezione funzioni.
6. Imposta la temperatura con cui vuoi cu-
cinare con la manopola della temperatu-
ra.
ð Il forno inizierà a funzionare imme-
diatamente alla funzione e alla
temperatura selezionata e la spia
della temperatura si accenderà.
Quando la temperatura all’interno
del forno raggiunge il livello impo-
stato, la spia della temperatura si
spegne. Il forno non si spegne au-
tomaticamente dopo l'avvio della
cottura. Bisogna controllare la cot-
tura da soli e spegnerlo apposita-
mente.
7. Per spegnere il forno a cottura ulti-
mata: Ruotare le manopole di selezione
funzioni e temperatura in posizione off
(in alto). Ruotare la manopola 3 in senso
orario sul simbolo " " sul display del
tempo di cottura.
Cottura con impostazione del tempo di
cottura;
ü È possibile far spegnere automatica-
mente il forno alla fine del tempo spe-
cificato, selezionando la temperatura e
la funzione di operatività specifica per i
propri alimenti e impostando il tempo
di cottura sul timer.
1. Ruotare la manopola 3 in senso orario
sul simbolo " " " sul display del tempo
di cottura.
2. Impostare il tempo di cottura desiderato
sul display del tempo di cottura ruotan-
do la manopola 3 in senso orario.
Il tempo massimo che può essere
impostato come fine cottura è 180
minuti. Il programma sarà annullato
se manca la corrente. Bisogna ri-
programmare il forno.
3. Mettere il piatto nel forno.
4. Selezionare la funzione di funzionamen-
to che si desidera cuocere con la mano-
pola di selezione funzioni.
5. Imposta la temperatura con cui vuoi cu-
cinare con la manopola della temperatu-
ra.
ð Il forno inizierà a funzionare imme-
diatamente alla funzione e alla
temperatura selezionata e la spia
della temperatura si accenderà.
Quando la temperatura all’interno
del forno raggiunge il livello impo-
stato, la spia della temperatura si
spegne. Viene emesso un segnale
acustico di avvertimento e il forno
si arresta.
6. Per spegnere il forno al termine del
tempo di cottura: Ruotare le manopole
di selezione funzioni e temperatura in
posizione off (in alto). Ruotare la mano-
pola 3 in senso orario sul simbolo " "
sul display del tempo di cottura.
Per impostare il tempo di fine cottura su
un tempo successivo;
ü Selezionando la temperatura e la fun-
zione operativa specifica per il proprio
pasto, è possibile impostare il tempo di
cottura e il tempo di fine cottura su un
tempo successivo, consentendo l'avvio
e lo spegnimento automatico del forno.
1. Ruotare la manopola 3 in senso orario
sul simbolo " "" sul display del tempo
di cottura.
2. Impostare l'ora di inizio cottura con la
lancetta di inizio cottura (2) (arancione)
tirando verso di sé la manopola 3.
3. Rilasciare la manopola 3.
EN
IT
IT / 54
4. Impostare il tempo di cottura desiderato
sul display del tempo di cottura ruotan-
do la manopola 3 in senso orario.
5. Mettere il piatto nel forno.
6. Selezionare la funzione di funzionamen-
to che si desidera cuocere con la mano-
pola di selezione funzioni.
7. Imposta la temperatura con cui vuoi cu-
cinare con la manopola della temperatu-
ra.
ð Quando arriva l'ora di inizio cottu-
ra, il forno inizia a funzionare im-
mediatamente alla funzione e alla
temperatura selezionate e la spia
della temperatura si accende.
Quando la temperatura all'interno
del forno raggiunge la temperatura
impostata, la spia della temperatu-
ra si spegne. Al termine del tempo
di cottura viene emesso un segna-
le acustico e il forno interrompe la
cottura.
8. Per spegnere il forno al termine del
tempo di cottura: Ruotare le manopole
di selezione funzioni e temperatura in
posizione off (in alto). Ruotare la mano-
pola 3 in senso orario sul simbolo " "
sul display del tempo di cottura.
Uso dell'orologio come sveglia
Si può usare l'orologio dell'apparecchio per
qualsiasi avvertenza o promemoria, tranne
che per il programma di cottura. La sveglia
non ha influenza sulle funzioni del forno. Si
usa solo come avvertenza. Per esempio, è
utile quando si desidera girare gli alimenti
nel forno ad un certo punto. La sveglia
emette un segnale una volta che il tempo
impostato è finito.
Il tempo massimo per l'allarme può
essere 55 minuti.
Impostazione della sveglia
1. Regolare la lancetta della sveglia (gialla)
(7) sull'ora desiderata sul quadrante ruo-
tando la manopola di regolazione
dell'ora (4) verso destra o sinistra.
ð Si sente l'allarme alla fine del tempo
impostato.
Spegnimento dell'allarme
1. Non appena si sente l'allarme, ruotare la
manopola (4) verso destra o verso sini-
stra per spostare la lancetta della sve-
glia (gialla) (7) sul simbolo di annulla-
mento dell'allarme “ ” per spegnere l'al-
larme.
6 Informazioni generali sulla cottura
In questa sezione è possibile trovare consi-
gli su come preparare e cucinare gli alimen-
ti.
Tale sezione descrive anche alcuni degli ali-
menti testati dal produttore e le imposta-
zioni più appropriate per questi alimenti.
Sono inoltre indicate le impostazioni del
forno e gli accessori appropriati per questi
alimenti.
6.1 Avvertenze generiche sulla cottu-
ra nel forno
• All'apertura dello sportello del forno du-
rante o dopo la cottura potrebbe fuoriu-
scire vapore caldo. Il vapore potrebbe
provocare bruciature a mani, viso e/o oc-
chi. Quando si apre lo sportello del forno,
stare lontano.
• Il vapore intenso generato durante la cot-
tura potrebbe formare delle gocce d'ac-
qua condensata all'interno e all'esterno
del forno e sulle parti superiori del mobile
a causa della differenza di temperatura.
Si tratta di un evento normale e fisico.
• I valori di temperatura e tempo di cottura
indicati per i cibi potrebbero variare a se-
conda della ricetta e della quantità. Per
questo motivo, tali valori sono indicati co-
me intervalli.

IT / 55
• Prima di iniziare la cottura, togliere sem-
pre dal forno gli accessori inutilizzati. Gli
accessori che rimangono nel forno po-
trebbero impedire la cottura dei cibi ai va-
lori corretti.
• Per i cibi che saranno cucinati secondo la
propria ricetta, fare riferimento a cibi si-
mili indicati nelle tabelle di cottura.
• L'utilizzo degli accessori in dotazione ga-
rantisce le migliori prestazioni di cottura.
Osservare sempre le avvertenze e le in-
formazioni fornite dal produttore per le
pentole esterne che si utilizzeranno.
• Tagliare la carta oleata che si userà per
la cottura in dimensioni adeguate al con-
tenitore da utilizzare. Le carte oleate che
traboccano dal contenitore potrebbero
creare un rischio di ustioni e influire sulla
qualità della cottura. Utilizzare la carta
oleata nell'intervallo di temperatura spe-
cificato.
• Per una buona prestazione di cottura, col-
locare i cibi sul ripiano corretto consiglia-
to. Non modificare la posizione del ripia-
no durante la cottura.
6.1.1 Pasticcini e alimenti da forno
Informazioni di carattere generale
• Per una buona cottura, si consiglia di uti-
lizzare gli accessori del prodotto. Se si ha
intenzione di utilizzare una pentola ester-
na, preferire pentole scure, anti-aderenti e
resistenti al calore.
• Se sulla tabella di cottura si consiglia il
preriscaldamento, assicurarsi di mettere
il cibo nel forno dopo il preriscaldamento.
• Se si deve cucinare con le pentole sul
grill a filo, posizionarle al centro del grill a
filo, non vicino alla parete posteriore.
• Tutti i materiali utilizzati nella fabbrica-
zione dei dolci devono essere freschi e a
temperatura ambiente.
• Lo stato di cottura dei cibi potrebbe va-
riare a seconda della quantità di cibo e
delle dimensioni delle pentole.
• Gli stampi di metallo, ceramica e vetro
prolungano il tempo di cottura e le super-
fici inferiori dei cibi da pasticceria non si
dorano in modo uniforme.
• Se si usa la carta da forno, si può osser-
vare una leggera rosolatura sulla superfi-
cie inferiore dei cibi. In questo caso, po-
trebbe essere necessario prolungare il
periodo di cottura di circa 10 minuti.
• I valori indicati nelle tabelle di cottura so-
no determinati in base ai test effettuati
nei nostri laboratori. I valori adatti al sin-
golo caso potrebbero differire da questi
valori.
• Mettere i propri alimenti sull'apposito ri-
piano consigliato nella tabella di cottura.
Tenere presente che ripiano inferiore del
forno è il ripiano 1.
Consigli per la cottura di torte
• Se la torta è troppo secca, aumentare la
temperatura di circa 10 ˚C e diminuire il
tempo di cottura.
• Se la torta è umida, utilizzare una piccola
quantità di liquido o ridurre la temperatu-
ra di 10°C.
• Se la parte superiore della torta è brucia-
ta, metterla su un ripiano inferiore, dimi-
nuire la temperatura e aumentare il tem-
po di cottura.
• Se l'interno della torta è ben cotto, ma
l'esterno è appiccicoso, usare meno liqui-
do, diminuire la temperatura e aumentare
il tempo di cottura.
Suggerimenti per la pasticceria
• Se l’impasto è troppo secco, aumentare
la temperatura di 10 ˚C e diminuire il tem-
po di cottura. Bagnare le sfoglie di pasta
con un intingolo di latte, olio, uova e yo-
gurt.
• Se l’impasto cuoce lentamente, assicu-
rarsi che lo spessore preparato non tra-
bocchi dal vassoio.
• Se l’impasto è dorato in superficie ma il
fondo non è cotto, assicurarsi che la
quantità di intingolo che userete non sia
eccessiva sul fondo. Per una doratura
uniforme, provare a spalmare l’intingolo
equamente tra le sfoglie e l’impasto.
• Cuocere l’impasto nella posizione e alla
temperatura specificata nella tabella di
cottura. Se il fondo non è ancora abba-
stanza dorato, metterlo su un ripiano in-
feriore per un’ulteriore cottura.
EN
IT

IT / 56
Tabella di cottura per pasticcini e cibi da forno
Suggerimento per la cottura con un vassoio singolo
Alimento Accessorio da
utilizzare
Funzione opera-
tiva
Posizione del ri-
piano
Temperatura (°C) Tempo di cottu-
ra (min) (appros-
simativ.)
Torta sul vassoio
Vassoio standard
*
Riscaldamento
superiore e infe-
riore
3 180 30 … 40
Torta nello stam-
po
Stampo per torte
su grill a filo **
Riscaldamento
ventola
2 180 30 … 40
Torte di piccole
dimensioni
Vassoio standard
*
Riscaldamento
superiore e infe-
riore
3 160 25 … 35
Torte di piccole
dimensioni
Vassoio standard
*
Riscaldamento
ventola
Su modelli con ri-
piani in filo metal-
lico : 3
Su modelli senza
ripiani in filo me-
tallico : 2
150 25 … 35
Pan di Spagna
Stampo per dolci
rotondo, diametro
26 cm con mor-
setto su grill a filo
**
Riscaldamento
superiore e infe-
riore
2 160 30 … 40
Pan di Spagna
Stampo per dolci
rotondo, diametro
26 cm con mor-
setto su grill a filo
**
Riscaldamento
ventola
2 160 30 … 40
Biscotti
Vassoio per pa-
sticceria *
Riscaldamento
superiore e infe-
riore
3 170 25 … 35
Biscotti
Vassoio per pa-
sticceria *
Riscaldamento
ventola
3 170 20 … 30
Pasticceria
Vassoio standard
*
Riscaldamento a
ventola superiore/
inferiore
2 200 35 … 45
Panino rotondo
Vassoio standard
*
Riscaldamento
superiore e infe-
riore
2 200 20 … 30
Panino rotondo
Vassoio standard
*
Riscaldamento
ventola
3 180 20 … 30
Pane integrale
Vassoio standard
*
Riscaldamento
superiore e infe-
riore
3 200 30 … 40
Pane integrale
Vassoio standard
*
Riscaldamento
ventola
3 200 30 … 40
Lasagne
Contenitore ret-
tangolare in vetro/
metallo su grill a
filo **
Riscaldamento
superiore e infe-
riore
2 o 3 200 30 … 40
IT / 57
Alimento Accessorio da
utilizzare
Funzione opera-
tiva
Posizione del ri-
piano
Temperatura (°C) Tempo di cottu-
ra (min) (appros-
simativ.)
Torta di mele
Stampo rotondo
in metallo nero di
20 cm di diametro
su grill a filo **
Riscaldamento
superiore e infe-
riore
2 180 50 … 70
Torta di mele
Stampo rotondo
in metallo nero di
20 cm di diametro
su grill a filo **
Riscaldamento
ventola
2 170 50 … 70
Pizza
Vassoio standard
*
Riscaldamento
superiore e infe-
riore
2 200 … 220 10 … 20
Suggerimenti per cucinare con due vassoi
Alimento Accessorio da
utilizzare
Funzione opera-
tiva
Posizione del ri-
piano
Temperatura (°C) Tempo di cottu-
ra (min) (appros-
simativ.)
Torte di piccole
dimensioni
2-Vassoio stan-
dard *
4-Vassoio per pa-
sticceria *
Riscaldamento
ventola
2 - 4
Su modelli con ri-
piani in filo metal-
lico :150
Su modelli senza
ripiani in filo me-
tallico :140
Su modelli con ri-
piani in filo metal-
lico : 25 … 40
Su modelli senza
ripiani in filo me-
tallico : 30 … 45
Biscotti
2-Vassoio stan-
dard *
4-Vassoio per pa-
sticceria *
Riscaldamento
ventola
2 - 4 170 25 … 35
Pasticceria
1-Vassoio stan-
dard *
4-Vassoio per pa-
sticceria *
Riscaldamento
ventola
1 - 4 180 35 … 45
Panino rotondo
2-Vassoio stan-
dard *
4-Vassoio per pa-
sticceria *
Riscaldamento
ventola
2 - 4 180 20 … 30
Il preriscaldamento è raccomandato per tutti gli alimenti.
*Questi accessori potrebbe non essere inclusi nel prodotto.
**Questi accessori non sono inclusi nel prodotto. Sono accessori disponibili in commercio.
6.1.2 Carne, pesce e pollame
I punti chiave della cottura alla griglia
• Prima di cucinarli, il condimento con suc-
co di limone e pepe aumenterà il risultato
della cottura del pollo intero, del tacchino
e dei grossi pezzi di carne.
• Per cuocere la carne disossata ci voglio-
no dai 15 ai 30 minuti in più rispetto al
cottura del filetto in padella.
• Si dovrebbero calcolare circa 4-5 minuti
di tempo di cottura per centimetro di
spessore della carne.
• Scaduto il tempo di cottura, lasciare la
carne in forno per circa 10 minuti. Il suc-
co della carne è meglio distribuito alla
carne fritta e non esce quando la carne
viene tagliata.
• Il pesce dovrebbe essere collocato su un
ripiano di medio o basso livello in un piat-
to resistente al calore.
EN
IT
IT / 58
• Cuocere i piatti consigliati secondo la ta-
bella di cottura con un solo vassoio.
Tabella di cottura per carne, pesce e pollame
Alimento Accessorio da
utilizzare
Funzione opera-
tiva
Posizione del ri-
piano
Temperatura (°C) Tempo di cottu-
ra (min) (appros-
simativ.)
Bistecca (intera)/
Arrosto (1 kg)
Vassoio standard
*
Riscaldamento a
ventola superiore/
inferiore
3
15 min. 250/max,
dopo 180 … 190
60 … 80
Stinco di agnello
(1,5-2 kg)
Vassoio standard
*
Riscaldamento a
ventola superiore/
inferiore
3
15 min. 250/max,
dopo 170
110 … 120
Pollo fritto (1,8-2
kg)
Grill a filo *
Mettere un vasso-
io sul ripiano infe-
riore.
Riscaldamento a
ventola superiore/
inferiore
2
15 min. 250/max,
dopo 190
60 … 80
Pollo fritto (1,8-2
kg)
Grill a filo *
Mettere un vasso-
io sul ripiano infe-
riore.
Riscaldamento
ventola
2 200 … 220 60 … 80
Pollo fritto (1,8-2
kg)
Grill a filo *
Mettere un vasso-
io sul ripiano infe-
riore.
Funzione "3D" 2
15 min. 250/max,
dopo 190
60 … 80
Turchia (5,5 kg)
Vassoio standard
*
Riscaldamento a
ventola superiore/
inferiore
1
25 min. 250/max,
dopo 180 … 190
150 … 210
Turchia (5,5 kg)
Vassoio standard
*
Funzione "3D" 1
25 min. 250/max,
dopo 180 … 190
150 … 210
Pesce
Grill a filo *
Mettere un vasso-
io sul ripiano infe-
riore.
Riscaldamento a
ventola superiore/
inferiore
3 200 20 … 30
Pesce
Grill a filo *
Mettere un vasso-
io sul ripiano infe-
riore.
Funzione "3D" 3 200 20 … 30
Il preriscaldamento è raccomandato per tutti gli alimenti.
*Questi accessori potrebbe non essere inclusi nel prodotto.
**Questi accessori non sono inclusi nel prodotto. Sono accessori disponibili in commercio.
6.1.3 Grill
Quando vengono grigliati, la carne rossa, il
pesce e la carne di pollame diventano rapi-
damente marroni, mantengono una bella
crosta e non si asciugano. Carni di filetto,
spiedini, salsicce e verdure succose (pomo-
dori, cipolle, ecc.) sono particolarmente
adatti per la cottura al grill.
Avvertenze generali
• Gli alimenti non adatti alla cottura al grill
determinano un rischio di incendio. Gri-
gliare solo cibi adatti alla cottura al grill.
Inoltre, non mettere il cibo troppo in fon-
do (internamente) al grill. Questa è la zo-
na più calda e i cibi grassi potrebbero
prendere fuoco.
IT / 59
• Durante la cottura alla griglia, chiude-
re lo sportello del forno. Non grigliare
mai con lo sportello del forno aperto.
Le superfici calde potrebbero causare
ustioni!
I punti chiave della cottura al grill
• Preparare alimenti di spessore e peso il
più possibile simili fra loro.
• Posizionare i pezzi da grigliare sul grill a
filo o sul vassoio del grill a filo distribuen-
doli senza superare le dimensioni del ri-
scaldatore.
• A seconda dello spessore dei pezzi da
grigliare, i tempi di cottura indicati in ta-
bella potrebbero variare.
• Far scorrere il grill a filo o il vassoio del
grill a filo nel forno fino al livello desidera-
to. Se si sta cucinando sul grill a filo, far
scorrere il vassoio da forno sul ripiano in-
feriore per raccogliere gli oli. Il vassoio
da forno che si intende far scorrere deve
essere dimensionato in modo da coprire
l'intera area del grill. Tale vassoio potreb-
be non essere fornito con il prodotto. Per
una facile pulizia mettere un po' d'acqua
nel vassoio da forno.
Tabella per il grill
Alimento Accessorio da utiliz-
zare
Posizione del ripia-
no
Temperatura (°C) Tempo di cottura
(min) (approssima-
tiv.)
Pesce Grill a filo 4 - 5 250 20 … 25
Pezzi di pollo Grill a filo 4 - 5 250 25 … 35
Polpette di carne (vi-
tello) - 12 quantità
Grill a filo 4 250 20 … 30
Costoletta di agnello Grill a filo 4 - 5 250 20 … 25
Bistecca - (cubetti di
carne)
Grill a filo 4 - 5 250 25 … 30
Costoletta di vitello Grill a filo 4 - 5 250 25 … 30
Verdure gratinate Grill a filo 4 - 5 220 20 … 30
Pane tostato Grill a filo 4 250 1 … 4
Si consiglia di preriscaldare per 5 minuti tutti i cibi da grigliare.
Girare i pezzi di cibo dopo 1/2 del tempo totale di cottura al grill.
Girarrosto con grill basso
Alimento Accessorio da
utilizzare
Funzione opera-
tiva
Posizione del ri-
piano
Temperatura (°C) Tempo di cottu-
ra (min) (appros-
simativ.)
Pesce Grill a filo
Girarrosto con
grill basso
4 200 30 … 35
Pezzi di pollo Grill a filo
Girarrosto con
grill basso
4 250 25 … 35
Polpette di carne
(vitello) - 12 quan-
tità
Grill a filo
Girarrosto con
grill basso
4 250 30 … 40
Bistecca (intera)/
Arrosto (1 kg )
Grill a filo - Mette-
re un vassoio sul
ripiano inferiore.
Girarrosto con
grill basso
3
15 min. 250, dopo
180 … 190
90 … 110
Non preriscaldare i piatti raccomandati in questa tabella del grill.
EN
IT

IT / 60
6.1.4 Alimenti di prova
• Gli alimenti di questa tabella di cottura
sono preparati secondo la norma EN
60350-1 per facilitare i test del prodotto
effettuati per gli istituti di controllo.
Tabella di cottura per i pasti di prova
Suggerimento per la cottura con un vassoio singolo
Alimento Accessorio da
utilizzare
Funzione opera-
tiva
Posizione del ri-
piano
Temperatura (°C) Tempo di cottu-
ra (min) (appros-
simativ.)
Shortbread (bi-
scotto dolce)
Vassoio standard
*
Riscaldamento
superiore e infe-
riore
3 140 20 … 30
Shortbread (bi-
scotto dolce)
Vassoio standard
*
Riscaldamento
ventola
Su modelli con ri-
piani in filo metal-
lico :3
Su modelli senza
ripiani in filo me-
tallico :2
140 15 .. 25
Torte di piccole
dimensioni
Vassoio standard
*
Riscaldamento
superiore e infe-
riore
3 160 25 … 35
Torte di piccole
dimensioni
Vassoio standard
*
Riscaldamento
ventola
Su modelli con ri-
piani in filo metal-
lico : 3
Su modelli senza
ripiani in filo me-
tallico : 2
150 25 … 35
Pan di Spagna
Stampo per dolci
rotondo, diametro
26 cm con mor-
setto su grill a filo
**
Riscaldamento
superiore e infe-
riore
2 160 30 … 40
Pan di Spagna
Stampo per dolci
rotondo, diametro
26 cm con mor-
setto su grill a filo
**
Riscaldamento
ventola
2 160 30 … 40
Torta di mele
Stampo rotondo
in metallo nero di
20 cm di diametro
su grill a filo **
Riscaldamento
superiore e infe-
riore
2 180 50 … 70
Torta di mele
Stampo rotondo
in metallo nero di
20 cm di diametro
su grill a filo **
Riscaldamento
ventola
2 170 50 … 70
IT / 61
Suggerimenti per cucinare con due vassoi
Alimento Accessorio da
utilizzare
Funzione opera-
tiva
Posizione del ri-
piano
Temperatura (°C) Tempo di cottu-
ra (min) (appros-
simativ.)
Torte di piccole
dimensioni
2-Vassoio stan-
dard *
4-Vassoio per pa-
sticceria *
Riscaldamento
ventola
2 - 4
Su modelli con ri-
piani in filo metal-
lico :150
Su modelli senza
ripiani in filo me-
tallico :140
Su modelli con ri-
piani in filo metal-
lico : 25 … 40
Su modelli senza
ripiani in filo me-
tallico : 30 … 45
Shortbread (bi-
scotto dolce)
2-Vassoio stan-
dard *
4-Vassoio per pa-
sticceria *
Riscaldamento
ventola
2 - 4 140 15 … 25
Il preriscaldamento è raccomandato per tutti gli alimenti.
*Questi accessori potrebbe non essere inclusi nel prodotto.
**Questi accessori non sono inclusi nel prodotto. Sono accessori disponibili in commercio.
Grill
Alimento Accessorio da utiliz-
zare
Posizione del ripia-
no
Temperatura (°C) Tempo di cottura
(min) (approssima-
tiv.)
Polpette di carne (vi-
tello) - 12 quantità
Grill a filo 4 250 20 … 30
Pane tostato Grill a filo 4 250 1 … 4
Si consiglia di preriscaldare per 5 minuti tutti i cibi da grigliare.
Girare i pezzi di cibo dopo 1/2 del tempo totale di cottura al grill.
7 Manutenzione e pulizia
7.1 Informazioni generiche per la puli-
zia
Avvertenze generali
• Attendere che il prodotto si raffreddi pri-
ma di pulirlo. Le superfici calde potrebbe-
ro causare ustioni!
• Non applicare i detergenti direttamente
sulle superfici calde. Questo potrebbe
causare macchie permanenti.
• Questo prodotto deve essere accurata-
mente pulito e asciugato dopo ogni utiliz-
zo. In questo modo, i residui di cibo sa-
ranno facilmente puliti e si eviterà che gli
stessi si brucino quando il prodotto viene
riutilizzato. In questo modo si riuscirà ad
estendere la vita utile dell'apparecchio e
si ridurranno le problematiche operative.
• Non usare pulitori a vapore per pulire il
forno.
• Alcuni detergenti o agenti detergenti po-
trebbero danneggiare la superficie. I de-
tergenti inadatti sono: candeggina, pro-
dotti per la pulizia contenenti ammonia-
ca, acido o cloruro, prodotti per la pulizia
a vapore, decalcificanti, smacchiatori e
togli ruggine, prodotti per la pulizia abra-
sivi (detergenti in crema, polvere abrasi-
va, crema abrasiva, scrubber abrasivi e
graffianti, filo, spugne, panni per la pulizia
contenenti residui di sporco e detergen-
ti).
• Dopo ogni utilizzo, non è necessario al-
cun materiale speciale per la pulizia. Puli-
re l’apparecchio con detersivo per piatti,
acqua calda e un panno morbido o una
spugna e asciugarlo con un panno
asciutto.
EN
IT

IT / 62
• Assicurarsi di pulire completamente il li-
quido rimasto dopo la pulizia e di pulire
immediatamente gli eventuali schizzi di
cibo creatisi durante la cottura.
• Non lavare nessun componente dell’ap-
parecchio in lavastoviglie.
Superfici in acciaio inossidabile
• Per pulire superfici e maniglie in acciaio
inossidabile non utilizzare detergenti con-
tenenti acido o cloro.
• La superficie inossidabile potrebbe cam-
biare colore nel tempo. Questo è norma-
le. Dopo ogni utilizzo, pulire con un deter-
gente adatto alla superficie inossidabile.
• Pulire con un panno morbido e sapone e
un detergente liquido (anti-graffio) adatto
alle superfici inox, avendo cura di strofi-
nare in una sola direzione.
• Rimuove immediatamente le macchie di
calcare, olio, amido, latte e proteine sulle
superfici di vetro e inox senza aspettare.
Le macchie potrebbero arrugginire dopo
lunghi periodi di tempo.
• I detergenti spruzzati/applicati sulla su-
perficie devono essere puliti immediata-
mente. I detergenti abrasivi lasciati sulla
superficie causano lo sbiancamento del-
la superficie.
Superfici smaltate
• Dopo ogni utilizzo, pulire le superfici
smaltate con detersivo per piatti, acqua
calda e un panno morbido o una spugna
e asciugarle con un panno asciutto.
• Se il prodotto dispone di una funzione di
pulizia a vapore facile, è possibile effet-
tuarla per lo sporco leggero non perma-
nente. (Vedere “Pulizia a vapore facile
[}63]”.)
• Per le macchie più difficili, si può usare il
detergente per forno e grill consigliato
sul sito web della marca del prodotto e
una spugnetta paglietta in lana d'acciaio
anti-graffio. Non usare detergenti per for-
ni esterni.
• Prima di effettuare la pulizia dell’area cot-
tura, il forno deve essere raffreddato. La
pulizia su superfici calde creerà sia peri-
colo di incendio che di danni alla superfi-
cie smaltata.
Superfici catalitiche
• Le pareti laterali dell’area di cottura pos-
sono essere rivestite solo con smalto o
pareti catalitiche. Varia a seconda del
modello.
• Le pareti catalitiche hanno una superficie
opaca e porosa. Le pareti catalitiche del
forno non devono essere pulite.
• Le superfici catalitiche assorbono l'olio
grazie alla struttura porosa e cominciano
a brillare quando la superficie è satura di
olio, in questo caso si consiglia di sosti-
tuire le parti.
Superfici in vetro
• Per la pulizia delle superfici in vetro non
utilizzare raschietti in metallo duro e ma-
teriali abrasivi. Possono danneggiare la
superficie del vetro.
• Pulire l'apparecchio con detersivo per
piatti, acqua calda e un panno in micro-fi-
bra specifico per superfici in vetro e
asciugarlo con un panno in micro-fibra
asciutto.
• Se dopo la pulizia ci sono residui di deter-
sivo, pulire con acqua fredda e asciugare
con un panno in micro-fibra pulito e
asciutto. Il detersivo residuo potrebbe
danneggiare la superficie del vetro.
• In nessun caso i residui essiccati sulla
superficie del vetro devono essere rimos-
si con coltelli seghettati, lana metallica o
simili strumenti da graffio.
• È possibile rimuovere le macchie di cal-
cio (macchie gialle) sulla superficie del
vetro con il decalcificante disponibile in
commercio, oppure con un agente decal-
cificante come l'aceto o il succo di limo-
ne.
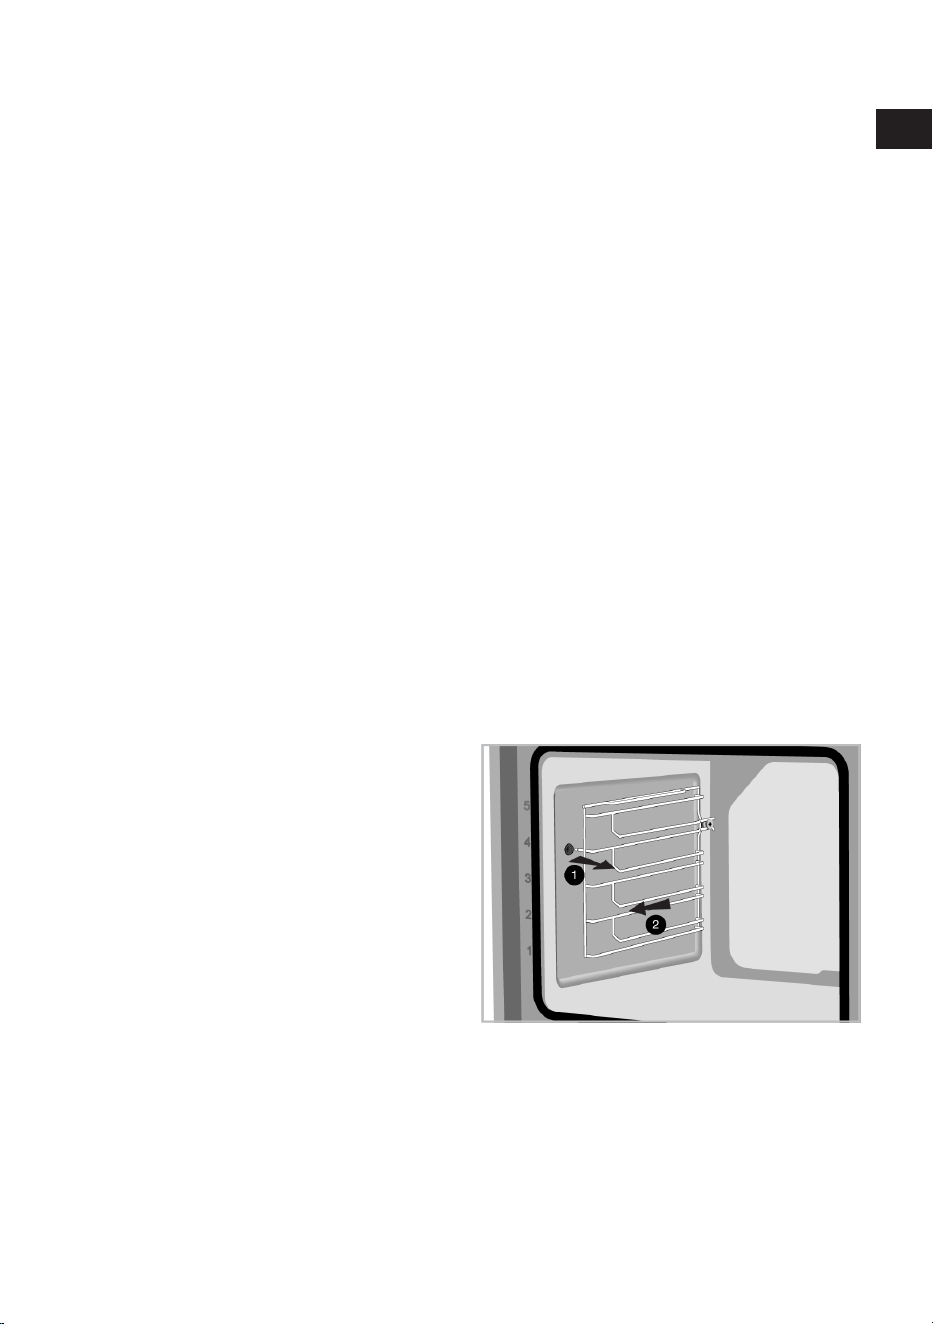
IT / 63
• Se la superficie è molto sporca, applicare
il detergente sulla macchia con una spu-
gna e aspettare molto tempo perché fun-
zioni correttamente. Pulire quindi la su-
perficie in vetro con un panno bagnato.
• Gli scolorimenti e le macchie sulla super-
ficie del vetro sono normali e non sono
difetti.
Parti in plastica e superfici verniciate
• Pulire le superfici smaltate con detersivo
per piatti, acqua calda e un panno morbi-
do o una spugna e asciugarle con un pan-
no asciutto.
• Non utilizzare raschietti in metallo duro e
detergenti abrasivi. Potrebbero danneg-
giare le superfici.
• Assicurarsi che i giunti dei componenti
del prodotto non siano lasciati umidi e
con detergente. In caso contrario, potreb-
bero corrodersi.
7.2 Accessori per la pulizia
Non mettere gli accessori del prodotto in
lavastoviglie se non diversamente indicato
nel manuale d'uso.
7.3 Pulizia del pannello di controllo
• Quando si puliscono i pannelli, pulire il
pannello e le manopole con un panno
morbido umido e asciugare con un panno
asciutto. Non rimuovere le manopole e le
guarnizioni sottostanti per pulire il pan-
nello. Il pannello di controllo e le mano-
pole potrebbero infatti danneggiarsi.
• Durante la pulizia dei pannelli inox con
comando a manopola, non usare deter-
genti inox intorno alla manopola stessa.
Gli indicatori intorno alla manopola po-
trebbero cancellarsi.
• Pulire i pannelli di controllo a sfioramen-
to (touch) con un panno morbido umido
e asciugare con un panno asciutto. Se il
prodotto è dotato di una funzione di bloc-
co tasti, prima di eseguire la pulizia del
pannello di controllo impostare il blocco
tasti. In caso contrario, i tasti potrebbero
essere involontariamente pigiati.
7.4 Pulizia dell'interno del forno (area
di cottura)
A seconda del tipo di superficie del forno,
seguire le fasi di pulizia descritte nella se-
zione "Informazioni generali sulla pulizia".
Pulizia delle pareti laterali del forno
Le pareti laterali dell’area di cottura posso-
no essere rivestite solo con smalto o pareti
catalitiche. Varia a seconda del modello. Se
il forno presenta una parete catalitica, con-
sultare la sezione "Superfici catalitiche" per
informazioni.
Se il forno è un modello con ripiani in filo
metallico, prima di pulire le pareti laterali, ri-
muovere i ripiani in filo metallico. A secon-
da del tipo di superficie del forno, comple-
tare quindi la pulizia come descritto nella
sezione "Informazioni generali sulla puli-
zia".
Per rimuovere i ripiani laterali in filo me-
tallico:
1. Rimuovere la parte anteriore del ripiano
in filo metallico tirandolo sulla parete la-
terale in direzione opposta.
2. Tirare il ripiano in filo metallico verso di
sè per rimuoverlo completamente.
3. Per riattaccare i ripiani, le procedure ap-
plicate per la sua rimozione devono es-
sere ripetute però in ordine inverso.
7.5 Pulizia a vapore facile
Questo permette di pulire facilmente lo
sporco (che non sia rimasto per troppo
tempo) che viene ammorbidito dal vapore
EN
IT
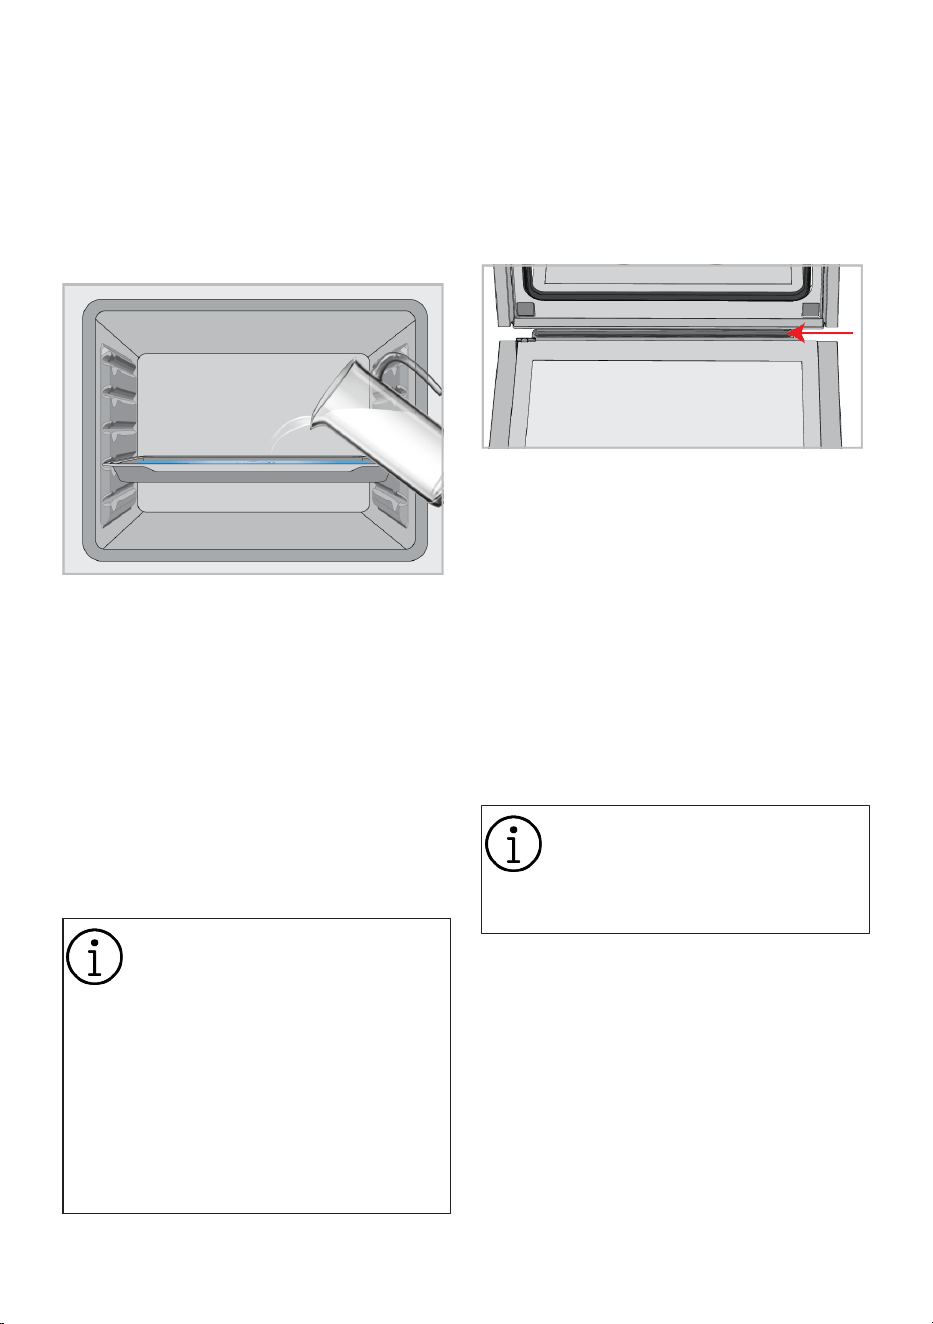
IT / 64
all'interno del forno e dalle gocce d'acqua
condensate nelle superfici interne del for-
no.
1. Rimuovere tutti gli accessori presenti
all'interno del forno.
2. Versare 500 ml di acqua nel vassoio e
posizionarlo sul secondo ripiano del for-
no.
3. Impostare il forno in modalità di pulizia
a vapore semplice e farlo funzionare a
100°C per 15 minuti.
Aprire immediatamente lo sportello e pulire
l’interno del forno con una spugna bagnata
o un panno. Il vapore verrà rilasciato quan-
do si apre lo sportello. Questo può creare
un rischio di ustioni. Fare attenzione quan-
do si apre lo sportello del forno.
Per lo sporco più ostinato, pulire il prodotto
con detersivo per piatti, acqua calda e un
panno morbido o una spugna e asciugarlo
con un panno asciutto.
Nella funzione di pulizia a vapore
semplice, si prevede che l'acqua
aggiunta evapori e si condensi
all'interno del forno e dello sportello
del forno per ammorbidire lo spor-
co leggero formatosi all’interno. La
condensa che si è formata sullo
sportello del forno potrebbe causa-
re un gocciolamento quando lo
sportello del forno viene aperto.
Non appena viene aperto lo sportel-
lo del forno, pulire la condensa.
(Varia a seconda del modello di forno. Po-
trebbe non essere disponibile sul proprio
prodotto.) Dopo la formazione di condensa
all'interno del forno, nel canale della va-
schetta sotto il forno potrebbe crearsi un
accumulo di acqua e umidità. Dopo l'uso,
pulire il canale della vaschetta con un pan-
no umido e poi asciugarlo.
7.6 Pulire lo sportello del forno
Per pulirli, è possibile rimuovere lo sportello
del forno e i vetri dello sportello. Come ri-
muovere gli sportelli e i vetri è spiegato nel-
le sezioni "Rimuovere lo sportello del
forno” e "Rimuovere i vetri interni dello
sportello". Dopo aver rimosso i vetri interni
dello sportello, pulirli con detersivo per piat-
ti, acqua calda e un panno morbido o una
spugna e asciugare con un panno asciutto.
Per i residui di calcare che potrebbero for-
marsi sul vetro del forno, pulire il vetro con
aceto e risciacquare.
Per pulire lo sportello del forno e il
vetro, non utilizzare detergenti
abrasivi aggressivi, raschietti me-
tallici, pagliette d’acciaio o candeg-
gina.
Rimozione dello sportello del forno
1. Aprire lo sportello del forno.
2. Aprire le clip nella cavità della cerniera
dello sportello anteriore a destra e a si-
nistra premendole verso il basso come
mostrato in figura.
3. I tipi di cerniera variano come (A), (B),
(C) secondo il modello del prodotto. Le
figure seguenti mostrano come aprire
ogni tipo di cerniera.
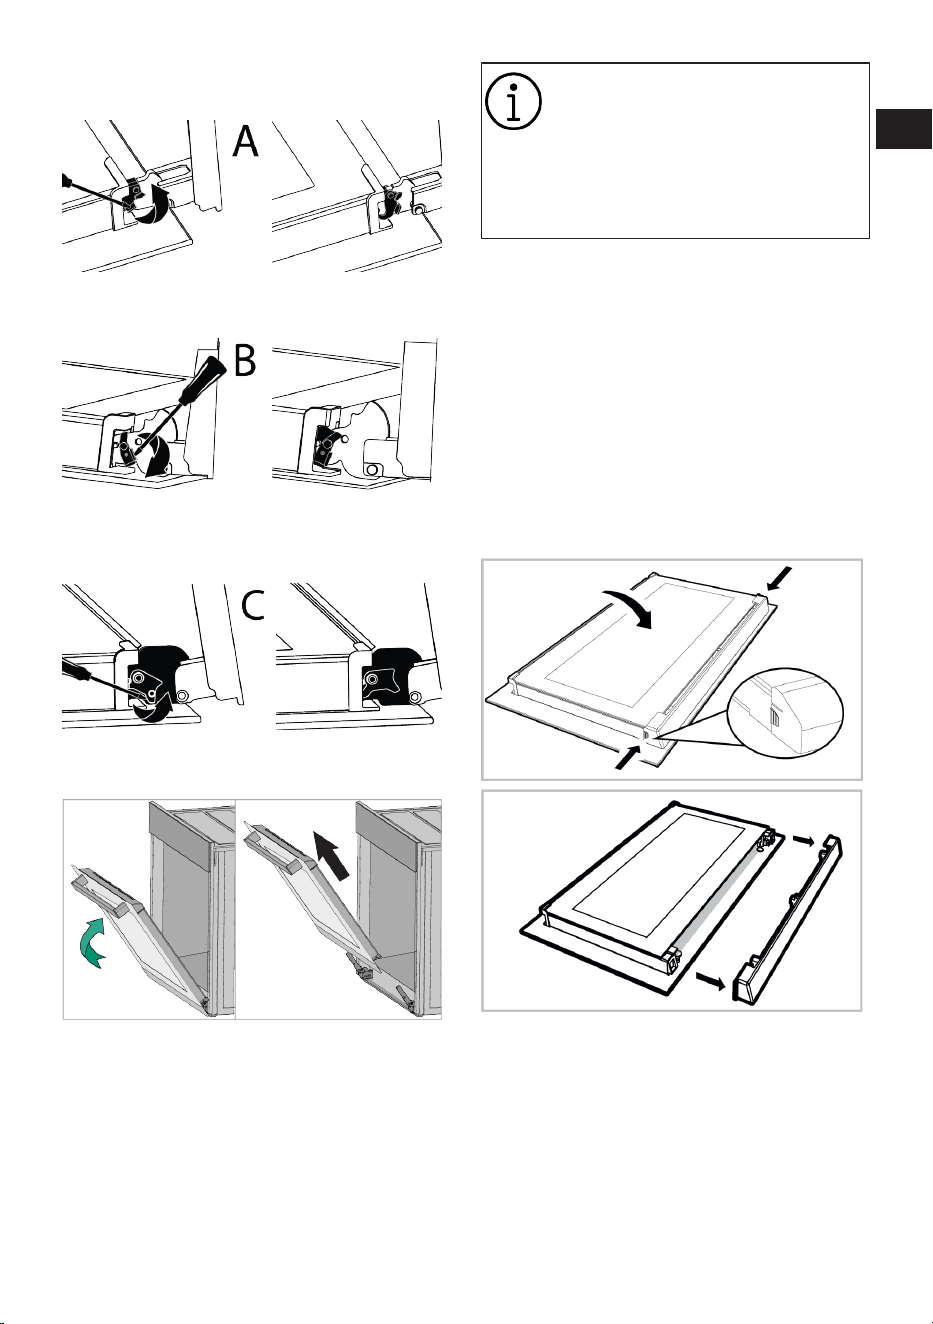
IT / 65
4. la cerniera di tipo (A) è disponibile nei
normali tipi di sportelli.
5. la cerniera di tipo (B) è disponibile nei ti-
pi di sportelli a chiusura morbida.
6. la cerniera di tipo (C) è disponibile nei ti-
pi di sportelli ad apertura/chiusura mor-
bida.
7. Mettere lo sportello del forno in posizio-
ne semiaperta.
8. Tirare lo sportello rimosso verso l'alto
per sganciarlo dalle cerniere di destra e
di sinistra e rimuoverlo.
Per riattaccare lo sportello, le pro-
cedure applicate per la sua rimozio-
ne devono essere ripetute, però in
ordine inverso. Durante l'installazio-
ne dello sportello, assicurarsi di
chiudere le clip sulla cavità della
cerniera.
7.7 Rimuovere il vetro interno dello
sportello del forno
Il vetro interno dello sportello anteriore del
prodotto può essere rimosso per la pulizia.
1. Aprire lo sportello del forno.
2. Tirare verso di sé il componente in pla-
stica, fissato sulla parte superiore dello
sportello anteriore, premendo contem-
poraneamente sui punti di pressione su
entrambi i lati del componente e rimuo-
verlo.
3. Come mostrato in figura, sollevare deli-
catamente il vetro più interno (1) verso
“A” e poi rimuoverlo tirando verso “B”.
EN
IT
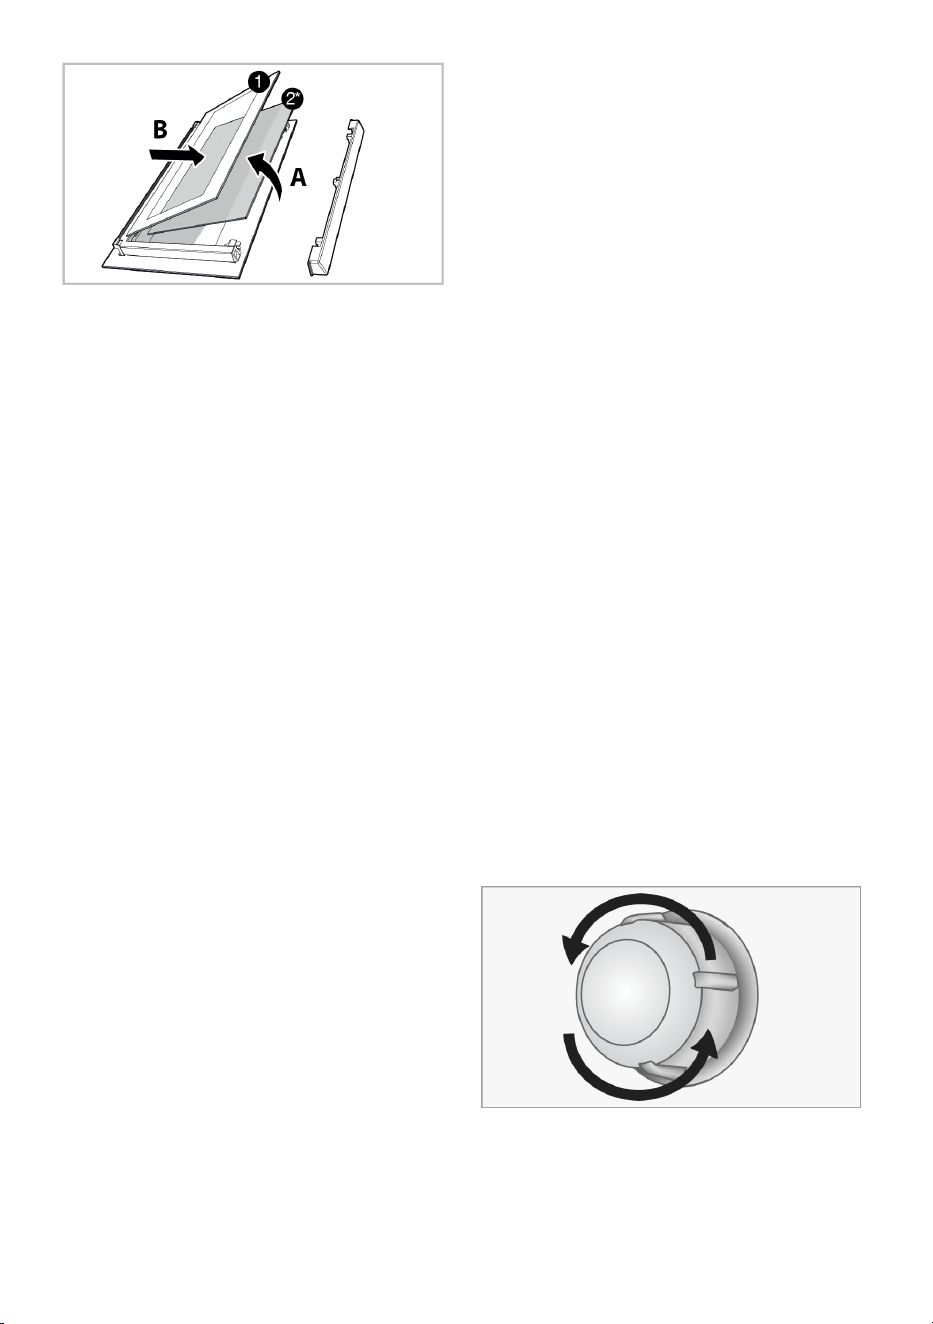
IT / 66
1 Vetro più interno 2* Vetro interno (Potreb-
be non essere dispo-
nibile sul proprio pro-
dotto)
4. Se il prodotto ha un vetro interno (2), ri-
petere lo stesso processo per staccarlo
(2).
5. Il primo passo per risistemare lo sportel-
lo è quello di rimontare il vetro interno
(2). Posizionare il bordo smussato del
vetro in modo da incontrare il bordo
smussato della fessura in plastica. (Se il
prodotto ha un vetro interno). Il vetro in-
terno (2) deve essere fissato alla fessu-
ra di plastica più vicina al vetro più inter-
no (1).
6. Nel rimontare il vetro più interno (1), fare
attenzione a posizionare il lato stampa-
to del vetro sul vetro interno. È fonda-
mentale posizionare gli angoli inferiori
del vetro più interno perché coincidano
con le fessure inferiori in plastica.
7. Spingere il componente in plastica ver-
so l’incastro fino a quando non si sente
un "click".
7.8 Pulizia della lampada del forno
Nel caso in cui lo sportello in vetro della
lampada del forno nell’area di cottura si
sporchi, pulire con detersivo per piatti, ac-
qua calda e un panno morbido o una spu-
gna e asciugare con un panno asciutto. In
caso di guasto della lampada del forno, è
possibile sostituirla seguendo le sezioni
che seguono.
Sostituzione della lampada del forno
Avvertenze generali
• Per evitare il rischio di scosse elettriche
prima di sostituire la lampada del forno,
scollegare il prodotto e attendere che il
forno si raffreddi. Le superfici calde po-
trebbero causare ustioni!
• Questo forno è alimentato da una lampa-
da a incandescenza con meno di 40 W,
meno di 60 mm di altezza, meno di 30
mm di diametro, o una lampada alogena
con prese G9 con meno di 60 W di poten-
za. Le lampade sono adatte al funziona-
mento a temperature superiori a 300 °C.
Le lampade per forni sono disponibili
presso i servizi autorizzati o i tecnici au-
torizzati. Questo prodotto si serve di una
lampada di classe energetica G.
• La posizione della lampada potrebbe dif-
ferire da quella indicata in figura.
• La lampada utilizzata in questo prodotto
non è adatta per l'illuminazione di am-
bienti domestici. Lo scopo della lampada
è quello di aiutare l'utente a vedere gli ali-
menti inseriti.
• Le lampade utilizzate in questo prodotto
devono resistere a condizioni fisiche
estreme come temperature superiori a
50°C.
Se il forno è provvisto di una lampada
rotonda,
1. Scollegare il prodotto dalla rete elettri-
ca.
2. Rimuovere il coperchio di vetro ruotan-
dolo in senso antiorario.
3. Se la lampada del forno è del tipo (A),
come mostrato in figura, ruotare la lam-
pada come mostrato in figura e sosti-
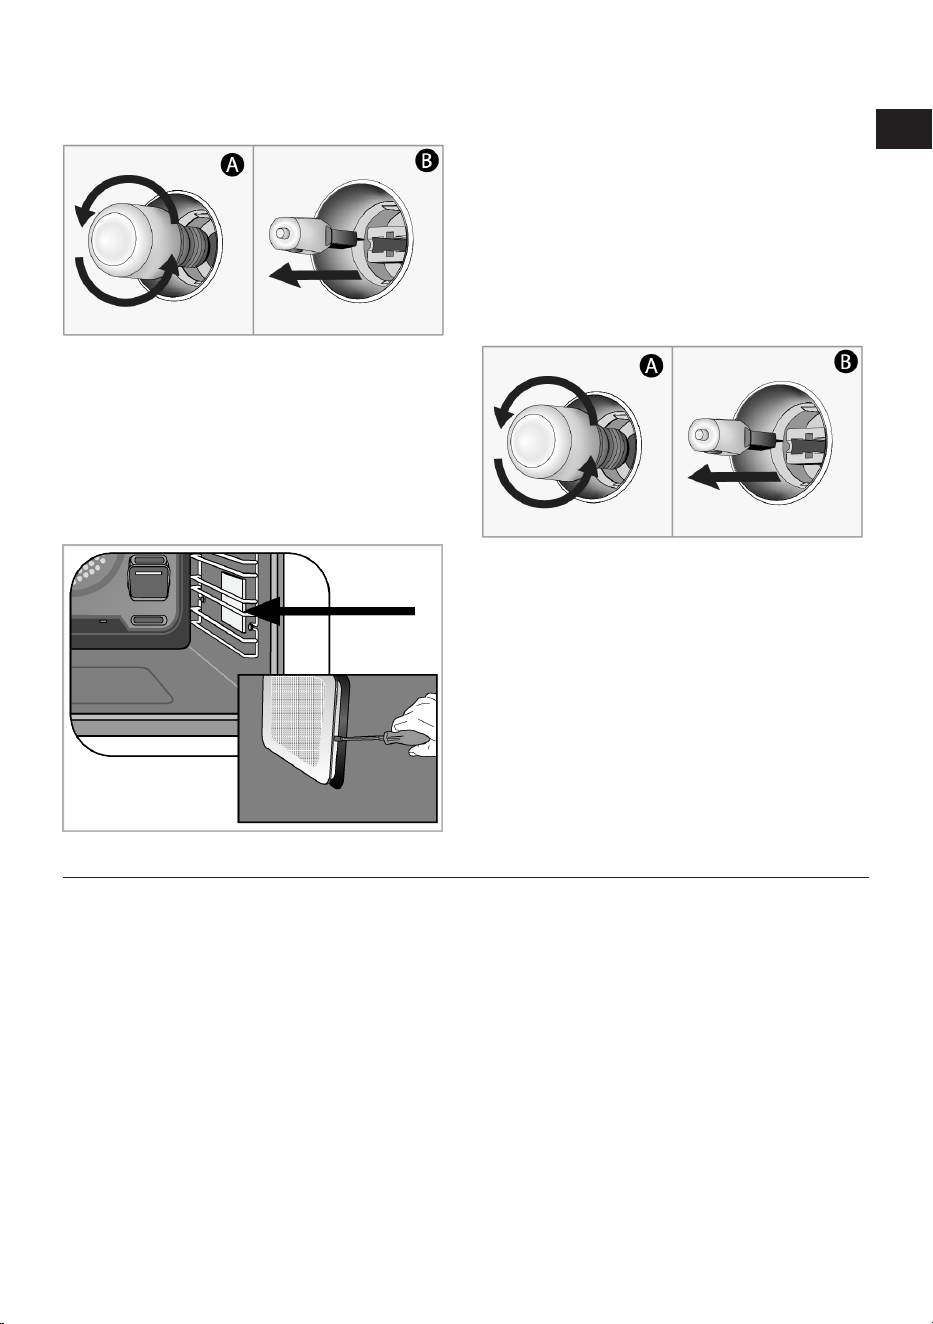
IT / 67
tuirla con una nuova. Se è un modello
del tipo (B), estrarla come mostrato in fi-
gura e sostituirla con una nuova.
4. Rimontare il coperchio di vetro.
Se il forno è provvisto di una lampada
quadrata,
1. Scollegare il prodotto dalla rete elettri-
ca.
2. Rimuovere i ripiani in filo metallico se-
condo la descrizione.
3. Sollevare il coperchio di protezione in
vetro della lampada con un cacciavite.
Rimuovere prima la vite, se è presente
una vite sulla lampada quadrata del pro-
dotto.
4. Se la lampada del forno è del tipo (A),
come mostrato in figura, ruotare la lam-
pada come mostrato in figura e sosti-
tuirla con una nuova. Se è un modello
del tipo (B), estrarla come mostrato in fi-
gura e sostituirla con una nuova.
5. Rimontare il coperchio di vetro e i ripiani
in filo metallico.
8 Risoluzione dei problemi
Qualora il problema persista dopo aver se-
guito le istruzioni contenute in questa sele-
zione, contattare il proprio fornitore oppure
un Servizio Autorizzato. Non cercare mai ri-
parare da soli il prodotto.
Mentre il forno è in funzione, viene emana-
to del vapore.
• È normale vedere del vapore fuoriuscire
durante il funzionamento. >>> Questo
non è un errore.
Durante la cottura si formano delle gocce
d'acqua
• Il vapore generato durante la cottura si
condensa quando entra in contatto con
le superfici fredde all'esterno del prodot-
to e potrebbe formare delle gocce d'ac-
qua. >>> Questo non è un errore.
Si sentono suoni metallici mentre il pro-
dotto si riscalda e si raffredda.
• Le parti metalliche possono espandersi e
produrre suoni se riscaldate. >>> Questo
non è un errore.
EN
IT

IT / 68
Il prodotto non funziona.
• Il fusibile può essere difettoso o bruciato.
>>> Controllare i fusibili nella scatola dei
fusibili. Sostituirli, se necessario, o riatti-
varli.
• L’apparecchio potrebbe non essere colle-
gato a una presa di corrente (messa a
terra). >>> Controllare se l'apparecchio è
collegato alla presa
• (Se l'apparecchio è dotato di timer) I tasti
del pannello di controllo non funzionano.
>>> Se il prodotto ha un blocco tasti, può
essere che sia attivo, disattivarlo.
La luce del forno non è accesa.
• La lampada del forno potrebbe essere di-
fettosa. >>> Sostituire la lampada del for-
no.
• Non c'è elettricità. >>> Assicurarsi che la
rete sia operativa e controllare i fusibili
nella scatola dei fusibili. Sostituire i fusi-
bili se necessario o riattivarli.
Il forno non si scalda.
• Il forno potrebbe non essere impostato
su una specifica funzione di cottura e/o
temperatura. >>> Impostare il forno su
una specifica funzione di cottura e/o
temperatura.
• Non c'è elettricità. >>> Assicurarsi che la
rete sia operativa e controllare i fusibili
nella scatola dei fusibili. Sostituire i fusi-
bili se necessario o riattivarli.