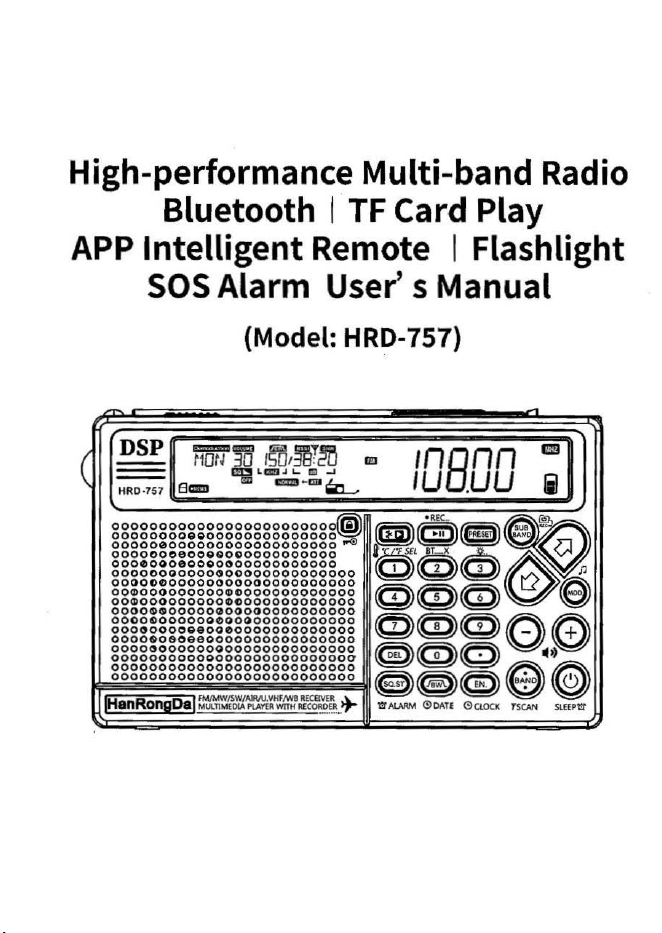
High-performance Multi-band Radio
Bluetooth
I
TF
Card Play
APP
Intelligent
Remote I Flashlight
SOS
Alarm User' s Manual
(Model: HRD-757)
(
DSP
iiillT~
.!SH~l~
m
1nann
al
---
---
IU
.UU
i
---
Sau
m111-m~
HRD·757
00000000000000000000000~
~®~~
ooooooooeooooooooooooooo
oooooeoooooooooooooooooo
~
'
{fJJ<O~a
~
ooooooeeooQQOQOOOOOOOOOO
oooeoooeoooooooooooooooo
00000000000000000000000000
00000000000000000000000000
ooeoooooooooGooooooooooooo
~~(@)
~
OOGOOOOOOOOOOOOOOOOOOOOOOO
0000&~00000000000000000000
00000000000000000000000000
~~~00
ooooooooeeooeooooooooooooo
ooooeoeoeeoooooooooooooooo
00000000000000000000000000
®~(Q)
0
00000000000000000000000000
00000000000000000000000000
~<®~9@
00000000000000000000000000
~
en
RongDel
~~:f~~H~::~~
-
~
"a
ALARM
0~Tf
<9Q.OCK 1
SCAH
SUEP
l!f
Thank
you
for buying our product.
Before
use
, pl
ease
read
this
manual carefully and
keep
it
properly.
1:
Product overview
Our aim
in
new product
R&D
has
always
been
continuous
innovation and meeting the
needs
of
user
s.
We
hope
you
like our meticulously crafted
HRD
-
757
radio
which will bring more happiness to people who like
to
li
ste
n to
the radio.
Thi
s
is
a high-performance Multi-band radio.
For
more details,
please
read
this manual.
2:
Product
features
2.1:
This product
can
receive
wireless
sig
n
als
of
FM
,
AM,
SW,
AIR,
VHF,
UHF
and
WB
with strong receiving sensitivity
by
means
of
software programming.
2.2:
This
product
uses
advanced
audio technology
to
realize
Bluetooth connection for wirel
ess
music
play.
2.3:
This product supports
TF
card music play, music play
of
MP3,
WMA,
WAV,
APE
and
FLA,
and
256G
memory maximally.
2.4:
The
TYPE-C
jack
is
universal: It supports charging and
connecting this product to the computer using
USB
cab
l
e.
It
can
be
used
for sound input
speaker,
copying with card reader
and
deleting the content in
TF
card.
2.5:
This product
has
multiple
ways
of
choosing a channel in
the mode
of
receiving: It
su
pports choosing a frequency by
pressing the number k
ey,
automatically searching and storing a
1
channel, manually
storing
a channel and choosing a channel
using
the
knob.
2.6:
FM
has
four
frequencies
for
you
to
switch. The
fr
equency
of
AM
is
adjusted
automatically
with
the
change
of
FM
without
national
boundary
limitation.
1): FM:87.5-108MHZ/AM:522-l 710KHZ (step value: 9KHZ)
2):
FM:87.0-108MHZ/AM:520-l 710KHZ (step value: lOKHZ)
3): FM:76.0-108MHZ/AM:522-l 710KHZ (step value: 9KHZ)
4): FM:64.0-108MHZ/AM:522-l 710KHZ (step value: 9KHZ)
2.7:
SW
has 14
meter
waves;
V.UHF
has
23
meter
waves.
Al
R has 7
meter
waves,
wh
ich
allows
you
to
search
your
frequency quickly.
2.8: This
product
offers
BASS
low
sound
quality
and supports
listening
with
headphones,
meeting
the
needs
of
all
users.
2.9: This
product
supports
four
mode
s
of
play
in
the
state
of
TF
card play:
rA
(repeat all),
rO
(repeat one)
rF
(repeat file,
rr
(r
andom)
2.10: This
product
uses a
2,SOOmAh
lithium
battery
which can
be replaced and has
long
time
of
endurance.
2.11: This
product
supports
the
function
of
lock.
2.12: The 4.17-inch large screen displays various
co
ntent
such
as
time,
perpetual calendar,
thermometer,
battery
level, signal,
sleep
time,
and clock
which
give users clear information.
2.14: The sleep
power-off
time
can
be
set
as
120, 110, 100, 90,
80, 70,
60,
50, 40, 30,
20
and 10 minutes.
2.15: Two modes
of
scheduled
power
-on
and
scheduled
alarm
clock
can be set. The
alarm
clock has
two
ringtones
for
you
to
choose.
2
2.16: After choosing scheduled
power
-on,
the
power-off
tim
e
after scheduled
power
-on can be
se
t
as
10, 20, 30, 40, 50, 60,
70, 80 and 90 minutes.
2.17: The
backlight
and backlight display
of
number
key are
convenient
for
yo
u
to
use in darkness.
2.18: In the
mode
of
receiving, this
products
has a large
memory
of
storing channels and can store 1,000 chan
ne
ls
(FM/VHF/AM/SW/AI
R:
200 channels
for
each)
2.19: Compared
with
traditional radios,
thi
s
product
can be
controlled
intelligently
and remotely
with
an
APP
(support
Android and Harmony)
2.20: Within
20
meter
s,
this
product
realizes band switching,
mode
switching, frequency choosing
with
the
number
key,
vol
ume
control, channel choosing
wit
h frequency, recording,
locking
... giving you new usage experience.
2.21: This
product
supports
EQ
play.
2.22: The type-c charging
jack
is
more
friendly
for
use.
3:
Packing
list
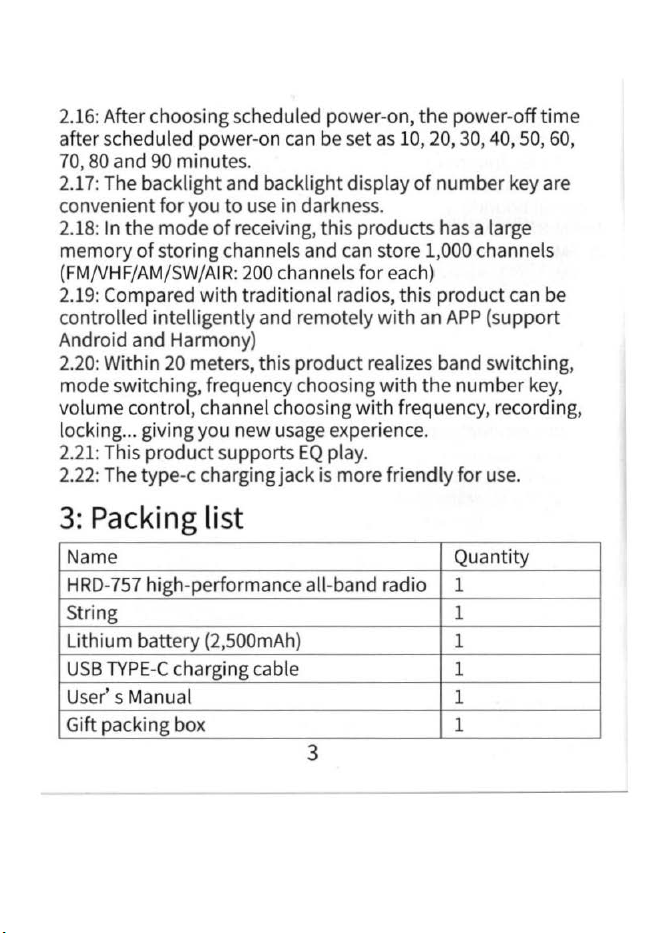
Name
Quantity
HRD
-757 high-performance all-band rad
io
1
String 1
Lithium battery (2,500mAh) 1
USB
TYPE
-C
charging cable 1
U
se
r's
Manual
1
Gift packing box 1
3
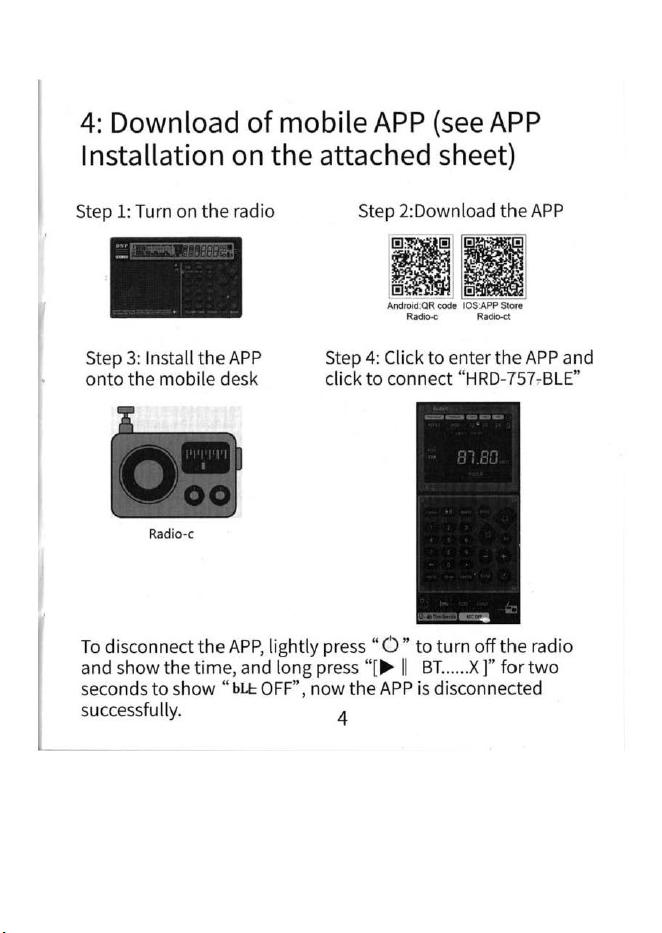
4:
Download of mobile
APP
(see
APP
Installation
on
the attached
sheet)
Step 1: Turn
on
the
radio
Step
3:
Install
the
APP
onto
the
mob
ile desk
Radio
-c
Step 2:Download
the
APP
l
Androtd:OR
code
lOS:APP
Store
Ra
dio-<:
R
adio-d
Step 4: Click
to
enter
the
APP
and
click
to
connect
"HRD-757,BLE"
To
disconnect
the
APP
, l
ight
ly press
"0"
to
turn
off
the
radio
and
show
the
time,
and
long
press " [
....
II
BT
...... X
)"
for
two
seconds
to
show
"bU:
OFF",
now
the
APP
is disconnected
successfu
ll
y.
4
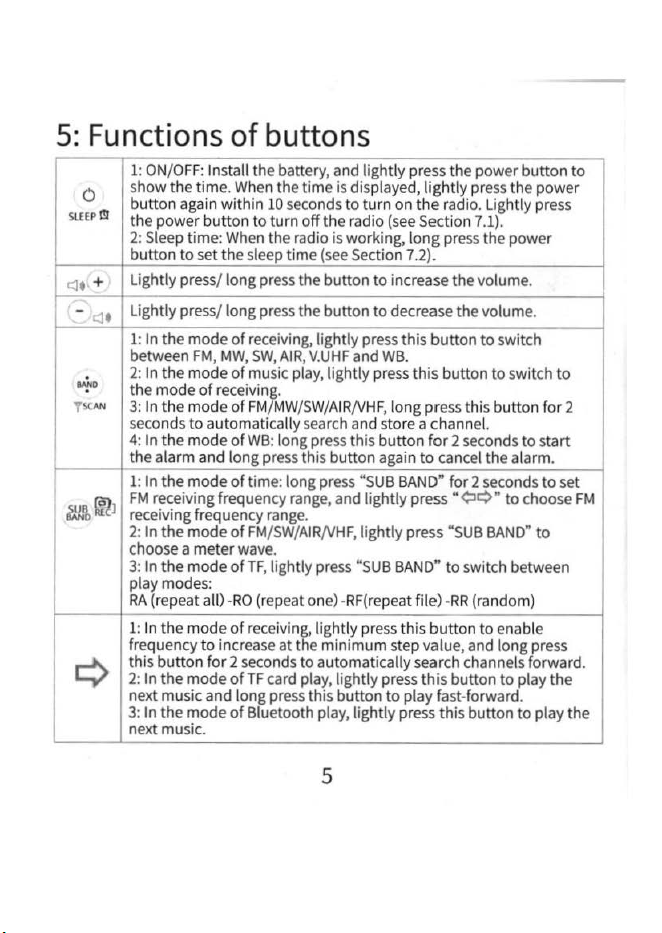
5:
Functions
of
buttons
1:
ON/O
F
F:
Install
the
battery,
and
lightly
press
the power button to
0
show the time.
When
the time
is
displayed, lightly
press
the
powe
r
button
again
within
10
seconds
to turn
on
the
ra
dio. Lightly p
ress
SUEP!!l
the power button
to
turn off
the
radio
(see
Sect
i
on
7.1).
2:
Sleep
time:
When
the radio is working, long p
ress
the power
I
button
to
set the
sleep
time
(se
e Section
7.2
).
~
c:J
• +
Lightly
press
/ long
press
the button
to
increase the volume.
-
.::J
•
lightly
press
/ long
press
the button
to
decrease
the volume.
1:
In
the mode
of
receiving,
lightly
press
this button
to
switch
between
FM,
MW
,
SW
,
AIR
,
V.UHF
and
WB.
...;..
2:
In
the mode
of
music
play,
lightly
press
this button
to
switch
to
the mode
of
receiv
i
n,,.
T
!C
AN
3:
In
th
e mode
of
FM
MW
/S
W/A
I
R/VHF,
long pr
ess
this button for 2
seconds
to automatically
search
and store a channel.
4:
In
the mode
of
WB
: long
press
this button for 2
seconds
to
start
the alarm and long
press
this button
again
to
cancel
the alarm.
1:
In
the mode
of
time: long
press
"SU
B
BAND"
for 2
seconds
to
set
WJ,~l
FM
receiving frequency
range,
and lightly
press
"¢1¢
•
to
choose
FM
receiving frequency
range
.
2:
In
the mode
of
FM
/
SW
/
AIR/VHF,
lightly
press
"
SUB
BAND"
to
choose
a meter
wave.
3:
In
the mode of
TF
, lightly
pre
ss
"S
UB
BAND"
to switch between
play
modes:
RA
(re
peat all)
·RO
(repeat
one)-RF(re
p
eat
file) ·
RR
(r
andom)
1: In the mode of
receiving,
lightly
press
this button to enable
frequency to
increase
at the minimum
step
value,
and
long
press
~
this button for 2
seconds
to
automatically search channels forward.
2:
In
the mode ofTF
card
play
, lightly
press
this button to play the
next music and long
press
this button
to
pl
ay
fast-forward.
3:
In
the mode of Bluetooth play, lightly
press
this button
to
play the
next
music.
5
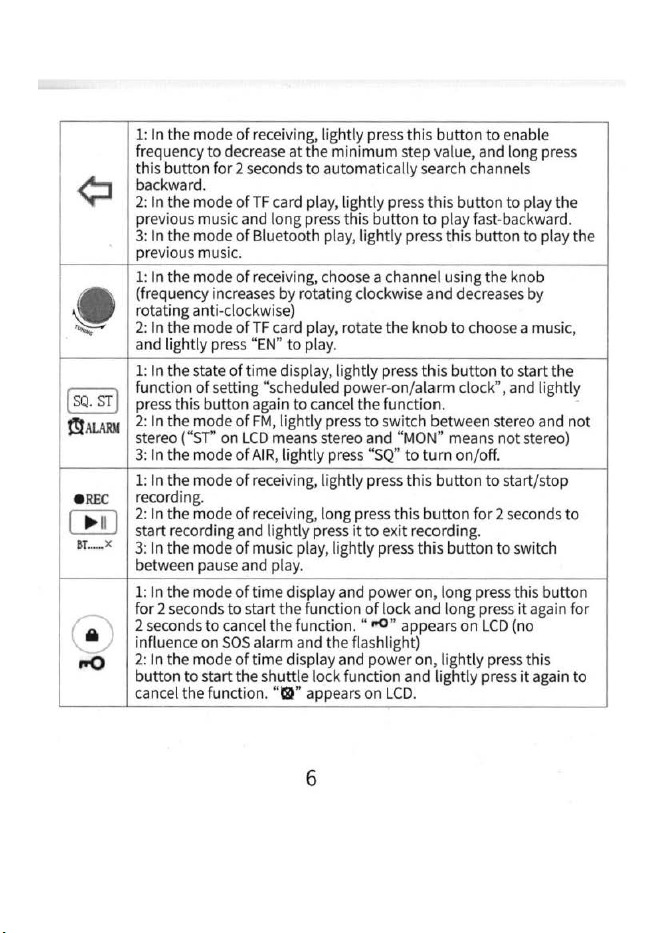
1:
In
the mode of receiving, lightly
press
this button to enable
frequency to
decrease
at the minimum
step
value,
and
long p
re
ss
¢:l
this button for 2 seconds to automatically
search
channels
backward.
2:
In
the mode of
TF
card
play, lightly press this button to pl
ay
the
previous music
and
long
press
this button
to
pl
ay
fast-backward.
3:
In
t
he
mode of Bluetooth play, lightly
press
this button to play the
previous music.
1:
In
t
he
mode of receiving,
choose
a channel using the knob
-
(frequency
increases
by rotating clockwise and
decreases
by
rotating anti-clockwise)
"'
2:
In
the mode of
TF
card
play, rotate t
he
knob to choose a music,
and
lightly
press
"EN"
to pl
ay.
1:
In
the
state
of
time display, lightly
press
this button to start the
[
SQ.
sr
)
function of setting "scheduled power-on/alarm clock",
and
lightly
press
this button
again
to
cancel
the function.
m
i\LARll
2:
In
the mode
of
FM,
lightly
press
to switch between stereo and not
stereo ("ST"
on
LCD
means
stereo
and
"MON"
means
not
stereo)
3:
In
the
mode
of
AIR,
lightly
press
"SQ"
to turn on/off.
1:
In
the mode
of
receiving, lightly
press
t
his
button to start/stop
e
REC
recording.
CE]
2:
In
the mode
of
receiving, long
press
this button for 2
seconds
to
start recording
and
lightly
press
it
to exit recording.
ar
_.x
3:
In
the mode
of
music play, lightly
press
this button to switch
between
pause
and
play.
1:
In the mode
of
time display
and
power on, long
press
this button
for 2
seconds
to start the function
of
lock and long
press
it
again
fo
r
M
2
seconds
to
cancel
the function. "
..O
" appears
on
LCD
(no
influence
on
SOS
alarm
and
the flashlight)
"°
2:
In the mode
of
time display
and
power on, lightly
press
this
button to start the shuttle lock function and lightly
press
it
again
to
cance
l the function. "
ISi
"
appea
rs
on
LCD.
6
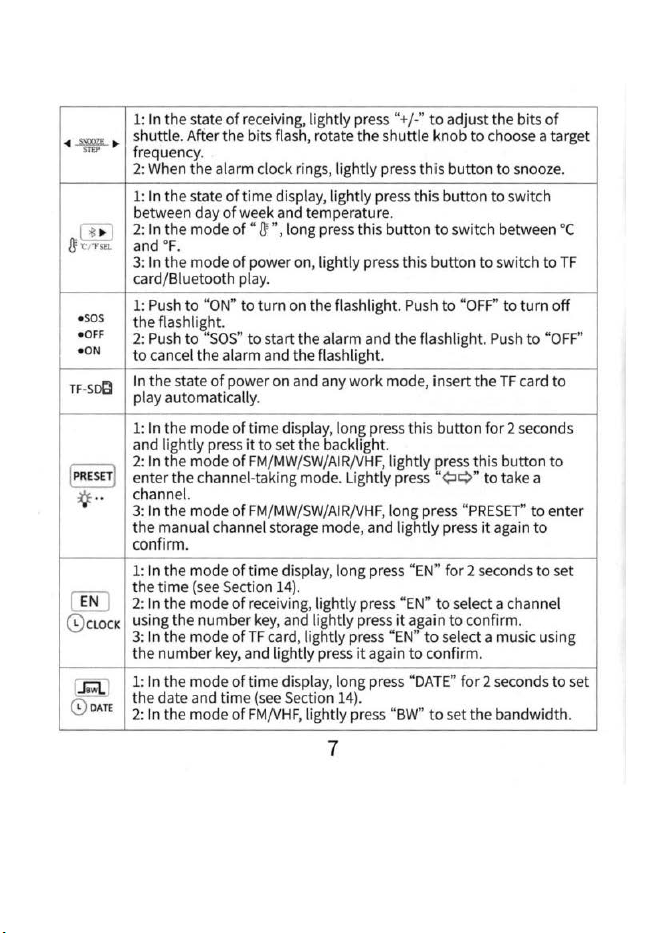
1:
In
the
state
of
receiving,
lightly
press
"+/-"
t o adjust
the
bits
of
•
-'Wi.IL
•
shuttle. After
the
bits flash, rotate
the
shuttle knob
to
choose a target
frequency.
2: When
the
alarm clock rings,
lightly
press this
button
to
snooze.
1:
In
the
state
of
time
display,
lightly
press
this
button
to
switch
between day
of
week and temperature.
CE:,
2:
In
the
mode
of•
IJ
·,long
press
this
button
to switch between ·c
IJ
-cna.
and °
F.
3:
In
the
mode
of
power on,
lightl
y press this
button
to
switch
to
TF
card/Bluetooth play.
•SO
S
1:
Push
to
"ON"
to
turn on
the
flashlight. Push
to
"OFF"
to
turn
off
the
flashlight.
•OFF
2: Push
to
"SOS"
to
start
the
alarm and
the
flashlight. Push
to
"O
FF
"
•
ON
to
cancel
the
alarm and
the
flashlight.
TF
-
So9
In
the
state
of
power
on
and any
wo
rk
mode,
in
sert
the
TF
card
to
play automatically.
1:
In
the
mode
of
tim
e display,
long
press this bu
tton
for 2 seconds
I
PRESET
J
and
lightly
press
it
to
set
the
backlight.
2: In
the
mode
of
FM
/MW/
SW
/AIR/V
HF,
lightly
pre
ss
this b
utton
to
enter
the
channel-taking mode. Lightly press
"¢>¢"
to
take a
*"
channel.
3: In
the
mode
of
FM/MW/SW/AIR/VHF, long pr
ess
"PR
ESET
"
to
en
ter
the
m
an
ual channel storage mode, and
lightly
press
it
again
to
confirm.
1: In the
mode
of
time
display, long
pr
ess "EN"
for
2 seconds
to
set
CT[)
the
time
(see Section 14).
2: In
the
mode
of
receiving, lig
htly
press "
EN
"
to
select a channel
@
cLOCK
us
ing
the
number
key, and
lightly
pre
ss
it
agai n
to
co
nfirm
.
3: In the
mode
ofTF
card,
lightly
press "EN"
to
se
lect a music using
the
number
key, and lightly pre
ss
it
again
to
co nfirm.
B:l
1: In
the
mode
of
time
display, long press "DATE"
for
2 seconds to set
@
DATE
the
date and
time
(see Section 14).
2: In
the
mode
of
FM
/V
HF
,
lightly
press "
BW
"
to
set
the
bandwidth.
7
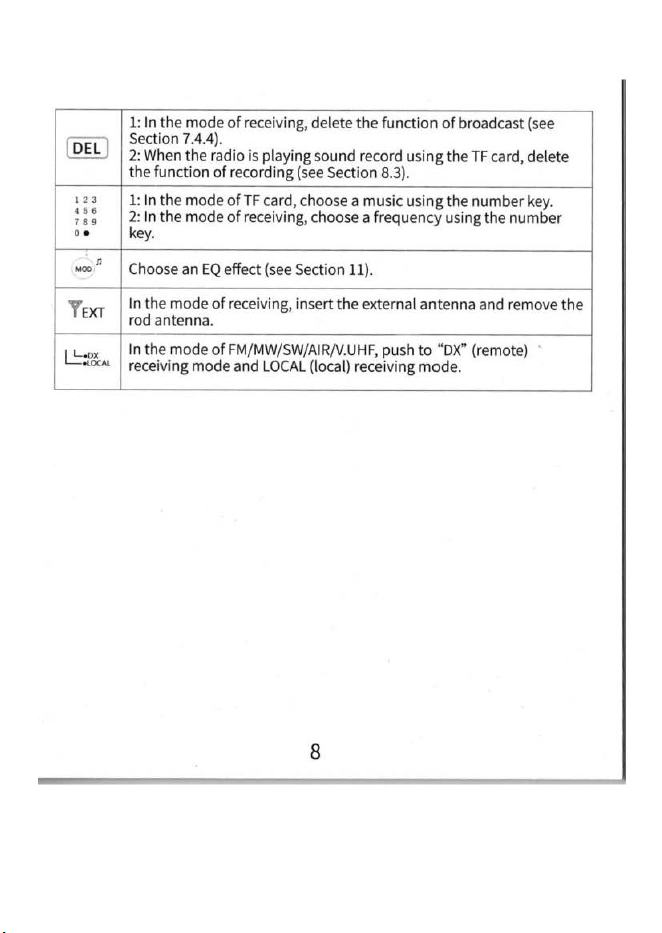
1: In
the
mode
of
receiving, delete
the
function
of
broadcast
(s
ee
!
DEL
)
Section 7.4.4).
2:
When the radio is playing
sound
record usi
ng
the TF card, delete
the
funct
ion
of
recording
(see
Section 8.3).
12
3
1: In
the
mo
de
of
TF card, choose a music usi
ng
the
number
key.
.
..
2:
In
the
mode
of
receiving, choose a frequency using
the
number
"'
..
key .
MOO
•
Choose an
EQ
effect
(see
Section 11).
T
EXT
In the
mode
of
receiving, insert
the
external
antenna
and remove
the
rod antenna.
L::.ox
In
the
mode
of
FM/MW/SW/AIR/V.UHF, push
to
"DX" {remote)
olOC-'l
receiving
mode
and
LOCAL
(local) receiving
mode.
8
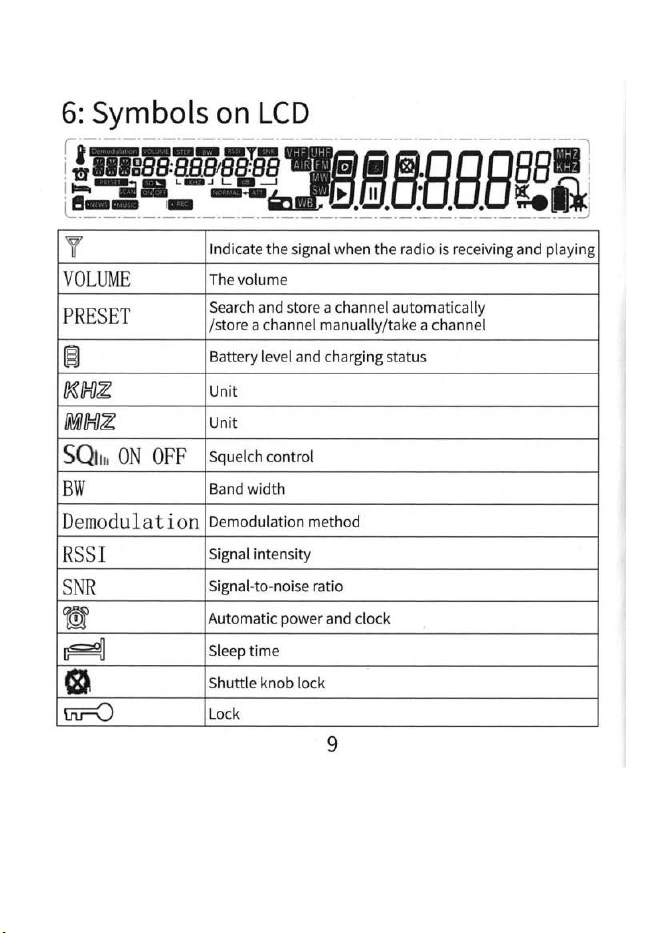
6:
Symbols
on
LCD
r -·-·-·- -·-·- ·-·
-·-
·-·- - - ·
-·-
-
·--
-·-·- - ·-
-·-·
;i
,
~nnnn
=
~lri~
...
s~~
.
888
aa•
'·
, ..
.,.
--~
.
0.0:
Ill:
1*
1
L
~~~
-
~
- -
-·-·
- ·-
·-·
-
'.
_ .
..:
___
._
_
_.:
___
:.._
___
~
---
~
y
Indicate
th
e signal wh
en
the
ra
dio
is receivi
ng
and playi
ng
VOLUME
The volume
PRESET
Search and store a channel
auto
m
at
ic
all
y
/store a channel manually/take a channel
~
Battery level and
cha
rging status
~{fO~
Unit
(OO{fO~
Unit
SQ1
11
. ON
OFF
Squelch control
BW
Bandwidth
Demodulation
Demodulation method
R
SSI
Signal intensity
SN
R
Sig
nal-to-noise ratio
~
Automatic power and clock
~
Sl
ee
p time
m
Sh
uttle
knob lock
w=O
Lock
9
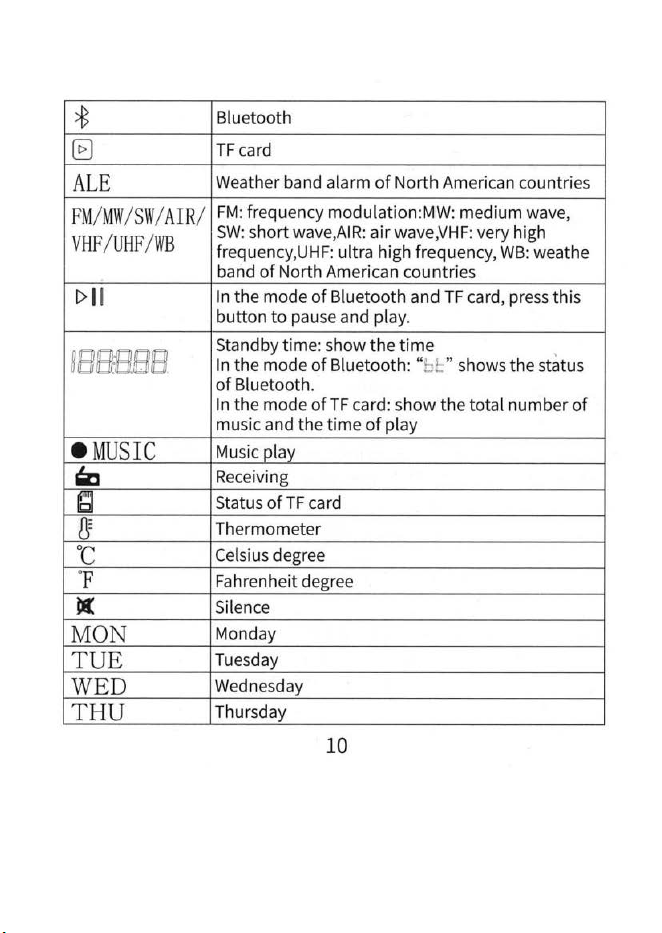
*
Bl
uetooth
(8
TF
card
ALE
Weather band alarm
of
North
American countries
FM
/
MW
/
SW
/A
IR
/
FM:
frequency modulation:MW: medium wave,
VHF
/U
HF
/
WB
SW:
short wave,AIR:
air
wave,VHF: very high
frequency,UHF: ultra
hig
h freq uency,
WB:
weathe
band
of
North American countries
I>
II
In
the
mode
of
Bluetooth
and
TF
card, press
this
button
to
pause and play.
188B88
Standby time: show
the
time
In
the
mode
of
Bluetooth: "
!:L
" shows
the
status
of
Bluetooth.
In
the
mode
of
TF
card:
show
the
total
number
of
music and
the
time
of
play
•
MUSIC
Music olav
~
Receiving
~
Status
of
TF
card
l!'
Thermometer
·c
Ce
lsi
us
degree
1' Fahrenheit degree
Ill:
Silence
MON
Monday
TUE
Tuesday
WED
Wednesday
THU
Thursday
10
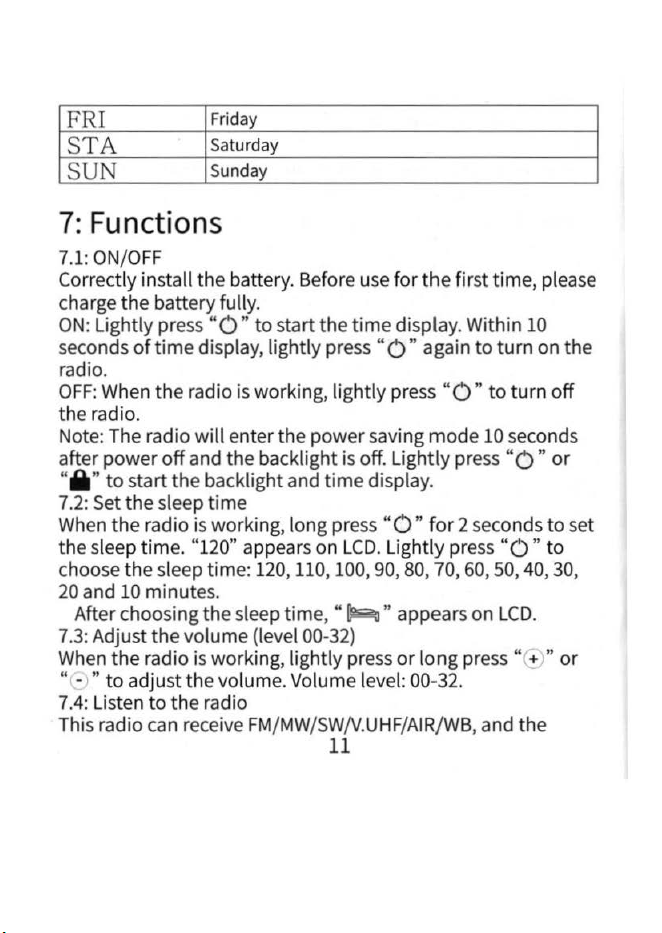
FRI
Friday
S
TA
Saturday
S
UN
Sunday
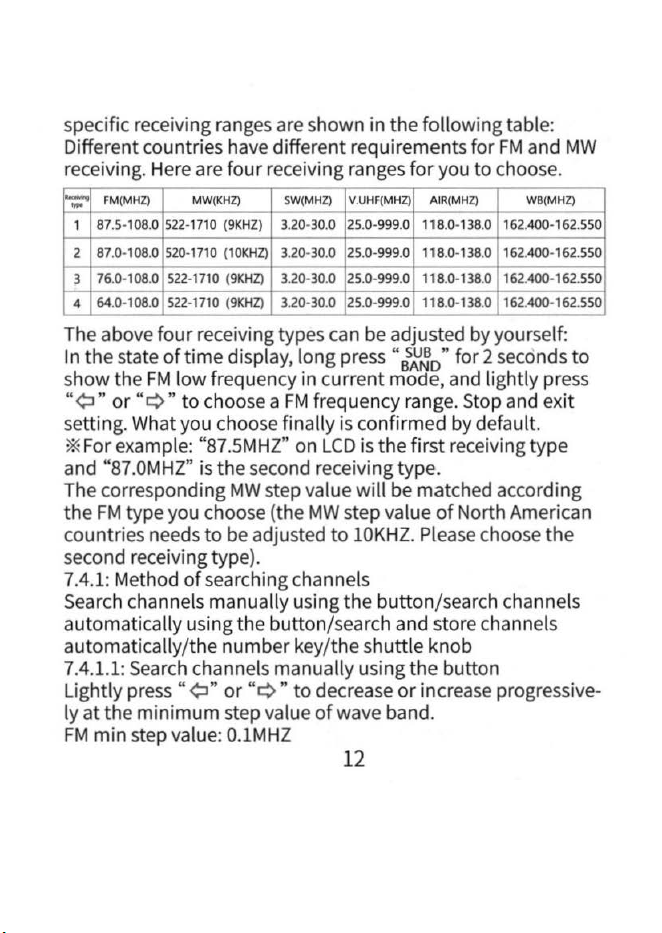
7:
Functions
7.1:
ON/OFF
Correctly install the battery.
Before
use
for the first time,
please
charge
the battery fully.
ON:
Lightly
press
"0"
to start the time display. Within
10
seconds
of
time display, lightly press"
O"
again
to
turn
on
the
radio.
OFF:
When
the radio
is
working, lightly
press
"O"
to turn off
the radio.
Note:
The radio will enter the power saving mode
10
seconds
after power off
and
the backlight
is
off. Lightly
press
"O"
or
"a" to start the backlight and time display.
7.2:
Set
the sleep time
When
the radio
is
working, long
press
"0"
for 2
seconds
to
set
the sl
eep
time. "1
20"
appears
on
LCD.
Lightly
press
"O"
to
choose the sl
eep
time:
120,
110, 100,
90,
80,
70,
60,
50
,
40,
30,
20
and
10
minutes.
After choosing the
sleep
time,
"~
"
appears
on
LCD
.
7.
3:
Adjust the volume
(level
00
-
32
)
When
the radio
is
working, lightly
press
or
long
press
" +
"or
" - " to adjust the
vo
l
ume.
Vo
lume level:
00-32.
7.4:
Listen
to
the radio
This
radio
can
receive
FM
/
MW
/
SW/V.UHF
/
AIR/WB,
and the
11
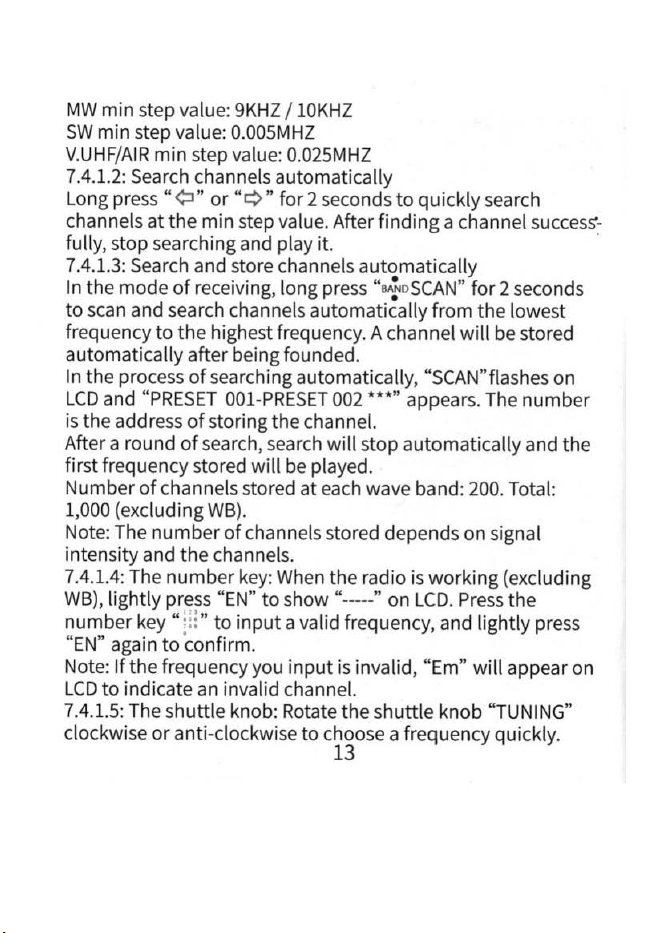
specific receiving ranges are s
hown
in
the
following table:
Different co
un
tries have different requirements for
FM
and
MW
receiving. Here are fou r r
ece
iving ranges
for
you to choose.
"'::"
FM(MHZ) MW (KHZ) SW(MHZ) V.UHF(MHZ) AIR(MHZ)
WB(MHZ)
1
87.5-108
.0
522
-
17
10
(9KHZ)
3.20-30.0 25.0-999.0 118.0-138.0 162.400-162.550
2
87.0-108.0 520-
1710
(lOKHZ)
3.20-30.0 25.0-999.0 118.0-138.0 162A00-162.550
3
76.0-1
08
.0
522
-
1710
(
9KHZ)
3.20-30.0 25.0-999.0 118.0-138.0 162.400-162.550
4
64
.0-108.0
522
-
1710
(
9KHZ)
3.20-30.0 25.0-999.0 118.0-138.0 162.400-162.550
The above four re
ce
i
vi
ng
ty
p
es
can be adjusted by yourself:
In
th
e state
oftime
di
splay, long press
"s5.!!Jo"
for 2 seconds
to
sh
ow
the
FM
low
fr
equency in c
ur
rent
mode,
and lig
ht
ly
press
"¢!"
or
"Q"
to
choose a
FM
frequency range. Stop and exit
setting. What you choo
se
finally
is co
nfirme
d by default.
* For example:
"8
7
.S
MHZ
" on
LCD
is
the
first
receiving type
and "87.0MHZ" is
the
second receiving type.
The correspondi
ng
MW
step value
will
be
matc
hed according
the
FM
type you choose
(t
he
MW
step value
of
North American
co
untr
ies n
ee
ds to be adjusted
to
lOKHZ. Please choose
the
second receiving type).
7.4.1: Method
of
searching channels
Search channels manually using
the
button
/search channels
automatically using the button/search and store channels
a
ut
omatically/
the
numb
er
key/
the
s
huttle
knob
7.4.1.1: Search channels man
ually
usi
ng
the
button
Lightly p
ress
"¢1"
or
"Q"
to
decr
ease
or
inc
r
ease
progressive-
ly
at
th
e mi
nimum
step value
of
wave band.
FM
min
step valu
e:
O.lMHZ
12
MW
min
st
ep
value: 9KHZ / lOKHZ
SW
min
step value:
O.OOSMHZ
V.U
HF
/A
IR
min
step
va
lu
e:
0.025MHZ
7.4.1.2: Search channels
automatically
Long press
"¢!"
or"¢"
for 2 seconds
to
quick
ly
search
cha
nn
els
at
t he
min
step
va
lue. After
finding
a channel
success'-
full
y, stop searching and play it. ·
7.4.1.3: Search and store channels
automat
ically
In
the
mode
of
receiving, long press "e.fo
SCAN"
for
2 seconds
to
scan
and
search channels
automatically
from
the
lowest
frequency
to
the
hi
ghest
fr
equency. A chan
nel
will
be stored
automatically
after
being founded.
In
the
process
of
sea
rching automa
ti
cally, "SCAN" flashes
on
LCD
and "
PRESET
001-PRESET
002 ***" appears. The
number
is
the
addre
ss
of
storing
the
channel.
A
ft
er a
round
of
search, search
will
stop
automatically
and
the
first fre
qu
ency stored
wi
ll be played.
Number
of
channels stored
at
each wave band: 200. Total:
1,000 (exclud
in
g WB).
Note: The
number
of
channels stored depends
on
signal
intens
it
y and
the
channel
s.
7.4.1.4: The
number
ke
y: When
the
radio is
work
in
g (exclud
in
g
WB),
lightly
press "EN"
to
sh
ow"-----"
on
LC
D.
Press
the
number
key"
·!:
"
to
input
a valid frequency, and ligh
tly
press
"
EN
" aga
in
to
c
onfirm.
Note:
If
the
frequency you
input
is invalid, "Em"
will
appear
on
LCD
to
i
nd
ica
te
an invalid channel.
7.4.1.5: The shu
ttl
e knob: Rotate
the
sh
utt
le
knob
"TU
NI
N
G"
clockwise
or
anti-clockwise
to
c
hoo
se a
fr
equency quickly.
13
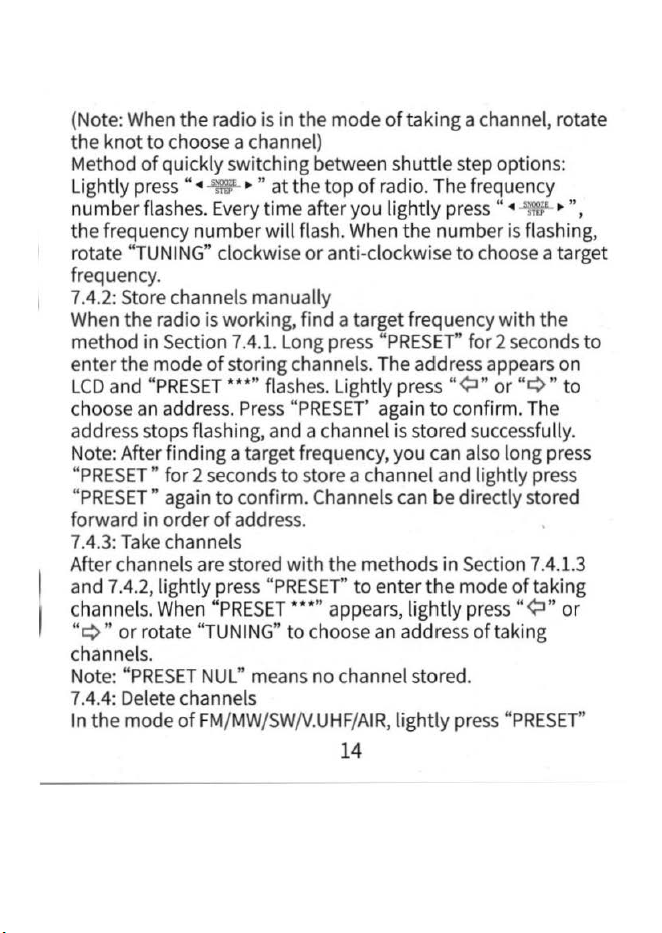
(Note:
When
the radio
is
in the mode
of
taking a channel, rotate
the knot to choose a channel)
Method
of
quickly switching between shuttle
step
options:
Lightly
press
" •
-V-
• " at the top
of
radio. The frequency
number
flashes.
Every
time after you lightly
press
"•-v-•
",
the frequency number will
flash.
Whe
n the number
is
flash
ing,
rotate
"TUNING"
clockwi
se
or anti-clockwise to
choose
a
ta
rget
frequency.
7.4.2:
Store
channels manually
When
the radio
is
working, find a target frequency with the
method
in
Section
7.4.1.
Long
press
"
PRESET"
for 2
secon
ds
to
enter the mode
of
storing channels.
The
address
appears
on
LCD
and "
PRESET***
"
flashes.
Lightly
press
"¢:i"
or
"Q"
to
choose
an
address.
Press
"
PRESET'
again
to
confirm.
The
address
stops flashing,
and
a channel
is
stored
successfully.
Note:
After finding a target freque
ncy,
you
can
also
long pre
ss
"P
RESET
" for 2
seco
nds
to store a channel
and
lightly
press
"P
RESET
"
again
to confirm. Channels
can
be directly stored
for
wa
rd
in
order
of
addre
ss.
7.4.3:
Take
channels
After channels
are
stored with the methods in
Section
7.4.1.3
and
7.4.2,
lightly
press
"
PRESET"
to enter the mode of taking
channels.
When
"PRESET***
" appears, lightly
press
"¢:l" or
"¢"
or
rotate "
TUNING"
to choose an address
of
taking
channels.
Note
: "
PRESET
NUL
"
mean
s no channel stored.
7.4.4:
De
l
ete
channels
In
the mode
of
FM
/
MW
/SW/V.
UHF
/
AIR,
lightly
press
"PRESET"
14
to
s
ho
w "PRESET***" on
LCD.
Lightly pres
s"
¢i"
or"¢"
to
choose
the
channel
to
delete and
long
press "
DE
L"
to
delete it.
"DEL" flashes
on
LCD
and disappears 2 seconds late
r,
whic
h
means
the
channel is deleted. The
numb
er of channel deleted
is unoccupied and is available
for
you
to
s
to
re a
new
on
e.
7.4.5:
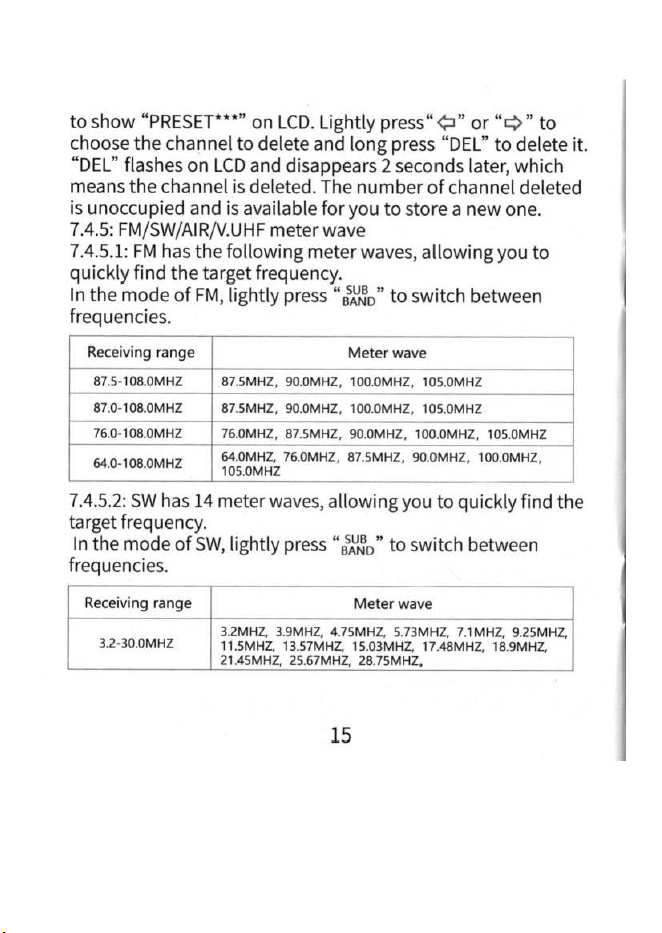
FM
/
SW
/AIR/V.UHF meter wave
7.4.5.1:
FM
has
the
following
met
er
waves,
allowing
you
to
quickly
find
the
target frequency.
In
the
mode
of
FM,
li
ghtly
pre
ss"
~~o"
to
switch be
tw
een
frequencies.
Receiving range
Me
ter
wa
ve
87
.5-108.0MHZ 87.5MHZ, 90.0MHZ, 100.0MHZ, 105.0MHZ
87.0· 108.0MHZ
87.5MHZ, 90.0MHZ, 100.0MHZ, 105.0MHZ
76.0· 108.
0MH
Z
76.0MHZ, 87.SMHZ, 90.0MHZ. 100.0MHZ, 105.0MHZ
64.0· 108.0MHZ
64.0MHZ. 76.0MHZ,
87
.5MHZ,
90
.
0MHZ
, 100.0MHZ,
105.0MHZ
7.4.5.2:
SW
has 14 meter w
av
es,
allowing you
to
quickly find the
target frequenc
y.
In
the
mode
of
SW,
lightly press
"~Jo"
to
swi
tch between
fr
equencies.
Recei
ving range
Meter
wave
3.2MHZ. 3.9MHZ. 4.75MHZ. 5.73MHZ. 7.1MHZ. 9.25MHZ.
3.2
-30.
0MHZ
11.5MHZ. 13.57MHZ. 15.03MHZ. 17.48MHZ. 18.9MHZ.
21.
45MHZ. 25.67
MH
Z.
28.75MHZ.
15
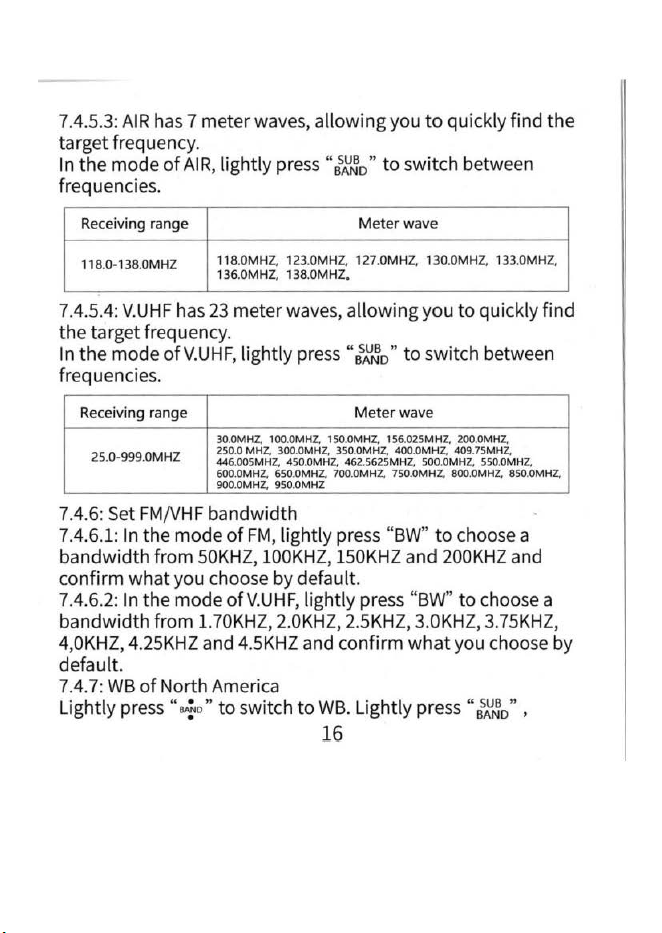
7.4.5.3: AIR has 7
meter
waves,
allowing
you
to
quickly find
the
target
frequency.
In
the
mode
of
AIR,
lightly
press
"~
0
"
to
switch
between
frequencies.
Recei
ving
range
Meter
wave
118.0-138.0MHZ
11
8.
0MHZ. 12
3.
0MHZ. 127.
0MHZ
,
130
.0MHZ. 133.0MHZ,
136.0MHZ. 138.0
MHZ
.
7.4.5.4:
V.UHF
has
23
meter
waves,
allowing
y
ou
to
quickly
find
the
target
frequency.
In
the
mode
ofV.UHF,
lightly
press
"if..!!J
o"
to
switch
between
frequencies.
Receiving range
Meter
wave
30.0
MH
Z.
100.0M H
Z.
150.0MHZ. 156.025M
HZ.
200.0MHZ.
25.0-999.0MHZ
250.0 M
HZ.
300.0
MH
Z.
350.0
MH
Z.
400.0M HZ. 409.
7S
MH
Z.
44
6.00SMH
Z.
450.
0MH
Z.
46
2.562S
MH
Z.
SCK
>.
OMHZ. 550.0MHZ.
600.0MHZ. 650.0
MH
Z.
700.0
MH
Z.
750.0
MH
Z.
800.0
MH
Z.
850.0
MH
Z.
900
.0MH
Z.
950.0
MHZ
7.4.6: Set FM/VHF
bandwidth
7.4.6.1: In
the
mode
of
FM,
lightly
press "BW"
to
choose a
bandwidth
from 50KHZ, lOOKHZ, 150KHZ
and
200KHZ and
confirm
what
you choose
by
default.
7.4.6.2: In
the
mode
ofV.UHF,
lightly
press "BW"
to
choose a
bandwidth
from
l.70KHZ, 2.0KHZ, 2.5KHZ, 3.0KHZ, 3.75KHZ,
4,0KHZ, 4.25KHZ and 4.SKHZ and
confirm
what
you choose by
default.
7.4.
7:
WB
of
North
America
Lightly press
"+"
to
switch
to
WB.
Lightly press "
if
..!!
Jo" ,
16
"¢IQ"
or
"TUNING"
to
choose
the
weather frequency
to
receive. Long press
"¢1"
or
"Q"
for2secondstosearch
weather channels automatically.
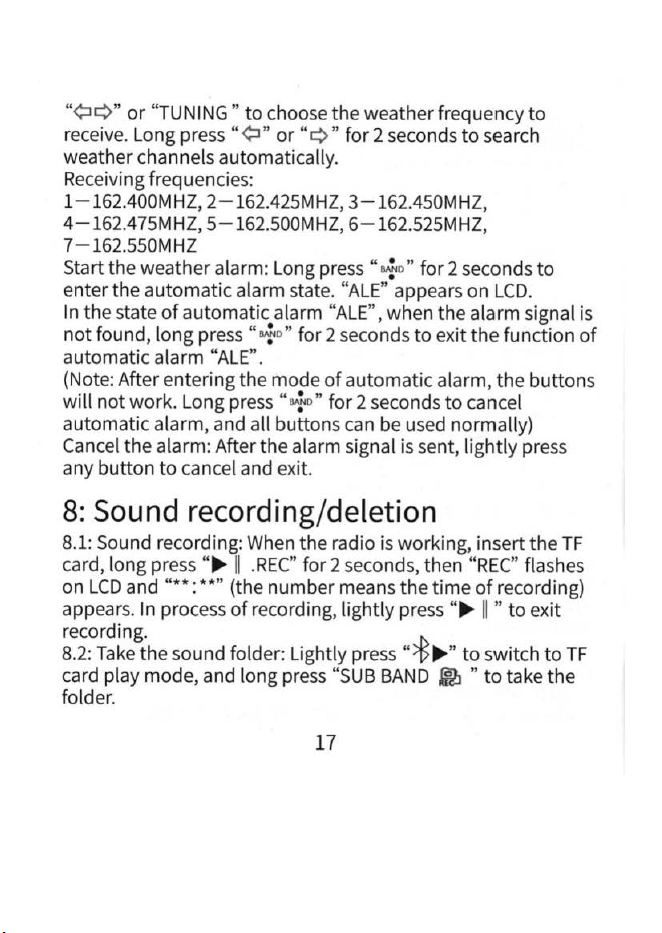
Receiving frequencies:
1-162.400MHZ, 2-162.425MHZ, 3-162.450MHZ,
4-162.475MHZ, 5-162.SOOMHZ,
6-162.525MHZ
,
7-162.SSOMHZ
Start the wea
ther
alarm: Long pre
ss
"o.fo"
for 2 seconds
to
enter
the
automatic
alarm state. "ALE" appears on L
CD.
In
the state
of
automatic alarm "ALE", when the alarm signal is
not
found, long press
"+"
for
2 seconds to exit
the
funct
ion of
automatic alarm
"A
LE
".
(Note: After enteri
ng
the mode
of
automatic alarm, the buttons
w
ill
not
work. Long pres
s"+"
for
2 seconds
to
cancel
automatic alarm, and all buttons can be used normally)
Cancel the alarm: After the alarm signal is
se
nt
,
lightly
pre
ss
any button to cancel and exit.
8:
Sound
recording
/deletion
8.1: Sound recording: When
th
e radio is
work
ing, insert the
TF
card, long pre
ss
..
..,.
II
.REC"
for
2 seconds, th
en
"
REC"
flashes
on
LCD
and
"**:
**" (the number means the
time
of
recording)
appears. In process
of
recording, lightly press
..
..,.
I
I"
to
exit
recording.
8.2:
Tak
e
the
sound folder: Lightly press
"*
..,.
..
to switch
to
TF
card play mode, and long press "
SUB
BAND
~
"to
take the
folder.
17
8.3: Delete the sound file: After recording, lig
ht
ly
press
..
>S
....
..
to
switch
to
TF
card play mode. Long press "SUB
BAN D
~"
to
take the folder. Lightly press
"¢:i"
or"¢"
to choose the
number
of
so
und
file. Long press "D
EL
"
for
2 seconds, then
"DE
L" appears on
LCD
. Lightly pr
ess
"DEL" again
to
confirm.
"DEL" disappears, indicating
that
the sound
fil
e
is
deleted
successfully.
9: Bluetooth mode
Bluetooth
of
this product: "
HRD
-757"
9.
1: Wh
en
the
radio is working, lightly press "t
11>
"
to
switch to
Bluetooth mode "bl:". "* " flashes, which means waiting
for
connection. Click to connect Bluetooth. After successful
connection,
"*
" is always displayed.
9.2: Lightly
press"¢"
to
play the next music and
"¢:i"
to
play
the previous one. Lightly press
..
.,..
II
" to switch between pause
and play
or
use
your phone
to
control.
9.3: Disconnect Bluetooth: In the state
of
B
lu
etooth connection,
long press
"*""
for
2 seconds
to
exit.
10:
TF
card
play
Insert
the
TF
card, lightly push
it
in place and lig
htly
push it
again
to
take
it
out.
When
the
radio is working, the music in
the
TF
card will be
played first after inserting the
TF
card.
In
other
play modes,
light
ly
press"
* " "
to
switch
to
TF
card.
Lightly press
..
.,..
II
"to
switch between pause and play.
18
Lightly
pre
ss «
Q"
to
play
the
next
music
and
"¢1"
to
play
the
previous one. Long press
"Q"
to
play
fast-forward
and
"¢1"
to
play
fast-backward. , , ,
When
the
radio
is
playing in
TF
card
mode,
press " ;
;:
"
to
input
the
mu
sic
number
or
rotate
"T
UNING"
to
choose
the
music
number
. Lightly pre
ss
«
EN
"
to
confirm
and
play.
In
TF
card
mode,
you
can choose
the
play
mode:
Lightly press "
=.i"
, then
cu
rrent
play
mode
appears
on
LCD
.
When
"rA",
"rO",
"rF" and
"rr"
are displayed,
lightly
press"
:.::."
to
choose one.
rA
(repeat all),
rO
(repeat one), rF (repeat file).
rr
(random)
TF
card
supports
256G
maximally.
TF card sup
ports
MP3, WMA,
WAV,
APE
and
FLAC
TF
card s
upports
65,535
file
s maxi
mally
Note:
1: When
the
radio is play
ing
music
in
TF
card mode,
in
case
of
sound
vibration
for
reason
of
music source, please
adjust
the
volume.
2:
When
the
radio is receiving in
Bluetooth
mo
d
e,
mus
ic play
fails
after
inserting
the
TF
card
and
"
.=.
" appears.
It
is
possibly
caused
by
mu
sic source
or
maybe
the
TF
ca
rd
is
broken.
It
t he
TF
card is broken, please replace
it
with
a
new
one
.
11:
EQ
effect setting
11.1: In the
mode
ofTF
card/Bluetooth/PC
music
play,
lightly
press [
MOD
.]
button
to
choose an
EQ
effect:
EQl:
(NORMAL),
EQ2:
(POP),
EQ3:
(ROCK)
EQ4:
(JAZZ),
EQ5
:
(CLASSIC),
EQ6:
(CO
UNTRY)
19
Current adjusted
EQ
effect will
be
chosen by default with
no
operation within 3
seconds.
11.2:
In
the mode
of
receiving, lightly press [
MOD.
] button to
choose
an
EQ
effect:
EQO:
(NORMAL),
EQl:
FM
working
sta
tus: high frequency
14K/other receiving mode: high frequency
4K
EQ2:
(POP),
EQ3:
(ROCK),
EQ4:
(JAZZ),
EQS:
(CLASSIC),
EQ6:
(COUNTRY)
Current adjusted
EQ
effect will
be
chosen by default with no
operation within 3
seconds.
12
:
SOS
alarm & emergency
fla
sh
li
ght
In any mode, push "
:!
"
to
"e
sos"
to
start
SOS
alarm.
The radio gives the alarm sound and
the
flashlight flash-
es.
Push
":! "
to
"e
ON"
to turn on the flashlight.
Push
"
::
"to
"e
OFF"
to
turn off the flashlight and
SOS
alarm.
13:
Use
of
lock
"
~
"
13
.
1:
Lock: In
the
mode
of
time and power on, lightly
press
"iii
",
then"®
" appears on
LCD
,
now
"TUN
I
NG
"
is
locked. Lightly press "a
..
again, then " ®,, disappears
and "TUNING"
is
unlocked; long
press"
iii " for 2 seconds,
then " ® ,
...o
"appears on
LCD.
"
;:
"c
annot
be
locked.
Other buttons and "TUN I
NG"
are locked.
20
13.2:
Unlock:
When
the
screen
is
off, lightly
pre
ss
"
ii
" or
"C
" to turn
on
the backlight. Long
press
"
ii
" again for 2
seco
nds
, then " ® ,
..o
" disappears
on
LCD
and
the
function
of
lock is
cance
l
ed.
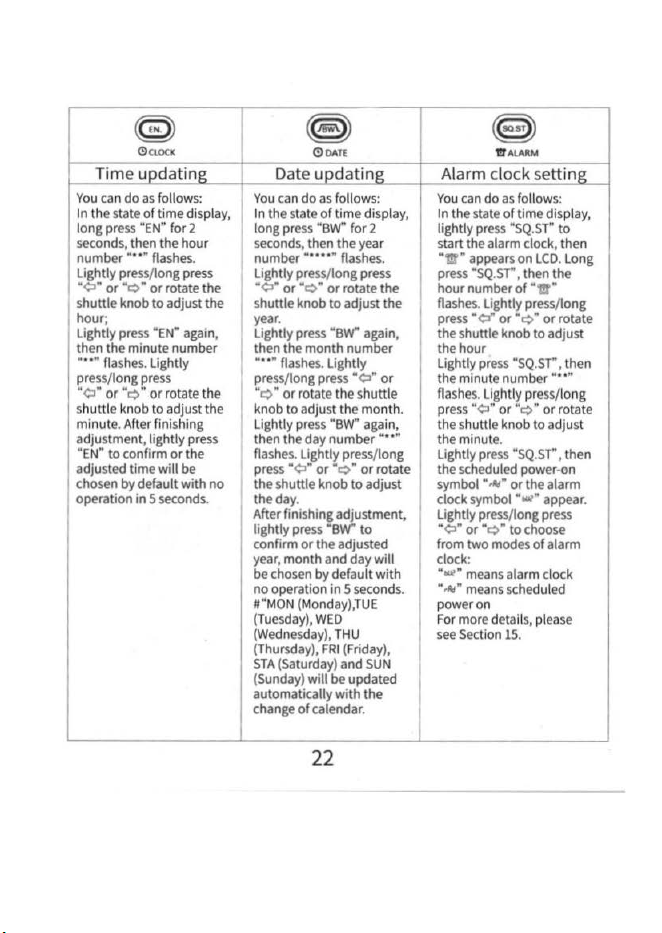
14: Date updating/time updating/alarm
clock setting
There are three clock symbols
at
the
bottom
of
the radio front,
and
their
functions are described
as
follows:
21
<9
CLOCK
Date u
datin
Alarm clock settin
t--~~~
~~~~~~
+-
~~~~
~~~~
~-t-~~-
You
can
do
as
follows:
In the state of time display,
long
press
·EN" for 2
secon
d
s,
then the hour
number
••••
flashes
.
lightly
press
/l
ong
press
·e.·
or•
¢ • orrotate the
shuttle knob to adjust the
hour;
lig
htly
pres
s
·e
N"
again,
I
then the minute number
•• ·•
fla
s
hes
.
lig
htly
press
/long
press
•
¢:1
•
or·
¢ ·
or
rotate the
I
shuttle knob to adjust the
minute. After finishing
adjustment, lightly
pres
s
·EN
" to confirm
or
the
adjusted time will be
chosen
by
default with no
operation
in
5
seconds.
Y o u
can
do
as
follows:
You
can
do
as
follows:
In
the
state
of
time display, In the
state
of
time display,
long
press
·
sw-
for 2 lightly
press
·sQ.sr
to
seco
nds,
then the year start the alarm clock, then
number
......
nashes.
·m·
appears
on
LCD.
Long
Lightly press/long
press press
·sQ.sr,
then the
·e.·
or•
¢·
or
rotate the hour number of
•tr•
shuttle knob to adjust the
nashes
. Lightly press/long
year.
press·
~
or •Q • orrotate
lightly
press
·sw-
again, the
shu
ttle knob to adjust
then the month number the hour
•• ••
flashes.
Lightly Lightly
press
·sQ.sr,
then
press/long
press
·e.·
or
the minute number •• ••
·¢
• or rotate the shuttle
flashes
. lightly press/long
knob to adjust the month.
press
·e.· or
•Q
•
or
rotate
lightly
press
·sw·
again, the shuttle knob to adjust
then the day number
..
..
the minut
e.
flashes
. lightly
press
/long Lightly
press
·SQ.Sr,
then
press
·e.· or
•¢
"
or
rotate the
sc
heduled power-on
the shuttle knob to adjust symbol •
..,.
or the alarm
the
day
. clock
symbol
.
...
appear.
After fini
shi
ng adjustment, Lightly
press
/ l
ong
pre
ss
lightly
press
·sw-
to ·e.•
or
· Q • to
choose
confirm
or
the adjusted from two
modes
of
alarm
year,
month
and
day will clock:
be
chosen
by default with .
...
means
alarm clock
no operation
in
5
seconds.
"..,.
means
schedu
l
ed
#.MON
(Monday),TUE
power
on
(Tuesday),
WED
For
more detail
s,
please
(Wednesday),
THU
s
ee
Section
15
.
(Thursday),
FRI
(
Friday
),
STA
(Sa
tu
rd
ay
)
and
SUN
(Sunday)
will
be
updated
automatically with the
change
of
calendar.
22
15
:
Scheduled
power
on
/
scheduled
alarm
clock
15.1:
Choose"
bU2"
alarm clock mode, and lightly press
"SQ.ST"
to
choose an alarm ringtone. Two ringtones
of"
n
i"
and "n
i"
appear on
LCD,
and
lightly
pr
ess/l
ong
press "
¢1"
or
"Q"
or
rotate
the
shuttle knob
to
choose one. Lightly press
"SQ.ST"
to
confirm.
When the alarm clock rings, l
ight
ly
press"
•
-'-mJI-
~ "
to
snooze.
After snoozing
for
5 minutes,
the
alarm clock
will
ri
ng
again.
Lightly press "SQ.ST"
to
turn
off
the alarm clock. The symbol
of
alarm clock stops flashing and is always displayed. The alarm
clock
will
ring
the
next day.
15.2: Choose
"rRd"
scheduled power-on mode,
light
ly press
"SQ.ST"
to
enter scheduled power-
off
time
setting after
choosing scheduled power-on. The
powe
r-off
time
is
displayed
on
LCD.
Now
lightly
pre
ss"¢:!
"
or"
Q"
or
rotate
the
shuttle
knob
to
choose the power-off
time
from 10,
20,
30, 40, 50, 60,
70,
80,
90 and
FULL
(no power off), and
light
ly press "SQ.ST"
again
to
confirm.
Tips:
----"
rRd"
scheduled power-on: The working
mode
before
power
off
will
be played automatically at
the
scheduled
power-on time. In the mode
of
Bluetooth, you sh
ould
click on
the
Bluetooth device
to
play.
If
the scheduled
po
wer-on/
off
time
is chosen,
the
radio
will
be turned on at
the
scheduled
power-
on
time
and
the
sleep symbol "
i-11
"
will
appear
on
LCD.
The radio
will
be turned
off
at
the
scheduled
pow
er-
off
23
time
and
the
sleep sym
bol
".-al" will disappear.
----
"bUC"
scheduled alarm clock: The alarm clock symbol
"
1:!f
"
will
flash
at
the
sc
heduled alarm clock time and current
ringtone
will
ring for 3 minutes
at
an
inter
va
l
of
5 minutes.
Lightly press "
SQ.ST"
to
turn
off
the
alarm clock, then '"t!f"
stops flashing. Lightly press "SQ.ST" again
to
cancel
the
alarm,
then
"
1:!f
" disappear. When the alarm clock rings, lig
htl
y press
"• ~W
~
"to
snooze for 5 minutes. Stop
the
alarm clock.
16
:
Cancel
the
scheduled
power-on
/
scheduled
alarm
clock
functions
Cancel scheduled power-on and scheduled alarm clock: In
the
state of time, li
ghtly
press "SQ.ST"
to
turn
off
the alarm clock,
then
"'l!f" disappear
s.
17:
Backlight
sett
i
ng
In
the
mode
of
ti
me
display, long press
"PRESET"
for
2
seconds, then "
br on"
or
"
br
RUb"
appears
on
LCD.
Lightly
press
"PR
E
SE
T "
to
choose "
br
on"
or
"br
AUb"
backlight mode.
What you choose finally
will
be the default
optio
n.
---
" br on" means power-on working
mod
e,
and the backlight is
always on;
--- "
br
AU
b" means power-on working mode, and
the
backl
ight
is
on
for 5 second
s.
*The backlight cannot be controlled in
the
mode
of
time
display. The backlight will be
off
automatically wi
th
no opera-
tion
in 5 second
s,
going
to
the
power
saving mode.
24
19:
Antenna
18.1: Listen
to
FM
,
VHF,
SW,
AIR
and
WB.
a.Pull
out
the
antenna, change
the
length
of
antenna,
try
the
direction and find a position
with
the
best receiving
effect.
b.
lnsert the external antenna " T
oo",
change the length
of
antenna,
try
the direction and find a position
with
the
best receiving effect.
*Note:
In
case
of
channel chaos due
to
strong
int
erfer-
ence, please shorten the antenna.
18.2: Listen
to
AM:
This product uses
the
built
-in magnet-
ic
an
tenna
to
receive
AM.
The magnetic antenna may be
affected by direction
to
receive signals, so you can
properly rotate the radio when listening
to
AM
to
find a
position with the best receiving effect.
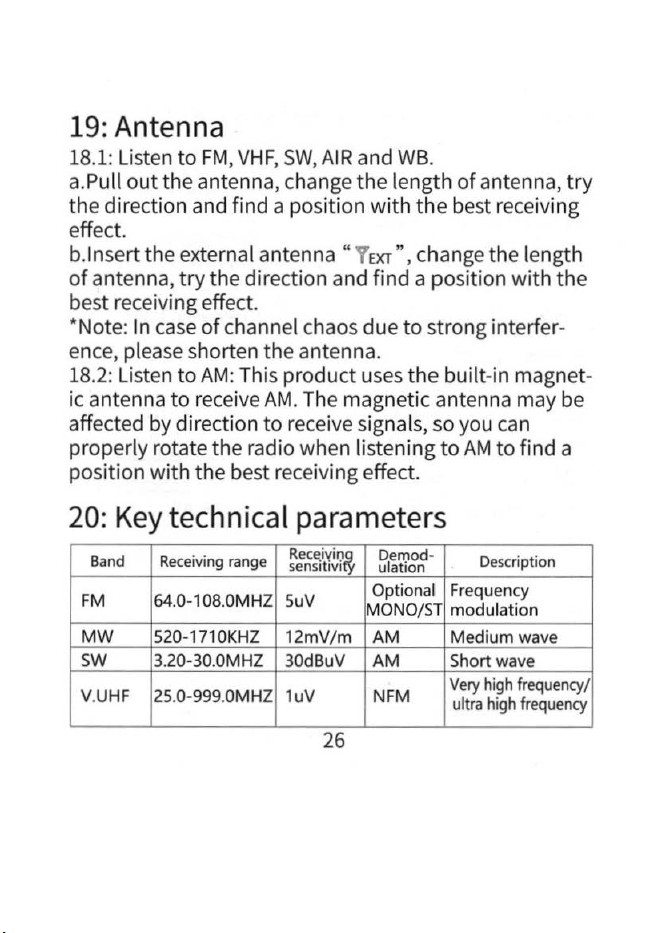
20:
Key
technical parameters
Band
Receiving
range
Rece
i
vin{?
sensitrvi
Demod-
ulation
Des
cription
FM
64.0-108.0MHZ
SuV
Optional Frequency
MONO
/ST
modulation
MW
520-
171
OKHZ
12mV
/m
AM Medium
wave
SW
3.20-30.0MHZ
30dBuV AM Short
wave
V.UHF
25
.0-999.0MHZ
1uV NFM
Very
high
frequency
/
ultra
high
frequency
26
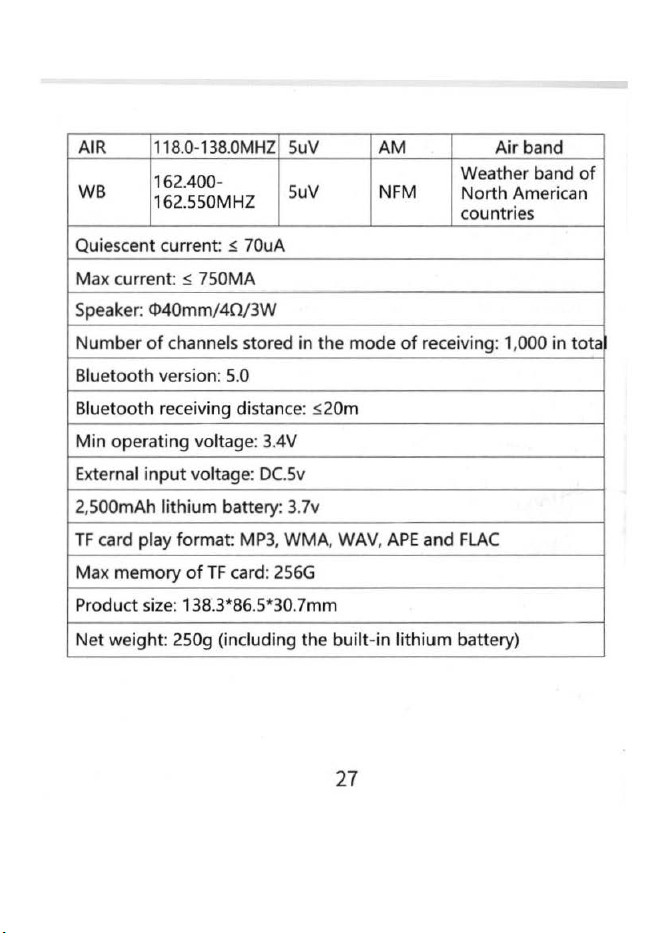
AIR
118.0-
138
.
0M
HZ
SuV
AM
Air
band
162.400-
Weather band
of
WB
162
.
SSOM
HZ
SuV
NFM
North
American
countries
Quiescent
current
s 70uA
Max current: s
?SOMA
Speaker:
<1>40mm
/
40
/
3W
Number
of channels stored in the
mode
of
receiv
ing
: 1,000
in
tota
Bl
uetooth
version:
5.0
Bl
uetooth
receiving distance: s20m
Min
operating voltage: 3.4V
External
input
voltage: DC.5v
2,500mAh
lithium
battery: 3.7v
TF
card play format: MP3,
WMA
, WAV,
APE
and
FLAC
Max
memory
of
TF
card: 256G
Product size: 138.3*86.5*30.7mm
Net
weight: 250g (including
the
built
-
in
lithium
battery)
27
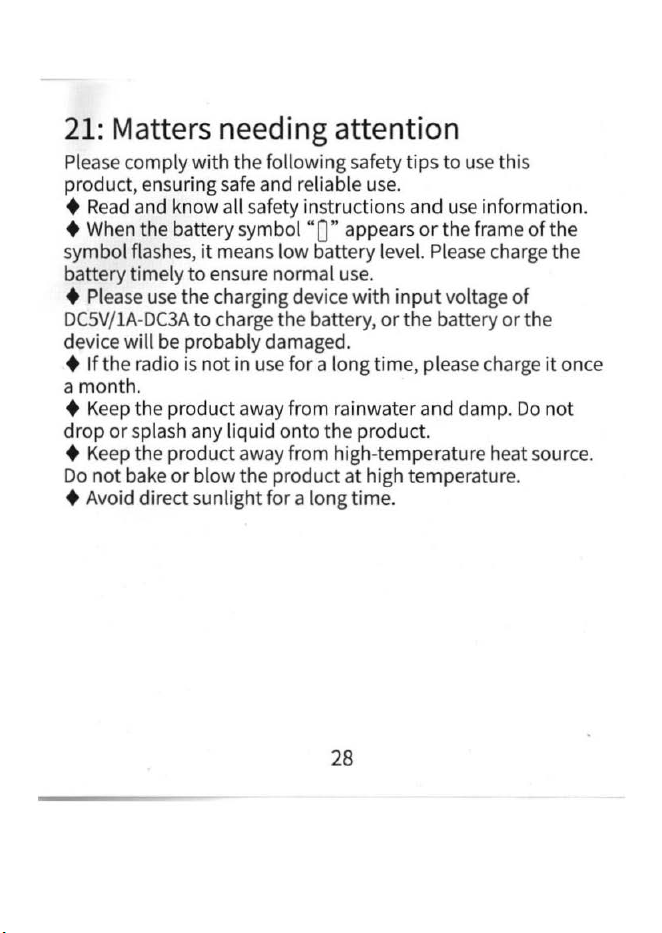
21
:
Matters
needing
attention
Please comply
with
the
following safety
tips
to
use this
product, ensuring safe and reliable use.
+
Read
and know
all
sa
f
ety
instructions and u
se
info
r
mation.
+ When the
batter
y sym
bol
"O"
appears or
the
frame
of
th
e
symbol flashe
s,
it
means
lo
w battery level. Please char
ge
the
battery
time
ly
to
ensure normal use.
+ Please use
the
charging device
with
input
voltage
of
DCSV/1A-DC3A
to
charge
the
battery,
or
the
battery
or
the
device
will
be probably damaged.
+
If
the radio is
not
in use
for
a
long
time, please charge
it
once
a
month.
+ Keep the produ
ct
away
from
rainwater and
damp
.
Do
not
drop
or
splash any liquid
onto
the
product.
+ Keep the product away
from
high-temperature heat source.
Do
not
bake
or
blow
the
product
at
high temperature.
+ Avoid direct sunlight
for
a
long
time.
28