1
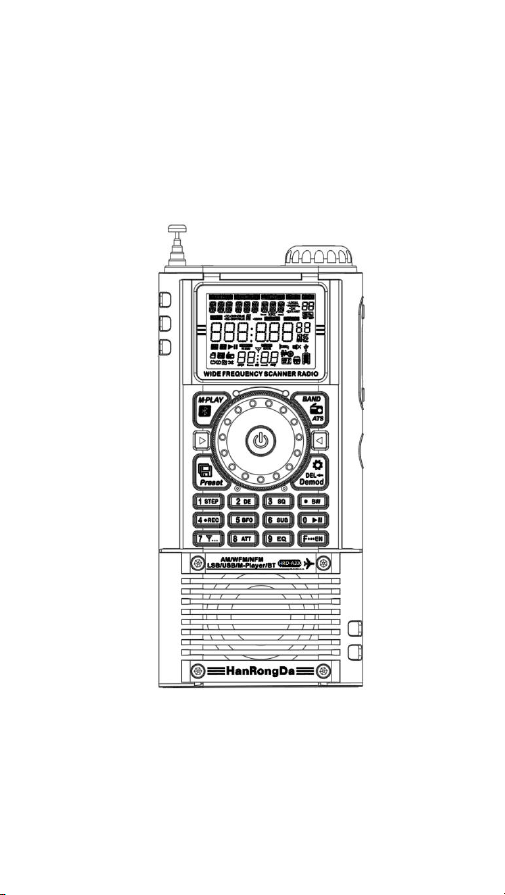
Wide Frequency Scanner Radio
Operating Manual
Model:HRD-A330
Thank you for your purchase. Please read these operating
instructions carefully before use and keep them properly for
future reference.

2
LIST
Package Contents................................................ 1
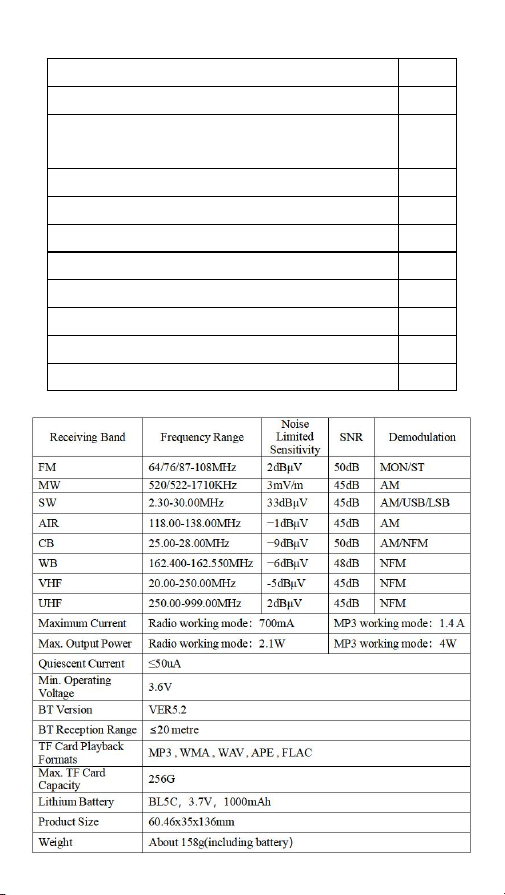
Main Technical Parameters............................... 1
Working Mode ...................................................... 2
Power On / Power Off ........................................ 3
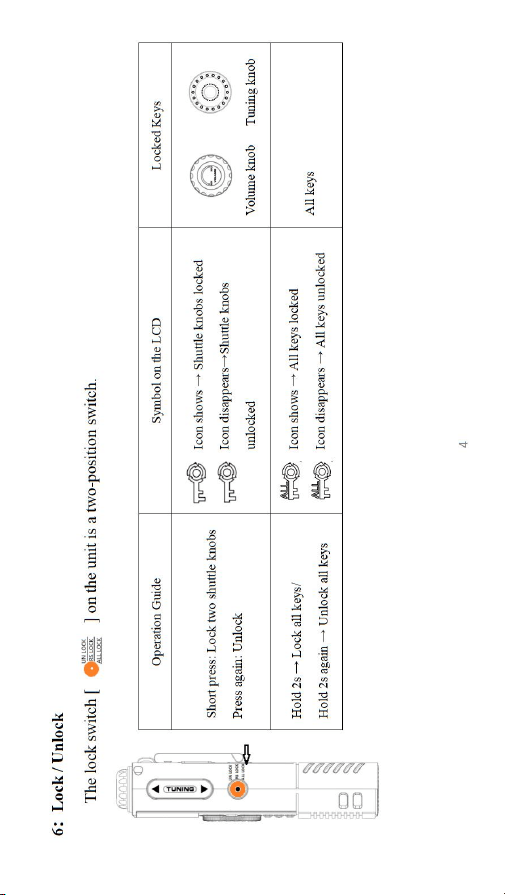
Lock/Unlock
..........................................................
4
Display Backlight Time Setting
.........................
5
Working mode switching ................................... 5
Restore Factory Settings................................... 6
Use Antenna........................................................ 7
Listen to radio broadcasts.................................. 7
Select band reception range
..............................
7
Set tuning step (STEP) for each band
.............
8
Radio station search methods........................... 8
Manual Station Storage Methods...................... 9
Recall Station..................................................... 10
Delete Saved Stations...................................... 10
North America WB Weather Band
..................
10
FM De-emphasis Settings
................................
11
Squelch (SQ) Settings ...................................... 11
BW Settings........................................................ 12
Radio Internal Recording.................................. 13
Select Demodulation Mode.............................. 14
SW SSB BFO Settings
......................................
14
Select Metre Wave
............................................
15
Local/DX Switch................................................. 15
Enable or disable key buzz .............................. 16
Bluetooth mode.................................................. 16
TF Card Mode.................................................... 17
Type-C USB Dual-Port Instructions
................
18
Time Setting
.....................................................
20
Alarm Setting...................................................... 20
Turn off alarm .................................................... 21
Install the back clip............................................ 22
APP Connection ................................................22
App Menu Icon Functions
...............................
25
Notes
..................................................................
28
Free Channels for Civil Walkie-talkies ............28
3
1
:
Package Contents
Item
QTY
HRD-A330 Wide Frequency Scanner Radio
1
shaped Ferrite Bar Medium Wave Antenna
(Exclusive for A330)
1
Strap
1
Lithium Battery
1
Data & Charging Cable
1
Back Clip
1
Screws for back clip
2
Screwdriver
1
Operating Manual
2
Packing box
1
2
:
Main Technical Parameters
4
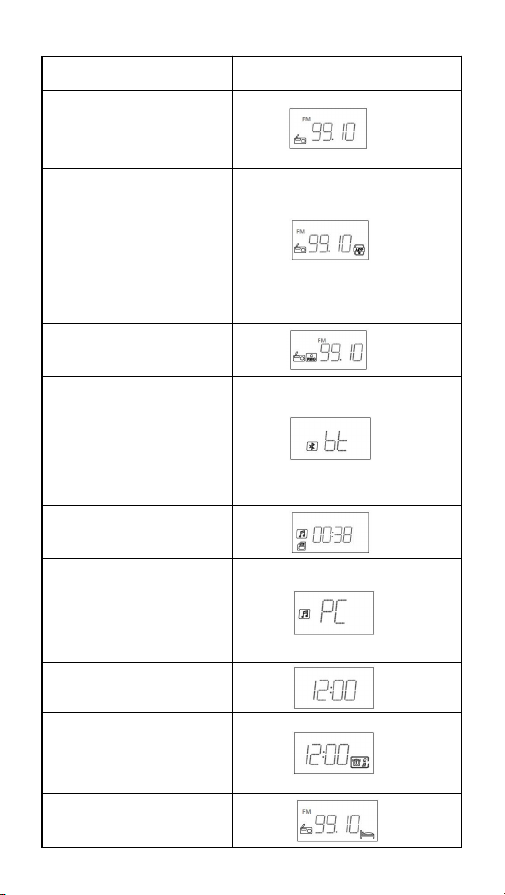
3:Working Mode
Working Mode
LCD Display
Wide Frequency Band:
FM-MW-SW(SSB)-VH
F-UHF-AIR-CB-WB
Supports Mobile APP
Remote Control:
Control station
selection, working
modes and volume via
your mobile phone.......
Supports Radio
Recording
BT Playback:
Can connect to mobile
phones and computers
via Bluetooth for audio
playback
TF Card playback
PC Playback
(Copy & delete TF
card files via PC
connection...)
Time Display
Two alarm types:
Radio timed power-on
Standard buzzer alarm
Sleep timer available
5
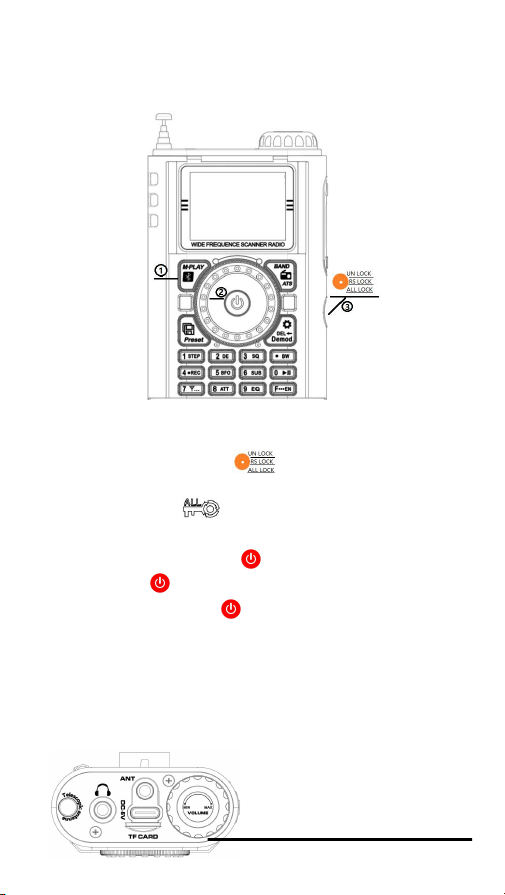
4: Power On / Power Off
Step 1:Turn on display:
Short press any one of the three keys to turn on the display
Step2: Unclock keys
Factory default status is locked. After turning on the display,
long press the lock key [ ]within 10 seconds to unlock
the radio.
The lock icon
” “
at the bottom right of the LCD
disappears.
Step3: Short press the [ ] key,turn on the radio. Short
press the [ ] key,turn off the radio.
Tip:The power key [ ] is a multi-color backlit button.
In dark environments, it lights up in different colors
corresponding to various working modes. (Subject to the
actual product.)
5
:
Volume Adjustment
The rotary knob on the top of the radio controls the volume.
Clockwise: Volume up (Max
Level 32)
Counterclockwise: Volume down
(Min Level 00)
6
7
7
:
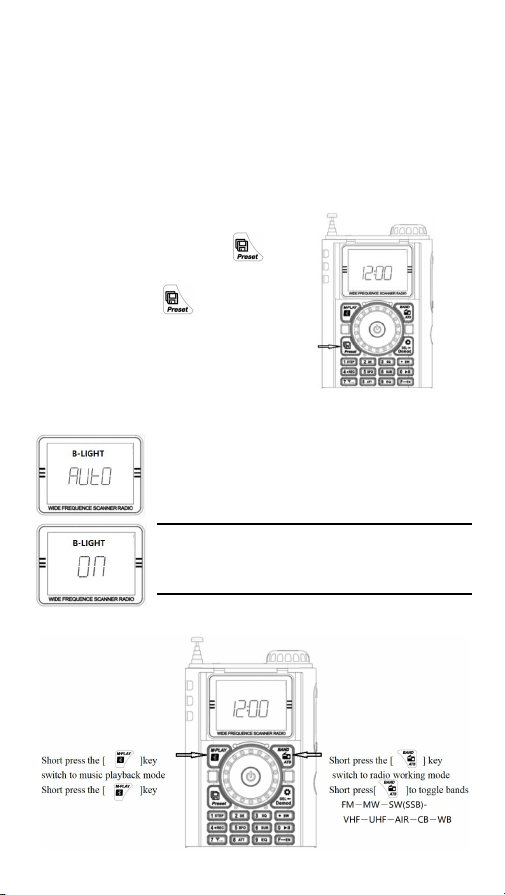
Display Backlight Time Setting
This product adopts STN LCD with negative display and blue
background.
Viewing Area Size:32.8X25.8mm(±2mm)
This display features low power consumption, clear visibility
outdoors, wide viewing angle, eye protection and high
durability.
Power on: Backlight modes — 10s / Always On (Factory
default: Always On)
Time display mode: Hold [ ]
key for 2s to enter backlight setting
Short press the [ ] key to
switch between the two modes
Two selections:
This indicates the working status. The
backlight stays on for 10 seconds after each
key operation.
(Press any key to activate the backlight; the
screen will turn off 10 seconds after no
further operation.)
Working status | Backlight: Always On
8
:
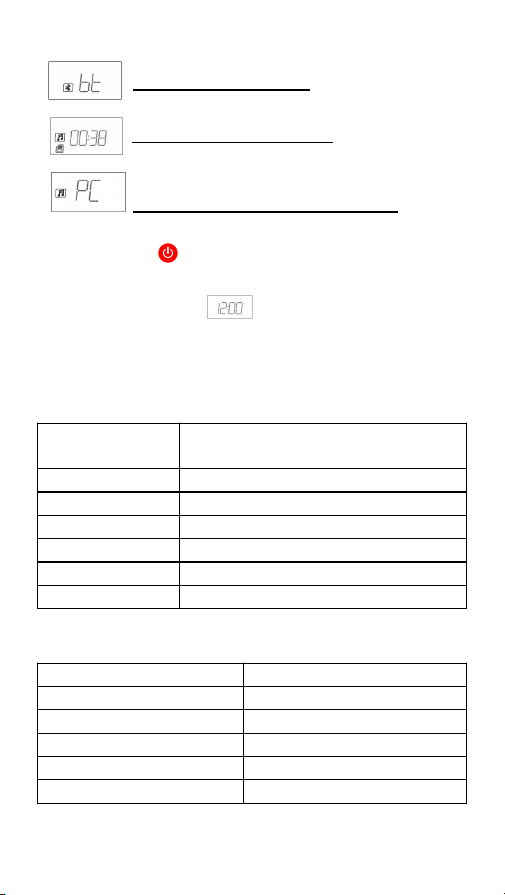
Working mode switching
8
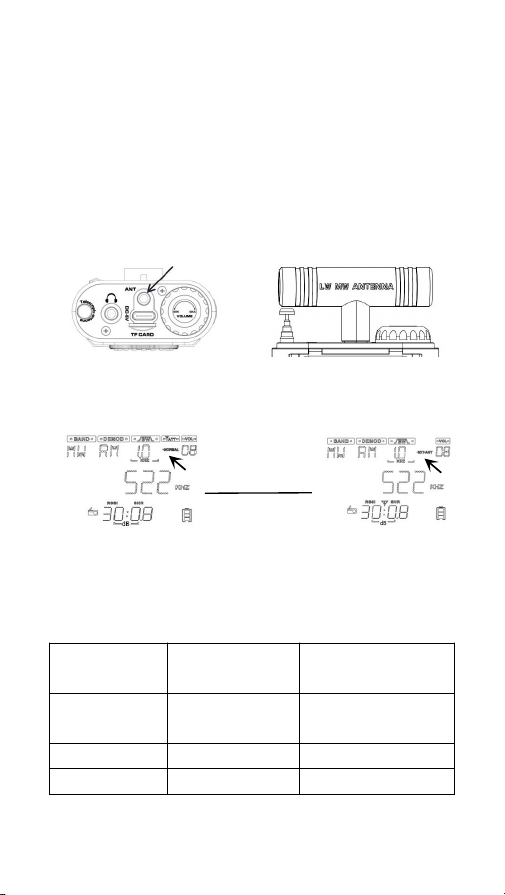
Toggle music modes below
:
Switch to Bluetooth mode
Insert TF card to start TF card playback
Connect to a computer via data cable to
enter PC playback / card reader mode.
9
:
Restore Factory Settings
Hold Power [ ] for about 10s
Keep holding until the LCD flashes once, then the time will
be displayed on the LCD.
Factory reset completed.
10: Select EQ sound effect
10.1 Radio mode: Short press key [9] repeatedly to select
EQ effects. Options are as follows:
SDA DC OFF
Digital audio channel off.
Anti-interference EQ (Factory default)
NORMAL
Standard
POP
Pop Music
ROCK
Rock Music
JAZZ
Jazz Music
CLASSIC
Classic Music
COUNTRY
Country Music
10.2 Music mode: Short press key [9] repeatedly to select
EQ effects. Available options are as follows:
NORMAL
Standard
POP
Pop Music
ROCK
Rock Music
JAZZ
Jazz Music
CLASSIC
Classic Music
COUNTRY
Country Music
Tip: EQ settings are memorized on power off.
9
11:Use Antenna
11.1
:
For radio reception (except MW), fully extend the
antenna. If severe interference or channel crosstalk occurs,
retract the telescopic antenna.
11.2: Listen to MW radio
11.2.1
:
Built-in directional magnetic antenna for MW. Rotate
unit for optimal reception.
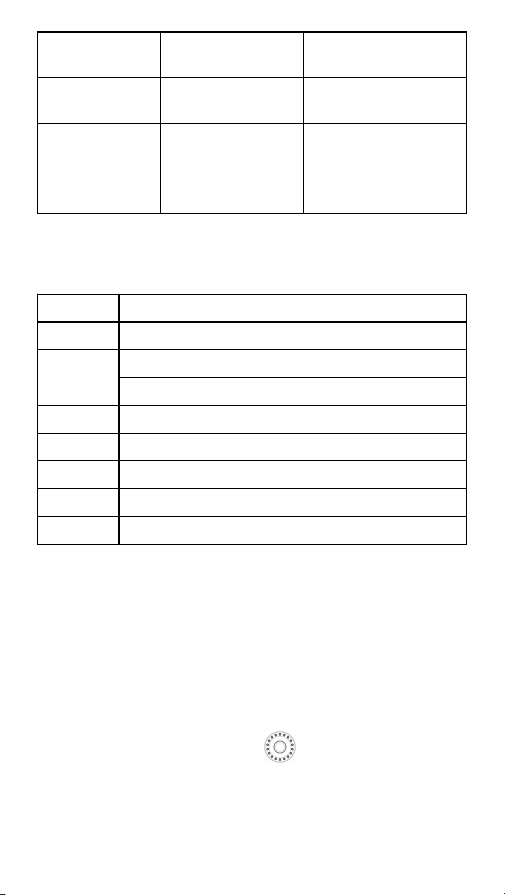
11.2.2: MW External Antenna: Insert included T-antenna into
top ANT port under MW mode.
Short press [7] to enable external T-rod antenna. LCD status
below
:
Short press [7]
12:Listen to radio broadcasts
12.1
:
Select band reception range
In FM mode, short press key [6] to select among three
reception bands. See below:
LCD Display
content
Reception range
Country
87
87.0-108.0MHz
China/USA/Europe/
South Korea...
76
76.0-108.0MHz
Japan
64
64.0-108.0MHz
Russia
In MW mode, short press key [6] to select MW tuning step.
See figure below:
10
LCD Display
content
Reception range
Country
522
522-1710KHz/9K
Hz or 3KHz
China/Europe/South
Korea/Russia...
520
520-1710MHz/10
KHz or 5KHz
North American
Countries
:
Canada、American、
Mexico
12.2: Set tuning step (STEP) for each band
Short press the [1] key to select the following tuning steps
for each band:
Band
step
FM
10KHz /50KHz/100KHz
MW
522-1710KHz :3KHz /9KHz
520-1710KHz :5KHz /10KHz
SW
1KHz/5KHz
VHF
25KHz/12.5KHz/7.5KHz/5KHz/1KHz
UHF
25KHz/12.5KHz/7.5KHz/5KHz/1KHz
AIR
8.3KHz/12.5KHz/25KHz
CB
5KHz/1KHz
12.3
:
Radio station search methods
12.3.1
:
Manual station search
:
Short press the[
◀
TUNING
▶
]key
,
Frequency increase /
Frequency decrease
Short press key [1] to select the band tuning steps
described in 12.2, then press the [
◀
TUNING
▶
] keys to
adjust the frequency.
Or rotate the shuttle knob[ ] to tune stations.
12.3.2:Automatic station search
Hold [
◀
TUNING
▶
] for 2s to Auto-search stations. It
stops and plays when a clear signal is received.
11
12.3.3:Full auto search & station memory
Hold the key[ ] for 2s in radio mode (except WB) to
auto-scan and save stations. Frequencies scan from low to
high, stations store to P001-P200 in order. Search stops
when finished and plays the first preset station.
After full auto station search, if stations are stored, the
radio enters preset recall mode. You can select stations by
short pressing [
◀
TUNING
▶
] or rotating the shuttle
knob[ ].
To re-tune frequencies, short press the [ ] key to exit
preset recall mode first.
Note: The number of automatically stored stations depends
on local signal strength.
12.3.4:Fine-tune Station Selection
Rotate the shuttle knob[ ], and the frequency will
flash to indicate the radio is in fine-tune standby mode.
Short press key [1] to select the digit position for
frequency increment. When the target digit flashes, rotate
the shuttle knob[ ] for quick station tuning.
Note: The fine-tune function is unavailable for MW and
WB bands
12.3.5:Frequency Input via Numeric Keys
Short press [ ] key,LCD display the symbol ------,Enter
the digits for a valid frequency.Press the key[ ] again
to confirm.
12.4:Manual Station Storage Methods
Tune to the desired frequency following the search
methods described in section 12.3.Hold the key[ ] for
2s until the LCD preset number flashes
12
Short press the key[ ] again within 5 seconds to save
the station.
12.4.1:Replace Saved Stations
Press and hold the key[ ] for 2 seconds. The preset
number on the LCD will flash.
Short press
【 ◀
TUNING
▶ 】
, rotate the shuttle
knob[ ] or enter the preset number via numeric keys
to select the position to be replaced, then short press the
key[ ] again to confirm saving.
12.5
:
Recall Station
Short press the key[ ] to activate preset recall
mode,LCD display:
Select presets via
【 ◀
TUNING
▶ 】
or shuttle knob
[ ] to play saved stations.
You may also enter the preset number via numeric keys, then
short press the key[ ] to confirm and recall the station.
TIP:
◆Short press the preset recall key[ ]. The LCD will
display corresponding characters:
indicating no stations have been saved.
◆
Keys 0-9 do not function during recall mode.
12.6:Delete Saved Stations
Short press the key[ ] to enter recall mode, and select
the target station. Hold the key[ ] for
2s until the LCD flashes:
then press the key[ ] once more to confirm deletion.
12.7:North America WB Weather Band
WB covers seven frequencies:
162.400MHz
,
162.425MHz
,
162.450MHz
,
162.475MHz
,
162.500MHz
,
162.525MHz
,
162.550MHz
13
12.7.1:Power on the Radio, press the key[ ] to enter
WB band. Choose frequencies via
【◀
TUNING
▶】
or shuttle knob[ ]
12.7.2:Alert Scan: Hold the key[ ] for 2s under WB
mode to enable alert. The LCD icon
“ ”
flashes during
scanning. Scanning halts automatically when an alert is
received, and the icon
” “
fades out.
12.7.3:Exit Alert Scan: Hold the key[ ] for 2s to quit
and return to WB playback.
Tip:
◆
No keys work while scanning. Hold the key[ ] for
2s to exit alert mode and resume operation.
12.8:FM De-emphasis Settings
In FM mode, short press numeric key [ 2 ] to select
de-emphasis: DE-EMP:50μs / DE-EMP:75μs.
The factory default setting is DE-EMP:75μs.
Tip:
◆
Adjust the de-emphasis to optimize FM audio quality,
delivering a more natural and balanced sound. It effectively
reduces high-frequency interference and noise, while
boosting the high-frequency components of the audio signal.
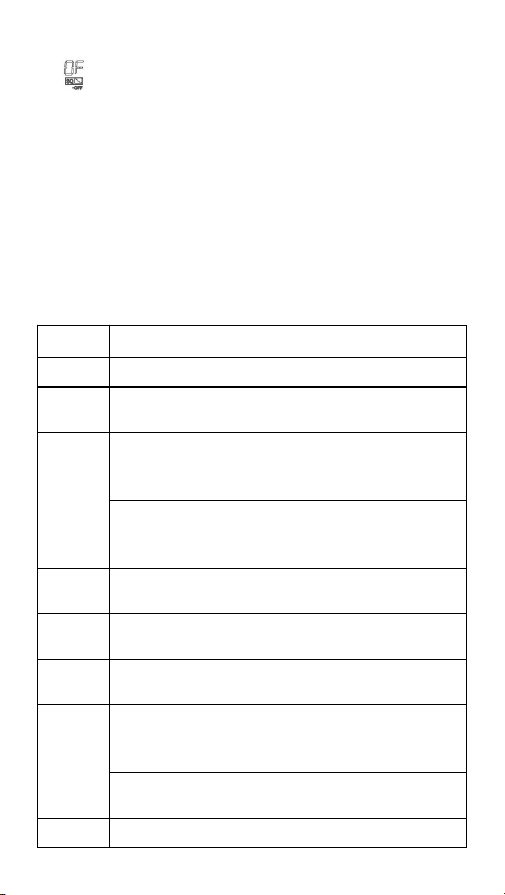
12.9:Squelch (SQ) Settings
Can enable SQ squelch for radio reception in five bands: SW,
VHF, UHF, AIR and CB,
according to your listening needs.
Short press numeric key [ 3 ]to select squelch level. A
total of 9 levels are available.
14
Short press numeric key [ 3 ]. The corresponding symbol
appears on the LCD, indicating the squelch function is
turned off.
Tip:
◆
If the squelch level is set too high, weak distant
stations will be muted and cannot be received. Near
the critical frequency of weak local stations, the audio
may cut in and out. Adjust the squelch appropriately
according to your needs.
12.10
:
BW Settings
In radio mode (excluding WB band), short press the BW key
to switch bandwidth.
Band
BW
FM
40KHz/60KHz/84KHz/110KHz
MW
1.0KHz/1.8KHz/2.0KHz/2.5KHz/3.0KHz/
4.0KHz/6.0KHz
SW
Demodulation is AM:
1.0KHz/1.8KHz/2.0KHz/2.5KHz/3.0KHz/
4.0KHz/6.0KHz
Demodulation is LSB/USB:
0.5KHz/1.0KHz/1.2KHz/2.2KHz/3.0KHz/
4.0KHz
VHF
1.7KHz/2.0KHz/2.5KHz/3.0KHz/3.75KHz/
4.0KHz/4.25KHz/4.5KHz
UHF
1.7KHz/2.0KHz/2.5KHz/3.0KHz/3.75KHz/
4.0KHz/4.25KHz/4.5KHz
AIR
1.0KHz/1.8KHz/2.0KHz/2.5KHz/3.0KHz/
4.0KHz/6.0KHz
CB
Demodulation is AM:
1.0KHz/1.8KHz/2.0KHz/2.5KHz/3.0KHz/
4.0KHz/6.0KHz
Demodulation is NFM:
1.7KHz/2.5KHz/3.75KHz/4.5KHz
WB
3KHz
15
The current selected bandwidth will be saved as default after
operation stops.
12.11
:
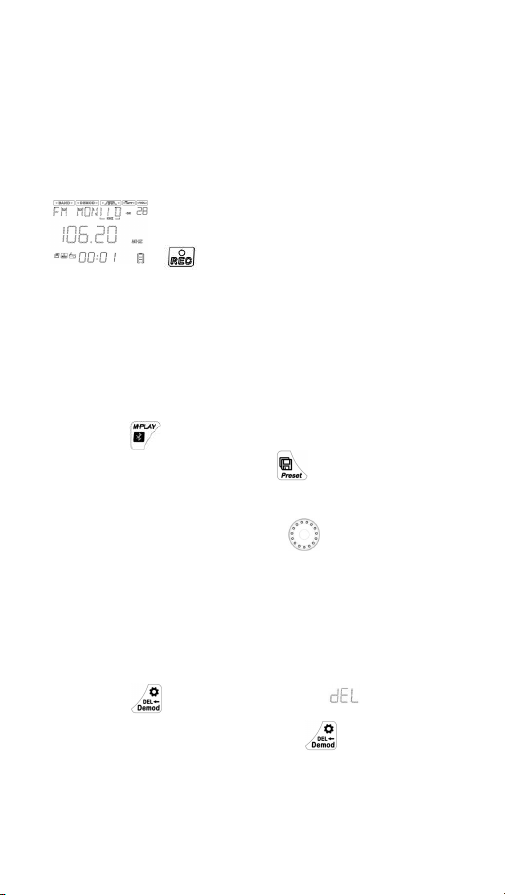
Radio Internal Recording
12.11.1 Radio Internal Recording: In radio mode, insert a
valid TF card, then press and hold numeric key[ 4 ]
The corresponding content will show on the LCD.
“ “
The symbol flashes and the recording
time increments.
12.11.2:To exit radio internal recording: Short press numeric
key [ 4 ] again
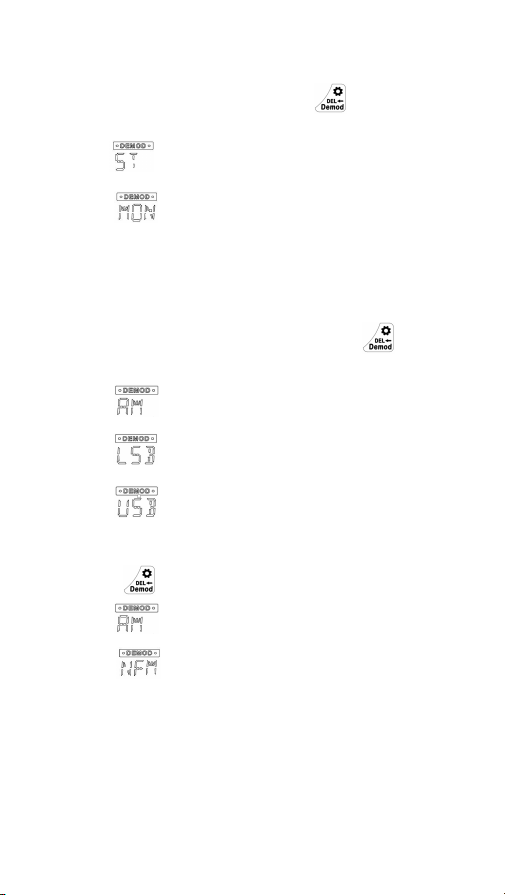
12.11.3:Quickly Retrieve Recording Files
Short press key [4] to quit recording,Short press the
[ ] key to switch to TF card playback
mode.Long press the [ ] key to quickly enter
the recording folder.
Rotate the shuttle knob [ ] or short press the
tuning button on the right [ ◀TUNING▶ ] to
select recording files.
12.11.4:Deleting Recording Files:
While playing a recording file, long press the
[ ] key. The characters " " flash on the
LCD. Then short press the [ ] key again to
confirm deletion.
16
12.12
:
Select Demodulation Mode
12.12.1
:
FM working mode
,
After inserting the
headphones,short press the
【 】
key
,
Switch
between mono and stereo demodulation modes
This symbol indicates stereo playback via
headphones.
This symbol indicates monaural listening
(factory default mode).
Tip:
◆
When listening via the built-in speaker,
switching between the two demodulation modes
above shows no obvious difference.
12.12.2:SW working mode:short press the [ ]
key,Switch AM/LSB/USB Demodulation Modes:
This symbol indicates the normal shortwave
mode (factory default mode).
This symbol indicates Lower Sideband
(LSB) mode.
This symbol indicates Upper Sideband
(USB) mode.
12.12.3:CB working mode:short press the
[ ]key,Switch AM/NFM Demodulation Modes
This symbol indicates the traditional
long-distance mode (factory default mode).
This symbol NFM (Narrowband FM)
represents the local high-fidelity and low-noise
mode.
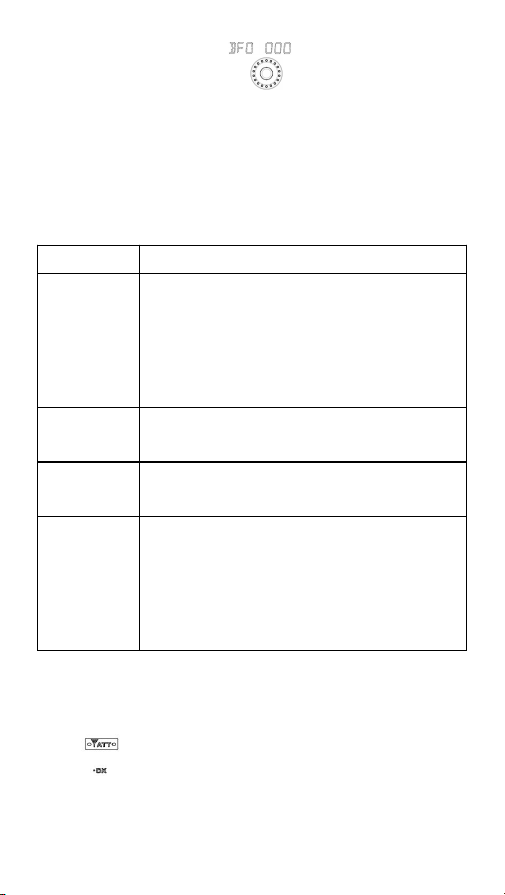
12.13:SW SSB BFO Settings
(Beat Frequency Oscillator
Abbreviation BFO)
In SW mode with demodulation set to LSB/USB, short
press the numeric key [5].
17
LCD display symbol:
Rotate the shuttle knob [ ] clockwise or
counterclockwise to adjust the BFO within the range of
-100 to +100 for clear audio.
12.14 :Select Metre Wave
Operating modes for SW, AIR, VHF and UHF bands
,
Short press numeric key [6] to quickly switch to Metre
Wave frequencies, as detailed below:
Band
Select Metre Wave
SW
3.2MHz,3.75MHz,3.9MHz,4.75MHz,
5.73MHz,7.1MHz,9.25MHz,
11.5MHz,13.57MHz,15.03MHz,
17.48MHz,18.9MHz,21.45MHz,
25.67MHz
AIR
118MHz,123MHz,128MHz,133MHz,
136MHz,138MHz
VHF
30MHz,136MHz,156.025MHz,
174MHz,220MHz
UHF
300MHz,350MHz,400MHz,
409.75MHz,446.005MHz,
462.5625MHz,500MHz,550MHz,
600MHz,650MHz,700MHz,750MHz,
800MHz,850MHz,900MHz,950MHz
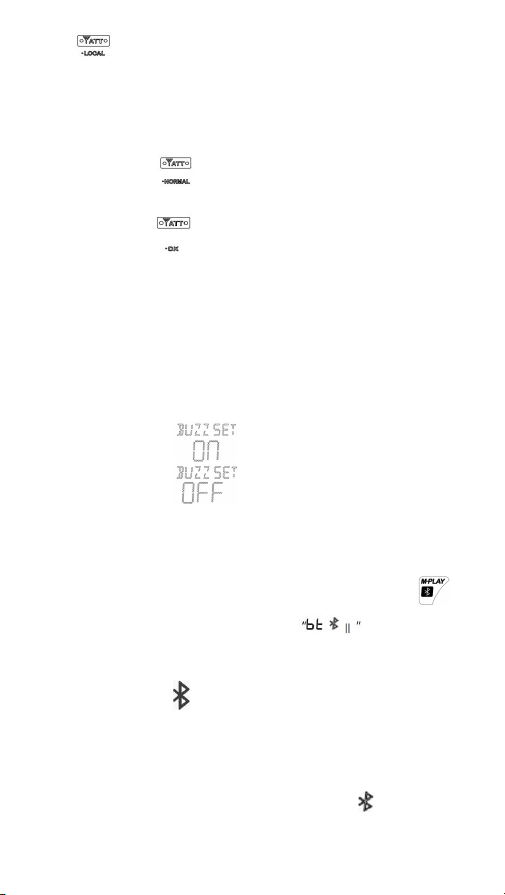
12.15: Local/DX Switch
Short press key [ 8 ] to switch LOCAL/DX in FM, SW,
VHF, UHF, AIR and CB modes:
This symbol stands for DX mode (factory default).
High gain & full sensitivity for receiving far weak
signals and overseas shortwave.
18
This symbol indicates LOCAL mode. It reduces
receiving sensitivity and filters out interference. Features:
clear audio for local stations with no noise or cross-talk.
Tip:
◆
In MW mode, ATT is fixed to the default
state , cannot be switched.
◆ In WB mode,ATT is fixed to default
state ,cannot be switched.
12.16: Enable or disable key buzz
In time display mode, press and hold numeric key [2] to
access the key buzz on/off selection.
Short press key [2] repeatedly to toggle between the two
modes.(Factory default: Key sound enabled)
LCD display
:
Key buzz On
LCD display: Key buzz off
13:Bluetooth mode
13.1:Bluetooth Connection Name:HRD-A330
12.2:Switch to Bluetooth mode by short pressing the [ ]
key. The corresponding content will appear on
the LCD.
The icon
“ ”
flashes to indicate device searching.
Enable Bluetooth on your phone or computer, find the
Bluetooth name HRD-A330 and follow the prompts
to connect. Once connected, the icon
“ ”
will stay lit
steadily.
19
12.3:Track Select
Short press the
【◀
TUNING
▶】
key or rotate the shuttle
knob[ ].
Play/Pause control: Short press the
【
0
▶‖】
key to
toggle between play and pause.
14:TF Card Mode
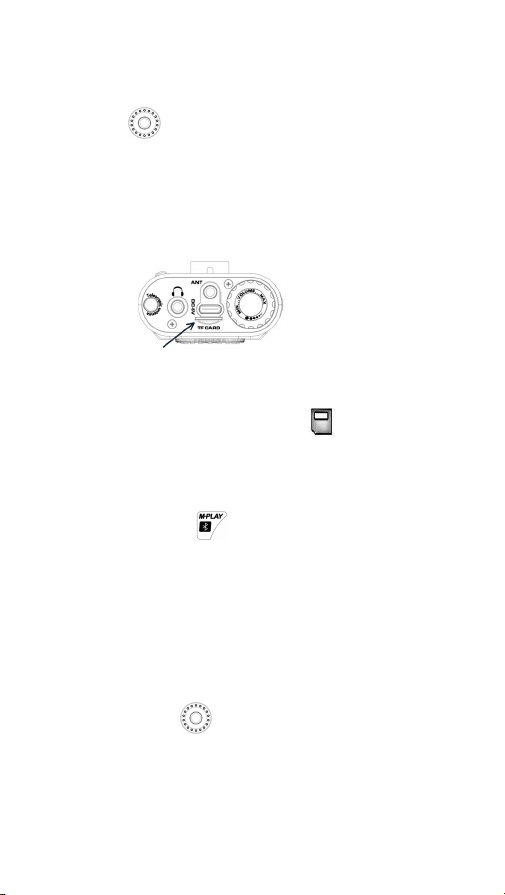
14.1:The TF card slot is located on the top of the radio, as
shown in the figure above. Insert a valid TF card into the
slot in the correct orientation “ “and press it gently
to secure.
Press gently again to eject the TF card.
Short press the [ ] key to switch to TF Card playback
mode.
14.2:Supports TF cards up to 256GB. Compatible with audio
formats: MP3, WMA, WAV, APE and FLAC.
14.3:Track Select
Short press the
【◀
TUNING
▶】
key or rotate the shuttle
knob[ ].
Play/Pause control: Short press the 【0 ▶‖】 key to
toggle between play and pause.
14.4:Fast Forward:Press and hold the [
◀
TUNING ] key
20
14.5: Rewind: Press and hold the [ TUNING
▶
] key.
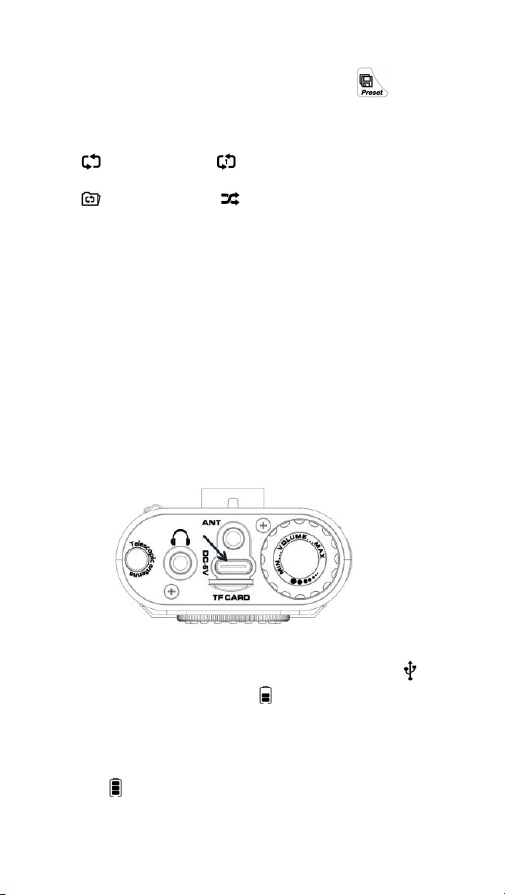
14.6:Select playback mode. Short press the [ ] key to
switch between playback modes. The playback modes are
listed below:
—All Repeat —Repeat one
—Repeat file —Random。
TIP
:
◆
When playing music from the TF card, audio distortion
may occur due to the source files. It is recommended to
adjust the EQ mode or volume.
◆ When switching to TF Card mode with an invalid TF
card, the LCD will display "----", indicating no card
detected. Please replace it with a working TF card.
15
:
Type-C USB Dual-Port Instructions
15.1
:
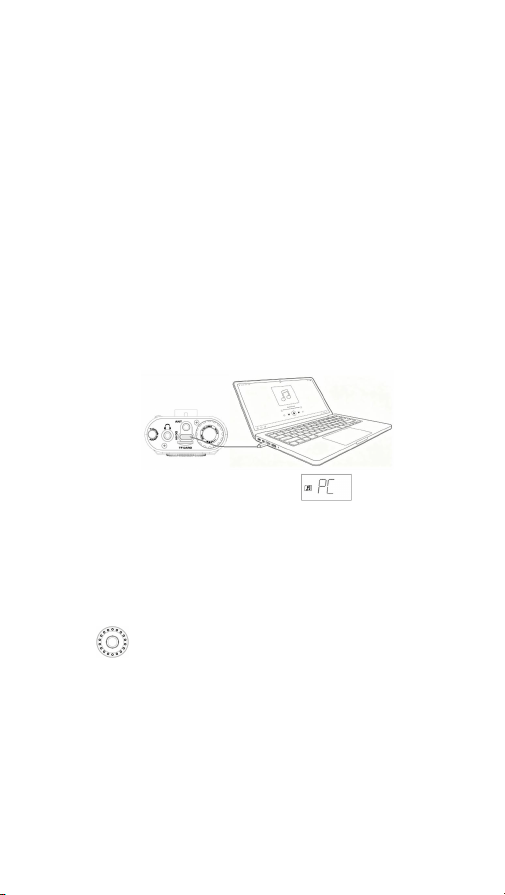
Type-C Charging : Connect a 5V DC power supply to the
DC-5V charging port. The charging icon
“ ”
and
scrolling battery icon
“ ”
will appear on the LCD to
indicate charging is in progress.
When fully charged, the LCD shows a full battery icon
“ ”
, indicating charging is complete.
21
Tip:
◆
It is recommended to use a charger with DC 5V/1A~3A
output to avoid damage to the lithium battery
and the device.
◆If the device will not be used for a long time, charge the
lithium battery once a month or remove the battery to
prevent power loss.
◆It takes approximately 5 hours to fully charge the lithium
battery.
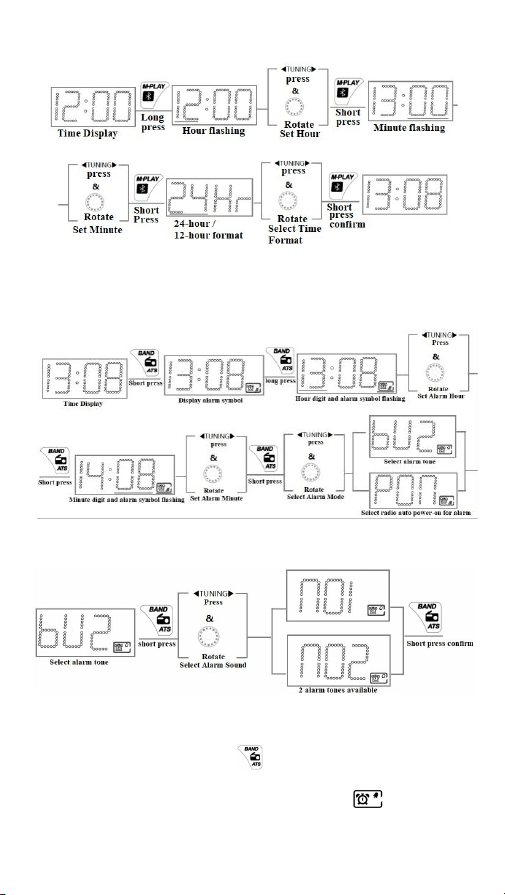
15.2:Connect to Computer
Connect the unit to a computer via the data cable, and it
will automatically switch to PC mode.
The LCD of the radio is display
At this time, the radio can be used as an audio input
device.
Track Select:
Short press the 【 ◀TUNING ▶ 】 key or rotate the shuttle
knob[ ].
Play/Pause control: Short press the 【0 ▶‖】 key to toggle
between play and pause.
After inserting a valid TF card into the radio and connecting it
to a computer, the device can function as
a card reader for file transfer, music downloading, track
deletion and other operations.
22
16
:
Time Setting
Tip
◆
If 12Hr format is selected, AM indicates a.m. and PM
indicates p.m
17
:
Alarm Setting
17.1:Alarm tone is selected, follow the operations below
Tip: ◆ After selecting the alarm mode and activating the
alarm:short press the [ ] key to turn off
the alarm for the day. The alarm icon will stay on
steadily.
23
◆
Press any other key to activate the snooze function. The
alarm icon will flash, and the alarm will sound again
after 5 minutes. The alarm will stop automatically after 6
snooze cycles.
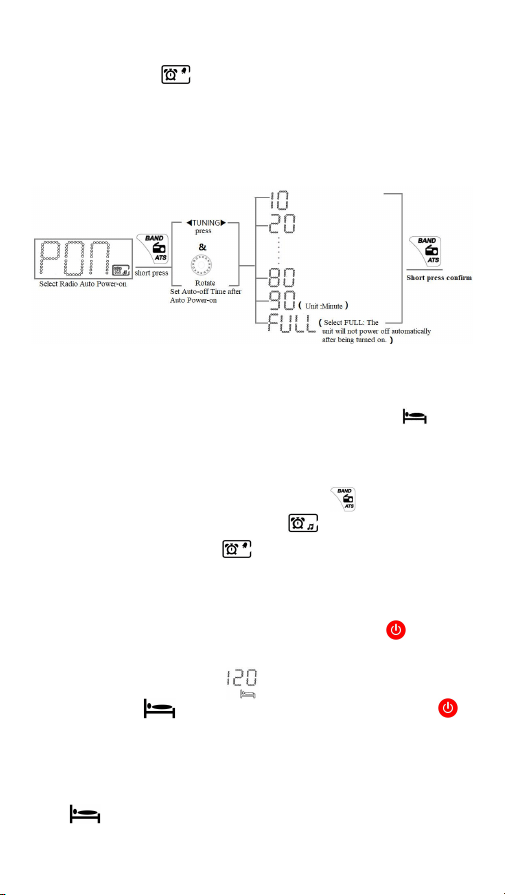
17.2:If the alarm is set to "Radio Auto Power-on"
Tip:◆When the alarm is set to Radio Auto power-on, the device
will resume the operating mode used before power-off.
◆After setting the auto-off time, the sleep icon will
display upon power-on.
18:Turn off alarm
In alarm active mode, short press [ ] to turn off the
alarm. The Timer Power-on or
Alarm tone icons on the LCD will disappear,
indicating the alarm is deactivated.
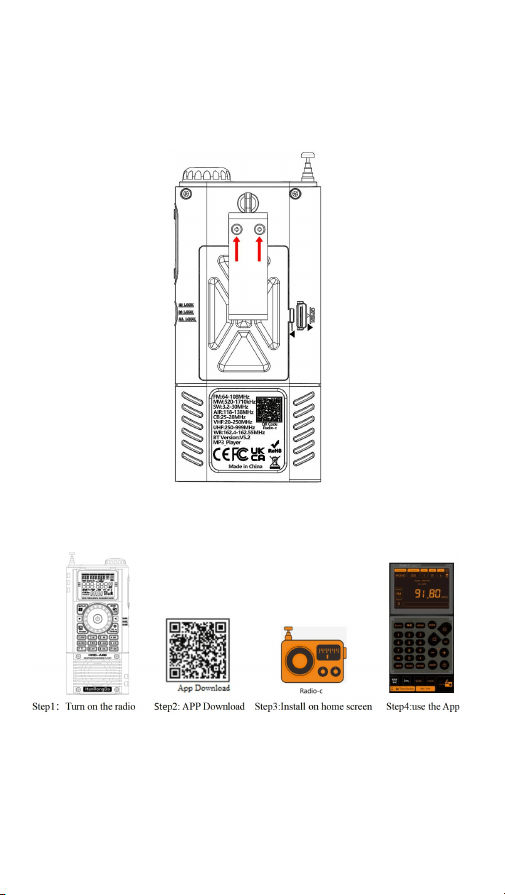
19:Sleep Time Setting
In power-on status, press and hold the Power [ ] key for
2 seconds to enter the sleep auto-off time setting. The
corresponding content will show on the LCD and the
sleep icon will flash. Short press the Power [ ]
key to select the sleep time:120, 110, 100, 90, 80, 70, 60, 50,
40, 30, 20, 10 (Unit: Minute)
Stop operation to confirm the last selection. The icon
will stop flashing and stay steady on.
24
20
:
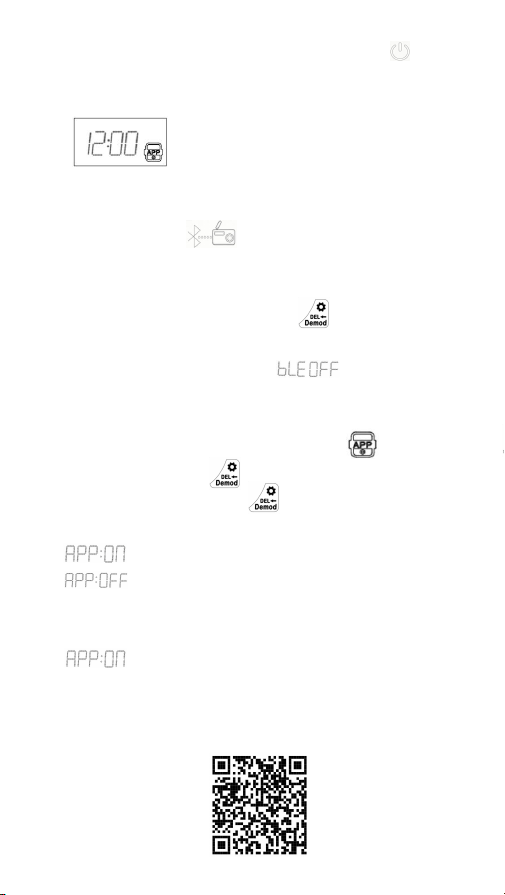
Install the back clip
Attach the back clip to the position indicated by the arrow in
the figure. Align the screw with the mounting hole on the
bottom housing, then tighten it clockwise with a screwdriver.
21
:
APP Connection
21.1
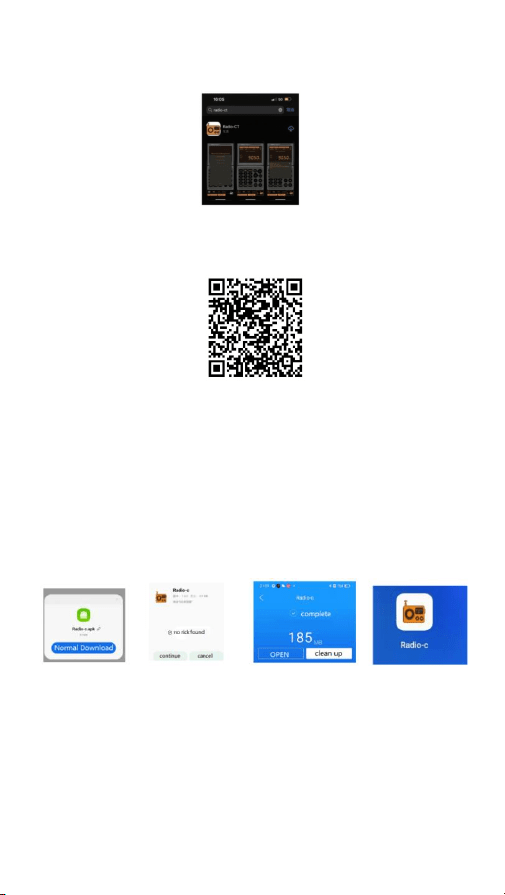
:
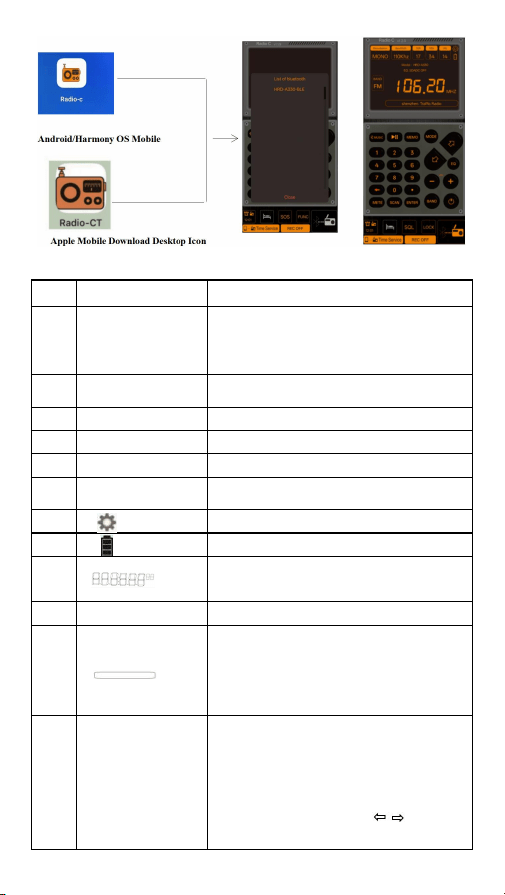
Schematic Diagram for Mobile APP Download
Tip:
◆
If you already own our Radio-C compatible device, no
need to download again. After turning on the
radio, tap HRD-A330-BLE to connect and use.
25
◆
After using the App, tap the power button [ ] on the
App interface to power off.
The radio will keep displaying the time.
To turn off the time display on the radio, disconnect from the
App. Follow the steps below:
Tap the button [ ] at the bottom right of the App
interface to disconnect.
The phone will show: Bluetooth BLE disconnected
You may also press and hold the [ ] key when the radio
is powered off to disconnect.
The corresponding characters will appear on the
LCD to indicate disconnection.
21.2 Turn the App on and off
When the time is displayed (no App icon on the LCD),
press and hold the [ ] button to enter the App on/off
selection. Short press the [ ] button again to make your
choice.
Indicates the App works normally.
Indicates the App is unavailable.
Tip: ◆
If you fail to access the App, follow these steps to
check if it is disabled. Switch to the corresponding status
for normal use.
21.3
:
App Download Steps
21.3.1:For Android and HarmonyOS phones, please scan the
QR code below with your phone to
install the App
:
26
21.3.2
:
For iOS devices, go to the App Store and search for
Radio-CT to download the app
:
You may also scan the QR code below to go to the
App Store page and download the app
:
21.3.3:After enabling the browser to scan the installation QR
code for HRD-A330,
follow the prompts: click “Download,” then click
“Continue Installation.”
Once the installation is complete, click “Open
Application.”
The APP icon will appear on the mobile home screen.
21.3.4 Entering APP Mode for Use
Click the APP icon on the mobile home screen to access
it.
Tap the symbol in the bottom right corner of the APP
interface,
Choose HRD-A330-BLE to establish a successful
connection.
27
22
:
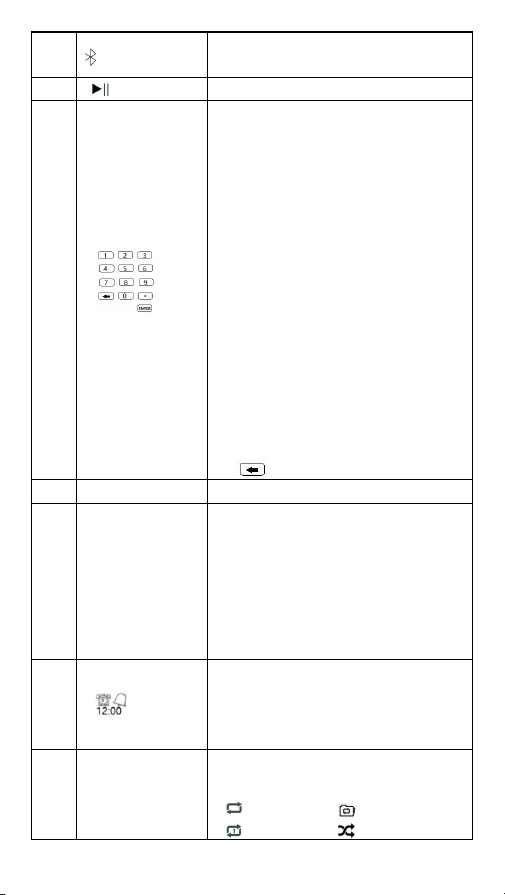
App Menu Icon Functions
No
Symbol
Button Function Description
1
Demodulation
Demodulation(Tap to select the
demodulation mode on your
phone.)
2
Bandwidth
click to select the bandwidth
3
SNR
Signal to Noise Ratio
4
RSSI
Receive Sensitivity
5
VOL
Sound level Indicator
6
BAND FM
Click to select the working mode.
7
View Device Version
8
Battery Indicator
9
Radio frequency display,working
mode display
10
KHZ MHZ
Unit
11
Edit the frequency name: long press
this position, input the present
frequency name according to the
language tips.
12
MEMO
Short press to recall stations.
Long press and short press to preset
stations.
You can select the station number
by short pressing the [ ] key
or numeric keys.
28
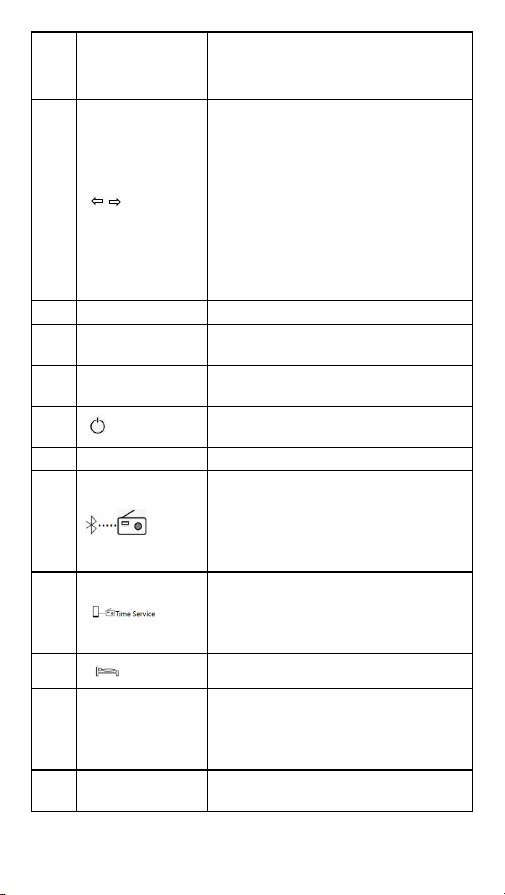
13
MUSIC
Bluetooth/TF card /PC playback
mode switch
14
Mute on&off / Play & Pause
15
1:Direct Frequency Input:
[ENTER]→Enter frequency via
numeric keypad
→
[ENTER]
confirm
2:Manual station storage in radio
mode
:
[MEMO]→Enter station number
via numeric keypad→[MEMO]
confirm
3:Recall station:[MEMO]→Enter
station number via numeric keypad
→
[ENTER] confirm
4:TF Card mode
Short press:Enter song folder via
numeric keypad
→
[ENTER]
confirm
5: Delete Button
16
METE
Select the meter wave.
17
SCAN
1:Radio operating mode: Press and
hold to enable full-automatic
station search (excluding WB).
2:In the WB mode, long press to
enter the automatic warning
function. Press long again to exit
the warning notification.
18
1
:
Short press to turn the alarm
on/off.
2
:
Long press to set the alarm and
scheduled power-on.
19
MODE
1:In TF Card playing mode,select
playback mode
:
repeat all, repeat one,
repeat file, random
29
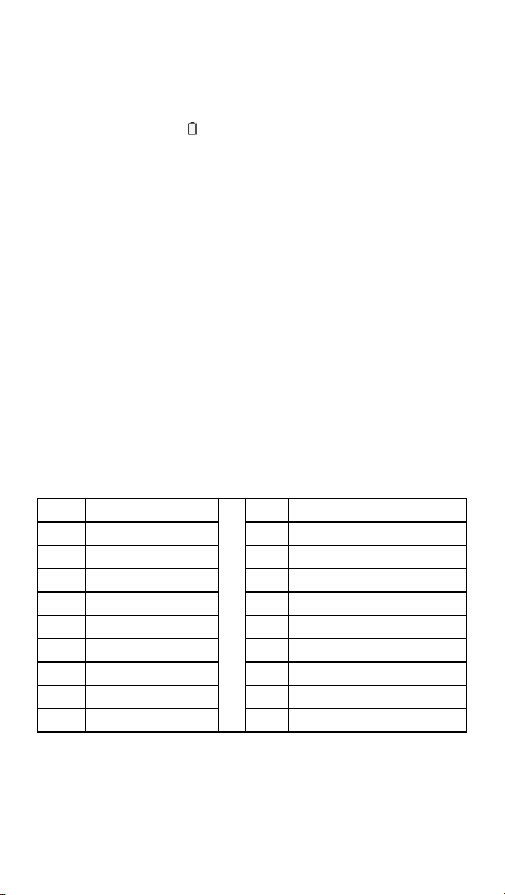
2:Radio mode: Switch
demodulation modes for FM, SW
and CB
20
1:Radio Mode:
Frequency increment, decrement,
deposit station, take station address
number selection
Long press: Automatically search
for radio stations
Recall station mode:Recall
station+/Recall station-
2:Music playback mode:Select
PREV,NEXT Song
21
EQ
Select EQ
22
VOL+ -
VOL+: Volume increases
VOL-: Volume decreases
23
BAND
switch radio receive mode / Switch
from Music Mode to Radio Mode
24
Tap to power on, and tap again to
power off.
25
LOCK
Lock/Unlock
26
The mobile APP connects to the
entry button of the HRD-A330
radio.
Press and hold for 2 seconds to exit
the APP connection
27
Device calibration time key (can
correct the time displayed on the
radio with one click, consistent
with that on the mobile phone)
28
Sleep time setting
29
REC OFF
After inserting the TF card, lightly
press to start recording in the radio,
and press again to exit the
recording.
30
SQL
Short press to set squelch for
SW/AIR/CB/VHF/UHF.
30
23.Notes
Before use, ensure that you follow the following basic safety
tips to ensure the safe and
reliable use of the product
:
♦Battery symbol:
“ ”
space symbol:Indicates that the battery
is low,In order to avoid affecting normal use, please charge the
machine or replace the new dry battery in time.
♦If you do not use it for a long time, charge it once a month.
♦It is recommended to charge a charging device with an output
voltage of DC5V/1A-DC3A to avoid damage to the lithium
battery or device.
♦Do not expose this product to rain, moisture, dripping or
splashing of any liquid.
♦Do not let this product near high temperature heat source, do
not barbecue or blow bake at high temperature
♦Do not place in direct sunlight for a long time.
♦ Do not allow this product to fall or be hit or put heavy
pressure on it.
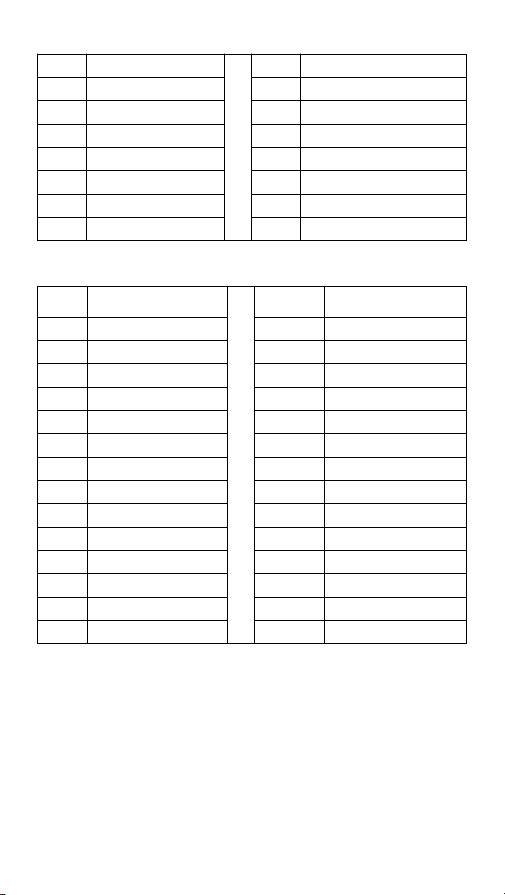
24:Free Channels for Civil Walkie-talkies
China Free Channels:
1
409.7500MHz
11
409.8750MHz
2
409.7625MHz
12
409.8875MHz
3
409.7750MHz
13
409.9000MHz
4
409.7875MHz
14
409.9125MHz
5
409.8000MHz
15
409.9250MHz
6
409.8125MHz
16
409.9375MHz
7
409.8250MHz
17
409.9500MHz
8
409.8375MHz
18
409.9625MHz
9
409.8500MHz
19
409.9750MHz
10
409.8625MHz
20
409.9875MHz
31
European Free Channels
1
446.00625MHz
9
446.10625MHz
2
446.01875MHz
10
446.11875MHz
3
446.03125MHz
11
446.13125MHz
4
446.04375MHz
12
446.14375MHz
5
446.05625MHz
13
446.15625MHz
6
446.06875MHz
14
446.16875MHz
7
446.08125MHz
15
446.18125MHz
8
446.09375MHz
16
446.19375MHz
US Free Channels:
1
462.5625MHz
16
462.5750MHz
2
462.5875MHz
17
462.6000MHz
3
462.6125MHz
18
462.6250MHz
4
462.6375MHz
19
462.6500MHz
5
462.6625MHz
20
462.6750MHz
6
462.6875MHz
21
462.7000MHz
7
462.7125MHz
22
462.7250MHz
8
467.5625MHz
15RP
467.5500MHz
9
467.5875MHz
16RP
467.5750MHz
10
467.6125MHz
17RP
467.6000MHz
11
467.6375MHz
18RP
467.6250MHz
12
467.6625MHz
19RP
467.6500MHz
13
467.6875MHz
20RP
467.6750MHz
14
467.7125MHz
21RP
467.7000MHz
15
462.5500MHz
22RP
467.7250MHz

25:FCC Statement:
This device complies with part 15 of the FCC Rules.
Operation is subject to the following two conditions: (1)
This device may not cause harmful interference, and (2)
this device must accept any interference received,
including interference that may cause undesired
operation.
This equipment has been tested and found to comply
with the limits for a Class B digital device, pursuant to
part 15 of the FCC Rules. These limits are designed to
provide reasonable protection against harmful
interference in a residential installation. This
Equipment generates,uses and can radiate radio
frequency energy and,if not installed and used in
accordance with the instructions,may cause harmful
interference to radio
communications.However,there is no guarantee that
interference will not occur in a Particular installation.If
thise quipment does cause harmful interference to radio
or television reception, which can be determined by
turning the equipment off and on, the user is
encouraged to try to correct the interference by one or
more of the following measures:
—Reorient or relocate the receiving antenna.
—Increase the separation between the equipment and
receiver.
—Connect the equipment into an outlet on a circuit
different from that to which the receiver is connected.
—Consult the dealer or an experienced radio/TV
technician for help.
Caution: Any changes or modifications not expressly
approved by the party responsible for compliance could
void the user's authority to operate the equipment.
This equipment complies with FCC radiation exposure
limits set forth for an uncontrolled environment. This
transmitter must not be co-located or operating in
conjunction with any other antenna or transmitter.
32