WS1010
200 Channel VHF/Air/UHF
Handheld Radio Scanner
OWNER’S MANUAL

2
Package Contents ..................................................... 3
Scanning Legally ........................................................ 3
Features ..................................................................... 4
Scanner Basics ........................................................... 5
Setup ......................................................................... 6
Connecting the Antenna ..................................................6
Connecting a Speaker or Headphones ............................7
Powering Your Scanner .....................................................8
Turning on the Scanner ..................................................10
Turning Off the Key Tone ................................................10
Understanding the Keypad ............................................11
Understanding the Display .............................................12
Configuring Your Scanner ........................................ 14
Preprogrammed Frequencies .........................................14
Programming Channels ..................................................14
Programming with a Computer ......................................15
Cloning Programmed Data .............................................15
Searching for Frequencies ....................................... 16
Service Bank Search........................................................16
Storing Found Frequencies ............................................17
Birdie Frequencies .......................................................... 17
Scanning & Monitoring ...................................................18
Using the Priority Channel .............................................. 19
Spectrum Sweeper ........................................................19
Locking Out Channels ................................................... 20
Clearing a Stored Channel ............................................ 21
Weather Features .................................................... 22
Receiving All Weather Alerts ......................................... 22
Receiving Alerts for Specific Areas ................................ 22
Skywarn™ ..................................................................... 24
Additional Information ............................................ 25
Care ............................................................................... 25
Initializing the Scanner ................................................... 25
Preprogrammed Frequency List .................................... 26
Service Banks ................................................................ 28
Specifications ................................................................. 30
FCC Notice .................................................................... 31
Limited Warranty ........................................................... 32
WELCOME
Thank you for choosing a Whistler product. We are
dedicated to providing products that represent both
quality and value. Please read the user manual carefully
before using this product. If you have additional
questions, please visit the FAQ page on our website at
www.whistlergroup.com or call toll free 800-531-0004,
8am to 5pm CT, Monday through Friday to speak to a
Customer Service Representative.
Package Contents
• Scanner
• Belt Clip
• Antenna
• AC Adapter
• User’s Guide
• Quick Start Guide
• Alkaline Battery Holder
• Rechargeable Battery Holder
Scanning Legally
Your scanner covers frequencies used by many
different groups including police and fire departments,
ambulance services, government agencies, private
companies, amateur radio services, military operations,
pager services, and wireline (telephone and telegraph)
service providers. It is legal to listen to almost every
transmission your scanner can receive. However, there
are some transmissions you should never intentionally
listen to. These include:
• Telephoneconversations(cellular,cordless,orother
private means of telephone signal transmission)
• Pagertransmissions
• Anyscrambledorencryptedtransmissions
According to the Electronic Communications Privacy
Act (ECPA), as amended, you are subject to fines and
possible imprisonment for intentionally listening to,
using, or divulging the contents of such a transmission
unless you have the consent of a party to the
communication (unless such activity is otherwise illegal).
TABLE OF CONTENTS

3
WELCOME
Thank you for choosing a Whistler product. We are
dedicated to providing products that represent both
quality and value. Please read the user manual carefully
before using this product. If you have additional
questions, please visit the FAQ page on our website at
www.whistlergroup.com or call toll free 800-531-0004,
8am to 5pm CT, Monday through Friday to speak to a
Customer Service Representative.
Package Contents
• Scanner
• Belt Clip
• Antenna
• AC Adapter
• User’s Guide
• Quick Start Guide
• Alkaline Battery Holder
• Rechargeable Battery Holder
Scanning Legally
Your scanner covers frequencies used by many
different groups including police and fire departments,
ambulance services, government agencies, private
companies, amateur radio services, military operations,
pager services, and wireline (telephone and telegraph)
service providers. It is legal to listen to almost every
transmission your scanner can receive. However, there
are some transmissions you should never intentionally
listen to. These include:
• Telephoneconversations(cellular,cordless,orother
private means of telephone signal transmission)
• Pagertransmissions
• Anyscrambledorencryptedtransmissions
According to the Electronic Communications Privacy
Act (ECPA), as amended, you are subject to fines and
possible imprisonment for intentionally listening to,
using, or divulging the contents of such a transmission
unless you have the consent of a party to the
communication (unless such activity is otherwise illegal).
INTRODUCTION

4
This scanner is designed to prevent reception of
illegal transmissions, in compliance with the law which
requires that scanners be manufactured in such a
way as to not be easily modifiable to pick up those
transmissions. Do not open your scanner’s case to
make any modifications that could allow it to pick up
transmissions that are not legal to listen to. Doing so
could subject you to legal penalties.
In some areas, mobile use of this scanner is unlawful
or requires a permit. Check the laws in your area. We
encourage responsible, legal scanner use.
Features
Your new WS1010 Handheld Scanner lets you scan
conventional transmissions, and is preprogrammed
with search banks for convenience. By pressing a
one touch search key, you can quickly search those
frequencies most commonly used by public service
and other agencies without tedious and complicated
programming.
This scanner gives you direct access to over 25,000
exciting frequencies, including those used by
ambulance services, aircraft, and amateur radio
services, marine, civil air patrol, VHF and UHF business
bands, government frequencies and some police and
fire departments.
Your scanner also has these special features:
Spectrum Sweeper – a powerful new tool for you
to rapidly detect, monitor and store frequencies for
nearby radio transmissions.
One-Touch Service Search Banks – Search preset
frequencies in separate marine, fire/police, aircraft, ham
and weather bands.
Display Backlight – Easy to read in low-light situations.
Lockout Function – Lets you skip specified channels or
frequencies when scanning or searching.
Ten Channel-Storage Banks – You can store 20
channels in each bank (200 total channels), letting you
group channels so you can more easily identify calls.
SAME/FIPS Weather Alert – Displays weather events
for the county or counties that you choose.
Memory Backup – Keeps the frequencies stored in
memory for an extended time.
Scan Delay – Delays scanning for about 2 seconds, so
that you can hear replies on the same channel.
Priority Channel – Lets you set the scanner to check
one channel every 2 seconds so that you do not miss
transmissions on that channel.
Data Cloning – Lets you transfer the programmed data
to another WS1010 scanner.
Scanner Basics
After you familiarize yourself with your scanner’s
features you can then set up your scanner.
Frequencies
A frequency is the waveband of the transmitting signal
(expressed in kHz or MHz). Your WS1010 receives a
range of analog frequencies; the best resource for your
local frequencies is www.radioreference.com.
Also, you can use your scanner’s search functions to
find active frequencies in your area.
Your WS1010 scanner can receive these bands:
Frequency Range Types of Transmissions
29–54 MHz 10-Meter Ham, VHF Lo, 6-Meter
Ham
108–136.9875 MHz Aircraft
137–174 MHz Military Land Mobile, 2-Meter Ham,
VHF Hi
380 –512 MHz UHF Aircraft, Federal Government,
70-cm Ham, UHF Standard, UHF “T”
n Note: See “Specifications” on page 30 for more
information about frequency steps.
FEATURES

5
This scanner is designed to prevent reception of
illegal transmissions, in compliance with the law which
requires that scanners be manufactured in such a
way as to not be easily modifiable to pick up those
transmissions. Do not open your scanner’s case to
make any modifications that could allow it to pick up
transmissions that are not legal to listen to. Doing so
could subject you to legal penalties.
In some areas, mobile use of this scanner is unlawful
or requires a permit. Check the laws in your area. We
encourage responsible, legal scanner use.
Features
Your new WS1010 Handheld Scanner lets you scan
conventional transmissions, and is preprogrammed
with search banks for convenience. By pressing a
one touch search key, you can quickly search those
frequencies most commonly used by public service
and other agencies without tedious and complicated
programming.
This scanner gives you direct access to over 25,000
exciting frequencies, including those used by
ambulance services, aircraft, and amateur radio
services, marine, civil air patrol, VHF and UHF business
bands, government frequencies and some police and
fire departments.
Your scanner also has these special features:
Spectrum Sweeper – a powerful new tool for you
to rapidly detect, monitor and store frequencies for
nearby radio transmissions.
One-Touch Service Search Banks – Search preset
frequencies in separate marine, fire/police, aircraft, ham
and weather bands.
Display Backlight – Easy to read in low-light situations.
Lockout Function – Lets you skip specified channels or
frequencies when scanning or searching.
Ten Channel-Storage Banks – You can store 20
channels in each bank (200 total channels), letting you
group channels so you can more easily identify calls.
SAME/FIPS Weather Alert – Displays weather events
for the county or counties that you choose.
Memory Backup – Keeps the frequencies stored in
memory for an extended time.
Scan Delay – Delays scanning for about 2 seconds, so
that you can hear replies on the same channel.
Priority Channel – Lets you set the scanner to check
one channel every 2 seconds so that you do not miss
transmissions on that channel.
Data Cloning – Lets you transfer the programmed data
to another WS1010 scanner.
Scanner Basics
After you familiarize yourself with your scanner’s
features you can then set up your scanner.
Frequencies
A frequency is the waveband of the transmitting signal
(expressed in kHz or MHz). Your WS1010 receives a
range of analog frequencies; the best resource for your
local frequencies is www.radioreference.com.
Also, you can use your scanner’s search functions to
find active frequencies in your area.
Your WS1010 scanner can receive these bands:
Frequency Range Types of Transmissions
29–54 MHz 10-Meter Ham, VHF Lo, 6-Meter
Ham
108–136.9875 MHz Aircraft
137–174 MHz Military Land Mobile, 2-Meter Ham,
VHF Hi
380 –512 MHz UHF Aircraft, Federal Government,
70-cm Ham, UHF Standard, UHF “T”
n Note: See “Specifications” on page 30 for more
information about frequency steps.
SCANNER BASICS

6
Channels
Channels are storage areas for frequencies saved
in your scanner’s memory. Each saved frequency is
assigned a channel.
Banks
A bank is a storage area for a group of channels. Your
scanner provides 10 banks (1 to 10) that can each store
up to 20 channels, for a total of 200 channels. You can
use the banks to group and organize frequencies.
For example, you could program the frequencies used
by your local police department starting with Channel
1 (the first channel in bank 1) and program the fire
department frequencies starting with Channel 21 (the
first channel in bank 2).
Setup
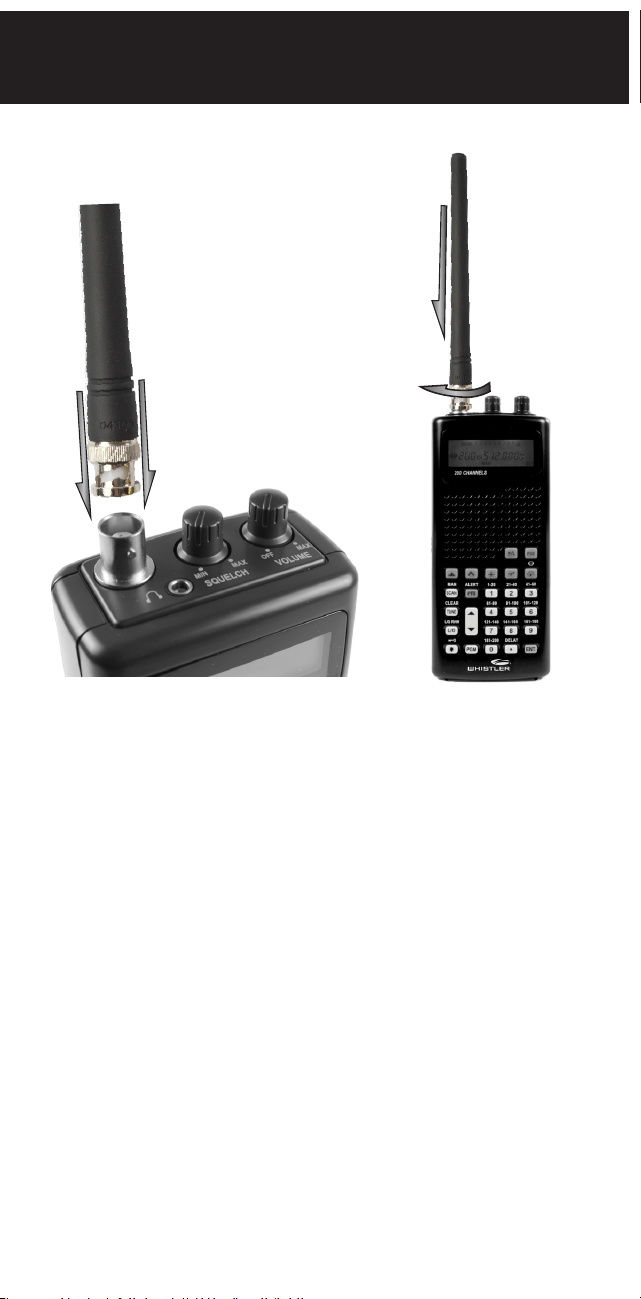
Connecting the Antenna
To attach the supplied flexible antenna to the antenna
jack on top of your scanner, align the slots around the
antenna’s connector with the tabs on the antenna jack.
Press the antenna down over the jack and turn the
antenna’s base clockwise until it locks into place.
Connecting an Outdoor Antenna
To connect an external antenna, follow the installation
instructions supplied with the antenna. Use 50 Ohm
coaxial cable, such as RG-58 or RG-8. For lengths over
50 feet, use RG-8 low-loss dielectric coaxial cable. If
the antenna cable’s connector does not have a BNC
connector, you will also need a BNC adapter.
w Warning: Use extreme caution when installing or
removing an outdoor antenna. If the antenna starts to
fall, let it go! It could contact overhead power lines. If the
antenna touches a power line, touching the antenna, mast,
cable, or guy wires can cause electrocution and death.
Call the power company to remove the antenna. DO NOT
attempt to do so yourself.
Connecting a Speaker or Headphones
You can plug an amplified speaker or headphones
(not supplied) with Çinch (3.5 mm) mini-plug into the
HEADPHONE jack on the top of the scanner. This
automatically disconnects the internal speaker.
Note: Use an amplified speaker with this scanner. Non-
amplified speakers do not provide sufficient volume for
comfortable listening.
Listening Safely
To protect your hearing, follow these guidelines:
• Donotlistenathighvolumelevels.Extendedhigh-
volume listening can lead to permanent hearing
loss.
• Setthevolumetothelowestsetting.Thenturn
on your audio device and adjust the volume to a
comfortable level.
• Avoidincreasingthevolume.Yourearswilladapt
to the volume level, so a level that does not cause
discomfort could still damage your hearing.
CONNECTING ANTENNA
7
Channels
Channels are storage areas for frequencies saved
in your scanner’s memory. Each saved frequency is
assigned a channel.
Banks
A bank is a storage area for a group of channels. Your
scanner provides 10 banks (1 to 10) that can each store
up to 20 channels, for a total of 200 channels. You can
use the banks to group and organize frequencies.
For example, you could program the frequencies used
by your local police department starting with Channel
1 (the first channel in bank 1) and program the fire
department frequencies starting with Channel 21 (the
first channel in bank 2).
Setup
Connecting the Antenna
To attach the supplied flexible antenna to the antenna
jack on top of your scanner, align the slots around the
antenna’s connector with the tabs on the antenna jack.
Press the antenna down over the jack and turn the
antenna’s base clockwise until it locks into place.
Connecting an Outdoor Antenna
To connect an external antenna, follow the installation
instructions supplied with the antenna. Use 50 Ohm
coaxial cable, such as RG-58 or RG-8. For lengths over
50 feet, use RG-8 low-loss dielectric coaxial cable. If
the antenna cable’s connector does not have a BNC
connector, you will also need a BNC adapter.
w Warning: Use extreme caution when installing or
removing an outdoor antenna. If the antenna starts to
fall, let it go! It could contact overhead power lines. If the
antenna touches a power line, touching the antenna, mast,
cable, or guy wires can cause electrocution and death.
Call the power company to remove the antenna. DO NOT
attempt to do so yourself.
Connecting a Speaker or Headphones
You can plug an amplified speaker or headphones
(not supplied) with Çinch (3.5 mm) mini-plug into the
HEADPHONE jack on the top of the scanner. This
automatically disconnects the internal speaker.
Note: Use an amplified speaker with this scanner. Non-
amplified speakers do not provide sufficient volume for
comfortable listening.
Listening Safely
To protect your hearing, follow these guidelines:
• Donotlistenathighvolumelevels.Extendedhigh-
volume listening can lead to permanent hearing
loss.
• Setthevolumetothelowestsetting.Thenturn
on your audio device and adjust the volume to a
comfortable level.
• Avoidincreasingthevolume.Yourearswilladapt
to the volume level, so a level that does not cause
discomfort could still damage your hearing.
CONNECTING ACCESSORIES

8
Using the Belt Clip
You can use the belt clip attached to the back of the
scanner for hands-free carrying when you are on the
go. Slide the belt clip over your belt or waistband. To
remove the belt clip, gently lift up the retaining catch at
the top of the belt clip from the back of radio and slide
the clip upward.
Powering Your Scanner
Using Batteries
Your scanner has a built-in charging circuit to maintain
peak performance of your Nickel-Metal Hydride (Ni-MH)
or Nickel Cadmium (Ni-CD) rechargeable batteries (not
supplied) while they are in the scanner.
For the best performance, use alkaline batteries. For
rechargeable battery holder, we recommend nickel-metal
hydride (Ni-MH) batteries. You must charge rechargeable
batteries before you use them the first time.
When battery power is low
B
appears and the
scanner beeps continuously.
1. Open the battery compartment.
2. Place four AA batteries (not supplied) into one of
the battery holders as indicated by the polarity
symbols (+ and –). For non-rechargeable batteries,
use the black holder; for rechargeable batteries,
use the yellow holder.
3. Place the battery holder into the battery
compartment and replace the cover.
Warning: Never install non-rechargeable batteries in the
rechargeable yellow battery holder. Non-rechargeable
batteries can get hot or explode if you try to recharge them.
Cautions:
• The battery holders fit only one way. Do not force
them.
• Use only fresh batteries of the required size and
recommended type.
• Remove old or weak batteries. Batteries can leak
chemicals that destroy electronic circuits.
• Dispose of old batteries promptly and properly. Do
not burn or bury them.
• Do not mix old and new batteries, different types of
batteries (alkaline, or rechargeable), or rechargeable
batteries of different capacities.
• If you do not plan to use the scanner with batteries
for a month or longer, remove the batteries. Batteries
can leak chemicals that can destroy electronic parts.
Using AC Power
Power the scanner using the supplied AC adapter.
To disconnect, unplug the adapter first.
Caution: Only use the supplied AC adapter. You must
use a Class 2 power source that supplies 9V DC and
delivers at least 400mA. Its center tip must be set to
positive and its plug must fit the scanner’s DC 9V jack.
Using an adapter that does not meet these specifications
could damage the scanner or the adapter.
Note: If you use a cigarette-lighter power cable and your
vehicle’s engine is running, you might hear electrical
noise from the engine while scanning. This is normal.
RECHARGEABLE
BATTERY HOLDER
ALKALINE
BATTERY HOLDER
POWERING SCANNER

9
Using the Belt Clip
You can use the belt clip attached to the back of the
scanner for hands-free carrying when you are on the
go. Slide the belt clip over your belt or waistband. To
remove the belt clip, gently lift up the retaining catch at
the top of the belt clip from the back of radio and slide
the clip upward.
Powering Your Scanner
Using Batteries
Your scanner has a built-in charging circuit to maintain
peak performance of your Nickel-Metal Hydride (Ni-MH)
or Nickel Cadmium (Ni-CD) rechargeable batteries (not
supplied) while they are in the scanner.
For the best performance, use alkaline batteries. For
rechargeable battery holder, we recommend nickel-metal
hydride (Ni-MH) batteries. You must charge rechargeable
batteries before you use them the first time.
When battery power is low
B
appears and the
scanner beeps continuously.
1. Open the battery compartment.
2. Place four AA batteries (not supplied) into one of
the battery holders as indicated by the polarity
symbols (+ and –). For non-rechargeable batteries,
use the black holder; for rechargeable batteries,
use the yellow holder.
3. Place the battery holder into the battery
compartment and replace the cover.
Warning: Never install non-rechargeable batteries in the
rechargeable yellow battery holder. Non-rechargeable
batteries can get hot or explode if you try to recharge them.
Cautions:
• The battery holders fit only one way. Do not force
them.
• Use only fresh batteries of the required size and
recommended type.
• Remove old or weak batteries. Batteries can leak
chemicals that destroy electronic circuits.
• Dispose of old batteries promptly and properly. Do
not burn or bury them.
• Do not mix old and new batteries, different types of
batteries (alkaline, or rechargeable), or rechargeable
batteries of different capacities.
• If you do not plan to use the scanner with batteries
for a month or longer, remove the batteries. Batteries
can leak chemicals that can destroy electronic parts.
Using AC Power
Power the scanner using the supplied AC adapter.
To disconnect, unplug the adapter first.
Caution: Only use the supplied AC adapter. You must
use a Class 2 power source that supplies 9V DC and
delivers at least 400mA. Its center tip must be set to
positive and its plug must fit the scanner’s DC 9V jack.
Using an adapter that does not meet these specifications
could damage the scanner or the adapter.
Note: If you use a cigarette-lighter power cable and your
vehicle’s engine is running, you might hear electrical
noise from the engine while scanning. This is normal.
POWERING SCANNER

10
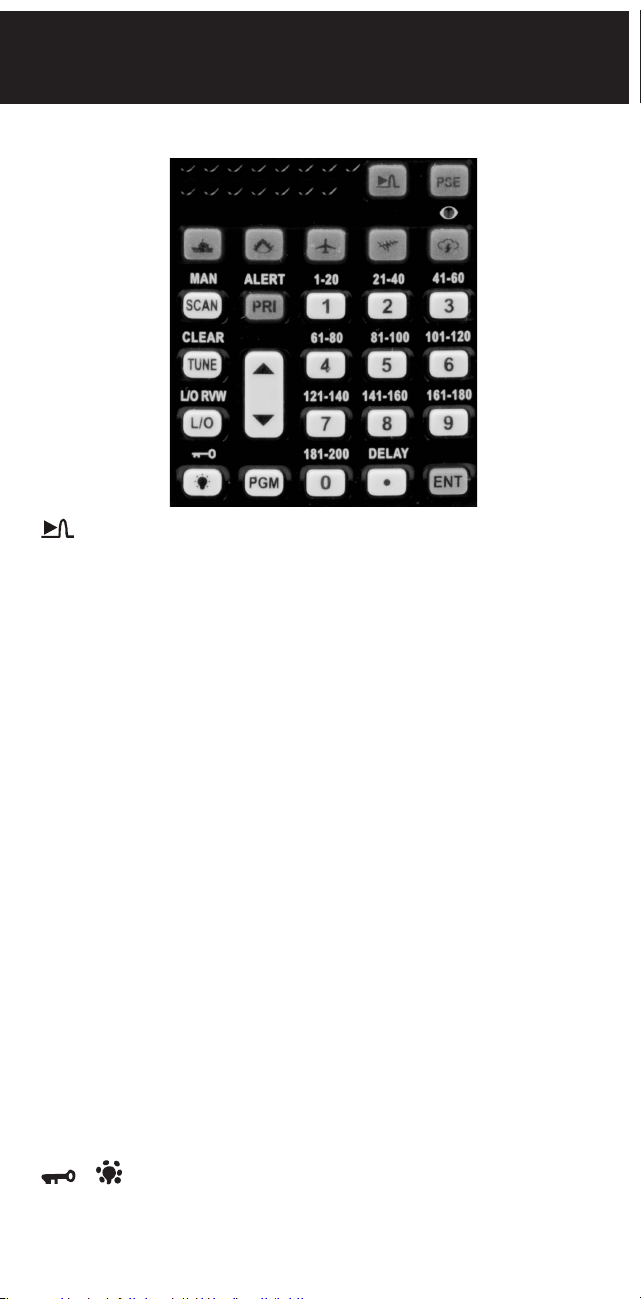
Understanding the Keypad
– Spectrum Sweeper.
PSE (Pause) – Stop and restart a search or tune.
MAR – Search the preprogrammed marine bank.
FD/PD – Search the preprogrammed fire/police bank.
AIR – Search the preprogrammed aircraft bank.
HAM – Search the preprogrammed amateur radio bank.
WX/ – Search the preprogrammed weather bank, or
hold to jump to the Skywarn channel. (First, program
your local Skywarn frequency into channel 200).
SCAN / MAN (Manual) – Press to scan programmed
channels. Press again to monitor a single channel.
– Select the direction for searching and scanning.
PRI / ALERT – Set the priority feature, or set SAME
standby mode when monitoring a weather channel.
0–9 – Input numbers or select banks (0 selects bank
10). The number range above the keys (1–20, 21–40, 41-
60, etc.) indicates the channels stored in that bank.
• / DELAY – Input a decimal point or set a channel delay.
ENT (Enter) – Complete the entry of a frequency.
L/O
/
L/O RV W – Lock-out selected channels or
frequencies. Review locked-out frequencies.
TUNE / CLEAR – Enter Tune search. Clear an incorrect
entry.
PGM – Program frequencies into channels.
/ – Locks (and unlocks) the keypad to prevent
accidental entries; turns the backlight on and off.
Turning on the Scanner
1. Turn the SQUELCH all the way down before you
turn on the scanner.
2. Turn the VOLUME knob to turn ON the radio. A
welcome message appears. After about 3 seconds,
adjust VOLUME to a comfortable level.
3. Turn SQUELCH clockwise, just until the hissing
sound stops. If you always hear a hissing sound, the
scanner will not scan or search properly.
• Tolistentoaweakordistantstation,turn
SQUELCH counterclockwise.
• Ifreceptionispoor,turnSQUELCH clockwise to cut
out weak transmissions.
Turning Off the Key Tone
The scanner is preset to sound a tone each time you
press one of its keys.
To turn the key tone on and off:
1. Turn on the scanner. WELCOME SCAnnInG rECEIVEr
appears.
2. While the welcome message is on the screen, press
1 to turn on the key tone or press 2 to turn it off.
TURNING ON SCANNER
11
Understanding the Keypad
– Spectrum Sweeper.
PSE (Pause) – Stop and restart a search or tune.
MAR – Search the preprogrammed marine bank.
FD/PD – Search the preprogrammed fire/police bank.
AIR – Search the preprogrammed aircraft bank.
HAM – Search the preprogrammed amateur radio bank.
WX/ – Search the preprogrammed weather bank, or
hold to jump to the Skywarn channel. (First, program
your local Skywarn frequency into channel 200).
SCAN / MAN (Manual) – Press to scan programmed
channels. Press again to monitor a single channel.
– Select the direction for searching and scanning.
PRI / ALERT – Set the priority feature, or set SAME
standby mode when monitoring a weather channel.
0–9 – Input numbers or select banks (0 selects bank
10). The number range above the keys (1–20, 21–40, 41-
60, etc.) indicates the channels stored in that bank.
• / DELAY – Input a decimal point or set a channel delay.
ENT (Enter) – Complete the entry of a frequency.
L/O
/
L/O RV W – Lock-out selected channels or
frequencies. Review locked-out frequencies.
TUNE / CLEAR – Enter Tune search. Clear an incorrect
entry.
PGM – Program frequencies into channels.
/ – Locks (and unlocks) the keypad to prevent
accidental entries; turns the backlight on and off.
Turning on the Scanner
1. Turn the SQUELCH all the way down before you
turn on the scanner.
2. Turn the VOLUME knob to turn ON the radio. A
welcome message appears. After about 3 seconds,
adjust VOLUME to a comfortable level.
3. Turn SQUELCH clockwise, just until the hissing
sound stops. If you always hear a hissing sound, the
scanner will not scan or search properly.
• Tolistentoaweakordistantstation,turn
SQUELCH counterclockwise.
• Ifreceptionispoor,turnSQUELCH clockwise to cut
out weak transmissions.
Turning Off the Key Tone
The scanner is preset to sound a tone each time you
press one of its keys.
To turn the key tone on and off:
1. Turn on the scanner. WELCOME SCAnnInG rECEIVEr
appears.
2. While the welcome message is on the screen, press
1 to turn on the key tone or press 2 to turn it off.
KEYPAD

12
Understanding the Display
Row 1
– Spectrum Sweeper search is active.
BANK – Appears with numbers (1-10) to indicate the
scan bank. The bar under the bank number shows
banks that are turned on for scanning.
- Keypad locked.
Row 2
WX – Searching weather channels.
MAR – Searching the marine bank.
FD/PD – Searching the fire/police bank.
AIR – Searching the aircraft bank.
HAM – Searching the amateur radio bank.
Row 3
- Skywarn channel active.
000 – Channel number the scanner is tuned to.
CH – Appears with channel number (1–200) or P
(priority channel).
000.0000 – Frequency the scanner is tuned to.
- Batteries are low.
L/0
– A locked out channel/frequency is manually
selected or reviewed.
Row 4
ed (Up/Down) – Search or scan direction.
SRCH – Searching a service bank.
SCAN – Scan mode.
MAN – Manual mode.
PGM – Program mode.
PRI – Priority feature is active.
DLY – Two-second delay is active.
Display Messages
ALL CH L-out – All channels locked out during scan or
marine band search.
b X Ch-FULL – All displayed bank channels are full.
b X StorE – Frequency programmed into displayed
bank’s channel.
CLOnE – Clone mode.
-dUPL- – Frequency is already stored in another channel.
Error – Entry error.
FLo ALL- CL – All the locked-out frequencies removed
during a FD/PD, AIRCRAFT, or HAM bank search.
L-r – Review the locked-out frequencies.
L-O Fr-FULL – Maximum of 50 frequencies already
locked out.
oFF tonE – Key tone deactivated.
On tonE – Key tone activated.
P – Scanner is tuned to the priority channel.
-t- – Tune mode.
Sub Bank Messages
Lo VHF – Sub-bank 1 of the fire/police bank.
Hi VHF – Sub-bank 2 of the fire/police bank.
UHF – Sub-bank 3 of the fire/police bank.
10 M – Sub-bank 1 of the HAM bank.
6 M – Sub-bank 2 of the HAM bank.
2 M – Sub-bank 3 of the HAM bank.
70CM – Sub-bank 4 of the HAM bank.
DISPLAY

13
Understanding the Display
Row 1
– Spectrum Sweeper search is active.
BANK – Appears with numbers (1-10) to indicate the
scan bank. The bar under the bank number shows
banks that are turned on for scanning.
- Keypad locked.
Row 2
WX – Searching weather channels.
MAR – Searching the marine bank.
FD/PD – Searching the fire/police bank.
AIR – Searching the aircraft bank.
HAM – Searching the amateur radio bank.
Row 3
- Skywarn channel active.
000 – Channel number the scanner is tuned to.
CH – Appears with channel number (1–200) or P
(priority channel).
000.0000 – Frequency the scanner is tuned to.
- Batteries are low.
L/0
– A locked out channel/frequency is manually
selected or reviewed.
Row 4
ed (Up/Down) – Search or scan direction.
SRCH – Searching a service bank.
SCAN – Scan mode.
MAN – Manual mode.
PGM – Program mode.
PRI – Priority feature is active.
DLY – Two-second delay is active.
Display Messages
ALL CH L-out – All channels locked out during scan or
marine band search.
b X Ch-FULL – All displayed bank channels are full.
b X StorE – Frequency programmed into displayed
bank’s channel.
CLOnE – Clone mode.
-dUPL- – Frequency is already stored in another channel.
Error – Entry error.
FLo ALL- CL – All the locked-out frequencies removed
during a FD/PD, AIRCRAFT, or HAM bank search.
L-r – Review the locked-out frequencies.
L-O Fr-FULL – Maximum of 50 frequencies already
locked out.
oFF tonE – Key tone deactivated.
On tonE – Key tone activated.
P – Scanner is tuned to the priority channel.
-t- – Tune mode.
Sub Bank Messages
Lo VHF – Sub-bank 1 of the fire/police bank.
Hi VHF – Sub-bank 2 of the fire/police bank.
UHF – Sub-bank 3 of the fire/police bank.
10 M – Sub-bank 1 of the HAM bank.
6 M – Sub-bank 2 of the HAM bank.
2 M – Sub-bank 3 of the HAM bank.
70CM – Sub-bank 4 of the HAM bank.
DISPLAY

14
Preprogrammed Frequencies
Your scanner includes 153 preprogrammed
frequencies, which you can load into Channels 1 to 153.
For a list of these frequencies, see “Preprogrammed
Frequency List” on page 26.
To load the preprogrammed frequencies:
1. Turn off the scanner and then turn it on again.
2. While WELCOME message appears, press PGM.
3. Load –Fr– appears, then YES––Ent and No––CLEAr
appear alternately.
4. Press ENT to load frequencies or CLEAR to cancel.
Programming Channels
If you do not have a list of frequencies in your area,
refer to www.radioreference.com.
1. Press PGM. PGM appears.
2. Enter the channel number (1–200) where you want
to store a frequency,
3. Press PGM again.
4. Use the number keys to enter
the frequency,
5. Press ENT.
6. To program the next channel
in sequence, press PGM and
repeat Steps 4 and 5.
• Yourscanner
automatically rounds
down to the closest valid
frequency. For example,
if you enter 151.473, your scanner rounds it to
151.470.
• IfError appears and the scanner beeps three
times when you press ENT, start again from Step
2.
• Ifthefrequencyisalreadystoredinanother
channel, the scanner beeps three times and
displays - d U PL- (duplicate) and the lowest
channel number where the frequency is already
stored. Press
TUNE/CLEAR to cancel. Press ENT if you still
want to store the frequency.
Programming with a Computer
You can upload or download programmed data to or
from a PC using a PC/IF cable.
The application software is available at www.PSRedit.
com or www.Starrsoft.com. Find the model WS1010 and
follow instructions in the software package to upload and
download data.
Cloning Programmed Data
You can transfer the programmed data to and from a
WS1010 scanner using an optional connecting cable with
Ç-inch (3.5mm) stereo phone plugs on both ends.
1. Turn on both scanners.
2. Connect the connecting cable to each scanner’s
PC/IF jack. CLOnE and UP to SEnd appears.
3. Press e on the host scanner.
4. SEndInG appears at the host scanner.
To exit clone mode after the data transfer is complete,
remove the cable.
No ConnEct appears if you try to connect to another
model scanner. The WS1010 does not clone with other
scanner models.
1,3,6
5
2, 4
CONFIGURING SCANNER

15
Preprogrammed Frequencies
Your scanner includes 153 preprogrammed
frequencies, which you can load into Channels 1 to 153.
For a list of these frequencies, see “Preprogrammed
Frequency List” on page 26.
To load the preprogrammed frequencies:
1. Turn off the scanner and then turn it on again.
2. While WELCOME message appears, press PGM.
3. Load –Fr– appears, then YES––Ent and No––CLEAr
appear alternately.
4. Press ENT to load frequencies or CLEAR to cancel.
Programming Channels
If you do not have a list of frequencies in your area,
refer to www.radioreference.com.
1. Press PGM. PGM appears.
2. Enter the channel number (1–200) where you want
to store a frequency,
3. Press PGM again.
4. Use the number keys to enter
the frequency,
5. Press ENT.
6. To program the next channel
in sequence, press PGM and
repeat Steps 4 and 5.
• Yourscanner
automatically rounds
down to the closest valid
frequency. For example,
if you enter 151.473, your scanner rounds it to
151.470.
• IfError appears and the scanner beeps three
times when you press ENT, start again from Step
2.
• Ifthefrequencyisalreadystoredinanother
channel, the scanner beeps three times and
displays - d U PL- (duplicate) and the lowest
channel number where the frequency is already
stored. Press
TUNE/CLEAR to cancel. Press ENT if you still
want to store the frequency.
Programming with a Computer
You can upload or download programmed data to or
from a PC using a PC/IF cable.
The application software is available at www.PSRedit.
com or www.Starrsoft.com. Find the model WS1010 and
follow instructions in the software package to upload and
download data.
Cloning Programmed Data
You can transfer the programmed data to and from a
WS1010 scanner using an optional connecting cable with
Ç-inch (3.5mm) stereo phone plugs on both ends.
1. Turn on both scanners.
2. Connect the connecting cable to each scanner’s
PC/IF jack. CLOnE and UP to SEnd appears.
3. Press e on the host scanner.
4. SEndInG appears at the host scanner.
To exit clone mode after the data transfer is complete,
remove the cable.
No ConnEct appears if you try to connect to another
model scanner. The WS1010 does not clone with other
scanner models.
PROGRAMMING

16
Searching for Frequencies
During a tune search, the scanner
tunes up or down starting from a
frequency you specify.
1. Press TUNE. The display
alternates between PSE and
–t–.
2. If you want to change the
starting frequency, enter a
new frequency and press
ENT.
3. Press PSE to start tune
search. –t– appears on the display.
4. To change the tuning direction, press or .
Service Bank Search
Your scanner contains groups of preset frequencies
called Service Banks. You can search for marine, fire/
police, aircraft, ham, and weather transmissions even if
you do not know the specific frequencies that are used
in your area.
Then you can store the frequencies you find into the
scanner’s channels (except for weather and marine
banks, which are already stored as channels).
To start the search, press the button for the Service
Bank you would like to search (Marine, Fire/Police, Air,
Ham, or Weather).
Storing Found Frequencies
You can save frequencies in channel-storage banks.
1. Press ENT when you find a
frequency. The bank number
and StorE appear.
2. To change banks, enter the
new bank number.
3. Press ENT. The channel and
frequency flash twice. To
cancel the operation, press
TUNE/CLEAR.
• Thefrequencyis
automatically stored in the
first empty channel of the selected bank.
• Ifthescannerdisplays-d U P L-, the frequency is
already stored in another channel. Press ENT to
continue. Press TUNE/CLEAR to cancel.
• Iftherearenoemptychannelsinthebank,Ch-FULL
appears. Clear a channel or select another bank
(see “Clearing a Stored Channel” on page 21).
• Ifthescannerdisplays-d U P L- or CH-FULL, you can
store another channel location by pressing PGM.
The channel number flashes and 000.0000 (or
previous frequency) appears. Press the desired
channel number then press ENT. Repeat if needed.
Press ENT again when an empty channel is found.
Search Commands
• PressPSE to pause searching. Press PSE again to
resume.
• Press•/Delay to turn the two-second delay
feature on and off.
• PressL/O to lock-out a frequency (except Weather
band).
•Toreversethesearchdirectionatanytime,press
or .
•Ifnecessary,youcanselectsearchgroupsusing
the number keys.
1
3
2
2
SERVICE SEARCH

17
Searching for Frequencies
During a tune search, the scanner
tunes up or down starting from a
frequency you specify.
1. Press TUNE. The display
alternates between PSE and
–t–.
2. If you want to change the
starting frequency, enter a
new frequency and press
ENT.
3. Press PSE to start tune
search. –t– appears on the display.
4. To change the tuning direction, press or .
Service Bank Search
Your scanner contains groups of preset frequencies
called Service Banks. You can search for marine, fire/
police, aircraft, ham, and weather transmissions even if
you do not know the specific frequencies that are used
in your area.
Then you can store the frequencies you find into the
scanner’s channels (except for weather and marine
banks, which are already stored as channels).
To start the search, press the button for the Service
Bank you would like to search (Marine, Fire/Police, Air,
Ham, or Weather).
Storing Found Frequencies
You can save frequencies in channel-storage banks.
1. Press ENT when you find a
frequency. The bank number
and StorE appear.
2. To change banks, enter the
new bank number.
3. Press ENT. The channel and
frequency flash twice. To
cancel the operation, press
TUNE/CLEAR.
• Thefrequencyis
automatically stored in the
first empty channel of the selected bank.
• Ifthescannerdisplays-d U P L-, the frequency is
already stored in another channel. Press ENT to
continue. Press TUNE/CLEAR to cancel.
• Iftherearenoemptychannelsinthebank,Ch-FULL
appears. Clear a channel or select another bank
(see “Clearing a Stored Channel” on page 21).
• Ifthescannerdisplays-d U P L- or CH-FULL, you can
store another channel location by pressing PGM.
The channel number flashes and 000.0000 (or
previous frequency) appears. Press the desired
channel number then press ENT. Repeat if needed.
Press ENT again when an empty channel is found.
Birdie Frequencies
All scanners have birdie frequencies, which are signals
created inside a scanner that can cause interference.
To find the birdies in your scanner:
1. Disconnect the antenna, and make sure that no
other nearby radio or TV sets are turned on near
the scanner.
2. Search every frequency range from its lowest
frequency to the highest. Occasionally, the
searching will stop as if it has found a signal,
often without any sound. This is a birdie.
3. Make a list of all the birdies in your scanner for
future reference.
3
1,3
2
STORING FREQUENCIES

18
Scanning and Monitoring
Press SCAN/MAN until SCAN appears to continuously
scan through all channels with stored frequencies. If
the scanner finds an active frequency, it pauses until
the transmission ends. Press or to change the
scanning direction. To monitor a channel, press SCAN/
MAN so that MAN appears.
The scanner does not scan channels in banks that are
turned off. To turn a channel-storage bank on or off,
press the bank’s number key (1–0, using 0 for bank
10) during scanning. The channel-storage banks that
are ON have a bar underneath them.
• Youcannotturnoffallbanks;theremustbeat
least one active bank.
• Youcanmanuallyselectanychannelinabank,
even if the bank is turned off.
Setting Delay
To avoid missing a reply in conversations, a two-second
delay is automatically set for each channel. The scanner
stops for two seconds after a transmission ends before
it resumes scanning or searching. D LY appears on the
display when the delay function is active.
To turn delay on:
•Ifthescannerisscanningandstopsonanactive
channel, quickly press •/DELAY before it resumes.
•Ifthedesiredchannelisnotselected,manually
select the channel, then press •/DEL AY.
•Ifthescannerissearching,press•/DEL AY. DLY
appears and the scanner adds a two-second delay
to every transmission it stops on in that bank.
To turn delay off:
Press •/DELAY while the scanner is monitoring a
channel or frequency. DLY disappears.
SCANNING & MONITORING

19
Using the Priority Channel
The priority feature sets the scanner to check one
channel every two seconds while scanning. You can
program one frequency into the priority channel.
1. Press PGM.
2. Press PRI/ALERT. PCH and
000.0000 (or the previously
stored frequency) appear.
3. Enter the frequency you
want stored in the priority
channel, then press ENT.
4. To turn on the priority
feature, press
PRI/ALERT during scanning
or searching. PRI appears.
The scanner checks the
priority channel every two seconds and stays on
the channel if there is activity.
To turn off the priority feature, press PRI/ALERT.
PRI disappears.
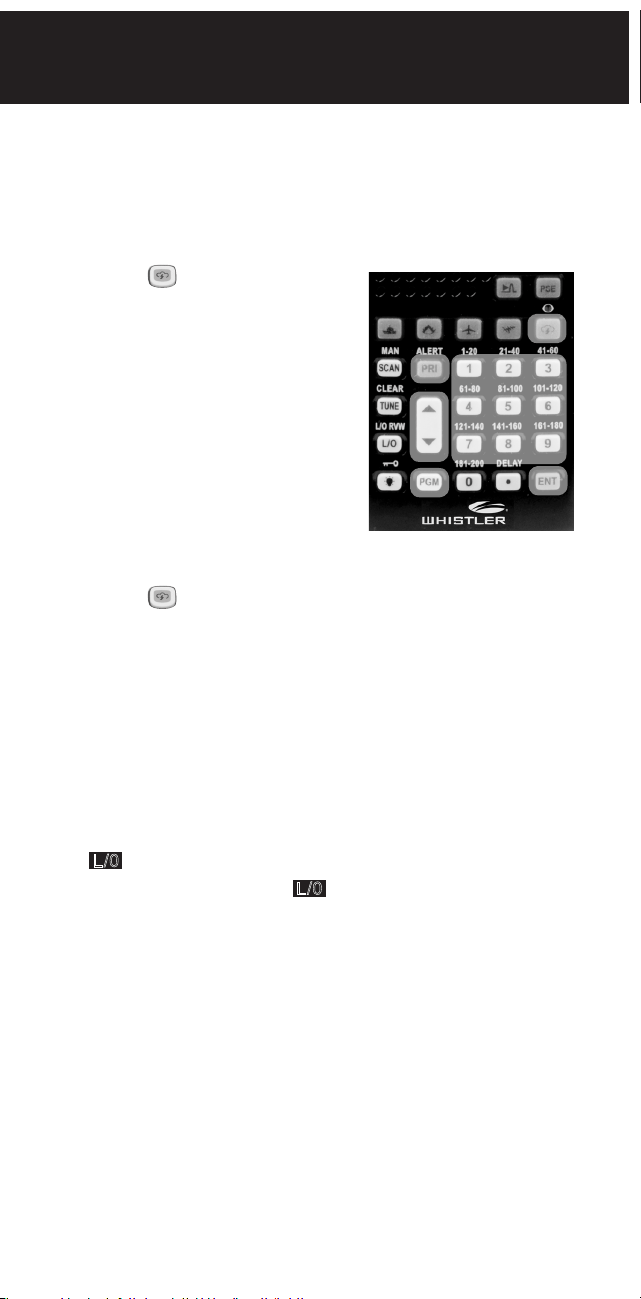
Spectrum Sweeper
Spectrum Sweeper allows you to sweep a range of
frequencies to detect, monitor and store frequencies
for nearby radio transmissions.
The Spectrum Sweeper feature is more sensitive
than portable frequency counters and detects
transmissions at greater distances.
The Spectrum Sweeper can be set to watch for
activity on all bands, or on Police/Fire, Aircraft, or
Ham frequencies exclusively.
When the scanner is in manual, scan or tune mode,
press to watch for activity on all bands.
To watch for activity on Police/Fire, Aircraft, or Ham
frequencies exclusively, press the button for the
desired service bank and then press .
NOTE: Priority mode is not available while using the
Spectrum Sweeper.
1
4
3
2
SPECTRUM SWEEPER

20
Locking Out Channels
You can increase the scanning or search speed by
locking out channels or frequencies that have a
continuous transmission, such as control channels,
weather channels, or birdie frequencies.
Press L/O when the scanner stops on a channel or
frequency while scanning or searching. The scanner
locks out the channel/frequency then continues
scanning/searching.
To manually lock-out a channel, select the channel
then press L/O.
L/0
appears in the display.
• Yourscannerautomaticallylocksoutempty
channels.
• Youcanstillmanuallyselectlocked-outchannels.
• Youcanlock-outamaximumof50frequencies
during a search. If you try to lock-out more, L- O
Fr-FULL appears.
Managing Lock-outs
1. Set the scanner to manual by pressing SCAN/
MAN until MAN appears
2. Hold down L/O
/
L /O RV W for about two seconds.
The scanner pulls up a locked out channels.
3. Press and hold L/O
/
L /O RV W to show the next
locked out channel. If an error beep sounds, there
are no locked out channels.
4. To remove the lock-out, press L/O
/
L/O RV W until
L/0
disappears.
Managing Service Bank Lock-outs
1. Hold down L/O
/
L /O RV W for about two seconds
during a Service Bank search.
2. Press or repeatedly to scroll through the list
of locked-out frequencies. L- r and
L/0
appear in
the display.
3. Press L/O
/
L /O RV W to remove the lock-out. The
list scrolls to the next locked-out frequency.
• Whenyoureachthehighestlocked-out
frequency, the scanner beeps twice and rolls to
the lowest locked-out frequency.
• IftheServiceBankhasnolocked-outfrequencies,
EMPty appears.
LOCKING OUT

21
Unlocking All Service Bank Frequencies
1. Hold down L/O
/
L /O RV W for about two seconds
during a Service Bank search. L- r appears.
2. While holding down TUNE/CLEAR, press
L/O
/
L /O RV W. FLo ALL–CL appears for about
two seconds. Then the display alternates with YES
---Ent and No --CLEAr.
3. Press ENT. L- r E M P t y appears. The scanner clears
lock-outs from all frequencies in the Service Bank.
Clearing a Stored Channel
To remove a frequency stored
in a channel.
1. Press SCAN/MAN to stop
scanning.
2. Press the number keys to
enter the channel number
(1–200).
3. Press PGM. PGM appears.
4. Press 0 then ENT. The
frequency number
changes to 000.0000 to
indicate the channel is cleared.
5. To clear another channel, use the number keys
to enter that channel number then press PGM
again. Or, repeatedly press PGM until the desired
channel number appears. Repeat Step 4.
1
3,5
4
2,4,5
CLEARING STORED CHANNEL

22
Weather Features
The NOAA and your local weather reporting agency
broadcast local forecast and regional weather
information on one or more channels allocated for
use by weather reporting agencies.
Your scanner is an extremely sensitive high-quality
receiver on the weather frequencies. However, the
included antenna is optimized for general purpose
scanning. To receive weather alerts, please make
sure you are receiving a clear signal or switch to an
external antenna.
Press to hear your local forecast and regional
weather information. WEAthEr appears for about
two seconds, then the scanner starts searching the
weather bank.
Press PSE to stop searching the channels. SRCH
disappears and MAN appears. To change the channel
manually, press or .
Receiving All Weather Alerts
To program the scanner to search for weather alerts
every two seconds, set a weather channel as the
priority channel. See “Using the Priority Channel“
on page 19.
If the scanner detects a 1050 Hz weather alert tone
on the programmed channel, the scanner sounds the
alert tone and ALErt flashes. Press any key to turn off
the alarm.
Receiving Alerts for Specific Areas
The National Weather Service precedes each weather
alert with a digitally encoded SAME (Specific Area
Message Encoding) signal, then a 1050 Hz tone. The
SAME signal includes a FIPS (Federal Information
Processing Standard) code and an event code.
A current list of FIPS codes is located at
www.NWS.NOAA.gov/NWR.
WEATHER FEATURES
23
SAME Standby Mode
In SAME Standby mode, your scanner monitors
weather channels for SAME alerts for up to seven
areas you specify by entering the FIPS codes.
To program your scanner for SAME Standby mode:
1. Press .
2. Press PGM to access the
FIPS code entry mode.
3. Use or to select the
desired FIPS code storage
location.
4. Use the number keys to
enter the FIPS code, then
press ENT to store the
code.
5. Repeat steps 3-4 for all
the FIPS codes that you wish to store.
6. Press to exit FIPS code entry mode. The
scanner displays F showing that FIPS codes are
enabled.
7. Press PRI/ALERT to initiate SAME Standby mode.
The scanner displays F [1-7]CH StAndby.
The scanner will monitor weather channels for alerts
with matching FIPS codes. To exit SAME Standby
mode, press PRI/ALERT again.
• PressL/O during step 4 to lock-out FIPS entries;
L/0
appears in the display. Press L/O again to
enable FIPS entries;
L/0
disappears.
• IfyoudonotenteranyFIPScodes,orifyourFIPS
codes are locked out, when you enter SAME
Standby mode the scanner receives alerts and
warning messages for all receivable areas.
• Thescannersoundsanalertwhenitreceives
the SAME code. To stop the alert and ready the
scanner to receive a new alert signal, press any key.
• Ifyoudonotstopthealertwithinveminutes,
the alert stops and the scanner beeps every ten
seconds. If the scanner receives a new weather
alert after five minutes, it sounds the new alert.
1,6
2
3
4
7
4
SAME STANDBY MODE

24
Testing the Weather Alert and Beep Tone
1. To test the weather alert, press and hold ENT for
more than 2 seconds while F [1-7] CH StAndby
appears on the display.
The display indicates the type of message, and the
scanner sounds an alert or series of beeps.
The beeps automatically change every 3 seconds.
2. Press any key to stop testing.
Skywarn™
Many areas of the country have amateur radio
repeaters that have been designated as “Skywarn”
repeaters. During times of severe weather, these
repeaters relay reports of severe weather directly to
the local National Weather Service forecast office.
Your scanner can easily jump to your local Skywarn
frequency and monitor these reports.
Before using this feature, you must program the
Skywarn frequency into channel 200. Refer to
www.radioreference.com to find Skywarn frequencies
in your area.
To activate Skywarn, press and hold
for about
two seconds. The scanner jumps to channel 200 to
monitor the Skywarn frequency
.
If no frequency is
programmed in the Skywarn channel, No ProG appears.
SKYWARN

25
Additional Information
Care
Your scanner is not waterproof. Do not expose it
to rain, moisture, or extremely high humidity. If
the scanner gets wet, wipe it dry immediately. Use
and store the scanner only in normal temperature
environments. Handle the scanner carefully; do not
drop it. Keep the scanner away from dust and dirt,
and wipe it with a damp cloth occasionally to keep it
looking new.
Initializing the Scanner
If the scanner’s display locks up or does not work
properly after you connect a power source, you might
need to initialize the scanner.
Important: This procedure clears all information you
stored in the scanner’s memory. Only initialize the
scanner when you are sure the scanner is not working
properly.
Important: Do not turn off the scanner until the
initialization is complete. When the initialization is
complete, 1CH 000.0000 appears on the display.
1. Turn off the scanner, then turn it on again.
WELCOME SCAnnInG rECEIVEr appears.
2. Press 0, then press 1 while the welcome message
is on the screen. InItIAL appears for about two
seconds, then YES — Ent and No — CLEAr appear
alternately.
3. Press ENT. WAIt appears for about two seconds.
ADDITIONAL INFORMATION

26
Channel Frequency(MHz)
Bank 1
1..................................40.5000
2..................................52.5250
3................................ 121.5000
4................................122.0000
5................................122.2000
6................................122.7000
7................................ 122.7500
8................................122.8000
9................................122.9000
10 .............................. 122.9500
11 .............................. 123.0000
12 .............................. 123.1000
13 .............................. 123.4500
14 .............................. 131.4500
15 ............................... 131.6750
16 ..............................146.5200
17 .............................. 146.7600
18 .............................. 146.8800
19 .............................. 146.9400
20.............................. 148.1500
Bank 2
21 .............................. 151.6250
22.............................. 151.8200
23.............................. 151.8800
24 ...............................151.9400
25...............................151.9550
26 .............................. 154.0100
27 .............................. 154.0700
28 .............................. 154.130 0
29...............................154.1450
30 ............................. 154.160 0
31 ...............................154.1750
32 .............................. 154.190 0
33..............................154.2050
34..............................154.2200
35..............................154.2350
36..............................154.2500
37 ..............................154.2650
38..............................154.2800
39 ..............................154.2950
40 .............................154.3100
Bank 3
41 .............................. 154.3250
42 ..............................154.3400
43 .............................154.3550
44 .............................154.3700
45..............................154.3850
46 .............................154.4000
47 .............................. 154.4150
48 .............................154.4300
49 ..............................154.4450
50..............................154.5700
51 .............................. 154.6000
52 .............................. 155.1600
53...............................155.1750
54 .............................155.2050
55..............................155.2200
56..............................155.2350
57 .............................. 155.2650
58..............................155.2800
59 .............................. 155.2950
60 .............................155.3250
Bank 4
61 .............................. 155.3400
62.............................. 155.3550
63 ............................. 155.3700
64 .............................155.3850
65..............................155.4000
66 ............................. 155.4750
67 .............................. 156.4250
68 .............................156.4500
69 .............................. 156.4750
70 .............................. 156.5750
71 .............................. 156.6250
72 ..............................156.8000
73 .............................. 156.9250
74 .............................. 157.0 50 0
75 ............................... 157.1000
76 ............................... 157.1250
77 ...............................157.4250
78 ..............................162.3000
79 ..............................163.2000
80 .............................415.2000
PREPROGRAMMED FREQUENCY LIST

27
Bank 5
81 .............................. 415.7000
82............................. 446.0000
83 .............................450.8000
84 ............................ 454.0000
85..............................460.0250
86 .............................460.0500
87 ..............................460.0750
88 .............................460.1000
89.............................. 460.1250
90 ............................. 460.150 0
91 .............................. 460.1750
92............................. 460.2000
93 ..............................460.2250
94 ..............................460.2500
95 ..............................460.2750
96 ............................. 460.3000
97 ..............................460.3250
98..............................460.3500
99 .............................460.3750
100 .......................... 460.4000
Bank 6
101 ............................460.4250
102 ............................460.4500
103 ............................ 460.4750
104 ........................... 460.5000
105 ............................460.5250
106 ............................460.5500
107 ............................460.5750
108........................... 460.6000
109 ............................460.6250
110 ............................460.6500
111 ............................460.7000
112 ............................460.7500
113 ........................... 460.8000
114 ............................460.8500
115 ............................460.9000
116 ............................ 460.9250
117 ............................460.9500
118 ............................ 460.9750
119 ............................462.5500
120 ............................462.5625
Bank 7
121 ............................462.5750
122 ............................ 462.5875
123 ............................462.6000
124 ............................ 462.6125
125 ............................462.6250
126 ............................ 462.6375
127 ............................ 462.6500
128 ............................462.6625
129 ............................ 462.6750
130 ............................ 462.6875
131 ............................ 462.7000
132 ............................ 462.7125
133 ............................ 462.7250
134 ............................462.9500
135 ............................ 462.9750
136 ........................... 464.5000
137 ............................ 464.5500
138 ............................464.8750
139 ............................ 4 67.0 625
140 ........................... 467.5625
Bank 8
141 .............................4 67. 5875
142 ............................. 4 67. 6125
143 .............................4 67.6 375
144 ............................ 467.6 625
145 .............................467. 6875
146 .............................467.7125
147 .............................4 67.76 25
148 ............................. 4 67.8125
149 ............................ 467.8 50 0
150 .............................467.8750
151 ............................ 467.9000
152 ............................469.5000
153 ............................469.5500
PREPROGRAMMED FREQUENCY LIST

28
Service Banks
The scanner is preprogrammed with the frequencies
allocated to marine, fire/police, aircraft, ham radio
broadcast and weather services. This is handy for quickly
finding active frequencies instead of searching through
an entire bank (see “Service Bank Search” on page 16).
Fire/Police
Group 1
Frequency Range (MHz) ............................................Step (kHz)
33.420-33.980 ...............................................................................20
37.0 20 -37.420 ................................................................................ 20
39.020-39.980 ................................................................................20
42.020-42.940 ...............................................................................20
44.620-45.860 ...............................................................................40
45.880
45.900-46.060 ............................................................................... 40
46.080-46.500 ..............................................................................20
Group 2
153.770-154.130 ............................................................................60
154.145-154.445 ............................................................................ 15
154.650-154.950 ............................................................................15
155.010-155.370 ............................................................................60
155.415-155.700 ............................................................................ 15
155.730-156.210 ............................................................................ 60
158.730-159.210 ............................................................................60
166.250
170.150
Group 3
453.0375-453.9625 ....................................................................12.5
458.0375-458.9625 ....................................................................12.5
460.0125-460.6375 .................................................................... 12.5
465.0125-465.6375 .................................................................... 12.5
Aircraft
Group 1 – 108.000-118.000 ..................................................... 12.5
Group 2 – 118.0125-136.9875 .................................................. 12.5
Amateur Radio
Group 1 – 29.000-29.700 ...............................................................5
Group 2 – 50.000-54.000 ..............................................................5
Group 3 – 144.000-148.000 ........................................................... 5
Group 4 – 420.000-450.000 .....................................................12.5
Weather
Channel ..........................................................Frequency (MHz)
1............................................................................................162.400
2............................................................................................162.425
3............................................................................................162.450
4............................................................................................ 162.475
5............................................................................................162.500
6............................................................................................162.525
7............................................................................................162.550
SERVICE BANKS

29
Marine
Channel ..........................................................Frequency (MHz)
01 ........................................................................................ 156.0500
02........................................................................................156.2500
06 ...................................................................................... 156.3000
07 ........................................................................................ 156.3500
08 .......................................................................................156.4000
09 .......................................................................................156.4500
10 ........................................................................................156.5000
11 ........................................................................................156.5500
12 ........................................................................................156.6000
13 ........................................................................................ 156.6500
14 ........................................................................................ 156.7000
15 ........................................................................................156.7500
16 ....................................................................................... 156.8000
17 ........................................................................................ 156.8500
18 ........................................................................................ 156.9000
19 ........................................................................................156.9500
20......................................................................157.0000 / 161.6000
21 ........................................................................................ 157.0 50 0
22........................................................................................ 157.1000
23.........................................................................................157.1500
24 ......................................................................157.2000 / 161.8000
25...................................................................... 157.2500 / 161.8500
26 ......................................................................157.3000 / 161.9000
27 ...................................................................... 157.3500 / 161.9500
28 ..................................................................... 157.4000 / 162.0000
63 ....................................................................................... 156.1750
64 .................................................................... 156.2250 / 160.8250
65........................................................................................156.2750
66 .......................................................................................156.3250
67 ........................................................................................156.3750
68 .......................................................................................156.4250
69 ........................................................................................ 156.4750
70 ........................................................................................156.5250
71 ........................................................................................156.5750
72 ........................................................................................156.6250
73 ........................................................................................ 156.6750
74 ........................................................................................ 156.7250
77 ........................................................................................156.8750
78 ........................................................................................ 156.9250
79 ........................................................................................ 156.9750
80 ....................................................................................... 157.025 0
81 ........................................................................................ 157.0750
82.........................................................................................157.12 50
83 ........................................................................................157.175 0
84 ..................................................................... 157.2250 / 161.8250
85.......................................................................157.2750 / 161.8750
86 ......................................................................157.3250 / 161.9250
87 .......................................................................157.3750 / 161.9750
88 ....................................................................................... 157.4250
NOTE: Both frequencies (transmission and reception) are
shown for marine channels used for duplex transmission.
NOTE: The frequencies in the scanner’s one-touch service
bands are preset. You cannot change them.
SERVICE BANKS

30
Specifications
Frequency Coverage
29-54 MHz .................................................. (5 kHz steps)/FM
108-136.9875 MHz .................................(12.5 kHz steps)/AM
137-144 MHz .......................................... (12.5 kHz steps)/FM
144-148 MHz ..............................................(5 kHz steps)/FM
148-150.8 MHz ...................................... (12.5 kHz steps)/FM
150.8-162 MHz ...........................................(5 kHz steps)/FM
162-174 MHz .......................................... (12.5 kHz steps)/FM
380-512 MHz ......................................... (12.5 kHz steps)/FM
Sensitivity (S+N)/N 20 dB
29-54 MHz ................................................................... 0.5 uV
108-136.9875 MHz .......................................................1.0 uV
137-174 MHz ................................................................0.5 uV
380-512 MHz ...............................................................0.7 uV
Spurious Rejection (FM @154 MHz) ............................ 50 dB
Selectivity
±8 kHz/±17kHz (FM/AM) ....................................-6dB/-50dB
Search Speed ........................................ Up to 80 Steps/Sec
Scan Speed ..................................... Up to 40 Channels/Sec
Delay Time ...........................................................2 Seconds
IF Frequencies
1st IF .......................................................................10.7 MHz
2nd IF ....................................................................... 455 kHz
IF Interference Ratio (10.7 MHz)............... 70 dB at 154 MHz
Squelch Sensitivity
Threshold (FM/AM) .....................................Less than 0.5 uV
Tight (FM) .................................................... (S + N)/N 25 dB
Tight (AM) ..................................................... (S+N)/N 20 dB
Antenna Impedance .............................................. 50 Ohms
Audio Output Power (10% THD) ................ 180mW Nominal
Built-In Speaker ...................... 1.37 Inches (36 mm), 8 Ohms
Operating Temperature ............. 14° to 140°F (-10° to 60°C)
Power Requirements .................................... 9V AC Adapter
...............................................9V DC Adapter (not supplied)
................................................4 AA Batteries (not included)
Dimensions (HWD) ................................5.68 x 2.37 x 1.56 In
.................................................................(145 x 63 x 40 mm)
Weight (without antenna) ................................ 7.8 oz (220 g)
Specifications and depictions are subject to change and
improvement without notice. Actual product may vary from
the images found in this document.
SPECIFICATIONS

31
FCC Notice
This equipment has been tested and found to
comply with the limits for a scanning receiver,
pursuant to Part 15 of the FCC Rules. These limits are
designed to provide reasonable protection against
harmful interference in a residential installation. This
equipment generates, uses and can radiate radio
frequency energy and, if not installed and used in
accordance with the instructions, may cause harmful
interference to radio communications.
However, there is no guarantee that interference will
not occur in a particular installation. If this equipment
does cause harmful interference to radio or television
reception, which can be determined by turning the
equipment off and on, the user is encouraged to try to
correct the interference by one or more of the following
measures:
•Reorientorrelocatethereceivingantenna.
•Increasetheseparationbetweentheequipment
and receiver.
•Connecttheequipmentintoanoutletona
circuit different from that to which the receiver is
connected.
This device complies with part 15 of the FCC Rules.
Operation is subject to the following two conditions:
(1) This device may not cause harmful interference, and
(2) this device must accept any interference received,
including interference that may cause undesired
operation.
FCC NOTICE

32
Consumer Warranty
This Whistler product is warranted to the original purchaser for a
period of one (1) year from the date of original purchase against
all defects in materials and workmanship, when purchased from
an authorized Whistler retailer. This limited warranty is void if
the unit is abused, misused, modified, installed improperly,
or if the housing and/or serial numbers have been removed.
There are no express warranties covering this product other than
those set forth in this warranty. All express or implied warranties
for this product are limited to one (1) year. Whistler is not liable
for damages arising from the use, misuse, or operation of this
product including but not limited to loss of time, inconvenience,
loss of use of your product or property damage caused by your
product or its failure to work, or any other incidental or
consequential damages including personal injury.
DO NOT RETURN ITEM TO STORE WHERE PURCHASED.
FOR WARRANTY INFORMATION, CONTACT WHISTLER
CUSTOMER SERVICE AT 1-866-923-8719.
Representatives are available to answer your questions
Monday – Friday
from 8:00 a.m. to 5:00 p.m. CT
Service Under Warranty
During the warranty period, defective units will be repaired or
replaced (with the same or a comparable model), at Whistler’s
option, without charge to the purchaser when returned prepaid,
with dated proof of purchase to the address below. Units
returned without dated proof of purchase will be considered
out of warranty and therefore are not covered by the described
Limited Warranty. (Refer to Service Out of Warranty section.)
Due to the specialized equipment necessary for testing
Whistler products, there are no authorized service centers other
than Whistler. When returning a unit for service under warranty,
please follow these instructions:
1. Ship the unit in the original carton or in a suitable sturdy
equivalent, fully insured, with return receipt requested to:
Whistler Repair Dept.
1412 South 1st St.
Rogers, AR. 72756
Please allow 3 weeks turnaround time.
WARRANTY

33
IMPORTANT: Whistler will not assume responsibility for
loss or damage incurred in shipping. Therefore, please
ship your unit insured with return receipt requested.
CODs will not be accepted!
2. Include with your unit the following information, clearly
printed:
• Your name and physical street address for shipping (no
PO Boxes), a daytime telephone number, and an email
address (if applicable).
• A detailed description of the problem (e.g.,“device will
not Power ON”).
• A copy of your dated proof of purchase or bill of sale.
3. Be certain your unit is returned with its serial number.
Units without serial numbers are not covered under
warranty.
IMPORTANT: To validate that your unit is within the warranty
period, make sure you keep a copy of your dated proof of
purchase. For warranty verification purposes, a copy of your
dated store receipt must accompany any Whistler product
sent in for warranty work.
Service Out Of Warranty
Units will be repaired at “out of warranty” service rates
when:
• The unit’s original warranty has expired.
• A dated proof of purchase is not supplied.
• The unit has been returned without its serial number.
• The unit has been misused, abused, modified,
installed improperly, or had its housing removed.
The minimum out of warranty service fee for your Whistler
Scanner is $50.00 (U.S.). If you require out of warranty
service, please return your unit as outlined in the section
“Service Under Warranty” along with a cashier’s check or
money order in the amount of $50.00. Payment may also
be made by MasterCard, VISA or American Express.
Personal checks are not accepted.
WARRANTY

34
In the event repairs cannot be covered by the minimum
service fee, you will be contacted by a Whistler technical
service specialist who will outline options available to you.
IMPORTANT: When returning your unit for service, be
certain to include a daytime telephone number and an
email address (if applicable).
Customer Service
If you have questions concerning the operation of your
Whistler product, or require service during or after the
warranty period, please call Customer Service at
1-866-923-8719.
Representatives are available to answer your questions
Monday - Friday from 8:00 a.m. to 5:00 p.m. (CT) or visit
the F.A.Q.’s at www.whistlergroup.com.
CORPORATE HEADQUARTERS
1716 SW Commerce Dr. Ste. 8
PO Box 1760
Bentonville, AR 72712
Toll Free (800) 531-0004
TEL (479) 273-6012
FX (479) 273-2927
www.whistlergroup.com
CUSTOMER RETURN CENTER
1412 South 1st St.
Rogers, AR 72756
Customer Service Tel (866) 923-8719
Email: [email protected]
P/N 581000a
05A14 © 2014 The Whistler Group, Inc.
WARRANTY

CORPORATE HEADQUARTERS
1716 SW Commerce Dr. Ste. 8
PO Box 1760
Bentonville, AR 72712
Toll Free (800) 531-0004
TEL (479) 273-6012
FX (479) 273-2927
www.whistlergroup.com
CUSTOMER RETURN CENTER
1412 South 1st St.
Rogers, AR 72756
Customer Service Tel (866) 923-8719
Email: [email protected]
P/N 581000a
05A14 © 2014 The Whistler Group, Inc.