SETUP INFORMATION
/////
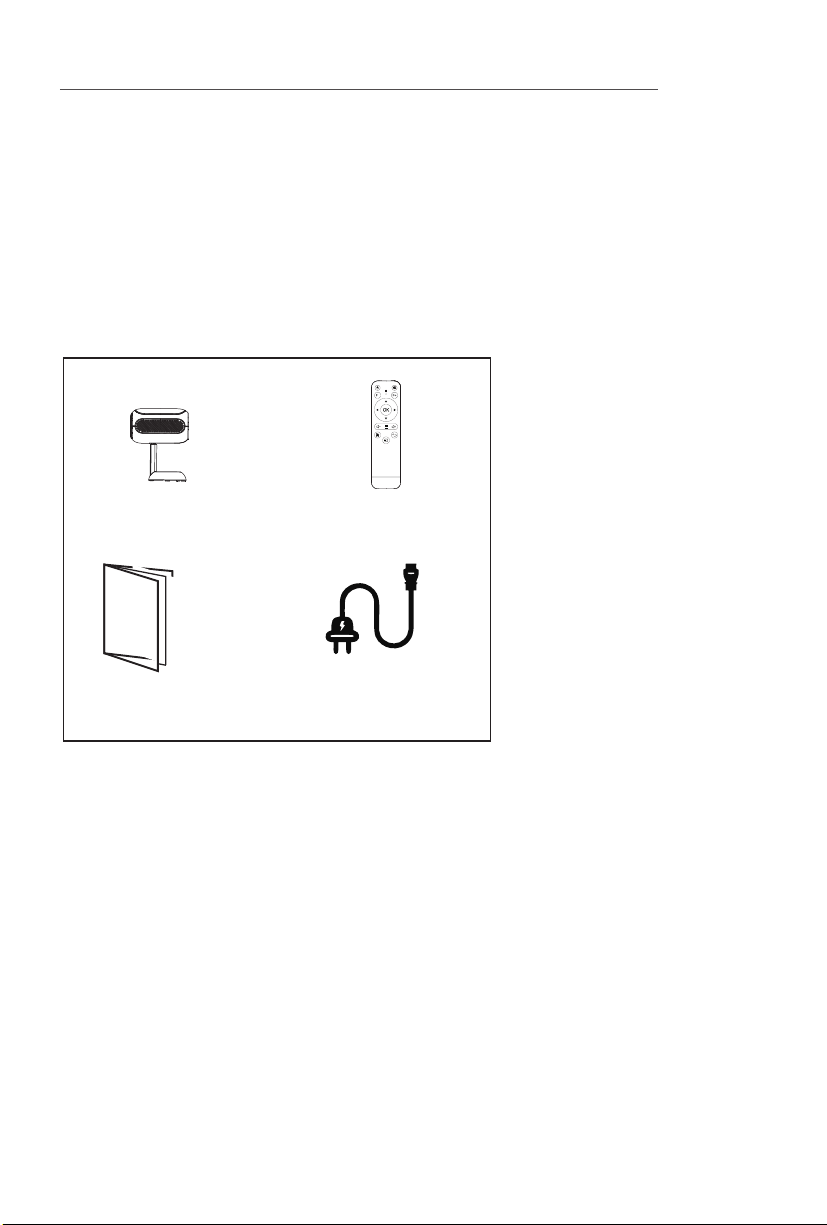
ð Projector 1 N
ð Power Cable 1 N
ð Remote Control 1 N
ð User Manual 1 N
Please check whether the physical products received are complete;
If the products and accessories you receive are not complete,
please contact the Customer Care in a timely manner.
(For specific items, please refer to the actual package.)
OPERATING INSTRUCTIONS
/////
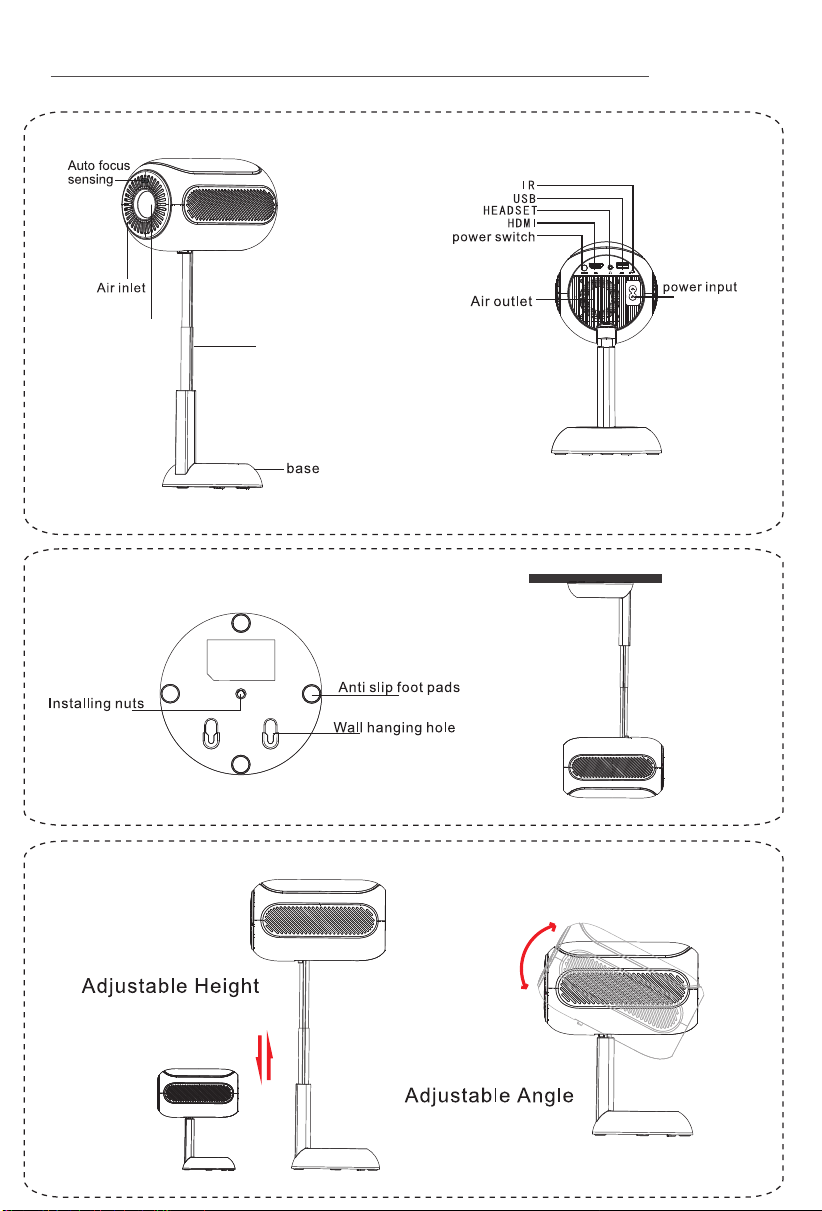
UNDERSTANDING THE PROJECTOR
/////
OPERATING INSTRUCTIONS
/////
OPERATING INSTRUCTIONS
/////
OPERATING INSTRUCTIONS
/////
OPERATING INSTRUCTIONS
/////
MAINTENCE AND CARE
/////
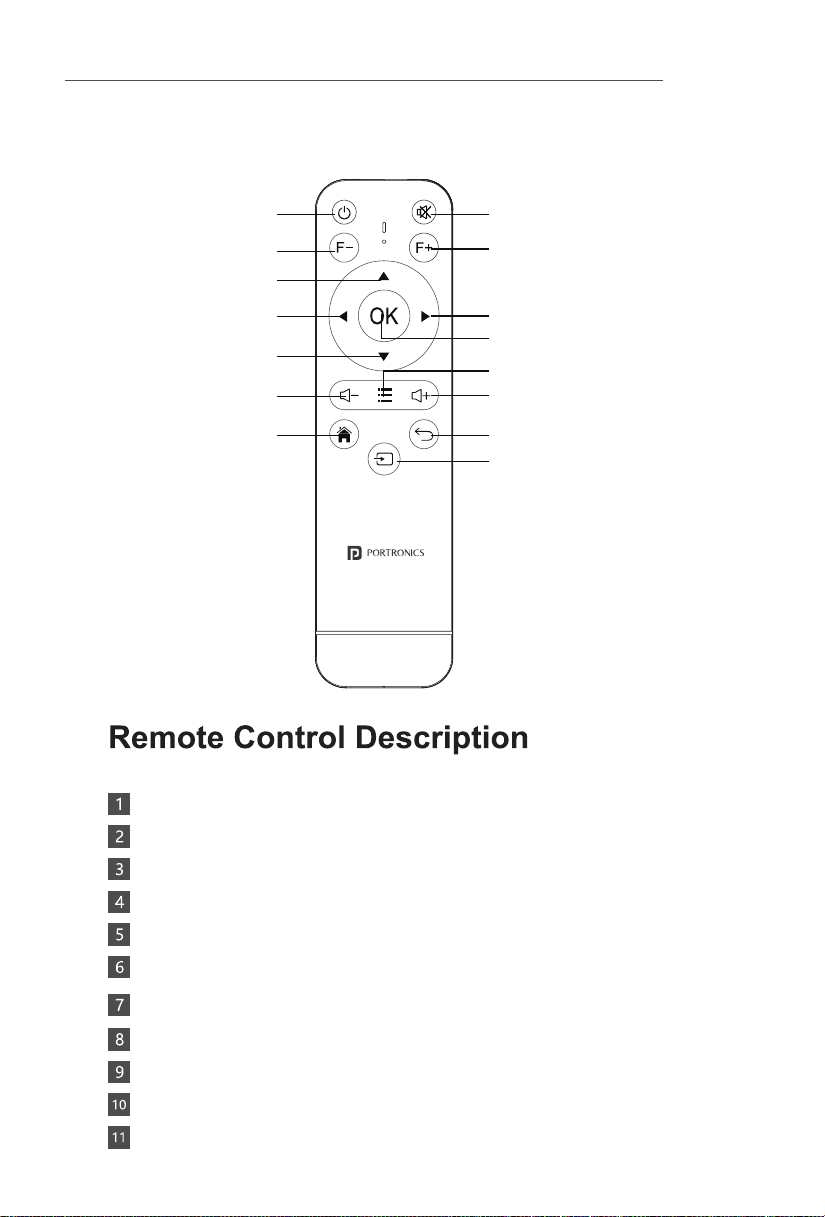
Power Mute
Adjust Focus
Adjust Focus
Upward
Left
Downward
Volume Down
Home
Menu
Volume Up
Return
Signal Source Switching
Enter
Right
Lens
Stand
Projector Remote Control
User Manual Power Cord Cable
Power: Turn The Projector ON/OFF
Mute: Mute or unmute the projector speaker
Adjust the lens focus backwards
Adjust the lens focus forwards
Direction Keys: Up, down, left and right navigation
Enter: Performs accept action
Volume +/-: Increase / decrease speaker volume
Menu: Open the menu of applications or files
Home: Go to homepage
Return: Back to previous menu or close current applications
Signal Source: Switch between projection sources
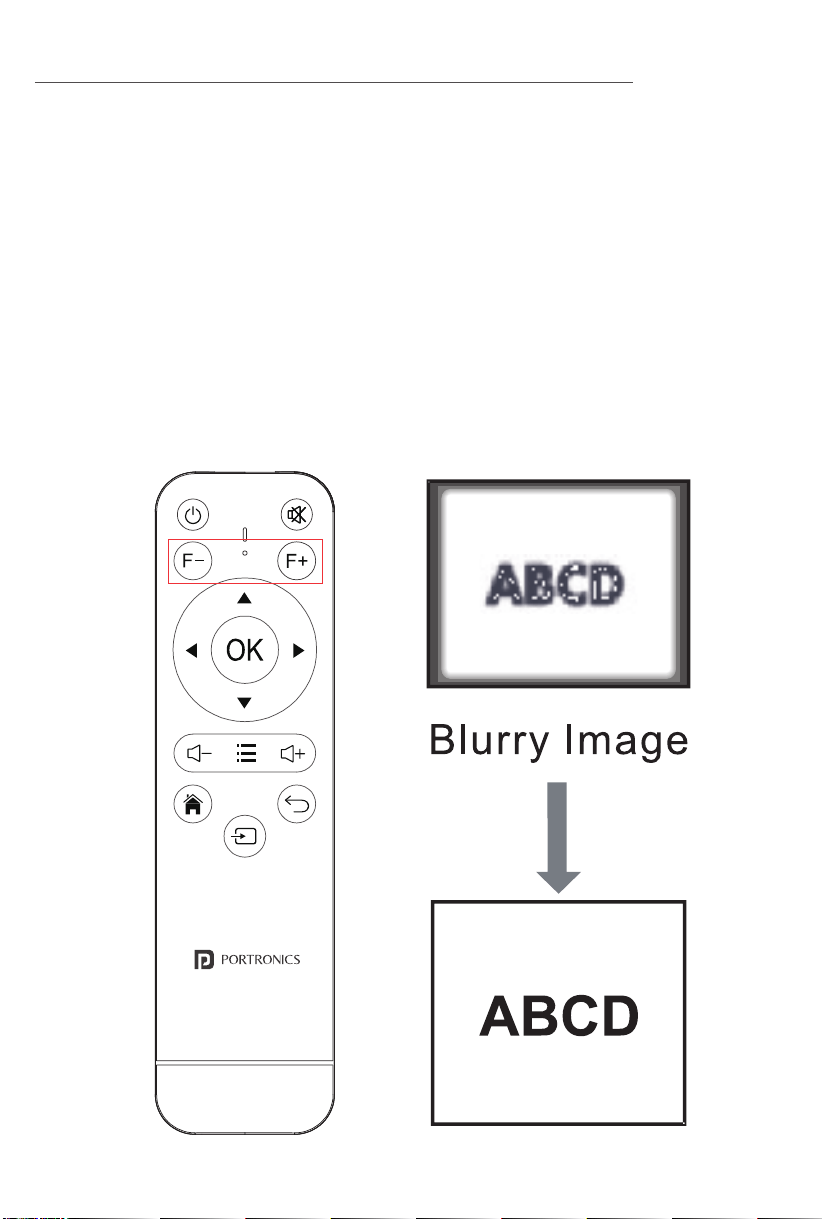
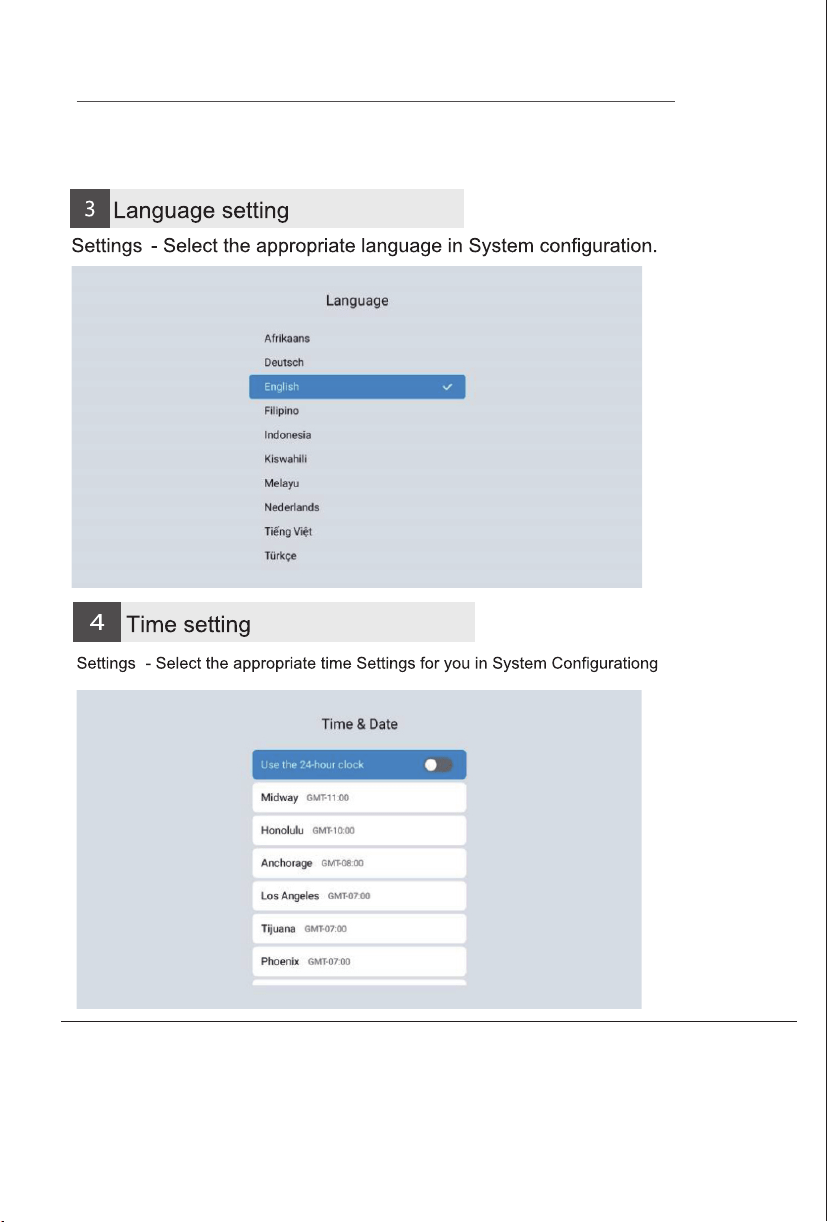
• Auto Focus: Enable the auto focus option in the settings. The
device will automatically adjust the focus for you.
• Manual Focus: You can also fine-tune the focal length using
the remote control (as shown in the figure below), whether in
manual or auto focus mode.
Note:With the system version update, there may be
differences from the actual interfaces. Please refer to the
displayed interfaces as the final version.
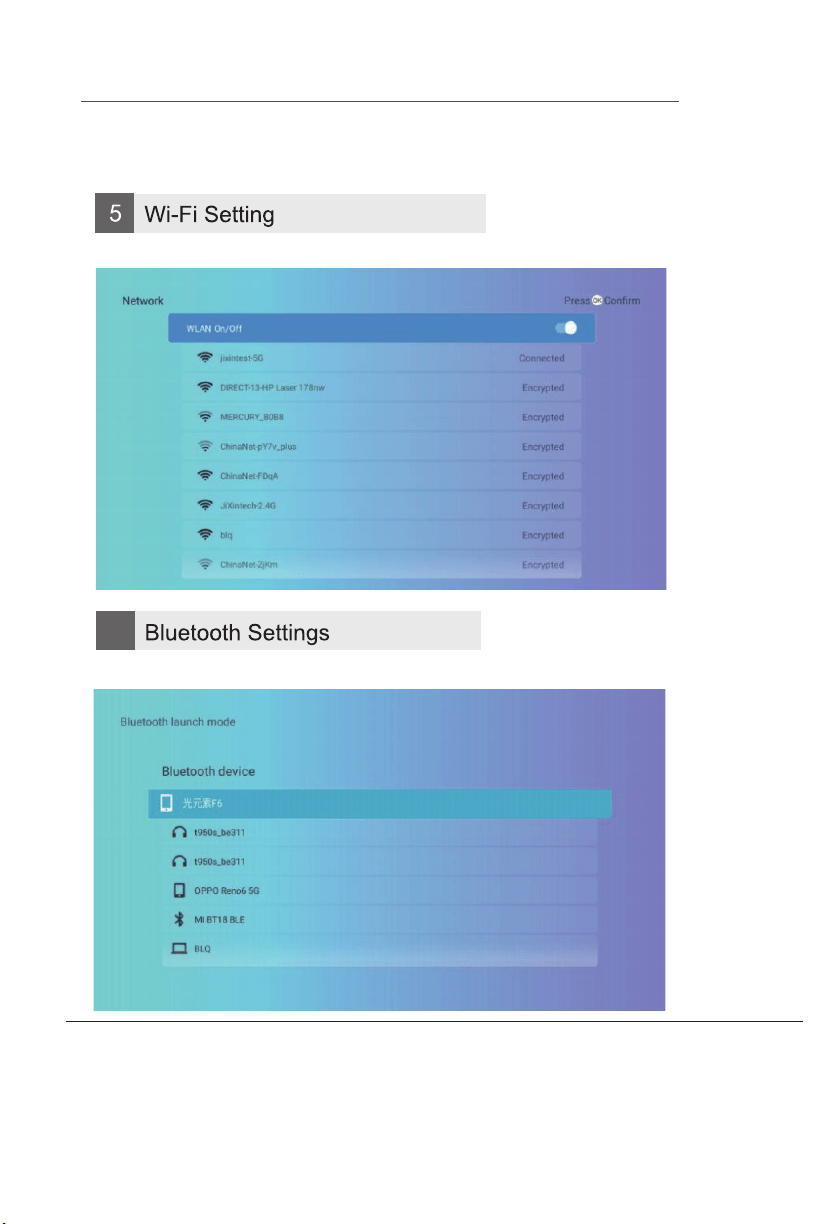
Open Bluetooth and select a device to pair
Note:With the system version update, there may be
differences from the actual interfaces. Please refer to the
displayed interfaces as the final version.
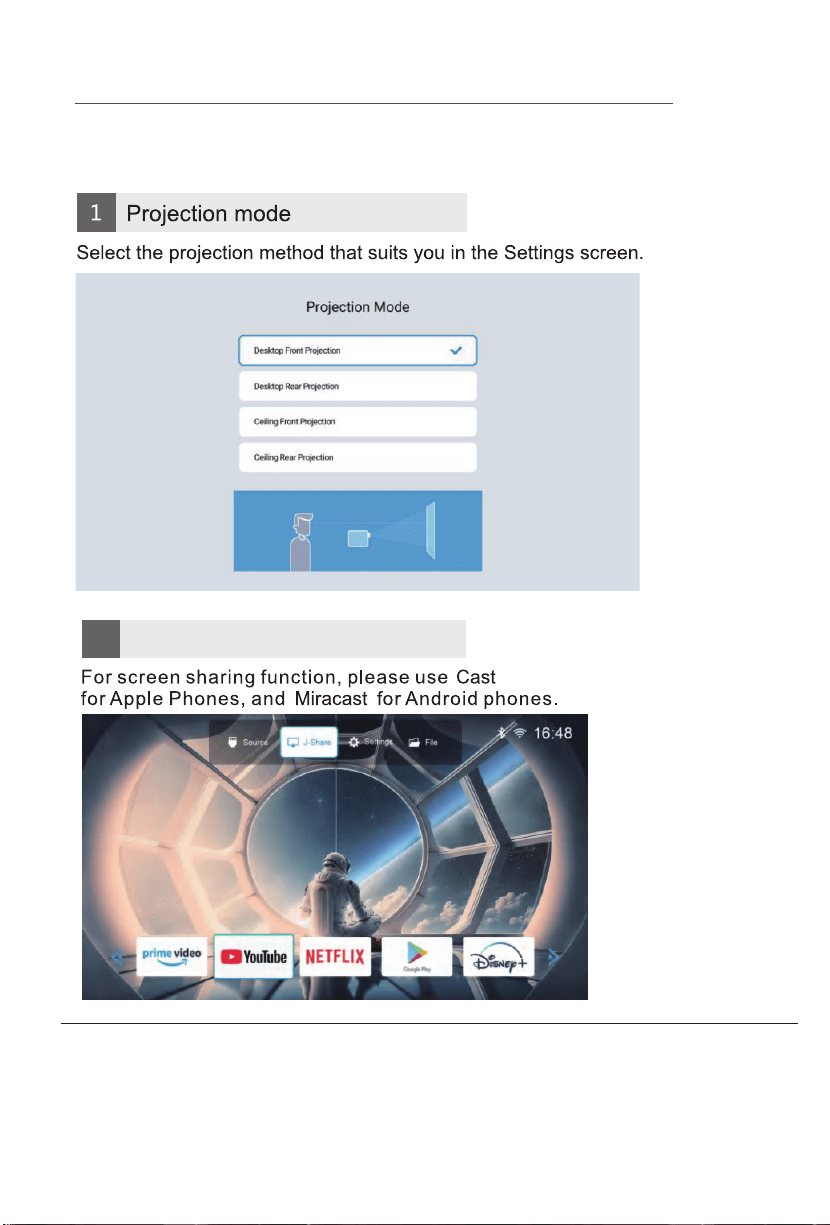
Screen Sharing
User Manual
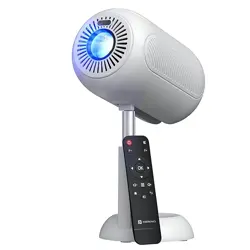
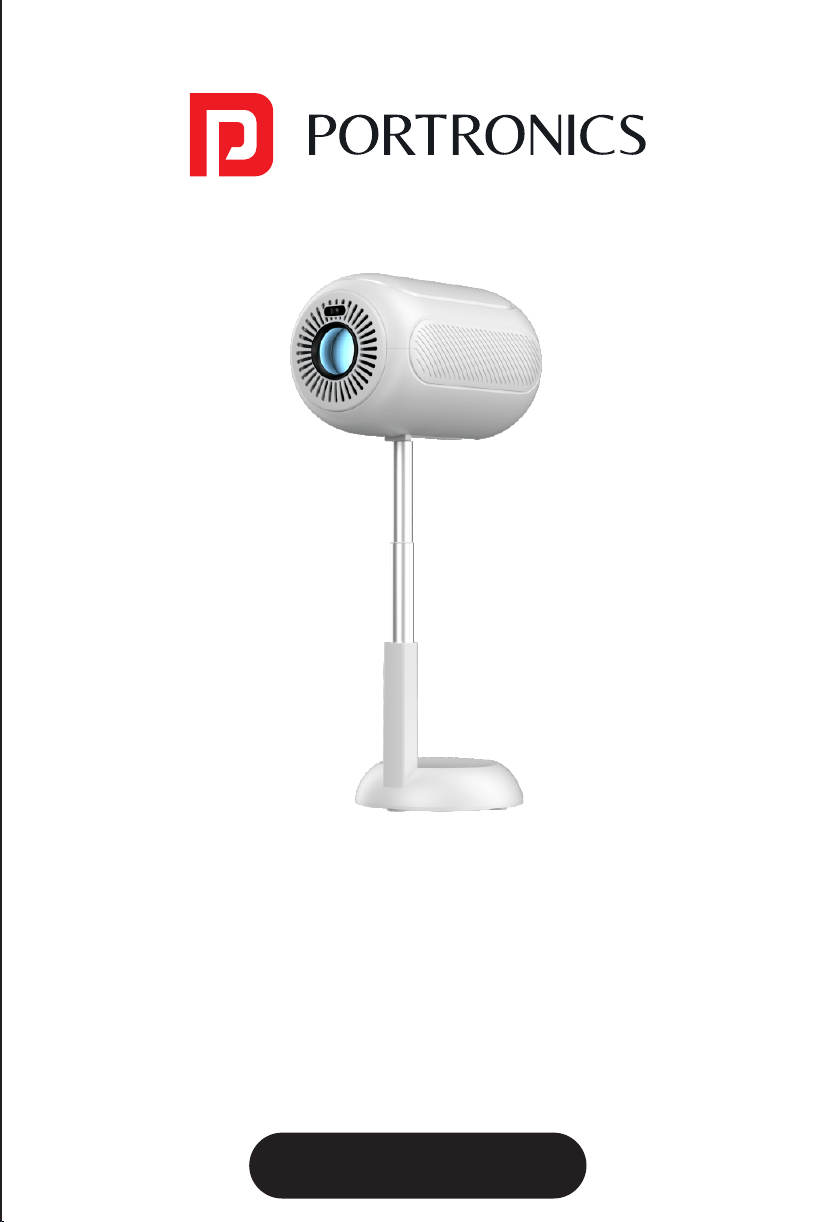
BEEM 540
S M A R T L E D P R O J E C T O R
INTRODUCTION
/////
Thank you for choosing the Beem 540 Smart LED Projector.
This manual will guide you through the setup, operation, and
maintenance of your projector to ensure optimal performance
and longevity. Please read the instructions carefully before using
the device.
SAFETY INFORMATION
/////
• Keep the projector in a dry, cool place away from direct
sunlight and extreme temperatures.
• Ensure proper ventilation by not blocking the air vents to
prevent overheating.
• Do not look directly into the projector lens when it is
operating, as the strong light may harm your eyes.
• Always place the projector on a stable, flat surface to
prevent it from falling.
• Avoid operating the projector near flammable materials or
in damp environments.
• Allow the projector to cool down before moving it after
extended use.
• Use only the provided power cable and accessories, and
connect to a surge protector to avoid voltage fluctuations.
• Keep the projector out of reach of children unless supervised
by an adult.
• Do not attempt to disassemble or repair the projector
yourself, as this may void the warranty.
Package Contents
Placement & Installation
• Position the projector at least 5 feet away from the projection
surface and 2 feet away from the wall.
• Maintain a height of 5 feet from the ground for the best viewing
experience.
• Use a flat surface or ceiling mount for stable placement.
Remote Control Functions
OPERATING INSTRUCTIONS
/////
Adjusting Focus
OPERATING INSTRUCTIONS
/////
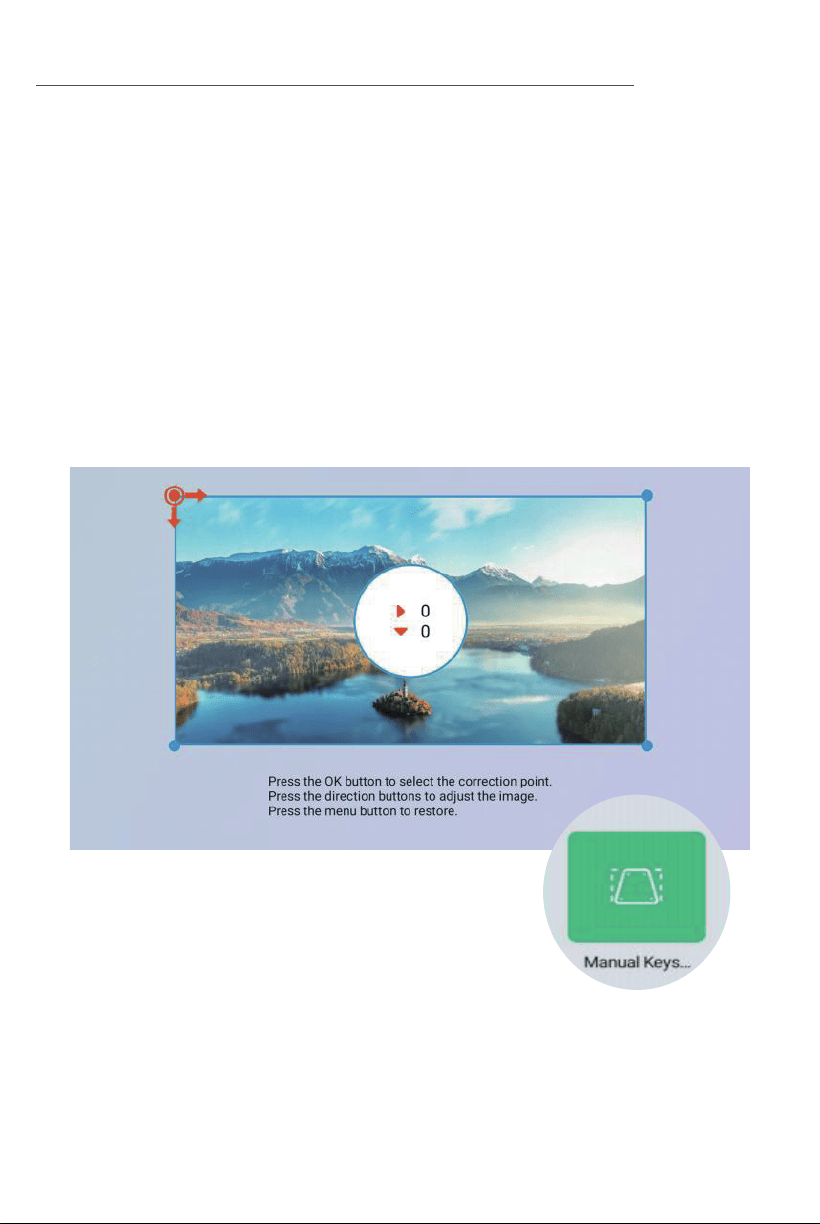
Keystone Correction
• Auto Keystone Correction: The Projector automatically adjusts
screen alignment for an optimal viewing experience as per
your projector placement.
• Manual Keystone Correction: Adjust screen alignment
manually through settings for better projection angles.
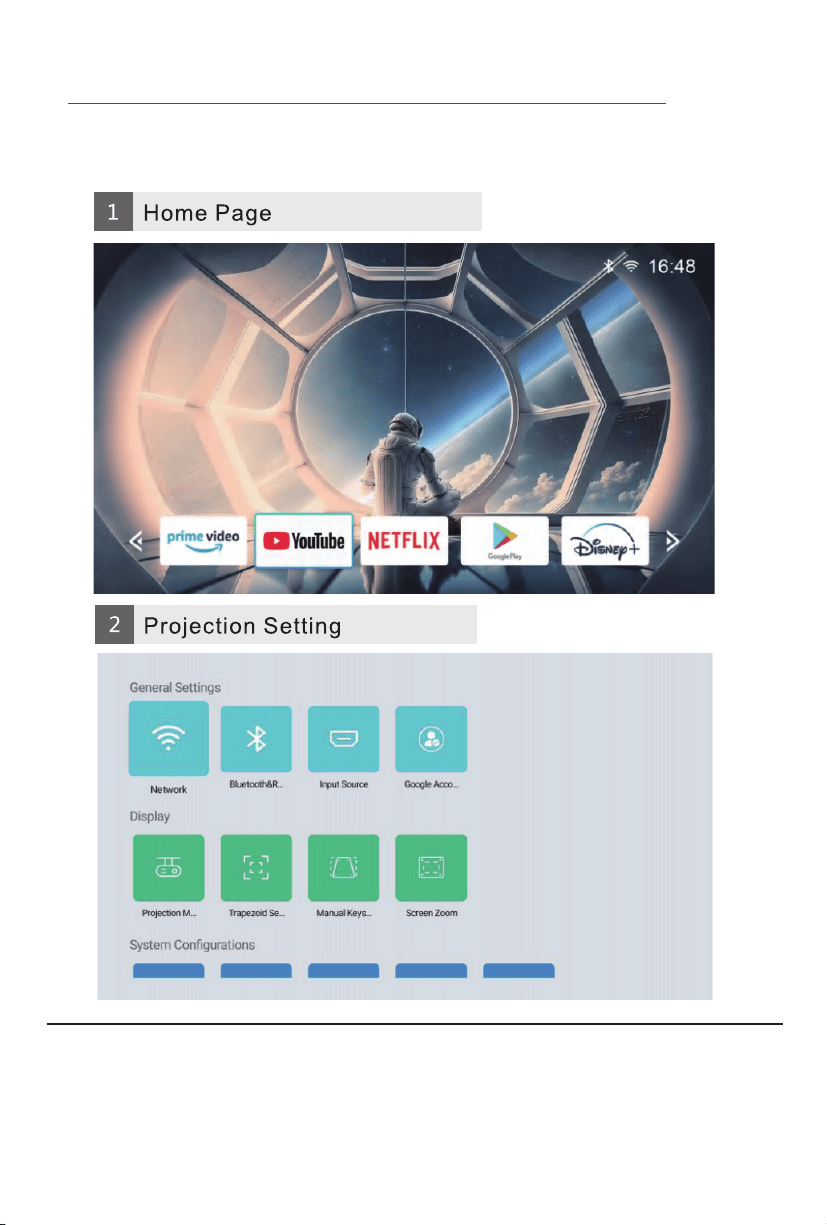
Software Settings Software Settings
Note:With the system version update, there may be
differences from the actual interfaces. Please refer to the
displayed interfaces as the final version.
Note:With the system version update, there may be
differences from the actual interfaces. Please refer to the
displayed interfaces as the final version.
6
2
Media Player
OPERATING INSTRUCTIONS
/////
Note:With the system version update, there may be
differences from the actual interfaces. Please refer to the
displayed interfaces as the final version.
Cleaning the Projector
Proper maintenance of your projector will enhance its
performance and longevity. Follow these guidelines for cleaning:
1. Cleaning the Lens
Use a soft, dry microfiber cloth to gently wipe the lens.
If necessary, apply a small amount of lens-cleaning solution to
the cloth—never directly on the lens.
2. Cleaning the Exterior
Wipe the projector body with a soft, dry cloth.
Avoid using abrasive cleaners or solvents that could damage the
surface.
3. Cleaning the Ventilation Openings
Use a small brush or compressed air to remove dust from the
ventilation grilles.Ensure vents remain unobstructed to prevent
overheating.
4. Cleaning the Remote Control
Use a slightly damp cloth to clean the remote.
Avoid direct moisture contact with buttons or the battery
compartment.
General Maintenance Tips
• Store the projector in a cool, dry place when not in use.
• Keep all cables properly organized to prevent damage.
• Ensure the power cord is unplugged before cleaning or
relocating the projector.
E-Waste Management
For E-Waste & ROHS compliance
refer to www.portronics.com/ewaste
www.portronics.com
For Support
Visit : www.portronics.com
E-mail : [email protected]
Contact No.: +91 9555245245
(Working Hours: Monday - Saturday, 10:00am - 6:00pm)
Ÿ The warranty covers defects in materials and workmanship.
Ÿ Damage due to physical impact, liquid exposure, or misuse is not
covered.
Ÿ Repairs, not replacements, are provided under the warranty period.
WARRANTY INFORMATION
/////
TROUBLESHOOTING
/////
For further assistance, contact customer support.
Select the network and enter the password to connect
To prevent damage or injury, follow these safety guidelines:
upto 10 inches

SETUP INFORMATION
/////
ð Projector 1 N
ð Power Cable 1 N
ð Remote Control 1 N
ð User Manual 1 N
Please check whether the physical products received are complete;
If the products and accessories you receive are not complete,
please contact the Customer Care in a timely manner.
(For specific items, please refer to the actual package.)
OPERATING INSTRUCTIONS
/////
UNDERSTANDING THE PROJECTOR
/////
OPERATING INSTRUCTIONS
/////
OPERATING INSTRUCTIONS
/////
OPERATING INSTRUCTIONS
/////
OPERATING INSTRUCTIONS
/////
MAINTENCE AND CARE
/////
Power Mute
Adjust Focus
Adjust Focus
Upward
Left
Downward
Volume Down
Home
Menu
Volume Up
Return
Signal Source Switching
Enter
Right
Lens
Stand
Projector Remote Control
User Manual Power Cord Cable
Power: Turn The Projector ON/OFF
Mute: Mute or unmute the projector speaker
Adjust the lens focus backwards
Adjust the lens focus forwards
Direction Keys: Up, down, left and right navigation
Enter: Performs accept action
Volume +/-: Increase / decrease speaker volume
Menu: Open the menu of applications or files
Home: Go to homepage
Return: Back to previous menu or close current applications
Signal Source: Switch between projection sources
• Auto Focus: Enable the auto focus option in the settings. The
device will automatically adjust the focus for you.
• Manual Focus: You can also fine-tune the focal length using
the remote control (as shown in the figure below), whether in
manual or auto focus mode.
Note:With the system version update, there may be
differences from the actual interfaces. Please refer to the
displayed interfaces as the final version.
Open Bluetooth and select a device to pair
Note:With the system version update, there may be
differences from the actual interfaces. Please refer to the
displayed interfaces as the final version.
Screen Sharing
User Manual
BEEM 540
S M A R T L E D P R O J E C T O R
INTRODUCTION
/////
Thank you for choosing the Beem 540 Smart LED Projector.
This manual will guide you through the setup, operation, and
maintenance of your projector to ensure optimal performance
and longevity. Please read the instructions carefully before using
the device.
SAFETY INFORMATION
/////
• Keep the projector in a dry, cool place away from direct
sunlight and extreme temperatures.
• Ensure proper ventilation by not blocking the air vents to
prevent overheating.
• Do not look directly into the projector lens when it is
operating, as the strong light may harm your eyes.
• Always place the projector on a stable, flat surface to
prevent it from falling.
• Avoid operating the projector near flammable materials or
in damp environments.
• Allow the projector to cool down before moving it after
extended use.
• Use only the provided power cable and accessories, and
connect to a surge protector to avoid voltage fluctuations.
• Keep the projector out of reach of children unless supervised
by an adult.
• Do not attempt to disassemble or repair the projector
yourself, as this may void the warranty.
Package Contents
Placement & Installation
• Position the projector at least 5 feet away from the projection
surface and 2 feet away from the wall.
• Maintain a height of 5 feet from the ground for the best viewing
experience.
• Use a flat surface or ceiling mount for stable placement.
Remote Control Functions
OPERATING INSTRUCTIONS
/////
Adjusting Focus
OPERATING INSTRUCTIONS
/////
Keystone Correction
• Auto Keystone Correction: The Projector automatically adjusts
screen alignment for an optimal viewing experience as per
your projector placement.
• Manual Keystone Correction: Adjust screen alignment
manually through settings for better projection angles.
Software Settings Software Settings
Note:With the system version update, there may be
differences from the actual interfaces. Please refer to the
displayed interfaces as the final version.
Note:With the system version update, there may be
differences from the actual interfaces. Please refer to the
displayed interfaces as the final version.
6
2
Media Player
OPERATING INSTRUCTIONS
/////
Note:With the system version update, there may be
differences from the actual interfaces. Please refer to the
displayed interfaces as the final version.
Cleaning the Projector
Proper maintenance of your projector will enhance its
performance and longevity. Follow these guidelines for cleaning:
1. Cleaning the Lens
Use a soft, dry microfiber cloth to gently wipe the lens.
If necessary, apply a small amount of lens-cleaning solution to
the cloth—never directly on the lens.
2. Cleaning the Exterior
Wipe the projector body with a soft, dry cloth.
Avoid using abrasive cleaners or solvents that could damage the
surface.
3. Cleaning the Ventilation Openings
Use a small brush or compressed air to remove dust from the
ventilation grilles.Ensure vents remain unobstructed to prevent
overheating.
4. Cleaning the Remote Control
Use a slightly damp cloth to clean the remote.
Avoid direct moisture contact with buttons or the battery
compartment.
General Maintenance Tips
• Store the projector in a cool, dry place when not in use.
• Keep all cables properly organized to prevent damage.
• Ensure the power cord is unplugged before cleaning or
relocating the projector.
E-Waste Management
For E-Waste & ROHS compliance
refer to www.portronics.com/ewaste
www.portronics.com
For Support
Visit : www.portronics.com
E-mail : [email protected]
Contact No.: +91 9555245245
(Working Hours: Monday - Saturday, 10:00am - 6:00pm)
Ÿ The warranty covers defects in materials and workmanship.
Ÿ Damage due to physical impact, liquid exposure, or misuse is not
covered.
Ÿ Repairs, not replacements, are provided under the warranty period.
WARRANTY INFORMATION
/////
TROUBLESHOOTING
/////
For further assistance, contact customer support.
Select the network and enter the password to connect
To prevent damage or injury, follow these safety guidelines:
upto 10 inches
