Input Voltage
Input Power
LED Color
Raw Lumens
Waterproof
Operating Temperature
DC 12V
Max 9 Watts per pod
6pcs - RGB per pod
600 LM (4 Pods Combined)
IP68
-5℉ - 120℉
INSTRUCTION MANUAL
+
Magnet
SPECIFICATIONS
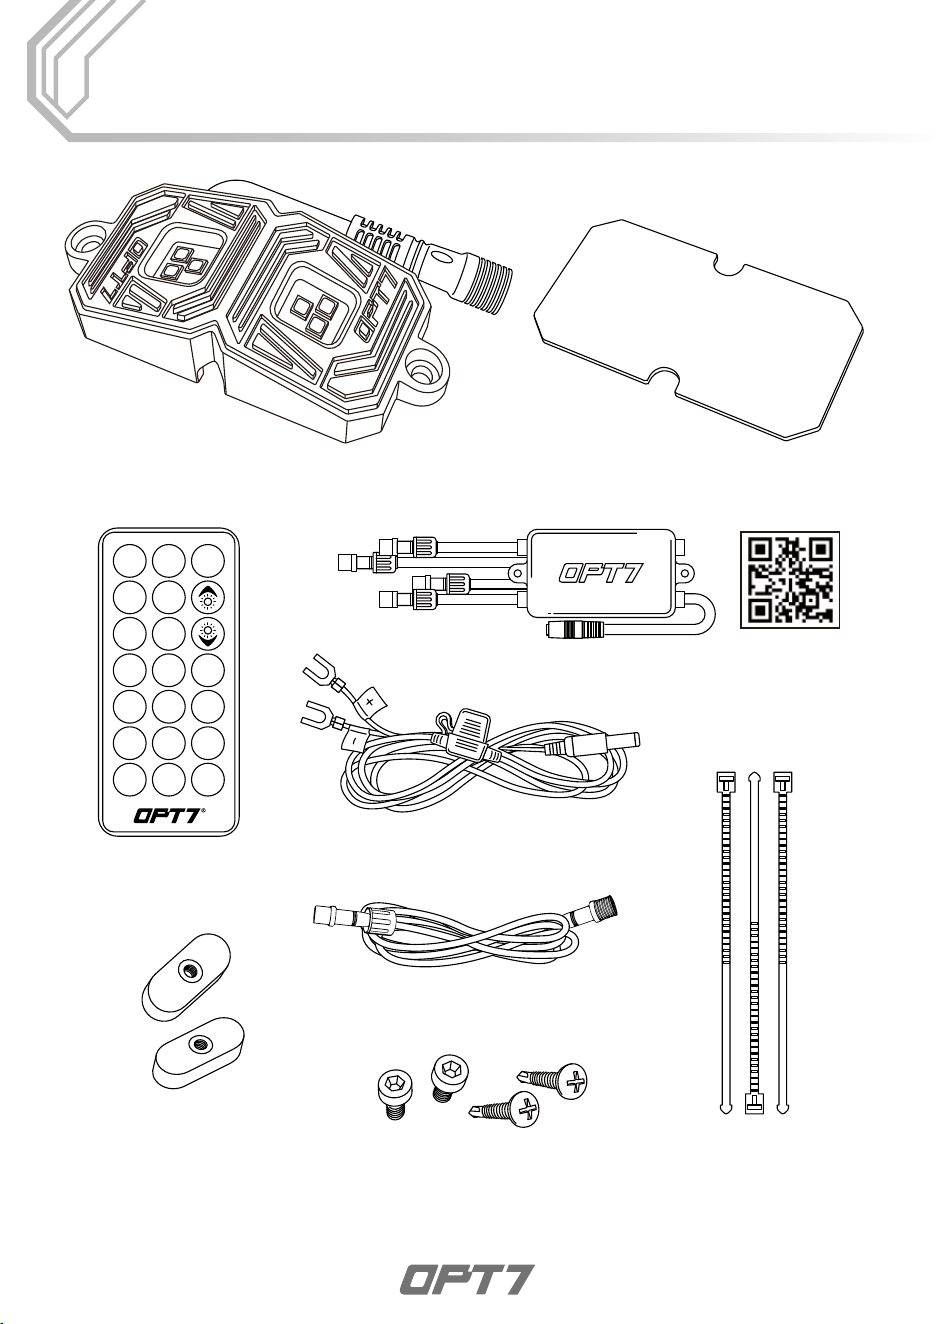
MAIN COMPONENTS
ON
S+ M+
OFF
AUTO
S- M-
4 X PHOTON RGB
ROCK LIGHT POD
EZ-REMOTE
CONTROL BOX
(SCAN QR CODE FOR APP USER GUIDE)
4 X 10FT EXTENSION WIRE
1 X HARDWIRE POWER HARNESS
4 X VHB DOUBLE SIDED
ADHESIVE TAPE
8 X HIGH QUALITY
MAGNETS
16 X MOUNTING SCREWS 30 X ZIP-TIE
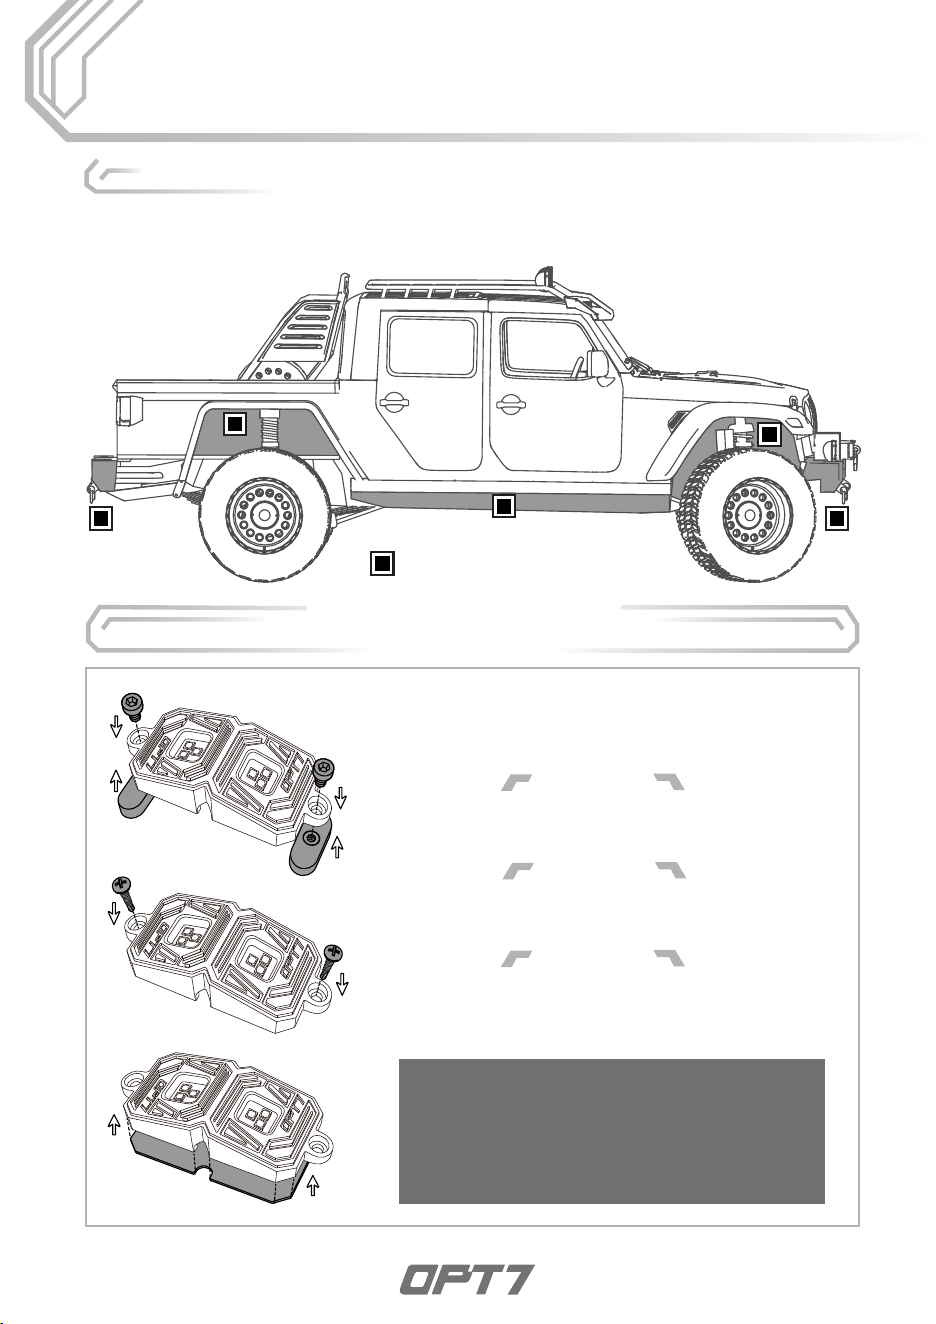
Recommended locations
INSTALLATION
Inspect kit to ensure all contents was included.Then decide where to locate the control box
and ensure wiring has enough length for the rock lights to be installed in the desired
location.
STEP 1
Before starting installation ,we recommend
that all rock light pods be checked to ensure
that all functions are working properly.
IMPORTANT
Avoid hot surfaces and / or moving parts.
1.
2.
There are 3 installation methods, you can refer to
the following methods to install and choose the
best method for your vehicle.
FIGURE 1
FIGURE 2
FIGURE 3
OPTION METHODS
Use “Strong Magnets” for mounting as
shown in Fig. 1
OPTION 1
Use “Self-Drilling Screws” for mounting as
shown in Fig. 2
OPTION 2
Use “VHB Double-Sided Adhesive” for
mounting as shown in Fig. 3
OPTION 3
Rock Light Pods become extremely hot during use-keep away from any vehicle parts
that may be damaged by exposure to high temperatures.
CAUTION
Avoid installation areas of the engine bay + heated surfaces.
Start installing the LED Pods onto your vehicle. If any excess wiring are exposed
during installation process, you must use the zip-ties to securely tie them together
and tuck the wire into the junction area to avoid snagging or damage wires.
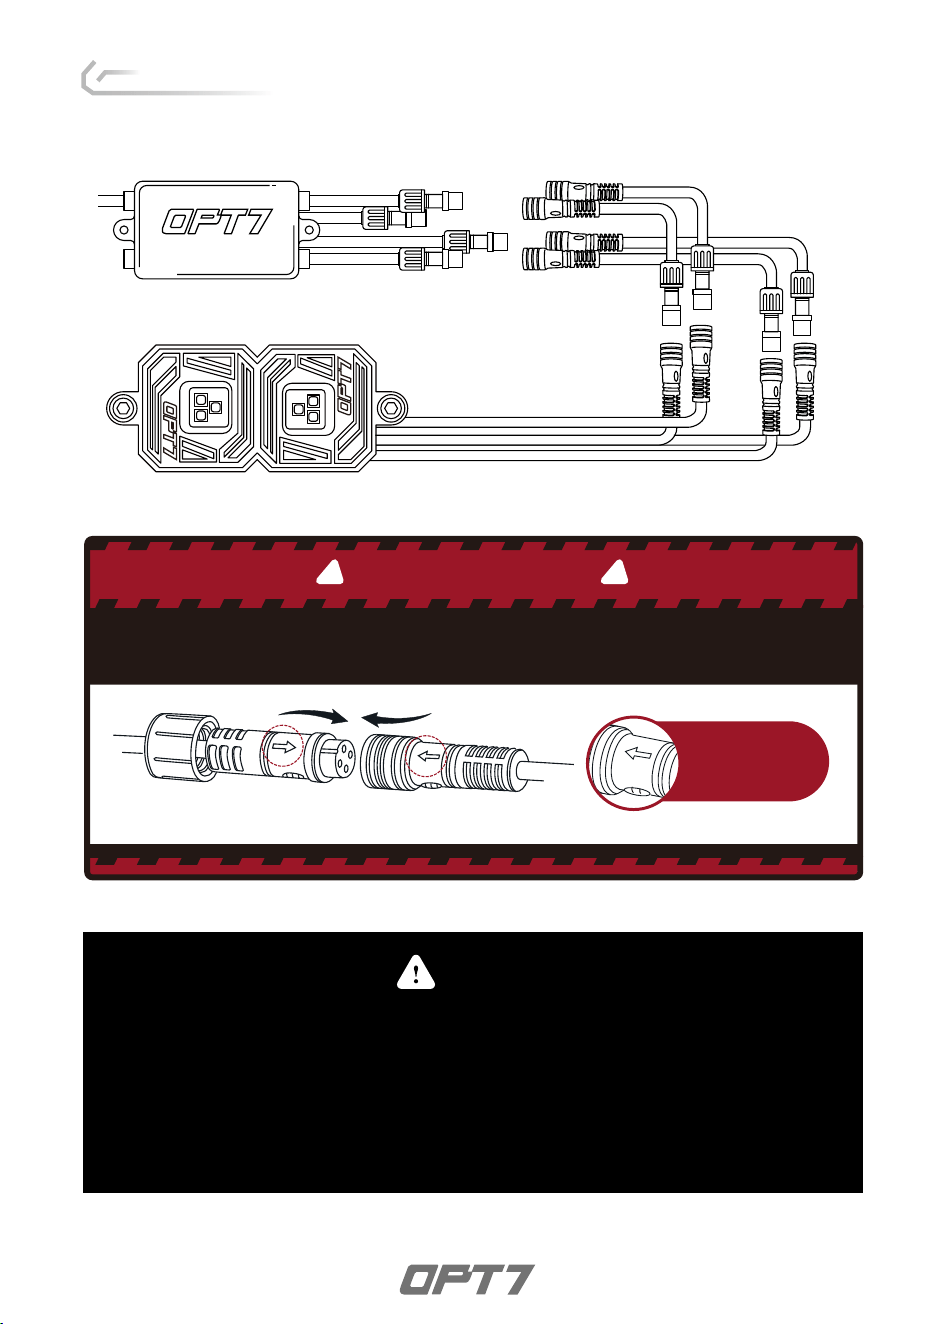
Note the
direction of
the arrows
BE SURE TO CONFIRM THE CORRECT DIRECTION OF THE ARROW!!
TO AVOID PRODUCT DAMAGE DUE TO INCORRECT INSTALLATION.
CORRECT INSTALLATION
IMPORTANT
! !
Flow direction
As show below, connect all the Rock Light Pods to the control box with the included extension
wires.
STEP 2
1.
2.
3.
CONTROL BOX
4 X
EXTENSION WIRE
4 X
ROCK LIGHT POD
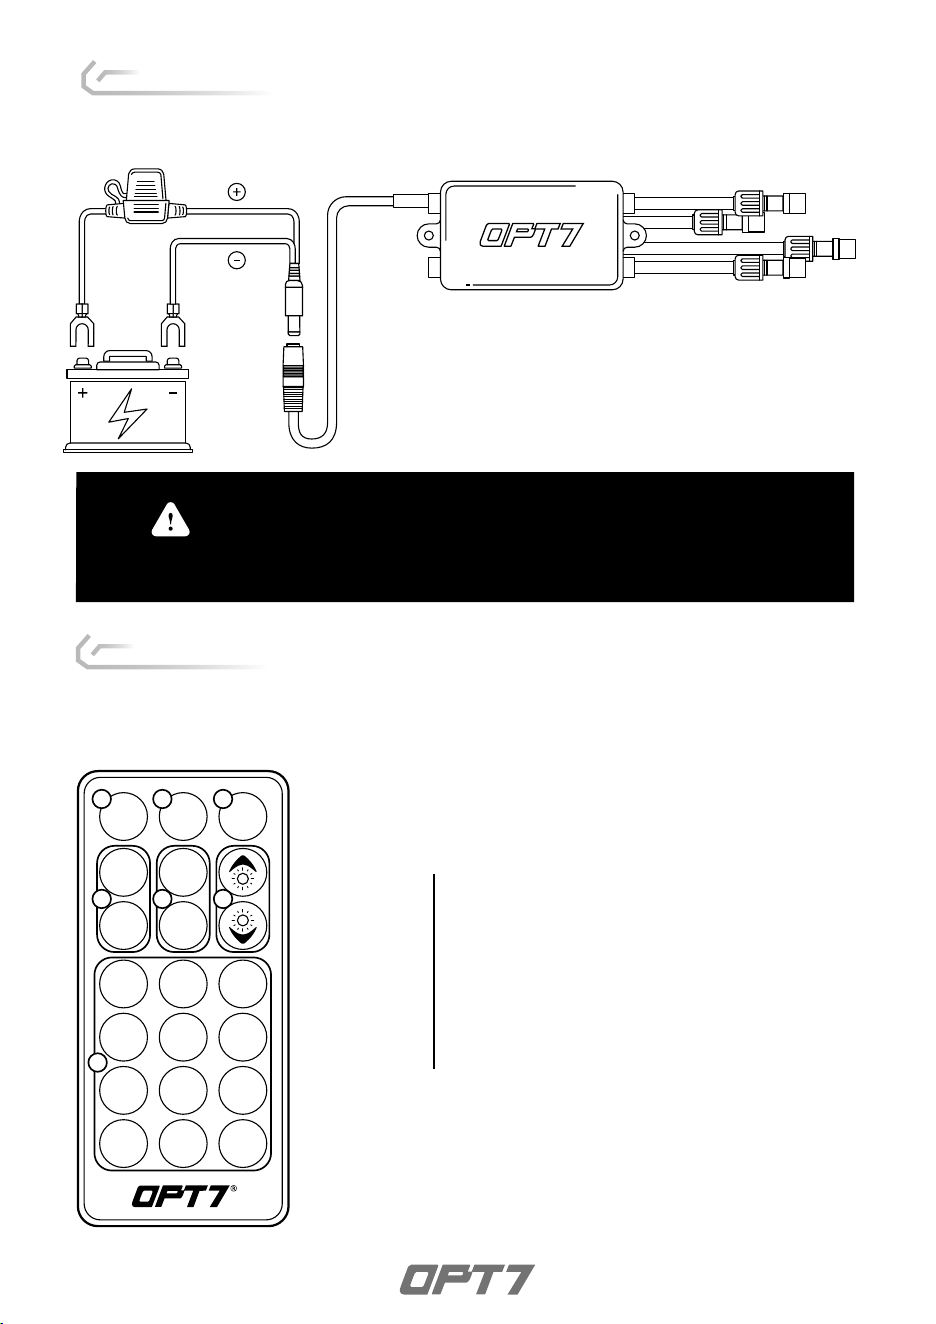
Connect the positive(+) wire to the positive
post (+) of the battery.
Connect the negative(-) wire to the negative
post (-) of the battery or to a common
Ground location.
-
-
Please ensure that the LED pods, control box and wiring all are
mounted in areas where will not exceed 85℃ or 185℉.
WARNING
FUSE
ON
S+ M+
OFF
AUTO
S- M-
Power-ON
Automatic Color Change
Power-OFF
Speed +/- 8 Levels
Mode +/- 19 Mode
Dimmer 8 Levels
Color Selection 12 Colors
1
2
3
4
5
6
7
BUTTON LAYOUT
Find a constant 12-volt power source to power the rock lights. For details refer to the
instructions below:
STEP 3
Using the included E-Z Remote, select your desired color or pattern.
STEP 4
Off
AUTO
On
S+
S-
M+
M-
OPT7 Lighting is not liable for damages or personal injuries while installing this
product. The Installation Guide is intended as assistance to reduce setup time.
OPT7 Lighting assumes no responsibility for improper installation. If you are
unfamiliar with your vehicle or inexperienced with aftermarket upgrades,
please seek professional assistance.
If you are uncomfortable performing work of this nature yourself, then do
not hesitate to consult a professional for help. Working with a vechicle’s
electrical system can be hazardous to an unqualified individual. OPT7 is
not liable for damages or personal injuries while installing this product.
The installation guide is provided as assistance to reduce set up time.
DISCLAIMER
Download the OPT7 GLOW
to have the best experience.
STEP 5
Please scan to see the OPT7 GLOW user guide.
https://wintis.ladesk.com/362302-OPT7-AURA-Glow-Application-User-Guide
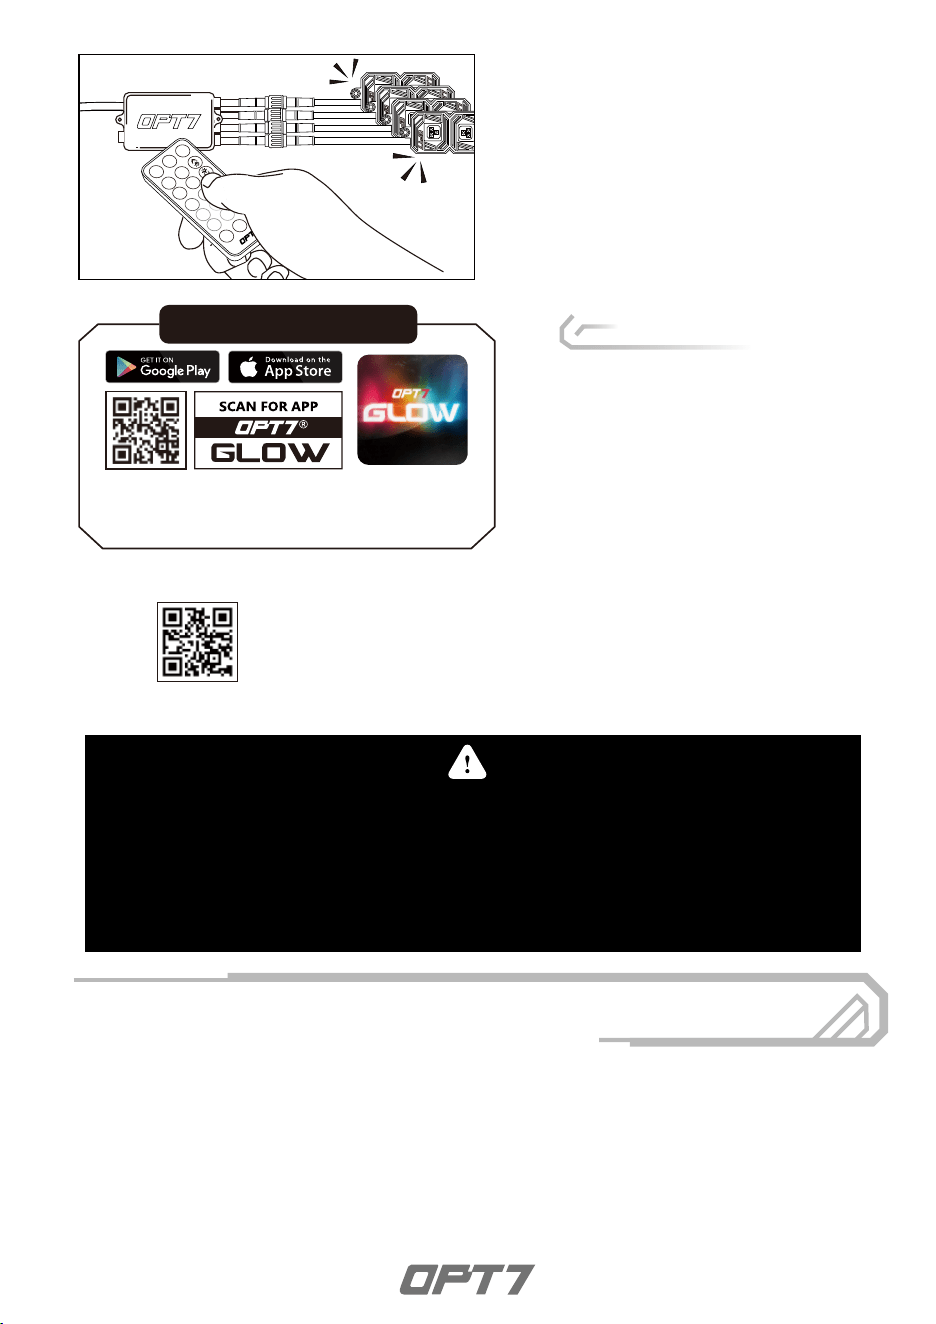
HOW TO PAIR THE REMOTE?
QR CODE TO DOWNLOAD
Download the free “OPT7 GLOW” App
• App iOS (12+) available on App Store
• Android (8+) available on Google Play
Pair the Device:
To pair the remote, reconnect the
power, then aim the remote at the
control box and hold the ON button
until the LED strips flash white.