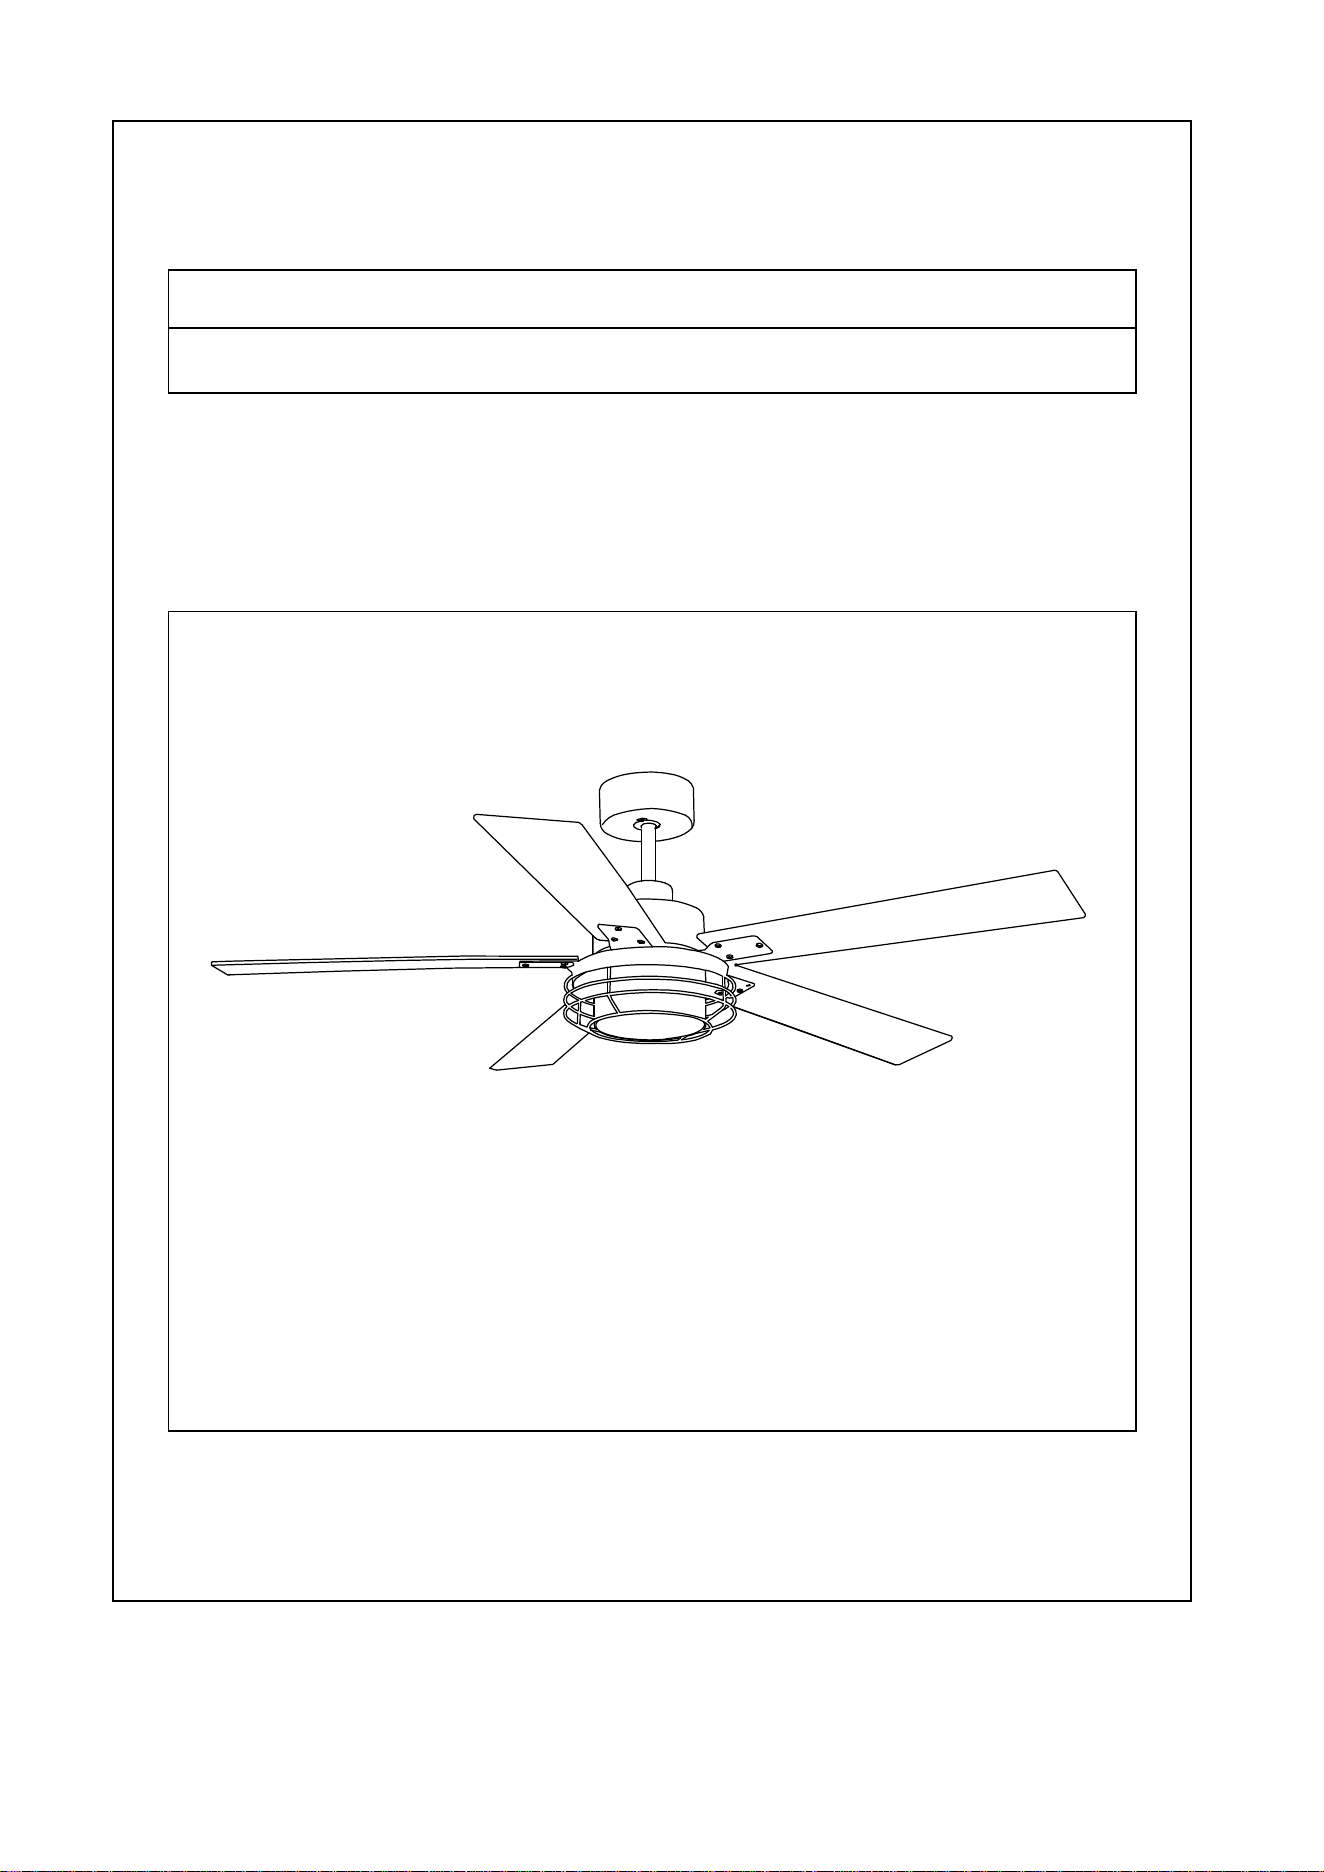
OWNER'S INSTRUCTION MANUAL
F6002BK/F6002WH
CEILING FAN WITH LED LIGHT/ REMOTE CONTOL
1. Installation work and electrical wiring must be done by qualified person(s) in accordance with all applicable codes and standards, including
fire-rated construction.
2. Use this unit only in the manner intended by the manufacturer. This fan is applied to 120V 60Hz only. If you have any questions
contact the manufacturer.
3. After making the wire connections, gently push connections into outlet box with wire nuts pointing up. The wires should be spread apart
with the grounded wire.
4. Before you begin installing the fan, Switch power off at Service panel and lock service disconnecting means to prevent power from being
switched on accidentally. When the service disconnecting means cannot be locked, securely fasten a prominent warning device, such as a
tag, to the service panel.
5. Be cautious! Read all instructions and safety information before installing your new fan. Review the accompanying assembly diagrams.
6. When cutting or drilling into wall or ceiling, do not damage electrical wiring and other hidden utilities.
7. Make sure the installation site you choose allows the fan blades to rotate without any obstructions. Allow a minimum clearance of 7 feet
from the floor to the trailing edge of the blade.
8. To reduce the risk of fire, electric shock, or personal injury, this fan must be mounted to an safety ceiling support. And use mounting
screws provided. (Mounting must support at least 35 lbs.)
9. Do not bend blade holders during installation to motor, balancing or during cleaning. Do not insert foreign object between rotating blades.
10. Attach the mounting bracket using only the hardware supplied. Fan is only to be mounted to an safety ceiling support.
11. To reduce the risk of fire or electric shock, do not use this fan with any solid state fan speed control device, or variable speed control,
dimmer switch which is not included in the box.
12. If this unit is to be installed over a tub or shower, it must be marked as appropriate
for the application.
13. NEVER place a switch where it can be reached from a tub or shower.
14. The combustion airflow needed for safe operation of fuel-burning equipment may be affected by this unit’s operation. Follow the local
heating equipment manufacturer’s guideline safety standards.
15. Before servicing or cleaning unit, Switch power off at Service panel and lock service disconnecting means to prevent power from being
switched on accidentally. When the service disconnecting means cannot be locked, securely fasten a prominent warning device, such as a
tag, to the service panel.
16. Do not operate on/off of fan and light frequently, it will shorten the lifespan. Do not operate continuously more than 12 hours.
17. Do not repair yourself. Only repair by skilled technicians, LED panel cannot be replaced.
18. Do not use and operate if any damage and problem is found.
SafETy TiPS
OBSERVE THE FOLLOWING: READ AND SAVE THESE INSTRUCTIONS
WARNING: TO REDUCE THE RISK OF FIRE, ELECTRIC SHOCK, OR PERSONAL INJURY, MOUNT TO CEILING SHOULD USE THE SCREWS PROVIDED. MOST
ORIGINAL SCREWS USED FOR THE SUPPORT OF LIGHTING FIXTURES ARE NOT ACCEPTABLE FOR FAN SUPPORT AND MAY NEED TO BE REPLACED.
CONSULT A QUALIFIED ELECTRICIAN IF IN DOUBT.
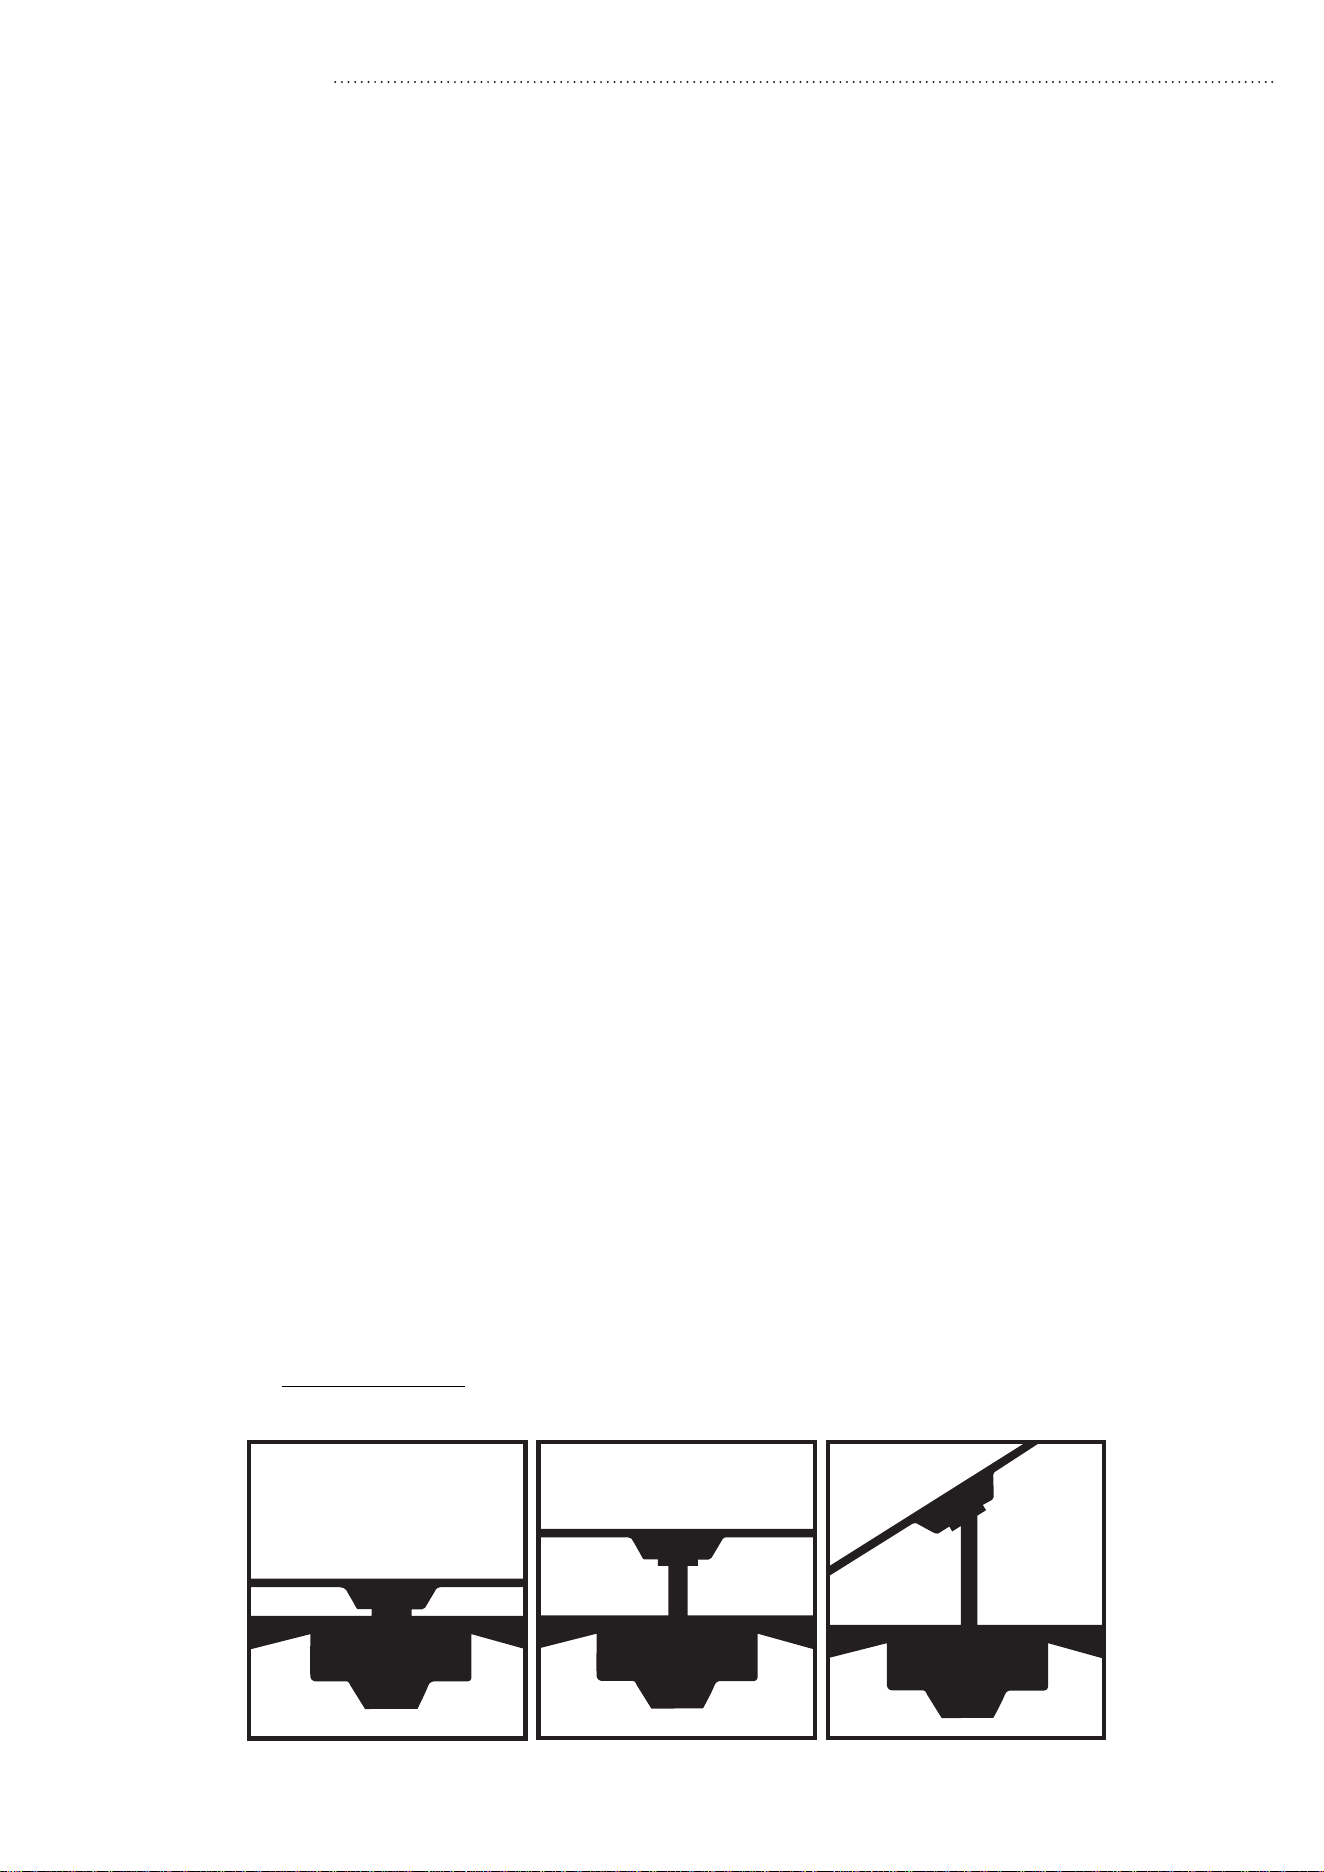
For normal ceilings
Para cielorrasos normales
VAULTED CEILING
INSTALLATION
INSTALACIÓN PARA
CIELORRASOS ABOVEDADOS
May require a longer
downrod (sold separately)
Podría requerir una varilla vertical más larga
(se vende por separado)
For low ceilings
Para cielorrasos bajos
FLUSH MOUNT INSTALLATION
INSTALACIÓN AL RAS
fEaTurES C
DOWNROD INSTALLATION
INSTALACIÓN CON
VARILLA VERTICAL
The illustrations in this guide were for reference only. It may differt
from the actualproduct, Please kindly understand we keep the right
to change without notice.
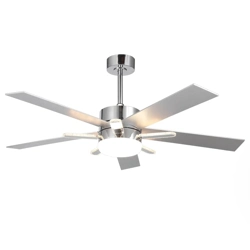
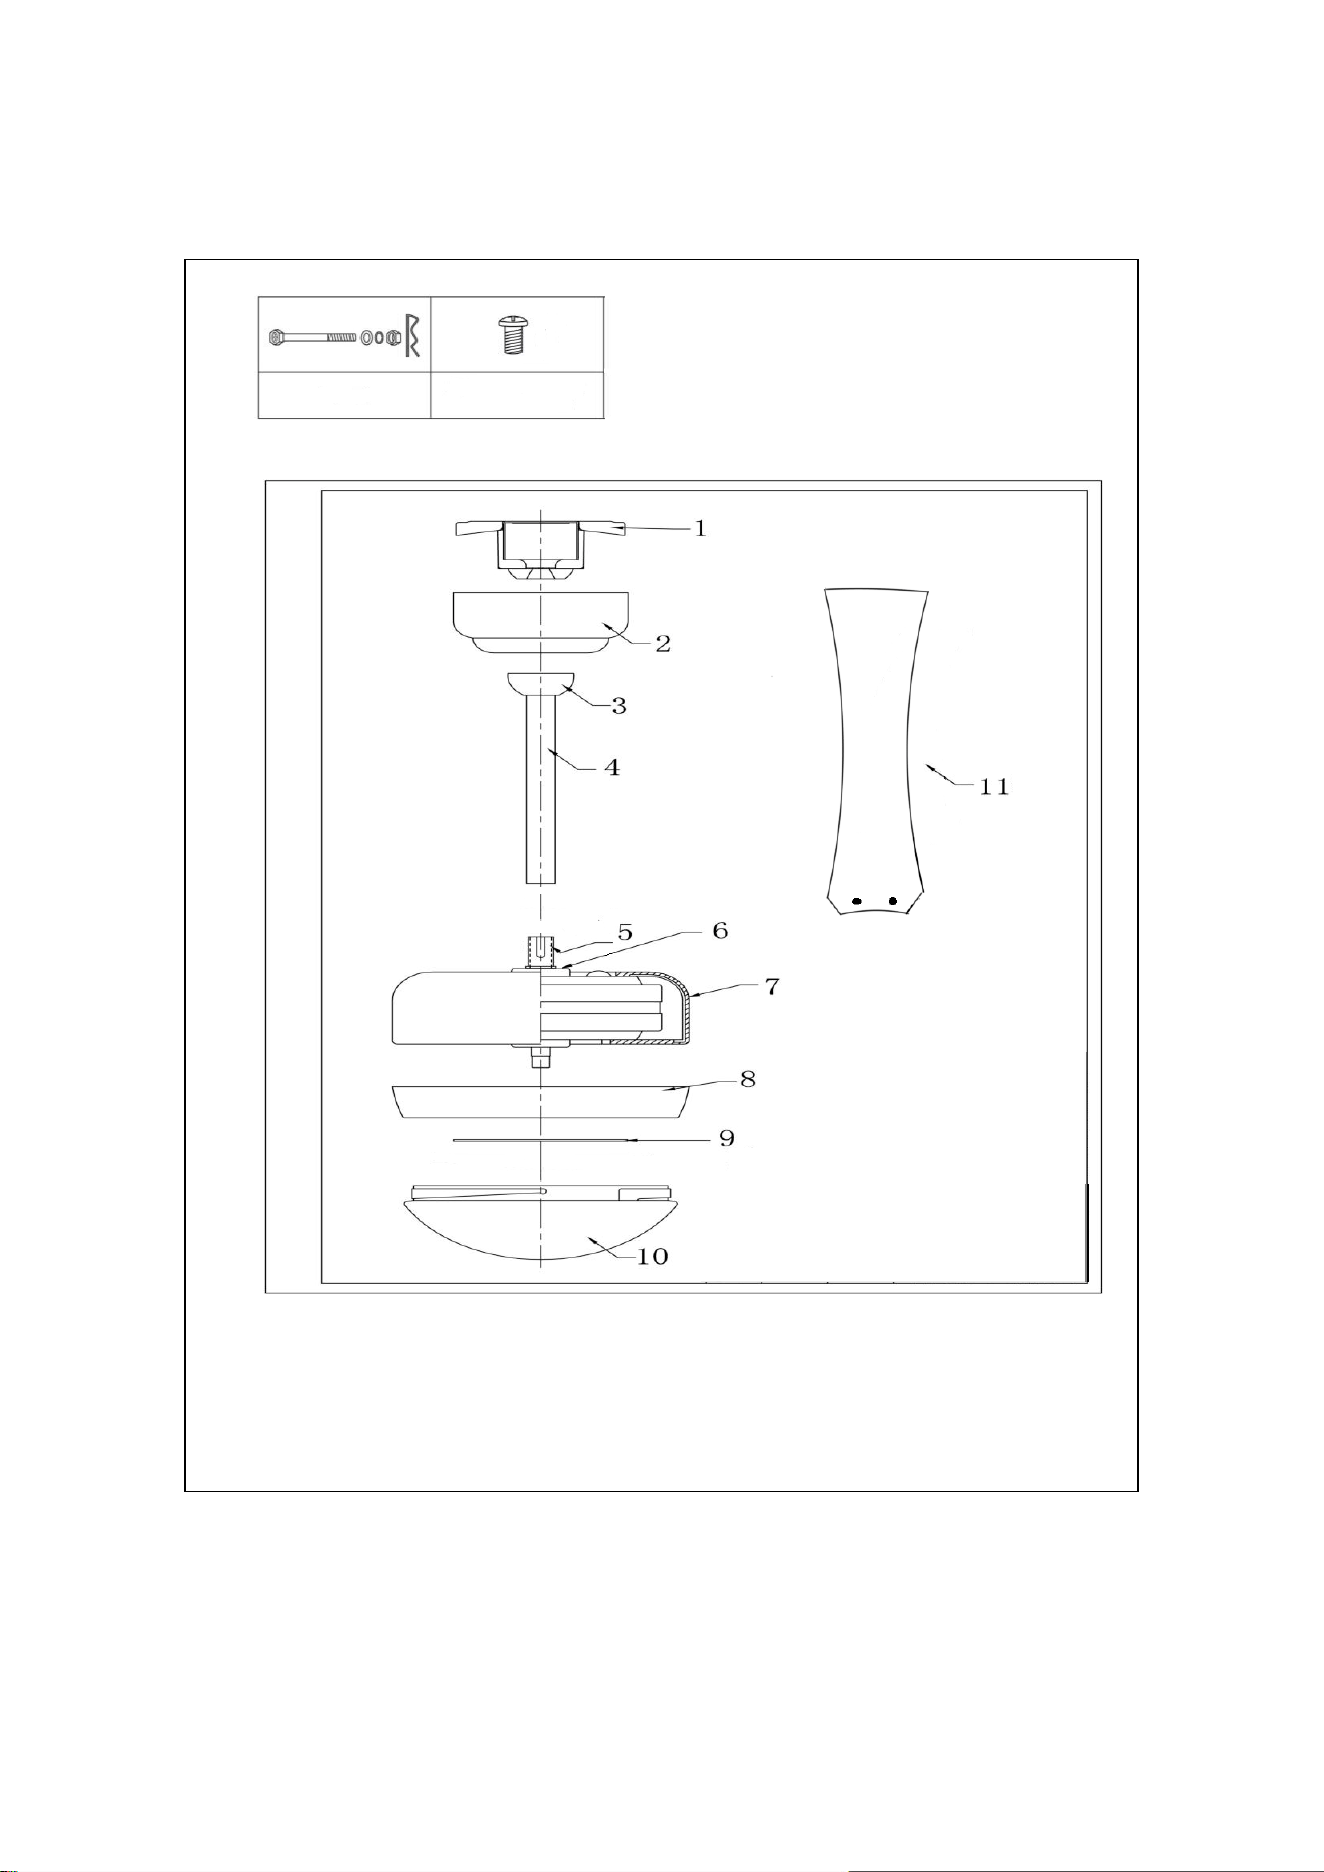
Parts and Accessories
1. Mounting bracket
2. Canopy
3. Downrod ball
4. Downrod
5. Coupling
6. Housing
7. Motor
8. Light plate
9. LED panel
10. PC light shade
11. Blade
Cross pin & Clamp pin
Blade screw*6
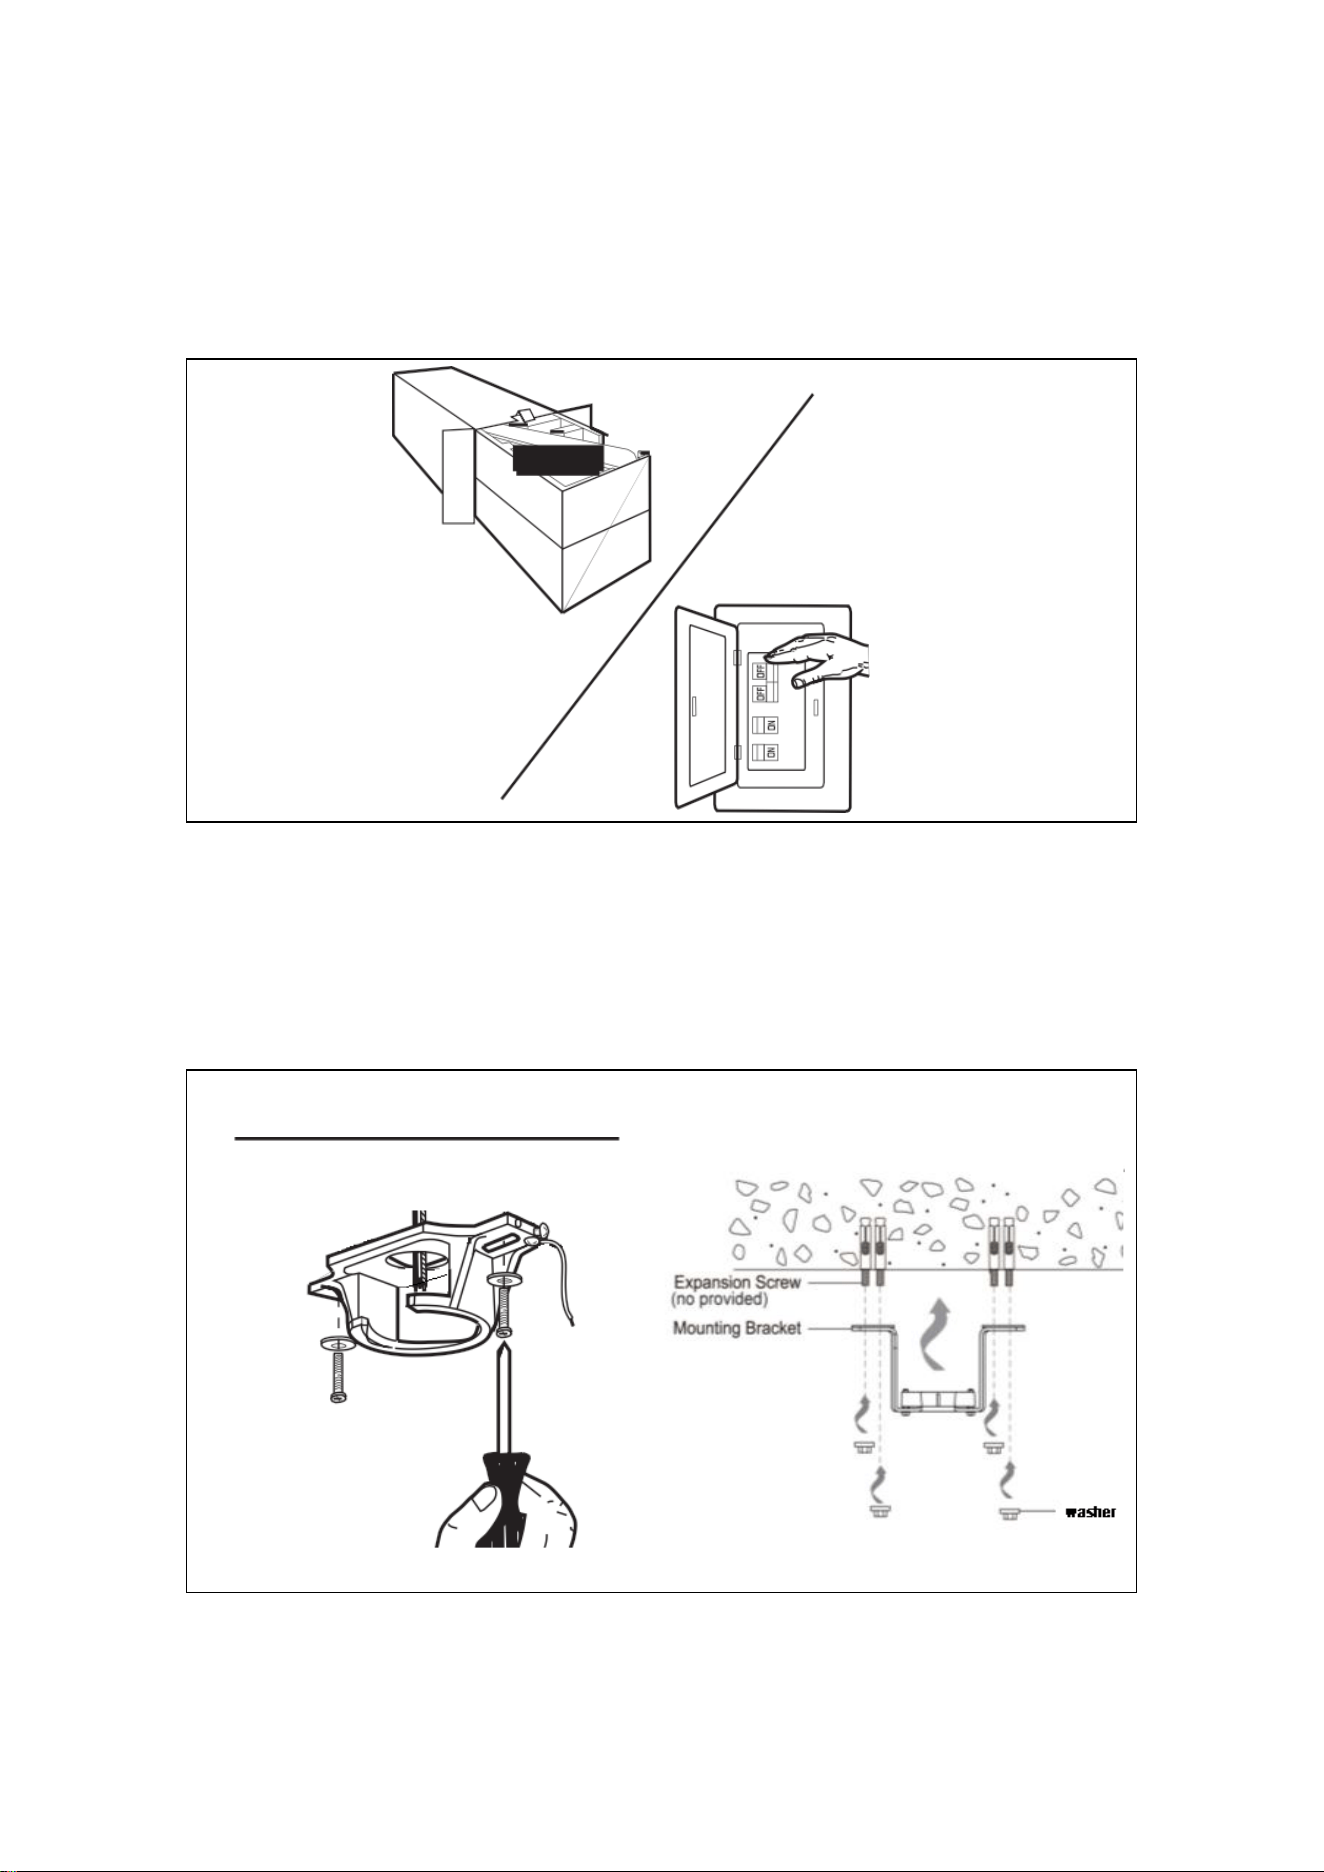
Unpack and inspect fan carefully to be certain all contents are included.
Turn off power at fuse box to avoid possible electrical shock.
Drill two mounting holes in the ceiling joist and securely screw the mounting bracket to the ceiling using the
washers and wood screws provided. The mounting position located should be able to hold a weight of at least
15.9kgs (35 lbs).
NOTE - Proper care must be taken when mounting to concrete ceilings. For safe mounting, these ceilings may
require expansion screw and plastic plugs or anchors than supplied with the product. Please mark the hole
positions first and then drill holes to avoid incorrect hole positions.
BEFORE INSTALL
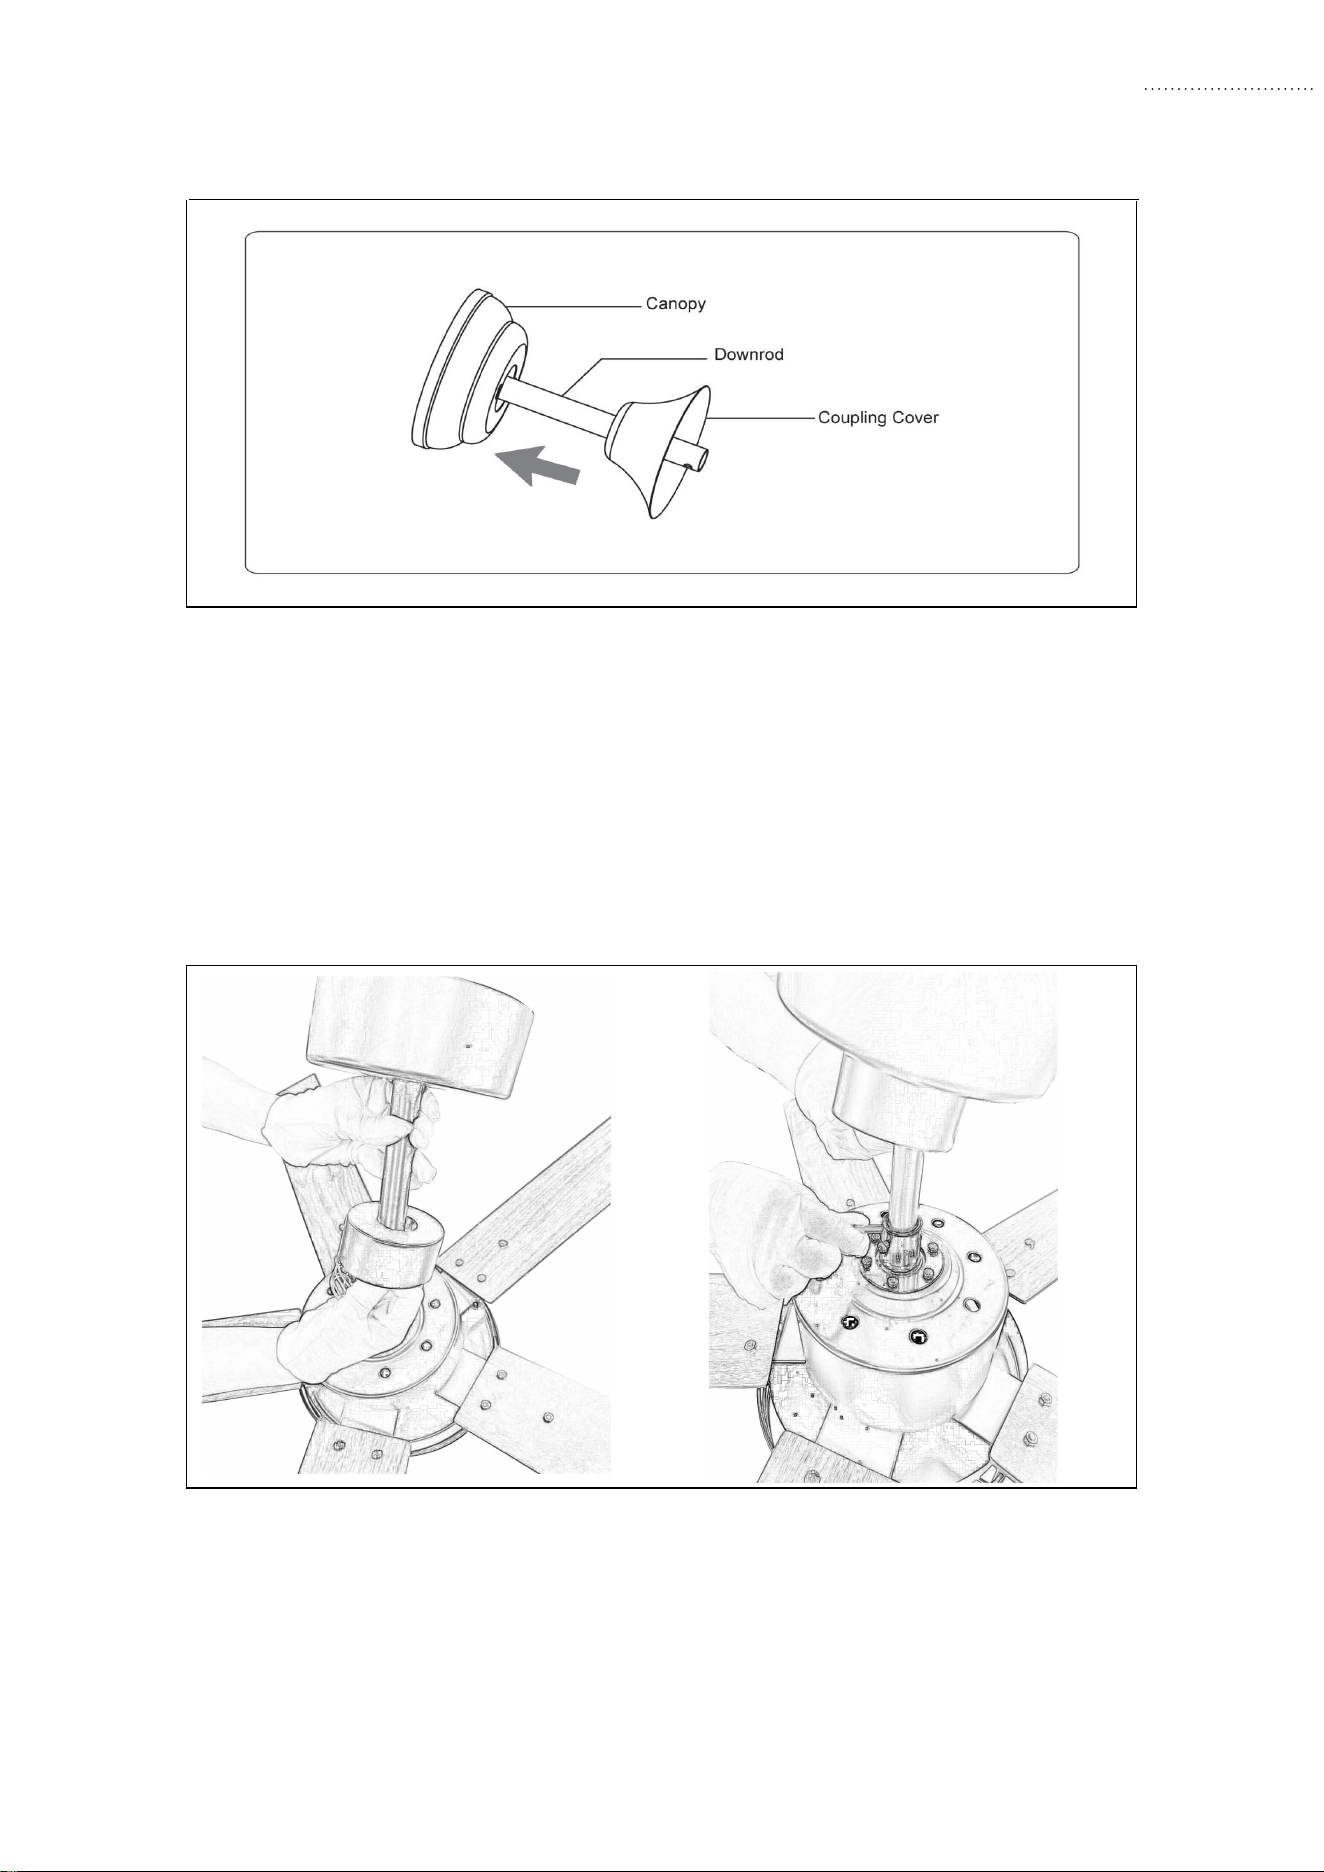
Step 1
Insert downrod into Coupling coupling cover and Canopy.
Step 2
Feed all Motor wire and LED drive power from coupling throuth the downrod assembly. Insert downrod
into downrod coupling. Make sure to align hole in downrod with the hole in downrod coupling. Install
cross pin through coupling and downrod, Insert Clamp pin into cross pin until it snaps into place. Tighten
set screws in coupling. Slide coupling cover over the downrod coupling.
IMPORTANT
All wires should not be stress while feed through the downrod.
The power wires Live& Neutral must be connected to wall swich(Double pole), seperate at least 3mm apart in all
poles.
INSTALLATION
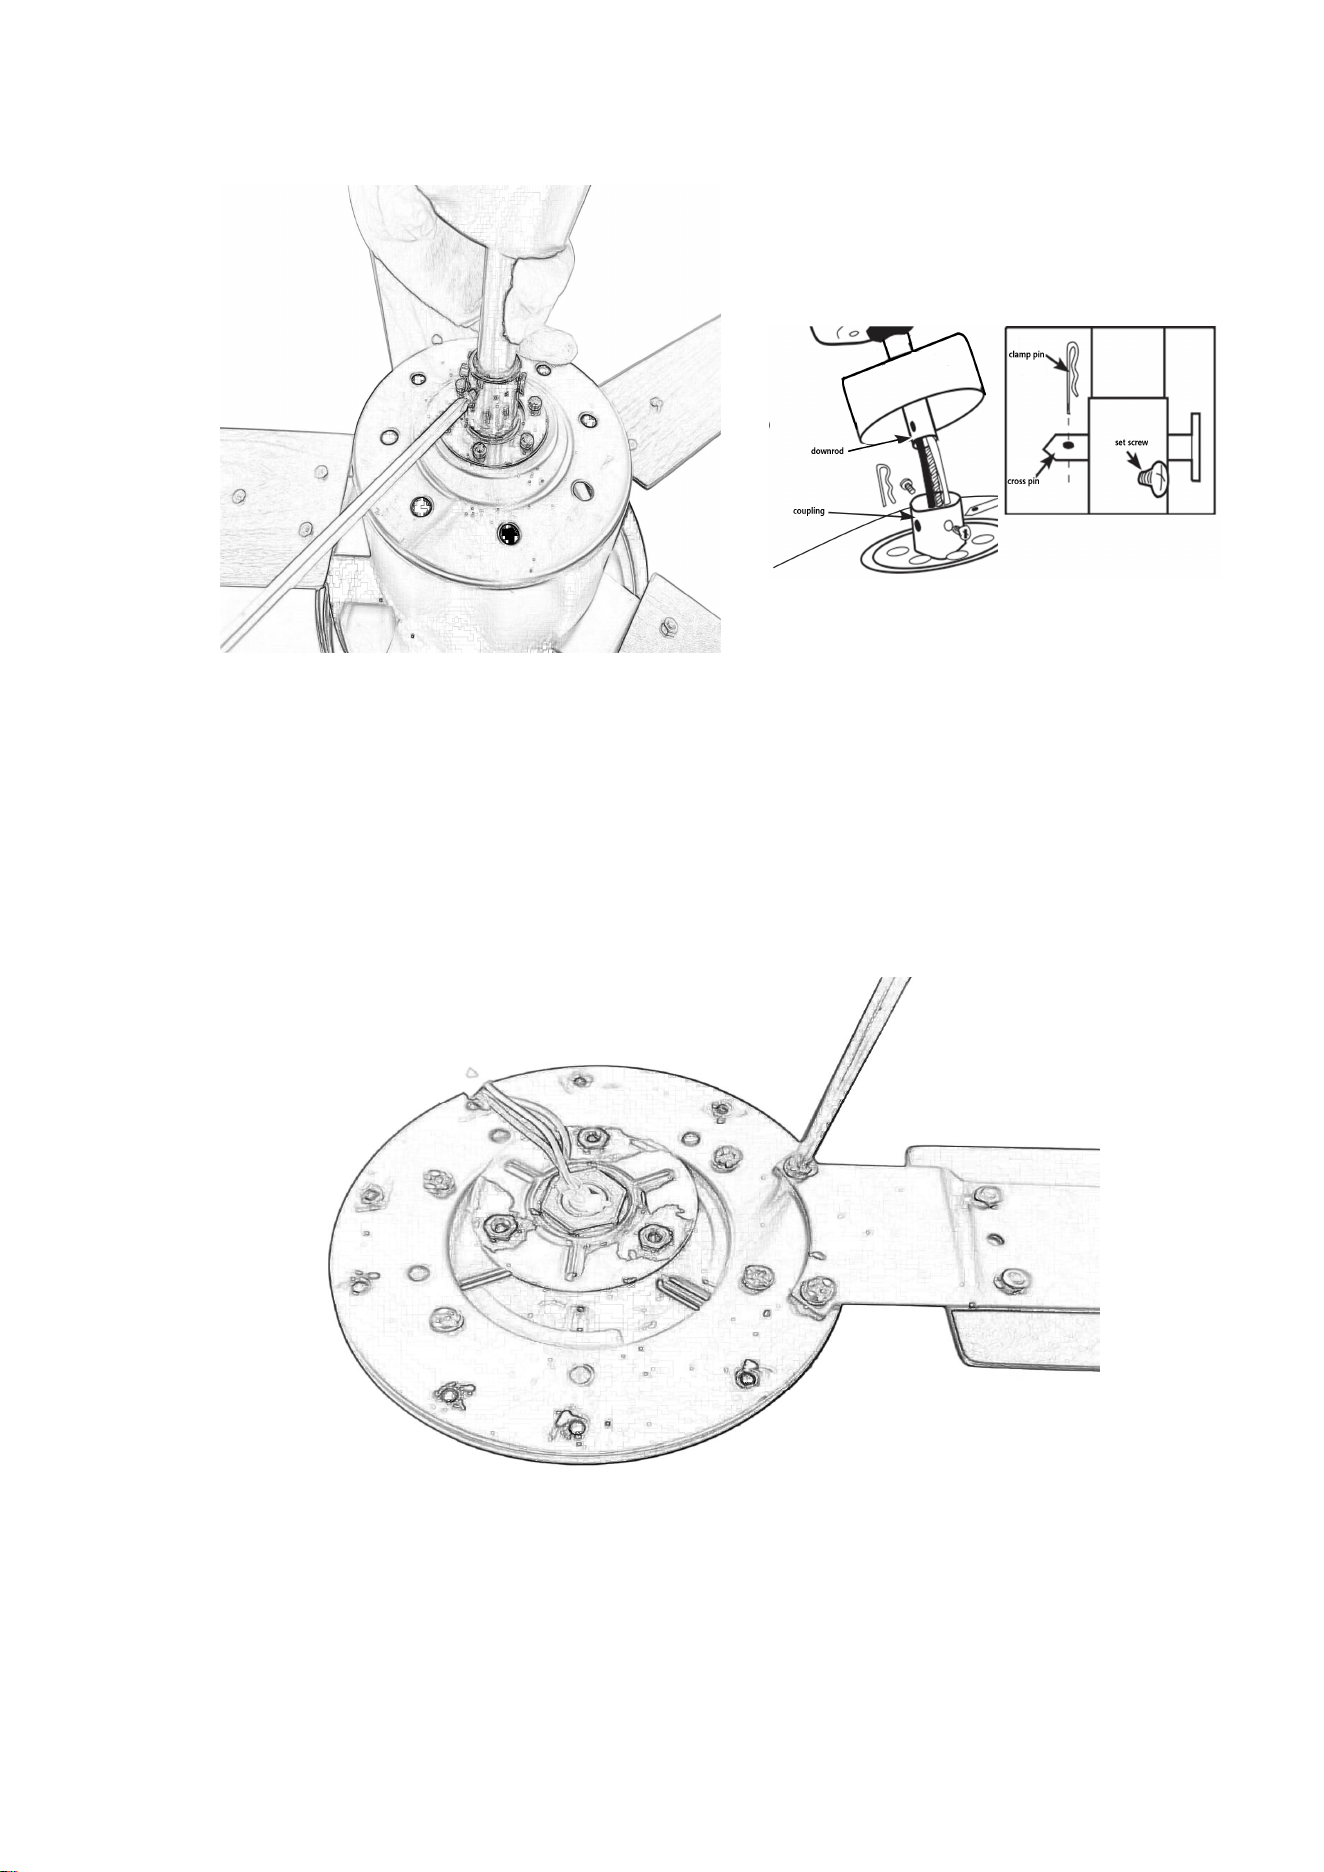
Step 3
Check the motor for plastic shipping stabilizer tabs, and remove them if they are present. Attach blade
assembly to motor using the motor screws provided. Tighten screws securely.
NOTE: Some models do not utilize motor gaskets, washers, or stabilizer tabs.
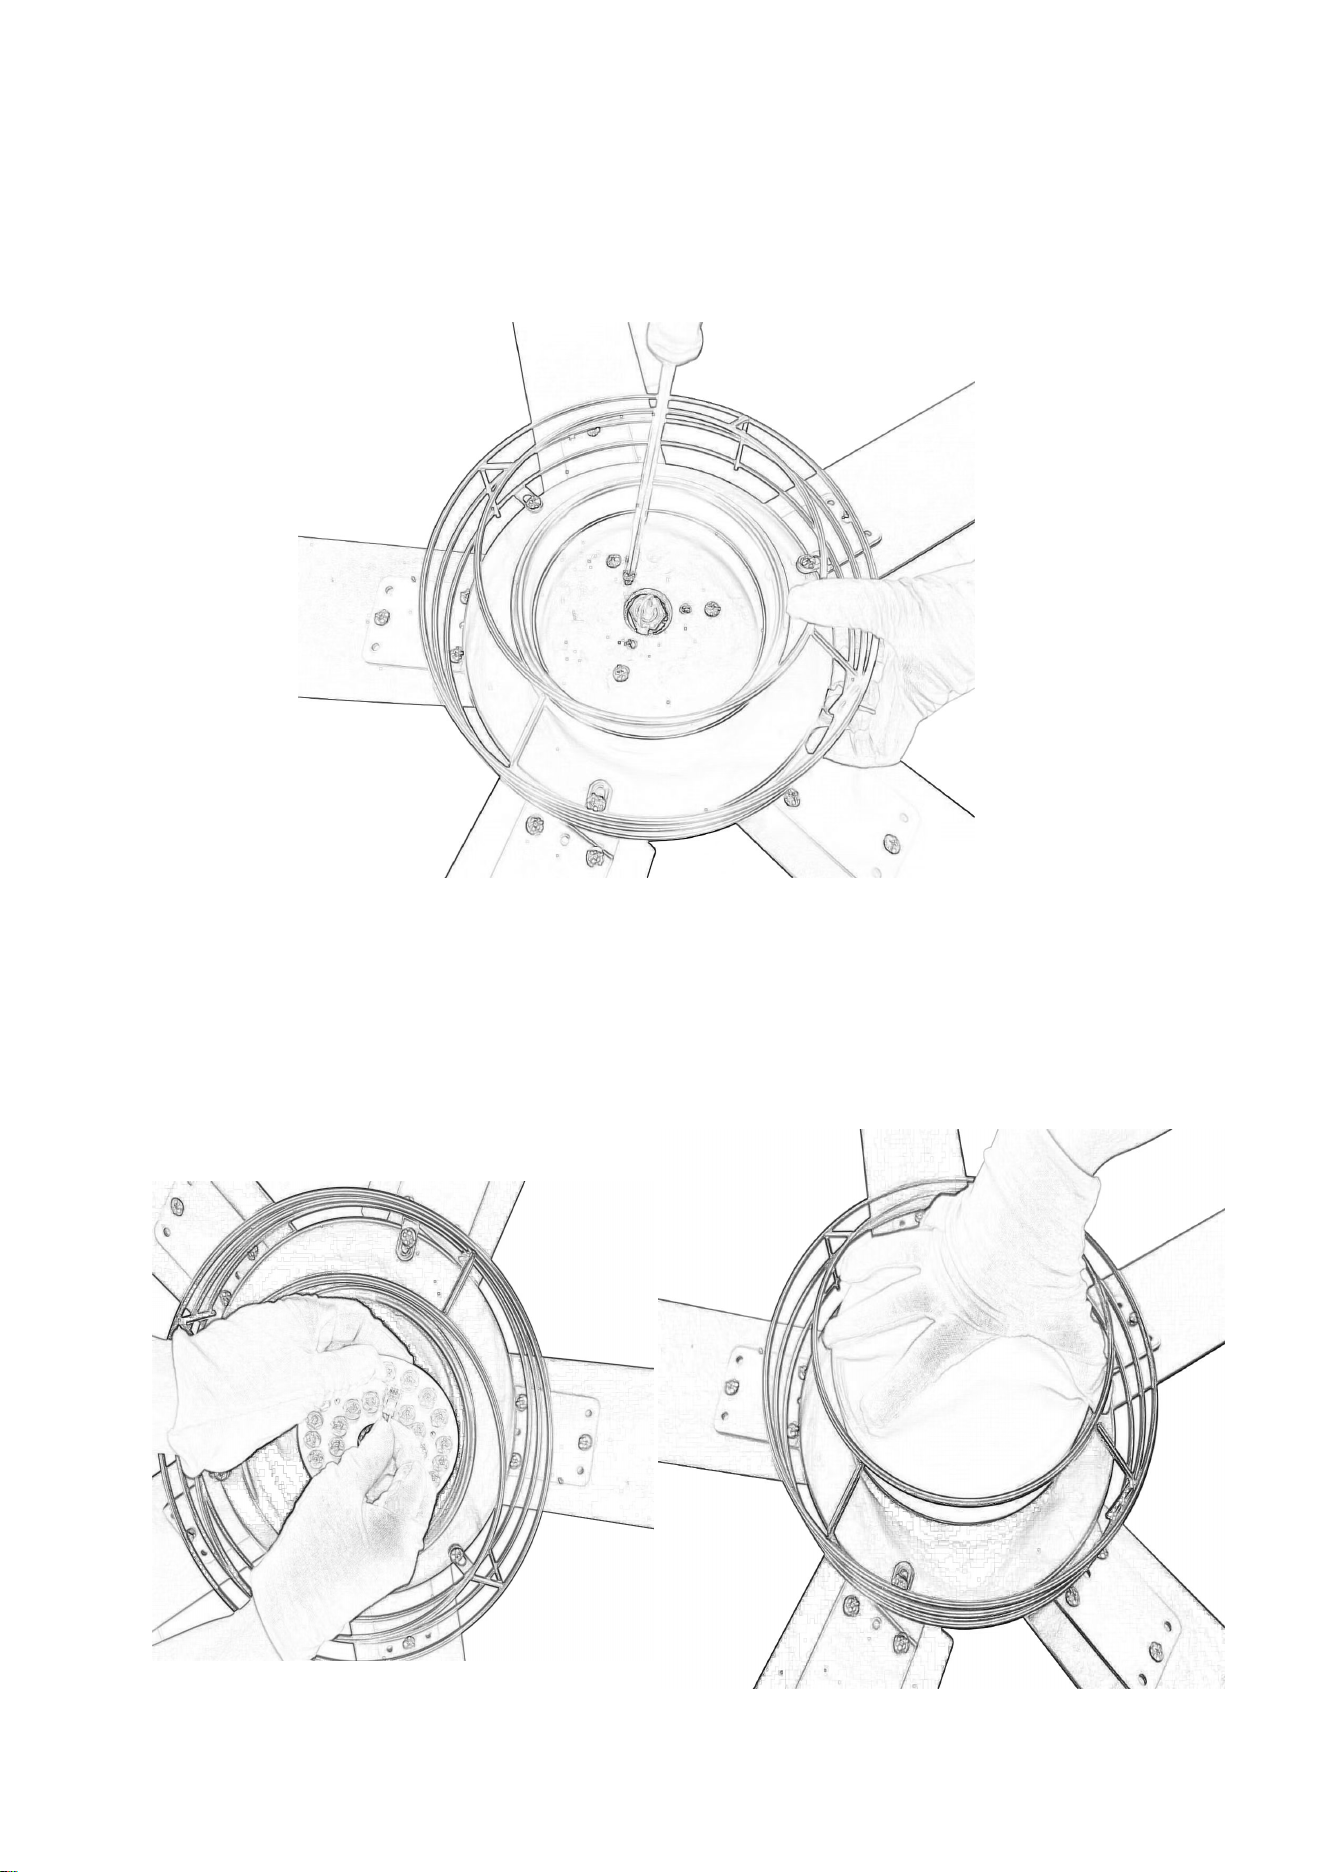
Step 4
The light plate has two mating slots. Position both slots on light plate directly under and in line with
two screws in the lighting switch. Lift the light plate, allowing the two screws to slide into the mating
slots. Rotate the light plate anticlockwise until both screws from the lighting switch drop into the slot
recesses. Tighten all the screws securely.
Step 5
Find the light wire plugs from the motor and guide it throuth the LED panel, Connect the plug to
LED panel and magnetic on the light plate. Place PC shade and twist it tighten into the light plate.
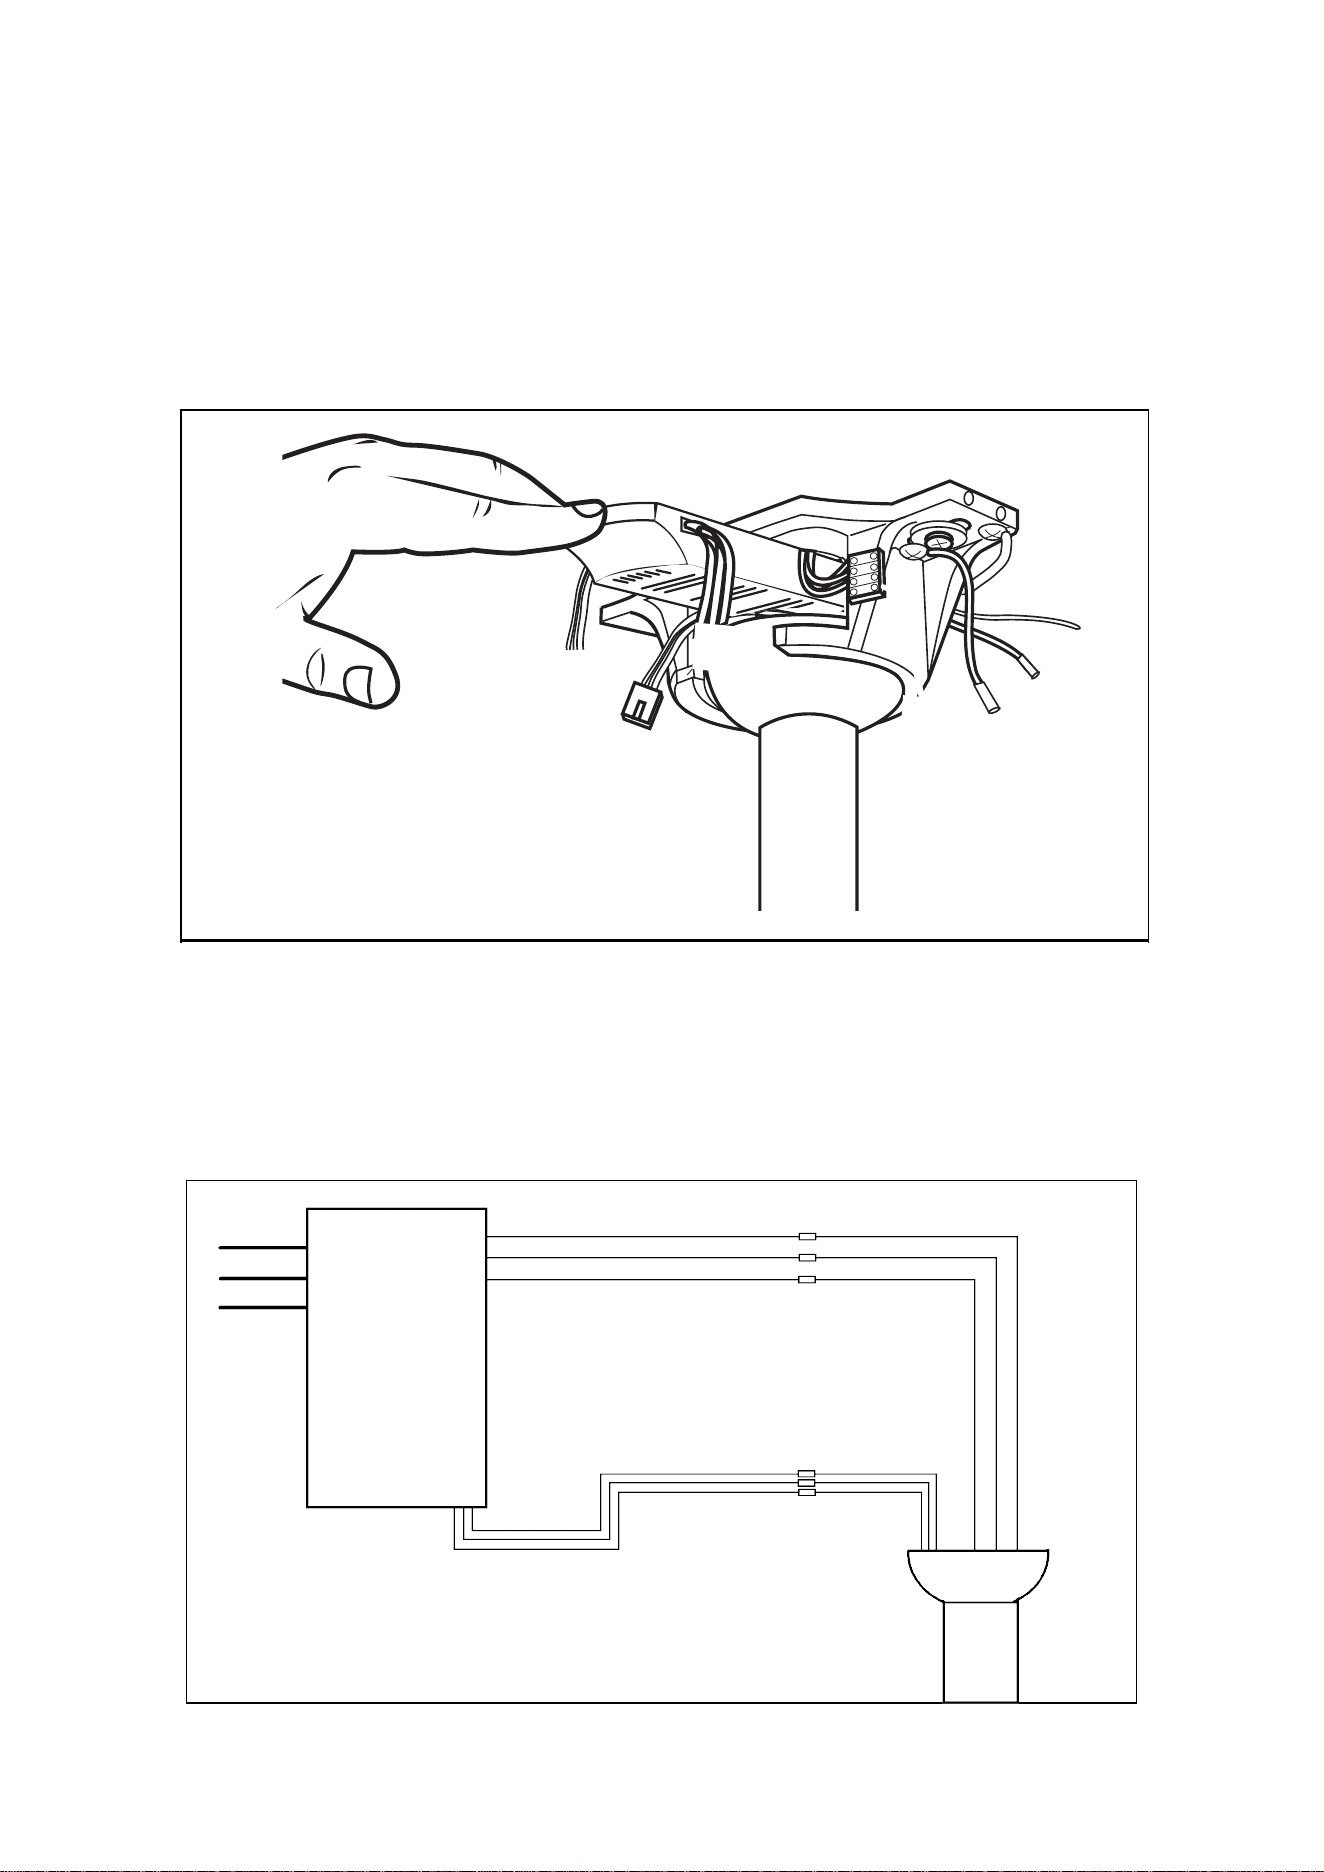
Step 6
Connect the LED drive power wire using the pin molex plug. And fix the LED drive power in the side
of the mounting bracket.
After hanging fan onto the mounting bracket, make sure wire from the ceiling fan and remote receiver
connect with terminal block correctly(1). Slide the remote receiver into the space above the downrod
ball as shown.
Follow diagram above to make wiring connections to the terminal block
on the mountihg bracket.
Remote
receiver
Power
AC-L
AC-N
AC-Earth
Red
Gray
Pink
Motor wire
Light Driver
Yellow
Red
White
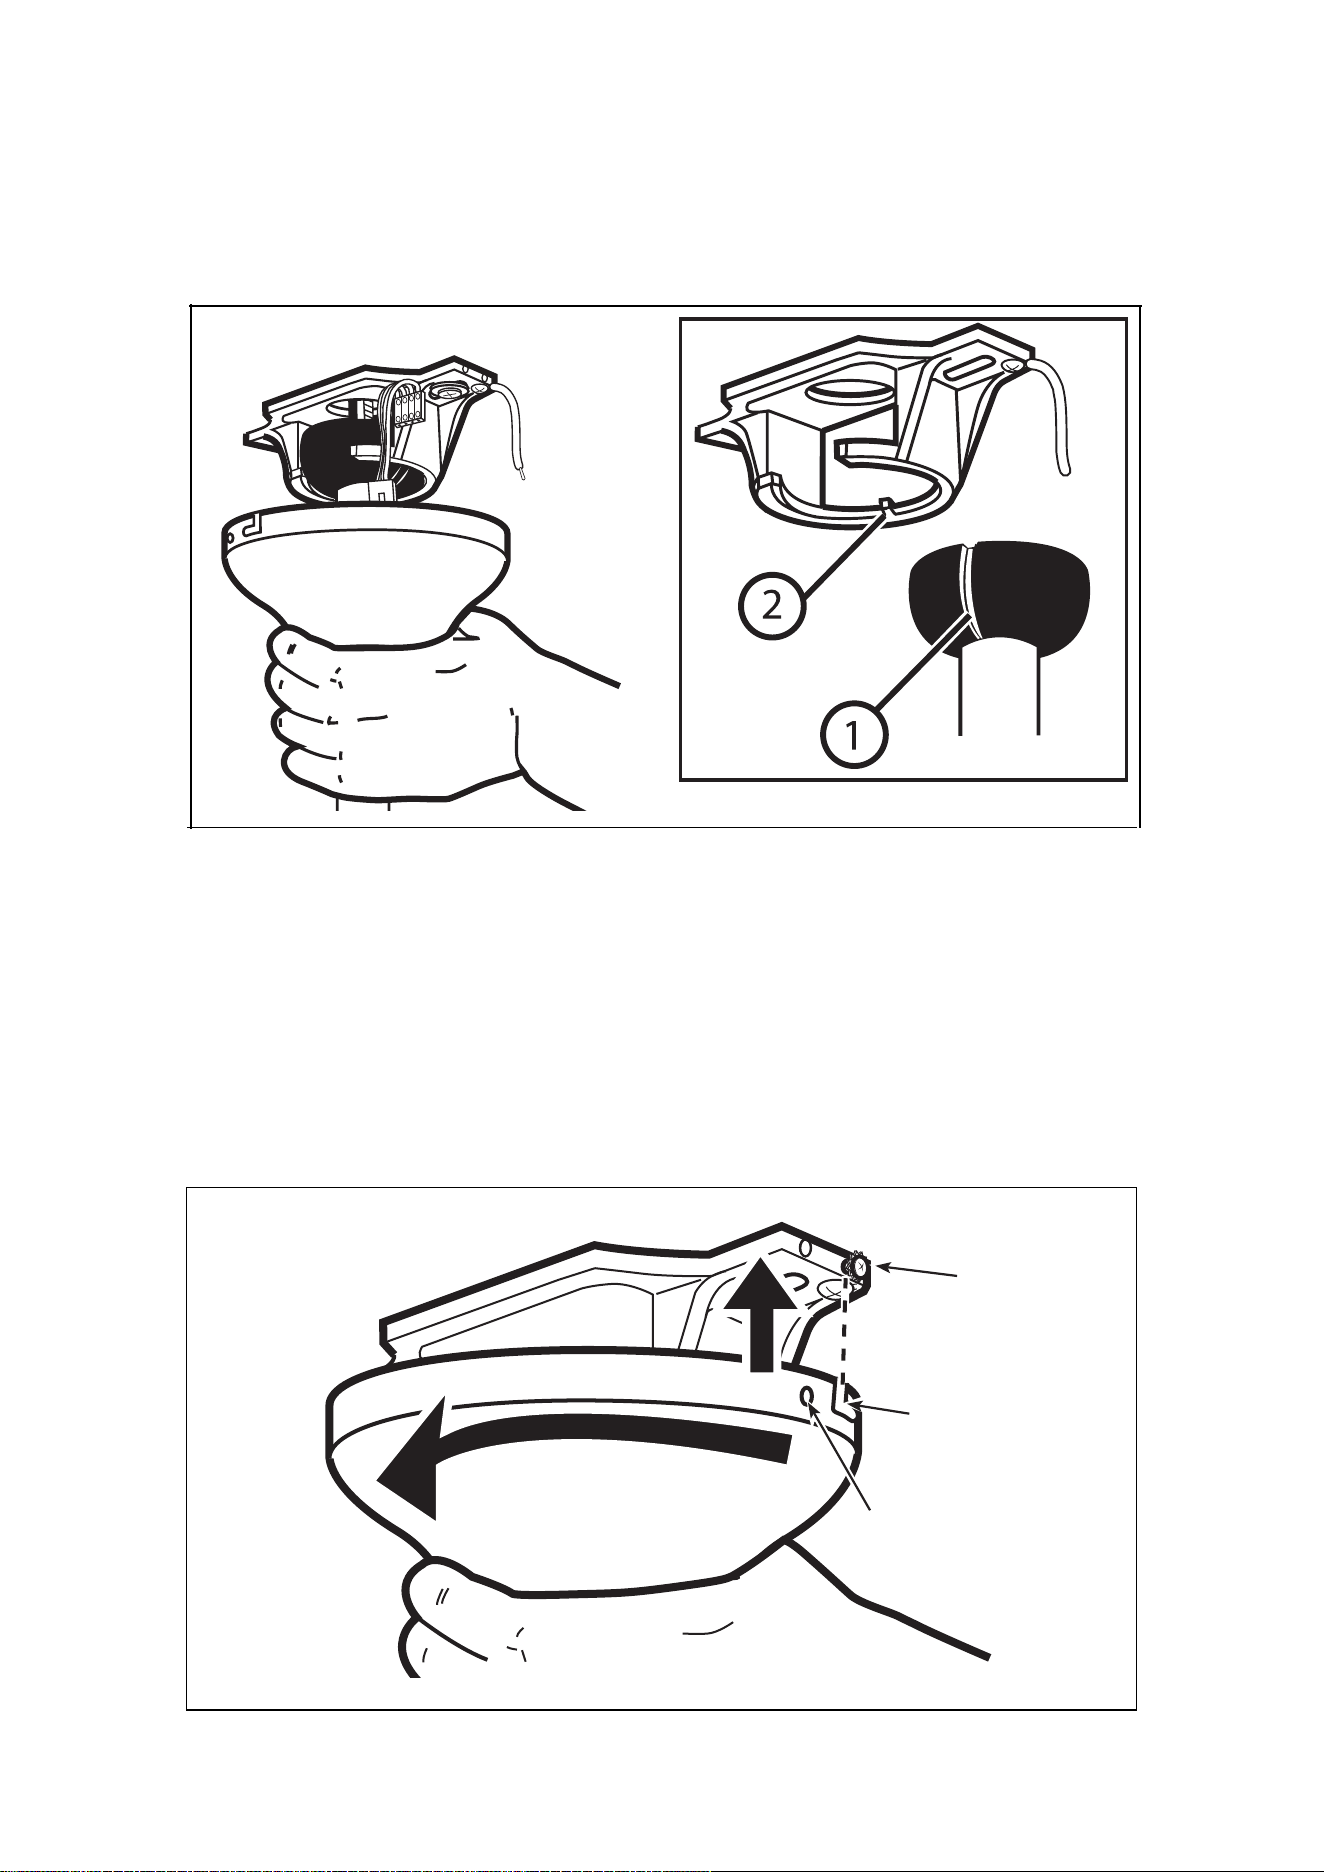
Step 7
Carefully lift fan assembly onto mounting bracket. Rotate fan until notch on downrod ball(1) engages
the ridge (2) on the mounting bracket. This will allow for hands free wiring.
Step 8
For downrod fans, slide the canopy up to the mounting bracket. The canopy has two mating slots
(1) and two mating holes (2). Position both slots on canopy directly under and in line with two
screws in the mounting bracket (3). Lift the canopy, allowing the two screws to slide into the
mating slots. Rotate the canopy until both screws from the mounting bracket drop into the slot
recesses. Tighten screws securely.
2
3
1
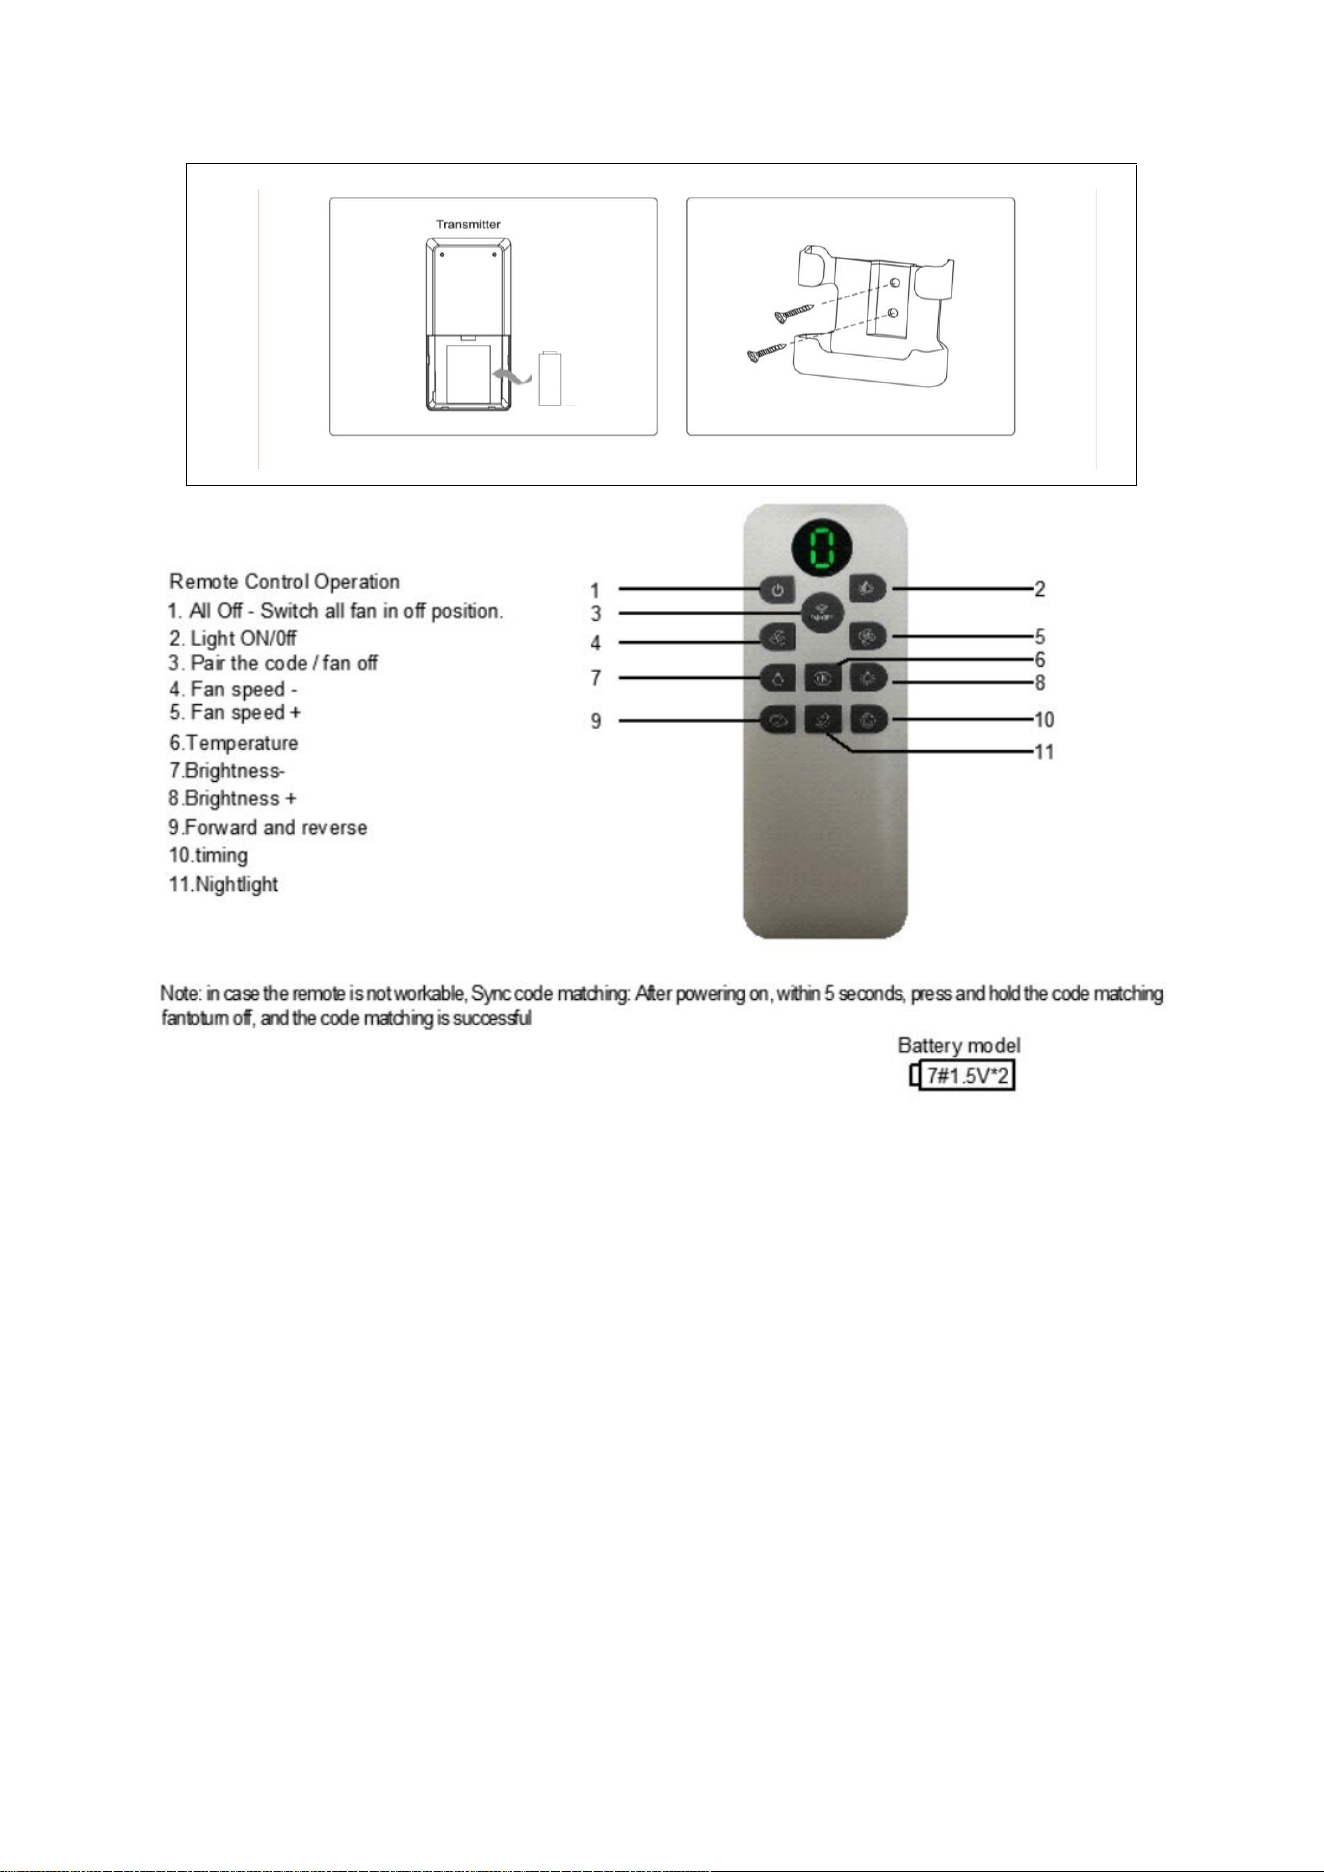
Step 9
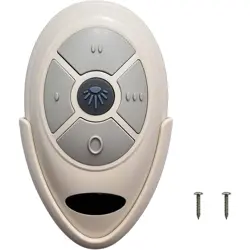
Install two AAA batteries
by removing battery cover on back of transmitter, installing batteries, and
replacing battery cover. If desired, install the transmitter holder onto the wall with included screws.
Operation
Turn on the power and check operation of fan. The remote controls the fan speeds as follows: 1 to 6 speed.
Speed settings for warm or cool weather depend on factors such as room size, ceiling height, number of fans and so
on. The upper housing slide switch controls direction, forward or reverse. Warm weather/down position - (Forward)
Fan turns counterclockwise direction. A downward air flow creates a cooling effect as shown in illustration A.
This allows you to set your air conditioner on a higher temperature setting without affecting your comfort.
Cool weather/up position - (Reverse) Fan turns clockwise direction. An upward airflow moves warm air off the ceiling
area as shown in illustration B.
This allows you to set your heating unit on a lower setting without affecting your comfort.
NOTE: Turn off and wait for fan to stop before changing the setting of the forward/reverse slide switch.
Maintenance
1. Because of the fan’s natural movement, some connections may become loose. Check the support connections,
brackets, and blade attachments twice a year. Make sure they are secure.
2. Clean your fan periodically to help maintain its new appearance over the years. Do not use water when cleaning.
This could damage the motor, or the wood, or possibly cause electrical shock.
3. Use only a soft brush or lint-free cloth to avoid scratching the finish. The plating is sealed with a lacquer coating
to minimize discoloration or tarnishing.
4. There is no need to oil your fan. The motor has permanently lubricated bearings.
OPERATION AND MAINTENANCE

TROUBLESHOOTING GUIDE
TROUBLE
1. If fan does not start:
2. If fan sounds noisy:
3. If fan wobbles:
4. If light does not work:
SUGGESTED REMEDY
1. Check main and branch circuit fuses or circuit breakers.
2. Check wire connections as performed installation. Caution: Make sure main power is turned off.
3. Make sure forward/ reverse switch is firmly in side position. Fan will not operate when switch is in the
middle.
4. if the fan still will not start, contact a qualified electrician. Do not attempt to troubleshoot internal electrical
connections yourself.
1. Check to make sure all screws in motor housing are snug (not over tightened).
2. Check to make sure the screws which attach the fan blade holder to the motor are tight.
3. If using an optional Ceiling Fan Light Kit, check to be sure the screws securing the glassware are finger tight.
Check to be sure light bulb is tight in socket and not touching glass shade. If vibration persists from glass,
remove glass and install a 6mm wide rubber band on glass neck to act as an insulator. Replace glass and
tighten screws against rubber band.
4. Some fan motors are sensitive to signals from Solid State variable speed controls. DO NOT USE a Solid-State
variable speed control.
5. Allow “break-in” period of 24 hours. Most noises associated with a new fan will disappear after this period.
......................................................................................
All blades are weighed and grouped by weight. Natural woods vary in density which could cause the fan to
wobble even though all blades are weight-matched. The following procedures should eliminate most of the
wobble. Check for wobble after each step.
1. Check that all blades are screwed firmly into blade holders.
2. Check that all blade holders are tightened securely to motor.
3. Make sure that canopy and mounting bracket are tightened securely to ceiling joist.
4. Most fan wobble problems are caused when blade levels are unequal. Check this level by selecting a point on
the ceiling above the tip of one of the blades. Measure this distance as shown in Figure 1. Keeping measure
within 3mm, rotate the fan until the next blade is positioned for measurement.
Repeat for each blade. If all
blade levels are not equal, you can adjust blade levels by the following procedure. To adjust a blade tip
down, insert a washer (not supplied) between the blade and blade holder at the screw closest to the motor.
To adjust a blade tip up, insert washer (not supplied) between the blade and blade holder at the two screws
farthest from the motor.
5. If blade wobble is still noticeable, interchanging two adjacent (side by side) blades can redistribute the weight
and possibly result in smoother operation.
1. Check to see that the wire connections are connected.
2. Check for faulty light plate.
3. If light kit will still not operate, contact a qualified electrician for assistance.
Installation errors may be mistaken for defects. If you experience any faults, please check this
Trouble Shooting Chart. If a problem cannot be remedied, please consult with your authorized
electrician and do not attempt any electrical repairs yourself.