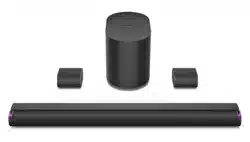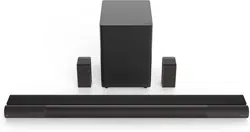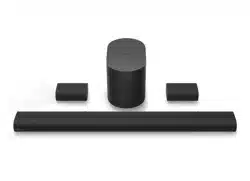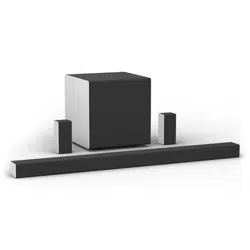
Please read this guide before using the product.
Model: SL514PW-1006
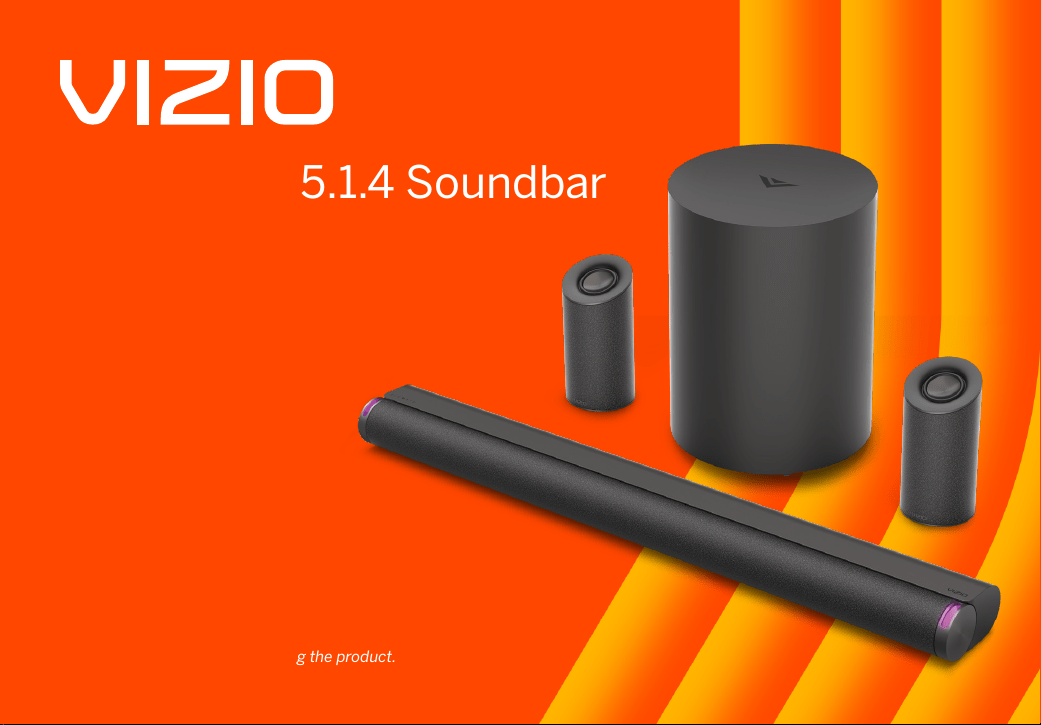
Elevate Pro 5.1.4 Soundbar
User Manual

Accessibility
Contact VIZIO for accessibility support at:
Email: accessibility@vizio.com
Phone: 1-877-698-4746
Binding Arbitration Agreement and Class Action Waiver
This purchase is subject to full VIZIO Terms and Conditions, including Binding Arbitration Agreement and Class Action
Waiver, which may be viewed at vizio.com/en/terms/terms-of-service.
By using this device, you accept those Terms and Conditions.
You have the right to opt out of the Binding Arbitration Agreement and Class Action Waiver within 60 calendar days
of your purchase. Please refer to the Limited Warranty section of this User Manual or view the full VIZIO Terms and
Conditions for opt-out instructions.

Your Unit is designed and manufactured to operate within dened design limits, and misuse may result in electric shock or re. To prevent your Unit from being damaged, the
following rules should be observed for its installation, use, and maintenance. Please read the following safety instructions before operating your Unit. Keep these instructions in
a safe place for future reference.
• Heed all warnings and follow all instructions.
• Do not use this Unit near water.
• Clean only with a dry cloth.
• Do not block any ventilation openings. Install in accordance with the manufacturer’s instructions.
• Do not install near any heat sources such as radiators, heat registers, stoves, or other unit (including ampliers) that produce heat.
• Do not defeat the safety purpose of the polarized or grounding-type plug. A polarized plug has two blades with one wider than the other. A grounding type plug has two
blades and a third grounding prong. The wide blade or the third prong are provided for your safety. If the provided plug does not t into your outlet, consult an electrician for
replacement of the obsolete outlet.
• Protect the power cord from being walked on or pinched particularly at the ends where the plug is located, near convenience receptacles, or where they exit from the Unit.
• Only use attachments/accessories specied by the manufacturer.
• Use only with the stand, tripod, or bracket specied by the manufacturer, or sold with the Unit. When a cart is used, use caution when moving the cart/Unit
combination to avoid injury from tip-over.
• When using the QuickFit mounting feature, the attached VIZIO device shall not exceed 25 pounds in weight.
• Unplug this Unit during lightning storms or when unused for long periods of time.
• Refer all servicing to qualied service personnel. Servicing is required when the Unit has been damaged in any way, such as when the power supply cord or plug is damaged,
liquid has been spilled or objects have fallen into the Unit, the Unit has been exposed to rain or moisture, does not operate normally, or has been dropped.
• To reduce the risk of electric shock or component damage, switch o the power before connecting other components to your Unit.
• Unplug the power cord before cleaning your Unit. Do not use a liquid or a spray cleaner on your Unit. Do not use abrasive cleaners.
• Always use the accessories recommended by the manufacturer to ensure compatibility.
• When moving your Unit from an area of low temperature to an area of high temperature, condensation may form in the housing. Wait before turning on your Unit to avoid
causing re, electric shock, or component damage.
• Slots and openings in the back and bottom of the Unit are provided for ventilation. To ensure reliable operation of your Unit and to protect it from overheating, be sure these
openings are not blocked or covered. Do not place your Unit in a bookcase or cabinet unless proper ventilation is provided.
• Never push any object into the slots and openings on your Unit. Do not place any objects on the top of your Unit. Doing so could short circuit parts causing a re or electric
shock. Never spill liquids on your Unit.
IMPORTANT SAFETY INSTRUCTIONS

• WARNING: Exposure to loud sounds can damage your hearing causing hearing loss and tinnitus (ringing or buzzing in the ears). With continued exposure to loud noises,
ears may become accustomed to the sound level, which may result in permanent damage to hearing without any noticeable discomfort.
• When connected to a power outlet, power is always owing into your Unit. To totally disconnect power, unplug the power cord.
• Do not overload power strips and extension cords. Overloading can result in re or electric shock.
• The wall socket should be located near your Unit and be easily accessible.
• Keep your Unit away from moisture. Do not expose your Unit to rain or moisture. If water penetrates into your Unit, unplug the power cord and contact your dealer.
Continuous use in this case may result in re or electric shock.
• Do not use your Unit if any abnormality occurs. If any smoke or odor becomes apparent, unplug the power cord and contact your dealer immediately. Do not try to repair
your Unit yourself.
• Avoid using dropped or damaged appliances. If your Unit is dropped and the housing is damaged, the internal components may function abnormally. Unplug the power cord
immediately and contact your dealer for repair. Continued use of your Unit may cause re or electric shock.
• Do not install your Unit in an area with heavy dust or high humidity. Operating your Unit in environments with heavy dust or high humidity may cause re or electric shock.
• Ensure that the power cord and any other cables are unplugged before moving your Unit.
• When unplugging your Unit, hold the power plug, not the cord. Pulling on the power cord may damage the wires inside the cord and cause re or electric shock. When your
Unit will not be used for an extended period of time, unplug the power cord.
• To reduce risk of electric shock, do not touch the connector with wet hands.
• Read and follow all warnings printed on the Unit.
• WARNING: This equipment is not waterproof. To prevent a re or shock hazard, do not place any container lled with liquid near the equipment (such as a vase or ower pot)
or expose it to dripping, splashing, rain, or moisture.
• If the main wall plug or the appliance coupler is disconnected, the disconnected device will remain readily operable upon reconnection to an appropriate power source.
• No open ames, such as lighted candles, should be placed on the Unit.
• The ventilation should not be impeded by covering the ventilation openings with items,such as newspapers, table-cloths, curtains, etc.
• The equipment shall be used at maximum 35°C (95°F) ambient temperature.
IMPORTANT SAFETY INSTRUCTIONS
IMPORTANT SAFETY INSTRUCTIONS
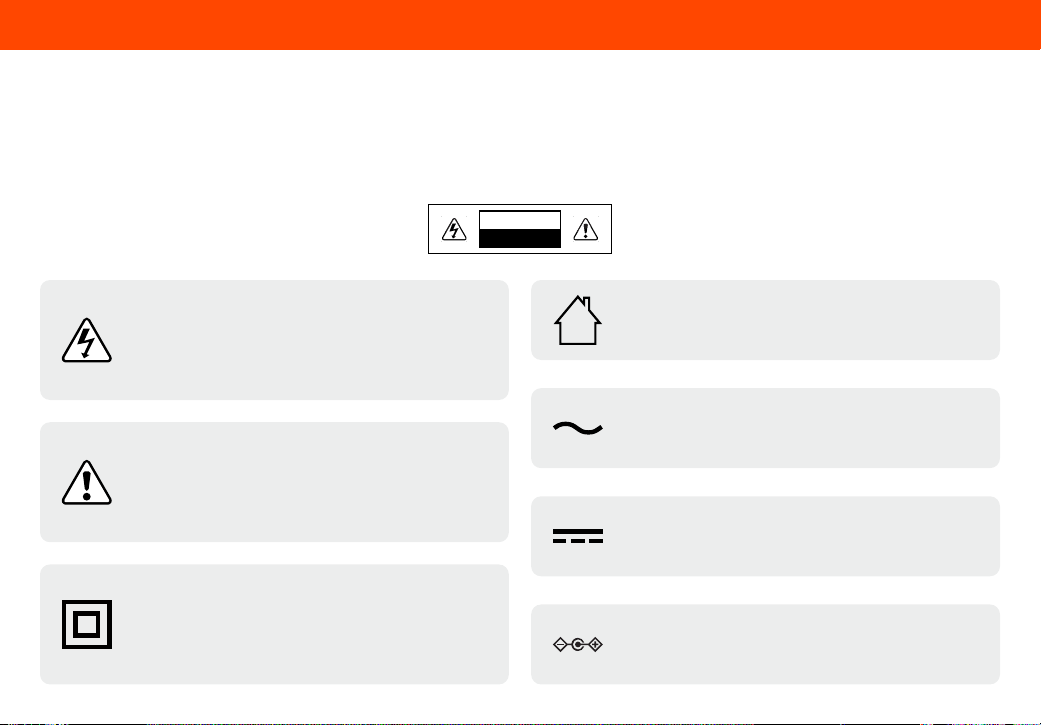
WARNING: To reduce the risk of re or electric shock, do not expose this Unit or components to rain or moisture.
CAUTION
RISK OF ELECTRIC
SHOCK DO NOT OPEN
The lighting ash with arrowhead symbol within an
equilateral triangle is intended to alert the user to the
presence of not isolated dangerous voltage within
the appliance that may be sucient magnitude to
constitute a risk of shock to persons.
The exclamation point within an equilateral triangle is
intended to alert the user to the presence of important
operating and servicing instructions in the literature
accompanying the appliance.
Warning: This equipment is a Class II or double
insulated electrical appliance. It has been designed in
such a way that it does not require a safety connection
to electrical earth.
The below symbols can be found on the soundbar, subwoofer or surround speaker.
This symbol indicates DC voltage.
Note: The surround speaker DC power adapters are used
to disconnect power from the devices.
This symbol indicates AC voltage.
Note: The soundbar and subwoofer power cords are used
to disconnect power from the devices.
This symbol indicates polarity of DC power connector.
Note: The surround speaker DC power adapters are used
to disconnect power from the devices.
For indoor use only.

Table of Contents
Package Contents ......................................................................................................................................................................................................1
Controls & Connections.............................................................................................................................................................................................2
First-time Setup ..........................................................................................................................................................................................................6
Recommended Placement Options ........................................................................................................................................................................11
Controlling Your Soundbar ........................................................................................................................................................................................13
VIZIO Mobile App ........................................................................................................................................................................................................14
Adjusting Audio Settings in the VIZIO Mobile App ................................................................................................................................................15
Bluetooth
®
Pairing for App Control ..........................................................................................................................................................................18
Bluetooth Pairing for Streaming Music ...................................................................................................................................................................19
Unpairing or Disconnecting Your Soundbar ..........................................................................................................................................................21
Using Bluetooth Mode ................................................................................................................................................................................................22
Understanding Standby Mode .................................................................................................................................................................................23
Using the Physical Buttons .......................................................................................................................................................................................24
Re-Pairing the Subwoofer & Surround Speakers ..................................................................................................................................................25
QuickFit
®
Mounting .....................................................................................................................................................................................................26
Wall Mounting ..............................................................................................................................................................................................................27
Product Registration & Support ..............................................................................................................................................................................30
Help & Troubleshooting .............................................................................................................................................................................................31
Limited Warranty ........................................................................................................................................................................................................32
Legal & Compliance ....................................................................................................................................................................................................35
Specications .............................................................................................................................................................................................................. 36
1
SETUP
SETUP
Quick Setup Guide
Safety & Legal Sheet
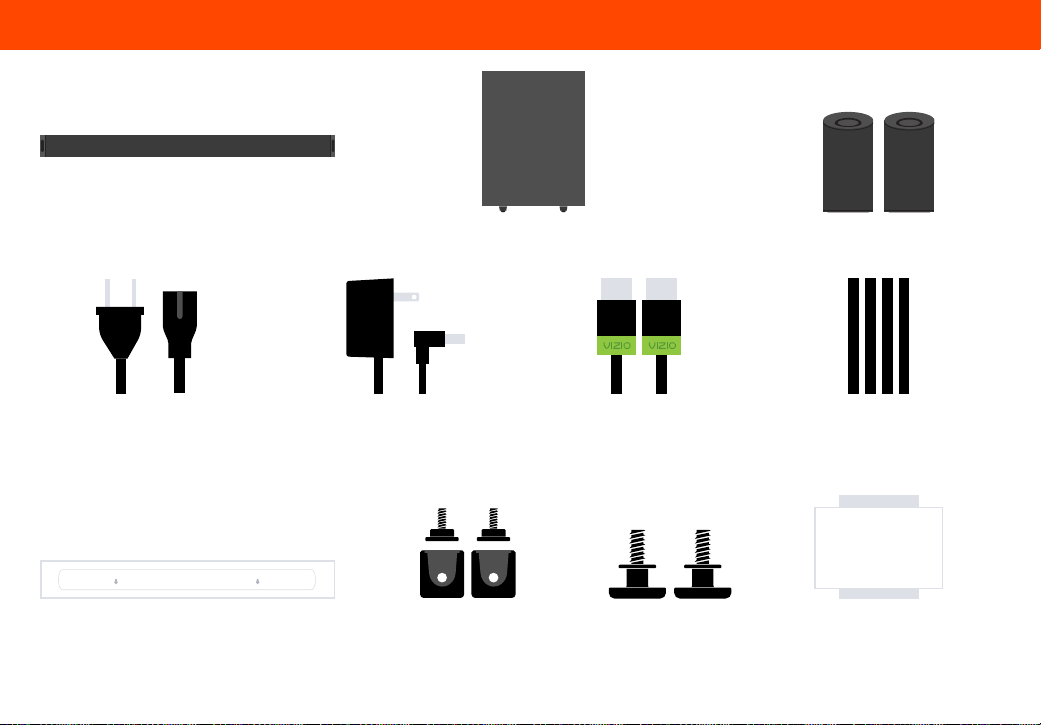
Package Contents
2x QuickFit
®
Screws
Wireless Subwoofer
2x Power Cables HDMI
®
Cable2x Wireless Surround
Power Adapters
4x Cable
Management Straps
2x Wireless Surround Speakers
2 x Wall Mount
Brackets & Screws
Wall Mount Template
VIZIO Soundbar
2
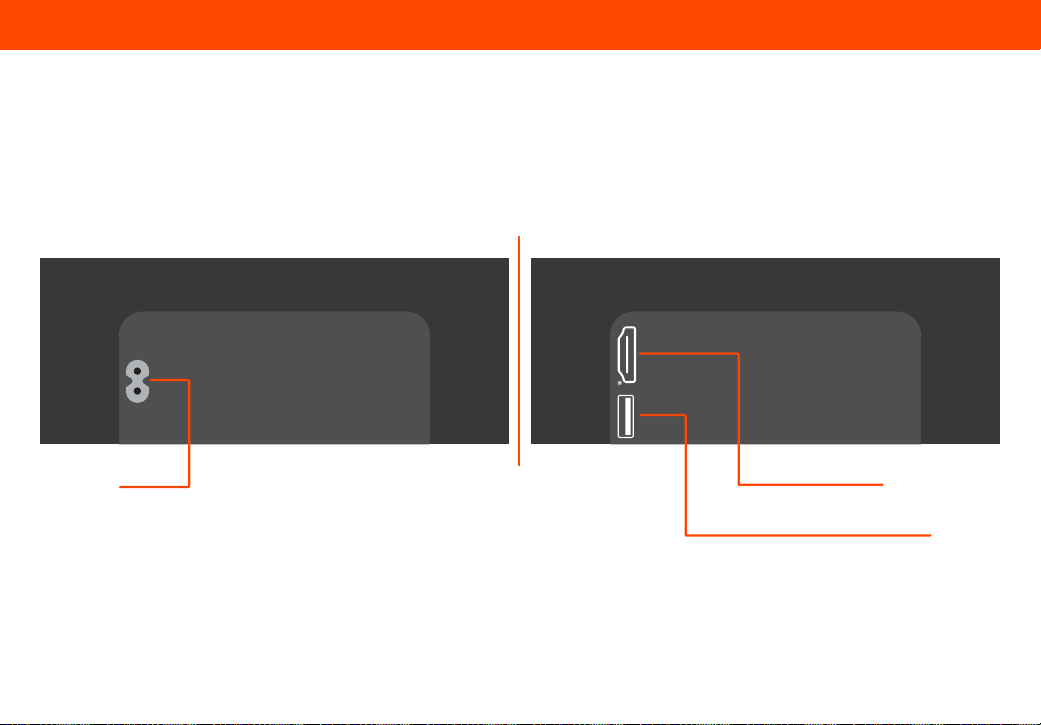
*Supports .WAV and .MP3 le format playback only.
Controls & Connections
Back of Soundbar
HDMI (eARC)
(to TV)
USB
*
in
Power in
3
Controls & Connections
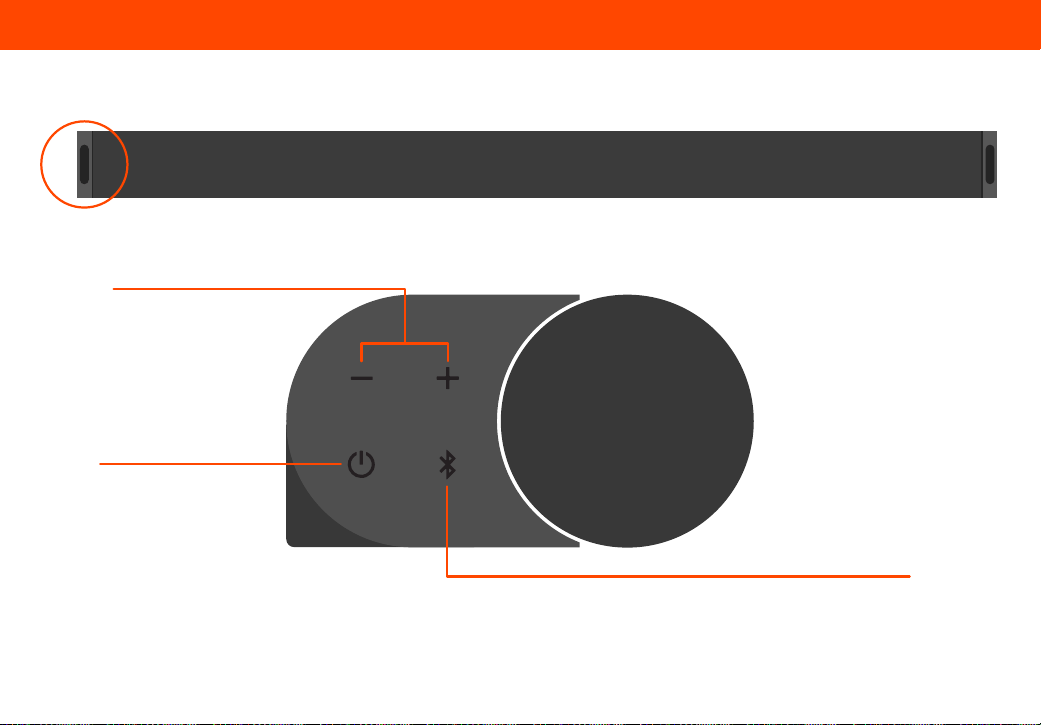
Side of Soundbar
Bluetooth
See Bluetooth Pairing sections
for more information
Power
Press to enter or exit
standby mode
Volume
Increase or decrease the
loudness of the audio
4
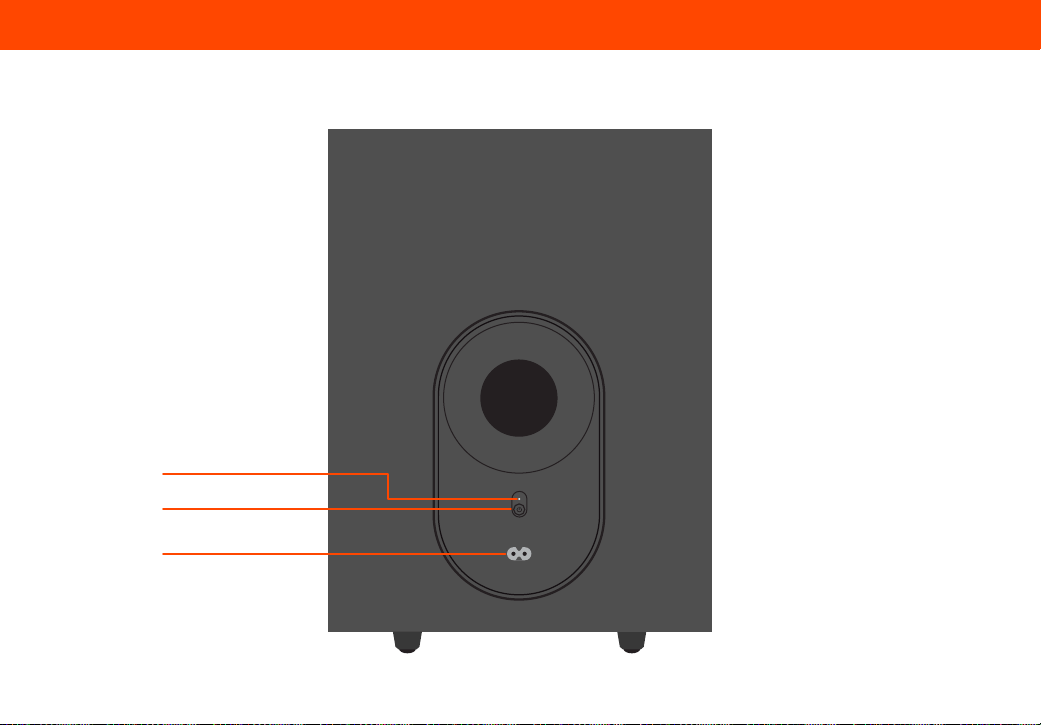
Controls & Connections
Back of Subwoofer
• White LED will be solid when
the subwoofer is connected
• White LED will blink when the
subwoofer is disconnected, or
is in Pairing mode
LED Indicator Behavior
LED Indicator
Power Button
Power Port
5
Controls & Connections
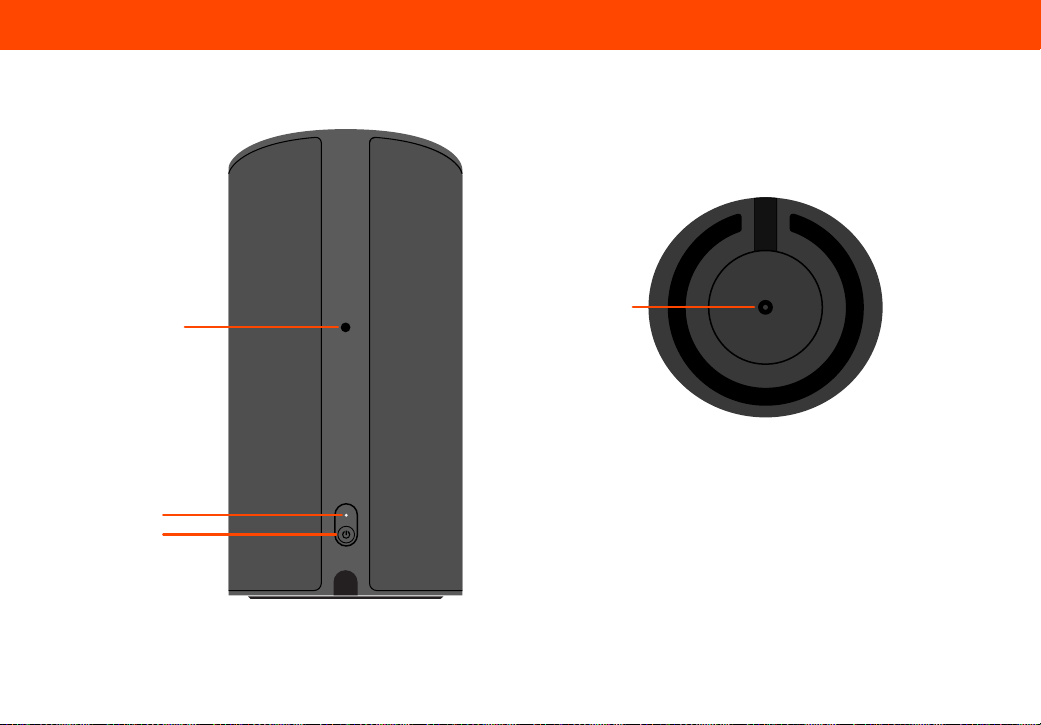
Back of Surround Speaker Bottom of Surround Speaker
LED Indicator
Power Button
Power Port
Wall Mount Hole
• White LED will be solid when the surround
speakers are connected
• White LED will blink when the surround speakers
are disconnected or in Pairing mode
LED Indicator Behavior
6
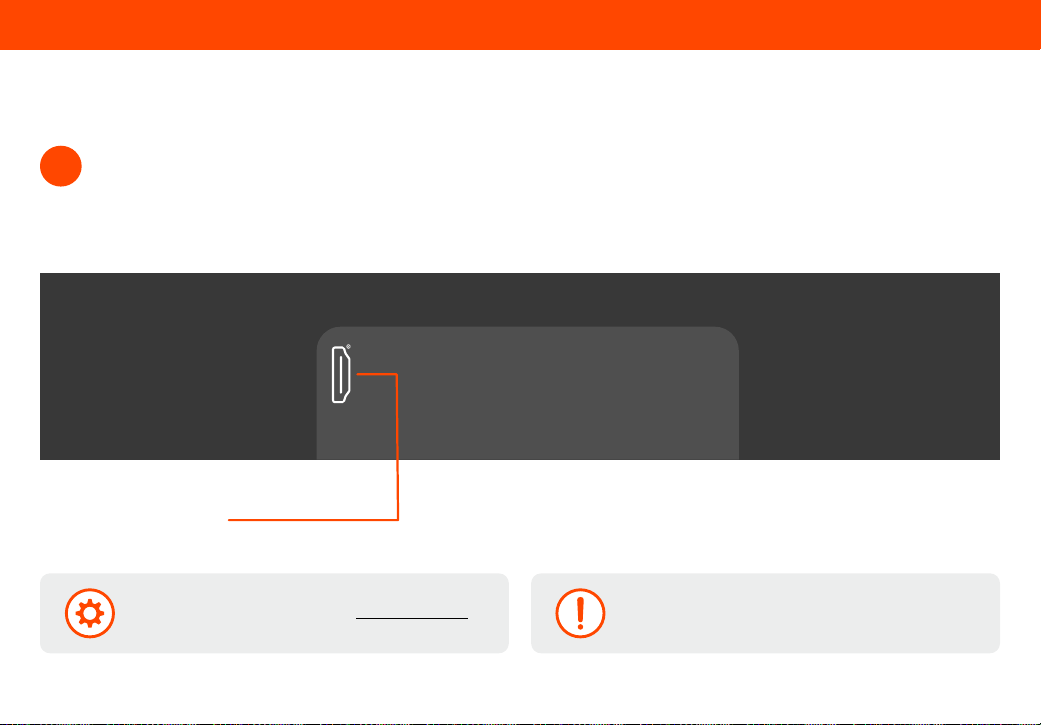
Connect the soundbar to the HDMI ARC or eARC port on your TV with the included HDMI cable.
For optimal audio performance, enable CEC settings on your TV and connect the included HDMI cable to your TV’s HDMI ARC
or HDMI eARC port. Refer to your TV manual to learn more about CEC. Now you can use your existing TV remote control to
control the soundbar audio.
1
First-Time Setup
Be sure the TV port is an audio output, not an audio input.
No TV HDMI port?
Contact VIZIO Customer Support at support.vizio.com if
your TV requires optical connection.
Back of Soundbar
HDMI (eARC) (to TV)
7
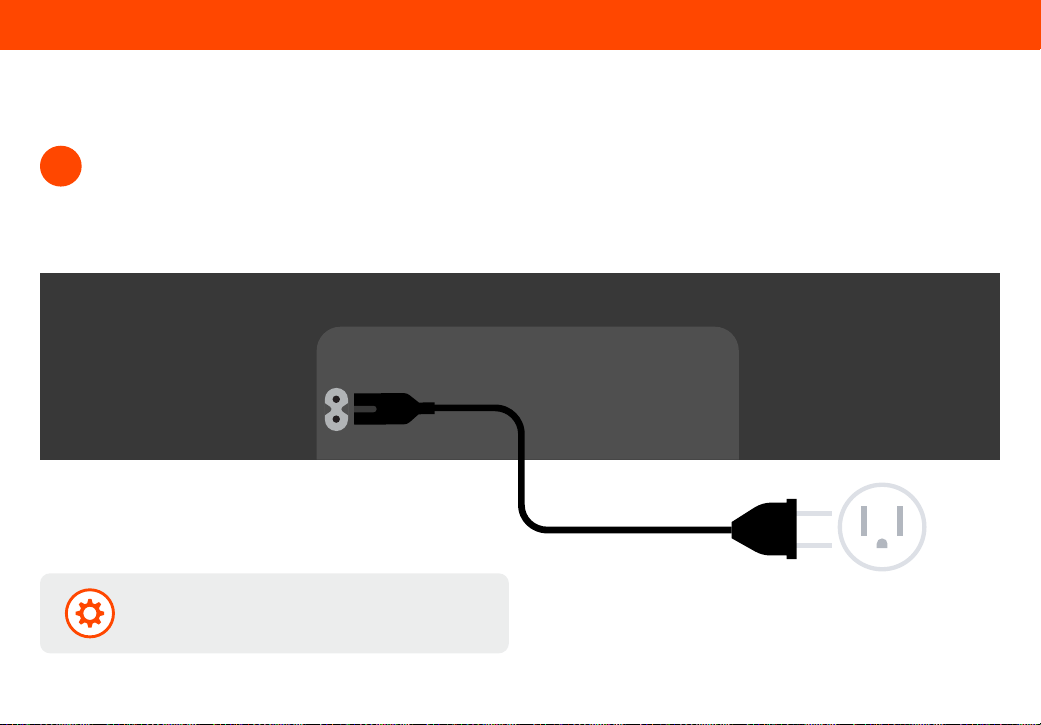
Connect the power cable to the soundbar AC IN as shown. Plug the power cable into an electrical outlet.
When rst plugging the soundbar into an electrical outlet, the soundbar LED will be a bright white and a welcome tone will play.
The soundbar power LED light indicator will then turn o.
2
Back of Soundbar
First-Time Setup
If preferred, the the power LED light can be toggled ON
in the VIZIO mobile app.
8
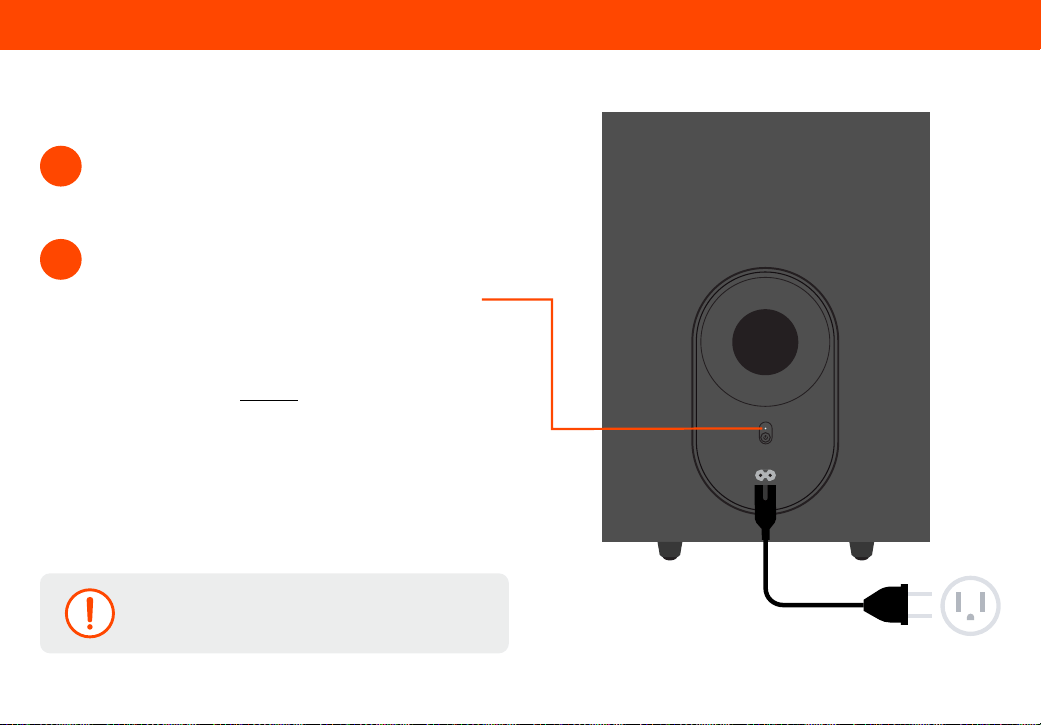
Connect the power cable to the subwoofer AC IN as
shown. Plug the power cable into an electrical outlet.
3
4
The subwoofer should automatically power ON and link
to the soundbar when plugged in.
The LED will glow solid to conrm connection with the
soundbar.
If the subwoofer LED is blinking, it may be disconnected.
Please refer to the Re-Pairing a Subwoofer & Surround
Speakers section on page 25.
Back of Subwoofer
First-Time Setup
If a hard reset is needed for troubleshooting, unplug the
subwoofer, wait 5 seconds, then plug it back in.
9
Bottom of Surround Speakers
First-Time Setup
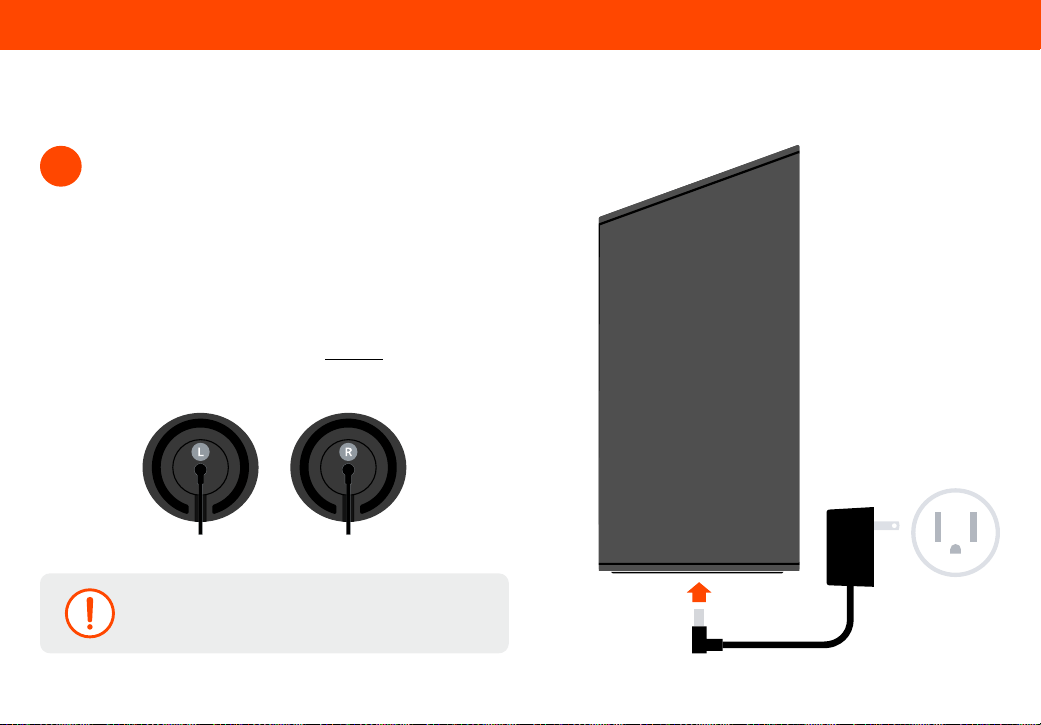
Connect the power cables to the surround speakers as
shown. Plug power cables into working electrical outlets.
The surround speaker will automatically power ON and
connect to the soundbar when plugged in.
The LED will glow solid to conrm connection with the
soundbar.
If the surround speaker LED is blinking, it may be
disconnected. Please refer to the Re-Pairing a Subwoofer
& Surround Speakers section on page 25.
5
Cables should be inserted into the cable slot so the
surround speakers sit at on the table.
10
Soundbar
First-Time Setup
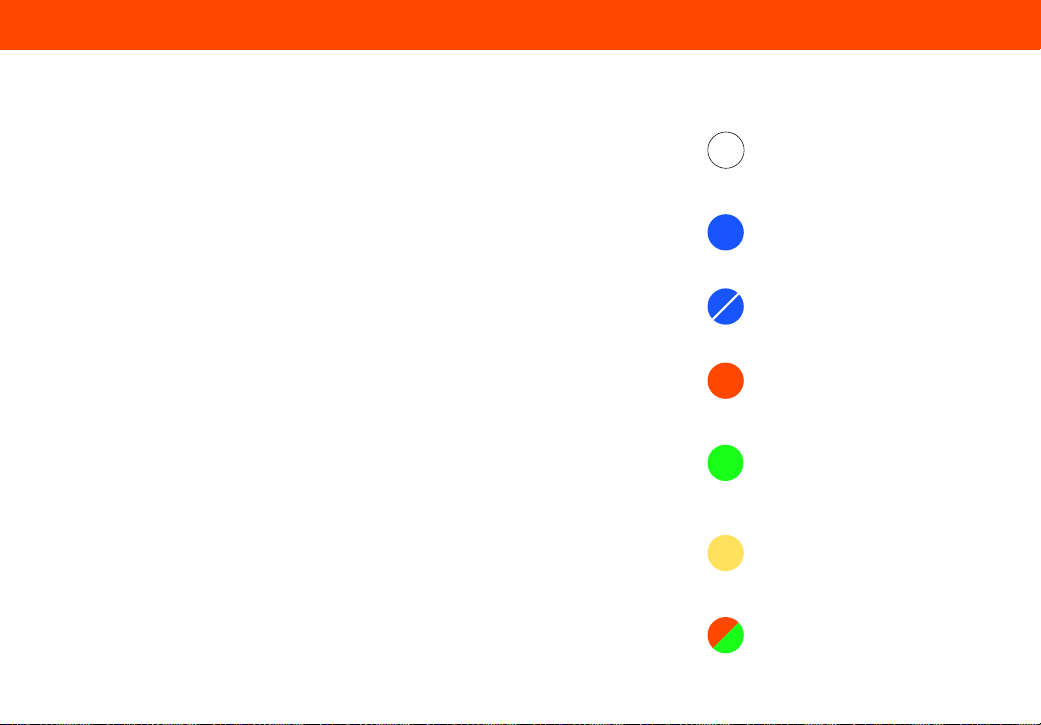
Your soundbar has an Auto HDMI feature for easy audio enjoyment.
• If using Bluetooth with the soundbar, the soundbar will default to the TV as the
audio source when the TV is turned on.
• If using Bluetooth with the soundbar when the TV is on, and the TV volume is
adjusted with its remote control, Bluetooth will be disconnected and the soundbar
will switch to TV audio.
• The VIZIO mobile app has a toggle to turn ‘Auto HDMI’ ON/OFF (when toggled OFF
this removes the automatic switch to TV Audio from Bluetooth allowing volume
control with the TV remote for Bluetooth content).
Soundbar behaviors
• Soundbar defaults to HDMI input when plugged in and powered ON.
• Soundbar enters Standby Mode when TV powers OFF or when Soundbar Power
panel button is pressed.
• If the bar is in Standby Mode, press and release the Volume (+) on the soundbar
to wake up the soundbar.
Soundbar LED behavior when connected to a VIZIO TV
• When volume adjustments are made, the LED will not blink. Reference the TV
screen to see volume adjustment.
• The white LED will slowly blink when the Soundbar is MUTED.
Soundbar LED behavior when connected to a non-VIZIO TV
• When volume is adjusted the LED will blink with every adjustment made.
• The white LED will slowly blink when the Soundbar is MUTED.
White
Power indicator
Lights up full bright then turns o
Dark Blue
Bluetooth input
Orange
USB input
Green
Dolby Atmos
®
content is detected
Bright light for 2 seconds, then dims o
Yellow
DTS:X
®
content is detected
Bright light for 2 seconds, then dims o
Orange + Green Flashing
Firmware is being updated
Soundbar LED light guide
Dark Blue Flashing
Bluetooth pairing mode
11
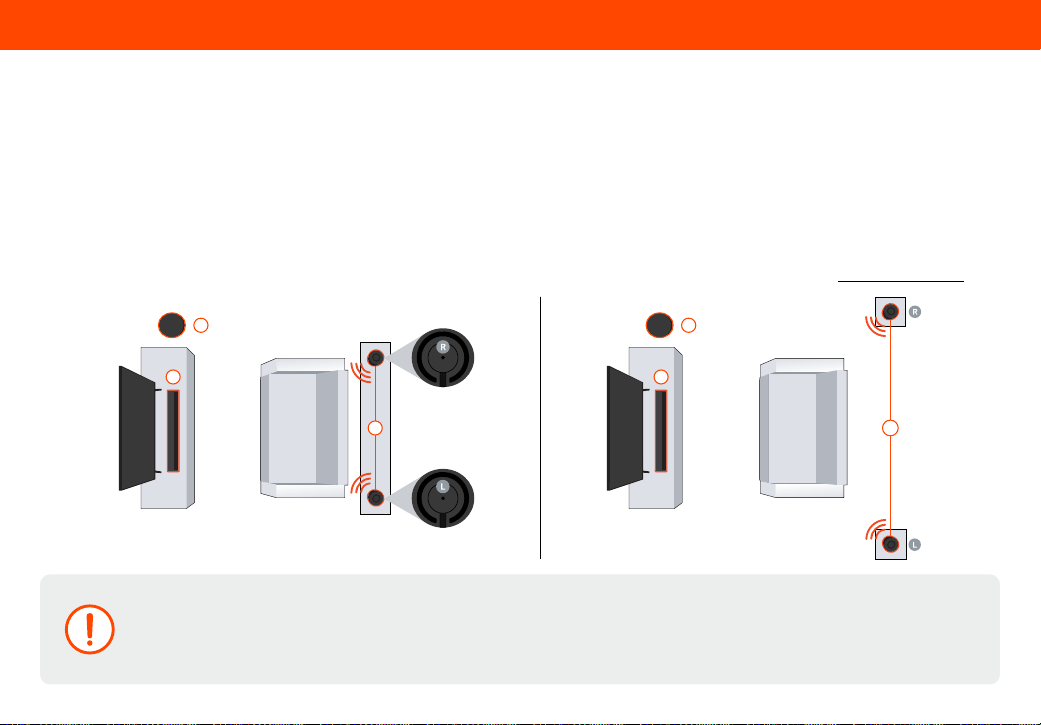
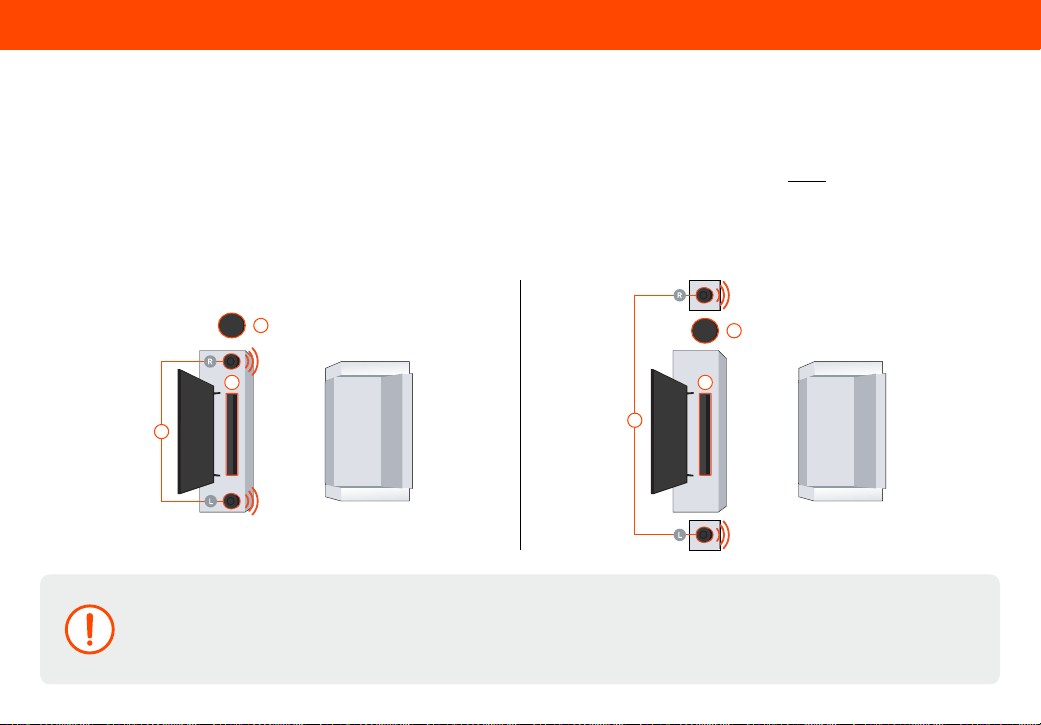
Position the soundbar (A), wireless subwoofer (B), and wireless surround speakers (C) to your desired room layout. For the best audio
experience, surround speakers should be placed in line with each other, with their front VIZIO logos pointed toward the center of your
seating, and the subwoofer placed in the corner of the room by the same wall as the TV. Use the VIZIO mobile app to produce the
optimal audio experience based on your setup.
Do not place the wireless surrounds on the oor, as optimal position is at or above ear level. Wireless surround speakers should remain
within 20 feet or closer for optimal connectivity, with a maximum range of 30 feet.
Note: This Soundbar comes with two QuickFit mounting screws. QuickFit allows you to attach this soundbar to select VIZIO TVs. For more information, visit www.vizio.com/quickt.
Recommended Placement Options
Recommended Rear Placement
Important
Place the wireless surrounds behind your seating position, to your right and left as you face the television. Look at the bottom of each
wireless speaker to identify which speaker is the Left (L) or Right (R).
Do not block the subwoofer port.
C
A
*
bottom of
surround
speaker
B
C
A
B
12
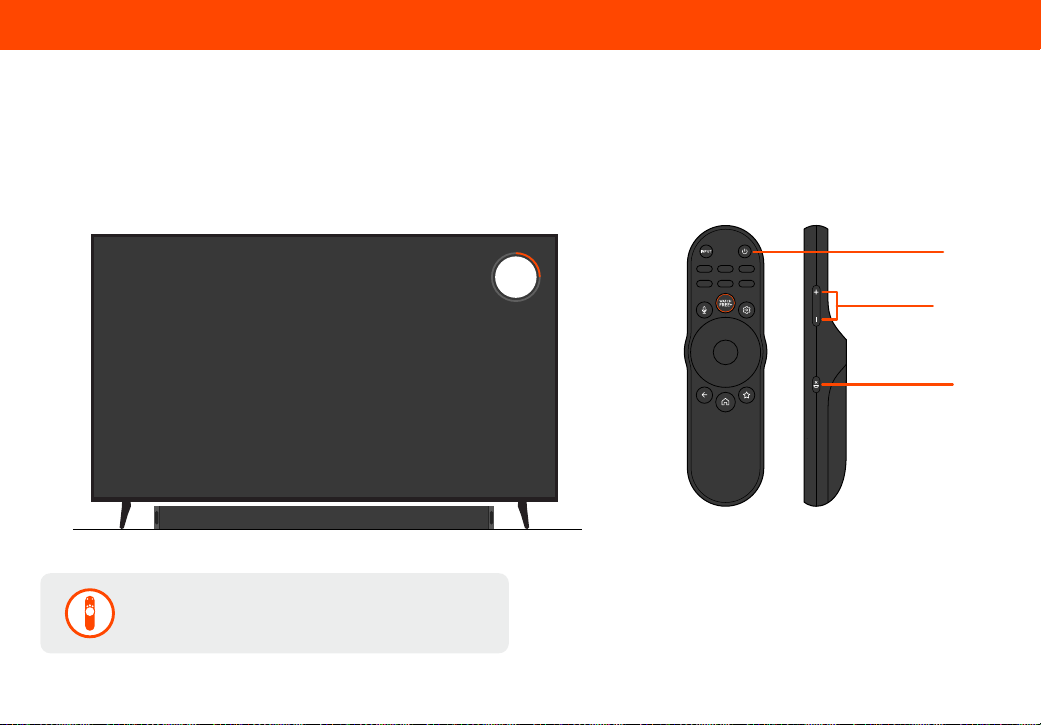
In rooms where ideal placement of the surround sound speakers is not practical, you can also place the soundbar (A), subwoofer (B),
and surround sound speakers (C) as shown below. Do not place the wireless surrounds on the oor, as optimal position is at or above ear
level. Use the VIZIO mobile app to nalize your audio setup. Refer to the VIZIO Mobile App section on page 14-15.
If placing surrounds in front of your seating area, select Front Mode under surround speaker settings in the VIZIO mobile app to produce
the optimal audio experience. Surround speakers should be placed in line with each other and the subwoofer placed in the corner of the
room by the same wall as the TV for the best audio experience.
Recommended Placement Options
Alternative Front Placement Options
Important
If the wireless surround speakers are in front of your seating position, place them to your right and left as you face the television.
Look at the bottom of each wireless speaker to identify which speaker is the Left (L) or Right (R).
Do not block the subwoofer port.
A
C
B
C
A
B
13
Controlling Your Soundbar
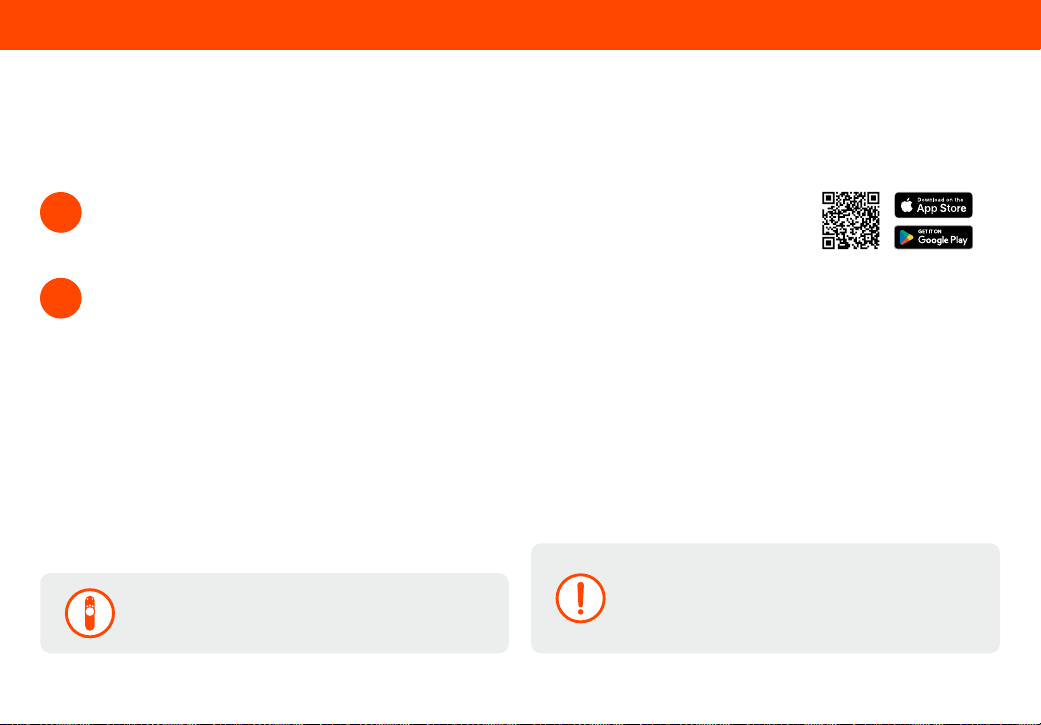
Use your existing TV remote to power on your TV; your soundbar will automatically wake up.
Use your TV remote to adjust the volume and to mute. Soundbar remote control not included.
How to Control Your Soundbar
Example Remote
To control the soundbar with your TV remote, the TV
must be ON.
30
VIZIO Elevate
r
Power
Mute
Volume
14
VIZIO Mobile App
The VIZIO mobile app and a Walmart account are required for control of soundbar functionality, settings, and to receive system
updates. Scan to download.
Take control with the VIZIO Mobile App
No smart phone?
Limited audio settings can be controlled via the TV remote.
Download the VIZIO mobile app. Create, or login with, your Walmart account.
Activate Bluetooth on your phone while standing next to your soundbar that is powered ON.
1
The soundbar can only be connected to one device at a
time. Your app will be connected to the soundbar as long
as it is open on your phone. When you close or swipe away
the app, it will disconnect to allow any other paired user to
connect and control the soundbar.
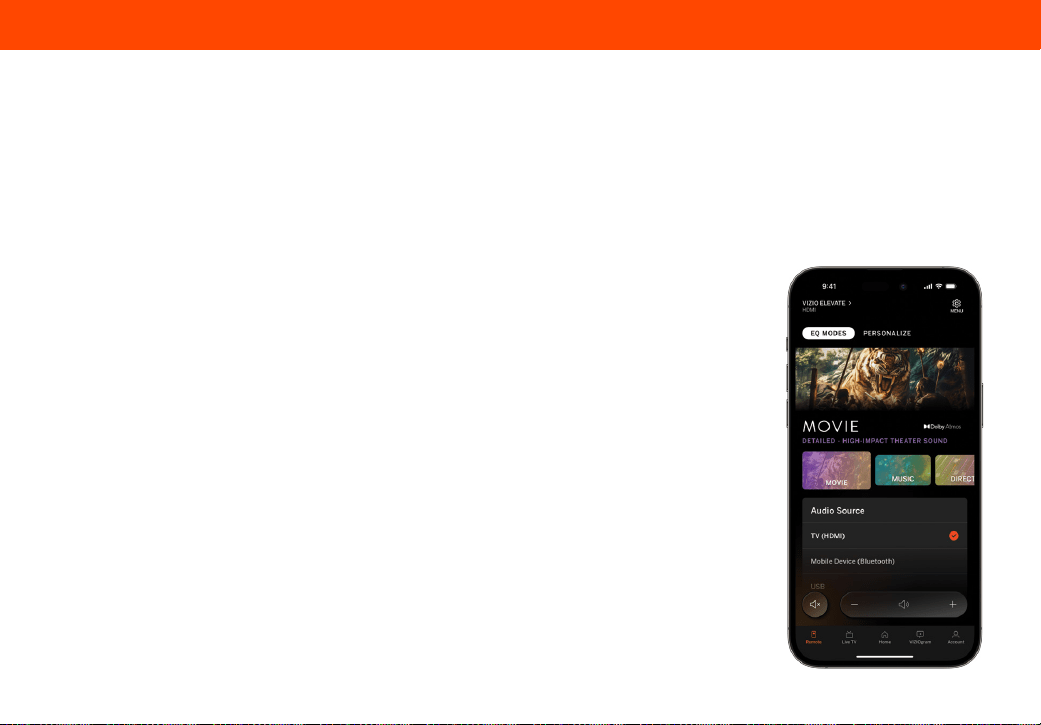
Open the VIZIO mobile app to pair and connect to the soundbar. In the VIZIO mobile app, press the remote tab at the
bottom left of the screen and tap to select your soundbar from the list of discovered devices (VIZIO Elevate).
The app automatically discovers your soundbar for the rst 72 hours after rst plugging in your soundbar.
Note: If you have already connected the App with another VIZIO TV or Soundbar, and you are on that device’s screen, tap the device name to open the list of
available devices to pair.
Once paired, you can adjust audio levels and enable Bluetooth music streaming in the app.
2
If pairing after the rst 72 hours, quickly press the soundbar Bluetooth button to initiate the pairing process for up to 1 hour
and follow the directions in step 2.
15
Adjusting Audio Settings in the VIZIO Mobile App
EQ Modes
• Movie: Optimized for theatrical movies.
(Default EQ mode)
• Music: Optimized for music.
(This is the default setting when streaming via Bluetooth)
• Direct: Plays the audio as the creator intended.
(Removes virtualization and overrides Rear Always On enhancements)
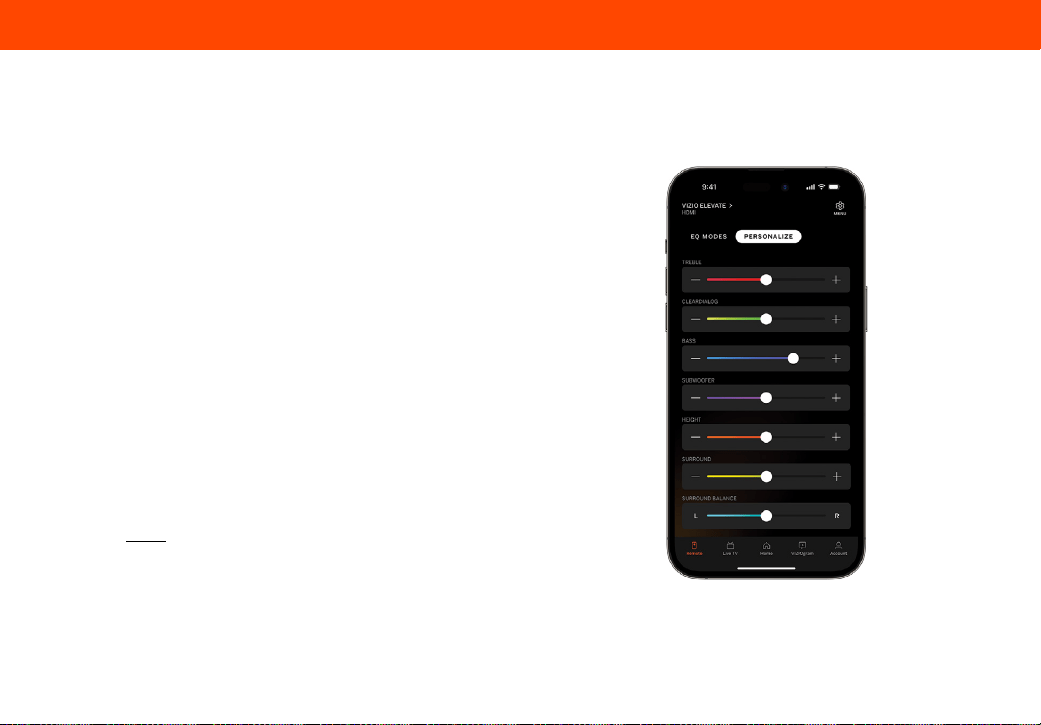
Personalized Audio Settings
• Bass: Adjusts low frequency audio.
• Treble: Adjusts high frequency audio.
• ClearDialog: Designed to keep voices clear, even when
background sounds get loud.
• Subwoofer: Adjusts the deep bass intensity.
• Height Level: Increases the immersive sound eect when
Dolby Atmos and DTS:X content is detected.
• Surround Volume: Adjusts the overall volume of the
surround speakers.
• Surround Balance: Adjusts the sound balance between
the Left and Right surround speakers.
(Ex: If the Right surround is further away from your seating area than the Left,
you may want to adjust the balance to favor the Right surround speaker so both
surround speakers are at the same level.)
Surround Modes
• Rear Always On: Automatically analyzes and converts audio
content to deliver enhanced surround sound audio.
(Recommended setting)
• Dual: Changes soundbar to stereo mode and surround speakers
play the same sound.
(Surrounds mirror the soundbar audio)
• Front: Apply if surround
speakers are front facing
and placed on either side of
the soundbar. This will utilize
special processing which
makes the surround sound
seem like it’s coming from
behind the listener.
Screen images are simulated and may vary.
16
Adjusting Audio Settings in the VIZIO Mobile App
Advanced Audio Settings
• Night Mode: Reduces the subwoofer level. Night Mode is
turned o when the soundbar goes into standby mode.
(Ex: Use to accommodate sleeping babies or easily annoyed apartment neighbors.)
• DTS Virtual: X: Provides spatial enhancement that creates
immersive surround and height with any content.
(Feature is disabled with Direct EQ or Direct Audio mode)
• TruVolume: Automatically adjusts the audio level to reduce
very loud sounds and increase very quiet sounds for a more
even listening experience.
• Speaker Test: Runs a pink noise test through each speaker
to ensure all speakers are functioning properly and in the
correct locations.
• AV Delay: Adjusts the audio to match a speaker’s lip
movements in TV shows or movies.
• Power Light: Toggle the Soundbar’s LED to be ON or OFF.
• Auto HDMI: Toggle Auto HDMI feature ON or OFF.
(Refer to page 10)
• Factory Reset: Restores default audio settings and unpairs
all paired Bluetooth Devices.
• Reset Audio Settings: Restores default audio settings but
keeps all paired Bluetooth Devices.
Screen images are simulated and may vary.
17
Adjusting Audio Settings in the VIZIO Mobile App
Home Audio. Elevated.
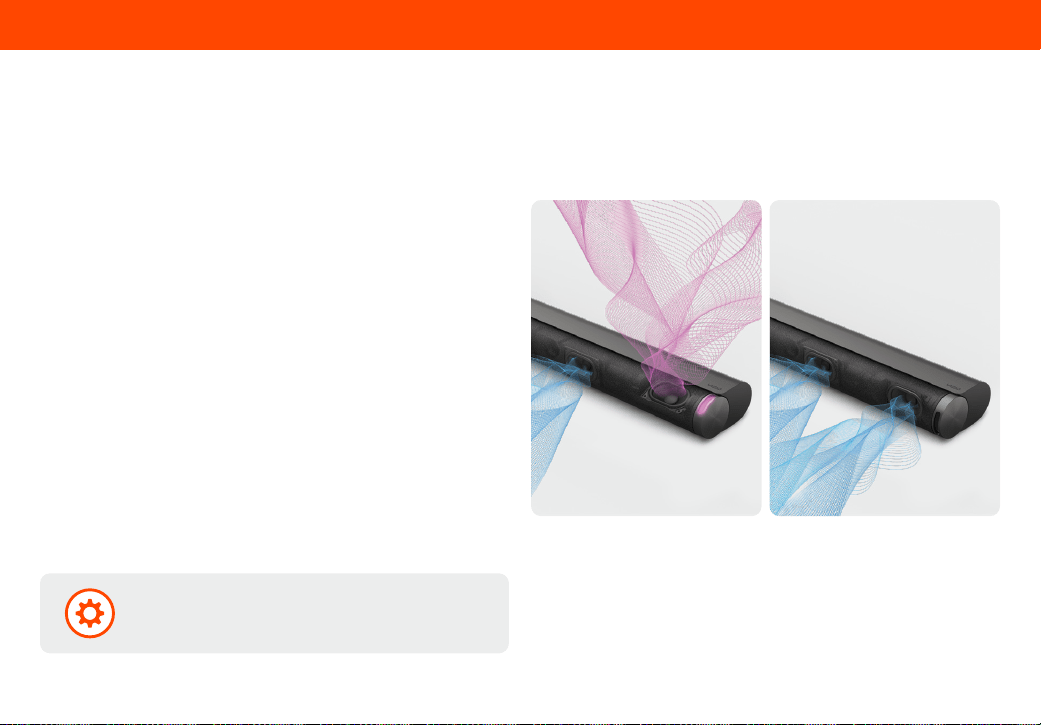
Experience the ultimate in surround sound. Elevate features adaptive height speakers that automatically rotate up when Dolby Atmos
®
and DTS:X
®
content is detected, reecting sound o the ceiling for a thrilling cinematic experience.
Elevate Height Speaker Settings
• Up: Keeps the soundbar height speakers in the upring
position, regardless of audio format.
• Wide: Keeps the soundbar height speakers in the forward
facing position, regardless of audio format.
• Auto (default): Soundbar height speakers are in the
forward facing position and automatically moves them
into the upring position when Dolby Atmos content
is detected. Once Dolby Atmos content is no longer
detected, the speakers will return to forward facing.
• Elevate LED: Adjust the Elevate soundbar LED light colors
or to turn them o.
(Default color: Magenta)
You can customize the height speaker position and color
of the LED lights on the Elevate soundbar through the
VIZIO mobile app.
Upward-ring immersive sound
Forward-facing powerful sound
18
Bluetooth Pairing for App Control
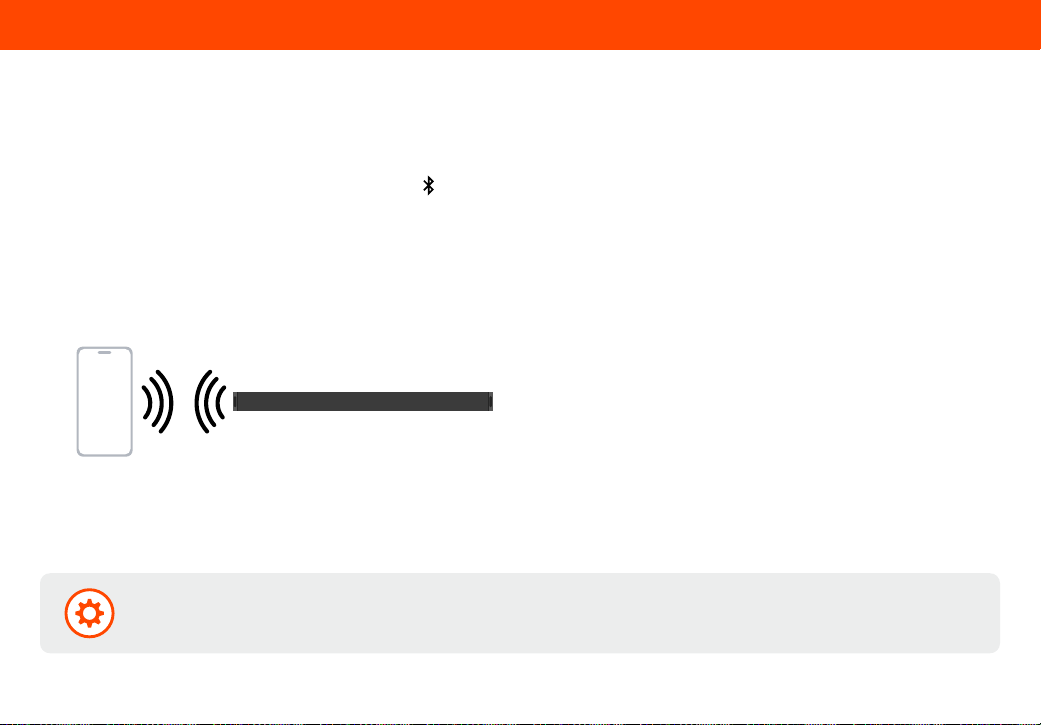
1. Download the VIZIO mobile app and open the app on the device that you wish to pair to the soundbar.
2. If pairing after the rst 72 hours, ensure the soundbar is powered ON with a quick press of the Volume (+) button on the
soundbar. Quick press the soundbar Bluetooth ( ) button to initiate the pairing process for up to 1 hour.
3. In the VIZIO mobile app, select your device from the list of discovered devices (VIZIO Elevate).
4. Now you are connected and can control the soundbar via the VIZIO mobile app while the app is open and you are within range.
To pair the soundbar with the VIZIO mobile app after the rst-time setup or to pair an additional Smart Phone
Only one paired device can control the soundbar at a time. To switch which device has the active controls, close the app on the device
you’re not using and open the app on the device that you want to use.
VIZIO Mobile App
19
Bluetooth Pairing for Streaming Music
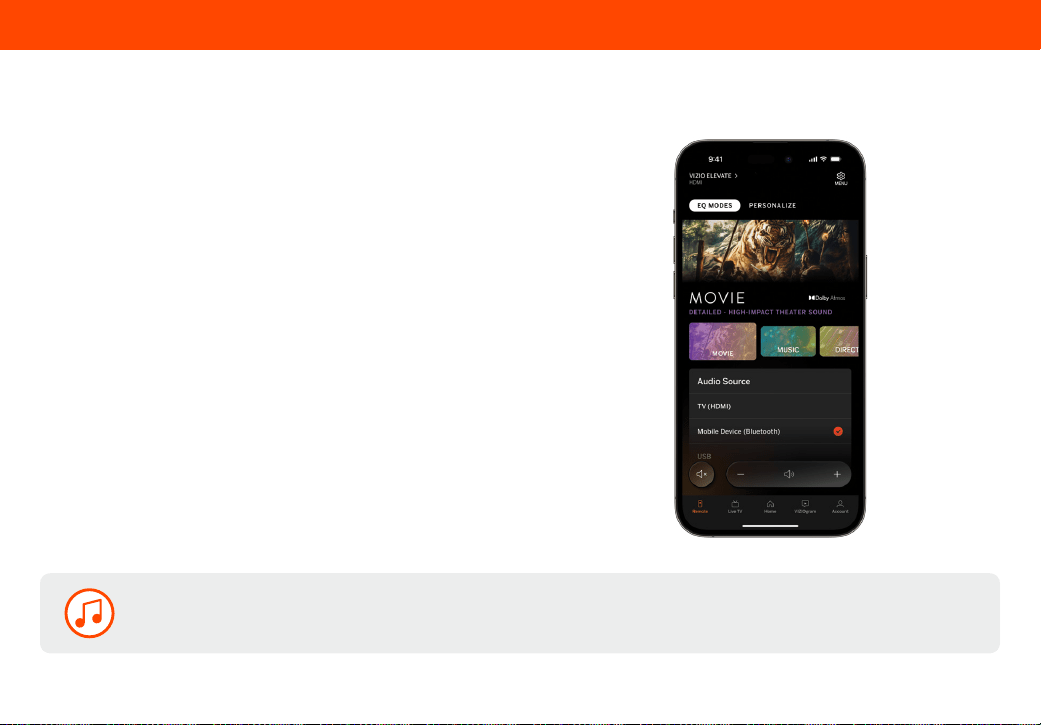
1. In the VIZIO mobile app for the soundbar, on the EQ Modes
tab, press the Mobile Device (Bluetooth) button.
2. Follow the instructions on the app. The soundbar LED will
rapidly blink blue and a tone will play twice, indicating that
your Soundbar is in pairing mode.
3. Go to the Bluetooth settings on your mobile device, and
select VIZIO Elevate to pair.
4. Once successfully paired, the blue LED will stop blinking
and a conrmation tone will be heard from the soundbar.
Now you can play audio from your Bluetooth device while it is in
range and your soundbar is in Bluetooth Input.
Pair the soundbar with a Bluetooth device for streaming music from the VIZIO mobile app
Only one paired device can stream music to the soundbar at a time.
To connect a new device, you must rst go to Bluetooth settings on the connected device and disconnect from the soundbar.
Then you can initiate pairing mode through the VIZIO mobile app for music streaming on the new device.
Screen images are simulated and may vary.
20
Bluetooth Pairing for Streaming Music
1. Quickly press and release the Bluetooth button ( ) on the soundbar to initiate Bluetooth pairing mode. The blue LED
will begin blinking rapidly and a tone will play twice.
2. Go to the Bluetooth settings on your mobile device, and select VIZIO Elevate to pair.
3. Once successfully paired, the blue LED will stop blinking and a conrmation tone will be heard from the soundbar.
4. Now you can play audio from your Bluetooth device while it is in range and your soundbar is in Bluetooth Input.
Pair the soundbar with a Bluetooth device to stream music from the soundbar button panel
Only one paired device can stream to the soundbar at a time. To switch which device is streaming, disconnect the streaming
device from the soundbar in your Device Settings (see Unpairing or Disconnecting Your Soundbar on page 21) or press and hold the
Bluetooth button for 2 seconds, then connect the device you want to stream from.
21
Unpairing the Soundbar from your VIZIO Mobile App
For iOS users, an extra step is required to fully unpair your iPhone from the soundbar. After going through the above steps, navigate to
Bluetooth on your mobile device settings, then tap the information button and tap unpair from VIZIO mobile app.
Unpairing or Disconnecting Your Soundbar
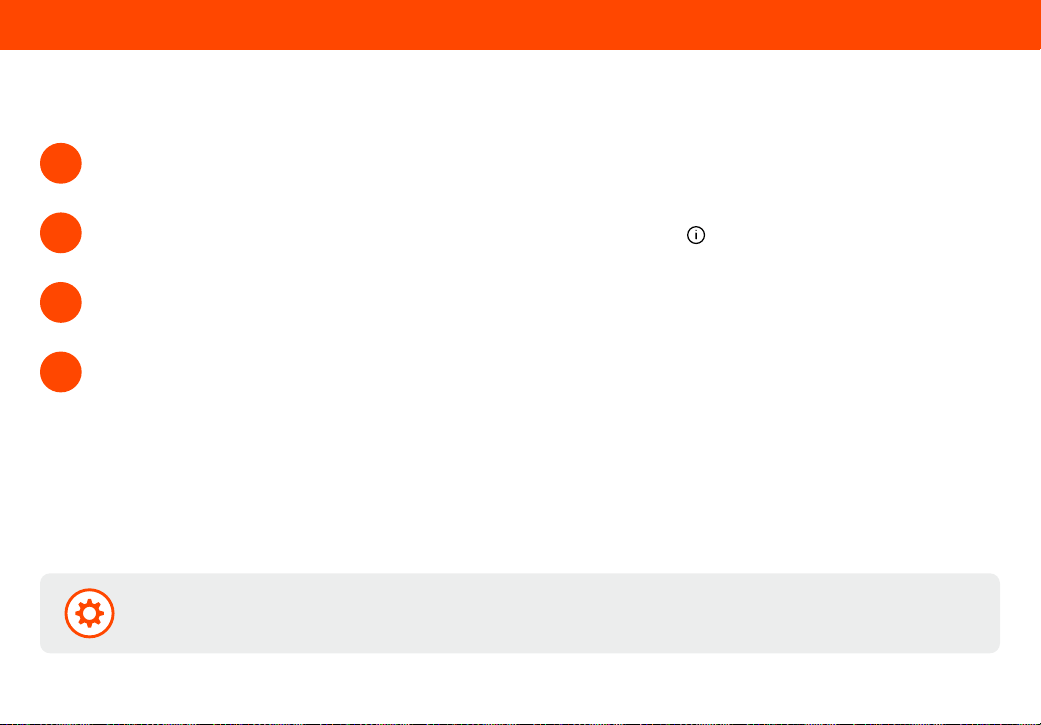
Under Paired Devices you will see the name of your soundbar. Tap the Information ( ) button to open the device info screen.
2
Scroll down and tap Unpair Device.
3
The VIZIO mobile app will ask for conrmation. Tap Yes. Your device will be unpaired from the soundbar.
4
Tap the name of your soundbar at the top of the VIZIO mobile app screen.
1
22
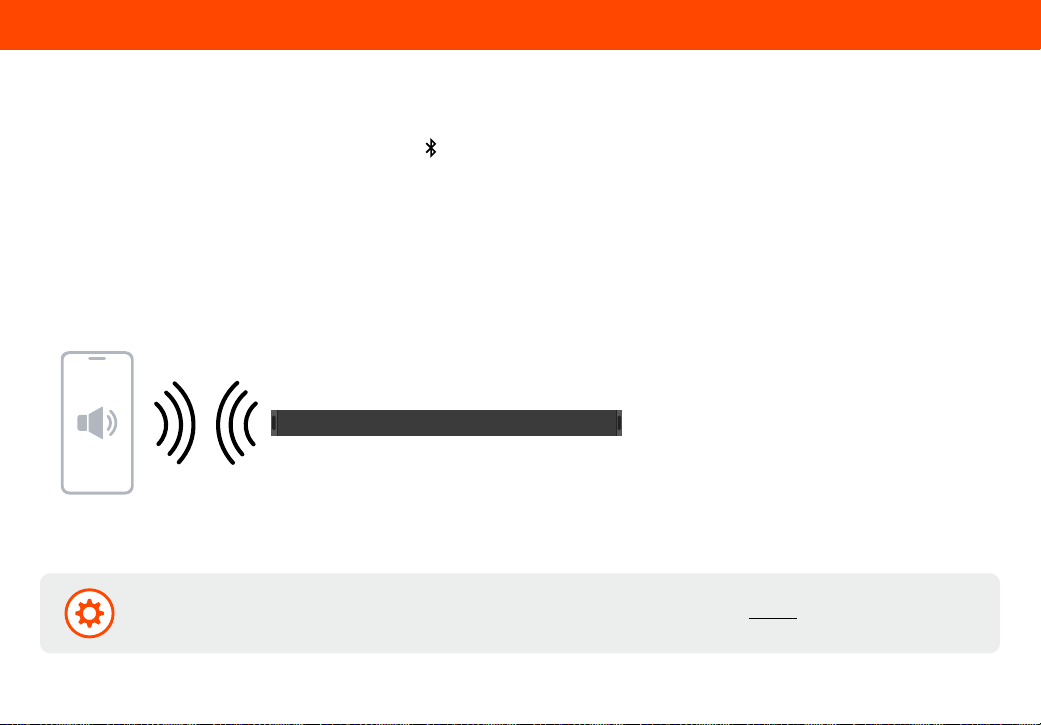
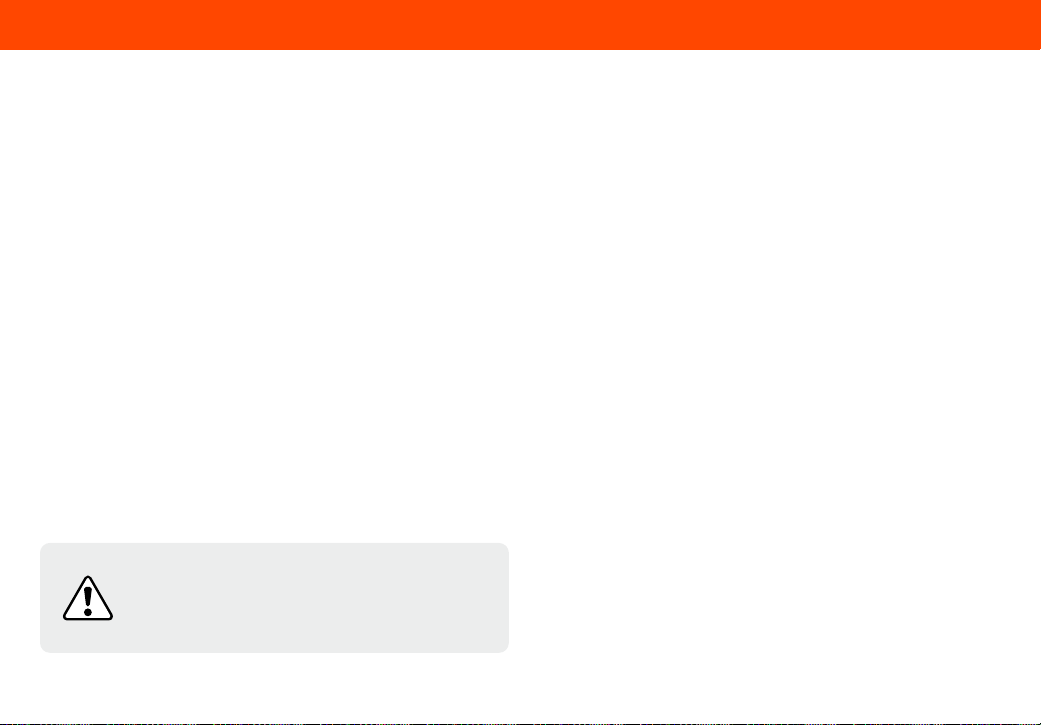
Your soundbar supports music streaming from devices with Bluetooth capability.
(Device compatibility will vary, see your device’s documentation for more information.)
• If the input is changed back to Bluetooth, the most recently connected Bluetooth device will reconnect automatically.
• If the soundbar input is changed, the Bluetooth device will disconnect.
A Bluetooth signal has a range of up to 30 feet. Keep in mind that Bluetooth is a compressed audio format, so streamed music
may lose some integrity when compared to a wired connection. Try the following if your sound quality is less than optimal:
• If you hear any break-up or you are disconnected while streaming music from your device, move the source device closer
to the soundbar.
• Be sure that there are no solid obstructions in the line-of-sight between the soundbar and the source device.
• Other wireless devices can aect Bluetooth range, including wireless security cameras, wireless video baby monitors,
cordless phones, and microwave ovens. Turning o or moving these devices may improve Bluetooth range.
Music Streaming with Bluetooth
Maximizing Signal
Reduce the volume levels on your device and on the
soundbar before pressing Play. High volume levels can
damage your hearing.
Using Bluetooth Mode
23
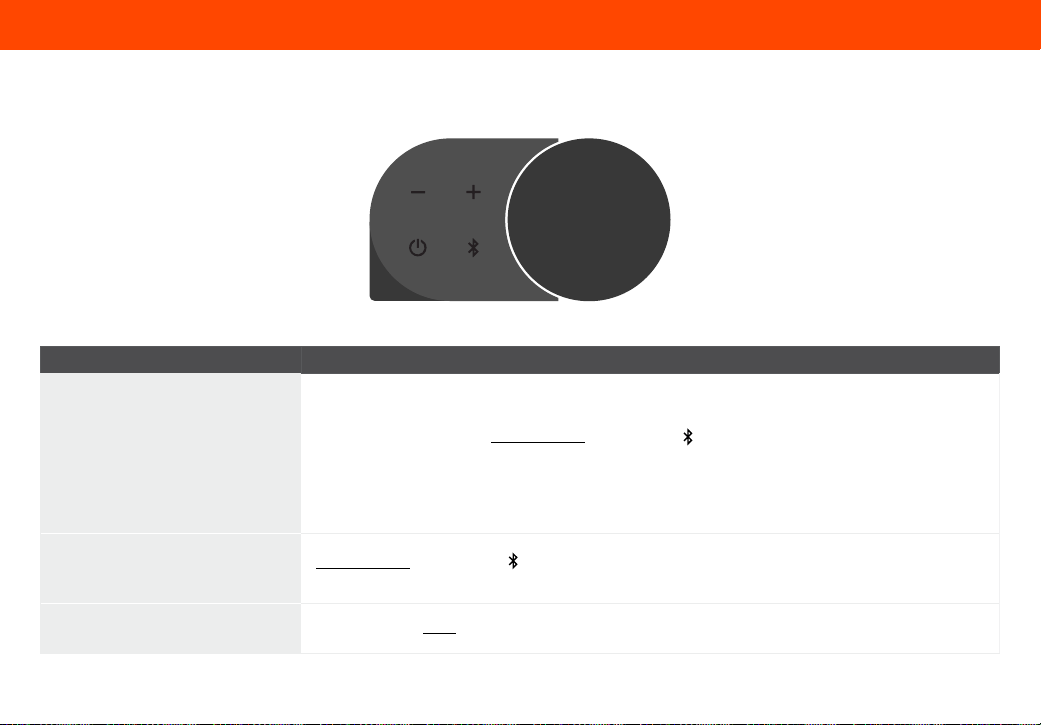
Standby Mode is when the soundbar is in a sleep state and is awaiting action from the TV. Press the POWER button to enter and exit
the Soundbar from Standby Mode. When the TV is powered ON, the soundbar will wake up and immediately support TV audio.
Quick Press any of the following Soundbar Buttons to wake up your soundbar from standby mode:
Power Button
Bluetooth Button
Volume (+) Button
Standby Mode
Understanding Standby Mode
Tapping Volume + or initiating Bluetooth in the
VIZIO mobile app will also wake up the soundbar from
Standby Mode.
24
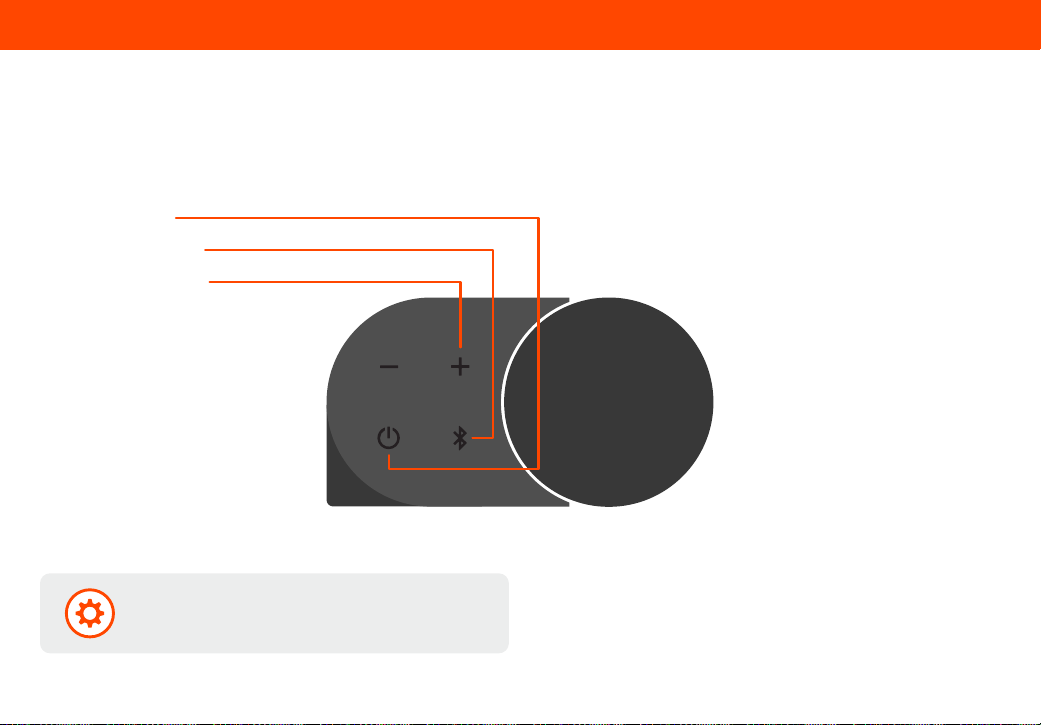
There are functions that are triggered by dierent button combinations on the soundbar.
Function Description
Factory Reset
Reset the soundbar to the factory default settings.
To perform a Factory Reset, Press and hold the Bluetooth (
) and Volume Down (—) buttons for 5 seconds
and release.
Notes:
• This will erase all settings and preferences that you have set.
Speaker Test
Press and hold the Bluetooth ( ) and Volume Up (+) buttons for 5 seconds and release.
This function is also available within the VIZIO mobile app.
Bluetooth Button Behaviors
Reference pages 18-21 for detailed Bluetooth information.
Using the Physical Soundbar Buttons
25
Re-Pairing the Subwoofer and Surround Speakers
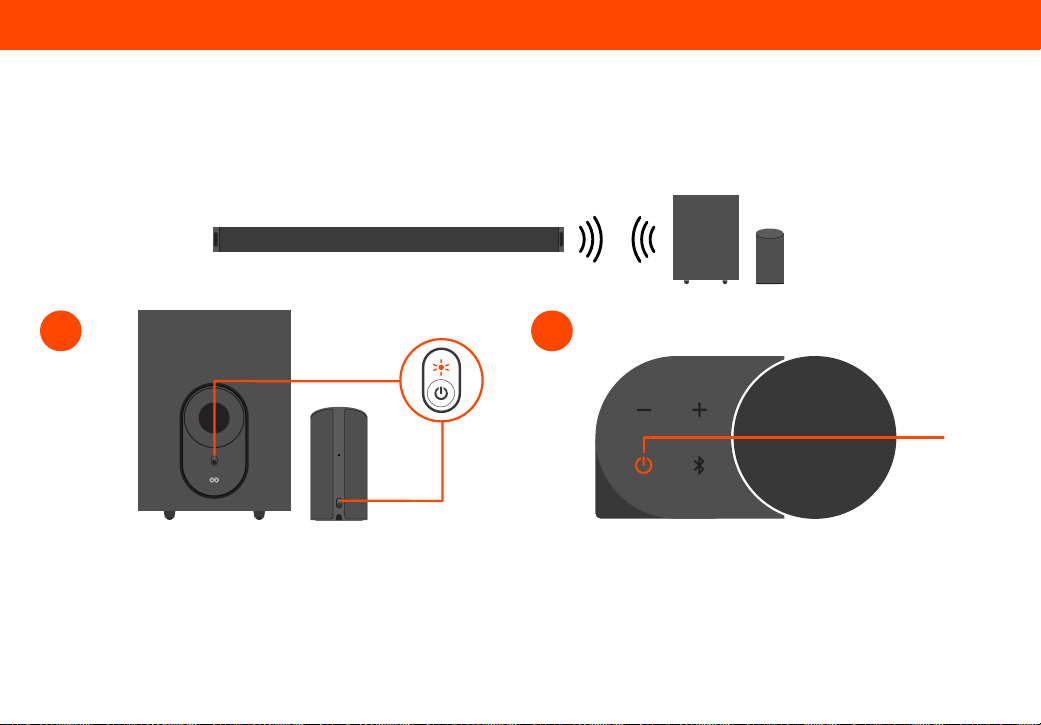
The subwoofer and surround speakers have already been paired with the soundbar by VIZIO and should automatically connect.
If there is no sound coming from the subwoofer and/or surround speakers, they may need to be re-paired to the soundbar. If the
subwoofer and/or the surround speakers are not paired, the LED indicator on the subwoofer and/or the surround speakers will slowly
blink white. Speaker Disconnected will display under the Personalize audio settings in the VIZIO mobile app.
First, conrm that the power LED is illuminated. Press and hold
the POWER button on the back of the subwoofer and/or surround
speakers for 5 seconds. The LED on the back of the subwoofer
and/or surround speakers will rapidly blink white.
Press and hold the POWER button on the side of the soundbar
for 4 seconds. The soundbar front LED light will blink white while
pairing. When successfully paired, the LED light on the soundbar
and subwoofer and/or surround speaker will turn solid white.
Repeat this action for each speaker that needs to be re-paired.
1 2
Power
26
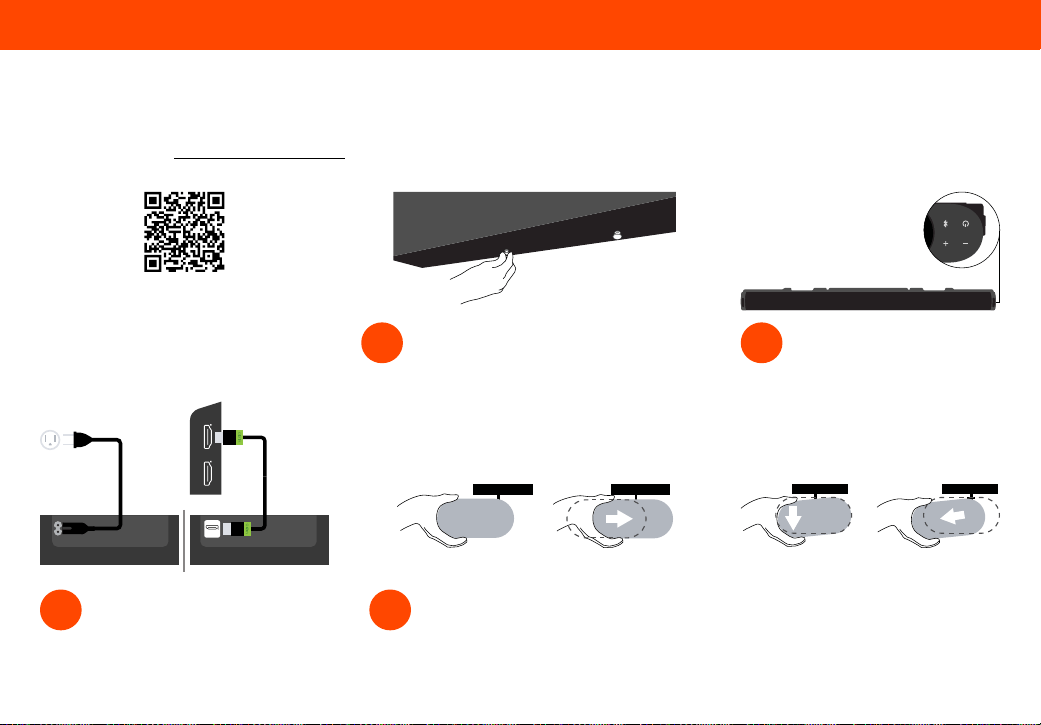
Your soundbar may be attached directly to the bottom of QuickFit compatible VIZIO TVs. For additional information and VIZIO TV
compatibility, visit www.vizio.com/quickt.
To detach the soundbar, hold it from the
front and tilt down, then pull it away from
your T V.
Note: When using the QuickFit mounting feature, the attached VIZIO device shall not exceed 25 pounds in weight.
Mounting with Quickt
®
Plug the power cable into a nearby
wall outlet and connect the soundbar
to the HDMI eARC port on your
QuickFit compatible VIZIO TV.
3
Align the soundbar with the thumb screws
inserted into your TV as illustrated in step 1.
Push the soundbar in until it locks in place.
4
Locate the thumb screws inside the included
accessory bag and screw them into the
bottom of your QuickFit compatible VIZIO TV.
1
Rotate the soundbar so that it
is upside down with the orange
tab on the left.
2
QuickFit
®
Mounting
Before you begin, scan the QR code to
learn more about setting up your QuickFit
compatible device, including installation
guidelines and important safety information.
TV
eARC
TO TV
HDMI
(eARC)
27
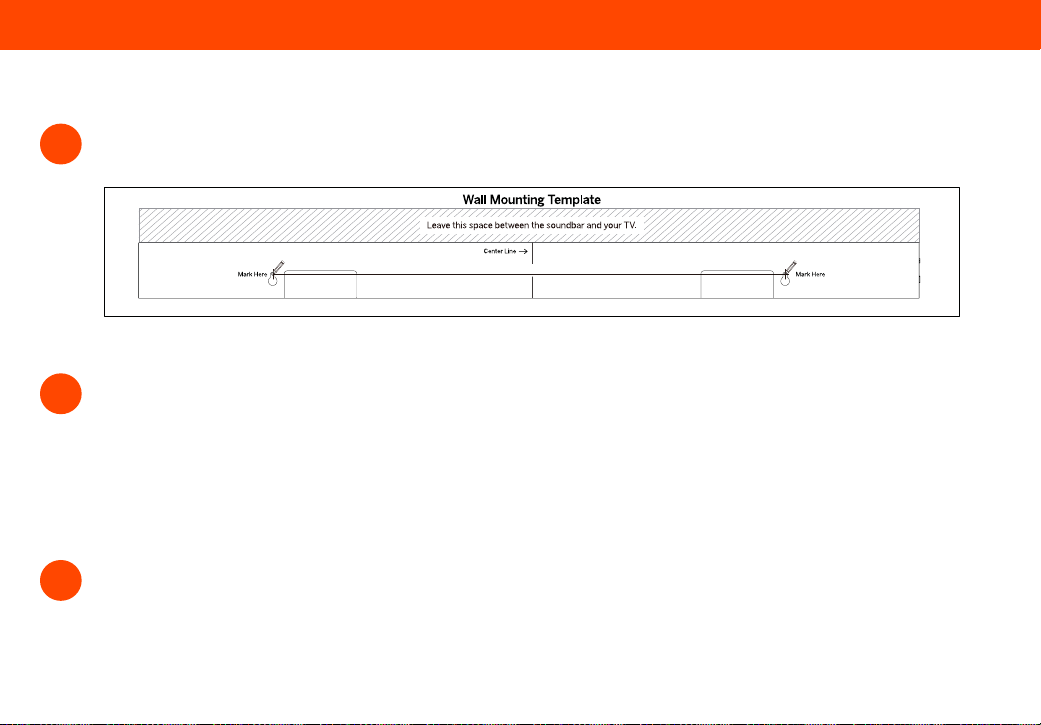
Install the screws to the wall. Be sure your screws are attached to wood studs, drywall anchors (for drywall), or concrete
anchors (for brick/concrete walls).
Suggested screw size:
4.5mm diameter
25mm minimum length
VIZIO recommends leaving 4-8mm of clearance between the screw head and the wall.
2
Wall Mounting
Wall Mounting the Soundbar
3
Ensure that your soundbar is plugged into a working power outlet. Insert one end of the provided HDMI cable to the HDMI
eARC port on your soundbar. Attach the other end to your TV’s ARC/eARC port.
1
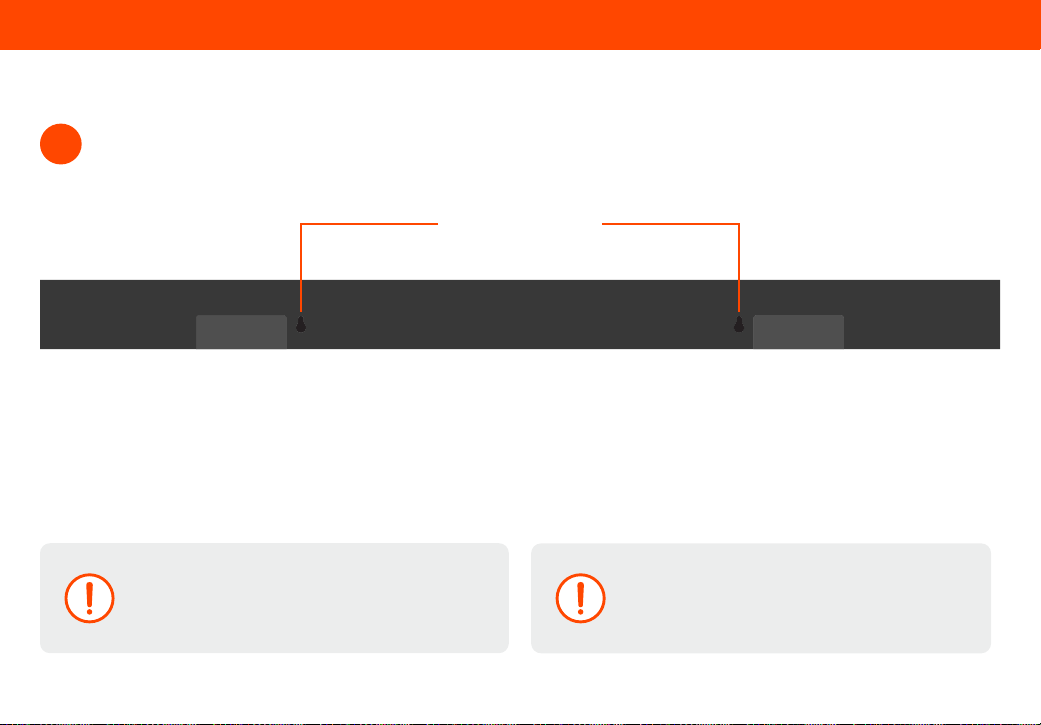
Place the included Wall Mounting Template against the wall under your TV. Mark the two bracket holes using a pencil.
28
Slide the soundbar’s wall mount slots over the installed screws.
4
Screws for wall mounting are not included.
Use the screw type and length noted above and on the
Wall Mounting Template and appropriate to your home’s
construction. If in doubt, consult a professional installer.
Wall Mounting
Wall Mount Slots
Do not use the included QuickFit Thumb Screws for
the wall mount installation. These are not intended for
wall mounting.
29
Wall Mounting
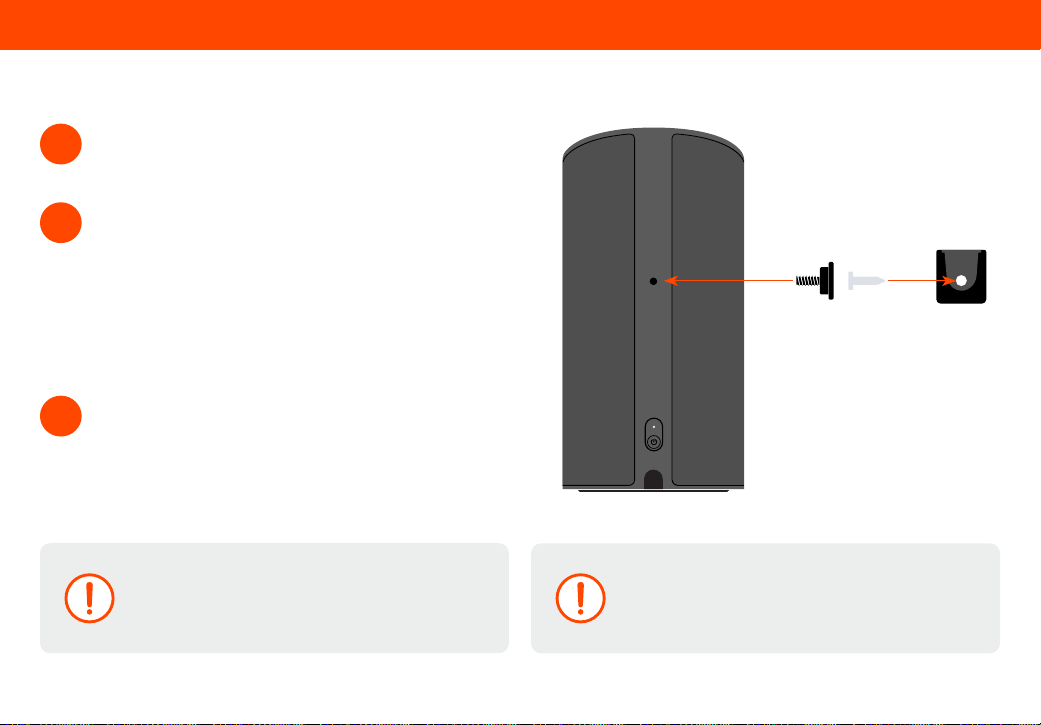
1
Attach the included wall mount screw to the back of the
surround speaker.
Wall Mounting the Surround Speakers
Secure the wall mount bracket to the wall (bracket
screw not included). Be sure your screws are attached
to wood studs, drywall anchors (for drywall), or concrete
anchors (for brick/concrete walls).
Suggested screw size:
3.5mm diameter
41.5mm minimum length
2
3
Slide the speaker on to the wall bracket. Ensure the wall
mount screw is secured within the bracket grooves.
Screws for wall mounting are not included.
Use the screw type and length noted above and on the
Wall Mounting Template and appropriate to your home’s
construction. If in doubt, consult a professional installer.
If you are unfamiliar with power tools or the layout of
electrical wiring in the walls of your home, consult a
professional installer.
Bracket screw
not included.
30
More questions? Find answers at:
SUPPORT.VIZIO.COM
Get helpful tips and register your soundbar.
Scan with your phone camera or QR reader.
Customized Support
Get assistance quickly with your information on hand.
News and Oers
Take advantage of the latest news and special oers from VIZIO.
Updates and Enhancements
Stay up-to-date with important product updates and notications.
Product Registration & Support
31
Help & Troubleshooting
Need Additional Support?
Contact VIZIO Customer Support at support.vizio.com
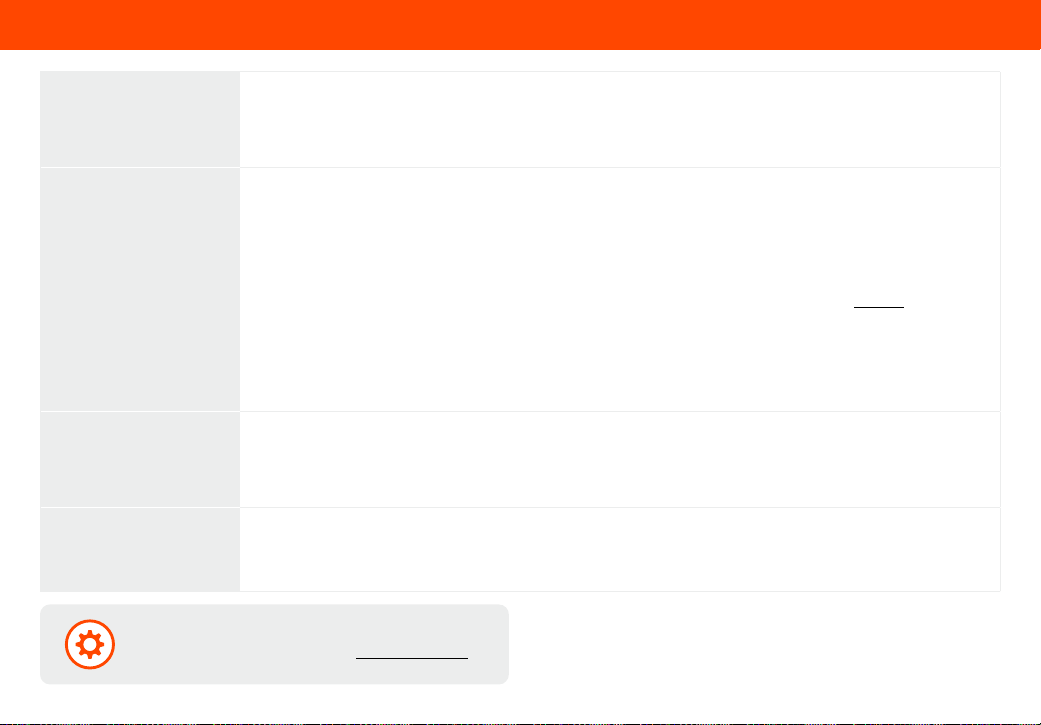
There is no power
Press the POWER button on the TV remote control or on the side of your soundbar.
Ensure the power cord is securely connected.
Plug a dierent device into the electrical outlet to verify that the outlet is working correctly.
There is no sound
Increase the volume. Press VOLUME UP on the TV remote or on the side of your soundbar.
On digital inputs, the soundbar LED will ash yellow rapidly if an unsupported format is present.
Your TV may be set to variable audio output. Conrm that the audio output setting is set to FIXED or STANDARD,
not VARIABLE. Consult your TV’s user manual for more detailed information.
If using Bluetooth, ensure that the volume on your source device is turned up and that the device is not muted.
Ensure your subwoofer and/or surround speakers are still connected to the soundbar. Refer to page 25 to reconnect
if needed (you will see the subwoofer and/or the surround speakers power indicator blinking white if disconnected.
Speaker Disconnected will display under the Personalize audio settings in the VIZIO mobile app.).
Perform a Speaker Test in the VIZIO mobile app to ensure all subwoofer and surrounds are functioning properly.
Set the source to output PCM.
I hear buzzing
or humming
Ensure all cables and wires are securely connected.
Try a dierent HDMI cable.
Connect a dierent TV to see if the buzzing persists. If it does not, the problem may be with the original device.
Can’t connect
mobile device to
stream Bluetooth
Only one paired device can stream music to the soundbar at a time.
To connect a new device, you must rst go to Bluetooth settings on the connected device and disconnect from the
soundbar. Then you can initiate pairing mode for music streaming again.

32
UNITED STATES
By using this VIZIO product, you accept all VIZIO Terms and Conditions, including all the Terms of Warranty, BINDING ARBITRATION AGREEMENT, and
Class Action Waiver. If you do not agree to the terms of this warranty, do not use the VIZIO product and, within thirty (30) days of the date of purchase, return it
for a refund to the authorized retailer where you purchased it. You have the right to opt out of the Arbitration Agreement and Class Action Waiver within 60
calendar days of your purchase. Please refer to the full section “Binding Arbitration Agreement; Class Action Waiver” below for more details and instructions
for opt-out. Full Terms and Conditions may be viewed at vizio.com/en/terms/terms-of-service.
How Long This Warranty Lasts
For non-commercial use, VIZIO warrants the product on the terms set forth below for one (1) year from the date of original purchase. For commercial use, VIZIO
warrants this product on the terms set forth below for ninety (90) days from the date of original purchase.
What This Warranty Covers
VIZIO warrants the product against defects in materials and workmanship when the product is used normally in accordance with VIZIO’s user guides and
manuals. Except where restricted by law, this warranty applies only to the original purchaser of a new product. The purchase must have been made from an
authorized retailer in the United States (including Puerto Rico). The product must also be located in the country where it was purchased at the time of warranty
service.
How to Get Service
Before obtaining warranty service, you may visit support.vizio.com for additional help and troubleshooting. To obtain warranty service, contact VIZIO Customer
Support by going to support.vizio.com and selecting Contact Us. You can also call Customer Support (US): 877-698-4946, or support.vizio.com/s/contact-us.
Your Obligations Before Service
You must obtain pre-authorization before sending your product to a VIZIO service center. You may be required to supply a purchase receipt (or copy) to show
that the product is within the warranty period.
When you return a product to a VIZIO service center, you must ship the product in its original packaging or in packaging that aords an equal degree of
protection. VIZIO Technical Support will provide instructions for packing and shipping the product to the VIZIO service center.
ALL USER DATA AND DOWNLOADED APPLICATIONS STORED ON A PRODUCT WILL BE DELETED IN THE COURSE OF SOME IN-HOME AND ALL SHIP-
IN WARRANTY SERVICE. If this occurs, your product will be restored to its original state. You will be responsible for restoring all applicable user data and
downloaded applications. Recovery and reinstallation of user data and downloaded applications is not covered under this warranty. In order to protect your
personal information, VIZIO recommends that you always clear all personal information from the product before it is serviced, regardless of the servicer.
VIZIO’s Responsibilities
If VIZIO determines that a product is covered by this warranty, VIZIO will (at its option) repair or replace it, or refund the purchase price to you. There will be no
charge for parts or labor during the warranty period. Replacement parts may be new or recertied at VIZIO’s option and sole discretion. Replacement parts and
VIZIO’s labor are warranted for the remaining portion of the original warranty or for ninety (90) days from warranty service, whichever is longer.
Limited Warranty

33
What This Warranty Does Not Cover
This warranty does not cover: (a) cosmetic damage; (b) normal wear and tear; (c) improper operation; (d) improper voltage supply or power surges; (e) signal
issues; (f) damage from shipping; (g) acts of God; (h) customer misuse, modications or adjustments; (i) installation, set-up, or repairs attempted by anyone
other than by a VIZIO authorized service center; (j) products with unreadable or removed serial numbers; (k) products requiring routine maintenance; or (l)
products sold “AS IS”, “CLEARANCE”, “FACTORY RECERTIFIED”, or by a non-authorized reseller.
What to Do If You Are Not Satised With Service
If you feel VIZIO has not met its obligations under this warranty, you may attempt to resolve the issue informally with VIZIO. If you are unable to resolve the
issue informally and wish to le a formal claim against VIZIO, and if you are a resident of the United States, you must submit your claim to binding arbitration
according to the procedures described below, unless an exception applies. Submitting a claim to binding arbitration means that you do not have the right to
have your claim heard by a judge or jury. Instead your claim will be heard by a neutral arbitrator.
Binding Arbitration Agreement; Class Action Waiver (U.S. Residents Only)
UNLESS YOU HAVE BROUGHT AN ELIGIBLE CLAIM IN SMALL CLAIMS COURT OR HAVE OPTED OUT AS DESCRIBED BELOW, ANY CONTROVERSY OR CLAIM
REL ATING IN ANY WAY TO YOUR VIZIO PRODUCT, INCLUDING ANY CONTROVERSY OR CLAIM ARISING OUT OF OR REL ATING TO THIS WARRANT Y, A BREACH
OF THIS WARRANTY, OR THE VIZIO PRODUCT’S SALE, CONDITION OR PERFORMANCE, WILL BE SETTLED BY BINDING ARBITRATION ADMINISTERED BY
THE AMERICAN ARBITRATION ASSOCIATION AND CONDUCTED BY A SINGLE ARBITRATOR APPOINTED BY THE AMERICAN ARBITRATION ASSOCIATION,
IN ACCORDANCE WITH ITS COMMERCIAL ARBITRATION RULES AND ITS SUPPLEMENTARY PROCEDURES FOR CONSUMER-RELATED DISPUTES. You may
learn more about the American Arbitration Association and its rules for arbitration by visiting www.adr.org or by calling 800-778-7879. Since this warranty
concerns a transaction in interstate or international commerce, the Federal Arbitration Act will apply.
The ling fees to begin and carry out arbitration will be shared between you and VIZIO, but in no event will your fees ever exceed the amount allowable by the
American Arbitration Association, at which point VIZIO will cover all additional administrative fees and expenses. VIZIO waives its right to recover attorneys’
fees in connection with any arbitration under this warranty. If you are the prevailing party in an arbitration to which the Supplementary Procedures for
Consumer- Related Disputes applies, then you are entitled to recover attorneys’ fees as the arbitrator may determine.
The dispute will be governed by the laws of the state or territory in which you resided at the time of your purchase (if in the United States). The place of
arbitration will be Irvine, California, or your county of residence (if in the United States). The arbitrator will have no authority to award punitive or other damages
not measured by the prevailing party’s actual damages, except as may be required by statute. The arbitrator will not award consequential damages, and any
award will be limited to monetary damages and will include no equitable relief, injunction, or direction to any party other than the direction to pay a monetary
amount. Judgment on the award rendered by the arbitrator will be binding and nal, except for any right of appeal provided by the Federal Arbitration Act, and
may be entered in any court having jurisdiction. Except as may be required by law, neither you nor VIZIO nor an arbitrator may disclose the existence, content,
or results of any arbitration under this warranty without the prior written consent of you and VIZIO.
ANY DISPUTE, WHETHER IN ARBITRATION, IN COURT, OR OTHERWISE, WILL BE CONDUCTED SOLELY ON AN INDIVIDUAL BASIS. VIZIO AND YOU AGREE
THAT NO PARTY WILL HAVE THE RIGHT OR AUTHORITY FOR ANY DISPUTE TO BE ARBITRATED AS A CLASS ACTION, A PRIVATE ATTORNEY GENERAL
ACTION, OR IN ANY OTHER PROCEEDING IN WHICH EITHER PARTY ACTS OR PROPOSES TO ACT IN A REPRESENTATIVE CAPACITY.
NO ARBITRATION OR PROCEEDING WILL BE JOINED, CONSOLIDATED, OR COMBINED WITH ANOTHER ARBITRATION OR PROCEEDING WITHOUT THE
PRIOR WRITTEN CONSENT OF ALL PARTIES TO ANY SUCH ARBITRATION OR PROCEEDING.
Limited Warranty

34
Opt-Out Instructions
IF YOU DO NOT WISH TO BE BOUND BY THE BINDING ARBITRATION AGREEMENT AND CLASS ACTION WAIVER, THEN: (1) you must notify VIZIO in writing
within sixty (60) days of the date that you purchased the product; (2) your written notication must be mailed to VIZIO at 39 Tesla, Irvine, CA 92618, Attn: Legal
Department; and (3) your written notication must include (a) your name, (b) your address, (c) the date you purchased the product, and (d) a clear statement
that you wish to opt out of the binding arbitration agreement and class action waiver.
In addition, you may pursue a claim in small claims court in your county of residence (if in the United States) or in Orange County, California. In such case the
provisions of the section titled “Binding Arbitration Agreement; Class Action Waiver (U.S. Residents)” will not apply.
Exclusions and Limitations
TO THE GREATEST EXTENT PERMITTED BY APPLICABLE LAW, THERE ARE NO EXPRESS WARRANTIES OTHER THAN THOSE DESCRIBED ABOVE. ANY
IMPLIED WARRANTIES, INCLUDING ANY IMPLIED WARRANTY OF MERCHANTABILITY AND FITNESS FOR A PARTICULAR PURPOSE, WILL BE LIMITED IN
DURATION TO THE WARRANTY PERIOD SET FORTH ABOVE. SOME STATES AND PROVINCES DO NOT ALLOW LIMITATIONS ON HOW LONG AN IMPLIED
WARRANTY LASTS, SO THE ABOVE LIMITATION MAY NOT APPLY TO YOU.
VIZIO WILL NOT BE RESPONSIBLE FOR LOSS OF USE, LOSS OF INFORMATION OR DATA, COMMERCIAL LOSS, LOST REVENUE OR LOST PROFITS, OR
OTHER INDIRECT, SPECIAL, INCIDENTAL OR CONSEQUENTIAL DAMAGES, EVEN IF VIZIO HAS BEEN ADVISED OF THE POSSIBILITY OF SUCH DAMAGES,
AND EVEN IF THE REMEDY FAILS OF ITS ESSENTIAL PURPOSE. SOME STATES AND PROVINCES DO NOT ALLOW THE EXCLUSION OR LIMITATION OF
INCIDENTAL OR CONSEQUENTIAL DAMAGES, SO THE ABOVE LIMITATION OR EXCLUSION MAY NOT APPLY TO YOU.
IN LIEU OF ANY OTHER REMEDY FOR ANY AND ALL LOSSES AND DAMAGES RESULTING FROM ANY CAUSE WHATSOEVER (INCLUDING VIZIO’S
NEGLIGENCE, ALLEGED DAMAGE, OR DEFECTIVE GOODS, NO MATTER WHETHER SUCH DEFECTS ARE DISCOVERABLE OR LATENT), VIZIO MAY, AT ITS
SOLE AND EXCLUSIVE OPTION AND IN ITS DISCRETION, REPAIR OR REPLACE YOUR PRODUCT, OR REFUND ITS PURCHASE PRICE. AS NOTED, SOME
STATES AND PROVINCES DO NOT ALLOW THE EXCLUSION OR LIMITATION OF INCIDENTAL OR CONSEQUENTIAL DAMAGES, SO THE ABOVE LIMITATION
OR EXCLUSION MAY NOT APPLY TO YOU.
How the Law Applies
This warranty gives you specic legal rights, and you may also have other rights, which vary from state to state and province to province. This warranty applies
to the greatest extent permitted by applicable law.
General
No employee or agent of VIZIO may modify this warranty. If any term of this warranty, other than the class action waiver, is found to be unenforceable, that term
will be severed from this warranty and all other terms will remain in eect. If the class action waiver is found to be unenforceable, then the entire section titled
“Binding Arbitration Agreement; Class Action Waiver (U.S. Residents Only)” will not apply. This warranty applies to the maximum extent not prohibited by law.
Changes to Warranty
This warranty may change without notice, but any change will not aect your original warranty. Check www.vizio.com for the most current version.
Limited Warranty

35
FCC Class B Radio Interference Statement
NOTE: This equipment has been tested and found to comply with the limits for a Class B digital device, pursuant to Part 15 of the FCC Rules. These limits are designed to provide
reasonable protection against harmful interference in a residential installation. This equipment generates, uses and can radiate radio frequency energy, and if not installed
and used in accordance with the instructions, may cause harmful interference to radio communications. However, there is no guarantee that interference will not occur in a
particular installation. If this equipment does cause harmful interference to radio or television reception, which can be determined by turning the equipment o and on, the user
is encouraged to try to correct the interference by one or more of the following measures:
1. Reorient or relocate the receiving antenna.
2. Increase the separation between the equipment and receiver.
3. Connect the equipment into an outlet on a circuit dierent from that to which the receiver is connected.
4. Consult the dealer or an experienced radio/TV technician for help.
This device complies with Part 15 of the FCC Rules. Operation is subject to the following two conditions: (1) this device may not cause harmful interference, and (2) this device
must accept any interference received, including interference that may cause undesired operation.
Notice:
1. Any Changes or modications not expressly approved by the party responsible for compliance could void the user’s authority to operate the equipment.
2. Shielded interface cables and AC power cord, if any, must be used in order to comply with the emission limits.
3. The manufacturer is not responsible for any radio or TV interference caused by unauthorized modication to this equipment. It is the responsibilities of the user to correct
such interference.
FCC RF Radiation Exposure Statement
1. This transmitter must not be co-located or operating in conjunction with any other antenna or transmitter.
2. This equipment complies with FCC radiation exposure limits set forth for an uncontrolled environment. This equipment should be installed and operated with minimum
distance 20cm between the radiator and your body.
Product Recycling
Always properly dispose of your VIZIO products in accordance with local laws and regulations. For information on how to properly recycle your VIZIO products and to learn more
about consumer electronics recycling laws, visit vizio.com/environment or call (844) 254-8087.
Software Licenses
All software is provided subject to software license agreements and you agree that you will be bound by such license agreements in addition to other applicable terms of use.
By using the VIZIO products, you agree to the VIZIO Terms of Service and Privacy Policy. The VIZIO Terms of Use and Privacy Policy may be updated from time to time and are
available to view at vizio.com/terms and vizio.com/privacy, respectively.
Export Regulations
Customer acknowledges that the VIZIO products, which include technology and software, are subject to customs and export control laws in the United States (“US”). The
products may also be subject to the customs and export control laws and regulations of the country in which the products are manufactured and/or received.
© 2026 VIZIO, Inc. All Rights Reserved.
This User Manual may not be copied in whole or in part without the written permission of VIZIO, Inc. VIZIO, Inc. has made reasonable eorts to ensure the accuracy of the
information provided herein. All product specications, functionality, features, congurations, performance, design and other product information described herein are
subject to change without notice. VIZIO, Inc. is not responsible for typographical, technical, or descriptive errors. To review the most updated version of this User Manual and
the associated Quick Setup Guide, go to vizio.com.
VIZIO, the VIZIO logo, the V logo, and other terms and phrases are trademarks or registered trademarks of VIZIO, Inc.
Legal & Compliance
36
*
Sound pressure level measured using pink noise at 1 meter, c-weighted.
Soundbar, Surround Speakers, and Subwoofer
Specications
Soundbar:
Left/Center/Right Speakers: 1.66” x 2.76” (42.3 x 70.3 mm) Full Range Drivers
Left/Right Height Speakers: 1.68” x 2.76” (42.7 x 70.3 mm) Full Range Drivers
Surround Speakers:
One 1.73” x 2.51” (44 x 64 mm) Full Range Driver and one 2.04” (52 mm) Height Driver for each surround speakerOne 1.73” x 2.51” (44 x 64 mm) Full Range Driver and one 2.04” (52 mm) Height Driver for each surround speaker
Subwoofer: One 8” (203.2 mm) Driver
Dimensions:
Soundbar - 36” x 2.60” x 4.73” (W x H x D) // 914.4 mm x 66.04 mm x 120.14 mm
Subwoofer - 11.61” x 15.64” x 11.61” (W x H x D) // 295 mm x 397 mm x 295 mmm
Surround Speakers - 3.81” x 7.64” x 3.62” (W x H x D) // 97 mm x 194 mm x 92 mm
Cable Lengths: HDMI Cable Length - 72” | Power Cable Length - 59” | Power Adapter Cable Length - 98.4”
Connections:
HDMI (eARC)
Bluetooth
USB (Supports .WAV and .MP3 format only)
No optical output connection is available on this soundbar.
No TV HDMI port? Contact VIZIO Customer Support at support.vizio.com if your TV requires optical connection.
Supported Audio Codecs
PCM
Dolby Digital/DD+
DTS
DTS: X
Dolby Atmos
Sound Pressure Level
*
(System): 104dB SPL
Frequency Response (System): 35Hz-16kHz +/- 5dB
Voltage:
Soundbar/Subwoofer Voltage - 100V-240V/50-60Hz
Surround Speaker Voltage - Input 100V-240V/50-60Hz | Output: 12V2A
Compliances: cTUVus/FCC Class B

37
Specications
The terms HDMI, HDMI High-Denition Multimedia Interface, HDMI Trade dress and the HDMI Logos are
trademarks or registered trademarks of HDMI Licensing Administrator, Inc.
®
The Bluetooth
®
word mark and logos are registered trademarks owned by Bluetooth SIG, Inc. and any use of such
marks by VIZIO Inc. is under license. Other trademarks and trade names are those of their respective owners.
Dolby, Dolby Atmos, and the double-D symbol are registered trademarks of Dolby Laboratories Licensing
Corporation. Manufactured under license from Dolby Laboratories. Condential unpublished works. Copyright
© 2012-2024 Dolby Laboratories. All rights reserved.
Manufactured under license from DTS, Inc. and/or its aliates. For patents, see https://xperi.com/dts-patents/.
DTS, the DTS logo, DTS:X, the DTS:X logo, Virtual:X, and the DTS Virtual:X logo are trademarks or registered
trademarks of DTS, Inc. and/or its aliates in the U.S. and/or other countries. ©DTS, Inc. and/or its aliates.
All rights reserved.

© 2026 VIZIO, INC. ALL RIGHTS RESERVED.
052026