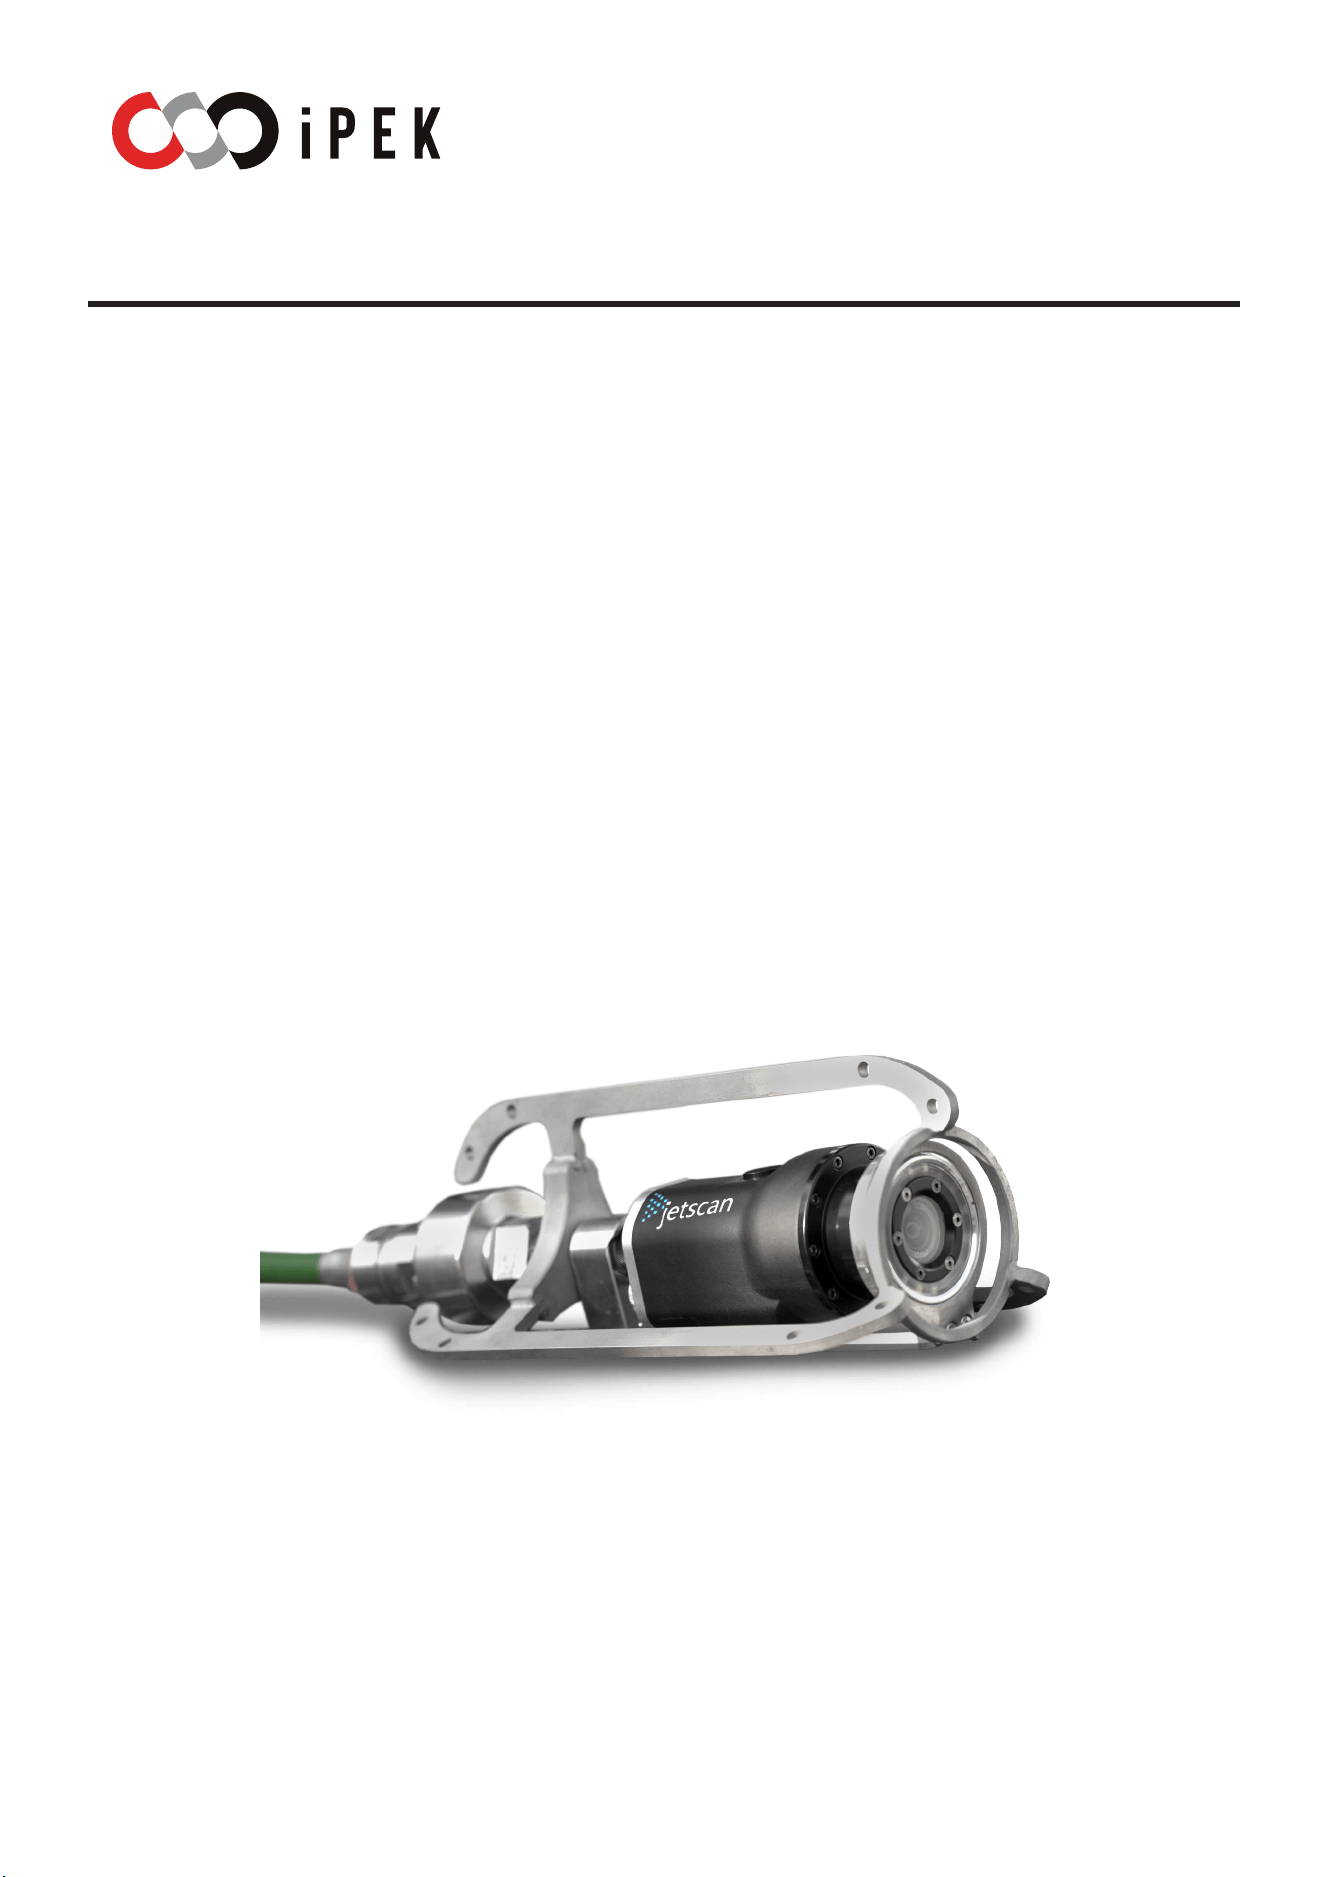
JETSCAN 2.1
Operating Instructions

JETSCAN 2.1
2

JETSCAN 2.1
Content
3
Content
Introduction ............................................................................................................... 7
Applicable directives and standards .................................................. ......................... 7
Target groups ............................................................................................................... 7
About this operating instruction .................................................................................. 7
Intended use ................................................................................................................. 8
Type plate ..................................................................................................................... 8
General Conditions ....................................................................................................... 9
Product names ....................................................................................................... 9
Operating steps ...................................................................................................... 9
Lists .................................................. ....................................................................... 9
Cross-references .................................................................................................... 9
Warnings, safety measures & care ........................................................................ 10
General warning and safety instructions .................................................................. 10
Further instructions .................................................................................................... 1 0
Product safety ......................................................................................................... 11
Intended use ............................................................................................................... 11
Unauthorized operation ....................................................................................... 11
Obligations of the operator .................................................. ...................................... 12
Obligations of the staff .............................................................................................. 12
Responsible staff and qualiications ........................................................................ 12
Operation site ............................................................................................................. 12
Power supply voltage requirements ......................................................................... 12
General safety instructions .................................................. ...................................... 13
Personal protective equipment ................................................................................. 13
Important warnings and safety instructions ............................................................ 14
Electrical safety .......................................................................................................... 15
Speciic hazards ......................................................................................................... 16
Working in manholes and sewers ............................................................................. 17
Cleaning and damage prevention .......................................................................... 18
Damage prevention .................................................................................................... 19
Sending system components .................................................. .................................. 19
Technical support....................................................................................................... 20
Maintenance and repair .......................................................................................... 20
General maintenance ................................................................................................. 20

JETSCAN 2.1
Content
4
Product description ................................................................................................ 21
Fields of application .................................................. ................................................. 21
Battery life .................................................. ................................................................. 21
Further information .................................................................................................... 21
System coniguration ................................................................................................. 22
JetScan 2.1 Camera ............................................................................................. 22
Installation and commissioning .................................................. ........................... 23
Visual inspection ........................................................................................................ 23
Turning on JetScan 2.1 .............................................................................................. 23
Connecting to Wi-Fi .................................................................................................... 23
Shutting down JetScan 2.1 ........................................................................................ 23
Regular shutdown ...................................................................................................... 23
Battery / Mains operation ....................................................................................... 24
Battery operation ..................................................................................................... ... 24
Mains operation ......................................................................................................... 24
Charging the battery ............................................................................................... 24
Charging time ............................................................................................................. 25
Application notes ....................................................................................................... 26
Transportation ............................................................................................................ 26
Maintenance and cleaning ........................................................................................ 26
Disposal ...................................................................................................................... 26
Working with the JetScan 2.1 app ......................................................................... 27
Main inspection view ................................................................................................. 27
Project management .................................................. .......................................... 28
Project gallery ..................................................................................................... .. 29
Camera videos ...................................................................................................... 30
Resolution ............................................................................................................. 30
Record / Pause / Stop .......................................................................................... 30
Screenshot ............................................................................................................ 30
Full screen / show/hide icons ............................................................................. 30
Camera and tablet battery ................................................................................... 31
Camera on/off ...................................................................................................... 31
Software version .................................................................................................. 31
Time zone ............................................................................................................. 31
License information ................................................................................................... 32
Settings ...................................................................................................................... 33

JETSCAN 2.1
Content
5
Miscellaneous ...................................................................................................... 33
Photo and video .................................................. .................................................. 34
Project and folder management.......................................................................... 35
Surveys .................................................. ................................................................ 35
Open WinCan Web...................................................................................................... 36
General .................................................................................................................. 36
Project management ................................................................................................. 36
Working with the system ........................................................................................ 37
Inserting and securing the camera ........................................................................... 37
Inserting into the pipe ................................................................................................ 37
Starting the JetScan recording.................................................................................. 37
High-pressure lushing ............................................................................................... 37
High-pressure lushing and ending the recording ................................................. 38
Removing the camera ................................................................................................ 38
Ending the recording .................................................................................................. 38
Reviewing and saving the recording ......................................................................... 38
Technical data ......................................................................................................... 39
JetScan 2.1 ........................................................................................................... 39
End-of-life equipment return ................................................................................... 40
Warranty statement ................................................................................................ 41
Scope of warranty ................................................................................................... 41
Warranty terms and conditions .............................................................................. 41
Limitations of liability ............................................................................................. 42
EC Declaration of Conformity ................................................................................. 43
Customer service addresses .................................................. ................................ 44
Legal notice ............................................................................................................. 45

JETSCAN 2.1
Introduction
Applicable directives and standards
7
Introduction
In this chapter, you will ind some preliminary remarks on using the JetScan 2.1 sewer inspec-
tion camera system, as well as explanations of the structure of this operating instruction and
the symbols and text markings used.
Applicable directives and standards
The JetScan 2.1 sewer inspection camera system was manufactured in accordance with ap-
plicable guidelines and standards.
Target groups
Target group Tasks
Operator
• Keep this manual available at the systems location for future reference.
• Instruct employees to read and follow this manual and the applicable docu-
ments, especially the safety and warning instructions.
Qualiied personnel
• Read, observe, and follow these instructions and the applicable documents,
paying particular attention to the safety and warning notices.
About this operating instruction
On the following pages, you will learn how to properly commission, operate, and maintain the
JetScan 2.1 sewer inspection camera system for your work environment. During develop-
ment, iPEK placed great emphasis on ensuring that you can operate the system safely, prop-
erly, and cost-effectively. To this end, it is essential that you read this user manual carefully
before using the inspection system. It contains important information that will help you avoid
hazards and increase the reliability and service life of the system and its associated com-
ponents. For your own safety, please read the Safety instructions section carefully. Follow
all instructions precisely to avoid endangering yourself and other employees and to prevent
damage to the system.
If you have any questions about using the JetScan 2.1 sewer inspection camera system that
are not answered in this user manual, please contact our service staff.
You can ind all customer service addresses in the Customer service addresses sec-
tion.

JETSCAN 2.1
Introduction
Intended use
8
Intended use
The JetScan 2.1 sewer inspection camera system is intended exclusively for use with
cleaning nozzles to record lushing operations within the speciied operating diameters.
Any other use or use beyond these speciications is considered improper. Never use the
JetScan 2.1 sewer inspection camera system for any other purpose. The system
must not be used in pipes containing explosive substances. Any violation of these in-
structions or improper use will void all warranties and the manufacturers liability.
In the vicinity of strong electric ields (EMC), operational performance may be im-
paired. Various factors may cause image distortion or lickering of the lighting.
Only components speciied in this user manual may be connected. Operation is permitted both
indoors and outdoors.
Type plate
You will ind a type plate on the product with the corresponding serial number. You will need
this information when contacting iPEK Customer Service, for example, if you wish to order
accessories or spare parts.

JETSCAN 2.1
Introduction
General Conditions
9
General Conditions
Product names
The names of iPEK products are labeled as follows:
JetScan 2.1
Operating steps
Operating steps are formatted as follows:
¾ Step description
– Bullet point within a step
– Bullet point within a step
¾ Step description
¾ Step description
Lists
Lists are formatted as follows:
– Variant A
– Variant B
– Variant C
Cross-references
Cross-references are formatted in italics.
JETSCAN 2.1
Warnings, safety measures & care
General warning and safety instructions
10
Warnings, safety measures & care
Read the safety instructions carefully and follow them. They are intended to ensure your own
safety, the safety of employees, and to prevent damage to the JetScan 2.1 sewer inspection
camera system and its components.
INFORMATION
The manufacturer is not liable for damages resulting from failure to follow the in-
structions in the complete documentation.
General warning and safety instructions
DANGER! This safety instruction describes an imminent hazard that will result in fatal
injuries or very serious personal injury.
WARNING! This safety instruction describes a potential hazard that could result in fatal
injuries or very serious personal injury.
CAUTION! This safety instructions describes a potential hazard that could result in
minor or slight injuries.
NOTE! This instruction describes a potentially harmful situation that could result in
property damage to the inspection system or other objects.
Further instructions
Information
This symbol indicates notes that are important for the eicient
use of the system and make it easier for you to operate it.
Disposal
This symbol indicates that the product and its components must
be disposed of properly and in accordance with regulations. The
operator of the product is responsible for its proper disposal!

JETSCAN 2.1
Product safety
Intended use
11
Product safety
The JetScan 2.1 pressure-lush camera is built in accordance with the current state of the art
and recognized safety standards. Nevertheless, its use may pose a risk to the life and limb of
the operator or third parties, or may result in damage to the pressure-lush camera or other
property.
The inspection system, when used in combination with the JetScan 2.1 ControlUnit and pow-
ered by a rechargeable battery, meets the IP68 protection rating.
The manufacturer is not liable for damage caused by factors not covered by the IP68 protec-
tion rating.
The USB-C port on the back of the camera should always be closed, except when charging
the device. The camera can only be connected to a tablet, iPad, or PC via Wi-Fi. The pres-
sure-lush camera may only be used if:
– it is in perfect working order,
– it is used as intended,
– the operator has the necessary safety and risk awareness,
– the instructions in this user manual are followed,
– in addition to the complete documentation, the legal or other safety and accident
prevention regulations as well as the applicable standards and guidelines of the
respective country of operation are observed.
Intended use
The JetScan 2.1 sewer inspection camera system is intended exclusively for the inspection
and lushing of sewer and industrial pipes.
Intended use includes, in particular:
– cleaning work inside pipes,
– removal of deposits,
– preparatory work for rehabilitation measures,
– use in pipes with a diameter of 200500 mm. The camera system can also be used
in larger pipes. In these applications, the built-in lighting may not be suicient.
Any use beyond or contrary to these instructions is considered improper.
The manufacturer assumes no liability for any resulting damage.
Unauthorized operation
Operation of the system is not permitted:
– during thunderstorms (risk of electric shock)
– in areas at risk of explosion
– when using components that have not been approved
– in outdoor conduit pipes
– in environments with strong electromagnetic ields (EMC), as image distortion or
lickering may occur
Improper use may result in serious injury, property damage, or voiding of the warranty.

JETSCAN 2.1
Product safety
Obligations of the operator
12
Obligations of the operator
The operator is required to:
– keep this operating manual available with the JetScan 2.1,
– ensure that operating personnel have read and understood the manual in its entire-
ty,
– comply with all legal and operational safety regulations,
– provide regular training to operating personnel,
– and, when operating in potentially explosive atmospheres, use only personnel who
have received appropriate training.
Obligations of the staff
The staff is required to:
– read, observe, and comply with this manual and all related documents,
– follow the applicable accident prevention regulations,
– adhere to the operating conditions described in this manual,
– maintain, clean, and service the product
Responsible staff and qualiications
Allow only trained or instructed personnel to operate the JetScan 2.1 pressure-lush camera.
Assign responsibilities according to the personnels qualiications. This manual contains all
the necessary information for:
– Installation
– Operation
– Maintenance
– Troubleshooting
The operating instructions are an integral part of the system and must be available at the site
of operation at all times.
Operation site
¾ Please note that the maximum permissible relative humidity during operation and stor-
age is 100%.
¾ Ambient temperature range: 0 °C to +40 °C
¾ Storage temperature range: −10 °C to +50 °C
Power supply voltage requirements
¾ Mains voltage tolerance: ±10% for AC power supply 100 V to 240 V
¾ Overvoltage category: 2
¾ Degree of pollution: 4 (outdoor use)
¾ Suitable for indoor and outdoor use
JETSCAN 2.1
Product safety
General safety instructions
13
General safety instructions
Before each startup, ensure that:
– the system is in perfect working order,
– all safety devices are in working order,
– only tools and accessories approved by the manufacturer are used,
– the system is used only for its intended purpose,
– the operator has suicient awareness of safety and hazards,
– all legal and company safety and accident prevention regulations are observed.
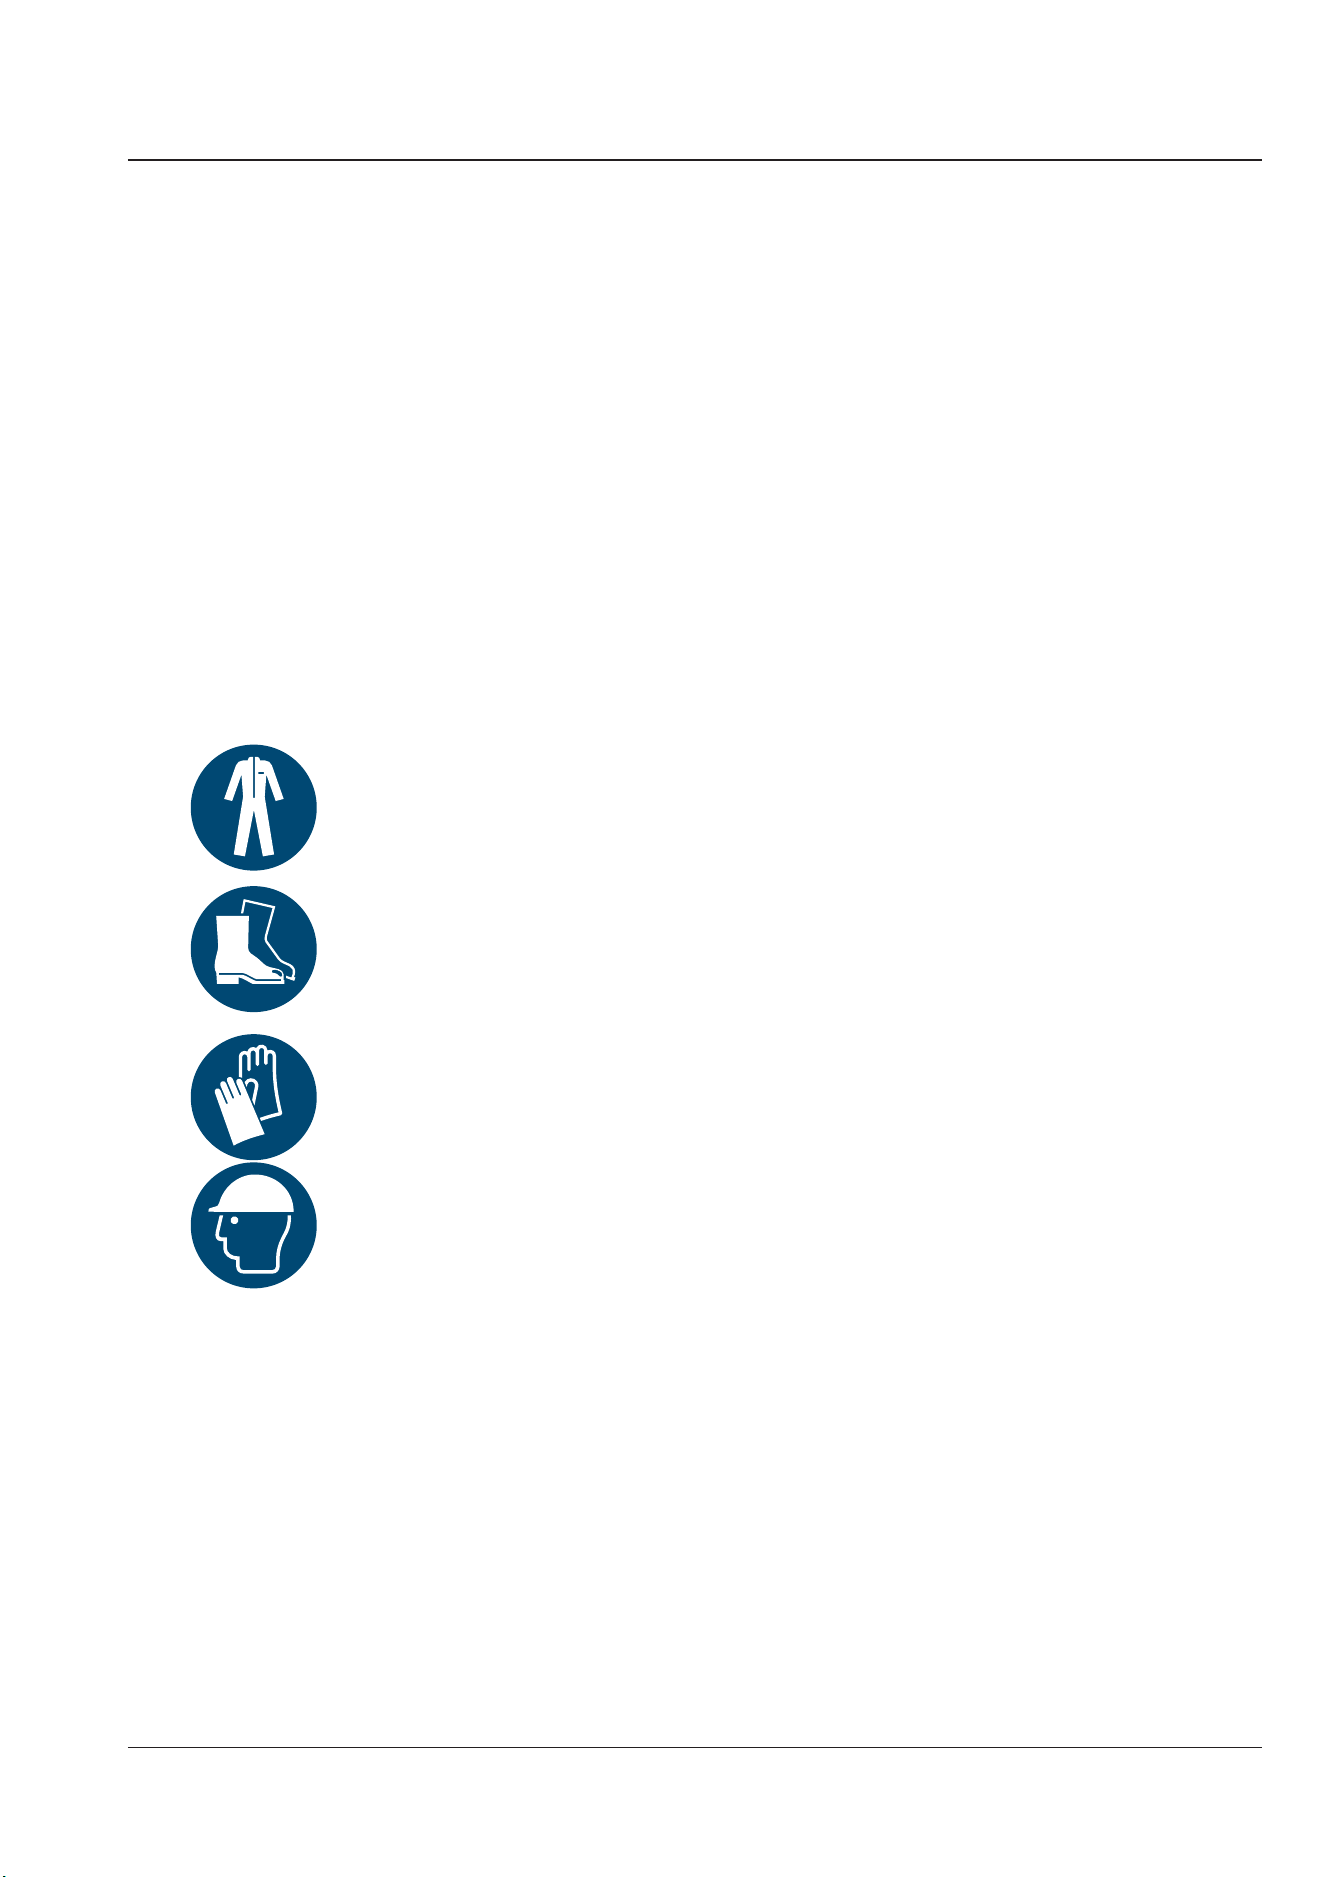
Personal protective equipment
To ensure the safe operation of the JetScan 2.1 sewer inspection camera system, it is man-
datory to wear the required personal protective equipment (PPE) and to follow the safety
precautions at the work site.
Work clothing
Closed-toe and form-itting to protect against injuries and hazardous sub-
stances.
Safety shoes
Non-slip and waterproof; protect against impacts and falling objects.
Gloves
Protect against injuries and hazardous substances.
Safety helmet
Protects the head from falling objects and impacts.
JETSCAN 2.1
Product safety
14
Important warnings and safety instructions
Please read the safety precautions thoroughly and follow them carefully. They are intended to
ensure your own safety, the safety of others, and to prevent damage to the JetScan 2.1 sewer
inspection camera system and its components.
INFORMATION
The manufacturer is not liable for damages resulting from failure to follow the in-
structions in the complete documentation.
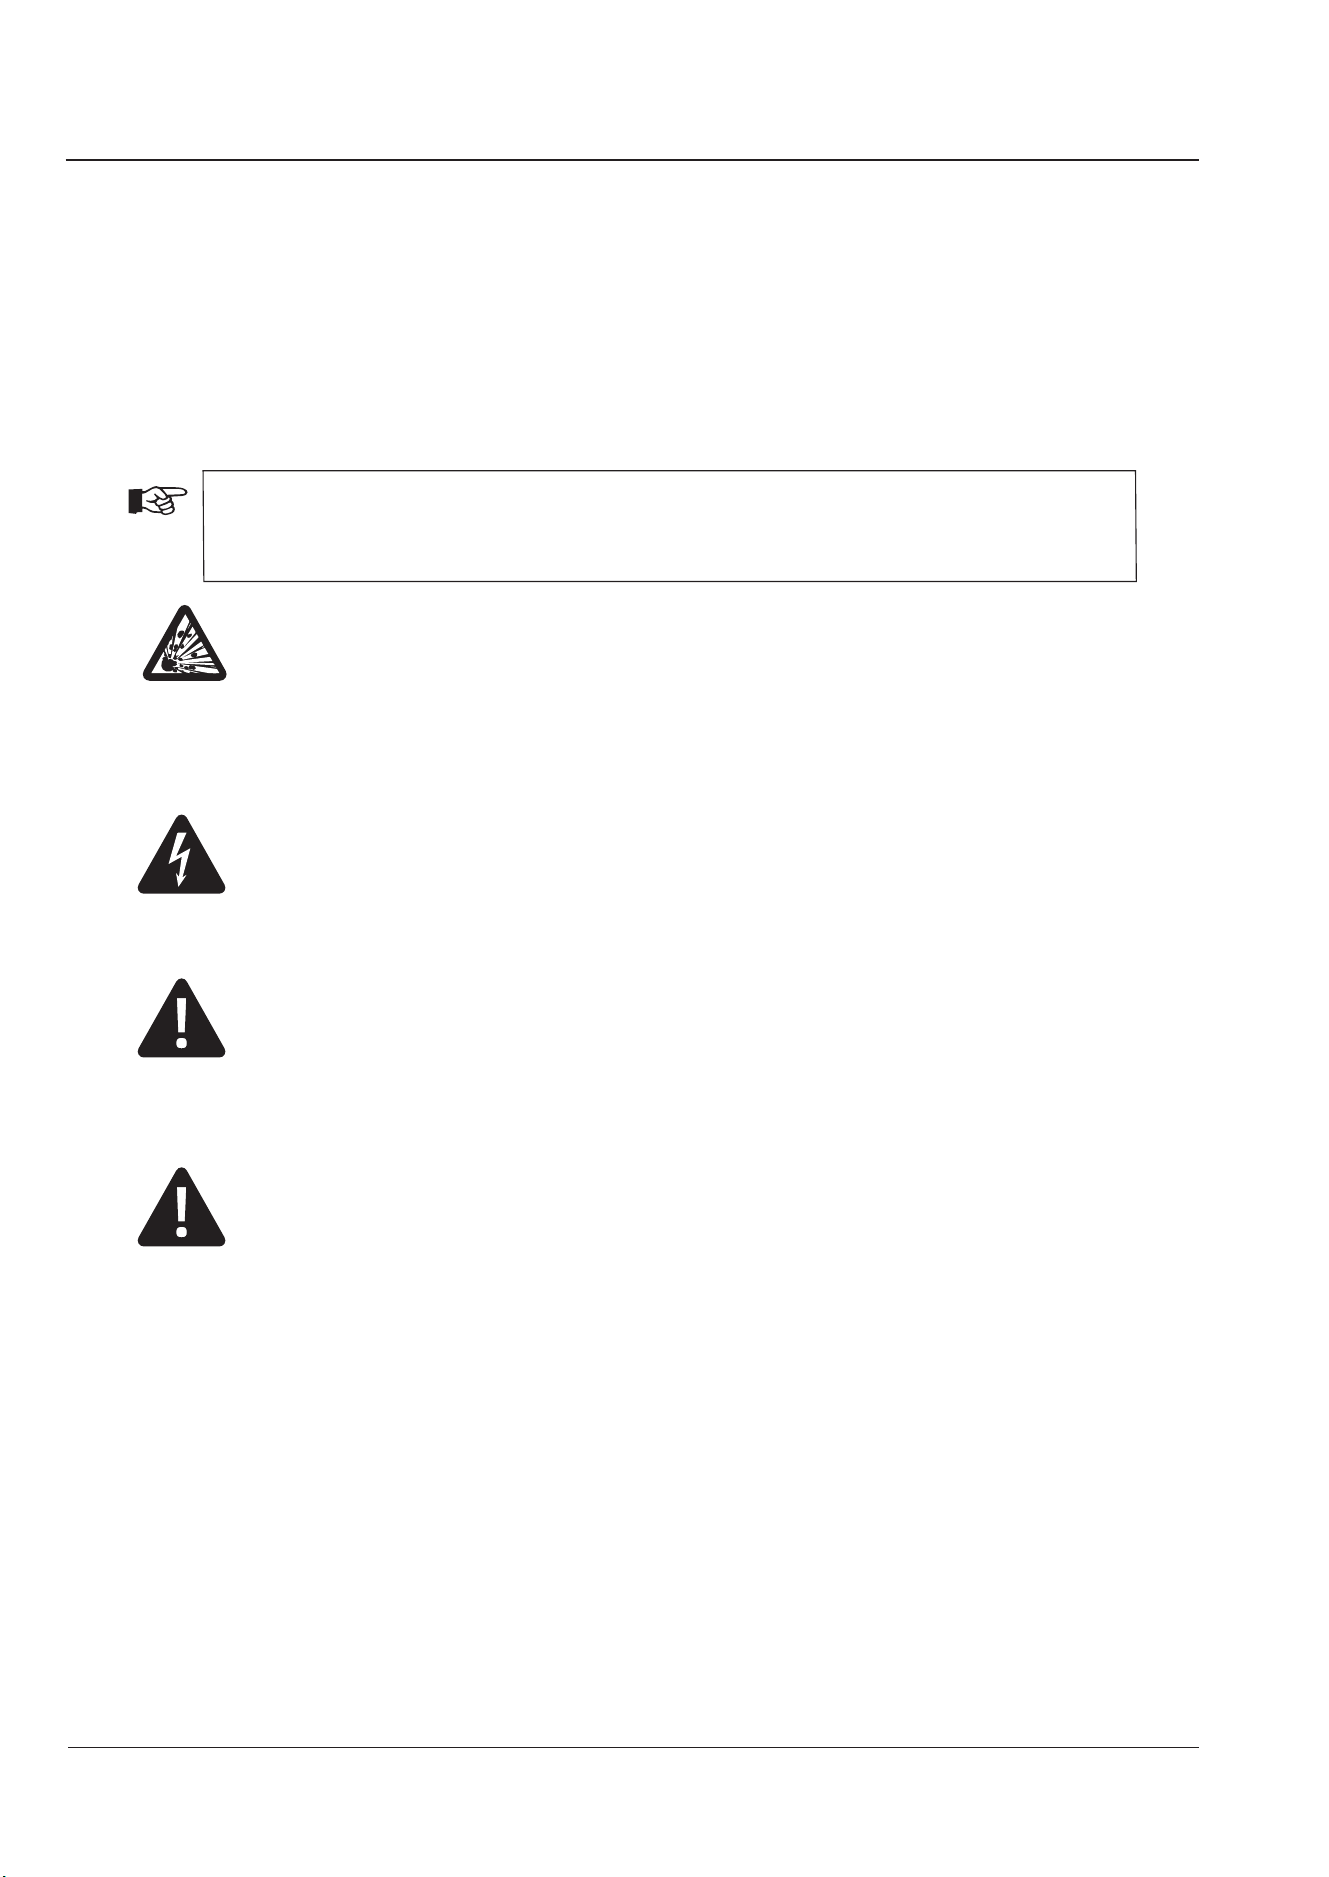
DANGER!
Risk of explosion.
¾ Do not use the sewer inspection camera system in pipes that contain or
have contained explosive substances, such as gas or solvents.
¾ For this application, contact your contract partner to obtain information
on appropriately designed system components.
WARNING!
Danger from lightning strikes.
¾ Never use the device during a thunderstorm or near thunderstorm activity.
¾ Stop working immediately and seek shelter
WARNING!
Unauthorized use by children, untrained personnel, or persons with limited
physical abilities may result in injury, misuse, or damage to the equipment.
¾ This product may only be operated by trained, authorized personnel.
¾ Keep out of reach of children.
WARNING!
Hazard due to an unsecured work area.
Unauthorized access or accidental entry into the work area during sewer in-
spection work can result in falls or accidents that may endanger third parties or
cause property damage.
¾ Cordon off the work area before and during sewer work. After completion,
remove all barriers and leave the work site in an orderly and safe condi-
tion.
JETSCAN 2.1
Product safety
15
WARNING!
Danger from heavy loads.
Improper handling or slippage of heavy loads can result in serious injury or
death.
¾ Move robots or heavy components only with suitable lifting equipment or
with suicient personnel.
¾ eople must not stand under suspended loads (e.g., in a manhole).
¾ When using cranes or hoists, ensure that no one is under the load.
Electrical safety
DANGER!
Risk of death from electric shock.
¾ If the housing is damaged, the IP rating is compromised. Water ingress
creates a risk of electric shock.
¾ If you notice any damage to the camera (on the front housing or the rear
cover), do not connect the device to the power supply. In this case, con-
tact our service team immediately.
¾ Immediately shut down any system with a damaged housing.
¾ Ensure that the electrical connection cables are undamaged and cannot
be kinked or crushed.
¾ Covers and parts of the electrical system may only be opened by autho-
rized personnel.
¾ Extensive maintenance and repair work may only be performed by iPEK
Customer Service or by persons authorized by iPEK International.
JETSCAN 2.1
Product safety
Speciic hazards
16
Speciic hazards
WARNING!
Direct exposure to light can cause eye injuries or permanent loss of vision.
¾ Do not look directly into the light emitted by the lighting units.
WARNING!
Risk of infection and contamination of fresh water.
¾ Never use the sewer inspection camera system interchangeably for work
in wastewater and fresh water!
– Even thorough cleaning of the system does not guarantee adequate
protection against contamination.
¾ Use a separate sewer inspection camera system for work in wastewater
and fresh water, respectively.
– Pathogens can lead to infection.
¾ All employees involved in the work must be informed of the hazards and
instructed on the necessary protective measures.
CAUTION!
Risk of burns!
The JetScan 2.1 Camera can become hot during operation. Touching the cam-
era may result in skin burns.
¾ Be sure to wear appropriate safety equipment (protective gloves) when
working on the camera!
CAUTION!
Risk of injury from overpressure or pressurized components (up to 2 bar).
¾ Fill the system with nitrogen as intended.
¾ Do not exceed the maximum pressure of 2 bar.
¾ Check for leaks and ensure all connections are secure before commis-
sioning.
¾ Before opening or loosening connections, completely depressurize the
system.
¾ Release pressure in a controlled manner.
¾ Wear appropriate protective equipment (helmet, safety goggles, gloves,
safety shoes).
JETSCAN 2.1
Product safety
Working in manholes and sewers
17
Working in manholes and sewers
WARNING!
Risk of falling due to open manholes and channels.
¾ Secure manholes and openings.
¾ Use appropriate fall protection.
¾ Clearly mark and cordon off the work area.
WARNING!
Working alone poses a risk to life.
¾ Never work alone.
¾ Ensure communication within the work team.
¾ Maintain constant visual contact and/or auditory contact:
– Clear commands, hand signals, and emergency signals.
JETSCAN 2.1
Cleaning and damage prevention
Working in manholes and sewers
18
Cleaning and damage prevention
CAUTION!
Electrical voltage during charging
There is a risk of electric shock when the charger is connected.
¾ Disconnect the device from the charger and turn it off before cleaning.
¾ Follow the Important warnings and safety instructions on page 14.
WARNING!
Risk of infection due to improper cleaning
¾ Only authorized personnel may perform cleaning tasks.
¾ Use only a clean and hygienically sound system to signiicantly reduce the
risk of contamination.
¾ Wear appropriate protective gloves during all cleaning tasks to avoid
direct contact with potentially infectious material.
To ensure the longest possible service life for your JetScan 2.1 system, it is highly recom-
mended that you properly maintain the systems devices and individual components, keep
them clean, and perform regular maintenance. The systems wear parts can achieve a signii-
cantly longer service life through consistent and proper cleaning following inspections.
Please also note that the risk of infection for the operator is signiicantly reduced when you
use a clean system.
Here we have listed some tips on care and maintenance for you. Please note that proper care
not only ensures greater reliability and enjoyment for you, but also simpliies and shortens
maintenance work performed by your service dealer.
¾ Keep the entire system clean and clean it immediately after each inspection.
¾ Thoroughly rinse the parts of your system that came into contact with moisture during
the inspection, and then dry them with a clean, dry cloth.
¾ Always keep all components that are not expressly designed for use in humid environ-
ments dry and free of dirt!
¾ Clean the camera and lushing nozzle with a soft, damp cloth.
¾ Do not clean with pressurized water.
¾ Keep all connectors and contacts dry and free of grease and dirt.
¾ Make sure that the pressure-lush nozzle is thoroughly cleaned after inspection.
¾ Replace the protective caps on the connectors. Clean the sockets and connectors only
with a suitable electronic contact cleaner.
¾ Use only running, clean water and soft plastic brushes (e.g., a toothbrush) to clean the
camera heads.
¾ After mechanical cleaning, all components that have come into contact with wastewa-
ter must be disinfected.
¾ To do this, use a disinfectant that is compatible with the materials and approved by the
manufacturer.
¾ Completely wet the surfaces, observe the speciied contact time, and then allow them
to dry.
JETSCAN 2.1
Cleaning and damage prevention
Damage prevention
19
¾ Under no circumstances should liquid be allowed to enter the camera heads, motors, or
connectors.
NOTICE!
Signiicant damage to the spray nozzle/pressure spray nozzle and other compo-
nents
¾ Never use a high-pressure washer when cleaning.
¾ Do not use cleaning agents or solvents when cleaning; use only clean water.
Damage prevention
Please follow these instructions to prevent damage to your sewer inspection system.
Storage and use
¾ Under no circumstances should you use or store the system outside the permissible
temperature range.
JetScan 2.1 system
¾ Avoid subjecting the front of the camera and the protective glass of the camera module
to hard impacts.
¾ Never kink the systems lushing hose, and prevent loops or knots from forming.
¾ Keep the operating software up to date by installing the latest updates.
¾ Routinely export your inspection data to a storage device or save the data to your tablet
or iPad.
¾ Make sure the charging port is properly covered.
Sending system components
If necessary repairs to system components go beyond the procedures described in this user
manual, send the component to your iPEK service partner. You can ind all of our service part-
ners in the Customer service addresses chapter.
Please note the following points:
¾ Ensure that the adjustment unit used to secure the camera to the cleaning nozzle is set
correctly.
¾ Cover any plug or screw connections with protective caps or tape them shut.
¾ Clean the component carefully.
¾ Ship the component in its original packaging if possible.
¾ Include a detailed description of the problem.

JETSCAN 2.1
Maintenance and repair
Technical support
20
Technical support
Your iPEK service partner will always provide you with detailed support for any questions you
may have.
Don't hesitate to contact your service partner, even if you think you only have a minor ques-
tionthey will be happy to help you in any case.
You can ind all of our service partners in the Customer service addresses section.
Maintenance and repair
General maintenance
¾ The camera head is maintenance-free. Make sure that all screw threads and connec-
tions are free of dirt.
¾ Routinely perform a visual inspection of all external screws and O-rings.
¾ Regularly check the pressure level on the control panel. If the pressure drops below
1bar, reill the camera accordingly.
JETSCAN 2.1
Product description
Fields of application
21
Product description
Fields of application
The JetScan 2.1 pressure-lushing camera is used for visual monitoring and documentation
during high-pressure lushing of pipelines.
The inspection range depends on the lushing vehicle. When the camera is inserted into the
mount, the connection between the tablet and JetScan 2.1 is automatically interrupted. How-
ever, video recording continues in the background, ensuring that the entire lushing process is
fully documented. The inspection data is stored in the camera and can be played back when
the camera is turned off or removed. Data can be transferred to the control panel via Wi-Fi or
the USB-C interface. The data can be downloaded to a tablet or iPad for further processing or
archiving for documentation purposes.
The JetScan 2.1 system, when operated on battery power (with the JetScan 2.1 ControlUnit
control panel), meets the IP68 protection rating.
DANGER!
Fire hazard due to short circuit!
¾ When the JetScan 2.1 is not in use, the system must be turned off to pre-
vent short circuits.
INFORMATION
To achieve IP protection class 68, the system must be powered by rechargeable
batteries, and the battery compartment covers must be closed.
Battery life
Battery life: 5 to 6 hours, depending on various factors:
– Brightness settings of the JetScan 2.1s lighting components
– Operating time
– Environmental conditions
Further information
¾ Be sure to turn off the JetScan 2.1 ControlUnit (tablet) when not in use.
– The standby mode of the JetScan 2.1 ControlUnit causes the battery to discharge.
¾ If you remove the USB lash drive from the port, put the protective cover back on to
protect the port from dirt and water.
¾ Please refer to the System coniguration section on page 22.
JETSCAN 2.1
Product description
System coniguration
22
System coniguration
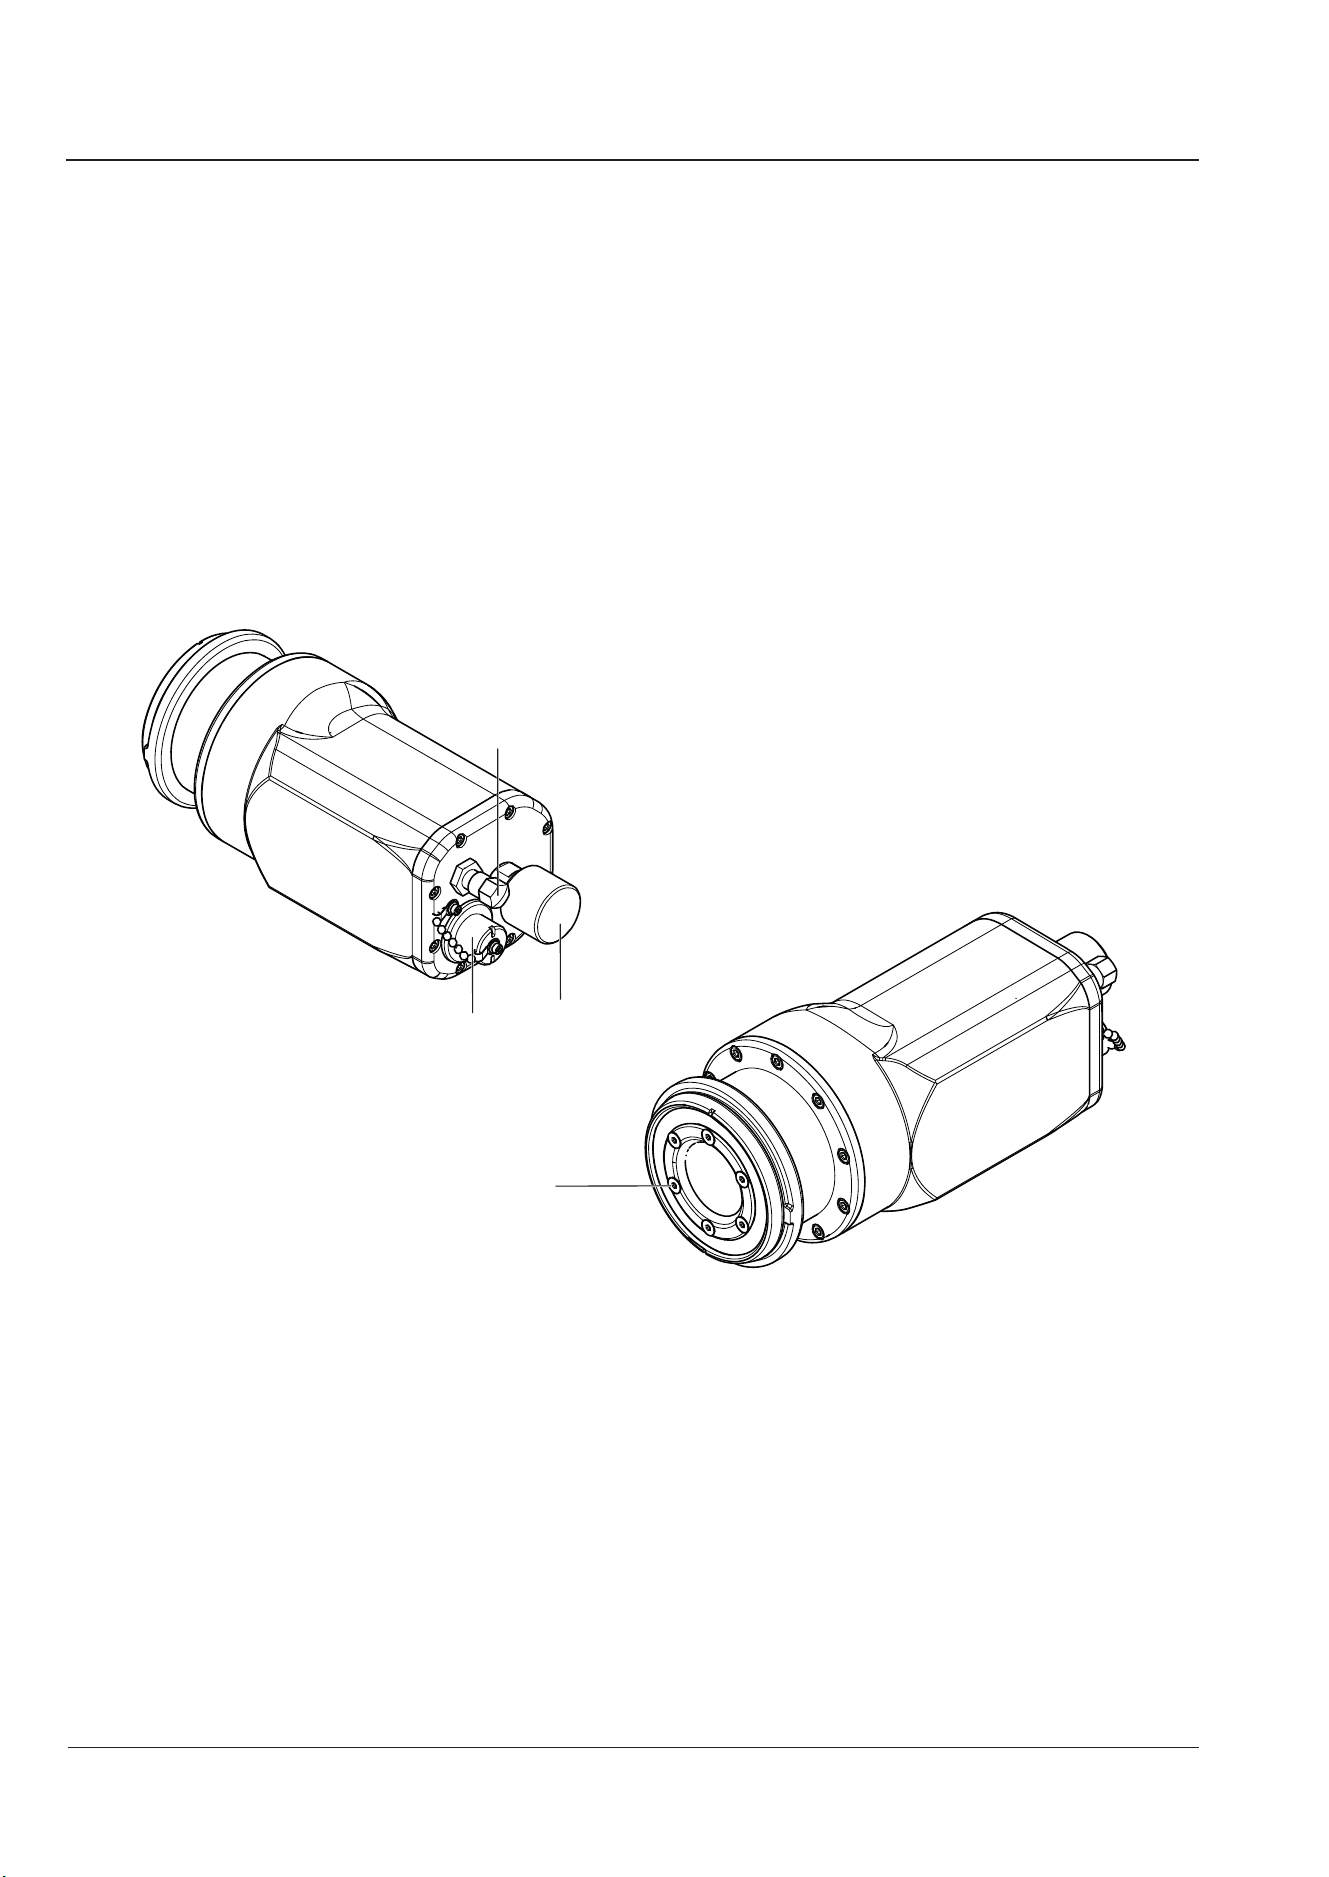
The high-pressure lushing inspection system consists of the following main components:
– Flushing camera (JetScan 2.1 Camera)
– Flushing hose (JetScan 2.1 CableReel)
– SewerLink app + tablet (JetScan 2.1 ControlUnit)
JetScan 2.1 Camera
4
2
3
1
1 Pressure valve
2 USB-C port
3 Adjustment unit
4 Camera module and LED ring
JETSCAN 2.1
Installation and commissioning
Visual inspection
23
Installation and commissioning
The initial commissioning of the JetScan 2.1 sewer inspection camera will take place as part
of a thorough training session for the operating personnel.
Visual inspection
Before each inspection, visually inspect the components for damage or contamination.
Do not use damaged or contaminated components.
¾ Refer to the section„Important warnings and safety instructions“ on page 14.
Turning on JetScan 2.1
¾ Place a magnet on the power button at the top of the camera for a few seconds.
¾ Wait until the cameras blue LED starts to lash.
¾ Remove the magnet from the button immediately after the LED starts lashing.
INFORMATION
Do not hold the magnet against the button any longer than necessary. Prolonged
contact may cause the system to malfunction.
Connecting to Wi-Fi
¾ Wait a few seconds until the camera has fully started up.
¾ Open the Wi-Fi settings on your device.
¾ Look for your camera‘s serial number in the list of available networks.
¾ Select the network and enter the corresponding password.
Shutting down JetScan 2.1
Regular shutdown
Turn off the JetScan 2.1 using your SewerLink app by shutting down the system.
JETSCAN 2.1
Battery / Mains operation
Battery operation
24
Battery / Mains operation
Battery operation
DANGER!
Risk of fatal electric shock!
¾ Never touch exposed electrical contacts or damaged wires.
INFORMATION
The battery charges when the system is connected to AC power.
Mains operation
WARNING!
Risk of electric shock!
¾ Connect the power adapter only to the designated outlet.
¾ Do not use damaged power adapters.
¾ Use only the original power adapter provided.
NOTE
Risk of system damage and data loss!
Make sure the system is switched to battery power before unplugging the power
cord.
Charging the battery
DANGER!
Risk of fatal injury from electric shock!
Water or dirt entering a charger increases the risk of electric shock.
Damaged chargers, cables, and plugs increase the risk of electric shock.
¾ Keep the charger away from rain or moisture!
¾ Keep the charger clean!
¾ Check the charger, cable, and plug before each use!
¾ Do not use the charger if you notice any damage!
¾ Do not open the charger yourself; have it repaired only by qualiied person-
nel and only with original spare parts!
JETSCAN 2.1
Charging the battery
Charging time
25
DANGER!
Risk of explosion due to overheating!
¾ Protect the device from heat, including, for example, prolonged exposure
to direct sunlight and ire!
DANGER!
Fire hazard!
¾ Do not operate the charger on highly lammable surfaces (e.g., paper,
textiles, etc.) or in a lammable environment! The charger heats up during
charging, posing a ire hazard.
WARNING!
Risk of chemical burns due to damage to the product!
If the battery is damaged or used improperly, vapors may be released.
¾ Ensure adequate ventilation and seek medical attention if you experience
any symptoms! The vapors may irritate the respiratory tract.
¾ Open the USB-C charging port on the back of the camera.
¾ Connect the USB-C charging cable to the camera‘s charging port.
¾ Plug the other end of the USB-C cable into the USB-C charger.
¾ Plug the charger into a suitable power outlet.
¾ Wait until charging is complete.
Charging time
It takes about 1 hour to fully charge the battery from 0% to 100%.
NOTE
Be sure to close the USB-C charging port completely after charging to protect the
camera from dust and moisture.
Charge the camera fully before using it for the irst time. A green LED indicates that
the battery is fully charged.
JETSCAN 2.1
Battery / Mains operation
Application notes
26
Application notes
The charger may become warm during continuous charging cycles or multiple consecutive
charging cycles without interruption. This is normal and does not indicate a technical defect
in the device.
A signiicantly reduced operating time after charging indicates that the batteries are worn out
and need to be replaced.
Transportation
The battery has been tested in accordance with UN Manual ST/SG/AC.10/11/Rev.3, Part III,
Subsection 38.3. It features effective protection against internal overpressure and short cir-
cuits, as well as mechanisms to prevent violent rupture and dangerous reverse current.
The lithium equivalent content of the battery is below the applicable limits. Therefore, the bat-
tery is not subject to national dangerous goods regulations, either as a single item or when
installed in a device. However, dangerous goods regulations may apply when transporting
multiple batteries. In this case, it may be necessary to comply with speciic requirements
(e.g., regarding packaging).
Maintenance and cleaning
The unit is maintenance-free. Always keep the unit and ventilation slots clear and clean. If the
unit should ever malfunction despite careful manufacturing and testing procedures, have it
repaired by an authorized service center.
For all inquiries and spare parts orders, please be sure to provide the part number as indicat-
ed on the charger’s nameplate.
Disposal
Chargers, accessories, and packaging should be recycled in an environmentally responsible
manner.
Do not dispose of chargers in household trash!
In accordance with European Directive 2012/19/EU on Waste Electrical and
Electronic Equipment and its implementation into national law, chargers that are
no longer usable must be collected separately and recycled in an environmentally
sound manner.
JETSCAN 2.1
Working with the JetScan 2.1 app
Main inspection view
27
Working with the JetScan 2.1 app
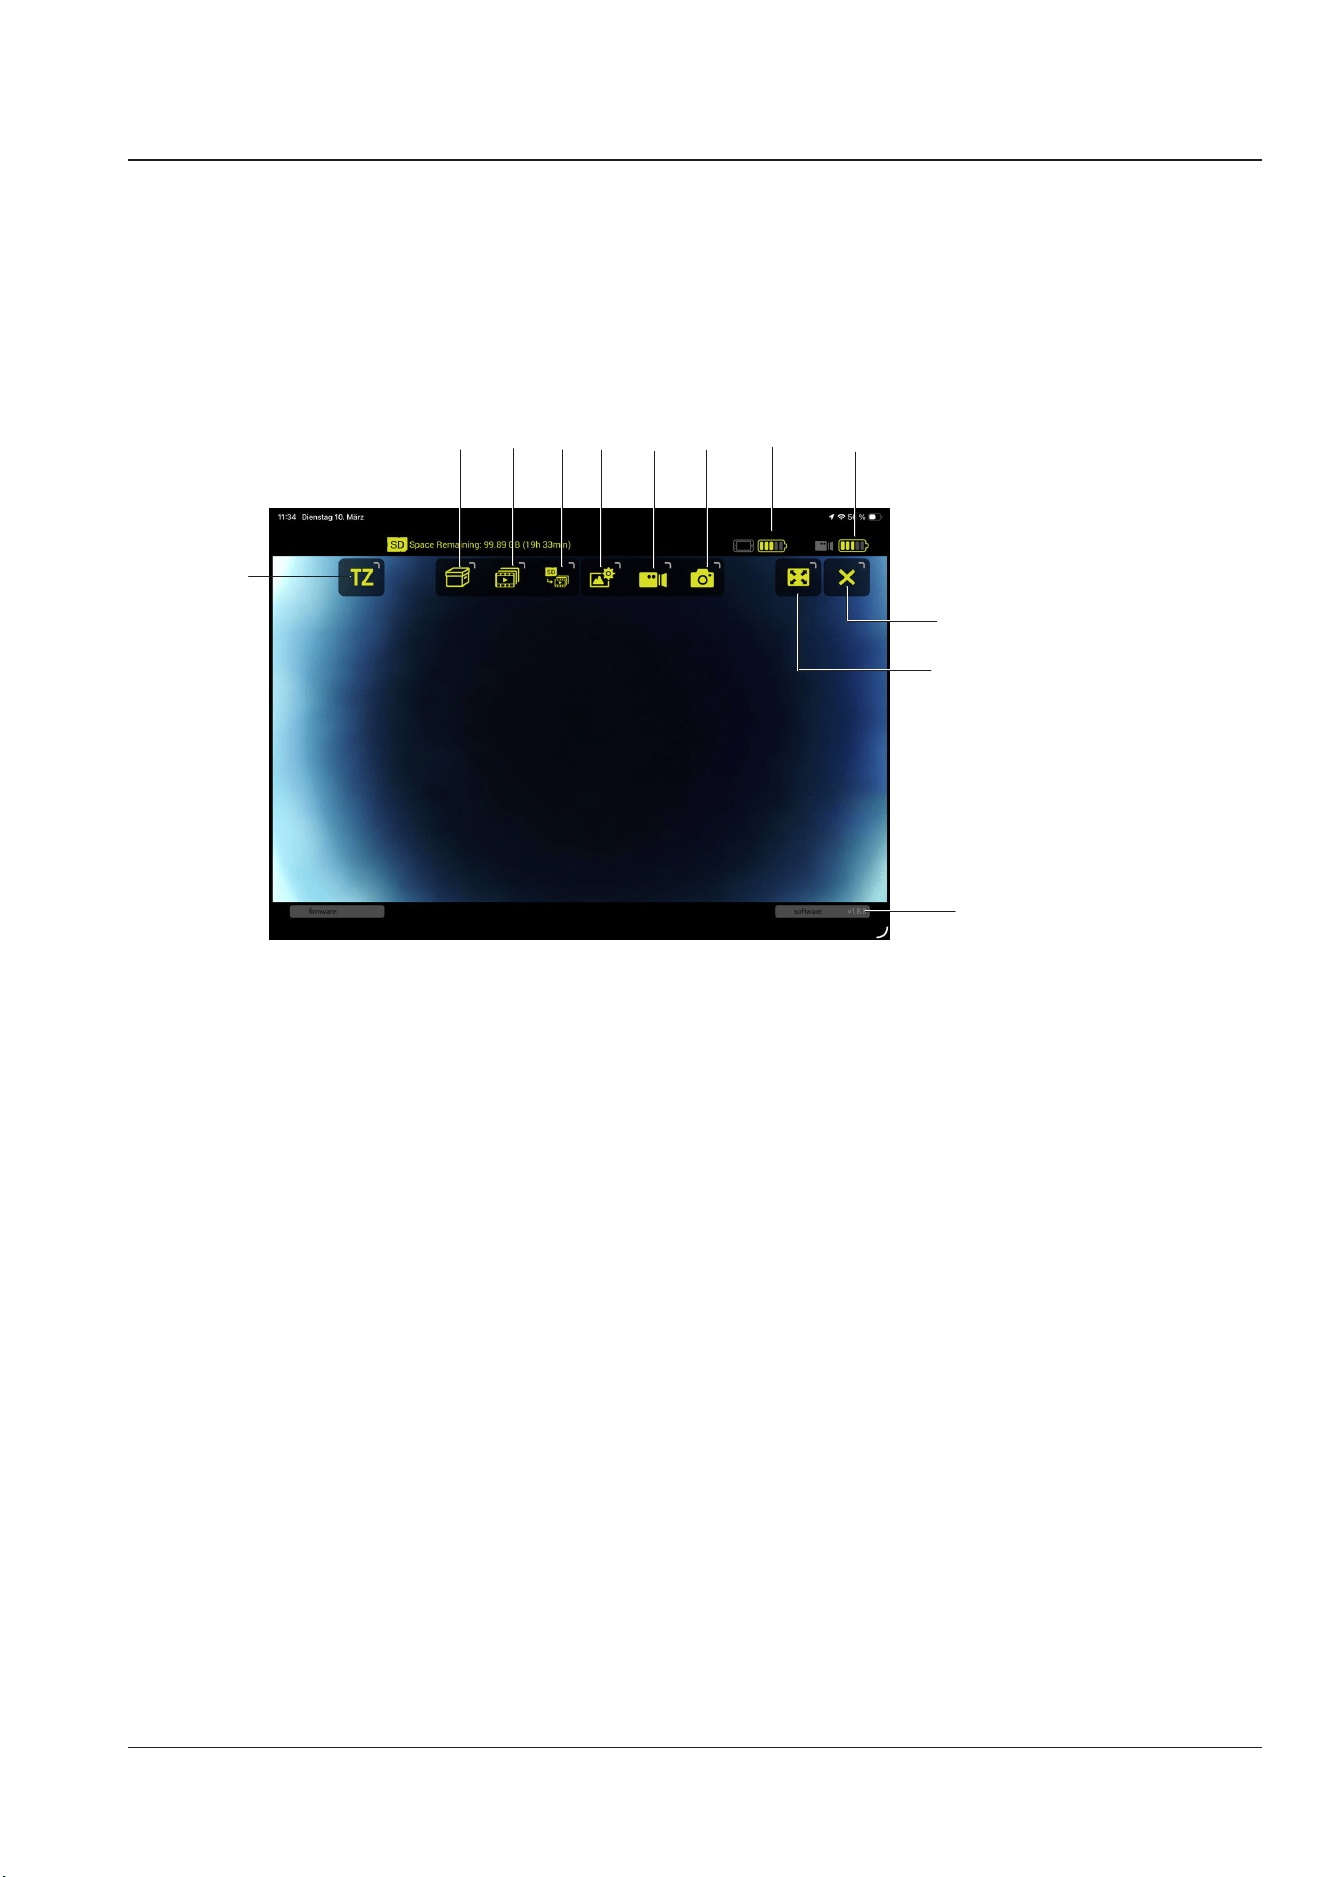
Main inspection view
1
12
9
10
2
3
4
5
6
7
8
11
1 Project management
2 Project gallery
3 Camera videos
4 Resolution
5 Start/Stop video recording
6 Screen recording
7 Tablet / iPad battery
8 Camera battery
9 Turn off camera
10 Full screen / hide/show icons
11 Software version
12 Time zone
JETSCAN 2.1
Working with the JetScan 2.1 app
Main inspection view
28
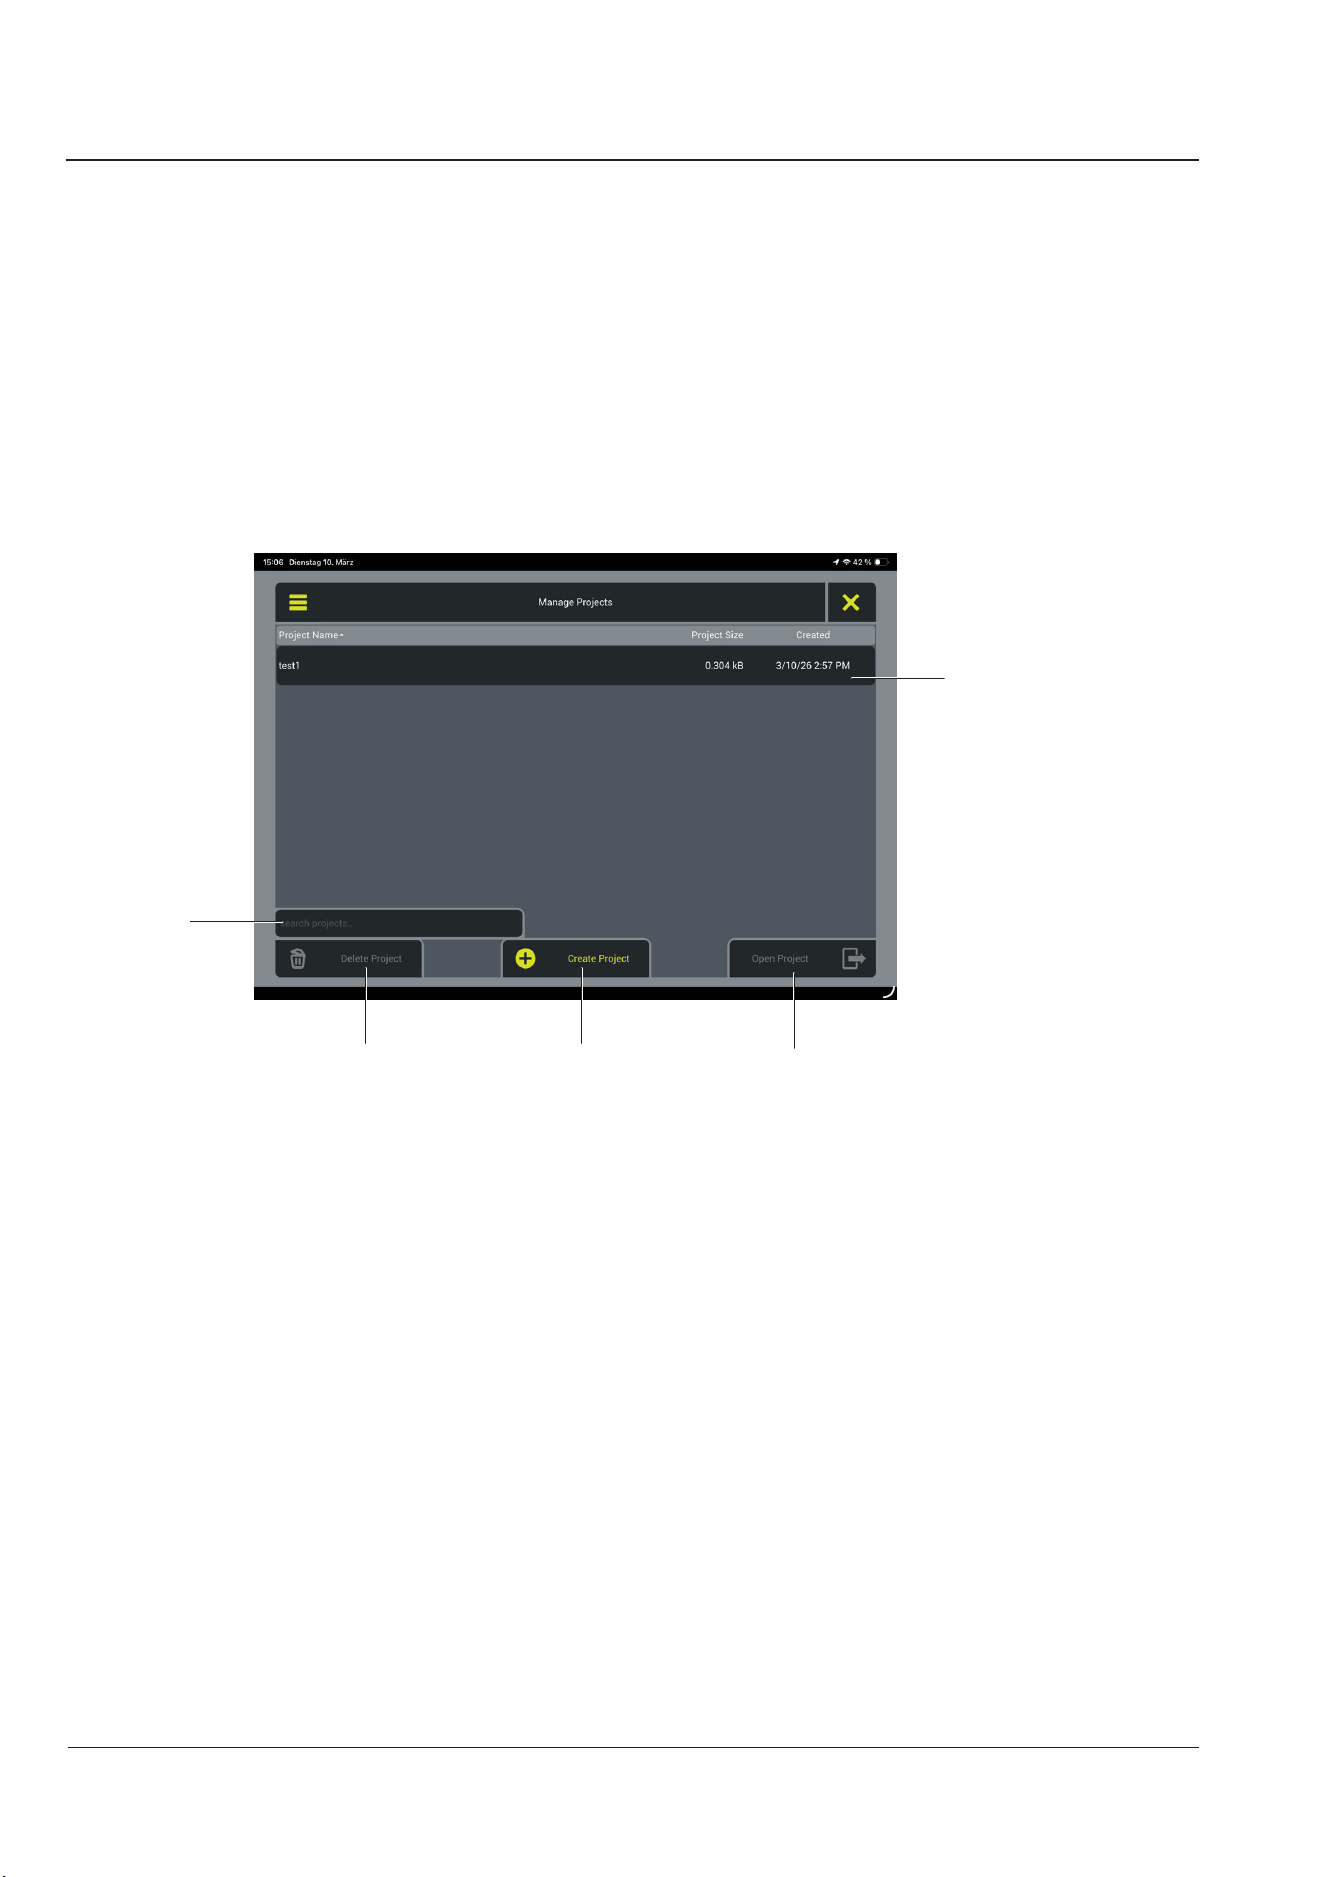
Project management
Here you can
– open,
– create,
– delete,
– search for,
– and rename projects.
4
1
3
2
5
1 Project list
2 Open project
3 Create project
4 Delete project
5 Search for project
JETSCAN 2.1
Working with the JetScan 2.1 app
Main inspection view
29
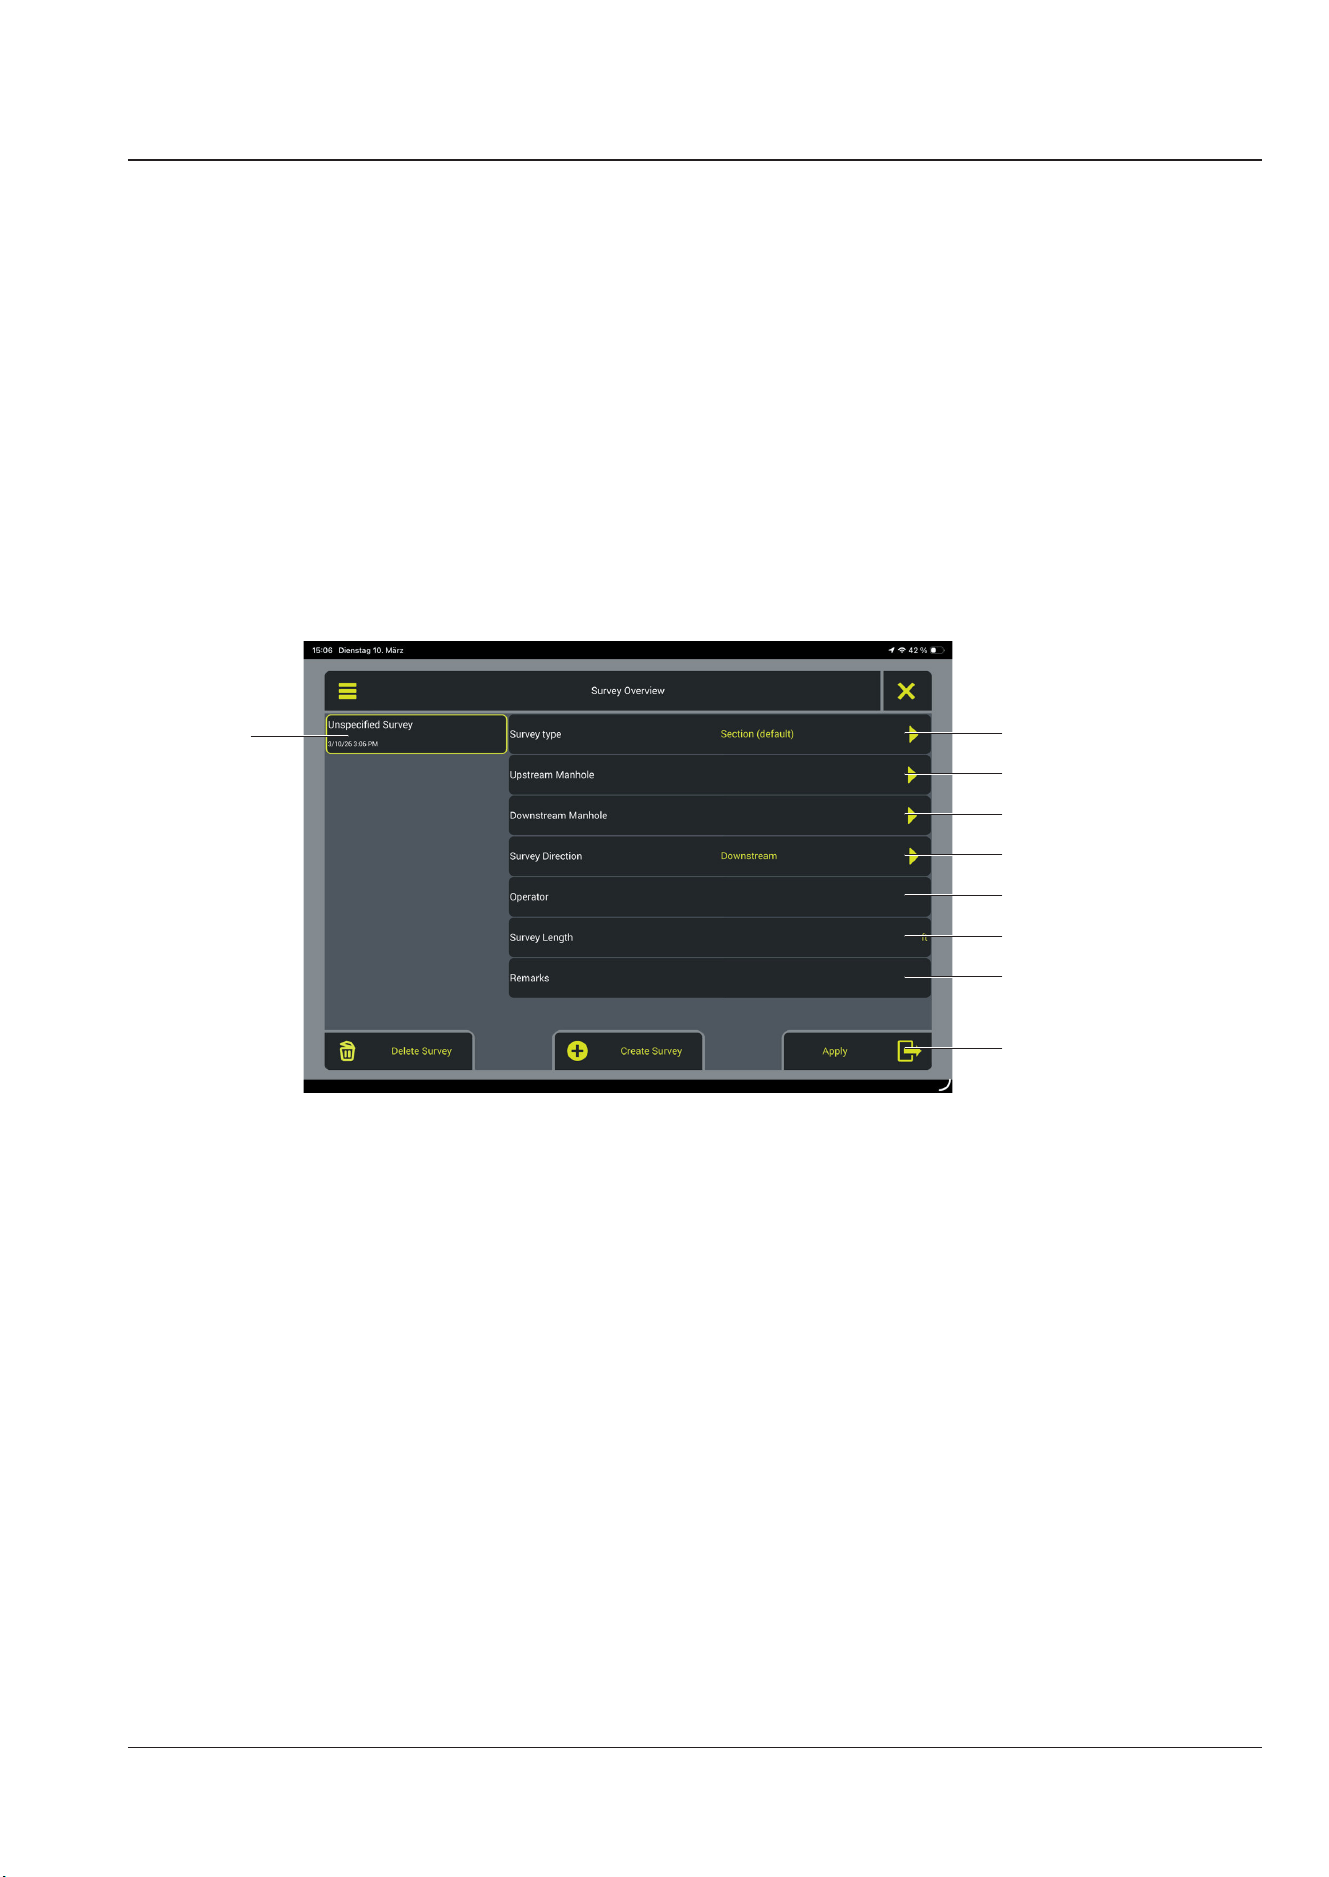
Project gallery
In the project gallery, you can create, manage, and select inspections and surveys. The fol-
lowing input options are available for each inspection:
– Inspection type
– Inspection direction (upstream or downstream)
– Manhole low direction
– Operator name
– Inspection length
– Optional comments
1
2
3
4
5
6
7
8
9
1 Inspection type
2 Upper manhole
3 Lower manhole
4 Inspection direction (upstream /
downstream)
5 Operator name
6 Inspection length
7 Remarks
8 Back
9 Active project
JETSCAN 2.1
Working with the JetScan 2.1 app
Main inspection view
30
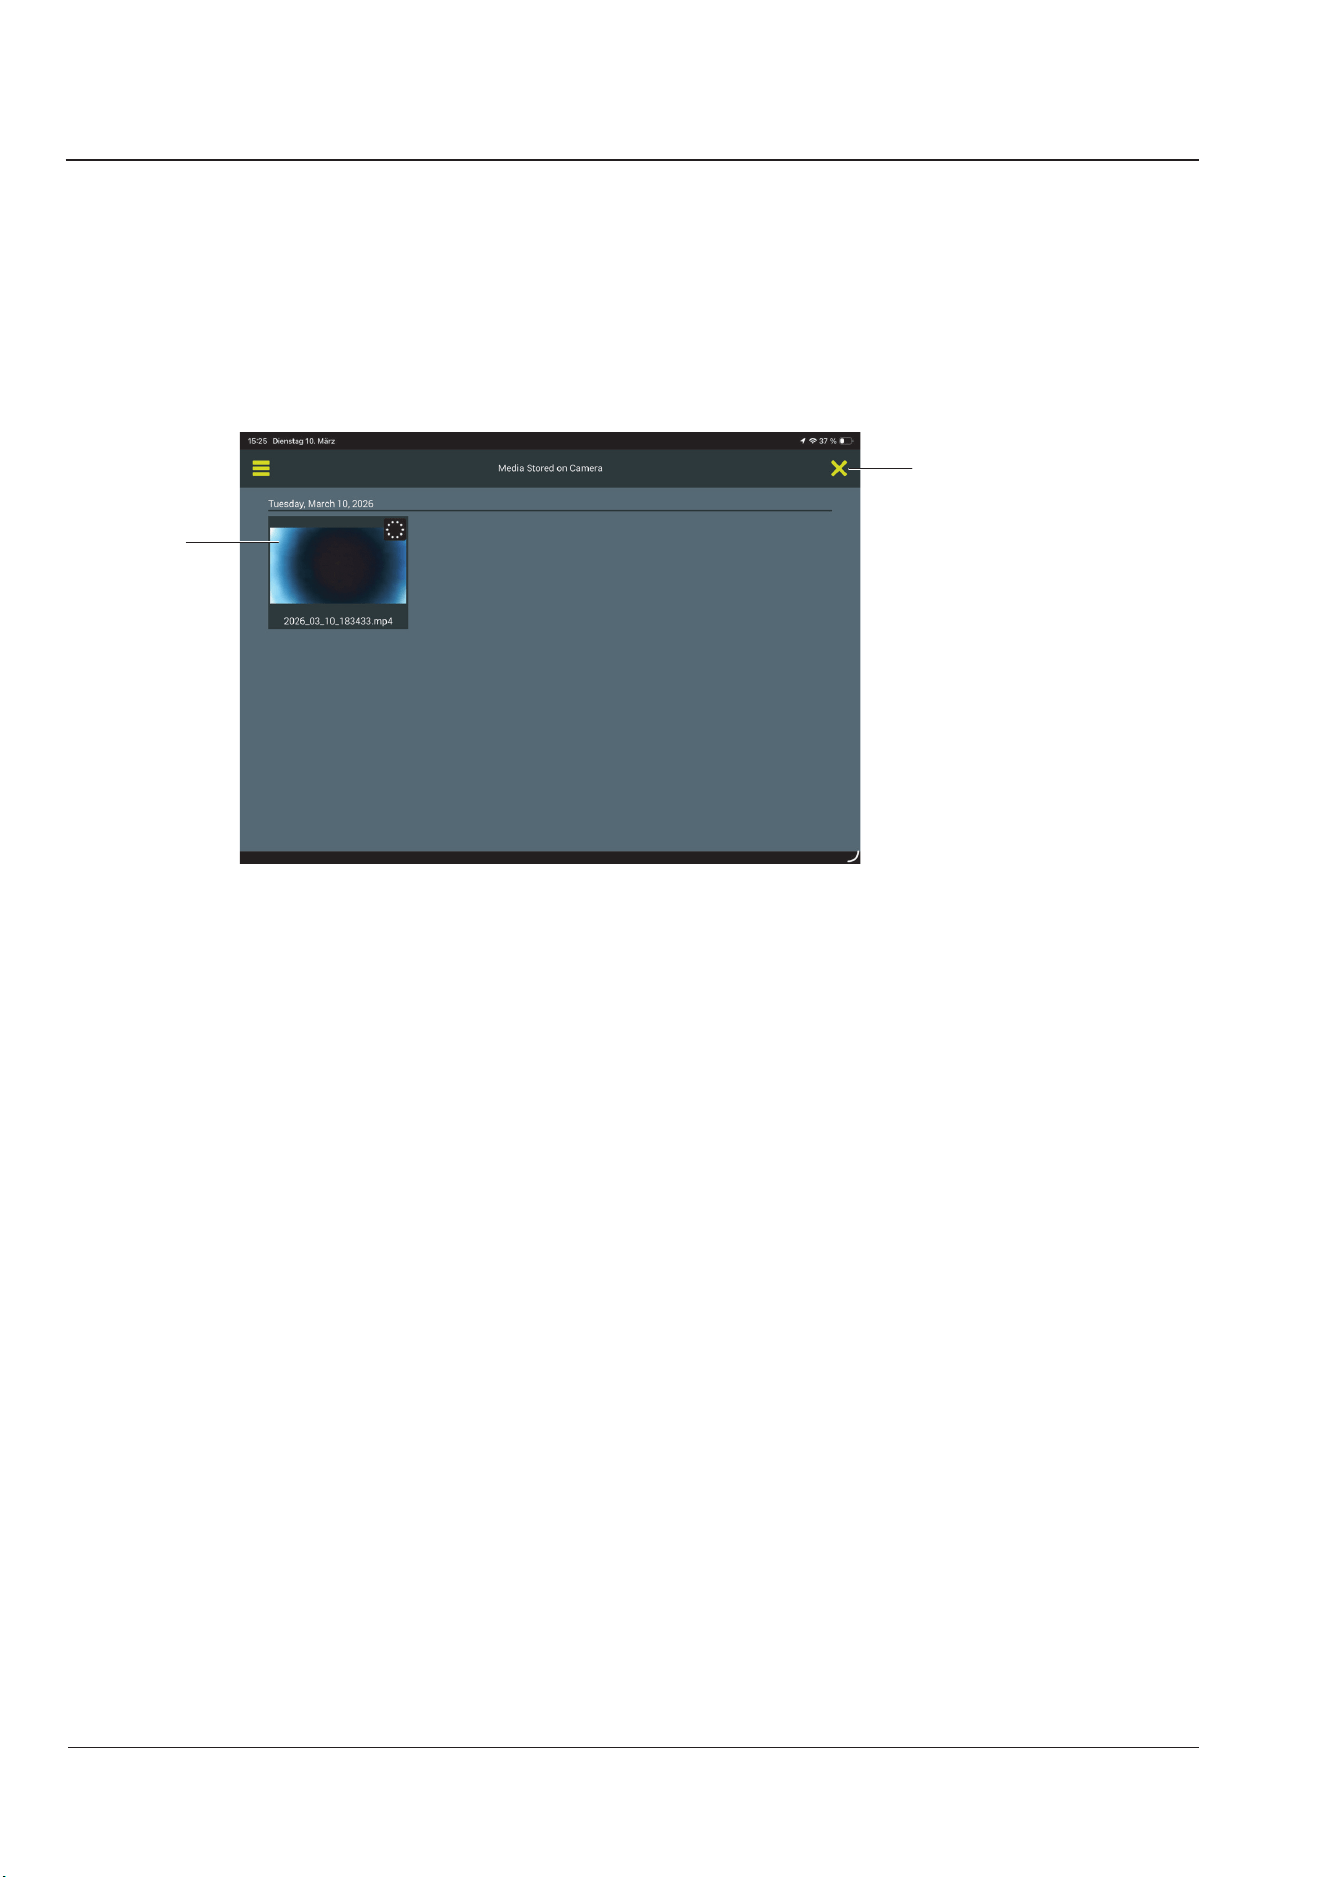
Camera videos
You can play back the recordings as soon as the connection to the tablet is established. Vid-
eos can then either be deleted or saved to the tablet.
1
2
1 Closing the camera video menu 2 Tap to play the video, or press and
hold to select, download, or delete the
video
Resolution
You can select from the following video resolutions:
– 720p
– 1080p
– 1440p
Record / Pause / Stop
These control functions allow you to start, pause, or stop video recording.
Screenshot
You can use the screenshot function to take screenshots as long as there is an active live
connection to the camera.
Full screen / show/hide icons
This feature allows you to show or hide the display options.
This does not affect video recording; it continues uninterrupted.
JETSCAN 2.1
Working with the JetScan 2.1 app
Main inspection view
31
Camera and tablet battery
The two icons display the current charge level of the tablet and camera in real time.
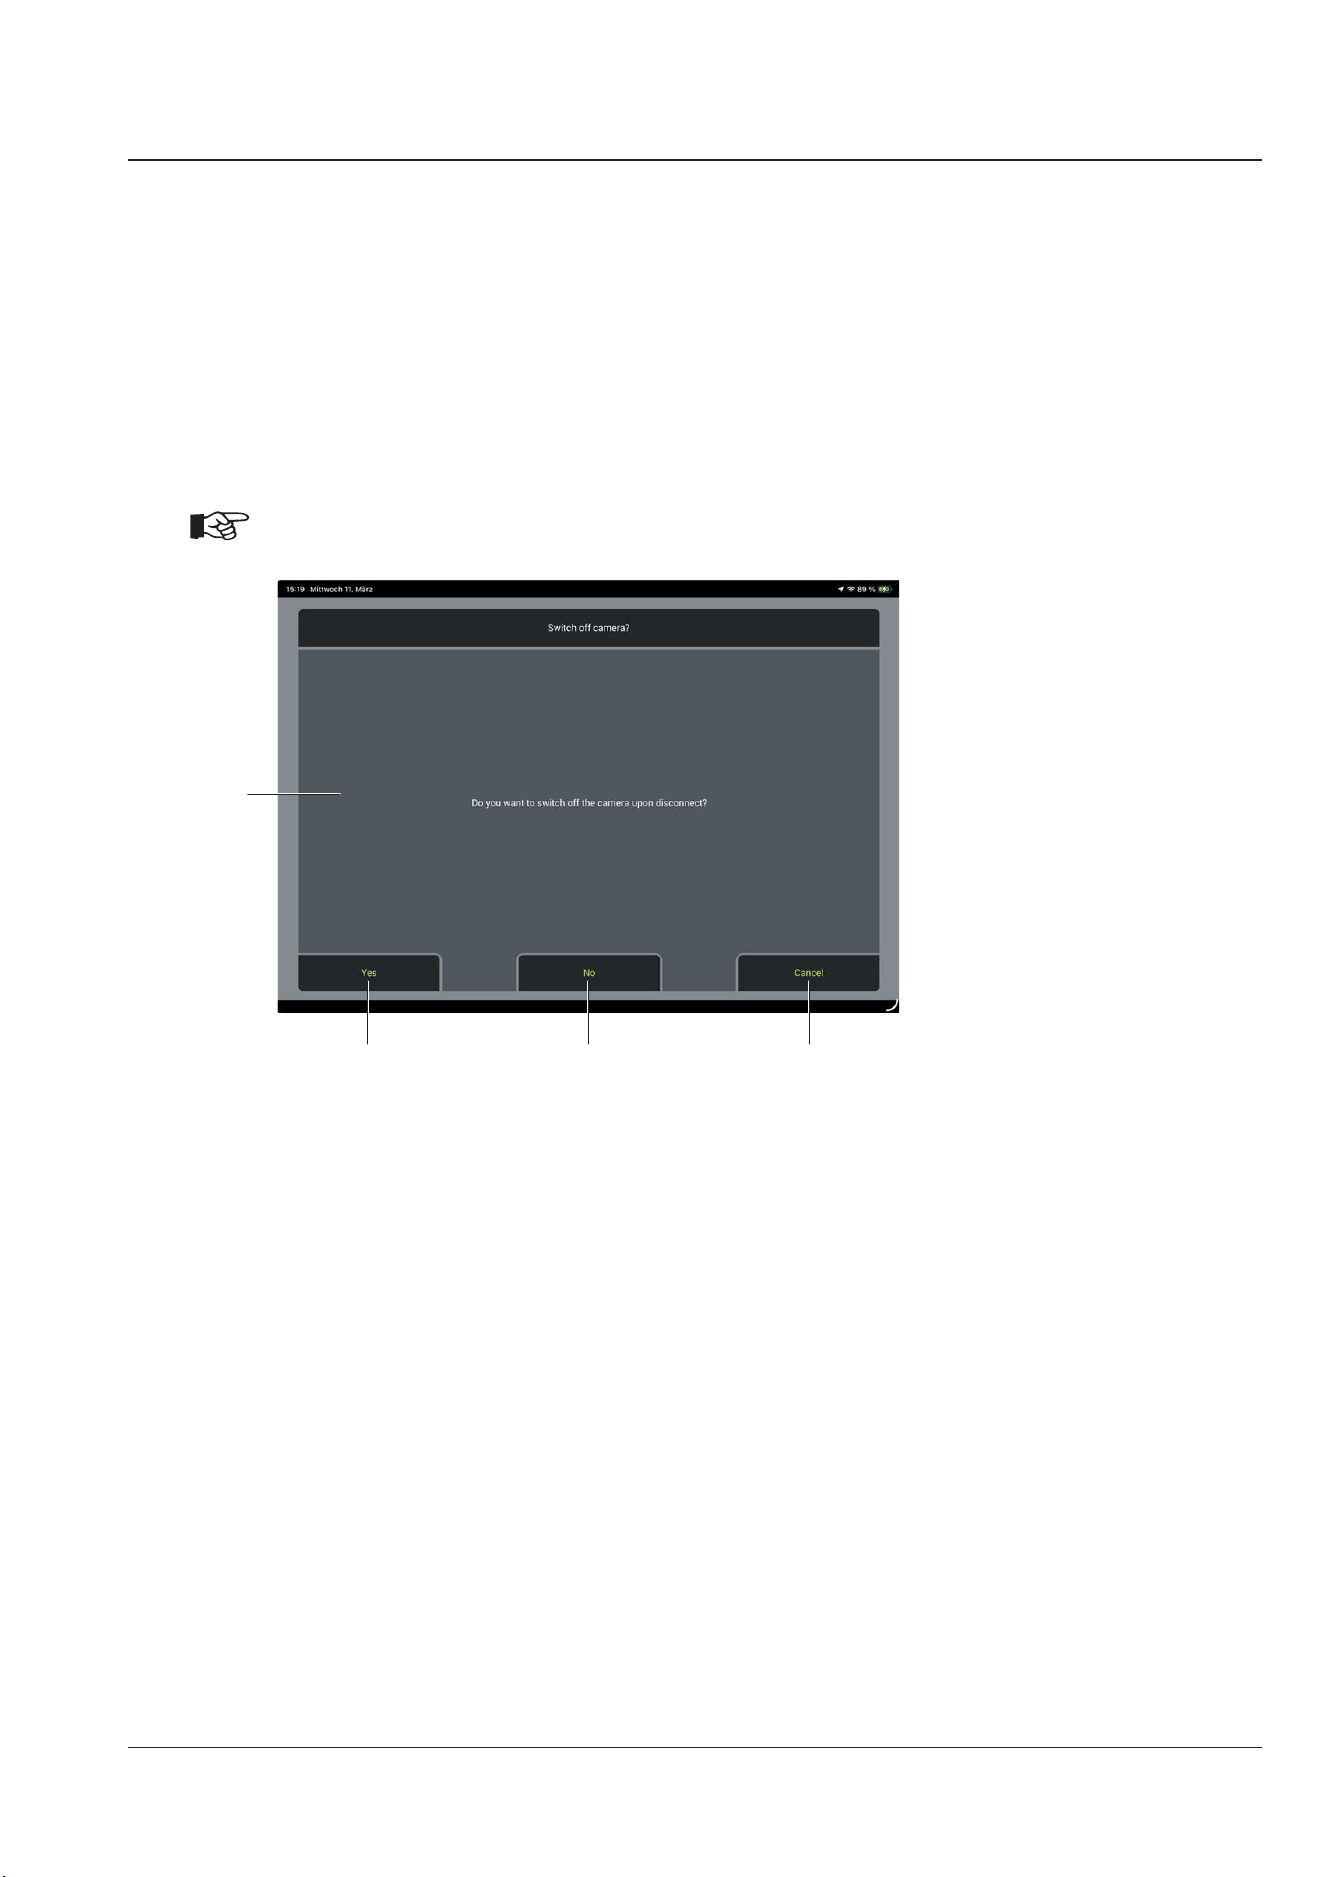
Camera on/off
Here, you can disconnect the SewerLink app from the camera.
The camera itself remains on, and any recording in progress will not be interrupted.
NOTE!
The camera can only be turned off using the app.
123
4
1 Cancel action
2 Do not turn off camera
3 Turn off camera
4 Conirmation dialog
Software version
Displays the currently installed version of your software.
Time zone
Adjusts the app settings to match the time zone of your current location.
JETSCAN 2.1
Working with the JetScan 2.1 app
License information
32
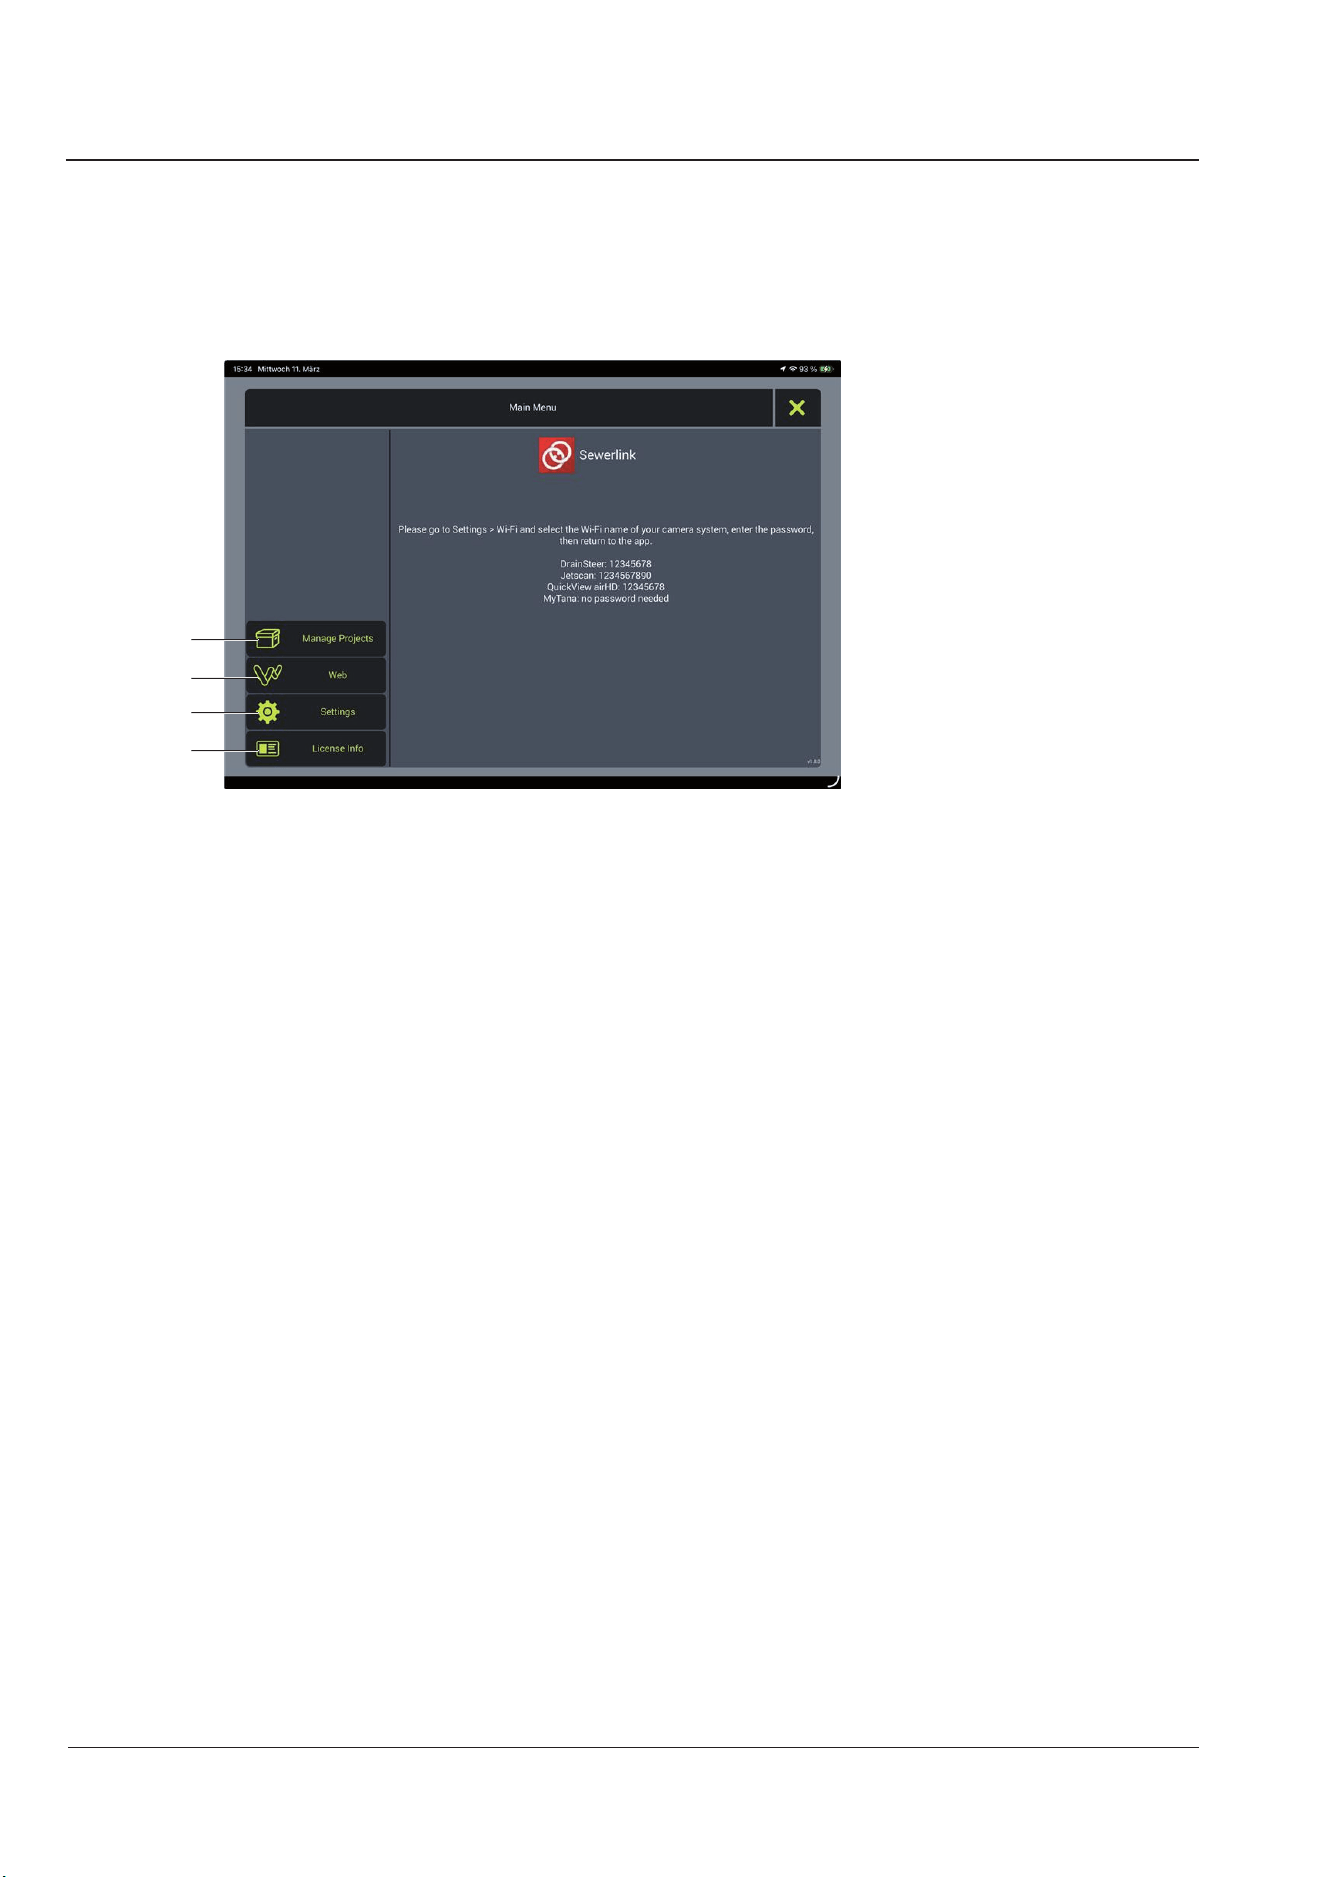
Main menu
1
2
3
4
1 License information
2 Settings
3 Open WinCan Web
4 Project management
License information
Displays information about the licenses for the software being used.
JETSCAN 2.1
Working with the JetScan 2.1 app
Settings
33
Settings
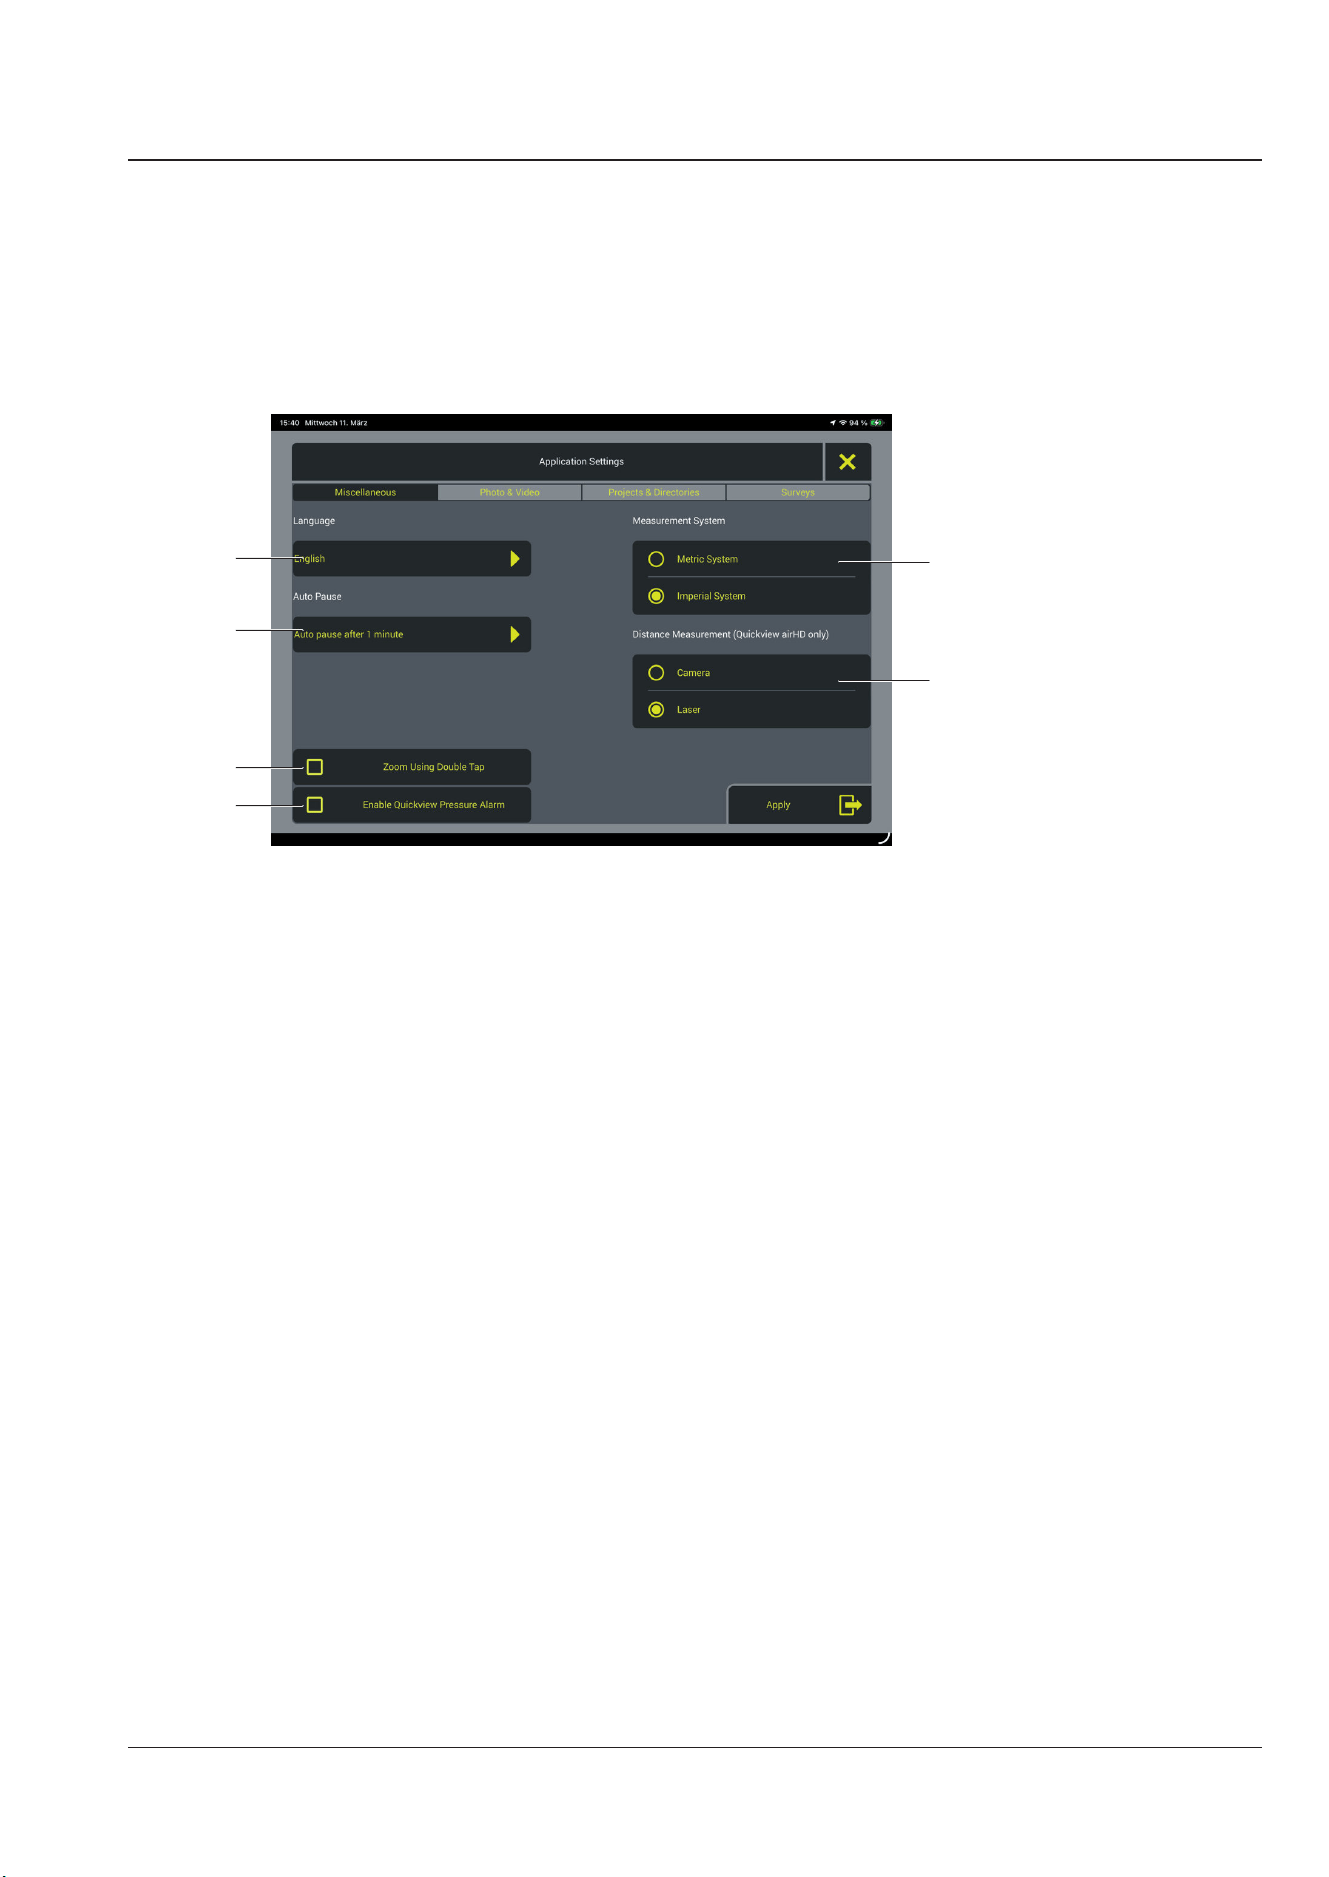
Miscellaneous
3
1
2
4
5
6
1 Select measurement system
2 Feature available only in QuickView
3 Feature available only in QuickView
4 Feature available only in QuickView
5 Feature currently unavailable
6 Select language
Select Language
Select the desired display language for the application.
Feature currently unavailable
This option is currently disabled.
Feature available only in QuickView
This setting can only be used in QuickView mode.
Feature available only in QuickView
This setting can only be used in QuickView mode.
Select measurement system
Specify which measurement system should be used.
Feature available only in QuickView
This setting can only be used in QuickView mode.
JETSCAN 2.1
Working with the JetScan 2.1 app
Settings
34
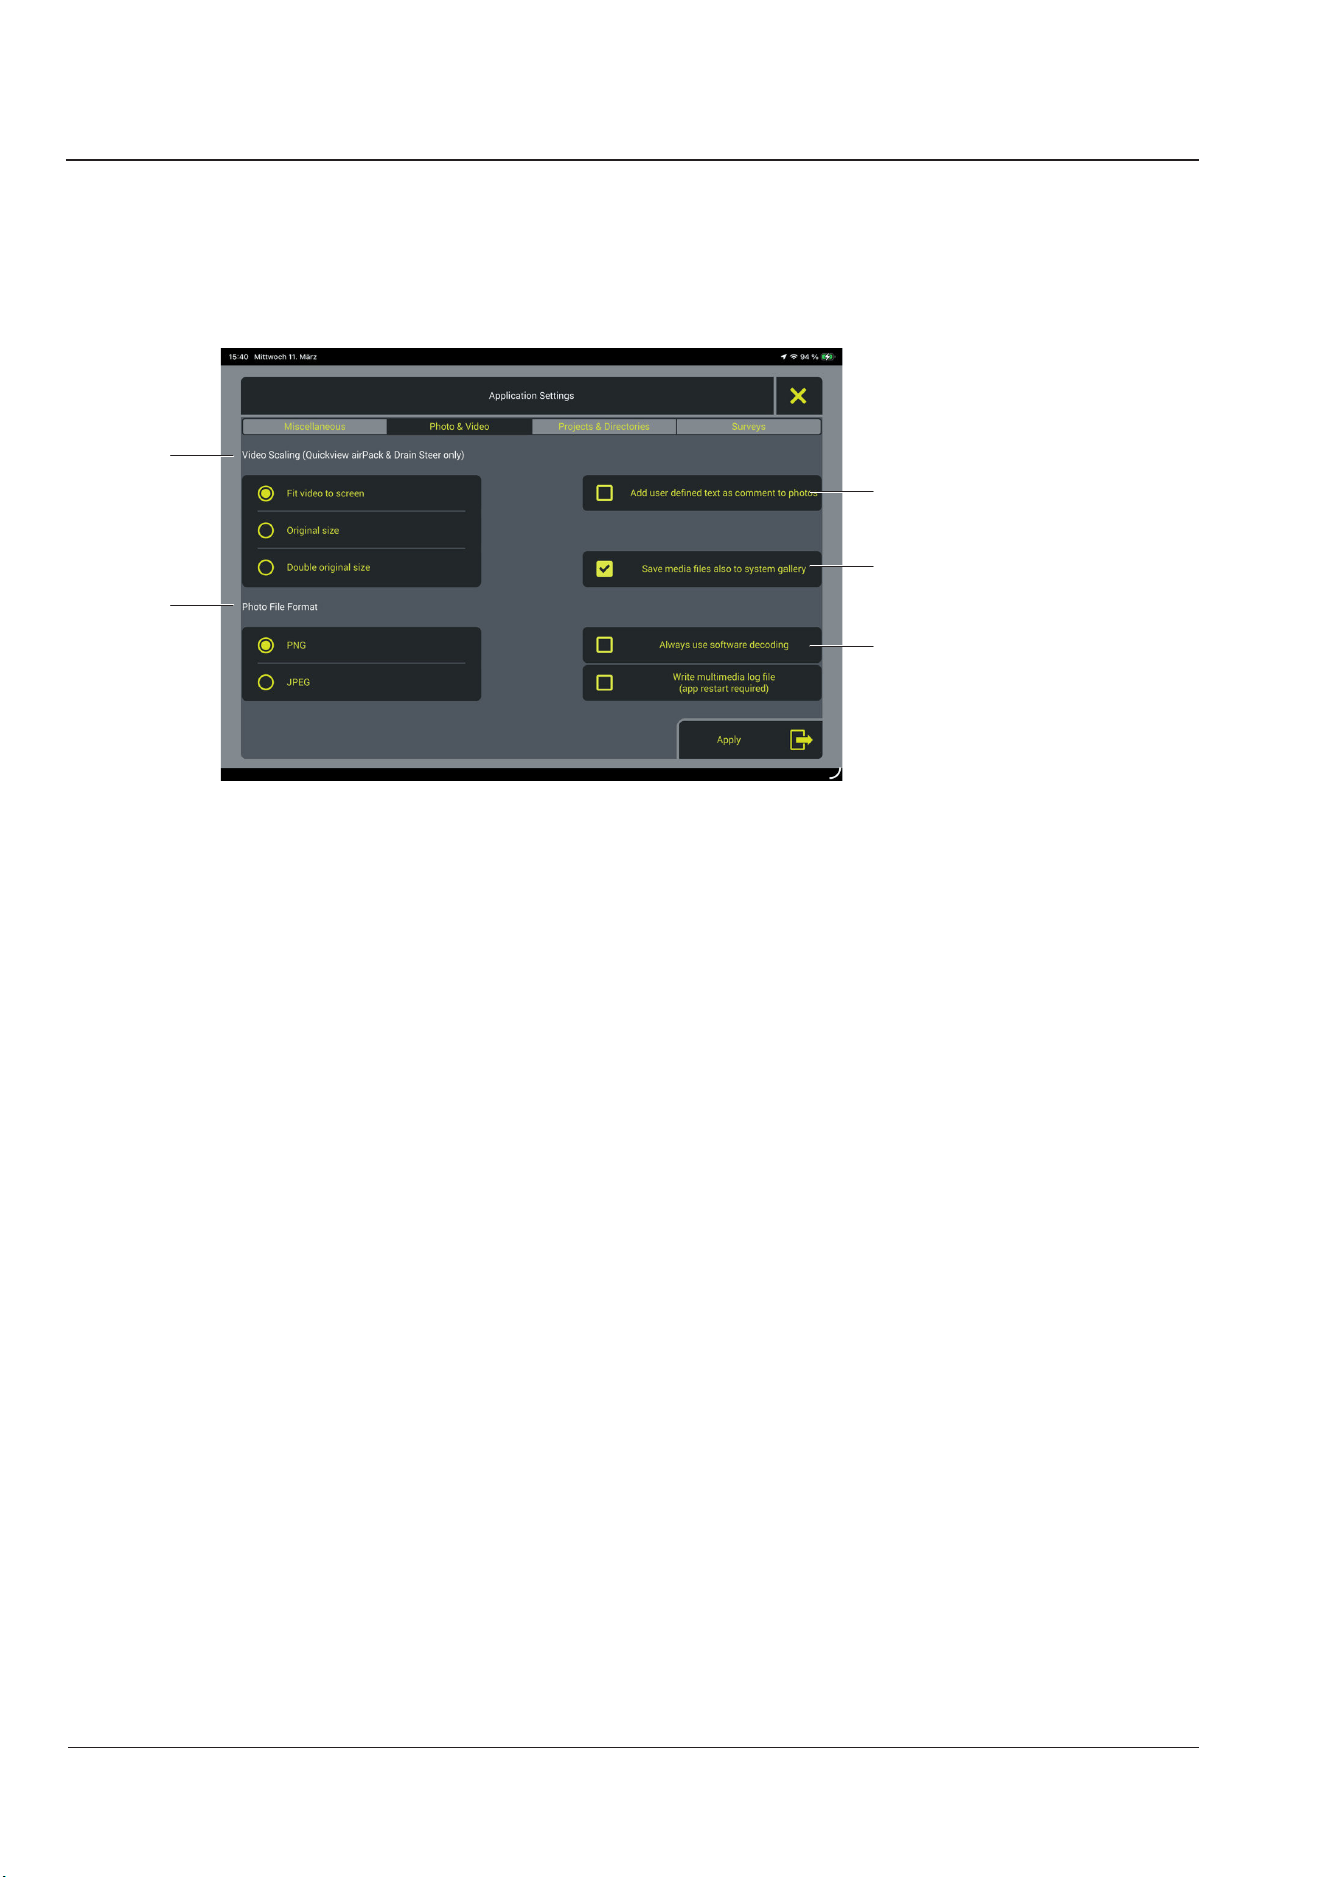
Photo and video
1
2
3
4
5
1 Add comments
2 Save media data
3 This feature is currently unavailable
4 Select image format
5 Video scaling
Add comments
Add predeined text as comments to photos youve taken.
Save media
Save media iles to your devices system gallery as well.
Feature currently unavailable
This option is not currently available and will be enabled in a future version.
Select image format
Choose between the supported image formats: PNG or JPEG.
Video scaling
This setting can only be used in QuickView mode.
JETSCAN 2.1
Working with the JetScan 2.1 app
Settings
35
Project and folder management
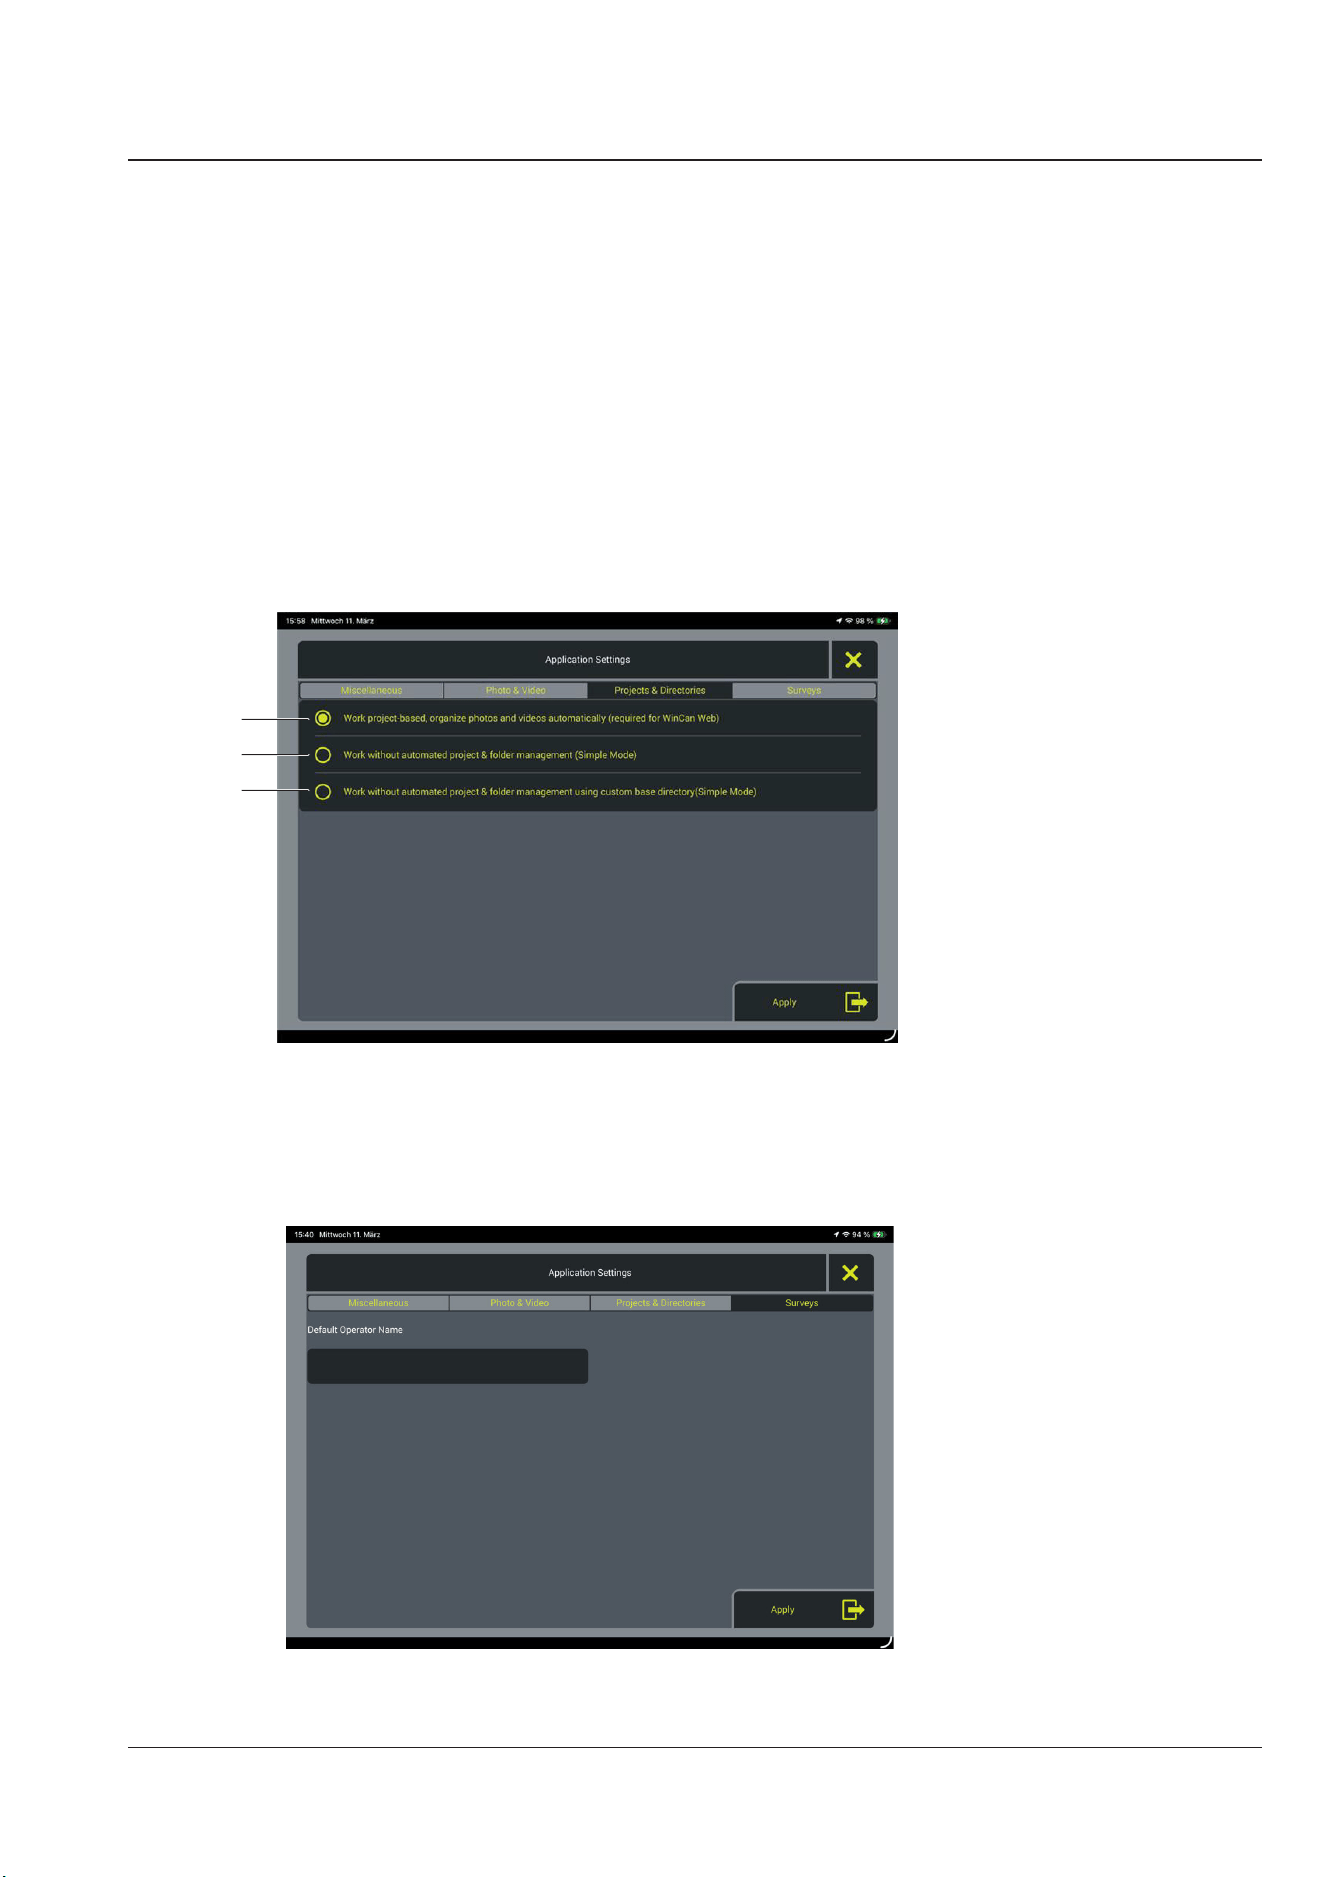
Three working modes are available in the application settings.
¾ Simple mode with a user-deined base directory (1) also does not include automatic
management, but additionally allows you to select your own main storage folder to use
custom folder structures.
¾ Simple mode (2) operates without automatic project and folder management and of-
fers a streamlined, clear working environment.
¾ Project-based mode (3) automatically organizes projects, photos, and videos and is
required for use with WinCan Web.
1
2
3
Surveys
Here you can specify a default operator name that will be used automatically in new surveys
(inspections).

JETSCAN 2.1
Working with the JetScan 2.1 app
Open WinCan Web
36
Open WinCan Web
NOTE!
An active internet connection is required to log in to WinCan Web.
General
If you are using a tablet that can only connect to the internet via Wi-Fi, follow these steps:
¾ Connect the tablet to the desired Wi-Fi network (Main menu Wi-Fi connection)
¾ Open the app (Project management Open WinCan Web) and continue.
¾ Enter your username and password, then tap “Log in”.
¾ If you want to save your login information, check the Save login box.
¾ Follow the instructions on the screen.
– You can now transfer projects to WinCan Web.
Project management
Create, open, or delete projects
¾ When creating a new project, you also have the option to create an inspection.

JETSCAN 2.1
Working with the system
Inserting and securing the camera
37
Working with the system
Inserting and securing the camera
¾ Carefully insert the camera into the skid’s mounting frame.
– Make sure the camera is correctly aligned and not tilted in the mounting frame
¾ Secure the camera to the skid using the provided mounting device so that it cannot slip
during the inspection.
Inserting into the pipe
¾ Carefully insert the skid with the camera in place into the pipe to be inspected.
– Take care to avoid obstacles or potential damage in the insertion area.
Starting the JetScan recording
¾ Start the JetScan recording while the camera is still visible and a stable connection to
the tablet is maintained.
– Make sure the recording is running properly.
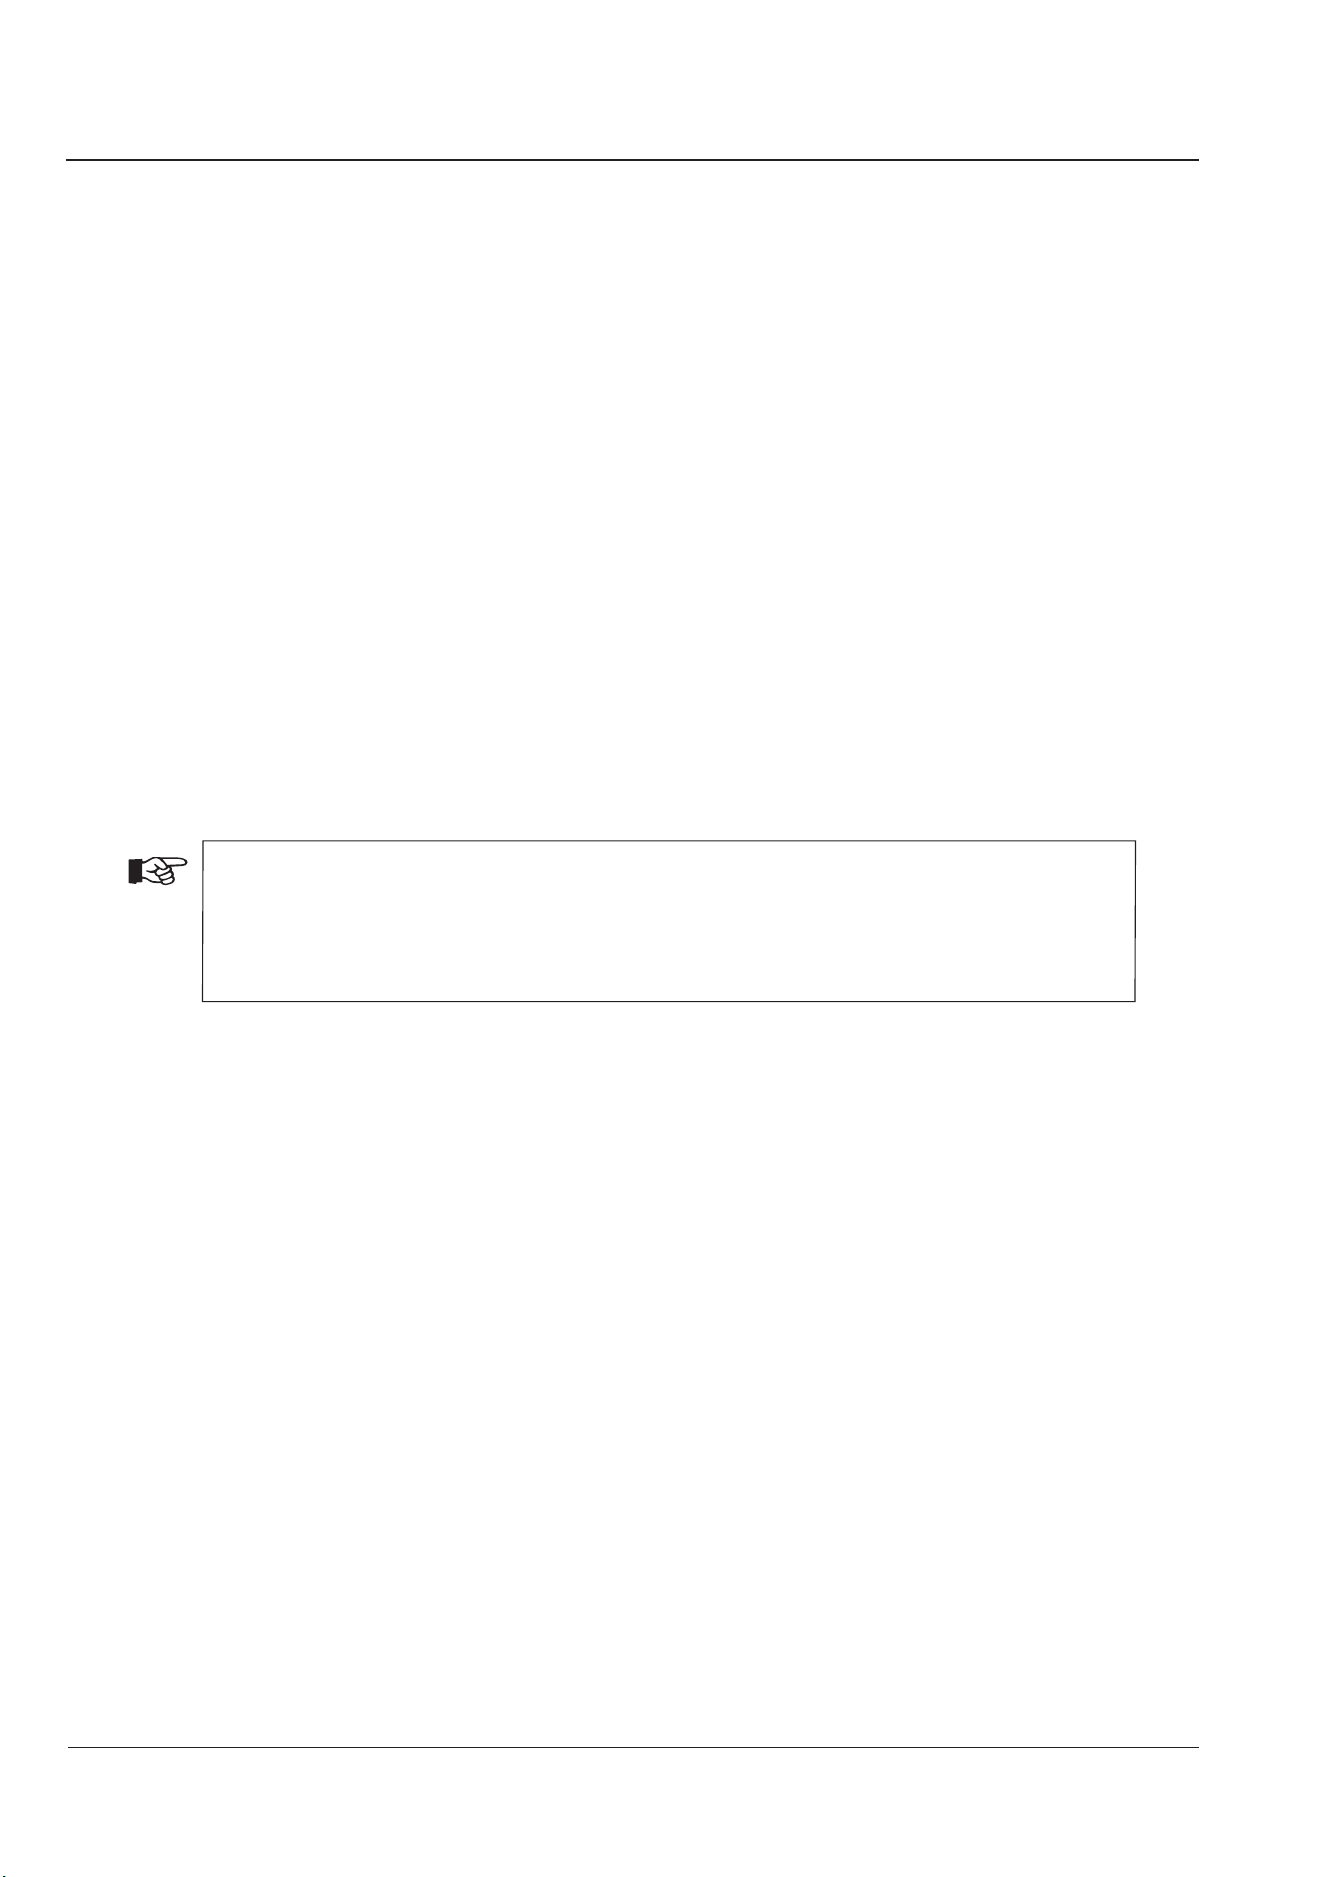
High-pressure lushing
¾ Do not begin high-pressure lushing until the recording has started successfully.
JETSCAN 2.1
High-pressure lushing and ending the recording
Removing the camera
38
High-pressure lushing and ending the recording
Removing the camera
¾ Stop the high-pressure lushing once the inspection is complete.
¾ Carefully pull the JetScan 2.1 out of the pipe.
¾ Be careful not to damage the camera while pulling it out.
Ending the recording
¾ Wait until the connection between the camera and the tablet is restored.
¾ As soon as the live image appears on the tablet, stop recording in the JetScan soft-
ware.
¾ The saved recording will then be available for playback under Play camera video.
Reviewing and saving the recording
¾ Check the condition of the line using the recorded video.
¾ If you are satisied with the quality of the recording, save the video to your tablet.
¾ Then turn off the camera.
INFORMATION
¾ If the connection between the camera and the app is not immediately restored
and the live video does not appear right away, open your devices Wi-Fi set-
tings again. Select the camera again, and then restart the app.

JETSCAN 2.1
Technical data
39
Technical data
JetScan 2.1
Scope of application DN 50 to DN 300
40 mm HD camera, self-leveling
Cable length 60 meters
Material Steel (powder-coated)
Dimensions* 420 x 690 x 1250 mm
Weight 34 kg
Meter counter Yes
Reel brake Yes, adjustable
Control unit interface 1xLAN, 1xUSB, 1xW-LAN
External power supply Yes
Wireless standard Wi-Fi 2.4 GHz
Voltage 110 – 230 VAC
Control unit battery replacement No
Battery life** Approx. 6 hours
Battery capacity 20,000 mAh/battery
Operating temperature range 0 °C to 40 °C
Storage temperature range*** -10 °C to 50 °C
Camera protection class IP 68
Compatible with – WinCanWeb (data transfer via browser)
– Reporting in WinCanWeb / WinCanVX possible
*Includes push rod; camera, batteries, control panel, and trolley not included. **Battery life depends on the controller and camera
used, as well as environmental conditions. ***Batteries not included
JETSCAN 2.1
End-of-life equipment return
40
End-of-life equipment return
The device supplied to you by iPEK is subject to the provisions of European Directive
2012/19/EU and the corresponding transpositions into the laws of EU member states (in Ger-
many: ElektroG3). This allows you to return the device at the end of its service life for proper
disposal and recycling.
This results in the following regulations for disposal at the end of the device’s service life:
– This device must not be disposed of with unsorted commercial waste.
– This device contains a built-in battery that cannot be removed by the end user. Proper
removal and recycling are carried out by authorized waste management companies in
accordance with applicable laws.
– The user is responsible for deleting any personal data that may be stored on the de-
vice.
– Under the WEEE Directive, this device is classiied as a device used exclusively for
commercial purposes” and must not be disposed of at municipal collection points
along with consumer appliances such as washing machines, VCRs, or standard PCs.
– For information on disposal, please contact iPEK directly (or your local sales partner).
– Disposal outside Germany: Dispose of this device properly and in accordance with
applicable regulations and laws.
The WEEE symbol — a crossed-out trash can — on your device indicates that
it is a WEEE-regulated item that must be disposed of separately. While this
symbol is not strictly required in EU countries such as Germany for devices
used exclusively for commercial purposes, iPEK uses it consistently throughout
Europe. The symbol does not mean that the device should be returned to munic-
ipal collection points!

JETSCAN 2.1
Warranty statement
41
Warranty statement
Congratulations on the purchase of your new iPEK sewer inspection system. Our equipment
is the result of many years of experience and continuous development.
Meticulous craftsmanship and quality control are key priorities at our company. Should any
defects nevertheless arise — which, of course, can never be completely ruled out — our gen-
erous warranty provides you with a high degree of assurance.
Please keep in mind, however, that even the best product can only function properly and reli-
ably over the long term if it is properly maintained and operated.
Scope of warranty
We provide a twelve-month warranty for the product you purchased from iPEK International
GmbH, which was manufactured and tested in accordance with our production and quality
guidelines.
Any defects that can be proven to be due to material and/or manufacturing defects will be
remedied by us free of charge during the warranty period. We reserve the right, at our sole
discretion, to repair the device, replace it entirely or replace the defective parts, or reimburse
you for the remaining value if repair or replacement is not possible.
Warranty terms and conditions
Opening the devices or the control electronics in any way is prohibited without the manufac-
turer’s consent. Failure to comply with this provision will void all warranty claims.
The warranty period begins on the date of delivery.
Damage resulting from improper use of the equipment, lack of maintenance, normal wear
and tear, and force majeure (lightning, ire, frost) is excluded from the warranty.
Furthermore, the warranty does not cover wear-and-tear parts such as front lenses, shaft
seals, lamps, cables, etc., nor does it cover damage that does not impair the equipment’s
functionality.
If you wish to make a warranty claim, please contact us, the dealer, or the nearest service
center, presenting the original invoice.

JETSCAN 2.1
Limitations of liability
42
Limitations of liability
Our liability under the above terms and conditions is limited exclusively to repair, replace-
ment, or refund.
iPEK is not liable for consequential or incidental damages that may arise in connection with
the sale or operation of the product. This also applies to consequential damages that can be
classiied as commercial losses, such as loss of proits, downtime, damage to reputation, as
well as damage to equipment and/or property.
We wish you every success and enjoyment in working with your new iPEK sewer inspection
system! Please feel free to contact us with any questions. We welcome your suggestions for
improvements and other feedback!
iPEK International GmbH
Sulzberg, June 2026

JETSCAN 2.1
EC Declaration of Conformity
43
EC Declaration of Conformity
This product complies with applicable EU directives and relevant harmonized standards. The
complete EC Declaration of Conformity is available from the manufacturer.

JETSCAN 2.1
Legal notice
45
Legal notice
©2026 iPEK International GmbH All rights reserved.
Operating instructions, manuals, and software are protected by copyright. Copying, reproduc-
ing, translating, or converting them into any electronic medium or machine-readable form, in
whole or in part, without the prior written permission of iPEK is prohibited.
iPEK International GmbH
See, Gewerbepark 22
87477 Sulzberg
Phone: +49-8376 921 800
Fax: +49-8376 921 80 21
E-Mail: [email protected]
Web: www.ipek.at
Version 4 EN
Replaces all previous versions
June 2026

FCC Stateet
’ .
T 5 FCC R.
:
T ,
T ,
.
T FCC
. T
& .

JETSCAN 2.1
46

JETSCAN 2.1
47

iPEK International GmbH · See, Gewerbepark 22 · 87477 Sulzberg · GERMANY
+49 8376 921 800 +49 8376 921 8021 isg_info@idexcorp.com www.ipek.at