
1
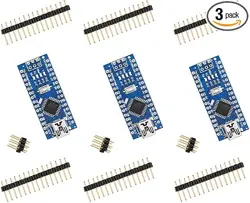
ELEGOO Nano Board User Instruction V1.0
V1.0.23.05.06

2
Preface
Our Company
Established in 2011, Elegoo Inc. is a thriving technology company dedicated to research & development,
production, and marketing of open-source hardware. Located in Shenzhen, the Silicon Valley of China,
we have grown to over 150+ employees with a 10,763+ square ft.factory.
Our product lines include DuPont wires, UNO R3 boards and complete starter kits designed for
customers of any level to learn Arduino knowledge. In addition, we also sell Raspberry Pi accessories like
TFT touch screens. Additionally, we plan to expand our offerings to include other technologies,
including products related to 3D printing. All of our products comply with international quality
standards and have been praised by our customers in a variety of different marketplaces throughout
theworld.
Official website:
http://www.elegoo.com
Amazon US storefront:
http://www.amazon.com/shops/A2WWHQ25ENKVJ1
Amazon Canada storefront:
http://www.amazon.ca/shops/A2WWHQ25ENKVJ1
Amazon Mexico storefront:
https://www.amazon.com.mx/shops/A2WWHQ25ENKVJ1
Amazon UK storefront:
http://www.amazon.co.uk/shops/A1780XYQ9DFQM6
Amazon Germany storefront:
http://www.amazon.de /shops/A1780XYQ9DFQM6
Amazon France storefront:
http://www.amazon.fr/shops/A1780XYQ9DFQM6
Amazon Spain storefront:
http://www.amazon.es/shops/A1780XYQ9DFQM6
Amazon Italy storefront:
http://www.amazon.it/shops/A1780XYQ9DFQM6

3
Our Tutorial
This tutorial is designed for beginners. You will learn all the basic information about how to use the
Arduino controller board, sensors and components. If you want to study Arduino in more depth, we
recommend that you read the book “Arduino Cookbook” by Michael Margolis.
Some code in this tutorial has been edited by Simon Monk. Simon Monk is the author of a number of
books relating to Open Source Hardware. Some of his works include “Programming Arduino”, “30
Arduino Projects for the Evil Genius” and “Programming the Raspberry Pi” and can be found on
Amazon
Customer Service
As a continuously and quickly growing technology company, we strive to offer you excellent products
and quality service. You can reach out to us by email at [email protected] or
[email protected]. We look forward to hearing from you and any comments or suggestions are
of great value to us.
4

5
Content
Lesson 0 Installing IDE
..............................................................................................
6
Lesson 1 Add Libraries and Installing the CH340 driver
..........................................
13
Lesson 2 Open Serial Monitor
..................................................................................
20
Lesson 3 Upload Code To The Nano Board
..............................................................
23
6
Lesson 0 Installing IDE
Introduction
The Arduino Integrated Development Environment (IDE) is the software sideof the Arduino
platform.
In this lesson, you will learn how to setup your computer to use Arduino and how to set
about the lessons that follow.
The Arduino software that you will use to program your Arduino is available for Windows,
Mac and Linux. The installation process is different for all three platforms and there is a
certain amount of manual work to install the software.
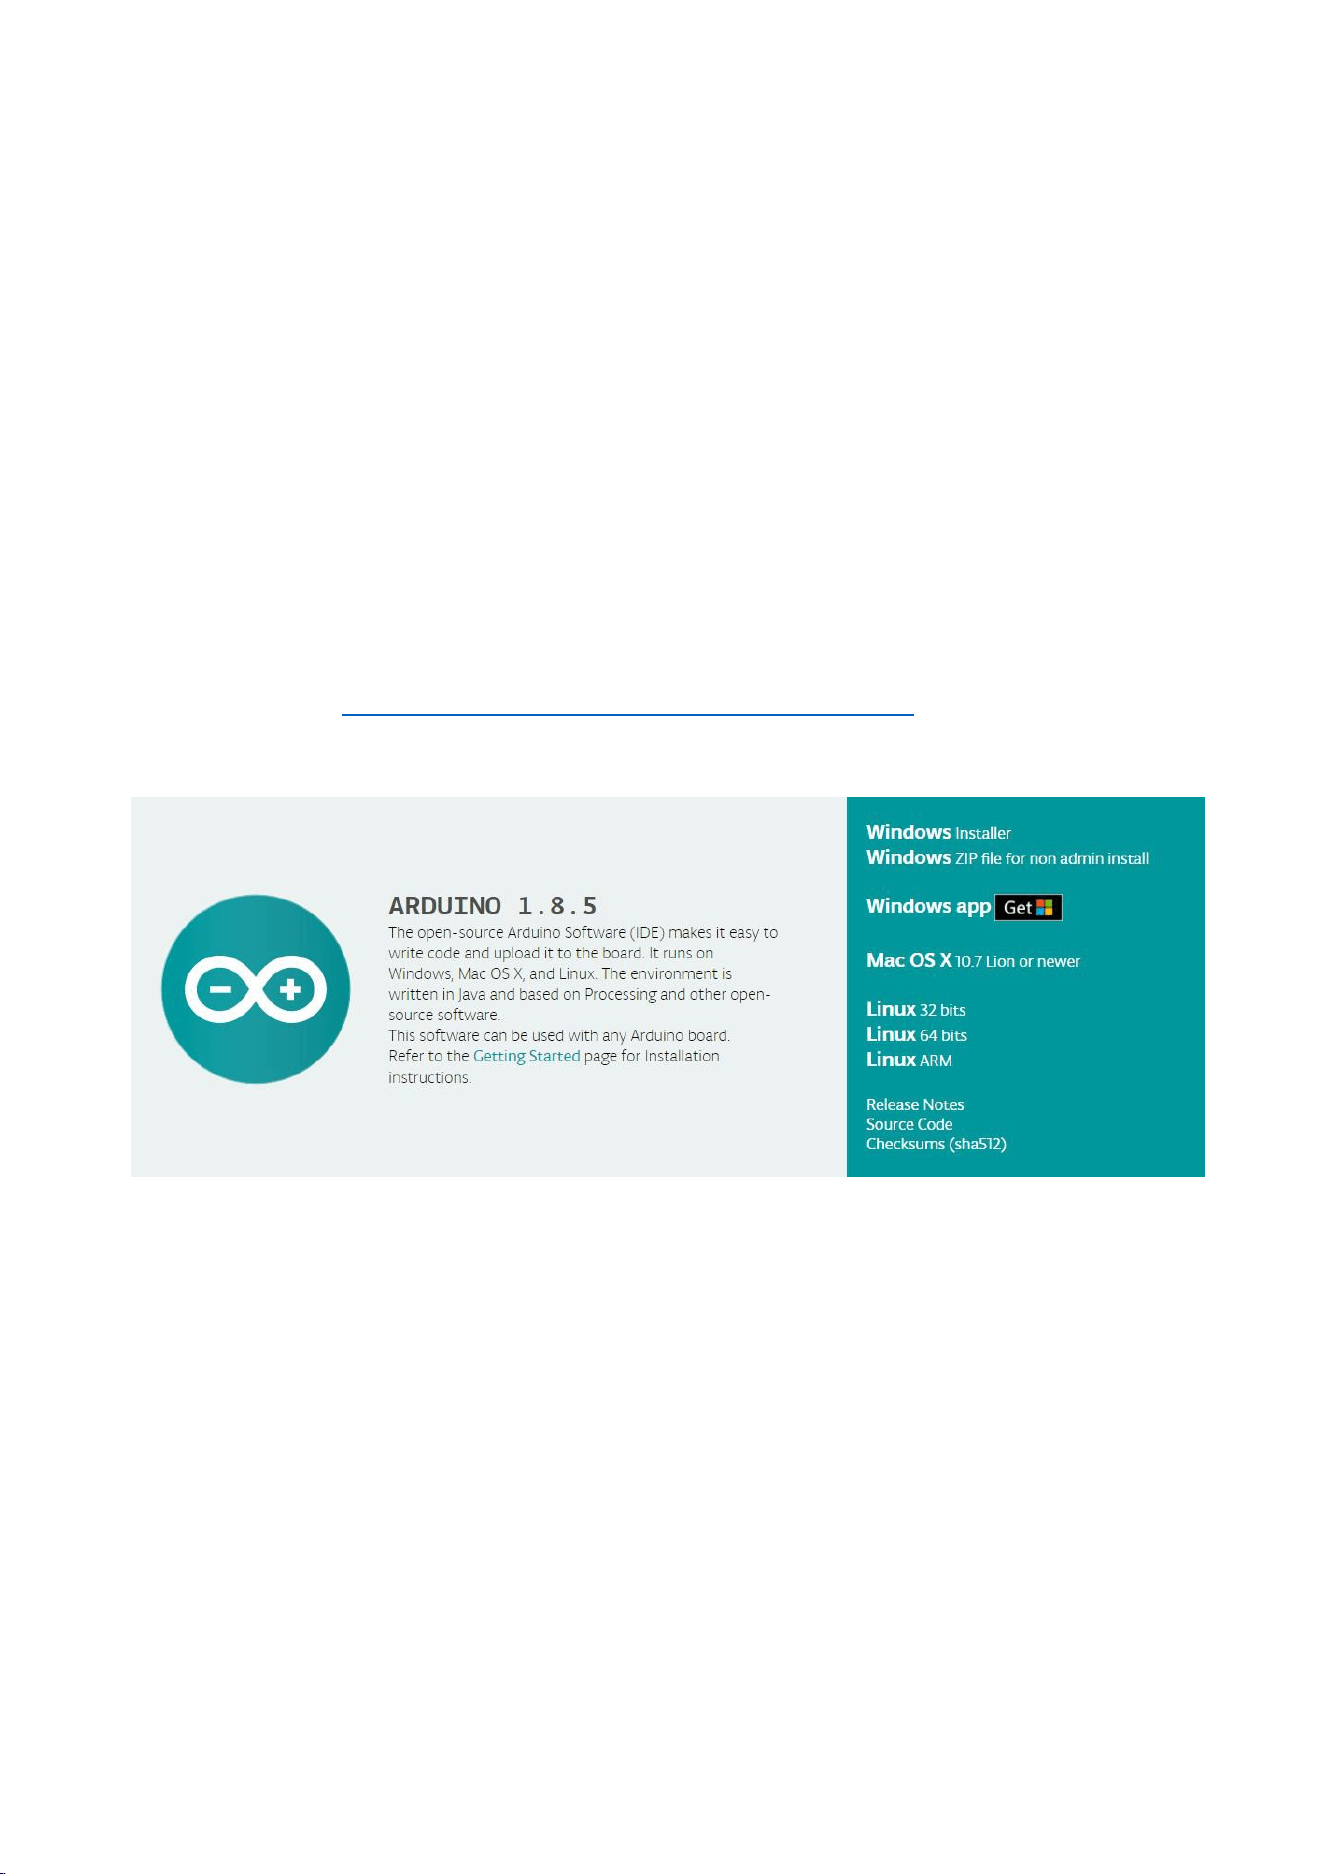
STEP 1: Go to https://www.arduino.cc/en/Main/Software and find the page
below.
The version available at this website is usually the latest version, and the actual version may
be newer than the version in the picture.
7
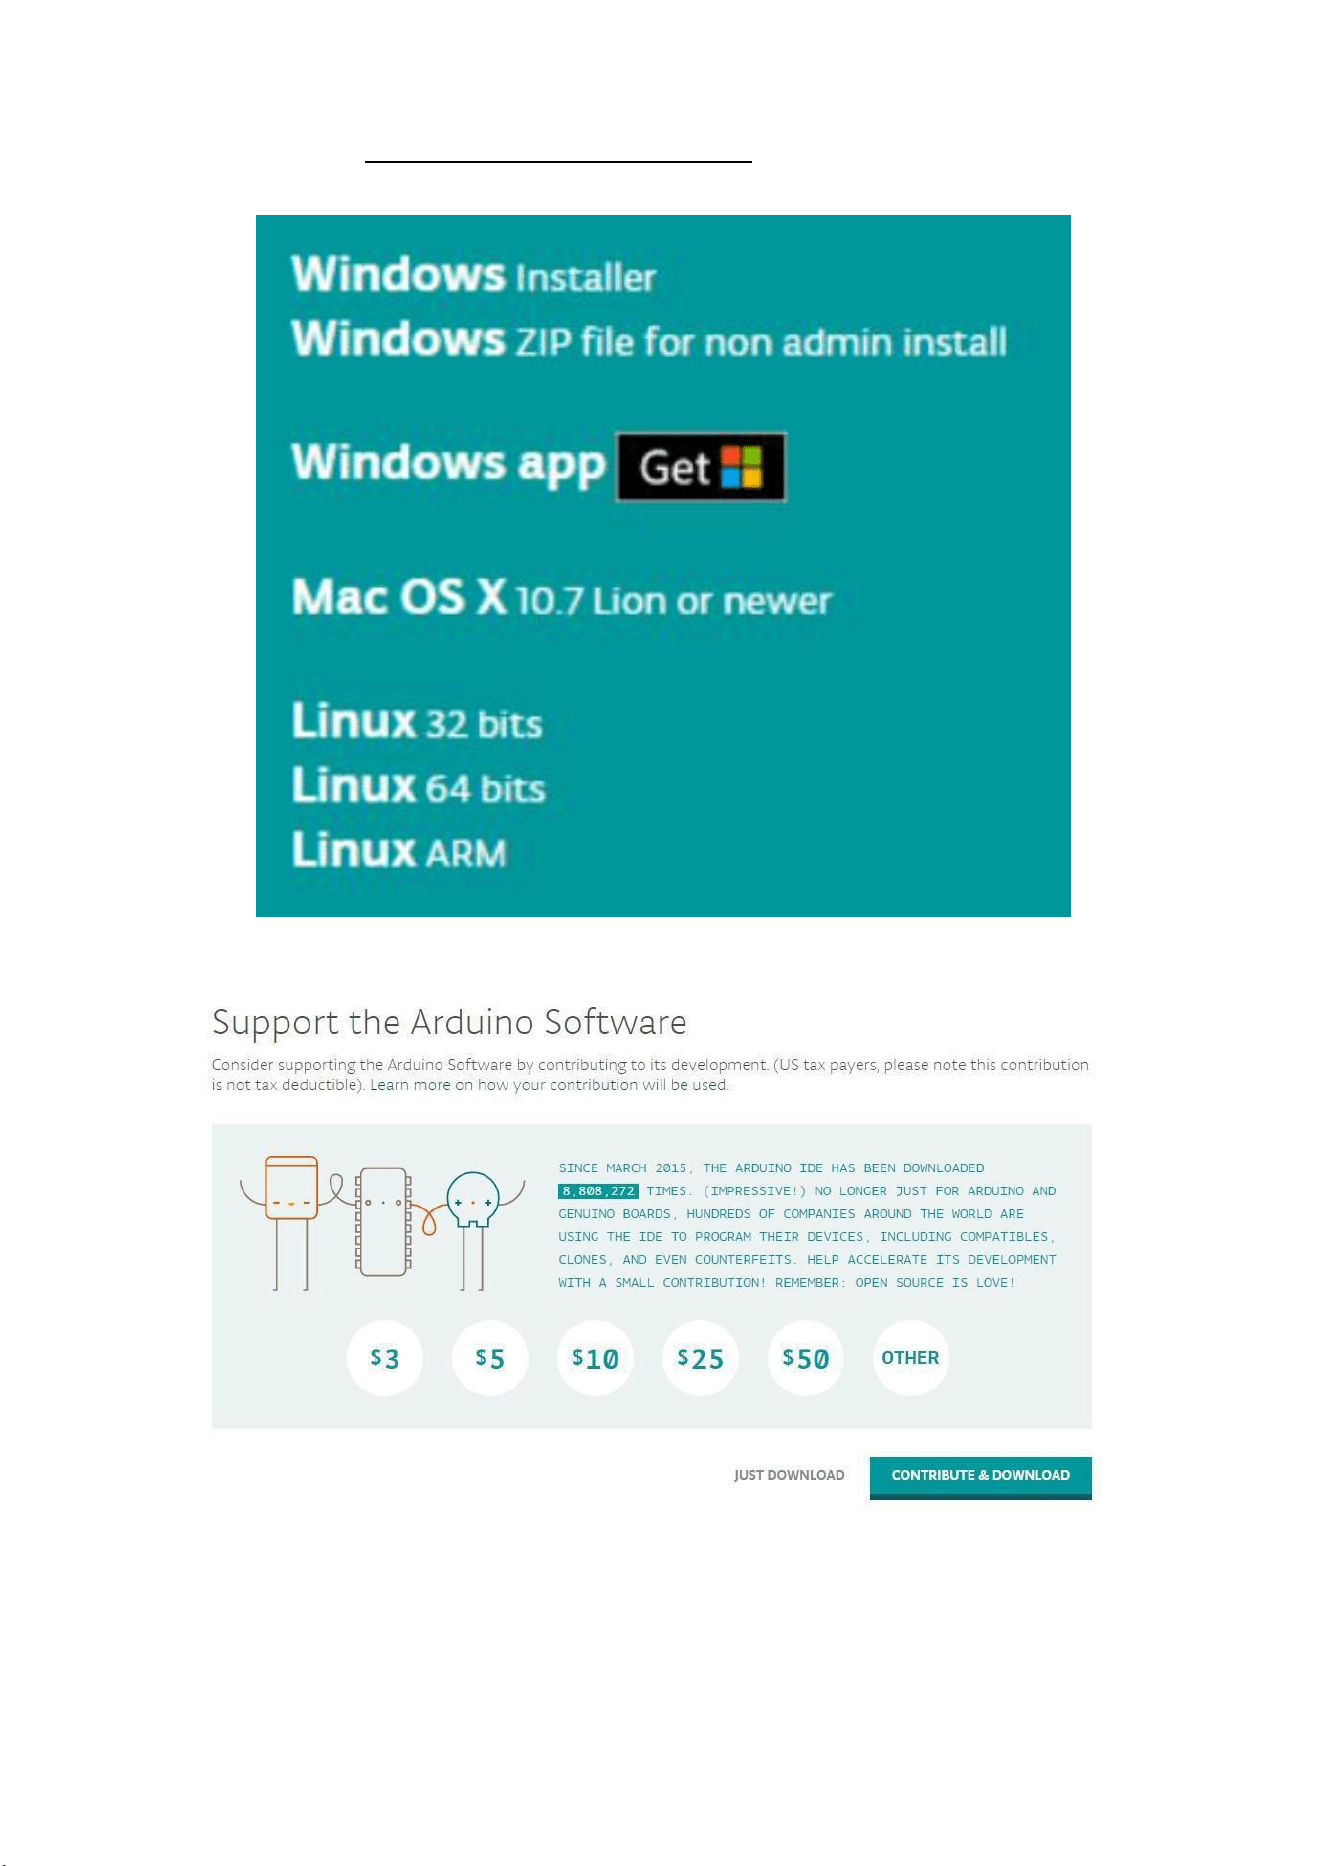
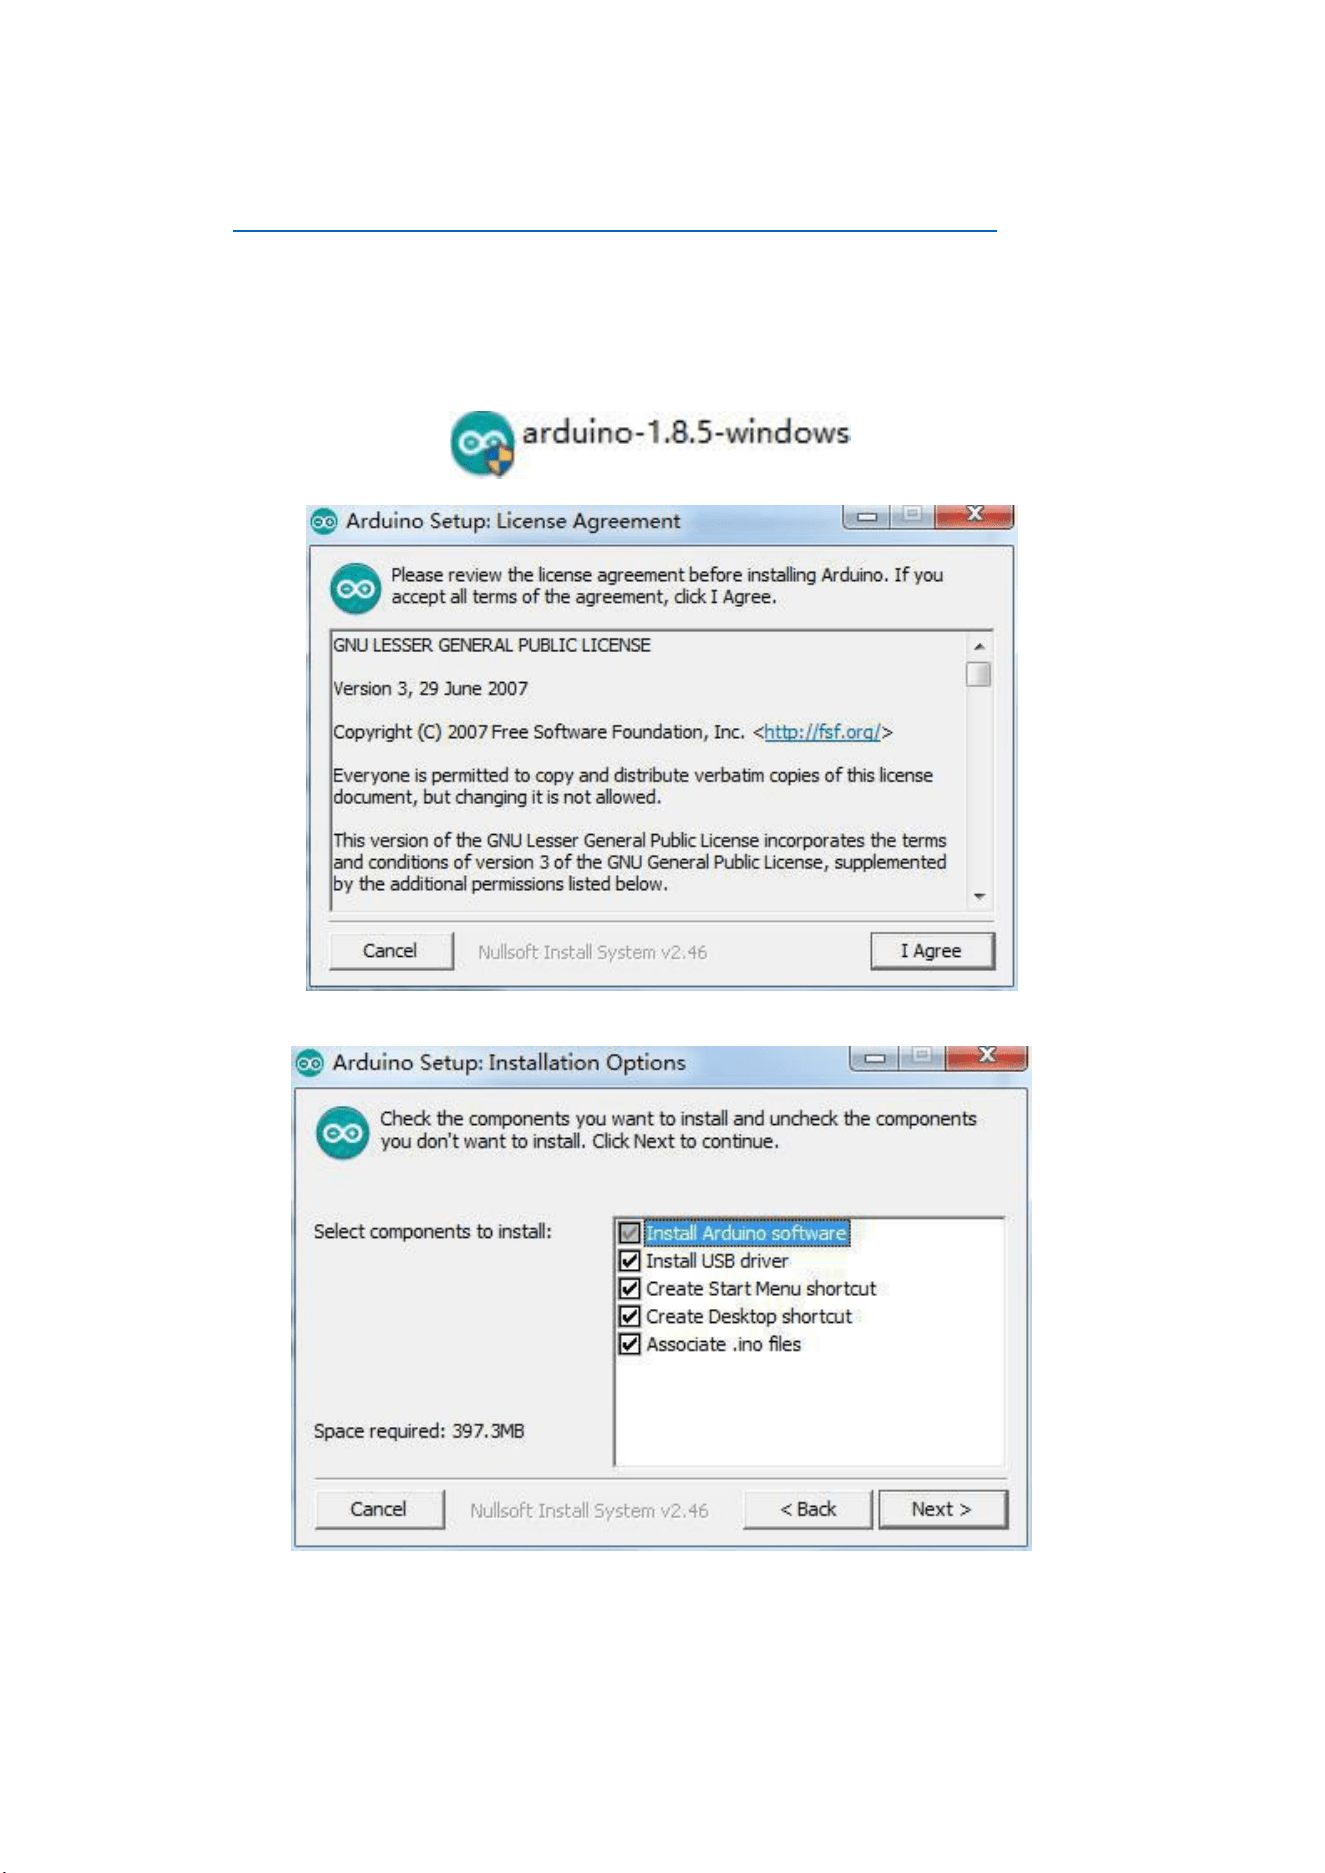
STEP2:Download the development software that is compatible with the operating system
of your computer. Take Windows as an example here.
Click Windows Installer.
Click JUSTD OWNLOAD.
9
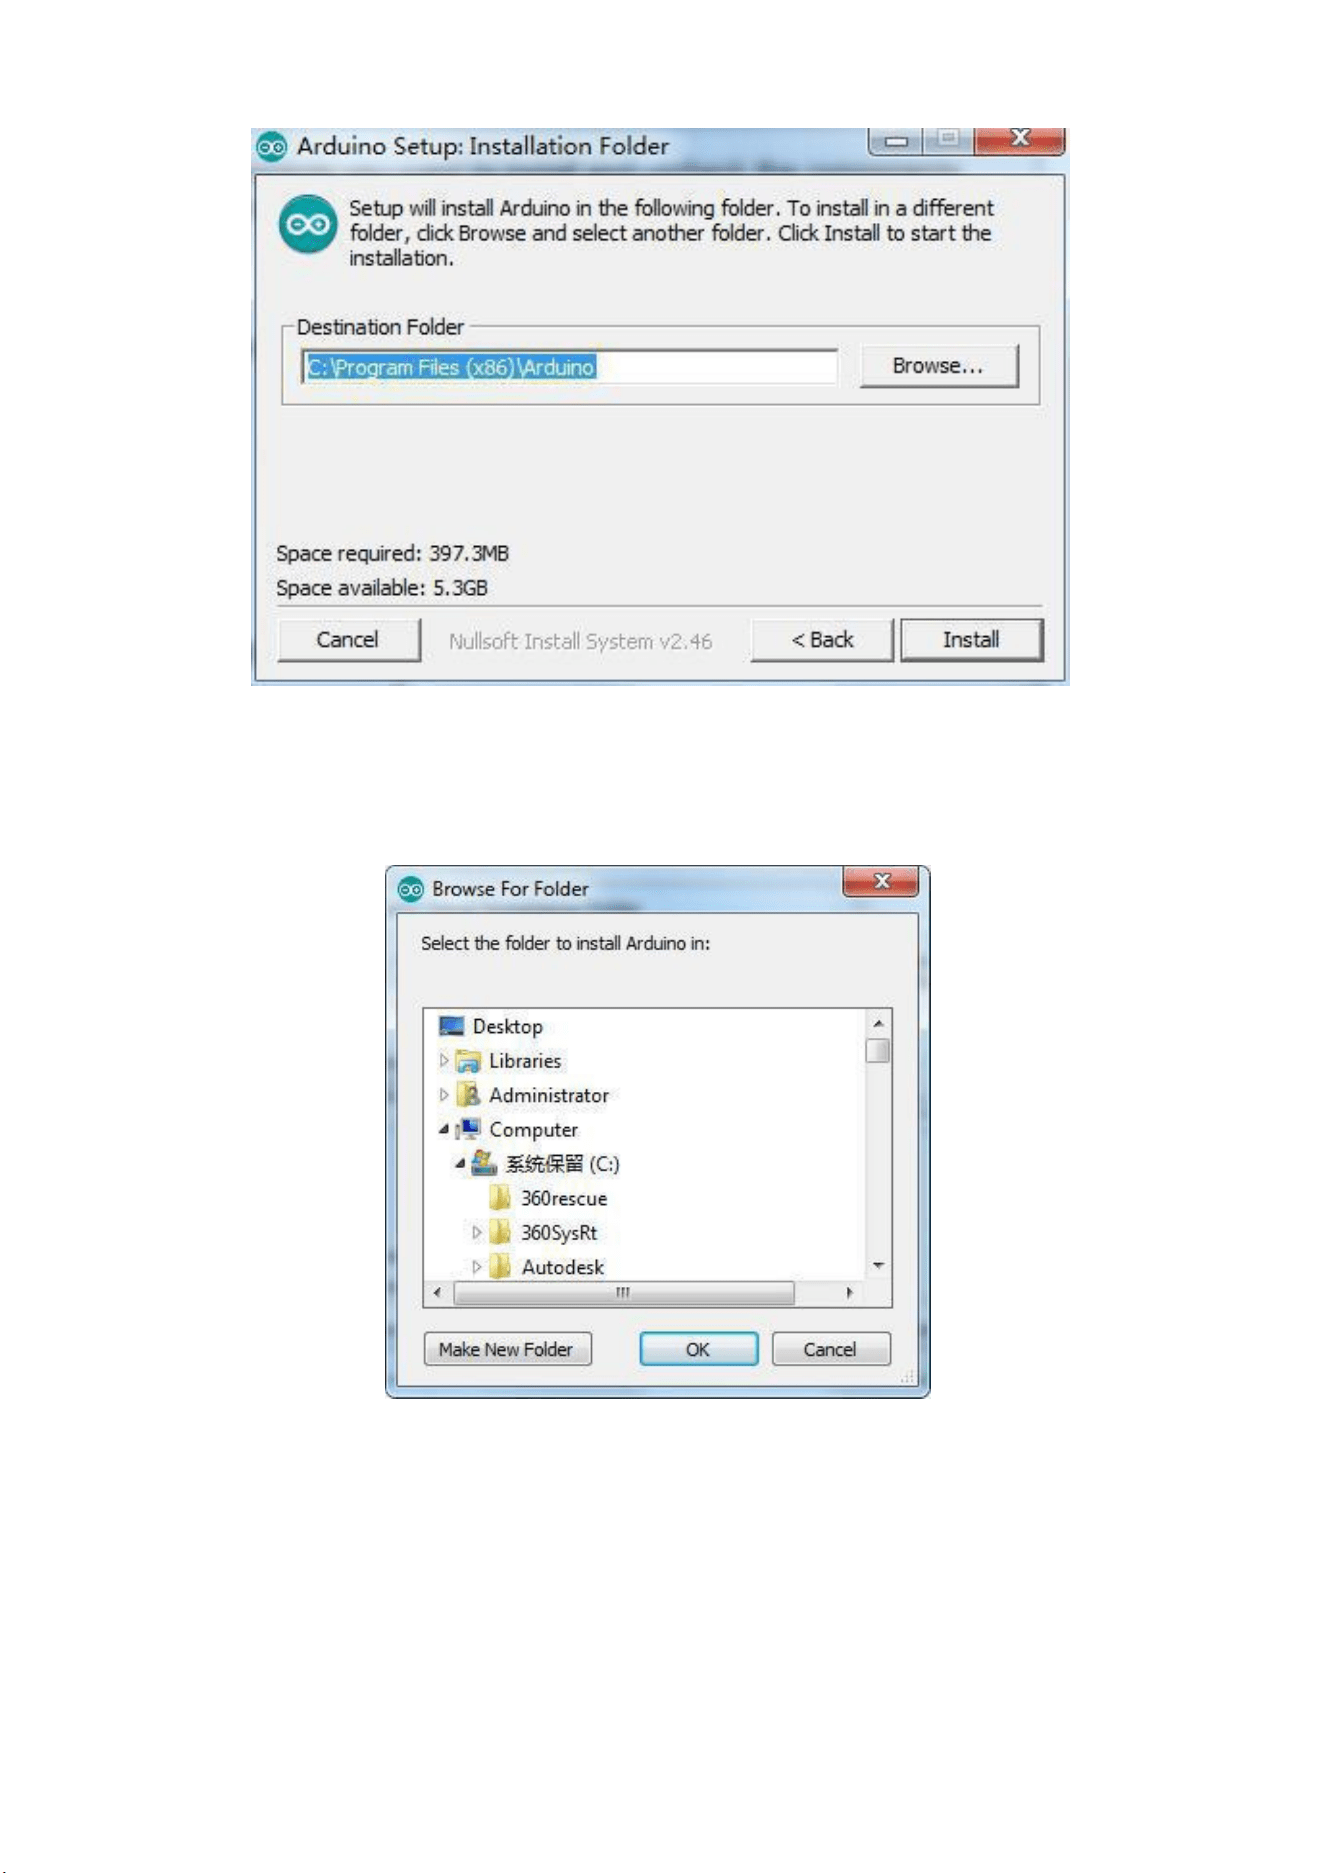
Click Next
You can press Browse… to choose an installation path or directly type in the directory
youwant.
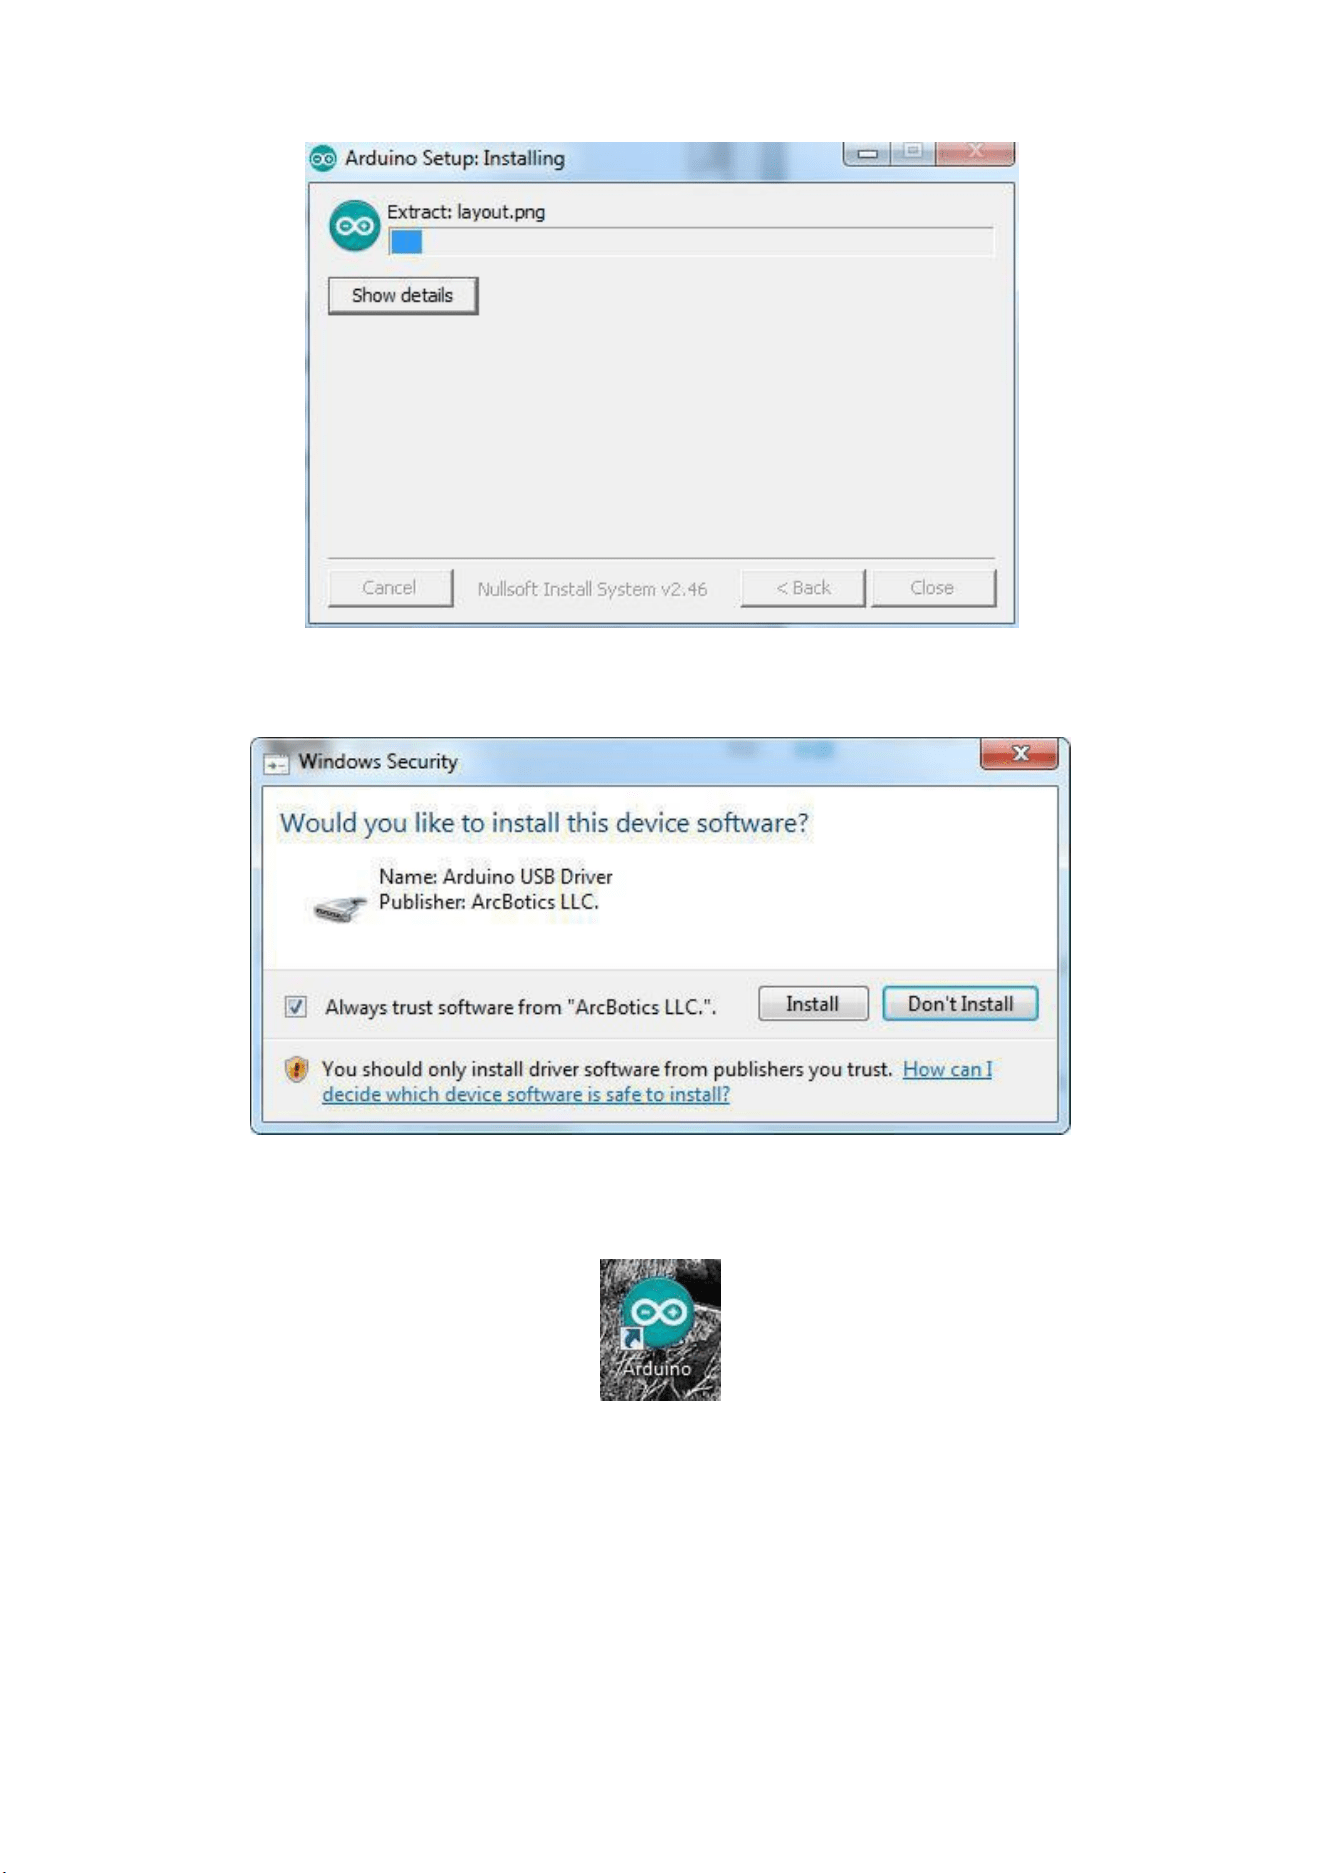
10
Click Install to initiate installation
Finally, the following interface appears, click Install to finish the installation.
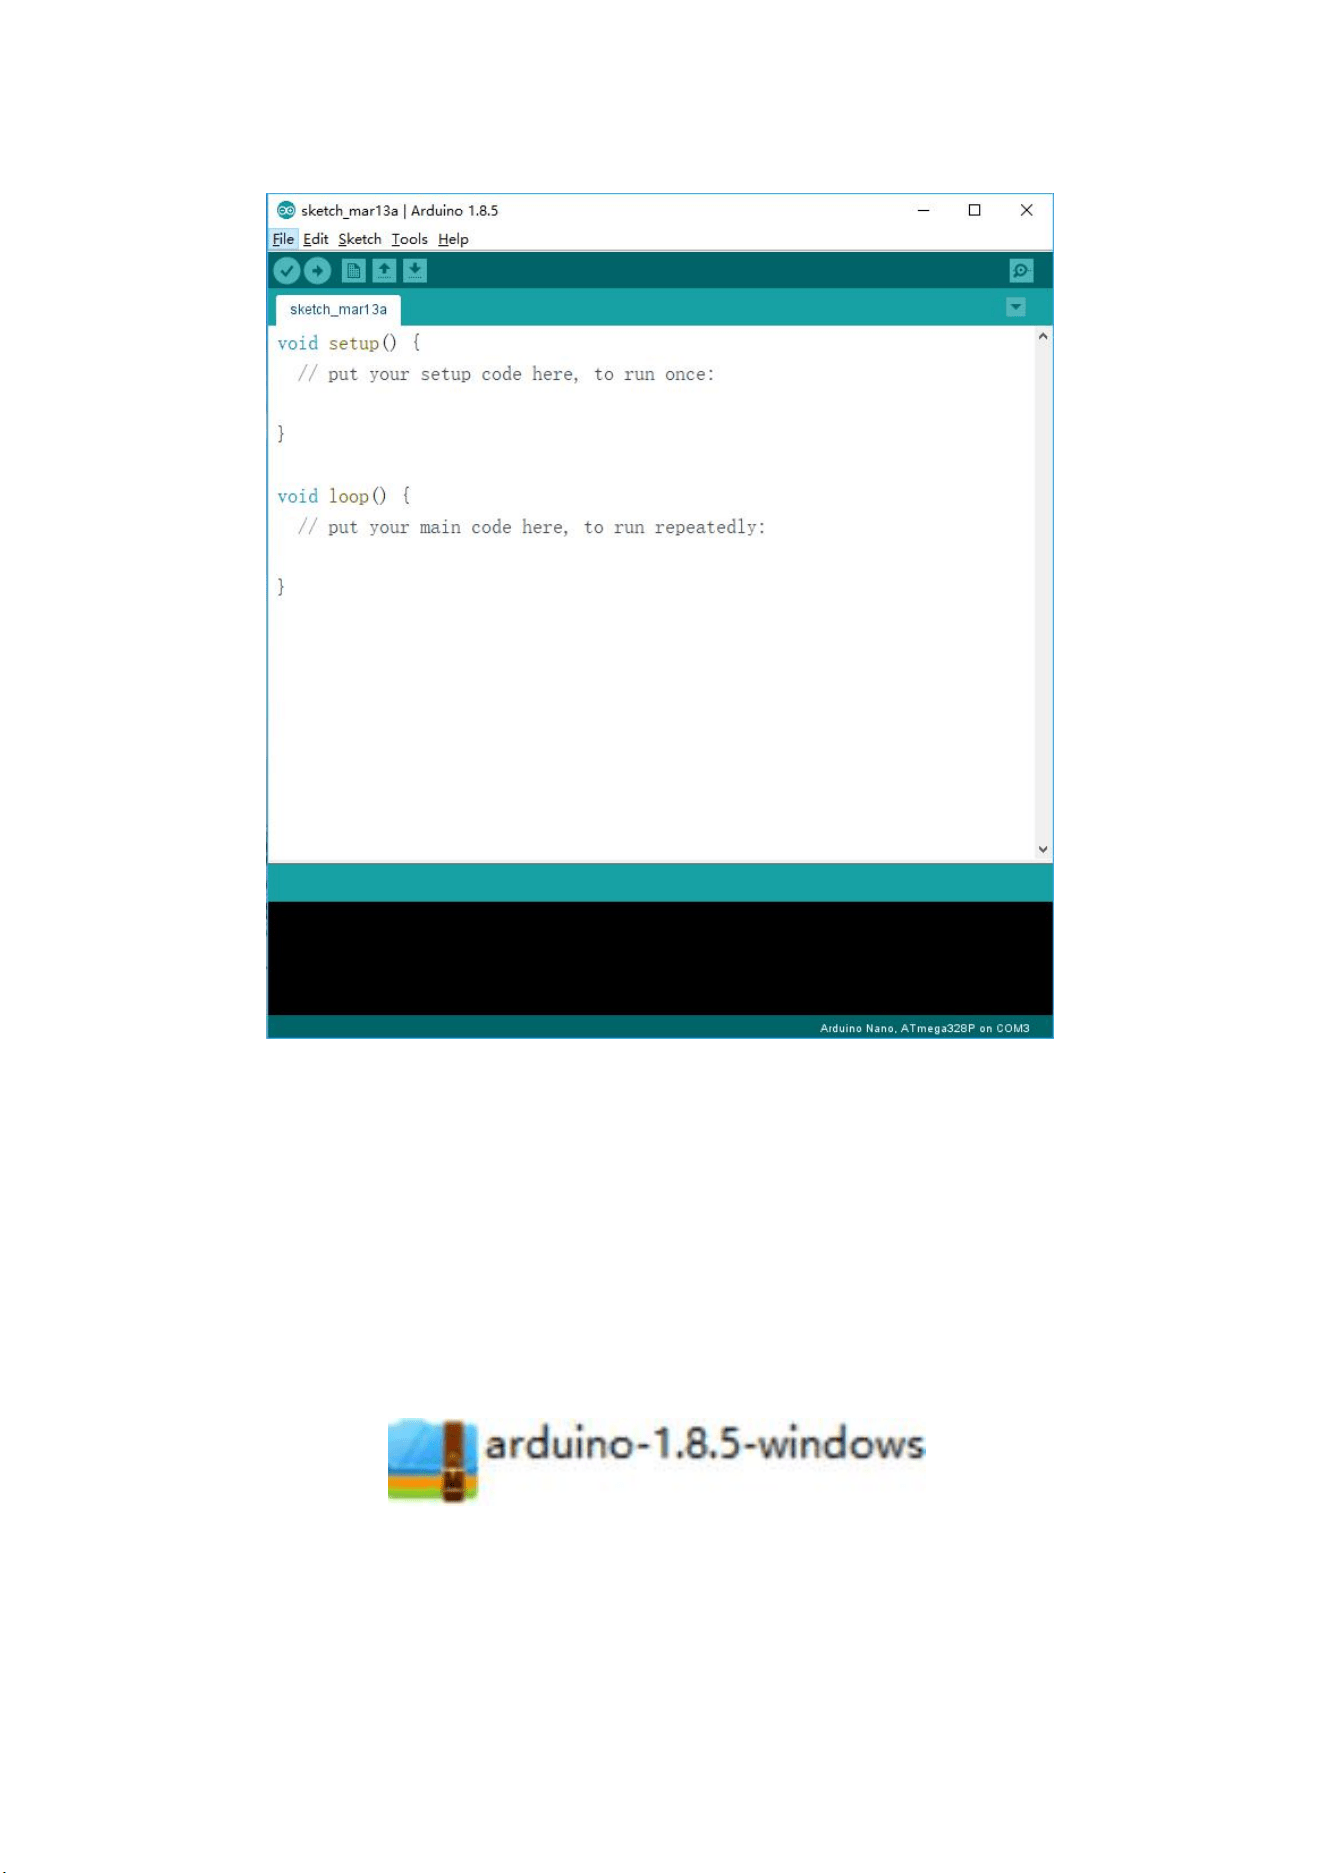
Next, the following icon appears on the desktop
11
Double-click to enter the desired development environment
You may directly choose the installation package for installation and skip the contents below and jump
to the next section. But if you want to learn some methods other than the installation package, please
continue to read the section.
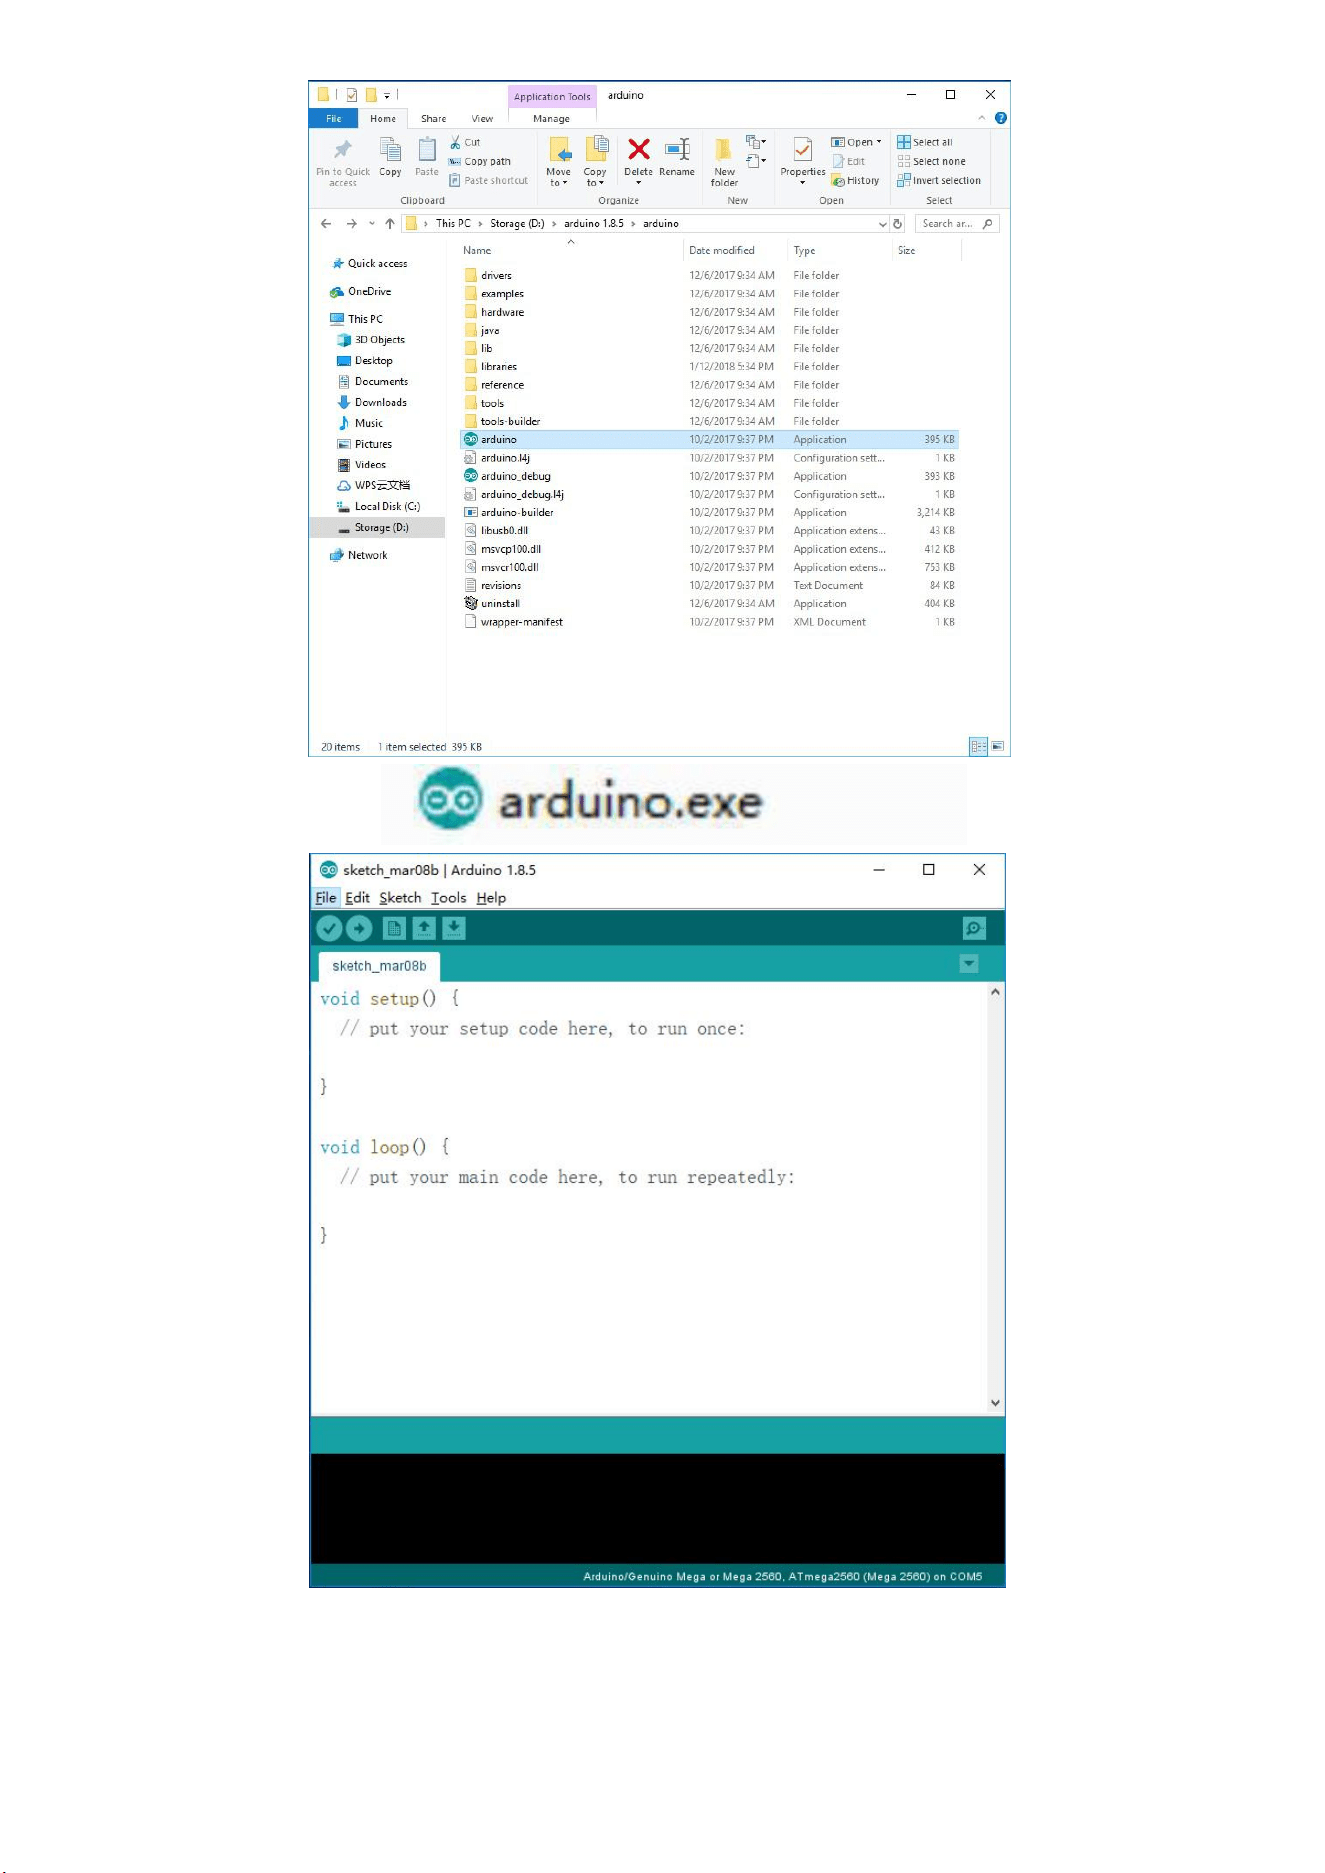
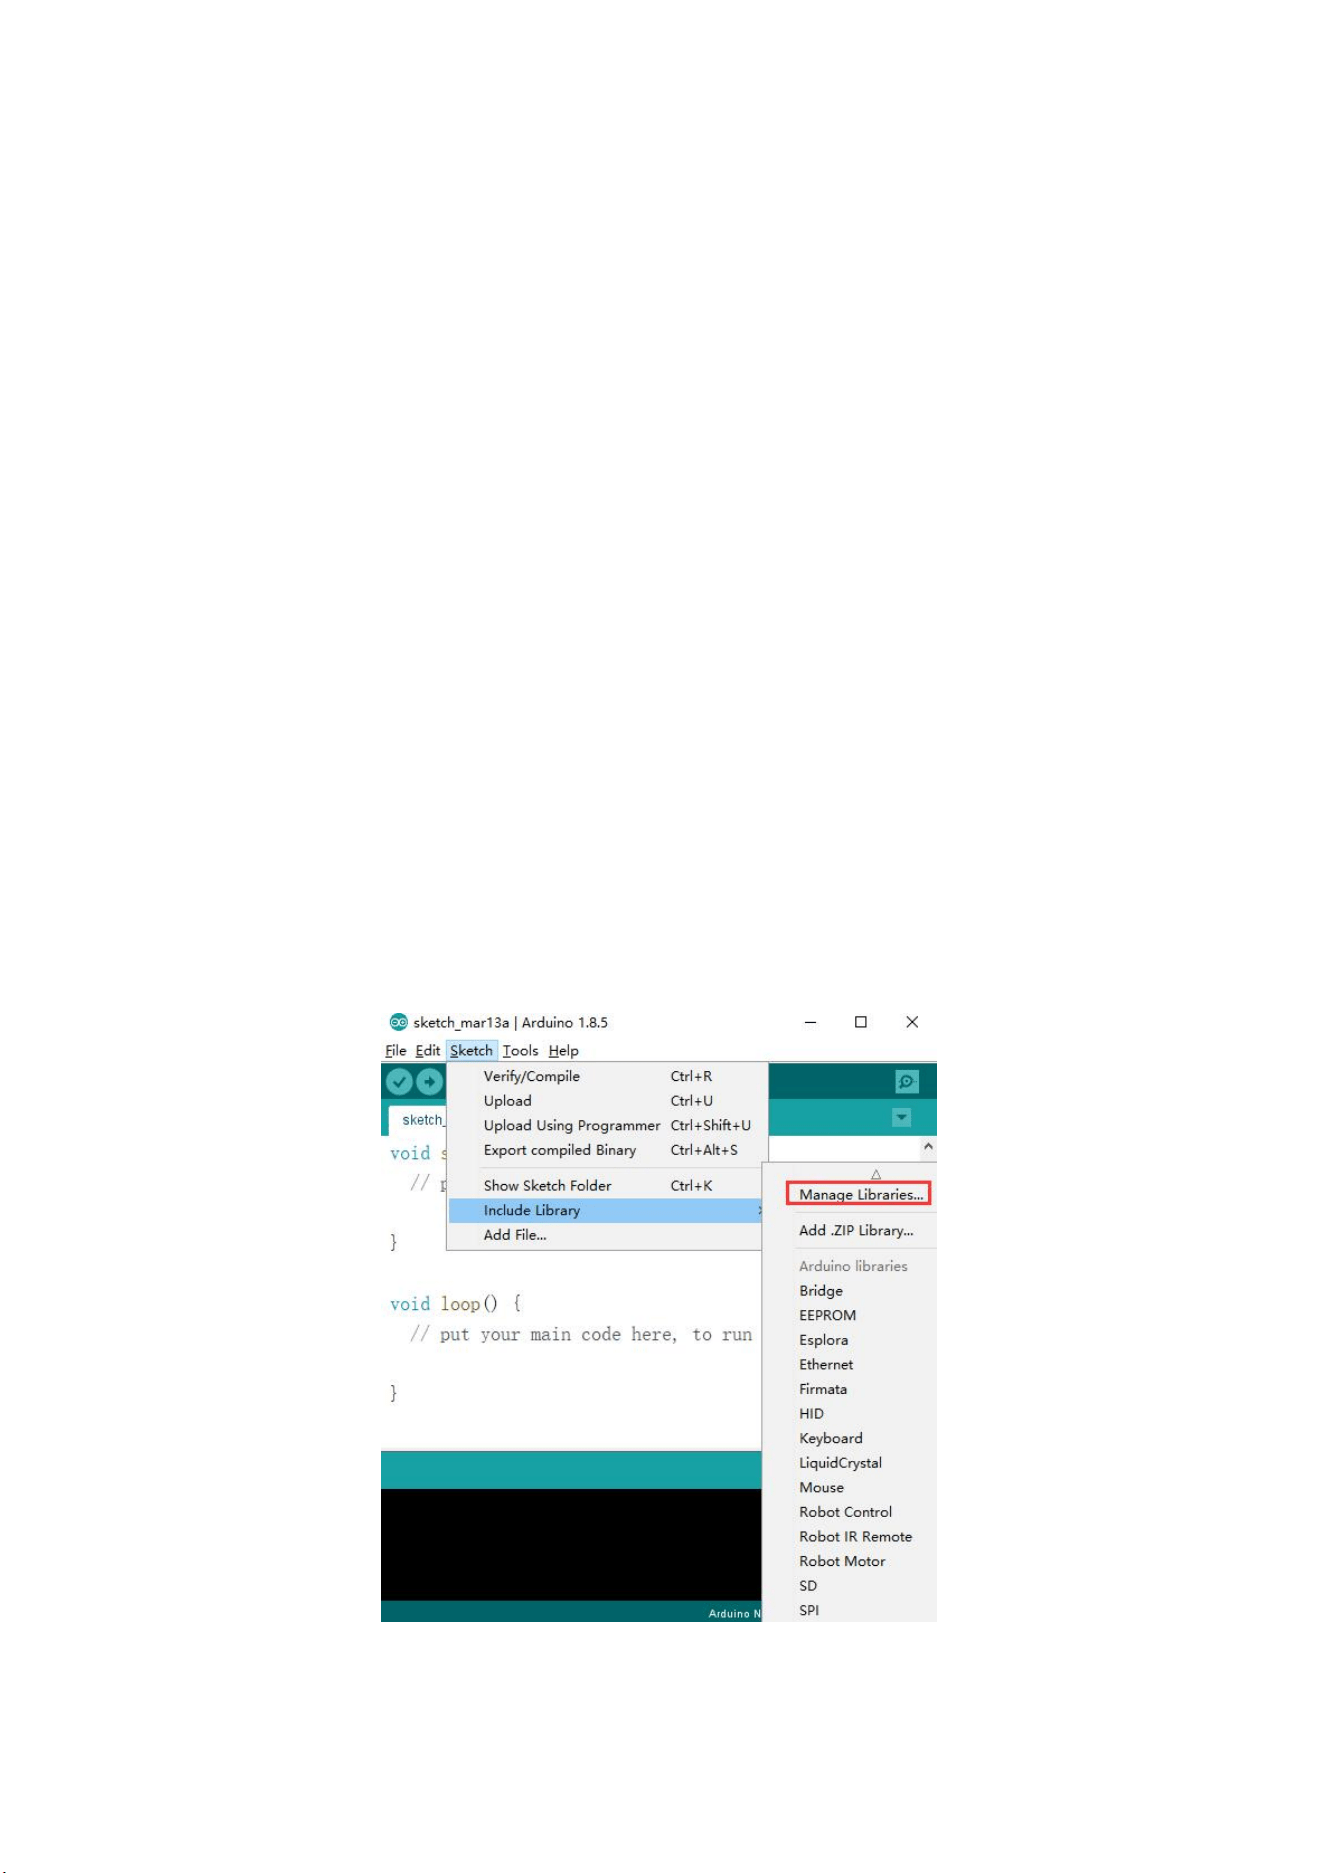
Unzip the zip file downloaded, Double-click to open the program and enter the desired
developmentenvironment
12
13
Lesson 1 Add Libraries and Installing the CH340 driver
Install other Arduino libraries
Once you are comfortable with the Arduino software and using the built-in functions, you may want to
extend the ability of your Arduino with additional libraries.
What are Libraries?
Libraries are a collection of code that makes it easy for you to connect to a sensor, display, module, etc.
For example, the built-in Liquid Crystal library makes it easy to talk to character LCD displays.
There are hundreds of additional libraries available on the Internet for download. The built-in
libraries and some of these additional libraries are listed in the reference. To use the additional
libraries, you will need to install them.
How to Install a Library
Using the Library Manager
To install a new library into your Arduino IDE you can use the Library Manager (available from IDE
version 1.8.5). Open the IDE and click to the "Sketch" menu and then Include Library > Manage
Libraries.
14
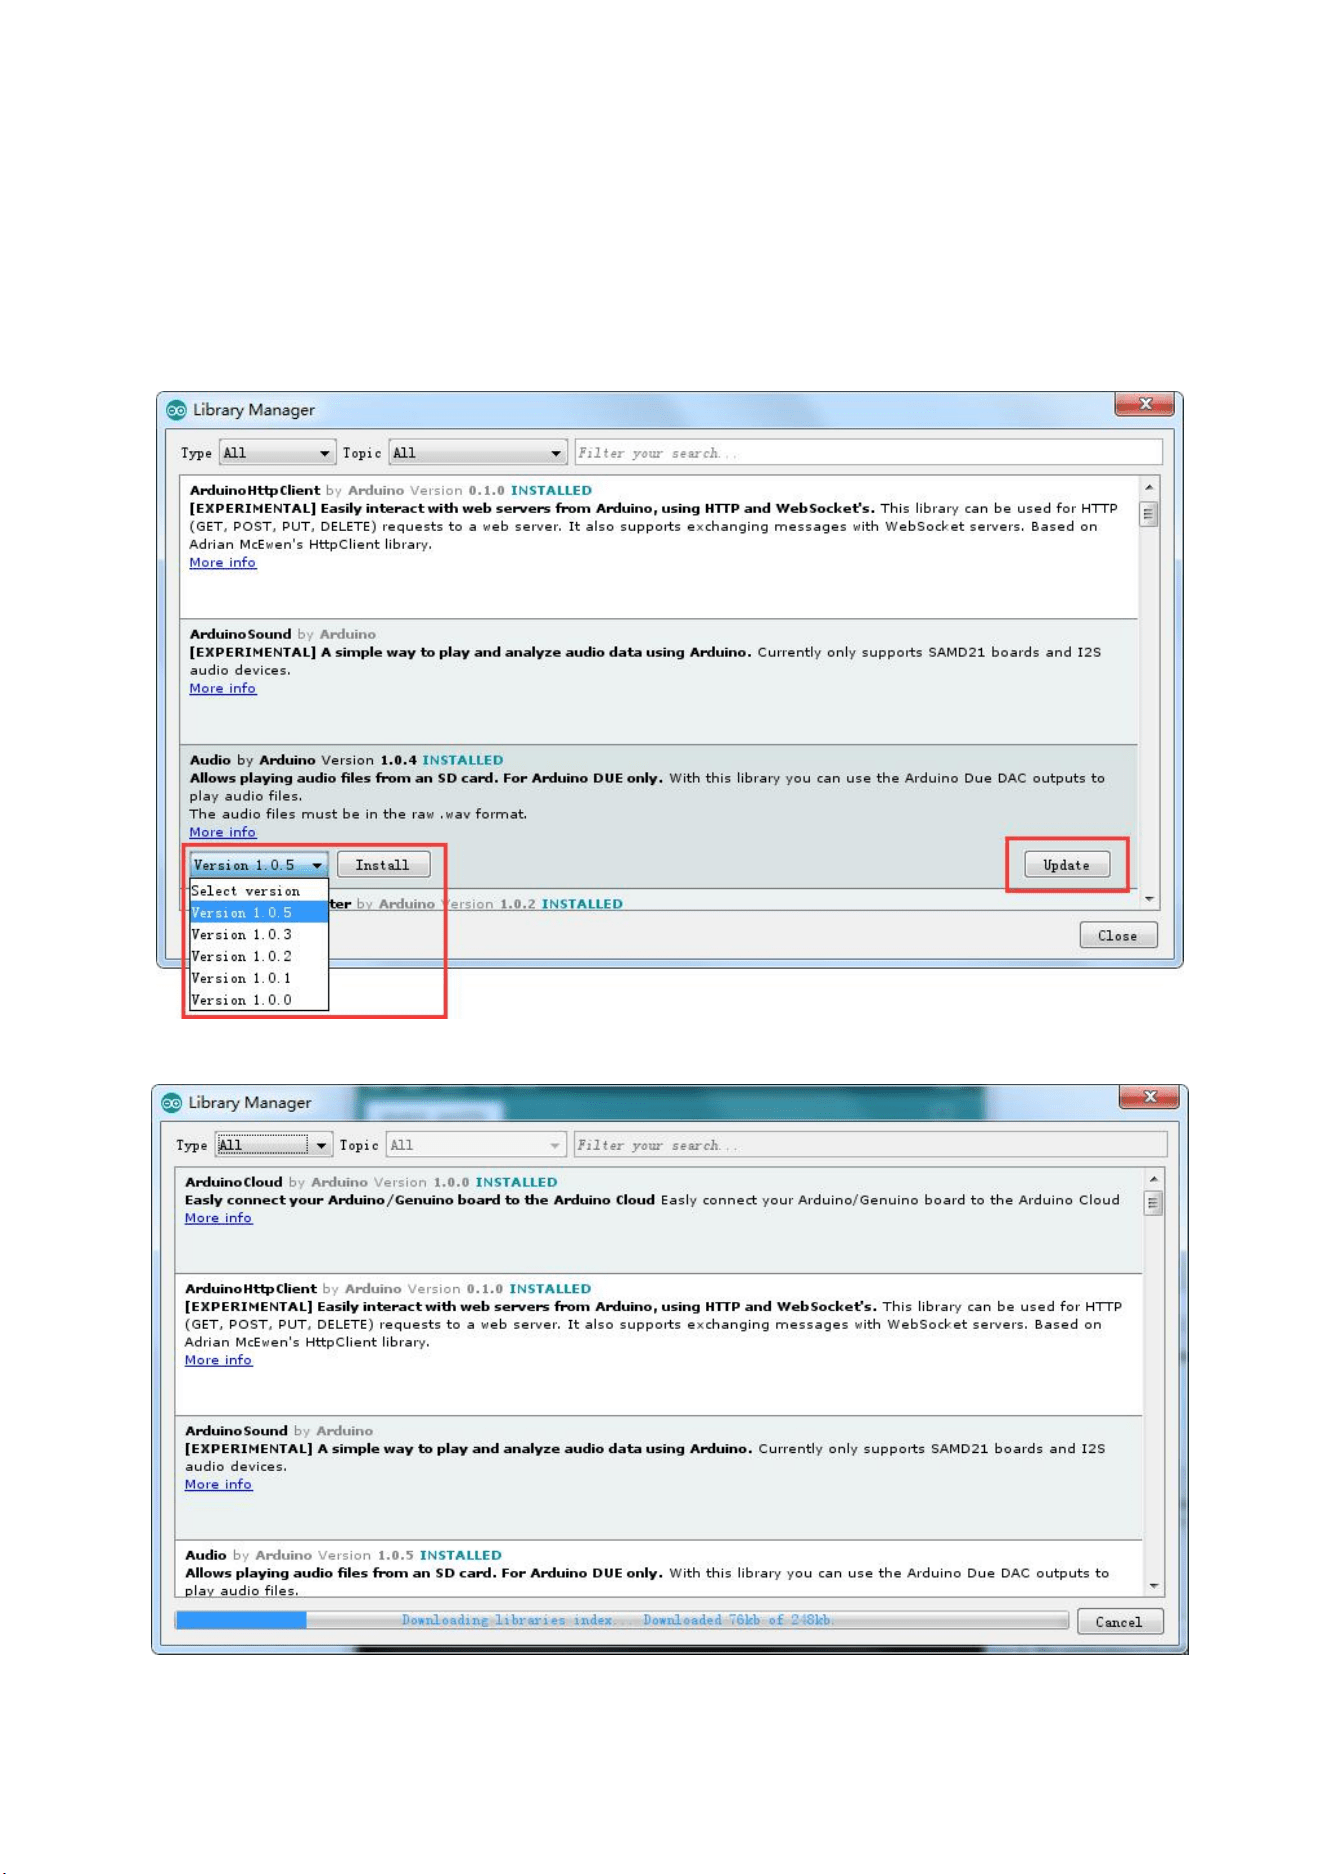
Then the library manager will open and you will find a list of libraries that are already installed
or ready for installation. In this example we will install the Bridge library. Scroll the list to find
it, then select the version of the library you want to install. Sometimes only one version of
the library is available. If the version selection menu does not appear, don't worry: it
isnormal.
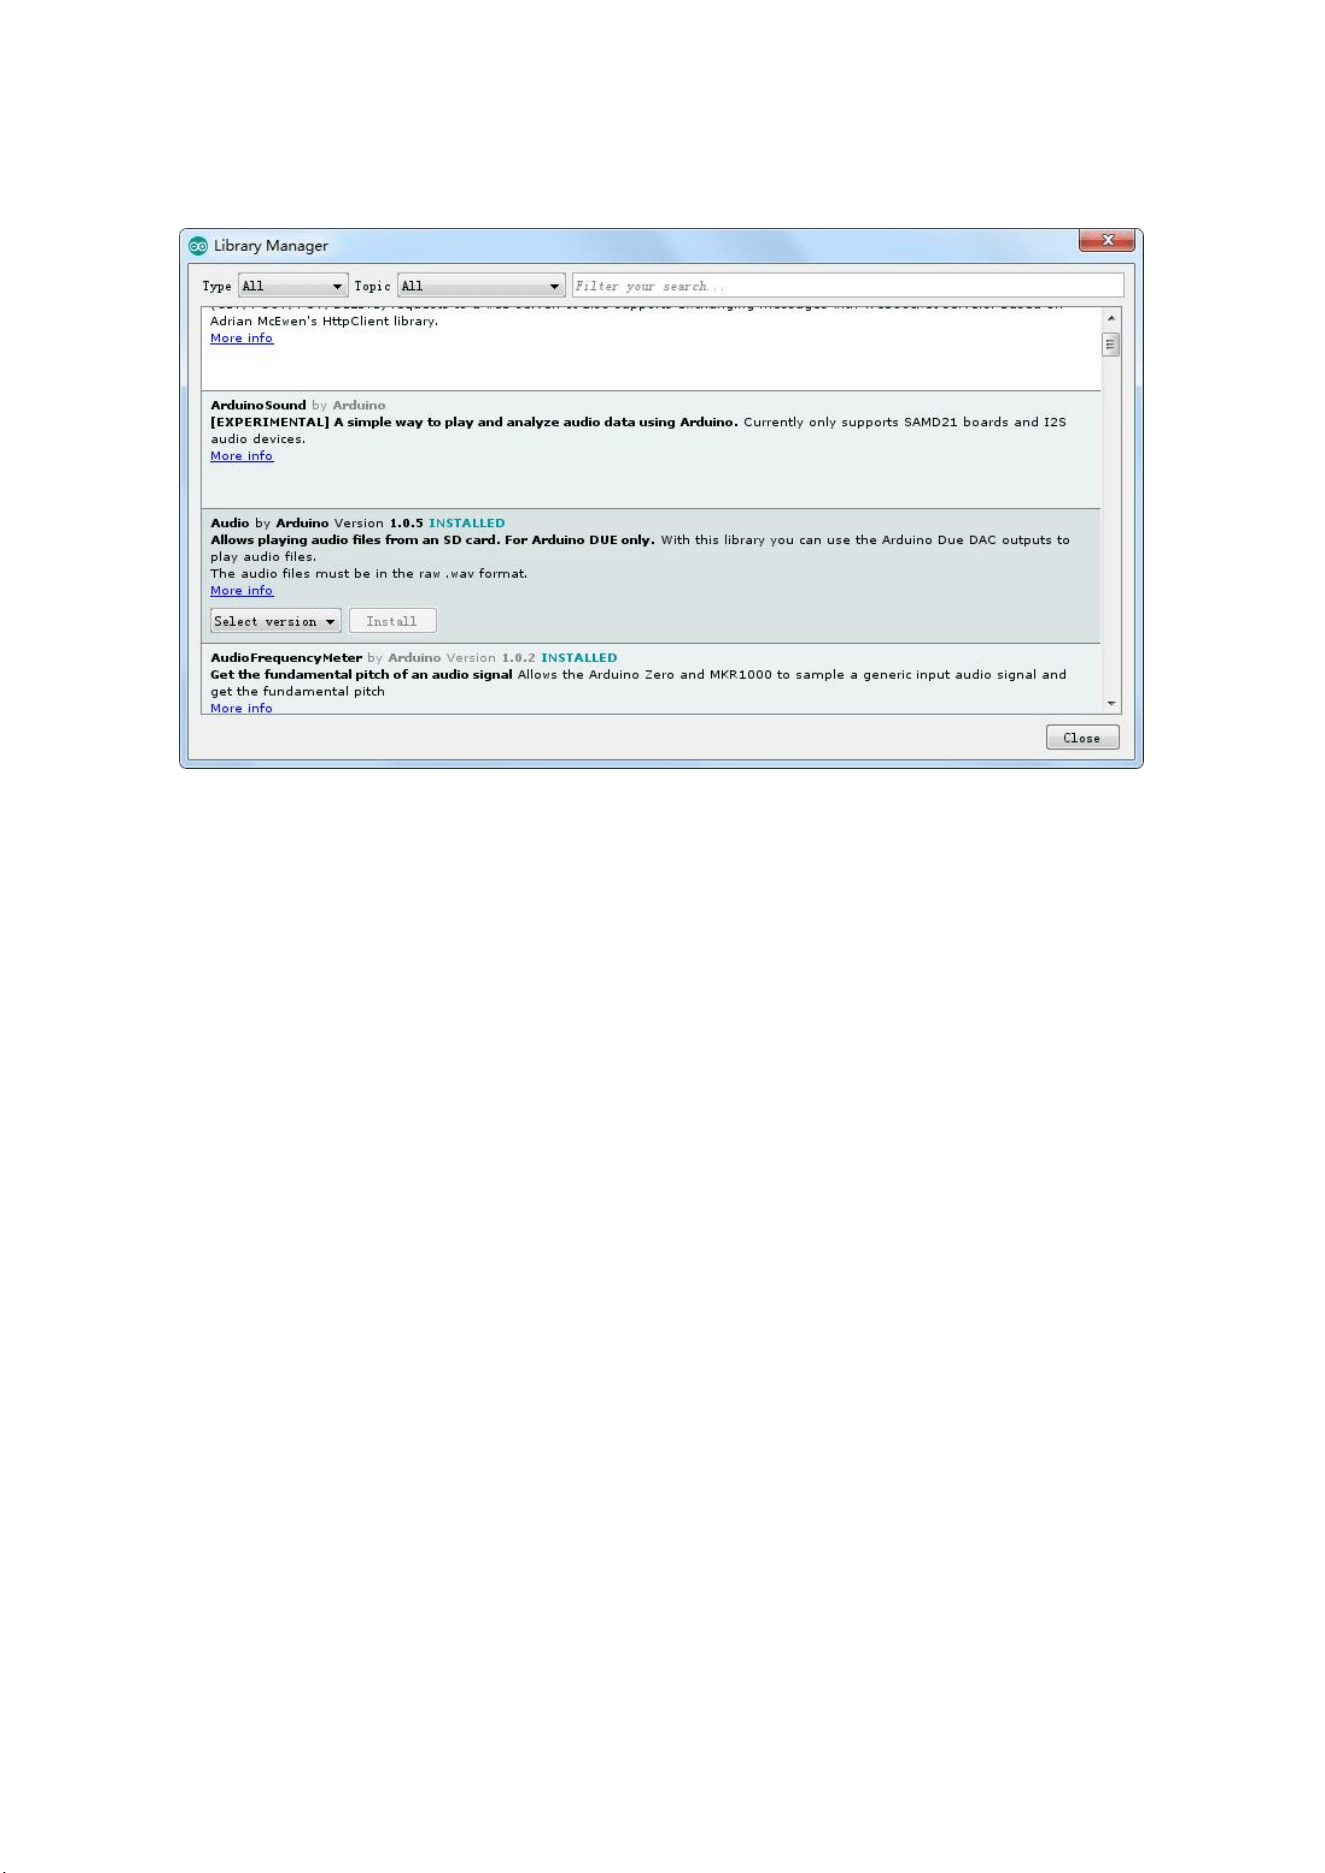
There are times you have to be patient with it, just as shown in the figure. Please refresh it and wait.
15
Finally click on install and wait for the IDE to install the new library. Downloading may take time
depending on your connection speed. Once it has finished, an Installed tag should appear next to
the Bridge library. You can close the library manager.
You can now find the new library available in the Include Library menu. If you want to add your own
library open a new issue on GitHub.
Importing a .zip Library
Libraries are often distributed as a ZIP file or folder. The name of the folder is the name of the library.
Inside the folder will be a .cpp file, a .h file and often a keywords.txt file, examples folder, and other
files required by the library. Starting with version 1.0.5, you can install 3rd party libraries in the IDE.
Do not unzip the downloaded library, leave it asis.
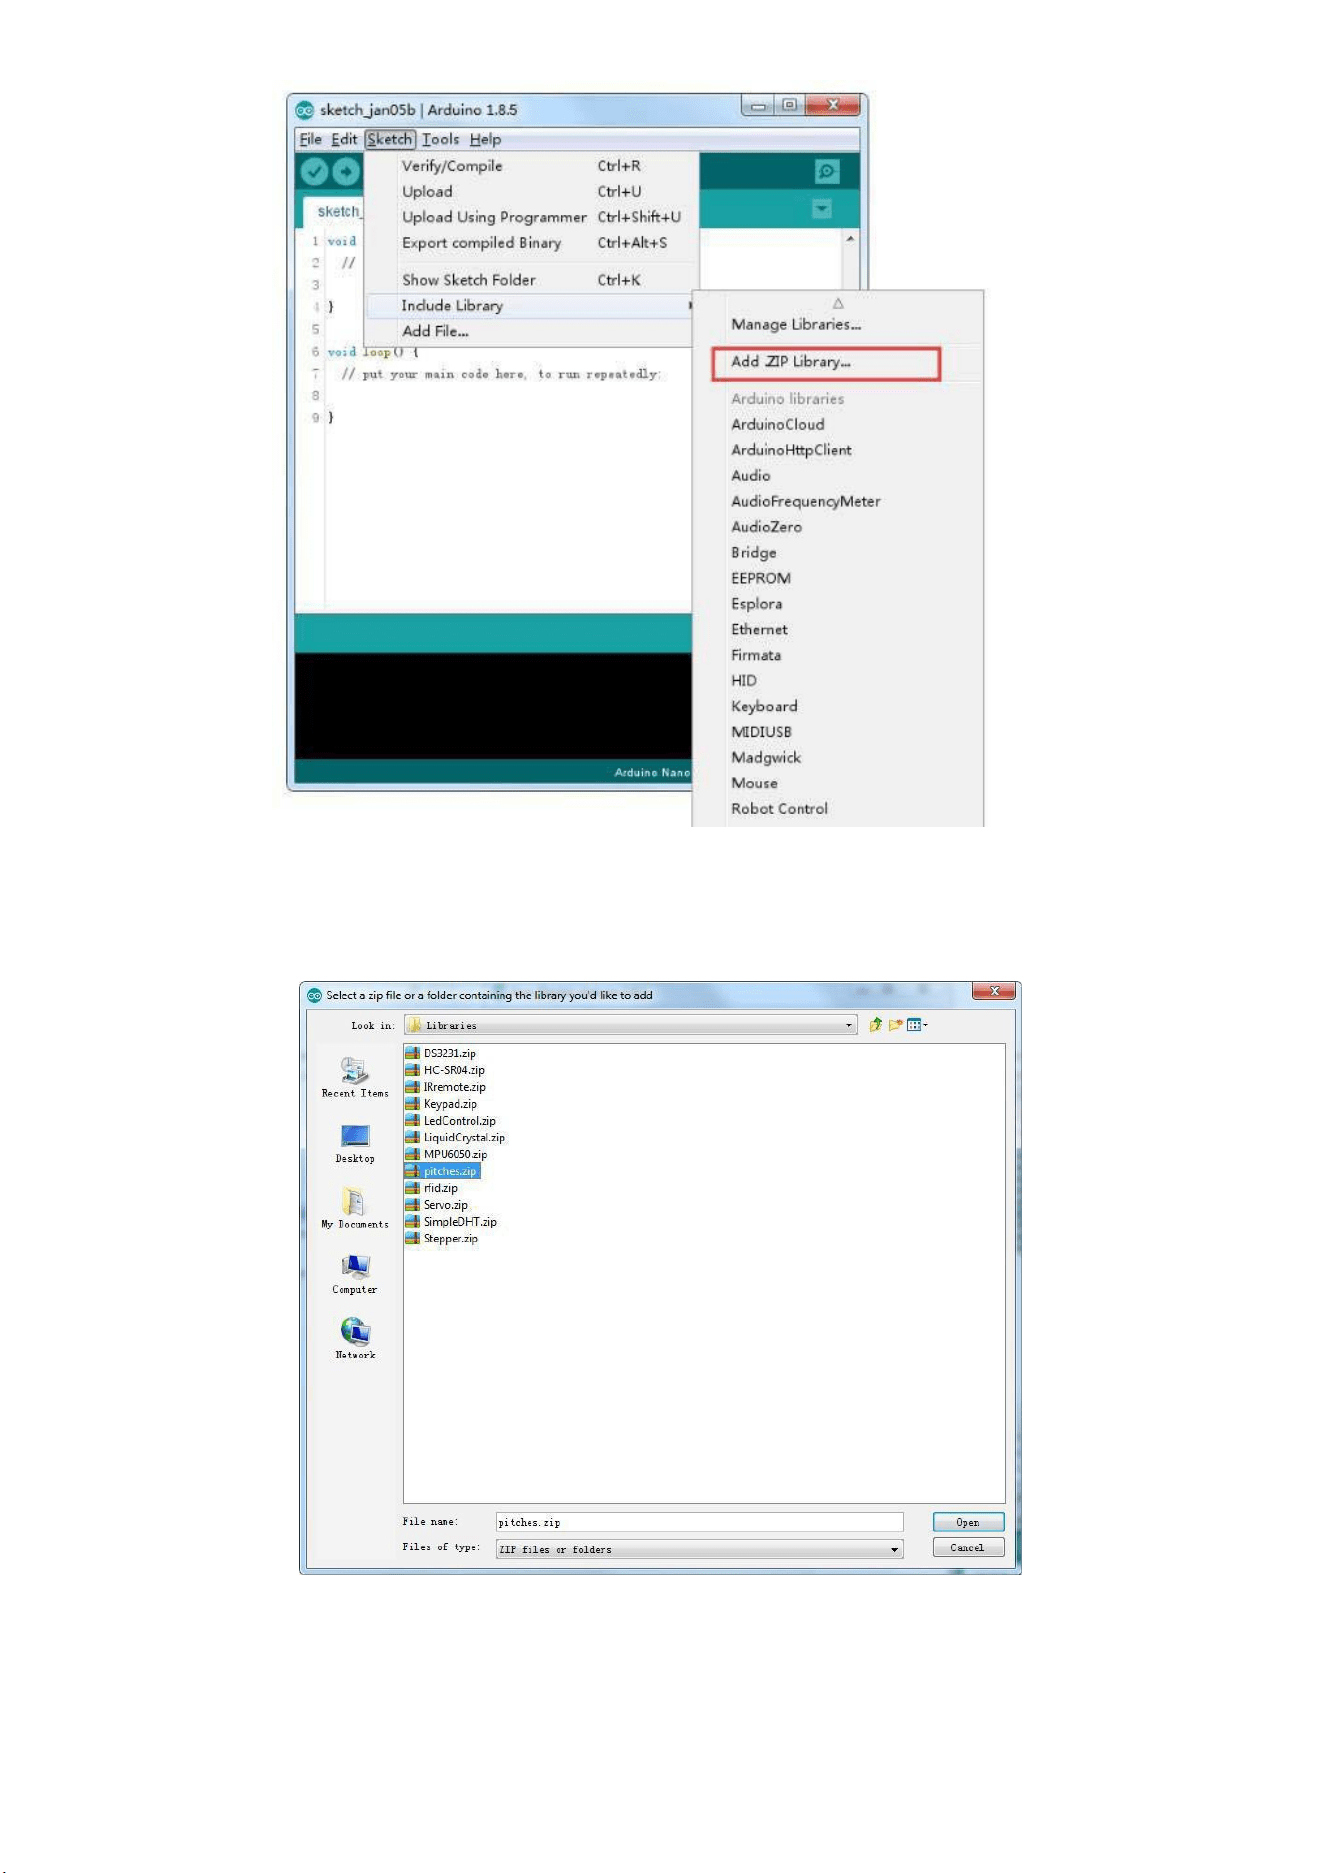
In the Arduino IDE, navigate to Sketch > Include Library. At the top of the drop down list, select the
option to "Add .ZIP Library''.
16
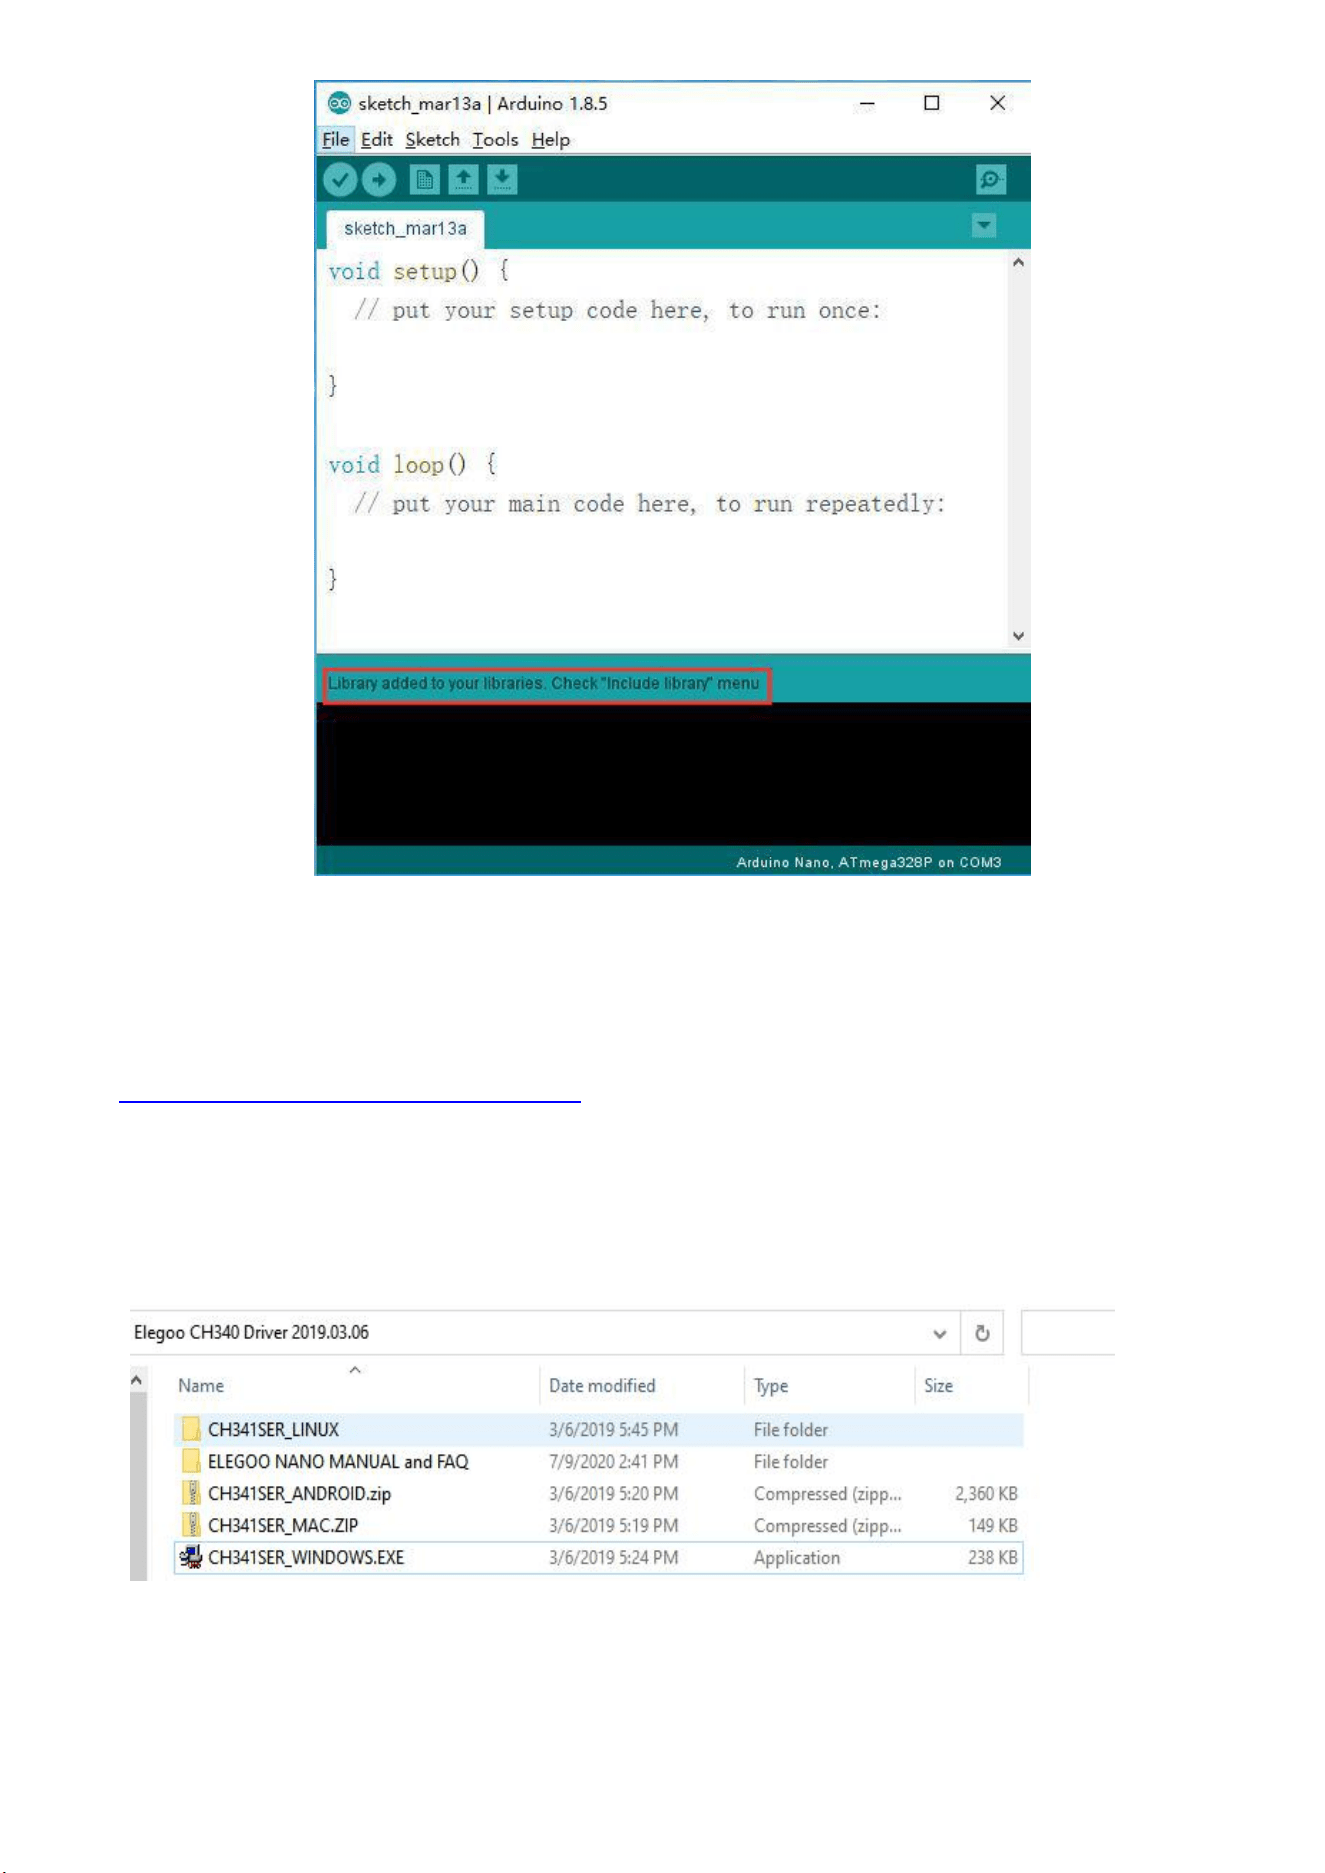
You will be prompted to select the Librariesyou would like to add. Navigate to the .zip file's location and
open it.
17
Install CH340 driver software
You can download the CH340 driver software from this link:
https://download.elegoo.com/?t=Nano3.0
After you open the tutorial file, you can find CH341SER_LINUX,CH341SER_MAC, and
CH341SER_WINDOWS.exe file.
18
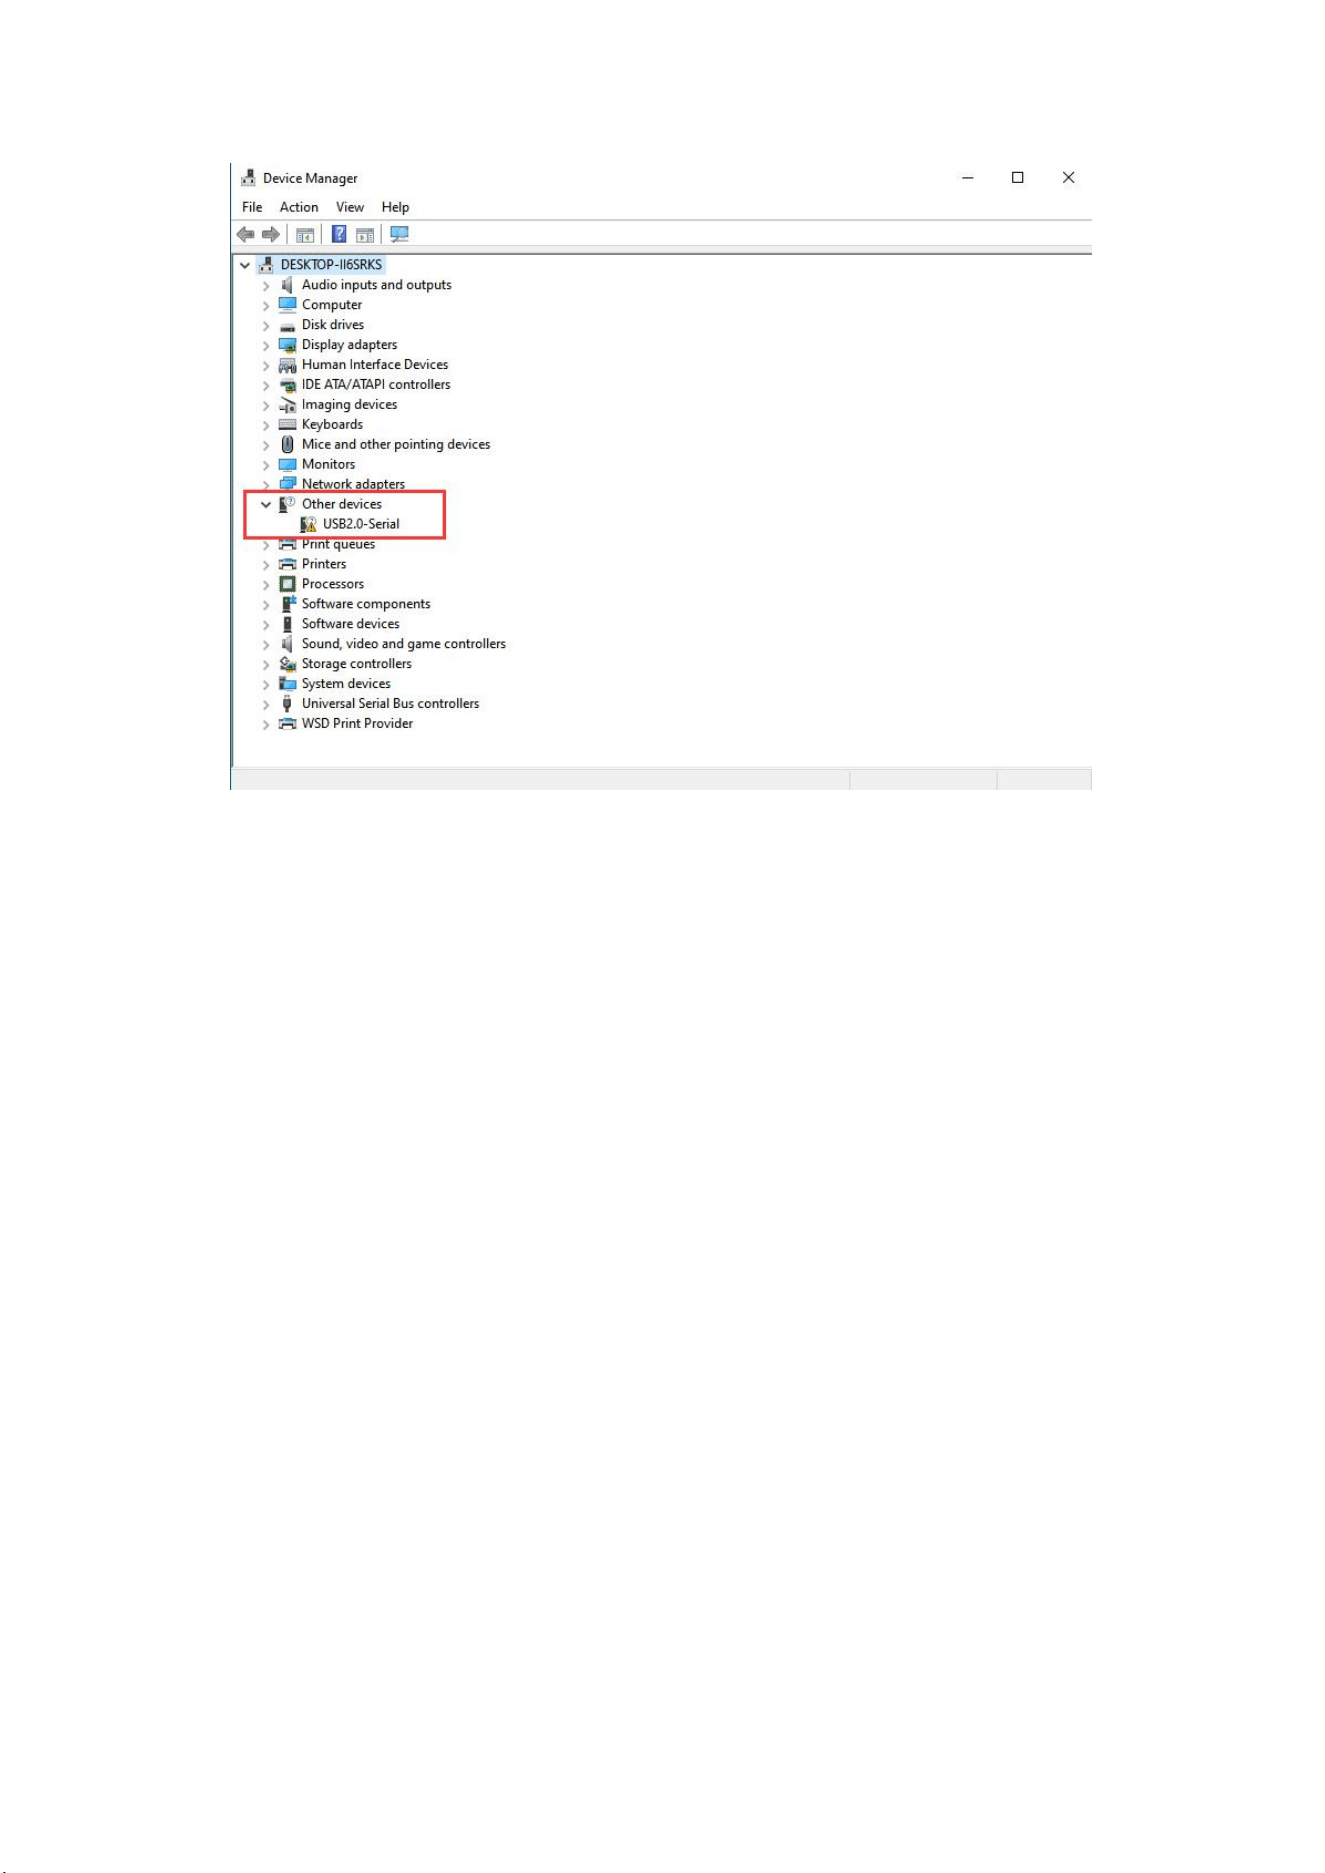
Please connect the Nano board to your computer and open the device manager. You will see the window
below
19
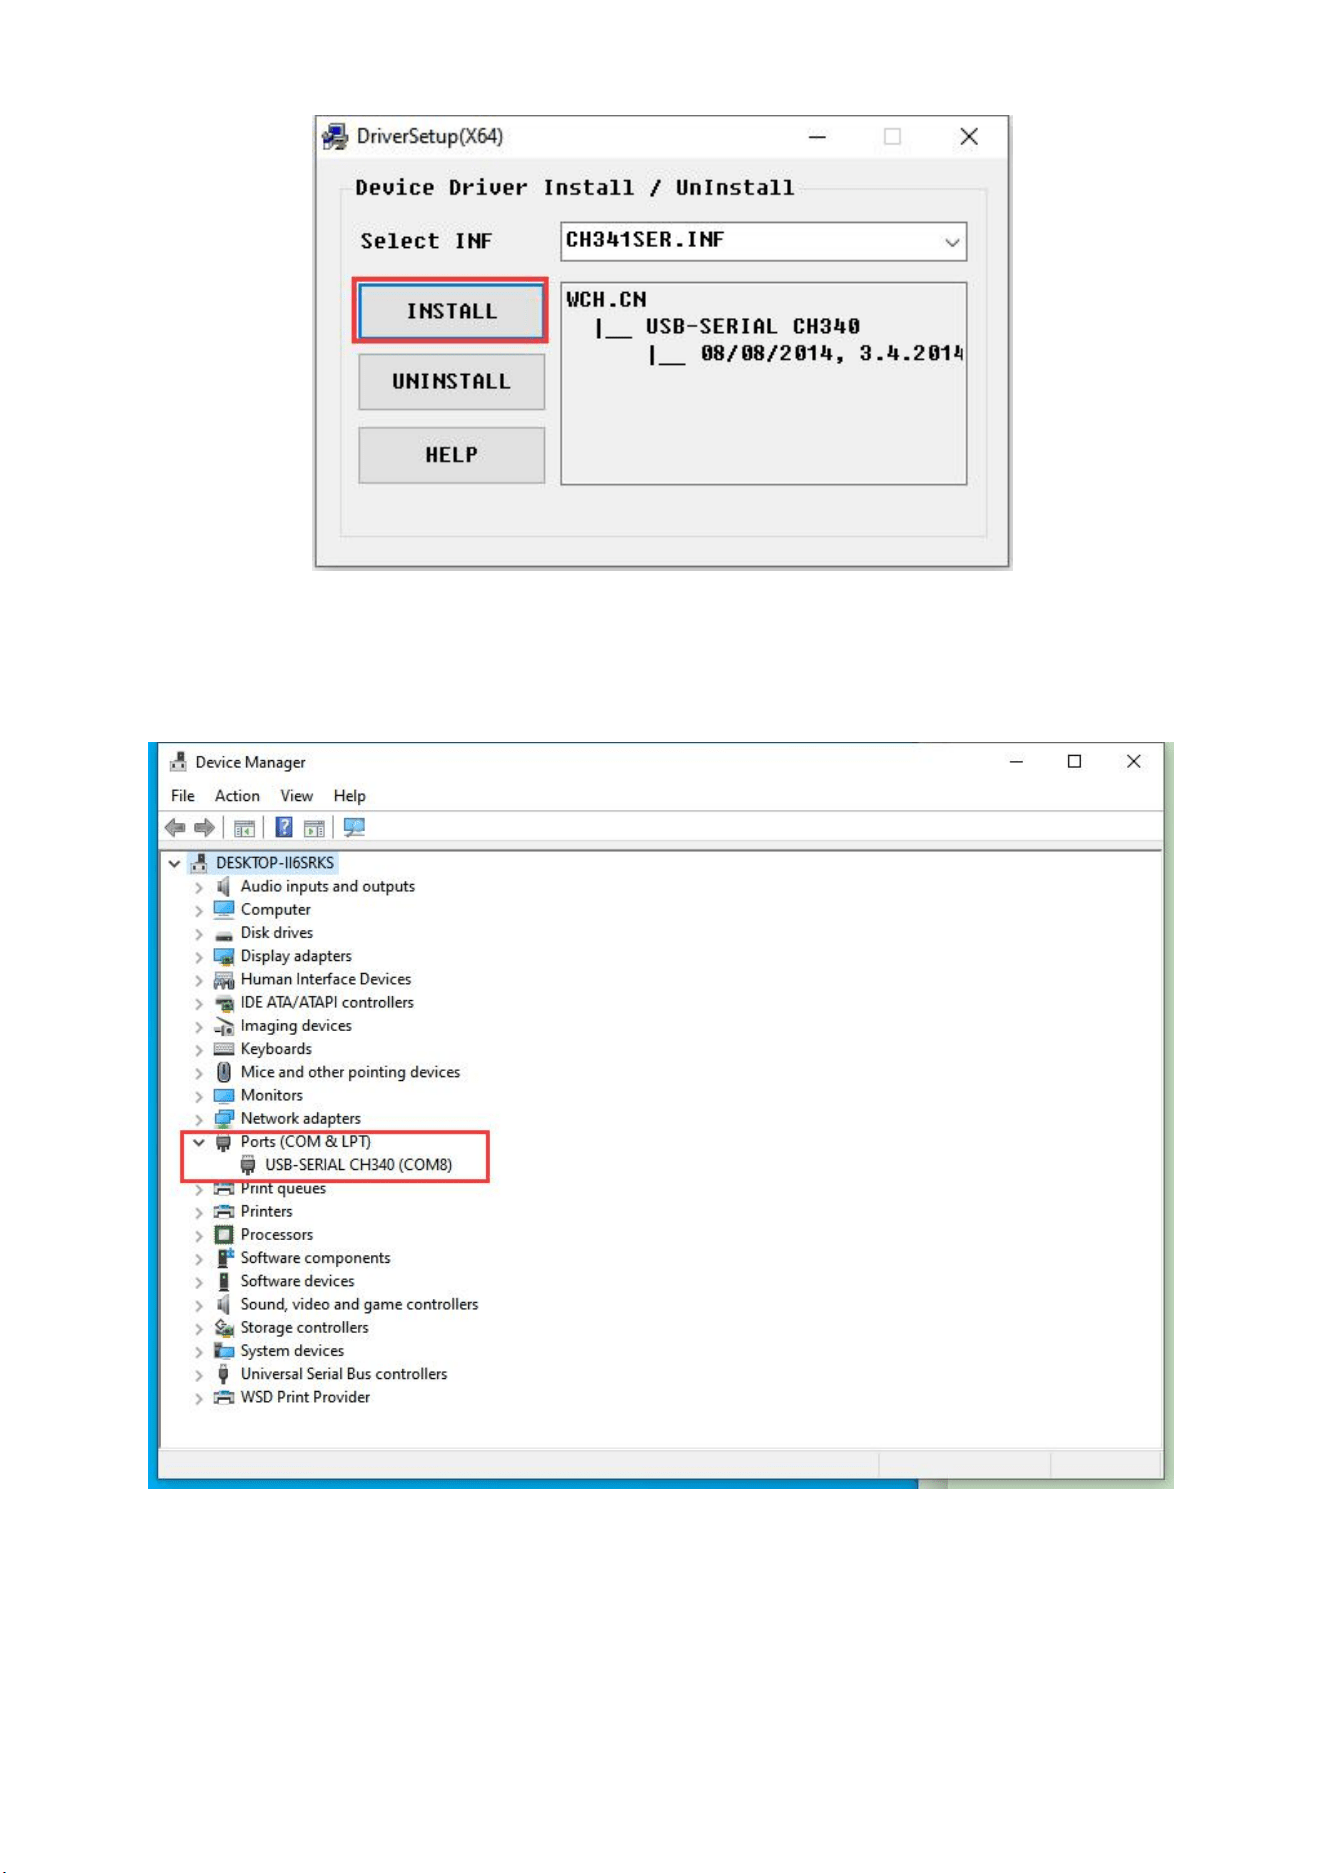
Please double click the CH341SER_WINDOWS.exe file. And click install.
After you install the CH340 driver, please check the Nano board on the device manager again.
If it shows as “USB-SERIAL CH340(COM)”, it means you install the driver successfully. Note:
the com number in different computer is different.
20
Lesson 2 Open Arduino Serial Monitor
The Arduino Integrated Development Environment (IDE) is the software side of the Arduino platform.
And, because using a terminal is such a big part of working with Arduinos and other microcontrollers,
they decided to include a serial terminal with the software. Within the Arduino environment, this is
called the Serial Monitor.
Making a Connection
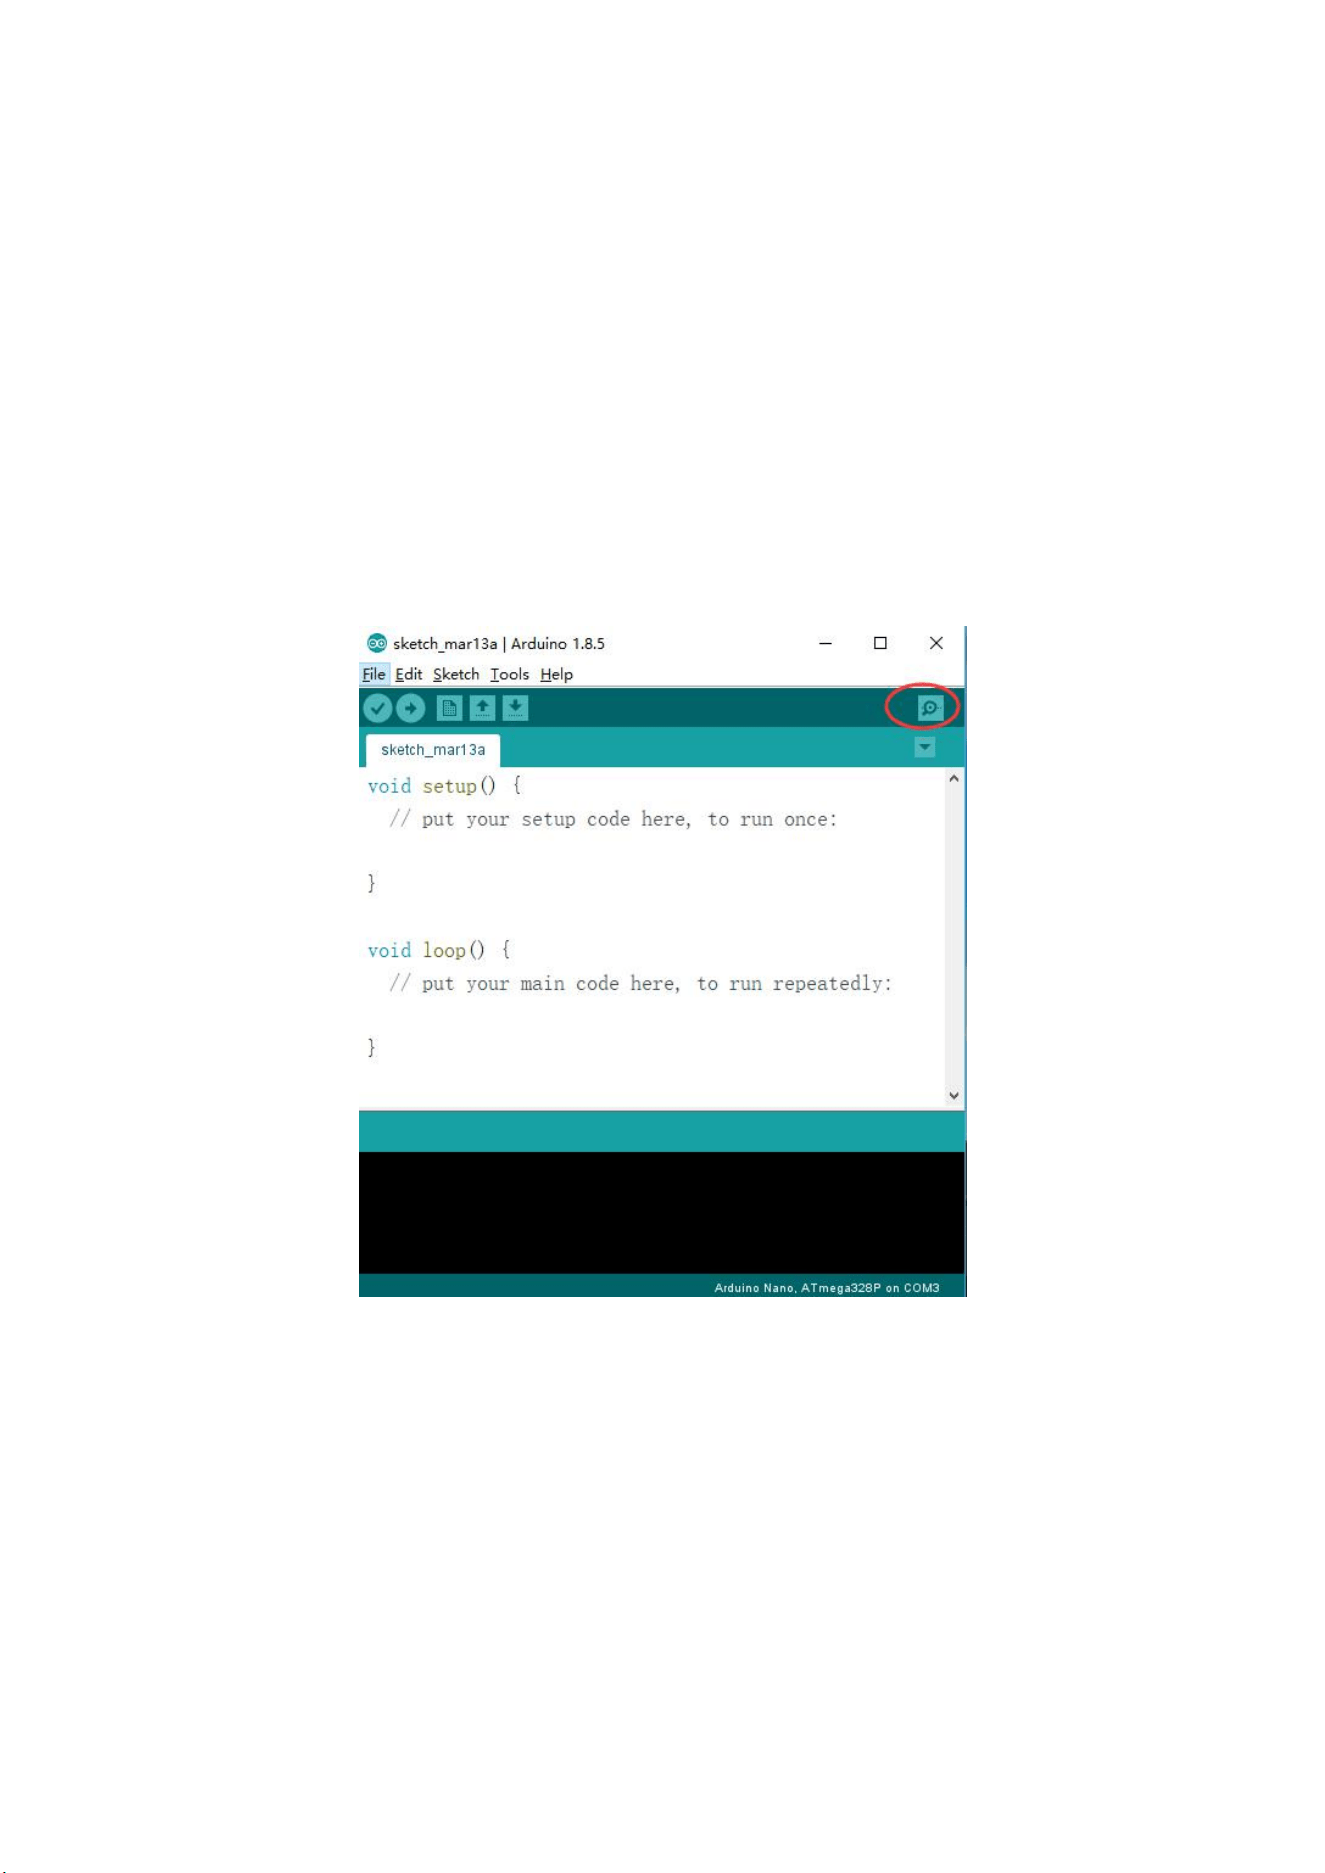
The serial monitor comes with any and all versions of the Arduino IDE. To open it, simply click the Serial
Monitor icon.
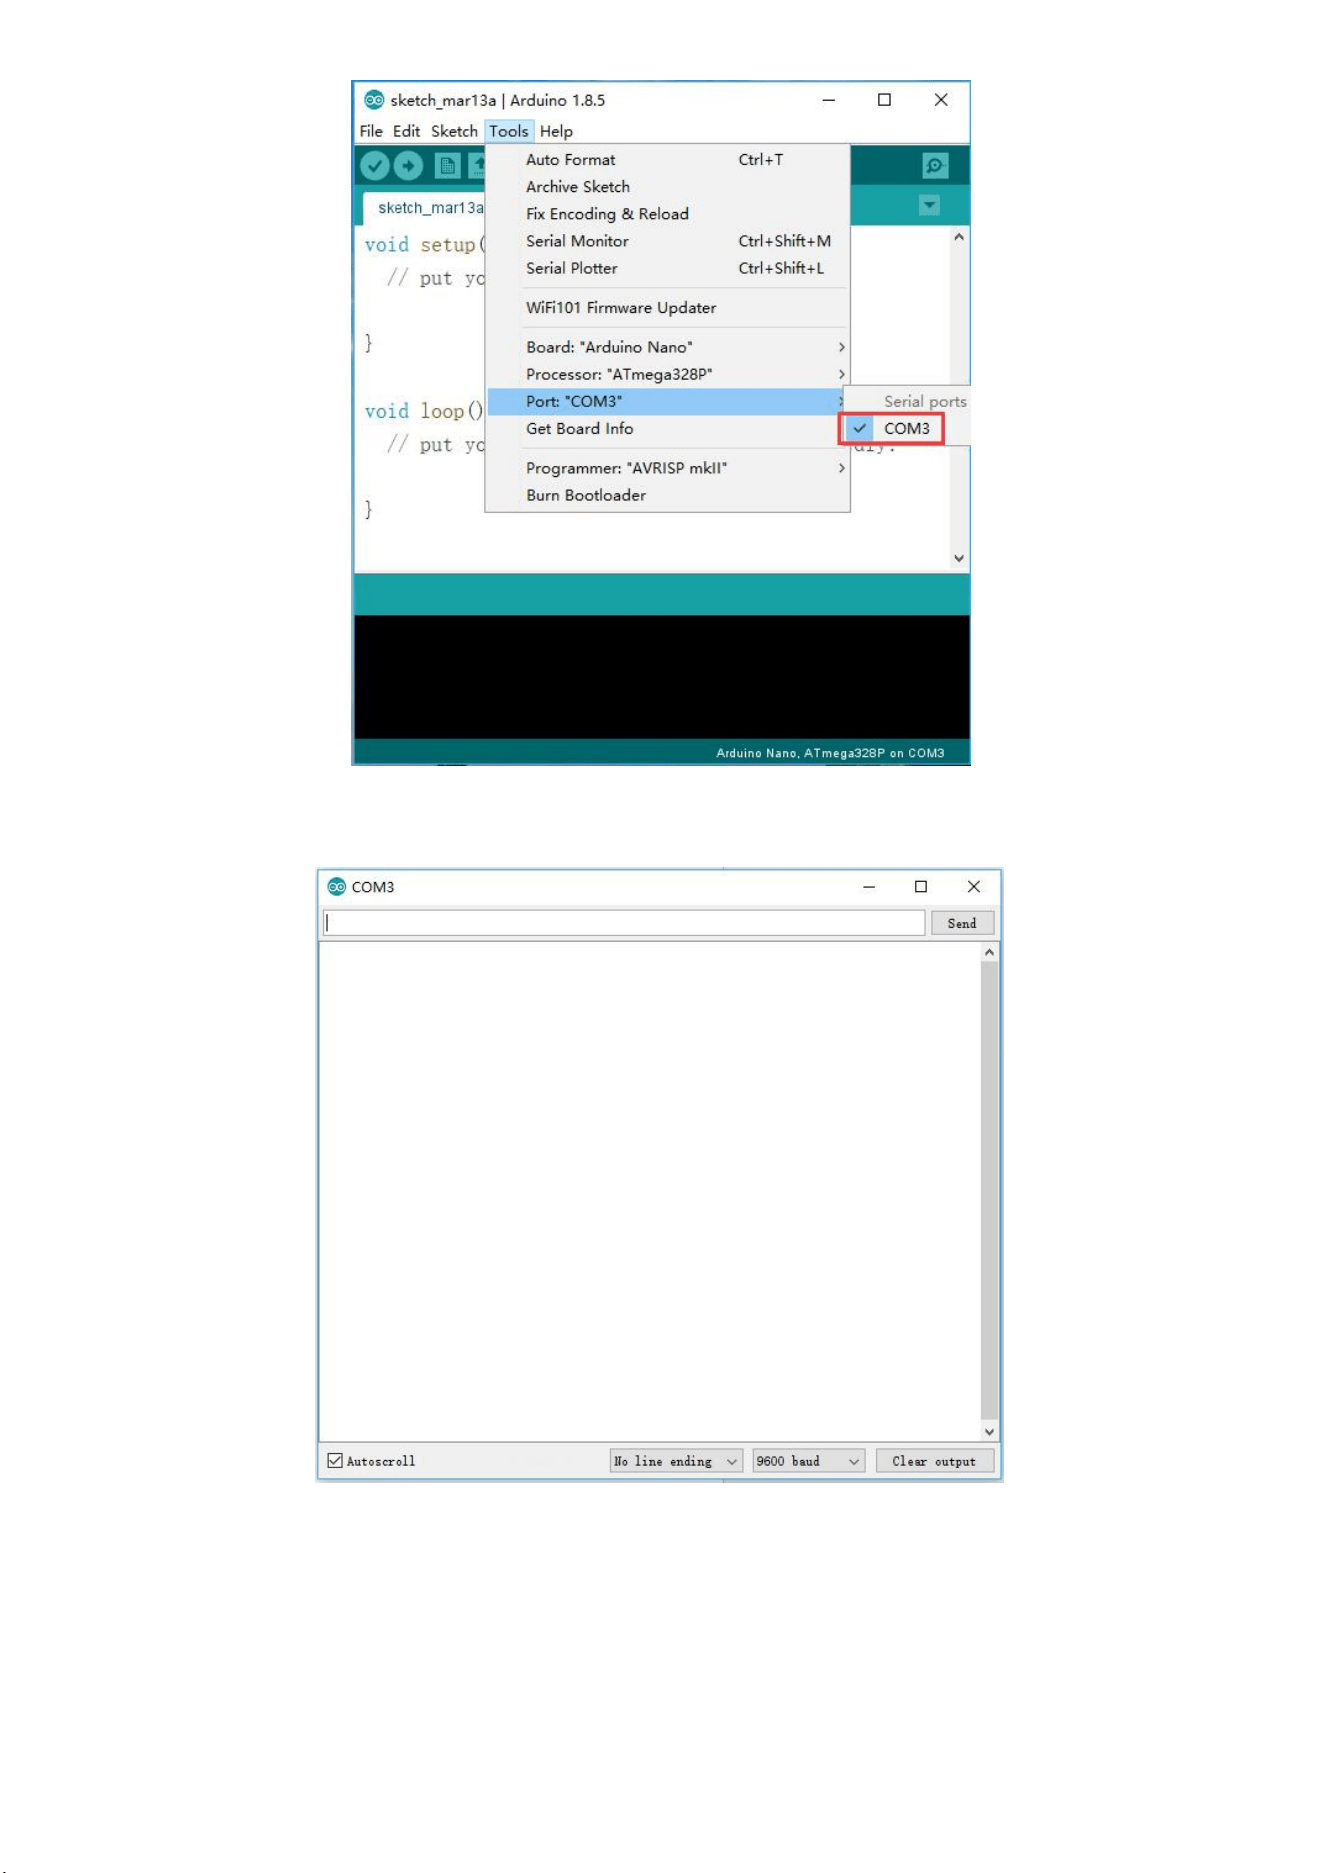
Selecting which port to open in the Serial Monitor is the same as selecting a port for uploading
Arduino code. Go to Tools -> Serial Port, and select the correct port.
Tips: Choose the same COM port that is shown in Device Manager.
21
Once open, you should see something like this:
22
Settings
The Serial Monitor has limited settings, but enough to handle most of your serial communication
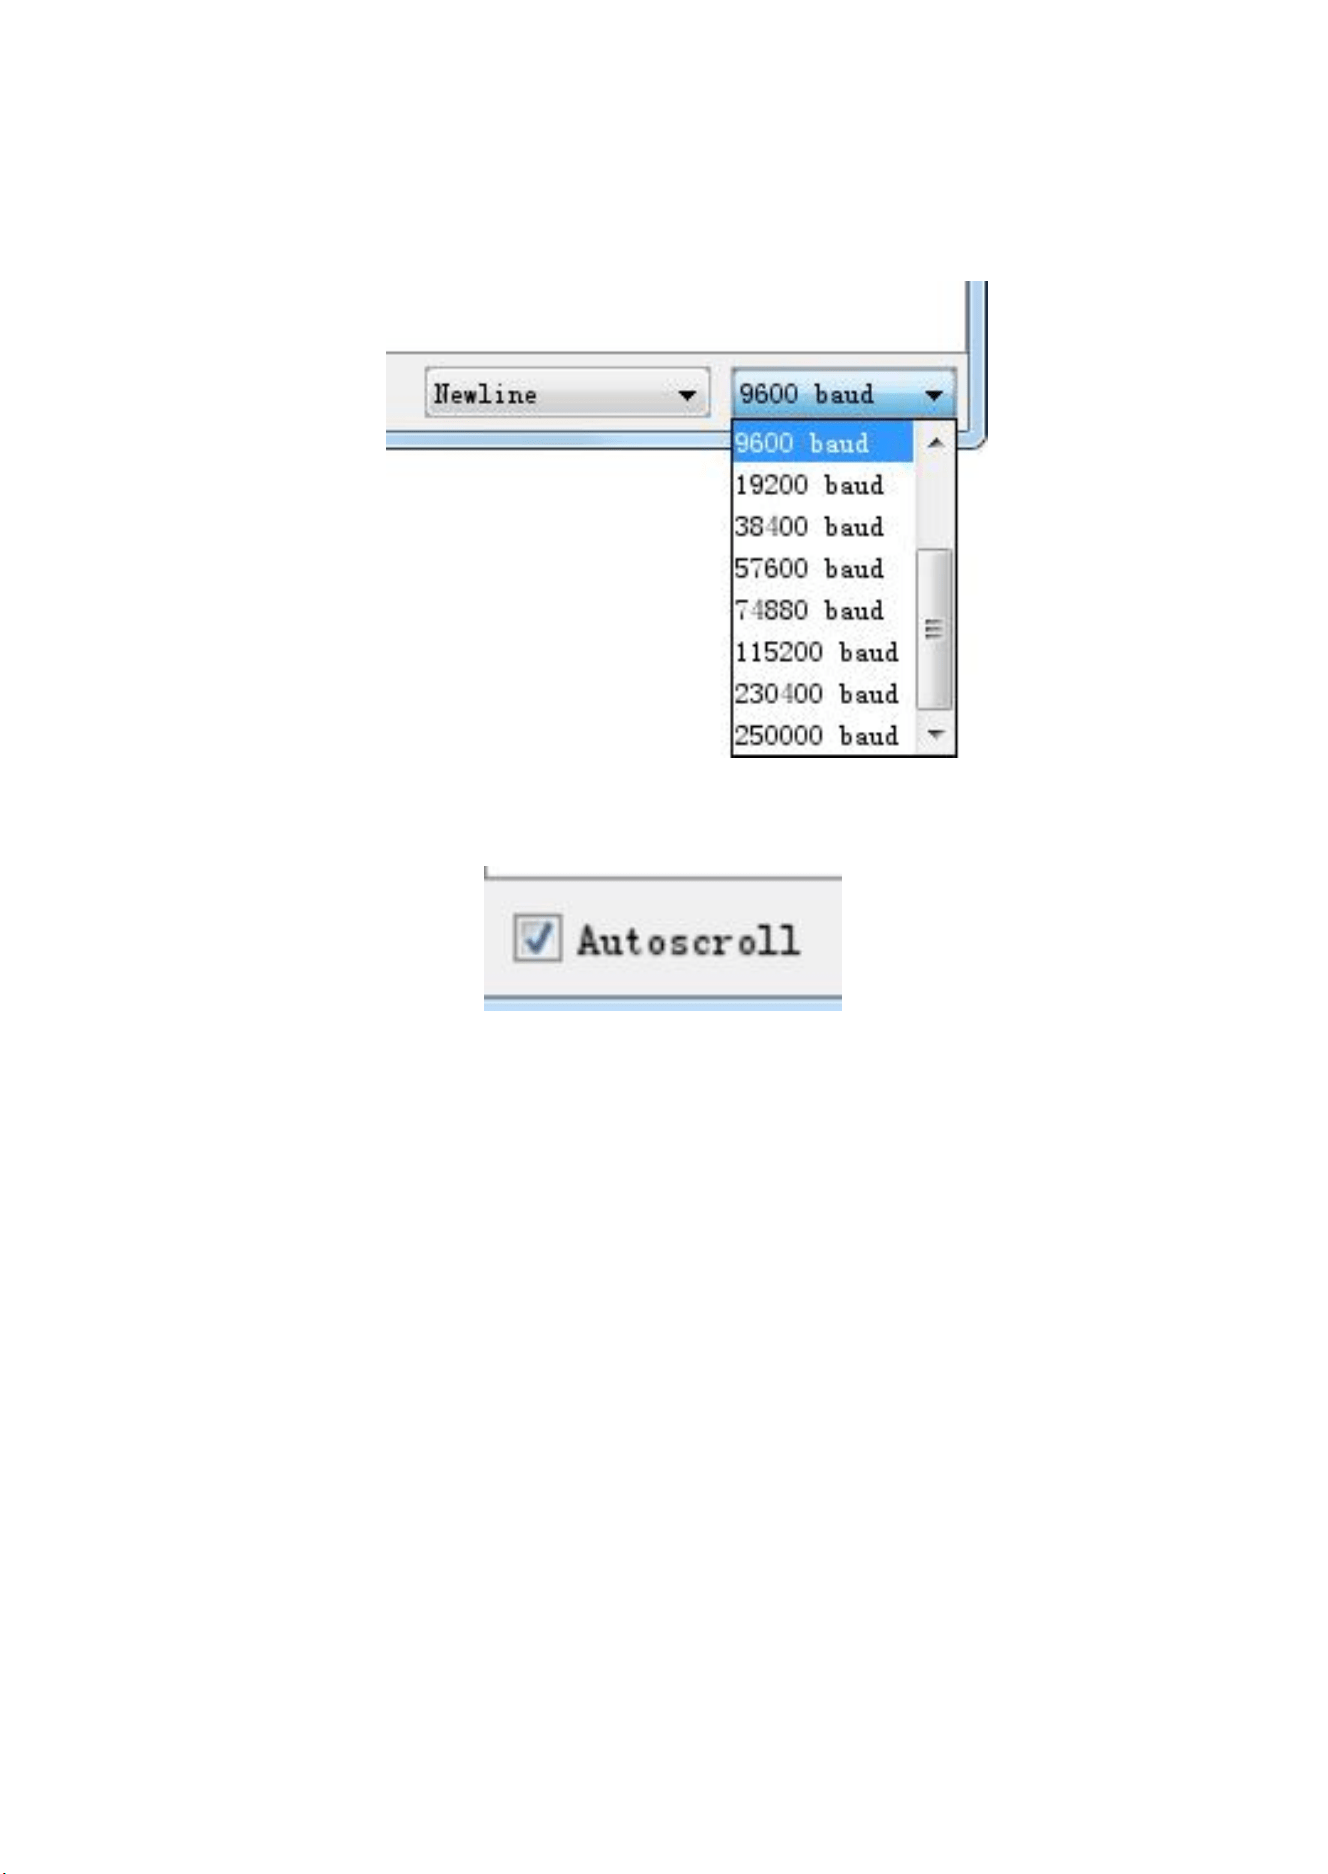
needs. The first setting you can alter is the baud rate. Click on the baud rate drop-down menu to select
the correct baud rate. (9600 baud)
Last, you can set the terminal to Auto scroll or not by checking the box in the bottom left corner.
Pros
The Serial Monitor is a great quick and easy way to establish a serial connection with your Arduino. If you’re
already working in the Arduino IDE, there’s really no need to open up a separate terminal to displaydata.
Cons
The lack of settings leaves much to be desired in the Serial Monitor. And for advanced serial
communications, it may not do the trick.
23
Lesson 3 Upload Code To The Nano Board
Overview
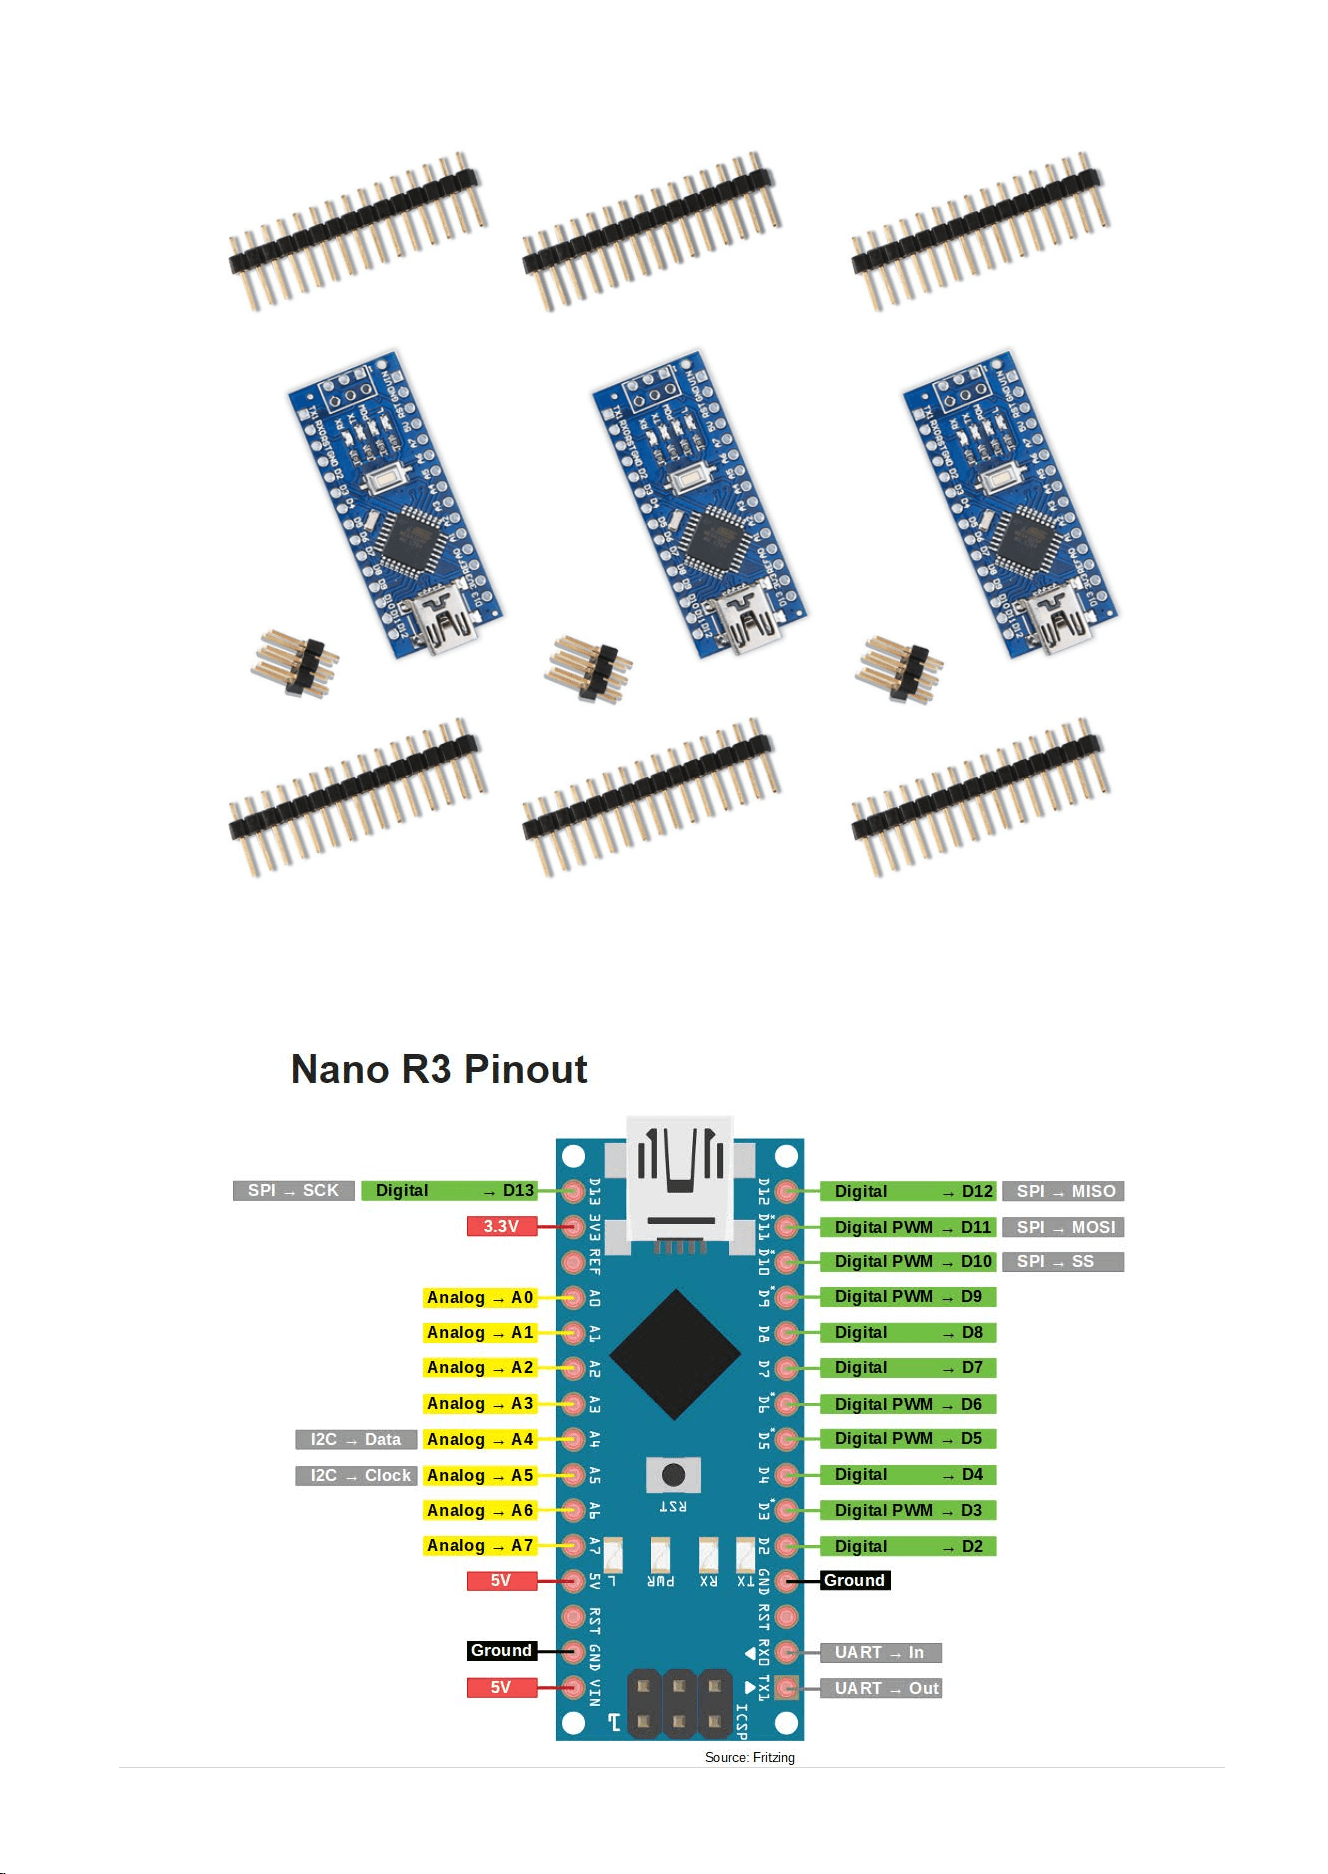
In this lesson, you will learn how to program your Nano R3 controller board to
blink the Arduino’s built-in LED, and how to download programs by basic
steps.
Component Required:
(1) x Elegoo Nano
Principle
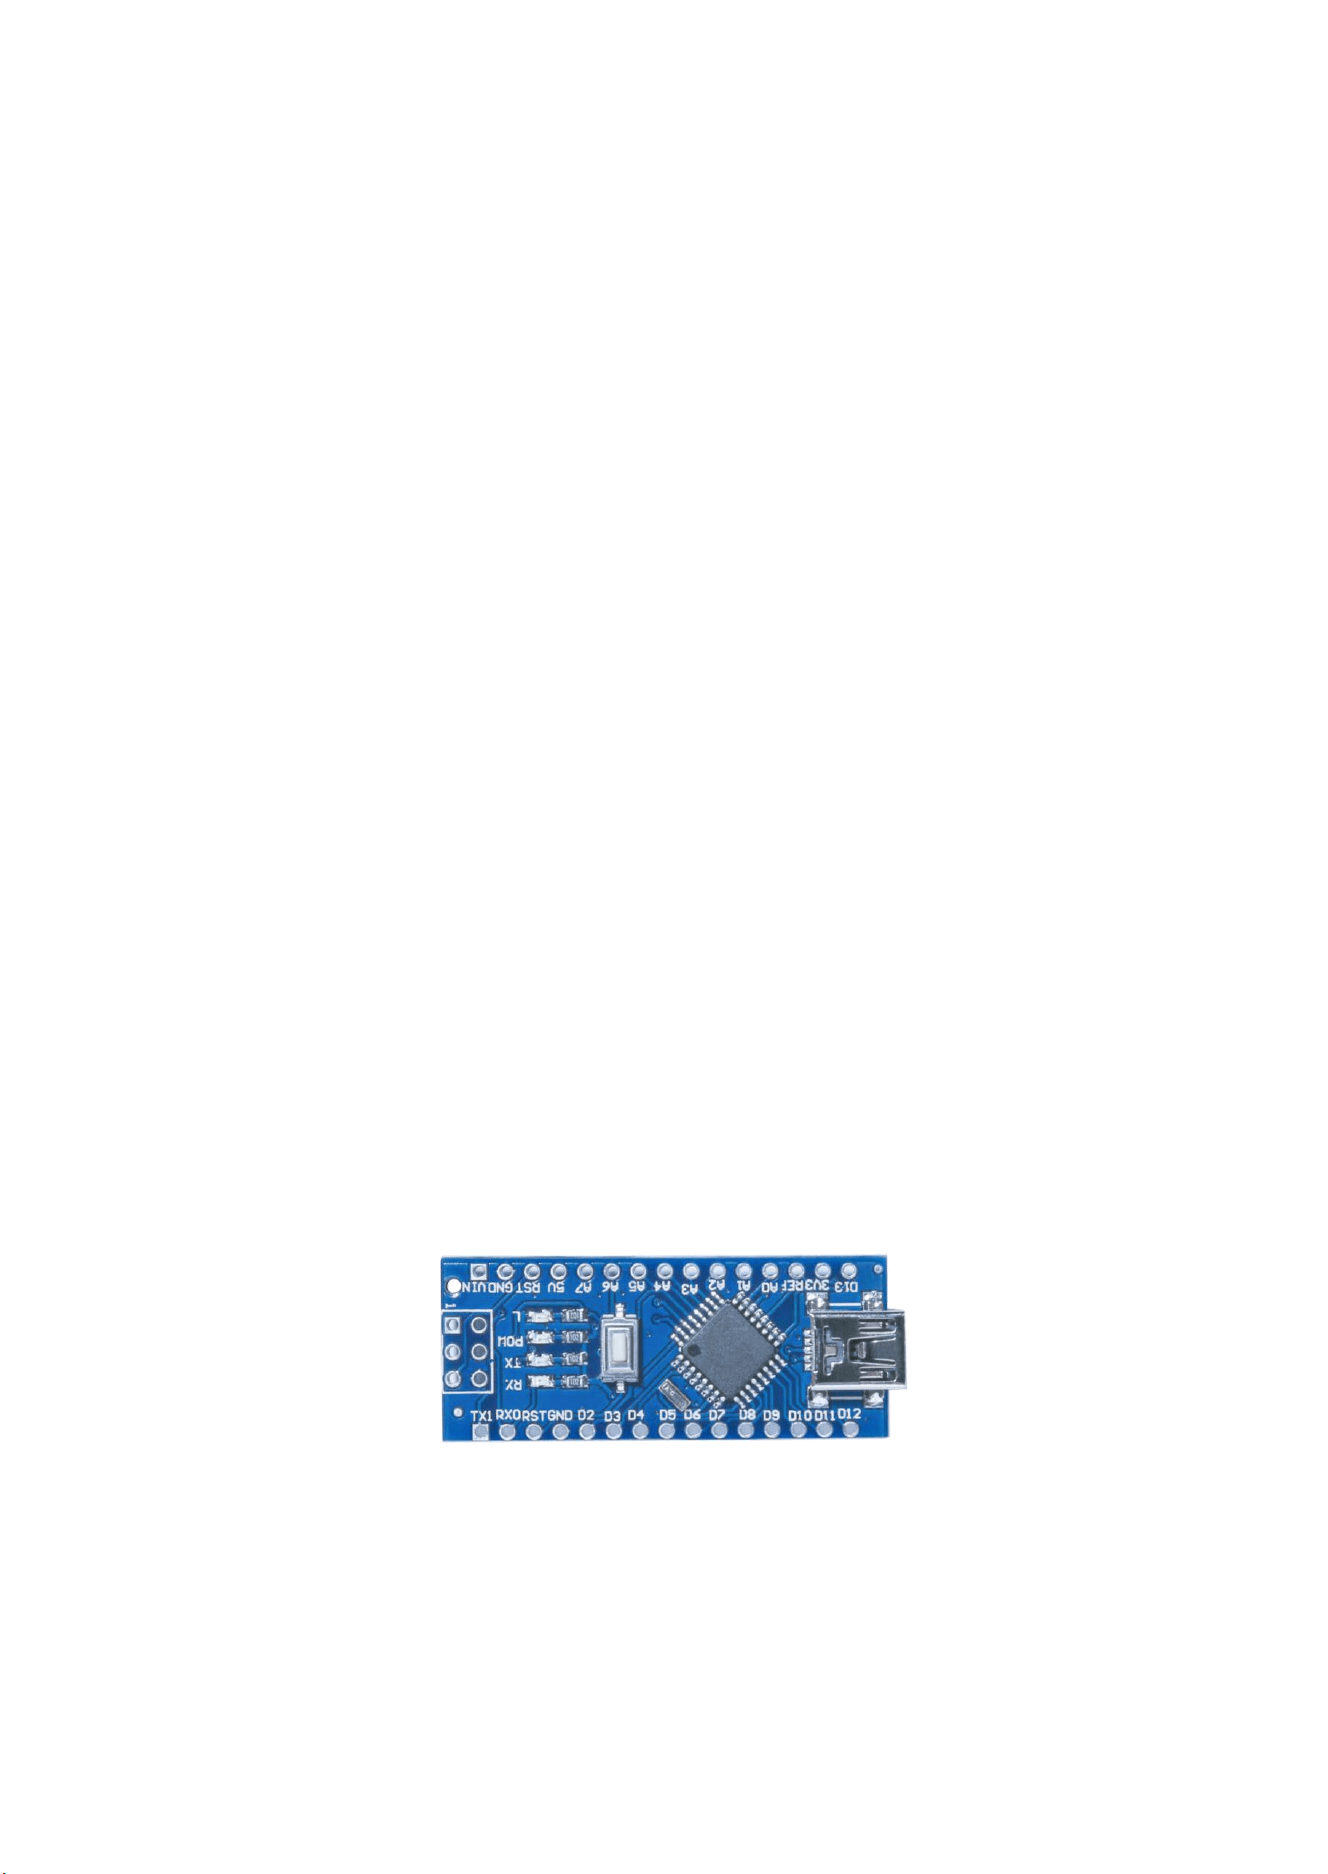
The Nano R3 board has rows of connectors along both sides that are used
to connect to several electronic devices and plug-in 'shields' that extends its
capability. It also has a single LED that you can controlfrom yoursketches. This
LED is built onto the Nano R3 board and is often referred to as the 'L' LED as
this is how it is labeled on the board.
24
You may find that your Nano R3 board's 'L' LED already blinks when you connect it to a USB plug.
This is because the boards are generally shipped with the 'Blink' sketch pre-installed.
In this lesson, we will reprogram the Nano R3 board with our own Blink sketch and then change
the rate at which itblinks.
In Lesson 0, you set up your Arduino IDE and made sure that you could find the right serial port
for it to connect to your Nano R3 board. The time has now come to put that connection to the
test and program your Nano R3 board.
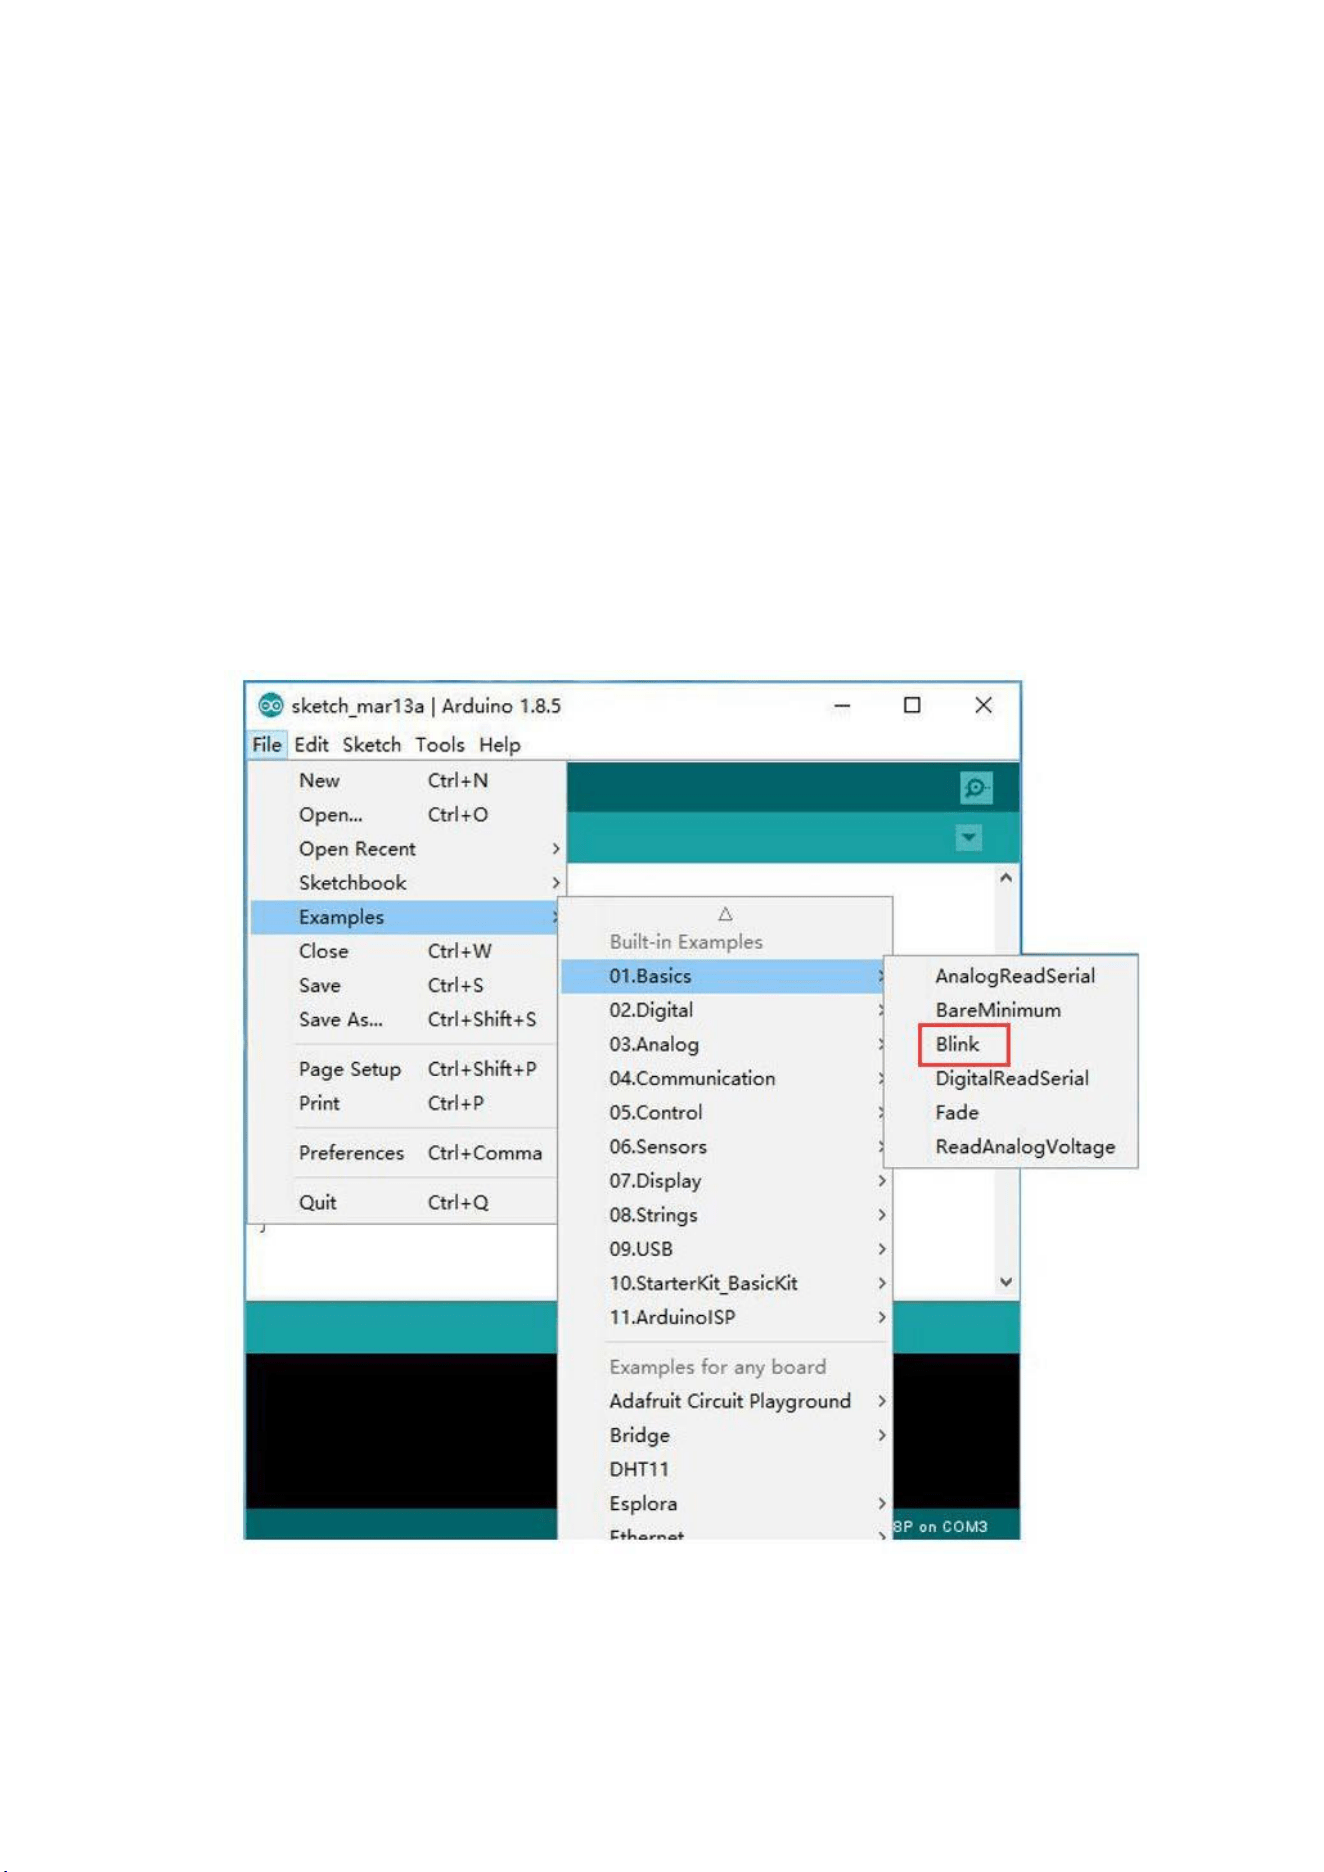
The Arduino IDE includes a large collection of example sketches that you can load up and use.
This includes an example sketch for making the 'L' LED blink.
Load the 'Blink' sketch that you will find in the IDE's menu system under File
> Examples > 01.Basics
25
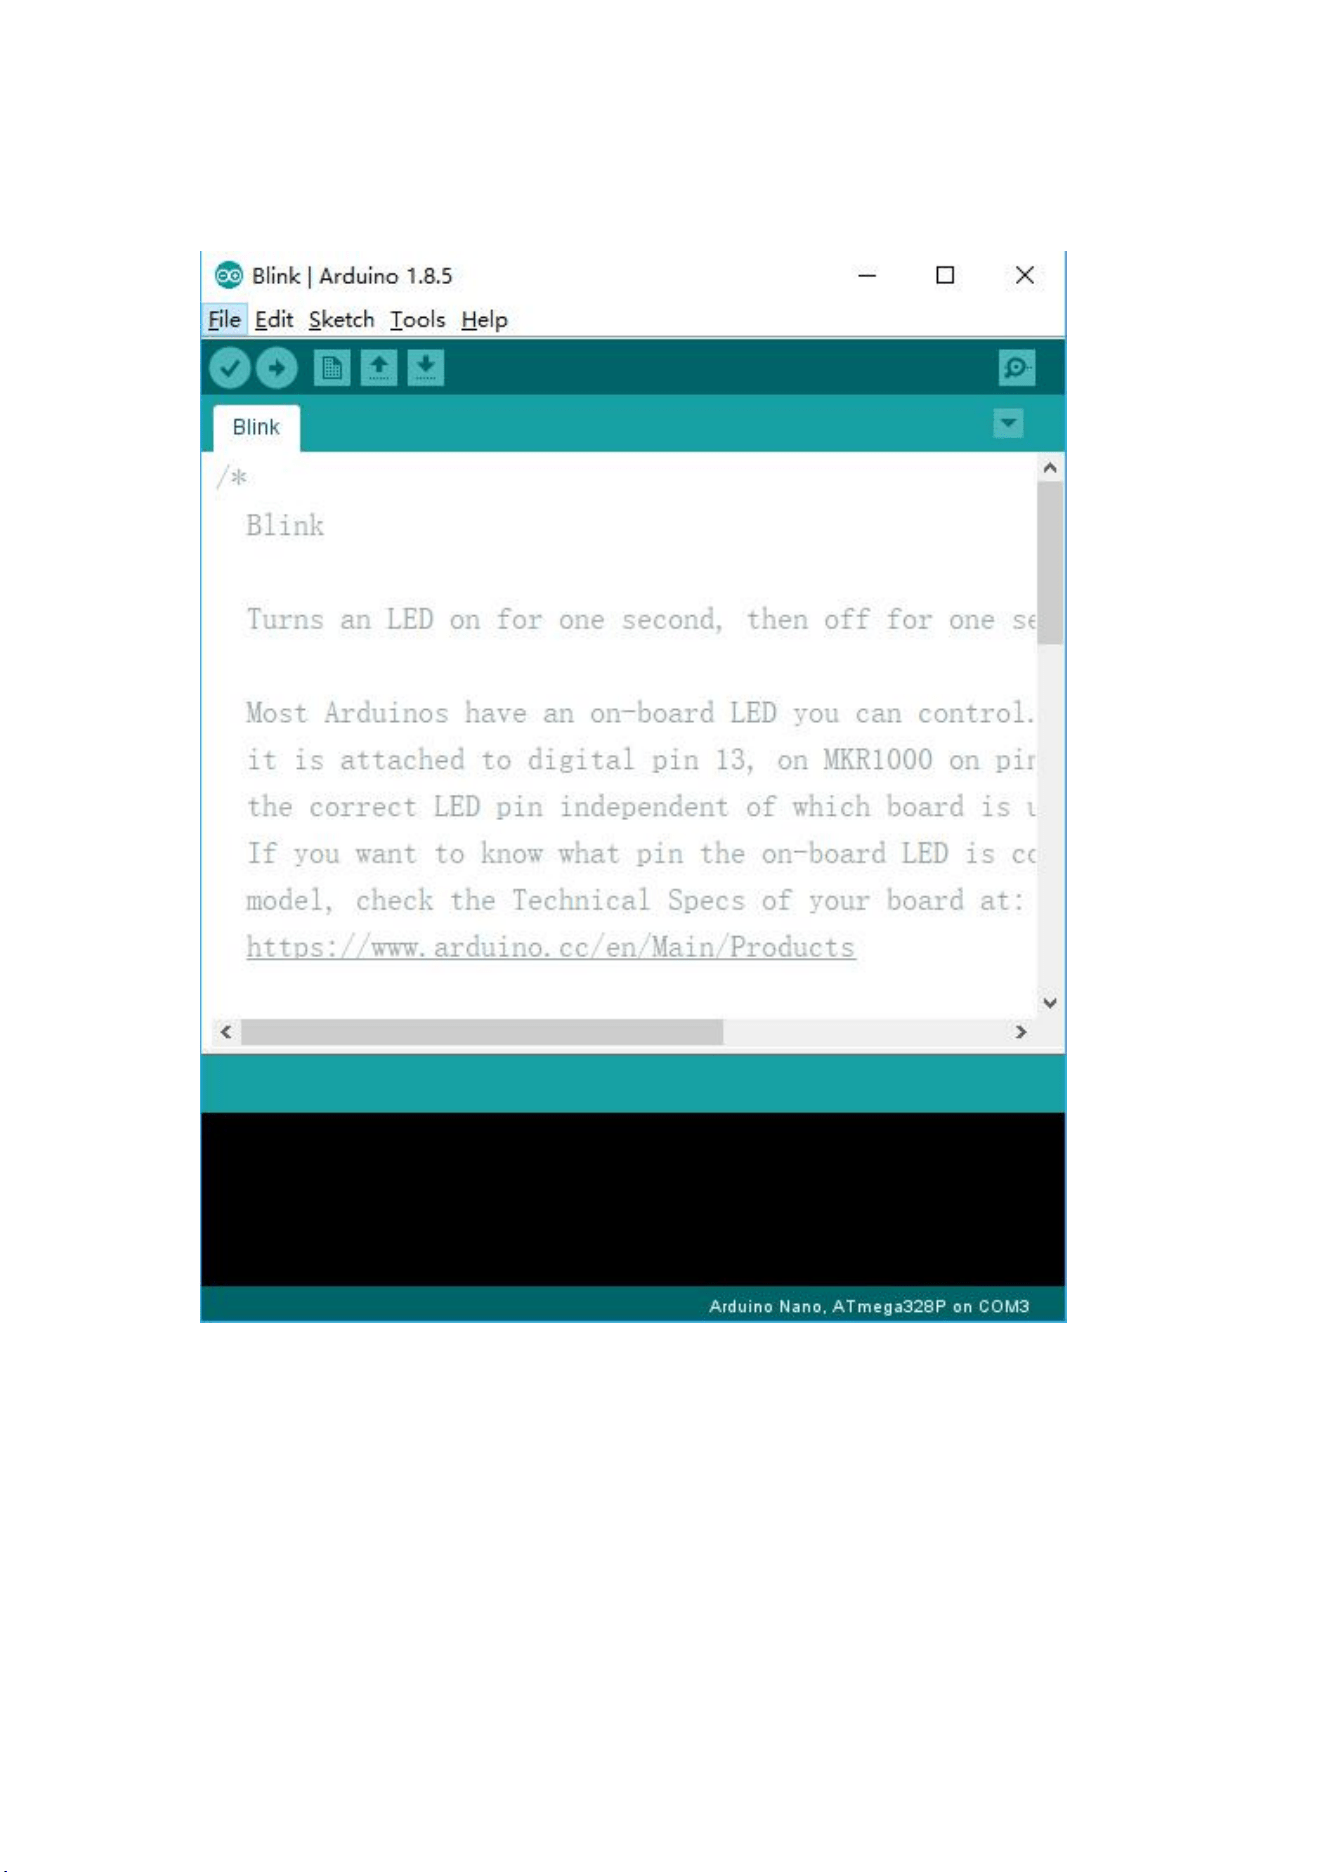
When the sketch window opens, enlarge it so that you can see the entire sketch in the window.
26
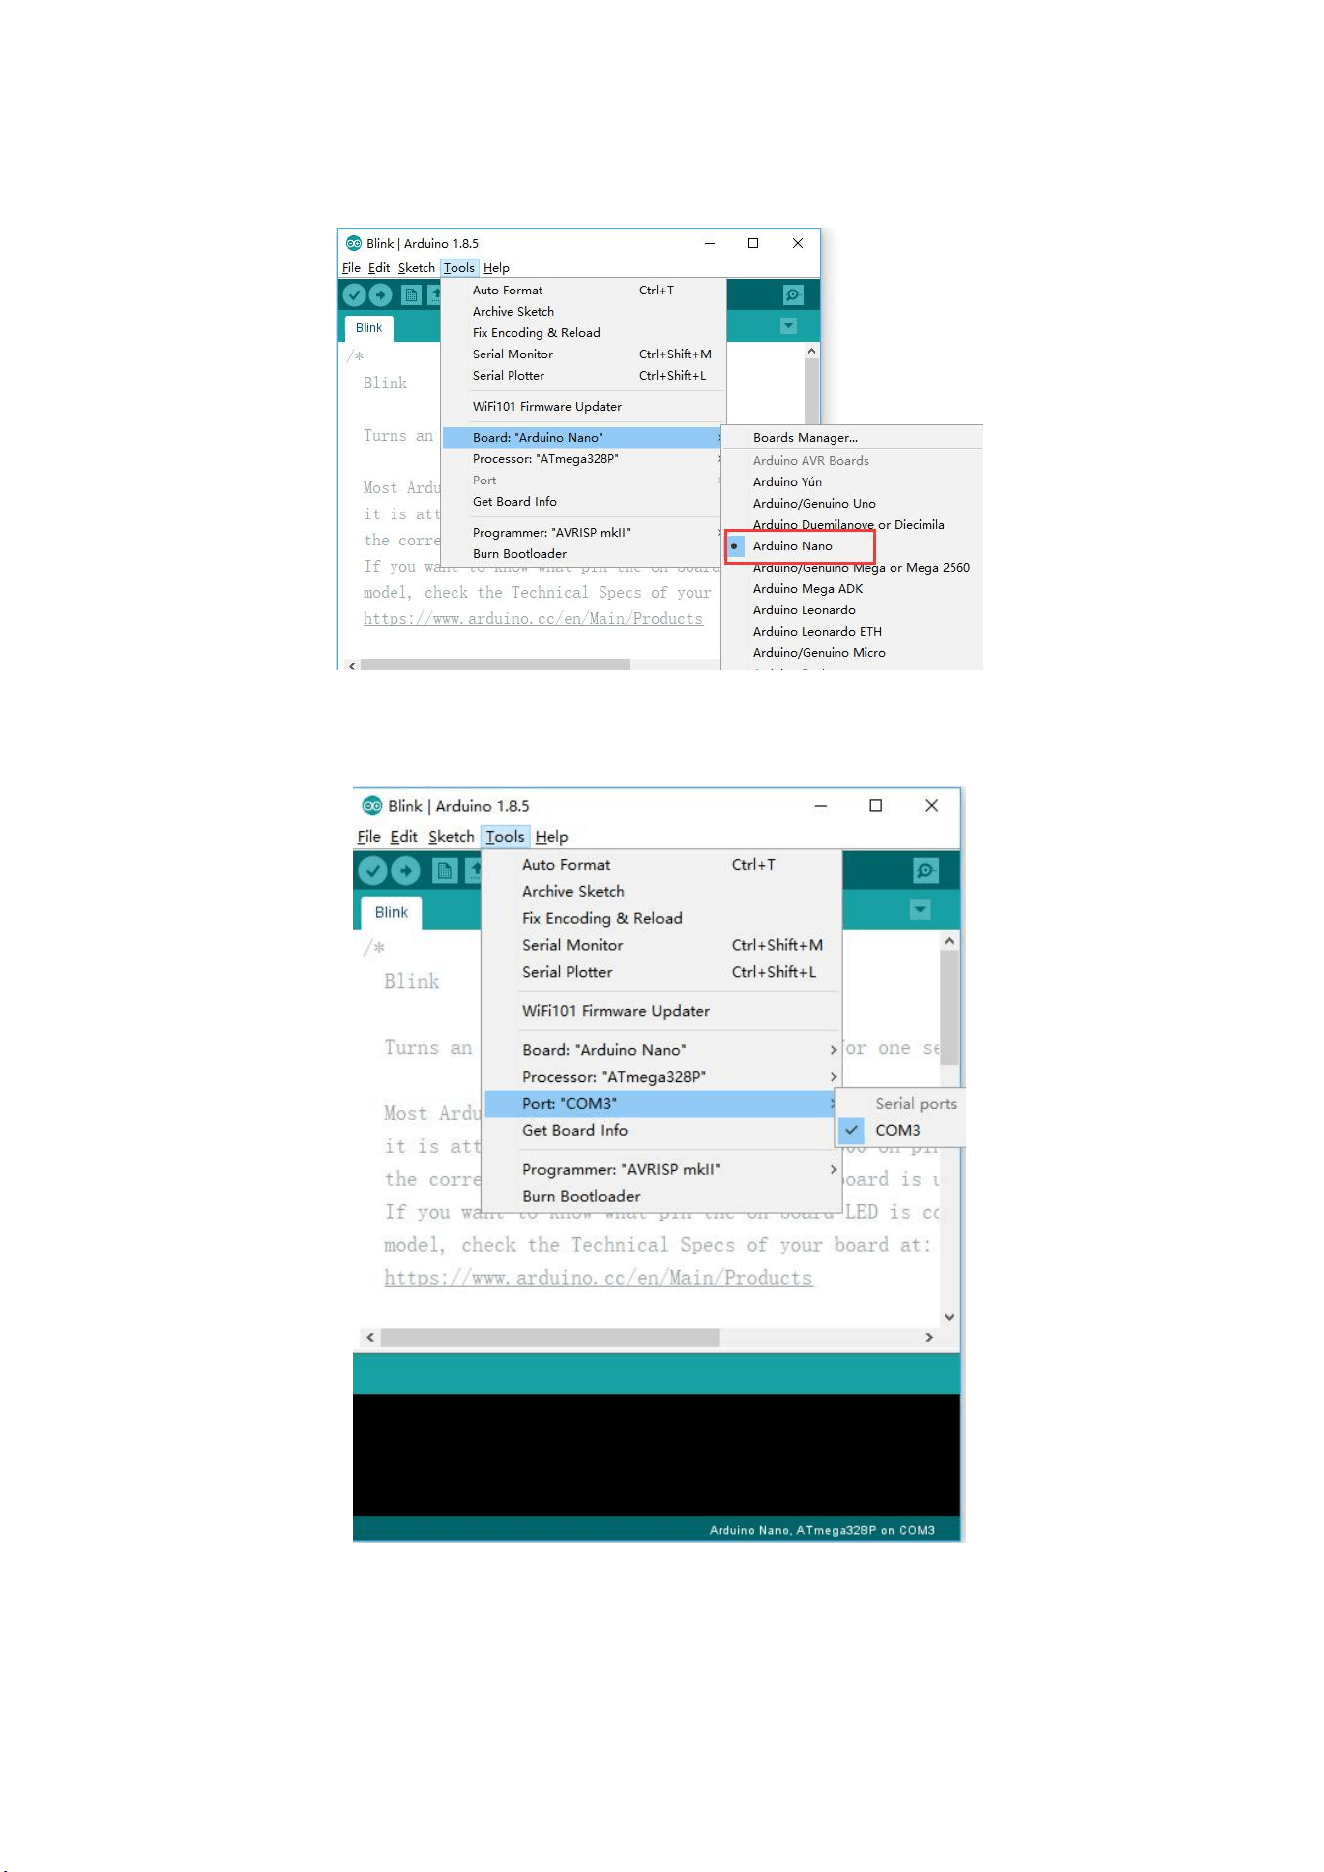
Attach your Arduino board to your computer with the USB cable and check that the 'Board Type'
and 'Serial Port' are set correctly.
27
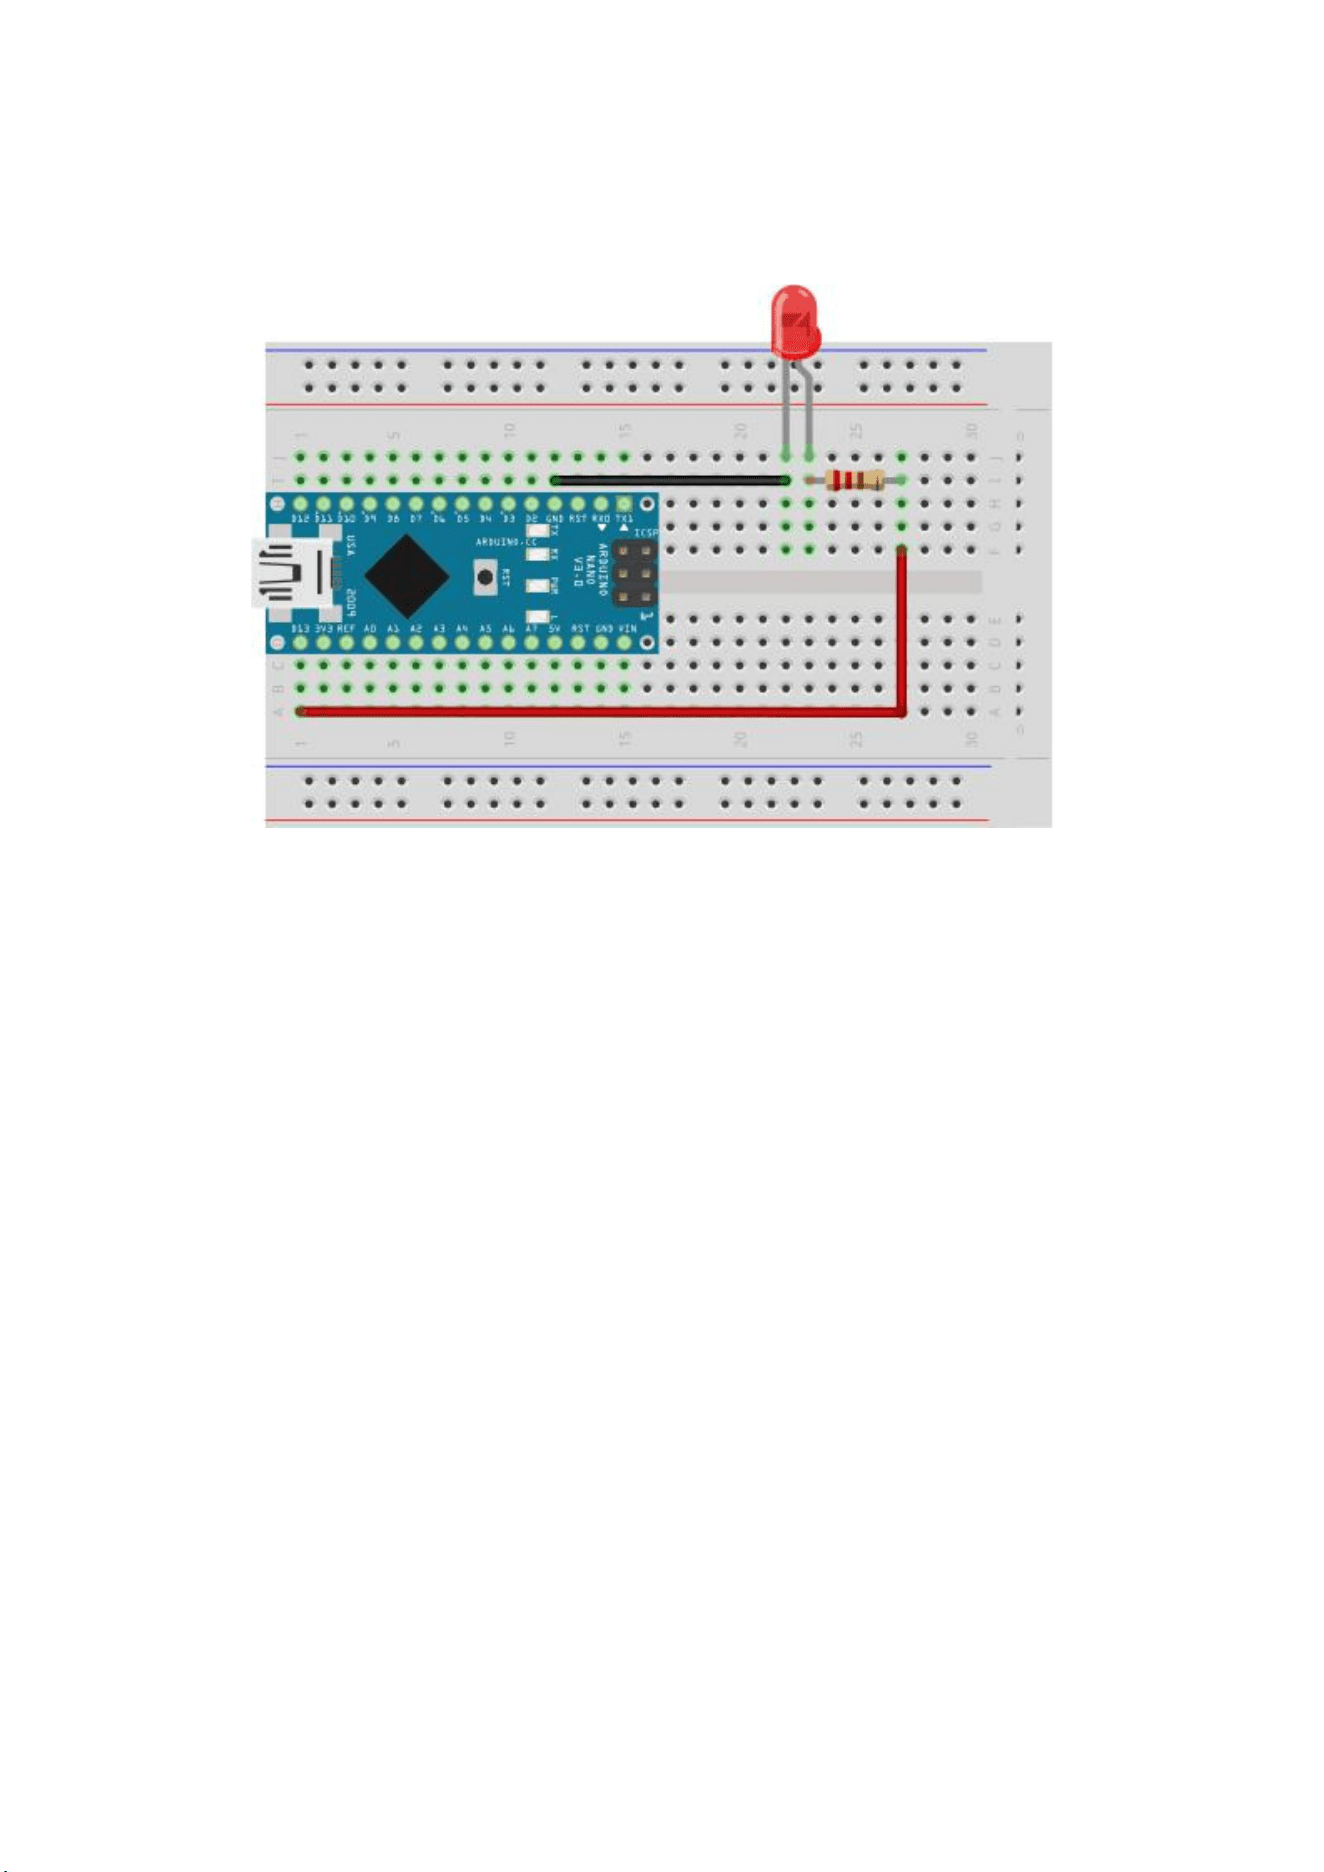
Wiring diagram
Code
void setup()
{
// initialize digital pin LED_BUILTIN as an output.
pinMode(LED_BUILTIN, OUTPUT);
}
// the loop function runs over and over again forever
void loop()
{
digitalWrite(LED_BUILTIN, HIGH); // turn the LED on (HIGH is the voltage level) delay(1000);
// wait for a second digitalWrite(LED_BUILTIN, LOW);
// turn the LED off by making the voltage LOW delay(1000);
// wait for a second
}