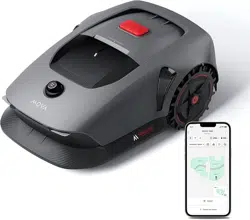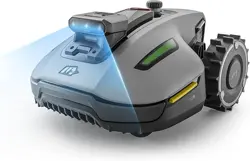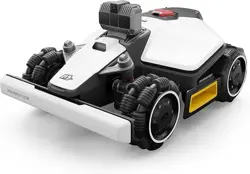

MOVA LiDAX Ultra
800/1000/1200/1600/2000
User Manual
The illustrations in this manual are for reference only.
Please refer to the actual product for accuracy.


EN
.........................................................................P04~P43
DE
.........................................................................P44~P83
FR
.......................................................................P84~P123
IT
.....................................................................P124~P163
ES
.....................................................................P164~P203
NL
.....................................................................P204~P243

EN
4
1 Safety Instructions ...................................................................................... P05
2 Product Introduction ...................................................................................P09
3 Installation ................................................................................................. P14
4 Preparation for First Use ..............................................................................P17
5 Map Your Garden ........................................................................................P22
6 Operation ...................................................................................................P28
7 MOVAhome App .........................................................................................P31
8 Maintenance ..............................................................................................P33
9 Battery ....................................................................................................... P37
10 Winter Storage .......................................................................................... P37
11 Transport ..................................................................................................P37
12 Troubleshooting ........................................................................................P38
13 Specications ........................................................................................... P42
Table of Contents
Original Instructions

EN
5
1.1 General Safety Instructions
1 Safety Instructions
• Carefully read and understand the user manual before using the product.
• Only use the equipment recommended by MOVA with the product. Any other usage is incorrect.
• Do not allow children to be in the vicinity or play with the machine when it is operating.
• Do not use the product in areas where people are unaware of its presence.
• When manually operating the product with the MOVAhome app, do not run. Always walk, watch your steps on
slopes, and maintain balance at all times.
• Avoid using the product when there are people, especially children or animals, in the work area.
• If operating the product in public areas, place warning signs around the work area with the following text:
"Warning! Automatic lawn mower! Keep away from the machine! Supervise children!"
• Wear sturdy footwear and long trousers when operating the product.
• To prevent damage to the product and accidents involving vehicles and individuals, do not set work areas or
transport paths across public pathways.
• Do not touch moving hazardous parts, such as the blade disc, before it has come to a complete stop.
• Seek medical aid in case of injury or accident.
• Set the product OFF before clearing blockages, performing maintenance, or examining the product. If the
product vibrates abnormally, inspect it for damage before restarting. Do not use the product if any parts are
defective.
• Do not install the main cable in areas where the product will cut. Follow the instructions provided for cable
installation.
• Only use the charging station included in the package to charge the product. Incorrect use may result in
electric shock, overheating, or corrosive liquid leakage from the battery. In case of electrolyte leakage, ush
with water/neutralizing agent and seek medical aid if the corrosive liquid comes into contact with your eyes.
• When connecting the main cable to the power outlet, use a residual-current device (RCD) with a maximum
tripping current of 30 mA.
• Only use original batteries recommended by MOVA. The safety of the product cannot be guaranteed with
non-original batteries. Do not use non-rechargeable batteries.
• Keep extension cords away from moving hazardous parts to avoid damage to the cords which can lead to
contact with live parts.
• The illustrations used in this document are for reference only. Please refer to the actual products.
• Never allow children, persons with reduced physical, sensory or mental capabilities or lack of experience and
knowledge or people unfamiliar with these instructions to use the machine, local regulations may restrict the
age of the operator.
• Do not connect or touch a damaged cable until it is disconnected from the power outlet. If the cable becomes
damaged during operation, disconnect the plug from the power outlet. A worn or damaged cable increases
the risk of electrical shock and should be replaced by service personnel.
• Do not push the product forcefully or quickly, as this may damage the product.
• To maintain compliance with the RF exposure requirement, a separation distance of 35 cm between the
device and the human should be maintained.
• For the purposes of recharging the battery, only use the detachable supply unit provided with this appliance.
• Avoid installing the charging station in areas where people may trip over it.
• Do not install the charging station in areas where there is a risk of standing water.
• Do not install the charging station, including any accessories, within 60 cm of any combustible material.
Malfunctioning or overheating of the charging station and power supply can pose a re hazard.
1.2 Safety Instructions for Installation

EN
6
• Keep your hands and feet away from the rotating blades. Do not place your hands or feet near or below the
product when it is turned on.
• Do not lift or move the product when it is turned on.
• Park the robot at the charging station or set it OFF when there are people, especially children or animals, in
the work area.
• Ensure that there are no objects such as stones, branches, tools, or toys on the lawn. Otherwise, the blades
may be damaged when they come into contact with an object.
• Do not put objects on top of the product or charging station.
• Do not use the product if the STOP button is not functioning.
• Avoid collisions between the product and people or animals. If a person or animal comes in the path of the
product, stop it immediately.
• Always set the product OFF when it is not in operation.
• Do not use the product simultaneously with a pop-up sprinkler. Utilize the Schedule function to ensure that the
product and pop-up sprinkler do not operate at the same time.
• Avoid placing a connection channel where pop-up sprinklers are installed.
• Do not operate the product in the presence of standing water in the work area, such as during heavy rain or
water pooling.
• Set the product OFF when performing maintenance.
• After washing, ensure that the product is placed on the ground in its normal orientation, not upside down.
• Do not reverse the product to clean the chassis. If you do reverse it for cleaning purposes, make sure to restore
it to its proper orientation afterward. This precaution is necessary to prevent water from entering the motor
and potentially aecting normal operation.
• Disconnect the plug from the charging station or operate the disabling device before cleaning or performing
maintenance on the charging station.
• Do not use a high-pressure washer or solvents to clean the product.
Lithium-ion batteries can explode or cause a re if disassembled, short-circuited, exposed to water, re, or high
temperatures. Handle them with care, do not dismantle or open the battery, and avoid any form of electrical/
mechanical abuse. Store them away from direct sunlight.
• Only use the battery charger and power supply provided by the Manufacturer. The use of an inappropriate
charger and power supply can cause electric shocks and/or overheating.
• DO NOT ATTEMPT TO REPAIR OR MODIFY BATTERIES! Repair attempts may result in severe personal injury, due
to explosion or electrical shock. If a leak develops, released electrolytes are corrosive and toxic.
• This appliance contains batteries that can only be replaced by skilled persons.
To avoid injuries, wear protective gloves when replacing the blades.
1.3 Safety Instructions for Operation
1.4 Safety Instructions for Maintenance
1.5 Battery Safety
1.6 Residual Risks
EN
7
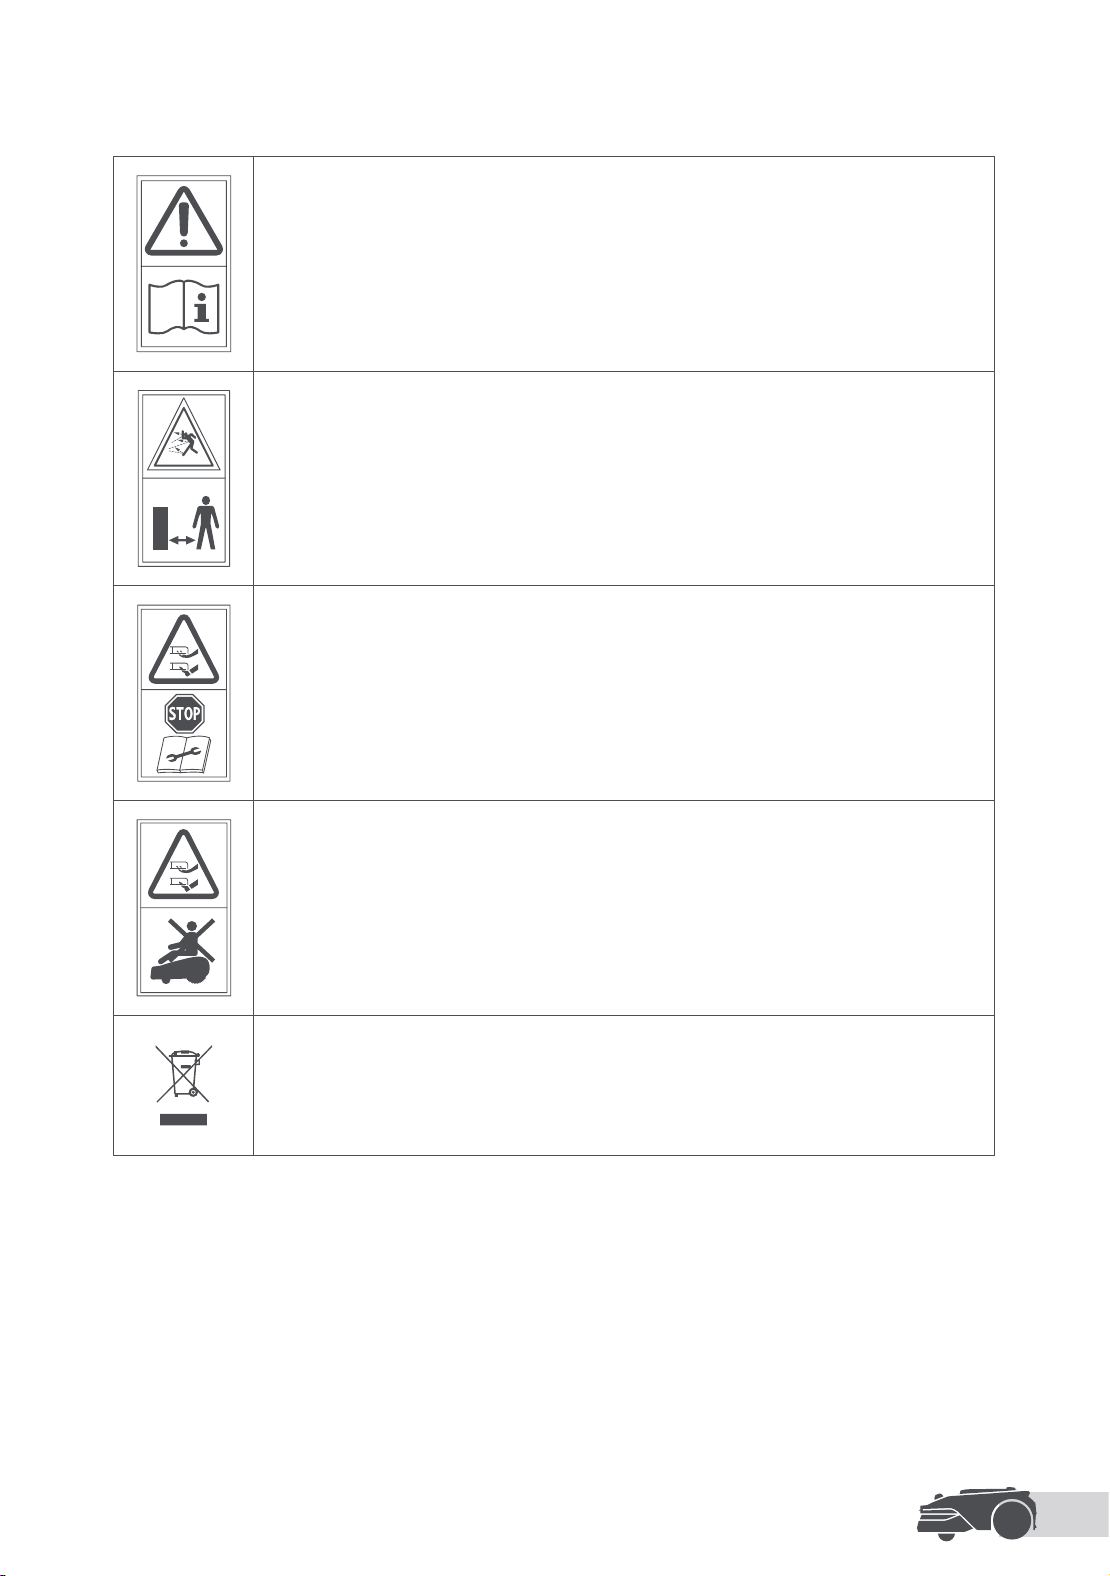
1.7 Symbols and Decals
WARNING –
Read user instructions before operating the machine.
WARNING –
Keep a safe distance from the machine when operating.
WARNING –
Operate the disabling device before working on or lifting the
machine.
WARNING –
Do not ride on the machine.
WARNING –
It is not permitted to dispose of this product as normal household
waste. Ensure that the product is recycled in accordance with local
legal requirements.
EN
8
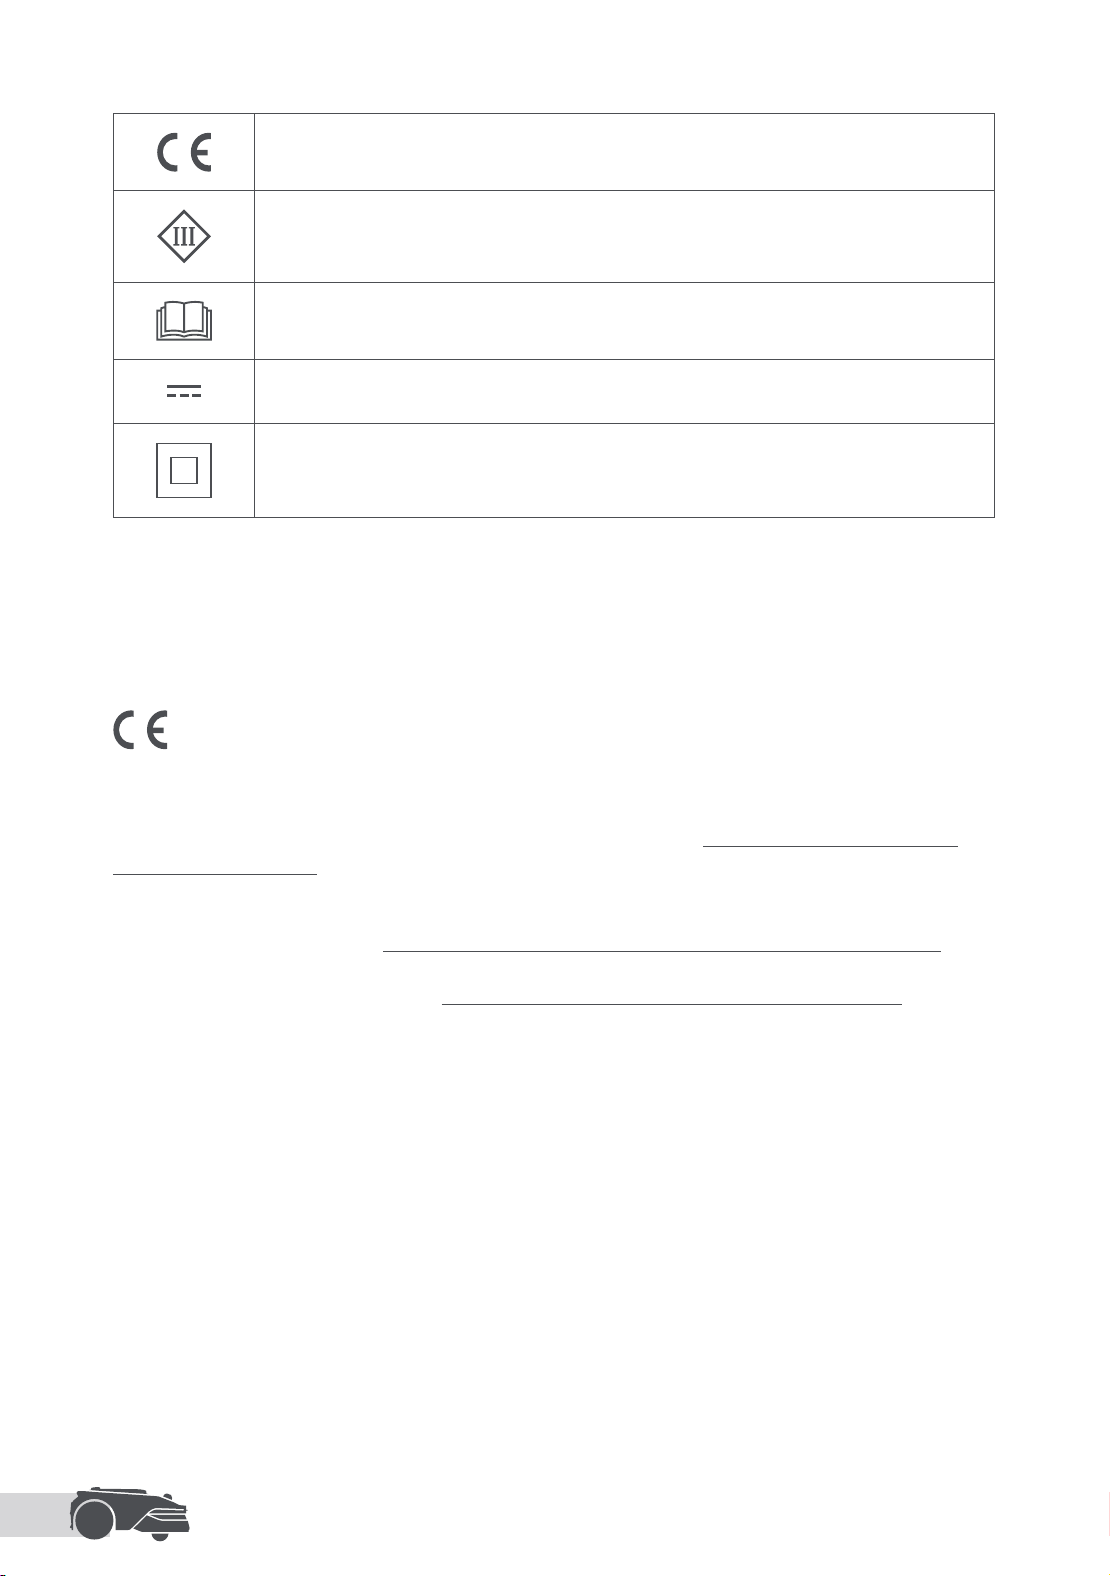
This product conforms to the applicable EC Directives.
Class Ⅲ
Before charging, read the instructions.
Direct current
Class Ⅱ
Hereby, Kutting Technology (Suzhou) Co., Ltd. declares that the radio equipment model MXXM2100/MXXM3100/
MXXM4100/MXXM5100/MXXM6100 Lawnmower is in compliance with Directive 2014/53/EU. The full text of the
EU declaration of conformity is available at the following internet address: https://www.mova.tech/pages/
declaration-of-conformity.
INTENDED USE
The garden product is intended for domestic lawn mowing. It is designed to mow often, maintaining a
healthier and better-looking lawn than ever before. Depending on the size of your lawn, your mower may be
programmed to operate at any time or frequency. It is impossible for digging, sweeping, or snow cleaning.
The product is in compliance with UK PSTI regulations; the full text of the declaration of conformity is available
at the following internet address: https://www.mova.tech/pages/statement-of-compliance-for-uk-psti.
For the detailed e-manual, please go to https://www.mova.tech/pages/user-manuals-and-faqs.
EN
9
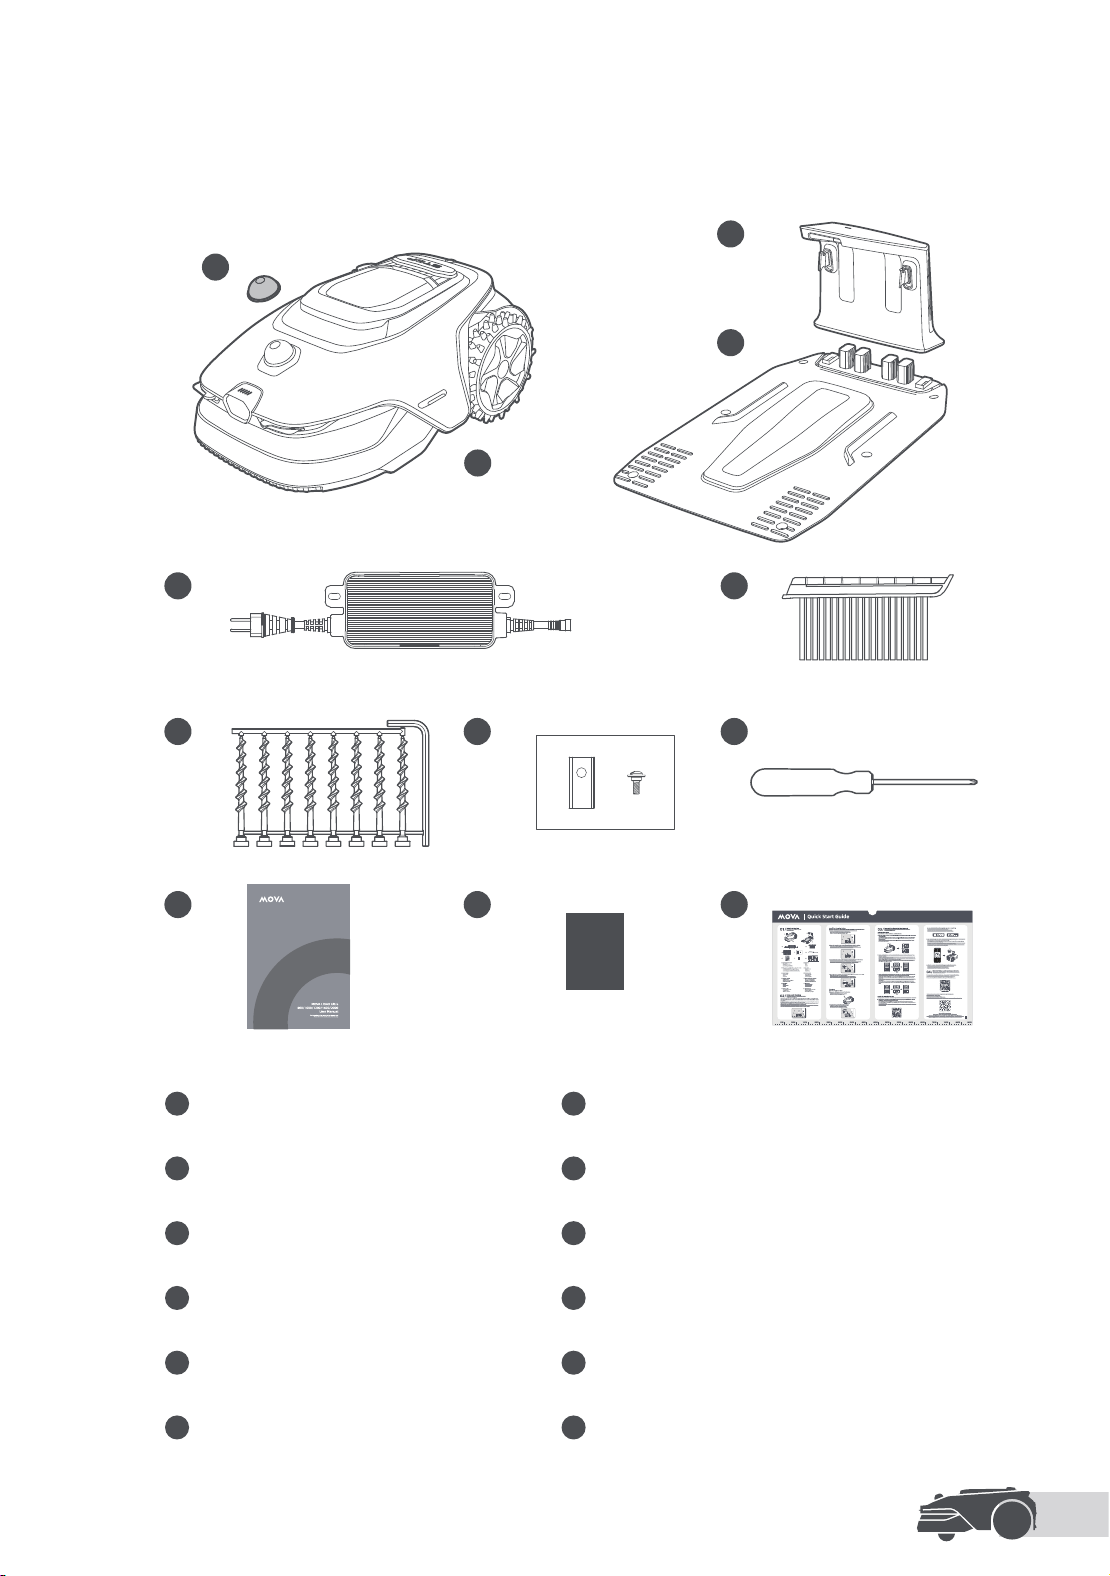
2 Product Introduction
11 Lint-free cloth 12 Quick start guide
1
LiDAR protective cover
2 The robot
3
Charging tower
(with a 10 m extension cable)
4 Baseplate
5 Power supply 6 Cleaning brush
7 Screws × 8, Hex key
8
Spare blades and screws × 9
9 Screwdriver 10 User manual
1
2
3
4
5 6
8 97
10
11
12
2.1 What's in the Box
EN
10
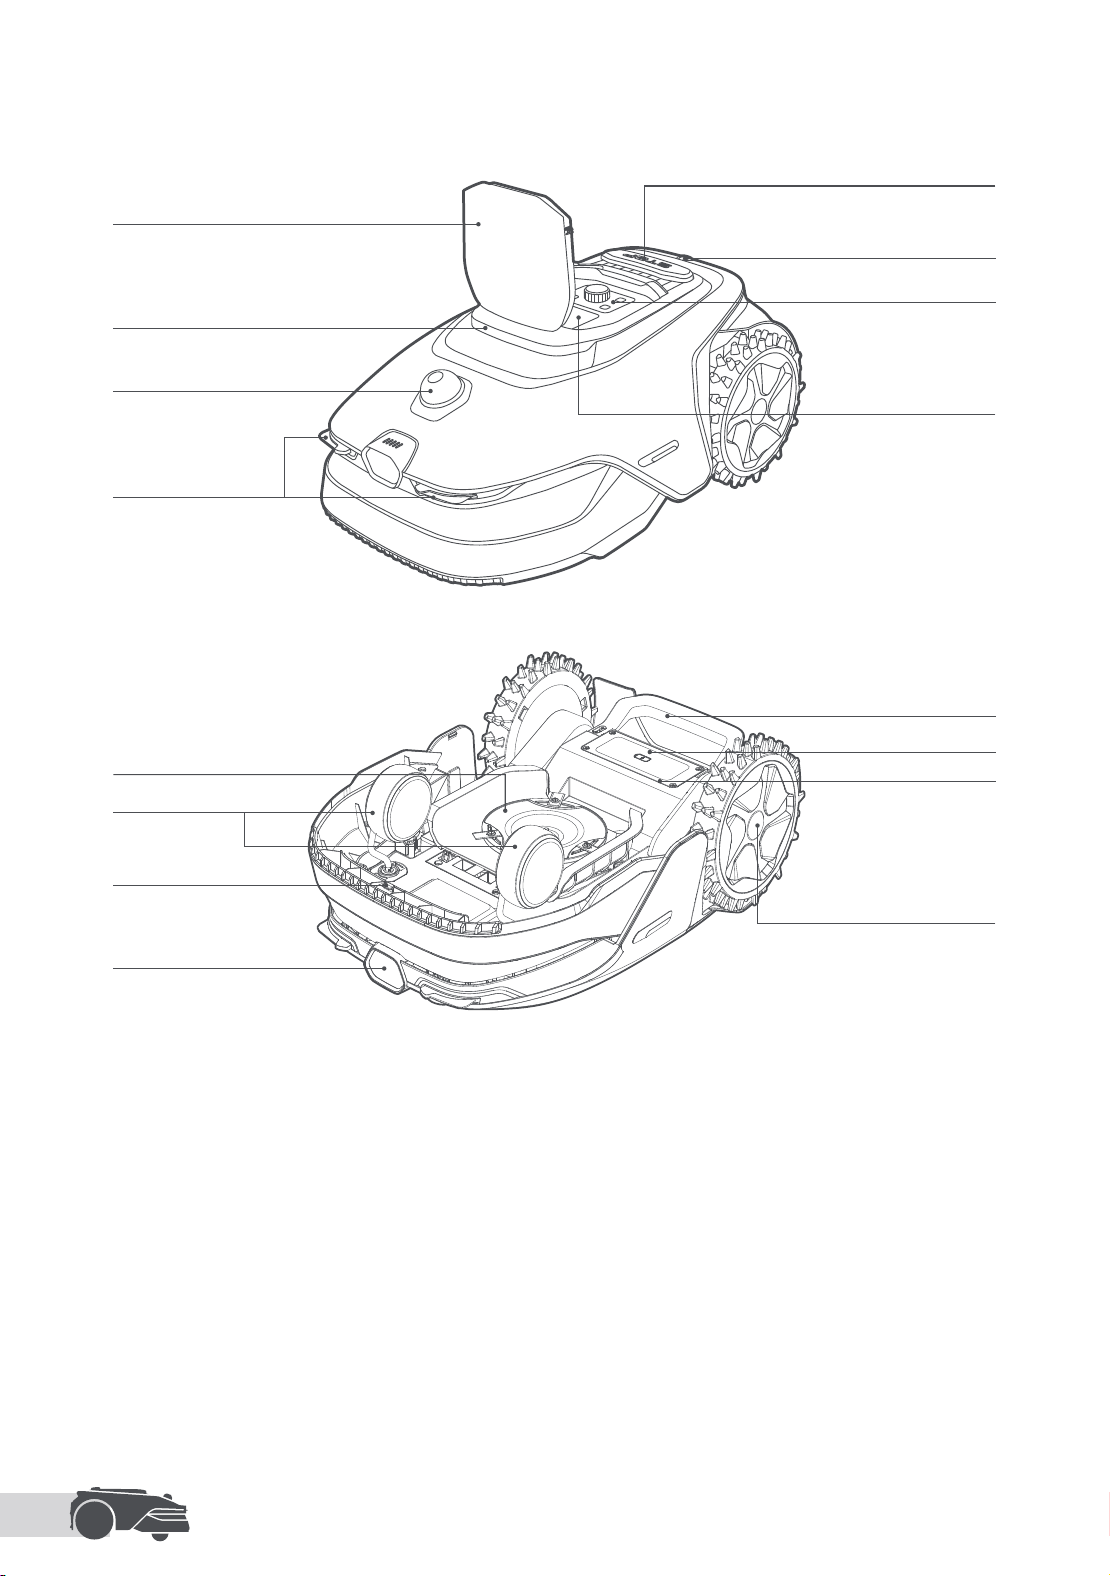
Charging contacts
Battery compartment
Link module ⁴
Handle
UltraTrim ™ blade disc
Front wheel
Airtag compartment
Front camera³
Status light²
Drive wheel
LiDAR¹
Top cover
Rain sensor
Display
Knob
Stop button
2.2 Product Overview
1: The LiDAR helps obtain environmental information and facilitates the robot's positioning, obstacle
avoidance and sensing of water and dirt. The detection range (at 100 klx) is 40 m at 10% reectivity and 70
m at 80% reectivity. The eld of view is 360° .
2: Only the LiDAX Ultra 1200/1600/2000 model is equipped with the status light.
3: The front camera detects obstacles, lawn boundaries, and human presence. The angle of view is 89°
(horizontal), 58° (vertical), 97° (diagonal). The resolution is 2 MP.
4:Only the LiDAX Ultra 1600/2000 model is equipped with the link module.
EN
11
2.3 Introduction to Link Module
Status Light
The Link Module oers 4G cellular network connectivity and GPS service.
• The 4G network connectivity allows you to remotely monitor your robot's status and initiate mowing tasks
without a Wi-Fi connection.
• The built-in GPS allows you to track the robot’s real-time location in Google Maps via the app and receive
notications if it moves outside the designated map area.
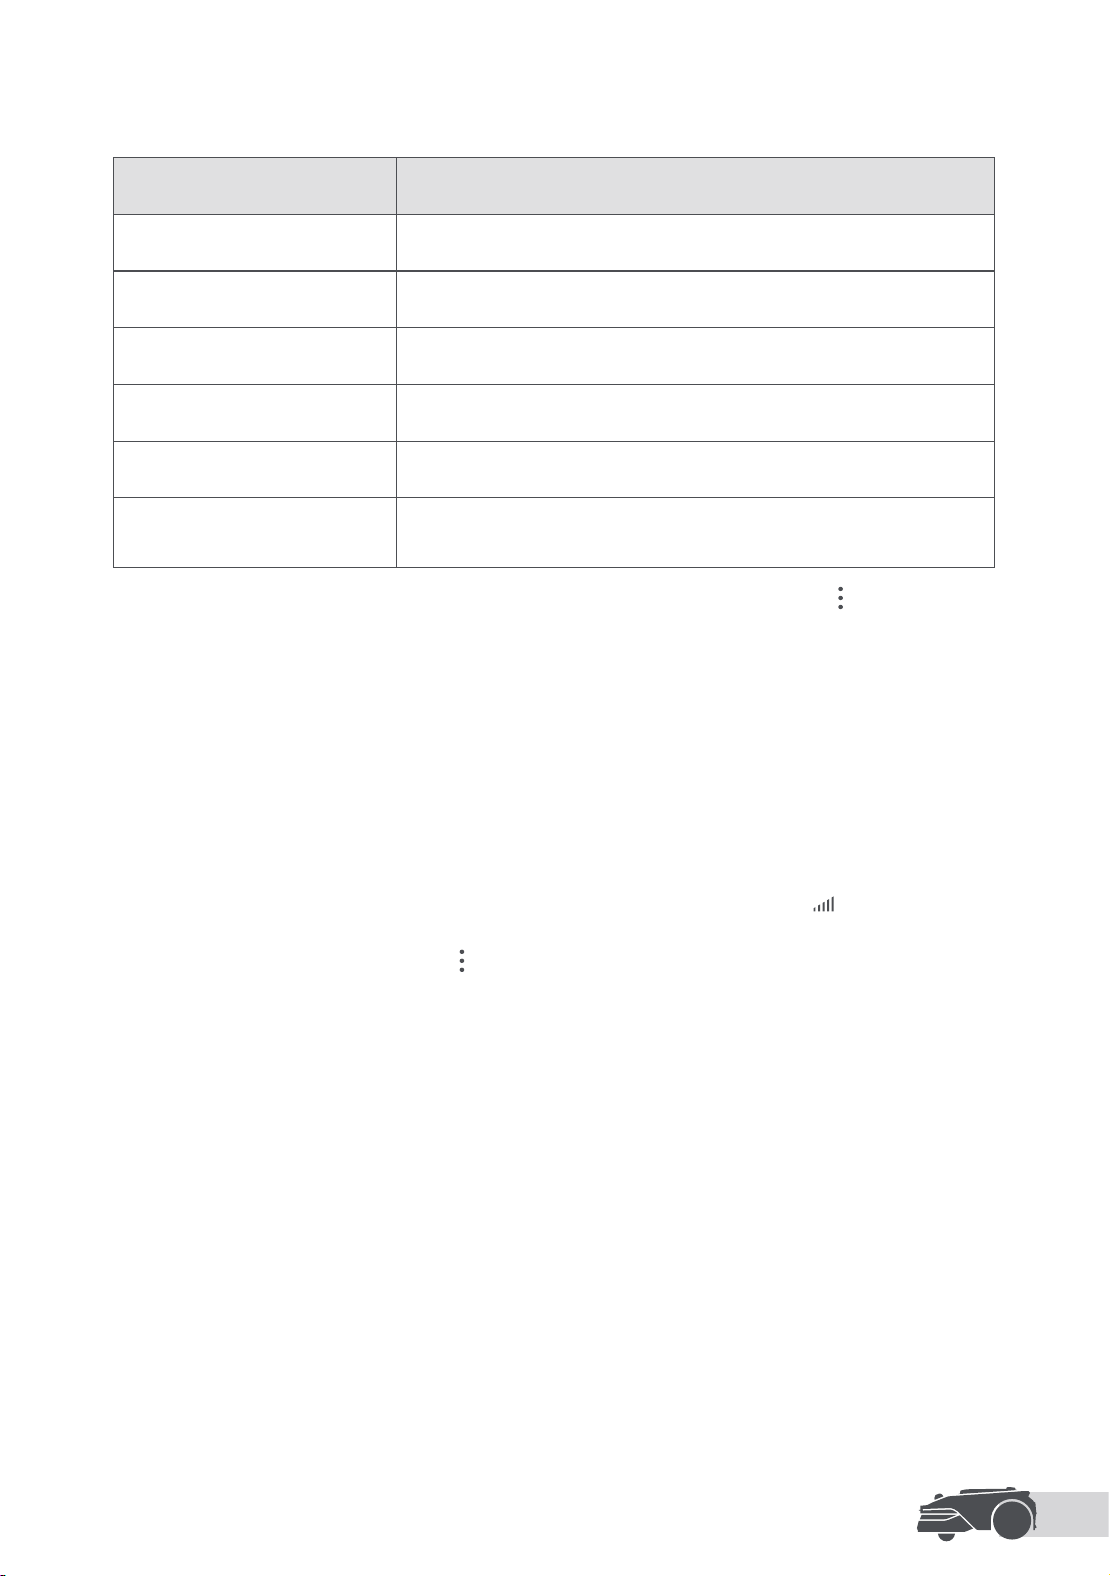
Color Meaning
Solid red An error has occurred.
Solid blue The robot is on standby.
Blinking blue The robot is performing a task or is paused.
Blinking green The robot is charging in the charging station.
Solid green The battery is fully charged.
Blinking yellow
• The robot is on patrol.
• Real-time video from the front camera is displayed via the app.
Note: You can customise the activation period and scenarios of the status light in Device Page >
> Light.
The Link Service activates automatically when you power on your robot. You'll see the illuminated on
both the robot's display and in the app, conrming successful activation. To check the Link Service status
and expiration date, go to Device Page >
> Connections > Link Module.
Link Service is oered free of charge for a period specied in the Specications section, starting from the
time of activation. To extend the service upon expiration, please contact the MOVA after-sales service team.
Note:
• The Link Module will be locked if the Link Service is not renewed within three months after expiration. To
reactivate the service, bring the module to a MOVA service center—reactivation may incur fees.
• The Link Module is designed exclusively to be used with MOVA lawnmowers. Any abnormal status detected
in the Link Service may result in the suspension of your service. If this occurs, please contact the MOVA after-
sales service team to help you restore the service.
Caution:
• Please wear protective gloves to prevent injuries.
• Make sure the protective cover is on the LiDAR before turning the robot over.
2.3.1 Activate the Link Service
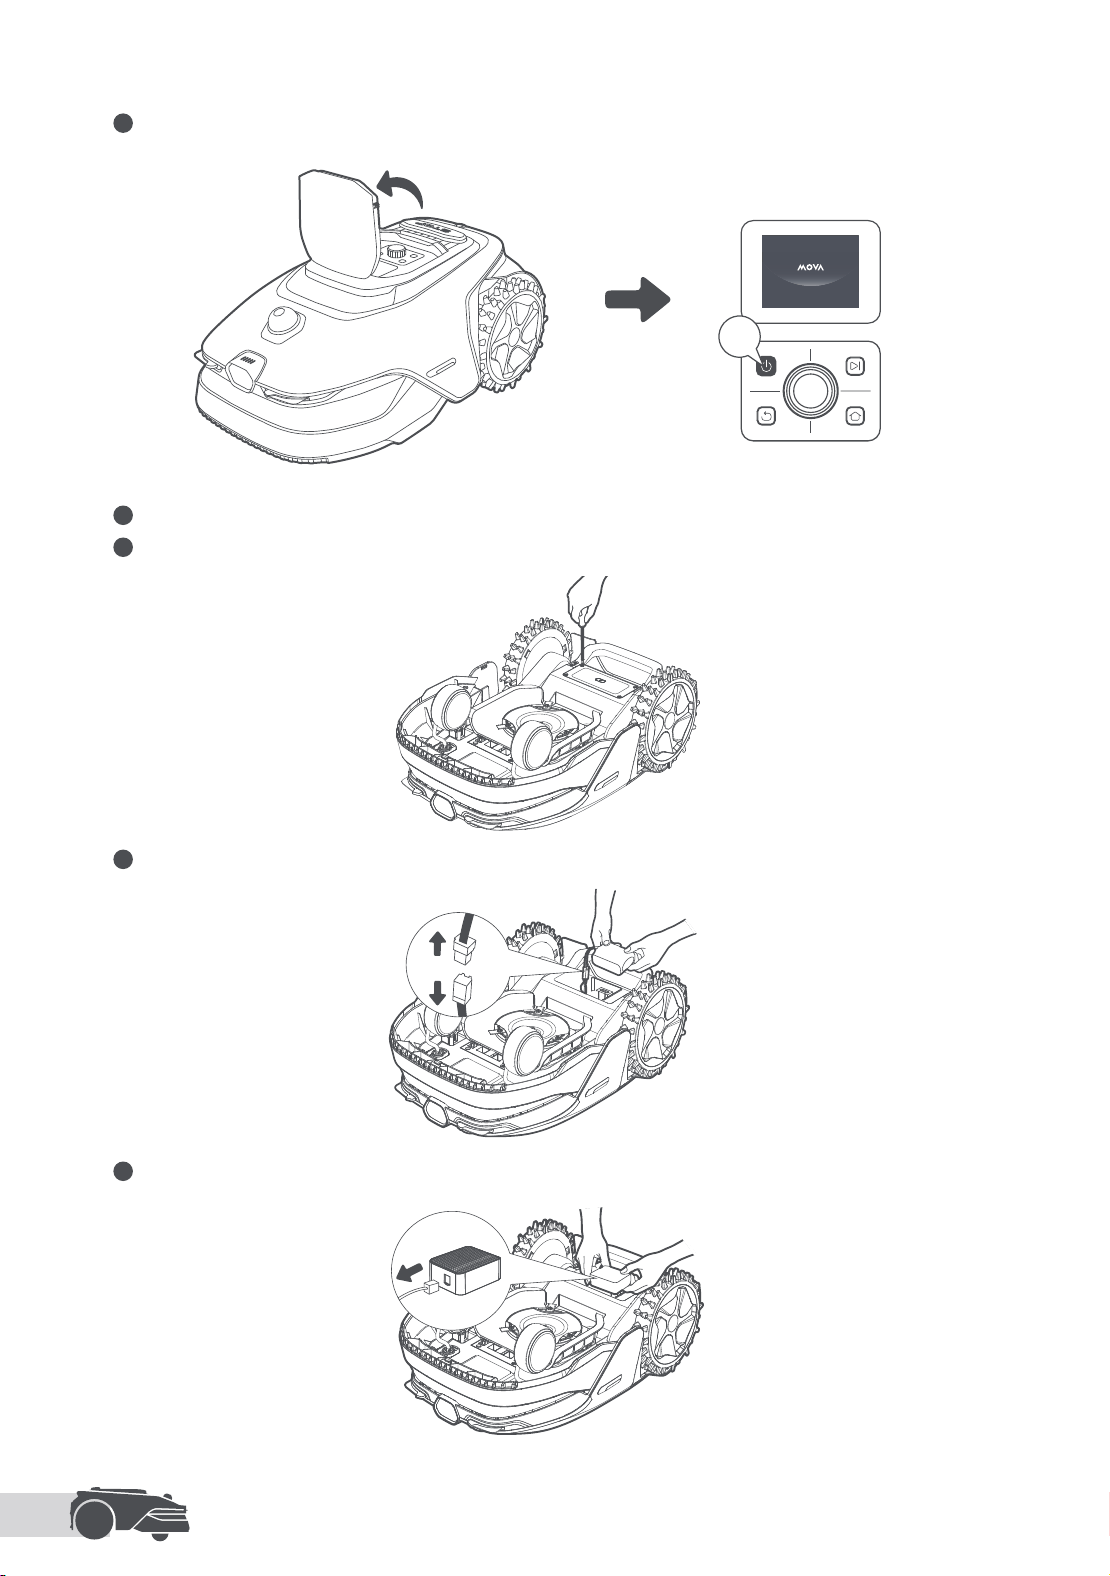
2.3.2 Remove the Link Module
EN
12
1 Turn o the robot.
2s
2 Place the robot on a soft surface and turn it upside down.
3 Loosen 4 screws to remove the cover using a screwdriver.
4 Take out the battery, and disconnect the battery connector.
5 Disconnect the module connector and carefully remove the Link Module from its slot.
EN
13
2s
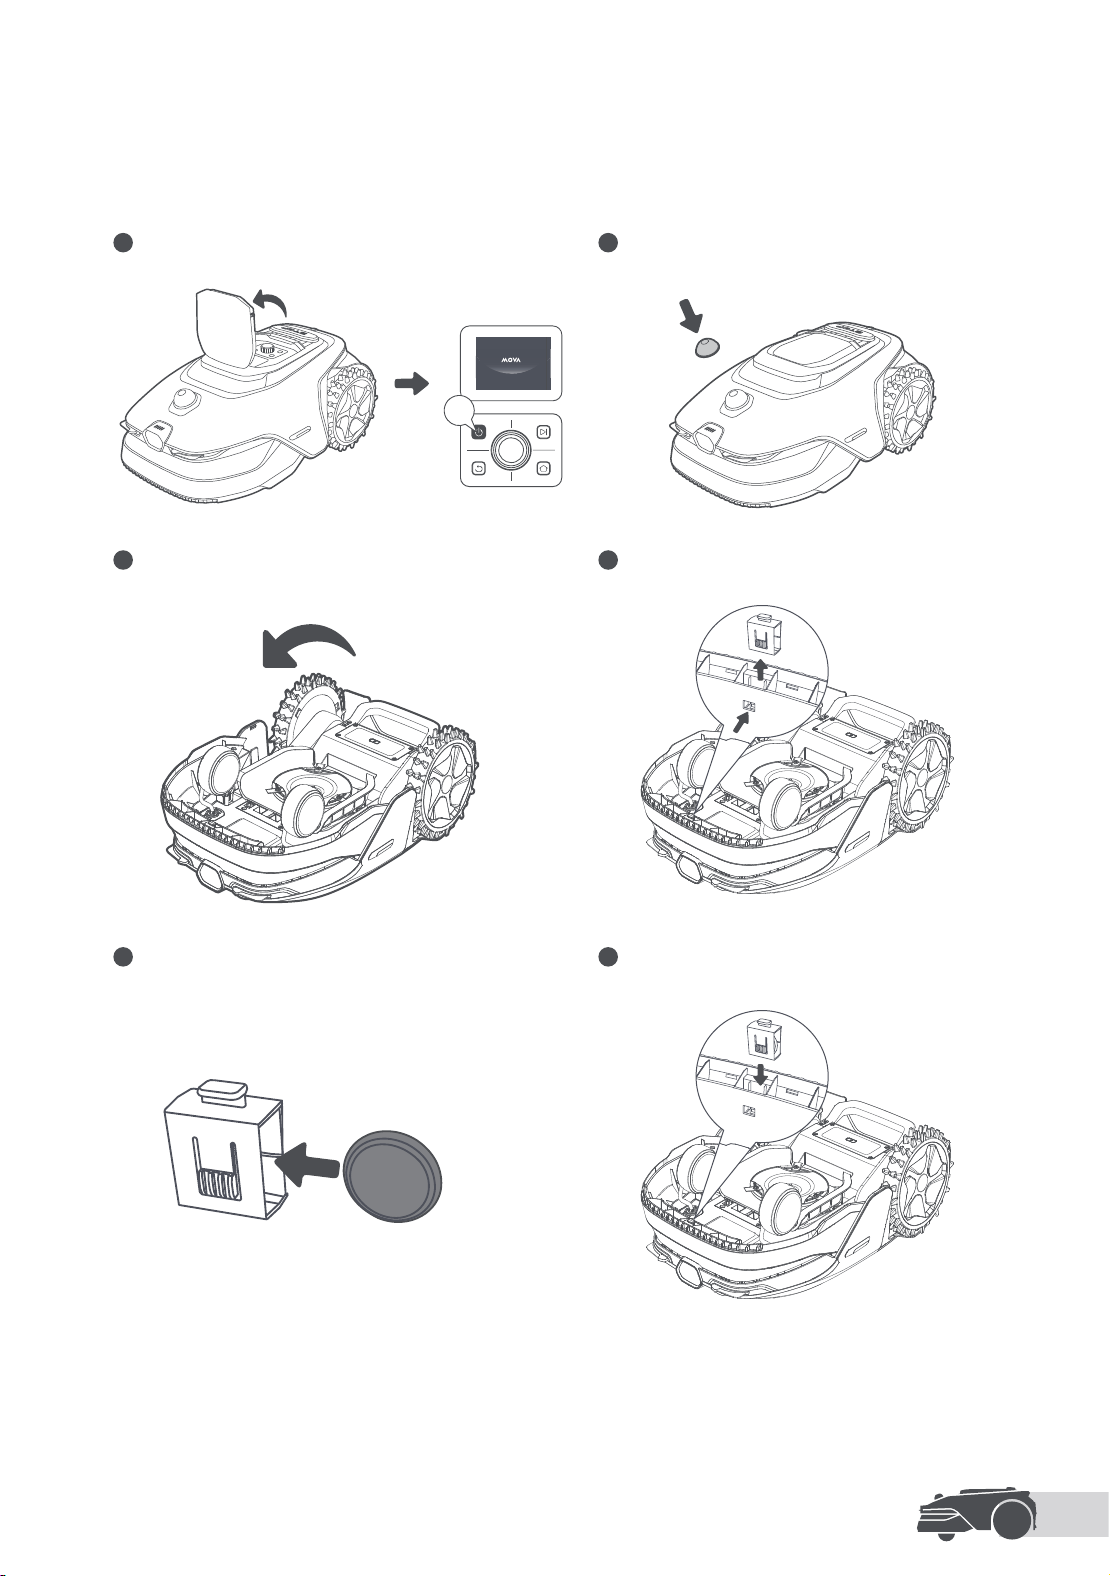
1 Turn o the robot. 2 Cover the LiDAR with its protective cover.
3 Place the robot on a soft surface and turn it upside
down.
4 Press the buckle to remove the AirTag holder.
5 Insert the AirTag into the holder or take the AirTag
out of the holder.
6 Reinstall the holder.
2.4 Introduction to Airtag Compartment
The airtag compartment supports Airtag or other tracking devices that help you locate and track your robot.
Note: AirTag is not included. Please prepare your own.
To install or remove AirTags:
EN
14
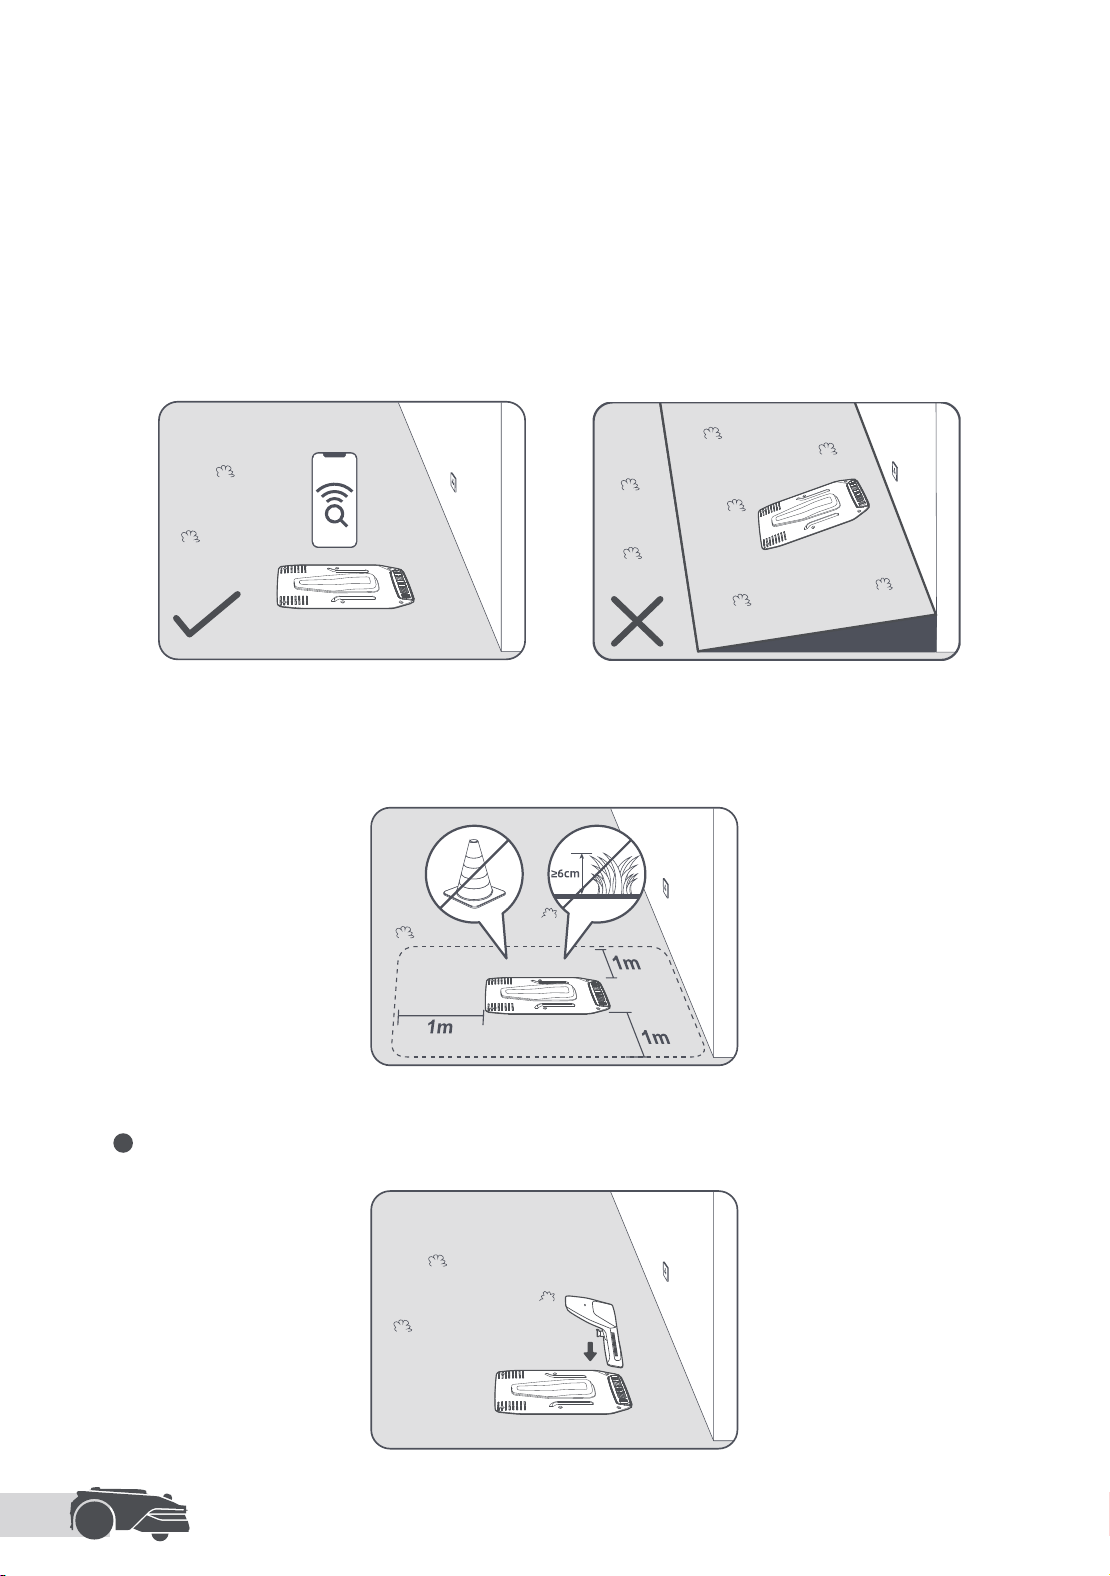
• Keep at least 1 m of free space with no obstacles to the left, right and in front of the charging station.
• The grass around the location is shorter than 6 cm.
• If the grass is taller, please mow it with a push mower rst. Tall grass may make it dicult for the robot to
return to the charging station.
3.2 Install the Charging Station
1 Insert the charging tower into the baseplate until you hear a click.
Place the charging station on a level surface near the edge of the lawn and close to a power outlet.
Ensure the location meets the following requirements:
• The area has a strong Wi-Fi signal.
Note: Use your mobile device to help check the Wi-Fi signal strength of the location. A strong Wi-Fi signal
ensures a stable connection between the robot and the app.
• The ground is soft enough to allow stake installation.
• The ground is on level terrain. A slope may cause the robot to roll backward and lose contact.
3 Installation
3.1 Select a Suitable Location
EN
15
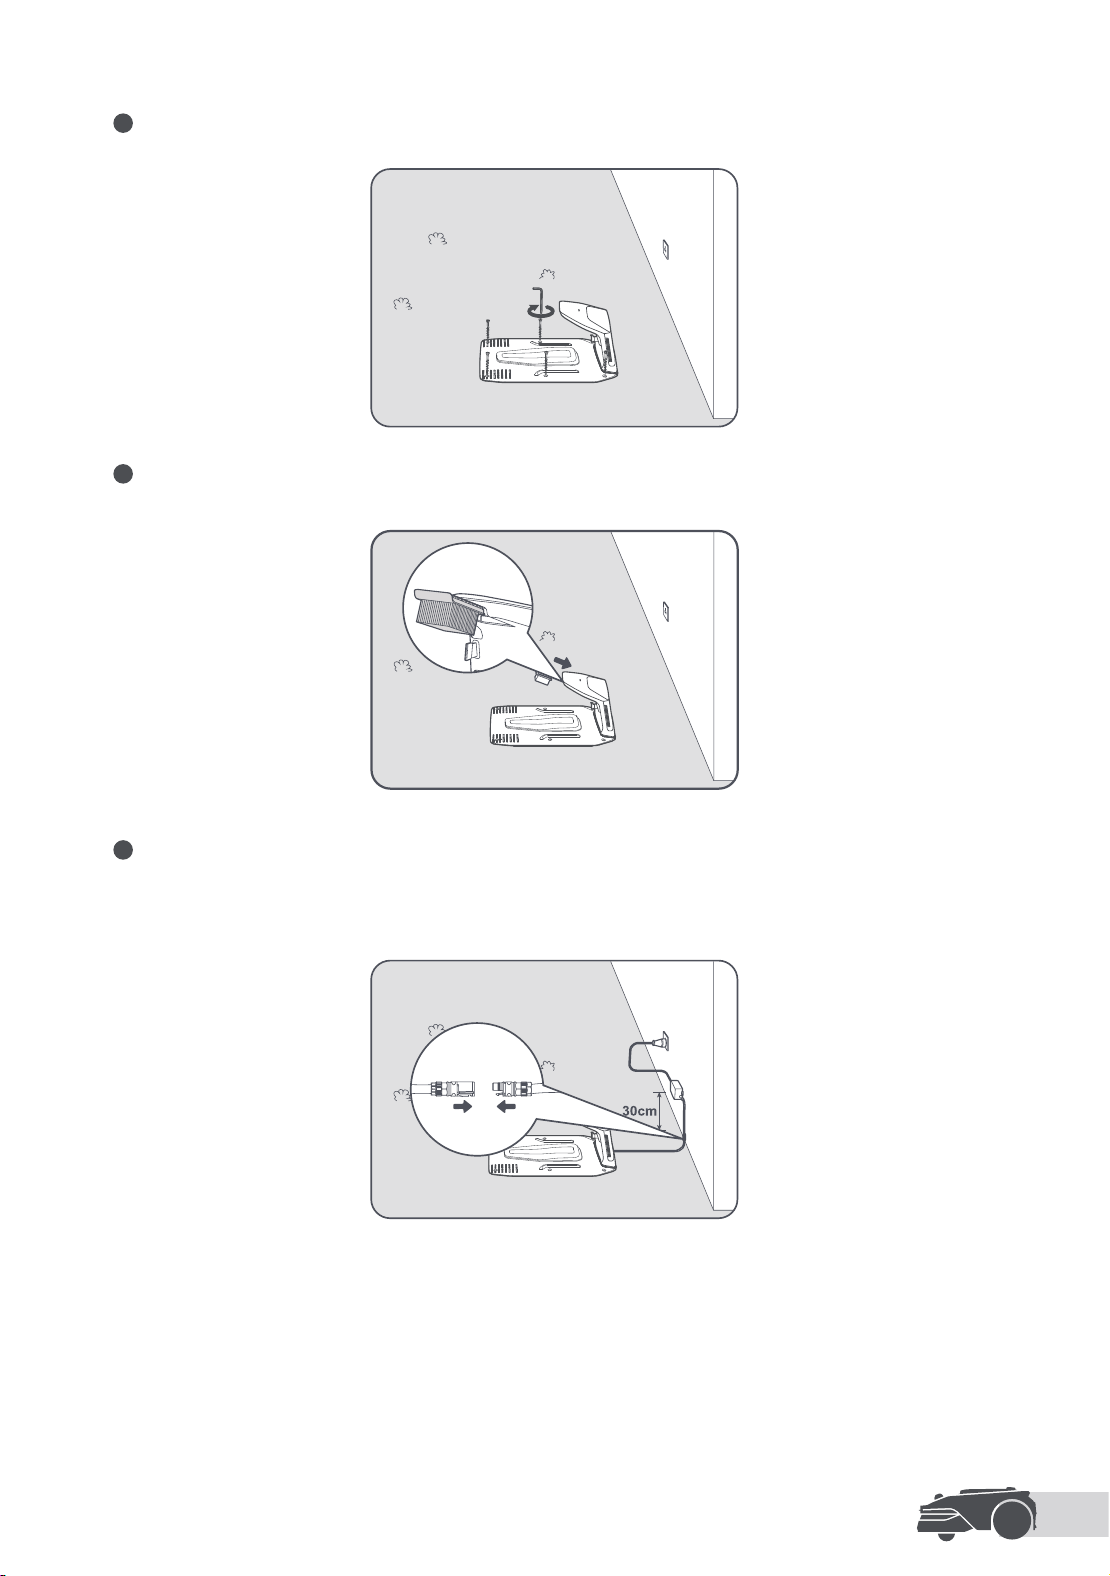
2 Secure the baseplate to the ground with the supplied stakes and hex key.
3 Insert the cleaning brush into the charging tower by aligning the tab with the slot.
4 Connect the power supply to the extension cable and then connect to a power outlet. Please keep the
power supply at least 30 cm above the ground.
Note: The LED indicator on the charging station will be constant blue when there is power.
EN
16
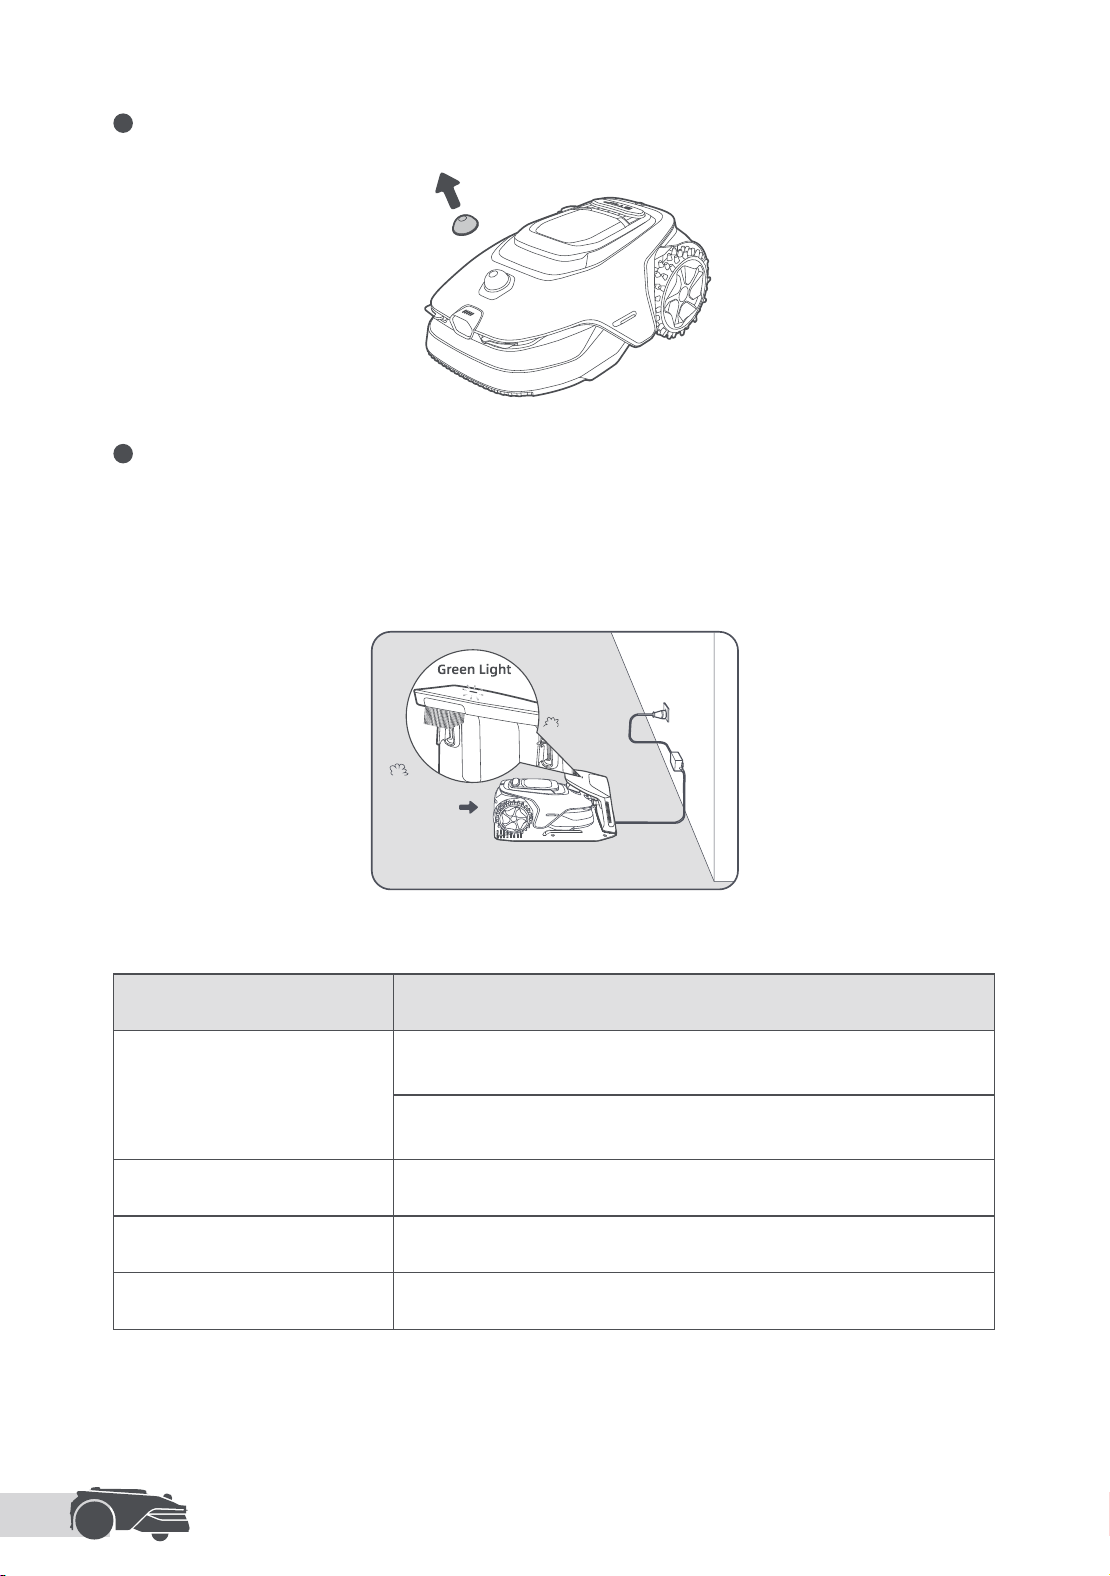
5 Remove the LiDAR protective cover.
LED Indicator on the Charging Station
LED Indicator Light Colour Meaning
Blinking/solid red
1. There is an issue with the charging station (such as a problem with the
charging current or voltage).
2. The robot docks in the charging station but the charging is abnormal
(for example charging contacts have a short circuit).
Solid blue The charging station has power. The robot is not in the charging station.
Blinking green The robot is charging in the charging station.
Solid green The robot is in the charging station and fully charged.
6 Put the robot in the charging station to charge. Make sure the charging contacts on the robot and the
charging station are connected correctly.
Note:
• The indicator light will blink green when the robot is charging successfully in the charging station.
• If you're looking to add a garage for extra protection, please use the matching MOVA Garage available at local
stores or online. Using a non-MOVA garage may cause issues during recharging.
EN
17
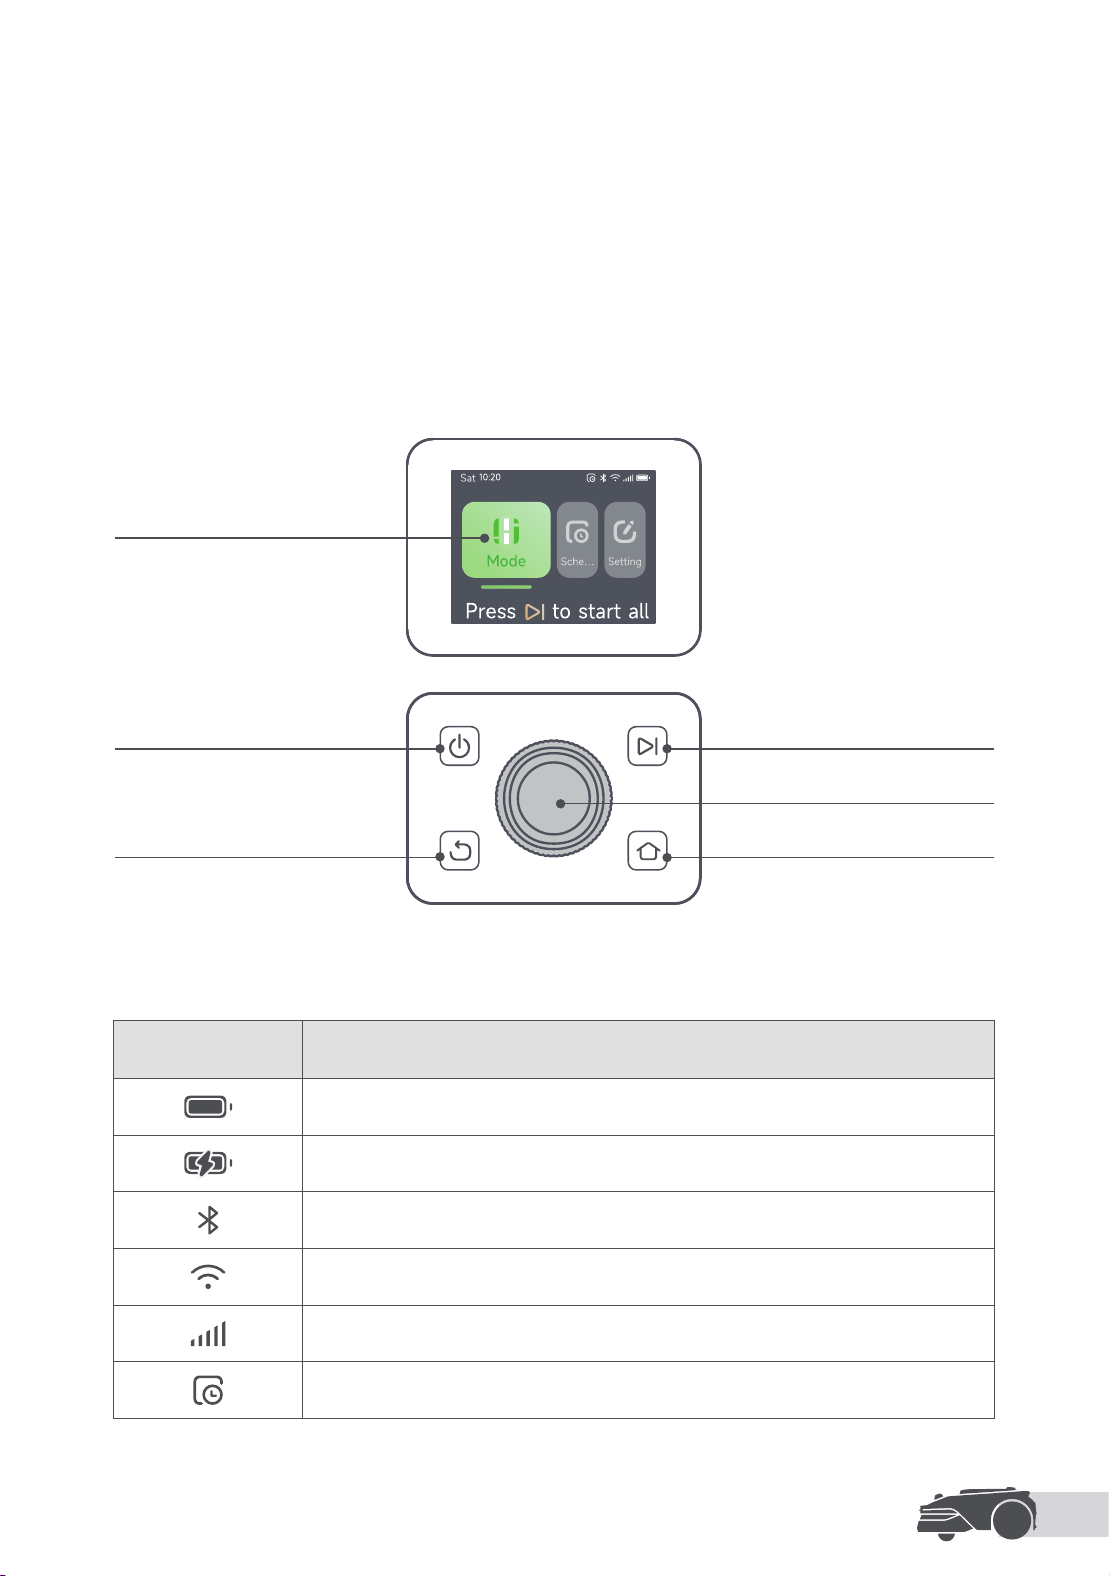
Display
Icon Status
Battery level (Shows the current battery level.)
Charging (The robot successfully docks in the charging station.)
Bluetooth (The robot is connected to the app via Bluetooth.)
Wi-Fi (The robot is connected to the app via a Wi-Fi network.)
Link service (Link service is activated.)
Schedule (A task is scheduled for today and has not started yet.)
Power on/o
Display
Back
Start
Knob
Home
4 Preparation for First Use
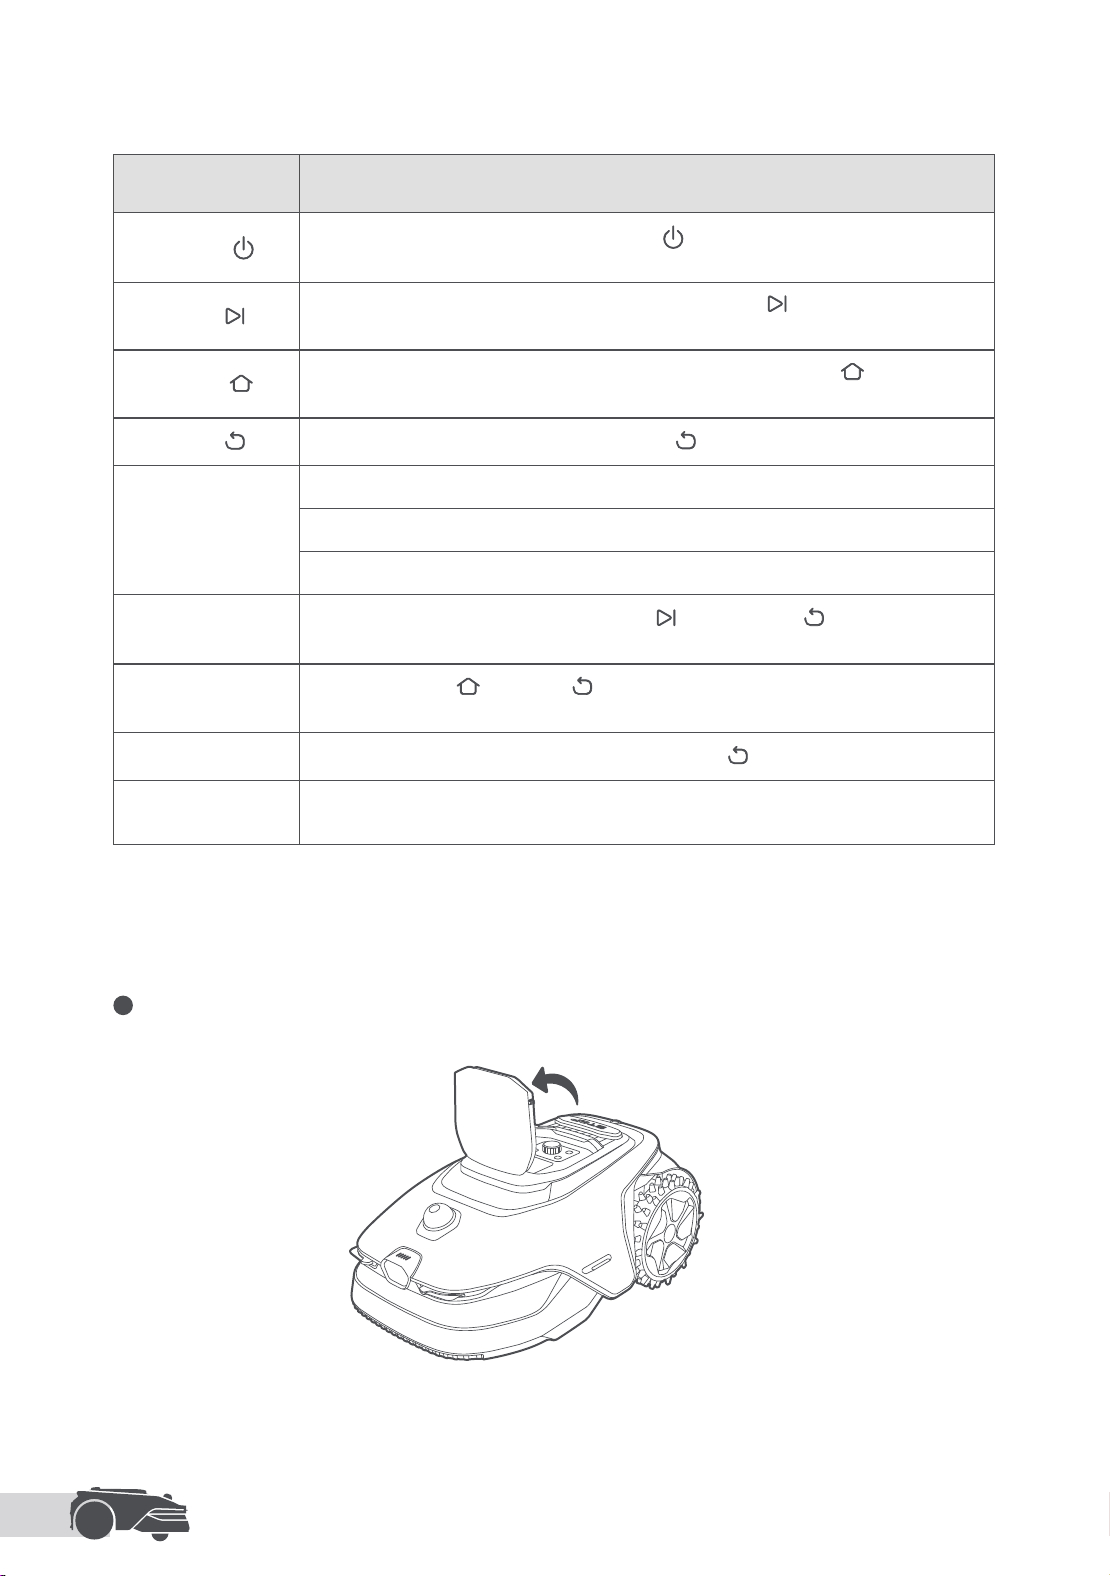
The control panel inside the top cover oers the following features.
• Modes: Switch between All-area mowing and edge mowing.
• Schedule: View and turn on/o the "Spr/Sum Schedule" and "Aut/Win Schedule".
• Settings: Access the mowing congurations such as mowing eciency, mowing height, obstacle
avoidance height, and rain/frost protection. Also, you can manage the robot congurations, including PIN
code, volume, language, etc.
Note: The features might be updated depending on the software version.
4.1 Get Familiar with the Control Panel
EN
18
Controls
Button Function
Power
To turn on/o the robot, press and hold the button for 2 seconds. Ensure it is
outside the charging station.
Start
To start all-area mowing or resume paused tasks, press the button, and close the
robot's top cover to conrm.
Home
To send the robot back to the charging station to charge, press the button, and
close the robot's top cover to conrm.
Back
To navigate up one level in the menu, press the button.
Knob
To conrm the selection in the menus, press the knob.
To enable Bluetooth pairing mode, press and hold the knob for 3 seconds.
To navigate through the menu, turn the knob clockwise/anticlockwise.
Start + Back
To factory reset the robot, press and hold the button and the
button together for
3 seconds.
Home + Back
Press and hold the button and button together for 3 seconds to enter the About
page in Settings. The About page will disappear in 5 seconds.
Knob + Back
To reset the PIN code, press and hold the knob and the button together for 3 seconds.
Stop
Press the Stop button to stop the robot. PIN code must be entered on the control panel
to resume the operation.
Complete the basic settings before the robot is ready to start working.
1 Open the robot's top cover.
4.2 Initial Settings
4.2.1 Set Language & PIN Code
EN
19
Note: The robot will automatically turn on when it docks in the charging station.
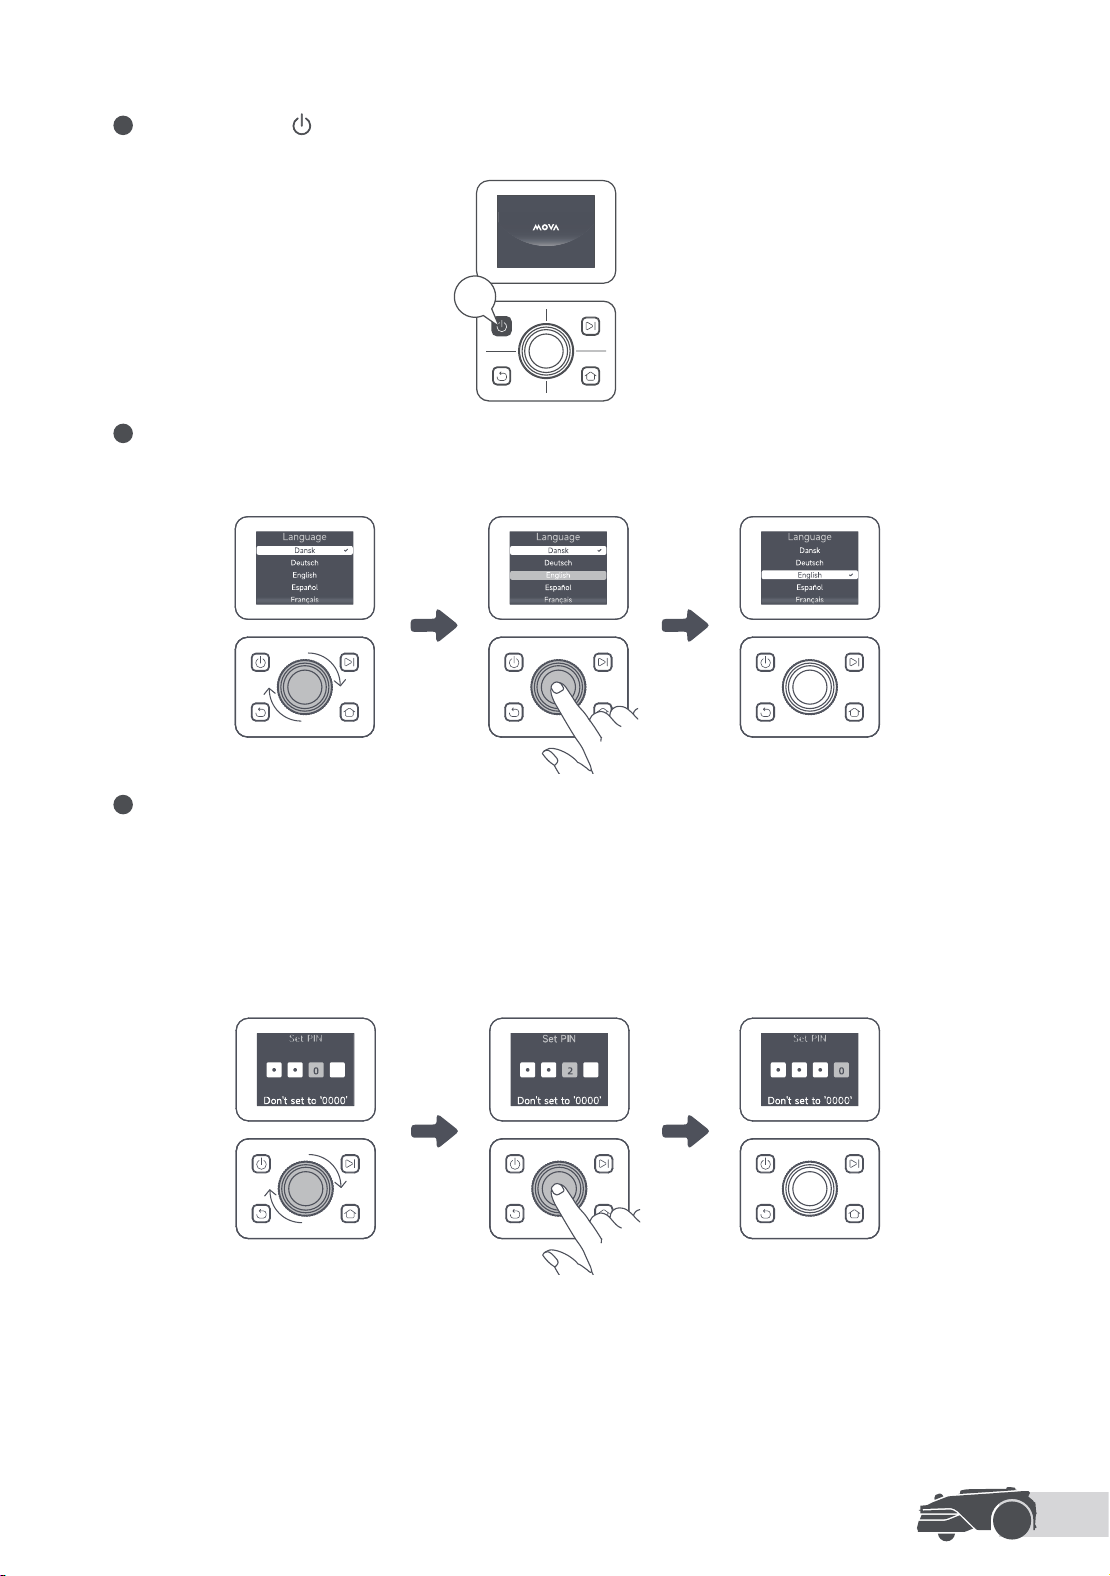
2
Press and hold the
button on the control panel for 2 seconds to turn on the robot.
3 Select the Language You Prefer
Turn the knob clockwise to go down and anticlockwise to go up to select your language. Press the knob to
conrm.
2s
4 Set PIN code
1. Turn the knob to select a number from 0 to 9.
Turn clockwise to increase the number and anticlockwise to decrease it.
2. Press the knob to conrm and set the next digit.
3. (Optional) To modify the previous digit, turn the knob anticlockwise until the number becomes 0 and keep
turning it one time more.
Important: Please do not set the PIN code to "0000".
4. Enter the PIN code again to complete setting the PIN code.
Note: Once your PIN code is set, you can update it at any time by navigating to Settings > Change PIN
Code in the app or selecting Settings > Change PIN on the display.
EN
20
Before network setup:
• Make sure the robot and your mobile device are on the same Wi-Fi network.
• Make sure that your mobile device is within 10 m of the robot.
• Enable Bluetooth function on your mobile device.
4.2.2 Connect the Robot to the Internet
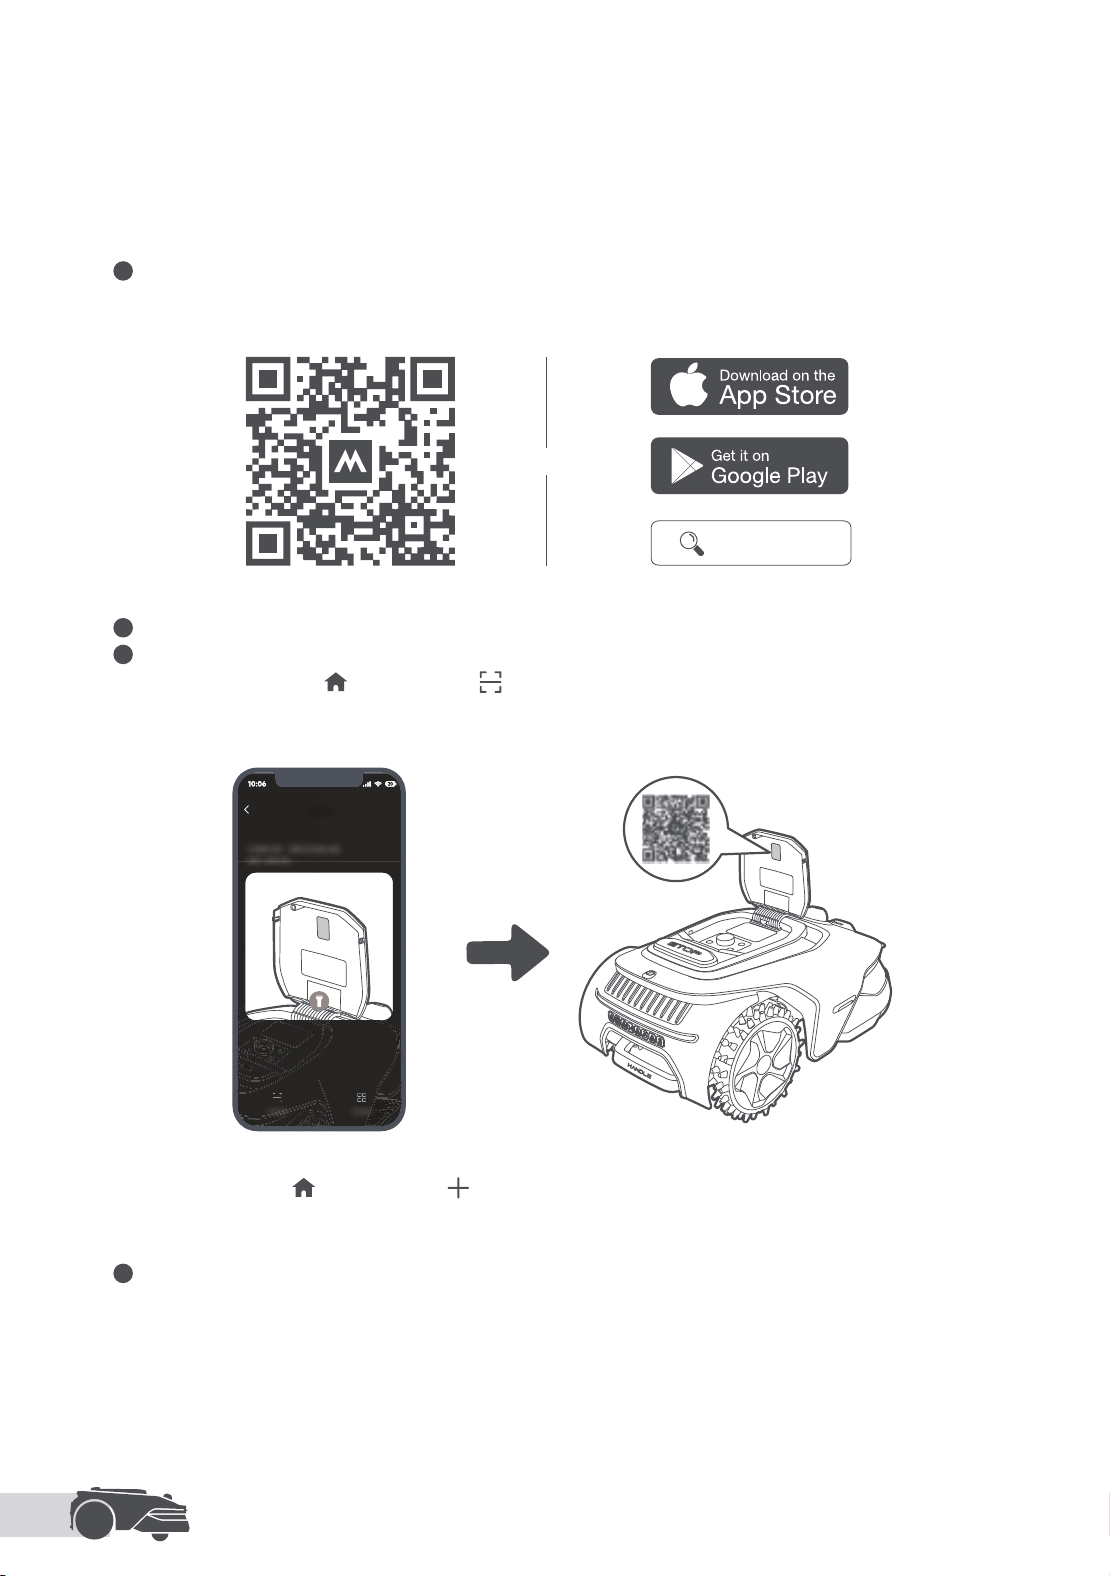
1 Scan the QR code to download the MOVAhome app on your mobile device.
You can also download MOVAhome app from App Store or Google Play.
2 Open the MOVAhome app, create an account, and log in.
3 Connect via one of the following methods:
• Scan the QR Code: Go to
Device and tap Scan to Connect. Scan the QR code located inside the
robot's top cover to connect.
• Add Manually: Go to
Device and tap Add. Then select your robot model to connect.
• Automatic discovery: The robot will search for nearby devices. Tap your robot from the list of discovered
devices to connect.
4 Follow the in-app instructions to complete the Wi-Fi network connection.
Important:
• Please use a single-band network of 2.4 GHz frequency or dual-band network of 2.4/5 GHz frequency.
• Make sure your Wi-Fi network doesn't have a rewall and isn't encrypted. Otherwise, the network setup may fail.
OR
MOVAhome
EN
21
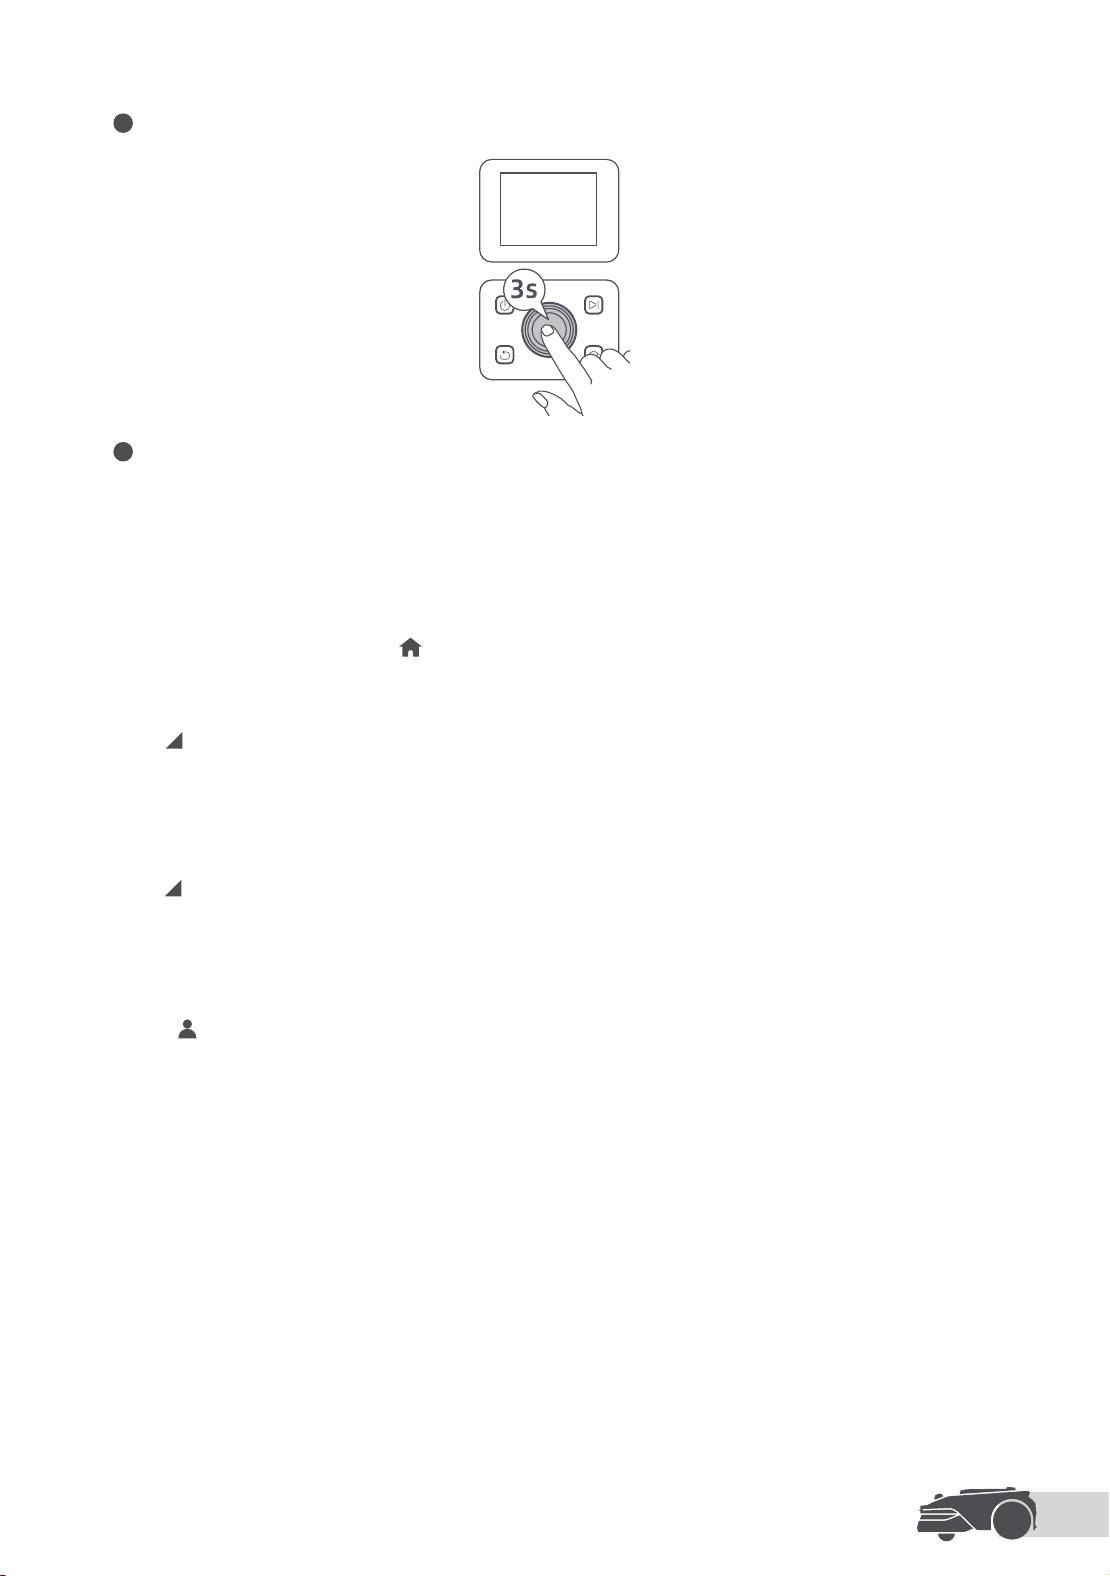
6 Follow the in-app instructions to complete the pairing.
5 Press and hold the knob on the control panel for 3 seconds. The robot will enter Bluetooth pairing mode.
Unbind the Robot
Reset Your Robot
Once you reset the robot to factory settings, all data on the robot will be erased. You can reset your robot via
either of the following ways:
• Press and hold Start and Back buttons together simultaneously for 3 seconds on the control panel.
• Go to Settings and select Reset the Robot via the display.
4.2.3 Other Settings
How to log out of your MOVAhome account or delete it?
How to share your robot?
The robot is automatically bound to the MOVAhome account once pairing is successful. Each device can only
be bound to one account. It cannot be bound to another account at the same time.
To pair the robot with a new account, you need to unbind it rst. To unbind it:
1. Open the MOVAhome app. Go to
Device.
2. Locate your robot's name. If you have multiple robots bound to your MOVAhome account, swipe left or
right to access the page of the robot you want to edit.
3. Tap
next to the robot's name.
4. Select Delete.
Important: Once the robot is unbound, all user data from the robot will be permanently erased from the server.
1. Go to
Me > Account.
2. Select Log Out or Delete Account.
1. Tap
next to the robot's name.
2. Select Device Sharing.
Note: You can manage user access for specic functions in Settings > Device Sharing.
EN
22
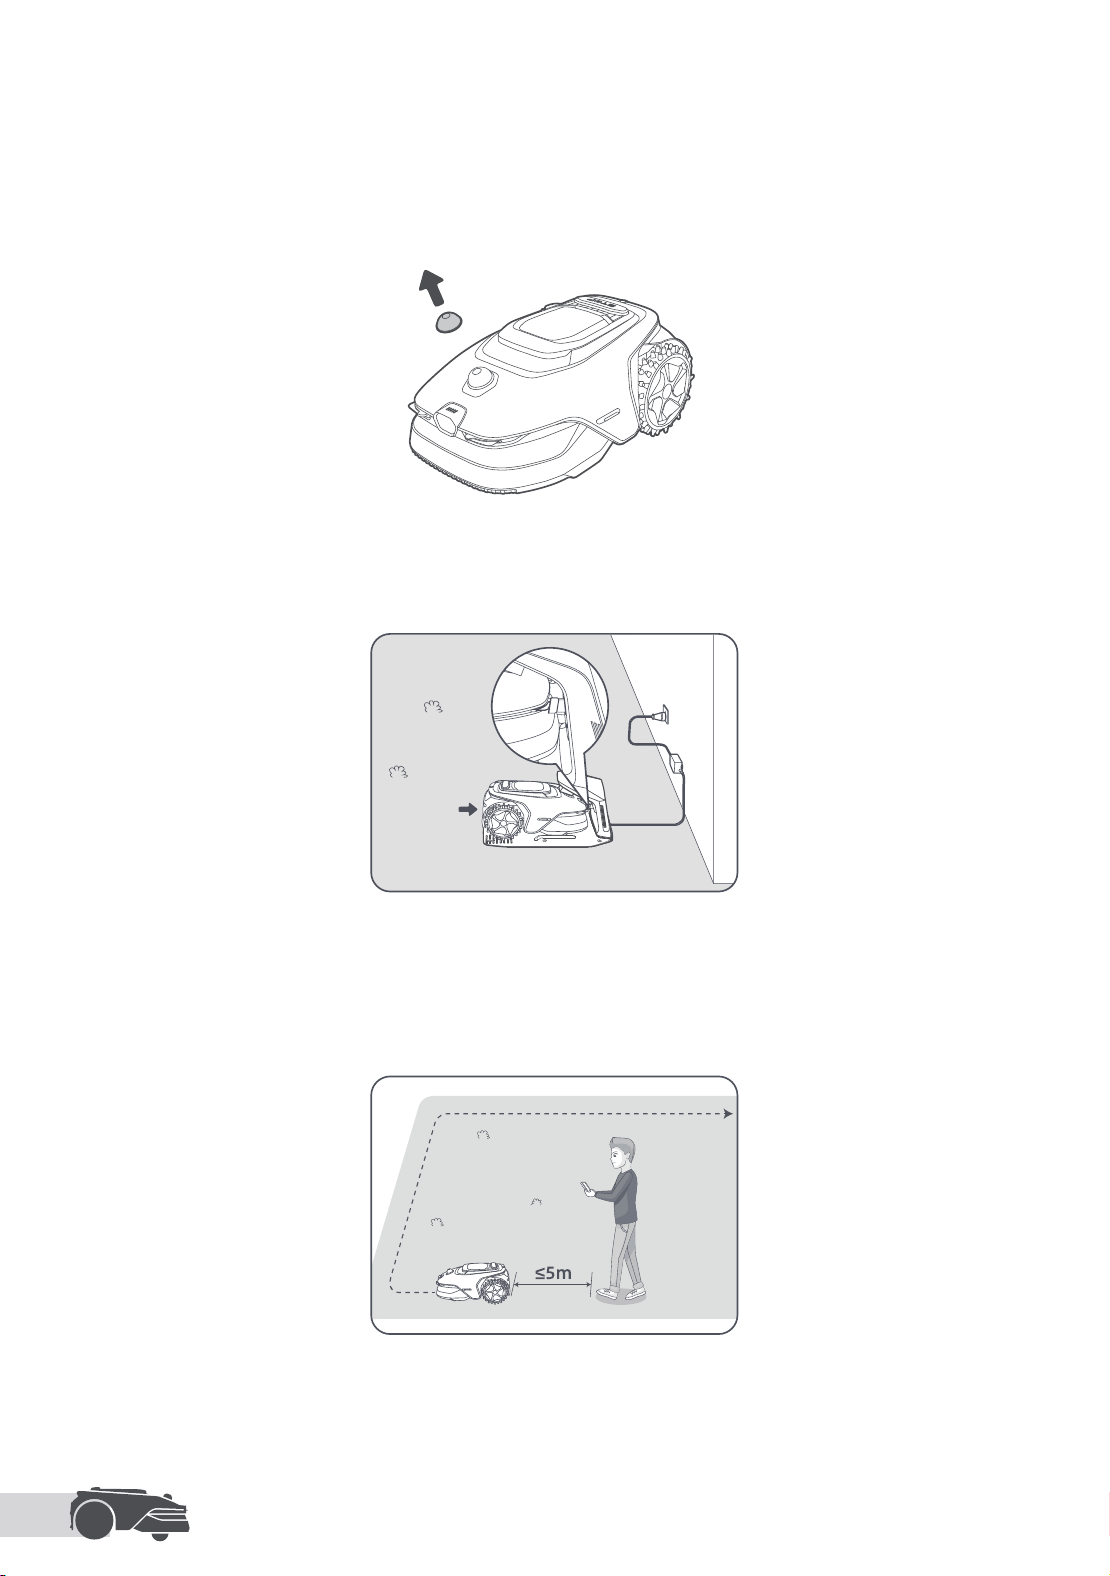
Important: Before mapping, please check the following:
• The battery level of the robot is more than 50%.
• The protective cover of the LiDAR is removed.
5 Map Your Garden
• The top cover is closed.
• The robot correctly docks in the charging station.
Before starting the mapping process, please keep the following in mind:
• Walk within 5 m behind the robot during the mapping process.
5.1 Create the Virtual Boundary
EN
23
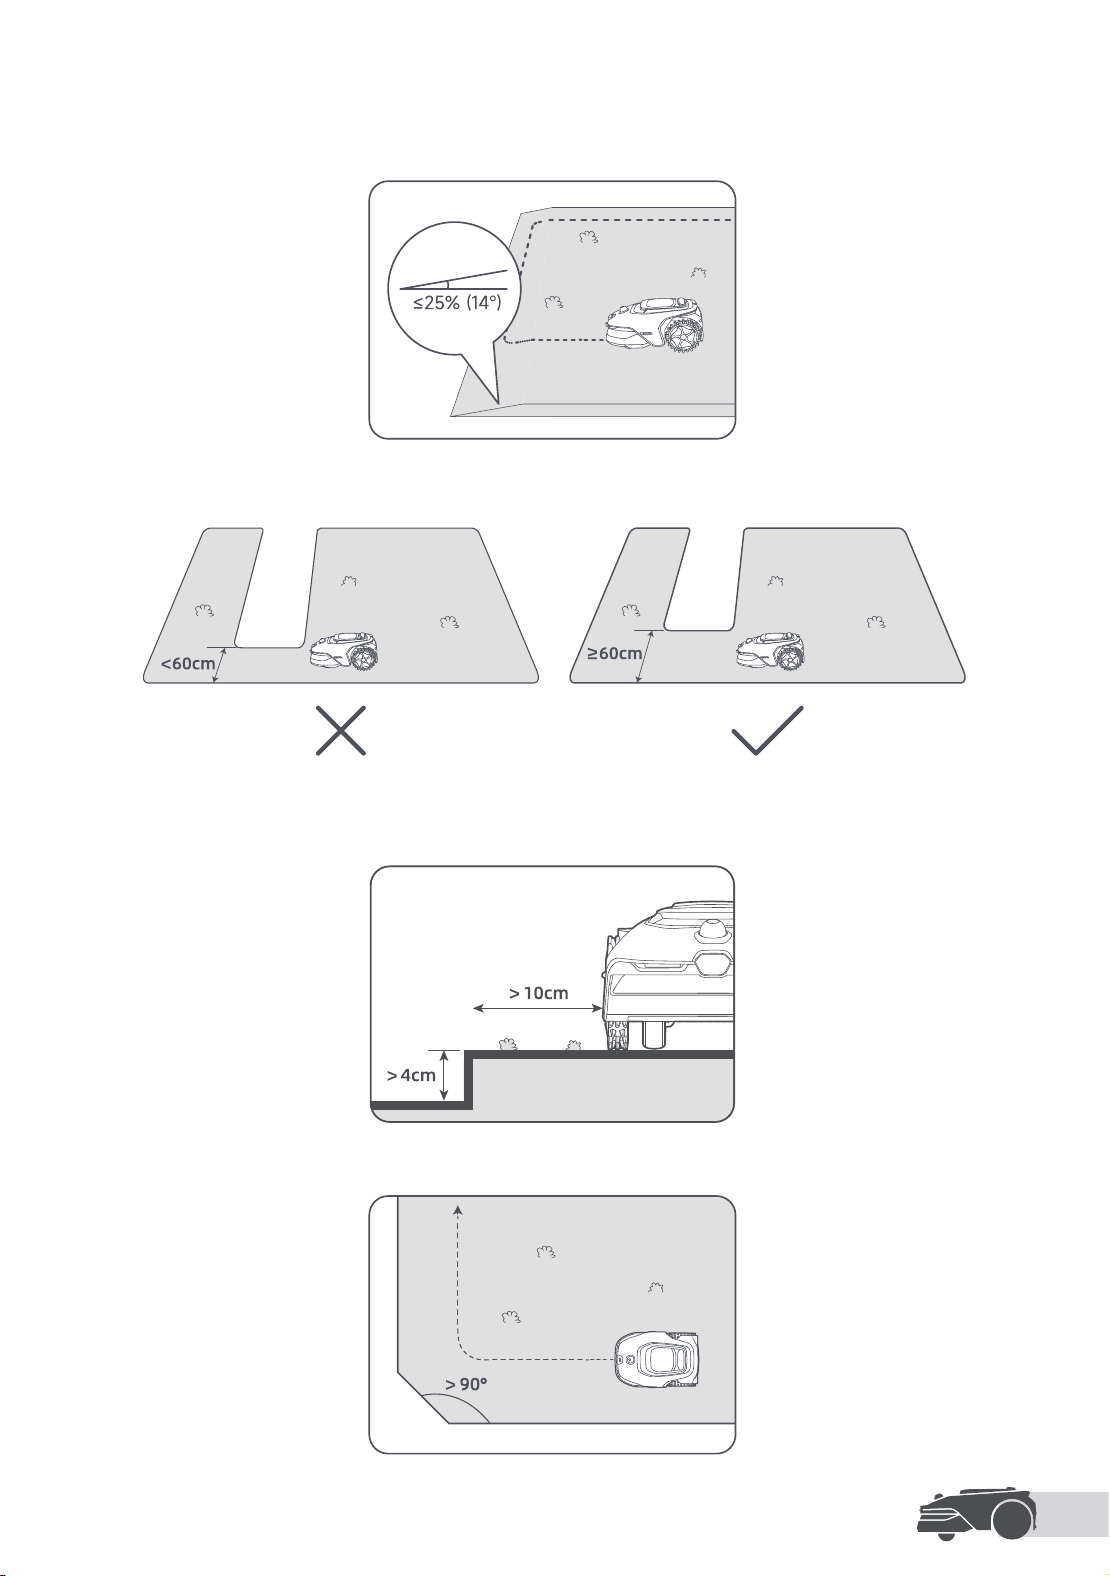
• The robot can navigate slopes with an incline up to 45% (24° ). However, for better mowing results, it is
recommended to keep the slopes of work areas below 25% (14° ).
• For areas narrower than 60 cm, please set them as paths to allow the robot to pass through. For details, see
7.1.3: Set Path.
• If your lawn is more than 4 cm higher than the adjacent ground, keep the robot at least 10 cm away from the
edge. If your lawn is level with the adjacent ground, the robot can cross the perimeter for optimal mowing
results along the edges.
• Make sure the turning angles are greater than 90° . Angles smaller than 90° can make it dicult for the robot
to achieve a clean cut.
EN
24
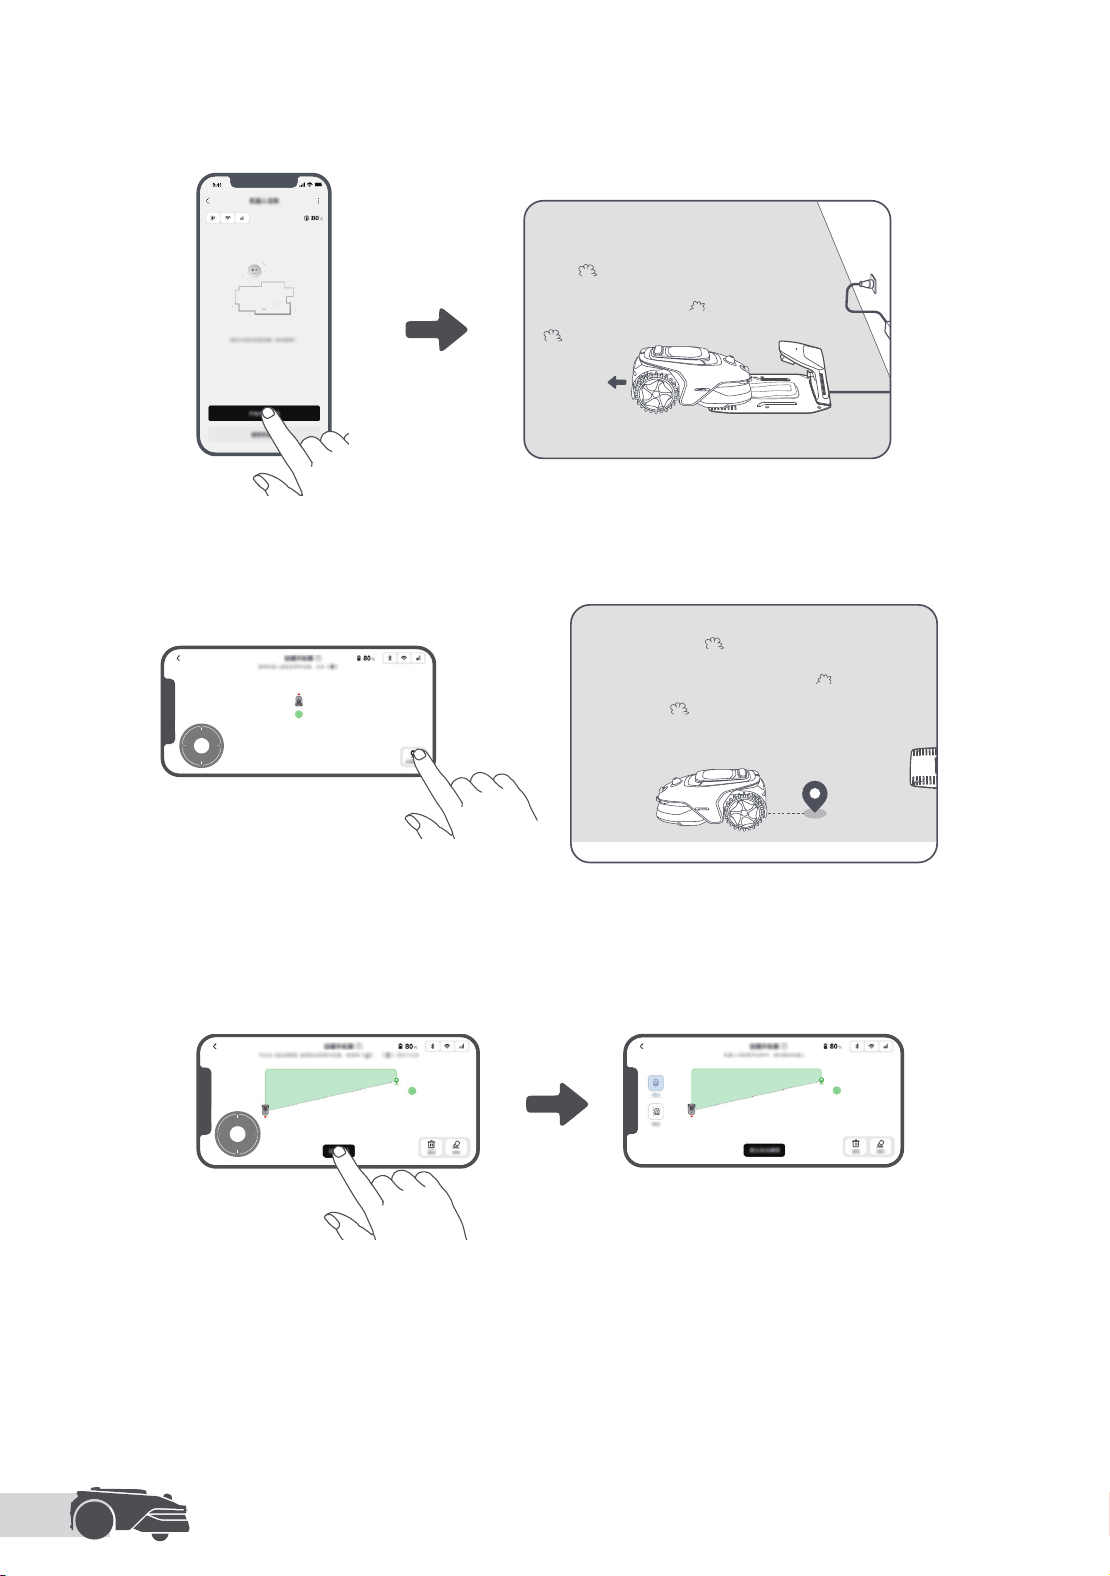
Start Mapping:
1. Tap Start Mapping via the app, and the robot will check its status and calibrate.
2. Guide the robot remotely to the edge of your lawn and tap Set Starting Point to establish the starting
point for the boundary.
• Remotely control the robot to move along the perimeter of your lawn to map out the work area.
• Enable the Auto Boundary Detection mode to map out the work area. Powered by an advanced AI algorithm,
the robot can identify boundaries without the need for manual guidance.
Caution: It will automatically leave the charging station to do the calibration. Please be careful.
Important:
• The Auto Boundary Detection mode requires clear lawn boundaries and should be used in daylight to
ensure proper visibility. Avoid using this feature in poor light or rainy conditions.
• We recommend following the robot when you use the Auto Boundary Detection Mode. If the robot fails to
accurately detect the boundaries, you can exit Auto Boundary Detection mode and switch to remote control at
any time.
• Make sure the robot's front camera is clean and unobstructed.
3. Map out the work area. The following two methods are supported.
EN
25
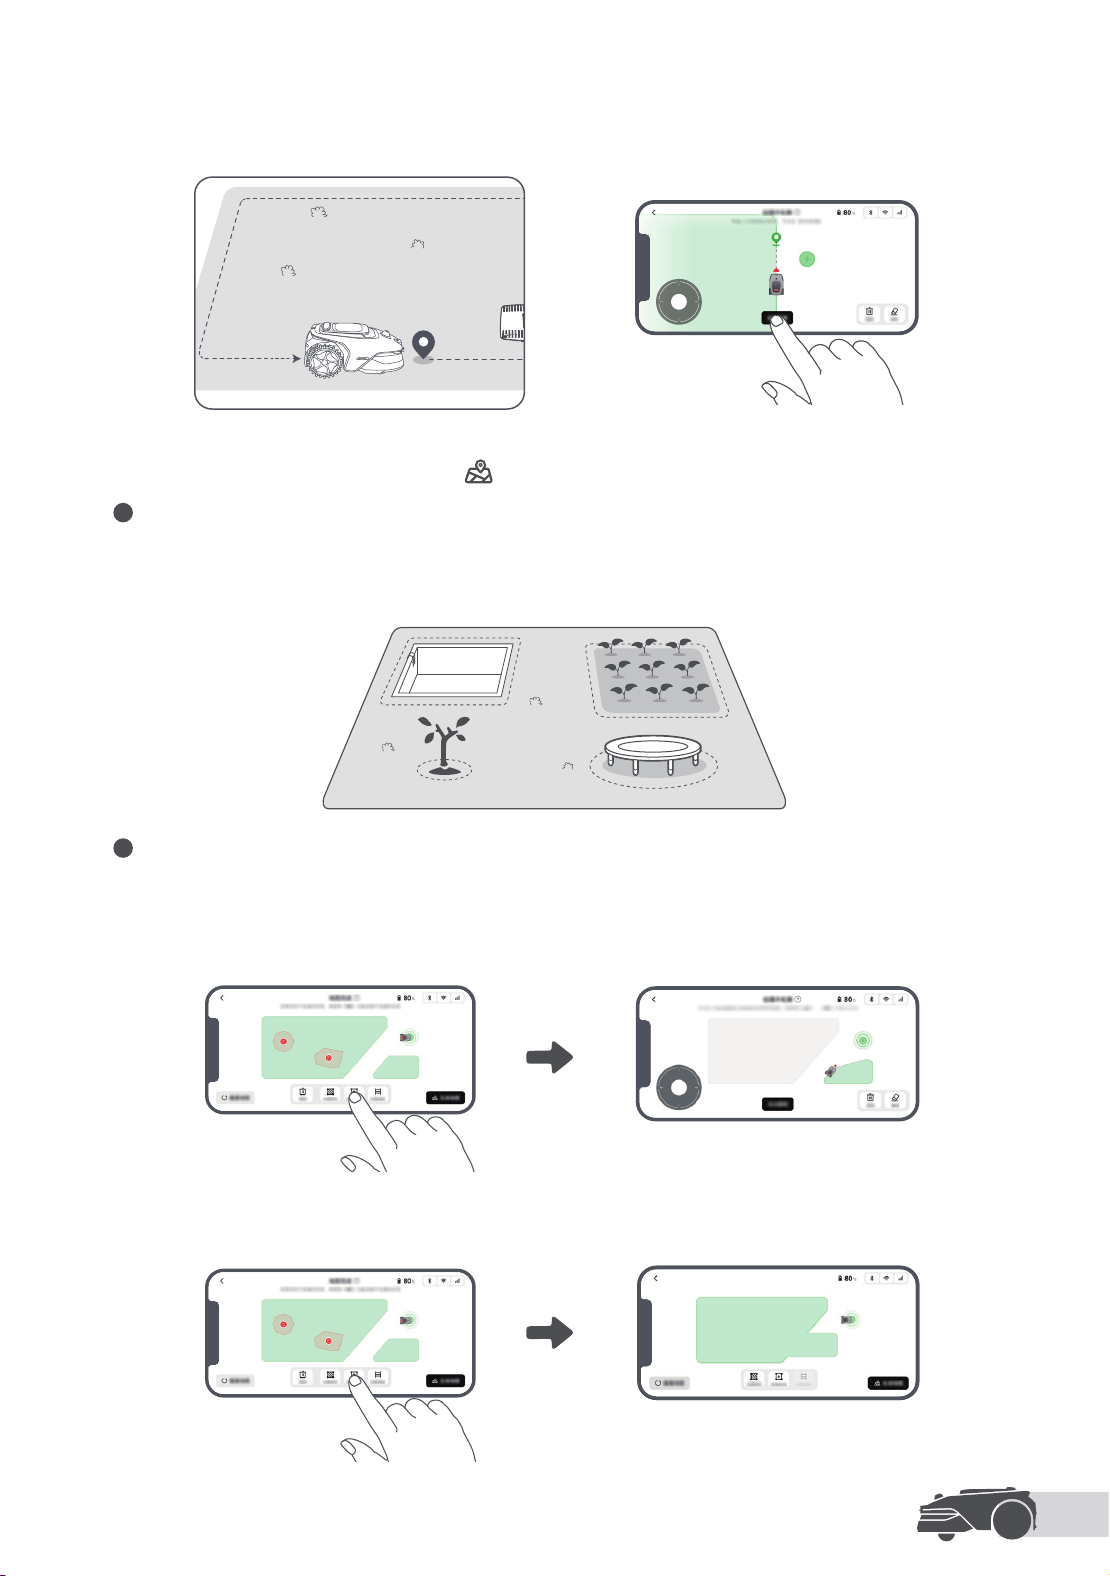
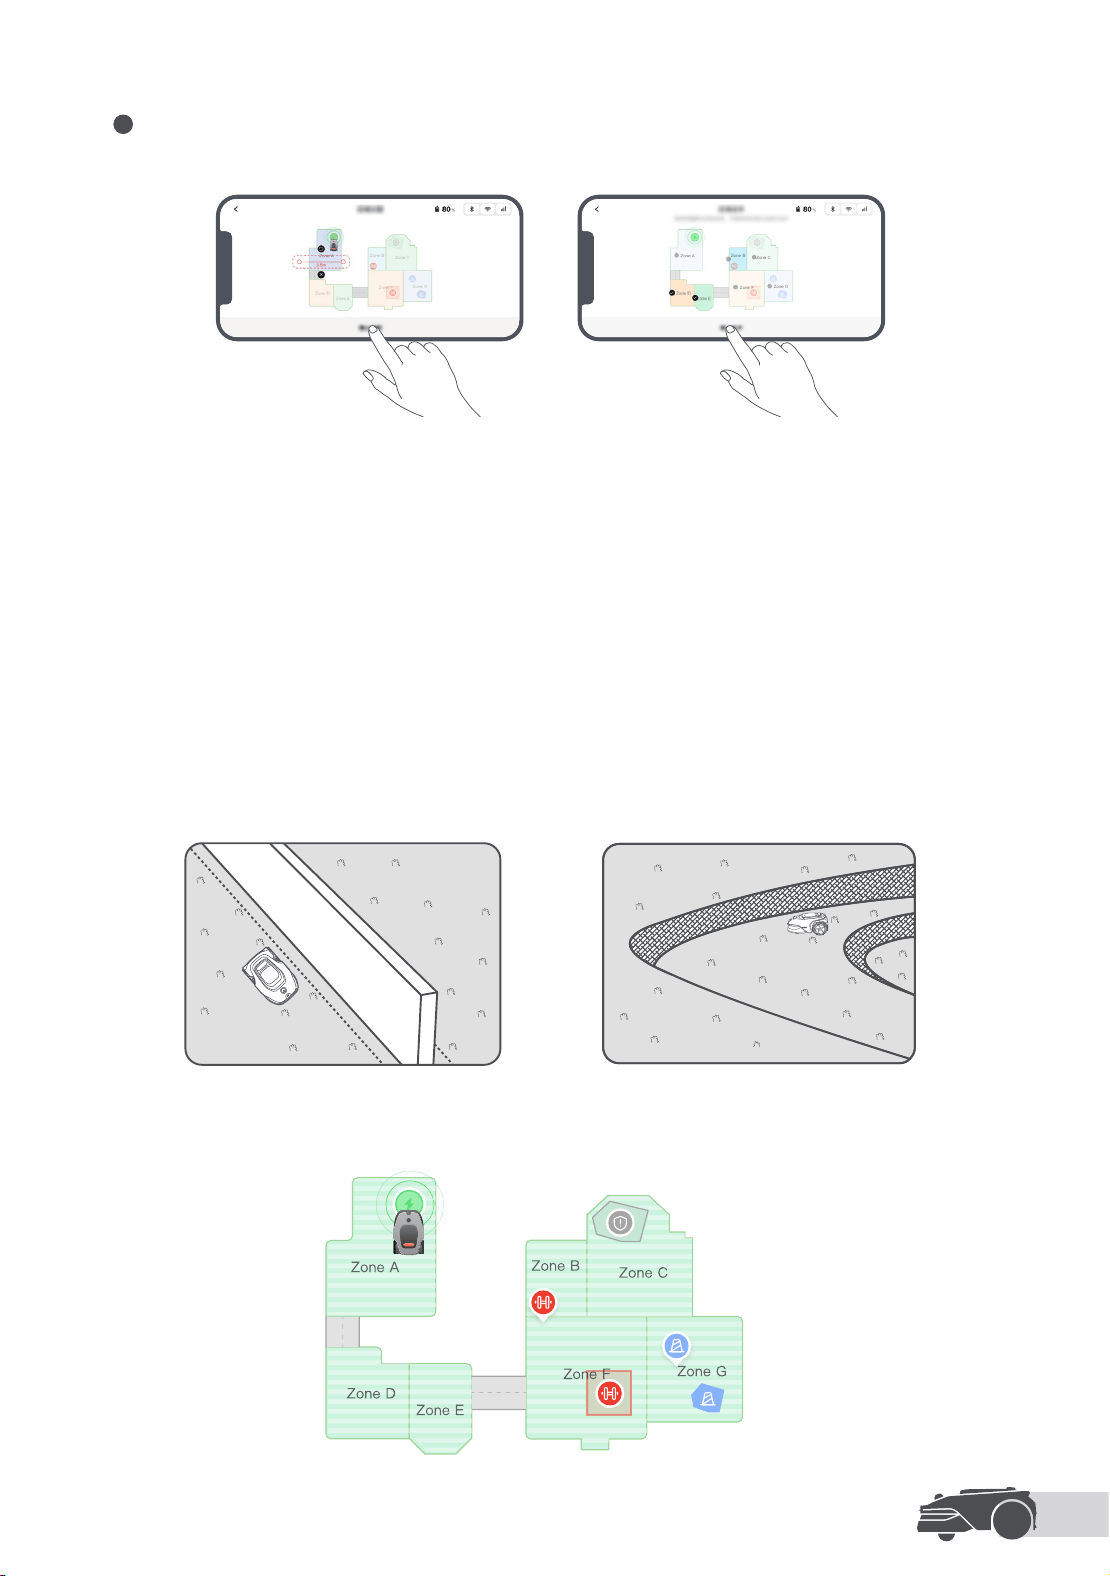
4. When the robot returns to within 1 m of the starting point, you can tap Close Boundary to complete the
boundary setting.
5. (Optional) Edit the map.
Alternatively, you can go to Device Page >
> Edit to adjust the map after the mapping is nished.
1 Set No-Go Zone
Though the robot can automatically avoid obstacles, it is still necessary to set areas with a risk of falling,
such as swimming pools and sandpits, as no-go zones. For objects you want to protect (such as a owerbed,
a trampoline, a vegetable patch or an exposed tree root), please set them as no-go zones.
2 Add or Expand Zones
• To Create More Zones
If your lawn is separated by roads or you have several isolated lawns, you can continue creating work areas.
Note: If your garden has stone paths, designate them as separate zones. Then draw linking paths so the
robot can navigate between zones.
• To Expand Existing Zones
You can expand an existing zone by creating the area you want to include. If the two areas overlap, they will
be automatically merged.
EN
26
3
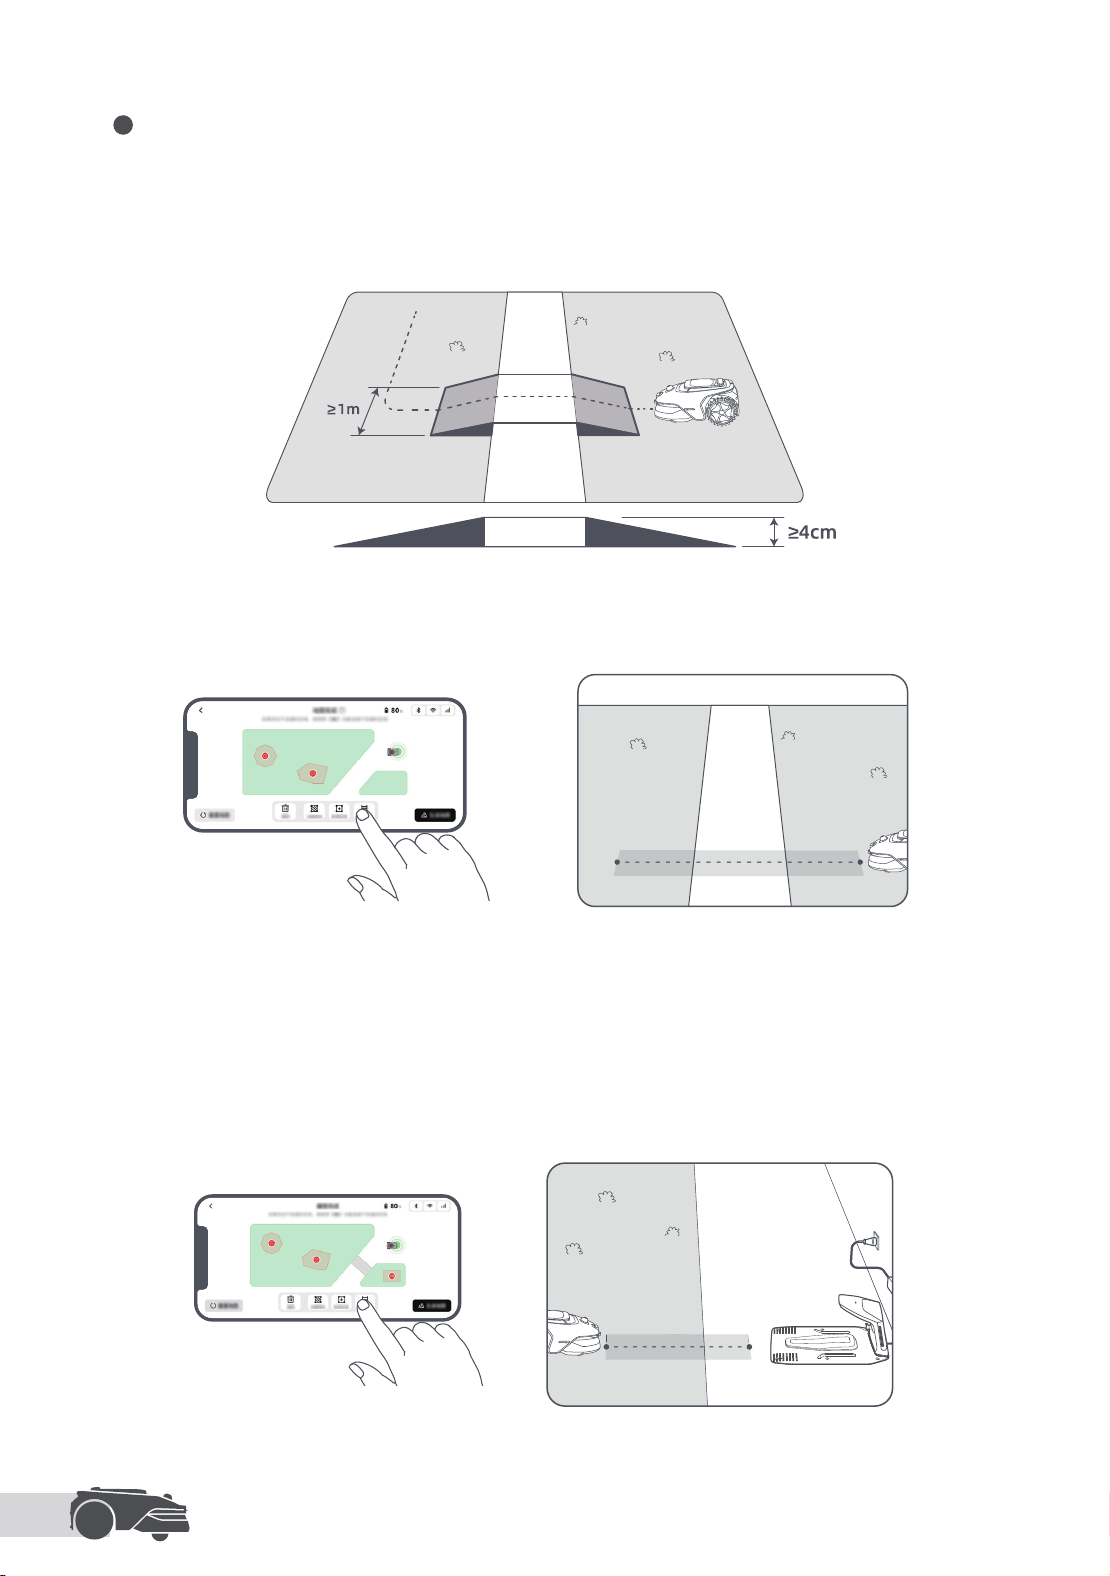
Set Path
For isolated zones, please create a path to connect them. Isolated zones without a path will be inaccessible
to the robot.
Note: By default, the robot only moves along the path without mowing the grass.
Important: If your lawn is divided by passages higher than 4 cm, place an object with a slope equal in
height to the passage (such as a ramp).
• To Connect Two Isolated Work Zones
For isolated areas, please create paths to connect them. Otherwise, they will be inaccessible to the robot.
Important: Make sure the beginning and end of the path are in the work area.
• To Connect the Work Area and the Charging Station
If your charging station is not in the work area, a path should be created to connect it to the work area.
Important:
• Ensure that one end is inside the work area, and the other end is right in front of the charging station. It's
advisable to align the path with the charging station.
• When creating paths to connect the work area and the charging station, do not remotely dock the robot in the
charging station. Otherwise, the LiDAR may be blocked, which can cause the mapping to fail.
EN
27
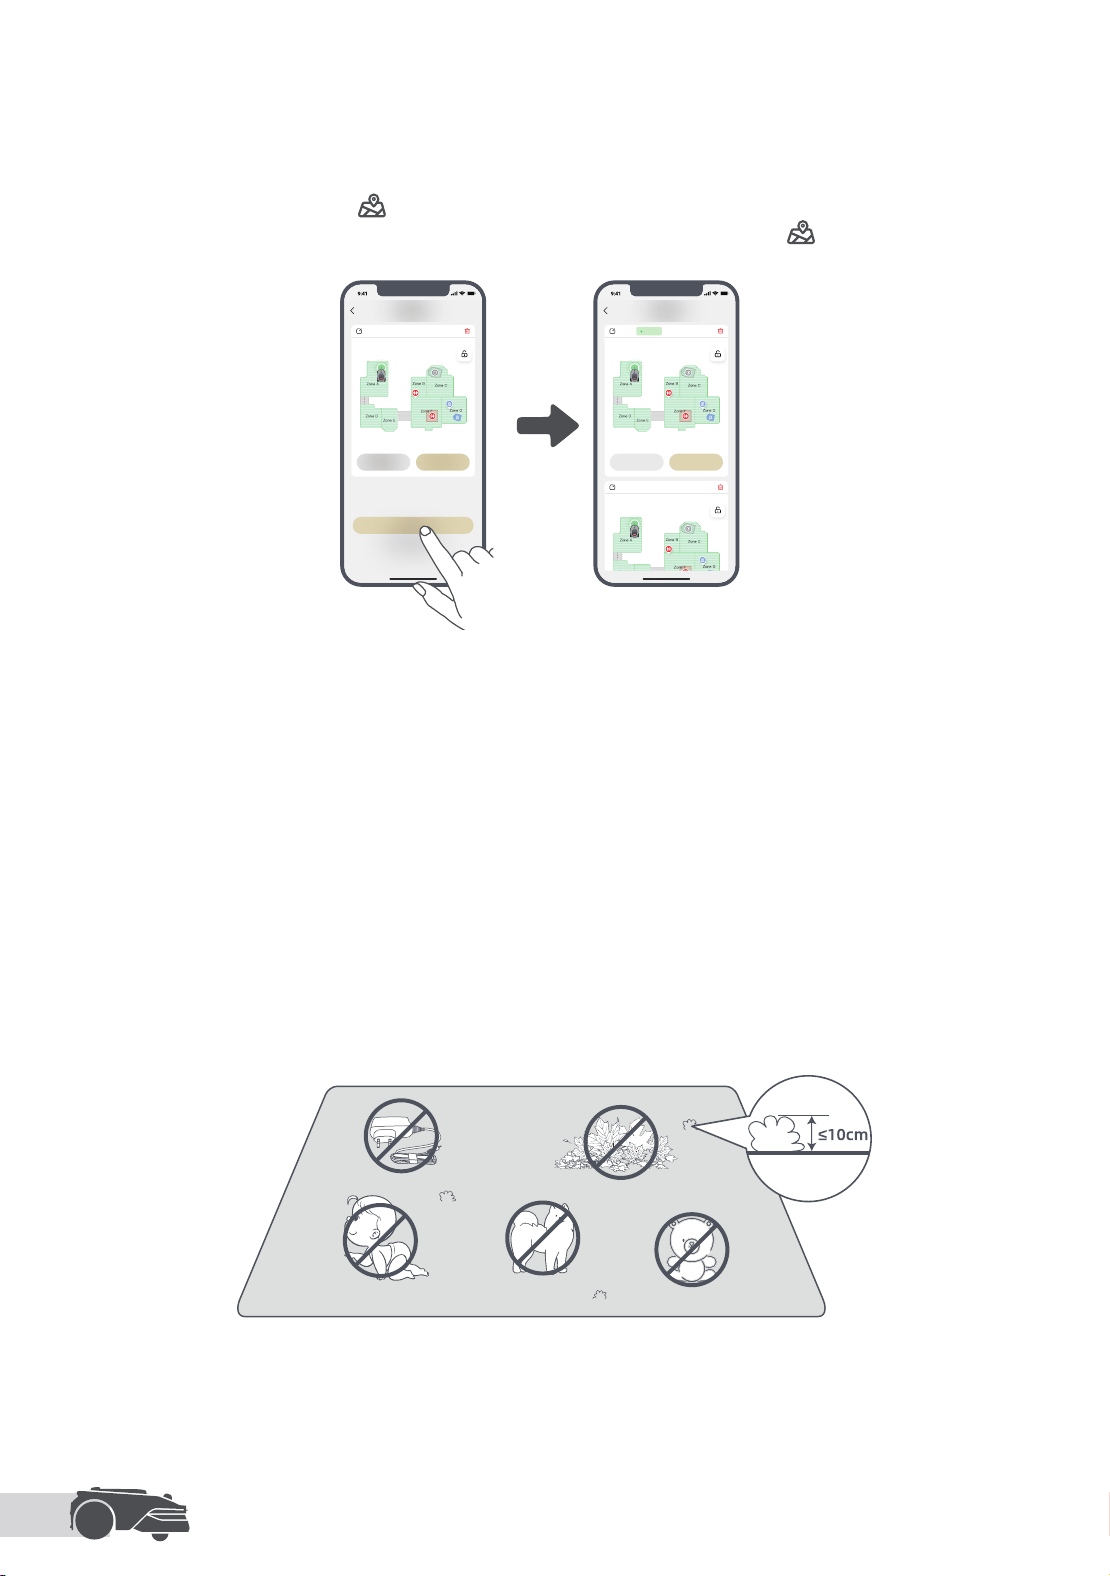
5.2 Add a Second Map
The Dual Map feature is designed for situations where the robot cannot autonomously travel between
separate lawns or when multiple maps are necessary.
You may need to create a second map if:
• Your front and back lawns can't be connected.
• There's a signicant elevation dierence between lawn areas.
• You have multiple properties but only one robot.
• Your lawn area is too large for a single map.
Note: If your lawns are connected and within the robot's capacity, use a Multi-Zone setup instead.
To map the second lawn:
4
Separate and Combine Zones
Divide a zone into smaller ones or merge zones that were divided into a larger one.
6. Tap Finish Map.
Important:
• Do not manually move the robot when creating the boundary, as this may cause the mapping to fail.
• When the mapping begins, do not remotely dock the robot in the charging station until the mapping process
is complete. Otherwise, the LiDAR may be blocked, which can cause the mapping to fail.
Map1
Map2
EN
28
Note:
• After switching the map, the schedules and mowing settings of the current map will be applied.
• You can purchase an additional charging station to install in the second map for greater convenience. With a separate
charging station installed in the second map, you only need to move the robot manually between two maps.
1. Prepare the charging station.
• If you have purchased a second charging station, install it on the second lawn.
• If not, move the robot and its charging station manually to start mapping the second lawn.
2. Navigate to Device Page >
and tap Add Map in the MOVAhome to create the second map.
3. Once you have nished the second map, you can switch between maps through > Use.
6.1 Start Mowing for the First Time
6 Operation
Tips before mowing:
• Use a push mower to mow the grass to a height of no more than 10 cm.
• Clear the obstacles including debris, leaf piles, toys, wires and stones from the lawn. Make sure no children or
pets are on the lawn when the robot is mowing.
• Fill in the holes in the lawn.
• Set your mowing preferences in the app in advance (such as mowing eciency, mowing height and mowing direction).
You can select one of the following two methods to start mowing.
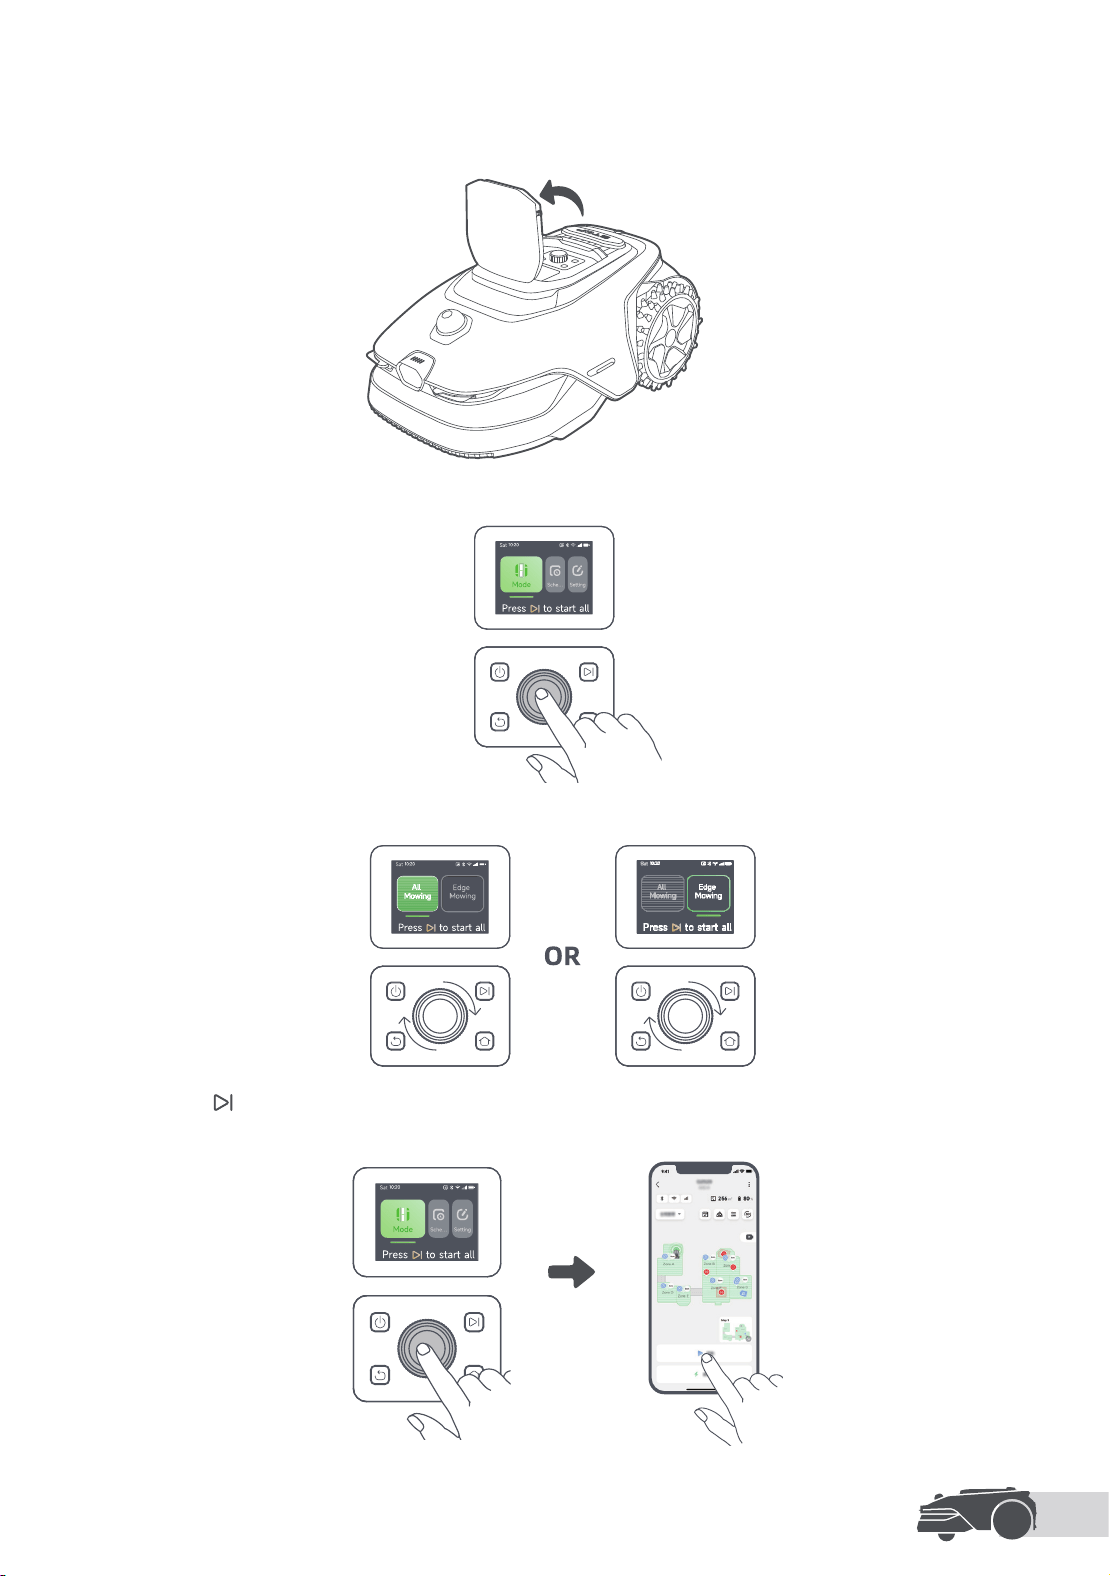
EN
29
3. Turn the knob to select the mowing mode.
4. Press the
button, and close the robot's top cover to conrm. The robot will leave the charging station
and start all-area mowing.
1. Open the robot's top cover.
2. Select Modes on the display and press the knob.
a) Start via the control panel
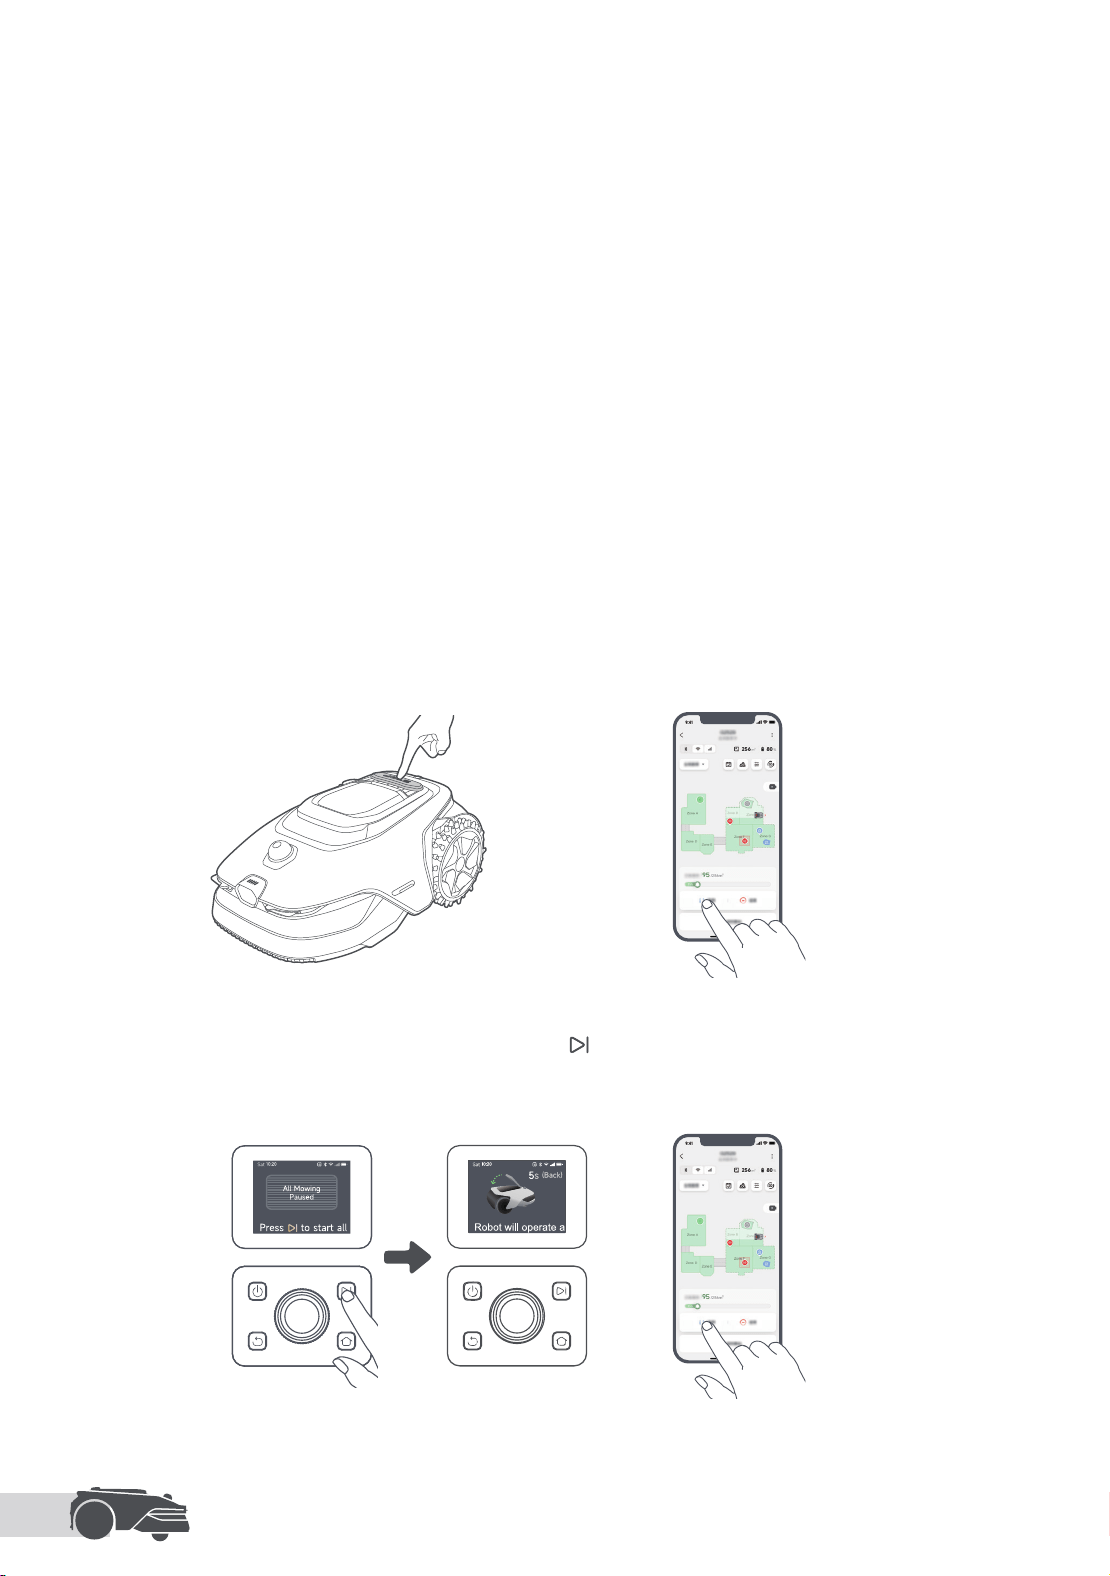
EN
30
1. Open the app.
2. Select a mowing mode and tap Start to start mowing.
b) Start via the app
6.3 Pause
6.2 Mow the Lawn with Dual Maps
To pause the current mowing task, you can press the Stop button on the robot or tap Pause in the app.
Note: The robot cannot be started directly through the app after the Stop button is pressed. To resume
operation, enter your PIN code on the control panel.
1. Manually move the robot to the map you want to mow.
2. Select the correct map in the app before beginning mowing tasks.
Note: After switching the map, the schedules and mowing settings of the current map will be applied.
How to Handle Low Battery or Charging Issues?
For the tasks with only one charging station, if you don't manually relocate the charging station along with
the robot to the second map, the robot might deplete its battery and prompt a charging failure since it can't
locate the charging station. To resolve this issue, please follow these steps:
1. Manually move the robot to the map with the charging station for recharging.
2. After charging, return the robot to the original map. It will resume mowing automatically.
Important: Do not change the map in the app during this process. This ensures the robot remembers its last
position and can continue where it left o.
3. Repeat these steps as needed until the entire lawn is mowed.
OR
6.4 Resume
To resume the task when the robot is paused, press the button, then close the robot's top cover to
conrm. The robot will resume the previous mowing task. Alternatively, you can tap Continue in the app to
resume the mowing task.
OR
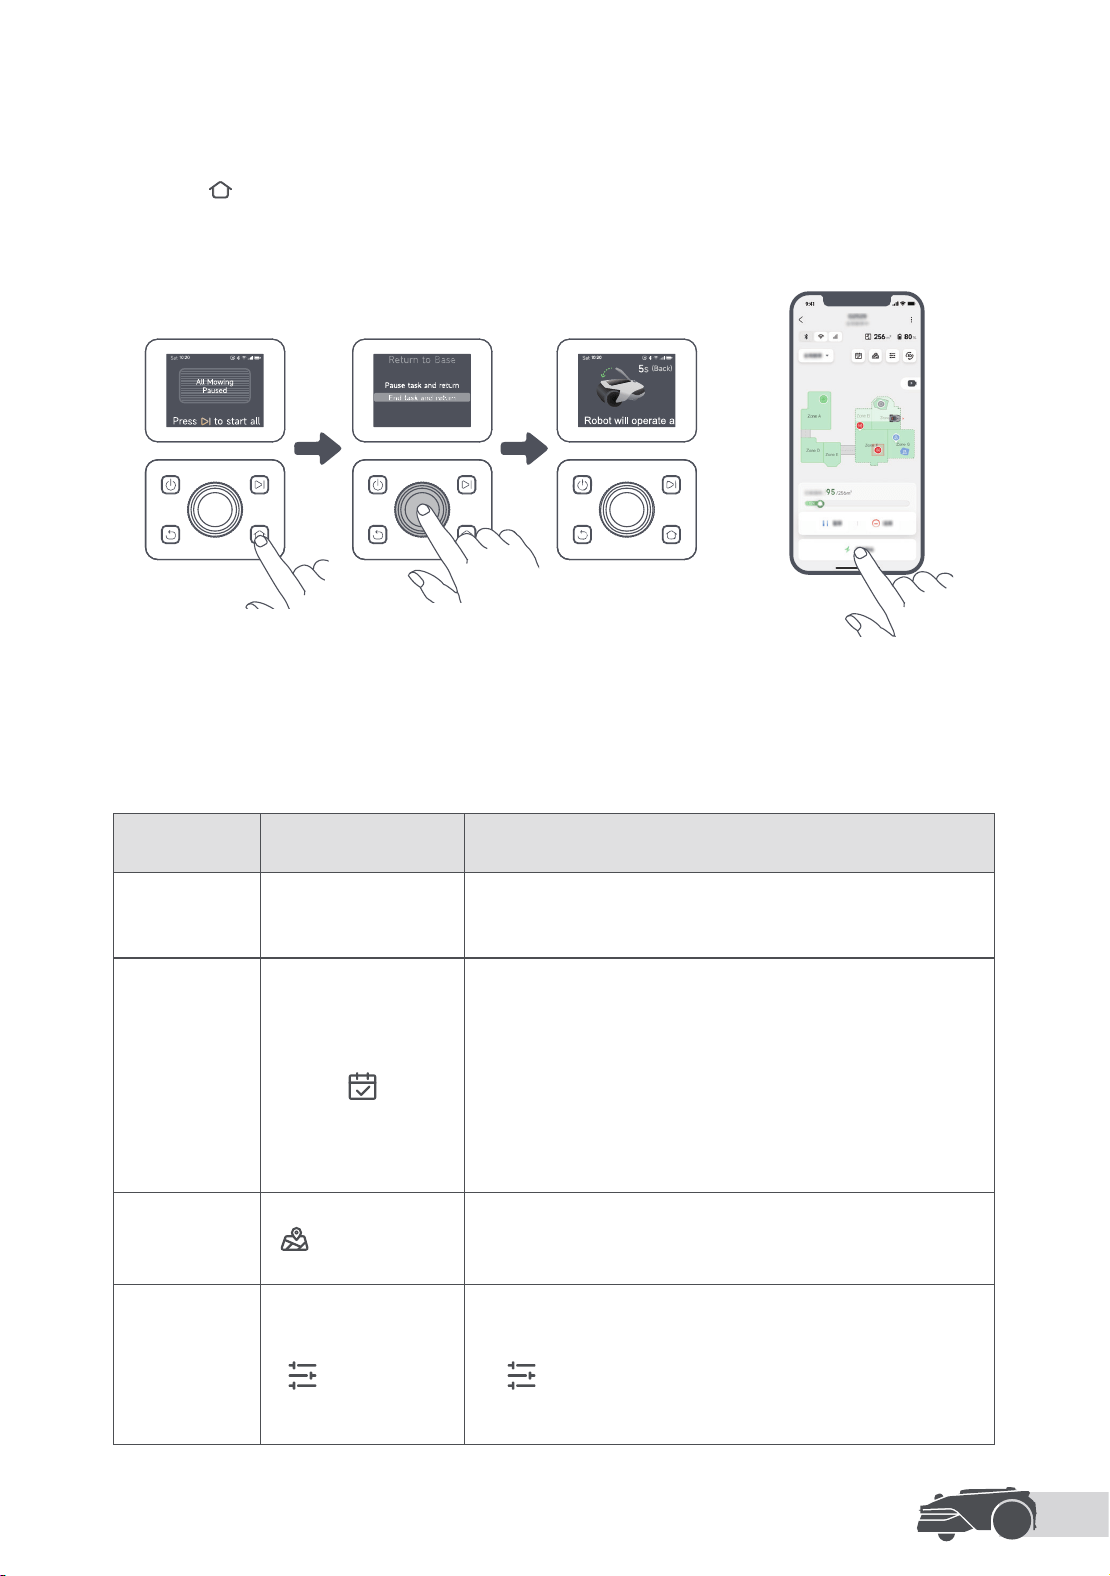
EN
31
Where You Can Explore More
MOVAhome app is more than a remote control. There are many things you can do through the app: complete
various settings remotely, experience dierent mowing modes, and adjust mowing schedules.
7 MOVAhome App
7.1 Mowing Settings
Feature Location in APP Description
Mowing
Modes
Device Page > Mode
selection box in the
upper left corner
The robot oers various mowing modes. You can switch
between modes through the app, including All-Area Mowing,
Zone Mowing, Edge Mowing, Spot Mowing and Manual Mode.
Schedule
Device Page >
After the rst map is completed, the robot automatically
creates two weekly mowing schedules according to the
lawn size, which are "Spr/Sum Schedule" and "Aut/Win
Schedule". With the schedule function, you can completely
leave the daily mowing work to the robot. You only need to
maintain the robot regularly.
Note: If you worry that the robot may disturb you or your
neighbours when it works autonomously during certain hours,
you can go to Settings > Do Not Disturb and set Do Not
Disturb time in the app.
Mowing
Shapes
Device Page >
> Edit > Shapes
Customise your lawn by adding shapes. Dened shapes will
be excluded from mowing in all mowing modes. You can
modify their position, size, or remove them in Shapes.
UltraTrim ™
Blade Disc
Device Page >
> UltraTrim ™
The UltraTrim ™ blade disc is designed to move to the side
when it reaches the lawn edges, ensuring a cleaner cut.
Note: You can congure additional mowing preferences via
the . Use General Mode to apply the settings across all
mowing zones, or switch to Custom Mode to dene individual
mowing preferences for each zone.
OR
6.5 Return to the Charging Station
To send the robot back to its charging station:
1. Press the
on the control panel.
2. Conrm to pause or cancel the current task.
3.
Close the robot's top cover to conrm. The robot will automatically return to the charging station to recharge.
Alternatively, you can select Start Returning to Station in the app to send the robot back.
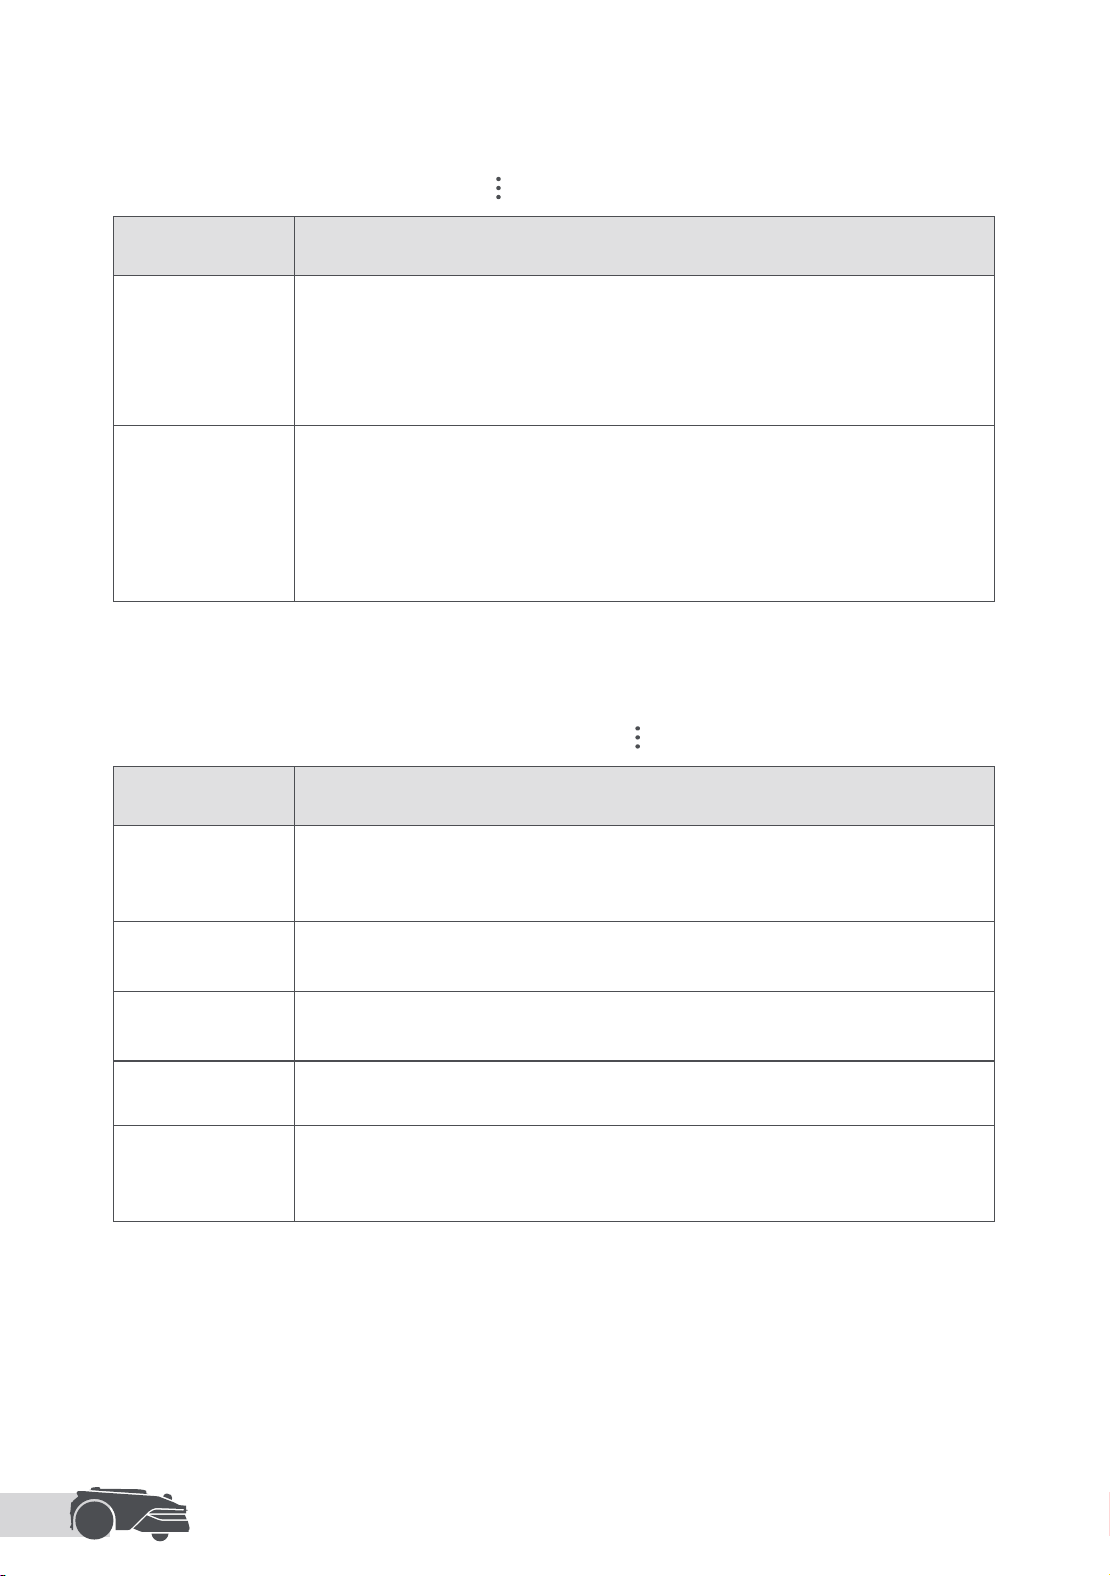
EN
32
7.2 Weather Protection Features
7.3 Anti-theft & Safety Features
Feature Description
Rain Protection
When this function is enabled, the robot automatically pauses mowing and returns
to the charging station when it rains. You can set the rain protection time in the
app.
Note: Mowing wet grass can damage your lawn. It is advisable to extend the
protection duration to allow the grass to get dry before mowing again.
Frost Protection
Mowing in temperatures below 6° C may cause permanent lawn damage. For
safety, the battery will not charge as a safety measure.
To protect your lawn and robot, you can enable the Frost Protection feature.
When enabled, the robot automatically pauses mowing and returns to the
charging station when the temperature falls below 6° C, and resumes mowing
once the temperature rises above 11° C.
Feature Description
Lift Alarm
With this function enabled, an alarm will go o immediately when the robot is
lifted, and the robot will be locked. To resume operation, enter the PIN code on the
robot rst.
O-Map Alarm
With this function enabled, the robot will be locked and the alarm will go o
immediately if it is away from the map.
Real-Time
Location
With this function enabled, you can view the current location of the robot in Google
Maps.
Human Presence
Detection Alert
When enabled, the robot will notify you upon detecting human presence.
Child Lock
When enabled, the robot will be locked if no operations are performed for 5
minutes when the cover is open. Enable this feature when you worry that children
may operate the robot.
If you worry that adverse weather conditions may aect the mowing work, you can enable the following
weather protection features in Device Page >
in the APP.
This section covers the robot’s anti-theft and safety features, including alarms for lifting or moving o-map,
real-time location tracking, human presence alerts, and a child lock to prevent unintended operation.
To enable the anti-theft & safety features, go to Device Page >
in the APP.
Note: The o-map alarm and real-time location features are only available when the Link Service is activated.
EN
33
7.4 TrueGuard Features
7.5 Charging
Feature Description
Real-time Video
Tap
to view a live video feed from the robot’s front camera, allowing you to
monitor your garden anytime, anywhere.
Patrol
While the robot is on standby, you can send it to patrol specic boundaries or spots
in your garden via the app. To access this feature, go to
> Patrol.
This robot allows you to keep an eye on your garden with real-time video and patrols for specic spots via
the app.
You can adjust the charging settings through Device Page >
> Charging in the app.
7.5.1 Custom Charging Period
7.5.2 Battery Level Control
The Custom Charging Period feature allows you to customise the robot's charging period to specic hours.
When enabled, the robot charges itself to a safe battery level when the battery level is low when there are
no mowing tasks, and completes a full charge only during the designated charging period.
• Battery Level for Auto-Recharge: Set the battery levels at which the robot automatically returns to the
charging station.
• Battery Level for Resuming Tasks: Set the battery levels at which the robot automatically resumes
unnished mowing tasks.
Note: MOVA development team will continuously conduct OTA (Over-the-Air) updates and maintenance
on the rmware and app. Please check for update notications or enable the Auto-update function to keep
the rmware and app up-to-date and enjoy more features.
8 Maintenance
For better performance and lifespan of the robot, please clean it regularly and replace worn parts according
to the frequency below:
Note:
• You can check the remaining time for blades and the cleaning brush by navigating to Device Page >
>
Consumables & Maintenance in the app. After replacing any consumables as prompted, go to the details
page for the consumable and tap I've Replaced It to reset the timer.
• If you have designated areas in your garden for routine robot cleaning and servicing, you can set Maintenance Points
on the map by navigating to Device Page > > Head to Maintenance Point > Edit Point. Once the maintenance
points are set, you can simply tap Go and direct the robot to the designated locations for easy servicing.
Part Replacement Frequency
Blades Every 6–8 weeks or sooner
Cleaning brush Every 12 months or sooner
EN
34
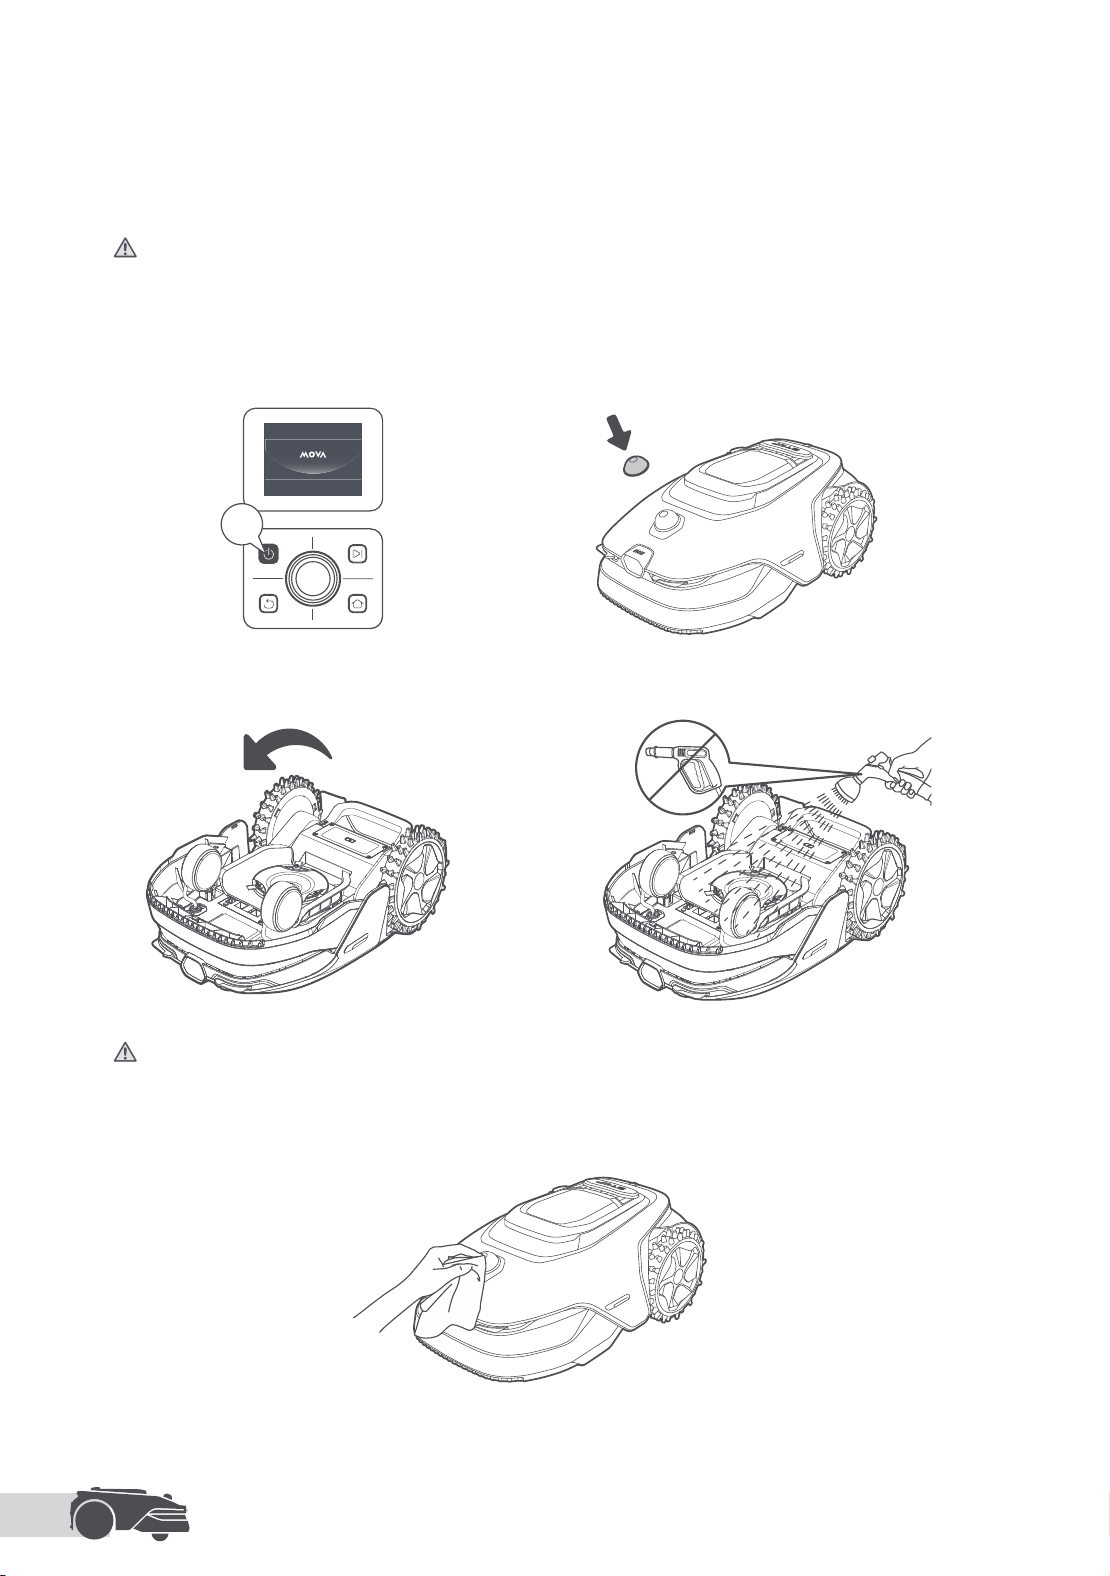
Regularly clean your robot to prevent grass clippings and dirt from accumulating and clogging the blade
disc and drive wheels, which can aect its mowing, docking, and movement performance. We recommend
using a cleaning kit, available at local stores or online.
8.1 Cleaning
Warning: Before cleaning, please turn o the robot and unplug the charging station.
Caution: Please make sure LiDAR protective cover is on the LiDAR before turning the robot upside down to
avoid damage to the LiDAR.
2s
2. Cover the LiDAR with its protective cover.
3. Turn the robot upside down. 4. Clean the housing, blade disc and chassis with a hose.
Warning: Do not touch the blades when cleaning the chassis. Please wear gloves when cleaning.
Caution: Please do not use a high-pressure washer for cleaning. Do not use detergents for cleaning.
• The Housing, Chassis and Blade Disc:
1. Turn the robot o.
5. Use a lint-free cloth to carefully clean the LiDAR sensor.
EN
35
2s
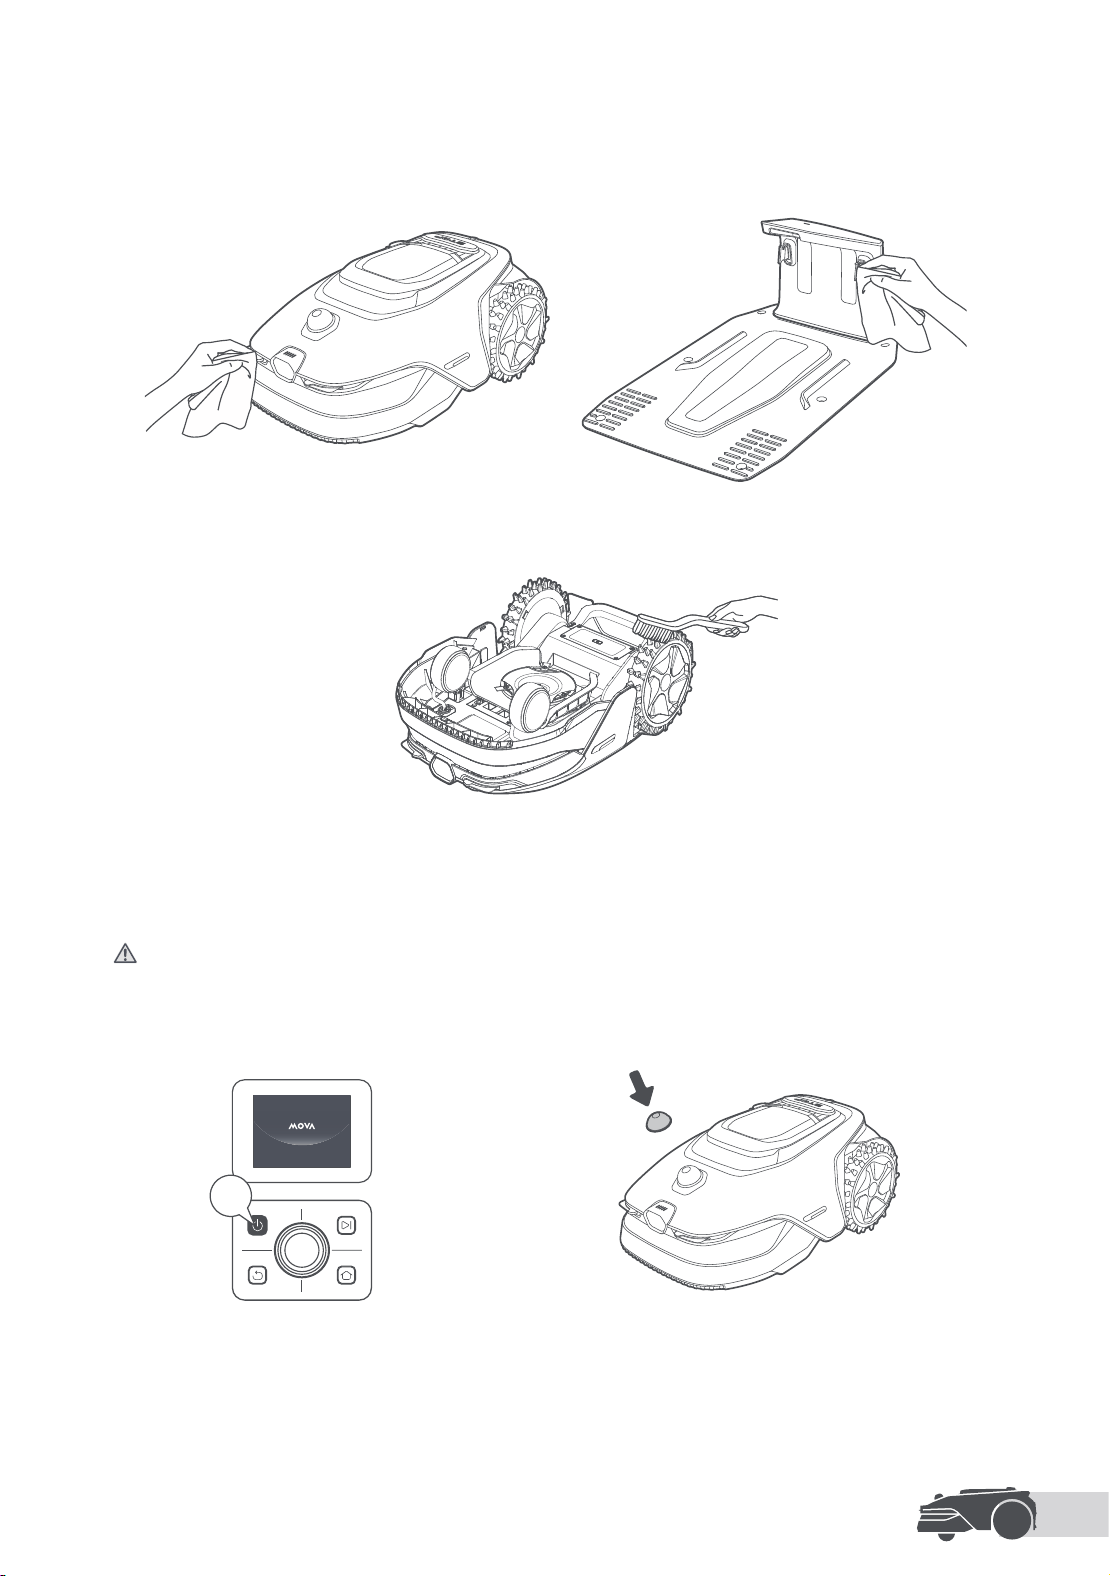
• Charging Contacts and Front Camera:
Use a clean cloth to wipe the charging contacts on the robot and the charging station, and also clean the
front camera. Keep the charging contacts and the front camera dry after cleaning.
• Drive Wheels:
Use a brush to remove mud from the wheels to ensure good grip.
8.2 Replacing the Components
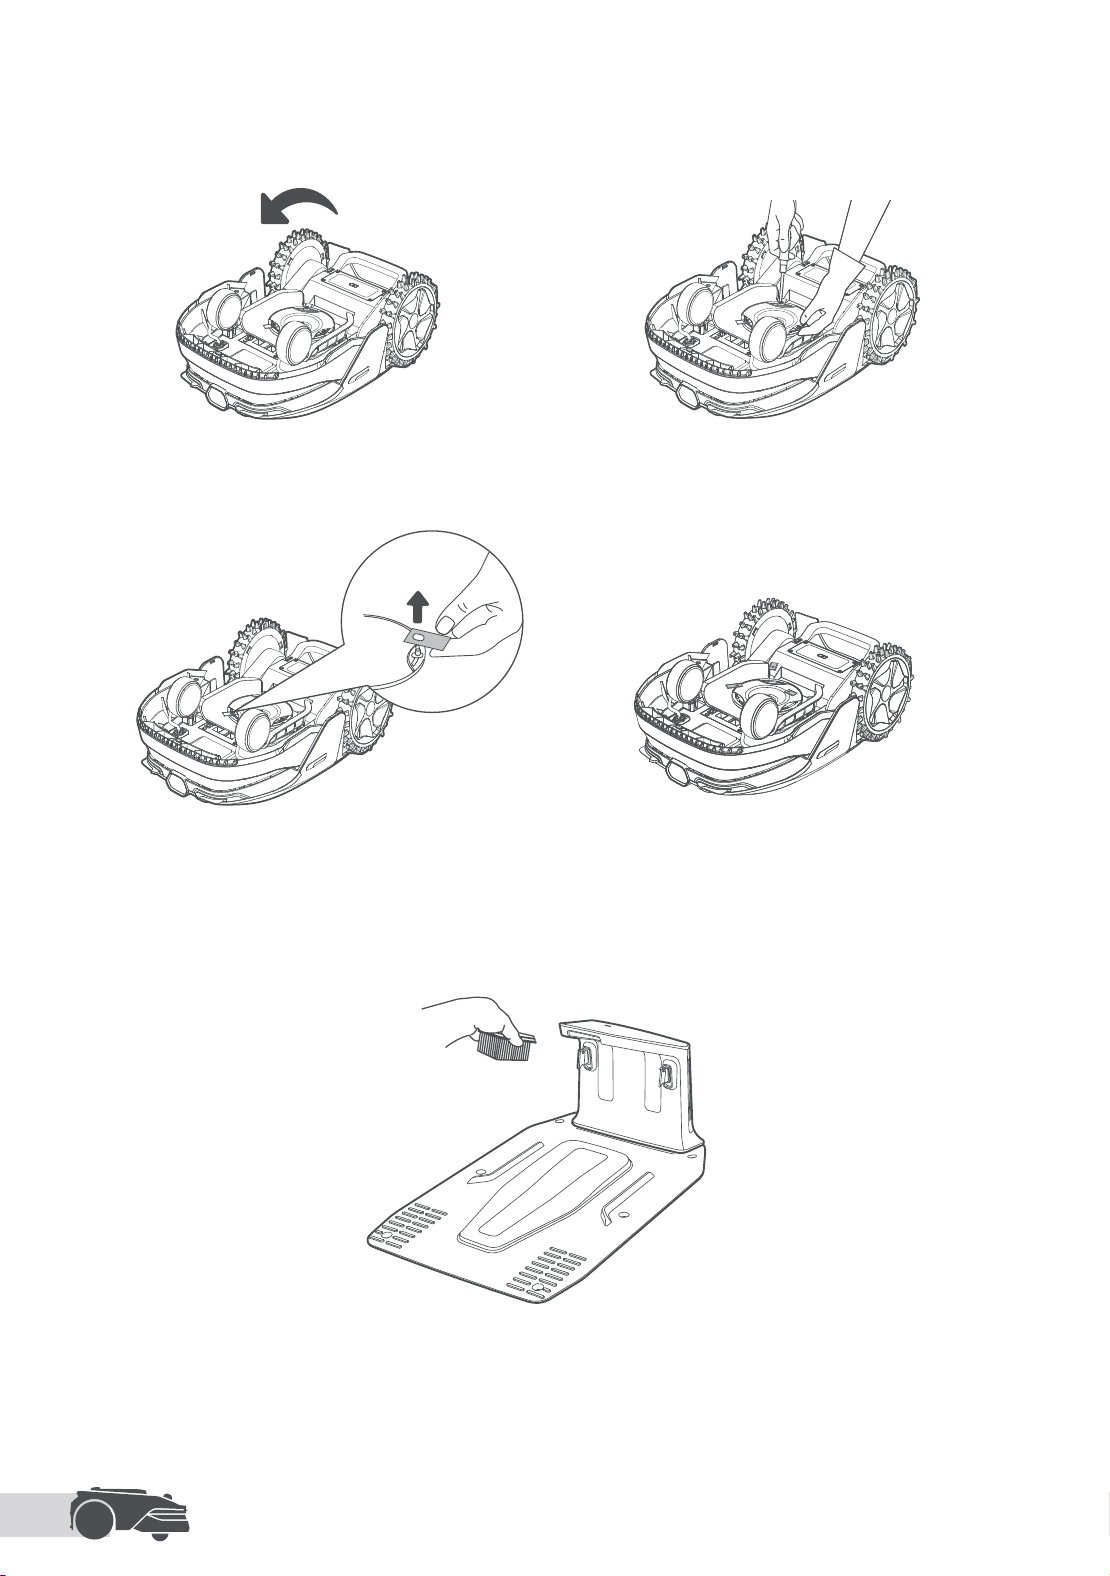
• Replacing the Blades
To keep the blades sharp, please replace the blades regularly. It is recommended to replace the blades
every 6–8 weeks or sooner. Please only use the MOVA genuine blades.
Warning:Please turn o the robot. Wear protective gloves before replacing the blades.
Note: Please replace all three blades at the same time to ensure a balanced cutting system.
1. Turn o the robot. 2. Cover the LiDAR with its protective cover.
EN
36
5. Remove the three blades and screws. 6. Align the new blades with the holes on the blade
disc, then secure them with the screws.
• Replacing the Cleaning Brush
When the cleaning brush for the LiDAR sensor wears out, its bristles may fray or deteriorate, aecting its
cleaning performance. Please replace the cleaning brush regularly to keep a good cleaning result. It is
recommended to replace the cleaning brush every 12 months or sooner.
3. Put the robot on a soft surface and turn it
upside down.
4. Loosen the screws using a Phillips screwdriver.
EN
37
9 Battery
Low-Power Charging Mode:
When the low-power charging mode is activated, functions unrelated to charging will be disabled (the
display and network will be turned o).
• To enable low-power charging mode, press and hold the
button and the button simultaneously, and
press the
button 5 times quickly at the same time. You will hear a voice prompt: Low-power charging
mode is on.
• To disable low-power charging mode, restart the robot or press the
button 5 times quickly.
For long-term storage, charge the robot every 6 months to protect the battery. Battery damage caused by
over-discharge is not covered by the limited warranty. Do not charge the battery at an ambient temperature
above 40° C or below 10° C. The long-term storage temperature for the battery should be between -10
and 35° C. To minimize the damage, the recommended storage temperature for the battery is between 0
and 25° C.
Note: The lifespan of the robot's battery depends on frequency of usage and hours of operation. If the
battery is damaged or cannot be charged, do not dispose of the obsolete or faulty battery arbitrarily. Please
obey local recycling regulations.
10 Winter Storage
11 Transport
• The Robot
1. Charge the battery fully before turning the robot o.
2. Clean the robot thoroughly before putting it into storage in winter.
3. Put on the LiDAR protective cover.
4. Store the robot inside in a dry place, at a temperature above 0° C.
• Charging Station
Unplug the charging station and store it in a dry and cool place, away from direct sunlight.
Note: After winter storage, please reinstall the charging station and place the robot in it to charge. If you
reinstall the charging station in a dierent location, the robot will automatically update the station's location
as soon as it charges and leaves the station. If you encounter positioning errors because of major changes
in your garden, it's recommended to remap the area.
For long distance transport, ensure that the robot is turned o. It is recommended to use the original
packaging. Please put on the LiDAR protective cover.
Warning:
• Please turn the robot o before transporting it.
• Lift the robot by the rear handle, keeping the blade disc away from your body.
EN
38
12 Troubleshooting
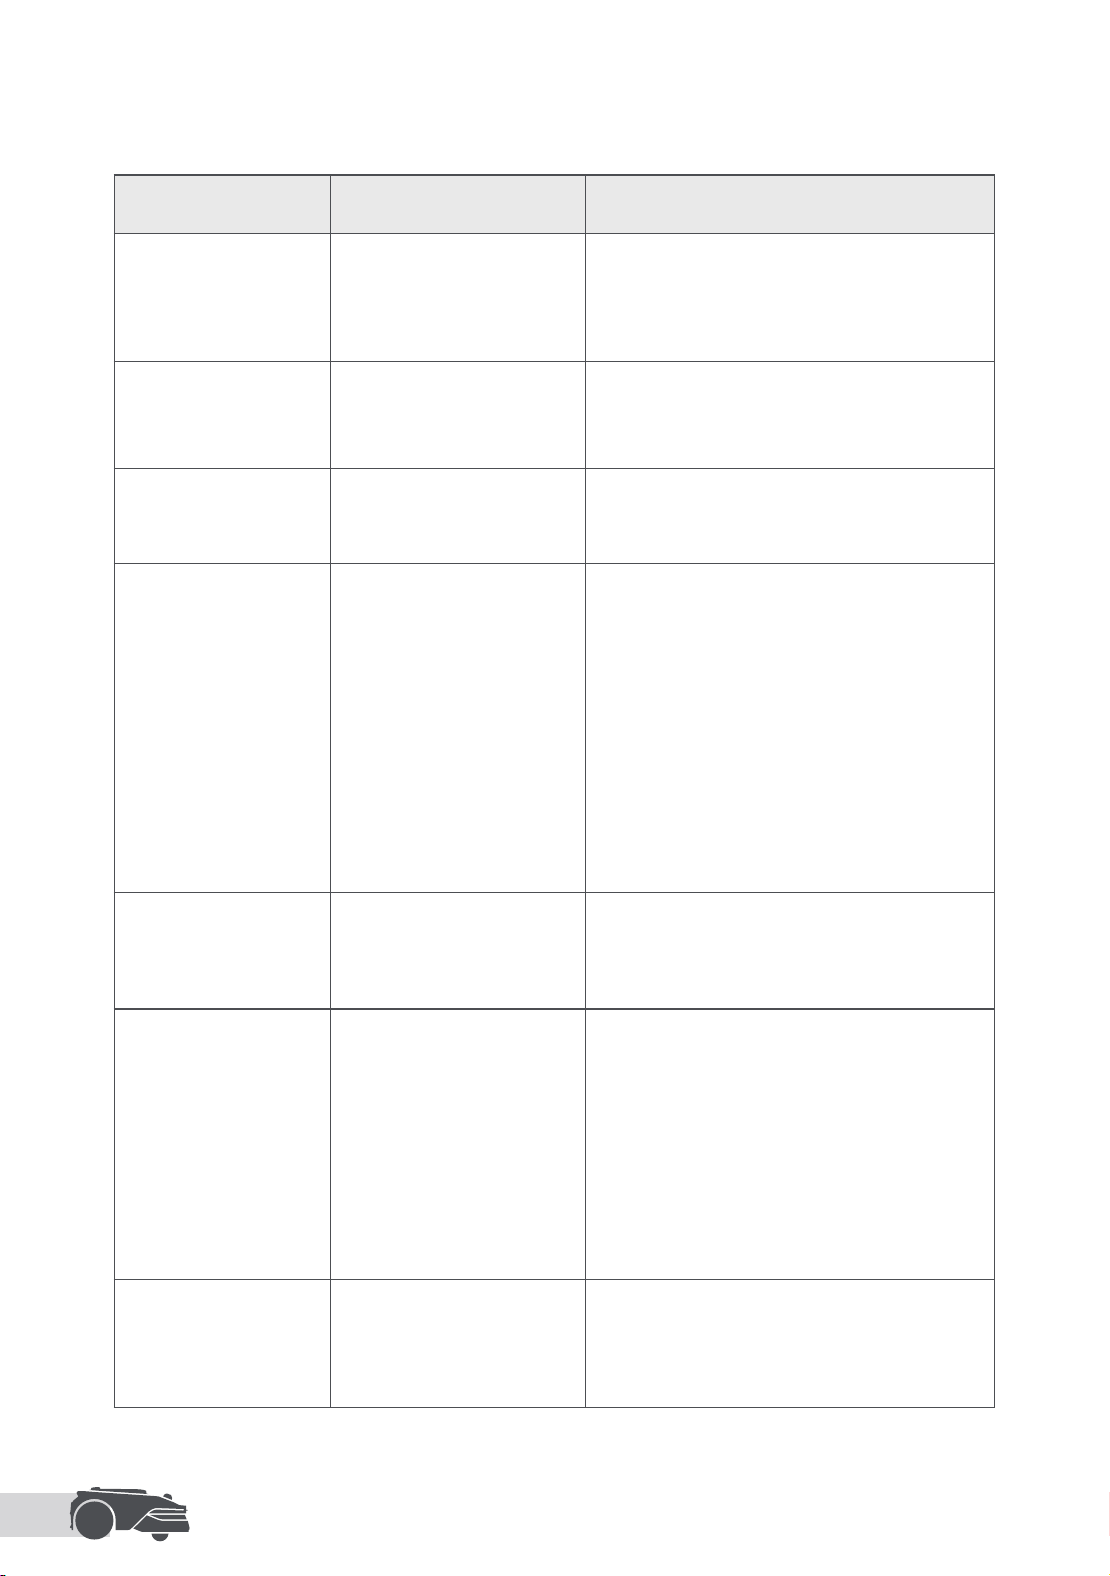
Issue Cause Solution
The robot is not
connected to the app.
1. The robot is not within Wi-Fi
signal coverage or Bluetooth
range.
2. The robot is turned o or is
restarting.
1. Check if the robot has completed the process of
turning on.
2. Check if the router is working properly.
3. Move closer to the robot to establish a Bluetooth
connection.
Robot lifted.
The wheel is not on the
ground.
1. Put the robot back on at ground.
2. Enter the PIN code on the robot and conrm.
3. The robot can't cross objects higher than 4 cm.
Please keep the ground even where it is working.
Robot tilted.
The robot tilts more than
37° .
1. Put the robot back on at ground.
2. Enter the PIN code on the robot and conrm.
3. The robot cannot climb slopes greater than 45%
(24° ).
Robot trapped.
The robot is trapped and
fails to get out.
1. Remove the surrounding obstacles and then retry.
2. Manually move the robot to a at and open place
inside the map and try starting the task again. If
you continue to encounter this problem, please
retry after the robot is in the charging station.
3. Check if there are holes in the ground. Fill in the
holes before mowing to prevent the robot from
being trapped.
4. Check if the surrounding grass is taller than
10 cm. You can adjust the obstacle avoidance
height or use a push mower to mow the lawn
in advance to prevent the robot from being
trapped.
5. If the robot is often trapped in this location, you
can set it as a no-go zone.
Left/right rear wheel
error.
The wheel cannot rotate
or the wheel motor has a
problem.
1. Clean the rear wheels and then retry.
2. If you continue to encounter this error, try
restarting the robot.
3. If the problem persists, please contact the after-
sales service.
Blade disc can't rotate.
The blade disc cannot rotate
normally or the cutting
motor has a problem.
1. Clean the blade disc and then retry.
2. Check if the surrounding grass is taller than 10
cm. You can use a push mower to mow the lawn
in advance to prevent the blade disc from being
blocked by tall grass.
3. Check if there is water under the blade disc. If
there is any, move the robot to a dry place and
then retry.
4. If you continue to encounter this error, try
restarting the robot.
5. If the problem persists, please contact the after-
sales service.
The blade disc fails to
move up or down.
The blade disc fails to move
up or down.
1. Clean the blade disc and then retry.
2. If you continue to encounter this error, try
restarting the robot.
3. If the problem persists, please contact the after-
sales service.
EN
39
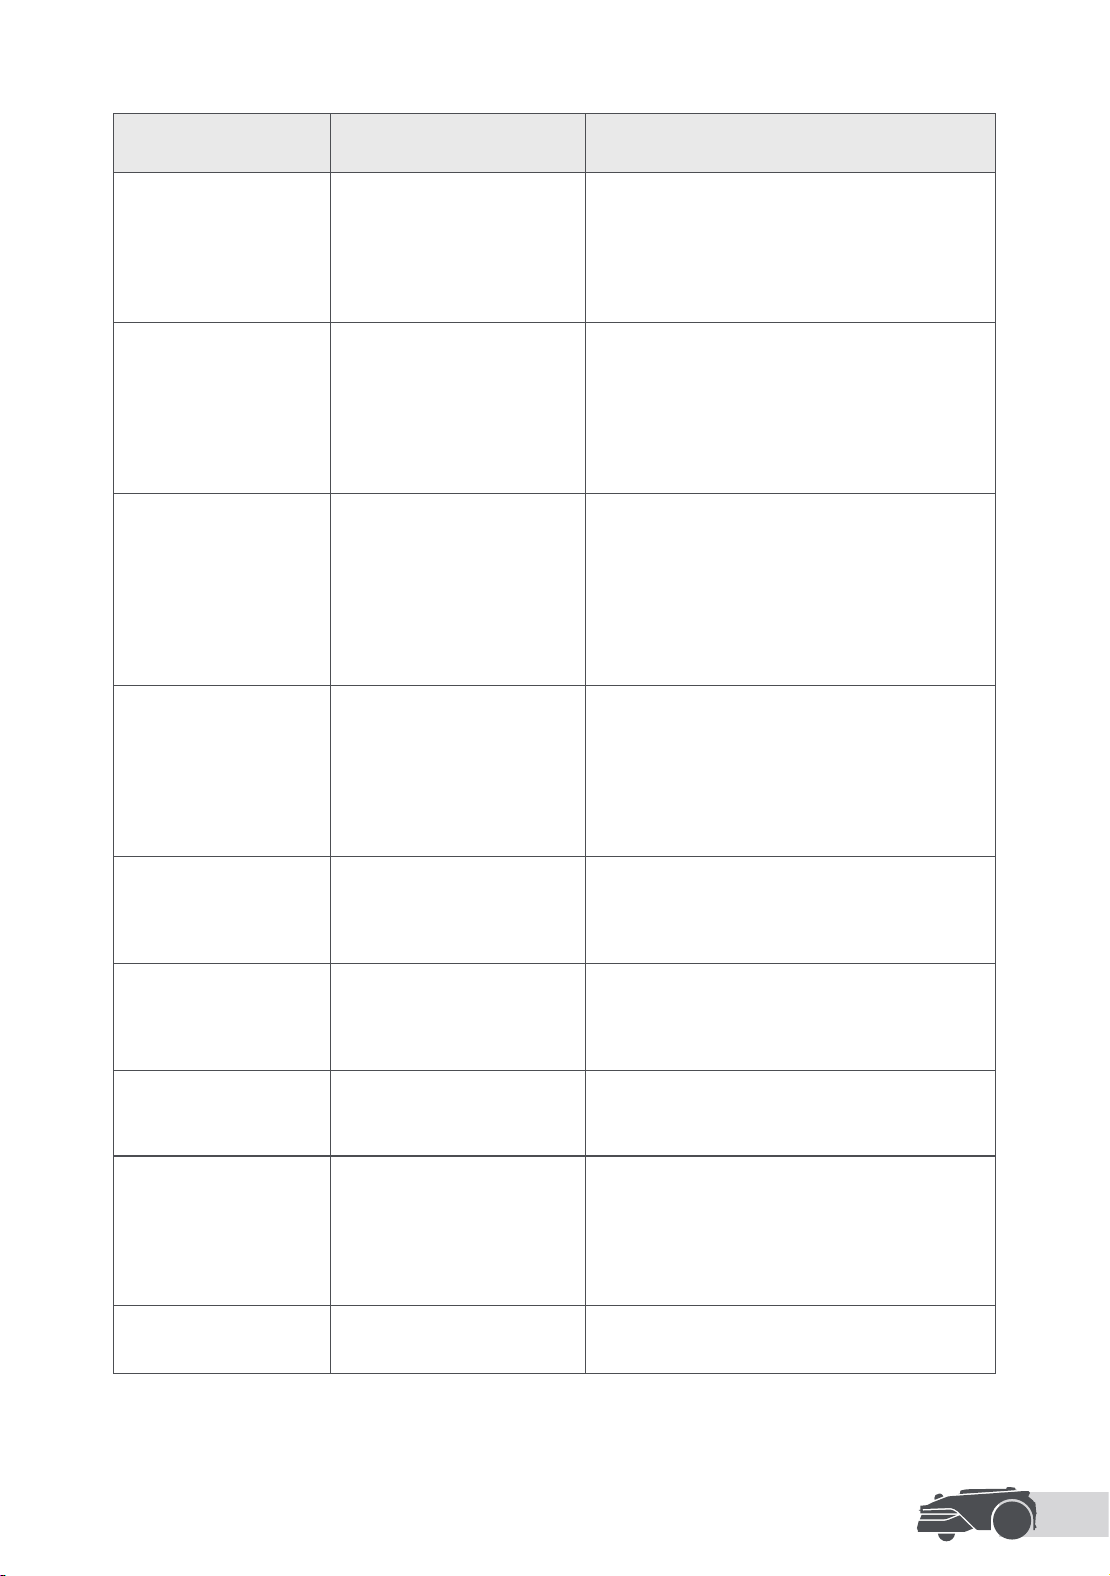
Issue Cause Solution
The blade disc cannot
move to the side.
The blade disc cannot move
to the side.
1. Clean the cutting system and remove any debris
or foreign objects.
2. If you continue to encounter this error, you can
disable the UltraTrim ™ function rst.
3. If the problem persists, please contact the after-
sales service.
Bumper error.
The front bumper sensor is
constantly triggered.
1. Check if the robot is trapped somewhere.
2. Gently tap the bumper and make sure it bounces
back.
3. If you continue to encounter this error, try
restarting the robot.
4. If the problem persists, please contact the after-
sales service.
Charging error.
The robot docks in the
charging station, but the
charging current or voltage
has a problem.
1. Check if the charging station is correctly
connected to power.
2. Check if the charging contacts on the robot and
the charging station are clean.
3. After checking is nished, try docking the robot in
the charging station again.
4. If the problem persists, please contact the after-
sales service.
Battery temperature too
high.
Battery temperature is ≥
60℃ .
1. Use the robot where ambient temperature is
below 40℃ . You can wait until the battery
temperature decreases automatically.
2. You can turn o the robot and restart it after a
while.
3. If the problem persists, please contact the after-
sales service.
Battery temperature is
high.
Battery temperature is ≥
40℃ .
1. Charging may fail when battery temperature is
above 40℃ .
2. Use the robot where ambient temperature is
below 40℃ .
Battery temperature is
low.
Battery temperature is ≤ 6℃ .
1. Charging may fail when battery temperature is
below 6℃ .
2. Use the robot where ambient temperature is
above 6℃ .
LiDAR is blocked.
LiDAR is blocked (for
example the LiDAR protective
cover is not removed).
1. Remove the lidar protective cover and then retry.
2. If lidar on the top of the robot is very dirty, clean it
with a lint-free cloth and then retry.
LiDAR malfunction.
LiDAR is very dirty or there is
a sensor error.
1. Check if the lidar is dirty. Clean it if necessary and
then try again.
2. If you continue to encounter this error, try
restarting the robot.
3. If the problem persists, please contact the after-
sales service.
LiDAR is dirty. LiDAR is dirty.
Wipe the LiDAR sensor on top of the robot with a
clean cloth. Keep the LiDAR dry after cleaning.
EN
40
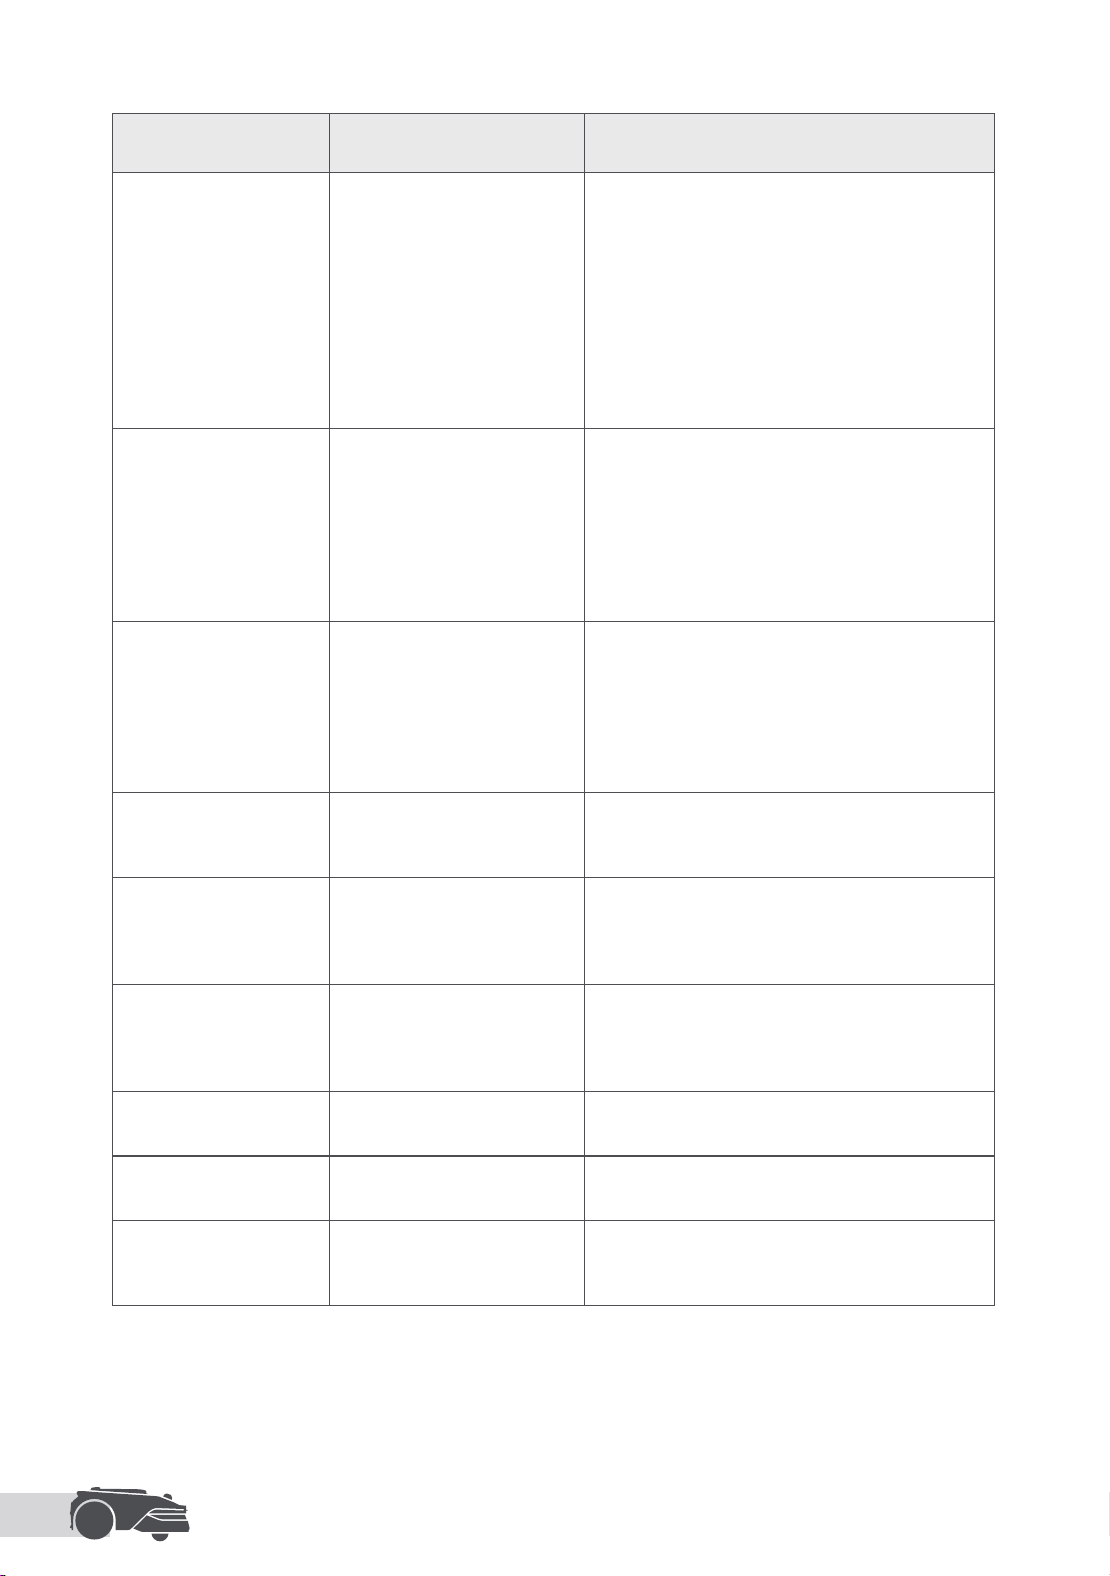
Issue Cause Solution
LiDAR temperature is
high.
The LiDAR temperature is
high. LiDAR will stop soon.
1. The robot will automatically try to return to the
charging station to cool down.
2. Ensure the robot operates at an ambient
temperature below 40 ℃ .
3. Place the robot in a shaded, cool, and well-
ventilated area. The alarm will stop when the
temperature drops to a normal range.
4. The robot will automatically resume operation
once the alarm stops.
5. If the problem persists, please contact after-sales
service.
LiDAR temperature is
too high.
The LiDAR temperature is too
high. LiDAR has stopped.
1. The LiDAR is turned o due to high temperatures.
2. Ensure the robot operates at an ambient
temperature below 40 ℃ .
3. Place the robot in a shaded, cool, and well-
ventilated area. The alarm will stop when the
temperature drops to a normal range.
4. If the problem persists, please contact after-sales
service.
Robot is lost. Positioning is lost.
1. Check if the LiDAR on the top of the robot is dirty.
Dirt will aect the positioning.
2. Manually move the robot to an open place inside
the map and try starting the task again.
3. If the positioning is not recovered, remote control
the robot back to the charging station via the
app, and then start the mowing task.
Sensor error. Sensor error.
1. Restart the robot and retry.
2. If the problem persists, please contact the after-
sales service.
The robot is in the no-
go zone.
The robot is in the no-go
zone.
1. Manually move the robot out of the no-go zone
and then retry.
2. Remotely control the robot through the app to
move it out of the no-go zone, and then retry.
The robot is outside the
map.
The robot is outside the map.
1. Manually move the robot inside the map, and
then retry.
2. Remote control the robot back inside the map via
the app, and then retry.
Emergency stop is
activated.
The Stop button on the robot
is pressed.
Enter the PIN code on the robot and conrm.
Low battery. The robot
will shut down soon.
Battery level is ≤ 10%. Dock the robot in the charging station to charge.
The robot is away from
the map. Risk of being
stolen.
The robot is away from the
map.
1. Enter the PIN code on the robot and conrm.
2. You can disable the O-Map Alarm in Settings in
the app.
EN
41
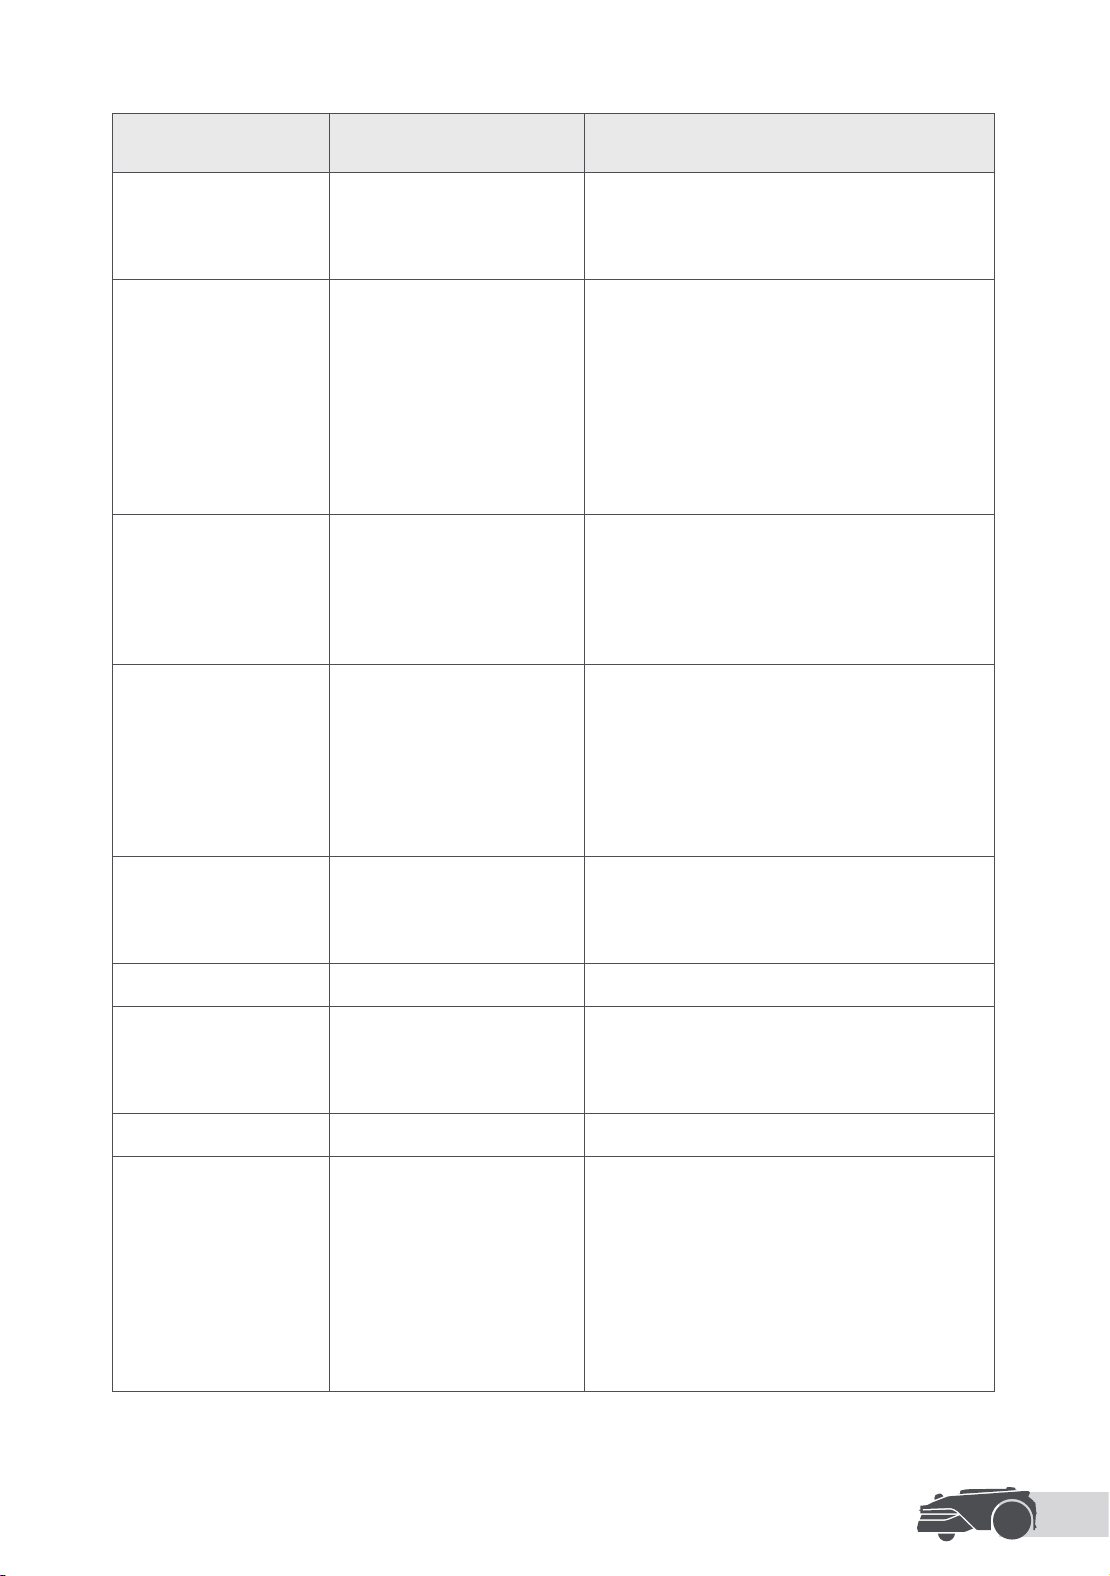
Issue Cause Solution
Failed to return to the
charging station.
The robot cannot nd the
charging station when
returning to the charging
station.
1. Check if there are obstacles blocking the robot.
Remove the obstacles and retry.
2. Remote control the robot back to the charging
station via the app.
Failed to dock in the
charging station.
The robot nds the charging
station but fails to dock.
1. Check if the reective lms on the station are
dirty or blocked.
2. Check if there are obstacles in front of the
station.
3. Check if the station is moved.
4. Check if the baseplate is covered with thick mud.
5. Check if the station is on a slope.
6. Check if the station has power.
7. Help the robot dock in the charging station by
using the remote control or manually.
Positioning failed.
Positioning fails when the
robot tries to start a mowing
task.
1. The lidar may be obstructed. Manually move the
robot to a at and open place inside the map
and try starting the task again.
2. If you continue to encounter this error, please
retry after the robot is docked in the charging
station.
Insucient space for
turning in front of the
station.
Insucient space for turning
in front of the station.
1. If the station is placed at the edge of the map
or within it, ensure there is at least 1 m of free
space between the front area of the station's
baseplate and the boundary of the map;
otherwise, the robot may not be able to make
turns.
2. Relocate the station, or change the map in Map
Editing.
Path obstructed. Path obstructed.
1. Check if a no-go zone is set in the path.
2. Check if there are obstacles blocking the robot.
3. If the robot still cannot pass, delete the path in
Map Editing and set a new one.
The front camera is dirty. The front camera is dirty. Wipe the front camera with a clean cloth.
There is an issue with the
front camera.
There is an issue with the
front camera.
1. Wipe the front camera with a clean cloth.
2. Try restarting the robot.
3. If the problem persists, please contact the after-
sales service.
Front camera blocked. Front camera blocked. Wipe the front camera with a clean cloth.
Boundary detection
error occurs during
Auto-Mapping.
Boundary detection error
occurs during Auto-
Mapping.
1. Ensure that the lighting conditions are suitable,
neither too bright nor too dim.
2. Conrm that the weather is clear, avoiding fog or
rain.
3. Ensure that the front camera is clean and
unobstructed.
4. Ensure that the ground surface is even, as
bumps may aect detection.
5. If boundary detection continues to fail, switch to
remote control mode for mapping.
EN
42
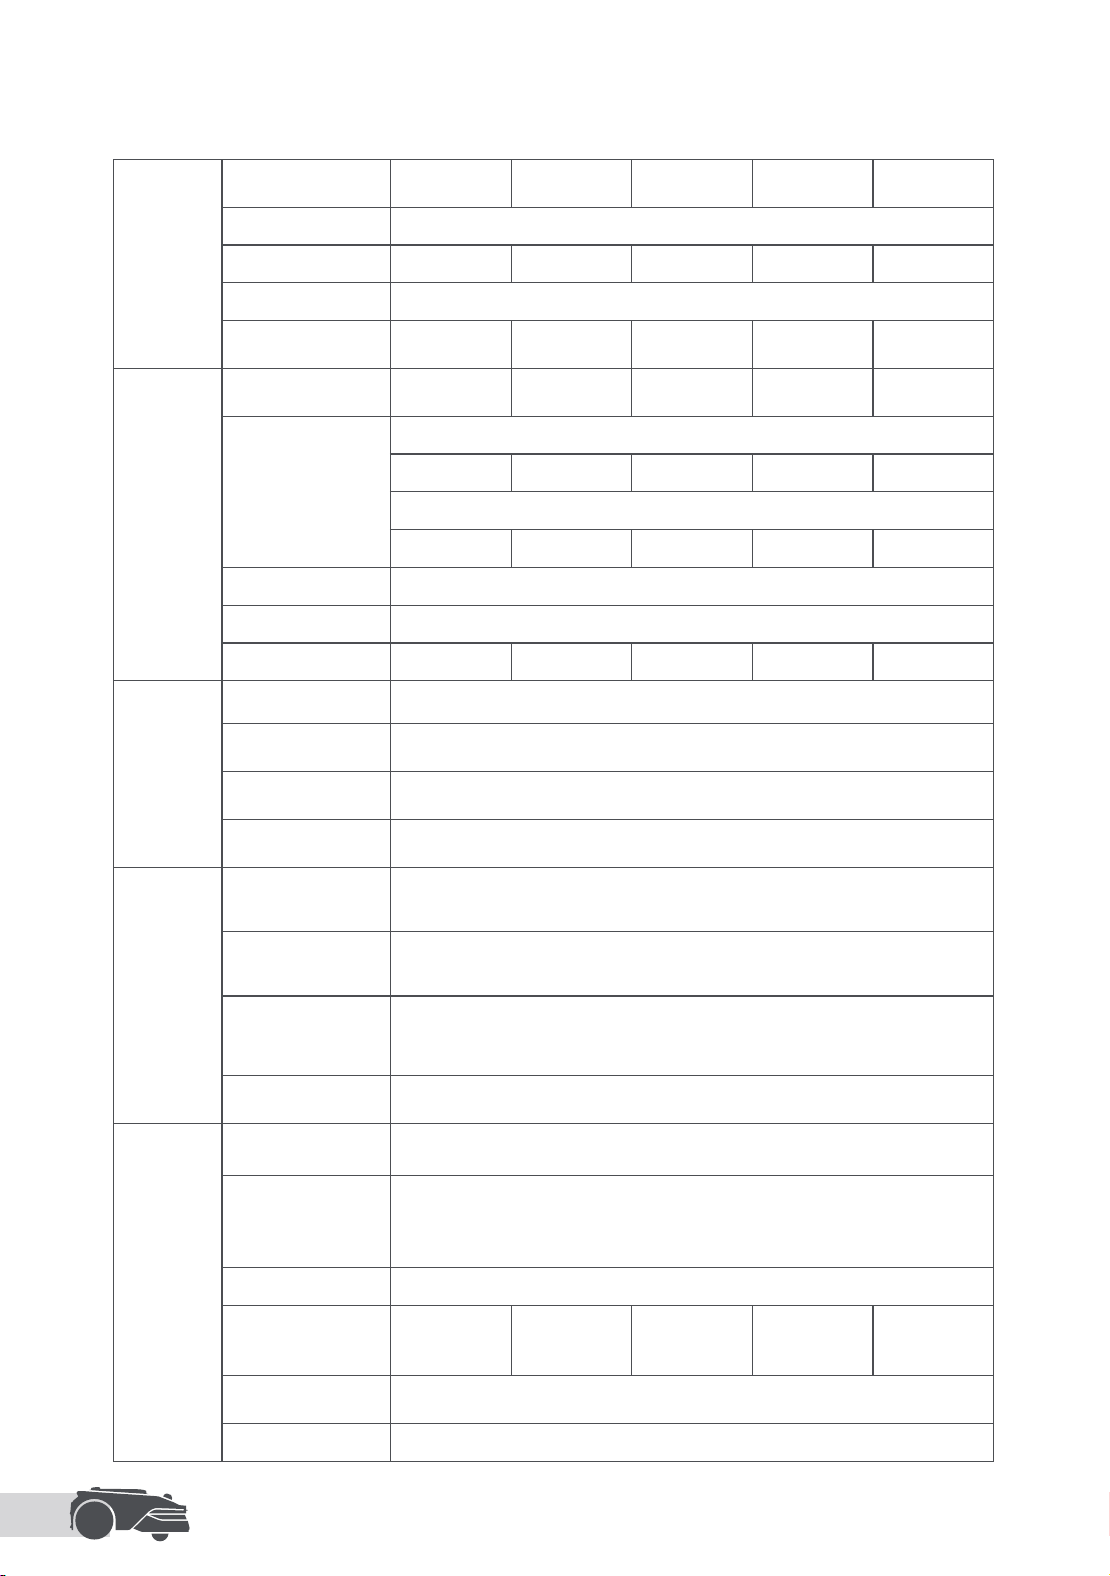
13 Specications
Basic
information
Product name
LiDAX Ultra
800
LiDAX Ultra
1000
LiDAX Ultra
1200
LiDAX Ultra
1600
LiDAX Ultra
2000
Brand MOVA
Model MXXM2100 MXXM3100 MXXM4100 MXXM5100 MXXM6100
Dimensions 666 mm × 444 mm × 273 mm
Weight (battery
included)
13.7 kg 13.7 kg 13.8 kg 13.8 kg 13.8 kg
Mowing
Recommended
working capacity
800 m² 1,000 m² 1,200 m² 1,600 m² 2,000 m²
Mowing
eciency
[1]
Standard
800 m²/day 800 m²/day
1,000 m²/day
1,200 m²/day 1,200 m²/day
Ecient
1,200 m²/day 1,200 m²/day 1,400 m²/day 1,600 m²/day 1,600 m²/day
Mowing height 3~10 cm
Mowing width 20 cm
Charging time
[2]
60 min 60 min 65 min 65 min 65 min
Noise
emissions
Sound power level LWA 57 dB(A)
Sound power
uncertainties KWA
3 dB(A)
Sound pressure level
LpA
49 dB(A)
Sound pressure
uncertainties KpA
3 dB(A)
Working
condition
Operating temperature
0~50° C
Recommended: 10~35° C
Long-term storage
temperature
-10~35° C
Recommended: 0~25° C
IP-classication
Robot: IPX6
Charging station: IPX4
Power supply: IP67
Maximum slope for
mowing area
45 % (24° )
Connectivity
Bluetooth frequency
range
2400.0–2483.5 MHz
Max. RF Power
802.11b:16±2dBm(@11Mbps)
802.11g:14±2dBm(@54Mbps)
802.11n:13±2dBm(@HT20,HT40)
Bluetooth: 7.49dBm
Wi-Fi Wi-Fi 2.4 GHz (2400–2483.5M)
Link Module Not Included Not Included Not Included
Included (free
for one year
from activation)
Included (free
for three years
from activation)
Link service
[3]
LTE-FDD: B1/3/7/8/20/28A
LTE-TDD: B38/40/41
GNSS
[4]
GPS/GLONASS/BDS/Galileo/QZSS
EN
43
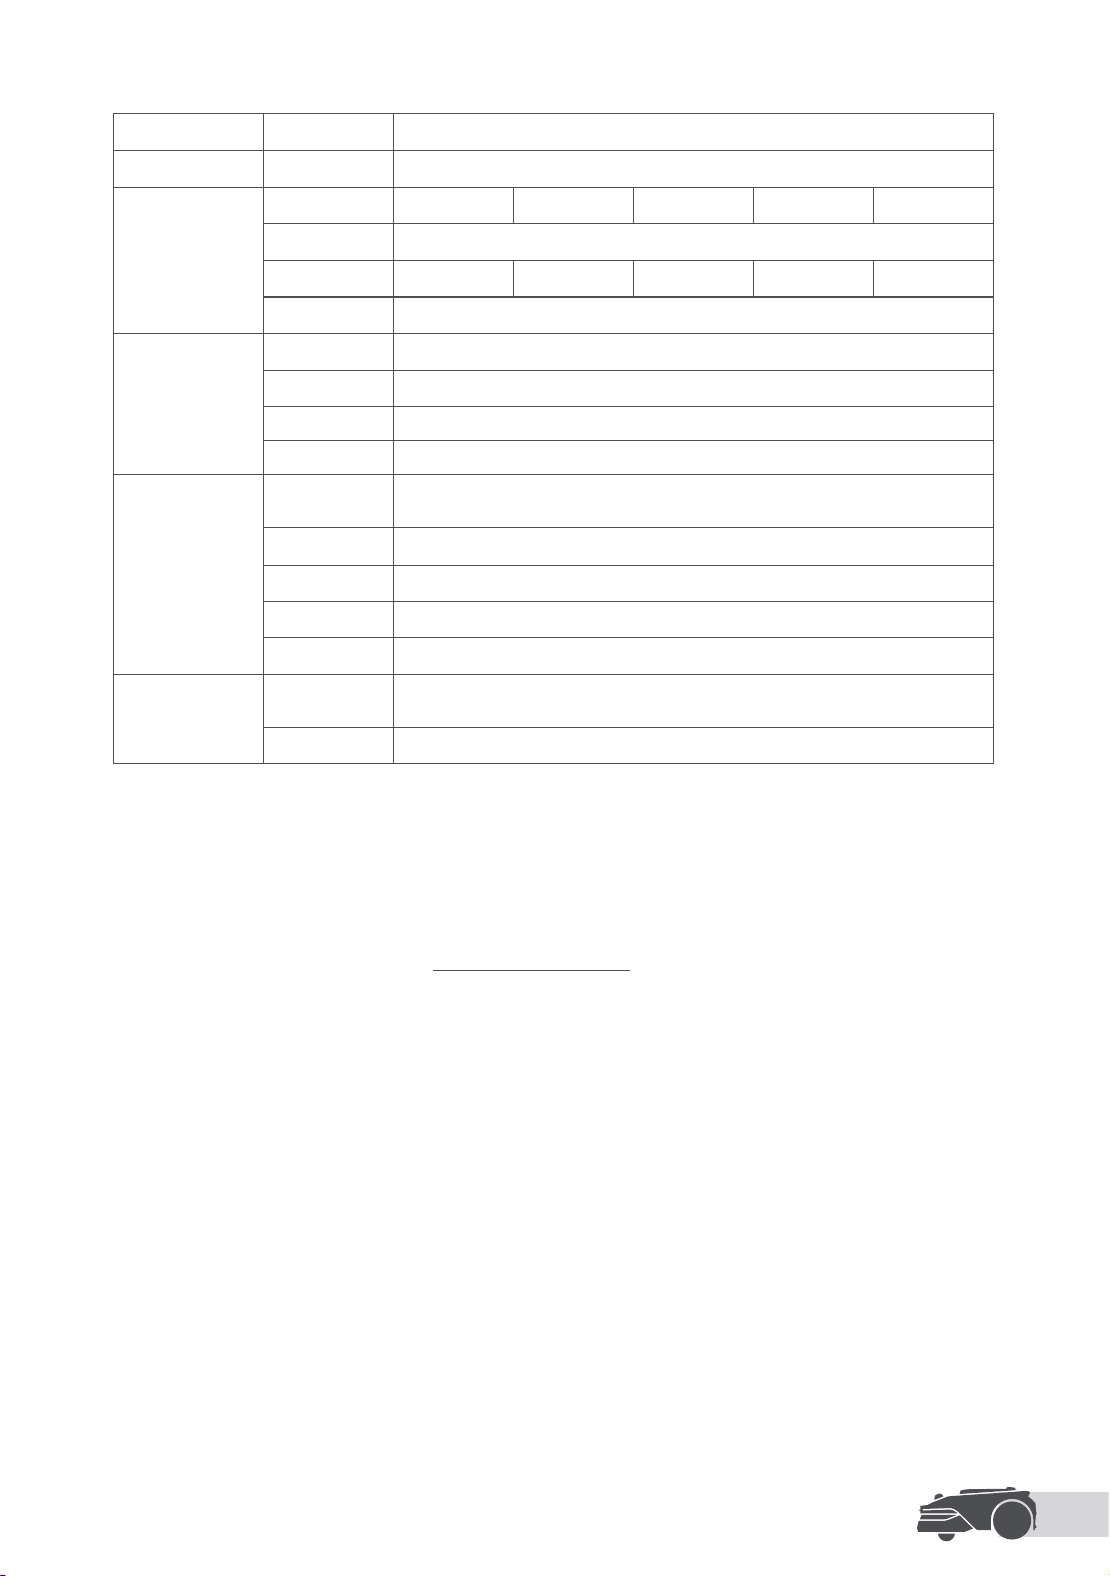
Driving motor Motor type Brushless Motor
Cutting motor Speed 2500 /min
Battery (robot)
Battery model MBPM30 MBPM30 MBPM20 MBPM20 MBPM20
Battery type Lithium-ion battery
Typical capacity 4000 mAh 4000 mAh 5000 mAh 5000 mAh 5000 mAh
Rated voltage 18 V DC
Power supply
Charger model MPAM20 / MPAM20(C)
Input voltage 100~240 V AC
Output voltage 20 V DC
Output current 3 A
Charging station
Charging station
model
MCM20
Input voltage 20 V DC
Output voltage 20 V DC
Input current 3 A
Output current 3 A
Accessories
Spare blades
and holders
9
Blade model MBKM10
[1] Based on testing by MOVA Laboratory.
[2] Charging time refers to the time needed to reach 85% capacity for resuming cutting when the robot
automatically returns to the charging station due to low battery.
[3] Requires the installation of the Link module.
[4] Requires the installation of the Link module.
Note: The specications are subject to change as we continually improve our product. For the latest
information, please visit our website at https://www.mova.tech.