1
Original instructions.
© 2026 Manufactured for All Season Power LLC.
Snow Joe
®
, Sun Joe
®
, Aqua Joe
®
and Auto Joe
®
are registered trademarks used under license from
Weather Brands LLC.
New Castle, DE 19720
*DISCLAIMER: Initial no‑load voltage, when fully charged,
peaks at 20V; nominal voltage under typical load is 18V.
SAVE THESE INSTRUCTIONS
THANK YOU FOR YOUR PURCHASE!
Failure to register your product purchase will not diminish
your warranty rights. For more information visit shopjoe.com
Place UPC sticker here
UPGRADE YOUR COVERAGE
AT SHOPJOE.COM
/
REGISTER
FOR UP TO 3, 4, OR 5 YEARS OF TOTAL TOOL COVERAGE
When we say we stand behind our product, we mean it! Now you can blow, mow, cut,
saw or tend to any other yard task with condence, knowing that if there is a problem
with your tool within the warranty period, we will gladly solve it.
+EXTENDED
WARRANTY
ACTIVATE YOUR
1 YEAR WARRANTY
RECEIVE
90 DAYS BONUS COVERAGE
VISIT
SHOPJOE.COM/REGISTER
TELL YOUR FRIENDS
AND TAG US!
We love to hear your feedback! Share your experience by
writing comments and reviews on shopjoe.com, or
connect with us on social media!
HAS YOUR SNOW JOE
EXPERIENCE LEFT
YOU SMILING?
#GOWITHJOE
E Q
OR HAS SOMETHING
LEFT YOU LESS
THAN SATISFIED?
WE’RE SORRY
ABOUT THAT!
Our friendly customer service team is ready to
help you with any issues you may have.
@ SNOWJOECO
CALL US
1‑866‑225‑9723
m
For fastest response
CHAT WITH US
SHOPJOE.COM/CHAT
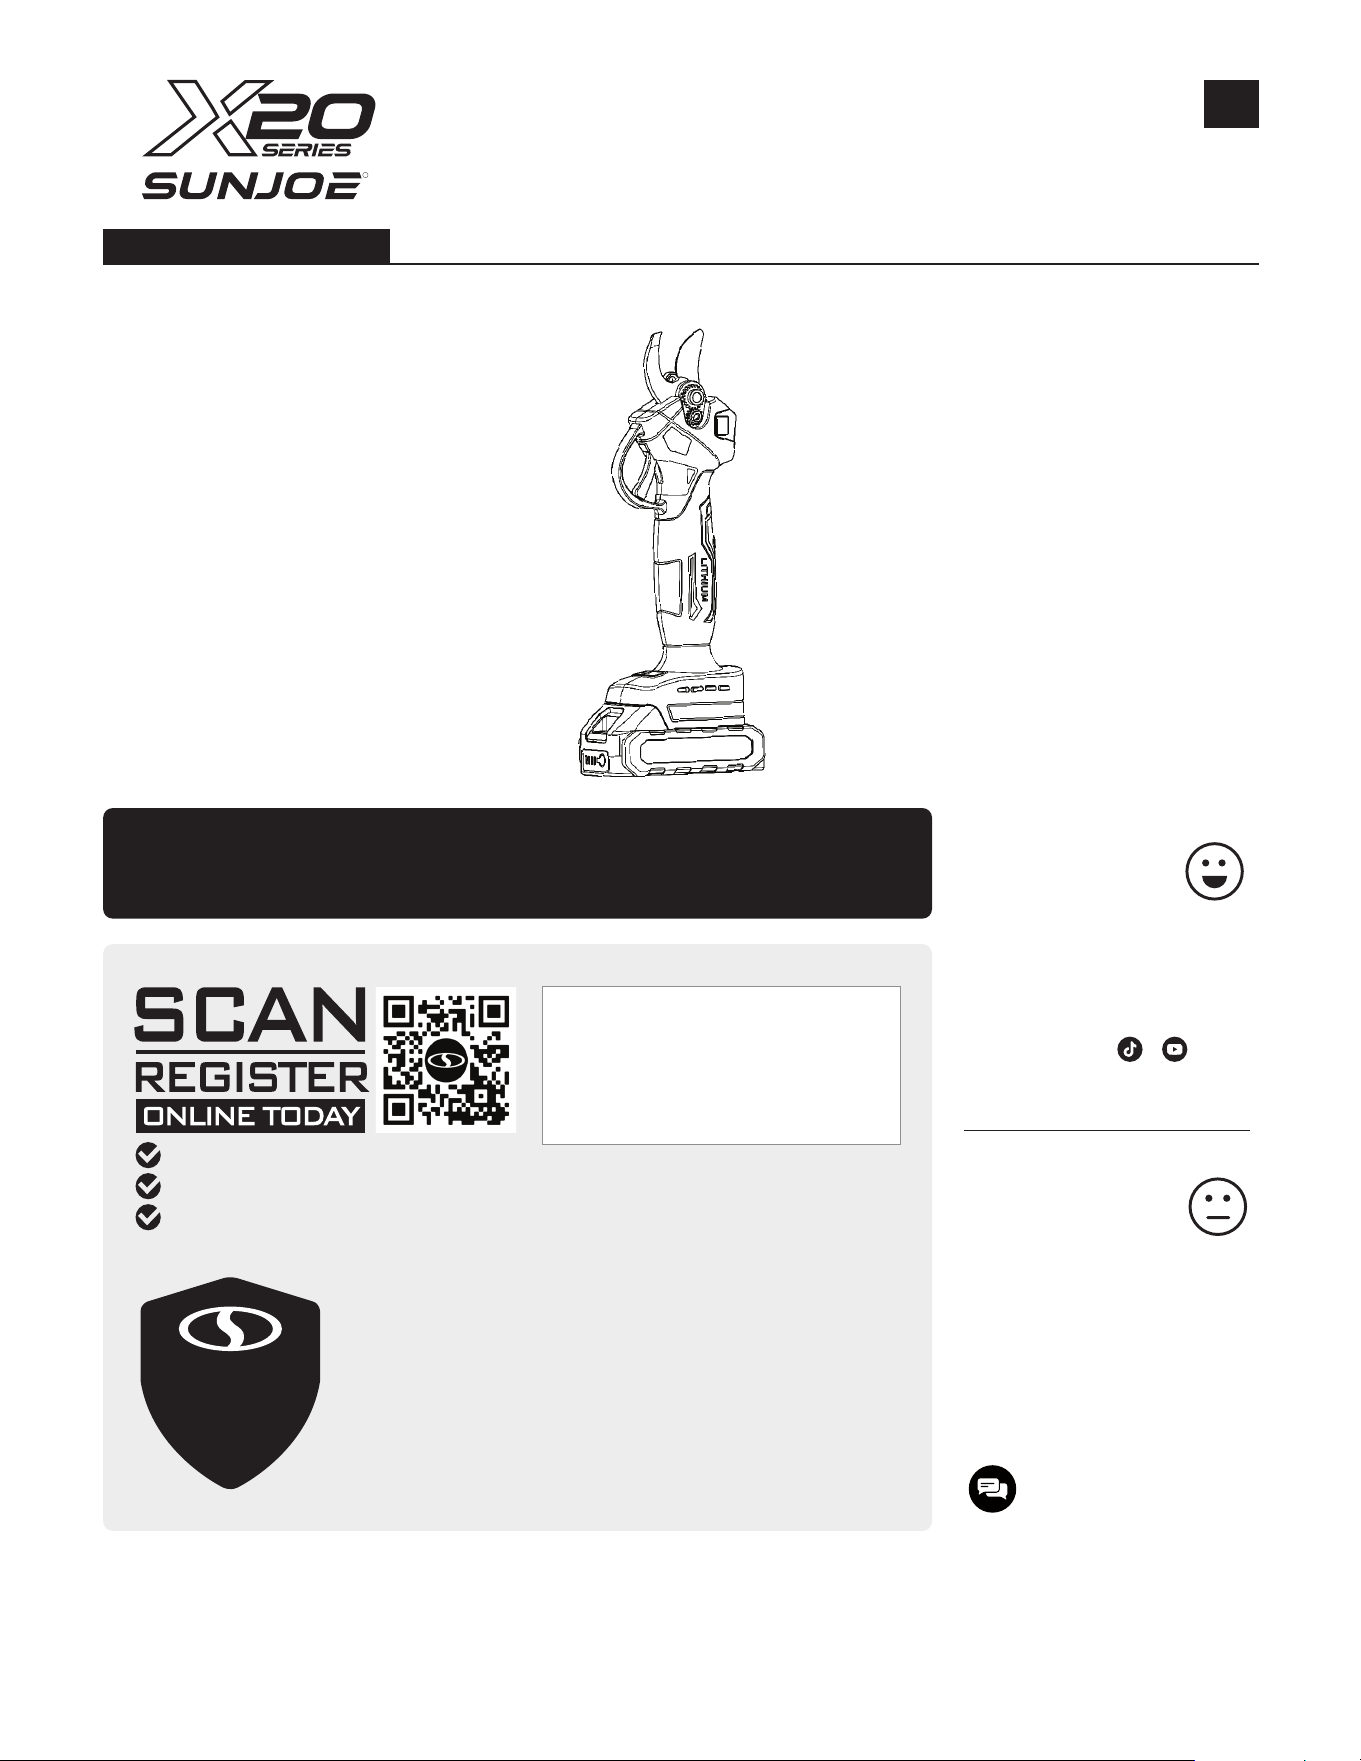
Model X20-PRU-2A
Form No. ASP-X20-PRU-2A-880E-M (TFG)
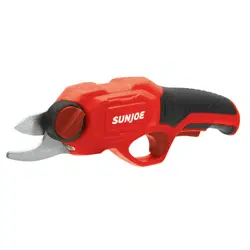
CORDLESS PRUNER
20-VOLT MAX* | 2.0 Ah | RECHARGEABLE
EN
OPERATOR’S MANUAL
R

2
SAVE THESE INSTRUCTIONS
Model X20-PRU-2A
Form No. ASP-X20-PRU-2A-880E-M (TFG)
CORDLESS PRUNER
20-VOLT MAX* | 2.0 Ah | RECHARGEABLE
EN
OPERATOR’S MANUAL
R
IMPORTANT!
Safety Instructions
All Operators Must Read These
Instructions Before Use
Always follow these safety guidelines. Failure to do so may
result in serious bodily injury or death.
General Safety WARNINGS!
Notice the personal safety alert symbol m used in this manual
to draw your attention to a WARNING given along with the
particular operating instruction. This means that the operation
requires special ATTENTION, CAUTION, and AWARENESS.
When using this power tool, basic safety precautions,
including the following, should always be followed to reduce the
risk of re, electric shock, personal injury and material damage.
mWARNING! This unit can be dangerous! Careless or
improper use can cause serious injury.
mWARNING! The cutting blades can cut you. Keep hands
and feet away from the blades and the cutting area.
Retain this manual for future reference and reread it at the start
of each trimming season.
mWARNING! This battery-operated power tool must be
recharged only with the specic charging unit for the battery.
A charging unit that may be suitable for one type of battery may
create a risk of re when used with another battery type.
• Avoid accidental starting.
• When the tool is not in use, keep it away from other metal
objects.
• Before operating the tool, read the entire manual carefully
and make sure you know how to switch the tool OFF in an
emergency.
Work Area Safety
1. Keep work area clean and well lit. Cluttered and dark
areas invite accidents.
2. Do not operate power tools in explosive atmospheres,
such as in the presence of flammable liquids, gases or
dust. Power tools create sparks which may ignite the dust
or fumes.
3. Keep bystanders and children away. All bystanders,
including children and pets, should be kept a safe distance
away from the work area.
4. Avoid dangerous environment. Don't use the appliance in
wet or damp location.
Electrical Safety
1. If the battery charger cable is damaged, please call the All
Season Power customer service department at 1-866-225-
9723.
2. If charging the power tool in a damp location is
unavoidable, use a residual current device (RCD) protected
power supply. The using of an RCD reduces the risk of
electric shock.
3. Power tool plugs must match the outlet. Never modify
the plug in any way. Do not use any earthed (grounded)
power tools or battery chargers. Unmodied plugs and
matching outlets will reduce risk of electric shock.
4. Avoid body contact with earthed or grounded surfaces
such as pipes, radiators, ranges and refrigerators. There
is an increased risk of electric shock if your body is earthed
or grounded.
5. Do not expose power tools to rain or wet conditions.
Water entering a power tool will increase the risk of electric
shock.
6. Do not abuse the charging cord. Never use the cord for
carrying, pulling or unplugging the power tool.
Keep cord away from heat, oil, sharp edges or moving
parts. Damaged or entangled cords increase the risk of
electric shock.
7. Battery charger is for indoor use only. Only charge this
battery-powered tool indoors.
Personal Safety
1. Stay alert. Watch what you are doing and use common
sense when operating a power tool. Do not use the
power tool while you are tired or under the inuence of
drugs, alcohol or medication. A moment of inattention while
operating power tool may result in serious personal injury.
2. Use personal protective equipment. Always wear eye
protection. Protective equipment such as safety glasses, a
dust mask, non-skid safety shoes, a hard hat, and hearing
protection, when used for appropriate conditions, will
reduce the possibility of personal injuries.

3
3. Avoid unintentional starting. Ensure the switch is in the
OFF position before connecting to the power source/
battery charger, or before picking up or carrying the
tool. Carrying power tools with your nger on the switch
or charging power tools with the switch ON can lead to
accidents.
4. Do not overreach. Keep proper footing and balance at
all times. This enables better control of the power tool in
unexpected situations.
5. Dress properly. Do not wear loose clothing or jewelry.
Dangling articles such as these can become caught in
moving parts. Using work gloves and substantial footwear
is recommended when working outdoors. Wear
a protective hair covering to contain long hair.
6. If devices are provided for the connection of dust
extraction and collection facilities, ensure these are
connected and properly used. Use of these devices can
reduce dust related hazards.
Power Tool Use and Care
1. Do not force the appliance. It will do the job better with
less likelihood of injury if it is used at the rate for which it
was designed.
2. Use the right appliance. Do not use the appliance for any
job except that for which it is intended.
3. Do not use the power tool if the switch does not turn it
on and off. Any power tool that cannot be controlled by the
switch is dangerous and must be repaired.
4. Disconnect the battery pack from the power tool
before making any adjustments, changing accessories
or storing the power tool. Such preventative safety
measures reduce the risk of starting the power tool
accidentally.
5. Store idle appliances indoors. When not in use,
appliances should be stored indoors in a dry and high or
locked-up place out of the reach of children.
6. Maintain appliance with care. Check for misalignment or
binding of moving parts, breakage of parts and any other
condition that may aect the power tool's operation.
If damaged, have the power tool repaired before use. Many
accidents are caused by poorly maintained power tools.
7. Keep cutting blades sharp and clean. Properly
maintained cutting blades with sharp edges are less likely
to bind and are easier to control.
8. Use the power tool and accessories in accordance with
these instructions and in the manner intended for the
particular use of the power tool, taking into account the
working conditions and the work to be performed. Using
the power tool for operations dierent from those intended
could result in a hazardous situation.
9. Keep all parts of the body away from the cutting blade.
Do not remove cut material or hold material to be cut
when blades are moving. Make sure the switch is o when
clearing jammed material. A moment of inattention while
operating the product may result in serious personal injury.
10. Carry the product by the handle with the cutting blade
stopped. When transporting or storing the product always
t the cutting device cover. Proper handling of the product
will reduce possible personal injury from the cutter blades.
Service
1. If your power tool requires service, contact an
authorized Snow Joe
®
+ Sun Joe
®
dealer or please call
the All Season Power customer service department at
1-866-225-9723. Only identical replacement parts should
be utilized for repairs. This will ensure that the safety of the
power tool is maintained.
2. If the battery charger cable is damaged, it must be
immediately replaced to avoid a hazard.
Please call the All Season Power customer service
department at 1-866-225-9723.
Battery Safety Warnings
This manual contains important safety and operating
instructions for your battery and charger.
1. Before using, always check the charger, cable and plug.
If defects are detected, do not use the charger; never
open the charger. Thoroughly read all instructions and
cautionary markings on the manual, the charger,
and the cordless pruner.
mWARNING! If the cordless pruner housing is cracked or
damaged, do not insert the charging adapter into the power tool
or plug the power tool into the mains outlet. There is a danger
of electric shock or electrocution.
2. Protect the battery charger from rain and moisture.
Water penetration in a battery charger increases the risk
of electric shock.
3. Only use the included battery for this unit.
4. Do not open or modify the battery. Release electrolyte is
corrosive and may cause damage to eyes and skin.
It may be toxic if swallowed.
5. Keep the battery charger clean. Contamination may
increase the risk of electric shock.
6. Do not short circuit. A battery pack will short circuit if a
metal object makes a connection between the positive
and negative contacts on the battery pack. Do not place a
battery pack near anything that may cause a short circuit,
such as paper clips, coins, keys, screws, nails and other
metallic objects. A short-circuited battery pack poses a risk
of re and severe personal injury.
7. This charger is ONLY intended to charge the rechargeable
battery inside of the cordless pruner. Any other use poses
a risk of re, electric shock or electrocution.
8. Do not place any object on top of the charger or place
the charger on a soft surface that may result in excessive
internal heat. Keep the charger away from any heat source.
9. To reduce the risk of damaging the electric plug and cord,
pull the plug, not the cord, when disconnecting the charger
from the electric outlet.

4
10. Make sure the battery charging cable is located in a safe
place so that it will not be stepped on, tripped over or
otherwise subjected to damage or stress.
11. An extension cord should not be used unless absolutely
necessary. Using an improper extension cord poses a risk
of re, electric shock or electrocution.
12. Do not operate the charger if it has received a sharp blow
or has become damaged in any way. Please call the All
Season Power customer service department at 1-866-225-
9723 before continuing use.
13. Do not disassemble the charger. Incorrect reassembly
may pose a serious risk of electric shock, re or exposure
to toxic battery chemicals. If the battery or charger are
damaged, please call the All Season Power customer
service department at 1-866-225-9723 for assistance.
14. To reduce the risk of electric shock, unplug the charger
from the outlet before cleaning the unit.
15. Never attempt to connect two (2) chargers together.
16. DO NOT store or use the tool and the charger in locations
where the temperature may reach or exceed
104 ºF (40 ºC). Dangerous storing locations include
outdoor sheds or metal buildings in the summer.
17. The charger is designed to operate on standard household
electrical power (120V). Do not attempt to use it with any
other voltage!
NOTE: The integrated battery is not fully charged out of
the carton. Read the safety instructions and then follow the
charging notes and procedures.
18. The longest life and best performance can be obtained if
the battery is charged when the air temperature is between
64.4 ºF – 75.2 ºF (18 ºC – 24 ºC). Do not charge the
battery pack when the air temperature falls below 50 ºF
(10 ºC) or above 104 ºF (40 ºC). Following these safety
measures will prevent damage to the battery pack.
19. Do not incinerate the integrated battery even if it is
seriously damaged or completely worn out. The battery
can explode in a re.
5
Safety Symbols
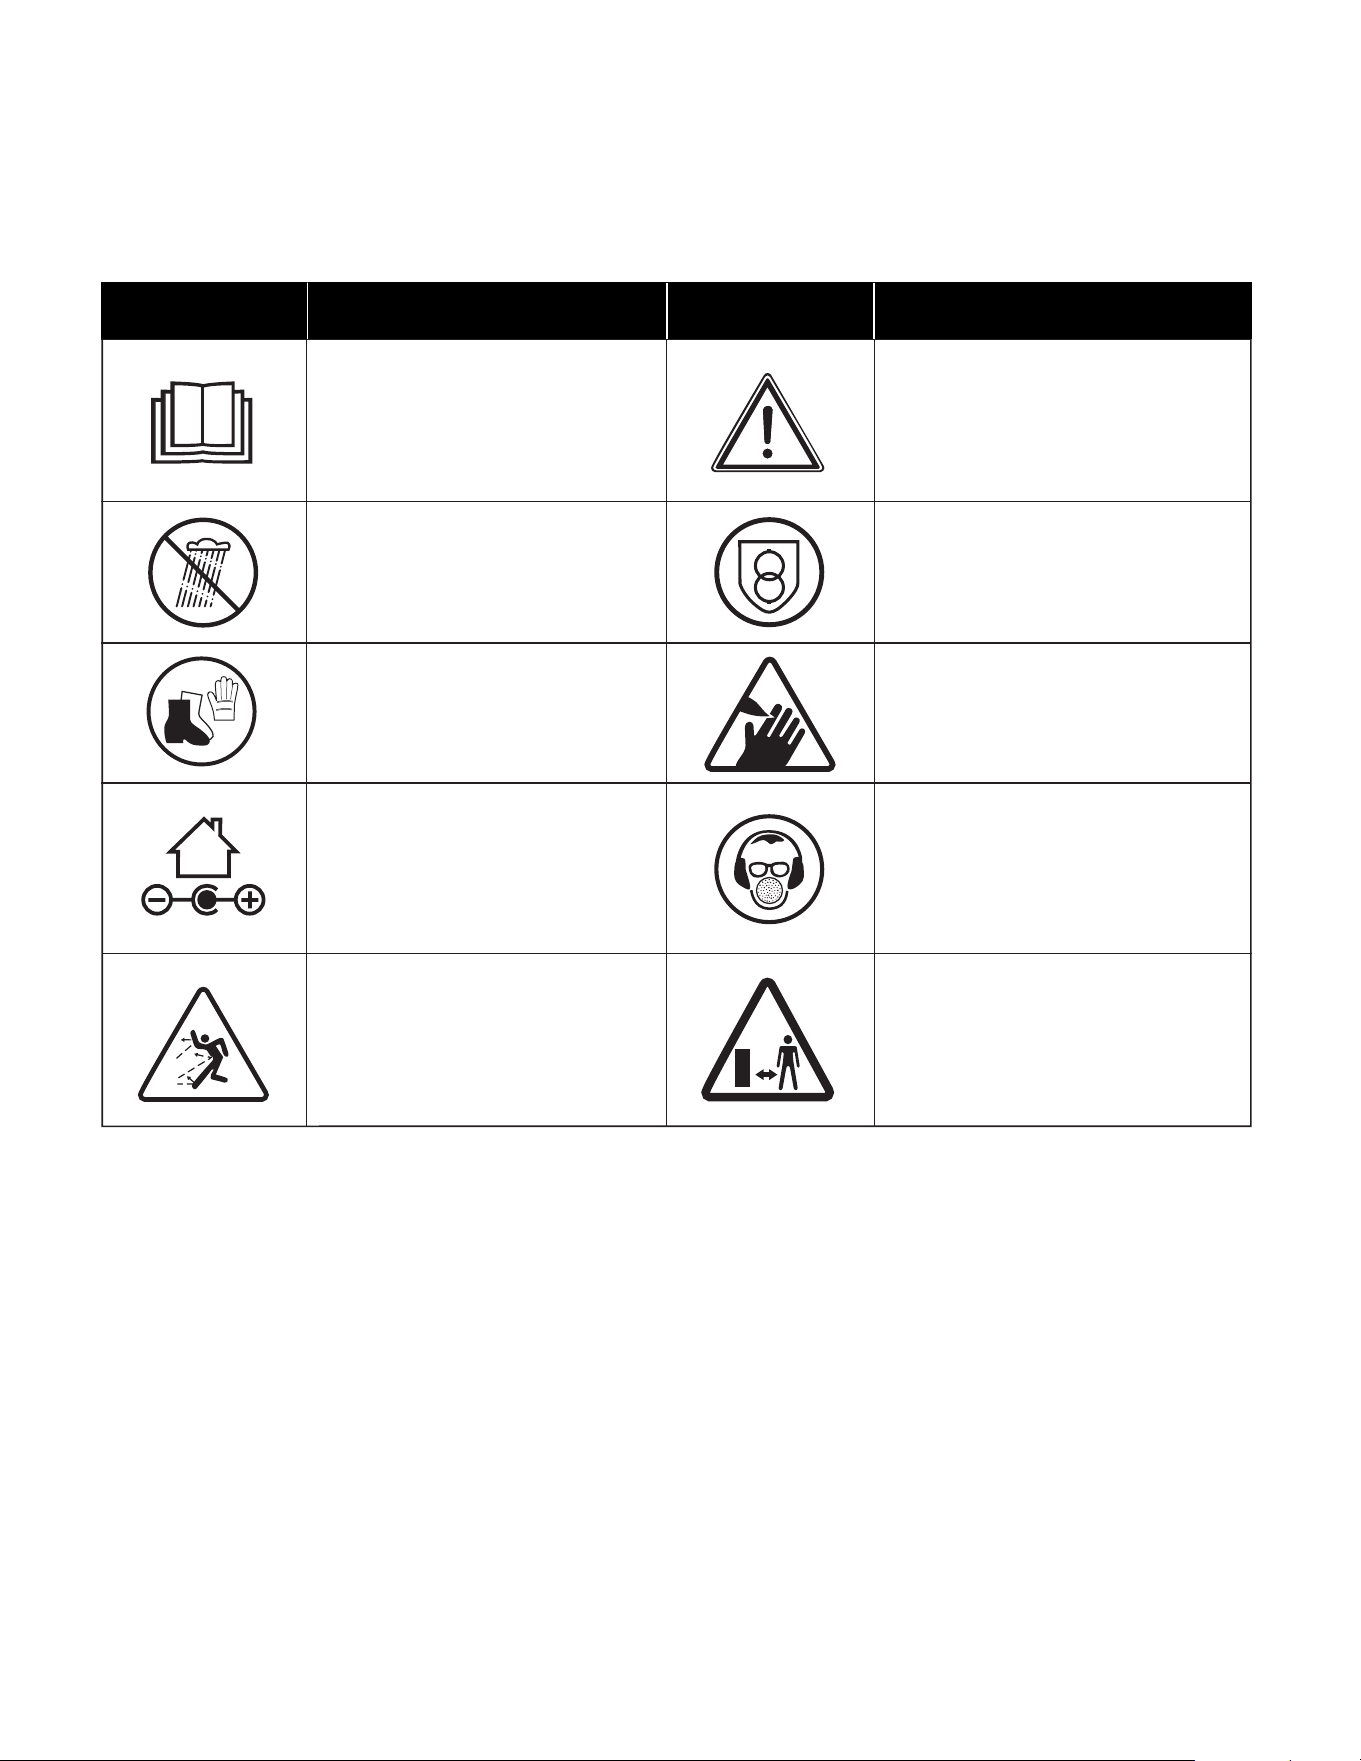
The following table depicts and describes safety symbols that may appear on this product. Read, understand and follow all
instructions on this tool before attempting to assemble and operate.
READ THE OPERATOR'S
MANUAL(S) – Read, understand
and follow all instructions in the
user manual(s) before attempting to
assemble and operate.
SAFETY ALERT – Indicates a
precaution, a warning or a danger.
WARNING! Do not expose the
unit to rain or wet conditions.
Keep dry.
Symbols
Symbols
Descriptions
Descriptions
Thrown objects and moving blade
can cause severe injury.
Only use battery charger indoors.
Battery charger contains a
safety transformer.
Risk of Injury. Use safety
glasses, hearing protection and
dust mask.
Keep bystanders a safe distance
away from the work area.
Wear protective gloves and
non-slip footwear when using
the machine and handling debris.
DANGER! Keep hands away from
blade.
6
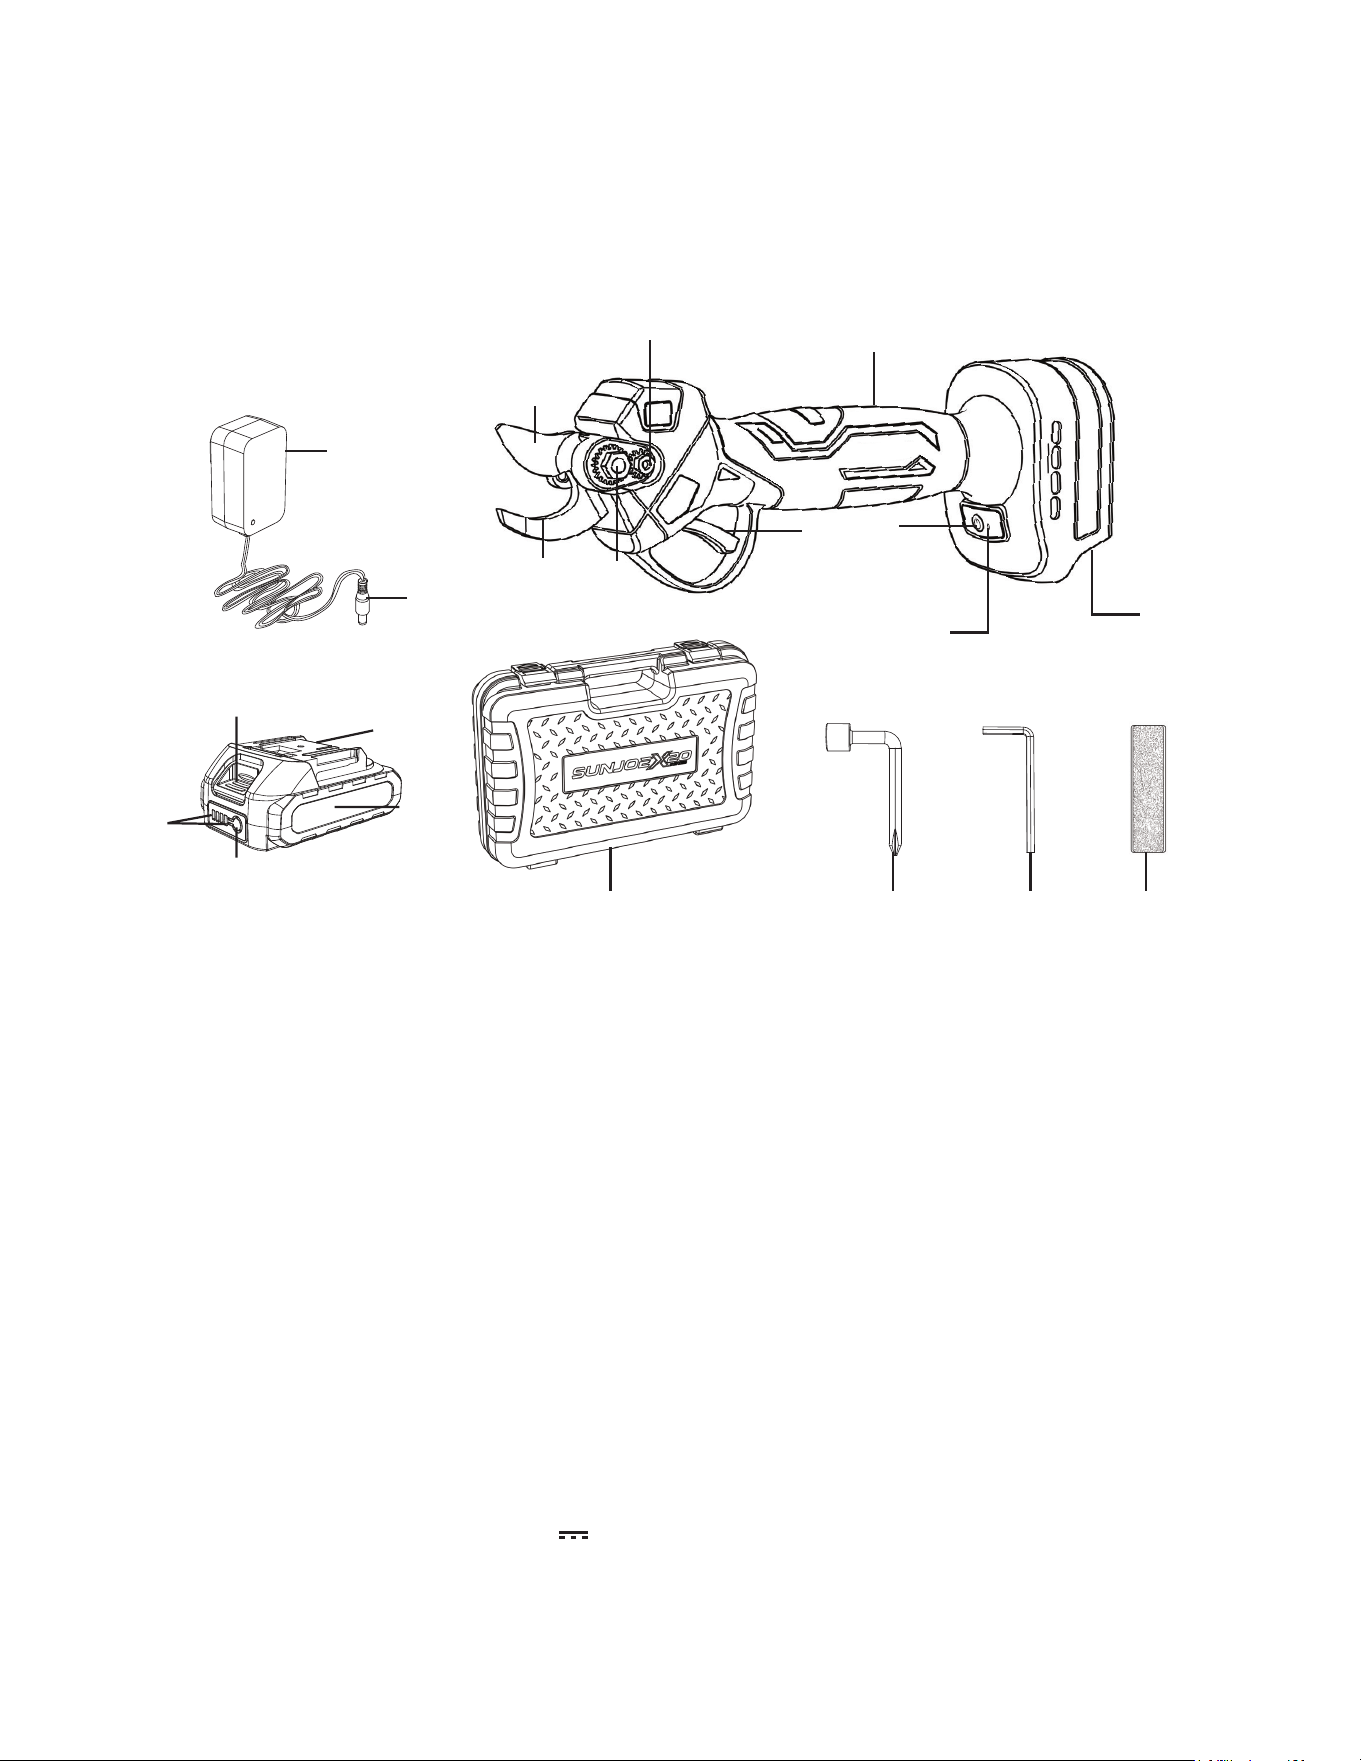
Know Your Cordless Pruner
Read the owner’s manual and safety instructions carefully before operating cordless pruner. Compare the illustration below to the
cordless pruner in order to familiarize yourself with the location of the various controls and adjustments. Save this manual for future
reference.
1. Cutting blade
2. Counter blade
3. Blade lock knob
4. Locking knob
5. Trigger switch
6. Handle
7. On/O switch
8. LED light
9. Battery compartment
10. Whetstone
11. Hex wrench
12. Socket wrench
13. Hard shell case
14. 20V* ECOSHARP
®
2.0 Ah Lithium-ion Battery
15. Charge socket
16. Push lock button
17. Battery indicators
18. Charge level button
19. Charger plug
20. 20V* Lithium-ion Charger
Technical Data
Motor ................................................................................ 100W
Battery Voltage Max* ................................................... 20V D.C.
Battery Capacity .............................................................. 2.0 Ah
Charger Input .................................................... 100 – 240V AC,
50 – 60 Hz, 0.5 A
Charger Output ....................................... 21V D.C.
750 mA
Charging Time Max .............................................. 3 hrs 30 mins
Motor Speed ......................................................20000 ±5% rpm
Cutting Capacity ................................. max. 28 mm in softwood
max. 15 mm in hardwood
Product Dimensions ..... 10.79 in. (L) x 2.76 in.(W) x 3.66 in.(H)
27.4cm (L) x 7cm (W) x 9.3cm (H)
Net Weight ........................................................ 2.2 lbs (1.88Kg)
10
5
13 12
9
8
3
4
1
2
19
16
18
15
14
17
20
7
6
11 10

7
Unpacking
Carton Contents
• Whetstone
• Socket wrench
• Hex wrench
• 20V* ECOSHARP
®
2.0 Ah Lithium-ion Battery
• 20V* Lithium-ion Charger
• Hard shell case
• Manual
1. Carefully remove the cordless pruner and check to see that
all of the above items are supplied.
2. Inspect the product carefully to make sure no breakage or
damage occurred during shipping. If you find damaged or
missing parts, DO NOT return the unit to the store.
Please call the All Season Power customer service center
at 1-866-225-9723.
NOTE: Do not discard the shipping carton and packaging
material until you are ready to use the cordless pruner.
The packaging is made of recyclable materials. Properly
dispose of these materials in accordance with local
regulations or save the packaging for long-term product
storage.
IMPORTANT! The equipment and packaging material are
not toys. Do not let children play with plastic bags, foils, or small
parts. These items can be swallowed and pose a suffocation
risk!
Battery Pack Operation
The equipment is powered by a Lithium-ion battery. The battery
pack is completely sealed and maintenance free. There are 4
indicator lights: 25%, 50%, 75%, 100%.
Battery Indicator Lights
The battery features 4 LED indicator lights to show the
remaining charge:
• 1 light on – 25% charge
• 2 lights on – 50% charge
• 3 lights on – 75% charge
• 4 lights on – 100% (fully charged)
NOTE: If the charge level button does not appear to be working,
insert the battery into the charger and charge as needed.
NOTE: Immediately after using the battery pack, the charge
level button may display a lower charge than it will if checked
a few minutes later. The battery cells “recover” some of their
charge after resting.
Charger Operation
m
WARNING! Charge only 20V* ECOSHARP
®
2.0 Ah
Lithium-ion battery packs with its compatible 21V* Lithium-ion
charger. Other types of batteries may cause personal injury and
damage.
To reduce the risk of electric shock, do not allow water to ow
into the charger's AC/DC plug.
When to Charge the 20V* ECOSHARP
®
2.0
Ah Lithium-ion battery
NOTE: The 20V* ECOSHARP
®
2.0 Ah Lithium-ion battery packs
do not develop a "memory" when charged after only a partial
discharge. Therefore, it is not necessary to run down the battery
pack before inserting the charger plug.
• Use the battery indicator lights to determine when to charge
your 20V* ECOSHARP
®
2.0 Ah Lithium-ion battery pack.
• You can "top-o" your battery pack's charge before starting a
big job or after a long day of use.
8
Charging the Battery
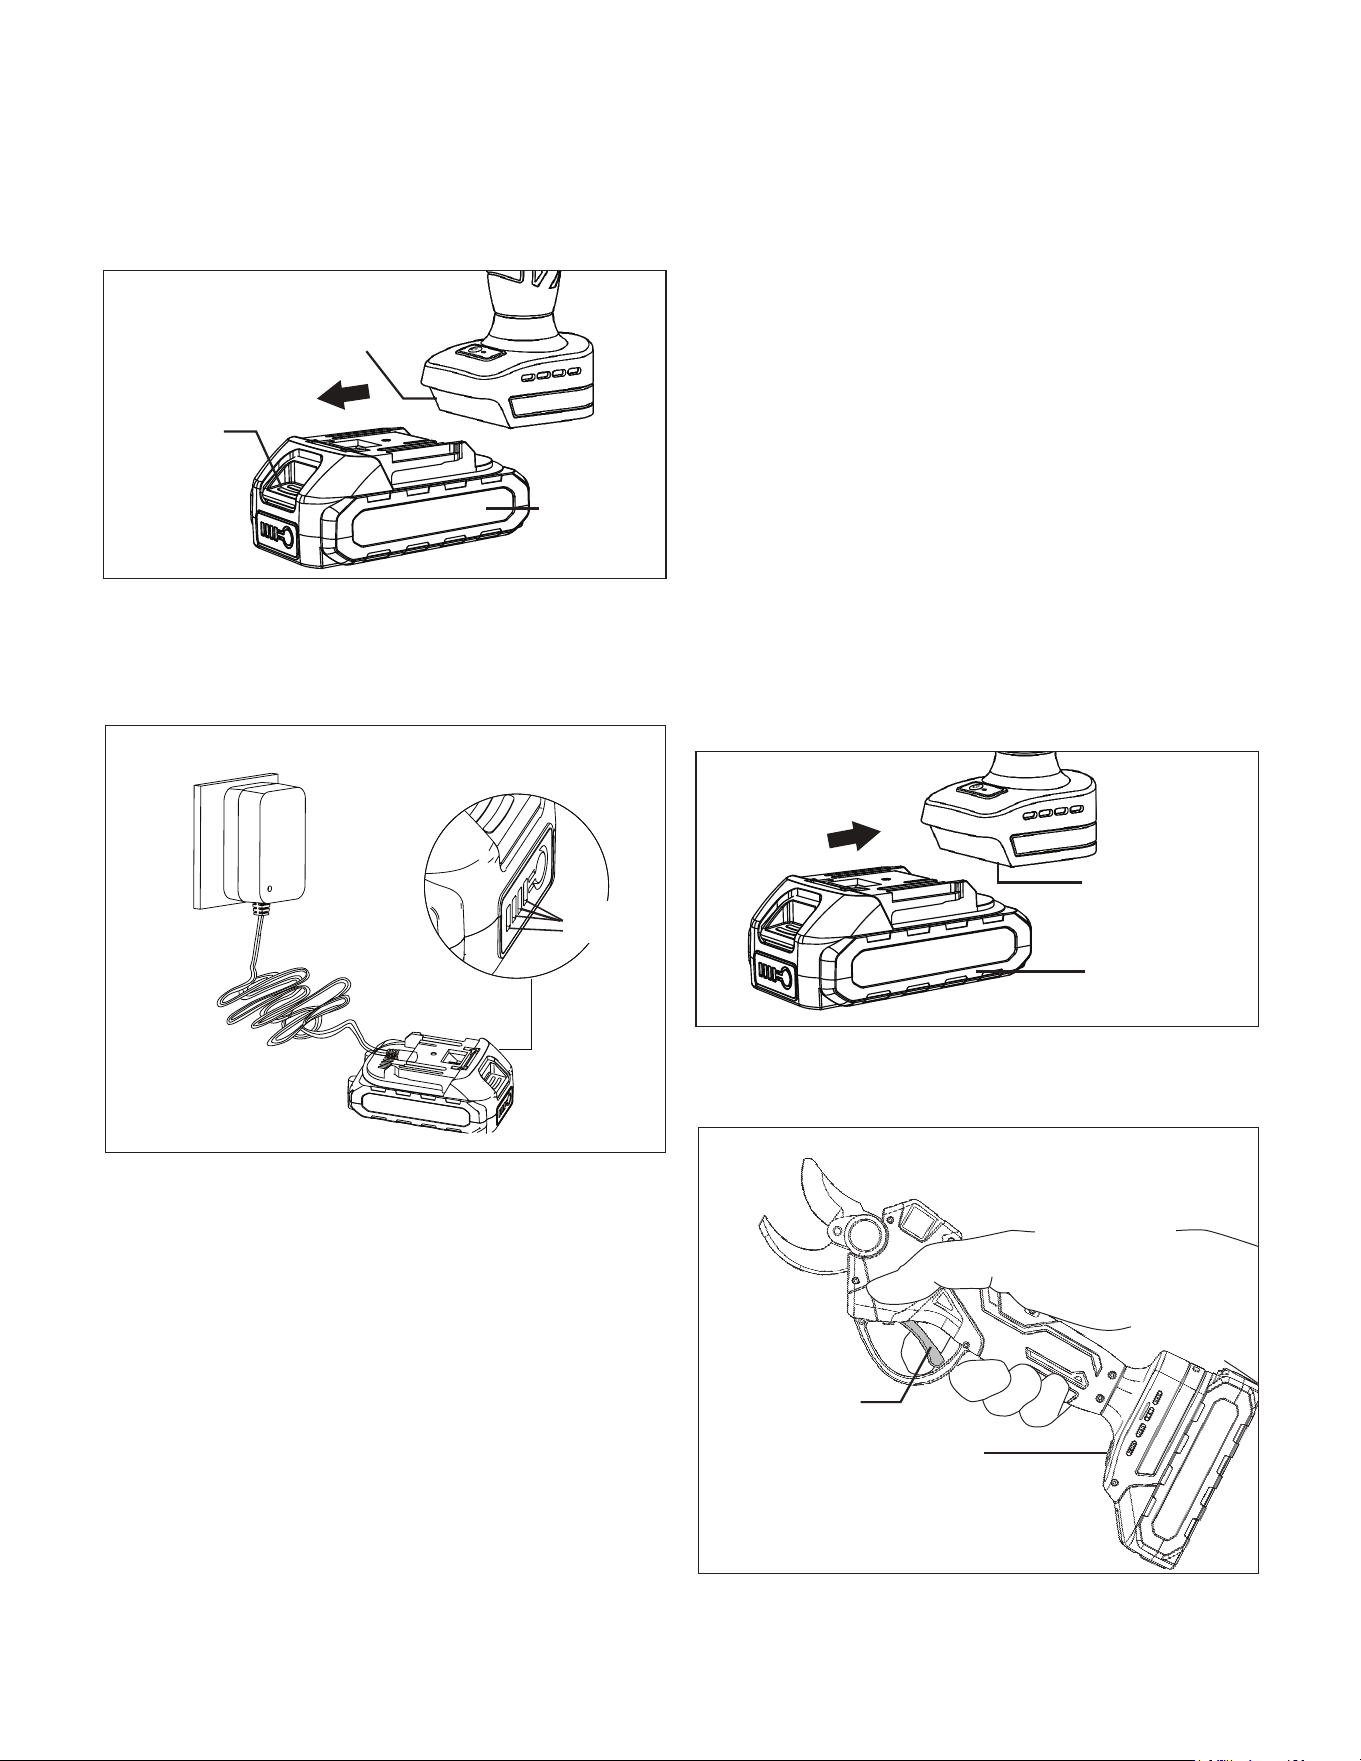
1. Push the push lock button on the battery to pull the battery
pack out of the equipment (Fig. 1).
2. Check that the mains voltage is the same as that marked
on the rating plate of the battery charger. Then, plug
the charger adapter into an appropriate AC power outlet.
Connect the charger plug into the charge socket of the
battery to start charging (Fig. 2).
3. The battery will take approximately 3 hours 30 minutes to
charge. During the charging process, the indicator light of
the charger is red. When the indicator light of the charger
turns green, the charger should be unplugged immediately.
mCAUTION! FIRE HAZARD. When disconnecting the
charger from the battery, be sure to unplug the charger from the
outlet first, then disconnect the charger from the battery
4. Timely recharging of the battery will help prolong the
battery's life. You must recharge the battery pack when
you notice a drop in the equipment's power.
IMPORTANT! Never allow the battery pack to become fully
discharged as this will cause irreversible damage to the battery.
Operation
mWARNING! Always wear safety goggles or safety
glasses with side shields when operating power tools.
Failure to do so could result in objects being thrown into your
eyes, resulting in possible serious injury.
mWARNING! Do not use any attachments or accessories
not recommended by the manufacturer of this product.
The use of attachments or accessories not recommended can
result in serious personal injury.
Starting + Stopping
mWARNING! Ensure the blade does not touch any
objects before turning on the cordless pruner.
mCAUTION! Starting, stopping, and restarting a DC motor
repeatedly within a few seconds can generate a great deal of
heat and damage the motor. To protect the life of your cordless
pruner always wait at least five seconds after stopping before
restarting the cordless pruner.
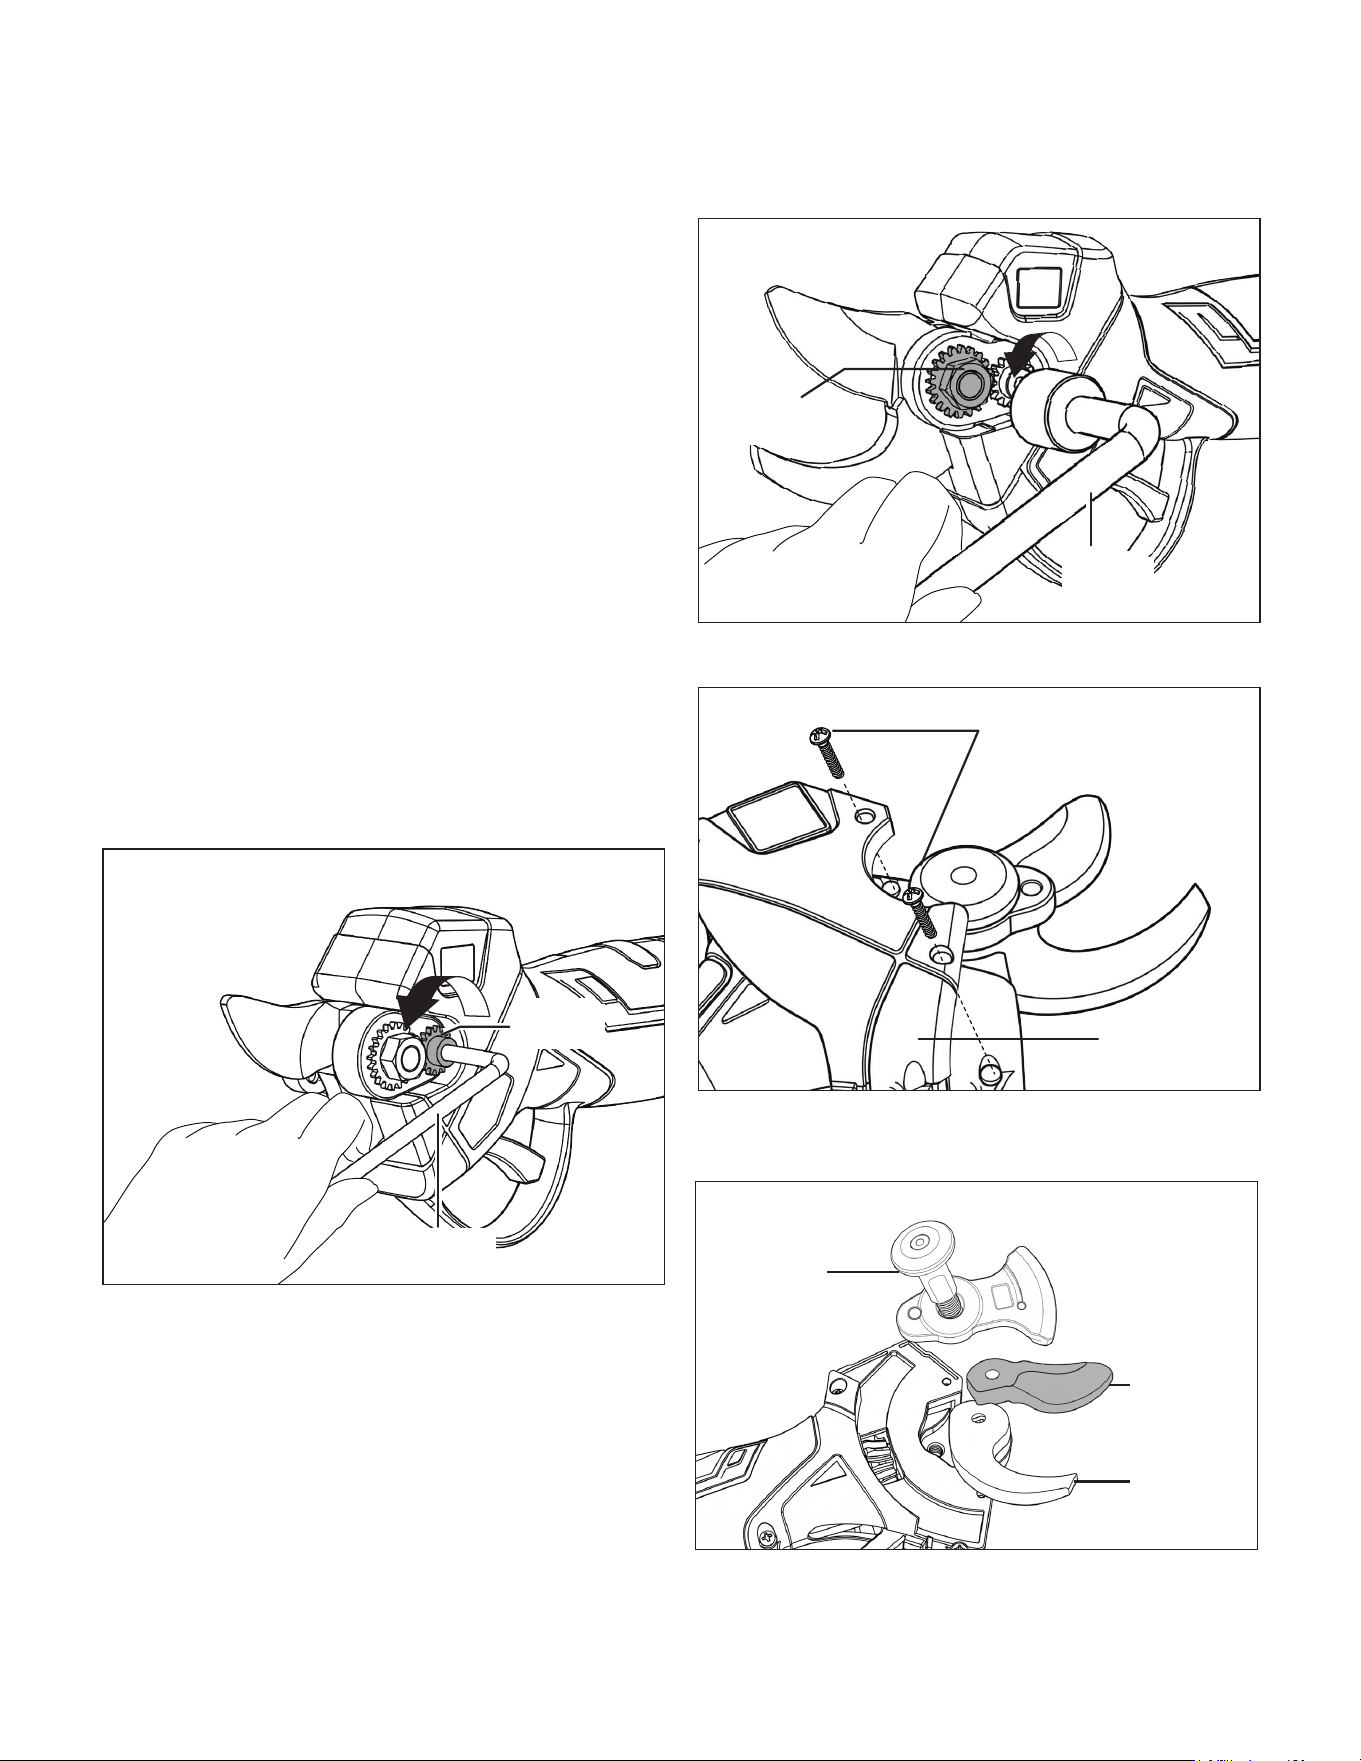
1. Insert the battery in the battery compartment (Fig. 3).
2. Press the On/Off Switch on the tool, then pull the trigger
switch to start the operation. Control cyclic working by
repeatedly releasing and pressing the trigger (Fig. 4).
3. To turn the tool OFF, release the Trigger switch (Fig. 4).
NOTE: Do not press the Trigger switch until you are ready
to make a cut.
Fig. 1
Push lock
button
Fig. 2
Battery
indicators
Fig. 3
Battery pack
Battery
compartment
Fig. 4
HANDHELD
PRUNER MODE
Battery
pack
Battery
compartment
Trigger
switch
On/Off Switch
9
Fitting and Changing the
Cutting Blade
This cordless pruner comes completely assembled with the
blade pre-installed.
mCAUTION! Wear protective gloves before handling
the blade.
mWARNING! Make sure the unit is powered o before
handling the blade.
mWARNING! Use only recommended replacement blade.
NOTE: Cutting will become dicult when the blade edge has
become dull, at which time you should change the blade.
mWARNING! Make sure that the pruner is o and always
wear protective gloves while changing the blade.
mWARNING! Risk of injury; keep hands away from the
switches when changing the blade.
mWARNING! Use only a recommended replacement blade.
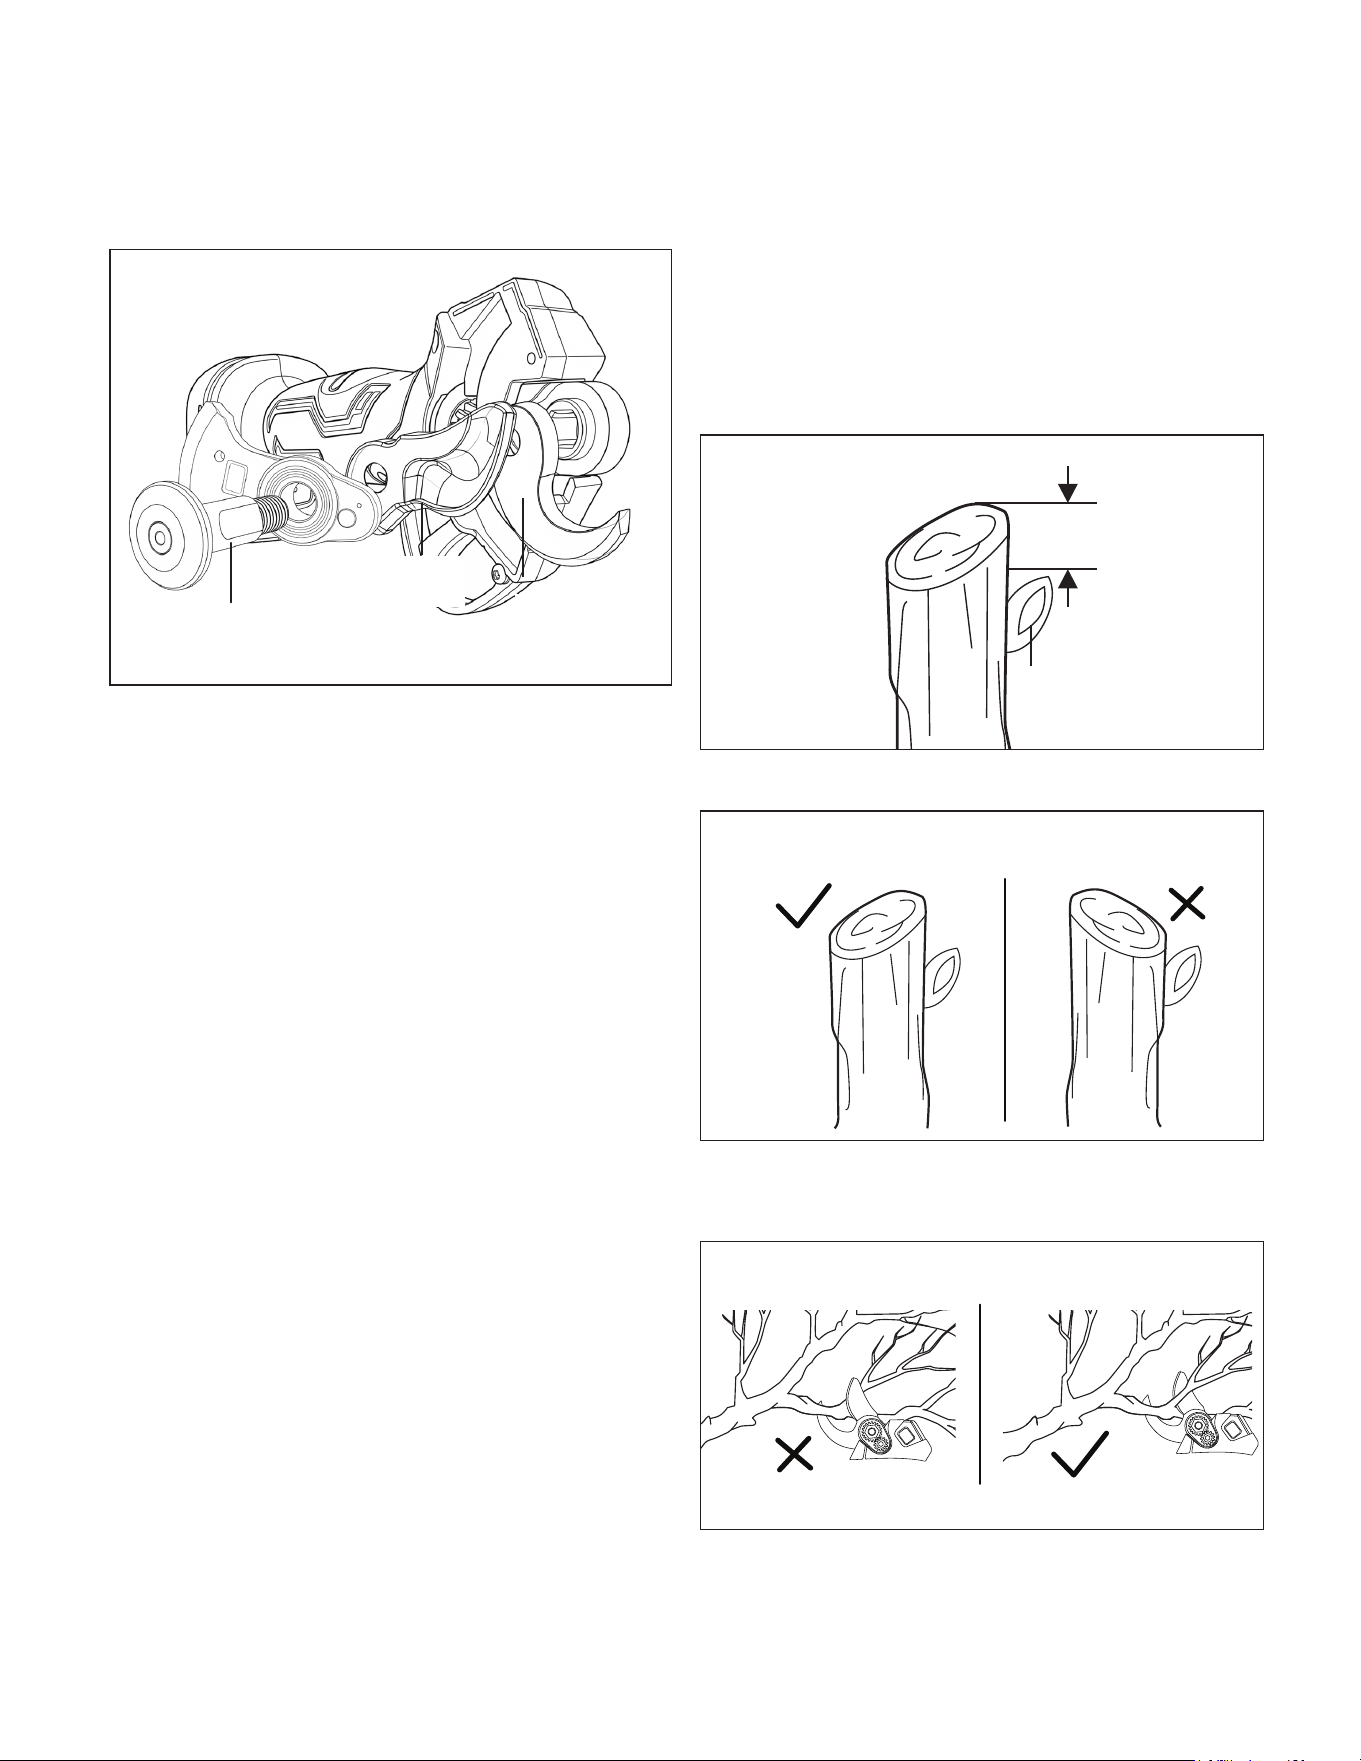
1. To remove the cutting blade, use the included hex wrench
to remove the locking knob securing the blade (Fig. 5).
2. Use the included socket wrench to remove the blade gear
from the blade lock knob. (Fig. 6).
3. Hold the pruner with its blades open and lay it at. Remove
the blade cover by unscrewing the two screws (Fig. 7).
4. Wearing gloves, grasp the cutting blade and pull it from the
pruner to remove it (Fig. 8).
Fig. 5
Locking
knob
Hex wrench
Fig. 6
Blade
lock knob
Socket
wrench
Fig. 7
Blade cover
Screws
Fig. 8
Blade bolt
Cutting
blade
Counter
blade
10
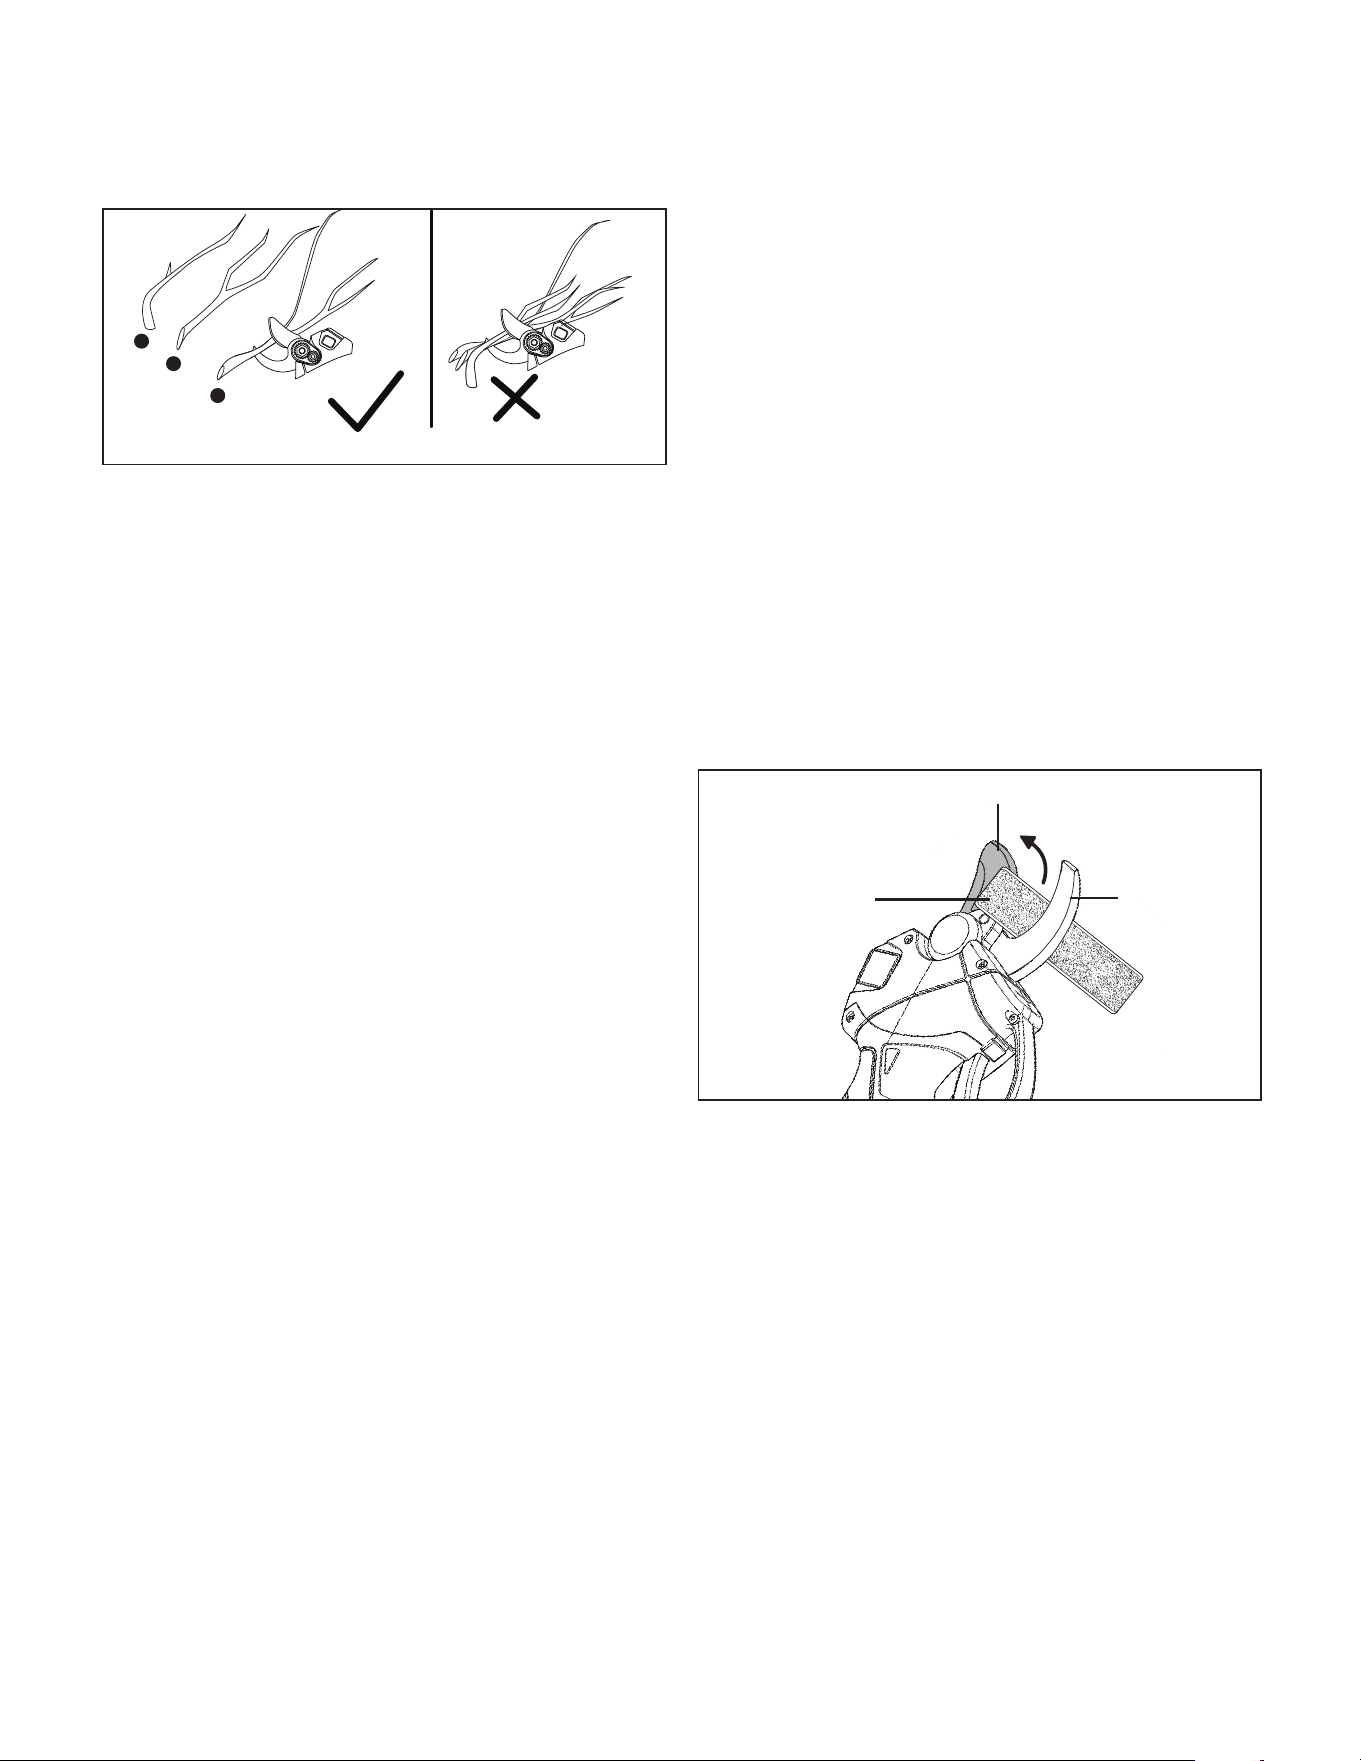
5. Install the new cutting blade. Reassemble the blade bolt,
cutting blade, and counter blade in the sequence shown in
Fig. 9 (Fig. 9).
6. Reinstall the blade cover, blade lock knob, and locking
knob onto the pruner in the reverse order of steps 3 to 1.
NOTE: When reinstalling the rack, make sure the gear
teeth are in contact with the pinion.
Trimming Tips
The cordless pruner can be used to remove fresh blooms
from the garden; also great for pruning overgrowth, dead and
overlapping stems and twigs, as well as thin and weak growth.
Follow the tips below for operation.
1. Never cut too close to the bud, so the wound can heal
properly.
2. Always make the cut above 0.3 inch (8 mm) from the bud
(Fig. 10).
3. The cut should slope away from the bud, so the rain can
run o (Fig. 11).
4. When removing the entire stem, cut back to the point
where it branched (Fig. 12).
Fig. 9
Cutting
blade
Blade bolt
Fig. 10
Bud
0.3 inch (8 mm)
Fig. 11
Fig. 12
Counter
blade
11
5. Cut branches one by one, as shown (Fig. 13).
Maintenance
mWARNING! Always switch the product o and let the
product cool down before performing inspection, maintenance,
and cleaning work.
1. If the cordless pruner requires cleaning, do not use
solvents to clean it. Only use a moistened soft cloth.
Never let any liquid get inside the tool; and never immerse
any part of the tool into any liquid.
2. Apply oil around the center bolt and open and close the
tool about 10 times to work it in. Use the steel wool to rub
the oil over the cutting surfaces. Spray the tool with alcohol
and wipe with a paper towel.
3. Inspect the product before each use for worn and damaged
parts. Do not operate it if you nd broken and worn parts.
Blade Maintenance
To ensure years of ecient and trouble-free operation,
blade cleaning should be performed if sap and debris have
built-up, or if you live in an area where the soil is sandy.
Cleaning unusually heavy deposits may require removal of the
blade.
NOTE: Snow Joe
®
+ Sun Joe
®
will not be held responsible for
any damage or injuries caused by repair of the pruner by an
unauthorized person or by mishandling of the cordless pruner.
1. Keep the cutting blades clean and free of debris.
Remove trimmings.
2. Keep the blades sharp. Have a worn or damaged cutting
device replaced with a new one of the same type by a
qualied specialist. Spare parts may be ordered online at
shopjoe.com or call the All Season Power customer service
department at 1-866-225-9723.
3. To replace the blade, see page 9 to 10 for instructions.
Blade Sharpening
mWARNING! Always take extra care, especially when your
hand may be facing the cutting edge.
Only sharpen the cutting blade; the counter blade should never
require sharpening.
Bypass pruners will generally only have one blade, the lower
part being the counter blade which should never require
sharpening.
The cut of a bypass tool is achieved by the blade precisely
passing by the counter blade. It therefore follows that you
should never sharpen the at side of the blade. If steel is
removed from here, the two parts will no longer meet precisely
and the tool will fail to cut. You must only sharpen on the
outside or bevelled side of the blade.
1. To sharpen your cordless pruner, hold the open pruner at
in one hand and with the other hand place the sharpener at
a 15 degree angle along the bevelled side of the blade
(Fig. 14).
NOTE: Be careful to not sharpen at too steep an angle as
this could damage the edge of the blade.
2. Move the sharpener in one direction only, with smooth
strokes from base to end 4 to 5 times.
mWARNING! Do not over-sharpen. Be sure to test blades
repeatedly throughout the sharpening process to prevent over-
sharpening.
3. Turn the pruner over so the at side of the blade is facing
up and slide the sharpener ush along the unbeveled edge
to remove burrs created by sharpening the cutting blade.
4. A Counter blade can also be used to hold the tool during
sharpening, taking care not to over tighten the vise which
can bend the tool.
mWARNING! Minimize coating loss. Stay to the edge of
the blade when sharpening blades with low-friction or titanium
coating to minimize the loss of coating.
mWARNING! Do not operate the cordless pruner with dull
or damaged cutting blades. This may cause overload and will
give unsatisfactory cutting results.
1
2
3
Fig. 13
Fig. 14
Cutting blade
Counter blade
Whetstone

12
Storage
When the tool will not be used for several months, proceed as
follows:
• Fully charge the battery.
• Clean the product as describe above.
• Store the tool in a secure and dry location. The storage
temperature must always remains in the range of
41°F (5°C) to 104°F (40°C).
• Before using the tool after prolonged storage,
fully recharge the battery.
Battery Caution + Disposal
Always dispose of your battery pack according to federal, state,
and local regulations. Contact a recycling agency in your area
for recycling locations.
mCAUTION! Even discharged battery packs contain some
energy. Before disposing, use electrical tape to cover the
terminals to prevent the battery pack from shorting,
which could cause a re or explosion.
mWARNING! To reduce the risk of injury or explosion,
never burn or incinerate a battery pack even if it is damaged,
dead, or completely discharged. When burned, toxic fumes and
materials are emitted into the surrounding atmosphere.
1. Batteries vary according to device. Consult your manual
for specic information.
2. Install only new batteries of the same type in your product
(where applicable).
3. Failure to insert batteries in the correct polarity, as
indicated in the battery compartment or manual, may
shorten the life of the batteries or cause batteries to leak.
4. Do not mix old and new batteries.
5. Do not mix Alkaline, Standard (Carbon-Zinc), or
Rechargeable (Nickel Cadmium, Nickel Metal Hydride, or
Lithium-Ion) batteries.
13
Service + Support
If your Sun Joe
®
cordless pruner requires service or
maintenance, please call the All Season Power customer
service department at 1-866-225-9723.
Model and Serial Numbers
When contacting the company, reordering parts, or arranging
service from an authorized dealer, you will need to provide the
model and serial numbers, which can be found on the decal
located on the housing of the unit. Copy these numbers into the
space provided below.
Record the following numbers from the housing or handle of your
new product:
X20-PRU-2A
Model #:
Serial #:
Federal Communications Commission
(FCC)
mWARNING! Any changes or modifications to this unit
not expressly approved by the party responsible for compliance
could void the user's authority to operate the equipment.
Class B device:
NOTE: This equipment has been tested and found to comply
with the limits for a Class B digital device, pursuant to part 15 of
the FCC Rules.
These limits are designed to provide reasonable protection
against harmful interference in a residential installation.
This equipment generates, uses and can radiate radio
frequency energy and, if not installed and used in accordance
with the instructions, may cause harmful interference to radio
communications.
However, there is no guarantee that interference will not occur
in a particular installation.
If this equipment does cause harmful interference to radio or
television reception, which can be determined by turning the
equipment off and on, the user is encouraged to try to correct
the interference by one or more of the following measures:
• Reorient or relocate the receiving antenna.
• Increase the separation between the equipment and
receiver.
• Connect the equipment into an outlet on a circuit different
from that to which the receiver is connected.
• Consult the dealer or an experienced radio/TV technician
for help.
14
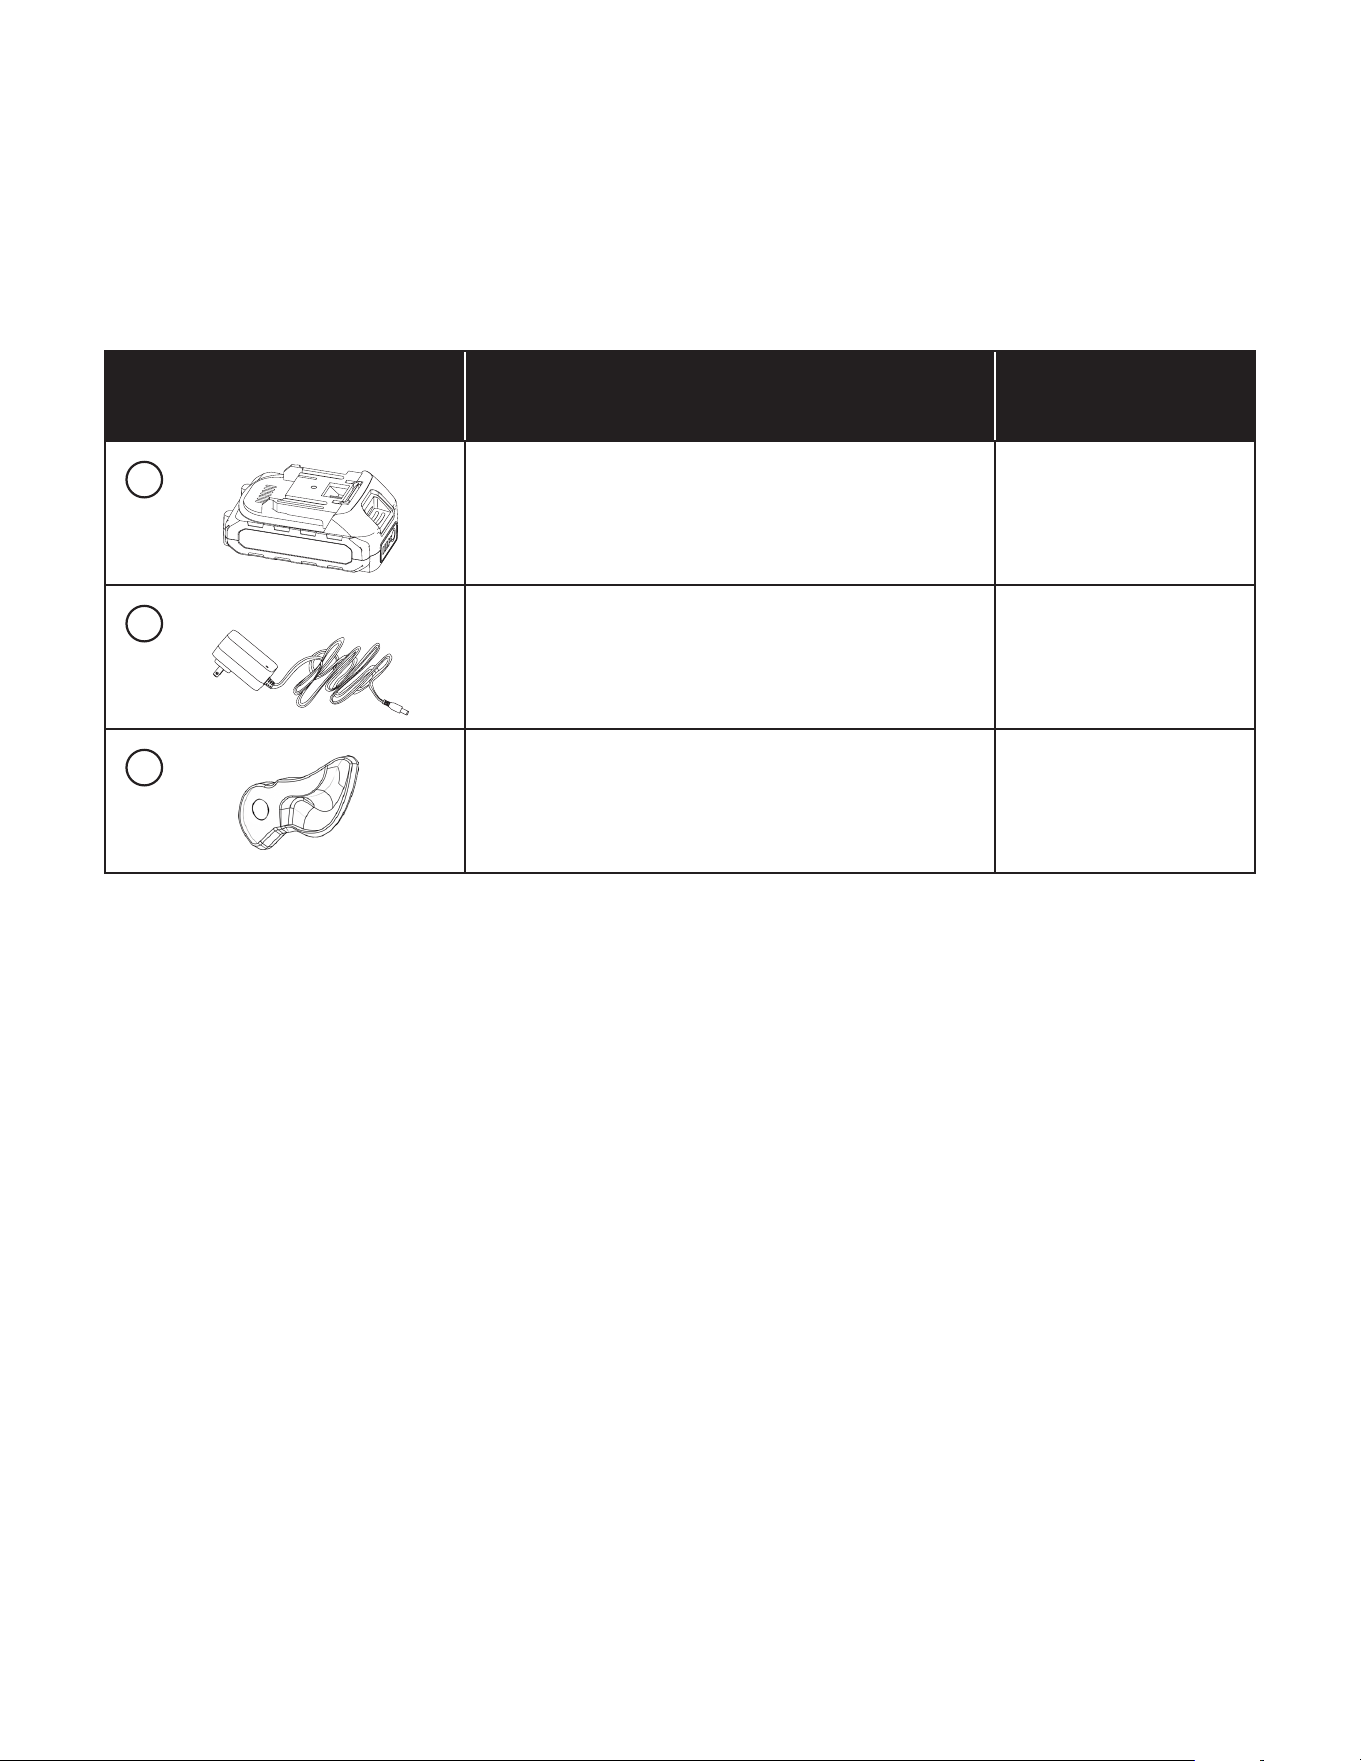
NOTE: Accessories are subject to change without any obligation on the part of All Season Power to provide notice of such
changes. Accessories can be ordered online at shopjoe.com or via phone by contacting the All Season Power customer service
center at 1-866-225-9723.
Optional Accessories
mWARNING! ALWAYS use only authorized Snow Joe
®
+ Sun Joe
®
replacement parts and accessories. NEVER use
replacement parts or accessories that are not intended for use with this cordless pruner. Contact All Season Power if you are
unsure whether it is safe to use a particular replacement part or accessory with your cordless pruner. The use of any other
attachment or accessory can be dangerous and could cause injury or mechanical damage.
Accessories Item Model
1
Sun Joe
®
20V* ECOSHARP
®
2.0 Ah Lithium-ion Battery 20V-BATT-2A
2
Sun Joe
®
21V* Lithium-ion Charger CZRW2200750U
3
Sun Joe
®
X20-PRU-2A Cordless Pruner Replacement
Cutting Blade
X20-PRU-BLD

15
Problem Possible Cause Solution
Unit will not start
a) Battery not inserted properly
b) Battery is discharged
c) On/O switch not pressed before
trigger
d) On/O switch is in the OFF position
a) Remove battery pack and reinsert
rmly until it clicks into place
b) Recharge battery using the 21V*
Lithium-ion charger; charge time is
approximately 3 hrs 30 mins
c) Press the On/O switch rst, then
pull the trigger switch to begin
operation
d) Slide the On/O switch to the ON
position before pulling the trigger
Battery does not charge or charges
slowly
a) Charger not fully connected to
battery charge socket
b) Ambient temperature too low or too
high
c) Battery is fully depleted
d) Charger indicator light remains red
after 3 hrs 30 mins
a) Reconnect the charger plug rmly
into the charge socket on the battery
b) Charge only when air temperature is
between 50°F–104°F (10°C–40°C);
ideal range is 64.4°F–75.2°F
(18°C–24°C)
c) Connect to charger immediately;
never allow battery to fully discharge
as this can cause irreversible
damage
d) Unplug charger and contact All
Season Power at 1-866-225-9723
Unit stops during operation
a) Battery charge is low
b) Motor overloaded by cutting
material that is too thick or hard
c) Rapid start/stop cycling overheated
motor
a) Recharge battery; 4 indicator lights =
full charge. Do not wait until battery
is fully depleted
b) Do not exceed max cutting capacity:
28 mm softwood, 15 mm hardwood.
Cut one branch at a time
c) Wait at least 5 seconds after
stopping before restarting to prevent
motor damage
Poor cutting performance / blade
snags on branches
a) Cutting blade is dull
b) Blade has sap or debris buildup
c) Attempting to cut material
exceeding rated capacity
a) Sharpen the beveled side of the
cutting blade using the included
whetstone at a 15° angle; make 4–5
smooth strokes from base to tip
b) Power o and remove battery. Clean
blade with a moistened soft cloth;
apply oil around the center bolt and
open/close the tool 10 times to work
it in
c) Max capacity is 28 mm in softwood
and 15 mm in hardwood; do not
force the tool beyond its rated limits
Blade does not lock or clicks loose
during use
a) Cutting blade not fully seated
b) Blade lock knob not tightened after
blade change
a) Remove blade and reinsert until an
audible click is heard, then rotate
blade lock knob clockwise to lock
b) Rotate blade lock knob clockwise
until it clicks into the locked position
(Fig. 6 in manual)
Unit vibrates excessively
a) Blade is loose or not properly
secured
b) Damaged or bent blade
a) Power o, remove battery, re-seat
cutting blade and lock blade lock
knob; for counter blade, check blade
bolt and blade gear are secure
b) Power o and remove battery.
Inspect blade; replace if bent or
cracked. Use only recommended
replacement parts
Troubleshooting

16
Troubleshooting
Problem Possible Cause Solution
LED light does not come on
a) Battery is discharged
b) On/O switch is in OFF position
a) Recharge battery pack; LED light
activates when unit is powered on
with sucient charge
b) Slide On/O switch to ON and press
trigger switch button; LED light
should illuminate
Only a company specialist may be able to correct faults that cannot be rectied with the aid of this table. Please call the All Season
Power customer service department at 1-866-225-9723.

17
R1_09222025
OUR CUSTOMER PROMISE + LIMITED WARRANTY
OUR WARRANTY:
All Season Power warrants new, genuine, powered and non-powered Products to be free from defects in material or workmanship when
used for ordinary household use for a period of one year from the date of purchase or delivery by the original, end-user purchaser when
purchased from All Season Power or from one of All Season Power’s authorized sellers with proof of purchase. Because All Season Power
is unable to control the quality of its Products sold by unauthorized sellers, unless otherwise prohibited by law, this Warranty does not
cover Products purchased from unauthorized sellers. If you have any questions about how to buy from an authorized seller, chat with us at
shopjoe.com/support or call us at 1-866-225-9723. If your Product does not work or there’s an issue with a specic part that is covered
by the terms of this Warranty, All Season Power will elect to either (1) send you a free replacement part, (2) replace the Product with a
new or comparable product (which may include a refurbished, like-new product) at no charge, or (3) repair the Product. How cool is that!
PRODUCT REGISTRATION:
All Season Power strongly encourages you to register your Product. You can register online at shopjoe.com/register, by chatting with us
at
shopjoe.com/support
or calling our Customer Service Department at 1-866-225-9723. Failure to register your Product will not diminish
your warranty rights. However, registering your Product will allow All Season Power to better serve you with any of your customer service
needs.
WHO CAN SEEK LIMITED WARRANTY COVERAGE:
This Warranty is extended by All Season Power to the original purchaser and original owner of the Product.
WHAT IS NOT COVERED?
This Warranty does not apply if the Product has been used commercially or for non-household or rental applications. This Warranty also
does not apply if the Product was purchased from an unauthorized seller. This Warranty also does not cover cosmetic changes that do
not aect performance. Wearing parts like belts, augers, chains and tines are not covered under this Warranty, and can be purchased at
shopjoe.com or by calling 1-866-225-9723.
We encourage you to use CERTIFIED AUTHENTIC Snow Joe
®
, Sun Joe
®
, Aqua Joe
®
+ Auto Joe
®
replacement parts + accessories.
Damage caused by the use of any other parts + accessories on your Product will not be covered under the warranty. Genuine parts +
accessories can be found and purchased here by entering the model number of your product.
ABOVE ALL ELSE, All Season Power, LLC (“All Season Power”) is dedicated to you, our customer. We strive to make your experience as
pleasant as possible. Unfortunately, there are times when a Snow Joe
®
, Sun Joe
®
, Aqua Joe
®
or Auto Joe
®
product (“Product”) does not
work or breaks under normal operating conditions. We think it’s important that you know what you can expect from us. That’s why we have
a Limited Warranty (“Warranty”) for our Products.
When you register your powered or non-powered Product with All Season Power at shopjoe.com/register, you will receive an additional
90 days of warranty coverage. In addition, you will have the option of purchasing extended warranty coverage beyond the standard 1-year
manufacturer’s warranty. Choose from two, three, or four years of extended coverage through Extend, Inc. Additional charges apply. When
you Go With Joe
®
, you’re not just buying an extended warranty; you’re buying total peace of mind to know that you can rely on our top-
notch tools, top-tier customer support, complete product coverage + no hassle return policy. Chat with us at shopjoe.com/support or call
us at 1-866-225-9723 7 days a week 10AM-6PM EST. We’ve got you covered!
There are no warranties which extend beyond those stated herein. ANY IMPLIED WARRANTIES THAT MAY BE APPLICABLE TO
PRODUCTS, INCLUDING IMPLIED WARRANTIES OF MERCHANTABILITY OR FITNESS FOR A PARTICULAR PURPOSE, ARE LIMITED
IN DURATION TO THE DURATION OF THIS WARRANTY. Some States do not allow limitations on how long an implied warranty lasts, so
the above limitation may not apply to you.
UNDER NO CIRCUMSTANCES SHALL WE BE LIABLE FOR ANY SPECIAL, INCIDENTAL, OR CONSEQUENTIAL DAMAGES BASED
UPON BREACH OF THIS LIMITED WARRANTY, BREACH OF CONTRACT OR STRICT LIABILITY. Some States do not allow the exclusion
or limitation of incidental or consequential damages, so the above limitation or exclusion may not apply to you. This warranty gives you
specic legal rights, and you may also have other rights which vary from State to State. This warranty supersedes those printed in product manuals.
EN
R


shopjoe.com
R