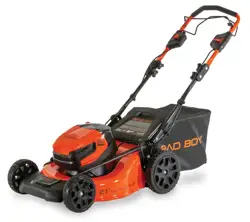
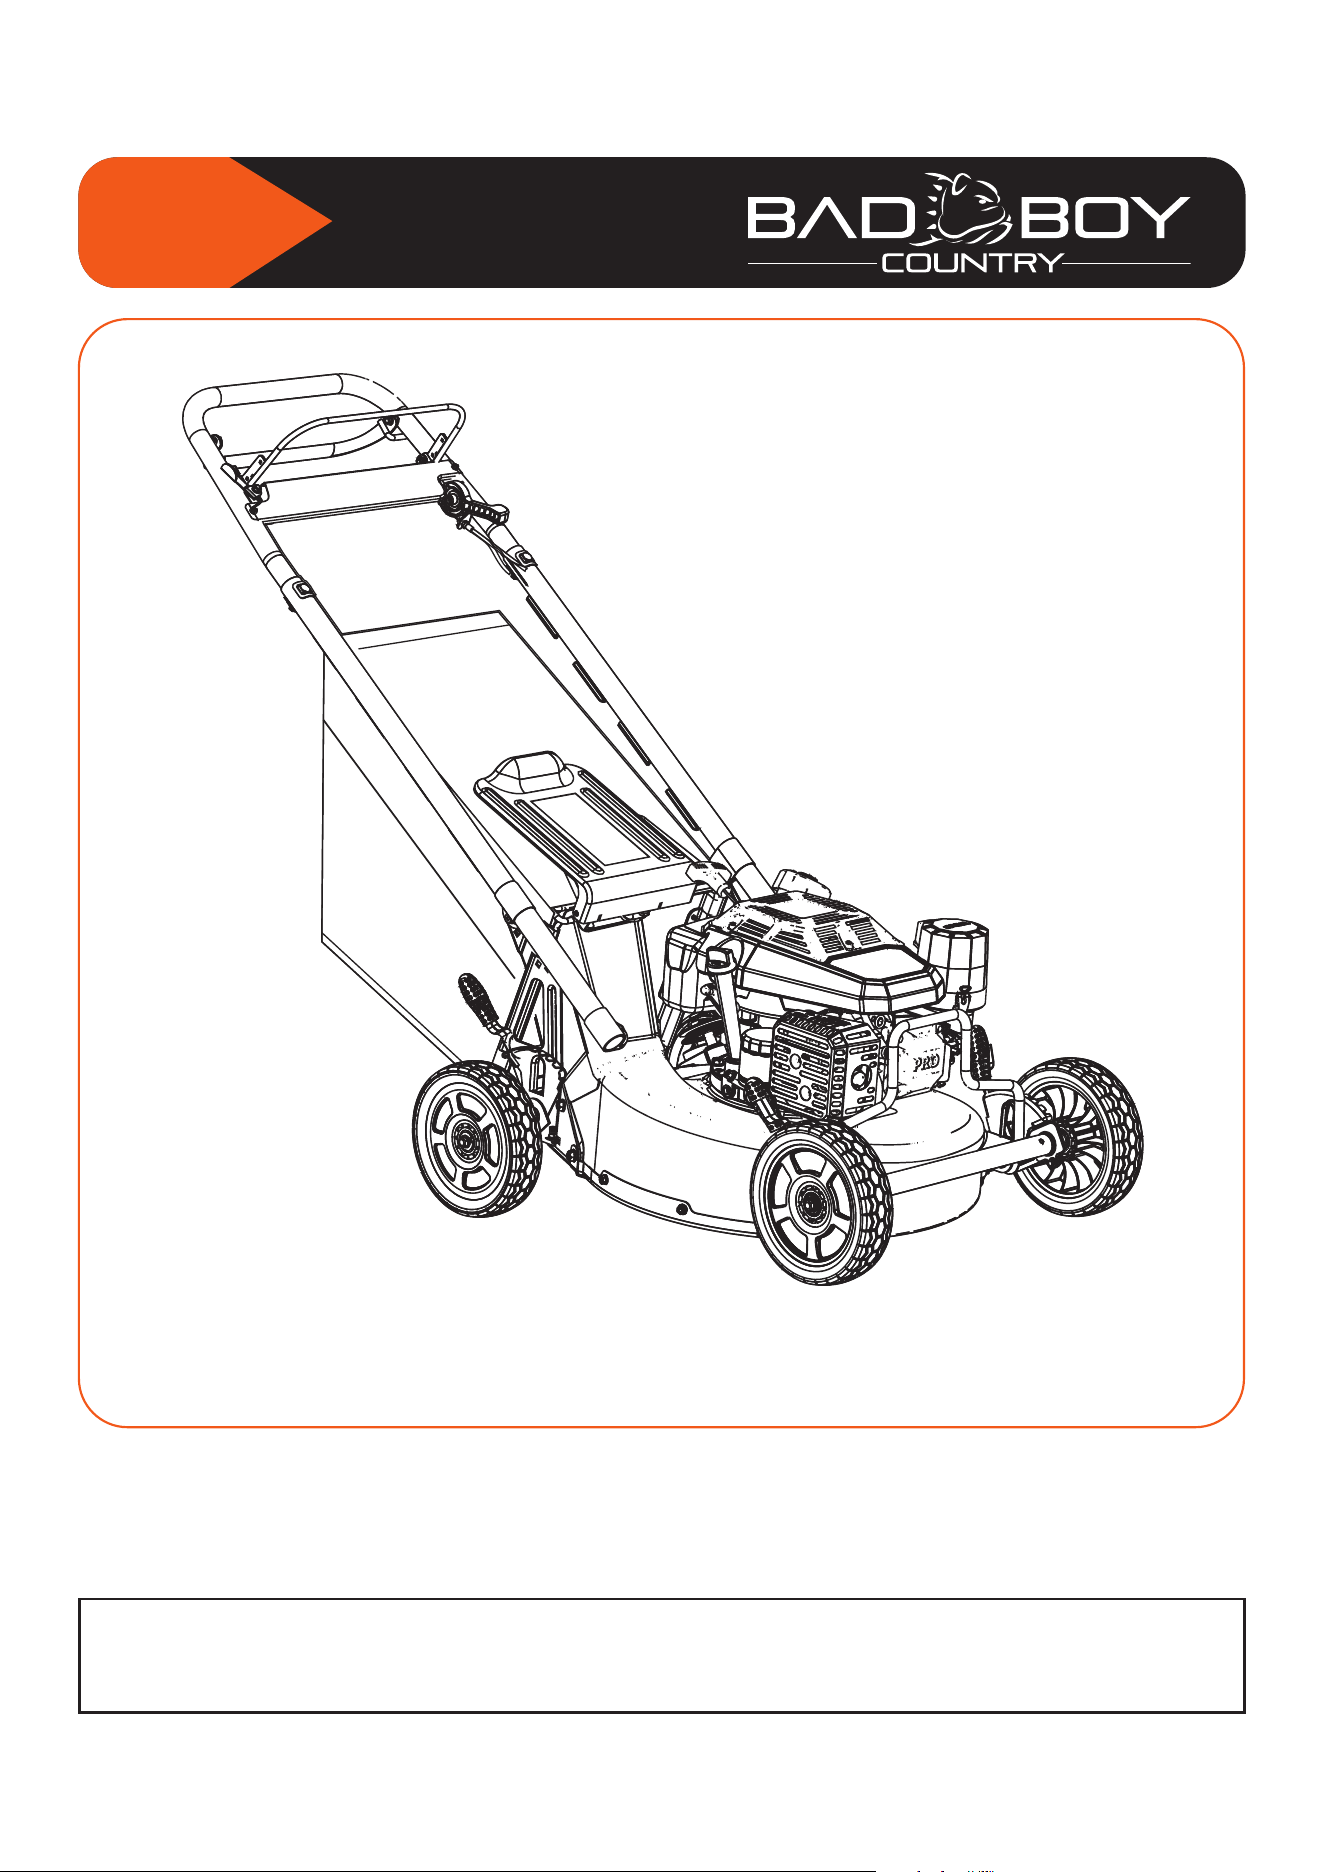
ZERO-TURN MOWER
OWNER’S OPERATOR SERVICE MANUAL
For additional information, please see us at
www.badboycountry.com
27
©2026 10-26
21˝ PUSH MOWER

INTRODUCTION
Common sense:
The focus of this manual is HOW to operate and service the equipment safely. It is not possible to cover every con-
ceivable situation you can face when using this mower. Therefore use this product only in a manner described in
this manual. Operation or handling the machine in any other manner can lead to serious injury or death. If a
situation is not described in this manual it should be considered dangerous - and not be done.
If you are unfamiliar with this product make sure that you carefully understand how it functions and practice all
operations and handling before putting the machine to use. Familiarize yourself in the presence of an experienced
operator. Avoid all situations that are beyond your capability.
If you still feel uncertain about the operating procedures after reading these instructions DO NOT operate the
machine until you have consulted an experienced operator.
Bad Boy Mowers is committed to keeping you up and running. For technical support, warranty questions, or parts,
reach out using the contact information below.
PERSONAL SAFETY EQUIPMENT
When working and operating garden equipment - approved personal safety items should be used:
Hearing
Protection
Eye
Protection
Protective
Shoes
Protective
Gloves
Careless or improper use of this Lawn Mower can cause serious or even fatal injury.
Carefully read, understand and follow ALL instructions in this manual as well as the
instructions in the included Owner’s Manual for the engine before using the Bad Boy 21"
Self-Propelled Push Mower.
Allow only competent adults to operate this lawn mower. It is the owner’s responsibility to
ensure that all operators of this mower have read and understand the content of this
manual.
2
Technical Support:
Warranty:
Parts:
Bad Boy, Inc.
102 Industrial Drive
Batesville, AR 72501
3
SAFETY HAZARDS
CAUTION
HEARING HAZARD
During the normal use of this machine, opera-
tor may be exposed to a noise level equal to or
higher than 85 dB(A). Use hearing protection.
WARNING
ASPHYXIATION HAZARD
Running an engine in a confi ned or badly ven-
tilated area can result in injury or death due to
asphyxiation or carbon monoxide poisoning.
WARNING
DO NOT MODIFY THE PRODUCT
Under no circumstances may the design of the machine be modifi ed without the permission of the manu-
facturer. Always use genuine parts and accessories. Unauthorized modifi cations, parts and/or acces-
sories can result in serious personal injury or the death of the operator or others. Your warranty may not
cover damage or liability caused by the use of unauthorized accessories or replacement parts.
SAFETY DEFINITIONS
In this manual a Safety Alert Symbol followed by the signal words WARNING and CAUTION are used to
identify safety information about hazards which can result in death, serious injury and/or property damage.
These signal words mean:
WARNING indicates a hazard which, if not avoided, could result in death or serious injury.
CAUTION indicates a hazard which, if not avoided, might result in minor or moderate injury.
NOTICE indicates a message not related to personal injury.
REGISTER THE PRODUCT
Record the following information for your records:
PURCHASE DATE: ________________
MODEL No: _______________________ SERIAL No: ________________________
ENGINE MODEL: ____________SPEC No ______________ ENGINE SERIAL No: __________________
Mail information:
Street Address: ______________________________________
Name: ______________________________ City, State, Zip code ___________________________________
BBY21CV200
CV200
PH-CV200-3020
The warranty registration must be completed within 30 days of purchase to validate your warranty. As a
new equipment owner, it is your responsibility to ensure warranty registration is completed.
Warranty registration should be completed by your selling dealer at the time of delivery. Please confirm
registration has been completed with your dealer.
The lawn mower model and serial number as well as the engine model number, engine type and serial number are critical in
order to obtain the correct service parts. Bad Boy Mowers has service parts available as listed in the spare parts list. All
engine parts are distributed through the Rehlko engine dealer networks. Please refer to the engine Owner’s Manual that was
included with the mower.
CONTENTS
Content Page
Introduction, personal safety ...................... 2
General safety message............................. 2-3
Registration of the product ………………… 3
Table of contents ………………………….... 4
Lawn mower safety..................................... 4-5
Decals and locations................................... 6
What is what on the product.......... .............. 6
Assembly - setup .............................. 7-9
Recommended engine oil .......…………… 8
Recommended fuels................................... 10
Fuel and fuel safety warnings……………... 10
Controls and operation …………………….. 10-11
Maintenance ........................................... 12-13
Maintenance schedule................................ 12
Blade maintenance ................................... 13
Oil change.................................................. 13
Warranty ..................................................... 15
LAWN MOWER SAFETY
4
WARNING
Always secure the mower when unattended.
Never leave the mower in such way that an
unauthorized person can operate or move the
mower.
SAFETY PRACTICES FOR WALK-BEHIND MOWERS
This lawn mower is capable of amputating hands and feet
and throwing objects. Failure to observe the following safety
instructions could result in serious injury or death.
I. GENERAL OPERATION
1. Read, understand, and follow all instructions on the
machine and in the manuals before starting.
2. Do not put hands or feet near or under the machine. Keep
clear of the discharge opening at all times.
3. Only allow responsible adults, who are familiar with these
instructions, to operate this machine.
4. Clear the area of objects such as rocks, wire, toys, etc.,
which could be thrown by the blade. Stay behind the handle
when the engine is running.
5. Be sure the area is clear of other people before operating.
Stop machine if anyone enters the area.
6. Do not operate machine barefooted or while wearing
sandals. Always wear substantial footwear (protective shoes).
7. Do not pull machine backward unless absolutely necessary.
Always look down and behind before and while moving
backward.
8. Keep the operating area clear of bystanders. Stop the
blade when crossing gravel surfaces.
9. Do not operate machine without the entire grass catcher, or
mulch plug and discharge door, rear guards, or other safety
protective devices in place and working.
10. Never leave a running machine unattended.
11. Stop the engine and wait until the blade comes to a
complete stop before cleaning the machine, removing grass
catcher, or unclogging the discharge chute.
12. Operate machine only in daylight or good artifi cial light.
13. Do not operate machine while under the infl uence of
alcohol or drugs.
14. Never operate mower in wet grass. Always be sure of
your footing - walk - never run.
15. Disengage the drive system, before starting the engine.
16. If the machine should start to vibrate abnormally, stop
the engine and check for the cause immediately. Vibration is
generally a warning of trouble.
17. Always wear approved personal safety equipment such
as hearing protection, eye protection, and protective gloves
when operating machine.
18. See manufacturer’s instructions for proper operation
and installation of accessories and parts. Only use
accessories or parts approved by Bad Boy or the engine
manufacturer.
WARNING
In order to prevent accidental starting when
setting up, transporting, adjusting or making
repairs, always disconnect spark plug wire and
place wire where it can not come in contact with
the plug.
5
LAWN MOWER SAFETY
II SLOPE OPERATION
Slopes are a major factor related to slip and fall accidents,
which can result in severe injury. Operation on all slopes
requires extra caution. If you feel uneasy on a slope, do not
mow it.
1. Mow across the face of slopes; never up and down. Exer-
cise extreme caution when changing direction on slopes.
2. Watch for holes, ruts, bumps, rocks, or other hidden ob-
jects. Uneven terrain could cause a slip and fall accident. Tall
grass can hide obstacles.
3. Do not mow on wet grass or excessively steep slopes.
Poor footing could cause a slip and fall accident.
4. Do not mow near drop-off s, ditches, or embankments. You
could lose your footing or balance.
III. CHILDREN
Tragic accidents can occur if the operator is not alert to the
presence of children. Children are often attracted to the ma-
chine and the mowing activity. Never assume that children will
remain where you last saw them.
1. Keep children out of the mowing area and under the watch-
ful care of a responsible adult other than the operator.
2. Be alert and turn mower off if a child enters the area.
3. Never allow children to operate the machine.
4. Use extra care when approaching blind corners, shrubs,
trees, or other objects that may block your view of a child.
IV. SAFE HANDLING OF GASOLINE:
To avoid personal injury or property damage, use extreme care
in handling gasoline. Gasoline is extremely fl ammable and the
vapors are explosive.
1. Extinguish all cigarettes, cigars, pipes, and other sources of
ignition.
2. Use only an approved gasoline container.
3. Never remove gas cap or add fuel with the engine running.
Allow engine to cool before refueling.
4. Never refuel the machine indoors.
5. Never store the machine or fuel container where there is an
open fl ame, spark, or pilot light such as on a water heater or
on other appliances.
6. Never fi ll containers inside a vehicle or on a truck or trailer
bed with a plastic liner. Always place containers on the ground
away from your vehicle before fi lling.
7. Remove the mower from the truck or trailer and refuel it on
the ground. If this is not possible, then refuel the mower with
a portable container, rather than from a gasoline dispenser
nozzle.
Continued,
8. Keep the nozzle in contact with the rim of the fuel tank or
container opening at all times until fueling is complete. Do not
use a nozzle lock-open device.
9. If fuel is spilled on clothing, change clothing immediately.
10. Never overfi ll fuel tank. Replace gas cap and tighten
securely.
V. GENERAL SERVICE
1. Never operate the mower in a closed area.
2. Keep all nuts and bolts tight to be sure the mower is in safe
working condition.
3. Never tamper with safety devices. Check their proper
operation before each use of the mower.
4. Keep the mower free of grass, leaves, or other debris build-
up. Clean up oil or fuel spillage and remove any fuel-soaked
debris.
Allow machine to cool before storing.
5. If you strike a foreign object, stop and inspect the mower.
Repair, if necessary, before starting.
6. Never make any adjustments or repairs with the engine
running. Disconnect the spark plug wire and ground against
engine to prevent unintended starting.
7. Never attempt to make wheel height adjustments while the
engine is running.
8. Check grass catcher components and the rear discharge
door frequently and replace only with Bad Boy original
parts
when necessary.
9. Mower blades are sharp. Wrap the blade or wear gloves,
and use extra caution when servicing them.
10 Do not change engine governor setting or over speed the
engine.
11. Maintain or replace all safety and instruction labels.
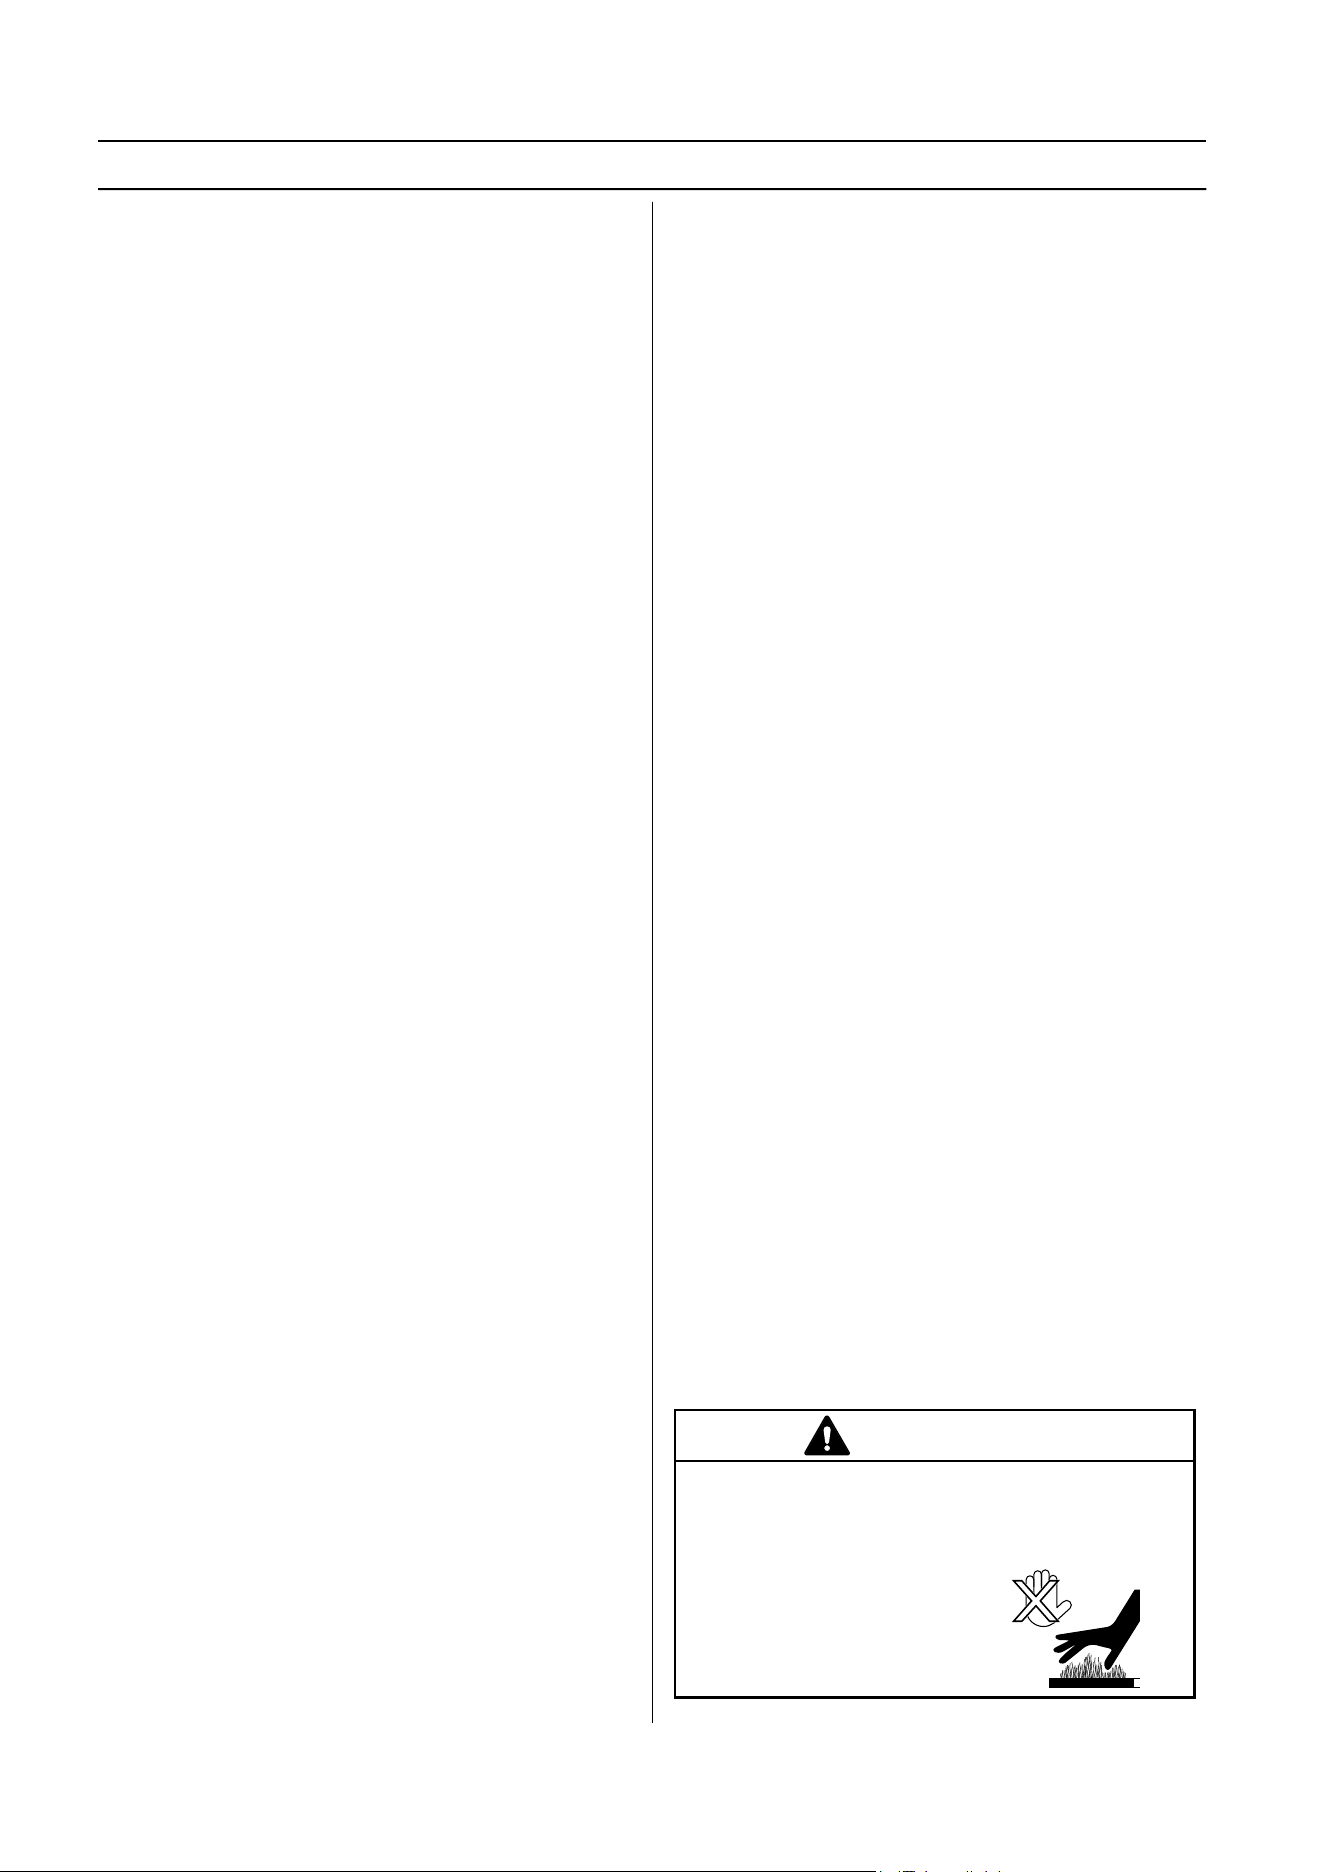
CAUTION
Muffl er and other engine parts become extremely
hot during operation and remain hot after engine
has stopped. To avoid severe burns on contact,
stay away from these areas.
6
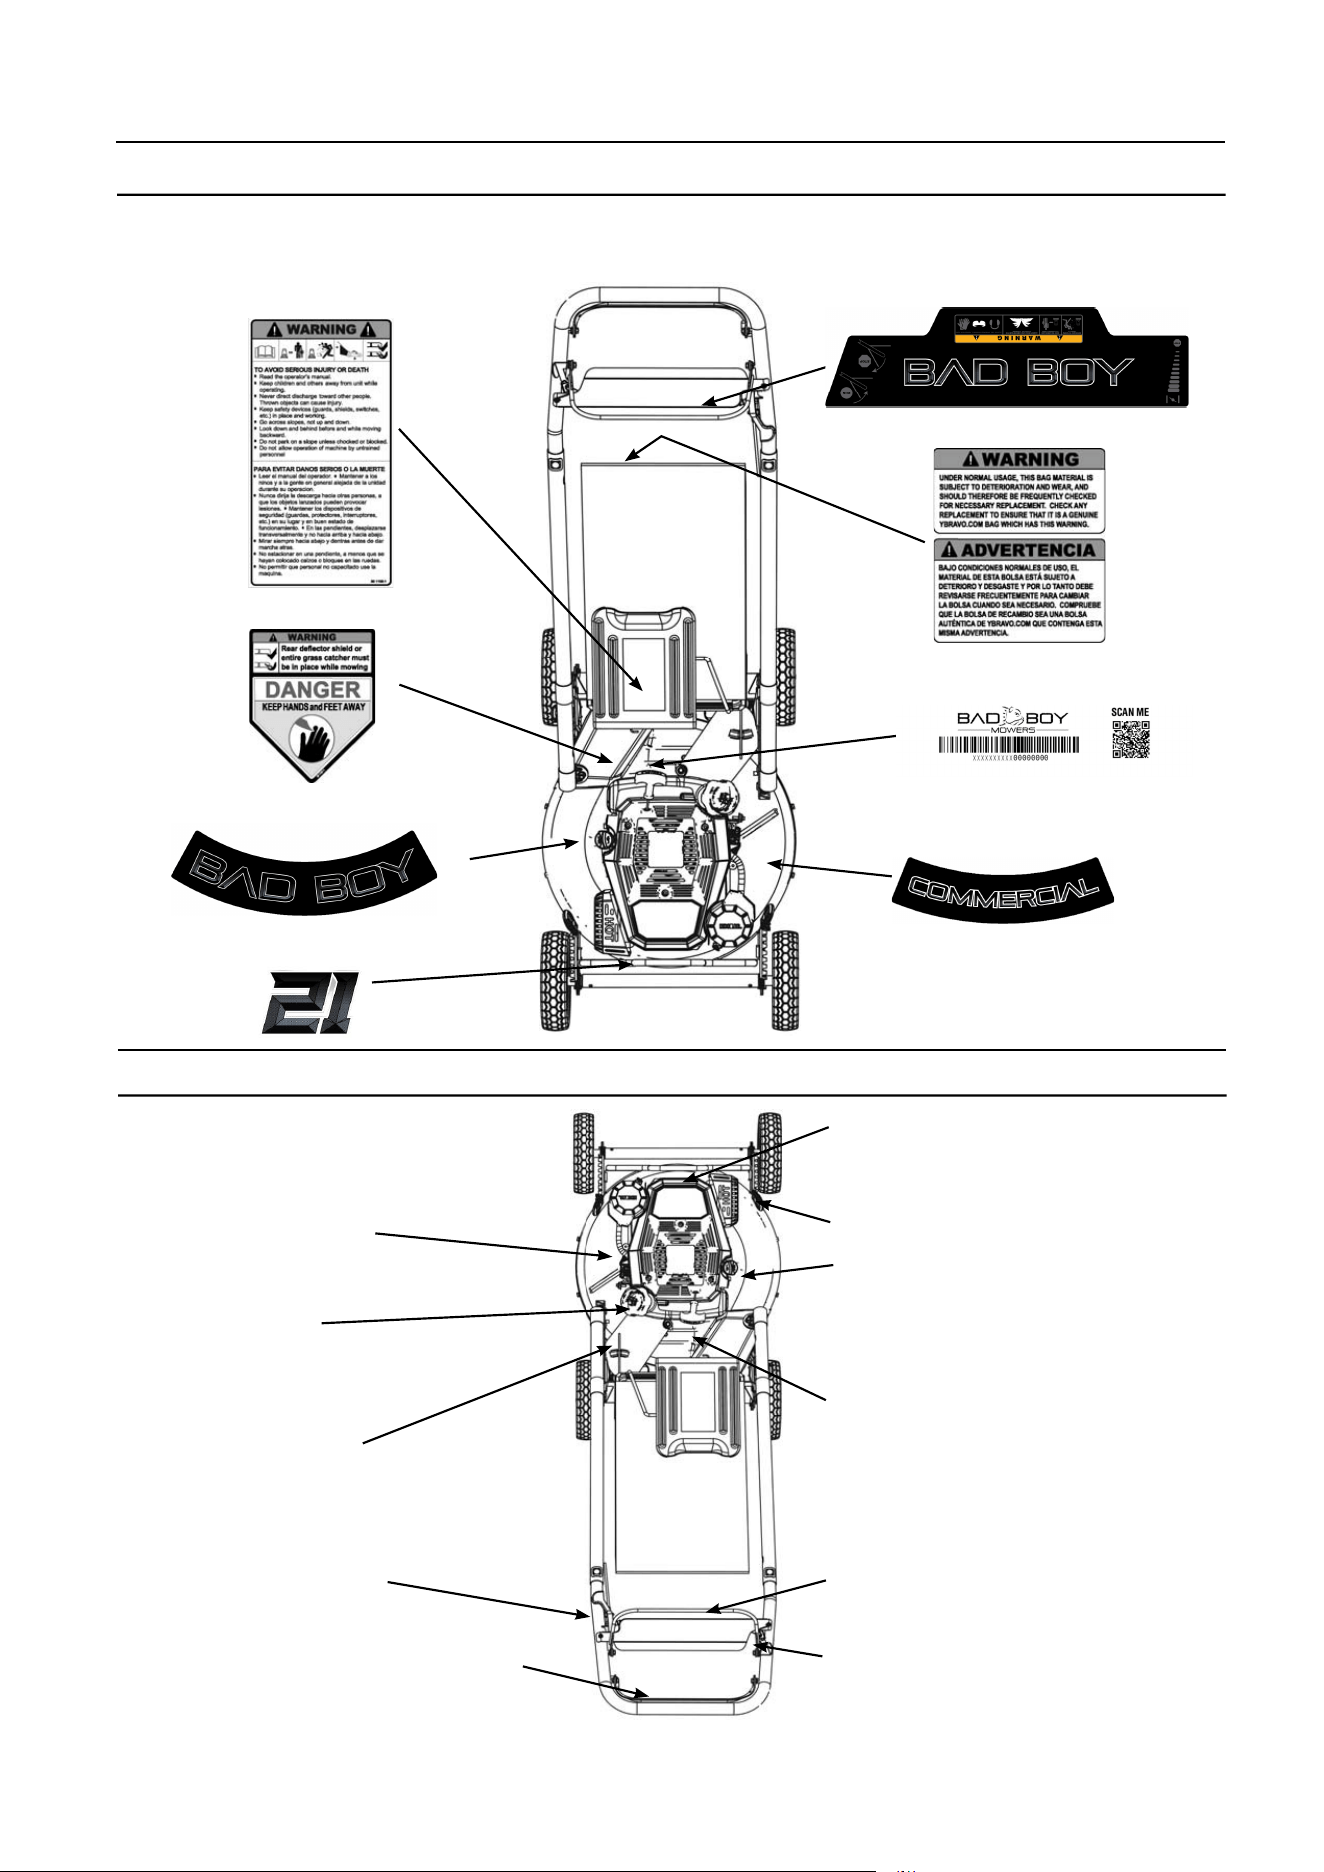
DECALS AND LOCATIONS
WHAT IS WHAT
All safety decals on the machine must remain in place, intact, and visible. Make sure to have a good understanding of
the decals prior to operating the machine. Become familiar with all decal locations and their purpose.
Cutting height adjustment - page 11
Lower control bar - drive control - page 11
Throttle cable adjustment
at the engine - page 9
Drive cable adjustment - page 11
Oil fi ller cap and dipstick - page 8, 13
Gasoline - page 10
Throttle control - page 9
Gear shift lever - page 11
HI and LO range
Upper control bar/Operator’s presence
control, Zone Start control - page 9-10,
Spark Plug - Engine Owner’s Manual
Label on grass bag
Model & Serial #
Lock for upper control bar
Part #:
091-0529-00
Part #:
091-0529-00
Part #:
091-0529-00
Part #:
091-0529-00
7
ASSEMBLY - SETUP
UNPACKING:
Carefully remove the mower from its packaging and check that
you have all the following items:
Upper Handle complete
(2) Lower Handle tubes
Grass Catcher and Mulch Plug (installed on the mower)
Tool kit
Engine Owner’s Manual and Warranty Statement
Bad Boy 21" Push Mower Operator’s Manual
NOTICE:
If you are missing any of these items or if you are unsure of
how to properly assemble this mower please contact your
authorized Bad Boy dealer.
Tools needed for assembly:
2 pcs 10mm wrenches
1 pcs 13mm wrench
1 pcs Needle nose pliers
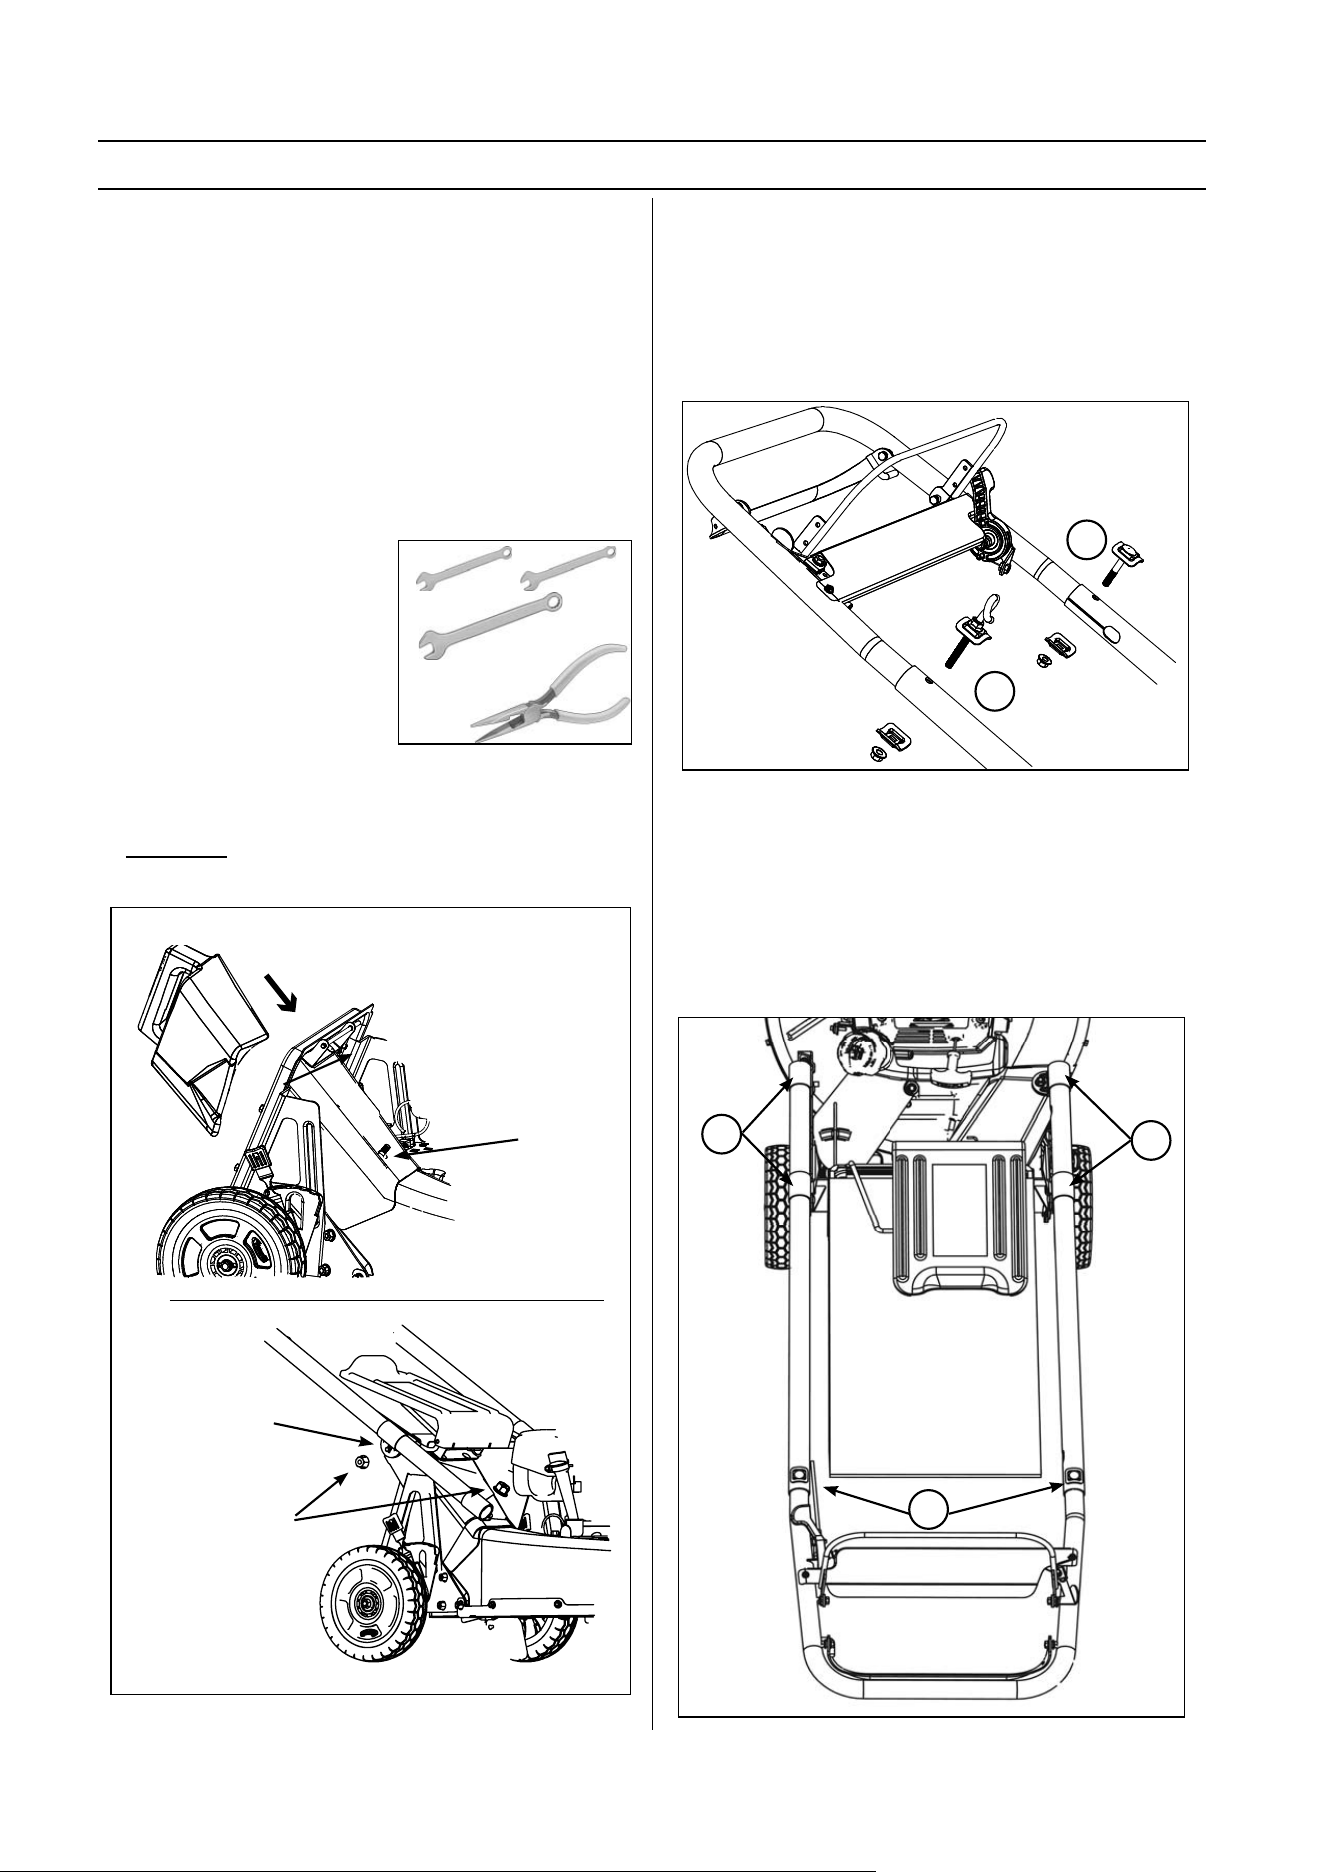
STEP 1
Install the black handle tubes to the mower with the M8
carriage bolts. Do not tighten the nuts. Please note that there
are three holes for the upper clamp. We suggest to install the
bolt in the center hole as a start.
STEP 2
Slide the upper handle assembly into the two lower tubes.
Insert the carriage bolt on the left side and use one square
washer on each side of the handle tube (1).
Insert the eyelet screw on the right side (2). Use the eyelet to
hold the starter rope and handle for convenient reach on the
Zone Start model. Leave nuts fi nger tight..
Eyelet screw used on
Zone Start models to hold
the starter handle
STEP 3
To simplify the alignment of the handle, install the grass
catcher.
Tighten the bolts in the following order:
1 - Tighten the two bolts on the right side tube clamps.
2 - Align the left tube with the catcher (same as the right side)
and tighten the two clamps.
3 - Tighten the upper bolts that attaches the handle
assembly to the tubes.
Install the right side front
bolt and insert the mulch
plug to hold the bolt
during installation.
Install the nuts fi nger tight.
Tighten completely
in step 3.
1
2
Needle Nose
Pliers
10 mm
13 mm
10 mm
Install the bolt in
center hole
1
2
3
8
BBC Models
21” Zone Start
ASSEMBLY - SETUP
Note: The control
panel does not
have to be removed
to install the cables
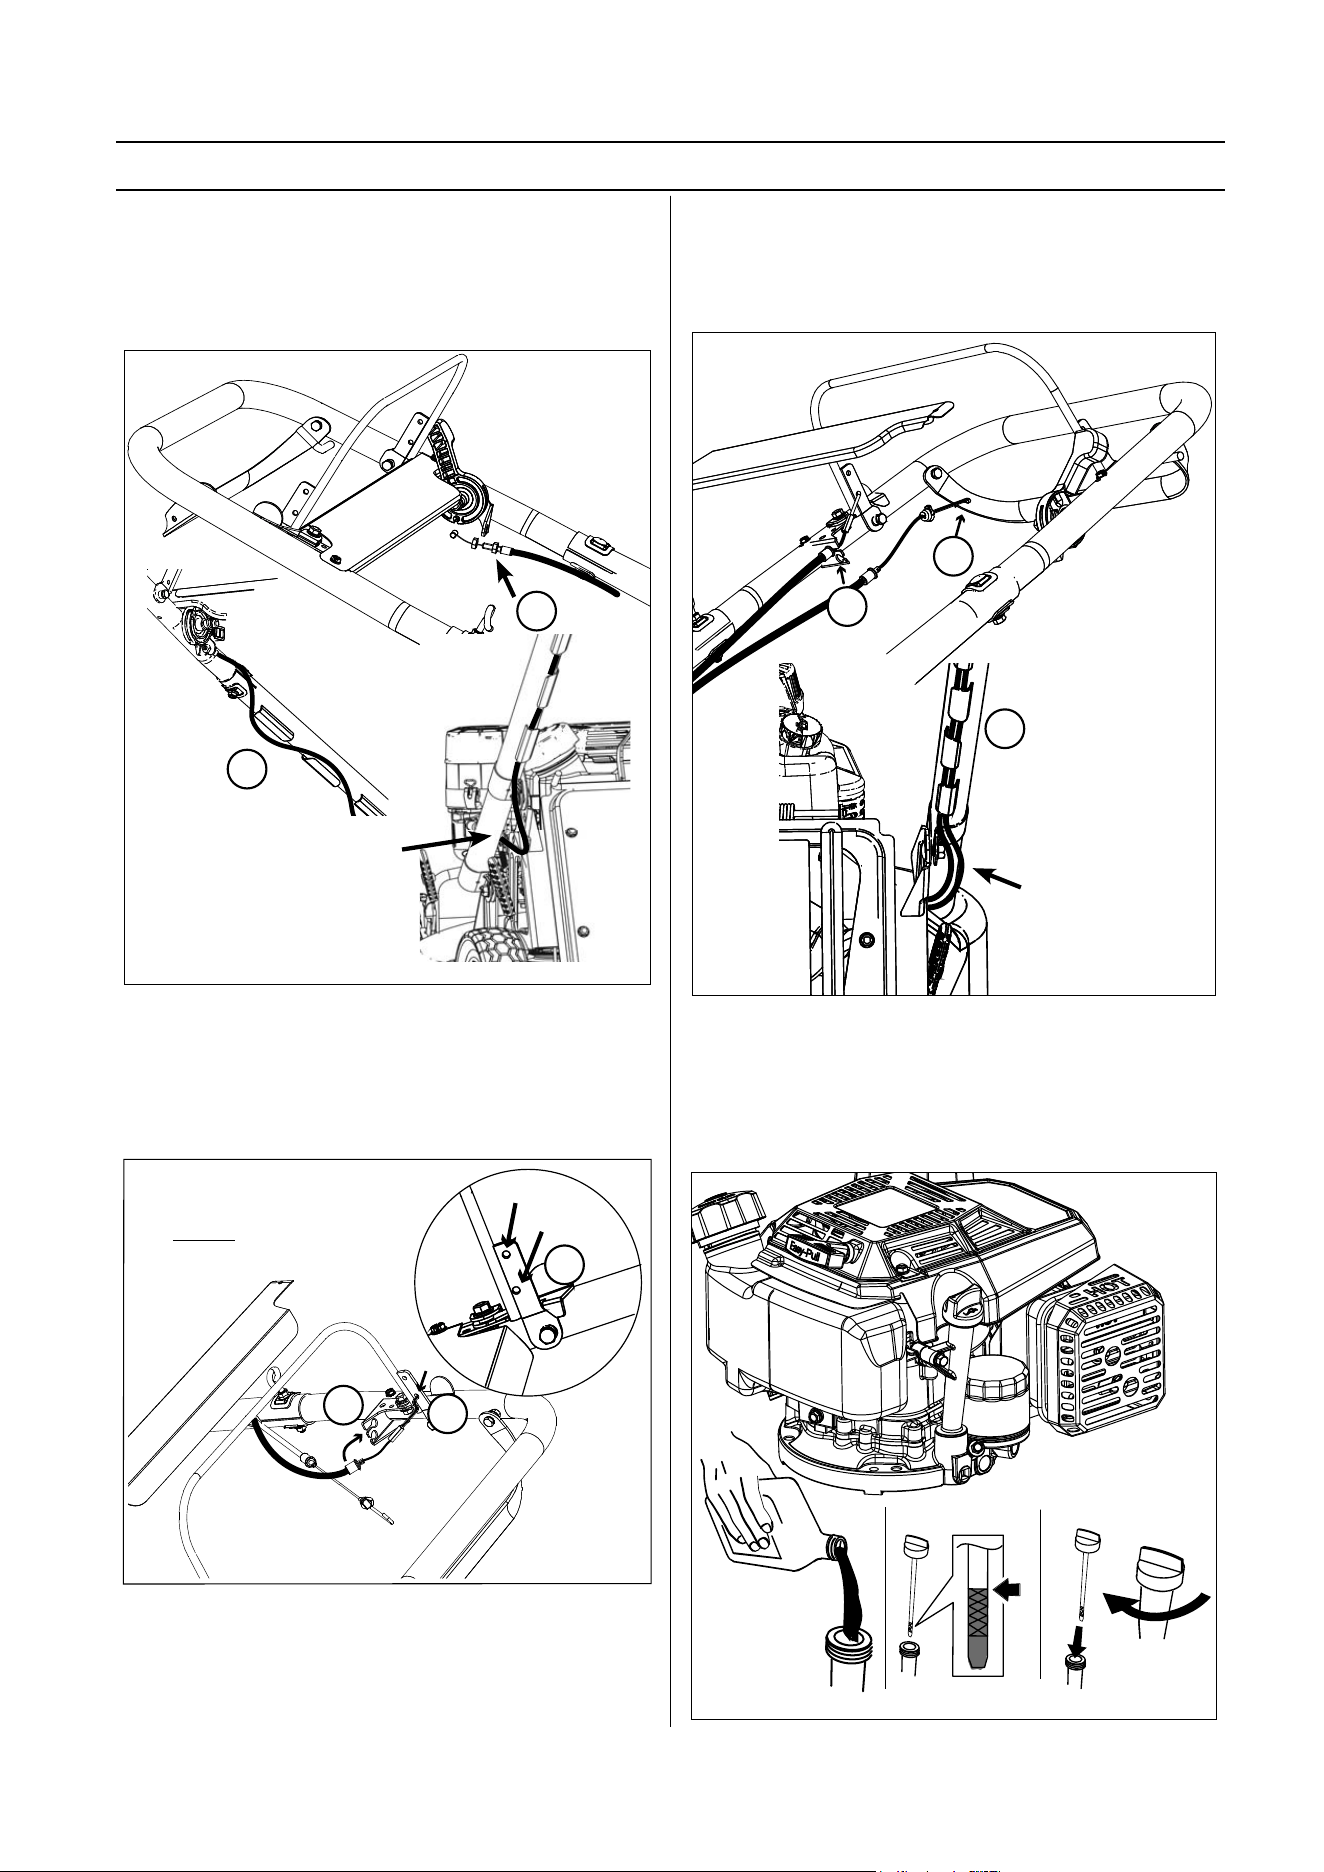
STEP 5
Install the engine control cable in the upper control bar (1).
Note that there are two holes for the control cable.
The 21” Zone Start mowers with the CV200 uses the lower
hole at (1). Pull on the cable sheath and insert into the hole
(2) of the handle bracket .
2
1
STEP 6
Install the drive cable into the lower control bar (1) and insert
the cable sheath fi tting into the lower hole of the handle
bracket (2). Install the cable in the holders along the tube as
illustrated (3)
1
2
STEP 4
Install the throttle cable into the throttle control. The cable has
been adjusted at the factory (1) and the nut locked in place.
However verify the proper throttle cable adjustment per the
instructions for the Rehlko engine - See “STEP 9”. Install the
cable in the holders along the tube as illustrated (2)
2
Notice: The cable should be
routed between the handle tube
and the handle bracket.
Notice: The cables
should be routed outside
the handle bracket
3
STEP 7
Fill Oil - Rehlko Engine
Fill a new engine with an SAE 10W-30 engine oil.
Fill approximate 24 Fl.Oz (0.7 Qt. - 0.7 Liters)
Please read the Rehlko engine Owner’s Manual for full infor-
mation. Check the engine oil level daily.
1
1
10W-30
Check oil level
with the dipstick
fully inserted
9
ASSEMBLY - SETUP - ENGINE CONTROLS
Follow these steps to verify proper setup of the mower
equipped the Rehlko Zone Start engine.
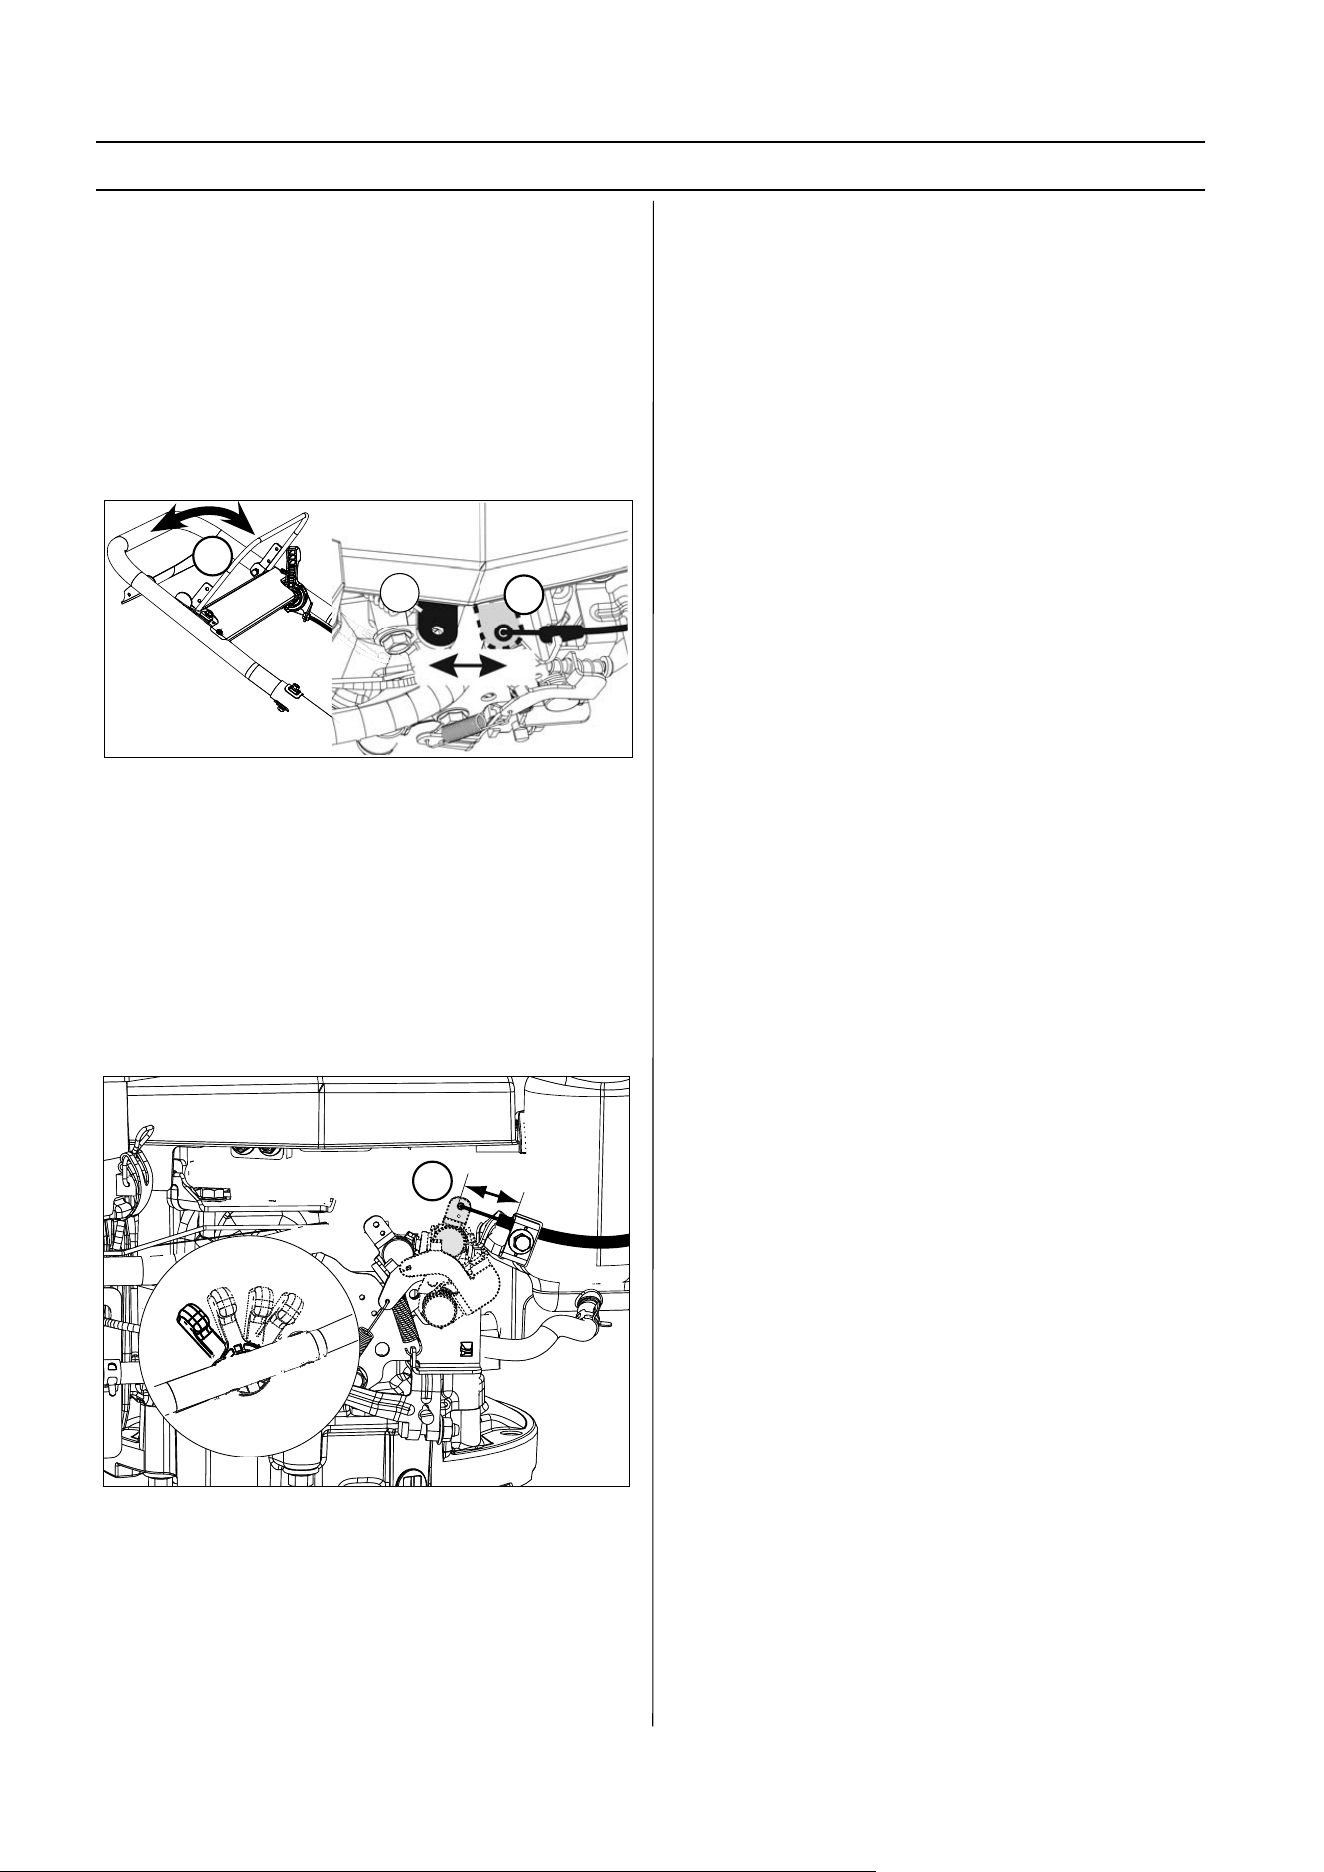
STEP 8
We recommend verifying that proper cable movement is
achieved at the engine when operating the upper control bar.
- Depress the upper control bar (1)
- When the upper control bar is depressed it will release the
fl
ywheel brake/stop switch at the engine.
- The cable length is verifi ed at the factory however it is
important to understand the function and how to check the
adjustment.
1
With the control bar in the released position (1) the arm on the
engine at (2) should be able to move forward towards its
limiter. This position of the arm ensures that the fl ywheel
brake and stop switch stops the engine. When depressing the
control bar the stroke of the arm (3) should be a minimum of
7/8” (22 mm) to properly release the engine brake and switch.
STEP 9
Verify that the throttle control is adjusted correctly as follows:
- Move the throttle control to the Choke position.
- In the Choke position the arm attached to the throttle cable a t
(1) the distance will meaure no more than 1 inch (25 mm).
- If needed an adjustment can be made at the throttle control.
Following these steps for the throttle adjustment will ensure
that the Rehlko engine performs properly for this mower.
The engine speed is adjusted to approximately 3300 RPM at
the factory.
NOTICE:
The engine speed should preferably be checked and verifi ed
with a tachometer. Normal full throttle speed of the engine
should be adjusted to 3300 RPM. An authorized Rehlko En-
gine Dealer can verify and adjust the engine speed properly.
1
2
3
Choke
Full Throttle
Idle Throttle
Engine Off
(BBC version)
10
Choke
Full
Throttle
Idle
Throttle
STOP
ENGINE
RUN
ENGINE
CONTROLS & OPERATION
Before operating the mower for the fi rst time, please review
and understand the entire manual including all Warnings and
Cautions.
Even if you have operated other mowers in the past please
take time to become familiar with how this mower works and
practice all operations to build up your skills.
BEFORE ANY OPERATION ALWAYS:
- Inspect the mower for any visible damage or broken parts
- Check the oil level in the engine on a daily basis
- Make sure that when you release the Upper Control Bar
the engine should stop within three seconds. If the engine
does not stop, contact your authorized Bad Boy dealer.
- Never operate the mower with obvious damage or
malfunction until the problems have been corrected.
WARNING
Never make adjustments or repairs with the
engine running. Disconnect the spark plug wire,
and keep the wire away from the plug to prevent
accidental starting..
STATING THE ENGINE
1. To start a cold engine it is important to use the “Choke”
position. To start a warm engine it is not necessary to use the
choke.
2. Press down on the upper control bar to release the engine
brake and kill switch. If the upper control bar is released
during normal operation the engine should stop completely
within three seconds.
For best performance use the “Full Throttle” position for all
mowing. To verify that the engine is running at full throttle
please follow the steps outlined under the setup instructions
on pages 7 through 9. A Bad Boy dealer can also verify the
correct full throttle adjustment. The engine speed should
be adjusted to approximately 3300 RPM.
Notice: The upper control bar is an “Operators
Presence Control” on the Zone Start mowers. It has to
be pushed down before starting the engine.
Taking the following precautions will lessen the risk of
injury and property damage.
Use extreme care in handling gasoline. Gasoline is ex-
tremely fl ammable and the vapors are explosive.
- Extinguish all cigarettes, cigars, pipes, and other
sources of ignition.
- Use only approved gasoline containers.
- Never remove gas cap or add fuel with the engine
running.
- Allow engine to cool a minimum of 3 minutes before
refueling.
- Never fuel the machine indoors.
- Never store the machine or fuel container where there
is an open fl ame, spark, or pilot light such as on a water
heater or other appliances.
- Never fi ll containers inside a vehicle or on a truck or
trailer bed with a plastic liner. Always place containers
on the ground away from your vehicle when fi lling.
- Remove the mower from the truck or trailer and refuel
it on the ground. If this is not possible, then refuel the
equipment with a portable container, rather than from a
gasoline dispenser nozzle.
- Keep the nozzle in contact with the rim of the fuel tank
or container opening at all times until fueling is com-
plete. Do not use a nozzle lock-open device.
- If fuel is spilled on clothing, change clothing
immediately.
- Never overfi ll fuel tank. Always wipe off any spilled fuel
or oil. Replace fuel cap and tighten.
WARNING
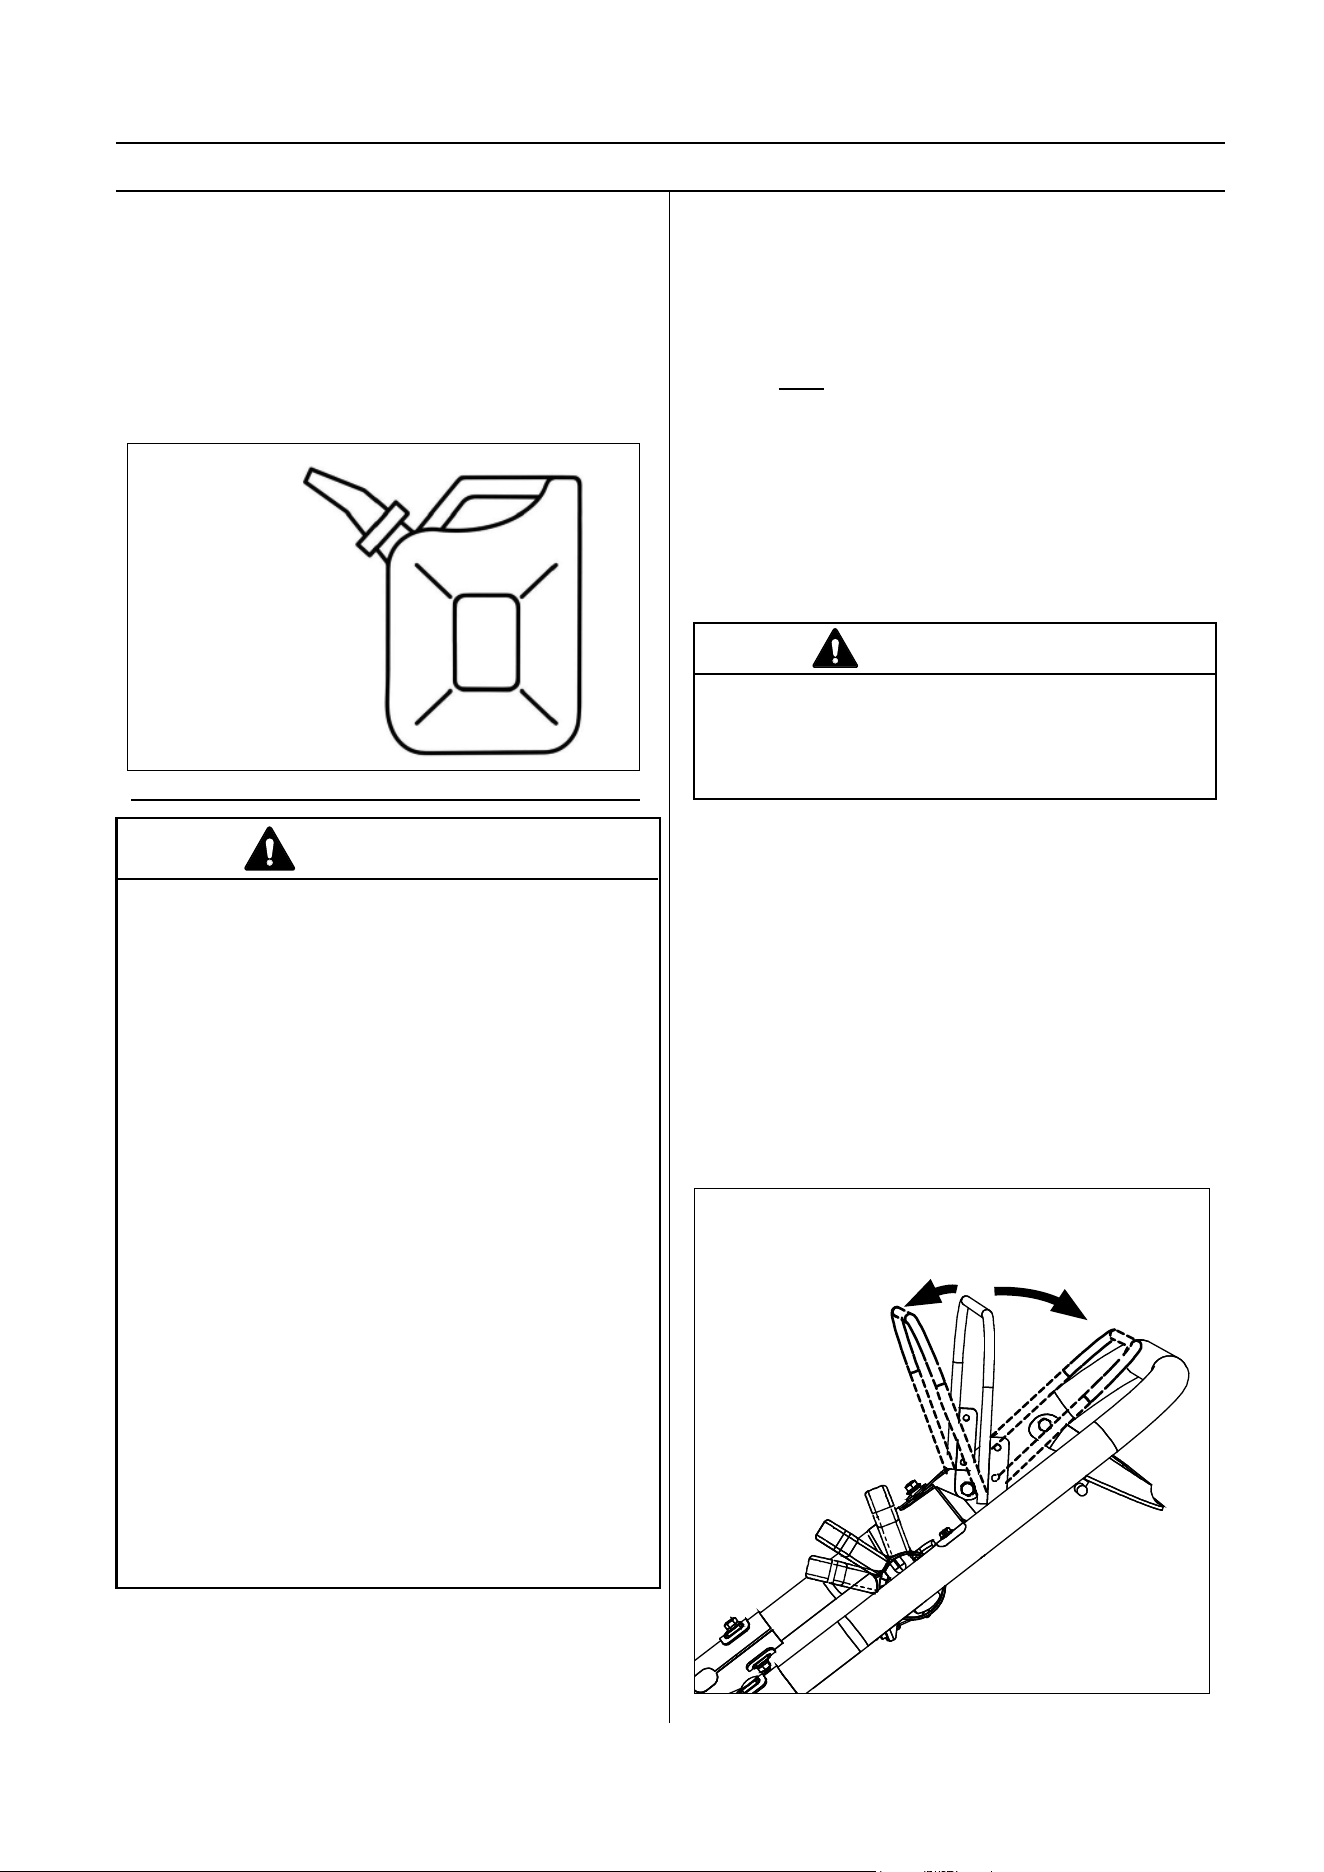
STEP 10
Before fi lling the engine with gasoline - follow all instructions in
this manual as well as all instructions provided in the Rehlko
engine Owner’s Manual.
Maximum fi ll volume:
1.5 Qt (1.4 Liter) - 87 octane or higher
The engine shall not be operated on gasoline
marketed as E-15, E-20 or E-85
USE ONLY APPROVED
FUEL CONTAINERs
11
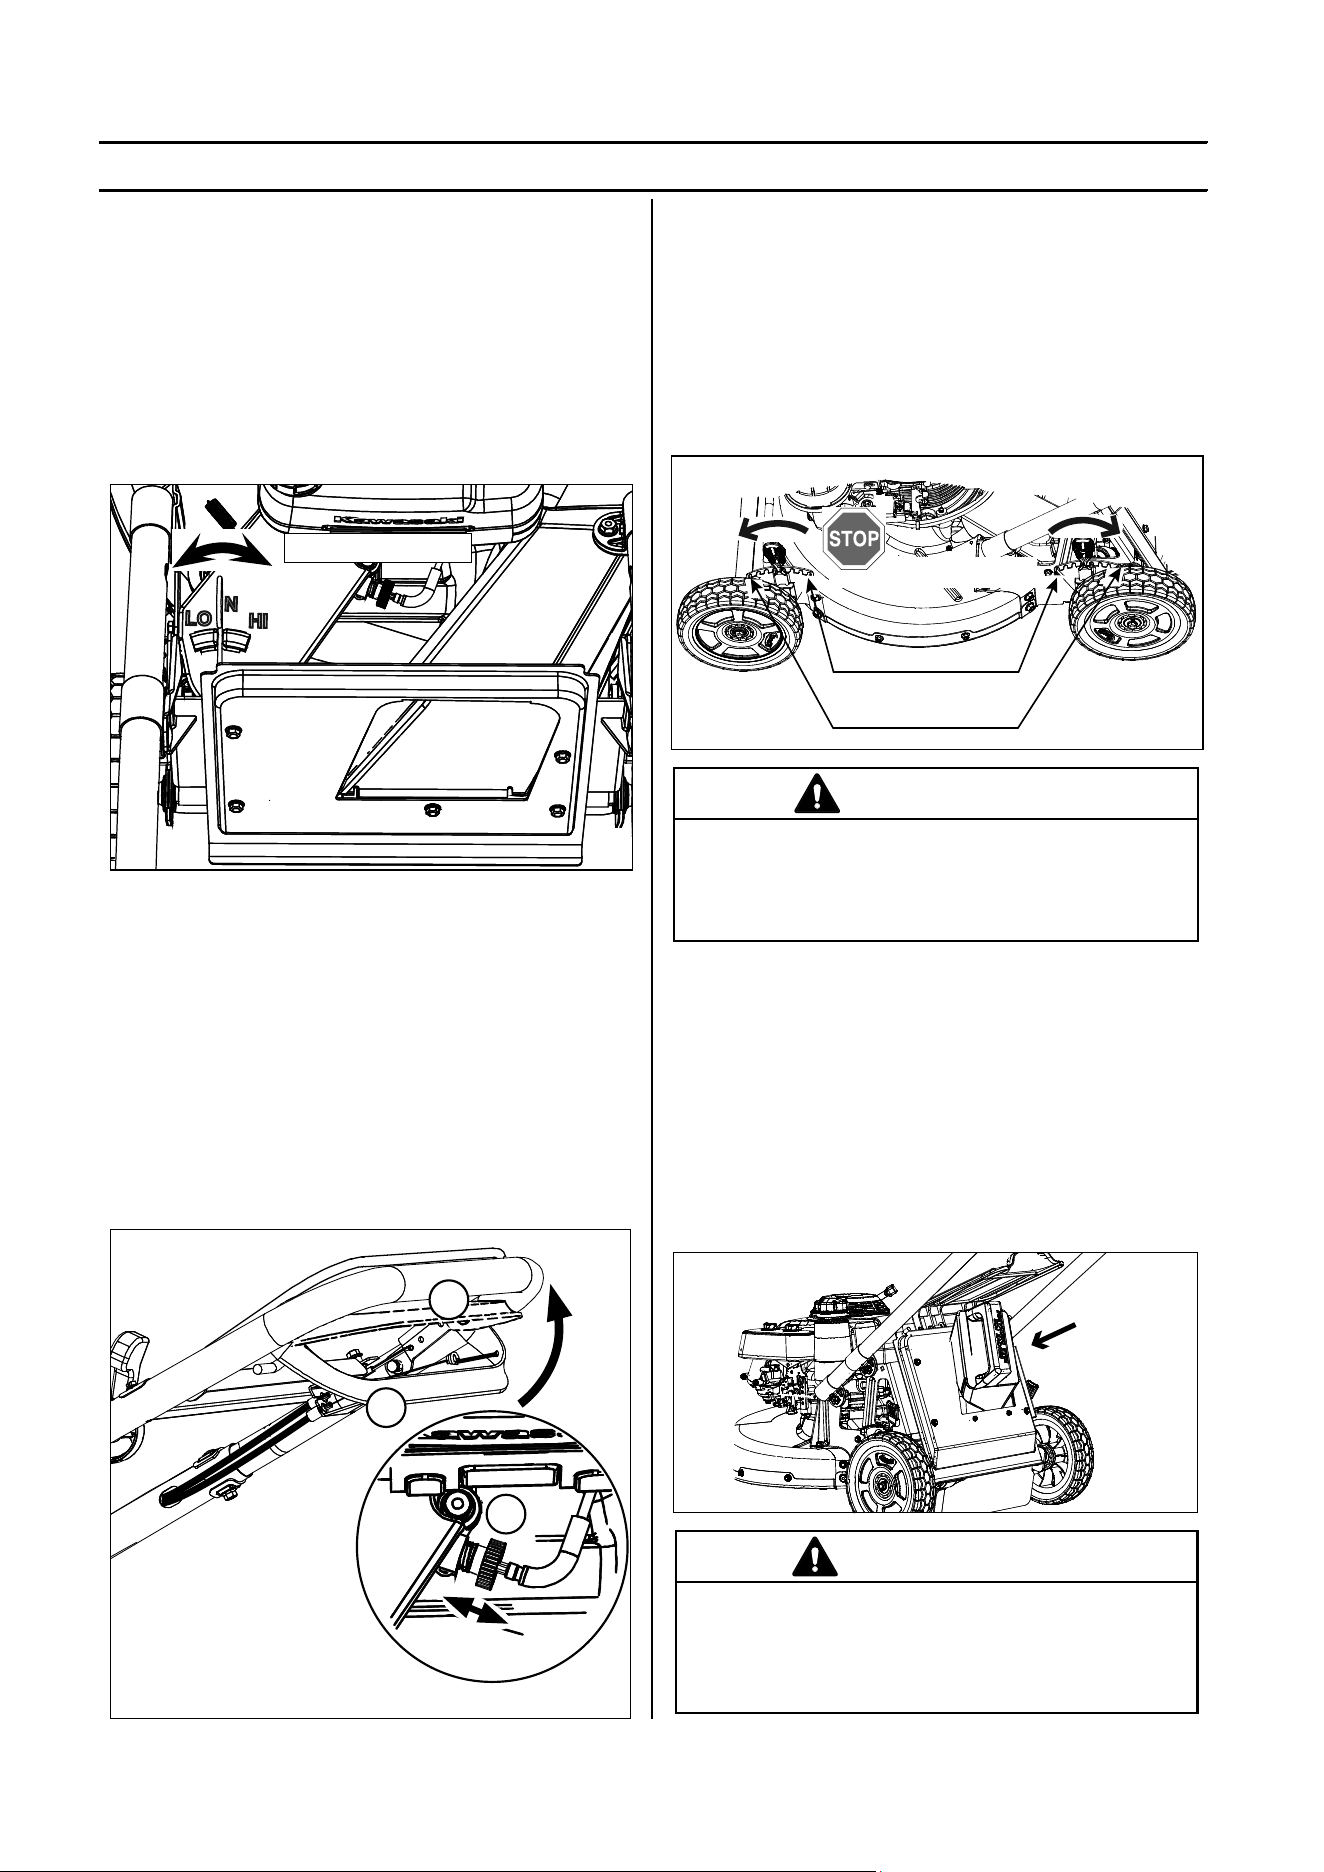
DRIVE CONTROL
The drive system consists of a two speed transmission and an
adjustable belt drive from the engine to the transmission.
The transmission speed can be set to LO - N - HI.
HI speed is approximately 4mph - a fast walking speed.
LO speed is approximately 3mph - an average walking speed.
The shifter arm is intentionally made fl exible. When the arm is
locked in the LO or the HI position the transmission will
automatically mesh into the gears as soon as the drive is
engaged by operating the lower control bar.
ENGAGING THE DRIVE
To engage and disengage the drive system pull up on the
lower control bar (1). Typically the drive will engage when the
lower control bar is approximately 1 to 1.5 inches from the
handle (2).
Notice
Due to wear, the drive engagement position of the lower
control bar can change. If the distance between the lower
bar and the handle (2) is less than a 1/4 inch when the mower
starts to drive make an adjustment on the red knob located
below the engine fuel tank (3).
If needed turn the red knob 2 turns clockwise. Verify the drive
position of the control bar by operating the mower. If needed
repeat the adjustment.
HEIGHT ADJUSTMENT
Each wheel can be adjusted individually to a specifi c cutting
height from 1 inch to 4.5 inch. Notice: It is only possible to
move the adjustment on one side 2 - 3 steps each time.
Moving the front wheel height adjusters forward raises the
cutting height. Moving the rear wheel height adjusters towards
the rear of the mower raises the rear cutting height.
Always adjust the height adjusters to the same position both in
the front and the rear for best cutting results.
WARNING
Never readjust the cutting height while the engine
is running. STOP the engine. Never lift the
mower by placing your hand or fi ngers under the
edge of the mower deck.
CONTROLS & OPERATION
MODES OF OPERATION
This mower is approved to be used in two diff erent operational
modes:
1 With a grass catcher in place
The grass catcher supplied with this mower has been tested
for compatibility. It is important to always inspect the catcher
for deterioration. If the material is ripped or worn the bag shall
not be used.
2. With the mulch plug installed
If the mulch plug is installed ensure that the rear door can
close completely.
WARNING
Do not operate the lawn mower without the mulch
plug or the grass catcher in place. Never attempt
to operate the mower with the rear door removed,
damaged or propped open.
3
1
Low 1” (25mm)
High 4.5” (114mm)
7 steps - 1/2” (13mm)
the engine before
making any height adjustment
2
Drive Adjustment
When operating the lower control
bar (1) typical movement on the
red adjustment knob (3) should be
between 1/4” to 3/8” (6 to 10 mm)
12
Maintenance -
Service Interval
Procedures
Before each use Check the engine oil level.
Check the operation and function of the Operators Presence Control bar.
Inspect the mower blade for wear or damage.
Inspect the cables for any wear or damage.
Inspect the grass catcher for any damage.
Check for any loose or missing screws or damaged parts.
Clean under the lawn mower deck (after usage).
First 20 Hours or
Within 4 weeks
Change the engine oil.
Check the throttle cable adjustment - see Page 9.
Every 50 Hours or
every 2 months
Lubricate the pivot arms on the control panel with oil.
Check and Clean the engine air fi lter (see the engine Owner’s Manual)
Every 100 Hours or
every 4 months
Change the engine oil (more often in dusty conditions).
Check the spark plug.
Clean the engine with compressed air.
Every 200 Hours or
every 8 months
Replace the paper air fi lter (more frequently in dusty conditions).
Replace the spark plug.
Adjust the valve clearance.
MAINTENANCE
In addition to this schedule follow the Maintenance Schedule in the Honda or Kawasaki Owner’s
Manual. This maintenance schedule assumes daily use by a landscape company.
One Month of use is assumed to be 15 to 20 days of operation.
CLEANING THE MOWER
We do not recommend using a garden hose to clean the
mower. The buildup of moist grass, fertilizer and water can
cause extreme corrosion damage to many parts of the mower
and the engine.
Never use a Pressure Washer:
The use of a pressure washer can force water and moisture
into ball bearings and engine parts and cause substantial
damage.
- Clean the underside of the mower by scraping any build-up
of grass and trash.
- Clean off
the outside of the engine and the top of the mower
with compressed air
.
Any accumulation of debris under the
belt cover can typically also be removed with compressed air
without removing the protective belt cover.
- W
ash the Grass Bag with a garden hose frequently.
The
holes that allows the grass bag to breathe will eventually clog
with dirt.
A
clogged bag will not collect the grass clippings
eff
ectively. Do not install and use a wet grass catcher. It wil
l
plug prematurely.
NOTICE
Several of the operations described in this
Maintenance section involves placing the mower
on its right side.
To avoid spills of oil and gasoline always:
- Place the mower on a hard surface such as a
concrete driveway or a garage fl oor.
- Never place the mower on its side when there is
gasoline in the tank - do the service of the mower
when you have run out of gasoline during normal
operation.
- Always make sure that the Oil Filler Cap is
tightened.
Any spillage of oil or gasoline can be extremely
fl ammable and explosive and under certain
conditions can cause serious personal injury and
property damage.
13
BLADE MAINTENANCE
For best results, the mower blade must be kept sharp. Always
replace a bent or damaged blade.
Removing the blade
1. Disconnect spark plug wire from spark plug and place wire
where it cannot come in contact with plug.
2. Turn lawn mower on its right side. (Make sure air fi lter and
carburetor are up).
3. Use a wood block between blade and mower deck to
prevent blade from turning when removing blade bolts.
NOTE: Protect your hands with gloves and/or wrap the blade
with a heavy cloth.
4. Remove blade bolts by turning counter-clockwise with a
11/16” (17mm) wrench or socket.
Installing the blade
1. Position the blade with the bent corner of the blade (sail)
pointing towards the deck. Install the blade bolts. Important:
Blade bolts are heat treated. If the bolts are worn or damaged
use only bolts available from Bad Boy.
2. Use a block of wood between blade and mower deck and
tighten the blade bolts. Always use a torque wrench.
The recommended tightening torque is 30 to 35 ft. lbs.
(40 to 45 Nm)
WARNING
Use only a replacement blade approved by Bad Boy
Using a blade not approved by Bad Boy is hazardous.
It can damage your mower and cause serious personal
injury.
A worn or damaged blade can break and parts of the
blade could be thrown into the operators or bystanders
area, resulting in serious personal injury or death.
Inspecting the blade
Carefully examine the blade for straightness, damage and
abnormal wear. In some areas abrasive sand and dust can
wear away the metal of the blade - see illustration.
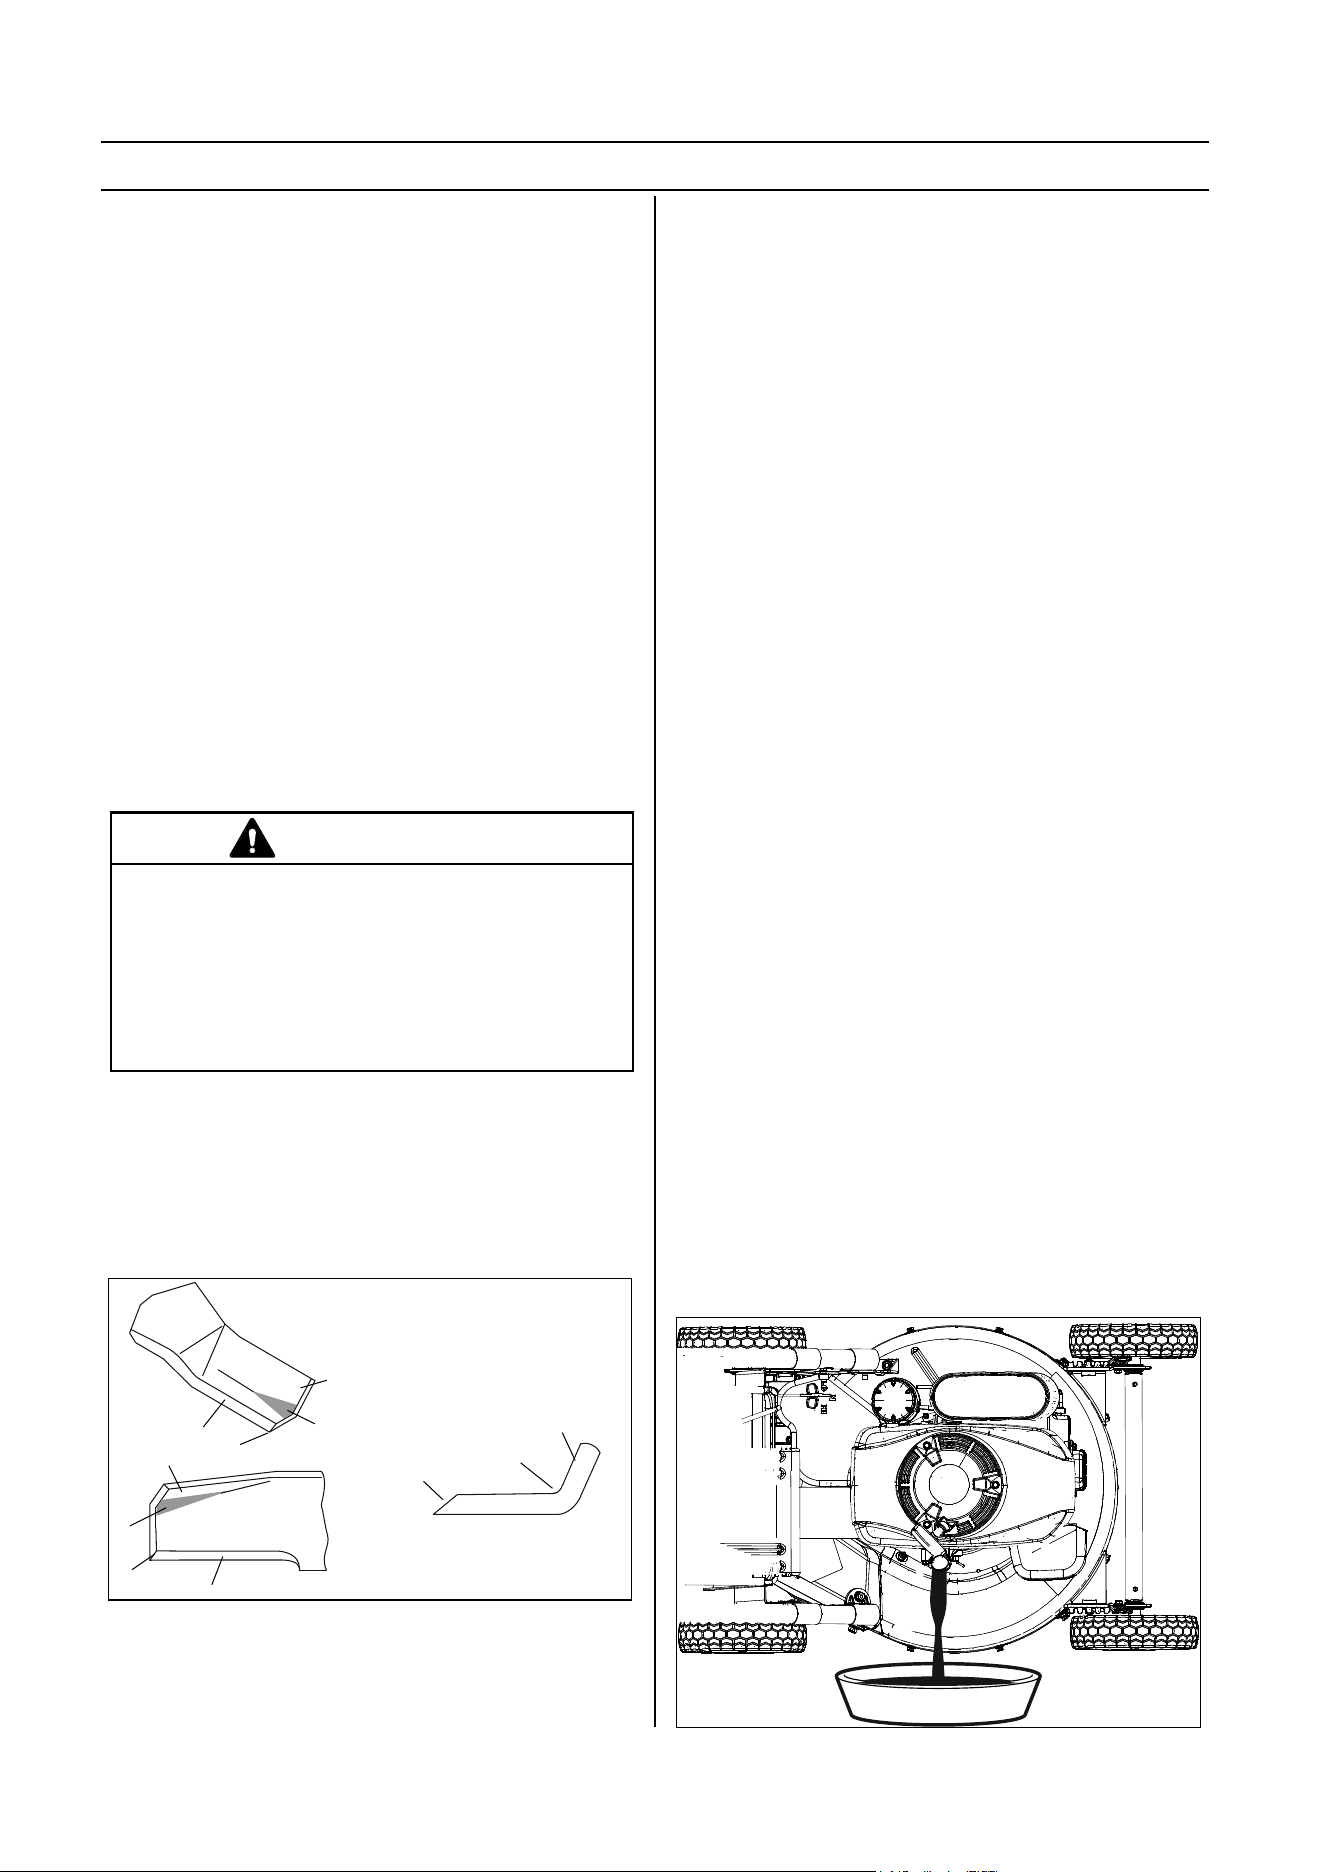
1. Cutting edge
2. Square corner
3. Erosion from sand and dirt
4. Air lift wing (sail)
1
2
3
4
1
2
3
4
1
3
4
MAINTENANCE
Sharpening the blade
File the top side of the blade (1) and maintain the original
angle of the cutting edge. Maintain the radius where the cut-
ting edge ends. Always remove the same amount of material
from both ends of the blade. This ensures that the blade stays
balanced.
If sharpening is done with a grinding stone the blade should
always be balanced using a blade balancing device. A blade
balance tool is available from Bad Boy or most lawn and
garden dealers, and hardware stores.
If the blade shows wear or cracking at the edge where the
blade is bent up (3) it must immediately be replaced.
ENGINE OIL CHANGE
NOTICE: Before tipping lawn mower on its right side to drain
oil, empty fuel tank by running engine until fuel tank is empty.
1. Disconnect spark plug wire from spark plug and place wire
where it cannot come in contact with plug.
2. Remove oil fi ller cap/dipstick.
3. Tip lawn mower on its right side as shown and drain oil
into a suitable container. Rock lawn mower back and forth to
remove any oil trapped inside of engine.
4. Wipe off any spilled oil from lawn mower or side of engine.
5. Fill engine with oil. Slowly pour oil down the oil fi ll spout into
the engine. Use an SAE 10W-30 oil 24 Fl.Oz - 0.7 Liter
See engine Owner’s Manual for complete information.
6. Wait one minute to allow oil to settle. Use the gauge on oil
fi ller cap/dipstick for checking level. Insert the dipstick into the
tube and tighten it for a proper reading before adding more oil.
7. Continue adding small amounts of oil and rechecking
the dipstick until it reads full. DO NOT overfi ll, or engine
will smoke on startup.
8. Always be sure to retighten oil fi ll cap/dipstick before
starting engine.
9. Reconnect spark plug wire to spark plug.

LIMITED WARRANTY
14
1. WHAT THIS WARRANTY COVERS, AND FOR HOW LONG:
Bad Boy Mowers, LLC will, at its option, repair or replace, without charge, any part covered by the warranty which is
found to be defective in material and/or workmanship for one (1) year after the date of sale to the original retail
purchaser unless the product is used for rental purposes, in which case this warranty is voided
.
• Replacement parts are warranted for sixy (60) days from the retail purchase date against materials or
workmanship defects.
At Bad Boy Mowers, LLC’s request, customer will make the defective part available for inspection by Bad Boy
Mowers, LLC and/or return the defective part to Bad Boy Mowers, LLC, transportation charges prepaid
.
2. WHAT THIS WARRANTY DOES NOT COVER:
A. This warranty does not cover defects caused by depreciation or damage caused by normal wear, accidents,
improper maintenance, improper use or abuse of the product, alterations, natural discoloration of material due to
ultraviolet light, sand abrasion damage, or failure to follow the instruction contained in the Owner’s Manual for
operation and maintenance.
B. The customer shall pay any charges for making service calls and/or for transporting the mower to and from the
place where the inspection and/or warranty work is performed. Bad Boy Mowers, LLC will not be responsible
for the pickup and delivery of a machine for warranty purposes.
C. Engines are warranted separately by their respective manufacturer. The available warranties covering this item
are furnished with each mower. Bad Boy Mowers, LLC does not assume any warranty obligation, liability or
modification for this item, which is covered exclusively by the stated warranty of the respective manufacturers.
D. Tires, blades, belts, and dust covers are considered to be consumable wear items and are therefore not
warranted.
E. Normal maintenance services such as oil change, cleaning, lubrication, and adjustments.
F. Replacement of services and items, such as oil, lubricants, spark plugs, belts, rubber hoses or other items subject
to normal service replacement.
3. HOW TO OBTAIN SERVICE UNDER THIS WARRANTY:
A. Warranty service can be arranged by contacting the authorized Bad Boy dealer where you purchased your mower
or your nearest authorized Bad Boy dealer. Proof of purchase may be required to verify warranty coverage. War-
ranty repairs must be completed by an authorized Bad Boy dealer.
B. Warranty claims will not be reviewed or paid unless the warranty registration is received by Bad Boy
Mowers, LLC within 30 days of the retail purchase date.
C. Warranty claims requiring parts returned will be settled upon return of parts to Bad Boy for inspection.
D. All warranty issues must be handled through an authorized service center or dealership.
4. WARRANTY LIMITATION:
A. THERE IS NO OTHER EXPRESS WARRANTY. ANY WARRANTY THAT MAY BE IMPLIED FROM THIS PUR-
CHASE INCLUDING MERCHANTABILITY AND FITNESS FOR A PARTICULAR PURPOSE IS HEREBY LIM-
ITED TO THE DURATION OF THIS WARRANTY AND TO THE EXTENT PERMITTED BY LAW ANY AND ALL
IMPLIED WARRANTIES ARE EXCLUDED. Some states do not allow limitations on how long an implied warranty
lasts, so the above limitations may not apply to you.
B. BAD BOY MOWERS, LLC WILL NOT BE LIABLE FOR ANY INCIDENTAL, CONSEQUENTIAL, OR SPECIAL
DAMAGES AND/OR EXPENSES IN CONNECTION WITH THE PURCHASE OR USE OF THE MOWER. Some
states do not allow the exclusion or limitation of incidental or consequential damages, so the above limitation(s) or
exclusion(s) may not apply to you.
C. Only the warranty expressed in this limited warranty shall apply and no dealer, distributor, or individual is
authorized to amend, modify, or extend this warranty in any way. Accordingly, additional statements such as
dealer advertising or presentations, whether oral or written, do not constitute warranties by Bad Boy Mowers, LLC,
and should not be relied on.
D. This warranty extends only to turf equipment operated under normal conditions and properly serviced and
maintained. The warranty expressly does not cover (i) any defects, damage or deterioration due to normal use,
wear and tear, or exposure; (ii) normal maintenance services such as oil change, cleaning, lubrication,
adjustment; (iii) replacement of services, items, such as oil, lubricants, spark plugs, belts, rubber hoses or other
items subject to normal service replacement; (iv) damage or defects arising out of or relating to misuse, neglect,
alteration, negligence or accident; (v) repair or replacement arising from operation of or use of the turf equipment
which is not in accordance with operating instructions as specified in the operator’s manual or other operational
instructions provided by Bad Boy Mowers, LLC; (vi) repair or replacement arising as a result of any operation from

LIMITED WARRANTY
15
turf equipment that has been altered or modified so as to, indetermination of Bad Boy Mowers, LLC, adversely
affect the operation, performance or durability of the equipment or that has altered, modified or affected the turf
equipment so as to change the intended use of the product; (vii) repair or replacement necessitated by use of
parts, accessories or supplies, including gasoline, oil or lubricants, incompatible with the turf equipment or other
than as recommended in the operator’s manual or other operational instructions provided by Bad Boy Mowers,
LLC; (viii) repairs or replacements resulting from parts or accessories which have adversely affected the
operation, performance or durability of the turf equipment; or (ix) damage or defects due to or arising out of repair
of turf equipment by person or persons other than an authorized Bad Boy Mowers, LLC, service dealer or the
installation of parts other than genuine Bad Boy Mowers, LLC, recommended parts. As a condition to this
warranty, customer shall have read the operator’s manual and ensured the mower has been registered
within 30 days of purchase.
E. This warranty gives you specific legal rights, and you may also have other rights, which vary from state to state.

www.badboycountry.com
Bad Boy, Inc.
102 Industrial Drive
Batesville, Arkansas 72501