badboymowers.com
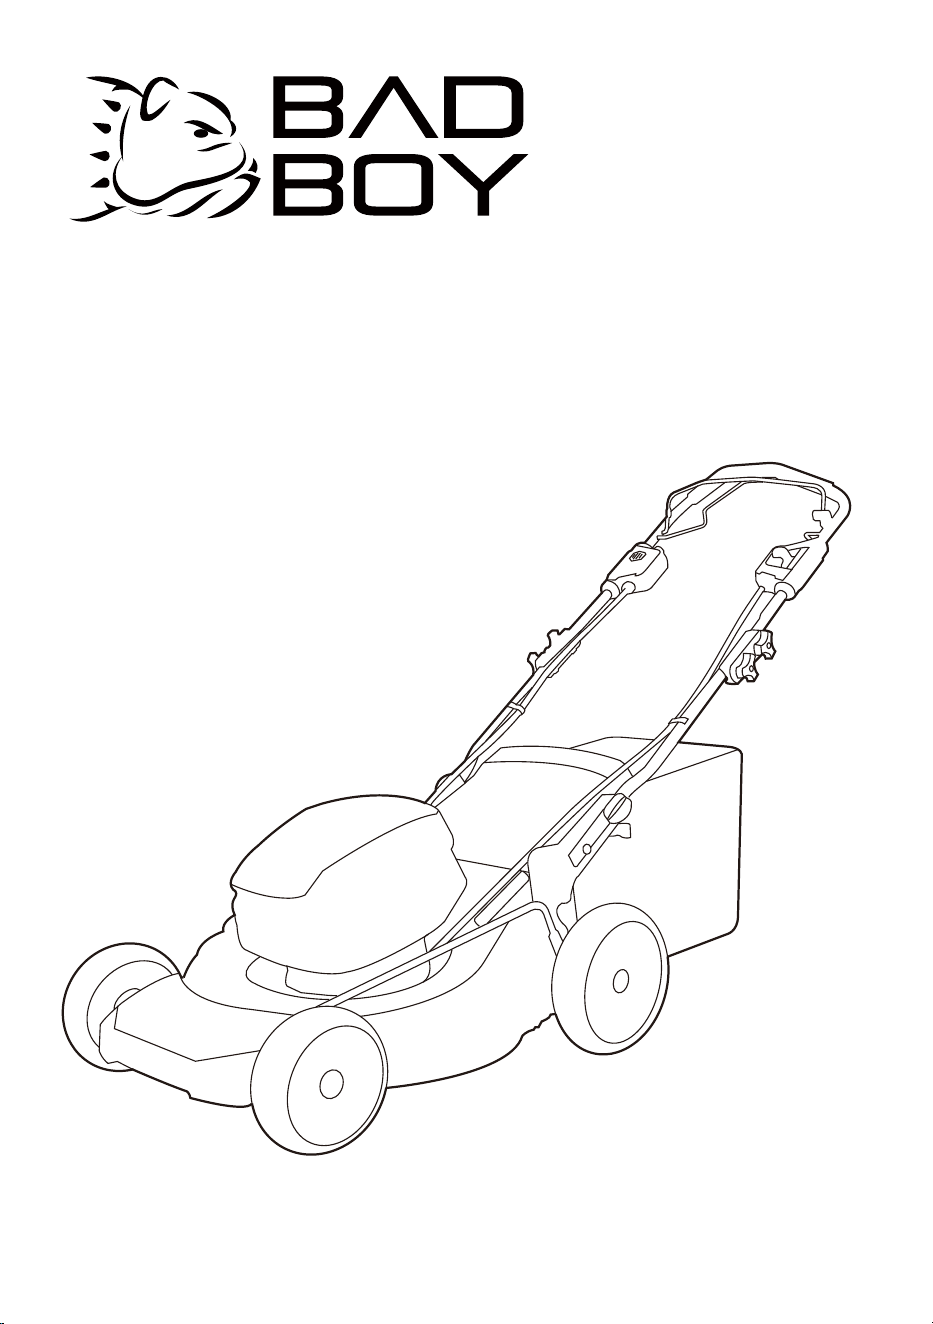
EN OPERATOR MANUALMOWER
ES MANUAL DEL OPERADORCORTACÉSPED
MODEL NO./ N.º MODELO
MS80B150A21
MS80B000A21
088-7500-00
PART NO./ N.º PIEZA
088-7555-00


1 Purpose........................................ 4
2
Overview...................................... 4
3 Read all instructions................... 4
3.1 Children and Bystanders............................ 4
3.2 General Operation......................................4
3.3 Slope Operation......................................... 6
3.4 Service/Maintenance..................................6
3.5 Lawn mower safety warnings..................... 7
4 Symbols on the product............. 8
5 Risk levels....................................8
6 Environmentally safe battery
disposal........................................8
7 Proposition 65............................. 9
8 Installation................................... 9
8.1 Unpack the machine...................................9
8.2 Unfold the lower handle............................10
8.3 Install the upper handle ........................... 10
8.4 Remove the mulch plug............................10
8.5 Install the grass catcher........................... 10
8.6
Install the side discharge chute................ 11
8.7 Set the blade height..................................11
8.8 Install the battery pack..............................11
8.9 Remove the battery pack..........................11
9 Operation....................................11
9.1 Start the machine..................................... 12
9.2 Stop the machine..................................... 12
9.3 Operate the self-propel drive system....... 12
9.4 Empty the grass catcher...........................12
9.5 Operation tips........................................... 13
10 Maintenance...............................13
10.1 Replace the blade.................................... 13
10.2 Store the machine.................................... 13
10.3 Stand the machine on end....................... 14
11 Troubleshooting........................ 14
12 Technical data............................15
13 Limited warranty........................15
14 Exploded view........................... 16
3
English
EN
1 PURPOSE
The lawn mower is intended for private use i.e. for use
in home and gardening environments. The machine is
primarily used to maintain small-scale, residential lawns
and home/hobby gardens.
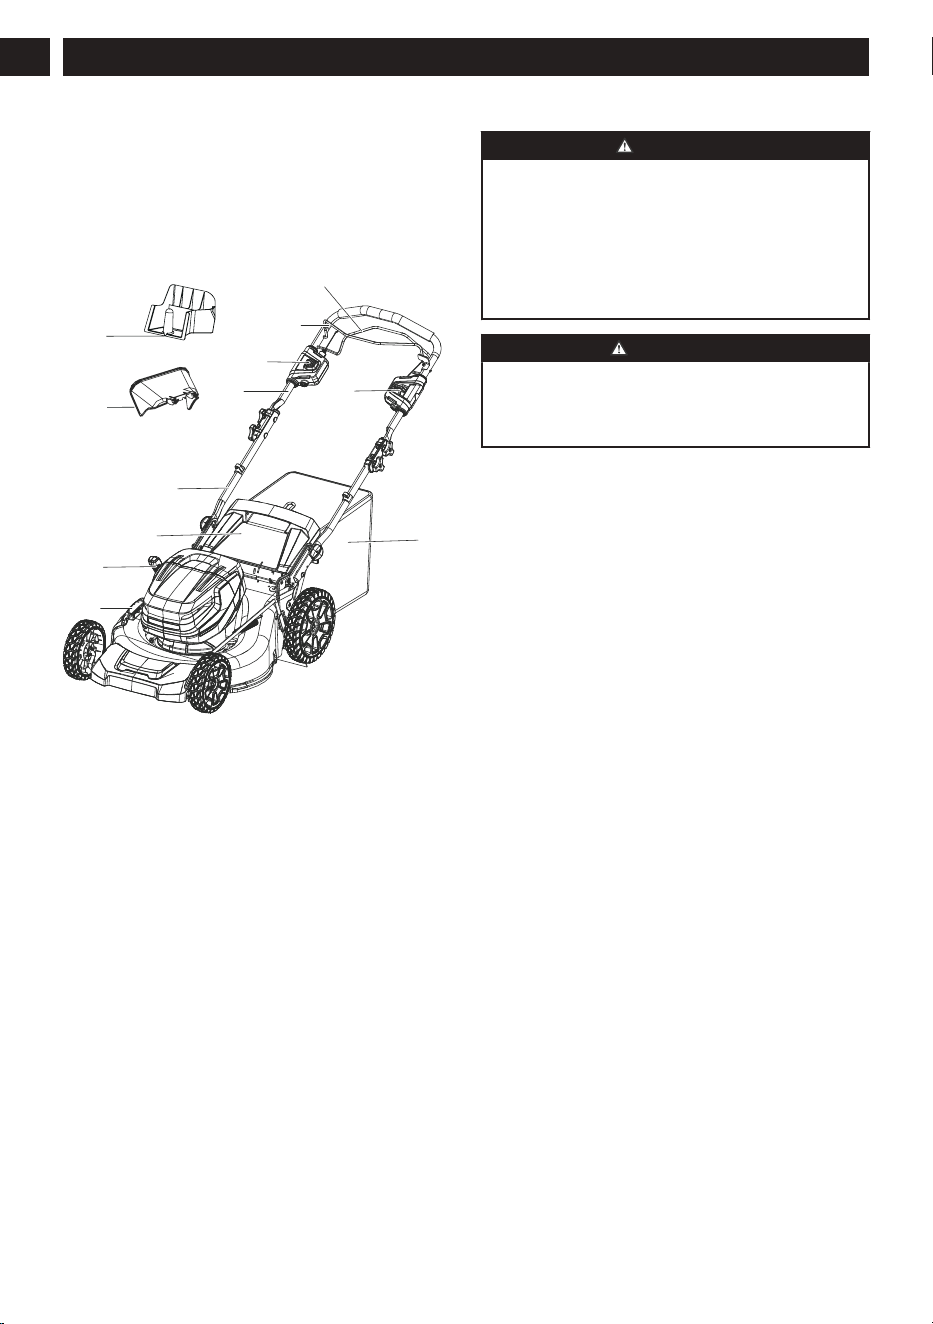
2 OVERVIEW
11
12
8
9
1
0
1
2
3
4
5
6
7
1
Bail switch
2
Start button
3
Upper handle
4
Lower handle
5
Rear discharge door
6
Height adjustment lever
7
Side discharge cover
8
Grass catcher
9
Speed control button
10
Self-propel drive lever
11
Mulch plug
12
Side discharge chute
3 READ ALL INSTRUCTIONS
DANGER
This machine was built to be operated according to
the rules for safe operation included in this manual.
As with any type of power equipment, carelessness or
error on the part of the operator can result in serious
injury. This machine is capable of amputating hands
and feet and throwing objects. Failure to observe all
safety instructions could result in serious injury or
death.
WARNING
When using electric lawn mowers, basic safety
precautions should always be followed to reduce the
risk of fire, electric shock, and personal injury
. These
basic precautions include the following:
3.1 CHILDREN AND BYSTANDERS
Tragic accidents can occur if the operator is not alert to
the presence of children or bystanders.
•
Keep the area of operation clear of all persons,
particularly small children, and pets.
• Use extreme care when approaching blind corners,
doorways, shrubs, trees, or other objects that may
obscure your vision of a child or bystander. Keep
children, bystanders, helpers and pets at least 100
feet (30m) from the mower while it is in operation.
Stop the machine if anyone enters the area.
• Never allow children under 14 years old to
operate a power mower. Operators 14 years
old and over should fully read and understand
the operator’s manual and safety rules. Only
responsible individuals who are familiar with these
rules of safe operation should be allowed to use this
machine.
3.2 GENERAL OPERATION
• Read this operator’s manual carefully in its entirety
before assembling or operating this machine. Read,
understand, and follow all instructions on the
machine and in the manuals before operation.
Familiarize yourself with the controls and proper use
of this machine before operation. Save this manual
for future and regular reference.
•
Do not use the lawn mower for any job except that
for which it is intended. Your lawn mower has been
designed to perform only one job: cut grass.
• Never attempt to make a wheel height adjustment
while the motor is running.
• Don’t force the lawn mower; it will do the job
better and more safely at the rate for which it was
designed.
• Don’t overreach, keep proper footing and balance
at all times. Many injuries occur as a result of
4
English
EN

the mower being pulled over the foot during a
fall caused by slipping or tripping. A slip and fall
can cause serious personal injury
. If you feel you
are losing your footing, release the control handle
immediately and the blade will stop rotating within
three seconds.
• Thoroughly inspect the area where the mower is to
be used and remove all stones, sticks, wires, dog
bones, and other foreign objects.
• Prevent unintentional starting. Ensure the switch
is in the off position before connecting to battery
pack, picking up or carrying the mower. Carrying the
mower with your finger on the switch or energizing
mower that has the switch on invites accidents.
• Never pull the mower back toward you while you are
walking. If you must back the mower away from a
wall or obstruction, first look down and behind you to
avoid tripping, and then follow these steps:
• Step back from the mower in order to fully
extend your arms.
• Be sure that you are well balanced.
• Pull the mower back slowly.
• Use appliances only with specifically designated
battery packs. Use of any other battery packs may
create a risk of injury and fire. Recharge only
with the charger specified by the manufacturer. A
charger that is suitable for one type of battery pack
may create a risk of fire when used with another
battery pack.
• Remove the battery pack from the mower before
making any adjustments, changing accessories, or
storing appliance. Such preventive safety measures
reduce the risk of starting the mower accidentally.
• Before and while moving backwards with the mower,
look behind and down for small children and other
people.
• Do not operate the mower while under the influence
of alcohol or drugs. Stay alert and watch what you
are doing at all times. Use common sense and do
not operate the lawn mower when you are tired.
• Only allow operators, who are responsible, trained,
familiar with the instructions, and physically capable
to operate the machine.
• Do not carry passengers.
• Do not operate the machine without the entire grass
catcher, discharge chute, or other safety devices
in place and functioning properly. Check frequently
for signs of wear or deterioration and replace as
needed.
• Do not mow in reverse unless absolutely necessary.
• Always wear safety glasses or safety goggles during
operation and while performing an adjustment or
repair to protect your eyes. Thrown objects that
ricochet can cause serious injury to the eyes.
Always use a face or dust mask if the operation is
dusty.
• Keep clear of the discharge opening at all times. Do
not put hands or feet near rotating parts or under the
cutting deck. Contact with the blade can amputate
hands and feet.
• Plan your mowing pattern to avoid discharge of
material toward roads, sidewalks, bystanders and
the like. Also, avoid discharging material against
walls or obstructions, which may cause discharged
material to ricochet back toward the operator.
• To help avoid the blade or an injury from a thrown
objects, stay in the operator zone behind the
handles.
• A missing or damaged discharge cover can cause
blade contact or injuries from thrown objects.
• Objects struck by the lawn mower blade can cause
severe injuries to persons. The lawn should always
be carefully examined and cleared of all objects
prior to each mowing.
• Stop the blade when crossing gravel drives, walks
or roads.
• Follow all charging instructions and do not
charge the battery pack or mower outside of the
temperature range specified in the instructions.
Charging improperly or at temperatures outside of
the specified range may damage the battery and
increase the risk of fire.
• If lawn mower strikes a foreign object, follow these
steps:
• Release the bail switch to disengage the motor.
• Remove the battery.
• Inspect for damage.
• Repair any damaged parts before restarting and
operating the lawn mower.
• Have servicing performed by a qualified repair
person using only identical replacement parts.
This will ensure that the safety of the product is
maintained.
• Dress properly; do not wear loose clothing or jewelry
that can be caught in moving parts. Use of safety
gloves and proper footwear is recommended when
working outdoors. Wear sturdy, rough-soled work
shoes and close-fitting slacks and shirts. Shirts
and pants that cover the arms and legs and steel-
toed shoes are recommended. Never operate this
machine in bare feet, sandals, slippery or lightweight
(e.g., canvas) shoes.
• Do not modify or attempt to repair the mower or the
battery pack (as applicable) except as indicated in
the instructions for use and care.
• Wear protective hair covering to contain long hair.
• Avoid dangerous environments; do not use the lawn
mower in damp/wet locations or if it is raining.
• Store idle lawn mower indoors. When not in use,
appliances should be stored indoors in dry, and high
or locked-up place – out of reach of children. Always
remove the battery from the mower before storing.
5
English
EN
• Mow only in daylight or good artificial light. Walk,
never run while operating.
•
If the mower should start to vibrate abnormally,
immediately stop the motor, remove the battery and
check for the cause. Vibration is generally a warning
that the mower is not functioning properly.
• Check bag frequently for deterioration and wear,
and replace worn bags. Check that replacement
bags comply with the original manufacturer's
recommendations or specifications.
• Before cleaning the mower, unclogging or removing
the grass bag, mulching insert, or side discharge
chute, turn the motor off and wait until the blade
comes to a complete stop, then remove the battery
pack. The cutting blade continues to rotate for a few
seconds after the motor is shut off. Never perform
these functions until you are sure the blade has
stopped rotating.
• Keep cutting edges clean and sharp to ensure best
performance.
• Periodically inspect safety devices and cords for
damage. If damaged do not operate the unit until
it has been repaired by an authorized service
professional.
• Never operate the mower without the proper
discharge cover, grass bag, mulching insert, side
discharge chute, or other safety devices in place
and working. Never operate the mower with
damaged safety devices. Failure to do so can result
in personal injury.
• Use only approved batteries and chargers. Non-
approved batteries and chargers may cause
damage to the mower or injure the operator.
• Do not dispose of the battery in a fire. The
cells could catch fire or explode. Check with local
codes and waste management for proper disposal
instructions.
• When battery pack is not in use, keep it away from
other metal objects, like paper clips, coins, keys,
nails, screws or other small metal objects that can
make a connection from one terminal to another.
Shorting the battery terminals together may cause
burns or a fire.
• Do not open or destroy the battery. Electrolytes
contained within the battery are corrosive and may
cause damage to eyes or skin if released. It may be
toxic if swallowed.
• Under abusive conditions, liquid may be ejected
from the battery; avoid contact. If contact
accidentally occurs, flush with water. If liquid
contacts eyes, additionally seek medical help. Liquid
ejected from the battery may cause irritation or
burns.
• Do not expose a battery pack or appliance to
fire or excessive temperature. Exposure to fire or
temperature above130°C may cause explosion.
• Exercise care in handling batteries to avoid shorting
the battery with conducting materials such as rings,
bracelets, keys, etc. The battery or conductor may
overheat and cause burns if contact with said
materials is made.
• Do not use a battery pack or appliance that
is damaged or modified. Damaged or modified
batteries may exhibit unpredictable behavior
resulting in fire, explosion or risk of injury.
• This appliance is not intended for use by
persons with reduced physical, sensory or mental
capabilities or lack of experience or knowledge,
unless they have been given supervison or
instruction concerning use of the appliance by a
person responsible for their safety.
3.3 SLOPE OPERATION
Slopes are a major factor related to slip-and-fall
accidents, which can result in severe injury
. Operation
on slopes requires extra caution. If you feel uneasy on a
slope, do not mow it.
Do:
• Mow across the face of slopes; never mow up
and down. Exercise extreme caution when changing
direction on slopes.
• Watch for holes, roots, rocks, hidden objects, or
bumps which can cause you to slip or trip. Tall grass
can hide obstacles. Remove all obstacles such as
rocks and tree limbs.
• Make sure that your footing is stable. If you are out
of balance, release the switch immediately.
Do not:
• Mow excessively steep slopes.
• Mow near drop-offs, ditches or embankments; you
could lose your footing or balance.
• Mow slopes greater than 15 degrees.
• Mow on wet grass. Unstable footing could cause
slipping.
W
ARNING
Do not mow on the slopes with incline more than 15°.
If you are not comfortable, do not mow on a slope.
TIP
In case of self-propelled mowers, please keep a low
self-propelled speed when you mow on a slope.
3.4 SERVICE/MAINTENANCE
• Check the blade and the motor (machine) mounting
bolts at frequent intervals for proper tightness.
•
Replace the blade if it is bent or cracked. An
unbalanced blade causes vibration that could
damage the motor drive unit or cause personal
injury.
• Keep all nuts, bolts, and screws tight in order to
ensure the equipment is in safe working condition.
6
English
EN

• Do not wash with a hose; avoid getting water in
motor and electrical connections.
•
Never remove or tamper with safety devices. Check
their proper operation regularly. Never do anything
to interfere with the intended function of a safety
device or to reduce the protection provided by a
safety device.
• Keep mower free of grass, leaves, or other debris
build up. Allow mower to cool before storing.
• Never make any adjustments or repairs with the
motor running.
• Always remove battery pack from mowers before
adjusting, cleaning, or repairing.
• Check grass catcher components and the discharge
guard frequently and replace with manufacturer’s
recommended parts, when necessary.
• Sharpen a dull blade equally at each end to
maintain the balance.
• Keep guards in place and in working order. Mower
blades are sharp, and can cut. Wrap the blades or
wear gloves, and use extra caution when servicing.
• Clean the blade thoroughly and check its balance by
supporting it horizontally on a thin nail through its
center hole. The nail should also be in a horizontal
position. If either end of the blade rotates downward,
remove some metal from the heavy or lower end
until the blade is balanced. It is balanced when
neither end drops.
• Use identical replacement blades only.
• Maintain lawn mower with care. Keep cutting edges
sharp and clean for best and safest performance.
Follow instructions for lubricating and changing
accessories. Inspect lawn mower cord periodically
and if damaged, have it repaired by an authorized
service facility.
• If situations occur that are not covered in this
manual, use care and good judgment or contact
Customer Service for assistance.
• Never operate the mower without proper guards,
plates, or other safety protective devices in place.
• Before each use, examine the machine for
damaged, missing, or loose parts such as screws,
nuts, bolts and caps.
• Tighten correctly all the fasteners and caps.
• Clean the machine with a dry cloth. Do not use
water.
The recommended ambient temperature range:
Item Temperature
Mower storage temperature
range
32°F (0°C) - 113°F
(45°C)
Mower operation temperature
range
32°F (0°C) - 113°F
(45°C)
Battery charging temperature
range
39°F (4°C) - 104°F
(40°C)
Item Temperature
Charger operation temperature
range
39°F (4°C) - 104°F
(40°C)
Battery storage temperature
range
32°F (0°C) - 113°F
(45°C)
Battery discharging temperature
range
32°F (0°C) - 113°F
(45°C)
3.5 LAWN MOWER SAFETY
W
ARNINGS
• Before using, always visually inspect to see that
the blade, blade bolt and the blade assembly are
not worn or damaged. Replace worn or damaged
components in sets to preserve balance. Replace
damaged or unreadable labels.
•
Do not mow excessively step slopes.
• Stop the blade(s) if the machine has to be tilted
for transportation when crossing surfaces other than
grass, and when transporting the machine to and
from the area to be used.
• Switch on the motor carefully according to
instructions and with feet well away from the
blade(s).
• Do not tilt the machine when switching on the motor,
except if the machine has to be tilted for starting.
In this case, do not tilt it more than absolutely
necessary and lift only the part, which is away from
the operator.
• Do not start the machine when standing in front of
the discharge opening.
• Do not transport the machine while the power
source is running.
• Stop the machine, remove the disabling device and
battery pack. Make sure that all moving parts have
come to a complete stop
- whenever you leave the machine;
- before clearing blockages or unclogging chute;
- before checking, cleaning or working on the
machine;
- after striking a foreign object. Inspect the machine
for damage and make repairs before restarting and
operating the machine.
• Keep all nuts, bolts and screws tight to be sure the
machine is in safe working condition.
• On machines with multi blade, take care as rotating
one blade can cause other blades to rotate.
• Be careful during adjustment of the machine to
prevent entrapment of the fingers between moving
blades and fixed parts of the machine.
• Always allow the machine to cool down before
storing.
7
English
EN
• When servicing the blades be aware that, even
though the power source is switched of
f, the blades
can still be moved.
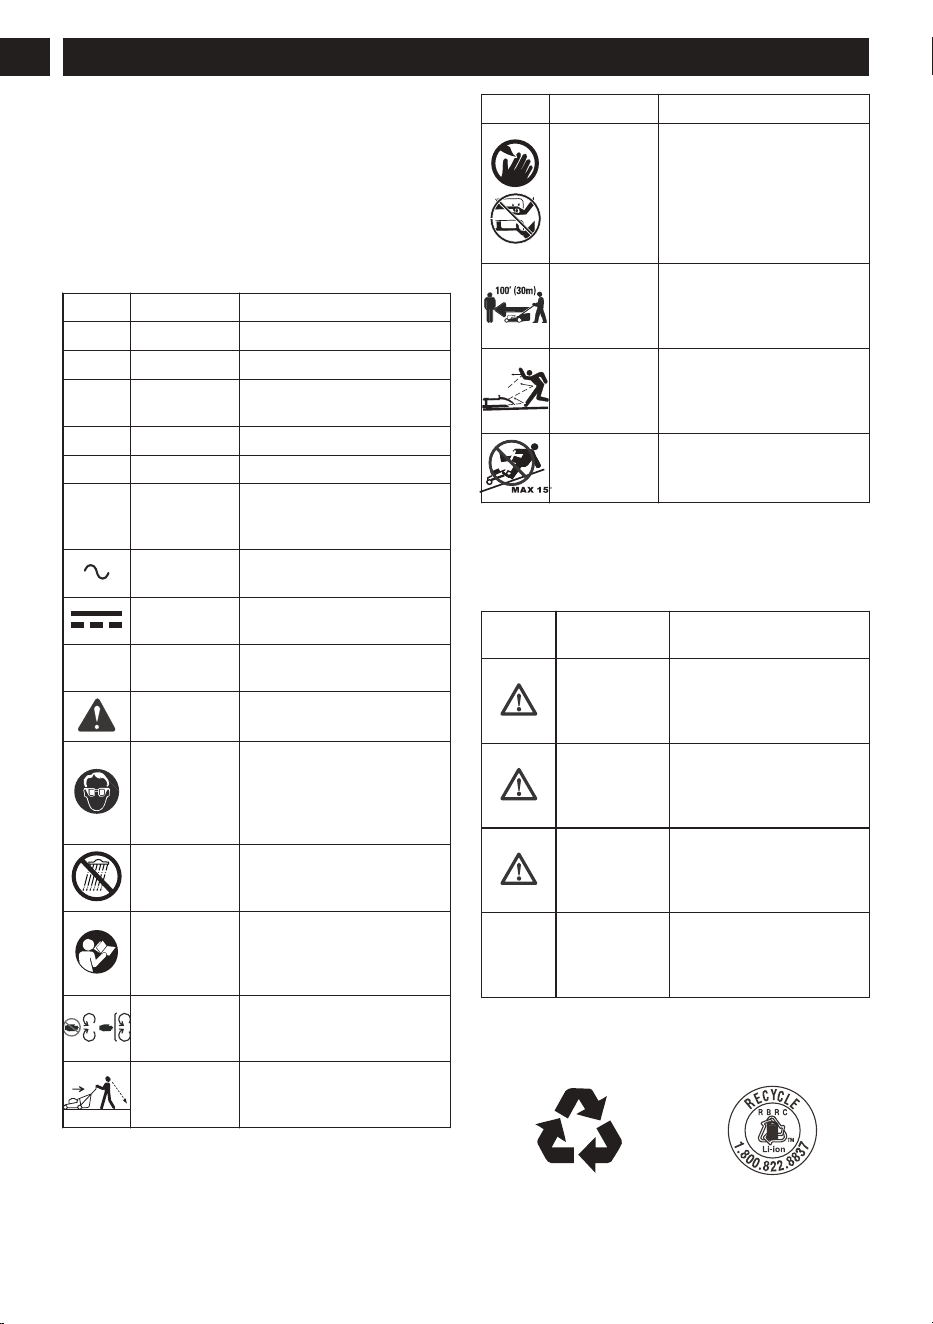
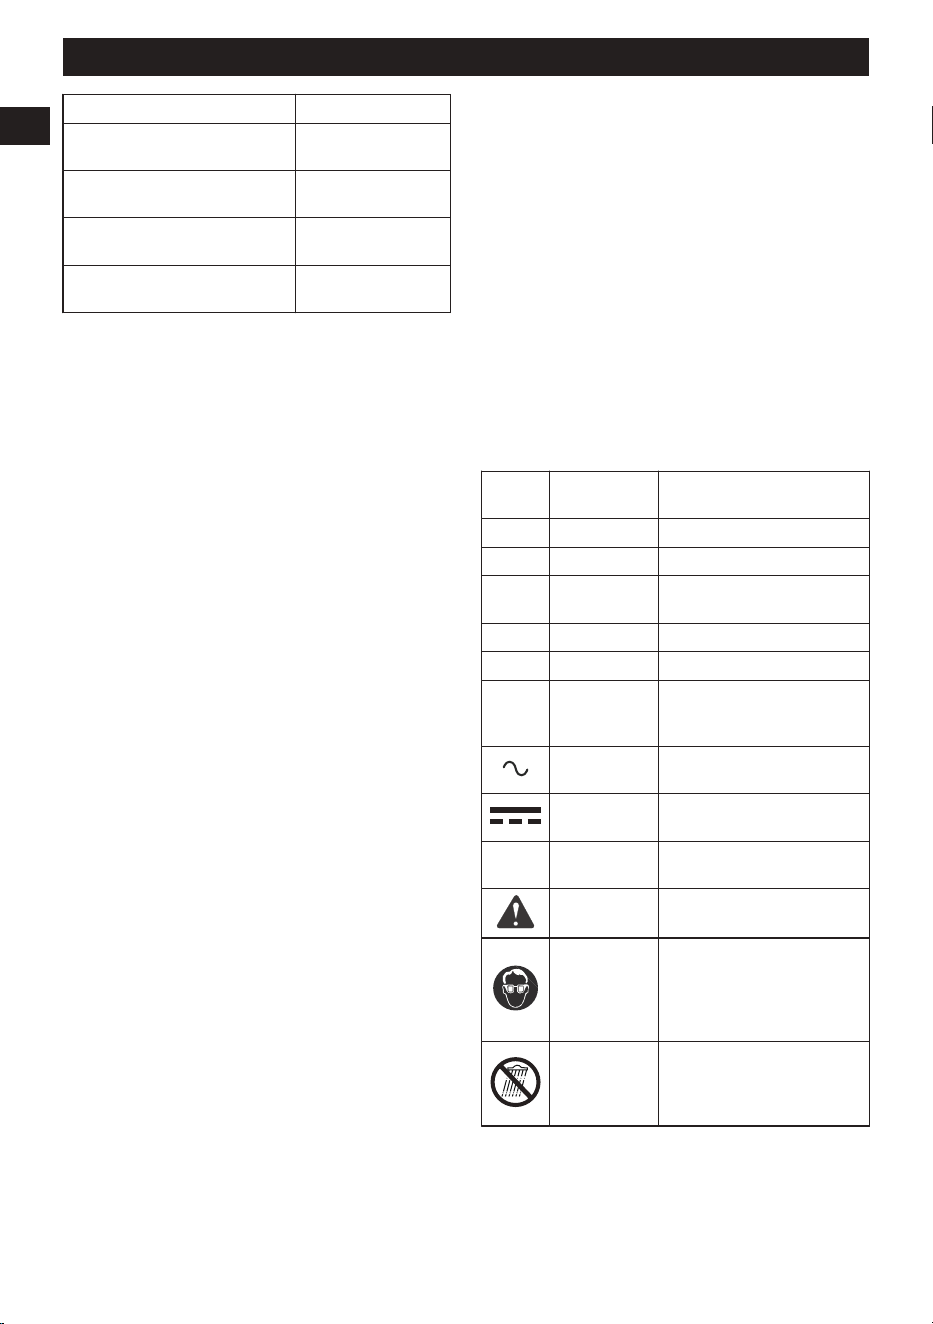
4 SYMBOLS ON THE PRODUCT
Some of the following symbols may be used on this
mower
. Please study them and learn their meaning.
Proper interpretation of these symbols will allow you to
operate the mower better and safer.
Symbol Name Explanation
V Volt Voltage
A Amperes Current
Hz Hertz
Frequency (cycles per sec-
ond)
W Watt Power
min Minutes Time
/min Per Minute
Revolutions, strokes, surface
speed, orbits etc., per mi-
nute
Alternating
Current
Type of current
Direct Current
Type or a characteristic of
current
n
o
No Load
Speed
Rotational speed, at no load
Safety Alert
Precautions that involve your
safety
.
Eye Protec-
tion
Always wear eye protection
with side shields marked
to comply with ANSI Z87.1
when operating this equip-
ment.
WARNING ---
W
et Condi-
tions
Do not expose the product to
rain or moist conditions.
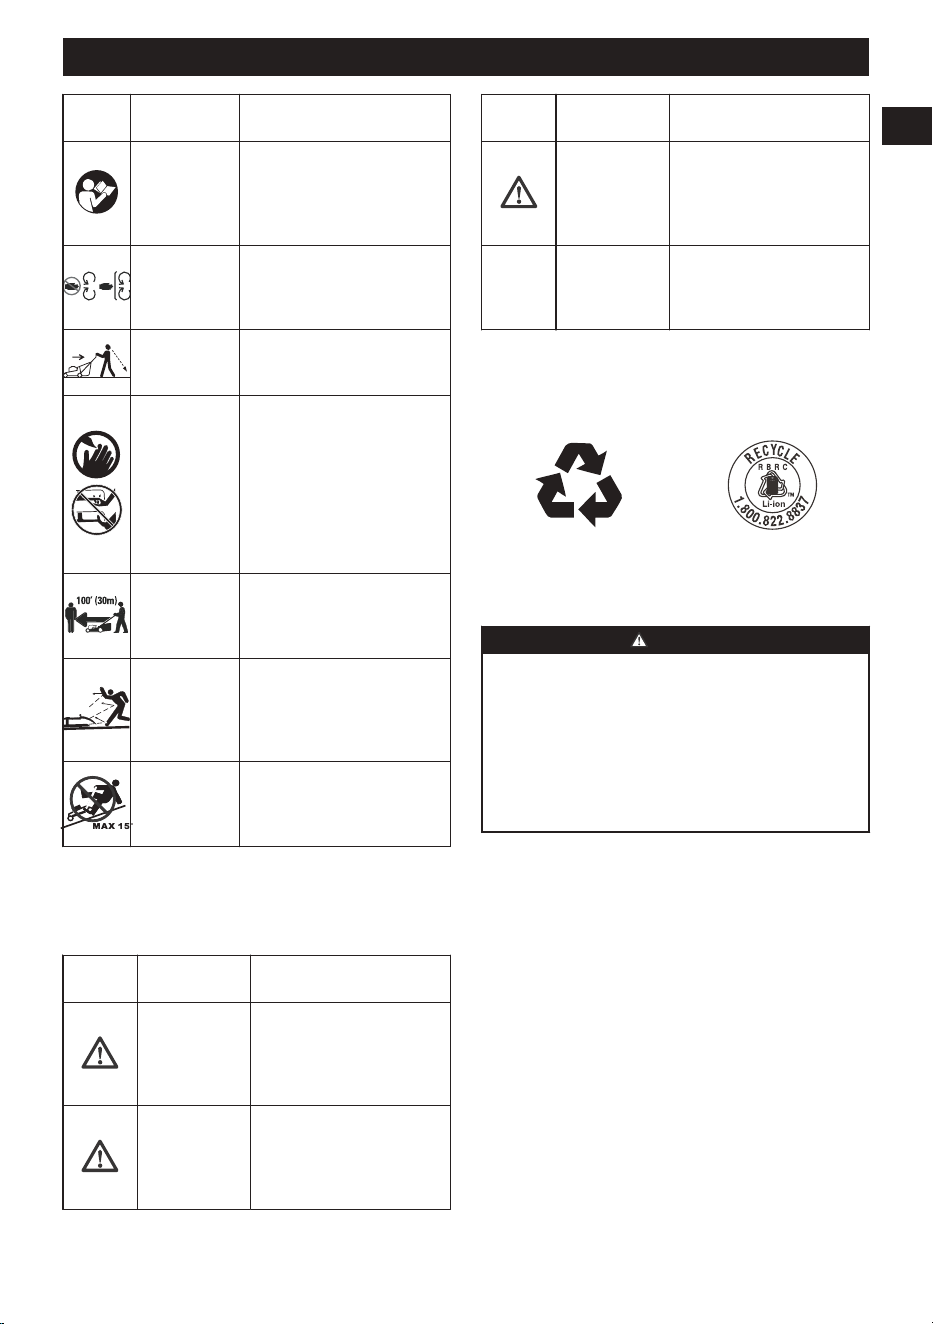
Read Opera-
tor’s Manual
To reduce the risk of injury,
user must read and under-
stand operator’s manual be-
fore using this product.
Maintain
Safety Devi-
ces
Do not open or remove safe-
ty devices while the tool is
running.
Look Behind
While Backing
Look down and behind first
to avoid tripping when pull-
ing back.
Symbol Name Explanation
DANGER ---
Keep Hands
and Feet
A
way
To reduce the risk of in-
jury, keep hands and feet
away from rotating parts. Do
not operate unless discharge
cover or grass bag is in its
proper place. If damaged,
replace immediately.
DANGER ---
Keep By-
standers
A
way
All visitors should be kept at
a distance from work area.
DANGER ---
Thrown Deb-
ris
Remove objects that can
be thrown by the blade in
any direction. W
ear safety
glasses.
DANGER ---
Steep Slope
Hazard
Use extra caution on slopes.
do not mow slopes greater
than 15 degrees.
5 RISK LEVELS
The following signal words and meanings are intended
to explain the levels of risk associated with this product.
SYM-
BOL
SIGNAL MEANING
DANGER Indicates an imminently
hazardous situation, which,
if not avoided, will result in
death or serious injury
.
WARNING Indicates a potentially haz-
ardous situation, which, if
not avoided, could result in
death or serious injury
.
CAUTION Indicates a potentially haz-
ardous situation, which, if
not avoided, may result in
minor or moderate injury
.
CAUTION (Without Safety Alert Sym-
bol) Indicates a situation
that may result in property
damage.
6 ENVIRONMENTALLY SAFE
BATTERY DISPOSAL
8
English
EN
The toxic and corrosive materials below are in the
batteries used in this machine: Lithium-ion, a toxic
material.
W
ARNING
Discard all toxic materials in a specified manner to
prevent contamination of the environment. Before
discarding damaged or worn out Lithium-ion battery
,
contact your local waste disposal agency, or the local
Environmental Protection Agency for information and
specific instructions. Take the batteries to a local
recycling and/or disposal center, certified for Lithium-
ion disposal.
W
ARNING
If the battery pack cracks or breaks, with or without
leaks, do not recharge it and do not use. Discard it
and replace with a new battery pack. DO NOT TR
Y
TO REPAIR IT! To prevent injury and risk of fire,
explosion, or electric shock, and to avoid damage to
the environment:
• Cover the terminals of the battery with heavy-duty
adhesive tape.
• DO NOT try to remove or destroy any of the
battery pack components.
• DO NOT try to open the battery pack.
• If a leak develops, the released electrolytes are
corrosive and toxic. DO NOT get the solution in the
eyes or on skin, and do not swallow it.
• DO NOT put these batteries in your regular
household trash.
• DO NOT incinerate.
• DO NOT put them where they will become part of
any waste landfill or municipal solid waste stream.
• Take them to a certified recycling or disposal
center.
7 PROPOSITION 65
W
ARNING
This product contains a chemical known to the
state of California to cause cancer
, birth defects
or other reproductive harm. Some dust created by
power sanding, sawing, grinding, drilling, and other
construction activities contains chemicals known to
cause cancer, birth defects or other reproductive
harm. Some examples of these chemicals are:
• Lead from lead-based paints;
• Crystalline silica from bricks and cement and other
masonry products;
• Arsenic and chromium from chemically treated
lumber.
Your risk of exposure to these chemicals varies
depending on how often you do this type of work. To
reduce your exposure to these chemicals, work in a
well-ventilated area, and work with approved safety
equipment, such as dust masks that are specially
designed to filter out microscopic particles.
Save these instructions.
8 INSTALLATION
W
ARNING
Do not use accessories that are not recommended by
the manufacturer
.
W
ARNING
Do not put in the safety key or the battery pack until
you finalised the assembly of all the parts.
8.1 UNPACK THE MACHINE
W
ARNING
Make sure that you correctly assemble the machine
before use.
W
ARNING
• If parts of the machine are damaged, do not use
the machine.
•
If parts are missing, do not operate the machine.
• If parts are damaged or missing, contact the
service center.
1. Open the package.
2.
Read the documentation provided in the box.
3. Remove all the unassembled parts from the box.
4. Remove the machine from the box.
5. Discard the box and packing material in compliance
with local regulations.
9
English
EN
W
ARNING
For your personal safety, do not insert battery before
the tool is assembled completely
.
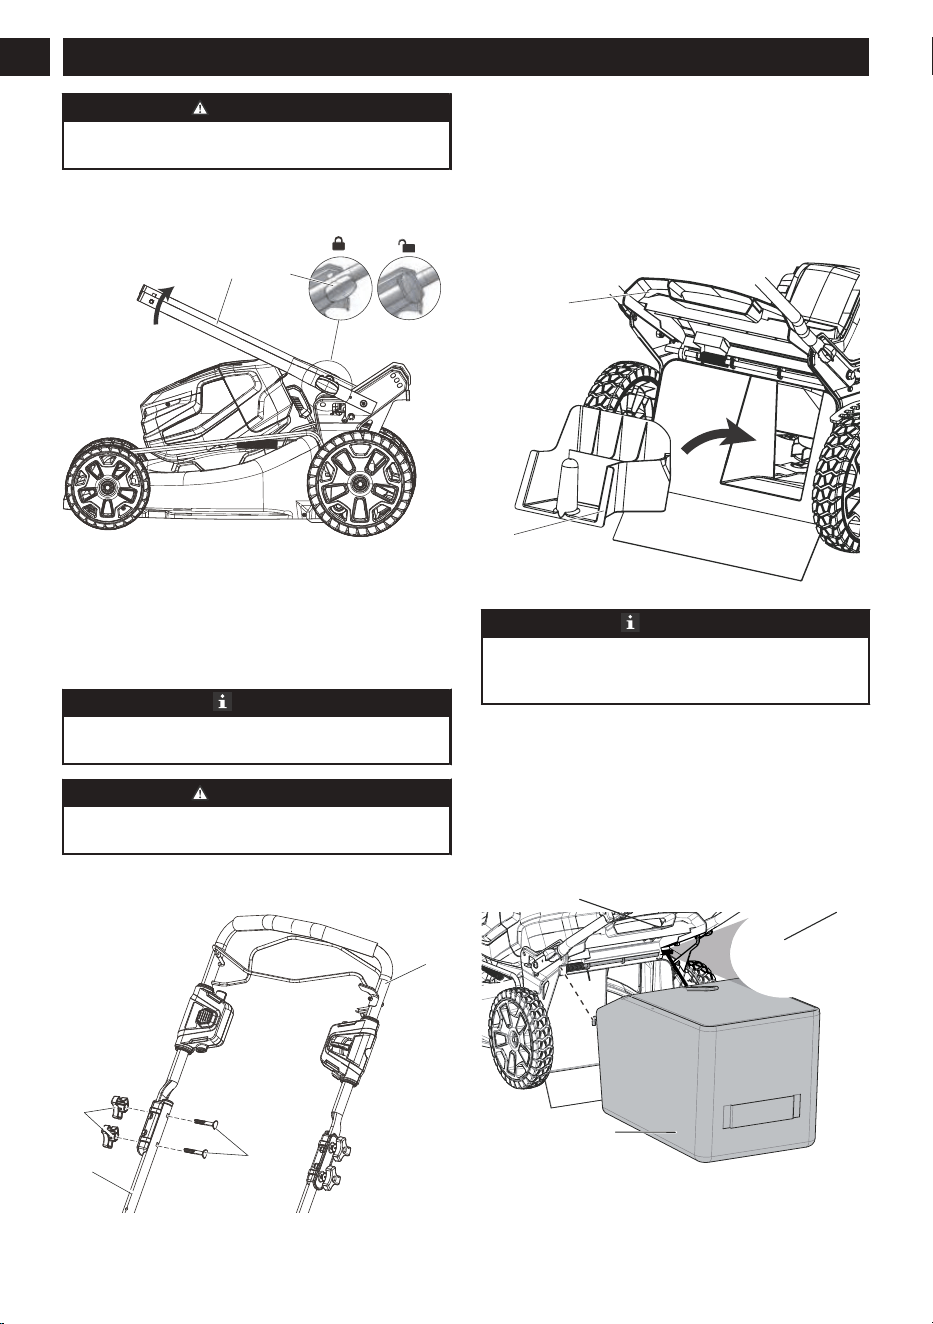
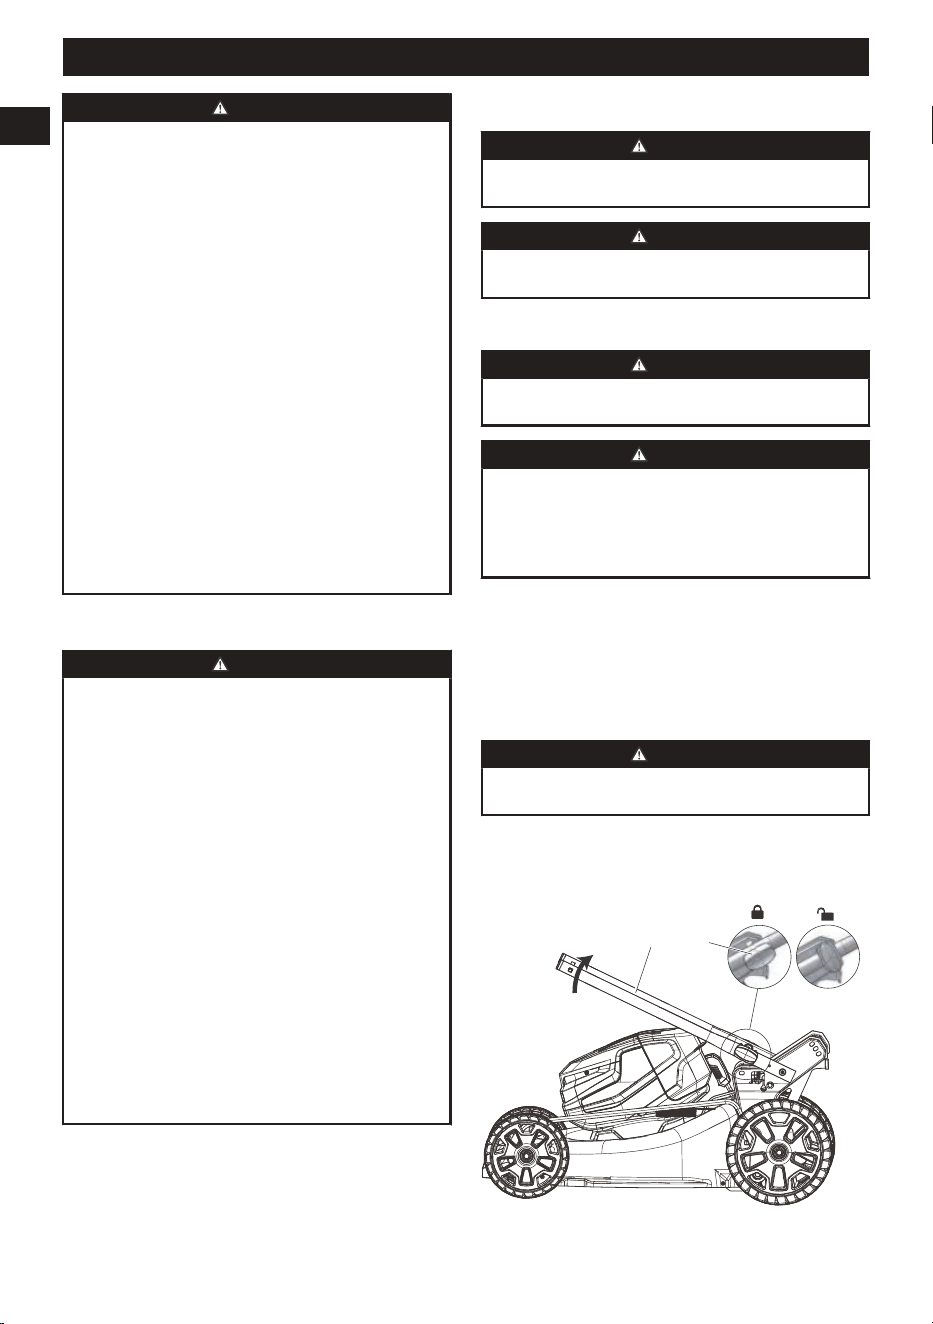
8.2 UNFOLD THE LOWER HANDLE
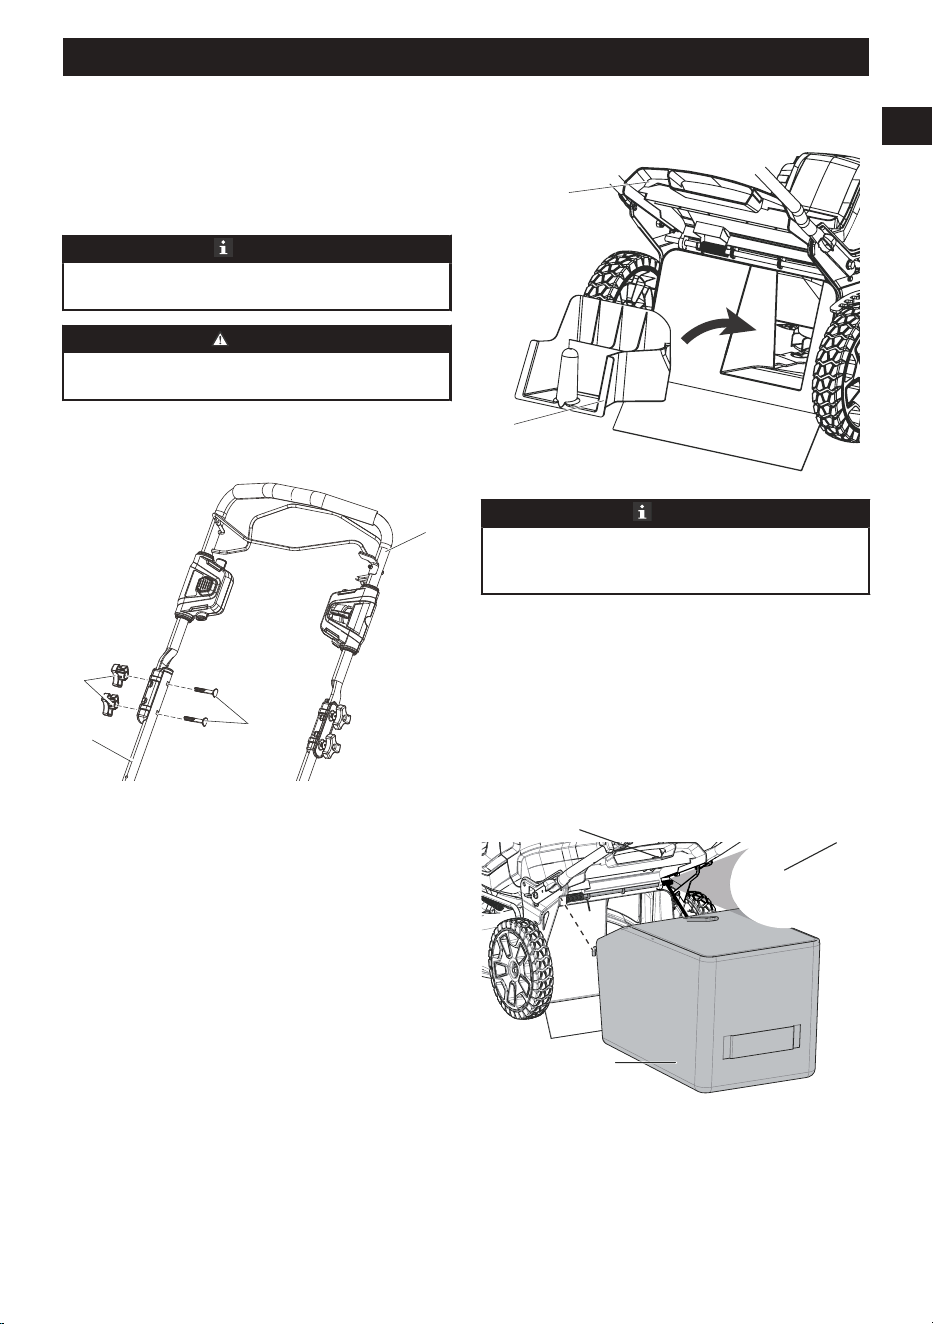
4
13
1. Pull and turn the handle knobs (13) 90°.
2.
Unfold the lower handle.
3. Line up the handle knobs in one of the three
positions on the brackets.
4. Turn the handle knobs 90° until they engage the
holes in the brackets.
NOTE
Make sure that the two handle knobs are in the same
position.
WARNING
Do not damage or pinch the cables when you fold or
unfold the handle.
8.3 INSTALL THE UPPER HANDLE
3
14
15
4
1. Align the holes in the upper handle (3) and the lower
handle (4).
2.
Put the bolts (14) through the holes.
3. Tighten the knobs (15) onto the bolts.
4. Do the same operation on the other side.
8.4 REMOVE THE MULCH PLUG
5
11
NOTICE
The mower comes with the mulch plug installed
properly
. To remove the mulch plug, please follow the
instructions below:
1. Open the rear discharge door (5).
2. Grasp the handle of the mulch plug (11), lift and pull
it out with some force, as it's installed at an angle.
3. The mulch plug must be re-installed back into
the discharge chamer when the grass catcher is
removed.
8.5 INSTALL THE GRASS CATCHER
5
8
16
1. Remove the side discharge chute.
2.
Open the rear discharge door (5).
10
English
EN
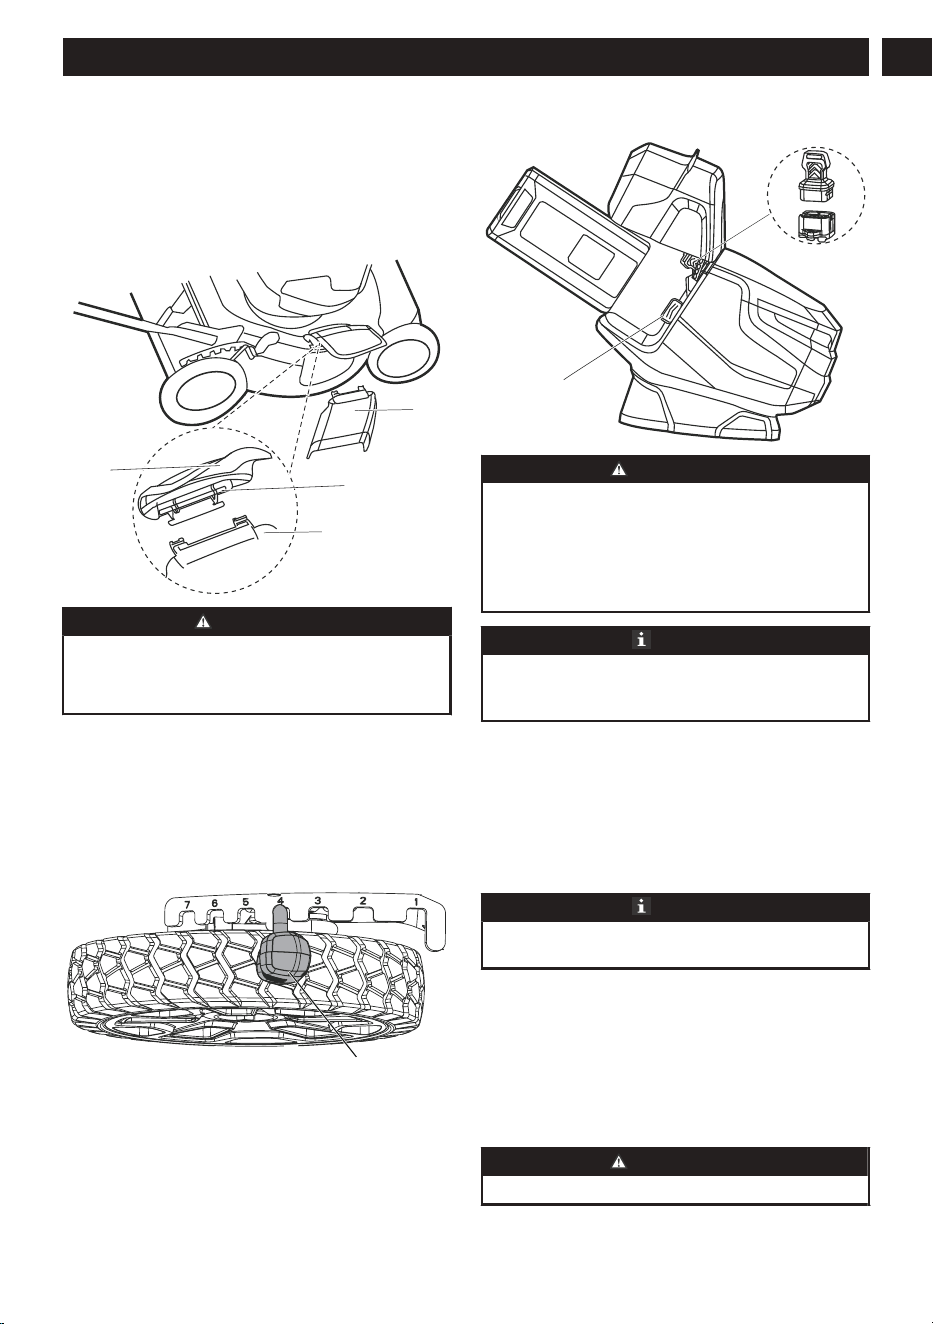
3. Remove the mulch plug.
4.
Hold the the grass catcher (8) by its handle and
engage the hooks (16) on the door rod.
5. Close the rear discharge door.
8.6 INSTALL THE SIDE DISCHARGE
CHUTE
12
7
18
12
CAUTION
When you use the side discharge chute,
•
do not install the grass catcher.
• keep the mulch plug installed.
1. Open the side discharge door (7) and hold it.
2.
Line up the recesses of the side discharge chute
(12) below the pivot (18).
3. Close the side discharge door.
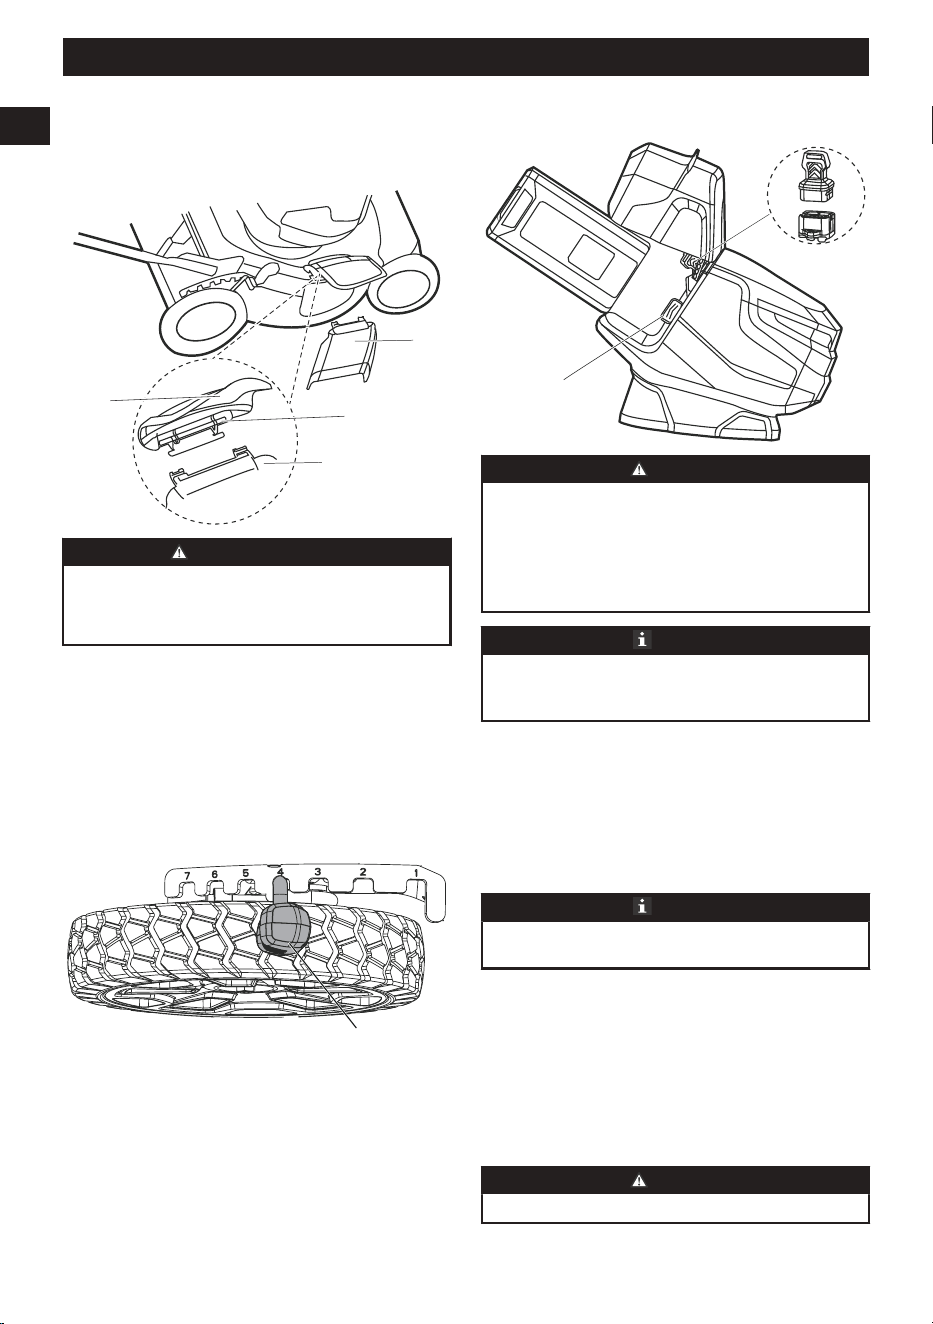
8.7 SET THE BLADE HEIGHT
The machine can be set to different blade heights.
6
1. Pull the height adjustment lever (6) rearward to
increase the blade height.
2.
Pull the height adjustment lever forward to decrease
the blade height.
8.8 INSTALL THE BATTERY PACK
19
20
W
ARNING
• If the battery pack or charger is damaged, replace
the battery pack or the charger
.
• Stop the machine and wait until the engine stops
before you install or remove the battery pack.
• Read, know, and follow the instructions in the
battery and charger manual.
NOTE
The machine has an automatic switch function that
lets the other battery work when the first cannot
operate.
1. Open the battery door.
2.
Align the lift ribs on the battery pack with the
grooves in the battery compartment.
3. Push the battery pack into the battery compartment
until the battery pack locks into place.
4. When you hear a click, the battery pack is installed.
5. Close the battery door.
NOTE
The engine starts only when you put in the safety key
(20).
8.9 REMOVE THE BATTERY PACK
1. Open the battery door.
2.
Push and hold the battery release button (19).
3. Remove the battery pack from the machine.
9 OPERATION
WARNING
Wear eye protection during operation.
11
English
EN
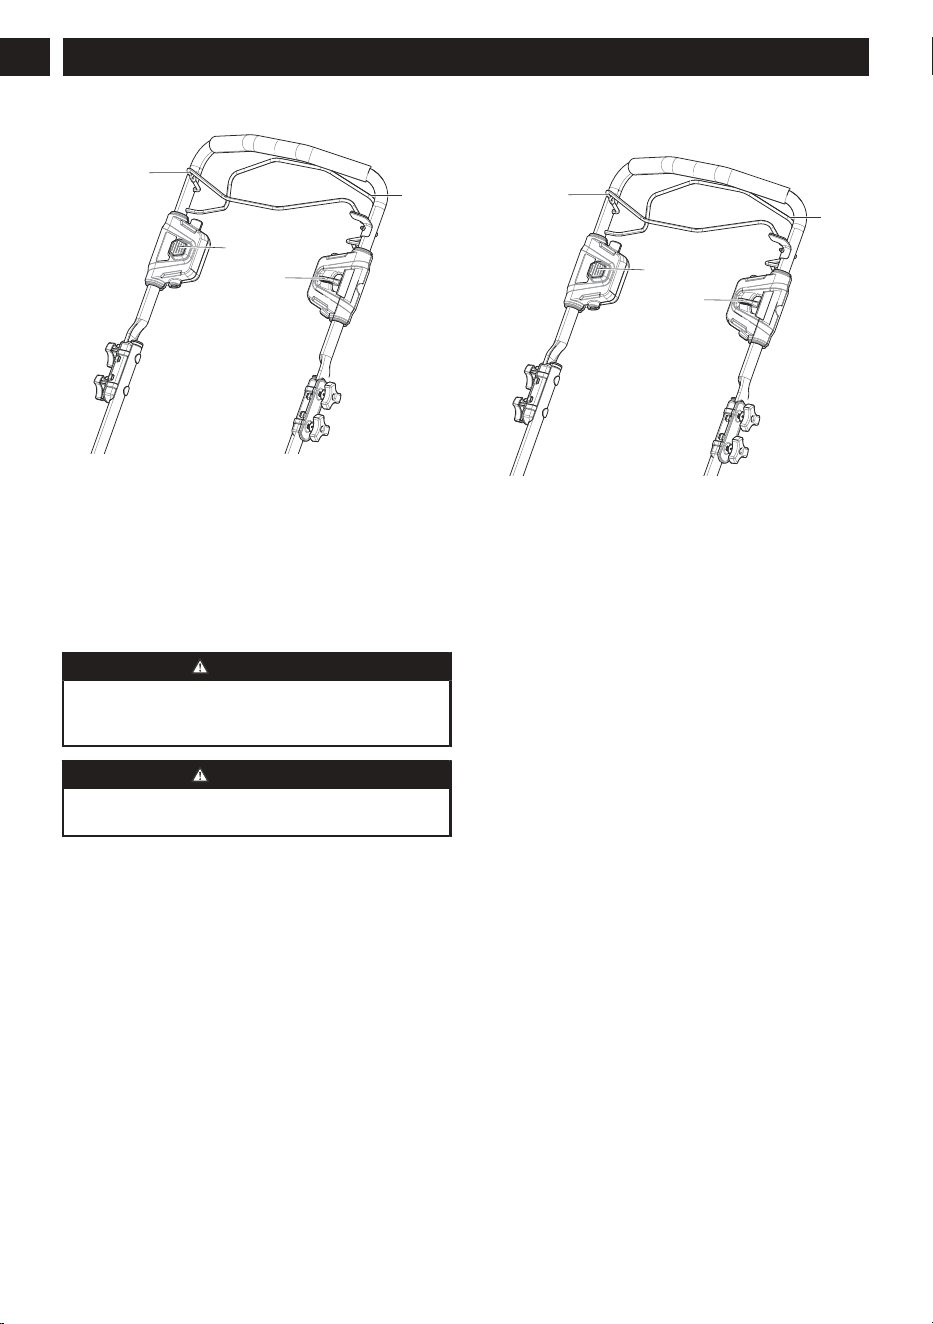
9.1 START THE MACHINE
1
10
2
9
1. Push and hold the start button (2).
2.
While you hold the start button, pull the bail switch
(1) in the direction of the handle bar.
3. Once the machine has started you can release the
start button.
9.2 STOP THE MACHINE
1. Release the blade bail lever to stop the machine.
W
ARNING
Wait until the blade fully stops before you start the
machine again. Do not quickly turn the machine of
f
and on.
W
ARNING
Always remove the safety key and battery pack after
you complete the work.
9.3 OPERATE THE SELF-PROPEL
DRIVE SYSTEM
1
10
2
9
To engage the self-propel drive system while the
mower is running:
1.
Start the machine.
2. While you hold the bail switch (1), pull the self-
propel lever (10) in the direction of the handle bar.
3. Hold the bail switch and the self-propel lever at the
same time with your right hand.
4. Adjust the speed control button (9) with your left
hand.
• Push the speed control button in the direction of
the Rabbit Symbol to increase the speed.
• Pull the speed control button in the direction of
the Turtle Symbol to decrease the speed.
5. Release the self-propel lever to close the self-propel
system.
To engage the self-propel drive system while the
mower is not running:
• Pull the self propel lever (10) upward to the handle.
To disengage the self-propel drive system while the
mower is not running:
• Release the self propel lever.
9.4 EMPTY THE GRASS CATCHER
1. Stop the machine.
2.
Remove the battery pack.
3. Open the rear discharge door and hold it.
4. Hold the grass catcher by its handle and unhook it
from the door rod.
5. Close the rear discharge door.
6. Empty the grass catcher.
12
English
EN
9.5 OPERATION TIPS
•
Do not try to override the operation of the start
button or bail switch.
• Do not tilt the machine when you start it.
• Do not put hands or feet near or below the turning
parts.
• Keep the discharge chute clean.
• Do not cut wet grass.
• Higher blade height is necessary for new or thick
grass.
• Clean the bottom of the mower deck after each
use. Remove grass clippings, leaves, dirt, and other
debris.
10 MAINTENANCE
W
ARNING
Remove the safety key and battery pack from the
machine before maintenance.
W
ARNING
Keep the motor and battery pack free from grass,
leaves or too much grease.
CAUTION
Use only approved replacement parts.
CAUTION
Do not let brake fluids, gasoline, petroleum-based
materials touch the plastic parts. Chemicals can
cause damage to the plastic, and make the plastic
unserviceable.
CAUTION
Do not use strong solvents or detergents on the plastic
housing or components.
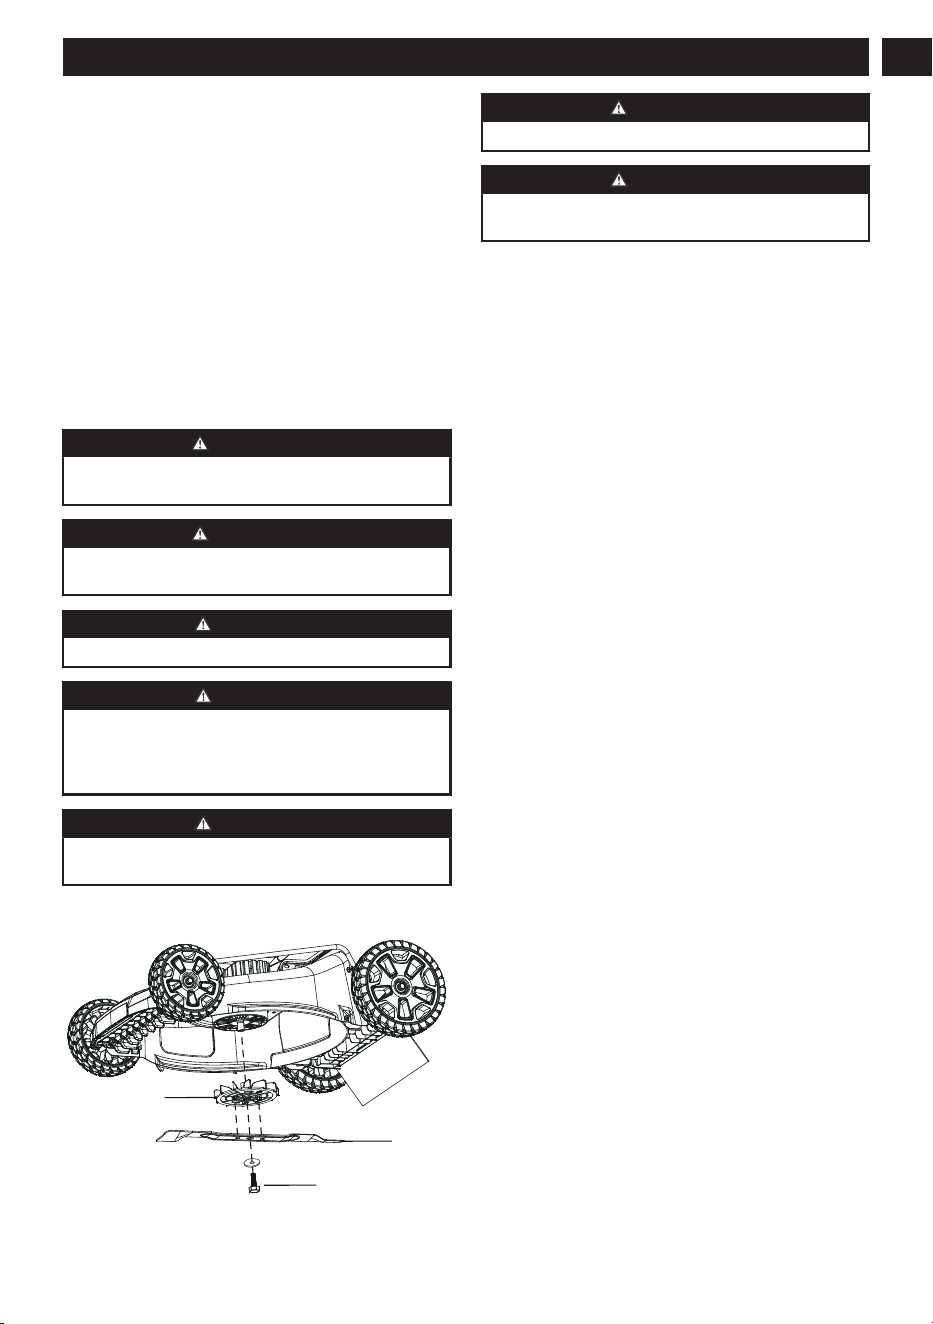
10.1 REPLACE THE BLADE
21
22
23
W
ARNING
Use only approved replacement blades.
W
ARNING
Wear heavy gloves or wind cloth around the blade
when you touch the blade.
1. Stop the machine.
2.
Make sure that the blade fully stops.
3. Remove the battery pack.
4. Turn the machine to its side.
5. Use a piece of wood to prevent the movement of the
blade.
6. Remove the mounting screw (21) with a wrench or
socket.
7. Remove the blade (22) and the fan (23).
8. Put back the fan.
9. Position a new blade with the cutting edges toward
the ground. Make sure the arrows engage the holes
on the blade.
10. Tighten the mounting screw.
10.2 STORE THE MACHINE
• Remove the safety key.
•
Remove the battery pack(s).
• Clean the machine before storage.
• Make sure the motor is not hot when you store the
machine.
• Make sure that the machine does not have loose
or damaged parts. If it is necessary, follow these
instructions:
• Replace the damaged parts.
• Tighten the bolts.
• Speak to a person at an approved service
center.
• Store the machine in a dry area.
• Make sure that children cannot come near the
machine.
13
English
EN
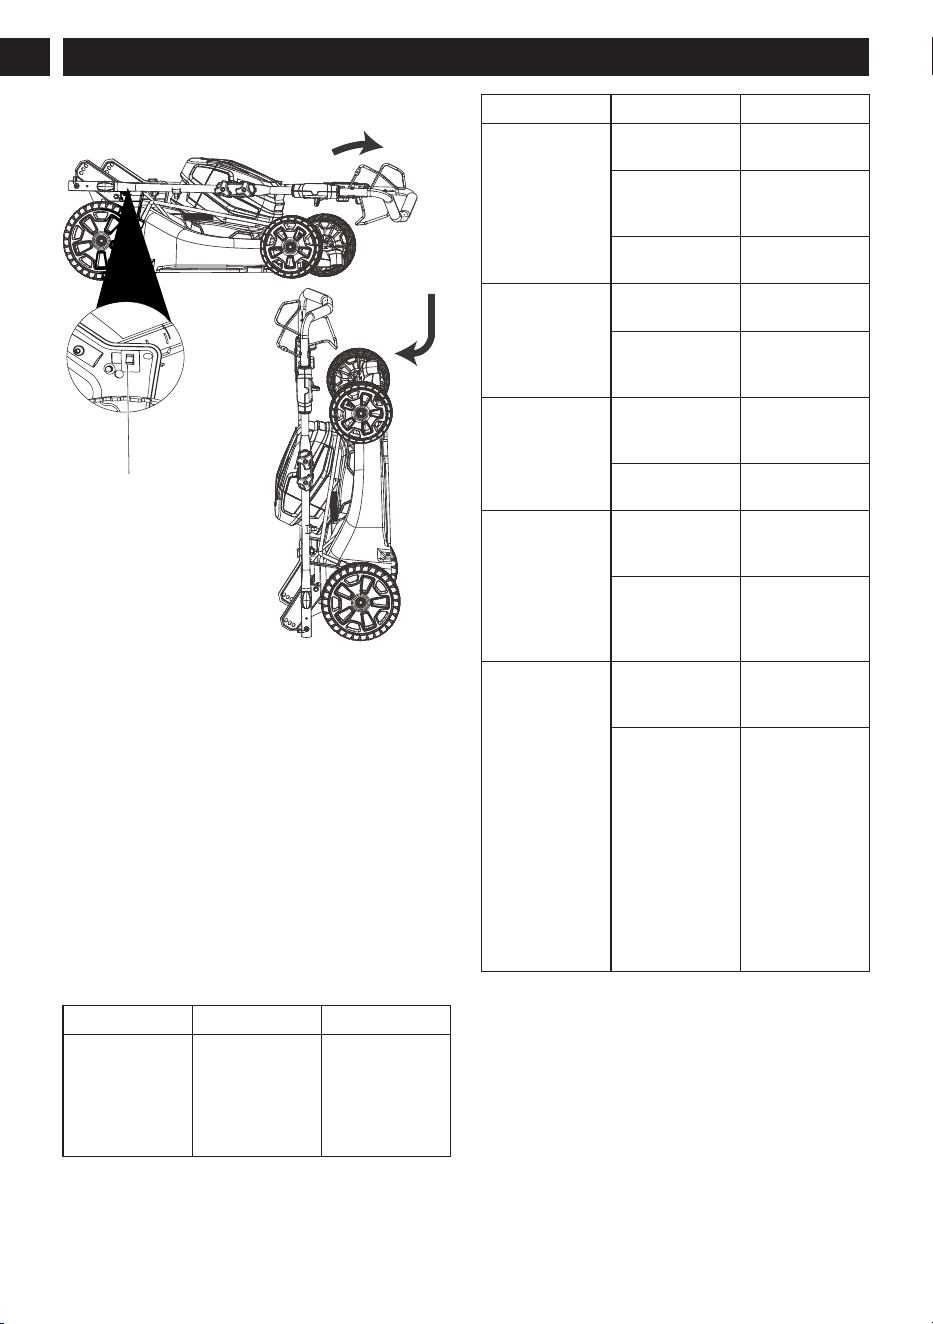
10.3 STAND THE MACHINE ON END
24
1. Remove the grass catcher.
2.
Pull and turn the handle knobs 90°.
3. Fold down the handle.
4. Turn the handle knobs 90° to lock the handle into
position.
5. Stand the machine on end and make sure that the
brackets touch the floor.
Storage Switch
The machine has a storage switch (24) that prevents its
startup in the storage position.
It is necessary to remove the safety key and the battery
pack to prevent accidental startup or unapproved use.
The storage switch does not replace this function.
11 TROUBLESHOOTING
Problem Possible cause Solution
The handle is
not in position.
The bolts are not
engaged correct-
ly
.
Adjust the height
of the handle
and make sure
that the knobs
and bolts are
aligned correctly.
Problem Possible cause Solution
The machine
does not start.
The battery ca-
pacity is low
.
Charge the bat-
tery pack.
The blade bail
lever is defec-
tive.
Replace the
blade bail lever.
The safety key is
not put in.
Put in the safety
key.
The machine
cuts grass un-
evenly.
The lawn is
rough.
Examine the
mowing area.
The blade height
is not set cor-
rectly.
Adjust the blade/
cutting height to
a higher position.
The machine
does not mulch
correctly.
Wet grass clip-
pings attach to
the deck.
Wait until the
grass dries be-
fore mowing.
The mulch plug
is missing.
Install the mulch
plug.
The machine is
hard to push.
The grass is too
tall, or the blade
height is too low.
Increase the
blade/cutting
height.
The grass catch-
er and the blade
drags in thick
grass.
Empty the grass
clippings from
the grass catch-
er.
There is a high
vibration in the
machine.
The blade is un-
balanced and
worn.
Replace the
blade.
The motor shaft
is bent.
1. Stop the mo-
tor.
2. Remove the
safety key
and battery
pack.
3. Inspect for
damage.
4. Repair the
machine be-
fore you start
it again.
14
English
EN
Problem Possible cause Solution
The machine
stops during
mowing.
The blade height
is too low.
Increase the
blade/cutting
height.
The battery pack
is out of power.
Charge the bat-
tery pack.
The grass clip-
pings attach to
the deck or the
blade.
Remove the bat-
tery pack and
check the deck.
Operation tem-
perature of the
machine is too
high.
Cool the ma-
chine.
* If you cannot find the solution to these problems, go to
the service center.
12 TECHNICAL DATA
Voltage 80 V
Battery model BAT80V50A and other BAT 80V
series
Charger model CHA180VA4 and other CHA 80V
series
No load speed 2800 RPM
Height adjust-
ments
1 3/8 - 3 3/4 (3.5 - 9.5 cm)
Self-propelled
speed
1.9-4.8 fps (0.6-1.5 m/s)
Functions 3-in-1 Mulch & Rear Bag & Side
discharge
Weight (without
battery pack)
67 lbs (30,5 kg)
Double-insulated
construction
13 LIMITED WARRANTY
Bad Boy hereby warranties this product, to the original
purchaser with proof of purchase, for a period of
four (4) years against defects in materials, parts or
workmanship. Bad Boy, at its own discretion will repair
or replace any and all parts found to be defective,
through normal use, free of charge to the customer.
This warranty is valid only for units which have been
used for personal use that have not been hired or
rented for industrial/commercial use, and that have
been maintained in accordance with the instructions in
the owners’ manual supplied with the product from new.
ITEMS NOT COVERED BY WARRANTY:
1. Any part that has become inoperative due to
misuse, commercial use, abuse, neglect, accident,
improper maintenance, or alteration; or
2. The unit, if it has not been operated and/or
maintained in accordance with the owner's manual;
or
3. Normal wear;
4. Routine maintenance items such as lubricants,
blade sharpening;
5. Normal deterioration of the exterior finish due to use
or exposure.
HELPLINE:
Warranty service is available by calling our toll-free
helpline, at 888-227-9443.
TRANSPORTATION CHARGES:
Transportation charges for the movement of any power
equipment unit or attachment are the responsibility of
the purchaser. It is the purchaser’s responsibility to
pay transportation charges for any part submitted for
replacement under this warranty unless such return is
requested in writing by Bad Boy.
Company name: Bad Boy Inc.
Address:
102 Industrial Drive
Batesville, Arkansas 72501
15
English
EN
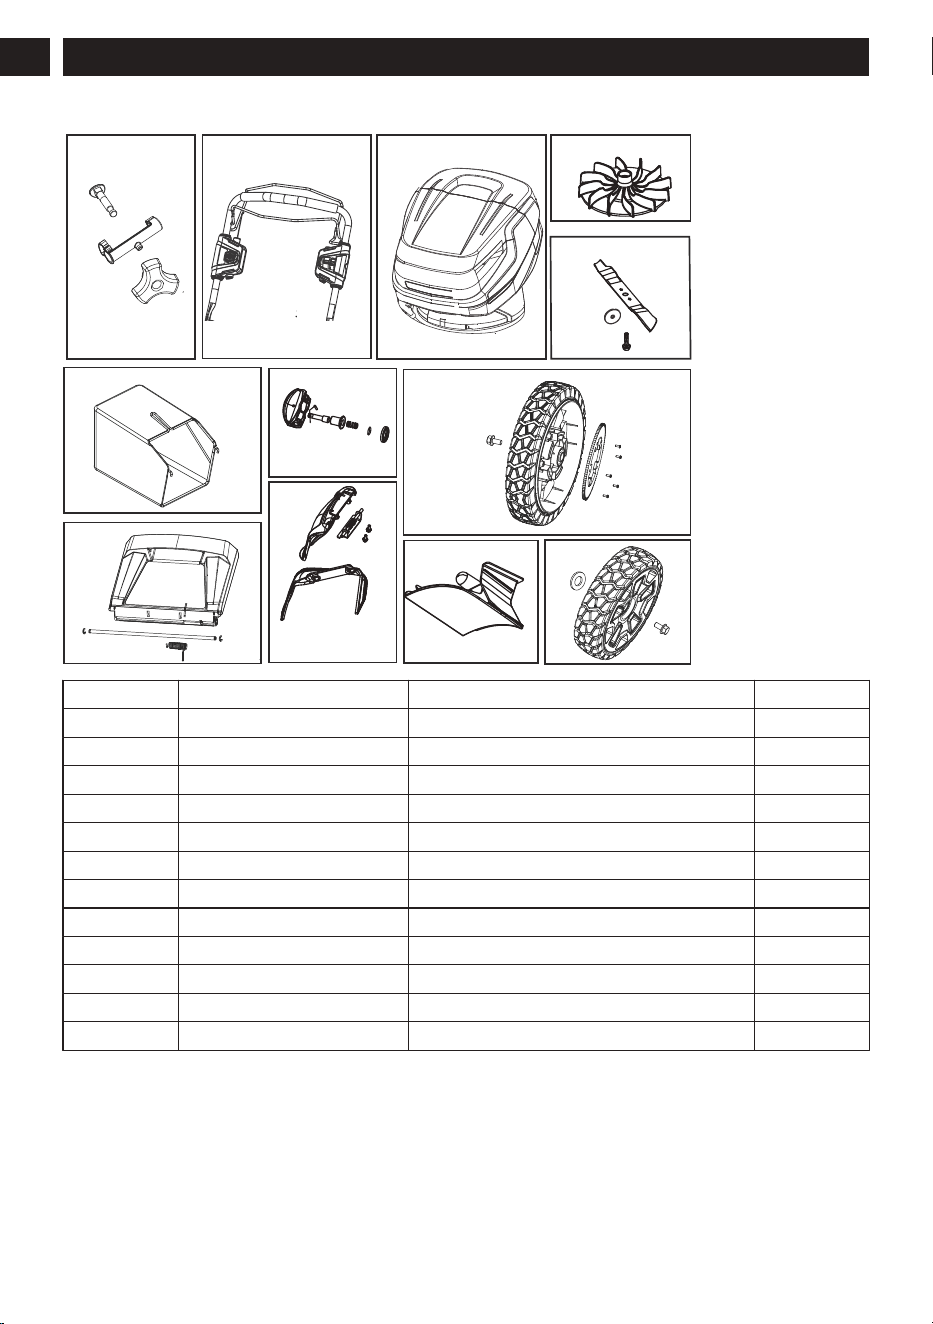
14 EXPLODED VIEW
1
5
6
8
9
7
11
12
2 3 4
10
No. Part No. Description Qty.
1 R0204810-00 Push Handle Knob Assembly 2
2 R0204811-00 Upper Push Handle Assembly 1
3 R0204812-00 Power Head Assembly 1
4 R0204813-00 Fan Blade 1
5 R0204814-00 Blade/Bar Assembly 1
6 R0204815-00 Grass Bag Assembly 1
7 R0202459-00 Push Handle Knob Assembly 1
8 R0200744-00 Rear Wheel Assembly 2
9 R0204816-00 Rear Coverplate Assembly 1
10 R0201028-00 Side discharge cover kit 1
11 R0203356-00 Rear Plug 1
12 0102028-00 Wheel Assembly 2
16
English
EN

1 Finalidad.....................................18
2
Perspectiva general.................. 18
3 Lea todas las instrucciones..... 18
3.1 Niños y transeúntes..................................18
3.2 Funcionamiento general...........................18
3.3 Funcionamiento en pendientes................ 20
3.4 Servicio/Mantenimiento............................ 21
3.5 Advertencias de seguridad para
cortacéspedes.......................................... 22
4 Símbolos en el producto.......... 22
5 Niveles de riesgo.......................23
6 Eliminación de batería
segura para el medio
ambiente.....................................23
7 Propuesta 65..............................24
8 Instalación..................................24
8.1 Desembalaje de la máquina.....................24
8.2 Desplegado del asa inferior......................24
8.3 Instalación del asa superior .....................25
8.4 Retirada del tapón de mulching................25
8.5 Instalación del recogehierba.................... 25
8.6 Instalación del conducto de descarga
lateral
........................................................26
8.7 Ajuste de la altura de la cuchilla...............26
8.8 Instalación de la batería........................... 26
8.9 Retirada de la batería...............................26
9 Funcionamiento.........................26
9.1 Puesta en marcha de la máquina.............27
9.2 Detención de la máquina..........................27
9.3 Funcionamiento del sistema de
transmisión autopropulsada..................... 27
9.4 Vaciado del recogehierba.........................27
9.5 Consejos de funcionamiento.................... 28
10 Mantenimiento........................... 28
10.1 Sustitución de la cuchilla.......................... 28
10.2 Almacenamiento de la máquina............... 28
10.3 Colocación de la máquina en posición
vertical...................................................... 29
11 Solución de problemas.............29
12 Datos técnicos...........................30
13 Garantía limitada....................... 30
14 Vista despiezada........................31
17
Español
ES
1 FINALIDAD
El cortacésped está destinado a un uso privado,
es decir
, para uso en entornos domésticos y de
jardinería. La máquina se utiliza principalmente para el
mantenimiento de céspedes residenciales a pequeña
escala y jardines domésticos/de aficionados.
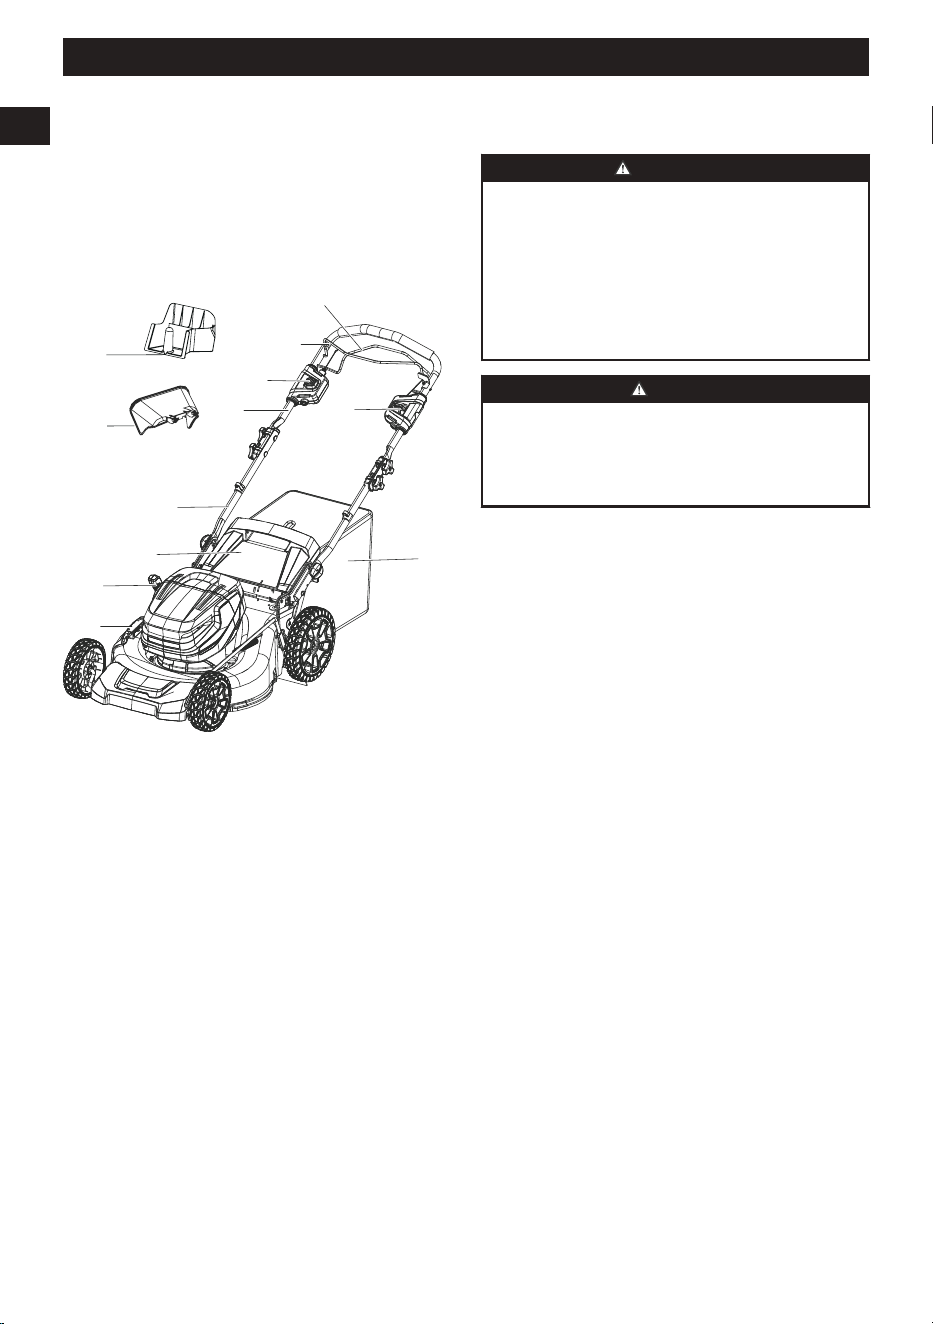
2 PERSPECTIVA GENERAL
11
12
8
9
1
0
1
2
3
4
5
6
7
1
Interruptor de seguridad
2
Botón de puesta en marcha
3
Asa superior
4
Asa inferior
5
Puerta de descarga trasera
6
Palanca de ajuste de altura
7
Cubierta de descarga lateral
8
Recogehierba
9
Botón de control de velocidad
10
Palanca de accionamiento de autopropulsión
11
Tapón de mulching
12
Conducto de descarga lateral
3 LEA TODAS LAS
INSTRUCCIONES
PELIGRO
Esta máquina se ha construido para utilizarse de
acuerdo con las normas para un funcionamiento
seguro que se incluyen en este manual. Como con
cualquier tipo de equipo eléctrico, un descuido o un
error por parte del operario puede provocar lesiones
graves. Esta máquina es capaz de amputar manos
y pies y de lanzar objetos. El incumplimiento de las
instrucciones de seguridad podría provocar lesiones
graves o incluso la muerte.
AVISO
Cuando utilice cortacéspedes eléctricos, siempre
deben seguirse precauciones básicas de seguridad
a fin de reducir el riesgo de incendios, descargas
eléctricas y lesiones personales. Estas precauciones
básicas incluyen lo siguiente:
3.1 NIÑOS Y TRANSEÚNTES
Pueden producirse accidentes trágicos si el operario no
está alerta a la presencia de niños y transeúntes.
• Mantenga la zona de funcionamiento libre de
cualquier persona, especialmente niños pequeños
y mascotas.
• Tenga mucho cuidado al acercarse a esquinas
ciegas, portales, arbustos, árboles u otros objetos
que puedan ocultar su visión de un niño o un
transeúnte. Mantenga a los niños, los transeúntes,
los ayudantes y las mascotas al menos a 30 m
(100 pies) del cortacésped cuando esté en
funcionamiento. Detenga la máquina si alguien
entra en la zona.
• Nunca permita que niños menores de 14 utilicen
un cortacésped eléctrico. Los operarios de 14 años
en adelante deben leer y entender en su totalidad
el manual del operario y las normas de seguridad.
Únicamente están autorizadas a utilizar la máquina
personas responsables que estén familiarizadas
con estas normas de funcionamiento seguro.
3.2 FUNCIONAMIENTO GENERAL
• Lea detenidamente este manual del operario en su
totalidad antes de montar o utilizar esta máquina.
Debe leer
, entender y seguir todas las instrucciones
en la máquina y en los manuales antes del
funcionamiento. Familiarícese con los controles
y el uso adecuado de esta máquina antes del
funcionamiento. Conserve este manual para su
consulta posterior y frecuente.
• No utilice el cortacésped para trabajos distintos
del previsto. El cortacésped se ha diseñado para
realizar un trabajo exclusivamente: cortar hierba.
18
Español
ES

• Nunca intente hacer un ajuste de altura de la rueda
mientras el motor esté en marcha.
•
No fuerce el cortacésped; hará el trabajo mejor y
con mayor seguridad a la velocidad para la que se
diseñó.
• No se estire, mantenga en todo momento una
postura adecuada y el equilibrio. Numerosas
lesiones se producen como resultado del paso del
cortacésped sobre el pie durante una caída debida
a resbalones o tropiezos. En caso de resbalar y
caer pueden producirse lesiones personales graves.
Si siente que está perdiendo el equilibrio, suelte
la palanca de control inmediatamente y la cuchilla
dejará de girar en tres segundos.
• Inspeccione exhaustivamente la superficie donde
va a utilizarse el cortacésped y elimine todas las
piedras, ramas, cables, huesos de perros y otros
objetos extraños.
• Evite el arranque accidental. Asegúrese de que el
interruptor esté en la posición de apagado antes
de conectar a la batería y al coger o transportar
el cortacésped. El transporte del cortacésped
con el dedo en el interruptor o la conexión de
un cortacésped que tiene el interruptor activado
fomenta los accidentes.
• Nunca tire del cortacésped hacia usted mientras
camina. Si debe hacer retroceder el cortacésped
desde una pared u obstrucción, primero mire
hacia abajo y hacia atrás para evitar tropezar, a
continuación, siga estos pasos:
• Aléjese del cortacésped para extender
totalmente los brazos.
• Asegúrese de tener un buen equilibrio.
• Tire del cortacésped hacia atrás lentamente.
• Utilice los aparatos únicamente con las baterías
designadas específicamente. El uso de cualquier
otra batería puede dar lugar a un riesgo de
lesiones e incendio. Recargue solo con el cargador
especificado por el fabricante. Un cargador
adecuado para un tipo de batería crear a un riesgo
de incendio cuando se utiliza con otro tipo de
batería.
• Retire la batería del cortacésped antes de realizar
ajustes, cambiar accesorios o almacenarlo. Estas
medidas de seguridad preventivas reducen el riesgo
de que el cortacésped se ponga en marcha
accidentalmente.
• Antes y durante el retroceso con el cortacésped,
mire hacia atrás y hacia abajo para ver si hay niños
pequeños y otras personas.
• No utilice el cortacésped bajo la influencia de
alcohol o drogas. Manténgase alerta y observe lo
que está haciendo en todo momento. Emplee el
sentido común y no utilice el cortacésped cuando
esté cansado.
• Únicamente permita que utilicen la máquina
operarios responsables, con formación,
familiarizados con las instrucciones y físicamente
capaces.
• No transporte pasajeros.
• No haga funcionar la máquina sin que todo
el recogehierba, el conducto de descarga u
otros dispositivos de seguridad estén colocados
y funcionen correctamente. Compruebe con
frecuencia si hay signos de desgaste o deterioro y
sustituya según sea necesario.
• No siegue marcha atrás a menos que sea
absolutamente necesario.
• Lleve siempre gafas o anteojos de seguridad
durante la utilización y al realizar un ajuste o
reparación para proteger sus ojos. Los objetos
proyectados que rebotan pueden producir lesiones
graves en los ojos. Lleve siempre una máscara
facial o antipolvo si se levanta polvo durante el
funcionamiento.
• Manténgase alejado en todo momento de la
abertura de descarga. No coloque las manos ni
los pies cerca de las piezas giratorias o debajo de
la plataforma de corte. El contacto con la cuchilla
puede amputar manos y pies.
• Planifique su patrón de corte para evitar la descarga
de material hacia caminos, aceras, transeúntes y
similares. Asimismo, evite descargar material contra
paredes u obstrucciones, lo que puede hacer que el
material descargado rebote hacia el operario.
• Para ayudar a evitar la cuchilla o una lesión por
un objeto proyectado, permanezca en la zona del
operario detrás de las asas.
• Si falta la cubierta de descarga o si esta ha sufrido
daños, puede haber contacto con la cuchilla o
lesiones por objetos proyectados.
• Los objetos golpeados por la cuchilla del
cortacésped pueden producir lesiones graves a
las personas. El césped siempre debe examinarse
detenidamente y deben eliminarse todos los objetos
antes de cada corte.
• Detenga la cuchilla cuando cruce senderos de
grava, aceras o caminos.
• Siga todas las instrucciones de carga y no cargue
la batería o el cortacésped fuera del intervalo de
temperatura especificado en las instrucciones. La
carga incorrecta o a temperaturas fuera del intervalo
especificado puede dañar la batería y aumentar el
riesgo de incendio.
• Si el cortacésped golpea un objeto extraño, siga
estos pasos:
• Suelte el interruptor de seguridad para
desacoplar el motor.
• Retire la batería.
• Inspeccione si hay daños.
• Repare las piezas dañadas antes de volver a
poner en marcha y utilizar el cortacésped.
• Solicite a un técnico de reparación cualificado que
realice las tareas de servicio utilizando únicamente
19
Español
ES

piezas de repuesto idénticas. Esto garantizará el
mantenimiento de la seguridad del producto.
•
Vestirse adecuadamente; no lleve ropa suelta ni
joyas que puedan quedar atrapadas en las piezas
móviles. Se recomienda el uso de guantes de
seguridad y calzado adecuado cuando se trabaje
en el exterior. Lleve zapatos de trabajo resistentes
con suela dura y pantalones y camisas ajustados.
Se recomiendan camisas y pantalones que cubran
los brazos y piernas, así como zapatos con punta
de acero. Nunca utilice la máquina descalzo, con
sandalias o calzado resbaladizo o ligero (p. ej. de
lona).
• No modifique ni intente reparar el cortacésped o
la batería (según corresponda), excepto según lo
indicado en las instrucciones de uso y cuidado.
• Lleve una protección capilar para sujetar el cabello
largo.
• Evite los entornos peligrosos; no utilice el
cortacésped en lugares húmedos / mojados o si
está lloviendo.
• Almacene el cortacésped inactivo en el interior.
Cuando no estén en uso, los aparatos deben
almacenarse en el interior, en un lugar seco y
alto o cerrado, fuera del alcance de los niños.
Retire siempre la batería del cortacésped antes de
almacenarlo.
• Siegue únicamente con luz diurna o con una buena
iluminación artificial. Camine, no corra durante la
utilización.
• Si el cortacésped empieza a vibrar de manera
anormal, detenga inmediatamente el motor, retire
la batería y compruebe la causa. Normalmente la
vibración es una advertencia de que el cortacésped
no funciona correctamente.
• Compruebe la bolsa con frecuencia en busca
de deterioro y desgaste, y sustituya las
bolsas desgastadas. Compruebe que las bolsas
de repuesto cumplan las recomendaciones o
especificaciones del fabricante original.
• Antes de limpiar el cortacésped, desatascar o
retirar la bolsa de hierba, el inserto para mulching
o el conducto de descarga lateral, apague el
motor y espere hasta que la cuchilla se detenga
por completo, posteriormente retire la batería.
La cuchilla de corte sigue girando durante unos
segundos después de apagar el motor. Nunca
realice estas funciones hasta que esté seguro de
que la cuchilla ha dejado de girar.
• Mantenga los filos de corte limpios y afilados para
garantizar el mejor rendimiento.
• Inspeccione periódicamente los dispositivos de
seguridad y los cables en busca de daños. En caso
de daños, no haga funcionar la unidad hasta que
haya sido reparada por un profesional de servicio
técnico autorizado.
• Nunca utilice el cortacésped sin la cubierta de
descarga adecuada, la bolsa recogehierba, el
inserto para mulching, el conducto de descarga
lateral u otros dispositivos de seguridad en su
posición y funcionando. Nunca utilice el cortacésped
con dispositivos de seguridad dañados. En caso
contrario podrían producirse lesiones personales.
• Utilice únicamente las baterías y cargadores
aprobados. Las baterías y cargadores no aprobados
pueden producir daños en el cortacésped o lesiones
al operario.
• No deseche la batería en el fuego. Las celdas
podrían incendiarse o explotar. Compruebe los
códigos locales y de tratamiento de residuos para
obtener instrucciones adecuadas de eliminación.
• Cuando la batería no esté en uso, manténgala
alejada de otros objetos metálicos como clips,
monedas, llaves, clavos, tornillos u otros objetos
metálicos pequeños que puedan hacer una
conexión entre los terminales. El cortocircuito
de los terminales de la batería puede provocar
quemaduras o un incendio.
• No abra ni destruya la batería. Los electrolitos
contenidos dentro de la batería son corrosivos y
pueden producir daños en los ojos o la piel si se
liberan. Puede ser tóxico si se traga.
• Bajo condiciones abusivas, es posible que salga
líquido de la batería; evite el contacto. En caso de
un contacto accidental, lavar con abundante agua.
Si el líquido entra en contacto con los ojos, busque
también atención médica. El líquido de la batería
puede provocar irritación o quemaduras.
• No exponga una batería o un aparato al fuego ni a
temperaturas excesivas. La exposición al fuego o a
una temperatura superior a 130°C puede provocar
una explosión.
• Tenga cuidado al manipular las baterías para
evitar un cortocircuito con materiales conductores,
como anillos, pulseras, llaves, etc. La batería o
el conductor puede sobrecalentarse y producir
quemaduras si se hace contacto con dichos
materiales.
• No utilice una batería o un aparato que haya sufrido
daños o modificaciones. Las baterías dañadas
o modificadas pueden exhibir un comportamiento
impredecible que puede causar un incendio, una
explosión o un riesgo de lesiones.
• Este aparato no debe ser utilizado por personas con
una discapacidad física, sensorial o mental, o que
no tengan experiencia ni conocimientos, a menos
que hayan recibido supervisión o instrucción sobre
el uso del aparato por una persona responsable de
su seguridad.
3.3 FUNCIONAMIENTO EN
PENDIENTES
Las pendientes son un factor principal relacionado con
los accidentes por resbalones y caídas, que pueden
provocar lesiones graves. Durante el funcionamiento
20
Español
ES
en pendientes, es necesario tomar precauciones
adicionales. Si no se siente seguro en una pendiente,
no la siegue.
Cosas que debe hacer:
•
En las pendientes debe segarse transversalmente;
nunca siegue hacia arriba y abajo. Extreme las
precauciones cuando cambie de dirección en
pendientes.
• Este atento por si hubiera agujeros, raíces, piedras,
objetos ocultos o baches que puedan hacer que
resbale o tropiece. La hierba alta puede ocultar
obstáculos. Elimine todos los obstáculos como
piedras y ramas de árboles.
• Asegúrese de tener un equilibrio estable. Si pierde
el equilibrio, suelte el interruptor inmediatamente.
Cosas que no debe hacer:
• Segar en pendientes excesivamente pronunciadas.
• Segar cerca de precipicios, zanjas o terraplenes;
podría perder el equilibrio.
• Segar en pendientes mayores de 15 grados.
• Segar sobre hierba mojada. Podría perder el
equilibrio y resbalar.
A
VISO
No siegue en pendientes con una inclinación superior
a 15°. Si no está cómodo, no siegue en una
pendiente.
SUGERENCIA
En caso de un cortacésped autopropulsado,
mantenga una velocidad de autopropulsión baja
cuando siegue en una pendiente.
3.4 SERVICIO/MANTENIMIENTO
• Compruebe la cuchilla y los pernos de montaje del
motor (de la máquina) a intervalos frecuentes para
verificar que estén bien apretados.
•
Sustituya la cuchilla si está doblada o agrietada.
Una cuchilla desequilibrada provoca vibraciones
que podrían producir daños en la unidad de
accionamiento del motor o provocar lesiones
personales.
• Mantenga todas las tuercas, los pernos y los
tornillos apretados para garantizar que el equipo
esté en condiciones seguras de funcionamiento.
• No lave con una manguera; evite que entre agua en
el motor y las conexiones eléctricas.
• Nunca retire ni manipule los dispositivos de
seguridad. Compruebe su correcto funcionamiento
periódicamente. Nunca haga nada para interferir
con la función prevista de un dispositivo
de seguridad o para reducir la protección
proporcionada por un dispositivo de seguridad.
• Mantenga el cortacésped libre de hierba, hojas
u otros residuos acumulados. Deje que el
cortacésped se enfríe antes de almacenarlo.
•
Nunca realice ajustes o reparaciones con el motor
en marcha.
• Retire siempre la batería de los cortacéspedes
antes de realizar tareas de ajuste, limpieza o
reparación.
• Compruebe los componentes del recogehierba
y la protección de descarga con frecuencia y
sustitúyalos por piezas recomendadas por el
fabricante, cuando sea necesario.
• Afile una cuchilla desafilada por igual en cada
extremo para mantener el equilibrio.
• Mantenga las protecciones en su posición y
en estado de funcionamiento. Las cuchillas del
cortacésped están afiladas y pueden cortar.
Envuelva las cuchillas o lleve guantes y tenga
especial cuidado al realizar tareas de servicio.
• Limpie la cuchilla exhaustivamente y compruebe
su equilibrio apoyándola horizontalmente sobre un
clavo delgado por su orificio central. El clavo
también debe estar en posición horizontal. Si
cualquiera de los extremos de la cuchilla gira hacia
abajo, retire algo de metal del extremo pesado o
inferior hasta que la cuchilla esté equilibrada. Está
equilibrada cuando ninguno de los extremos cae.
• Utilice únicamente cuchillas de repuesto idénticas.
• Cuide el mantenimiento del cortacésped. Mantenga
los filos de corte afilados y limpios para obtener
el mejor rendimiento de forma segura. Siga las
instrucciones para la lubricación y el cambio de
accesorios. Inspeccione periódicamente el cable del
cortacésped, y si está dañado, haga que lo repare
un centro de servicio técnico autorizado.
• Si se producen situaciones que no están cubiertas
en este manual, tenga cuidado y utilice el buen
juicio o contacte con el servicio al cliente para
obtener asistencia.
• Nunca utilice el cortacésped sin las protecciones,
placas u otros dispositivos de protección de
seguridad adecuados en su posición.
• Antes de cada uso, examine la máquina para
comprobar si hay piezas dañadas, ausentes o
sueltas como tornillos, tuercas, pernos y tapas.
• Apriete correctamente todos los elementos de
fijación y las tapas.
• Limpie la máquina con un paño seco. No utilice
agua.
El intervalo de temperatura ambiente recomendado:
Elemento Temperatura
Intervalo de temperatura de al-
macenamiento del cortacésped
32°F (0°C) - 113°F
(45°C)
Intervalo de temperatura de fun-
cionamiento del cortacésped
32°F (0°C) - 113°F
(45°C)
21
Español
ES
Elemento Temperatura
Intervalo de temperatura de car-
ga de la batería
39°F (4°C) - 104°F
(40°C)
Intervalo de temperatura de fun-
cionamiento del cargador
39°F (4°C) - 104°F
(40°C)
Intervalo de temperatura de al-
macenamiento de la batería
32°F (0°C) - 113°F
(45°C)
Intervalo de temperatura de
descarga de la batería
32°F (0°C) - 113°F
(45°C)
3.5 ADVERTENCIAS DE SEGURIDAD
P
ARA CORTACÉSPEDES
• Antes del uso, realice siempre una inspección
visual para comprobar que la cuchilla, el perno de
la cuchilla y el conjunto de la cuchilla no estén
desgastados o dañados. Sustituya los componentes
desgastados o dañados de forma conjunta para
mantener el equilibrio. Sustituya las etiquetas que
hayan sufridos daños o resulten ilegibles.
•
No siegue en pendientes excesivamente
empinadas.
• Detenga la(s) cuchilla(s) si la máquina tiene que
inclinarse para el transporte al cruzar superficies
que no sean césped, así como al transportar la
máquina hacia y desde la zona de uso.
• Arranque el motor con cuidado según las
instrucciones y con los pies alejados de la(s)
cuchilla(s).
• No incline la máquina cuando arranque el motor,
excepto si es necesario inclinar la máquina para
la puesta en marcha. En tal este caso, no la
incline más de lo estrictamente necesario y levante
únicamente la parte que está alejada del operario.
• No ponga en marcha la máquina cuando esté
delante de la abertura de descarga.
• No transporte la máquina mientras la fuente de
alimentación esté en marcha.
• Detenga la máquina, retire el dispositivo de
inhabilitación y la batería. Asegúrese de que todas
las piezas móviles se hayan detenido por completo
- siempre que deje la máquina;
- antes de eliminar obstrucciones o de desatascar
un conducto;
- antes de comprobar, limpiar o trabajar en la
máquina;
- tras golpear un objeto extraño. Inspeccione
la máquina en busca de daños y realice las
reparaciones necesarias antes de volver a poner en
marcha y utilizarla.
• Mantenga todas las tuercas, los pernos y los
tornillos apretados para asegurarse de que
la máquina esté en condiciones seguras de
funcionamiento.
• En máquinas con varias cuchillas, tenga cuidado
ya que al girar una cuchilla puede hacerse que las
otras cuchillas giren.
•
Tenga cuidado durante el ajuste de la máquina para
evitar que sus dedos queden atrapados entre las
cuchillas móviles y las piezas fijas de la máquina.
• Deje siempre que la máquina se enfríe antes de
almacenarla.
• Al realizar el mantenimiento de las cuchillas, tenga
en cuenta que, aunque la fuente de alimentación
esté apagada, las cuchillas aún pueden moverse.
4 SÍMBOLOS EN EL PRODUCTO
En este cortacésped pueden utilizarse algunos de los
siguientes símbolos. Le rogamos que los estudie y
aprenda su significado. La interpretación correcta de
estos símbolos le permitirá manejar el cortacésped
mejor y de manera más segura.
Símbo-
lo
Nombre
Explicación
V Voltios Tensión
A Amperios Corriente
Hz Hertzios
Frecuencia (ciclos por se-
gundo)
W Vatios Potencia
min Minutos Tiempo
/min Por minuto
Revoluciones, carreras, ve-
locidad de superficie, órbi-
tas, etc., por minuto
Corriente al-
terna
Tipo de corriente
Corriente con-
tinua
Tipo o una característica de
corriente
n
o
Velocidad sin
carga
Velocidad rotacional, sin car-
ga
Alerta de se-
guridad
Precauciones que afectan a
su seguridad.
Protección oc-
ular
Lleve siempre protección oc-
ular con protectores later-
ales marcada para cumplir
la ANSI Z87.1 cuando utilice
este equipo.
ADVERTEN-
CIA --- Condi-
ciones húme-
das
No exponga el producto a la
lluvia o a condiciones de hu-
medad.
22
Español
ES
Símbo-
lo
Nombre
Explicación
Lea el manual
del operario
Para reducir el riesgo de le-
siones, el usuario debe leer
y entender el manual del op-
erario antes de utilizar este
producto.
Mantenga los
dispositivos
de seguridad
No abra ni retire los disposi-
tivos de seguridad mientras
la herramienta esté funcio-
nando.
Mire hacia
atrás cuando
retroceda
Mire hacia abajo y hacia
atrás en primer lugar para
evitar tropezar al retroceder
.
PELIGRO ---
Mantenga ale-
jados los pies
y las manos
Para reducir el riesgo de le-
siones, mantenga las manos
y los pies alejados de las
piezas giratorias. No utilice
a menos que la cubierta de
descarga o la bolsa recoge-
hierba estén en su posición.
En caso de daños, sustituya
inmediatamente.
PELIGRO ---
Mantenga ale-
jados a los
transeúntes
Todos los visitantes deben
mantenerse a una distancia
segura de la zona de traba-
jo.
PELIGRO ---
Proyección de
residuos
Retire los objetos que pue-
dan ser proyectados por la
cuchilla en cualquier direc-
ción. Lleve gafas de seguri-
dad.
PELIGRO ---
Riesgo en
pendientes
pronunciadas
Tenga mucho cuidado en las
pendientes. No siegue en
pendientes con una inclina-
ción superior a 15 grados.
5 NIVELES DE RIESGO
Las siguientes indicaciones y los significados explican
los niveles de riesgo asociados a este producto.
SÍMBO-
LO
INDICACIÓN SIGNIFICADO
PELIGRO Indica una situación de
peligro inminente que, de
no evitarse, provocará le-
siones graves o incluso la
muerte.
ADVERTEN-
CIA
Indica una situación de pel-
igro potencial que, de no
evitarse, podría provocar
lesiones graves o incluso
la muerte.
SÍMBO-
LO
INDICACIÓN SIGNIFICADO
PRECAU-
CIÓN
Indica una situación de pel-
igro potencial que, de no
evitarse, puede provocar
lesiones leves o modera-
das.
PRECAU-
CIÓN
(Sin símbolo de alerta so-
bre seguridad) Indica una
situación que puede provo-
car daños materiales.
6 ELIMINACIÓN DE BATERÍA
SEGURA P
ARA EL MEDIO
AMBIENTE
Los materiales tóxicos y corrosivos que figuran a
continuación se encuentran en las baterías utilizadas
en esta máquina: Ion de litio, un material tóxico.
A
VISO
Deseche todos los materiales tóxicos de una manera
especificada para evitar la contaminación del medio
ambiente. Antes de desechar una batería de iones
de litio dañada o agotada, contacte con la agencia
local de eliminación de residuos o con la agencia
de protección medioambiental local para obtener
información e instrucciones específicas. Lleve las
baterías a un centro de reciclaje o eliminación local
certificado para la eliminación de los iones de litio.
23
Español
ES
A
VISO
Si la batería se agrieta o se rompe, con o sin fugas,
no la recargue ni la utilice. Deséchela y sustitúyala
por una batería nueva. ¡NO INTENTE REP
ARARLA!
Para evitar lesiones y riesgos de incendio, explosión
o descarga eléctrica, y para evitar daños al medio
ambiente:
• Cubra los terminales de la batería con cinta
adhesiva resistente.
• NO intente retirar o destruir ninguno de los
componentes de la batería.
• NO intente abrir la batería.
• Si se produce una fuga, los electrolitos liberados
son corrosivos y tóxicos. NO deje que la solución
entre en contacto con los ojos o la piel, y no la
ingiera.
• NO deseche estas baterías con la basura
doméstica normal.
• NO incinere.
• NO lleve las baterías a lugares donde formarán
parte de vertederos de residuos o flujos de
residuos sólidos urbanos.
• Llévelas a un centro de reciclaje o eliminación
certificado.
7 PROPUESTA 65
A
VISO
Este producto contiene una sustancia química
conocida en el estado de California como causante
de cáncer
, defectos de nacimiento u otros daños
reproductivos. El polvo generado por el lijado
eléctrico, el serrado, el esmerilado, la perforación y
otras actividades de construcción contiene sustancias
químicas que se sabe que son causantes de cáncer,
defectos de nacimiento u otros daños reproductivos.
Algunos ejemplos de estas sustancias químicas son:
• Plomo de pinturas con base de plomo;
• Sílice cristalina de ladrillos y cemento y otros
productos de albañilería;
• Arsénico y cromo de la madera tratada
químicamente.
El riesgo de exposición a estas sustancias químicas
varía según la frecuencia con la que realice este
tipo de trabajo. Para reducir su exposición a
estas sustancias químicas, trabaje en una zona
bien ventilada y trabaje con equipos de seguridad
aprobados, como máscaras antipolvo, que estén
especialmente diseñadas para filtrar partículas
microscópicas.
Conserve estas instrucciones.
8 INSTALACIÓN
A
VISO
No utilice accesorios que no sean los recomendados
por el fabricante.
AVISO
No coloque la llave de seguridad ni la batería hasta
que no haya finalizado el montaje de todas las piezas.
8.1 DESEMBALAJE DE LA MÁQUINA
AVISO
Asegúrese de montar correctamente la máquina antes
del uso.
A
VISO
• Si las piezas de la máquina presentan daños, no
utilice la máquina.
•
Si faltan piezas, no haga funcionar la máquina.
• Si faltan piezas o hay piezas dañadas, contacte el
centro de servicio.
1. Abra el embalaje.
2.
Lea la documentación que se encuentra en la caja.
3. Retire todas las piezas sin montar de la caja.
4. Retire la máquina de la caja.
5. Deseche la caja y el material de embalaje de
conformidad con los reglamentos locales.
A
VISO
Por su seguridad personal, no inserte la batería antes
de haber montado la herramienta por completo.
8.2 DESPLEGADO DEL ASA
INFERIOR
4
13
24
Español
ES
1. Tire de los mandos del asa (13) y gírelos 90°.
2.
Despliegue el asa inferior.
3. Alinee los mandos de las asas en una de las tres
posiciones en los soportes.
4. Gire los mandos de las asas 90° hasta que encajen
en los orificios de los soportes.
NOT
A
Asegúrese de que los dos mandos de las asas estén
en la misma posición.
A
VISO
No dañe ni pellizque los cables cuando pliegue o
despliegue el asa.
8.3 INSTALACIÓN DEL ASA
SUPERIOR
3
14
15
4
1. Alinee los orificios del asa superior (3) y el asa
inferior (4).
2.
Introduzca los pernos (14) por los orificios.
3. Apriete los mandos (15) en los pernos.
4. Realice la misma operación en el otro lado.
8.4 RETIRADA DEL TAPÓN DE
MULCHING
5
11
NOT
A
El cortacésped viene con el tapón de mulching
instalado correctamente. Para retirar el tapón de
mulching, siga estas instrucciones:
1. Abra la puerta de descarga trasera (5).
2. Coja el asa del tapón de mulching (11), levante y tire
para sacar con algo de fuerza, ya que está instalado
en ángulo.
3. El tapón de mulching debe volver a instalarse en la
cámara de descarga cuando el recogehierba esté
retirado.
8.5 INSTALACIÓN DEL
RECOGEHIERBA
5
8
16
1. Retire el conducto de descarga lateral.
2.
Abra la puerta de descarga trasera (5).
3. Retire el tapón de mulching.
4. Sostenga el recogehierba (8) por el asa y enganche
los ganchos (16) en la varilla de la puerta.
25
Español
ES
5. Cierre la puerta de descarga trasera.
8.6 INSTALACIÓN DEL CONDUCTO
DE DESCARGA LA
TERAL
12
7
18
12
PRECAUCIÓN
Cuando utilice el conducto de descarga lateral,
•
no instale el recogehierba.
• mantenga instalado el tapón de mulching.
1. Abra la puerta de descarga lateral (7) y sujétela.
2.
Alinee los huecos del conducto de descarga lateral
(12) debajo de la articulación (18).
3. Cierre la puerta de descarga lateral.
8.7 AJUSTE DE LA ALTURA DE LA
CUCHILLA
La máquina puede ajustarse a distintas alturas de
cuchilla.
6
1. Tire hacia atrás de la palanca de ajuste de altura (6)
para aumentar la altura de la cuchilla.
2.
Tire hacia delante de la palanca de ajuste de altura
para disminuir la altura de la cuchilla.
8.8 INSTALACIÓN DE LA BATERÍA
19
20
A
VISO
• Si la batería o el cargador ha sufrido daños,
sustituya la batería o el cargador
.
• Detenga la máquina y espere hasta que el motor
se pare antes de instalar o retirar la batería.
• Debe leer, conocer y seguir las instrucciones del
manual de la batería y el cargador.
NOT
A
La máquina tiene una función de interruptor
automático que permite que la otra batería funcione
cuando la primera no puede funcionar
.
1. Abra la puerta de la batería.
2.
Alinee las nervaduras de elevación de la batería con
las ranuras del compartimento de la batería.
3. Introduzca la batería en el compartimento de la
batería hasta que encaje en su posición.
4. Cuando escuche un clic, la batería está instalada.
5. Cierre la puerta de la batería.
NOT
A
El motor arranca solo cuando se introduce la llave de
seguridad (20).
8.9 RETIRADA DE LA BATERÍA
1. Abra la puerta de la batería.
2.
Pulse y mantenga pulsado el botón de desbloqueo
de la batería (19).
3. Retire la batería de la máquina.
9 FUNCIONAMIENTO
AVISO
Lleve protección ocular durante el funcionamiento.
26
Español
ES
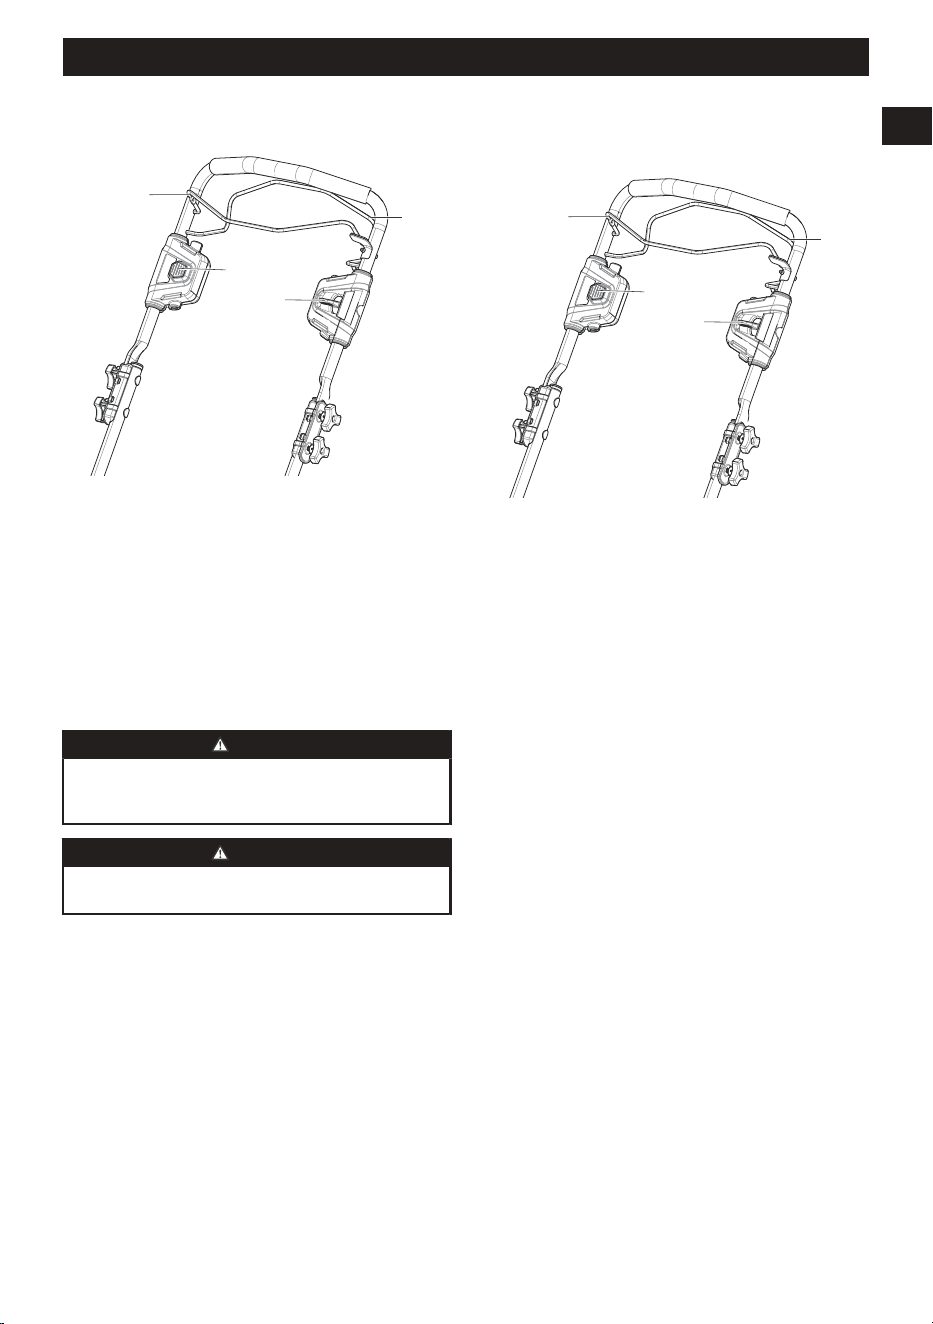
9.1 PUESTA EN MARCHA DE LA
MÁQUINA
1
10
2
9
1. Pulse y mantenga pulsado el botón de puesta en
marcha (2).
2.
Mientras mantiene pulsado el botón de puesta en
marcha, tire del interruptor de seguridad (1) en la
dirección del manillar.
3. Una vez que la máquina esté en marcha, puede
soltar el botón de puesta en marcha.
9.2 DETENCIÓN DE LA MÁQUINA
1. Suelte la palanca de seguridad de la cuchilla para
detener la máquina.
A
VISO
Espere hasta que la cuchilla se detenga por completo
antes de volver a poner en marcha la máquina. No
apague y encienda la máquina rápidamente.
A
VISO
Retire siempre la llave de seguridad y la batería tras
finalizar el trabajo.
9.3 FUNCIONAMIENTO DEL
SISTEMA DE TRANSMISIÓN
AUT
OPROPULSADA
1
10
2
9
Para acoplar el sistema de transmisión
autopropulsada mientras el cortacésped está
funcionando:
1.
Ponga en marcha la máquina.
2. Mientras mantiene el interruptor de seguridad (1),
tire de la palanca de autopropulsión (10) en la
dirección del manillar.
3. Sujete el interruptor de seguridad y la palanca
de autopropulsión al mismo tiempo con la mano
derecha.
4. Ajuste el botón de control de velocidad (9) con la
mano izquierda.
• Empuje el botón de control de velocidad en la
dirección del símbolo del conejo para aumentar
la velocidad.
• Tire del botón de control de velocidad en
la dirección del símbolo de la tortuga para
disminuir la velocidad.
5. Suelte la palanca de autopropulsión para cerrar el
sistema de autopropulsión.
Para acoplar el sistema de transmisión
autopropulsada mientras el cortacésped no está
funcionando:
• Tire de la palanca de autopropulsión (10) hacia
arriba en dirección al asa.
Para desacoplar el sistema de transmisión
autopropulsada mientras el cortacésped no está
funcionando:
• Suelte la palanca de autopropulsión.
9.4 VACIADO DEL RECOGEHIERBA
1. Detenga la máquina.
27
Español
ES
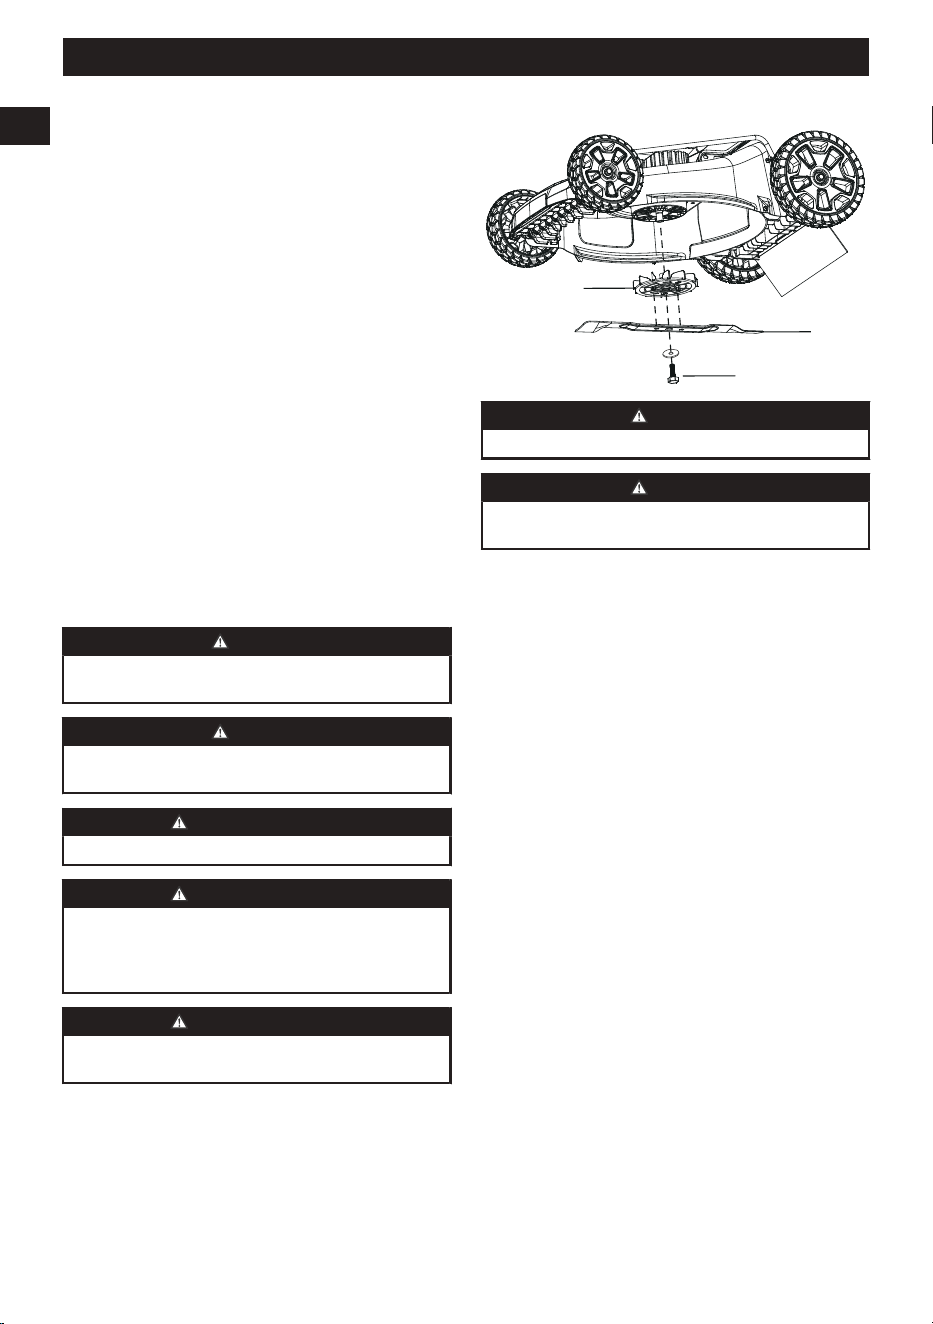
2. Retire la batería.
3.
Abra la puerta de descarga trasera y sujétela.
4. Sostenga el recogehierba por el asa y
desengánchelo de la varilla de la puerta.
5. Cierre la puerta de descarga trasera.
6. Vacíe el recogehierba.
9.5 CONSEJOS DE
FUNCIONAMIENT
O
• No intente anular el funcionamiento del botón de
puesta en marcha o el interruptor de seguridad.
•
No incline la máquina cuando la ponga en marcha.
• No ponga las manos ni los pies cerca o debajo de
las piezas giratorias.
• Mantenga limpio el conducto de descarga.
• No corte hierba mojada.
• Es necesaria una mayor altura de la cuchilla para
césped nuevo o denso.
• Limpie la parte inferior de la plataforma del
cortacésped después de cada uso. Retire los
recortes de hierba, las hojas, la suciedad y otros
residuos.
10 MANTENIMIENTO
A
VISO
Retire la llave de seguridad y la batería de la máquina
antes de realizar tareas de mantenimiento.
A
VISO
Mantenga el motor y la batería libres de hierba, hojas
o un exceso de grasa.
PRECAUCIÓN
Utilice únicamente piezas de repuesto aprobadas.
PRECAUCIÓN
No permita que líquidos de frenos, gasolina y otros
derivados del petróleo toquen las piezas de plástico.
Las sustancias químicas pueden dañar el plástico y
hacer que quede inservible.
PRECAUCIÓN
No utilice disolventes o detergentes fuertes en la
carcasa o los componentes de plástico.
10.1 SUSTITUCIÓN DE LA CUCHILLA
21
22
23
A
VISO
Utilice únicamente cuchillas de repuesto aprobadas.
AVISO
Lleve guantes gruesos o enrolle un trapo alrededor de
la cuchilla cuando la toque.
1. Detenga la máquina.
2.
Asegúrese de que la cuchilla se detenga por
completo.
3. Retire la batería.
4. Apoye la máquina sobre un lateral.
5. Utilice un trozo de madera para impedir el
movimiento de la cuchilla.
6. Retire el tornillo de montaje (21) con una llave o una
llave de tubo.
7. Retire cuchilla (22) y el ventilador (23).
8. Vuelva a colocar el ventilador.
9. Coloque una cuchilla nueva con los filos de corte
hacia el suelo. Asegúrese de que las flechas se
acoplen en los orificios de la cuchilla.
10. Apriete el tornillo de montaje.
10.2 ALMACENAMIENTO DE LA
MÁQUINA
• Retire la llave de seguridad.
•
Retire la(s) batería(s).
• Limpie la máquina antes del almacenamiento.
• Asegúrese de que el motor no esté caliente cuando
almacene la máquina.
• Asegúrese de que la máquina no tenga piezas
sueltas o dañadas. Si es necesario, siga estas
instrucciones:
• Sustituya las piezas dañadas.
• Apriete los pernos.
• Hable con una persona de un centro de servicio
aprobado.
28
Español
ES
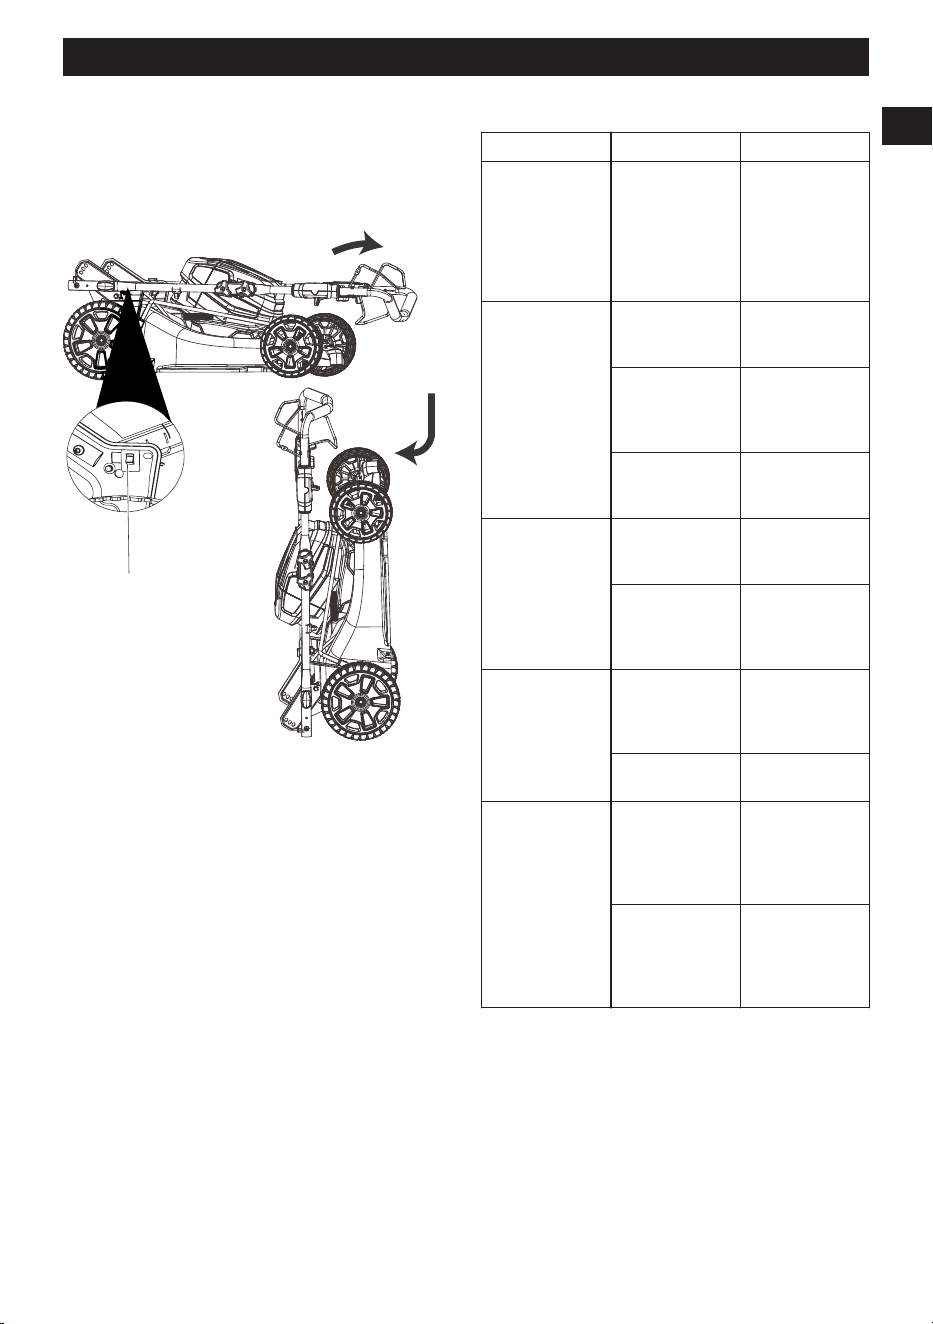
• Almacene la máquina en una zona seca.
•
Asegúrese de que los niños no puedan acercarse a
la máquina.
10.3 COLOCACIÓN DE LA MÁQUINA
EN POSICIÓN VERTICAL
24
1. Retire el recogehierba.
2.
Tire de los mandos del asa y gírelos 90°.
3. Pliegue el asa.
4. Gire los mandos del asa 90° para bloquear el asa
en su posición.
5. Coloque la máquina en posición vertical y
asegúrese de que los soportes toquen el suelo.
Interruptor de almacenamiento
La máquina tiene un interruptor de almacenamiento
(24) que impide su puesta en marcha en la posición
de almacenamiento.
Es necesario quitar la llave de seguridad y la batería
para evitar la puesta en marcha accidental o el uso
no autorizado. El interruptor de almacenamiento no
sustituye a esta función.
11 SOLUCIÓN DE PROBLEMAS
Problema Posible causa Solución
El asa no está
en posición.
Los pernos no
se han acoplado
correctamente.
Ajuste la altura
del asa y ase-
gúrese de que
los mandos y los
pernos se hayan
alineado correc-
tamente.
La máquina no
se pone en
marcha.
La capacidad de
la batería está
baja.
Cargue la bate-
ría.
La palanca de
seguridad de la
cuchilla tiene un
defecto.
Sustituya la pal-
anca de seguri-
dad de la cuchil-
la.
La llave de se-
guridad no se ha
introducido.
Introduzca la
llave de seguri-
dad.
La máquina cor-
ta la hierba irreg-
ularmente.
El césped es
agreste.
Examine la su-
perficie de sega-
do.
La altura de la
cuchilla no se ha
ajustado correc-
tamente.
Ajuste la altura
de cuchilla/corte
a una posición
más alta.
La función de
mulching de la
máquina no se
realiza correcta-
mente.
Hay recortes de
hierba mojada
adheridos a la
plataforma.
Espere hasta
que la hierba se
seque antes de
segar
.
Falta el tapón de
mulching.
Instale el tapón
de mulching.
Es difícil empujar
la máquina.
La hierba está
demasiado alta o
la altura de la
cuchilla es de-
masiado baja.
Aumente la al-
tura de cuchilla/
corte.
El recogehierba
y la cuchilla ar-
rastran cuando
se trabaja en hi-
erba densa.
Vacíe los re-
cortes de hierba
del recogehier-
ba.
29
Español
ES
Problema Posible causa Solución
Hay una vibra-
ción elevada en
la máquina.
La cuchilla está
desequilibrada y
desgastada.
Sustituya la cu-
chilla.
El eje del motor
está doblado.
1. Detenga el
motor.
2. Retire la
llave de se-
guridad y la
batería.
3. Inspeccione
si hay daños.
4. Repare la
máquina an-
tes de volver
a ponerla en
marcha.
La máquina se
detiene durante
el segado.
La altura de la
cuchilla es de-
masiado baja.
Aumente la al-
tura de cuchilla/
corte.
La batería se ha
agotado.
Cargue la bate-
ría.
Hay recortes de
hierba adheridos
a la plataforma o
a la cuchilla.
Retire la batería
y compruebe la
plataforma.
La temperatura
de funciona-
miento de la má-
quina es dema-
siado alta.
Deje enfriar la
máquina.
* Si no puede encontrar la solución a estos problemas,
vaya al centro de servicio.
12 DATOS TÉCNICOS
Tensión 80 V
Modelo de bate-
ría
BAT80V50A y otras series BAT 80V
Modelo de car-
gador
CHA180VA4 y otras series CHA
80V
Velocidad sin
carga
2800 RPM
Ajustes de altura 1 3/8 - 3 3/4 (3.5 - 9.5 cm)
Velocidad auto-
propulsada
1.9-4.8 fps (0.6-1.5 m/s)
Funciones 3-in-1 Mulching, bolsa trasera y
descarga lateral
Peso (sin bate-
ría)
67 lbs (30,5 kg)
Estructura con
doble aislamien-
to
13 GARANTÍA LIMITADA
Por la presente Bad Boy garantiza este producto, al
comprador original con el comprobante de compra,
durante un periodo de cuatro (4) años frente a defectos
en materiales, piezas o mano de obra. A su entera
discreción Bad Boy reparará o sustituirá cualquiera y
todas las piezas que resulten ser defectuosas, con
un uso normal, sin coste alguno para el cliente. Esta
garantía es válida únicamente para unidades que se
hayan utilizado para uso personal que no han sido
arrendadas o alquiladas para uso industrial/comercial y
cuyo mantenimiento se ha realizado de acuerdo con las
instrucciones del manual del propietario suministrado
con el producto nuevo.
ARTÍCULOS NO CUBIERTOS POR LA GARANTÍA:
1. Cualquier pieza que no funcione debido a mal
uso, uso comercial, abuso, negligencia, accidente,
mantenimiento inadecuado o alteración; o
2. La unidad, si no ha sido utilizada o mantenida de
acuerdo con el manual del propietario; o
3. Desgaste normal;
4. Artículos de mantenimiento de rutina tales como
lubricantes, afilado de cuchillas;
5. Deterioro normal del acabado exterior debido al uso
o la exposición.
LÍNEA DE ASISTENCIA TELEFÓNICA:
Puede contactar con el servicio de garantía llamando
a nuestra línea de asistencia telefónica gratuita, a
888-227-9443.
COSTES DE TRANSPORTE:
Los costes de transporte por el desplazamiento de
cualquier unidad o accesorio de equipos eléctricos son
responsabilidad del comprador. Es responsabilidad del
comprador pagar los costes de transporte de cualquier
pieza enviada para su sustitución bajo esta garantía, a
menos que dicha devolución sea solicitada por escrito
por Bad Boy.
Nombre de em-
presa:
Bad Boy, Inc.
30
Español
ES
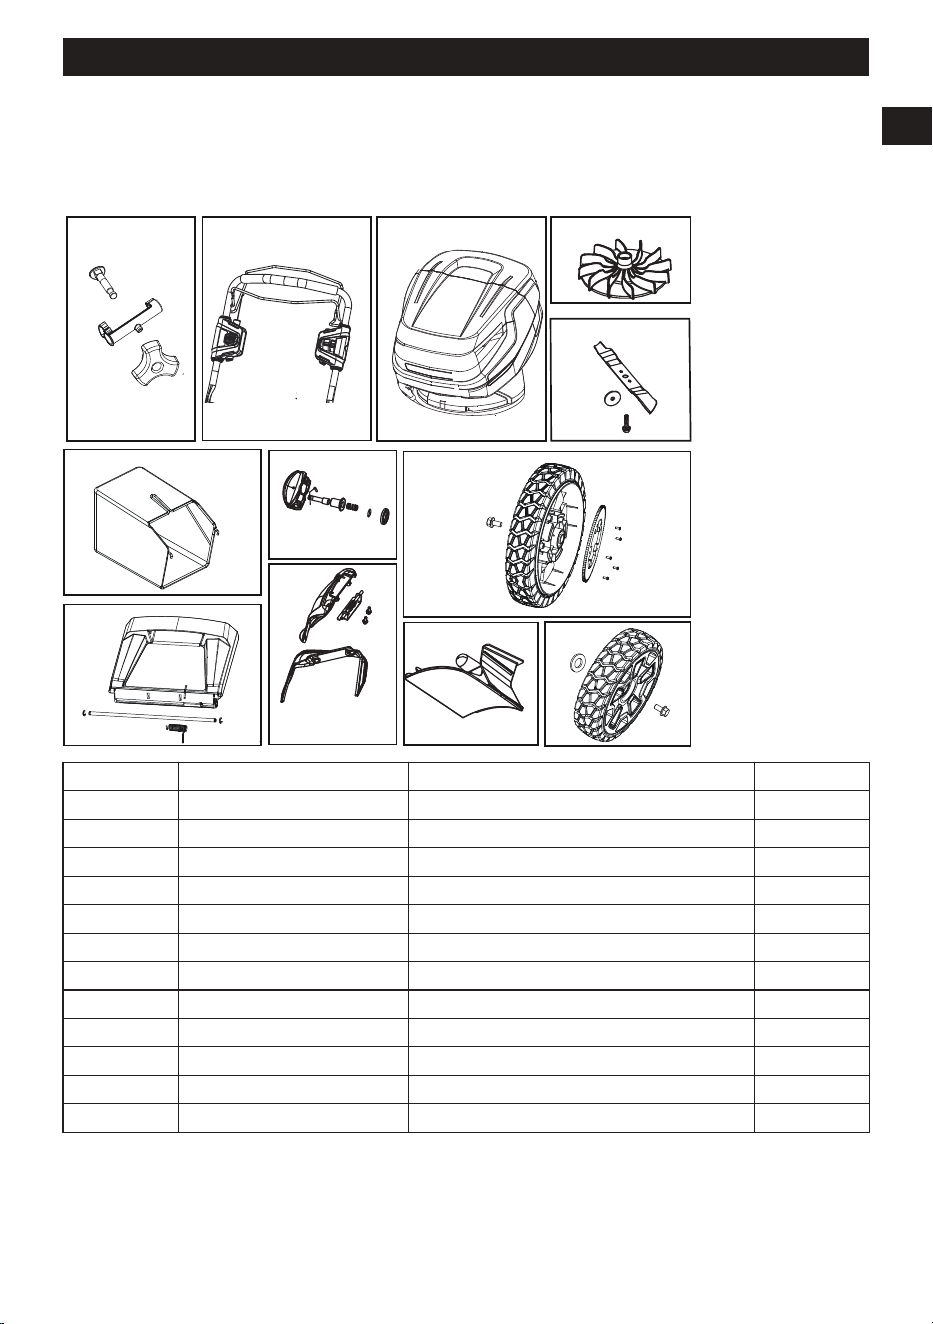
Dirección:
102 Industrial Drive
Batesville, Arkansas 72501
14 VISTA DESPIEZADA
1
5
6
8
9
7
11
12
2 3 4
10
N.º N.º pieza Descripción Cant.
1 R0204810-00 Conjunto de mando del asa de empuje 2
2 R0204811-00 Conjunto de asa de empuje superior 1
3 R0204812-00 Conjunto de cabezal de accionamiento 1
4 R0204813-00 Cuchilla del ventilador 1
5 R0204814-00 Conjunto de cuchilla/barra 1
6 R0204815-00 Conjunto de bolsa recogehierba 1
7 R0202459-00 Conjunto de mando del asa de empuje 1
8 R0200744-00 Conjunto de rueda trasera 2
9 R0204816-00 Conjunto de placa de cubierta trasera 1
10 R0201028-00 Kit de cubierta de descarga lateral 1
11 R0203356-00 Enchufe trasero 1
12 0102028-00 Conjunto de rueda 2
31
Español
ES
badboymowers.com
P0804480-00 Rev B