

1
Introduction................................................. 2
Overview of MIDI Song to Style....................................... 2
Precautions When Using the Application......................... 2
Setting Up.................................................... 3
Connections and Setting Up ............................................ 3
Quick Guide/Overview................................ 6
How to Use MIDI Song to Style ....................................... 6
Saving or Loading the Currently Edited Data (Project) .... 8
Functions (Display Description)................ 9
Display Transitions .......................................................... 9
Display Functions .......................................................... 10
How to Use the App .................................. 17
Playing back (listening to) the converted Style ..............17
Saving and Transferring Converted Styles ....................19
Changing Presets of Automatic Analysis .......................20
Editing the Converted Style............................................21
Appendix ................................................... 29
Terminology ...................................................................29
Menu List........................................................................30
Keyboard Shortcuts........................................................31
Meta Events Texts when Specifying Sections and Parts
(Markers, Track Names)...........................................32
Detailed Editing Window: Editing Section Parameters...33
Troubleshooting .............................................................38
Confidential
• Copying of the commercially available music sequence data and/or digital audio/graphic /video files is strictly prohibited except for your
personal use.
• The software and this Owner’s Manual are exclusive copyrights of Yamaha Corporation.
• Copying of the software or reproduction of this manual in whole or in part by any means is expressly forbidden without the written consent of
the manufacturer.
• Yamaha makes no representations or warranties with regard to the use of the software and documentation and cannot be held responsible for
the results of the use of this manual and the software.
• The screen displays as illustrated in this Owner’s Manual are for instructional purposes, and may appear somewhat different from the screens
which appear on your computer. Although the screen displays shown are based on the Windows version, the methods of operation are the
same for the Mac version.
• Windows is a registered trademark of Microsoft® Corporation in the United States and other countries.
• Apple and Mac are trademarks of Apple Inc., registered in the U.S. and other countries.
• MIDI is a registered trademark of the Association of Musical Electronics Industry (AMEI).
• The company names and product names in this Owner’s Manual are the trademarks or registered trademarks of their respective companies.
• The license to use within this software is described in “Licenses.txt,” found in the app’s installation folder.
This Owner’s Manual assumes that you are already familiar with basic Windows/Mac operations. If you are not, please refer to the
owner’s manual which came with your Windows/Mac software before using this application.
MIDI Song to Style
Owner’s Manual
Contents
© 2023 Yamaha Corporation
Published 09/2024 CR-B0
2
Introduction
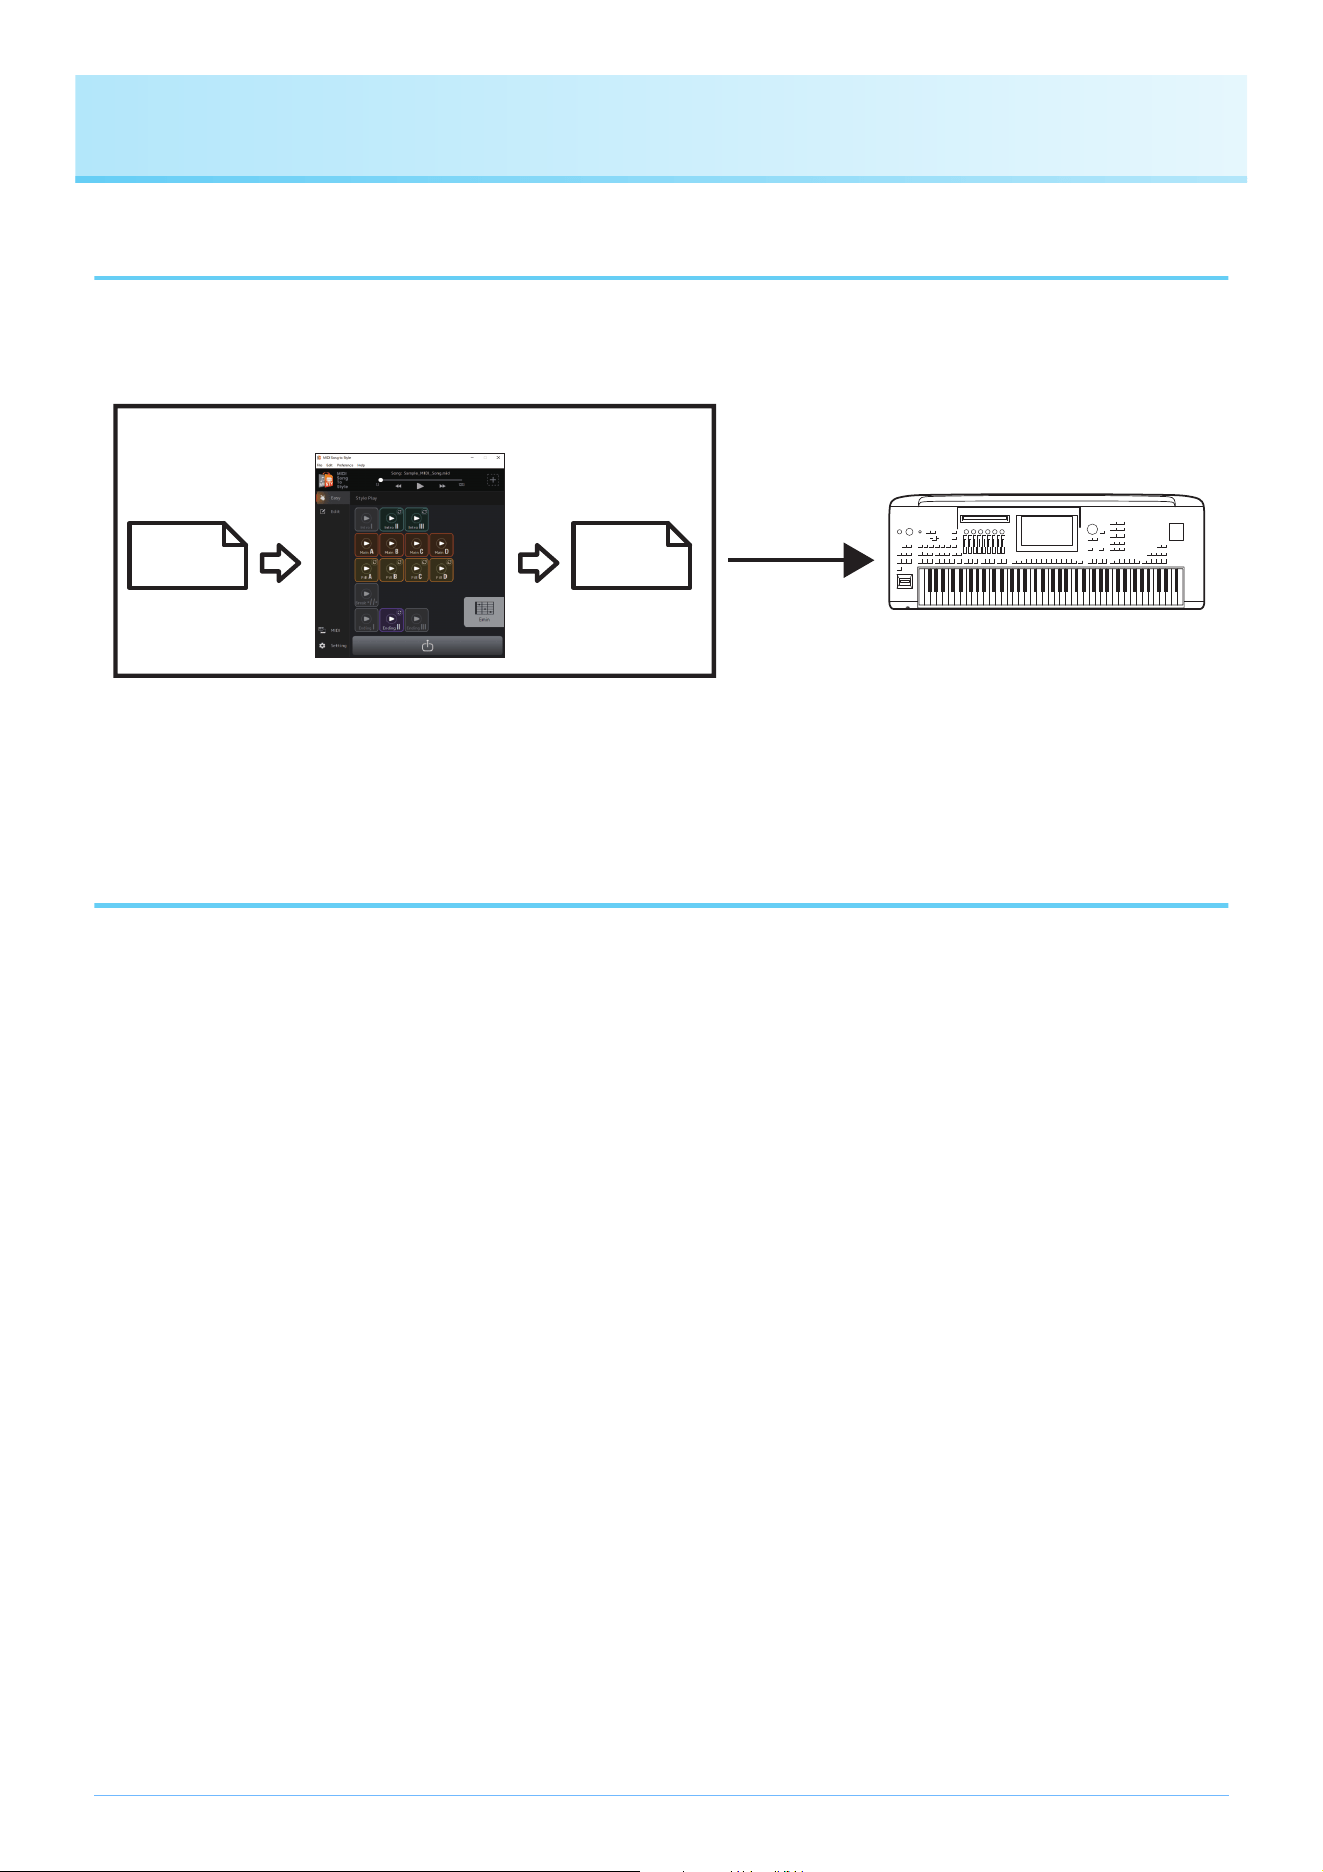
Overview of MIDI Song to Style
The MIDI Song to Style app automatically converts MIDI Songs (SMF: Standard Midi File; extension: .mid) into Style files (.sty),
allowing you to play the desired songs as Styles on the instrument.
You can also listen to and edit converted data by:
- Playing loaded MIDI Songs and changing Voice assignments for each channel.
- Listening to and editing converted Styles.
Precautions When Using the Application
• This application (hereinafter referred to as the “app”) anonymously collects function usage data for the purpose of improving
service quality and promoting related products and services. The actual data you are editing will not be collected. If you do not
wish to send the usage status, you can disable this from Settings (page 13).
• The main purpose of this app is to convert MIDI Songs into Style files and it is not designed to be used as a music player.
Please note that the following app’s preview functions only serve as support for editing, and full compatibility of audio playback,
etc. is not guaranteed.
- Playback of MIDI Songs
- Playback of converted Styles
• This app can be used only with models which are compatible with SFF GE format (such as Genos2).
Computer
Instrument
MIDI Song to Style
MIDI Song
(.mid)
Style
(.sty)
Transfer by
connecting USB
cable or via USB
flash drive

3
Setting Up
Connections and Setting Up
This app can be used in two ways: either by connecting it to the instrument, or simply by using it standalone on a computer.
Using the app by connecting the computer to the instrument
This method is recommended since it allows you to listen to the changes as they would actually be heard.
Connection example
For instructions on how to connect the computer to the instrument, refer to the corresponding owner’s manual.
What you can do when connecting to the instrument:
• Play back MIDI files with the sounds of the instrument.
• Listen to converted Styles with the sounds of the instrument.
• Save (transfer) the converted Style files directly to the instrument.
• Specify chords on the instrument’s keyboard while listening to the converted Styles.
Required settings:
Open [Preference] -> [MIDI Device] from the menu at the top of the app, and then set the port as follows.
• MIDI Input Device: Instrument’s MIDI Out
• MIDI Output Device: Instrument’s MIDI In
NOTE
When you specify chords from the instrument while listening on this app, make sure that the [ACMP] button on the instrument is off. (If
you use the instrument with the loaded converted Style files, turn on [ACMP] as usual.)
NOTE
Both Input and Output must be set to the instrument for proper file transfer.
Computer
Instrument
Instrument’s
speakers or
audio output
USB cable
MIDI Output Device
MIDI Input Device
Setting Up
4
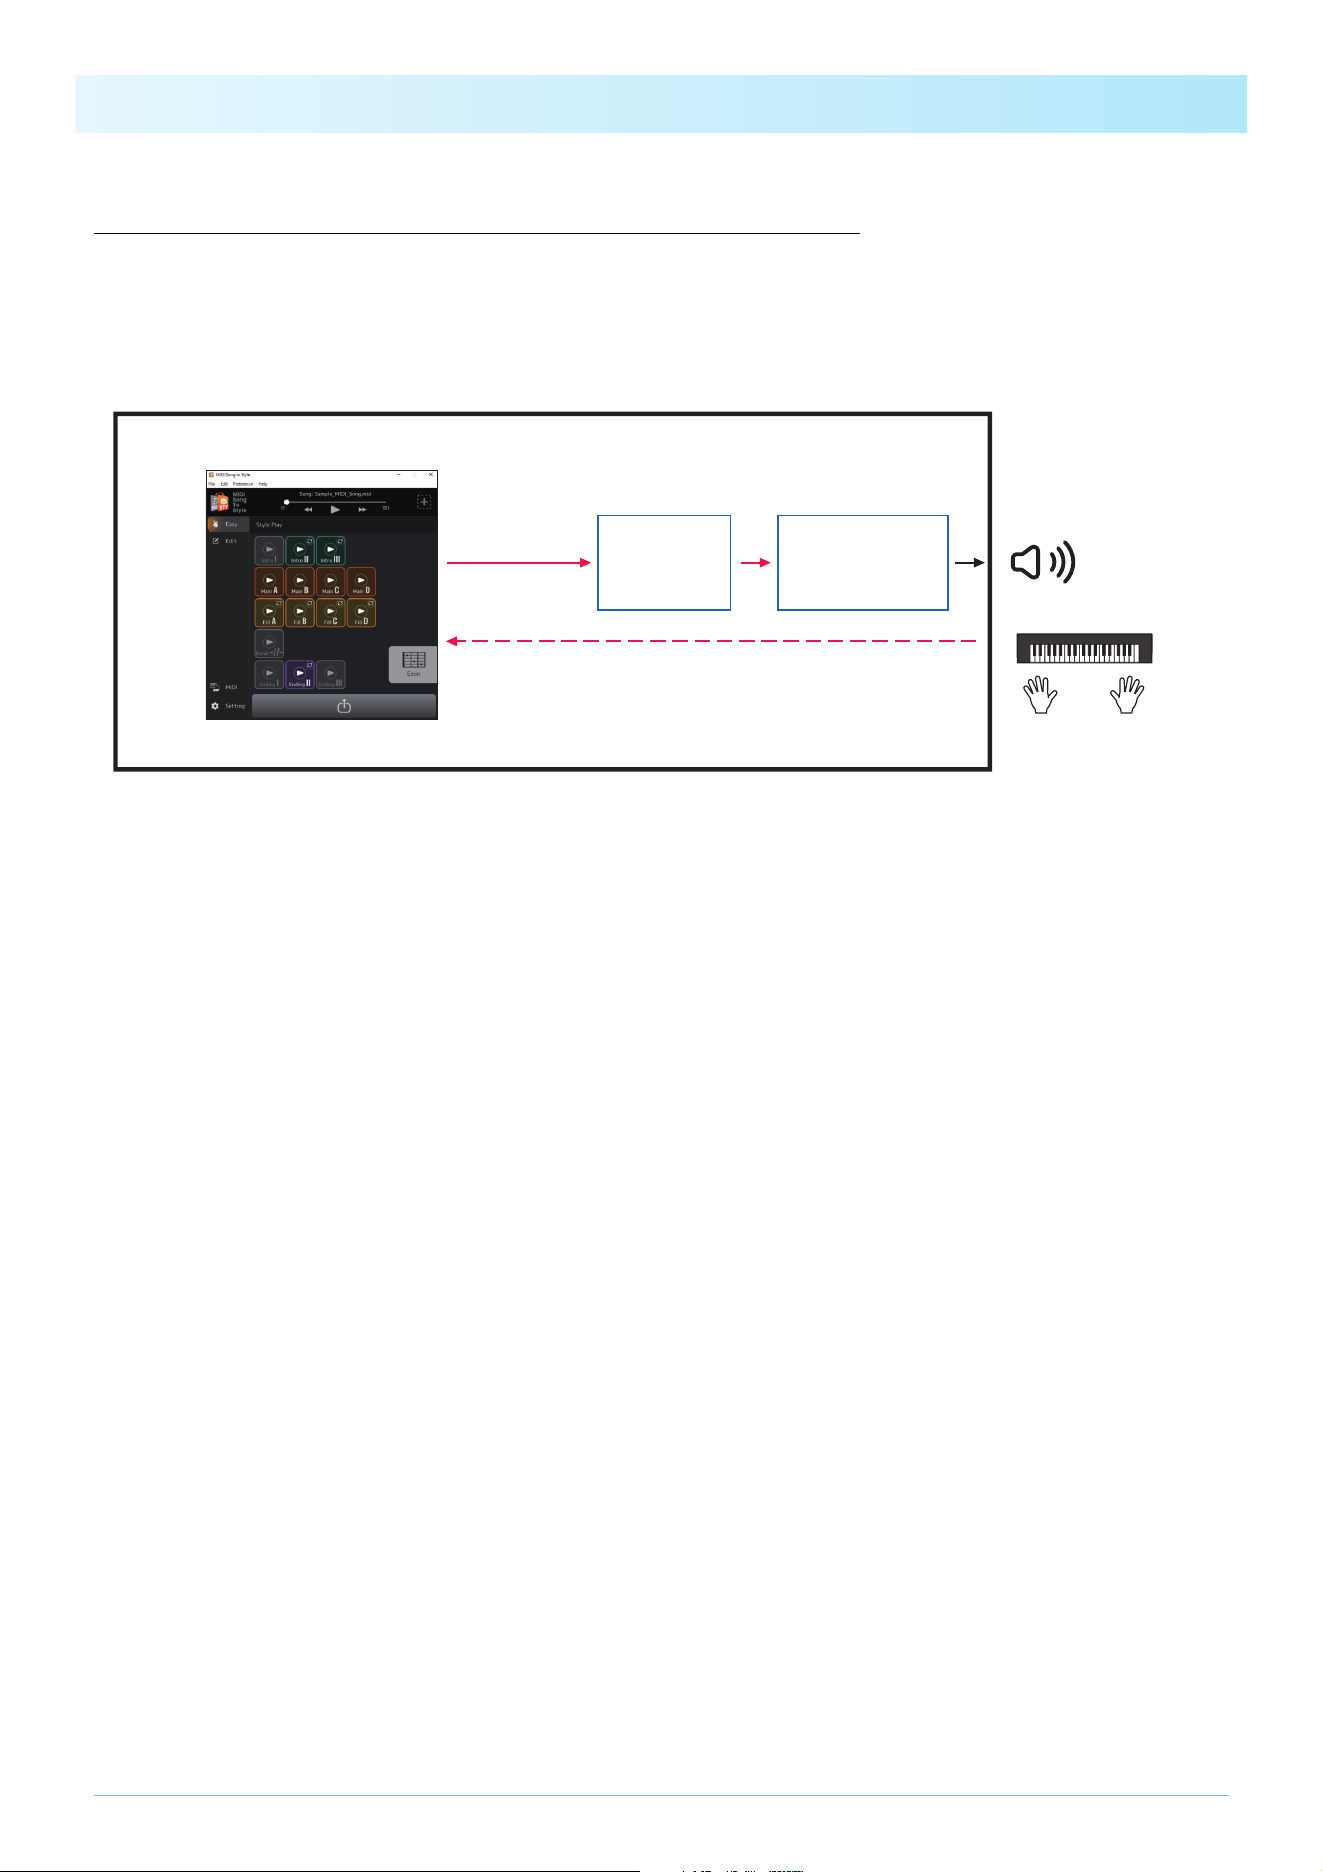
Using the app as standalone with just a computer
You can simply use this app by itself, without having to connect the instrument to the computer. Although the Voices and Styles
will not be reproduced as accurately, this method allows you to work just with the computer.
Connection example
What you can do just with a computer:
• Play back MIDI Songs using the sounds of the soft synth within the application (*1).
• Listen to converted Styles with the sounds of the soft synth within the application (*1).
• Save the converted Style file on the computer or transfer it to the instrument via a USB flash drive.
• Specify chords on the chord palette (page 14) in the app while listening to the converted Styles.
*1) The sounds will not be reproduced with full accuracy.
Required settings:
Open [Preference] -> [MIDI Device] from the menu at the top of the app, and then set the port as follows.
• MIDI Input Device: None (set this if you have a MIDI keyboard, etc.)
• MIDI Output Device: MIDI Song to Style Synth, as well as an audio device for actually producing sound
Computer
internal audio
device
Computer speakers
Built-in soft
synth
MIDI keyboard, etc.
Computer
MIDI Output Device
MIDI Input Device

Setting Up
5
Importing the Voice list
When changing Voices of each channel of a MIDI song that has been loaded to this app (page 26), you can select Voices from the
Voice list within the app. The Voice list for Genos2 firmware version 1.00 is the initial list of this app.
By importing the Voice list, you can match the Voice list in this app with that of the linked instrument.
For compatible products, information on the Voice list file for MIDI Song to Style can be found on the product page on the Yamaha
website (https://www.yamaha.com/).
1. Select [Edit] -> [Import Voice List] from the menu at the top of the app.
A file selection window will open.
2. Select the Voice list (.txt) for your instrument.
The Voice list in the app will be updated to the loaded list.
If no error message appears, loading has been completed.
6
Quick Guide/Overview
How to Use MIDI Song to Style
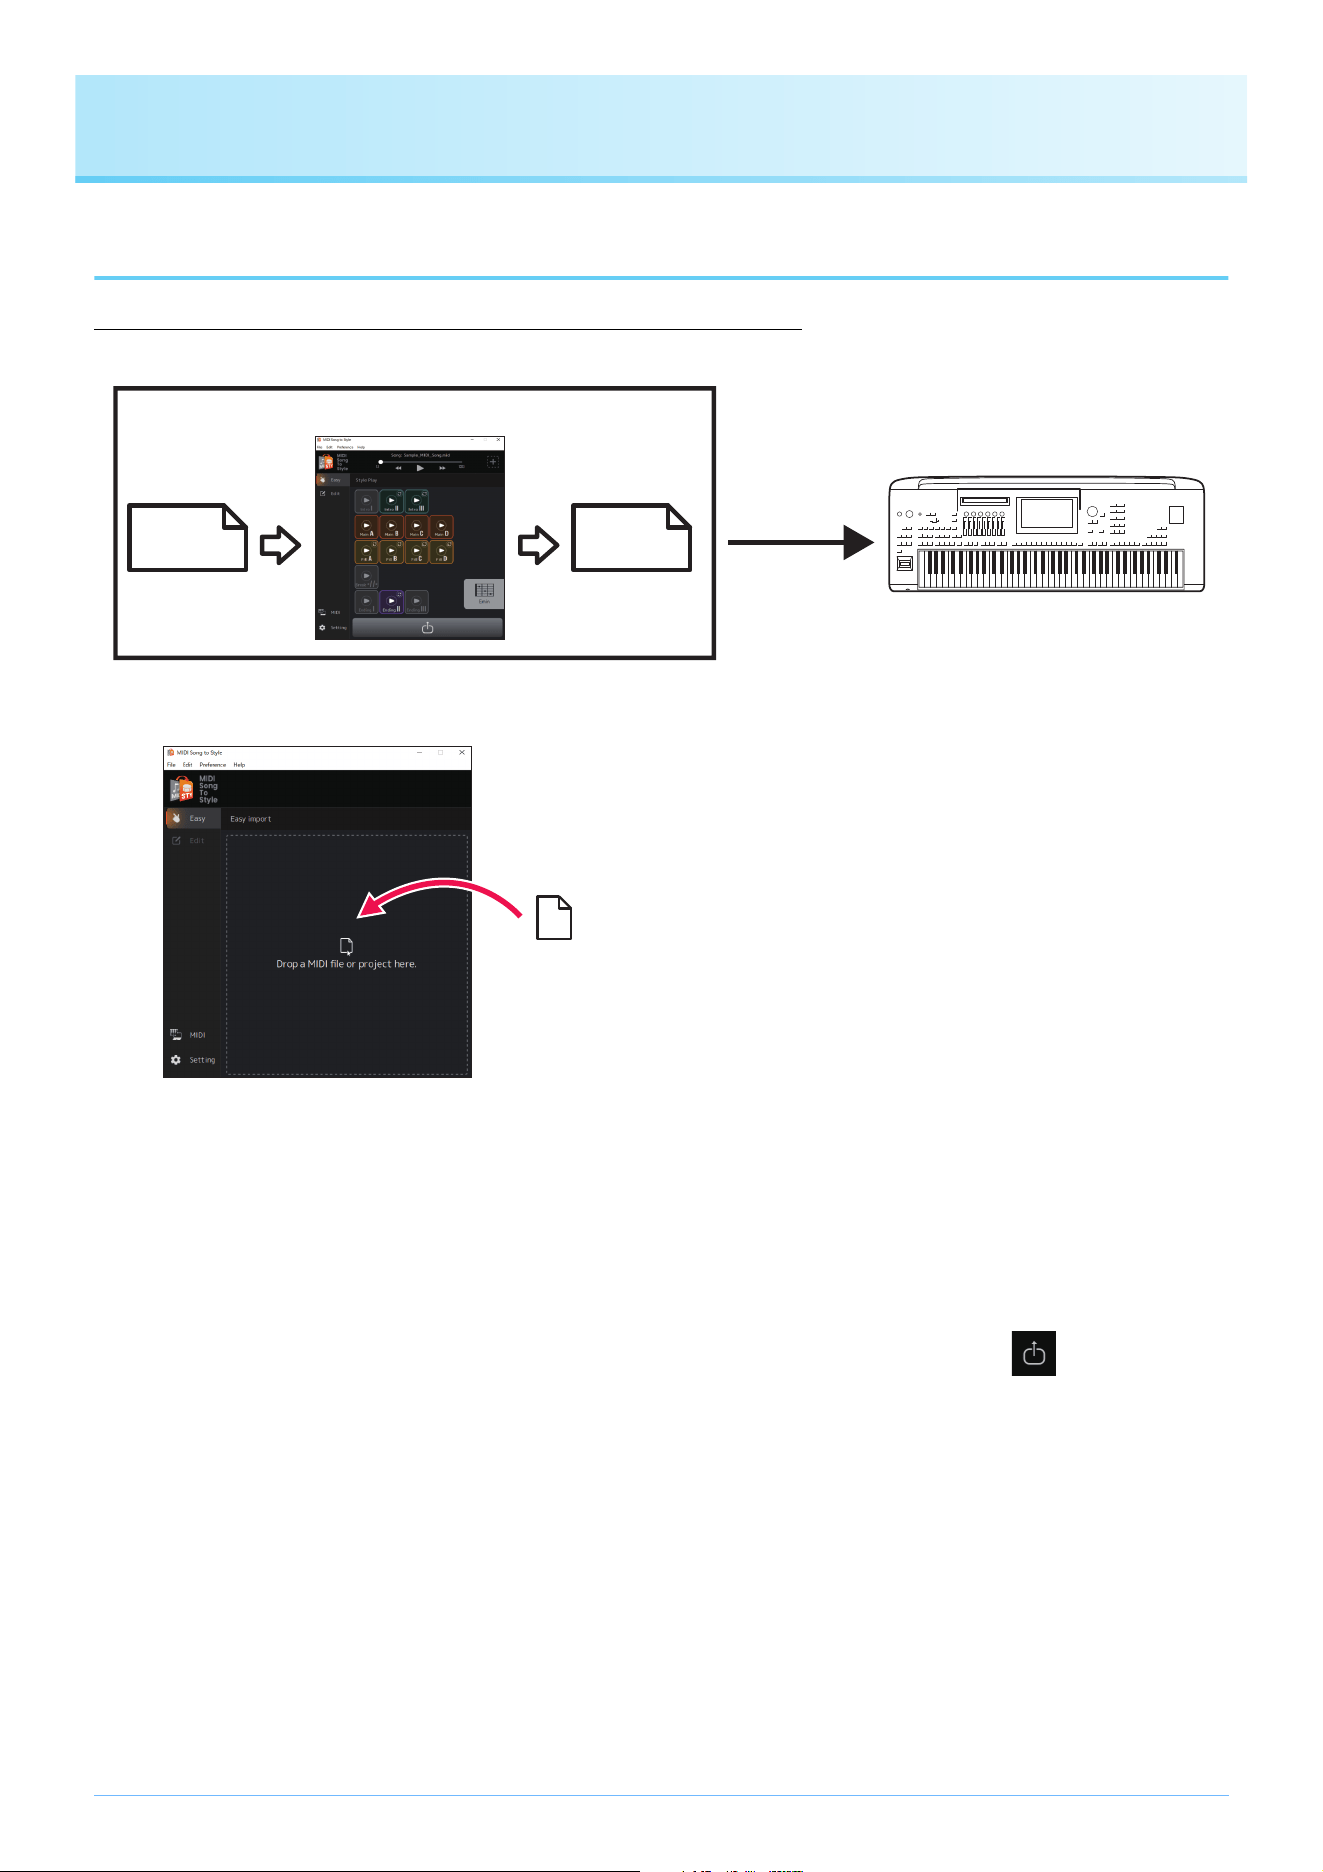
The simplest way to use: Convert and transfer
1. Drag and drop the SMF file to MIDI Song to Style.
The MIDI Song you’ve transferred is automatically analyzed and converted into a Style, allowing you to play and edit the
converted Style within the app (page 17).
2. Transfer the results of analysis as a Style file to the instrument. (Click icon )
There are two ways to transfer:
A) Save the Style file directly to the instrument via USB cable connection (Save to Instrument).
(You can transfer the file when the computer is connected to the instrument via a USB cable. Refer to page 3 for
necessary settings.)
B) Save as a Style file to a USB flash drive, and then transfer the file to the instrument (Save to Computer).
3. Play the instrument with the transferred Style.
NOTE
You can also assign Sections and Parts using Meta Events (Markers and Track Names) that you have embedded in the MIDI Song
beforehand, instead of using the results of automatic analysis.
See the Other Settings display (page 13) for the settings necessary to enable this function, and the table (page 32) for the format of
Meta Events which should be embedded in the MIDI Song.
1
2
Computer
MIDI Song to Style
MIDI Song
(.mid)
Style
(.sty)
Transfer by
connecting USB
cable or via USB
flash drive
Instrument
MIDI Song file
Standard MIDI File format
(.mid)

Quick Guide/Overview
7
Reanalyze by changing the analysis conditions
If the results of the automatic Style conversion are not what you desired, you can change the conditions of the analysis and recon-
vert the loaded MIDI Song.
• Make sure to exclude the main melody channel and other channels you do not want to include in the Style (page 20).
Edit the automatically converted Style
You can manually edit the automatically converted Style in the following ways.
• Change the range extracted from a MIDI Song as a Section (page 21)
• Reorder Sections (page 22)
• Select a new range and assign it to a Section (page 23)
• Change the MIDI channel assignments of each Style Part for each Section (page 25)
• Change the Voice for each channel of a MIDI Song (page 26)
• Change/reset the volume for each Part of a Style (page 27)
• Change the Style beat or time signature (page 28)

Quick Guide/Overview
8
Saving or Loading the Currently Edited Data (Project)
You can save or load the loaded MIDI Songs, including the analyzed information and edited contents, as a project file in a dedi-
cated file format (.sts).
The following contents are saved in the project file:
• Contents of the loaded MIDI Song (SMF file)
• The automatic analysis results of a MIDI Song
• The Style editing status, including Section and Part assignments
Saving a project
Open [File] -> [Save Project] in the menu at the top of the app and specify the location for saving.
Loading a project
Open [File] -> [Open Project] in the menu at the top of the app and select the desired project file. Alternately, you can simply drag
and drop the project file into the app.
9
Functions (Display Description)
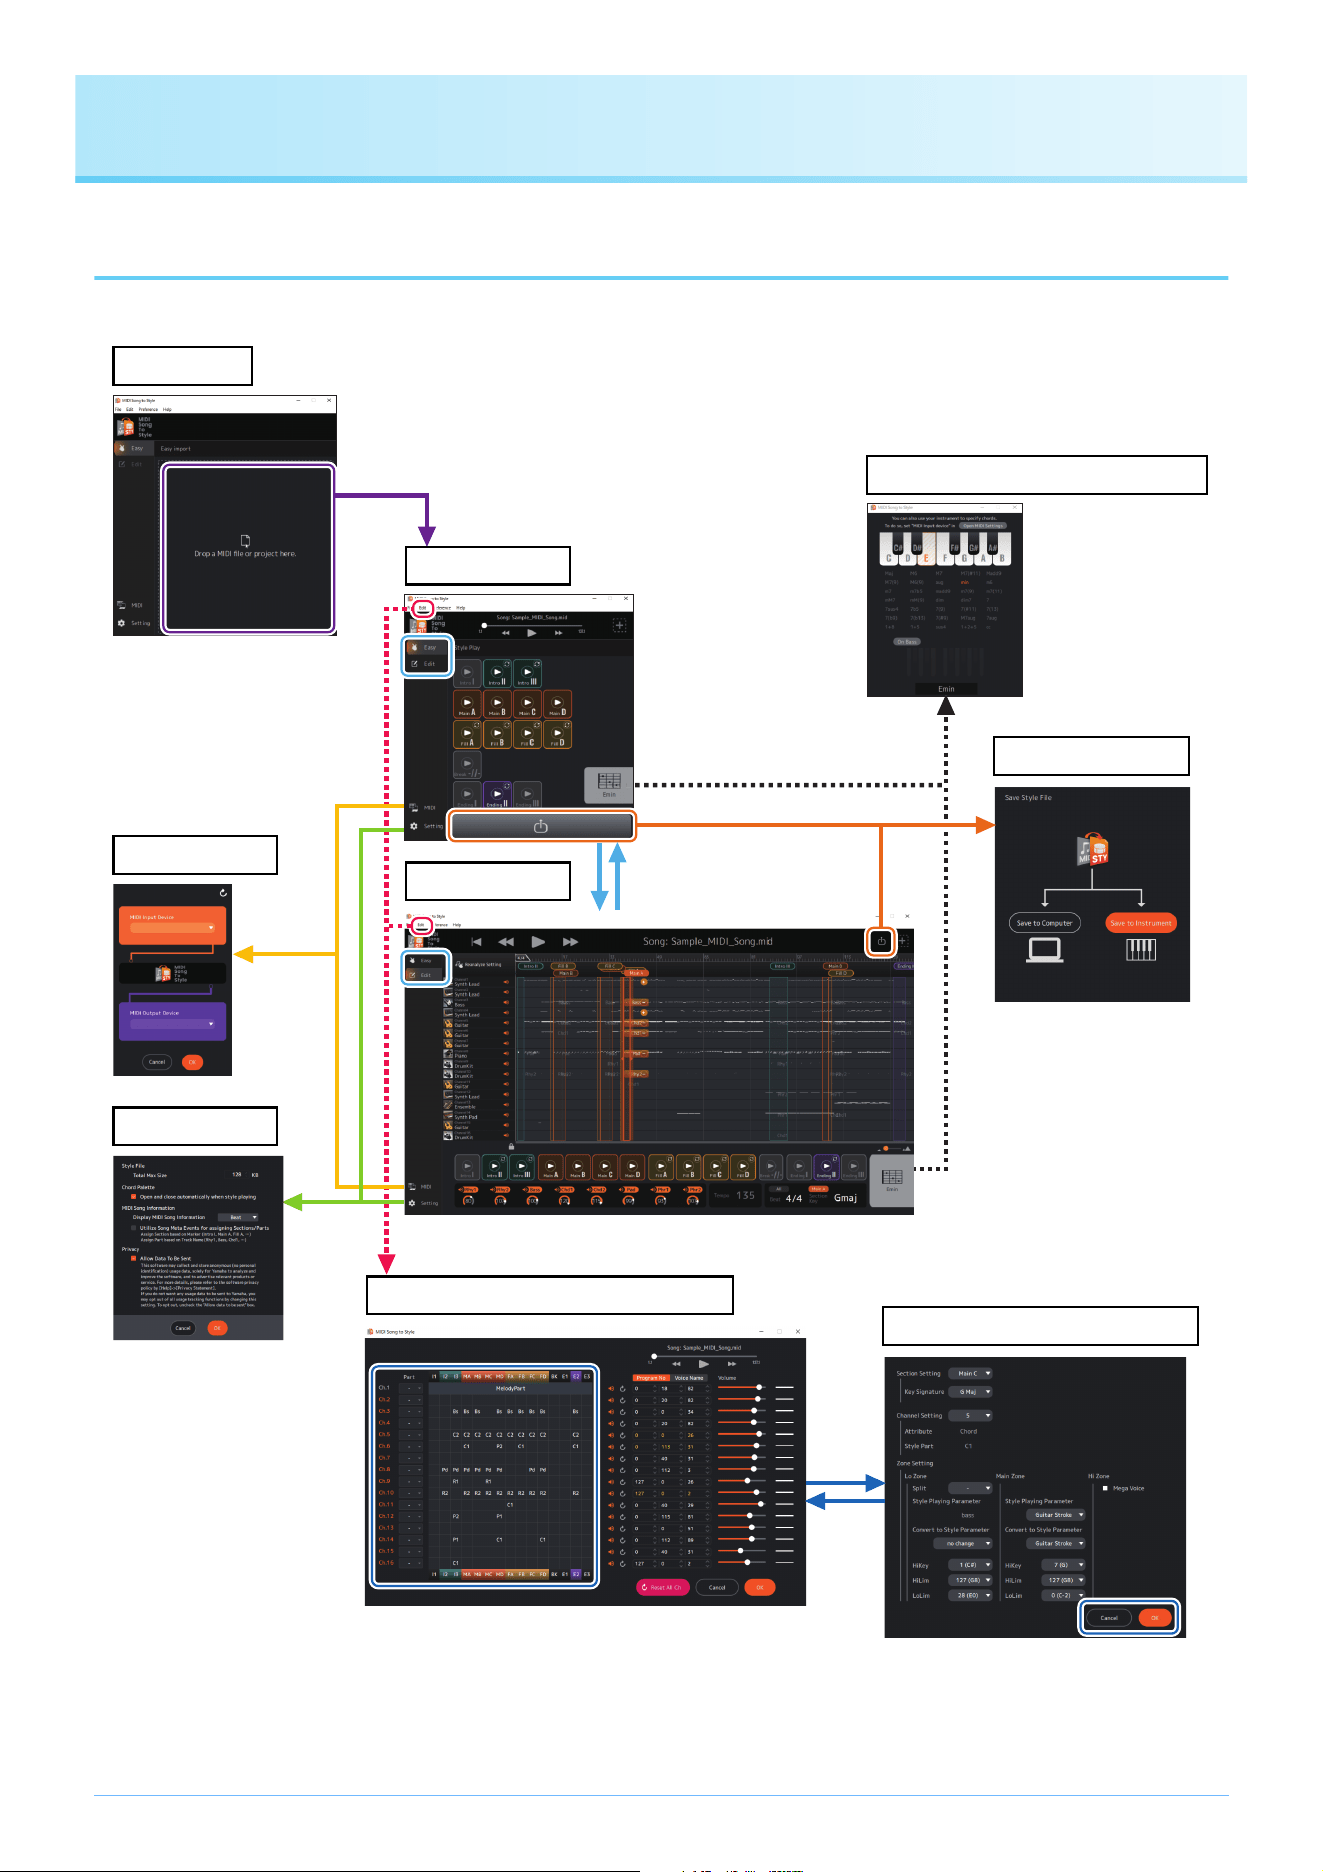
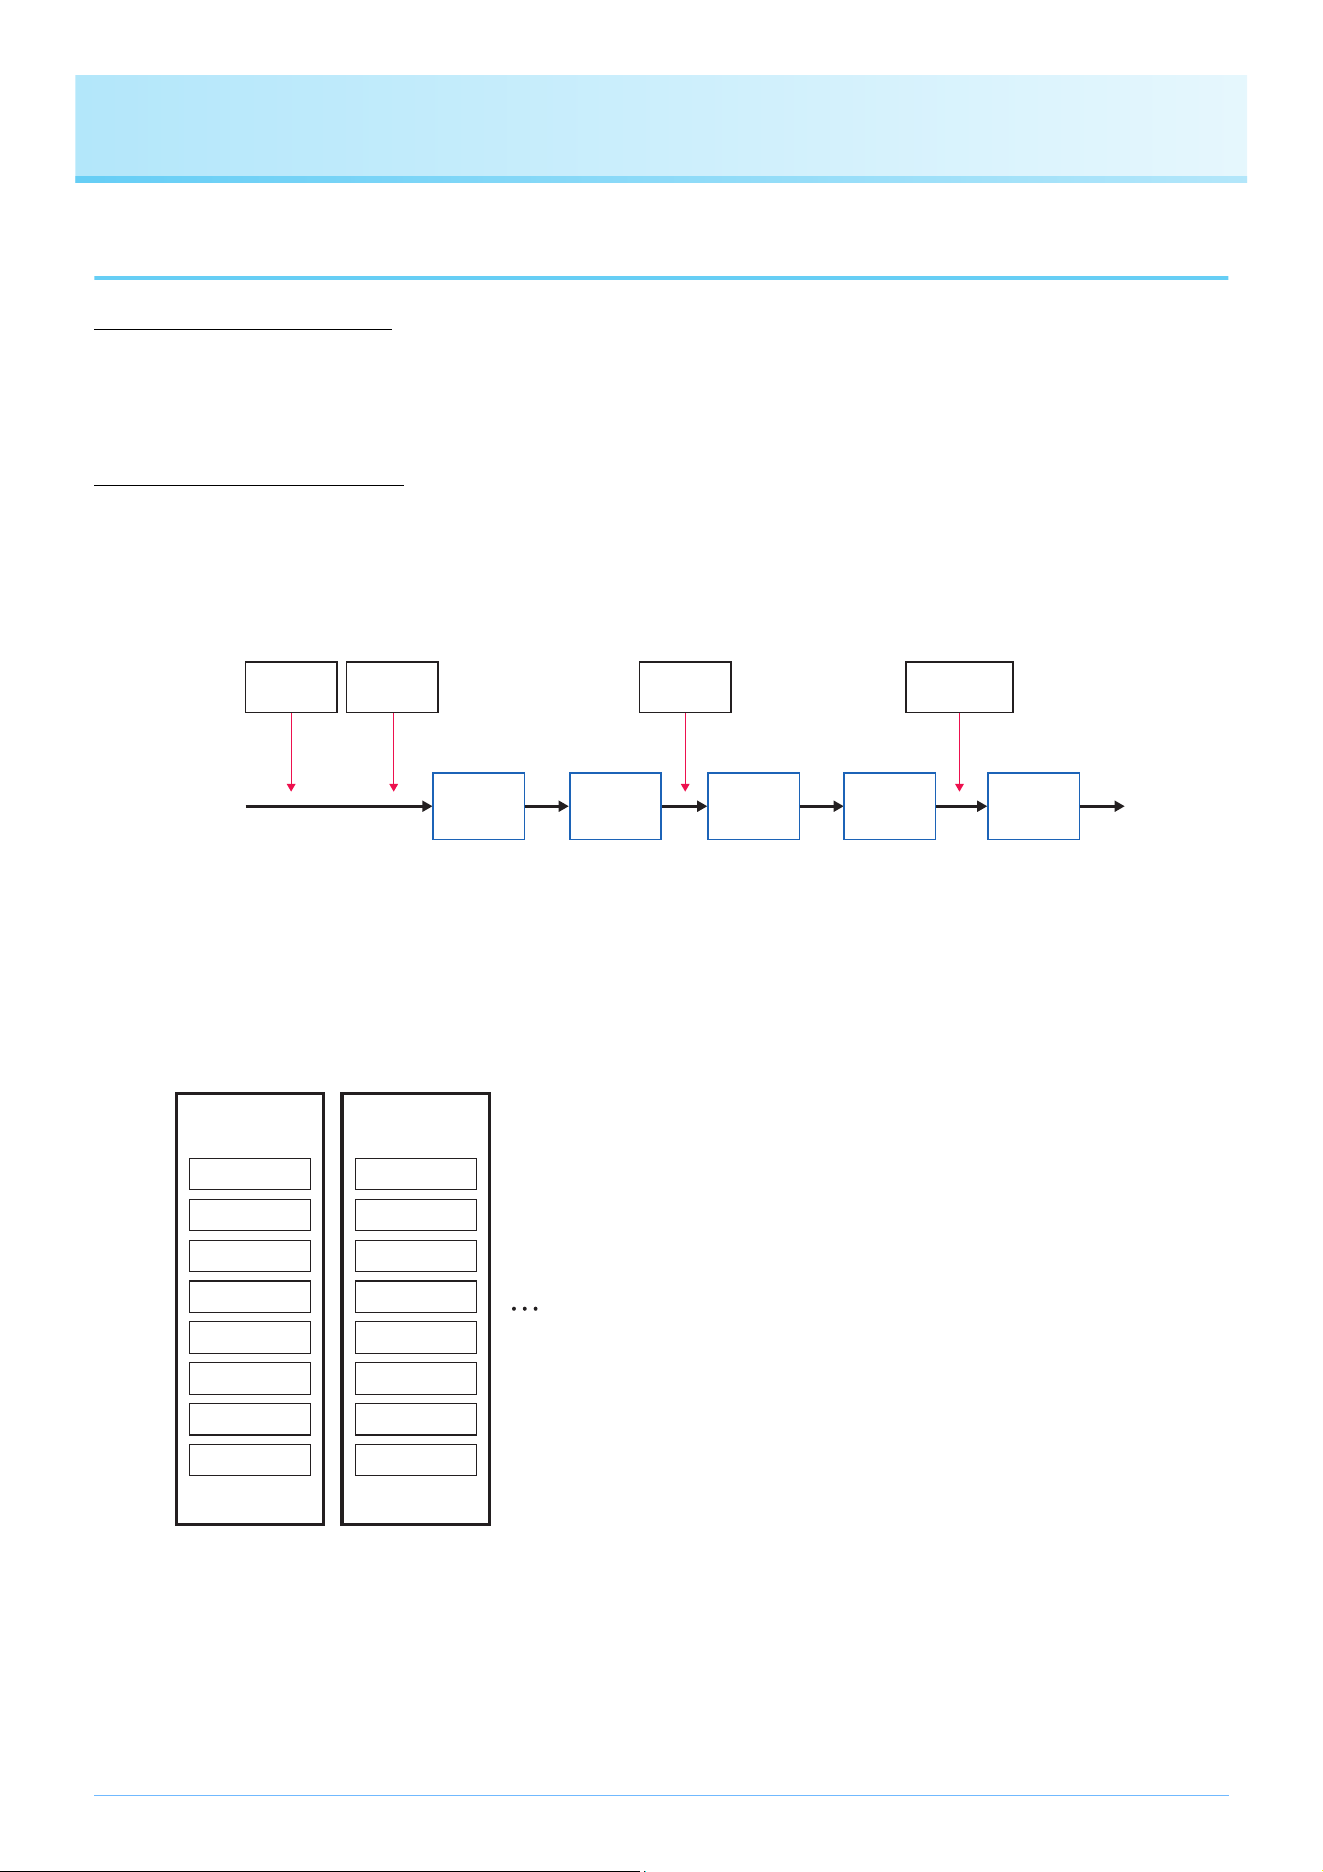
Display Transitions
Below is a rough outline of the display transitions that appear after starting the app.
At startup
MIDI settings
Other settings
Home (Easy)
Chord Palette (separate window)
Home (Edit)
Saving of Styles
Detailed Editing (separate window)
Editing of Section parameters
File loading
Mode switching
Functions (Display Description)
10
Display Functions
This section explains what can be done from each of the displays shown in the previous outline.
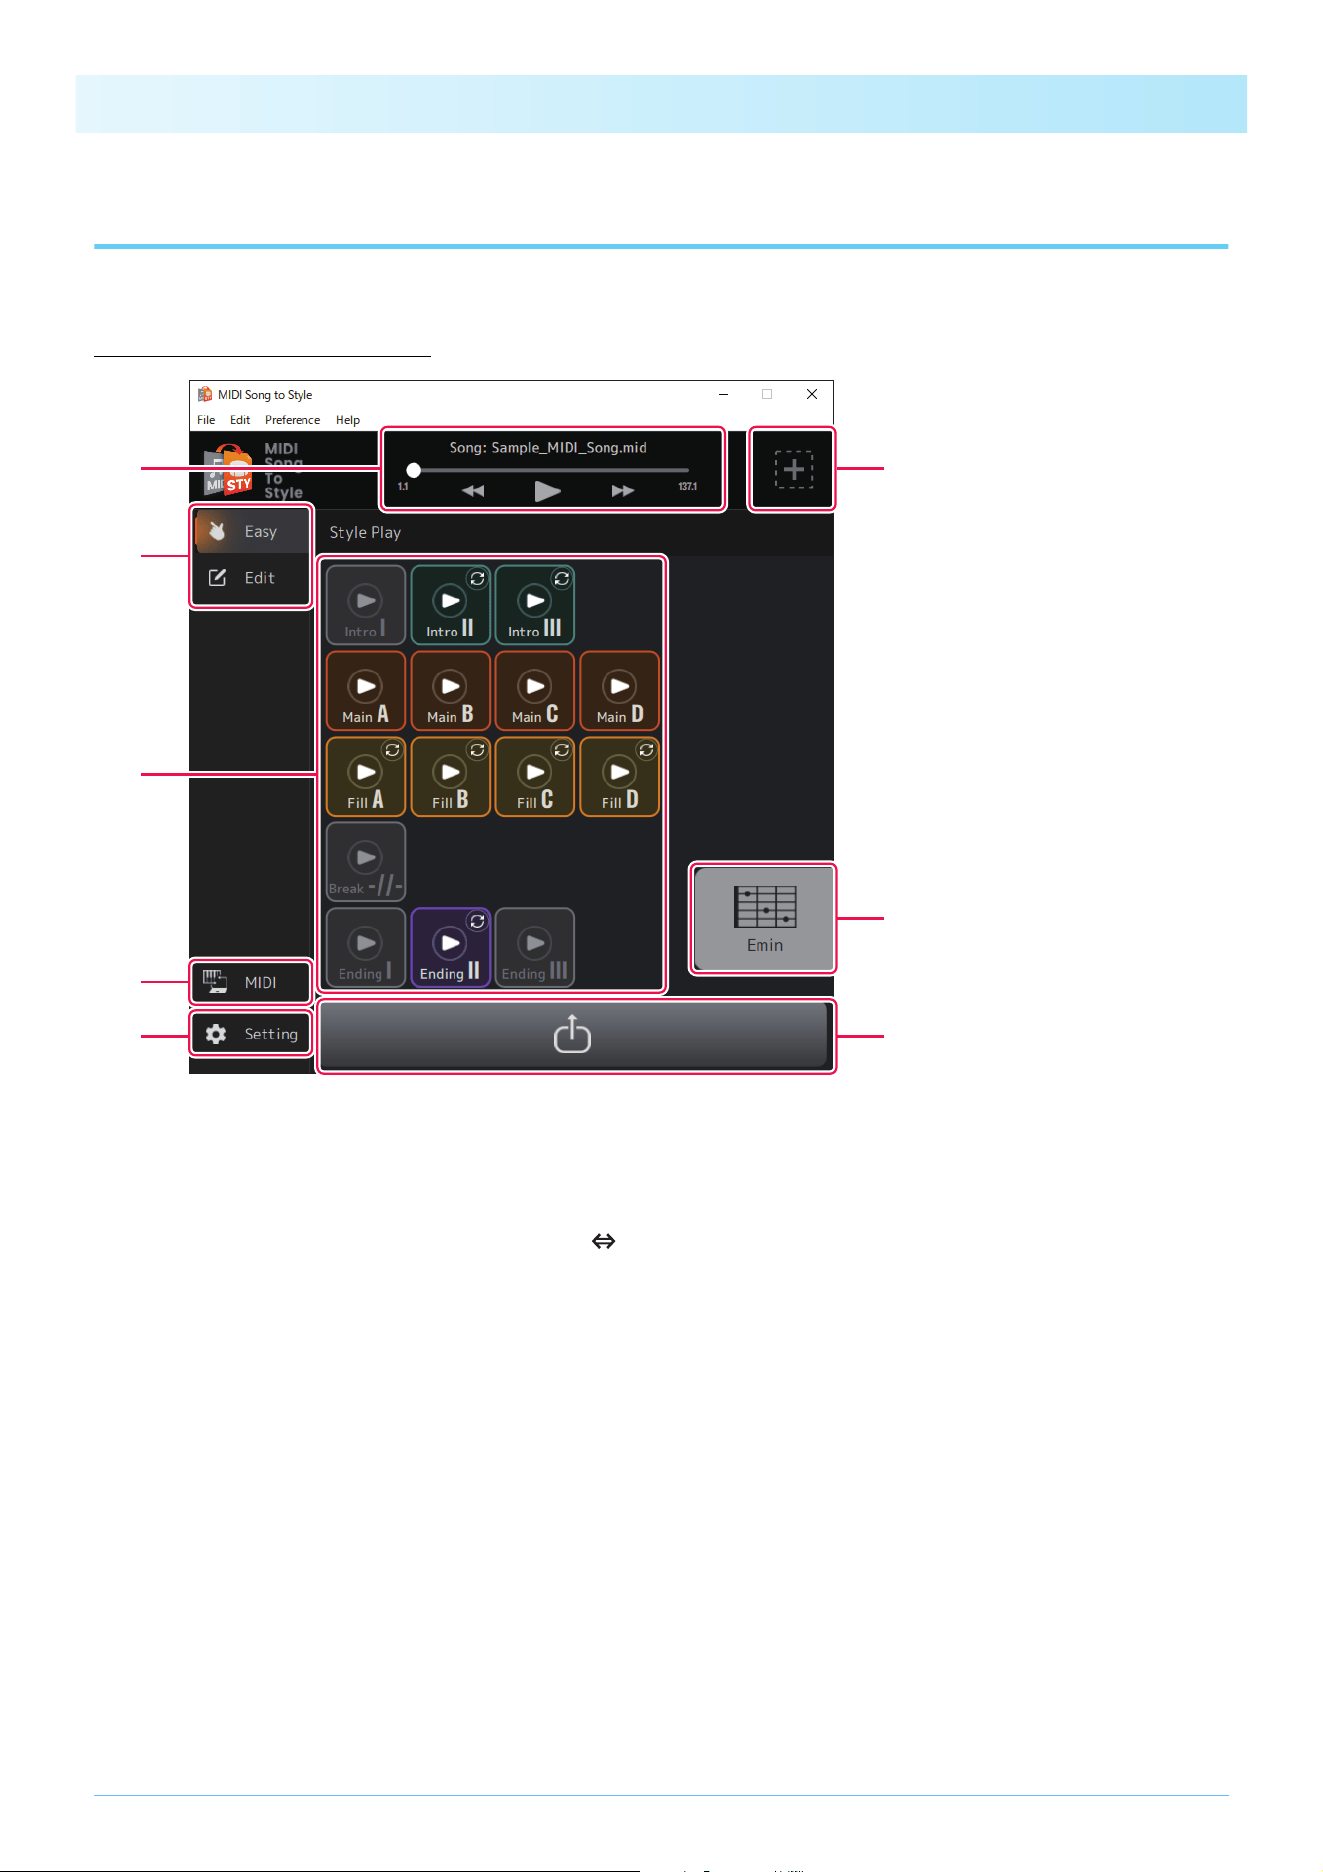
Home display (Easy)
q Controls MIDI Song playback
w Opens the display for loading a new file
e Switches the Home display mode (Easy Edit)
r Opens the MIDI Settings window (page 12)
t Opens the Other Settings window (page 13)
y For playing Sections of the converted Style (page 17)
u Displays the specified chord during Style playback and opens the Chord Palette window
(page 14)
i Opens the Style Save display (page 19)
q
t
y
e
r
w
u
i
Functions (Display Description)
11
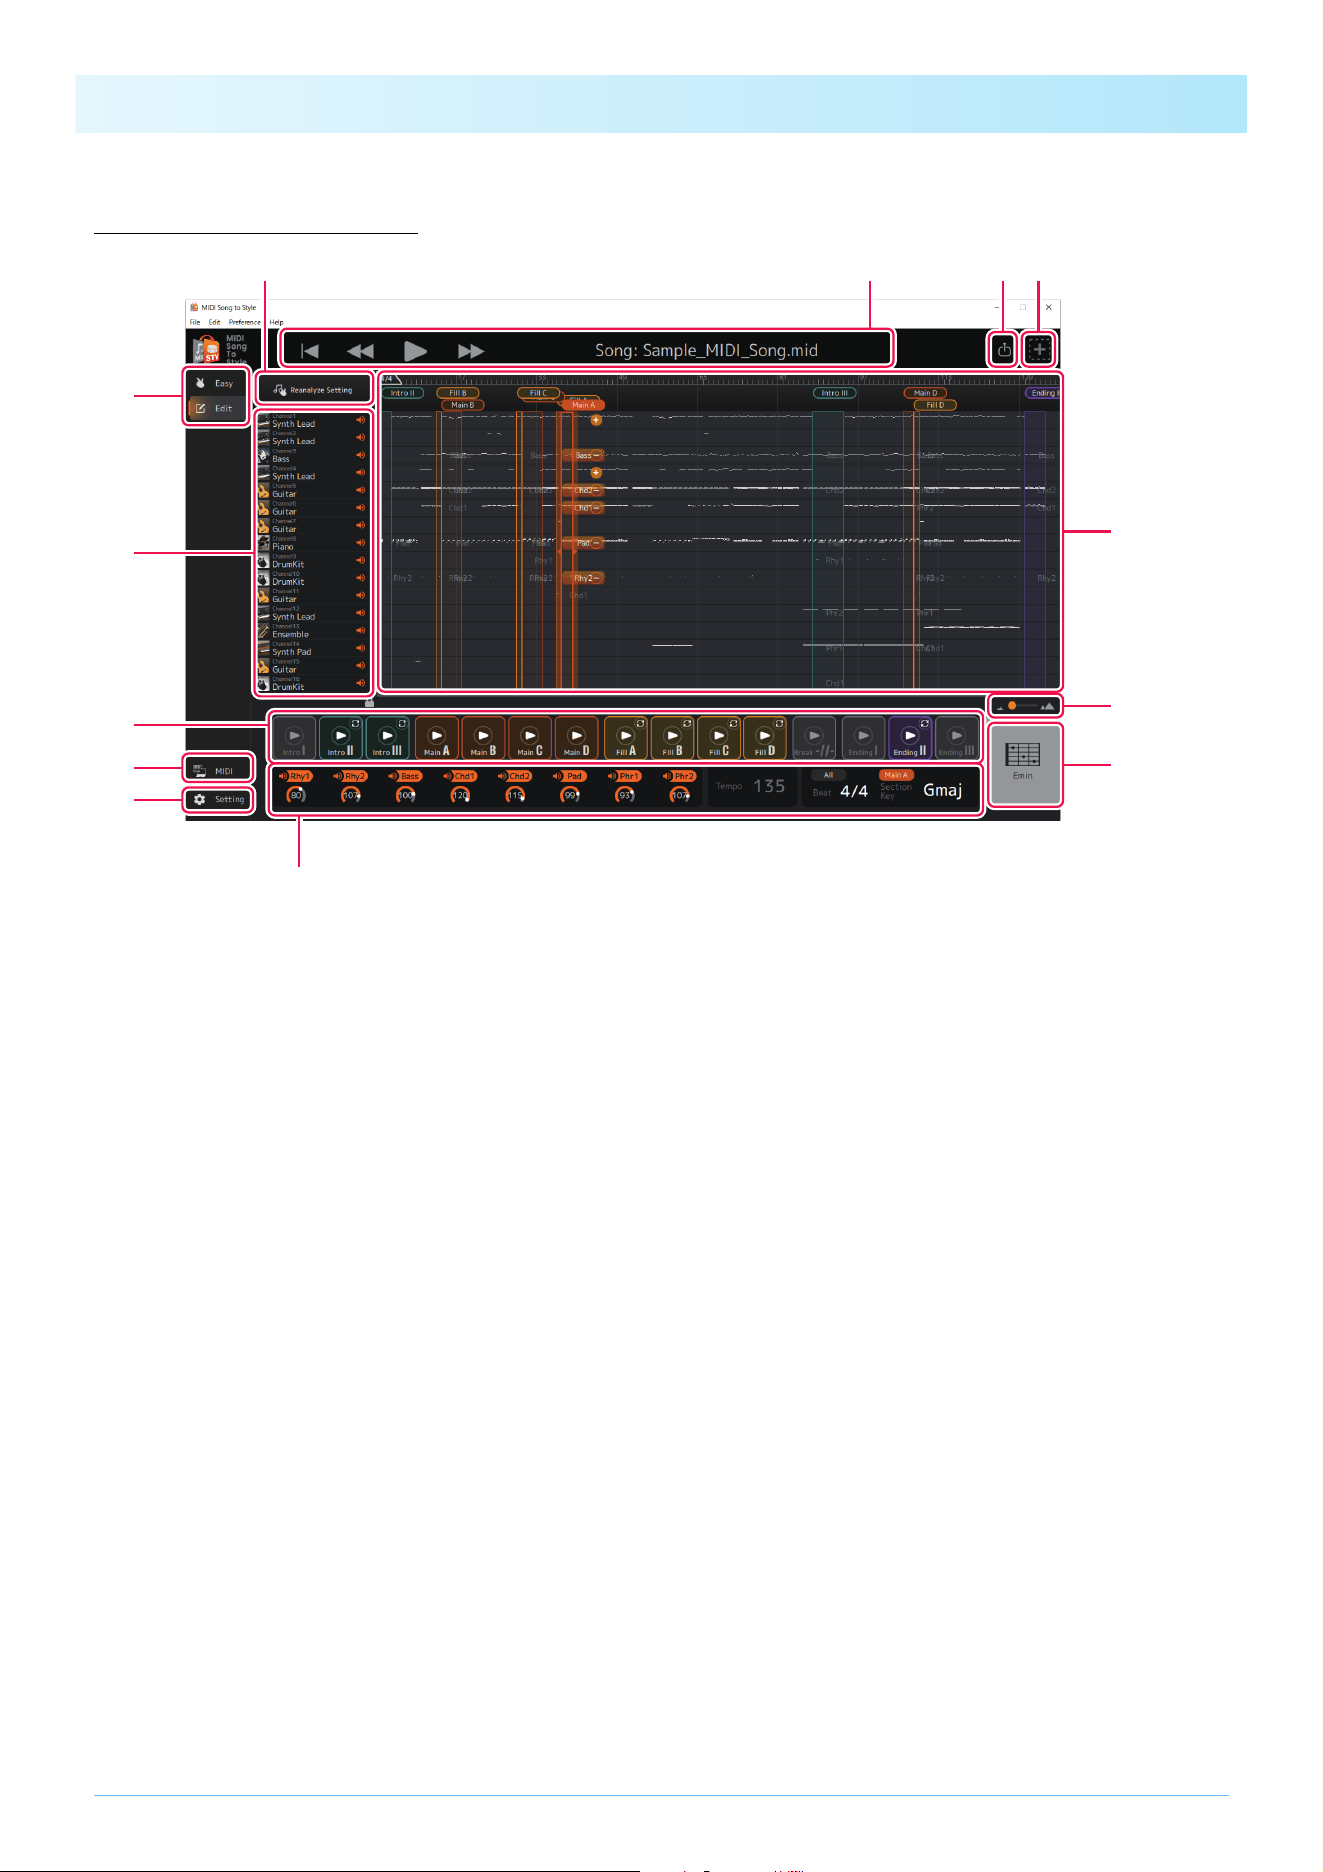
Home display (Edit)
Functions q to i are the same as those on the Home display (Easy).
o Reanalyzes after changing the automatic analysis setting (page 20).
!0 Checks and operates each channel for MIDI Song playback.
• Displays the rough type of Voice (display only).
• Determines the on/off (mute) setting for each channel.
!1 Displays the overview of MIDI Song data and lets you edit the Style Sections.
• Displays the data overview of each channel for a MIDI Song (display only).
• Edits the Style Section (page 21).
• Changes the MIDI channel assignment for each Style Part (page 25).
!2 Changes the magnification for MIDI Song data overview display (!1).
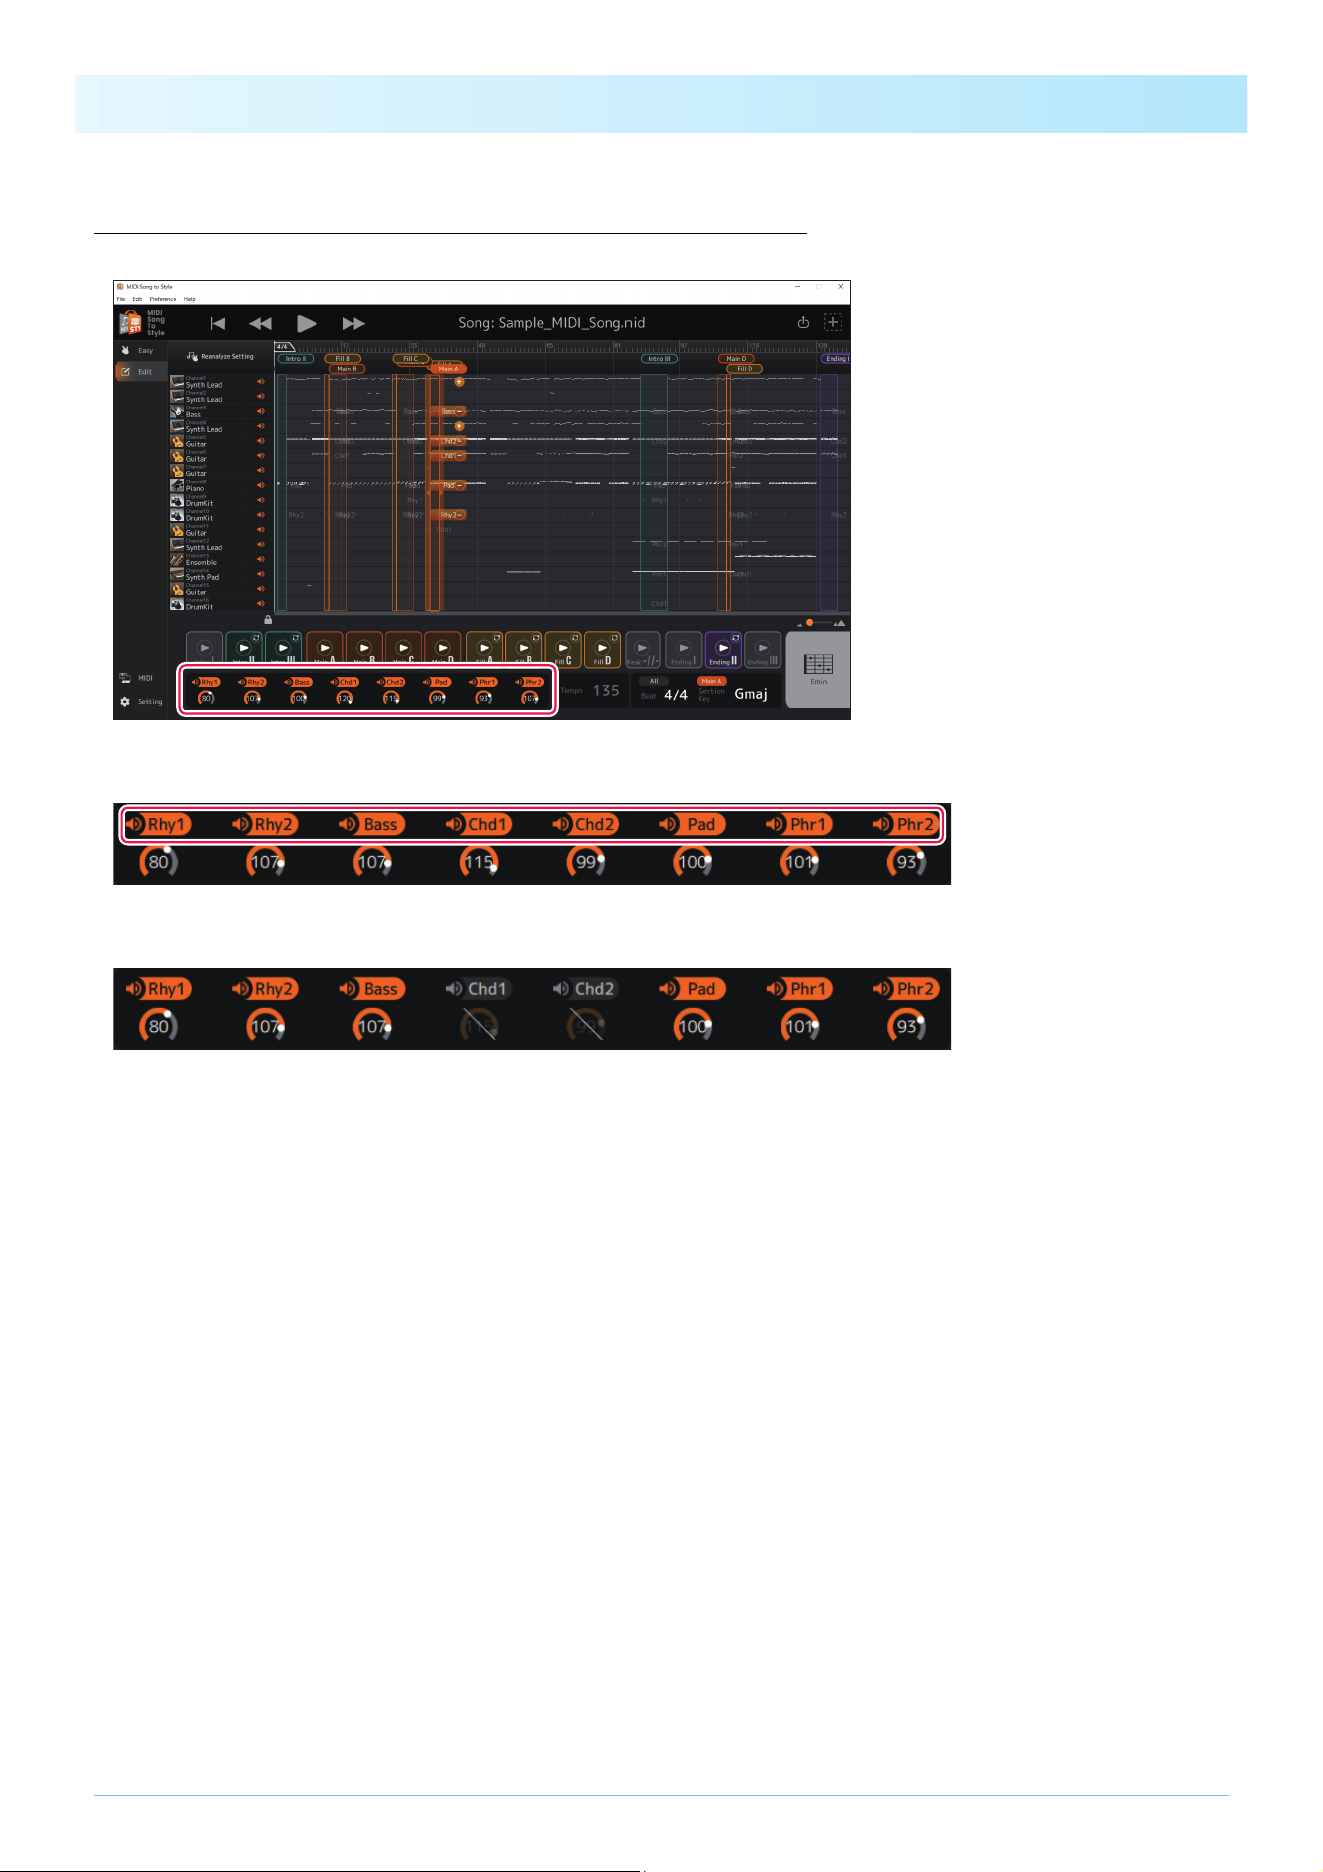
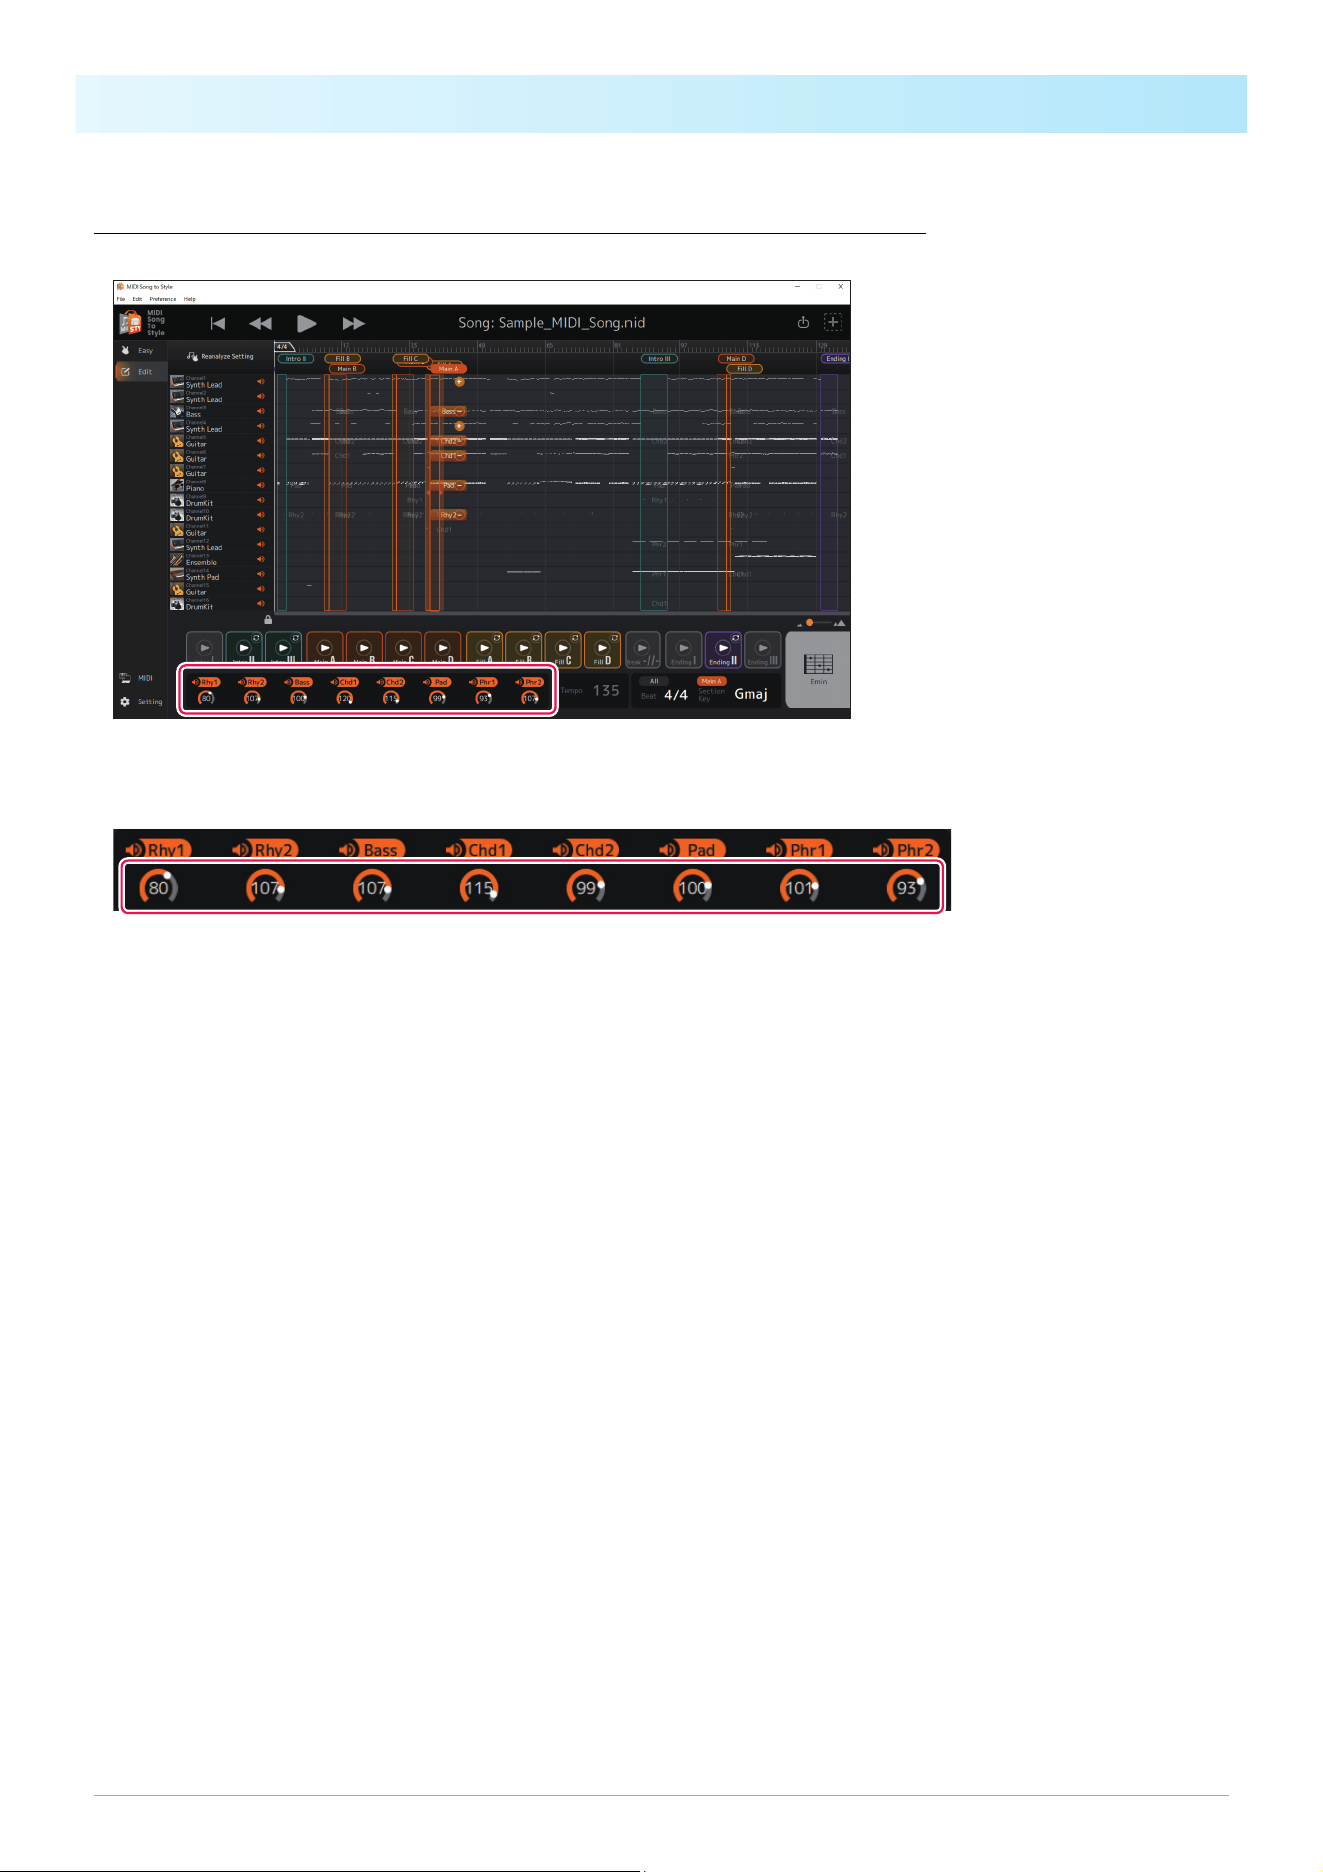
!3 Displays and lets you change various Style settings (pages 18, 27).
• Tempo (display only)
• Time signature (Beat)
• On/off and volume of each Style Part
• Section key
!3
u
!1
!2
t
y
r
e
!0
qo wi
Functions (Display Description)
12
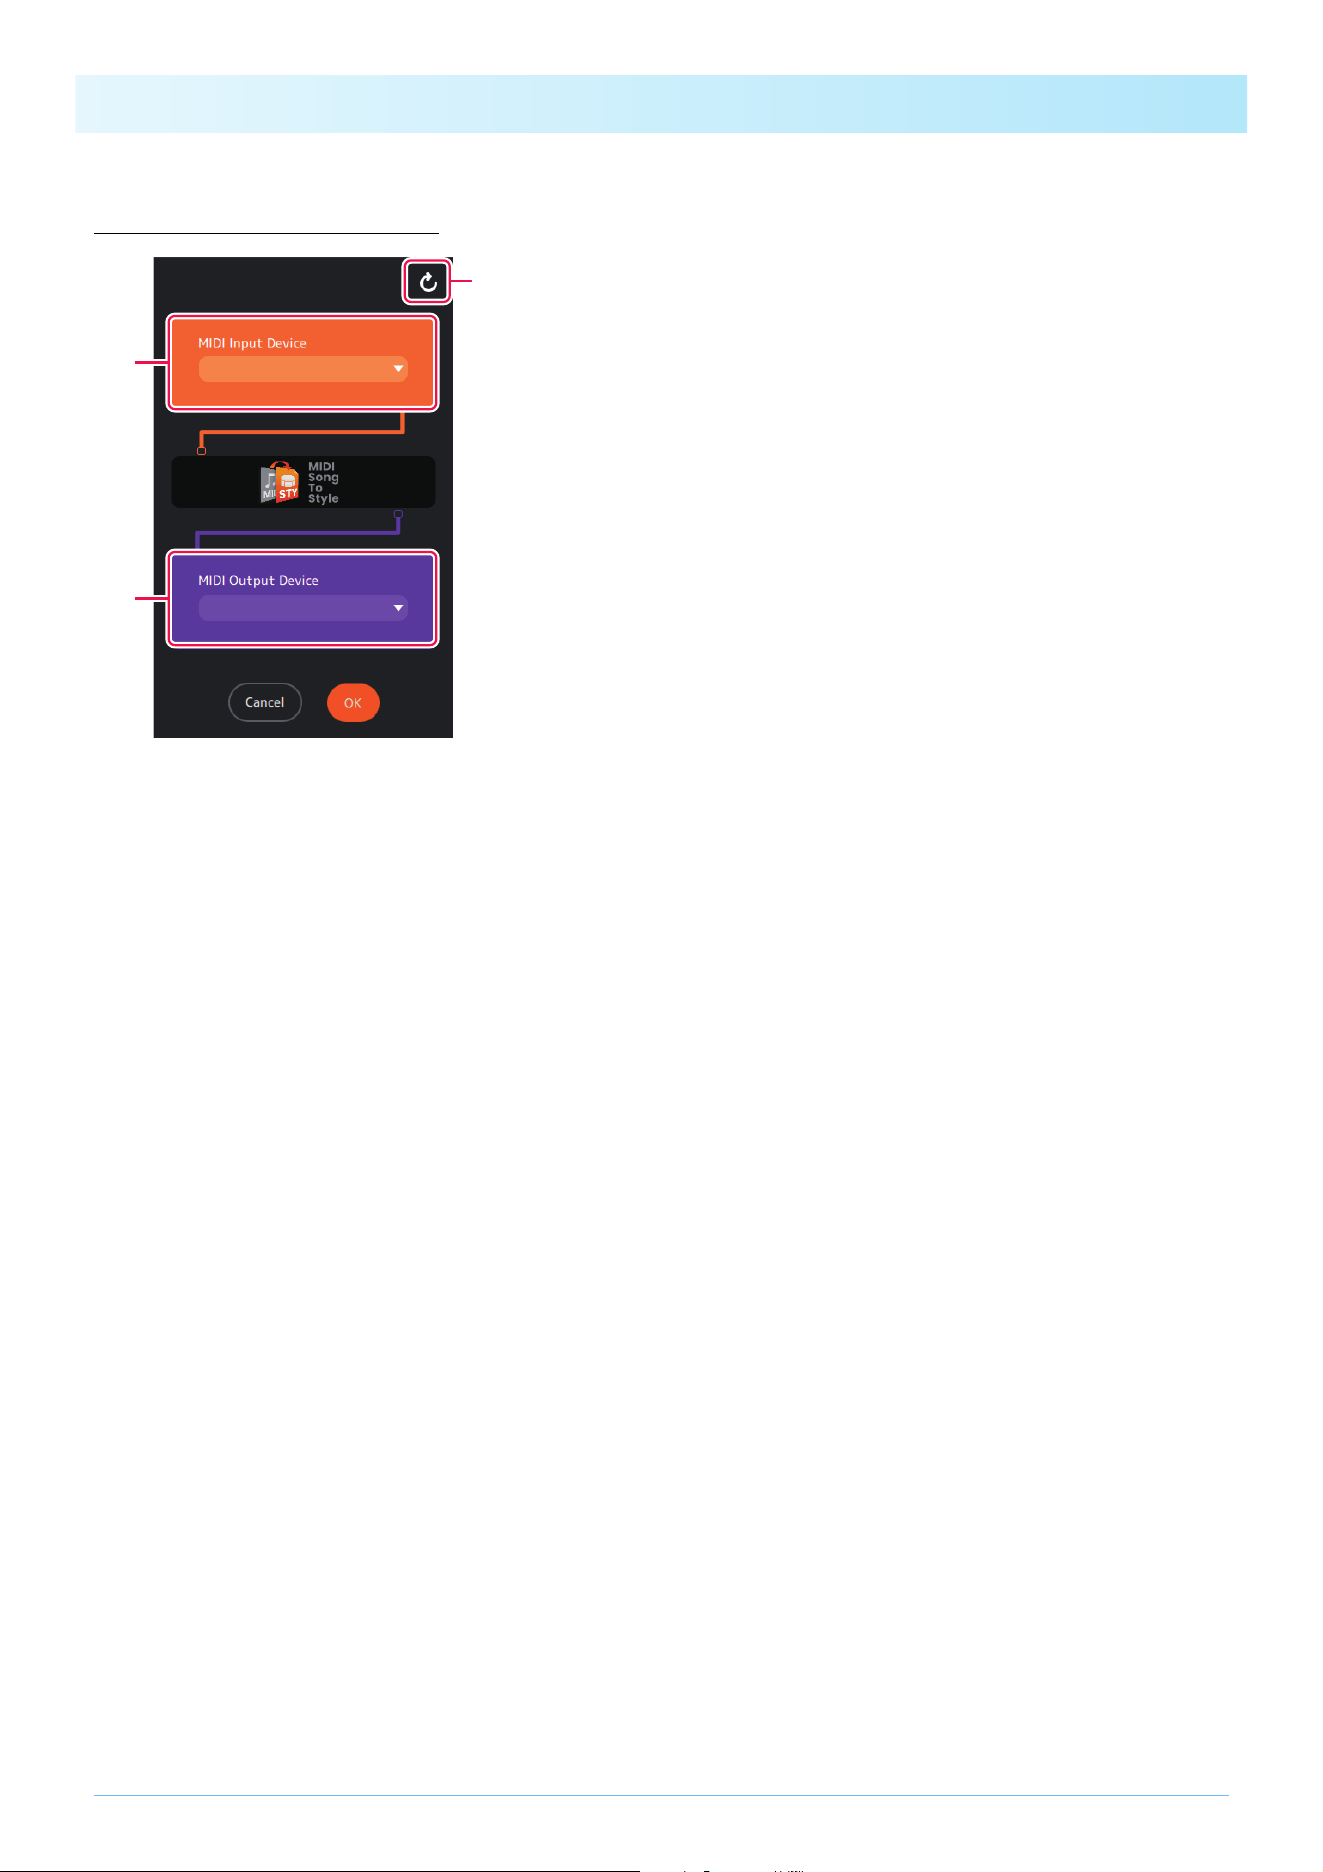
MIDI Settings display
q Determines the MIDI Input Device.
w Determines the MIDI Output Device.
If you select “MIDI Song to Style Synth,” you will also need to set the audio output destination.
e Updates the list of MIDI devices.
w
q
e
Functions (Display Description)
13
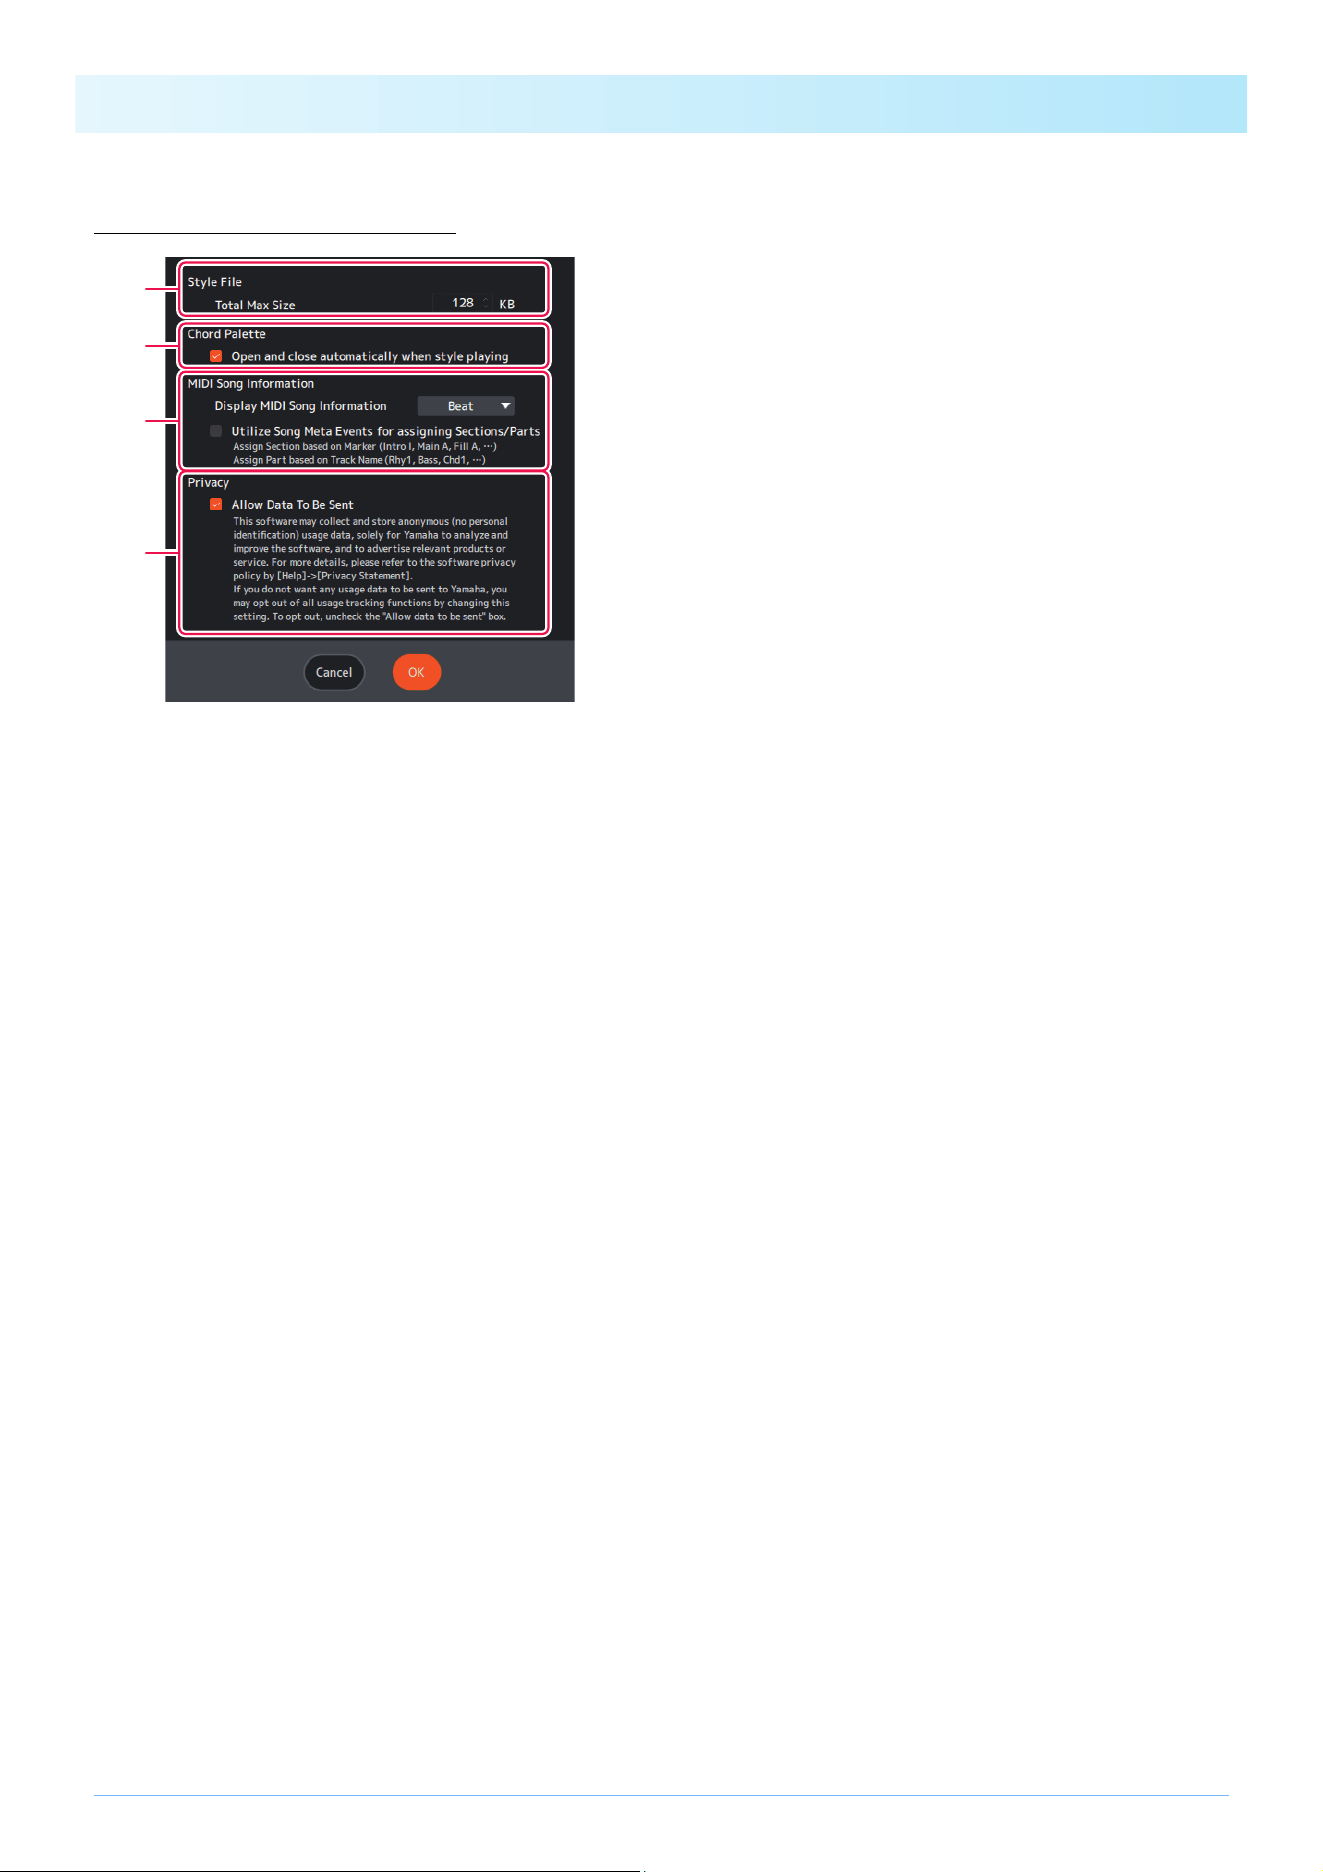
Other Settings display
q Determines the maximum size of converted Style files.
w Determines whether the Chord Palette window (page 14) is automatically called up when play-
ing back a Style.
e Determines how the information embedded in the MIDI Song is handled.
There are two items.
• Select one from the following information to be displayed at the top of the Home display (Edit).
- None: Nothing is displayed.
- Marker: Displays the Meta Event (Marker) text.
- Beat: Displays the beat (time signature).
- Tempo: Displays the tempo.
- Chord (XF): Displays the chord.
• Enable/disable the function to use Meta Events in the MIDI Song to assign Sections and Parts.
When using this function, Sections and Parts are assigned using only the embedded Meta Events, without using the results
of automatic analysis. This means that if you embed information in the MIDI Song beforehand, you can assign them as
specified.
Markers are used to assign Sections, and Track Names are used to assign Style Parts.
For the strings that can be used to specify Sections/Parts, see the table on page 32.
r Determines whether to allow collection of anonymous data regarding the usage status of this
app.
q
w
e
r
Functions (Display Description)
14
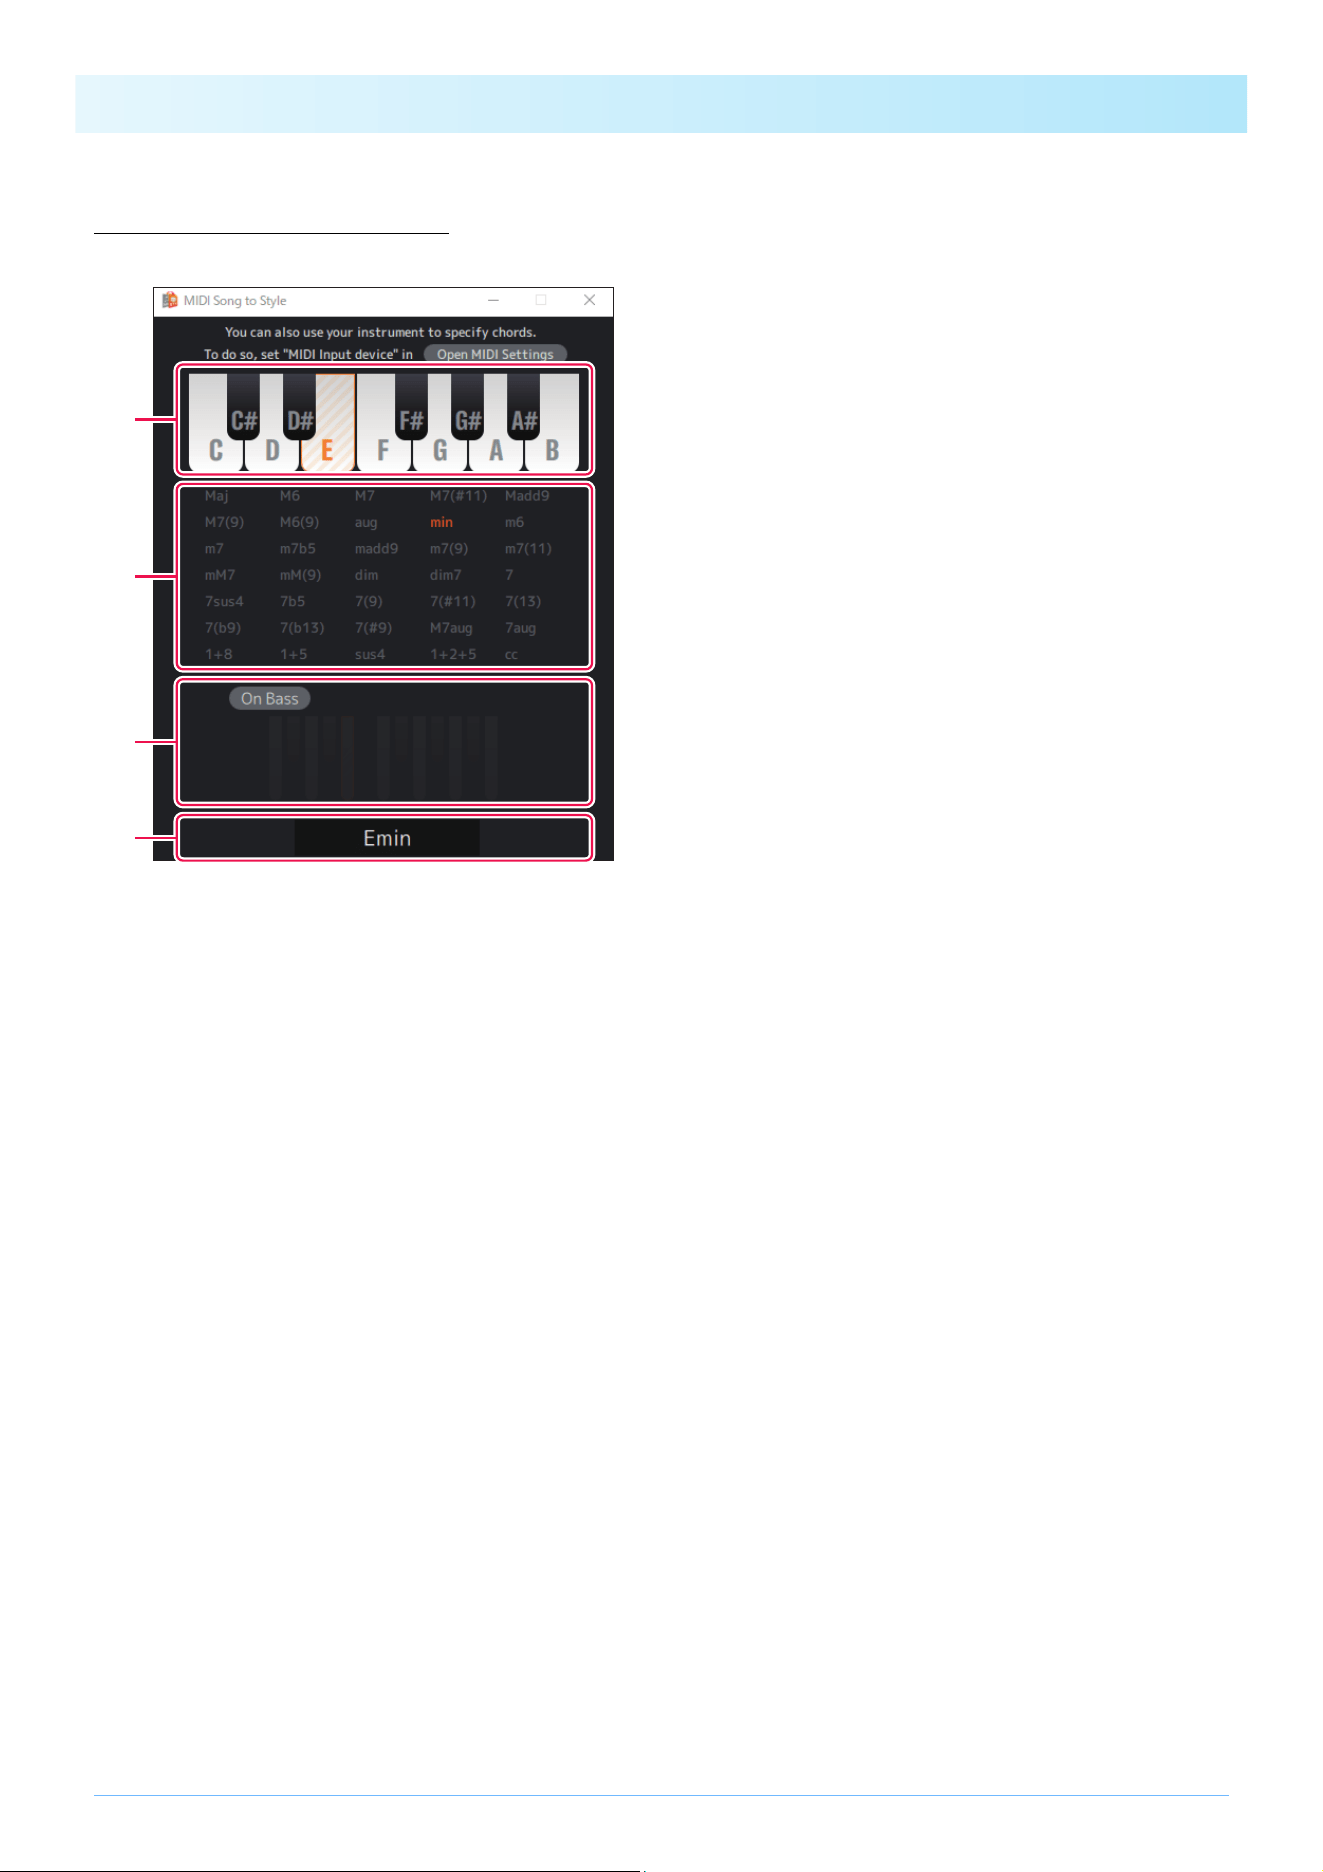
Chord Palette window
This window allows you to specify the chord used when the Style is played back.
q Specifies the root of the chord.
w Specifies the type of chord.
The abbreviation “cc” means “chord cancel” (no chord specified).
e Enables/disables the On Bass chord and allows you to specify the bass note.
r Displays the specified chord.
e
w
r
q
Functions (Display Description)
15
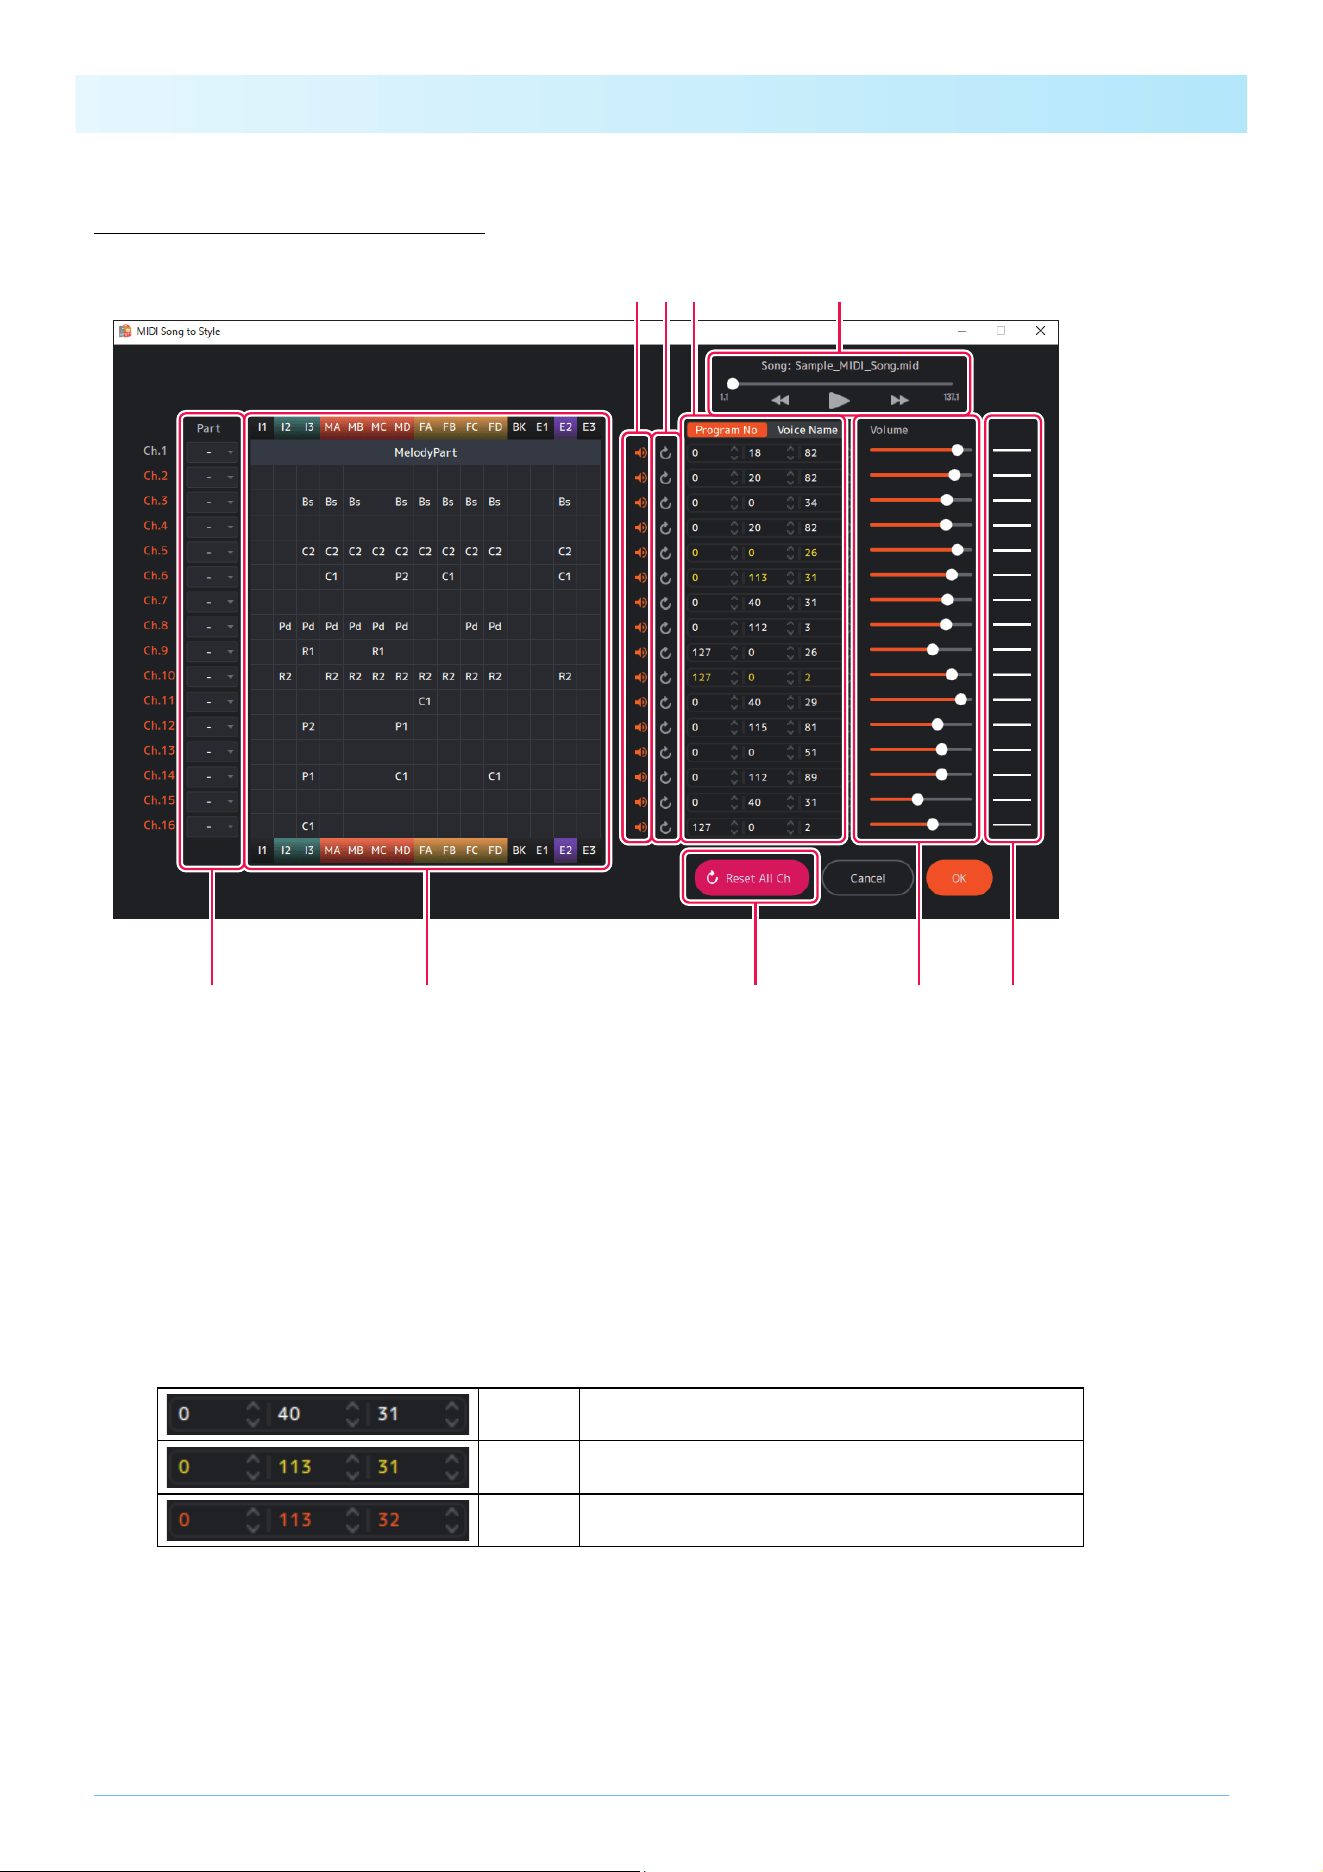
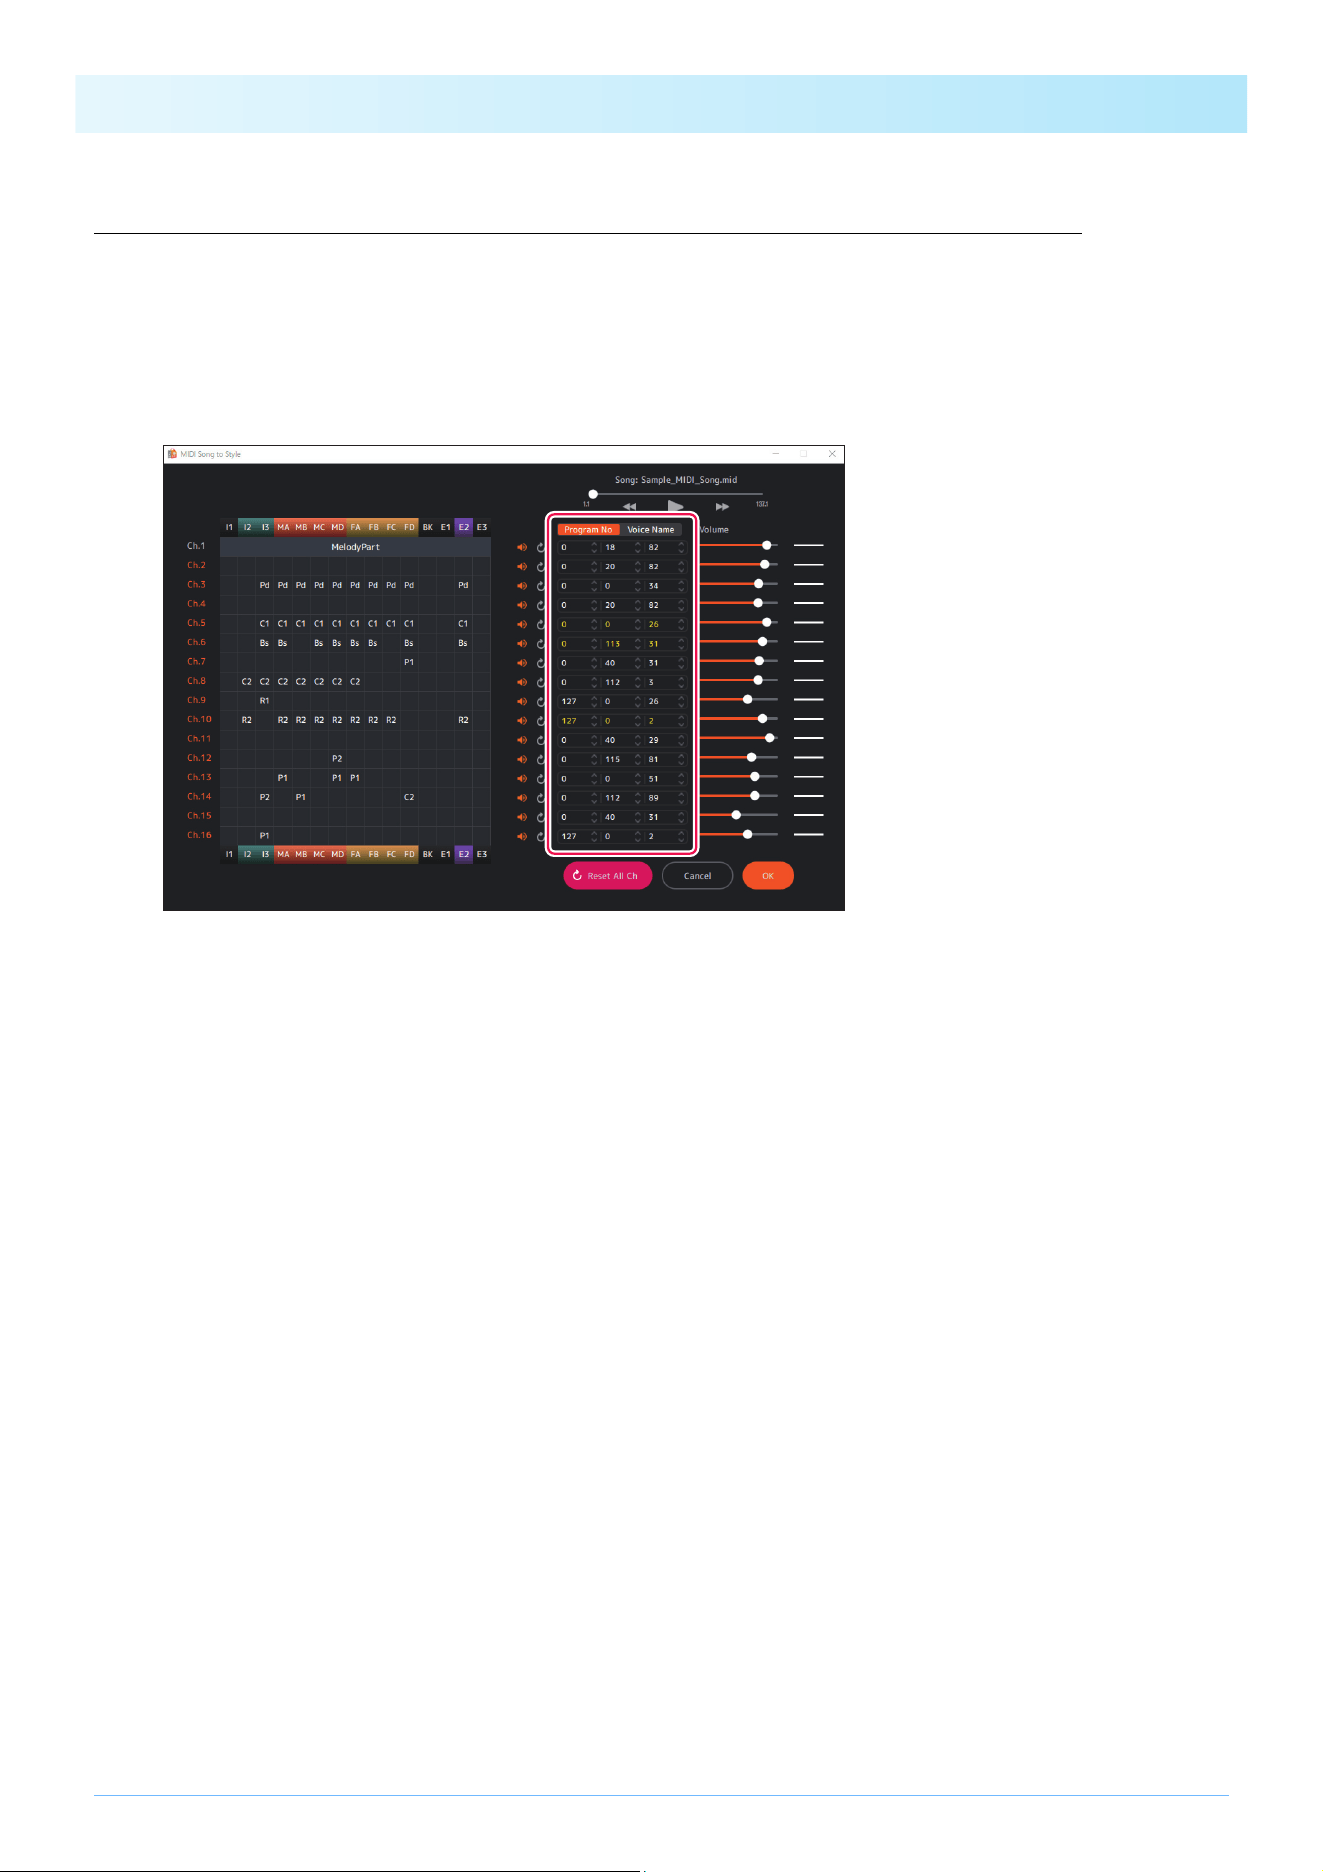
Detailed Editing window
This window allows you to edit the MIDI Song channel settings and change detailed settings for each Part in the Style Section.
q Controls MIDI Song playback.
w Determines the on/off (mute) setting for each MIDI channel.
e Resets MIDI channel settings.
Resets to the status before editing.
r Determines the Voice for each MIDI channel.
You can specify this by program change numbers or Voice names.
The imported Voice list (page 5) is used for the Voice name setting.
The colors given to the Voice numbers or Voice names indicate the following conditions.
t Determines the volume for each MIDI channel.
White Unedited and the Voice will not change during the sequence.
Yellow Unedited and the Voice will change during the sequence.
Orange The Voice was set manually.
ew r q
io u t y
Functions (Display Description)
16
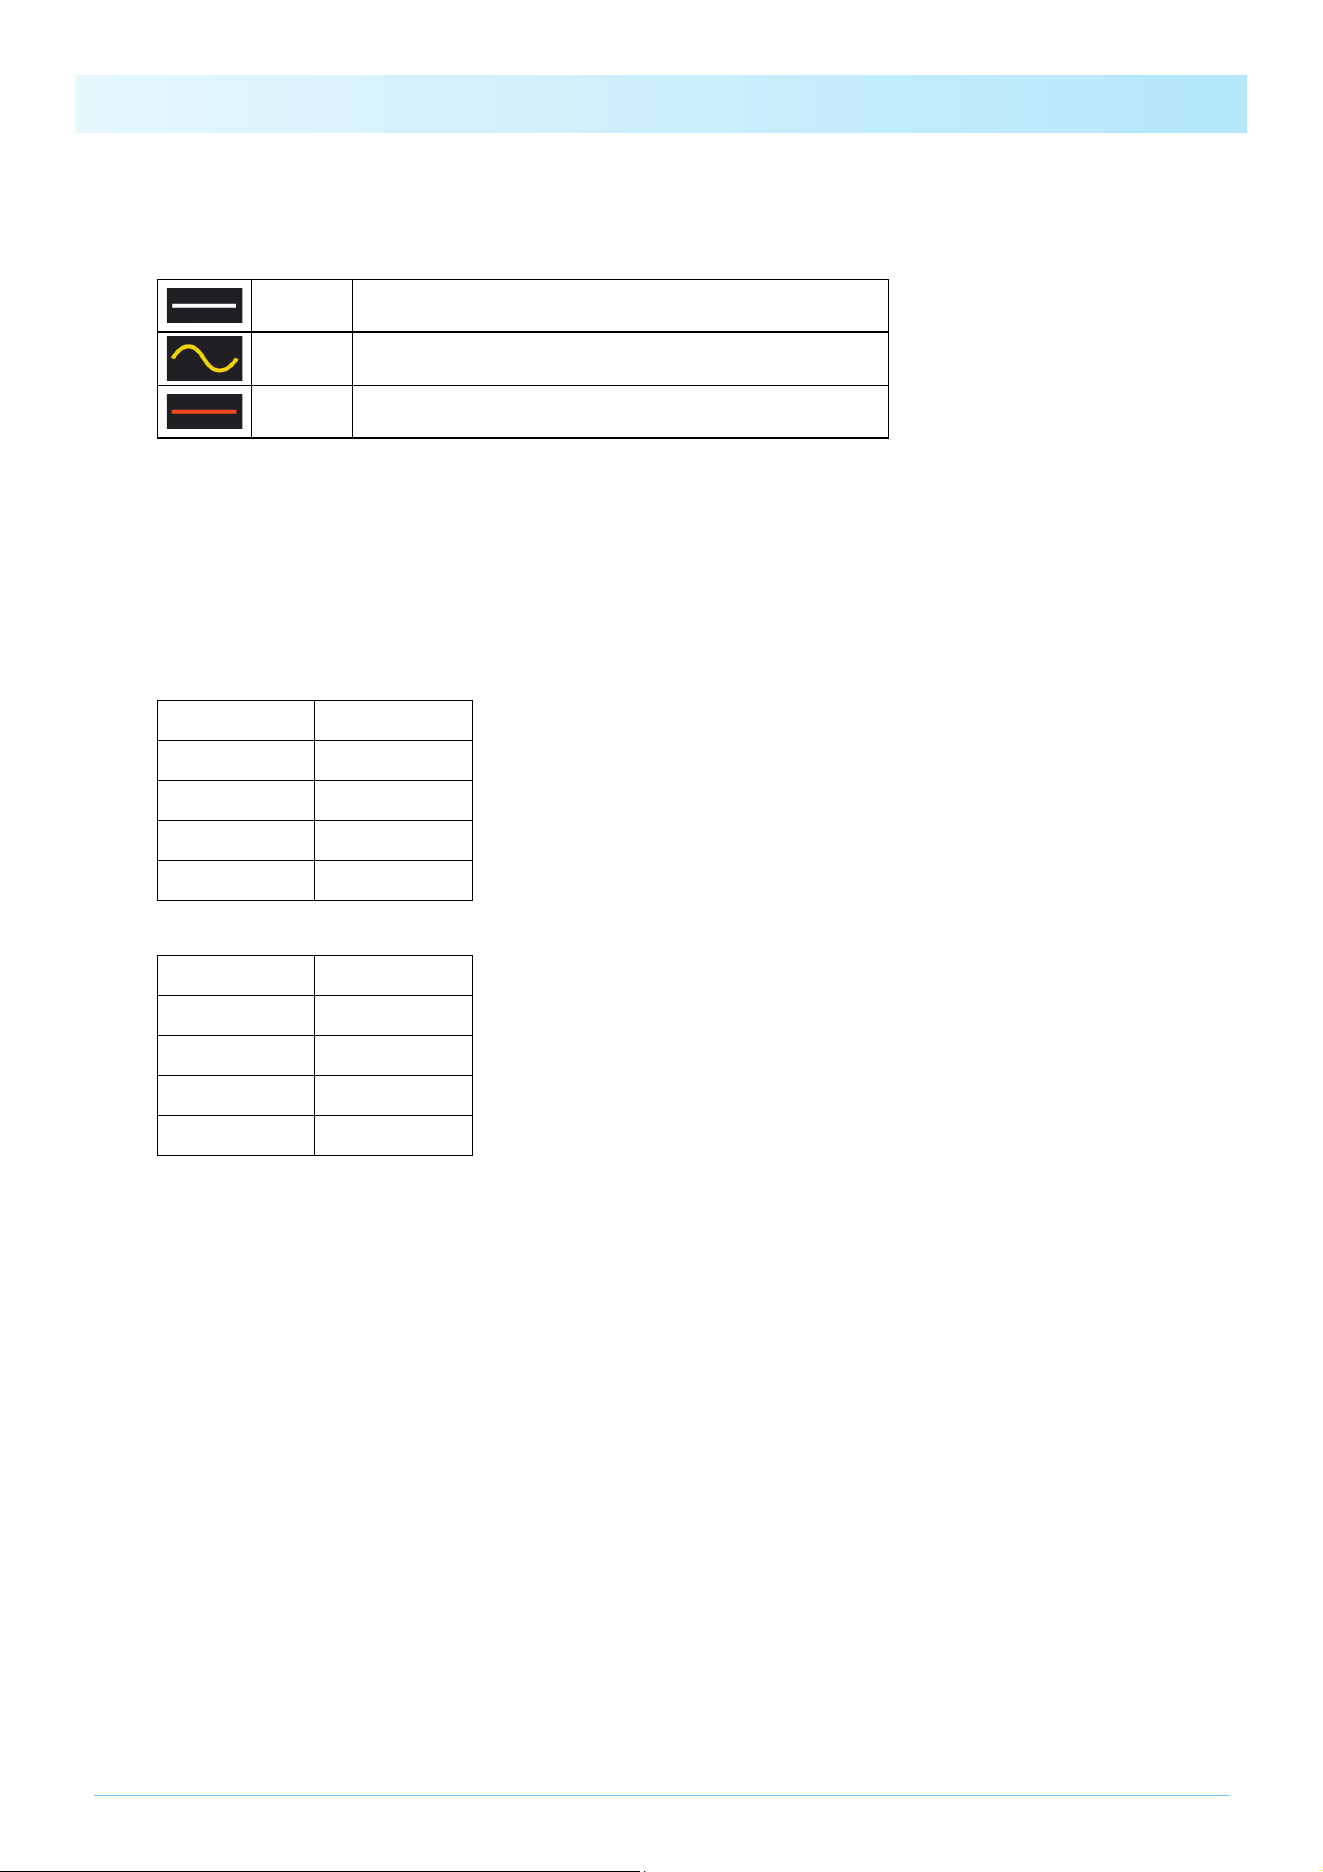
y Displays the volume status of each MIDI channel.
The three types of volume conditions are indicated as follows.
u Resets all MIDI channel settings.
i Displays the assignment status of each channel for the Section and calls up detailed settings of
Style Parts.
Displays the Part assignments for each channel in each Section of the Style.
The following display abbreviations are used.
Section name
Style Part name
Clicking on each Style Part name allows you to edit detailed parameters for the Parts within each Section.
For more information on detailed parameters, refer to page 33.
o Changes Part Assignments.
You can change the Part assignments for each MIDI channel all at once. When you specify a Part for the desired channel, that
channel is assigned to the specified Part for all Sections.
White Unedited and the volume will not change during the sequence.
Yellow Unedited and the volume will change during the sequence.
Orange The volume was set manually.
I1 to 3 Intro I to III
MA to MD Main A to D
FA to FD Fill In A to D
BK Break
E1 to E3 Ending I to III
R1, R2 Rhy1, Rhy2
Bs Bass
C1, C2 Chd1, Chd2
Pd Pad
P1, P2 Phr1, Phr2
NOTE
Since detailed parameters are automatically set according to the analysis results, editing is not normally required.
NOTE
If you want to assign different channels for the Part of each Section, change the assignments individually on the Home display (Edit)
(page 25).
17
How to Use the App
Playing back (listening to) the converted Style
You can try out how the converted Style plays while specifying the chord.
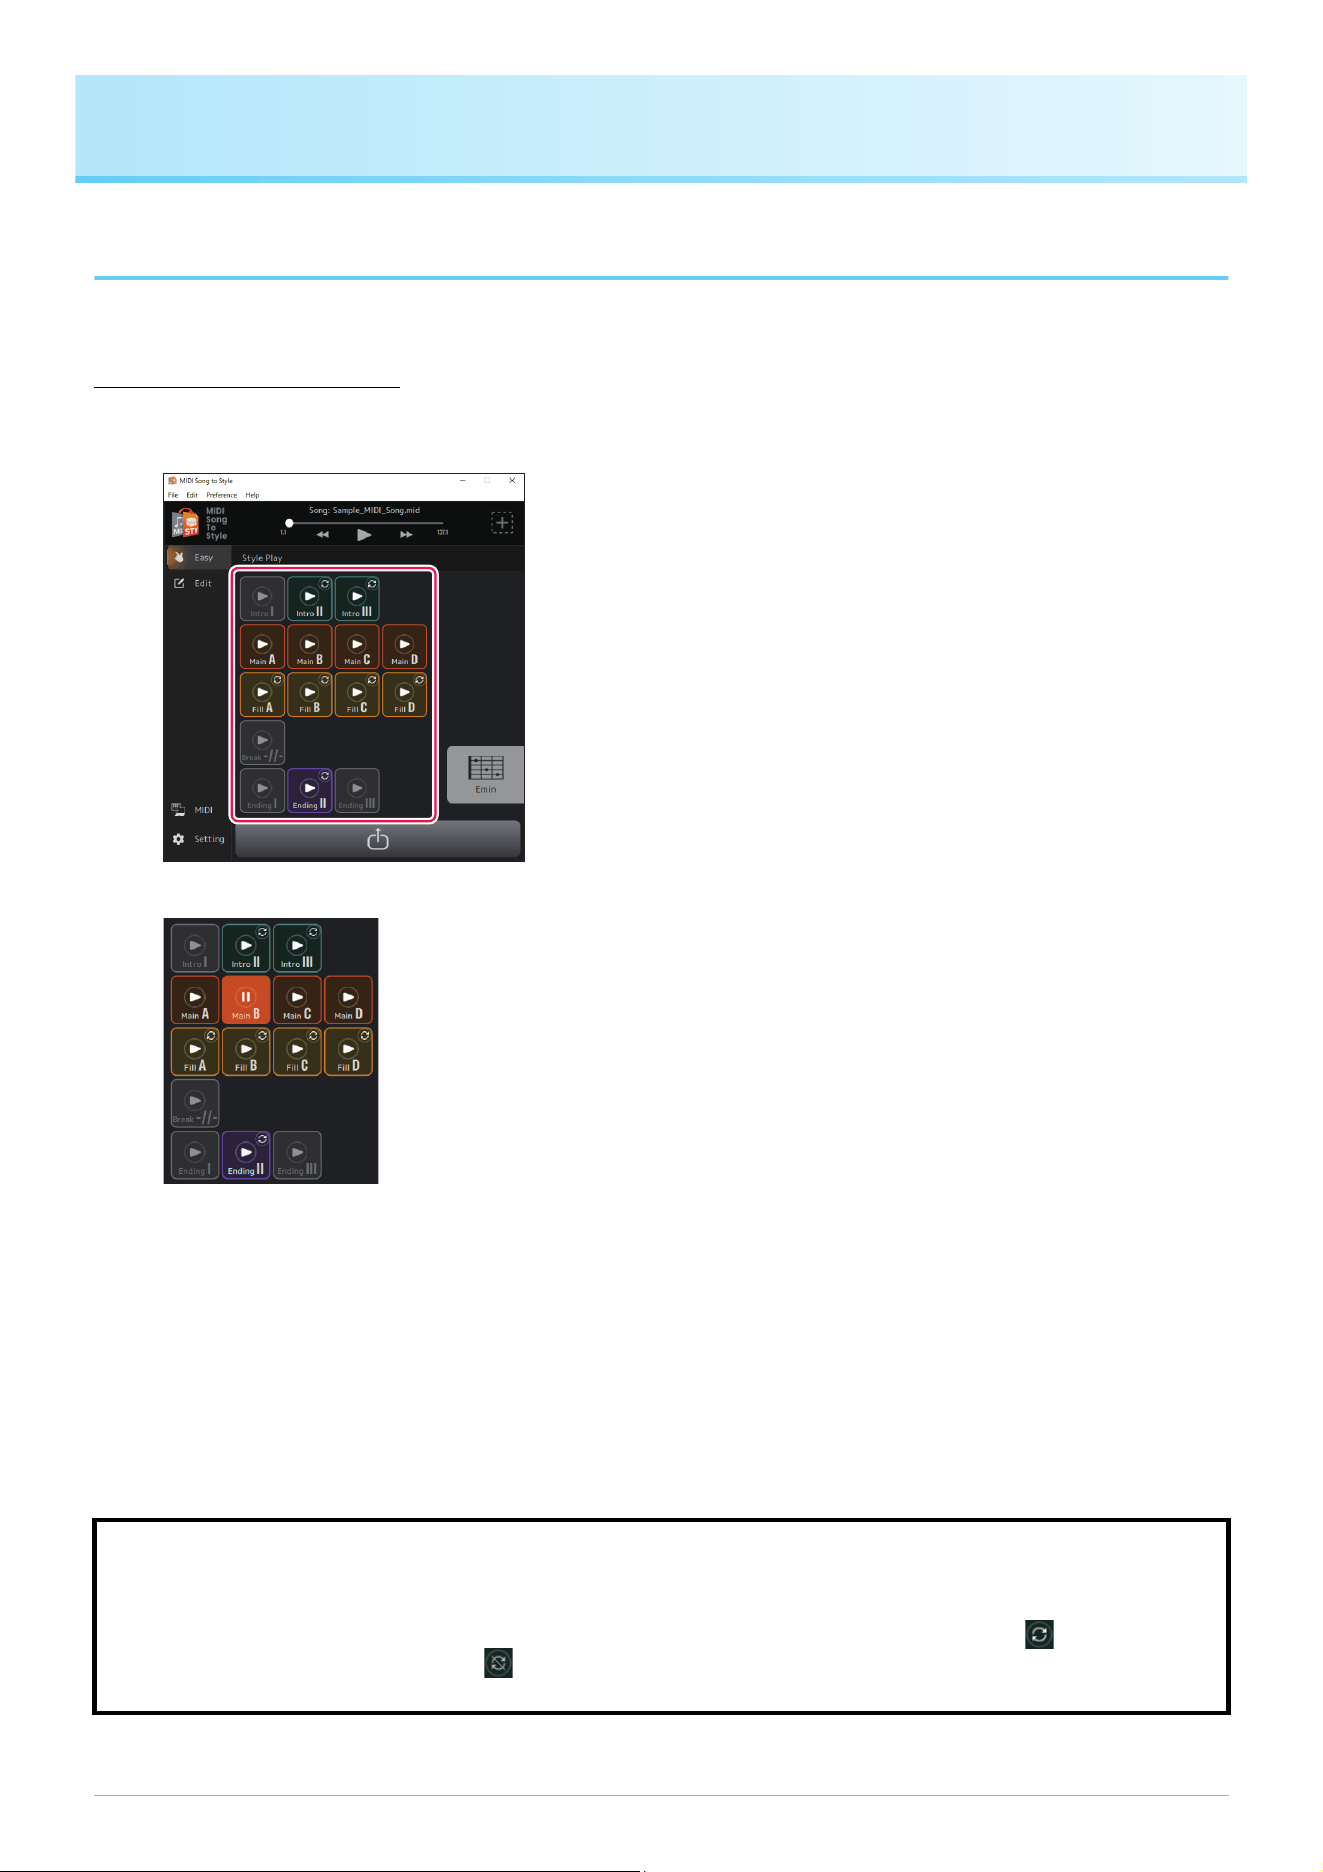
Playback of Styles
1. Click the icon for the Section you want to play.
The Section icon will be displayed as playing (highlighted) and the Section will be played in a loop.
In this example, Main B is being played.
Also, by default, the Chord Palette window (page 14) is automatically called up.
2. Control Style playback, such as changing Sections and specifying chords.
• If you click on another Section’s icon, that Section will be played.
• You can check the change in sound while specifying the chord from the Chord Palette window or the instrument that has
been set as the MIDI Input Device.
3. Click the icon of the currently playing Section to stop Style playback.
Determines the on/off setting for Section loop playback.
With the default settings of this app, each Section is played in a loop allowing you to check the contents of the Style. This
behavior differs from that of normal Style-equipped instruments. If you want to change the behavior of normally non-looped
Sections (Intro I to III, Fill In A to D, Break, and Ending I to III) so that they do not play in a loop, click the mark on the top
right of the icon. The display will change to (loop off) and those Sections will be played only once, and then resume playing
the Style—just as is common in Style-equipped digital keyboards.
How to Use the App
18
Turning each Style Part on/off during playback
On the Home display (Edit), you can turn each Part on/off (mute).
Click on each Style Part name to turn on/off.
Parts that are turned off will be grayed out.
In this example, Chd1 and Chd2 are turned off.
How to Use the App
19
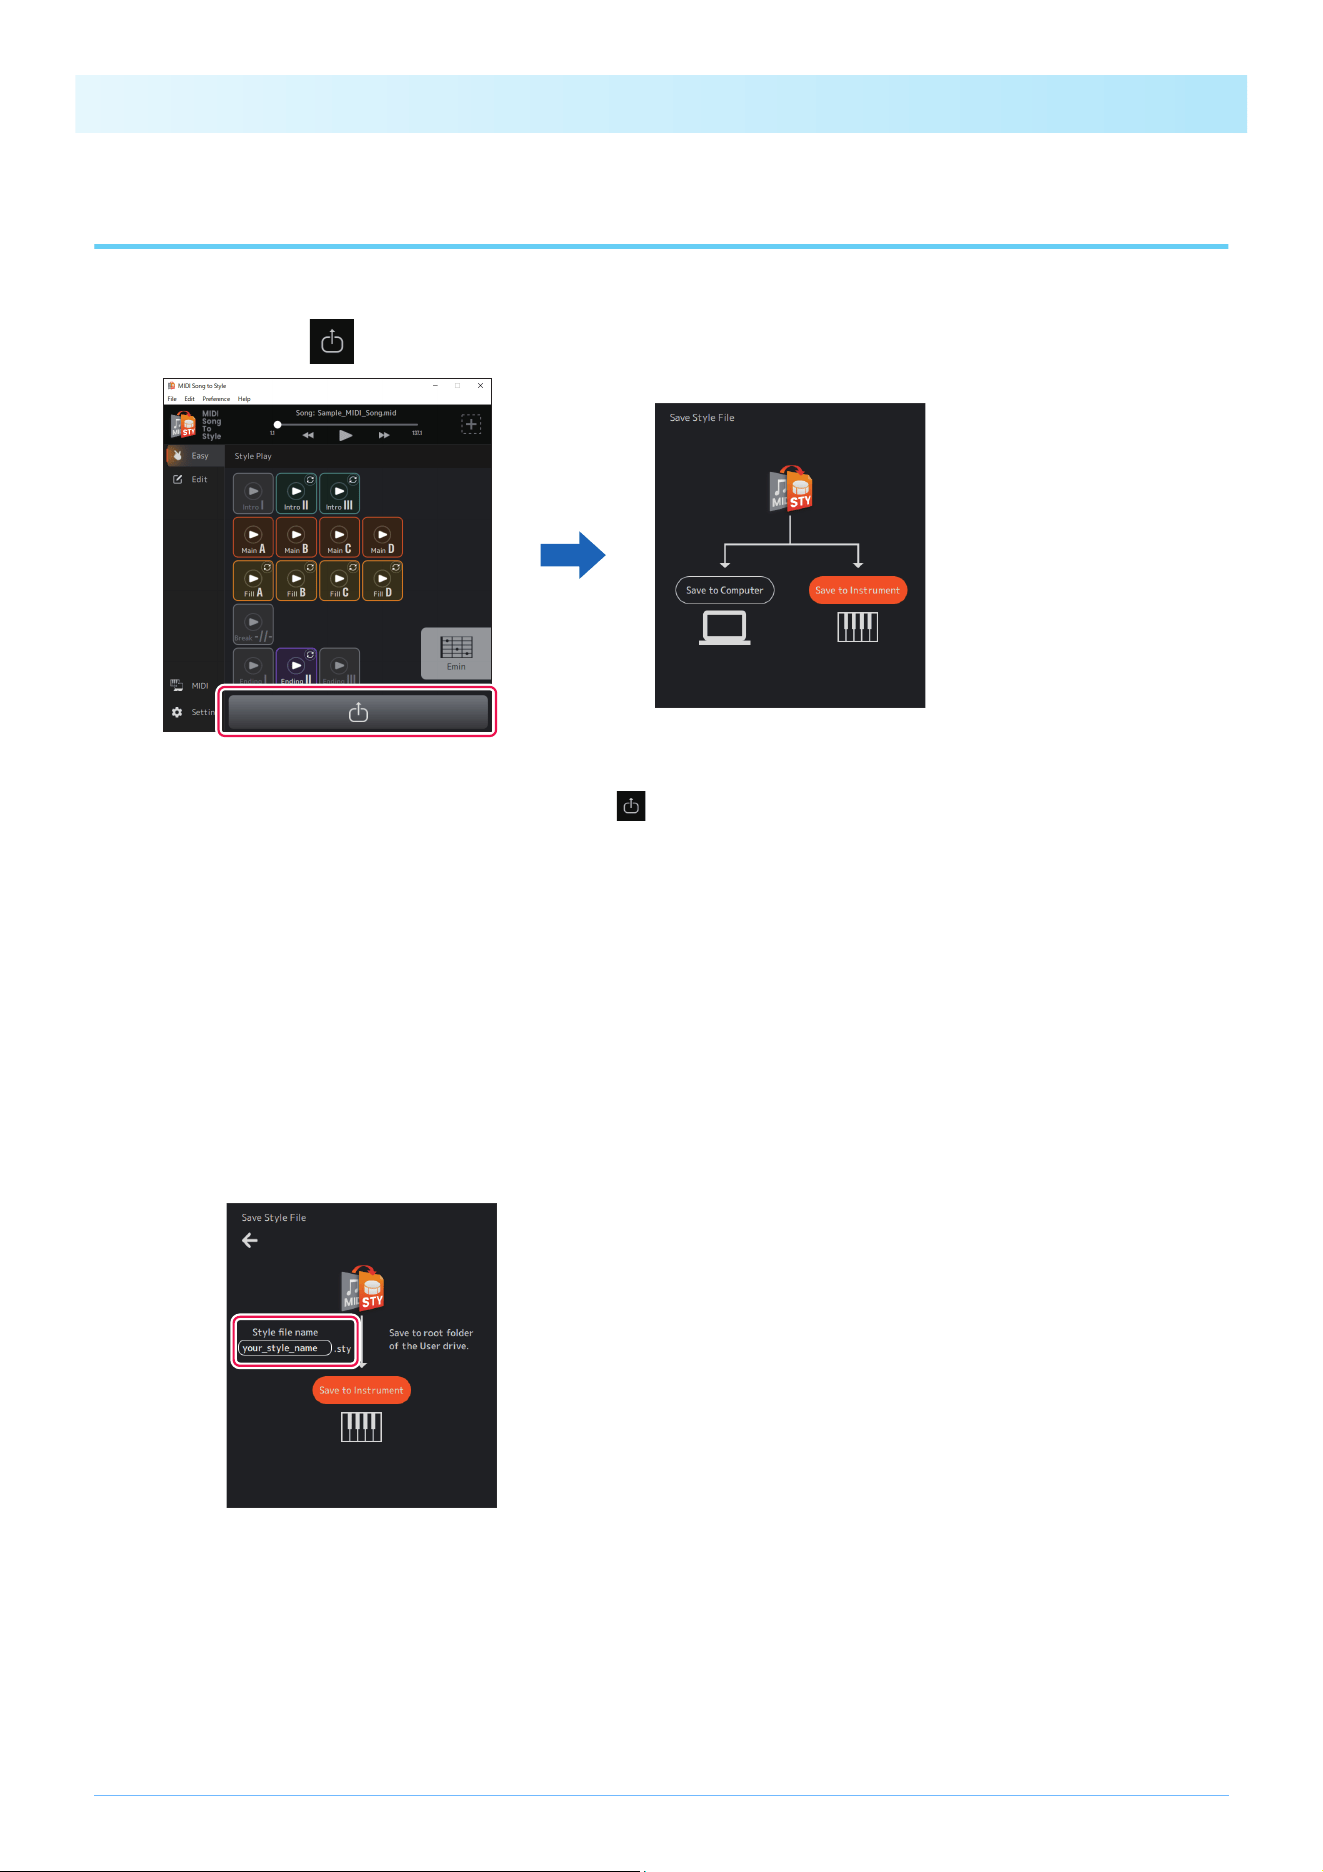
Saving and Transferring Converted Styles
The conversion results can be saved to the computer or transferred to the connected instrument as a Style file (.sty).
1. Click the icon .
2. Select how to save the file.
• [Save to Instrument]: This transfers and saves Style files directly to the instrument.
The file will be saved in the root folder of the User drive.
• [Save to Computer]: This saves Style files to the computer.
3. Follow the on-screen instructions to save or transfer.
A) For [Save to Instrument] (transferring directly to the instrument)
Enter a name and click [Save to Instrument] to start the transfer.
B) For [Save to Computer] (saving to computer)
After the file save dialog appears, enter a name and save it to the desired location.
When transferring data to the instrument, use a USB flash drive.
NOTE
If you want to cancel the save operation, click the icon again.
NOTE
[Save to Instrument] can only be used when the computer is connected with the instrument by a USB cable. For instructions, refer to
page 3.

How to Use the App
20
Changing Presets of Automatic Analysis
The analysis conditions for MIDI Songs are automatically set, but this may lead to undesirable results depending on the particular
MIDI data. The setting of whether to include each channel in the analysis can be changed so that you can reanalyze the data and
get the desired results.
Manually specify channels you want to exclude from the analysis and reanalyze
1. Set the Home display to Edit mode.
2. Click [Reanalyze Setting].
The analysis settings display will be called up.
3. Change channel exclusion settings as desired.
Edit the checkmarks on the [Melody] and [Assign] tabs as necessary.
• [Melody] tab: The checked channels will be treated as the “main melody.”
The main melody channels are used to estimate the Section range.
When you check the [Melody] tab, the [Assign] tab is automatically unchecked.
For the initial value, the automatic identification results of the main melody are reflected.
Check channels you want to specify as the main melody (for example, the channel that contains the notes
you want to play).
• [Assign] tab: Checked channels are Parts that can be assigned to Style Parts.
If you do not want the performance sound of a specific channel to be included in the converted Style,
uncheck that channel.
4. Click [Reanalyze] to perform the reanalysis.
The conversion results will be updated.
How to Use the App
21
Editing the Converted Style
In the Edit mode (page 11) of the Home display, you can modify an automatically converted Style as necessary to achieve the
desired conversion result.
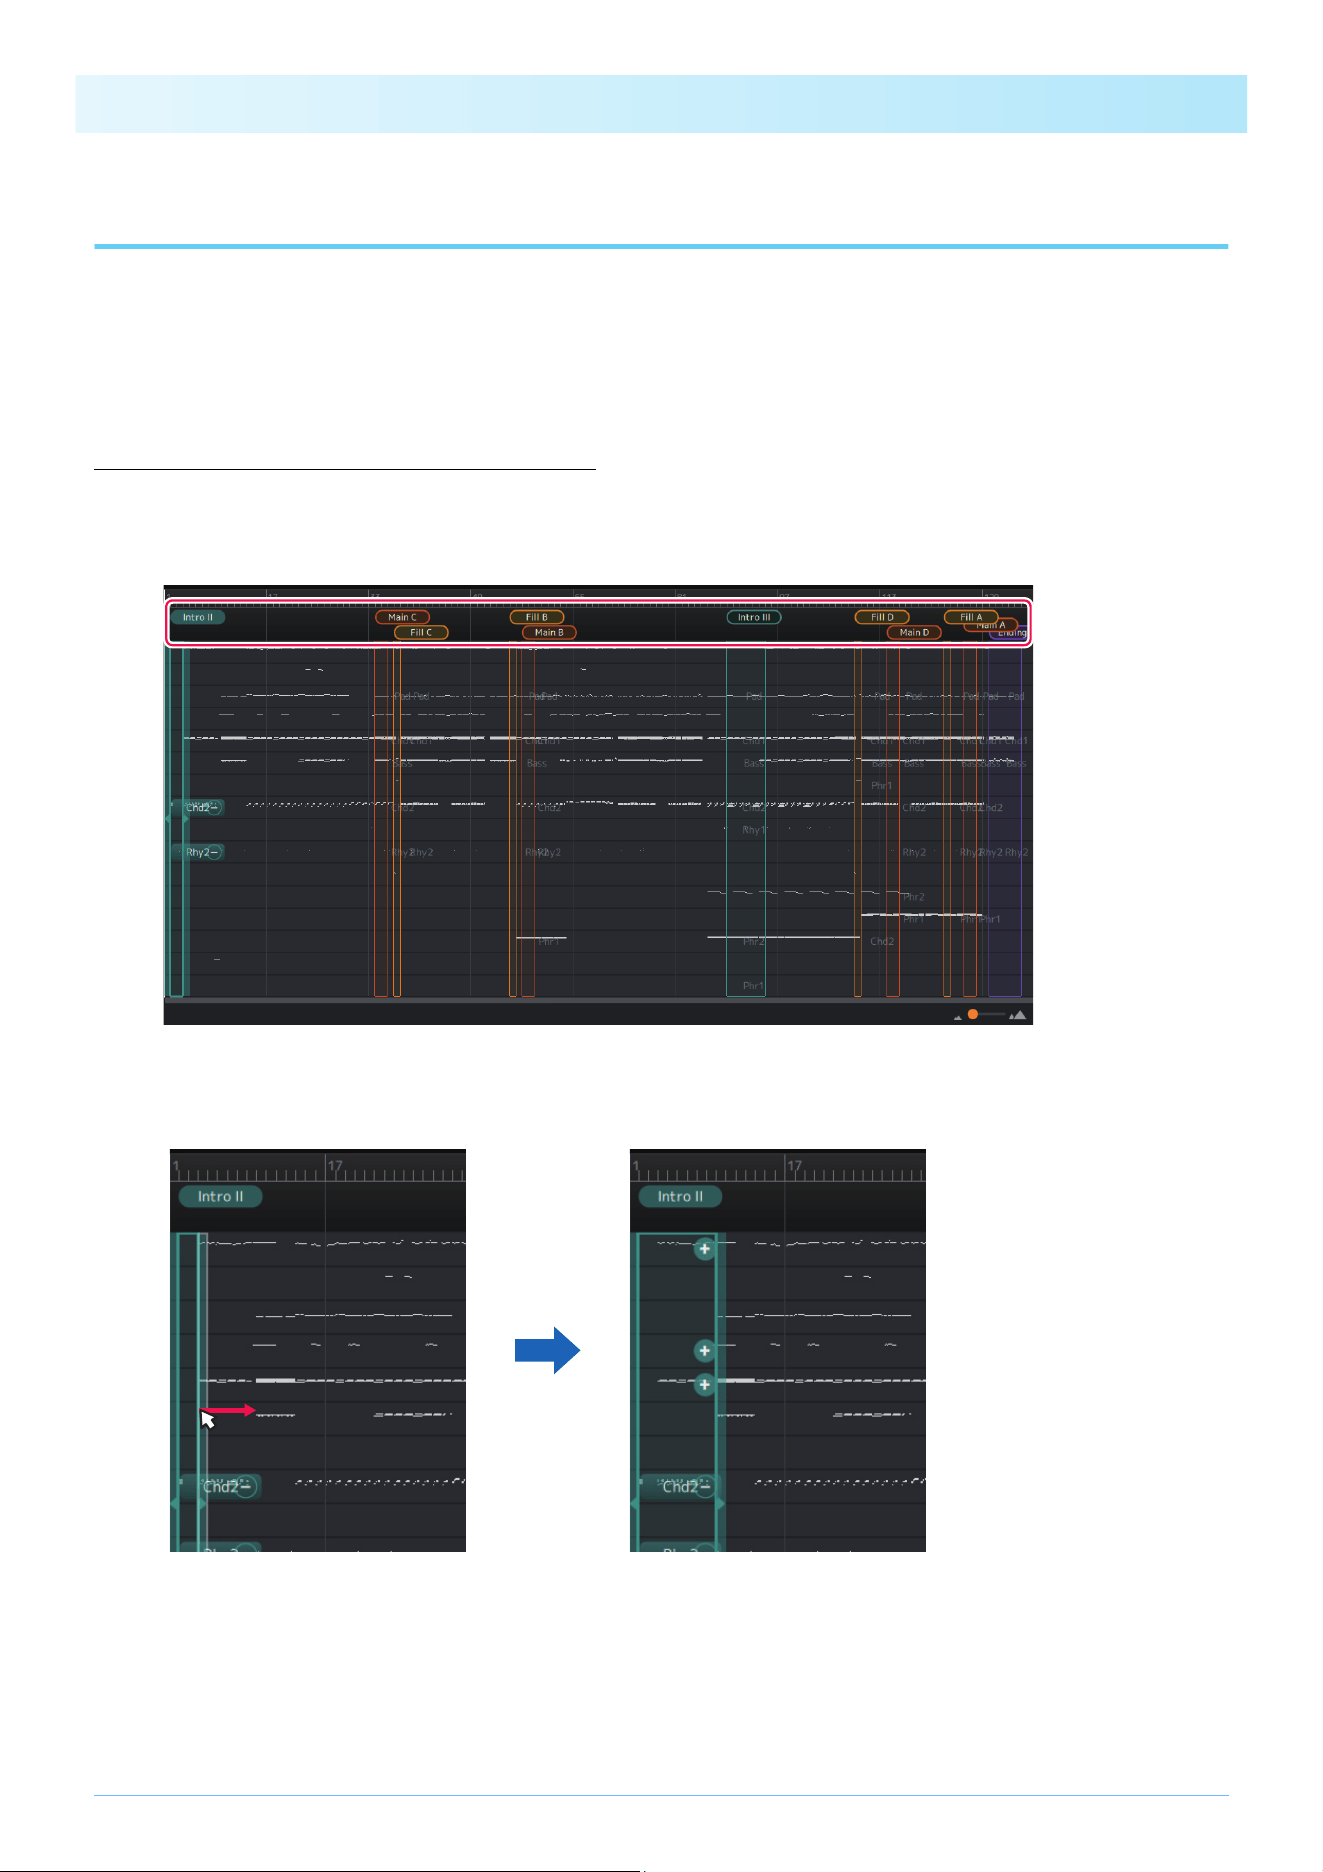
Changing the range of Sections
1. Click the Section name at the top of the display and select the Section whose range you want
to change.
The selected Section will be highlighted. In this example, Intro II has been selected.
2. Drag the right or left edge of the Section range to adjust the range as desired.
The Section range has been changed.
NOTE
The editing operations introduced in this chapter can be undone or redone using [Edit] -> [Undo]/[Redo] in the menu at the top of the app.
How to Use the App
22
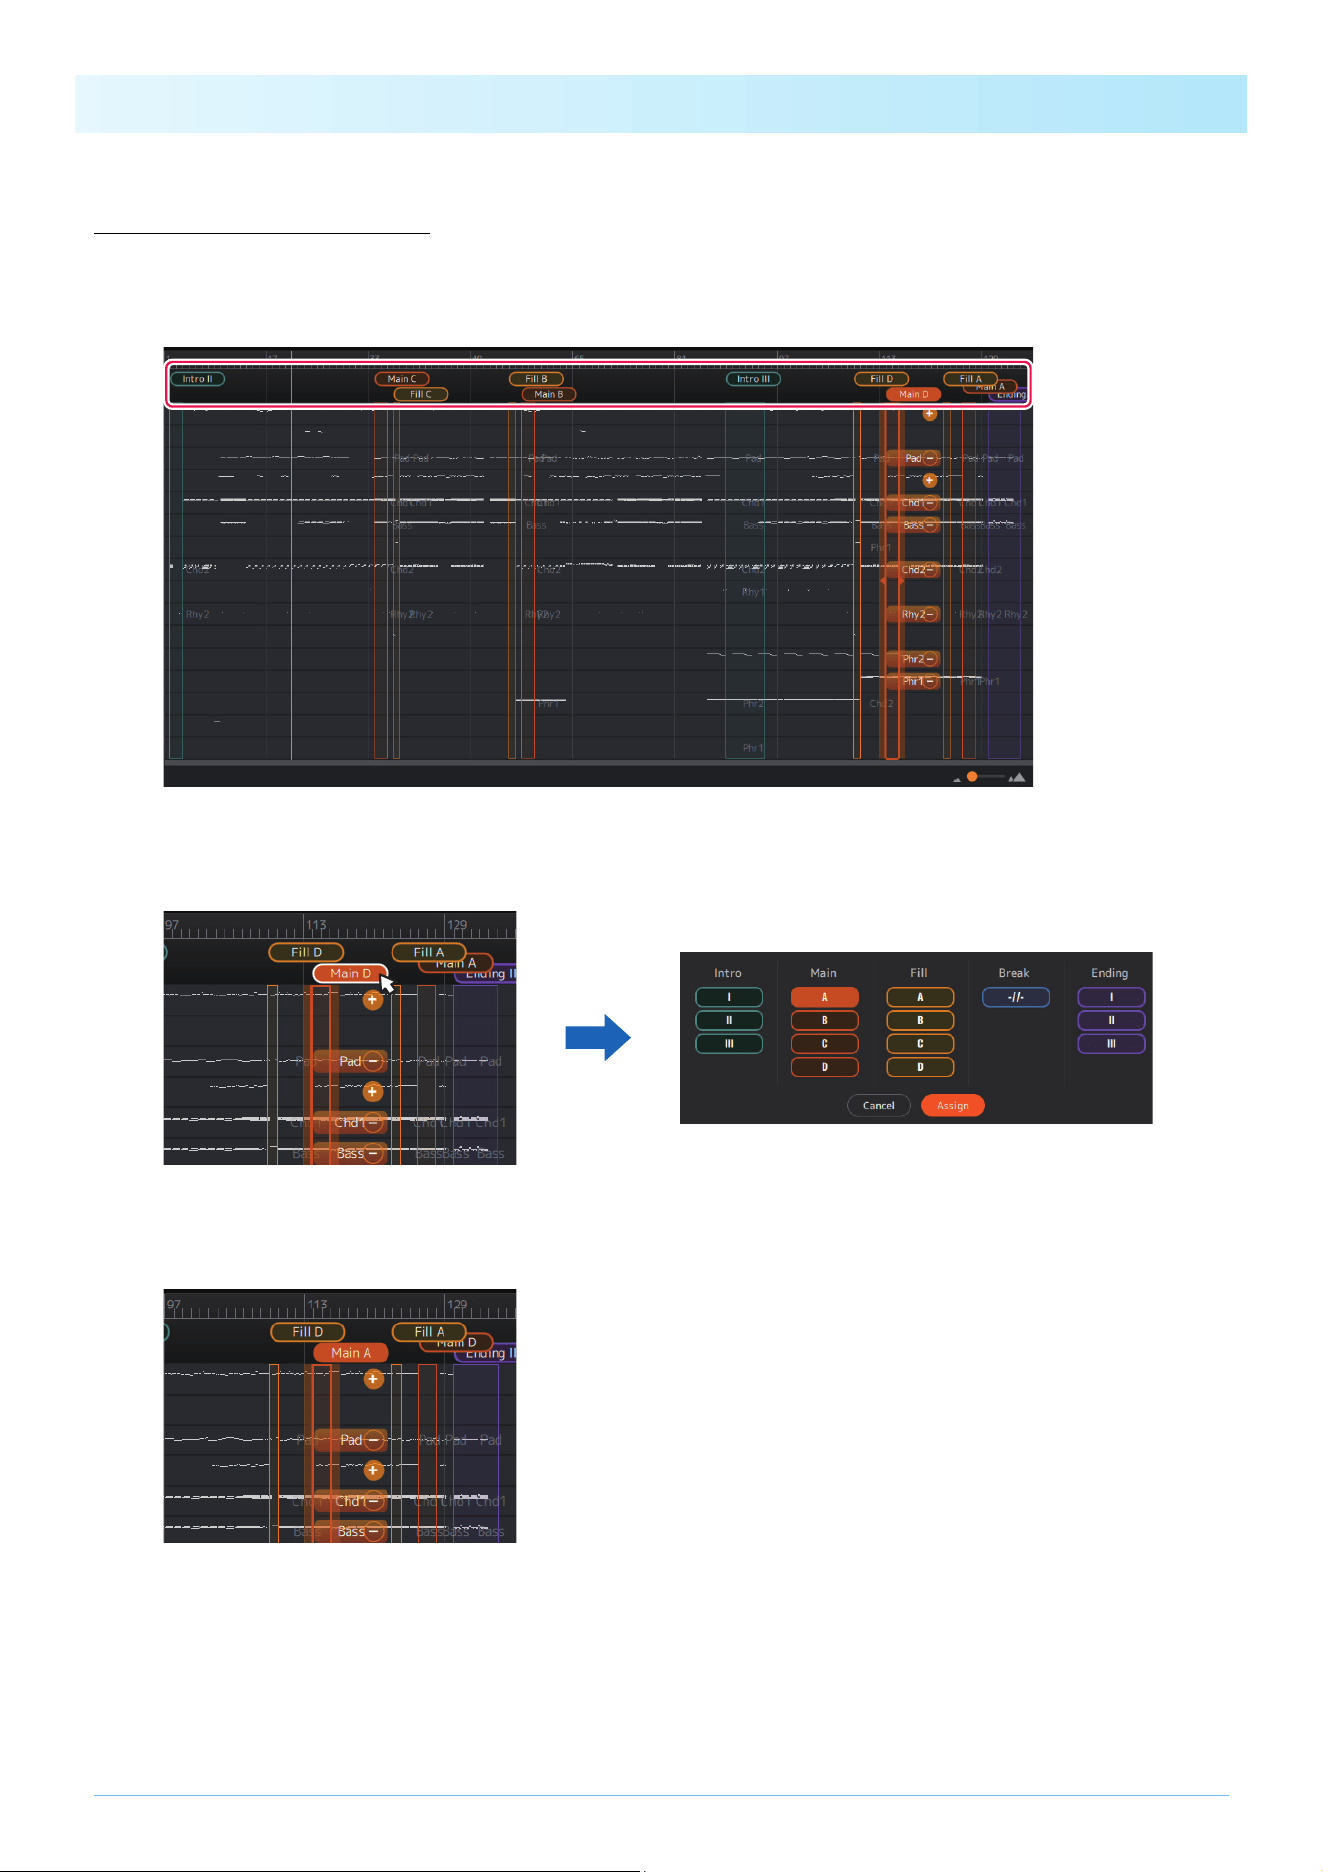
Reordering Sections
If the automatic Section assignment results are not in the desired order, you can reorder the Sections.
1. Click the Section name at the top of the display to select the Section you want to replace.
The selected Section will be highlighted. In this example, Main D is selected.
2. Click the selected Section name again.
The Section assignment popup is called up.
3. Select the Section name for the replace destination and click [Assign] to confirm.
The Section assignment has been changed. In this example, Main A and Main D have been replaced.
NOTE
You can maintain naturalness by replacing the Main Section and Fill In Section as a set.
You can maintain a natural feel by replacing the Main Section and Fill In Section as a set. For example, when you replace Main B
with Main C, you should also replace Fill B with Fill C to ensure consistency among the patterns.
How to Use the App
23
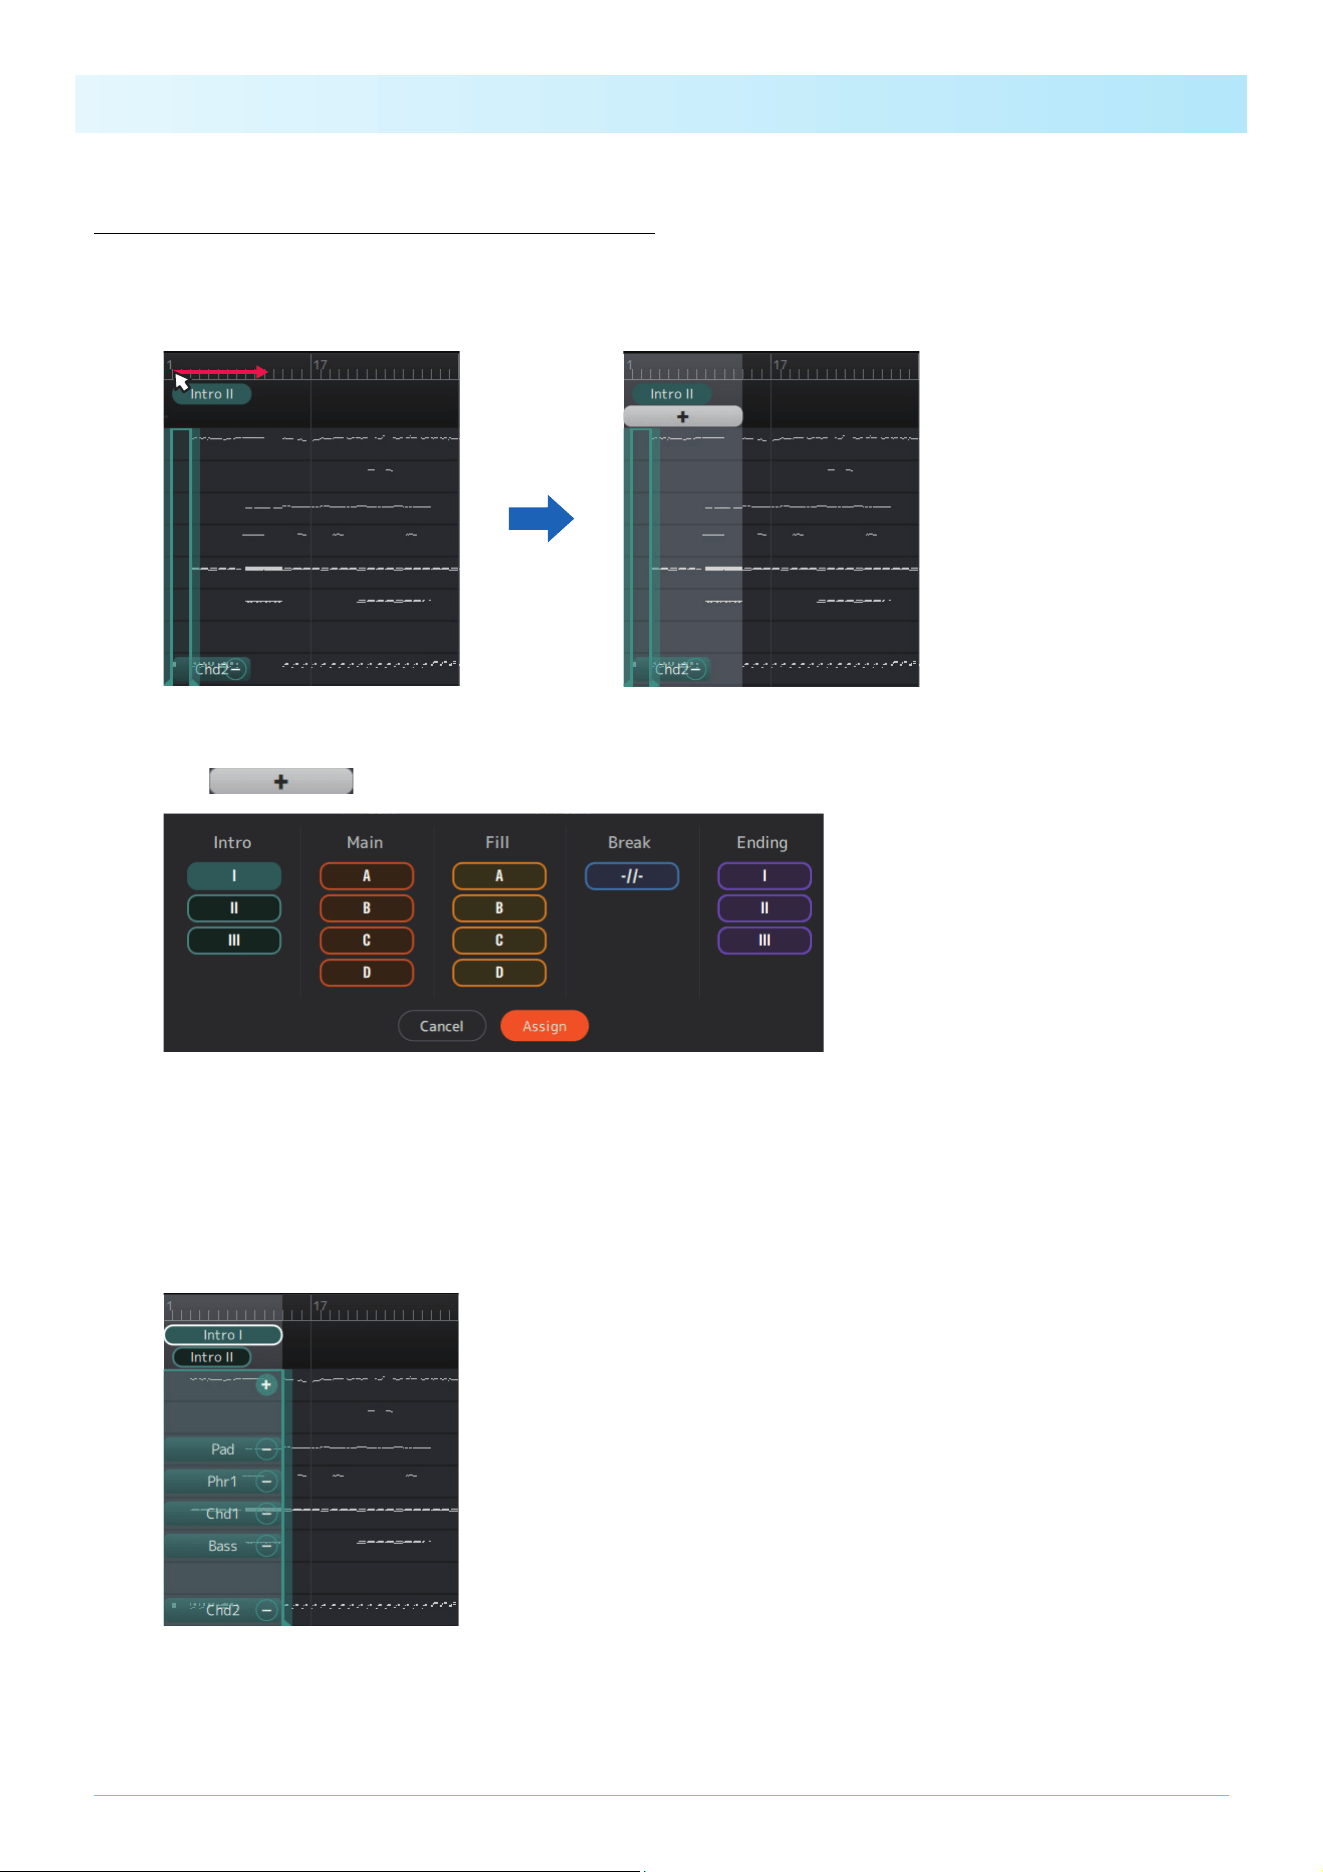
Assigning a new Section (manually)
You can specify a desired range to be used for assigning a new Section.
1. On the display, select the range to which you want to assign.
The selected range will be displayed.
2. Click .
The Section assignment popup is called up.
3. Select the Section name to which you want to assign the selected range and click [Assign] to
confirm.
• When you select a Section with no existing assignments, a new Section will be added.
• When you select a Section with existing assignments, the existing Section will be deleted and replaced with the new
range.
In this example, the selected range is newly added as Intro I.
How to Use the App
24
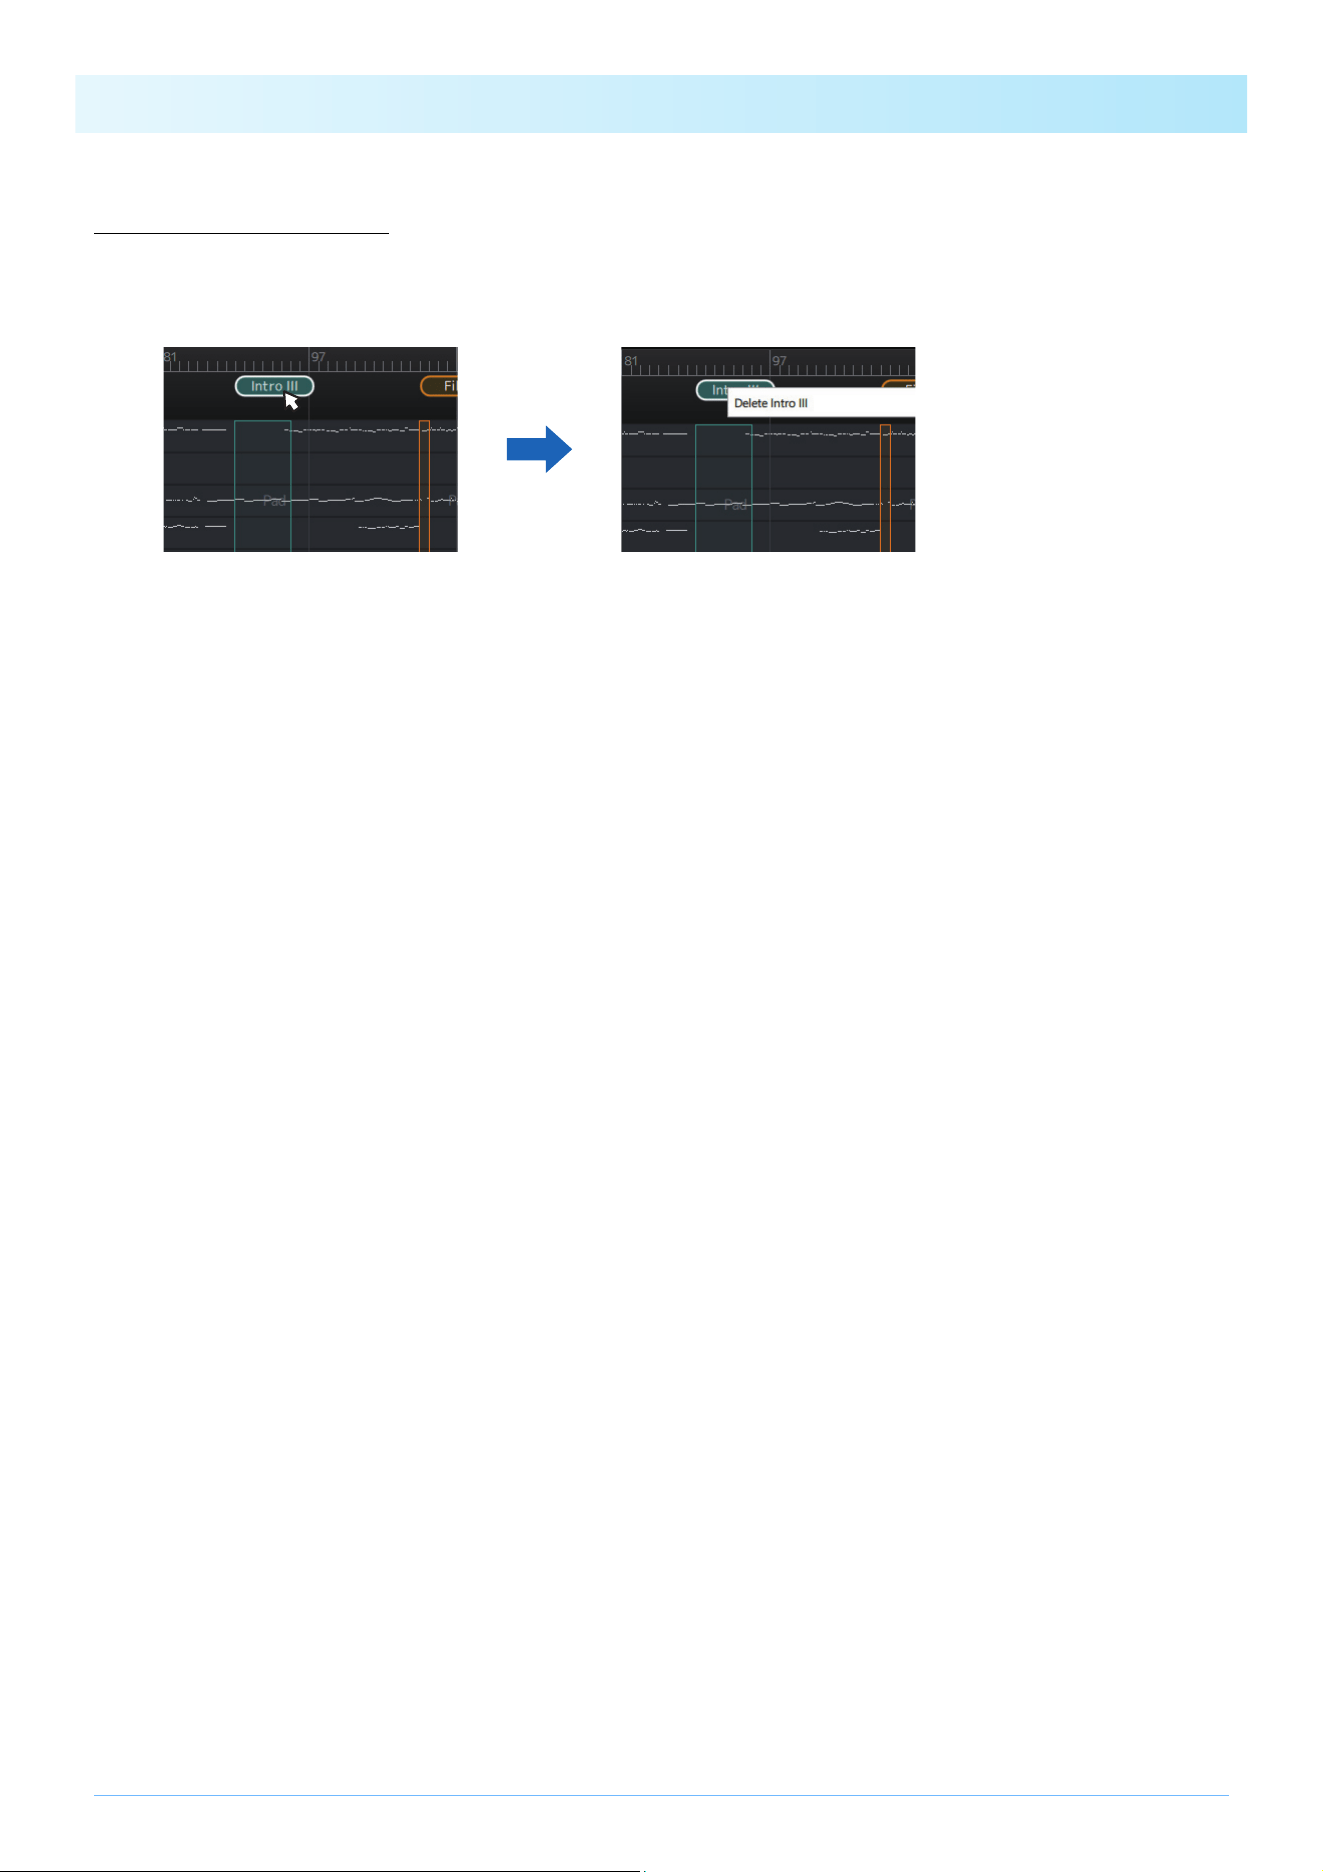
Deleting Sections
You can delete unnecessary Sections.
1. Right-click on the Section name you want to delete.
A delete menu is called up.
2. Click [Delete <Section name>].
The Section will be deleted.
How to Use the App
25
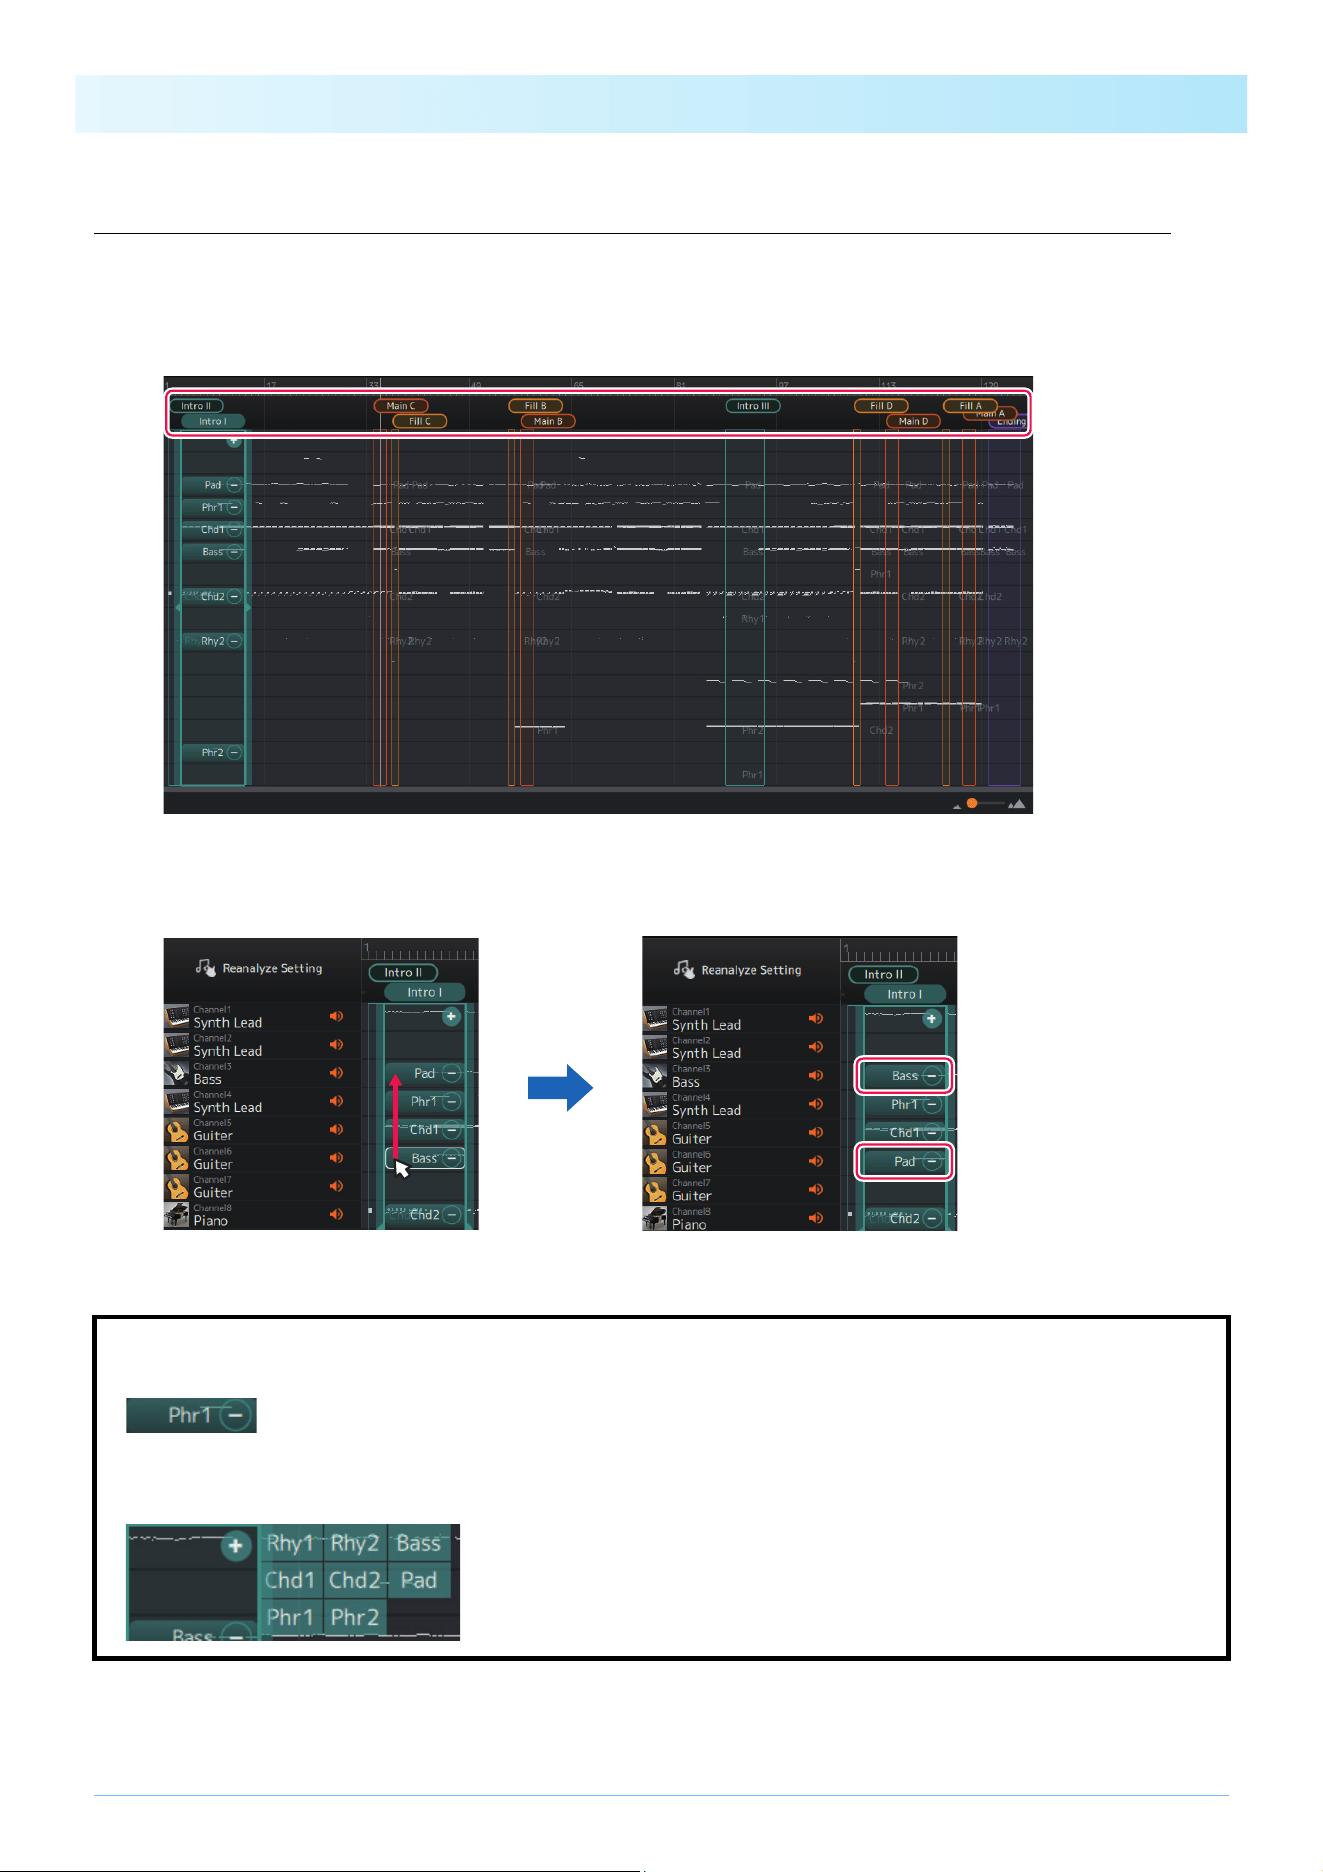
Changing the combination of Parts and MIDI channels within a Section
The assignment for which individual MIDI channels are converted to specific Style Parts can be changed independently for each
Section.
1. Click the Section name at the top of the display to select the Section you want to edit.
The channel assignment status for each Part in the selected Section will be displayed.
2. Drag and drop the Part whose assignment you want to change.
The drag source Part and drag destination Part have been replaced.
Removing or adding Parts within a Section
You can remove a Part assignment by clicking the [-] icon next to the Part name.
A [+] icon is displayed for unassigned channels that have performance data within the range of the Section.
Clicking on that [+] icon lets you select and assign a Section Part.
NOTE
If you want to set the Part assignments to channels for all Sections at once, you can do so in the Detailed Editing window (page 15).
How to Use the App
26
Changing the Voice for each channel of a Song (Detailed Editing)
You can change from the generic Voices specified in a MIDI Song to the higher quality Voices unique to the instrument.
1. Select [Edit] -> [Open DetailEdit Window] from the menu at the top of the app.
The Detailed Editing window is called up.
2. Change the Voice settings for each channel.
You can set this by using program change numbers or Voice names.
The imported Voice list (page 5) is used for the Voice name setting.
How to Use the App
27
Changing/resetting the volume for each Part of a Style
You can change the volume of each Style Part throughout all Sections.
The volume of each Part can be adjusted by operating the knobs below the Style Part names. Alternately, values can be edited
directly.
If you want to reset the changed volume to its initial state (the state when the MIDI Song was loaded), do one of the following:
• From the menu at the top of the app, open [Edit] -> [Reset Style Parameter] -> [Volume] and select the Part you want to reset.
• Hold down the CTRL key (Windows) or Command key (Mac) and click the knob corresponding to the Part you want to reset.
If you want to restore the previous change, select [Edit] -> [Undo].
How to Use the App
28
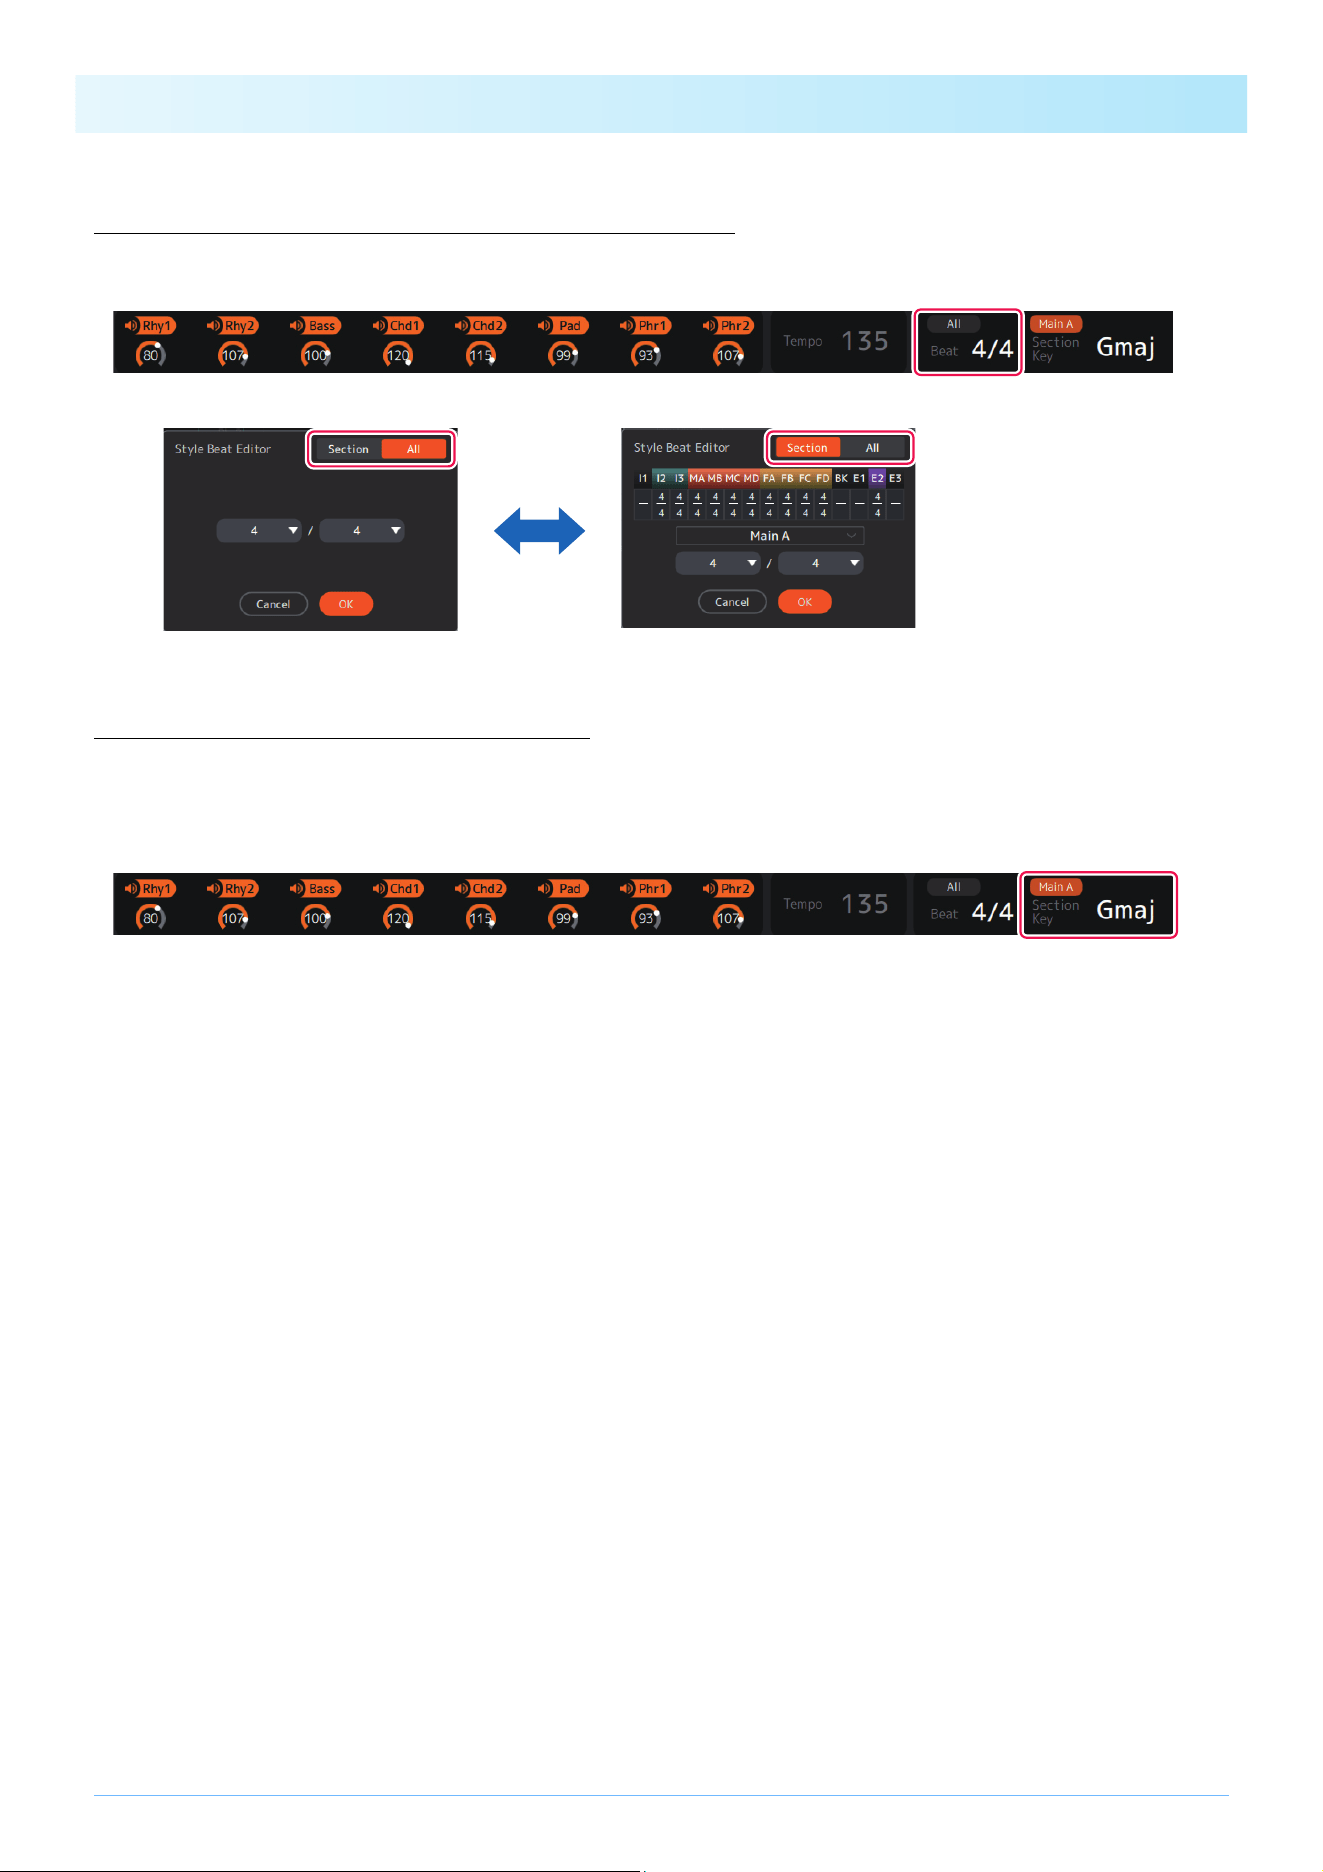
Changing the Style beat (Time Signature)
You can change the settings for the Style’s beat (Time Signature) after conversion.
Click the “Beat” area at the bottom of the display and set the value.
Editing of the beat settings can be switched between common (All mode) and each Section (Section mode).
Changing the Style Section key
Section key (Section Key Signature) is a parameter that indicates which key the data in each Section is based on.
When you specify chords with the same root note as this key during Style playback, Intro and Ending Sections will be played back
at the same pitch as the MIDI Song before conversion. Select the Section name you want to change at the top of the display, and
then click the “Section Key” area at the bottom of the display to set the value.
29
Appendix
Terminology
MIDI Songs (SMF)
• Electronic music score data. Loading such data into a compatible device allows music playback.
• Includes 16 “Channels” that allow you to specify different Voices (instrument sounds), volume, and performance content.
• SMF (Standard MIDI File) (.mid) is the name of the standard format for MIDI files.
Style related terms
Section:
A collective group of musical data (or pattern) that is used to build a song.
According to the progress of the performance or song, Sections are switched automatically or manually.
The Sections include Intro I-III, Main A-D, Fill In A-D, Break, and Ending I-III.
Playback example:
Part:
A component within a Section. Voices, etc. can be set for each Part individually. Parts are equivalent to channels in a MIDI Song.
The Parts include Rhythm 1-2, Bass, Chord 1-2, Pad, and Phrase 1-2.
Style file:
Style file format (SFF) is a format related to Yamaha’s auto accompaniment function (Style).
There are two formats: SFF and SFF GE.
SFF GE (Guitar Edition) is an extended format of SFF that further enhances the expressiveness of guitar Voices.
MIDI Song to Style exports Style files in SFF GE format.
NOTE
Automatic conversion in MIDI Song to Style always leaves some Sections (Intro I, Break, Ending I, Ending III) unassigned, making it
necessary (and desirable) to assign these manually.
Operation
Style playback
INTRO
[I]
START/
STOP
MAIN
[B]
ENDING
[II]
Stop
Intro I
(once)
Main A
(loop)
Fill In B
(once)
Main B
(loop)
Ending II
(once)
Main A
Rhythm 1
Rhythm 2
Bass
Chord 1
Chord 2
Pad
Phrase 1
Phrase 2
Main B
Rhythm 1
Rhythm 2
Bass
Chord 1
Chord 2
Pad
Phrase 1
Phrase 2
Appendix
30
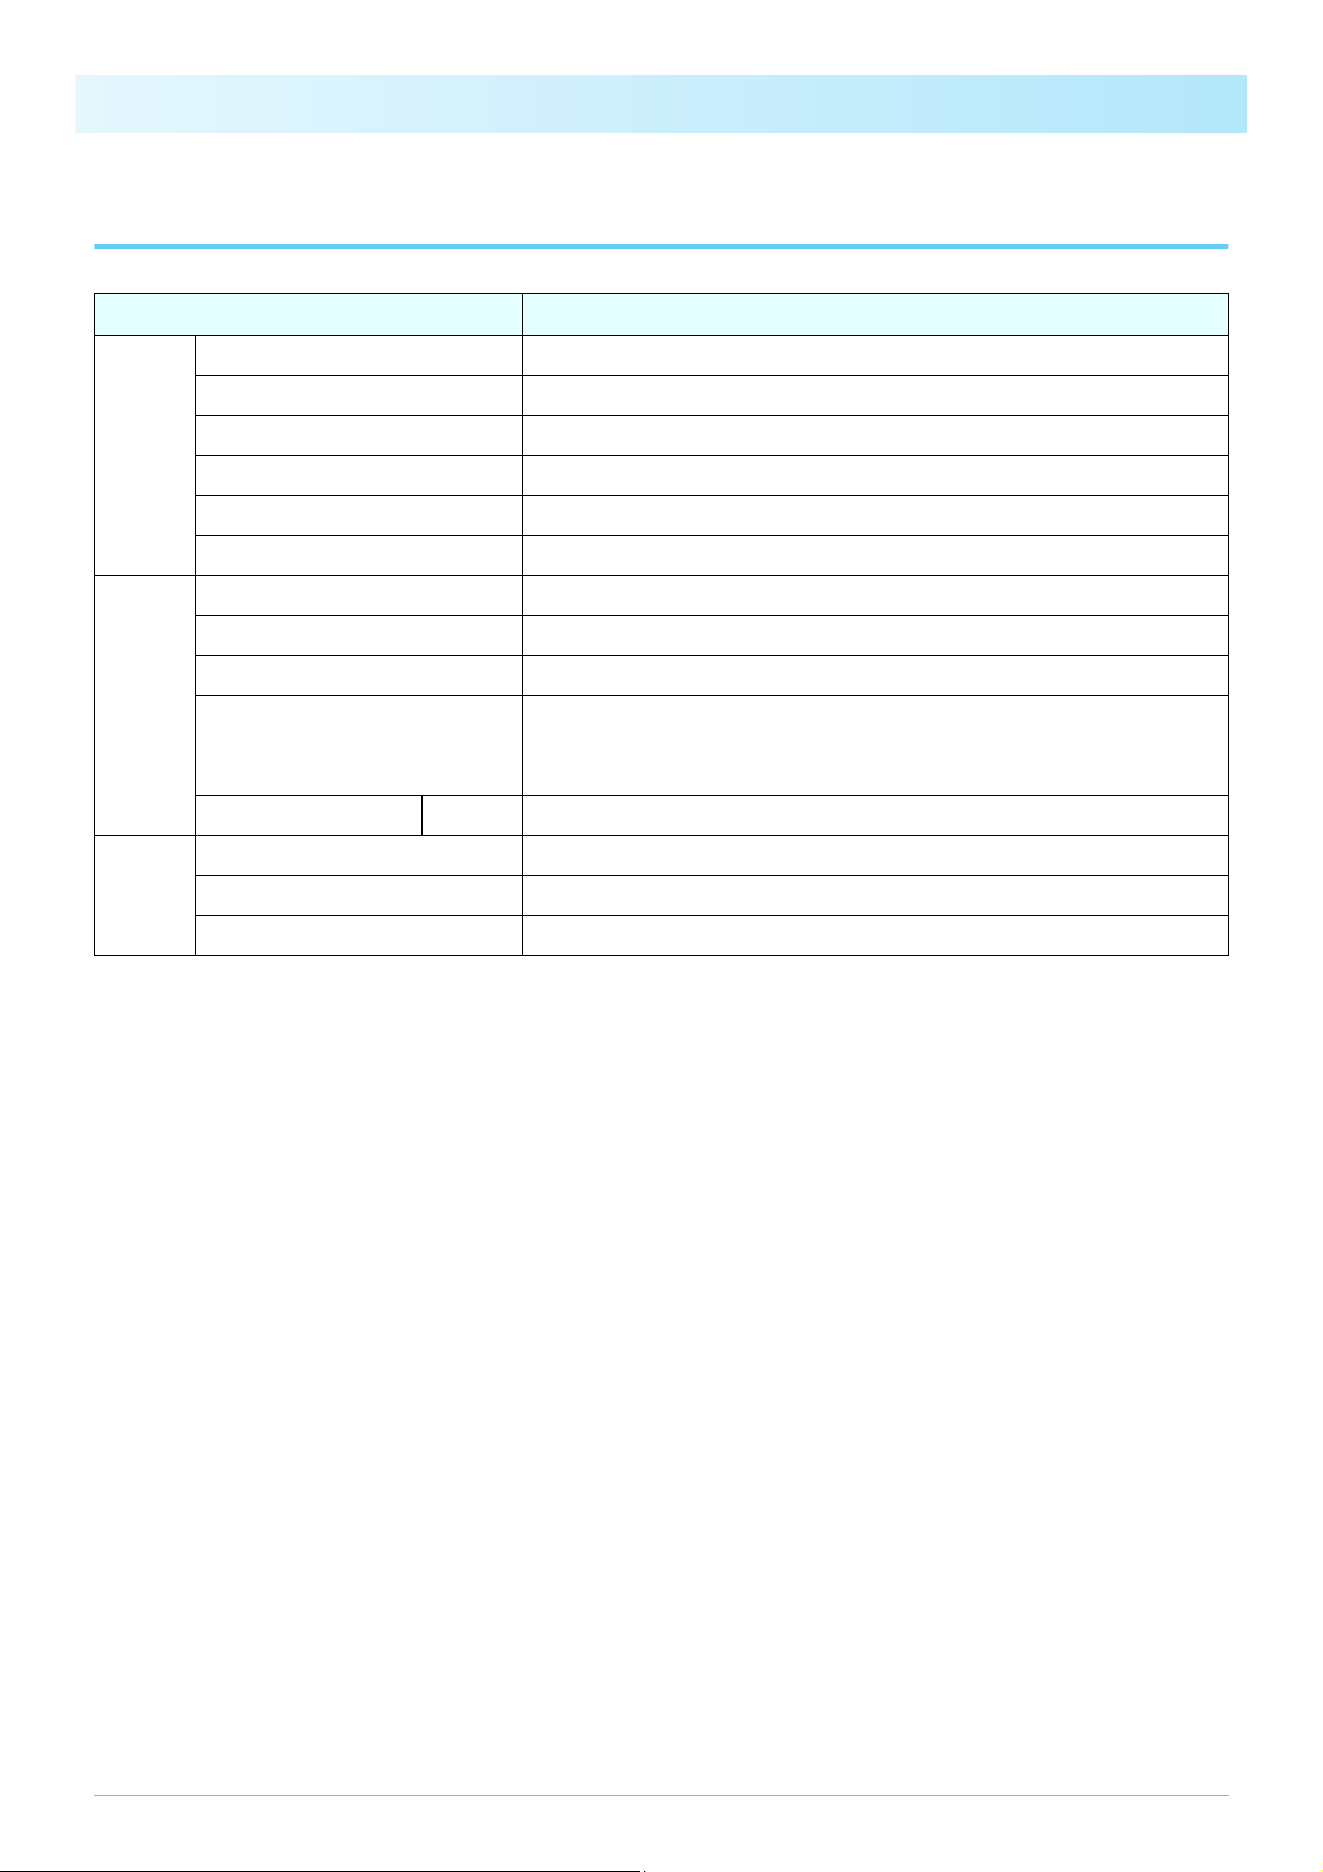
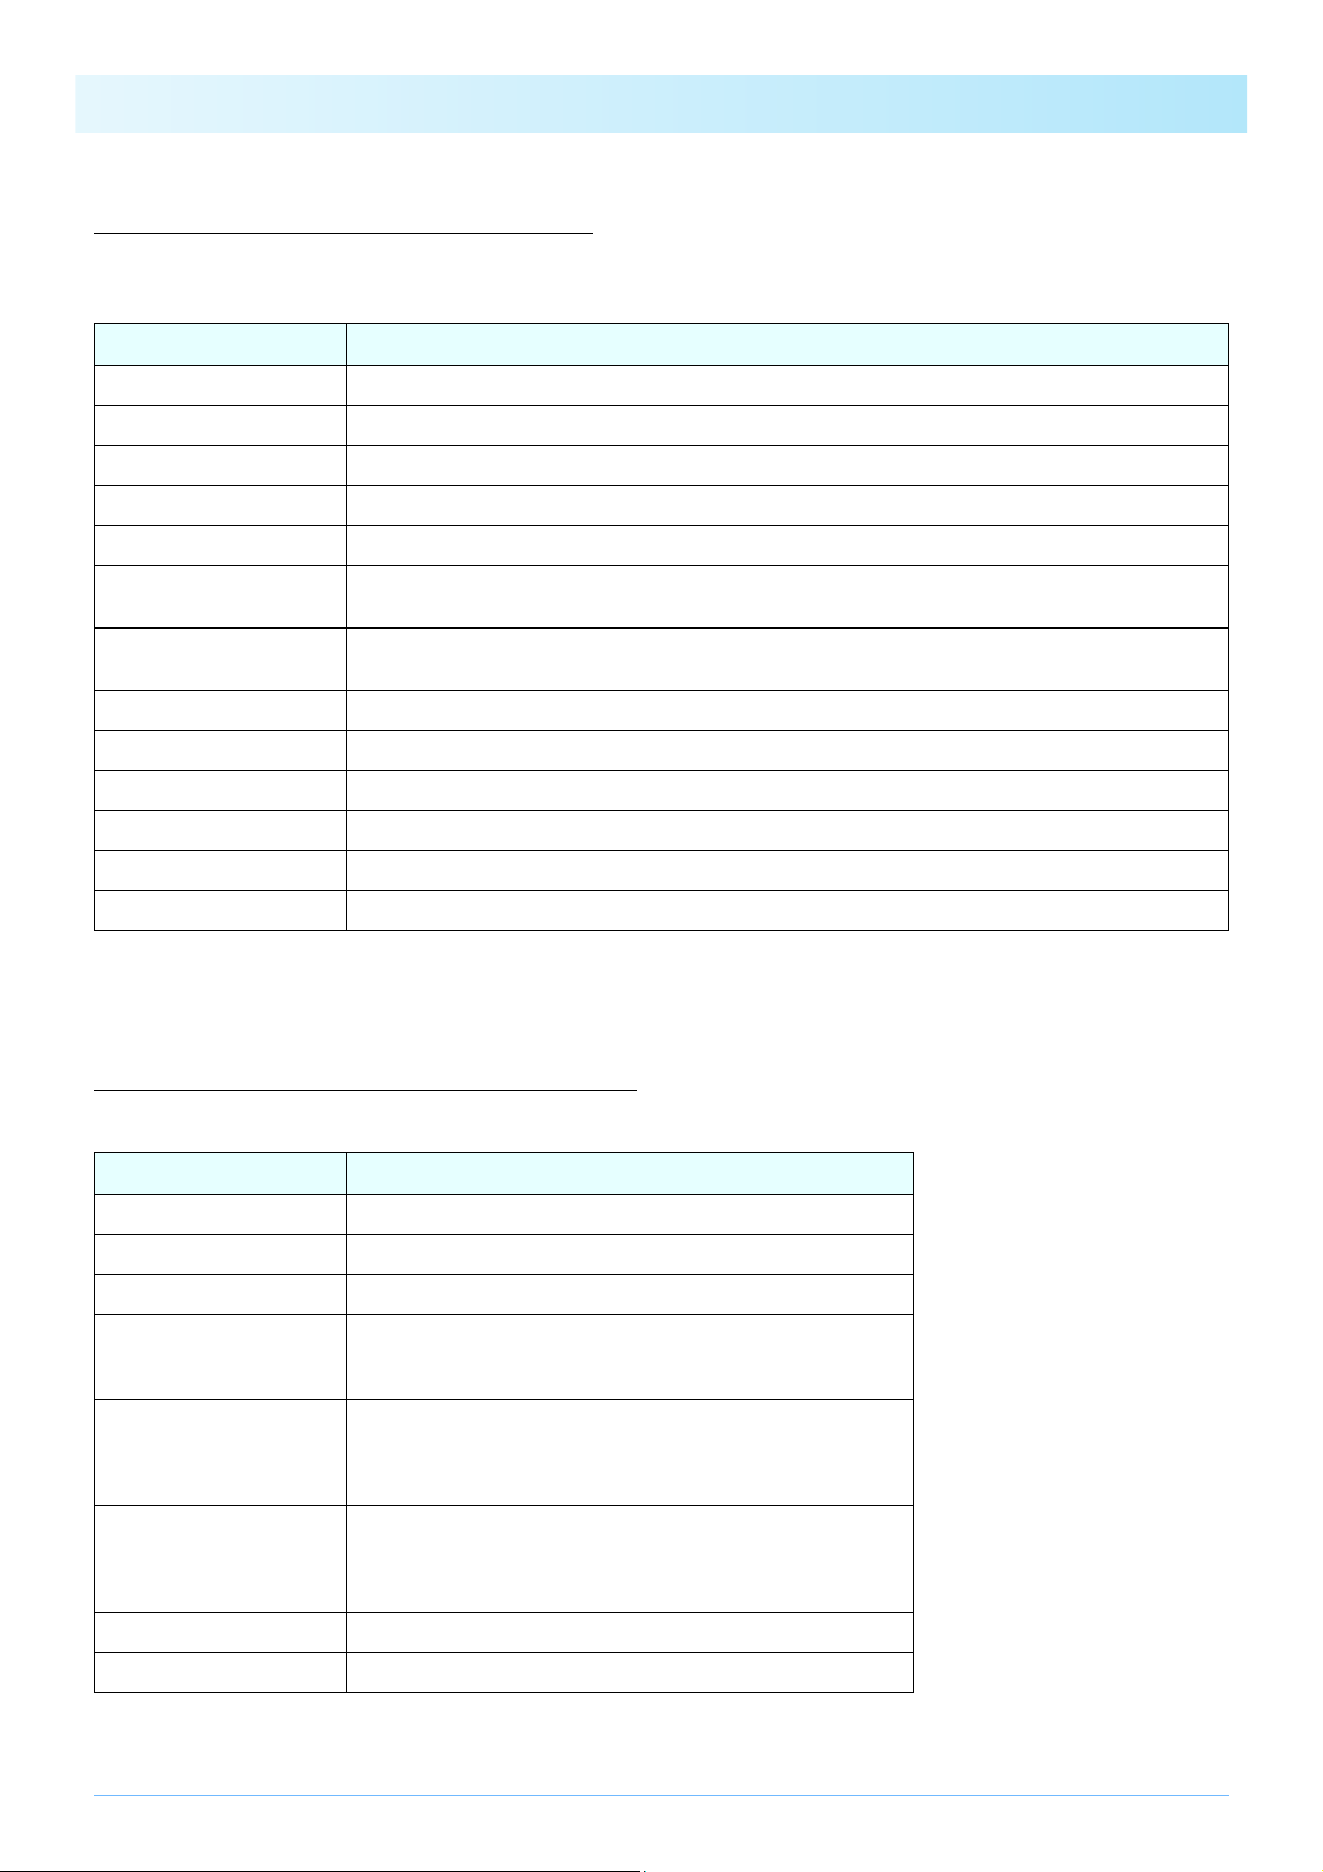
Menu List
* For the Mac version, this Menu can be found in the menu of the “MIDI Song to Style” app.
Menu Description
File
Open SMF Loads MIDI Song files (.mid,.midi).
Save Style File Saves the converted Style file to the computer.
Open Project Loads the project file (.sts) and reproduces the editing state at the time of saving.
Save Project Saves the project being edited to a project file in a proprietary format (.sts).
Recent Files Selects recently opened files.
Exit (Quit)* Exits the app.
Edit
Undo Returns the editing state to the previous step.
Redo After using Undo, advances the editing state one step forward.
Open DetailEdit Window Opens the Detailed Editing window.
Import Voice List
Imports the Voice list.
NOTE
The Voice list is used when specifying Voices in the Detailed Editing window.
Reset Style Parameter Volume Resets the volume for each Part of the Style.
Help
Manual Displays the Owner’s Manual (this book).
Privacy Statement Displays the Privacy Policy.
About* Displays the app version and copyright.
Appendix
31
Keyboard Shortcuts
Operation Shortcut
Loading a MIDI Song file (.mid) Ctrl + Shift + O
Saving a Style file (.sty) Ctrl + Shift + S
Loading a project file (.sts) Ctrl + O
Saving a project file (.sts) Ctrl + S
Undo Ctrl + Z
Redo Ctrl + Shift + Z
Open the Detailed Editing display Ctrl + Shift + D
Play/stop a MIDI Song Space key
MIDI Song Playback Position: Go forward one bar . (period)
MIDI Song Playback Position: Go back one bar , (comma)
Play/Stop a Style (currently selected Section) Shift + Space key
Click [OK] Enter
Click [Cancel] Esc
Close the active separate window Ctrl + W
Home (Edit) display: Zoom in the overview of MIDI Song data H
Home (Edit) display: Zoom out the overview of MIDI Song data G
NOTE
• Keyboard shortcuts may not be available immediately after entering numbers on the keyboard. If this happens, click once anywhere on
the display to activate the shortcuts.
• For Mac, replace Ctrl with Command.
• Keyboard shortcuts only work when the corresponding window is active.
Appendix
32
Meta Events Texts when Specifying Sections and Parts (Markers, Track Names)
This is a table of the valid strings that are correctly recognized by the app when specifying Sections and Parts using Meta Events
within a MIDI song. For an overview of the functions, see the Other Settings display (page 13).
For specifying Sections: Meta Event 06 (Marker)
The area from a valid Marker to the next valid Marker will be assigned as the specified Section.
For specifying Parts: Meta Event 03 (Sequence/Track Name) or 04 (Instrument Name)
If the Track Name/Instrument Name for a channel matches one of the names in the table below, the channel is assigned to the
corresponding Part.
Section Text in Meta Event
Intro I Intro i, Intro 1, Intro A
Intro II Intro ii, Intro 2, Intro B
Intro III Intro iii, Intro 3, Intro C
Main A Main A
Main B Main B
Main C Main C
Main D Main D
FIll In A Fill A
Fill In B Fill B
Fill In C Fill C
Fill In D Fill D
Break Break
Ending I Ending i, Ending 1, Ending A
Ending II Ending ii, Ending 2, Ending B
Ending III Ending iii, Ending 3, Ending C
End of Section End of Section, End, EOS
Part Text in Meta Event
Rhythm 1 Rhythm1, Rhy1, AddDrum
Rhythm 2 Rhythm2, Rhy2, MainDrum
Bass Bass
Chord 1 Chord1, Chd1
Chord 2 Chord2, Chd2
Pad Pad
Phrase 1 Phrase1, Phr1
Phrase 2 Phrase2, Phr2
NOTE
Only alphanumeric characters (ASCII character set) can be used in the text of Meta Events.
If double-byte characters are used, the text will be garbled and will not be recognized correctly.
Appendix
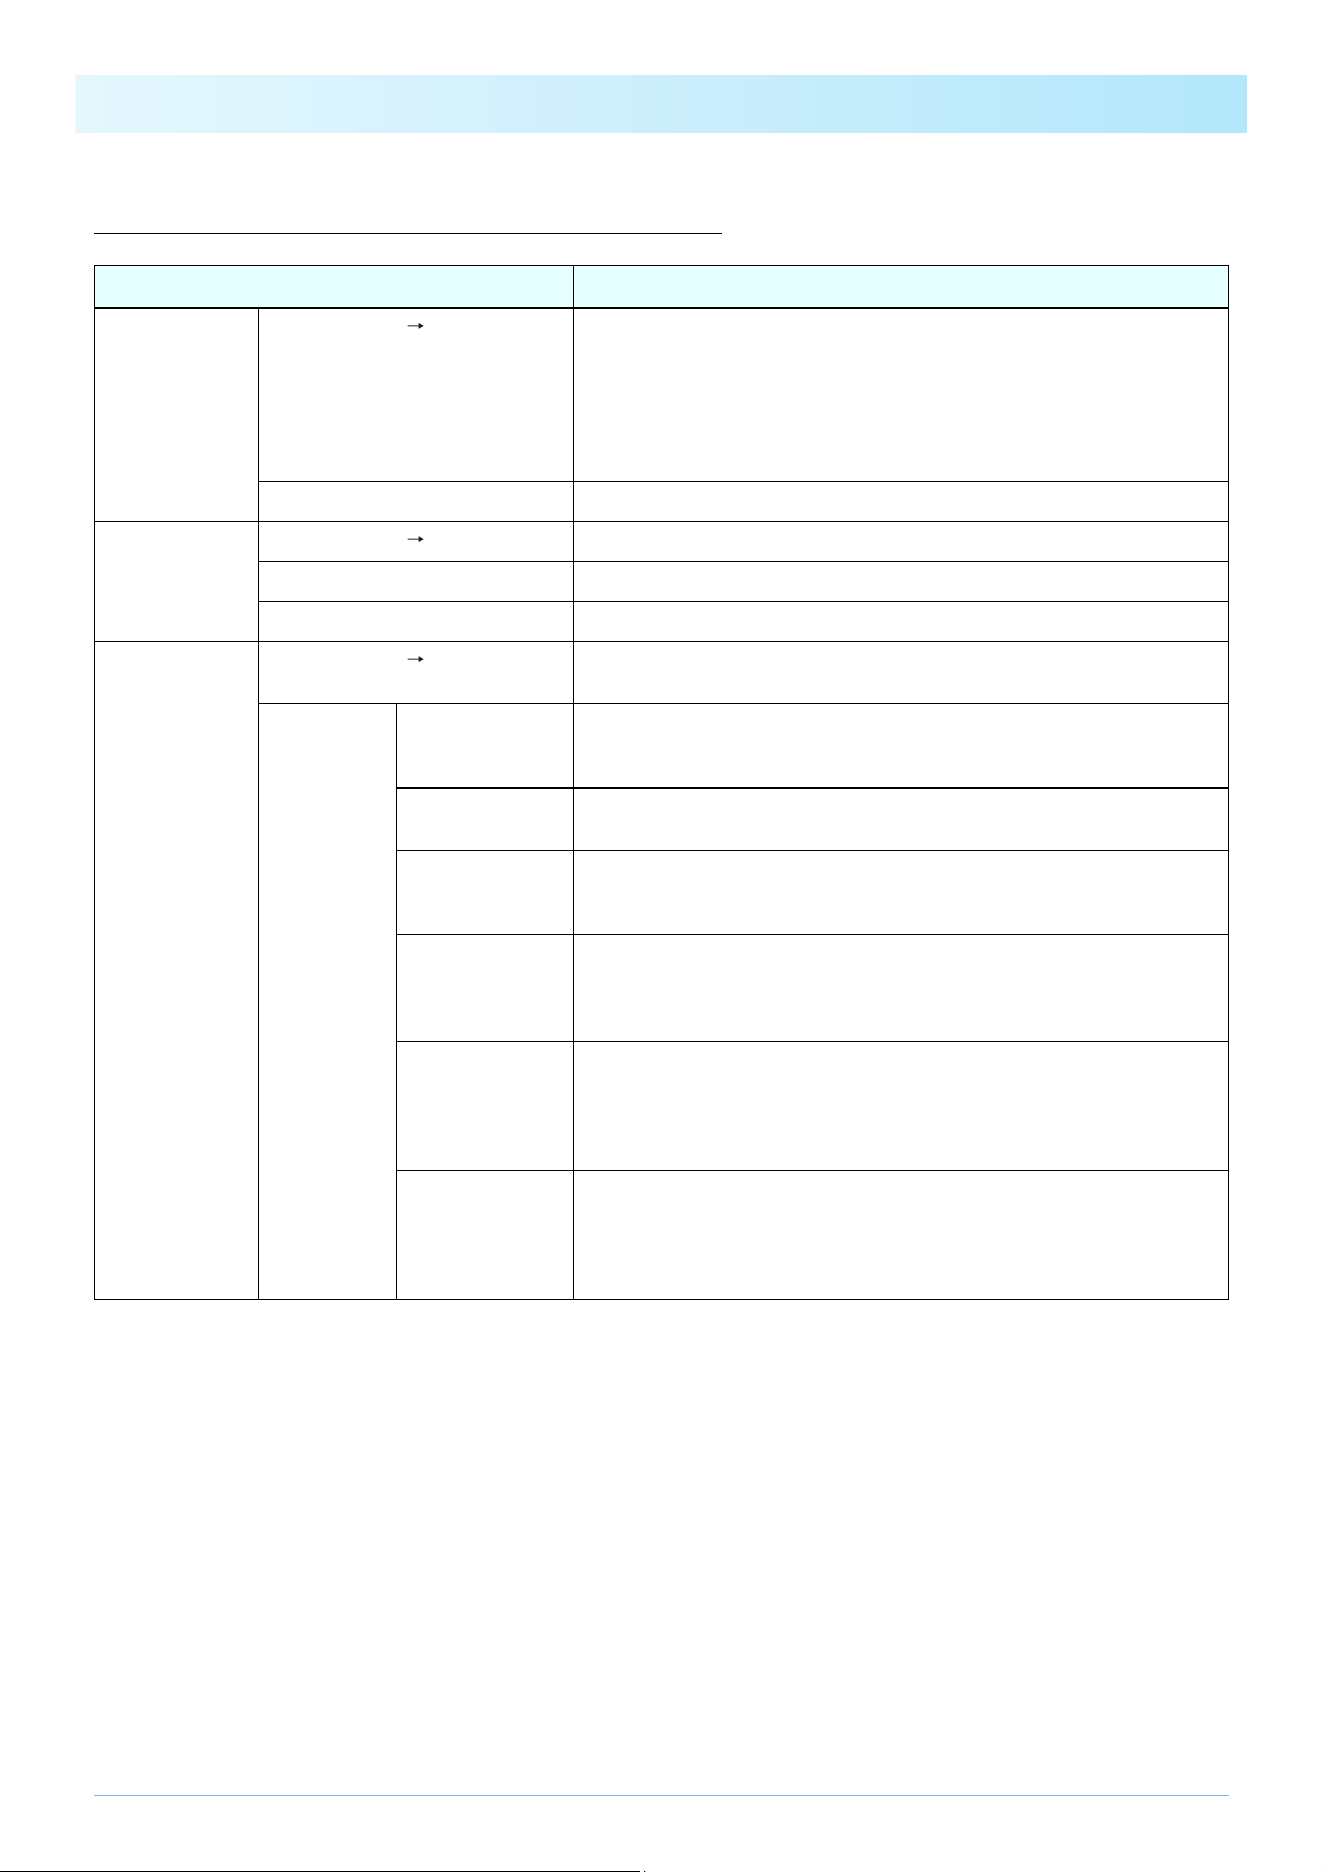
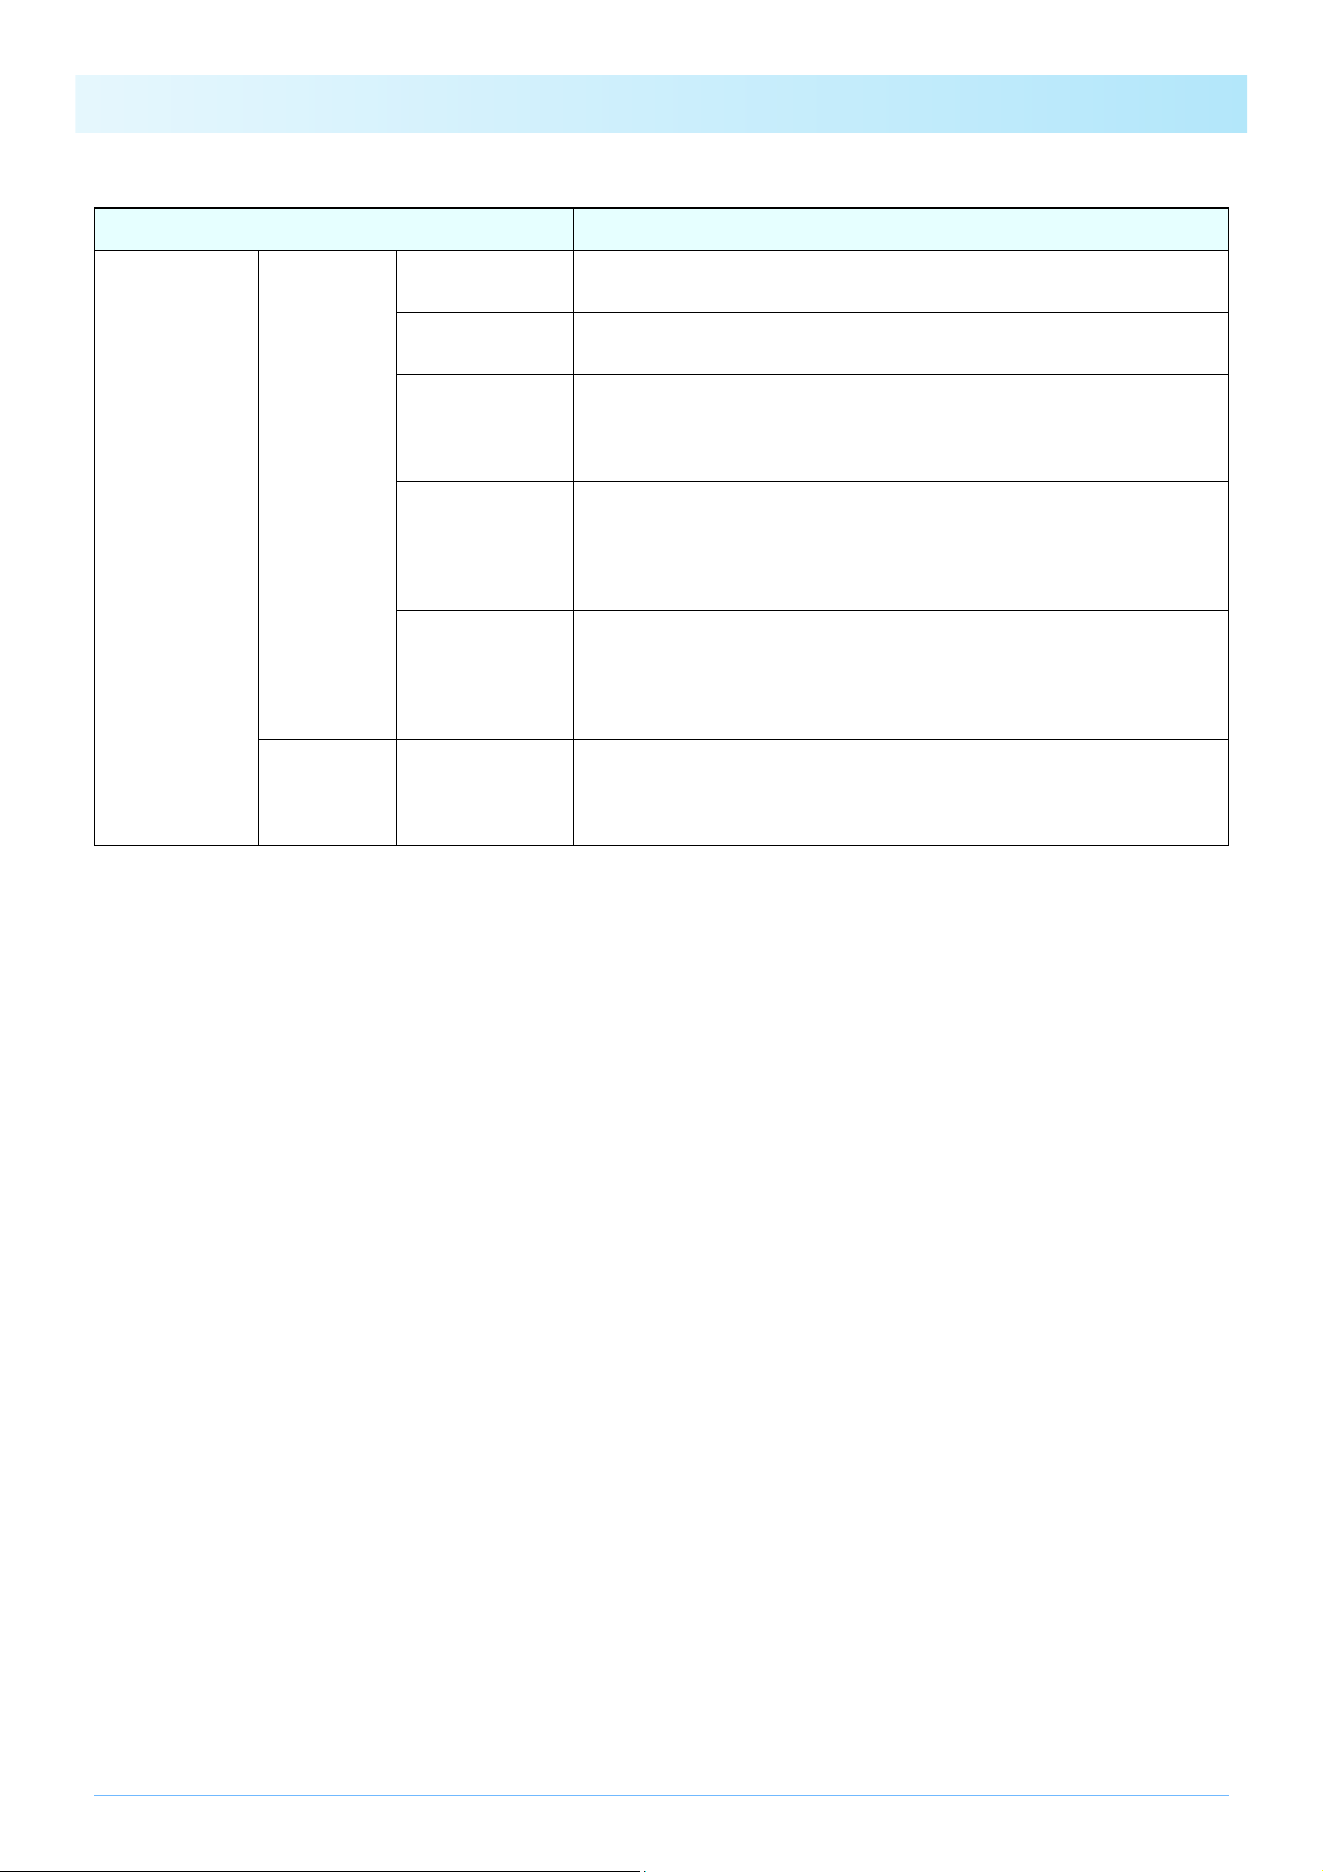
34
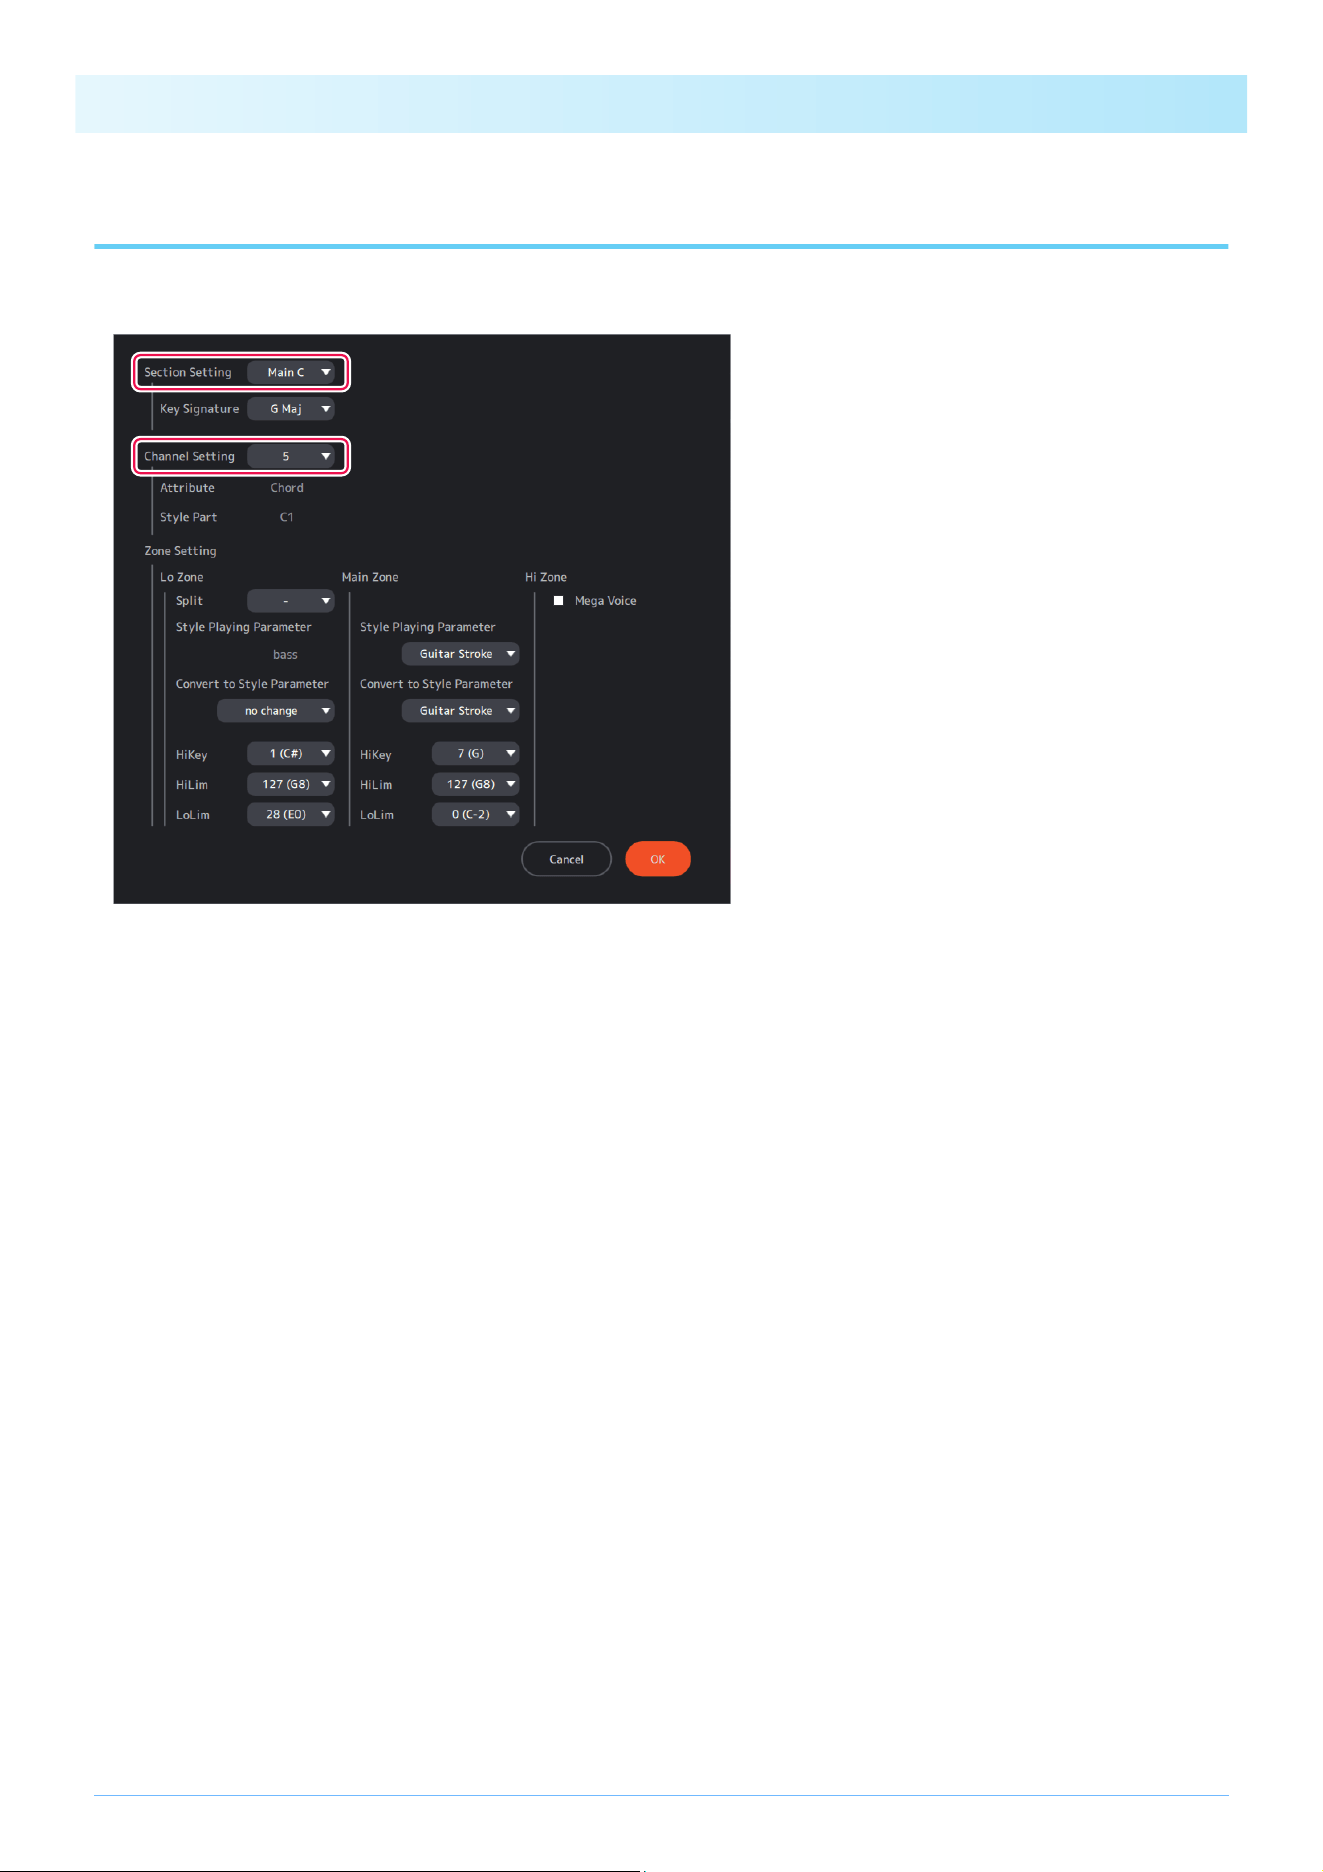
Descriptions of each item on the display
Item name Description
Section Setting Switches the Section to edit.
Only for this item, the Section name display differs from the normal display.
Replace Section names with the following when you see:
• Intro A-C: Intro I-III
• Fill In AA-DD: Fill In A-D
• Fill In BA: Break
• Ending A-C: Ending I-III
Key Signature Determines the Section Key Signature.
Channel Setting Switches the MIDI channel to be edited within the selected Section.
Attribute Displays channel attributes (automatic analysis results).
Style Part Displays the Part assignment of the selected channel within a Section.
Zone Setting Divides the area and sets the operation for the above channels (style Parts
assigned to channels) within a Section range.
Lo Zone Split Determines where to separate the Lo Zone and Main Zone.
Enter the lowest key value (-, 1 to 127) of the Main Zone.
If the value is “-”, the settings in the Lo Zone will be disabled.
Style Playing
Parameter
Displays the Style Playing Parameter for the Lo Zone (automatic setting and edit-
ing are not allowed).
Convert to Style
Parameter
Determines the note conversion rules for the Lo Zone when converting to a
Style.
There are four options: Root only, Active for Main, Semi-active Bass, and -.
HiKey
(High Key)
Determines the standard value (0 to 11: C to B) for switching whether to trans-
pose up or down during Style playback for the Lo Zone.
When a note higher than this value is specified as the chord root during
playback, the transpose will be downward.
LoLim
(Low Limit)
Determines the minimum transpose value (0 to 127) during Style playback for
the Lo Zone.
If the transpose calculation result becomes a number smaller than this value
during playback, actions such as octave folding or stopping of sound will be
performed according to Style Playing Parameter.
HiLim
(High Limit)
Determines the maximum transpose value (0 to 127) during Style playback for
the Lo Zone.
If the transpose calculation result becomes a number greater than this value
during playback, actions such as octave folding or stopping of sound will be
performed according to Style Playing Parameter.
Appendix
35
Zone Setting Main Zone Style Playing
Parameter
Determines the Style Playing Parameter for the Main Zone.
Convert to Style
Parameter
Determines the note conversion rules for the Main Zone when converting to a
Style.
HiKey
(High Key)
Determines the standard value (0 to 11: C to B) for switching whether to trans-
pose up or down during Style playback for the Main Zone.
When a note higher than this value is specified as the chord root during
playback, the transpose will be downward.
LoLim
(Low Limit)
Determines the minimum transpose value (0 to 127) during Style playback for
the Main Zone.
If the transpose calculation result becomes a number smaller than this value
during playback, actions such as octave folding or stopping of sound will be
performed according to Style Playing Parameter.
HiLim
(High Limit)
Determines the maximum transpose value (0 to 127) during Style playback for
the Main Zone.
If the transpose calculation result becomes a number greater than this value
during playback, actions such as octave folding or stopping of sound will be
performed according to Style Playing Parameter.
Hi Zone Mega Voice Determines whether to perform MegaVoice processing on notes in the Hi Zone
(C6 or higher).
If checked notes above C6 or higher will not be converted and will continue to be
played correctly when using MegaVoice.
Item name Description
Appendix
36
About Style Playing Parameters
These are note conversion rules that allow each Part of a Section to correspond to a chord specification during Style playback.
Choosing presets that match the characteristics of each Part will ensure the quality and accuracy of your performance.
About Convert to Style Parameters
These are the rules for converting notes in channels to notes in Style Parts.
Preset name Description
Bass For Bass Part of Main/Fill Section.
Bass (Intro) For Bass Part of Intro/Ending Section.
Chord For a Part which mainly consists of multi-note chords of Main/Fill Section.
Phrase chordal For a Part which mainly consist of single-note, dispersed chords (arpeggios, etc.) of Main/Fill Section.
Phrase melodic For a Part which mainly consists of single-note melodic phrases of Main/Fill Section.
Guitar Stroke
For a Part which uses a guitar Voice and mainly consists of multi-note chords (chord strokes, etc.) of Main/Fill
Section.
Guitar Arpeggio
For a Part which uses a guitar Voice and mainly consists of single-note, dispersed chords (arpeggios, etc. ) of
Main/Fill Section.
Chromatic For a Part which mainly consists of chromatic scale phrases of Main/Fill Section.
Maj-min (Intro) For a Part other than Bass and Phr1-2, of Intro/Ending Section.
Drum with cymbal For a Part using drum kit with Crash Cymbal.
Drum no cymbal For a Part using drum kit without Crash Cymbal.
SFX For a Part using SFX kit.
- No assignment (if there is no Part assignment).
NOTE
Parts set to Bass (Intro) or Maj-min (Intro) are strongly influenced by that’s Part’s Section key.
Preset name Description
no change The notes will not be changed.
Root only Only the chord root is reproduced.
Root & 5th Only the chord root and the perfect 5th will be reproduced.
Semi-active Bass
The original performance will be reproduced with some possible
limitations. The overall stability and appropriateness for specifying
chords during Style playback may be inferior to “Root Only.”
Stable for Main
Stable playback of multi-note chords is possible for specified chords
during Style playback.
However, the original performance may not be accurately
reproduced.
Active for Main
If the chord analysis results during analysis are appropriate, the
original performance will be accurately reproduced. If there are errors
in the chord analysis results, the converted Style may be musically
inappropriate.
Guitar Stroke Settings exclusive to “Guitar Stroke.”
Guitar Arpeggio Settings exclusive to “Guitar Arpeggio.”

Appendix
37
Restrictions on Convert to Style Parameter options
The Convert to Style Parameter options change depending on the Style Playing Parameter settings as shown in the table below.
Style Playing Parameter
Bass
Bass
(Intro)
Chord
Phrase
chordal
Phrase
melodic
Guitar
Stroke
Guitar
Arpeggio
Chromatic,
Maj-min (Intro),
Drums with cymbals,
Drums without
cymbals, SFX
Convert to Style
Parameter
no change
Root only
Root & 5th
Semi-active
Bass
Stable for Main
Active for Main
Active root
only
Active root &
5th
Guitar Stroke
Guitar
Arpeggio

Appendix
38
Troubleshooting
If the app fails to operate normally, check the following points to determine whether the problem can be corrected by the simple
measures suggested.
Problems Possible Causes Solutions
Files cannot be saved (transferred) to the
instrument although the app is connected to
the instrument.
No instruments are set for either or both
MIDI Input/Output Device.
Make sure the connected instrument is
properly set to both MIDI Input/Output
Device in the Setting.
Chords cannot be specified from the instru-
ment during Style preview although the app
is connected to the instrument.
The [ACMP] on the instrument side is turned
on. When the [ACMP] is on, chord informa-
tion is sent only to the instrument and not to
the computer.
Turn off the [ACMP] on the instrument.
The app display goes dark. The window is maximized. If you use the app
with the window maximized, the display of
other windows may be distorted due to OS
processing.
• Press the [ESC] key to cancel maximizing
the window.
• Use the app without maximizing the
window.
