ASSEMBLY AND USER’S GUIDE
IMPORTANT:
Review the instruction manual thoroughly before operating the machine.
Keep it for future reference.
SKU: 90155SPA SALT CHLORINATOR
WITH CONTROL BOX
90155


TABLE OF CONTENTS
1
TABLE OF CONTENTS
IMPORTANT SAFETY INSTRUCTIONS
OVERVIEW (PRODUCT INFORMATION)
PRODUCT OVERVIEW
INSTALLATION
PREPARE THE SPA
INSTALLATION INSTRUCTIONS
OPERATION
STARTUP
STANDBY MODE
TROUBLESHOOTING 9
Disclainmer
Legends and Symbols
DISCLAIMER 10
1
10
2
2
4
4
5
5
5
Customer Service and Technical Support
10
PRODUCT INTRODUCTION
4
7
CHLORINATION CYCLE
CHLORINE PRODUCTION SCHEDULE
ENERGY LEVEL ADJUSTMENT
7
7
7
SALINITY MONITORING
8
7
7
ELECTRODE LIFE INITIALIZATION
ELECTRODE MAINTENANCE
PROTECTION MODES
8
8
8
IMPORTANT SAFETY INSTRUCTIONS
2
For safety reasons, children should not be allowed to use this product.
Packing materials and plastic bags are not toys. Keep them away from children to prevent the risk
of suffocation.
Failure to comply with all instructions and warnings may lead to severe bodily
injury or even death. For optimal safety and functionality, it is advisable to have the product installed
and serviced by a certified service professional. Prior to using this product, installers, operators, and
owners must carefully review these warnings and all instructions provided in the owner's manual. It
is essential to leave these warnings and the owner's manual with the owner for their reference and
safety.
ATTENTION INSTALLER: This manual contains vital information regarding the installation,
operation, and safe use of this product. It is essential to provide this manual to the end user of the
product. Failure to read and follow all instructions could lead to severe injuries.
USE OF NON-XTREMEPOWERUS REPLACEMENT PARTS VOIDS WARRANTY
DANGER: Ignoring these hazards can result in death, severe personal injury, or
significant property damage.
WARNING: Indicates potential hazards that can result in severe personal injury,
death, or significant property damage. Ignoring these warnings presents a real
danger.
CAUTION: Indicates potential hazards that can result in minor or moderate
personal injury, property damage, or actions that are unpredictable and unsafe.
Ignoring these cautions presents a potential hazard.
NOTICE: This label indicates important special instructions that are not directly
related to hazards.
This guide provides instructions for installing and using the SPA Salt Chlorinator. If you have any
questions about the equipment, please contact XtremepowerUS.
This guide contains important information about safely installing and operating this product. After
installation, make sure to share this information with the owner/operator or leave it with them for
their reference.
Legends and Symbols
When you come across the safety-alert symbol on your equipment or in this manual, pay attention
to the following signal words and remain vigilant about the potential for personal injury.
IMPORTANT SAFETY INSTRUCTIONS
DANGER
WARNING
WARNING
CAUTION
NOTE
DANGER
IMPORTANT SAFETY INSTRUCTIONS
3
• Do not use if XtremepowerUS Spa Salt Chlorinator is damaged.
• Remove the XtremepowerUS Spa Salt Chlorinator electrode before entering the spa.
• Avoid touching the electrode during chlorine generation.
• Salt levels too high or too low will keep the system from working.
DANGER
• Only adults should operate this product to prevent injury.
• Connect to a GFCI-protected power source only.
• Do not alter the power cord; it will cause damage.
• Disconnect power supply carefully, without tugging on the cord, and avoid rough handling.
• Do not insert anything into the electrode; it can cause damage.
• Use only the provided power supply to prevent damage to XtremepowerUS Spa Salt Chlorinator.
• Water temperature must be a minimum of 95° for XtremepowerUS Spa Salt Chlorinator to work.
WARNING
CAUTION
• Ensure compatibility with the spa by consulting the manufacturer.
• Use XtremepowerUS Spa Salt Chlorinator as instructed.
• Shield power supply and outlet from weather.
• Store XtremepowerUS Spa Salt Chlorinator indoors when the spa is not in use.
• Ventilate spa cover before use to release gases.
• Check and adjust water quality before each use.
• Regular manual water testing is required for safety.
• Verify secure connection when connecting cell wires.
NOTE
• Adhere to all guidelines provided.
• Keep this manual for reference.
• Install according to relevant codes and regulations.
• Check the cell function with a salt test strip or professional testing.
• Filters must be clean and in good condition for proper flow. Flow errors will keep the system from
working.
OVERVIEW (PRODUCT INFORMATION)
4
OVERVIEW (PRODUCT INFORMATION)
PRODUCT INTRODUCTION
XtremepowerUS Spa Salt Chlorinator is a semi-automatic chlorine generator designed for portable
spas. It efficiently creates chlorine by utilizing common table salt (NaCl) dissolved in the water, at a
concentration typically undetectable by taste.
The system not only purifies water by producing chlorine through electrolysis but also softens it,
offering additional benefits for smoother skin and hair. The chlorinator's detection technology
initiates chlorine production when levels dip, maintaining safe water without the risk of
over-chlorination.
After cleansing the water, chlorine transforms back into salt, facilitating a self-renewing process with
negligible salt depletion, mostly from water splash-out or when spa users depart.
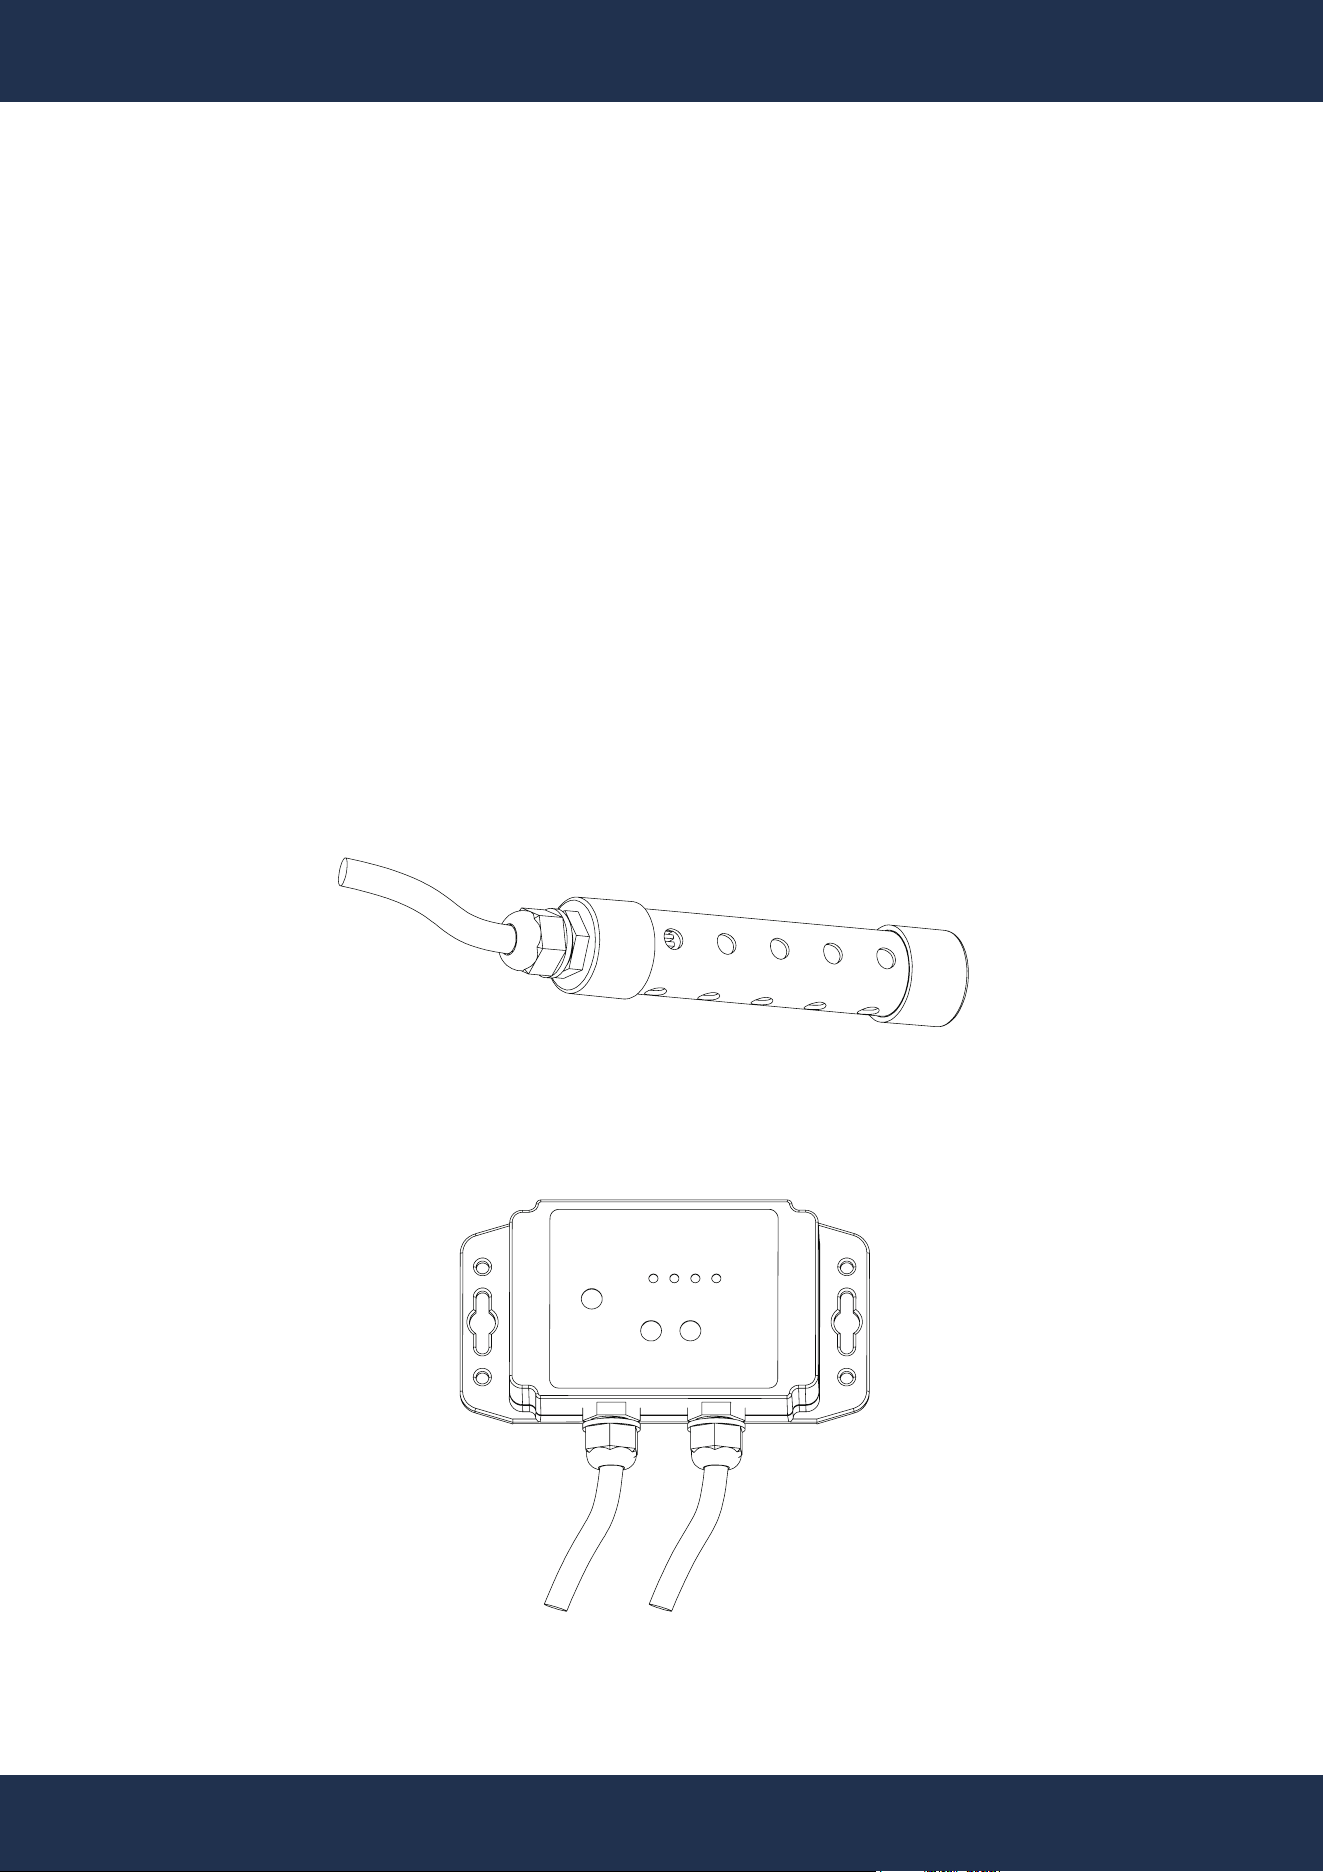
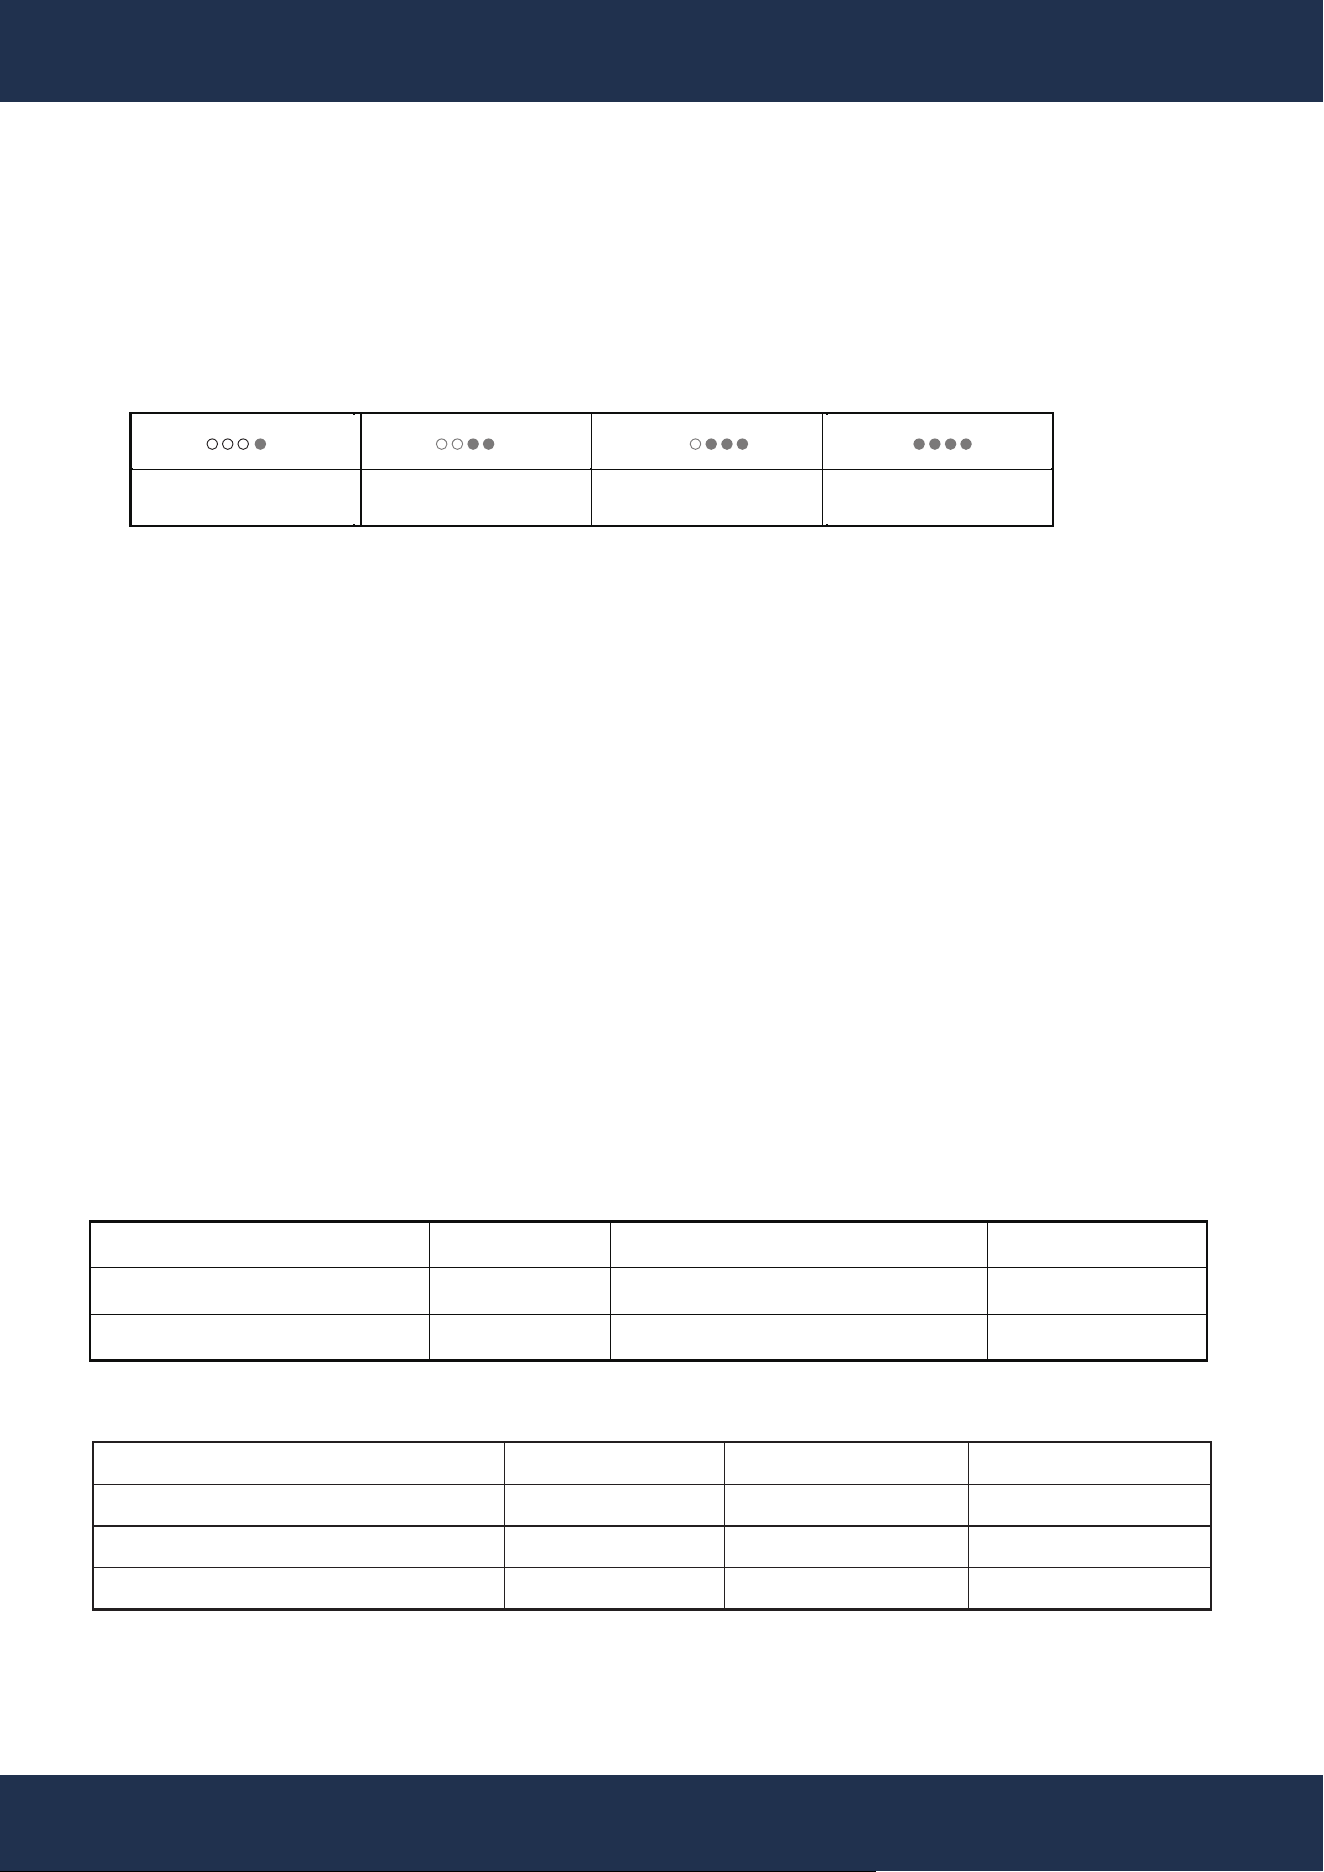
PRODUCT OVERVIEW
Electrode
Control Box

INSTALLATION
5
INSTALLATION
Drain, clean, refill with water, add salt, heat to above 95°F, and balance the water chemistry.
PREPARE THE SPA
INSTALLATION INSTRUCTIONS
Power Supply Guidelines
• Use the included power supply.
• Protect the power supply with a weather-resistant cover.
• Avoid placing equipment inside the spa compartment.
115V Electrical Outlet Installation
• Ensure a GFCI-protected outlet is available near the spa for safety.
• If not present, hire a licensed electrician to install a 115V GFCI outlet.
Connecting The Power Supply
• Unstrap and route the power supply cable to the outlet, ensuring correct pin alignment to avoid
damage.
• Utilize the provided cable clips for secure attachment to a surface.
Cold Weather Considerations
• The power supply should not be used in temperatures below -4°F.
• In cold climates, store the power supply in a warm place or install it within the spa’s equipment
area for protection.
NOTE
• Unscrew the back of the control box using a Phillips screwdriver.
• Remove the bottom cover to access the internal circuit board.
• Secure the waterproof connector of the Electrode by tightening it clockwise.
• Connect the Electrode’s connector to the control box firmly.
• Reattach and secure the back cover of the control box with screws.
• Mount the control box to a suitable wall location using screws. (See below for “Control Box
Location Requirements”)
Control Box Installation
Control Box Location Requirement
• Install vertically with cables exiting from the bottom.
• Avoid direct sunlight and excessive moisture.
• Choose a flat spa skirt location where:
▪ The power cable reaches the outlet and is protected.
▪ The 8-foot electrode cable reaches the deepest part of the spa.
Mounting the Control Box
• Install two screws 5 3/8 inches apart and at least 1 1/4 inches below the spa’s top edge.
• Hang the box on the screws and slide it down to secure.
• Securely fasten all screws.

INSTALLATION
6
Draping the Electrode
• Place the electrode in the spa's deepest part for maximum chlorine generation.
• Maintain a vertical orientation for efficient chlorine production.
• Avoid placing in the filter area to ensure optimal chlorine distribution.
• Use the provided cable clip to secure the electrode cable to the spa side if needed.
OPERATION
7
STARTUP
• Connect to power: Control box LED flashes 3 times, then enters standby mode.
• LED flashes at startup indicate electrode life: 1 lights (below 25% life), 2 lights (25-50% life), 3
lights (50-75% life), and 4 lights (over 75% life).
OPERATION
CHLORINE PRODUCTION SCHEDULE
• Cycles every 3 hours.
• Production time varies by energy level (1-10): e.g., level 1 equals 18 min production, followed
by 162 min wait.
STANDBY MODE
• Only the GENERATING light is on.
CHLORINATION CYCLE
• Activate by pressing the POWER key.
• During chlorine production: GENERATING light flashes, salinity level light shows current level.
• After chlorine production: GENERATING and salinity level lights are on, indicating current
salinity level.
> 75%50% ~ 75%25% ~ 50%< 25%
SALINITY MONITORING
Salinity Indicator Light
Running Current
Salinity Range (PPM)
Low
<0.8A
<1500PPM
Normal
0.8A< | ≤1.6A
1500PPM≤SALT≤3700PPM
High
1.6A< | ≤2.4A
>3700 PPM
• Optimal Salt Level: Maintains 3,200 PPM for ideal balance
POOL / SPA CAPACITY
1,000 GALLON
1,500 GALLON
2,000 GALLON
0 PPM
27 LBS
40 LBS
53 LBS
1,000 PPM
18 LBS
27 LBS
37 LBS
2,000 PPM
10 LBS
15 LBS
20 LBS

8
OPERATION
Level
1
2
3
4
5
6
7
8
9
10
Run Time Per
Inner Cycle (Min)
18
36
54
72
90
108
126
144
162
180
Run Time Per
Day(H)
2.4
4.8
72
9.6
12
14.4
16.8
19.2
21.6
24
Chloride Production
At 24h(G/D)
12
24
36
48
60
72
84
96
108
120
Remark
Super Chlorine
ELECTRODE LIFE INITIALIZATION
• Long press all keys to initialize new electrode.
ENERGY LEVEL ADJUSTMENT
• Hold GENERATING key for 3-5 seconds until buzzer sounds.
• Count continuous Salt_Low light flashes every 2 seconds to determine current level.
• Exits adjustment mode after three cycles.
• Restart at new energy level after adjustment.
ELECTRODE MAINTENANCE
• Automatic positive and negative electrode adjustment every 3 hours.
PROTECTION MODES
• Ultra-low Salinity: Below 0.3A, GENERATING and Salt_Low lights flash. Restarts after 3
minutes.
• High Current: Above 3A, GENERATING and Salt_High lights flash. Restarts after 3 minutes.
Manual restart required if current exceeds 3A during operation.

9
TROUBLE SHOOTING
TROUBLE SHOOTING
Excessive Salt Indication
• If both the Green (Salt High) and Red (Salt Low) lights are on, it indicates excess salt. The
Chlorinator will shut down to prevent damage. Remove the electrode, press "Boost," and
observe the lights. If they remain on, the issue is not with the water itself.
• To correct excessive salt, mix a bucket with two-thirds spa water and one-third fresh water.
Place the electrode in the bucket, wait 5 minutes, then turn it on. Aim for the Blue light, which
signifies an optimal salt level. Adjust the spa water based on these bucket test results.
Electrode Buildup
• Calcium buildup can interfere with chlorine generation. Disconnect power, soak the electrode in
a mild acid like vinegar for 10-30 minutes, then rinse thoroughly.
Low Salt Level During Chlorine Generation
• A Red light during operation indicates low salt levels. Add salt to the water, but first confirm the
necessity with a salt test strip.
Electrode Lifespan
• Depleted electrode lifespan can hinder performance. If chlorine generation is consistently low,
check the Electrode Lifespan Indicator. If near the end of its life, consider replacing the
electrode.
Chlorine Levels Management
• For low chlorine levels, increase the power level and monitor the chlorine production over the
next few days.
• For high chlorine levels, lower the power level. Confirm the salt level with a test strip, and dilute
with fresh water if levels are above the recommended range.
Unit Non-Operational
• If the Chlorinator is not functioning, perform a reset by unplugging it for at least 10 seconds, then
plugging it back in.
• Ensure there is no moisture near the control box and that the power cord is securely connected
to both the outlet and the Chlorinator.

10
DISCLAIMER
DISCLAIMER
PLEASE READ THE FOLLOWING CAREFULLY
The manufacturer and/or distributor have provided the parts list and assembly diagram in this
manual for reference purposes only. They do not make any representation or warranty to the buyer
that they are qualified to make repairs to the product or replace any parts of the product. In fact, the
manufacturer and/or distributor expressly state that all repairs and parts replacements should be
undertaken by certified and licensed technicians, and not by the buyer.
The buyer assumes all risk and liability arising from their repairs to the original product or
replacement parts or arising from their installation of replacement parts. It is strongly advised that
qualified professionals handle any repairs or replacements to ensure safety and proper functioning
of the product. Improper installation and operation may result in injury, property damage, or voiding
of warranty. The manufacturer and/or distributor shall not be held responsible for any accidents,
damages, or malfunctions resulting from the buyer's installation and operation of the product. It is
essential to follow all safety guidelines and recommendations provided in this manual and to seek
professional assistance if unsure about the installation or operation procedures.
CUSTOMER SERVICE
If you have any questions about ordering our pool pumps and replacement parts or pool products,
please feel free to contact us using the following contact information:
Customer Service and Technical Support
Phone: (909) 628-0880
Email: [email protected]
Hours of Operation: Monday – Friday, 9AM – 4PM (CST)
