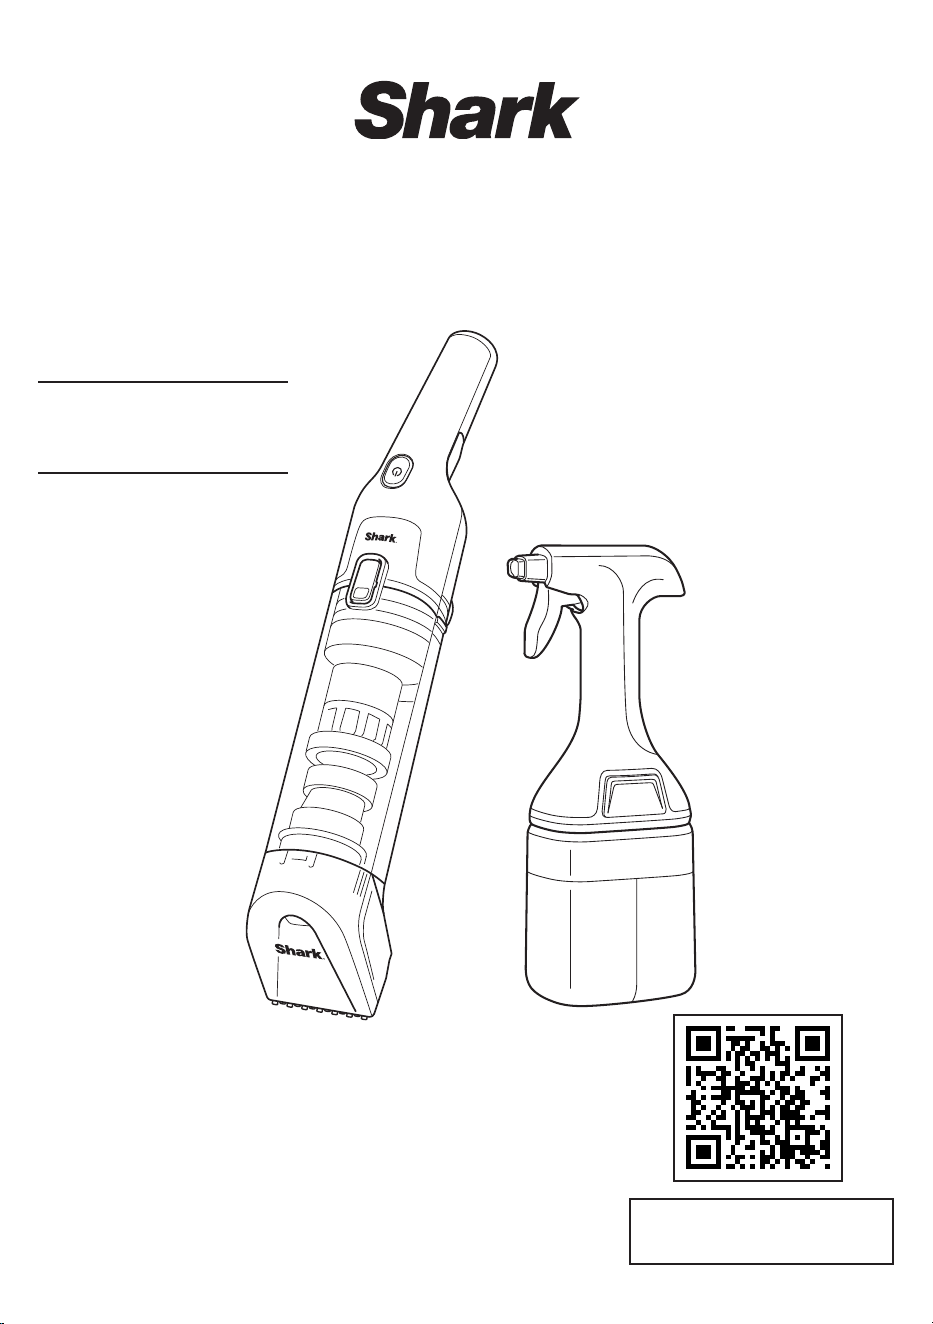
*Product color may vary by model.
Scan QR code to view
HOW-TO VIDEOS.
HX100
Series
CORDLESS STAIN-DESTROYING SYSTEM
STAINFORCE
sharkclean.co.uk 32 sharkclean.co.uk
IMPORTANT SAFETY INSTRUCTIONS
FOR HOUSEHOLD USE ONLY
READ CAREFULLY BEFORE USE. SAVE THESE INSTRUCTIONS. FOR HOUSEHOLD USE ONLY.
READ ALL INSTRUCTIONS BEFORE USING THIS SPOT AND STAIN CLEANER
General Safety and Usage Instructions
1. DO NOT put any object into openings. Do not use with any opening blocked;
keep free of dust, lint, hair, and anything that may reduce air flow.
2. To reduce the risk of fire or electric shock due to internal component damage,
use ONLY Shark formula, as intended for use with this appliance.
3. The areas around where you are cleaning may become wet. Use care to avoid
slipping and falling.
4. DO NOT refill the solution sprayer with any different chemicals. Use ONLY
Shark formula.
5. DO NOT operate if any exterior surface of the appliance is wet. If the
appliance is wet, dry with a cloth before use.
6. Before each use, carefully inspect each part for damage or wear. If a part is
damaged or worn out, immediately discontinue use. DO NOT use if any part
is damaged or if stain cleaner is not working as it should, has been dropped,
left outdoors, or submerged in water.
7. DO NOT immerse or spray water on the body of the stain cleaner. To clean the
surface, wipe with a dry cloth.
8. DO NOT use without the dirty water tank, tools, or filters in place.
9. DO NOT modify or attempt to repair the appliance except as indicated in the
instructions for use and care.
10. Have servicing performed by a qualified repair person using only identical
Shark replacement parts. Only use Shark branded filters and accessories.
11. DO NOT place the appliance on uneven surfaces.
12. DO NOT use in the following areas:
a. Poorly lit areas.
b. Outdoor areas.
c. Spaces that are enclosed and may contain explosive or toxic fumes or
vapors (lighter fluid, gasoline, kerosene, paint, paint thinners, mothproofing
substances, or flammable dust).
13. Keep hair, loose clothing, fingers, and all parts of the body away from
openings and moving parts.
14. DO NOT store unit where temperatures reach freezing levels to avoid
damaging internal parts.
15. FIRST AID: Keep out of reach of children. Causes skin and serious eye
irritation. If in eyes, rinse continuously with water for minutes. Remove
contact lenses if present and easy to do so. Continue rinsing. If on skin,
wash with soap and water. If skin and eye irritation persists, seek
medical attention.
16. Please recycle container. Dispose of contents/container with licensed
waste disposal site in accordance with the requirements of the local
waste disposal authority. DO NOT dispose in drains or watercourses in
concentrate form.
17. This product is for use on carpets and upholstery only. Do not use on hard
surfaces like wood, laminate, tile, metal, etc.
18. Shark Cleaning Solution contains hydrogen peroxide, which has the potential
to damage some materials like unsealed wood, tile, metal, and electronics.
Use caution when spraying chemicals or storing chemical bottles. Only spray
on upholstered or carpeted surfaces as intended.
19. Always conduct a chemical spot test on a discreet or hidden area of the
material before cleaning.
20. Ensure the unit is powered off before carrying the appliance.
DO NOT carry the
appliance with your finger on the power button.
21. Use extra care when cleaning on stairs.
Electrical Safety Instructions
22. DO NOT modify the plug provided with the appliance. If the plug does not fit
fully into the socket, reverse the plug. If it still does not fit, contact a qualified
electrician.
23. DO NOT force the plug into the socket or try to modify it.
24. DO NOT pull cable, close door on cable, or wrap it around sharp edges or
corners. To unplug, grasp the plug, not the cable. Keep cable away from
heated surfaces.
25. To reduce the risk of shock and unintended operation, turn off and unplug stain
cleaner before any adjustment, cleaning, maintenance, or troubleshooting.
26. DO NOT handle plug or stain cleaner with wet hands.
27. If plugging unit into extension cord, ensure cord is no more than 15 meters
long to prevent damage to the unit.
28. Use only Shark charger GQ-1546175 or YL-1546807. Use of an incorrect charger
may result in no charging, and/or unsafe conditions.
29. The battery is the power source for the appliance. DO NOT carry the appliance
with your finger on the button. DO NOT charge stain cleaner with the power on.
Battery Safety
30. Battery should not be stored at temperatures below 3°C (*37.4°F) or above
40°C (104°F) to maintain long term battery life.
31. Under abusive conditions, liquid may be ejected from the battery. Avoid
contact with this liquid, as it may cause irritation or burns. If contact occurs,
flush with water. If liquid contacts eyes, seek medical help.
32. The battery pack is non-serviceable. Call Customer Service with any questions
and concerns.
33. DO NOT expose stain cleaner to fire or temperature above 130°C (266°F) as it
may cause explosion.
34. This appliance contains batteries that are non-replaceable
35. DO NOT use a battery pack or appliance that is damaged or modified.
Damaged or modified batteries may exhibit unpredictable behavior resulting in
fire, explosion or risk of injury.
Chemical and Material Safety.
36. DO NOT spray solution on your skin or in your eyes.
37. DO NOT use to pick up:
a. Large objects
b. Hard or sharp objects (glass, nails, screws, or coins)
c. Large quantities of dust (e.g., drywall dust)
d. Smoking or burning objects (hot coals, cigarette butts, or matches)
e. Flammable or combustible materials (lighter fluid, gasoline, or kerosene)
f. Toxic materials (chlorine bleach, ammonia, or drain cleaner)
38. DO NOT use or extract vinegar in this device. The combination of vinegar and
other substances may produce peracetic acid, which can accelerate rusting
and cause damage to internal components.
Child Safety
39. DO NOT allow appliance to be used by children or as a toy. Close supervision is
necessary when used near children.
40. This appliance can be used by persons with reduced physical, sensory, or
mental capabilities or lack of experience or knowledge if they have been
given supervision or instruction concerning use of the appliance in a safe way
and understand the hazards involved. Cleaning and user maintenance shall
not be done by children.
TO REDUCE THE RISK OF FIRE, ELECTRIC SHOCK,
INJURY, OR PROPERTY DAMAGE:
WARNING
This appliance is not intended for use by persons (including children) with reduced physical, sensory or mental
capabilities, or lack of experience and knowledge, unless they have been given supervision or instruction
concerning use of the appliance by a person responsible for their safety. Children should be supervised to ensure
that they do not play with the appliance.
SAVE THESE INSTRUCTIONS
CONTENTS
Important Safety Instructions .........................................................................................................3
What’s Included ....................................................................................................................................4
Getting Started .....................................................................................................................................5
How To Clean .........................................................................................................................................6
Tips and Tools ......................................................................................................................................7
Emptying The Dirty Water Tank .....................................................................................................8
Full Cleaning ..........................................................................................................................................9
Self-Wash Cycle ..................................................................................................................................10
Shark Cleaning Solution ................................................................................................................... 11
Charging Your Stainforce ........................................................................................................... 12
Troubleshooting ................................................................................................................................. 13
Three (3) Year Limited Warranty .................................................................................................14
2 Year Limited Battery Guarantee ............................................................................................... 15
This marking indicates that this product should not be disposed with other household wastes
throughout the UK. To prevent possible harm to the environment or human health from uncontrolled
waste disposal, recycle it responsibly to promote the sustainable reuse of material sources.
To return your used device, please use the return and collection systems or contact the retailer where
this product was purchased. They can take this product for environmentally safe recycling.
sharkclean.co.uk 54 sharkclean.co.uk
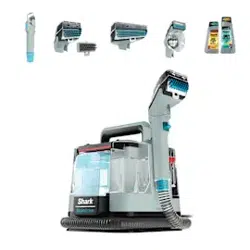
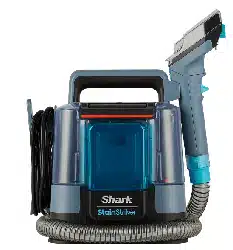
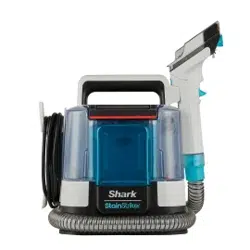
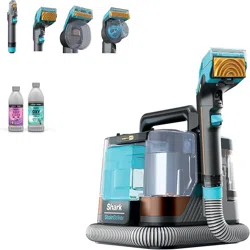
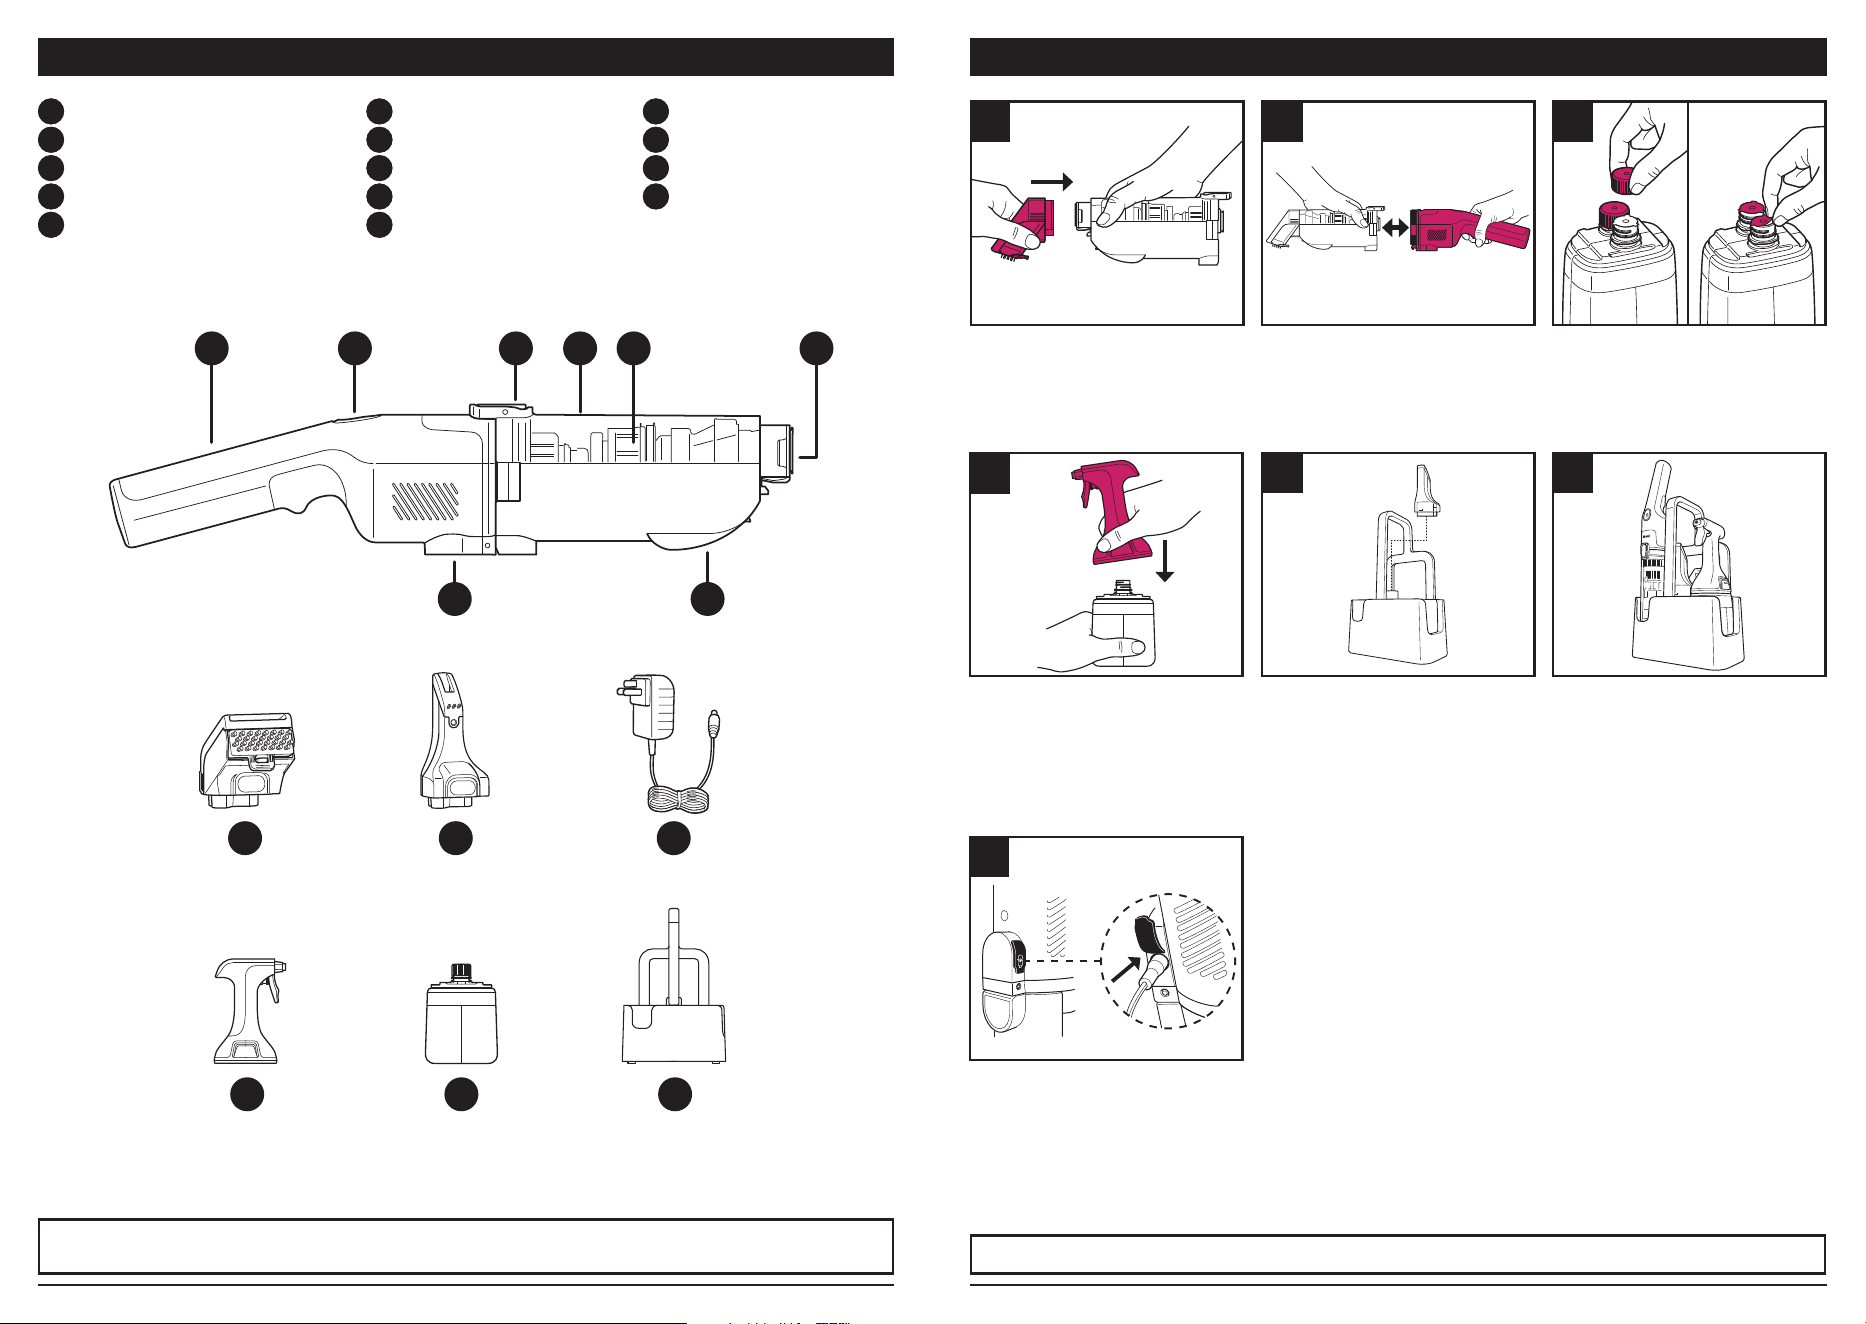
WHAT’S INCLUDED
Align the Stain Tool with the end of the
Dirty Water Tank. Insert the tool onto
the tank until it clicks into place.
Align the handle with the other end of
the tank, then insert the handle until
it clicks securely into place.
Twist off both caps on the Refill
Cartridge, then peel off the foil seals.
GETTING STARTED
Press the sprayer down over the
openings on top of the bottle. Make
sure it clicks securely into place.
Note: The sprayer only fits one way.
Place the Crevice Tool onto the Tool
Post on the inside of the Caddy.
Place the unit and the Spray Bottle
into the caddy.
Note: The StainForce can only be
stored in the caddy with the
Stain Tool attached.
Charge the unit fully before use. To
begin charging, open the charging
port cover and insert the charger.
It can take up to 4 hours to
charge completely.
NOTE: Charge battery completely after every use for best results and maximum runtime next time.
A
Handle
B
Power Button
C
Dirty Water Tank Release
D
Dirty Water Tank
E
Water Separator Motor
F
Hair Filter
G
Charging Port
H
Quick-Pour Door
I
Stain Tool
J
Crevice Tool
K
Charger
L
Reusable Solution Sprayer
M
Shark Refill Cartridge
N
Storage Caddy
NOTE: Not all accessories come with all units. Tools may vary by model. For additional accessories available, please visit sharkclean.co.uk
Do not dispose of the black foam filter.
A B C D E F
HG
M
I K
L N
J
65
31 2
4
7
sharkclean.co.uk 76 sharkclean.co.uk
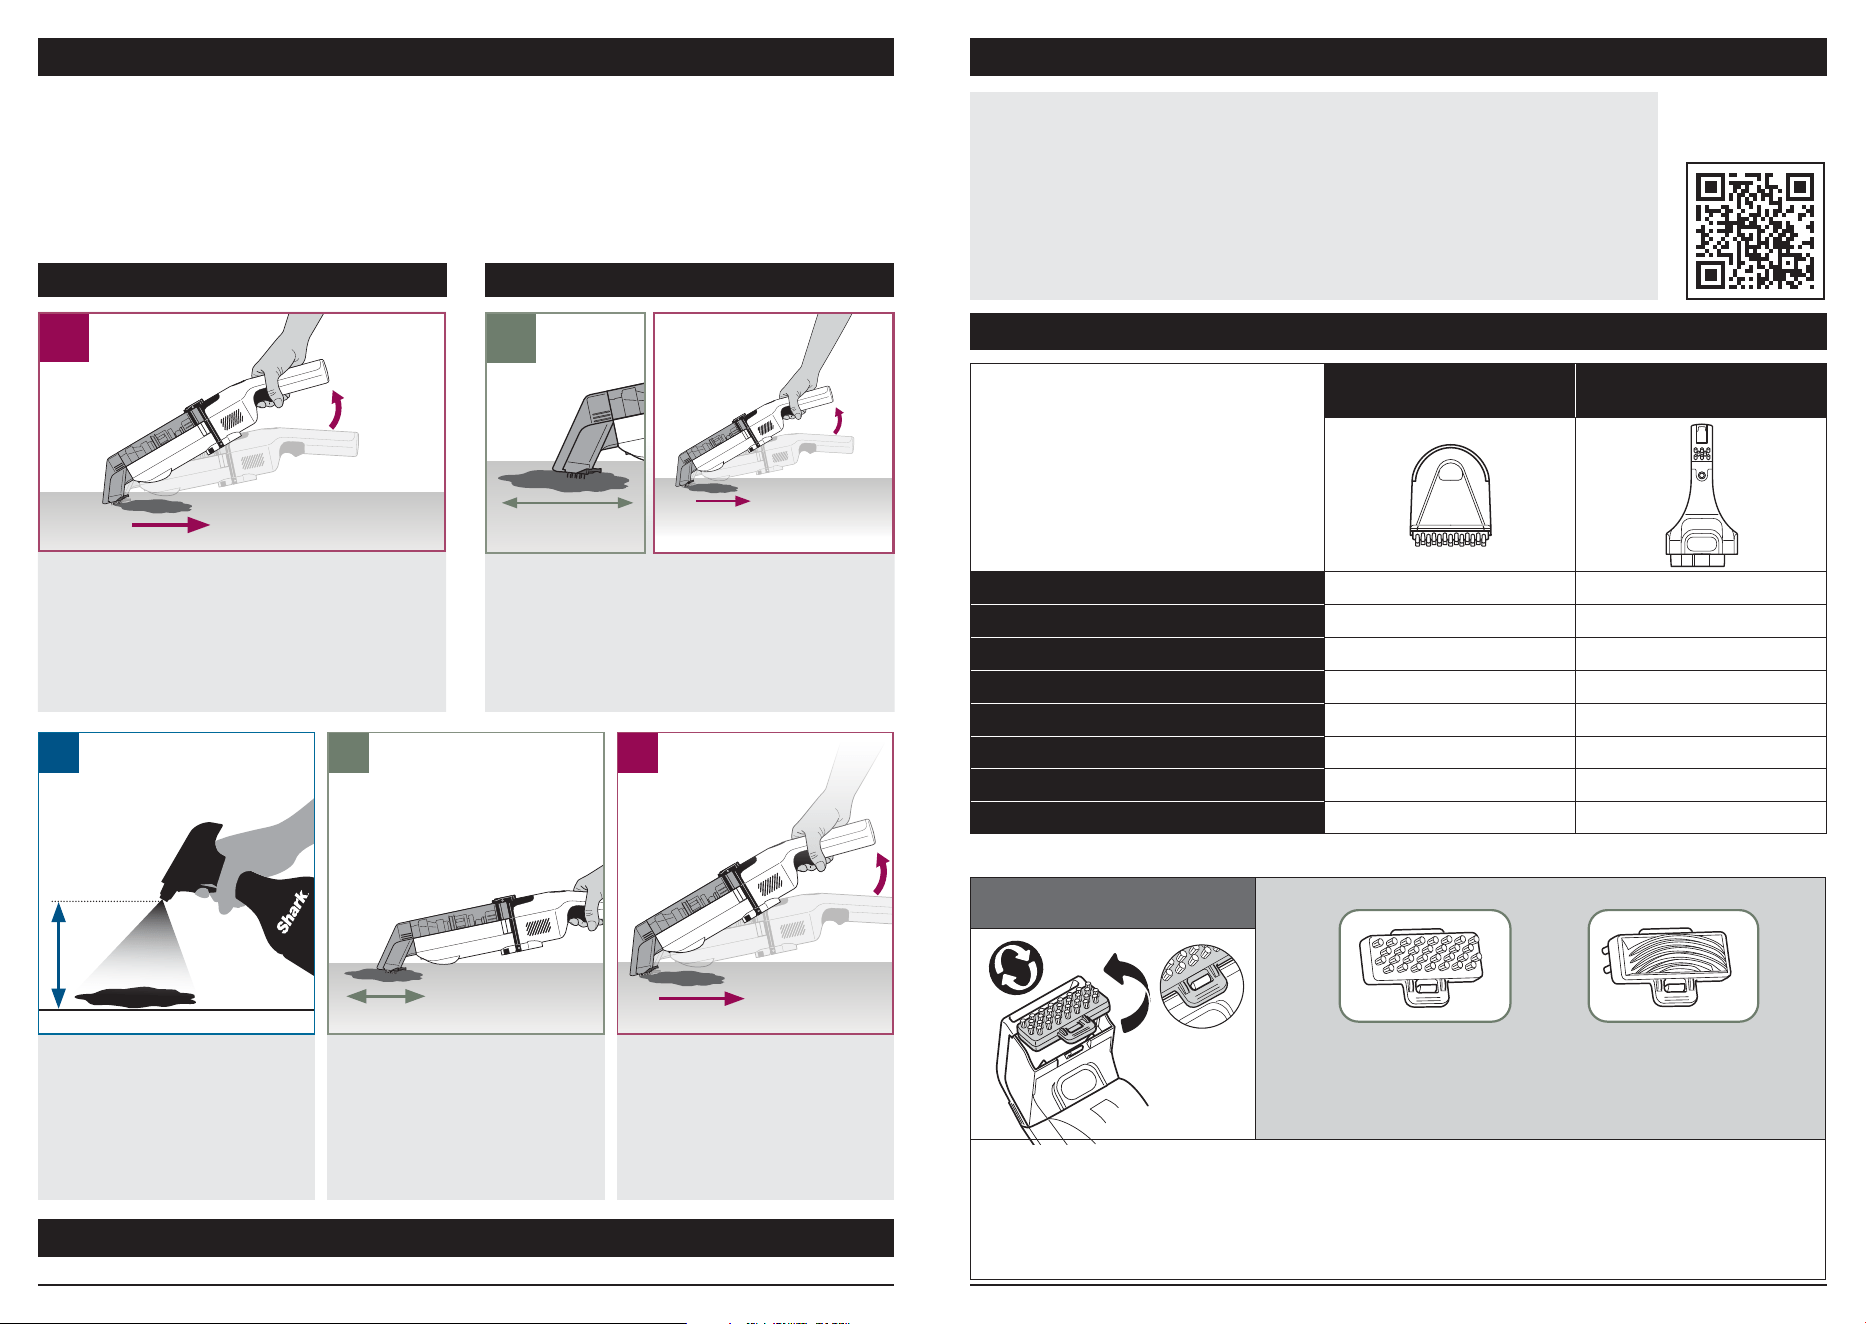
TIPS AND TOOLSHOW TO CLEAN
Preparing for Use:
1. Before first use, make sure to charge the unit completely. See Charging Your StainForce section for instructions.
2. StainForce is designed for cleaning carpets and upholstery only. Do not use on hard surfaces.
3. Before spraying a dry stain, vacuum the surface with a traditional vacuum cleaner to remove loose dirt.
4. Always follow instructions below for cleaning wet and dry stains.
NOTE: Clean water is not required to use this product.
TOOL GUIDE
Stain
Tool
Crevice
Tool
Tough Stains
Delicate Stains
(With Hair-Gripping Fins)
Tight Corner Stains
Hair Pickup
(With Hair-Gripping Fins)
Dry Stains
Wet Stains
Self-Wash Cycle
Storage
Always on the unit Tool post only
Included tools may vary by model.
REVERSIBLE BRISTLES
TIPS:
• Use bristles for deep cleaning and to agitate stains.
• Use Hair-Gripping Fins on delicate or hairy surfaces to prevent tangling.
• For hair removal, use short backward strokes to avoid clumping.
DRY STAINWET STAIN
1. EXTRACT SPILL
First, suction up the liquid spill
to prevent spreading the stain.
Tilt
Pull Back Only
1
1
Back & Forth
Tilt
Pull Back Only
1. SCRUB STAIN & EXTRACT
Scrub stain back and forth using
bristles or fins, then, turn on unit,
tilt handle, and drag backwards to
extract dry debris.
2. SPRAY
Spray cleaning solution
to over-saturate, 2 inches
from the stain.
Let soak for a few minutes
and spray again. Apply at
least 2 layers of solution.
3. SCRUB
Lay bristles flat on the
surface & scrub the stain
back and forth firmly.
See below for bristle info.
4. EXTRACT
For best suction be sure
to tilt up (as shown) and
apply pressure. Slowly pull
backwards to extract the
solution. Pull back only.
5cm
(2 in.)
2
SPRAY
TO SATURATE (X2)
Back & Forth
3
SCRUB
TO AGITATE STAIN
4
Tilt
Pull Back Only
EXTRACT
USING PRESSURE
LET DRY. REPEAT STEPS 2-4 UNTIL STAIN FULLY FADES.
BRISTLES
Deep cleaning
& agitation.
FINS
For delicate or
hairy surfaces.
Cleaning Tips:
1. Scrub carefully to avoid spreading. Extract the stain immediately after spraying.
2. For older and tougher stains, let the spray solution sit for 5 minutes before extracting.
3. If a difficult stain was not removed, wait 24 hours and repeat the stain cleaning process. Very old or
tough stains may require multiple attempts to fully clean.
Scan QR code
to view
HOW-TO VIDEOS.
sharkclean.co.uk 98 sharkclean.co.uk
Align the unit with the quick-pour door
facing up. Pull down the door to open.
Carry the unit to a sink or drain and pour
the dirty water out through the door.
When the dirty water is completely
drained, close the door, pressing
firmly until it clicks shut.
IMPORTANT
1. Always empty and clean the unit after each use. DO NOT store the unit with dirty water in the tank as this risks the build up of
odors, mould, or mildew.
2. After maintenance please make sure each part is installed correctly or your unit may not work properly.
3. Always charge the unit after every use.
Using the Quick-Pour Door
Designed to enable continuous cleaning with minimal stoppage, the quick-pour door allows you to quickly and easily empty the
dirty water tank—perfect for handling large spills and stains.
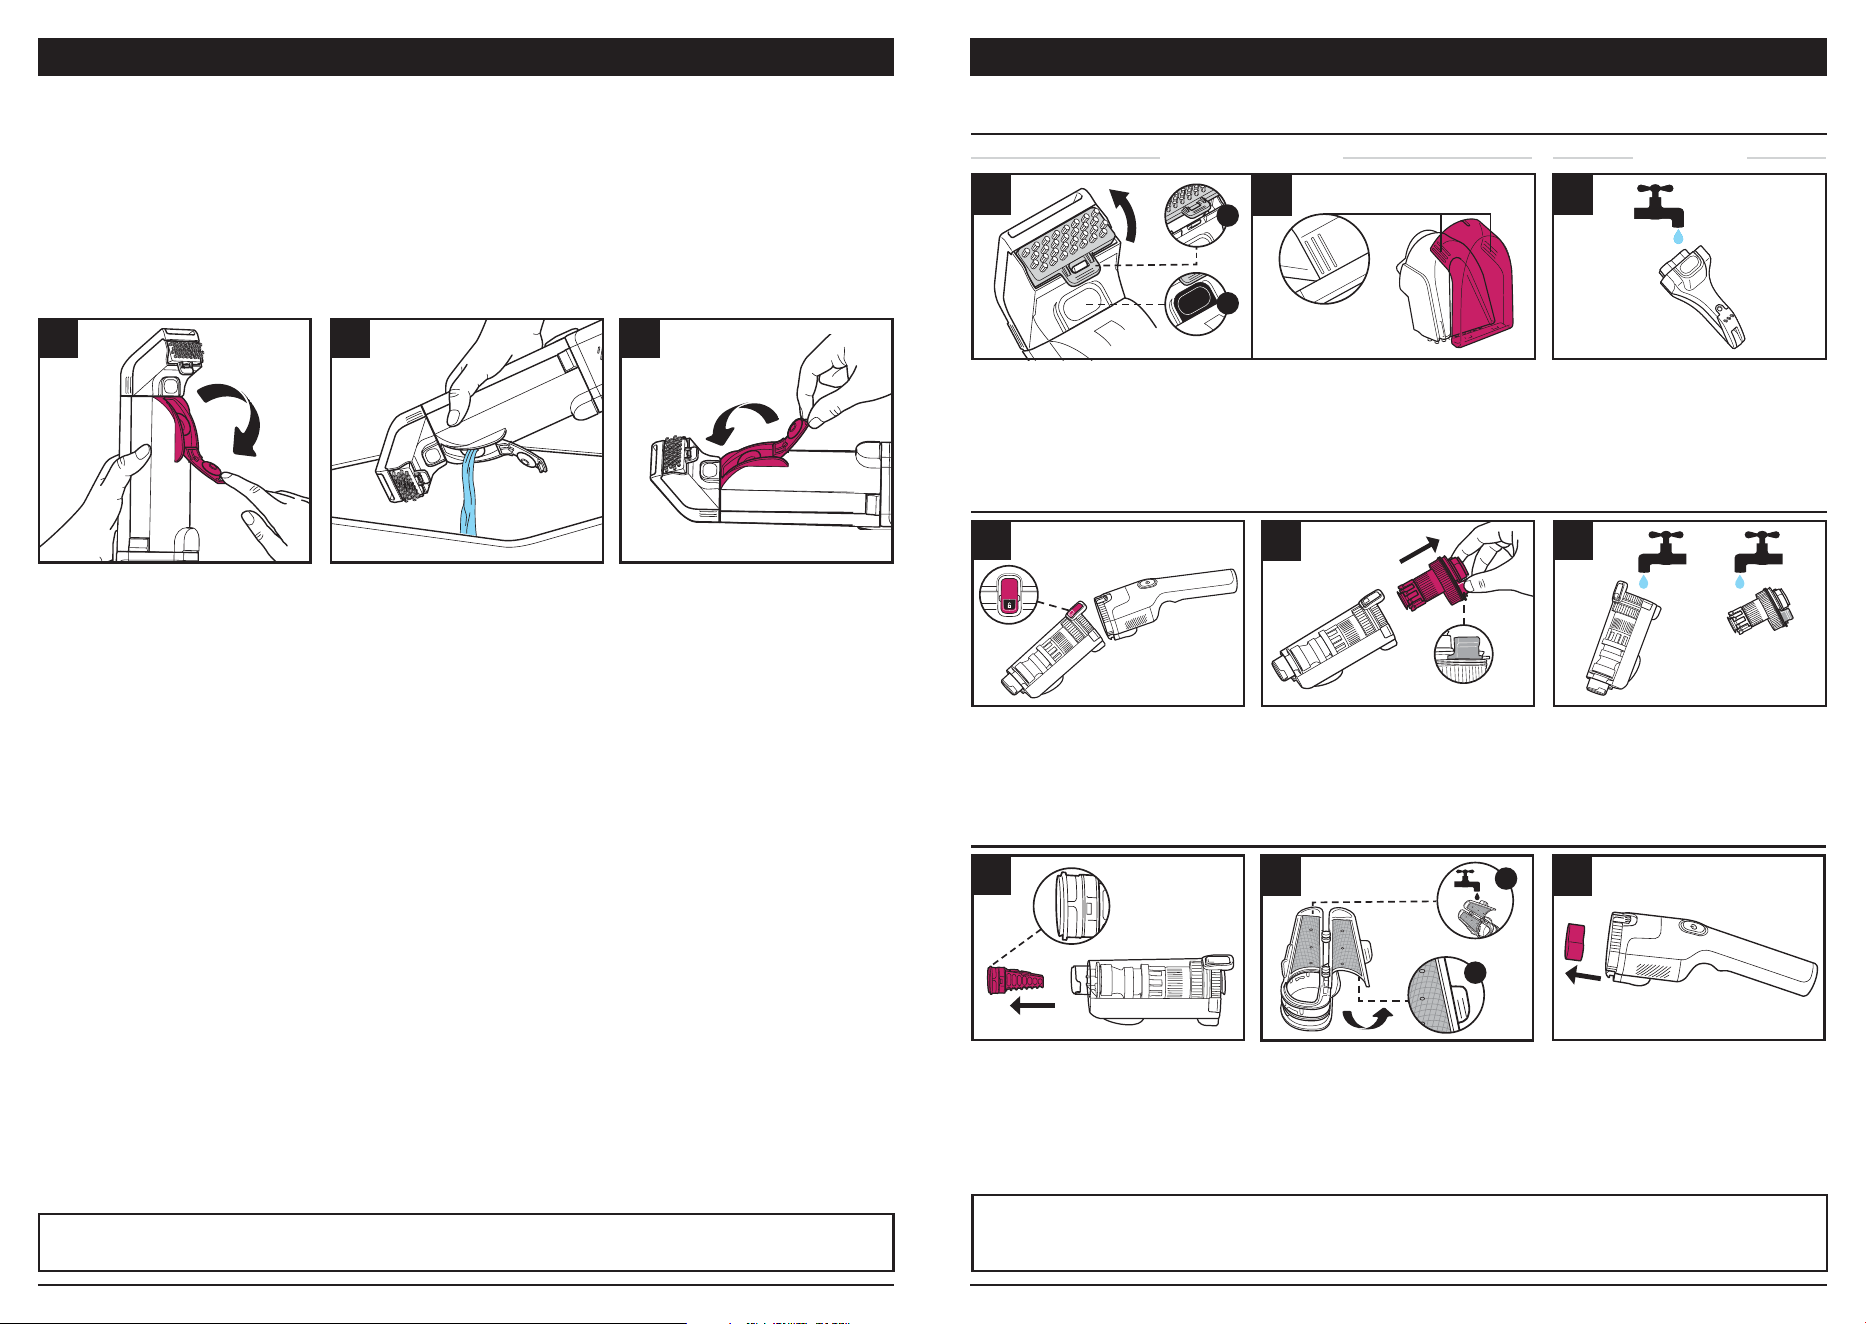
EMPTYING THE DIRTY WATER TANK
NOTE: DO NOT submerge the handle in liquid. Please allow all the parts to air-dry fully before reassembly.
Press the release button on the tool
to detach it from the water tank. Pull
the tab to remove the bristles from
the tool.
Press both sides of the tool to detach
the window. Rinse off the bristles,
tool, and window with water then
allow to air dry.
Rinse off the Crevice Tool with running
water, then allow it to air-dry.
FULL CLEANING
Press
Pull
CLEANING THE TOOLS
Press the release button to detach the
tank from the handle.
To remove the motor from inside the
tank, squeeze the tabs on both sides of
the motor, then slide it out of the tank.
Wash the tank with soapy water, and
rinse the colored section of the motor
lightly under a tap before allowing to
air dry fully.
CLEANING THE DIRTY WATER TANK
STAIN TOOL CREVICE TOOL
1 1
With the cleaning tools detached,
remove the hair filter from the
opening in the end of the water tank.
Grip the tabs on both sides of the filter
and pull it out.
Pull the filter open. Remove any hair or
debris and rinse the filter with running
water.
Pull the foam filter out of the handle.
Rinse the filter with water only. Squeeze
out excess water, then allow the filter to
air-dry completely before reinstalling.
Do NOT submerge the handle in liquid.
CLEANING FILTERS
NOTE: Make sure to inspect, rinse, and air-dry the filters after each cleaning session. Make sure to reinstall the filters before use.
Make sure that the hair filter is properly closed before reinstalling the hair filter into place. If the tool collects debris, rinse it with water and
allow it to air dry.
2
1
31 2
2
Squeeze & Pull
2
1 3
Press
1
2
3
Pull
Pull
2
1
sharkclean.co.uk 1110 sharkclean.co.uk
NOTE: If unit needs further cleaning - follow the instructions in the Full Cleaning section.
Empty the dirty water tank, using the
quick-pour door.
Gently squeeze the tab on the side of
the self-wash caddy cup. Pull it up and
out of the caddy.
Fill the cup with clean water to the
Max Fill line, the replace the cup in
the caddy.
With the Stain Tool attached, insert the
StainForce into the cup and power on.
Remove the StainForce from the
cup and turn off power. Open the
quick-pour door latch and pour the
water down a drain. Repeat the cycle
if needed.
Check the other parts and the tools and
clean them if necessary, allowing them
to dry fully.
Designed for effortless maintenance, the self-wash feature helps give your StainForce a quick clean after tackling
small messes.
SELF-WASH CYCLE
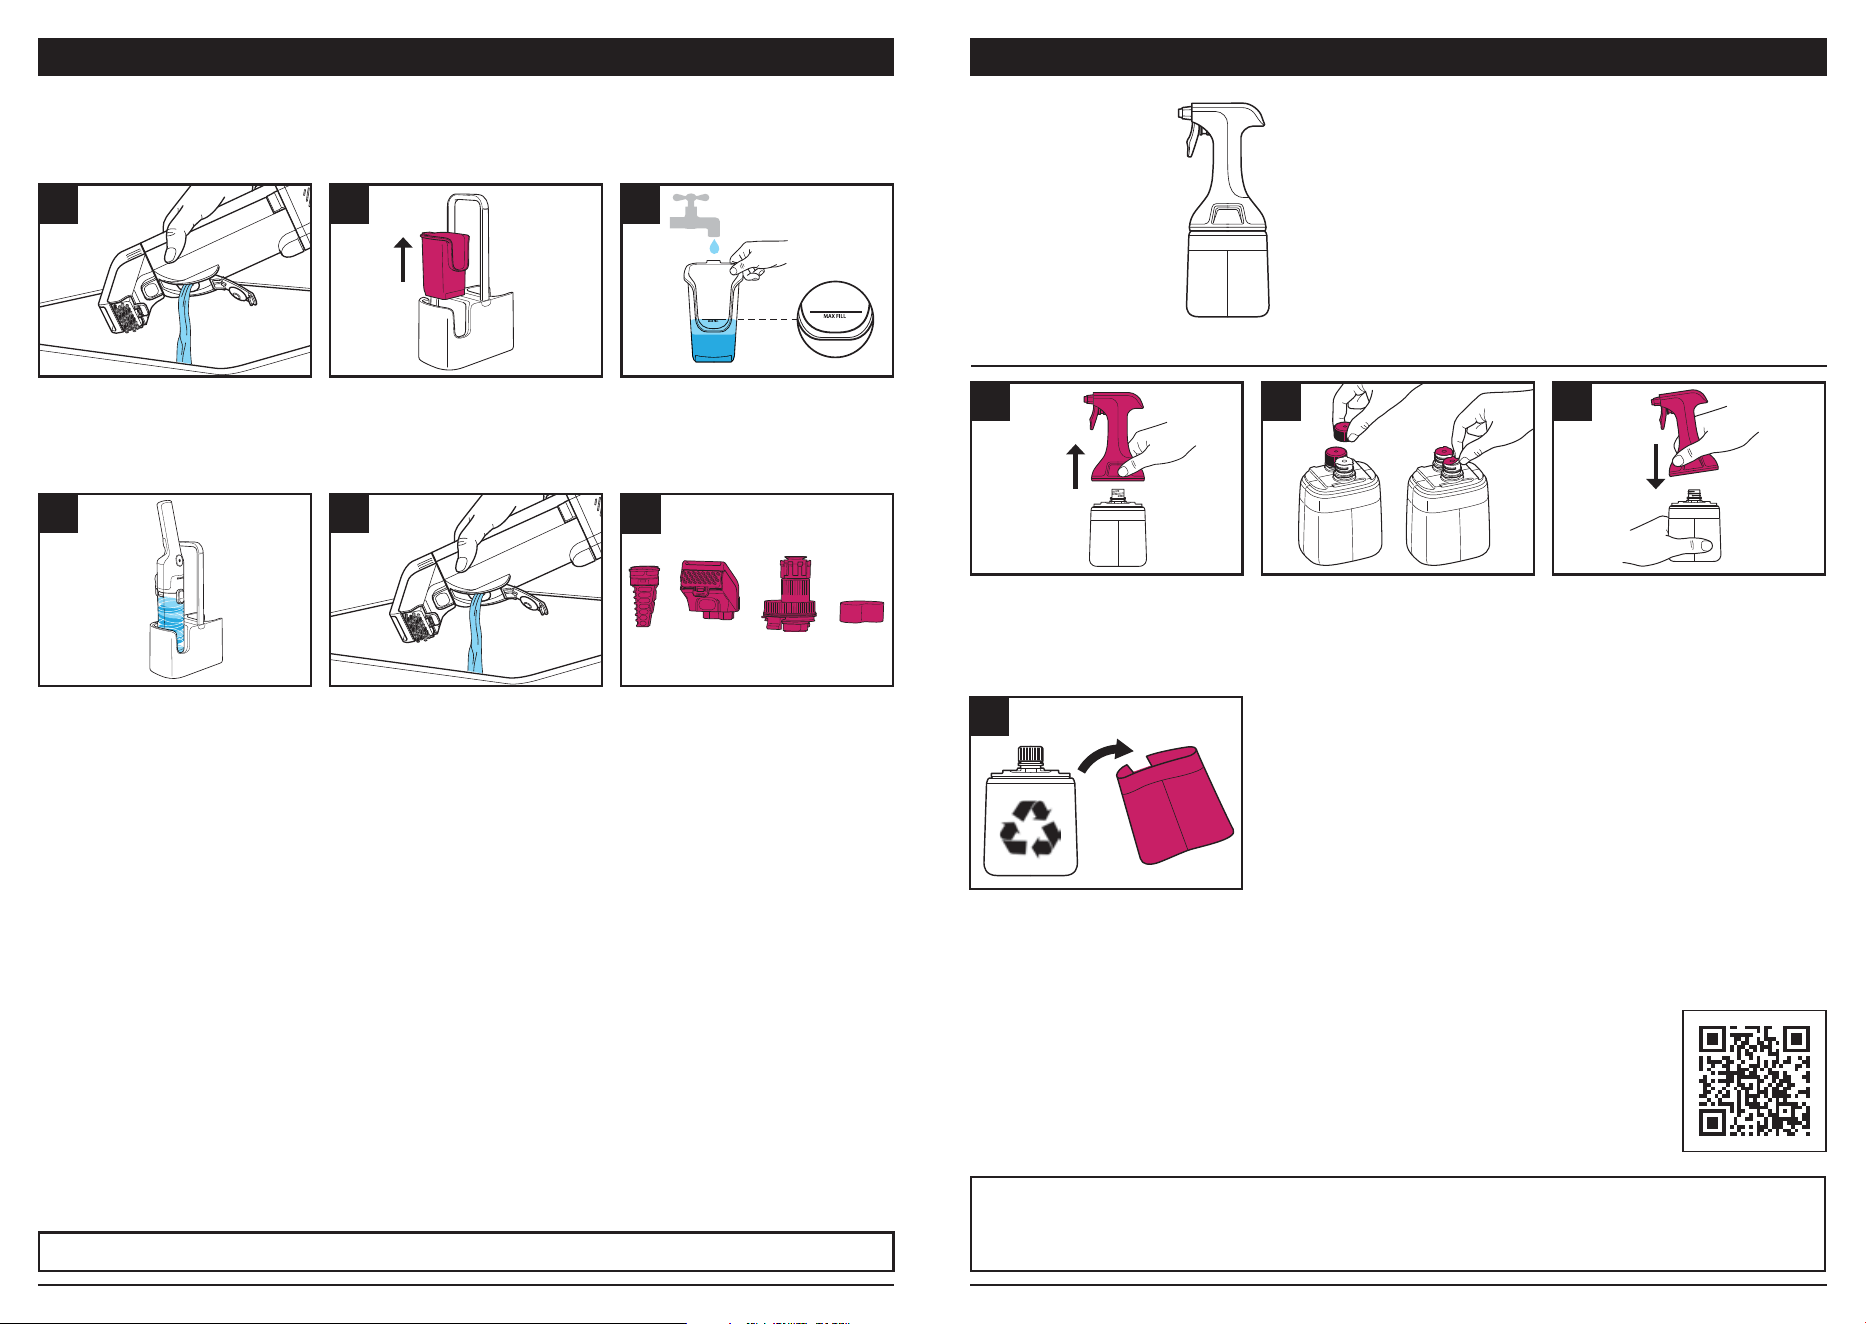
Squeeze both buttons at the same time
and lift to detach the reusable solution
sprayer from the bottle of solution.
Remove both caps from the new
bottle of solution, then peel off the
foil seals.
Press the sprayer down over the
openings in the bottle until it clicks
securely into place.
Note: It only fits one way.
Remove the label from the empty
solution bottle and recycle the bottle.
Use ONLY Shark branded cleaning solutions and sprayers.
Your StainForce unit is not compatible with other chemical
solutions or cleaners.
The Solution Sprayer is reusable. DO NOT dispose of it.
SHARK® CLEANING SOLUTION
REPLACING THE CLEANING SOLUTION
Running low?
Scan QR code to order
replacements, or visit
sharkclean.co.uk
IMPORTANT: Before cleaning a surface, check the manufacturer’s tag. DO NOT clean delicate rugs (including wool,
cotton, silk, antique, or area rugs) unless they have a manufacturer’s tag. If the manufacturer’s tag says S or “Dry Clean
Only,” DO NOT clean that surface. If the tag says W or WS, you CAN use Shark Cleaning Solution on that surface.
1
4
2 3
6
5
1 2
4
3
sharkclean.co.uk 1312 sharkclean.co.uk
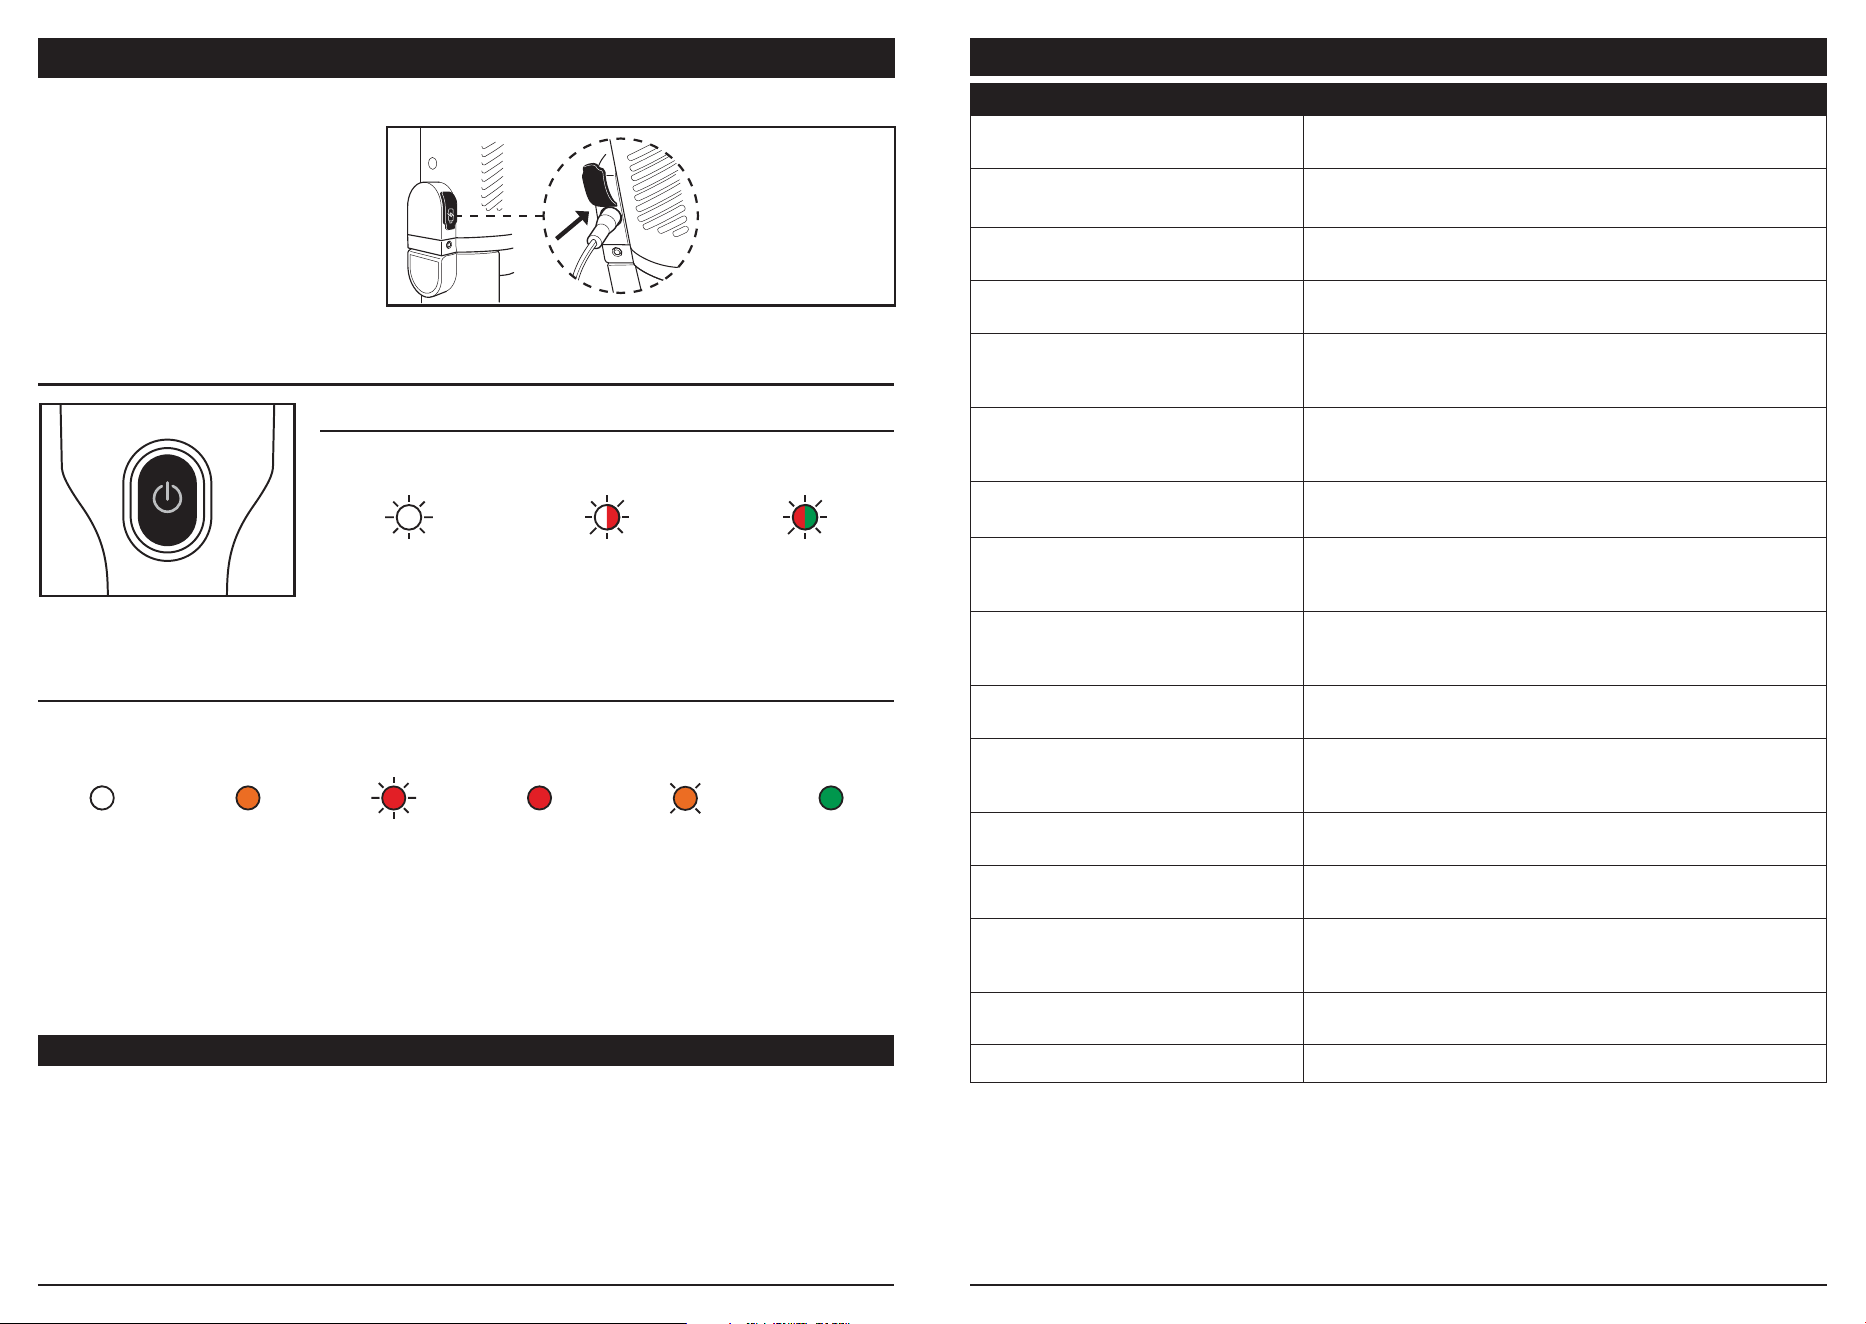
It’s important to fully charge your StainForce
before using it for the first time, and after
every use.
When the battery is fully charged, the power
button LED will be solid green for 5 minutes.
LED INDICATOR LIGHTS
CHARGING YOUR STAINFORCE
Error Warnings
Dirty Water
Tank Full
Blinking
White
Dirty Water
Tank Missing
Blinking
White/Red
Wrong
Charger
Blinking
Red/Green
CHARGING INDICATORS
100 - 51%
Charged
Solid
White
50 - 26%
Charged
Solid
Orange
25 - 1%
Charged
Blinking
Red
Recharge
Needed
Solid
Red
Unit
Charging
Breathing
Orange
Fully
Charged
Solid
Green
TECHNICAL SPECIFICATIONS
HX100 Series: 14.4V DC
The standby power consumption: 0.1 W.
RECORD THIS INFORMATION
Model Number: ������������������������������������������������������������������
Date of Purchase: ����������������������������������������������������������������
(Keep receipt)
Store of Purchase: ����������������������������������������������������������������
PROBLEM SOLUTION
Low or no suction Inspect and remove any trapped debris from the StainForce filters, cleaning tools and
tank. Make sure all parts are connected securely.
Cannot Install Tool Ensure the Hair Filter is fully closed and inserted. Tools cannot be placed on the unit
without the Hair Filter present.
Cannot install spray head onto refill. The spray head only fits in one direction, turn it around and try to click into place again.
Water Separator Motor not spinning Remove the Water Separator Motor, clear any stuck debris. Rinse the motor with clean
water and ensure it spins freely. Reassemble the unit and begin cleaning.
Unit not charging Make sure the unit is fully charged (Ensure you are using the correct charger)
Try a dierent socket.
Wipe the charging contact on the unit with a cloth to remove any debris or build up.
Liquid is leaking from the unit Make sure the Dirty Water Tank is correctly attached to the handle.
Make sure the Quick-Pour Door is firmly closed.
Remove the foam filter, and allow unit to dry before reassembly and use.
Unit is emitting air that smells bad. Disassemble unit and perform maintenance with clean, soapy water. Allow all parts to
air-dry fully before reassembling.
Debris present in the Dirty Water Tank Disassemble your Stain Force and perform full maintenance.
Reassemble the unit, ensuring that the hair filter door is closed and it is securely
inserted.
Dirty Water Tank Full indicator light flashing -
Tank is empty. (LED blinking white)
Remove the Water Separator Motor, clear any stuck debris. Rinse the motor with clean
water and ensure it spins freely. Reassemble the unit and begin cleaning.
Dethatch and re-attach the Dirty Water Tank.
LED blinking white
Dirty Water Tank Full
Empty the Dirty Water Tank via Quick Pour, if by removing the Water Separator Motor
and pouring out the dirty water.
LED alternating white/red
Dirty Water Tank missing.
Install the Dirty Water Tank onto the handle. Wait 15 seconds after emptying dirty water
tank before restarting the unit. Make sure the dirty water tank is completely installed on
both ends and is clicked securely into place.
LED alternating red/Orange
Discharge/charge protection.
Remove any blockages from the air path.
Ensure you are using the correct charger.
LED Alternating blue/orange.
Overheat protection
Allow the unit to cool down to room temperature for a minimum of 30 minutes before
powering on.
LED blinking orange/white
Water separator overcurrent protection.
Make sure the water separator motor in the dirty water tank is spinning freely. If the
motor is stuck, remove it, reinstall, then try again. If the issue persists, contact Customer
Service.
LED blinking Green/white
Wrong Charger
Make sure you are using the included Shark charger.
LED blinking purple Contact Customer Service.
TROUBLESHOOTING
To charge, connect the
charger to the port
on the handle.
sharkclean.co.uk 1514 sharkclean.co.uk
THREE (3) YEAR LIMITED WARRANTY
THE SHARK GUARANTEE
When a consumer buys a product in the UK & ROI, they get the benefit of
legal rights relating to the quality of the product (your “legal rights”). You
can enforce your legal rights against your retailer, including Shark if you
bought your Shark appliance from sharkclean.co.uk. However, at Shark we
are so confident about the quality of our products that we give the owner an
additional, free parts and labour manufacturer’s guarantee of up to 3 years.
A household appliance like a Shark floorcare appliance constitutes a sizeable
investment. Your new machine needs to work properly for as long as
possible. The guarantee it comes with is an important consideration - and
reflects how much confidence the manufacturer has in its product and
manufacturing quality.
The manufacturer’s guarantee does not aect your legal rights.
The Lithium ION power pack is not covered by the 3 year guarantee (see
battery guarantee on next page).
How long are new Shark machines guaranteed for?
Our manufacturer’s guarantee lasts for one year from the date of purchase as
standard, or for three years if you register your purchase with us within 28
days. There is information on how to register below.
How do I register my Shark guarantee?
If you have purchased your Shark appliance directly from sharkclean.co.uk
your guarantee is registered automatically. If you bought it from anywhere
else, you can register your guarantee online within 28 days of purchase.
• To register online, please visit www.sharkclean.co.uk/register-guarantee
or scan the QR code in your instruction manual.
• Keep a note of the date you purchased the machine.
IMPORTANT:
• Keep your receipt if you bought your Shark floorcare appliance from
anywhere except sharkclean.co.uk. You will need it to claim under your
guarantee.
• This free shark guarantee is only valid in the country of purchase.
What are the benefits of registering my free Shark guarantee?
When you register your guarantee, you will get an extra two years of cover.
We’ll also have your details to hand if we ever need to get in touch. If you
further agree to receive communications from us, you can also receive tips
and advice on how to get the best out of your Shark floorcare appliance and
hear the latest news about new Shark technology and launches.
What is covered by the free Shark guarantee?
Repair or replacement (at Shark’s option) of your Shark machine, including
all parts and labour.
What is not covered by the free Shark guarantee?
• Normal wear and tear.
• Accidental damage or faults caused by negligent use or care, misuse,
neglect, careless operation or handling of the Shark appliance which is
not in accordance with the Shark Operating Manual supplied with your
machine.
• Damage caused by use of the Shark appliance for anything other than
normal domestic household purposes.
• Damage caused by use of parts not assembled or installed in accordance
with the operating instructions.
• Damage caused by use of parts and accessories which are not Shark
Genuine Components
• Faulty installation (except where installed by Shark).
• Repairs or alterations carried out by parties other than Shark or its
agents.
• The Lithium ION power pack is not covered by the 3 year guarantee (see
battery guarantee on next page)
How can I claim under the free Shark guarantee?
Contact our customer service helpline on 0800 862 0453. For service hours
please visit our website under ‘Contact Us’. It’s free to call, and you’ll be put
straight through to a Shark representative. You’ll also find online support at
https://support.sharkclean.co.uk/. The Shark representative will go through
some troubleshooting with you, and if we conclude that the item has failed,
we will send you a replacement part or a returns label to send the defective
item back to us free of charge. When you have delivered the defective
product to us, we will send you a replacement.
Please remember that the item will need to be boxed when you return
it to us, which can be any suitable box; it does not have to be the original
packaging.
Where can I buy genuine Shark spares and accessories?
Shark spares and accessories are developed by the same engineers who
developed your Shark floorcare appliance. You’ll find a full range of Shark
spares, replacement parts and accessories for all Shark machines at
www. sharkclean.co.uk. Please remember that damage caused by the use
of non-Shark spares may not be covered under your guarantee.
When a consumer buys a product in the UK and ROI, they get the benefit of legal rights relating to the quality of
the product (your “statutory rights”). You can enforce these rights against your retailer. However, at Shark we are
so confident about the quality of our products that we give you an additional manufacturer’s guarantee of up to
two years for the battery (1 year as standard plus 1 year when you register). These terms and conditions relate to
our manufacturer’s guarantee only - your statutory rights are unaected.
Every Shark machine comes with a free parts and labour guarantee. Our customer service helpline (0800 862 0453)
is open from 9.00am to 6.00pm Monday - Friday. It’s free to call, and you’ll be put straight through to a Shark
representative. You’ll also find online support at www.sharkclean.co.uk
IMPORTANT
• The manufacturer’s guarantee covers your battery for 2 years starting on the date of purchase.
• Please keep your receipt at all times. Should you need to use your guarantee we will need your receipt to verify
the information you have supplied to us is correct. The inability to produce a valid receipt may invalidate your
guarantee. This free Shark guarantee is only valid in the country of purchase.
How long are new Shark batteries guaranteed for?
Our confidence in our design and quality control means that your new Shark STAINFORCE battery is guaranteed
for a total of one year as standard, one year on registration.
What is covered by the free Shark guarantee?
Repair or replacement of your Shark battery (at Shark’s discretion to decide whether to replace or repair)
including all parts and labour. A Shark guarantee is in addition to your legal rights as a consumer.
What is not covered by the free Shark guarantee?
1. Normal wear and tear of parts which require regular maintenance and/or replacement to ensure the proper
functioning of your unit.
2. Accidental damage, faults caused by negligent use or care, misuse, neglect, careless operation or handling of
the Spot Cleaner which is not in accordance with the Shark Instructions supplied with your machine.
3. Use of the battery for anything other than powering the Spot Cleaner.
4. Use of parts not assembled or installed in accordance with the instructions.
5. Use of parts and accessories which are not Shark spares.
6. Faulty installation (except where installed by Shark).
Where can I buy genuine Shark spares and accessories?
Shark spares and accessories are developed by the same engineers who developed your Shark Spot Cleaner
You’ll find a full range of Shark spares, replacement parts and accessories for all Shark machines at
www.sharkclean.co.uk.
Please remember that damage caused by use of non-Shark spares is not covered under your guarantee.
2 YEAR LIMITED BATTERY GUARANTEE
RECYCLING THE LI-ION BATTERY
When the Shark Li-ion battery needs to be replaced, dispose of it or recycle it in accordance with local
ordinances or regulations. In some areas, it is illegal to place spent lithium-ion batteries in the standard rubbish
bin. Return spent batteries to an authorised recycle centre or to the retailer for recycling. Contact your local
recycling centre for information on where to drop the spent battery.

SharkNinja Europe Limited,
1st/2nd Floor Building 3150,
Thorpe Park, Century Way,
Leeds, England, LS15 8ZB
+44 (0)800 862 0453
www.sharkclean.co.uk
SharkNinja Germany GmbH,
Rotfeder-Ring 9,
60327 Frankfurt am Main,
Germany
www.sharkclean.eu
HX100UKT�IB�MP�Mv7�250624
SHARK is a registered trademark in the United Kingdom of
SharkNinja Operating LLC.