
EN
English
HDF5I90H*2
USER’S OPERA
TION MANUAL
Before operating this unit, please read this manual
thoroughly, and retain for future reference.
HDF5I90H
HDF5I90H*
HDF5I90H*3

Thank you very much for choosing our company's products.
Please correctly install and use this product, and do not use this product to dry items that are not
suitable for drying in a clothes dryer.
The images in the manual are for illustration purposes only. The appearance, printing, etc. shall be
subject to the actual product.
Our company emphasizes technology updates. In order to enhance the overall performance of
this appliance, we will make technical changes to it without further notice. Your understanding is
appreciated.
This product is for household use only.
The following symbols in this manual are indicated as follows:
Information, suggestions, prompts, or advice
WARNING - GENERAL HAZARD
WARNING - ELECTRIC SHOCK HAZARD
WARNING - BURN HAZARD
WARNING - FIRE HAZARD
Please read the user manual carefully.

3
CONTENTS
INTRODUCTION
PREPARATION
BEFORE FIRST
USE
DRYING STEPS
CLEANING AND
MAINTENANCE
TROUBLE-
SHOOTING
MISCELLANE-
OUS
4 SAFETY PRECAUTIONS
13 PRODUCT DESCRIPTION
14 Specifications
15 INSTALLATION AND CONNECTION
15 Packing/packaging
16 Installation location
16 Adjustable feet
17 Installation clearance
19 Stacking installation
20 Changing the door opening direction
22 Connect the drain hose
23 Drying rack
24 Transportation after installation
25 BEFORE THE FIRST USE
26 Connecting to power mains
28 Programs and functions
29 Program table
31 Additional settings and functions
35 Function selection table
37 Start the program
37 End of the program
38 MAINTENANCE AND CLEANING
38 Cleaning the filter
39 Clean the heat exchanger
40 Empty the condensate box
41 Clean the water tank filter
41 Clean the door seal
41 Cleaning the outside of your washer
42 TROUBLESHOOTING
44 FAULT CODES AND TROUBLESHOOTING
45 SERVICING
45 USAGE RECOMMENDATIONS
46 DISPOSAL
47 PROGRAM TABLE

SAFETY PRECAUTIONS
Please read the manual carefully before using
this appliance.
Do not use this appliance if you have not read or understood
this manual.
This manual is applicable to multiple models. Therefore, this
manual is applicable to multiple model.
Failure to follow the instructions or improper operation may
damage clothing or the appliance, or cause injury to you.
Please place the manual near the appliance for easy access.
To reduce the risk of explosion, fire, death, electric shock,
injury or scalding to persons when using this product, follow
basic precautions, including the following.
staff kitchen areas in shops,offices and other working environments;
farm houses;
by clients in hotels, motels and other residential type
environments; bed and breakfast type environments;
areas for communal use in blocks of flats or in launderettes.
If the appliance is used for professional, for-profit purpose or
purpose exceeding normal use in a household and similar
applications, or if the appliance is used by a person who is not a
consumer, the warranty period shall be equal to the shortest
warranty period required by relevant legislation.
This appliance is not intended for use by persons (including
children) with reduced physical, sensory or mental capabilities, or
lack of experience and knowledge, unless they have been given
supervision or instruction concerning use of the appliance by a
person responsible for their safety.
Children should be supervised to ensure that they do not play with
the appliance.
If the supply cord is damaged, it must be replaced by the
manufacturer, its service agent or similarly qualified persons in
order toavoid a hazard.
4

5
The tumble dryer is not to be used if industrial chemicals have been
used for cleaning.
The lint trap has to be cleaned frequently.
The lint must not to be allowed to accumulate around the tumble
dryer.
For appliances with ventilation openings in the base, a carpet must
not obstruct the openings.
The maximum capacity in some cycles for dry clothes to be used is
Dry(9.0kg).
The recommended maximum capacity may vary among different
programs. For best drying results, refer to the "Program Table".
Do not dry unwashed items in the tumble dryer.
Items that have been soiled with substances such as cooking oil,
acetone, alcohol, petrol, kerosene, spot removers, turpentine, waxes
and wax removers should be washed in hot water with an extra
amount of detergent before being dried in the tumble dryer.
Items such as foam rubber (latex foam), shower caps, waterproof
textiles, rubber backed articles and clothes or pillows fitted with foam
rubber pads should not be dried in the tumble dryer.
Fabric softeners, or similar products, should be used as specified by
the fabric softener instructions.
Remove all objects from pockets such as lighters and matches.
Fill steam generators only with liquids specified by the
manufacturer.
WARNING: Never stop a tumble dryer before the end of the drying
cycle unless all items are quickly removed and spread out so that
the heat is dissipated.
WARNING: The appliance must not be supplied through an external
switching device, such as a timer, or connected to a circuit that is
regularly switched on and off by a utility.
Exhaust air must not be discharged into a flue that is used for
exhausting fumes from appliances burning gas or other fuels.

6
That adequate ventilation has to be provided to avoid the back flow
of gases into the room from appliances burning other fuels, includi
ng
open fires.
ELECTRICAL SAFETY
This appliance complies with relevant safety standards.
Before connecting the appliance to the power supply, please
wait at least 2 hours to ensure it reaches room temperature.
This appliance must be repaired by an authorized service
center, and only spare parts recognized by the authorized
manufacturer shall be used.
Any repairs and maintenance related to safety or performance
should be conducted by trained professionals.
Do not attempt to repair this appliance yourself. Repairs by
unprofessional personnel may cause personal injury or more
serious malfunctions. Please consult your local service center
and always use original spare parts.
Before connecting the appliance to the power supply, ensure that
the electric voltage specified on the rating plate matches the Voltage
of your socket.
Do not attempt to operate the appliance if it is damaged,
malfunctioning, partially disassembled, or has missing or damaged
parts, including damaged wires or plugs.
Do not bend the power cord excessively or place heavy objects on it.
Ensure that the mains cable is not kinked or trapped, and it does not
come into contact with heat sources or sharp edges.
Do not use multiple outlets, extended power cords, or dual adapters
on the appliance. Do not use an extended cord to connect the
appliance to the power supply.
The appliance must not be installed behind a lockable door, a
sliding door or a door with a hinge on the opposite side to that of the
tumble dryer, in such a way that a full opening of the tumble dryer
door is restricted.

7
Do not spray cleaning solution inside or outside the appliance.
In case of flooding, please disconnect the power plug and contact
the after-sales service center.
Do not connect the appliance to the electrical socket of an electric
shaver or hair dryer.
Do not connect the appliance to an electrical outlet specifically
designed for low-load appliances.
This appliance must be earthed via the power cord. In the event of
malfunction or breakdown, grounding will reduce the risk of electric
shock by providing a path of least resistance for electric current.
Improper connection of the equipment-grounding conductor can
result in risk of electric shock. Check with a qualified electrician or
service personnel if you are in doubt as to whether the appliance is
properly grounded.
This appliance is equipped with a power cord having an equipment-
grounding earthing pin and a grounding power plug. The power plug
must be plugged into an appropriate outlet socket that is installed
and grounded in accordance with all local codes and ordinances.
INSTALLATION
Before using the appliance, be sure to remove the packaging (sponge,
polystyrene foam, etc.) attached to the bottom of the appliance.
Please install the appliance correctly according to the instructions
and connect the water and electricity (see "INSTALLATION AND
CONNECTION").
The connection of water and electricity should be carried out by fully
trained technicians or professionals.
Installing a dryer on top of a washing machine at least requires two
people.
Do not install this appliance in places where door opening is restricted.
Always use the pipe or hose provided with the appliance.

8
The appliance may not be in contact with a wall or adjacent furniture.
Please install the appliance in a room with adequate ventilation
and a temperature between 10°C and 25°C. Do not install the
appliance in an area where the temperature may drop to 5°C
below, otherwise, the parts may be damaged when water freezes.
Place the appliance on a sturdy flat surface. If the appliance is
installed on a high platform, it must be secured to prevent it from
tipping over.
Keep the bottom and surrounding area of the appliance free of
flammable materials such as threads, paper, rags, chemicals, etc.
This appliance must not be stored or used in any outdoor locations.
Avoid lint accumulation near the appliance. For appliance with vents
at the bottom, please ensure that the vents are not blocked by carpet.
Do not block the air outlet, and do not place the appliance on a
long-fiber carpet to avoid obstructing air circulation.
Do not install the appliance near heaters or any flammable items.
Do not install the appliance in places where gas leakage may occur
or where the air contains dust particles.
Please ensure good ventilation conditions to avoid the gas
generated by this appliance from flowing back into the room, thereby
causing a fire.
USAGE
After the installation is complete, please let the appliance stand
for 24 hours before using it. If the appliance needs to be laid down
during transportation or maintenance, please face the appliance and
tilt it to the left side horizontally.
Inspect the appliance to see if it has been damaged during
transportation. Never operate the appliance in a damaged
condition.
The dryer uses a heat pump system to heat the air.

9
If the condensate tube is blocked or clogged, then tumble dryer
operation is stopped.
When cleaning the filters, the lint should be thrown in the garbage
bin and not washed through the drain in order to avoid spreading
microplastics in the used water system.
Do not use wet hands to touch the power plug or operate the
appliance.
The system consists of a compressor and a heat exchanger. When
the dryer is started, compressor operation (the sound of flowing
liquid) or flow of refrigerant may be louder as long as the
compressor operates. This is not a sign of malfunction and it will not
affect useful life of the dryer. In time and with use of the dryer this
noise will become quieter.
Do not drink or prepare food with the condensed water/ distilled
water. It can cause health problems to people and pets.
Never attempt to operate the appliance if it is damaged,
malfunctioning, partially disassembled, or has missing or broken
parts, including a damaged cord or plug.
BURN HAZARD
If you open the dryer door during the drying process, the clothes
may be very hot and there is a risk of burning.
FIRE HAZARD
This appliance is only for drying clothes washed with water. Do not
dry clothes washed or cleaned with industrial cleaners, chemicals,
flammable cleaners, or similar substances (such as gasoline,
trichloroethylene, etc.); otherwise, it may cause an explosion.
Do not attempt to separate any panels or disassemble the
appliance.
Do not use sharp objects like pins, knives, or fingernails to press
the button.
After the program is finished, unplug the power plug. Never
unplug an appliance by pulling on the power cord. Always firmly
grasp the power plug and pull it directly out from the socket.

10
Because the appliance is heavy, you may injure yourself trying to
lift it. Do not lift the appliance yourself; your hands may be cut by its
sharp edges.
Do not grasp the appliance by its protruding parts. The protruding parts
on the appliance may break when lifting or pushing the appliance.
Do not dry clothes with large buttons or other heavy metal items.
Make sure all pockets of clothes to be dried are empty. To prevent
odors and mold, leave the door open and let the drum air dry after
the drying cycle.
Do not leave metal objects in the drum for a long time.
The door glass may break due to strong impact, so be careful when
using the appliance.
Please put the clothes completely into the drum so that the clothes
do not get caught in the door.
Unplug the power cord from the electrical outlet when the appliance
is not in use.
Do not put animals (such as pets) into the appliance.
Oil-affected items can ignite spontaneously, especially when
exposed to heat sources such as in a tumble dryer. The items
become warm, causing an oxidation reaction in the oil.
Oxidation creates heat. If the heat cannot escape, the items can
become hot enough to catch fire. Piling, stacking or storing oil-affected
items can prevent heat from escaping and so create a fire hazard.
If it is unavoidable that fabrics that contain vegetable or cooking
oil or have been contaminated by hair care products be placed in
a tumble dryer they should first be washed in hot water with extra
detergent - this will reduce, but not eliminate the hazard.
Do not use any solvents or cleaning agents that may damage the
appliance (please refer to the recommendations and instructions of
the relevant cleaning agent manufacturer).
Do not use this appliance to dry unwashed clothing (except for
certain drying care programs).

11
BURN HAZARD
During the drying process, the door may become hot. Be careful to
avoid burns. Do not let children play near the door. Do not touch the
door glass during the operation of the appliance.
The back of the appliance may become very hot during operation.
Do not touch the back of the appliance until it has completely cooled
down.
Do not turn off the power during the drying process. After drying,
please take out the clothes immediately to avoid leaving them in
the appliance for a long time to prevent fire. After taking them out,
please hang or lay them flat as soon as possible and let them cool
naturally.
The dryer is protected with an automatic switch-off system in case of
overheating. This system wiIl switch off the dryer if the temperature
is too high.
Never reach into the appliance while it is operating. Wait until the
drum has completely stopped.
Do not push down on the door, when the appliance door is open.
If the net filter is clogged, the overheating automatic switch- off
system may be activated. Clean the filter, wait for the dryer to cool
down, and try running it again. If the dryer still fails to start, call a
service technician.
WARNING
In the appliance enclosure or in the built-in structure, keep
ventilation openings clear of obstruction.
WARNING
The appliance contains refrigerant which although it is
environmentally friendly, is flammable R290. Failure to dispose of it
properly may result in a fire or poisoning dispose of the appliance
properly and do not damage the pipes in the refrigerant circuit.
Always ensure that the condensate tank is drained before moving
the appliance or storing it in an unheated room during the winter.

12
WARNING
Do not damage the refrigerant circuit.
CHILD SAFETY
Before you close the appliance door and run the program, please
ensure that there is only clothing in the drum. Make sure that no
children climb into the appliance and close the door from the inside.
Do not let the appliance door stay open. Children may hang on the
door or climb inside the appliance, causing damage or injury.
Keep all packaging materials in a place out of the reach of children,
as these may be dangerous.
Do not let children under 3 years old approach the appliance if
they are not supervised at all times.
After understanding the safe use of the appliance and the dangers
caused by improper use, children aged 8 years and above, as well
as people with reduced physical, sensory, or mental abilities, or lack
of experience and knowledge, can use this appliance, but they need
to be supervised.
Children must not clean the appliance or perform any maintenance
on it without supervision.
SERVICING
The user shall be responsible for the repair costs of damage caused
by improper connection, improper installation and use, or repair
by unauthorized personnel, as such damage is not included in the
warranty.
The warranty does not include consumables, slight color
deviations, increased noise due to appliance aging (which does
not affect the functionality of the appliance), and cosmetic defects
of parts (which do not affect the functionality and safety of the
appliance).
13
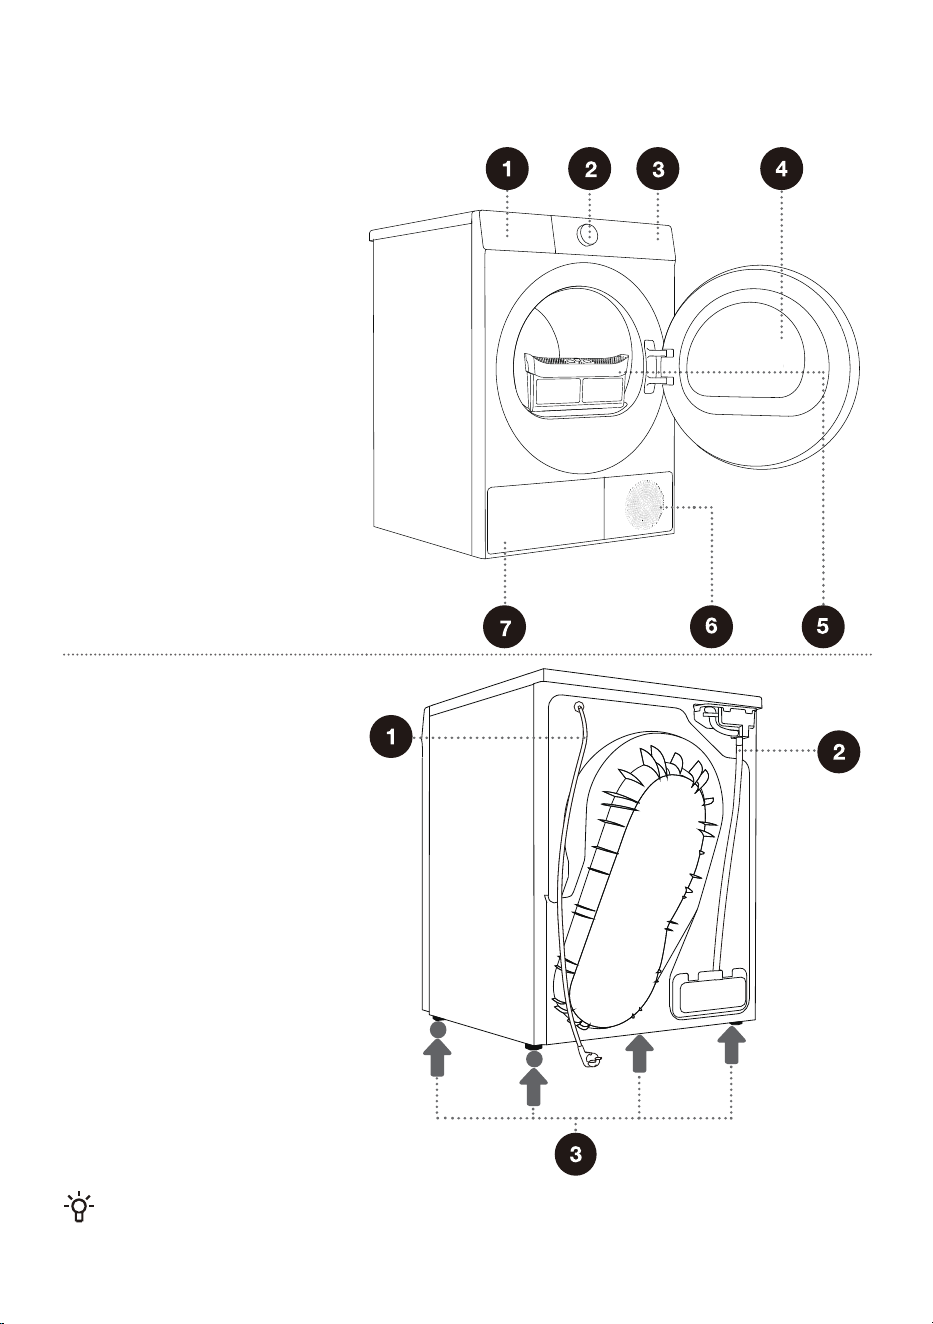
PRODUCT DESCRIPTION
Front
1 Condensate box
2 Knob
3 Control panel
4 Door
5 Filter
6 Air vent
7 Heat exchanger door cover
Back
1 Power cord
2 Condensate discharge hose
3 Adjustable feet
The illustrations in this manual are for demonstration purposes only. Due to product improvements
and series expansion, the product appearance, color, and functional components you receive may
differ from the illustrations in this manual. Please refer to the actual product.
14
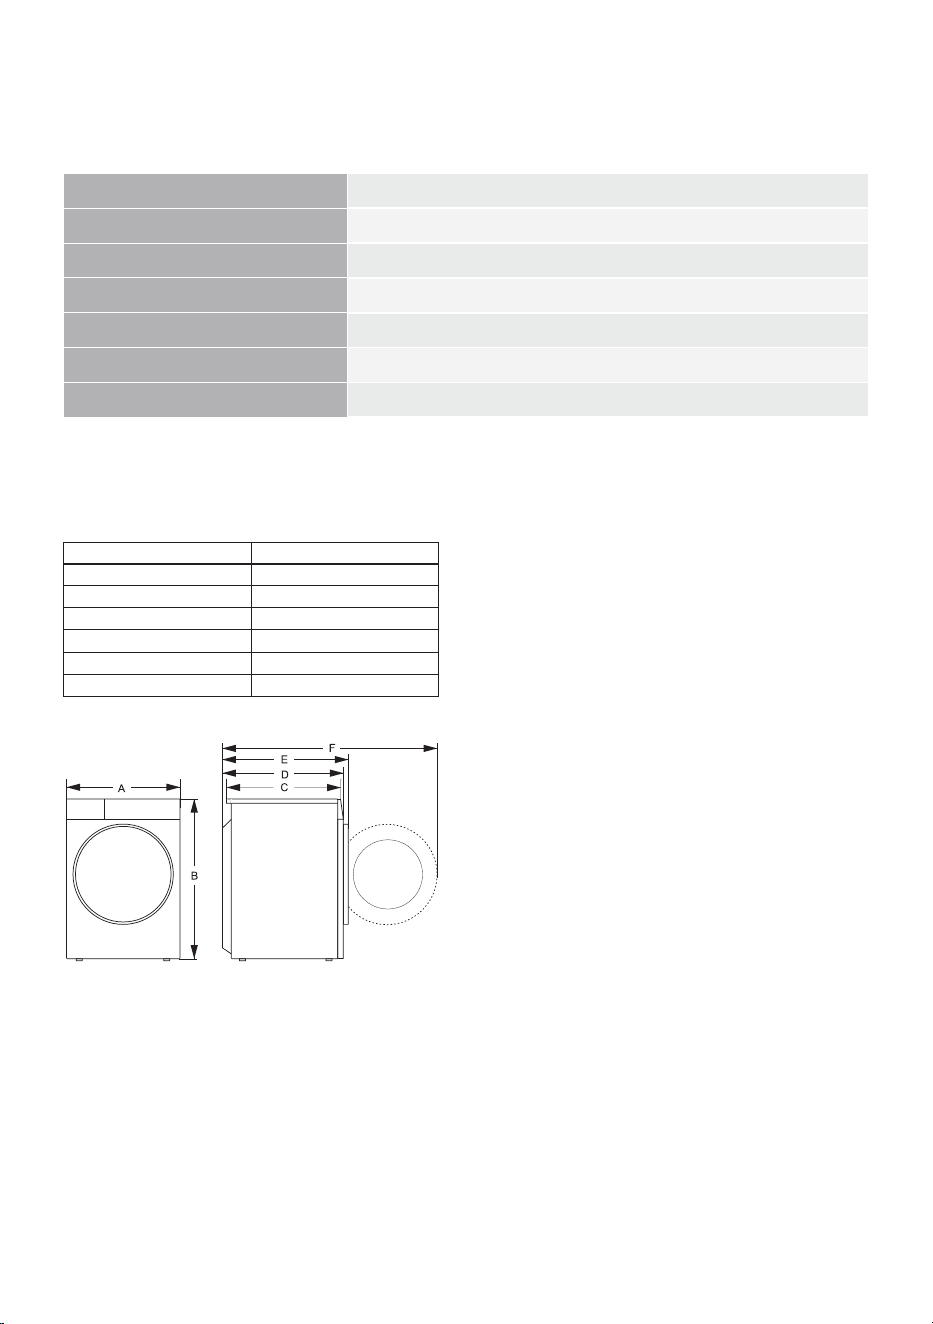
SPECIFICATIONS
(depending on the model)
Maximum load
Net weight
Rated voltage
Rated frequency
Rated power
Refrigerant type
Refrigerant capacity
DIMENSIONS (MM)
Index Dimensions (mm)
A
B
C
D
E
F
9.0kg
47kg
220-240V~
600W
50Hz
110g
R290
595
845
565
590
620
1110
15
INSTALLATION AND CONNECTION
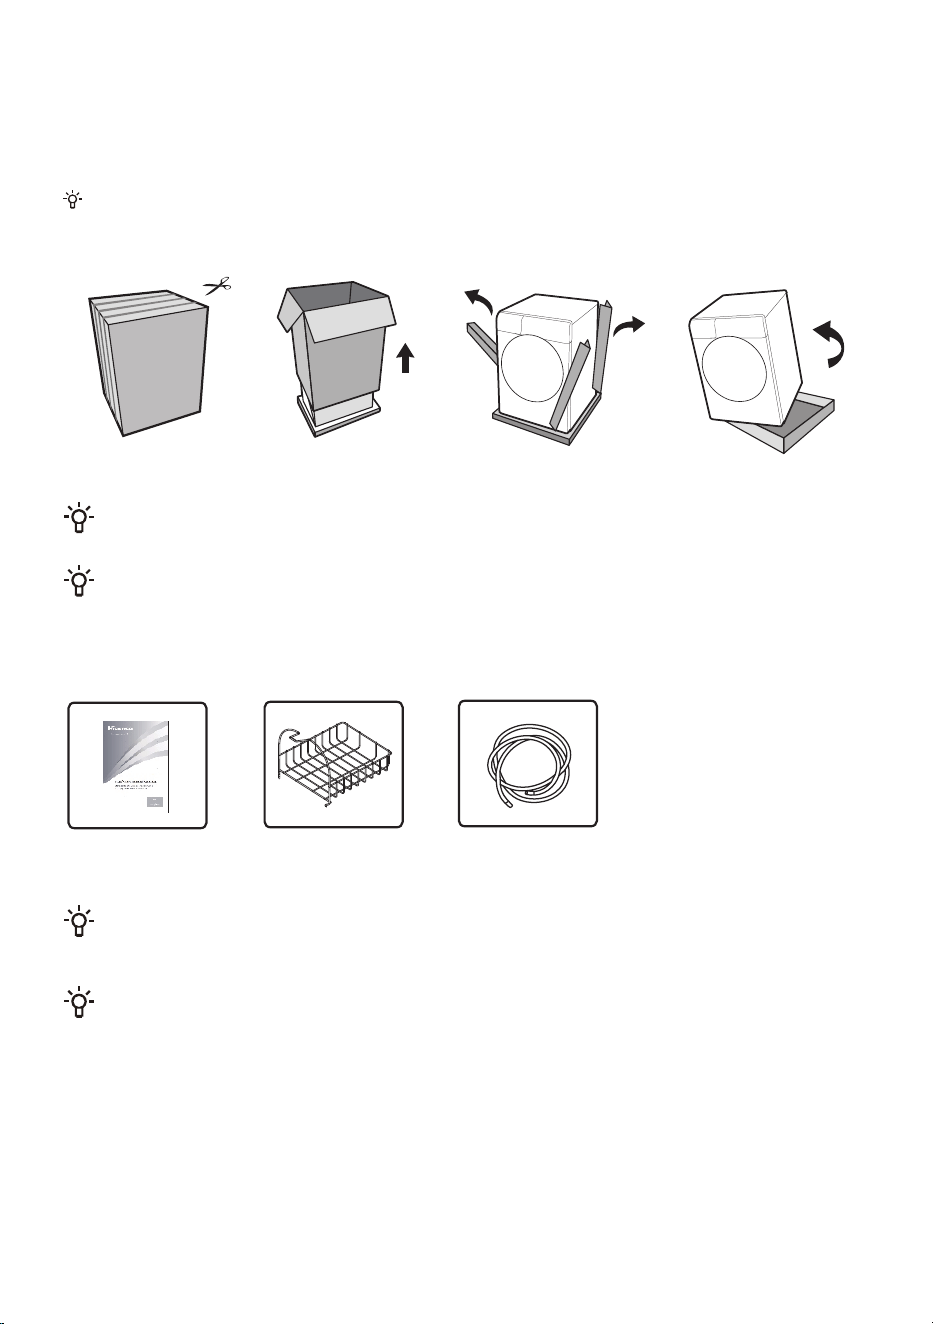
PACKING/PACKAGING
Please first remove all the packaging and foam, especially the foam base. When unpacking the
device, please do not use sharp objects to damage it. Keep packaging materials (plastic bags, other
plastic parts, etc.) out of reach of children.
The process of packing the machine is just the opposite of unpacking above.
Please check the device for any damage. If damaged, do not use it, and immediately contact
after-sales service.
The accessories included with this appliance include one or more of the following:
Instructions Drying rack Drain pipe
Different models have different configurations, and the included accessories are subject to the
actual configuration of the model.
For your safety and extended product life, use only authorized components. The manufacturer is
not responsible for product malfunction or accidents caused by the use of unauthorized components or
parts.
16
INSTALLATION LOCATION
Please place the appliance on a solid surface and keep it steady. The flat surface should be kept
clean and dry; otherwise, the appliance may slip. Also, clean the bottom of the adjustable feet.
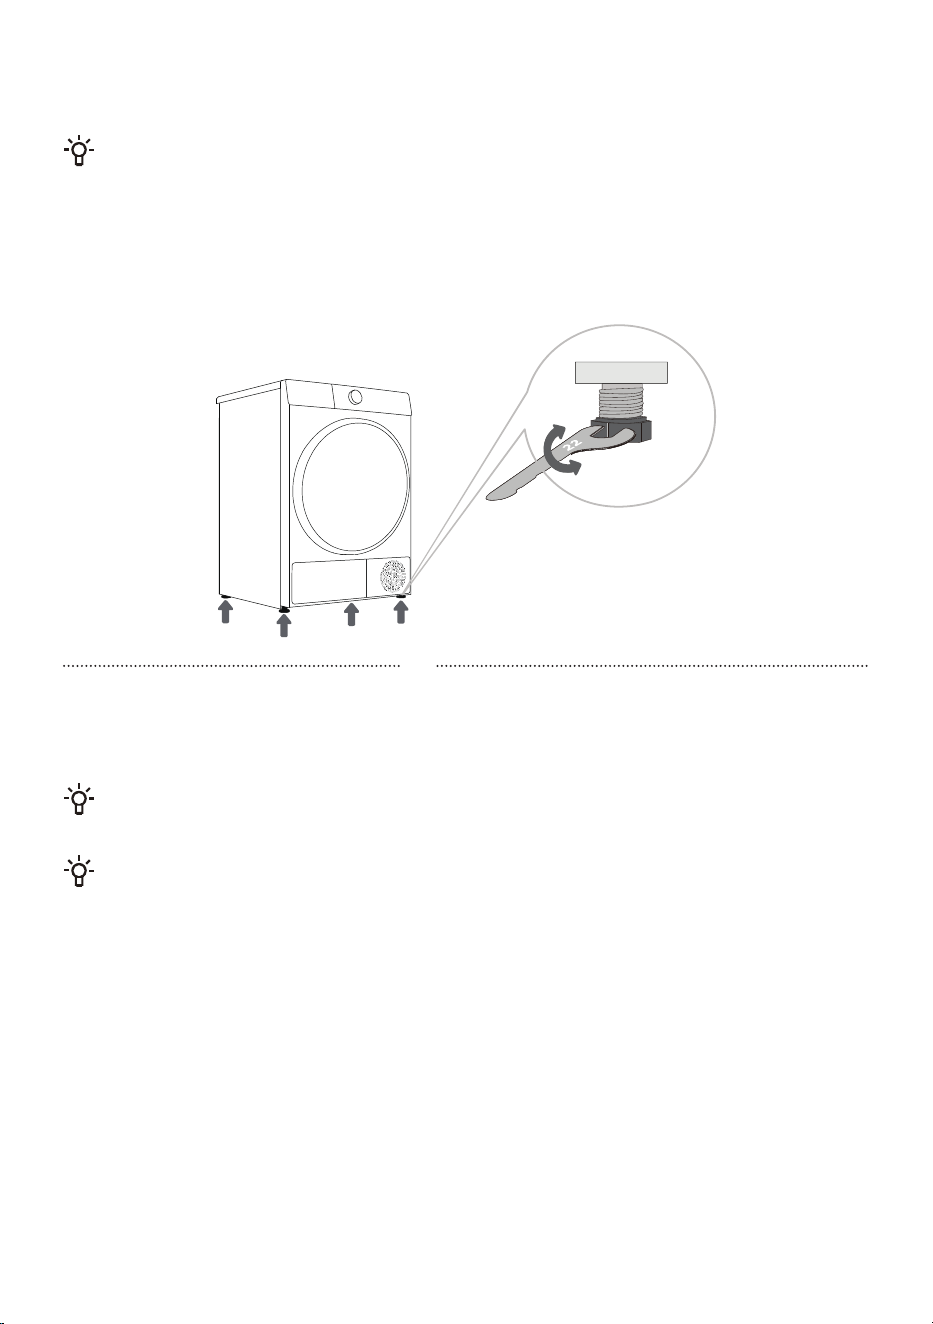
ADJUSTABLE FEET
Use a level and a 22 mm wrench for adjustment.
1
Level the appliance by turning the
four adjustable feet. The adjustable
feet allow 1 cm height adjustment.
2
After adjusting the height, use a wrench to tighten
the lock nut by rotating it counterclockwise (see
figure).
Incorrect levelling of the dryer with the adjustable legs may cause vibration, appliance sliding
across the room, and loud operation. Incorrect levelling of the dryer shall not be subject to warranty.
Sometimes, unusual or louder noise may appear during appliance operation; these are mostly the
result of improper installation.
17
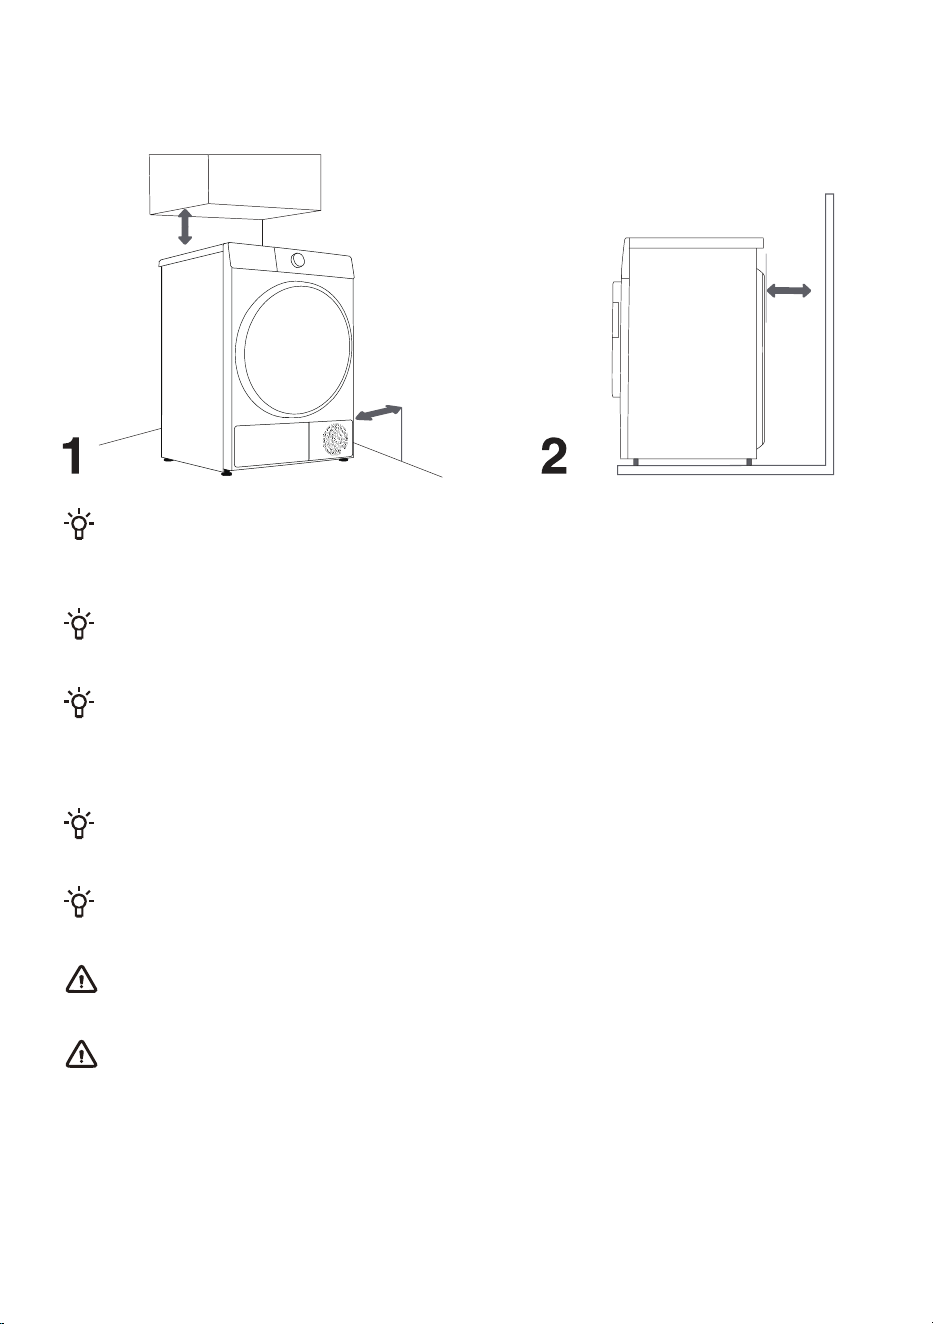
INSTALLATION CLEARANCE
25 mm
50 mm
25 mm
The dryer may not be in contact with a wall or adjacent furniture. For optimum dryer operation,we
recommend observing the clearance from the walls as indicated in the figure. In case of failure to heed
the required minimum clearance, the dryer may overheat.
Vents on the back wall and the air exhaust opening on the front side of the dryer should never be
obstructed.
The room in which you will install the dryer should be sufficiently ventilated, with a temperature
between 10°C and 25°C. Dryer operation at a lower environment temperature may result in
condensate accumulation in the dryer interior. Do not place the dryer into a place where there is
danger of freezing. Frozen water in the condensate tank and pump may damage the dryer.
The dryer emits heat. Therefore, do not place it in a very small room, as the drying process may
take longer due to limited amount of available air.
Lighting in the room should be sufficient to allow reading the information on the display unit on the
control panel.
Do not place the dryer behind lockable or sliding door, or door with a hinge on the opposite side
of the dryer door hinge. Install the dryer in such way that the door can always be freely opened.
Do not place the dryer on a carpet with long fibres as this may impede air circulation.
18
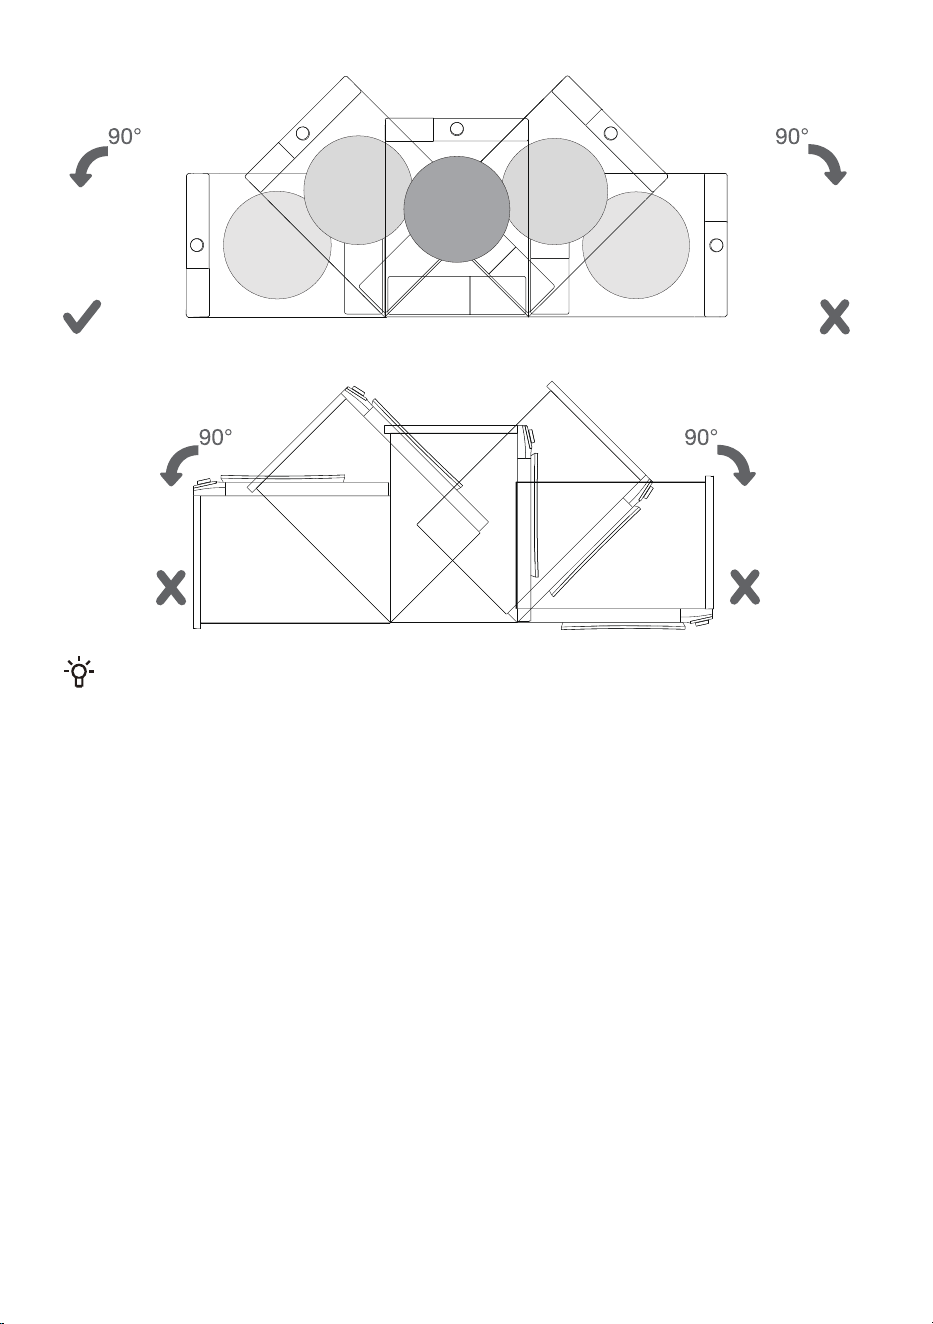
After installation, wait for 24 hours without moving the appliance before using it for the first time. If
the dryer has to be laid down on one of the sides during transport or servicing, place it with its left side,
viewing from the appliance front, downwards.
19
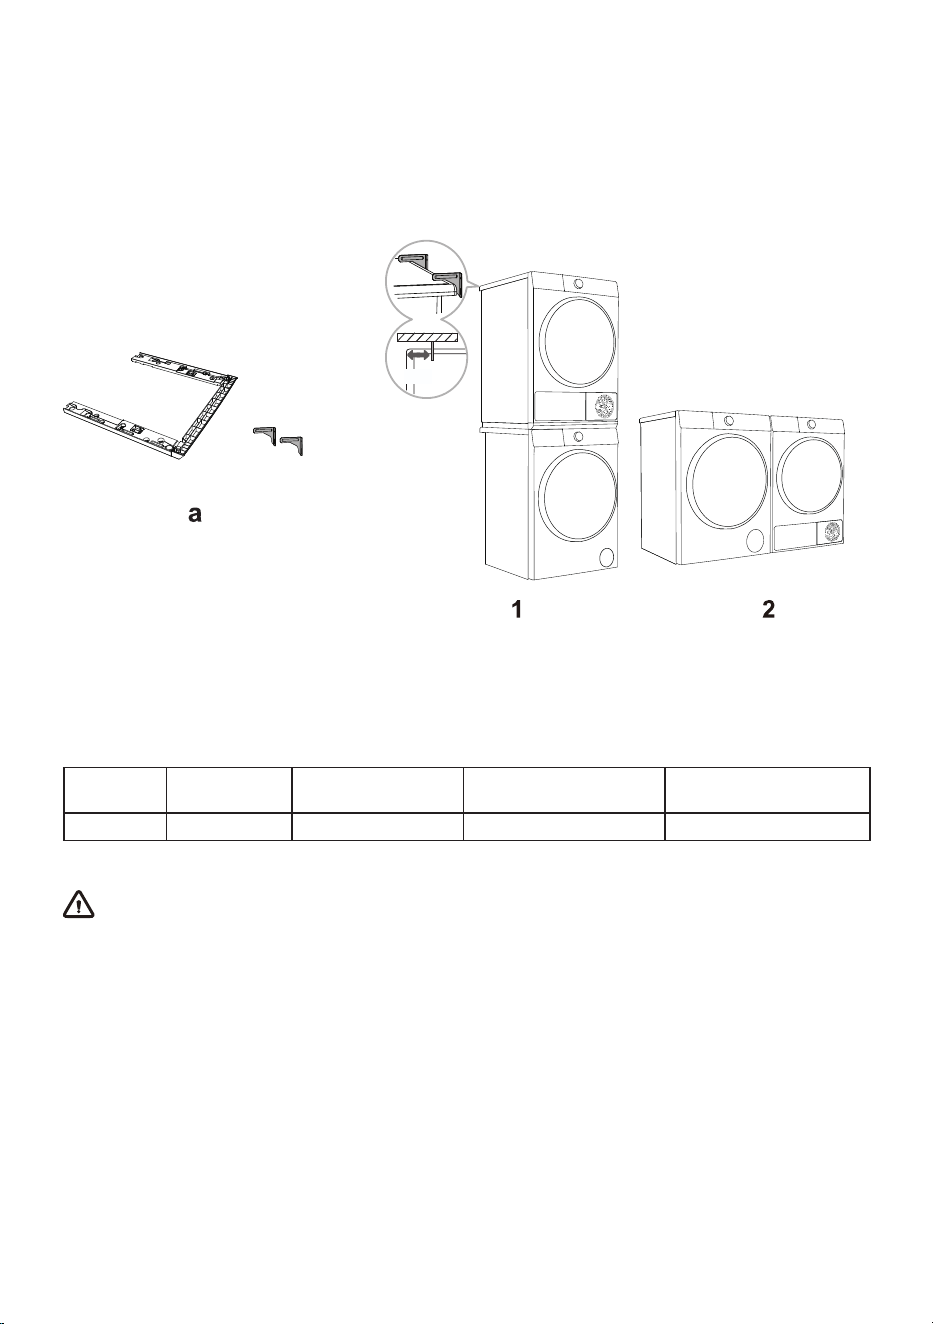
STACKING INSTALLATION
This dryer must be stacked with a washing machine of the same brand using a stacking kit of the same
brand(see Figure 1). You can contact local dealer for purchase figure a, and install it according to user
manual.
Alternatively, the dryer can be placed next to the washing machine (figure 2).
5 cm
Stacking Brackets
Wall fixed support
STACKING BRACKETS (ACCESSORIES)
Please use original accessories. You can refer to the following recommendations for purchasing
stacking brackets.
Dryer series Dryer depth(D)
Washing machine
series
Washing machine depth(D) Matching Stacking Brackets
At least two persons are required to install the tumble dryer on top of a washing machine.
3I 590mm 3I 510/550/590mm HPSS5I
20
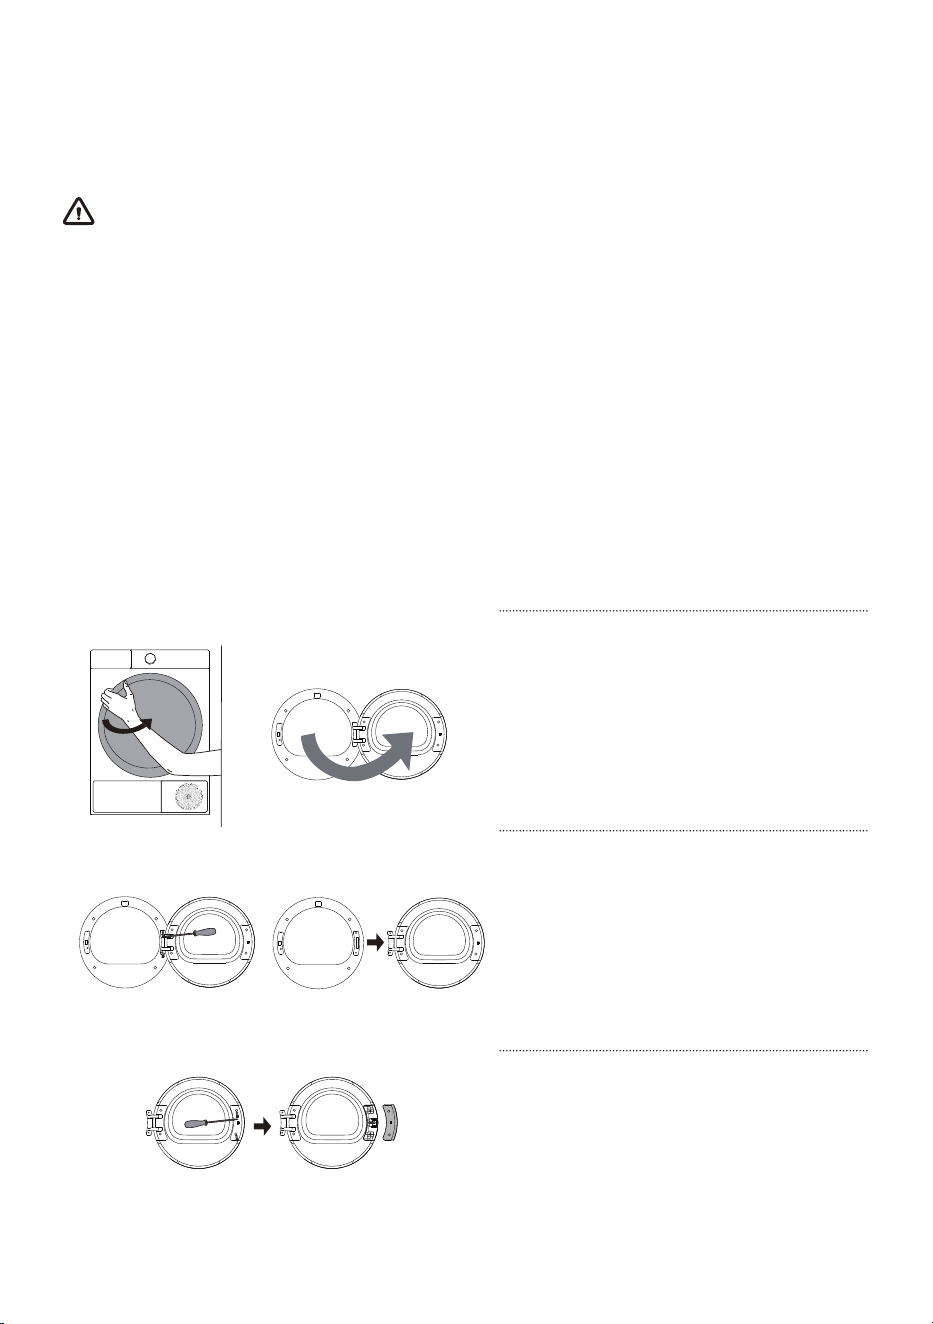
CHANGING THE DOOR OPENING DIRECTION
For easier operation, you can change the door opening direction. The steps are as follows (taking the
example of changing from opening the door from the left side to opening the door from the right side).
WARNING
Support the door with a stool or box that fits under the door, or have an assistant support the weight of
the door.
Avoid dropping the door.
Unplug the appliance or turn off power at the main circuit breaker before beginning door reversal.
Always reverse the door BEFORE stacking the appliance on top of the washer.
Do not reverse the door while the appliance is stacked on a washing machine.
Before removing the hinge screws, have an assistant support the weight of the door. The door could
fall on the floor due to the weight of the door.
For safety reasons, two or more people need to work together to reverse the door.
The appearance of the screws varies and the screws must be inserted differently depending on the
position. Make sure that you've selected the correct screw before tightening.
1
Fully open the door.
2
Unscrew the two fastening screws of the
door hinge with a phillips screwdriver (or
8 mm socket spanner) to remove the whole
door body.
3
Unscrew the two screws of the door hook
cover plate with a phillips screwdriver,
and remove the whole door hook cover plate
(including the door hook).
21
4
Unscrew the two screws of the hinge
cover plate, pull it out horizontally
with a little force, and then remove the two
screws (stainless steel pan head screws)
on the reinforcing iron plate. And press
the door body with one hand, grasp the
hinge with the other hand, lift it up little by
little, and slowly remove the hinge from
the positioning pin. If necessary, use a flat
head screwdriver to pry it.
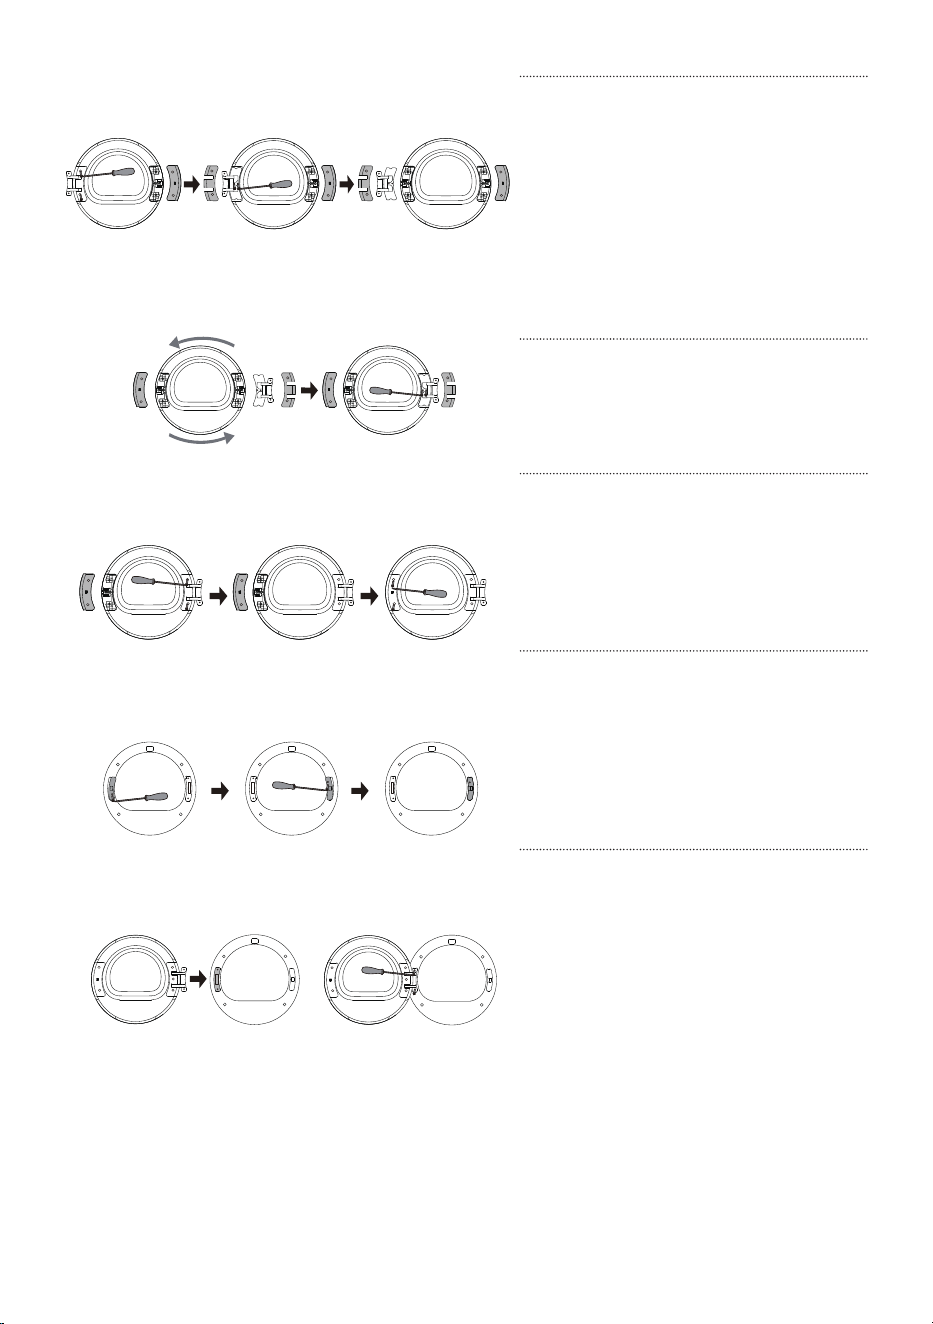
5
Rotate the hinge assembly 180° to the
other side, install the hinge assembly
on the stud and press it tightly, and then
tighten the two screws in the middle.
6
Rotate the hinge cover plate and
the door hook cover plate 180°
respectively and install them at the
corresponding positions on the other side
of the inner frame, and then tighten the
screws.
7
Remove the door lock screw of front
assembly pull down the door lock
vertically by hand, take it down and rotate
it 180° to the other side. Then install it to
the hole of front assembly, pull it down to
clamp it, and tighten the screws. Now, the
reversing of door lock is completed.
8
Finally, install the door hinge on
the front assembly, tighten the two
screws, and close the door. At present, the
door reversing (from left opening to right
opening) is completed.
22
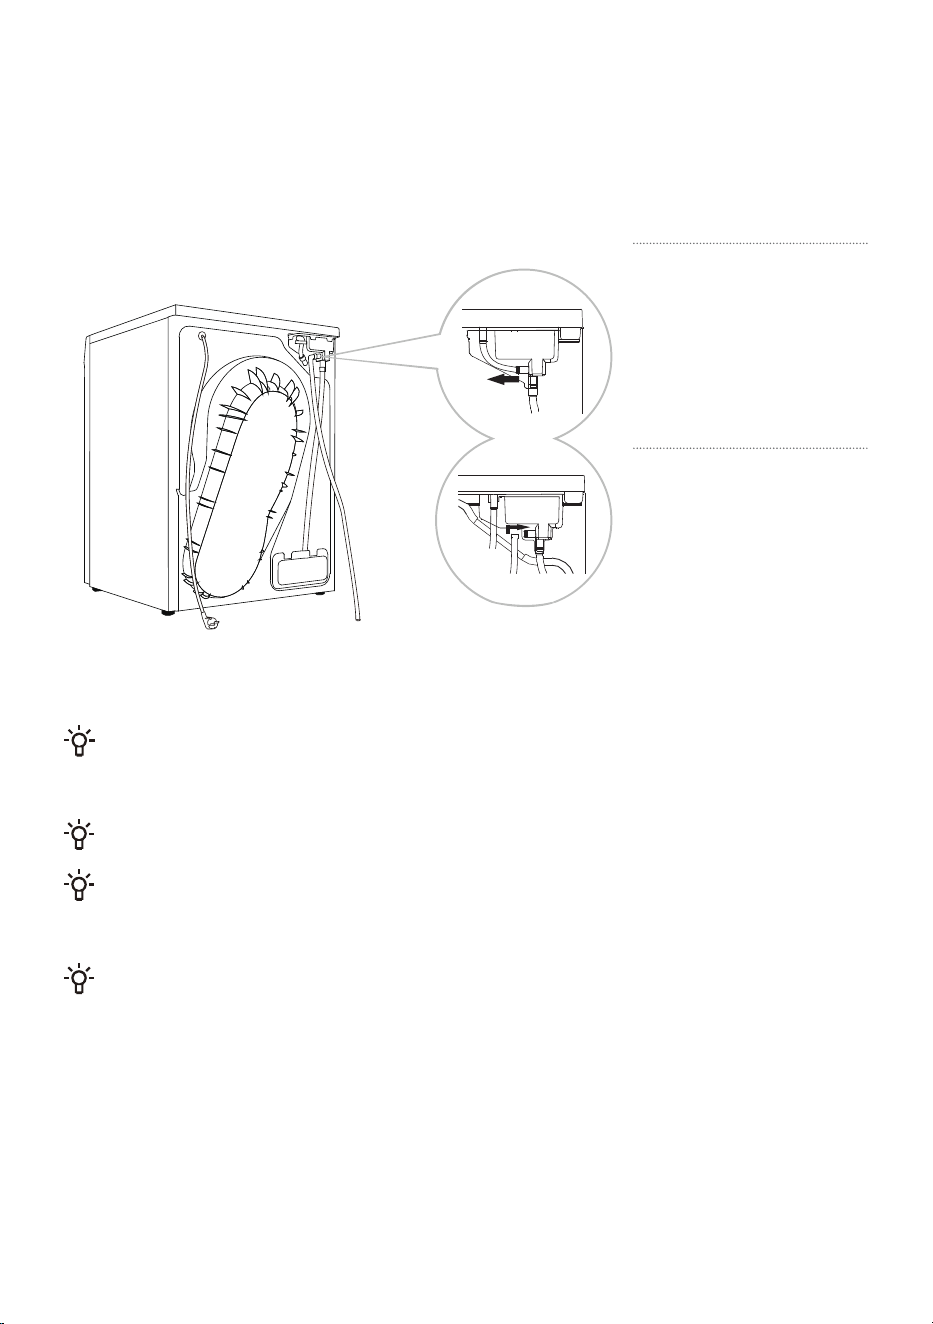
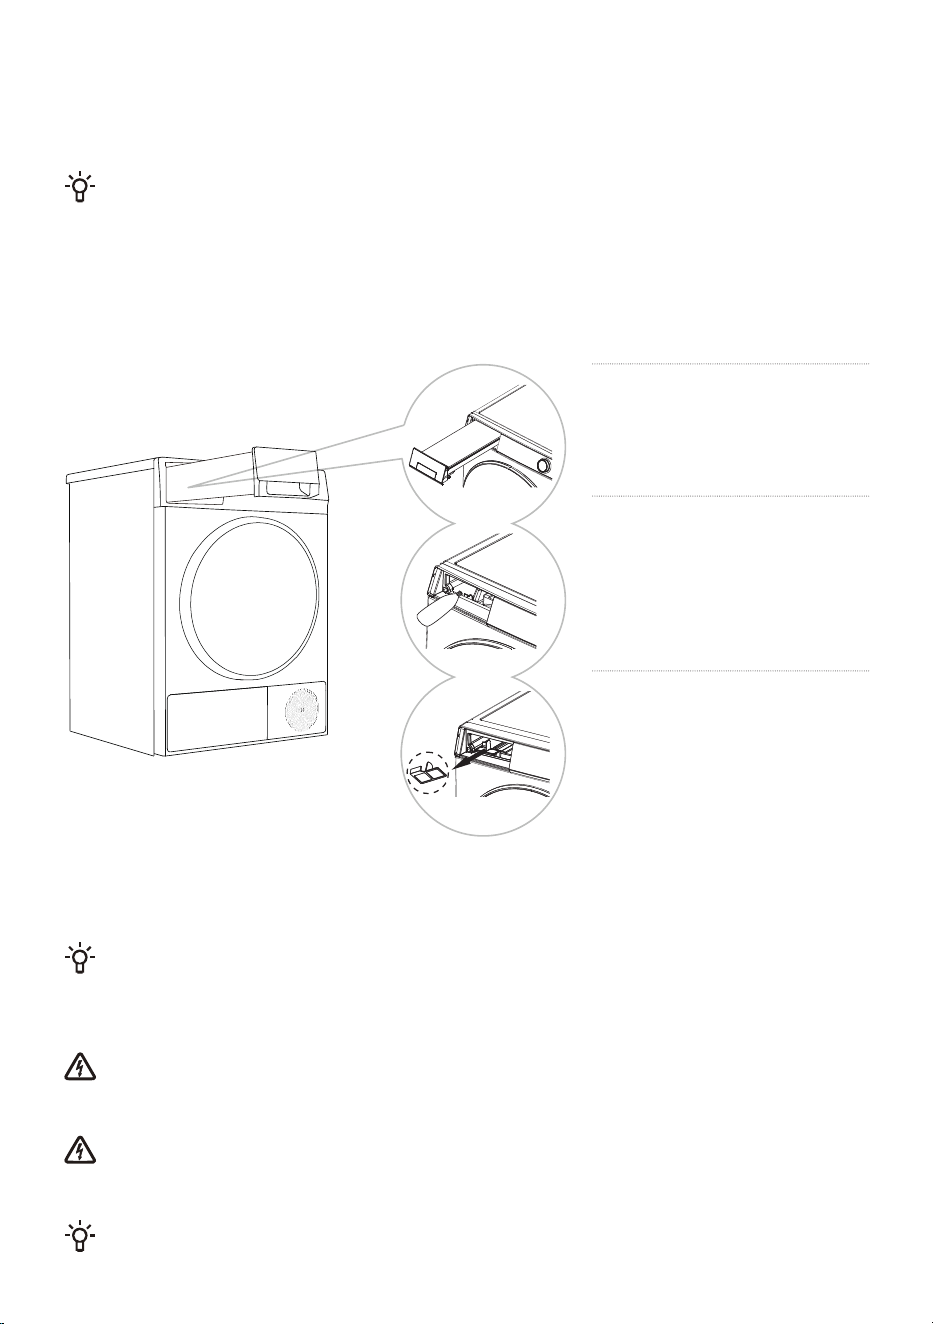
CONNECT THE DRAIN HOSE
If the appliance is not connected to a drain hose, the water extracted from the clothes by the
condenser will accumulate in the condensate box, which needs to be emptied after each program. If
the installation location of the appliance is close to the drain outlet, or if the dryer is stacked on top of
the washing machine, you can install the drain hose included in the package to drain the water directly
into the drain outlet.
Connecting
tube
Drain hose
1
Unplug the connecting
tube at the back of the
appliance's condensate box
and hang it on the back of
the appliance.
2
Install the drain hose in
the accessories to this
position (as shown in the
figure), please confirm that
the installation connector is
firmly inserted, and insert the
other end of the drain hose
into the drain outlet.
If you decide to place the condensate drain hose into the drain outlet, make sure the drain hose
is installed correctly. After the drain hose is installed in place, the condensate water can be discharged
directly, without the need to empty the condensate box after each use.
Please use the drain hose provided with this appliance.
Do not twist or compress the drain hose, otherwise it will affect normal drainage. The height of the
drain hose must not exceed the height of the machine body; otherwise, the water cannot be drained. If
the drain hose is too long, please cut off the excess portion.
Do not place the drain outlet in stagnant water; this may cause backflow.
23
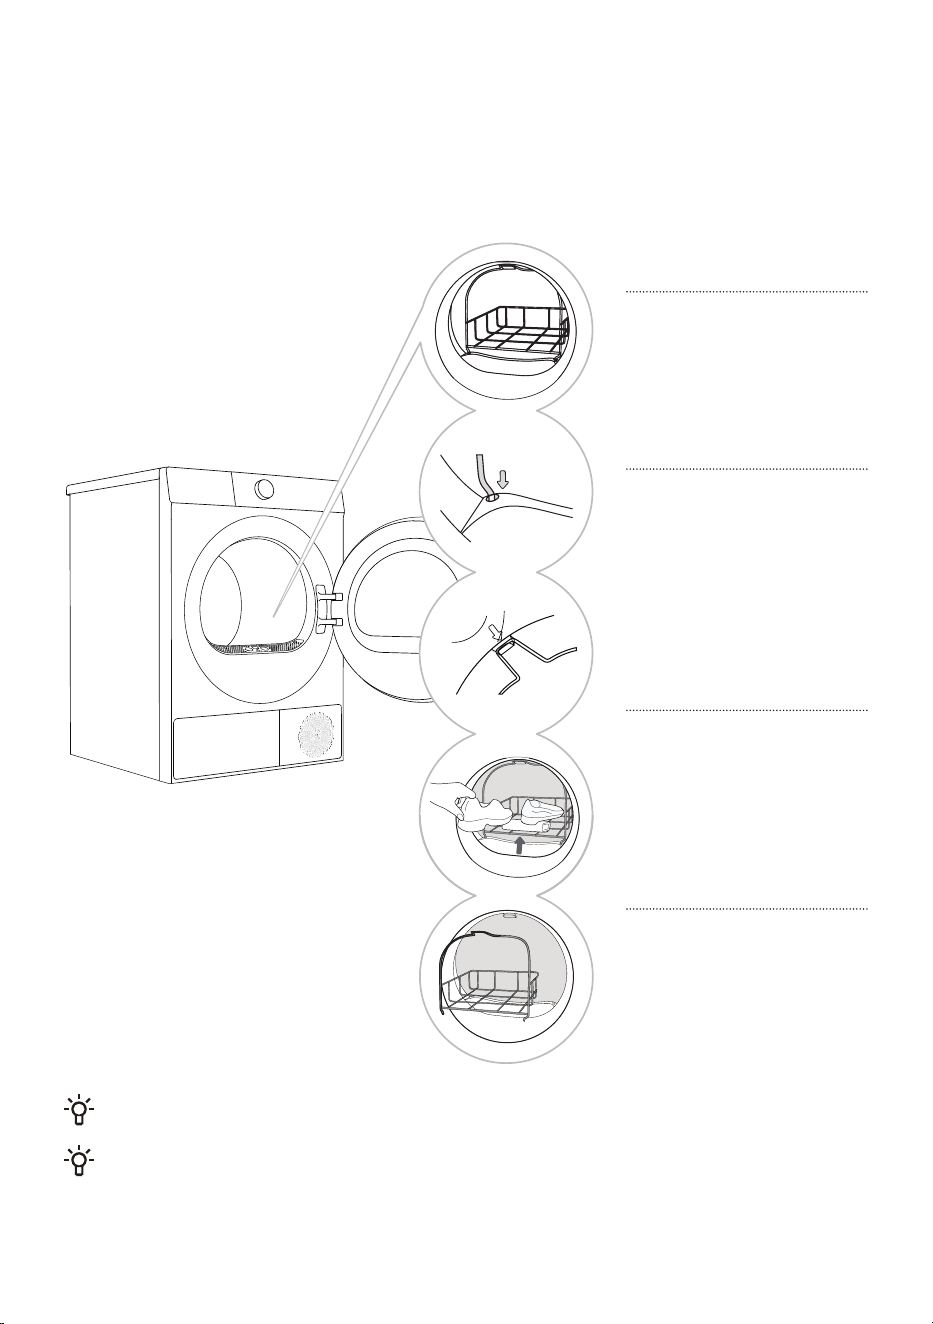
DRYING RACK (AVAILABLE ON SELECT MODELS)
Before the first drying cycle, remove the drying rack and all packaging materials from the drum. When
using the drying rack for special garments, install it as follows.
1
Open the door and insert
the drying rack.
2
Tilt the drying rack at
an angle, securing the
lower end into the two holes
of the filter and hooking the
top end onto the slot of the
front support (as shown).
3
The drying rack can be
used for sports shoes,
slippers, or other items
unsuitable for tumbling.
4
After drying is complete,
remove the drying rack
and close the door.
Before drying, sports shoes or slippers should be wrung out to prevent dripping.
The drying rack remains stationary during drum rotation. Therefore, ensure items on the drying
rack do not contact the drum. Otherwise, garments and the dryer may be damaged.
24
TRANSPORTATION AFTER INSTALLATION
If you need to transport an installed appliance, first unplug the power plug, detach the drain hose, and
ensure the door is closed properly.
After each drying program, a small amount of condensation may remain in the appliance. Start the
appliance, select any program, and run it for about half a minute to drain the accumulated water to
prevent damage to the appliance during transportation. If it is not possible to transport the appliance
upright, please tilt it to the left.
Pack all packaging materials (plastic bags, other plastic parts, etc.).
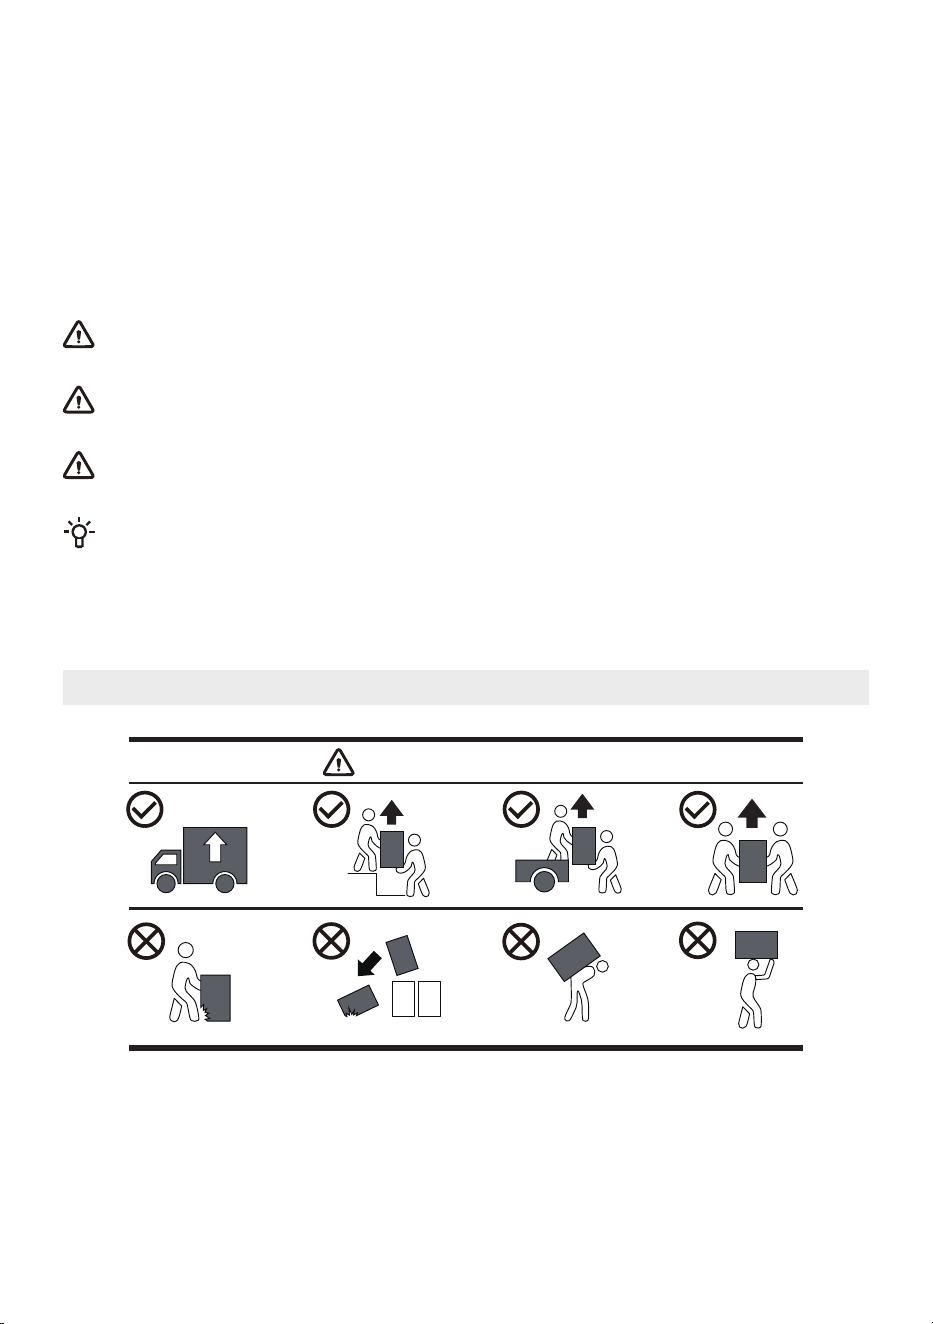
The device is heavy. Please use at least two people to move it. When transporting, do not hold
protruding parts such as the door, top cover, etc., to prevent them from falling off or being damaged.
After transport, let the device sit for at least 2 hours before connecting it to the power supply. The
device should be installed and connected by trained technicians.
Please read the instructions carefully before reconnecting the device. Damage caused by
improper connection or use is not covered by the warranty.
If the appliance was not transported according to the instructions, it should be allowed to rest for
at least 24 hours before connecting it to the power supply. Failure to do so may lead to heat pump
failure, and such failures are not covered by the warranty. Be careful not to damage the cooling
system; please refer to "Installation and connection".
Transport and Handling Method
Handling Method
25
BEFORE USING THE APPLIANCE FOR
THE FIRST TIME
THE FIRST USE
Before using this product for the first time, please ensure that the appliance is not connected to the
power supply. Then, open the door and clean the drum with a soft damp cloth.
Do not use solvents or cleaning agents that may damage the appliance (please follow the
recommendations and warnings provided by the cleaning agent manufacturer).
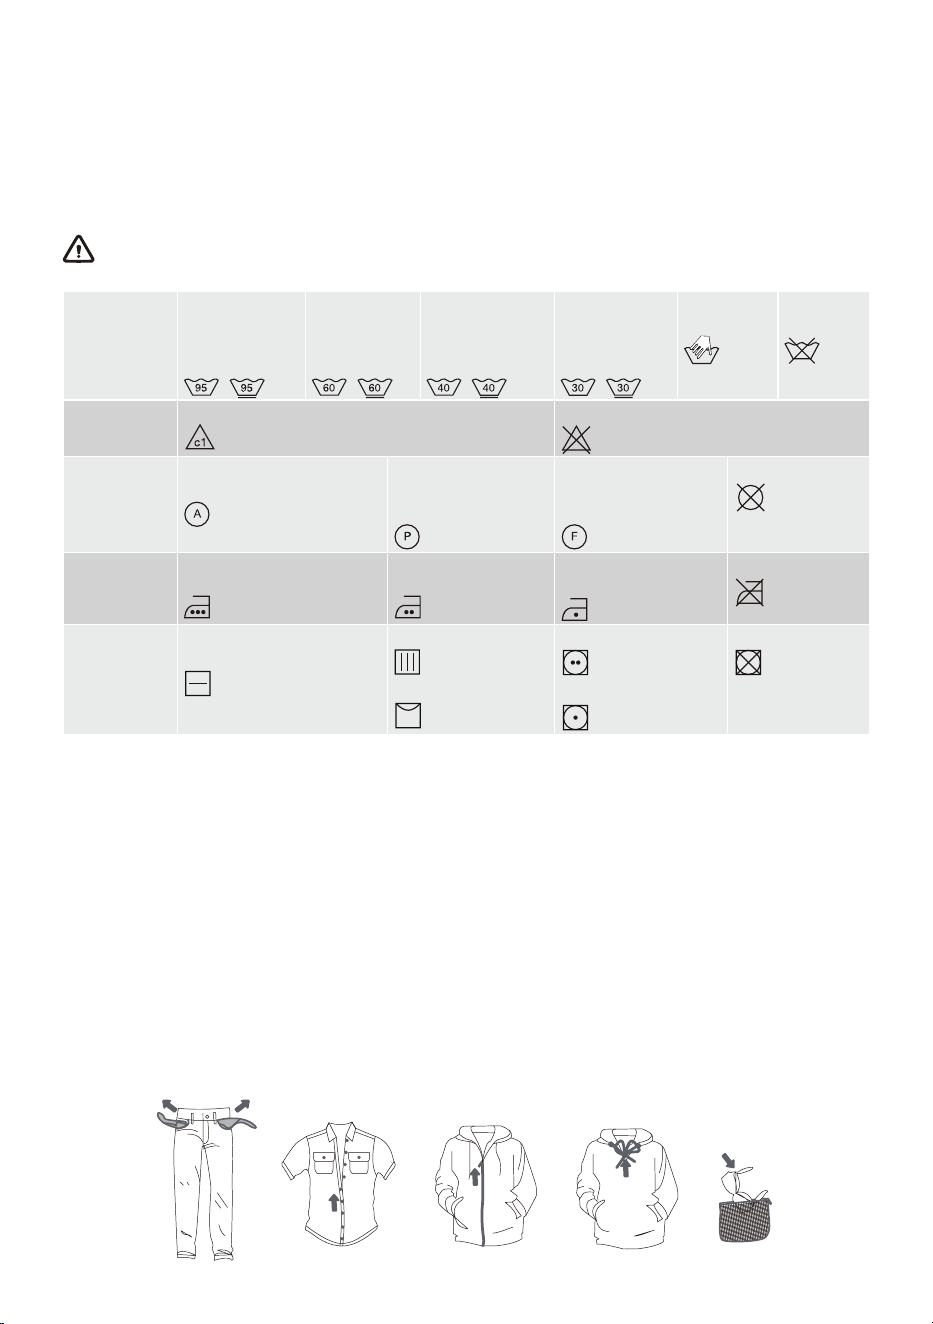
Washing Maximum
water
temperature
95°C
Maximum
water
temperature
60°C
Maximum
water
temperature
40°C
Maximum
water
temperature
30°C
Hand wash
only
Do not
wash
Rinsing Rinse in cold water Do not rinse
Dry cleaning It can be dry cleaned. No
restrictions on detergent.
Dry clean with
petroleum solvents
R11 and R113.
Dry clean with
kerosene, pure
alcohol, and R113.
Do not dry clean
Ironing Maximum ironing
temperature 200°C
Maximum ironing
temperature 150°C
Maximum ironing
temperature 110°C
Do not iron
Drying Dry flat (placed on a flat
surface)
Drip dry
Line dry
High heat
Low heat
Do not dry
PREPARATION FOR DRYING
1. Classify clothing according to its type and thickness, and refer to the requirements on the clothing
labels.
2. Empty all pockets. Remove metal items that could damage clothing or the appliance. Fasten
buttons and turn garments with buttons or embroidery inside out. Zip up and tie any drawstrings.
3. Place sensitive clothing and small, lightweight clothing into a dedicated mesh laundry bag and dry
them with other clothing.
4. For clothes with pilling surfaces or long pile fabrics, please turn them over before drying.
5. It is not recommended to use a dryer to dry delicate fabrics, as they may be damaged during
drying. To avoid damage, please do not put the following types of clothing into the dryer:
• Leather clothing and other leather products.
• Clothing that has undergone waxing treatment or requires special care.
• Clothing with a large amount of wool, plastic, or metal decoration.
• Clothing with sequins.
• Clothing with metal accessories that are prone to rusting.
26
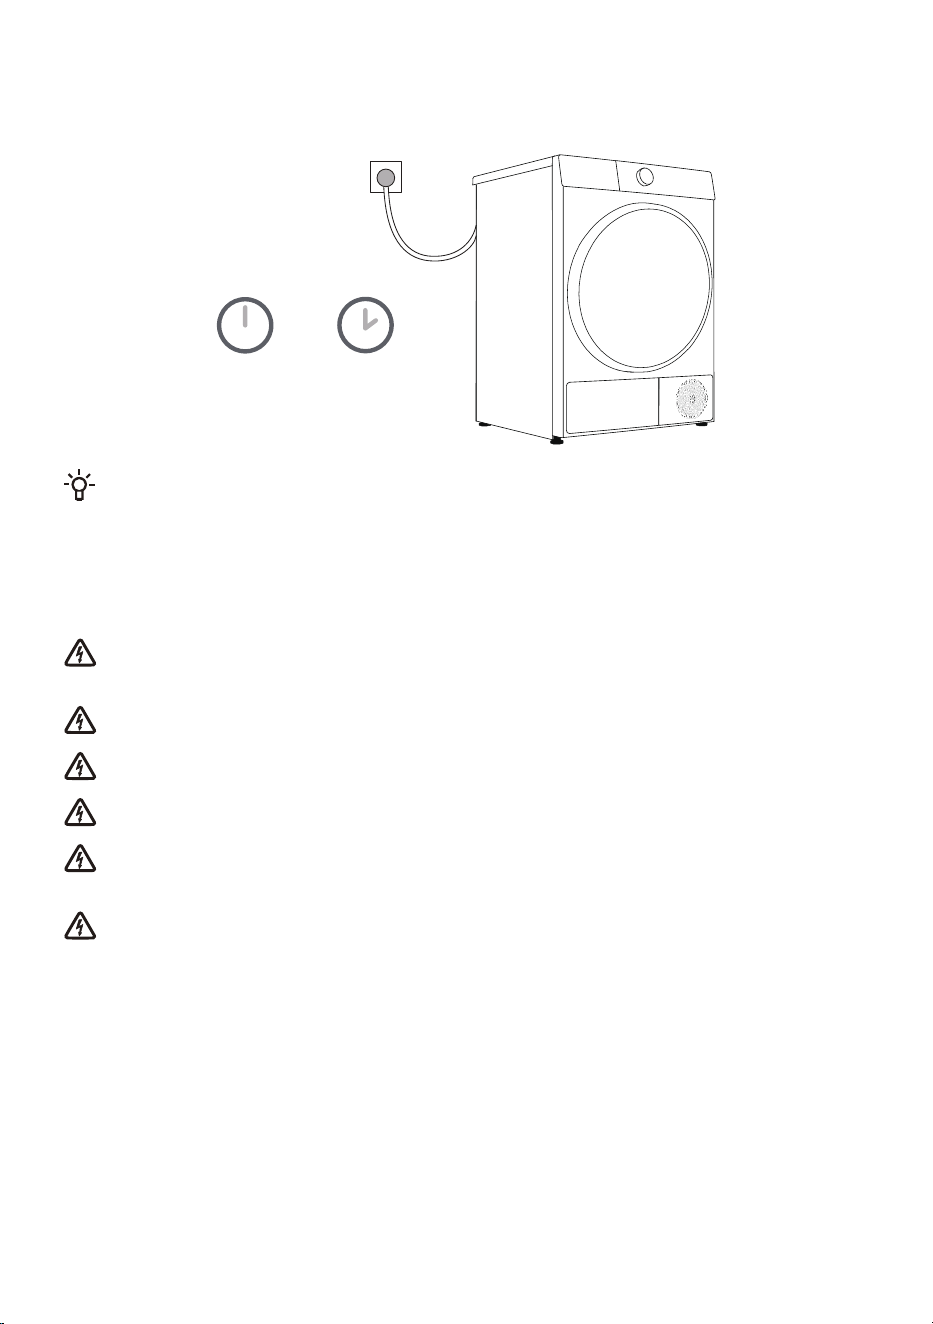
CONNECTING TO POWER MAINS
2 hours
After installation, the appliance must remain on a stable surface for at least 2 hours before
connecting to the power supply.
This appliance is connected to a grounded power socket, and there should be no obstructions between
the appliance and the socket. The power socket should have compliant grounding protection. Ensure
that the power supply is consistent with the power requirements of the appliance. For basic information
about the appliance, please refer to the nameplate.
It is recommended to use overvoltage protection devices to protect this appliance from
lightning strikes.
Do not use an extension cord to connect the appliance to the power supply.
Do not connect the appliance to a power outlet designated for light-load appliances.
Please do not plug or unplug the appliance with wet hands.
The repair and maintenance of this appliance should be handled by professionally trained
personnel.
Only personnel authorized by the manufacturer can replace a damaged power cord.
27
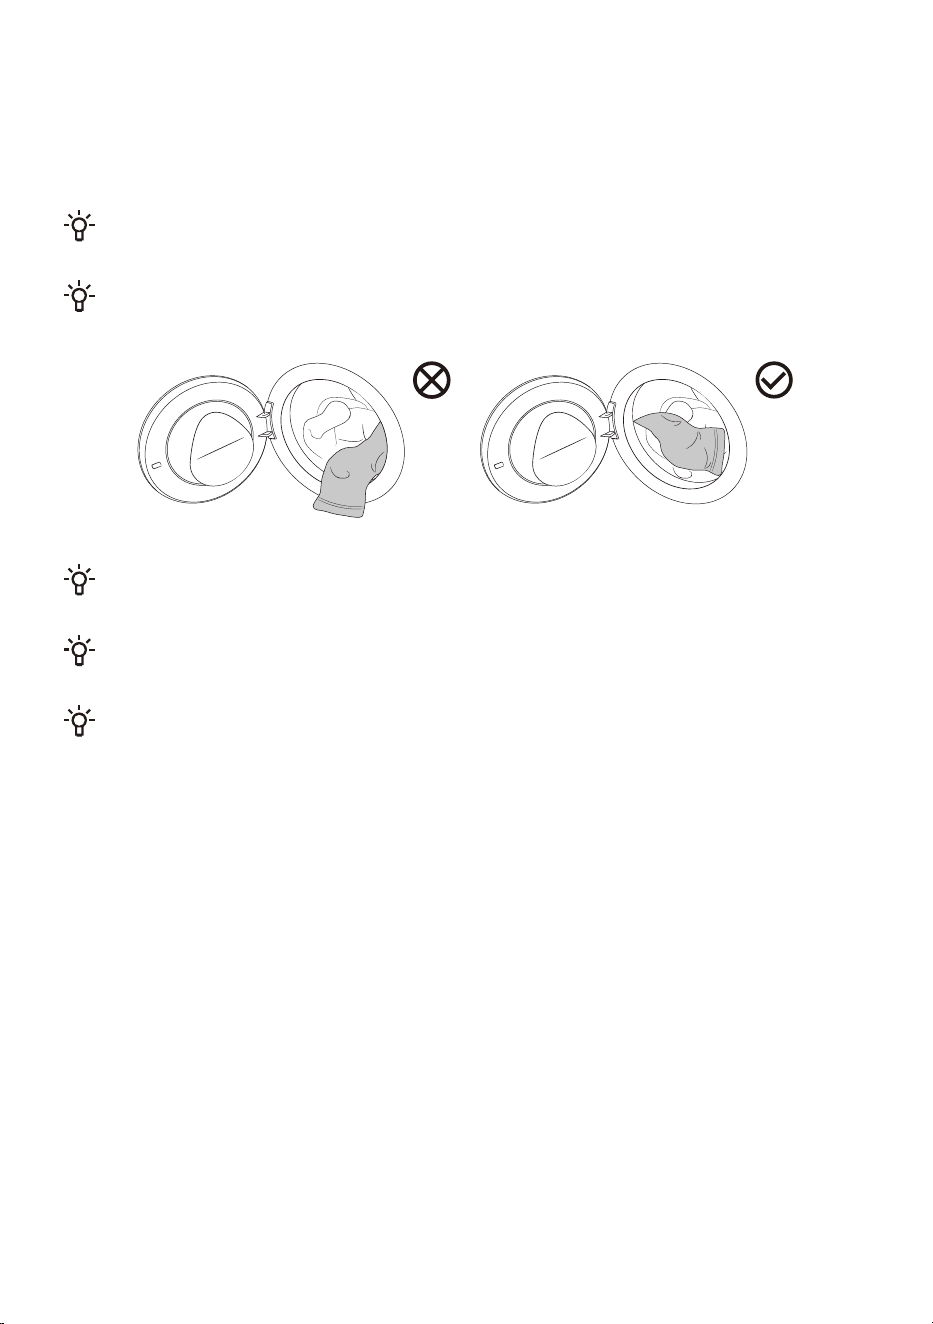
PUT IN THE CLOTHES TO BE DRIED
Open the machine door, confirm there is no foreign matter in the drum, and loosely place the clothes
into the drum.
Close the door until you hear a "click" indicating it is securely closed.
Do not overload the drum! Refer to the "PROGRAM TABLE" for the maximum load. If the drum is
too full, the clothes will be more wrinkled and may not dry effectively.
Please completely put the clothes into the drum to prevent the clothes from getting caught in the
door.
While the dryer is operating, you can easily open the door to add or remove clothes. After closing
the door, press the Start/Pause button to resume operation.
Do not put clothing into a dryer without wringing or spinning it (recommended minimum drying
speed of 800 RPM).
When drying larger items (bedding, quilts, etc.), be sure to shake out the clothing before placing it
in the dryer.
28
PROGRAMS AND FUNCTIONS
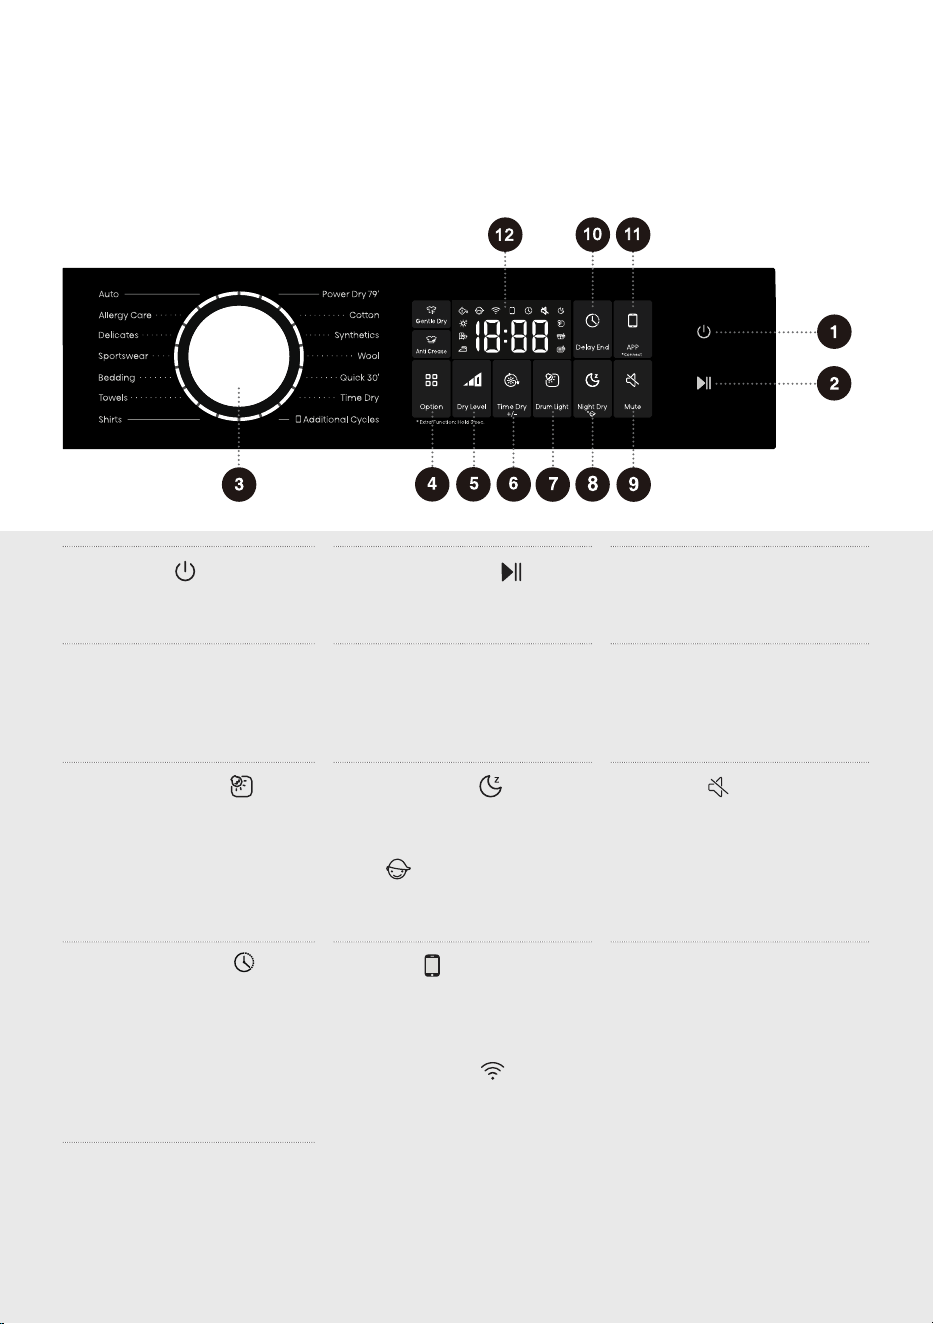
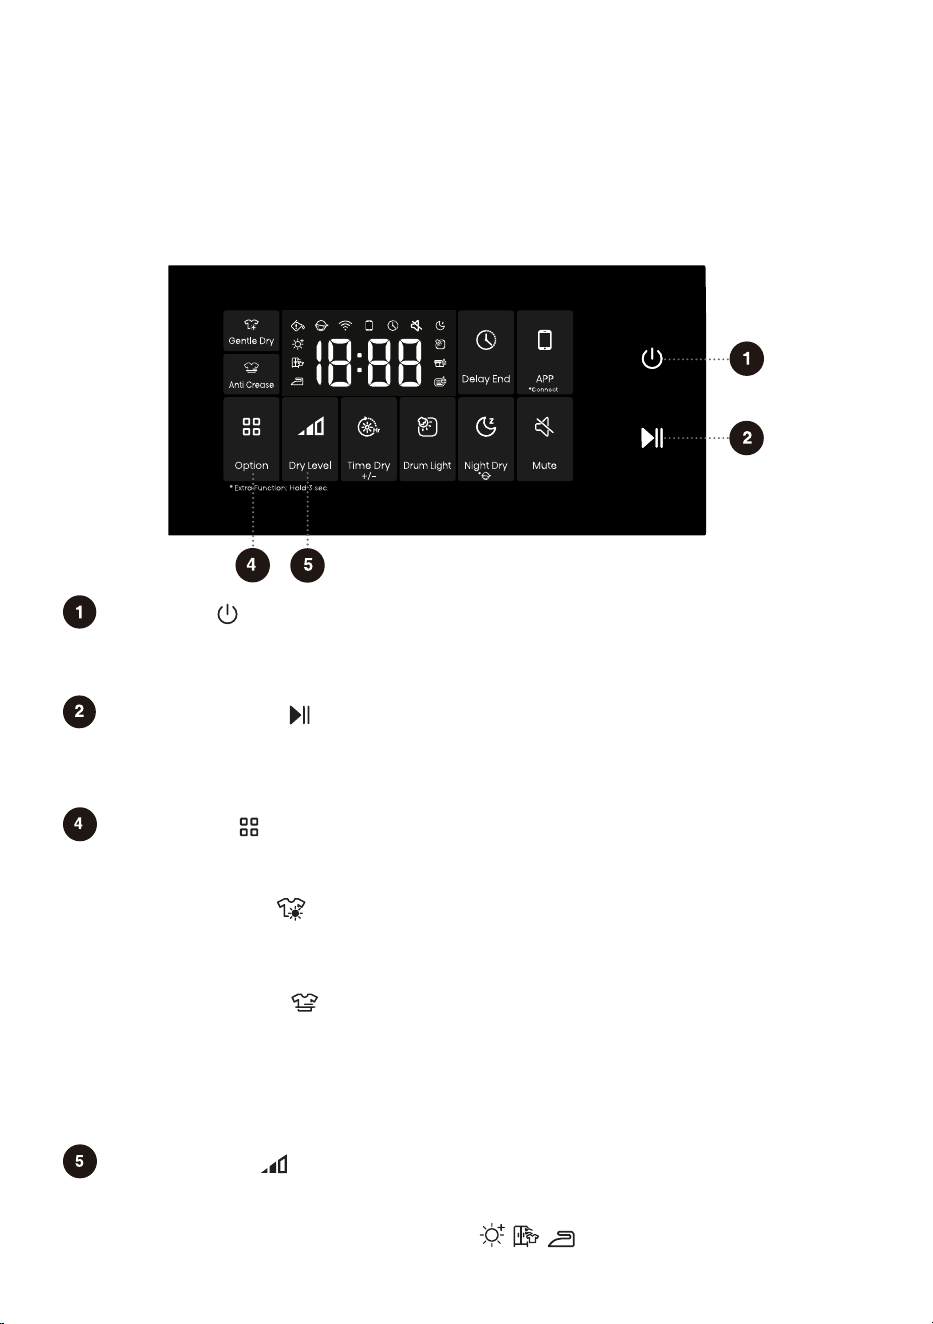
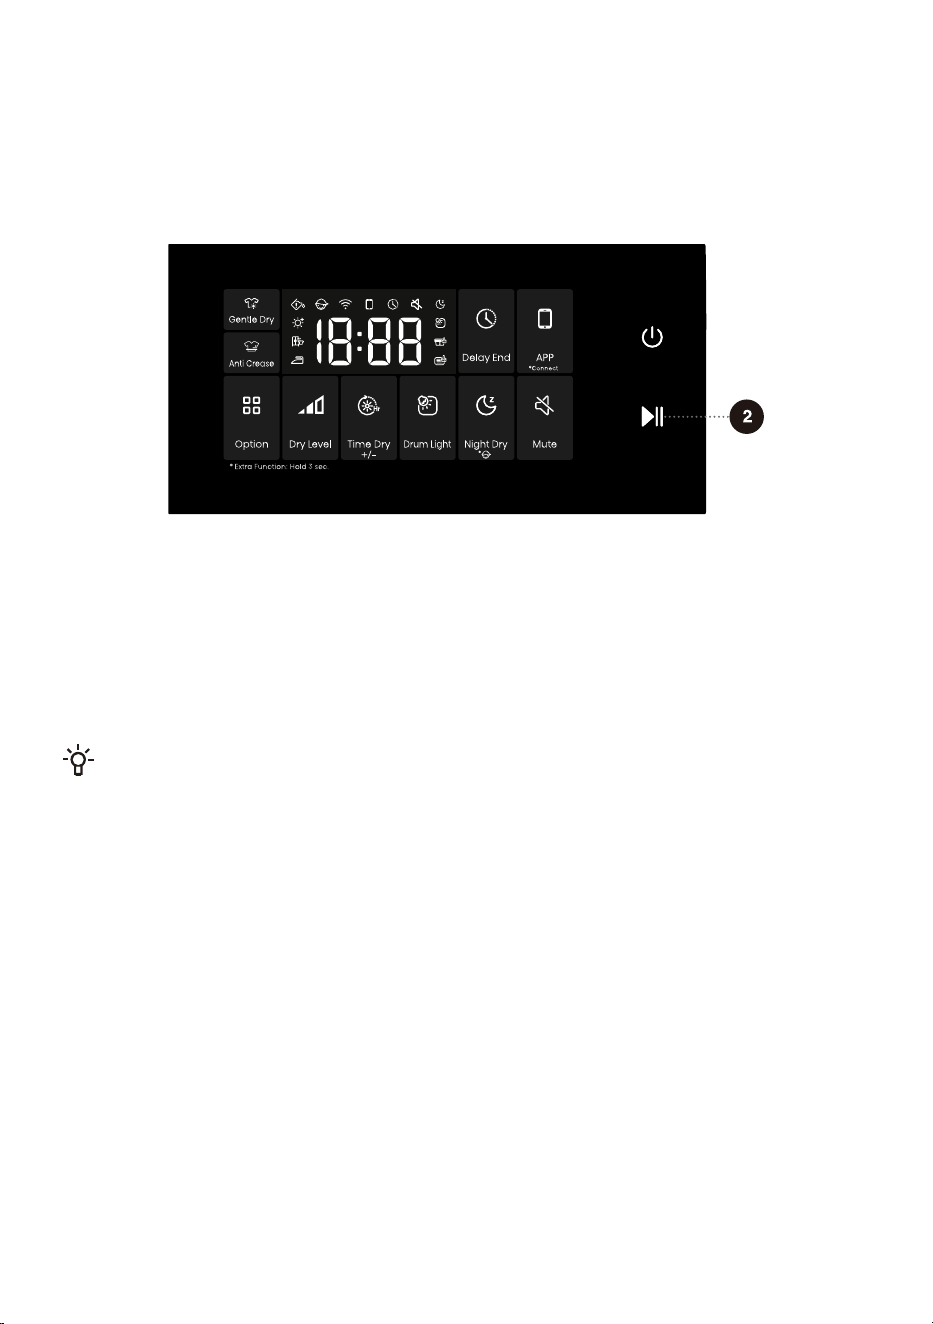
CONTROL PANEL
Please refer to the actual product for the final print
1
Power
Used to turn on/off the
device power.
2
Start/Pause
Used to start/pause a
program.
3
Cycle Selector
Turn the knob to select the
program.
4
Options
Press this button to select
additional functions for
the program.
5
Dry Level
This function selects
the drying effect of the
program.
6
Time Dry +/-
The function adjusts
the drying time of the
program.
7
Drum Light
The function manually
turns the Drum Light on/
off.
8
Night Dry
Press to turn the Night Dry
function on/off.
*
Long-press turns the Child
Lock function on/off.
9
Mute
Press this button to turn
the mute function on or
off.
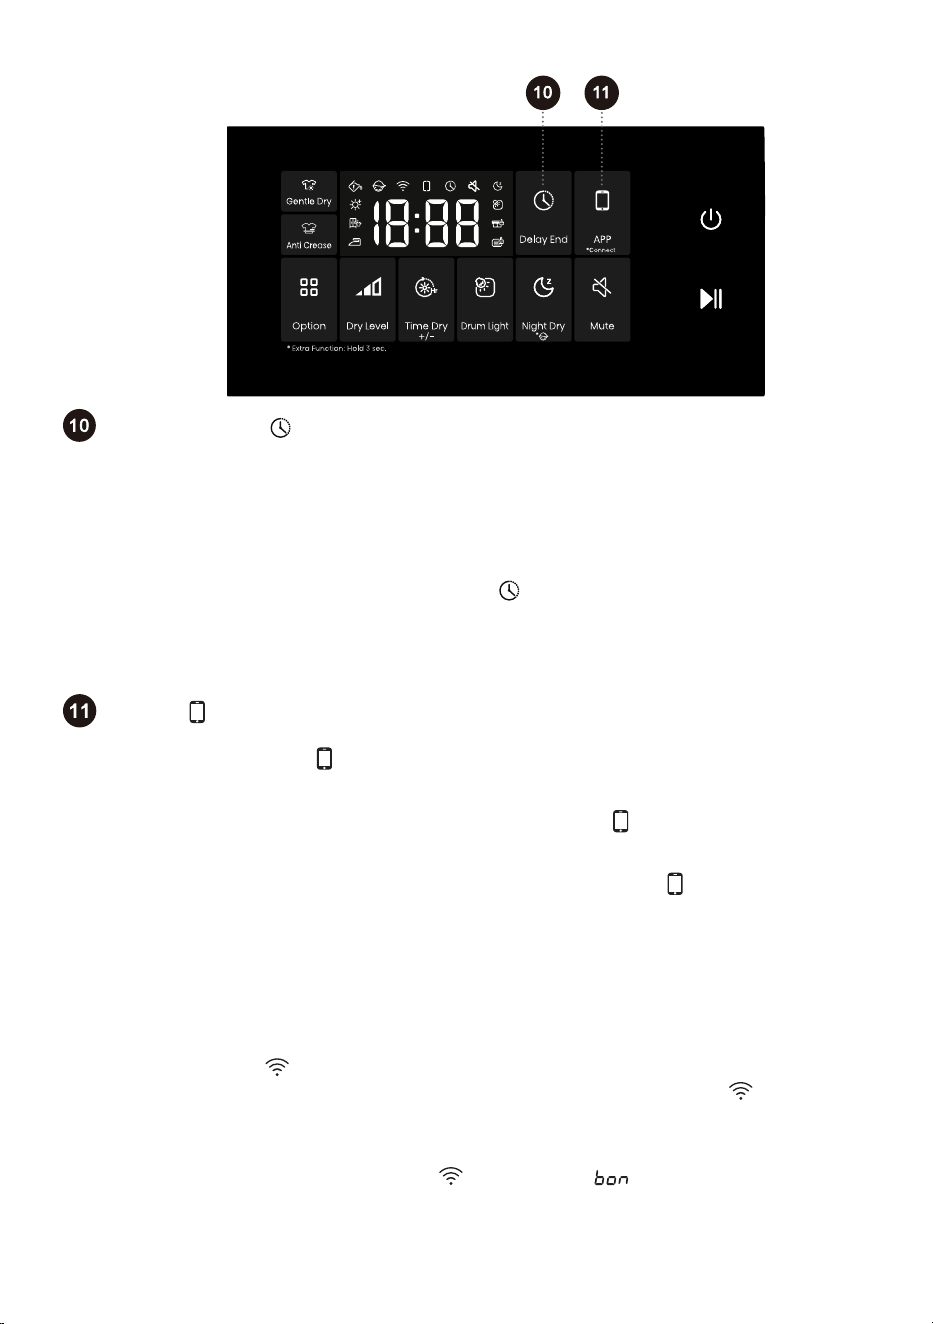
10
Delay End
This function allows
you to schedule
drying clothes at your
convenience.
8
APP
Short press to turn on/off
the device's APP remote
control.
* Connect
Long press to turn on/off the
Wi-Fi function of the device.
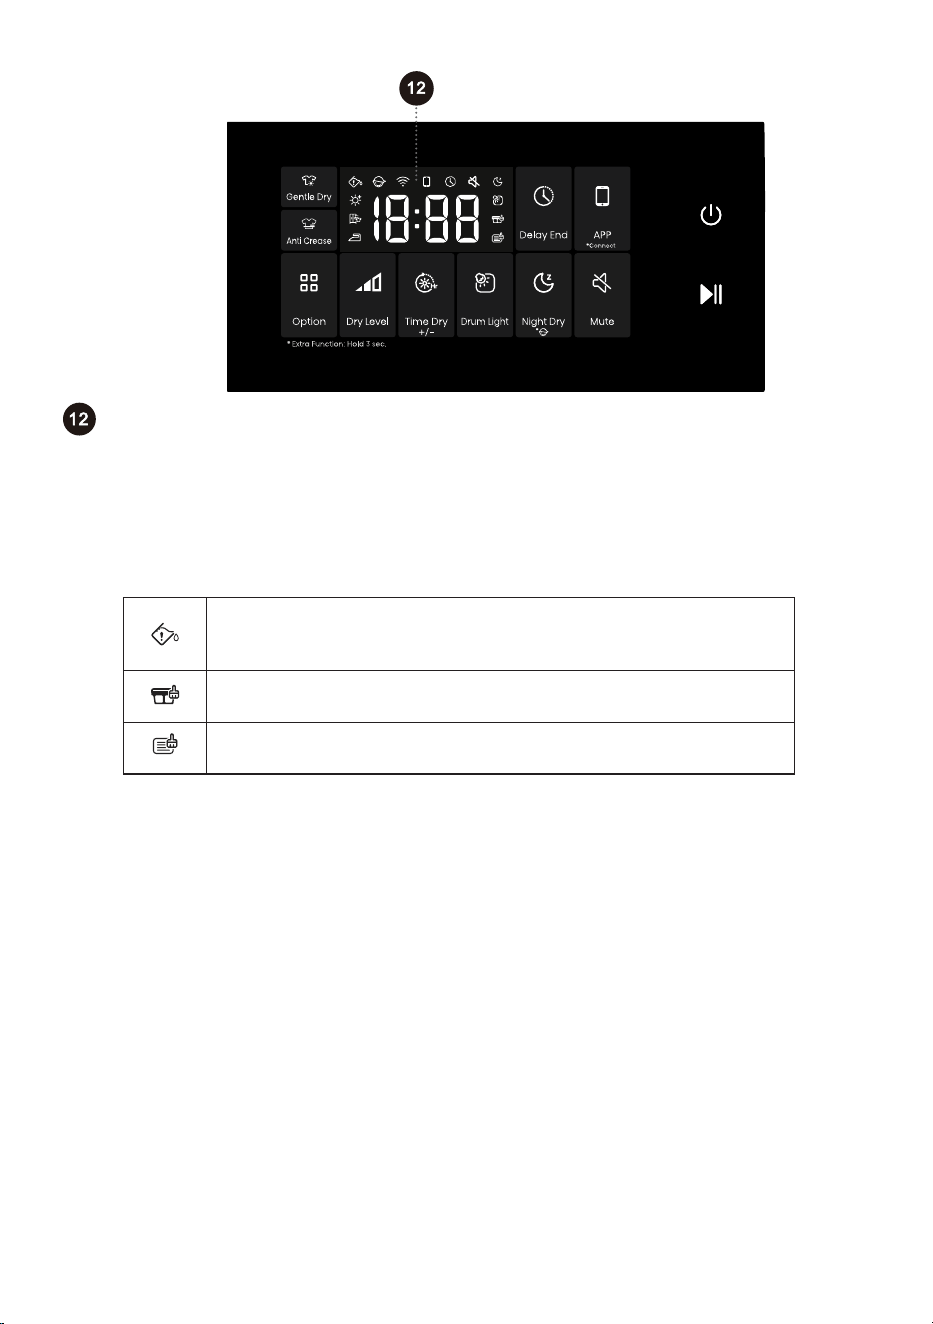
12
Display
Used to display the
remaining time of the
program, reservation
time, fault code, and other
related information.
*Extra Function: Hold 3 sec.
For extra function:
Press and hold for 3 seconds.
28
29
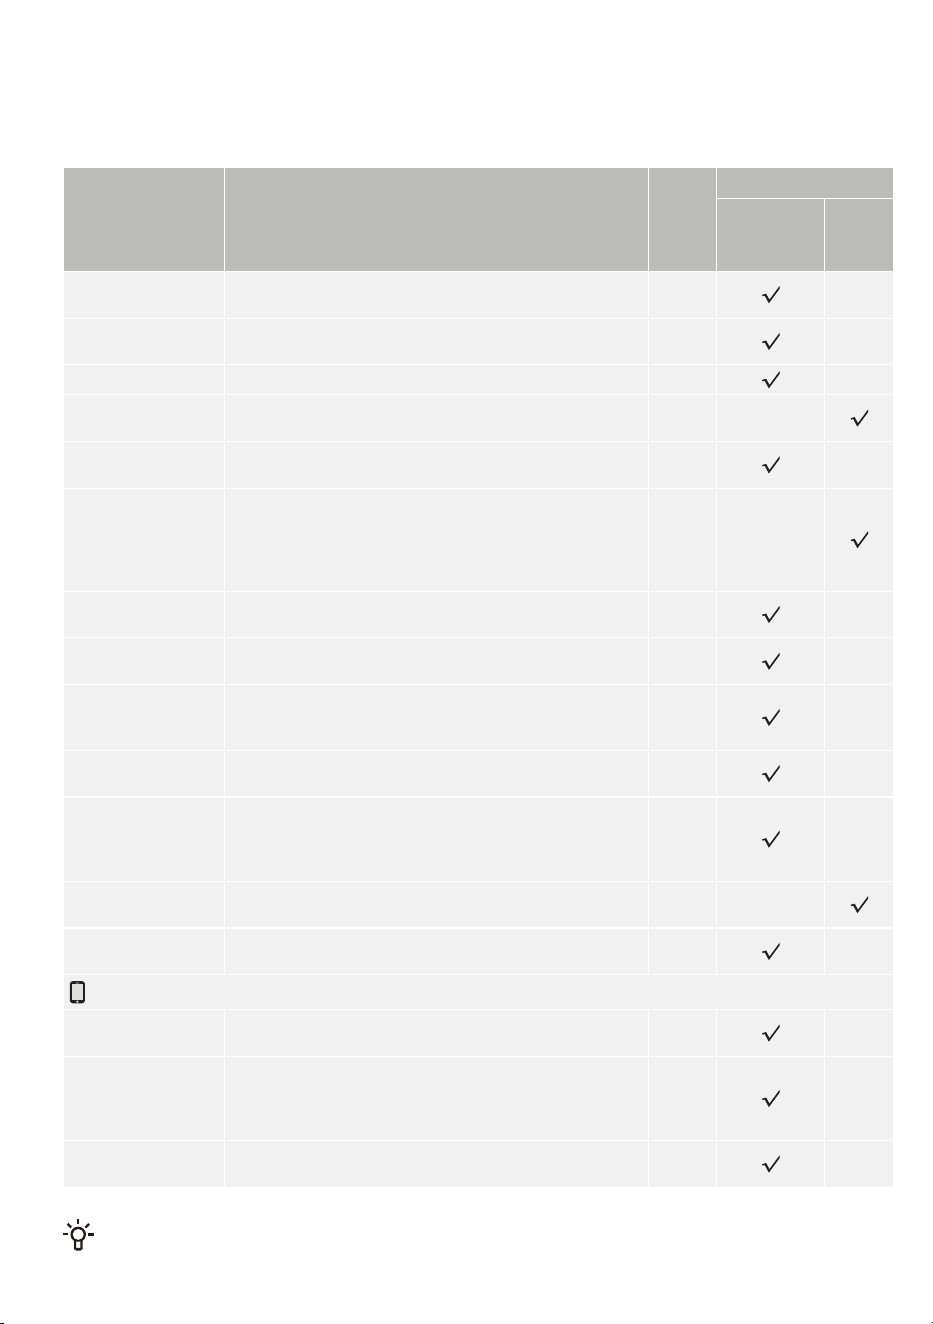
PROGRAM TABLE
Turn on the device and turn the main knob to select the appropriate program (depending on the type of
clothing and desired degree of drying). During operation, the main knob will not turn automatically.
Program Program description
Maxi-
mum
load
Drying Type
Stop when
the clothes
are dry
Timed
dry
Power Dry 79' This program is suitable for drying daily clothes such as
synthetic fibers or blended fabrics in a short period of time.
4.0 kg
Cotton This program is suitable for drying thicker, non-sensitive
cotton clothes.
9.0kg
Synthetics
This program is suitable for drying synthetic and cotton fabrics. 4.5kg
Wool The program is suitable for drying wool and delicate clothing
(refer to the drying instructions on the clothing label).
1.0 kg
Quick 30' This program is suitable for quick drying of lightweight and
small items (fewer than 3 pieces).
1.0 kg
Time Dry This program is suitable for thorough drying of non-sensitive
clothing. During the drying process, the remaining moisture
of the clothes will not be automatically detected. Select a
suitable drying time to avoid the clothes not achieving the
expected drying effect or over-drying causing creases.
/
Shirts This program is suitable for drying shirts made of cotton,
linen, polyester, synthetics or blends.
2.0 kg
Towels This program is suitable for drying non-sensitive clothing
(fleece, kitchen wiping cloths, etc.).
4.5kg
Bedding This program is designed with the anti-tangling function
for large pieces of clothing and is suitable for drying large
pieces of clothing.
2.5 kg
Sportswear This program is suitable for drying outdoor clothing and
sportswear made of synthetics.
2.0 kg
Delicates The program is suitable for drying very delicate synthetic
fiber clothing. The clothing may be slightly damp after the
program ends. It is recommended to put the clothes in a
special mesh laundry bag for drying.
1.5kg
Allergy Care This program is suitable for high-temperature drying of
clothing to remove allergens such as mites.
2.0 kg
Auto This program is suitable for drying non-sensitive synthetics
and cotton clothing with uniform thickness.
4.5kg
Additional Cycles
Pet This program is suitable for drying clothes that have pet hair
after washing and spinning.
2.5 kg
Down This program is suitable for drying down-filled clothing
(such as pillows and down jackets). Please dry large
pieces of clothing separately, using the Time Dry program if
necessary.
2.0 kg
Baby Care This program is suitable for drying infant and toddler
clothing.
2.0 kg
Energy efficiency test program: Cotton + Wear immediately + Press and hold Time Dry for 3 seconds.
If your clothing has not reached the expected drying level, please use another function or select a more suitable
drying program.

30
Note for Additional Cycles:
To use the Additional Cycles function, the user needs to turn on the APP remote control module of the
device and connect the APP to the smartphone.
When the device is not connected to the network, the default program for Additional Cycles is
"Sportwear". After connecting, the user can select "Sportwear, Towels, Delicates, Power Speed 79'"
and other programs in Additional Cycles through the mobile APP.
31
ADDITIONAL SETTINGS AND FUNCTIONS
The program comes with default settings, and some functions can be changed by user. You can adjust the settings
by pressing the corresponding function button (before pressing the Start/Pause button).
Some settings cannot be selected or changed in some programs. These settings will not light up, and the buttons are
inactive (see "FUNCTION SELECTION TABLE").
Most functions can only be set in standby mode, i.e., before a program starts. After starting the program, most
functions cannot be adjusted anymore.
Power
Used to turn the device's power on or off.
If you need to shut down the program during operation, press and hold the "Power" button to shut down.
Start/Pause
Used to start/pause a program.
The device cannot be started if the door is not closed or the door lock is not locked.
Options
Press this button to select additional functions for the program. The corresponding icon lights up when an
additional function is selected.
Gentle Dry
We recommend drying at a relatively low temperature to protect your clothes.
The mode is not available for some programs.
Anti Crease
The function enables the anti-crease mode. After the program ends, the inner drum rotates intermittently to
prevent clothes from forming creases when the clothes are not taken out for a long time.
When this function is activated, the appliance automatically enters Anti Crease mode at the end of the program.
During the anti-crease mode, pressing any key, turning the knob or opening the door can end this function.
If no operation is performed, the program will automatically end after a maximum of 12 hours by default.
Dry Level
The function selects the drying effect of the stop-on-drying programs.
It displays the current drying effect for the first time. Press this button to cycle through the set gears. The
drying effect can be selected in the following gears:
/ / . The drying effect gears that can be set
for each program are different.

32
" " Extra: After drying, the clothes are ready for storage.
" " Cupboard: After drying, the clothes can be worn immediately.
" " Iron: After drying, the clothes contain a small amount of moisture and can be ironed again.
The function only applies to stop-on-drying programs and not to timed drying programs.
Time Dry +/-
The function increases or decreases the drying time of the timed drying programs.
Before starting a program, press the button to display the current drying time for the first time. Press the button
again to cycle through the gears set for the preset time slots. Available gears vary depending on the programs.
The function only applies to timed drying programs and not to stop-on-drying programs.
Please select a suitable drying time. If the drying time is too short, the clothes may not be completely dried.
Drum Light
The option manually turns Drum Light on/off.
When the door is opened, the power is on, the program is paused, or the program has ended, or when the
main knob is rotated, or any button is touched while the power is on, the Drum Light automatically illuminates.
Night Dry
This function can reduce drying noise, making it suitable for drying clothes at night.
Press this button, and the icon " " will light up, indicating that this function is enabled. Press the button
again to turn the function off.
*
To prevent children from operating the device accidentally and protect their safety, this device is equipped
with a Child Lock function.
Long-press the button, the Child Lock icon "
" lights up and the child lock function is turned on.
The same operation can be used to disable the Child Lock.
When the child lock is enabled, only the Power button's on/off operation and the child lock release function
are available; all other functions and knob operations are locked.
When the program ends or the appliance is powered off and restarted, the Child Lock function is
automatically canceled.
Mute
This function can mute all prompt sounds except the alarm sound.
When the device is in standby, pause, or running state, press the button, the " " icon lights up and the
Mute function is turned on. The same operation can disable the Mute function, and all prompt sounds will
be reactivated.
When the program ends or the device is turned off and restarted, the Mute function setting remains unchanged.
33
Delay End
This function allows you to schedule drying clothes at your convenience.
After selecting the program and function, make a reservation. Press this button to set a delayed start; press it
again to cycle through the set time gears. Each press adjusts the time by 1-hour increments. The maximum
selectable time is 24 hours.
The reservation time is the end time of the program, including the entire program running time, so the
reservation time must be greater than the program running time.
After selecting the delay end time, press the Start/Pause button to start the Delay End process.
When the reservation process is in progress, the icon "
" on the display lights up or flashes. When the
reservation process finishes, the icon goes off.
If the Delay End function has been selected before the program starts, it can be canceled by selecting
another program or function button.
After the program is started, if you need to cancel the Delay End function, you need to shut down and restart.
APP
The function activates the APP remote control module of the device.
Short-press the button, the "
" icon lights up, and the APP remote control module of the device is activated.
The same operation can be used to turn off this function. Before activating the APP function, check and
make sure that the Wi-Fi function is turned on and connected normally.
When the Wi-Fi function is turned on and connected normally, and the "
" icon on the screen is not lit,
you can view the status or set the program parameters and function items (depending on the different
permissions of the model) through your mobile phone, but you cannot start the program remotely.
When the Wi-Fi function is enabled, and the device is connected correctly, the "
" icon will illuminate on the
screen. At this point, you can use your mobile phone to set program parameters and options, and remotely
start the program.
Once the Remote Control is activated, if the door of the appliance is opened at any time before it starts, the remote
activation function will be canceled. You need to enable Remote Control again to remotely start the program.
After turning on Remote Control mode, if there is no operation on the entire machine and the App for a period of
time, it will enter Energy Saving mode, and it will automatically shut down if there is no operation within 7 days.
After the Remote Control is started, children should be closely monitored to prevent them from crawling into
the drum and causing danger.
* Connect
Wi-Fi intelligent control function is supported on this device. Long press this button, the " " icon flashes,
and the Wi-Fi function is turned on. The same operation can be used to turn off the Wi-Fi function.
Network configuration steps:
1. Press the Power button to turn on the appliance.
2. Long-press the "*Connect" button until the "
" icon flashes and " " is displayed on the screen.
3. Open the APP, and follow the instructions to connect the appliance to the network.
4. If not successful, you can start over from step one.
After the appliance is successfully connected to the network and paired, the Wi-Fi icon stays solid. The remote
control module of the appliance is activated, and the appliance can be remotely controlled through the mobile APP.
34
Display
Used to display the remaining time of the program, reservation time, fault code, and other related
information.
The remaining time indicated by the program may differ from the actual running time. Due to factors such as
clothing type and quantity, drying grade, and ambient temperature, the device will automatically adjust the
actual drying time.
Icon description
Water box empty icon. When this icon is on, the condensate box needs
to be emptied. After emptying and resetting the condensate box, press
the "Start/Pause" button to resume operation.
Lint and debris cleaning icon. When this icon flashes, it means that lint
and debris need to be cleaned.
Evaporator cleaning icon. When this icon is on, it means the appliance
has been run 20 times and the evaporator needs to be cleaned.
35
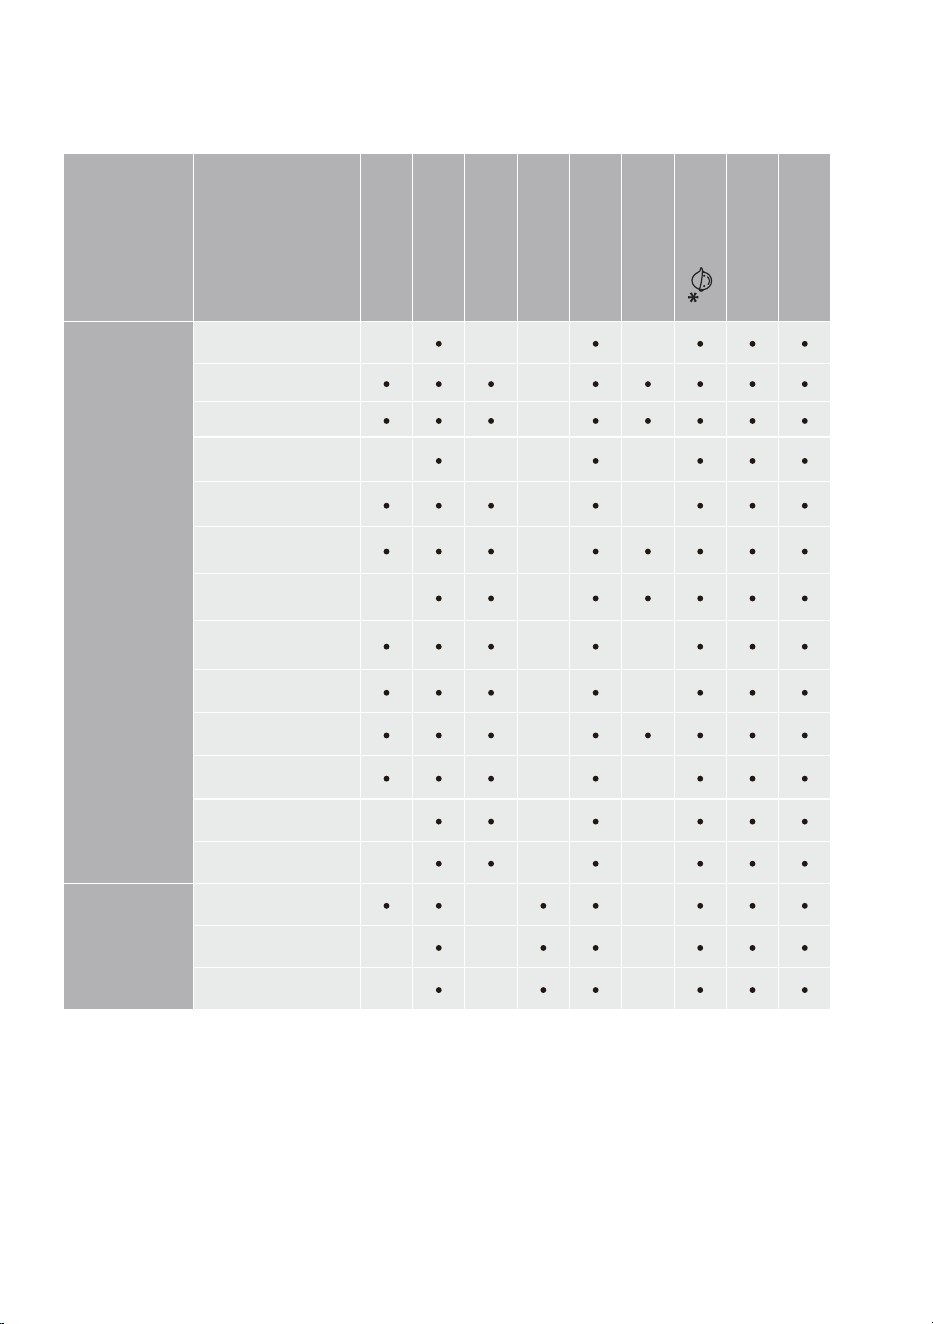
FUNCTION SELECTION TABLE
Program
Gentle Dry
Anti Crease
Dry Level
Time Dry +/-
Drum Light
Night Dry
Mute
Delay End
SENSOR DRY
Power Dry 79' -
- - -
Cotton
-
Synthetics
-
Quick 30'
- - - -
Shirts
- -
Towels
-
Bedding
- -
Sportswear
- -
Delicates
- -
Auto
-
Pet
- -
Down
- - -
Baby Care
- - -
MANUAL DRY
Wool
- -
Time Dry
- - -
Allergy Care
- - -
• The function is optional
- The function is not optional

36
SMART NETWORKING
Enter the "Settings" interface of your smartphone or tablet PC, enable Bluetooth and wireless
connections, and connect to a wireless network.
Note:
This appliance supports 2.4 GHz Wi-Fi.
When the Wi-Fi function is activated, the energy consumption of the appliance will increase. However,
the Wi-Fi power is less than 2W, so it has no impact on the energy efficiency rating of the appliance.
Download
In the app store on your smartphone or tablet PC (Google Play Store or Apple App Store), you can find
the ConnectLife application, download and install it.
Note:
To improve performance and experience, the application may be updated without notice.
Log in
You need to log in to ConnectLife with your account first. If you don't have a ConnectLife account, you
need to create a new account. Please refer to the application usage instructions for details.
Note:
If you already have a Google account, you can use your Google account to log in directly.
Device Binding
1. Open ConnectLife on your smartphone or tablet PC.
2. Bind your appliance on ConnectLife as follows:
A. Click "+" on the "Home" interface, and select "Add device" or "Scan".
B. Select "TUMBLE DRYER" or click "Scan QR/BAR code" or "Manual entry" below.
C. Scan the "QR/BAR code" on the appliance or manually enter the "AUID/SN" of the appliance. If
you can't find it, click " " to view instructions.
D. Click "SET UP APPLICATION".
E. Read the instructions and operate the appliance until it reaches "Networking" or "Binding" state,
then click "NEXT".
F. At this time, APP begins searching for devices. You can select the device you want to connect
to the network from the search list; if no device is found, please check whether your Bluetooth is
turned on. Please keep Bluetooth turned on at all times, and click "NEXT".
G. Select your home Wi-Fi, enter the password, and then click "CONNECT". The device starts
networking and binding.
H. After the binding is successful, you can set the device name and room.
I. Now you can remotely control the device through the APP.
Note:
How to reset Wi-Fi and unbind all devices?
1. Turn on the device power and make sure the " " icon lights up or blinks.
2. Long-press the "Time Dry +/- + Delay End" buttons at the same time until " " is displayed on the
screen.
3. Power off and restart the device to perform the new binding.
4. After unbinding, you must restart the device; otherwise, the next binding will fail. Unbinding will
delete the user information previously stored in the device.
5. How to exit the network pairing mode?
If you want to cancel the network connection when " " is displayed on the screen, no operation is
required, and it will automatically exit after the timeout.
Some models do not support unbinding on the device; unbinding can be done through the APP.
37
START THE PROGRAM
Select the program and additional functions, and press Start/Pause button to start the program.
END OF THE PROGRAM
When the program finishes, the device emits an acoustic signal and "End" appears in the display.
Press and hold the Power button to turn off the device.
In standby mode, at the end of the program, if no operation is performed for a period of time, the
device will automatically shut down.
After the program ends, turn off the device, open the door and take the clothes out of the drum.
38
MAINTENANCE AND CLEANING
Regular maintenance can extend the appliance's service life. Before maintenance, please be sure to
disconnect the power supply.
Children are not allowed to clean or perform any maintenance work on this device without supervision.
The dryer is equipped with a filtration system made up of several filters that prevent impurities from entering
the heat exchanger system.
The device must not be operated if the filter is not installed in place or the filter is damaged, as
excessive accumulation of fabric fibers may cause the device to malfunction or fail.
Never use harsh chemicals, abrasive cleaners, or solvents to clean the appliance. They will damage the
finish.
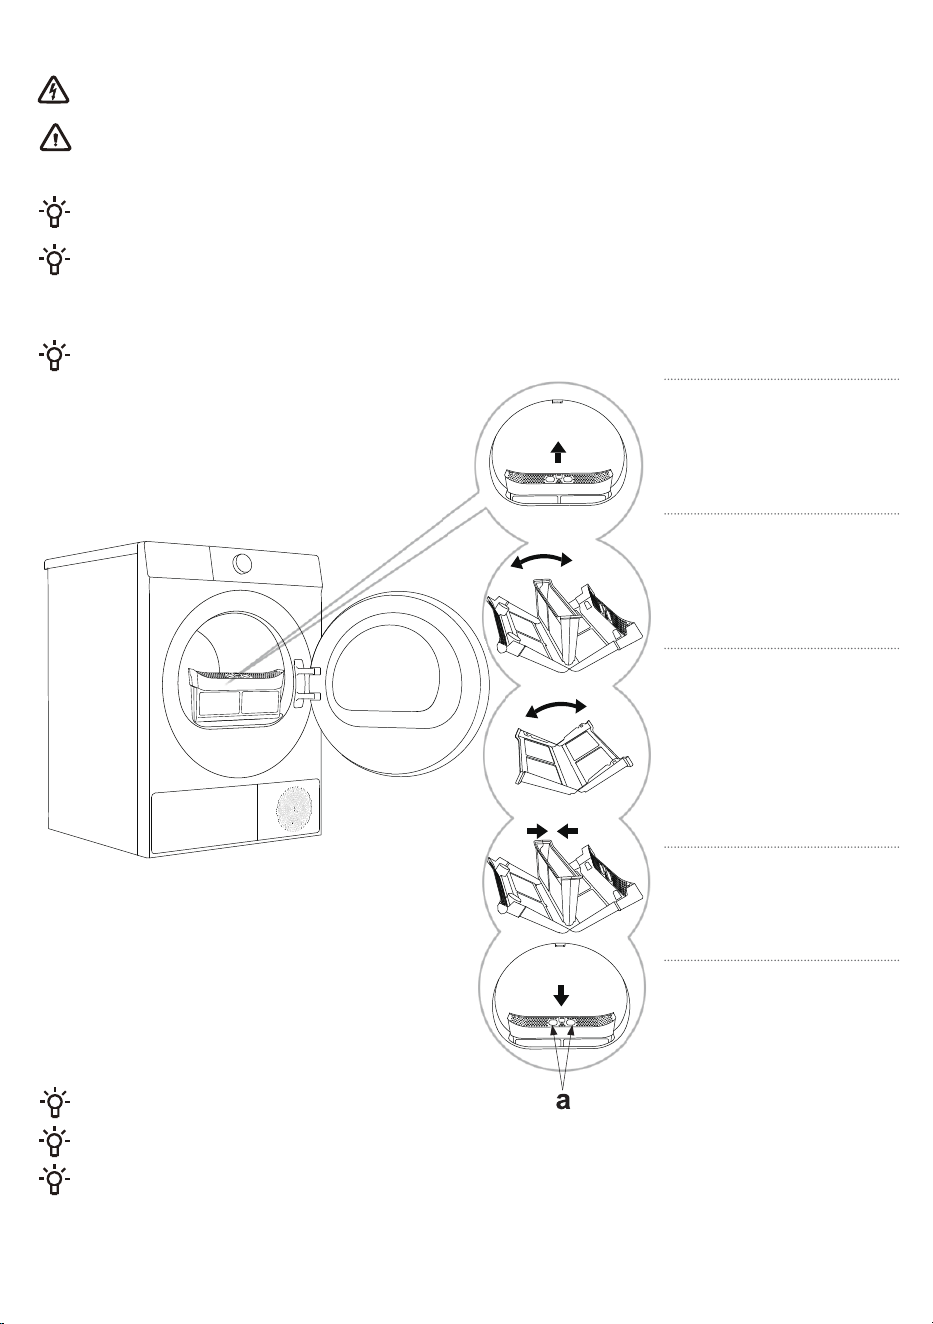
CLEANING THE FILTER
Please clean the filter after each use.
1
Remove the lint filter.
2
Open the lint filter.
3
Open and gently scrape
off the lint, fibers and
threads on the two filters (if
the filter debris is difficult
to clean manually, you can
rinse it with warm water and
dry it).
4
Reassemble the filter
and clean the debris on
the door seal if necessary.
5
Reinstall the filter
(please install it with
hole "a" facing you).
Please be careful not to get your fingers caught in the filter cover.
Refer to the instructions to clean the filter properly, otherwise it will cause lint accumulation and affect
the drying performance of the device. Proper and timely cleaning of the filter can reduce the drying time and
energy consumption of the device and prevent unnecessary malfunctions.
Do not run the dryer without the lint filter installed.
39
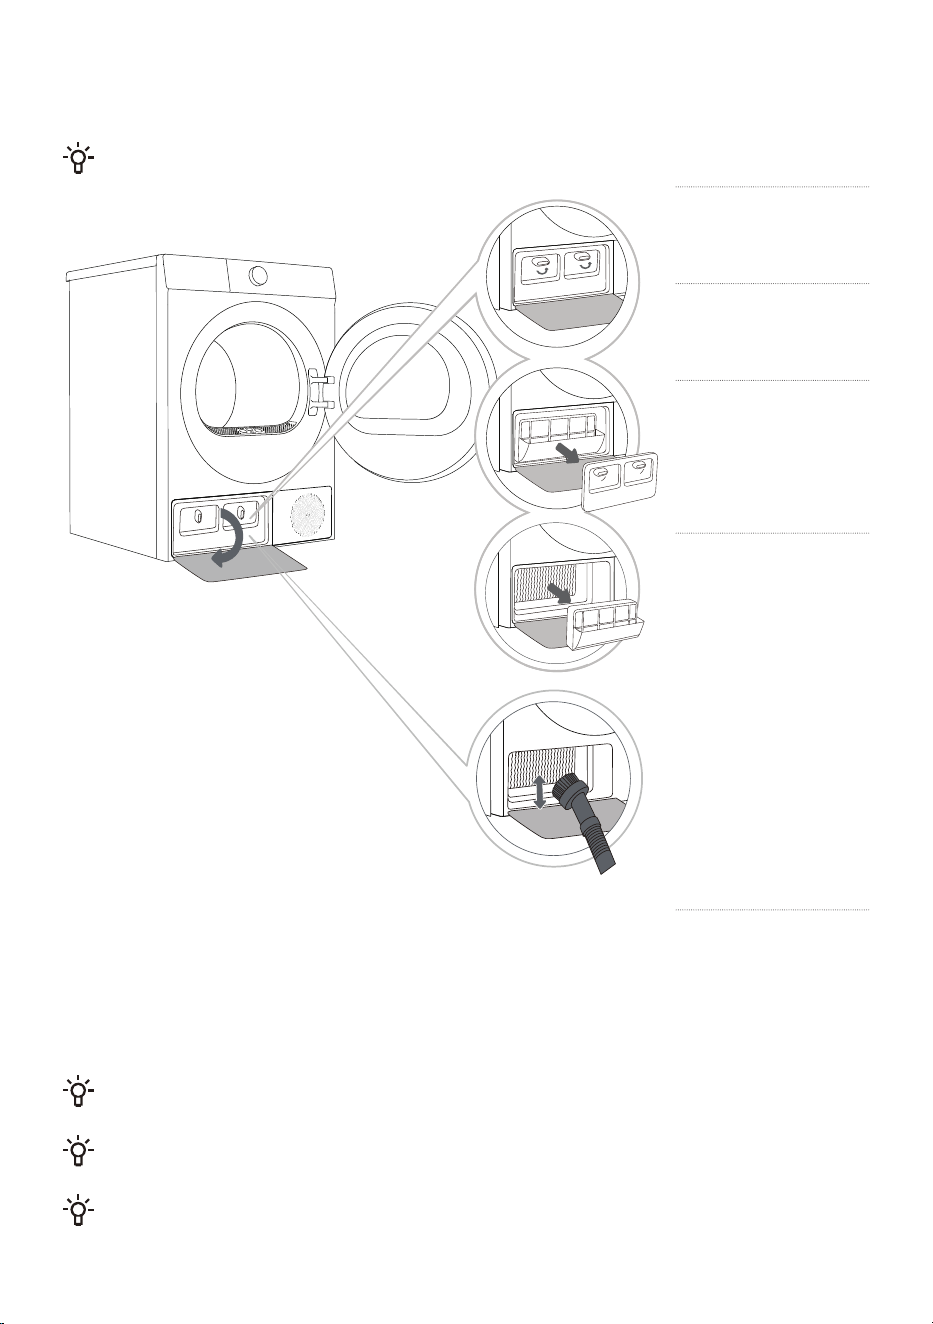
CLEAN THE HEAT EXCHANGER
When cleaning the heat exchanger, water may overflow; it is recommended to place an absorbent cloth on the floor.
1
Press the heat
exchanger door cover
buckle on the lower left to
open the door cover.
2
Turn the locking knob
on the inner door
cover to the unlocked
position.
3
Remove the inner
door cover and take
out the heat pump filter.
Clean the dust on the
filter with a damp cloth
or running water. After
cleaning, dry the filter.
4
If after using for
a period of time,
there is dust on the heat
exchanger, please use
a vacuum cleaner, soft
brush, or other tools to
remove the dust. The heat
exchanger can be seen
after removing the heat
pump filter. Lightly brush
the metal sheet with the
brush, and the brush can
only be moved from top to
bottom. Excessive force
may damage or bend
the metal sheet. Do not
touch the heat exchanger
directly with your hands to
avoid injury.
5
After cleaning,
reinstall the heat
pump filter and inner door
cover to their original
positions, tighten the
knob, and close the heat
exchanger door cover.
Do not touch the internal metal parts of the heat exchanger with your bare hands to avoid scratches. Wear
suitable protective gloves when cleaning the heat exchanger.
Improper cleaning of the heat exchanger metal sheets may cause permanent damage to the device. Do not
press the metal sheet with hard objects (such as the plastic tube of a vacuum cleaner, etc.).
It is recommended to clean the heat exchanger at least once every 20 drying programs.
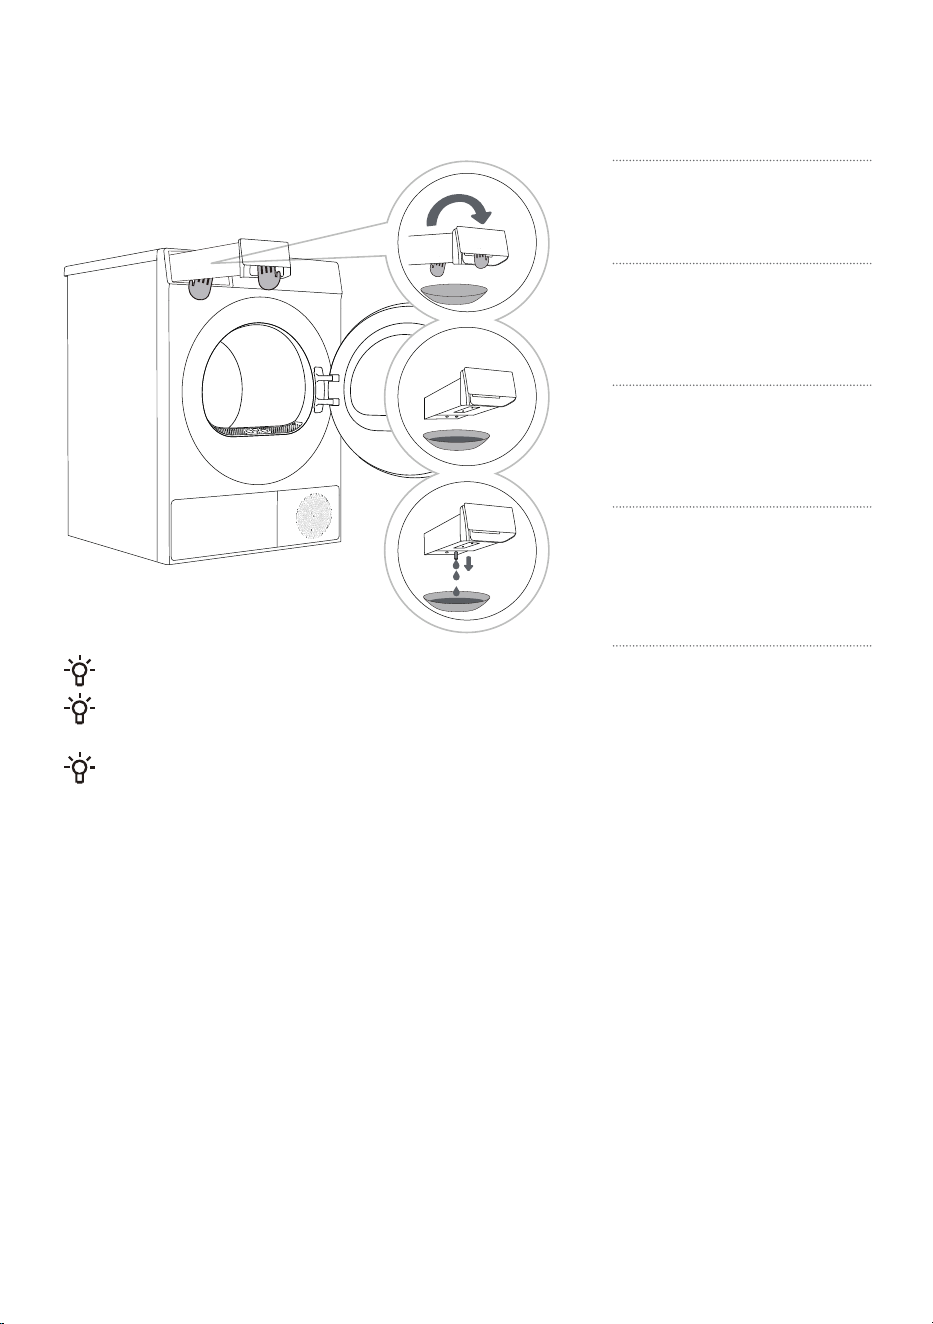
EMPTY THE CONDENSATE BOX
If the condensate box is full, the drying program will automatically pause. Please follow the steps
below to empty the condensate box.
1
Pull out the condensate box
(using both hands as shown).
2
Turn the condensate box
upside down over a basin, sink,
or any suitable container.
3
Empty the condensate box.
4
Reinstall the condensate box.
Empty the condensate box after each drying cycle.
The water discharged from the condensate box is not for drinking. After sufficient filtering, it can
be used for ironing.
Do not add chemicals or fragrances to the condensate box.
40
41
CLEAN THE WATER TANK FILTER (APPLICABLE
TO SOME MODELS)
The water tank filter may be clogged with impurities after long-term use; it is recommended to clean it once a
month.
• If the appliance is equipped with the steam function program, ensure that there is sufficient water in the water tank
to form steam. When using for the first time or when the low-water icon appears on the screen during operation,
please add purified water.
• For the models without the steam function program, there is no need to add purified water into the water tank;
simply remove the water tank filter for cleaning.
1
Pull out the condensate box
by pulling it outward.
2
Pour approximately 500 ml
of purified water into the
water tank using a water kettle or
a pointed mineral water bottle.
3
Reach in with your fingers
to grasp the water tank filter
at the bottom, remove it, clean it,
and reinstall it in place. Finally,
reinstall the condensation box to
its original position.
CLEAN THE DOOR SEAL
Check the door seal regularly; clean it with a damp cloth if necessary.
After use, slightly open the door for ventilation and drying.
CLEANING THE OUTSIDE OF YOUR WASHER
Before cleaning the outside of your washer, please be sure to disconnect the machine from the power
supply.
Clean the appliance housing and control panel with a soft, damp cloth. Then wipe them dry with a soft dry cloth.
Do not use solvents, abrasive cleaners, or cleaner that may damage the device (Please follow the
recommendations and warnings provided by the cleaner manufacturer).
Wipe the drum door with a damp cloth, and then wipe it dry with a soft dry cloth.
If cleaning with a wet towel, make sure to ring out the water from the towel before wiping down the washer.
42
TROUBLESHOOTING
The device is equipped with various automatic safety functions, ensuring that faults can be detected
promptly and effective safety countermeasures can be initiated. These faults are usually minor and can
be eliminated in a very short time.
When the device cannot operate normally, the display will show abnormal information. Please refer to
the warning content and take appropriate actions.
If the fault persists after you have handled it yourself according to the recommended
processing method, please contact after-sales service.
If the user performs maintenance by themselves or hires non-manufacturer after-sales personnel, all
consequences will be assumed by the user.
Fault Description Recommended handling methods
The device cannot
start
Check the power connection.
Check whether the Start/Pause button is pressed.
Check whether the door is closed correctly.
Check whether a fuse has blown, a circuit breaker has tripped,
or a power outage has occurred.
The device cannot
start, and the screen
displays "End".
Check whether the program settings are correct.
Check whether there are any clothing items in the drum.
Drying time is too long
Check whether the program settings are correct.
Check whether there is too much clothing tangled into a bunch.
Check the filter for cleanliness.
Some programs have a cooling process after drying.
Poor drying effect
Check whether the clothes have been washed and spun.
Check whether the program settings are correct.
Check whether the amount of clothing is too much.
Check whether the clothing is sorted correctly and whether the
clothing that dries easily is mixed with the clothing that dries
slowly.
Check whether there are too many heavy garments.
Check whether the filter is clean.
The remaining time on
the display stops or
jumps
The remaining time may vary depending on the type of
clothing, weight, moisture, and surrounding environment; this is
a normal phenomenon.
Wrinkled clothing
The drying time of the clothes is too long; try shortening the
drying time.
Leaving clothing in the dryer for too long after the program has
ended.
The program running
time displayed on the
device is different from
the actual program
running time
For programs that stop automatically when clothes are dry, the
drying duration displayed is calculated according to standard
environment, initial laundry moisture, load mass and type.
The drying time is automatically adjusted for any change in
conditions. The difference between the actual time and the
display time is normal, which ensures the best drying effect.
Faults or problems caused by external factors (such as lightning strikes, power grid failures,
natural disasters, etc.) are not covered by the warranty.
Fault Description Recommended handling methods
The appliance is too
loud
Look for coins, loose buttons, nails, and other objects and
remove them immediately.
Check the lint filter. Remove any items stuck inside the lint filter.
Make sure the dryer is level and standing firmly on the floor.
The dryer may hum due to air moving through the drum and fan.
This is normal.
Clothes are shrinking
Garment care instructions are not being followed. Use a low or
no heat setting.
Lint is left on clothes
Lint filter has not been cleaned properly.
Clothes have not been sorted properly.
Some fabrics cause more lint and should be dried separately
from fabrics that lint attaches easily.
Tissue, paper, etc., has been left in pockets.
The appliance has an
odour
The smell is caused by rubber material that is attached to the
appliance inside. This kind of smell is a rubber's own smell and
disappears automatically after using the appliance several times.
When washing the clothes, use the detergent in accordance with
the manufacturers recommendations. If you use the detergent
excessively not according to the recommendations, undissolved
detergent may accumulate on the clothes and cause an odour.
You can smell odours from the clothes if the clothes were left
in the appliance after drying or in the washing machine after
washing. Unload the clothes promptly at the end of the drying or
washing cycle.
Ensure you can smell same odour in the washing machine. If so,
clean the tub of the washing machine referring to the washing
machine user manual.
Always take care of both lint filters clean. If any residues were left
in the lint filter after drying, it may cause odours. And also dry the
lint filter completely after cleaning.
The appliance is
powered on and started
directly after power
failure, but does not
work
When the program is suspended, the set functions cannot be
changed, If the program or function needs to be changed during
operation, or the power is off during operation and the power
needs to be powered on again, select the requirred program and
function, and finally start it.
43

44
FAULT CODES AND TROUBLESHOOTING
When the device does not operate normally and the display shows the following code, it may not be a
fault. Please refer to the content in the fault code and take the corresponding measures.
Some fault codes are only applicable to certain models. The actual alarm display is subject to the
actual model.
Problem/
Fault
Description Solution
F50/F51 Abnormal sensor Please contact after-sales service.
F21
Abnormal display panel and
the power board
Switch off the appliance, and restart it.
Press the "start/pause" button again
If the abnormality is not removed, please contact
after-sales service.
F22
Abnormal display the motor
control board and the power
board
Switch off the appliance, and restart it.
Press the "start/pause" button again
If the abnormality is not removed, please contact
after-sales service.
Other Electronic module fault
Switch off the appliance, and restart it.
Press the "start/pause" button again
If the abnormality is not removed, please contact
after-sales service.

SERVICING
Before calling maintenance personnel
When you contact the service center, please first state your device model.
Information such as model number, code/ID, model type, and serial number are displayed on the
nameplate of the device.
In case of defects, only use spare parts approved by the authorized manufacturer.
Repairs or any warranty claims resulting from incorrect connection or use of the device are not
covered by the warranty. In this case, the maintenance costs shall be borne by the user.
USAGE RECOMMENDATIONS
The most economical way of drying is to dry the recommended amount of laundry in each batch (see
PROGRAMME TABLE).
Drying laundry made of particularly delicate fabrics that may be deformed is not recommended.
Use of conditioner in the washing cycle is not necessary as the laundry is soft and smooth after
drying in the dryer. Drying time will be shorter and power consumption will be lower if the garments
are thorourghly wrung or spun before drying. By selecting the appropriate drying programme, you will
avoid over-drying your laundry and problems with ironing or shrinkage of fabric
Regular cleaning of the filters will lead to optimum drying time and minimum power consumption.
When drying smaller amounts of laundry or individual garments, the sensor may not perceive the
actual level of moisture in the laundry. In such cases, it is recommended to dry smaller items or
amounts with programmes for dryer laundry or with the timed programme.
45

DISPOSAL
The packaging is made of environmentally friendly materials and can be
recycled, reused, processed, or destroyed without causing harm to the
environment. For this purpose, the packaging materials are marked with
appropriate labels.
This icon on the product or its packaging indicates that this product cannot be
disposed of as household waste. Please dispose of this product at a collection
point for the recycling of electrical and electronic equipment.
When the device reaches the end of its life and needs to be scrapped, please
remove all power cords, destroy door locks and switches to prevent the doors
from locking. This is to avoid the risk of children or small animals becoming
trapped inside.
Ensure this product is handled correctly and avoid inappropriate waste disposal
measures for this product, as this helps prevent potential negative impacts on
the environment and human health. For more information on product recycling,
please contact your local municipal department, your household waste disposal
service center, or the store where you purchased the product.
46
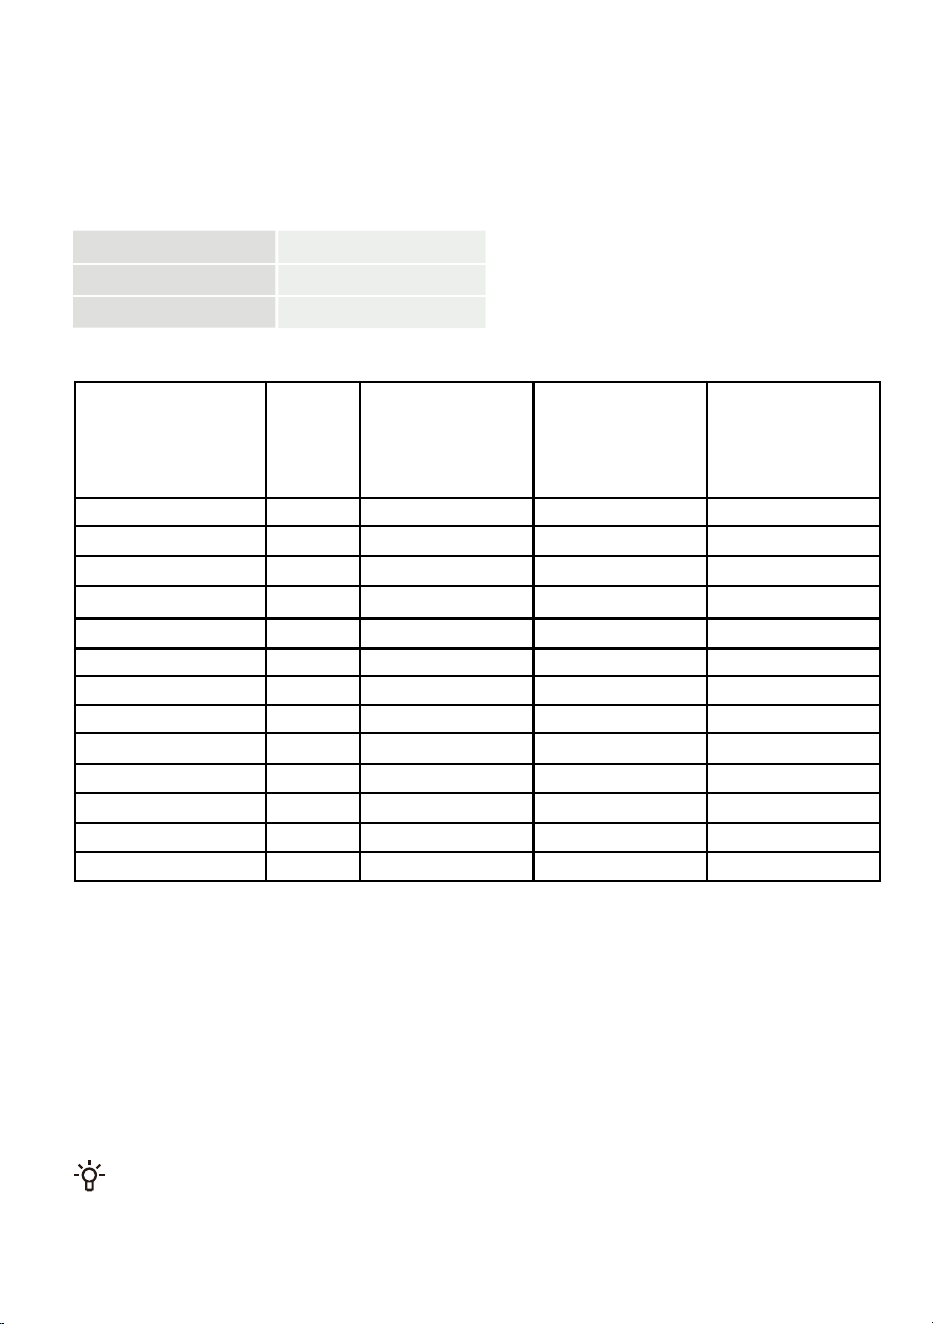
PROGRAM TABLE
Program Instructions
The table indicates the power consumption and time values for drying of a test batch of
laundry with various loads and after washing machine spinning .
The following requirements apply to the consumption values specified below.
Inlet air temperature
Inlet air humidity
Drying temperature
room temperature
50–60%
Normal
Due to deviations in terms of type and amount of laundry, spinning, power supply oscillation,
and environment temperature and humidity, the values measured at the user may differ from the one
stated in the table.
We reserve the right to any changes and errors in the instructions for use.
Program Load
size*
Final spin
speed in
washing
machine (rpm)
Program
consumption
approximately
(kWh)
Program
duration
approximately
(h:min)
Cotton
9
1000
2.01 3:31
Bedding
2.5
1000
1.25 2:56
Baby care
2
1000
0.65 1:21
Shirts
2
1000
0.41
1:00
Power Dry79'
4
1400
0.63 1:19
Synthetics
4.5
1000 0.65 1:14
Down
2
800 0.78 2:03
Quick30'
1
1400 0.27 0:30
Sportswear
2
1000
0.62 1:16
Towels
4.5
1200
1.57 3:00
Auto
4.5
1000 1.34
2:43
Pet
2.5
1000 0.79
1:40
Delicates
1.5
600
0.51
1:08
47

20203379-N6020017116