User Manual Manual De Usuario
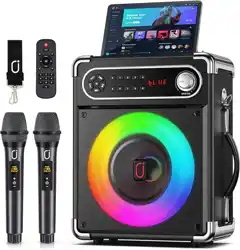
True Wireless Party Speaker
With Two Wireless Microphones
Altavoz inalámbrico para fiestas con dos micrófonos inalámbricos
KH131BK
EN
...
01
08
...
ES
User Manual
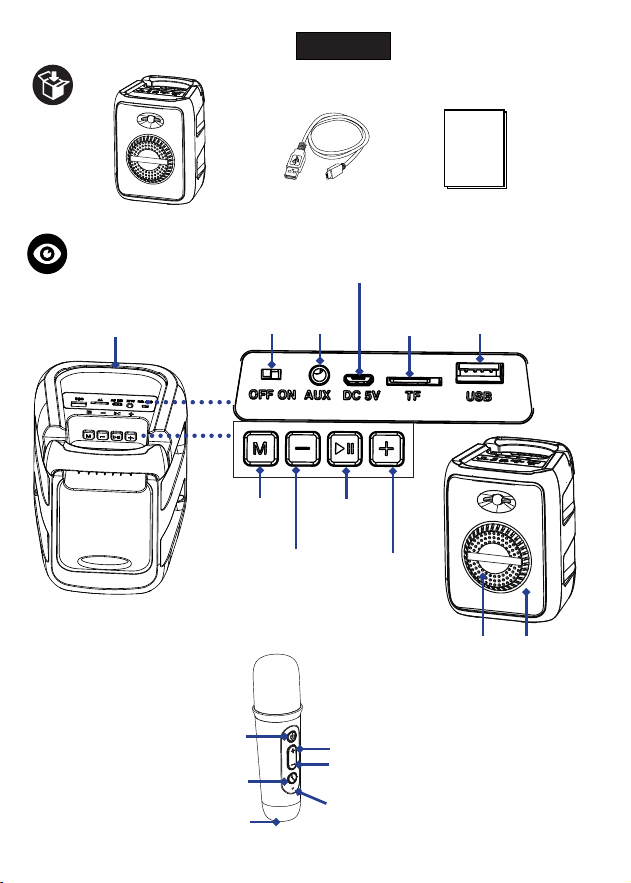
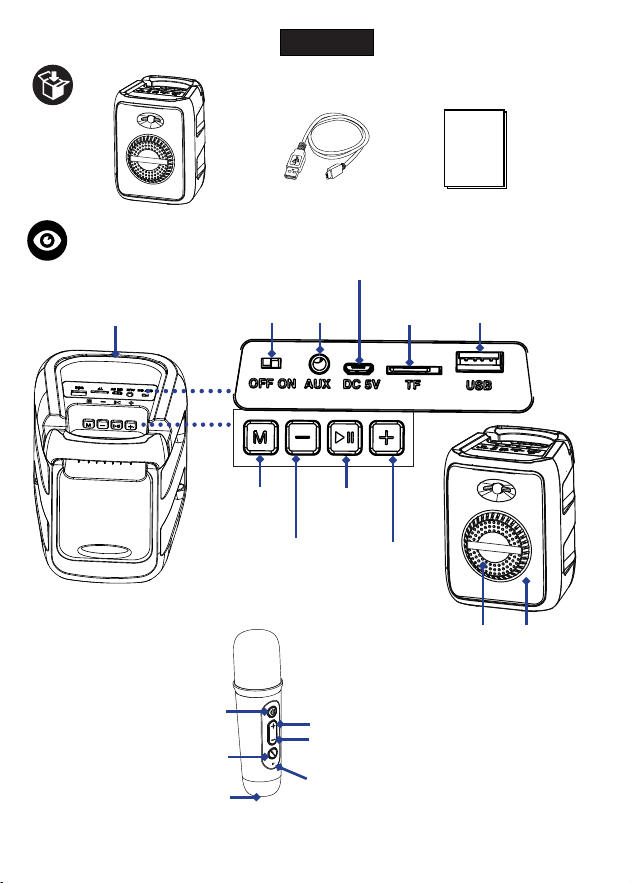
Buttons and Parts
Volume +/Next
track button
Play/Pause
button
Mode
button
Micro USB charging port
USB Port
TF Card
Slot
AUX-IN
Port/LED
Indicator
Handle
Power
Switch
Speaker RGB Light
Volume - / Previous
track button
English
EN 01
Microphone
Power button
Voice Control button
Next track/Increase volume
Previous track/Decrease volume
USB-C Charging port
LED indicator
Charging
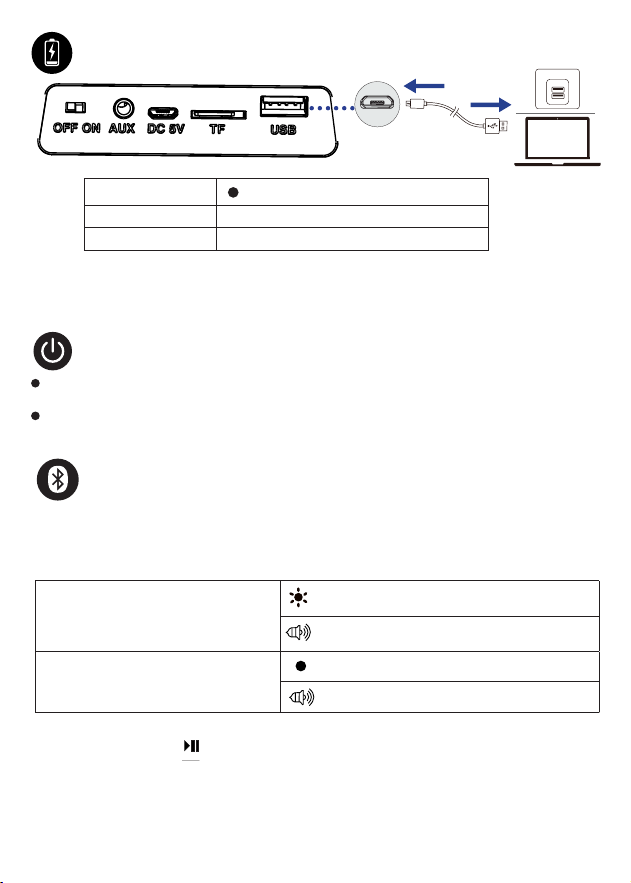
Note: When the battery power level is low, the RGB light may not work, and the volume
will turn lower, indicating that it requires charging. When the speaker's battery power
gets used up, it will automatically power off.
Slide the Power Switch to the "ON" position to turn on the speaker. Once the speaker
is on, it will default to Bluetooth mode, and the RGB light will be on.
To turn off the speaker, slide the Power Switch to the "OFF" position, and the RGB
light will be off.
Steady red (LED indicator)
Charging
Fully charged
Charging time
O (LED indicator)
3 hours
Bluetooth Mode
Bluetooth connection with your device
When the speaker is on, it will automatically enter Bluetooth pairing mode (If the speaker is in
other playback modes, repeatedly press the Mode button M to enter Bluetooth mode). Turn on
Bluetooth in your device’s settings and search for ‘‘KH131BK’’, then tap ‘‘KH131BK’’ to connect.
Enter Bluetooth pairing mode
Connected to a device (Successfully
paired with your device).
Quickly flashing blue (LED indicator)
Steady blue (LED indicator)
Connected tone notification
Bluetooth mode tone notification
?
EN 01
Powering on/off
?
EN 02
NOTES: 1. Before pairing,
ensure the speaker is not currently connected to another device. If
it is,
press and hold the button for 2 seconds to unpair the speaker from the current
connected device.
2. The speaker will automatically be paired with your last successfully connected media
device the next time it is turned on.
3. If there is no Bluetooth connection on the speaker for more than 5 minutes, it will
automatically turn o.
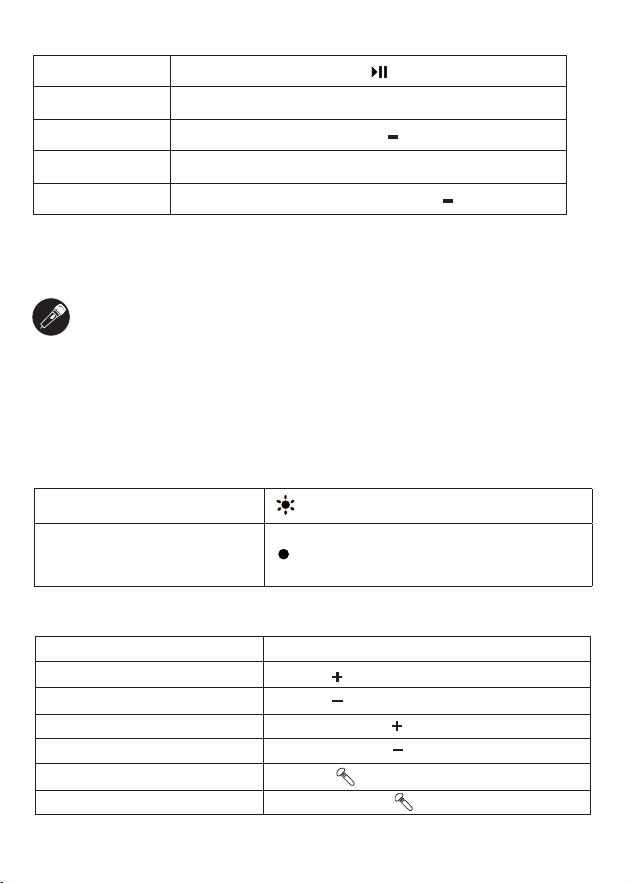
For Music Playback
Play / Pause Press the Play/Pause button once
Next track
Press the Next Track button
+
once
Previous track Press the Previous Track button once
Volume up
Press and hold the Volume Up button
+
Volume down Press and hold the Volume Down button
Note: When you receive or make a call, the music that is playing will automatically
pause, and the person’s voice on the other end of the line can only be heard through
your phone. When you end the call, the music will resume.
EN 03
Singing along to the music (Karaoke mode)
Pair the Microphone with the Speaker
1. Pair the speaker with your device following the instructions in “ Bluetooth connection
with your device” section.
2. Bring the microphone and the speaker close to each other, turn on the microphone,
and it will automatically enter Bluetooth pairing mode and pair with the speaker. Once
they are successfully paired, the LED indicator on the microphone will turn steady blue.
Enter Bluetooth pairing mode
Connected to a device
(Successfully paired with
your device).
Quickly flashing blue (LED indicator)
Steady blue (LED indicator)
Next track
Play/Pause Quickly press the Power button twice.
Previous track
Change voice modulation mode
Add/Remove vocals
Press and hold the button.
Press and hold the button.
Press the button once.
Press and hold the button.
Controls in singing (using the buttons on the microphone)
Volume up (For speaking) Press the button once.
Volume down (For speaking) Press the button once.
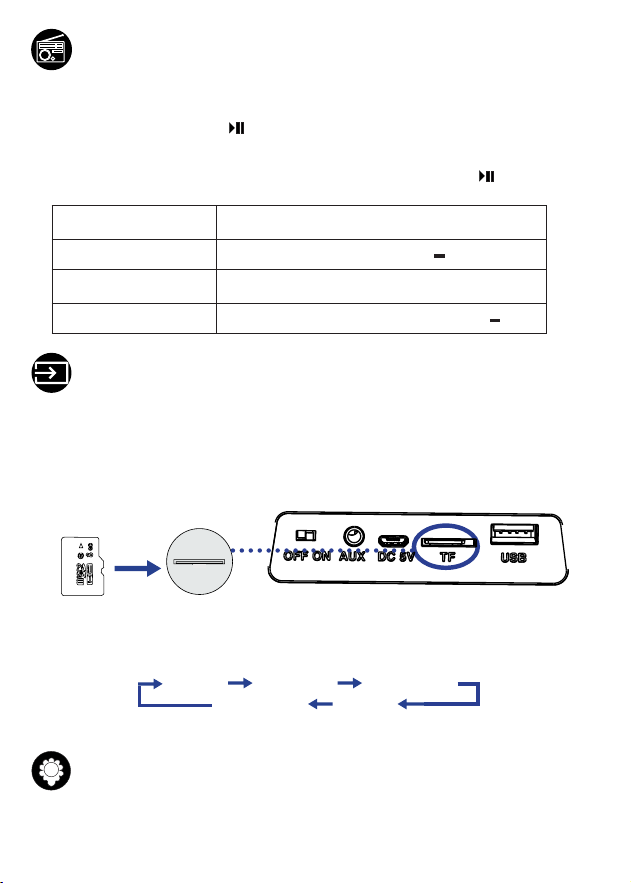
Next radio station
Press the Next Track button
+
once
Previous radio station Press the Previous Track button once
Volume up
Press and hold the Volume Up button +
Volume down Press and hold the Volume Down button
Repeatedly press the Mode button M to switch to the FM Radio mode. Insert the
included Micro USB charging cable into the charging port as an antenna to adjust for
better signals.
Press the Play / Pause button to automatically search for the radio stations, then all
available radio stations will be stored by the preset channel number in order, and the
first preset radio station will broadcast automatically.
While searching for the radio stations, press the Play / Pause button again to stop
searching and broadcast the current frequency radio.
FM Radio mode
Playing from external device
USB / TF card/AUX mode
The speaker will take the newly connected USB disk, TF card, or Audio out device as the
first priority for the music playback. If the USB disk, TF card, and Audio Out device are
connected to the speaker at the same time, you can repeatedly press the Mode button
M to toggle these playback modes, and the playback mode will change as follows:
Note: Under AUX mode, you can mute the music playback sound, adjust the volume level on the
speaker, and for other music playback controls, you can operate them through your media device.
Under any mode, insert a TF card/USB disk into the TF card slot/USB port of your
speaker, or connect the AUX cable(not included) to the AUX In port of the speaker and
to the Audio Out of your media device (such as your phone). It will immediately play
the music files in the TF card, USB disk, or Audio Out device.
The music playback controls are the same as the Bluetooth mode.
EN 03 EN 04
Under any mode (except FM Radio mode), if the RGB light is o, press and hold the Mode
button M to enable the light mode. There are six light modes available, repeatedly press
and hold the Mode button M to toggle between the six light modes and light o mode.
RGB Light Mode
TF card (supports
up to 16GB)
USB Mode TF Card Mode FM Radio Mode
Bluetooth Mode AUX Mode
Safety stament
Safety Precautions
1. Avoid dropping.
2. Do not disassemble this device.
3. Do not expose this device to rain or moisture or submerge in water.
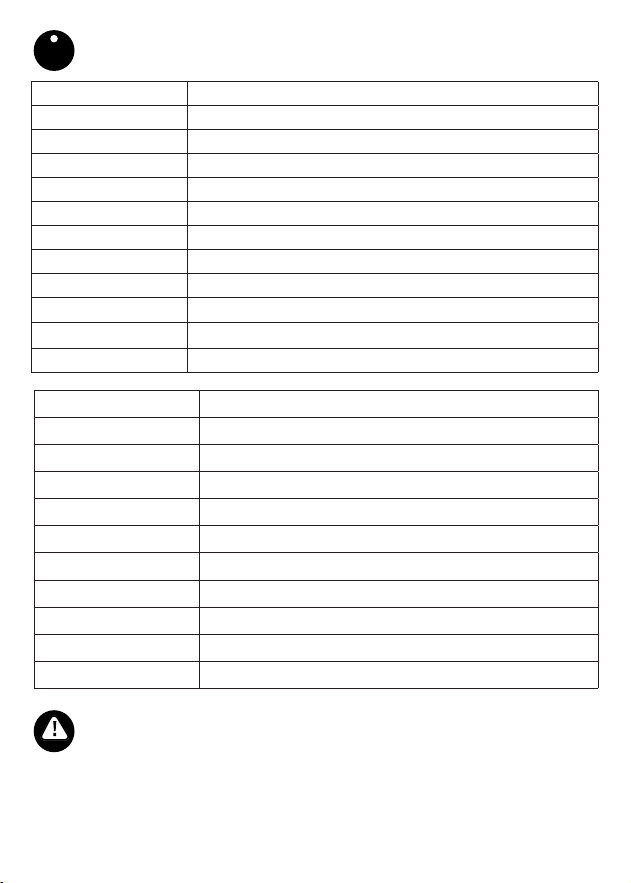
Specifications
I
Model Number KH131BK
Model Name Ture Wireless Party Speaker
Power Input 5V / 0.5 A
Battery Capacity 1200 mAh
Charging Time 3 hours
Playtime Up to 6.5 hours
Frequency Response 80Hz-18kHz
FM Frequency Range 87.5-108.0Mhz
Bluetooth Version V5.3
Operation Range 33ft (10 M)
Dimension 6.69” x 5.12” x 4.92”(170 x 130 x 125 mm)
Weight 17.89 oz (507g)
Model Number KH131BK
Model Name Wireless Karaoke Microphone
Power Input 5V / 0.5A
Battery Capacity 500 mAh
Charging Time 1.5 hours
Playtime Up to 16 hours
S/N Ratio > 60 dB
Bluetooth Version V5.3
Operation Range 33ft (10M)
Dimension 1.48” × 1.48” × 5.28”/ 37.5 x 37.5 x134mm
Weight 4.48 oz /127 g (Two mics: 63.5g x2 )
EN 05

4.
Ideal temperatures are 0°C to 35°C.
Avoid extreme temperatures.
5. Keep the device away from excessive heat, such as sunshine, fire or the like.
6. Do not use the device outdoors during thunderstorms.
7. Use original or certified cables.
8. Do not use any corrosive cleaner/oil to clean.
9. Keep out of reach of children. It contains small parts which may be a choking hazard.
10. Observe local laws and regulations while using the device.
11.To prevent damage to your device’s parts or internal circuits, do not use it in dusty, smoky,
damp or dirty environments.
12. Do not use, store or transport the device where flammables or explosives are stored. Using
FCC Statement
For Speaker - FCC ID: 2AJVKKH131
For Microphone - FCC ID: 2AJVKKH131MIC
This device complies with Part 15 of the FCC Rules. Operation is subject to the following two
conditions:
(1) this device may not cause harmful interference, and (2) this device must accept any interference
received, including interference that may cause undesired operation.
Warning: Changes or modifications not expressly approved by the party responsible for compli-
ance could void the user’s authority to operate the equipment.
Note: This equipment has been tested and found to comply with the limits for a Class B digital
device, pursuant to Part 15 of the FCC Rules. These limits are designed to provide reasonable
protection against harmful interference in a residential installation.
This equipment generates, uses and can radiate radio frequency energy and, if not installed and
used in accordance with the instructions, may cause harmful interference to radio communica-
tions. However, there is no guarantee that interference will not occur in a particular installation.
If this equipment does cause harmful interference to radio or television reception, which can
be determined by turning the equipment o and on, the user is encouraged to try to correct the
interference by one or more of the following measures: (1) Reorient or relocate the receiving
antenna. (2) Increase the separation betw
een the equipment and receiver. (3) Connect the
equipment into an outlet on a circuit dierent from that to which the receiver is connected. (4)
Consult the dealer or an experienced radio / TV technician for help.
FCC Radiation Exposure Statement:
The device has been evaluated to meet general RF exposure requirement.
The device can be used in portable exposure condition without restriction.
Hearing Safety
1. To avoid hearing damage, do not listen for extended periods at high volume.
2. You should use caution or temporarily discontinue use in potentially hazardous situations.
Notice
This symbol means the product must not be discarded as household waste, and
should be delivered to an appropriate collection facility for recycling.
Follow local rules and never dispose of the product and rechargeable batteries with
normal household waste. Correct disposal of old products and rechargeable batteries
helps prevent negative consequences for the environment and human health.
EN 06
EN 05

EN 07
Limited 1 Year Warranty
The ChargeWorx® Limited 1 Year Warranty guarantees the original purchaser that the product
is free from any defect in material and workmanship in conjunction with the original purchaser
using the product according to any accompanying labels and instructions. ChargeWorx® agrees
that it will, at its option, either repair the defect or replace the defective product or part thereof
at no charge to the purchaser for parts or labor for the time period stated.
This limited 1 Year warranty does not cover any damage caused by accident, misuse, modifi-
cation, or normal wear and tear, and is limited to the value of the prodoct. There are no other
express or implied warranties for battery powered products. The limited 1 Year warranty de-
scribed herein is in addition to applicable law. ALL IMPLIED 1 YEAR WARRANTIES INCLUDING
THE WARRANTIES OF MERCHANTABILITY AND FITNESS FOR USE ARE LIMITED TO THE
PERIOD FROM THE DATE OF ORIGINAL PURCHASE SET FORTH. Some states do not allow
limitations on how long an implied warranty lasts, so the above limitation may not apply to you.
Neither the sales personnel of the seller nor any other person is authorized to make any war-
ranties other than those described herein or to extend the duration of any warranties beyond
the time period described herein on the behalf of ChargeWorx®.
The warranties described herein shall be the sole and exclusive warranties granted by Charge-
Worx® and shall be the sole and exclusive, remedy available to the purchaser. Corrections of
defects, in the manner and for the period of time described herein, shall constitute complete
fulfillment of all liabilities and responsibilities of ChargeWorx® to the purchaser with respect
to the product and shall constitute full satisfaction of all claims, whether based on contract
negligence, strict liability or otherwise. In no event shall be liable or in any way responsible
for an incidental of consequential economic or property damage. Some states do not allow the
exclusion of incidental or consequential damages, so the above exclusion may not apply to you.
THIS LIMITED 1 YEAR WARRANTY, GIVES YOU SPECIFIC LEGAL RIGHTS. YOU MAY ALSO
HAVE OTHER RIGHTS, WHICH VARY FROM STATE TO STATE.
Where to ship product
ChargeWorx® Returns Department
1 Rewe Street
2nd floor
New York, NY 11211
Enclose proof of purchase and $5.95 for Shipping
and Handling.
If you have any questions, please contact
ChargeWorx® at support@chargeworxtech.com
or visit https://chargeworxtech.com.
Disclaimer
All information, design and specifications contained in this manual were correct at the time of
this publication. As the product goes under continuous upgrades and changes, however, the final
device may have slight dierences. The contents of this manual are subject to change without
prior notice, and
ChargeWorx®
will not be liable for any errors contained herein or for incidental
or consequential damages in connection with the furnishing performance or use of this manual.
ChargeWorx
®
is a registered trademark of The Fesco Group, manufactured by The Fesco
Group. The information contained in this user manual and all accompanying documentation is
copyrighted and all rights are reserved.
© 2025
ChargeWorx®
, All rights reserved.
EN 07
Botones y Partes
Botón Volumen
+/Siguiente
Pista siguiente/Aumentar el volumen
Botón de
reproducción/
pausa
Pista anterior/Disminuir volumen
Botón de
modo
Puerto de carga
micro USB
Puerto USB
Ranura
para
Puerto
AUX-IN/
Indicador
Manejar
Interruptor de
alimentación
Orador Luz RGB
Volumen - / Botón
de pista anterior
ES 08
Español
Manual de usuario
Botón de
encendido
Botón de control por voz
Puerto de carga USB-C
Indicador LED
Micrófono
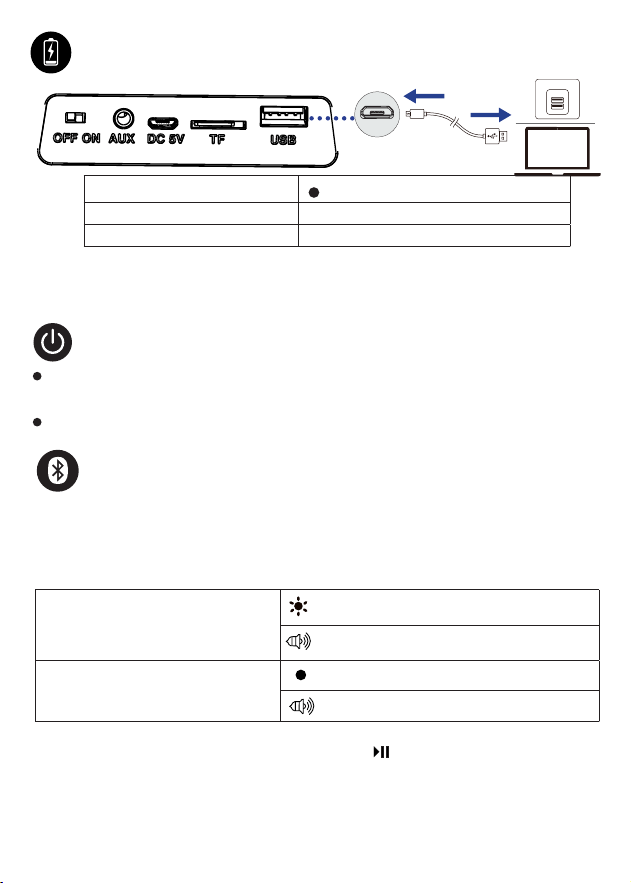
Deslice el interruptor de encendido a la posición "ON" para encender el altavoz. Una vez
que el altavoz está encendido, se establecerá de manera predeterminada en el modo Bluetooth
y la luz RGB se encenderá.
Para apagar el altavoz, deslice el interruptor de encendido a la posición "OFF" y la luz RGB se apagará.
Modo Bluetooth
Conexión Bluetooth con tu dispositivo
Cuando el altavoz está encendido, ingresará automáticamente al modo de emparejamiento de
Bluetooth (si el altavoz está en otros modos de reproducción, presione repetidamente el botón Modo
M para ingresar al modo Bluetooth). Active Bluetooth en la configuración de su dispositivo y busque
“KH131BK”, luego toque “KH131BK” para conectarse.
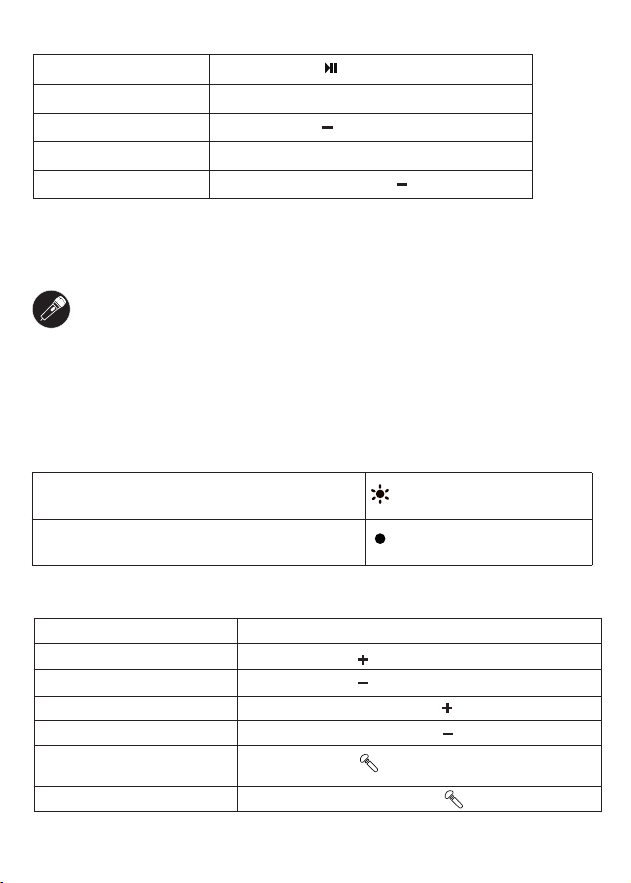
Parpadeo rápido en azul (indicador LED)
Azul fijo (indicador LED)
?
Encendido/apagado
?
ES 09
Ingrese al modo de emparejamiento
de Bluetooth
Conectado a un dispositivo
(Emparejado con éxito con su
dispositivo).
Notificación de tono conectado
Notificación de tono de modo Bluetooth
NOTAS: 1. Antes de emparejar, asegúrese de que el altavoz no esté actualmente conectado a
otro dispositivo. Si es así, mantenga presionado el botón durante 2 segundos para
desvincular el altavoz del dispositivo conectado actualmente.
2. El altavoz se emparejará automáticamente con su último dispositivo multimedia conectado
correctamente la próxima vez que se encienda.
3. Si no hay conexión Bluetooth en el altavoz durante más de 5 minutos, se apagará automáti-
camente.
Nota: Cuando el nivel de carga de la batería es bajo, es posible que la luz RGB no funcione y el
volumen baje, lo que indica que requiere carga. Cuando la energía de la batería del altavoz se
agote, se apagará automáticamente.
Rojo fijo (indicador LED)
Cargando
Completamente cargado
Tiempo de carga
Apagado (indicador LED)
3 horas
Cargando
Nota: Cuando recibe o realiza una llamada, la música que se está reproduciendo se
detiene automáticamente y la voz de la persona al otro lado de la línea solo se puede
escuchar a través de su teléfono. Cuando termine la llamada, la música se reanudará.
ES 10
Para reproducción de música
Reproducir pausar Presione el botón una vez
Siguiente pista
Presione el botón
+
una vez
Pista anterior
Presione el botón una vez
Sube el volumen
Mantenga presionado el botón
+
Bajar volumen
Mantenga presionado el botón
MODE
V+
V-
TWS
Cantando junto con la música (modo karaoke)
Emparejar el micrófono con el altavoz
1. Empareje el altavoz con su dispositivo siguiendo las instrucciones de la sección “Con-
exión Bluetooth con su dispositivo”.
2. Acerque el micrófono al altavoz, encienda el micrófono y este entrará automática-
mente en modo de emparejamiento Bluetooth y se emparejará con el altavoz. Una vez
emparejados correctamente, el indicador LED del micrófono se iluminará en azul fijo.
Controles al cantar (usando los botones del micrófono)
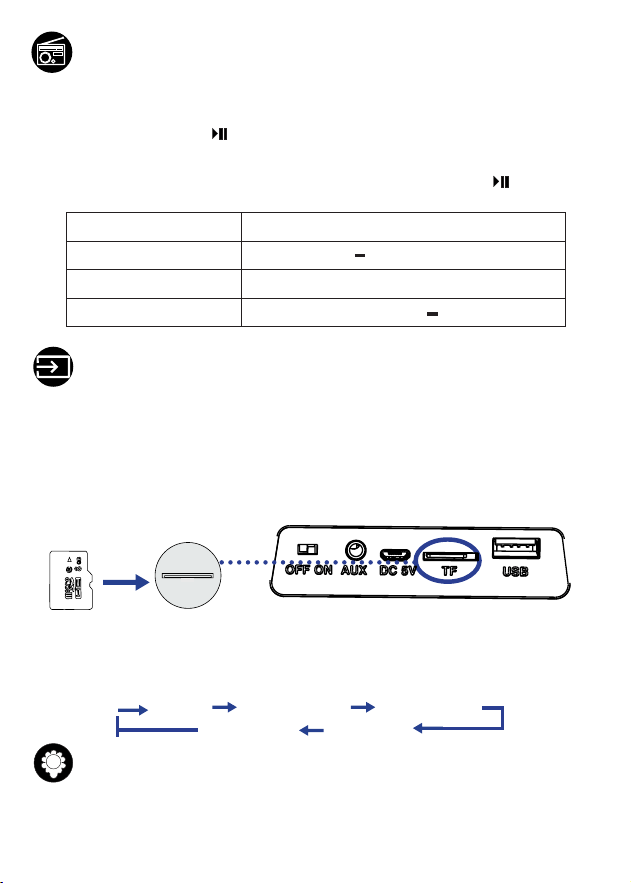
Ingresar al modo de emparejamiento Bluetooth
Conectado a un dispositivo (Emparejado
correctamente con su dispositivo).
Parpadeo rápido de color
azul (indicador LED)
Azul constante (indica-
dor LED)
Pista siguiente
Reproducir/Pausa
Presione rápidamente el botón de encendido dos veces.
Pista anterior
Cambiar el modo de
modulación de voz
Agregar o quitar voces
Mantenga presionado el botón .
Mantenga presionado el botón .
Mantenga presionado el botón .
Subir volumen (para hablar) Presione el botón una vez.
Bajar volumen (para hablar) Presione el botón una vez.
Presione el botón una vez.
Presione repetidamente el botón de modo M para cambiar al modo de radio FM. Inserte el
cable de carga Micro USB incluido en el puerto de carga como una antena para ajustar y
obtener mejores señales.
Presione el botón Play/Pause para buscar automáticamente las estaciones de radio, luego
todas las estaciones de radio disponibles se almacenarán por el número de canal preestableci-
do en orden, y la primera estación de radio preestablecida se transmitirá automáticamente.
Mientras busca las estaciones de radio, presione el botón Reproducir/Pausar nuevamente
para detener la búsqueda y transmitir la radio de frecuencia actual.
Modo de radio FM
Reproducción desde un dispositivo
USB/tarjeta TF/modo AUX
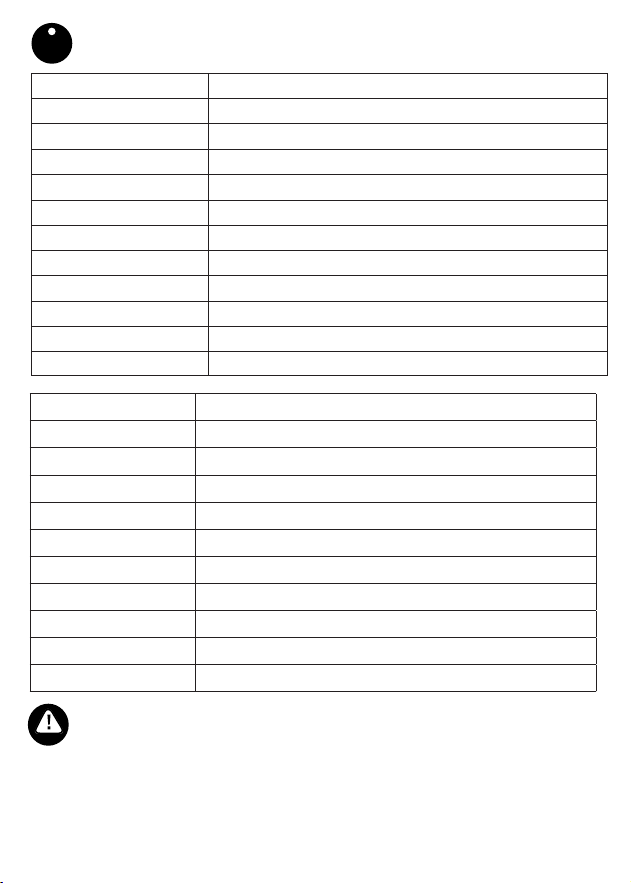
En cualquier modo, inserte una tarjeta TF/disco USB en la ranura para tarjeta TF/puerto USB
de su altavoz, o conecte el cable AUX (no incluido) al puerto de entrada AUX del altavoz y a la
salida de audio de su dispositivo multimedia ( como su teléfono). Inmediatamente reproducirá
los archivos de música en la tarjeta TF, disco USB o dispositivo de salida de audio.
Los controles de reproducción de música son los mismos que los del modo Bluetooth.
Tarjeta TF (admite
hasta 16GB)
Próxima estación de radio
Presione el botón + una vez
Emisora de radio anterior
Presione el botón una vez
Sube el volumen
Mantenga presionado el botón
+
Bajar volumen
Mantenga presionado el botón
El altavoz tomará el disco USB, la tarjeta TF o el dispositivo de salida de audio recién conecta-
dos como la primera prioridad para la reproducción de música. Si el disco USB, la tarjeta TF y
el dispositivo de salida de audio están conectados al altavoz al mismo tiempo, puede presionar
repetidamente el botón Modo M para alternar estos modos de reproducción, y el modo de
reproducción cambiará de la siguiente manera:
Modo USB Modo de tarjeta TF Modo de radio FM
Modo Bluetooth Modo auxiliar
En cualquier modo (excepto el modo Radio FM), si la luz RGB está apagada, mantenga pre-
sionado el botón de modo M para activar el modo de luz. Hay seis modos de luz disponibles;
mantenga presionado repetidamente el botón de modo M para alternar entre los seis modos de
luz y el modo de luz apagada.
Modo de luz RGB
ES 11
Especificaciones
I
Declaración de seguridad
Precauciones de seguridad
1. Evite dejar caer.
2. No desmonte este dispositivo.
3. No exponga este dispositivo a la lluvia o la humedad ni lo sumerja en agua.
4. Las temperaturas ideales son de 0 °C a 35 °C. Evite las temperaturas extremas.
ES 12
Número de modelo KH131BK
Nombre del modelo Altavoz inalámbrico para fiestas Ture
Entrada de energía 5V / 0.5 A
Capacidad de la batería 1200 mAh
Tiempo de carga 3 horas
Hora de jugar Hasta 6.5 horas
Versión Bluetooth V5.3
Rango de Operación 33 pies (10 m)
Dimensiones 6,69” x 5,12” x 4,92” (170 x 130 x 125 mm)
Peso 17,89 onzas (507 g)
Número de modelo KH131BK
Nombre del modelo Micrófono de karaoke inalámbrico
Entrada de energía 5V / 0.5A
Capacidad de la batería 500 mAh
Tiempo de carga 1.5 horas
Hora de jugar Hasta 16 horas
Relación señal/ruido > 60 dB
Versión Bluetooth V5.3
Rango de Operación 33 pies (10 m)
Dimensiones 5,28” × 1,48” × 1,48”/ 134,0 x 37,5 x 37,5 mm
Peso 4,48 oz / 127 g (Dos micrófonos: 63,5 g x2)
Respuesta de frecuencia
Rango de frecuencia FM
80Hz-18kHz
87,5-108,0 MHz

5. Mantenga el dispositivo alejado del calor excesivo, como la luz solar, el fuego o similares.
6. No utilice el dispositivo al aire libre durante tormentas eléctricas.
7. Utilice cables originales o certificados.
8. No use ningún limpiador/aceite corrosivo para limpiar.
9. Manténgase fuera del alcance de los niños. Contiene piezas pequeñas que pueden suponer un
peligro de asfixia.
10. Observe las leyes y regulaciones locales mientras usa el dispositivo.
11. Para evitar daños a las piezas o circuitos internos de su dispositivo, no lo use en ambientes
polvorientos, con humo, húmedos o sucios.
12. No utilice, almacene ni transporte el dispositivo donde se almacenan productos inflamables o
explosivos. El uso de su dispositivo en estos entornos aumenta el riesgo de explosión o incendio.
Declaración de la FCC
Para altavoz - ID FCC: 2AJVKKH131
Para micrófono - ID FCC: 2AJVKKH131MIC
Este dispositivo cumple con la Parte 15 de las Normas de la FCC. La operación está sujeta a las
siguientes dos condiciones:
(1) este dispositivo no puede causar interferencia dañina y (2) este dispositivo debe aceptar
cualquier interferencia recibida, incluida la interferencia que pueda causar un funcionamiento
no deseado.
Advertencia: Los cambios o modificaciones no aprobados expresamente por la parte responsable del
cumplimiento podrían anular la autoridad del usuario para operar el equipo.
Nota: Este equipo ha sido probado y se encontró que cumple con los límites para un dispositivo
digital Clase B, de conformidad con la Parte 15 de las Reglas de la FCC. Estos límites están
diseñados para brindar una protección razonable contra interferencias dañinas en una insta-
lación residencial.
Este equipo genera, usa y puede irradiar energía de radiofrecuencia y, si no se instala y usa de
acuerdo con las instrucciones, puede causar interferencias dañinas en las comunicaciones por
radio. Sin embargo, no hay garantía de que no se produzcan interferencias en una instalación
en particular. Si este equipo causa interferencias dañinas en la recepción de radio o televisión,
lo cual se puede determinar apagando y encendiendo el equipo, se recomienda al usuario que
intente corregir la interferencia mediante una o más de las siguientes medidas: (1) Reorientar
o reubicar la antena receptora. (2) Aumentar la separación entre el equipo y el receptor. (3)
Conecte el equipo a un tomacorriente en un circuito diferente al que está conectado el receptor.
(4) Consulte al distribuidor oa un técnico experimentado en radio/TV para obtener ayuda.
Declaración de exposición a la radiación de la FCC:
El dispositivo ha sido evaluado para cumplir con los requisitos generales de exposición a RF.
El dispositivo se puede utilizar en condiciones de exposición portátil sin restricciones.
ES 13
Precau-
ciones
Este símbolo indica que el producto no debe descartarse como residuos domésticos y
debe enviarse a las instalaciones de recogida adecuadas para su reciclaje.
Cumplir con las regulaciones locales y no tratar los productos y las baterías recar-
gables con los residuos domésticos normales. Manejar correctamente los productos
antiguos y las baterías recargables ayuda a prevenir efectos negativos en el medio
ambiente y la salud humana.
ChargeWorx® es una marca registrada de The Fesco Group, fabricada por The Fesco Group. La
información contenida en este manual del usuario y toda la documentación que lo acompaña tiene
derechos de autor y todos los derechos están reservados.
© 2025 ChargeWorx®, Todos los derechos reservados.
Seguridad auditiva
1. Para evitar daños auditivos, no escuche música a un volumen alto durante períodos prolongados.
2. Tenga cuidado o suspenda temporalmente su uso en situaciones potencialmente peligrosas.

ES 13 ES 14
Declaración de exención de responsabilidad
Toda la información, el diseño y las especificaciones contenidas en este manual son correctos
en el momento de la publicación. Sin embargo, a medida que el producto se actualiza y cambia
constantemente, el dispositivo final puede tener una ligera diferencia. El contenido de este man-
ual está sujeto a cambios sin previo aviso, y
ChargeWorx®
no es responsable de ningún error o
daño colateral o indirecto relacionado con el suministro, cumplimiento o uso de este manual.
Garantía Limitada De 1 Año
La garantía limitada de 1 año de ChargeWorx® garantiza al comprador original que el producto está
libre de defectos de material y mano de obra, siempre que el comprador original utilice el producto
de acuerdo con las etiquetas e instrucciones que lo acompañan. ChargeWorx® acepta que, a su
elección, reparará el defecto o reemplazará el producto defectuoso o parte del mismo sin cargo
para el comprador por piezas o mano de obra durante el período de tiempo establecido.
Esta garantía limitada de 1 año no cubre ningún daño causado por accidente, mal uso, mod-
ificación o desgaste normal, y está limitada al valor del producto. No existen otras garantías
expresas o implícitas para los productos alimentados por batería. La garantía limitada de 1 año
descrita en este documento se suma a la ley aplicable. TODAS LAS GARANTÍAS IMPLÍCITAS
DE 1 AÑO, INCLUIDAS LAS GARANTÍAS DE COMERCIABILIDAD E IDONEIDAD PARA EL USO,
SE LIMITARON AL PERÍODO A PARTIR DE LA FECHA DE COMPRA ORIGINAL ESTABLECIDA.
Algunos estados no permiten limitaciones en cuanto a la duración de una garantía implícita, por
lo que la limitación anterior puede no aplicarse en su caso. Ni el personal de ventas del vendedor
ni ninguna otra persona están autorizados a otorgar garantías distintas a las descritas en este
documento ni a extender la duración de ninguna garantía más allá del período de tiempo descrito
en este documento en nombre de ChargeWorx®.
Las garantías descritas en este documento serán las únicas y exclusivas garantías otorgadas por
ChargeWorx® y serán el único y exclusivo recurso disponible para el comprador. Las correcciones
de defectos, en la forma y durante el período de tiempo descrito en este documento, constituirán
el cumplimiento completo de todas las obligaciones y responsabilidades de ChargeWorx® ante
el comprador con respecto al producto y constituirán la satisfacción total de todas las reclama-
ciones, ya sea que se basen en negligencia contractual, responsabilidad estricta o de otro tipo. En
ningún caso ChargeWorx® será responsable de ningún modo por daños económicos o materiales
incidentales o consecuentes. Algunos estados no permiten la exclusión de daños incidentales o
consecuentes, por lo que la exclusión anterior puede no aplicarse en su caso. ESTA GARANTÍA
LIMITADA DE 1 AÑO LE OTORGA DERECHOS LEGALES ESPECÍFICOS. TAMBIÉN PUEDE TENER
OTROS DERECHOS, QUE VARÍAN DE UN ESTADO A OTRO.
Dónde enviar el producto
Departamento de devoluciones
de ChargeWorx®
Calle Rewe, 1
2 ° piso
Nueva York, NY 11211
Incluya comprobante de compra y $5,95 por gastos
de envío y manipulación.
Si tiene alguna pregunta, comuníquese con
ChargeWorx® en support@chargeworxtech.com
o visite https://chargeworxtech.com.
ES 14
Customer Service
Servicio al Cliente
To get the best after-sales service, access the Contact
webpage from the link:
https://chargeworxtech.com
Or email us at
support@chargeworxtech.com
for return
information and customer support!
Para obtener el mejor servicio postventa, acceda a la
página web de contacto desde el enlace:
https://chargeworxtech.com
¡O envíenos un correo
electrónico a
support@chargeworxtech.com
para obtener
información sobre devoluciones y atención al cliente!
For more information, please visit:
Para mayor información por favor visite:
https://
chargeworxtech.com