
empty page before TOC


English
6
English
Contents
IMPORTANT SAFETY INSTRUCTIONS______________________ 6
General description ____________________________________ 12
Introduction __________________________________________ 13
What do the icons on my product handle mean?___________ 13
What does the icon on my Quick Clean Pod mean?_________ 15
How do I charge my product? ___________________________ 15
How do I use my product? ______________________________ 18
How do I clean my shaver? ______________________________ 25
How do I use the Quick Clean Pod? (S7885 and S7886 only) _ 30
How do I connect my shaver and smartphone? ____________ 33
How do I replace the shaving heads? _____________________ 35
Accessories ___________________________________________ 37
Assistance ____________________________________________ 37
Disposal ______________________________________________ 38
Full Two-Year Warranty ________________________________ 38
45-DAY MONEY-BACK GUARANTEE______________________ 41
Trademarks ___________________________________________ 42
IMPORTANT SAFETY
INSTRUCTIONS
When using an electric product, basic precautions should always be
followed, including the following:
Read all instructions before using this product.
7
English
DANGER
To reduce the risk of electric shock:
-
To charge the product, only use a USB power source on a
certified product with output rating 5V, ≥ 1A. For safe charging
in a moist environment (e.g. in a bathroom), only use an IPX4
(splash-proof) power source. A suitable power source (e.g. Philips
HQ87) is available via www.philips.com/support. If you need
support finding the correct USB power source, contact Philips
support at 1-800-243-3050. Using a non-certified USB power
source may cause hazards or serious injuries.
-
Keep the USB cable and the USB power source dry.
-
Do not reach for a corded product that has fallen into water.
Unplug immediately from the power outlet.
-
Do not place or store the product or charging stand where it can
fall or be pulled into a tub or sink. Do not place or drop the
product or charging stand into water or other liquid.
-
This product does not work while it is connected to the power
outlet. Except when charging, always unplug this product from
the power outlet.
-
Remove USB power source from power outlet and product
before cleaning.
WARNING
To reduce the risk of burns, fire, electric shock, or injury to
persons:

8
English
-
This product is not intended for use by persons (including
children) with reduced physical, sensory or mental capabilities, or
lack of experience and knowledge, unless they have been given
supervision or instruction concerning use of the product by a
person responsible for their safety. Children should be
supervised to ensure that they do not play with the product.
-
Use this product only for its intended household use as described
in this manual. Misuse can lead to hazards or serious injuries. Do
not use attachments not recommended by Philips North America
LLC. Accessories supplied may vary for different products.
-
Never operate this product if it has a damaged USB power
source, if it is not working properly, after it has been dropped or
damaged, or after the product or the USB power source has
been dropped into water. For assistance call 1-800-243-3050.
-
Keep the USB cable and the USB power source away from
heated surfaces.
-
Never drop or insert any object into any opening.
-
Do not use the USB power source in or near a power outlet that
contains an electric air freshener to prevent damage to the USB
power source.
-
Do not charge or plug in product or charging stand outdoors or
operate where aerosol (spray) products are being used or where
oxygen is being administered.
-
Always check shaving heads (guards and cutters) before using
the product. Do not use the product if cutters or guards are
damaged, as injury may occur.
-
Always attach the USB cable to the USB power source and the
product or charging stand first, then attach the USB power
source to the power outlet. To disconnect, set all controls to 'off'
position. Then remove the USB power source from the power
outlet.

9
English
-
Plug USB power source directly into power outlet. Do not use an
extension cord.
-
Unplug USB power source before plugging in or unplugging the
product.
-
Be careful when handling your smartphone near water and in
moist environments.
-
The radio waves of Bluetooth-enabled products may impair the
operation of pacemakers and other medical devices. Consult
your phycisian for advice and keep the product at least 8 inches
(20cm) away.
-
The batteries used in this product may present a fire or chemical
burn hazard if mistreated. Do not disassemble, heat above
100°C (212°F) or incinerate.
-
Only use original Philips accessories or consumables.
-
Charge, use and store the product at a temperature between 50
°F / 10°C and 95 °F / 35°C.
-
Keep product and batteries away from fire and do not expose
them to direct sunlight or high temperatures.
-
If the product becomes abnormally hot or smelly, changes color
or if charging takes longer than usual, stop using and charging
the product and contact Philips.
-
Do not place products and their batteries in microwave ovens or
on induction cookers.
-
Do not open, modify, pierce, damage or dismantle the product
or battery to prevent batteries from heating up or releasing toxic
or hazardous substances. Do not short-circuit, overcharge or
reverse charge batteries.
-
If batteries are damaged or leaking, avoid contact with the skin
or eyes. If this occurs, immediately rinse well with water and seek
medical care.
-
When you handle batteries, make sure that your hands, the
product and the batteries are dry.

10
English
-
To avoid accidental short-circuiting of batteries after removal, do
not let battery terminals come into contact with metal objects
(e.g. coins, hairpins, rings). Do not wrap batteries in aluminum
foil. Tape battery terminals or put batteries in a plastic bag
before you discard them.
Philips Norelco Quick Clean Pod Cartridge fluid
-
Keep out of reach of children.
-
Do not swallow.
-
If necessary, seek medical help. If possible, show the
packaging/labeling of the product.
-
Before use, read the instructions for use/labeling of the product.
-
Store the product frost-free in closed packaging.
Electromagnetic fields (EMF)
This Philips product complies with all applicable standards and
regulations regarding exposure to electromagnetic fields.
-
The frequency band in which the appliance
operates is 2.4 GHz.
-
This appliance is equipped with Bluetooth
class 2.
-
The maximum radio frequency power radiated
in the frequency band in which the appliance
operates is less than 20 dBm
-
This device complies with the FCC RF exposure
limits and has been evaluated in compliance
with portable exposure condition.
Changes or modifications not expressly approved
by Philips could void the users' authority to
operate the equipment.
This device complies with Part 15 of the FCC
Rules. Operation is subject to the following two
conditions: (1) this device may not cause harmful

11
English
interference, and (2) this device must accept any
interference received, including interference that
may cause undesired operation.
This equipment has been tested and found to
comply with the limits for a Class B digital device,
pursuant to Part 15 of the FCC Rules. These limits
are designed to provide reasonable protection
against harmful interference in a residential
installation. This equipment generates, uses and
can radiate radio frequency energy and, if not
installed and used in accordance with the
instructions, may cause harmful interference to
radio communications. However, there is no
guarantee that interference will not occur in a
particular installation. If this equipment does
cause harmful interference to radio or television
reception, which can be determined by turning
the equipment off and on, the user is encouraged
to try to correct the interference by one or more
of the following measures:
-
Reorient or relocate the receiving antenna.
-
Increase the separation between the
equipment and receiver.
-
Connect the equipment into an outlet on a
circuit different from that to which the
receiver is connected.
-
Consult the dealer or an experienced radio/TV
technician for help.
-
There is no limitation as to which distance can
be used from the human body.
SAVE THESE INSTRUCTIONS

12
English
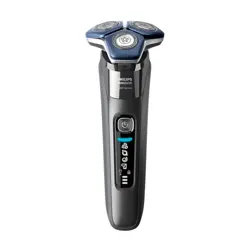
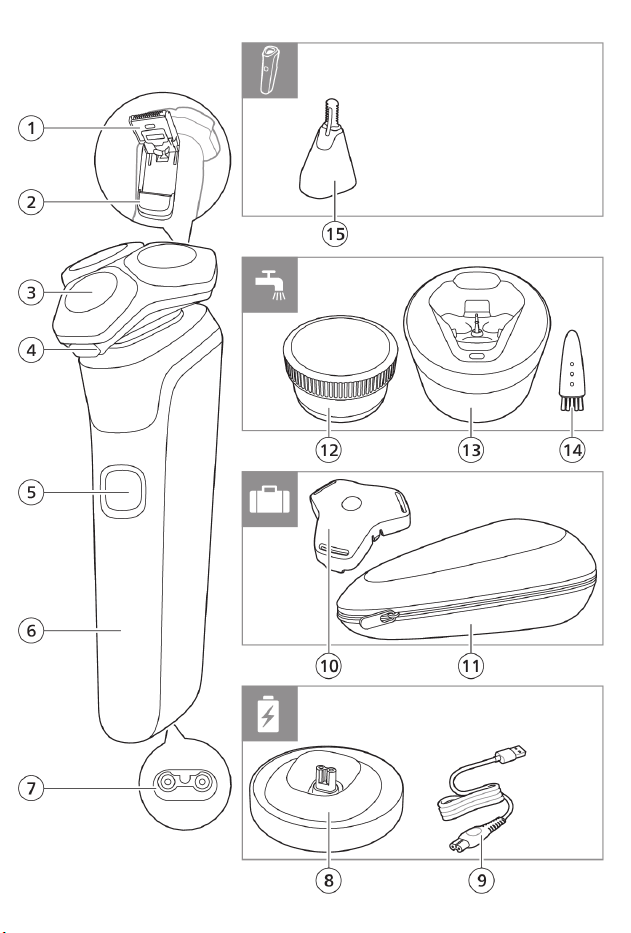
General description
1 Pop-up trimmer
2 Trimmer release slide
3 Shaving unit
4 Shaving unit release button
5 On/off button
6 Handle
7 Socket for small plug
8 Charging stand (S7885, S7887/92, S7889/91
only)
9 USB cable
Note: A suitable supply unit (e.g. Philips HQ87)
is available via www.philips.com/support.
10 Protection cap (S7887/82)
11 Travel case (S7885, S7886, S7887/92,
S7889/91 only)
12 Quick Clean Pod cartridge (S7885, S7886 only)
13 Quick Clean Pod (S7885, S7886 only)
14 Cleaning brush
15 Nose and ear hair trimmer
13
English
Introduction
Congratulations on your purchase and welcome
to Philips! To fully benefit from the support that
Philips offers, register your product at
www.philips.com/welcome or via the app.
What do the icons on my product handle
mean?
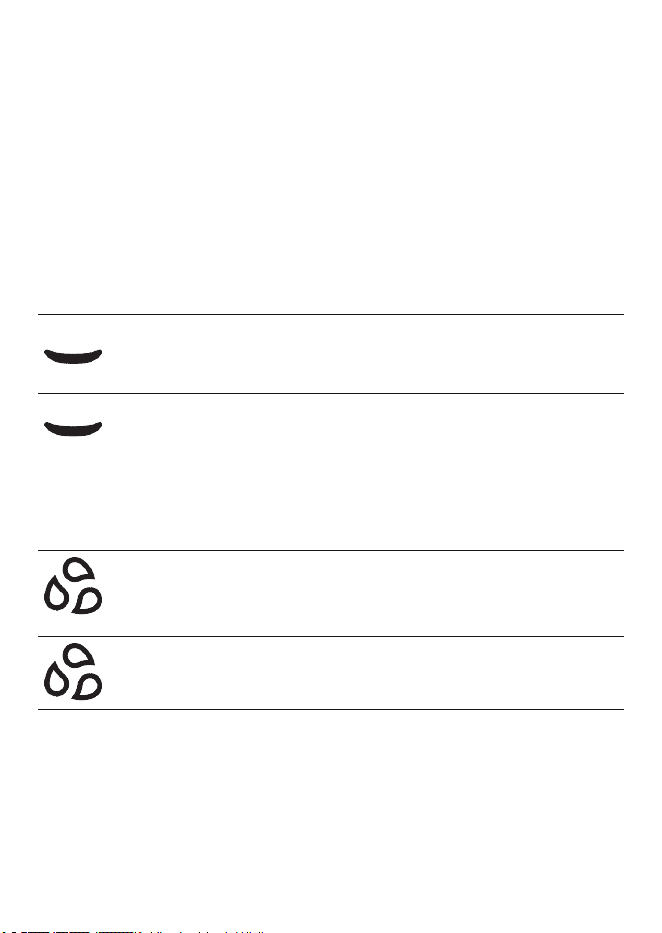
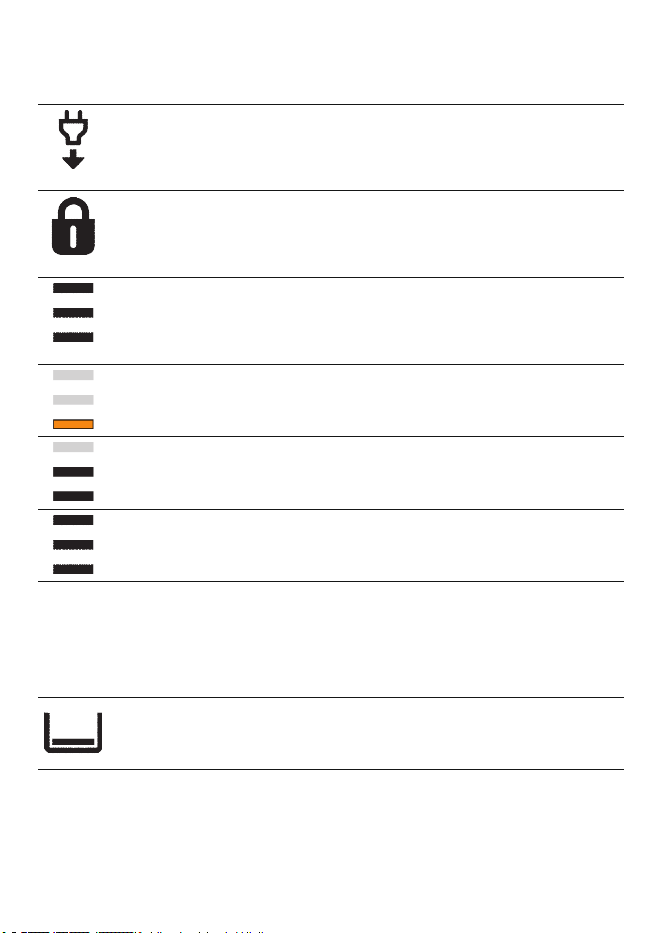
Icon Behavior Meaning
Pulsing The cleaning program is in progress.
Flashing slowly
when you remove
the shaver from
the Quick Clean
Pod during the
cleaning program
The cleaning program was
interrupted. If you put the shaver
back into the Quick Clean Pod within
four seconds, the cleaning program
resumes automatically.
Flashing when you
switch off the
product
Clean the shaver in the Quick Clean
Pod.
Lights up
continuously
The cleaning program is in progress.
14
English
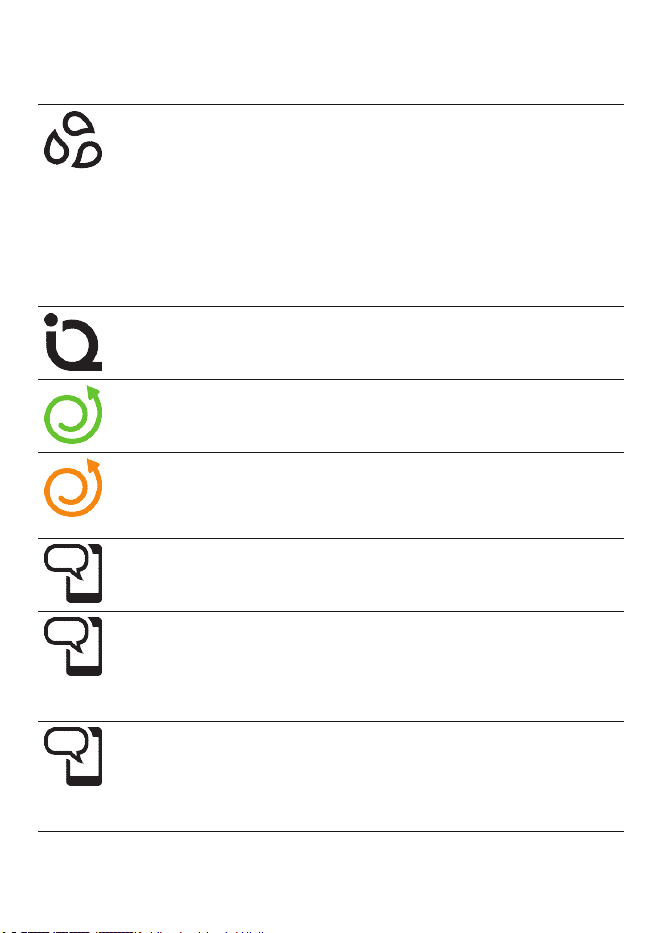
Icon Behavior Meaning
Flashing quickly
when you remove
the shaver from
the Quick Clean
Pod or press the
on/off button
during the
cleaning program
The cleaning program was stopped.
If you wish to continue, you need to
restart the cleaning cycle by putting
the shaver into the Quick Clean Pod
and pressing the on/off button.
Lights up The SenseIQ technology is actively
detecting your shaving behavior.
Lights up green The correct shaving motion (circular
movements) was used.
Lights up orange Your shaving motion can be
improved. See the app for details
and advice.
Lights up Synchronize your shaver with the
app to prevent data loss.
Flashing slowly No connection is established
between your shaver and
smartphone (see 'How do I connect
my shaver and smartphone?').
Flashing quickly The shaving heads need to be
replaced (see 'How do I replace the
shaving heads?'). Check the app for
further instructions.
15
English
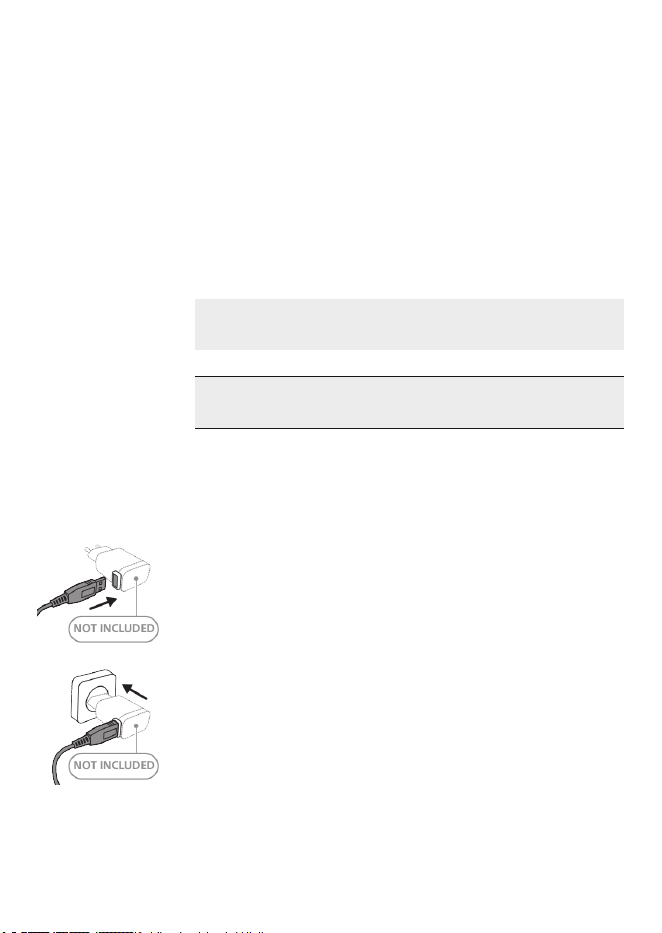
Icon Behavior Meaning
Flashing The product must be disconnected
from the power outlet before you
can switch it on.
Flashing when you
press the on/off
button
The travel lock is activated (see
'Storage and travel').
Lights up when
you pick up the
product
The number of bars lit up show the
remaining battery charge.
Bottom light
flashing orange
The battery is almost empty (see
'How do I charge my product?').
Lights flashing in
sequence
The product is charging.
Lights up
continuously
The product is fully charged.
What does the icon on my Quick Clean Pod
mean?
Icon Behavior Meaning
Becomes visible on the
Quick Clean Pod
The Quick Clean Pod Cartridge
needs to be replaced.
How do I charge my product?
Charge the product before you use it for the first
time and when the bottom light of the battery
16
English
status indicator flashes orange, indicating that
the battery is almost empty.
Charging takes approx. 1 hour.
Quick charge: After approx. 5 minutes of
charging, the battery contains enough energy for
one full shave.
When the product is fully charged it has a
cordless operating time of up to 60 minutes.
Note: You cannot use the product while it is
charging.
Danger: Keep the USB cable and the USB
power source dry.
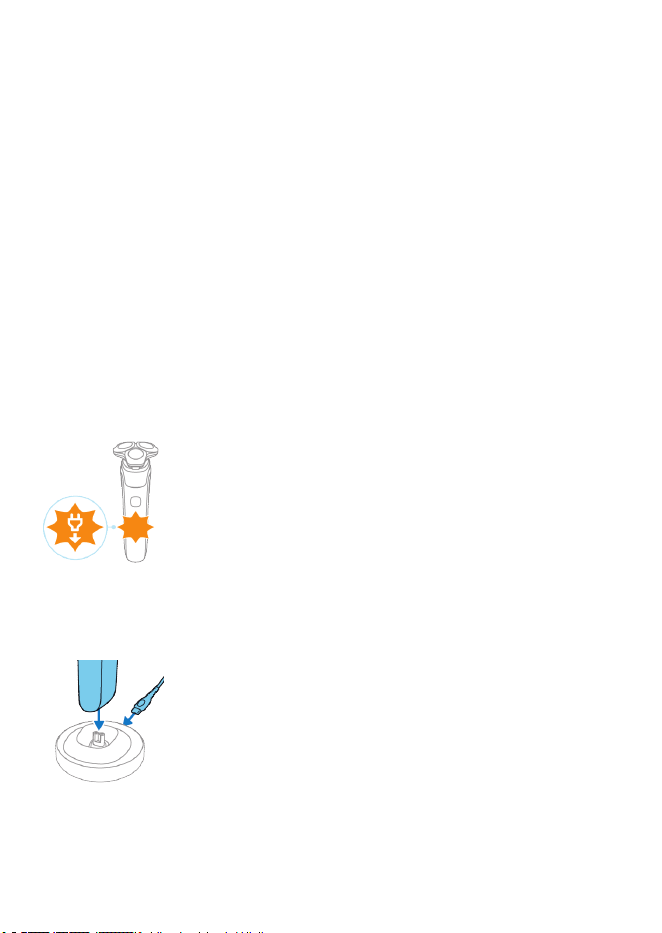
1 Make sure that the product is switched off.
2 Insert the small plug of the USB cable into the
socket in the bottom of the product.
3 Insert the USB plug into the USB power source
(not included).
4 Insert the USB power source into the power
outlet.
-
While the product is in quick charge mode,
the lights of the battery status indicator
light up one after the other. After
approximately 5 minutes, the bottom light
of the battery status indicator flashes. The
battery now contains enough energy for
one full shave.
17
English
-
While the product charges, first the bottom
light of the battery status indicator flashes
and then lights up continuously. Next the
second light flashes and then lights up
continuously, and so on until the product is
fully charged.
-
When the product is fully charged, all three
battery status indicator lights light up
continuously. After approx. 30 minutes, the
light goes out automatically.
5 After charging, remove the USB power source
from the power outlet and pull the small plug
out of the product.
'Unplug for use' symbol
The 'unplug for use' symbol flashes to remind you
to disconnect the USB power source from the
power outlet and remove the small plug from the
product before you switch it on.
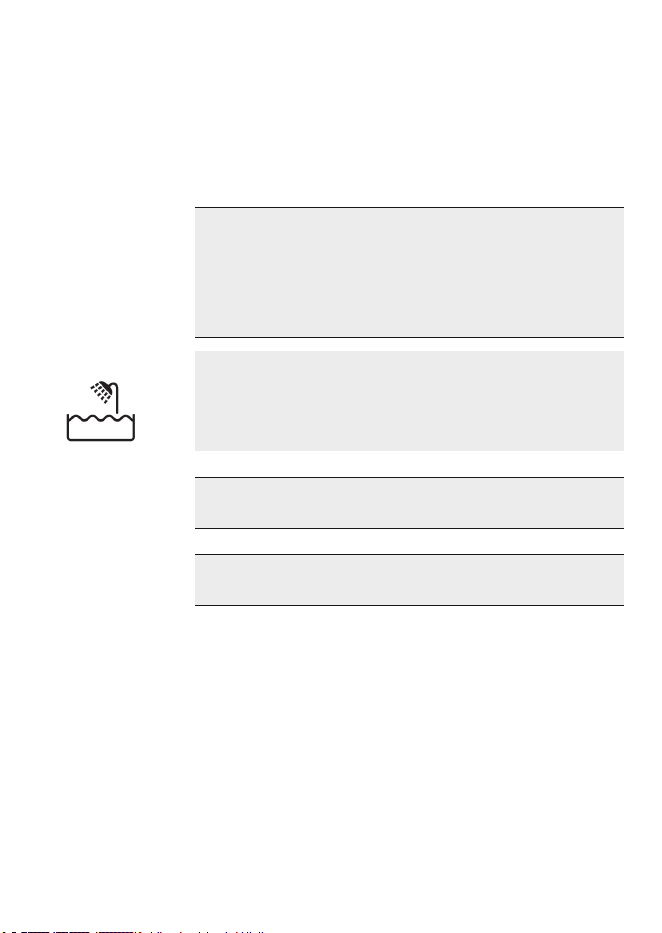
Charging in the charging stand (S7885, S7887/92,
S7889/91 only)
1 Make sure that the product is switched off.
2 Put the small plug of the USB cable in the
charging stand.
3 Insert the USB plug into the USB power source
(not included).
4 Insert the USB power source into the power
outlet.
5 Put the product in the charging stand.
18
English
6 After charging, remove the USB power source
from the power outlet and pull the small plug
out of the product.
How do I use my product?
Always check the product and all accessories
before use. Do not use the product or any
accessory if it is damaged, as this may cause
injury. Always replace a damaged part with
one of the original type.
Note: This product is waterproof. It is suitable for
use in the bath or shower and for cleaning under
the tap with water. For safety reasons, this
product can only be used without cord.
Use this product for its intended household
use as described in this manual.
For hygienic reasons, the product should only
be used by one person.
SenseIQ technology
This product is equipped with SenseIQ
technology which intelligently detects your beard
density and shaving technique. For a better
technique, you can get personalized shaving
advice in the app.
You get advice in 2 ways: guided shaves in real
time and synchronized shaves. We advise you to
start with the guided shave to enhance your
shaving experience.
19
English
-
Correct handling of your product will
contribute to the best shaving results.
-
Follow the advice obtained from the
synchronized shaves and the personalized
programs.
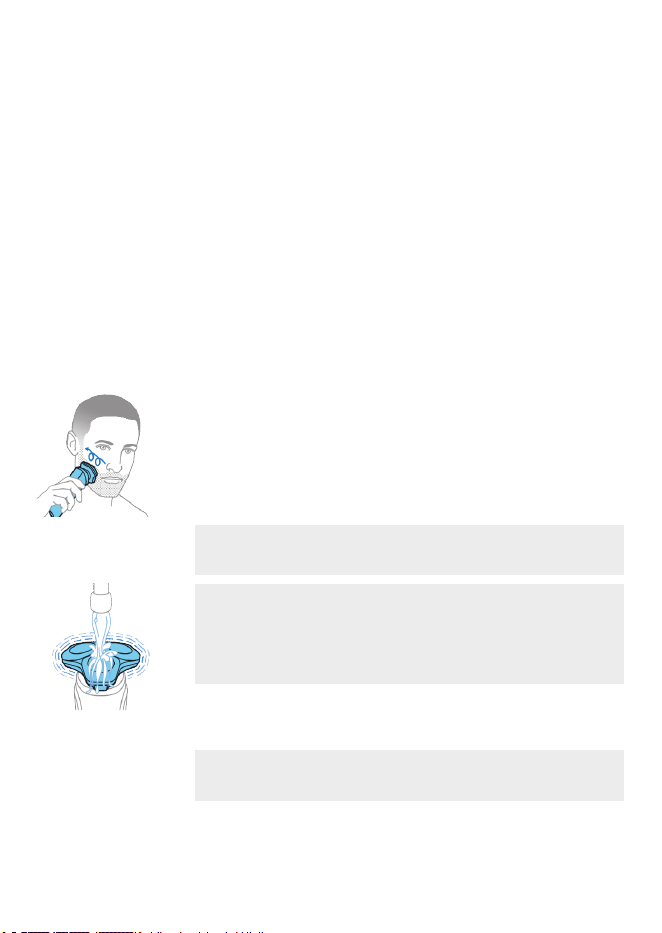
Shaving
You can use this product either wet or dry, or
even in the shower. For a wet shave, apply some
water and shaving foam or gel to your skin and
rinse the shaving heads under the tap with warm
water before following the steps below.
1 Switch on the product.
2 Move the shaving heads over your skin in
circular movements to catch all hairs growing
in different directions. Make sure each shaving
head is fully in contact with the skin. Exert
gentle pressure for a close, comfortable shave.
Note: Do not press too hard, as this can cause
skin irritation.
Note: If you are shaving with gel or foam, rinse
the shaving unit regularly during your shave to
ensure that it continues to glide smoothly over
your skin.
3 Switch off and clean the product after each
use.
Note: Make sure you rinse all foam or shaving
gel off the product.
20
English
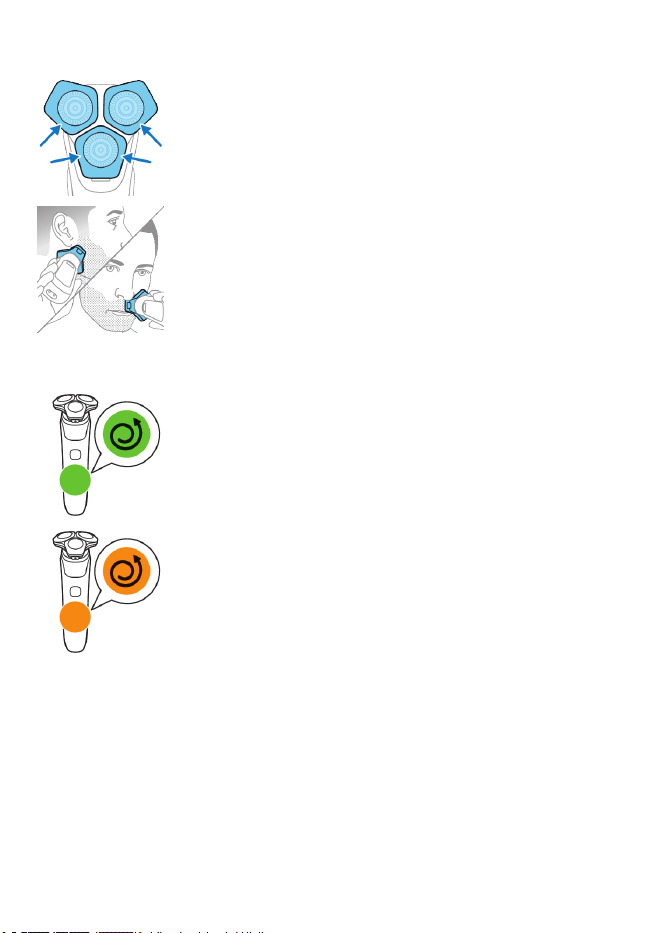
4 Use the narrow sides of the shaving unit to
shave in hard-to-reach areas such as along
your jawline and under your nose.
SenseIQ: When you have finished shaving you
receive feedback on the handle. The Motion
Control sensor icon lights up in various colors,
giving you feedback on your overall shave.
-
When you shave in the correct motion
(circular movements), the Motion Control
sensor icon lights up green.
-
When your shaving motion can be
improved, the Motion Control sensor icon
lights up orange. See the app for details
and advice.
21-Day adaptation process
-
21 Day Trial and Conversion Process. It is a fact
that your skin and beard need time to adjust
to a new grooming system.
-
Use your new shaver exclusively for 3 weeks to
fully enjoy the closeness of a Philips Norelco
shave.
21
English
-
At first you may not get as close a shave as you
expect, or your face may even become slightly
irritated. This is normal since your beard and
skin will need time to adjust. Invest 3 weeks
and you'll soon experience the full joy of your
new shaver.
-
Stick with it! If you alternate shaving methods
during the adjustment period, it may make it
more difficult to adapt to the Philips Norelco
shaving system.
-
If you are still not convinced after 21 days,
Philips Norelco will refund you the full
purchase price as long as the request is
received within 45 days of purchase.
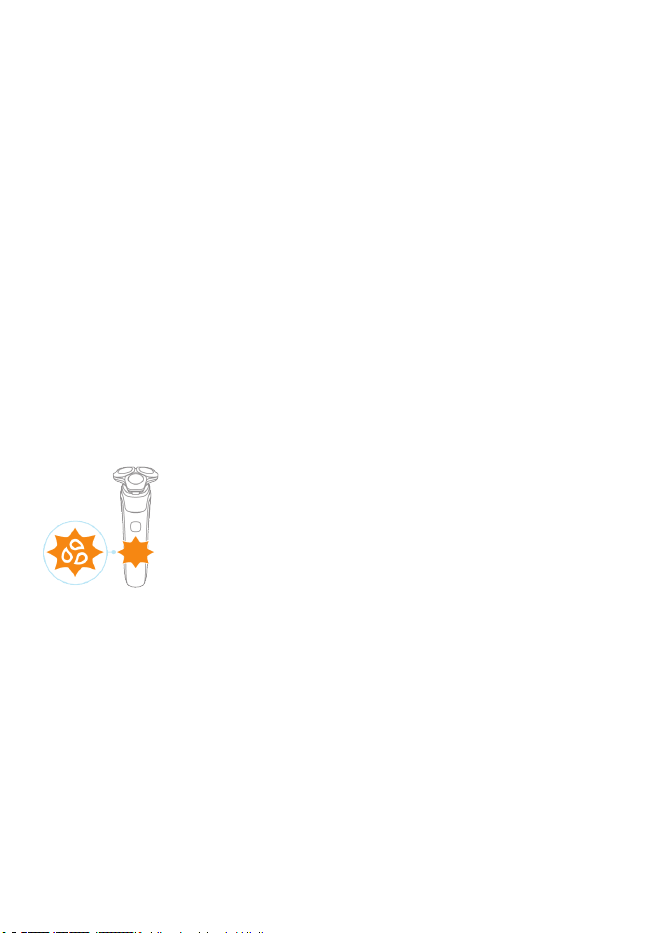
Cleaning reminder
When you switch off the product, the cleaning
reminder flashes to remind you to clean the
product.
-
Clean the product and attachments after each
use (see 'How do I clean my shaver?') to
prevent clogging and damage.
-
Clean the shaving heads thoroughly once a
month or when the product does not shave as
well as it used to.
Synchronize your shaves
This shaver stores your shave data so you don't
need to take your smartphone with you when
you shave.
22
English
When the data storage is almost full, the
notification symbol flashes. To prevent data loss,
synchronize the shaver with the app (see 'How do
I connect my shaver and smartphone?').
1 Make sure you are close to the shaver and
open the app.
2 The app connects automatically and
synchronizes your last shaves.
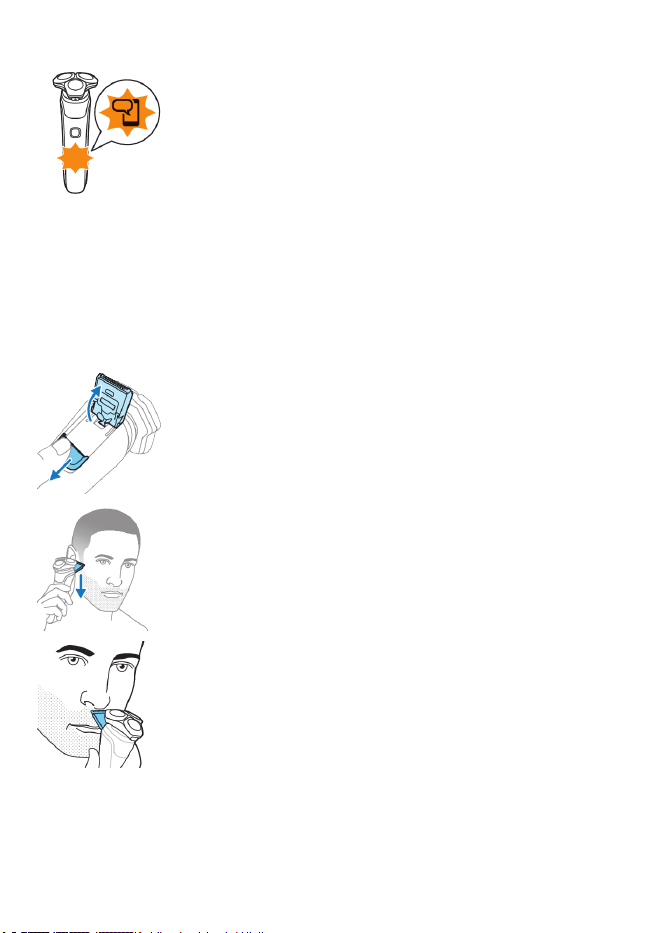
Trimming
You can use the pop-up trimmer to groom your
sideburns and moustache.
1 Push the trimmer release slide downwards to
open the trimmer.
2 Switch on the product.
3 Hold the trimmer perpendicular to the skin
and move it downwards while exerting gentle
pressure.
4 You can also use the trimmer under your nose.
5 Switch off the product and clean the trimmer
after each use to prevent clogging and
damage (see 'How do I clean my shaver?').
6 Close the trimmer.
Using the nose/ear trimmer attachment (S7887/92
only)
You can use the nose/ear trimmer attachment to
trim your nose and/or ear hair.
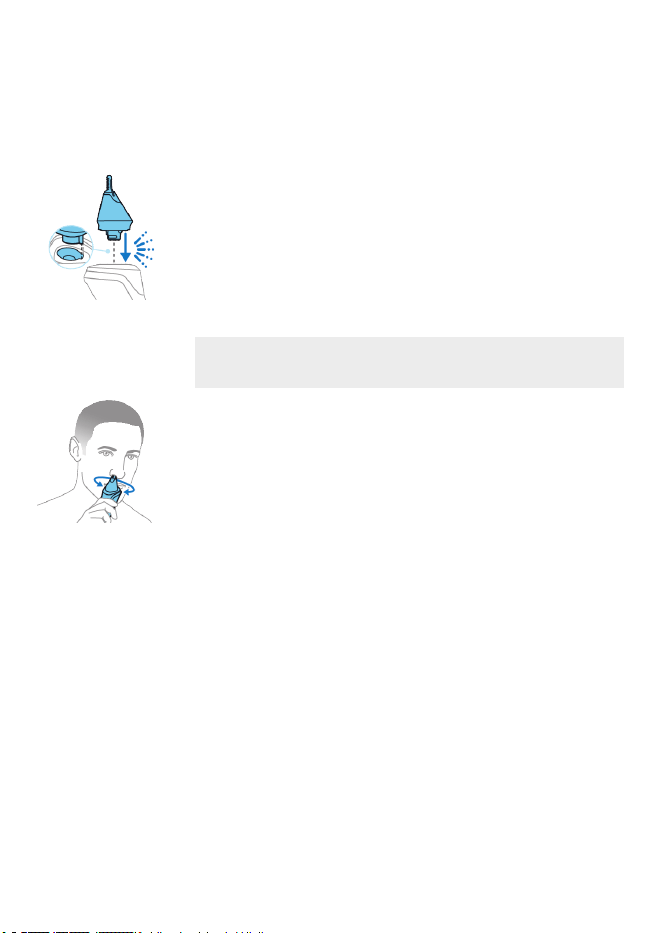
23
English
Trimming nose hair
Make sure both the nose/ear trimmer
attachment and nasal passages are clean before
trimming.
1 Twist the shaving head or other attachment to
remove it from the handle and press the
nose/ear hair trimmer onto the handle.
2 Switch on the appliance.
3 Carefully insert the trimming head into one of
your nostrils.
Do not insert the attachment more than
0.5cm into your nostrils.
4 Slowly move the trimming head around inside
each nostril, making sure the side of the tip is
held firmly against the skin. This reduces the
tickling effect that can occur.
5 Switch off the appliance and clean the
attachment after use.
Dried nasal mucus can block the cutting element,
preventing the appliance from switching on. If
the cutting element is blocked, clean the
attachment (see 'How do I clean my shaver?').
Trimming ear hair
Make sure your outer ear channels are clean and
free from wax.
1 Switch on the appliance.
2 Slowly move the trimming head along the rim
of the ear to remove hairs that stick out
beyond the rim.
3 Carefully insert the trimming head into the
outer ear channel.
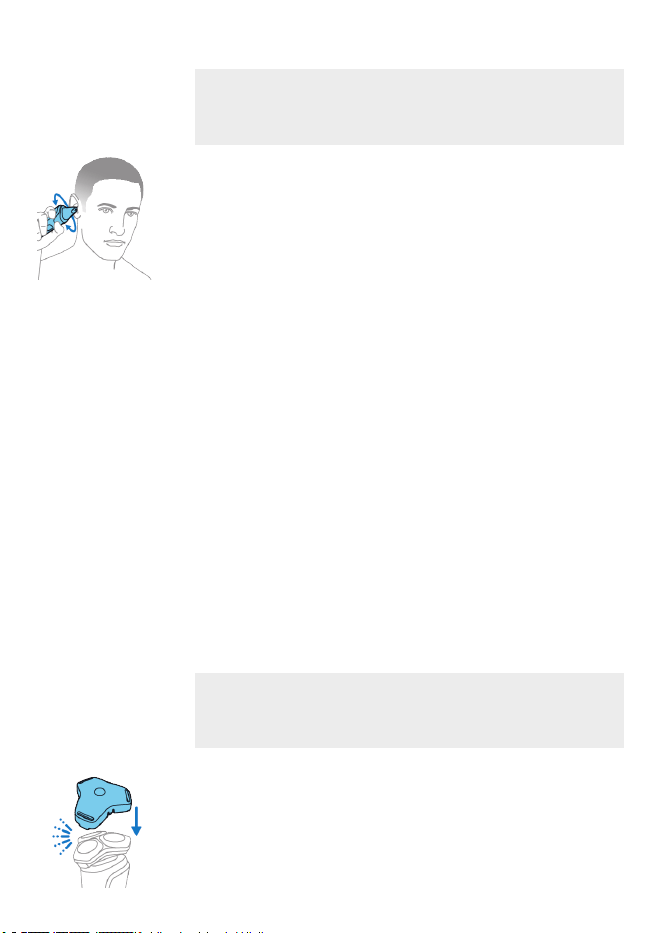
24
English
Do not insert the trimming head more than
0.5cm into your ear channel, as this could
damage the eardrum.
4 Slowly turn the trimming head around to
remove all unwanted hairs from your outer ear
channel.
5 Switch off the appliance and clean the
attachment after use.
Storage and travel
-
Make sure the product is switched off. Remove
the USB power source from the power outlet
and the product before storing the product in
a safe, dry location where it will not be
crushed, banged, or subject to damage.
-
Do not wrap cord around the product when
storing.
-
Store cord and other accessories in a safe
location where these will not be cut or
damaged.
-
Do not place or store the product where it can
fall or be pulled into a tub or sink, water or
other liquid while plugged in.
Note: We advise you to let the product and its
attachments dry completely before you store
them for the next use.
-
Put the protection cap (S7887/82 only) on the
shaver to protect it.
-
Store the product in the pouch (S7885, S7886,
S7887/92, S7889/91 only)
25
English
Alternatively, store the product on the charging
stand (S7885, S7887/92, S7889/91 only).
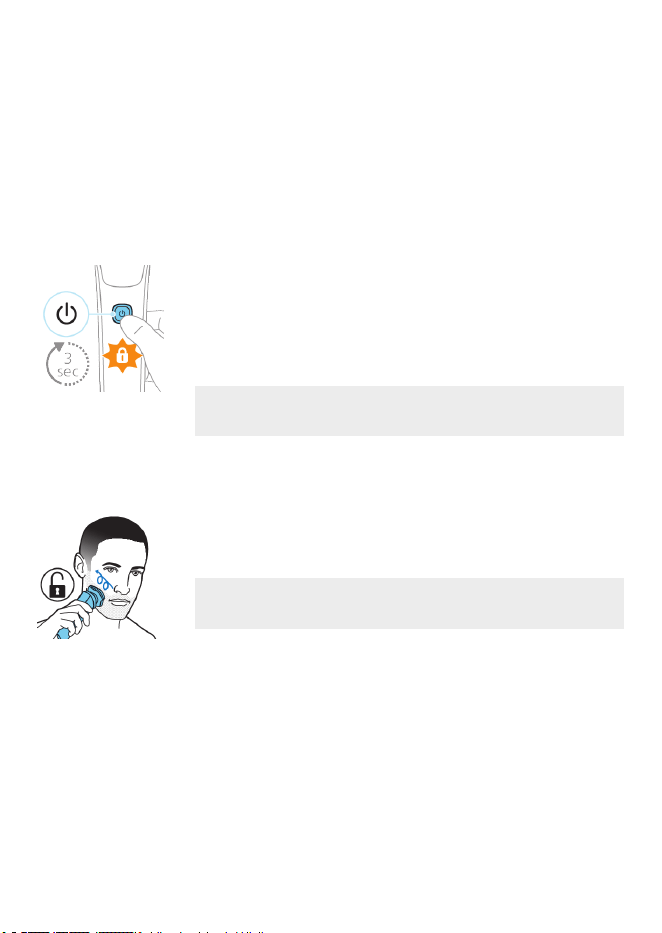
Travel lock
You can lock the shaver when you are going to
travel to prevent it from switching on
accidentally.
Activating the travel lock
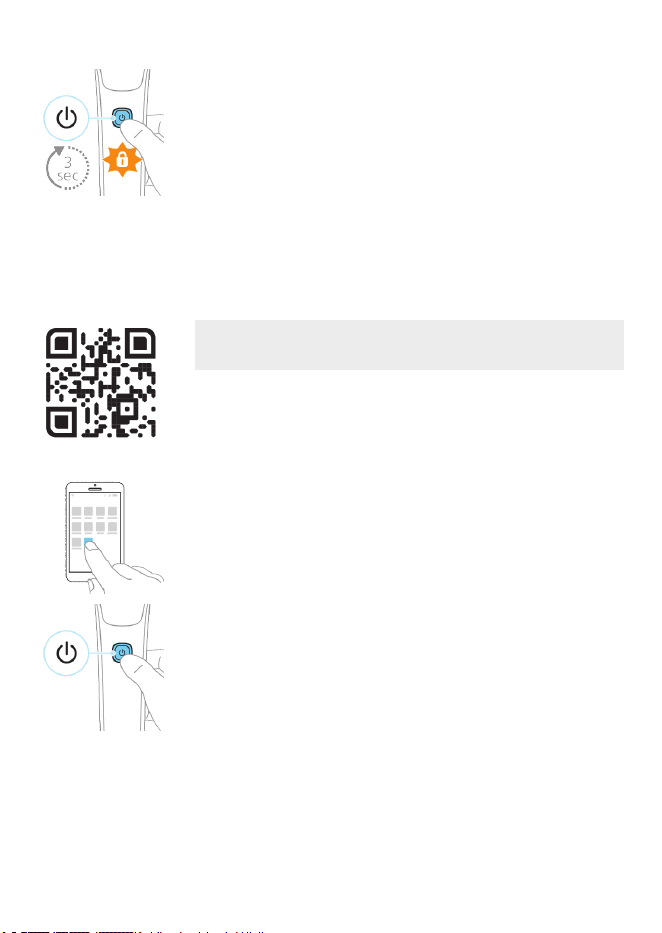
Press the on/off button for 3 seconds to use the
travel lock mode.
When the travel lock has been activated, the
travel lock symbol flashes.
Note: Bluetooth is switched off when the travel
lock is activated.
Deactivating the travel lock
Press the on/off button for 3 seconds.
Once the travel lock is deactivated, the product
switches on automatically.
Note: The product unlocks automatically when
connected to a power outlet.
How do I clean my shaver?
Clean the product and the attachments after
each use for optimal performance.
Cleaning the shaver with water
Clean the shaver after each use to prevent
clogging and damage.
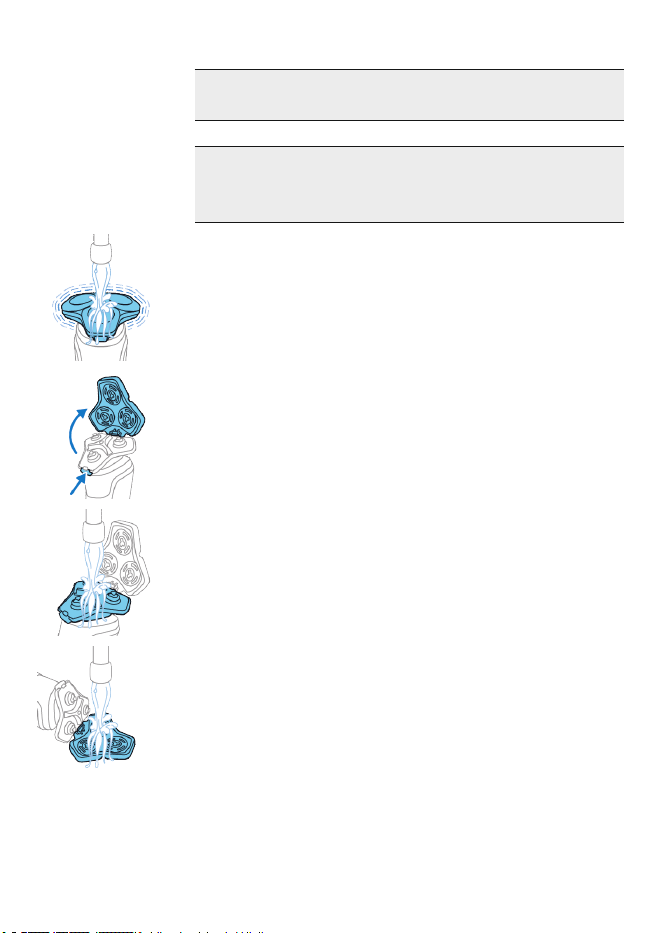
26
English
Never dry the shaving unit with a towel or
tissue, as this may damage the shaving heads.
While rinsing the shaving unit, water may
drip out of the base of the shaver. This is a
normal occurrence.
1 Switch on the shaver.
2 Rinse the shaving unit with warm water.
3 Switch off the shaver. Press the release button
to open the shaving unit.
4 Rinse the hair chamber with warm water.
5 Rinse the shaving head holder warm water.
6 Carefully shake off excess water and let the
shaving head holder air-dry completely.
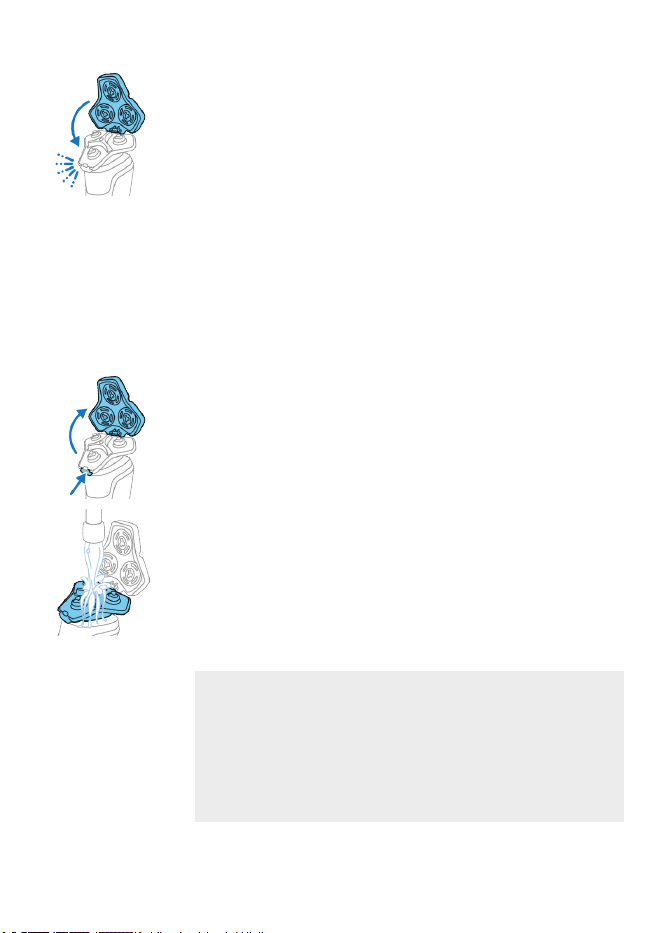
27
English
7 Close the shaving unit.
Thorough cleaning
We advise you to clean the shaving heads
thoroughly once a month or when the shaver
does not shave as well as it used to.
1 Make sure that the appliance is switched off
and disconnected from the wall socket.
2 Press the release button on the shaving unit
and pull the shaving head holder off the
shaving unit.
3 Rinse the hair chamber and shaving head
holder with warm water.
4 Remove the shaving heads (see 'How do I
replace the shaving heads?'). For detailed
instructions, see 'How do I replace the shaving
heads?'.
Note: Do not clean more than one cutter and
guard at a time, since they are all matching
sets. If you accidentally put a cutter in the
wrong shaving guard, it may take several
weeks before optimal shaving performance is
restored.
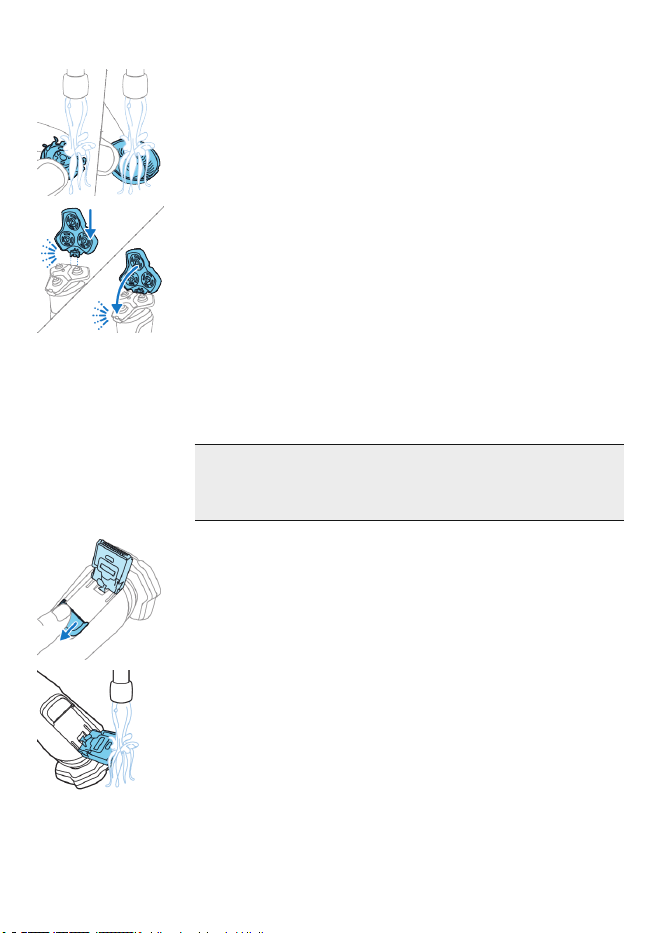
28
English
5 Clean the cutter and guard with warm water.
6 Shake off excess water.
7 Put the shaving heads back into the shaving
unit. For detailed instructions, see 'How do I
replace the shaving heads?'.
8 Insert the hinge of the shaving head holder
into the slot in the top of the shaving unit and
close the shaving unit.
Cleaning the pop-up trimmer
Clean the trimmer after each use to prevent
clogging and damage.
Caution: Never dry the trimmer teeth with a
towel or tissue, as this may damage the
trimmer teeth.
1 Make sure that the appliance is switched off
and disconnected from the wall socket.
2 Push the trimmer release slide down to open
the pop-up trimmer.
3 Switch on the appliance and rinse the pop-up
trimmer with warm water.
4 After cleaning, switch off the appliance.
5 Carefully shake off excess water and let the
pop-up trimmer air dry.
6 Close the trimmer.
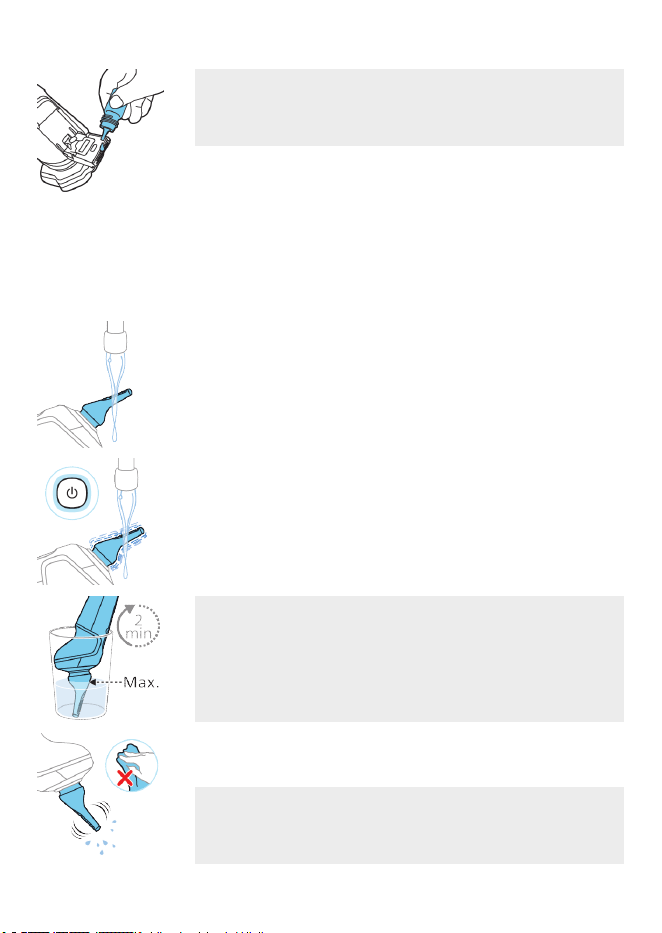
29
English
Tip: For optimal performance, lubricate the teeth
of the pop-up trimmer with a drop of mineral oil
every six months (oil not included).
Cleaning the nose trimmer attachment (S7887/92 only)
Clean the nose trimmer attachment every time
you have used it.
1 Switch off the appliance.
2 Rinse the trimming head of the nose trimmer
with hot water.
3 Switch on the appliance and rinse the
trimming head once more to remove any
remaining hairs. Then switch off the appliance
again.
If rinsing the trimming head under the tap is
not sufficient, immerse the trimming head in a
glass with warm water for a few minutes.
Then switch on the appliance and rinse it
under the tap.
4 Carefully shake off excess water and let the
nose trimmer attachment dry.
Tip: For optimal trimmer performance, lubricate
the trimming head with a drop of sewing
machine oil every six months.
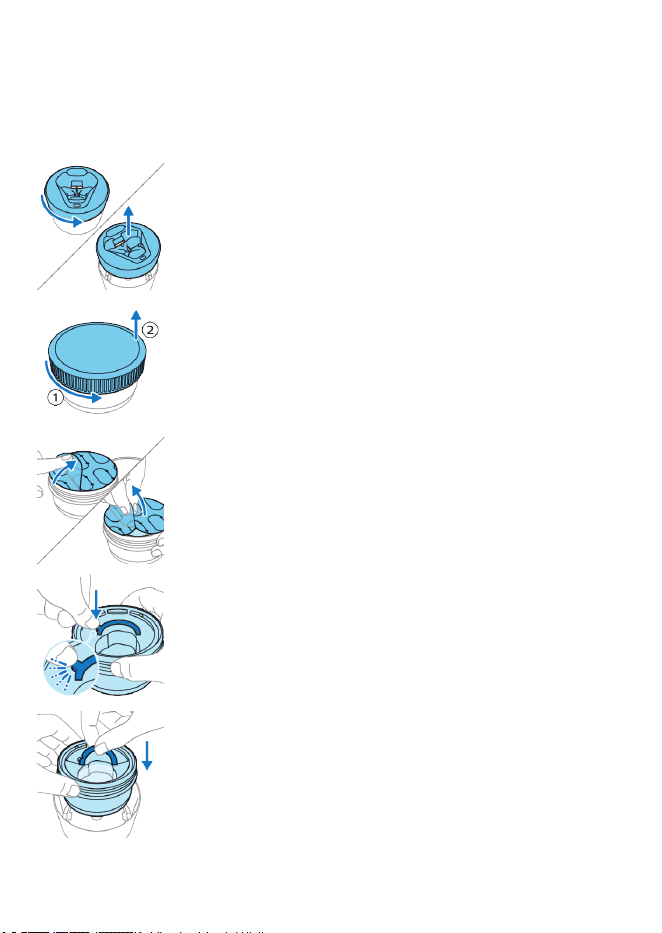
30
English
How do I use the Quick Clean Pod? (S7885
and S7886 only)
Preparing the Quick Clean Pod for use
1 Twist and remove the top of the Quick Clean
Pod.
2 Twist the lid off the Quick Clean Pod Cartridge.
3 Lift the tab on the seal and pull it by the corner
to remove the seal from the Quick Clean Pod
Cartridge.
4 Press the small circular piece on the handle of
the Quick Clean Pod Cartridge to break the
snap hook on the handle.
5 Place the Quick Clean Pod Cartridge into the
Quick Clean Pod.
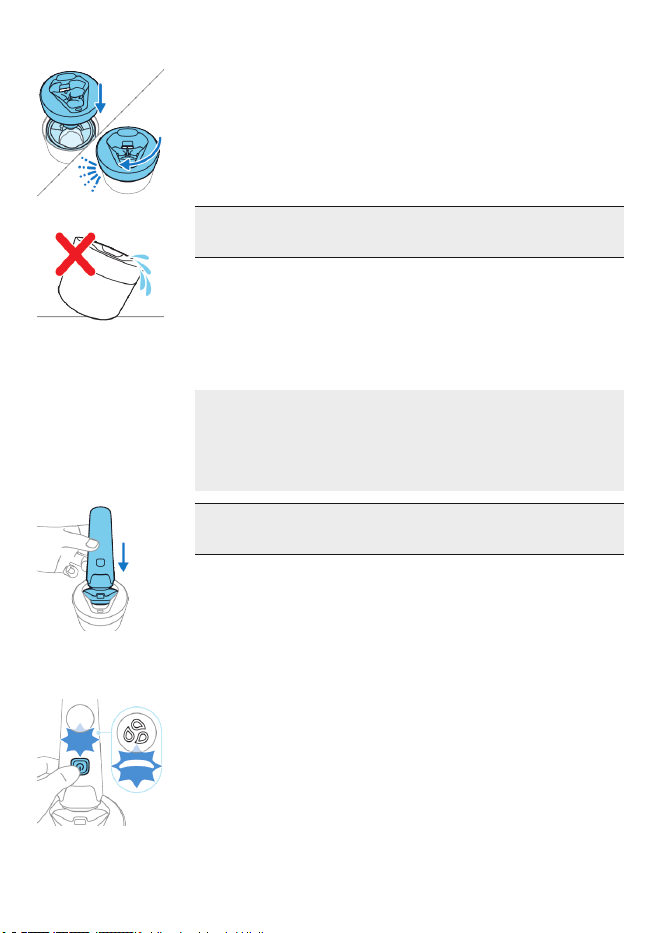
31
English
6 Put the top of the Quick Clean Pod back onto
the base and turn it clockwise until you hear a
click.
Do not tilt the Quick Clean Pod to prevent
leakage.
Using the Quick Clean Pod
Note: If you use the shaver with shaving foam,
shaving gel or pre-shave products, thoroughly
rinse the shaving heads before you use the Quick
Clean Pod (see 'How do I clean my shaver?').
Always shake excess water off the shaver
before you place it in the Quick Clean Pod.
1 Place the shaver upside down into the Quick
Clean Pod. The shaver automatically detects
that it is in the Quick Clean Pod.
2 Switch on the shaver to start the cleaning
program.
Each cleaning program takes approximately
one minute. During the cleaning program the
cleaning symbol lights up continuously and
the blue icon pulses.
The shaver handle vibrates twice quickly when
the cleaning program is finished.
32
English
3 Let the shaver air-dry completely in the Quick
Clean Pod before storing it.
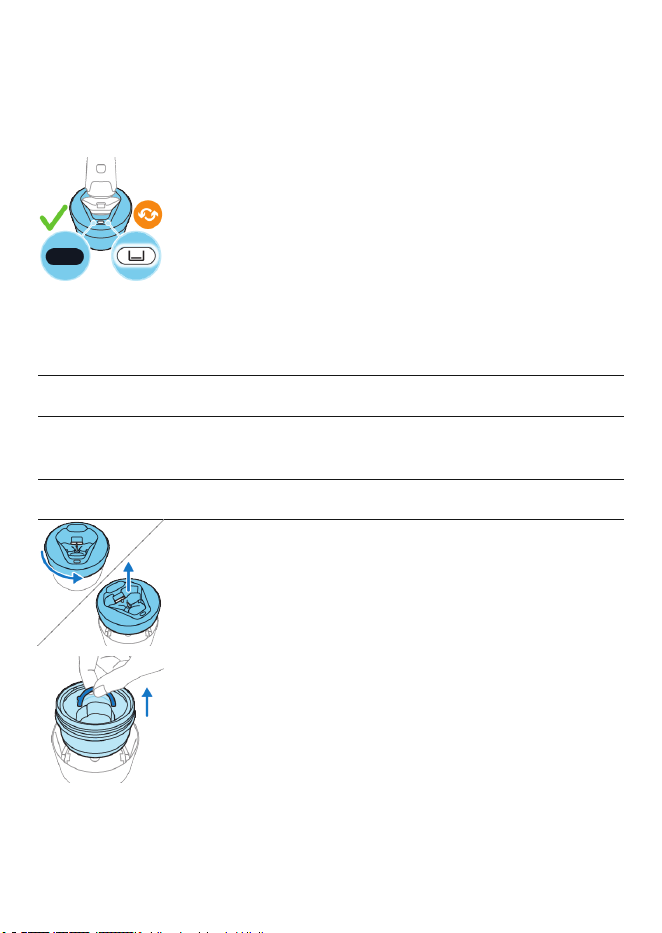
Replacing the Quick Clean Pod Cartridge
Replace the Quick Clean Pod Cartridge
immediately when the cartridge replacement
icon on the Quick Clean Pod becomes visible or
follow the table below.
Frequency of use Cycles When to replace
the Quick Clean
Pod Cartridge
Every day About 30 Every month
A few times per
week
About 20 Every 2 months
Every week About 13 Every 3 months
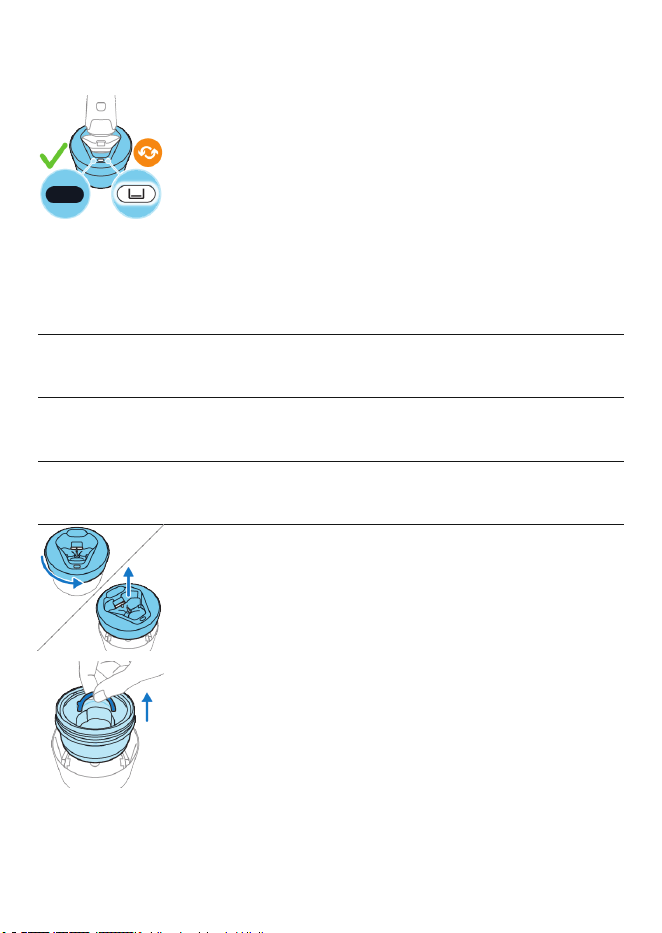
1 Twist and remove the top of the Quick Clean
Pod.
2 Lift the Quick Clean Pod Cartridge out of the
Quick Clean Pod by the handle.
33
English
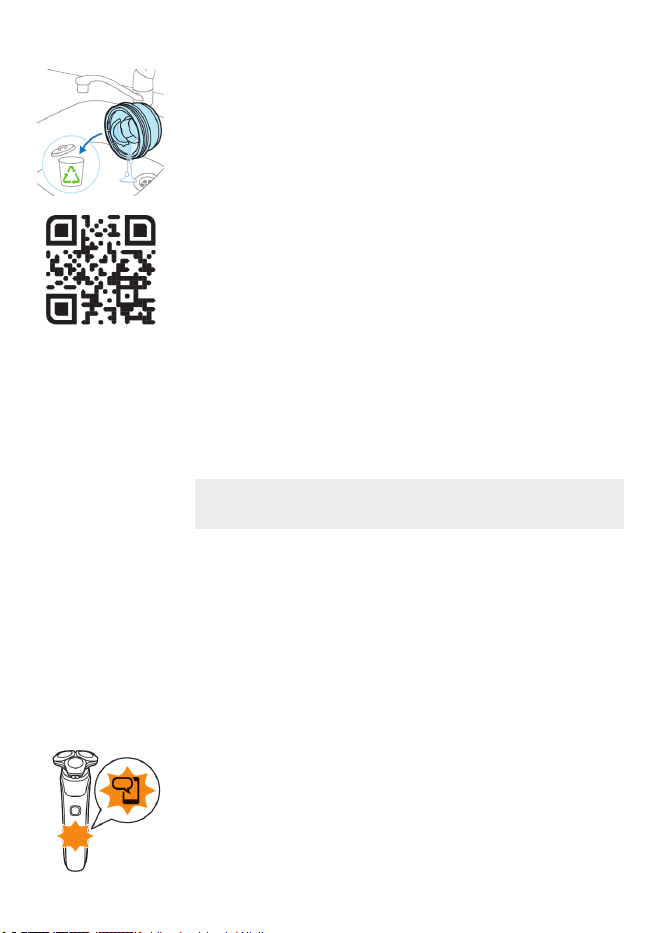
3 Pour any remaining fluid down a drain and
recycle the empty cartridge in accordance with
local waste regulations.
4 Place a new Quick Clean Pod Cartridge into
the Quick Clean Pod (see 'Preparing the Quick
Clean Pod for use').
Scan the QR code to the left or visit
www.philips.com/cleaning-cartridge to
order replacement Quick Clean Pod
Cartridges.
How do I connect my shaver and
smartphone?
Note: Make sure your smartphone is equipped
with Bluetooth® 4.1 or higher.
This shaver is compatible with Bluetooth® 4.1
and higher to connect to the app. When you
have paired your shaver and smartphone,
Bluetooth on your shaver is switched on
automatically, even when the shaver is switched
off. This allows your shave data to be synced later
so you don't need to take your smartphone with
you when you shave.
The first few times you switch on the shaver, the
notification symbol flashes if no connection is
established with a smartphone.
34
English
You can switch off Bluetooth on your shaver by
activating the travel lock (see 'Storage and
travel').
Pair the shaver and smartphone
You can use the app to synchronize your shave
data, change your personal settings and get
routine-based coaching.
The app is compatible with a wide range of
iPhone and Android™ smartphones.
More information is available at
www.philips.com.
1 Download the app.
2 Make sure Bluetooth on your smartphone is
switched on.
3 Switch on the shaver.
4 Open the app and follow the instructions to
start the pairing process.
5 Once paired, the shaver and app connect
automatically when the app is open and
Bluetooth on your phone is switched on.
35
English
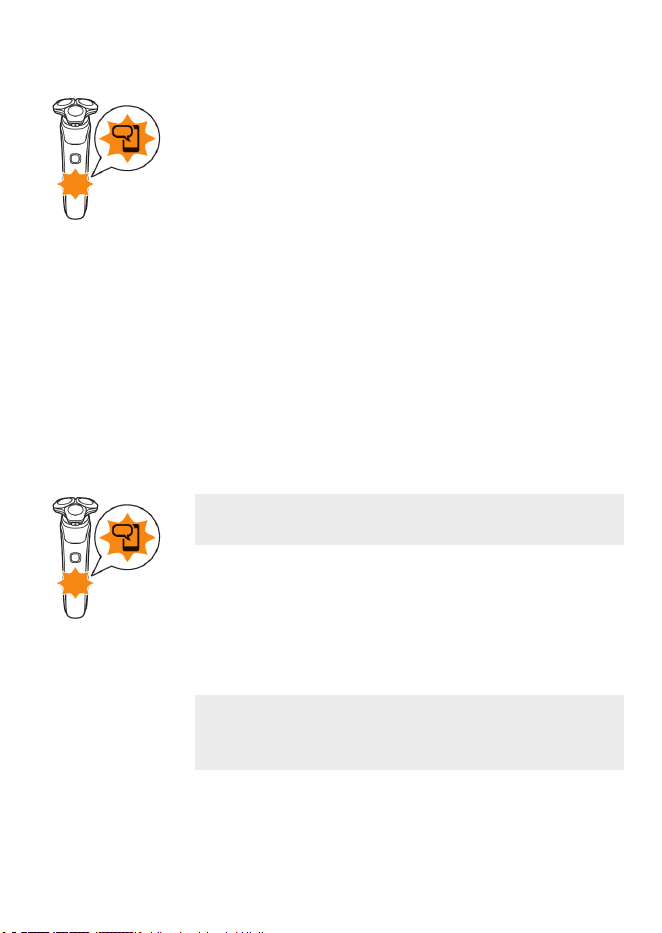
Notification symbol
The shaver is equipped with a notification
symbol. The notification symbol lights up when
there is an important message for you in the app.
When it lights up, simply open the app on your
smartphone and follow the easy tips that the app
gives you. If you need further support, visit
www.philips.com/support.
Unpair the shaver and smartphone
You can pair your shaver with only one
smartphone at a time. To unpair your shaver from
your smartphone (e.g. when you get a new
smartphone), follow these steps:
Unpair the shaver: press and hold the on/off
button on the handle for approx. 10 seconds to
remove the bond between shaver and app.
Note: Unpairing is successful when the
notification symbol lights up 4 times briefly.
Unpair your smartphone:
1 Go to the settings on your smartphone and
select Bluetooth.
2 Tap on the name of the shaver.
3 Tap 'forget' or 'unpair'.
Note: The unpairing procedure may vary by
smartphone. Please check your smartphone
manual for more information.
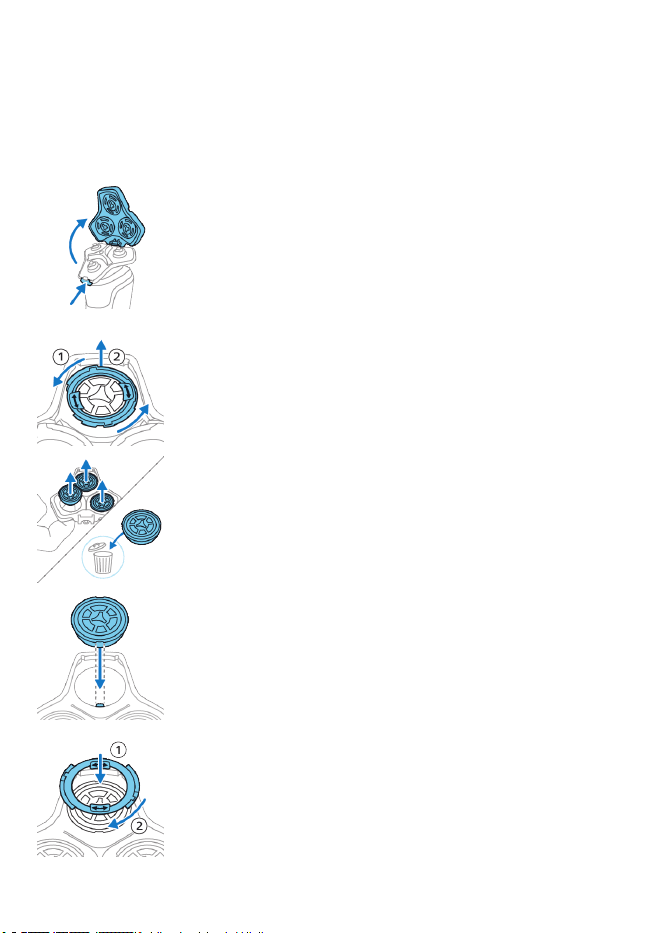
How do I replace the shaving heads?
For maximum shaving performance, we advise
you to replace the shaving heads every two years.
Replace damaged shaving heads immediately.
36
English
Always replace the shaving heads with original
Philips Norelco shaving heads.
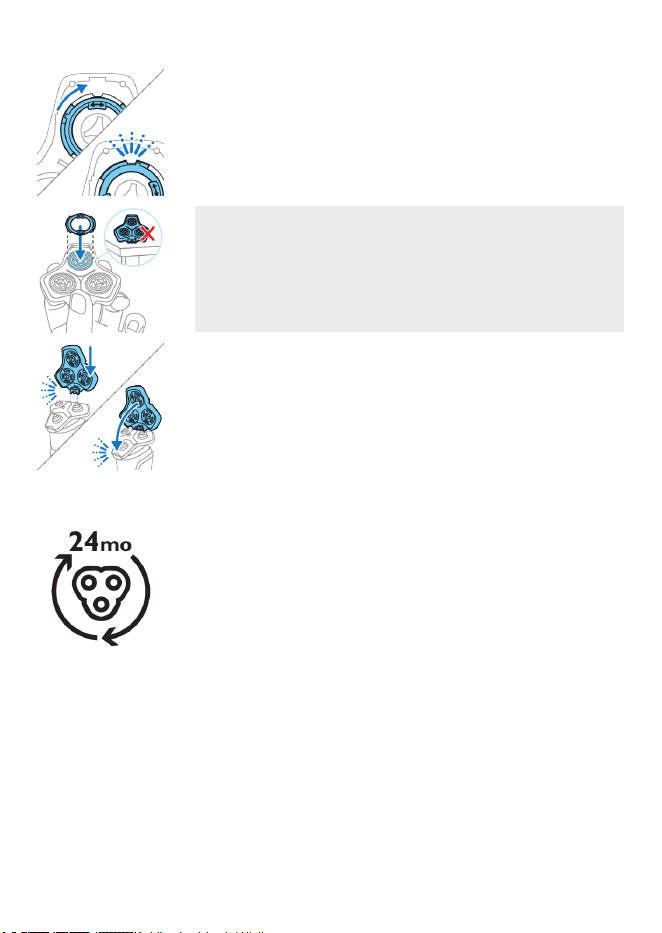
Replacing the shaving heads
1 Switch off the shaver.
2 Press the release button on the shaving unit
and pull the shaving head holder off the
shaving unit.
3 Turn the retaining rings counterclockwise and
remove them. Place them aside in a safe place.
4 Remove the shaving heads from the shaving
head holder.
Discard the used shaving heads immediately
to avoid mixing them with the new shaving
heads.
5 Place new shaving heads in the holder.
6 Place the retaining rings back onto the shaving
heads and turn them clockwise to reattach the
retaining rings.
37
English
-
Each retaining ring has two recesses that fit
exactly into the projections of the shaving
head holder. Turn the ring clockwise until your
hear a click to indicate that the ring is fixed.
Note: Hold the shaving head holder in your
hand when you reinsert the shaving heads and
reattach the retaining rings. Do not place the
shaving head holder on a surface, as this may
cause damage to the shaving heads.
7 Insert the hinge of the shaving head holder
into the slot in the top of the shaving unit and
close the shaving unit.
Accessories
Replacement parts and accessories may be
purchased at a store near you or on our website
www.philips.com/store.
The following accessories and spare parts are
available:
-
SH71 Philips Norelco replacement shaving
heads
-
CC12 Philips Norelco Quick Clean Pod
Cartridge 2-pack
Assistance
For assistance, visit our website:
www.philips.com/support or call toll free
1-800-243-3050.

38
English
Disposal
-
This product contains a rechargeable lithium-
ion battery which must be disposed of
properly.
-
Contact your local town or city officials for
battery disposal information. You can also call
1-800-822-8837 or visit
www.call2recycle.org for battery drop-off
locations.
-
For assistance, visit our website
www.philips.com/support or call
1-800-243-3050 toll free.
-
Your product is designed and manufactured
with high quality materials and components,
which can be recycled and reused. For
recycling information, please contact your
local waste management facilities or visit:
www.recycle.philips.com.
Full Two-Year Warranty
Philips warrants its products for a specific period
of time after the first date of purchase. If the
product is purchased in the USA, Philips North
America LLC (USA) or, if the product is purchased
in Canada, Philips Electronics Ltd., warrants this
new product against defects in materials or
workmanship for a period of two years from the
date of purchase (as evidenced by a valid proof of
purchase), and agrees to replace any defective
product without charge. Philips will refund the
purchase price if it is unable to provide
replacement.

39
English
Parts that are subject to normal wear and tear,
accessories, replacement batteries and
consumables such as toothbrush heads, are not
covered by the terms of this warranty.
IMPORTANT: This warranty does not cover
damage resulting from accident, misuse or abuse,
lack of reasonable care, the affixing of any
attachment not provided with the product or loss
of parts or subjecting the product to any but the
specified voltage.*
NO RESPONSIBILITY IS ASSUMED FOR ANY
SPECIAL, INCIDENTAL OR CONSEQUENTIAL
DAMAGES.
For more information and in order to obtain
warranty service, simply go to
www.philips.com/support.
NOTE: This warranty gives you specific legal
rights, and you may also have other rights which
vary from state to state, province to province or
country to country. Some states do not allow the
exclusion or limitation of incidental or
consequential damages, so the above exclusion
and limitations may not apply to you. This
warranty is transferable.
*Read enclosed instructions carefully.
THE WARRANTY DOES NOT COVER THE
FOLLOWING:

40
English
-
Indirect or consequential damages, such as
loss of time, loss of data, or loss of income.
Some states do not allow the exclusion or
limitation of incidental or consequential
damages, so the above limitation may not
apply to you.
-
Compensation for activities done by yourself,
such as regular maintenance, installing
firmware updates, or saving data.
THE WARRANTY DOES NOT APPLY:
-
If the proof of purchase, model number, serial
number, or production date code on the
product has been made illegible.
-
If the product was purchased as faulty stock.
-
If the defect is the result of abuse or excessive
use outside the intended purpose.
-
If the defect is caused by environmental
conditions, connecting peripherals, additional
equipment, or accessories (including software)
that are not in accordance with the user
manual.
-
If the unit has been damaged, including but
not limited to damage by animals, lightning,
abnormal voltage, fire, natural disaster,
transportation, or water (unless the user
manual expressly states that the product may
be rinsed).
-
For non-electrical parts, normal wear and tear,
accessories, replacement batteries or
replacement of consumable parts such as
toothbrush heads.

41
English
-
If the product does not function properly
because it was not originally designed for use
in the country where the product is used,
which may occur if you import the product.
-
If the product does not function properly due
to problems with connection with service
providers, such as for the internet.
45-DAY MONEY-BACK GUARANTEE
To enjoy the closest and most comfortable shave
from your new Philips Norelco Men’s Shaver, the
shaver should be used exclusively for 3 weeks.
This allows your hair and skin enough time to
adapt to the Philips Norelco Shaving System. If,
after that period of time, you are not fully
satisfied with your Philips Norelco Men’s Shaver,
send the product back along with dated sales
receipt and we’ll refund you the full purchase
price.
The product must be shipped prepaid by
insured mail, insurance prepaid, have the
original sales receipt, indicating purchase
price and date of purchase.
We cannot be responsible for lost mail.
The product must be postmarked no later than
45 days after the date of purchase. Philips
reserves the right to verify the purchase price of
the product and limit refunds not to exceed
suggested retail price.
To obtain money-back guarantee service,
please go to www.PhilipsMoneyBack.com.

42
English
Delivery of refund check will occur 6–8 weeks
after receipt of returned product.
Supplier's Declaration of Conformity
This device complies with part 15 of the FCC
Rules. Operation is subject to the following two
conditions: (1) This device may not cause harmful
interference, and (2) this device must accept any
interference received, including interference that
may cause undesired operation.
We, PHILIPS CONSUMER LIFESTYLE B.V., hereby
declare that the equipment bearing the model
name specified below was tested conforming to
the applicable FCC Rules under the most accurate
measurement standards possible, and that all the
necessary steps have been taken and are in force
to assure that production units of the same
equipment will continue to comply with the
Commissions requirements.
Unique Identifier: PHILIPS, NORELCO S7889,
S7887, S7886, S7885
Responsible Party – U.S. Contact Information
Philips North America LLC
P.O. Box 10313
Stamford | CT 06904
1-800-243-3050
Trademarks
Apple, the Apple logo, iPad, and iPhone are
trademarks of Apple Inc., registered in the U.S.

43
English
and other countries. App Store is a service mark
of Apple Inc.
Android is a trademark of Google Inc. Google
Play and the Google Play logo are trademarks of
Google Inc.
The Bluetooth® word mark and logos are
registered trademarks owned by the Bluetooth
SIG, Inc. and any use of such marks by Koninklijke
Philips N.V. is under license.

Español
44
Español
Contenido
INSTRUCCIONES IMPORTANTES DE SEGURIDAD ___________ 44
Información general ___________________________________ 50
Introducción __________________________________________ 52
¿Qué significan los íconos que están en el mango del
producto?
_ 52
¿Qué significa el ícono que está en mi Quick Clean Pod? ____ 54
¿Cómo se carga el producto?____________________________ 55
¿Cómo se usa el producto?______________________________ 57
¿Cómo se limpia la afeitadora? __________________________ 66
¿Cómo uso el Quick Clean Pod? (S7885 y S7886 solamente) _ 70
¿Cómo conecto la afeitadora con mi smartphone? _________ 74
¿Cómo se reemplazan los cabezales de afeitado? __________ 77
Accesorios ____________________________________________ 79
Asistencia_____________________________________________ 79
Desecho ______________________________________________ 79
Garantía Total de Dos Años _____________________________ 80
GARANTÍA DE DEVOLUCIÓN DE SU DINERO POR 45DÍAS ___ 83
Marcas registradas _____________________________________ 85
INSTRUCCIONES
IMPORTANTES DE
SEGURIDAD
Cuando utilice un producto eléctrico, siempre debe seguir las
precauciones básicas, incluidas las siguientes:
Lea todas las instrucciones antes de usar este producto.
45
Español
PELIGRO
Para reducir el riesgo de descarga eléctrica:
-
Para cargar el producto, use solo una fuente de alimentación
USB en un producto certificado con valores de salida de 5V, ≥
1A. Para la carga segura en ambientes húmedos (por ejemplo,
en un baño), use solo una fuente de alimentación IPX4 (a prueba
de salpicaduras). Una fuente de alimentación adecuada (por
ejemplo, Philips HQ87) se encuentra disponible en
www.philips.com/support. Si necesita asistencia encontrando la
fuente de alimentación USB correcta, comuníquese con
asistencia de Philips al 1-800-243-3050. Usar una fuente de
alimentación USB no certificada podría causar lesiones graves o
peligrosas.
-
Mantenga el cable USB y la fuente de alimentación USB secos.
-
No intente agarrar un producto con cable que haya caído al
agua. Desconéctelo inmediatamente del enchufe de la pared.
-
No coloque ni guarde el producto la base de carga en un lugar
desde donde pueda caerse a una bañera o un lavamanos. No
coloque el producto o la base de carga en agua ni deje que caiga
en agua o cualquier otro líquido.
-
Este producto no funciona mientras está conectado al enchufe
de pared. Excepto cuando se esté cargando, siempre desenchufe
este producto del enchufe de pared.
-
Desconecte la fuente de alimentación USB del tomacorriente y
del producto antes de limpiarlo.

46
Español
ADVERTENCIA
Para reducir el riesgo de quemaduras, incendio, descarga
eléctrica o lesiones:
-
Este producto no está destinado a personas (adultos o niños) con
capacidades física, sensorial o mental disminuidas, o que no
tengan los conocimientos o la experiencia necesarios, a menos
que una persona responsable de su seguridad los supervise o los
instruya sobre el uso del producto. Evite que los niños jueguen
con este producto.
-
Use este producto solo para el uso doméstico previsto como se
describe en este manual. El uso inadecuado puede causar
posibles riesgos o lesiones graves. No use accesorios que no
estén recomendados por la corporación Philips North America
LLC. Los accesorios incluidos pueden variar según el producto.
-
Nunca use este producto si tiene una fuente de alimentación
USB dañada, si no funciona correctamente, después de haberse
caído o dañado o después de que el producto o la fuente de
alimentación USB se hayan caído al agua. Para solicitar asistencia
1-800-243-3050.
-
Mantenga el cable USB y la fuente de alimentación USB lejos de
superficies calientes.
-
No deje caer ni introduzca ningún objeto en ninguna abertura.
-
No utilice la fuente de alimentación USB dentro o cerca de un
tomacorriente que contenga un aromatizador eléctrico para
prevenir daño a la fuente de alimentación USB.
-
No cargue, limpie ni enchufe el producto o la base de carga al
aire libre ni lo use en lugares donde se utilicen aerosoles (sprays)
o se administre oxígeno.

47
Español
-
Siempre revisa los cabezales de afeitado (las protecciones y las
cuchillas) antes de usar la afeitadora. No uses la afeitadora si las
cuchillas o las protecciones están dañadas, ya que podrías
lastimarte.
-
Siempre conecte el cable USB a la fuente de alimentación USB y
al producto o la base de carga primero y luego conecte la fuente
de alimentación USB al tomacorriente. Para desconectar, ponga
todos los controles en la posición 'off'. Luego, retire la fuente de
alimentación USB del tomacorriente.
-
Enchufe la fuente de alimentación USB directamente al
tomacorriente. No use un cable de extensión.
-
Desconecte la fuente de alimentación USB antes de conectar o
desconectar el producto.
-
Tenga cuidado cuando esté usando su smartphone cerca del
agua y en ambientes húmedos.
-
Las ondas de radio de los productos con Bluetooth pueden
afectar el funcionamiento de marcapasos y otros dispositivos
médicos. Consulta a un médico para que te aconseje y mantén el
producto, al menos, a 8 pulgadas (20cm) de distancia.
-
Las baterías que se emplean en este producto pueden
representar un riesgo de incendio o de quemadura química si no
se manipulan correctamente. No desarme, incinere ni permita
que la temperatura de las baterías supere los 100°C (212°F).
-
Use únicamente accesorios o productos consumibles originales
de Philips.
-
Cargue, utilice y guarde el producto a una temperatura entre 50
°F / 10°C y 95 °F / 35°C.
-
Mantenga el producto y las baterías lejos del fuego y no los
exponga a la luz solar directa ni a altas temperaturas.
-
Si el producto se pone anormalmente caliente, despide un olor
extraño, cambia de color o tarda más tiempo de lo normal en
cargarse, deje de usarlo y de cargarlo y comuníquese con Philips.

48
Español
-
No coloque los productos y sus baterías en hornos microondas ni
en ollas de inducción.
-
No abra, modifique, perfore, dañe ni desarme el producto o la
batería, para evitar que las baterías se calienten o liberen
sustancias tóxicas o peligrosas. No provoque un cortocircuito,
sobrecargue ni invierta la posición de las baterías.
-
Si las baterías se dañan o tienen fugas, evite el contacto con la
piel o los ojos. Si esto sucede, enjuague bien inmediatamente
con agua y busque atención médica.
-
Cuando manipule las baterías, asegúrese de que sus manos, el
producto y las baterías estén secas.
-
Para evitar un cortocircuito en las baterías después de la
extracción, no permita que las terminales de las baterías entren
en contacto con objetos metálicos (p. ej., monedas, horquillas,
anillos). No envuelva las baterías en papel de aluminio. Cubra las
terminales de las baterías con cinta o colóquelas en una bolsa de
plástico antes de desecharlas.
Líquido para cartucho del Quick Clean Pod de Philips Norelco
-
Manténgase fuera del alcance de los niños.
-
No se debe tragar.
-
En caso necesario, busque ayuda médica y, si es posible, muestre
el envase o etiquetado del producto.
-
Antes de usar, lea las instrucciones de uso y el etiquetado del
producto.
-
Almacene en un envase cerrado y libre de heladas.
Campos electromagnéticos (CEM)
Este producto Philips cumple con todos los estándares y las
regulaciones aplicables sobre la exposición a campos magnéticos.

49
Español
-
El aparato funciona en la banda de frecuencia
de 2.4 GHz.
-
Este aparato cuenta con Bluetooth clase 2.
-
La potencia máxima de radiofrecuencia
irradiada en la banda de frecuencia en la que
funciona el aparato es inferior a 20 dBm
-
Este dispositivo cumple con los límites de
exposición a la radiación por radiofrecuencia
de las reglas FCC y ha sido evaluado de
acuerdo con la condición de exposición
portátil.
Las modificaciones o los cambios que no hayan
sido aprobados expresamente por Philips podrían
anular la autoridad del usuario para operar el
equipo.
Este dispositivo cumple con la Parte 15 de las
reglas de la FCC. El funcionamiento está sujeto a
las dos condiciones siguientes: (1) es posible que
este dispositivo no cause interferencia perjudicial,
y (2) este dispositivo debe aceptar cualquier
interferencia que reciba, inclusive aquella que
pueda causar un funcionamiento no deseado.
Este equipo ha sido probado y se encontró que
cumple con los límites de un dispositivo digital de
Clase B según la parte 15 de las reglas de la FCC.
Estos límites están diseñados para brindar una
protección razonable en contra de la
interferencia perjudicial en una instalación
doméstica. Este equipo genera, usa y puede
irradiar energía de radiofrecuencia, y si no se
instala y se utiliza de acuerdo con las
instrucciones, puede causar interferencia

50
Español
perjudicial a las comunicaciones por radio. Sin
embargo, no hay garantía de que no ocurrirá
interferencia en una instalación en particular. Si
este equipo causa interferencia perjudicial a la
recepción de radio o televisión, lo cual puede
determinarse encendiendo y apagando el
equipo, se le recomienda al usuario tratar de
corregir la interferencia tomando una o más de
las siguientes medidas:
-
Reorientar o cambiar de lugar la antena
receptora.
-
Aumentar la distancia entre el equipo y el
aparato receptor.
-
Conecte el equipo en un enchufe en un
circuito diferente al que está conectado el
recibidor.
-
Consultar a un distribuidor o a un técnico de
radio/televisión con experiencia para recibir
ayuda.
-
No hay ninguna limitación en cuanto a la
distancia a la que puede utilizarse del cuerpo
humano.
CONSERVE ESTAS
INSTRUCCIONES
Información general
1 Cortadora emergente
2 Botón deslizante de apertura de cortadora
3 Unidad de afeitado
4 Botón de liberación de la unidad de afeitado
5 Botón de encendido/apagado

51
Español
6 Mango
7 Toma para clavija pequeña
8 Base de carga (S7885, S7887/92, S7889/91
solamente)
9 Cable USB
Nota: Una unidad de alimentación adecuada
(por ejemplo, Philips HQ87) se encuentra
disponible en www.philips.com/support.
10 Tapa protectora (S7887/82)
11 Estuche de viaje (S7885, S7886, S7887/92,
S7889/91 solamente)
12 Cartucho del Quick Clean Pod (S7885, S7886
solamente)
13 Quick Clean Pod (S7885, S7886 solamente)
14 Cepillo de limpieza
15 Cortadora de vello de nariz y orejas
52
Español
Introducción
¡Felicidades por su compra y bienvenido a Philips!
Para aprovechar al máximo el soporte que le
ofrece Philips, registre su producto en
www.philips.com/welcome o a través de la
aplicación.
¿Qué significan los íconos que están en el
mango del producto?
Ícono Comportamiento Significado
Pulsaciones El programa de limpieza está en
marcha.
Parpadea lentamente
cuando quita la
afeitadora del Quick
Clean Pod durante el
programa de limpieza
Se interrumpió el programa de
limpieza. Si vuelve a poner la
afeitadora en el Quick Clean Pod
antes de que pasen cuatro
segundos, el programa de
limpieza se reanuda
automáticamente.
Parpadea al apagar el
producto
Limpie la afeitadora en el Quick
Clean Pod.
Está continuamente
iluminada
El programa de limpieza está en
marcha.
53
Español
Ícono Comportamiento Significado
Parpadea
rápidamente cuando
retira la afeitadora del
Quick Clean Pod o
presiona el botón de
encendido/apagado
durante el programa
de limpieza
Se detuvo el programa de
limpieza. Si desea continuar, es
necesario que reinicie el ciclo de
limpieza; para hacerlo, coloque la
afeitadora en el Quick Clean Pod
y presione el botón de
encendido/apagado.
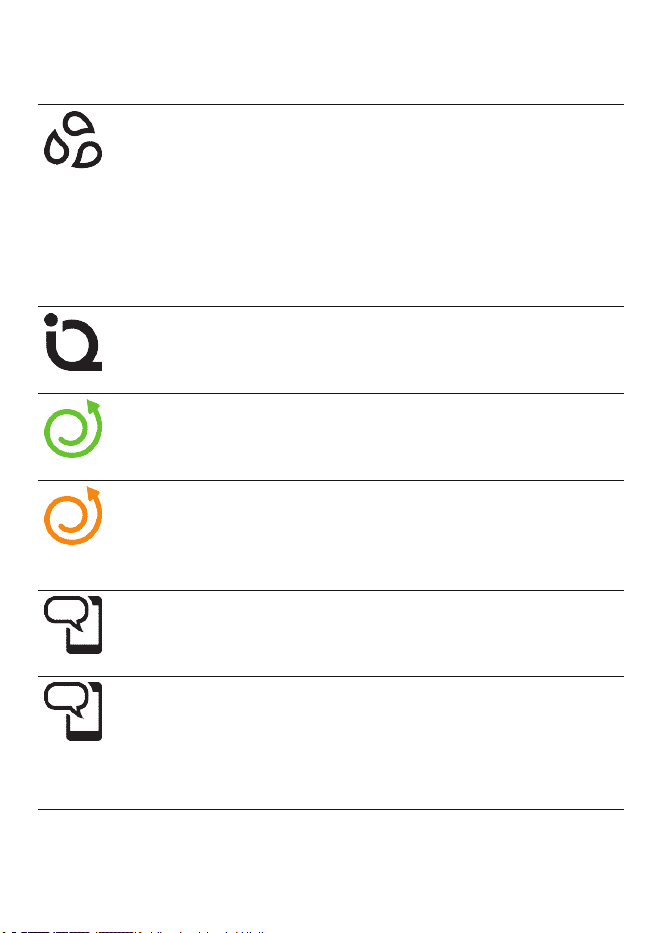
Se ilumina La tecnología SenseIQ está
detectando activamente su
modo de afeitarse.
Se ilumina de color
verde
Se utilizó el movimiento de
afeitado correcto (movimientos
circulares).
Se ilumina de color
naranja
Su movimiento de afeitado
puede mejorarse. Revise la
aplicación para obtener más
detalles y consejos.
Se ilumina Sincroniza la afeitadora con la
aplicación para evitar que se
pierdan datos.
Parpadea lentamente No se estableció una conexión
entre la afeitadora y su
smartphone (ver '¿Cómo conecto
la afeitadora con mi
smartphone?').
54
Español
Ícono Comportamiento Significado
Parpadea
rápidamente
Es necesario reemplazar (ver
'¿Cómo se reemplazan los
cabezales de afeitado?') los
cabezales de afeitado. Consulta
la aplicación para obtener más
instrucciones.
Parpadeante El producto se tiene que
desconectar del tomacorriente
antes de que se pueda encender.
Parpadea al presionar
el botón de
encendido
El bloqueo de viaje está activado
(ver 'Almacenamiento y viaje').
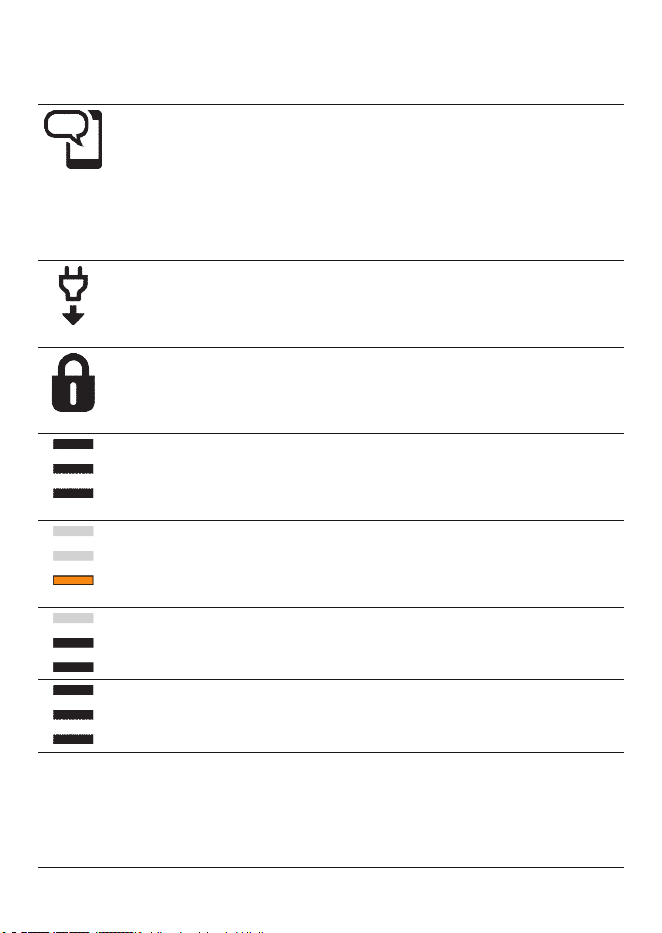
Se ilumina al levantar
el producto
El número de barras iluminadas
muestra la carga que le queda a
la batería.
La luz inferior es de
color naranja y
parpadea
La batería está casi
completamente descargada (ver
'¿Cómo se carga el producto?').
Las luces parpadean
en secuencia
El producto se está cargando.
Está continuamente
iluminada
El producto está completamente
cargado.
¿Qué significa el ícono que está en mi Quick
Clean Pod?
Ícono Comportamiento Significado
55
Español
Se vuelve visible en el
Quick Clean Pod.
Se tiene que reemplazar el
cartucho del Quick Clean Pod.
¿Cómo se carga el producto?
Cargue el producto antes de usarlo por primera
vez y cuando la luz inferior del indicador de
estado de la batería empiece a parpadear de
color naranja, lo que indica que la batería está
casi completamente descargada.
La carga toma, aproximadamente, 1hora.
Carga rápida: Después de cargarla durante
alrededor de cinco minutos, la batería tendrá
suficiente energía para una afeitada completa.
Cuando el producto está totalmente cargado,
posee una autonomía de funcionamiento de
hasta 60minutos sin cable.
Nota: No puede usar el producto mientras se
carga.
Peligro: Mantenga el cable USB y la fuente
de alimentación USB secos.
1 Asegúrese de que el producto esté apagado.
2 Inserte el enchufe pequeño del cable USB en el
puerto que se encuentra en la parte inferior
del producto.
3 Inserte el enchufe USB en la fuente de
alimentación USB (no incluida).

56
Español
4 Inserte la fuente de alimentación USB en el
tomacorriente.
-
Mientras el producto está en modo de
carga rápida, las luces del indicador de
estado de la batería se van iluminando una
tras otra. Después de aproximadamente 5
minutos, empieza a parpadear la luz
inferior del indicador de estado de la
batería. La batería ahora tiene carga
suficiente para una afeitada completa.
-
Mientras se está cargando el producto,
primero parpadea la luz inferior del
indicador de estado de la batería y luego se
queda iluminada constantemente. Después
empieza a parpadear la segunda luz y,
luego, se queda iluminada
constantemente, y así sucesivamente hasta
que el producto se haya cargado
completamente.
-
Cuando el producto se ha cargado
totalmente, las tres luces indicadoras de
estado de la batería se quedan iluminadas
continuamente. Después de
aproximadamente 30 minutos, la luz se
apaga automáticamente.
5 Después de cargarla, retire la fuente de
alimentación USB del tomacorriente y retire la
clavija pequeña del producto.
57
Español
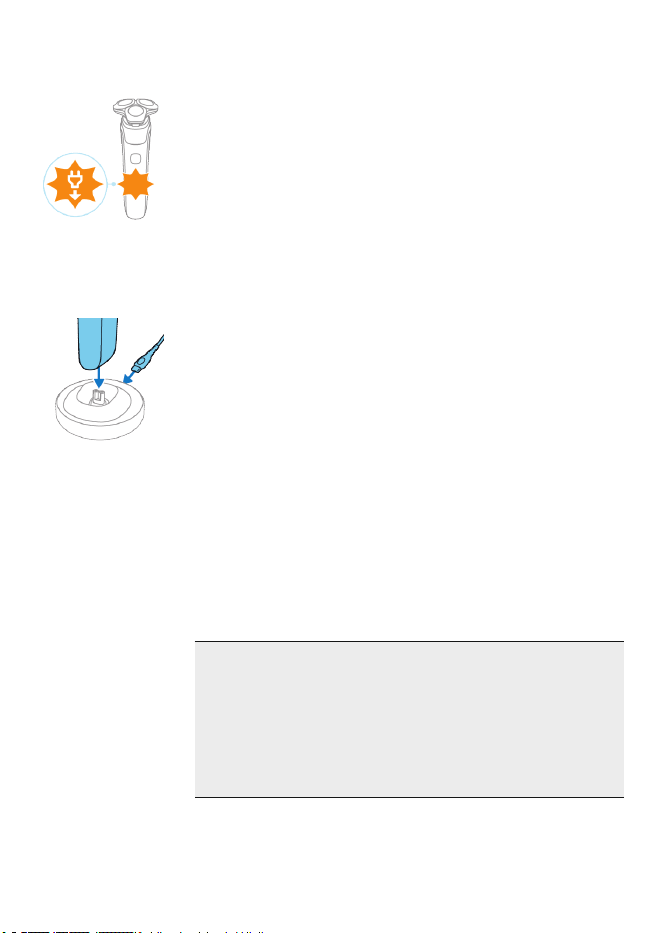
Símbolo de "Desconectar para usar"
El símbolo de "Desconectar para usar" parpadea
para recordarle que debe desconectar la fuente
de alimentación USB del tomacorriente y retirar la
clavija pequeña del producto antes de
encenderlo.
Carga con base carga (S7885, S7887/92, S7889/91
solamente)
1 Asegúrese de que el producto esté apagado.
2 Coloque el enchufe pequeño del cable USB en
la base de carga.
3 Inserte el enchufe USB en la fuente de
alimentación USB (no incluida).
4 Inserte la fuente de alimentación USB en el
tomacorriente.
5 Coloque el producto en la base de carga.
6 Después de cargarla, retire la fuente de
alimentación USB del tomacorriente y retire la
clavija pequeña del producto.
¿Cómo se usa el producto?
Siempre revise el producto y todos los
accesorios antes de usarlos. No use el
producto ni ningún accesorio si están
dañados, ya que esto puede causar alguna
lesión. Siempre reemplace una pieza dañada
con una del tipo original.
58
Español
Nota: Este producto es a prueba de agua. El
producto es adecuado para su uso en el baño o la
regadera y puede limpiarse colocándolo bajo el
agua de la llave. Por razones de seguridad, este
producto solamente se puede usar sin cable.
Use este producto para su uso previsto en el
hogar, según se describe en este manual.
Por motivos de higiene, el producto debe
emplearse únicamente por una persona.
Tecnología SenseIQ
Este producto está equipado con tecnología
SenseIQ que detecta automáticamente la
densidad de su barba y su técnica de afeitado.
Para una mejor técnica, puede obtener consejos
de afeitado personalizados en la aplicación.
Recibirá consejos de 2 formas: afeitadas guiadas
en tiempo real y afeitadas sincronizadas. Le
aconsejamos que empiece con la afeitada guiada
para mejorar su experiencia de afeitado.
-
El manejo correcto de su producto le ayudará
a obtener los mejores resultados en el
afeitado.
-
Siga los consejos que se obtengan de las
afeitadas sincronizadas y los programas
personalizados.
Afeitado
Puede usar este producto en húmedo o en seco,
e incluso en la regadera. Para una afeitada en
húmedo, aplíquese algo de agua y espuma o gel
59
Español
de afeitar en la piel y enjuague los cabezales de
afeitado con agua tibia de la llave antes de seguir
los pasos que se detallan a continuación.
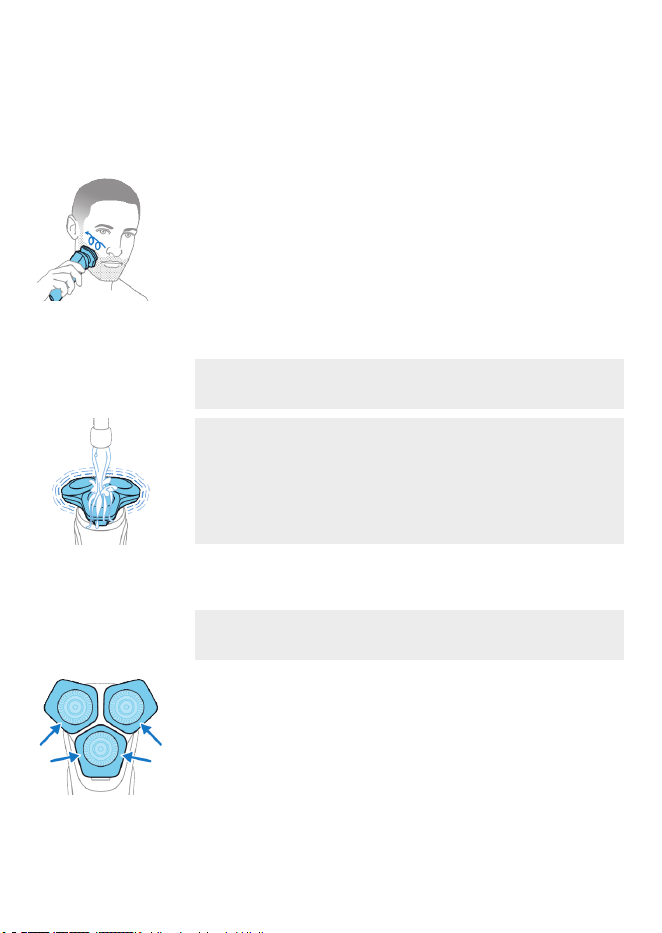
1 Encienda el producto.
2 Mueva los cabezales de afeitado sobre la piel
con movimientos circulares para llegar a todos
los vellos en las diferentes direcciones de
crecimiento. Asegúrese de que cada unidad de
afeitado esté siempre en contacto total con la
piel. Ejerza una suave presión para una
afeitada al ras y cómoda.
Nota: No presione demasiado fuerte ya que
esto puede producir irritación en la piel.
Nota: Si se afeita con espuma o gel de afeitar,
enjuague la unidad de afeitado con
regularidad durante el afeitado para asegurar
que se siga deslizando suavemente sobre la
piel.
3 Desconecte y limpie el producto después de
cada uso.
Nota: Asegúrese de enjuagar toda la espuma
o gel de afeitar del producto.
60
Español
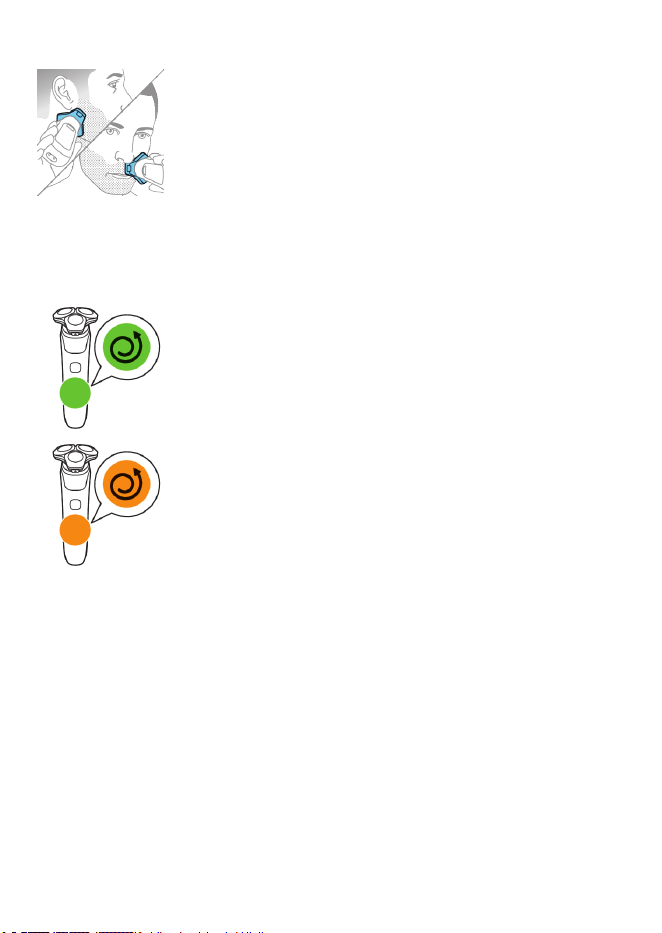
4 Use los lados estrechos de la unidad de
afeitado para afeitarse en lugares difíciles de
alcanzar, por ejemplo, a lo largo de la línea de
la quijada y debajo de la nariz.
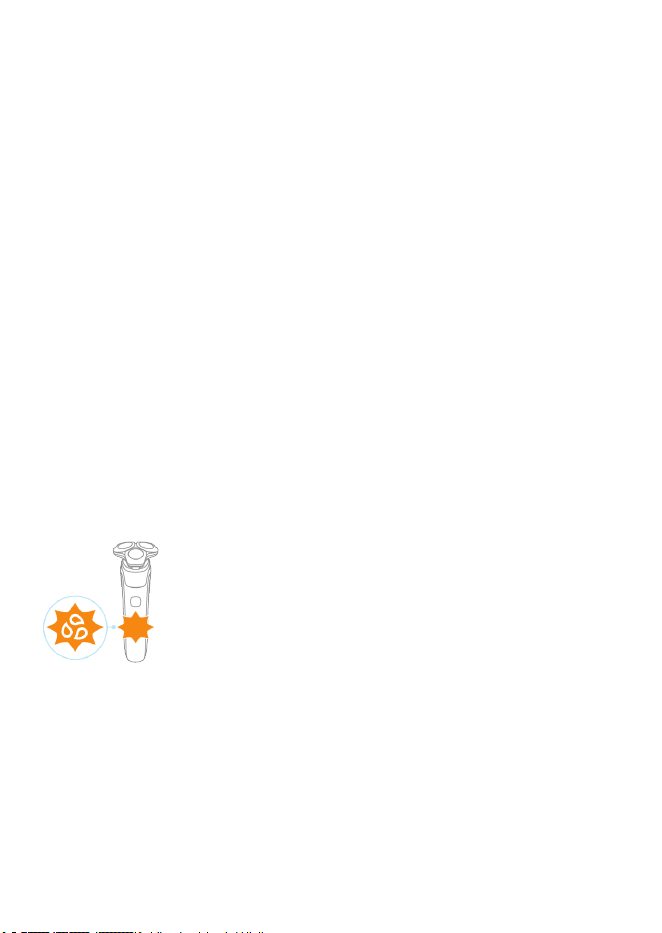
SenseIQ: Al terminar de afeitarse, recibirá
retroalimentación en el mango. El ícono del
sensor de Control de movimiento se ilumina
de varios colores para darle retroalimentación
sobre su afeitado en general.
-
Cuando se afeita con el movimiento
correcto (movimientos circulares), el ícono
del sensor de Control de movimiento se
ilumina de color verde.
-
Cuando se puede mejorar el movimiento
de afeitado, el ícono del sensor de Control
de movimiento se ilumina de color naranja.
Revise la aplicación para obtener más
detalles y consejos.
Proceso de adaptación de 21 días
-
Prueba de 21 días y proceso de adaptación. Es
un hecho que la piel y la barba tardan algún
tiempo en acostumbrarse al nuevo sistema de
arreglo personal.
-
Utilice su nueva afeitadora únicamente 3
semanas para disfrutar completamente de un
afeitado Philips Norelco al ras.
61
Español
-
Es posible que al principio no obtenga la
afeitada al ras que espera e incluso es posible
que su rostro se irrite levemente. Esto es
normal, ya que la barba y la piel necesitan
tiempo para ajustarse. Invierta 3 semanas y
pronto podrá disfrutar al máximo de su nueva
afeitadora.
-
Sea perseverante. Si alterna entre métodos de
afeitado durante el período de adaptación,
será más difícil acostumbrarse al sistema de
afeitado de Philips Norelco.
-
Si después de 21 días todavía no está
satisfecho con los resultados, Philips Norelco le
reembolsará el precio total de la compra,
siempre que la solicitud de reembolso se
reciba dentro de los 45 días posteriores a la
compra.
Recordatorio de limpieza
Cuando apaga el producto, el recordatorio de
limpieza destella para recordarle limpiar el
producto.
-
Limpie el producto y los accesorios después de
cada uso (ver '¿Cómo se limpia la afeitadora?')
para evitar que se obstruya o se dañe.
-
Limpie los cabezales de afeitado a fondo una
vez al mes o cuando el producto ya no afeite
tan bien como antes.
Sincronice sus afeitadas
La afeitadora almacena sus datos de afeitado
para que no tenga que traer su smartphone con
usted cuando se afeite.
62
Español
Cuando el espacio de almacenamiento de datos
está casi lleno, parpadea el símbolo de
notificación. Para evitar que se pierdan datos,
sincronice la afeitadora con la aplicación (ver
'¿Cómo conecto la afeitadora con mi
smartphone?').
1 Asegúrese de que esté cerca de la afeitadora y
abra la aplicación.
2 La aplicación se conecta automáticamente y
sincroniza sus últimas afeitadas.
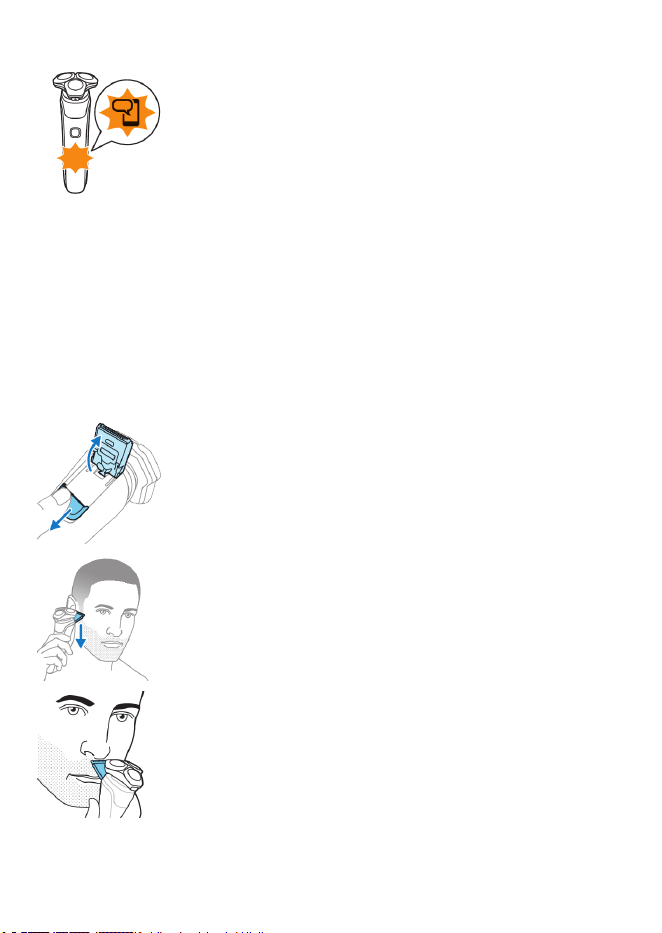
Recorte
Puede usar la cortadora emergente para recortar
el bigote y las patillas.
1 Deslice el botón de apertura de la cortadora
hacia abajo para abrirla.
2 Encienda el producto.
3 Sostenga la cortadora perpendicular a la piel y
muévala hacia abajo ejerciendo una presión
suave.
4 También puedes usar el recortador para
afeitar el área debajo de la nariz.
5 Apague el producto y limpie la cortadora
después de cada uso para evitar que se
obstruya o se dañe (ver '¿Cómo se limpia la
afeitadora?').
6 Cierre la cortadora.
63
Español
Uso del accesorio de la recortadora de vello de
nariz/oreja (S7887/92 solamente)
Puede usar el accesorio cortador de vello de
nariz/oreja para recortar el vello de la nariz o de
las orejas.
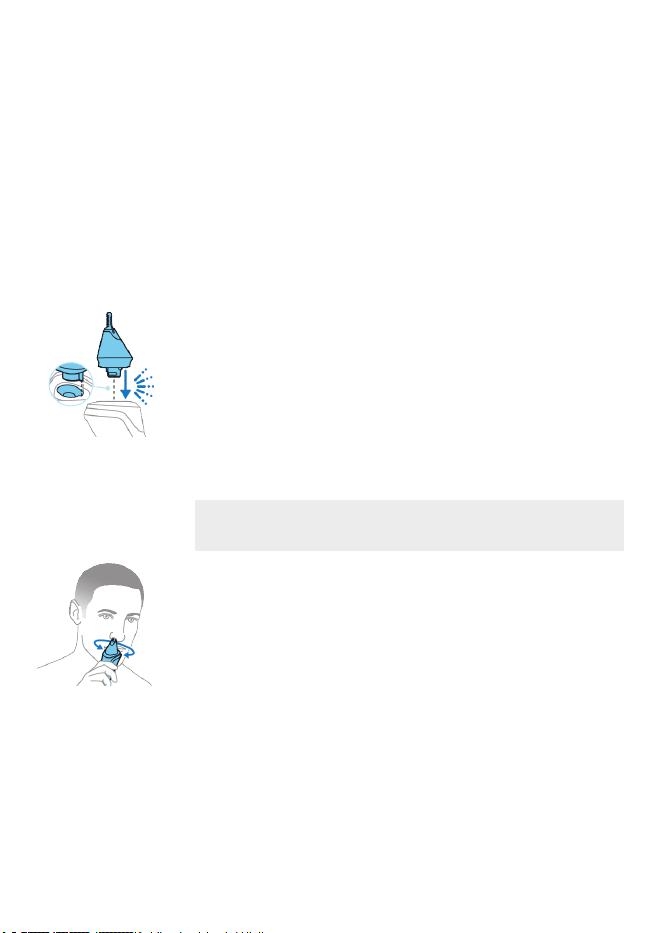
Recorte del vello de la nariz
Asegúrate de tanto el accesorio de la recortadora
de vello de nariz/oreja como las vías nasales
estén limpias antes de recortar el vello.
1 Gira el cabezal de afeitado u otro accesorio
para retirarlo del mango y presiona la
recortadora de vello de nariz/oreja sobre el
mango.
2 Encienda el aparato.
3 Introduzca con cuidado el cabezal de recorte
en una de sus fosas nasales.
No introduzcas el dispositivo más de 0,5cm en
las fosas nasales.
4 Mueve el cabezal de recorte lentamente
alrededor de cada fosa nasal para asegurarte
de que la punta del recortador se sostenga
firmemente contra la piel. Esto reduce el
efecto de picazón que podría ocurrir.
5 Desconecte el dispositivo y limpie el accesorio
después de usarlo.
La mucosidad nasal seca puede bloquear la
unidad de corte, lo que impide que el dispositivo
se encienda. Si el elemento de corte está
bloqueado, limpia el accesorio (ver '¿Cómo se
limpia la afeitadora?').
64
Español
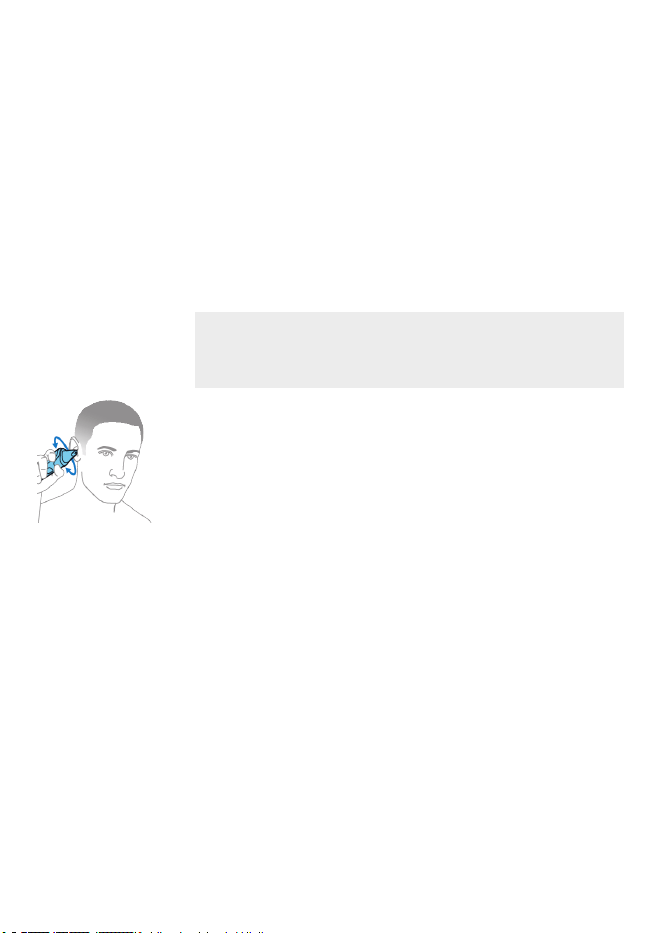
Recorte del vello de la oreja
Asegúrese de que los canales externos estén
limpios y libres de cera.
1 Encienda el aparato.
2 Mueva lentamente el cabezal de recorte a lo
largo del borde del oído para eliminar los
vellos salientes.
3 Inserte cuidadosamente el cabezal de recorte
en el canal auditivo externo.
No introduzcas el cabezal de recorte más de
0,5cm en el canal auditivo, ya que esto podría
dañar el tímpano.
4 Gire lentamente el cabezal de recorte
alrededor para eliminar todo el vello no
deseado en el canal auditivo externo.
5 Desconecte el dispositivo y limpie el accesorio
después de usarlo.
Almacenamiento y viaje
-
Asegúrese de que el producto esté apagado.
Retire la fuente de alimentación USB del
tomacorriente y del producto antes de
guardarlo en un lugar seguro y seco donde no
pueda aplastarse, golpearse o dañarse.
-
No enrolle el cable alrededor del producto
para guardarlo.
-
Guarde el cable y otros accesorios en un lugar
seguro donde no sufran cortes ni daños.
-
No coloque ni guarde el producto en un lugar
desde donde pueda, de algún modo, caerse a
una bañera, lavabo o dentro de cualquier
recipiente que contenga agua o líquido.
65
Español
Nota: Le recomendamos que deje que el
producto y los accesorios se sequen
completamente antes de guardarlos para el
próximo uso.
-
Coloque la tapa de protección (S7887/82
solamente) en la afeitadora para protegerla.
-
Guarde el producto en la funda (S7885,
S7886, S7887/92, S7889/91 solamente)
Como alternativa, guarde el producto en la base
de carga (S7885, S7887/92, S7889/91
solamente).
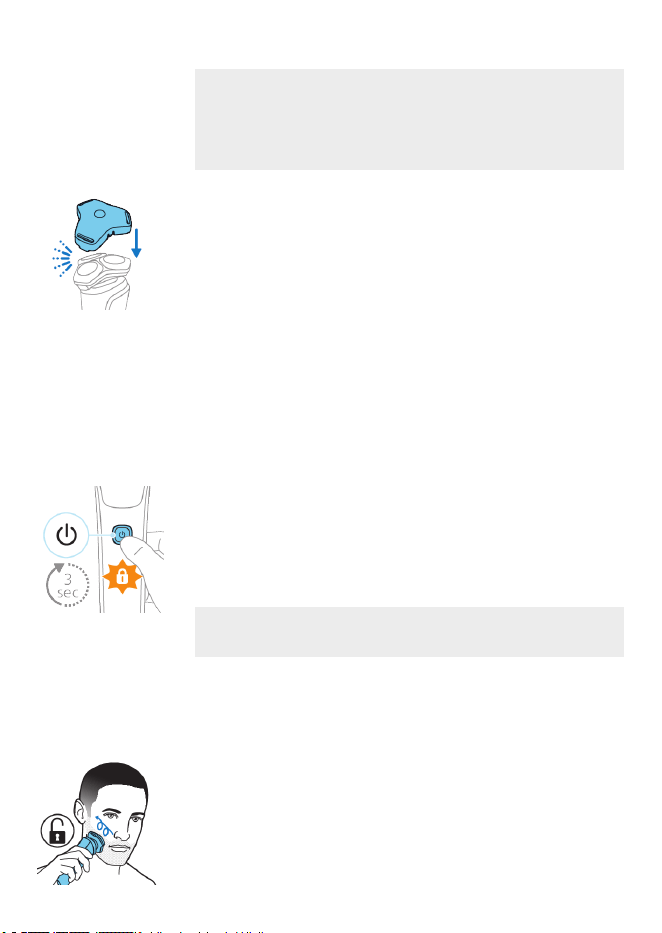
Bloqueo para viajes
Puede bloquear la afeitadora cuando viaja para
evitar que se encienda accidentalmente.
Activación del sistema de bloqueo
Pulse el botón de encendido/apagado durante 3
segundos para usar el modo de bloqueo de viaje.
Cuando se activa el bloqueo de viaje, el símbolo
de bloqueo de viaje destella.
Nota: Bluetooth se desactiva cuando está
activado el bloqueo de viaje.
Desactivación del bloqueo de viaje
Pulse el botón de encendido/apagado durante 3
segundos.
Una vez que se desactiva el bloqueo de viaje, el
producto se enciende automáticamente.
66
Español
Nota: El producto se desbloquea
automáticamente cuando se conecta a un
tomacorriente.
¿Cómo se limpia la afeitadora?
Para un óptimo desempeño, limpie el producto y
los accesorios después de cada uso.
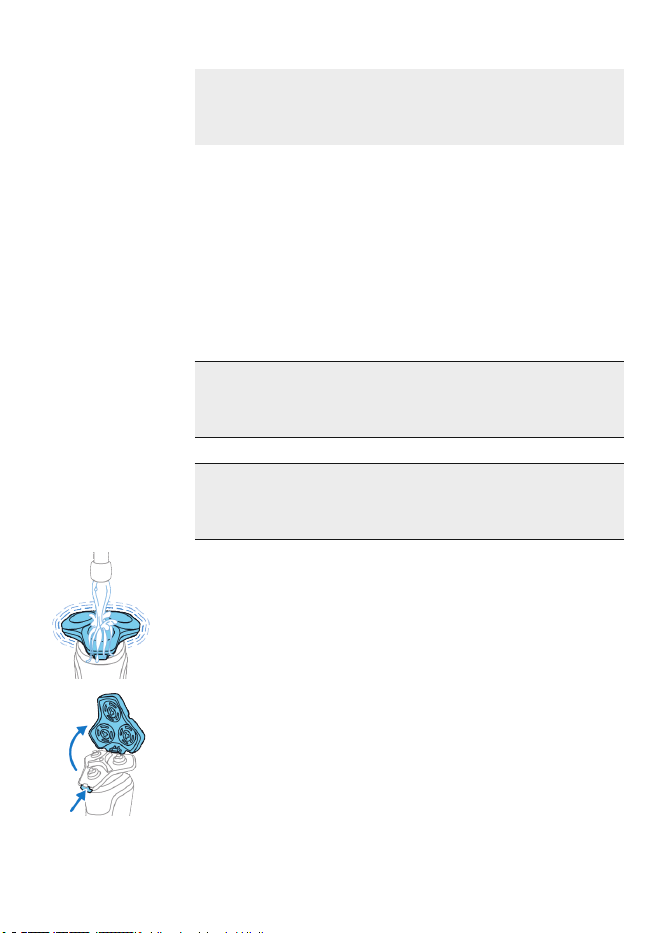
Limpieza de la afeitadora con agua
Limpie la afeitadora después de cada uso para
evitar que se obstruya o se dañe.
Nunca seque la unidad de afeitado con una
toalla o pañuelo desechable, ya que esto
puede dañar los cabezales de afeitado.
Al enjuagar la unidad de afeitado, es posible
que salga agua por la base de la afeitadora.
Esto es algo normal.
1 Encienda la afeitadora.
2 Enjuague la unidad de afeitado con agua tibia.
3 Apague la afeitadora. Presione el botón de
liberación para abrir la unidad de afeitado.
67
Español
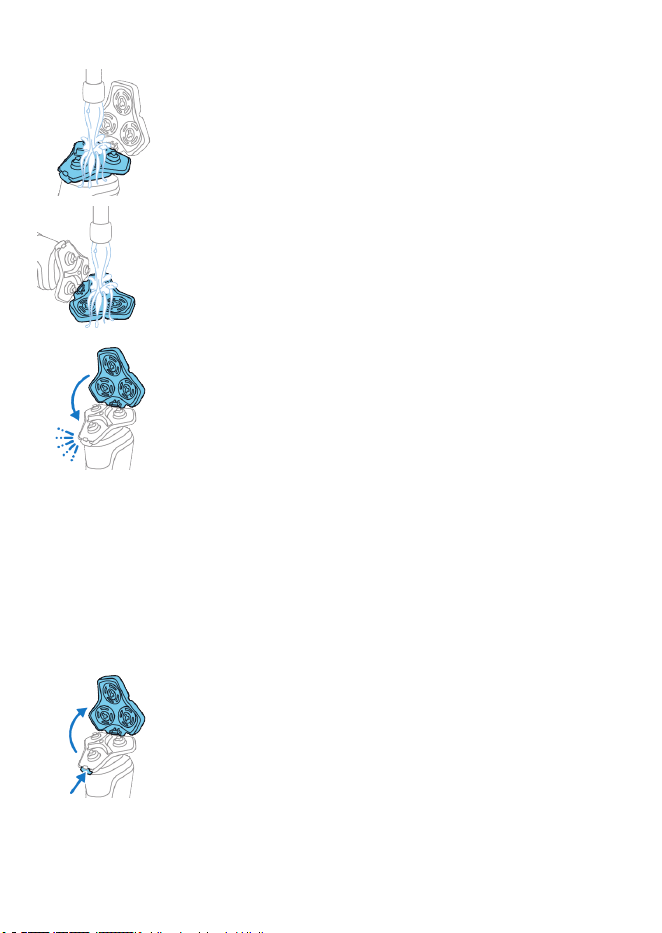
4 Enjuague la cámara de acumulación de vello
con agua tibia.
5 Enjuague el portacabezales de afeitado con
agua tibia.
6 Elimine cuidadosamente el exceso de agua y
deje que el soporte del cabezal de afeitado se
seque al aire completamente.
7 Cierre la unidad de afeitado.
Limpieza a fondo
Le aconsejamos que limpie los cabezales de
afeitado a fondo una vez al mes o cuando la
afeitadora ya no afeite tan bien como antes.
1 Asegúrese de que el dispositivo esté apagado
y de que lo haya desconectado del
tomacorriente.
2 Presiona los botones de liberación de la
unidad de afeitado y tira del soporte de
cabezales de afeitado para quitarlo de la
unidad de afeitado.
68
Español
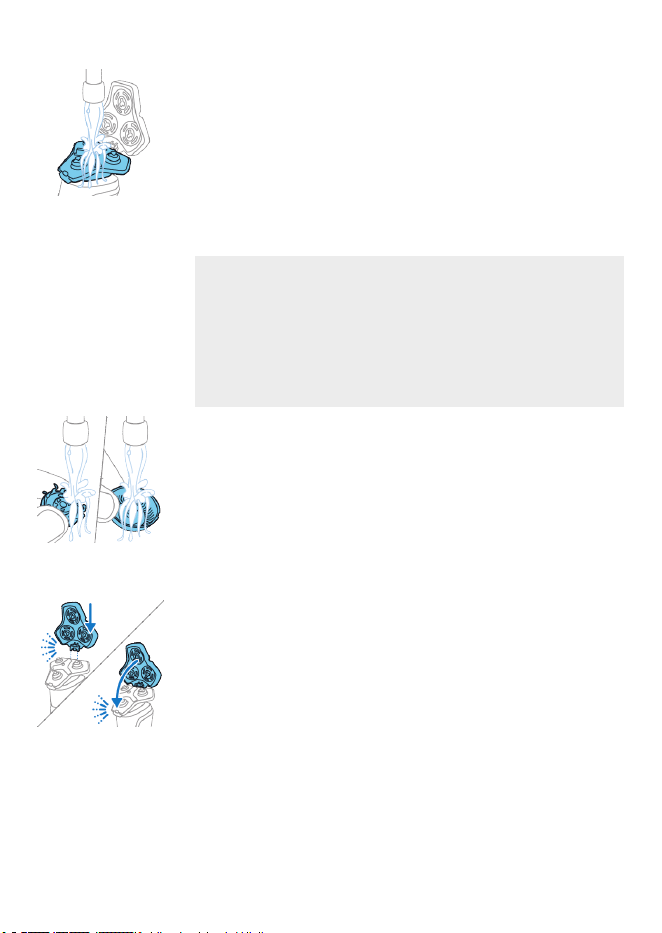
3 Enjuague la cámara de acumulación de vello y
el portacabezales de afeitado con agua tibia.
4 Retira los cabezales (ver '¿Cómo se
reemplazan los cabezales de afeitado?') de
afeitado. Para consultar instrucciones
detalladas, vea "¿Cómo se reemplazan los
cabezales de afeitado?"
Nota: No limpie más de un cortador y
protector a la vez, ya que todos son pares. Si
accidentalmente coloca una cuchilla en el
protector de afeitado equivocado, tardará
varias semanas en volver a lograr un
desempeño óptimo del afeitado.
5 Limpie la cuchilla y la protección con agua
tibia.
6 Sacuda el exceso de agua.
7 Vuelva a colocar los cabezales de afeitado en
la unidad de afeitado. Para consultar
instrucciones detalladas, vea "¿Cómo se
reemplazan los cabezales de afeitado?"
8 Inserte la bisagra del portacabezales de
afeitado en la ranura que está en la parte
superior de la unidad de afeitado y cierre la
unidad de afeitado.
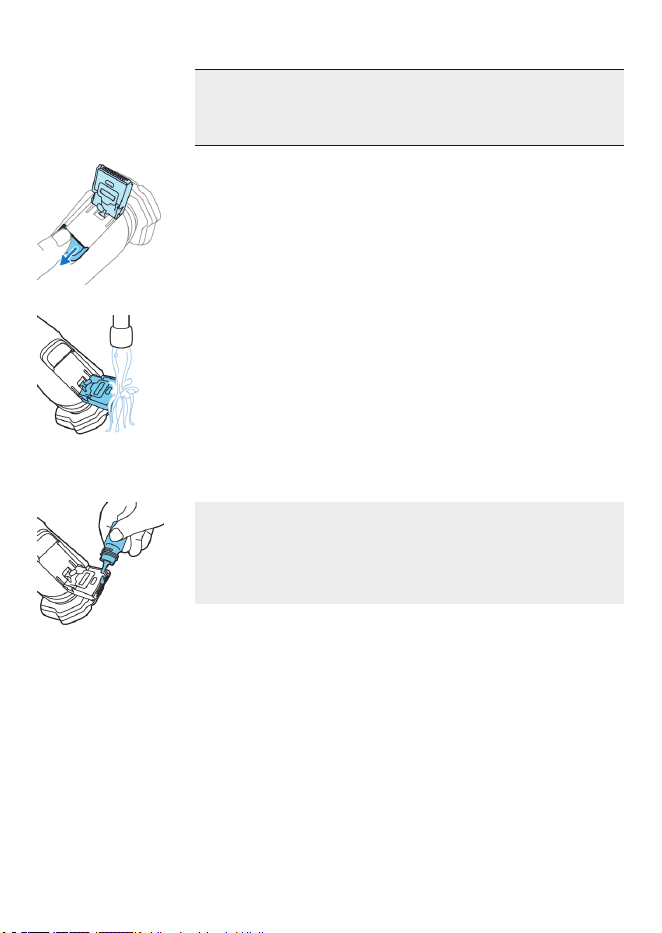
Limpieza de la cortadora emergente
Limpie la cortadora después de cada uso para
evitar que se obstruya o se dañe.
69
Español
Precaución: Nunca seque los dientes de la
cortadora con una toalla o paño, ya que esto
puede dañar el dentado de recorte.
1 Asegúrese de que el dispositivo esté apagado
y de que lo haya desconectado del
tomacorriente.
2 Empuje hacia abajo el botón deslizante de
liberación de la cortadora emergente para
abrirla.
3 Encienda el dispositivo y enjuague la
cortadora emergente con agua tibia.
4 Después de limpiarlo, apague el dispositivo.
5 Elimine cuidadosamente el exceso de agua y
deje que la cortadora emergente se seque al
aire.
6 Cierre la cortadora.
Sugerencia: Para obtener un rendimiento
óptimo, lubrique los dientes de la cortadora
emergente con una gota de aceite mineral cada
seis meses (el aceite no está incluido).
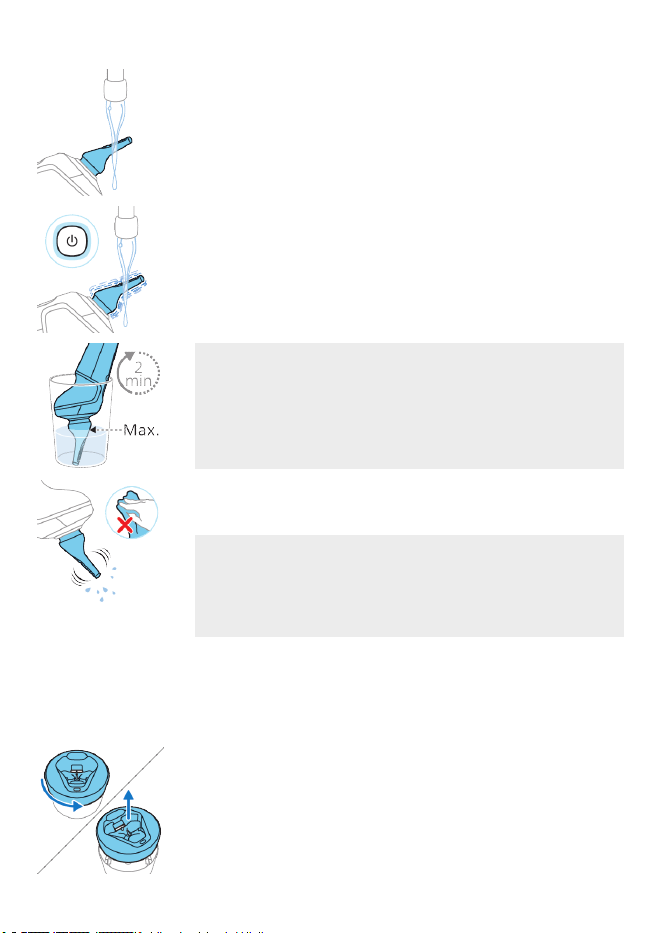
Limpieza del accesorio de la cortadora de vello de nariz
(S7887/92 solamente)
Limpie el accesorio de recorte de vello de nariz
cada vez que lo use.
1 Apague el aparato.
70
Español
2 Enjuague el cabezal recortador del recortador
nasal con agua caliente.
3 Encienda el aparato y enjuague el cabezal
recortador una vez más para remover
cualquier vello restante. Luego apague el
aparato nuevamente.
Si enjuagar el cabezal de recorte bajo la llave
no es suficiente, sumerja el cabezal de recorte
en un vaso de agua caliente por unos minutos.
Luego encienda el dispositivo y enjuáguelo
bajo la llave.
4 Sacuda con cuidado el agua excedente del
accesorio recortador nasal y déjelo secar.
Sugerencia: Para mantener el buen desempeño
de la afeitadora, lubrique el cabezal recortador
con una gota de aceite de máquina de coser cada
seis meses.
¿Cómo uso el Quick Clean Pod? (S7885 y
S7886 solamente)
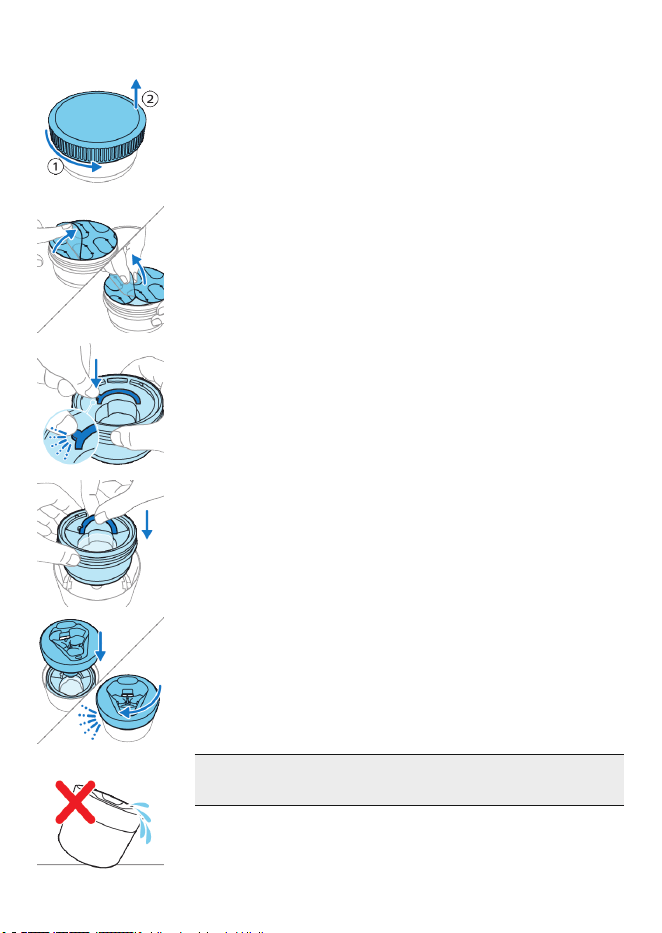
Preparación del Quick Clean Pod para el uso
1 Gire y retire la parte superior del Quick Clean
Pod.
71
Español
2 Gire la tapa del cartucho del Quick Clean Pod
para quitarla.
3 Levante la lengüeta del sello y jálela de la
esquina para retirar el sello del cartucho del
Quick Clean Pod.
4 Presione la pequeña pieza circular en el
mango del cartucho del Quick Clean Pod para
romper el broche de presión del mango.
5 Coloque el cartucho del Quick Clean Pod en el
Quick Clean Pod.
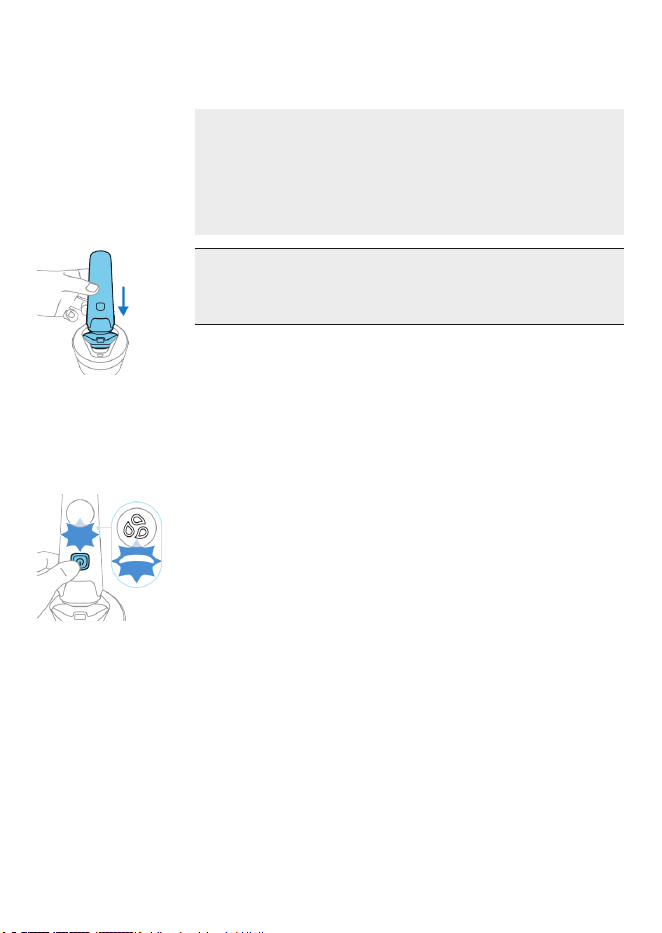
6 Vuelva a colocar la parte superior del Quick
Clean Pod en la base y gírela en el sentido de
las manecillas del reloj hasta que escuche un
clic.
No incline el Quick Clean Pod para evitar
derrames.
72
Español
Uso del Quick Clean Pod
Nota: Si utiliza la afeitadora con espuma de
afeitar, gel de afeitar o productos para antes de
afeitar, enjuague bien los cabezales de afeitado
antes de usar el Quick Clean Pod (ver '¿Cómo se
limpia la afeitadora?').
Siempre sacuda la afeitadora para eliminar el
exceso de agua antes de colocarla en el Quick
Clean Pod.
1 Coloque la afeitadora de cabeza en el Quick
Clean Pod. La afeitadora detecta
automáticamente que está en el Quick Clean
Pod.
2 Encienda la afeitadora para iniciar el programa
de limpieza.
Cada programa de limpieza toma
aproximadamente un minuto. Durante el
programa de limpieza, el símbolo de limpieza
se queda continuamente iluminado y el ícono
azul pulsa.
El mango de la afeitadora vibra dos veces
rápidamente cuando termina el programa de
limpieza.
3 Deje que la afeitadora se seque
completamente al aire en el Quick Clean Pod
antes de guardarla.
73
Español
Reemplazo del cartucho del Quick Clean Pod
Reemplace el cartucho del Quick Clean Pod
inmediatamente cuando el ícono de reemplazo
del cartucho del Quick Clean Pod se vuelva
visible, o bien, siga las indicaciones que se
muestran en la siguiente tabla.
Frecuencia de uso Ciclos Cuándo
reemplazar el
cartucho del Quick
Clean Pod
Todos los días Aproximadamente
30
Cada mes
Unas cuantas veces
por semana
Aproximadamente
20
Cada 2 meses
Cada semana Aproximadamente
13
Cada 3 meses
1 Gire y retire la parte superior del Quick Clean
Pod.
2 Levante el cartucho del Quick Clean Pod por el
mango para sacarlo del Quick Clean Pod.
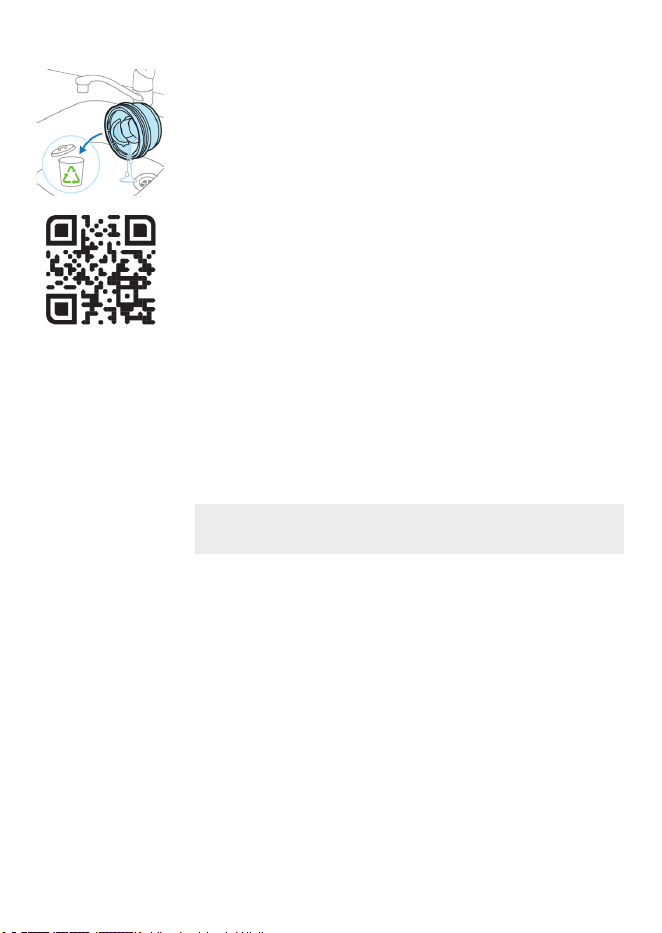
74
Español
3 Vierta el líquido restante por el desagüe y
recicle el cartucho vacío conforme a la
reglamentación local en materia de residuos.
4 Coloque un nuevo cartucho del Quick Clean
Pod en el Quick Clean Pod (ver 'Preparación
del Quick Clean Pod para el uso').
Escanea el códigoQR que se encuentra a la
izquierda o visita
www.philips.com/cleaning-cartridge para
pedir cartuchos de repuesto del Quick Clean
Pod.
¿Cómo conecto la afeitadora con mi
smartphone?
Nota: Asegúrese que su smartphone esté
equipado con Bluetooth® 4.1 o superior.
Esta afeitadora es compatible con Bluetooth® 4.1
y versiones superiores para conectarse con la
aplicación. Cuando haya apareado la afeitadora y
su smartphone, el Bluetooth de la afeitadora se
enciende automáticamente, incluso cuando está
apagada. Esto permite que sus datos de afeitado
se sincronicen más tarde para que no tenga que
traer su smartphone con usted cuando se afeite.
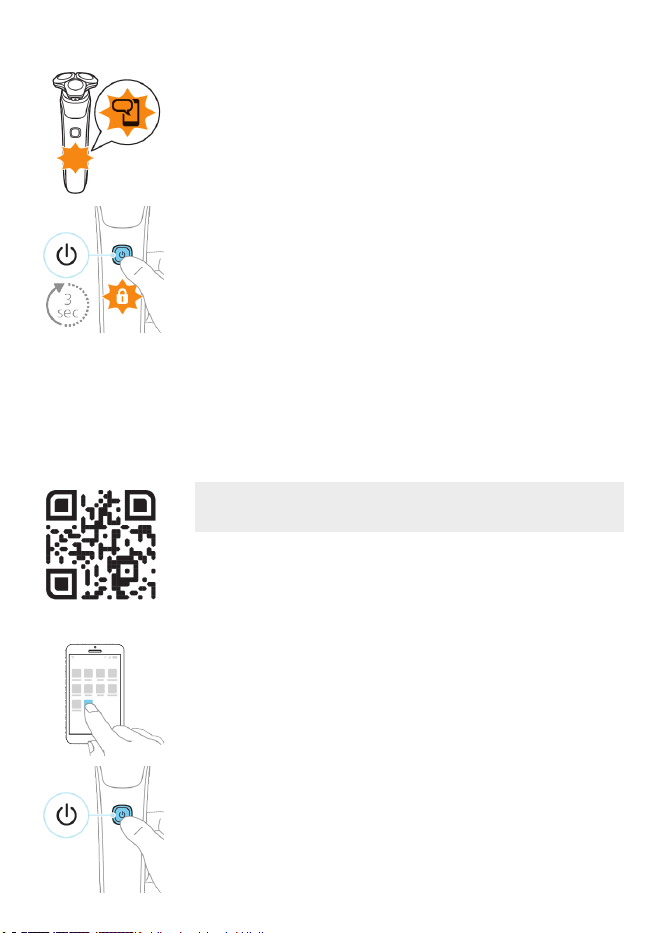
75
Español
Las primeras veces que se enciende la afeitadora,
el símbolo de notificación parpadea si no se
establece una conexión con un smartphone.
Para apagar el Bluetooth de su afeitadora, active
el bloqueo de viaje (ver 'Almacenamiento y
viaje').
Empareja la afeitadora y el teléfono inteligente
Puede usar la aplicación para sincronizar sus
datos de afeitado, cambiar su configuración
personal y obtener entrenamiento basado en su
rutina.
La aplicación es compatible con una amplia gama
de teléfonos inteligentes iPhone y Android™.
Encontrará más información disponible en
www.philips.com.
1 Descarga la aplicación.
2 Asegúrate de que el Bluetooth esté encendido
en tu teléfono inteligente.
3 Encienda la afeitadora.
4 Abre la aplicación y sigue las instrucciones
para iniciar el proceso de apareo.
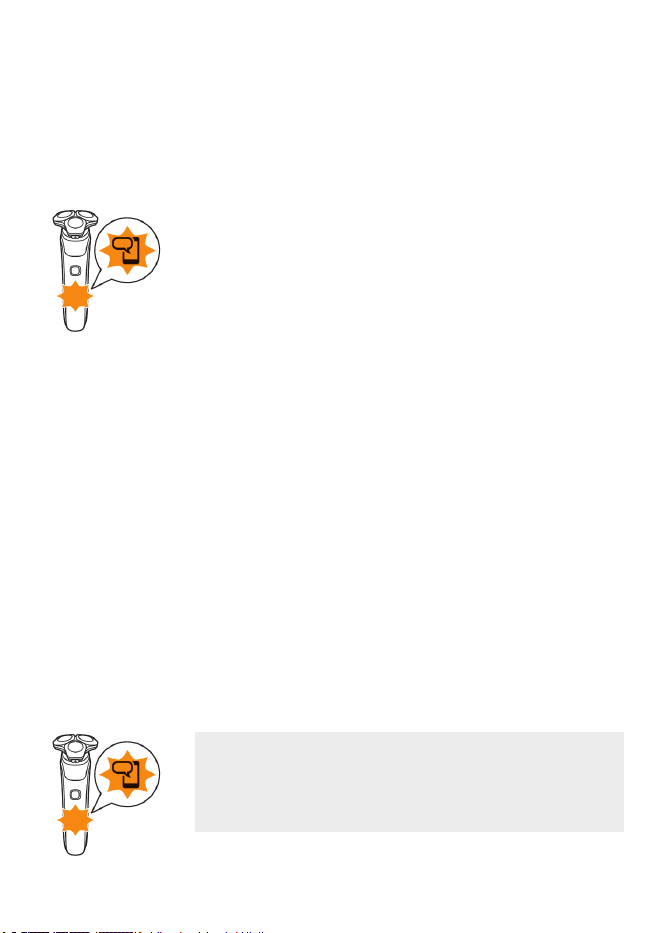
76
Español
5 Cuando se hayan emparejado, la afeitadora y
la aplicación se conectarán automáticamente
cuando abras la aplicación y el Bluetooth de su
teléfono esté encendido.
Símbolo de notificación
La afeitadora está equipada con un símbolo de
notificación. El símbolo de notificación se
enciende cuando hay un mensaje importante
para usted en la aplicación. Cuando se encienda,
simplemente abra la aplicación en su smartphone
y siga los consejos fáciles que le dé la aplicación.
Si necesita soporte adicional, visite
www.philips.com/support.
Desempareja la afeitadora y el teléfono inteligente
Puedes emparejar tu afeitadora con un solo
teléfono inteligente a la vez. Para desaparejar la
afeitadora de tu teléfono inteligente (por
ejemplo, cuando adquieres un nuevo teléfono
inteligente), sigue los pasos que se describen a
continuación:
Desaparee la afeitadora: presione y mantenga
presionado el botón de encendido/apagado que
está en el mango durante aproximadamente 10
segundos para eliminar la vinculación entre la
afeitadora y la aplicación.
Nota: El símbolo de notificación se encenderá
cuatro veces brevemente para indicar que la
afeitadora se ha desemparejado de forma
correcta.
Desaparee su smartphone:
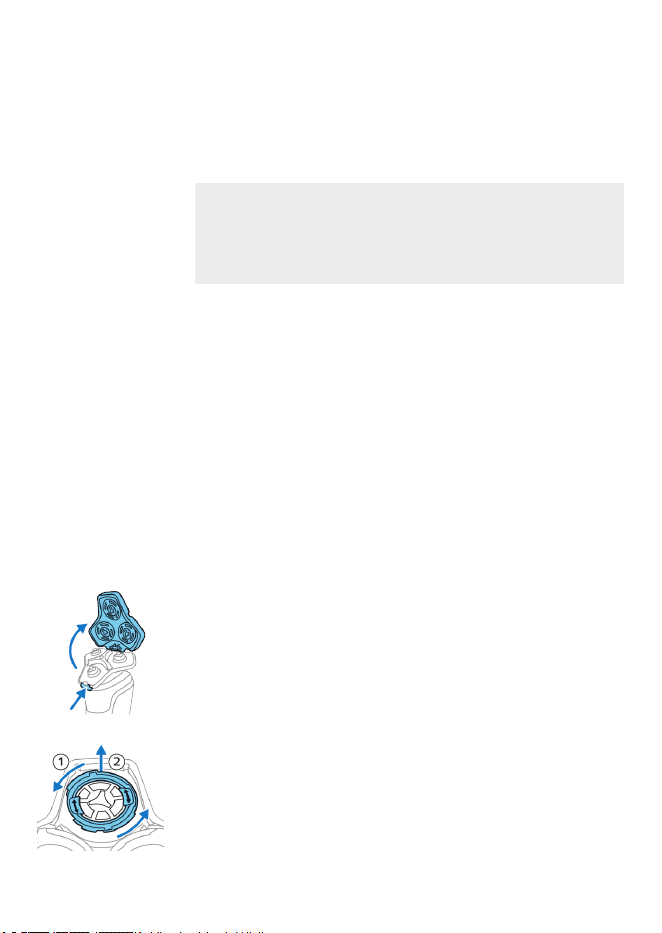
77
Español
1 Ve a la configuración en su teléfono
inteligente y selecciona Bluetooth.
2 Pulsa el nombre de la afeitadora.
3 Pulsa "olvidar" o "desaparejar".
Nota: El procedimiento para desemparejar el
dispositivo puede variar según el teléfono
inteligente. Para obtener más información,
consulta el manual de su teléfono inteligente.
¿Cómo se reemplazan los cabezales de
afeitado?
Para un rendimiento de afeitado óptimo, le
aconsejamos que reemplace los cabezales de
afeitado cada dos años. Reemplace los cabezales
de afeitado dañados inmediatamente.
Siempre reemplace los cabezales de afeitado con
cabezales originales de Philips Norelco.
Reemplazo de los cabezales de afeitado
1 Apague la afeitadora.
2 Presiona los botones de liberación de la
unidad de afeitado y tira del soporte de
cabezales de afeitado para quitarlo de la
unidad de afeitado.
3 Gire los anillos de retención a la izquierda y
retírelos. Colóquelos aparte en un lugar
seguro.
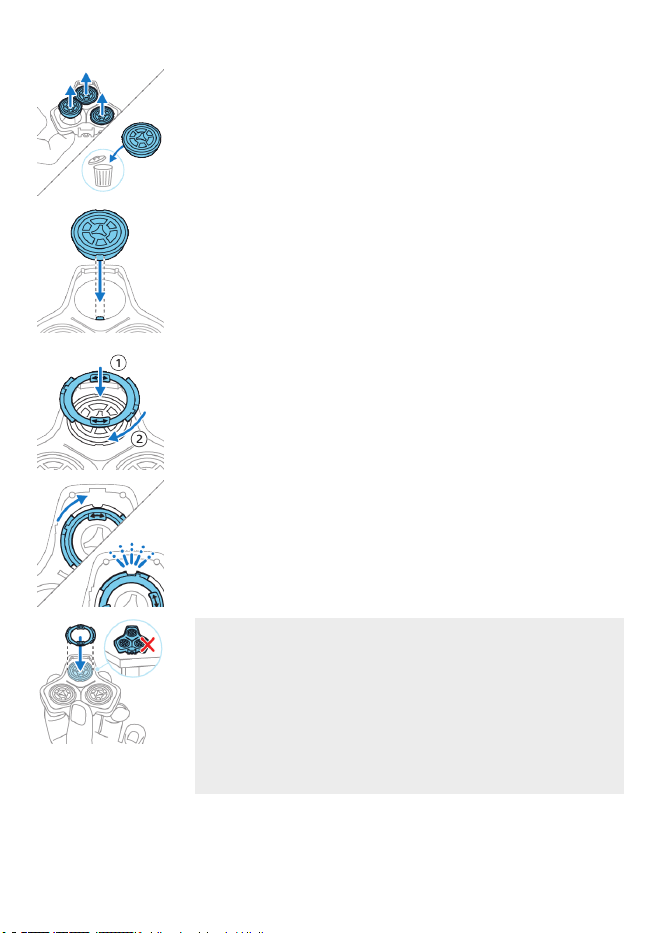
78
Español
4 Quite los cabezales de afeitado del soporte del
cabezal de afeitado.
Deseche inmediatamente los cabezales de
afeitado usados para evitar mezclarlos con los
nuevos cabezales de afeitado.
5 Coloque los nuevos cabezales de afeitado en
el portacabezales.
6 Coloca los anillos de retención de nuevo en los
cabezales de afeitado y gíralos hacia la
derecha para volver a colocar los anillos de
retención.
-
Cada anillo de retención tiene dos ranuras que
ajustan perfecto en los salientes del soporte
del cabezal de afeitado. Gire el anillo a la
derecha hasta que escuche un clic para indicar
que el anillo está fijo.
Nota: Tome el sostenedor del cabezal de
afeitado en su mano cuando vuelva a insertar
los cabezales de afeitado y vuelva ajustar los
anillos de retención. No coloque el soporte del
cabezal de afeitado sobre una superficie, ya
que esto pueden dañar los cabezales de
afeitado.
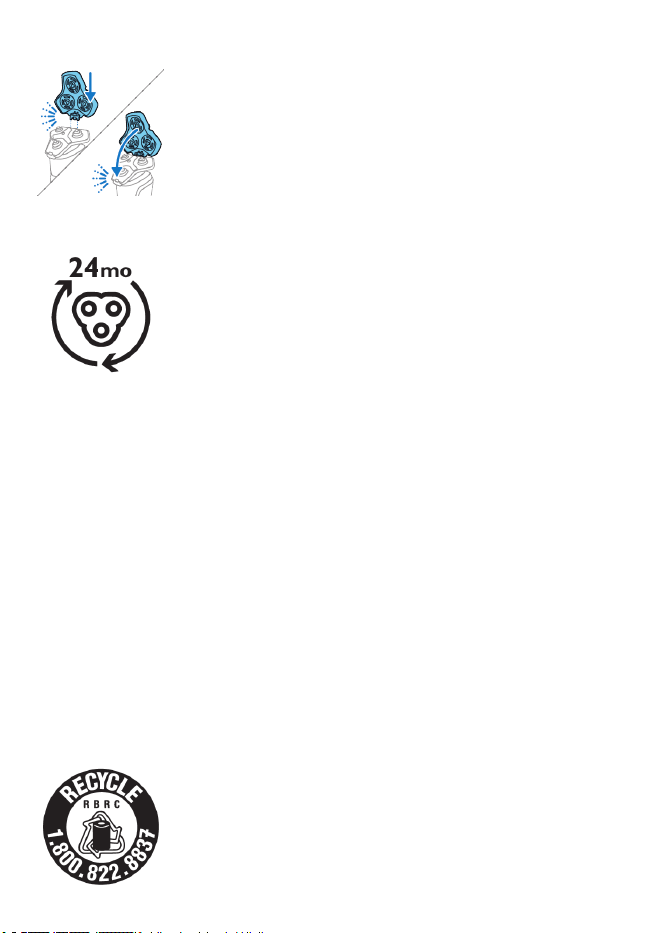
79
Español
7 Inserte la bisagra del portacabezales de
afeitado en la ranura que está en la parte
superior de la unidad de afeitado y cierre la
unidad de afeitado.
Accesorios
Puede adquirir los accesorios y partes de
reemplazo en la tienda más cercana a su
domicilio o a través de nuestro sitio web
www.philips.com/store.
Están disponibles los siguientes accesorios y
piezas sueltas:
-
Cabezales de afeitado de repuesto Philips
Norelco SH71.
-
Paquete de 2 cartuchos del Quick Clean Pod
de Philips Norelco CC12
Asistencia
Para asistencia, visite nuestro sitio web:
www.philips.com/support o llame al número
gratuito1-800-243-3050.
Desecho
-
Este producto posee una batería recargable de
litio-ión que debe desecharse
apropiadamente.
-

80
Español
Comunícate con los funcionarios locales o de
la ciudad para obtener más información
acerca del manejo final de la batería. También
puede llamar al 1-800-822-8837 o visitar
www.call2recycle.org para las ubicaciones
donde se pueden desechar las baterías.
-
Para recibir asistencia, visite nuestro sitio Web
www.philips.com/support o comuníquese
gratuitamente al 1-800-243-3050.
-
Su producto está diseñado y fabricado con
materiales y componentes de alta calidad, que
pueden ser reciclados y reusados. Para obtener
información sobre el reciclaje, contacte a las
instalaciones de manejo de residuos locales o
visite: www.recycle.philips.com.
Garantía Total de Dos Años
La garantía de Philips cubre los productos por un
período de tiempo específico después de la
primera fecha de compra. La garantía de Philips
North America LLC (EE.UU.) cubre este producto
nuevo comprado en EE.UU. contra defectos de
materiales o mano de obra por un período de dos
años a partir de la fecha de compra (como se
evidencia mediante un comprobante de compra
válido) y acepta reemplazar cualquier producto
defectuoso sin cargo. Si el producto fue
comprado en Canadá, la garantía es de Philips
Electronics Ltd. Philips reembolsará el total de la
compra si no puede proporcionar el reemplazo.
Las piezas que están sujetas a desgaste normal,
accesorios, baterías de repuesto y consumibles

81
Español
como cabezales de cepillos dentales, no están
cubiertos por los términos de esta garantía.
IMPORTANTE: Esta garantía no cubre ningún
daño que surja como resultado de un accidente,
del uso indebido o abuso, de la falta de cuidado
razonable, del uso de cualquier accesorio no
provisto con el producto, de la pérdida de piezas
o del uso del producto bajo un voltaje no
especificado.*
NO SE ASUME NINGÚN TIPO DE
RESPONSABILIDAD POR CUALQUIER DAÑO
ESPECIAL, FORTUITO O RESULTANTE.
Para obtener más información y el servicio de
garantía, vaya a www.philips.com/support.
NOTA: Esta garantía le brinda derechos legales
específicos y usted también puede tener otros
derechos los cuales varían de estado a estado, de
región en región o de país en país. En algunos
estados no se permite la exclusión o la limitación
de los daños fortuitos o resultantes, de modo que
es posible que las limitaciones o exclusiones
mencionadas anteriormente no apliquen a su
caso. Esta garantía es transferible.
*Lea las instrucciones adjuntas atentamente.
LA GARANTÍA NO CUBRE LO SIGUIENTE:

82
Español
-
Daños indirectos o resultantes, como pérdida
de tiempo, pérdida de datos o pérdida de
ingresos. En algunos estados no se permite la
exclusión o la limitación de los daños fortuitos
o resultantes, de modo que es posible que la
limitación mencionada anteriormente no
aplique a su caso.
-
Compensación por actividades que usted
realizó, como mantenimiento periódico,
instalación de actualizaciones de firmware o
almacenamiento de datos.
LA GARANTÍA NO SE APLICA A:
-
Si el comprobante de compra, número de
modelo, número de serie o código de fecha de
producción del producto se han vuelto
ilegibles.
-
Si el producto fue comprado como producto
defectuoso.
-
Si el defecto es resultado de un abuso o uso
excesivo diferente del fin previsto.
-
Si el defecto es causado por condiciones
ambientales, conexión de periféricos, equipos
adicionales o accesorios (incluido el software)
que no estén de acuerdo con el manual del
usuario.
-
Si la unidad ha sufrido daños, incluidos, entre
otros, daños causados por animales, rayos,
voltaje anormal, incendio, desastre natural,
transporte o agua (a menos que el manual del
usuario indique expresamente que el
producto puede enjuagarse).

83
Español
-
Para piezas no eléctricas, desgaste normal,
accesorios, baterías de repuesto o reemplazo
de piezas consumibles, como cabezales de
cepillos dentales.
-
Si el producto no funciona correctamente
porque no fue diseñado para su uso en el país
donde se utiliza el producto, lo que puede
ocurrir si importa el producto.
-
Si el producto no funciona correctamente
debido a problemas de conexión con los
proveedores de servicios, como Internet.
GARANTÍA DE DEVOLUCIÓN DE SU DINERO
POR 45DÍAS
Para disfrutar de una afeitada cómoda y al ras
con su nueva afeitadora para hombres Philips
Norelco, la afeitadora se debe usar únicamente
por 3 semanas. Esto permite que su cabello y su
piel tengan tiempo suficiente para adaptarse al
Sistema de afeitado Philips Norelco. Si, después
de ese periodo de tiempo, no está satisfecho con
los resultados de su afeitadora para hombre
Philips Norelco, puede devolver el producto con
su recibo de compra fechado y le
reembolsaremos el importe que pagó.
El producto debe enviarse por correo
certificado pago, con seguro prepago, junto
con el recibo original de compra, donde se
indique el precio y la fecha de compra.
No asumimos ninguna responsabilidad por los
paquetes perdidos.

84
Español
El paquete del producto debe contar con
matasellos que no supere los 45días a partir de la
fecha de compra. Philips se reserva el derecho a
verificar el precio de compra del producto y limita
los reembolsos al precio de venta minorista
sugerido.
Para obtener el servicio de garantía de
devolución de dinero, visite
www.PhilipsMoneyBack.com.
La entrega del cheque de reembolso ocurrirá
de 6 a8 semanas después de la recepción del
producto devuelto.
Declaración de conformidad del proveedor
Este dispositivo cumple con la Parte 15 de las
reglas de la FCC. El funcionamiento está sujeto a
las dos condiciones siguientes: (1) Es posible que
este dispositivo no cause interferencia perjudicial,
y (2) este dispositivo debe aceptar cualquier
interferencia que reciba, inclusive aquella que
pueda causar un funcionamiento no deseado.
Por medio de la presente, nosotros, PHILIPS
CONSUMER LIFESTYLE B.V., declaramos que el
equipo que lleva el nombre de modelo
especificado a continuación se probó de
conformidad con las reglas aplicables de la
Comisión Federal de Comunicaciones (Federal
Communications Commission, FCC) conforme a
los estándares de medición más precisos posibles,
y que se han tomado y están vigentes todas las
medidas necesarias para asegurar que las
unidades de producción del mismo equipo

85
Español
continuarán cumpliendo con los requerimientos
de la Comisión.
Identificador único: PHILIPS, NORELCO S7889,
S7887, S7886, S7885
Parte responsable – Datos de contacto en los
Estados Unidos
Philips North America LLC.
Apartado postal 10313
Stamford | CT 06904
1-800-243-3050
Marcas registradas
Apple, el logotipo de Apple, iPad y iPhone son
marcas comerciales de Apple Inc., registradas en
los Estados Unidos de América y otros países. App
Store es una marca de servicio de Apple Inc.
Android es una marca comercial de Google Inc.
Google Play y el logotipo de Google Play son
marcas comerciales de Google Inc.
La marca denominativa y los logotipos de
Bluetooth® son marcas comerciales registradas
propiedad de Bluetooth SIG, Inc. y todo uso que
hace Koninklijke Philips N.V. de dichas marcas es
conforme a una licencia.




Empty page before back cover
Manufactured for:
Philips Personal Health
a division of Philips North America LLC
P.O. Box 10313, Stamford, CT 06904
This symbol on the product’s nameplate means it is listed
by Underwriters’ Laboratories, Inc.
Norelco and Tripleheader are registered trademarks of Philips North
America LLC.
PHILIPS and Philips shield are registered trademarks of Koninklijke
Philips N.V.
©2026 Philips North America LLC. All rights reserved.
3000.089.3324.5 (3/10/2026)